Why build it when you can buy it? It seems that we’ve become a nation of consumption, more likely to spend our money than our time or effort. We solve our problems by buying things — and when they break, we just purchase new ones instead of repairing what we have. Due to this trend of disposable products , the ability to fix, build, or create seems to be becoming a lost art. Since this publication is all about self-sufficiency and using what you have around you, we wanted to provide you with a couple of ways to think outside the box.
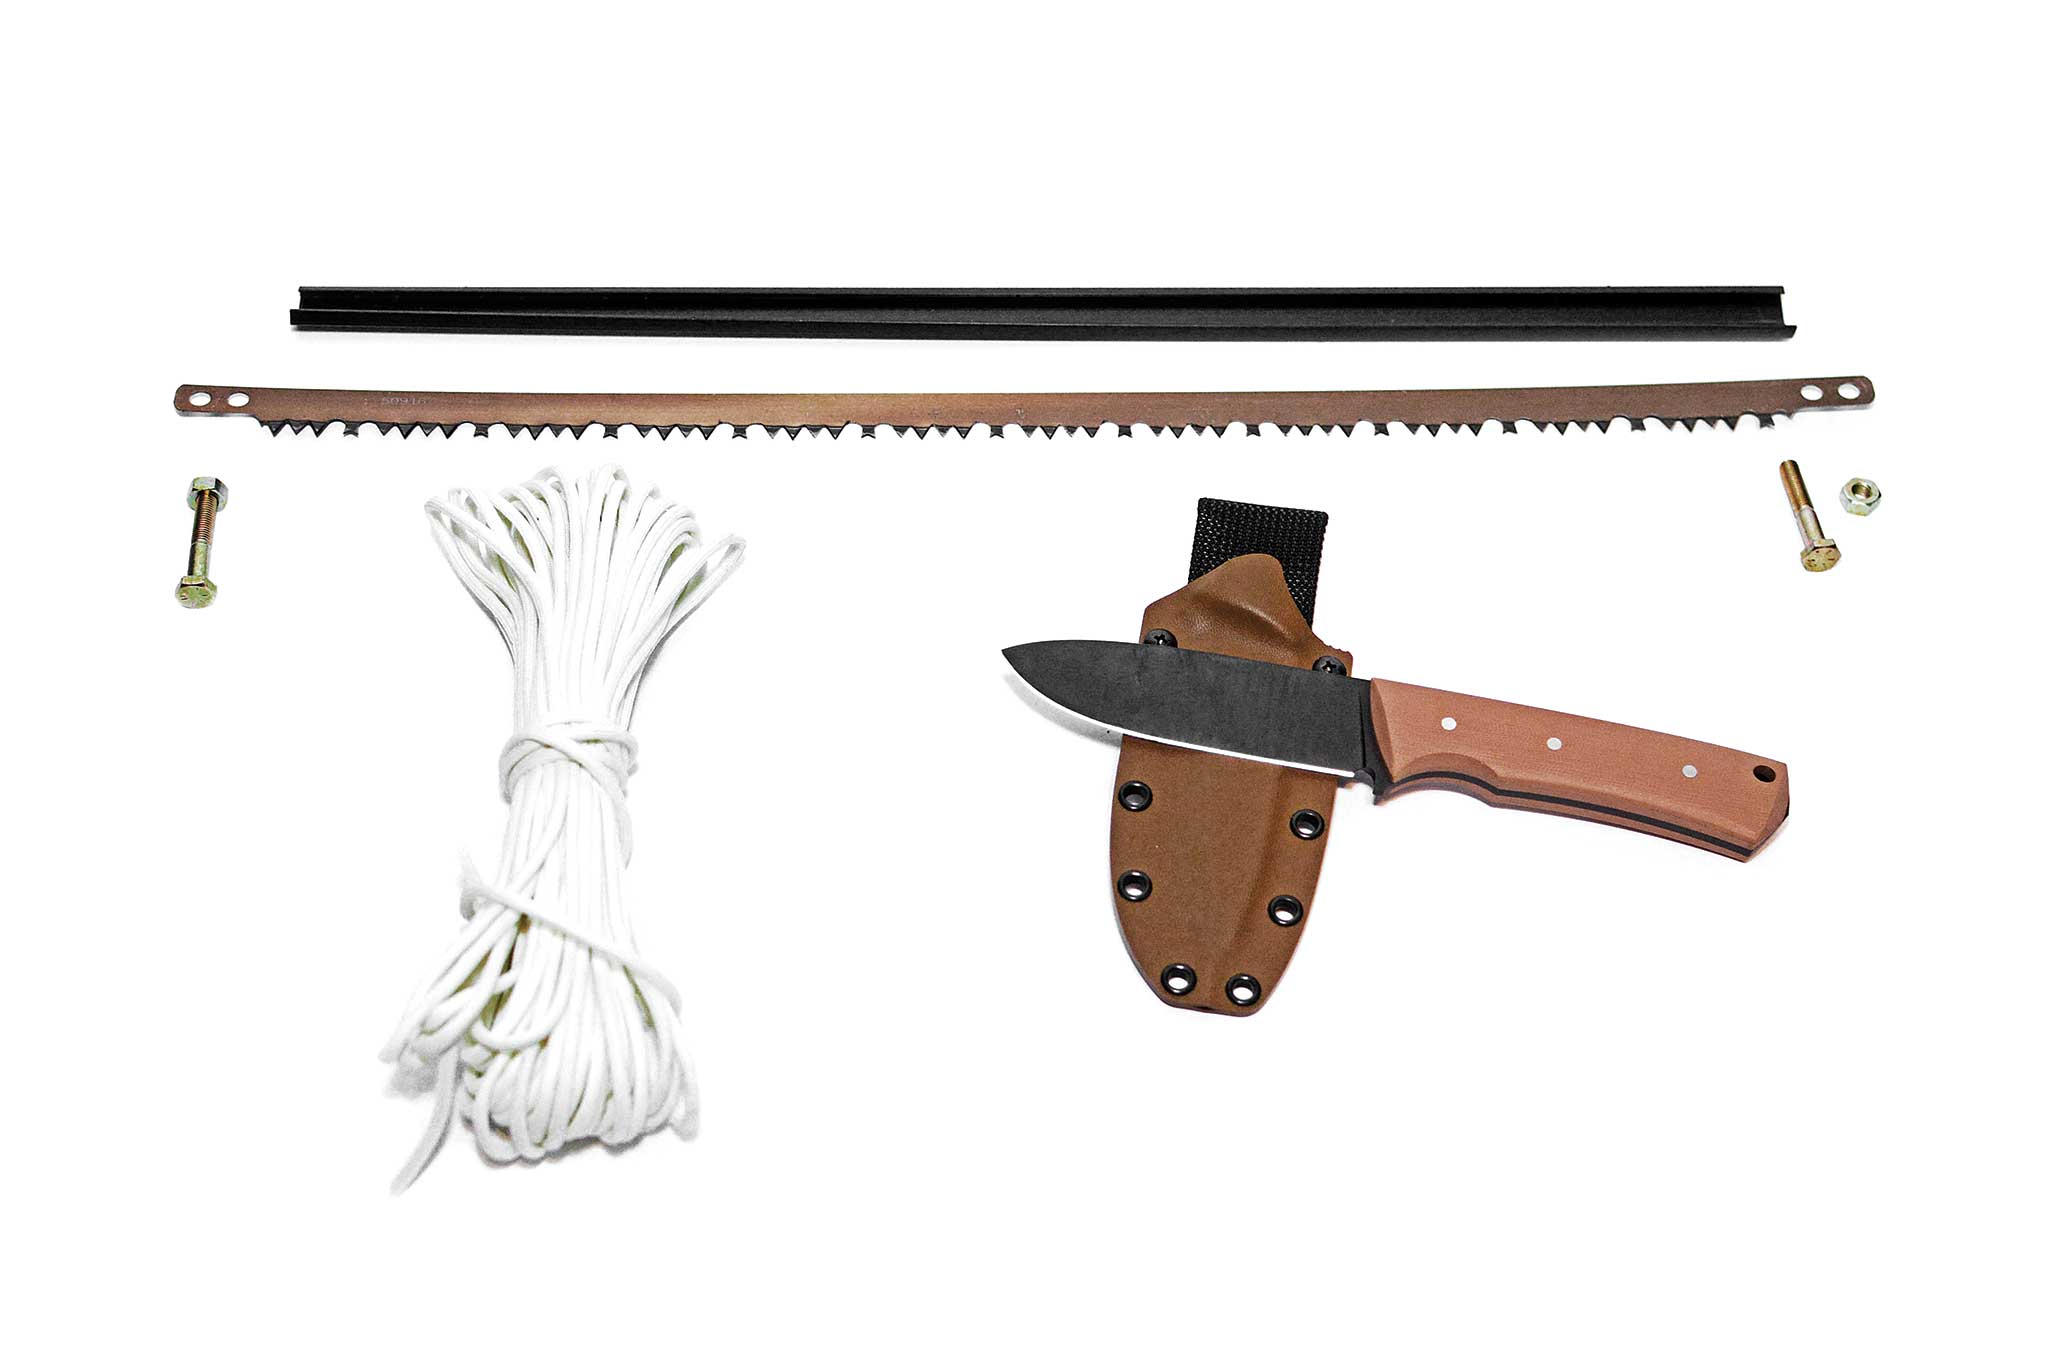
Knowing how to MacGyver things in a pinch can go a long way in a desperate situation. If all you have at your disposal is a long saw blade, paracord, and some nuts and bolts, you might think you’re SOL in terms of any serious cutting or sawing. Don’t lose hope though — it just takes a little ingenuity. With the items listed and some pieces of wood, we can create a frame to improvise a practical cutting instrument that’ll make it a heck of a lot easier to cut some firewood or tree trunks for an improvised shelter.
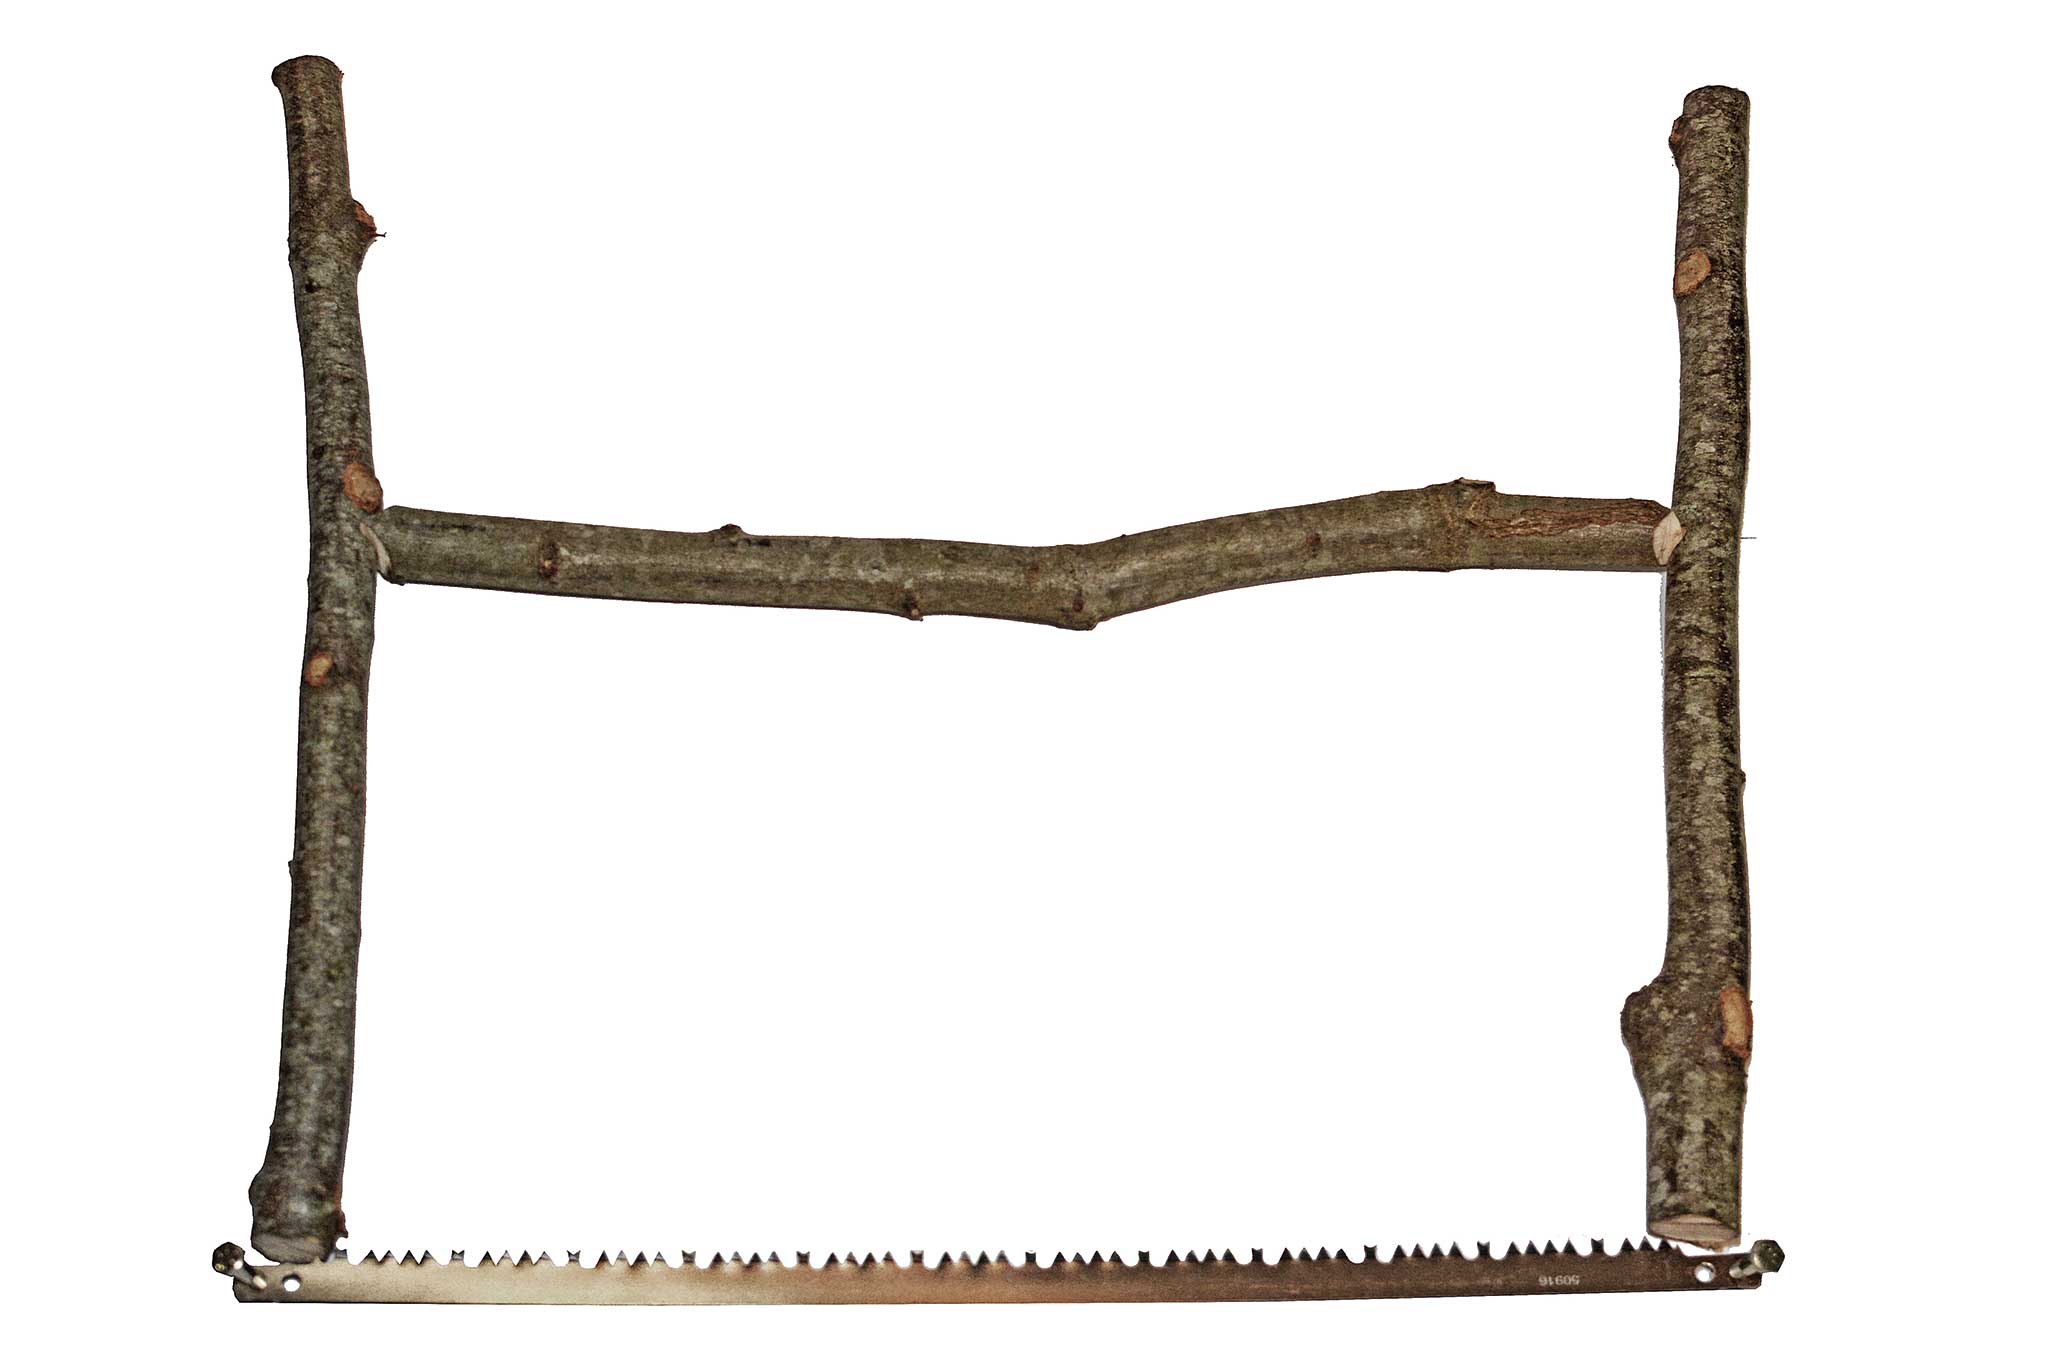
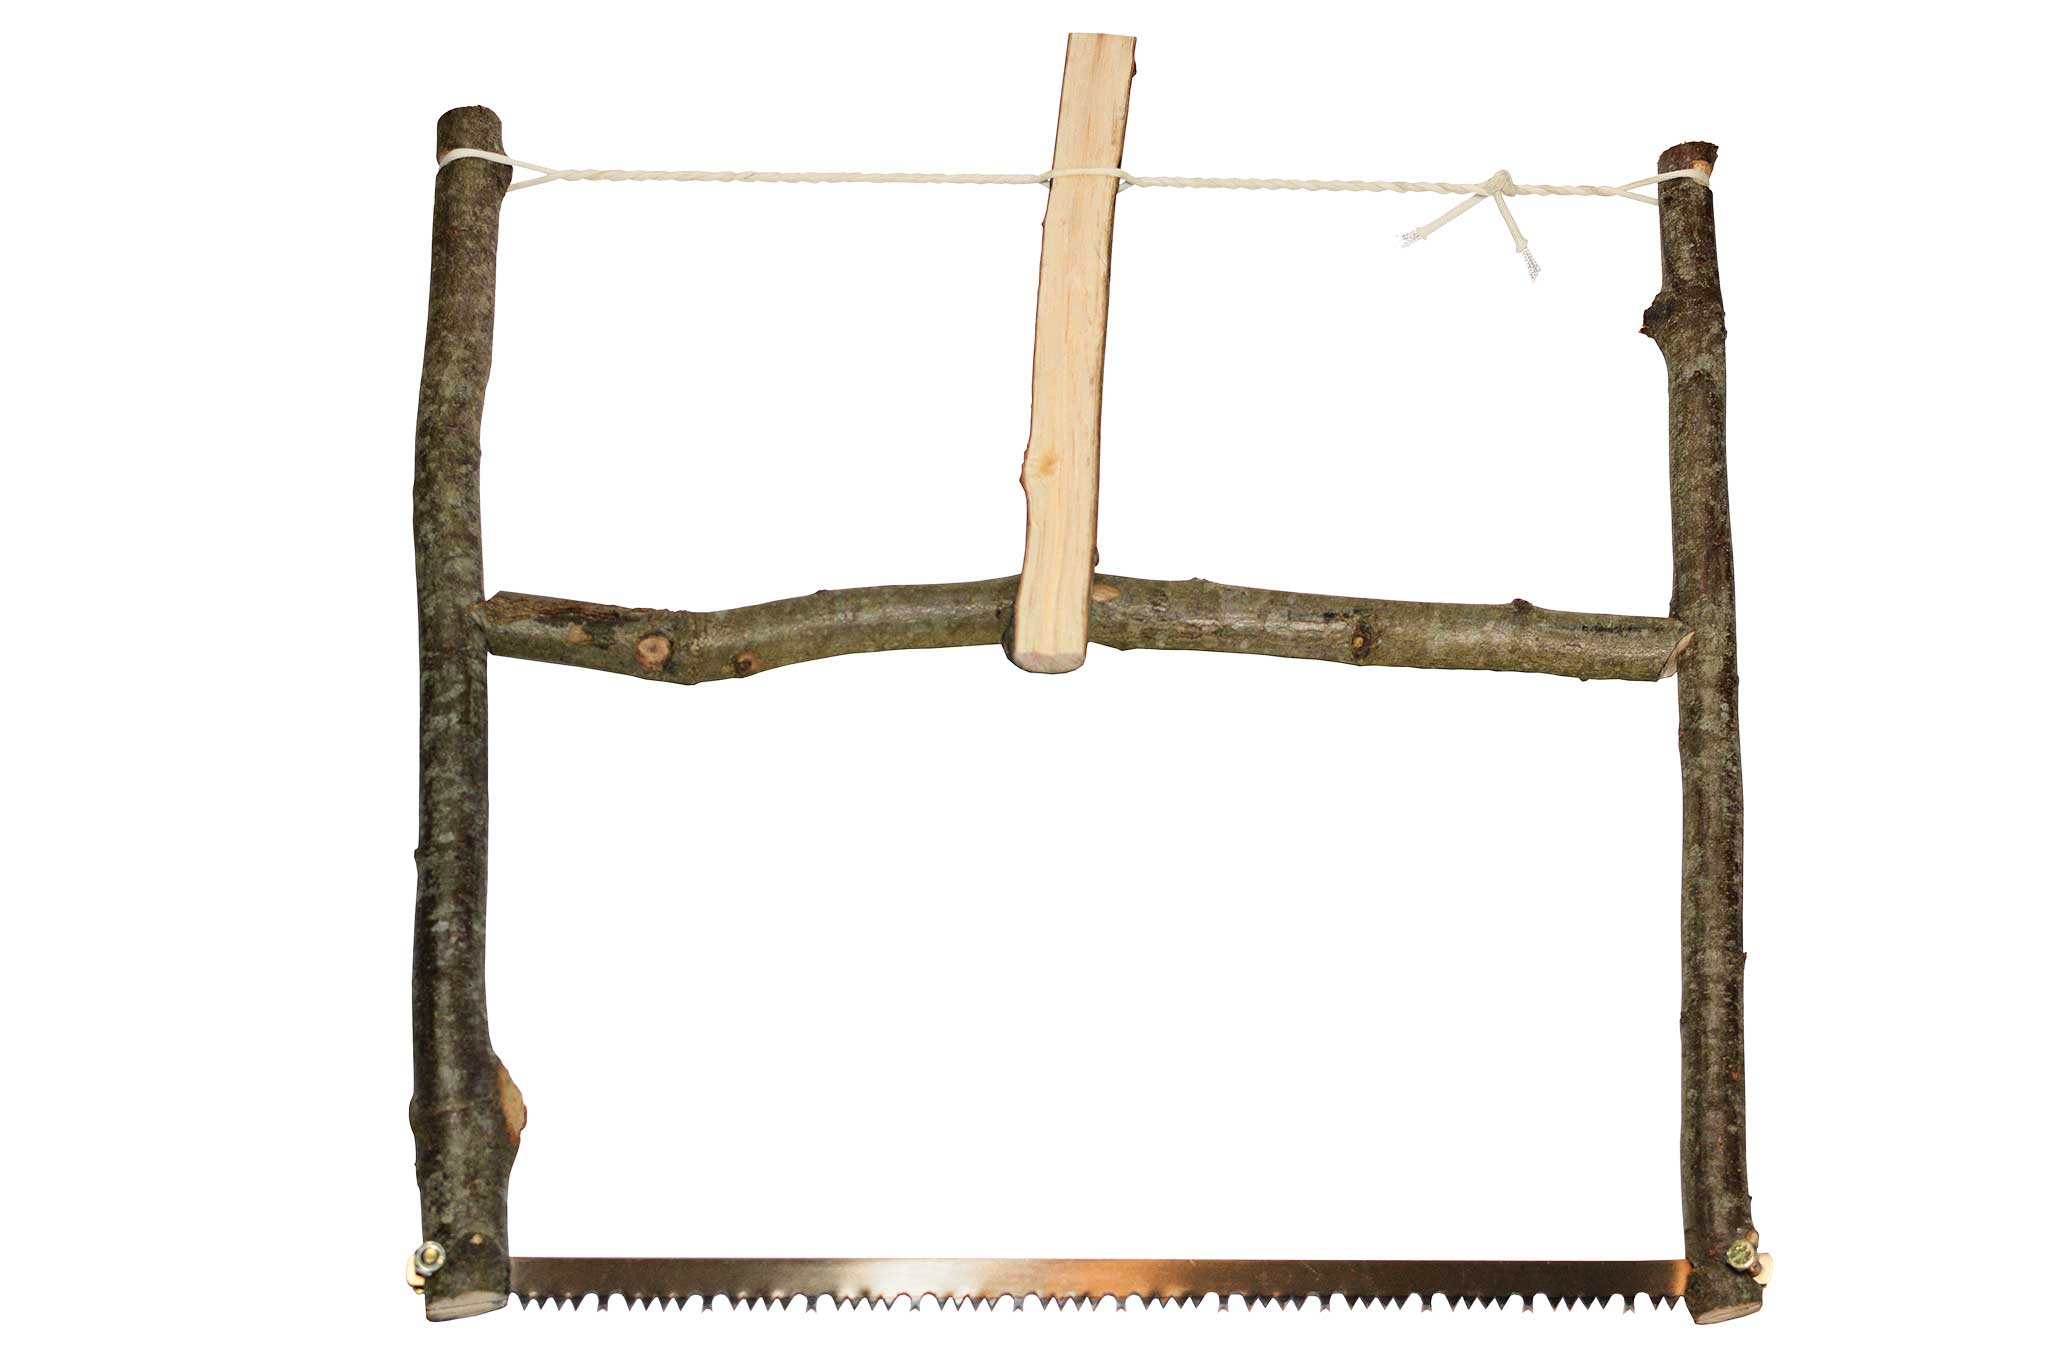
First of all, what exactly is a bucksaw? For our purposes, it’s a wooden frame that has a blade held in place using tension, some branches or pieces of tree trunk, and some nuts and bolts. Twine, paracord, or other heavy string provides the tension, created when the vertical arms pivot on the crossbar, and pull outward on the ends of the saw blade. Bucksaws allow for a more natural handle position compared to trying to grab the end of a flimsy saw blade to move it back and forth. This frame will give you better leverage and grip, allowing more control of the cuts you make. This is beneficial for processing a lot of wood or building your survival palace.
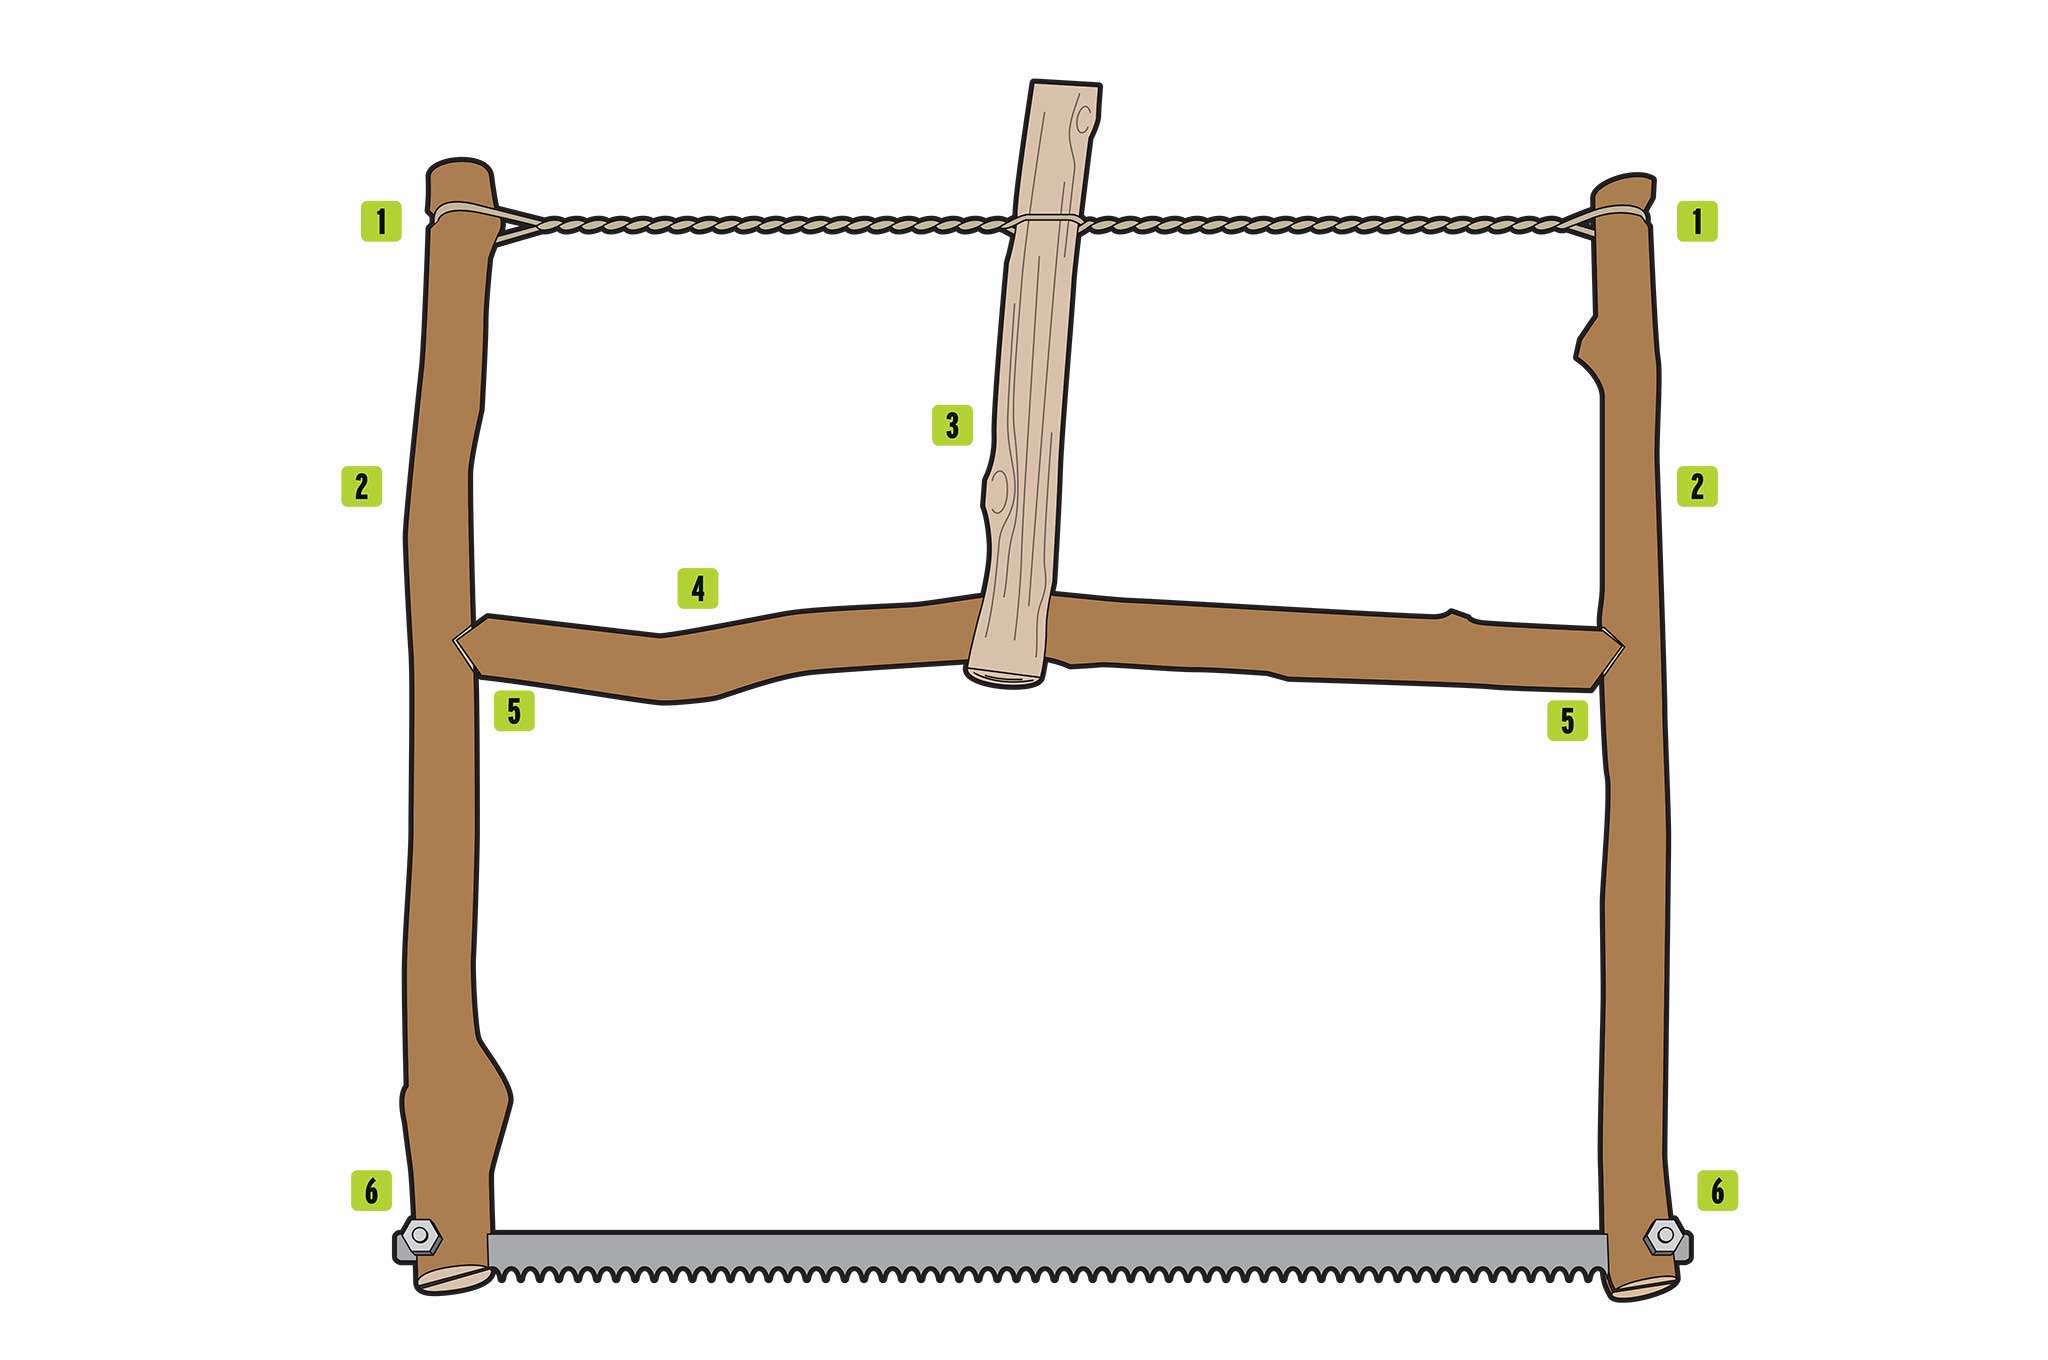
2. Arm/handle
3. Toggle
4. Cross bar
5. Cross bar notch
6. Bolt notch
First, examine the saw diagram above. We’ll describe its various parts and how to fashion them in further detail as you read on. The parts you’ll need to purchase, if you don’t already have them, are the saw blade, bolts, nuts, and paracord. We prefer replacement bucksaw or bowsaw blades with four to six teeth per inch. Hacksaw blades tend to be shorter than we’d like, plus the size and number of teeth are more geared toward cutting metal or plastic. They can work, but it’s really a matter of preference. The blade on our example is 21 inches.
After you’ve acquired a blade, the next step is finding a couple nuts and bolts. It’s important that this hardware fit through the existing holes on the ends of the blade that are usually used to mount it to a standard plastic and metal frame. Ideally, you want the two bolts to be long enough to have around 1 inch of thread showing through the nut at the end, as this will give you some extra room when you mount the blade to your homemade frame. The longer the bolts, the bigger the branches or pieces of wood you can work with.
You’ll also need to find or purchase some paracord. Typically it comes in lengths of 50 feet, but if you have a survival bracelet with paracord, it should provide enough length to complete the project. The paracord, or acceptable substitute cordage, creates the pulling force on the handles or arms to keep the blade taut.
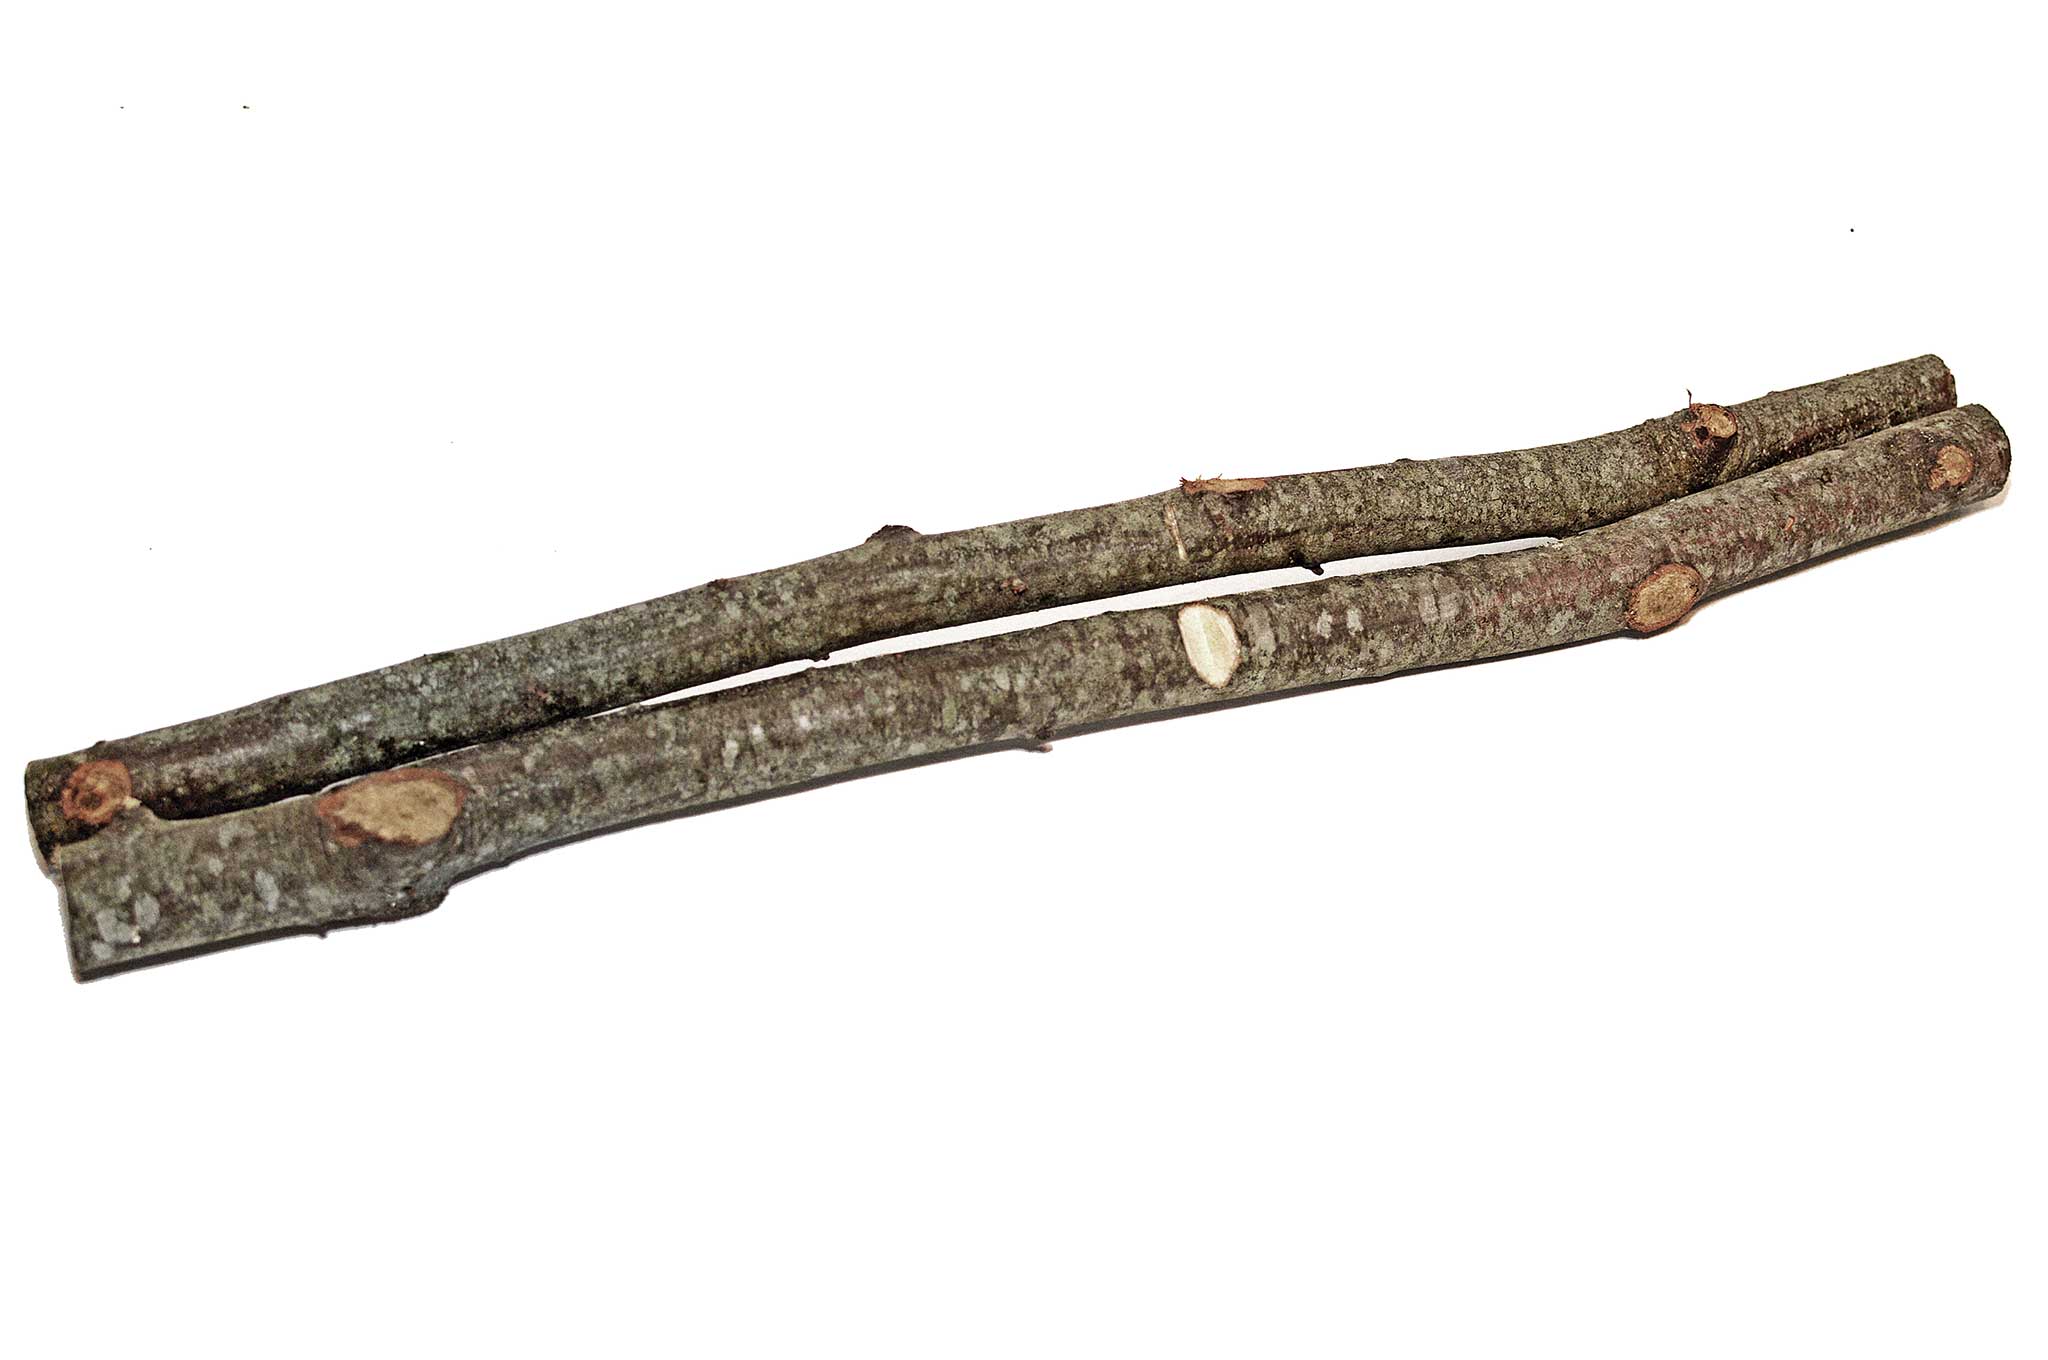
Next, you need a nice straight tree or two that are close to the handle diameter you want. Look for branches that are around 3/4 to 1 inch in diameter. The actual length depends on how long your blade is and how long you want your handles to be. Typically they’ll be around 12 to 15 inches long. A good rule of thumb is to select three pieces that are as long as, or slightly longer than, the blade being used.
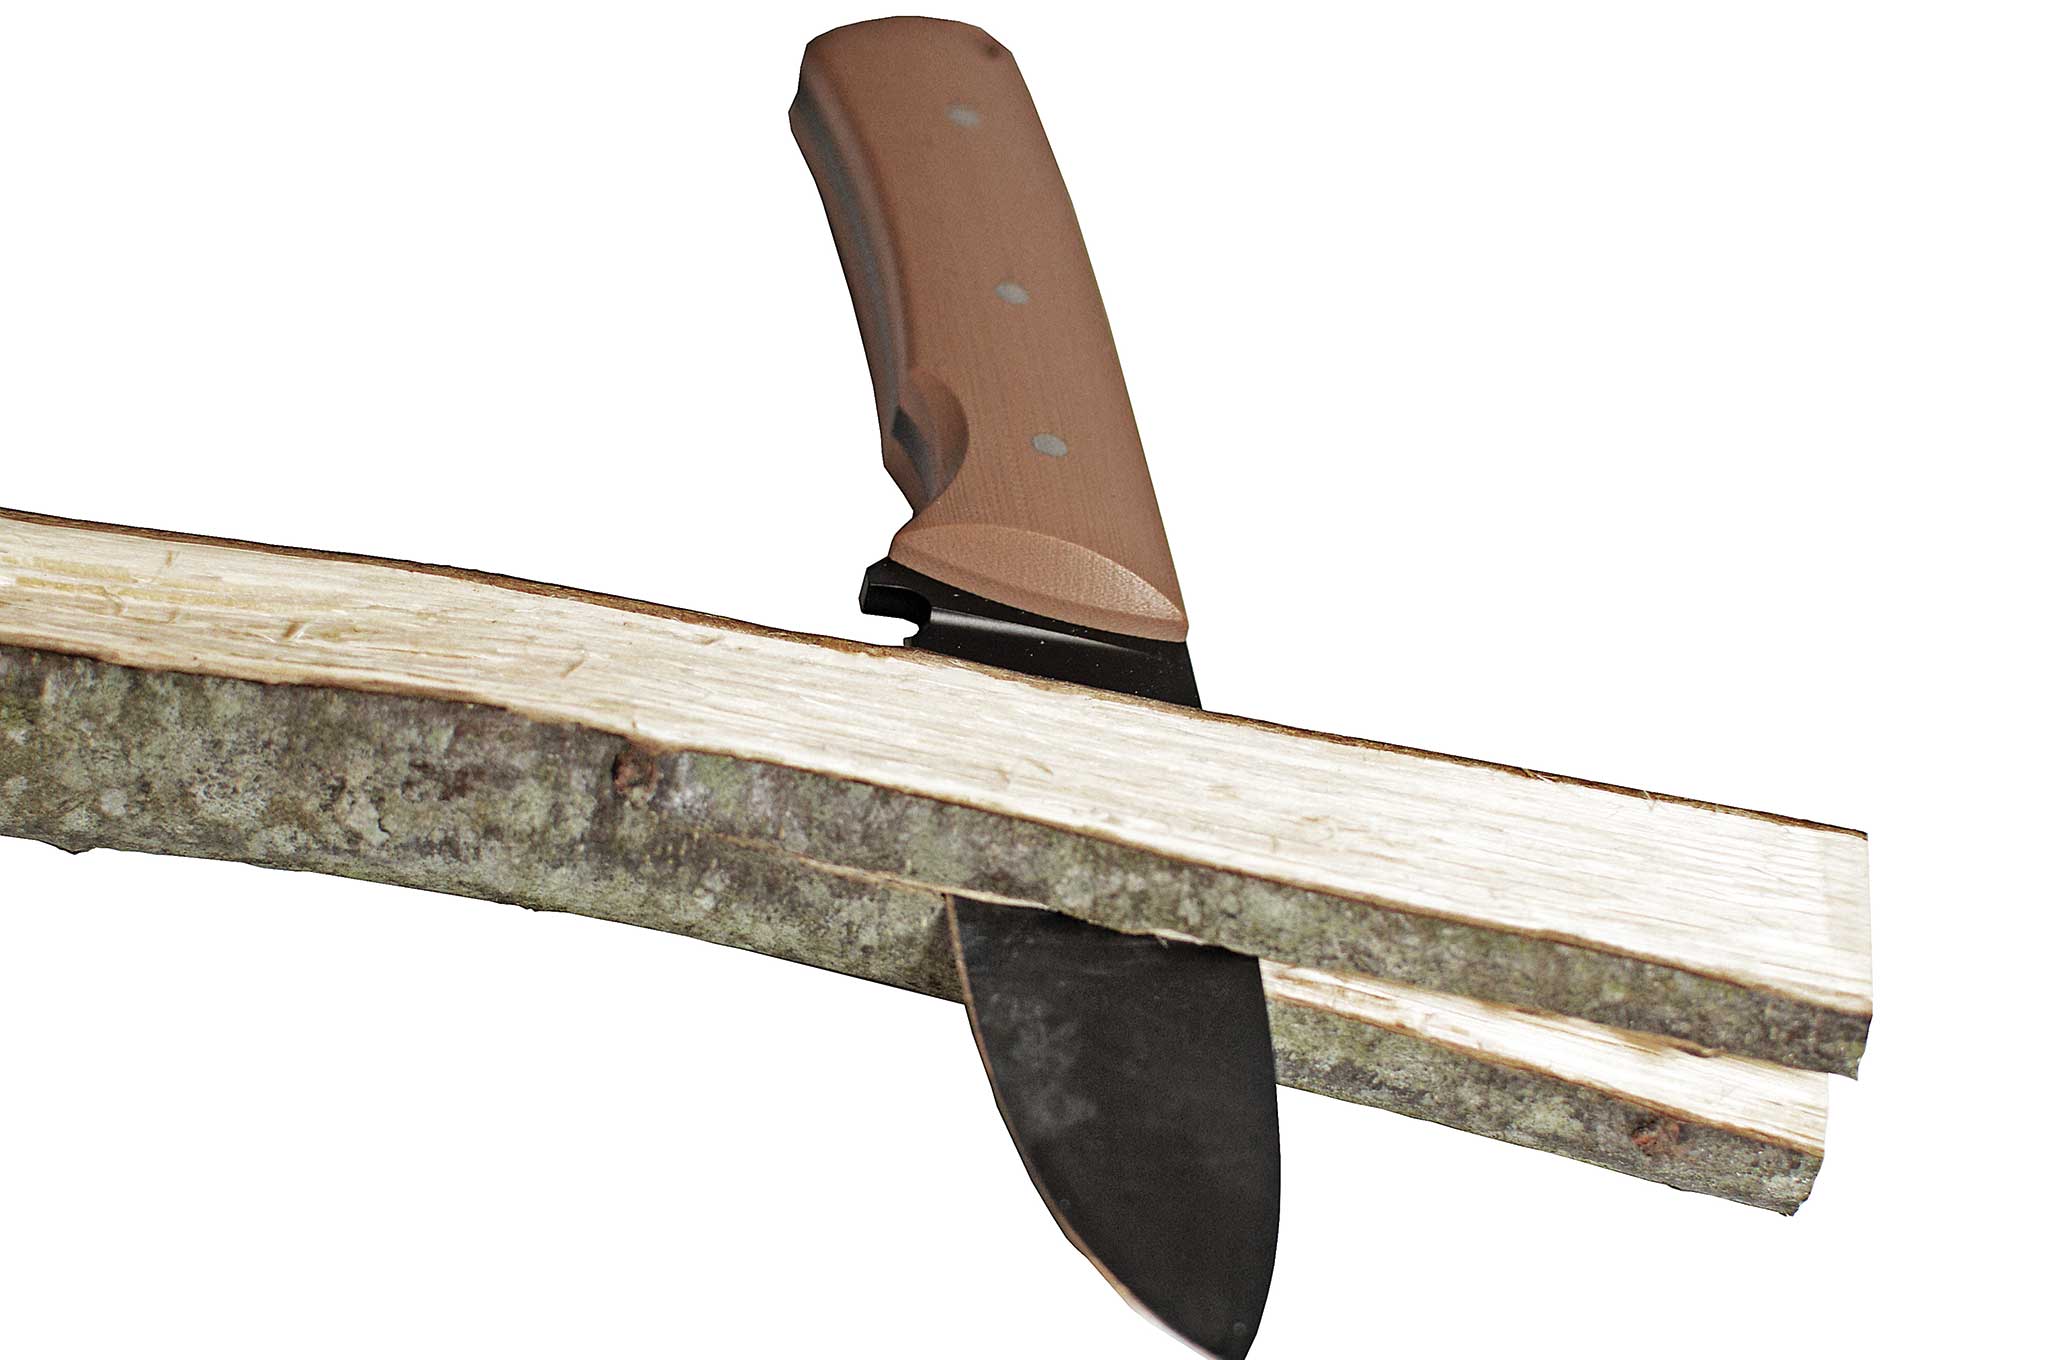
In procuring the wood needed to build the bucksaw frame, you’ll quickly see the disadvantages of working with a bare saw blade. First, insert the nuts and bolts into the ends of the blade and get ready to look like a terrible accordion player as you painstakingly cut some appropriate lengths of wood.
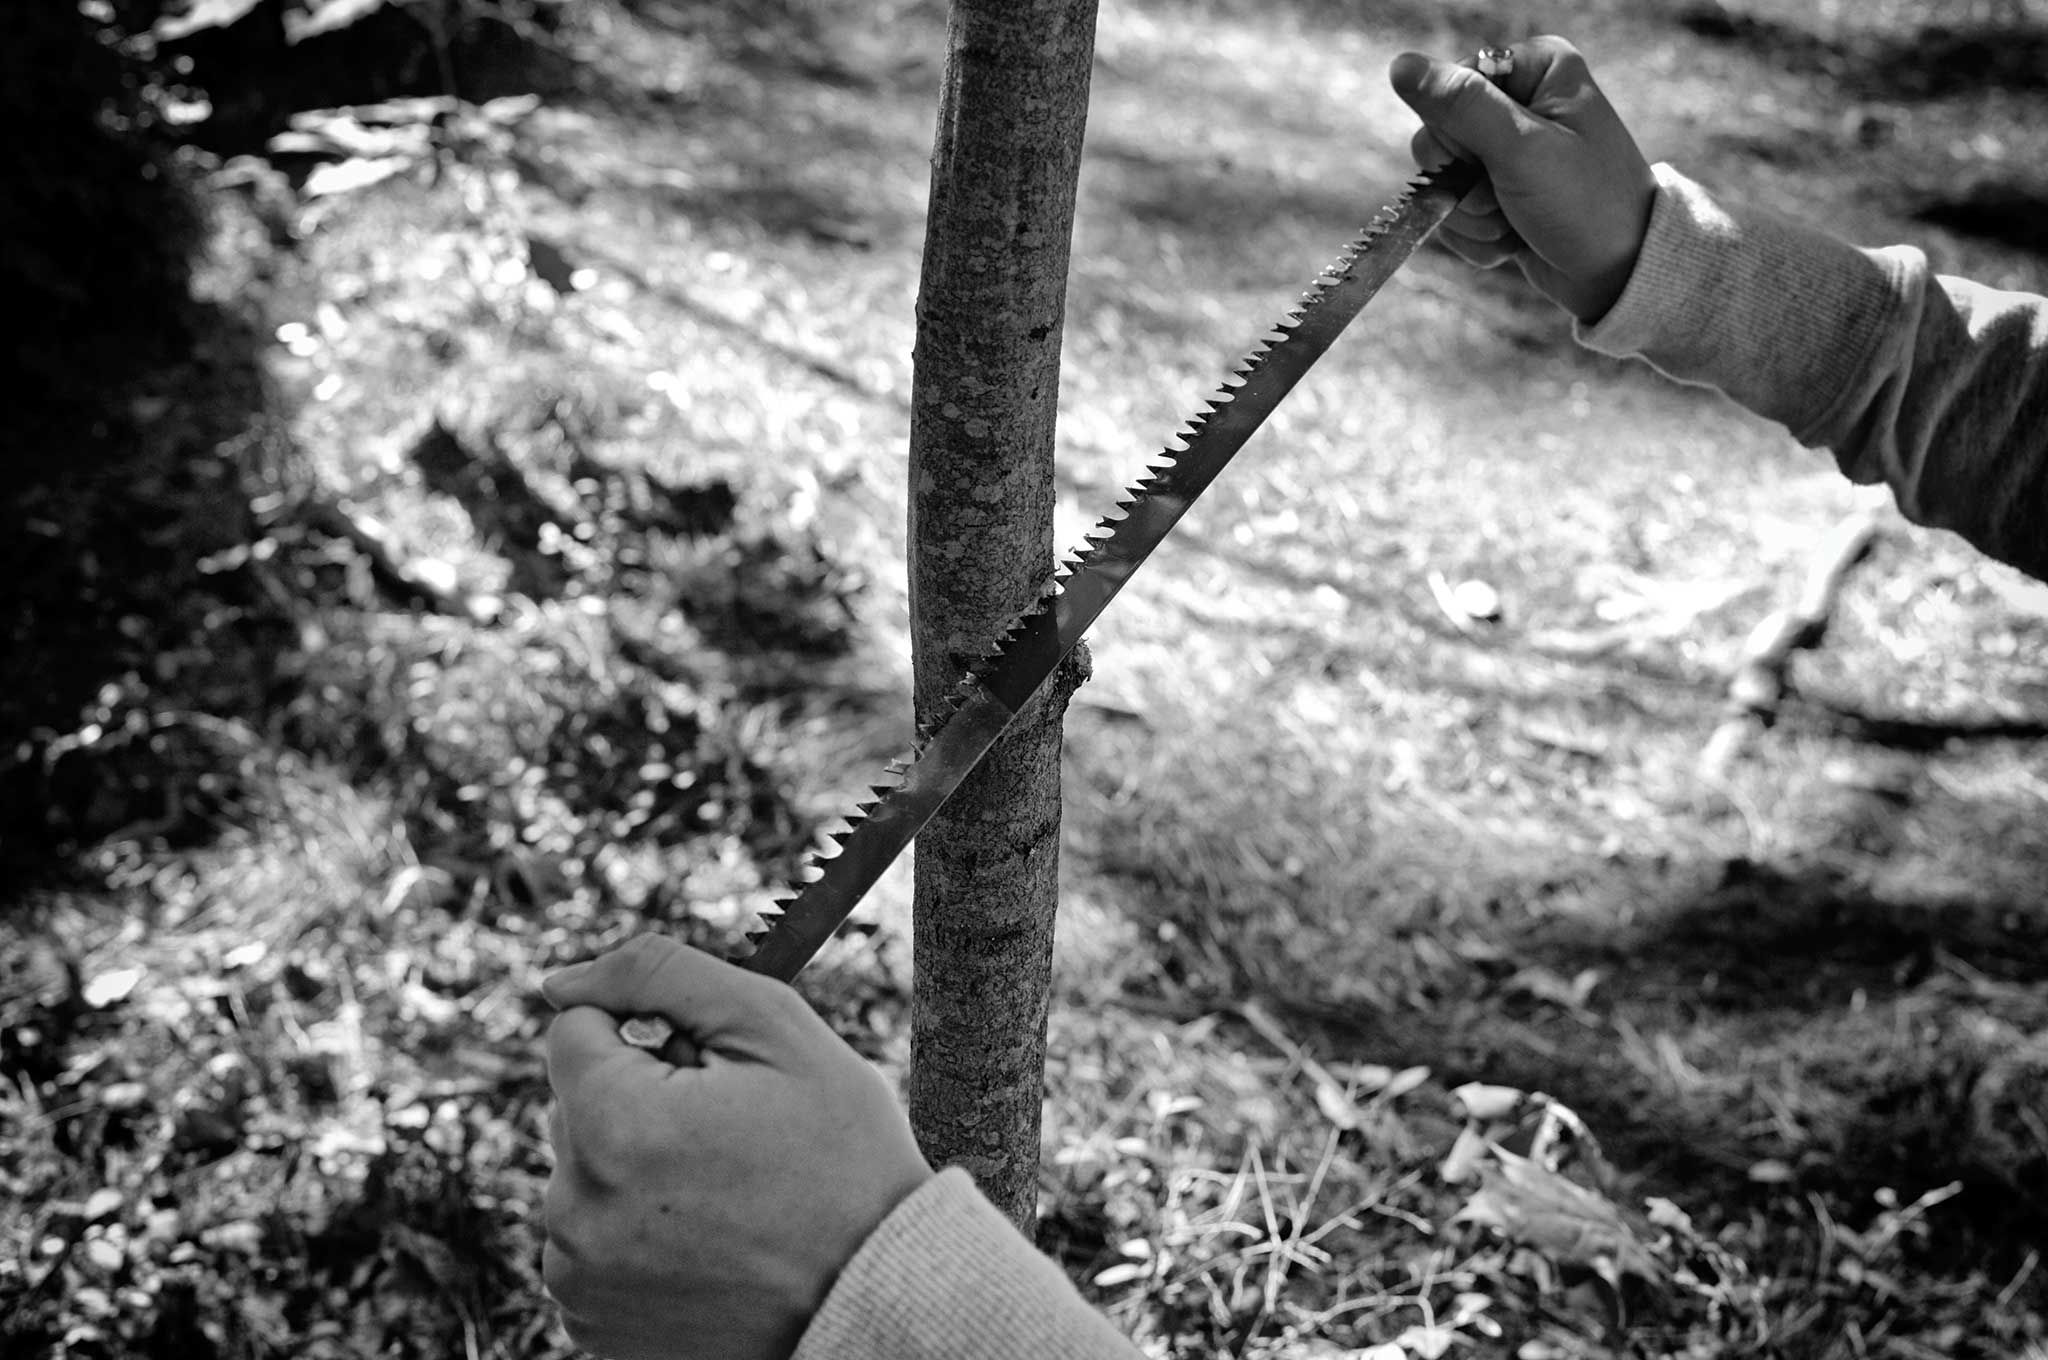
Hold the blade in between your fingers and curl your fingers around the bolts. This will give you something to hold on to as you sway your arms back and forth to hack some lengths of tree branch or trunk. If you have gloves, wear them — they’ll help you hold the blade more securely and reduce the risk of accidental cuts if your hands slip on the blade. Good news: You’ll have a handle soon, so this should be the last time you’ll need to use the blade in this frustrating manner.
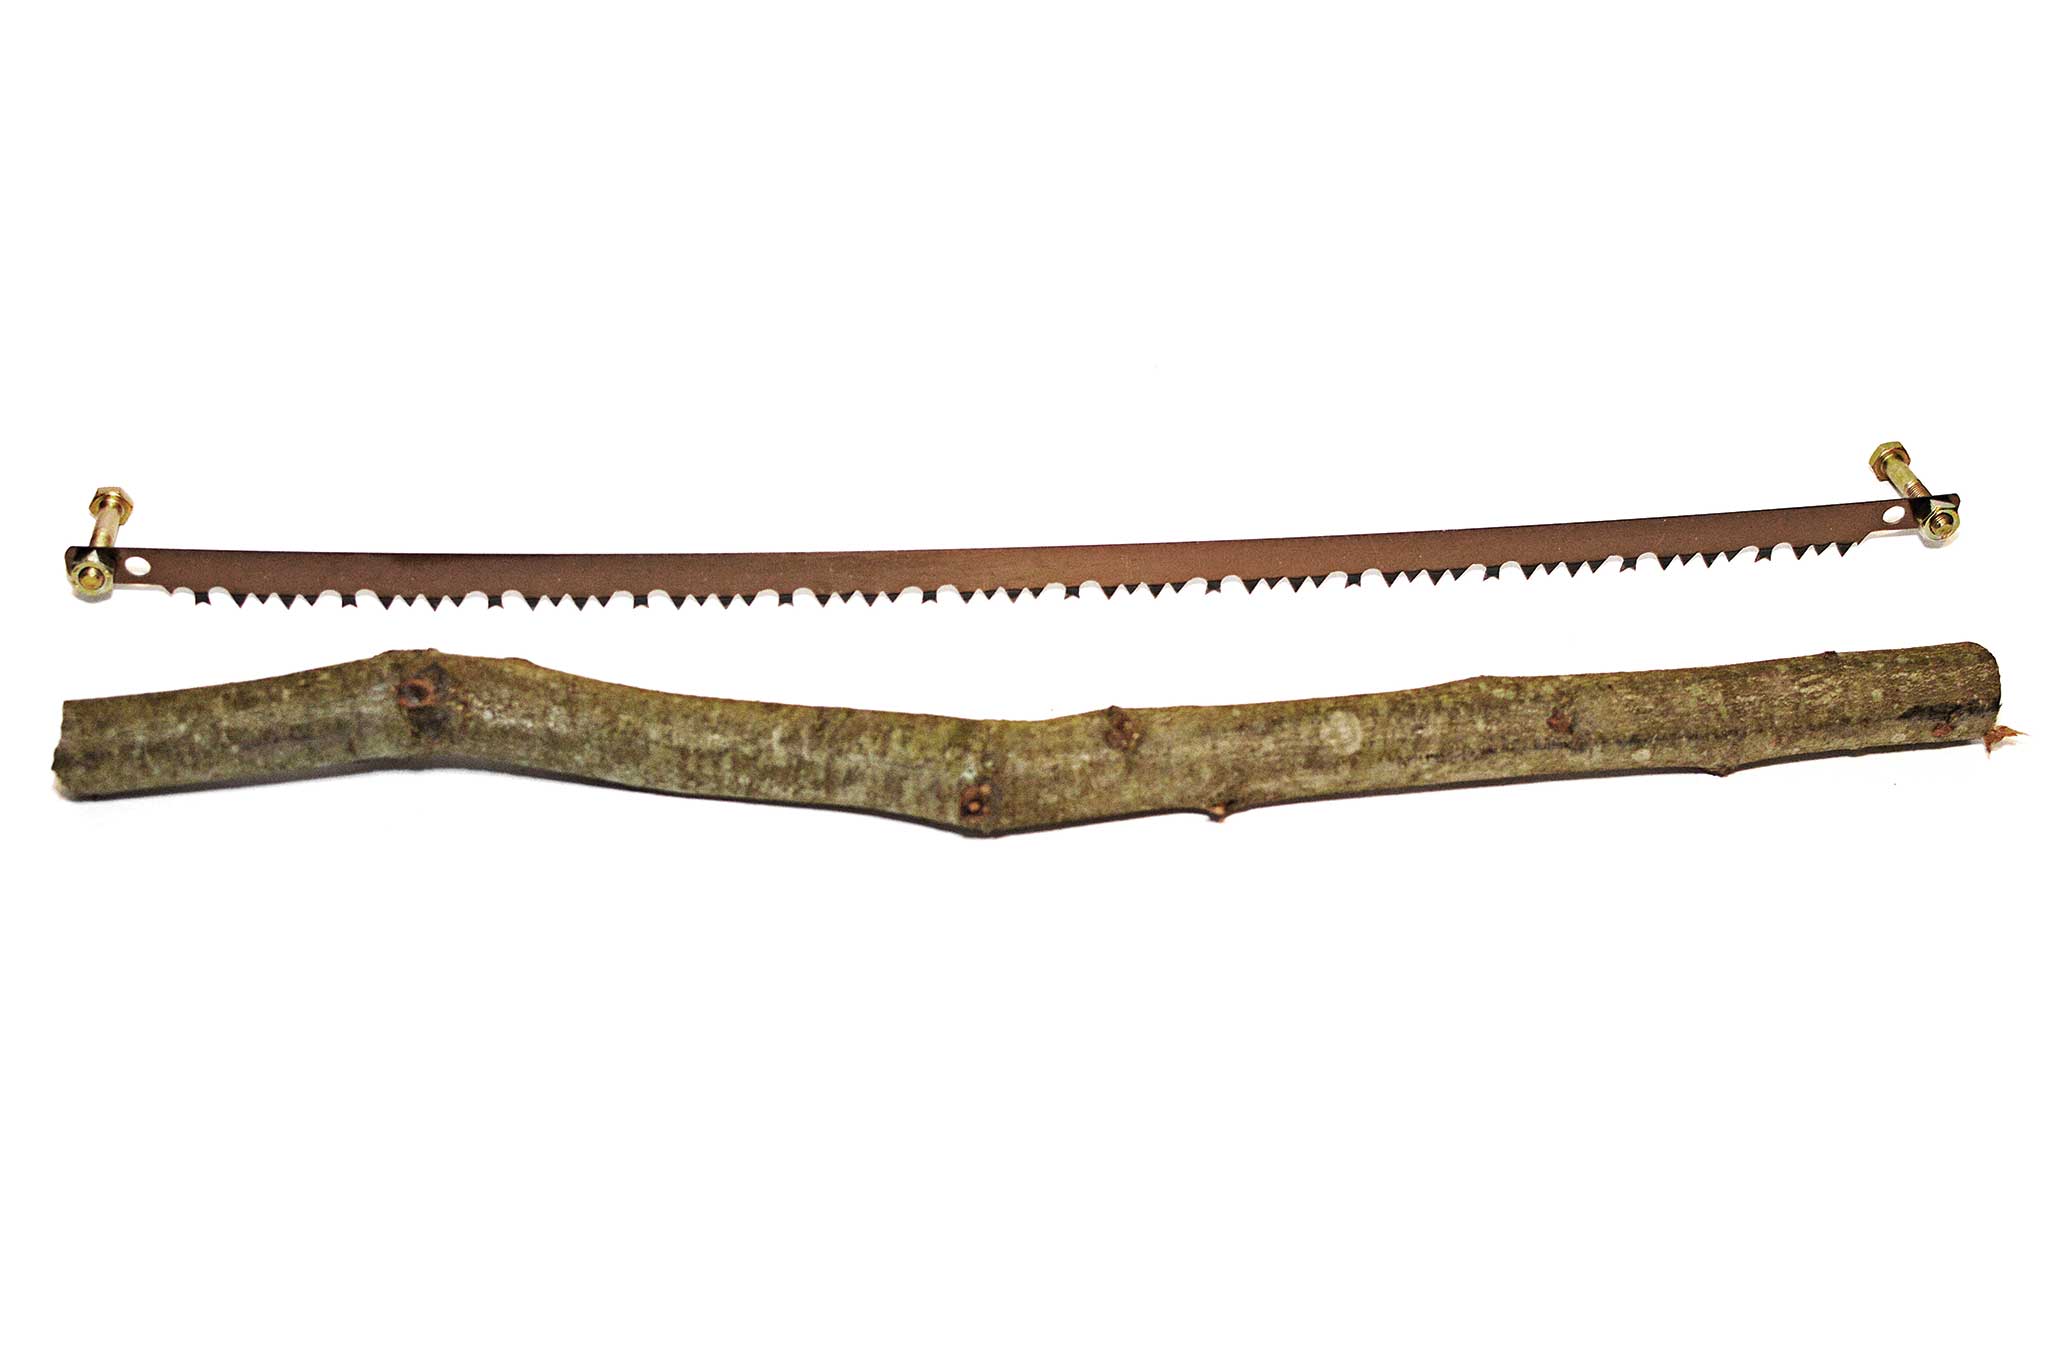
Now it’s time to assemble the pieces. The first is the crossbar. This piece will likely require a bit of fine-tuning to achieve the appropriate length. You should aim to cut this a bit shorter than the distance between the screw holes in the chosen blade. This is because the screws will be on the outside of the saw’s arms.
Once you have the crossbar cut to size, its ends must be finished in a way to help secure them to the vertical arms. In our case we fashioned triangular ends, as they’re fairly easy to make. You can do this with your knife, or if you have to use your crude bolt-handled saw blade. Try to create two symmetrical cuts, so that each end of the crossbar resembles a wedge. You might need to adjust the angle on these for fitment and to remove any twist your blade has once it’s all assembled.
The arms or handles are your next task, which you can adjust based on your preferences. The crossbar will be held in place about halfway up the arms. The distance from the teeth of the saw to this crossbar is known as the throat, determining the thickest object you can cut through without making multiple cuts. So if all the trees in your area are half a foot in diameter, it’s best to make the arms a bit longer than a foot in length.
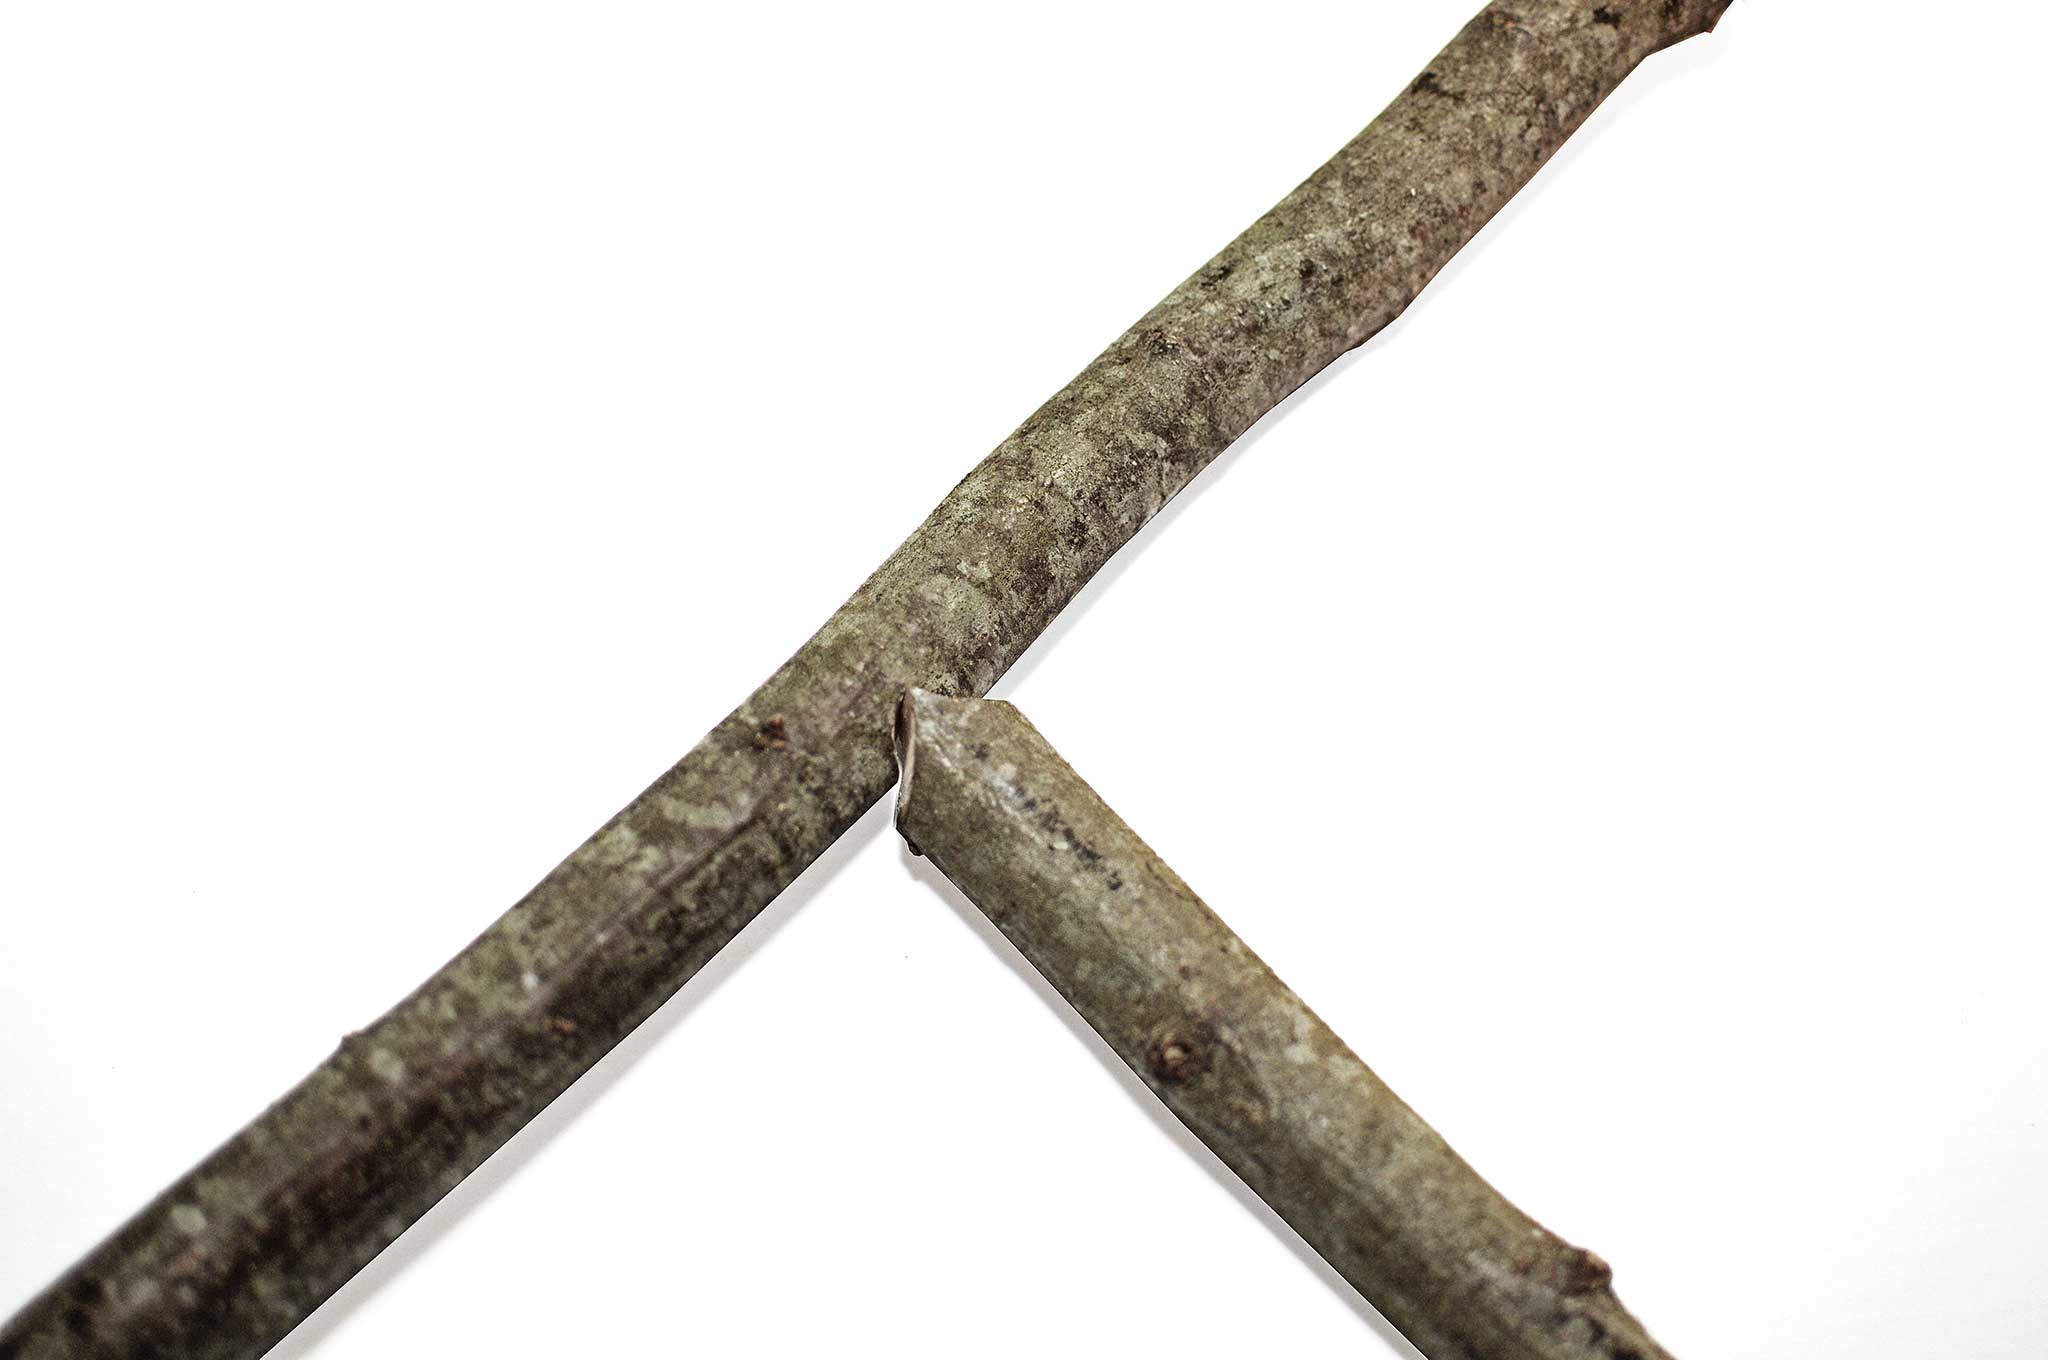
Each arm needs three cuts, the first one being a V-shaped notch for the crossbar. Start approximately halfway up from where the teeth will be, or a bit higher, and mark a line on both arms in the same spot. Make a corresponding notch that the ends of the crossbar will fit into. This will allow them to lock in and provide the pivot point. You’ll need a small amount of slop in this so that the arms can move when tightened. If necessary, you can start with a small notch and gradually widen it. Remember, you can’t remove too little from the wood, but you can remove too much. If your notch is too wide or deep, you may have to start over on that particular piece.
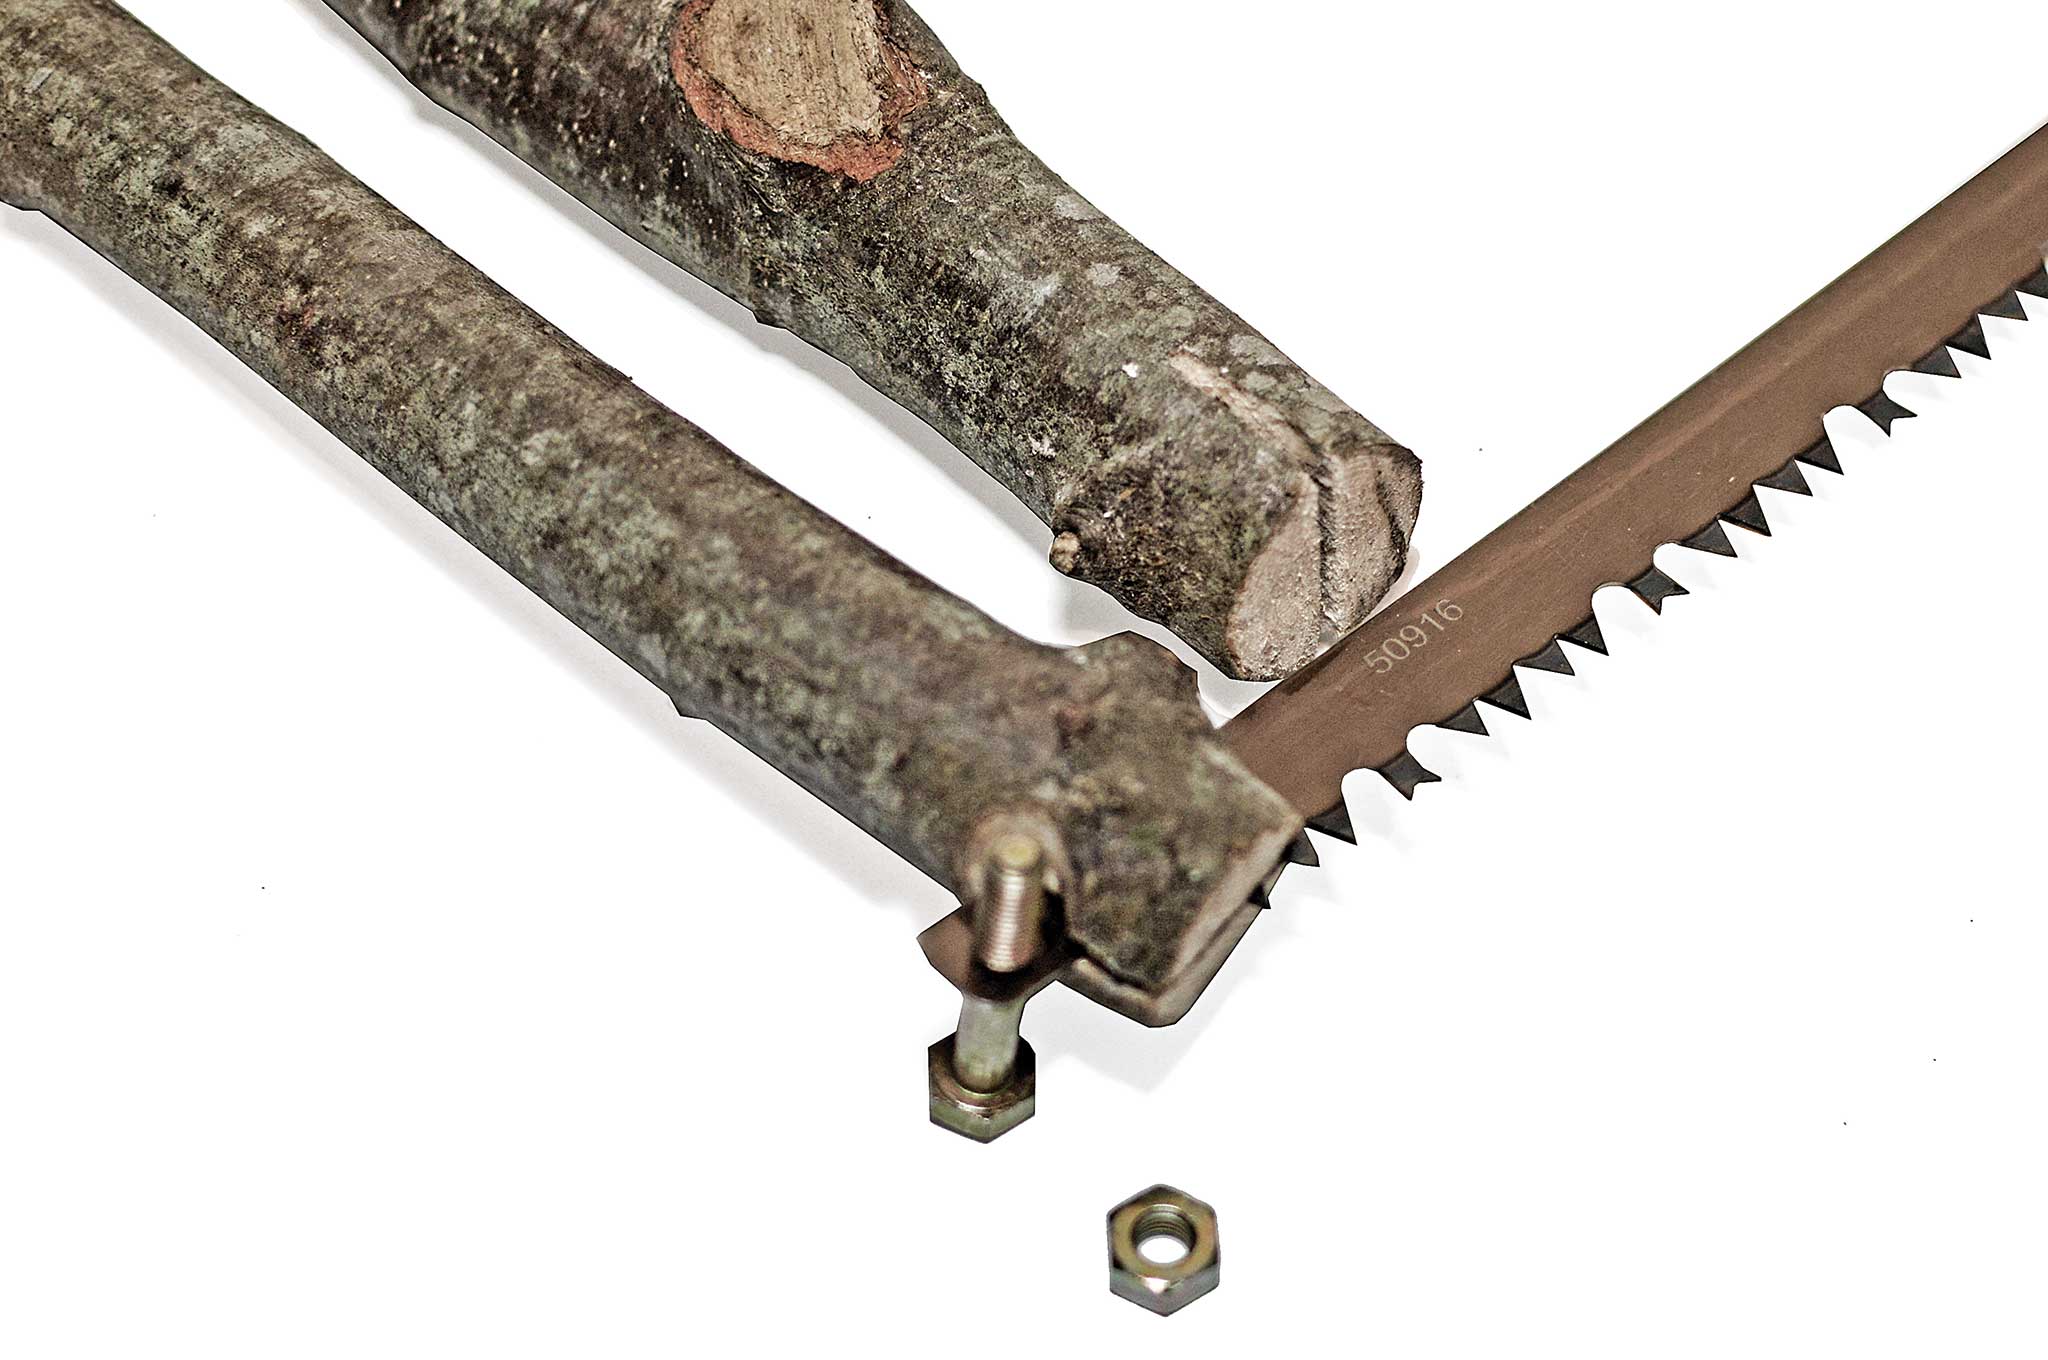
Next you’ll need to cut a slot in one end of each arm to accommodate the saw blade. You can use the blade itself or a sharp knife to whittle these openings. The width of the slots should only be as thick as the saw blade so the ends of the arms will securely hold it in place. Make the slots just slightly deeper than the height of the blade so the ends fit snugly into the wood when you fasten them with the bolts. It’s also helpful to add small notches for the bolts on the outside of the arms.
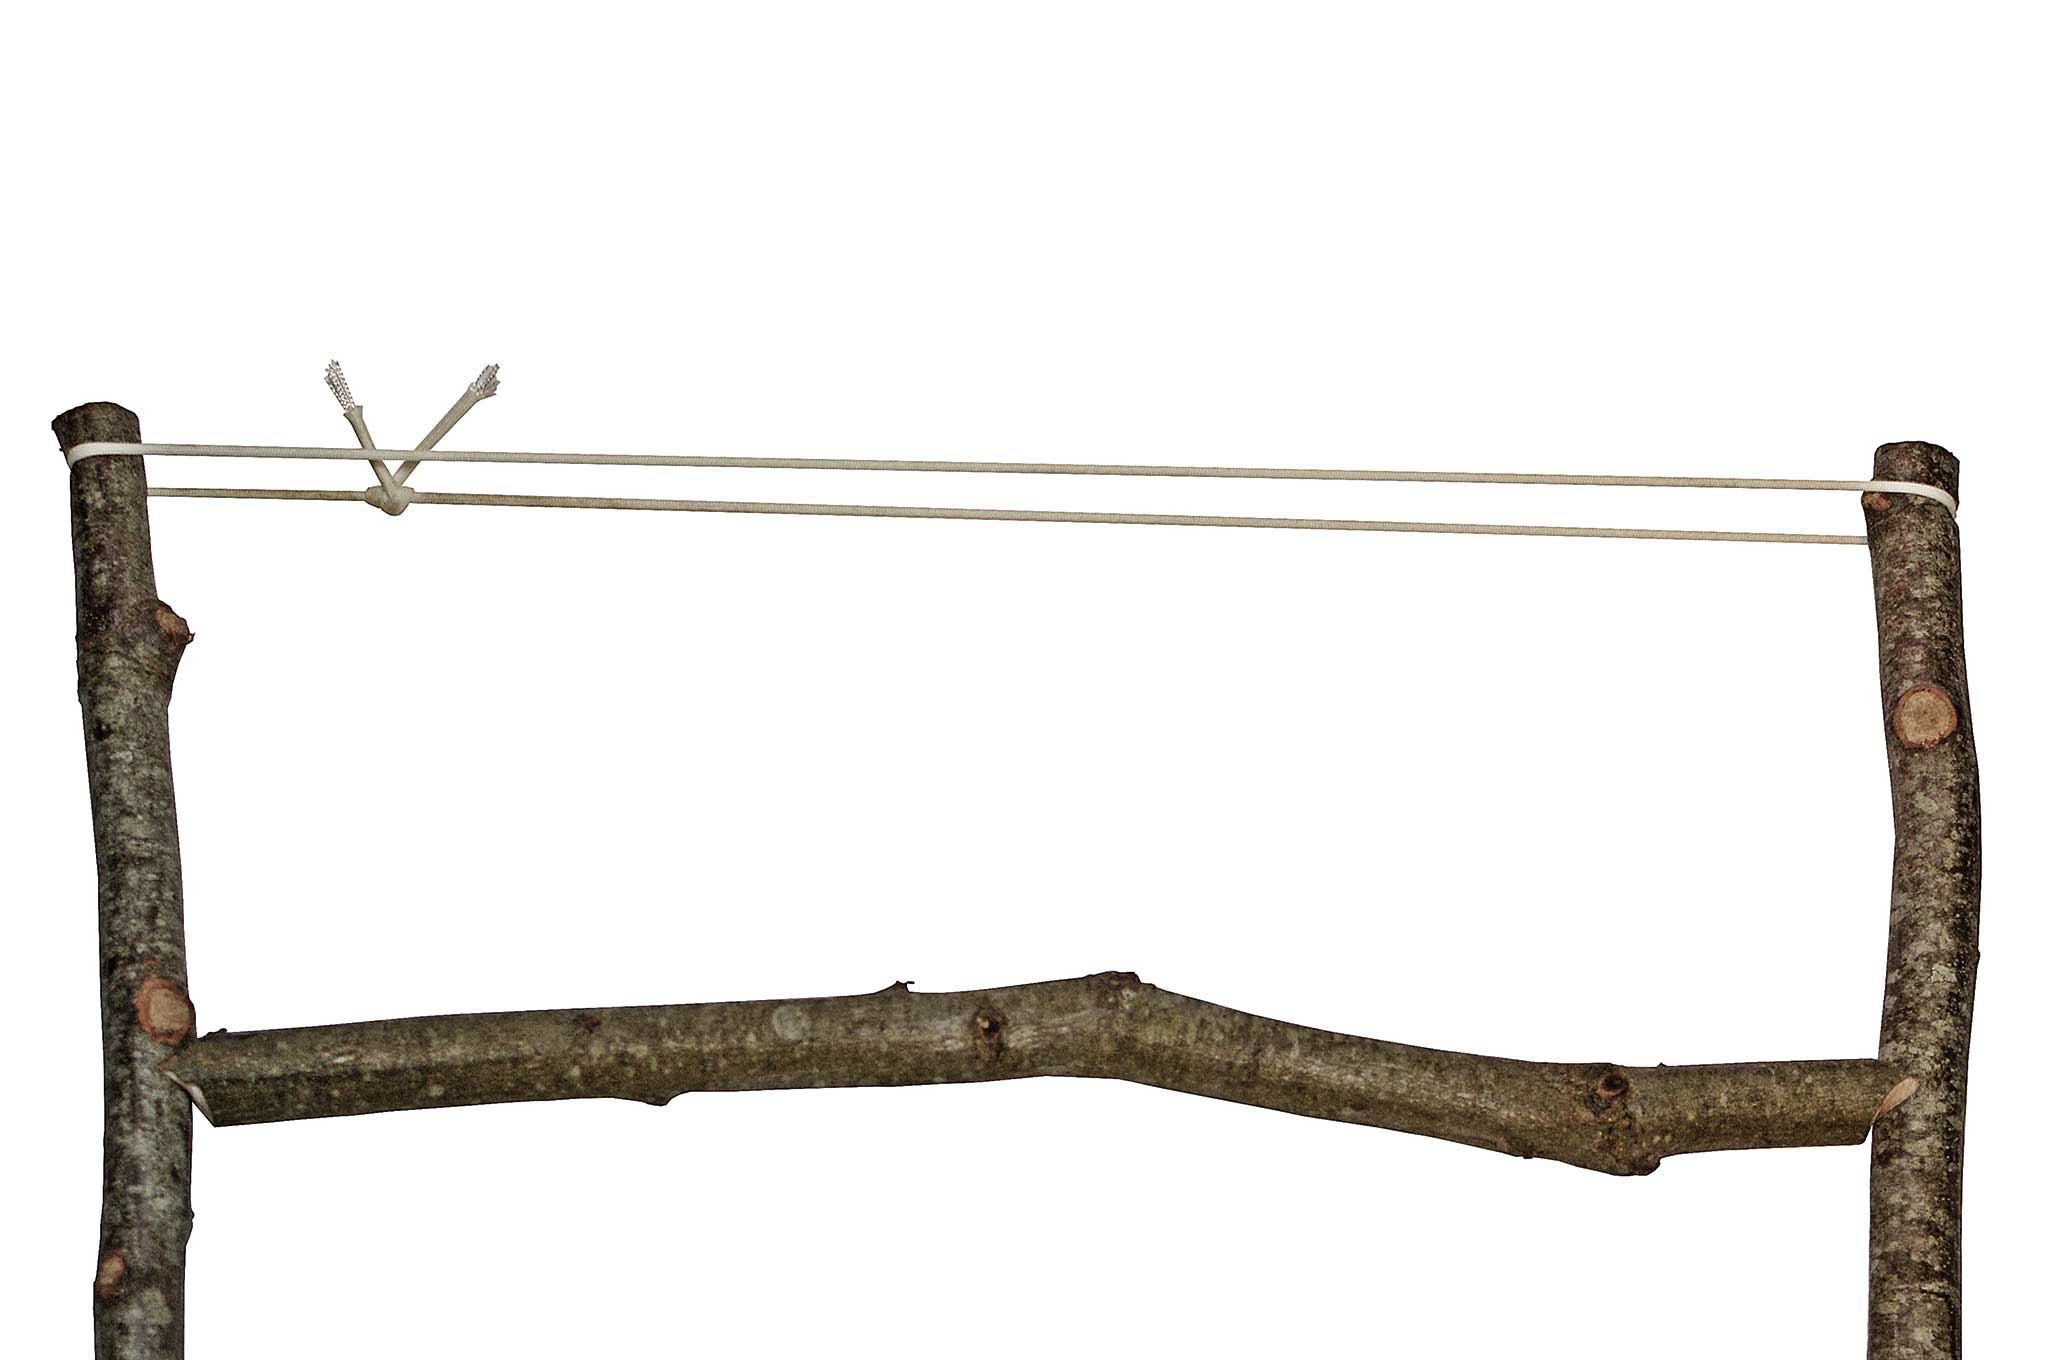
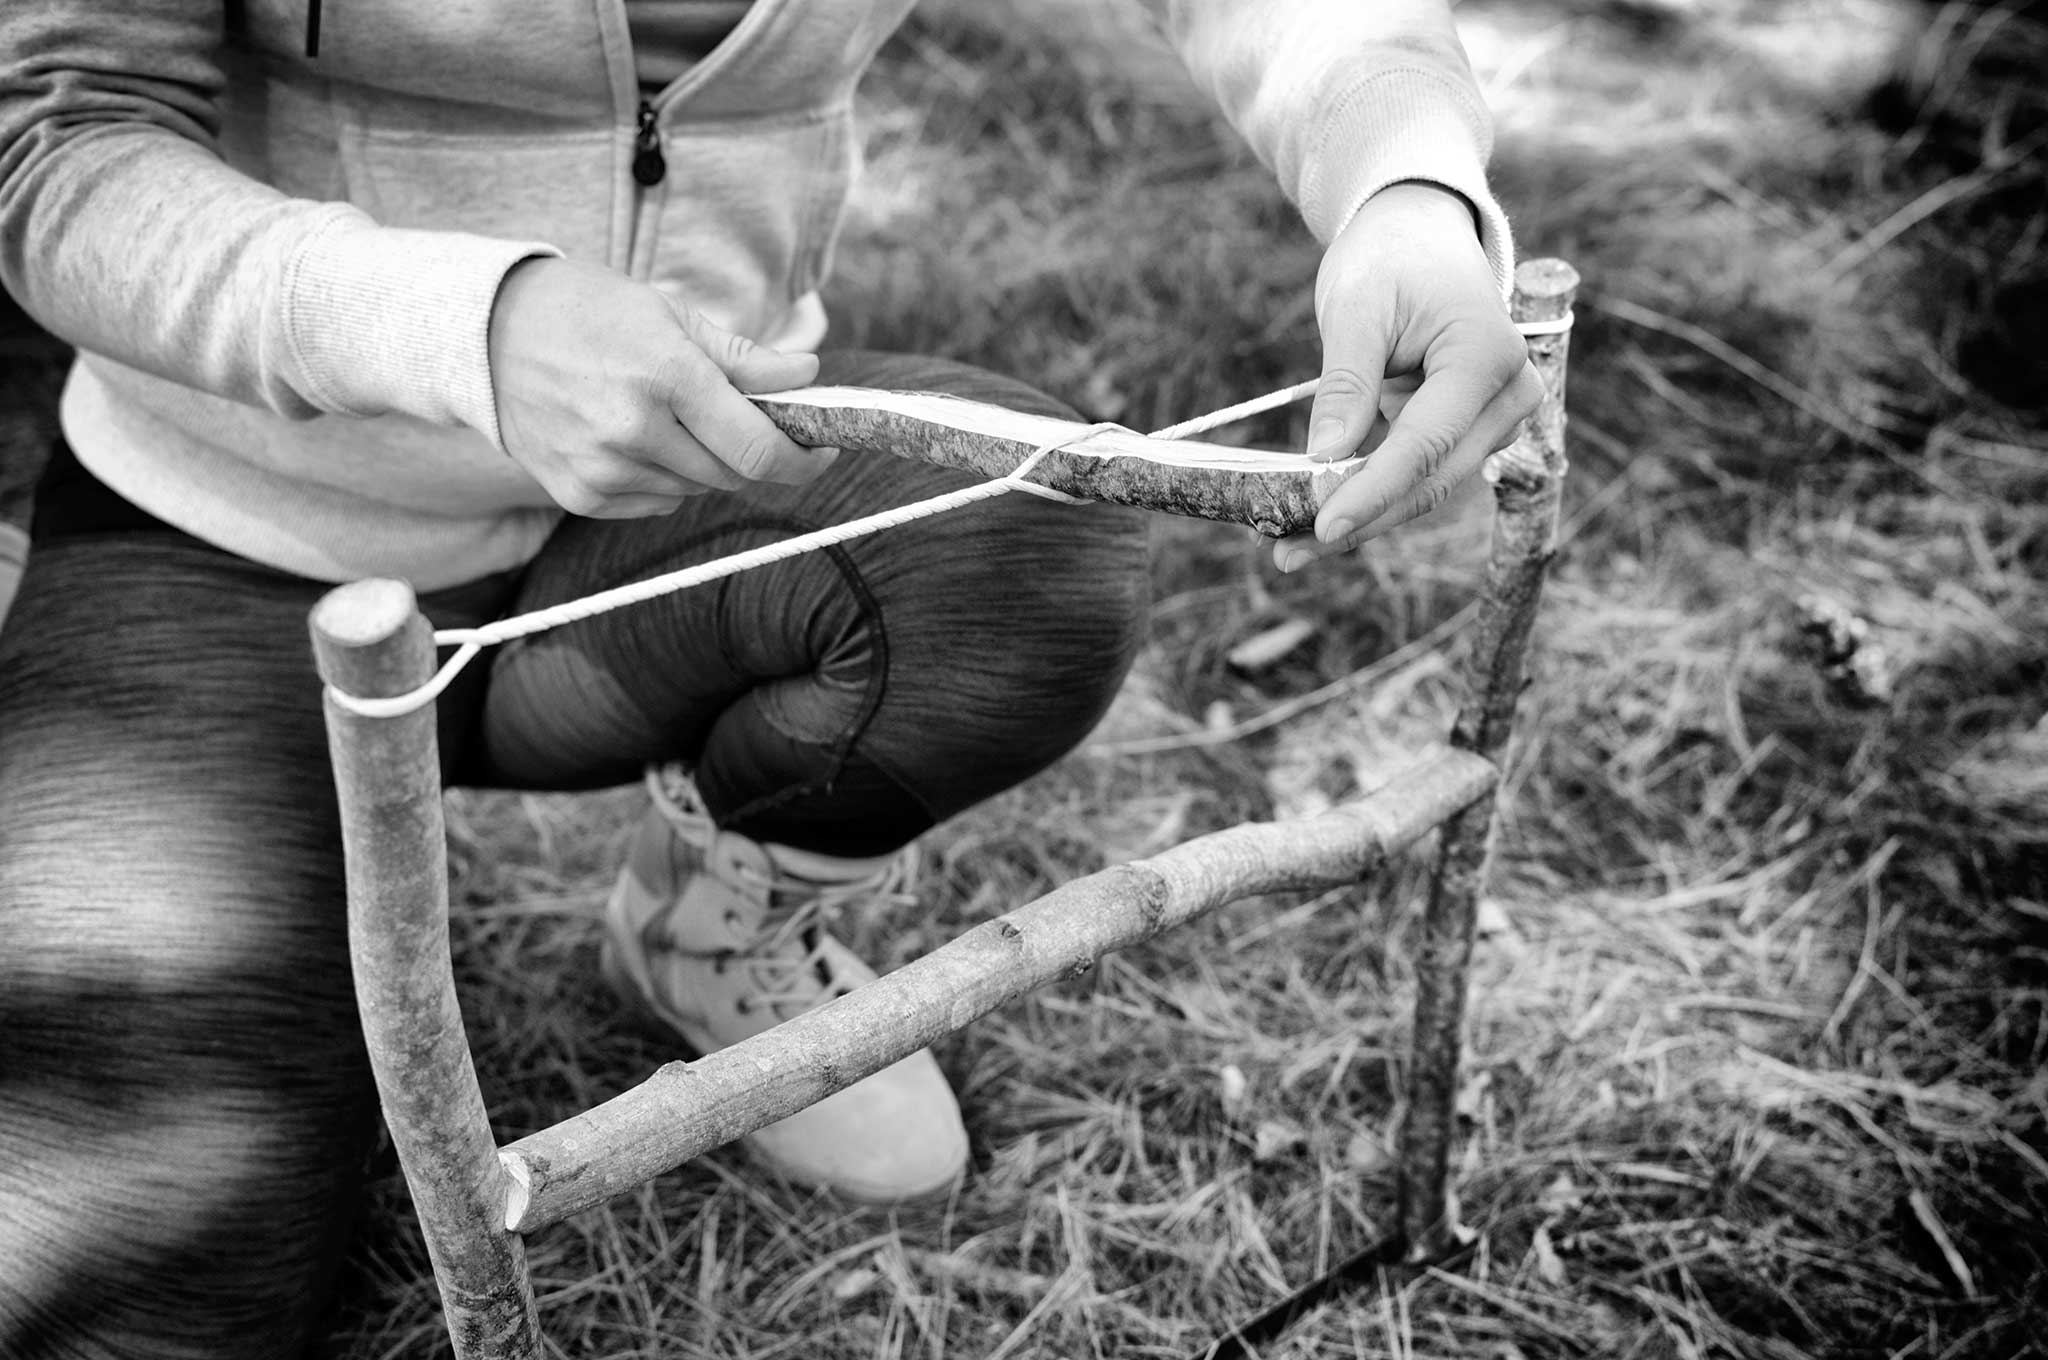
The last cuts are the rope-retaining notches at the ends of the arm opposite the blade. Similar to the bolt notches, just cut small V shapes on the outside near the top of each arm. Your paracord will attach here, and the notch will prevent it from sliding off. Now that you can see how much distance you’re playing with, cut enough paracord to wrap around each end of the arms. Tie the ends together as tightly as possible.
To tighten the cord and create the leverage to hold everything else in place, you need to make a toggle that goes from the crossbrace to just above the paracord. You can see on the diagram that the toggle should be a little more than half the length of the arms. It’s held in place by the tension of the cord and will be spun around the paracord to twist it. Thread it through the paracord and twist it as if it’s the windlass in a tourniquet. One end of the toggle will eventually rest loosely on the crossbar when you’ve tightened it appropriately. Some people make a slight indentation on the crossbar for the toggle to sit in. It’s up to you how (or if) you want to add this notch to secure it.
Finally, it’s time to tighten it all up and get to cutting. Once you’ve constructed this frame, you can smooth out handle surfaces or make aesthetic improvements. You now have a functional tool that’ll help you build a solid structure or break down wood to build a fire.
With this improvised bucksaw, if anything other than the blade breaks, you can simply make new parts for the frame. If you’re venturing out into the woods, you can always carry spare blades and create the other components when needed. We’d also advise you to practice building a few versions to get the hang of it. The last thing you want is to need to figure out how to build one when you’re in dire need of a saw. Eventually you’ll get the hang of it, and it’ll be that much easier to build one in a hurry so long as you have the requisite hardware. You can devise other ways to use branches to create a slightly different style of saw; the point is to get you thinking about how you can still function with only limited resources on hand.

