At face value, running seems deceptively simple. Just put one foot in front of the other—anyone can do it, right? Well, yes and no. In a survival scenario, you may have to run long distances without becoming exhausted, or sprint short distances without injuring yourself. Therefore, knowing and practicing proper running form is a wise choice.
In this video, we hear five running tips from Daniel Lieberman, a Harvard biology professor whose studies formed the foundation for best-selling book Born to Run. Even if you have no prior running experience, these tips are easy to understand and implement. If you ever need to literally run for your life, you’d better hope you have good form.
Professor Lieberman makes a good point: running properly is not an overnight process. It takes practice, so get out there and give it a shot!
We’ve always been advocates of keeping your preparedness covert in public. You want to be ready for anything, without making yourself an obvious target for opportunists and thieves. The team at 5.11 Tactical just released a clever shirt that fits this philosophy to a T, if you’ll forgive the pun.
As part of their new Fall/Winter product line, the Covert Flex long-sleeved shirt displays a clean-cut professional look while retaining high performance characteristics you’d expect from 5.11 Tactical. It’s tough, breathable, moisture-wicking, quick-drying, and stretchable. Best of all, it provides quick access to a concealed firearm via a RAPIDraw™ breakaway placket.
For more information or to place an order, visit 5.11 Tactical.
In modern televised media, animal attacks are often exaggerated to the point of appearing ridiculous. You’ve probably seen one of the many TV shows we’re referring to. The deep-voiced narrator ominously recounts the gory details of an animal attack as slow-motion video of teeth, fangs, and claws flash on the screen. It seems outlandish, to say the least. In this day and age, with all our modern weapons, technology, and medical advancements, are animal attacks really still a threat? Statistically speaking, yes they are—especially if you’re an outdoorsman, hiker, or survivalist.
A 2012 study in the Wilderness & Environmental Medicine Journal analyzed mortality data from the CDC, and found that 1,802 people were fatally injured by animals between 1999 and 2007 in the United States. At first glance, this may seem like a relatively small number, but keep in mind that it only refers to reported fatalities—thousands more were seriously injured, and may have died if it weren’t for immediate medical treatment. In a true survival scenario, you may not have access to medical care, so it’s crucial to know what you’re up against before heading out into the wild.
So, what should you do in case of an animal attack? We’ve answered this question for three of America’s most common and dangerous mammals, and also provided evasion strategies that may help you avoid being attacked in the first place.
Note: The information presented in this article is general in nature. Always consult with experts and take every precaution before interacting with or approaching any potentially dangerous animal.
Bears
Appearance: Black bears and grizzly or Alaskan brown bears are the most common types in the United States. Black bears are smaller, averaging around 300-400 pounds, and have fur ranging from jet black to blond as well as a lighter-colored muzzle. Grizzly or Alaskan brown bears average at 800-1500 pounds, and have longer brown fur with pronounced shoulder humps.
Geographic Location: Black bears can be found throughout the U.S., but are most common in the northeast and northwest, as well as the Rocky Mountains and Alaska. Brown and grizzly bears are found primarily in the northwest and Alaska.
Behavioral Patterns: In most instances, a bear will act defensively around humans. It may open and shut its jaws, snort, swat the ground, or charge short distances to scare you away. If you surprise a bear at close range, or it approaches within 20 to 30 feet of you, an attack is much more likely.
Here’s an example of a “bluff charge” used by a grizzly bear on a group of fishermen. When the charge fails to scare them away, the bear becomes less aggressive.
Avoidance Strategy: If you encounter a any bear at a distance, speak in a calm monotone voice, and attempt to maintain visual contact while backing away slowly. Black bears (and ONLY black bears) may be discouraged by standing tall and yelling or making loud noises—but never try this with a brown bear or grizzly! With brown or grizzly bears, back away slowly and leave the area, but do not turn your back, run, or make sudden movements.
Defense Strategy: If a bear gets within 20-30 feet or makes physical contact, how you should react depends on the type of bear. Bear spray or mace is always the best option, and has been proven to be almost twice as effective at deterring a charging bear than even a large-caliber firearm. If the attack involves a surprised grizzly bear or a mother grizzly with cubs, roll onto your stomach and play dead while covering your head and neck with your hands. Then remain stationary until the bear leaves the area. In any other case, or in a prolonged attack, kick, punch, or stab the bear’s face, eyes, and nose.
Below, a hunter perched in a tree encounters a curious black bear, which climbed up to reach him:
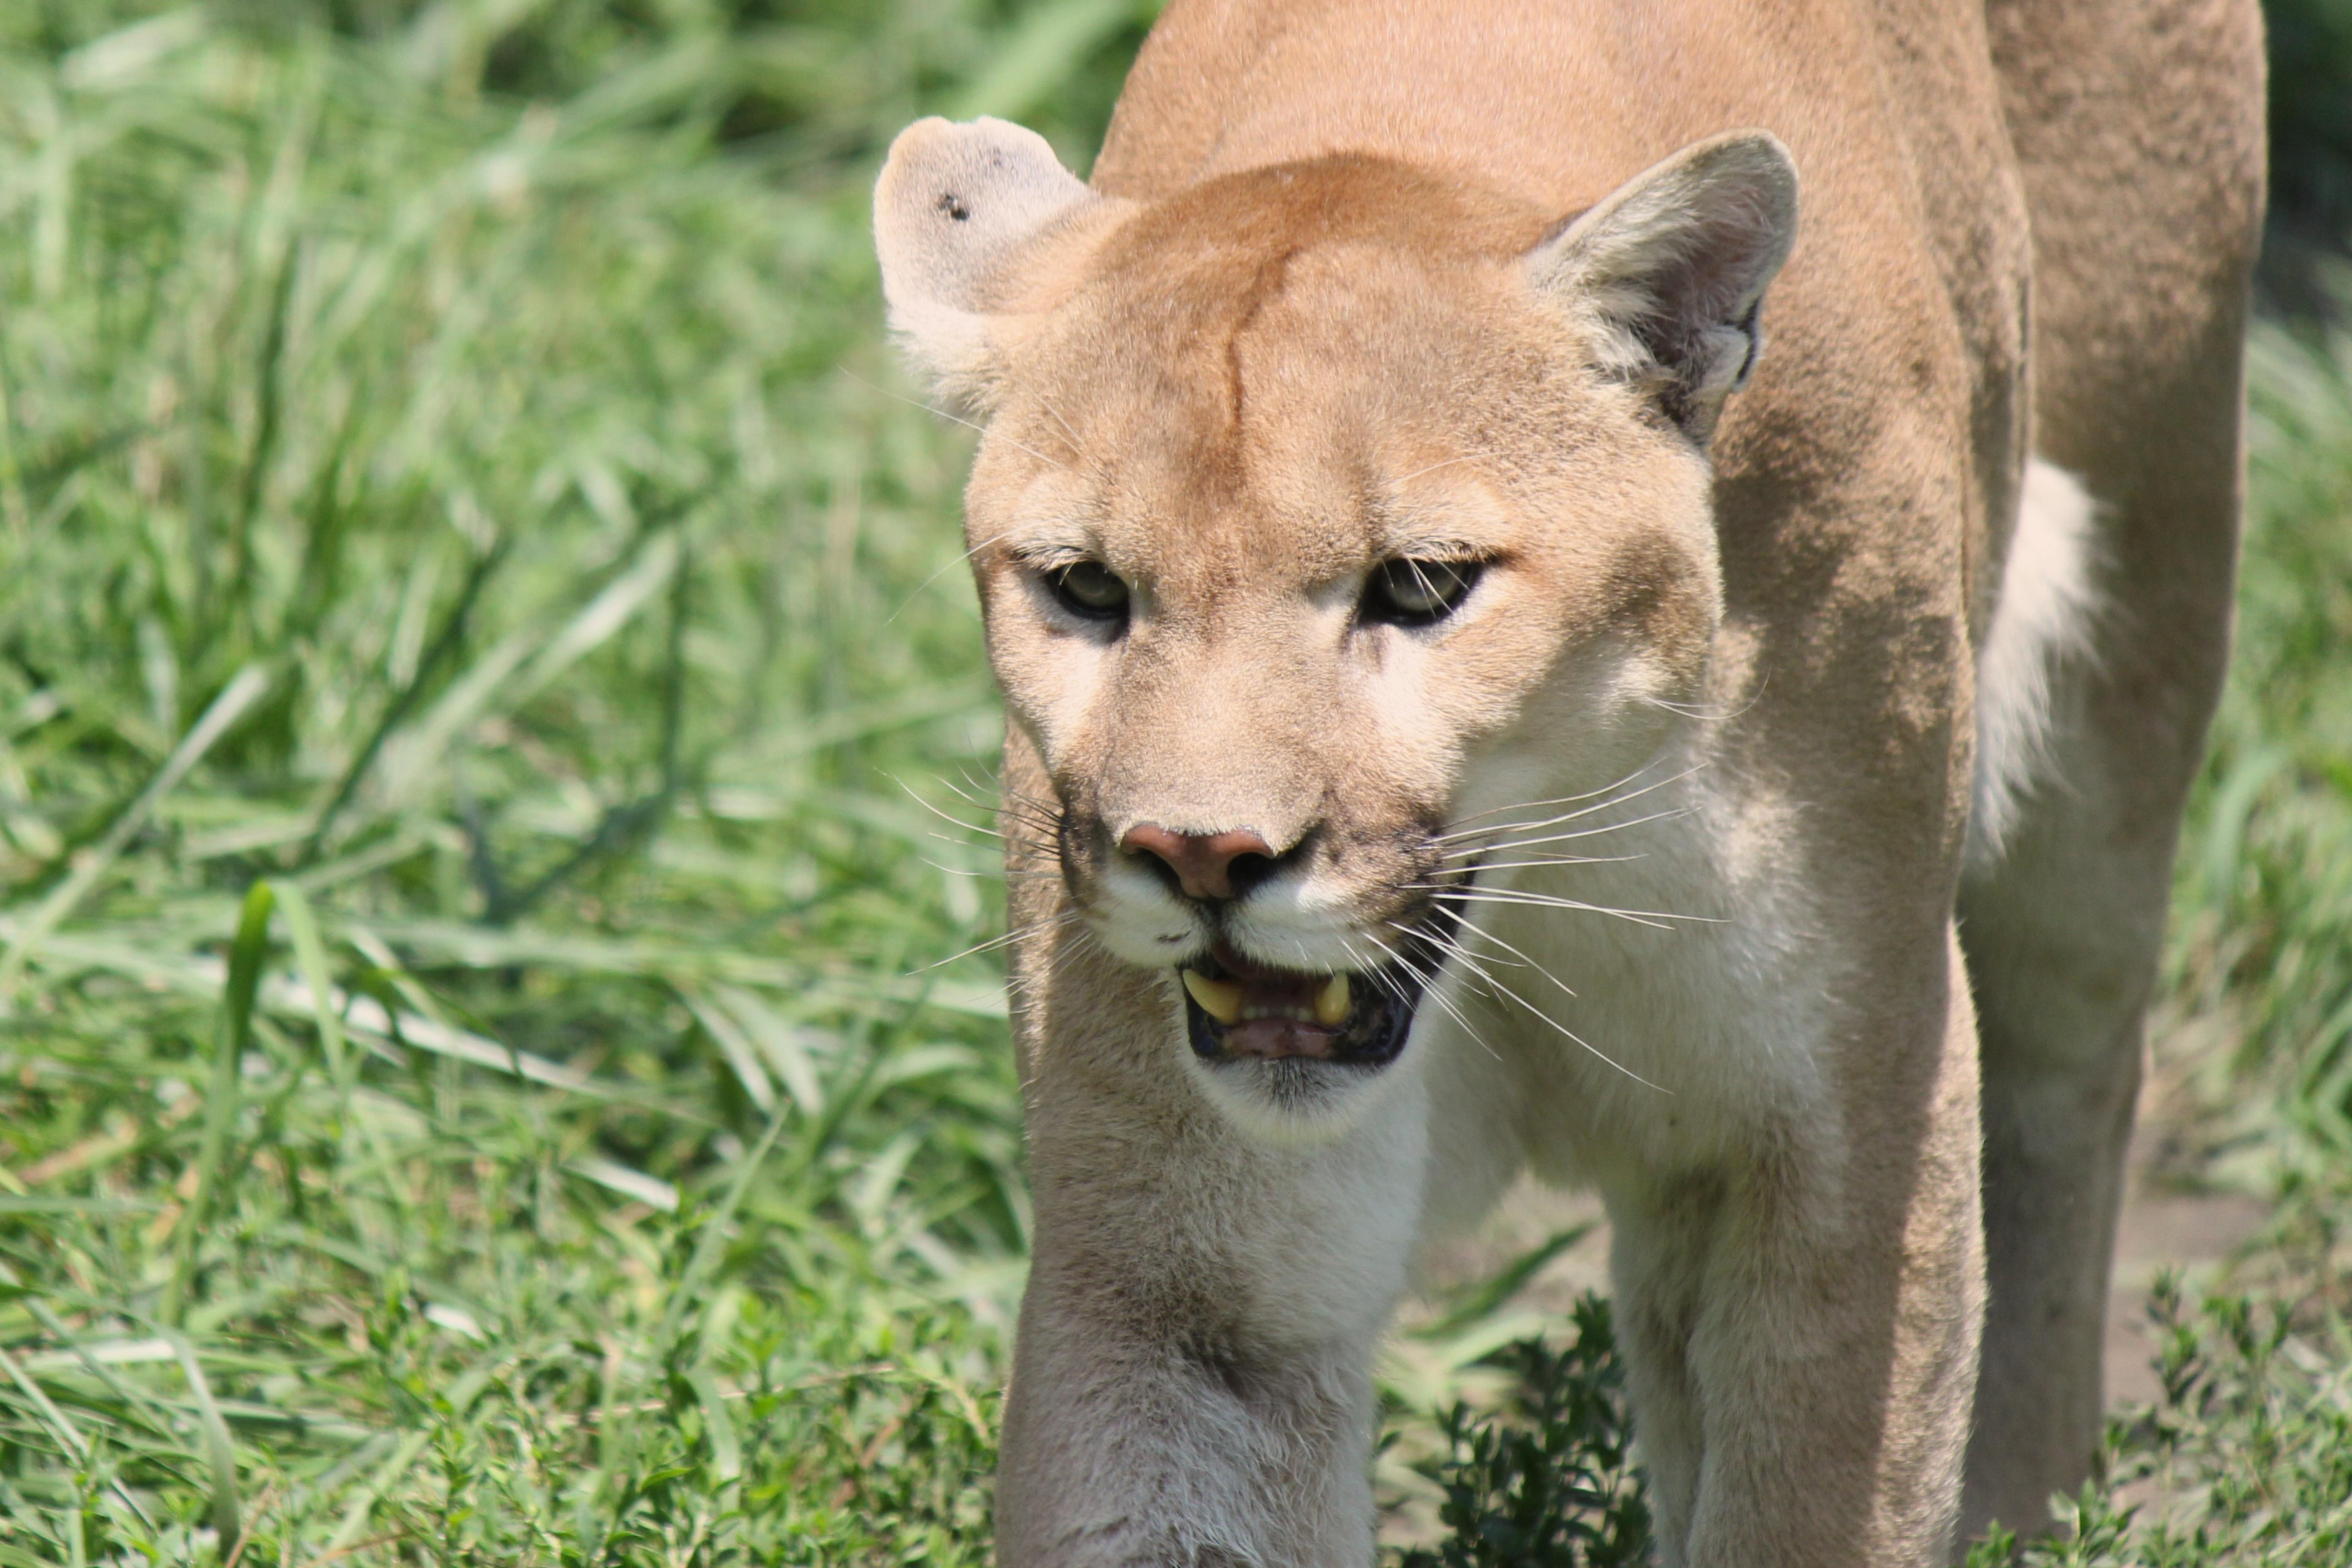
Mountain Lions / Cougars / Panthers
Appearance: Healthy adult male mountain lions tend to be about 140 pounds, 2 to 3 feet tall at the shoulder, and tan in color with a lighter underbody. Mountain lions are also known as cougars or panthers, and share similar biology (but different coloration) to the leopards and jaguars found outside the United States.
Geographic Location: The Mountain Lion Foundation claims there are approximately 20,000-40,000 mountain lions in the United States, virtually all of which reside in the western half of the country. Most mountain lions are found west of the Rocky Mountains, although there is a small population of about 100 in Florida.
Behavioral Patterns: Mountain lions are camouflage experts, and rarely make themselves seen to humans, preferring to hide in dense undergrowth. They hunt primarily at night, dusk, and dawn, and typically kill a single deer (their primary prey) every 10 to 14 days. When hunting or preparing to attack, mountain lions crouch low to the ground, maintain direct eye contact, and creep slowly towards their prey, almost always attacking from the side or rear.
A group of Coyotes in Yosemite National Park fend off a Mountain Lion. Fortunately for the coyotes, the mountain lion wasn’t looking for a fight:
Avoidance Strategy: Be alert, as most attacks are sneak attacks. When encountering a mountain lion at a distance of more than 50 yards, stand tall, remain calm, and slowly back away while maintaining visual contact. Do not turn your back or run, act imposing, and appear as large as possible. If the animal approaches closer or shows interest, make loud noises and throw rocks or sticks in its direction. If the mountain lion gets within 25 yards, prepare for an attack.
Defense Strategy: Similar to bears, pepper spray or mace is a very effective deterrent. Firearms may also be effective, but mountain lions can run 40-50 miles per hour and will be difficult to hit at close range. Try to remain standing, since mountain lions target the head and neck. If you’re knocked down, strike or stab at the head and eyes.
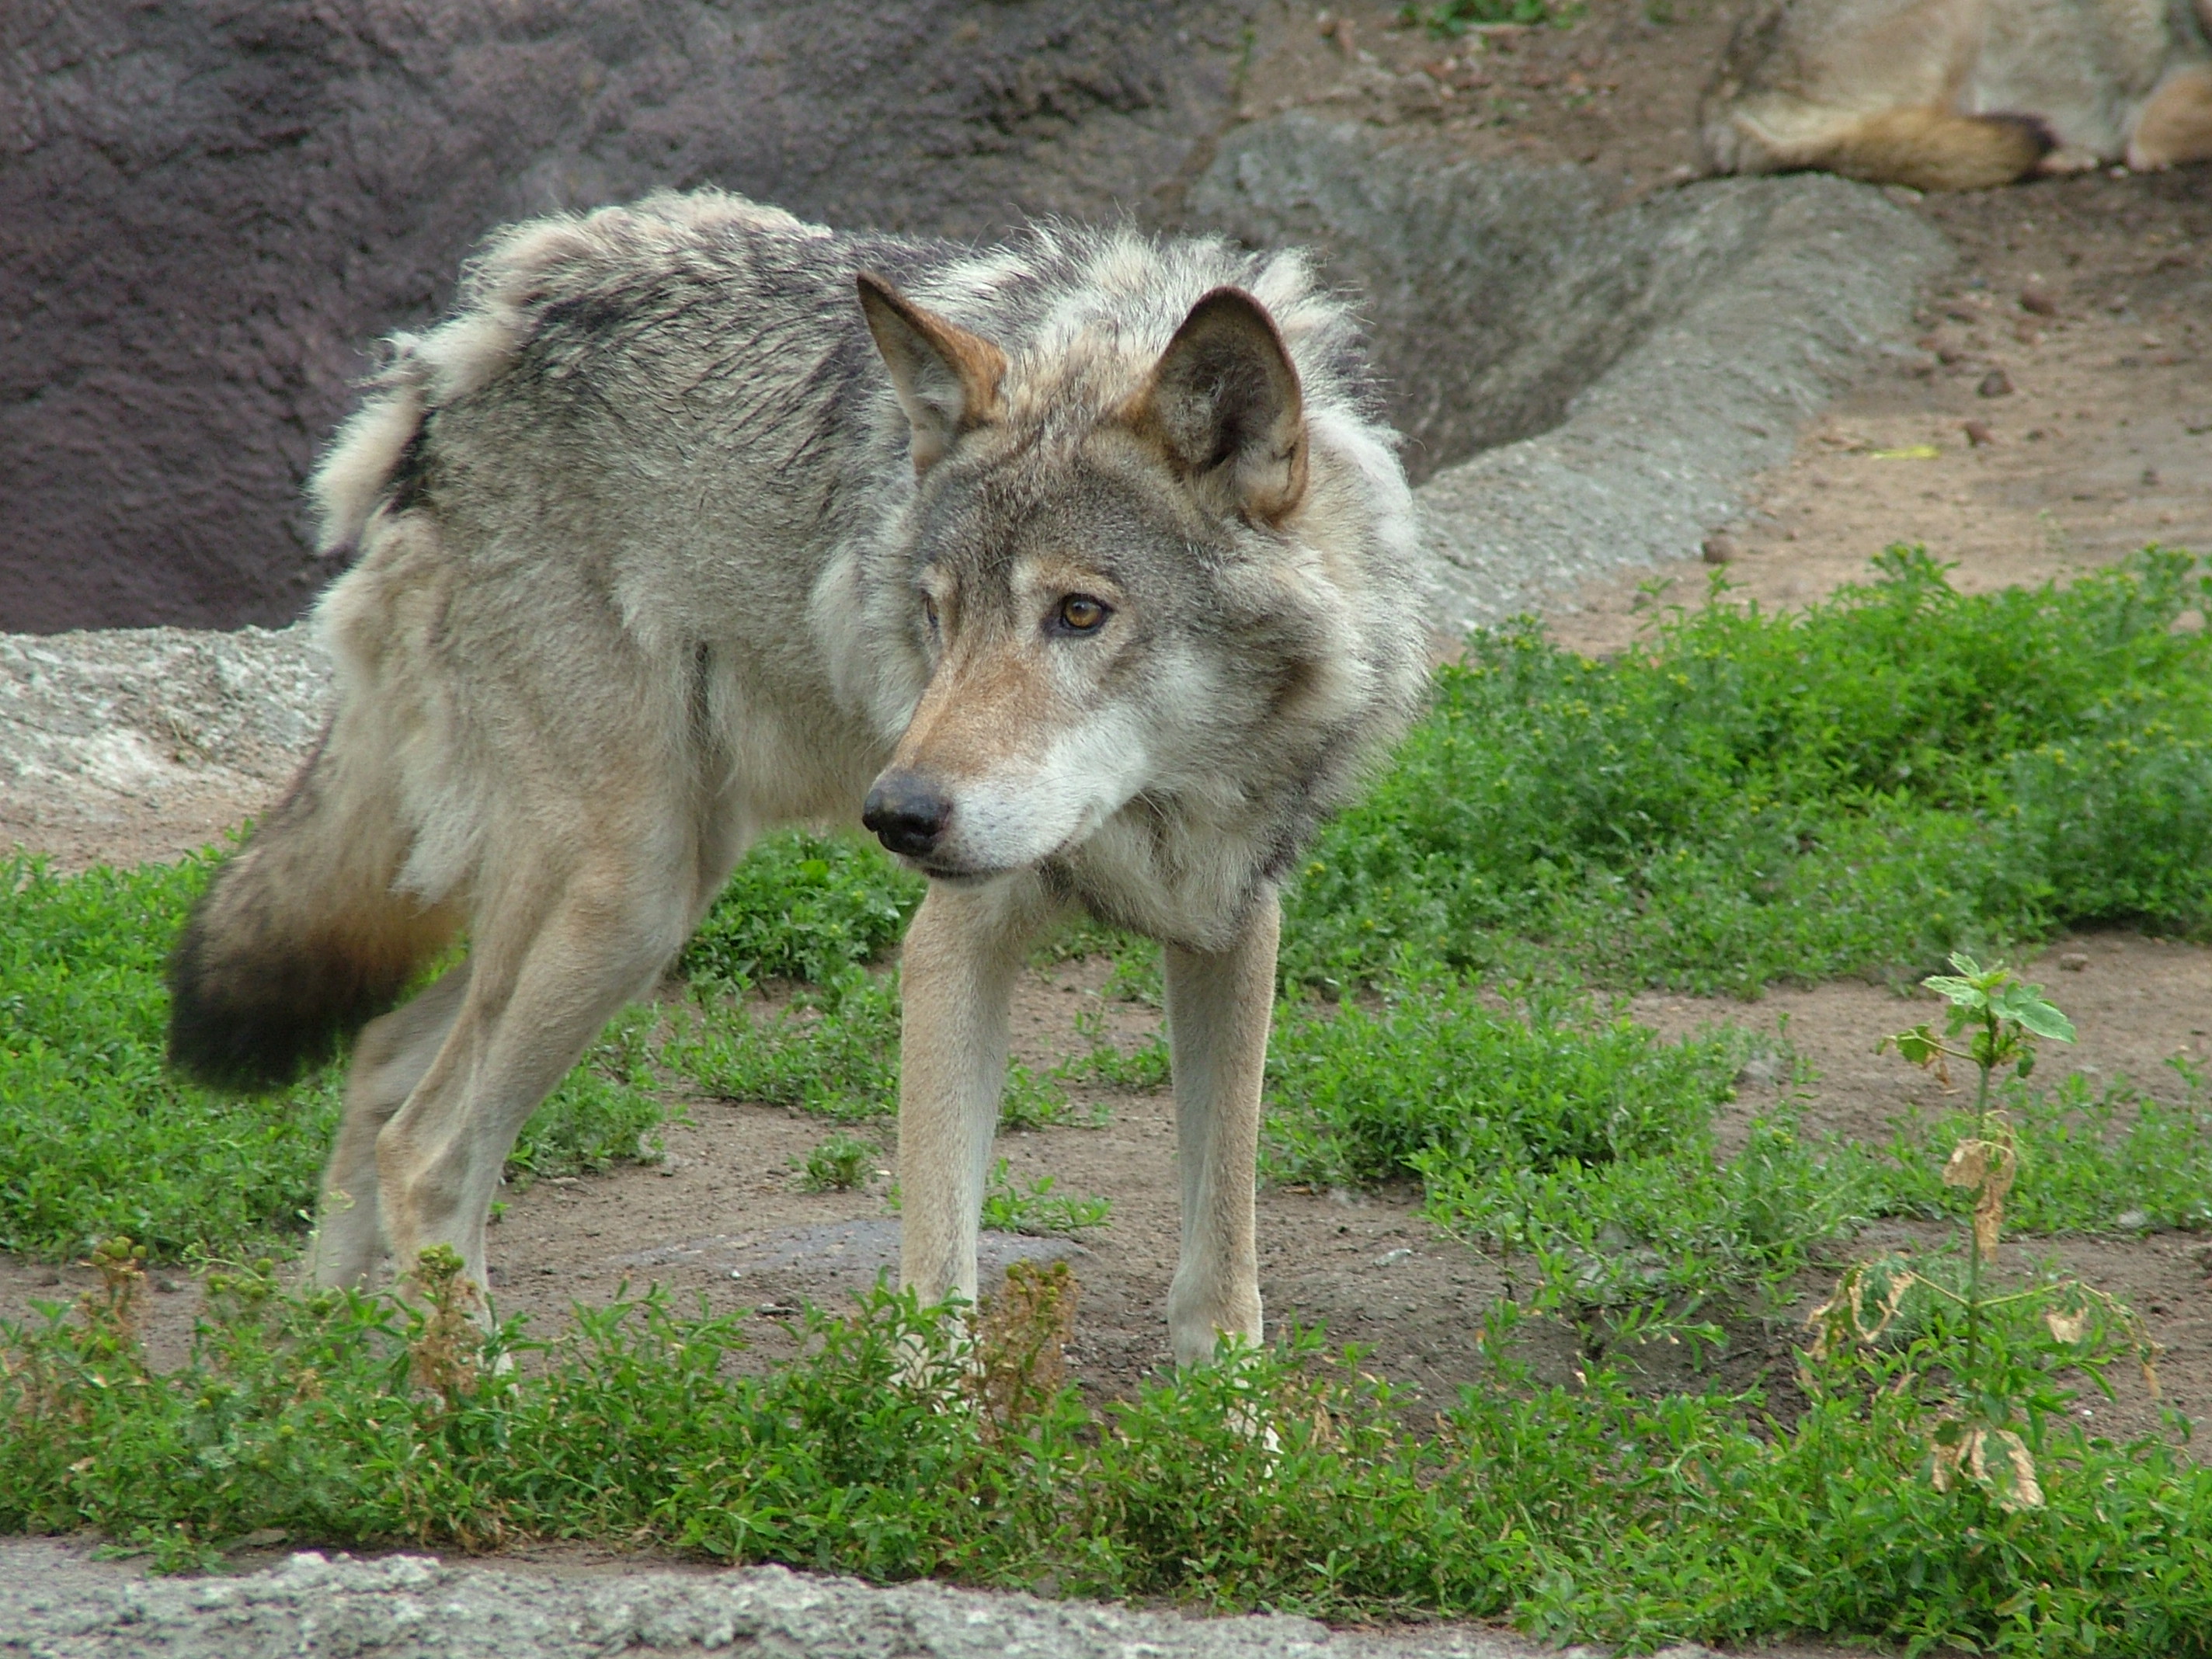
Canines (Wolves and Wild Dogs)
Appearance: The average North American grey wolf or timber wolf is approximately 110 pounds, stands 2.5-3 feet at the shoulder, and has fur that is mottled gray and brown. For comparison, an average domesticated German Shepherd is 2 feet at the shoulder and 75-95 pounds. Although domesticated dogs have substantially different physiology from their wolf ancestors, defense strategies against wolves should generally work against wild dogs as well. If observing animal tracks in the wild, wolves tend to produce “single tracks” by placing their rear foot onto the mark made by their front foot, while domestic dog tracks have staggered dual front and rear foot track patterns.
Geographic Location: Wolves tend to occupy the midwest and northwest United States, with a smaller population present in the southwest. There is also a substantial wolf presence throughout Alaska and Canada. Wolf population density is generally low, with each 5-7 member wolf pack covering a territory of approximately 70 square miles. After falling drastically in the past, wolf population is once again on the rise in the United States, and the western gray wolf was removed from the endangered species list in 2008.
Behavioral Patterns: Wolf attacks on healthy adults are rare, but wolves are opportunists, so they may target the weak, the injured, or young children. Wolves hunt by working in packs and forcing their prey animals to run, often to the point of exhaustion. Wolves also use their presence to intimidate prey, and use environmental obstacles such as deep snow or bodies of water to their advantage. They then surround the prey and attack in groups. Rabies-induced aggression has also proven to be a factor in many wolf attacks on humans, though it is less prevalent in wolves within the U.S. than Europe or Asia.
Avoidance Strategy: If you see a wolf at a distance, do not make direct eye contact, and do not run. Take a non-aggressive stance and back away slowly, but maintain visual. If the wolf continues to pursue you, or displays aggressive behavior such as baring its teeth, try the opposite tactic—make loud noises and appear as large as possible. This may discourage the animal long enough for you to escape or climb a tree.
Sometimes, the most useful survival tools are the most often overlooked. Few of us would see an ordinary pencil sharpener and think it could be used for anything but sharpening pencils—after all, its purpose is right there in the name. However, after seeing this video from SensiblePrepper, we’ll think twice before discarding one of these tiny tools.
Inserting a pencil into a sharpener and twisting produces perfect spirals of tinder material, and it sure beats whittling away wood shavings with a knife. Using the graphite as a lubricant is an added bonus, and when you’re done, you’ve got a fresh writing instrument. Nothing goes to waste—we like that. Maybe the humble pencil sharpener is worth including in a bug-out bag after all.
If you’re planning to bug out when SHTF, you’re going to need reliable transportation, and for many of us that means a car or truck. However, in the chaos that ensues during a major disaster, car theft is a major threat.
This infographic from Autoblog provides some basic statistics on auto theft in the United States, and can help you gauge your risk ahead of time. Some of this may seem like common sense—of course you should keep your car locked and hide your valuables—but the fact that theft is statistically more likely in a garage than a back alley is surprising.
Check out the graphic below, and remember to consider the likelihood of auto theft while forming a bug-out plan.
At face value, starting a fire is about as simple as it gets. Throw some wood, a little tinder, and a few sparks together in dry conditions, and you’re all set. No need to over-complicate it, right? Well, not necessarily. This age-old process has plenty of room for improvement, and the Dakota Fire Pit is one of the most effective upgrades to a traditional campfire.
As taught in the USMC Survival, Evasion, and Recovery manual, the Dakota Fire Pit uses an underground cavity to create an efficient and concealable fire source. It draws in air through an inlet, and focuses the heat upward so minimal energy (and firewood) is wasted. Constructing this type of fire pit is certainly more difficult than an above-ground campfire, but may be worth the effort if you’re planning to remain at your camp for several days.
The contents of an ideal bug-out bag are often hotly debated, and rarely agreed upon. Although there’s no set formula for a successful B.O.B, it’s always good to observe other survivalists’ setups in order to come up with ideas and compare your kits.
The guys over at The Bullet Points on YouTube have a helpful video series that walks through several different approaches to building a bug-out bag. Each of the three hosts breaks down his bag and its contents in the first two videos, and then they do some real-world testing of the bags in the third video. Check out the videos below, and consider possible modifications to your B.O.B.—it should always be evolving and improving, after all.
In an emergency, it’s always a good idea to have backup plans for your backup plans. Sure, you may have a handful of flashlights, lighters, matches, or even fancy scented candles around the house, but what happens if the power is out for weeks and you run out of dependable light sources?
In the video below, YouTube user DaveHax demonstrates five ingenious improvised light sources that can be made with household items. We’re especially fond of the tuna can method—a candle AND a healthy snack. The other methods vary between somewhat useful and totally out there, but it’s worth checking out.
Do you have any methods for improvised light sources using household items? If so, tell us in the comments below.
Warning! This article is meant to be a quick overview and not a detailed guide on poisonous flowers. Eating certain plants could lead to serious illness and even death. To learn more, consult with a reputable instructor or trained botanist.
Bright and colorful fruits and berries attract our attention just as much as vibrant poisonous flowers. Since humans have been foraging for naturally-occurring food sources since the dawn of our species, knowing which ones are safe and which are toxic is of the utmost importance. While this quest has revealed countless nutritious and medicinally useful plant varieties, it has also revealed a number of deadly species. As a survivalist, it’s important to be aware of the poisonous plants in your area, so you can recognize and avoid them in the wild.
This helpful infographic from Ava’s Flowers outlines some of the world’s deadliest flowering plants, as well as where to find them. If you resort to foraging in a survival situation, you’ll certainly want to avoid everything on this list—and as always, if you’re not positive what species a plant is, it’s best not to consume it and find out the hard way.
It should be reiterated that just reading this infographic will not make you an expert on identifying poisonous flowers. Only by training with an expert will you be able to safely spot something that could be dangerous to interact with, or fatally toxic. But this will give you a better sense of awareness when the next time you think about reaching for that beautifully colored, or pleasantly fragrant flower.
Because you’re a survival-minded person — and you paid attention in your fourth-grade health class — you know that water is life. It provides not only hydration for our bodies, but also a means to maintain good hygiene and overall cleanliness, as well as fend off disease and other ailments. And we can use it to cook. Whether we’re on a leisurely day hike or scrambling to get out of town for good, it’s clear that water is one of the survival essentials that we must carry with us — but how we carry this precious resource is always up for debate.
Obviously, in normal circumstances, you can grab a glass, mug, or even a used Big Gulp cup and simply fill ‘er up. Voila, water to go. But that’s not the scenario we’re talking about here. We’re looking for a vessel that will give us a means to contain, carry, and drink water while keeping it clean and safe from contamination and spillage during a run or running for our lives.
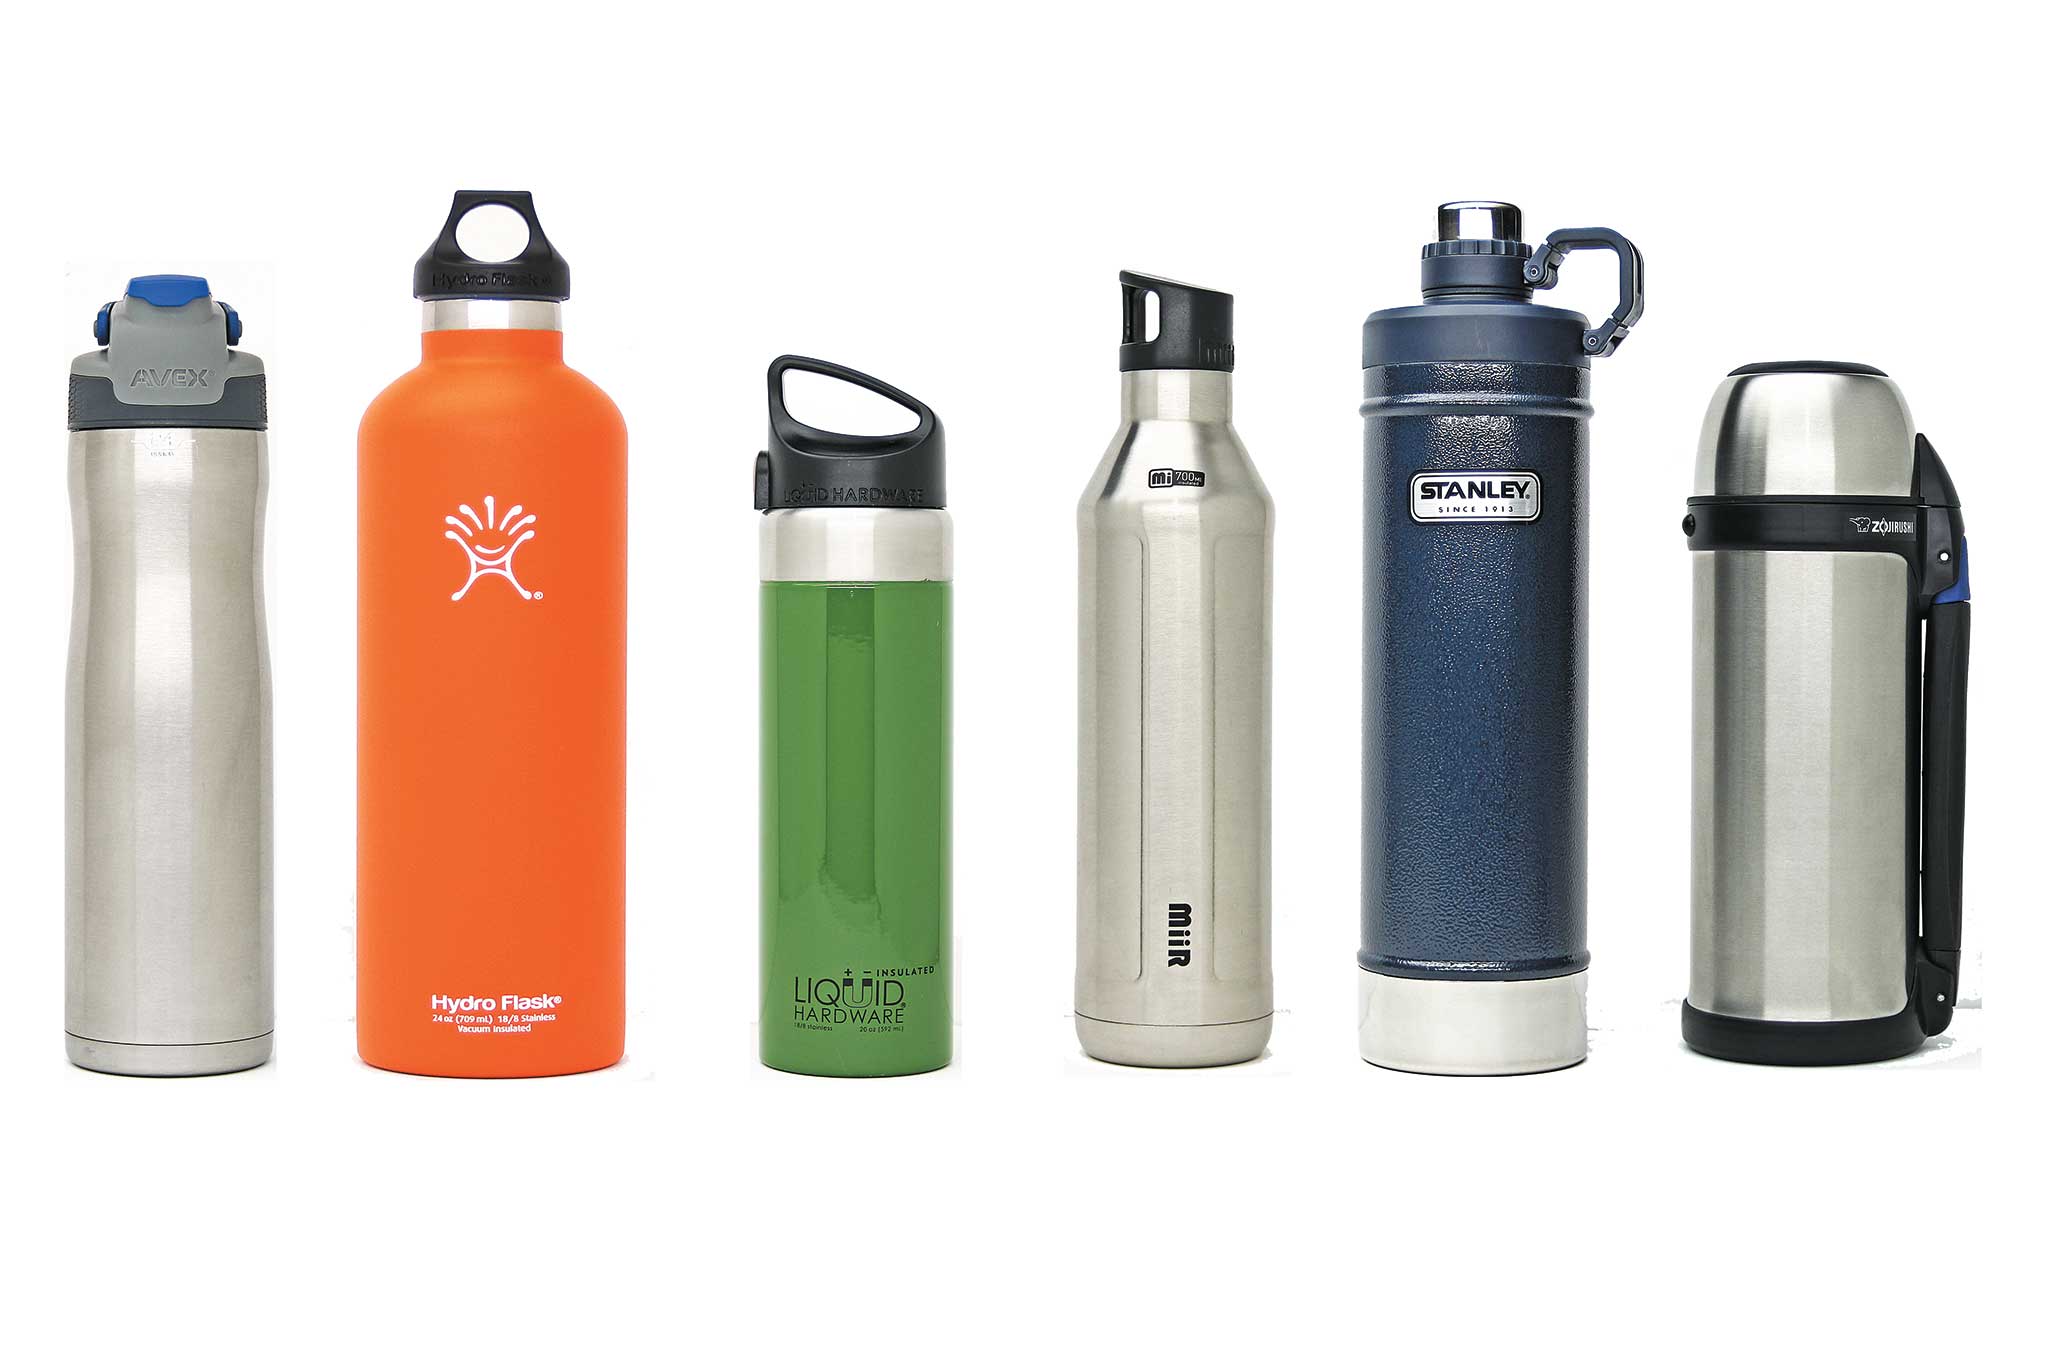
Navigating the aisles of your local camping, sporting goods, or big-box store, you’ll inevitably find a section that will inundate you with water containers of every conceivable shape, size, color, and material imaginable. With so many variations out there, how do we go about choosing one? For the scope of this article, we’re focusing on reusable bottles that are easily carried and can hold both hot and cold water, as well as other beverages. (Coffee is nearly as essential as water, after all.)
Material Costs & Benefits
Reusable water bottles are made of different materials, the most common of which are plastic and metal. While plastic bottles do a bang-up job on transporting liquids, they don’t tend to keep hot or cold liquids at temperature all that well. They’re lightweight and are easy to clean, but they can shatter when broken. And there’s always the debate about toxins, such as bisphenol A (BPA), found in certain grades of plastics. Even if a plastic is rated BPA-free, it could be just as toxic as, if not worse than, the chemical it’s replacing.
Within the realm of metal bottles, you primarily have two types: stainless steel and aluminum. Food-grade stainless steel is the go-to material for most metal bottles because stainless steel is non-reactive, meaning that it will not leach chemical elements into your drink — whereas reactive materials such as aluminum do. Aluminum bottles are reactive to acidic foods and beverages, so they can give off a metallic taste if not coated. Enamel- or epoxy-coated aluminum bottles are protected from the leaching effect, but one drop or dent of the bottle can damage the inner coating and release bits of it into your drink. Ironically, sometimes those coatings contain BPA.
Stainless Steel
Since bottles made of food-grade stainless steel don’t require any coatings, they are toxin-free and have no known health issues stemming from their usage. They’re inherently durable due to the plain fact that they are made of steel, and insulated types tend to keep both hot and cold liquids at their desired temperature for a lot longer than their plastic counterparts. Besides being strong, they are also easily cleaned and can be lightweight as well.
Aside from the health and strength benefits of going with food-grade stainless steel bottles, there are the practical uses for metal containers too. Because a steel-bodied bottle isn’t coated on the inside, it can still be used if dented. For survivalists, a steel bottle can substitute for a pot to boil water over an open flame without worry of ingesting bits of the inner lining. Using it to create a makeshift water filter device or even as an improvised blunt weapon is a possibility, too.
Stainless bottles aren’t all sunshine and puppy’s kisses, however. One of the drawbacks of using stainless steel bottles is that they aren’t compressible, taking up valuable storage space when not being used. They can also inadvertently heat up your water during hikes in the hot summer sun, making for a not-so-refreshing feeling when you drown your thirst in water that’s warmer than the weather.
With all those factors in mind, we believe that the strengths of stainless-steel bottles far outweigh their shortcomings. Let’s take a look at a few stainless-steel bottles that would be great to rely on while bugging out during an alien invasion or simply hiking the local trails.
What’s a Vacuum Bottle?
Vacuum bottles are actually made up of two separate bottles, one inside a slightly larger one, which are then merged at the neck. The air in the cavity between the two bottles is partially extracted, which creates a vacuum-like state that helps prohibit or drastically slow down the transfer of heat. This makes vacuum bottles ideal for holding hot or cold liquids for extended periods of time.
Temperature Test
How many times have you craved a piping hot cup of Joe poured directly from your travel mug only to get a mouthful of lukewarm sludge instead° It’s been our experience that the claims of some bottle-makers are more than just slightly exaggerated. For your perusal, we slaved over a hot stove (and freezing icebox) to get you some real-world temperature test results for each of the featured bottles.
Full journalistic disclosure: We did the tests in this writer’s kitchen and not some scientific laboratory, so the results should be taken with a grain of salt. We didn’t see how each one would do at the peak of summer in Death Valley or buried under an avalanche on Mount Everest. And other variables, such as overall fluid capacity, were not taken into consideration. But our testing does give you a ballpark idea of how each of the bottles performed against each other under similar conditions. Your mileage may vary.
Note: Only the insulated bottles were tested, as the non-insulated models aren’t designed to keep beverages hot or cold for extended periods of time.
Avex Brazos Autoseal
Hydro Flask Insulated Water Bottle
Liquid Hardware Sidewinder
MiiR Vacuum Insulated
Stanley Classic Vacuum Water Bottle
Zojirushi Tuff Sports SJ-SHE
0.7L
0.7L
0.6L
0.7L
0.8L
0.95L
Hot Water Test
Start
195°
195°
195°
195°
195°
195°
2 hrs
155°
165°
155°
170°
166°
168°
4 hrs
128°
156°
140°
150°
155°
166°
8 hrs
111°
141°
113°
132°
137°
159°
12 hrs
92°
130°
96°
120°
126°
151°
Average Ambient Air Temperature at time of testing: 72 degrees F
Average Humidity: 62%
Cold Water Test
Start
36°
36°
36°
36°
36°
36°
4 hrs
48°
44°
54°
46°
41°
38°
8 hrs
60°
50°
66°
54°
50°
43°
12 hrs
68°
54°
70°
58°
54°
45°
24 hrs
72°
61°
74°
64°
59°
50°
Average Ambient Air Temperature at time of testing: 78 degrees F
Average Humidity: 43% Liquid Temperatures in Fahrenheit
Liquid Temperatures in Fahrenheit
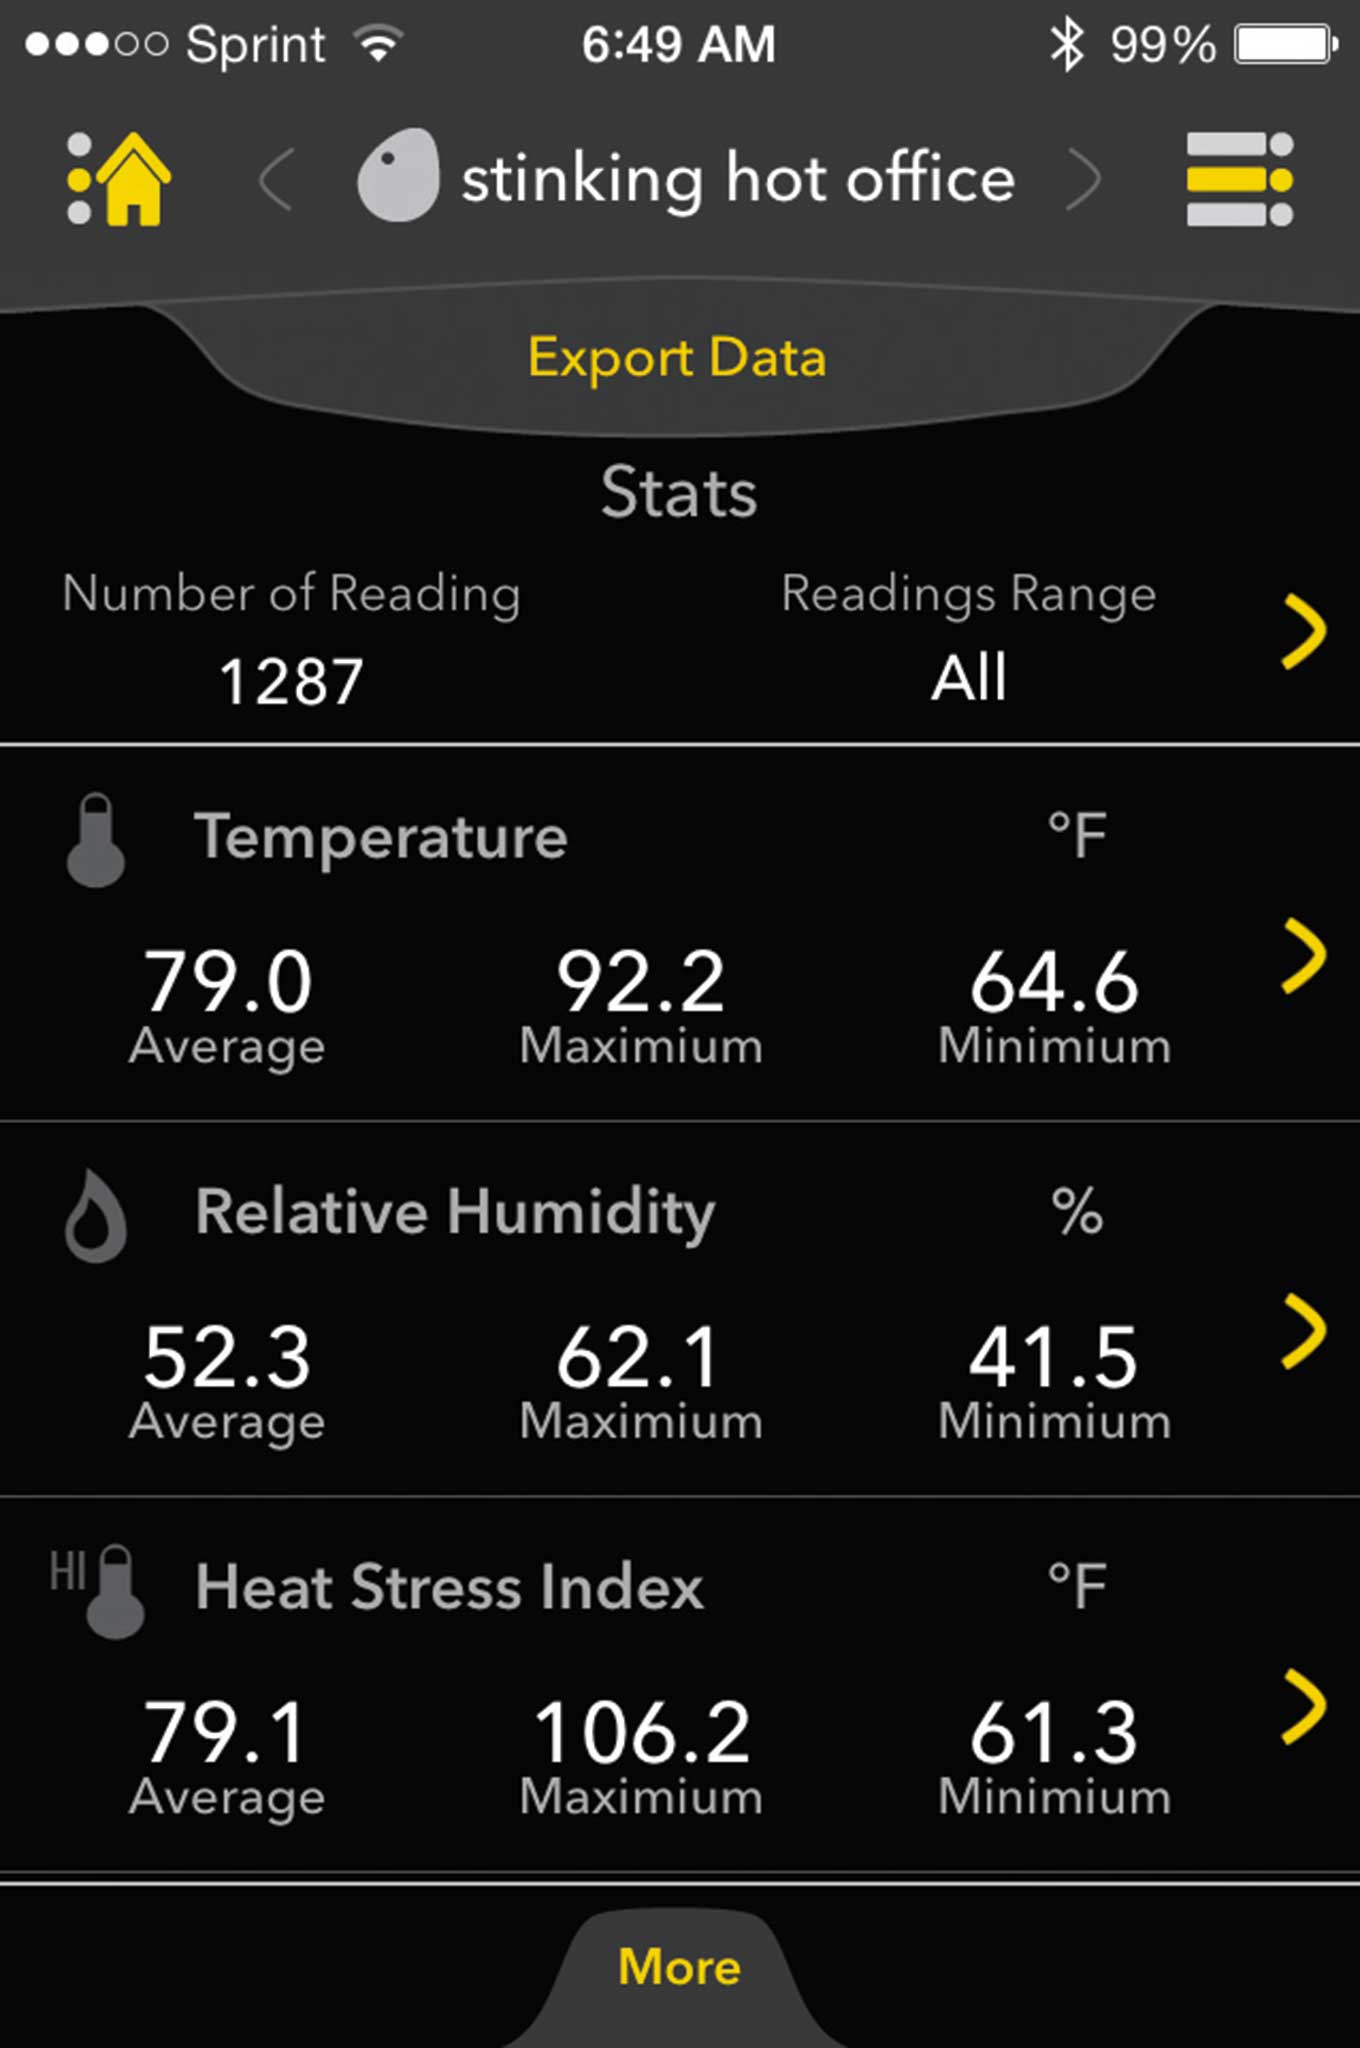
OFFGRID Tech Brief
We used Kestrel DROP 1 Smart Temperature Data Loggers to measure the water temperatures for this test. DROP units connect to your smartphone or tablet through the Kestrel Connect app via Bluetooth. You can record and monitor the conditions of most any environment while accessing and charting real-time data on your smart device. The DROP 1 measures only temperature while its siblings, the DROP 2 and DROP 3 can also monitor much more, such as humidity, heat index, and dew point temperature.