Think fast: what’s the most valuable item on your person right now? Unless you’re carrying a wad of 100-dollar bills or wearing a Rolex, it’s likely that the answer to this question is your smartphone. Many smartphones these days cost $600 or more, and most people carry these devices wherever they go, making phones a common target for thieves and muggers. While it’s wise to protect the sensitive data on your phone with a passcode and remote-wipe feature, a thief can still sell your physical device online or at a shady pawn shop for some quick cash.
Smartphone theft is a major problem — a 2014 FCC study found that more than 1 million smartphone thefts occurred that year in the United States alone. Beyond the loss of property, running into a criminal who wants your phone can be dangerous. This is why it’s advisable to have a self-defense strategy in mind ahead of time.
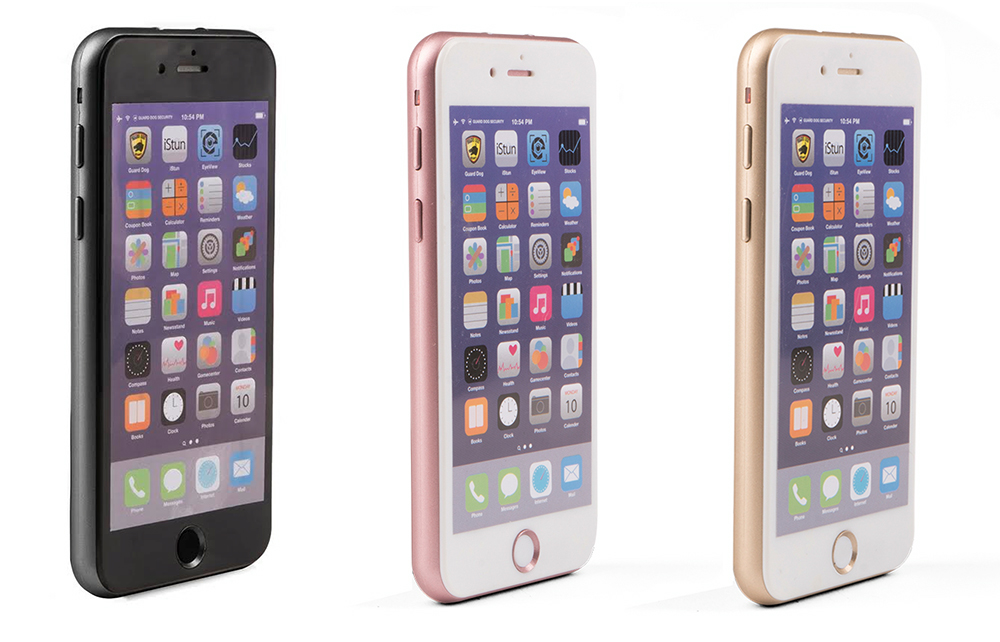
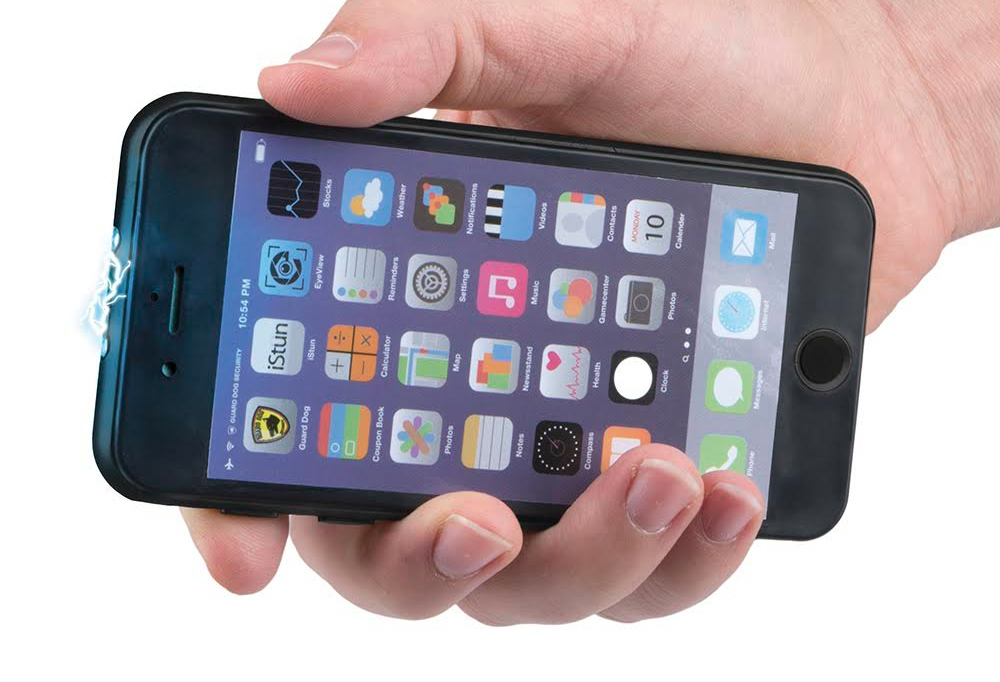
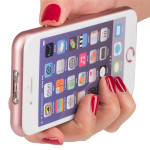
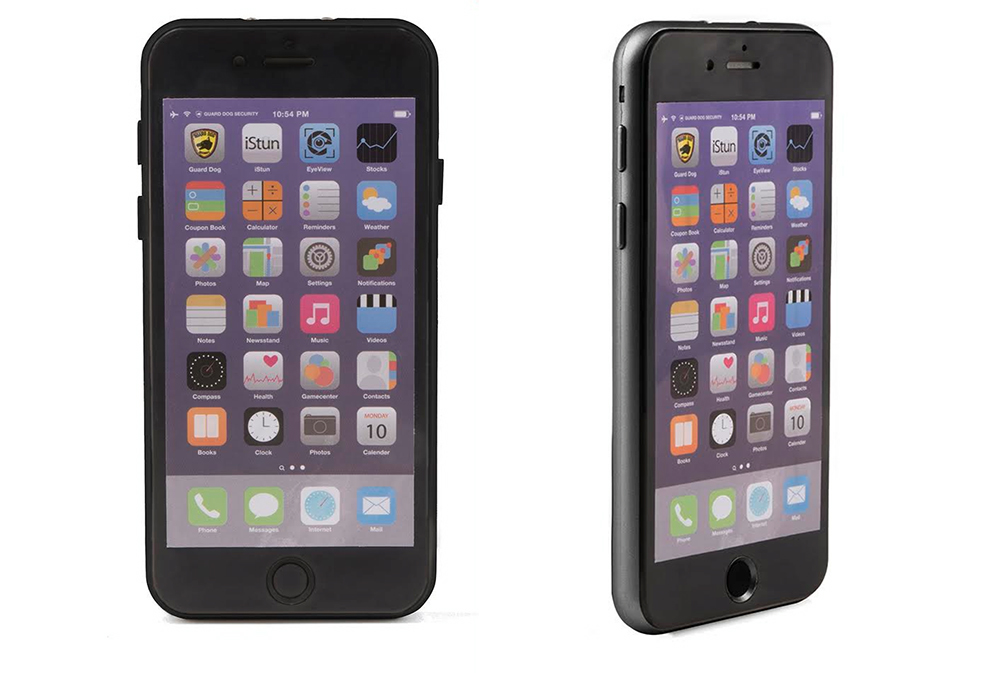
Guard Dog Security has just announced a new self-defense device targeted at combating the threat of smartphone theft. It’s called the iStun 2, and it’s a concealable stun gun that closely resembles a smartphone. The iStun 2 is an updated version of the original iStun, a device which was significantly thicker and didn’t match the profile of a modern phone. However, based on the photos that have been released so far, the slim new iStun 2 appears to look convincing enough to fool an attacker.
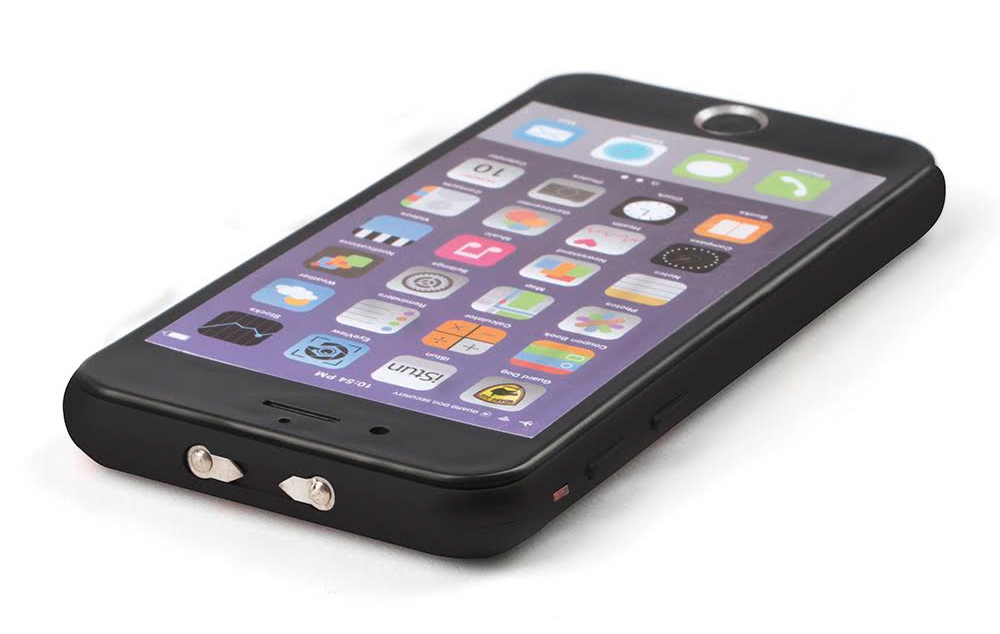
The Guard Dog iStun 2 is activated by a button that appears to be the phone’s power button. Pushing this button produces a burst of high-voltage current across two low-profile prongs at the top of the “phone”. Guard Dog Security claims this power is “capable of temporary incapacitation”. There’s also a built-in LED light on the back side of the device, which can be activated by another button in place of the volume control.
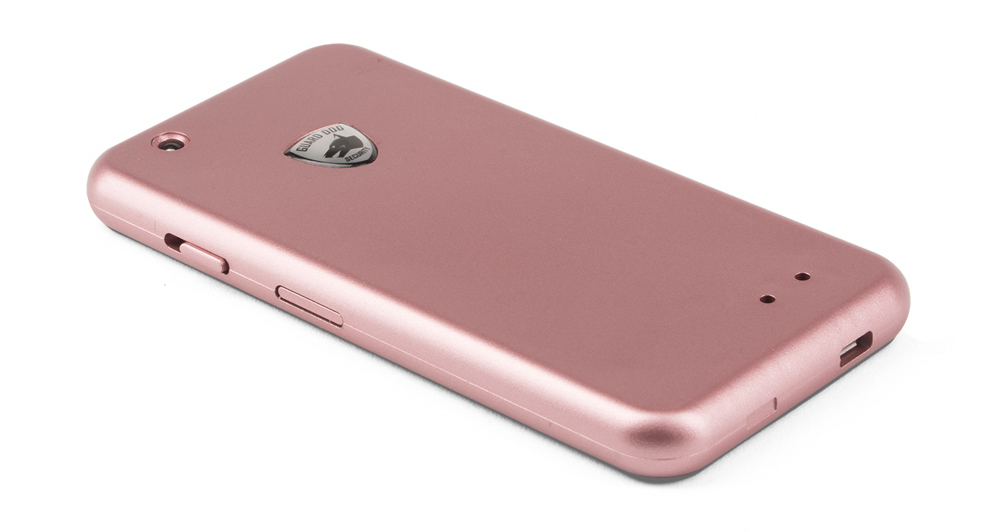
The iStun 2 is rechargeable over USB, weighs about 3 ounces, and includes a leather carrying case. In order to match the appearance of various phones, the iStun is offered in three color combinations: solid black, white/rose, and white/gold. MSRP for all versions of the iStun 2 is $45.
We haven’t gotten our hands on an iStun 2, but the concept looks interesting — zapping a thief as he reaches for your phone could provide enough of a distraction to escape. This may also provide a self-defense option in places where other weapons are not permitted. Obviously, you should check your local laws before purchasing a stun gun, as some states have restricted or banned their use. Guard Dog Security provides a convenient map of stun gun laws in the U.S. on its web site.
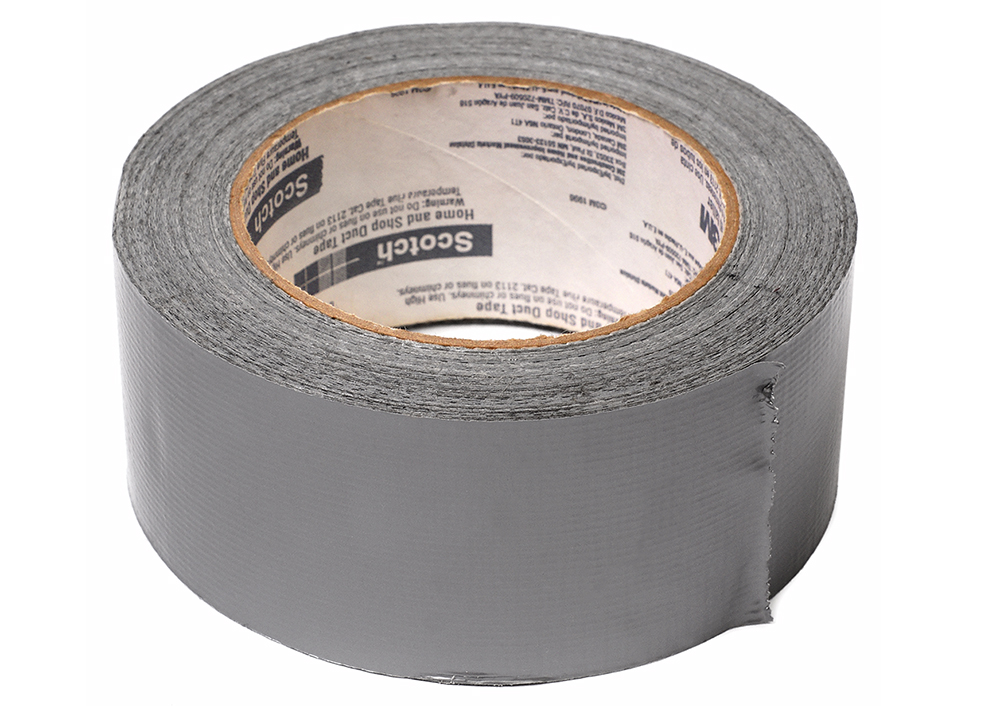
Duct tape, duck tape, or 100-mile-per-hour tape — no matter what you call it, this tough sticky substance is undeniably a valuable resource in survival situations. It can be used for mending broken tools, patching holes, sealing food, bandaging wounds, binding together gear, and hundreds of other purposes. You can even build improvised items entirely from duct tape, such as emergency cordage, a collapsible cup, or a pair of flip-flop sandals.
As useful as it is, there’s one obvious problem with duct tape: portability. You’ll find duct tape with ease at any hardware store or home goods store, but it’s typically sold in large 4- to 6-inch-diameter rolls. This isn’t a problem if you’re planning to keep your tape at home, in the garage, or in a vehicle. However, it’s a major issue if you’re looking to put some tape in your bug-out bag, get-home bag, or pocket. Storing an entire full-size roll is heavy, bulky, and impractical when all you need is a few feet for emergencies.
So, what’s the best duct tape storage method to maximize portability? There’s no one answer to that question, since there are many convenient ways to store tape for every-day carry. We’ll list a few below, starting with methods best-suited for small quantities, and working up to methods that can accommodate longer strips of tape.
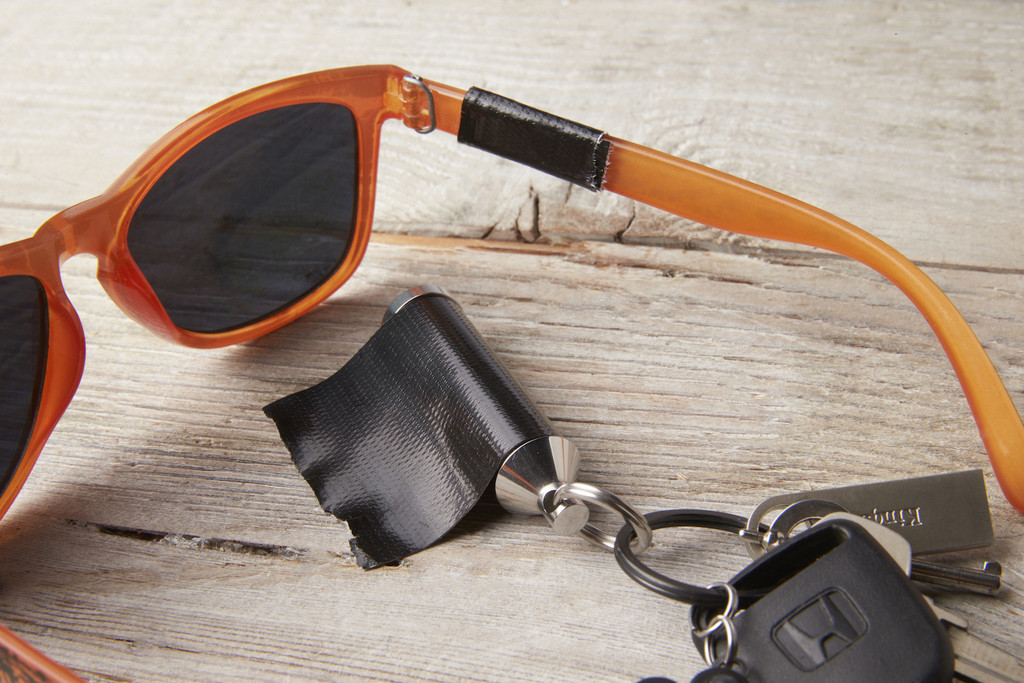
This stainless steel keychain from Gearward is designed for EDC duct tape storage.
Flat roll around a credit card or gift card
Duct tape keychain wrapped around wire, paracord, or a purpose-built metal spool. The video below shows a quick method to make DIY duct tape keychains:
Small pen or pencil wrapped in tape
Lip balm tube wrapped in tape
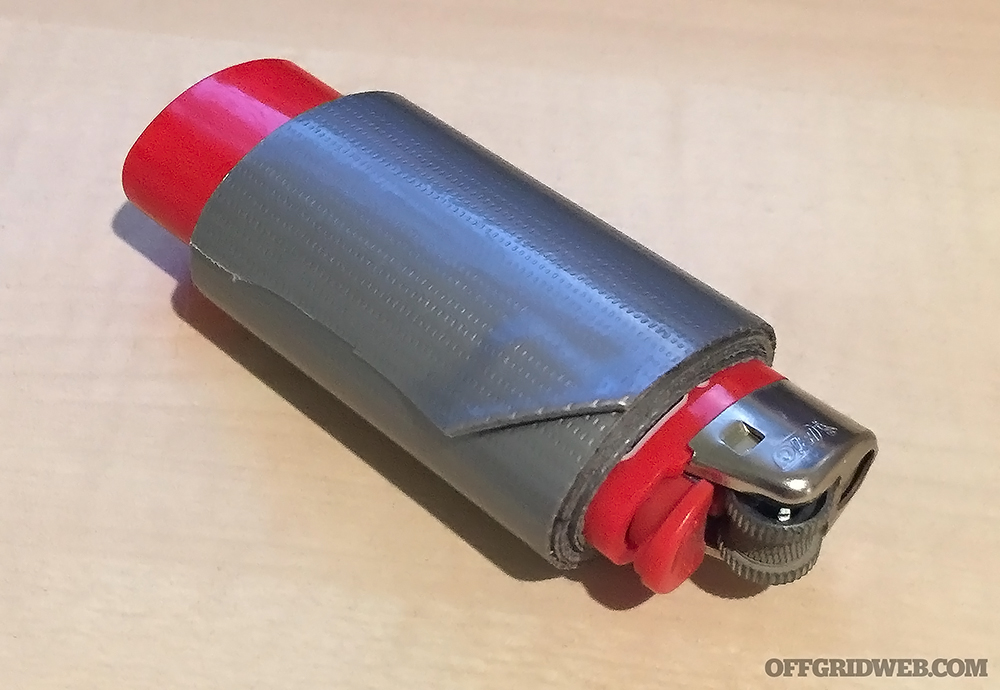
Lighter wrapped in tape
A plastic Bic lighter serves as a great storage location for several feet of duct tape.
Flattened full-size roll, with cardboard tube removed
As you can see, there are many good options to consider for portable duct tape storage. Which one is your favorite — one of the above, or something we didn’t mention? Let us know in the poll below:
Heroes are people capable of incredible feats of courage, but they don’t expect any thanks for their actions. Instead, they’re content to look for ways to teach us how to pay it forward and make the world a safer place, one person at a time. Kaitlin Roig-DeBellis is no different.
On December 14, 2012, while working as a teacher at Sandy Hook Elementary School, Kaitlin heard the initial shots and immediately recognized what was about to happen. RECOIL OFFGRID spoke with Kaitlin about how she survived this harrowing event and protected her students. She shares her insights for anyone who might face a similar situation.
Photo by Peggy Sirota
RECOIL OFFGRID: What was the first sign that something was wrong?
Kaitlin Roig-Debellis: I had probably a very different experience than many in our school that day in the fact that my classroom was the first one in the school. I know there were a lot of reports that they heard something, but didn’t know what it was. The second the first shot was fired, I heard it and knew what it was immediately. I teach first grade. We were seated about 15 feet from where the shooting began. We were not at all removed from the situation.
ROG: When you heard the shot, what was your first reaction?
KRD: We needed to hide. Being that we were in such close proximity I understood that we didn’t have time to run, because if we were to have gone out our door we would have had to choose going left or right. Going right would have headed right toward the shooter and going left would’ve been a long straight hallway that I wasn’t confident we’d have time to get down. I knew immediately that hiding was going to be my students’ and my only option.
ROG: So you hid inside your own classroom?
KRD: Within our own classroom we had a closet that had shelving so that wouldn’t have worked, and we had a bathroom. When I say bathroom, you’re probably thinking of a bathroom you use at home or at work. It was not that. It was an impossibly small space that was built for a tiny child. Our school is very old; it was built in 1958, I think. So the classroom bathroom was very old and very, very small. It was about 3 by 3 and 1/2 feet with a toilet in the center, but for us, it was that or nothing because I couldn’t lock our classroom door. So if we didn’t attempt to fit into the bathroom we’d have just been sitting ducks.
ROG: How many children were in your classroom?
KRD: On that day, 15 students were present.
ROG: Can you walk us through those few moments? You heard the shot and said, “Class we need to hide, we’re going to go into the bathroom,” and you were able to get all 15 children in there?
KRD: When the shooting began, luckily my students were seated in our morning meeting, which is a very calm and quiet time, so I had their undivided attention. When the first shots were fired from the outside of the school, I got up, closed our door, and turned off our lights. I realized that my keys were across the classroom on my desk, and I knew I didn’t want to risk the time it would take to get them, so our classroom door remained unlocked.
I turned back around to my students and said, “We need to get into our bathroom.” And my students of course began to say, “What do you mean?” “How are we going to do that?” because they understood having used our bathroom every day how tiny it was. I, as an adult, had never been in that bathroom until that day. It was simply not a space that was large enough for an adult to fit comfortably, but for us in those moments, that really was our only option. After I repeated myself a couple times my students understood that I meant business and that this was going to happen.
We started rushing to the back of our classroom to where our bathroom was, and we just started piling in, which was me picking students up. I put one little boy behind the toilet where the flusher is, a couple of my little boys stood on top of the toilet, and we just literally pressed our bodies inside of it.
ROG: And then you just closed the door and waited it out, or did the shooter enter the classroom?
KRD: We did. Our bathroom door opened in, so once we were finally in we couldn’t close the door because we were blocking it. That was horrific because it was just another moment of “What are we going to do?” But thankfully I was able to pick up my students and cram them behind the door, so we were able to close it and lock it. I did not turn the light off in the bathroom, it stayed on. Before I closed the door, there was a storage cabinet that was kept right outside our bathroom door that was on wheels. It was a pretty large piece of furniture, but it moved easily. So I just wheeled that right in front of our door and basically barricaded us in.
I am sure the shooter came into our classroom. The police can’t tell us that, but we were the first classroom and he only caused harm in the hallway and in classrooms 2 and 3, so I can’t imagine he bypassed classroom 1. I don’t know why he would have, but I’ll never know.
rypson/istockphoto.com
ROG: So you didn’t hear anyone walking around or anything like that?
KRD: We heard everything.
ROG: As far as the shooter walking around, was there anything to indicate that he was in fact inside the classroom?
KRD: What you have to understand is that when you’re in a tiny space it all becomes relative, meaning what we heard on the other side of our bathroom wall, being out of cinder block, which was probably 7 inches, that’s where our principal and school psychologist lost their lives. We heard everything, but it was hard to determine in our space where what we were hearing was. Was it in the next classroom? Was it coming from the cafeteria? It was hard to pinpoint where the sounds came from.
ROG: So you and your students managed to avoid any injury?
KRD: Correct.
ROG: How long were you there before you realized it was OK to come out?
KRD: We were in our bathroom, I’m told, for 45 minutes. We were the last class found and rescued in our school. I was not opening the door, so we were waiting for someone to find us, and eventually they did. The SWAT team found us.
ROG: If you had it to do over again, would you do anything differently knowing what you know now?
KRD: No, I wouldn’t be here, and that I know. The classroom had an adjoining door, and we had bullet casings on our floor that had rolled under our adjoining door.
ROG: Has this changed your everyday preparedness in any way, whether it be supplies you carry with you or enrolling in self-defense training or anything like that?
KRD: No, but something that’s important to know is that I have always been a very hyper-vigilant and hyper-aware person, sometimes to a disservice. After the tragedy, I sought out counseling like anyone should after such a horrific encounter. One of the things that individual helped me work through was that my hyper-alertness and hyper-awareness that probably stems from being someone who is adopted is probably what saved us on that day. Because while many might have been thinking, “What is that? Is that a firecracker? Did something fall?” and took their time, I went into lockdown within 30 seconds. And I can only attribute that to whatever’s always been inside of me as a person who is very aware.
I think that if I were to give anyone a piece of advice about preparedness or safety at a school or any public place is just being aware. Where are the exits? Who’s coming in and out? Where is a place you could hide? Don’t have your back to an entrance. Things I think a lot of people take for granted or don’t think about. I think a lot of people turn that little voice off, and I’d recommend they keep it on.
ROG: Do you think ego can make people reluctant to react decisively in an emergency situation? Say, if someone thinks there’s a fire, they don’t want to be the first one to say it for fear they might be wrong.
KRD: But what’s the worst thing that can happen? One of the people whom I’ve met over the past few years is a gentleman who used to be involved in Israel with their defense. He and I did some training together, and I explained my heightened awareness to him and that led us to a discussion about profiling. What he taught me is that in our country, we have this very negative connotation around the word “profiling.” We think of it as racial. We think of it as singling people out, whereas in Israel they think of it as a very positive word. You’re aware of who’s connected to a situation. You’re aware if someone looks out of place. You’re aware if you’re in an audience and someone’s sitting alone and not at all interacting with people around them. These are all things that should heighten our awareness to say, “Hmm, something might not be right,” and pay attention to it. I think in our country we need to be better at that in a positive way of being aware of our surroundings. If somebody looks like they’re not in the right place for whatever reason, we need to pay attention to that. I really don’t think we do a good job of that.
ROG: Police have also said the same thing — that it’s good to profile people because it might save your life.
KRD: Right, but it’s not racial. A Caucasian female could look very out of place and you should pay attention. I think the other thing that very much comes to mind in terms of school safety specifically is that I wouldn’t be talking to you right now if our school had not been a secure, locked building. There’s this misconception that Sandy Hook Elementary School was this very laissez-faire place. While it was idyllic and very much like Pleasantville, it was not laissez-faire. We took safety and security extremely seriously.
Our doors were locked, there were double sets of locked doors, there was video surveillance, there was voice recognition. You were not getting in our school without three secretaries knowing who you were, seeing your ID, and buzzing you in. That monster shot his way through a window. There’s still so many schools in our country — and I know this because I visit lots of different states — that aren’t locked. That’s a huge problem. It’s 2016. We lock our homes, we lock businesses, we certainly lock large corporations that make millions of dollars. We need to lock schools.
ROG: Do you know why schools tend not to be locked? Is it because of fire codes or something along those lines?
KRD: The arguments that I have heard is that our schools are such special, warm places that we don’t want them to feel like a prison. That’s the most common argument that I have found. So was our school. That door being locked did not diminish or take away one ounce of the warmth and specialness that lived within those walls. Children’s lives and teachers’ lives are far more important. And look what happened at our school with our locked doors. It’s not a complete solution, but it is a really important step in the right direction. We go home at night and put our children to bed, and our front door is locked. Why shouldn’t our school doors be locked?
ROG: Are you still teaching at Sandy Hook Elementary?
KRD: No, I started a nonprofit in 2013 and have written a book titled Choosing Hope, and that keeps me very busy. I teach in different ways now. I travel and speak all around the world about my story, and I also now teach at college level. I teach future teachers about being teachers and love it.
More 411 To learn more about Kaitlin Roig-DeBellis, go to https://kaitlinroigdebellis.org.
Let’s face it: although action movies are often entertaining, they also have a tendency to be highly unrealistic. We’re not just talking about the sideways-diving dual-wielding slow-mo pistol fights found in John Woo films — even purportedly realistic action and war movies sometimes feature goofy physics and laughably bad firearms technique.
In “16 Blocks”, Bruce Willis is shown aiming a jammed Glock. In the next shot, it continues firing normally. Source: Screencap via Internet Movie Firearms Database
We can understand why this is the norm in Hollywood, since fantasy and entertainment value sell more movie tickets than pure realism. It’s a lot more dramatic when a grenade launches the villain cartwheeling into the air with a massive fireball, or when a shotgun blast knocks a henchman back 20 feet through two plate glass windows and a fruit stand. While you may see the clip below from Commando and roll your eyes, you’ll probably also find Arnie’s muscle-bound blank-firing antics at least a little fun to watch.
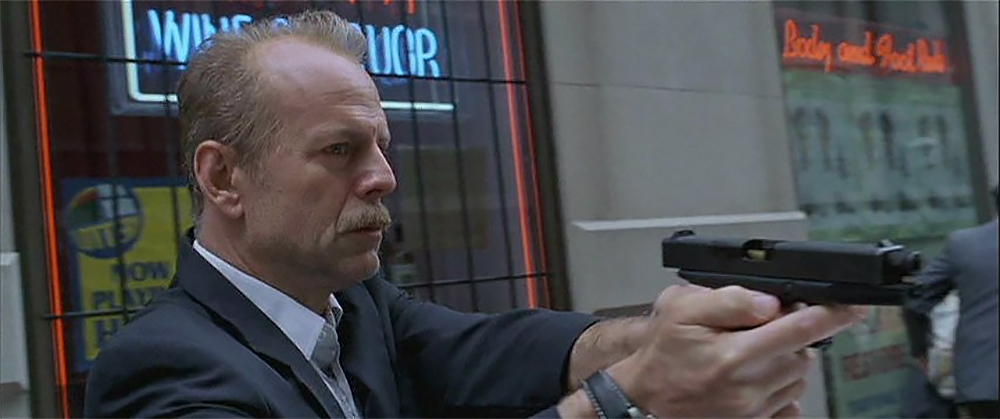
However, not all movies are unrealistic when it comes to firearms. A select few films put in the time and effort to maintain a sense of authenticity, while still managing to remain entertaining. Director Michael Mann has received praise for his work on the classic heist film Heat, as well as the action thriller Collateral. In Collateral, Tom Cruise plays a ruthless and highly-skilled hitman who has been hired to kill several individuals in a single night.
Tom Cruise plays a hardened contract killer named Vincent in the 2004 film “Collateral”.
In order to determine if the gunfights in Collateral are based in reality, firearms instructor and Special Operations veteran Larry Vickers analyzed a famous alleyway scene from the movie. In this “Shot for Shot” video, Vickers also recreates the exact technique Cruise used — drawing from concealment, deflecting the mugger’s gun with his free hand, firing two rounds from retention, and transitioning to put three more rounds into the next threat.
Vickers calls this “one of the best movie gunplay scenes ever”. Do you agree? If not, what’s your favorite movie gunfight scene, and why?
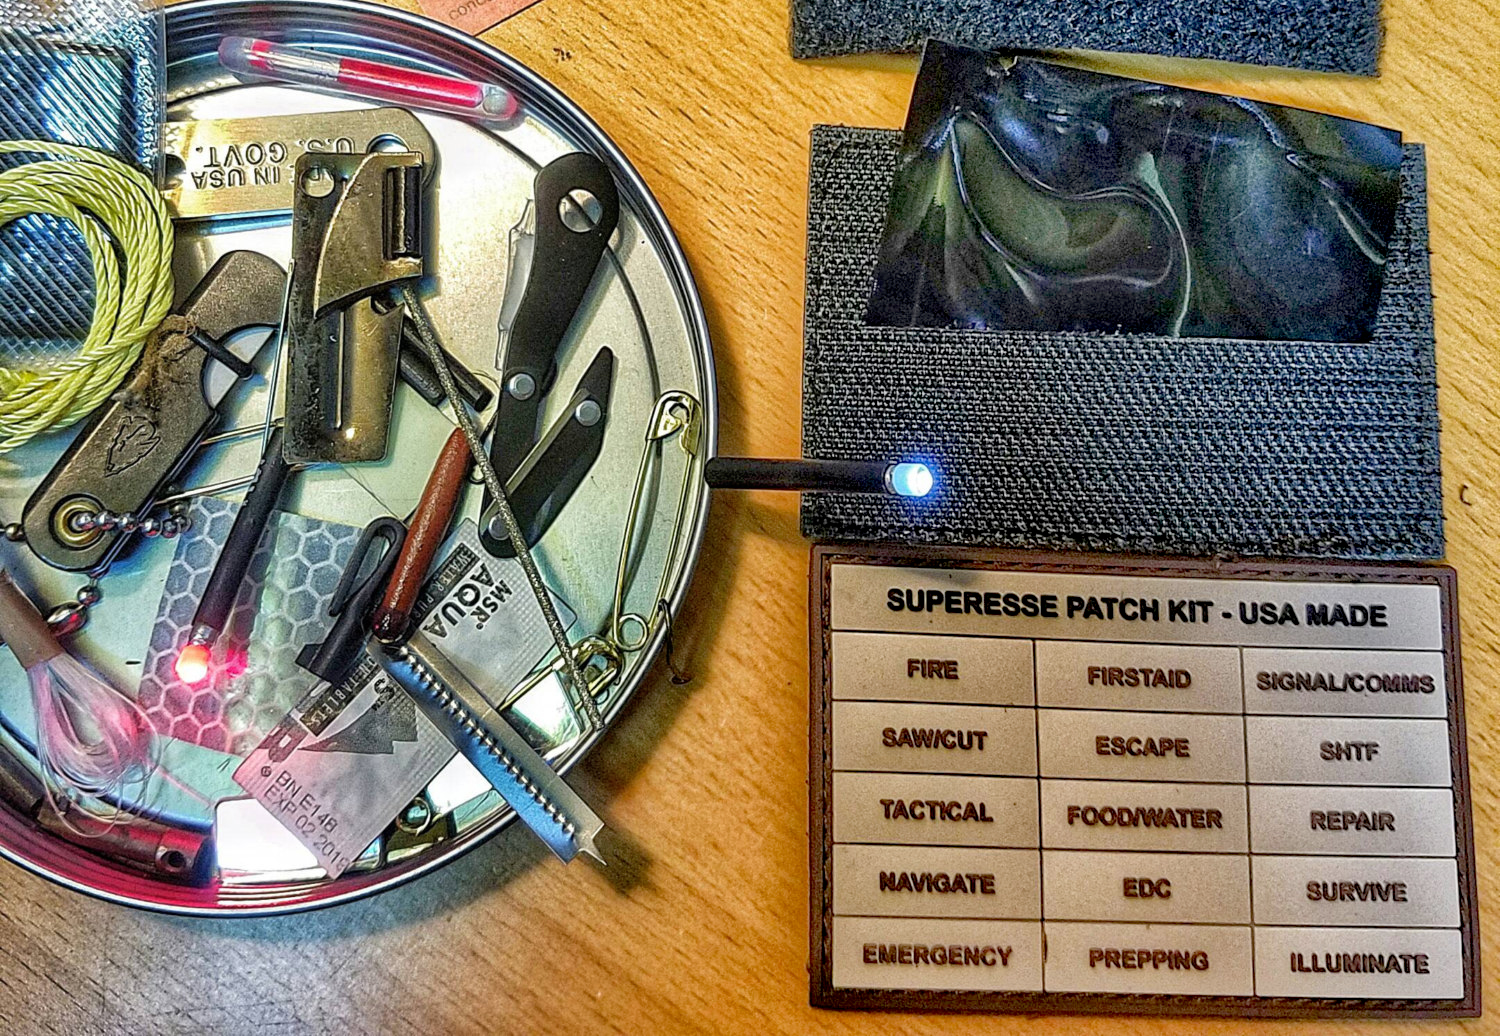
It doesn’t take much to turn the tide in a survival situation. When it comes to starting a fire, collecting food and water, or navigating to safety, even a handful of small tools can provide a tremendous advantage. While it’s certainly possible to survive bare-handed, this will consume far more time and energy than would be required with a proper set of resources. This realization led one veteran to create Superesse Straps, a company that hand-makes miniature survival kits for everyday carry.
The new Superesse patch kit can contain a variety of different survival tools.
Superesse Straps is known primarily for its paracord survival bracelets, such as the Bug-Out Bracelet we reviewed in the past. The company has recently expanded its line into keychains, neck knife lanyards, and handkerchiefs. More recently, Superesse announced a new type of discreet EDC survival kit: the Superesse Morale Patch Kit.
The new Superesse morale patch kits consist of a standard-size 3-inch by 2-inch velcro patch, with a concealed slit cut on the back side. This offers a small compartment that can be filled with a variety of mini survival tools, ranging from fire-starters and water purification tablets to handcuff keys and fishing kits. The standard Superesse Morale Patch Kit uses a clearly-labeled patch for quick identification, but flag patches and other inconspicuous designs are also available.
As for the kit contents, Superesse offers 13 different pre-built configurations to choose from, or you can request a custom set of tools. Here’s a breakdown of the standard 13 patch kits, and some of the notable items in each:
Survival – Water purification tab, fish hook and line, P38 tool, mini surgical blade
Clear vision is essential in any survival situation, since it allows you to observe, orient, decide, and then act on what’s around you. In the dark of night or a pitch-black room, it can be difficult to accomplish any of those tasks reliably, so illumination is key.
However, there’s one particular time when visibility is almost guaranteed to make the difference between life and death: self-defense with a firearm. If you can’t see your attacker clearly, you may hesitate to fire or miss your target completely; and with devastating consequences. Worse, misidentification of an innocent as a threat may lead to a different set of devastating consequences.
Therefore, we expanded our HighLights guide for this important theme, selecting 10 pistol flashlights to test and review. These lights offer diverse sizes, features, controls, and prices, so you should be able to find one that fits your specific needs. For evaluation purposes, we selected lights that fit the most popular pistol on the market, the Glock 19. If you own or carry a different gun, that’s not a problem — many of these weapon-mounted lights (WMLs) are universal-fit, and the remaining few offer similar variants that fit other guns. Keep in mind, holster selection can be limited for light-bearing pistols, but it’s a secondary concern for bedside guns.
Most importantly, each of these lights can help you identify a threat in the shadows and decide if you need to pull the trigger. No other type of flashlight carries such a heavy burden.
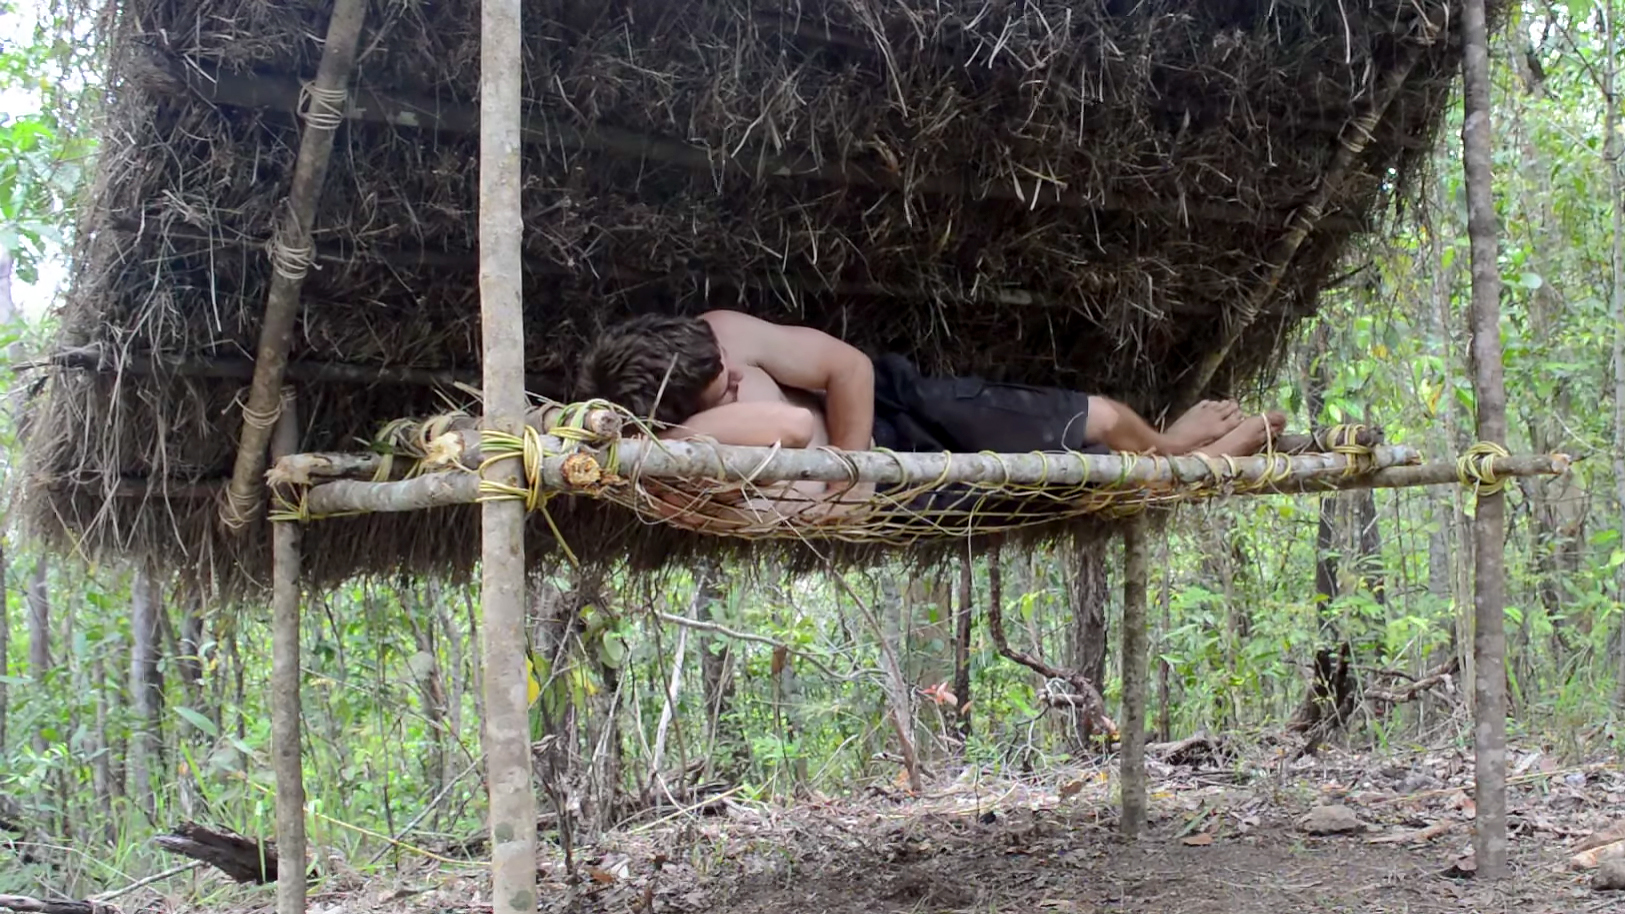
During a survival situation, exposure to the elements is one of the fastest ways to end up in trouble (or dead). Often, building a shelter is the top priority for survival in the wilderness, even taking precedence over finding food or water. Without adequate protection from the rain, wind, or snow, hypothermia can set in quickly — even in warmer climates.
In the past, we’ve discussed various forms of improvised survival shelters. While all of these structures provide protection from the elements, they’re also typically built at or below ground level. This can be a problem in certain environments, such as tropical rainforests, because all sorts of creepy-crawlies roam the ground at night. Sleeping on the ground can lead to numerous issues:
Loss of sleep due to insect bites and other pest-related annoyances
Soaked bedding if heavy rainfall occurs
Potential danger from snakes, scorpions, or other small nocturnal predators
Therefore, it’s wise to build a shelter with an elevated sleeping platform to alleviate these issues. In his latest video, Primitive Technology demonstrates how to construct a “bed shed” elevated shelter. Sticking with his typical format, he doesn’t say a word or use any modern tools. He doesn’t even wear shoes.
This project required nothing more than wood, vines, dry grasses, sharp stones, patience and skill. The end result is impressive and actually looks quite comfy, especially once he adds a small fire pit beneath the sleeping platform to generate heat. Check out the full video below:
Protein is one of the human body’s core components. This substance makes up approximately 15% of an average person’s total body weight, acting as the major substance for muscle cell growth and repair. Protein is also composed of smaller building blocks known as amino acids, which are necessary for the production of many key bodily substances — for example, immune system antibodies, digestive enzymes, and hormones.
The human body can produce some amino acids on its own, but other amino acids must come from the protein in foods we eat. These are known as essential amino acids, and they typically are found in animal-based sources of protein, such as meat, fish, poultry, eggs, or dairy. Many other beneficial amino acids are available through plant-based protein sources, such as beans and legumes, nuts, seeds, grains, and fruits/vegetables.
According to the Harvard School of Public Health, we “need to eat a variety of protein-containing foods each day in order to get all the amino acids needed to make new protein.” Failure to consume enough protein can lead to a condition known as Kwashiorkor, which “often occurs during a drought or other natural disaster, or during political unrest”, according to the U.S. National Library of Medicine.
In order to vary and maximize your protein intake, check out the following infographic. It contains 20 protein-rich foods to incorporate into your diet:
Several of these foods, such as dry beans, nuts, peanut butter, and beef jerky have a long shelf-life. For more shelf-stable food options, check out our article on shelf-stable survival food. Other sources of protein can be obtained in a survival situation by learning to hunt or fish. Either way, remember to keep your protein sources varied as much as possible.
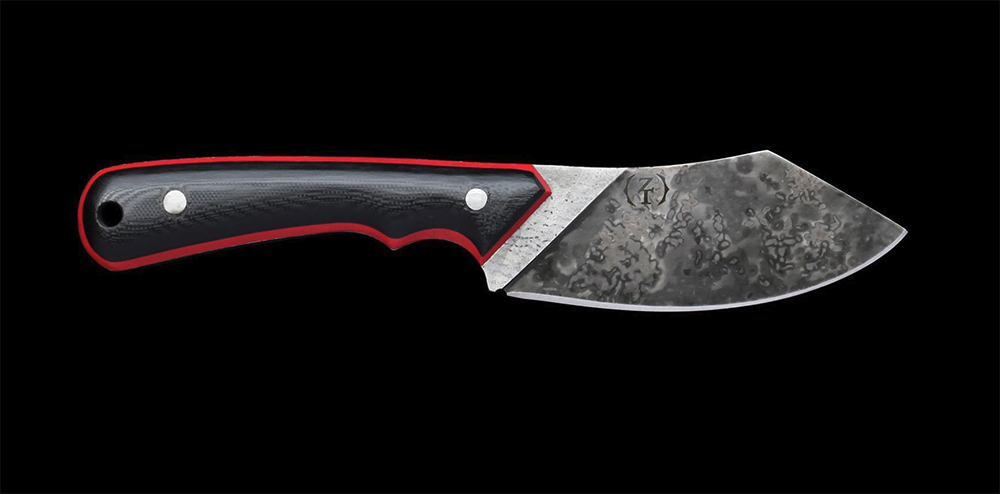
Including a knife as part of your every-day carry is pretty much a no-brainer. This cutting tool is useful for a nearly-endless list of tasks, whether you’re opening boxes at work or splitting firewood in a survival situation. However, let’s be real — it’s not always all about pure functionality. It’s nice to have a knife that both looks cool and cuts effortlessly. If that weren’t the case, more of us would end up carrying around simple box cutters, and there wouldn’t be as much of a market for high-dollar custom blades.
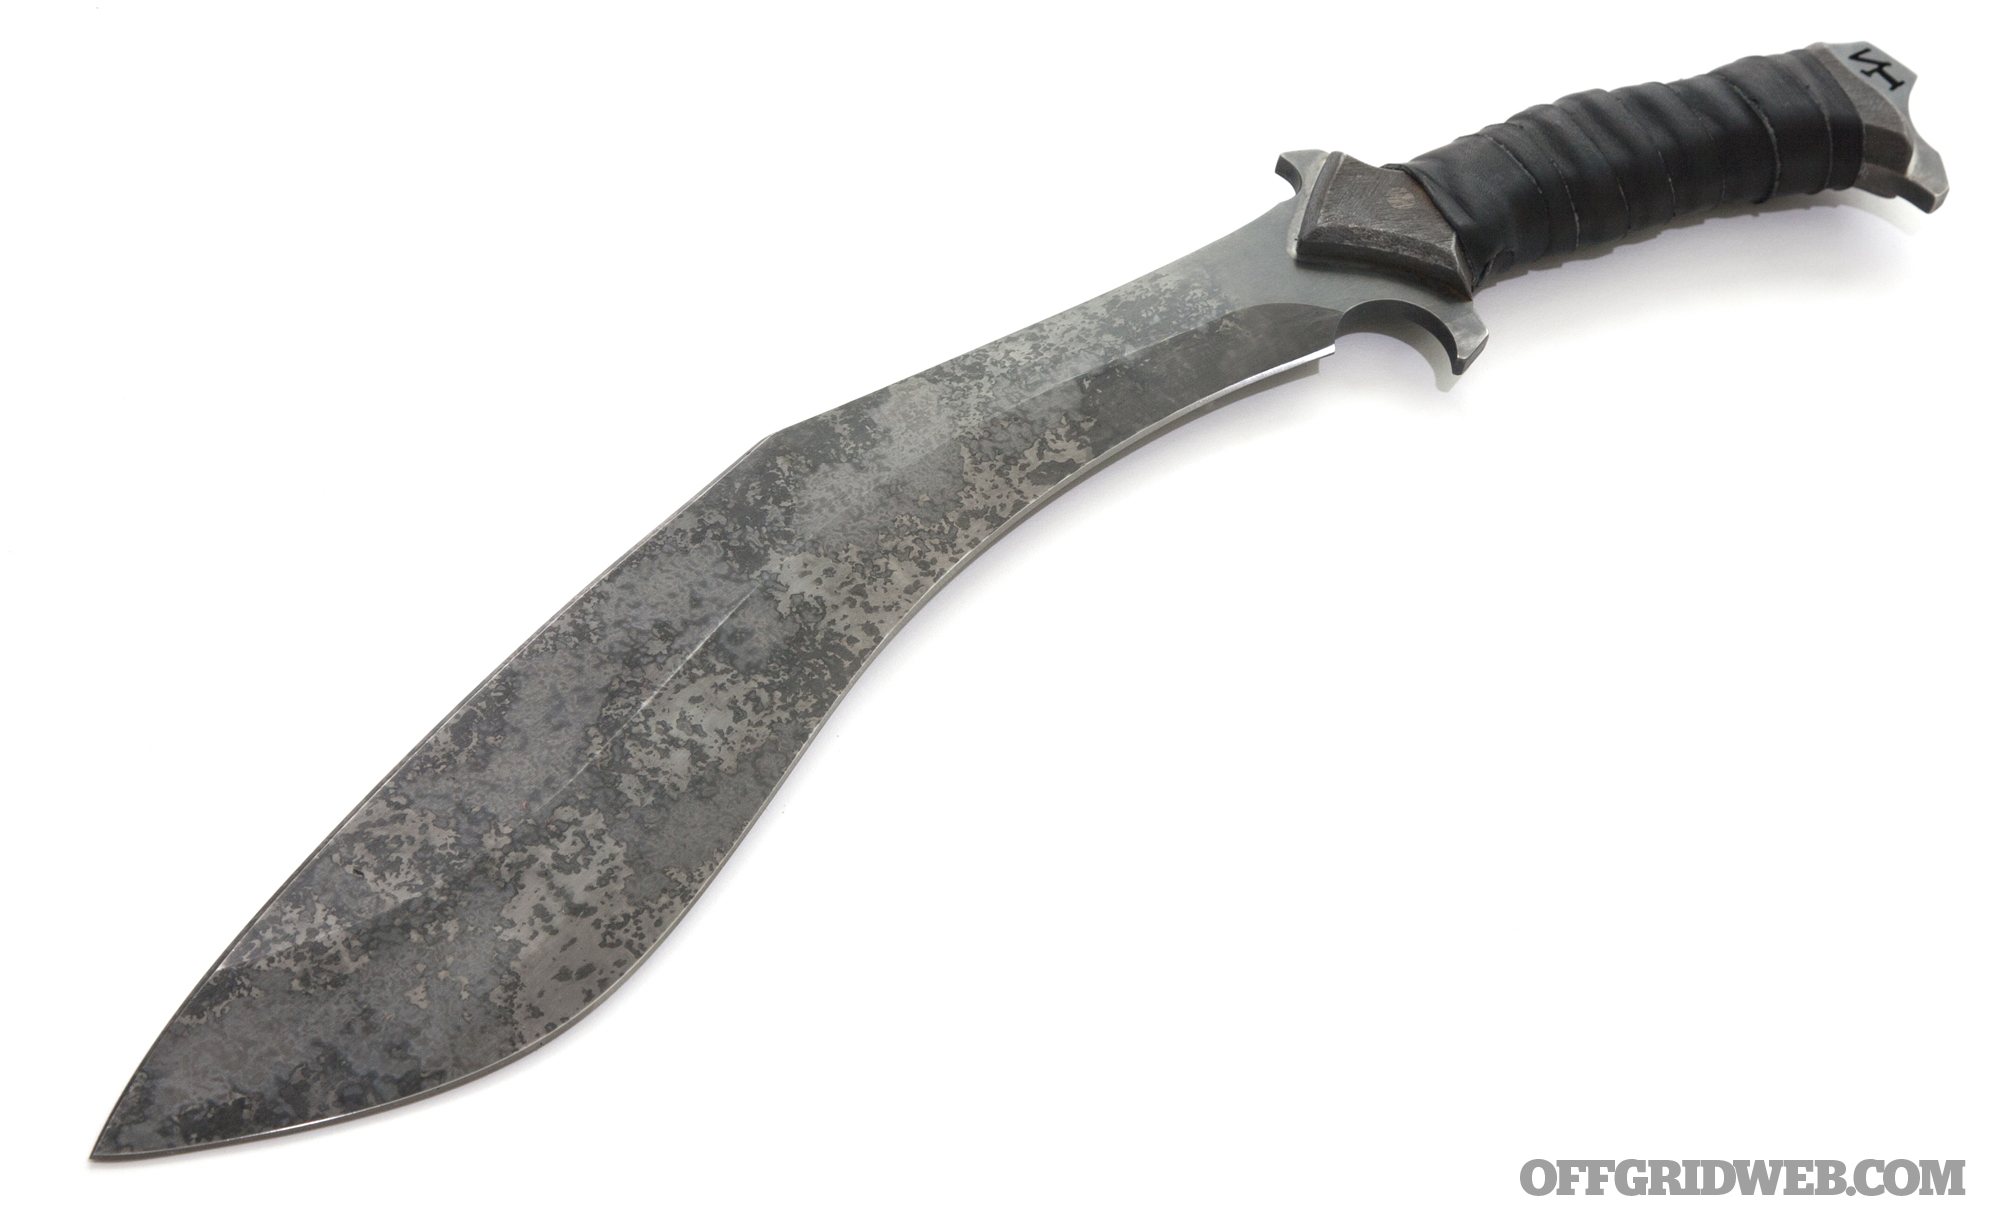
The cool splatter-finish on this Zombie Tools Vakra kukri was created through careful application of ferric chloride acid.
So, what do you do if you have a knife that works well, but is a bit aesthetically boring? You could retire it and buy a new one, or you could spend a little time and learn to customize your existing knife. Time-tested methods like acid etching and stonewashing are frequently used by major knife manufacturers, and with a little practice and around $100 in materials, you can use these techniques as well.
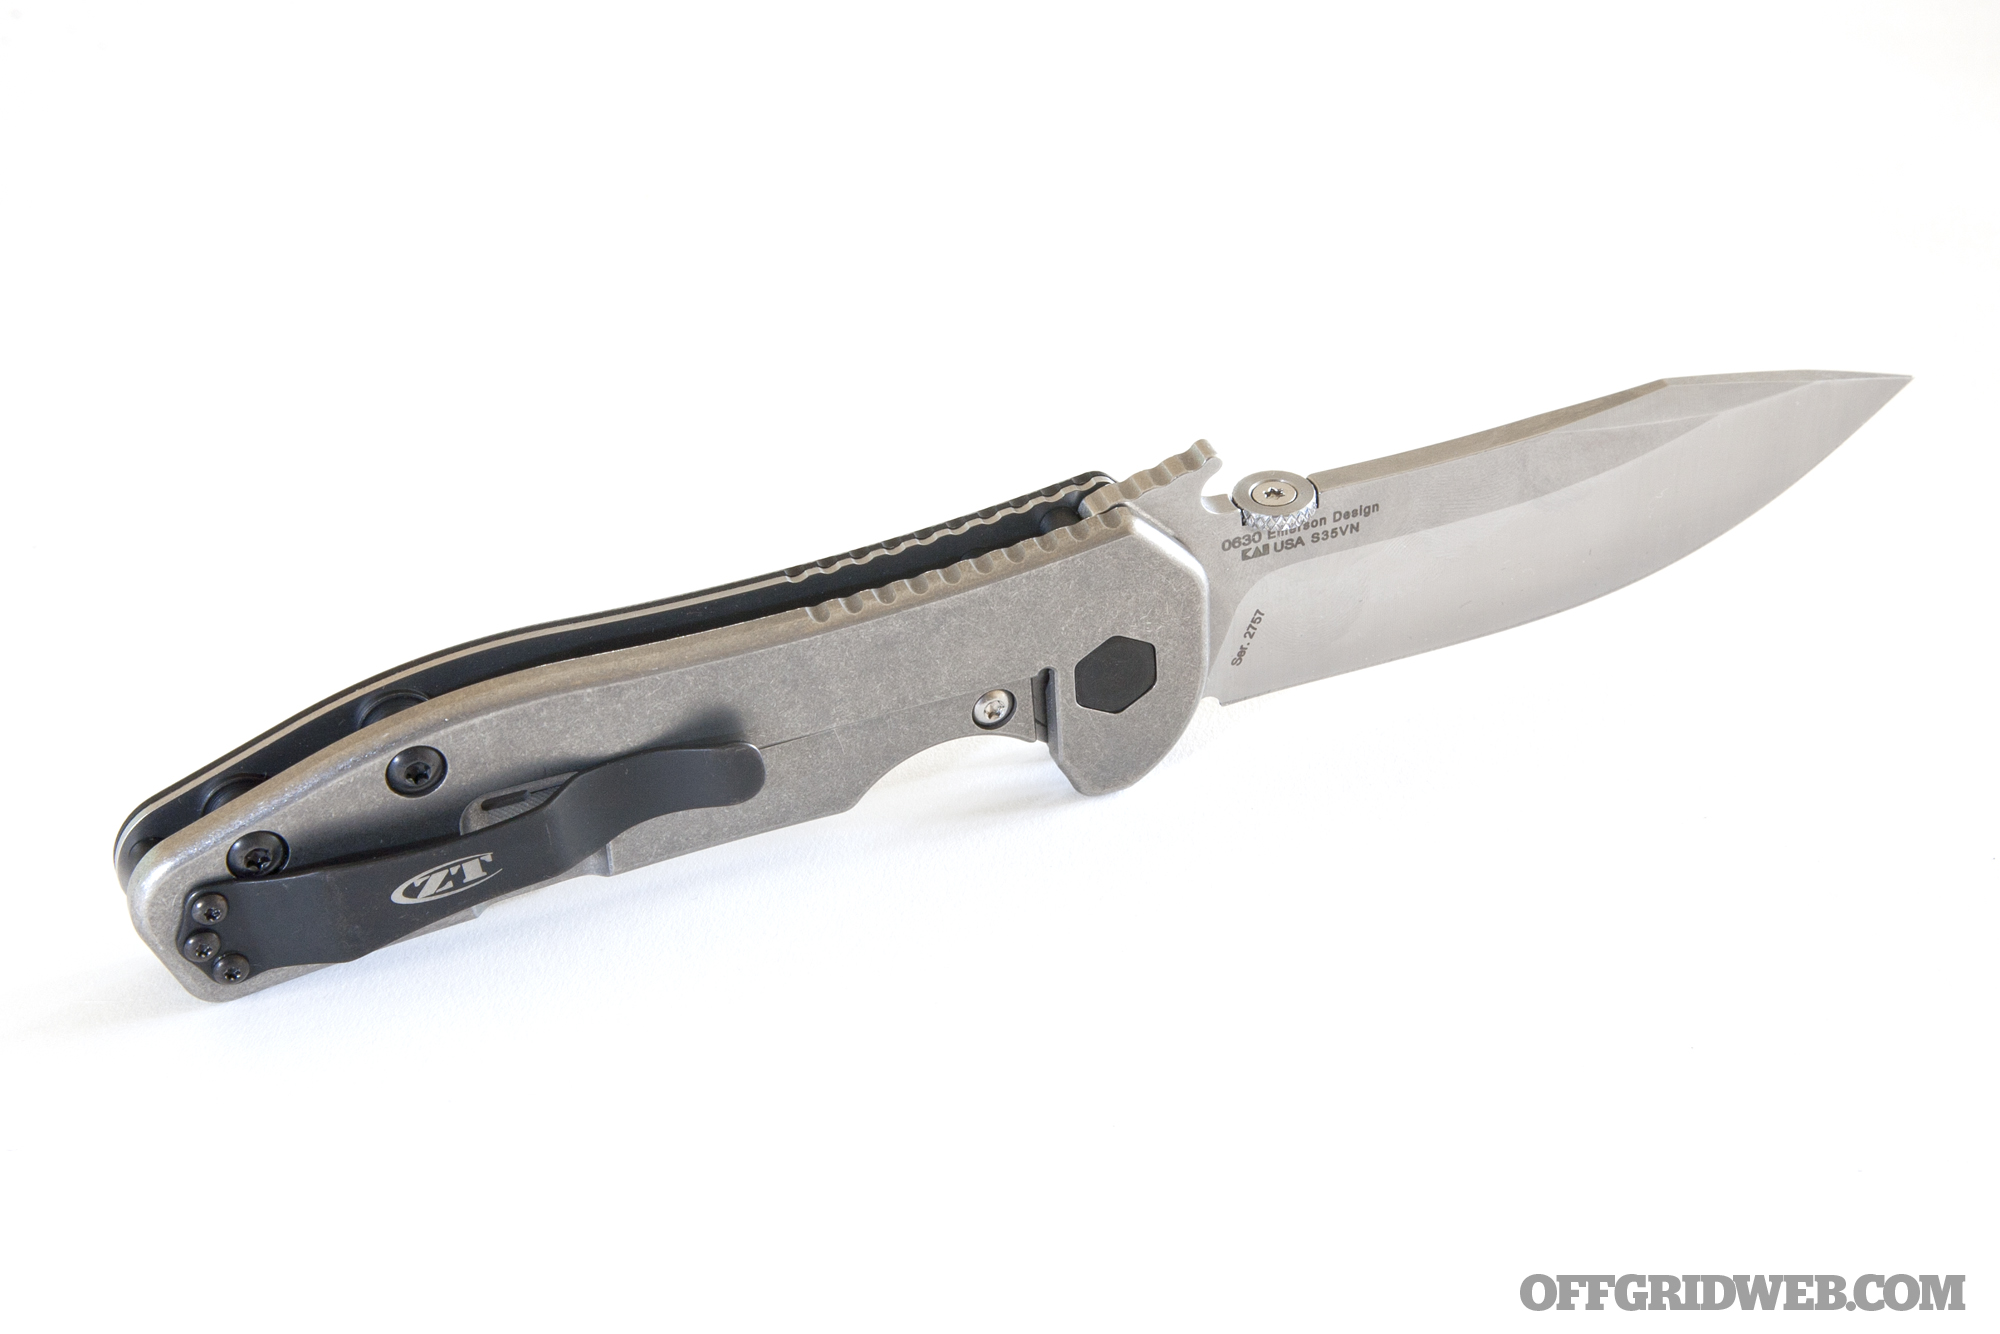
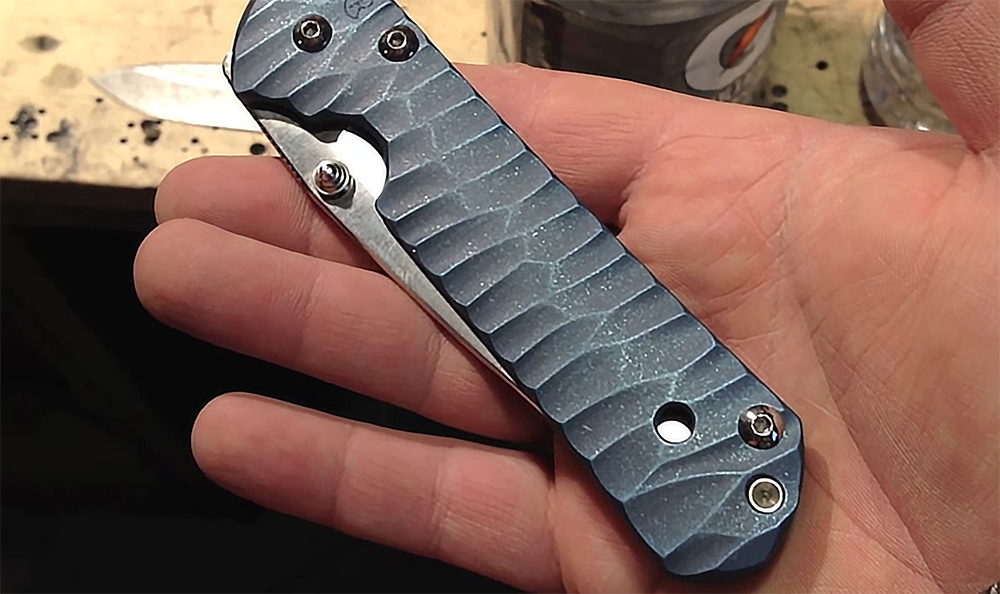
The handle on this Zero Tolerance 0630 is made from finely-stonewashed titanium.
WARNING: Before you begin refinishing any blade, take every safety precaution. Be careful to ventilate your work area and wear protective gear. Research the type of steel and acid you’ll be using, and any dangerous interactions they may have. Remember that you’re dealing with powerful acid and/or fast-moving stone fragments, so protect your eyes and skin. If you don’t take these precautions and hurt yourself, don’t blame us. This is not an exhaustive guide — we encourage doing additional research to ensure your own safety.
Acid Etching
Acid etching makes use of a chemical reaction between an acidic etchant solution and the steel of your blade. There are many variables here, such as the type of steel used, the type of acid applied, and the amount of time the blade is treated. Etching acids can range from powerful hydrochloric or sulfuric acid to much weaker acids — even household vinegar, citrus fruit, or mustard can be used effectively.
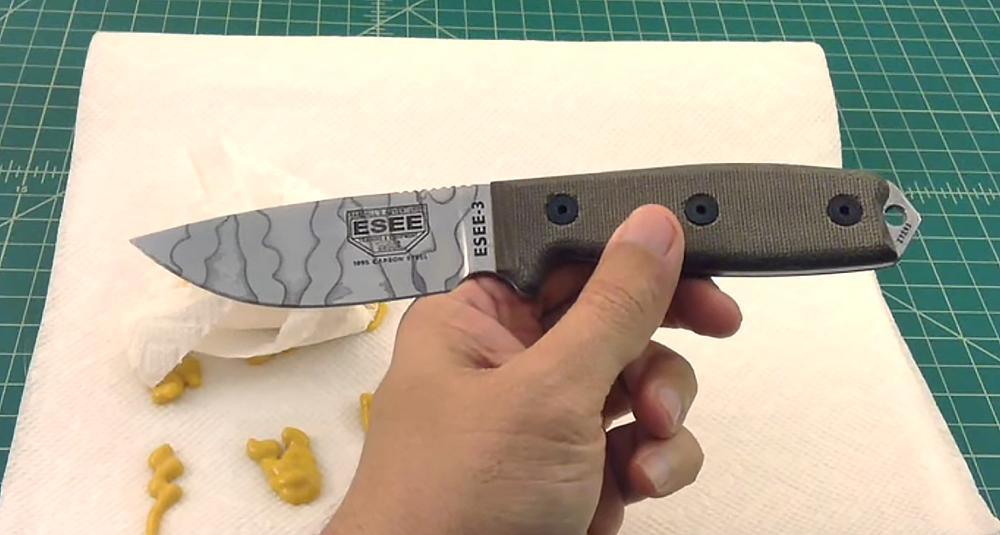
In the video linked above, YouTuber TheSmokinApe acid-etches an ESEE blade with French’s mustard. Yum.
However, for the purposes of this guide, we’ll discuss one of the most common acid etching solutions in the knife industry: ferric chloride. This etchant is available from most electronic supply stores for about $15 per quart, usually under the name PCB etchant (used for acid-etching circuit boards). Warning: while ferric chloride works well on steel, DO NOT use it with aluminum parts, as it can create a dangerous reaction.Again, research your acid and metal ahead of time to avoid unwanted reactions.
Above:Zombie Tools uses ferric chloride solution to acid etch its blades, yielding a dark and blotchy finish. You shouldn’t expect to replicate this exact look without some serious trial and error, especially since Zombie Tools keeps the exact process they use on these blades a trade secret. However, basic acid-etching is also an approachable DIY skill.
In the video at the end of this article, Smock Knives demonstrates both DIY acid etching and stonewashing.
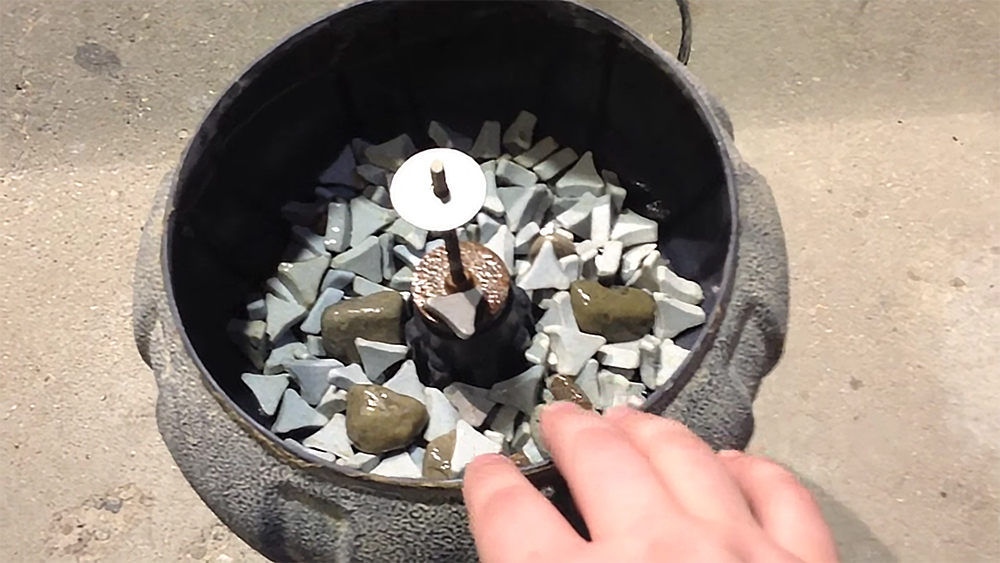
Stonewashing
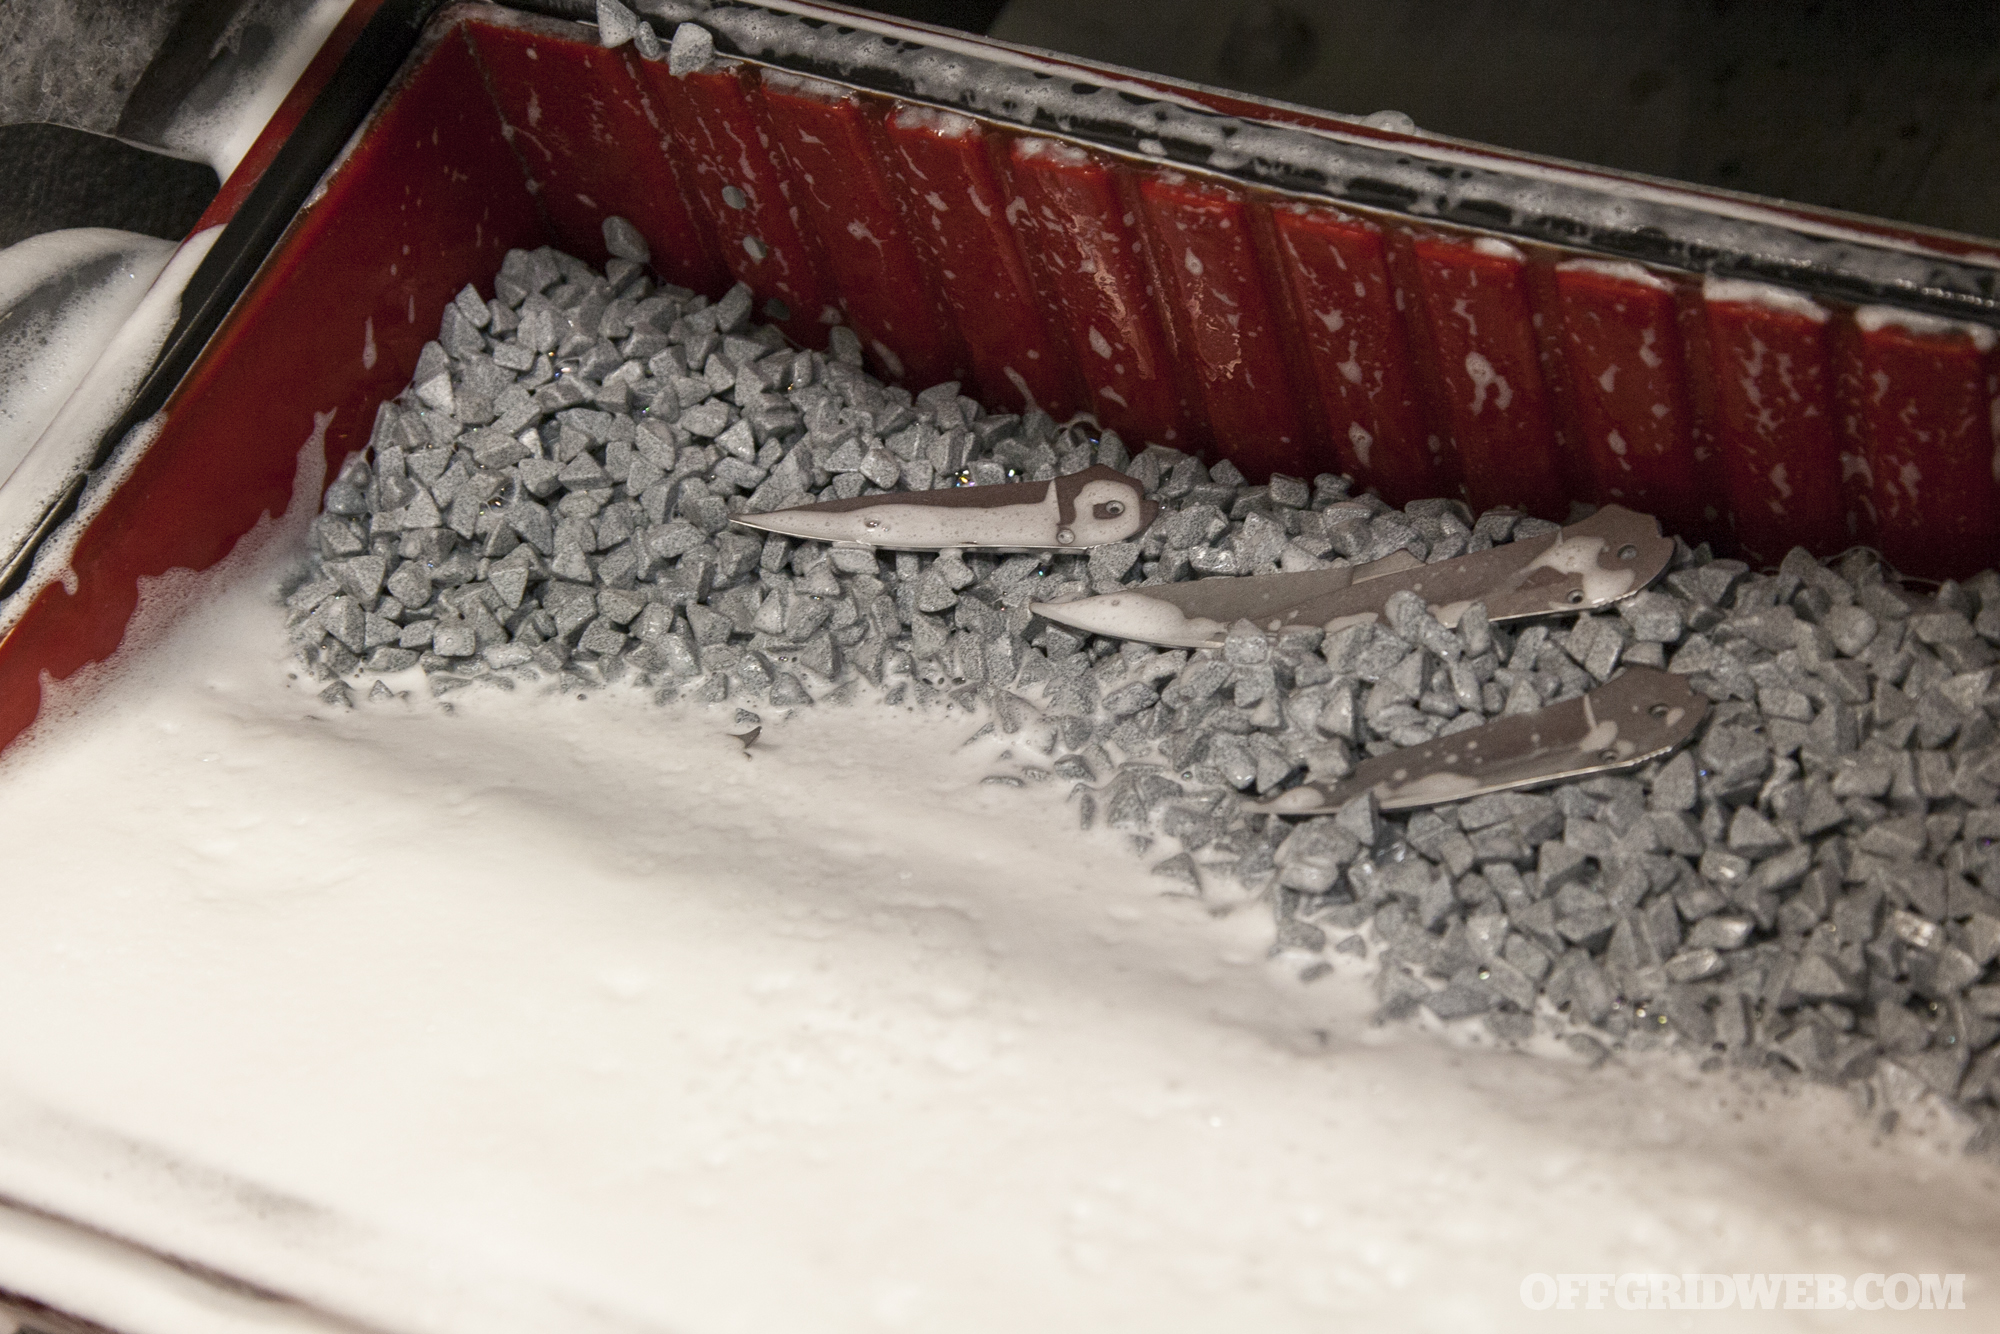
Often heard in the context of denim fabric and jeans, stonewashing (also called tumble finishing) is a technique that works exactly as you’d imagine — an item is washed in tumbling or vibrating container with water, soap, and an abrasive material. With fabric, this produces a lighter, well-worn appearance. With metal, it can create anything from a finely-textured matte finish to a rough scratched-up look.
Above: In our recent tour of the Zero Tolerance knives HQ, we saw how the company uses large industrial machines to stonewash its blades. On a much smaller scale, it’s possible to use a similar technique in your own garage.
These Zero Tolerance blades were recently stonewashed, and will soon be sharpened.
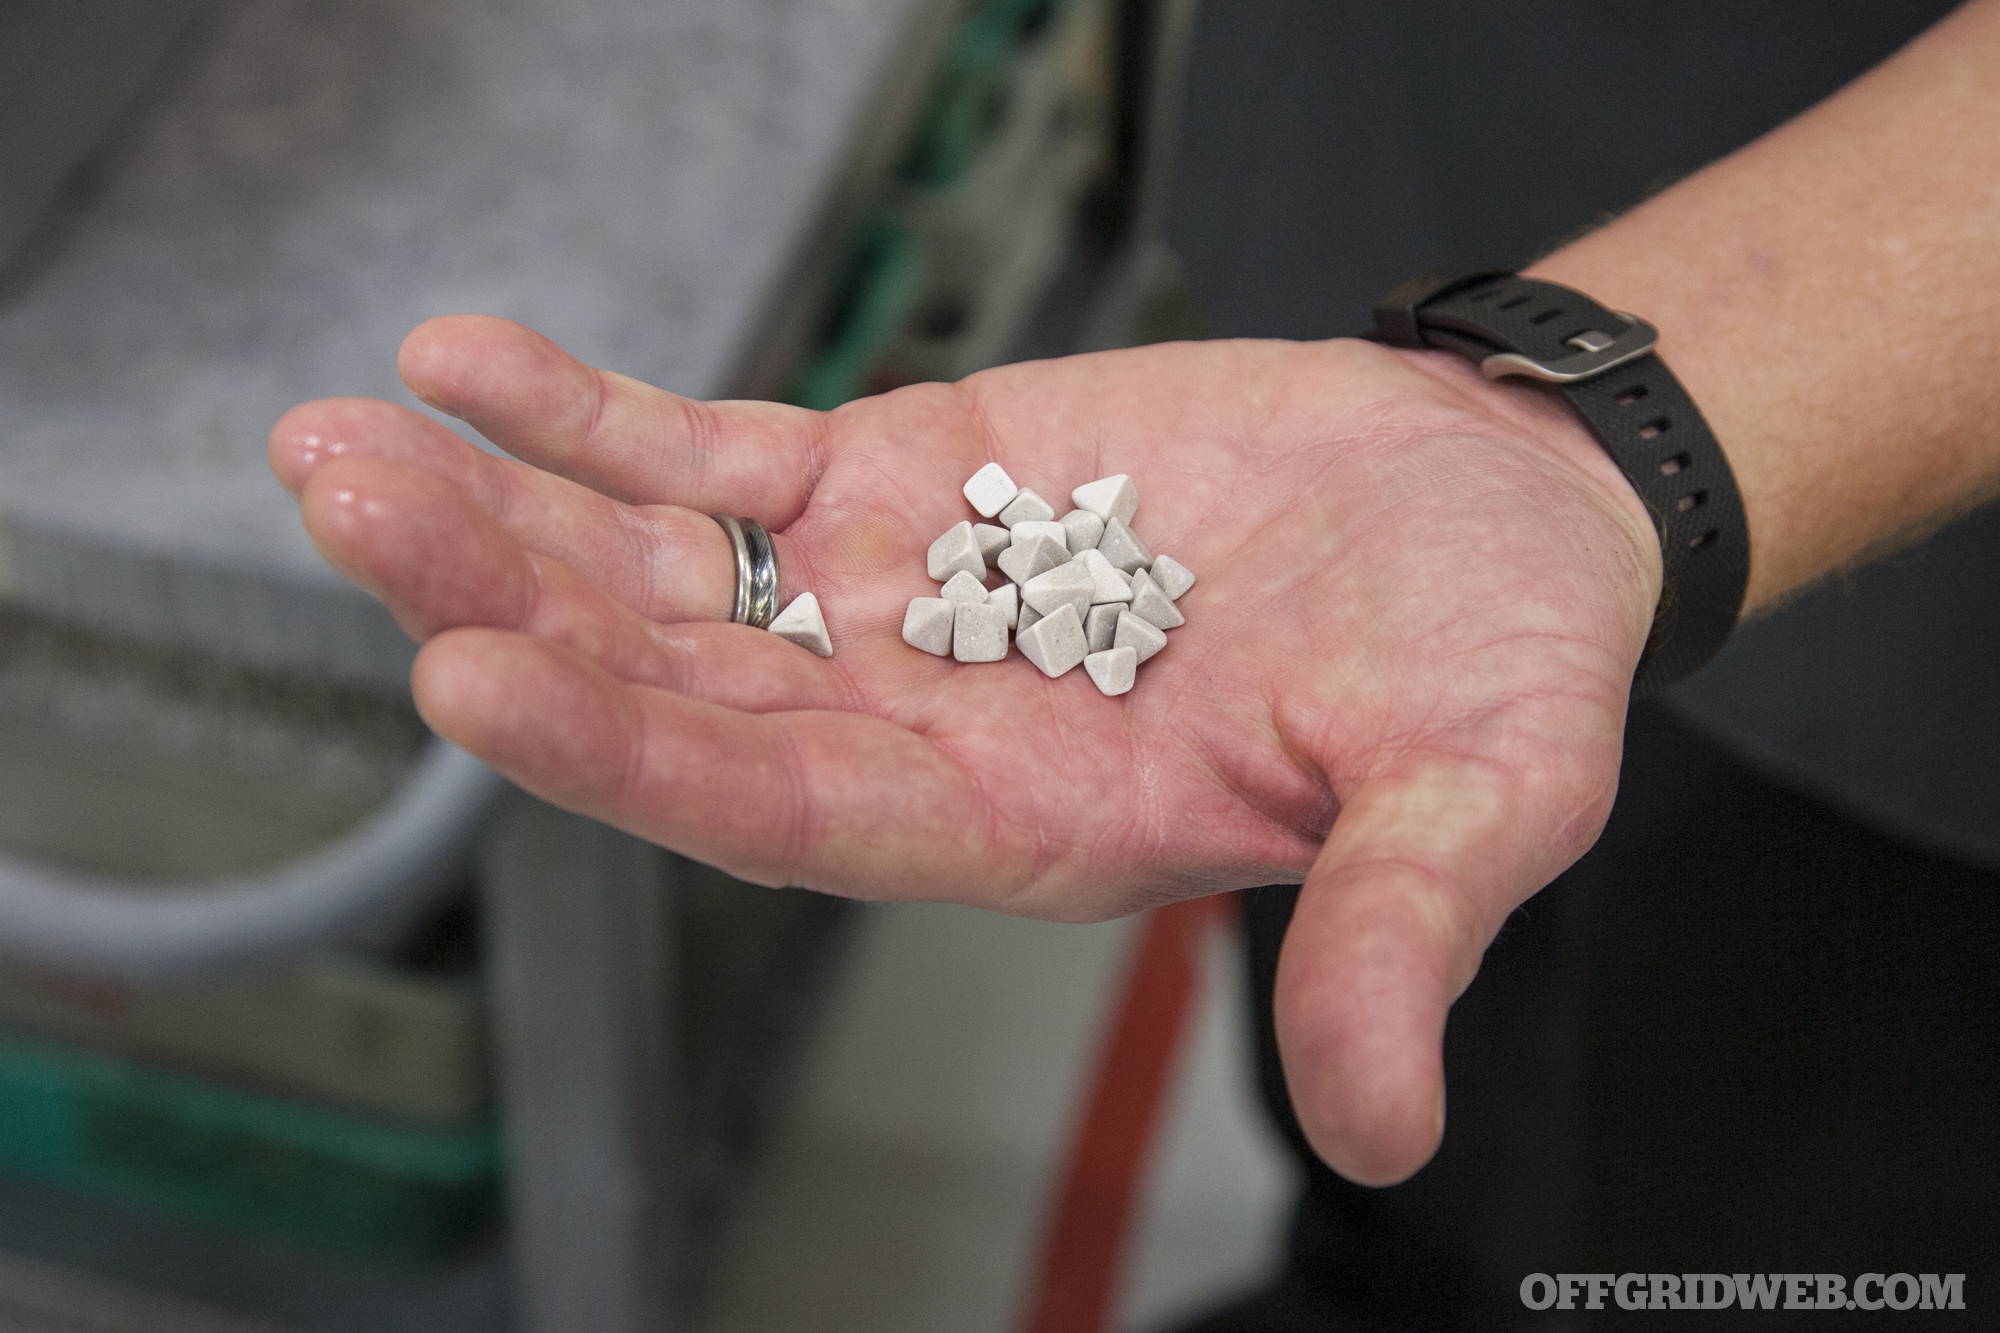
The end result of stonewashing is highly-dependent on both tumble intensity and the media (i.e. stones) used. Extremely fine media, such as sand or walnut shell fragments, will produce an even matte finish — this is often considered tumble polishing rather than a true stonewash.
A Kershaw knife handle scale, before (top) and after bead blasting (bottom).
Bead blasting or sandblasting, which fires these abrasives from a pressurized nozzle, is also used to achieve these lighter finishes. However, these techniques will require an air compressor and media blasting setup, which can be expensive. So, we’ll be focusing on the rougher side of the spectrum, as it’s easier and less costly for beginners.
Stonewashing can be accomplished with under $100 in materials, and these items can be reused on future projects.
Heavier stonewashing media typically consists of literal stones or ceramic pieces, which produce a rougher worn appearance. Increasing the vibration or tumbling intensity or adding unevenly-shaped natural stones can enhance the roughness of this finish.
Materials List
So, what do you need to acid etch and stonewash a knife? Here’s a quick breakdown.
Acid Etch:
Protective gloves/eyewear and a well-ventilated work area
Acidic etching solution such as pre-diluted ferric chloride, available on Amazon or at local electronics stores – $15
Acid-etch resist substance, such as nail polish, vaseline, or vinyl stickers
Two plastic or glass containers, one for acid and the other full of water
Baking soda to neutralize acid
Coat hanger or wire
Optional: sandpaper, cotton swabs
Other metal parts, such as handle scales, can be stonewashed as well. This handle was stonewashed, then anodized.
Optional: plastic bottle with additional stones (for manual stonewashing)
Learn the Techniques
Once you have these materials, the techniques are quite simple. Some fine-tuning and experimentation will be necessary to get the finish you’re looking for, so start out with an inexpensive knife. The following video from Smock Knives shows how to perform the DIY acid etch and stonewash process on your blade (or handle, for that matter). We’ll also summarize the steps below.
Acid Etch:
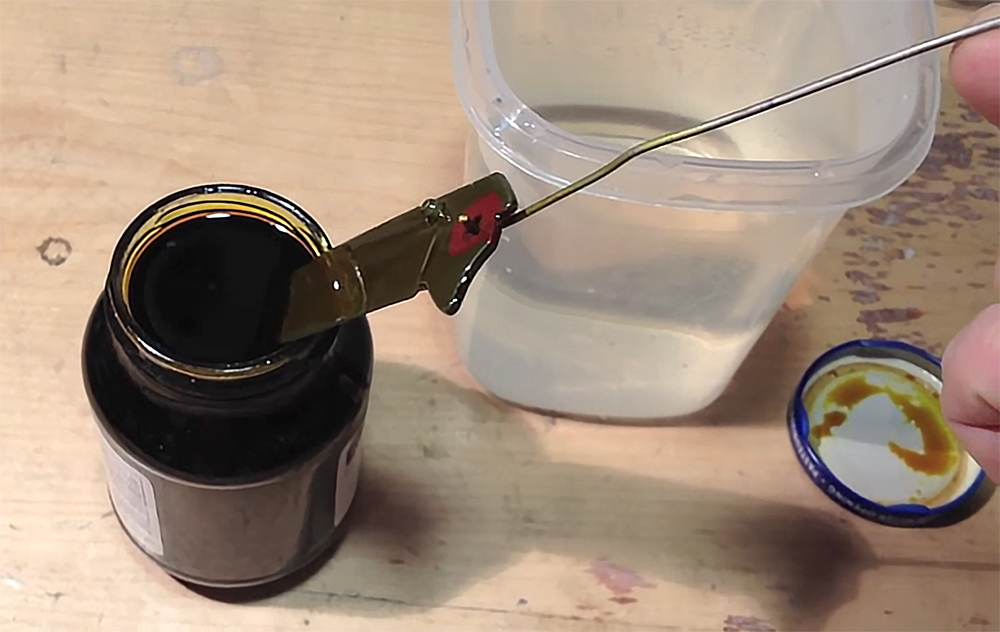
Disassemble your knife, and thoroughly clean and dry the part you’re going to etch (blade, handle, or clip). Even a single fingerprint will effect your acid etch, so be cautious.
Fill a glass jar with enough ferric chloride to cover the metal part.
Apply resist substance such as nail polish or vaseline to coat any sensitive areas, namely the pivot point, detent, and lock face. This can also be used to paint stripes, lettering, or splatter designs on the blade — feel free to get creative.
Use a wire to lower the part into the acid, being careful NOT to touch the acid. (Alternate method: apply acid to steel in small quantities using cotton swabs, rather than submerging the entire part.)
Leave the part submerged for about 5-15 minutes. Longer immersion will darken and remove more metal.
Carefully remove the knife with your wire, and submerge it in water, agitating to rinse. Apply baking soda to neutralize the acid. Be sure the acid has been thoroughly neutralized and rinsed before touching any item it came into contact with.
Clean the resist substance from the blade. Optional: use sandpaper to remove the resist material and add brushed texture to the blade.
Optional: repeat steps 3 through 7 to etch away more metal.
Store your acid in a safe and sealed plastic container marked “DANGER POISON” for future use.
Stonewash:
Stonewashing can be used on its own, or applied after acid etching for a darker worn appearance.
Set up your vibratory tumbler, and fill it partially with ceramic stones or other media.
Add some water and a small amount of dish soap to lubricate the media.
Insert your metal part, and power up the tumbler. Run the tumbler as long as needed to achieve your desired finish.
Optional: Insert the part into a sealed plastic jug with stonewashing media, water, and soap. Manually shake, or wrap in towels and place in a clothes dryer on “no heat” setting. This can produce a rougher or more uneven finish.
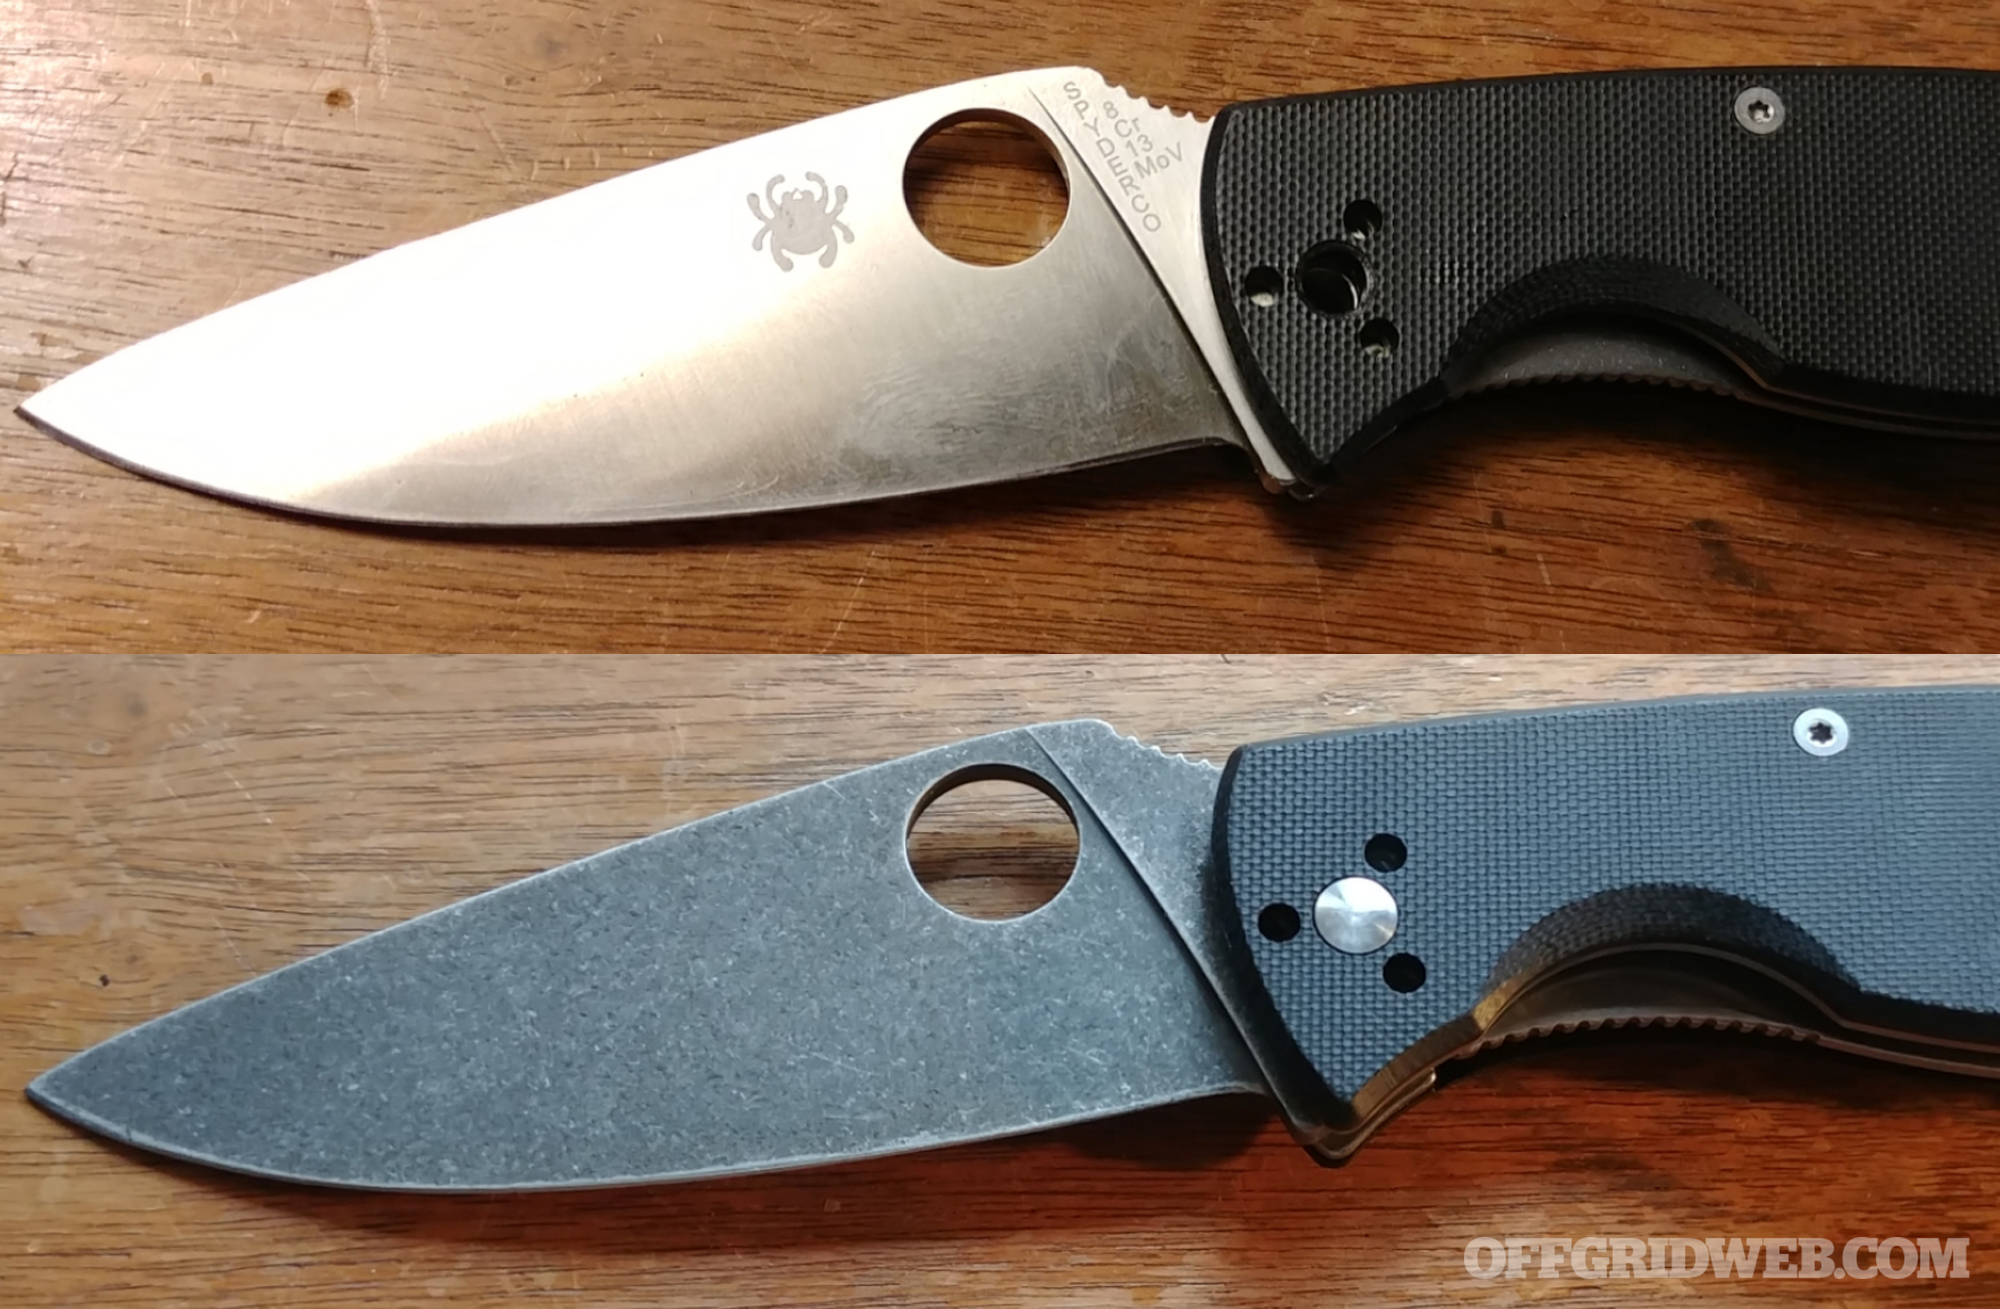
After following the steps in this article, a reader named Alex sent us the below before-and-after photo of his Spyderco. We’d say it turned out pretty cool — nice work, Alex.
Planning to try refinishing one of your knives? We’d love to see the results. Snap some photos and email them to me.
When it comes to survival gear, versatility is a major concern. If you have a tool that works extremely well in one specific setting but struggles in all other cases, it’s probably too specialized to be of much use in the long run. This is why we often carry compact multi-tools instead of lugging around a toolbox full of single-use items.
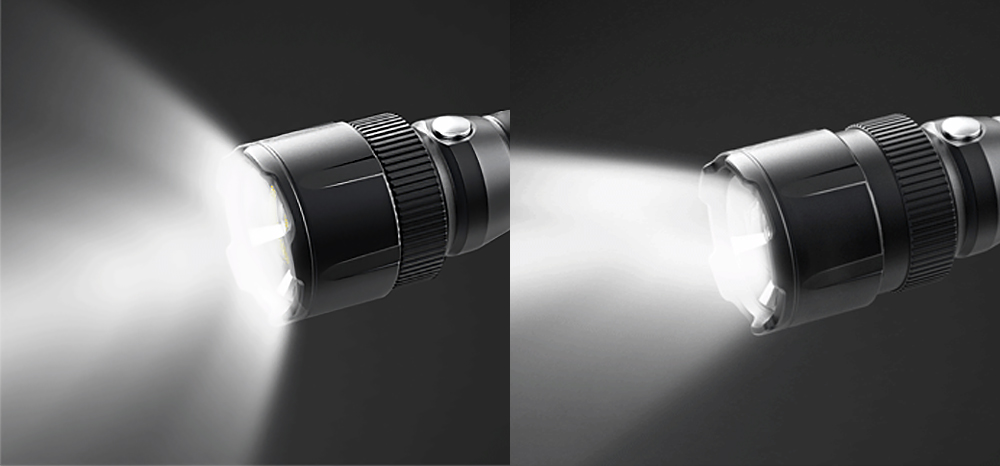
Just like these other tools, flashlights offer a wide range of shapes, sizes, and intended purposes. However, if you’re going to rely on a single flashlight for every-day carry or emergency use, it needs to be versatile enough to provide the illumination you need in a variety of settings. This desire for maximum versatility led to the development of flashlights with beam-focusing optics. This category of lights features an adjustable lens, which moves closer to or further from the LED light source, changing the beam angle on demand.
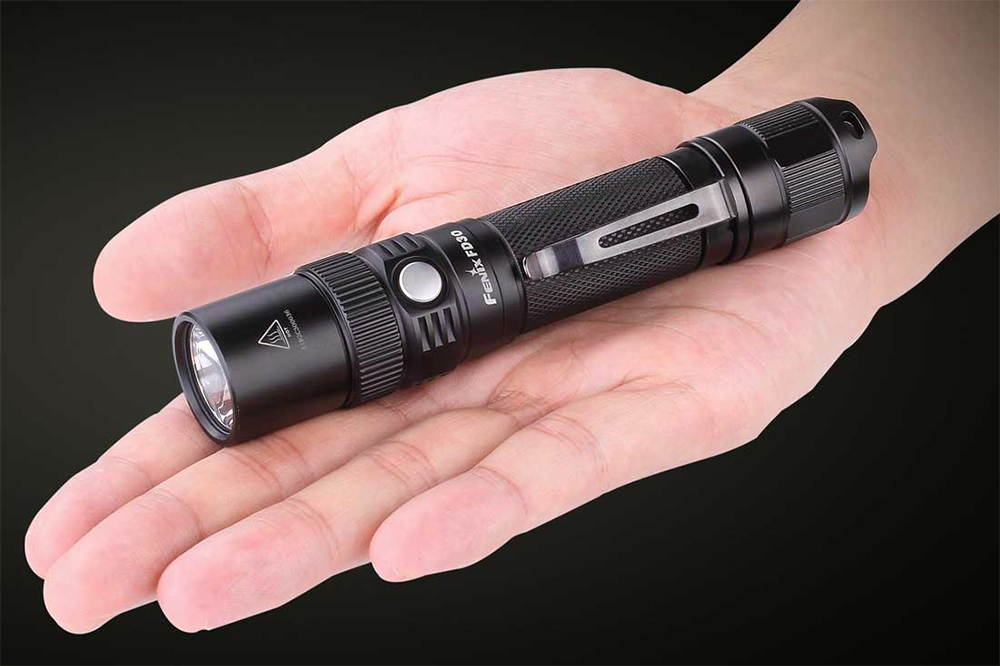
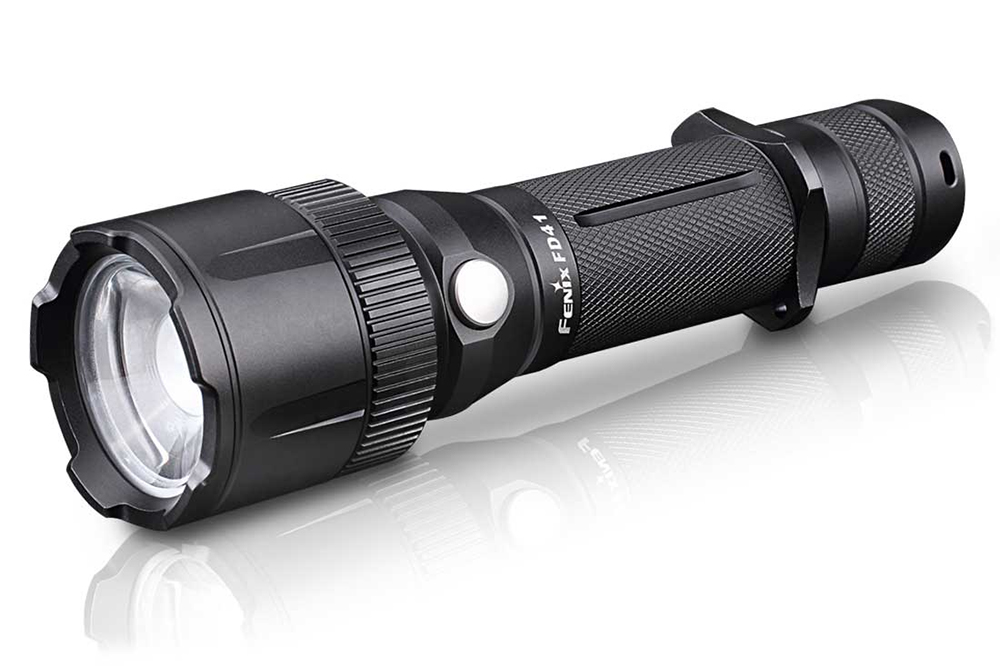
Fenix has recently announced that it will be offering a line of beam-focusing flashlights for 2017. The new Fenix FD Series is launching with two lights: the FD30 and the FD41.
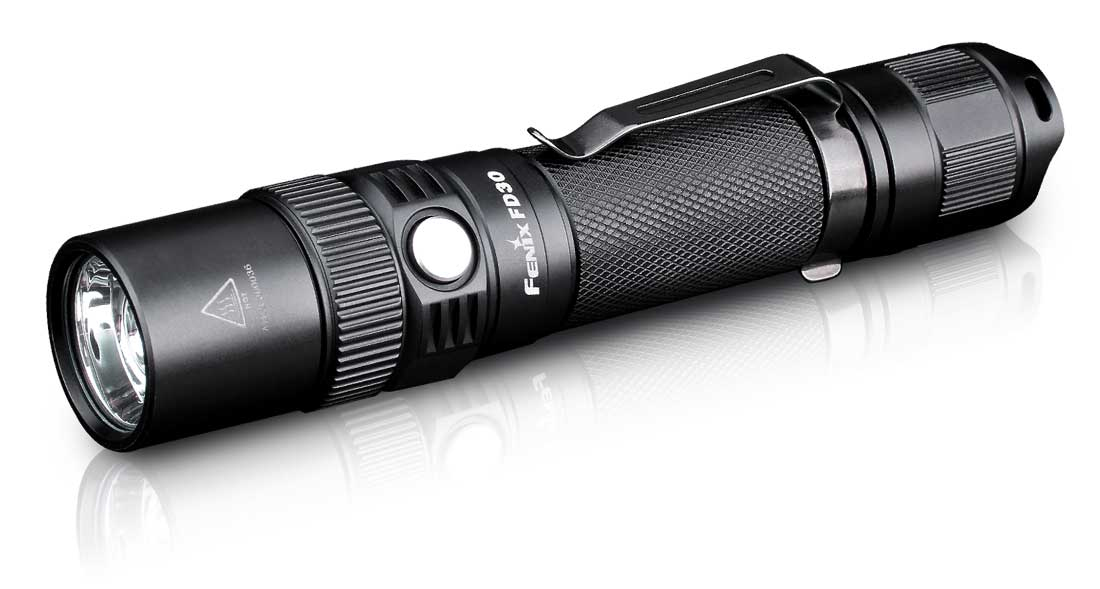
The FD30 (seen here) and the FD41 are both designed for pocket carry and EDC use.
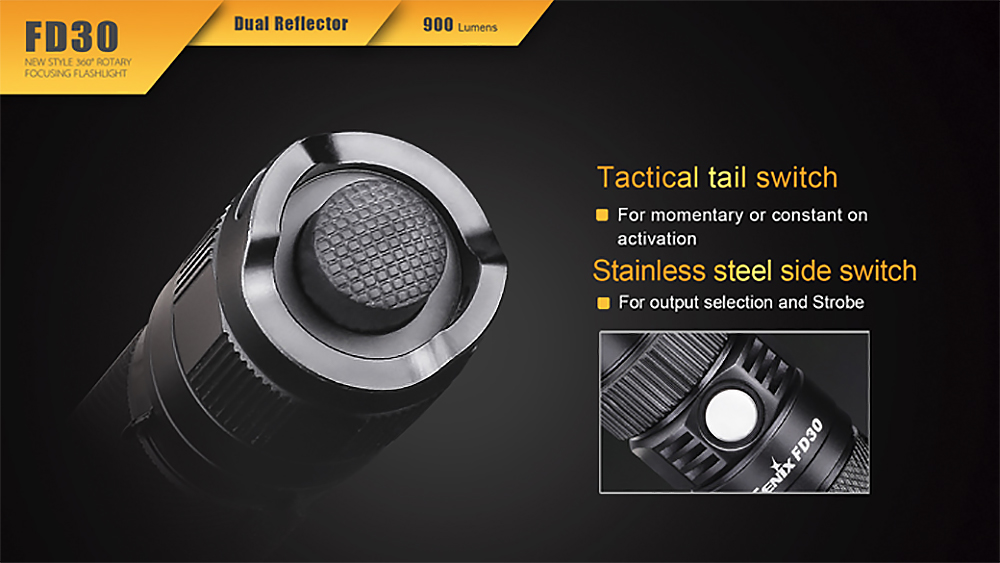
Both the Fenix FD30 and FD41 are constructed from tough anodized aluminum, which is impact-resistant to 1 meter drops and IP68 waterproof to 2 meter depth. Both lights also produce a maximum of 900 lumens, and are controlled by a combination of two switches:
Tail cap switch – Turns the light on and off, with a half-press for momentary mode and a full-press for constant-on.
Side switch – Cycles through five output modes: Turbo (900 lumens), High (350 lumens), Medium (150 lumens), Low (10 lumens), Strobe
These lights also offer dual-battery compatibility, and can run on a single rechargeable 18650 lithium cell or two CR123A batteries. To adjust the optical lens and beam pattern, the ridged focusing ring is twisted clockwise or counter-clockwise.
The new Fenix lights share many functional similarities, but the key difference between the FD30 and FD41 is dimensions. The FD30 (above) is the smaller light, with a 5.5-inch long by 0.9-inch diameter body, and a 1-inch diameter head. The FD30 flood light reaches 67 meters, while the focused spotlight reaches 200 meters. MSRP is $75.
The FD41 is slightly larger, with a 5.7-inch by 1-inch body, and a flared 1.6-inch diameter head. The FD41 also offers a crenelated bezel, for use as an impact weapon in self-defense scenarios. The FD41’s larger head diameter provides more adjustability and range — its flood light has a 47-meter range, while the fully-focused spotlight reaches 340 meters. MSRP is $85.
For more information on the new Fenix FD series flashlights, visit FenixLight.com.