This article was originally published in Issue 2 of our magazine.
We all know that having instant access to a bright stream of light anytime you need it can not only be incredibly useful, but also in some situations, it can even be a potential lifesaver. Many of us may rely on a trusty flashlight that we’ve had for years to light up dark areas and some of us even lean on a flashlight app on our smart phones when in a pinch. While the reasons you’d want light in low- or no-light spaces are obvious, it isn’t always obvious that your all-important choice of light implement can end up tying up another crucial tool of yours, such as your hands.
If you’ve ever explored the crevices of your truck’s undercarriage or the dark corners of your basement, you’ve probably run into a situation where you find yourself biting down on a flashlight, precariously aiming its beam with your teeth while working with your two hands. You don’t need us to tell you that isn’t an ideal situation to be in. In a disaster scenario where you need both of your hands to get someone or even yourself out of danger, the need to have your hands freed up is multiplied exponentially.
In addition to handheld lights, hands-free lights should be a part of everyone’s disaster preparedness kit. The most common hands-free-style lights are ones that are worn on the head. Out of your hands and constantly pointed in the direction that you are looking, headband-mounted lights are great when you need to see what you are doing or where you are going while keeping your hands available for any job. Those aren’t the only options, however. Other lights that do not tie up your hands include glove- and baseball cap-mounted, as well as clip-on and magnetic lights.
Hands-free lights vary not only in method of attachment, but intended purpose, as well. Some are made with high-powered lamps that can penetrate deep into the darkness, while others are made to flood a large workspace. Since you may not always need the surface of the sun at the push of a button, some lights are made to dimly light up one’s personal space for reading or map navigation without the blinding effect. With so many options, we recommend not having only one type of hands-free light available to you. Let’s take a closer look at some of the different offerings that are currently out in the marketplace.
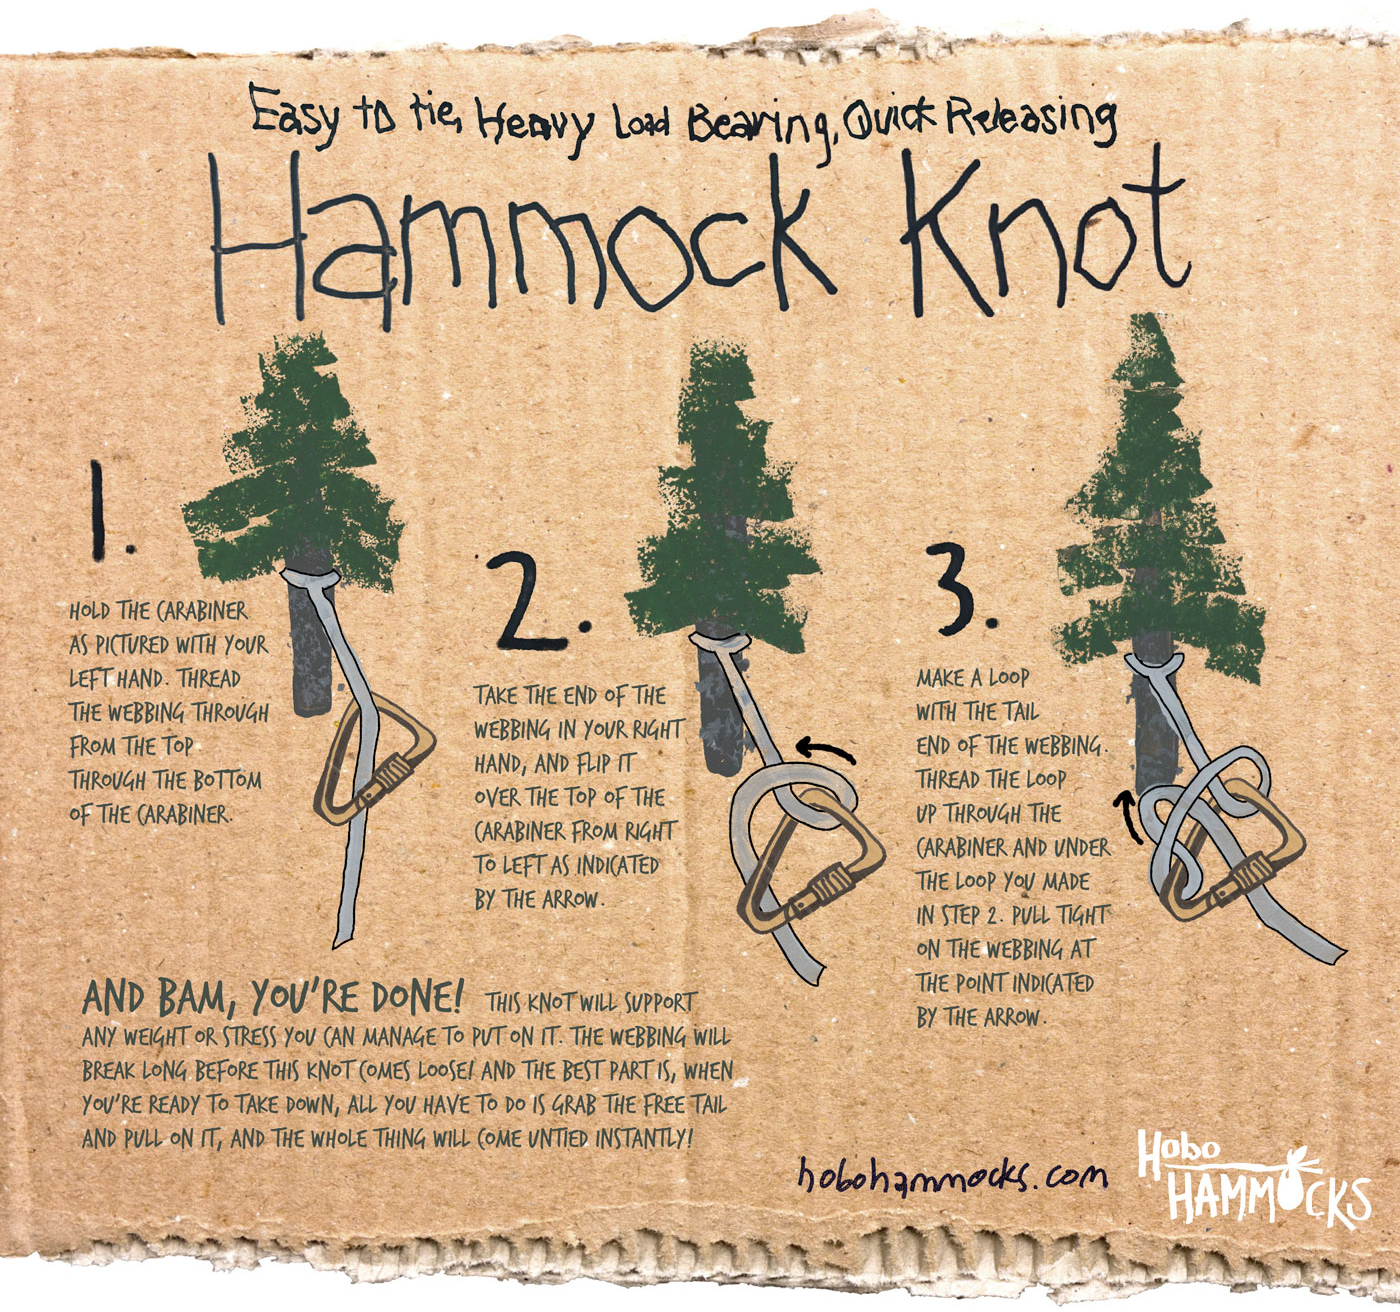
The more we think about it, the more we’ve realized hammocks are an excellent resource for survivalists. Hammocks are generally less expensive, lighter, faster to set up and tear down, and more concealable than tents. However, you’ll need the right knowledge to set up a hammock correctly. Unlike tents, that generally means tying knots.
Luckily for us, the knots you need for a hammock aren’t that complicated, and you don’t need a Boy Scouts knot-tying merit badge to figure them out. In fact, Hobo Hammocks claims that there’s only one knot you’ll ever need to rig a hammock. They call it “the hammock knot”, but it’s basically a modified quick-release clove hitch.
Simple enough, right? As the infographic above states, all you need to do to tear down the hammock in the morning is pull the “tail”, and the knot instantly unties. Here’s a video that shows it in action:
In the video, they use the flat nylon strap supplied with most hammocks, but we tested it out with 550 paracord, and found that the technique works equally well.
Hobo Hammocks claims this “hammock knot” is the only one you need, but there’s one case when that’s not true. If you’re using regular rope or paracord instead of a pre-sewn nylon tree strap (like the ones included with many hammocks), you’ll need to know a fixed loop knot to secure your hammock line to a tree. We strongly suggest learning the bowline knot, since it’s easy to remember and extremely secure.
On a side note, we recently received a new Serac hammock to review for OFFGRIDweb. So, if you’re into hammock camping, keep an eye out for the results of our review in the future.
This article was originally published in Issue 2 of our magazine.
In a recent survey conducted by American Pet Products Association, studies have revealed that roughly 83 million dogs are owned in the United States. With numbers like that, it’s no surprise that pets have become an increasingly important extension of our families — and for some, their only family. The smiles they bring and the personalities they share have made them an integral and intimate part of the new family household and further studies reveal just how important they have become.
Further investigation by Kelton Research also reveals that there are blurred lines when it comes to dogs and children. Although humorous (and disconcerting at the same time) the studies show that many consider their dogs as equally important as their children. Needless to say, we can all understand the love of a pet, but even more powerful is the passing of one. While pets are often at the forefront of our minds during our daily routines, in many cases, they are an afterthought when it comes to emergency preparation.
Having a contingency plan that includes your pets is crucial to any pet owner, and it would be most beneficial to include them in any plan ahead of time. That said, be prepared to handle any canine emergencies by studying this buyer’s guide which was designed with your pets in mind.
From basic necessities like food and water, understanding the pedigree of your dog is crucial to determining the “hardiness zone” of your geographic area in order to truly understand what you’ll need. Take for instance, dogs with thicker coats (think Pomeranians and Chow Chows); even in the coldest of winters in a location such as Southern California, they do NOT need jackets. Whereas you may be cold, the thicker fur coats on dogs within these breeds acts like insulation to keep them warm. As a matter of fact, you can actually “overheat” the dog and potentially cause death or seizures, so again, understanding the conditions you might be facing because of different pedigrees will require different attention.
Another thing to keep in mind is that these products will help increase the chances of your pets surviving and sustaining, but you will also need to plan strategically if you need to leave your home in a crisis. In the event of major catastrophes, many will be forced to flee in search of shelter, but you have to keep in mind (and understand) that some shelters may not allow your pets inside. So plan in advance, stock up on the supplies you feel necessary for your pets, and have a game plan. You don’t want to have to plan that during the crisis itself, or even worse, after the crisis, when there will simply be no time or resources to be able to help your four-legged friend survive.
In addition to some of the topics we have discussed, as well as the many online resources you can peruse, you should also consider talking to your local veterinarian about pet needs in the event of an emergency. They can offer crucial advice on what supplies you should stock up on, as well as what unconventional methods you might be wise to use in treating a sick pet. The wealth of knowledge veterinarians have can truly be your best benefit when it comes to ascertaining the exact needs you’ll need to meet for your pet in the event of an emergency. In fact, you’d be surprised to find out what you can find in you cupboards to help treat a dog and in the end, the most powerful resource is knowledge, so by all means ask questions and do your research.
U.S. Dog Ownership Estimates
83.3 M- Number of owned dogs 47%- Percentage of households that own at least one dog 70%- Percentage of owners with one dog 20%- Percentage of owners with two dogs 10%- Percentage of owners with three or more dogs 1.47- Average number of owned dogs per household 20%- Percentage of owned dogs who were adopted from animal shelters $231- Average annual amount spent by dog owners on routine veterinary visits 83%- Percentage of owned dogs who are spayed or neutered Even- Proportion of male to female owned dogs
Source: 2013-2014 statistics, contact the American Pet Products Association Pet Owners Survey
Dog Survival Gear
There is plenty of gear on the market that can help you prepare and protect your dog from tough elements and unexpected events. Don’t let your canine buddy get left out of your preparation plans. A few standouts of some dog-specific kit are presented in this guide.
[buyersguide title=”You’ve Got Your Plans & Survival Essentials. What About Your Best Friend?” ids=”2930, 2931, 2932, 2933, 2934, 2935, 2936, 2937, 2938, 2939, 2940, 2941, 2942, 2943, 2944, 2945, 2946, 2947″]
We’re always intrigued by the creative campfire techniques people come up with, especially those that create efficient flames and minimize wasted fuel. There are actually several methods for creating a fire from a single log—we already discussed the Swedish torch in a previous post. Today, we’re sharing a similar technique, known as a rocket stove.
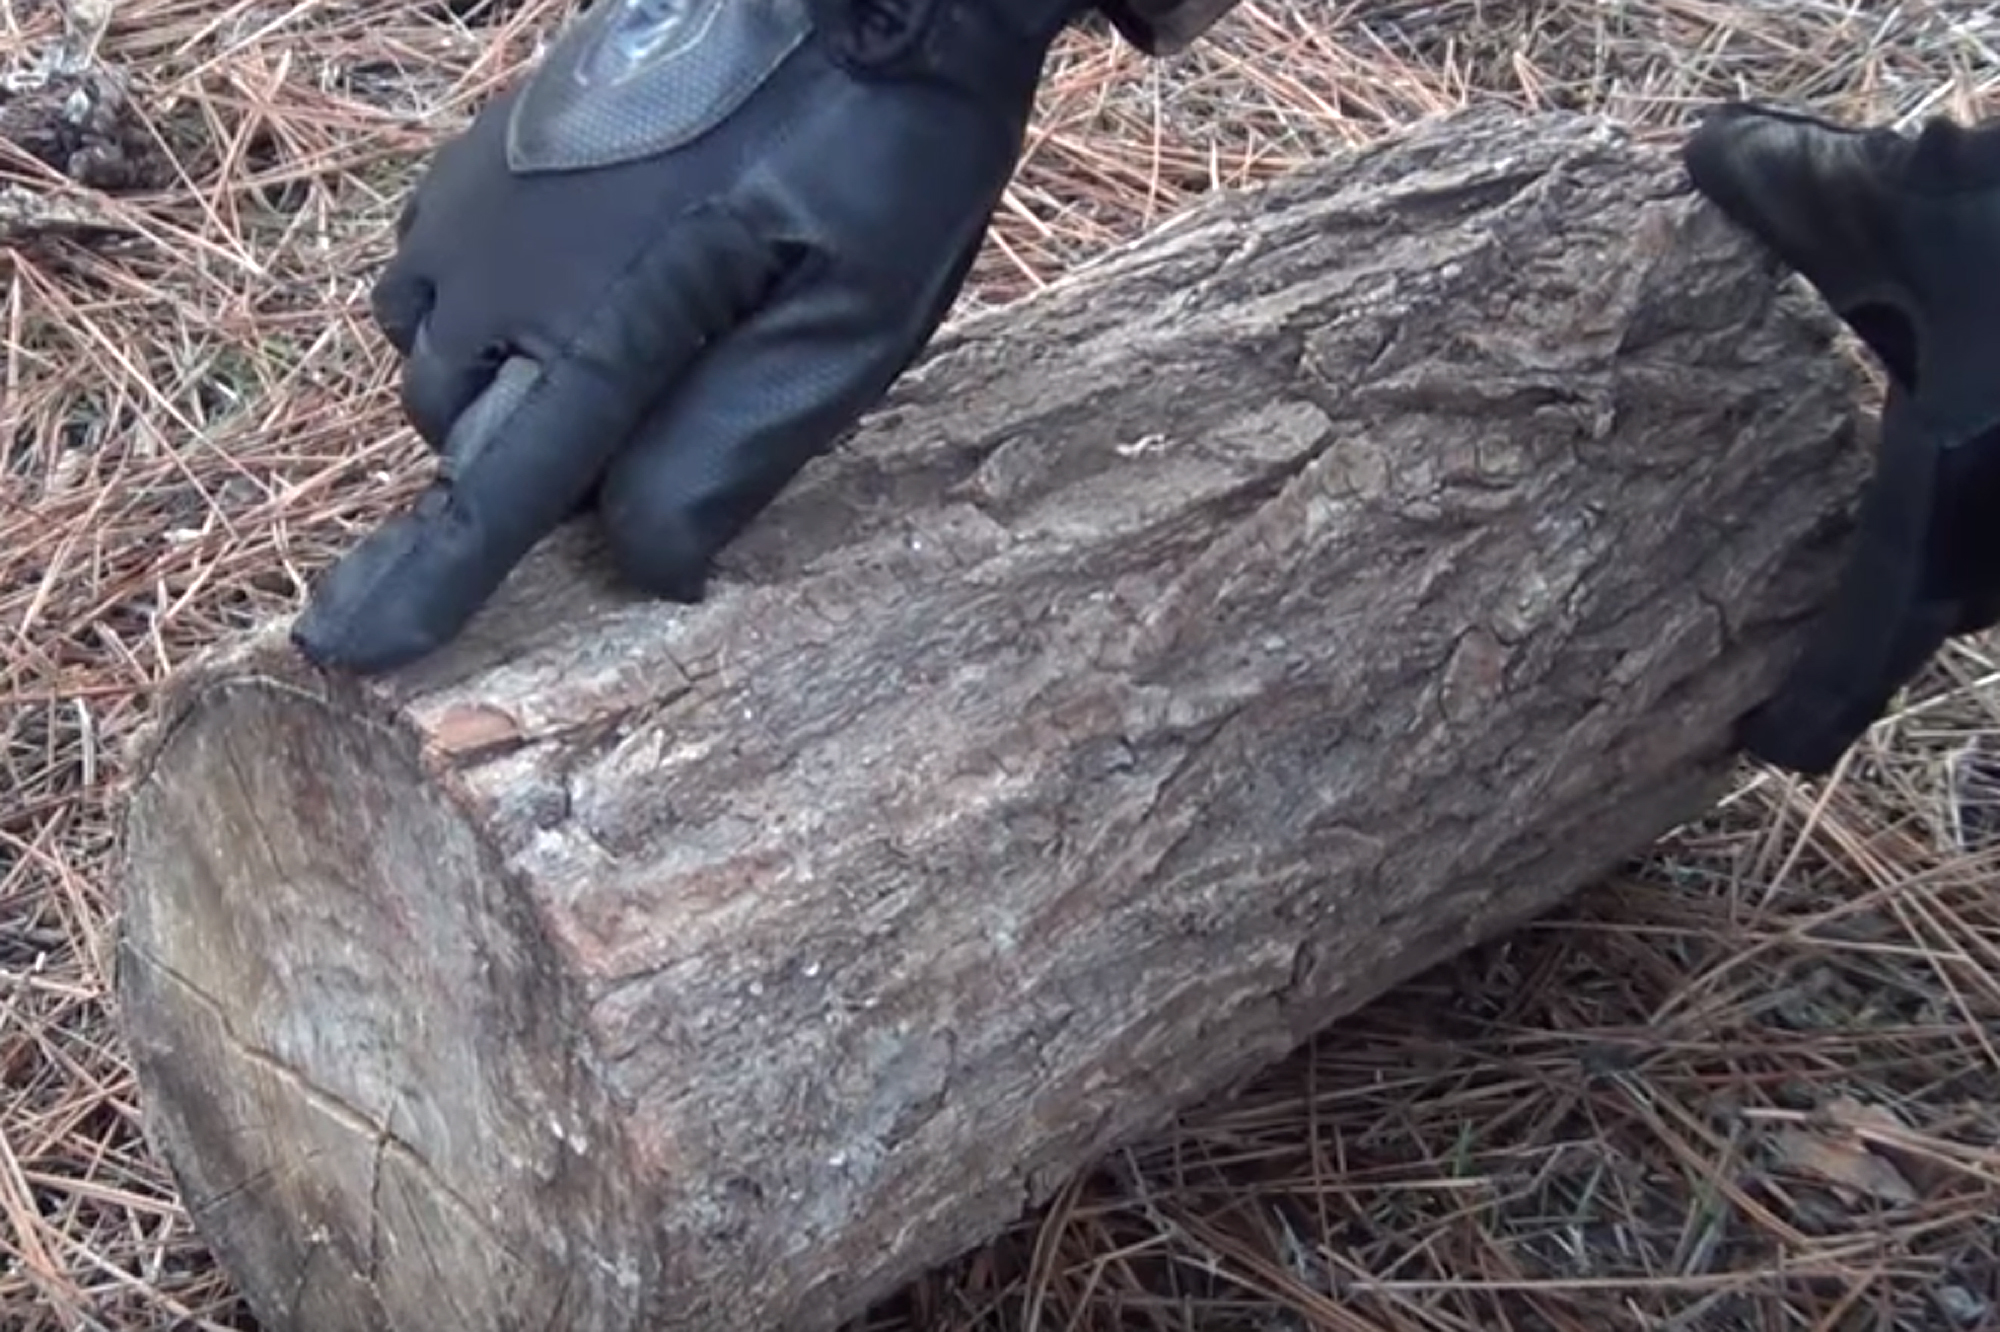
A log that’s about 6 inches wide and 1 foot long will work well for this stove.
No, we’re not suggesting you try to cook with a model rocket engine. A so-called rocket stove uses a small-diameter combustion chamber with an insulated vertical chimney. This creates a narrow jet of flame, much like the one found at the business end of a rocket, hence the name.
When creating a rocket stove from a log, this means drilling into the center of the wood, both from the top and from one side. The L-shaped ventilation design feeds the fire with oxygen, and the log itself acts as fuel. This video from IntenseAngler shows how it’s done:
Of course, if you don’t have power tools, you may want to choose the Swedish torch. That design only requires an ax or knife to split the log into quarters. Nevertheless, this rocket stove design seems promising, and could be fun to try in your backyard or while car camping.
We especially like the point about throwing the rocket stove onto your campfire when you’re finished with it. Waste not, want not.
Warning! This article is meant to be an overview and not a detailed guide on identifying and consuming edible plants. Seek guidance from a trained botanist before attempting to eat any plants. Any attempt to consume plants shall solely be at the reader’s risk.
Hunting is an important survival skill, whether that is for live animals or wild edible plants. You could kill deer or wild boar with a rifle or bow, snag small game in snares, take down birds with a slingshot, or spear fish in streams. However, it’s equally important to incorporate edible plants, fruits, and vegetables into your survival diet—especially because you may not always be able to hunt successfully when your life depends on it.
Foraging for Wild Edible Plants
Few things are as rewarding as being able to identify a wild edible plant and harvesting it for consumption, but this skill is not without a level of risk. There are plants out there which look very similar to the edible versions, but can be fatally toxic. So, how can you start foraging for wild edible plants? Obviously, you don’t want to ingest anything poisonous, so you’ll need to know what to look for first. The infographic below from Ava’s Flowers provides some great information and illustrations to get you started.
If you’re interested in reading more on the subject, check out the other infographic we featured from Ava’s Flowers, called “The Devil’s Greenhouse“. It goes into more detail on toxic plants that you should avoid at all costs.
This article was originally published in Issue 2 of our magazine.
It is conceivable that after the onset of a large-scale disaster, our current-day communications equipment of choice, smart phones, which depend on a complex infrastructure to operate, would quickly become little more than paperweights in our pockets. With traditional means of communications out of action, what would be other go-to options we could lean on?
When the subject of communications in disaster scenarios comes up, immediate thoughts go to high-powered radio systems, including CB and Ham radio. While those systems are excellent tools that can put you in touch with those who are many miles away, they do require training, specialized equipment, and power sources that might be hard to come by in order to operate. For their ease of use, relatively low power usage, and low cost, FRS and GMRS two-way radios, or walkie-talkies, should not be overlooked.
Radio communications are important in disaster situations and can be used to help coordinate information between individuals or groups such as family members. Not all radios need to be of the long-range variety. Short-range radios, such as those that operate on FRS and GMRS bands, work well in areas covering a couple of miles. Your health status, position, and security situation can easily be relayed between basecamp and someone who is out foraging for supplies. Likewise, coordinating the search for fellow survivors in the collapsed rubble of a metropolitan wasteland is difficult at best without wireless communications. A rescuer could likely become a victim without the ability to coordinate assistance when trying to pull out another victim. Coordinating your neighborhood after a disaster and checking up on neighbors is a process that can be sped up with the use of short-range radios. Radios are a critical communication tool that can greatly improve the efficiency of almost any operation.
FRS and GMRS
Handheld two-way radios are the most cost-effective method of talking at ranges where yelling becomes impractical. Walkie-talkies operate on FRS and GMRS bands. FRS stands for Family Radio Service and encompasses low-power transmissions at as much as 0.5 watt. FRS bands are free of charge to operate on and require no license. GMRS is short for General Mobile Radio Service and does require licensing with the FCC. The license requires an $85 fee for a five-year term, even though a license is not required to buy a GMRS radio. GMRS radios require more power over FRS units, and in the radio world, more power means longer range. GMRS radios commonly have 1- to 2-watt transmissions, but can get as much as 50 watts, which gives it some pretty decent reach. Most radios on the market today are hybrid GMRS/FRS radios, possessing the capability of using both bands.
Features
Radios available on the consumer market greatly range in both price and quality. As with most things in this world, the cost reflects increases in durability, reliability, clarity, and range. Most units feature distance ratings that are very optimistic. We find that in real-world scenarios that structures, obstructions, elevations, weather patterns, and electrical signals, among other things, cut those distances down significantly. As a rule of thumb, cut those ratings in half, if not more. Test your chosen radio for use in your intended area of use to make sure that unit works for you.
Many walkie-talkies include rechargeable batteries that can be replaced with disposable batteries. Radios that have mini-USB-charging capability can be charged with a solar charger, as well, so keep that in mind, too. Water- and dust-resistance is rated by Ingress Protection (IP) rating. IP ratings have two digits; the first digit measures Intrusion Protection and the second is for Moisture Protection. See the chart for detailed rating information.
Channels
FRS radios have seven channels that are shared with GMRS radios and an additional seven channels that are for FRS use only, giving it 14 total channels. Higher-powered GMRS radios have 22 channels, including the shared FRS channels, which give GMRS users more flexibility to find a clear line to talk on.
Privacy Codes
Aside from the main channels, radios also have privacy codes. Privacy codes subdivide channels into more channels so that the user can find a clear channel to use when others are taken. In a busy radio environment, you and your party might get traffic on Channel 1/Code 0, but when you switch to Channel 1/Code 5, you find it clear to use. Most radios have 22 privacy codes and some have more, helping make plenty of channel/code combinations to choose from. Be aware, however, that privacy codes don’t work the way you probably think they do. They don’t encode your transmission; instead, they encode your receiver to only pick up transmissions on the same privacy code. For example, if you are on Channel 3/Code 4, you could only hear transmissions on the same code, but if someone else were on Channel 3/Code 0 (0 being no privacy code), they would be able to hear all transmissions on Channel 3, regardless of code, including yours.
Transmission Range
Now that we’ve broken all that down, what does all that mumbo jumbo mean in the real world? Well, for starters, even in ideal conditions, if you’re operating a radio in FRS mode, meaning 0.5-watt transmission power, your range will be limited to (generously speaking) 6 miles. In any sort of urban area with obstructed lines of sight or in a dense forest, that range is going to drop to 2 miles or less even on GMRS. Your range will be affected by myriad factors, including terrain (hills and trees), weather, electromagnetic noise (solar flares, power lines, and so on), and steel and concrete structures.
Up to 6 Miles (Urban) Up to 8 Miles (Lake) Up to 18 Miles (Mountain to Valley)
Remember, line of sight is the name of the game. If you want to transmit long distances, you will need to be able to see your other party. If you can’t see them, chances are, your range is going to drop significantly. Our tested effective range on the Motorola MT350R in a suburban residential area on GMRS from inside a moving vehicle was at about 2 miles. Your mileage may vary, so this is not gospel, but be aware that range is limited. Most of the time, none of this will matter because you will be speaking to someone only a few buildings over, at most, a few blocks away, and range limitations should not be a major issue. Frequent radio check-ins will prevent this range limitation from sneaking up on you and will mitigate communications losses and blackouts from terrain and structures.
No matter which unit you choose, keep in mind its limitations, and be sure to test out how it’ll work out in your environment before committing it to your disaster preparedness plan. Remember that short-range communications you get from handheld FRS and GRMS radios can be as important as the long-range comms you get from Ham or CB radio. Stay safe out there, and stay prepared. You never know when the next disaster will strike.
Ingress Protection Rating
First Digit (Intrusion Protection)
0 >> No special protection
1 >> Protected against solid objects from 50 mm or more 2 >> Protected against solid objects from 12.5 mm or more 3 >> Protected against solid objects from 2.5 mm or more 4 >> Protected against solid objects from 1 mm or more 5 >> Protected against dust that may harm equipment 6 >> Totally dust tight
Second Digit (Moisture Protection)
0 >> No protection 1 >> Protection against condensation 2 >> Protection against water droplets deflected as much as 15 degrees from vertical 3 >> Protected against spray as much as 60 degrees from vertical 4 >> Protected against splashes of water from all directions 5 >> Protection against low-pressure water jets from all directions 6 >> Protection against powerful water jets from all directions 7 >> Protected against temporary immersion 8 >> Protected against prolonged immersion
This article was originally published in Issue 2 of our magazine.
G-10 isn’t the latest business jet that all the iced-out rappers are flying in these days. It’s a durable material that’s popular as handle scales for knives. Its use on folders and fixed blades has become more prevalent in recent years — particularly among cops, troops, bushcrafters, and outdoor adventurers who are looking for something that can take a serious beating in the most serious conditions.
Some people assume that the blade is the most (and only) important part of a knife, but the handle is just as important. Without a sturdy grip, you wouldn’t be able to keep the tool in your hand, let alone use it for any vital tasks. So the handle is the yin to the blade’s yang. Both are equally important; that’s why more and more manufacturers are putting G-10 scales on their knives.
However, not every end user of a G-10 handle really knows what he wields in his hand. Is it plastic? Is it fiberglass? Why is it so expensive? Does it really perform when SHTF? In this case, the marketing is true: G-10 is among the best knife handle materials to be in your palm in an emergency situation.
Benefits
G-10 is actually a laminate. It’s made of layers of fiberglass cloth that are soaked in an epoxy resin binder and then compressed under high pressure before being baked. What does that all mean? It means G-10 has all the strengths of other popular synthetic materials, but fewer weaknesses.
Strength:
It’s incredibly strong, so unlike more traditional knife handle materials such as wood, G-10 won’t crack, break, chip, or scratch easily. It also stabilizes the knife by providing outstanding lateral support, preventing flexing during hardcore use, such as, maybe, cutting through a fuselage.
Lightweight:
As the saying goes, ounces equal pounds, and pounds equal pain. G-10 provides tremendous benefits in an extremely light package, helping to keep the weight of a knife down. It reportedly has the same tensile strength as aluminum, but is 30 percent lighter. So a G-10 knife is ideal if you have to GTFO, but can carry only a limited load.
Grip:
Slippage is rarely an issue with a G-10 handle, because it can be textured to a variety of patterns and finishes that provide both a badass aesthetic and a sturdy grip. (It also comes in different colors, another reason for its popularity.)
Low Maintenance:
When you’re off-grid, finding knife oils is probably pretty low on your priority list. Thankfully, G-10 is a low-maintenance kind of gal. She doesn’t need any polishing products like a stag handle does, and when she does get dirty she cleans up quickly with dish soap, a toothbrush, and warm water.
Electrical Insulation:
G-10 was developed in the mid-20th century as a base for circuit boards because it doesn’t conduct electricity. Today, it’s used in a variety of applications, from electrical equipment and medical diagnostics to rocket cases and antennae insulators. Unless you plan on stabbing a Decepticon anytime soon, electrical insulation for a knife is probably an unnecessary attribute — but it is kinda cool to have. Everything-Proof… Almost:
G-10 is resistant to chemicals and doesn’t absorb water or even moisture, which means it won’t rust, shrink, or expand. It also doesn’t conduct heat or cold. So if you accidentally drop your knife in snow or lay it too close to a heat source, you can still handle it immediately without numbing or burning your hand.
Conclusion
There’s no such thing as a perfect handle, and the same holds true for G-10. But, most of the complaints about G-10 stem more from the way a particular handle feels in hand or in your pocket (e.g. it’s too thick, too thin, too smooth, too rough, etc.) as opposed to the properties of the material itself. Some non-believers say that G-10 will crack under a hard impact, but so will pretty much any other knife handle material that’s not rubber or metallic. Besides, if you’ve just been hit with enough force to crack G-10, you have much bigger things to worry about than the condition of your handle.
It’s a tough-as-nails material that gives the end user an assured grip during all manner of duties, from light-duty chores like cutting paracord to hardcore tasks like batoning wood logs. It requires almost zero care, can be used in any environment, and will last like nobody’s business.
With this in mind, we present you with a guide to some of the more recent knives that feature G-10 handles. Though varying in size, shape, and texture, they all have one thing in common: superior quality and functionality. We’re certain you’ll find one that fits your needs.
[buyersguide title=”G-10 Handles Do More Than Just Provide Some Traction” ids=”2969, 2970, 2971, 2972, 2973, 2974, 2975, 2976, 2977, 2978″]
An underwater volcano eruption releasing gas and lava. Source: NOAA/Wikipedia
The power of nature can be a great and terrible force, whether it’s manifested through hurricanes, tornados, lightning strikes, earthquakes, or any other natural disaster. Volcanic eruptions are just one more to add to the list… but not for the reasons you might think.
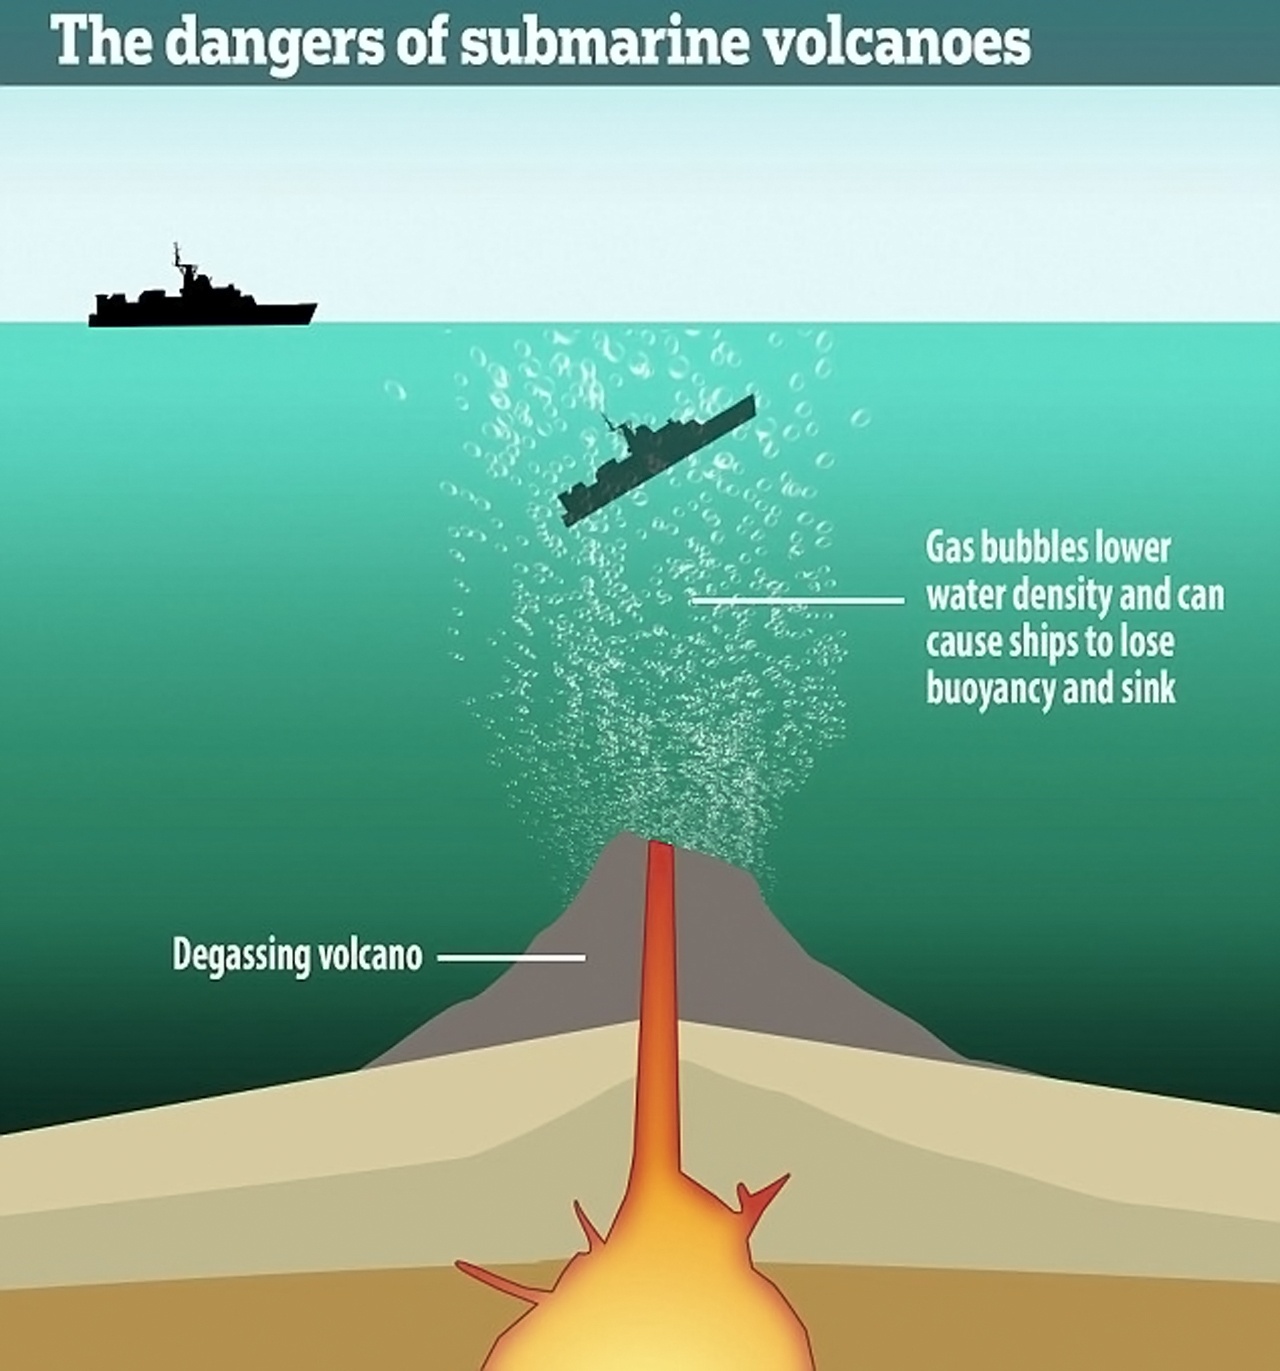
Sure, volcanoes can spew choking ash, poisonous gas, and red-hot lava—most of us know about these dangers already. However, most of the general public isn’t as familiar with the dangers posed by submarine or underwater volcanoes. Even if they’re not erupting, they can produce pockets of bubbles under the surface that reduce the water’s density and can even sink ships.
A graphic from The Daily Mail illustrating the threat of underwater volcanoes.
The illustration above from The Daily Mail shows how the process happens. Looking out across the surface of the water, nothing may appear wrong, but tiny bubbles can cause ships to lose buoyancy with little warning. Imagine sailing along, and then watching as the deck of your ship falls through the surface of the water—it’s a pretty horrifying thought.
Now, you may be thinking this is science fiction or some sort of Bermuda Triangle myth, but it’s actually a real phenomenon. In 1952, Japanese research vessel Kaiyo Maru No. 5 sank while investigating an undersea volcano, killing all 31 crew members.
An underwater volcano eruption releasing gas and lava. Source: NOAA/Wikipedia
There’s also strong suspicion the underwater volcano Kick ’em Jenny (yes, we know, it’s a strange name for a volcano) sank the Island Queen in 1944, killing all 67 people on board. No debris was ever found on the surface, indicating that the ship sank without a trace. Even today, there’s a maritime exclusion zone that diverts ships around the Kick ’em Jenny volcano due to the danger.
In 2006, sailors aboard the yacht Maiken came across a huge patch of sandy material in the South Pacific near the Vava’u Islands. At first, they thought it was a sandbar, but as they got closer, it turned out to be floating pumice stone, spanning as far as the eye could see. They sailed through this patch of stone, wondering what caused it.
Photos taken by the crew of the Maiken as it sailed over an erupting volcano.
Shortly after reaching the other side of the pumice “sandbar”, a massive volcanic eruption broke the surface behind them. The Maiken had sailed over an active volcano, miraculously not hitting a gas pocket or sustaining any damage. You can view the rest of the Maiken’s photos here.
Although submarine volcanoes can be unpredictable, the safest option is to avoid marked maritime exclusion zones—and don’t let your curiosity about strange phenomenon at sea lead you into danger.
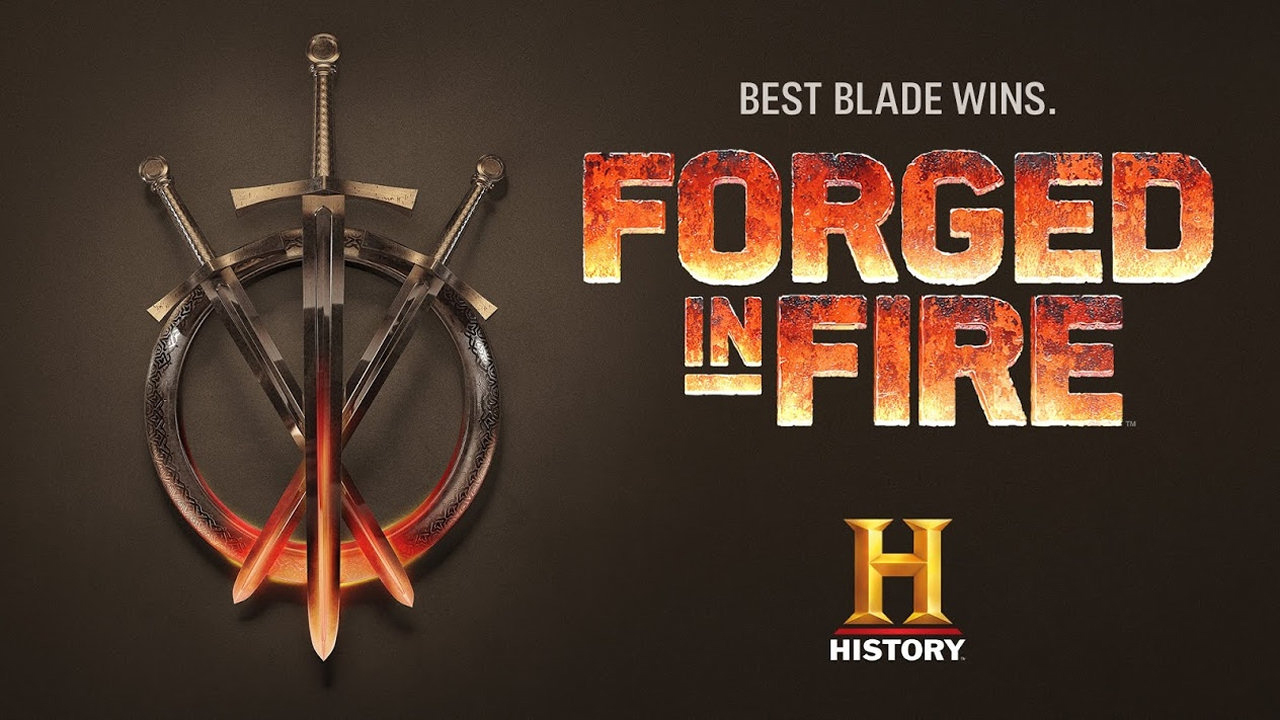
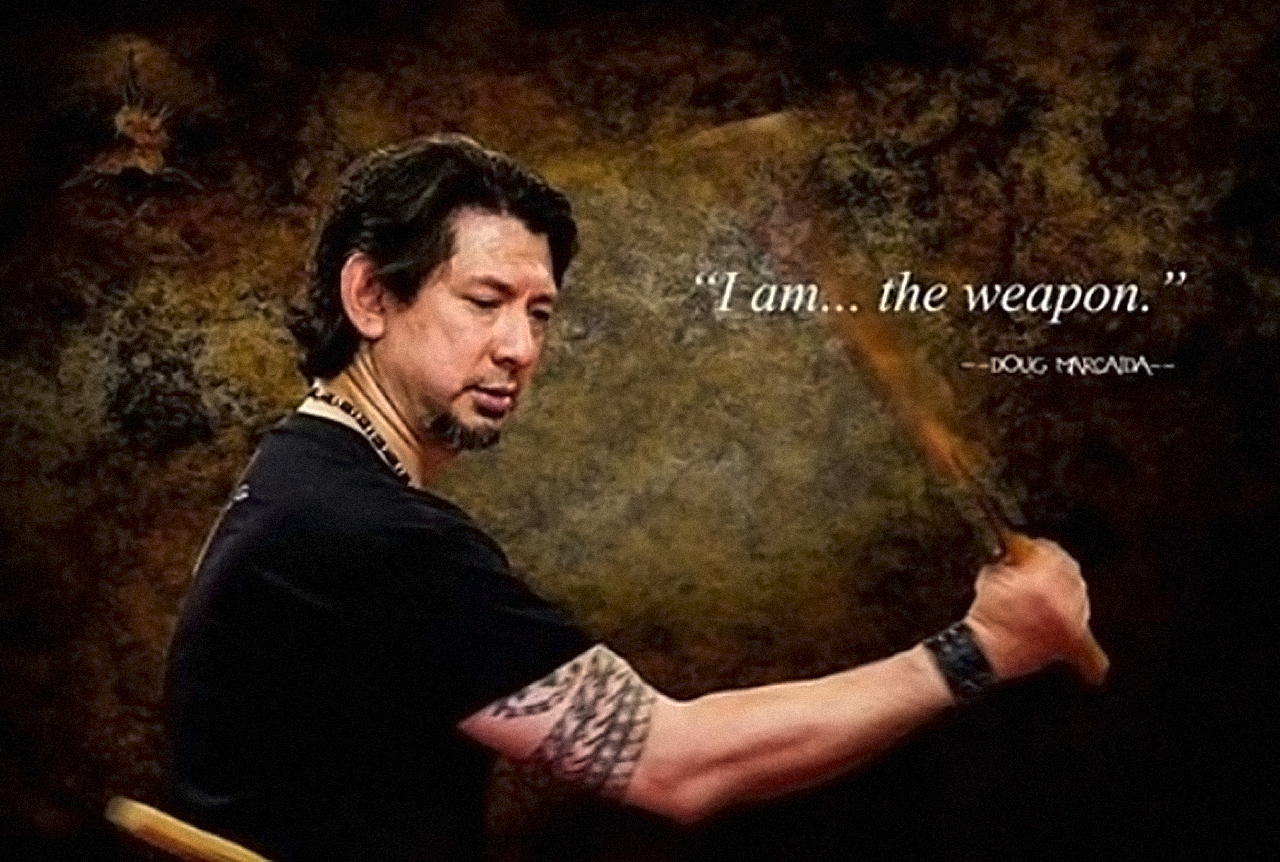
Today we had the opportunity to interview a very special guest: Doug Marcaida. Doug is a man of many talents—he’s the founder and expert martial arts instructor at Marcaida Kali, an experienced knife designer (known for the DART karambit), and also one of the judges on the History channel hit TV series Forged in Fire.
Even though he has been on the road in Europe, Doug graciously answered our questions and gave us some insight into his martial arts and knife-designing philosophies. In fact, he gave us so much good info, we decided to split it into two parts for both RECOILweb and OFFGRIDweb readers. Check out the Q&A below, then hit the link at the bottom of this page for even more of Doug’s answers at RECOILweb.
General Questions
OFFGRIDweb: First of all, thanks very much for taking the time to chat with us today. For our readers who aren’t familiar, please tell us a little about Marcaida Kali, and the martial arts training philosophy you pass along to your students.
Doug Marcaida: Marcaida Kali is my personal interpretation of the different Filipino Martial Arts systems I trained in. It is a weapons-based art that develops the use of tools as weapons, because in the end, the methodology and training process is to be able to realize and use what is to me the only weapon: your mind.
The philosophy of this art is that “it’s not about how many you hurt, but how many you can protect”. Honor and integrity through the practice of the arts. Many times, we get caught up with how bad ass one’s martial arts is. Well, these are weapons. We know that there is a body count. Let’s not glorify the obvious, but find the responsibility one gets from training, and also seek to develop the good attributes aside from the physical skills and bring back what good qualities martial training develops in a person.
OG: We’re excited to check out the new season of Forged in Fire on the History channel. Can you tell us a little about your involvement in the show, and how that started?
DM: I am one of the judges in the show, and I represent the end user of the weapons. In the end, these works of art have to prove to be fully-functional weapons that will have to stand up to a strength and durability, sharpness and kill test. I simply get to test the weapons with the specially-designed tests. Because this is a competition, I have to let the weapons do the work so we can differentiate and pick the best weapon presented.
OG: What was one of the biggest challenges about being part of a major TV show?
DM: The biggest challenge for me is not being able to go up against a target that fights back to give me a true test of the weapons capabilities, because my expertise is about the use of the weapons in combat. Also, that these are fully functional and sharpened weapons that I do not touch till the actual testing. I don’t have time to dial in my strikes or get familiar with the weapon. There is no “do over” aside from testing with a sharp weapon, safety is also important.
This is a competition about weapons forging, and not about me or what I do. But I am blessed to be part of an exciting show that on a personal level has taught me so many things about the weapons I wield. It’s almost as if I’ve come full circle, because now I also understand the creation process and don’t limit myself to the design and use of edged weapons.
OG: We’re sure there were also many upsides to being on Forged in Fire. How has being on TV positively impacted you and your business?
DM: The biggest upside for me is that I have learned so much about the weapons I train with. From discovering iconic weapons from history to understanding the process of blade making. It has allowed to give a true personal understanding, and in a romantic sense, to be able to see the process where the soul of the blade smith is transferred to the weapon.
In terms of business, I can’t deny the exposure has allowed people to see my craft and what I do when they search deeper into who the judges are. Kali or Filipino Martial Arts are not as exposed as other arts. It’s used in many movies like the Bourne series, to Blade and even 300. But in due time with the advent of media and shows like this, it really helps give exposure to my craft.
OG: How did you begin your career as a knife designer?
DM: One of our methodologies of training is to have trainers that match the real knives or weapons you would carry on a regular basis. And in the weapons world, like underwear… you can’t only have one. (laughs)
In my training group, we would often discuss the attributes of our tactics and then imagine what kind of knife or weapon would best allow us to execute the desired result or action. This then allowed me to design the blades we use in our group. That’s how I got started.
OG: If you could go back in time with the knowledge you have now, would you have approached your knife-designing career differently?
DM: Design wise, no. I’m quite blessed that my journey has been a positive one, even with some ups and downs. But what I would have liked to add is the forging process.
OG: How important are knives in Marcaida Kali? What if your student is without a knife?
DM: Knives are tools. It’s the attribute of a tool that has an edge. If you train in our system and understand the process, then you would realize that you are never without a weapon, because you are the weapon. And your environment always provides you with tools.
The use of tools is important because they are force multipliers in combat. And the true nature of combat is weapons or tools use. Not hand-to-hand combat, as history has shown. There never was a battle or war fought with hand-to-hand combat. Somebody always ruins the party and shows up with a knife. (laughs) But we also know that a knife can be an equalizer—a 7-year-old or 90-year-old can punch and hit, and their age makes a difference in damage. But a knife wielded by someone the same age? Get my point?
What we also teach is that everything has to be wielded by the body. So, we choose something inanimate that doesn’t affect the body. It’s a risk to make skin-to-skin contact. Our hands are for loving, and an inanimate object never complains when it hits or gets hit. Our training uses the same moves with or without a tool. We call these physical weapons. But once again we go for the choice that gives us maximum effect for the least effort or risk. In survival, it’s about making the best choices that give you the highest percentage of success.
OFFGRIDweb Exclusive Questions
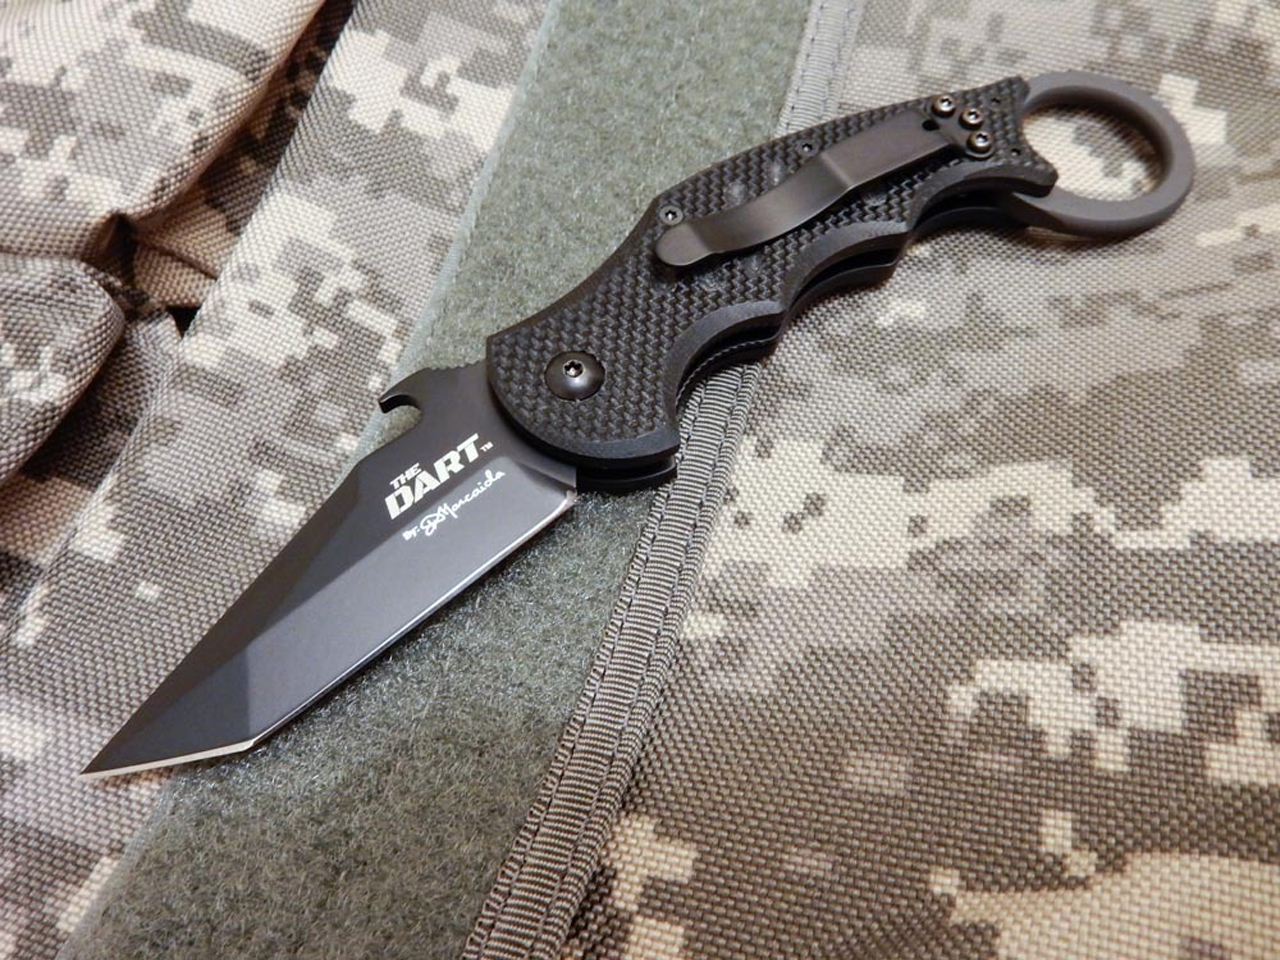
OG: Do you carry a knife every day? If so, please tell us about the knife you have with you today, and the features that made you choose it as part of your EDC.
DM: My EDC varies, depending on what I feel like carrying or what matches my shoes. Today it might be the DART knife, but for more rugged use I have designed the DART XT, which is coming out in March. It’s based on the Direct Action Response theory for use. It has to have the ability to open as it deploys. It has to have the ability for retention, which is a ring. It can be used for impact if not deployed, and straight bladed for EDC use.
On another design venture, I have a collaboration with another designer Bastien Bastinelli with new knives that tell stories. The Le Piquer or scalpel shiv, the fast-opening folder we call the Mako, and a blade called the Contrador. Watch for it.
Just as times change, so do the designs of knives and tactics. I always like to engage my thoughts, and designing knives and their uses is my creative process that keeps my passion for what I do active and ever-evolving. And yes, there is another project that will reflect this. Just like my videos show the constant movement and flow, so goes the constant movement and ideas in my head. I know, it’s too much coffee and energy drinks.
OG: What other essential tools does your EDC usually incorporate?
DM: The ability to cut, deploy quickly, ease of carry and concealment if need be, retention, and to have an option to use as an impact weapon.
OG: In previous OFFGRID Web posts, we have mentioned the potential dangers of attempting to fend off a knife attack while unarmed. What would you advise a reader to do if an attacker draws a knife, and the reader is unarmed?
DM: If you have time to think and react, then you have time to run. But if you have time to pick anything up, or use your environment, do so. Never stay in one place. Always move. For knives to hit their mark you need close distance. A moving target is hard to hit. A target that moves and hits back is the kind of target you want to be. So, learn how to attack. Learn to make offense your defense. If you are faced with no other choice, then you fight a knife. You don’t defend against it. That requires training. Be vigilant about your own safety. Study something.
Doug has trained civilians, military members, and law enforcement officers around the world.
OG: On the other hand, what would you say about a reader drawing a knife to defend themselves against an unarmed attacker, or a group of attackers?
DM: In the eyes of the law, you can only do what is required to keep you safe or defuse the situation of danger. The one-upmanship may only apply to military or law enforcement, not civilians. Like I said, if you have the time to draw a knife from a concealed carry, did you have the time to run? Is your choice of drawing a knife against an unarmed attacker going to be justified in a court of law? The one thing based on your question says “unarmed ATTACKER”. There are laws that protect you and allow you protect yourself with lethal force if your life is in danger. Survive, but be smart. Make the right choices. 9 times out of 10, you probably could have gone less-than-lethal and de-escalated the situation.
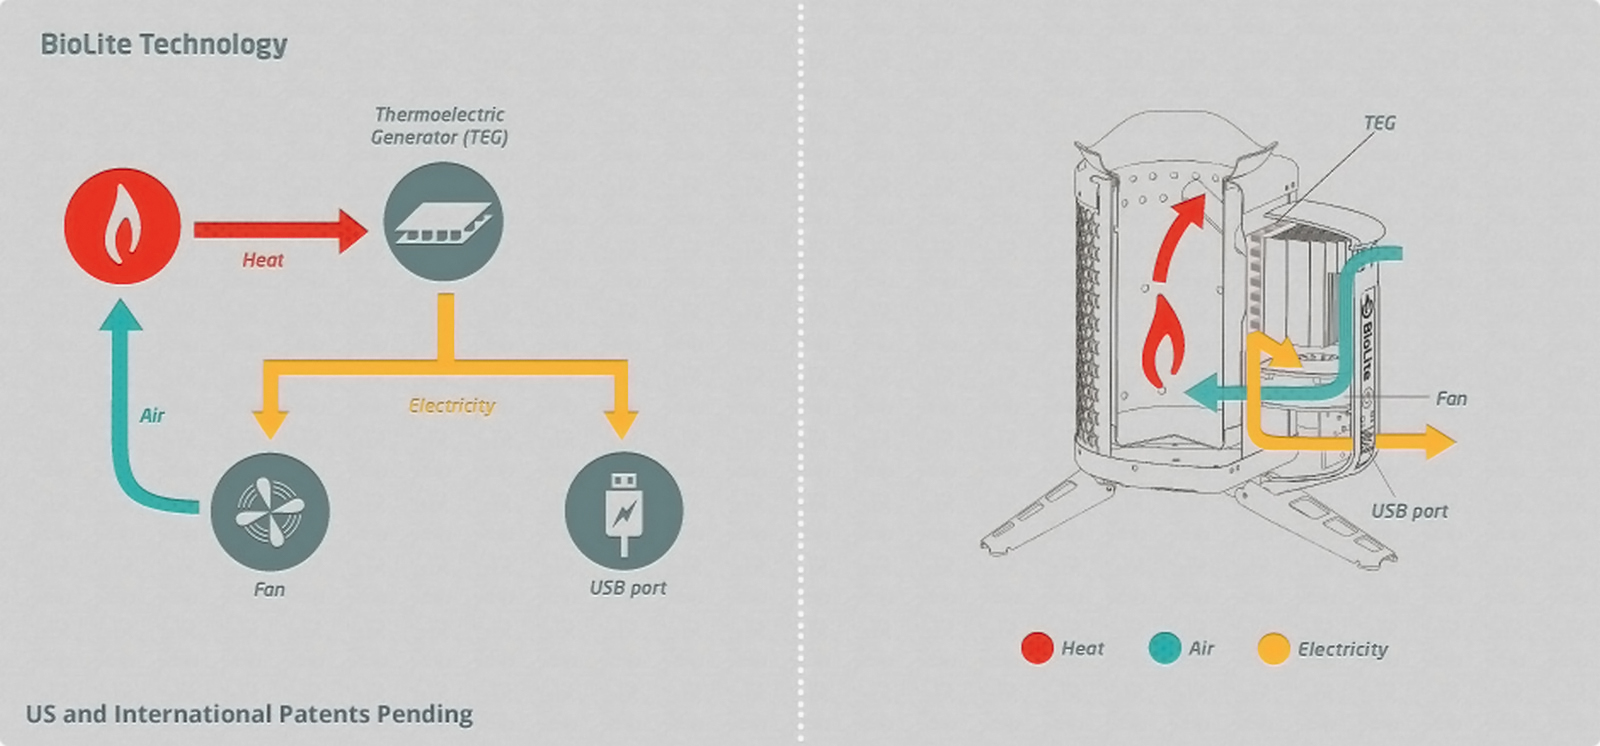
The core concept of a stove is pretty simple: it’s an enclosed space where fuel is burned, and heat is channeled in one direction. Just this week, we showed you the improvised “hobo stove” that can be made from a cut-up tin can. Now, we’re going to the opposite end of the spectrum, with a design that’s as high-tech as it gets.
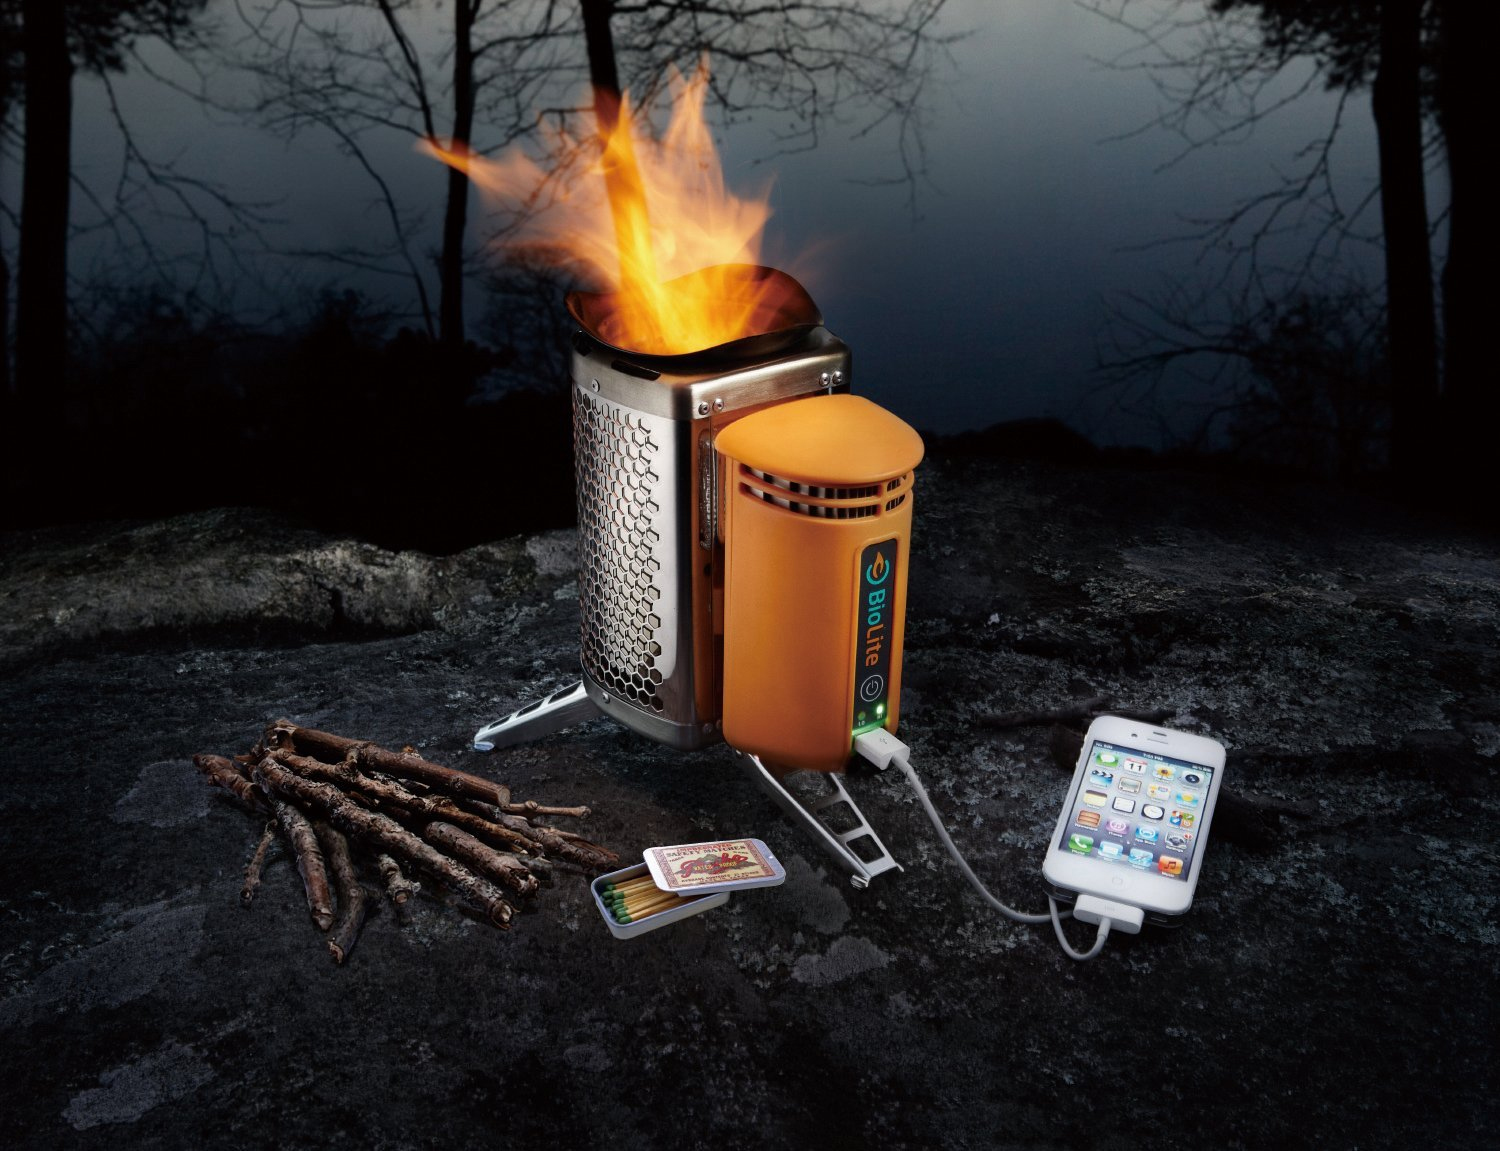
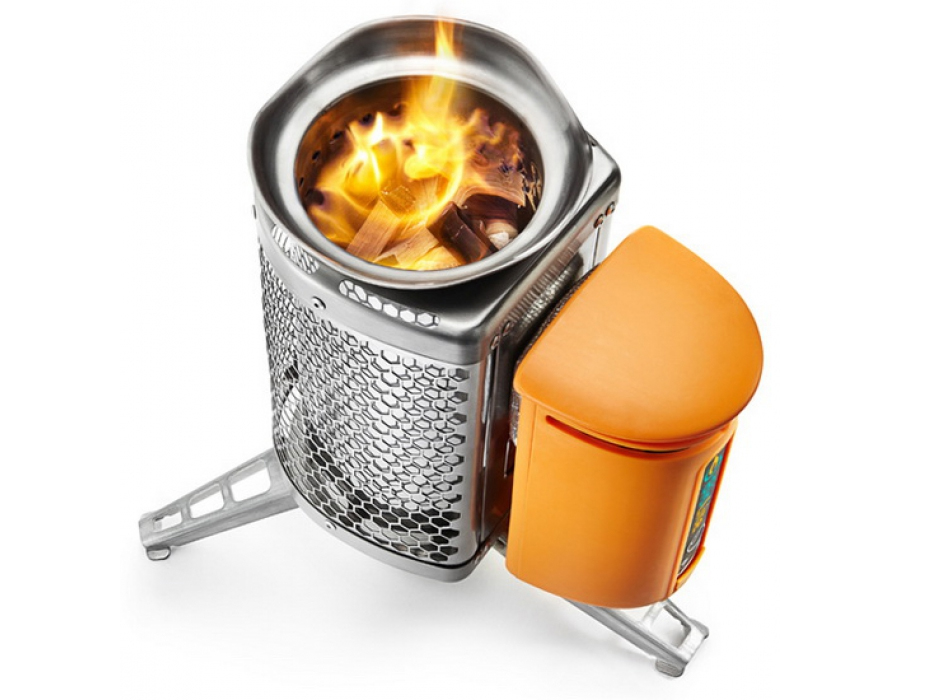
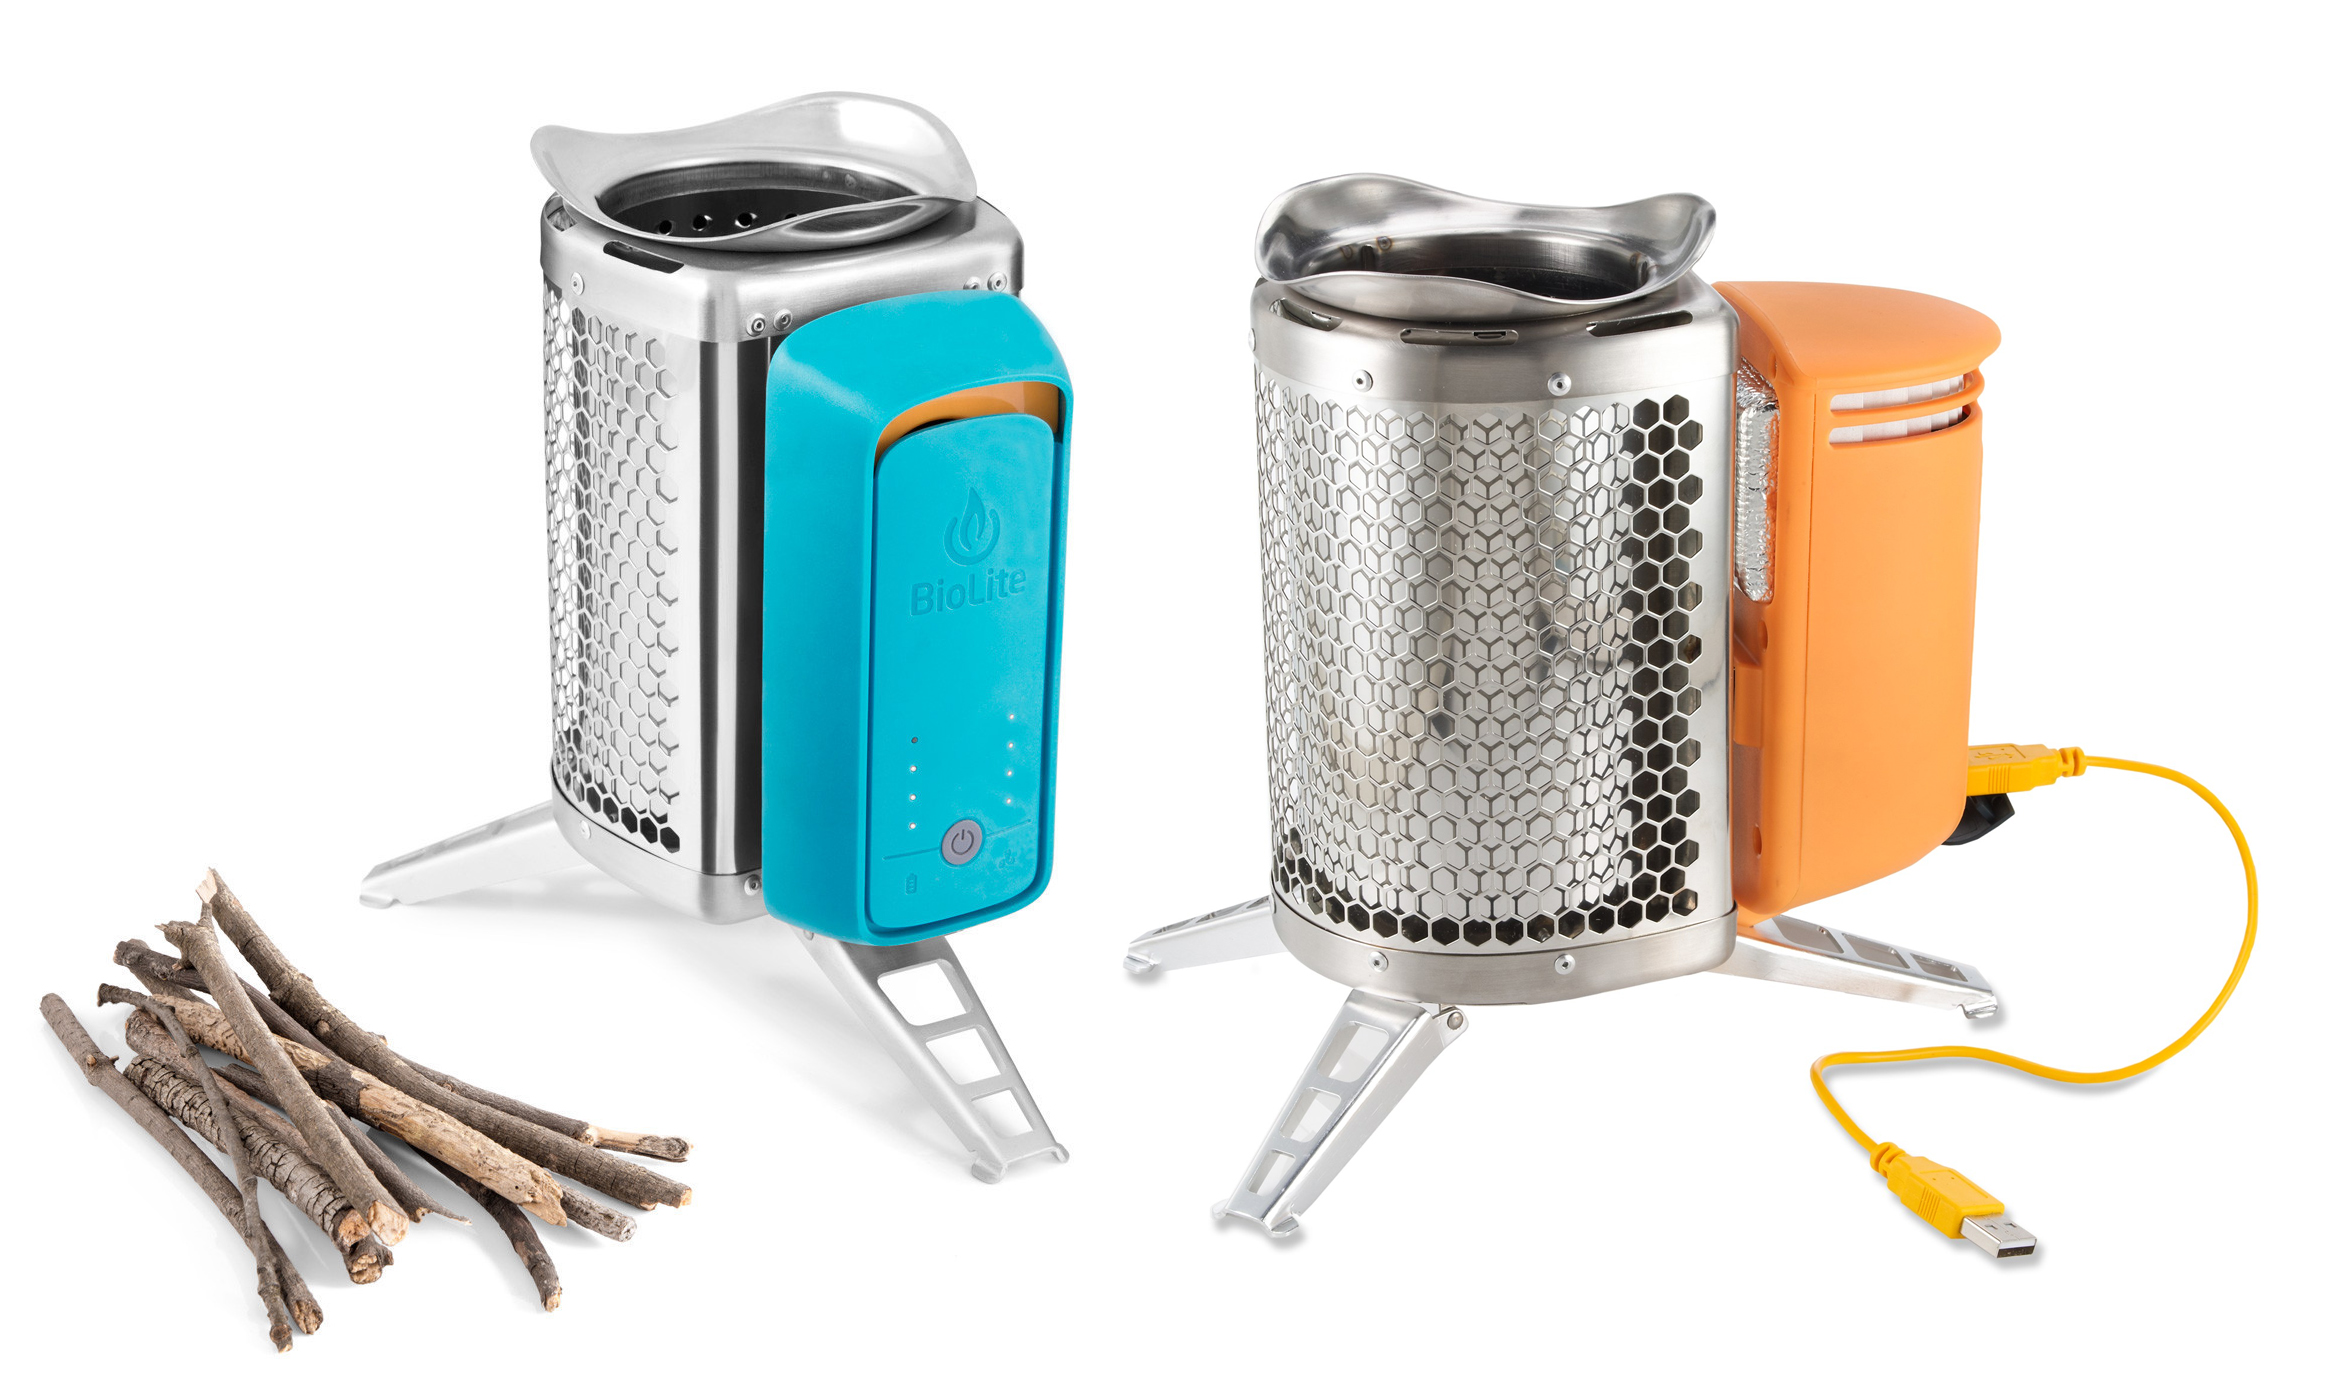
BioLite produces a pair of compact, portable wood-burning camp stoves. First, there’s the BioLite CampStove (not the most creative name we’ve heard). This model not only produces a small and efficient fire from twigs, it uses this energy to charge electronic devices via a USB port.
The CampStove design is ingenious because it recycles some of the heat from the fire, and converts it into electricity through a Thermoelectric Generator (TEG). Some of that electricity drives a fan that keeps feeding the fire with oxygen, but most of it powers a USB port, which you can plug small electronic devices into. If you don’t need to charge anything, it also comes with a USB FlexLight, which you can use for map reading or illuminating a work area.
The BioLite CampStove features an orange USB charger/fan unit.
Turning wood into a toasty fire and an instant charger for your electronics or batteries—that’s killing two birds with one stone. Biolite also offers a KettlePot for boiling water on the stove, and a portable grill attachment.
More recently, BioLite has launched a second model of stove: the CookStove. This model is designed to replace traditional gas-powered camp stoves, and uses a USB-rechargeable battery pack to power a small fan system. The fan uses four adjustable speeds to alter airflow and flame size, allowing you to produce a calm smokeless campfire or a turbocharged fire for boiling water ASAP.
The new BioLite CookStove has a light blue adjustable fan unit with four speeds.
This means no more lugging around natural gas canisters for your stove, and no choking on the smoke from your campfire. The integrated fan’s batteries are said to last for about 30 hours on a single charge.
For survival purposes, we’d probably lean towards the versatility and USB charging abilities of the CampStove, but we could also see the smokeless fire of the CookStove being useful for concealment. The CampStove is sold for an MSRP of $130, while the CookStove is $100.
We hope to get our hands on one (or both) of these high-tech BioLite stoves in the future, and if we do, we’ll be sure to let you know if they work as advertised.