Whether you’re on-grid or off, information is king. The data traveling around us via radio and microwaves can provide a wealth of intelligence about what’s going on, be it in our neighborhood or around the world, for anyone who can tap into it and make use of it. Thanks to advances in Software Defined Radio (SDR) receivers, anyone with a couple hundred dollars and some modest skills can turn their computer or tablet into a signals intelligence platform that was once the exclusive, multimillion-dollar domain of governments.
In this series, we’ll discuss the basics of SDR, from selecting the right receiver and antennas, to basic setup for gathering both communications intelligence (COMINT; listening to audio transmissions) and signals intelligence (SIGINT; receiving other types of signals such as tracking aircraft or getting weather satellite images).
The Setup: What is SDR?
While traditional radio receivers are hard-wired to handle only specific bands and modes, software defined radios (SDR) leverage computer processors and software to perform most of the demodulation. This allows a small package of radio frequency (RF) sensing hardware to support a wide range of frequencies and the ability to listen into all modes of transmission.
The receiver itself still has some limitations in terms of the range of frequencies it can support, the receiver bandwidth, and so on. However, compared to traditional radio receivers that may support a handful of modes and bands, the limits seem to fade away.
The flexibility comes at the price of the tyranny of choice, however. You need to not only choose the right piece of hardware for your purposes, but also learn to leverage various software packages to take full advantage of the capabilities.
Choosing the Right SDR
Perhaps the most popular SDR devices on the market today are those that rely on the RTL2832 chipset, commonly referred to as the “rtl-sdr.” These come in a number of flavors, such as the NooElec NESDR. Other popular SDR receivers include the SDRPlay, AirSpy series, and the HackRF. Some, such as The Great Scott Gadgets HackRF, can transmit as well, albeit at extremely low levels of RF output.

Above: SDR equipment and antennas can pack small. Often, the largest piece of equipment is going to be the laptop. You may consider an Android tablet or phone as well.
Each of these devices have their own pros and cons. Personally, I have both a NooElec NESDR Smart rtl-sdr as well as a HackRF. For those just getting started, I recommend the NooElec. A great starter bundle can be had on Amazon for $99, which includes the NESDR Smart, the NooElec Ham It Up upconverter, some antennas, and adapters.
The bundle allows the reception of signals down to 300Hz and up to 1.7GHz, giving a receive range of all high-frequency communications, including shortwave radio stations, and up into some of the microwave bands used by aircraft and satellites.
Choosing the Right Antenna
There’s nothing magic about SDRs, so all the usual considerations regarding antennas apply if you want high performance. The better your antenna placement, and the more resonant it is on the bands that you want to receive, the better.
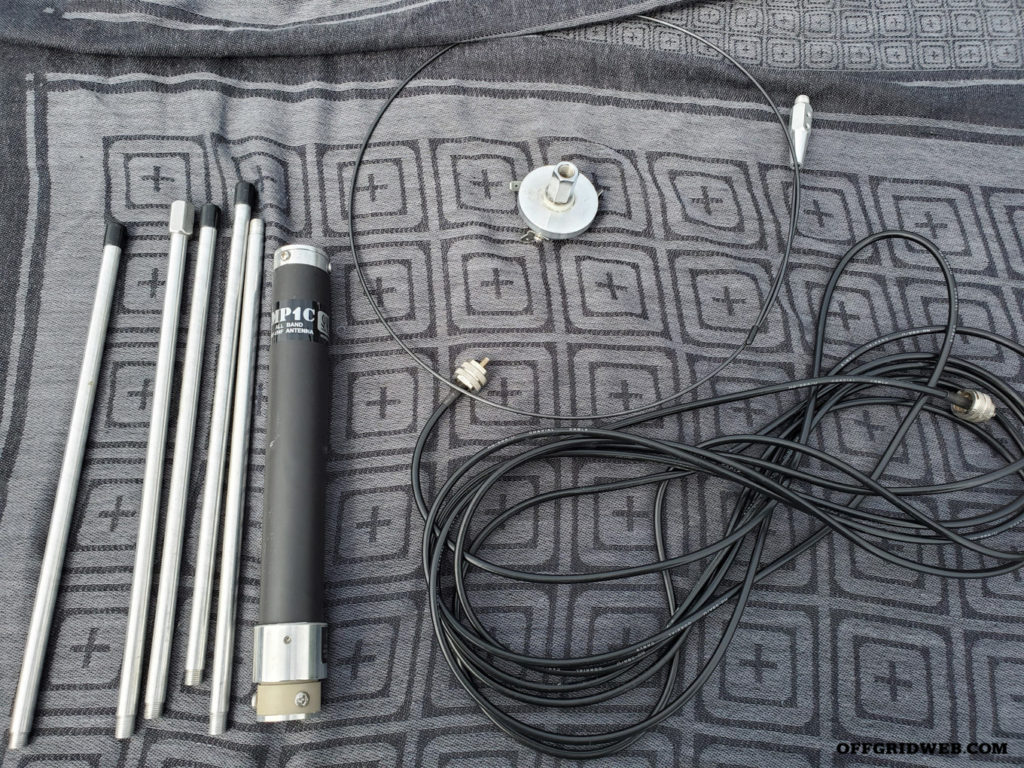
Above: The SuperAntenna MP1C is a portable antenna system utilizing a loaded coil system for tuning the antenna. This same antenna can be used with a standard transcienver such as the popular Yaesu FT-891.
For most applications, low-gain whip antennas will be fine. However, for receiving highly polarized, highly directional microwave data from satellites, directional antennas (those that focus the transmission or reception) need to be used.
If you already have an established antenna deployment, you can share the antenna with both your traditional radio transceiver and the SDR using a device such as the MFJ-1708SDR. This gives you the added benefit of a wide-bandwidth panadapter display for your radio, if it doesn’t have one of its own.
For COMINT collection, any wire antenna or vertical whip which is resonant on high frequency (HF), very high frequency (VHF), or ultra-high frequency (UHF) bands that you have interest in is all you need.
Choosing the Right Software
The software that you use for your SDR will come down to a few criteria:
• The mission at hand
• What’s available for your chosen platform (both the operating system on your computer as well as what supports your chosen SDR receiver)
• Cost
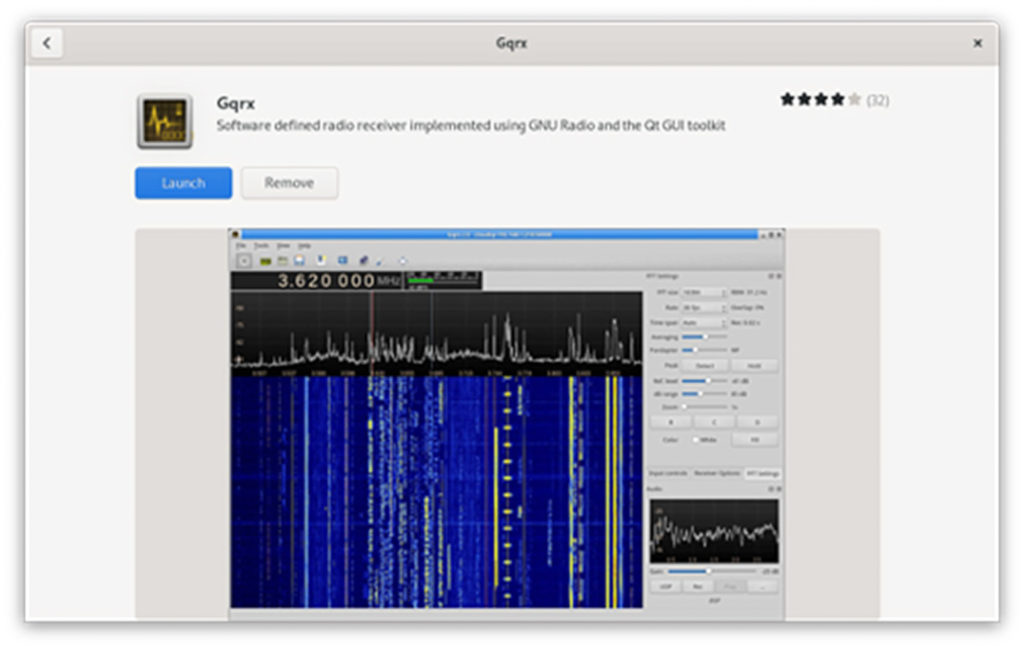
Free and open-source (FOSS) platforms such as Linux have a plethora of choices available when it comes to SDR software, and they’re generally free. The GNU Radio project provides tools and libraries, which others have built upon to provide easy-to-use frontends for various purposes. On Linux, my favorite choice is Gqrx, which is easily installed through the package manager in any user-friendly Linux distribution such as Ubuntu. Windows users will find SDR# is a popular choice.
For mobile operations where weight is a consideration, bringing a full laptop may not be the best option. If you choose to use an Android phone or tablet, you’ll find programs such as RF Analyzer available in the Google Play store. This allows you to use an RTL-SDR for much the same purpose in a smaller package.
Many people in the amateur radio community use small computers such as the Raspberry Pi, running Linux, for both SDR purposes as well as running digital modes attached to their HF transceiver. Personally, I run Linux on my main laptop as well, but with a little research you’ll find something that suits you on whatever platform you choose.
Getting Started: The Install
Getting set up to listen to analog transmissions on VHF and UHF bands is incredibly easy. The demonstration is based on Gqrx, but the setup will be similar regardless of platform.
Installing the application and its supporting libraries is an easy point-and-click operation in modern Linux distributions. Search for “Gqrx” in the software store application on Ubuntu or Fedora Linux and click install. Once it’s installed, it’ll be ready to launch.
Before launching the software, connect the antenna to the SMA connector on the RTL dongle and then plug the USB into your computer.
When you launch Gqrx for the first time, you’ll be asked to do some initial configuration. At this time, all you need to do is fill in the device string to read rtl=0 and then hit OK.
When the main window comes up, hit the Play button and you should begin receiving radio signals. There are a lot of controls and options, but you only need a few to get started.
The main window looks like this:
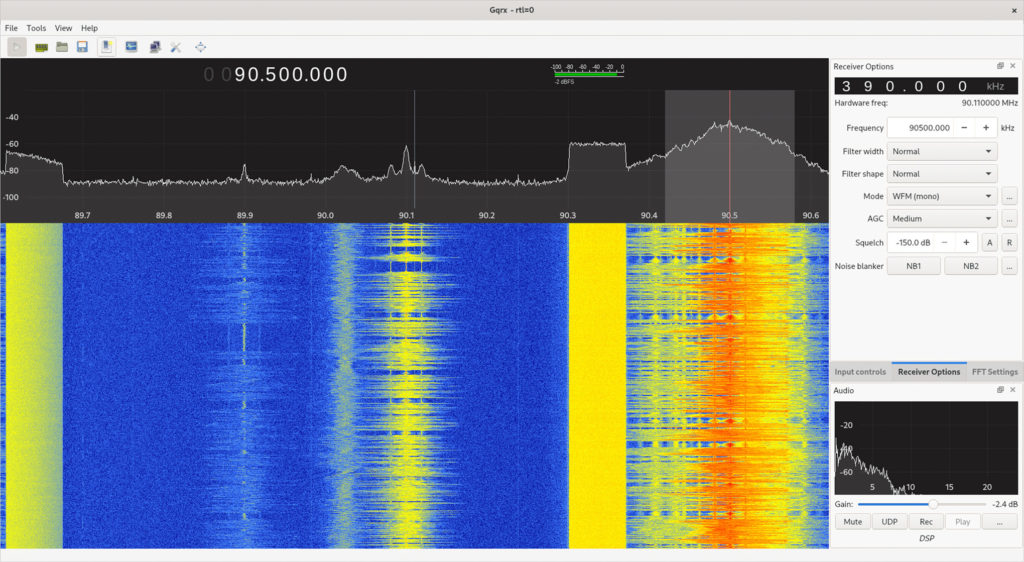 Above: Gqrx provides a waterfall display to show signal intensity (X-axis) over time (Y-axis), with color indicating signal strength. Here, we see the waterfall display for some broadcast FM stations in the Austin, Texas, area. Note that the mode is set to Wide FM.
In the main pane, you see it’s split into two. From left to right, you see a spectrum analyzer which shows relative amplitudes in different frequencies within the receive bandwidth. Below that, you see a waterfall display showing the historical record of what was received on any given frequency and is read vertically.
To the right, we see that by default the Receiver Options are selected. The main control here you need to be aware of is the “Mode” selection. Different types of communications require a different demodulation mode. In general, just be aware of the following:
• Use WFM for commercial FM stations
• Use AM for air and marine band VHF/UHF, shortwave broadcasts, and commercial AM radio
• Use NFM for 2-way analog VHF/UHF in amateur or public safety bands
• For HF amateur radio transmissions, follow convention (USB in 20m and LSB in 40m, for example)
Knowing Where to Listen: VHF and UHF
You’ll likely know your favorite commercial FM stations in your area off-hand. If you’re a licensed ham radio operator with at least a tech class license (refer to our article “Can Anyone Hear Me?” in Issue 38 for more details on ham radio capabilities and licensing), you probably know the output frequencies of repeaters in your area that you can hit.
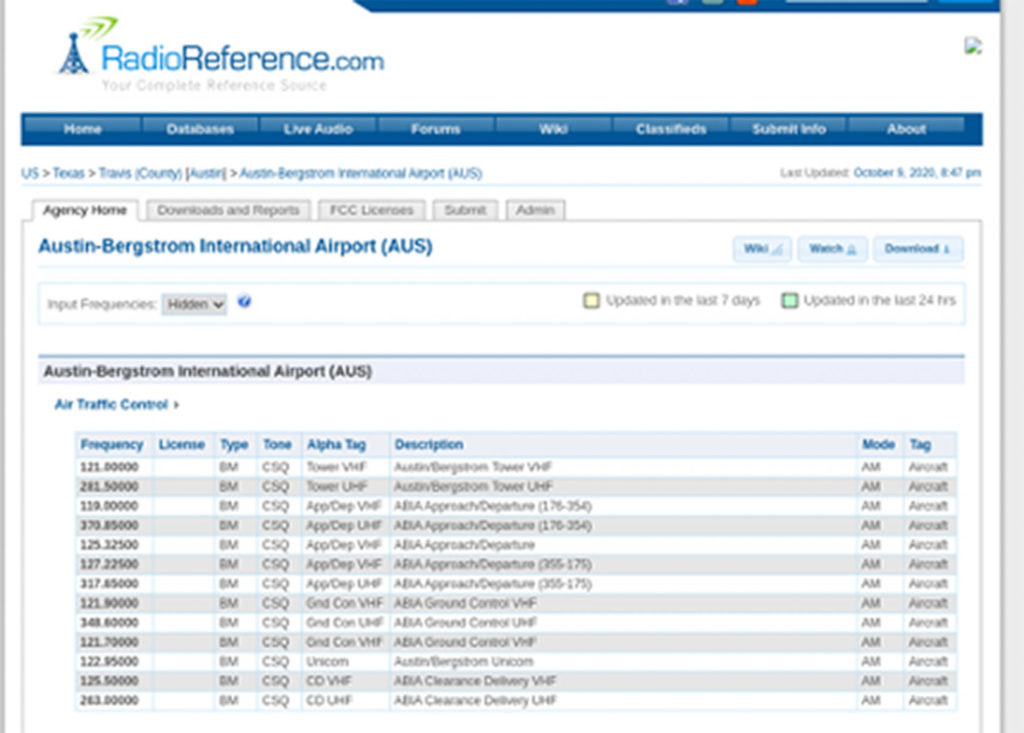
If you don’t already have that information, there are two great sources. First, to find repeaters in your area of operations (AO), The Repeater Book (www.repeaterbook.com) is where you want to look. To find air, public safety, and commercial frequencies in your AO, check out www.radioreference.com.
For instance, to find out what frequencies and modes are in use at my nearest airport, Austin-Bergstrom, all I need to do is look it up:
Of course, you can always just tune around. One of the major advantages of an SDR versus running the scanning feature on a handheld radio is that you can see the spectrum activity across the entire receive bandwidth, giving you a quick visual indicator of activity that you might want to investigate and listen in on.
Shortwave and HF Listening
In a truly grid-down situation where the radio is your only tool to find out what’s going on in the world, the ability to listen to shortwave radio broadcasts and 2-way HF communication from hams or other radio operators could be a lifesaver, making an SDR receiver a prime source of intelligence. Just make sure you have a reliable emergency power source for all your electronic equipment, such as a solar backup system or a generator.
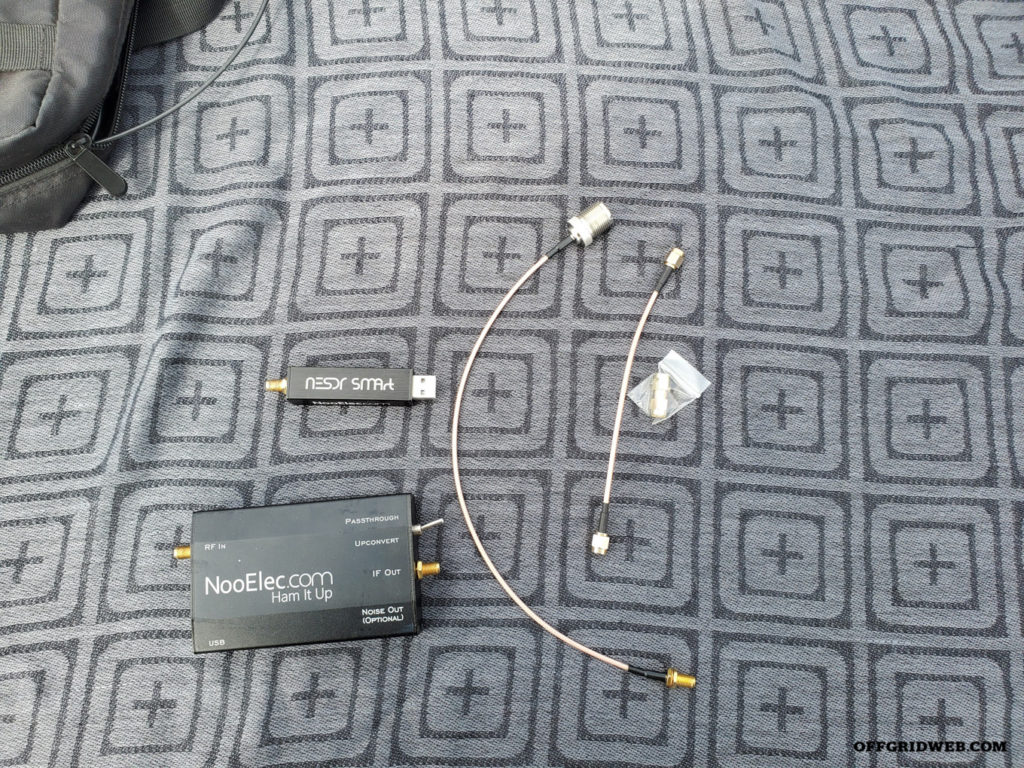 Above: The Nooelec RTL-SDR bundle is a common, inexpensive way to get into SDR, including the ability to access HF bands with the Ham It Up up-converter. Depending on the antenna you want to use, you may need different cables.
Unfortunately, we can’t use the RTL-SDR by itself to receive most shortwave or other HF frequencies, such as those used by amateur radio operators, militaries, and the like. This is where the NooElec Ham It Up TXCO Up Converter comes in. This device is put in-line between the antenna and the SDR dongle, and shifts the RF signal into a frequency that’s within the receive range of the RTL-SDR.
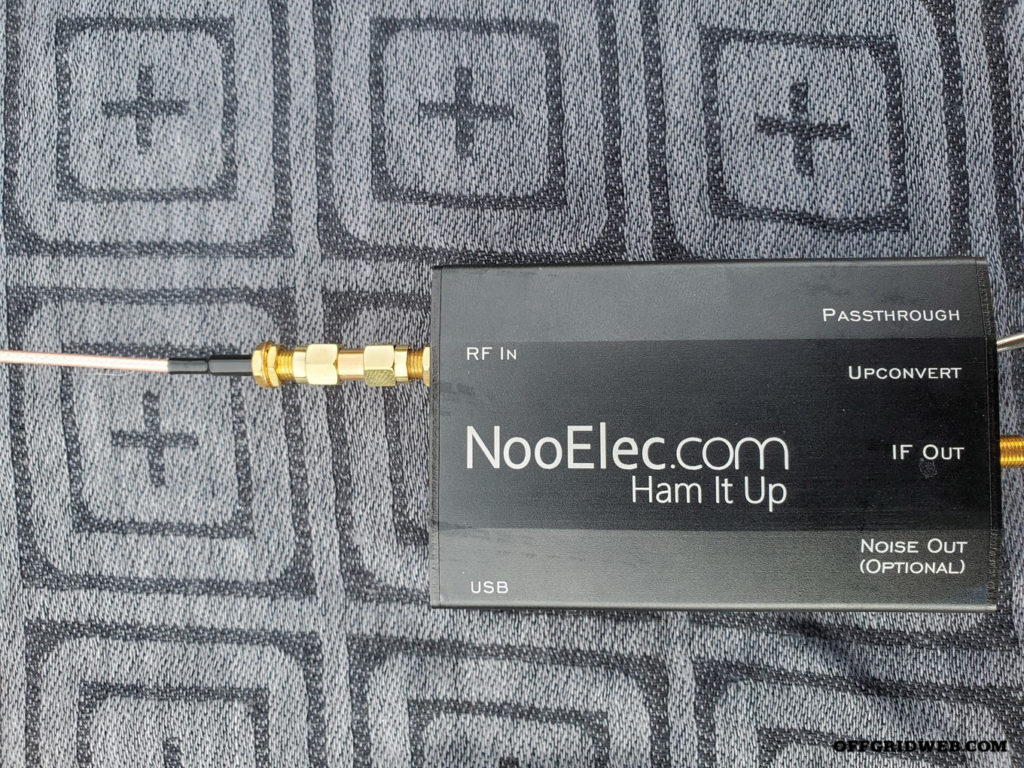
Above: If you want to utilize HF bands, the upconverter must be in line between the SDR and the antenna, with the antenna connected to “RF IN.”

Above: The RTL-SDR must then be connected via USB to the laptop. If you want to operate only within the range of the RTL-SDR, you can leave the upconverter out of the circuit entirely, leave it unpowered (not connect its own USB power cable to the laptop, as pictured), or use the “Passthrough” switch. The Ham It Up fails open, so it can work unpowered.
Once the box is placed in-line with the “RF IN” connected to the antenna and the “RF OUT” connected to the RTL-SDR, power it on and make sure that the switch is set to “UPCONVERT”.
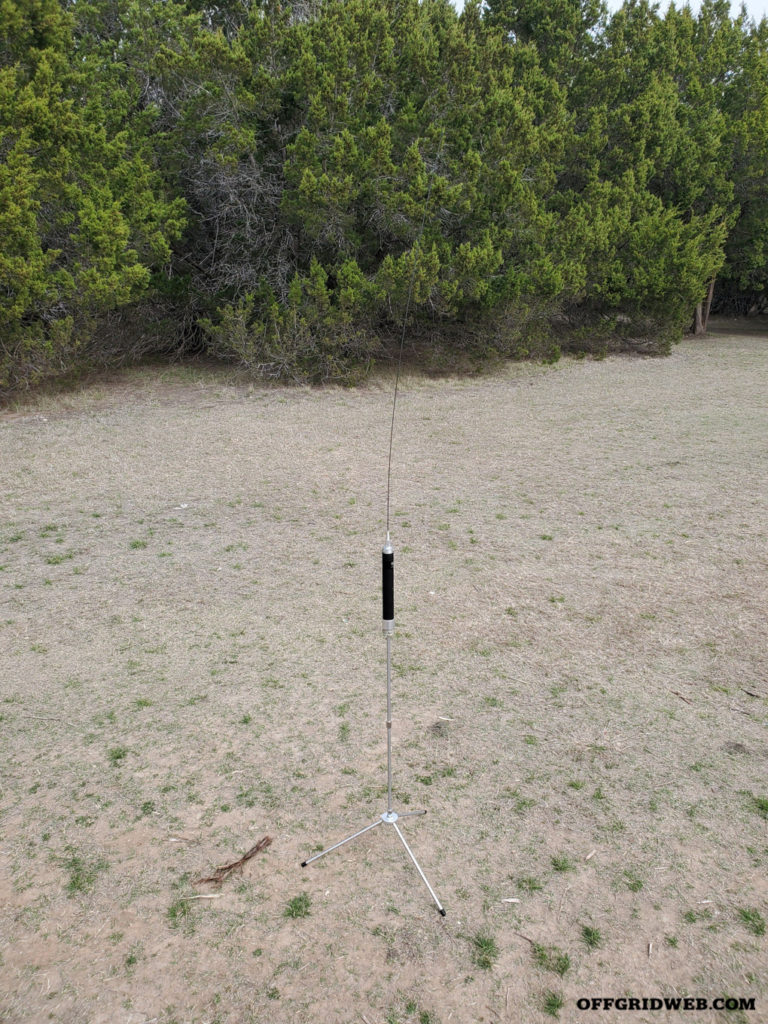
Above: Here, the MP1C is set up on a standard, low-profile tripod with a flexible whip on top. The system is modular and can be configured in other ways depending on conditions.
The upconverter has a 125Mhz offset, so in order to make use of it, there are two options. The first is to add 125Mhz to every frequency that you want to listen to, but that’s tedious and prone to mistakes. The second option is to configure your SDR software to calculate the offset and allow you to directly input the frequency that you want to listen to. Option two is far better, and is accomplished by adjusting the setting LNB LO (Low Noise Blank Local Oscillator) setting in the Input Settings:
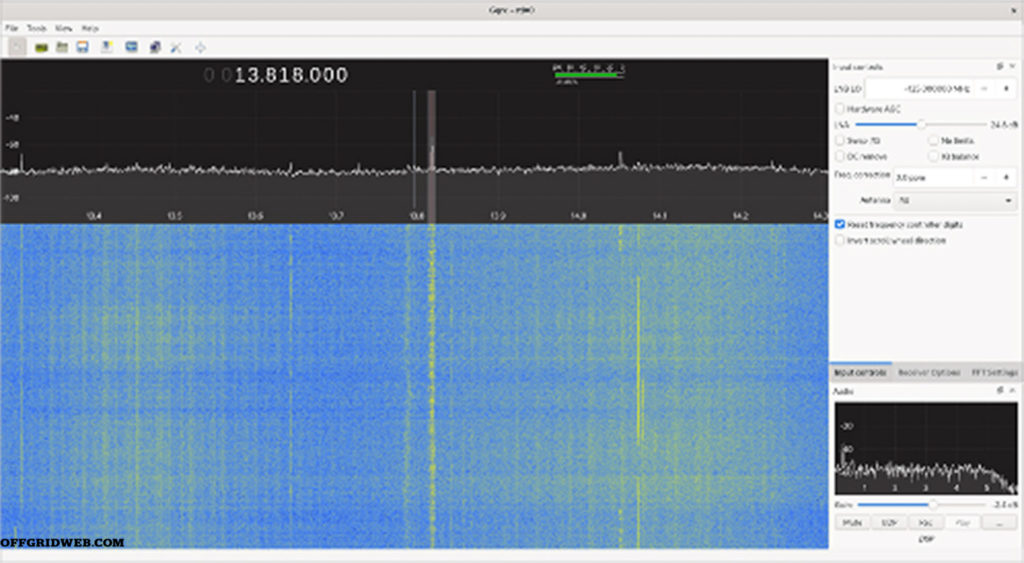
Since we’re using an upconverter, we give a negative offset, so the field should read -125Mhz. Then here, coupled with a Super Antenna MP1C vertical whip antenna slide tuned to 20m, we can see we’re able to receive a shortwave radio station from Latin America on 13.818Mhz.
With the I/Q recorder, we can record the broadcast to replay at a later date, transcribe, or translate.
Emergency and Tactical Uses of SDR
- Monitoring emergency communications
- Listening to radio news and NOAA weather broadcasts
- Pulling down weather satellite images
- Tracking aircraft
Step-by-Step SDR Setup
1. Have your SDR gear ready (computer, SDR device, up/down converters, antenna, cables)
2. Install the software of your choice (Gqrx, SDR#, etc.) on the computer
3. If necessary, connect the up/down converter to the SDR
4. Connect the antenna to either the SDR or the up/down converter
5. Connect the SDR system via USB to the computer
6. Start the application
7. Choose your device
8. Start listening
Conclusion
With a few dollars spent, you now can listen in on analog communications, whether they’re around the world or in your neighborhood, helping to turn the RF spectrum into a source of information to give you the edge when it comes to situational awareness. This just scratches the surface of what SDRs can help you do when it comes to preparedness and intelligence gathering. In a future article, we’ll discuss using SDRs to intercept digital transmissions, such as satellite phone transmissions, aircraft transponders, and weather satellite imagery.
Find Out More about nooelec.com
More on Radios and Comms
- Emergency Communications: Handheld Radios
- Team Wendy Radio Rig Review
- Ham Radio Fundamentals
