If you’re planning to spend time outdoors this winter, you’ll need to be cautious of frostbite and hypothermia due to the cold conditions. However, there’s another more insidious medical problem to be watchful for: trench foot. Also known as immersion foot syndrome, trench foot is a harmful condition caused by prolonged exposure to damp, cold, and/or unsanitary conditions. If left untreated, it may cause loss of blood flow, numbness, open sores, fungal infection, and tissue decay (necrosis) which may force amputation of the foot or leg.
You might be thinking, “trench foot only happens to soldiers living in cold muddy trenches, right?” While the name of the condition originated in World War I as a result of those conditions, it’s not restricted to winter. The related condition of tropical immersion foot (or “paddy foot”) afflicted many soldiers during the Vietnam war, despite temperatures of 70°F and up. Trench foot is also not restricted to wartime environments, and frequently affects hikers, mountain climbers, and backpackers. It has even affected attendees of a particularly rainy music festival.
Here’s an interesting 5-minute documentary segment from the BBC, which briefly addresses the initial causes of and solutions to trench foot during World War I:
British physician and bacteriologist Almroth Wright made tremendous progress in trench foot treatment by cleaning the wounds thoroughly, then leaving them open to the air to heal naturally. This contradicted the older practice of pouring antiseptic into the infected wound, and immediately closing or covering it. The key cause of trench foot is excessive moisture, so allowing the feet to breathe and dry out was a game-changer at that time.
Almroth Wright advanced treatment of trench foot by allowing patients’ feet to breathe and dry.
In modern times, we have a better understanding of trench foot. Since it begins as a result of prolonged exposure to moisture, and is accelerated by cold temperatures and bacteria/fungi, the best preventative measure is to keep feet dry, warm, and clean. In heavy rain or snow, this can be difficult, but regular foot inspection is essential to watch for initial symptoms — numbness, tingling, swelling, and pain. Even waterproof boots aren’t a sure fire fix — while they can keep out external moisture, they may also trap in sweat, leading to maceration and softening of the skin.
The introduction of wooden “duckboards” helped keep soldiers’ feet out of the mud and moisture during WWI. Source: Wikipedia / Australian War Memorial
If these initial symptoms are spotted, the Centers for Disease Control and Prevention (CDC) recommends trench foot treatment via applying warm packs or soaking in warm water (102° to 110° F) for approximately 5 minutes. Medical attention should be sought if symptoms continue to worsen.
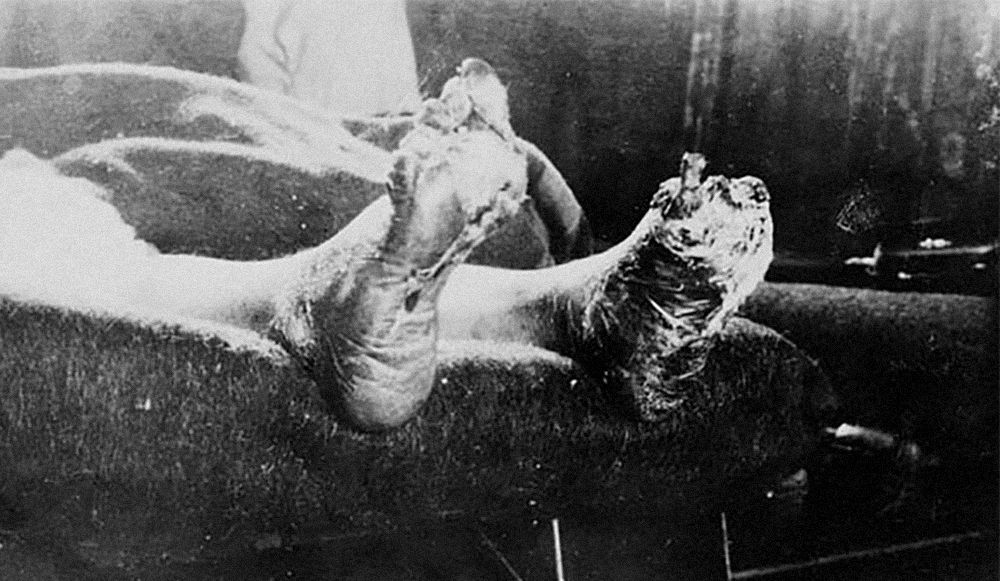
The effects of trench foot on an unidentified soldier during WWI. Source: Library and Archives Canada, PA-149311 / Flickr
Even if no symptoms are present, the following preventative measures should always be taken if you’re spending time in a wet environment:
Thoroughly clean and dry feet at least once per day, or multiple times throughout the day if possible.
Put on clean, dry socks daily. If no fresh socks are available, air-dry your existing socks or place them near a fire to dry.
Do not wear socks when sleeping or resting. Allow your feet to breathe and dry out. However, keep them warm and be cautious of frostbite.
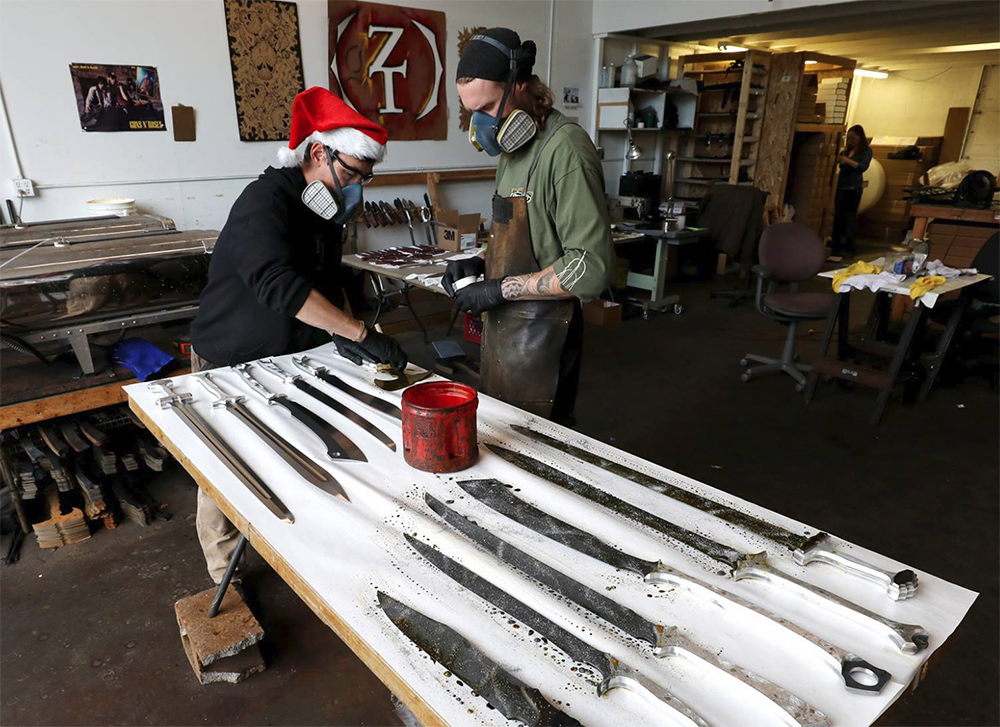
With a name like Zombie Tools, you might expect this Montana-based team of bladesmiths crafts weapons that look cool but are impractical for survival use. Fortunately, that’s not the case — Zombie Tools blades may look good, but they can also take a beating in the real world. The company has continued to prove this point by unveiling knives that emphasize practicality, while retaining the unique battle-worn ZT aesthetic.
The Zombie Tools elves are hard at work finishing a backlog of blade orders before Christmas.
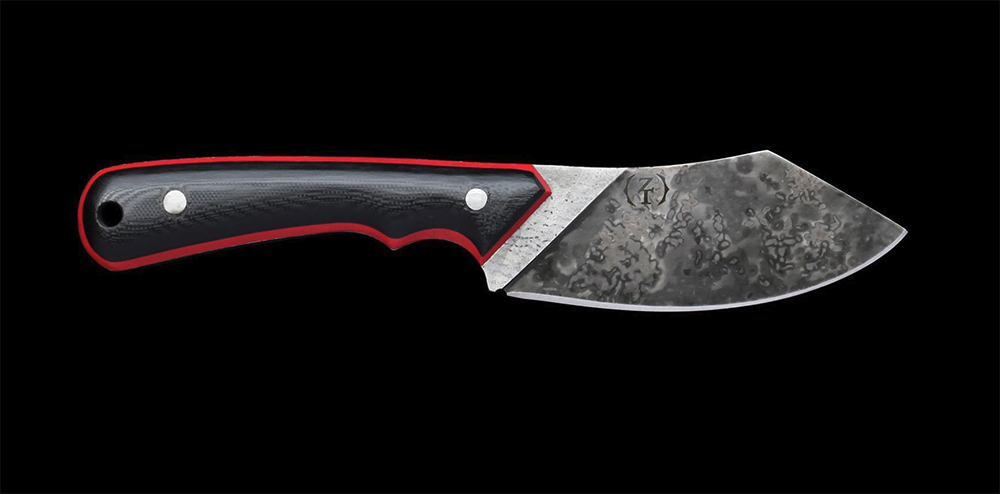
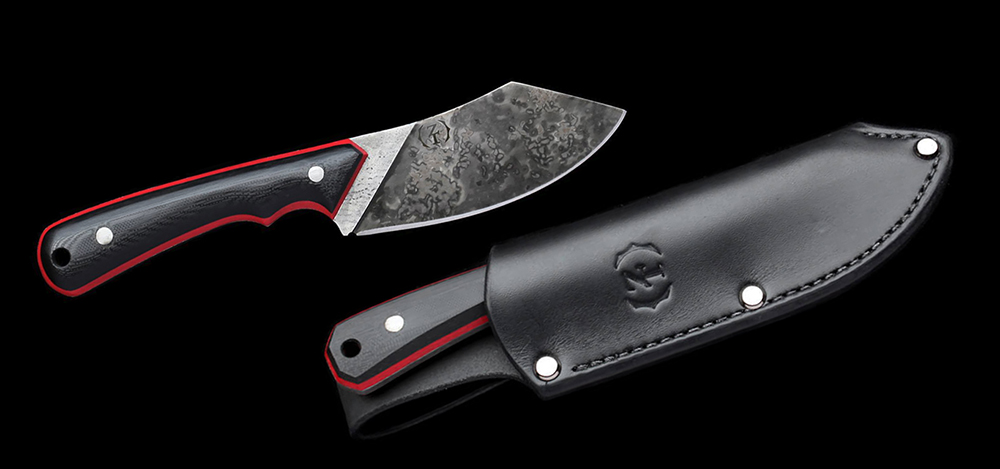
A few weeks ago, we wrote about the redesigned Zombie Tools Para Bellum, a slight twist on the traditional Filipino bolo knife. More recently, ZT has announced the release of another practical blade, known as the Bushlicker. The innuendo-laced name fits right in alongside other creatively-dubbed ZT blades like the Traumahawk and D’Capitan. However, the Bushlicker is substantially different from most previous ZT blades in a number of key areas.
The Bushlicker is ZT’s very first bushcraft knife, designed with a simple and useful blade size and profile. The short, upswept belly is ideal for carving wood and skinning game, while the hard-edged spine serves as a ferro rod striker. Rather than ZT’s typical leather-wrapped aluminum handle scales, this knife uses black G10 laminated onto a red Kydex liner on each side of the full-tang handle.
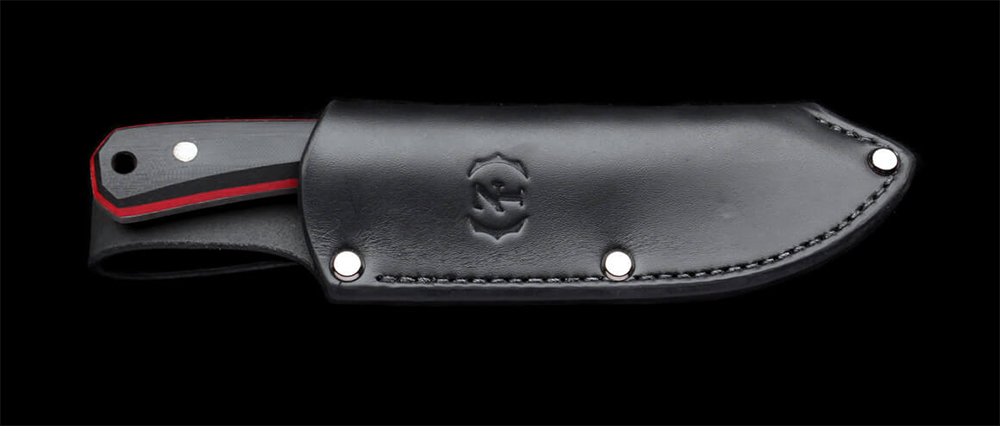
Speaking of materials, there’s another first for ZT: a departure from 5160/6150 spring steel. All previous ZT blades have been made of these forms of steel, but the Bushlicker is different. This little blade uses German 80CRV2, which in ZT’s words is “tough as f**k” and “will outlive you”. The blade can be carried into the wilderness in its included black leather sheath, which is embossed with the ZT logo. Here are the rest of the key specs:
Total Length: 8.5 inches
Blade Length: 4.25 inches
Handle Length: 4.25 inches
Steel Width: 0.165 inches
Weight: 8 ounces
MSRP: $275
Finally, the ZT Bushlicker knife is the company’s first limited-edition blade. Only a few dozen have been produced for release this holiday season, and the knife will only be available for purchase while this supply lasts. Once they’re gone, the Bushlicker will be no more. The upside is that unlike standard-production ZT blades, these are not being made-to-order, and are therefore ready to ship immediately. So, you can still pick one up before Christmas.
For more info on the Zombie Tools Bushlicker bushcraft knife, go to ZombieTools.net.
Ferrocerium — it’s a word that sounds like it should describe the contents of a pill bottle from the drug store, rather than a tool in your survival kit. Adding to this confusion, ferrocerium rods or “ferro rods” are referred to and associated with a myriad of other terms: fire steel, metal match, magnesium rod, mischmetal, Auermetall, flint, or artificial/man-made flint. A quick search on Amazon.com reveals products with various combinations of these names.
So, what the heck is ferrocerium, and how does it work?
Baron Carl Auer von Welsbach, inventor of ferrocerium. Source: Wikipedia
The substance now called ferrocerium was invented in 1903 by Austrian scientist Baron Carl Auer von Welsbach, pictured above. Welsbach was experimenting with types of mischmetal — that is, combinations of rare earth elements, such as cerium, lanthanum, and neodymium. Cerium was especially notable for its low ignition temperature.
Cerium is a rare earth metal that is an essential element of ferrocerium. Source: Wikipedia / images-of-elements.com
When Welsbach mixed a combination of 70% cerium and 30% iron, he noticed the resulting alloy gave off sparks when scratched. When ferrocerium is struck by a hard and sharp object, such as a carbon steel blade, tiny shavings are oxidized and ignited by the friction of the striker and burn at 3,000°C/5,430°F.
Chemistry students may remember that iron compounds use the prefix ferro due to iron’s Latin name ferrum. Therefore, this new iron-cerium alloy was called ferrocerium. Some European countries still call the material Auermetall after the baron’s first name.
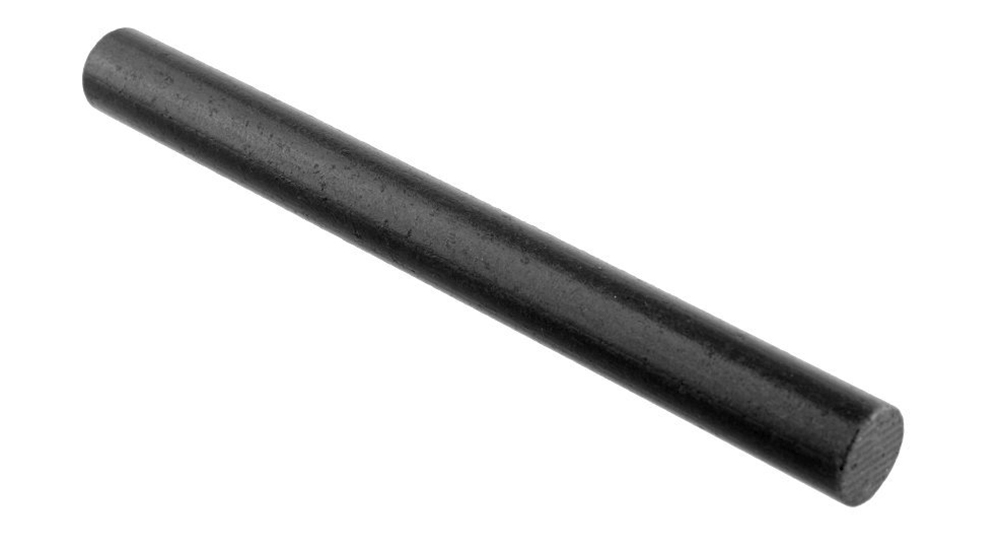
Modern ferrocerium typically appears as a dark-colored metal rod.
Later on, Welsbach added other metals to ferrocerium in order to fine-tune its properties. Lanthanum created brighter sparks, and other metals made the alloy harder and more durable. Since then, material scientists have continued to modify the recipe, producing a substance with the following approximate makeup:
30% Iron
35-50% Cerium
25% Lanthanum
Small amounts of neodymium, praseodymium, and magnesium
The DGT Shadrach knife contains a mini ferrocerium rod. See Issue 17 for a full review.
Notice that ferrocerium contains magnesium. However, it’s inaccurate to call the alloy a “magnesium fire starter” due to the extremely small amounts it contains (about 2%). Actual magnesium bar fire starters contain a large block of pure magnesium, which can be shaved and ignited with a ferro rod.
This magnesium bar has an embedded ferro rod, but the rest of the bar is pure magnesium tinder material.
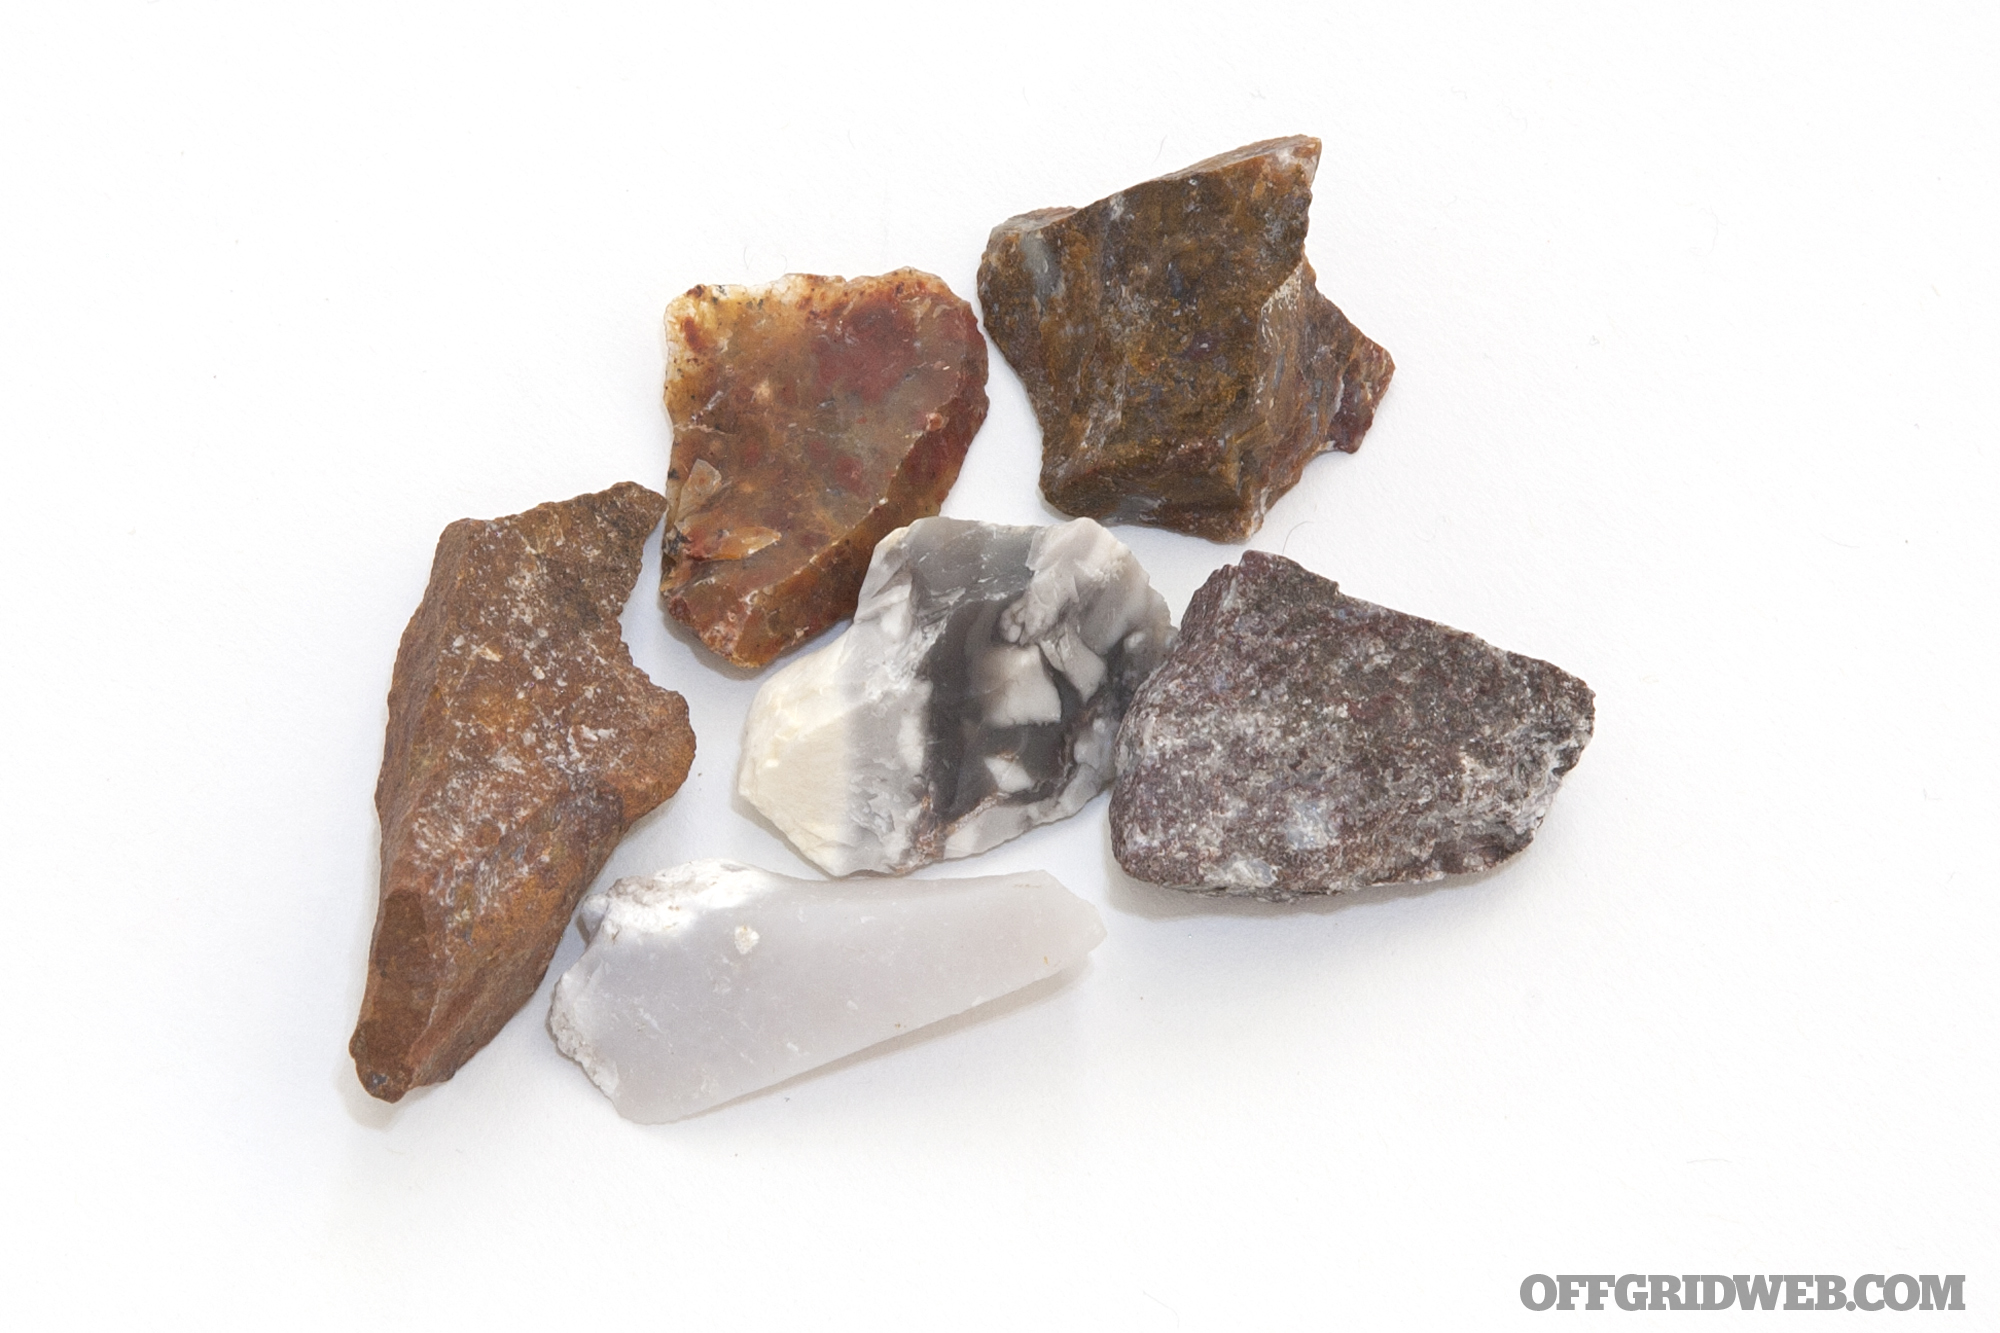
It’s also technically inaccurate to call ferrocerium “flint” because it has no chemical relationship with the rock/mineral of the same name. However, since both ferro rods and flint rocks spark when struck against steel, ferrocerium is often called flint or artificial flint. The “flint” insert in a Zippo lighter, for example, is just a tiny piece of ferrocerium.
Flint, chert, quartz, and other hard minerals can be used to create sparks, but are unrelated to ferrocerium.
Not even the name “fire steel” is technically accurate, since ferrocerium contains no carbon steel, only iron or iron oxide. “Fire iron” would be a more appropriate name, but doesn’t quite have the same ring to it.
To the average person, viruses may seem confusing and overwhelming. Unless you’ve studied medicine or virology, it’s hard to explain the technical differences between a common cold and the flu, much less hantavirus and encephalitis. However, understanding the relationships between viruses can help us remember their symptoms, as well as how they’re transmitted. This allows us to better prepare for everything from mundane sickness to major viral outbreaks.
An electron micrograph of the varicella zoster virus (VZV) known as chickenpox. Source: Wikipedia / CDC
We’ll introduce this concept with some approachable examples. Chickenpox and shingles are both forms of herpesvirus, specifically the sub-category varicella zoster virus (VZV). VZV is highly contagious among humans, but it can be prevented through vaccination.
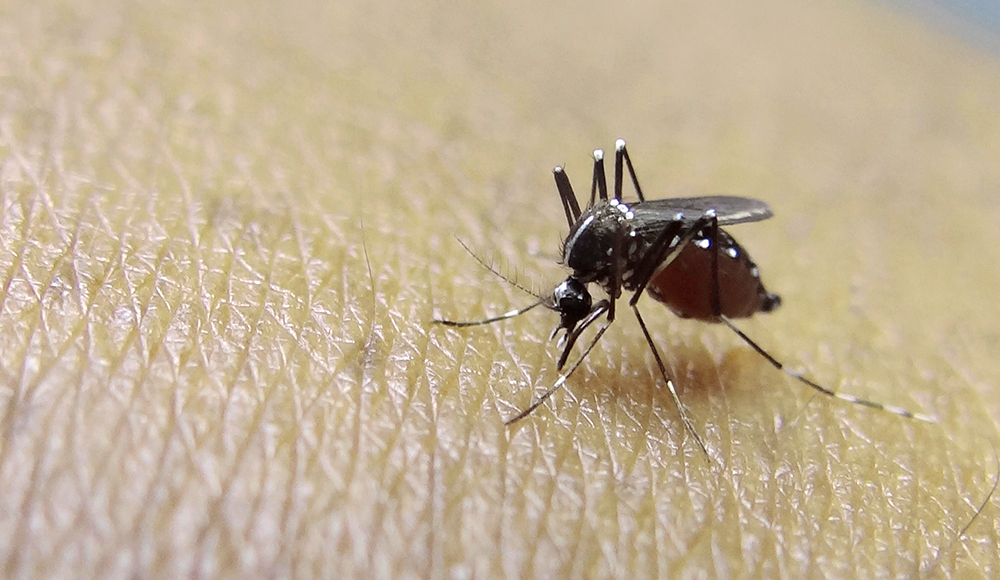
Many viruses in the flavi family are transmitted by mosquitoes.
Zika, west nile, dengue, and yellow fever are all forms of the flavi virus. All of these are considered arboviruses, meaning they are transmitted via insects, specifically Aedes mosquitoes. Flavi viruses also tend to cause moderate to severe fever — so, if you were bitten by a mosquito and are experiencing this symptom, you should know to seek medical attention. You don’t need to comprehend the genetic structure of viruses to understand these relationships.
The graphic above was created by Mikael Haggstrom for the WikiJournal of Medicine and shows the body parts affected by some of the most notable viruses. For an in-depth look at the families of dangerous viruses, check out the infographic below from Eleanor Lutz of Nerdcore Medical. Note the arbovirus insect symbol, as it shows which viruses can be transmitted by mosquitoes, flies, and ticks. The syringe symbol indicates viruses which can be prevented through early vaccination.
For a much larger full-size version of this infographic, click here.
Even with all the information above, there’s a whole host of other diseases caused by bacteria instead of viruses. For more information on the difference between a virus and a bacterial infection, go to the CDC page “Viruses or Bacteria – What’s got you sick?”
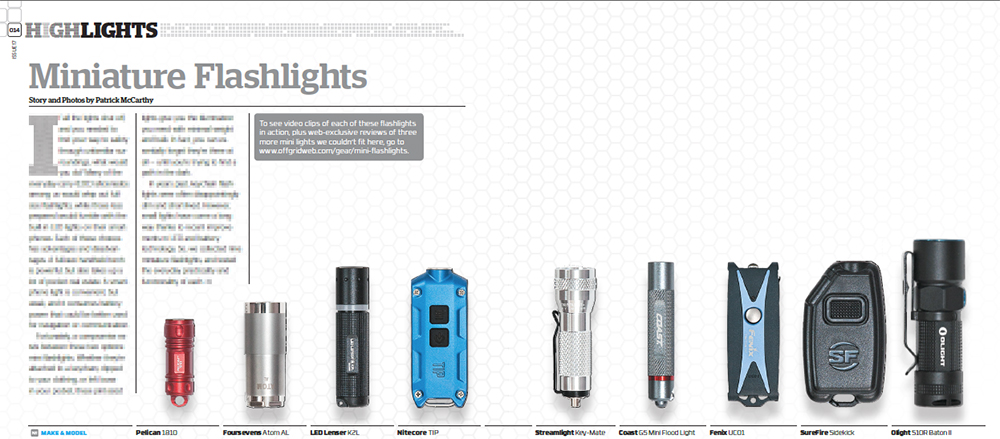
In the HighLights flashlight buyer’s guide in Issue 17 of our printed magazine, we reviewed nine miniature flashlights. These lights are designed to fit in the palm of your hand, in your pocket, or on a keychain. Rather than rely on your smartphone’s built-in LED, you can have significantly brighter light on demand, plus other useful features such as waterproofing and adjustable brightness modes. To read our full thoughts on the nine mini flashlights, pick up a copy of Issue 17, on shelves starting December 2nd, 2016.
As we were finishing up the print article, we came across three additional lights that fit this theme. We didn’t have room to include them in the print article, so we’ll share our thoughts on these three mini flashlights here on the web. We also recorded short video clips of all 12 flashlights, so you can get a feel for the physical size and controls.
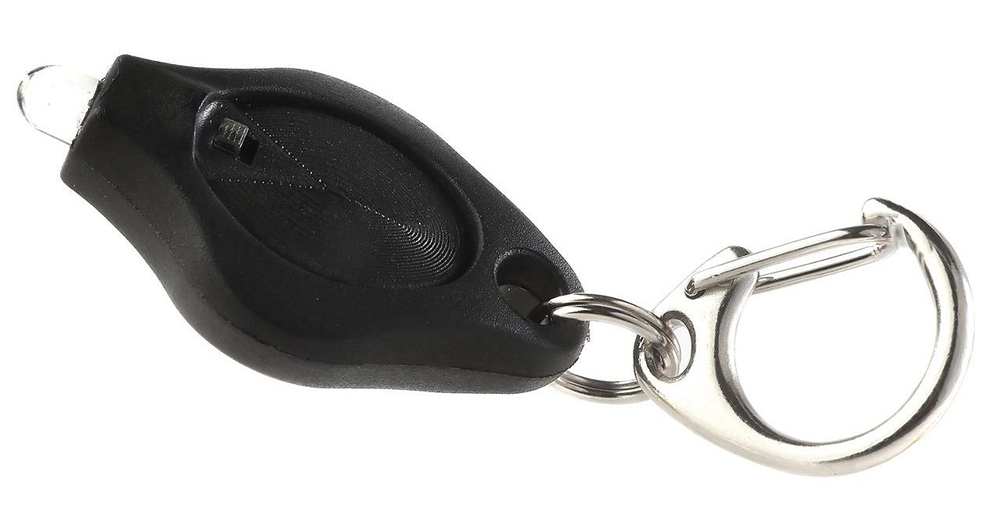
Bonus: LRI Photon II
We’ve had this Photon II keychain light for several years, and it has served us well despite its diminutive size. It’s extremely compact — about the size of a quarter. The thumb pressure pad is great for quick momentary activation, and there is a tiny switch for constant-on mode if you’d prefer to leave the light running. The output is focused in a soft spotlight pattern. Although it’s rated at only 4.5 lumens, the manufacturer states it hasn’t been tested to official ANSI standards, and it appears closer to 10 or 15 lumens. That’s still not a lot of power, but the Photon II is a good choice for an ultra-small keychain light.
Max Lumen Output: 4.5 Max Runtime: 18 hrs. Overall Length: 1.6 in. Weight with Batteries: 0.2 oz. Battery Type: CR2016 (two, included) Controls: Pressure pad, small constant-on switch Output Modes: N/A Special Features: Quick-release keyring, small split ring MSRP: $12 URL:www.photonlight.com
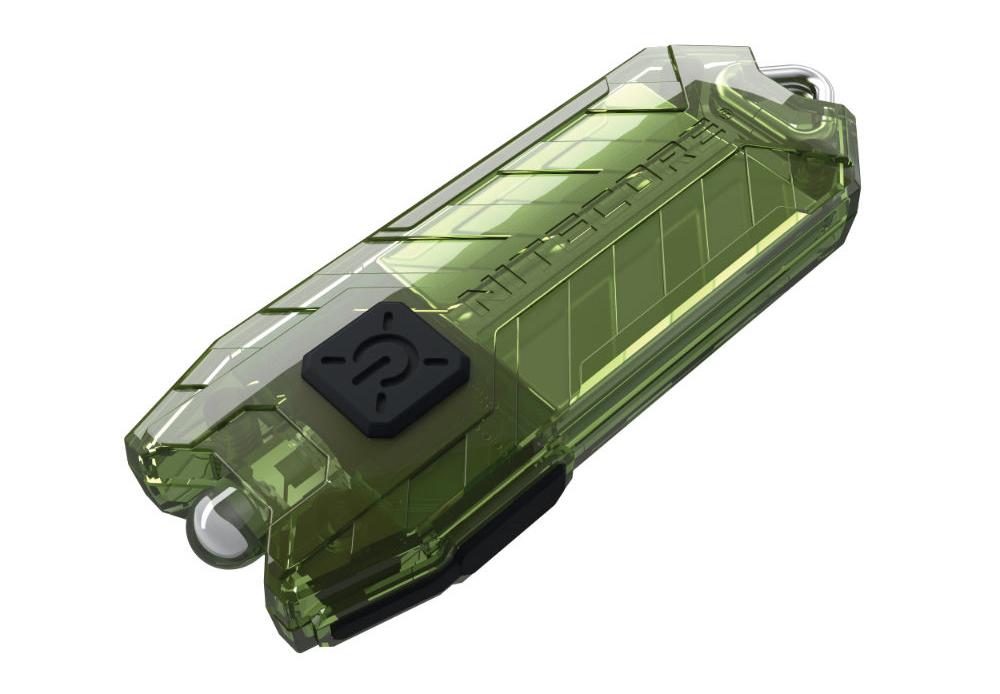
Bonus: Nitecore Tube
Despite being called the Tube, this Nitecore light is not cylindrical. It’s actually thin and flat, comparable in size to a mini Bic lighter. It offers two brightness modes, selectable by the power button on top of the light — press once for 1-lumen moonlight mode, and double-tap for full 45-lumen power. The button can also be held down for momentary full-power mode. Rather than replaceable batteries, this light uses an integrated li-ion battery with micro-USB charging. The beam pattern is a wide and soft flood light, ideal for illuminating a workspace or reading a map, but not ideal for focused directional output. We like the Tube a lot, but we still prefer the new Nitecore TIP for its higher output and tough aluminum body.
Max Lumen Output: 45 Max Runtime: 48 hrs. Overall Length: 2.2 in. Weight with Batteries: 0.3 oz. Battery Type: Built-in lithium-ion battery with micro-USB charging Controls: Push-button power switch with momentary mode Output Modes: High, low Special Features: Stainless steel keyring connector, micro-USB port with dust cover, charging indicator LED MSRP: $10 URL:www.nitecore.com
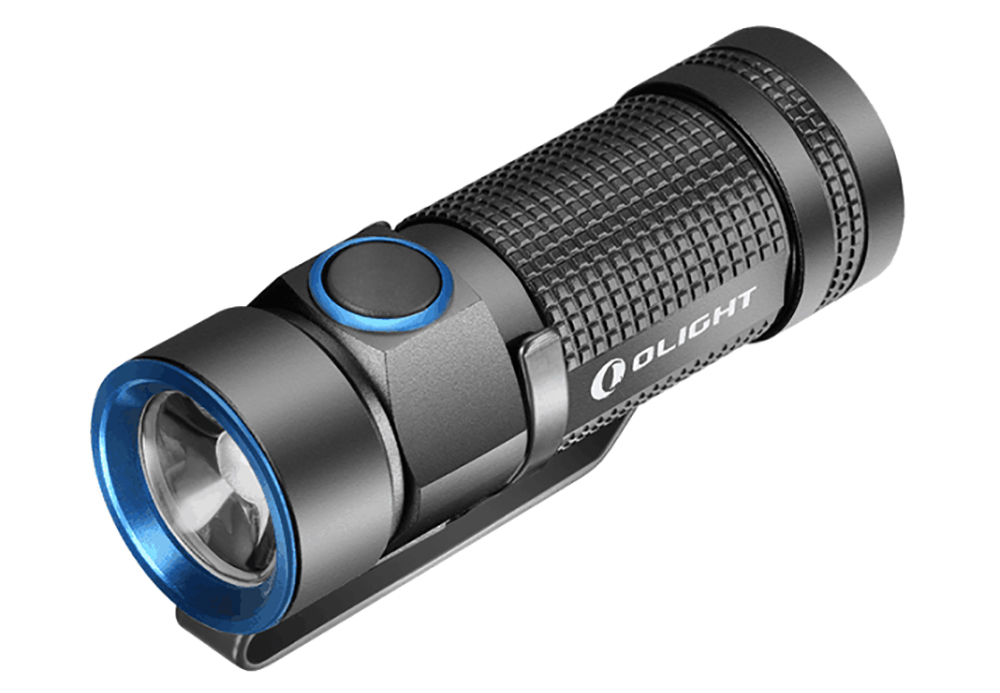
Bonus: OLIGHT S1 Baton
The OLIGHT S1 Baton is an updated version of the S10R Baton II we reviewed in the magazine article. It looks similar to the S10R, but there are several key differences. First, the business end of the light uses a TIR optic lens rather than the older light’s basic reflector. This makes the beam softer and more even, a significant improvement. This S1 Baton is a non-rechargeable model, so it lacks the charging dock compatibility of the R-series lights (although the tail cap is still magnetic). A rechargeable S1R model is available for $15 extra ($65 MSRP), but we haven’t tested it yet.
The S1 shares the same 500-lumen brightness as the old S10, but extends run time to a claimed 600 hours. It’s also smaller and lighter than the S10R, and it’s even IPX8 waterproof. This is a truly superb EDC flashlight, and a nice improvement on the S10 series.
Max Lumen Output: 500 Max Runtime: 600 hrs. Overall Length: 2.4 in. Weight with Batteries: 1.7 oz. Battery Type: CR123 (one, included) Controls: Push-button power switch with momentary mode Output Modes: Turbo, high, low, moonlight, strobe Special Features: Magnetic tail cap, pocket clip, wrist lanyard, IPX8 waterproof MSRP: $50 URL:www.olightworld.com
Coast G5
Max Lumen Output: 18 Max Runtime: 45 min. Overall Length: 2.5 in. Weight with Batteries: 0.5 oz. Battery Type: AG5 (four, included) Controls: Push-button tail cap with on-off and momentary modes Output Modes: N/A Special Features: Large split ring, small split ring, swivel MSRP: $6 URL:www.coastportland.com
Fenix UC01
Max Lumen Output: 45 Max Runtime: 50 hrs. Overall Length: 2.5 in. Weight with Batteries: 0.5 oz. Battery Type: Built-in lithium-polymer with micro-USB charging Controls: Push-button switch with 0.5-second lockout delay Output Modes: High, medium, low Special Features: Carabiner, small split ring, battery indicator LED, micro- USB port with dust cover MSRP: $12 URL:www.fenixlight.com
FourSevens Atom AL
Max Lumen Output: 110 Max Runtime: 40 hrs. Overall Length: 1.8 in. Weight with Batteries: 1.6 oz. Battery Type: CR123 (one, included) Controls: Twist-on bezel Output Modes: Low, high Special Features: Magnetic tail cap, glow-inthe- dark LED backing, IPX8 waterproof, wrist lanyard MSRP: $40 URL:www.foursevens.com
LED Lenser K2L
Max Lumen Output: 25 Max Runtime: 5 hrs. Overall Length: 2.4 in. Weight with Batteries: 0.6 oz. Battery Type: AG13 (four, included) Controls: Twist-on bezel Output Modes: N/A Special Features: Large split ring, small split ring, swivel, clear Magic Light Ring behind bezel MSRP: $10 URL:www.ledlenserusa.com
Nitecore TIP
Max Lumen Output: 360 Max Runtime: 46 hrs. Overall Length: 2.4 in. Weight with Batteries: 0.8 oz. Battery Type: Built-in lithium-ion with micro-USB charging Controls: Push-button power switch with lockout function, push-button mode selector Output Modes: Turbo, high, medium, low Special Features: Large split ring, battery indicator LED, micro-USB port MSRP: $30 URL:www.nitecore.com
OLIGHT S10R Baton II
Max Lumen Output: 500 Max Runtime: 168 hrs. Overall Length: 2.9 in. Weight with Batteries: 2.2 oz. Battery Type: Rechargeable CR123 (one, included) or standard CR123 (not included) Controls: Push-button power switch Output Modes: High, medium, low, moonlight, strobe Special Features: Magnetic tail cap, pocket clip, battery indicator LED, magnetic USB charging dock, wrist lanyard MSRP: $66 URL:www.olightworld.com
Pelican 1810
Max Lumen Output: 16 Max Runtime: 8.75 hrs. Overall Length: 1.5 in. Weight with Batteries: 0.4 oz. Battery Type: LR41 (four, included) Controls: Twist-on bezel Output Modes: N/A Special Features: Carabiner, small split ring, metal Pelican logo tag MSRP: $13 URL:www.pelican.com
Streamlight Key-Mate
Max Lumen Output: 10 Max Runtime: 96 hrs. Overall Length: 2.4 in. Weight with Batteries: 0.8 oz. Battery Type: LR44 (four, included) Controls: Twist-on bezel Output Modes: N/A Special Features: Small split ring, swivel, carabiner, pocket clip, neck lanyard MSRP: $17 URL:www.streamlight.com
SureFire Sidekick
Max Lumen Output: 300 Max Runtime: 45 hrs. Overall Length: 2.5 in. Weight with Batteries: 1.4 oz. Battery Type: Built-in lithium-ion battery with micro-USB charging Controls: Push-button power switch Output Modes: High, medium, low Special Features: Large split ring, carabiner, micro-USB port MSRP: $80 URL:www.surefire.com
Ever wonder where the words we use came from? The English language is an amalgamation of words from many languages and cultures, and these terms are often generated by memorable events over the course of centuries. The history behind specific words is known as etymology, and it can provide valuable insight into their true meaning. For example, the word “jumbo” came to mean “very big” because it was the name of an extra-large elephant owned by P.T. Barnum in the 1800s. We may think we know the meaning of jumbo, but not realize that it implies something as large as a 6.5-ton elephant.
The modern word “thug” originated from the Hindi language spoken in India.
As survivalists, we may use the term “thugs” to describe marauding criminals who may steal our resources during a disaster scenario. However, understanding the etymology of this word provides some much-needed context on what thugs really are — in fact, it’s even worse than our modern interpretation.
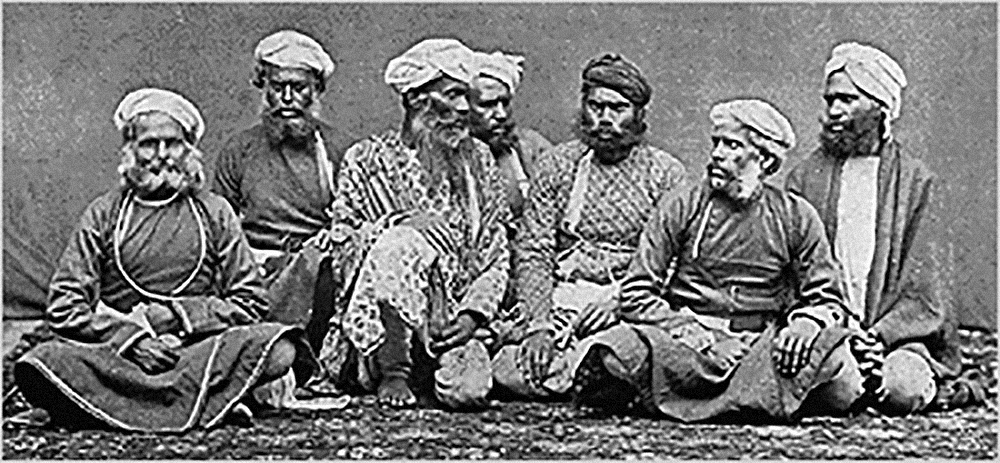
The word “thug” is derived from a word ठग्गी in the Hindi language of India. This word is pronounced as “thuggee” in English, and it is derived from another Hindi word: “thag” which means deceiver or swindler. Historically, Thugs were an organized criminal gang that thrived in India from the mid-1300s to the late 1800s. Their brutally-violent actions built a reputation over the course of these 450 years, and eventually made their name synonymous with criminality.
Three Thug gang members restrain and strangle a sleeping traveler. Source: Wikipedia / Columbia University
Membership in the Thug gang was typically passed down from father to son, creating a actual class of trained criminals. There was also a religious element to thuggery, as the Thugs considered themselves servants of Kali, a scimitar-wielding Hindu goddess associated with destruction and renewal. Movie fans may remember references to the Thuggee and goddess Kali in Indiana Jones and the Temple of Doom, though this film’s depiction was heavily fictionalized.
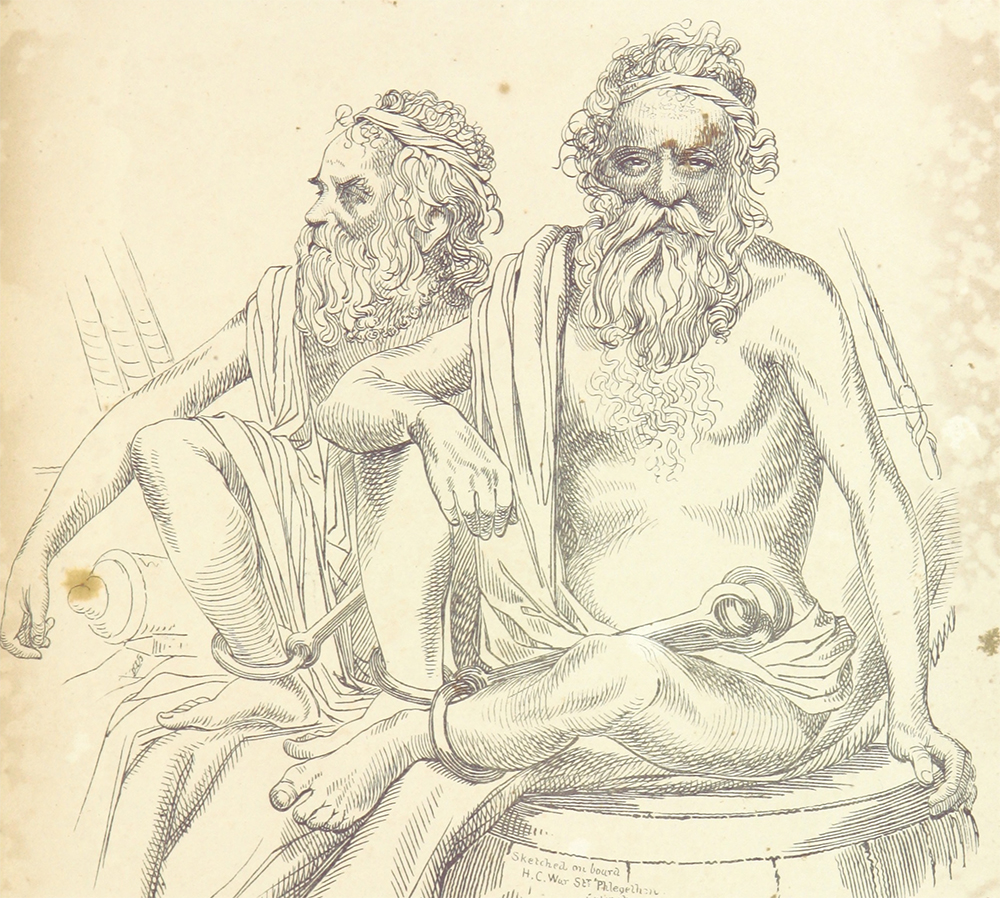
A sketch of a 90-year-old Thug in jail, circa 1840. Source: Wikipedia / The British Library
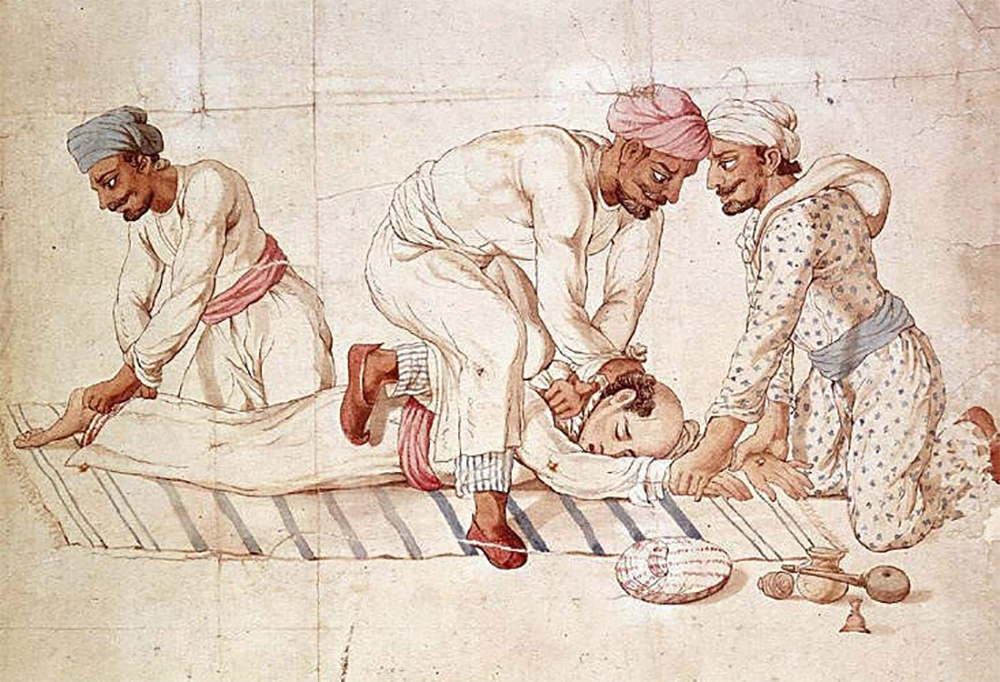
Historical accounts tell us that Thug gang members would target isolated travelers, and blend in with their group to seem non-threatening. Then, when the targeted individual was asleep or alone, the Thugs would silently strangle their victim with a handkerchief or rope noose. Any valuables would be stolen, and the body would be disposed of quickly. The Guinness Book of World Records estimates that Thugs caused as many as two million deaths through these methods.
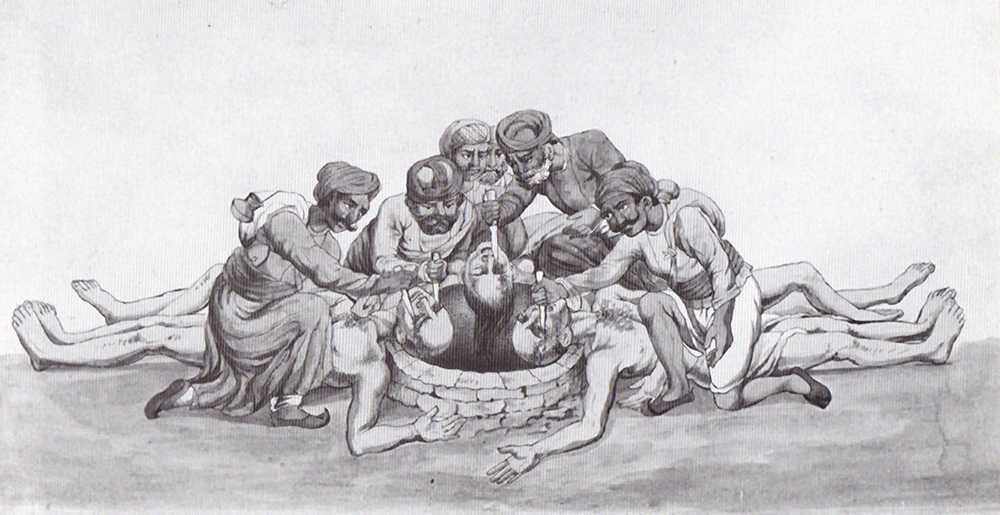
Thugs stabbing the eyes of murdered travelers before throwing their bodies into a well. Source: Wikipedia / The British Library
As survivalists, we should remember the history behind the term “thug”, and realize that criminals who prey on travelers are not a new phenomenon. Although the Thuggee gang is no longer in existence, we should always be aware of our surroundings, prepare to defend ourselves, and avoid falling victim to modern-day thuggery.
In the words of Ned Stark, winter is coming. Actually, depending on where you live, the cold months may have already arrived. With the cold often comes a thick blanket of snow. If you’re a dedicated survivalist, you should prepare yourself for traversing this snow safely. That means wearing warm clothing, carrying fire-starting tools, knowing how to construct a winter shelter. However, you’re not going to accomplish much if you can’t even make it 10 steps into the woods due to waist-deep snow.
Without snowshoes, you’re going to have a hard time making progress in winter environments.
Snowshoes are a key asset for winter environments, but it’s not always as simple as buying a pair at your local sporting goods store. There are many instances when off-the-shelf snowshoes can’t be used. For example, your car may break down in the middle of nowhere, or one of your snowshoes could be damaged or lost. Maybe in your rush to bug out, you simply didn’t have time to grab them. Whatever the case, it’s advantageous to know how to build a pair of DIY snowshoes from found materials.
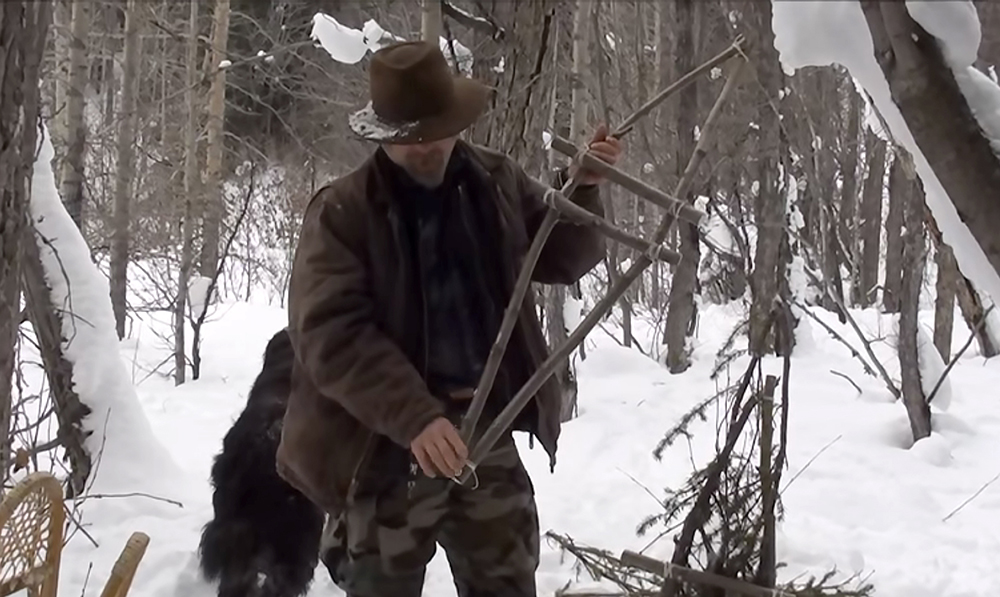
Lonnie shows off the framework of his DIY snowshoe.
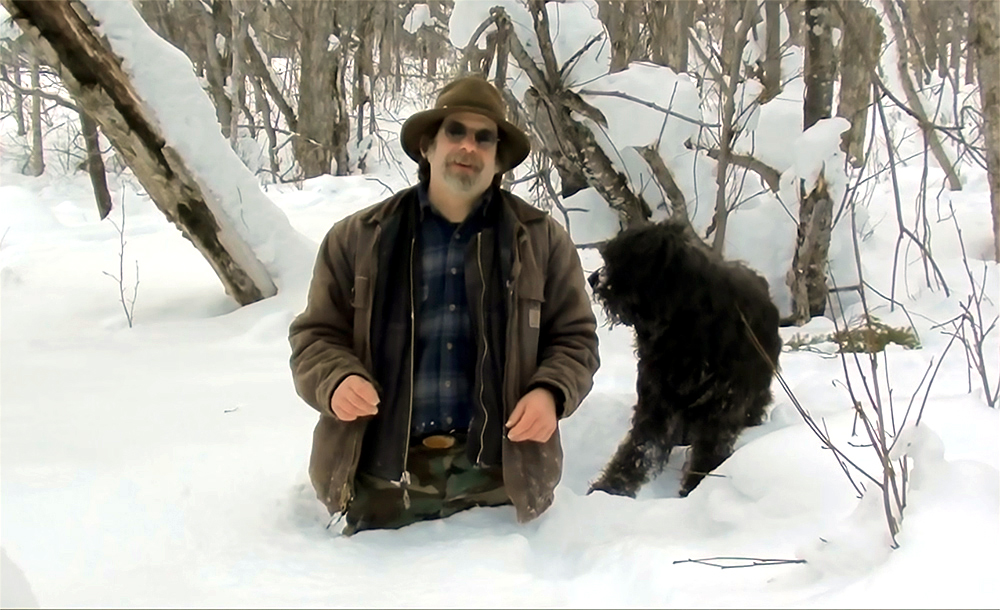
In the following video from Far North Bushcraft and Survival, host Lonnie shows how to build simple snowshoes from some alder saplings and spruce boughs. The outer section is composed of two curved saplings or branches, tied at each end with nylon rope or paracord. Lonnie recommends building the snowshoes at least chest-high for adequate surface area. Two boot supports are lashed to the center, and saplings are pulled through underneath.
We were definitely wondering how much of a difference the snowshoes were actually making, so we appreciated the humorous demonstration at the end of the video. Given this side-by-side comparison, we’d say this snowshoe design is a resounding success.
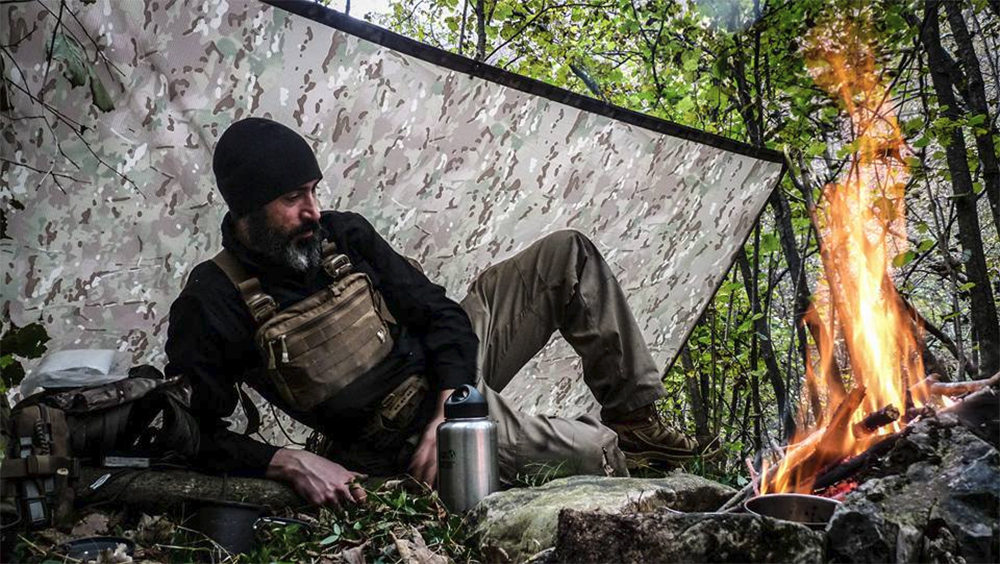
We first met Alex Wander at Blade Show earlier this year, and he immediately got our attention with some very cool knife designs from his company, Wander Tactical. After talking with him some more, we realized that he’s not only a bladesmith, he’s also an avid outdoorsman and a survivalist — our kind of guy. When he’s not working on knives with his brother Greymoose Dino, Alex is practicing his bushcraft skills in the backwoods of his home country, Italy.
A video posted by RECOIL OFFGRID (Official) (@recoiloffgridmagazine) on
Alex recently shared a photo of his personal go bag with us, and his loadout provides some insight into the no-frills survival philosophy he emphasizes.
Here’s a list of the items in Alex’s go bag loadout:
Vacuum-packed meals and energy bars, approx. 3,000 calories total
Typhoo tea bags
2 Lansky diamond sharpening stones (medium and fine grit)
Fenix E35 flashlight with paracord lanyard
5 Lithium 18650 flashlight batteries
Large ferrocerium rod fire-starter
Waterproof match container with stormproof matches
Mint tin with fatwood tinder shavings
Recta DP 6G compass with luminous markings
550 paracord
Helikon-Tex poncho/tarp with stuff sack
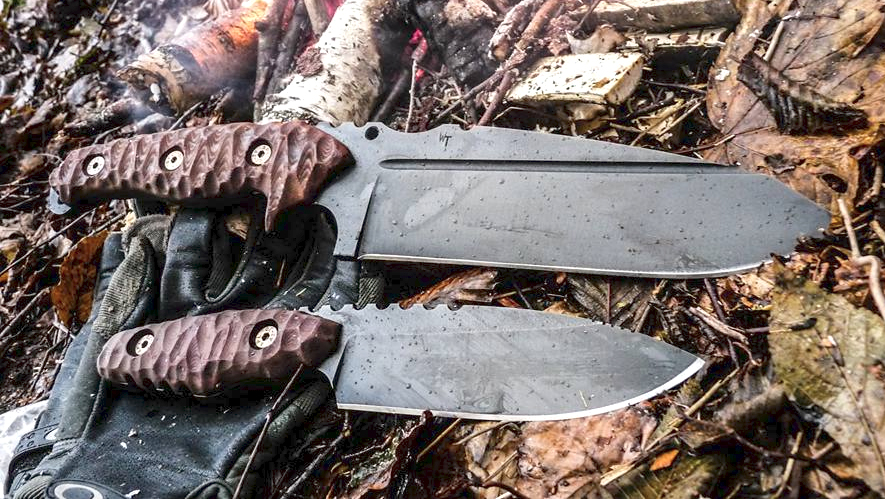
A Wander Tactical Smilodon (top) next to Alex’s new Freedom knife (bottom). Photo: Alex Wander/Facebook
First-aid kit with 2 Israeli bandages, Celox hemostatic granules, tourniquet, bandages, and iodine disinfectant (also used as a water purifier)
Locking carabiner
Not pictured: Klean Kanteen stainless steel water bottle, GSI Outdoors stainless steel cup, shemagh scarf
These items are contained in an old Flyye Industries handheld pack, with a shoulder strap, PALS webbing, and carabiner. In a SHTF situation, Alex would be able to grab the bag and be out the door and into the woods in no time. This lightweight wilderness survival kit gives Alex quick mobility, without the weight and bulk of a full-size 30-pound bug-out bag.
The tarp and paracord allow construction of an improvised lean-to shelter. Photo: Alex Wander/Facebook
Unsurprisingly, of all his tools, this knife-maker values his knife the most. He wrote, “In 25 years I’ve tried tons of knives and now I have my own idea about how a knife should be. I always spend my weekends in the wilderness, and sometimes more than a weekend, learning primitive survival skills and so on. I’ve been also in a lot of places around the world even for months, and your loyal companion will always be your tool: a knife.”
Alex learned his knife-making skills from his brother and business partner at Wander Tactical, Greymoose Dino. He taught Alex how to grind his first blade, and they have now built a successful company together. To see more of Alex and Greymoose’s latest blade designs, follow @wandertactical_cutting_tools on Instagram or visit WanderTactical.com.
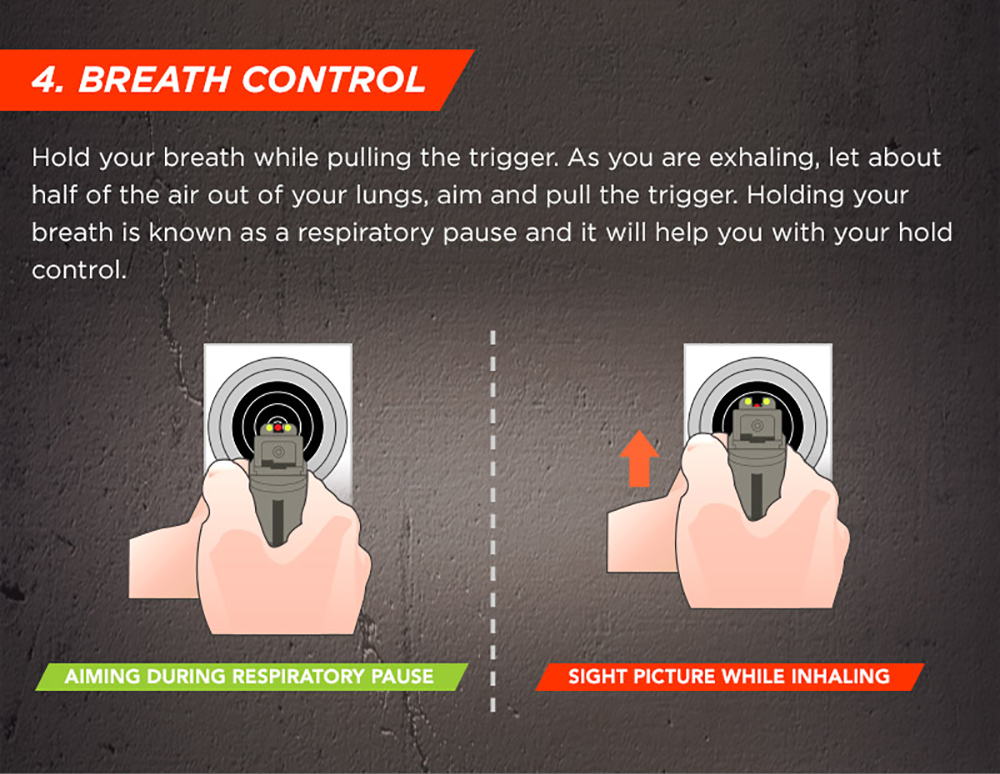
Every survivalist should know how to shoot, and hit targets consistently with a variety of weapons. This skill set is invaluable for both hunting and self-defense, but it takes serious practice. Whether you’re an expert shooter or a complete newbie, understanding and maintaining your technique is the key to shooting accurately.
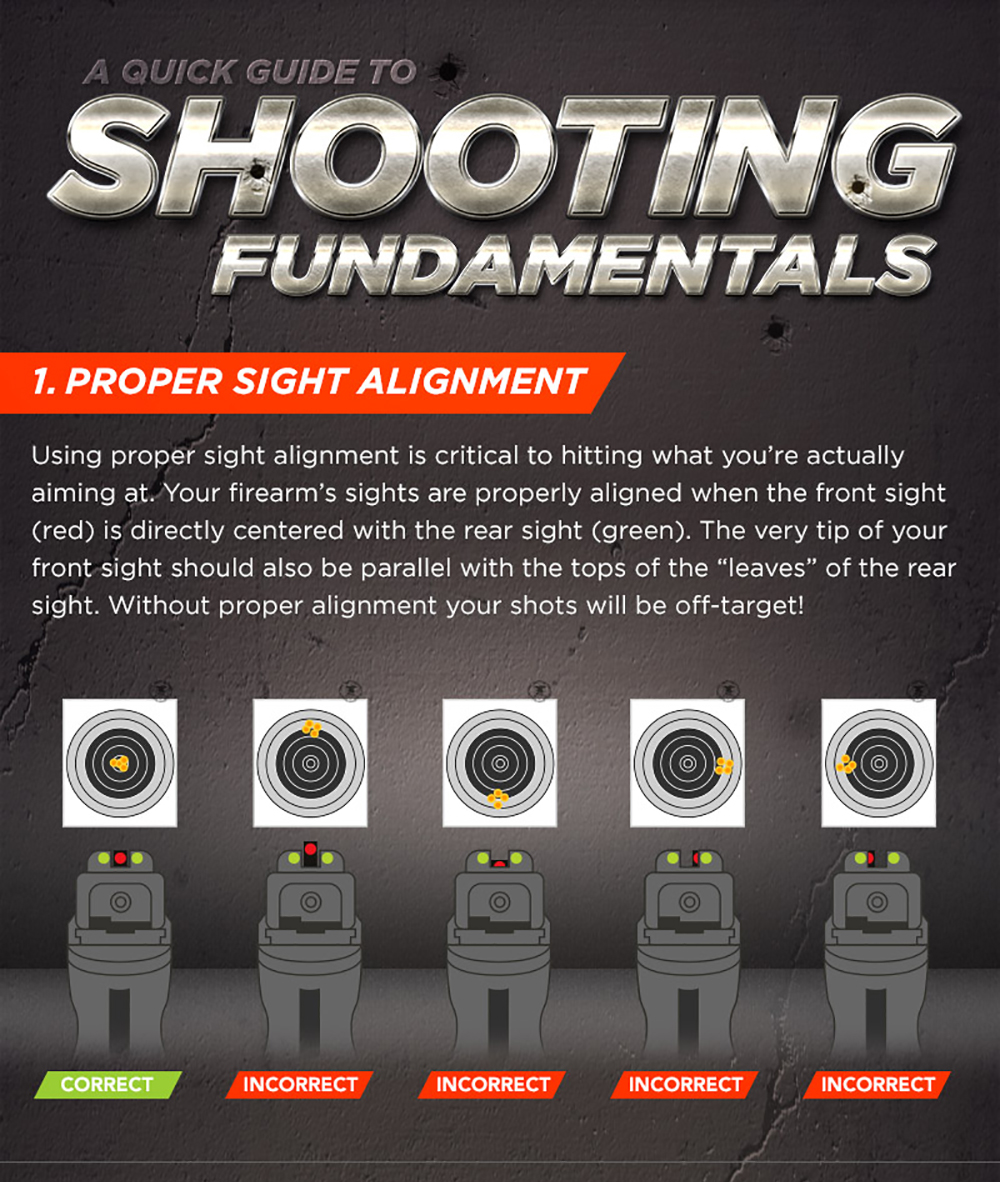
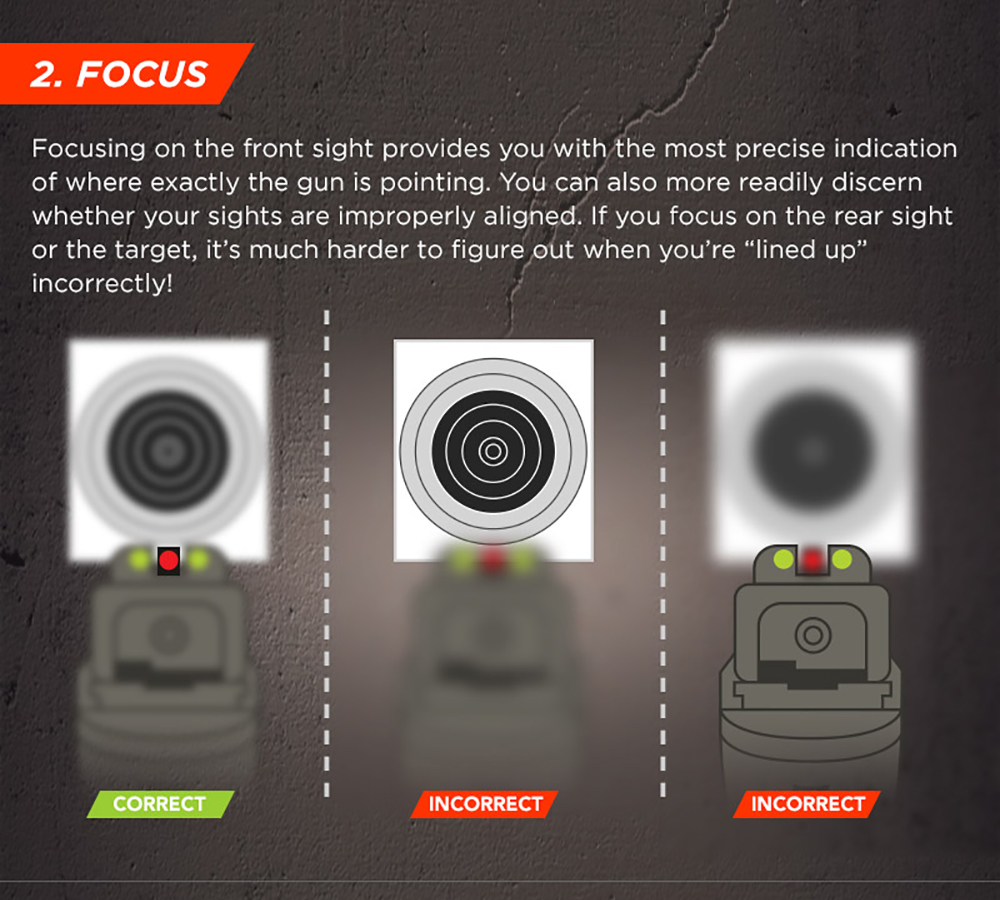
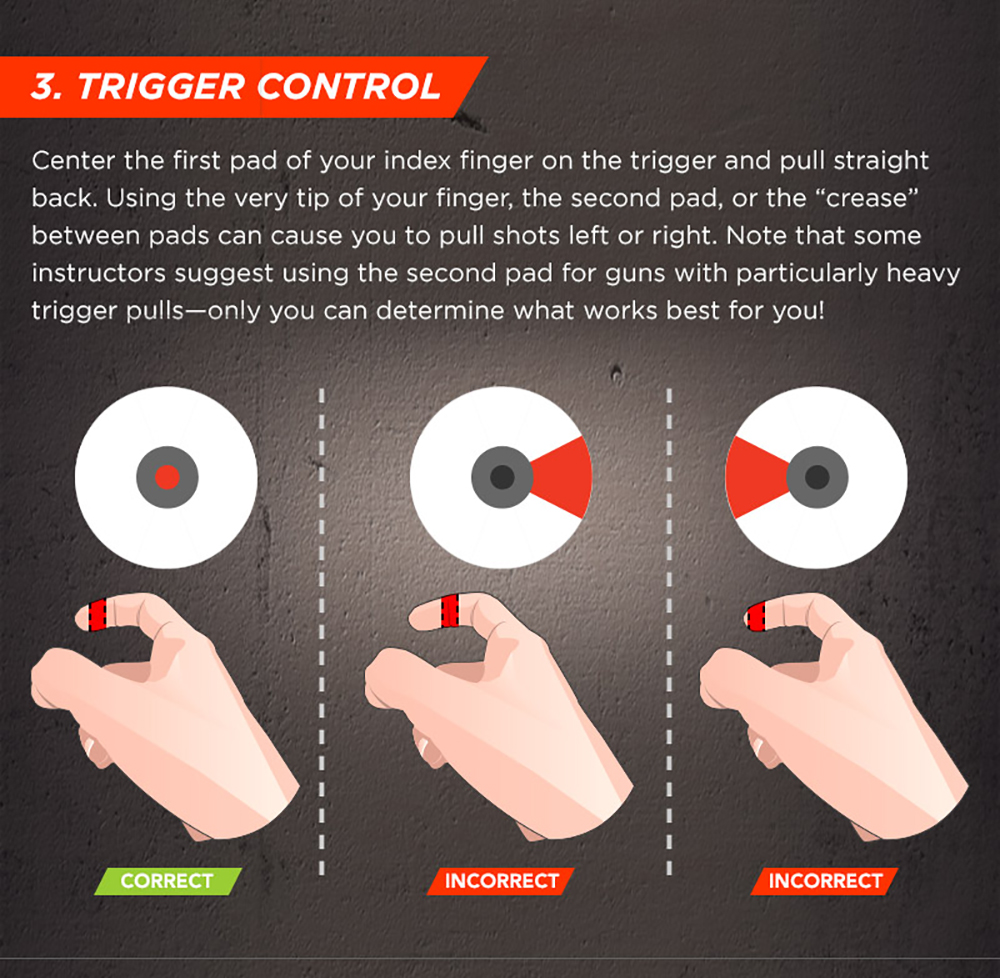
In survival or emergency situations, you may need to train a new or inexperienced shooter on the absolute basics. During those circumstances, an illustrated guide can help the individual visualize some parts of the technique before they ever handle a gun. The following infographic was created by the NRA to show pistol shooting fundamentals — you may find it useful for friends or family members who are learning how to shoot for the first time.
Of course, like most infographics, this graphic leaves out certain important elements for the sake of brevity. There’s no primer on the essential safety rules to know before ever handling a gun, nor is there any reference to grip technique or body stance. Despite the obvious need for additional information, the infographic does provide a good head start on aiming and shooting a pistol accurately.
So, consider showing this Pistol Shooting Fundamentals graphic to a new shooter you know. Though much of this information may seem obvious to those of us who’ve been shooting for years, you might be surprised to hear how much new shooters can benefit from it.
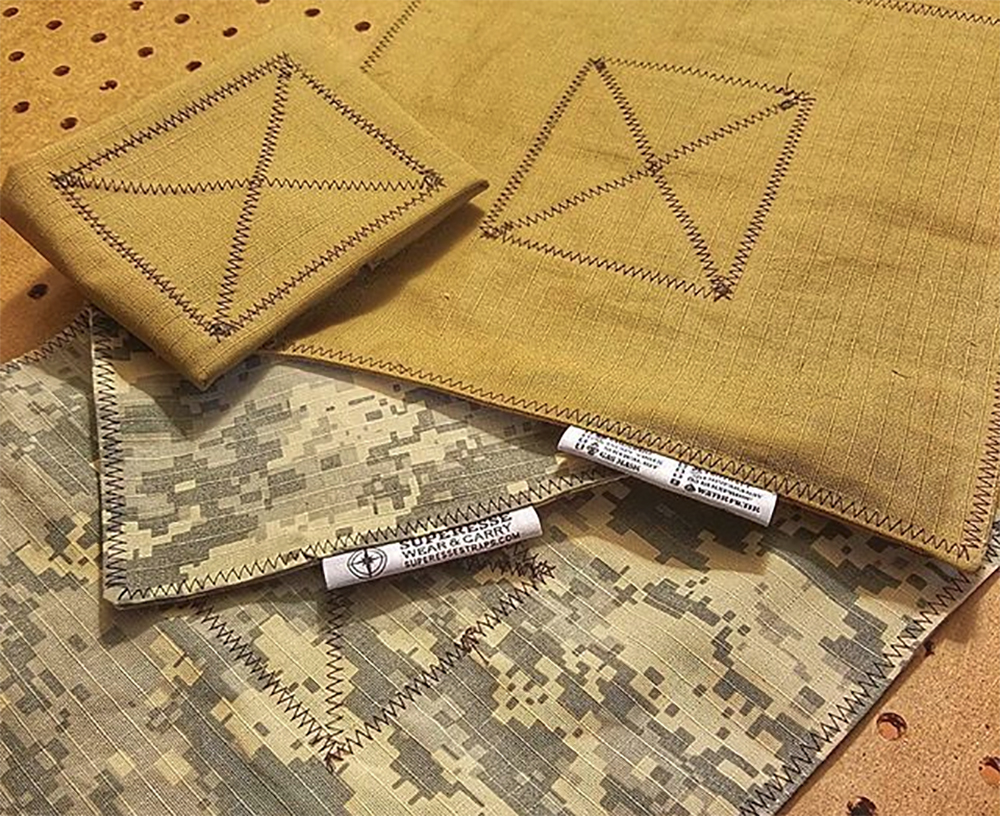
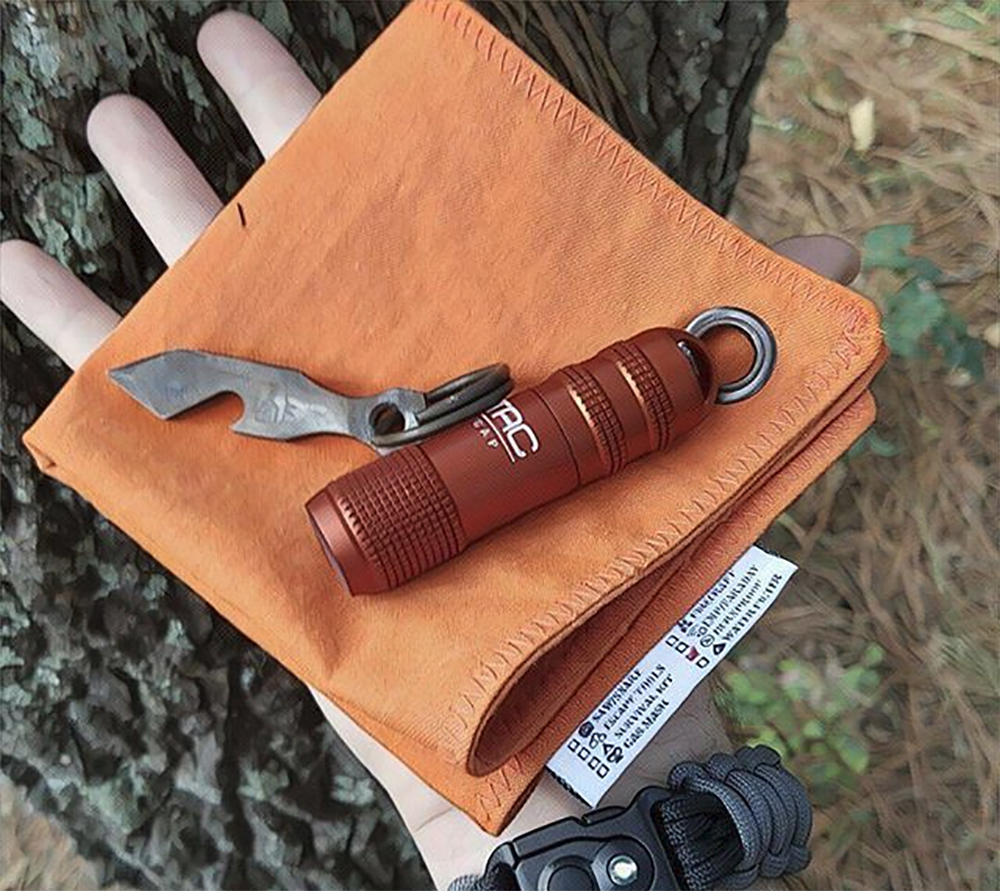
The concept of carrying a handkerchief every day may seem a bit old-fashioned. After all, if you need to sneeze or dab away a stain these days, most homes and businesses have disposable tissues. However, a handkerchief can be much more than a simple square of fabric. In fact, Superesse Straps, a company famous for its paracord survival bracelets, has developed a new line of “survival and tactical” handkerchiefs.
Before you go scoffing at the idea of a high-tech handkerchief, keep reading. These “hanks” offer various added features that can be helpful for everyday carry purposes, or even in survival scenarios. Of course, they can always be used for the traditional purposes: wiping spills, drying sweat on your brow, or covering your face while you sneeze. However, you may be surprised by the additional capabilities.
The Faraday Hank blocks electromagnetic radiation and RFID signals.
Faraday Hank – Sewn-in nickel and copper EMF shield material to block RFID chip readers and electromagnetic pulses. Ideal for wrapping your credit cards, cell phone, and other electronics. MSRP: $40
Camp Rag – Two-layer Kevlar cloth with aramid thread and brass grommet. Burnproof and flame resistant up to 8,000 degrees Fahrenheit. Ideal for grabbing hot equipment or shielding items from flames. MSRP: $40
Saw Shemagh – Soft woven handkerchief with hidden kevlar aramid saw thread. Saw is secured by a flap, resistant to heat, and offers 200-pound breaking strength. MSRP: $40
Tactical Tissue – Ripstop material with morale patch mounting point and hideaway storage compartment. Optional Urban Kit version includes a hidden non-metallic handcuff key and kevlar thread saw for escaping illegal restraints. MSRP: $40 for standard version, $50 with Urban Kit option
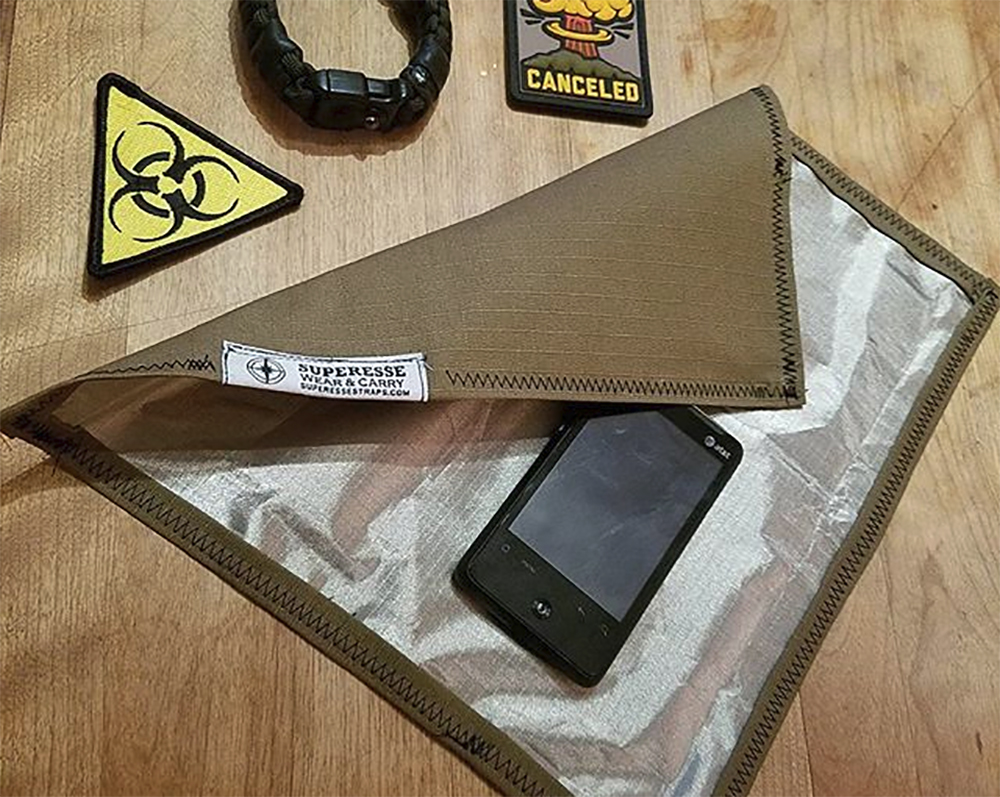
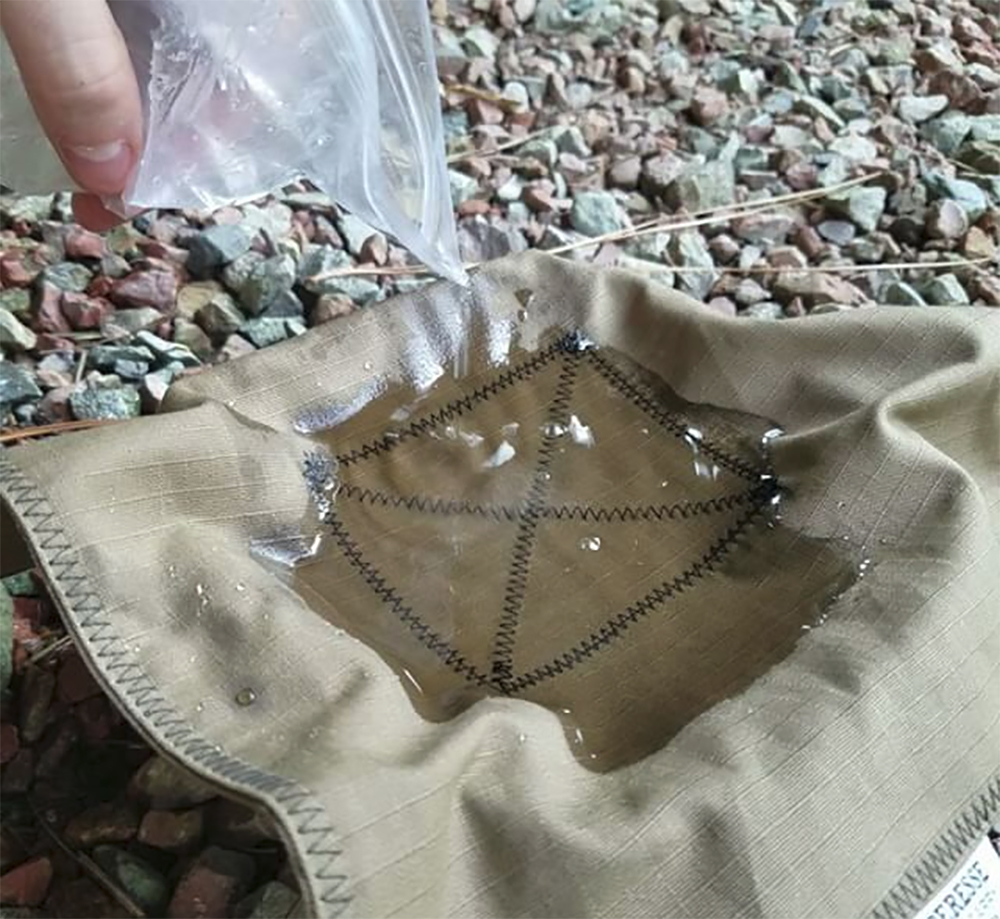
The Superesse Straps Filter Bandana incorporates a carbon fiber water filter.
Filter Bandana – Three-layer handkerchief with porous 4″x4″ carbon fiber filter sewn into the center. Superesse Straps says the filter can be activated by flame to remove particulate and contaminants from water, or it can be used as an improvised face shield/gas mask. MSRP: $40
Char Cloth – Features two forms of built-in fire tinder. Wax-coated tinder wick is stored in a hidden pocket, and a square of burnable char cloth is also included. MSRP: $40
The Camp Rag features flame-resistant fabric for gripping hot items.
EDC Hank – Standard double-layer heavy-duty handkerchief. Optional Survival Kit version adds supplies hidden in a waterproof corner pocket: fish hook, fire tinder, two matches, paracord, water purification tablet, and safety pin. MSRP: $25 for standard version, $40 with Survival Kit option