In This Article
Safety Disclaimer
Climbing or descending with ropes is an inherently dangerous activity, and a magazine article is not a substitute for hands-on instruction. Never participate beyond the level of your training.
During a mass-shooting scenario, it may not be tactically feasible to try and evacuate the wounded (or yourself) by dragging them down a set of stairs and out the main entrance. If you’re safely barricaded inside a room, wouldn’t it make more sense to evacuate a victim through a window before they bleed to death? Or, for example, you’re doing a canyon hike with your family and someone falls 20 feet down a sheer cliff. How would you get down to attend to them?
Basic knowledge of rope rescue including raising, rappelling, and lowering allows us to defy gravity in whichever direction we choose. In this article we’ll give you the basics of what you need to know and what gear can aid your mobility. If you choose to build and maintain this perishable skill, you’ll unlock a rescue “cheat code” and be able to save lives in ways you’d never previously imagined.
Why Ropes?
Rope skills are always useful. Perhaps you routinely work and play in places where you can’t dial 911, or maybe you’re interested in learning to be an active bystander or “first care provider” who is willing to make a difference before the professionals arrive. Alternately, think about an escape-and-evasion scenario. Need to get out of a building quickly, and have a sinking feeling that the stairs and main entrance are being watched? Ropes can get you there.
To provide a proper introduction to rope rescue we sat down with firefighter Dominick Briganti. Dominick is a 27-year veteran of the fire service. He was deployed to the World Trade Center during Sept. 11 and now works as a lead instructor for SWAT teams, firefighters, and special operations warfighters on the subject of technical rescue.
Rope rescue, specifically, is a vast subject and there’s a ton of conceptual theory and background behind it. Experienced climbers could have a field day nitpicking all the things we “should have” noted or warned you about in this article. But thanks to Dominick’s instruction we’re able to give you all the ground-level knowledge you need to start down the path — without making you reach for a glass of whiskey and two Ibuprofen.
The Basics
Rope rescue techniques consist primarily of three different actions:
- Rappelling down to a lower level by yourself
- Lowering (or being lowered) with someone else’s help
- Raising (or being raised) with someone else’s help
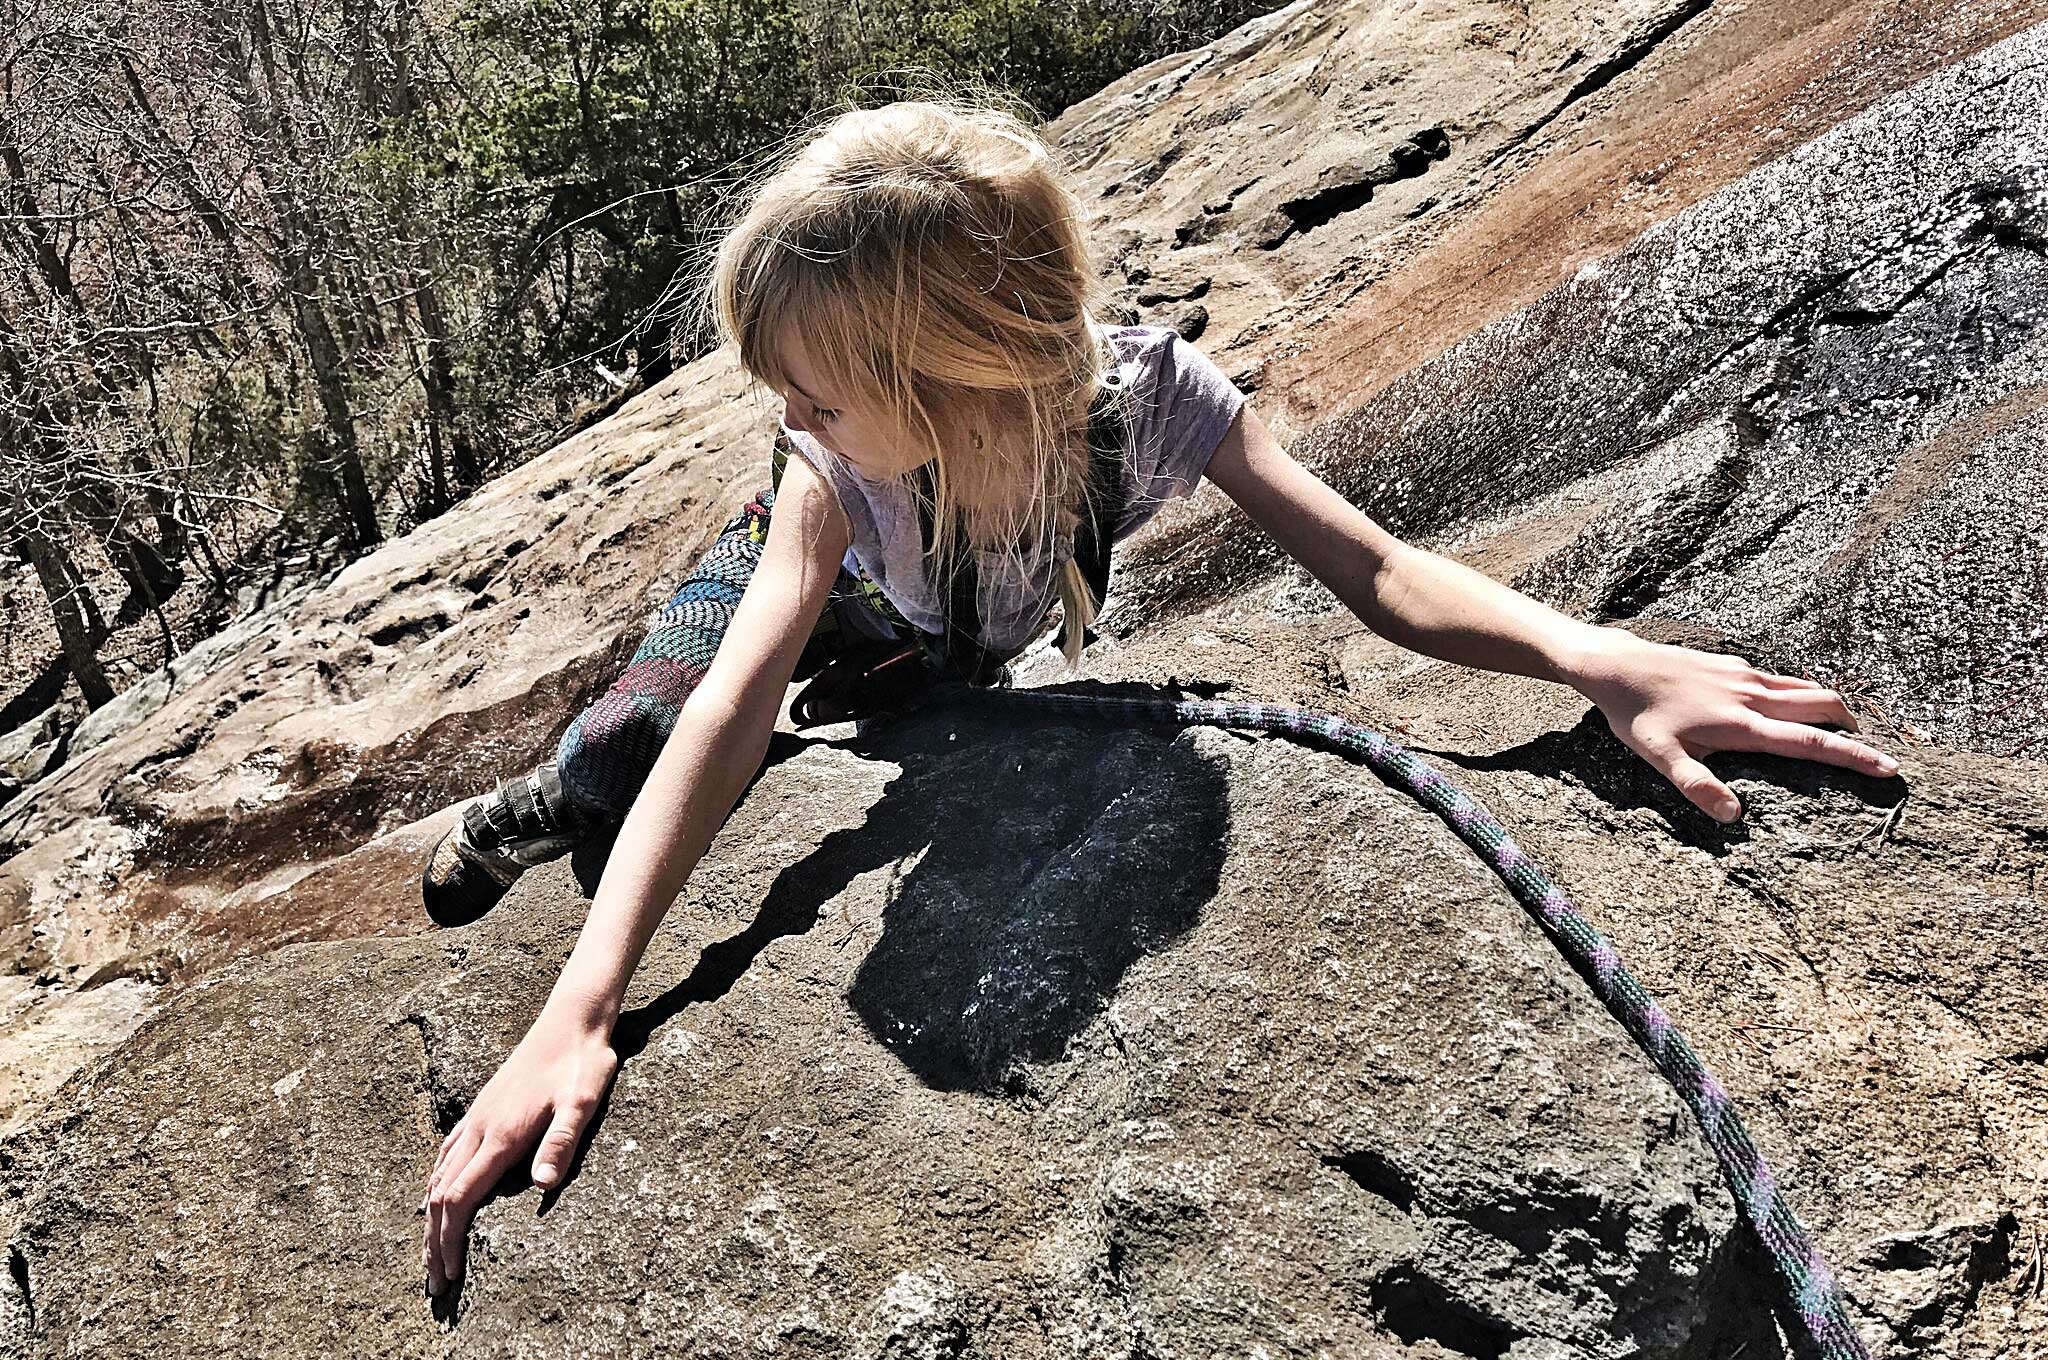
Rappelling is the most simple of these three to rig. It’s also the only one of those actions you can accomplish by yourself, although it’ll require both hands to do so. This means that you won’t be able to carry tools down in your hands or brandish a weapon. It also won’t be as easy to circumvent tight spaces, snags, or obstructions as it is with some other rope access methods. On the plus side, you’ll be able to personally control your rate of descent as well as set up and get down quickly. That’s the big advantage — it’s simple and very fast. Rappelling allows you to access an incapacitated victim very quickly, and can also be used for escape/evasion should you be having a seriously bad day.
Being lowered allows you to descend with both hands free. Now you can use a weapon while descending (think sweeping a gun into each window on your way down, instead of just peering inside and waiting for what may be an unpleasant surprise). Mobility and flexibility of your descent path is improved as well. Lowering doesn’t require any additional gear, but it does require a second person at the top of the drop who’ll control your descent.
Raising (hauling) someone is like the final exam for Rope Rescue 101. It requires more complicated rigging and more gear. Since an average person can only haul roughly 50 to 80 pounds vertically (much less than what a person weighs), you’ll have to use the principles of mechanical advantage and multiple pulleys.
In this article we’ll focus on rappelling. This will give the uninitiated a bite-size introduction to the subject, and hopefully whet an appetite to level up to the next two tiers of capability.
Ingredients for Rappelling
These are some of the basic components for rope rescue rappelling:
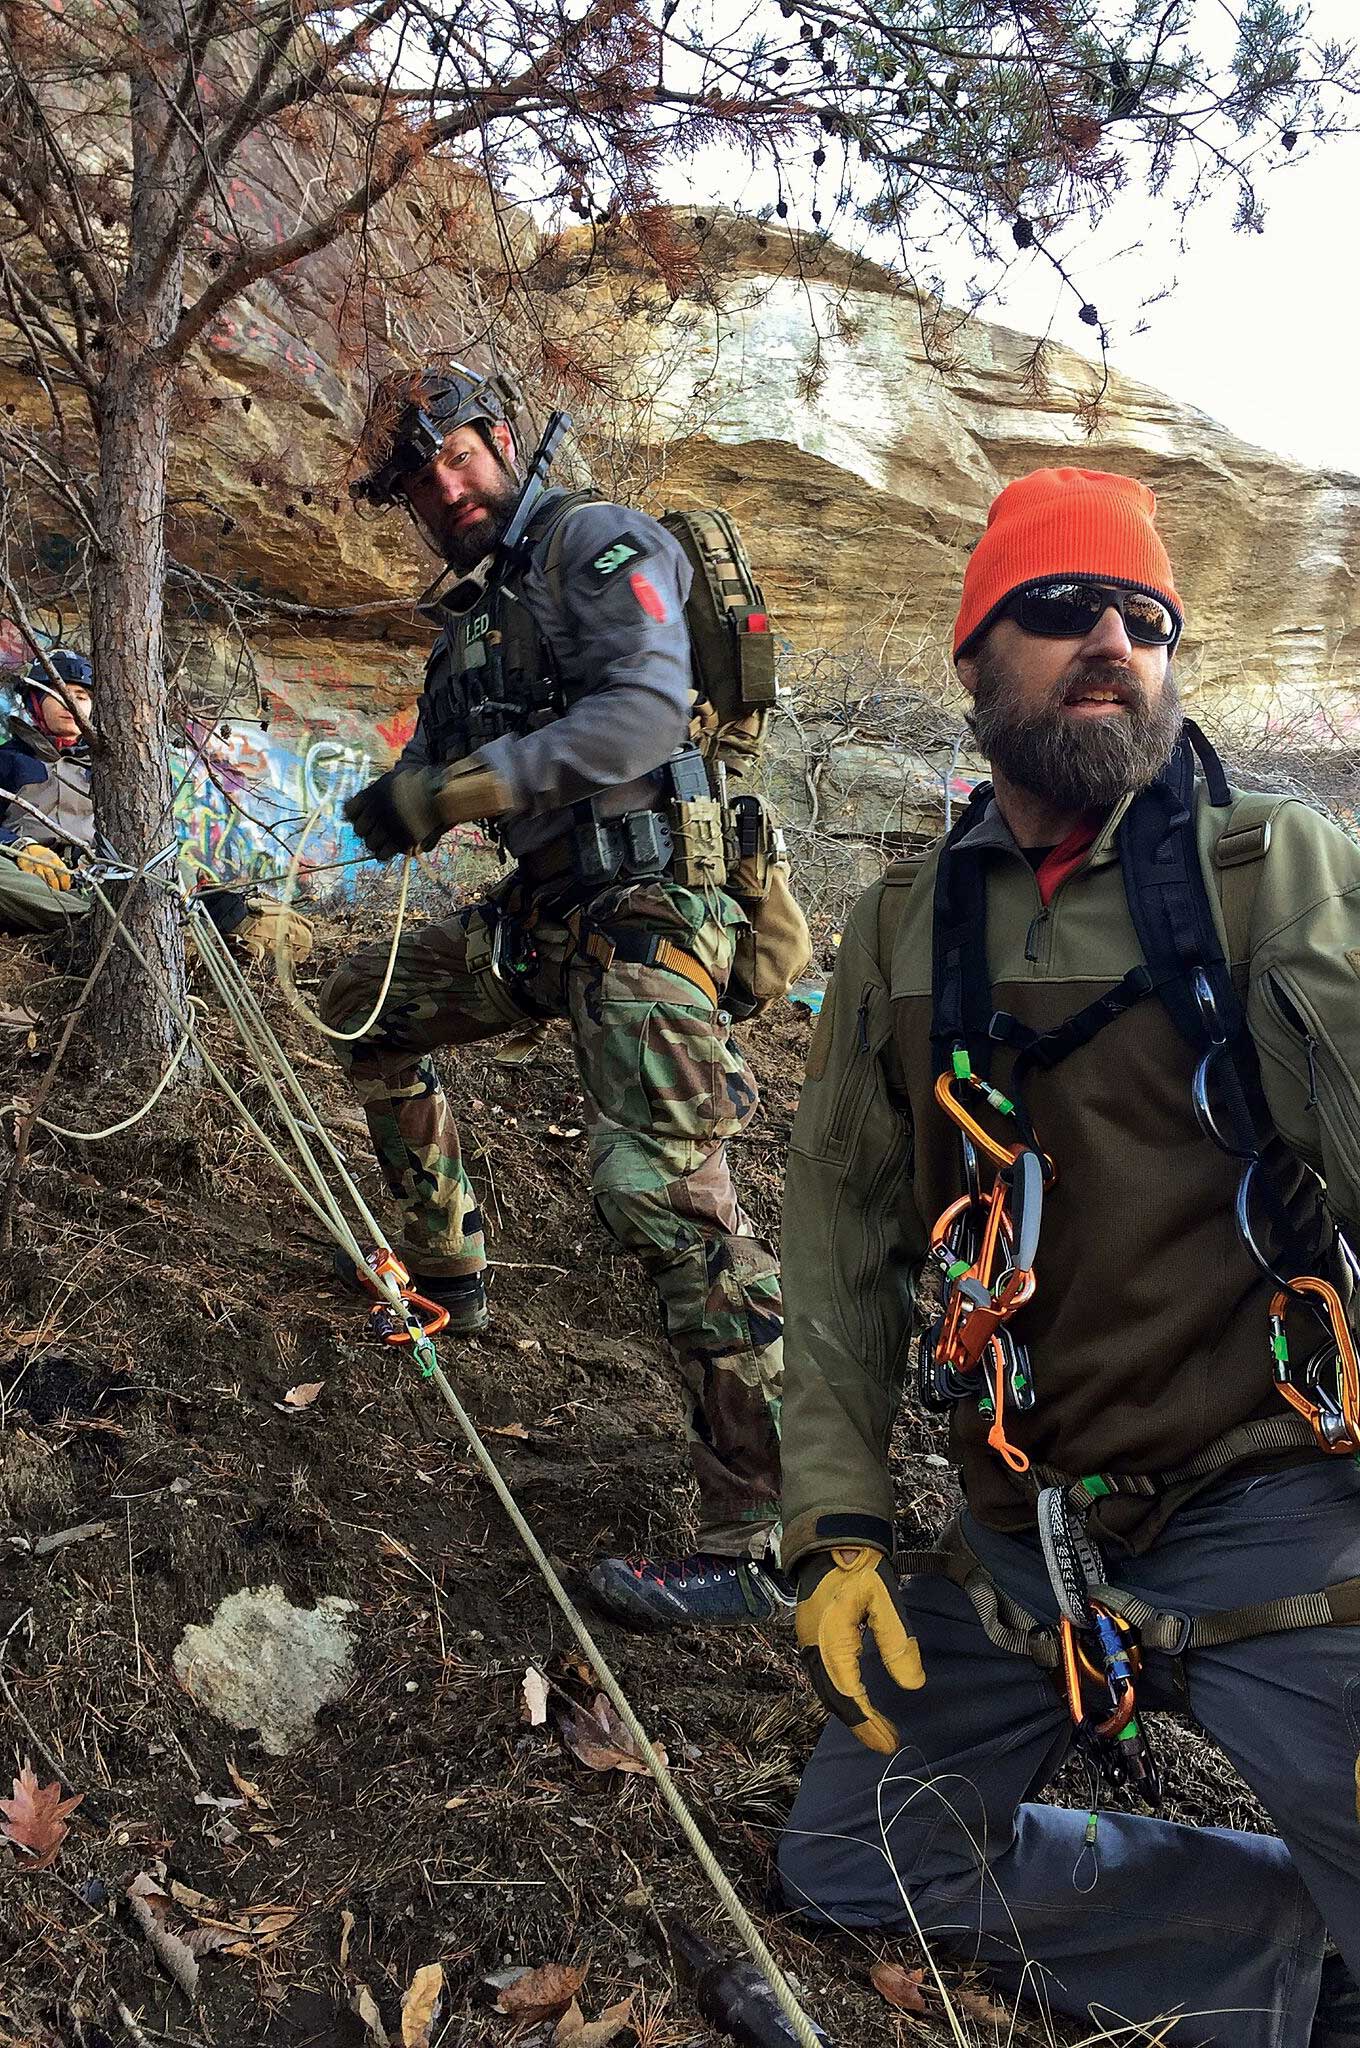
Anchor: This will hold you and your rope system in place. It should be stable and fixed in position. In the woods, we might use a tree trunk — in a canyon, a large rock. In an urban environment such as a hotel room or high-rise we could use large heavy furniture or substantial railings. Alternatively, if we wanted to go full Jason Bourne we could even attach a carabiner to the end of our rope, feed it through the hinged side of the open door into the hallway and then close the door. Once the rope is loaded, the carabiner will prevent the rope from being pulled through.
100% Aramid Rope (75 to 100 feet): Ropes made from 100-percent aramids like Technora or Kevlar are relatively new. These materials offer superb abrasion resistance and brush off the effects of high heat and fire. They also don’t lose strength in wet conditions and can shed water quickly, unlike nylon rope. Last, they’re stupid-strong — a 9mm-thick piece of rope can take roughly 7,000 pounds.
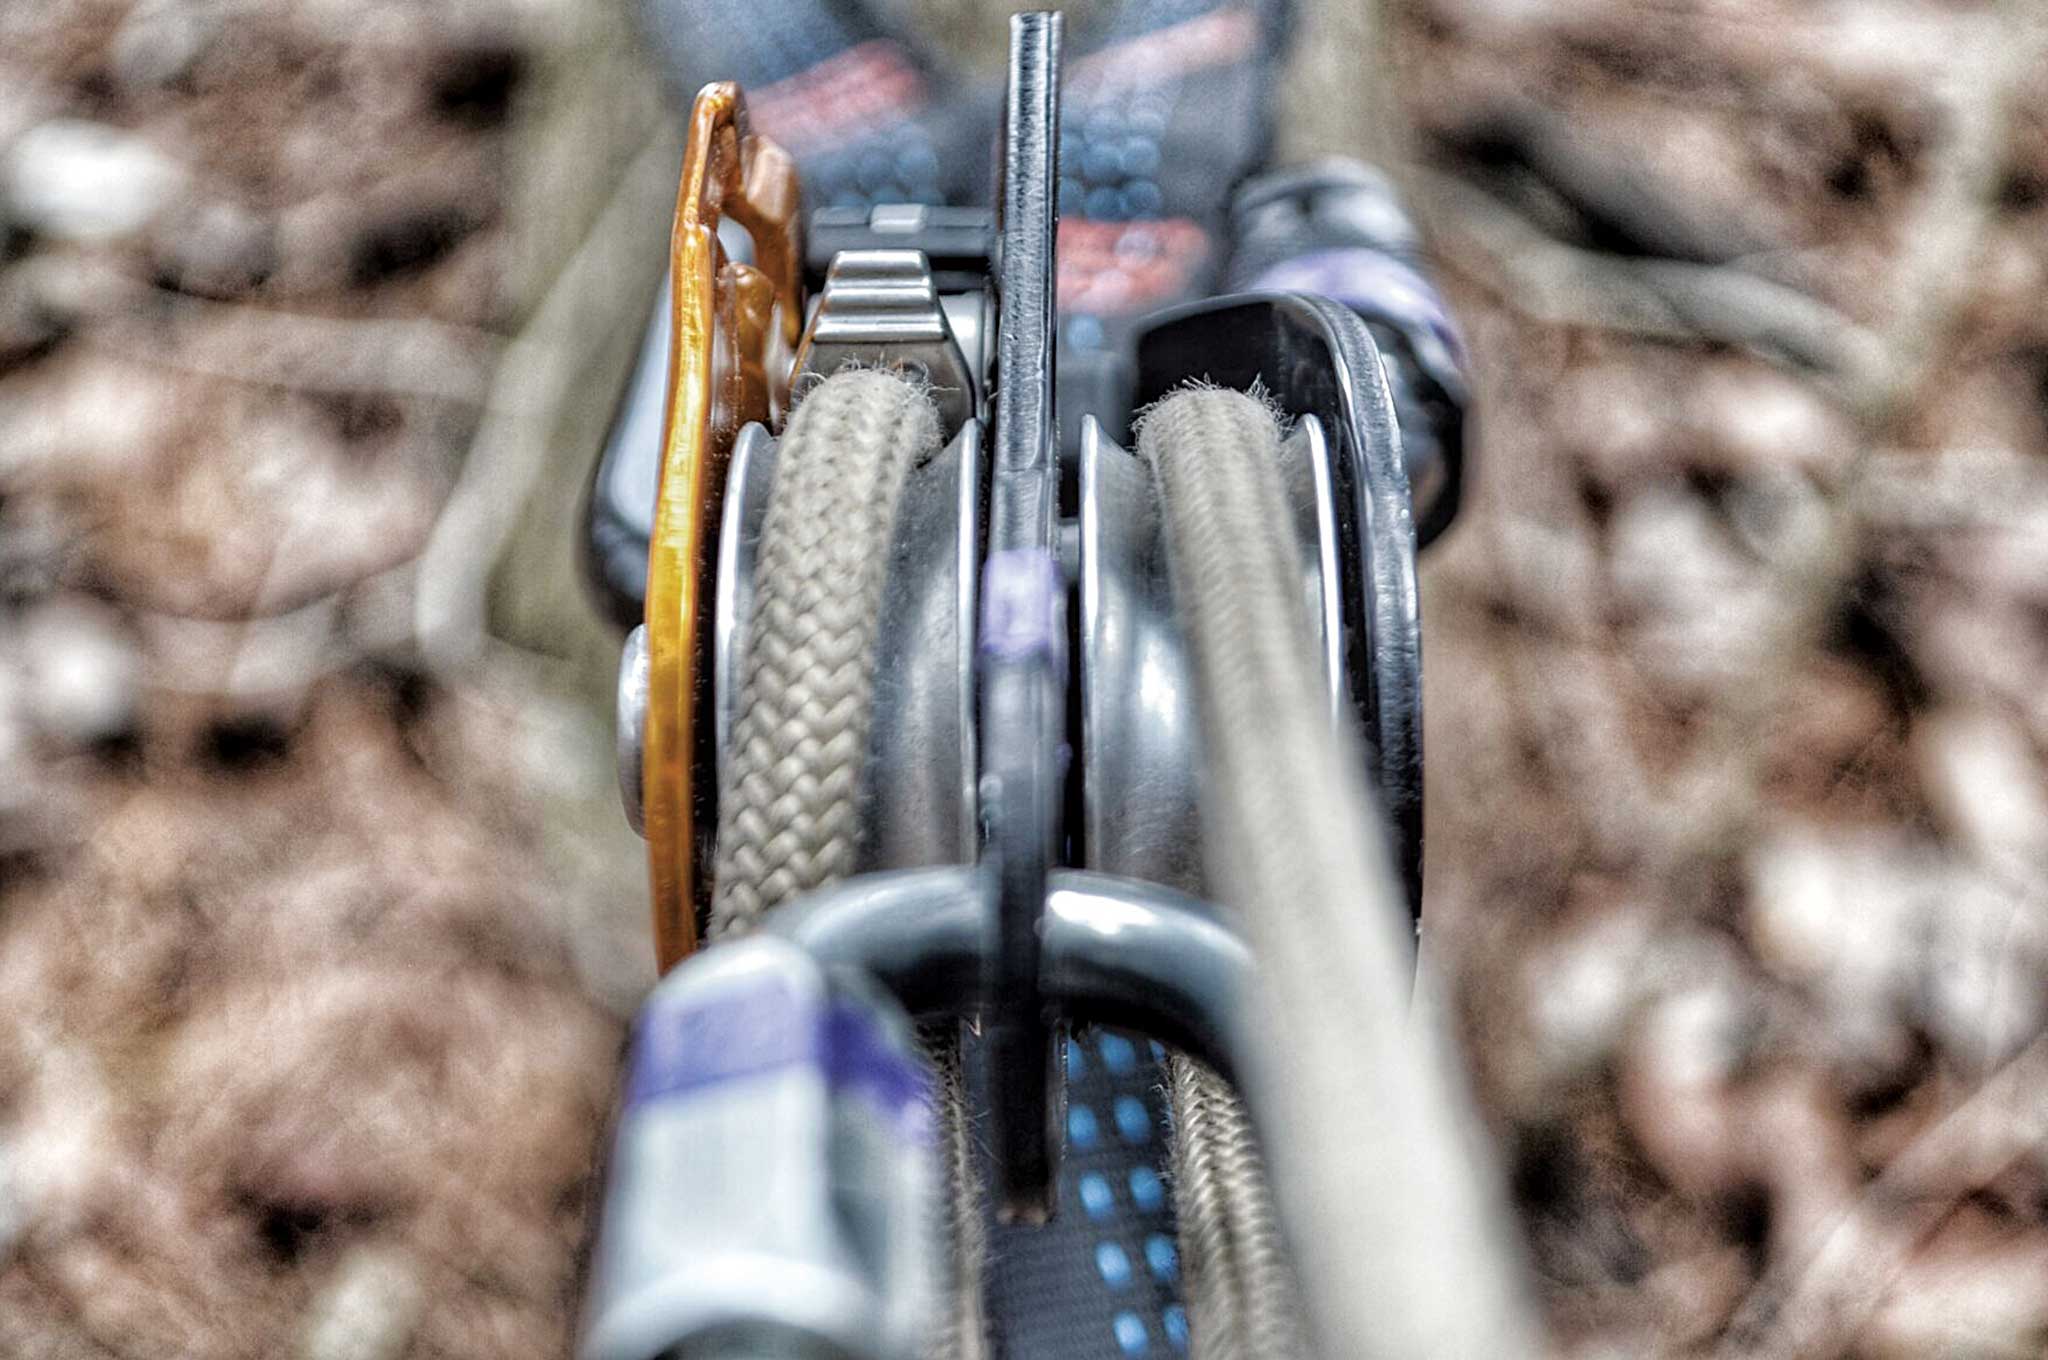
Auto-Locking Carabiners (2 to 3 total): A carabiner is a specialized shackle used to temporarily connect your ropes to your harness. Because they’re very easy to manipulate with gloved hands, we prefer magnetic-locking carabiners like the Rocklock Magnetron from Black Diamond Equipment.
Rappel Device: During the early days of climbing, rope was simply wrapped around your body to increase friction and slow your decent. Although convenient, using your flesh as a brake pad is obviously uncomfortable. As an alternative, rappelling devices (aka descenders or descending devices) were developed, providing a hand-holdable forged metal loop through which the rope is passed. As the rope rubs on the metal the friction is increased, allowing a controllable rate of descent. There are tons of options too numerous to mention, but usually we prefer a metal-descending device such as a Rock Exotica Totem — or we make our own by using a simple Munter hitch knot (see photo in sidebar).
Climbing Harness: For minimalist experts, it’s possible to make a climbing harness from webbing material. But for this introduction we’re going to err on the side of safety and comfort, and suggest purchasing a commercially available version, such as the value-priced Patriot Harness from Metolius.
10 Steps to Your First Descent
Once you’ve assembled the ingredients, you’re ready for your first rappel. The steps shown below illustrate a simplified method, which doesn’t include a contingency to lower you down if you get stuck. For this reason it’s appropriate only in dire emergencies, or in training when you have a partner watching, and at heights which you feel comfortable jumping down from.
Tie a Figure 8 Stopper Knot to the end of your rope. This ensures you don’t rappel off the end of the rope and into the history books under the chapter titled “Dumb Ways to Die.”
Check your drop distance by lowering the rope to the ground. If your rope can’t touch the ground from your position, relocate. You should have enough rope to touch the ground below you plus at least 5 feet extra.
Tie the rope around your anchor. The most simple and effective way to do this is by using a bowline knot with a Yosemite finish (see photo in sidebar), which strengthens the knot and prevents the knot from coming loose.
Keep the anchor point as low as possible. Don’t tie it at eye-level just because it’s convenient. This will help minimize shock-loading or jarring of the anchor.
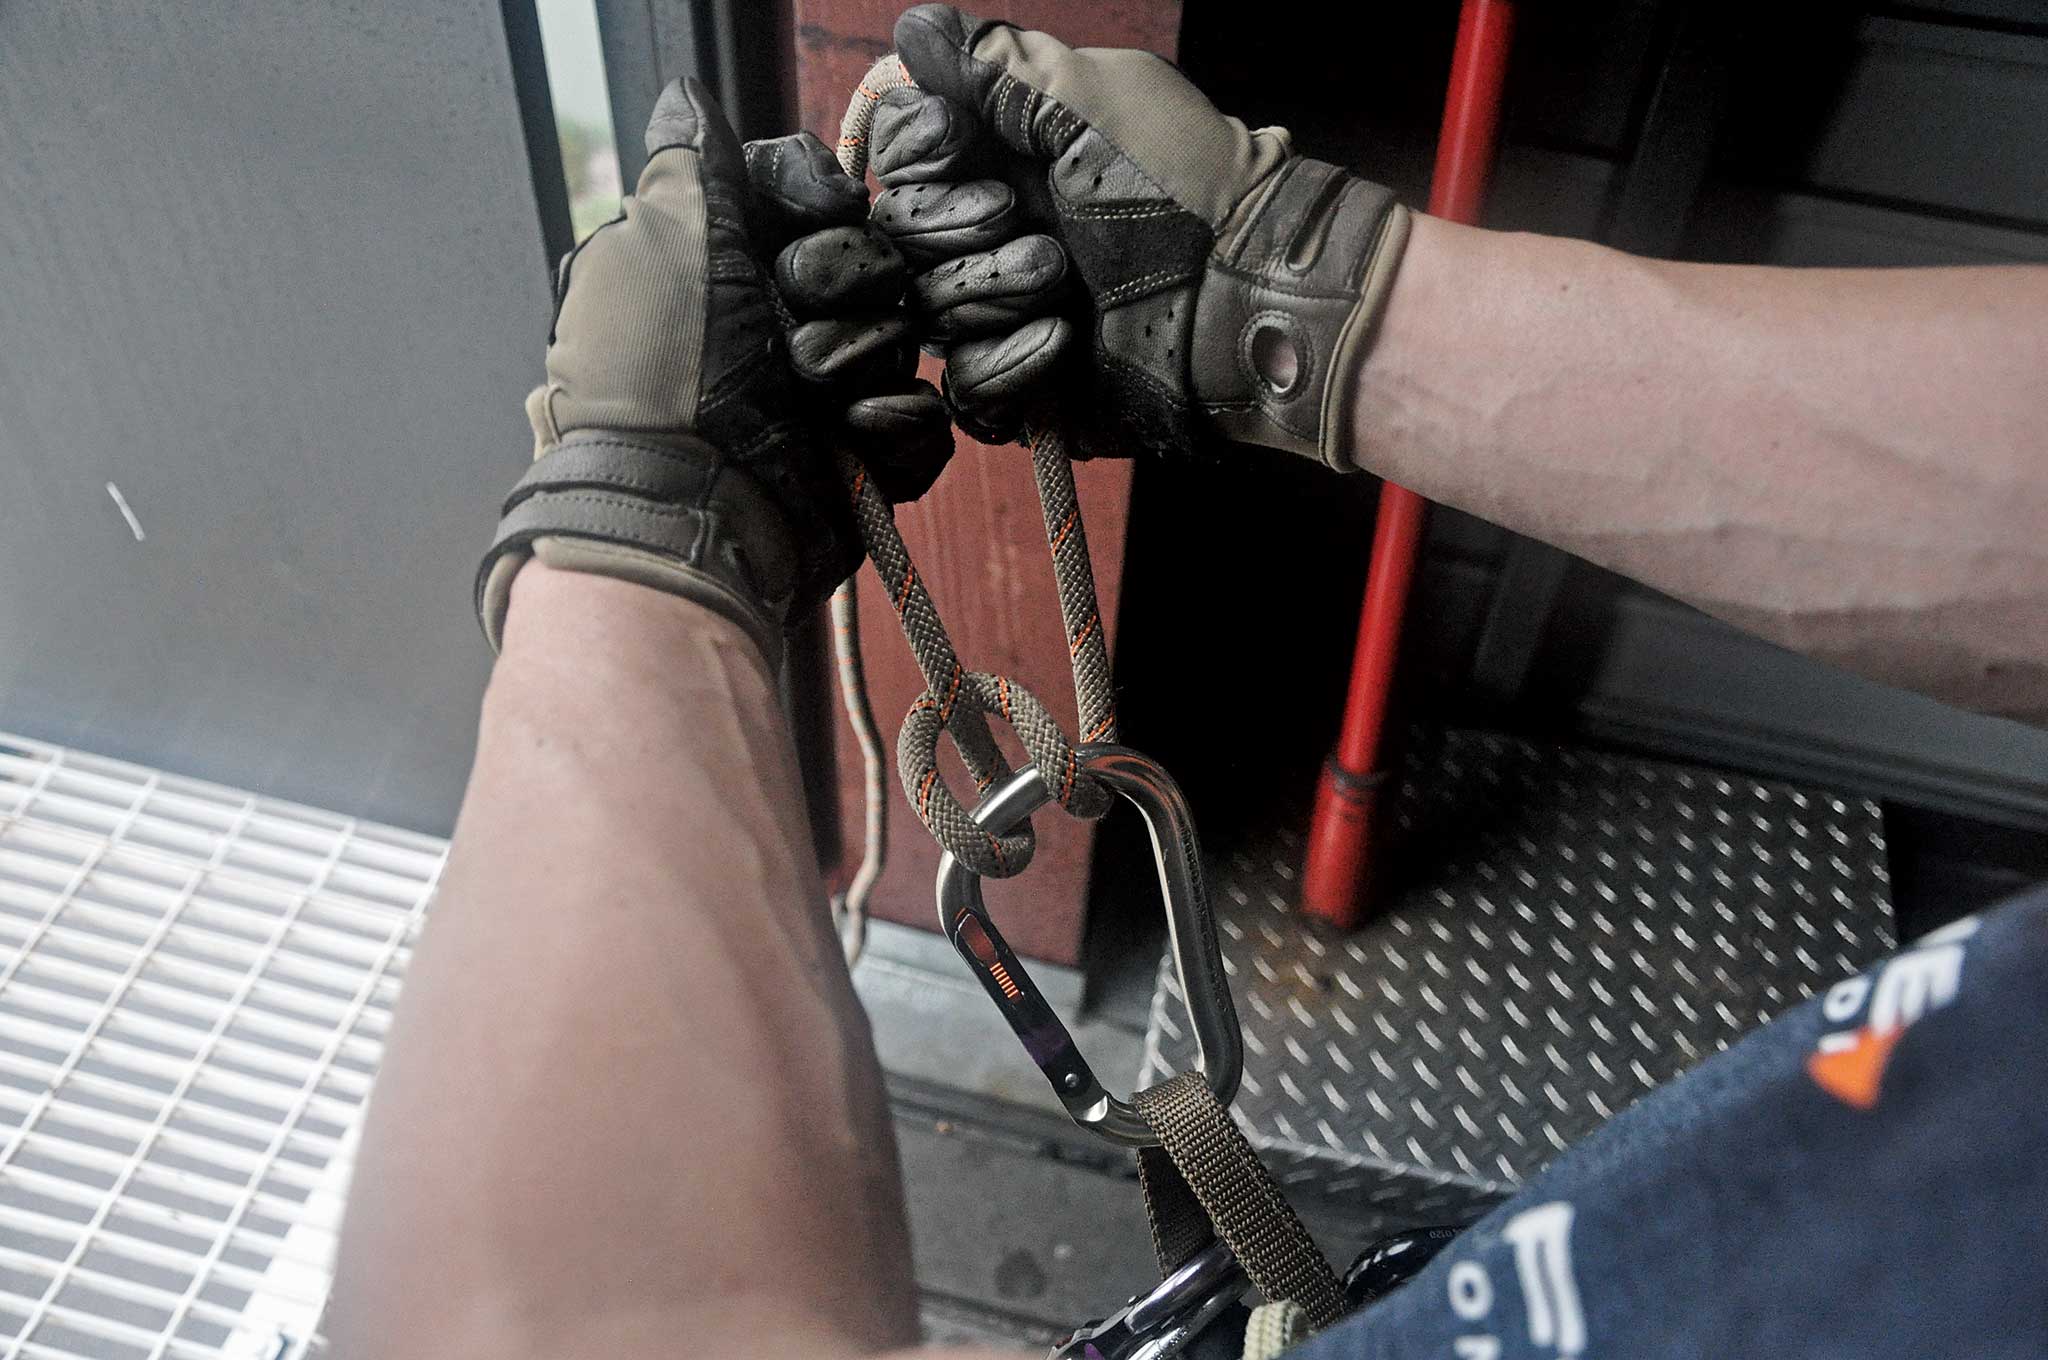
Attach your anchored rope to your descending device using a vertaco-mode configuration. This means that the rope comes back to the carabiner, and if you’re right-handed it will go from the left side of the carabiner, through the right side, then back up (see sidebar photos for reference). Then attach the descending device to a carabiner on your climbing harness.
Double-check your system. Most rappelling deaths aren’t due to failures of the equipment. Instead, they’re caused by preventable mistakes that could have been detected if the climber had bothered to double-check their anchor, knots, and climbing harness.
Stay low, go slow. Instead of standing up and walking backward over the edge, keep your center of gravity close to the ground and roll over. This will help prevent your anchor from dislodging and also maintains a lower profile in a tactical situation.
Once you’re over the edge, face the wall and plant your feet shoulder-width apart. Maintain a sitting position in the harness and proceed step by step down the wall while slow-feeding line through the descending device. The bounding, large downward jumps you see the SWAT teams doing in the movies are pure fantasy (and poor practice). The correct pace and posture is kind of like walking down, but you maintain an “L” position instead of straightening up.
Use friction to control your speed and keep both hands out in front of your face. Because we’re using the vertaco configuration, we can keep our hands out in front instead of having one hand down by our hips as is traditionally seen. This allows us to assume a lower-profile position on the wall and more easily lock off the rope to stop our descent.
Once you’re on the ground, unhook your carabiner from the rappel device. Then, go to work.
We hope this article gives you the head start you need to add rope work to your bug-out and rescue skillset. As you learn more, you’ll find that you can enhance your capabilities by using different knots and gear configurations, instead of simply buying more components. You’ll be able to do more with less gear. Unlike many of our other interests, this makes rope rescue a unique pursuit that rewards the craftiest and most knowledgeable — not just the guys who can drop top dollar on the most expensive offerings.
About the Author
Andrew Schrader is a licensed professional engineer and is certified by the U.S. Army Corps of Engineers as an Urban Search and Rescue (USAR) Structural Specialist. His company, Recon Response Engineering LLC, advises state and federal government organizations on the subject of urban search and rescue and structural collapse. He recently assisted the U.S. Department of State’s Italian Consulate in the development of their post-earthquake response and rescue protocol.
www.reconresponse.com
Knots and Rigging
Because many of the techniques described here are more easily seen in a video than by reading check out www.elementrescue.com and www.netknots.com to learn more.
Based on what we’re showing you in this article, these are the four knots you should care about:
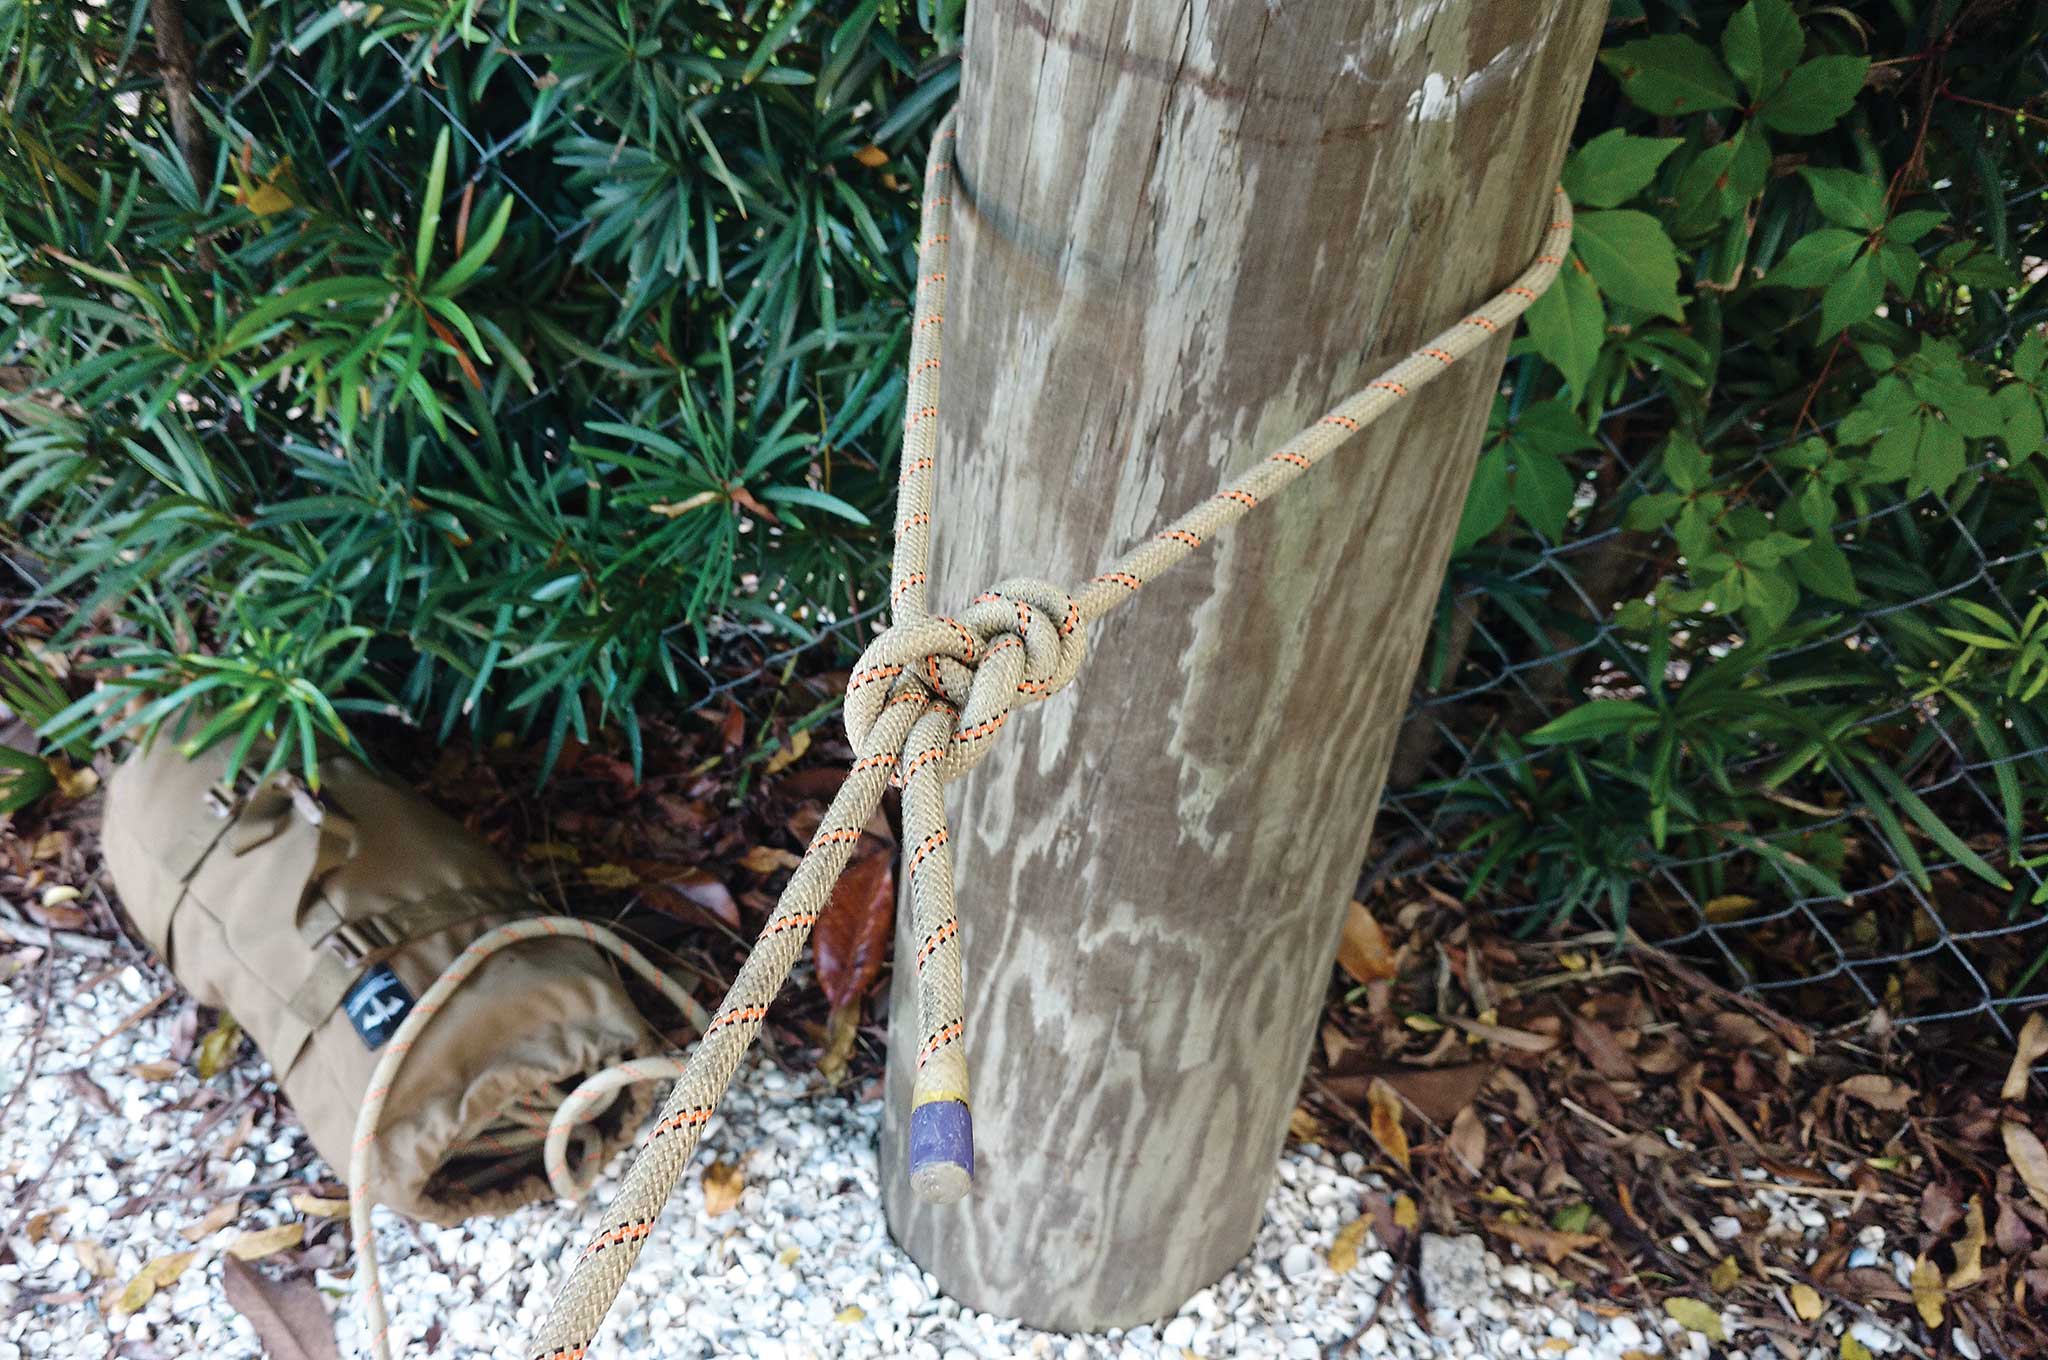
Bowline with Yosemite Finish: This quick knot is used to secure your rope around a suitable anchor.
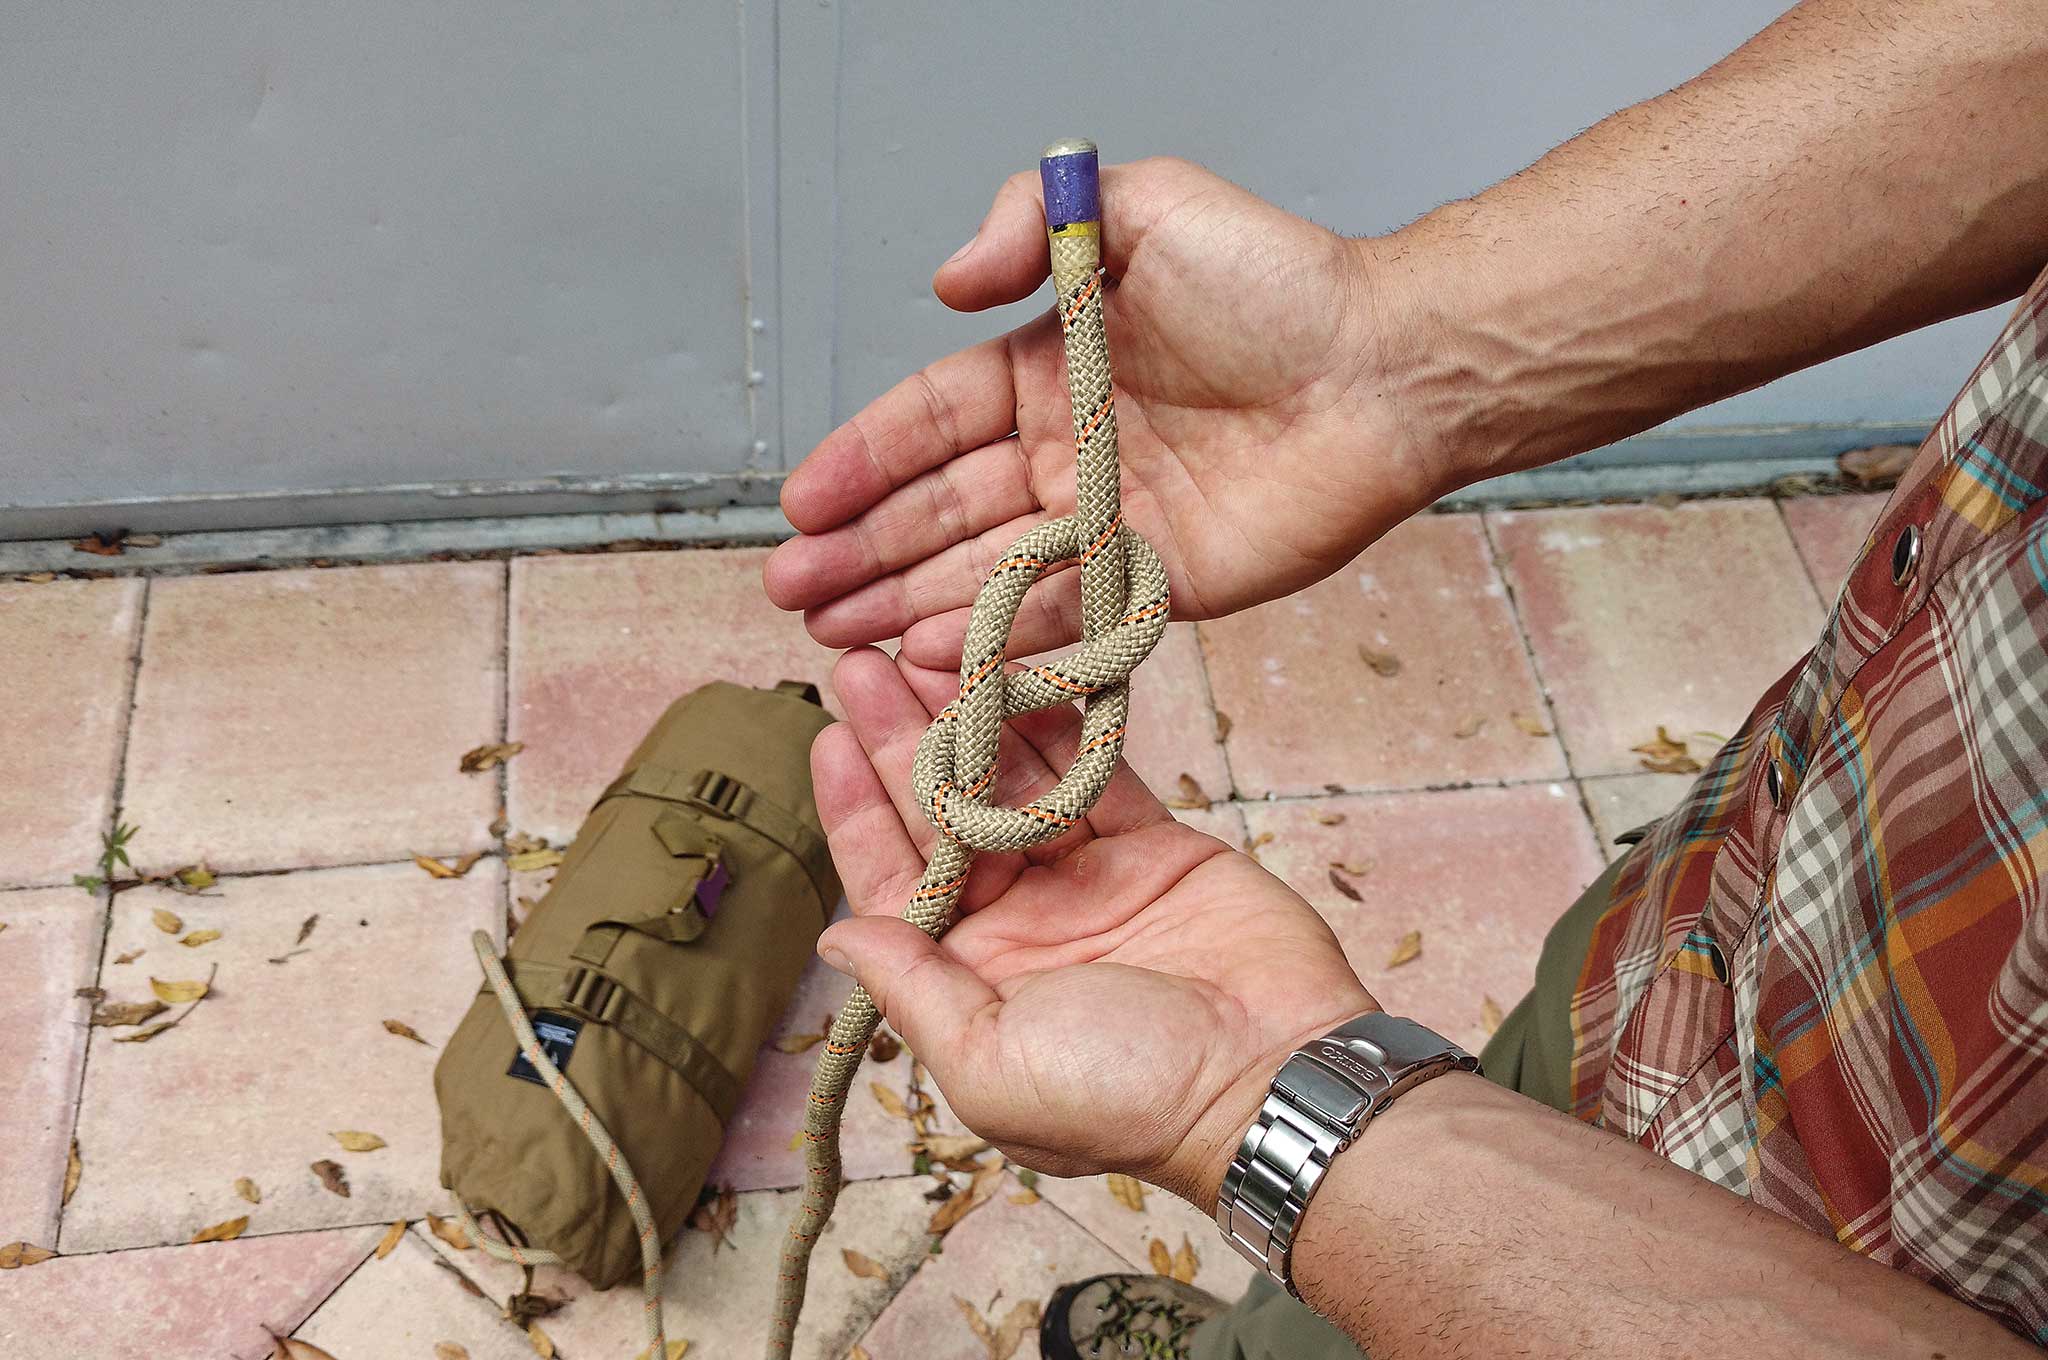
Figure 8 Stopper: This is used as an end knot to prevent the rope from passing through the end of your rappelling device, in which case you’d fall the rest of the way down.
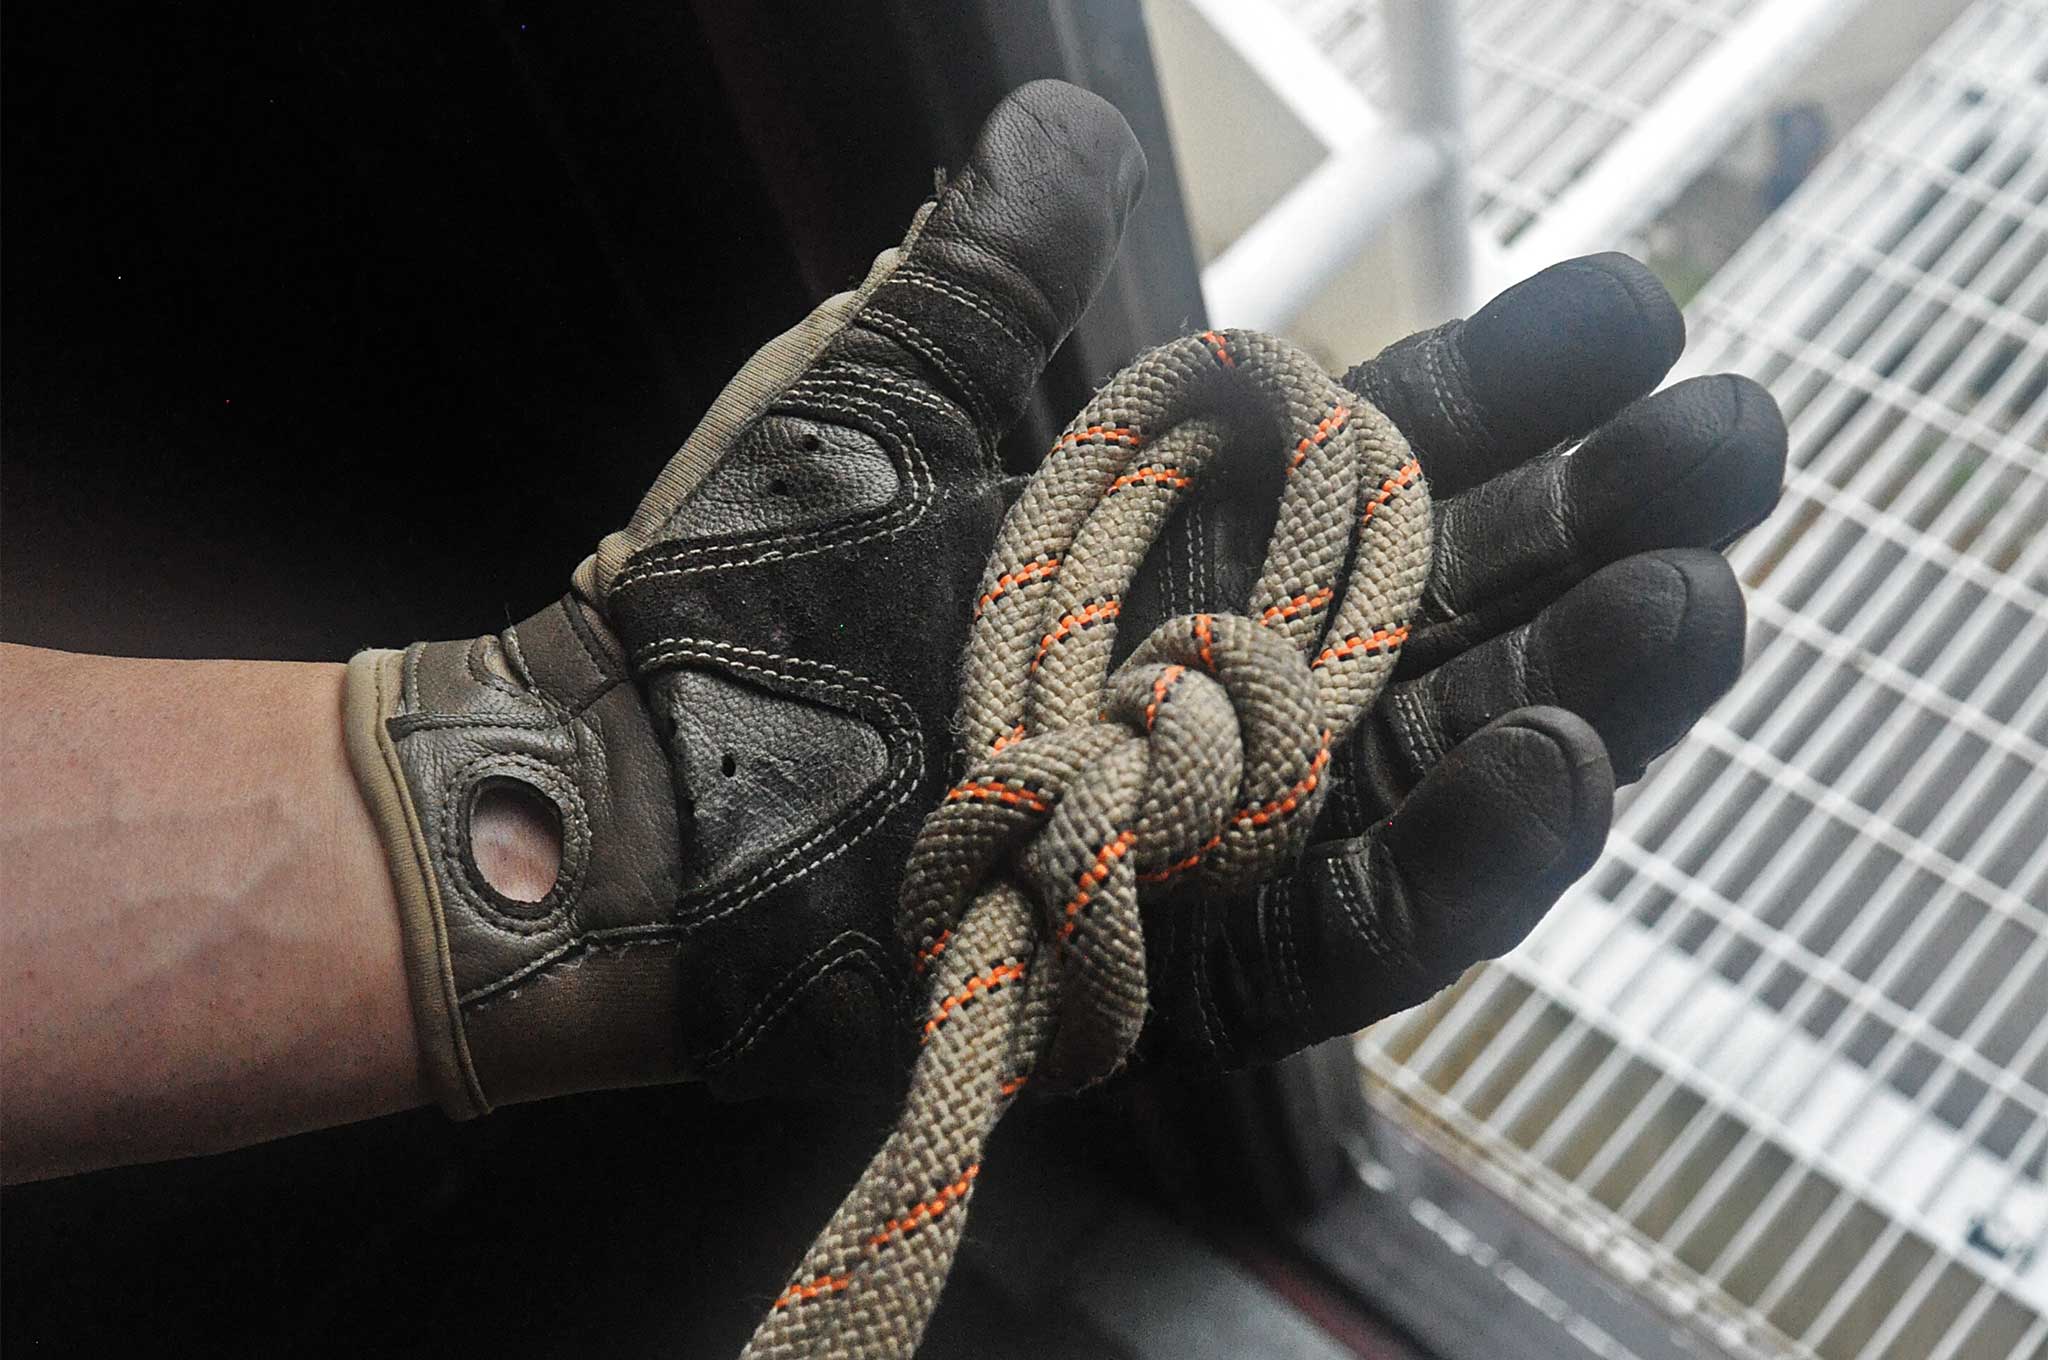
Munter Hitch: Can be used as a friction or descending device for controlling the rate of descent.
Double Bight Bowline: Not strictly necessary for rappelling, but will be critical if you intend to learn anything else about rope rescue.
Rookie Mistakes to Avoid
Not bothering to tie a stopper knot at the end of your line. To prevent this, make sure the knot is on the end of your rope before you even stuff it in the bag for storage. This way there’s never a question.
Rappelling “Hollywood Style” by bounding and bouncing. The faster you go, the greater the chance of getting your hands or clothing sucked into the descending device. This will stop you cold, and unless you built in a lowering contingency to your anchorage you’ll be stuck there. To avoid being the rescuer who had to be rescued, keep your descent speed to a minimum.
Keeping hands too close to the rappel device. Maintain a minimum 12-inch distance between your hands and the descender to prevent a finger from getting sucked in. Also, avoid loose clothing and long hair. We’ve seen long hair get sucked into a descender before, and it literally pulls the skin out with the hair. Not pretty. Don’t do that.
Not having enough rope. Check to make sure your rope can reach the ground, and then some. Not just sometimes but every time. Otherwise you’ll find yourself jumping down from a height that may or may not be survivable.
Best Gear for Rope Rescue
Could a skilled rescuer do this work with just a rope? Of course. But having some modern equipment can make you much faster and more effective in the process.
Exfil SAR Tactical Helmet by Team Wendy
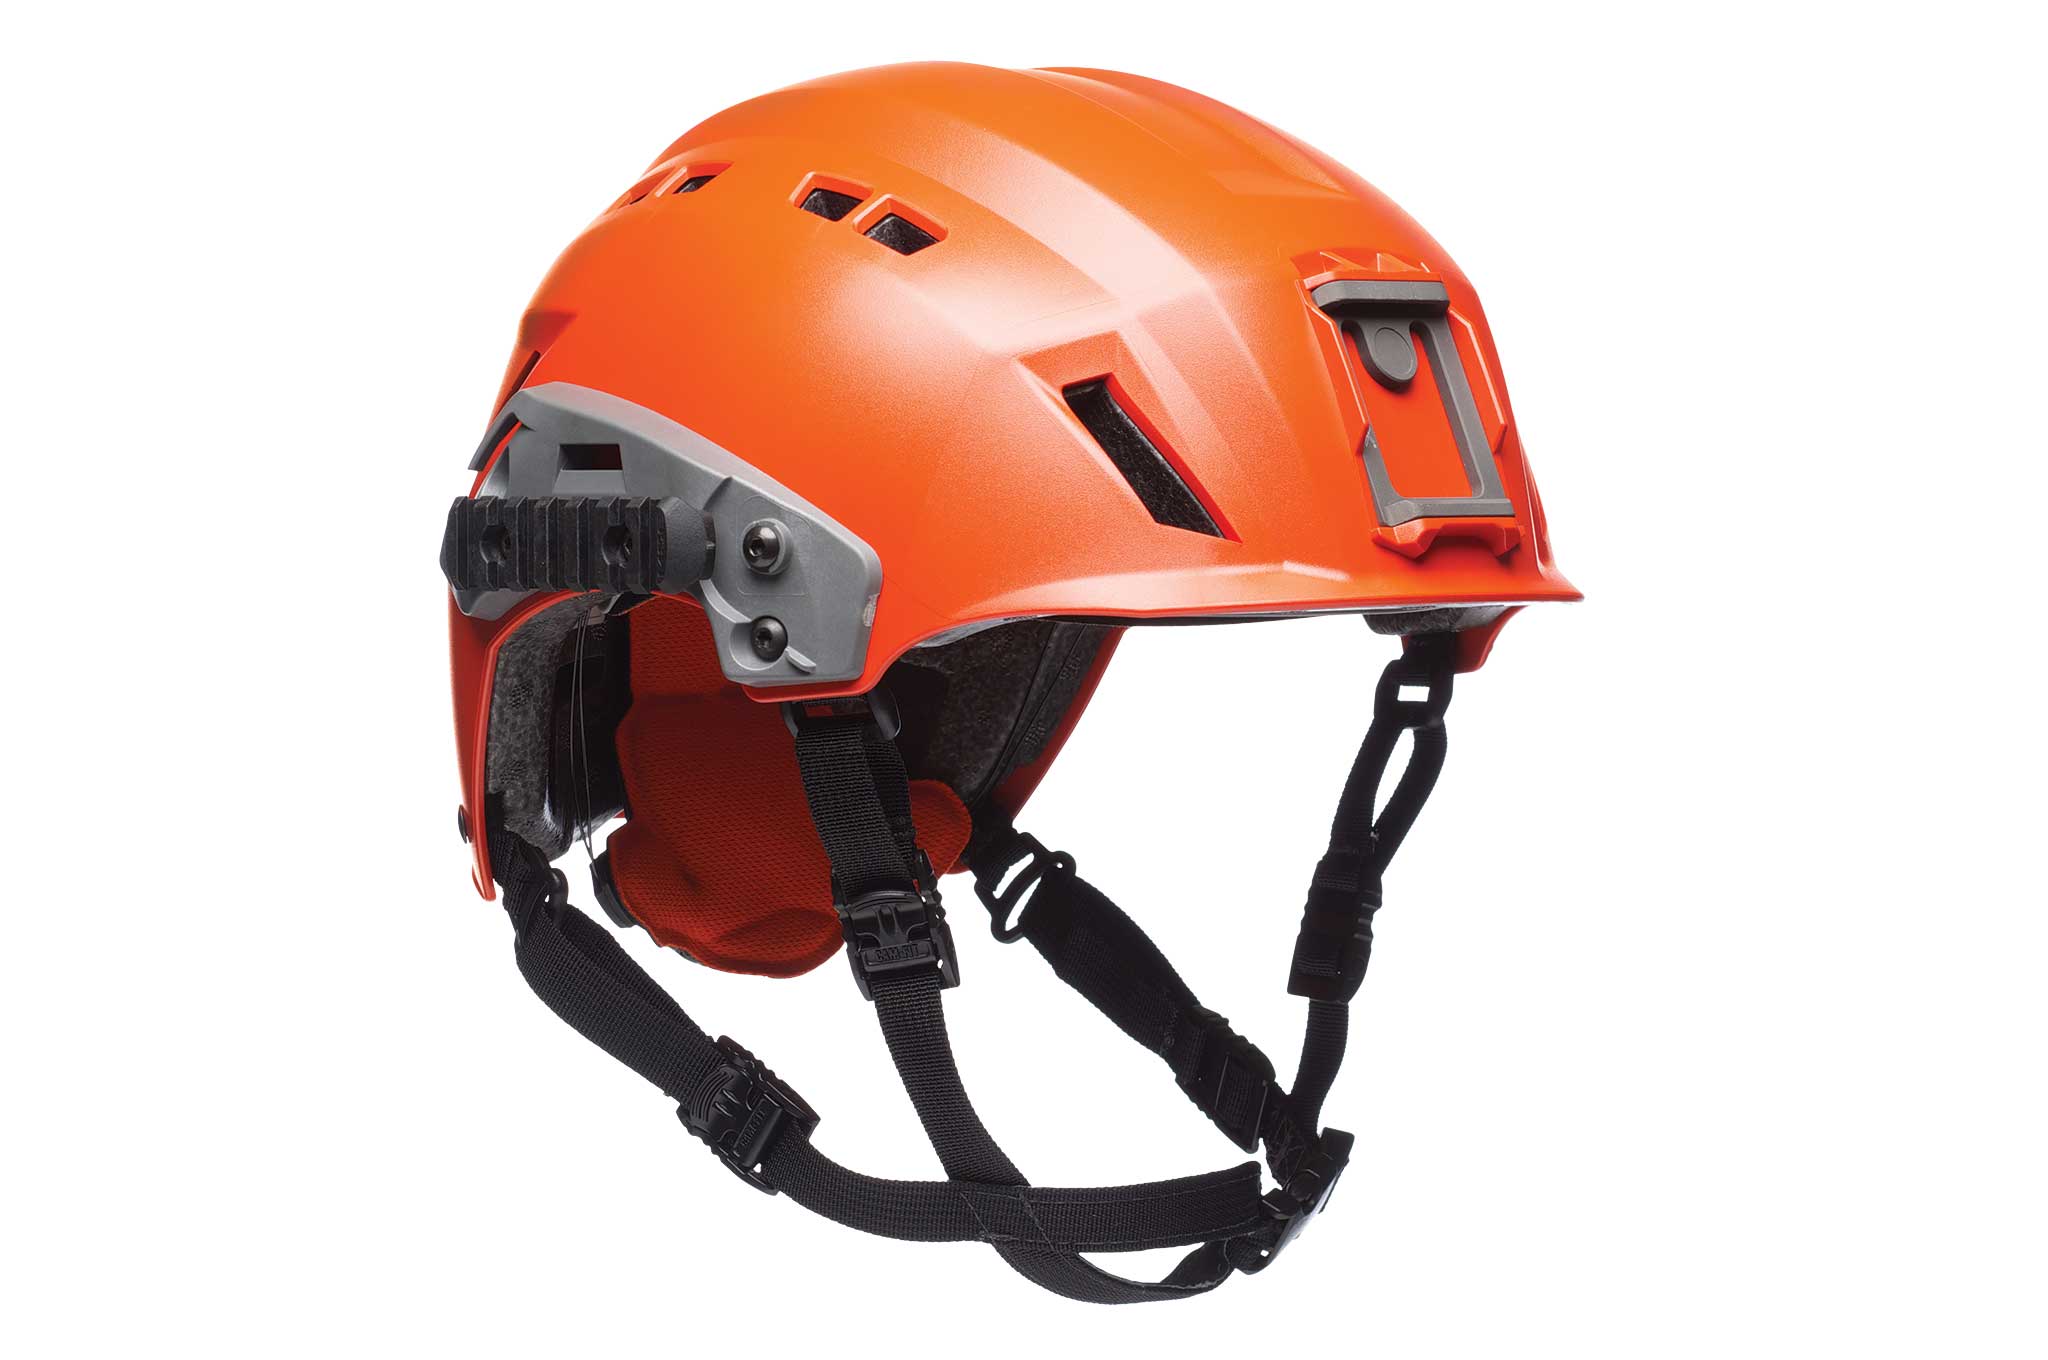
Anytime there’s a falling hazard, as there always is in rappelling and rope rescue, protect yourself from traumatic brain injuries or death by wearing a helmet. The Exfil SAR Tactical Helmet from Team Wendy provides lightweight, long-term comfort by using an updated four-point retention system that instantly adjusts to the shape of your entire head instead of just cinching down front-to-back like a cheap hardhat. We liked the heavy-duty front shroud that’s purpose-built to accommodate night-vision goggles or your GoPro, as well as the Magpul picatinny side rails to mount lights and other accessories.
We also appreciated the array of useful accessories that allowed us to customize the helmet for our needs. These included a positive-locking clear visor as well as quick-release Peltor headset adapters, which provided hands-free communications with no need for an uncomfortable headband.
www.teamwendy.com
Transition Gloves by Black Diamond Equipment
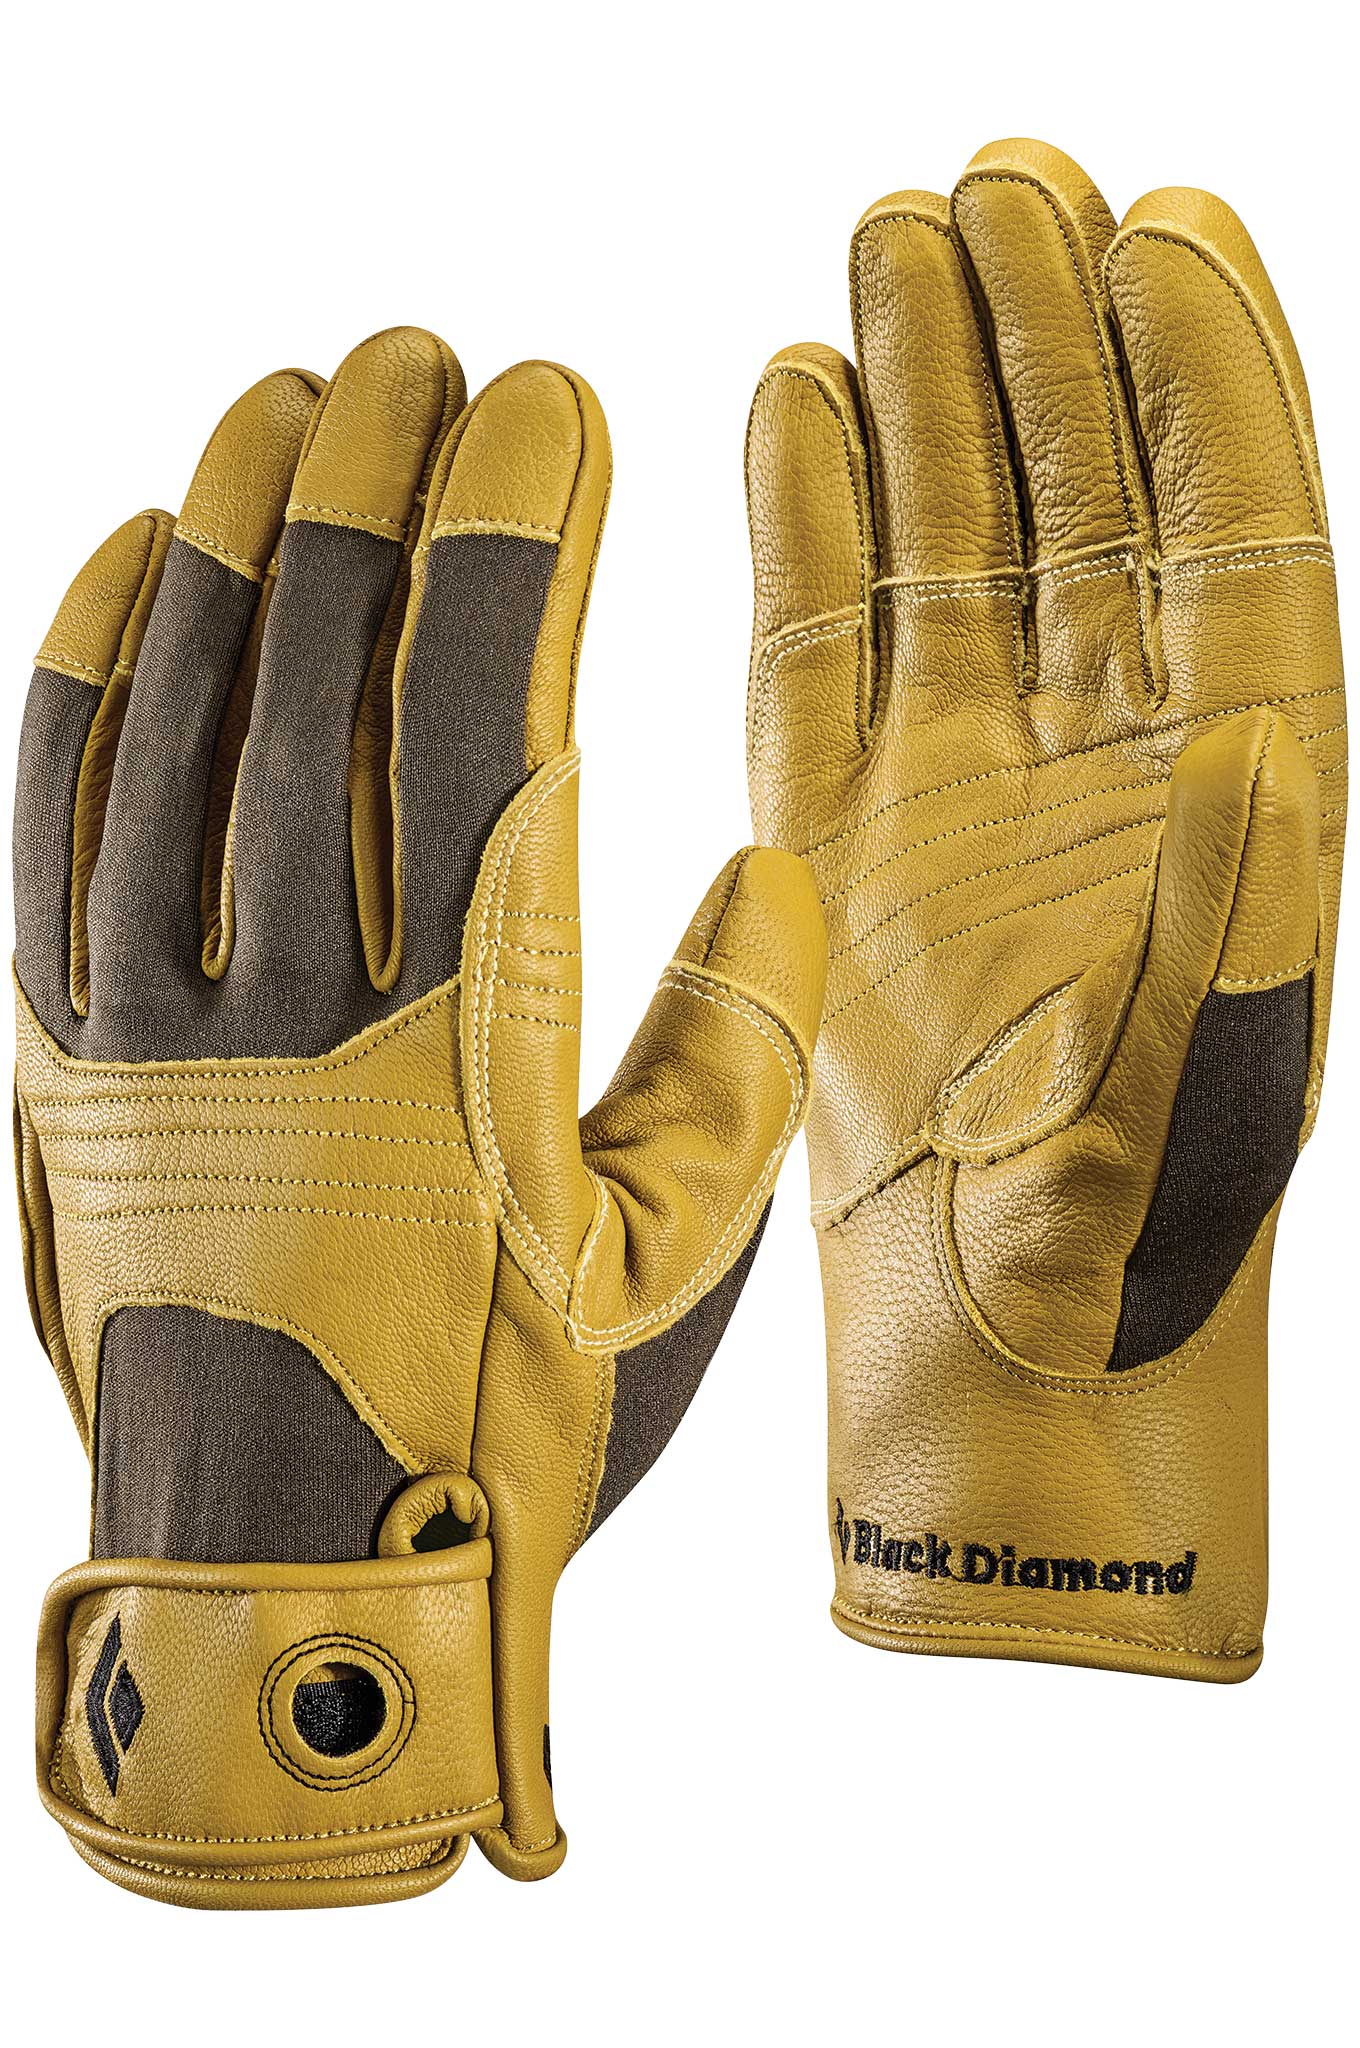
Use all-leather gloves for rappelling. If you cheap out and try to use a random pair of gloves, the heat from the rope generated during rappelling can cause the glove material to melt on your hand. Instead, we’d recommend the Transition Gloves by Black Diamond Equipment. These full-fingered goat leather gloves feature Kevlar stitching and reinforced patches on the knuckles and palm.
The fit at first felt much too small, and took several hours of wearing before we had anything approaching dexterity. However, once the gloves had broken in we had a form-fitting second skin that allowed us to thread ropes into our gear while enjoying protection from the rescue environment, be it rocky crags or broken glass and metal.
www.blackdiamondequipment.com
Phantom AVS Kit from Rescue Craft by Tactical Medical Solutions
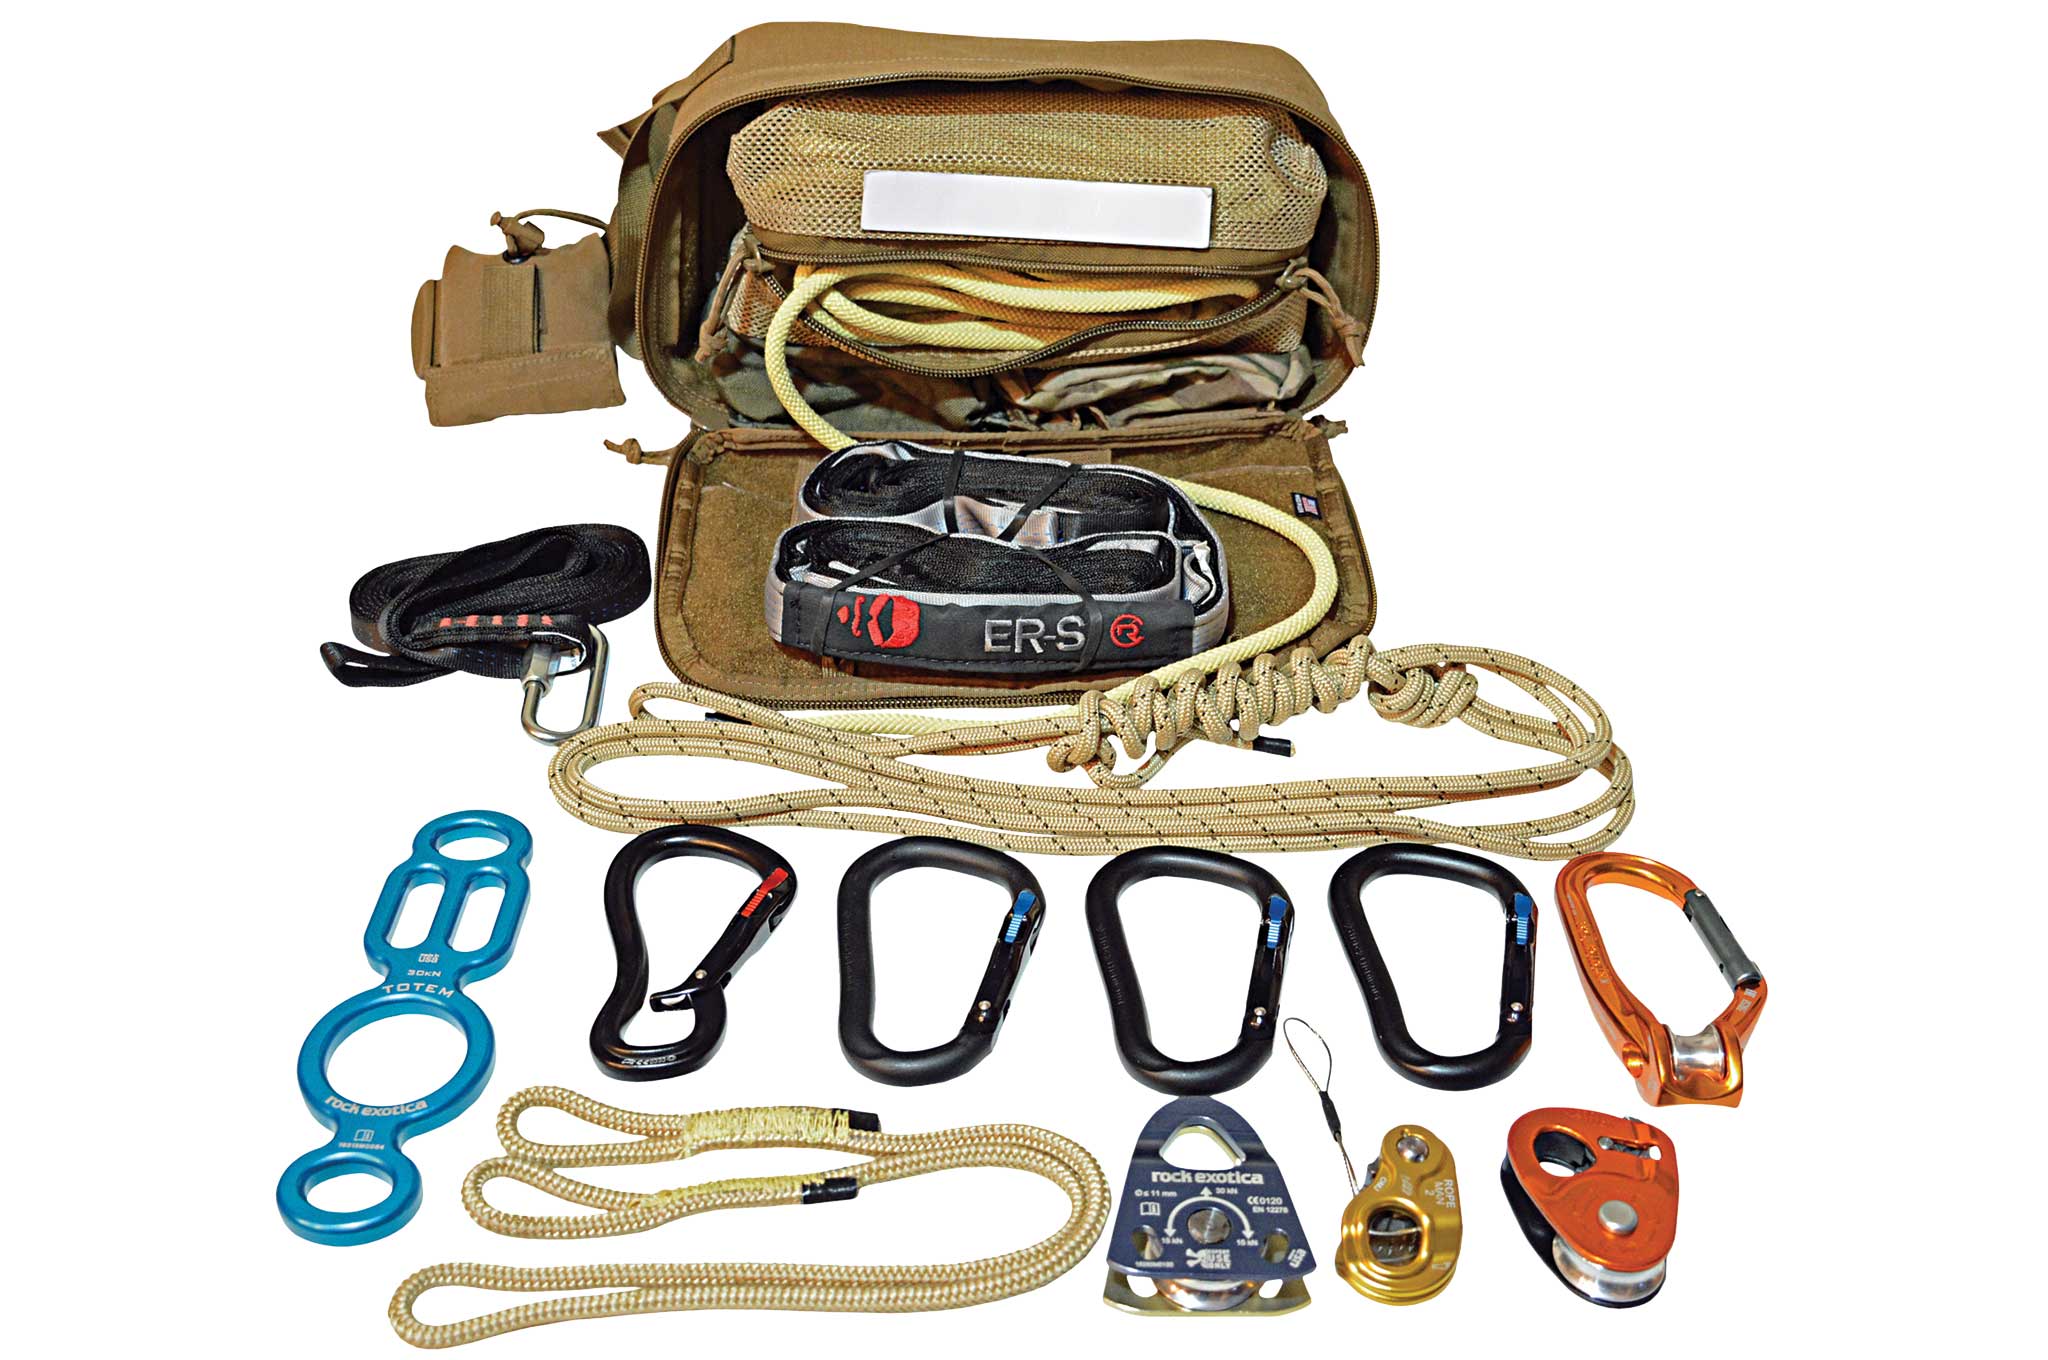
The amount of different gear options can be staggering for laypersons just starting out. For this reason, a ready-made kit may make a lot of sense. The Phantom Adaptive Vertical System (AVS) kit from Rescue Craft by Tactical Medical Solutions includes everything you’ll need from the start for rappelling, hauling, and lowering.
The kit weighs less than 7 pounds and is small enough to attach to your bug-out bag, so that you’ll never be without an egress or rescue option. Start off like we did by using the kit’s most basic components. As you gain additional skills you’ll be able to use more and more of the kit — its usefulness will grow along with your capabilities.
Note: When storing your gear, you usually want to keep your rope in a separate rope bag and all your other gear in its own bag or pack. Storing the rope in a bag will help prevent it from getting kinks during storage and transport.
www.tacmedsolutions.com
More From Issue 23
Don’t miss essential survival insights—sign up for Recoil Offgrid’s free newsletter today!
- What If A House Fire Breaks Out During an Ice Storm?
- Portable Utensils Buyers Guide – Have Spork, Will Travel
- Six Lighters & Torches to Keep Your Fires Burning This Winter
- Crafting and Using a Survival Stick
- Mykel Hawke Spotlight – Wake-up Call
- The Power of Survival Comes From Within
- Improvised Knife Sharpening Methods
- Rope Rescue 101
- How to Assemble Tools to Fish, Trap, and Hunt
- One-Piece Multi-Tools
- Physical Preparation with Limited Space
- Issue 23 Gear Up
- The Foraging Myth of Subsisting on Nothing More than Wild Plants
- IN-CASE Water Filtration System Review
Read articles from the next issue of Recoil Offgrid: Issue 24
Read articles from the previous issue of Recoil Offgrid: Issue 22
Check out our other publications on the web: Recoil | Gun Digest | Blade | RecoilTV | RECOILtv (YouTube)
Editor’s Note: This article has been modified from its original version for the web.
