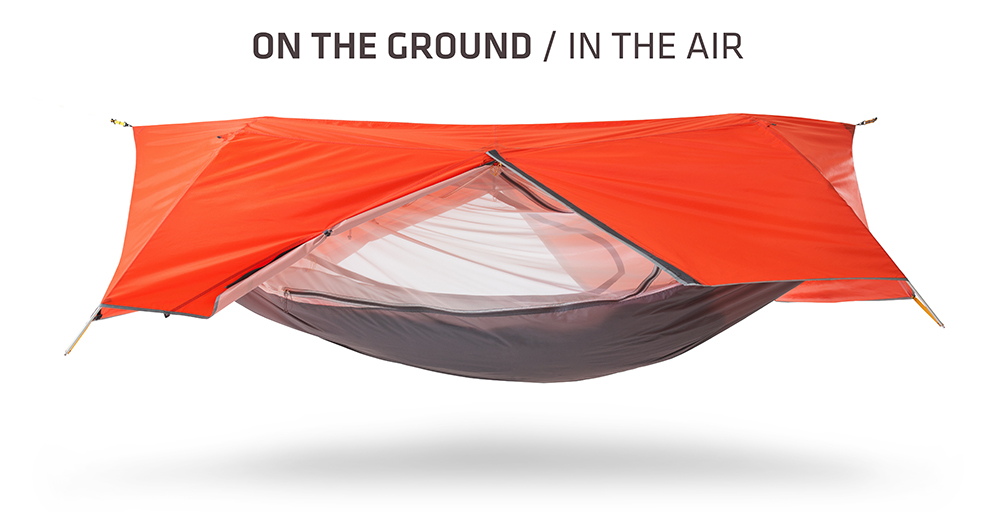
In the past, we’ve said that hammocks can have several advantages over tents. These hanging shelters are compact, lightweight, quick to set up, and they elevate you from any creepy crawlies on the ground. However, tents have their own advantages—they’re sturdy, spacious, and won’t leave you blowing in the breeze or freezing your butt off during a storm. Rather than pick and choose between these two shelter options, why not combine them? That’s exactly what Kammok did with the new Sunda transformable survival shelter.
On the company’s Kickstarter campaign, the new Kammok Sunda is called “a graceful romance between the tent and the hammock”. In essence, it’s a free-standing two-person tent, which also re-configures into an all-in-one hammock. The tent’s waterproof outer layer turns into a rain fly for the hammock, and the inner layer acts as a semi-transparent insect screen. During good weather, you can omit the rain fly, and set up the hammock in minimalist mode (with or without “jungle mode” insect mesh).
The Kammok Sunda weighs only 3 pounds 11 ounces, but manages to offer 35 square feet of floor space. That’s enough for two adults plus a dog, and there are dual 6.5-square-foot exterior vestibules for storing backpacks, boots, and other gear outside. For smaller items, the Sunda has 6 internal mesh pockets, plus 9 gear hanging loops.
Build quality is held to the high standard you’d expect from Kammok, with snag-free YKK zippers, waterproof seam tape, Mini Kanga Claw carabiners, 70-denier nylon “bathtub” floor, Nannoet no-see-um mesh, and Lumos light-enhancing interior fabric. Kammok says they’ve designed the Sunda for maximum durability, with “over-engineered floor and fly fabrics [which] amplify abrasion resistance and tear strength”.
There are many more details about the Sunda on Kammok’s Kickstarter page, including videos, weight breakdown charts, and complete specifications. Also, if you visit the Kickstarter and back the project, you can pre-order the Sunda now for $299. That’s $100 off the projected MSRP of $399.
Anyone who has sat through a seemingly-never-ending math class can tell you that numerical data can be boring. Next to images and video, numbers and graphs often seem uninteresting. However, there are some cases when this data can paint a clear picture that no camera could accurately capture, like probes measuring the inhospitable atmosphere on Mars, or a seismograph showing the progression of a massive earthquake. In these cases, data is anything but boring.
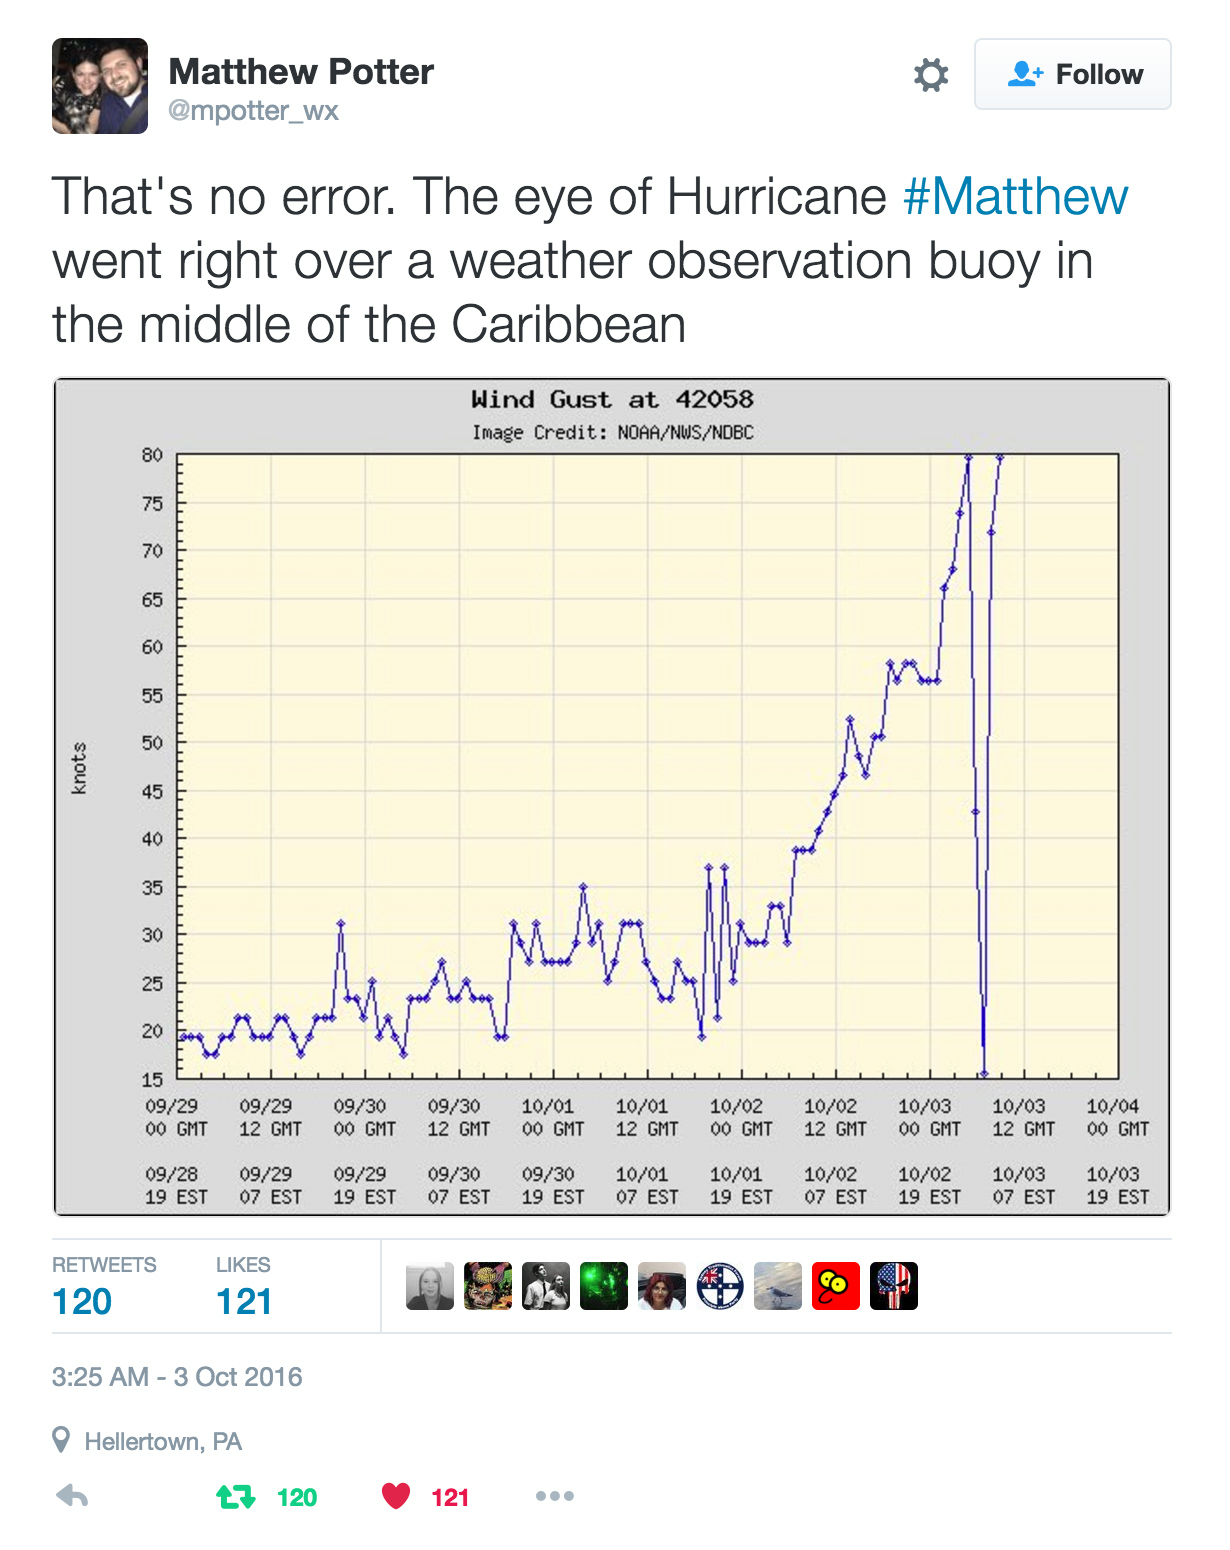
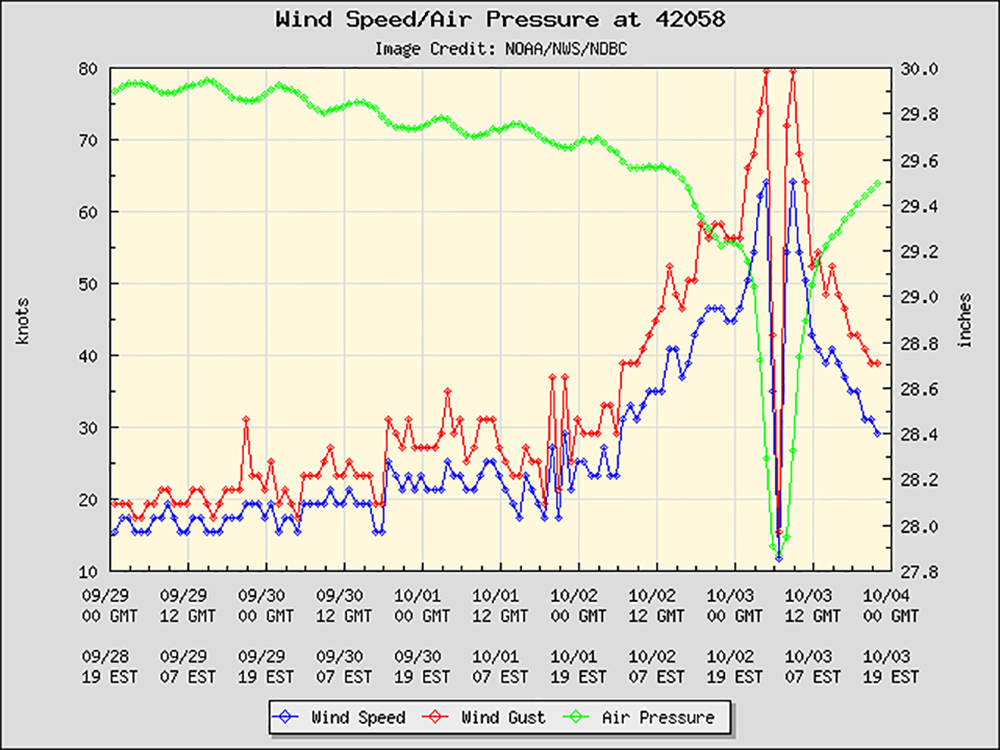
This week, we found an incredible set of data from a lone weather buoy in the middle of the Caribbean. This buoy reports data on waves, wind, water temperature, and barometric pressure to the National Oceanic and Atmospheric Administration (NOAA). On Monday, October 3rd, the buoy was passed directly over by the central eye of Hurricane Matthew, and it illustrates the raw power of this storm. In the screenshot above, forensic meteorologist Matthew Potter confirms the validity of this data.
The chart above shows wind speed rising and barometric pressure falling exponentially as Hurricane Matthew’s center approaches the buoy. The gusts build to an immense 80 knots—that’s 92 miles per hour. Suddenly, winds drop to a dead calm, and almost immediately resume hammering the buoy. It must have been quite the experience.
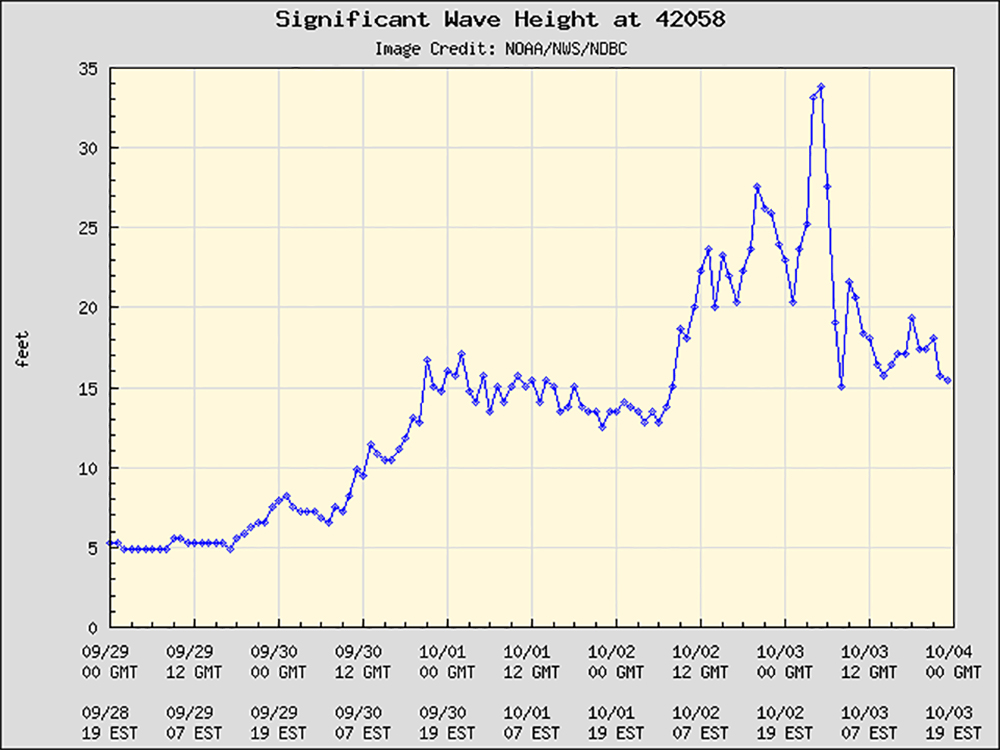
The above wave height graph paints an equally incredible picture. Swells reached nearly 35 feet, enough to sink all but the toughest boats. To put this into perspective, here’s a clip from Discovery Channel’s Deadliest Catch showing a crabbing boat hit by a 35-foot wave:
Seawater temperature and wind direction (seen below) also mirror these drastic changes. It’s a rarely-seen glimpse into the conditions at the center of a powerful hurricane, one which would continue to grow stronger and reach a peak diameter of 70 miles wide. It’s also moving rapidly toward Florida, Georgia, and the Carolinas, and is expected to make landfall in the next few days.
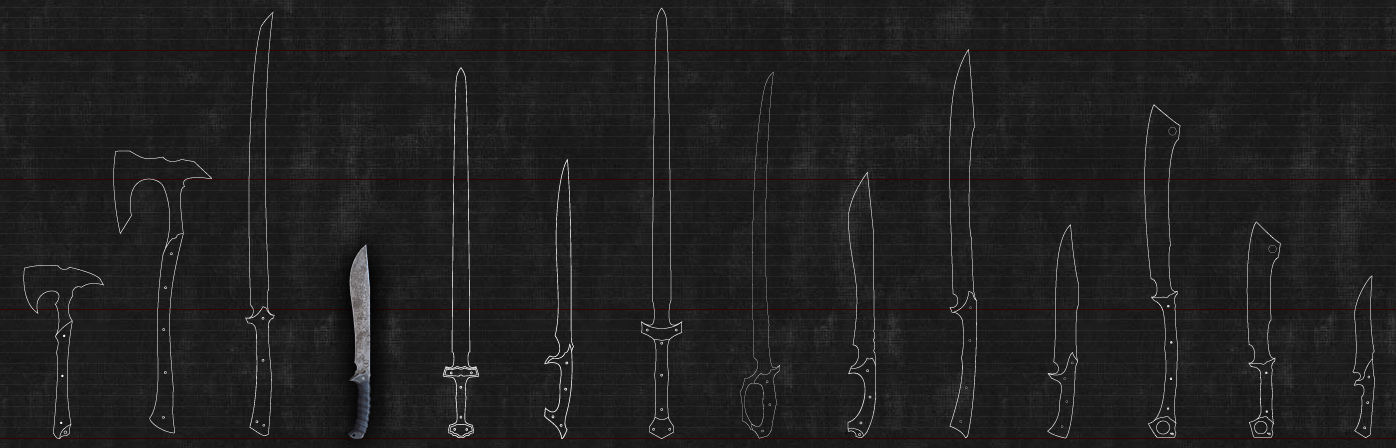
If you’ve been reading our print magazine, you may recall the kukri buyer’s guide we published in Issue 14. In that article, we tested the Zombie Tools Vakra kukri, and found that it was much more than some cool-looking prop for Hollywood horror films. The Vakra is an impressively well-made blade with lots of durability and visual appeal, earning it our Top Pick award.
The guys at Zombie Tools have a great sense of humor, but they’re also very serious about their craft.
More recently, Zombie tools has announced the release of a new fixed blade model that could give the Vakra a run for its money. It’s called the Para Bellum, and it’s an 18-inch twist on the traditional Filipino bolo knife. Like a machete, parang, or kukri, the bolo is used primarily to clear vegetation, but it also can be applied to combat and Filipino martial arts.
The Para Bellum fits into Zombie Tools’ wide range of edged weapons.
ZT drew inspiration from the bolo design in 2009, when the company produced the first edition of the Para Bellum. It was created after a request from an Army service member for a compact yet substantial combat knife—hence the blade’s name. The Para Bellum was eventually discontinued, but it has now been redesigned and refined.
This knife is constructed from 5160 spring steel, much like the Vakra and other Zombie Tools blades. It is also fitted with aluminum handle scales, which are then wrapped in black leather for added grip. The blade edge is 12 inches long, with a smoothly-curved edge and drop point. ZT says it is “balanced to feel fluid in the hand with a slight forward weighting”.
Here are the rest of the Zombie Tools Para Bellum specs:
Total Length: 18 inches
Blade Length: 12 inches
Grip Size: 4.5 inches
Blade Thickness: 0.204 inches
Steel Type: 5160 spring steel
Weight: 1 pound 7 ounces
Sheath: Kydex (standard) or leather (optional upgrade)
Availability: 6-8 week wait time
Price: $275
As with all Zombie Tools’ hand-made blades, you’ll need to wait several weeks for any orders to be produced. However, based on our experience with the Vakra, this blade should be well worth your patience. To learn more about this blade, visit ZombieTools.net.
If you’ve watched the blockbuster film The Revenant, you’ll surely remember what we need only refer to as “the bear scene”. Leonardo DiCaprio is walking silently through the forest, when he comes across two bear cubs. Suddenly, he’s charged and blindsided by a massive female grizzly bear, which tears at his flesh with claws and teeth. After a tremendous struggle, he sustains grave injuries but makes it out alive.
Hugh Glass, played by DiCaprio, is attacked in the film “The Revenant”. Source: 20th Century Fox
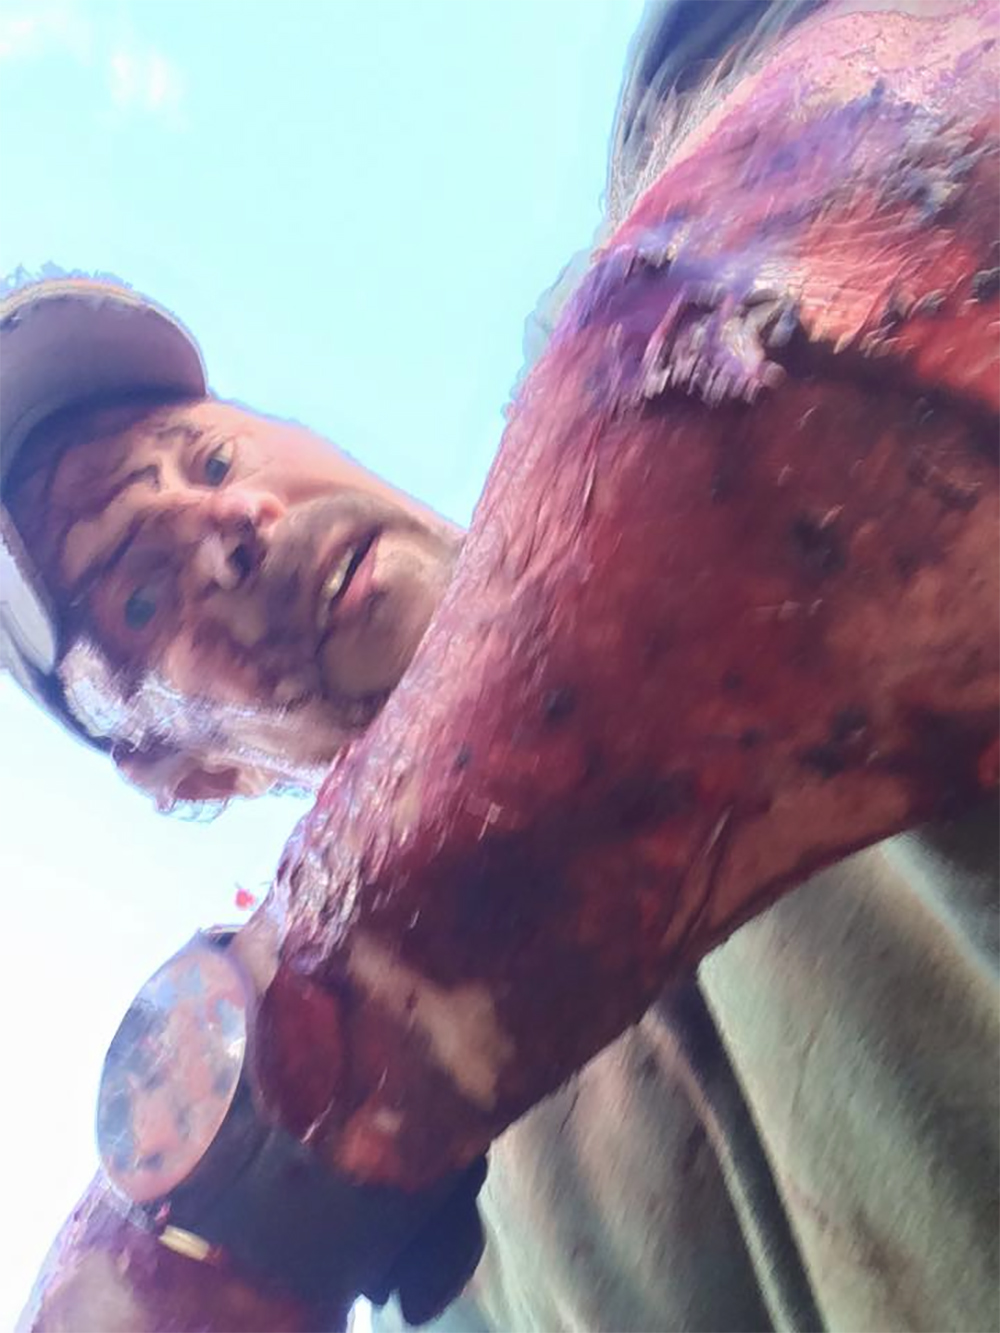
The Revenant is based on the true story of frontiersman Hugh Glass, who lived from 1783 to 1833, so it may seem like ancient history to some. This week, however, we came across a modern survival story that bears (forgive the pun) an uncanny resemblance to Glass’ experiences. Much like Glass, Montana resident and knife-maker Todd Orr survived a brutal attack by a mother grizzly, and managed to rescue himself against all odds. In fact, the bear attacked him not once, but twice on the same day.
A photo of Orr taken earlier this year, before the attack. Source: Todd Orr / Facebook
Orr was hiking in the early morning, scouting elk before a hunt. He wisely carried a canister of bear spray, as well as a pistol on a chest holster, and even says he called out “hey bear” loudly as he walked to warn wildlife of his presence. After walking three miles, he spotted a sow (full-grown female) grizzly with cubs, and it charged in his direction. He tried to defend himself, but was unable to: “Within a couple seconds, she was nearly on me. I gave her a full charge of bear spray at about 25 feet. Her momentum carried her right through the orange mist and on me.”
The brutal grizzly bear attack continued as Orr fell to the ground, and he was bitten repeatedly. After “what seemed like an eternity”, the bear eventually left him for dead. He stood up, and began walking the three miles back to his truck—but it wasn’t over. The bear chased him down again, and tore a deep gash into the side of his head. “The blood gushed over my face and into my eyes. I didn’t move. I thought this was the end.”
The bear disappeared yet again, and Orr picked himself up yet again. As he walked to his truck, he still had the presence of mind to snap a few photos, and record the following video. Warning: as you’d expect, there’s a lot of blood and gore.
Incredibly, Orr was able to walk to his truck, call 911 to alert the local ER staff, and drive himself to the hospital. There, he received treatment for numerous tears, punctures, bruises, a chipped forearm bone, and a 5-inch gash that exposed his skull. In a lengthy Facebook post about the events that day, Orr says it was “not my best day, but I’m alive.”
Orr’s head wound was treated at a local hospital, and will eventually heal. Source: Todd Orr / Facebook
For more photos and details about the grizzly bear attack and Orr’s recovery, visit his Facebook profile.
We frequently hear that the cost of gear is a major concern for many of our readers, and understandably so. Survival gear can be quite expensive, exceeding the budget of average consumers. On the other hand, it’s important to stick with brands that produce quality equipment, and not skimp too much on the items that could save your life. A balance of quality and affordability is key.
Fortunately, these days there are dozens of manufacturers of quality gear in just about every price range. Even if you don’t have much money to spare, it’s possible to find survival gear that you can depend on. To prove this point, RECOIL OFFGRID editor Patrick Vuong met with contributor and survival expert Tim MacWelch of Advanced Survival Training. The pair show three bug-out bag choices at a wide range of price points:
Depending on your specific needs and budget, these three packs provide viable options for almost any survivalist. Here’s a recap of the three packs seen in the video above:
For more videos from RECOIL, check out RECOILweb.com/recoiltv. A new SHTF/OFFGRID video is released each month, so be sure to keep an eye out for the latest clips.
The mention of the word radiation tends to evoke thoughts of mushroom clouds, death, and destruction. However, radiation is simply a natural phenomenon that describes the emission of energy waves or particles. You’re experiencing radiation right now, in the form of light, heat, and invisible radio waves. Microwaves, sound, and seismic waves are other forms of radiation.
The potentially dangerous form of radiation is what’s known as ionizing radiation. This type can sometimes knock electrons off atoms, changing their structure and potentially harming the DNA inside living cells. Ultraviolet rays (such as those found in sunlight) and X-rays fall into this category, as do alpha, beta, and gamma radiation.
Without delving too deep into the science behind this topic, it’s important to remember that the vast majority of radiation is not harmful. The U.S. Nuclear Regulatory Committee (NRC) states, “We live in a radioactive world, and radiation has always been all around us as a part of our natural environment.”
Myth #2: Glow
Radioactive materials glow, pulsate, and/or are brightly colored.
A plutonium fuel rod on “The Simpsons” is depicted as glowing bright green.
There’s a grain of truth to this myth, as certain radioactive materials can produce a luminescent (glow-in-the-dark) effect. But—and this is a key distinction—the radioactive material itself isn’t what glows, it only produces a glowing effect on certain other substances in specific conditions.
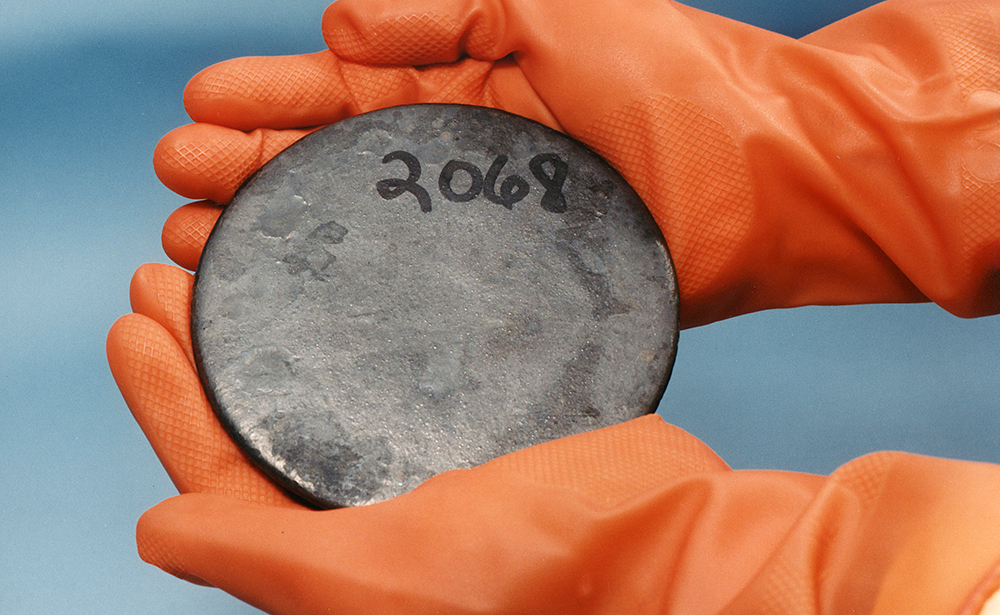
A disc of enriched uranium appears blotched gray. Source: eia.gov / Wikipedia
Trace levels of radiation produced by elements such as radium and tritium can be used to excite the molecules of other phosphor materials, producing a faint glow (radioluminescence). There’s also a complex effect called Cherenkov radiation, which causes nuclear reactor cores to produce a blue glow in underwater cooling pools.
So, radioactive materials don’t necessarily glow, but they can sometimes produce a glowing effect in other materials. Most of the time, radioactive isotopes look like ordinary silvery-grey metal.
Myth #3: Volatility
Fuel rods and other radioactive materials explode easily if jostled, dropped, or smashed.
Actually, the opposite is true. Turning a radioactive material such as uranium into a nuclear bomb is an extremely difficult and complex process. It took some of the world’s brightest scientists many years to figure out how to trigger a chain reaction and produce the first atom bomb. We’re sure Oppenheimer and friends would have figured it out pretty quick if all it took was hitting some uranium-235 with a big mallet.
On top of this, the type of uranium found in nuclear reactors is not the same type used in bombs. Reactors use slightly-enriched materials with low fissile content (about 4 percent), for a stable power source. Bombs use highly enriched and volatile materials with high fissile content (90 percent or more), in order to create an effective chain reaction.
Obviously, radioactive materials must be transported with great care, but this is in order to prevent accidental radiation exposure—not because they could explode unexpectedly.
Myth #4: Medical X-Rays
Medical or dental X-rays produce dangerous amounts of radiation.
Radiation dose comparison chart from the U.S. Nuclear Regulatory Commission (NRC).
On one hand, medical and dental X-rays do account for about half of any given individual’s radiation exposure each year. On the other hand, this amounts to approximately 310 millirems per year for the average individual, according to the U.S. Nuclear Regulatory Commission. To put this number into perspective, the maximum safe annual dose for an individual who works directly with nuclear materials is 5,000 millirems. Studies of the Hiroshima and Nagasaki bombings showed that a single dose of 600,000 millirems was lethal.
One chest X-ray produces about 10 millirems, which is less than a coast-to-coast plane flight (12 millirems) and an infinitesimal fraction of what would be considered dangerous.
Myth #5: Transparency
High levels of radiation produce an “X-ray vision” effect on nearby people or objects.
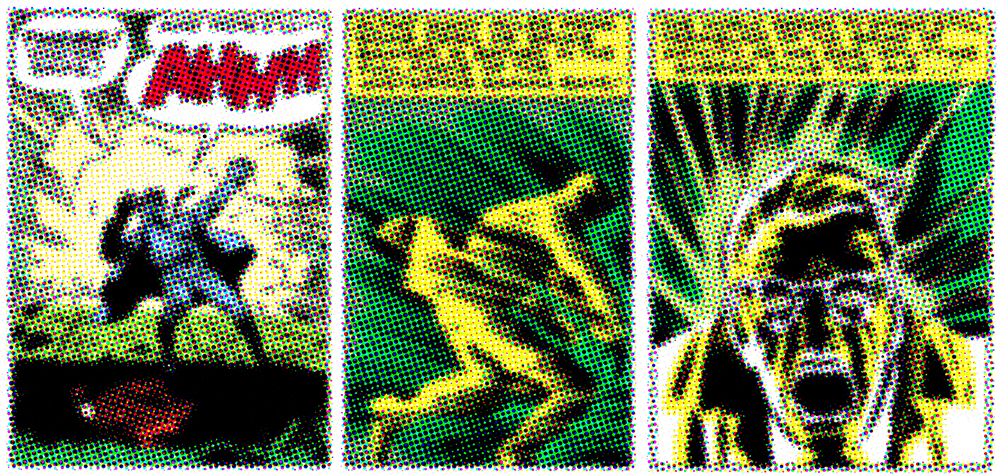
A depiction of Superman’s X-ray vision powers on the TV show “Smallville”.
This “X-ray glasses” trope is often shown in TV shows, cartoons, comic books, and movies for comedic effect. Unfortunately, the reality is that X-rays are not visible to the human eye in the same way that visible light is. Think about it—any X-rays you manage to produce would pass straight through your target and keep going. X-ray machines only work because the output is captured on X-ray-sensitive film or an electronic sensor behind the target.
Also, in this futile attempt to see through objects, you’d be constantly exposing everything in your path to high doses of X-rays. As we mentioned above, short bursts of X-rays in a medical setting aren’t harmful, but the same can’t be said for using that X-ray emitter continuously.
Myth #6: Power Plant Emissions
Nuclear power plants emit dangerous amounts of radiation to surrounding areas during normal operation.
According to the NRC, someone living within a 50-mile radius of a nuclear power plant would receive an additional radiation dose of 0.01 millirems per year. Given that a medical X-ray produces 1,000 times that amount instantly, and is still considered completely safe, it’s obvious that this dose is negligible.
The NRC also states that “most of an operating nuclear power plant’s direct radiation is blocked by the plant’s steel and concrete structures. The remainder dissipates in an area of controlled, uninhabited space around the plant, ensuring that it does not affect any member of the public. … Even in the very unlikely event of a nuclear power plant accident, it would be extremely unlikely that someone would be in an area for a sufficient period of time to receive a radiation dose that would be considered lethal.”
Myth #7: Marine Life
The Fukushima disaster caused dangerous levels of radiation in seawater, fish, and other marine life.
This myth became pervasive after the Fukushima nuclear power plant disaster in 2011. Like many myths, this has some basis in reality. After the disaster, there was a measurable increase in radiation levels found in the waters surrounding Japan, as well as in tuna caught in the Pacific ocean. However, just because there was a measurable increase does not mean that increase was dangerous.
Oceanographers called these oceanic radiation increases“detectable but not hazardous”, and found that the radiation levels in the aforementioned tuna were still ten times lower than the strictest food safety guidelines. Additionally, radiation expert Andrew Karam told Popular Mechanics, “I calculated that dissolving all of the fuel of all three operating reactors, plus the entire contents of all of the spent fuel pools at Fukushima into the waters of the northern Pacific would still give a person swimming in the ocean off Hawaii, Alaska, or California about one billionth the amount of radiation dose needed to cause any harm.”
Myth #8: Superpowers
Radiation can produce beneficial mutations or superpowers in humans.
Sorry comic book fans, radiation doesn’t produce superpowers. If Bruce Banner was exposed to a massive blast of gamma rays in the real world, he wouldn’t have become the Incredible Hulk. He would have become dead.
In reality, ionizing radiation does have the ability to damage the genetic structure of human cells. This can lead to higher cancer risk among those exposed, as well as many other physical symptoms. However, contrary to popular belief, studies indicate that there is no statistically demonstrable increase in birth defects for children conceived by parents who were previously exposed to high levels of radiation. It is therefore unlikely that any radiation-induced mutations will be passed to subsequent generations.
For more details on the effects of Acute Radiation Syndrome (ARS), pick up a copy of Issue 16 of our magazine, on sale October 7th, 2016.
Time for a pop quiz. Kudzu vines, Africanized “killer” bees, Burmese pythons, nutria, wild boar—what do these animals and plants have in common? Answer: they are all considered invasive species in the USA. This classification refers to plants, animals, or even fungi that have spread excessively resulting in damage to the environment.
Kudzu vines choke out local trees in Georgia and other southern states.
Often, these species are introduced from foreign countries, and grow out of control due to favorable weather conditions or lack of natural predators. This throws the local food chain out of balance with disastrous consequences. Scientists and government organizations warn of the dangers of introducing invasive species, and they’re the reason border checkpoints search for contraband that may harbor these pests.
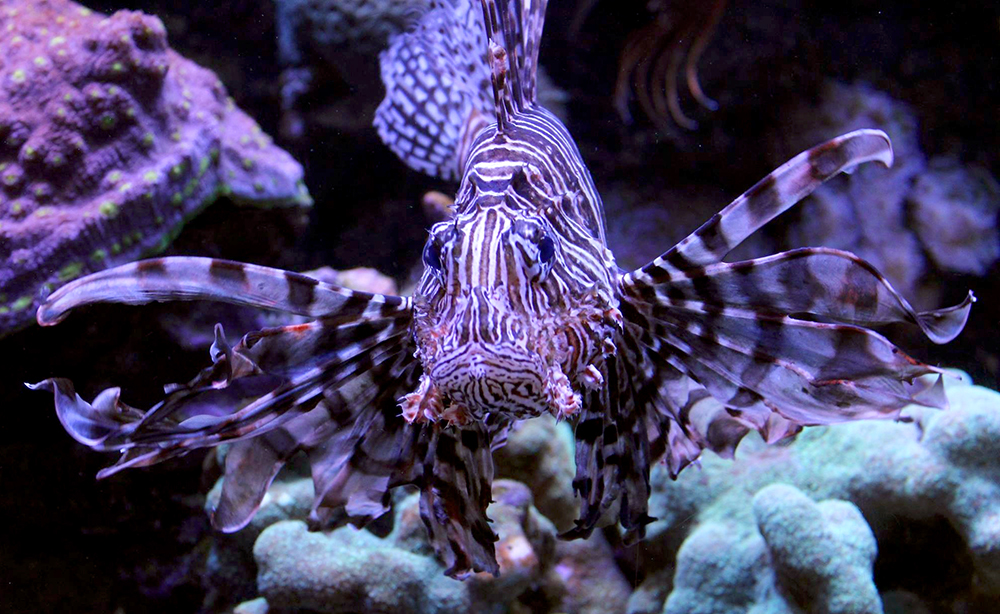
On the eastern seaboard of the United States, the lionfish has become a notable invasive species. These brightly-striped and fringed fish may look graceful, but they’re aggressive predators that can lay 30,000 eggs every four days and gobble up local salt water species. In addition, lionfish are covered in venomous spikes which can cause extreme pain, vomiting, difficulty breathing, and convulsions in humans. Obviously, this poses a serious threat to fishermen, swimmers, divers, and local marine environments.
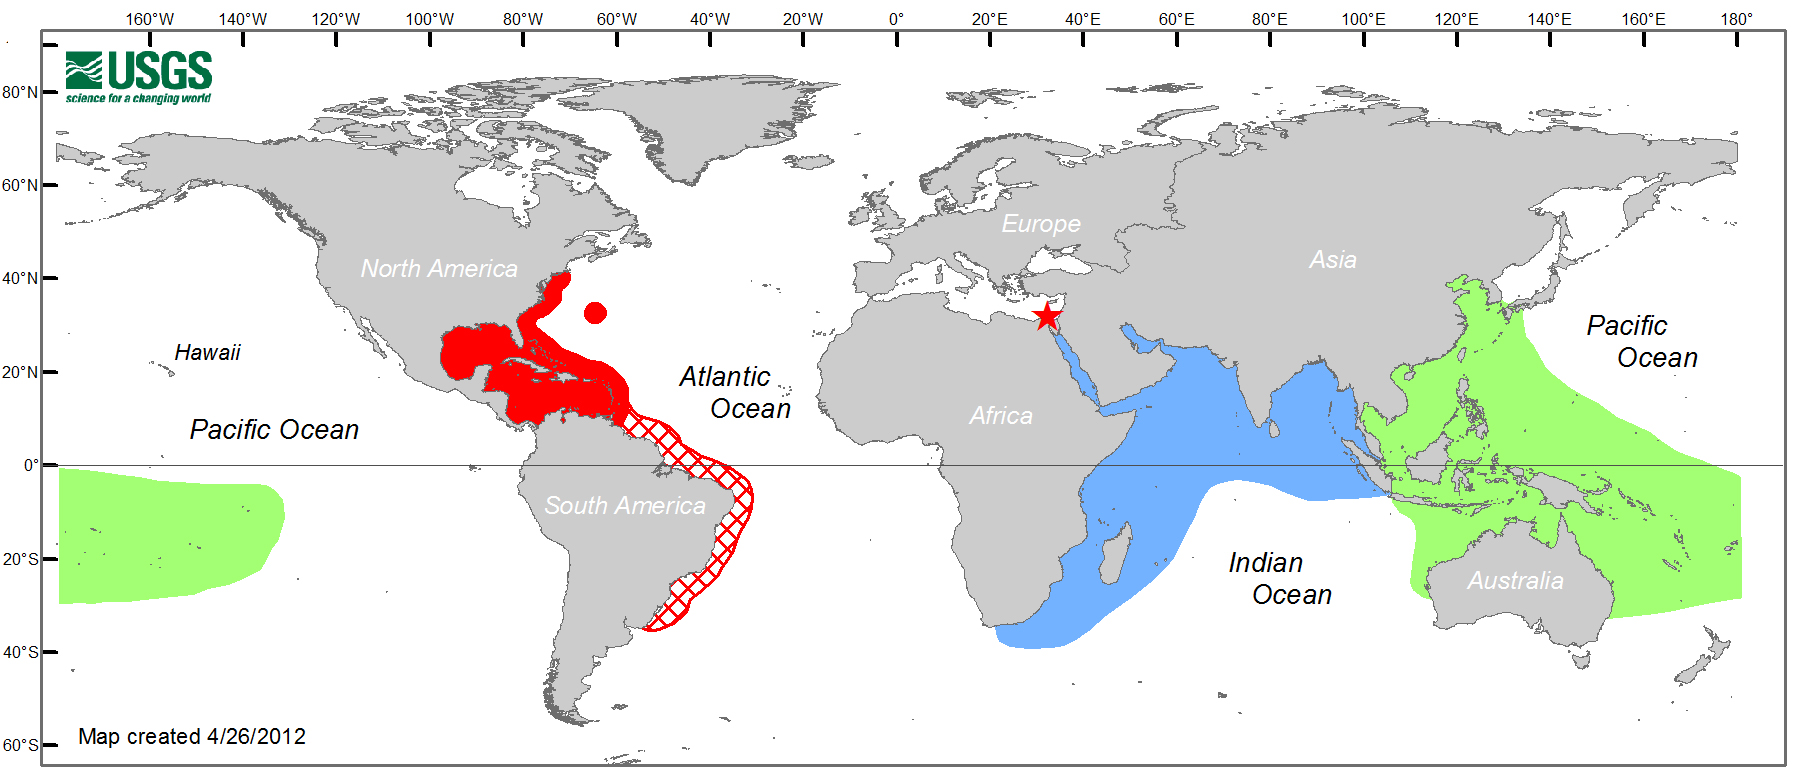
The natural range of lionfish (blue/green) versus its invasive range (red). Grid shows predicted growth. Source: USGS.gov
In Florida, the lionfish population has spiraled out of control so far that these fish are even resorting to cannibalism. So, Florida officials have encouraged divers to hunt lionfish and reduce their numbers. The fish can be speared, caught in hand-held nets, or hooked, and there is no recreational or commercial limit on lionfish. However, one Florida man has developed an even more creative solution to this pest problem: underwater fishing with a Glock.
Courtland Hunt documents his lionfish culling on his YouTube channel:
It’s good to see that efforts were made to reduce damage to the reefs, by using lead-free ammunition, collecting spent brass, and only firing above sandy areas. Also, the fish don’t go to waste, as lionfish flesh is edible (only the spines are venomous). That said, this looks like a fun way to help the local fish population in Florida.
Most people travel with just their basic EDC — Every Day Carry — if they travel prepared at all. Others wear a day pack, courier satchel or other off-body style wearable to keep additional necessities nearby. We’ll call that the “urban ready” equivalent of what military personnel often refer to as First Line and Second Line Gear. There’s a Third Line, but in this context that would likely be restricted to vehicle stowage.
Messenger bags and packs are a great, and often the only, option for any sort of extended load carriage. Passersby might look at you askance were you to go walking down Jefferson Street at Fisherman’s Wharf while fully jocked-up. However, these bags’ very nature makes them relatively easy to separate from their proper owner, they’re not easy to get into (at least not quickly, or repeatedly) and they can be uncomfortable. It is for this reason that some people (like OFFGRID contributor Freddy Osuna) choose to stow redundant First Line, all their Second Line and in some cases parts of their Third Line gear in a “battle belt” — even if that battle belt never sees a holster or weapon magazine.
Carrying equipment this way spread-loads weight around the wearer’s waist and supports it with the hips. In some cases this makes it more comfortable to carry the load; in many more it’s just more convenient. This is true whether you’re hiking the Pacific Crest Trail or moving to a hit on a mud-walled compound somewhere in the Hindu Kush.
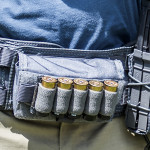
If you are one of those who carry a lot fear around your waist, you’ve likely considered the High Speed Gear Sure-Grip Padded Belt. If you’re one of the many who’ve chosen that platform, you’ll welcome news of the Battle Belt Bridge. It’s essentially a cummerbund type attachment you can fasten to either side of the buckle gap to the belt’s front, adding an additional six rows of PALS for modular pouch attachment.
It won’t work for everyone, obviously, particularly someone who for whatever reason needs to prone out or crawl, but for those who do need it, it’s an elegant, if simple, solution. Though in these images the Battle Belt Bridge has been used to “plus up” available ammunition, it could just as easily be used to stow tools, other “necessaries”, even snacks or — for those of us who travel with small humans in tow — baby wipes.
The Battle Belt Bridge ships with an HSGI Clip and their side-release buckles so it’s simple to install and quick to remove. You can pick one up for $35 on the HSGI website right here.
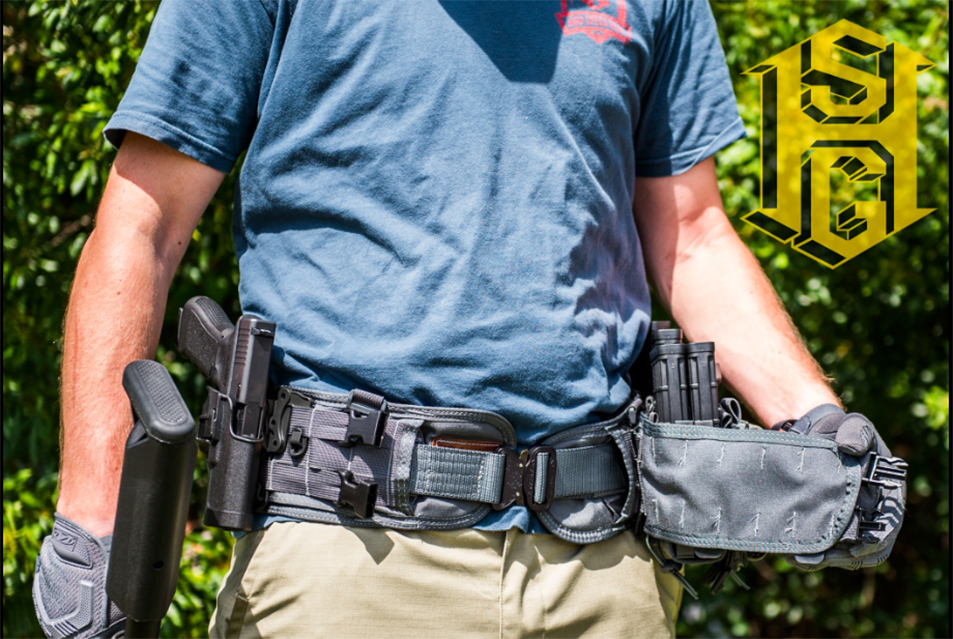
Becoming a “gray man” is an important concept for anyone who is formulating an emergency bug-out plan. For those unfamiliar with this phrase, it refers to remaining unnoticed and forgettable. On a practical level, this has a tendency to affect the gear we choose — the public perception of a $30 backpack from Wal-Mart will be drastically different from that of a $400 tactical pack with camo fabric and PALS webbing. However, this concept goes much deeper than gear alone. It also has to do with your surroundings, your physical appearance, and even your mannerisms.
While highly functional, a backpack like this 5.11 Rush pack will likely draw attention in an urban setting.
Last Man Projects recently published a post on its Facebook page on this topic, and it makes some excellent points. Here are some excerpts that really resonated with us:
“Being gray isn’t something you can just throw money at and achieve, nor is it as easy as not wearing “tactical” clothing all the time. … It takes the right mindset, planning, practice, and even then isn’t guaranteed because (and this is important) situations are fluid. Being gray is highly dependent on your ability to read the changing situation and adapt quickly and appropriately.”
Going gray isn’t about trying to be the blandest, most monotone person in the room, it’s about being forgettable. This isn’t done by trying to be Average Joe all the time; it’s done by understanding what other people expect to see in a given area at a given time, meeting those expectations, and the ability to mitigate any incongruities. In other words, looking basically like everyone else does, when everyone else does. Walk down the street in a chainmail thong and I’ll bet you’ll turn some heads; do it at the Burning Man event and no one will give two s**ts or look at you twice. In this case, the chainmail thong is an indicator that you aren’t, or maybe are, where you’re supposed to be at the time. Speaking of indicators…
Indicators are things that can stick out in a person’s mind, and can potentially help them notice and remember you. … An indicator, like beauty, is in the eye of the beholder. A bystander’s or witness’ own level of training, situational awareness, and even personality are just a few variables that will effect your “grayness” regardless of anything you choose to do.
Going gray isn’t just about how you look, it’s about how you act. This important truth seems to be left out a lot. As any actor would likely tell you, the devil’s in the details. Your mannerisms while trying to blend in can sometimes broadcast more about you than your appearance. … You may be wearing a conservative blue suit with all your EDC stuffed in a leather messenger bag, but carrying yourself like a tough guy when you’re trying to blend in with a group of white collar drones is going to get you noticed.
The point is you have to be flexible in your mannerisms. This is the most important and difficult part of going gray to master, and usually takes constant focus and lots of practice to be convincing at. You can buy all the “gray man gear” you want, but if you don’t take the time to really study how average people act during times of crisis and convincingly put that veneer of panic and uncertainty over your real personality, you will never be able to truly “go gray” when the SHTF.”
It’s a windy day, but you don’t notice. You’ve been holed up at home playing Fallout 4 for the past two days and haven’t seen the weather reports. Suddenly, there’s a thunderous sound of windows breaking and columns cracking. The roof caves in, and you’re pancaked under tons of steel, wood, and concrete. What do you do?
Wind storms are possible throughout most of the country. Although a tornado brings wind speeds of up to 300 mph, its path is generally no wider than a mile. This makes the damage more localized and easier to access for responders. Although they have lower wind speeds, hurricanes may clear a path wider than 100 miles, which is more likely to spread rescuers out too thin.
If and when this happens, rescue teams will be in short supply — assuming that, given blocked roads and other hazards, they can even reach those most in need. In that case, everyday civilians must start the job themselves. Search and rescue will become self-search and self-rescue. Knowledge and preparation could make the difference in saving yourself and others, or waiting in vain for the government to arrive.
Before the Storm
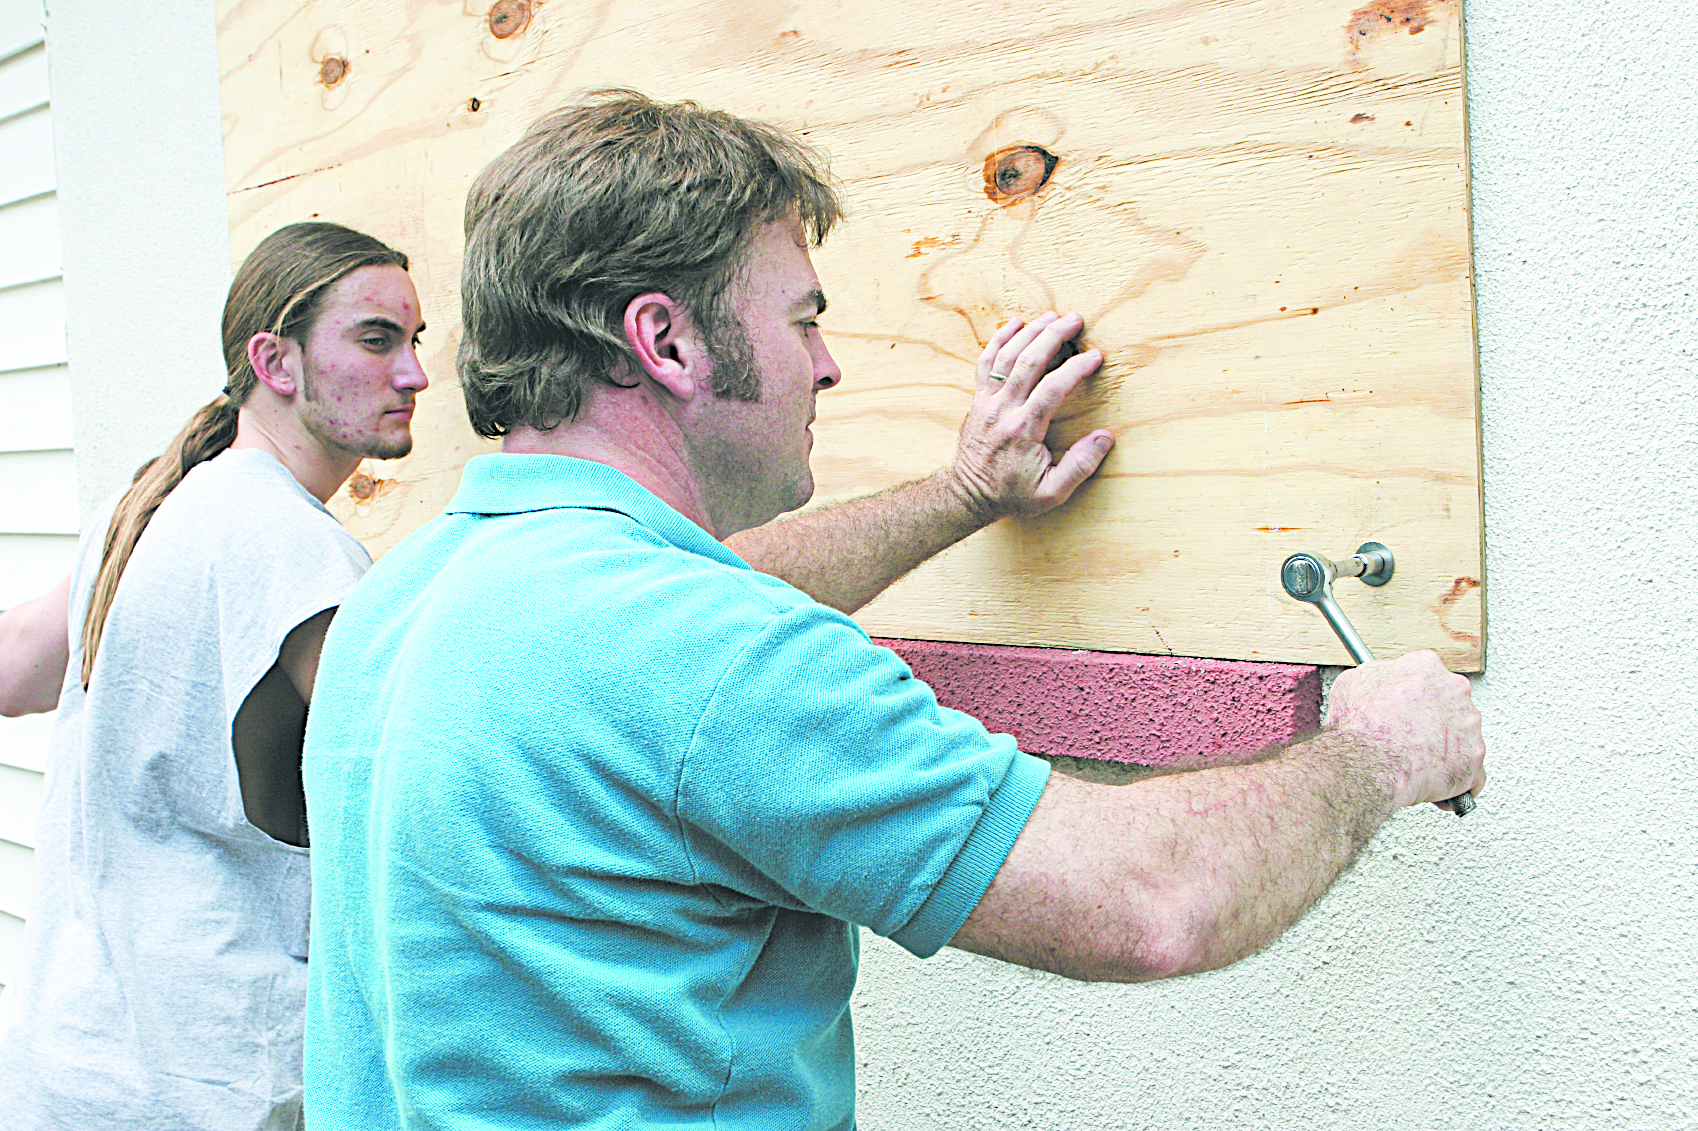
Protection of window openings is critical during high-wind events. If windows blow out and wind gets inside a typical residential home, the roof may quickly blow off. Pre-cut, location-labeled 5/8-inch plywood panels with pre-drilled holes work well, assuming that the screws are kept in a safe place. If thick plywood is too bulky and heavy for easy installation, consider polycarbonate hurricane panels. These plastic sheets are about one-quarter the weight of plywood and clear enough to transmit light.
Even if your home is made of concrete block, a common weak link may exist where the wood-frame gable end of the roof connects to the walls. Remember that part in Top Gun when the F-14’s canopy blew off and then the ejection seat rocketed through? Of course you do. Think of that gable end connector like a fragile latch that holds your roof (F-14 canopy) in place. If the latch goes, everything else goes with it. And Goose dies.
Once the home is “safed-up” as best as possible, listen closely for evacuation orders. If they come, and if it’s at all possible, then get the hell out of Dodge. It’s not a badge of honor to stoically remain — it’s foolhardy. If the storm hits hard, it could take weeks for supplies, power, and water to be restored. And if the supply cache and water storage basins you worked so hard to make are destroyed in the storm, what then?
If evacuation is really, truly impossible (and not just undesirable), then consider carefully where you’ll shelter. Residential homes and townhomes are built to a lower standard of construction than three-story-and-higher structures. Lightweight wood frame and light metal structures are especially prone to collapse during wind storms. This means you should stay out of mobile homes and buildings like airplane hangars, marina structures, etc. “Big box” stores like Home Depots or Walmarts aren’t much better given their long, unsupported roof spans.
In extreme cases, if you have advance notice of the incoming storm, consider breaking into buildings — this is a true, life-and-death emergency, right? — that are three stories or higher because they’re more heavily reinforced and subject to more stringent requirements. Or even better, consider specially reinforced structures like federal government buildings and hospitals, with public schools as a second-best option. Unless they’re made of old-school brick, their skeletons are more likely made of reinforced concrete or heavy steel frame. High-rise glass curtain wall buildings are an option as well; even if all of their windows blow out (a frequent occurrence) they remain structurally stable during high wind events.
Once the wind picks up, put your egress (escape) bag on and don’t take it off. If you’re trying to sleep, sleep with it on. If and when things start happening, they’ll happen faster than you think. You won’t have time to look for it. Keep your phone charged as best you can at all times. Once the cell network opens back up (and it will) it has been proven to save lives by helping rescuers locate victims. Turn off any accessible utilities, including water, power, and gas lines. This will lessen the chance of fire and/or electrocution when those lines break. (See sidebar for a tool that can help you here.)
In single-family houses, the gable end of the roof is usually the weakest link. (Image courtesy of Simpson Strong-Tie Company.)
Indicators of Collapse
“Warning shots” of impending collapse will vary depending on the type of construction. Windows blowing out is not one of them, at least in taller structures. As the building is stressed, walls may begin to separate from ceilings and from other walls. Cracks will form at these junctions, and cracks wider than your thumb indicate that things are getting desperate. Dust hanging in the air or creaking and groaning that suddenly seem amplified also matter.
One of the final (and most eerie) indicators in a multi-story building is doors suddenly opening or closing by themselves as the building twists or “racks.” Disturbingly, when the doors close they often do not properly shut, but get jammed into the racked openings, possibly locking occupants inside. At that point you probably have less than 15 seconds to get out.
If It’s Collapsing Around You
Get out by any means necessary. Head towards the light — windows are often the most accessible egress points assuming that they’re below three stories. If in a multi-story building, try to make it to a stairwell, which is often specially reinforced. (The few survivors of the World Trade Center collapse during the 9/11 attacks were often found inside stairwells.) Otherwise, at least try to get into a hallway where there will be less debris to crush you. The centers of rooms away from the walls are often the most dangerous locations. As a last resort, shelter under heavy office equipment or furniture, or at least hug a wall. If the floors tilt as they fall, all of the debris will pile up against one side, so at least this way you may have a shot of not being crushed immediately.
If you’re being covered by debris, try to keep your arms and hands in front of your face as you fall. As with an avalanche, this can help create a life-saving air pocket (void) around your head.
Afterwards
Get out of the building as soon as you can gather your senses — don’t hang out or wait to see what happens next. Small hand tools, gloves, and headlamps can be invaluable to aid in your escape. Keep in mind that broken electrical lines mix poorly with broken water lines, even more so if gas lines are present. This makes the immediate threat of fire a distinct possibility, and it’s the reason smart rescue crews stretch and charge a water hose as soon as they pull up to a structural collapse even if no fire is visible.
If you are lightly buried, try to orient yourself. Not sure which way is up? Try to spit, and see which way the saliva falls. If you’re trapped inside a void, a little bit of water and air can make all the difference. This is why it’s critical to carry that egress bag on you at all times, especially if you have advance warning.
Helping Others
Again, unless there are family members or folks who owe you more than $10,000 in gambling debts inside, get yourself out of the building first. Then take time to reassess yourself first, and next, whatever damaged building it is you might want to get back into.
If hurricane winds suddenly appear to die down, remember that you are most likely within the calm eye of the storm — the other half is yet to pass by. Typically this calm period lasts less than an hour so whatever you’re going to do, begin immediately.
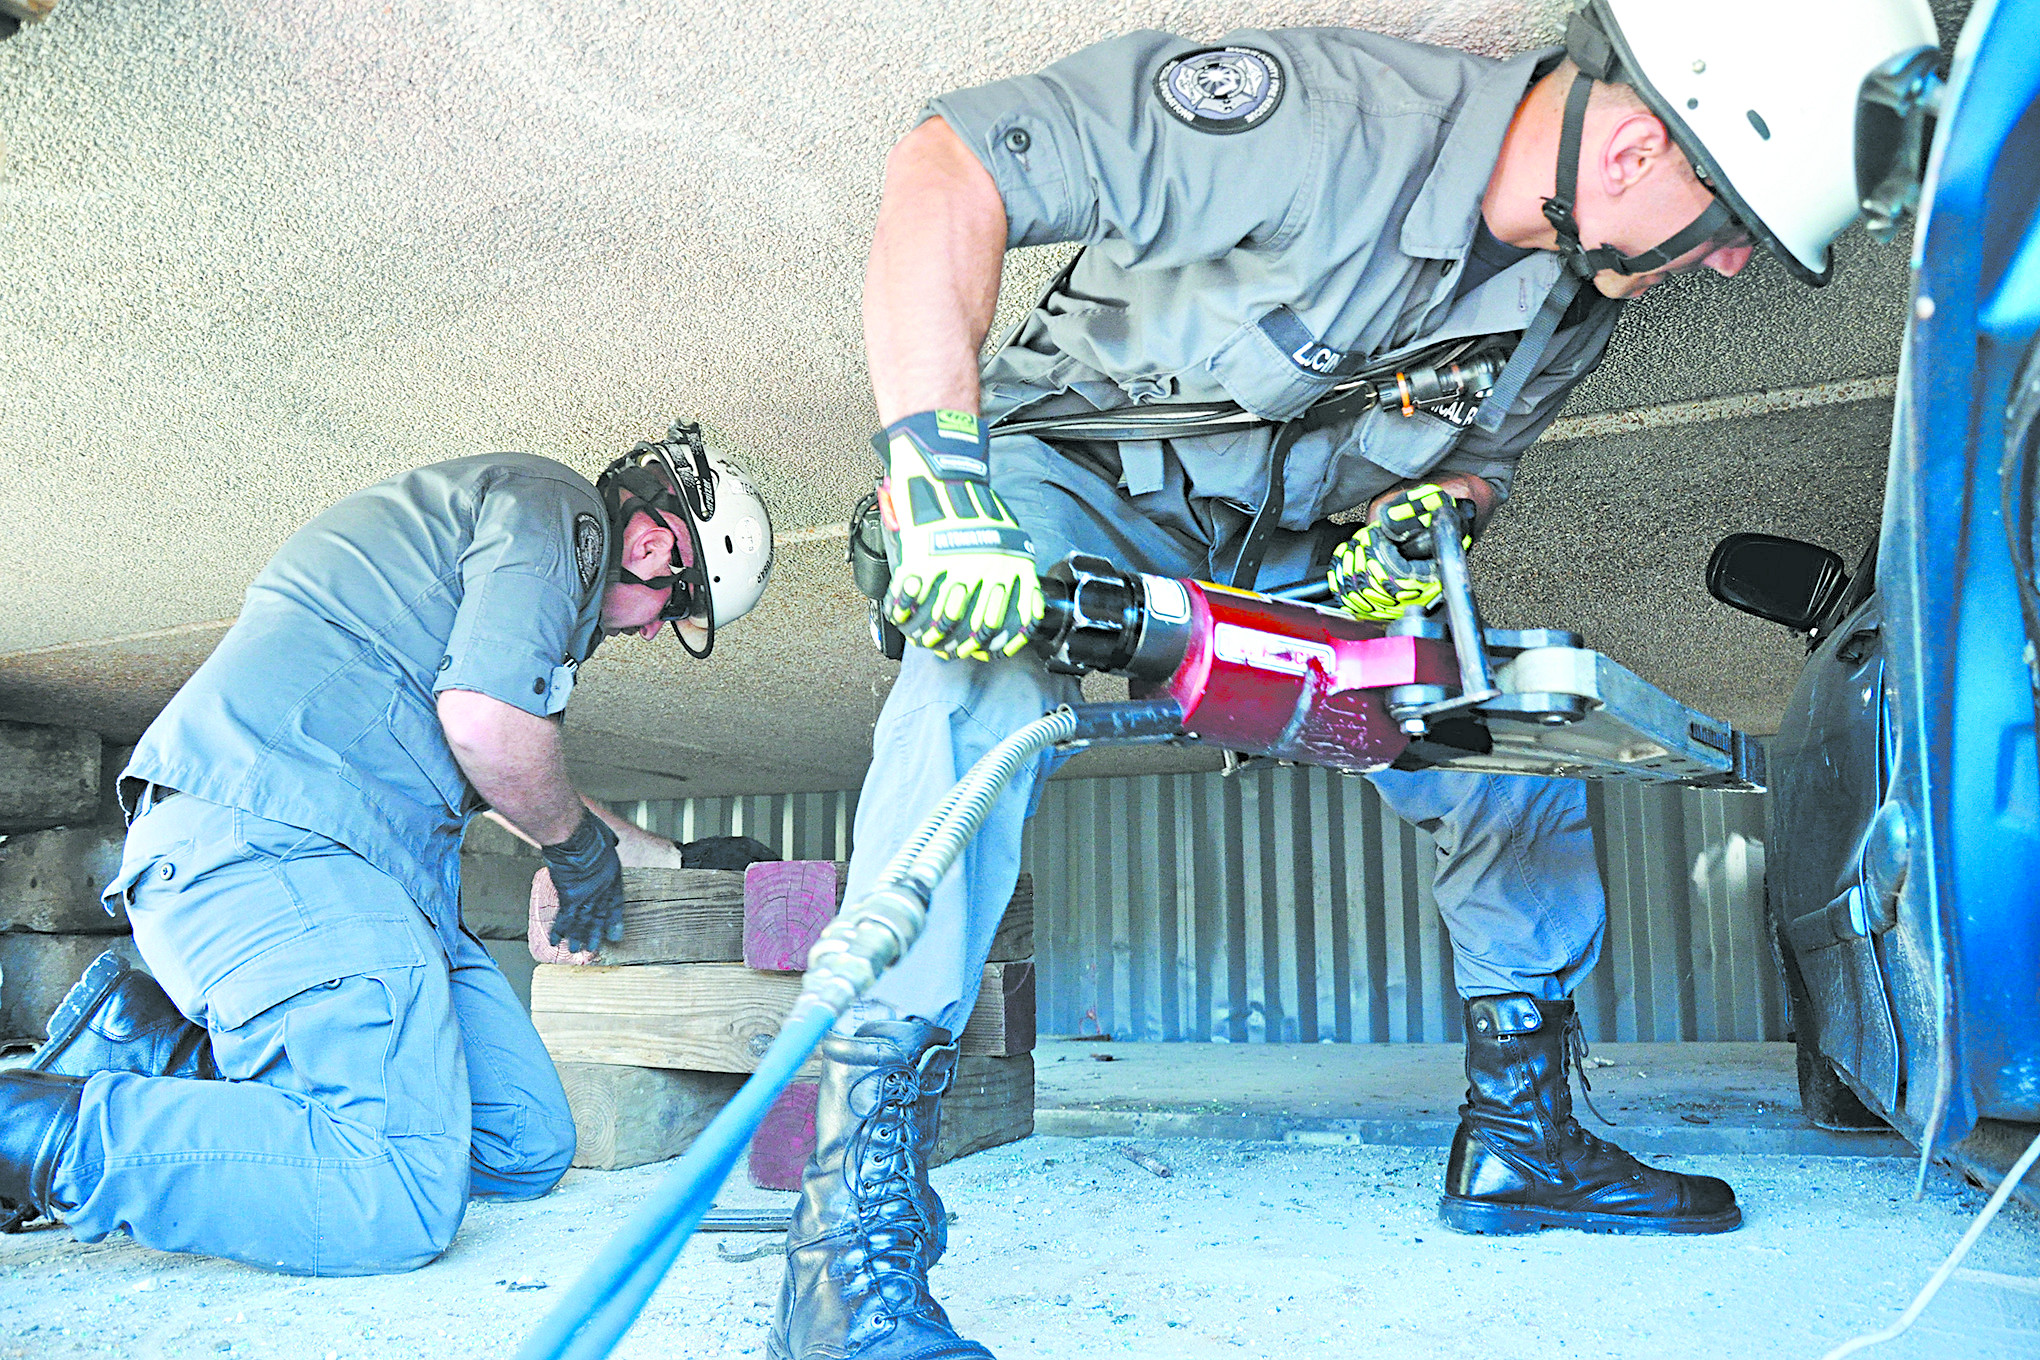
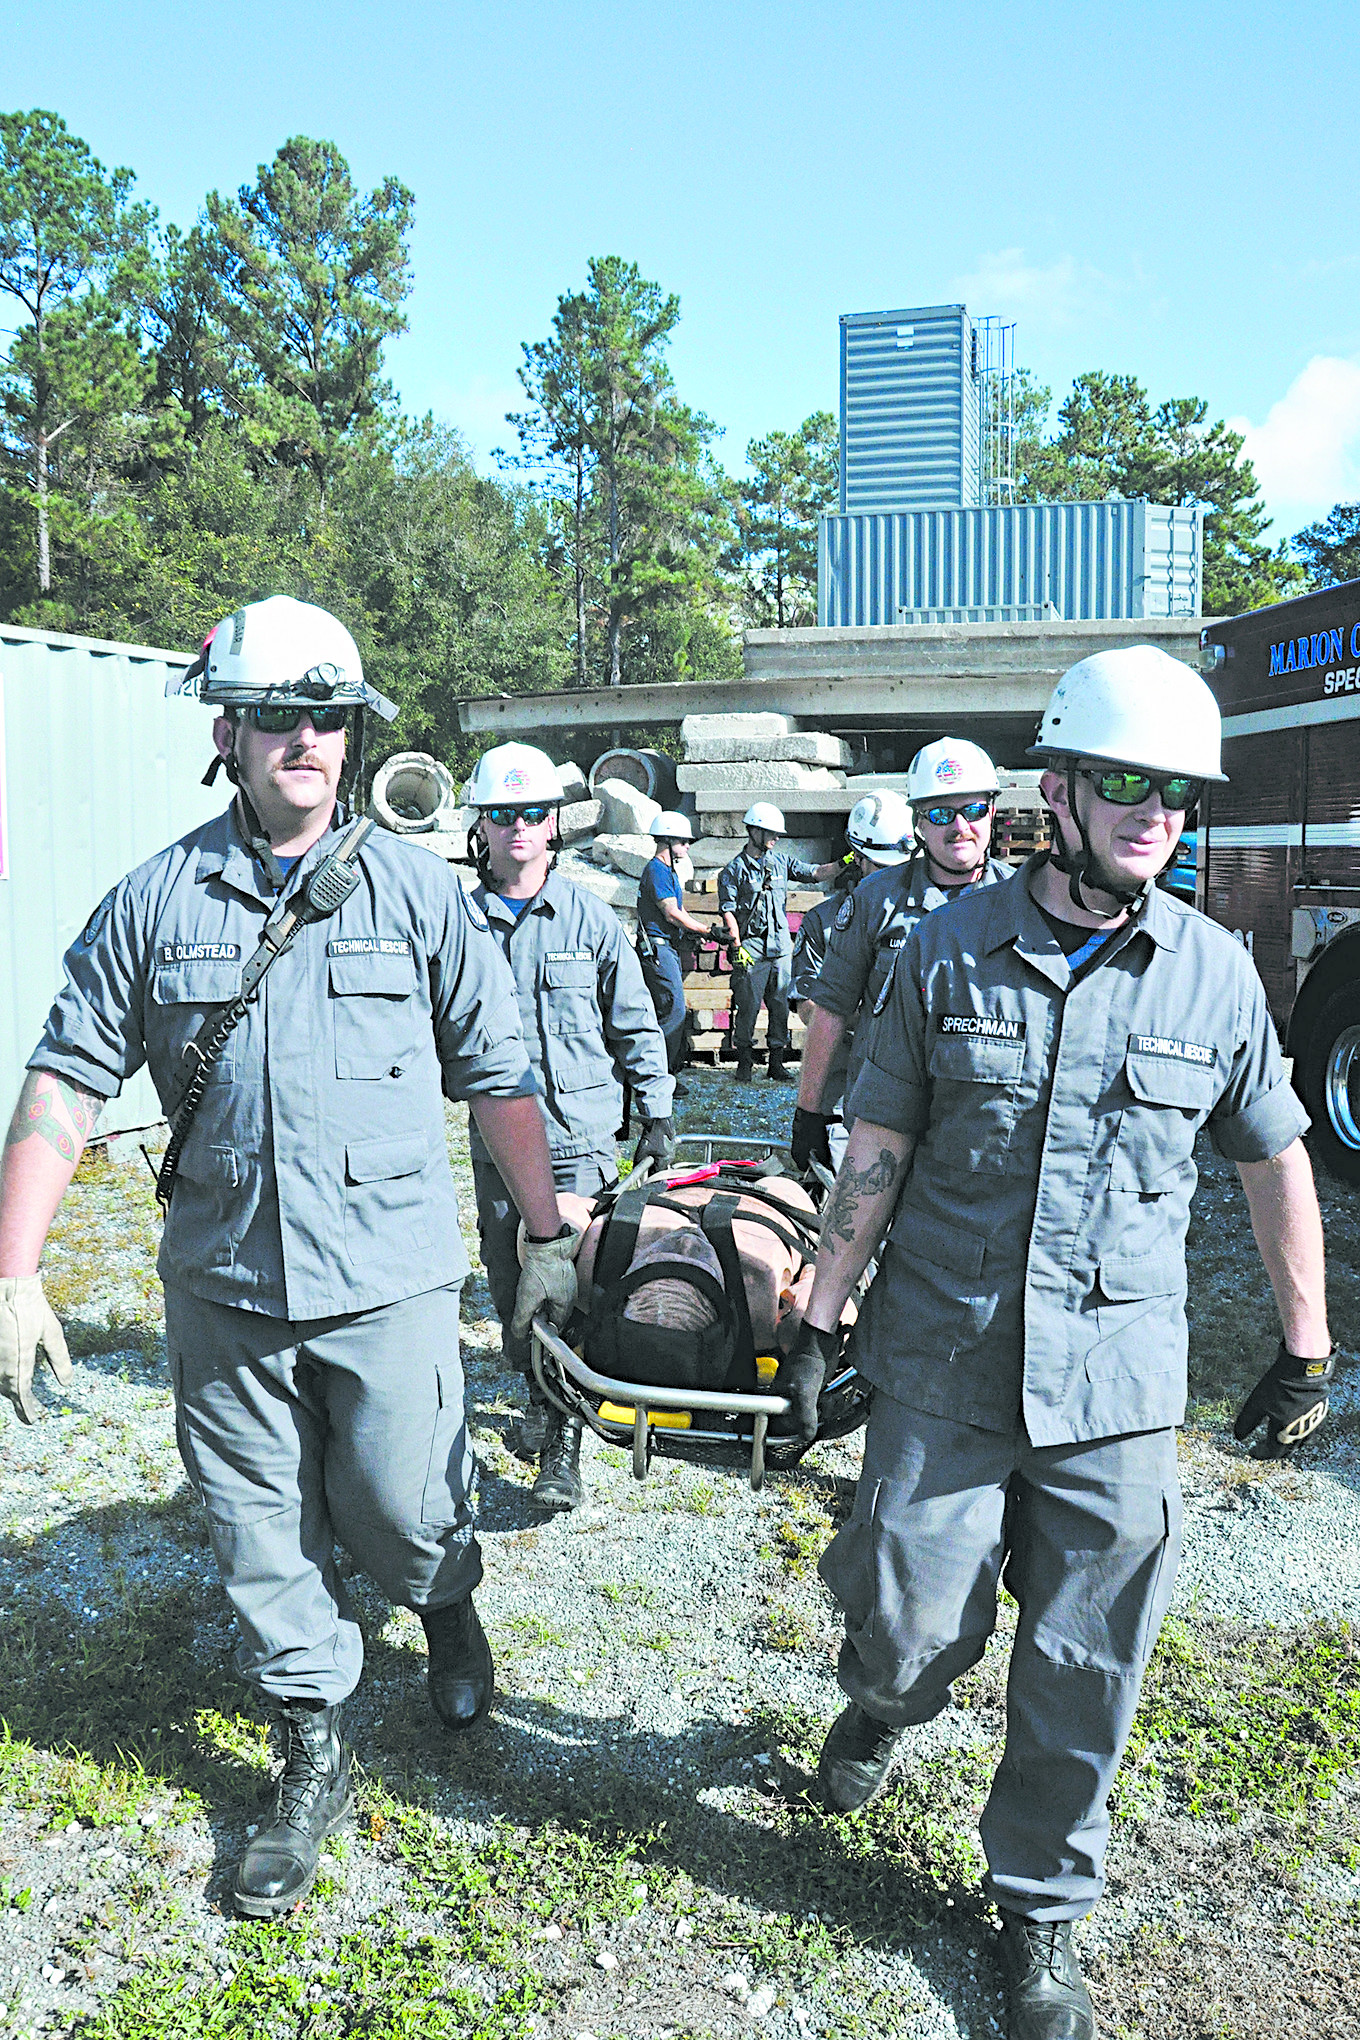
The first step in rescuing others from a collapsed or partially collapsed building is sizing up the structural damage, ideally while locating any surface victims. Be wary of any cracks wider than your thumb, or obviously missing supports like beams, columns, etc. “X” cracks forming between window openings indicate that huge shear forces have been absorbed and that the structure is in very fragile condition. If there’s a rubble pile, climb on top of it to get a better view and more access to surface victims. While there’s a chance of the rubble moving beneath your weight, thus posing more hazard to entombed victims, the possible benefit of finding more surface victims usually outweighs that risk. If at all possible, try to make sure the utilities are turned off before entering the building. Otherwise serious risks of fire and/or electrocution compound the threat of secondary collapse.
Once you’ve cleared the perimeter of all easily accessible surface victims, it may be time to make your way inside or start digging into the pile. Gloves, eye protection, and steel-toed boots are necessities here. An N-95 respirator or a Buff are also nice to have, considering the large amount of airborne dust and debris.
Focus your efforts on searching the stairwells. These sheltered locations often provide the most survivable voids for victims. If you can’t find the stairwells, focus on searching adjacent to any walls that are still standing. These areas are often more prone to harbor survivors. Out and away from the walls, in the middle of rooms, is where debris often piles up and crushes anything underneath.
This is the time to slow the pace somewhat and think before doing. Do not rush. Do not run. You need to be able search in a methodical manner. That means shouting out to possible victims, and being quiet while listening for calls back. It’s hard to hear while you’re running or breathing hard, or thinking about what you’re going to do next. Anyone who hasn’t been found yet is more likely than not buried under something — otherwise they would have walked out. That means their voices will be muffled and small.
Remember, no matter how bad the collapse looks, keep in mind that there’s always a chance for survival. At least one World Trade Center survivor literally rode the building down, something which should have been technically impossible. Victims have survived in voids up to 14 days, and recent experience at the Haiti earthquake disaster has pushed the limits of survivability longer than anyone had previously thought. Even if you’re not a first responder by trade, you may still have the responsibility of one day being the first responder by chance.
Common Myths … Collapsed!
Duct tape on windows provides protection: It doesn’t provide protection, but it does increase the chances of getting both glass shards and duct tape fragments inside your eyes when the windows blow.
My home was inspected by the local building department during construction. It must be structurally sound: With all present building officials excluded, of course, inspections during residential construction are known for missing critical deficiencies, especially during construction booms when city inspectors are stretched thin. Concrete block walls may have never been filled with grout and reinforcing steel. Roof-to-wall connections may consist of a handful of toe-nailed screws. And the common gable-end wall weakness makes many homes built before 2002 (when more stringent wind resistance requirements commonly came into effect) prone to wind-related roof collapses.
The government will help us: Depending on the scale of the disaster, rescue resources will be spread over a huge area. This means that if the town next door was hit harder than yours, most or all of the government resources could be diverted to that area. One collapsed house in your town will not draw attention when 100 houses in the next town were knocked over. Survivors of Hurricane Katrina still remember trying to signal Blackhawk helicopters from the roof as they flew by. However, many of those flights were focused on aiding the tourist and convention center locations instead of the more sparsely populated residential sections. This led to help being significantly delayed in certain areas.
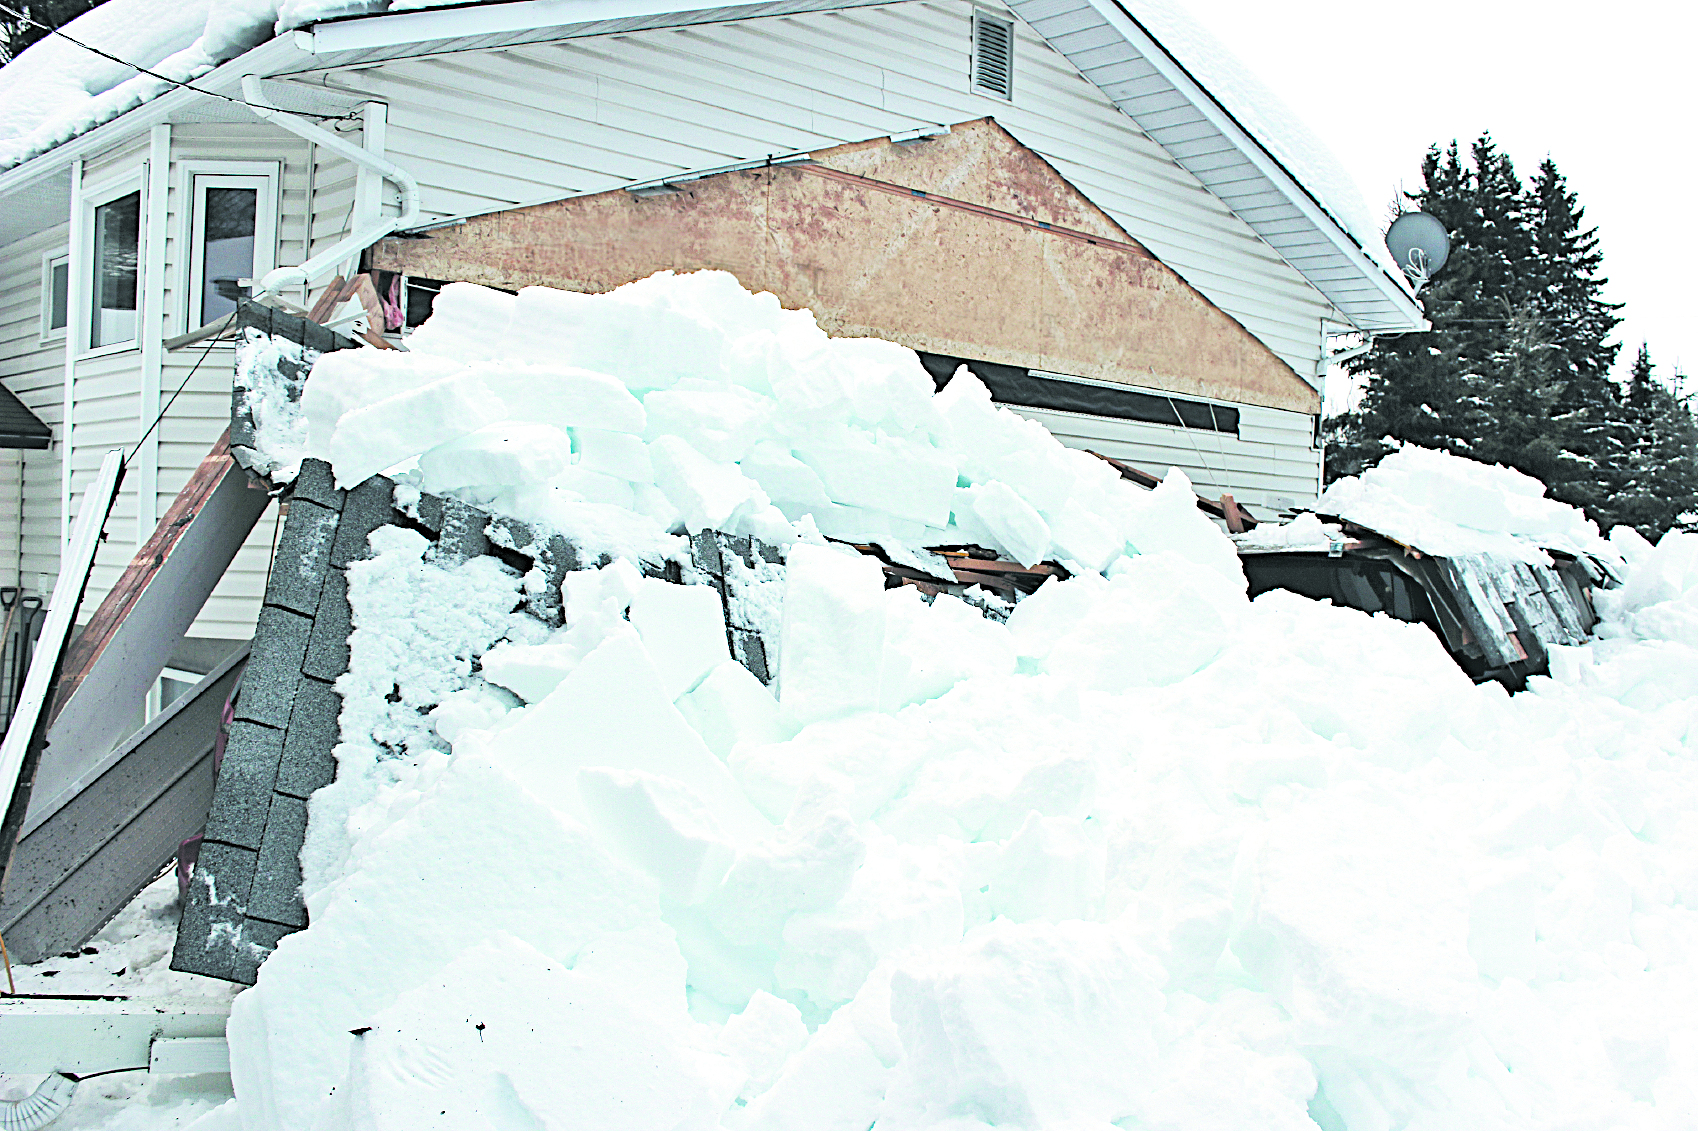
Snow-Related Collapse
With the recent winters being more severe than almost any in recent history, snow-related structural collapses are occurring with record frequency. A major factor is lack of “warm-up” or sunny days that lead to ice and dense snow. This dramatically increases the stress on the roof.
To help avoid a collapse, inspect all four sides of your roof for covering snow — just because the front is clear doesn’t mean the backside is the same. Although roof capacities (and snow density) will vary, as a rule of thumb anything more than 24 inches of snow on the roof is a red flag. Reduce that value to 18 inches if rain and/or ice is expected. Talk to a local structural engineer and/or your local building department, since local weather patterns and construction types are often the deciding factor in allowable thickness. Sagging roofs and rafters indicate excessive snow weight. Popping noises, creaking, and visible cracking are also signs that the structure is being overloaded.
To use a snow rake (roof rake), start from the roof edges and work your way to the center. Buy a rake that’s long enough to allow you to remove the snow while standing on the ground. Climbing on the roof will only add to the weight on the over-burdened roof and increase your chances of falling off. An icy ladder plus iced boots is a deadly combination. To avoid damaging the shingles, shave the snow down to a few inches in thickness but avoid trying to scrape the roof completely clean. Also make sure that snow is cleared from your furnace and dryer exhaust vents.
In rural areas, establish a communication and evacuation plan with an offsite party. Check in with them using scheduled, twice daily status updates. If two consecutive calls are missed then the emergency rescue plan should go into effect. Return to or remain at your last reported location and await contact. If you think a collapse is likely, keep your supply bag on your person at all times and consider woolen undergarments, which will maintain their warmth even if they get wet.
Try to keep a fire going, but make sure that adequate ventilation is maintained. If you run out of water, do your best to melt ice and snow before consuming. Keep in mind that if you’re already cold, eating snow will only lower your temperature further. At a minimum, try to thaw snow enough in your hands to be able to mold it into a ball before sucking on it. If things really go bad and your home suddenly becomes a snow cave, cold will quickly dull your mind — make a plan while you can still think clearly.
Vital Gear
If you want to prep for a building collapse, but the closest you’ve ever come to a search and rescue is watching reruns of Baywatch, you’ll need to start by reading the main feature in these pages and any reputable books or online sources you can find. Then, you need the right gear. Sure you can do a lot with your bare hands and when you’ve got adrenaline on your side. But imagine how much more you can do with a little bit of assistance. Keep these small items, plus a couple of bottles of water, in your egress bag always.
Gloves
You need paw protection to help safely lift small objects and clear debris. The Stryker Gloves from Line of Fire can do just that and more. This heavy-duty glove has four-way stretch Kevlar, flexible abrasion- and impact-resistant knuckles, and Line of Fire’s TEGS grip surface atop the leather palm and fingers. For more info, go to www.loftactical.com.
Headlamp
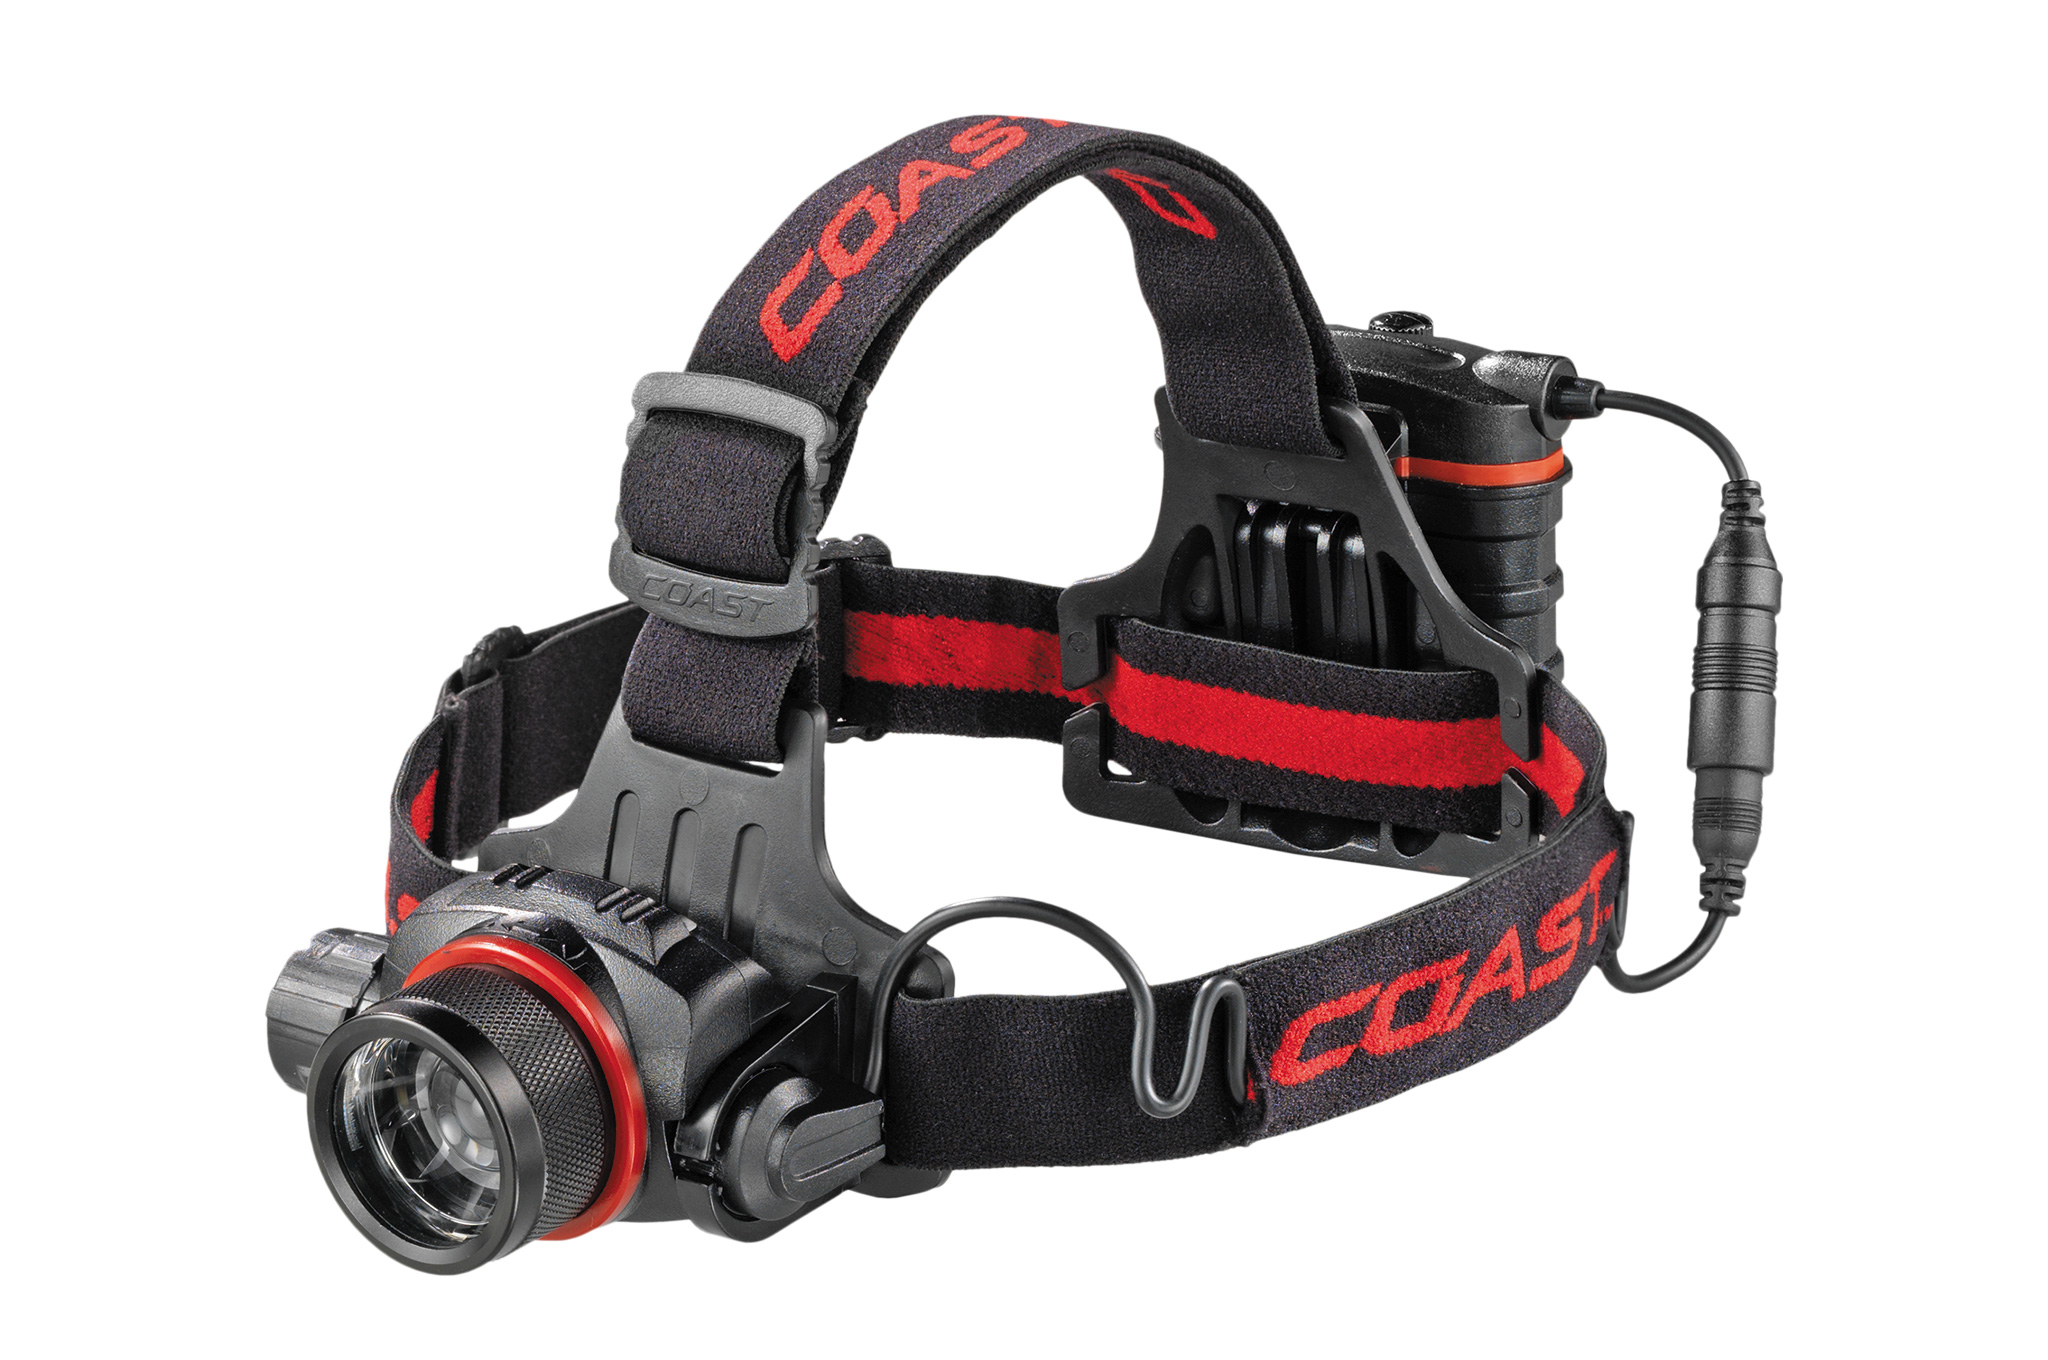
Powerful flashlights are great — until you realize that you need two hands to accomplish most any task related to search and rescue. The Coast HL-8 headlamp features a huge 390-lumen adjustable light output powered by four easily-scrounged AA batteries. And because the old adage still holds true that “two is one, one is none,” a small powerful flashlight should be part of your everyday-carry kit at all times. For more info, go to www.coastportland.com.
Axe
Made of 1/4-inch-thick 1095 epoxy powdercoated carbon steel with full-tang construction, the SP16-SPAX Rescue Tool by Ontario Knife Company was modeled after WWII emergency crash axes. It’s designed for breaching walls, although its 2.1-pound weight means it can still be carried on you full time. It even has a built-in opening so the tool can be used like a wrench, with the hole sized to turn fire hydrants or gas valves. For more info, go to www.ontarioknife.com.
Boots
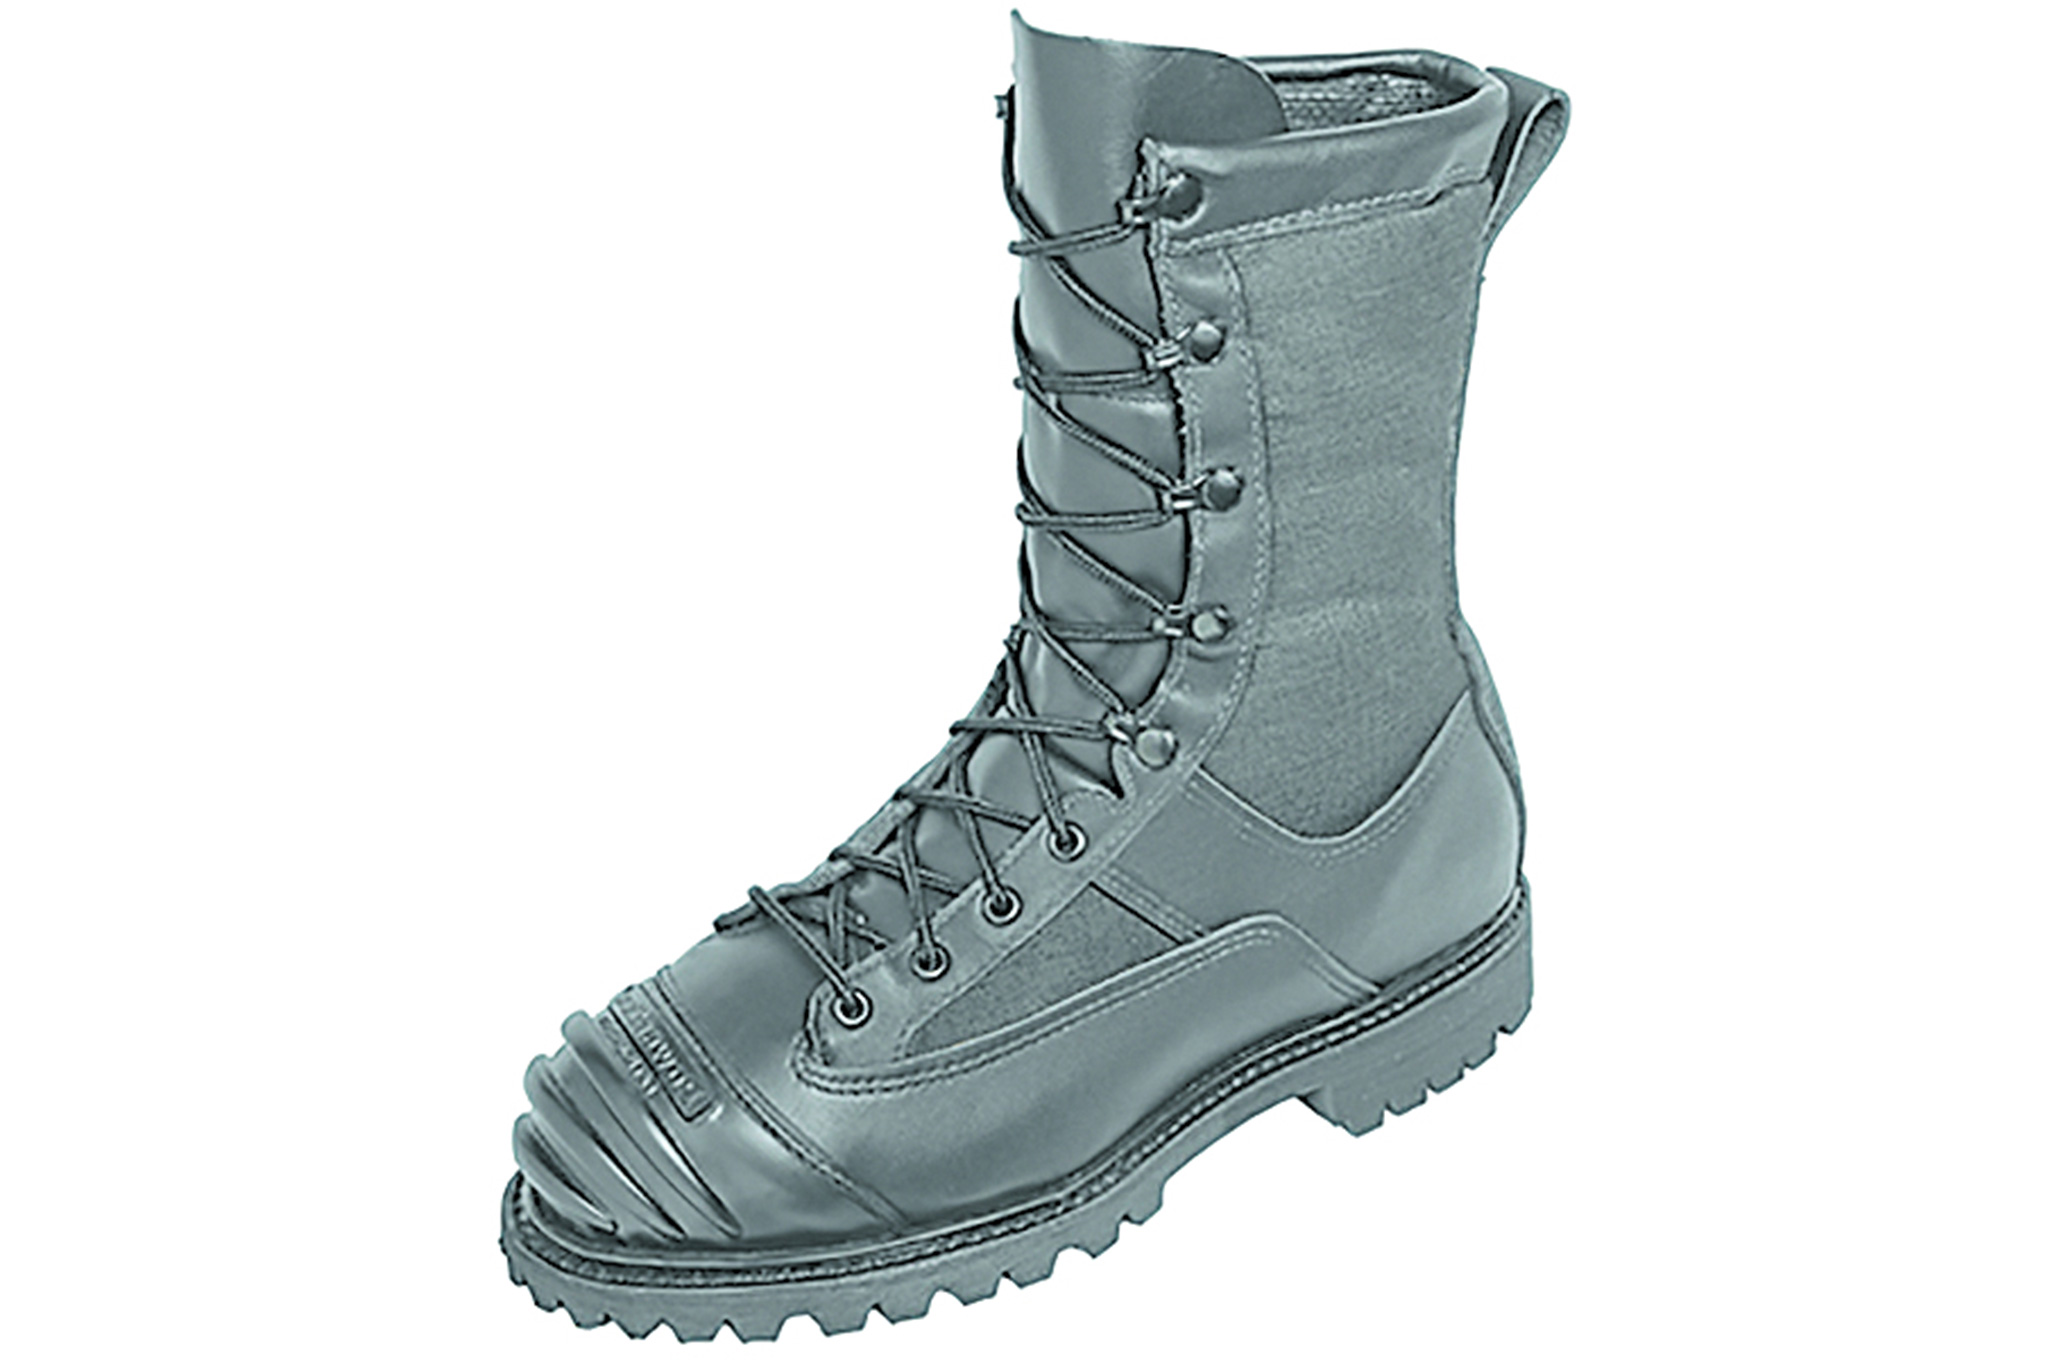
Steel- or safety-toed boots are a must for any kind of structural collapse scenario, given the possibility of shifting debris falling on your feet or puncture items underfoot. One of the best examples of this type is the Pro Series Model 6006 by Honeywell. These 8-inch technical rescue boots feature a composite toe cap, steel bottom plate and ladder shank, and 7-ounce Kevlar/Nomex ripstop cloth paneling. For more information, go to www.honeywellfirstresponder.com.
Eye Protection
Losing your eyesight means immediately losing your effectiveness, and your status changing from rescuer to victim. Fortunately, there’s eye protection like the Wiley-X XL-1 Advanced frames, which include interchangeable clear and dark lenses. Keep the clear lenses in at all times, even indoors at night, if you suspect a collapse or breaking windows is possible. We love the positive-connection elastic straps that won’t come off even when they get caught on something, as well as the removable foam gaskets which block out dust and debris and combine the best of both goggles and sunglasses. For more information, go to www.wileyx.com.
About the Author
Andy Schrader is a licensed professional engineer and certified by the U.S. Army Corps of Engineers as a structural specialist responder. He is assigned to Florida’s Urban Search and Rescue (USAR) Task Force 8, based in Marion County, Florida. His company, Recon Response Engineering, specializes in educating the public, technical rescue crews, and firefighters on the subject of structural collapse.