Summer is a great time to be outdoors, since you can spend time enjoying nature without bundling up in thick clothes. However, there’s also a drawback to these warmer months: ticks are also enjoying the weather.
The same warm weather that brings you outdoors also makes ticks more active.
These annoying parasites are usually transferred onto your body as you walk through tall grass or undergrowth, and embed themselves in your skin, growing fat on your blood. Worse still, ticks can transmit serious diseases such as Tularemia, Rocky Mountain Spotted Fever, and Lyme disease. If you’re bitten by a tick, it’s important to know how to remove it safely. If you don’t, its barbed feeding tube may remain embedded in your skin, or it may rupture its contents into your bloodstream, leading to infection.
An adult tick with 8 distinct legs. Source: CDC/Wikipedia
Unfortunately, many urban legends and myths have spread about tick removal. First, it’s said that burning or freezing the abdomen will make the tick release from its host. This may cause the tick to drop off, but it may also release the contents of its guts into the host, causing infection or spreading disease.
Second, it’s said suffocating the parasite with petroleum jelly or nail polish is effective. However, this isn’t true either. Ticks breathe through tiny holes in their skin called spiracles, and only need to breathe a handful of times per hour. Like fire and freezing, this technique may also do more harm than good, by causing the tick to regurgitate into the host’s bite wound.
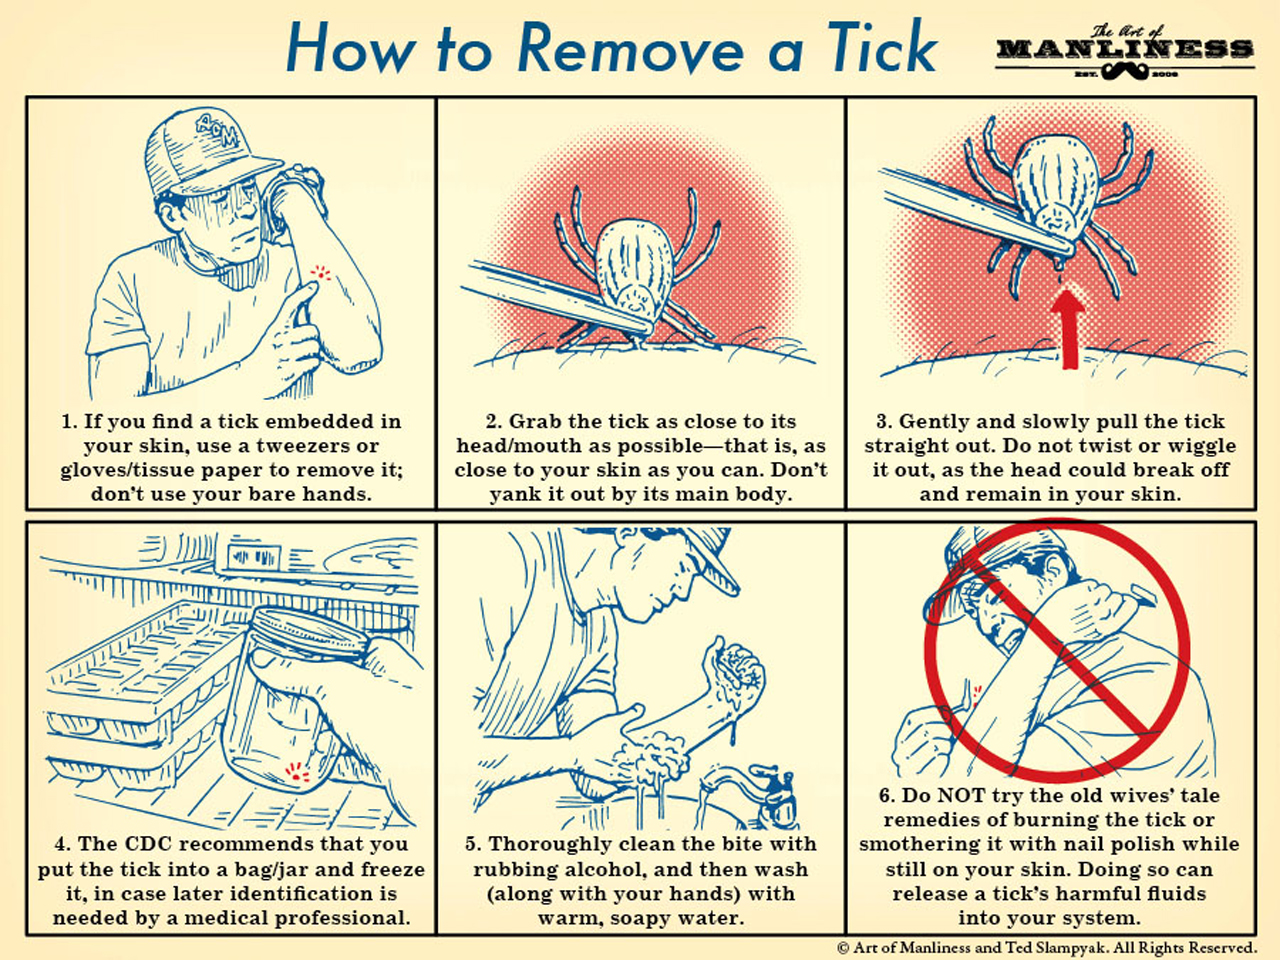
So, what’s the easiest way to remove a tick safely? The answer is simple: fine-point tweezers. Here’s an infographic from The Art of Manliness that shows how it’s done:
This computer-animated video shows the technique in motion:
The key is to use light pressure and a steady pulling motion, to avoid compressing or injuring the tick and increasing your risk of infection.
Of course, specialized tick removal tools do exist, and are often used by doctors or veterinarians to remove multiple ticks from a host quickly. However, for the average outdoorsman or survivalist, simply carrying a $2 pair of fine-point tweezers is simple insurance against these blood-suckers.
When it comes to survival tools, function must take precedence over form. If a knife looks appealing, there’s certainly nothing wrong with that. However, these styling cues should take a back seat to its true purpose: cutting reliably and effectively. Let’s face it—a knife that looks good but can’t stand up to the rigors of daily use is about as helpful as a jewel-encrusted hammer.
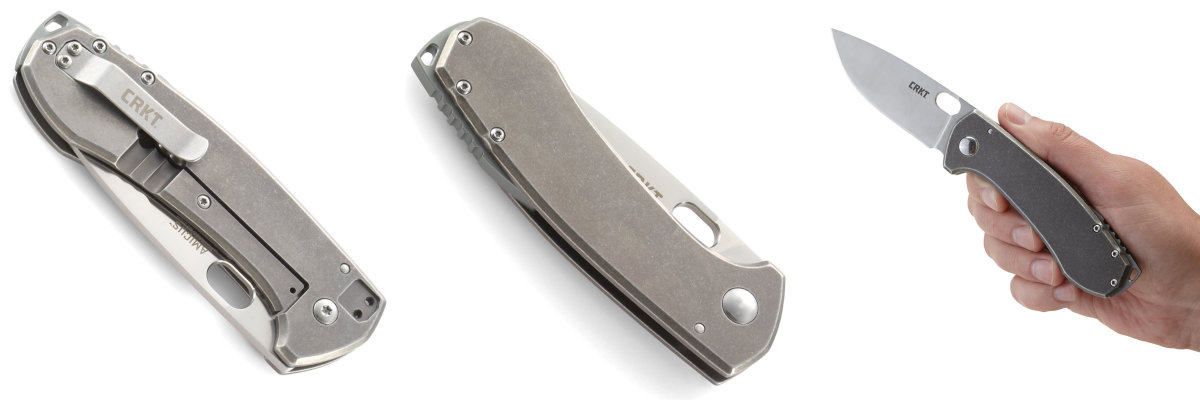
Scandinavian cultures have become famous for their simple and highly effective blade designs, so we were pleased to see CRKT launch a new folding knife inspired by this tradition. The new blade is called the Amicus, which means friend or comrade, and it was designed by Jesper Voxnaes, of Loegstrup, Denmark.
Voxnaes set out to create the perfect field-folder, a knife that would be at home in the mountains and woods of the Danish countryside. In the past, he would always carry a fixed blade, but the Amicus was crafted to serve the same purposes in a more portable and compact form.
In the video below, Voxnaes explains his inspiration for designing this blade:
The full-flat grind on this 3.4-inch blade was crafted with strength and durability in mind, and is offered in a plain edge or with Triple Point serrations. The 8Cr13MoV steel blade is further supported by a sturdy frame lock carved into the stonewashed stainless steel handle. An ergonomic forefinger guard and jimping on the protruding back spacer provide excellent control for delicate tasks, even in the rain or while wearing gloves.
This new CRKT Amicus folding knife is available now at an affordable MSRP of $60 (with or without serrations). For more information on the Amicus, visit CRKT.com.
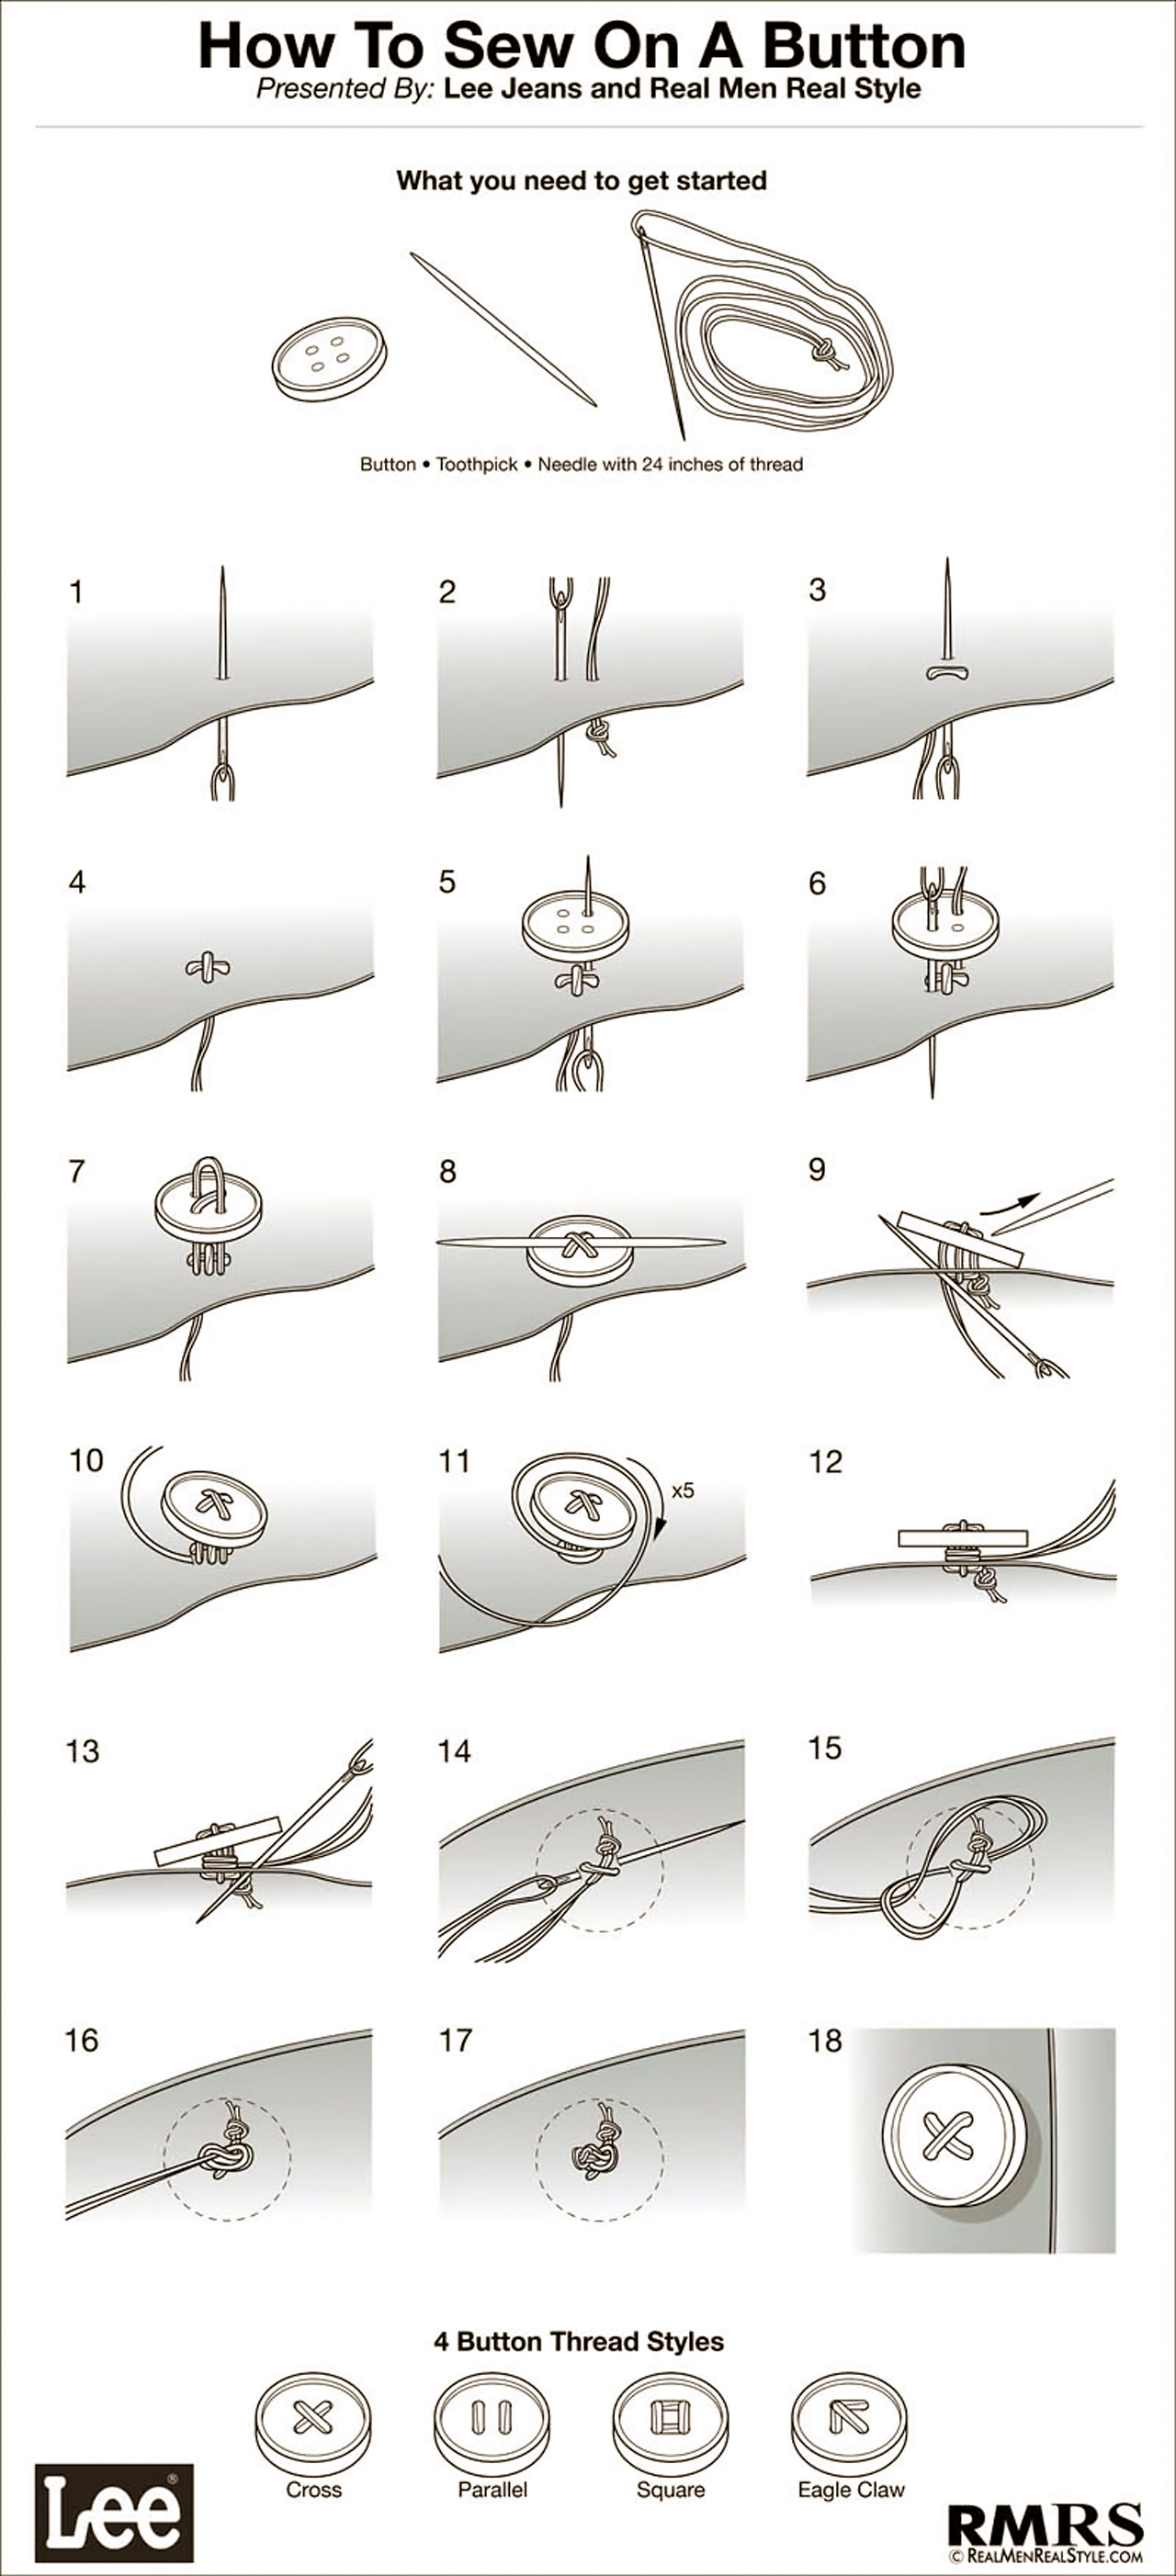
Most pre-made survival kits include small tools such as fish hooks, matches, water purification tablets, and a needle and thread. Most of us know how to use the first three items, but when it comes to sewing, many of us struggle. Sure, it’s easy enough to stitch up a tear with copious amounts of messy thread, but if you want your repairs to last, you’ll need to learn the right technique.
Buttons are one of the most common points of failure for clothing. If you lose a button in a survival situation, you could be left with a drafty shirt, non-functional pocket, or pants that are falling down. Obviously, these are not optimal for survival, especially in cold conditions. In order to avoid this, it’s handy to know how to re-attach a button with a needle and thread.
The following infographic from Lee Jeans and Real Men Real Style shows how to sew on a button securely:
If you’re a bit confused by these diagrams, here’s a video that shows the technique clearly:
Much like knots, this technique may seem rather complicated at first. However, with a little practice, muscle memory will kick in and you’ll be able to sew on buttons in seconds. Even if you don’t care about looking a bit disheveled, it’s important knowledge to have so you can stay warm and protected from the elements.
This article was originally published in Issue 1 of our magazine.
Urban disasters come in all shapes and forms. Whether it is a small-scale power outage or full-scale breakdown of society, there are strong arguments to be made for having a firearm.
Guns are the great equalizer, allowing even a small-framed woman to fend off a bulked-up muscle-bound brute. With proper training, they can provide protection for you, your family, and your property in uncertain times.
Firearm Safety
Before we start delving into the selection or the use of firearms, we need to talk about firearm safety. There are four universal firearm safety rules, and while often worded differently, the theme is always the same.
If I were to add a fifth safety rule, it would state: You are responsible for the storage and care of your firearms. With these safety rules in mind, we can all grasp the idea that firearms are tools, and like a vehicle or a chainsaw, they can all be dangerous if used improperly. The key to proper use is proper training.
Universal Firearm Safety Rules
1. Treat all guns as if they are loaded. 2. Never point a gun at anything you are not willing to kill or destroy. 3. Keep your finger off the trigger until your sights are on target and you are ready to fire. 4. Be aware of your target, as well as what is in front of it, around it, and behind it.
Selecting a Firearm
What should you look for in a firearm? The answer for that one lies within what your intent is for the firearm itself. Buying a gun to carry every day is different than buying one to keep in your house. A shotgun can easily defend your home, but you probably don’t want to go shopping at the mall with it. By looking at different types of firearms, we can get an idea of what does or doesn’t work in the role of home protection or urban defense, and as with all else, there are pros and cons to just about everything.
With many types of firearms on the market, understanding which one best suits your needs can be a daunting task. The topic is as broad as it is deep. This article is meant as a simple primer and is not all-inclusive in its scope or reach. This does not take the place of experience, nor does it take the place of proper instruction. What I hope to impart is a basic understanding of some various aspects of firearms in the role of protection.
Handguns
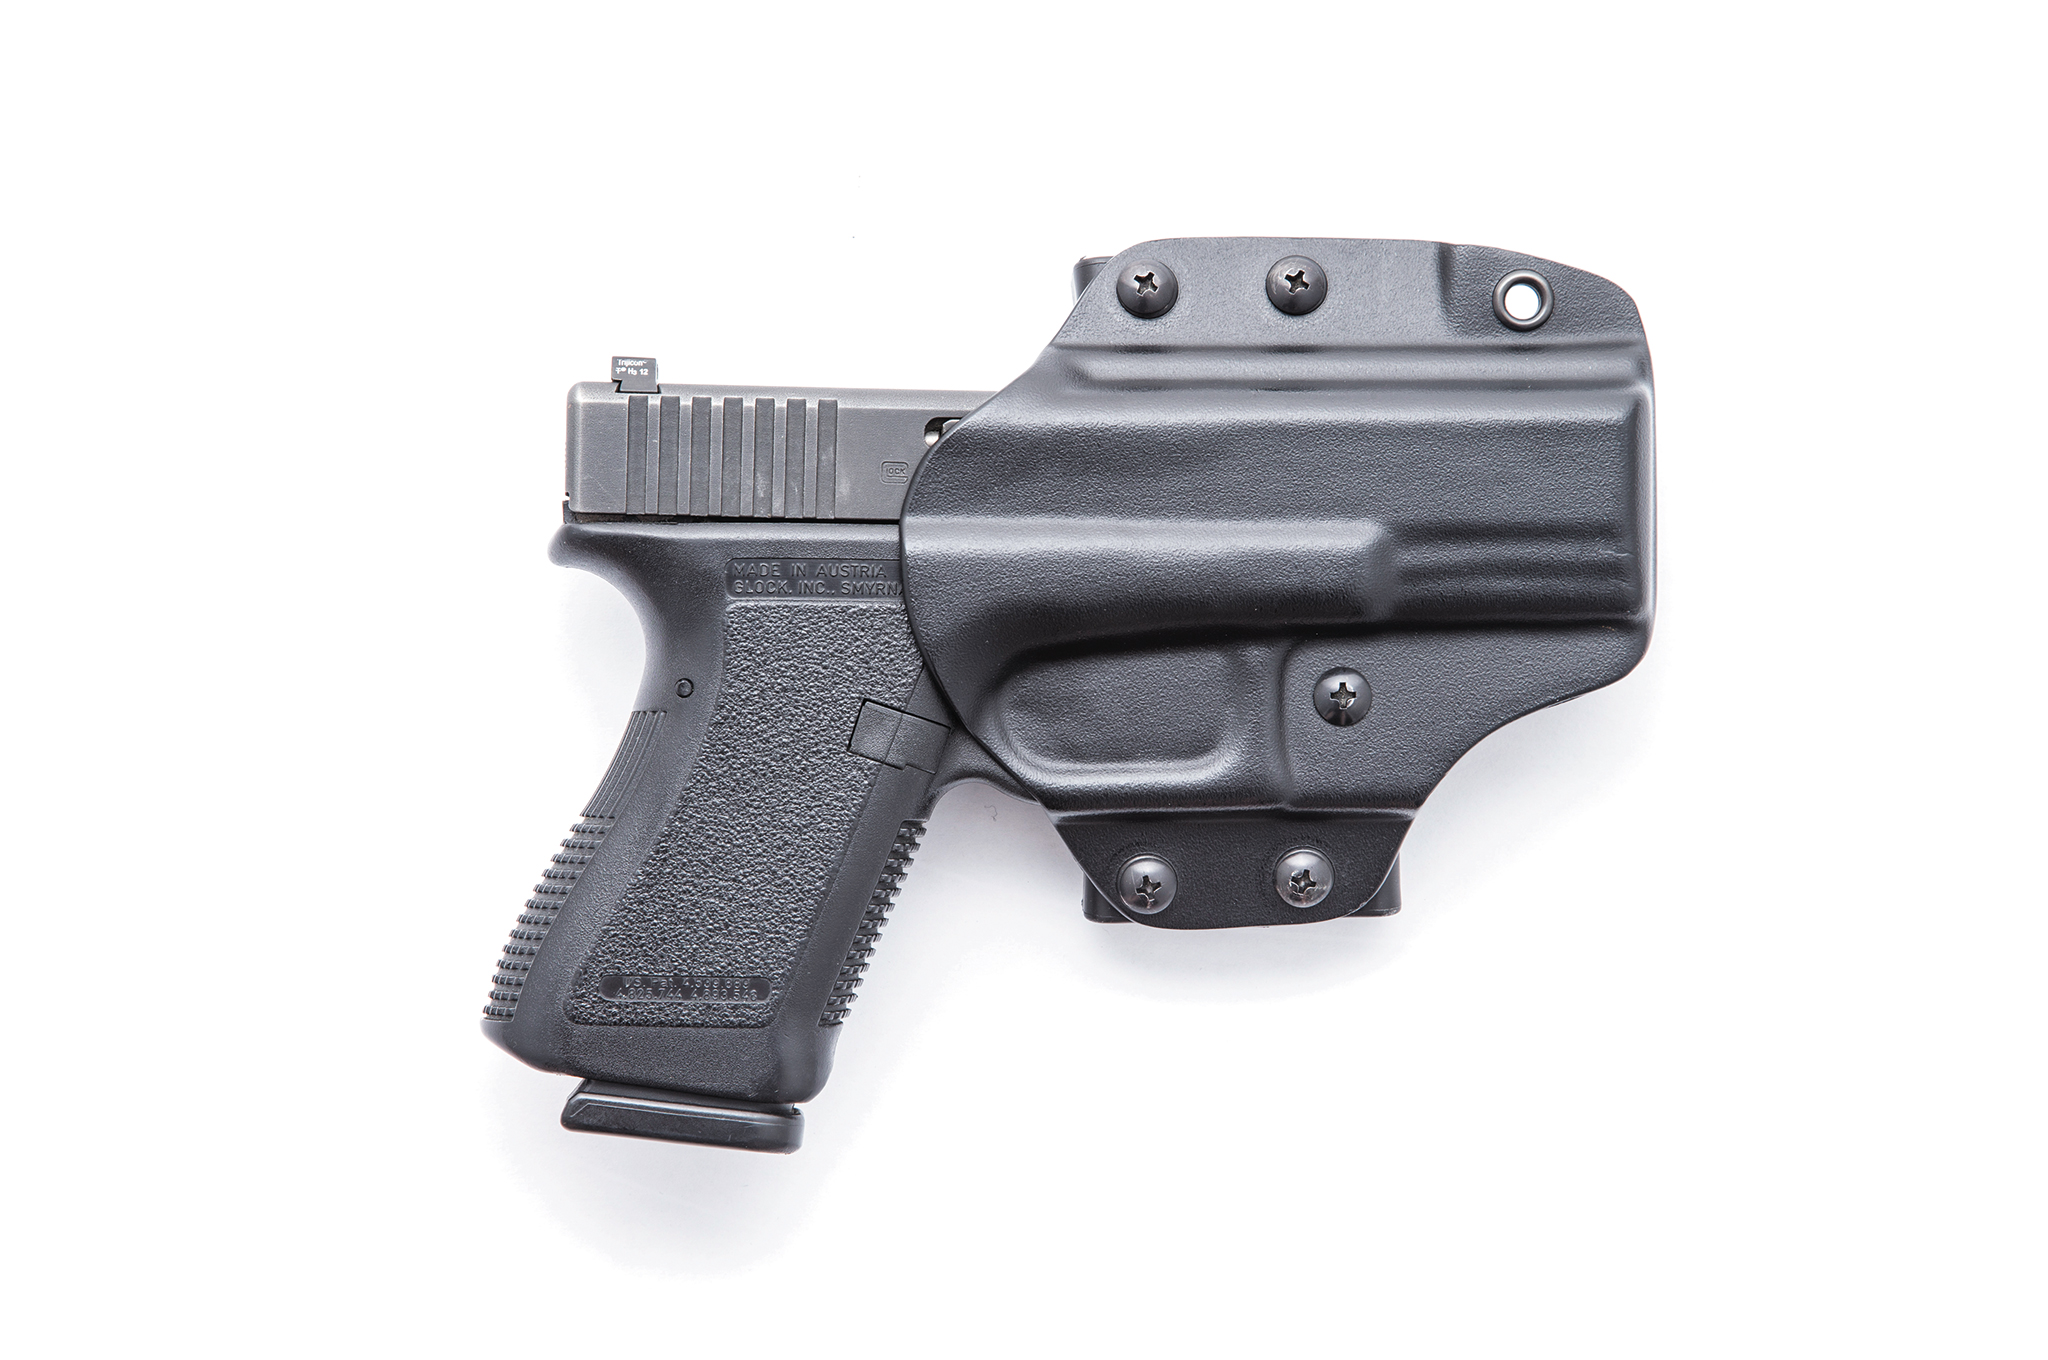
Handguns, commonly referred to as pistols, are what you see your local police officer walking around with on their duty belt. In general, our police are carrying a full-size handgun because concealment isn’t a concern for them. Pistols come in many sizes and calibers. When looking for a pistol, try to find one that fits your hand and feels somewhat comfortable. One that is too large or too small will be harder to hold onto when the gun recoils. The term caliber is used to determine the size of the bullet. Small-caliber handguns have less recoil and are sometimes easier to shoot. Also, small-caliber handguns tend to lack stopping power; I have been on plenty of calls as a police officer when a person has been shot with a small-caliber handgun and in all the excitement hasn’t even noticed. This is much more common when someone is on narcotics, but you shouldn’t ever expect to stop a threat with just one bullet being fired.
For protection, a 9mm, .40 caliber, or .45 caliber are the most common with 9mm being the most common of all, when it comes to semi-automatic pistols. The Glock 19 is easy for most anyone to shoot and is small enough to be carried by most.
Small-caliber handguns, like those chambered in .22LR, are cheaper to shoot and are very useful for training and for hunting small game. For protection, a 9mm, .40 caliber, or .45 caliber are the most common, with 9mm being the most common of all, when it comes to semi-automatic pistols. A semi-automatic pistol is one that uses a magazine to store bullets, and each time you pull the trigger a new bullet is fed into the pistol from the magazine. A person can keep multiple magazines, which will allow them to fire more rounds as needed.
A revolver is a handgun that has a cylinder, and ammunition is loaded into the cylinder. Most revolvers carry six rounds, though some carry more or less. Revolvers were often thought to be the appropriate handgun for females, but in general, this is outdated thinking. A revolver can be a good choice, but it can also be a poor one. They are much slower to load, but the flip side is they tend to be a bit simpler to operate. If at all possible, go to a store and handle as many handguns as possible to see what fits and feels right for you.
Caliber=Size of Bullet
There are some additional things to think about when buying a handgun with regard to buying a holster to carry it with you, cleaning supplies, and ammunition. In terms of ammunition, there are lots to choose from, but your store employee can help you. What they will need to know is whether you are buying ammunition for target practice or for defensive purposes. Defensive ammunition is almost always hollow point, which results in limited penetration when fired. Expect to spend $500-$750 for a new high-quality pistol, but used models including police trade-ins can be found for several hundred cheaper.
POINT! Stickman Says: What is the go-to handgun for my house? A 9mm Glock 19 or 17, mainly because the caliber is effective, they are easy for anyone to shoot, and the 19 is small enough to be carried with me anywhere. I keep a stockpile of training and hollow-point ammunition on hand, along with extra magazines.
Second Opinion Kyle Lamb Says: Handgun is a must. It is best if you can carry a model that is very prolific. I carry an M&P, but have plenty of Glocks in 9mm laying around that I believe would be the most popular overall. Basic field replacement parts are also plentiful, but you should have these before the fan gets hit with crap.
Rifles
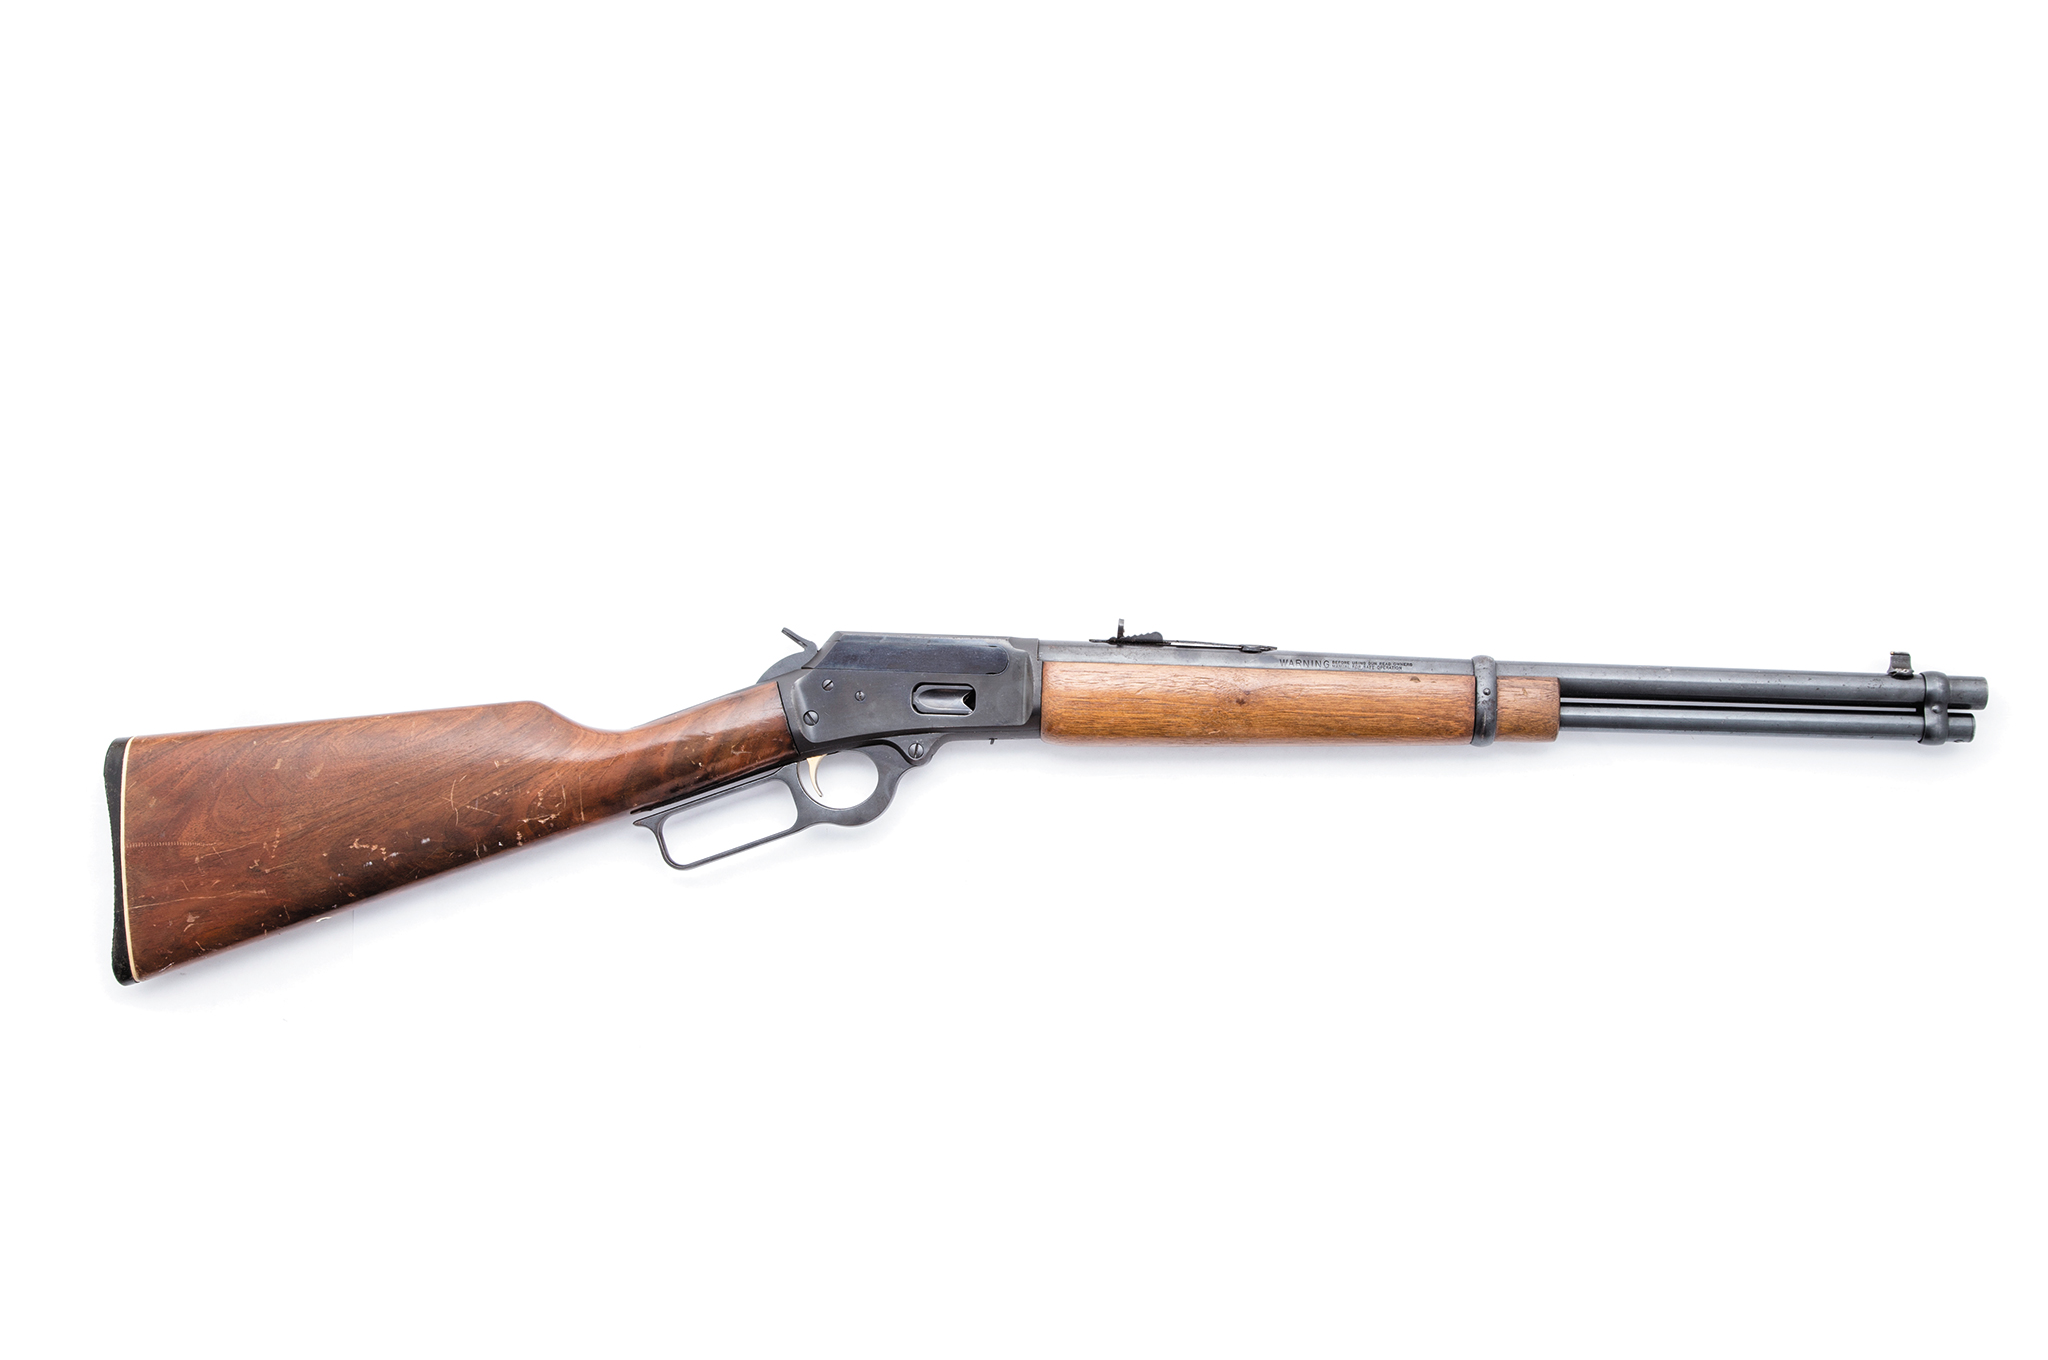
Rifles are much higher-powered firearms than handguns. The rifle is shoulder-supported when fired and comes in many forms. Many people are familiar with the lever-action cowboy-style rifles, the bolt-action hunting rifles, and the AR-15s.
The lever- and bolt-action rifles are often used in a hunting role, but that certainly doesn’t negate the ability to be effective in the role of protection. These rifles often have a scope, which allows the user to see the target better from farther away. This can be fantastic if you own a large amount of property or if you are hunting. The downside to this is these scoped firearms are typically not effective inside buildings, due to the magnification that makes it hard to see things up close.
High-powered rifles are long and harder to move around with inside structures, and the ammunition will often run a high risk of over-penetration inside buildings. Do I own these types of guns? Yes, I own bolt- and lever-action rifles. Would I rely on them for protection inside my house? No. I bought my last used lever-action rifle a few years back for $150, and that was without a scope. A high-quality bolt-action rifle can easily cost more than $1,000 when you add in the cost of a scope.
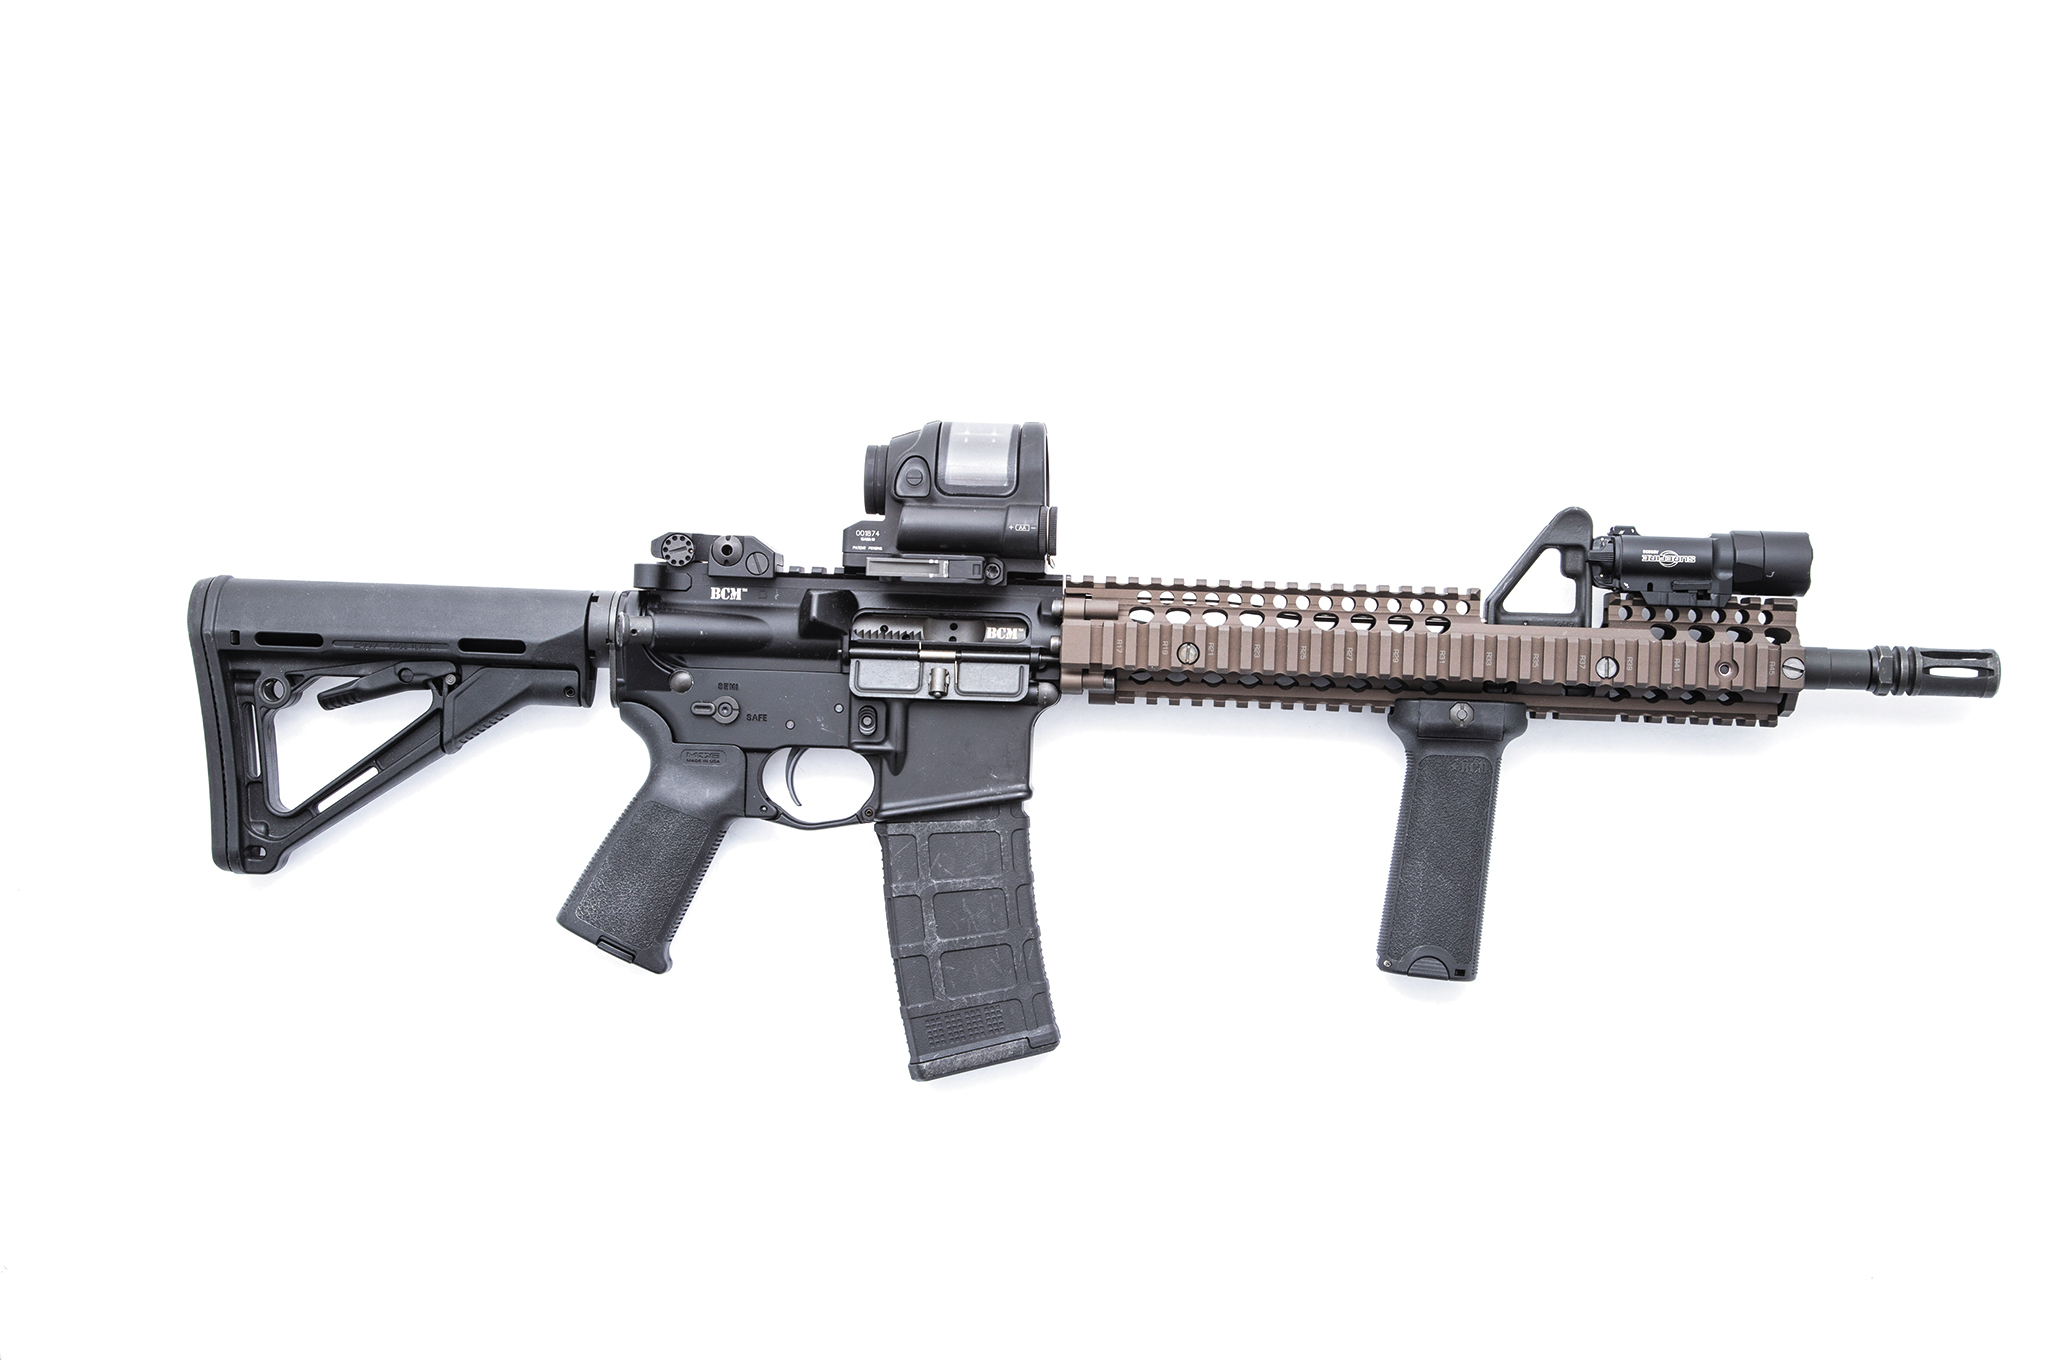
AR-15s are one of the most popular and common rifles around. They are available with a fixed or adjustable stock, accept a wide variety of optics, and can be found with different barrel lengths from 7 to 26 inches. The most common barrel length is 16 inches and can be found in the patrol cars of many police agencies across the nation. The .223 Remington, 5.56mm caliber it most commonly fires makes for a lightweight firearm with low recoil, long range, and interchangeable magazines, and it is easy to use. The AR-15 is compact enough to be highly functional inside a residence or structure, and over-penetration is not as much of an issue with defensive ammunition. Good AR-15s tend to cost in the $950-and-up price range, and the accessories can double or even triple that.
Additional things to think about when buying a rifle are a cleaning kit, ammunition, and whatever accessories you think you might need. The first accessories I would look at would be additional magazines and a good flashlight that attaches to the rifle.
POINT! Stickman Says: What is the go-to rifle for my house? An AR-15 with an attached flashlight. I consider this my primary weapon, if needed in the event of an urban disaster.
Second Opinion Kyle Lamb Says: AR15/M4 variant without model-specific parts. My favorite weapon to use is the AR15/M4 type system. Plenty of capacity and works well for hunting … whatever your quarry may be. As with the Glock, plenty of spare parts are a must, focusing on the bolt, gas rings, extractor, and extractor springs.
Shotguns
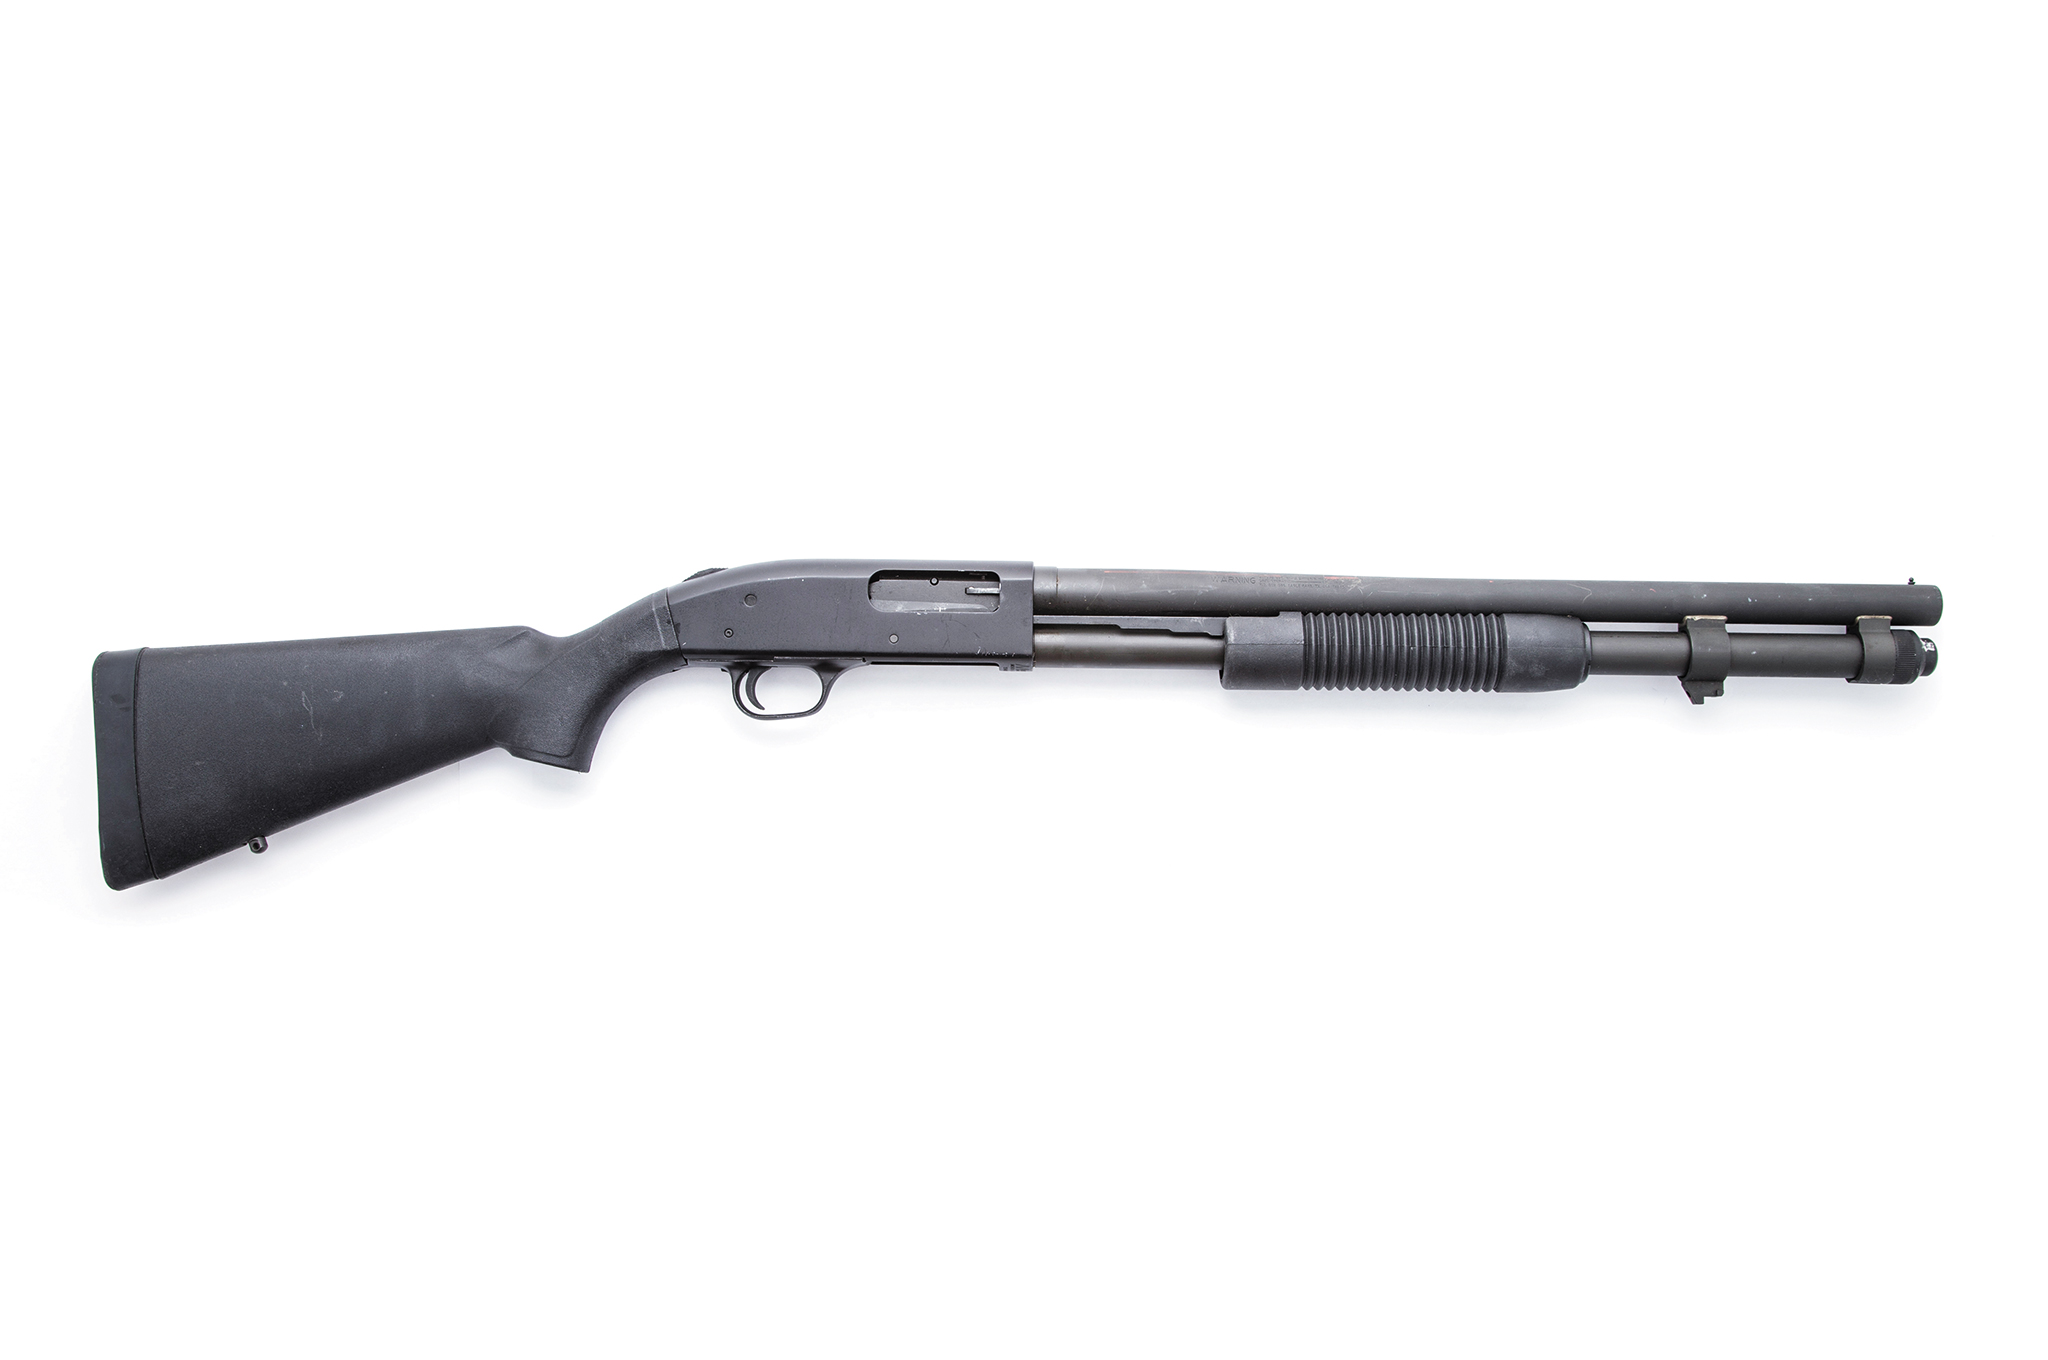
The strength of the shotgun is its unique versatility. It is able to accept ammunition that fires heavy slugs, buckshot (large pellets), birdshot (small pellets), and a variety of sizes in between. Specialty ammunition can be found such as signal flares, along with more exotic things like beanbag rounds or rubber bullets, which are typically available only to police and military units. Shotguns come in a variety of styles, including pump-action, break-action, and autoloaders.
Most shotguns hold between five and seven rounds, which is certainly on the low side, compared to pistols and the AR-15. Break-action shotguns open the way the name suggests; they break open by way of a hinge in the middle. Double- and single-barrel break-action shotguns only hold one or two rounds each, which is certainly a detriment in many, if not most, cases.
What shotguns do have going for them is a good amount of stopping power, if used with the appropriate ammunition, and for defensive purposes that means OO-buck (pronounced double-ought-buck) shot. Double-ought-buck shot consists of nine .32 caliber lead balls packed into the shotgun shell.
Pump-action shotguns are what rode in patrol cars for decades, and the familiar pump-action sound has been in many movies. One of the best things about pump-action shotguns is they are available for a pretty low cost. While there are many upper-end shotguns, the basic defensive shotguns in 12- and 20-gauge can be found for $350, often less when on sale or found used.
The difference between 12- and 20-gauge is the size, with 12-gauge being the most popular as well as the larger of the two. Last in the list is the semi-auto shotgun. This shotgun lets you fire as fast as you can pull the trigger. But, remember you are only doing this for five to seven rounds.
Additional things to remember when looking to buy a shotgun are that you do your homework and find whether you would be better served with a 12- or 20-gauge. Find the right model, so you aren’t swinging a super-long goose-hunting gun down your halls and banging into walls. Also, you’ll need to find a good cleaning kit and the right ammo.
Don’t buy into the shotgun hype that it is the best defensive weapon available, because the rounds tend to over-penetrate and, since you are firing nine .32 caliber pellets, you have a lot of lead in the air that may miss and go through walls. The shotgun is still a fearsome weapon, but make sure you know its limitations.
POINT! Stickman Says: Do I have a go-to shotgun? Yes, I have a Mossberg 590A1 pump-action, as well as some others, but they aren’t my first or second choice in a crap-hits-the-fan scenario.
Second Opinion Kyle Lamb Says: Remington 870 or Mossberg 500 both will work fine and should not require much maintenance. Ammo selection should be plentiful and can aid in hunting small and big game or for protection.
Size & Weight
Size and weight should be deciding factors of which type of firearm you choose, as well. Handguns are small and can be carried more easily when compared to long arms such as rifles and shotguns. Handguns tend to be more difficult to shoot accurately at range, however.
With both the rifle and shotgun, something to consider are their portability, size, and weight. If you find yourself in a full-on breakdown of society and need to move from one place to another, especially on foot, a long arm may draw unwanted attention to yourself. While they do provide a good deal of standoff protection, they can also make you look like a threat if handled out in the open. This is just another factor to think about when choosing a firearm with urban disaster as the subcontext.
Training
After you select a gun, your next step is to get some training. Your local gun store is usually a good source to find a list of qualified instructors. Talk with the employees and find out how long an instructor has been teaching and what their credentials are. Also, find out how long the instructor has been interacting with the gun store. Good firearm instructors have more than combat time and good stories; they have the ability to interact and teach in a professional manner.
You want someone to be able to show you the safe handling, loading and unloading your firearm, the fundamentals of marksmanship, cleaning and care, and other basics when you are starting out.
Are you looking at a firearm or firearms for family protection? If so, consider having your family participate in a basic firearm course with you. All of the courses in the world won’t help you any if you are at work and your significant other has someone breaking in the house.
About The Authors
Stickman’s experience as a team leader in the law enforcement and military fields allows him to have a high level of expertise and understanding of firearms usage in defensive roles. He is an active-duty police officer with over 20 years experience. Stickman is also a military veteran of eight years, firearm instructor, and armorer of a variety of handgun and long gun platforms.
Kyle Lamb retired as a Sergeant Major after 20-plus years in the U.S. Army, 18 of them in the Special Forces. He’s been deployed to all parts of the world including Iraq, Bosnia, and Somalia. Lamb has experienced some serious action and brings those experiences with him to his training and firearms accessories company, Viking Tactics (http://www.vikingtactics.com).
Here’s a shocking fact: not everything you see on the internet is true.
If you’re looking for true survival knowledge, you should never take advice solely from one source—not even us. We would encourage everyone to retain a healthy degree of skepticism, double-check the facts, and (most importantly) practice the survival skills you learn to test their effectiveness. Otherwise, it’s easy to fall for some “survival expert” who could be leading you astray.
Lemons: are they just a tasty fruit or are they an invaluable survival tool?
Recently, we came across a YouTube video that claims to show how a single lemon can supposedly be used to start a fire. The video states that all you need is one lemon, six copper clips, six galvanized (Zinc-coated) nails, a piece of wire, and some steel wool. The video has generated over 12 million views in a single month.
We won’t embed the video, since we don’t want to spread misinformation, but if you really want to watch it, you can do so here.
A screenshot from the video shows the simple construction of this “fire starter”.
Most of us have learned about the concept of a “lemon battery” in school, and understand that a lemon can produce a small amount of electricity, so it seems plausible, right? Well, yes and no.
Despite what we saw in the video above, multiple sources tell us that a single lemon (with zinc and copper electrodes) produces about 1 milliamp (0.001 amp) and about 0.7 volts. For perspective, even an ordinary 9-volt battery can produce as much as 500 milliamps in short bursts. Since the milliamp current determines how much heat the wires will quickly generate when touched together, a single lemon should be several hundred times less effective for fire-starting than a 9V battery.
We prefer our lemons in cocktails, not in survival kits.
Here’s a video that explains why a lemon isn’t an effective fire-starter:
Remember the scientific method: if a survival technique’s results can’t be replicated again and again, there’s something fishy going on. Unfortunately, it appears that starting fires with a lemon battery is a hoax. Several sites which originally shared the video later posted retractions, admitting that the original video must have been faked.
But don’t take our word for it—go get a lemon and try it. Just don’t expect a spectacular crackling fire …unless your lemon contains a 9V battery.
This article was originally published in Issue 1 of our magazine.
Using the right tool for the right job makes all the difference. Sure, you can get away with using a flathead screwdriver on a Phillips screw, but every time you do so, you run the risk of stripping the screw. It’s much better to use the correct driver for the proper fit to avoid damage to the screw and the driver. Similarly, using the right knot can be a huge factor in the success of accomplishing a job, easily and safely.
Unless knots factor into your daily grind like bungee jump operator or first mate of the S.S. Minnow, the majority of people may only use one or two knots on a daily basis — or if you have Velcro on your shoes, maybe even none at all. Whether or not you have ever been taught what sort of knot is used for what, or if you have, it’s probably been a long time since you earned your merit badge in that endeavor. Let’s take a look at a few useful knots that can get you out of a pinch or simply help you get things done quicker.
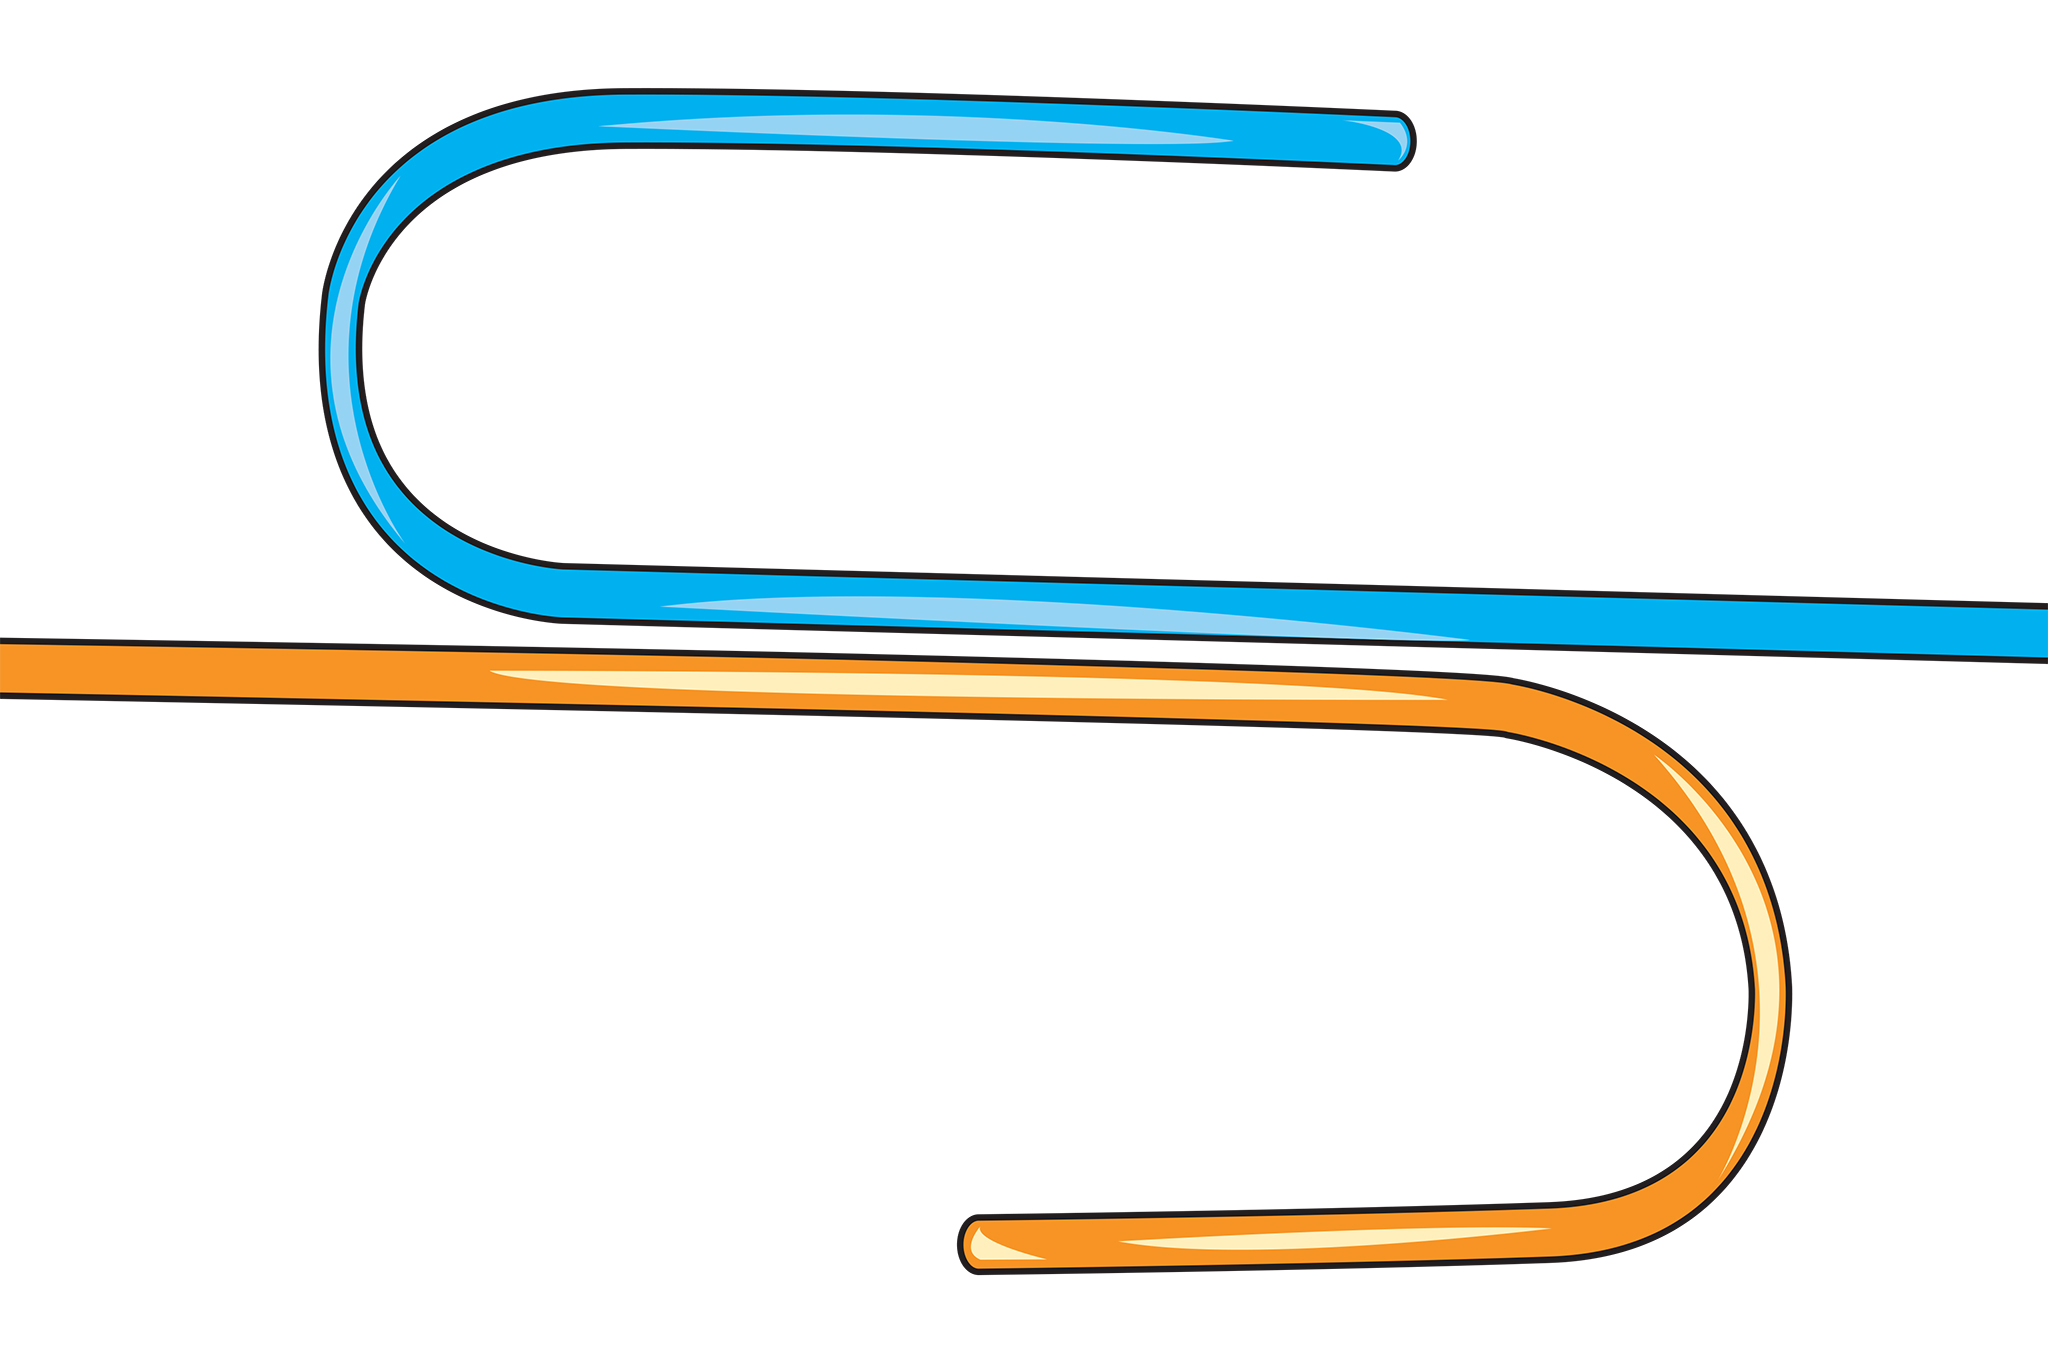
There are countless knots out there as well as multiple variations for many of them. Each knot was created for a specific application. Realistically, unless it’s part of your everyday life, it’s difficult to remember how many of these knots are tied. We’ve picked out three knots that are strong and versatile that can be used in just about any situation.
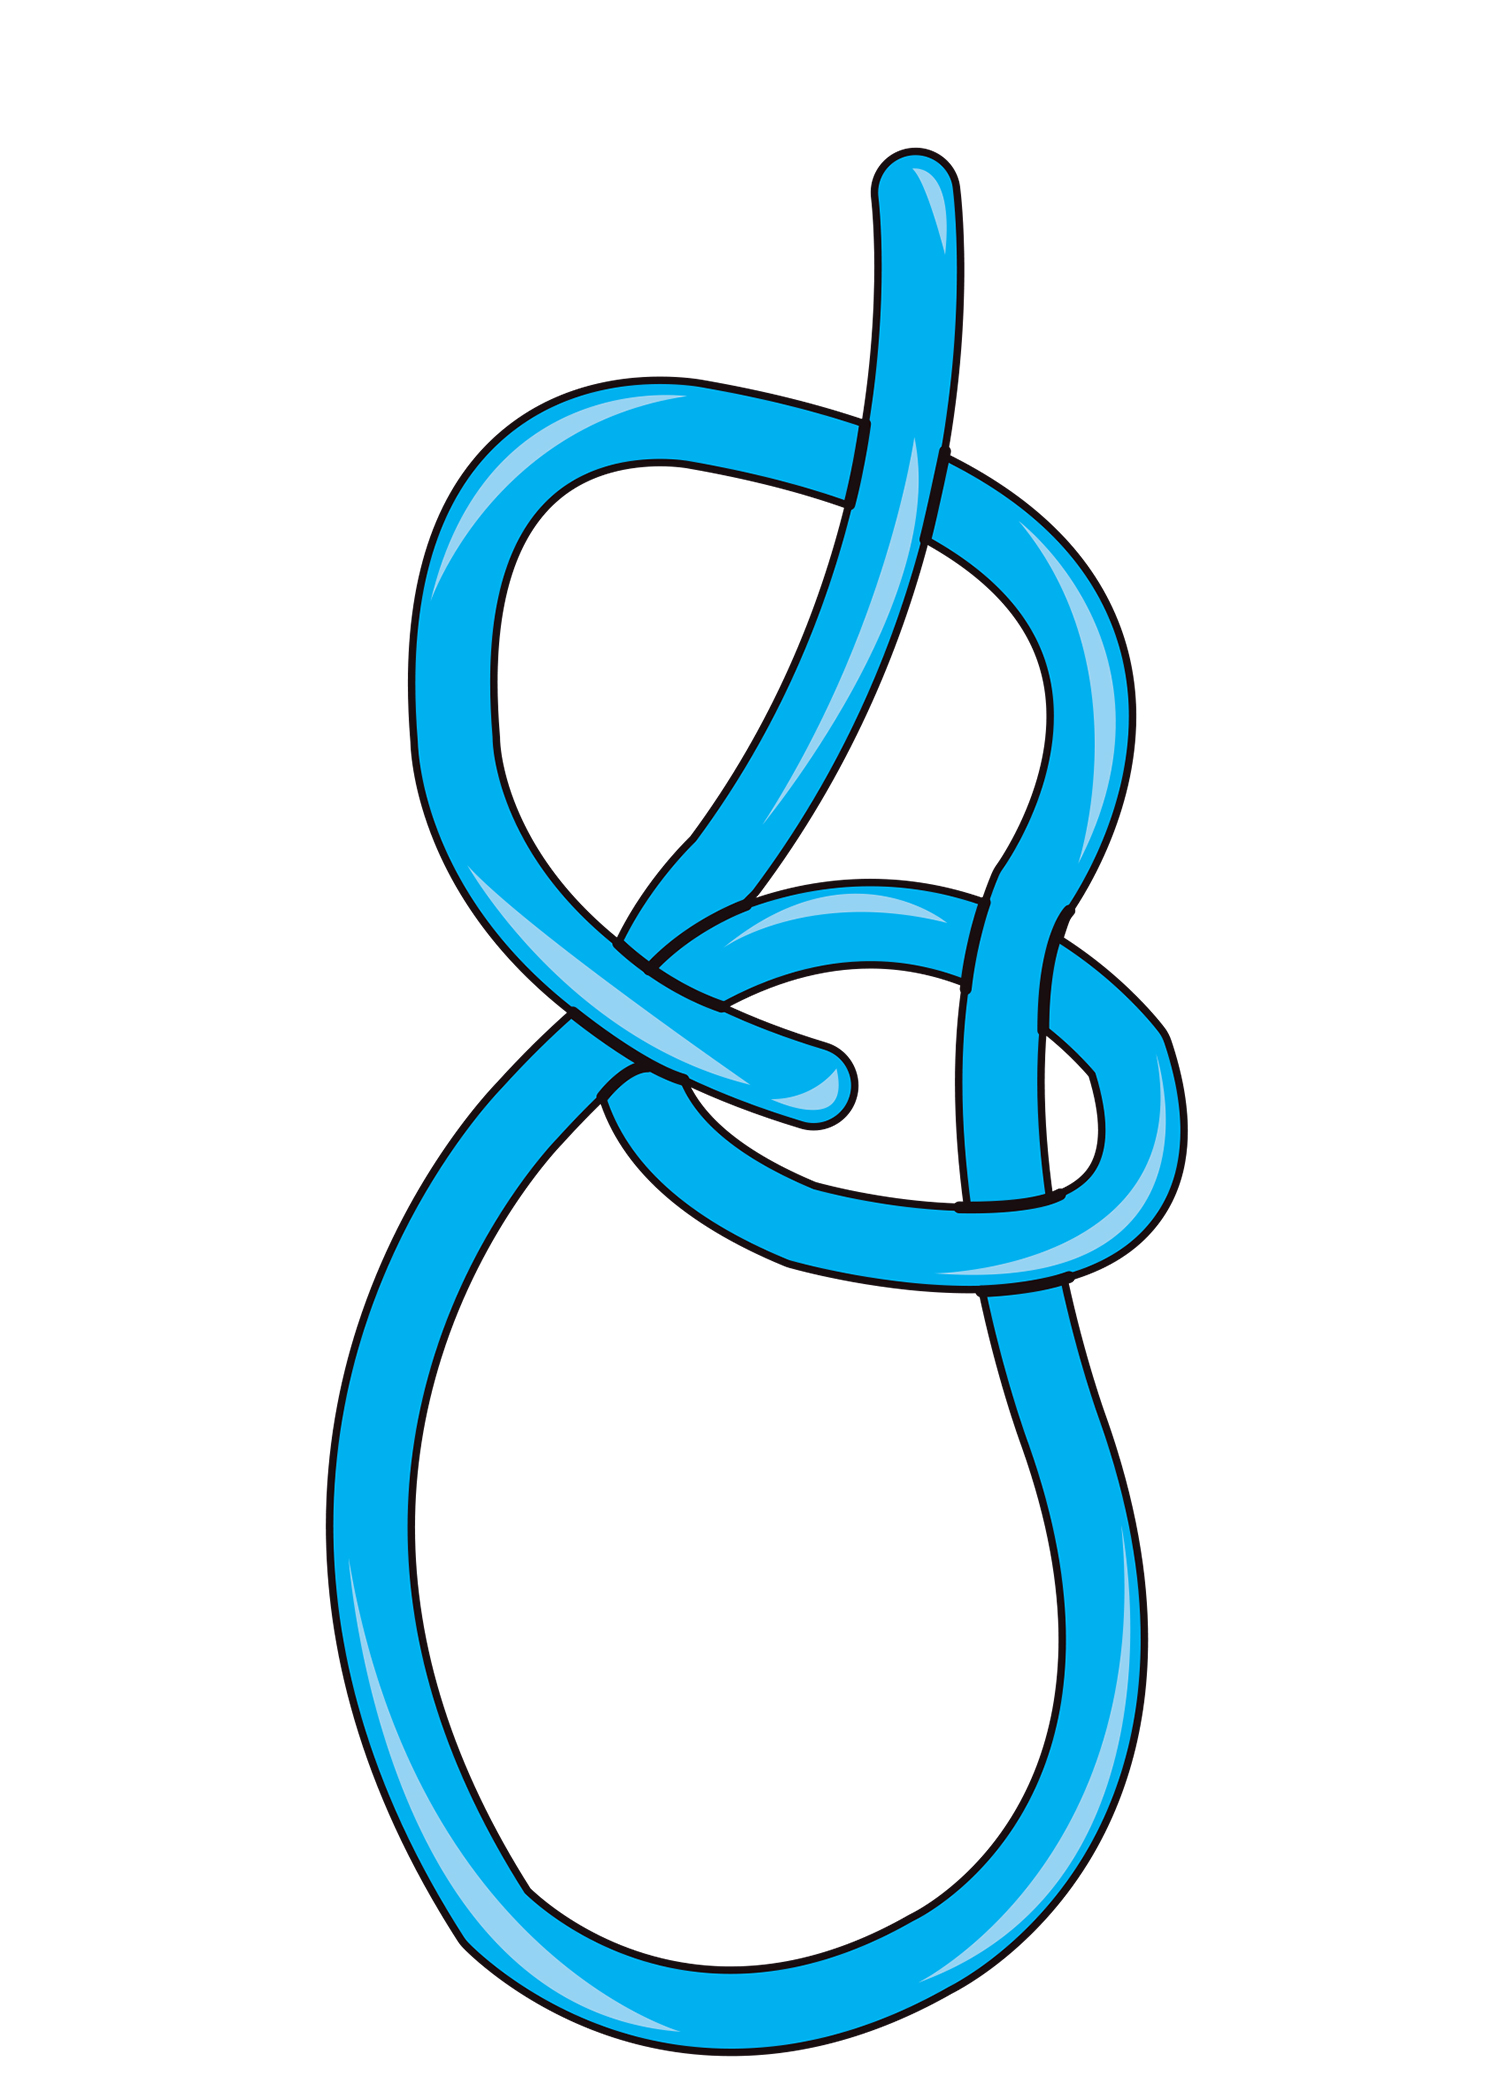
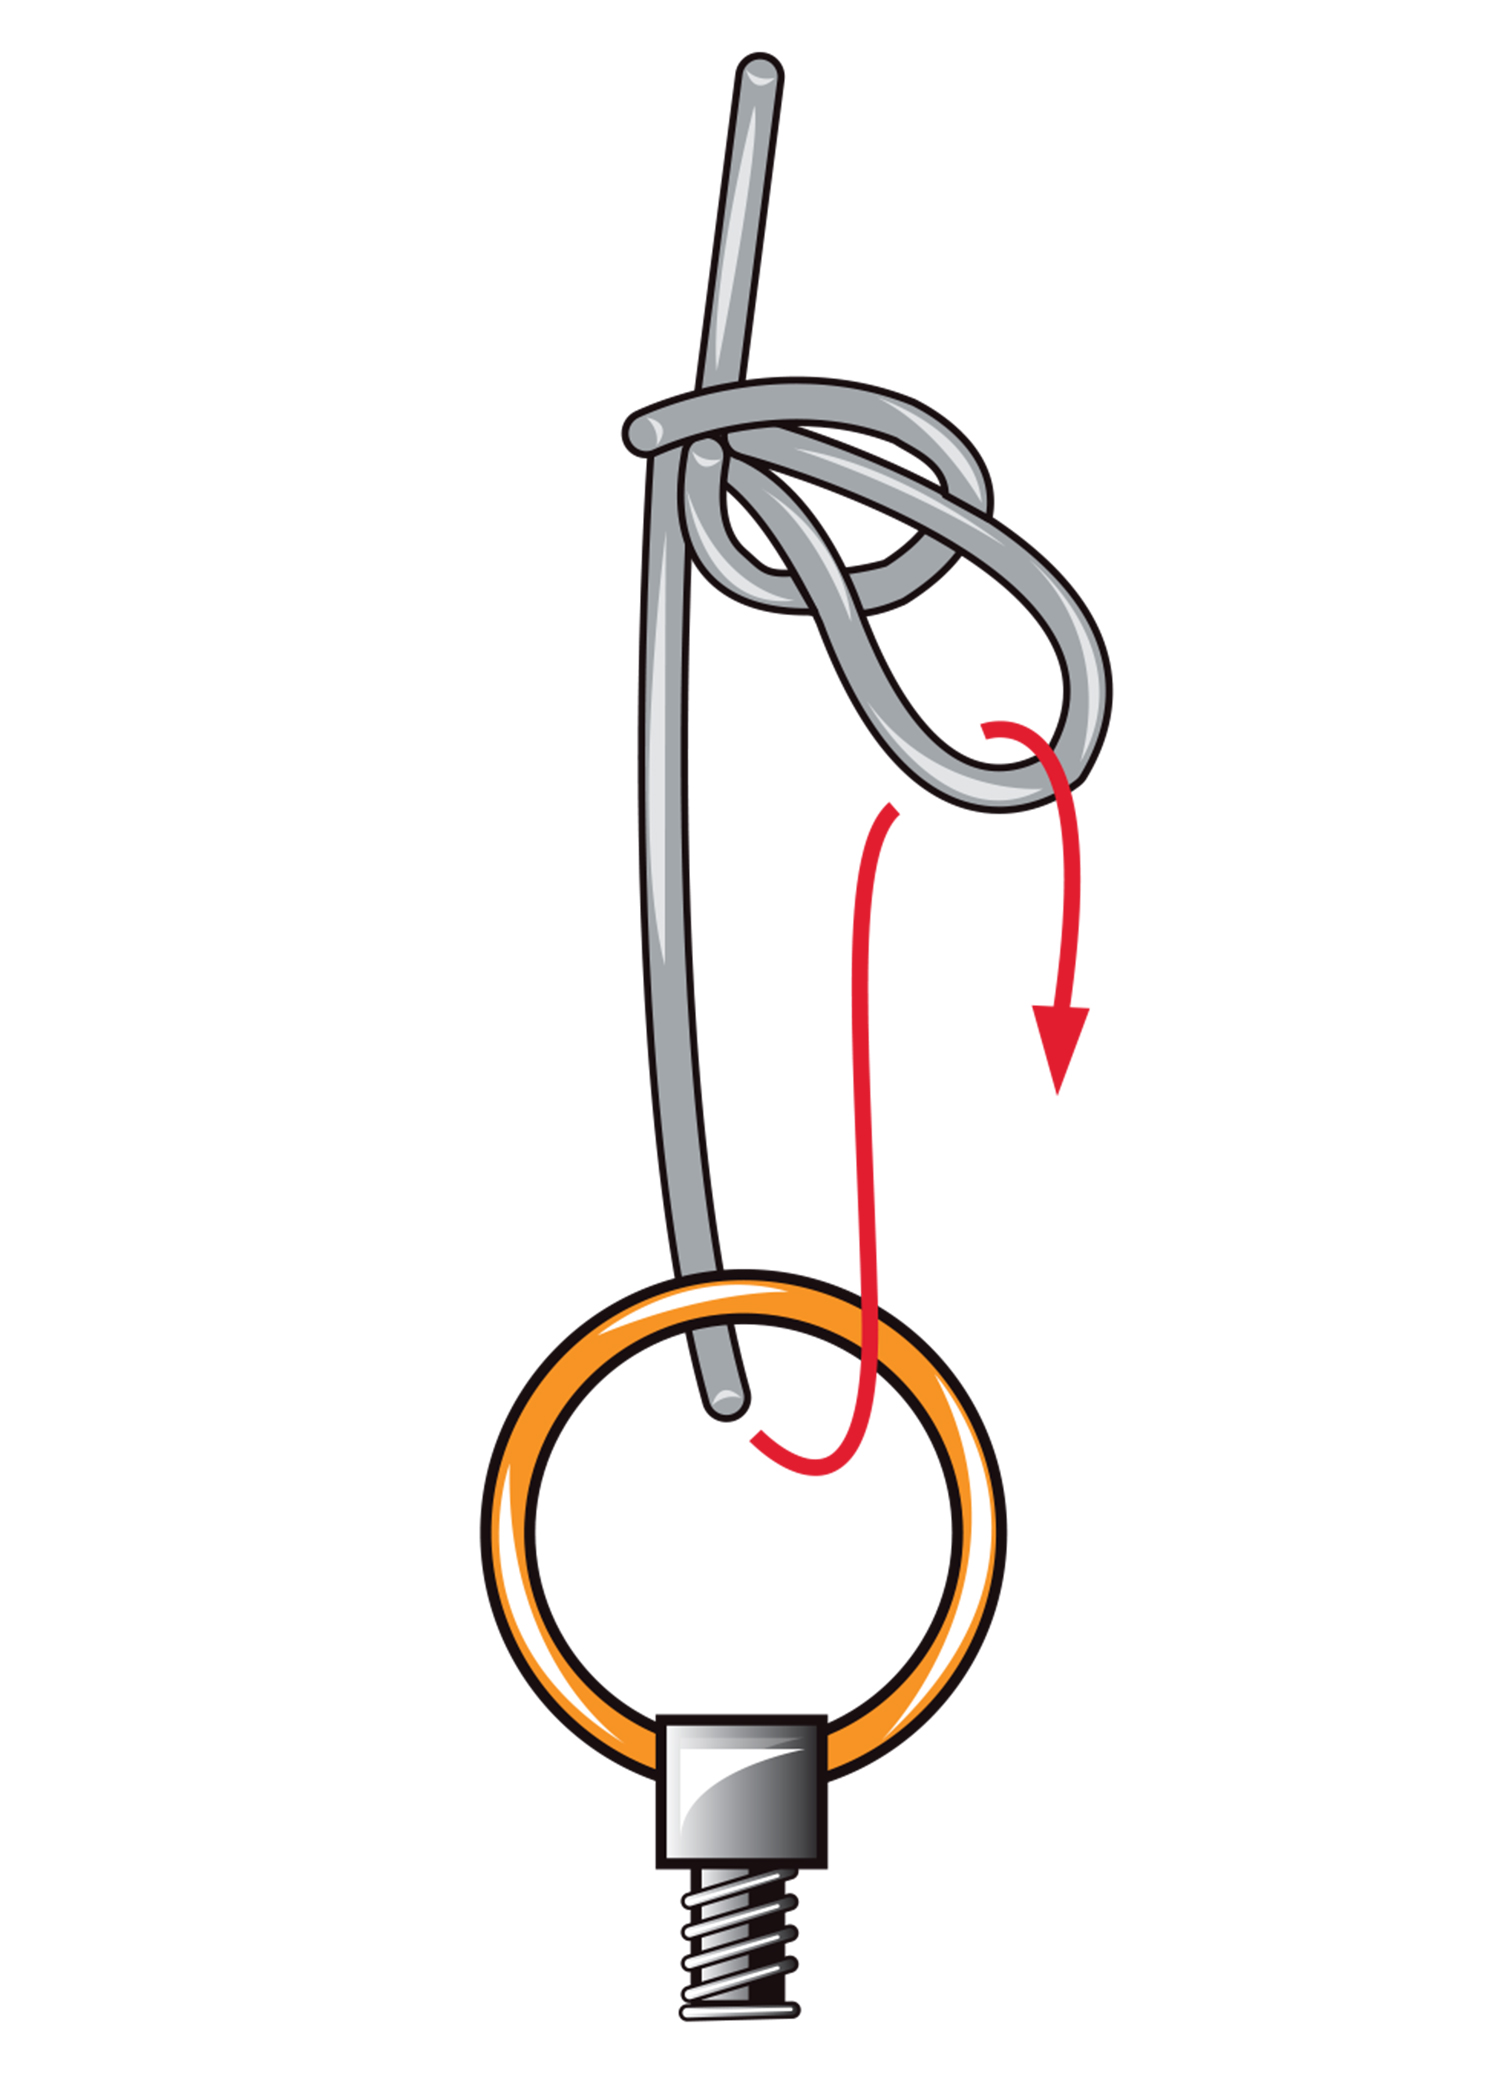
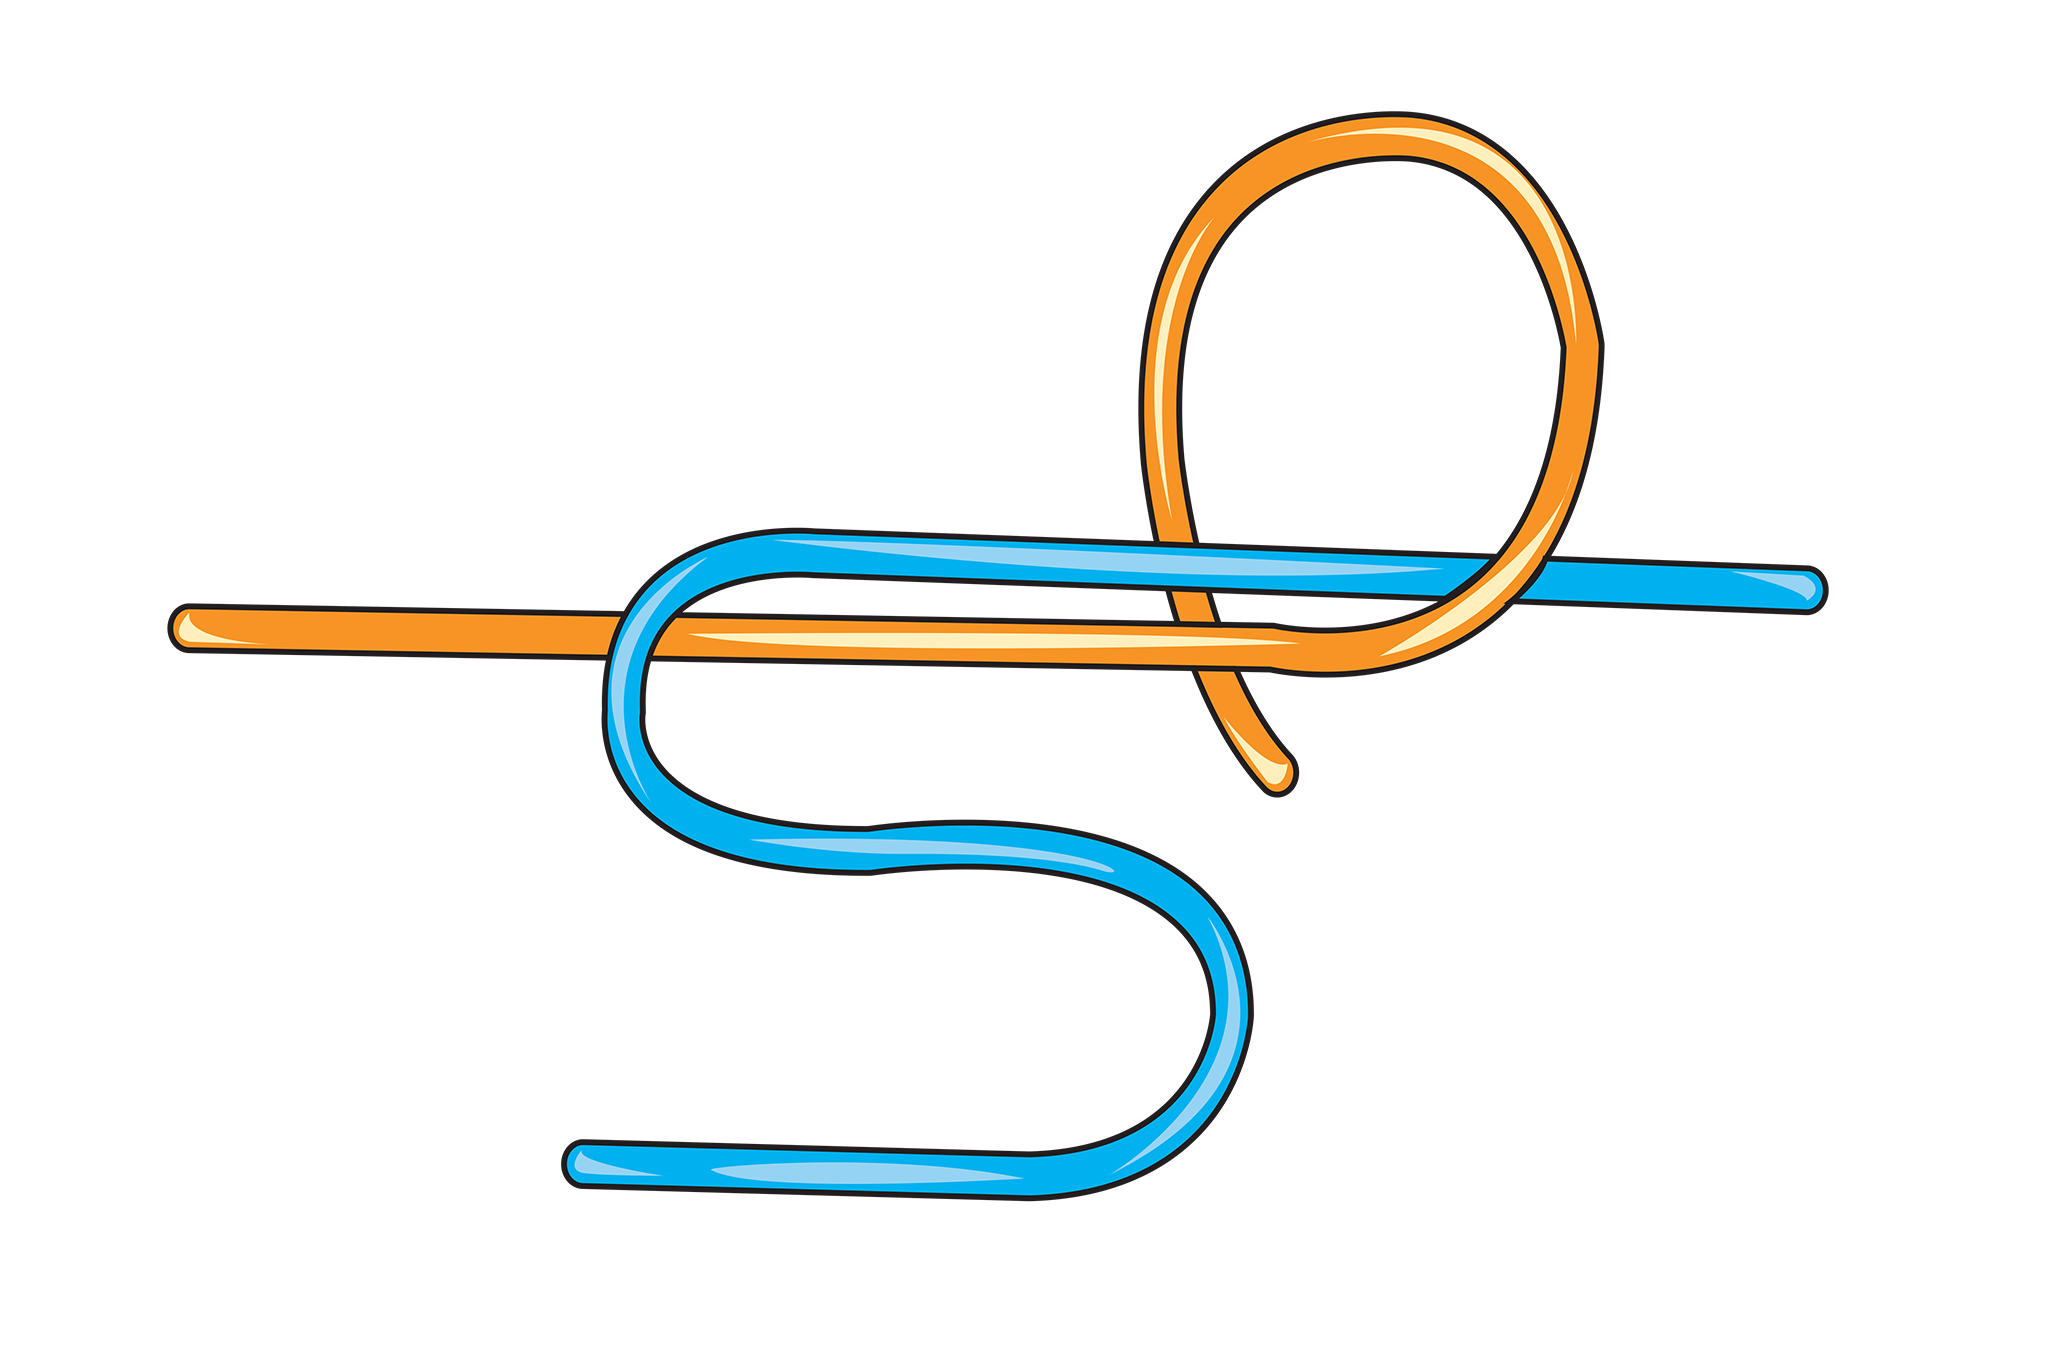
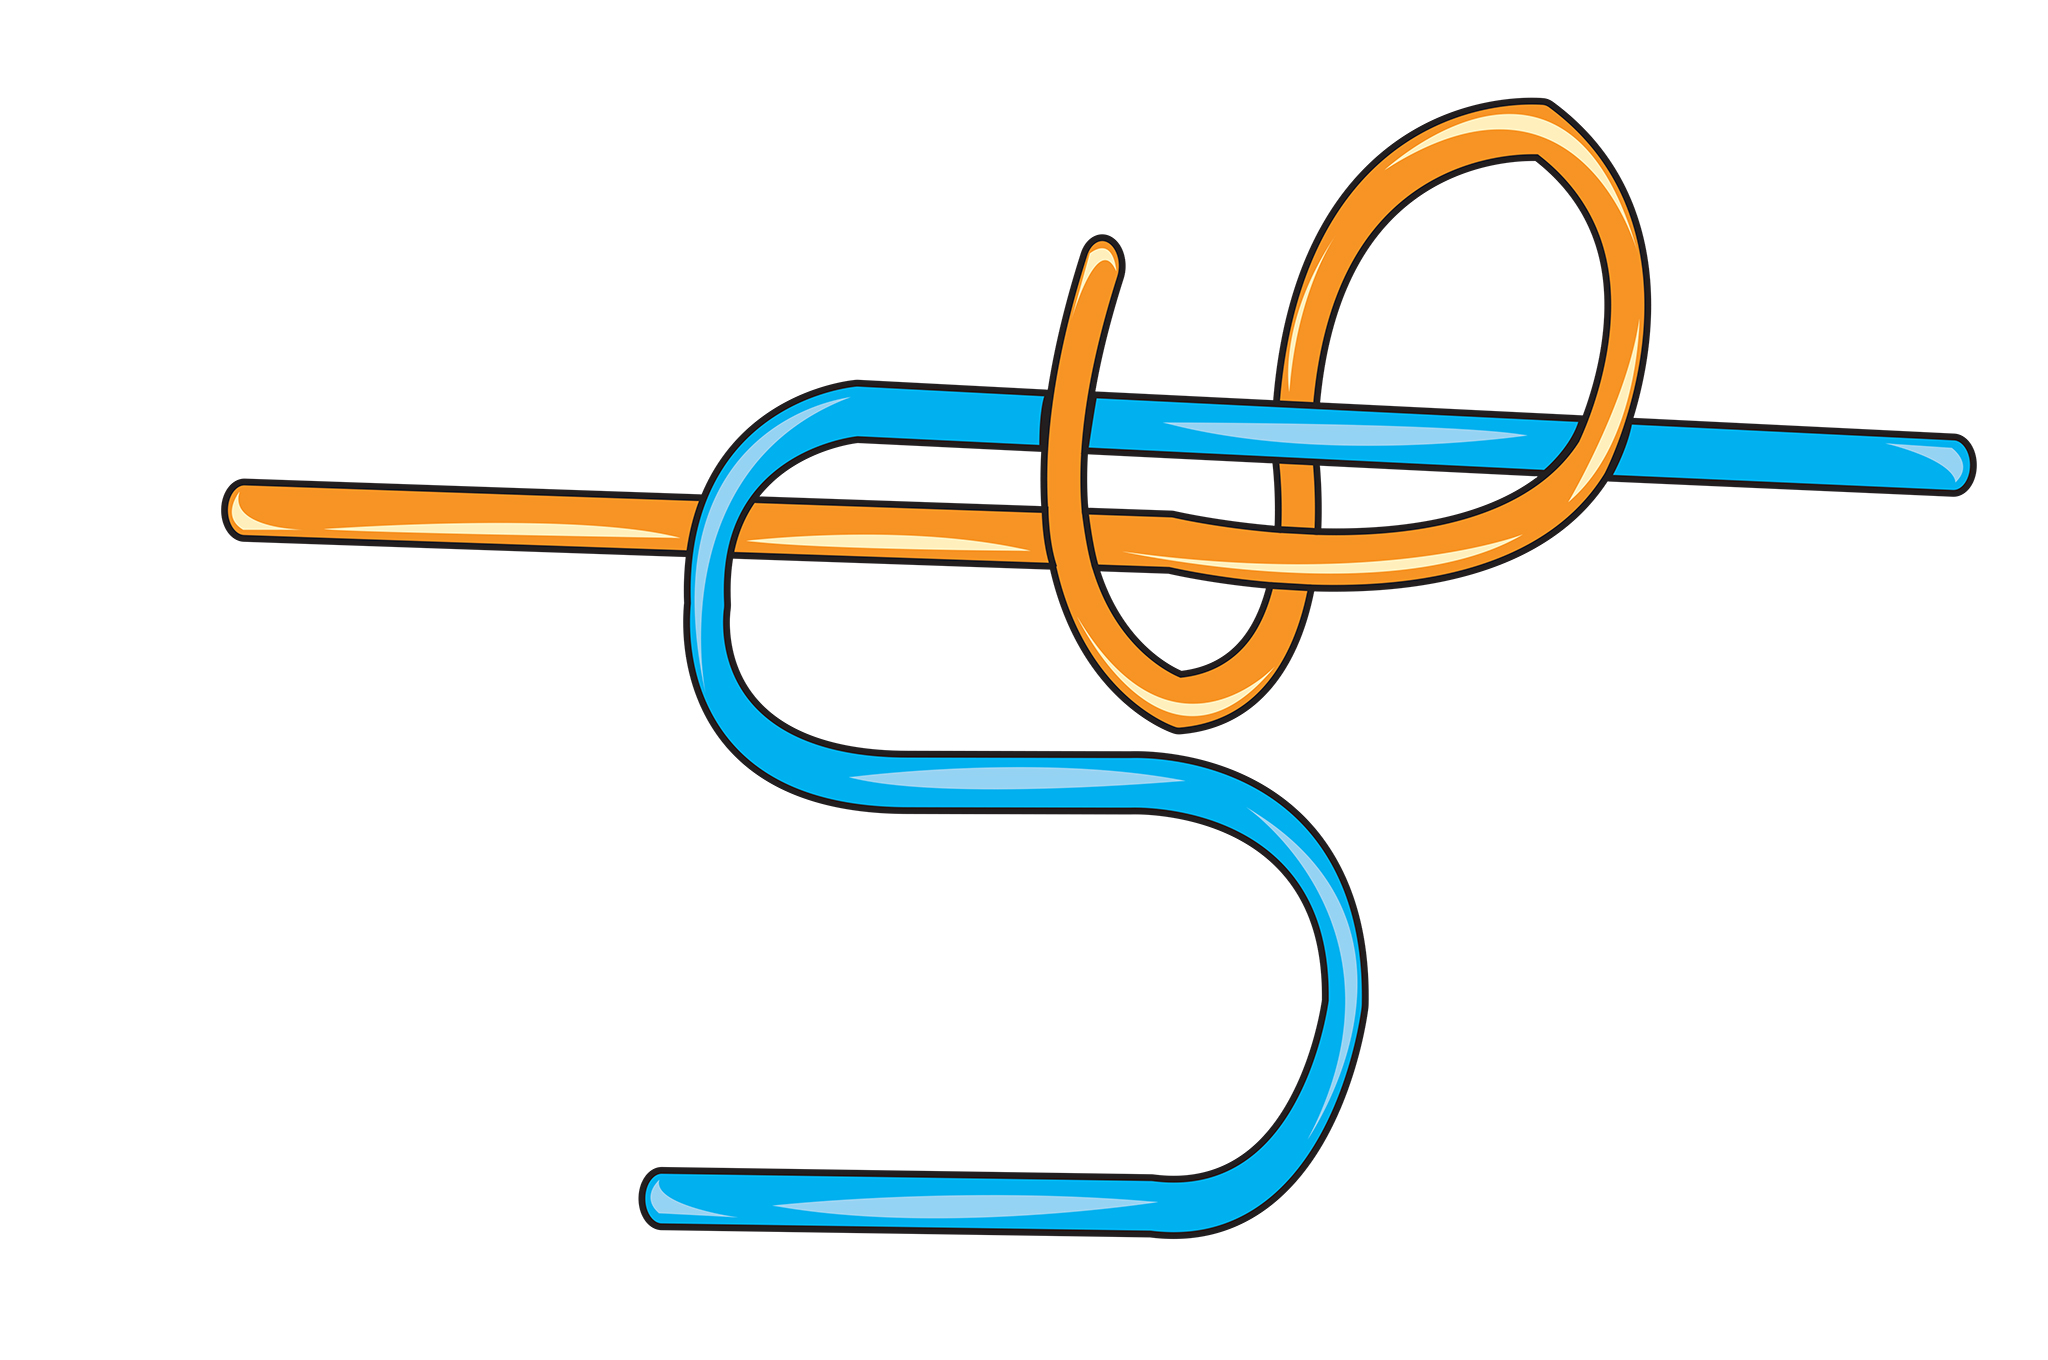
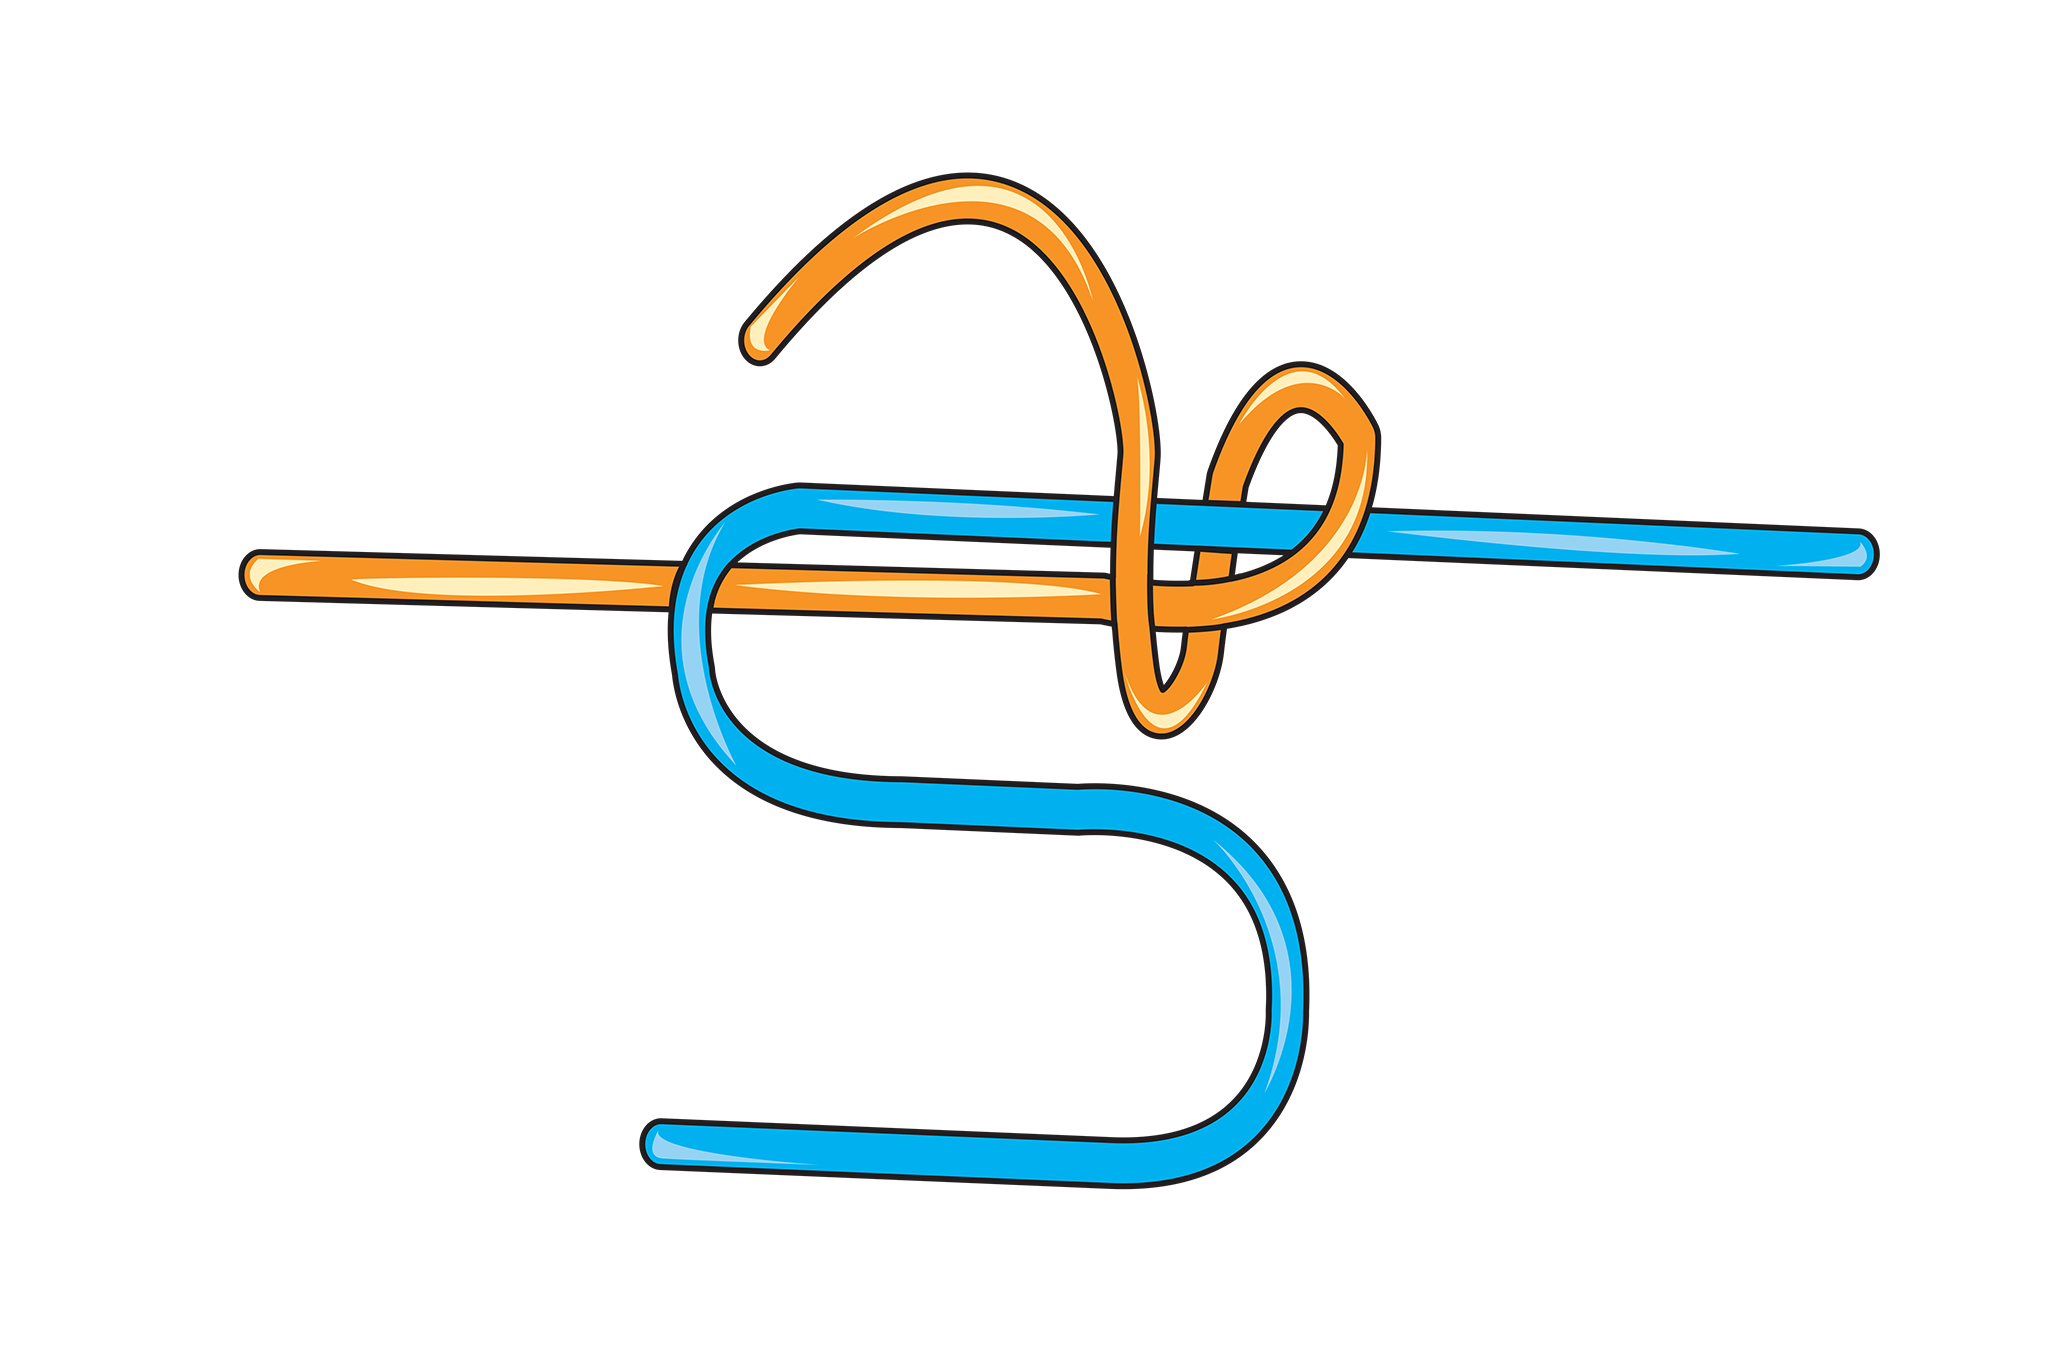
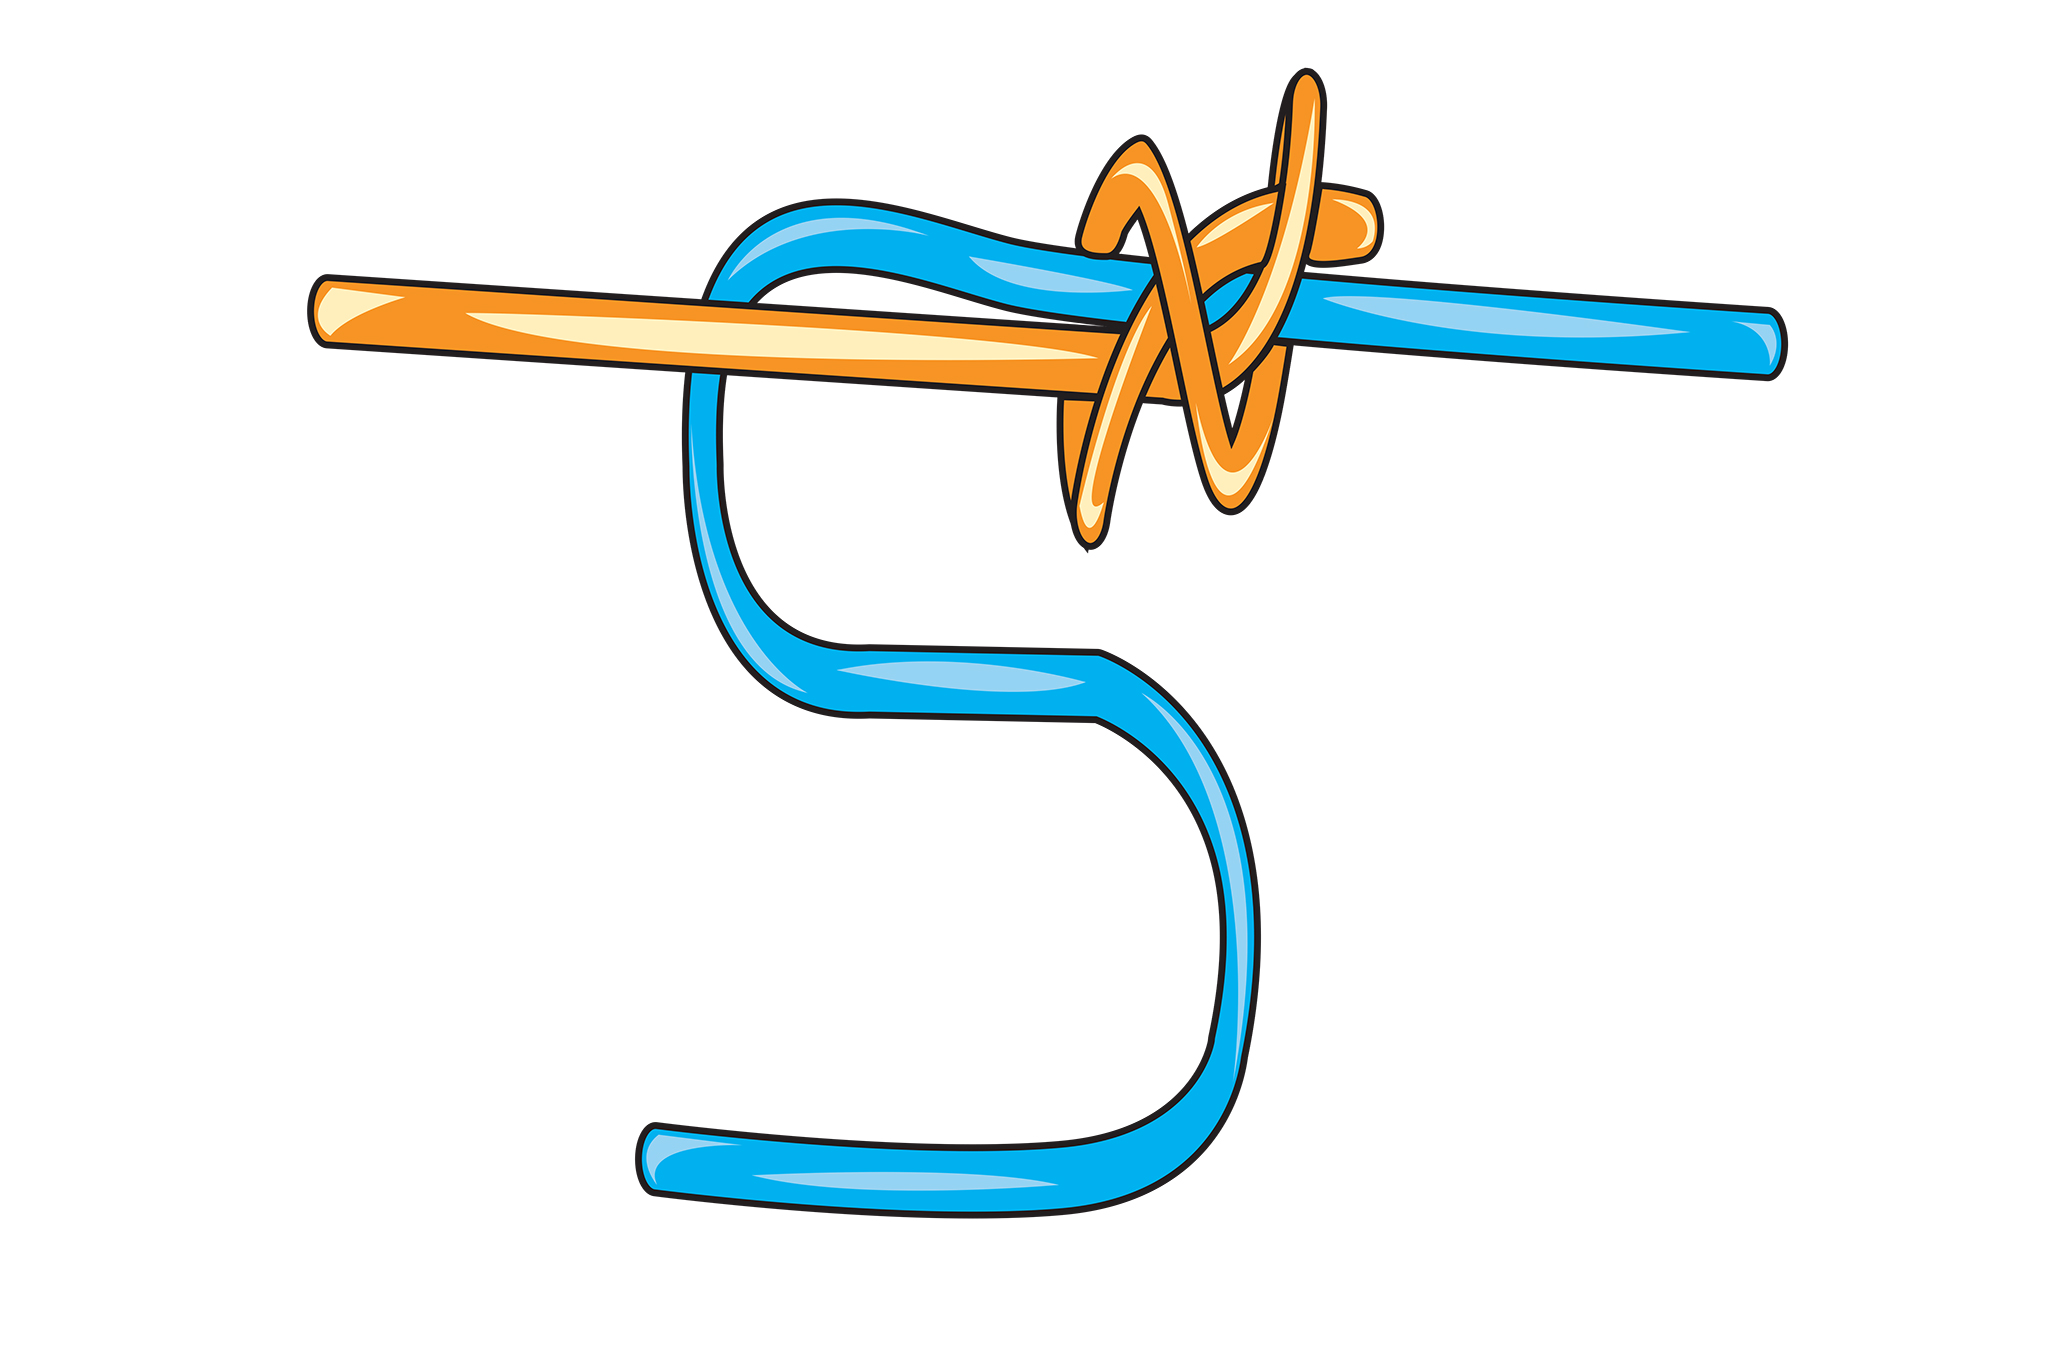
The Bowline
The Bowline forms a secure, non-sliding loop. When a load is placed on the Bowline, it will not slip or jam, but when the line is relaxed, the knot can be easily untied. The loop may pass around or through an object such as a railing, pole, tree, or a fence, during the making of the knot. When no longer being used, the knot comes undone relatively easily, even after being used under great load. For this reason, this knot is not recommended for uses such as climbing or rappelling.
Uses
Hoist or lower objects from an elevated position
The loop can be tied around just about anything you need to pull or drag
Use as an anchor point when tying down cargo. When using it in this manner, finish off tying the cargo with the Trucker’s Hitch.
Tying off a boat to prevent drifting
1
2 3 4 5
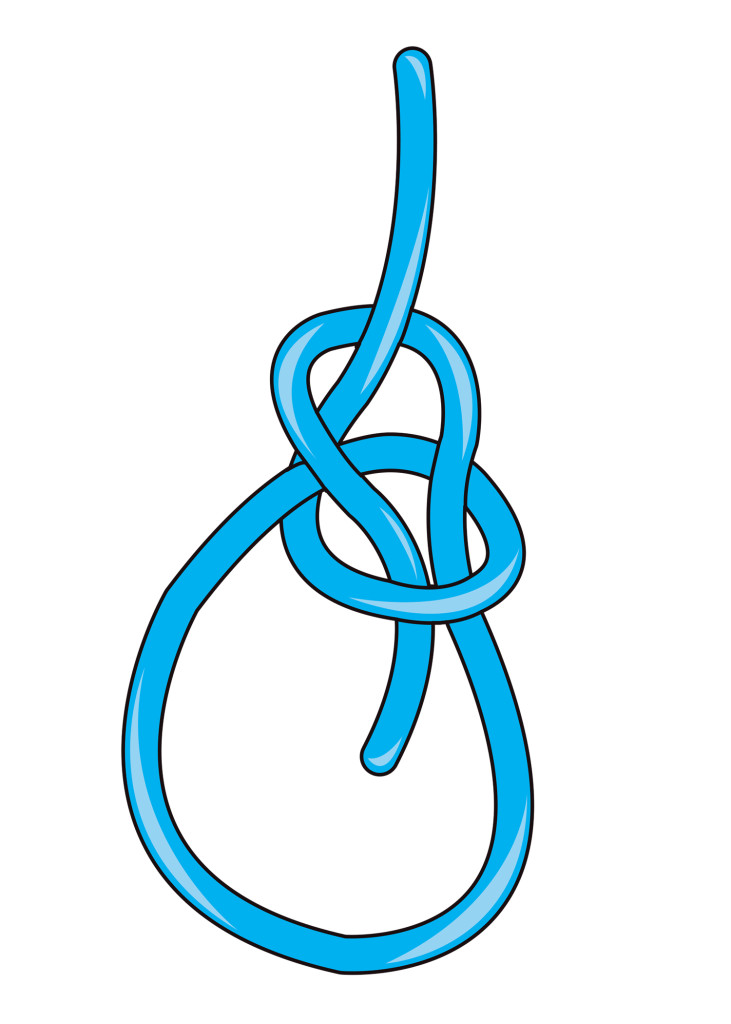
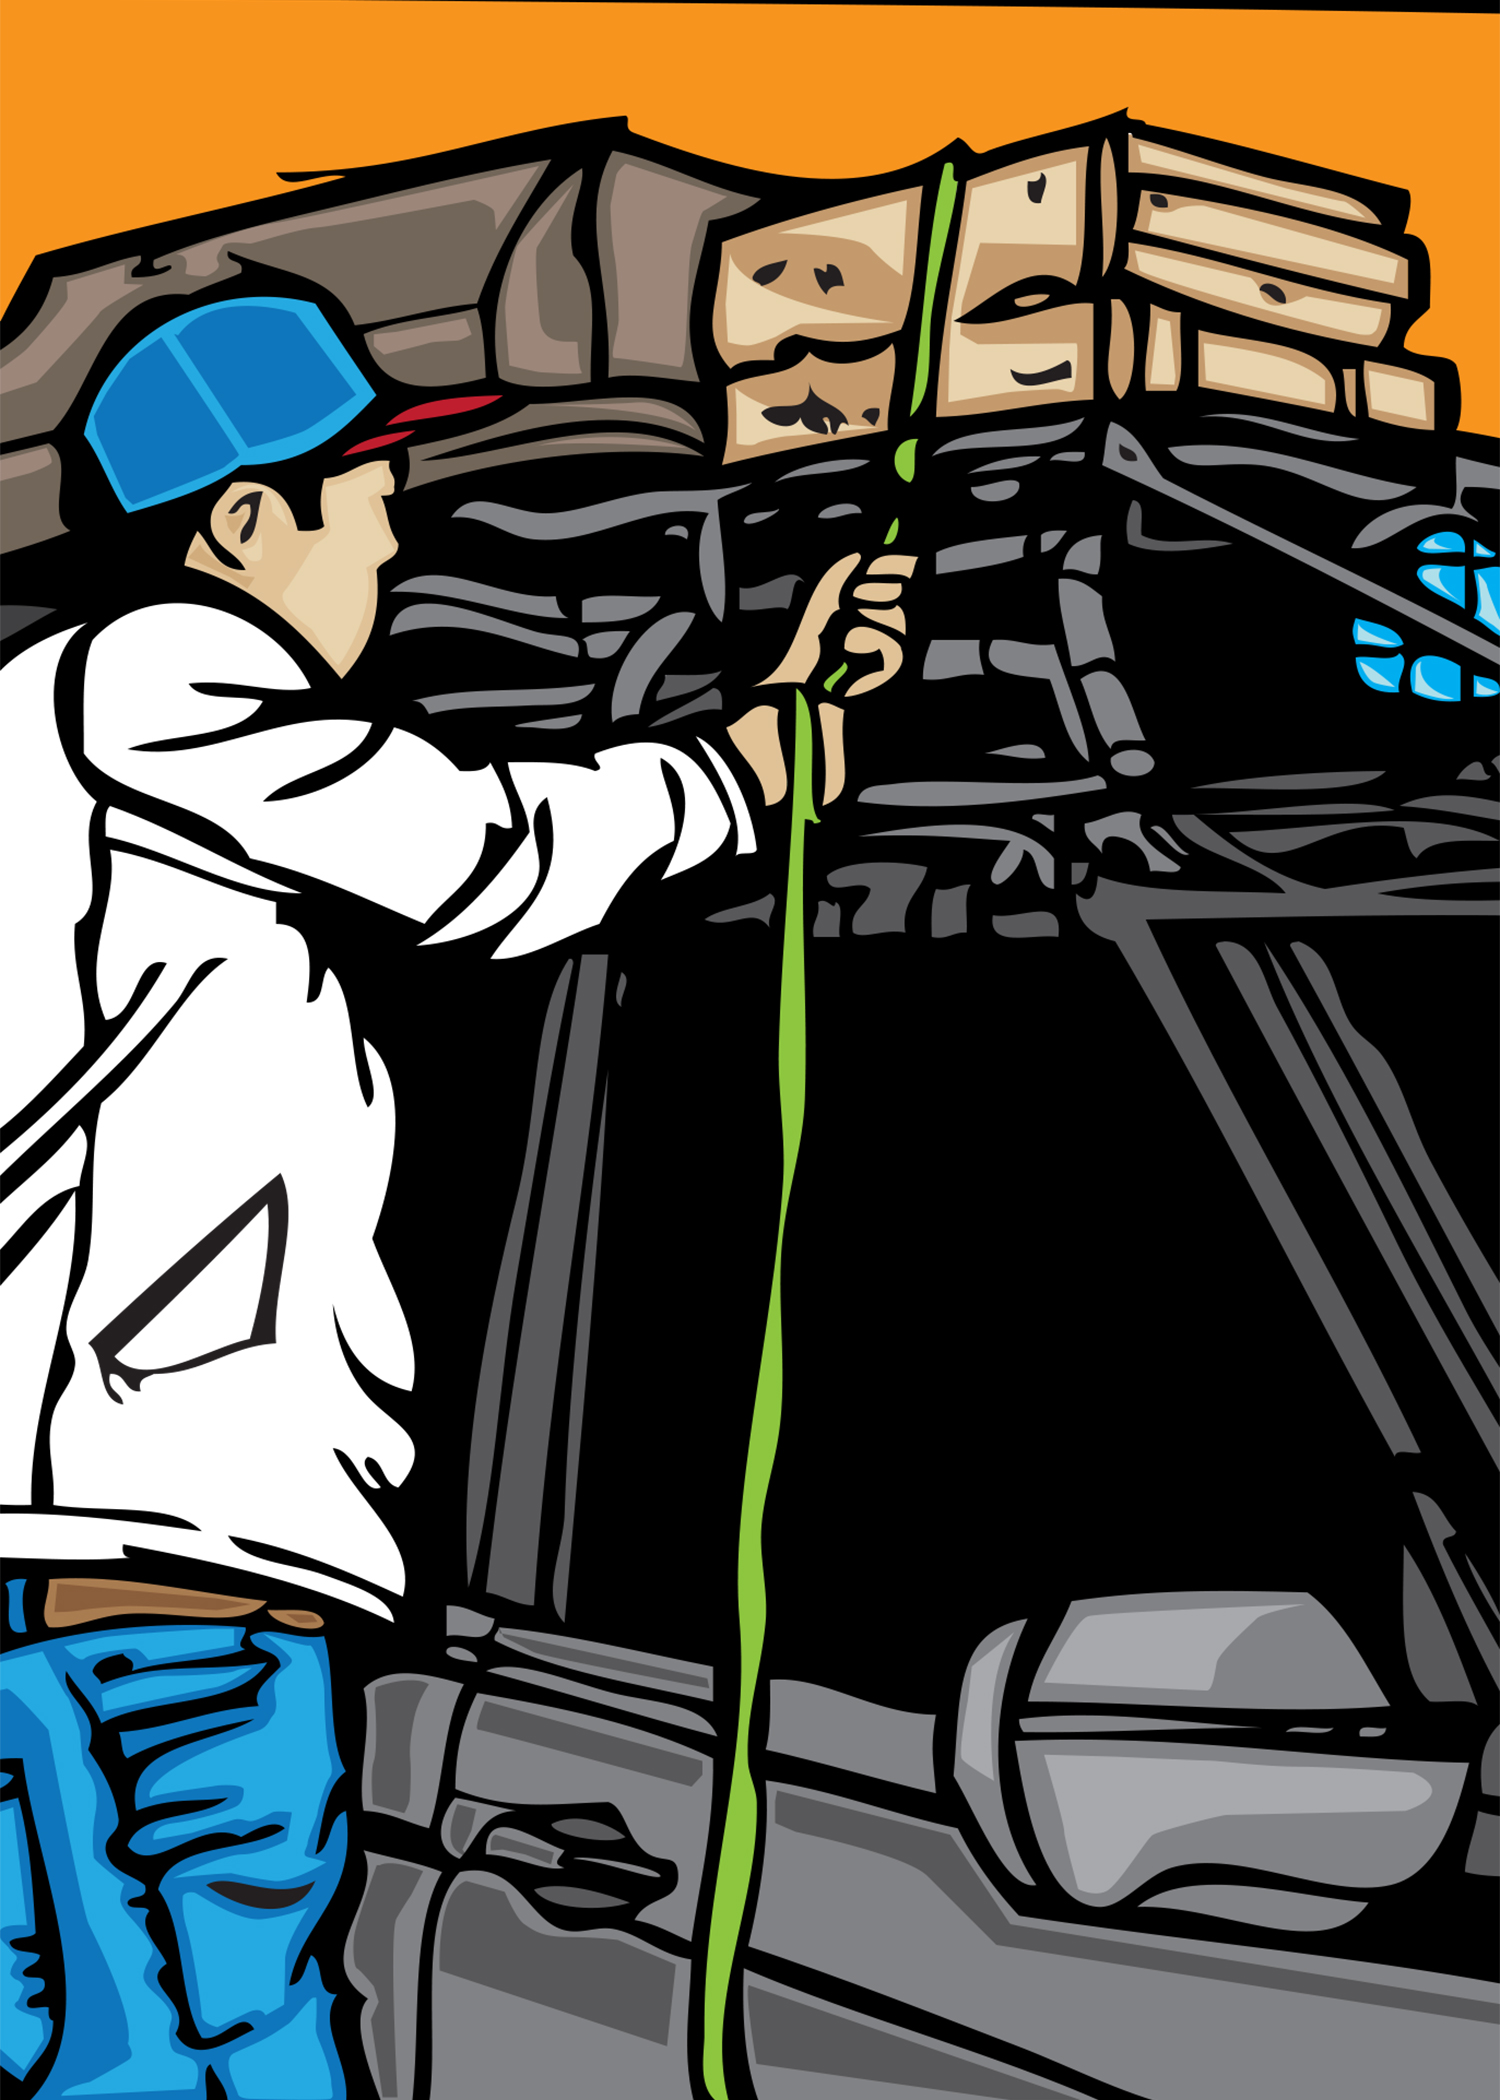
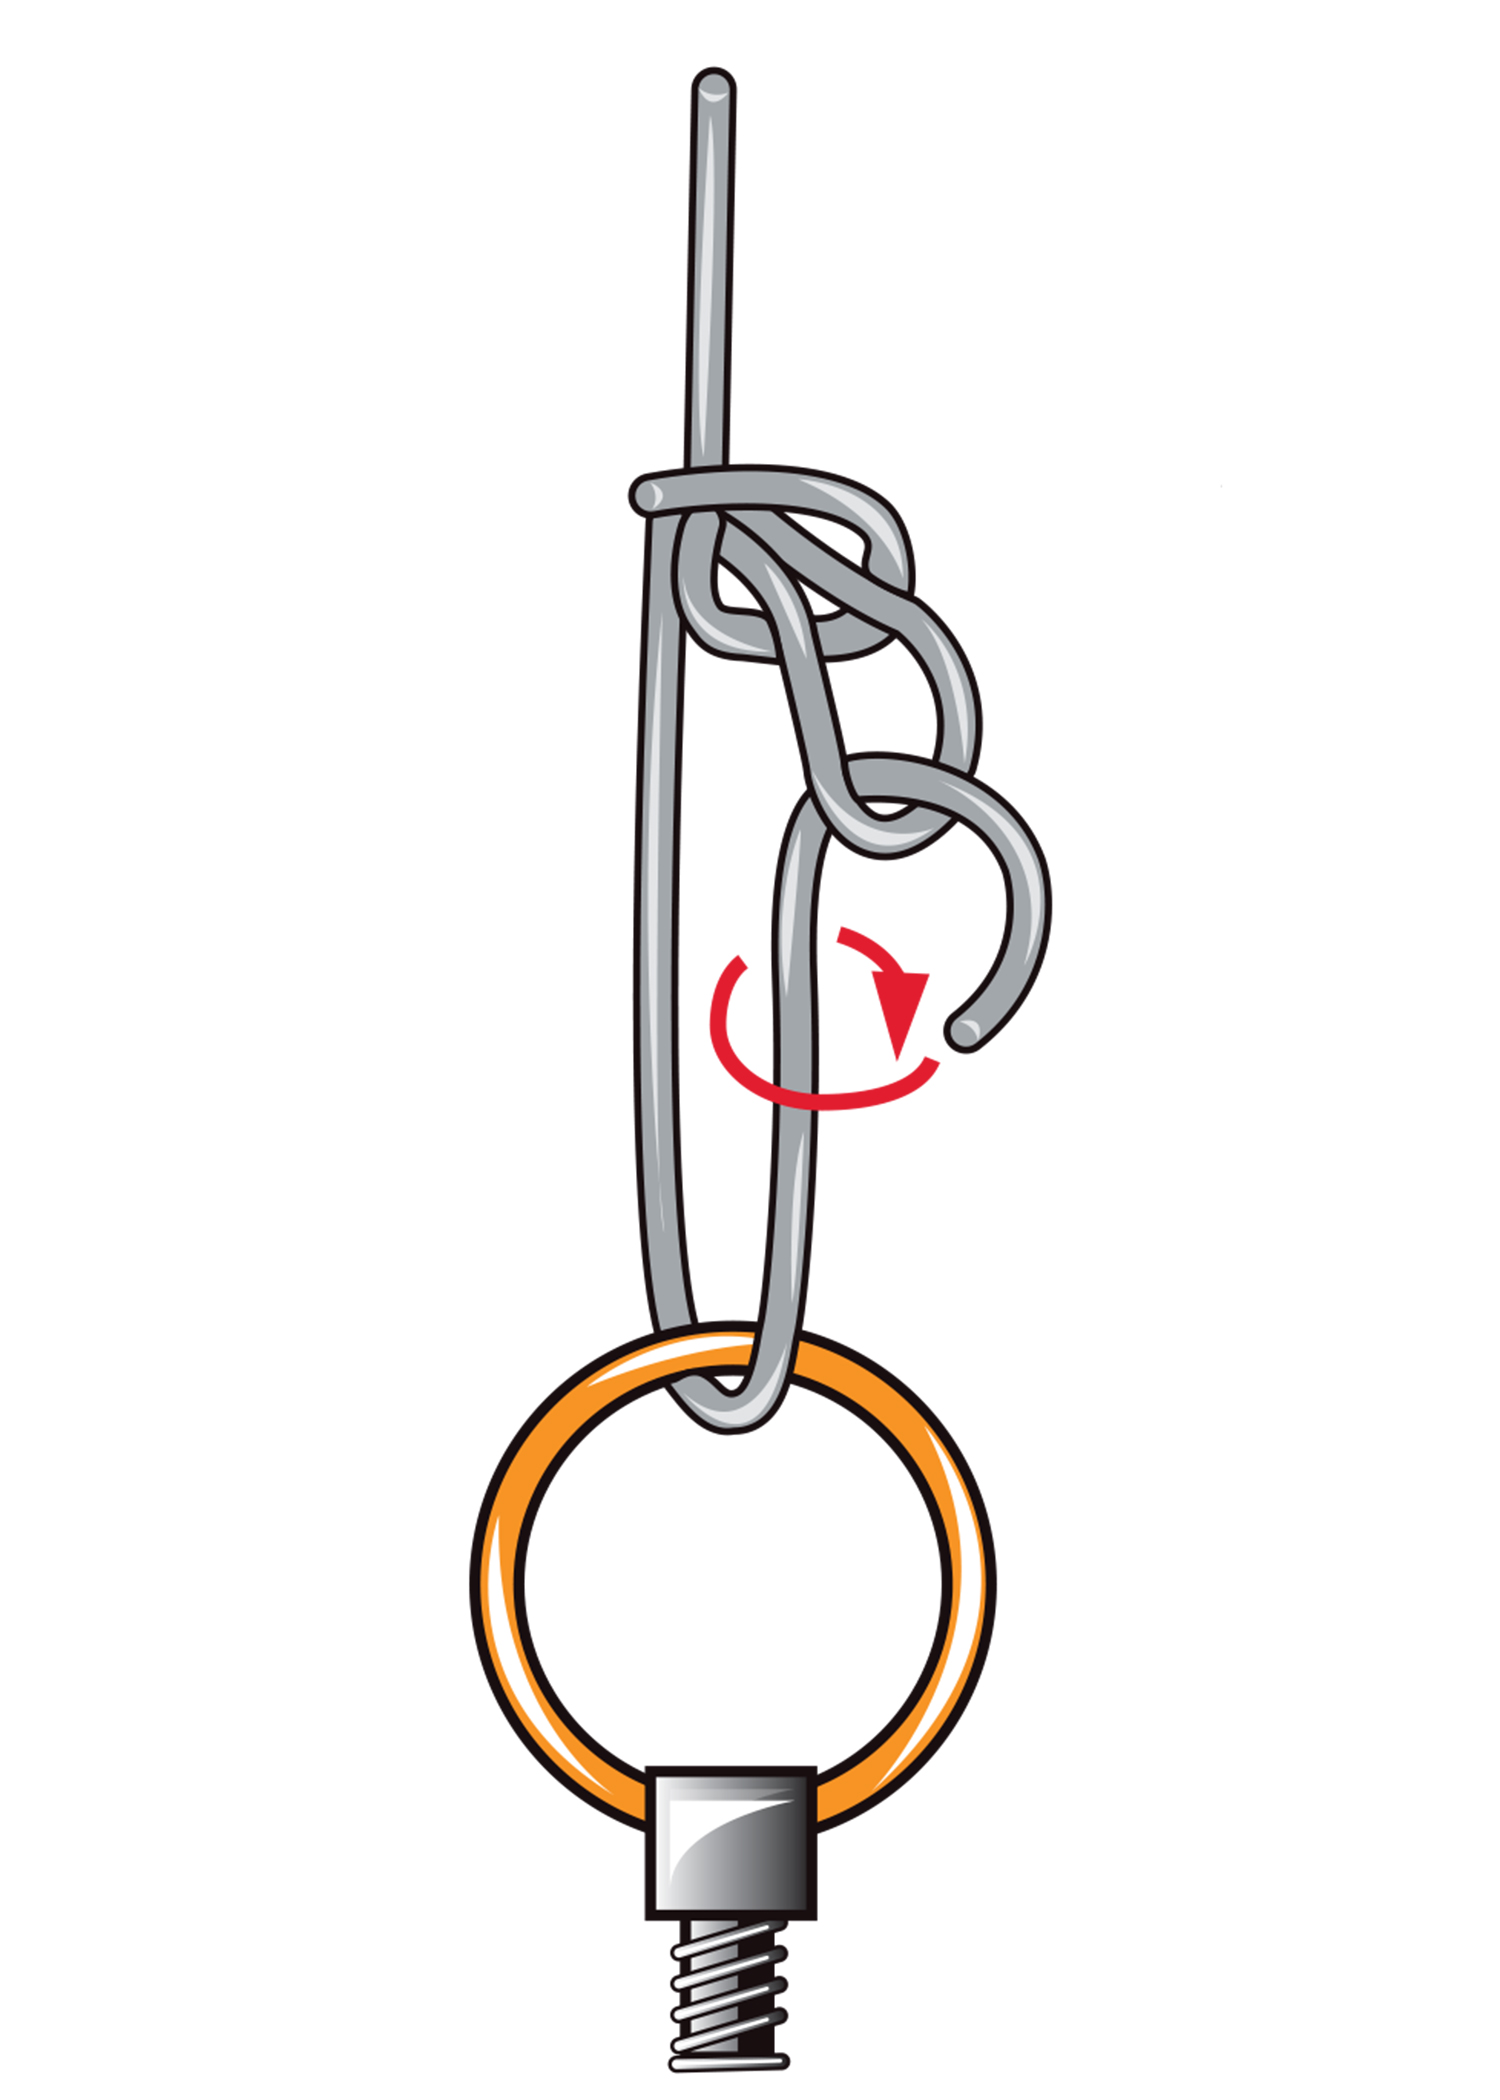
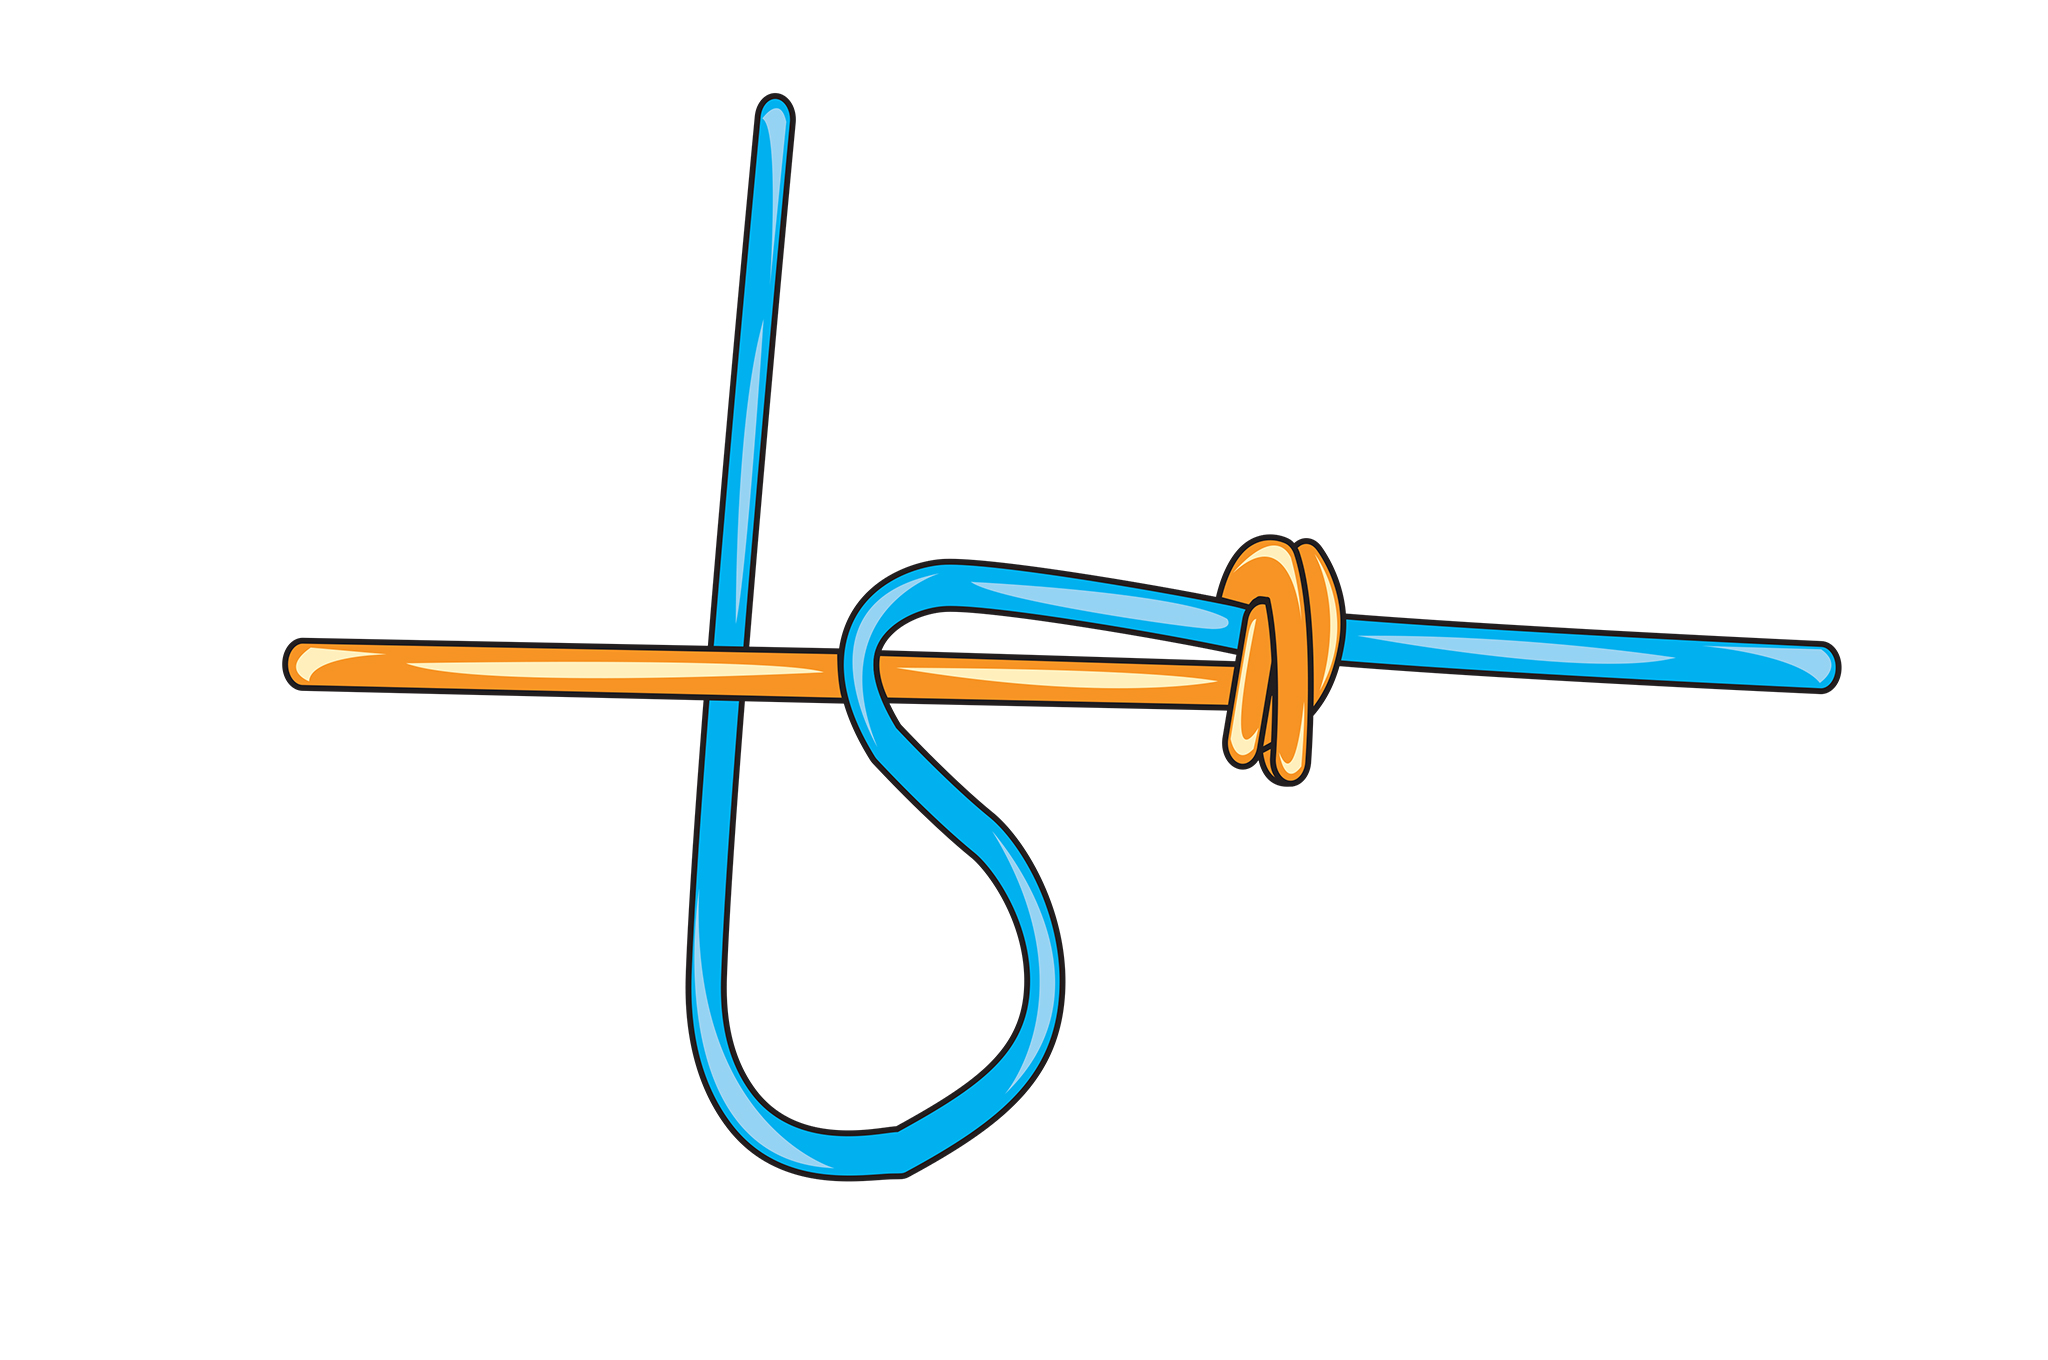
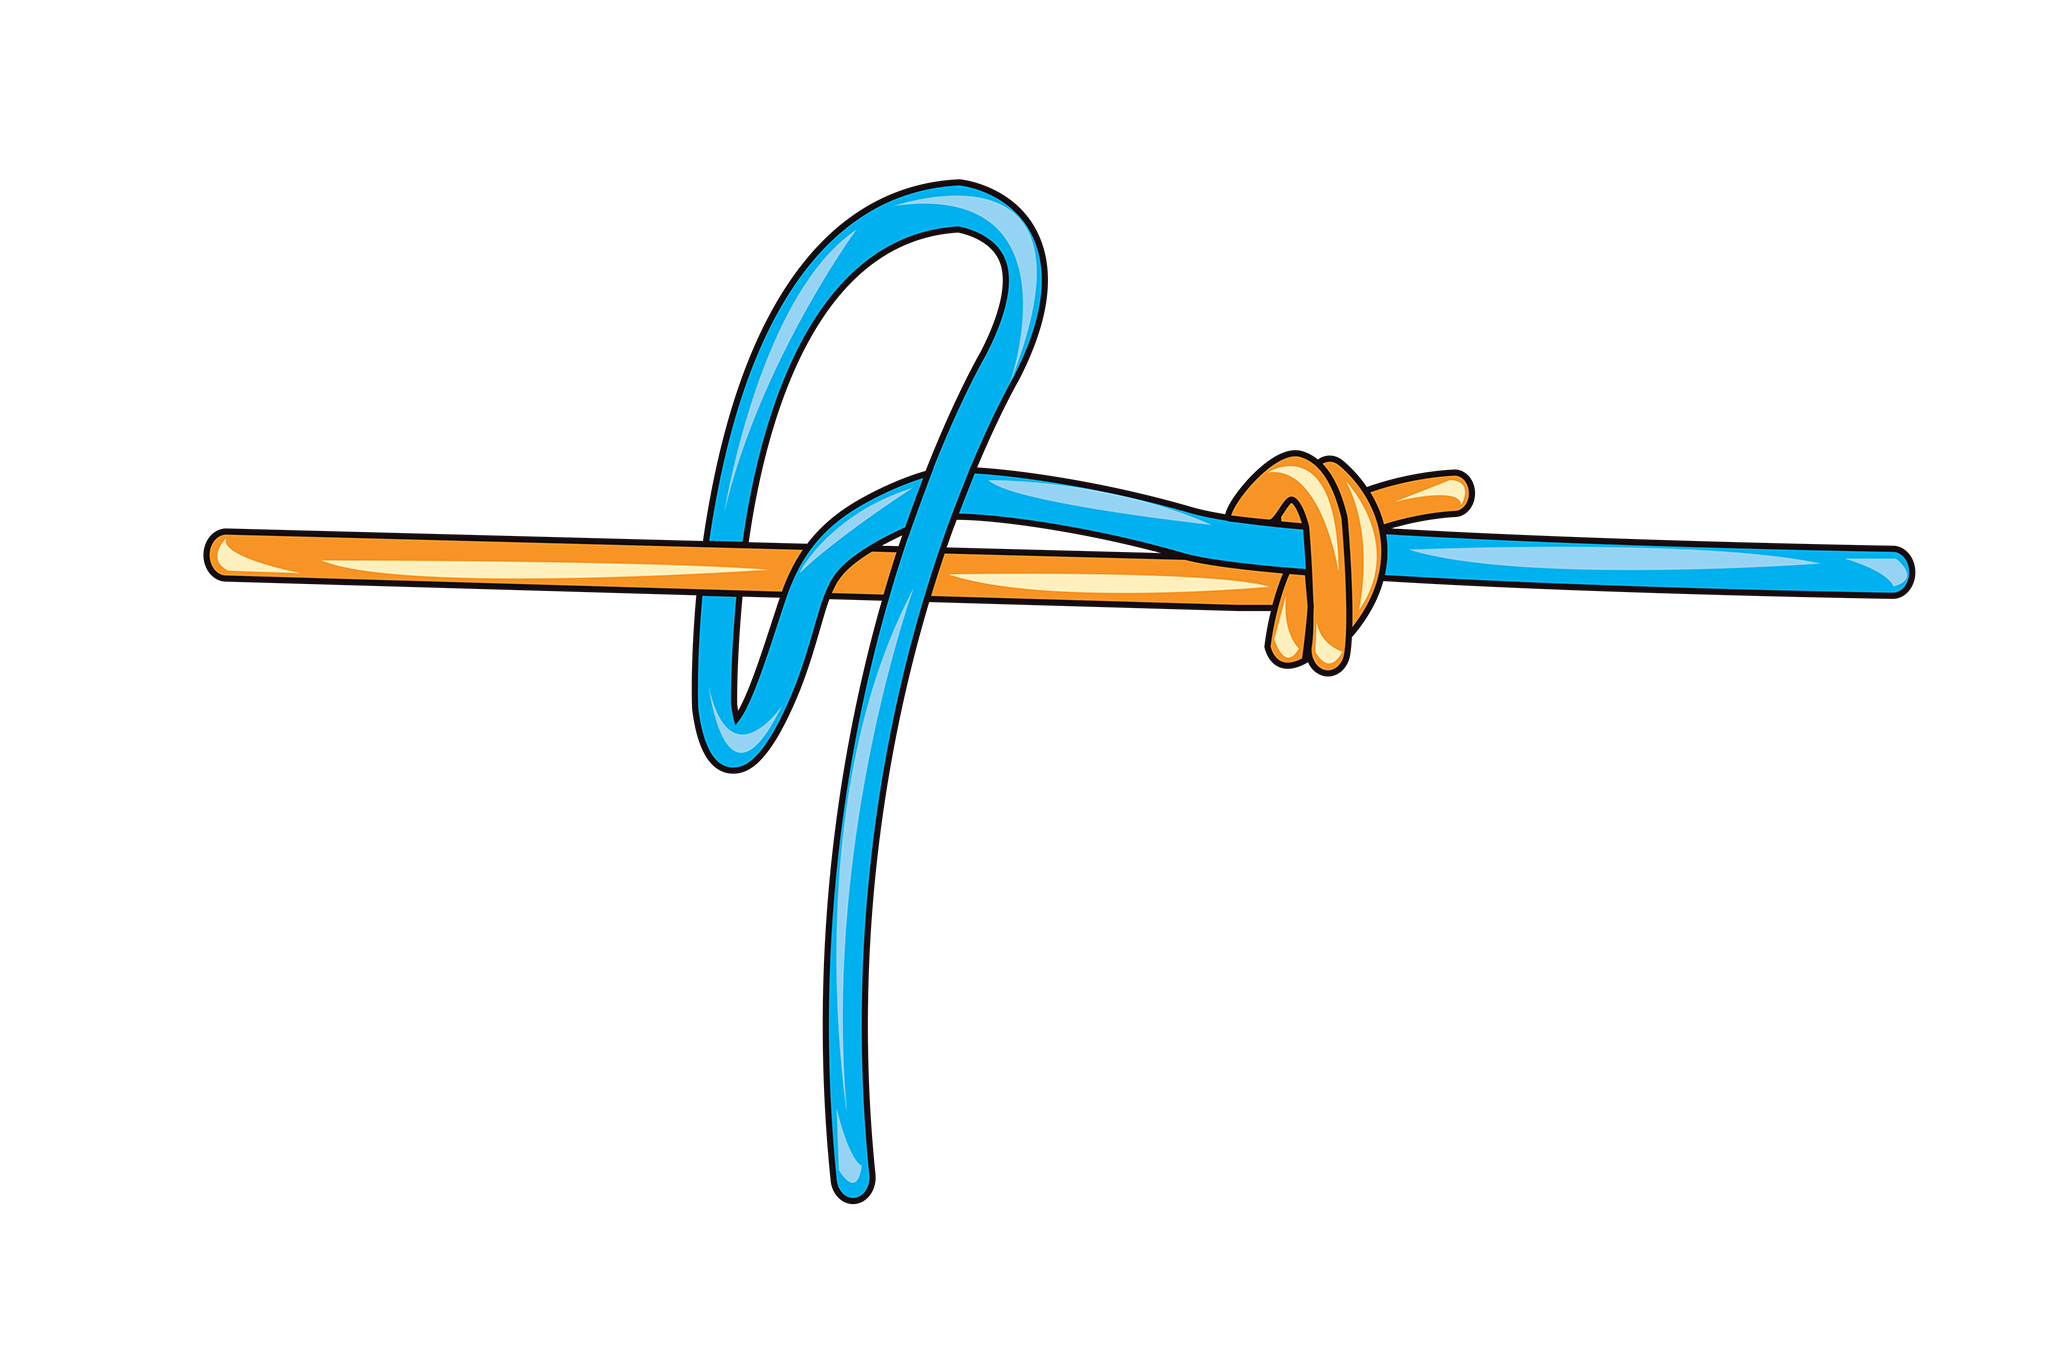
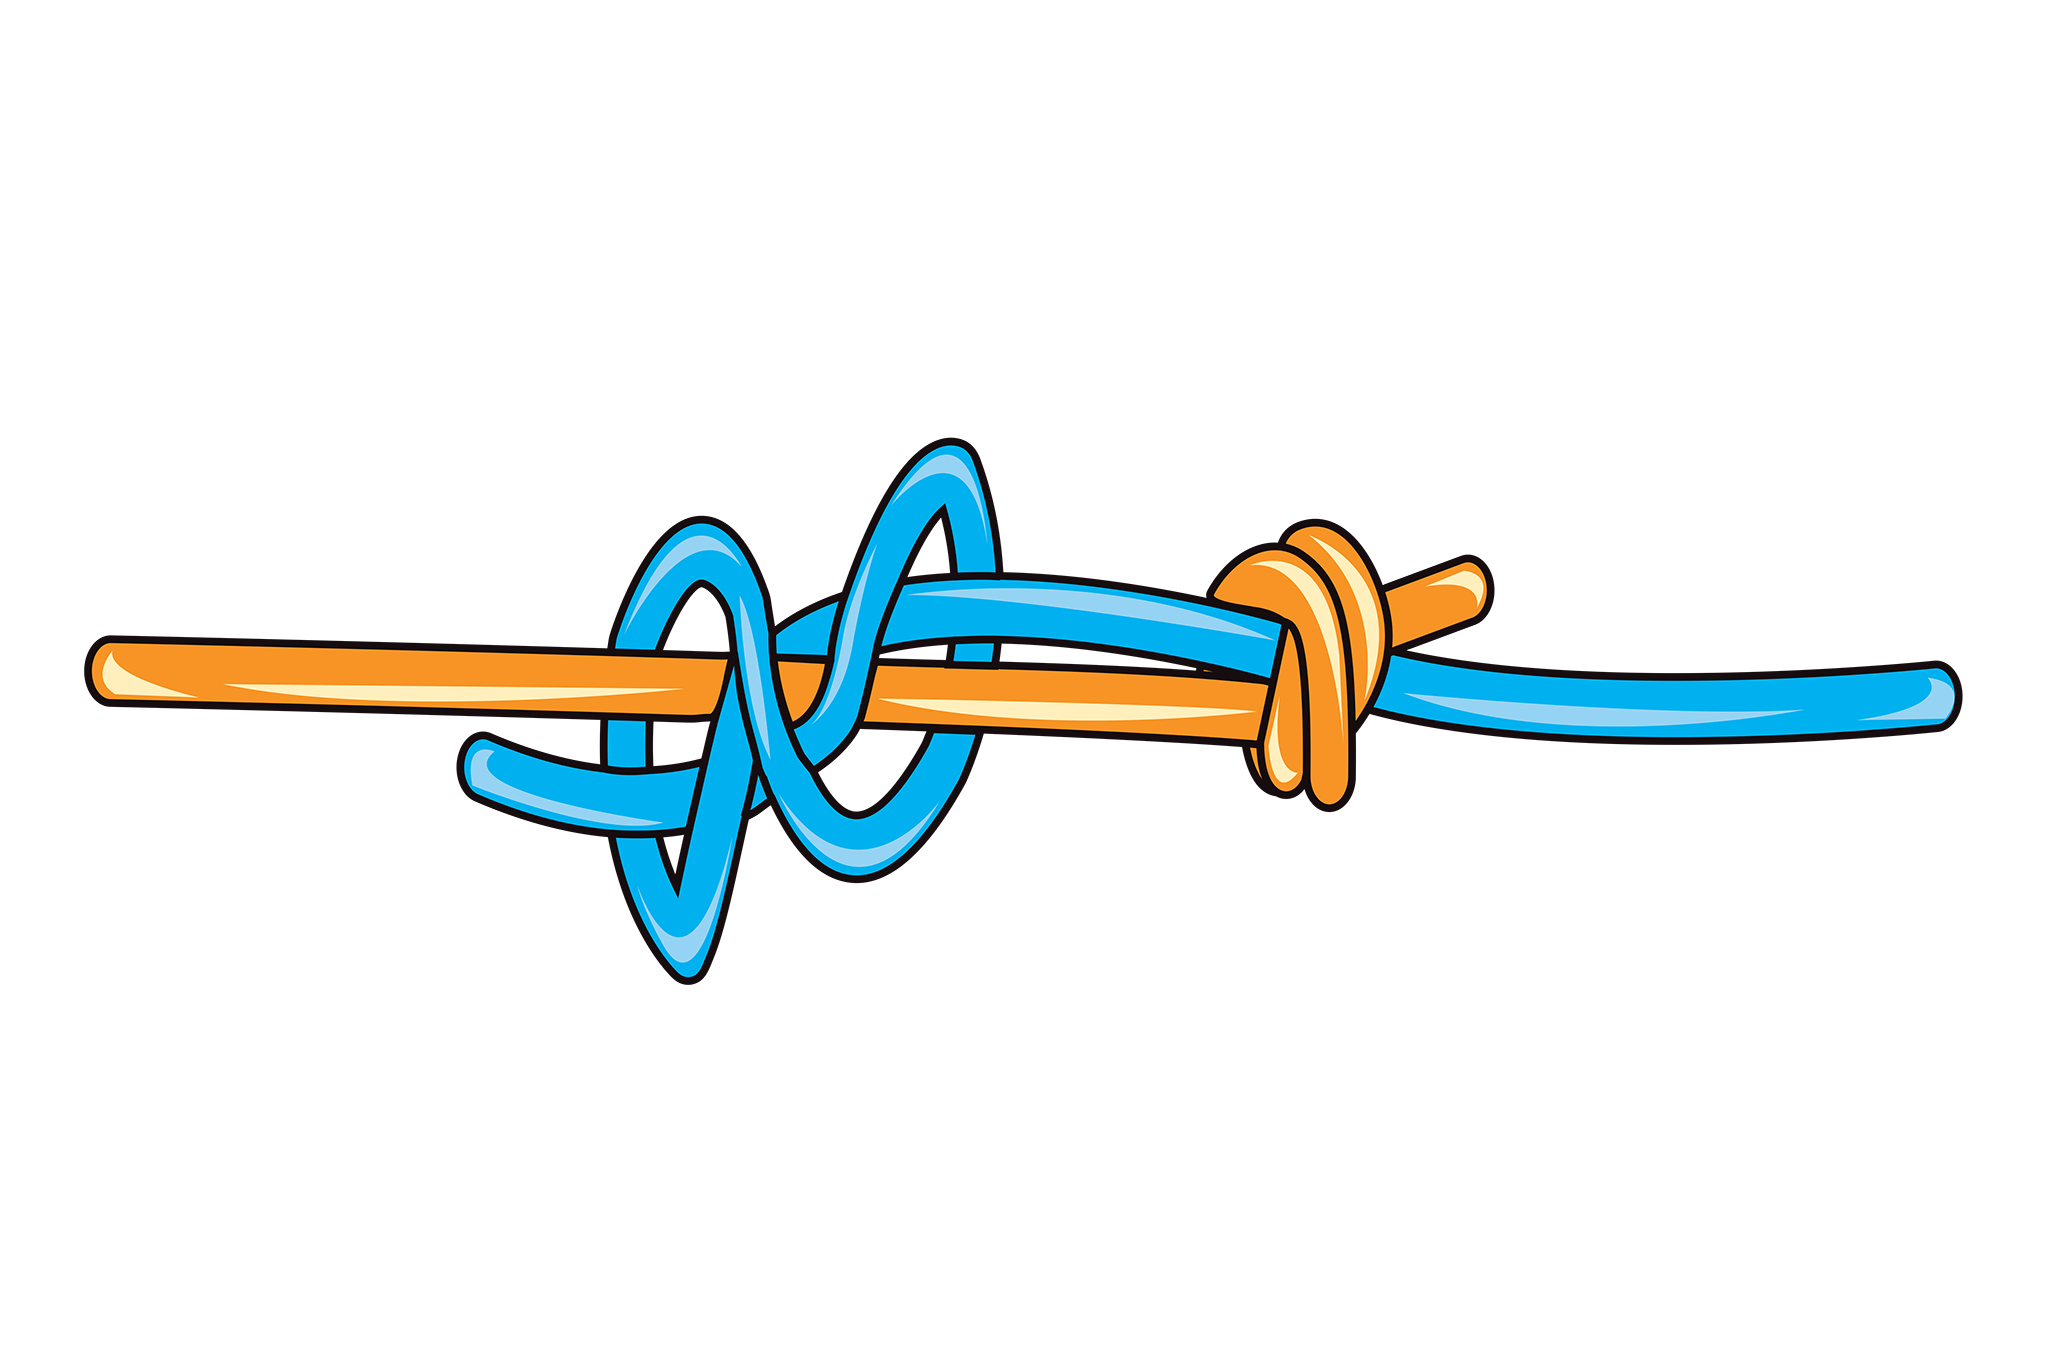
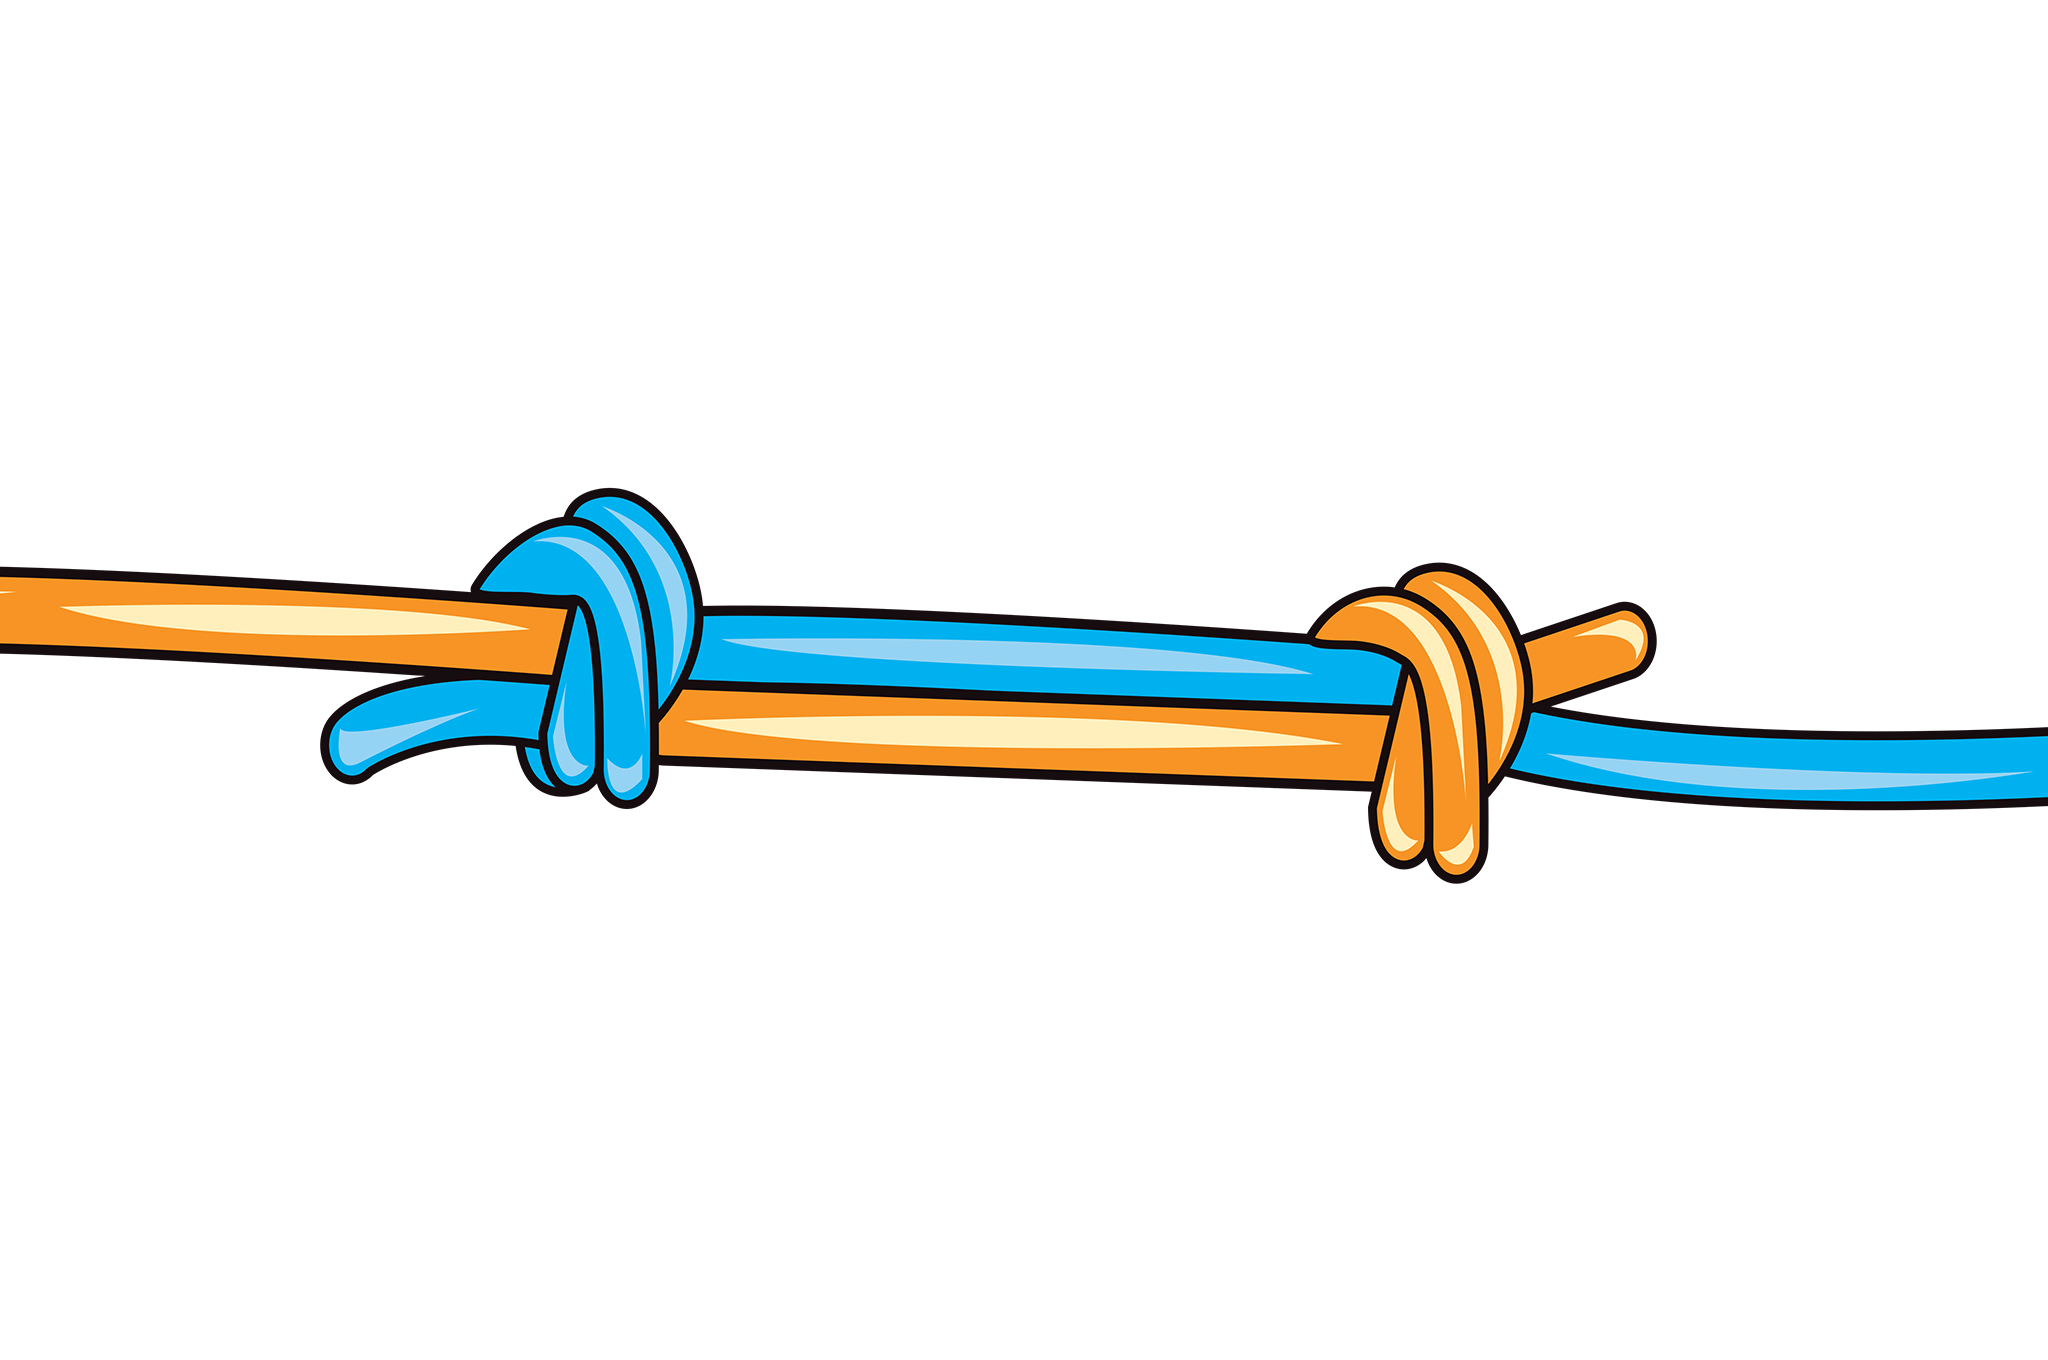
Trucker’s Hitch
Commonly used by truckers, the Trucker’s Hitch is used to tie down loads securely and with great tension. The loop formed while tying this knot acts as a pulley that tightens up slack to keep even heavy loads in place. The Trucker’s Hitch is actually a system of several knots used together to great effect.
Uses
Cinch down heavy loads on roof racks, car roofs, and truck beds
Securely tie down tarps
1 2 3
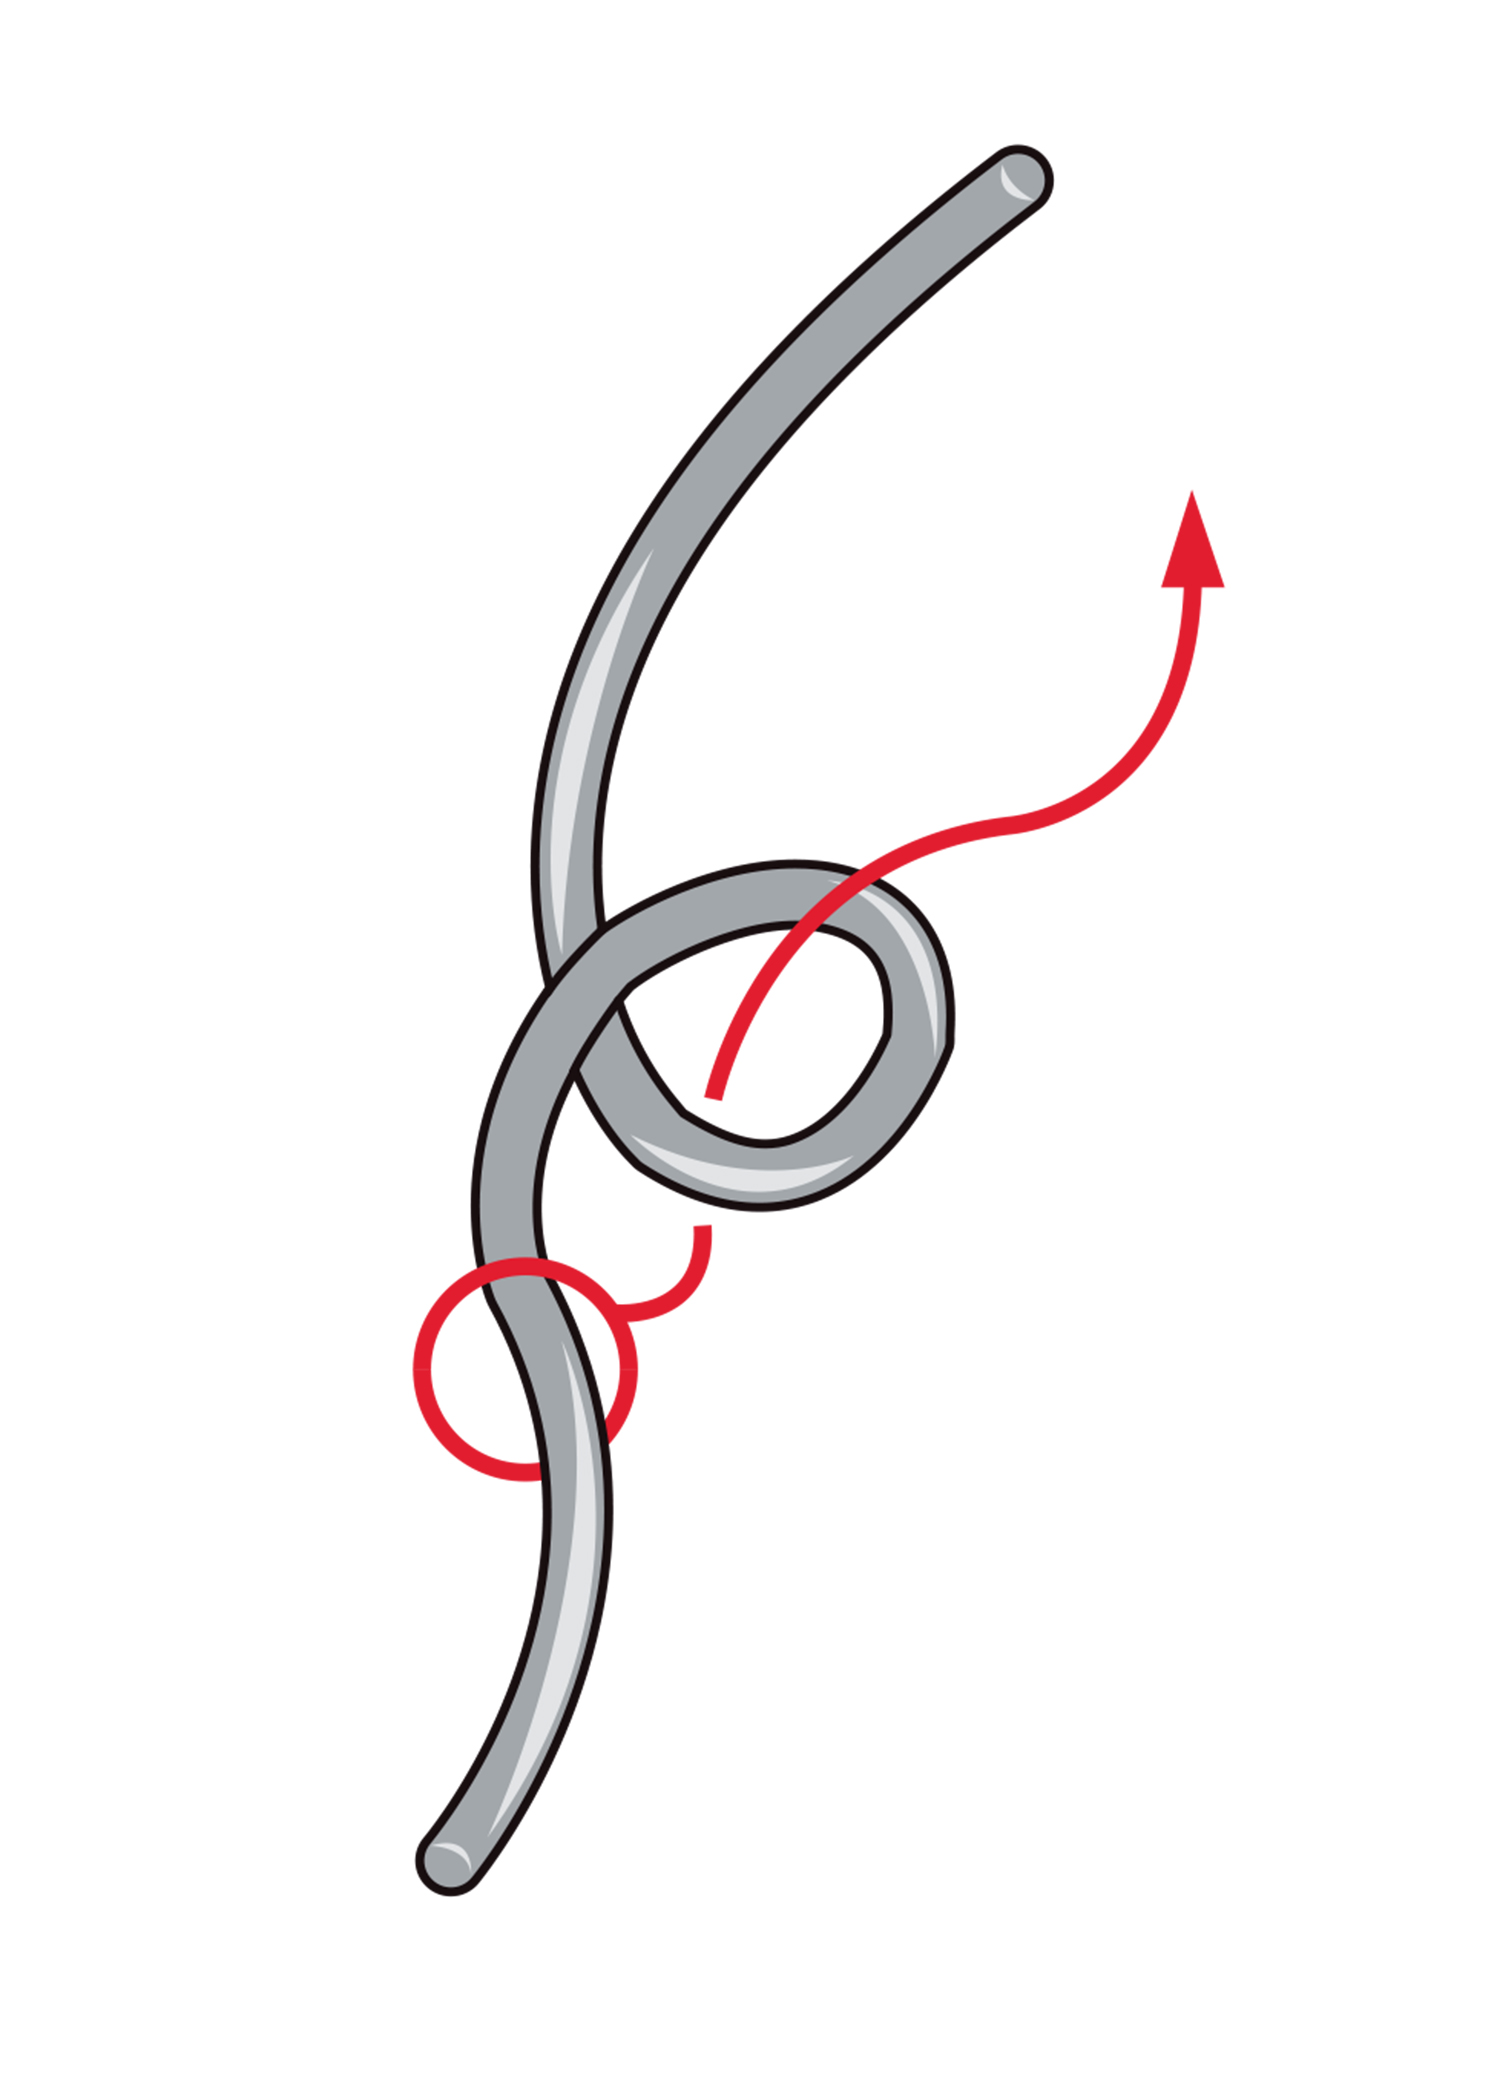
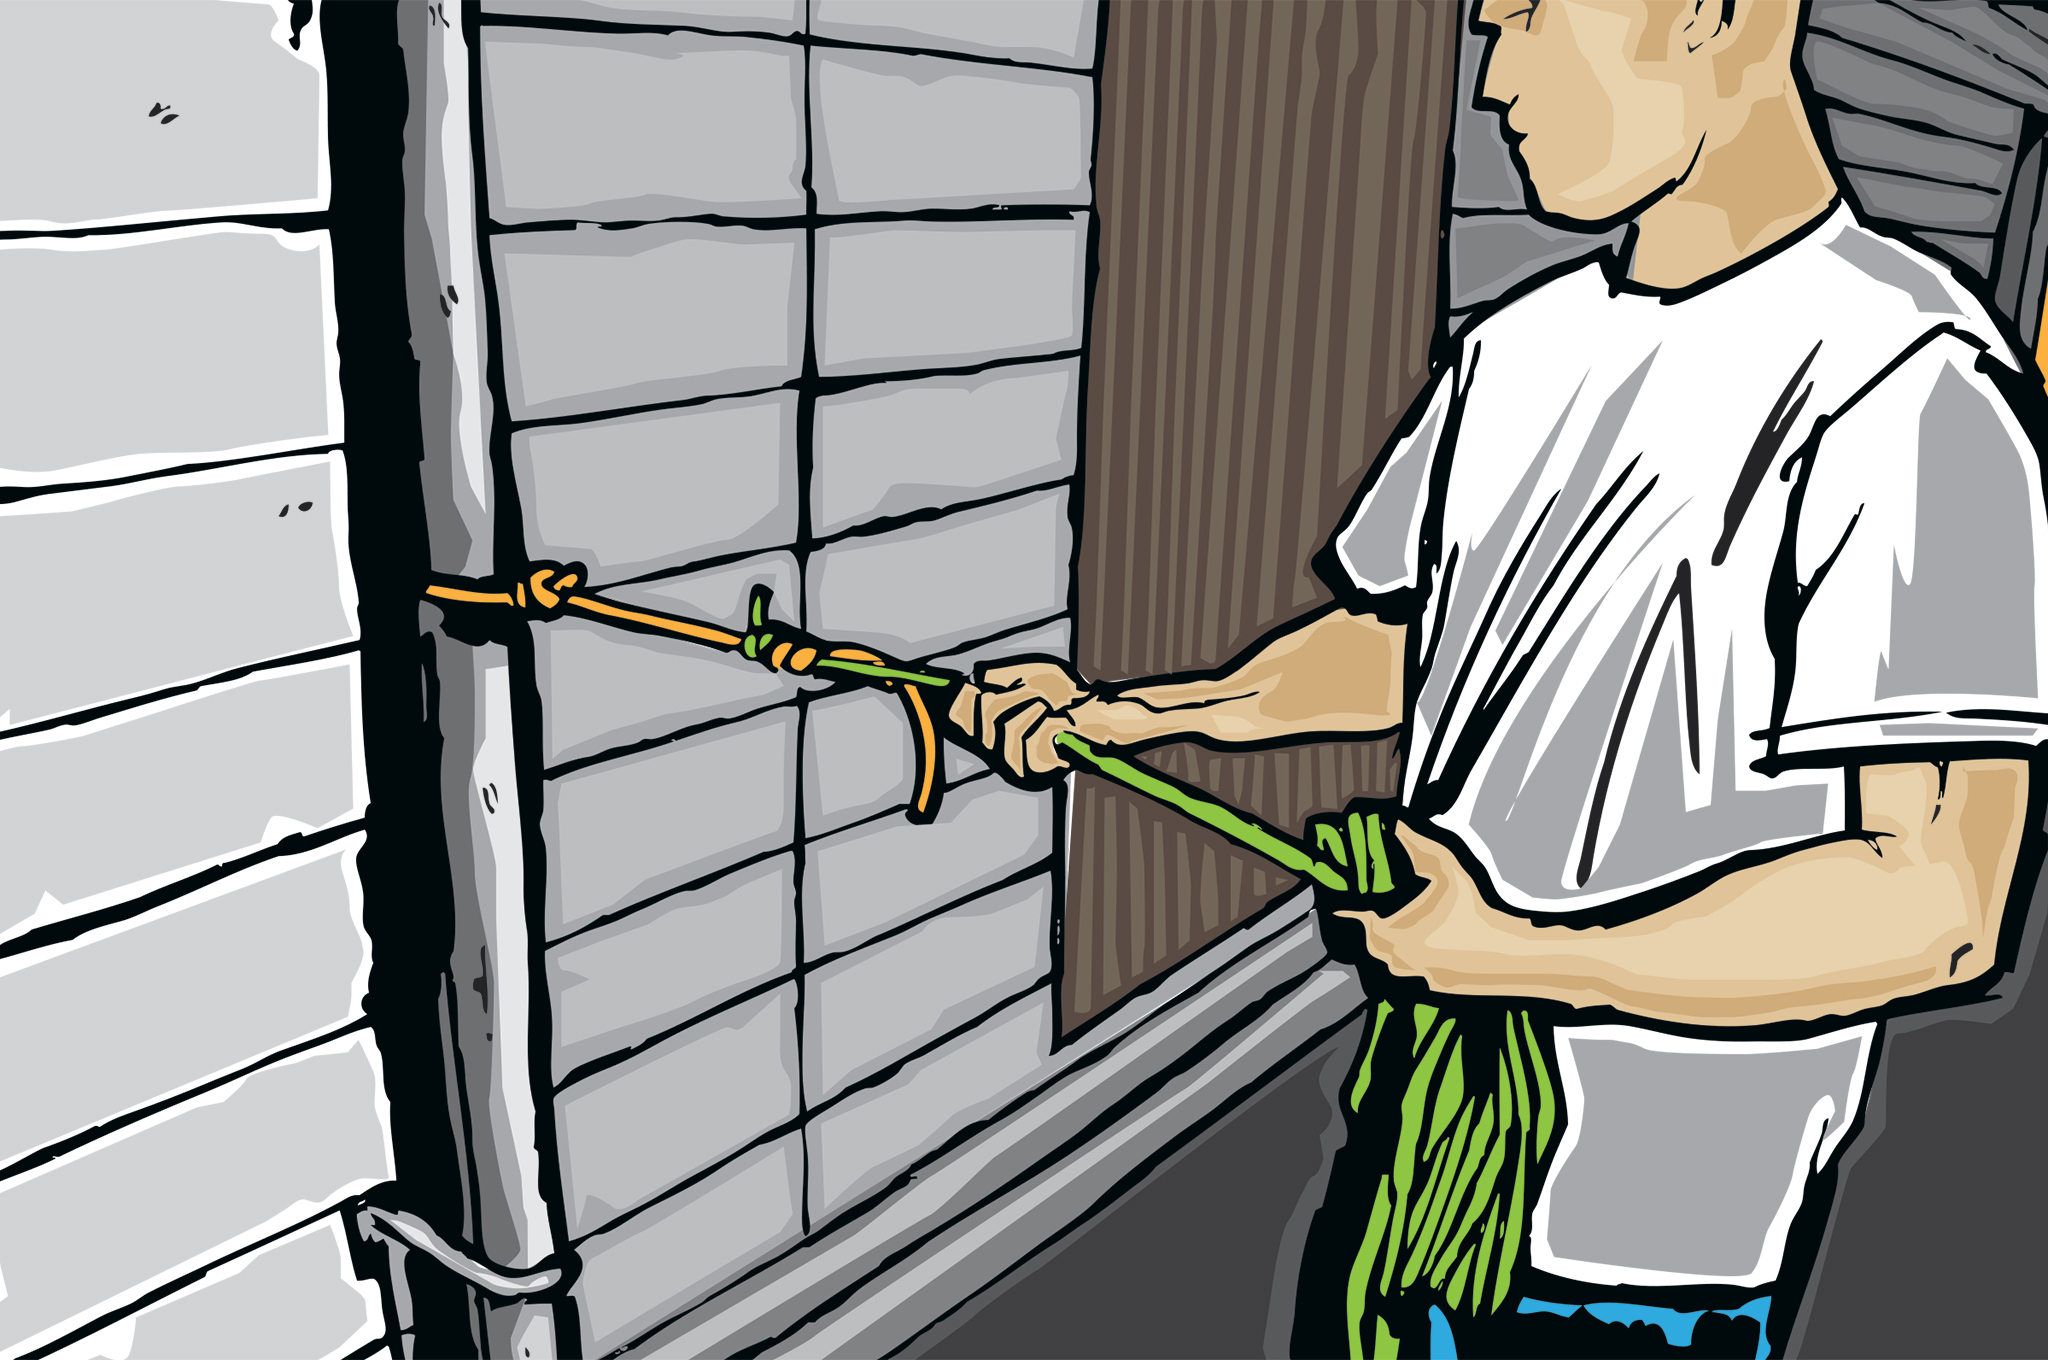
Double Fisherman’s
This knot is used to tie two ropes of similar width and strength together. If you don’t have a single rope long enough to get the job done, use this technique to tie two ropes together. What you’re essentially doing with this knot is tying two knots, one on each rope. When pulled toward each other, the two knots come together, tighten, and form a secure method of combining two ropes.
Uses
Joining two ends of shorter ropes to make a longer one
Joining two ends of the same rope to make a secure circle or loop
1 2 3 4 5 6 7 8 9 10 11 12 13 14 15
Rope Care
It’s always important to check your ropes for kinks, debris, and frays. Keep your rope away from water if possible, unless it is designed for it. Damaged and weakened rope that is under a lot of tension can break and cause serious injury or death.
Tidbit
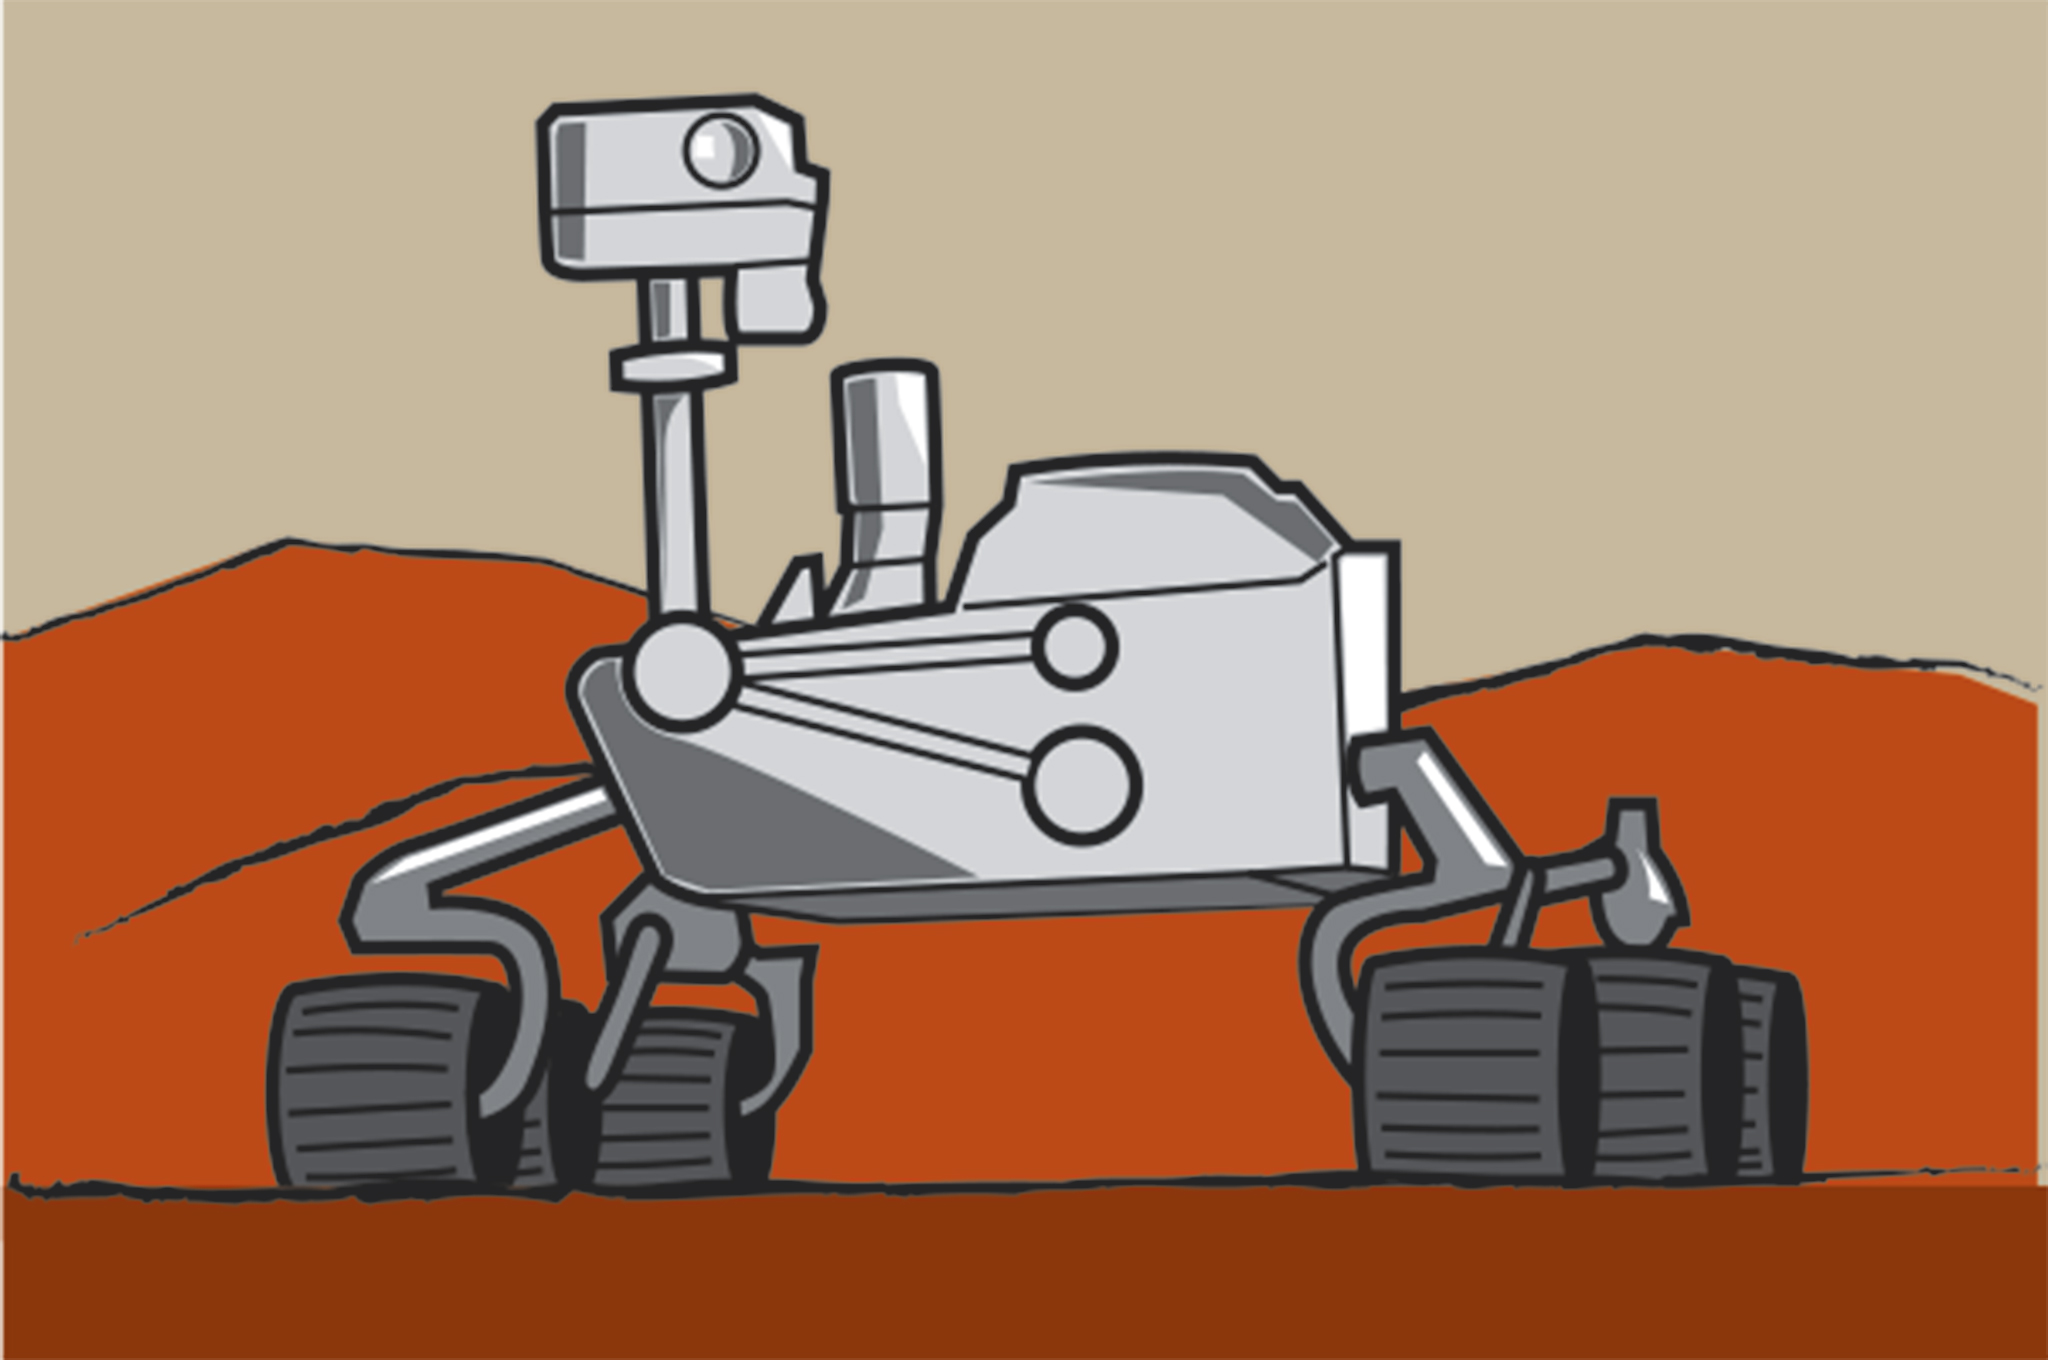
The origin of knots has been lost to time, but what we do know is that they have been in use for thousands of years by many ancient civilizations. This human knowhow now lives on the surface of the planet Mars. NASA’s Mars Rover Curiosity features cables that are bundled together with hand-tied knots. The knots keep the cables bundled without wearing them out like cable ties would.
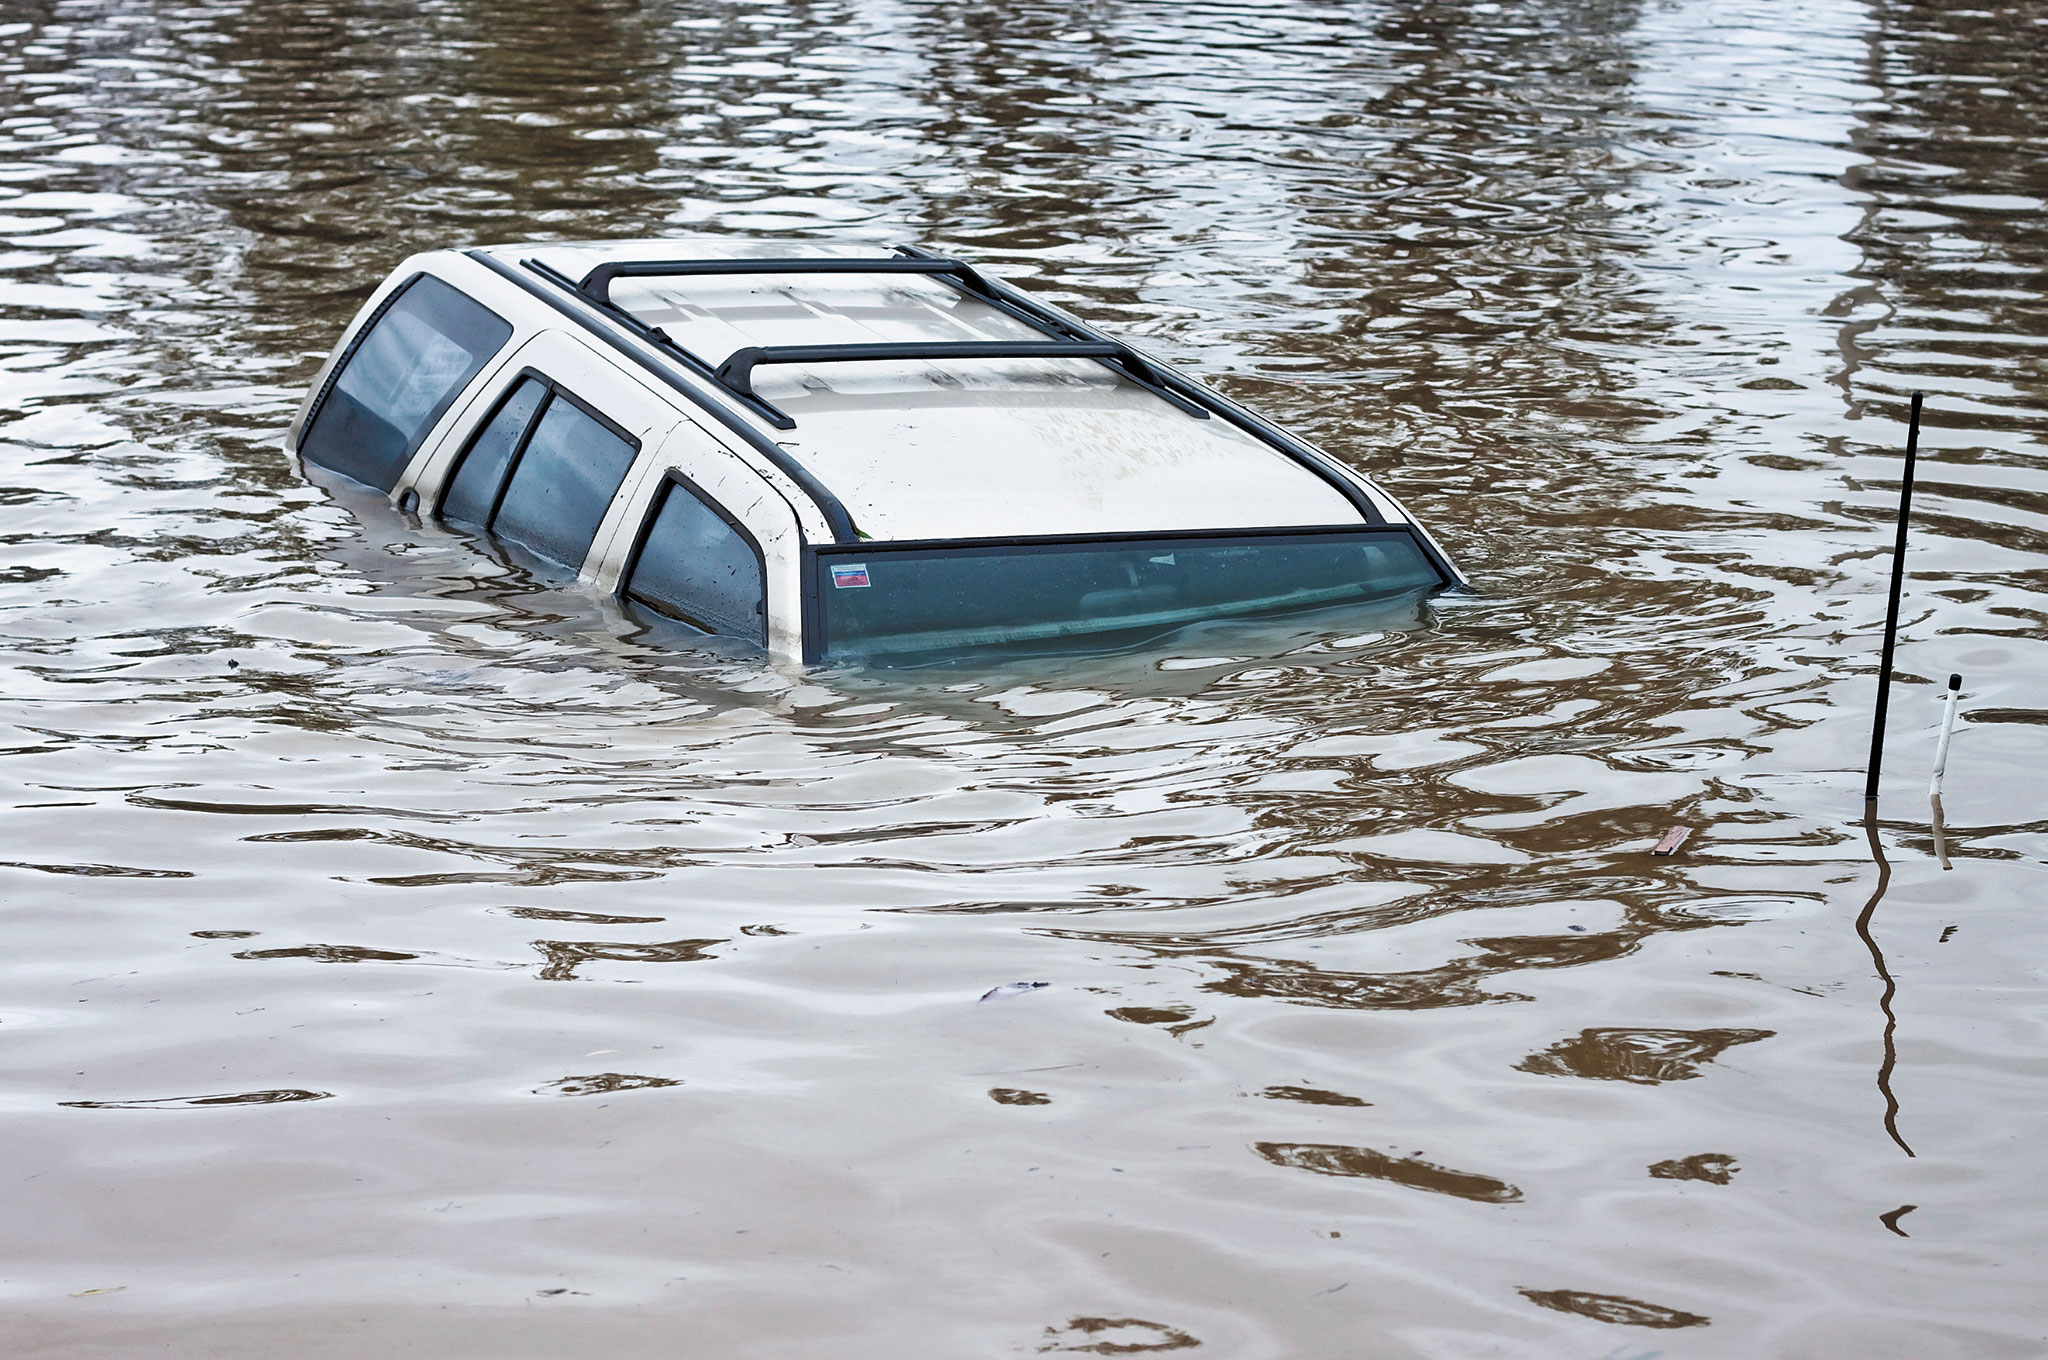
Imagine that you’re driving home from a long day at work, cruising down the highway at 65mph, and looking forward to relaxing on your couch with a cold beer. You’re only a few minutes from home as you enter an intersection—then, out of nowhere, a truck blows through the red light and blindsides you, slamming into your car’s rear wheel with tremendous force. Your vehicle spins violently out of control, skidding in a wide arc across two lanes.
You try to counter-steer, but it’s too late—an impact with the curb flips your car onto its side, and it topples down an embankment into a river. Your head is spinning and your heart is pounding, as water begins to trickle into the cabin. Upside-down, you fumble for the seatbelt release, but your hands can’t seem to find it.
This terrifying scenario isn’t as unlikely as you might think. An NHTSA study found a national average of 384 drowning deaths per year in motor vehicle accidents, between 2004 and 2007. Meanwhile, other types of vehicle accidents may leave occupants pinned in other equally dangerous scenarios, such as a car that has caught fire.
Under these circumstances, quick access to a rescue tool has the potential to save lives. With such a tool, a passenger can slice through a seatbelt, break the glass out of a window, and crawl to safety before paramedics arrive. They may even be able to use this time to save others from the crash.
About Rescue Knives
This brings us to the topic of the rescue knife, a blade with several added features which could help a user escape a dangerous situation (or rescue others from it). These knives must be effective and reliable for day-to-day use, and when the time comes, they must slice and smash their way to safety.
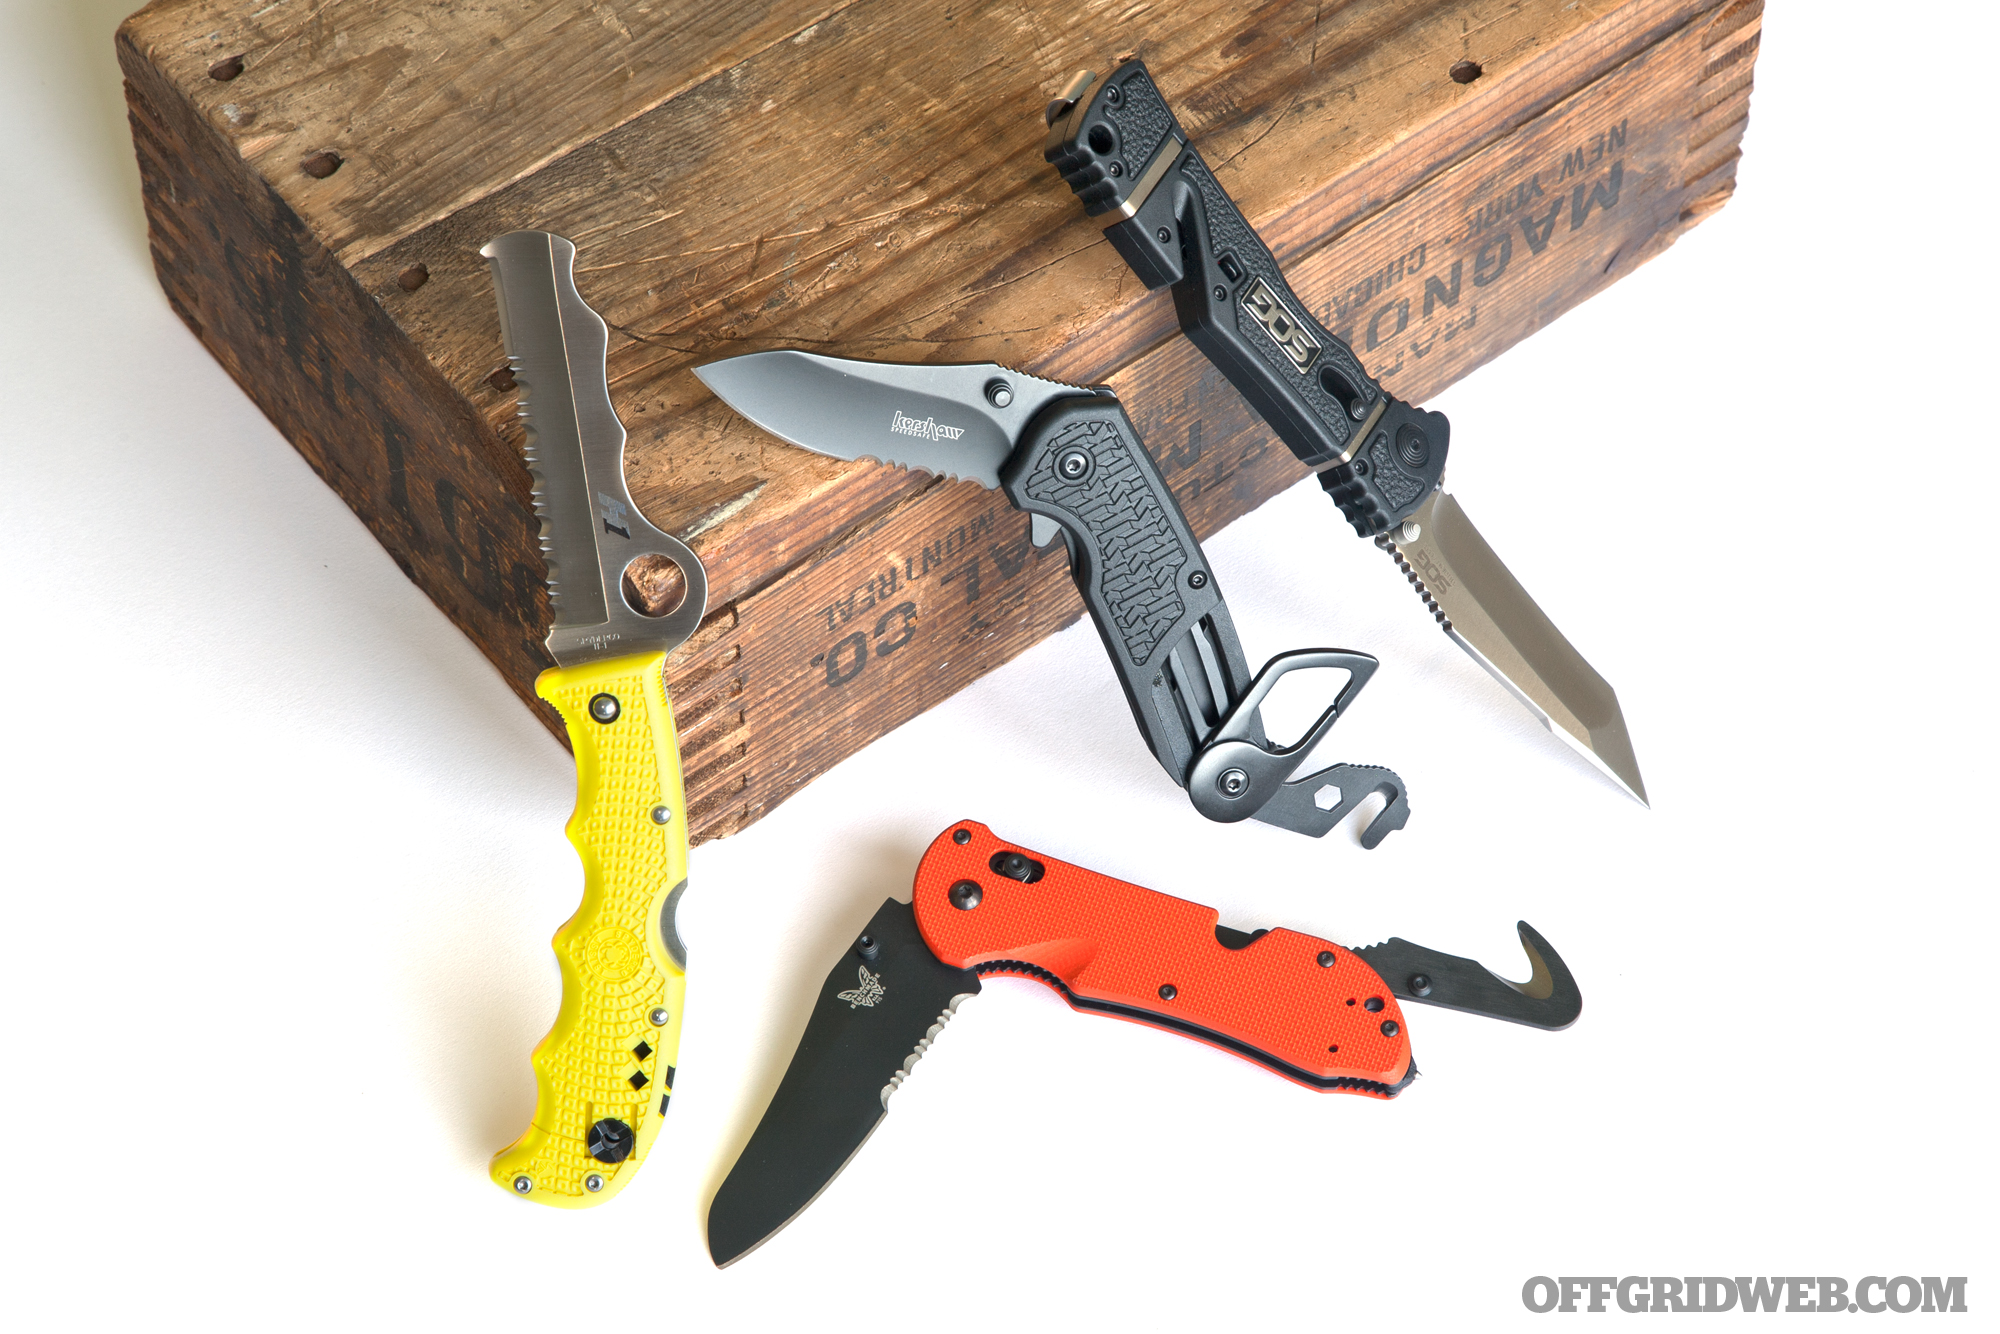
In order to provide you with some rescue knife options to consider, we narrowed it down to four folding blades which could also double as emergency tools. We obtained a Benchmade Triage, a Kershaw Funxion EMT, a SOG Trident Elite, and a Spyderco Assist for this guide. So, read on to learn our impressions of each of these multi-function blades.
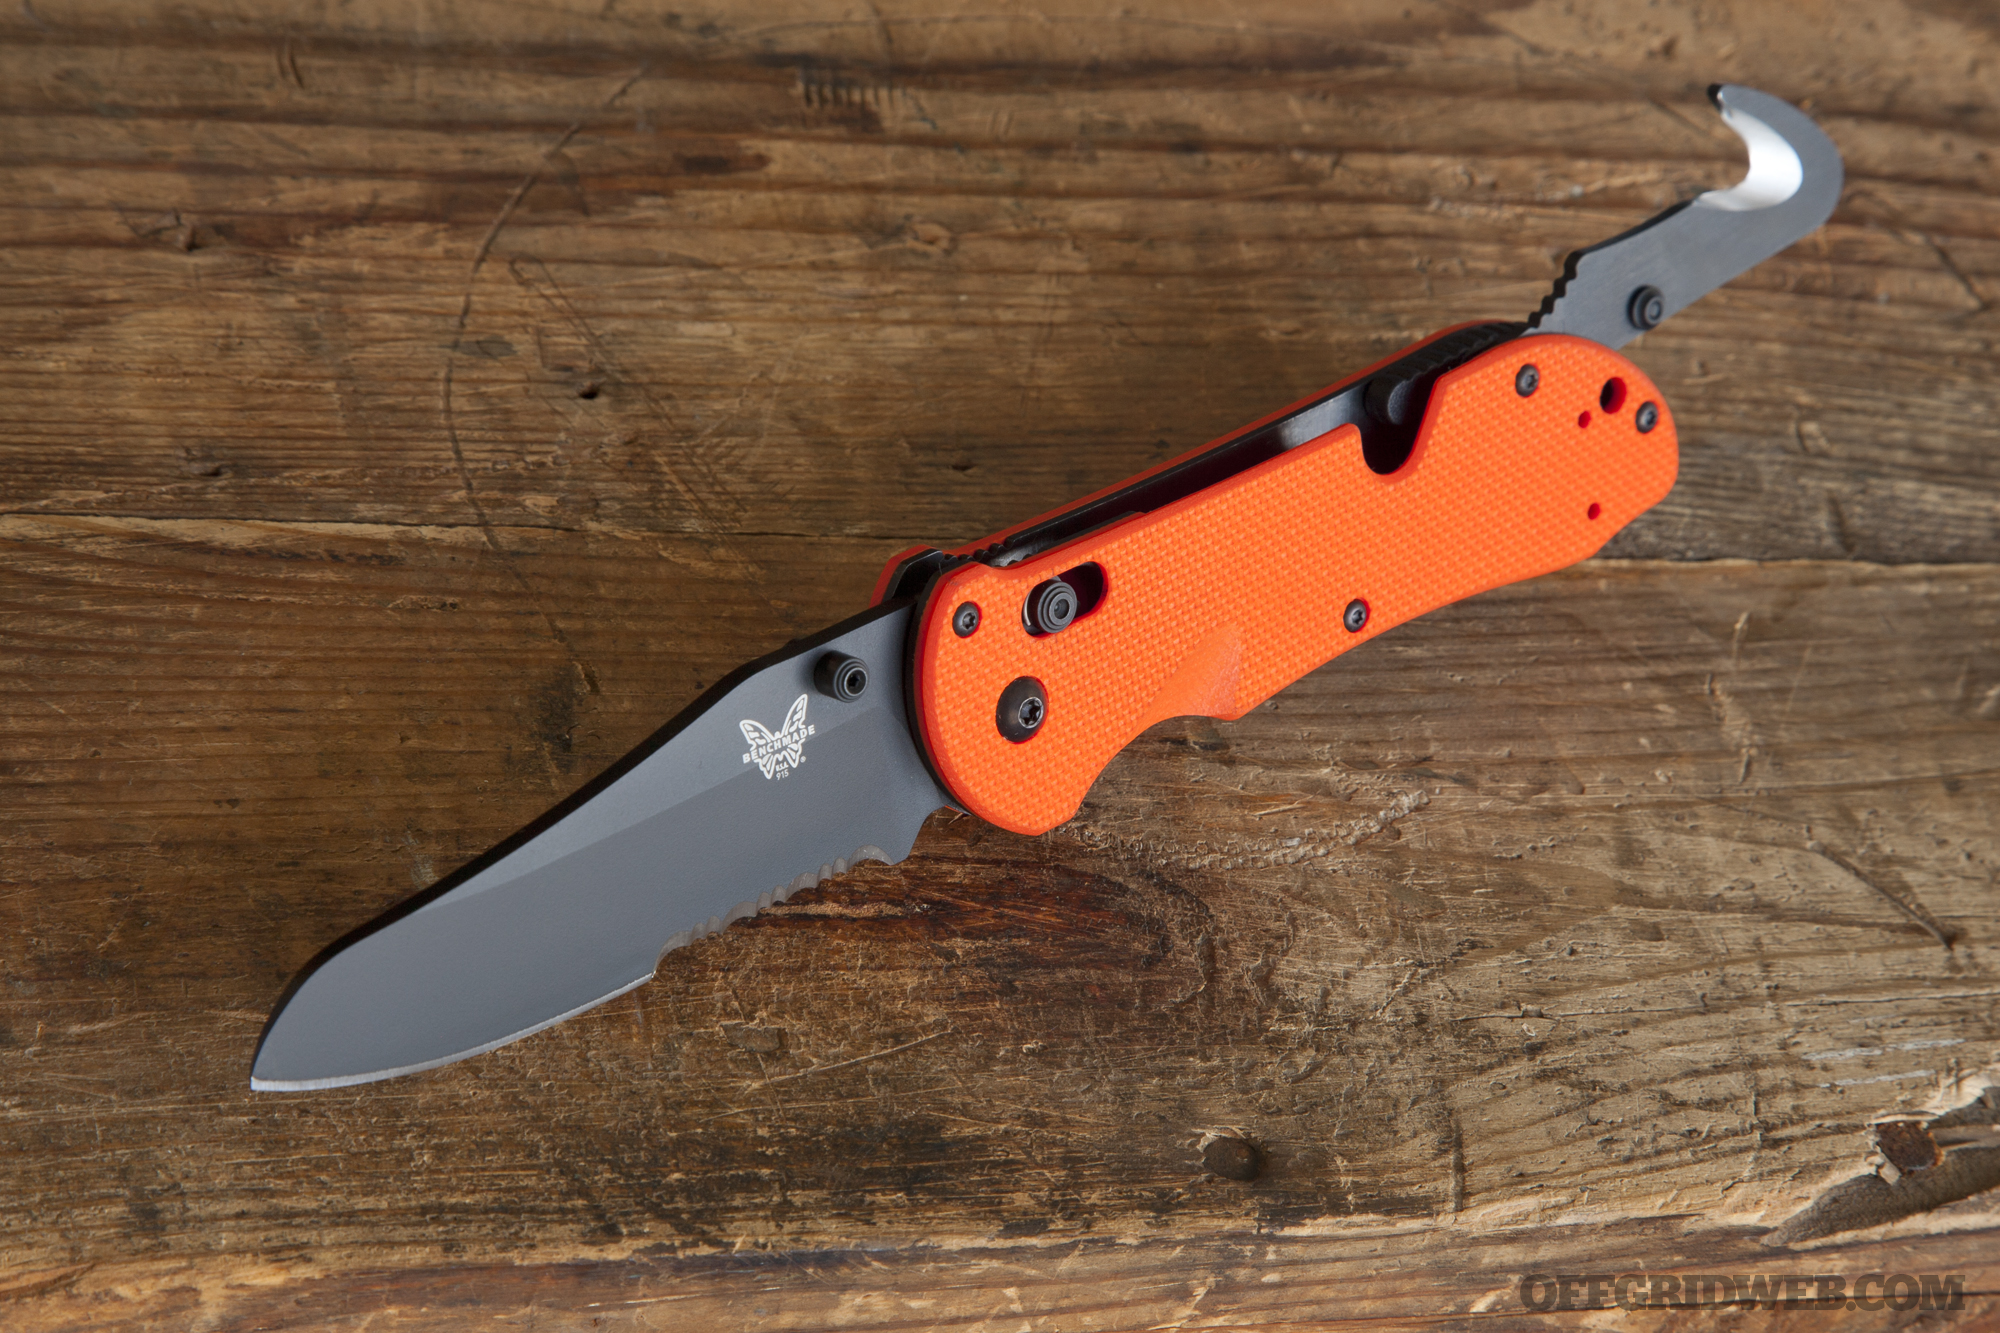
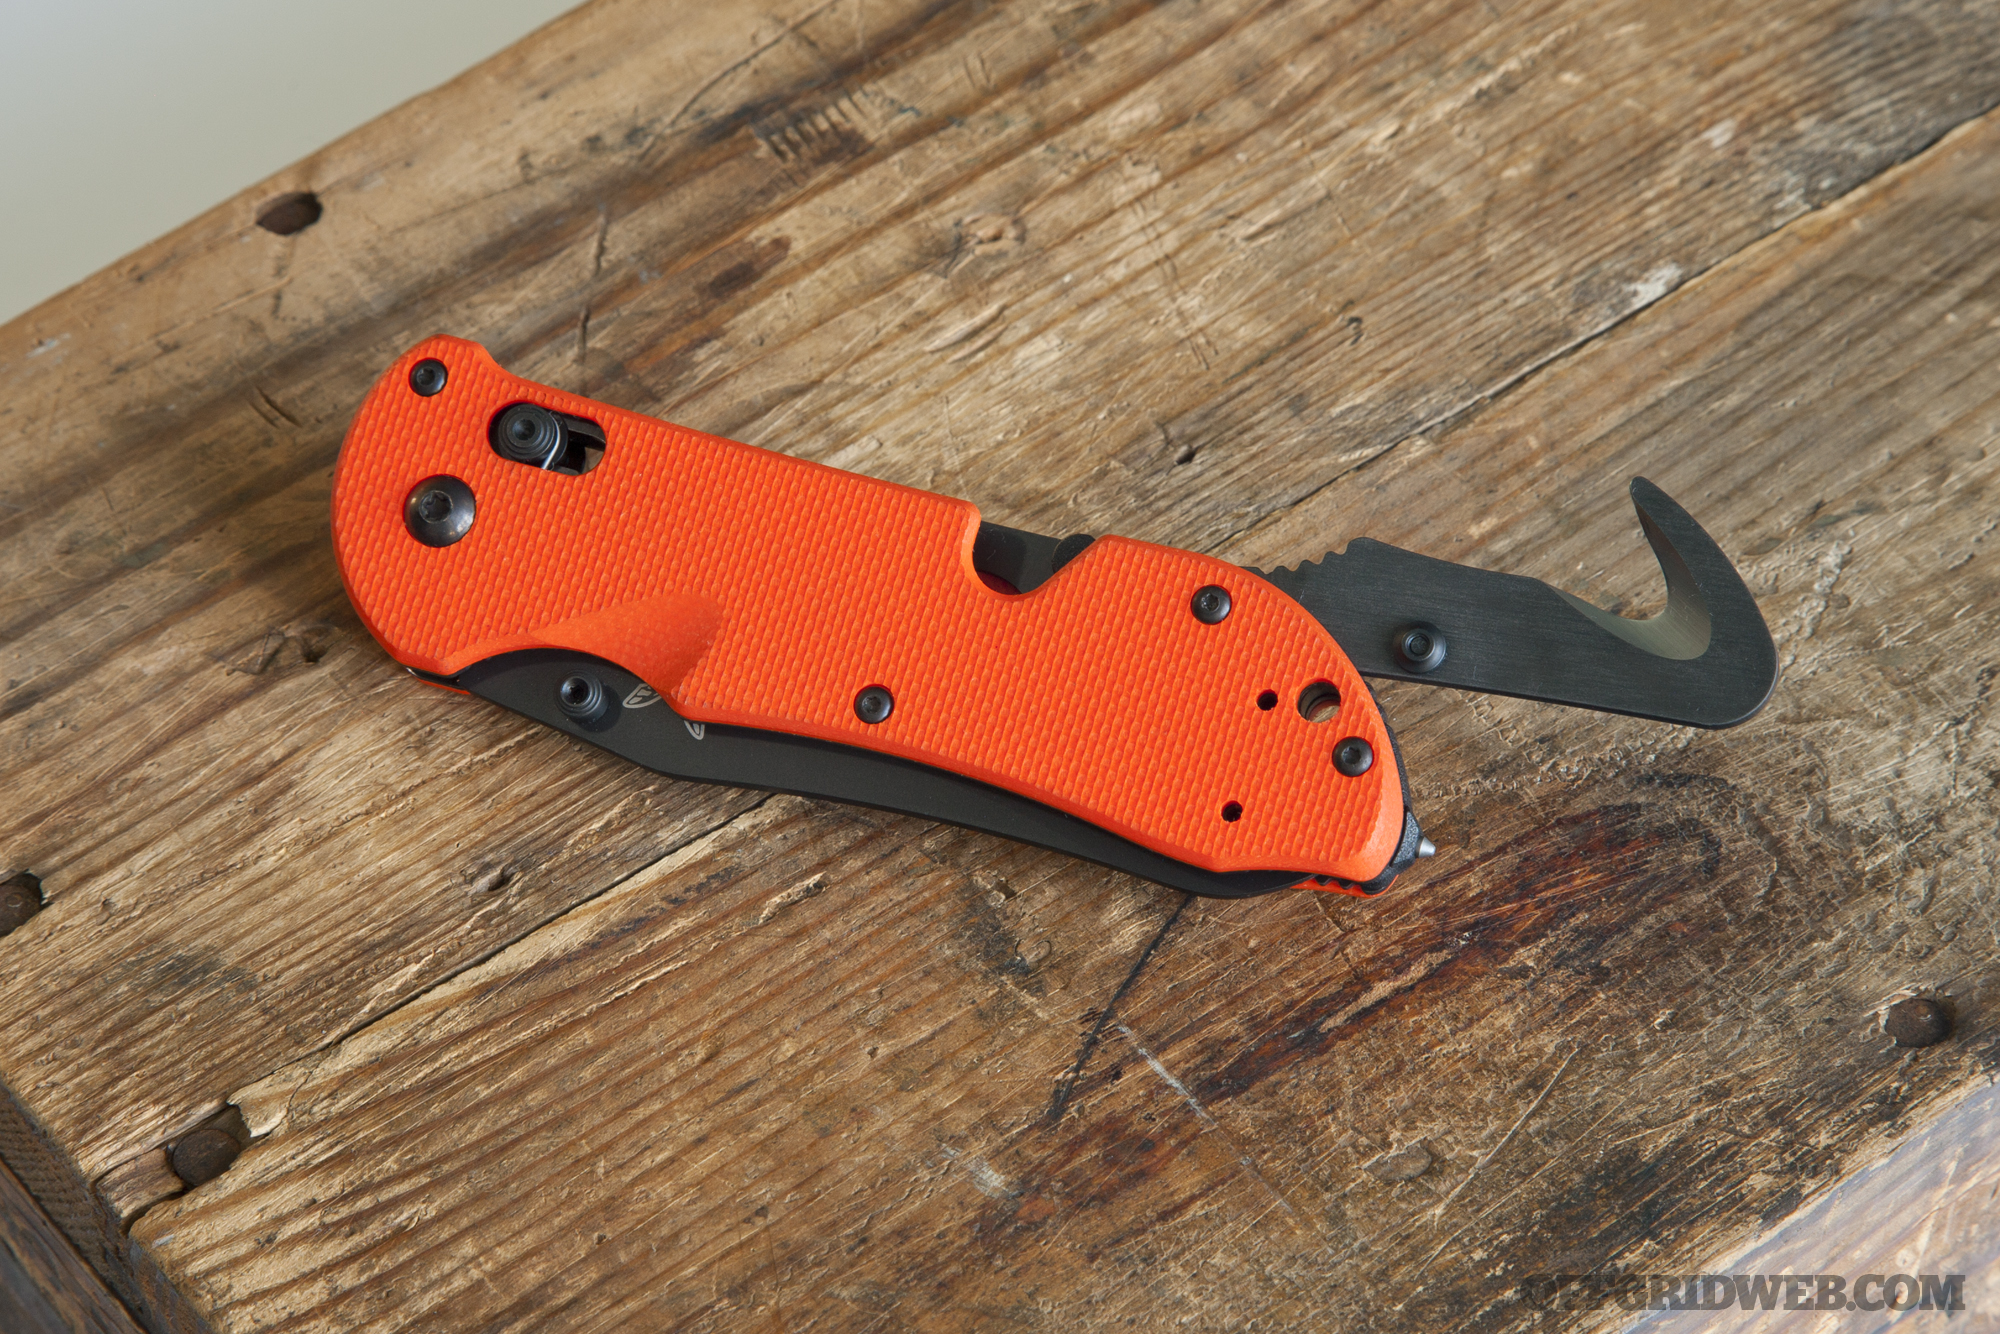
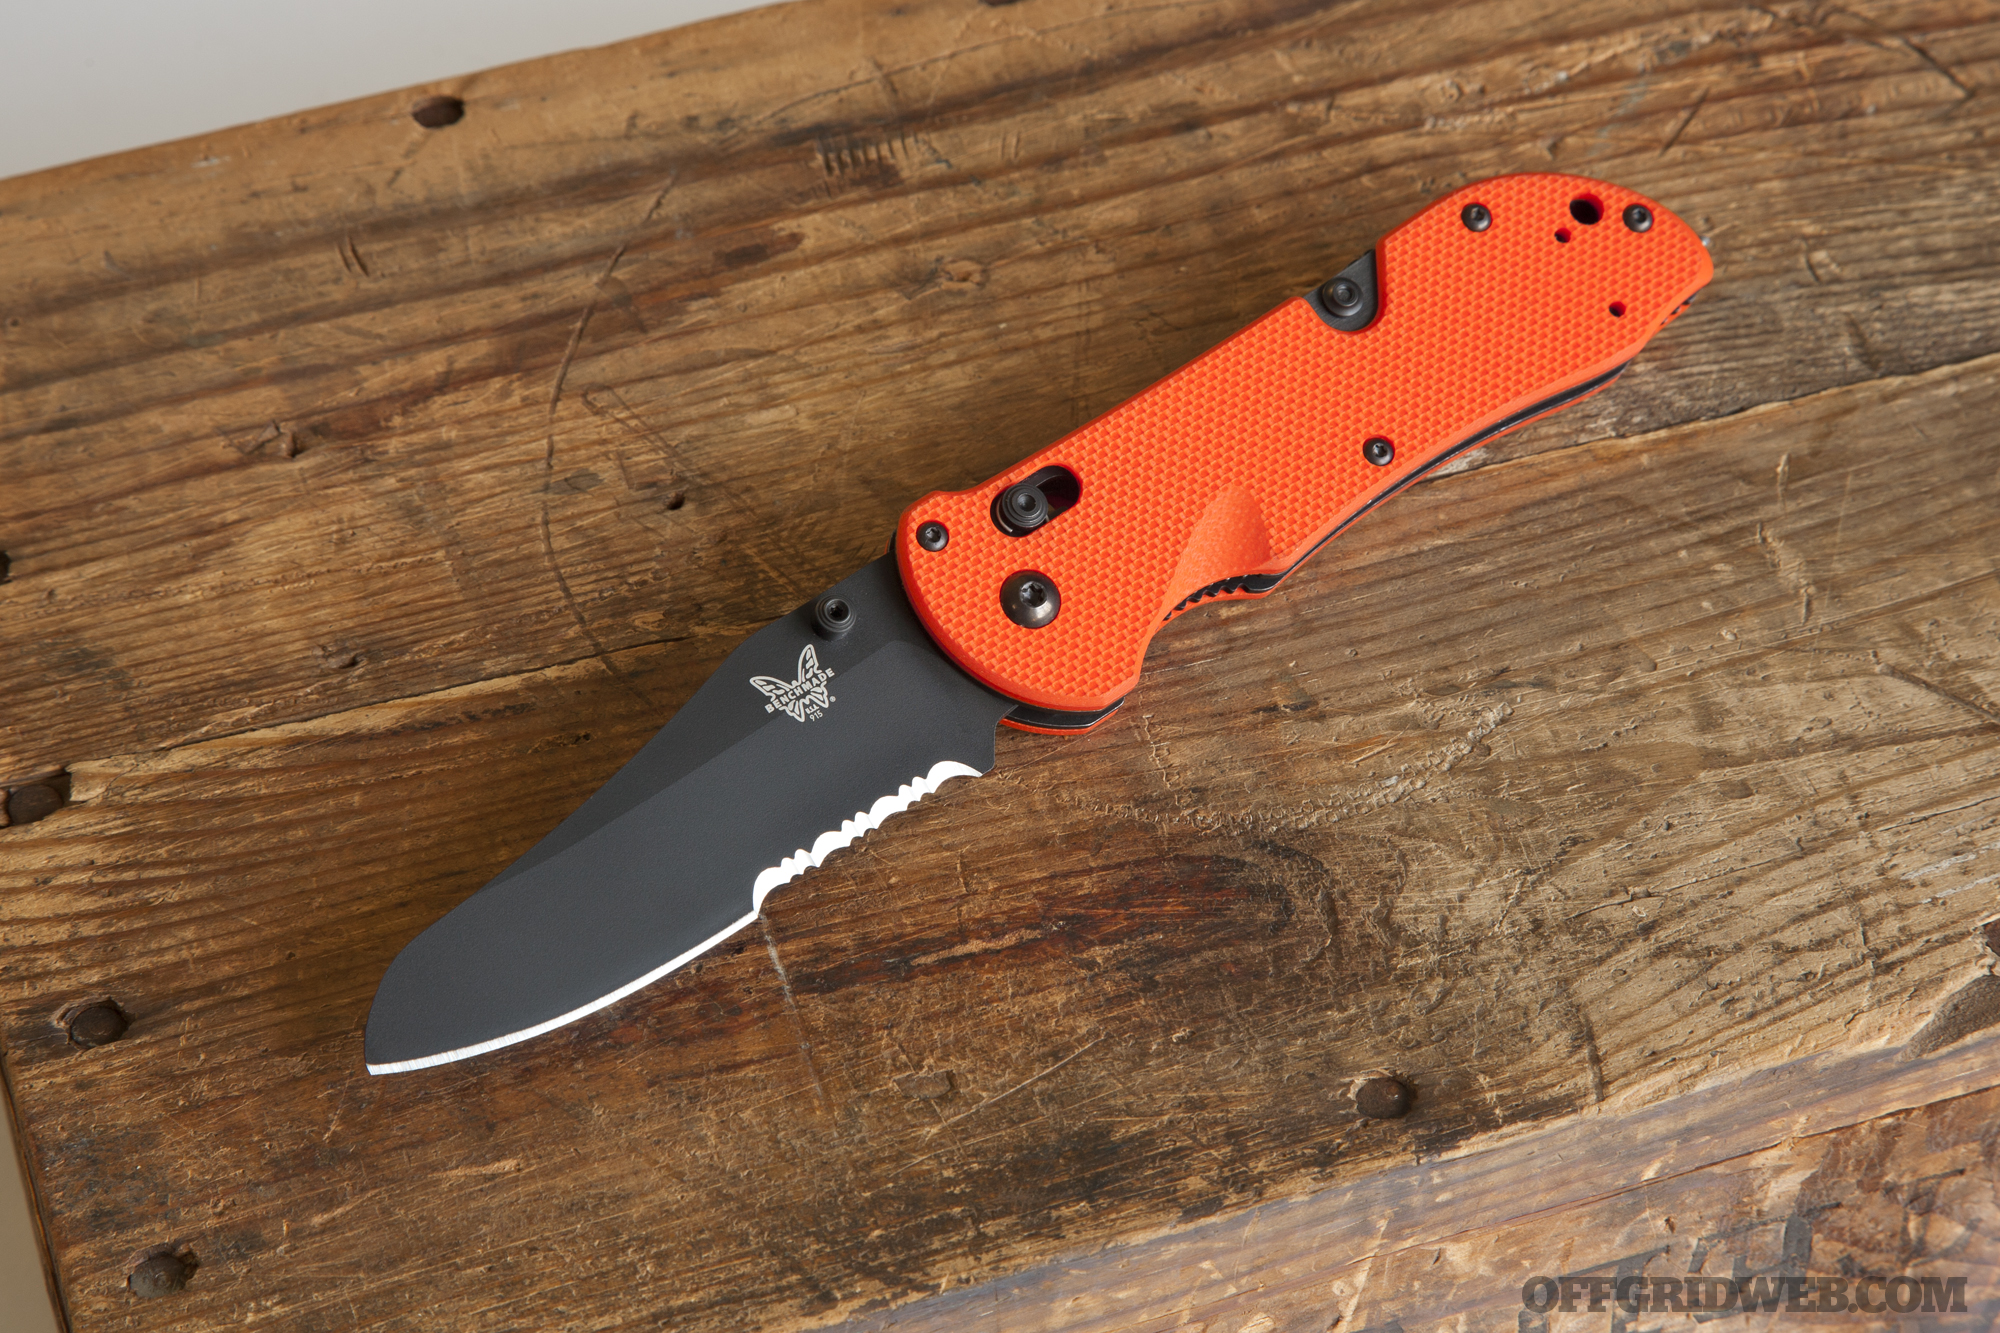
Benchmade Triage
The Benchmade Triage family of blades offers many possible configurations. First, you’ll need to select either a sheepsfoot blade shape, or one that Benchmade calls an “opposing bevel” shape (essentially a blunt cut-off tip to avoid accidental punctures). Then, there’s either a plain or partially-serrated edge, a satin silver or black coated finish, and black or safety orange handle scales. Benchmade even offers an Auto Triage model with a revised design and automatic opening. (It is, however, over $100 more expensive than the original Triage seen here.)
We selected a model 915 Triage with black sheepsfoot blade, partially-serrated edge, and orange handle scales.
The Triage’s blade is constructed of Bohler N680, a resilient steel that features strong corrosion resistance for use in wet environments or even salt water. The blade opens smoothly, either by pushing lightly on the thumb stud, or by pulling back on the AXIS lock bar. We’ve always been fans of Benchmade’s signature AXIS lock, since it allows the knife to be flicked open and shut with one hand, even if the user is wearing gloves. The finely-textured G10 scales also provide superb grip on the handle.
As far as additional features, the Triage has two. First, there’s a hook-shaped cord/seatbelt cutter that folds out of the spine via a thumb stud. It flips out smoothly like the blade, and is held open by a ball detent mechanism (but doesn’t lock). We will say that the short thumb stud on this cutter is a bit tricky to manipulate with gloves or wet hands. Secondly, there’s a very prominent glass breaker tip on the butt of the knife, which is optimally-placed for striking impacts.
All in all, the Triage would make for a great rescue tool or a multi-purpose EDC knife. It’s rather expensive, but it’s made in the USA, and Benchmade’s build quality is consistently very good, so you get what you pay for.
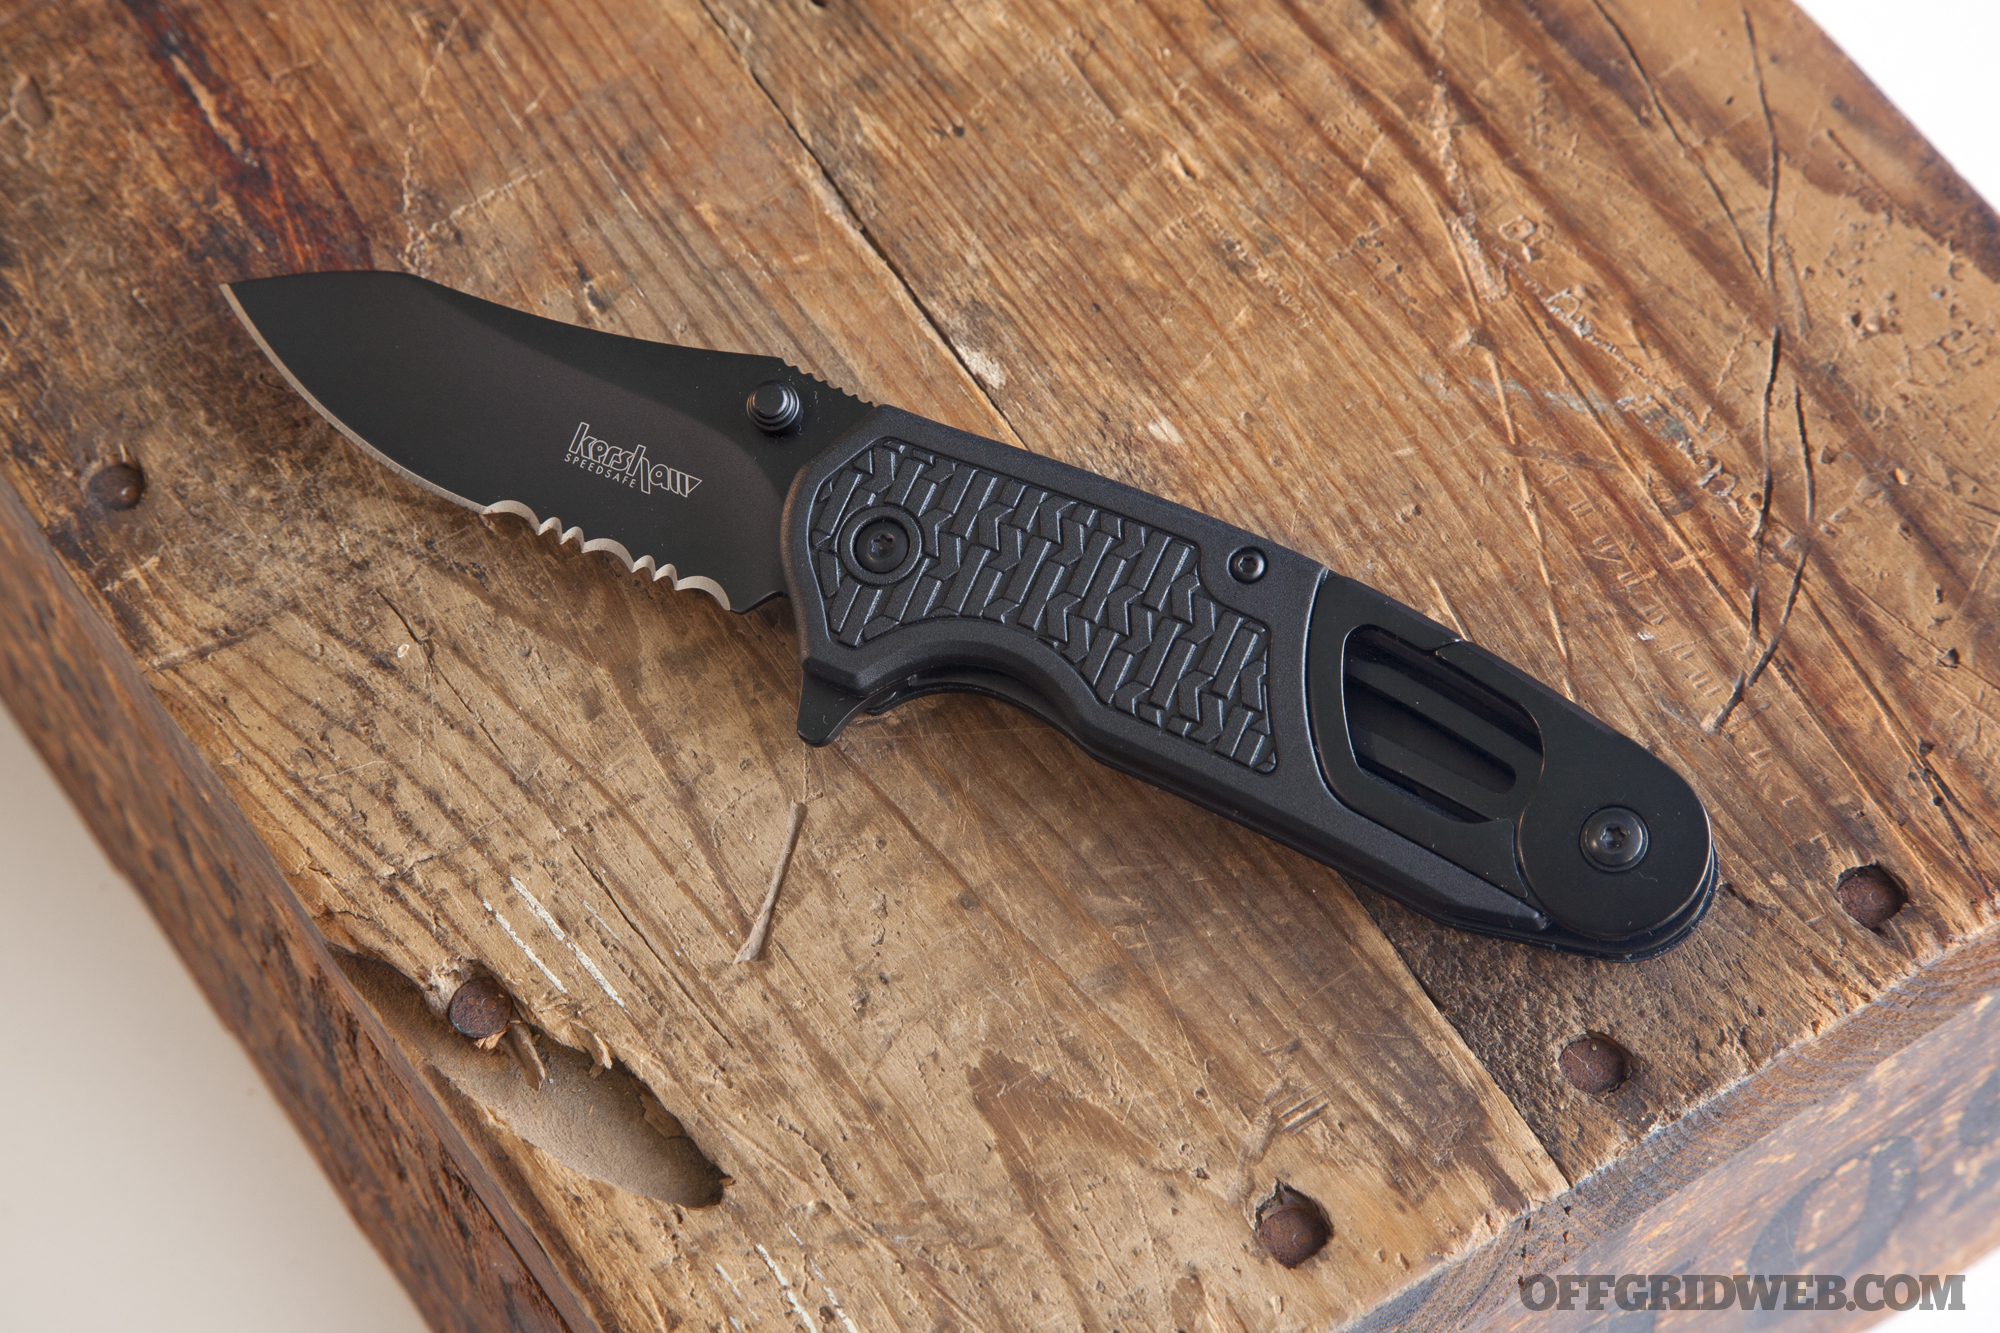
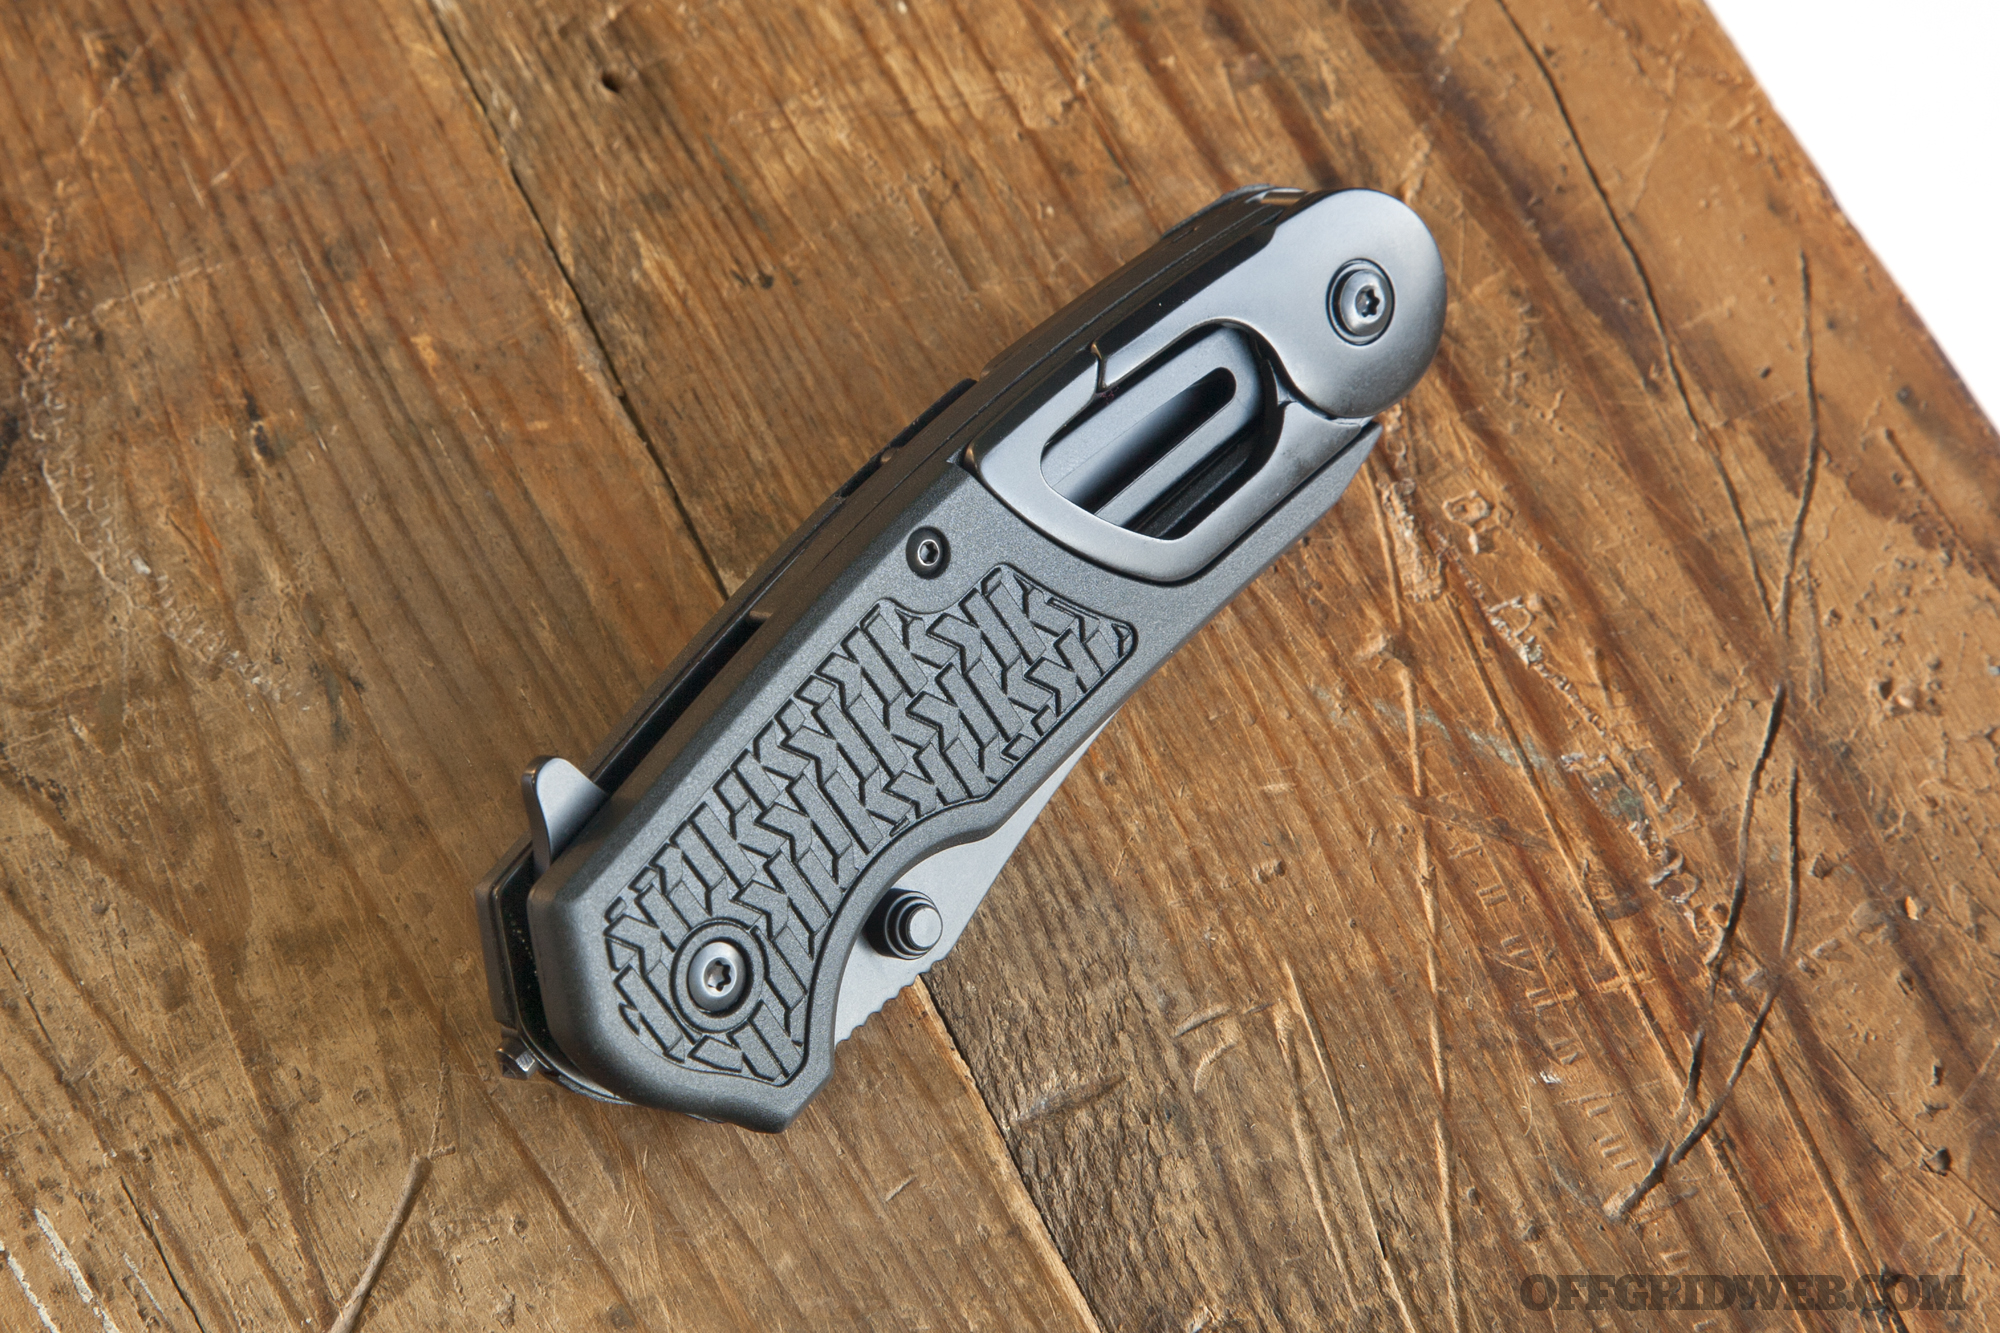
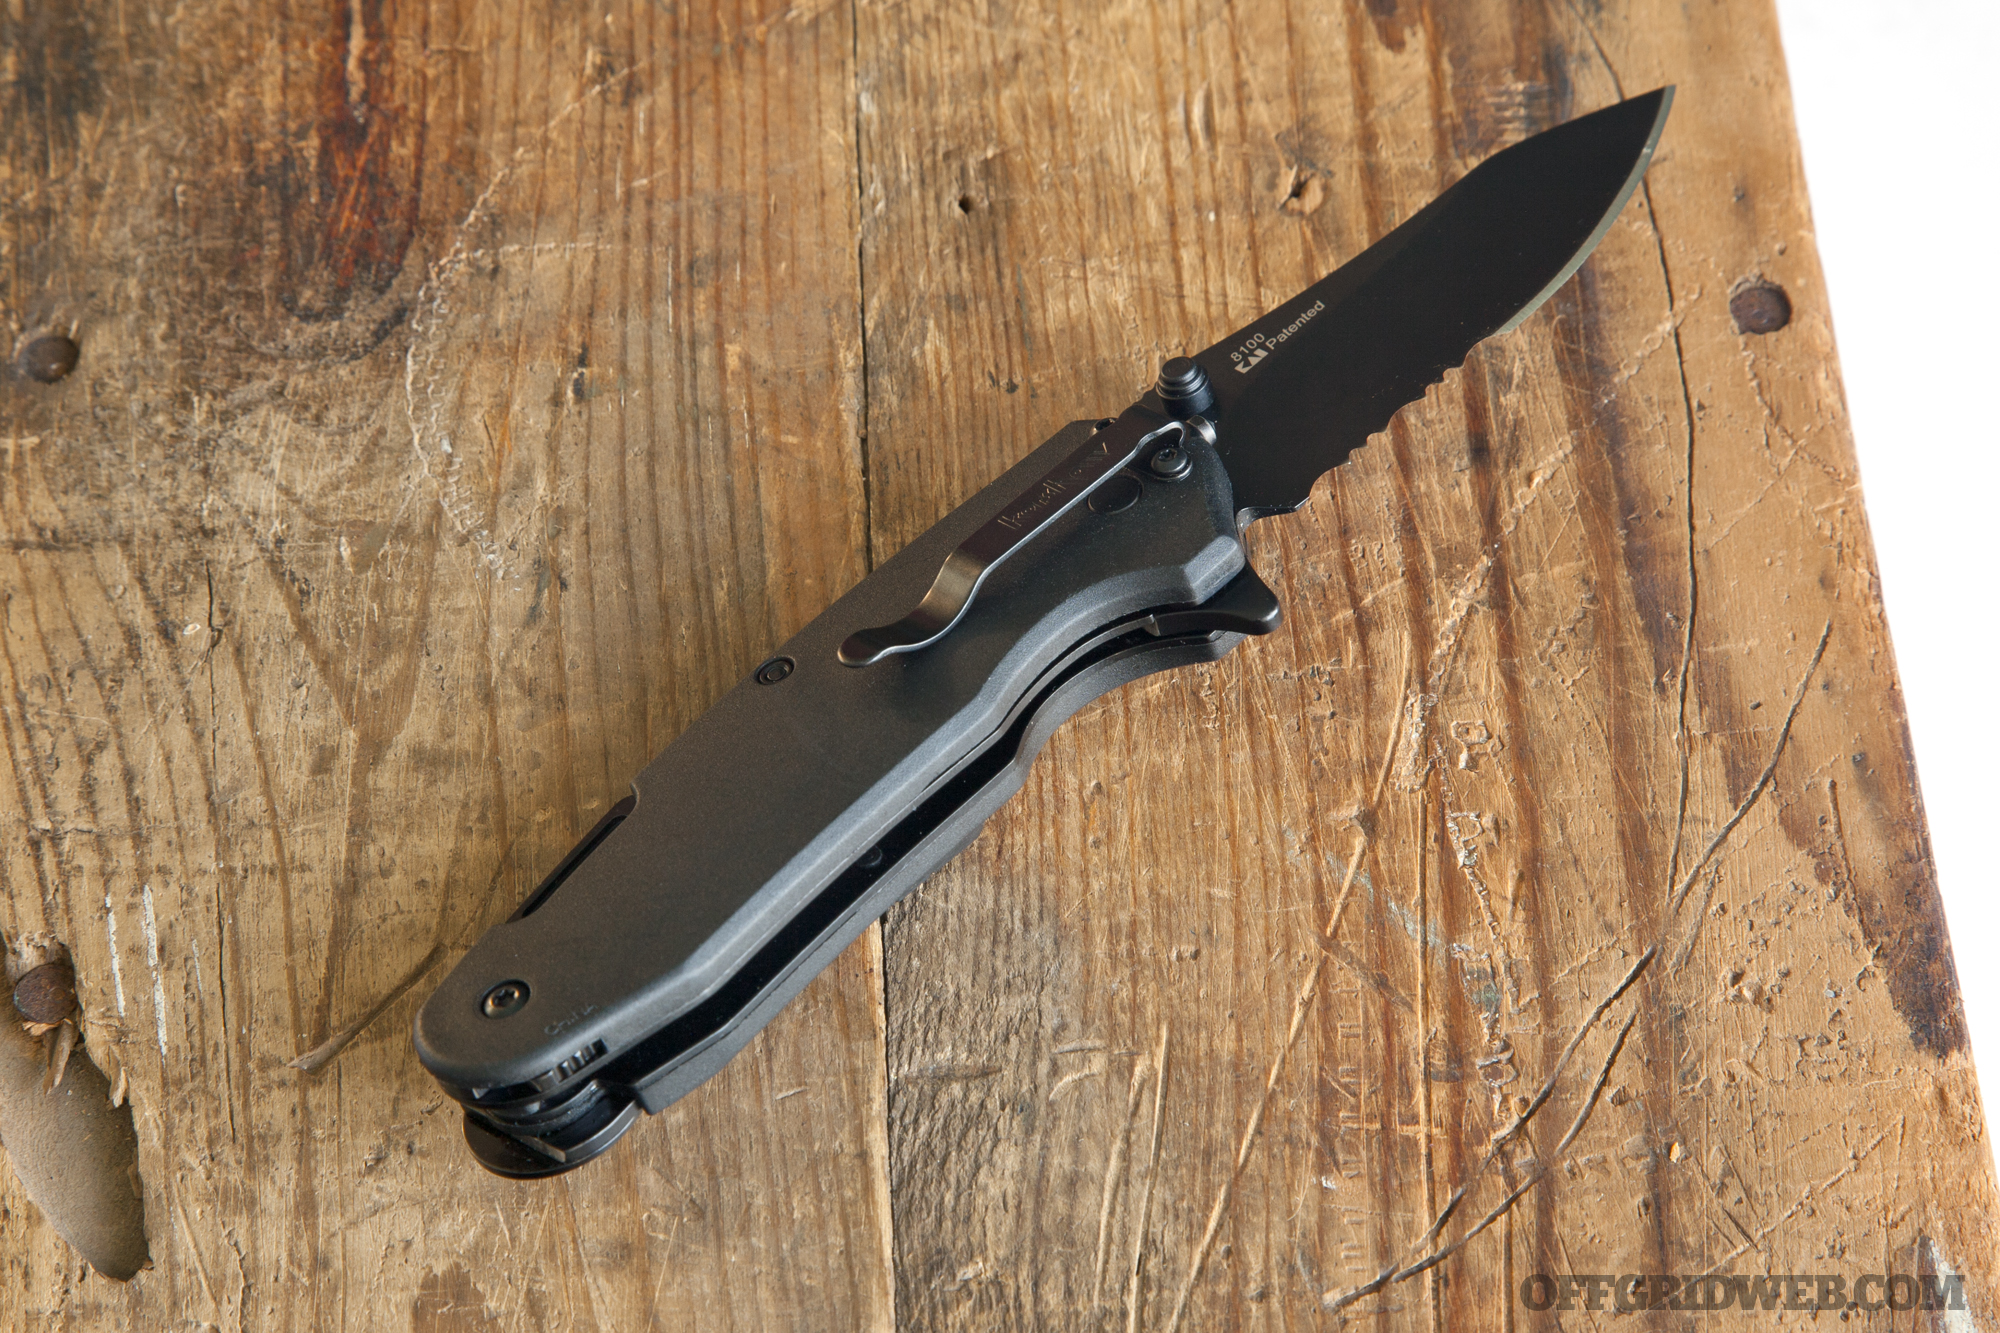
Kershaw folding knives have become known for their solid value at an affordable price, and the Kershaw Funxion EMT is no exception. At only $50, it’s definitely not going to break the bank. On top of this, it has the most additional features of any of the four knives in our test. But, more on that later.
The Funxion EMT is a compact knife, with an overall length about 1.5 inches shorter than our other contenders. Nearly half of the 3-inch blade is serrated, but it still handles delicate slicing tasks admirably. Admittedly, the 8Cr13MoV steel wouldn’t be our first choice, as we’ve found it’s not the most durable in the long term, but it’s understandable at this price point.
This blade uses Kershaw’s SpeedSafe assisted-opening technology, and flips open smoothly in the blink of an eye. However, we experienced a problem: the liner lock engages properly when the knife is opened via the flipper, but our knife fails to lock correctly when opened via the thumb stud. It appears that the liner lock on our test knife has a very tight clearance, and requires the extra momentum of the flipper to engage correctly. This concerns us, but it seems likely that this is an isolated quality-control slip-up, and we hardly would have used the thumb studs anyway.
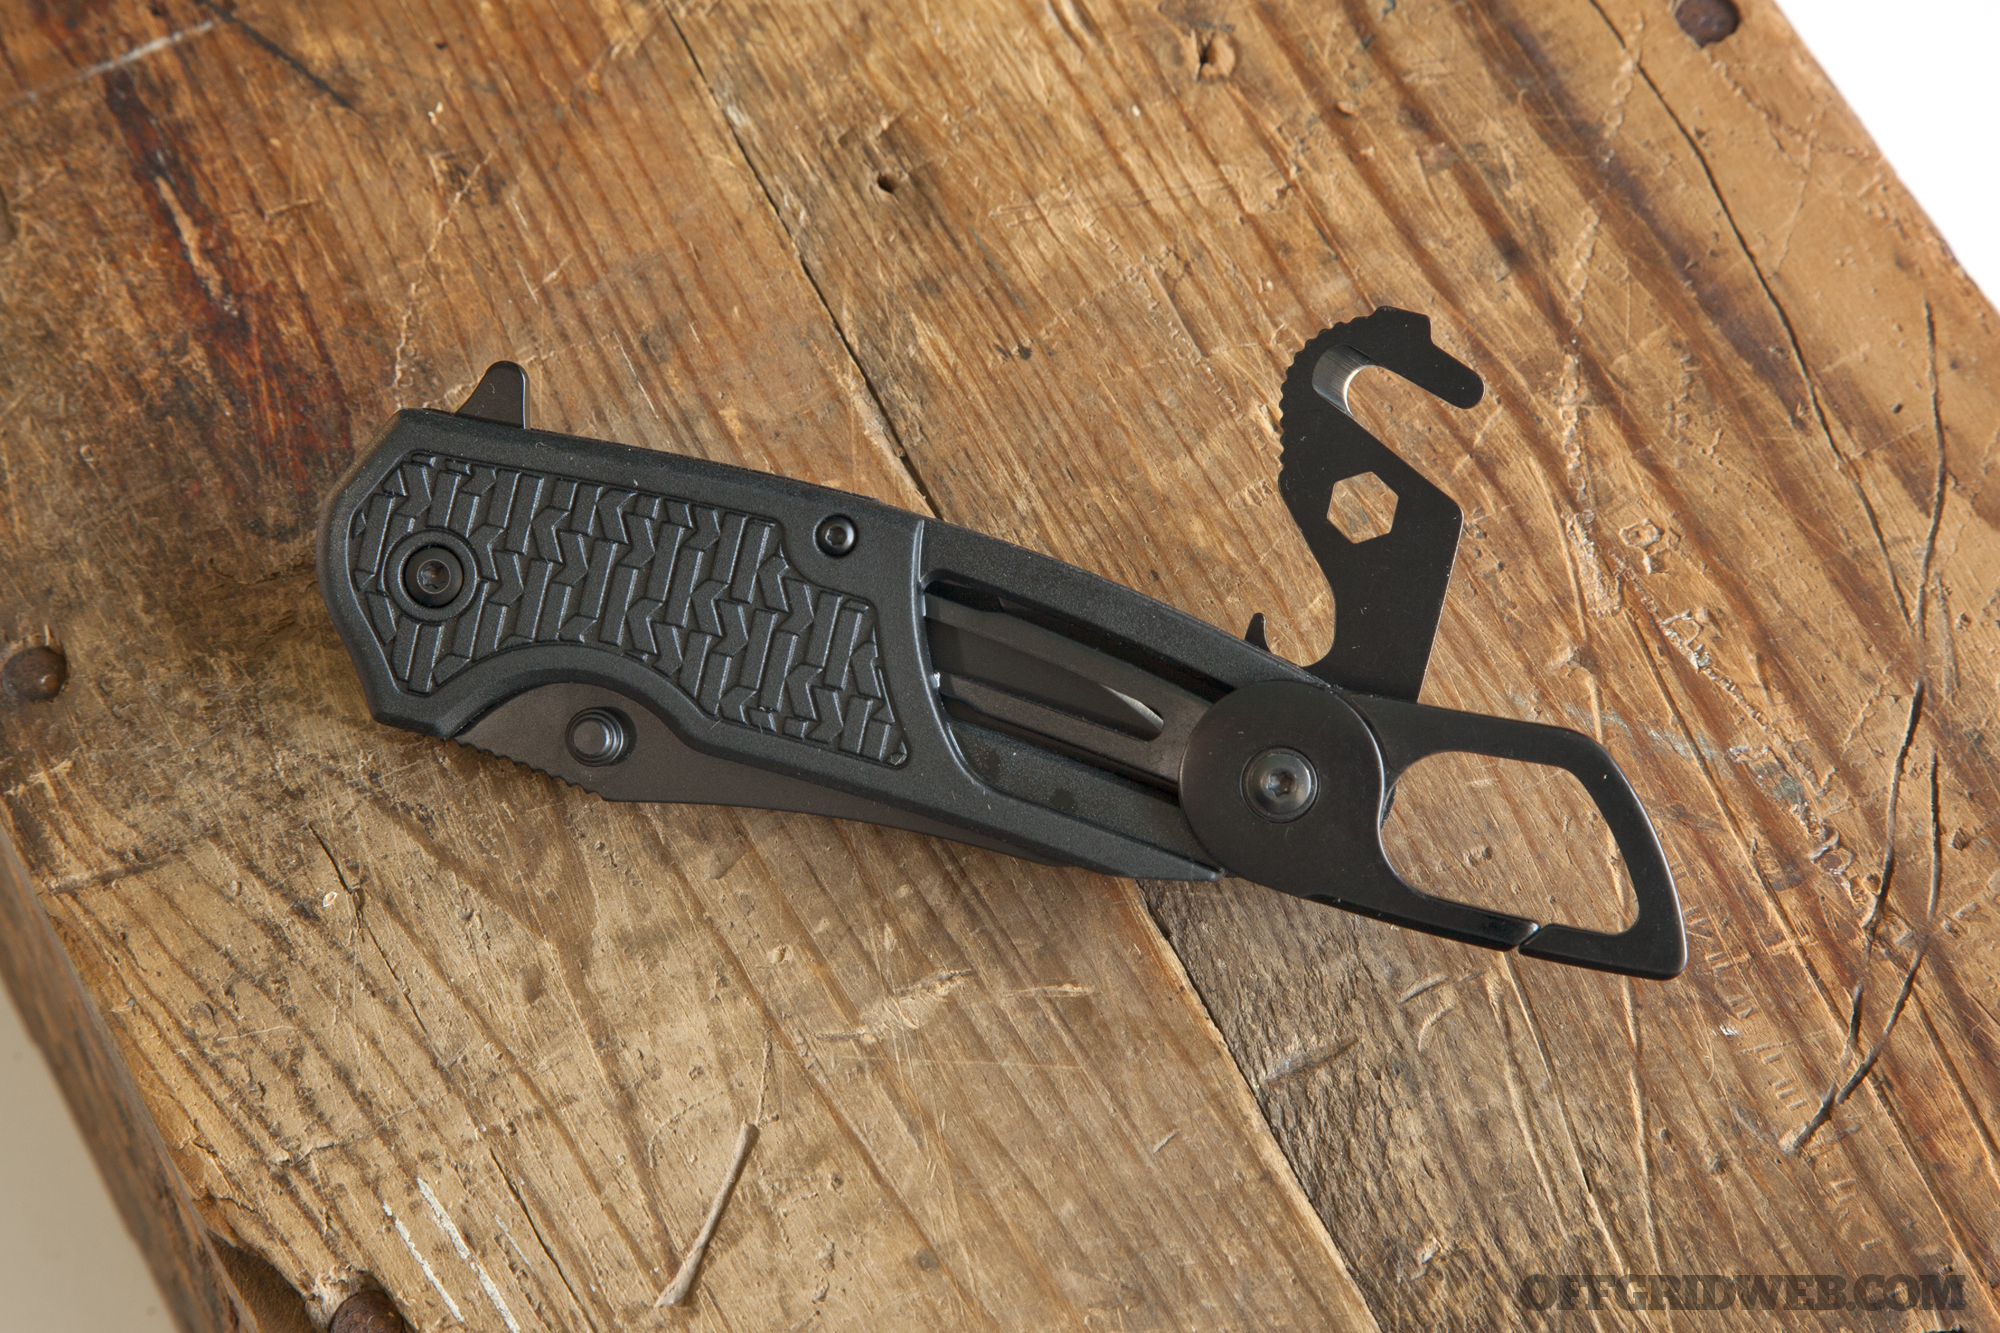
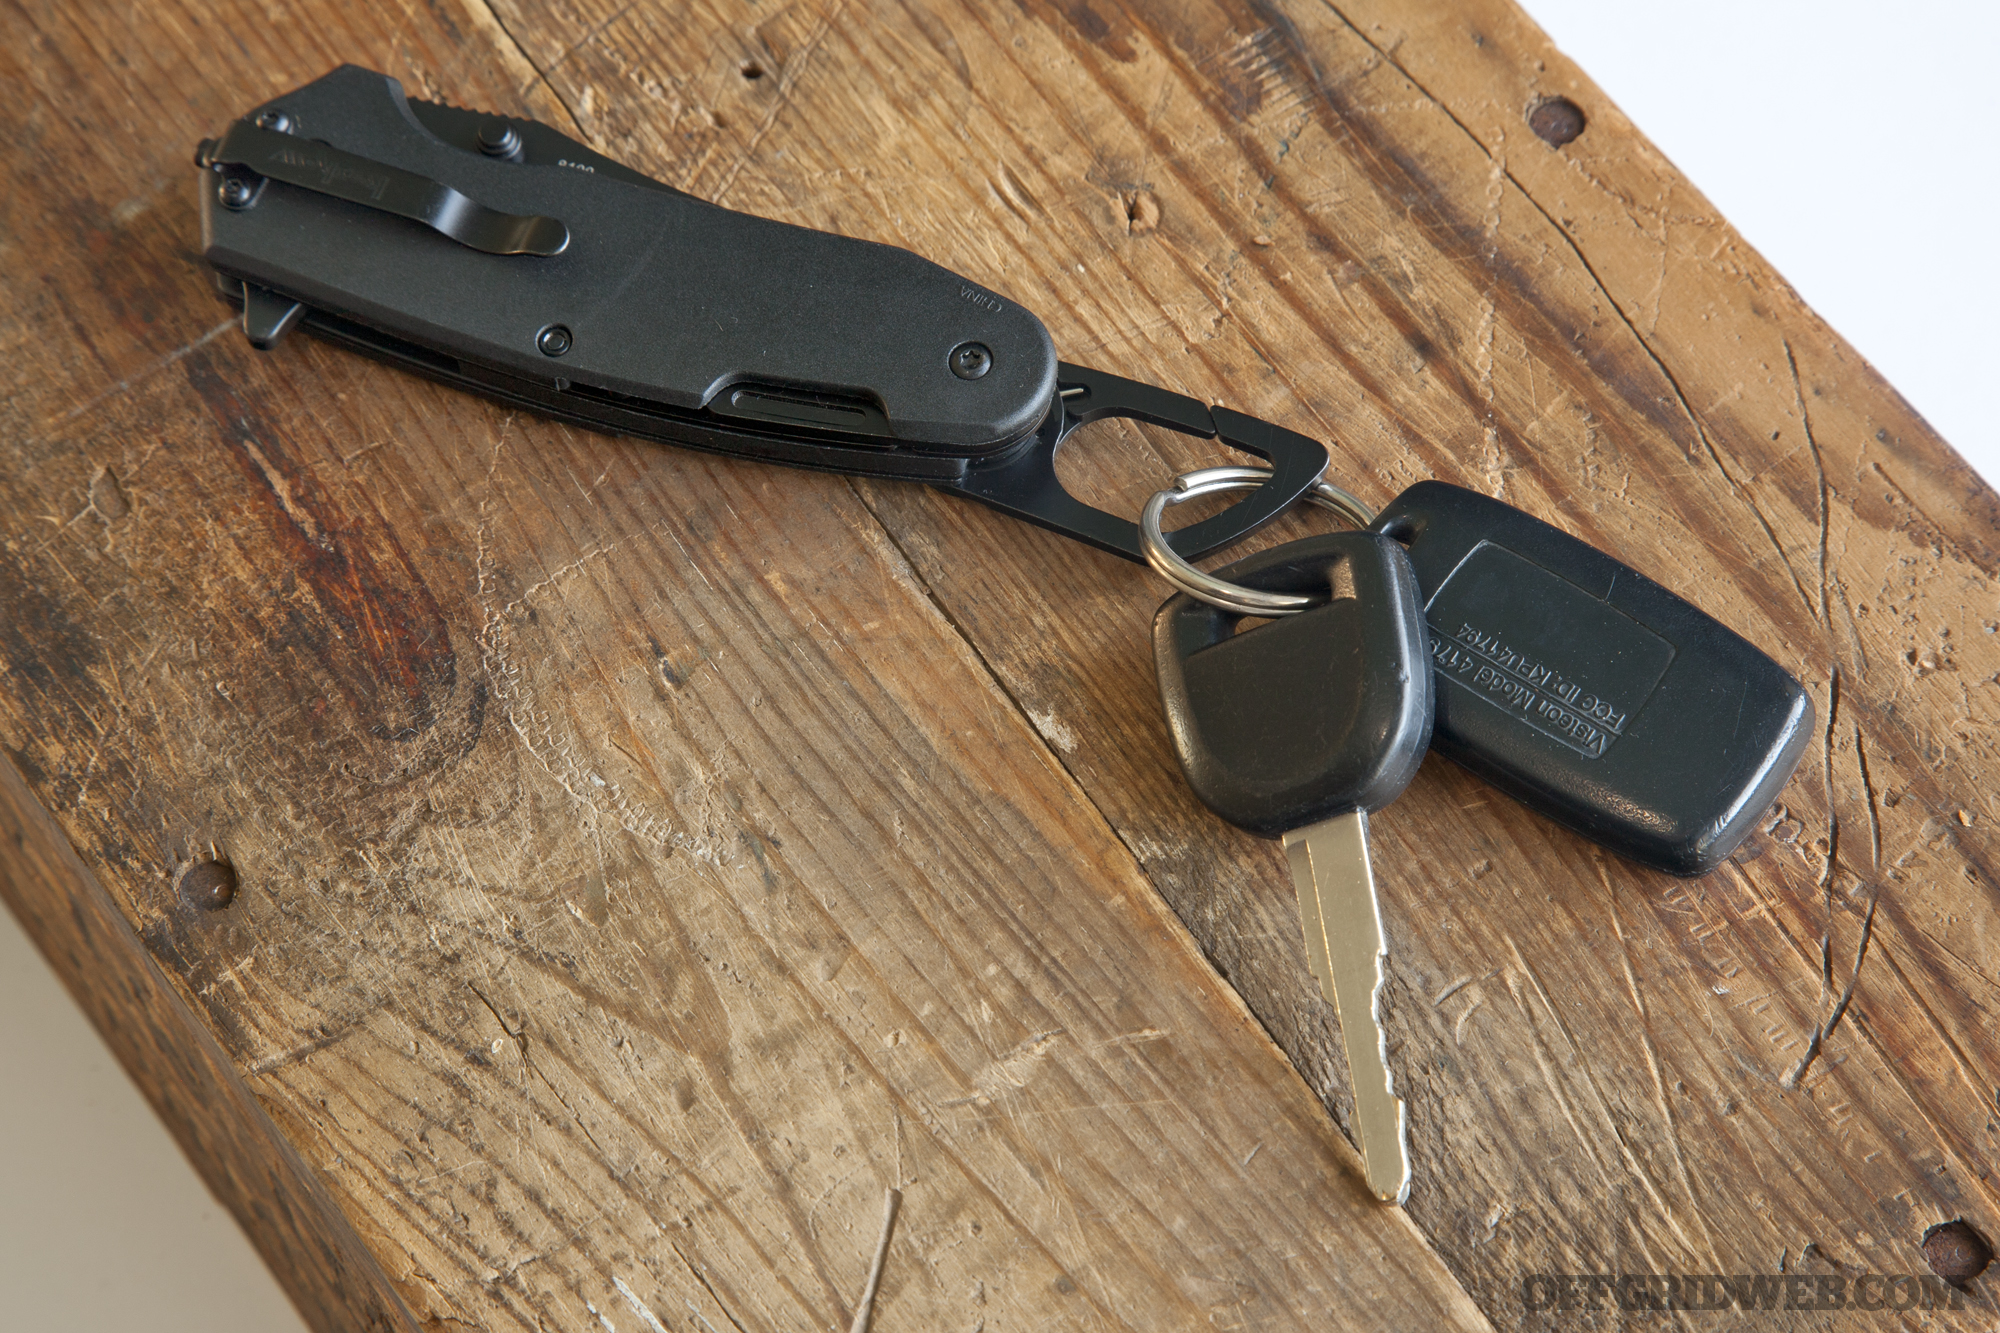
When it comes to added features, the Funxion EMT has two flip-out tool components, giving the knife a total of six additional functions. On one side of the handle, there’s a carabiner clip, which is extremely handy for attaching the knife to a belt loop or key ring. On the other side, there’s a multi-tool component that includes a flathead screwdriver, cord cutter, hex wrench, and bottle opener. Both flip-out tools lock open securely, with integrated lock bars (a great feature). Finally, the knife has a glass breaker just above the deep-carry pocket clip.
We were happy with the Funxion EMT overall, but the improperly-filed liner lock was a letdown. However, despite this one flaw, the knife still works well as long as you only open it with the flipper (which we would have anyway). And, it has a plethora of useful features unmatched by the other knives we tested—that’s saying a lot when you consider it only cost $50.
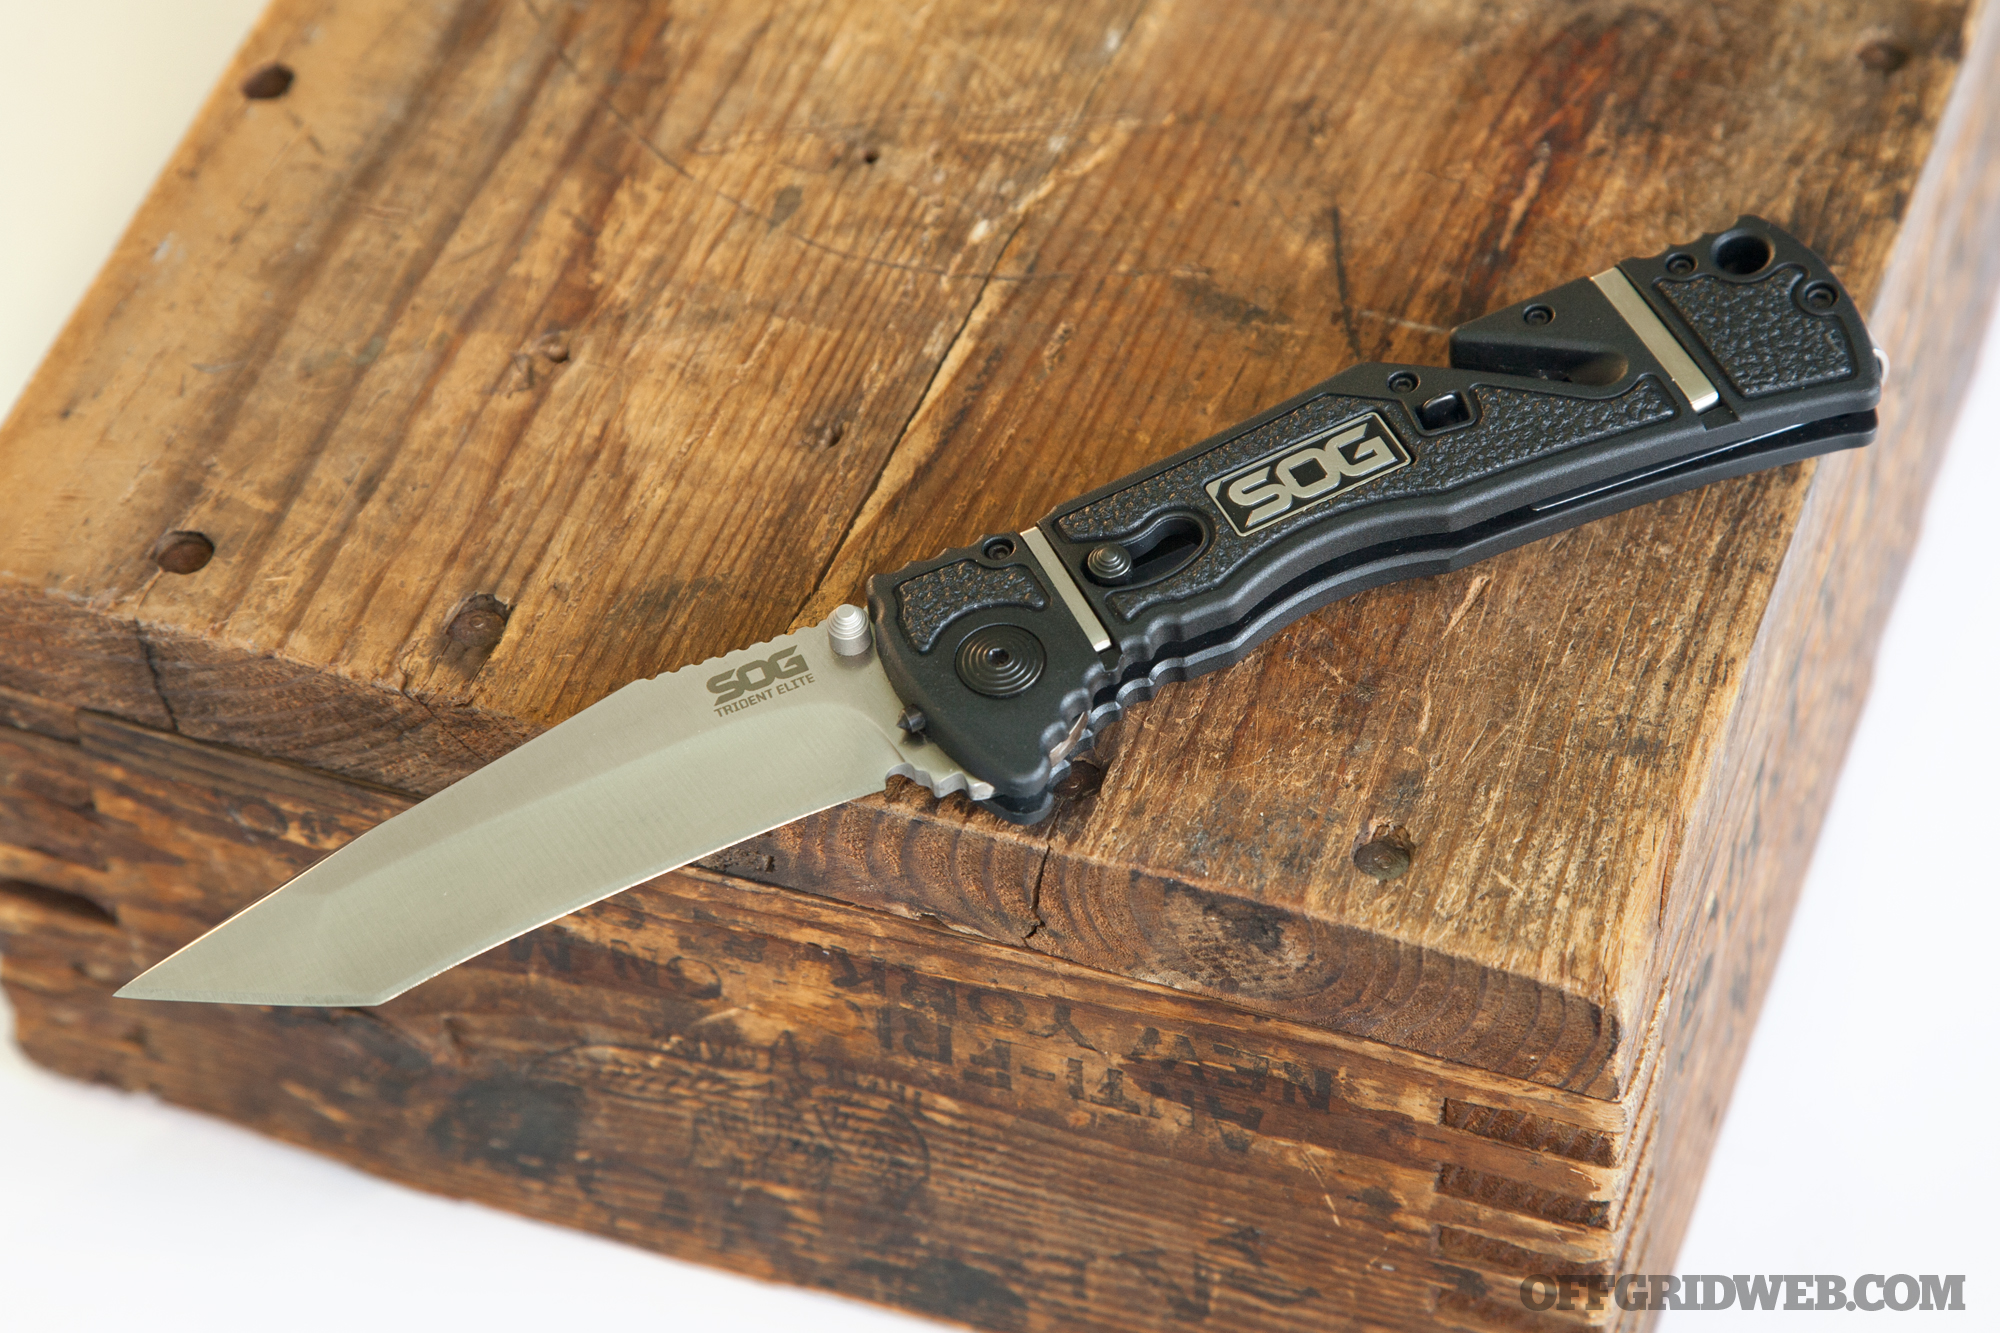
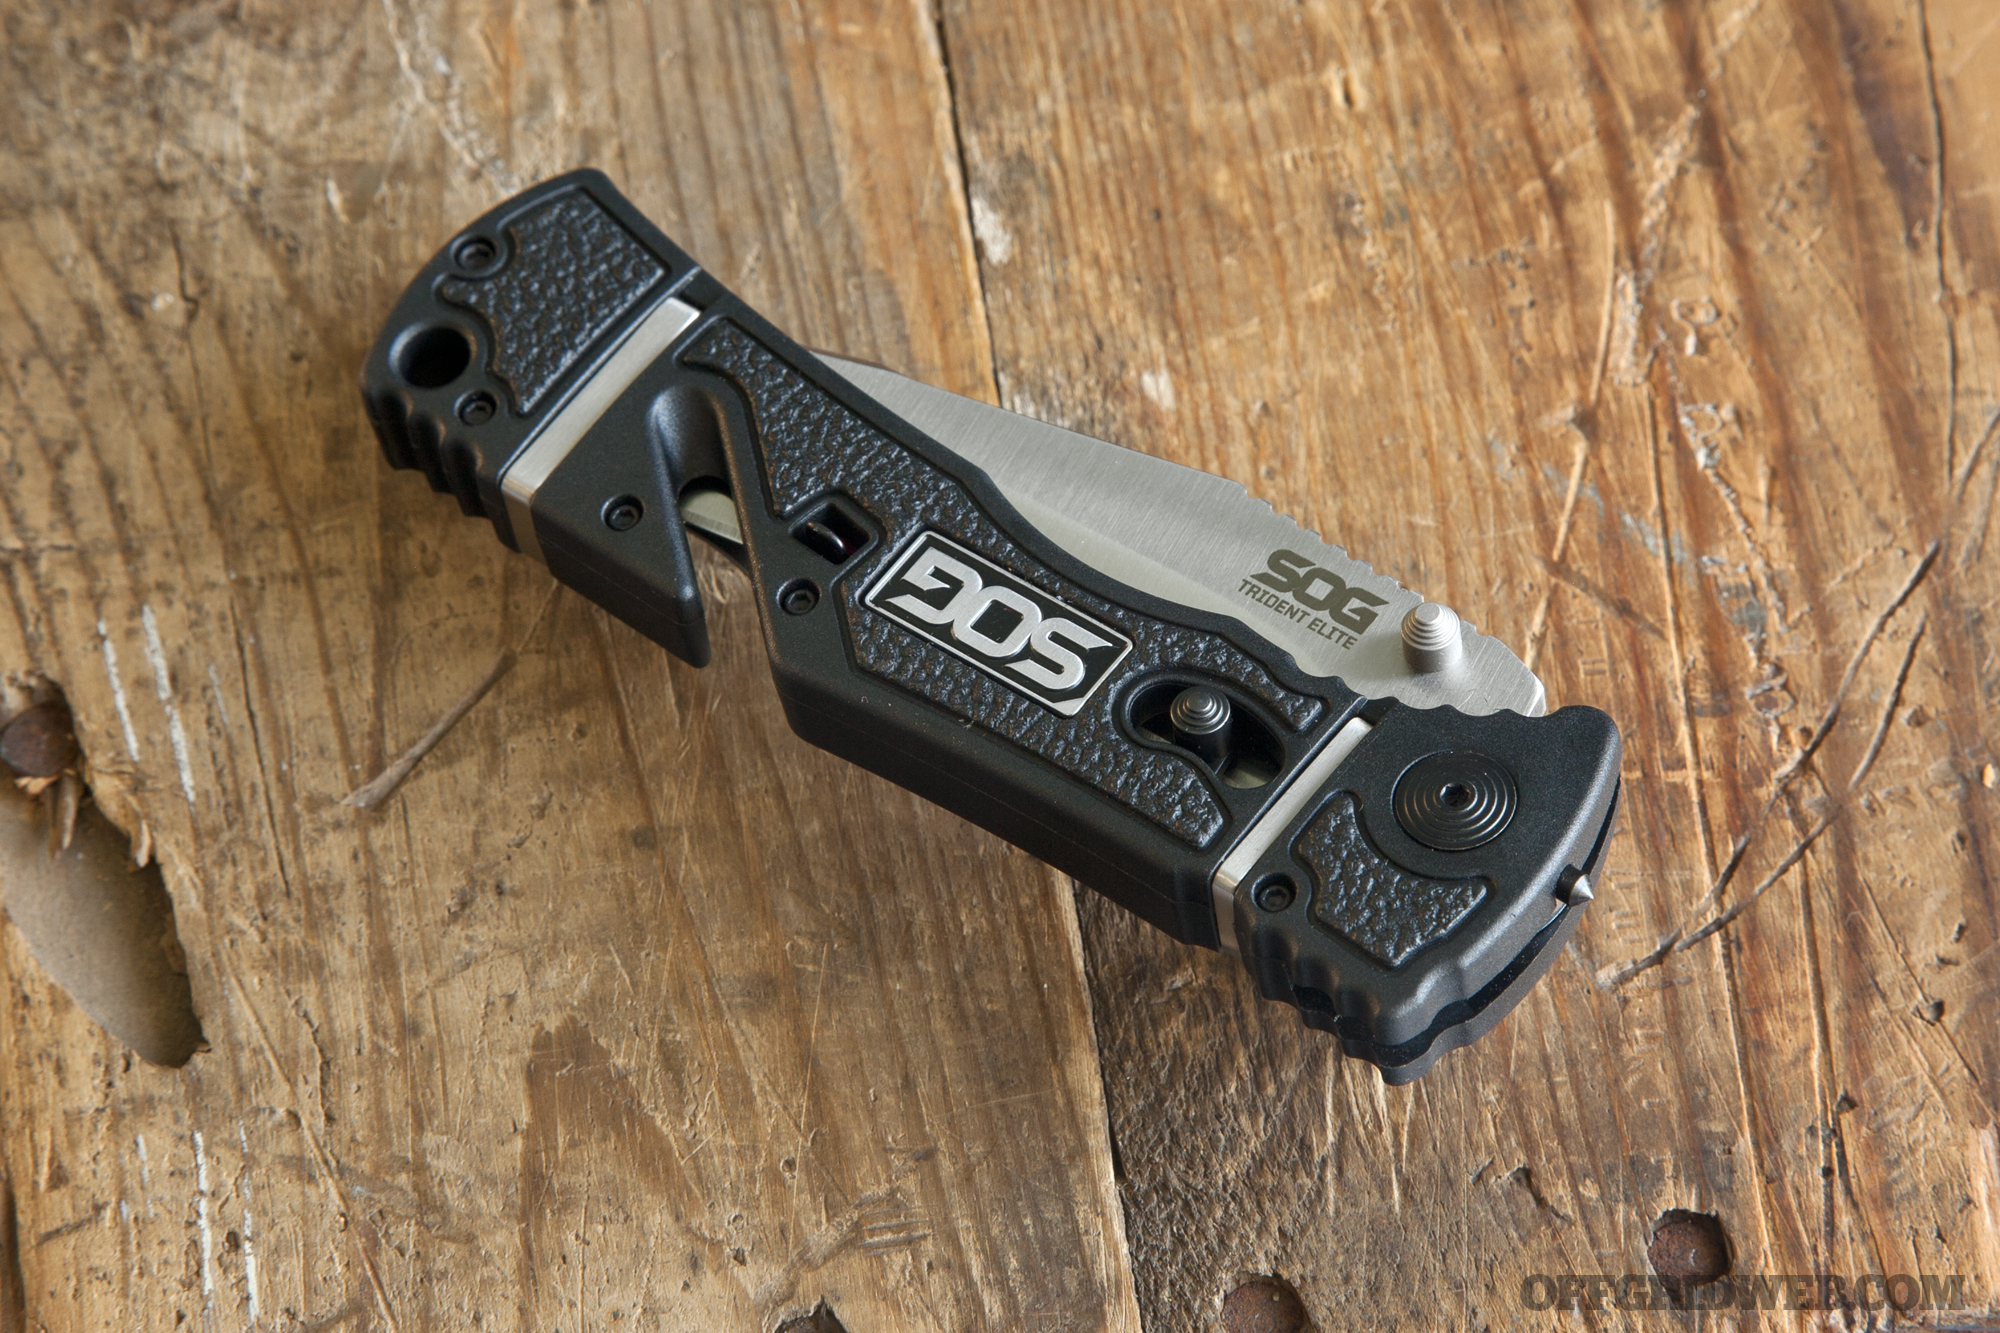
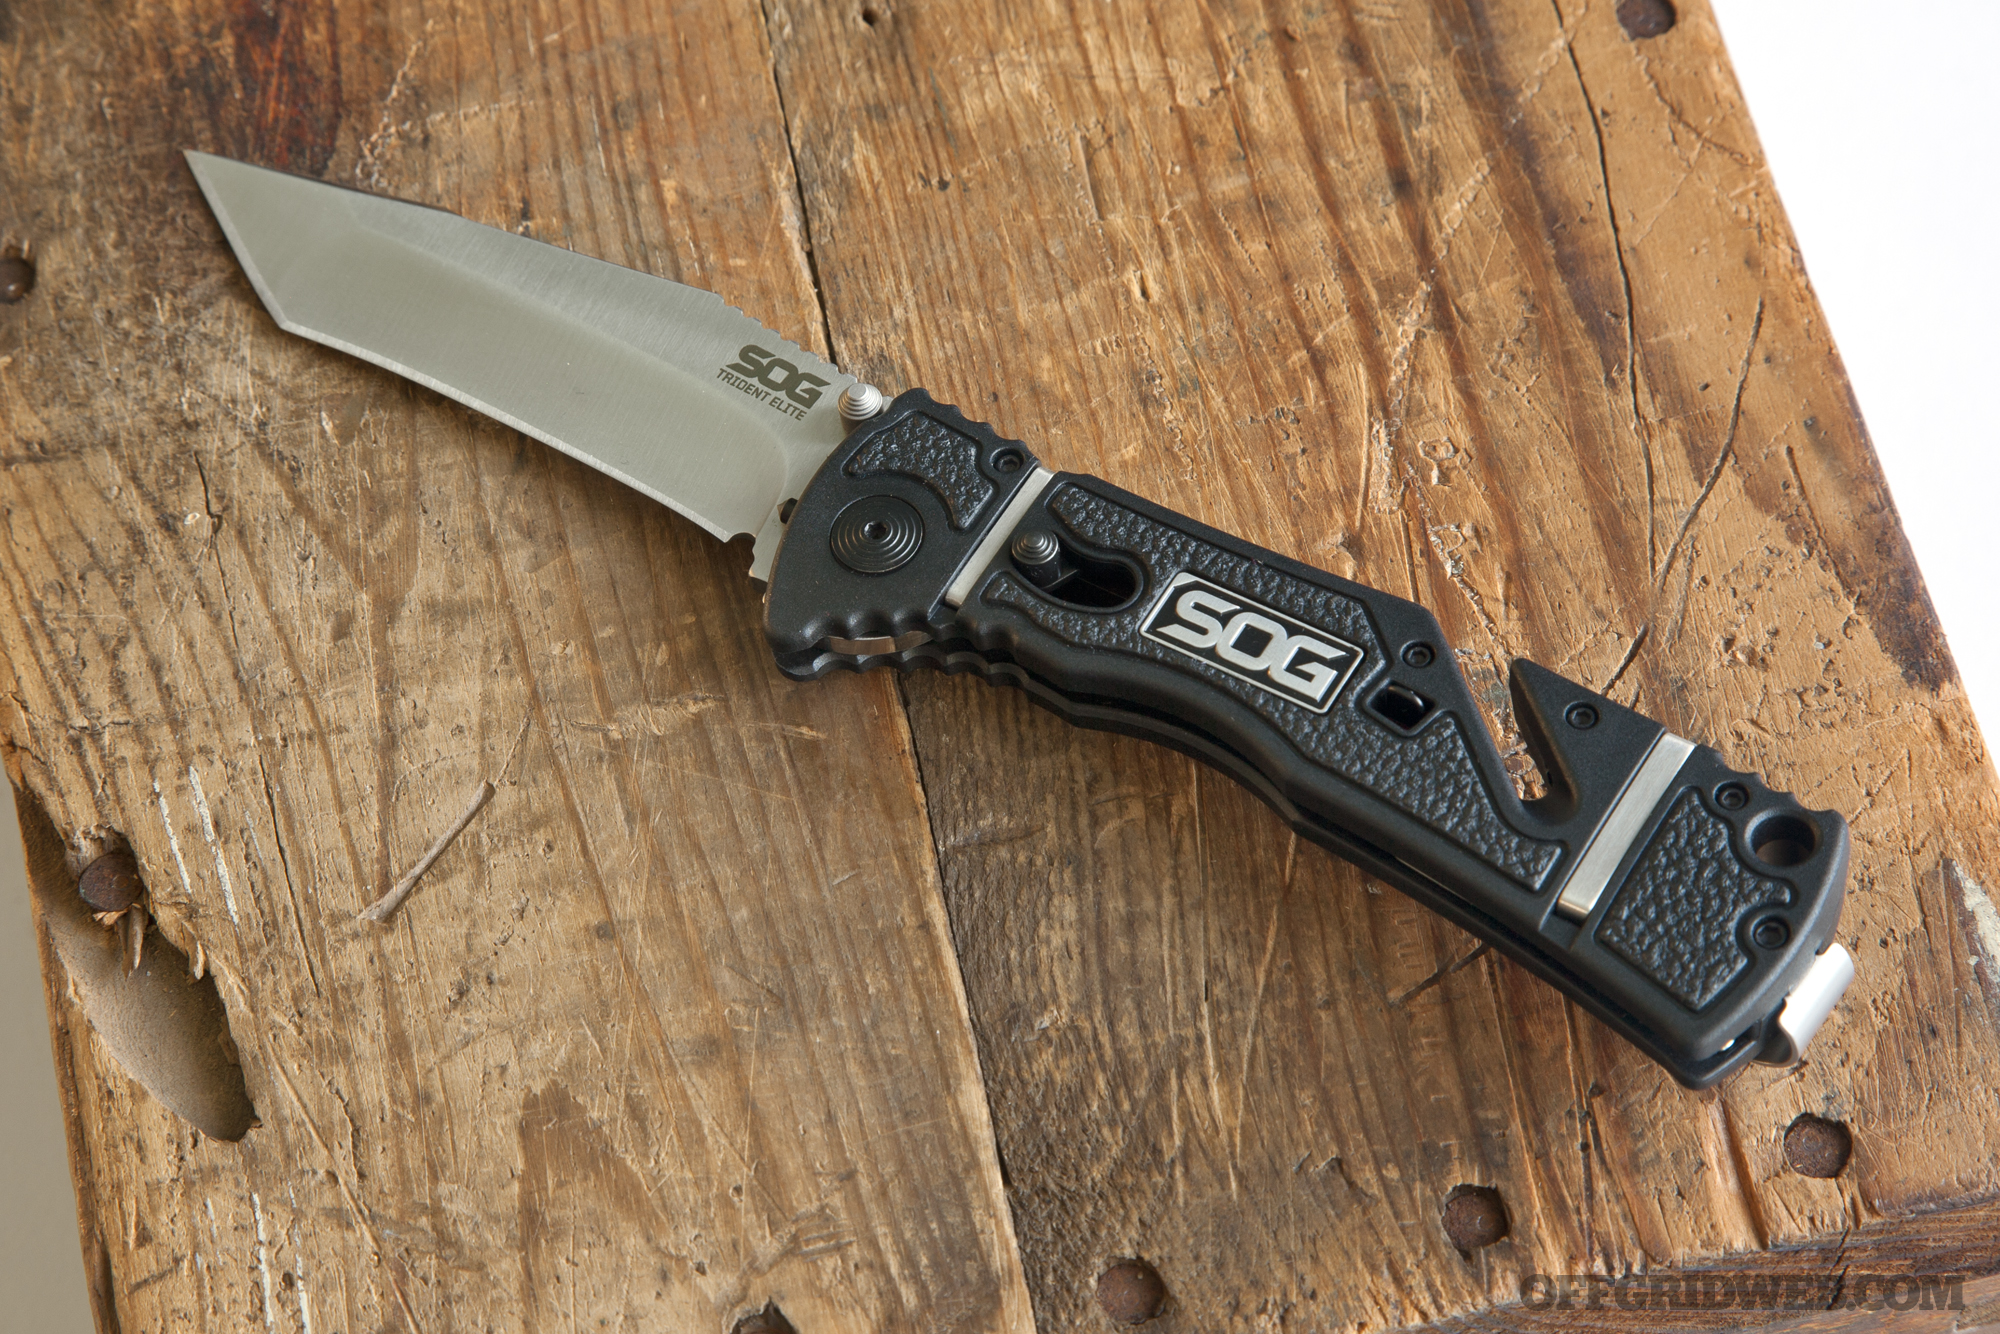
The SOG Trident Elite line offers several options to choose from: tanto point or clip point, black TiNi coated or satin finish, and plain or partially-serrated edge. We picked out a Trident Elite tanto model, with satin silver non-serrated blade. With an open length approaching 9 inches, it’s the biggest knife in our guide, but the slim handle and light weight make it easy to manipulate.
The blade is constructed of AUS-8 stainless, a good quality steel used extensively by SOG. The assisted-open knife flips open from either side via thumb studs, but the piston lock bar on the handle is not ambidextrous, so lefties will have a hard time closing this one-handed. We do like the inclusion of a safety switch on the handle, since it prevents the knife from opening unintentionally in a pocket or backpack.
The Trident Elite’s fiberglass-reinforced nylon handle features textured rubber inserts and plenty of jimping, which provide a very comfortable and secure grip. There’s also a lanyard hole, and it’s the perfect size for some 550 paracord. A stainless steel SOG logo and decorative stainless bands on the handle add a little extra visual appeal.
SOG’s Trident Elite includes two added rescue features. First, there’s a sharp glass breaker tip on the pivot end of the folded knife. Secondly, there’s a diagonal slot in the handle, which SOG refers to as the Groove. This slot can be used to cut paracord or fishing line while the blade is folded shut. It’s ideal for cutting small cords, but didn’t do as well on thicker materials like fabric straps and seatbelts.
We’d recommend the SOG Trident Elite to anyone looking for a strong, sharp, reliable folding knife at a price that won’t break the bank. We would have preferred slightly better belt cutting performance and an ambidextrous lock release, but those are small nitpicks on an otherwise great blade.
Overall Length – 8.7 inches Blade Length – 3.7 inches Blade Width – 1.1 inches Blade Thickness – 0.12 inch Handle Thickness – 0.55 inch Handle Material – Fiberglass-reinforced nylon (FRN) with rubberized and stainless steel inserts Weight – 3.9 ounces Blade Material – AUS-8 stainless steel Opening Mechanism – Thumb stud with assisted opening Locking Mechanism – Piston lock with safety Additional Features – Cord cutter groove, glass breaker MSRP – $87 URL – sogknives.com
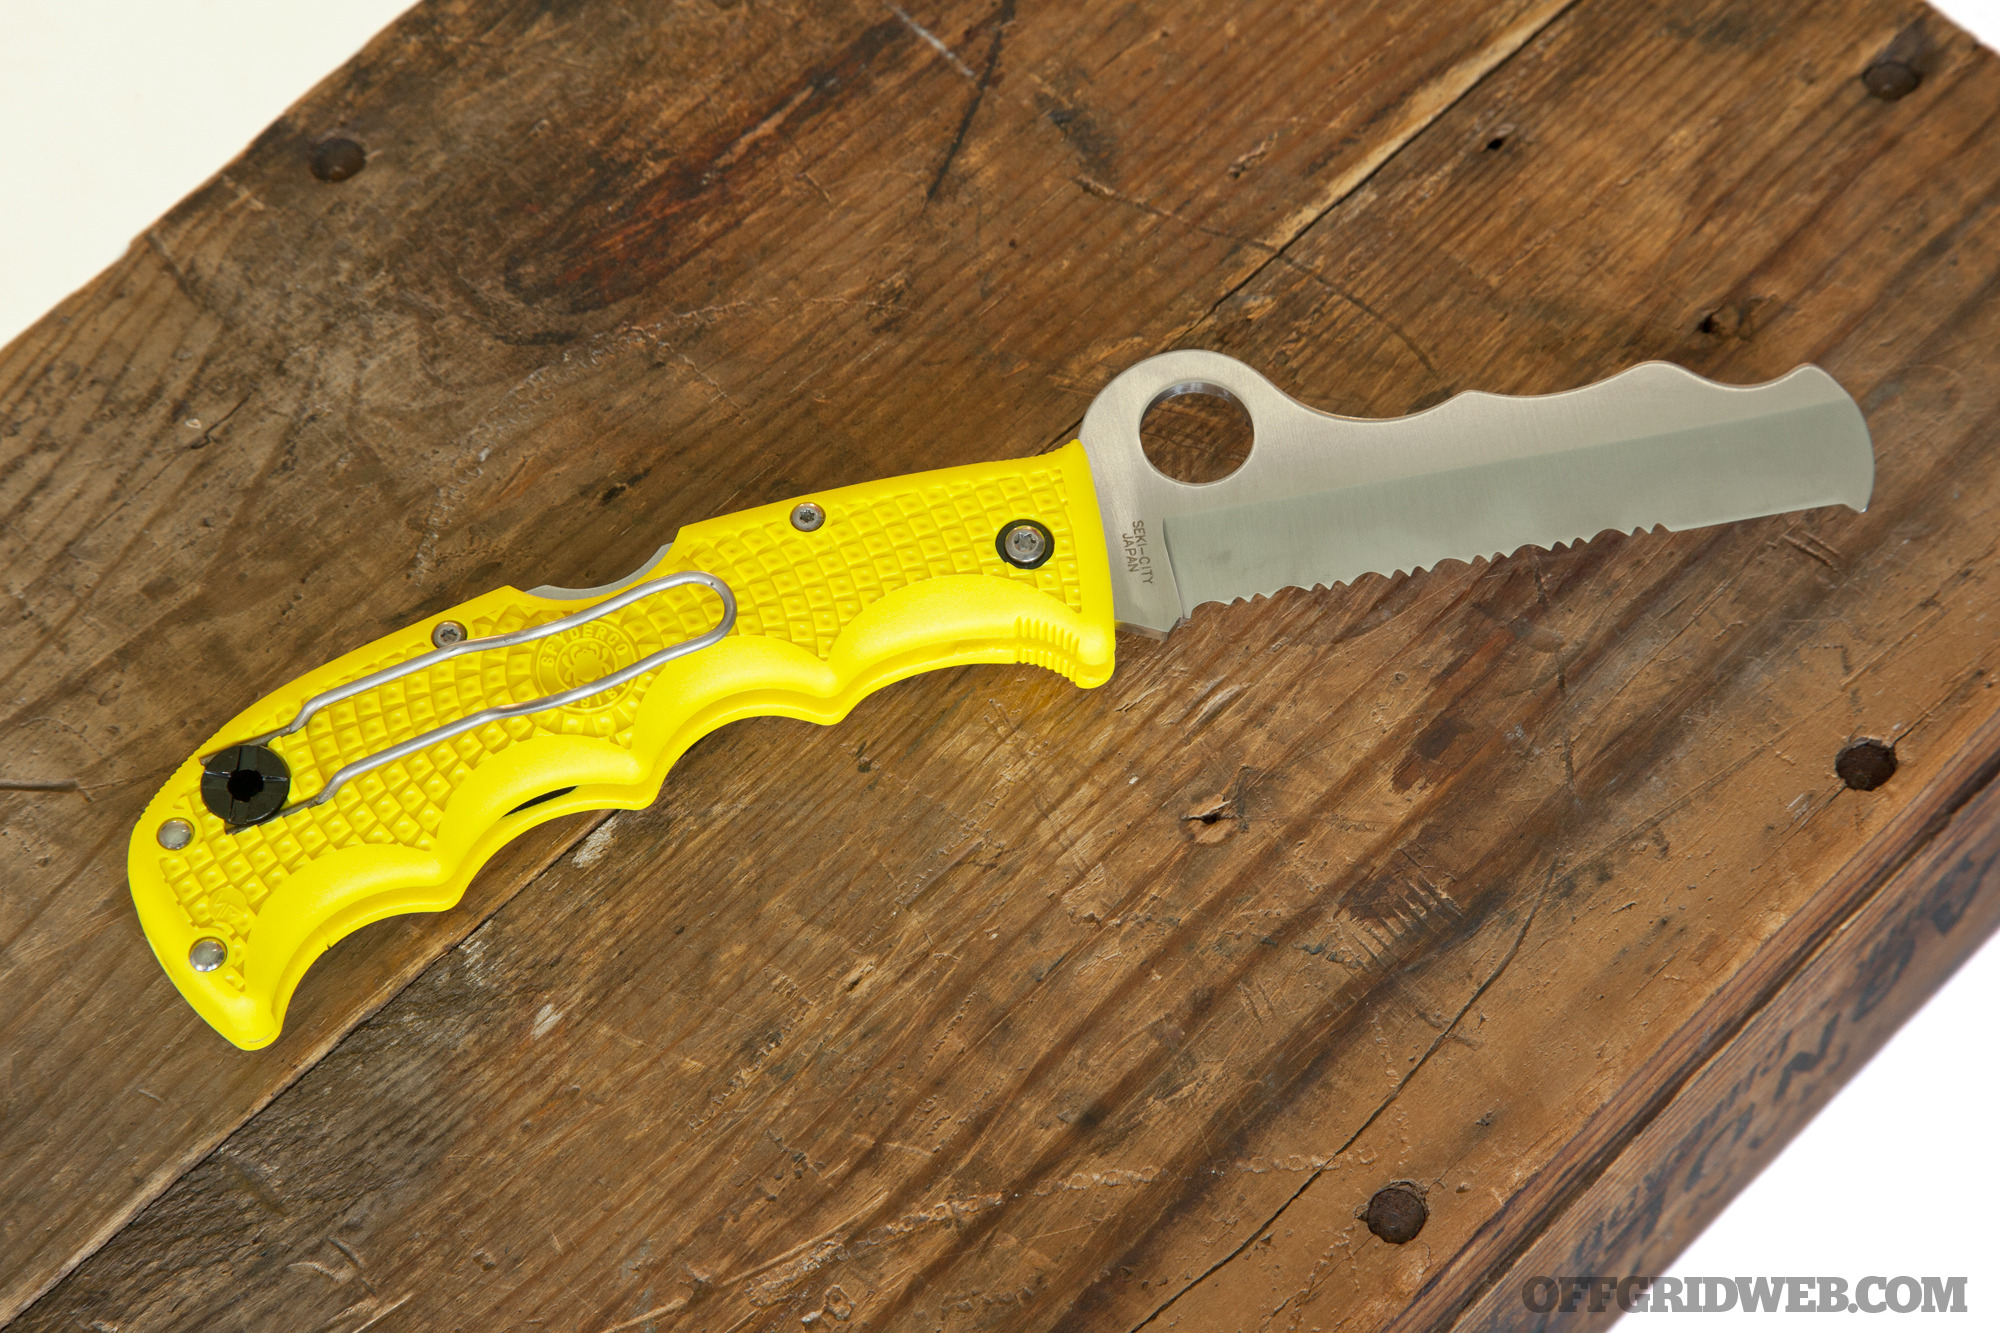
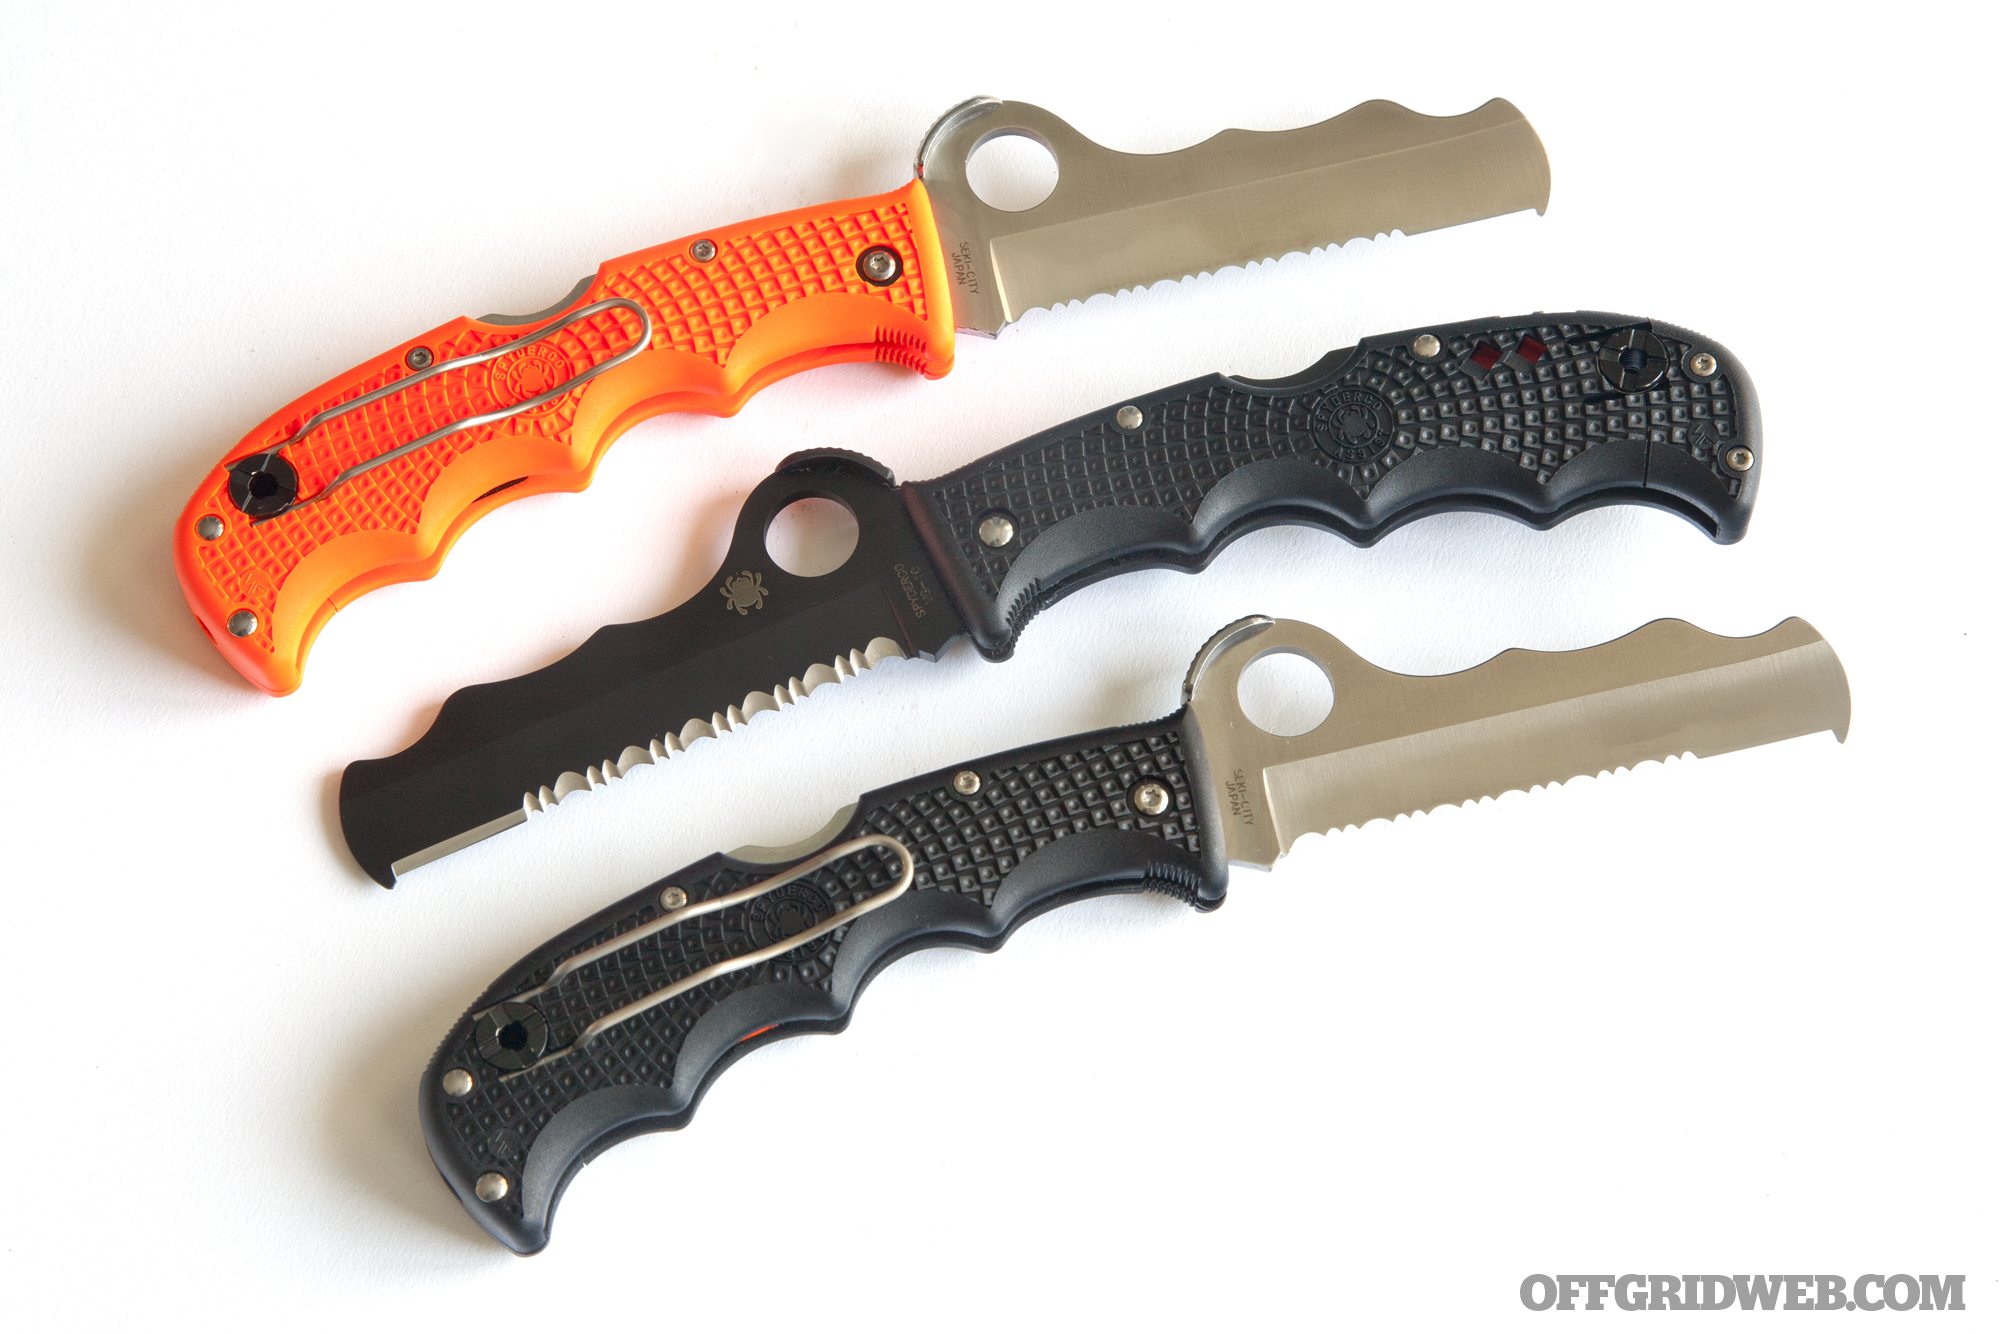
Spyderco Assist Salt
The Spyderco Assist family consists of four models. First, there’s the standard Assist with a black handle, and the standard Assist with an orange handle. There’s also a standard Assist model with a black handle and black blade finish. All three of these variants use VG-10 stainless steel, and include a metal plate above the thumb hole, called the Cobra Hood. The Cobra Hood provides added leverage for one-handed opening, and serves as a thumb rest while cutting.
The Spyderco Assist family includes three other models which use VG-10 blade steel.
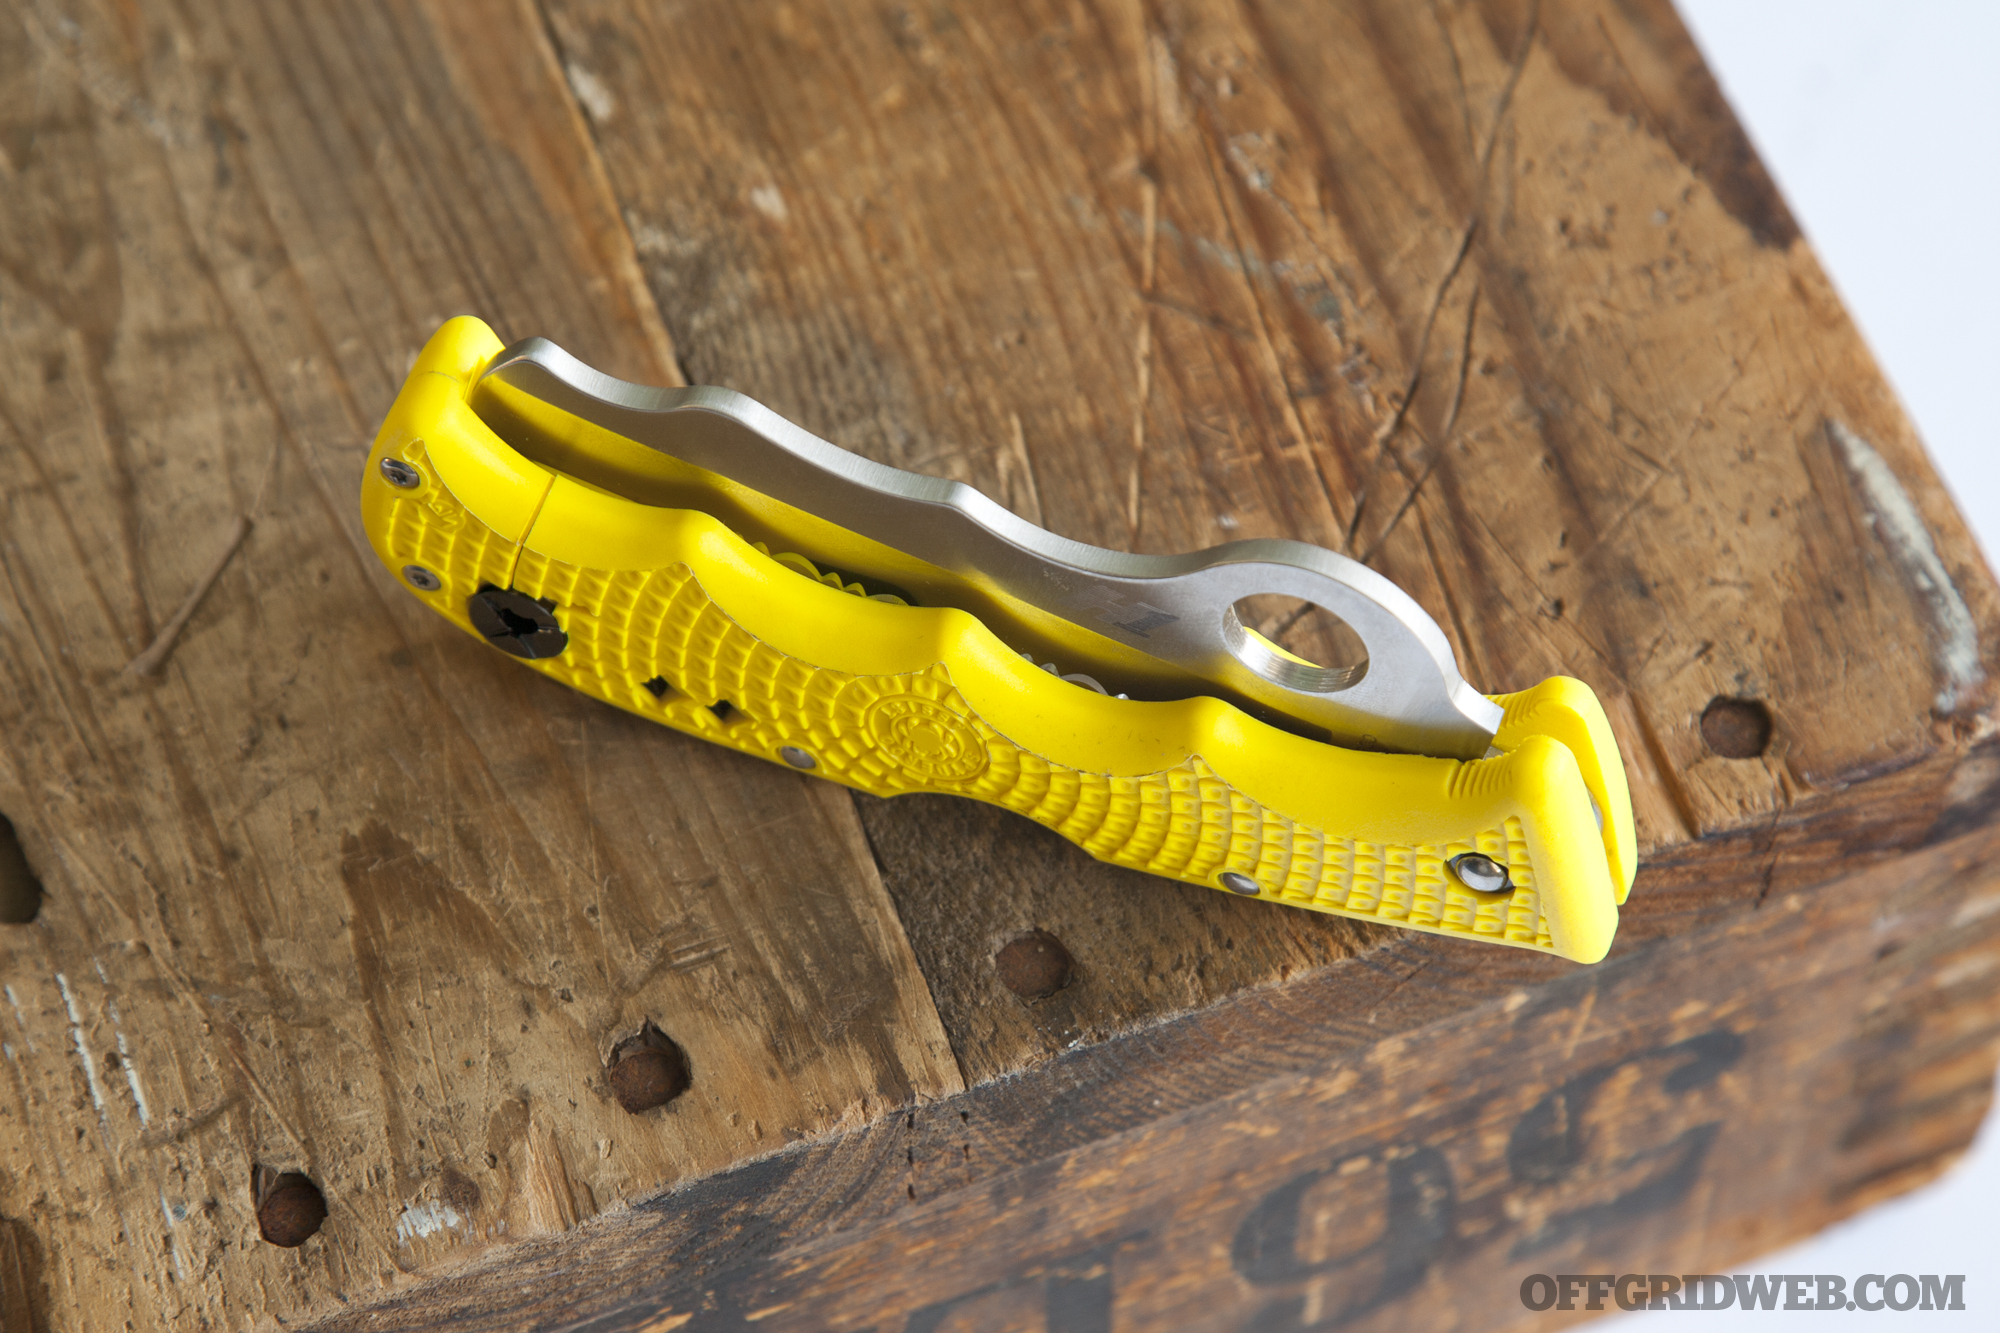
You may have noticed that the knife in these photos has a yellow handle, and lacks the Cobra Hood feature. That’s because it’s a special version of the Assist family known as the Assist Salt. Instead of VG-10 steel, this yellow model uses high-end H1. This is a special steel with added Nitrogen content, and Spyderco states that it’s completely immune to corrosion as a result.
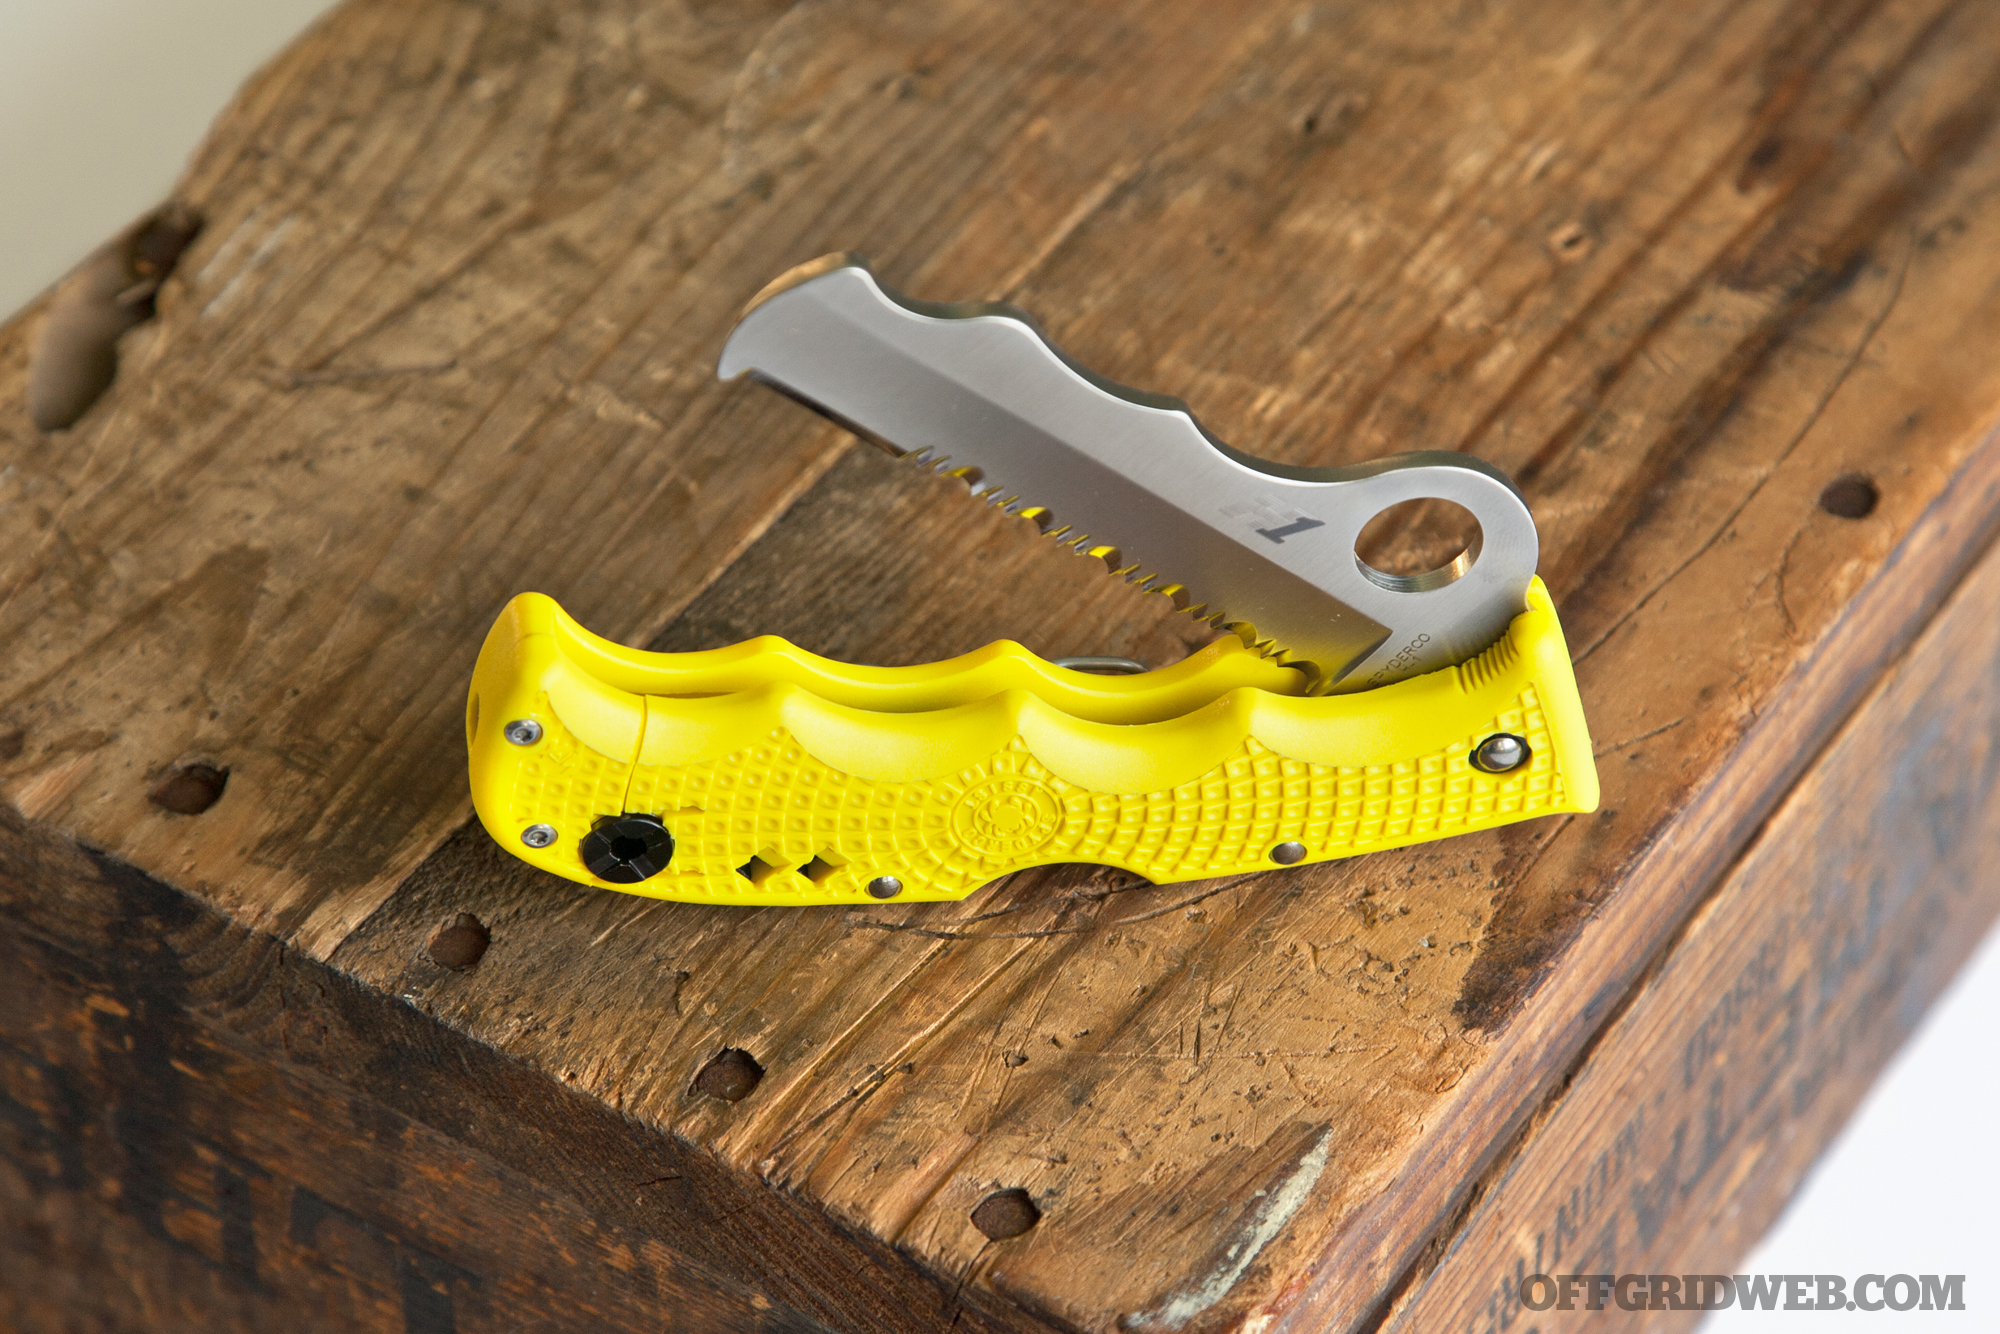
Aside from the special steel, the Assist Salt uses a patented blunt-nose blade shape, which prevents accidental pokes or punctures while using the blade in tight quarters. You’ll also spot Spyderco’s iconic Round Hole, which makes opening the blade easy. A back lock bar on the handle’s spine snaps securely in place, locking the blade open.
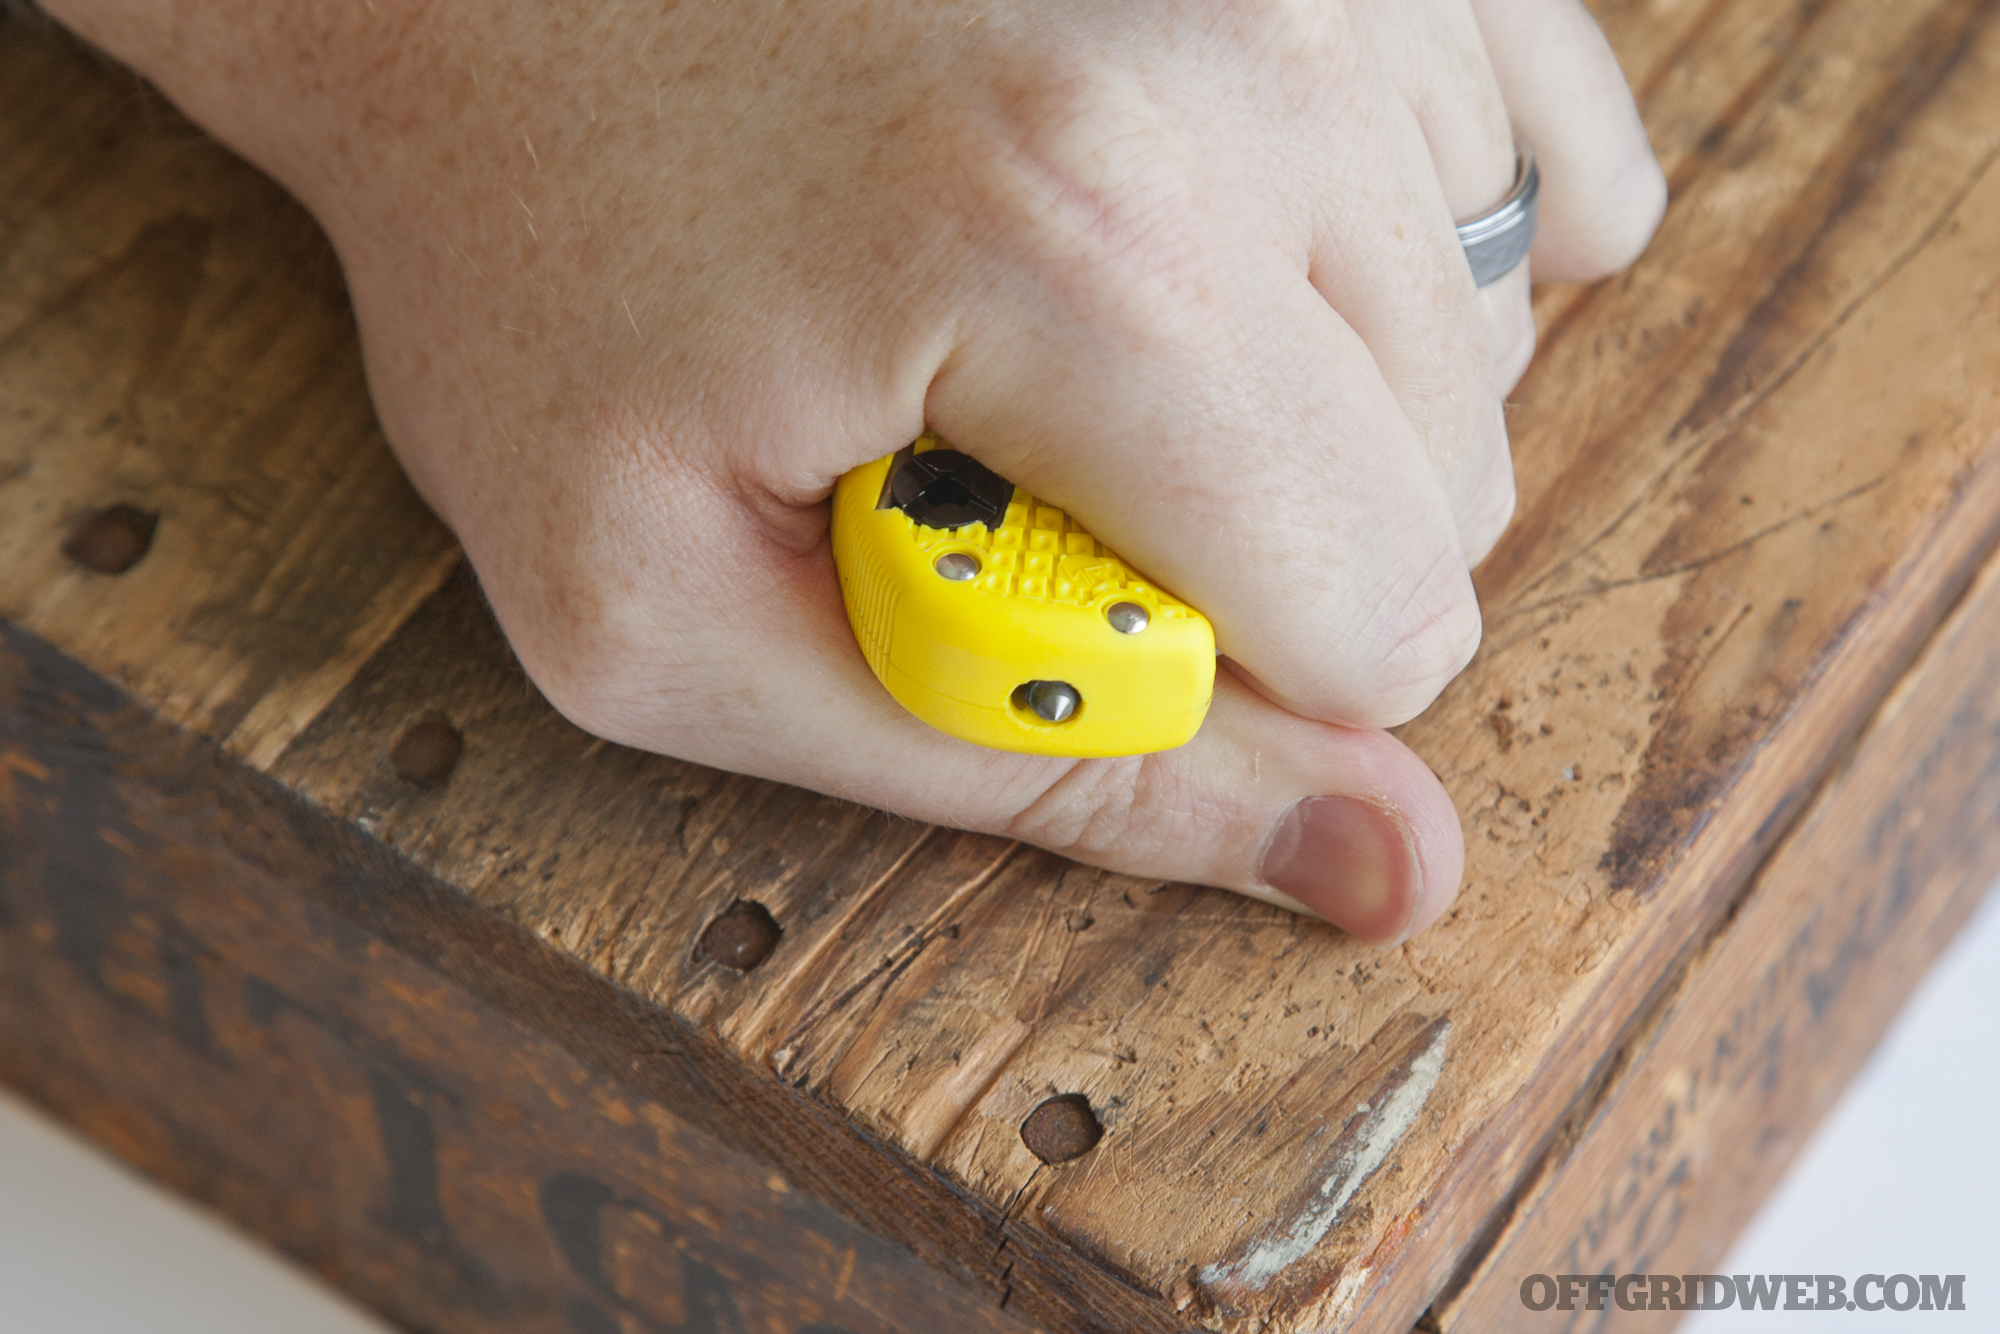
Distinct finger grooves on the spine of the blade were inspired by a firefighter from Sweden, and they serve two additional purposes. First, if you grip the folded blade firmly and squeeze, a retractable carbide glass breaker appears at one end of the handle. Additionally, you can open the blade slightly and insert a cord, then squeeze the blade shut to slice through the cord like a pair of scissors. However, this is not very effective for scissor-cutting thin straps and belts, as it just squeezes them into the handle without cutting through.
Finally, two square holes on the handle act as a surprisingly loud survival whistle. Some people scoff at the idea of needing a whistle in a survival situation, but if you’re pinned down off the beaten path and desperately hoping for rescue, you’ll definitely be glad to have one. We’d say this is actually a very useful feature for certain cases.
With exotic steel, an unconventional blunt-nose blade, and an edge that’s 80% serrated, the Spyderco Assist Salt is clearly a specialized tool. If you’re an EMT, paramedic, or search and rescue professional, it would make an excellent addition to your loadout.
On the other hand, if you’re looking for an everyday pocket knife with a few added rescue features, the Assist may be a little too specialized for your needs. However, we could easily see storing one of these knives in a vehicle glove box or roadside emergency kit, so if SHTF, you’ll have a quality tool on hand.
Overall Length – 8.6 inches Blade Length – 3.7 inches Blade Width – 1 inch Blade Thickness – 0.12 inch Handle Thickness – 0.67 inch Handle Material – Fiberglass-reinforced nylon (FRN) Weight – 3.9 ounces Blade Material – H-1 rust-proof steel Opening Mechanism – Round hole Locking Mechanism – Back lock Additional Features – Scissor-type cord cutter, retractable glass breaker, survival whistle MSRP – $160 URL – spyderco.com
If you spend enough time on the internet, it’s hard not to be a skeptic. The web is chock full of producers of vaporware who promise incredible feats, collect truckloads of investors’ money, then disappear into the ether from whence they came.
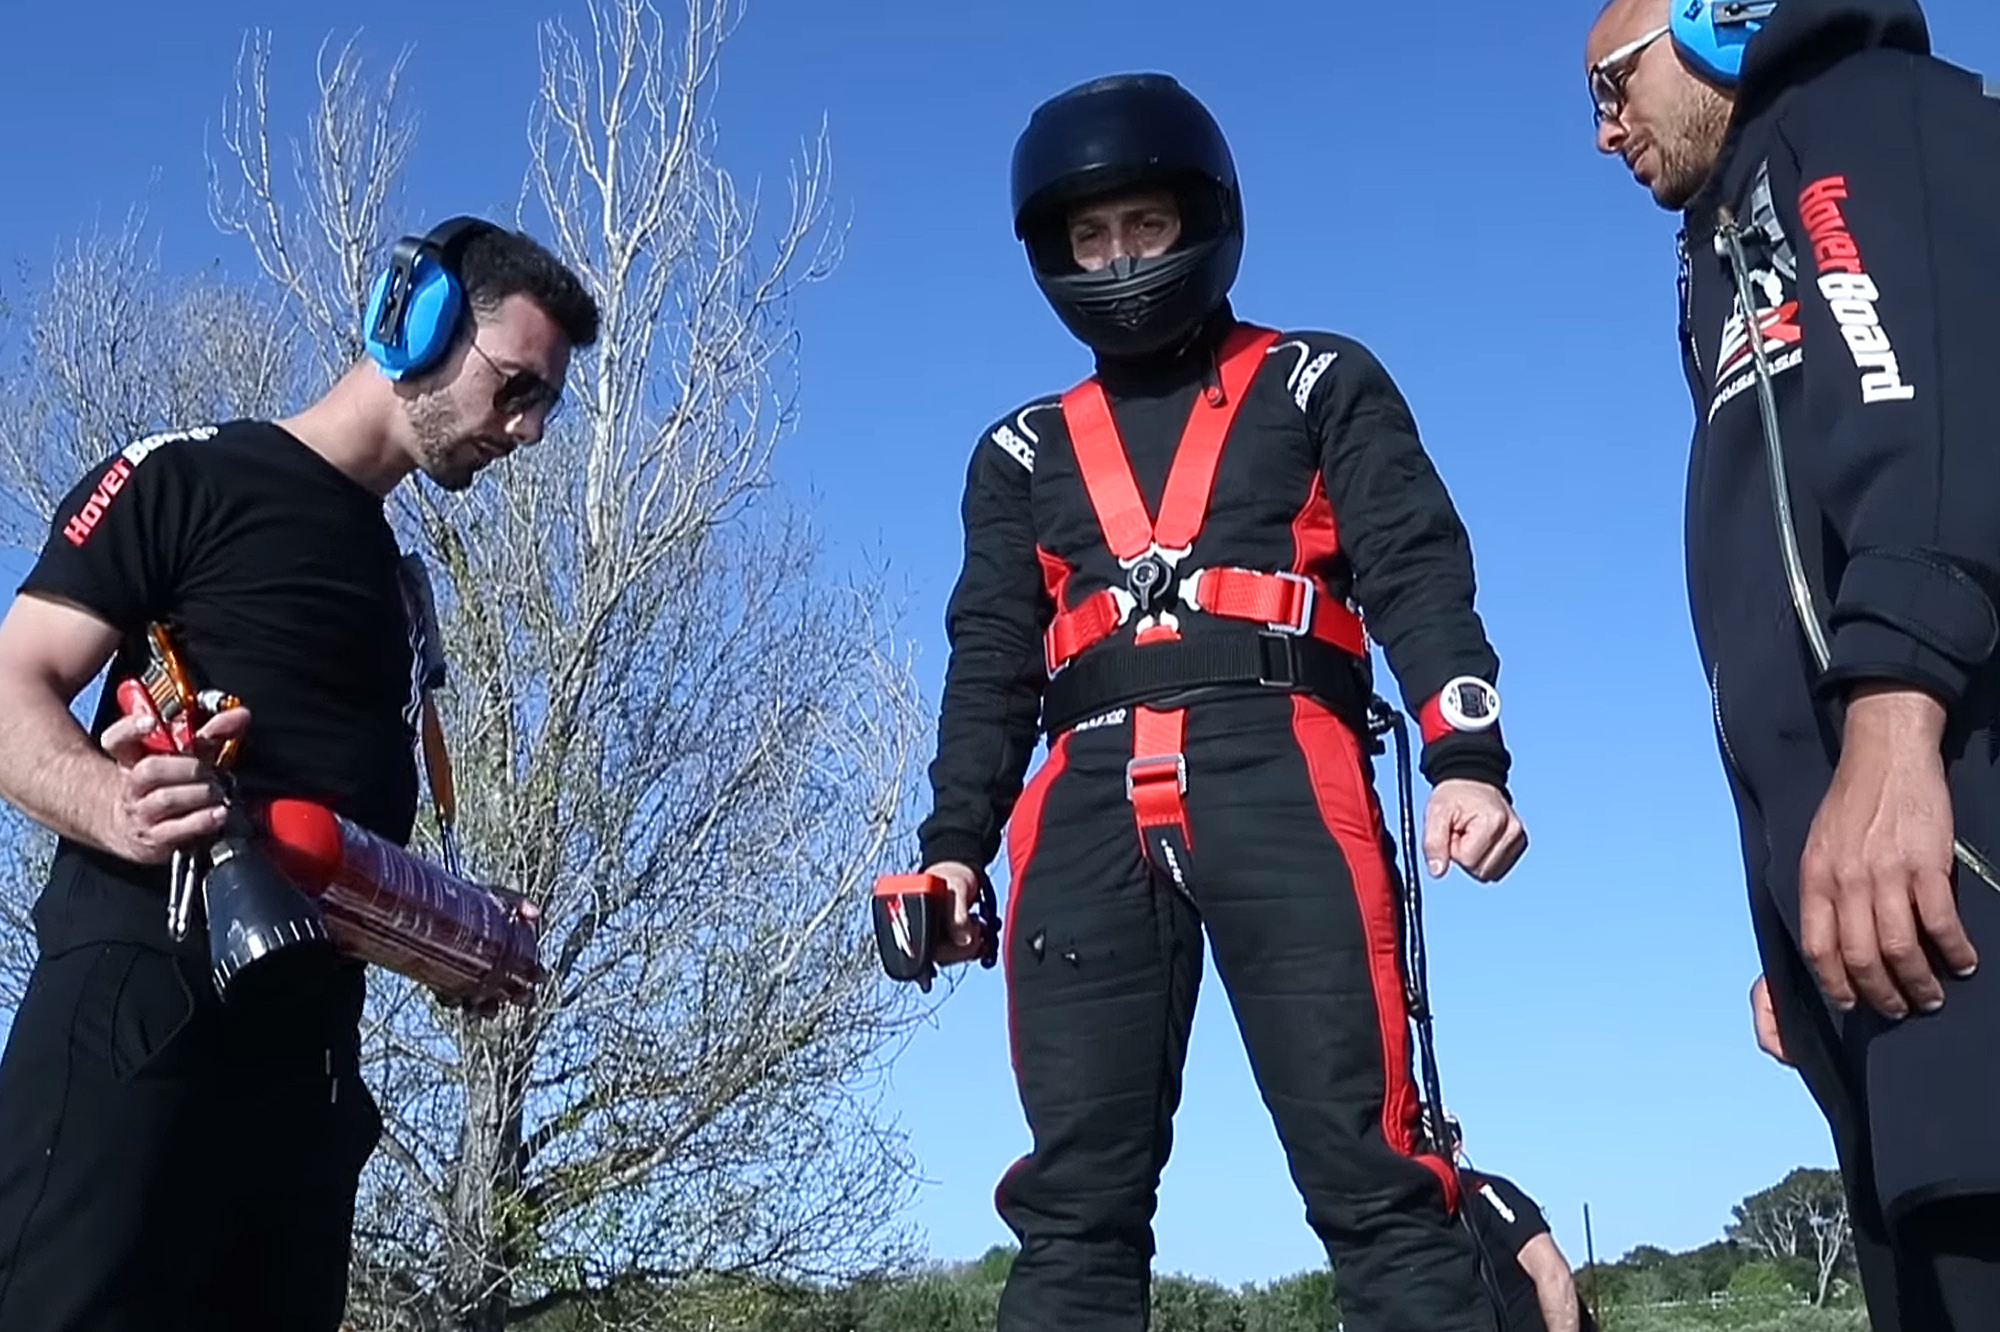
Franky Zapata suits up for his first test flight on the Flyboard Air.
So, when we heard about the Flyboard Air—a product claiming to be a real, functional hoverboard—we admittedly rolled our eyes. Most of us have daydreamed about flying effortlessly through the sky on personal aircraft, but people have been making fantastic claims about this subject since before the Wright brothers were born. Is it really possible with current technology?
A handheld remote appears to allow Zapata to control the aircraft.
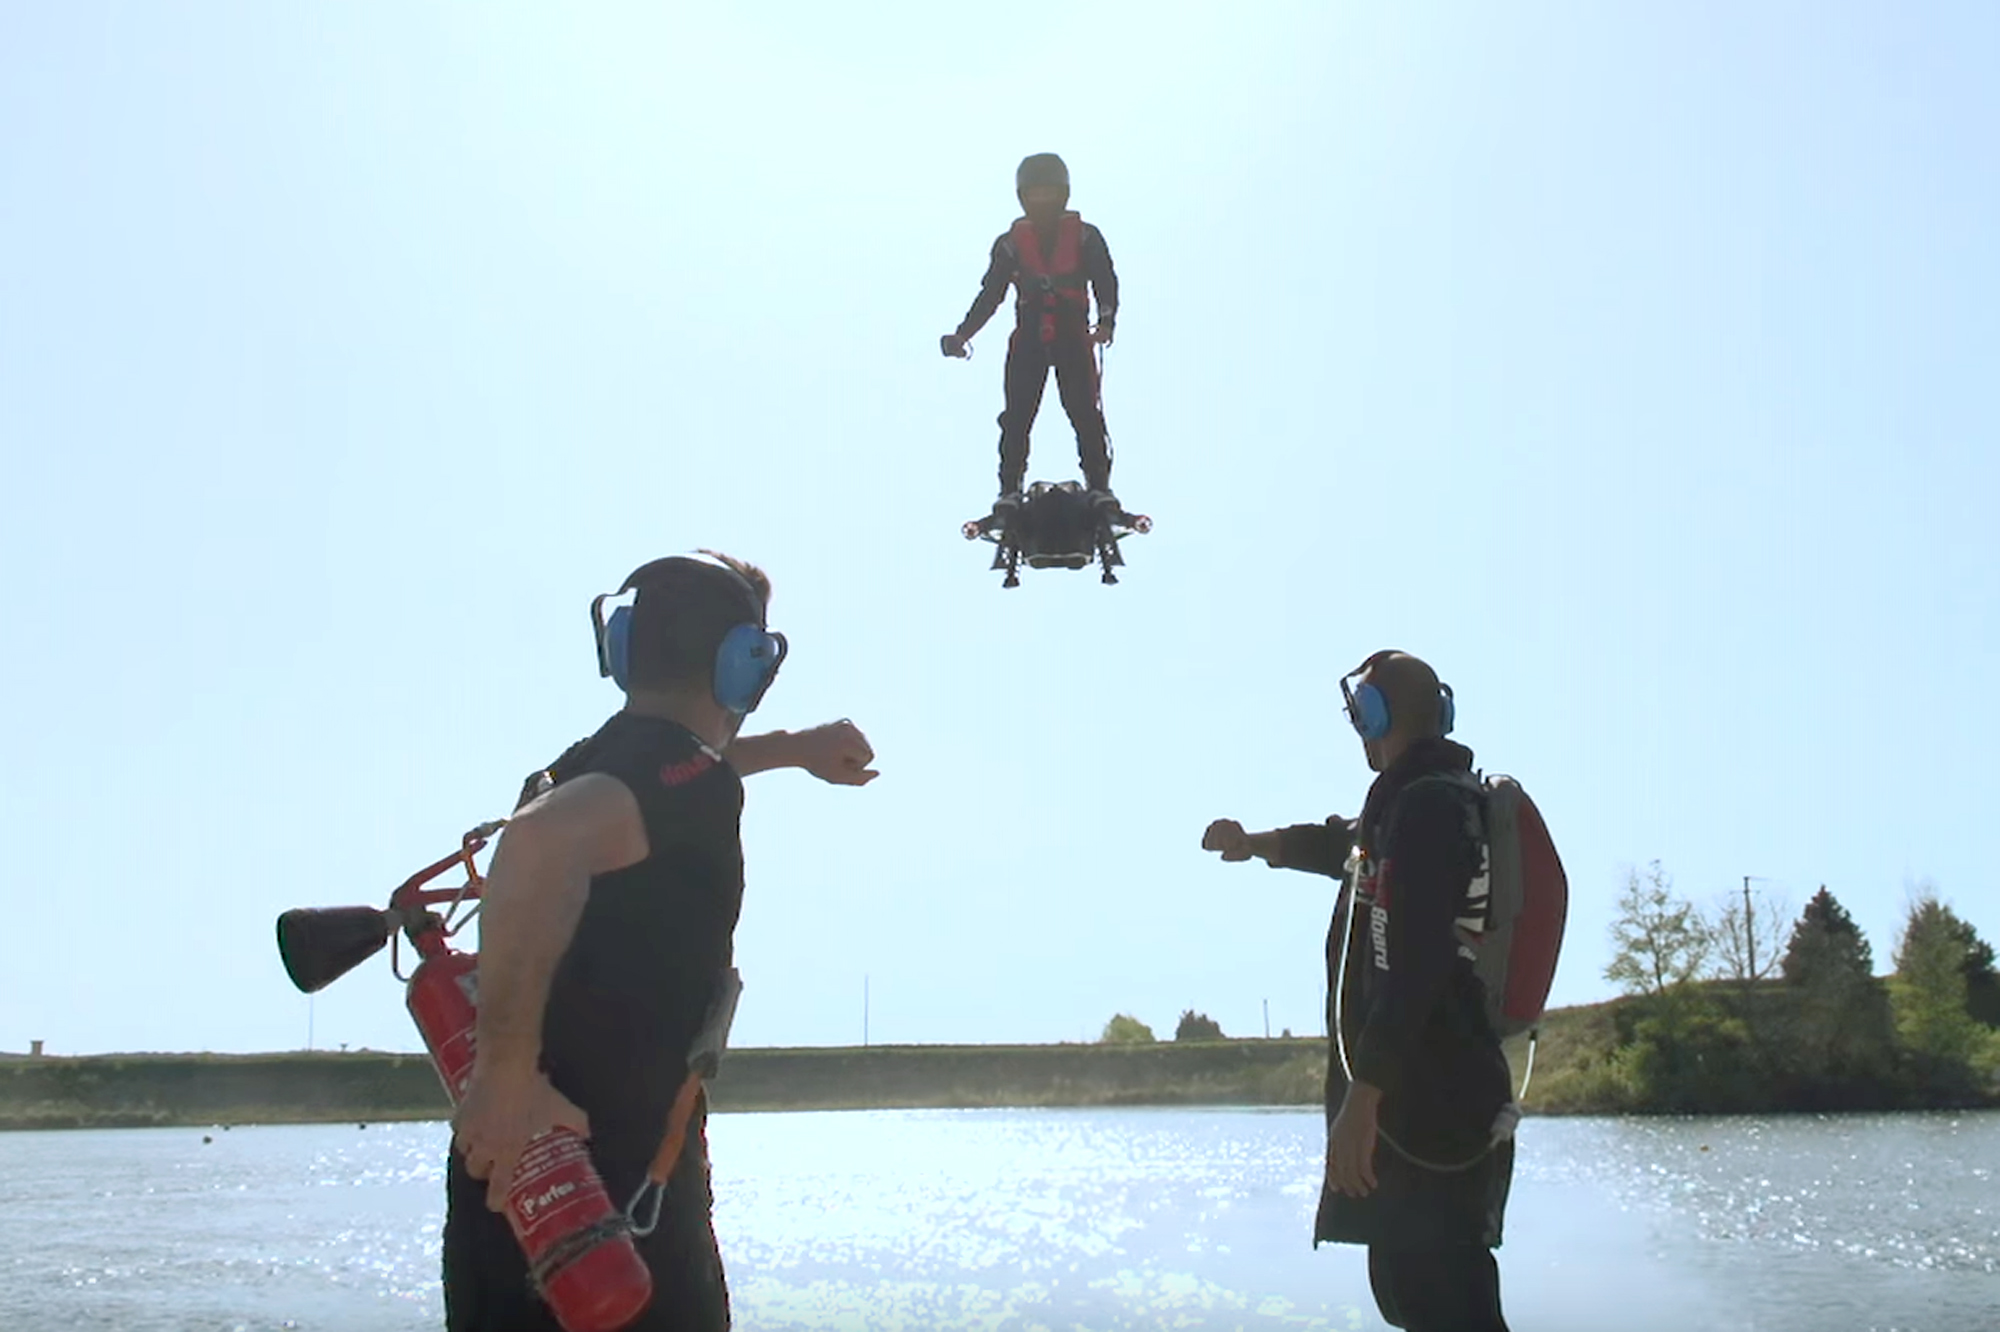
Well, if you believe the following incredible video from French company Zapata Racing, then yes it is. See for yourself:
Zapata Racing has already developed the impressive original Flyboard, a hydro-propulsion device that allows its user to soar several stories over the surface of a body of water. The new Flyboard Air doesn’t use water jets, but it’s not entirely clear how the device works, since the company has not released specifics yet. It’s currently theorized that it uses a jet turbine engine hooked to a backpack full of fuel (the video seems to support this).
In this video, Zapata takes the Flyboard Air up to a speed of about 34mph (55 kph), but the company says the hoverboard can nearly triple that figure at a top speed of 93mph. The Flyboard Air is also claimed to ascend to 10,000 feet—that’s almost as much as a recreational skydiver. The company says maximum autonomous flight time is 10 minutes. It may not sound like a lot, but at highway speeds, you could cover a lot of distance.
Before you get hyped about bugging out via your personal hoverboard, or playing Green Goblin and mounting weapons on one of these, there’s a catch. It took the company 4 years to produce this working prototype, and the finalized Flyboard Air will not be ready for release to the public until at least 2017. Government approvals from the FAA may also slow the process down even further.
If it works as claimed, the Flyboard Air could be revolutionary.
However, assuming the video above is legit, we’re interested to see what the future holds for this vehicle. It could definitely serve as a quick way to get out of Dodge.
Our eyes’ pupils dilate, or widen, in the dark to allow more light to enter, allowing us to see better. That’s what some people call our natural night vision. It takes a few moments for our eyes to adjust to darkness or brightness, so drastic changes in light levels can leave us seeing bright spots or nothing at all until our pupils can adjust. This is where multicolor flashlights can help us out.
The most common colored lights are red, blue, and green. Each of these is “softer” and don’t affect our night vision as severely as white light. They are also less likely to be seen at distance, which is an advantage for those who wish to keep a low profile.
Because red light appears less bright to the human eye and also provides more contrast, it is most commonly used as a general-use light at night.
However, red light can make map reading a bit more challenging, since many lines and markers are printed in red. For this reason, blue light is preferred for map reading. Blue light is also better at spotting bodily fluids like blood, which makes it a common choice for not only police investigators and search-and-rescue teams, but hunters as well. It’s also known to be useful for cutting through fog.
Like red and blue, green light can help preserve natural night vision. Unlike white light, it doesn’t attract insects and doesn’t spook fish or game — remember that the next time you go camping, angling, or hunting.
Multicolor flashlights allow us to stay effective long after the sun has set. So, we’ve gathered some of the premier models on the market. Read on to see which one lights up your nightlife.
This article was originally published in Issue 1 of our magazine.
It’s always a good idea to hope for the best, but prepare for the worst. In this case, we’re applying that thought to vehicular travel. As a city dweller, you may already realize that if something bad happens in a major metropolitan area, a chance of monumental gridlock occurring is almost guaranteed. In that instance, you’re not going anywhere via car, truck, or most other land conveyances. But, if the disaster is not widespread and is localized to your particular area or you choose to bug-in and lay low for a while, the streets might clear up enough for you to escape. In that case, you need your wheels to be good to go at a moment’s notice.
A key thing to keep in mind is that your vehicle should always be in good working order. This isn’t even a tip for disaster preparedness; this is a tip for everyday life. Your vehicle, be it car, truck, or motorcycle, must be well maintained and reliable because it is important for the safety of you, your family, and those around you. Make sure your vehicle is mechanically sound and not leaking any fluids, your gas tank is always at least half full at all times, the battery is charged, and the tires have the proper air pressure in them.
Other precautions would be to make sure you have a few supplies stored in the car, such as drinking water in a BPA-free container, toilet paper, and a first aid kit. It’s also a good idea to keep a Return To Home (RTH)-style backpack on hand for the supplies it contains and in case vehicular travel becomes impossible and you need to proceed on foot. (Read more about RTH backpacks in “A Walk On The Wild Side” elsewhere in this issue.) Be sure that easily forgotten items such as your car’s fluids are topped off, and remember to keep your spare tire inflated to factory recommendation.
If you take the proper precautions, you’ll have a reliable and safe vehicle for your everyday commute, road trip vacations, or the occasional escape from the freak volcano eruption or alien invasion at the center of town. In the spirit of vehicle preparedness, we gathered a few items that make good additions to your onboard emergency kit.
Seatbelt Cutters / Glass Breakers
Drivers should be concerned about being trapped in a vehicle in the event of an accident. Doors can become jammed and seatbelts may become impossible to release; there are plenty of scenarios that can play out.
In the occurrence of certain types of disasters, road debris may be widespread, and the possibility of multiple tire punctures should be anticipated. Fixing a tire puncture while on the road may be your only option to traverse to safety.
It goes without saying that fuel is life on the road (just ask Mad Max), and if you’re heading out into the great unknown, it is a good idea to have extra just in case. If you have somewhere to stash an approved fuel container on your vehicle’s exterior, such as a roof rack or a mounted fuel can carrier, then that’s your best bet.
If you have a vehicle such as a sedan that has a trunk, a hatchback, a van, or an SUV without exterior racks, then your options can get a bit tricky. It is not recommended to have a full fuel can inside your vehicle, even in the confines of a trunk. Flammable vapors will escape and can create an explosive atmosphere within your car.
[buyersguide title=”Fuel” ids=”3425, 3426″]
Electricity
If you end up powering multiple devices from your cigarette lighters in your vehicle, the battery can drain pretty quickly. Be sure that you can keep your power flowing by possibly upgrading your battery to a more powerful or efficient version. It’s also advised to carry a set of fuses just in case you experience a short.
[buyersguide title=”Electricity” ids=”3427″]
OFFGRID Tidbit
Road Debris Did you know that road debris causes an estimated 25,000 accidents happen every year on America’s highways? In the event of a disaster, chances are that those numbers may rise. To avoid hitting debris, always scan at least 12 seconds ahead of your path to be sure your way is clear. But keep in mind that if you do come across debris, depending what it is, it’s sometimes safer to run it over than to swerve into oncoming traffic or off pavement.
OFFGRID Tip
More Vehicle and Driver Safety Resources
For more information about vehicle safety, check out: AAA


