The term “utility belt” evokes images of a caped superhero wearing a bulky belt full of pockets, gadgets, and gizmos. Obviously, that’s not practical for the real world for a number of reasons—most importantly, you’d end up attracting unnecessary attention to yourself, and we all know that’s a bad idea in any dangerous scenario.
However, anyone who has ventured into EDC gear understands that it can be useful to carry a few tools and key resources on your person. Unfortunately, carrying these items loose in pockets isn’t always ideal either, as it lacks organization and attracts pickpockets or muggers.
So, there needs to be a compromise—how can one carry survival tools and EDC gear, while also remaining inconspicuous? Texas-based Wazoo Survival Gear has developed a new belt that they say provides a solution. It’s called the Wazoo Cache Belt, and it recently launched a crowdfunding campaign on Kickstarter.
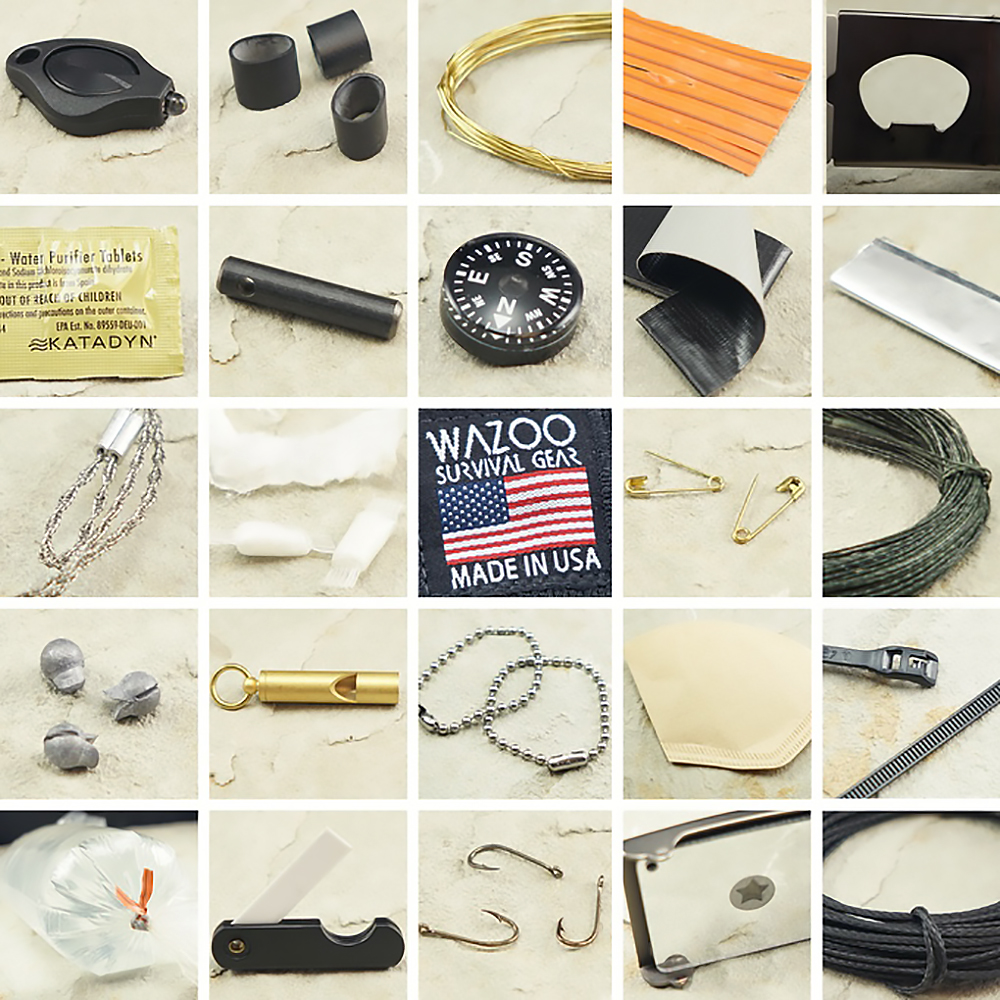
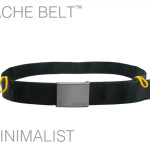
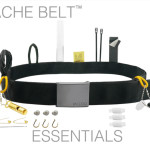
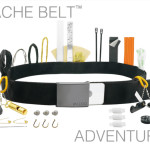
As the name implies, the Cache Belt provides a covert hiding place for EDC and survival gear. Yes, the Cache can also cache your cash, among other items. The company offers three packages, for varying needs and situations:
The Minimalist is the a la carte version, with integrated gear loops, webbing, pocket, and bottle opener buckle. Expected MSRP is $30.
The Essentials is the belt, plus some survival gear, including fire-starter, cordage, and water purification tabs. Expected MSRP is $75.
The Adventure adds more gear still, such as an LED flashlight, ceramic knife, snare wire, and compass. Expected MSRP is $115.
Unlike traditional money storage belts and S.E.R.E. belts, the Cache Belts have a 28-inch pocket that spans much of the belt’s length continuously. Also, this pocket is sealed by hook-and-loop (Velcro-style material), so it’s accessible while the belt is worn, unlike some zippered models currently on the market. We also like that the belt buckle on the Cache Belt doesn’t look militaristic, and can open bottles if necessary.
For more information on the Wazoo Cache Belt, click here to check out the Kickstarter page. The company is also offering discounts off the predicted MSRP for Kickstarter Early Bird supporters.
Preparedness at home is crucial, but any frequent flyer knows that adequate preparation for international travel is even more important. Forgetting something small can result in major headaches abroad, especially if you’re visiting a locale where replacement goods are exorbitantly expensive or completely unavailable. You’ll probably get by if you forget your toothbrush, but finding electronic equipment can be much more difficult. This is why we recommend building a portable electronics EDC kit to cover all your mobile devices.
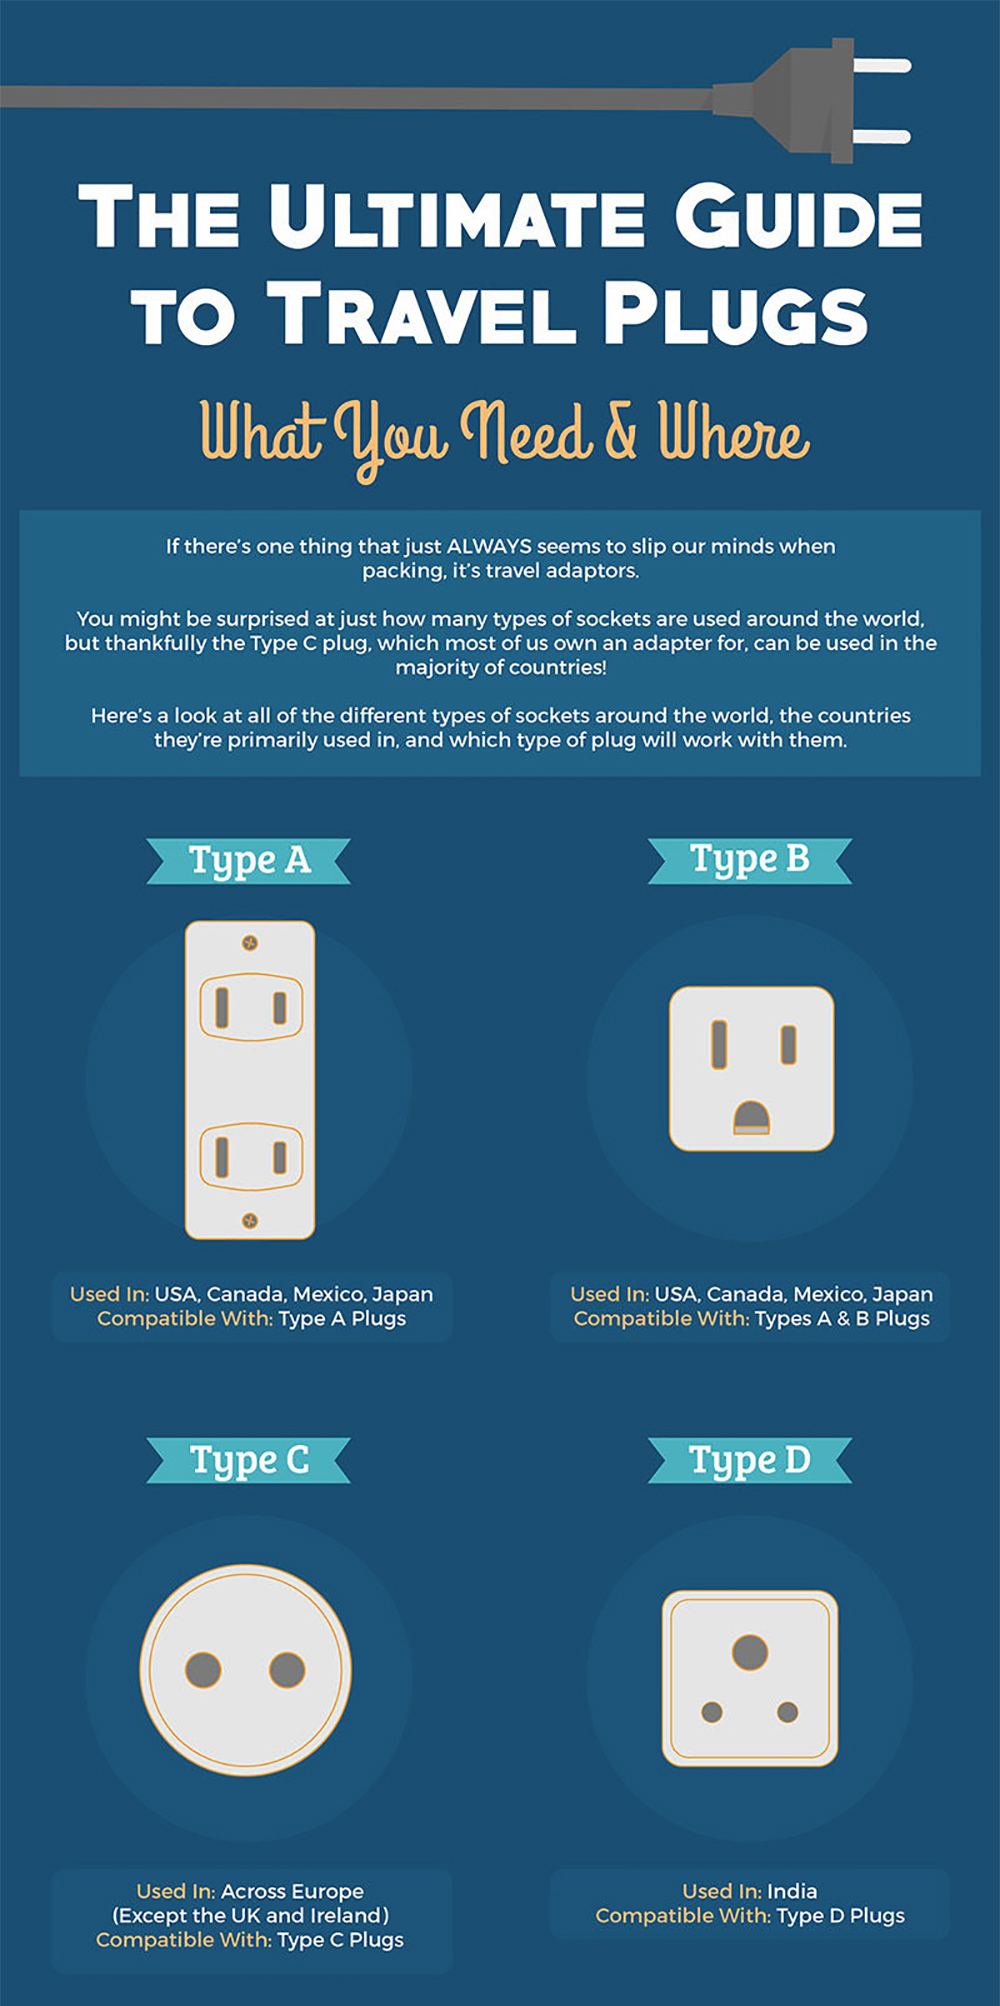
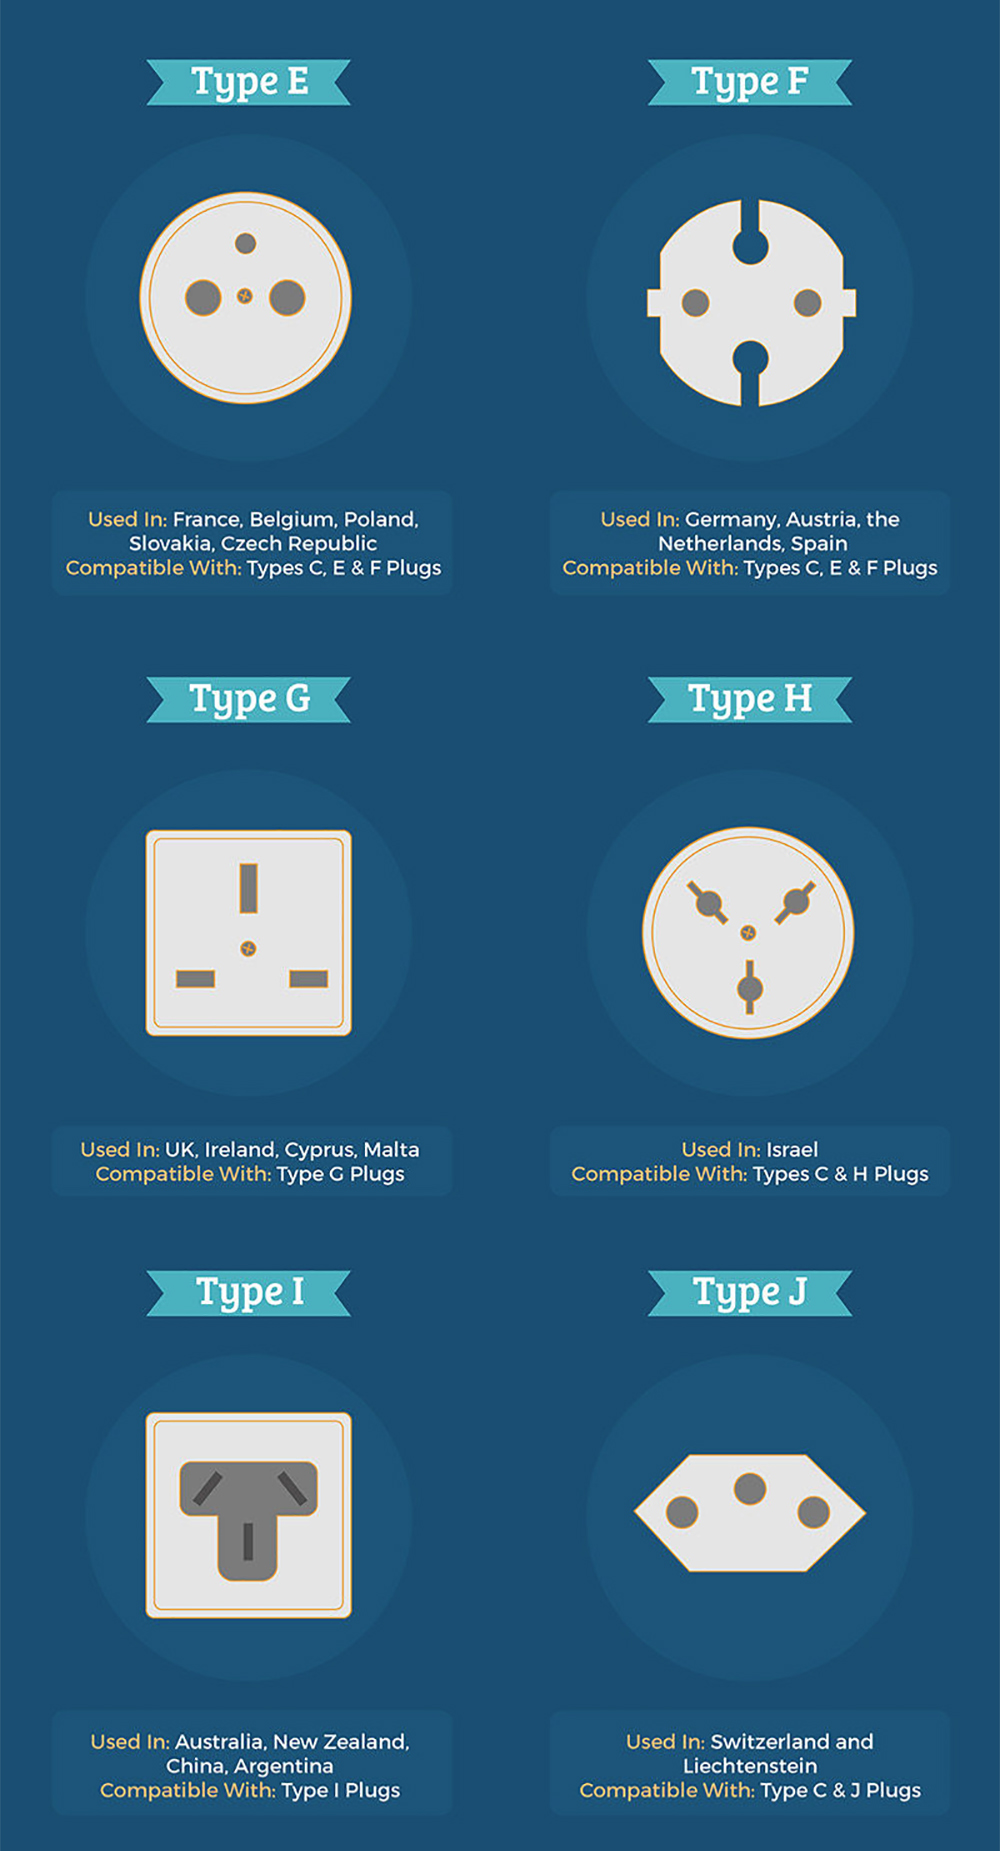
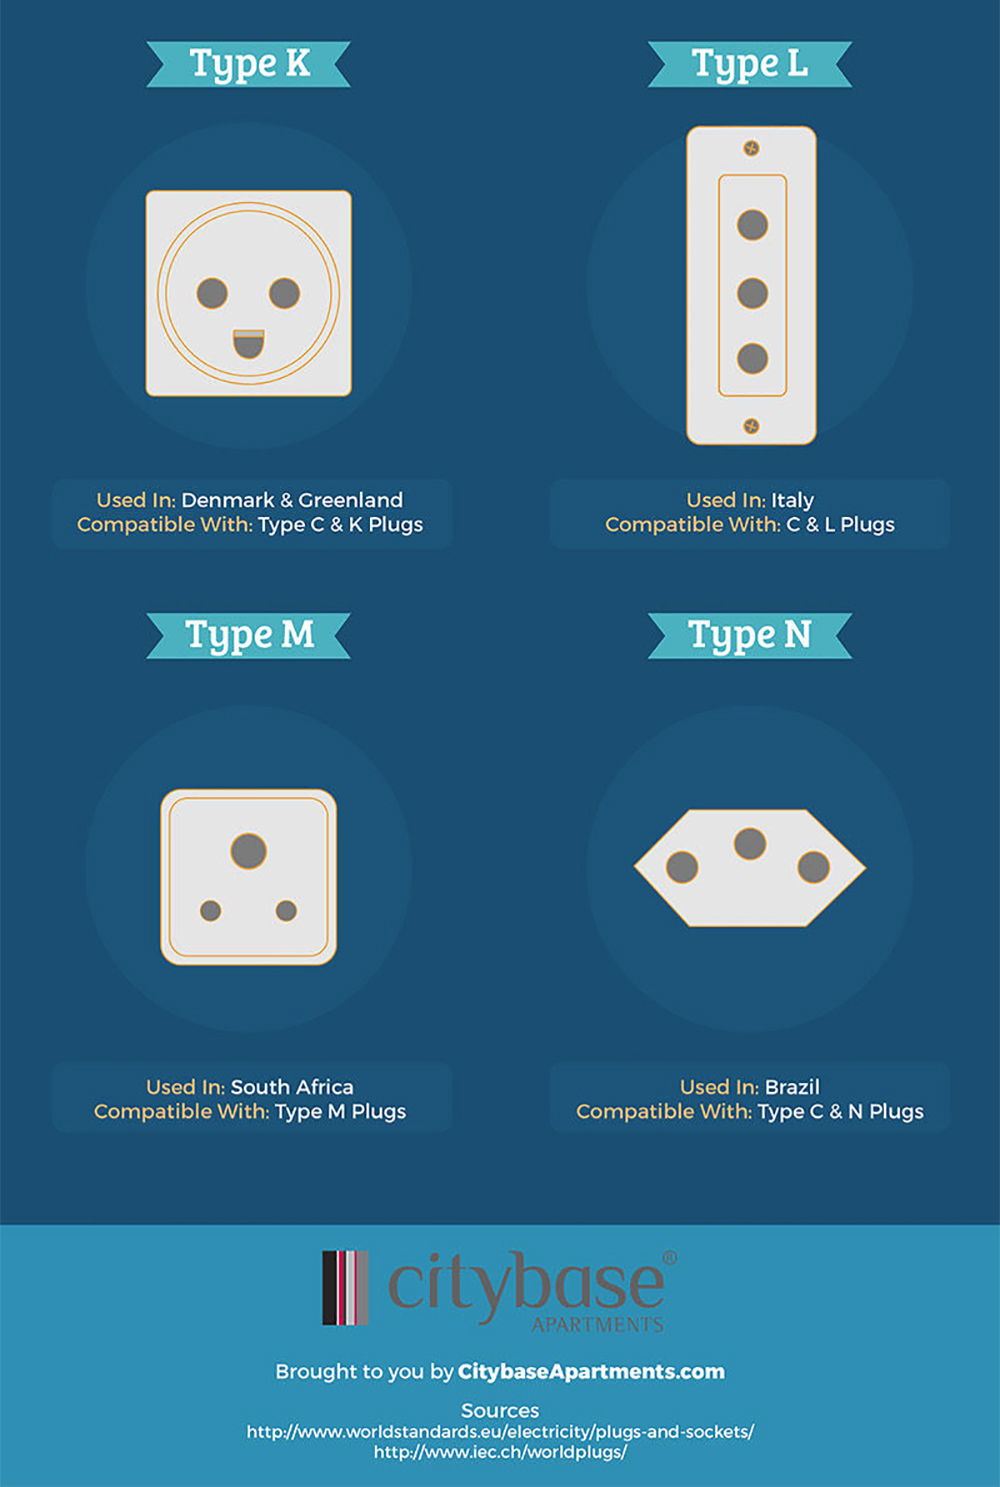
However, there’s something we alluded to in past articles that we feel deserves more attention—travel plugs. Many countries outside North America use different wall outlet types, so you’ll need to obtain an adapter ahead of time. Otherwise, your entire electronics kit will become useless in a matter of hours. However, it’s not always easy to know these travel plug types, and where they’re all used.
The following infographic from Citybase Apartments makes the subject much easier to understand. It visually identifies fourteen different types of travel plugs, their cross-compatibility, and the countries which use them.
As with the other infographics we’ve posted in the past, you can view larger versions of these images by clicking the image, then clicking the Download button in the top right corner.
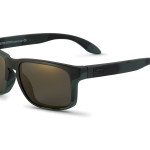
Eye protection is helpful in any survival scenario, whether it’s used to protect your eyes from dust and debris, or simply to shield your vision from sunlight and glare. They can even help conceal your identity in certain cases. As a result, we rarely leave home without a good pair of sunglasses.
Supporters of “Team Skeleton” include many celebrities and athletes.
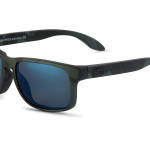
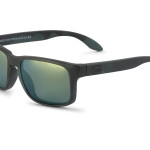
Skeleton Optics is an American eyewear company headquartered in Florida, which uses high-quality components to craft sunglasses designed for active lifestyles. The company’s flexible Grilamid TR-90 material frames are manufactured in Italy, while the polarized lenses are supplied by Carl Zeiss Vision. The lenses also include patented Tri-Pel hydrophobic, anti-smudge, oil-repellent technology, for maximum clarity in all conditions.
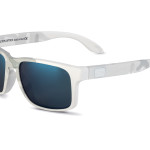
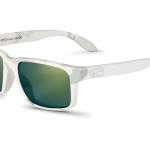
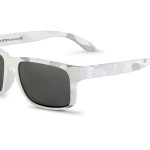
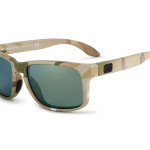
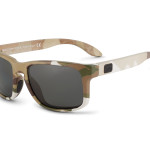
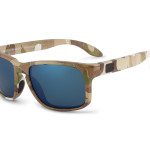
Recently, Skeleton Optics has announced a new partnership with MultiCam. This has led to a range of the company’s popular Decoy model sunglasses with three different MultiCam camo finishes. These special editions of the Decoy MultiCam include:
Alpine Edition – White and grey winter camouflage pattern, for snow-covered environments
Black Edition – Black with dark green camouflage pattern, for urban environments
Original Edition – Original MultiCam camouflage pattern, the same camo pattern that has been officially-issued to U.S. Army forces
The application of the camouflage pattern varies slightly from one frame to the next, so no two frames will have the same pattern. Each edition also offers a variety of lens color choices: Bronze Titanic, Blue Gun, Silver Chrome, Petrol Green, and Gray.
All variants of the Skeleton Optics Decoy MultiCam have a MSRP of $180. For more information on the Skeleton Optics MultiCam partnership, go to SkeletonOptics.com/collections/multicam-edition.
Life is unpredictable. Whether it’s a bear mauling, a mudslide, or a mugging, being prepared for the bad stuff is what RECOIL OFFGRID is all about.
Because manure happens, we know many of you carry some sort of self-defense tool, be it a gun, knife, pepper spray, tactical pen, or all the above. Alas, Murphy’s Law often pops up, and there could be times when we might not be armed (think entering a court house or going on vacation in non-permissive regions). Then there are times when we just can’t access our weapon fast enough — especially during extreme close-quarters combat. Therefore, all preppers should consider learning empty-hand combatives or martial arts.
Knee Strikes for Self-Defense
In Issue 16 of RECOIL OFFGRID, we’re bringing you enough information on knee strikes to aid in any SHTF self-defense situation. But can’t wait for the print magazine to go on sale in early October to become a napalm-kneeing ninja? Well, you’re in luck, my friend. Read on for extra techniques shown by a variety of martial-arts experts and exclusive content you can only get right here at OFFGRIDweb.com.
Breaking Free
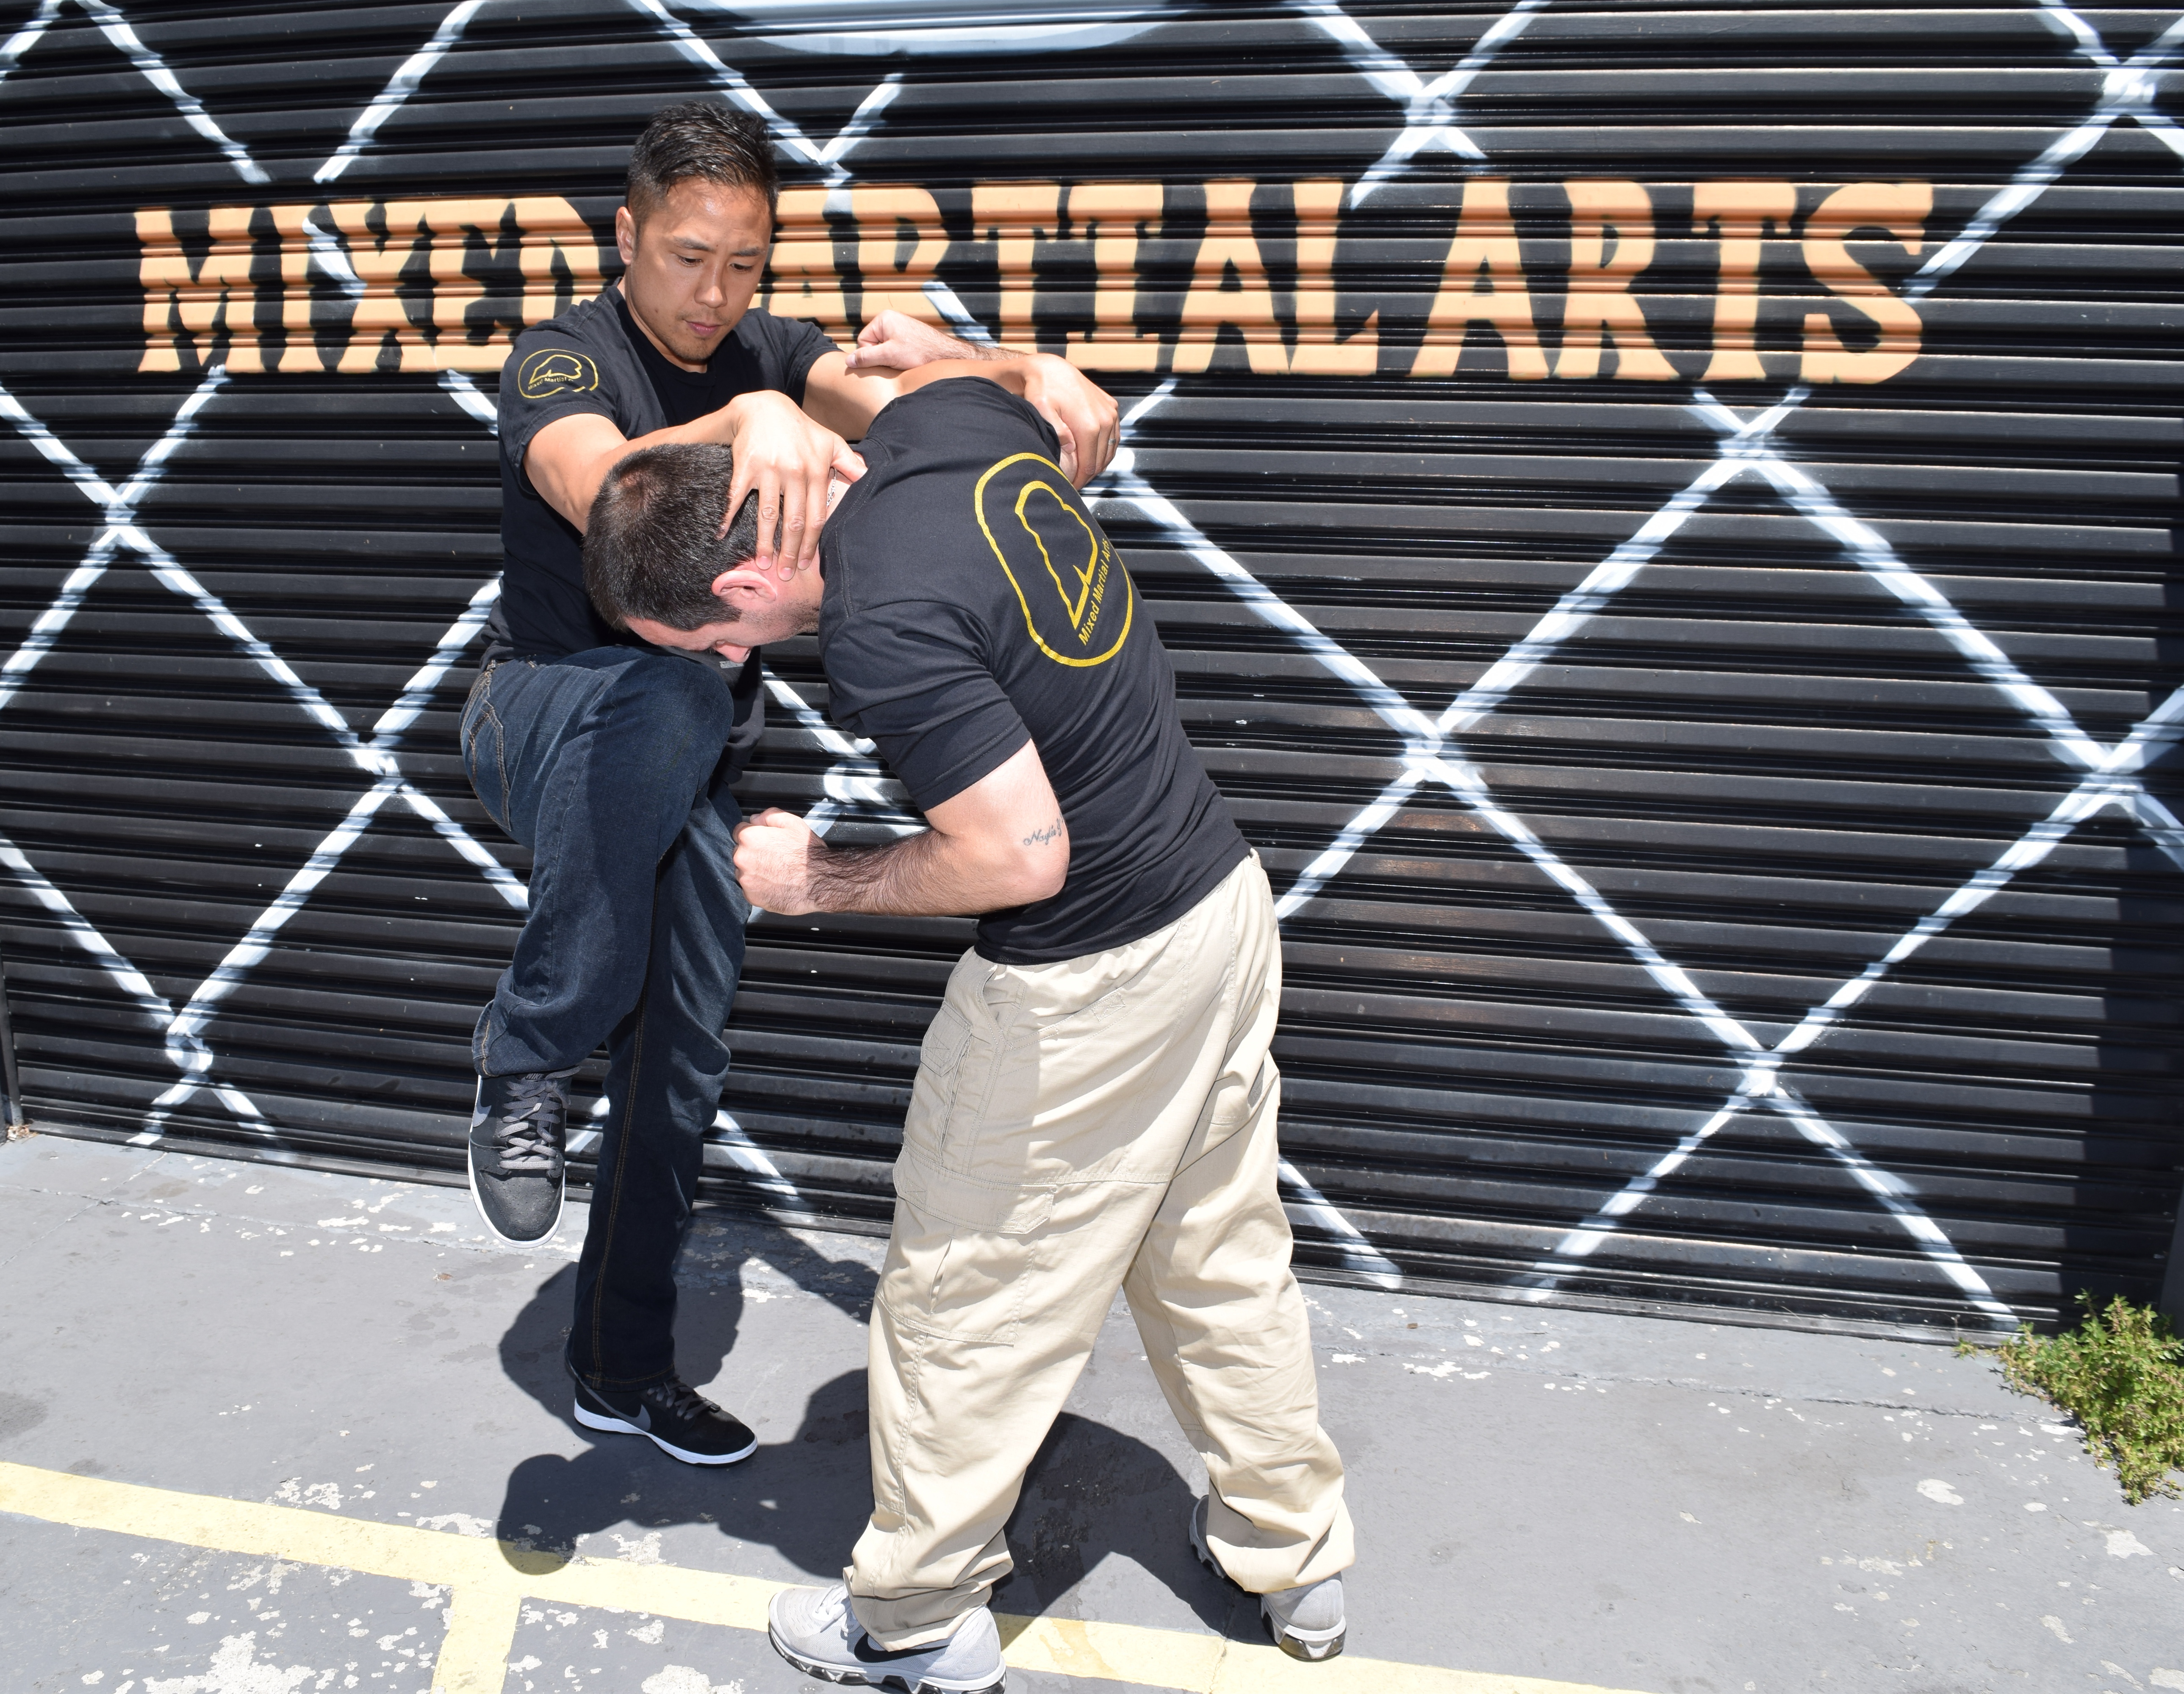
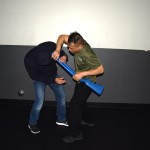
In our feature called “Simply Smashing” in Issue 16 of our print edition, we discuss how a head clinch (often seen in Muay Thai and MMA matches) is a dangerous position to be in. When someone has their hands around your neck or head, you must escape because knees to your body or face are only moments away.
Michael Mananquil, head Muay Thai instructor at AB MMA in San Francisco, knows all too well the power of the knee strike: “When I was a young hotshot, one of the senior students grabbed me and knee’d me during sparring. For the remainder of the class, I was curled up in the corner, crying out of every pore.”
Now a Muay Thai world champion with 25 wins and four losses to his record, Mananquil says his knee strikes have helped him finish some big and tough contenders, allowing him to deliver devastating blows for someone of his size. With this in mind, the world champ shares two effective ways to escape and counter the deadly clinch of Muay Thai.
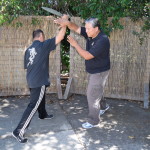
ABOVE: Clinch Counter – Robert Arnold goes for the Thai clinch. Not a position to hang-out in, Muay Thai coach Michael Mananquil quickly lowers his level and grabs Arnold around the waist. Mananquil continues to pull at the waist while digging his chin into his opponent’s chest. Having dumped Arnold to the ground, Mananquil can now continue the onslaught or make his escape.
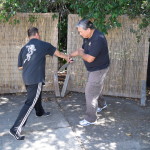
BELOW: Clinch Counter Two – Arnold has the clinch on Mananquil. Not able to perform the first counter, Mananquil extends his back to prevent his head from being yanked down and jams his fingers into his opponent’s eyes. He circles his left hand inside, breaking the clinch, and following with an elbow strike and a knee strike to the groin. With an incapacitated bad guy, Mananquil steps back to assess the situation.
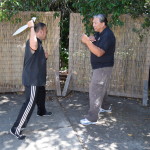
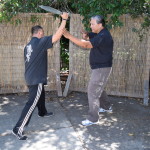
Indonesian Kneeing Knowledge
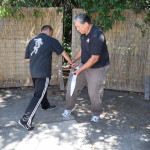
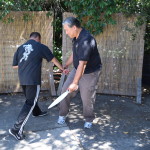
Pentjak silat is an ancient fighting system that focuses on close-quarters combat with blades and empty hands. Dr. Andre KnustGraichen, a master of several silat styles, shows us how to use the knee as a leveraging tool to disarm a machete attack. Take that, Jason Voorhees!
ABOVE: Silat Knee Assisted Machete Disarm – Against a machete slash, KnustGraichen angles his body away from the attack and parries with both hands. Continuing the trajectory of the slash, KnustGraichen traps the machete with his hand and knees. Once the weapon is under control KnustGraichen is able to disarm the attacker.
Craving for More Krav Maga
Tragically, Americans are becoming more aware of mass shooting scenarios due to recent news headlines. “Escape, hide, barricade, then fight” is the formula most trained professionals suggest you use if you’re faced with such a scary situation; here is the fight portion of that paradigm.
Edgar Gabriel, an instructor in Krav Maga (a popular system that is used by law enforcement and military around the world), shows us the rifle disarm.
ABOVE: Shotgun/Rifle Defense – Tony Hoang aims a shotgun at Edgar Gabriel’s center mass. Immediately Gabriel angles his body and pushes the shotgun’s muzzle offline. Gabriel brings his right hand in to reinforce the control and fires off a knee strike into Hoang’s groin. Once Hoang is hitting the high notes of the Star Spangled Banner, Gabriel steps in and slams the muzzle of the shotgun into his head. Gabriel now has control of the gun and moves to a safe distance.
About the Author
Dr. Conrad Bui is a San Francisco-based chiropractor and martial artist with more than 30 years of continuous experience. He regularly gives and receives knees as a Muay Thai coach at World Team USA under Ajarn Sam Phimsoutham. A frequent contributor to RECOIL OFFGRID, Conrad is also a guru in the art of Indonesian Pentjak Silat Serak under Guru Besar Andre KnustGraichen. He is currently working on his Brazilian Jiu-Jitsu black belt under the tutelage of Professor Diego Herzog.
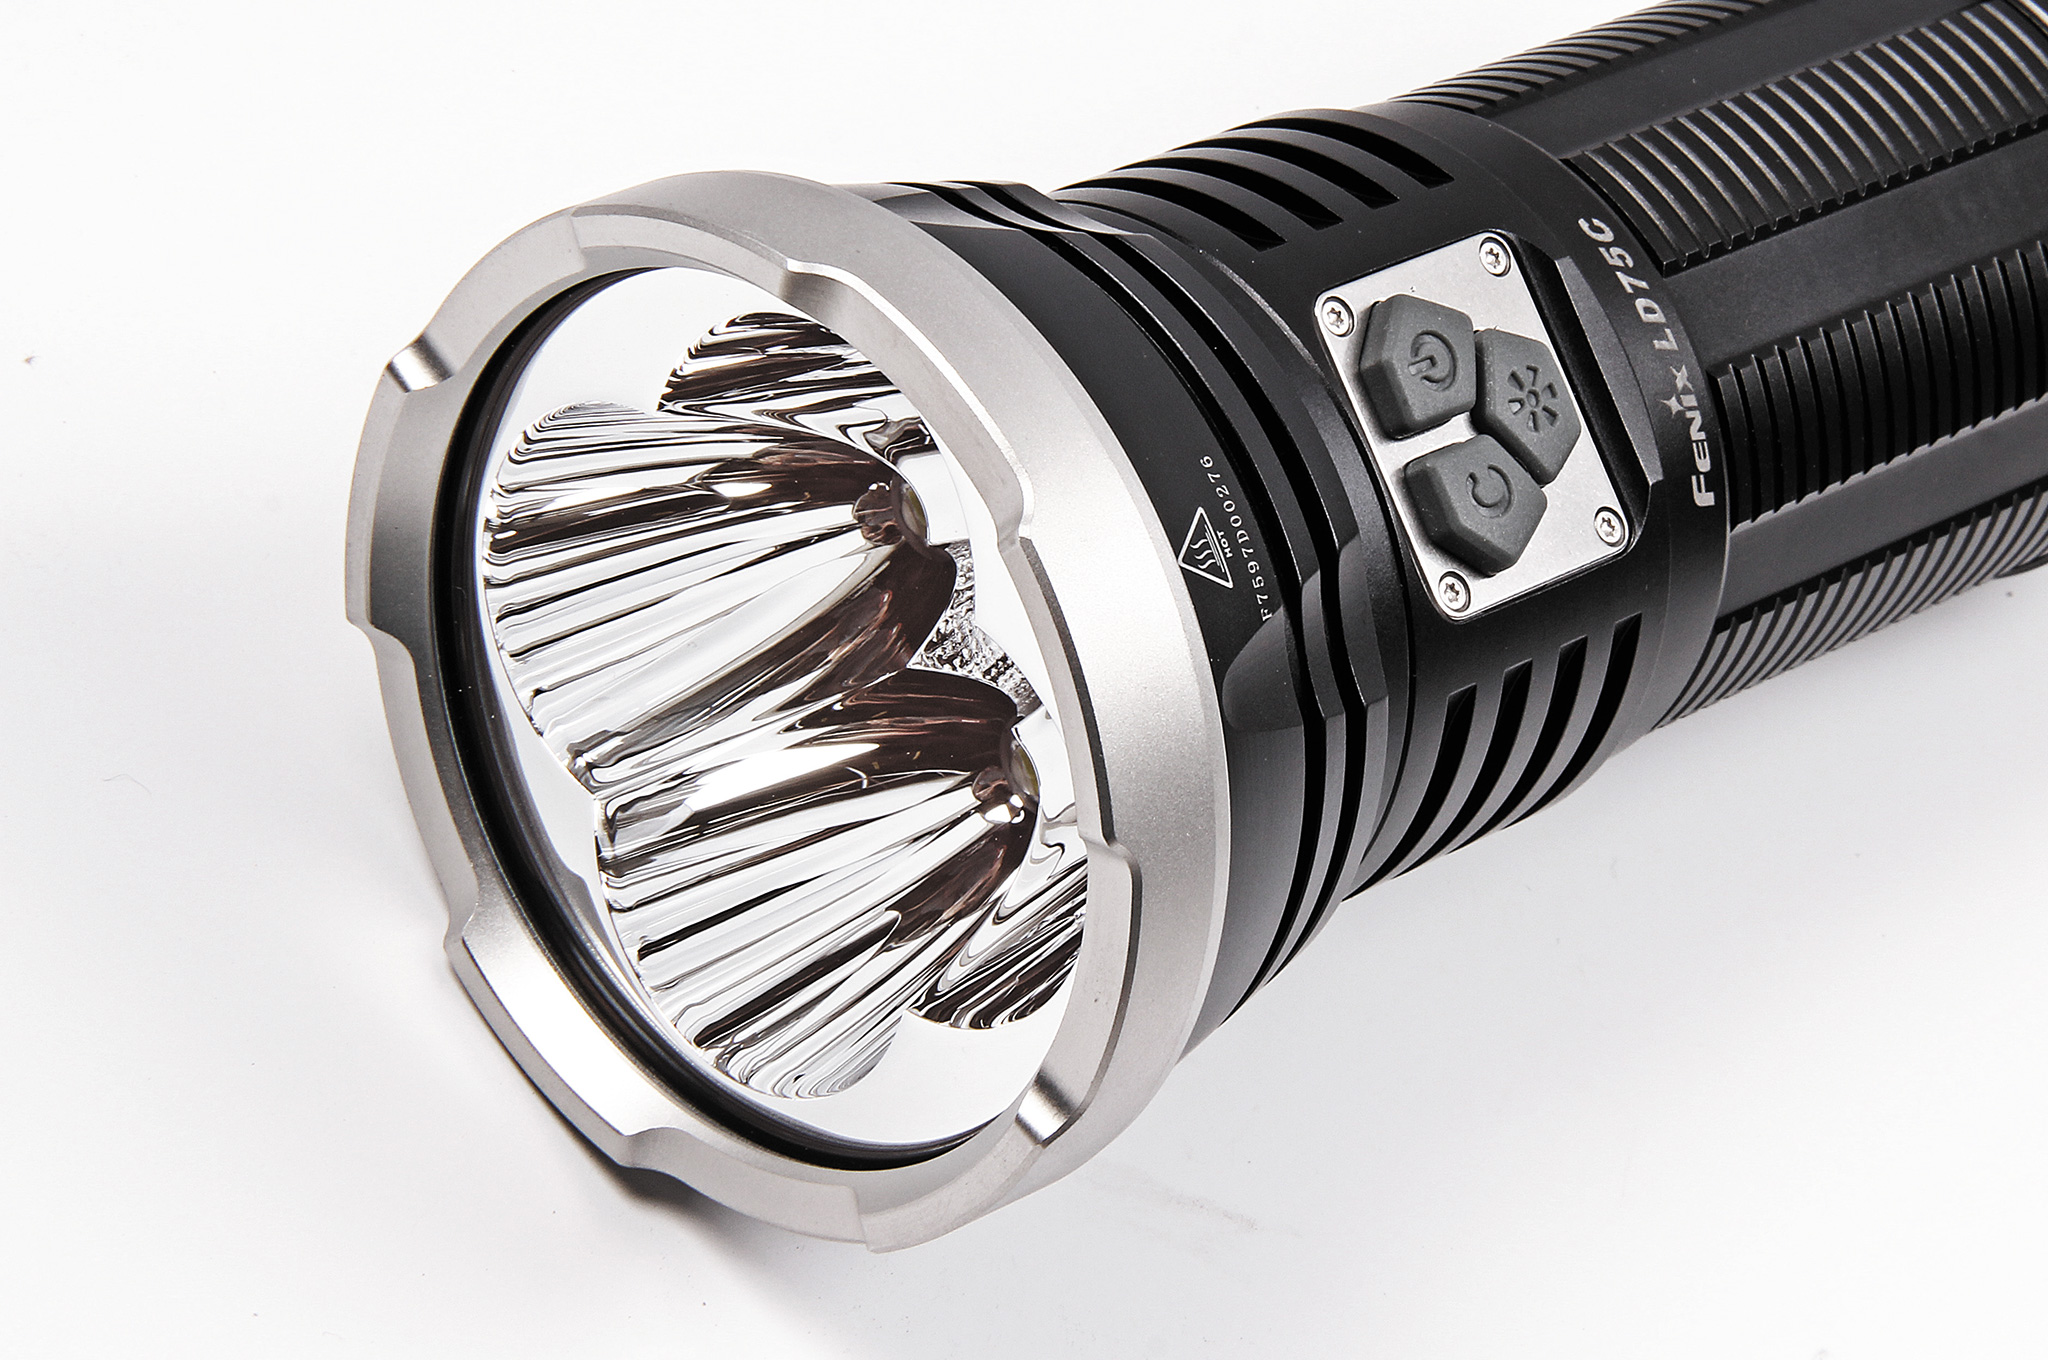
When it comes to flashlights, is there such a thing as too bright? Some powerful consumer-grade handheld LED flashlights reach 1,000 to 2,000 lumens, or even more. We can tell you firsthand from our recent experiences with a 2,500-lumen Olight R50 Seeker that this is a lot of light output. You essentially need to be outside to use such a powerful light to its full potential, since splash-back during indoor use can be blindingly bright. Regardless, it’s nice to have this massive output on tap—you can turn day to night at the flip of a switch.
This Fenix LD75C produces 4,200 lumens, but that’s still nowhere near the DIY flashlight seen below.
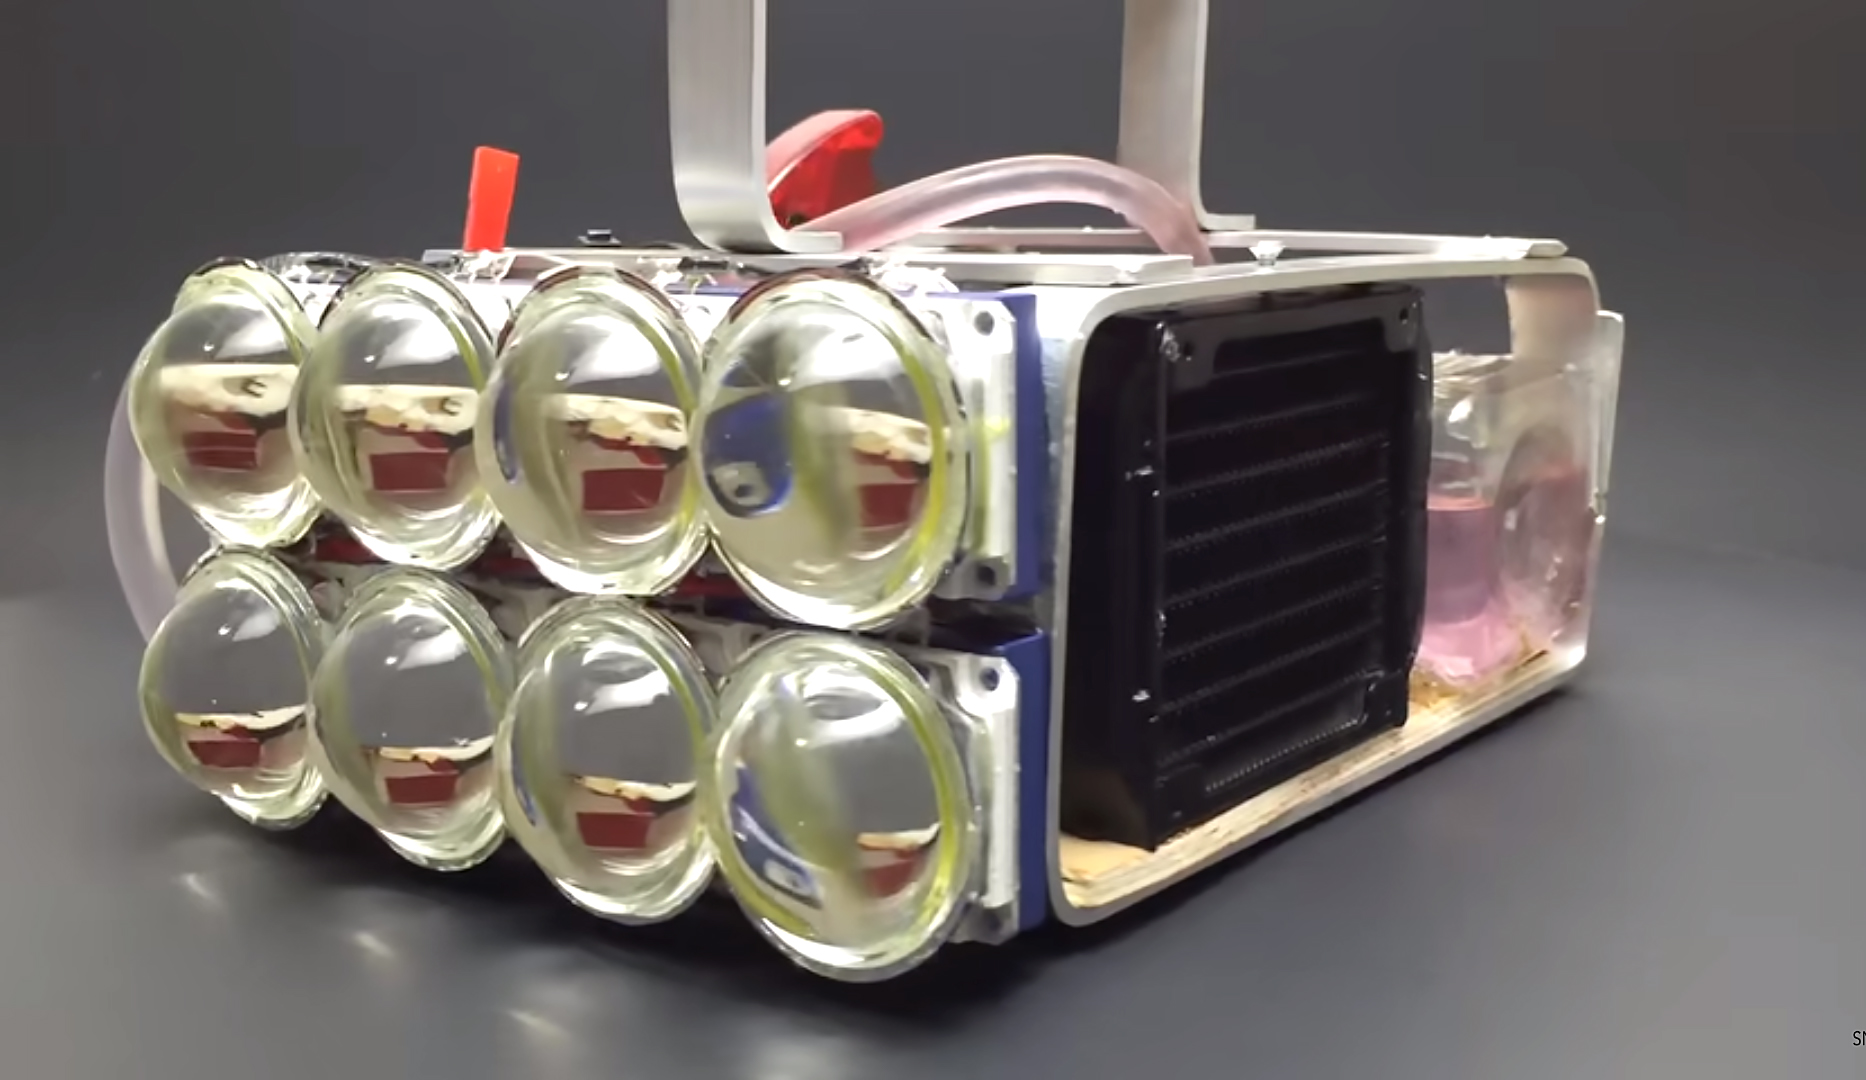
In most circumstances, we’d consider a 1,000+ lumen flashlight to be quite powerful. So, we don’t really have the words to describe a light that produces 72 times that amount. In a recent video, YouTube channel host Samm Sheperd created a DIY flashlight that easily achieves 72,000 lumens. It’s composed of eight powerful LEDs, focused by individual lenses, and powered by a set of three 3-cell lithium battery packs which produce 36 volts.
This light vaguely resembles some sort of Martian weapon from a sci-fi movie.
Now, if you’ve ever worked with powerful LED lights before, you’ll likely know that heat creates a host of problems. Many off-the-shelf flashlights (including the Olight R50 we mentioned) have to ramp down output after a minute or two, otherwise the LED will become hot enough to melt or damage sensitive circuitry. To avoid this problem, Sheperd bought some water-cooling components designed for gaming computer builds, and adhered them to the LED array. A tiny pump and radiator circulates cool water over the LED cases, preventing heat damage—pretty ingenious.
The results are pretty mind-blowing. Check out the video below:
At the end of the video, Sheperd adds three more LEDs to bring output to 100,000 lumens—because why not. So, do you think there’s such a thing as too bright? Let us know in the comments.
In an emergency bug-out scenario, preexisting transportation plans can easily backfire. Your primary escape route may be blocked by excessive traffic, or your vehicle may break down unexpectedly. If SHTF and you desperately need to get out of town quickly, it’s wise to know additional methods of obtaining a ride. In urban areas, bicycles are especially common, and will often be left behind or abandoned when disaster strikes. In these life-and-death scenarios, defeating a bike lock could provide a means to escape danger much faster than walking.
Bicycles can be found throughout all urban areas, and are often abandoned during disasters.
Disclaimer: we’re obviously not advocating the use of this knowledge for any illegal purposes. It should only be used as an absolute last resort to escape mortal danger, and if you are forced to use a locked bicycle under these circumstances, you should always return it as soon as possible. Nobody likes thieves, so don’t steal.
Most bicycles in cities and towns will be locked to poles, railings, and other stationary objects with some form of combination lock. Whether you’re in a major emergency, or you simply forgot the combination to your own lock, it can be useful to know how to crack a bike lock. Most bike locks use a set of four combination dials, connected to a strong metal cable. While you could cut the cable with bolt cutters, it’s actually much easier to unlock using a little manual pressure.
Here’s how it’s done:
The key is to use one hand to apply tension to the cable, which will cause the dials to fall into place as they unlock. Now that you know this trick, it should serve as a reminder that most consumer-grade locks are surprisingly easy to crack. So, if you have a bike, you may want to upgrade to a solid metal lock with a key, rather than a combination cable.
Electronic circuit boards are one of the greatest inventions of the 20th century. These microscopic networks of conductive pathways transmit millions of energy pulses in the blink of an eye. However, there’s one common substance that can bring this brilliant electronic ballet to a grinding halt: water.
Even a single drop of moisture has the power to corrode and short out components, leading to malfunctions or total failure. If you’ve ever spilled coffee on your laptop or dropped your smartphone in the porcelain throne, you know firsthand the vulnerability of these devices.
Flashlights are at a higher risk than other electronics, as they’re frequently used in circumstances where moisture is present. As a result, many flashlights are rated as water-resistant, meaning they can withstand splashes and spills. Truly waterproof flashlights, however, are held to a much higher standard of waterproofosity. These lights must continue to operate normally while completely immersed in water.
Read on for our thoughts on seven of the latest waterproof flashlights, and find out which can keep shining brightly — come hell or high water.
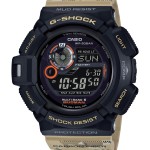
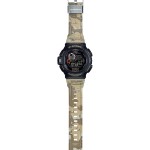
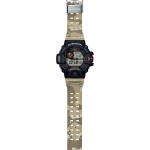
Casio G-SHOCK has announced the launch of a new Desert Camouflage Series of outdoor watches. These new timepieces include MUDMAN, RANGEMAN, and MUDMASTER models, all of which are a part of the Master of G line. Each watch has a military-inspired design, with a black bezel, light brown lettering, orange accents, and a desert camo wristband.
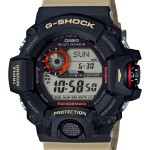
Casio G-SHOCK MUDMAN GW9300DC-1
Casio G-SHOCK MUDMAN GW9300DC-1
Above: the Casio G-SHOCK MUDMAN GW9300DC-1 has a mud-resistant case, reverse LCD display, and Twin Sensor (compass/thermometer). MSRP: $350
All three of these new watches are powered by G-SHOCK’s Tough Solar system, which uses integrated solar panels to gather energy from the sun during normal use. This solar energy is then stored in a rechargeable battery that powers all the watch’s functions, including Multiband 6 atomic timekeeping. The atomic system allows the watch to receive calibration signals from radio transmitters around the globe, ensuring your watch is accurate down to the second.
Casio G-SHOCK RANGEMAN GW-9400DCJ-1
Casio G-SHOCK RANGEMAN GW-9400DCJ-1
Above: the Casio G-SHOCK RANGEMAN GW9400DCJ-1 uses a standard LCD display, plus a Triple Sensor (altimeter/barometer, compass, and thermometer). MSRP: $450
As expected from G-SHOCK, these three watches are designed to withstand the company’s 7 Elements: electric shock resistance, gravity resistance, low temperature resistance, vibration resistance, water resistance (200 meters, in this case), shock resistance and toughness. The MUDMAN and MUDMASTER models are also mud-resistant for added protection during wilderness survival scenarios.
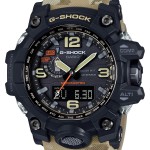
Casio G-SHOCK MUDMASTER GWG1000DC-1A5
Casio G-SHOCK MUDMASTER GWG1000DC-1A5
Above: the Casio G-SHOCK MUDMASTER GWG1000DC-1A5, with a combination of analog and digital features. This variant also features a Triple Sensor (altimeter/barometer, compass, and thermometer) and sapphire crystal. MSRP: $800
These three new watches will be available beginning in October via select retail stores and www.gshock.com.
RECOILtv has unleashed a new viral video, and it’s definitely a sight to behold if you’re into bikes, guns, video games, or action films (or all of the above). Armed Ronin was filmed in an abandoned nuclear power plant, and features some impressive stunt riding on a very special custom motorcycle: the Magpul Ronin.
The Ronin was inspired by the now-defunct American sport bike manufacturer Buell, picking up where it left off—and then some. It uses a custom monoshock suspension linkage, front-mounted radiator, unitized handlebar, ram-air intake, cast aluminum tail, and many other outside-the-box characteristics. Like its namesake, there are 47 of these Ronin motorcycles in existence.
Warning The concepts shown here are for illustrative purposes only. Seek professional training from a reputable instructor before attempting any techniques discussed or shown in this story.
Long before anyone ever lit a cannon fuse or pressed a trigger, some evil genius in a tactical loincloth discovered that if you put something into a hollow tube and blew into one end, it would fly out the other end with enough energy to cause trouble. That simple discovery, the blowgun, ultimately became the basis of all barreled weapons — especially when another evil genius figured out how to replace lung power with gunpowder.
Although the exact history of the blowgun is unclear, it appears that people in various parts of the world independently discovered the concept of a breath-powered weapon over a thousand years ago. Blowguns were widely used in the Philippines, Japan, and among Native American tribes in the Southeastern USA, but they reached their greatest potential in the Amazon basin of South America and the Malay Archipelago. That’s no coincidence, as both those areas had species of plants that could be used to make potent poisons — the kind that transformed low-powered blowgun darts into true killing projectiles and made them effective against more than snack-sized animals.
Even without poison, blowguns are surprisingly powerful and accurate. With the right kind of projectiles, they’re very capable of taking down many types of small game. They also offer some unique advantages that make them ideal weapons for preppers. If you don’t already have one in your TEOTWAWKI kit, by the time you’re done reading this article, you’ll want one.
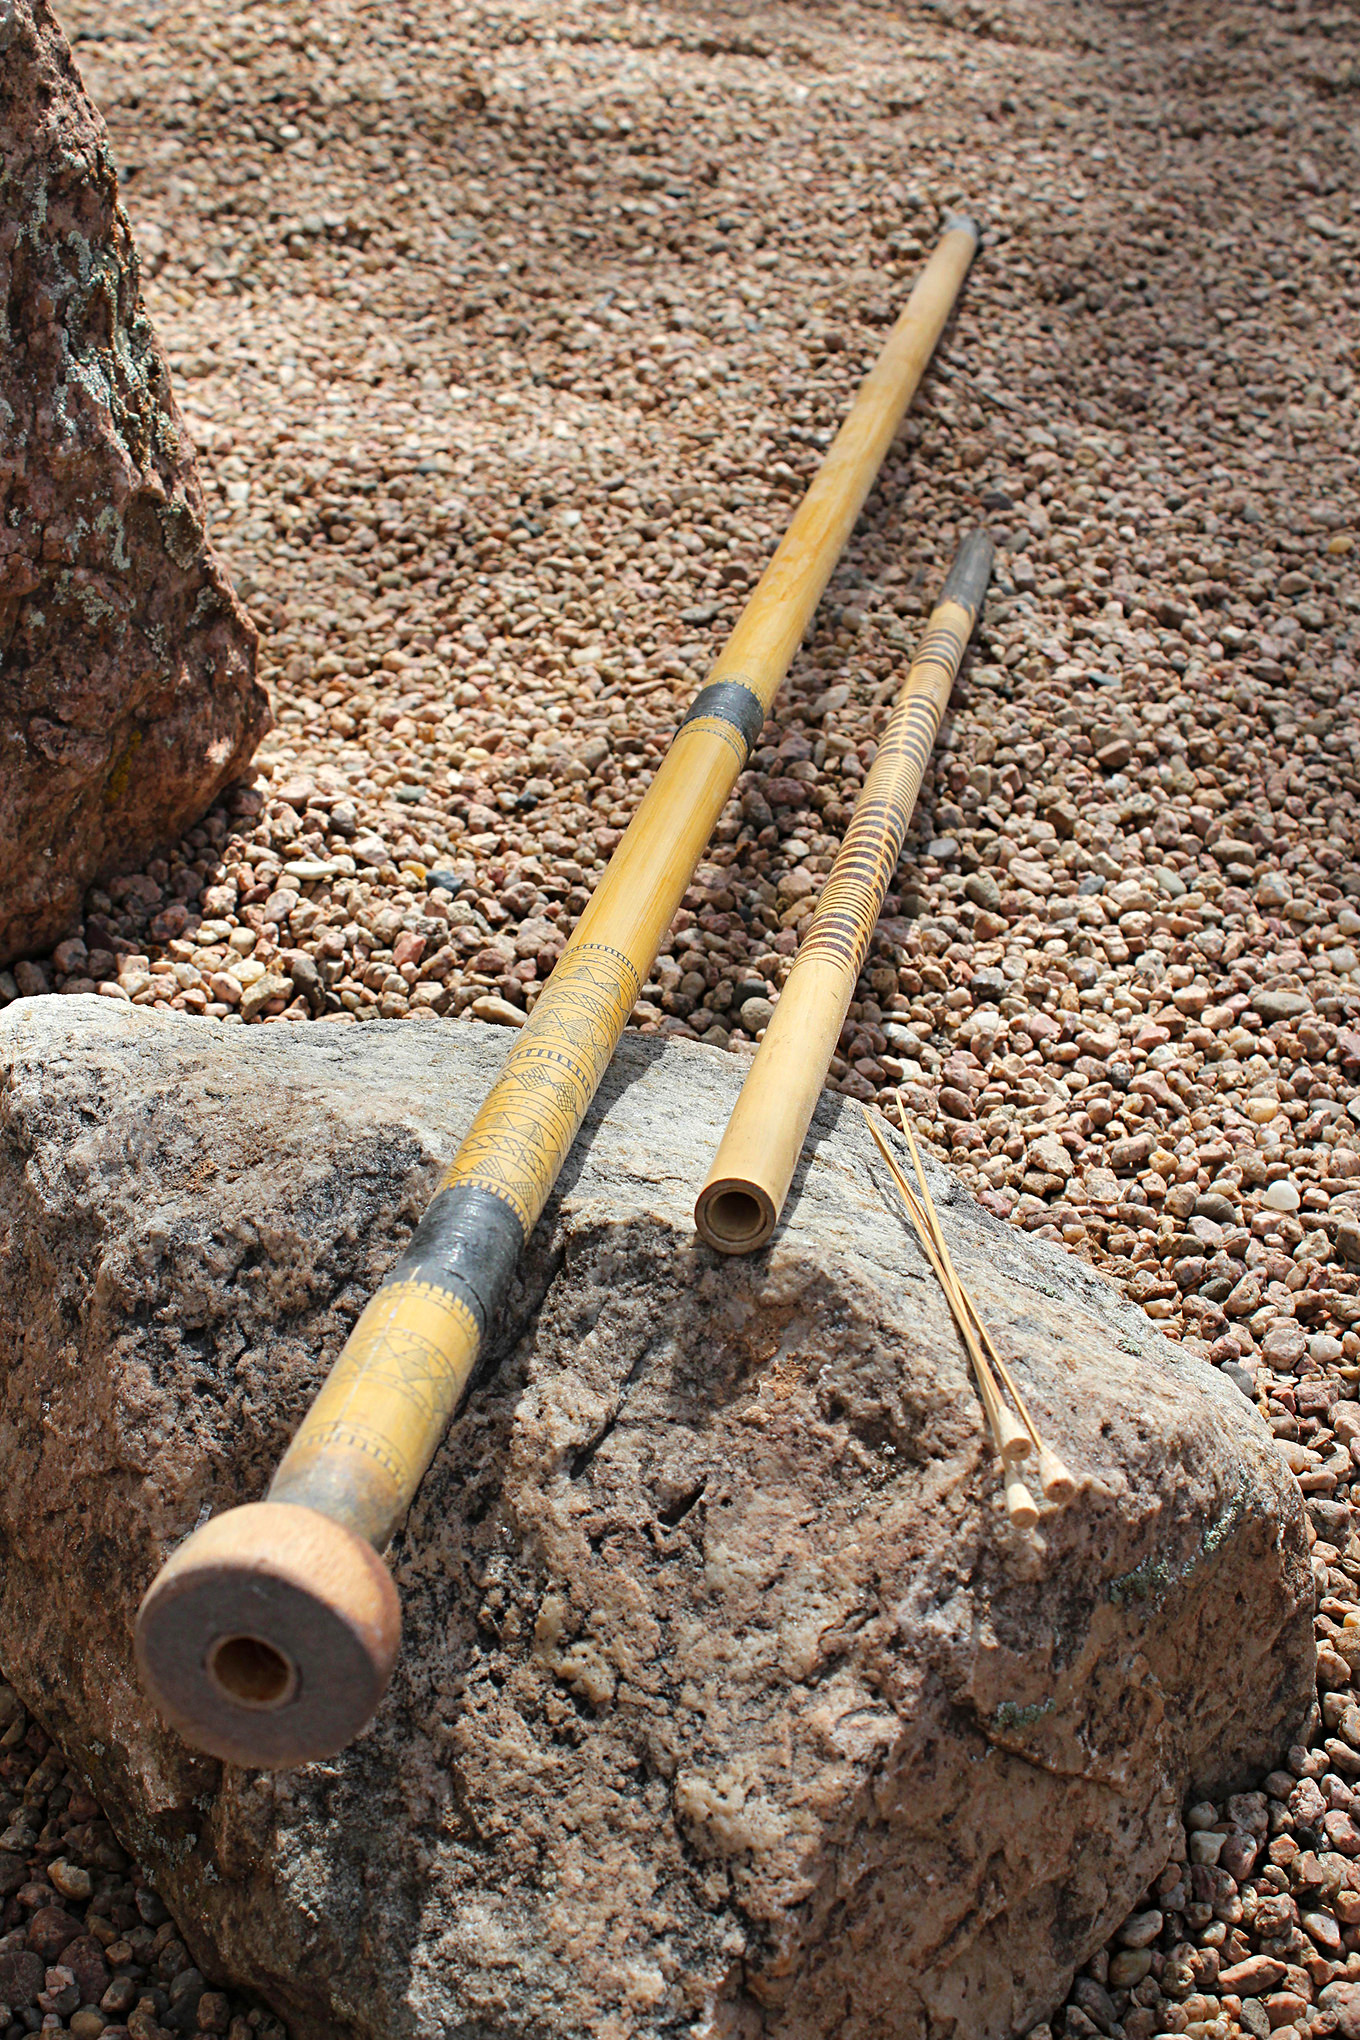
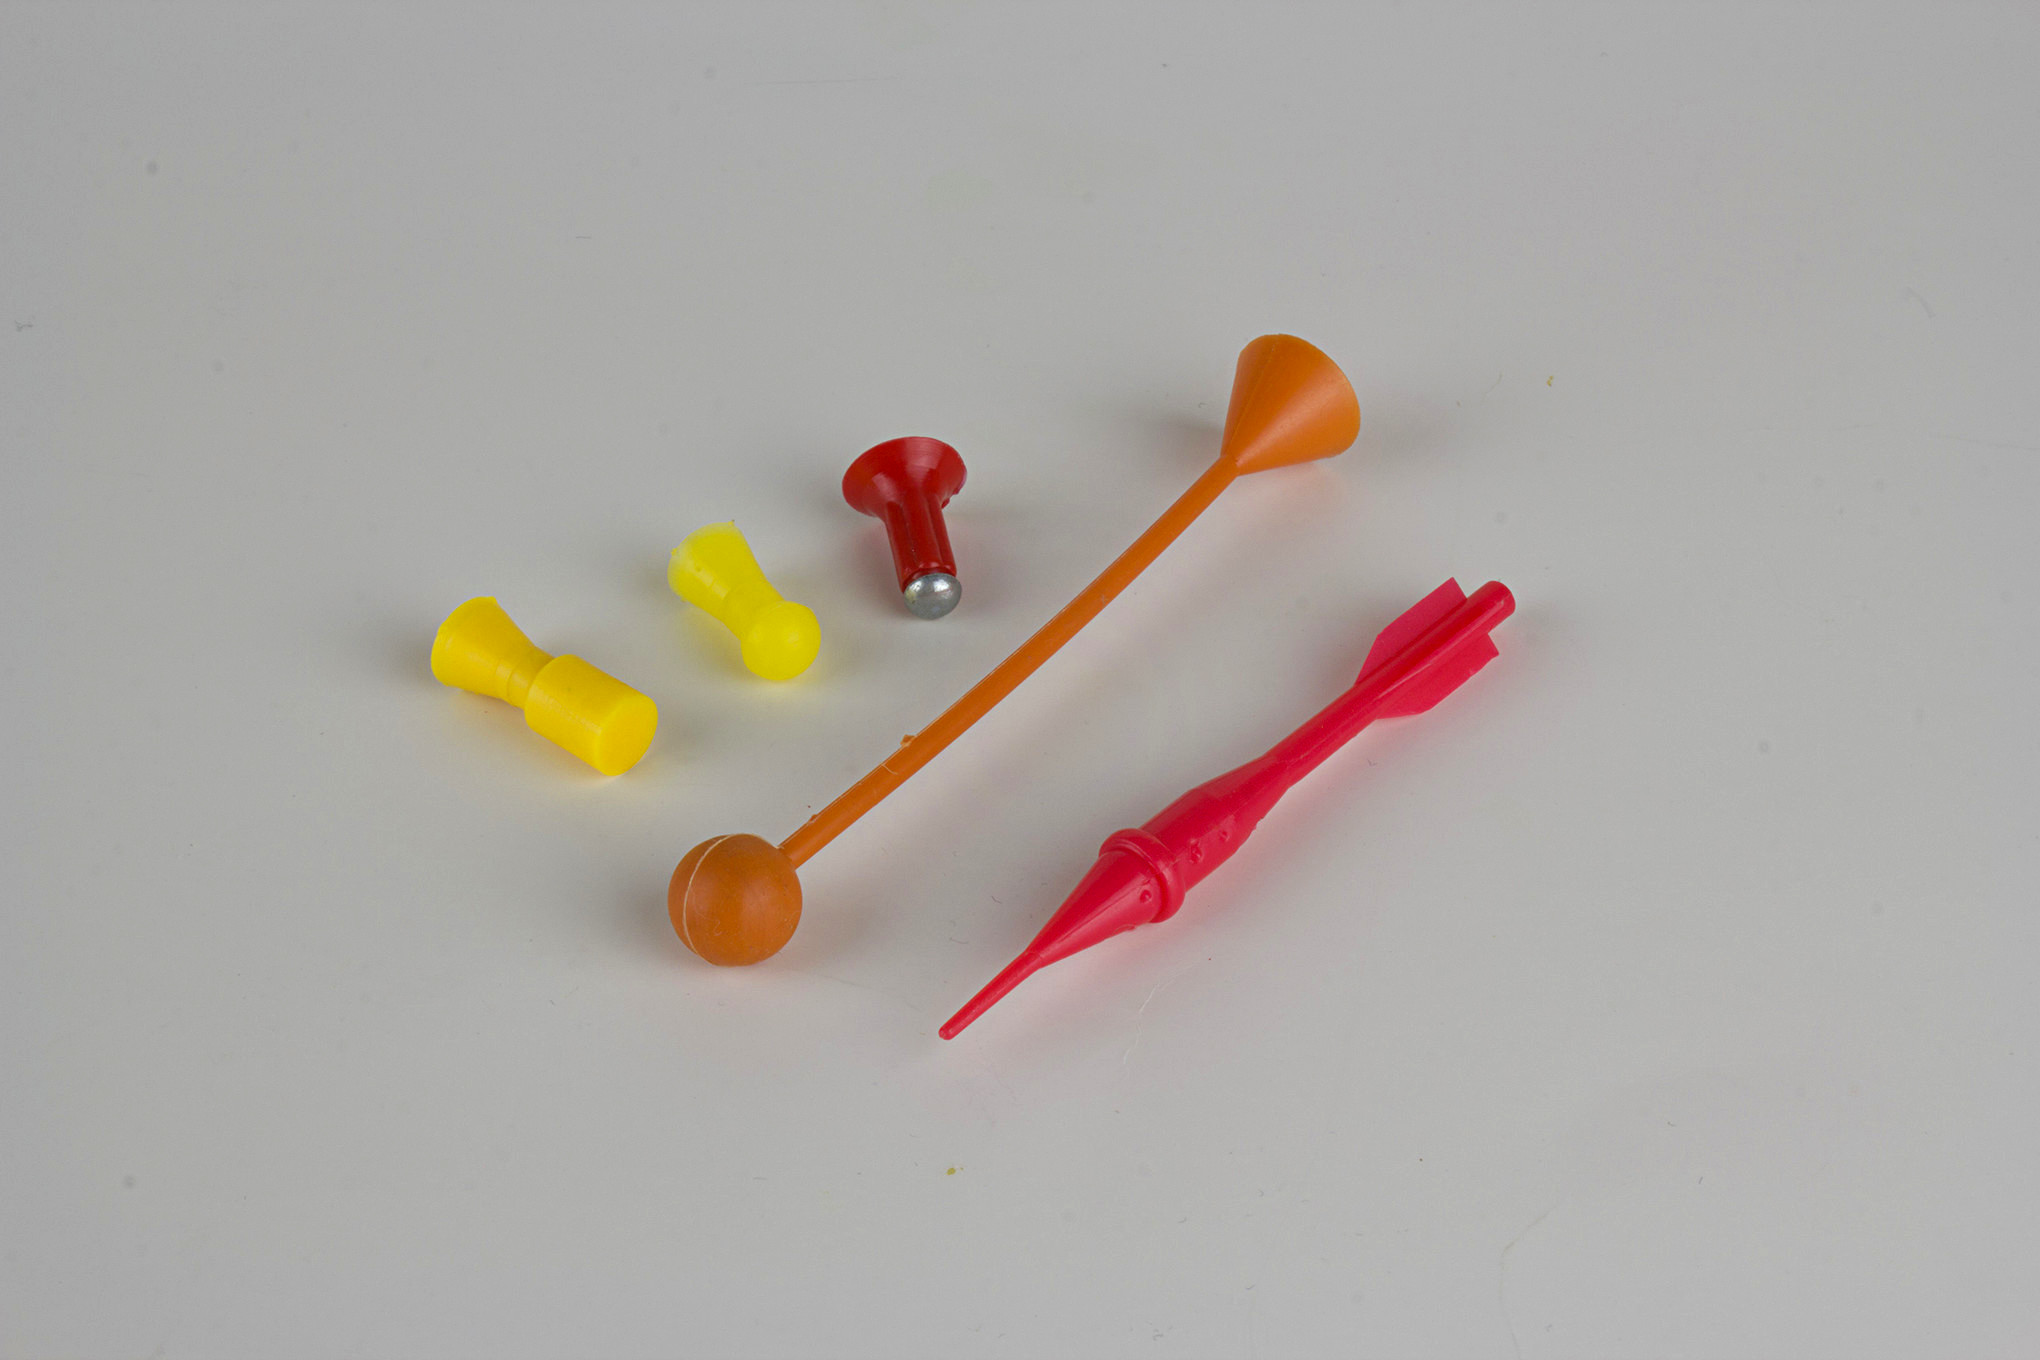
Two traditional blowguns, from Malaysia (with mouthpiece on left) and the Philippines. Their darts consisted of thin bamboo shafts with “stoppers” or seals made of soft wood.
Blowgun Basics
A blowgun is about as simple as it gets. In its basic form, it consists of a rigid tube with a smooth bore typically somewhere between 3?8 and 5?8 inch in diameter and anywhere from 2 to more than 10 feet long. Typically it’s equipped with a mouthpiece at the breech end to allow a better air seal and more effectively focus the shooter’s breath into the tube. That’s it.
Traditional blowguns were usually made of wood or natural reeds, sometimes even featuring composite tube-within-a-tube construction. Southeast Asian ‘guns were most often made of bamboo, providing a significant head start for fashioning the bore. In South America, however, blowguns were crafted by the laborious process of either drilling through the length of a solid piece of wood or splitting the wood, carving a groove in each half, and gluing it back together to create the bore. Longer ‘guns were also either pre-bent or bored on a bias to compensate for the sagging effects of gravity.
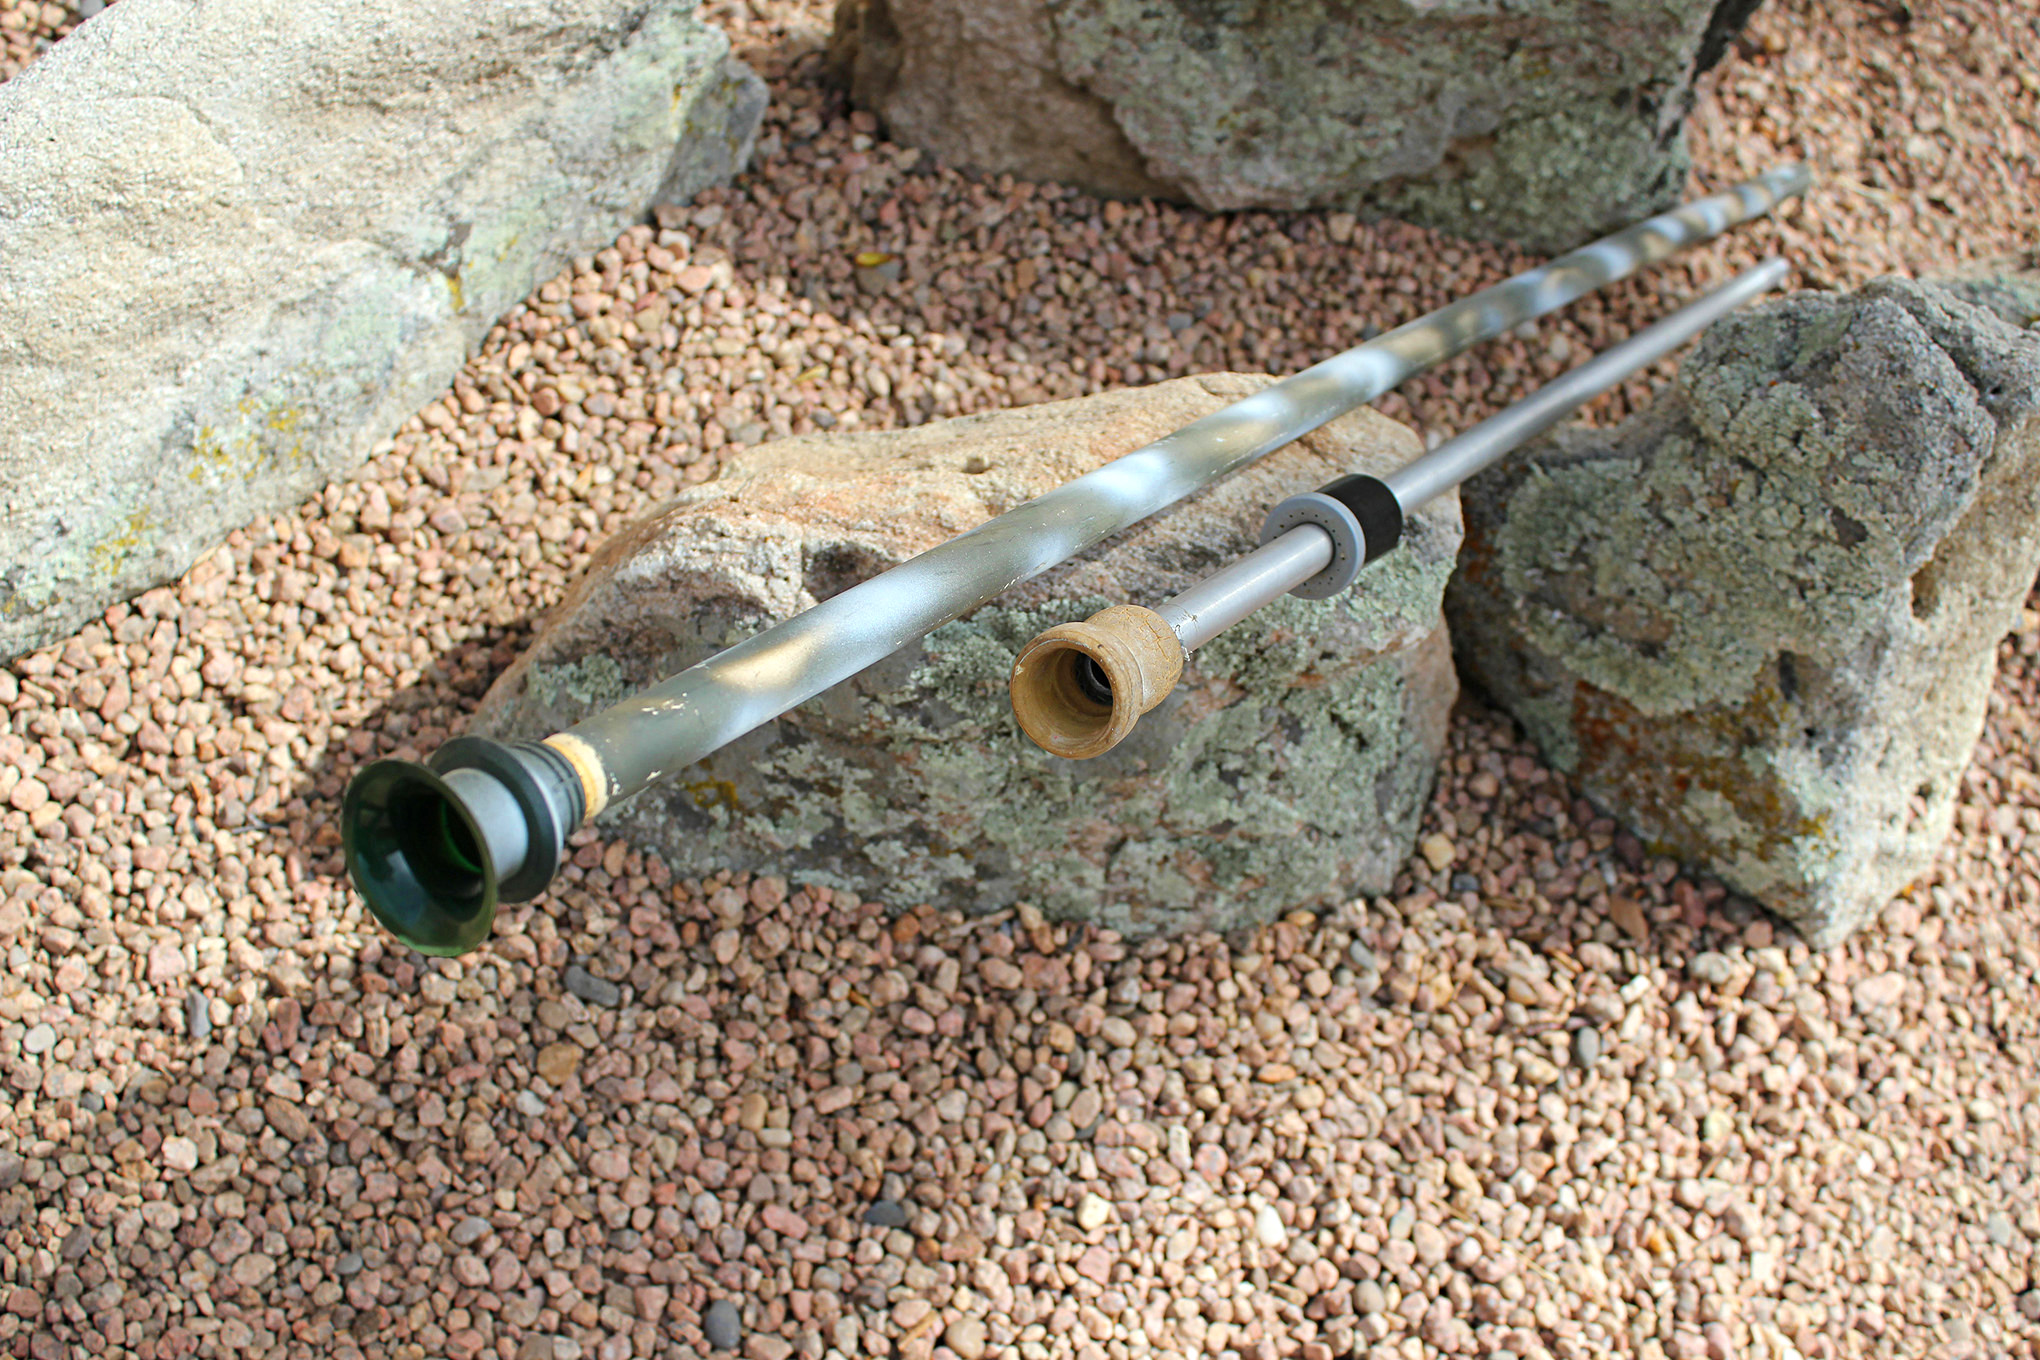
Modern blowguns are generally made of seamless aluminum tubing with injection-molded plastic mouthpieces and quivers for carrying darts.
Today’s commercial blowguns take the same simple design and render it with precision tolerances and more modern materials — seamless aluminum tubing for the barrel and injection-molded plastic mouthpieces. These improvements minimize leakage of air around the projectile and make the most of what your lungs have to offer. Forty-caliber ‘guns are by far the most common, but .38-, .50-, and .625-caliber are also readily available. In addition to conventional one-piece blowguns, you can also find backpackable takedown models with multiple barrel sections joined by plastic or metal couplings.
Projectiles
The most common type of blowgun projectile is a dart consisting of a needle-like shaft and a “stopper” of some sort at the rear end that creates an air seal in the bore of the ‘gun. Native darts were generally made of thin shafts of bamboo or hardwood with cork, kapok, or thistledown seals. Poison-coated darts were small and lightweight, but unpoisoned darts sometimes had hand-carved broadhead points and functioned like small arrows.
Native darts often had points carved into miniature broadheads to increase their effectiveness on game. Instead of wooden seals, many of them also used Q-Tip-like stoppers of twisted thistledown, kapok, or similar fiber.
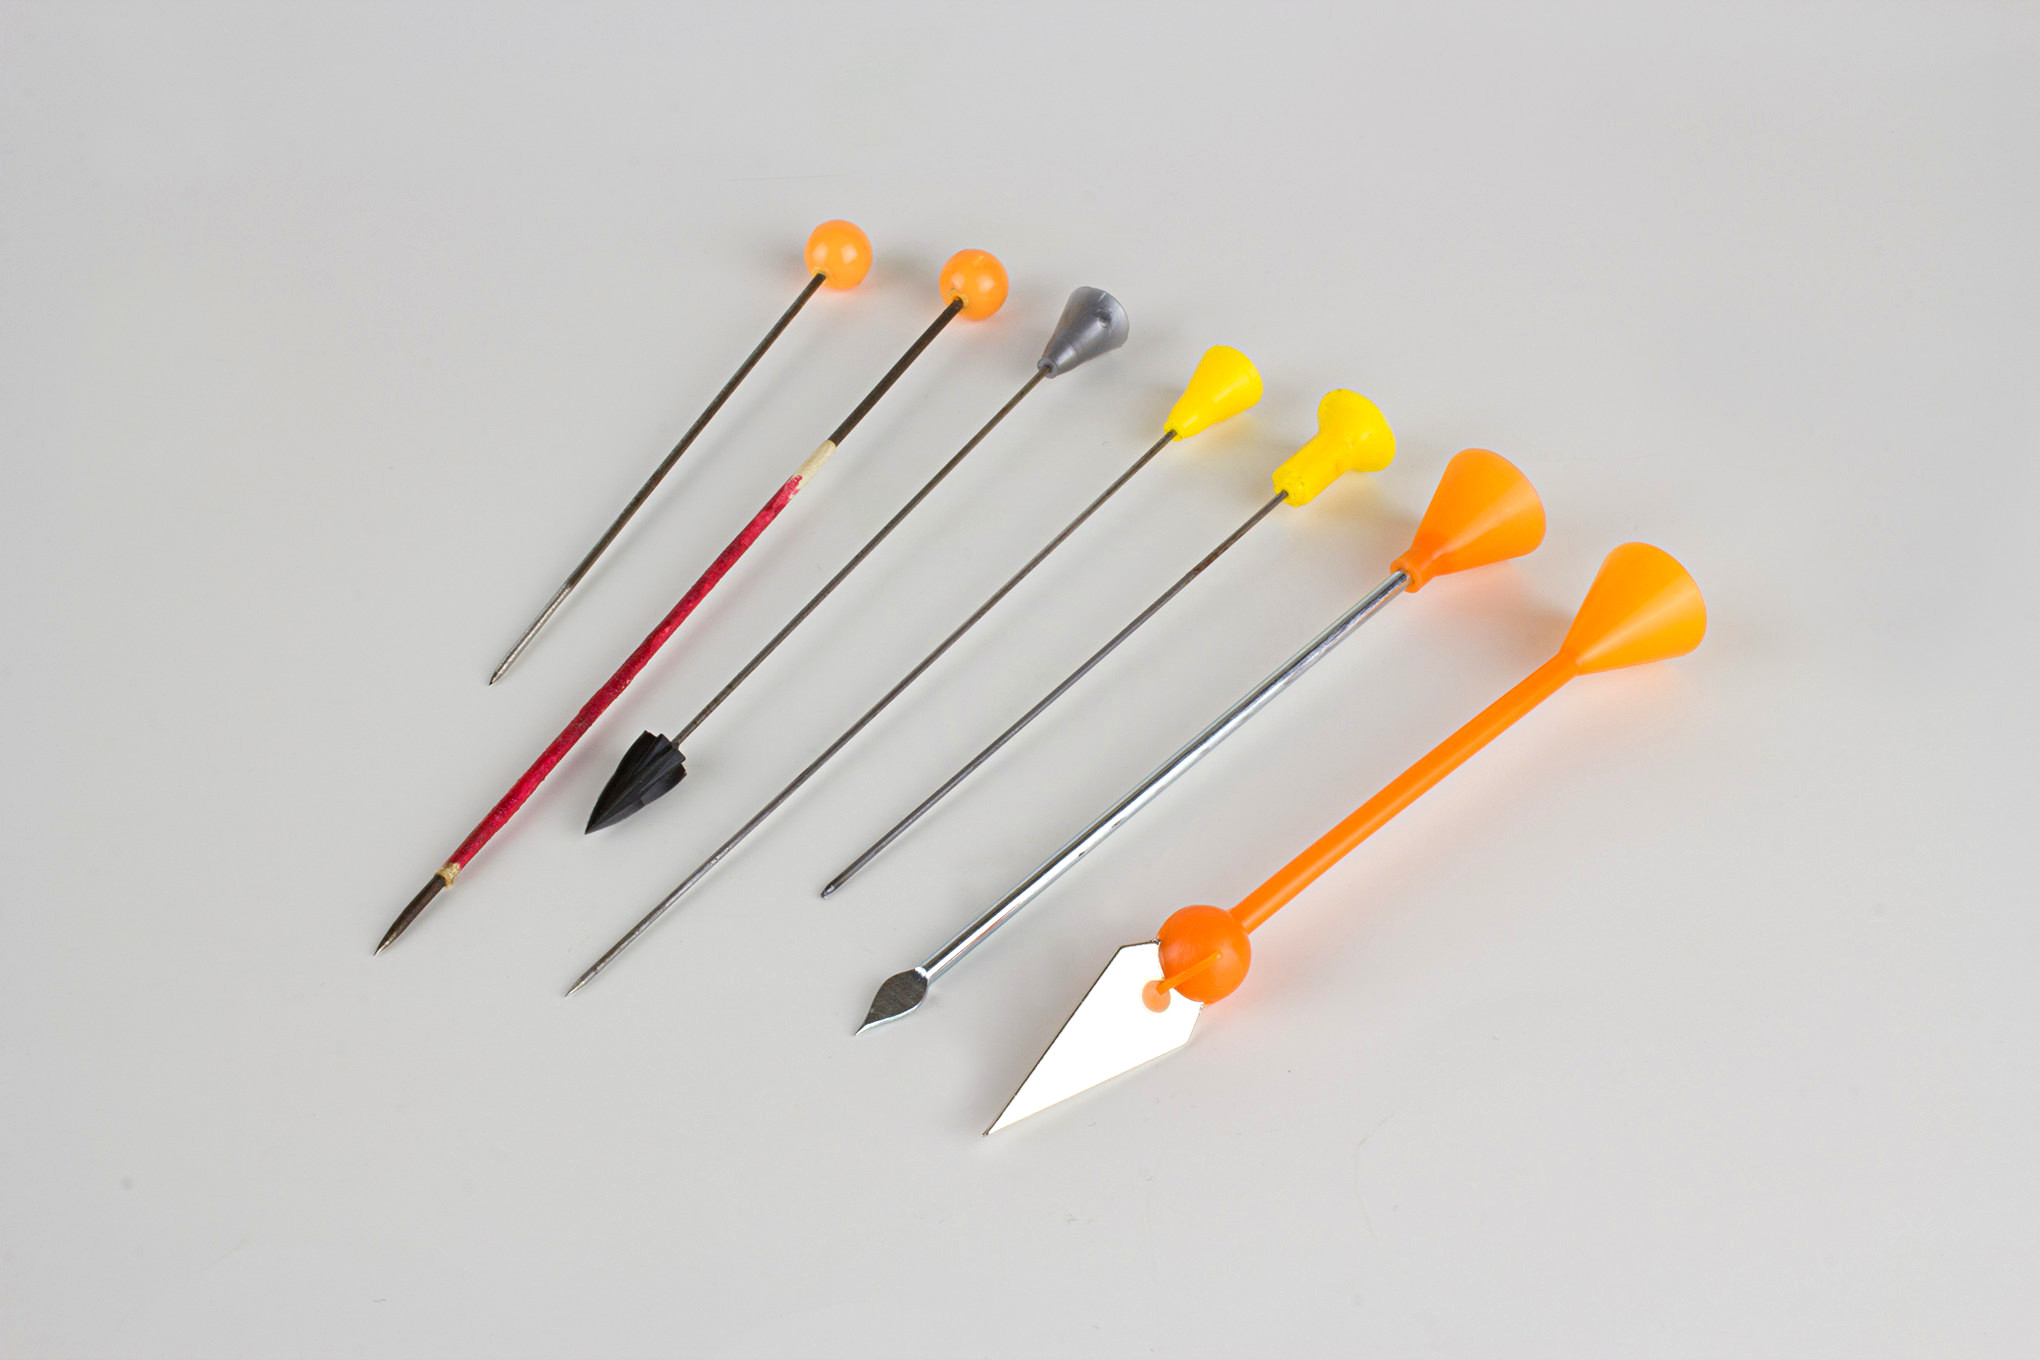
Modern blowgun darts are more high-tech, using spring steel wire for the shaft and aerodynamic injection-molded plastic cones for the seal. Since the wire creates a very small wound channel, hunting darts sometimes also have plastic or steel broadheads to increase their lethality.
Modern blowgun darts have mild steel or spring steel shafts and molded plastic beads or cones to provide a seal in the ‘gun’s bore.
In addition to darts, both primitive and modern blowguns can also shoot impact projectiles ranging from hardened clay pellets to blunt steel-tipped darts to paintballs.
Factory-made blowgun projectiles also include impact or “stun” darts and even safety-tipped darts for use with dart boards.
Performance Check
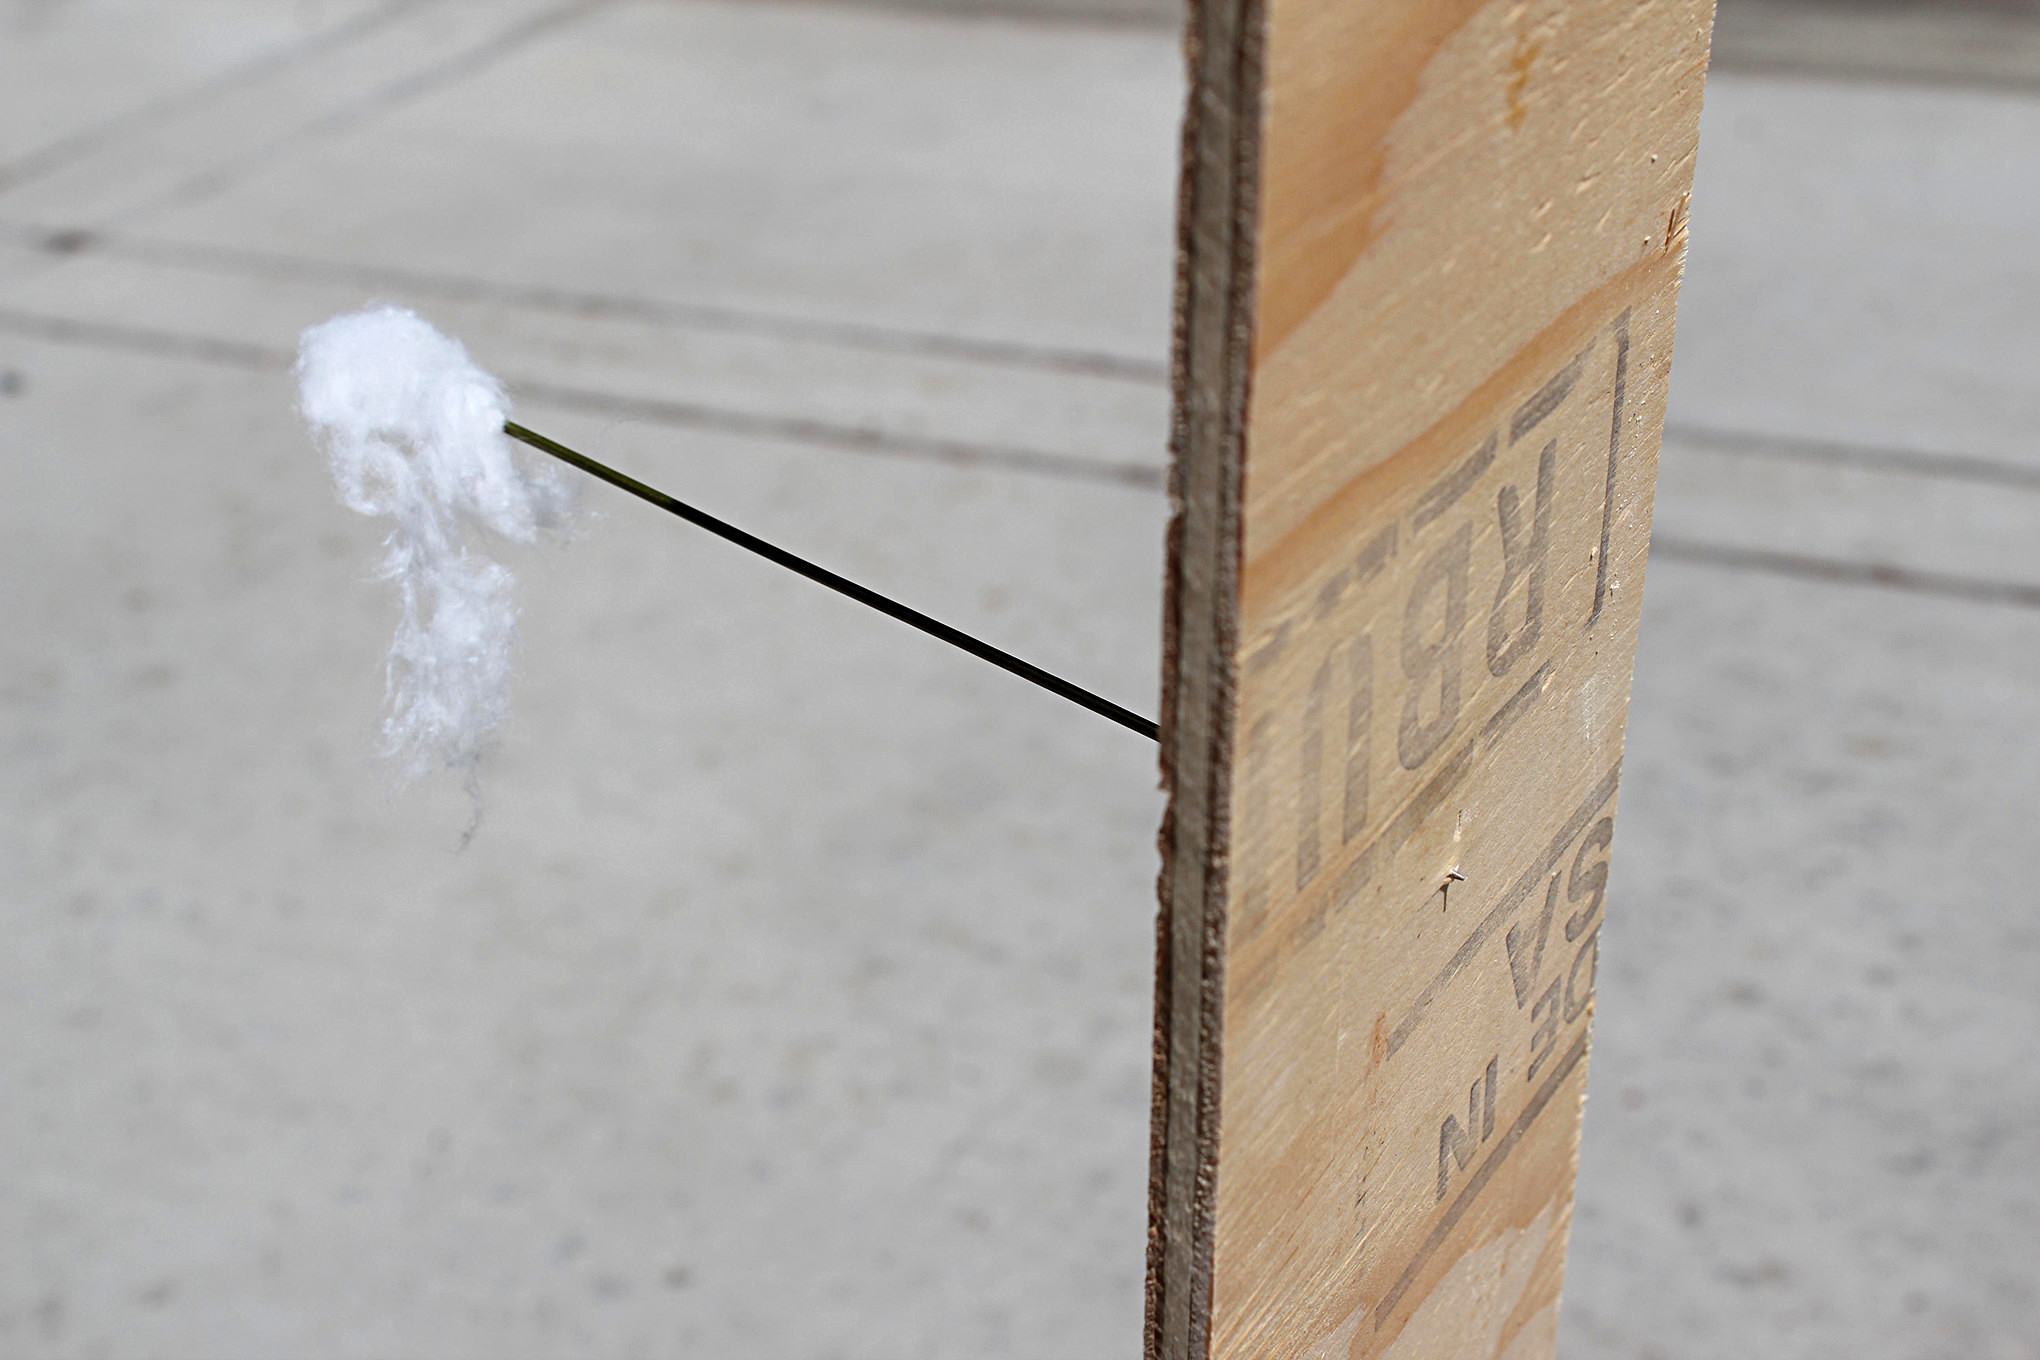
So what can a blowgun really do? Well, in terms of muzzle energy, they’re not nearly as potent as more advanced weapons like firearms. The average .40-caliber blowgun dart weighs about 14 grains. Out of a 4-foot blowgun, that dart will achieve a muzzle velocity of about 155 fps, yielding a muzzle energy of about 0.76 ft-lb. Ballistically, that’s nothing to brag about; however, it’s still enough to bury the shaft of a sharp spring steel dart several inches deep into soft flesh.
The author chronographing a .40-caliber blowgun. Note that the dart has just exited the muzzle. Blowguns can typically achieve muzzle velocities of 150 to 200 fps.
Larger calibers, like .625, usually use much heavier darts (about 44 grains), but produce about the same muzzle velocity. That translates to greater muzzle energy — about 2.33 ft-lb — but at the expense of a shorter effective range. In 40 years of making, shooting, and testing blowguns of all different sizes, I’ve found that bore diameters of .50 to .625 harness a shooter’s breath best and are generally the most powerful. While they don’t hold a candle to a firearm or even an airgun, a well-shot blowgun dart can easily penetrate 3?8-inch plywood — more than enough power to skewer a small animal.
The blowgun is deceptively powerful. Well-shot darts can penetrate 3?8-inch plywood and even a steel trashcan lid.
The maximum range of a typical 6-foot, .40-caliber blowgun is about 100 yards. Its maximum effective range, however, is substantially less. Most blowguns don’t have sights and are aimed instinctively — like “gap” shooting with a bow. Their low velocities also mean rainbow-like trajectories, further limiting practical accuracy. Nevertheless, with a little practice, even novice shooters can consistently hit a grapefruit-sized target at up to 50 feet with enough energy to penetrate deeply.
What Good Is It?
Besides being tons of fun to shoot, blowguns offer a number of advantages to survivalists, including:
They’re inexpensive.
They’re virtually silent.
Both ‘guns and ammo can be stored indefinitely.
Ammo can be reused many times.
They can be shot safely and inconspicuously in areas where ‘guns can’t.
They shoot a wide range of projectiles.
What does all that mean? Well, if society crumbles and a gang of looters is approaching your house, spitting darts at them shouldn’t be your first choice. However, if the system is down, it’s been a month since your garbage has been picked up, and you’re worried about the newly arrived vermin frolicking in your trashcans, the blowgun is the perfect tool.
Similarly, a blowgun would allow you to hunt any meal-worthy critters that wander into range without endangering neighbors, revealing your activity, or burning firearm ammo that might be better reserved for more serious needs.
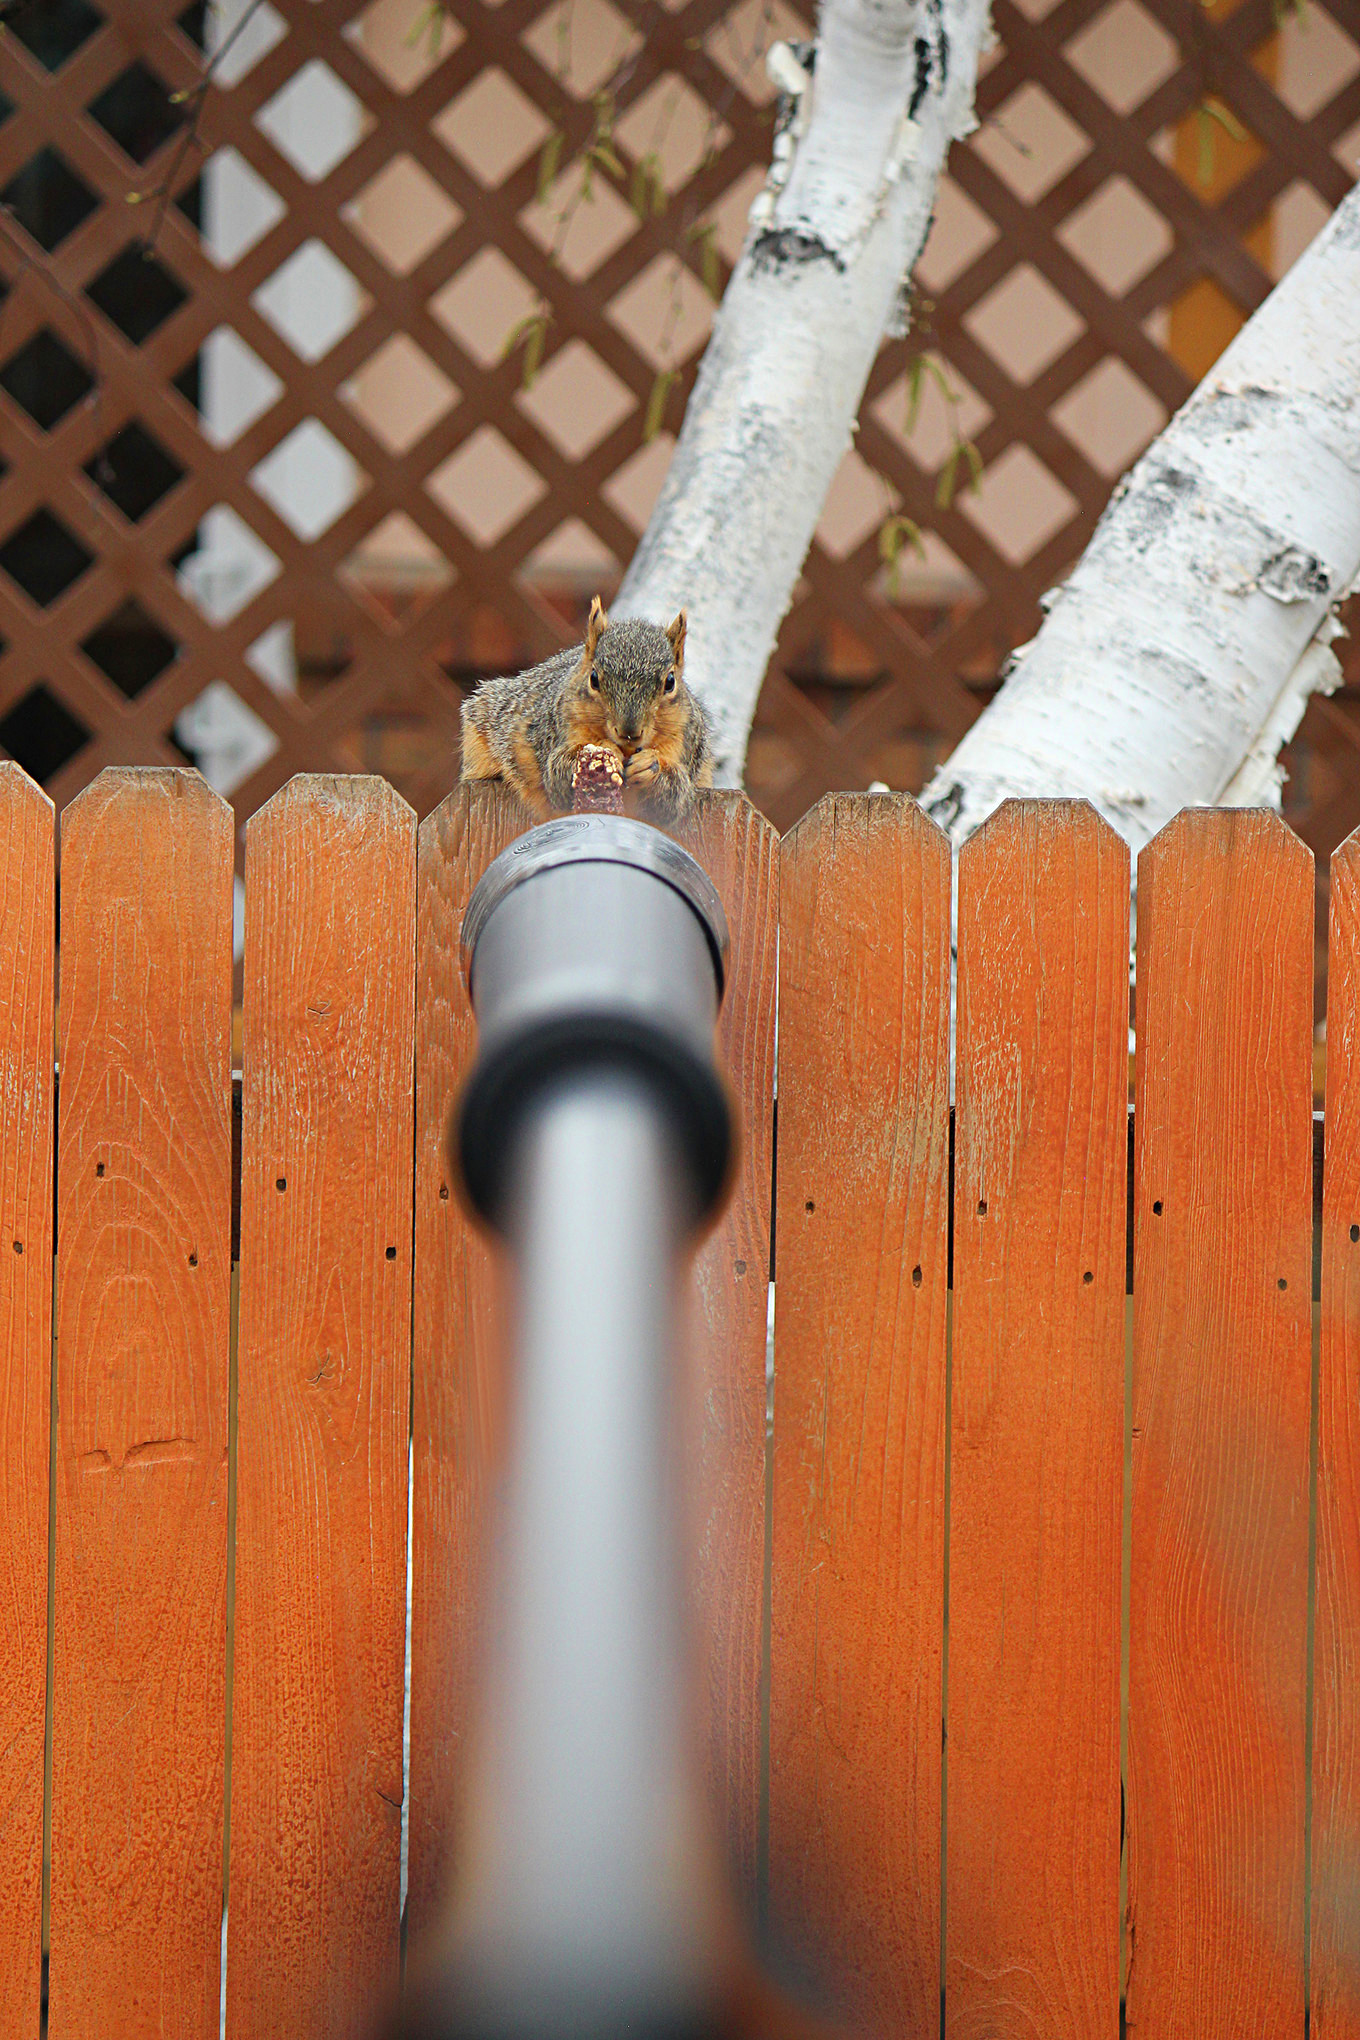
While working in Vietnam and Laos in the early 1990s, the author included a .40-caliber takedown blowgun in his kit to cope with the constant rodent visitors. This rat — shot in the lobby of a Hai Phong hotel — weighed about 3 pounds and was killed with a single homemade dart.
In the late 1980s and early ’90s, I worked for U.S. government agencies investigating the fates of American POW/MIAs from the Vietnam War. I regularly worked in remote areas of Vietnam and Laos and in refugee camps throughout Southeast Asia — places that had two things in common: They didn’t permit firearms, and they were heavily populated by rats. After a few unpleasant rodent run-ins, I was determined to fight back and started packing a .40-caliber takedown blowgun in my kit. Unlike a firearm or even an airgun, it didn’t look like a weapon (especially disassembled) and was innocuous enough to fly under my hosts’ radar.
At first, I used the standard 3- to 4-inch spring steel darts that came with the ‘gun. Although I had no problem hitting the rats and burying the darts completely into their nasty little bodies, the result was a population of very pissed off rodent versions of Pinhead from Hellraiser. To fix the problem, I crafted more potent darts with thicker, longer spring steel shafts and paper cone stoppers. If possible, I tried to shoot the rats as they scurried along the baseboard.
The longer, heavier darts would go right through the rat and have enough power to stick into the wall, pinning it in place for an easy second shot or a quick smack with a hammer. Even if it wasn’t stuck to the wall as a rat kebob, it was a lot harder for the critter to run into holes, crevices, and all the other places wounded rats go to die — again providing the opportunity for follow-up shots if necessary.
DIY
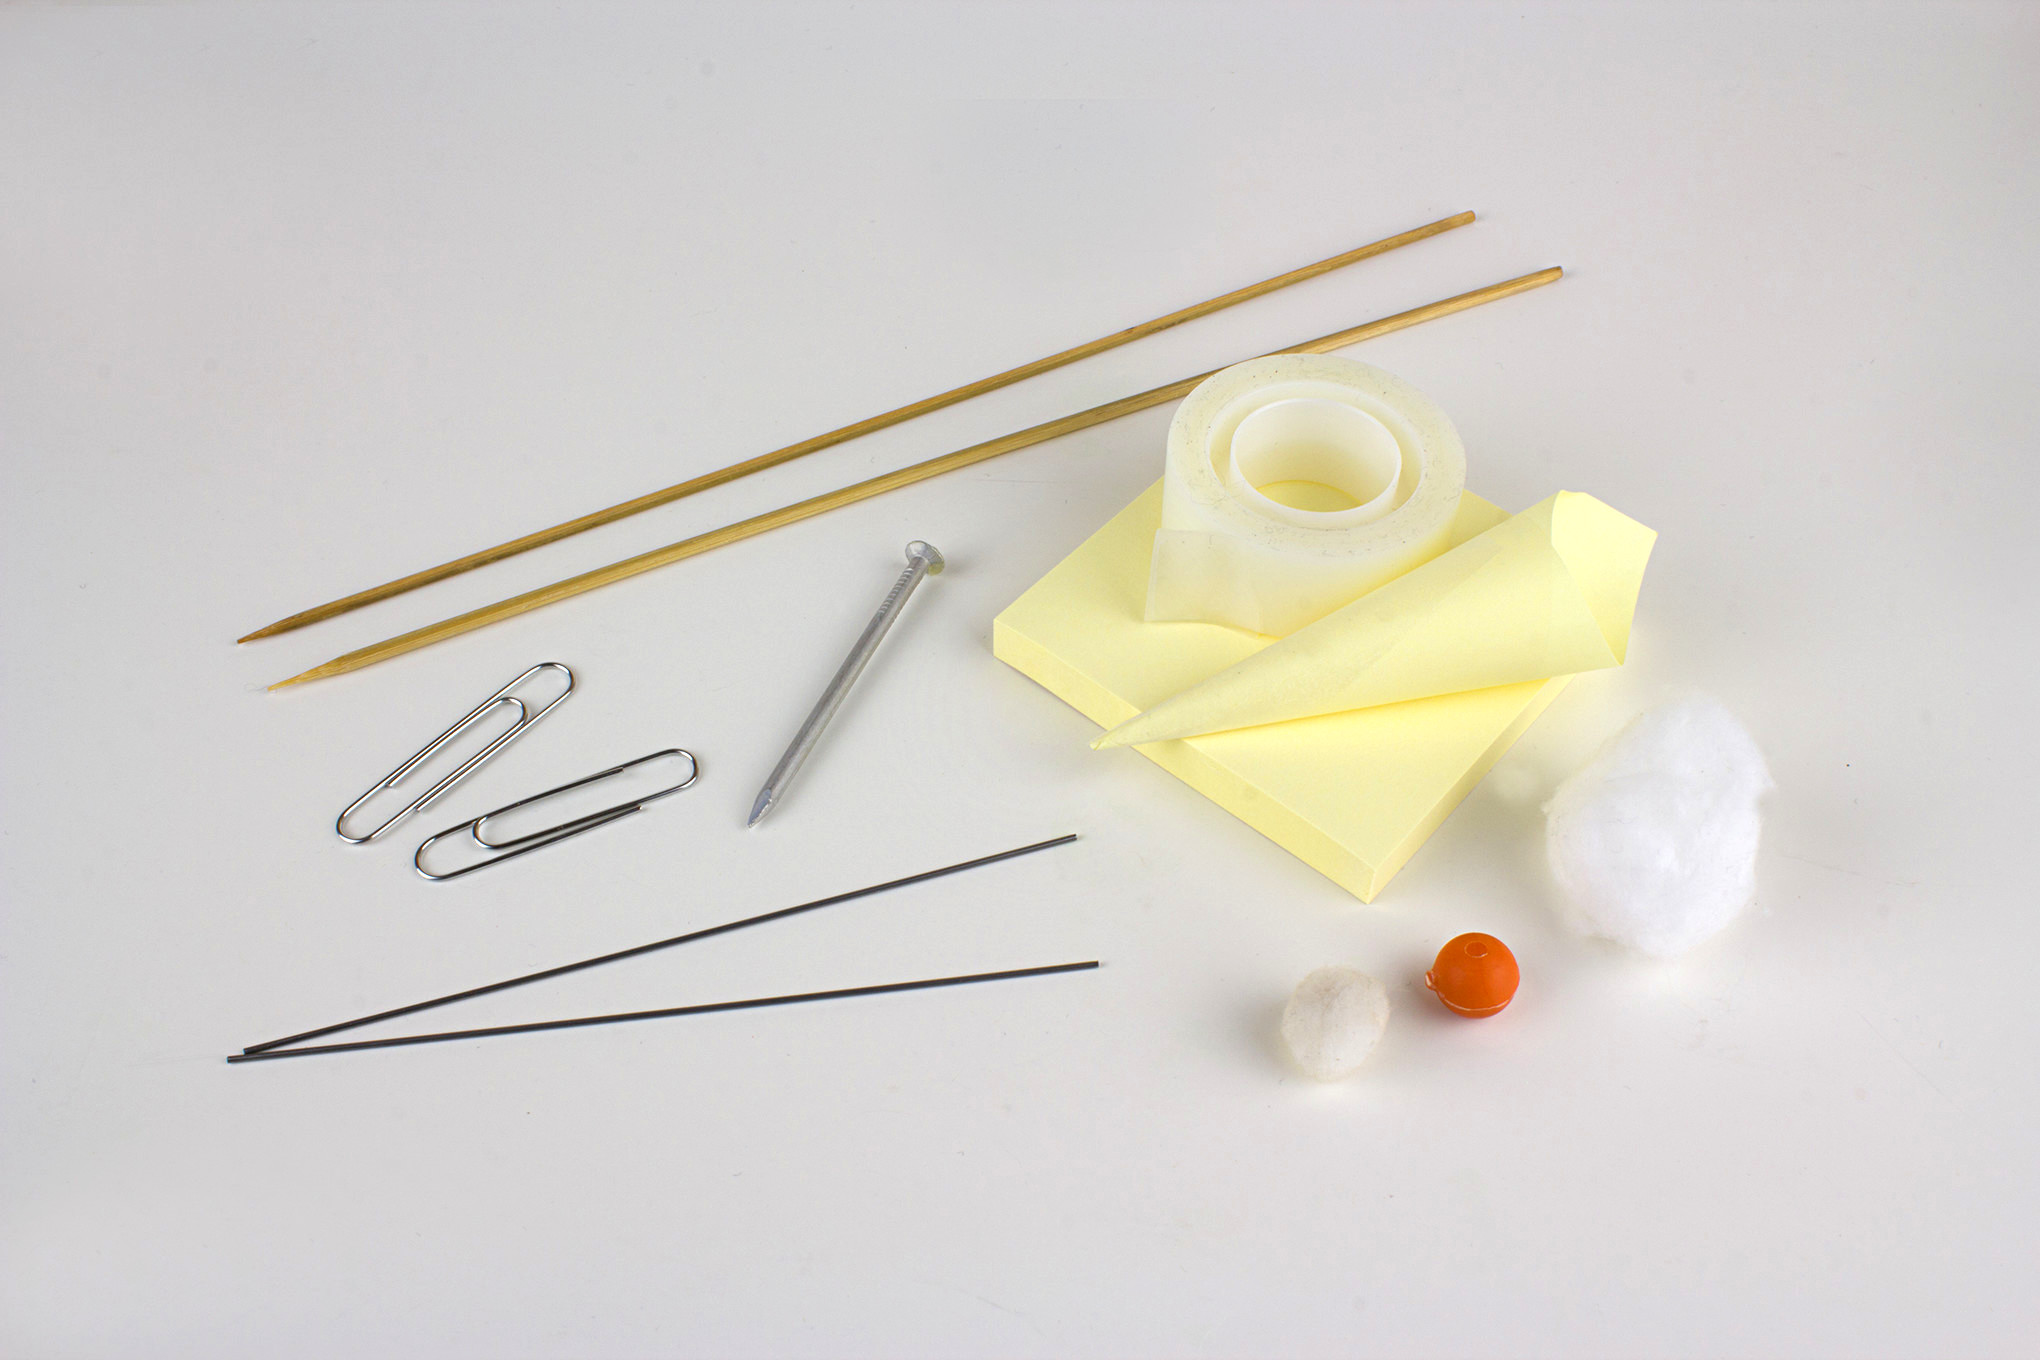
Because blowguns and the projectiles they shoot are so simple, they make outstanding expedient weapons and are great DIY projects for preppers. For the ‘gun itself, all you need is a length of straight, rigid tubing 4- to 6-feet long with a smooth interior and a suitable bore diameter. Aluminum tubing, plastic, PVC, and copper plumbing pipe, and even electrical conduit all work well, as long as you deburr or chamfer both ends of the tube so your darts will fly true. A simple mouthpiece can be crafted from the neck of a 2-liter soda bottle and a few wraps of duct tape, but rubber crutch tips and pill bottles also work great.
Improvised dart shafts can be crafted from music wire, bicycle spokes, nails, bamboo BBQ skewers, and even paper clips. Dart seals can be made from cotton balls, paper cones, hobby pom poms, plastic beads, and any other lightweight material that will fit your ‘gun’s bore.
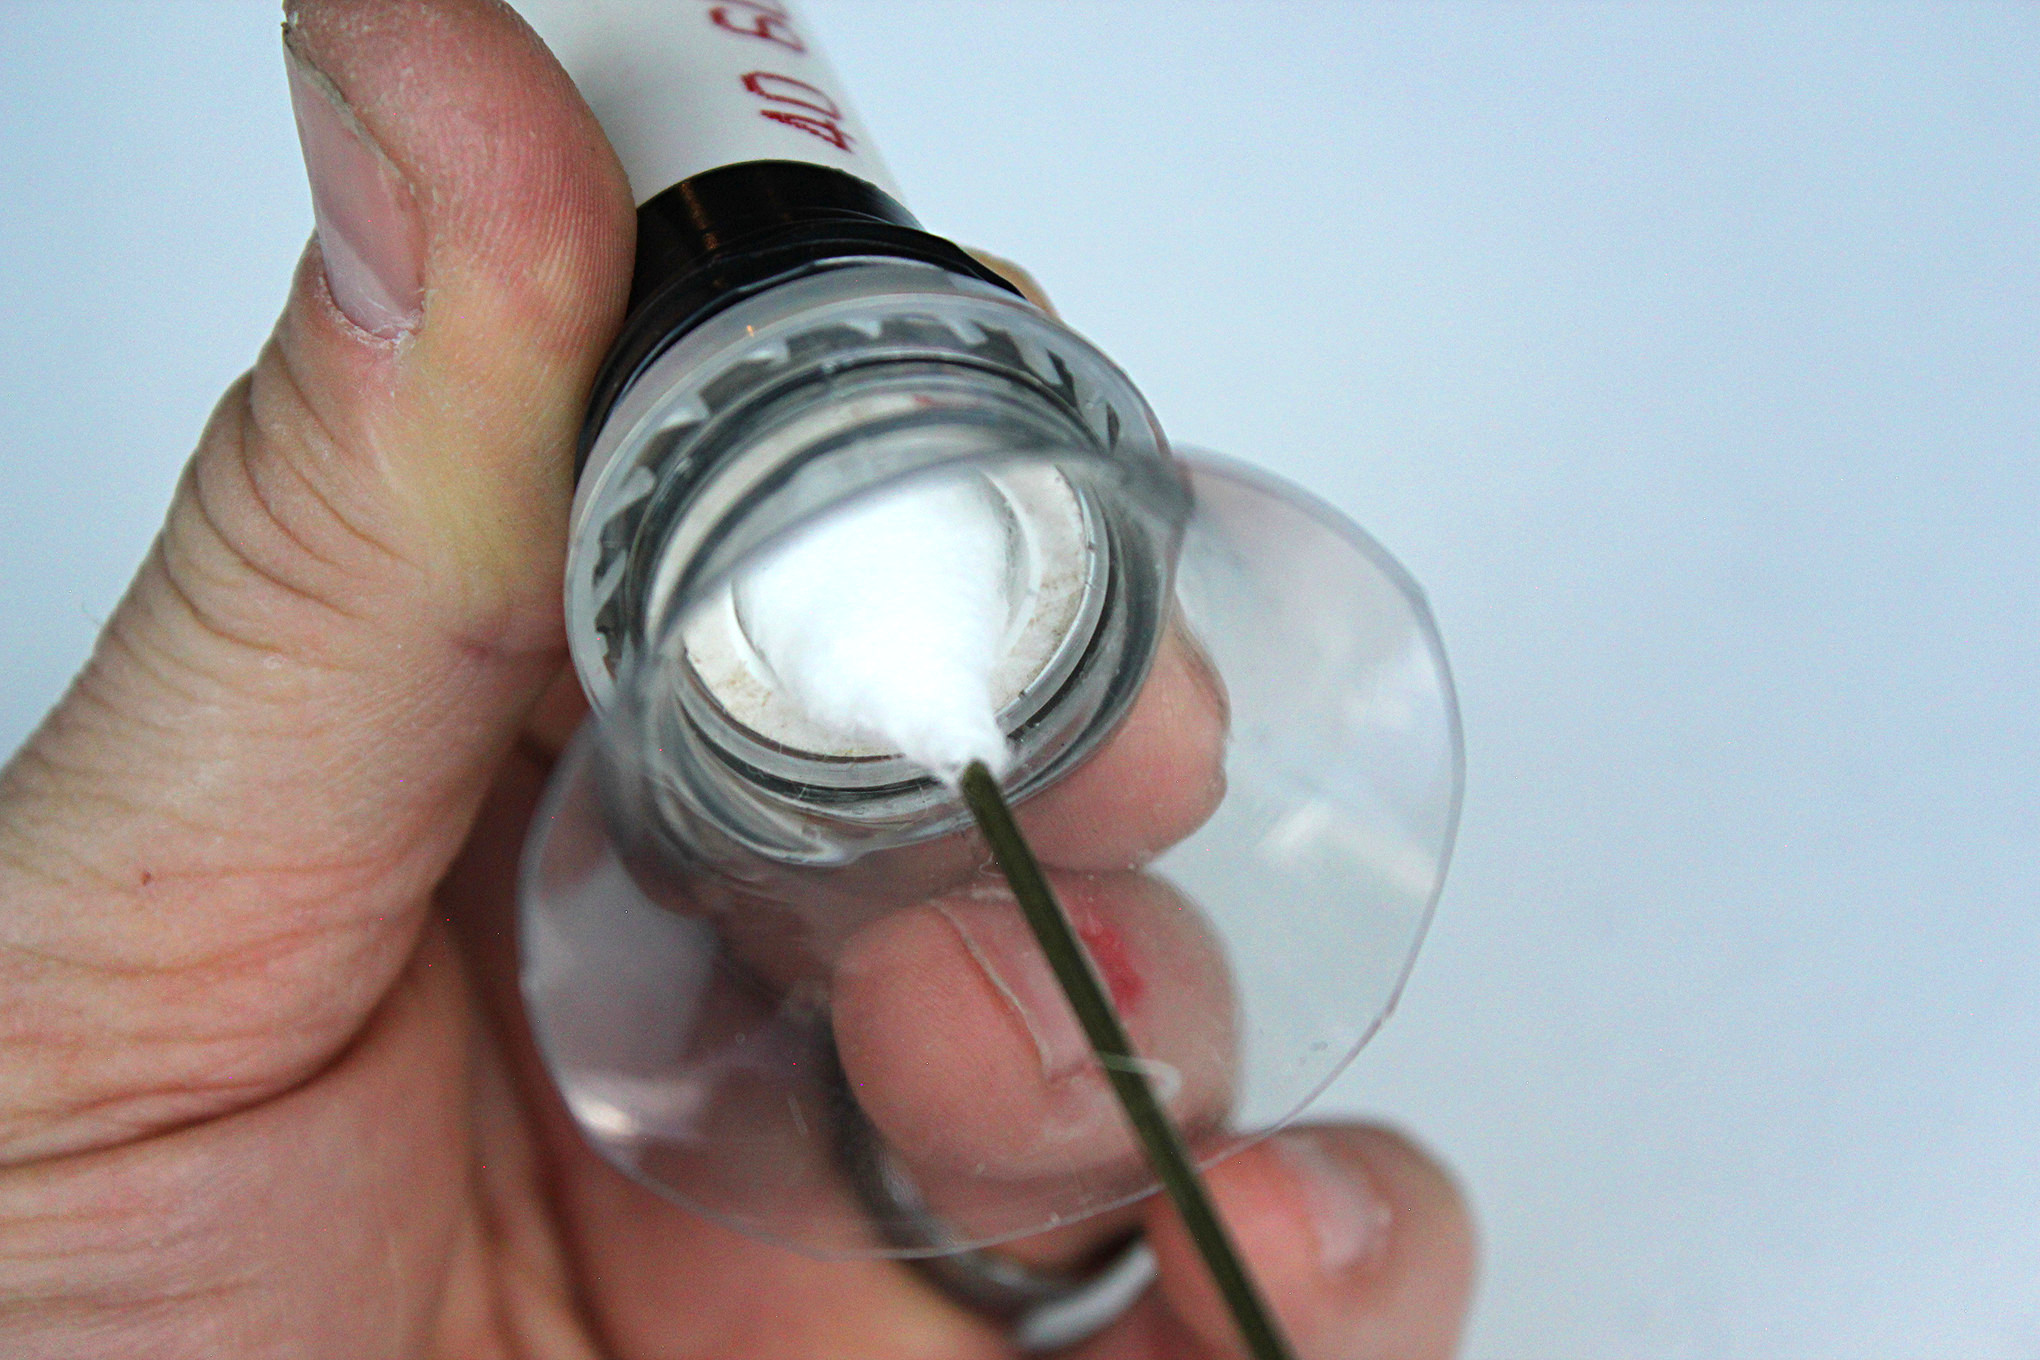
Darts are also quick and easy to make. For the shaft material you can use bamboo BBQ skewers, bicycle spokes, nails, wire clothes hangers, straightened paperclips, and of course spring steel wire from the hobby shop. The easiest way to make an air seal is to notch the rear end of the dart or coat it with a drop of Super Glue and then wind a cotton ball around it. Pull the cotton ball apart a bit and spin the dart in your fingers so the cotton wraps around the shaft. Keep going until you achieve the appropriate diameter for a good air seal in your ‘gun’s bore.
Cotton ball seals are great because they act almost like the fletching of an arrow to help stabilize darts in flight, though they don’t hold up well to multiple shots and must be replaced. If you prefer darts that can be reused more readily, air seals can also be made from rolled paper cones (secured with Scotch tape), plastic beads, corks, golf tees, or anything else that fits your bore snugly and isn’t too heavy. When crafting your darts, it helps a lot to cut a short section of your barrel tubing as a size gauge. If they’re too big, it’s much easier to push a stuck dart out of a 2-inch tube than a 6-foot one.
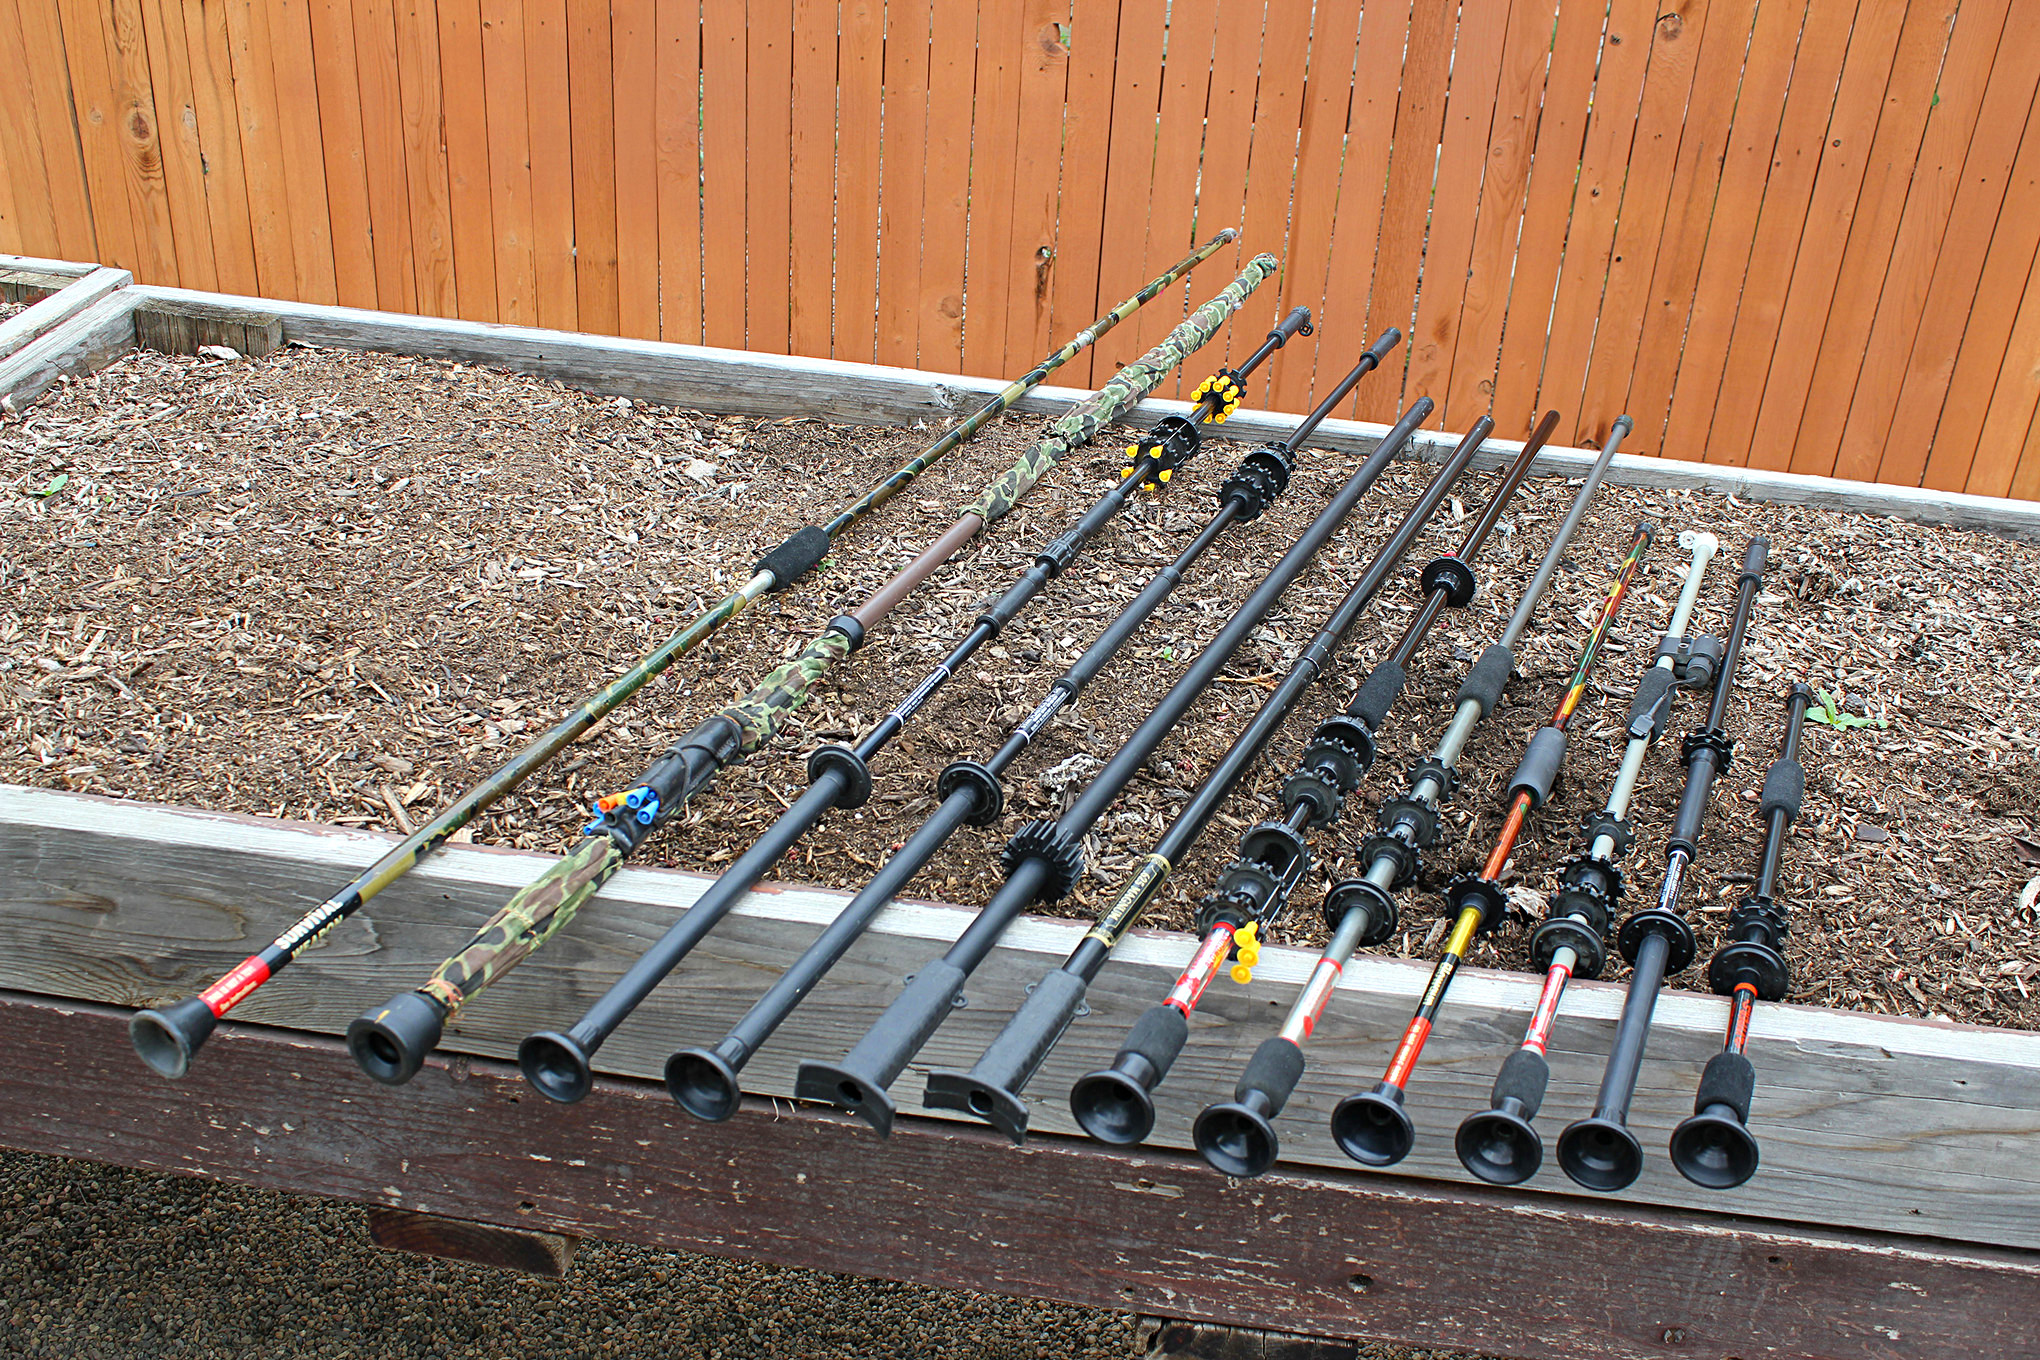
Because of their simplicity, blowguns are very easy to make from readily available materials, as these DIY ‘guns illustrate.
If you’re not the DIY type, the internet is full of sources for commercial blowguns, dart kits, impact projectiles, ‘gun-mounted quivers, and lots of other stuff. Some overachieving types have even developed magazine-fed and revolver-style multi-shot attachments as well as laser sights to pimp your blowgun. Give a man a rope and he wants to be a cowboy ….
Blowgun Technique
Before shooting your blowgun, first find an appropriate target. Steel-shafted darts easily penetrate deep enough into wood to require pliers to pull them out, so opt for a thick piece of foam or layered, corrugated cardboard instead. You want enough density to stop the dart without shearing off its head, while allowing the shaft to be easily removed. Place your target in a safe, controlled area away from people, pets, and anything else that you really wouldn’t want to skewer with a fast-moving, sharp piece of steel.
Hold your blowgun with one hand near the mouthpiece and the other supporting the body of the ‘gun. I prefer to put my dominant hand in front with my index finger extended along the barrel to help point the ‘gun naturally.
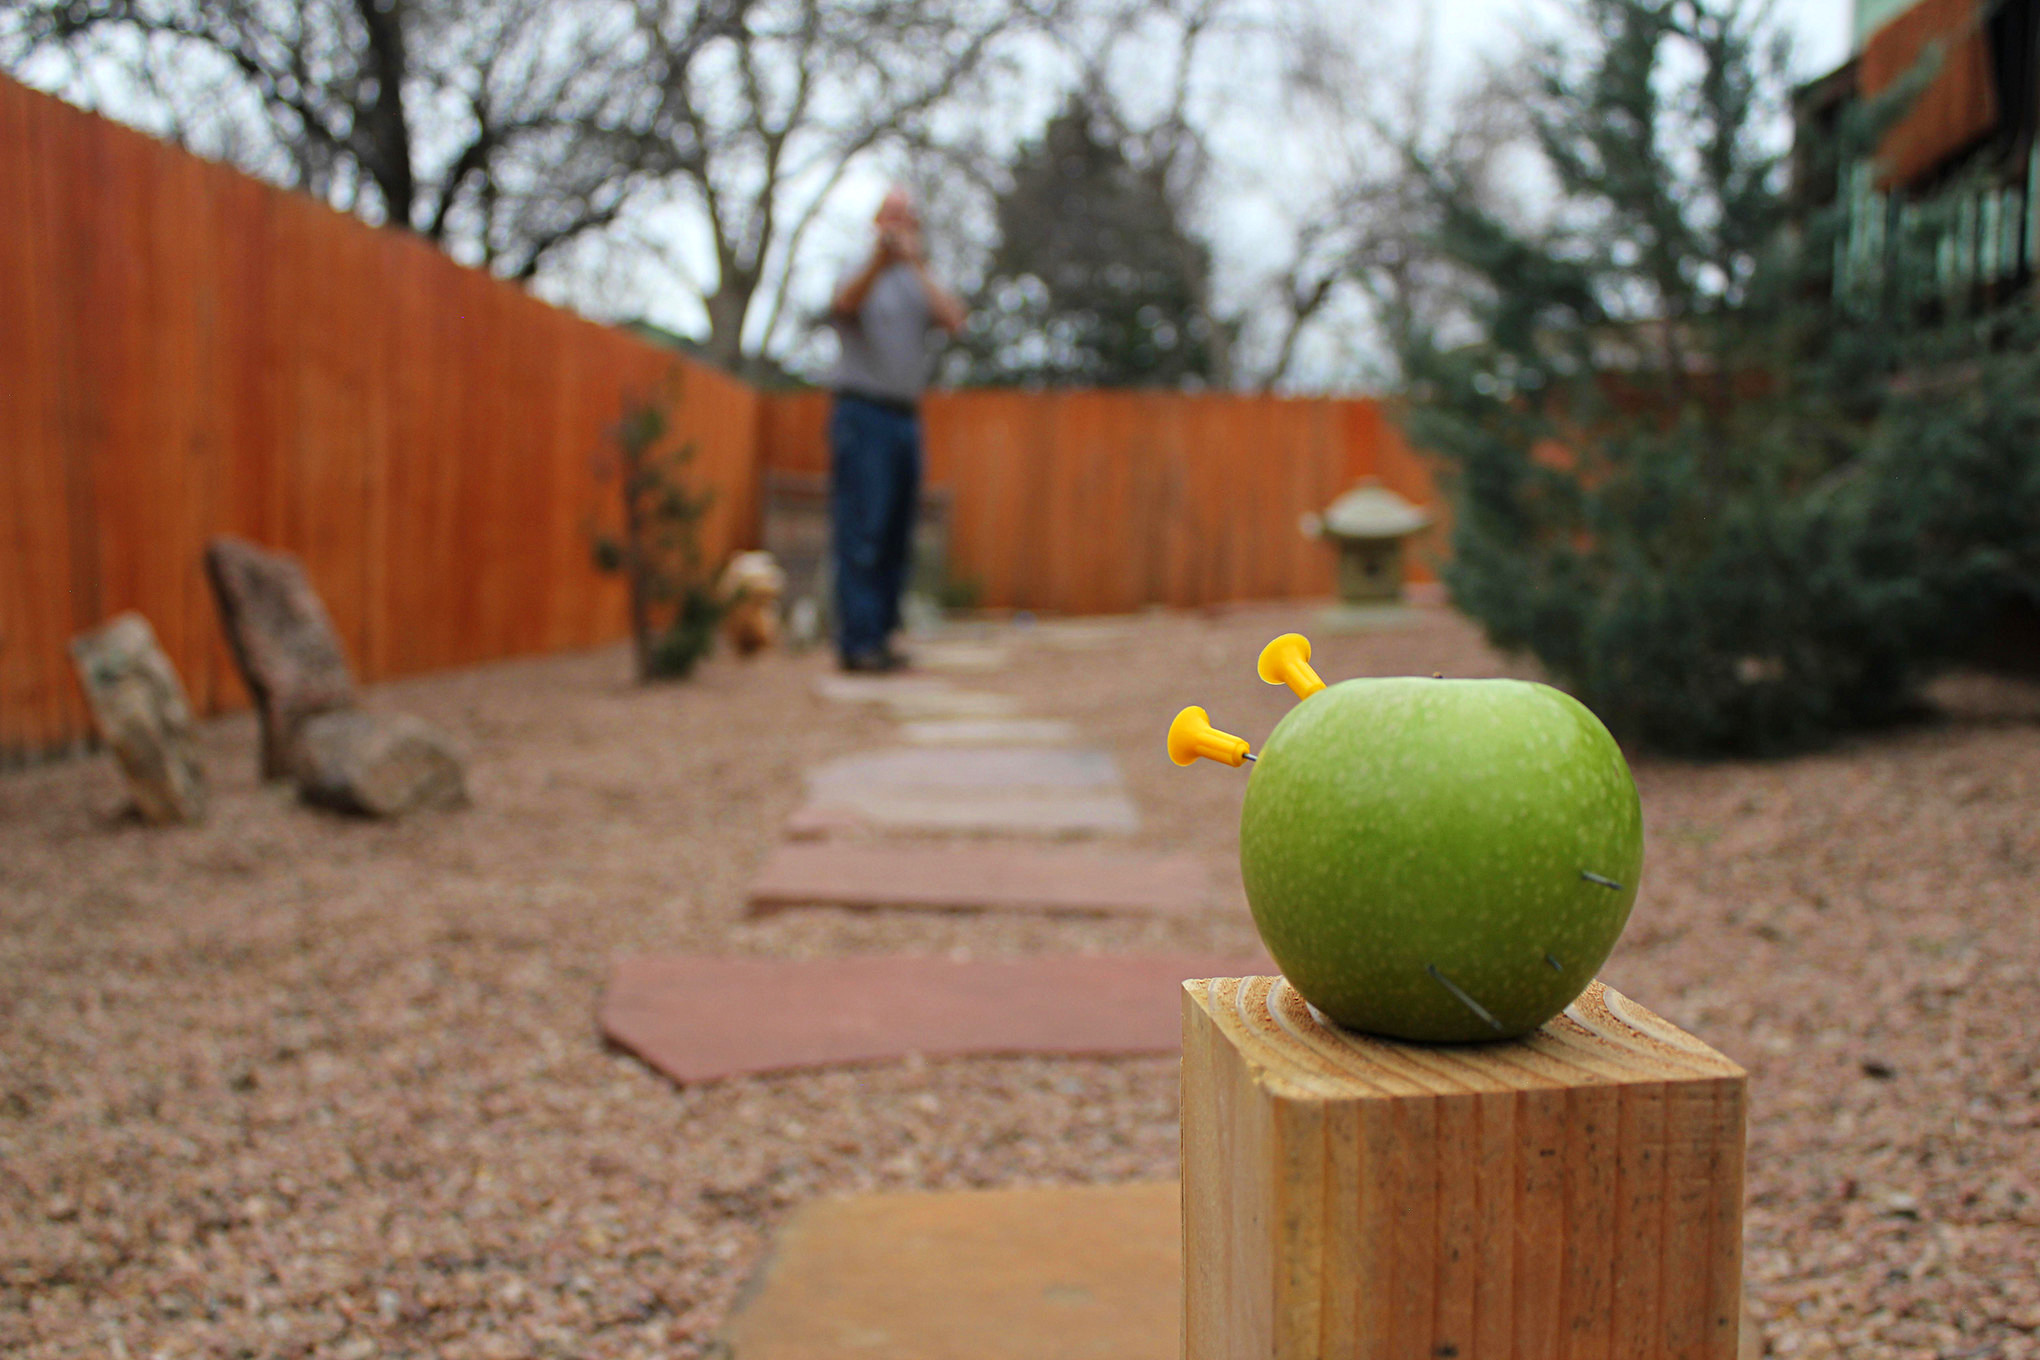
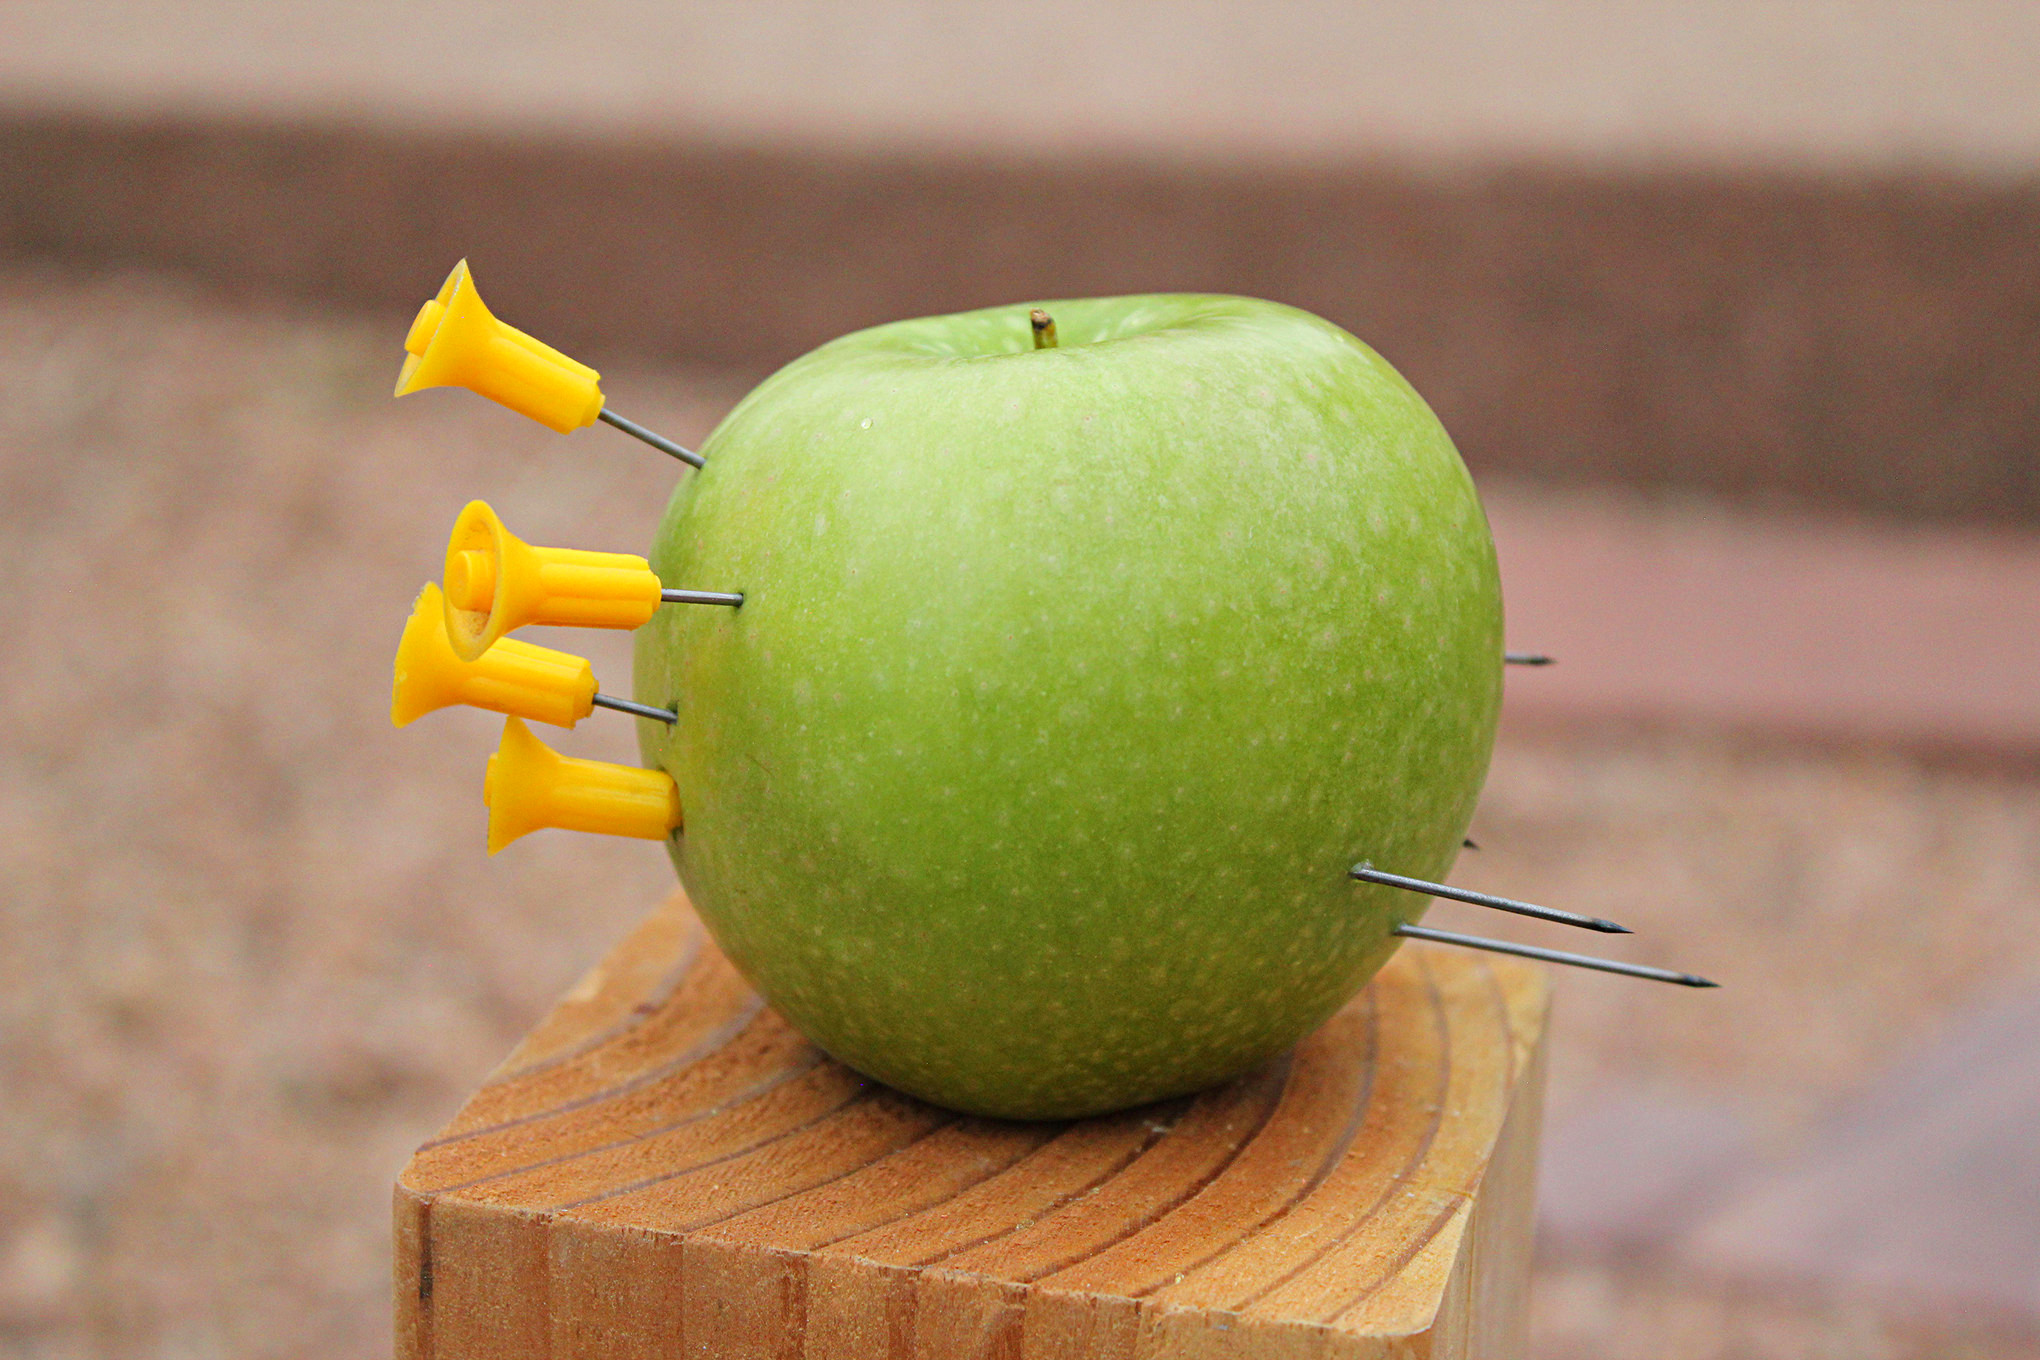
Although it doesn’t have sights, the blowgun can be amazingly accurate. Here the author easily puts a cluster of darts in an apple from about 25 feet.
Load the dart into the breech end and, with your mouth well away from the mouthpiece, take a deep breath. Press the mouthpiece tightly to your lips, aim the ‘gun at the target, and blow explosively into the ‘gun. Don’t use a steady stream of breath; contract your diaphragm hard and try to replicate the explosion of gunpowder with your lungs. As you get more comfortable with the process, focus on making the power of your breath consistent so you can achieve consistent velocity and flight of your darts.
Next, mark a specific aiming point on the target and orient the muzzle of the ‘gun so it appears to point right at it. Because your line of sight is above the ‘gun, you’ll naturally point high, compensating for the dart’s drop. Shoot a few more darts to achieve a consistent group, and then adjust your point of aim to move your group to the desired point of impact. Then, do the same thing at different ranges until you can quickly judge distance to the target and adjust your aim appropriately.
Because they’re virtually silent and low powered, blowguns can also be used to hunt meals of opportunity in environments where firearms would be too dangerous or attract unwanted attention.
If you plan to hunt or control pests with your blowgun, practice shooting 3D targets like fruit, vegetables, and stuffed animals you bought your ex-girlfriend. Try it from various angles and distances. Unlike flat targets, they’ll give you a better idea of the path of your dart’s wound channel through the “animal’s” vitals. Make sure you back your targets with a suitable backstop, as missed shots can fly a long way and trying to find lost darts in your lawn can be a painful process.
Blowguns are not the mysterious assassin’s weapons you’ve seen in bad ninja movies, nor are they just oversized spitball launchers. Cheap, silent, versatile, easy to make, and easy to use, they offer convenient, controllable close-range killing power that can be very useful in many survival contexts.
Told you you’d want one ….
The 90-Second Blowgun DIY
How easy is it to make a functional blowgun and dart? You don’t need to be MacGyver to do it. After 40 years of rolling my own blowguns, I’ve come up with a dead simple DIY method that anyone can do at almost no cost. How simple? How about 90 seconds from parts and tools to the first shot?
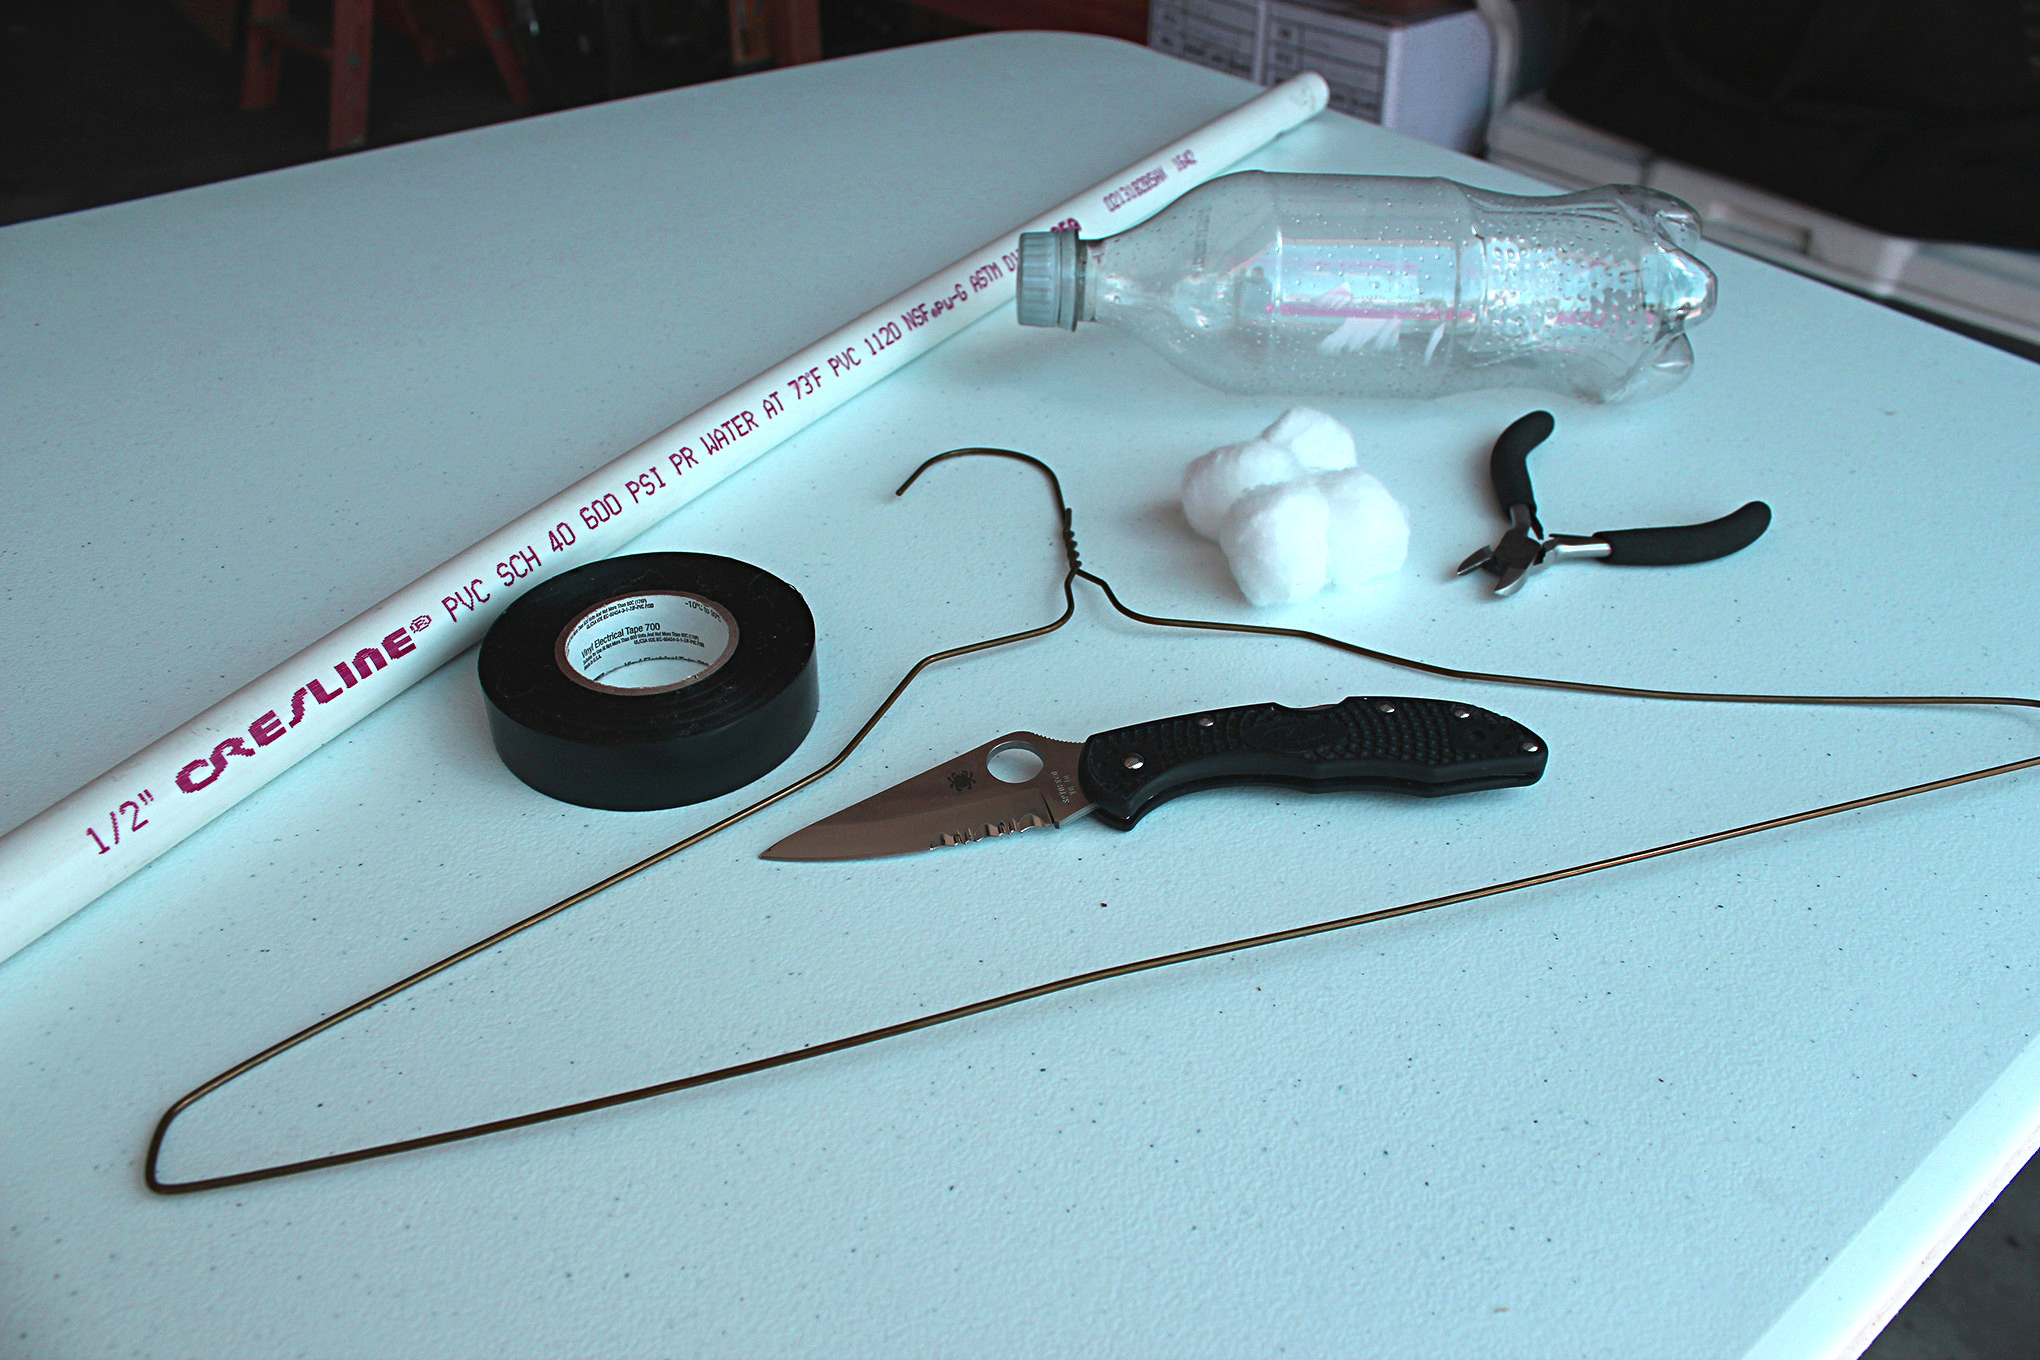
1. Here’s what you’ll need:
A 5-foot length of 1/2-inch Schedule 40 PVC tubing
An empty soda bottle
Electrical tape or duct tape
A wire coat hanger
Cotton balls
Wire cutters
A knife and/or scissors
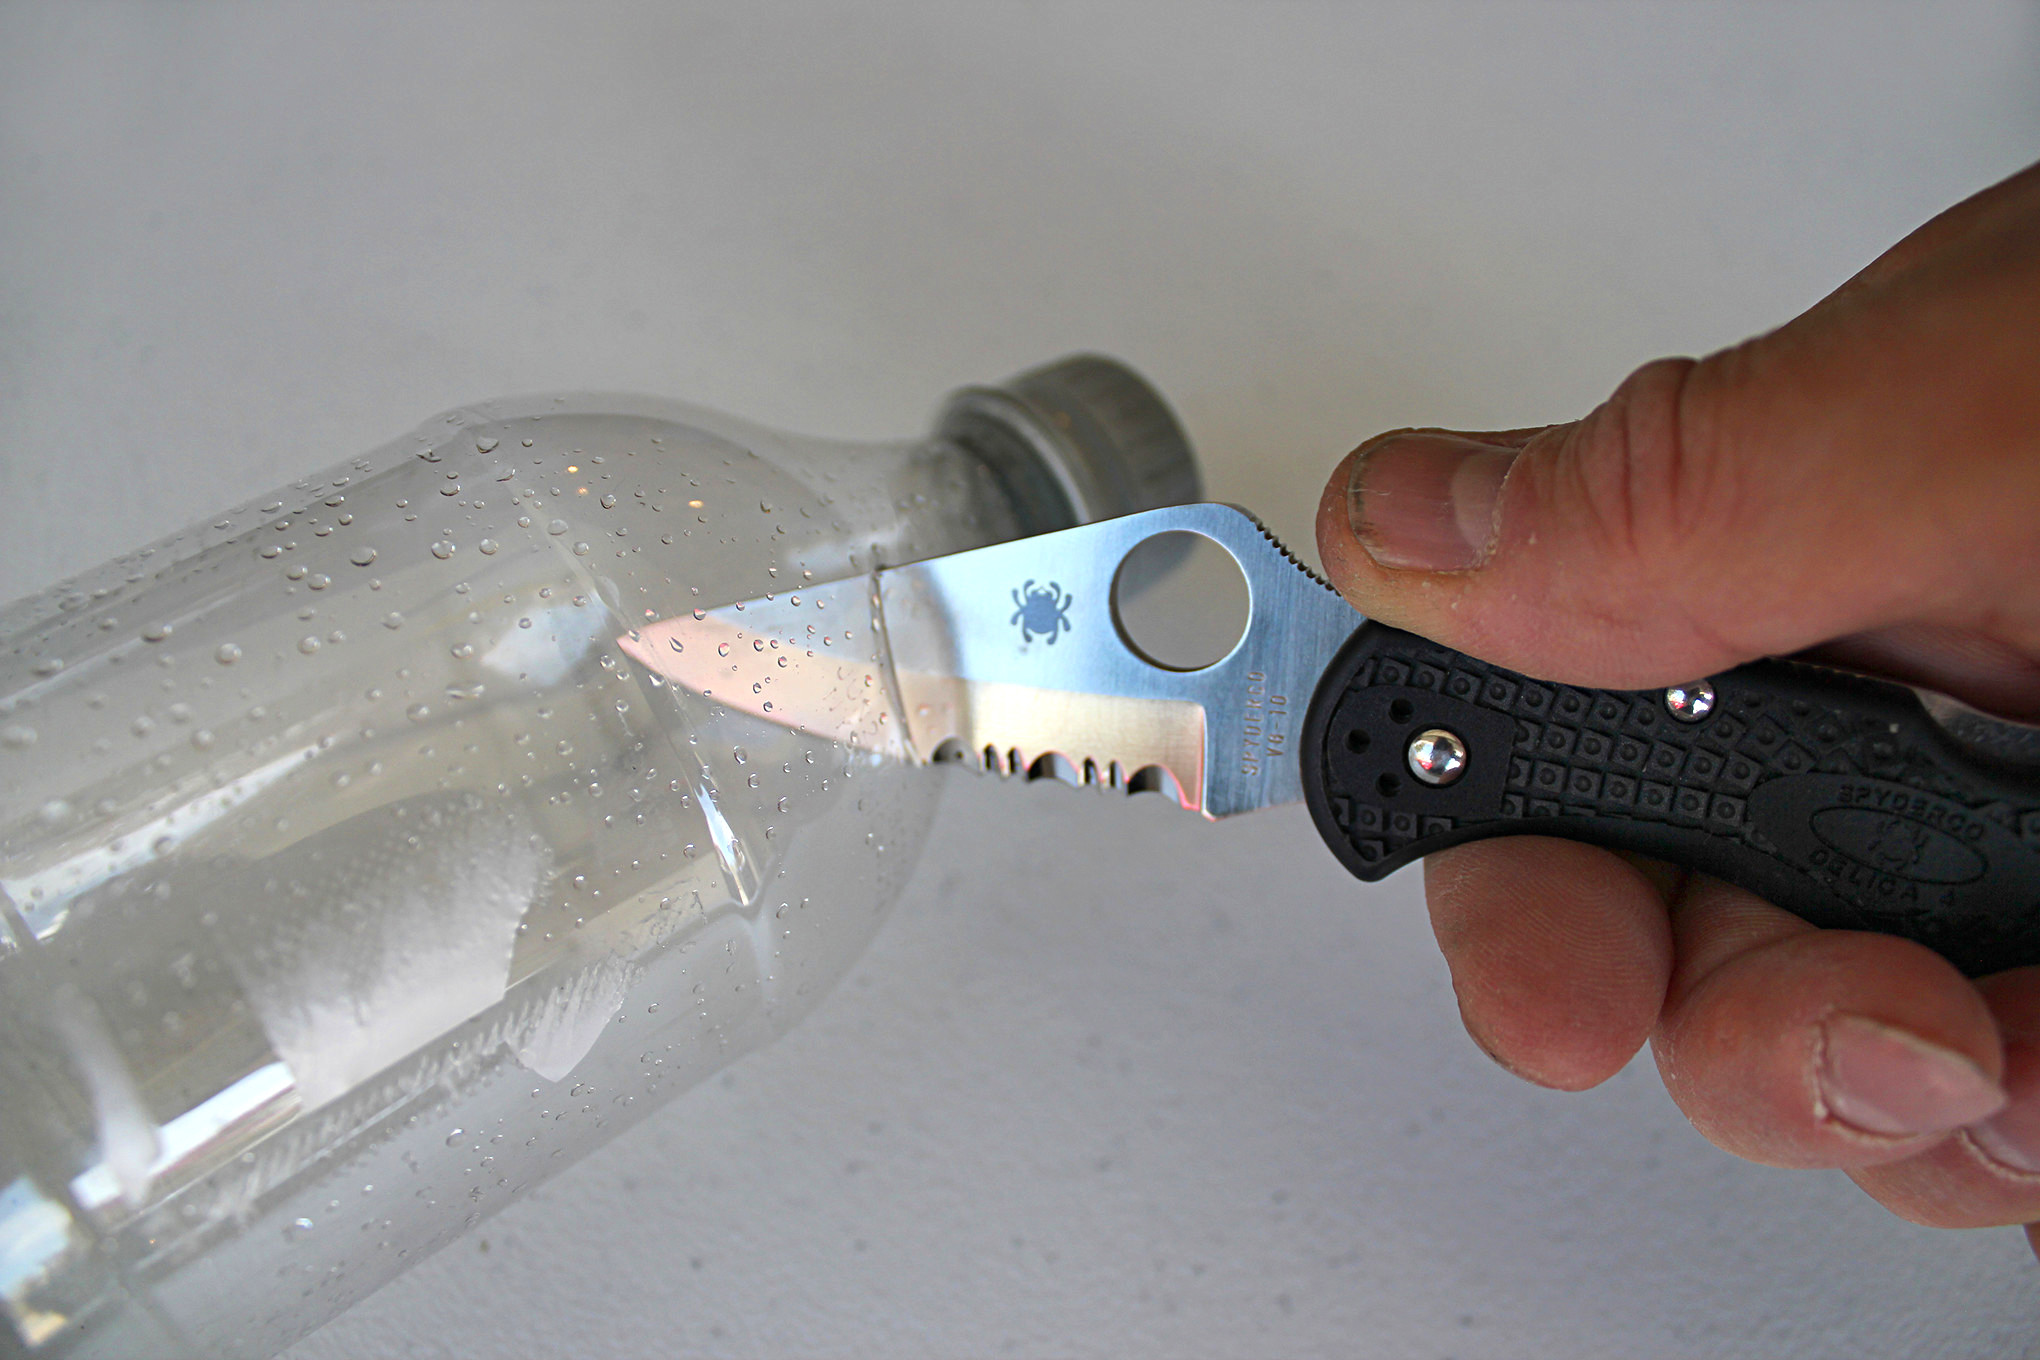
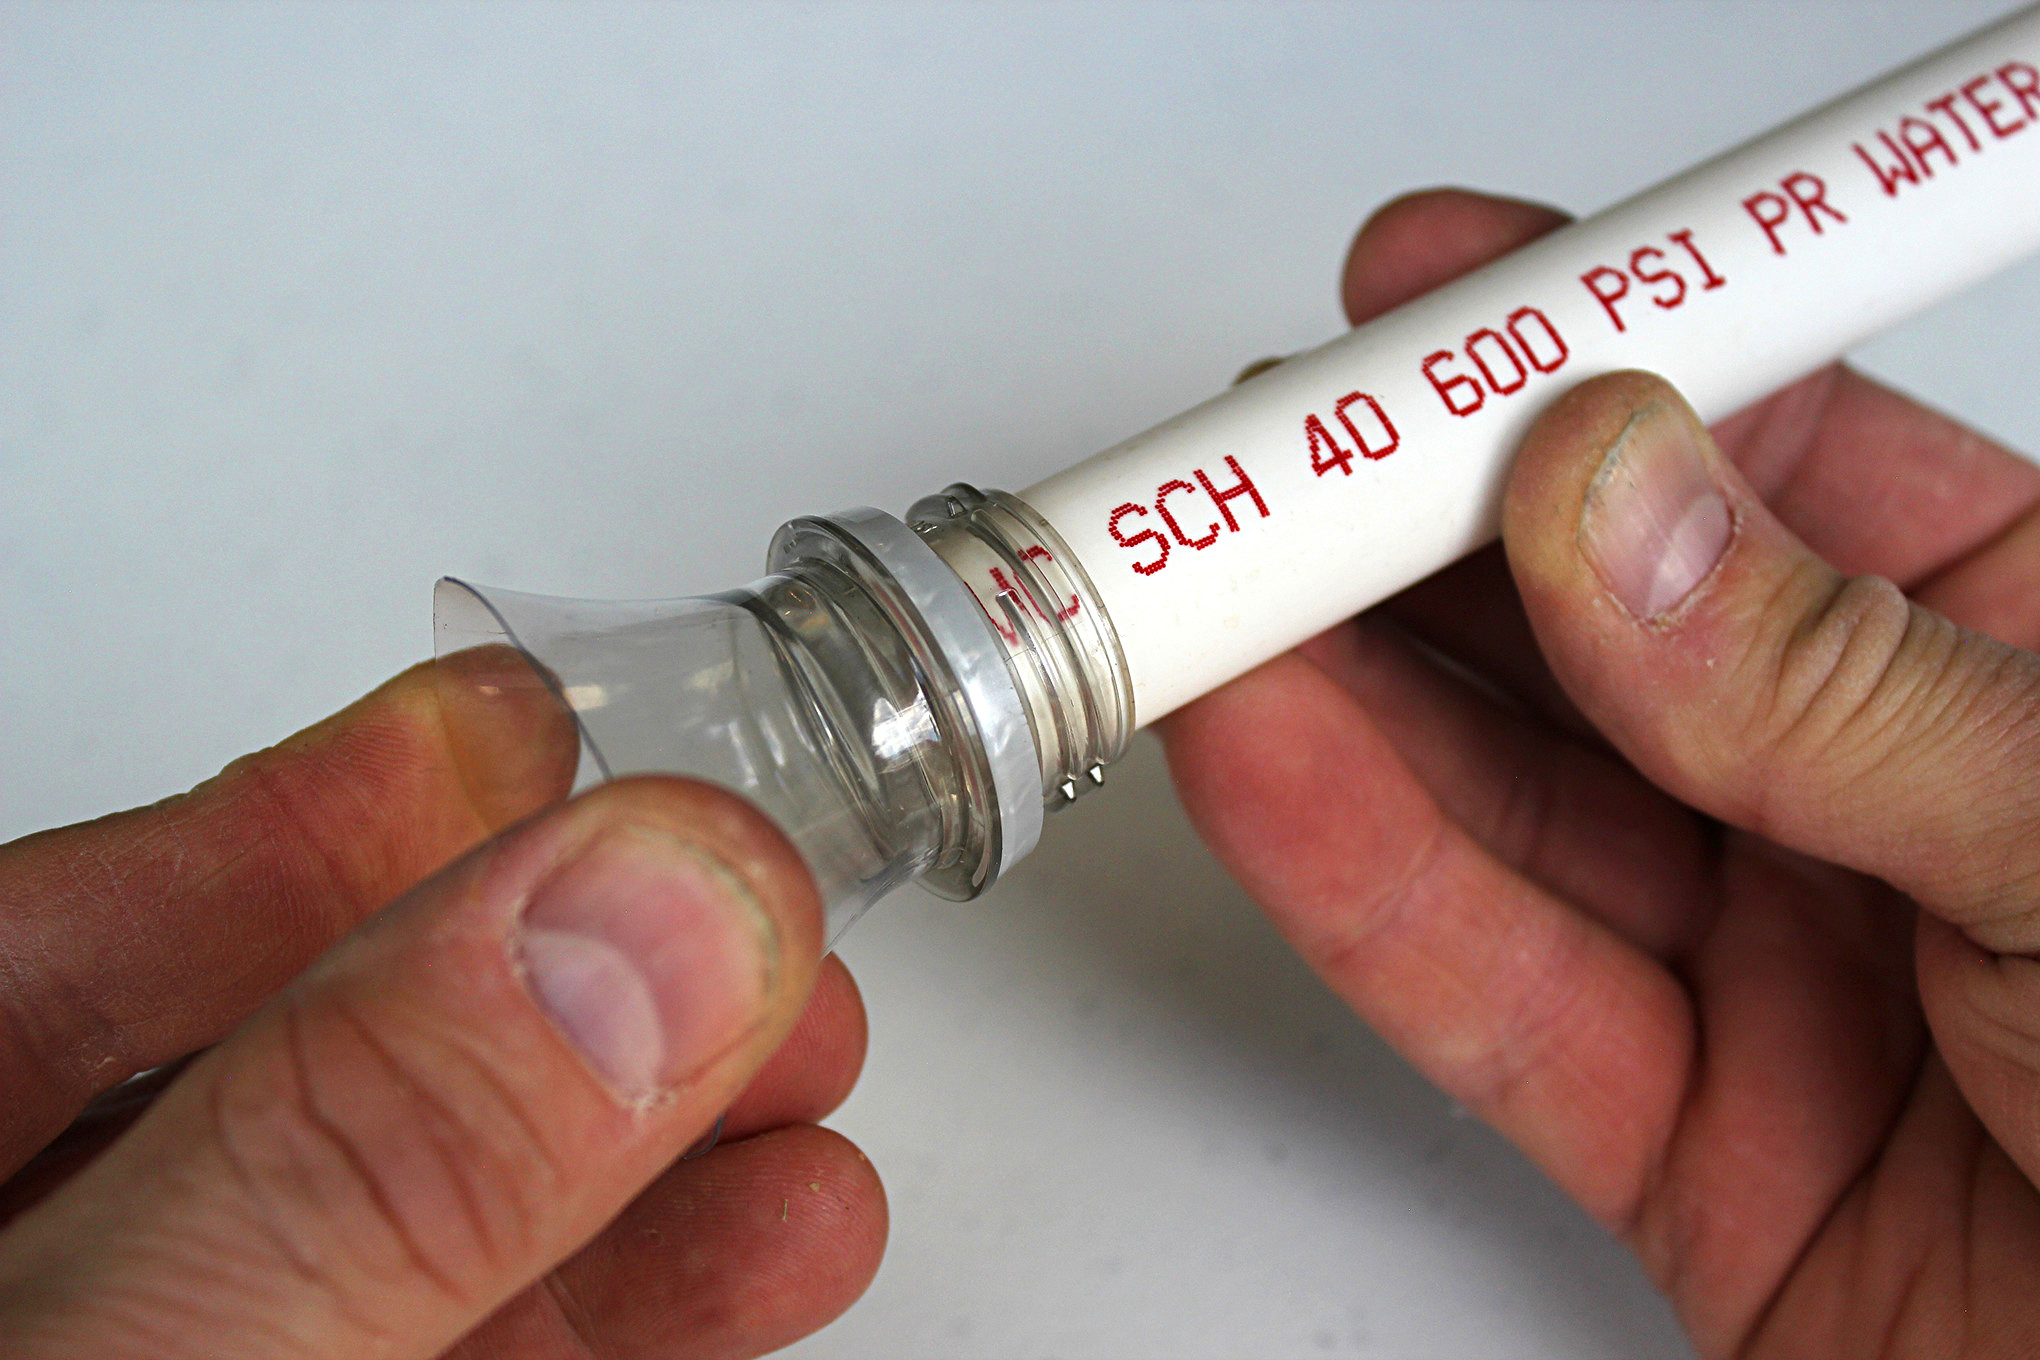
2. First, use the knife to cut the neck off the soda bottle and trim it so there are no sharp edges. You want the last couple of inches for your mouthpiece.
3. Slip the mouthpiece over one end of the barrel tube.
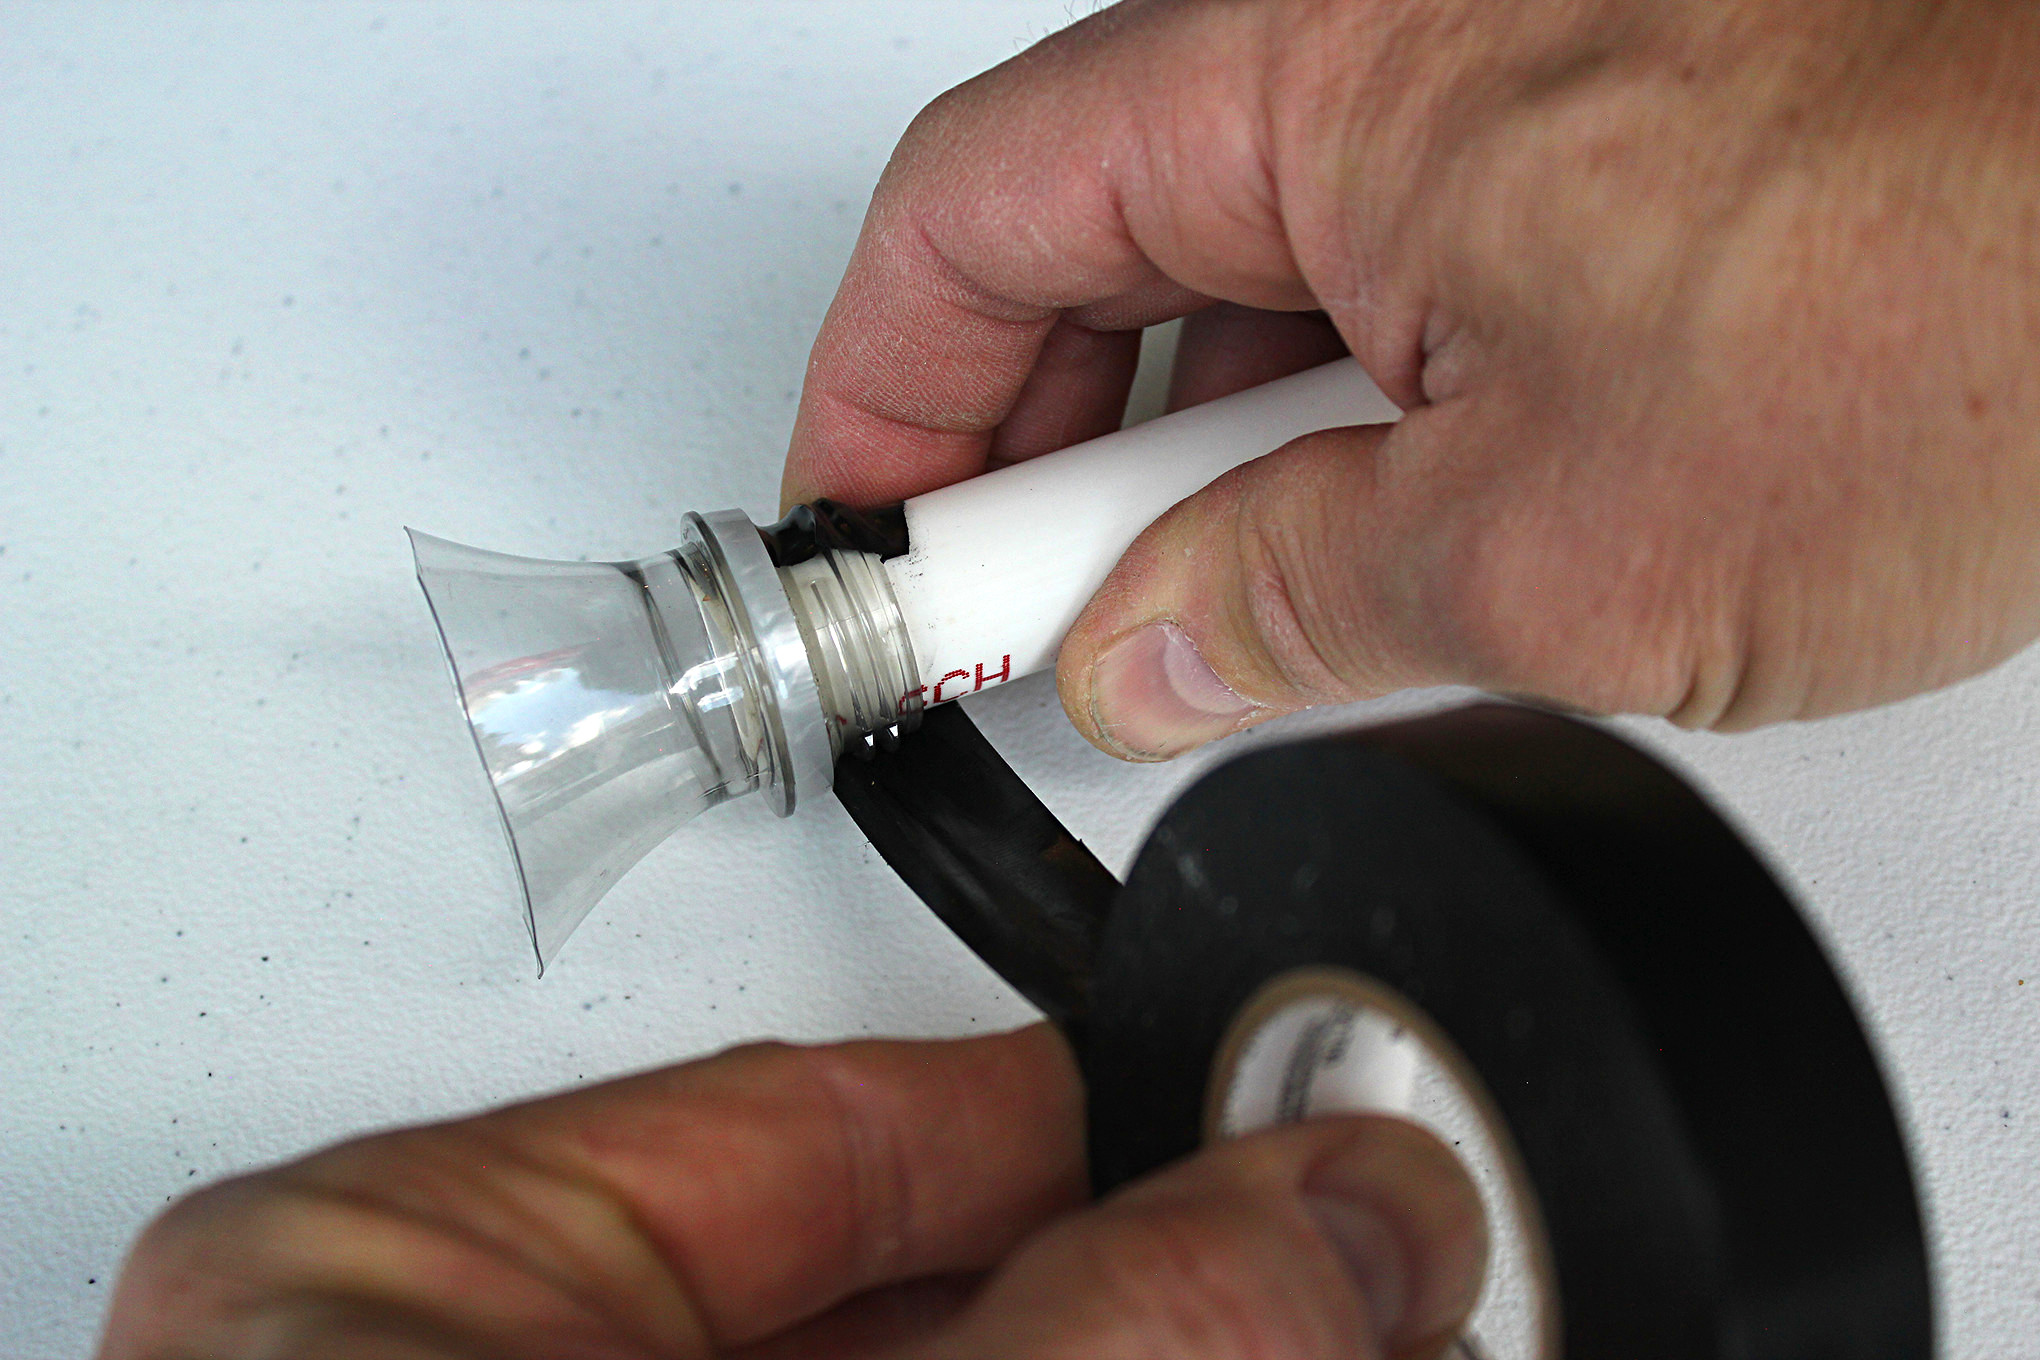
4. It’s inside diameter is slightly larger than the outside diameter of the tube (0.84-inch), so add a few wraps of tape to hold it in place and ensure a good air seal. Your blowgun is finished.
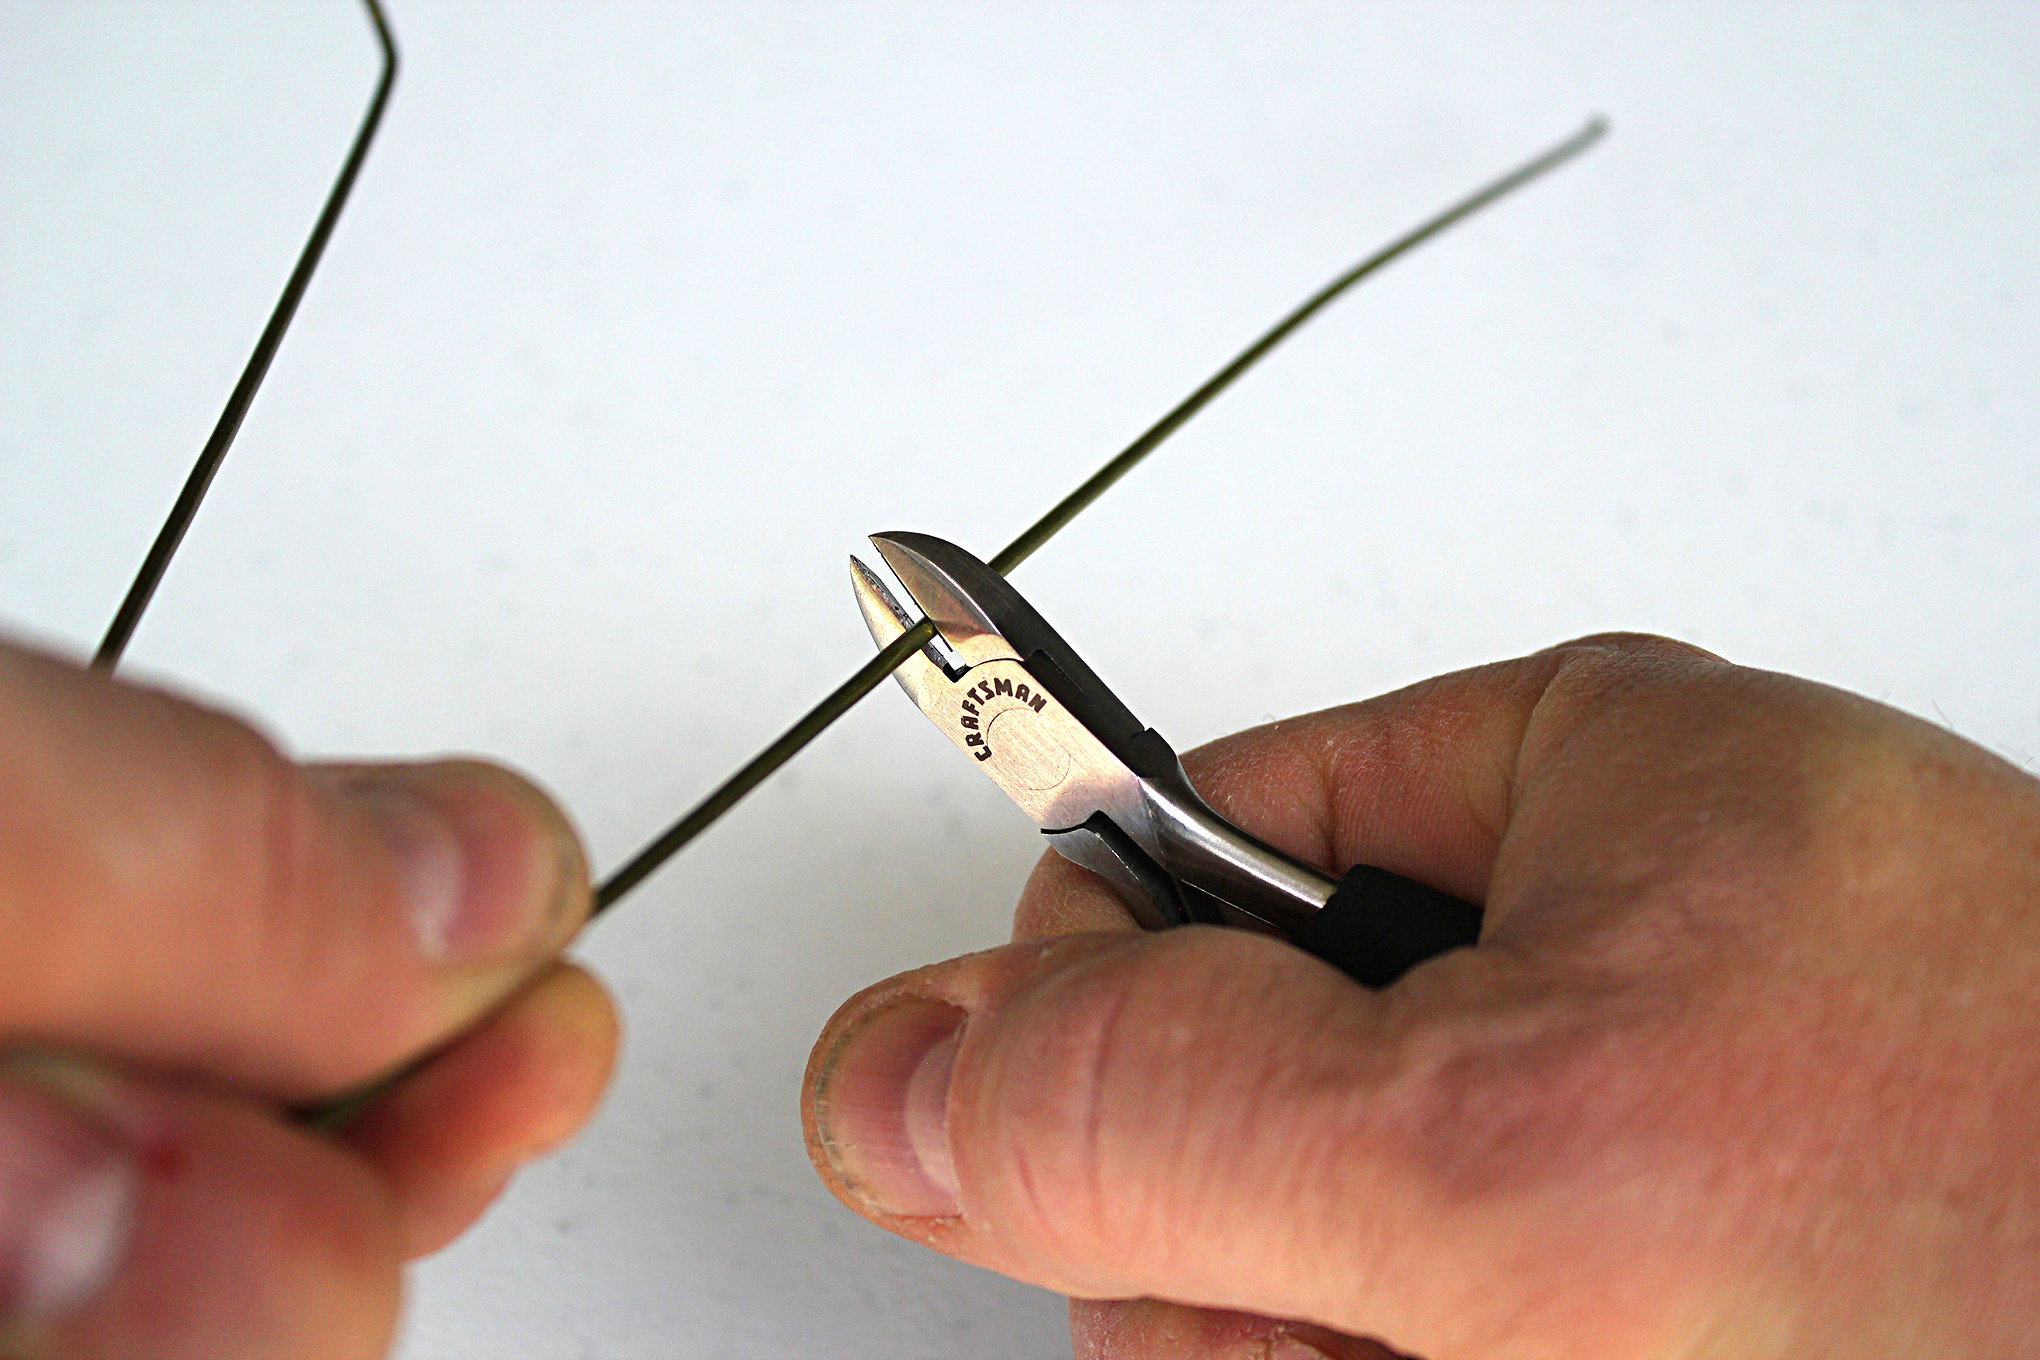
5. To make a dart, cut a section of wire from the coat hanger about 8 inches long. Then use the wire cutters to make a few notches in one end of the wire.
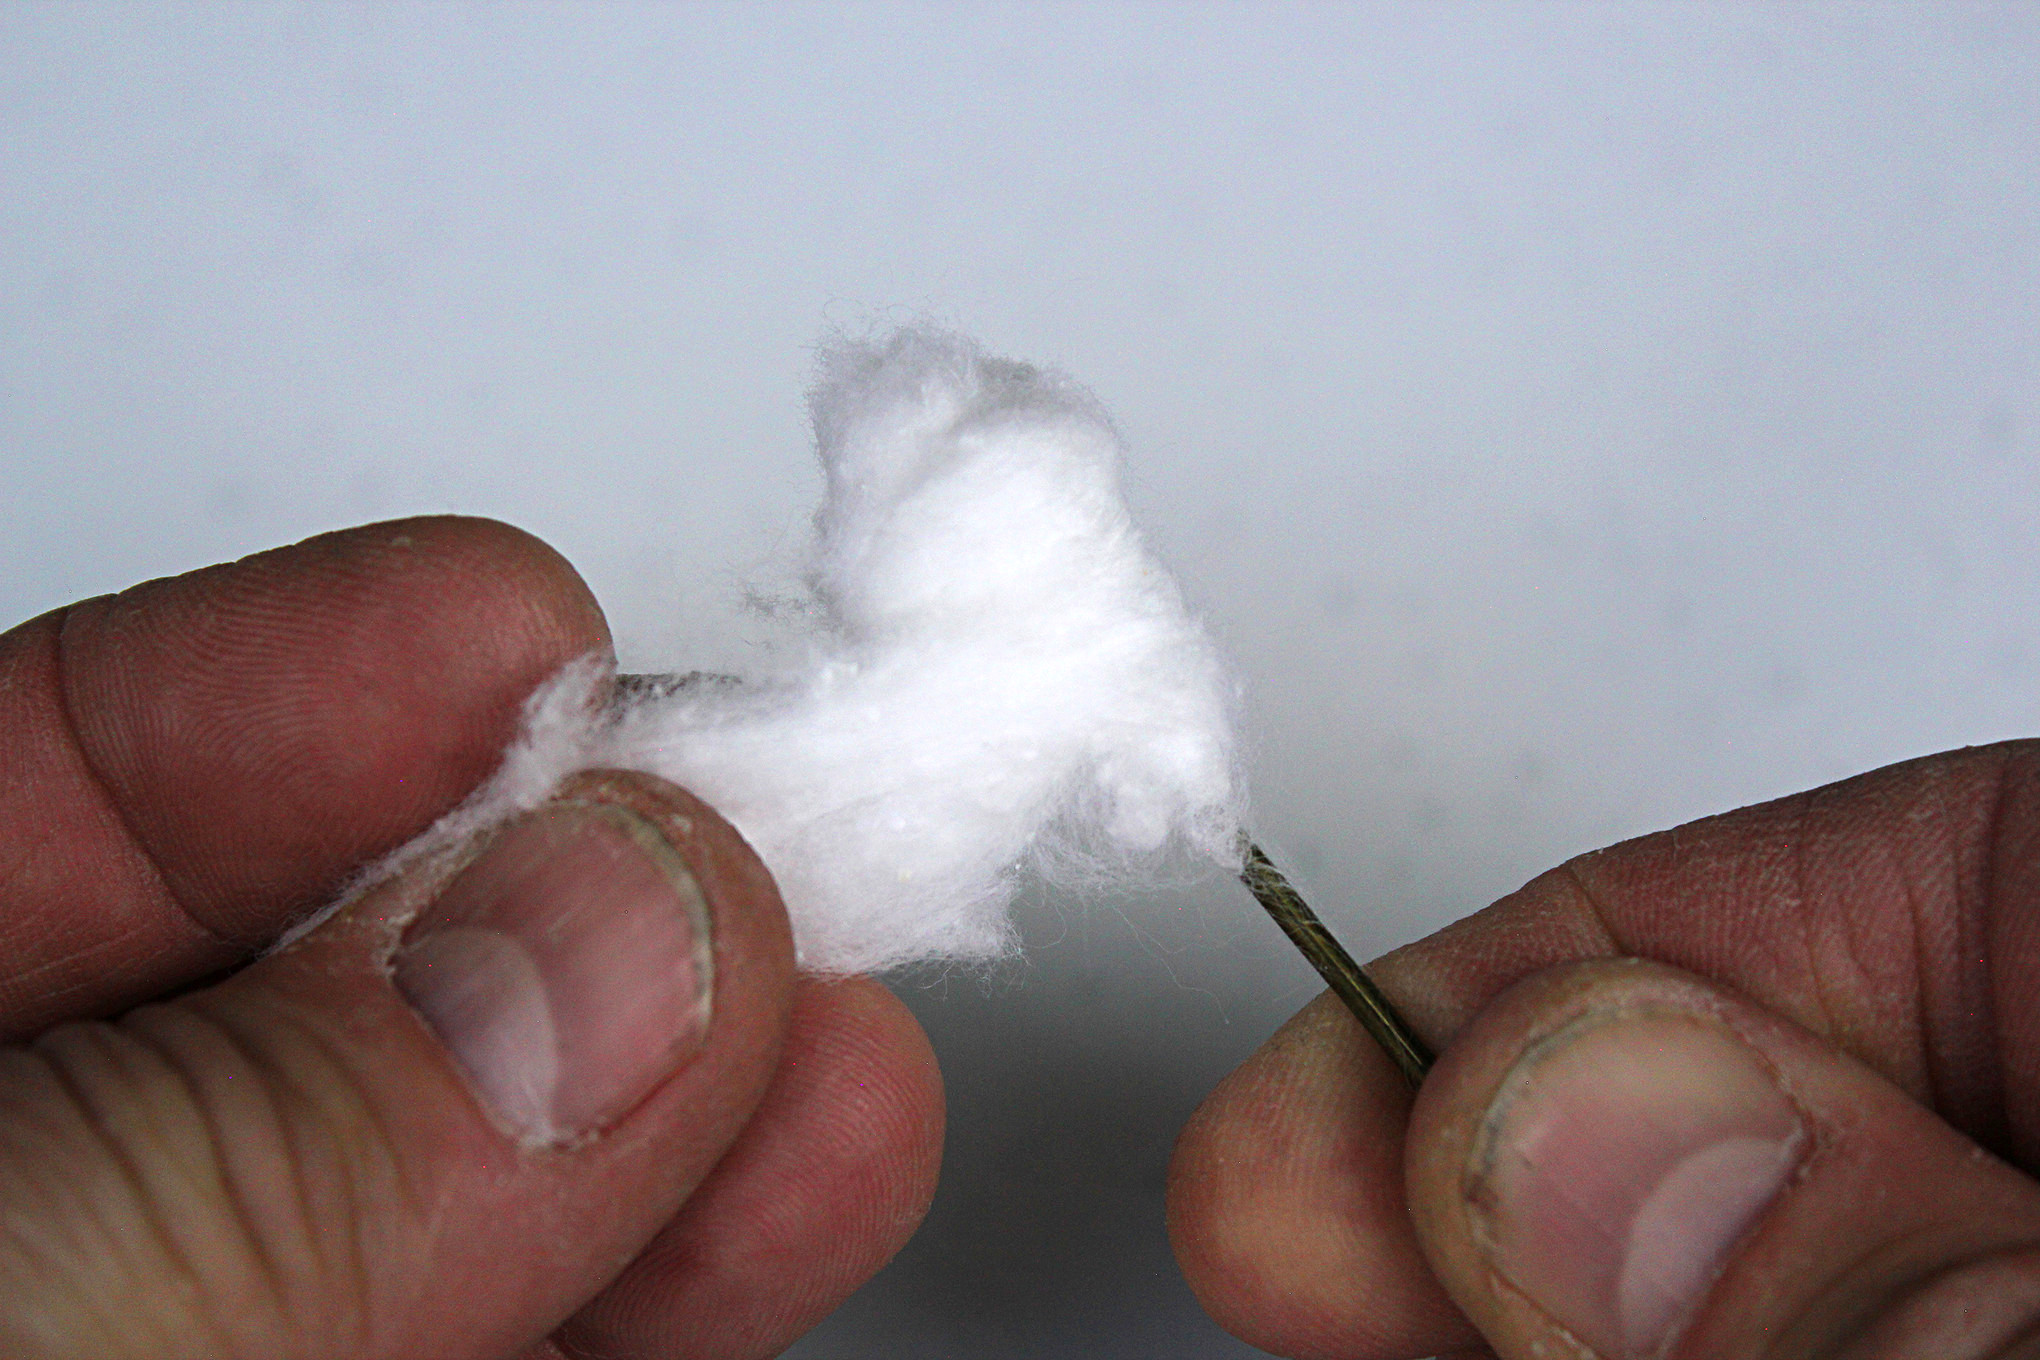
6. Holding the wire in one hand and a cotton ball in the other, spin the wire between your fingers and allow the notches to snag the cotton. Keep spinning and allow the cotton ball to unravel as it winds around the wire. Keep going until it looks like a big Q-Tip and keep shaping it with your fingers until it fits into the bore of your ‘gun well enough to create a good air seal.
7. Test the fit of your dart seal in the ‘gun then reshape it as necessary.
8. Then load and shoot.
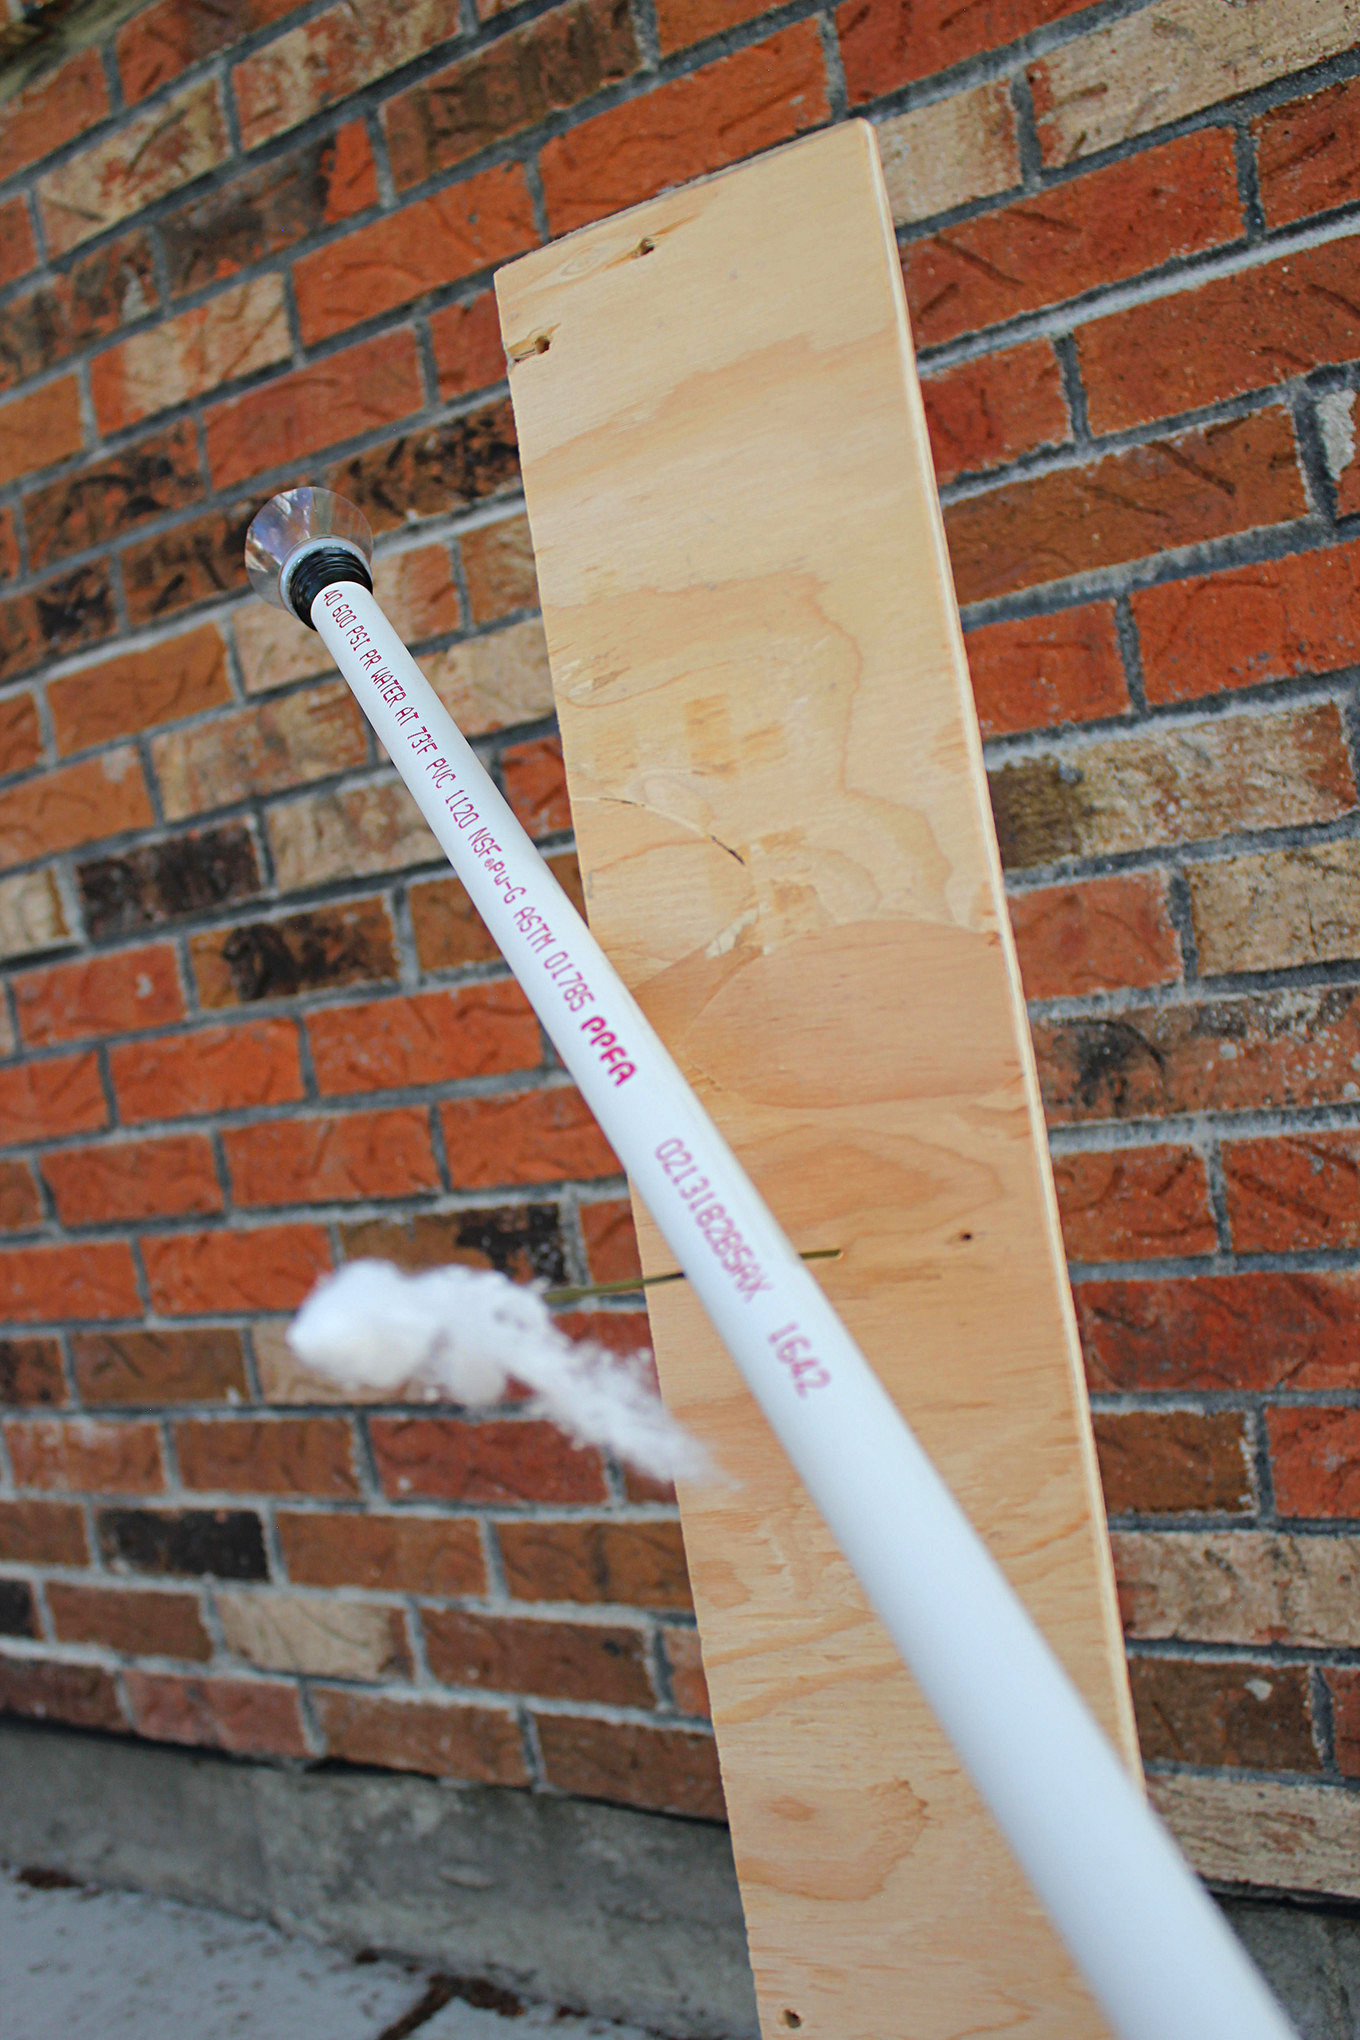
9. I did this entire process — including firing my first dart into a target — in 92 seconds. (OK, OK, so I was 2 seconds over … I took a moment to aim, alright?) The dart stuck solidly into a piece of 3?8-inch plywood with about 1?8-inch of the point poking out the other side. Take that, MacGyver.
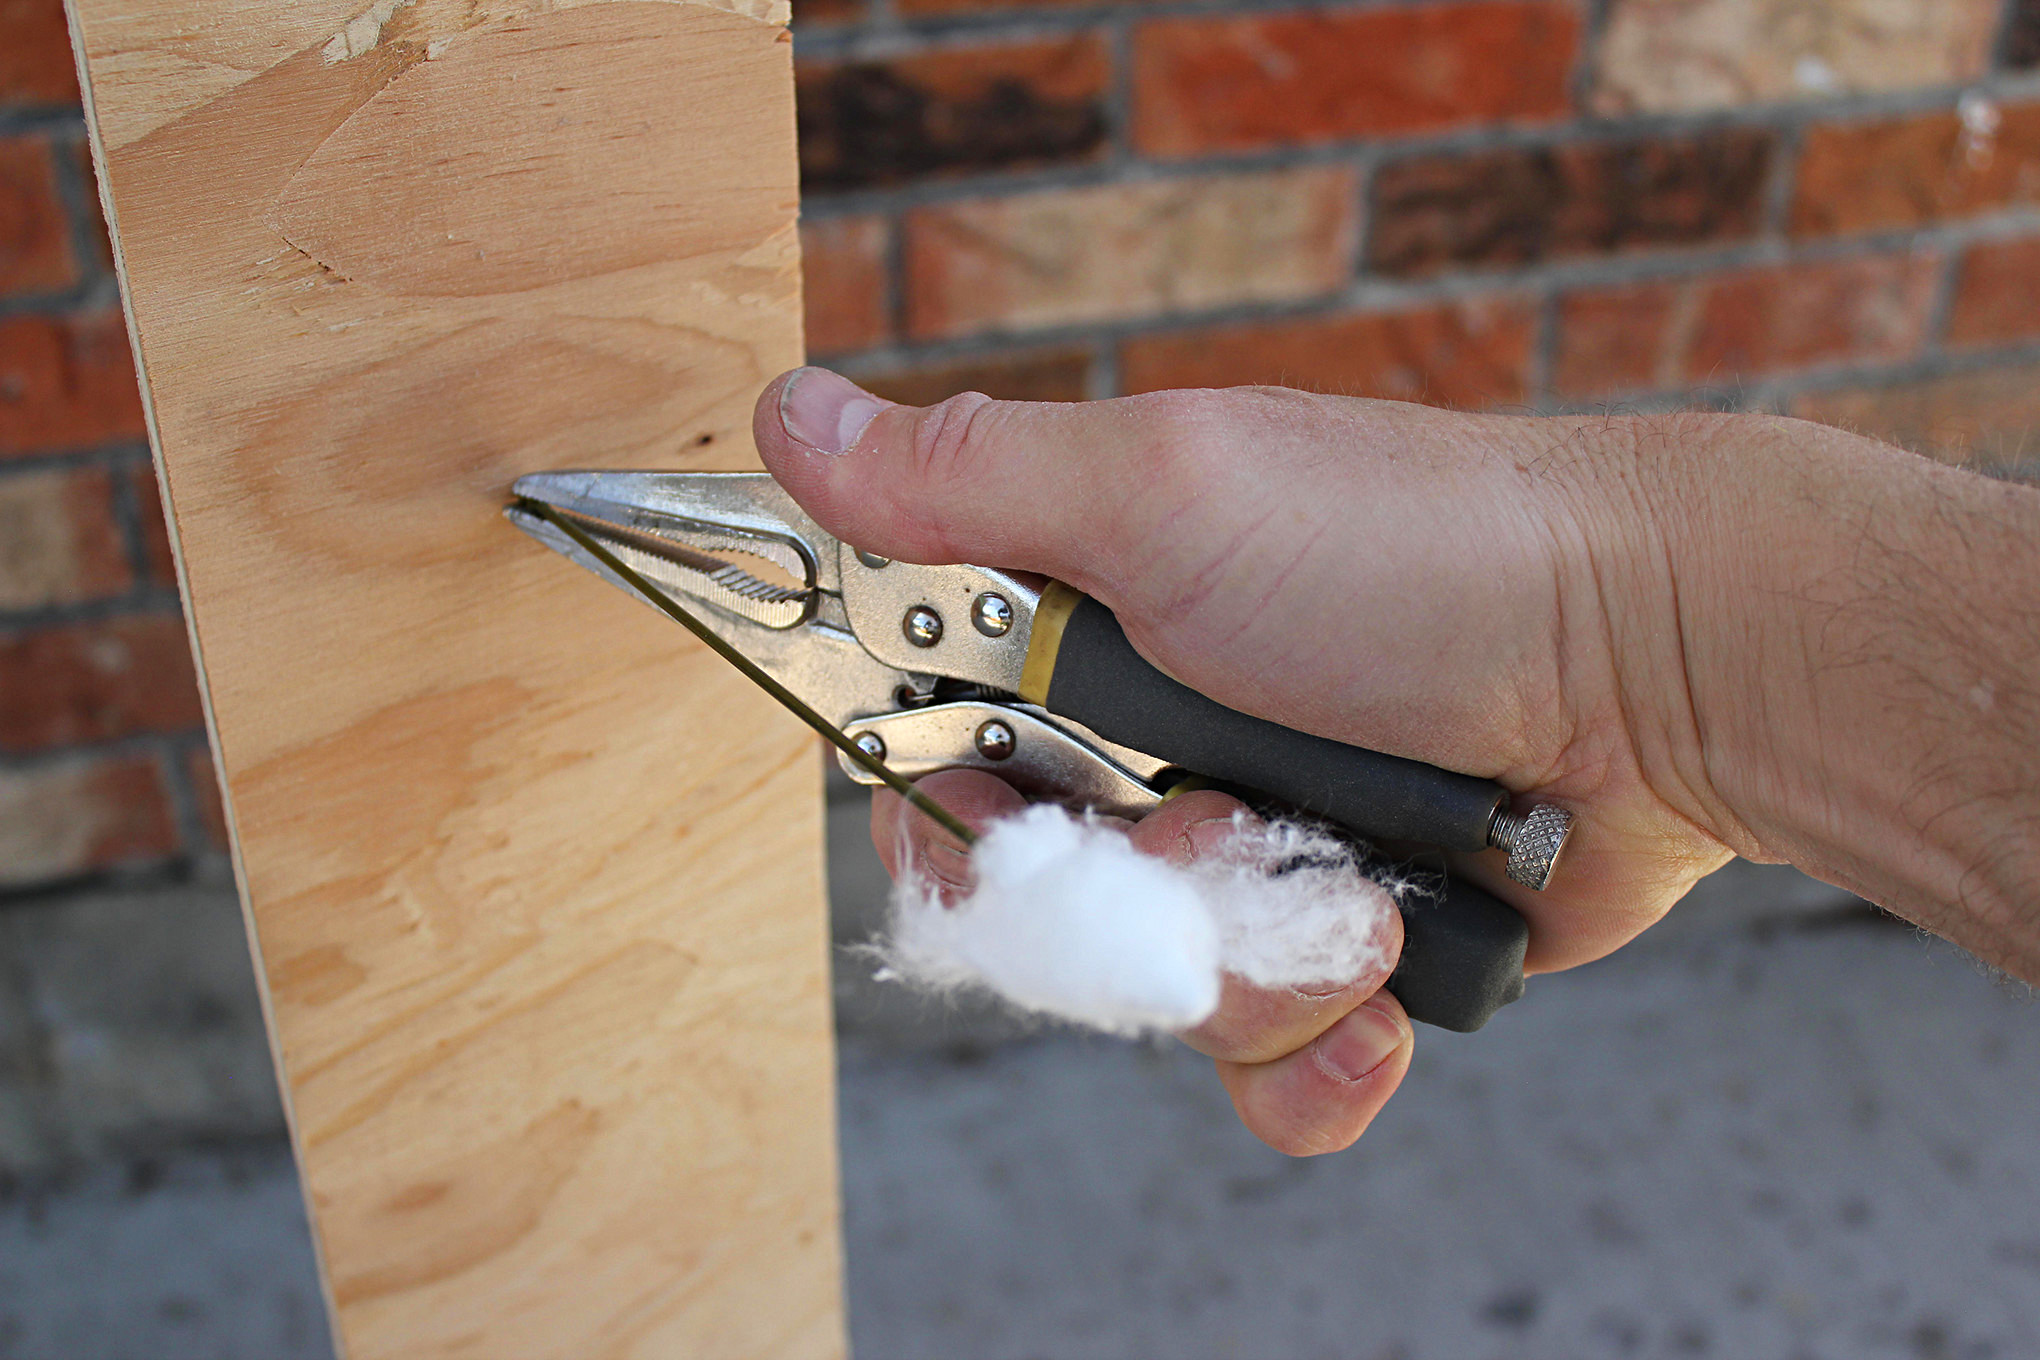
10. Vise Grips are a great investment for blowgunners and are the best (sometimes only) way to pull darts out of wooden targets or backstops.