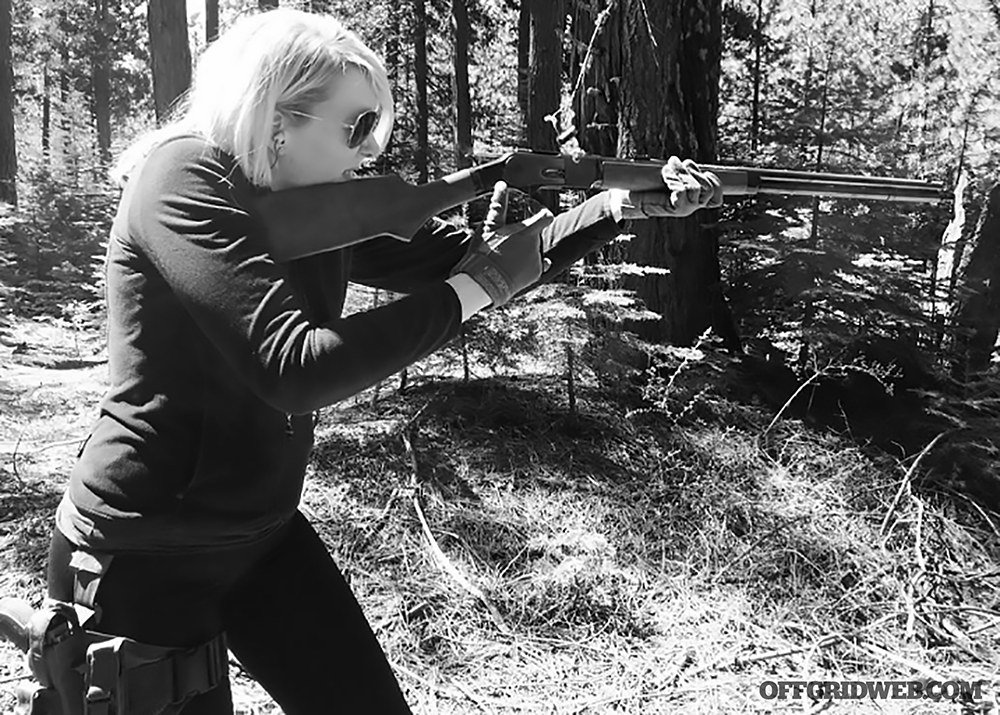
About the Author: The following article was submitted by Sharon Durand, an avid outdoorswoman and auditor by day, wife and mother by night. She’s fairly certain her husband married her for either her fried chicken or her skill with an HK USP .45… perhaps both. Sharon prefers a Winchester lever gun to most any AR and uses her 6′ 3″ Wonder Woman tall girl powers mostly for good.
I can’t say I wasn’t warned. I chose the Lite Force anyway.
There are times when husbands do know best, particularly when said husband is an infantry combat veteran and unabashed gear whore.
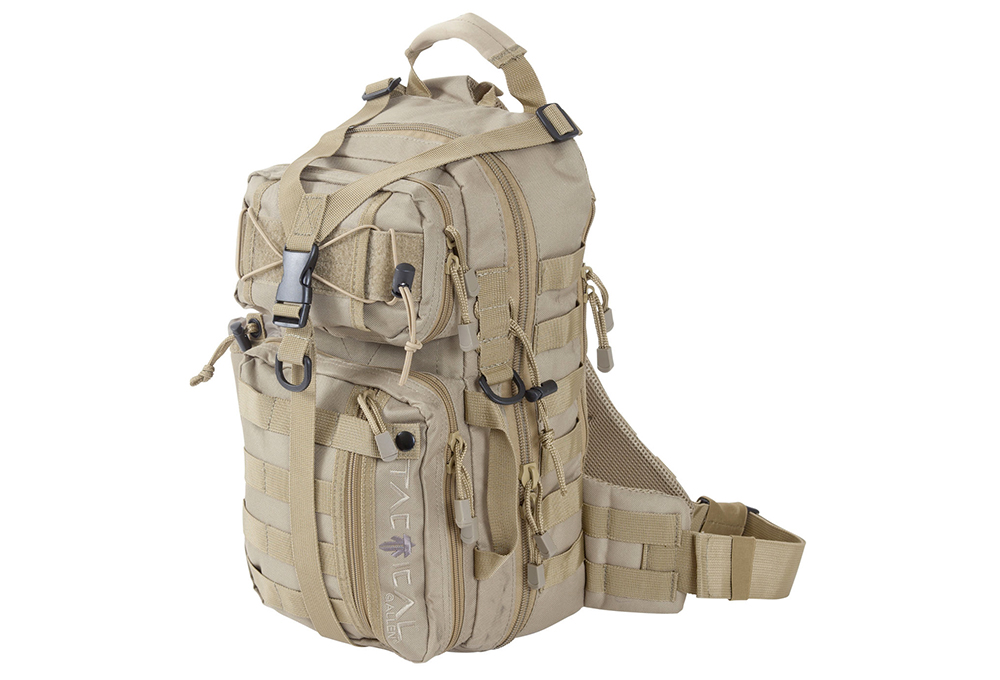
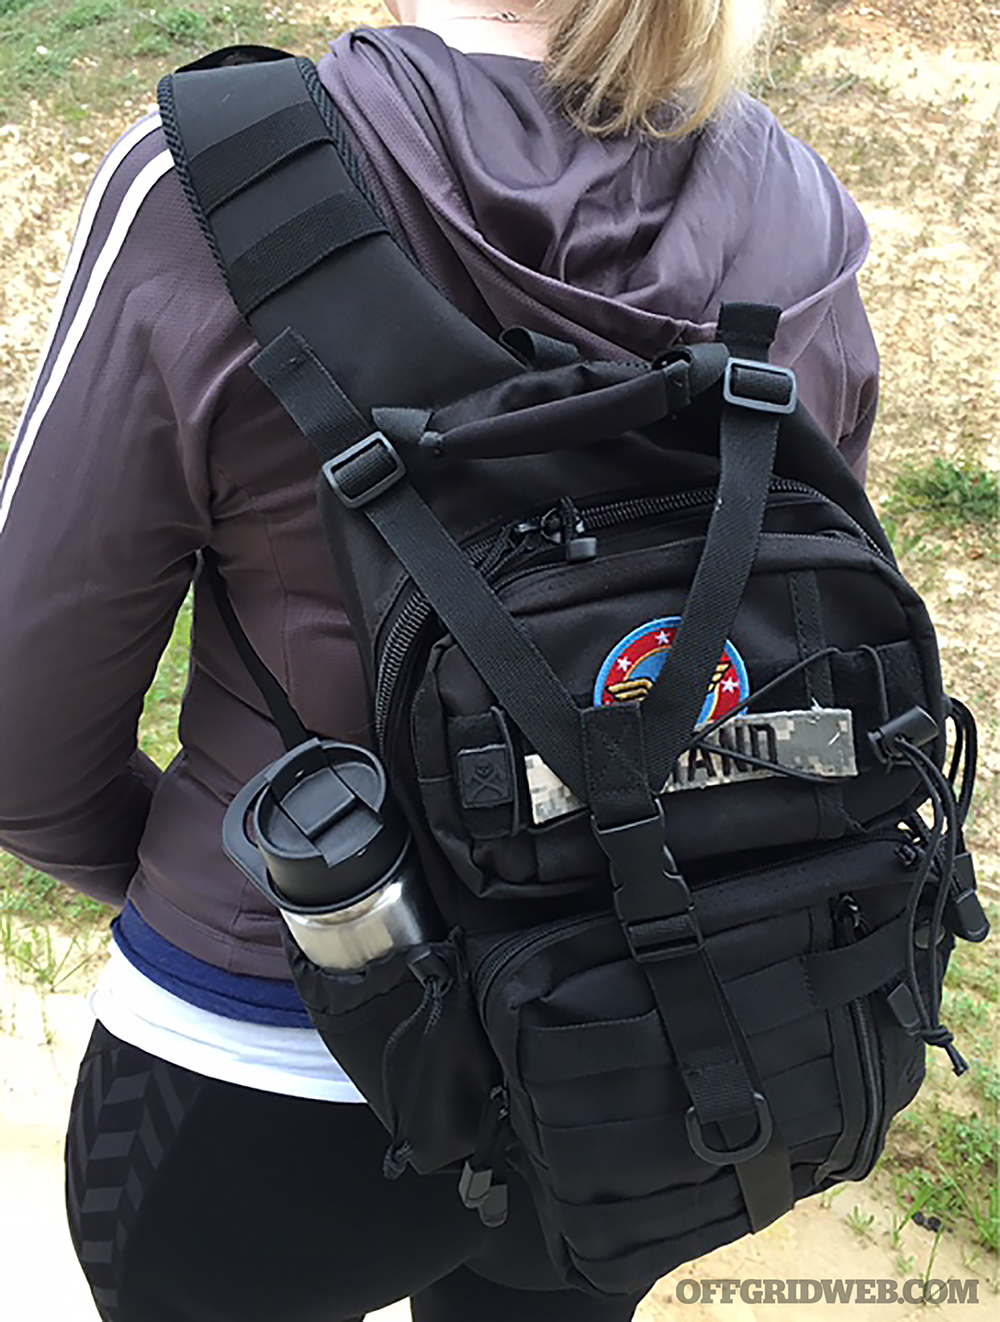
I am not unfamiliar with packs, having used many styles of backpacks over the years. I thought the Allen Lite Force Tactical Sling Pack (co-branded with the Smith & Wesson logo for reasons) would be worth trying, primarily because it is less cumbersome than the full rucks I own, and it’s a sling style. A sling pack is one I could just swing around for easy access while on the trail rather than having to doff the pack entirely. The Lite Force Tactical Pack accomplished what I wanted, but had some major drawbacks. Of course, I didn’t know that when I bought it.
“Yeee-aaaah, I wouldn’t recommend that,” my husband Mike said, when I showed it to him. A laconic warning, but as it turns out a good one.
Lite Force Sling Pack Specs
From the Manufacturer:
“The Lite Force Tactical Sling Pack’s sling design gives access to the pack without having to remove it. Conceal-carry compatible and hydration ready, this pack has a 1200-cubic-inch capacity, MOLLE system loops, a large main compression strap, and water bottle and sunglasses pockets. Made with rugged Endura fabric, this sling also has a padded carry handle and a padded adjustable single sling strap.”
Dimensions: 18″ x 9.75″ x 7.5″ Colors: Black, tan, or A-TACS AU camo
Loadout & Testing
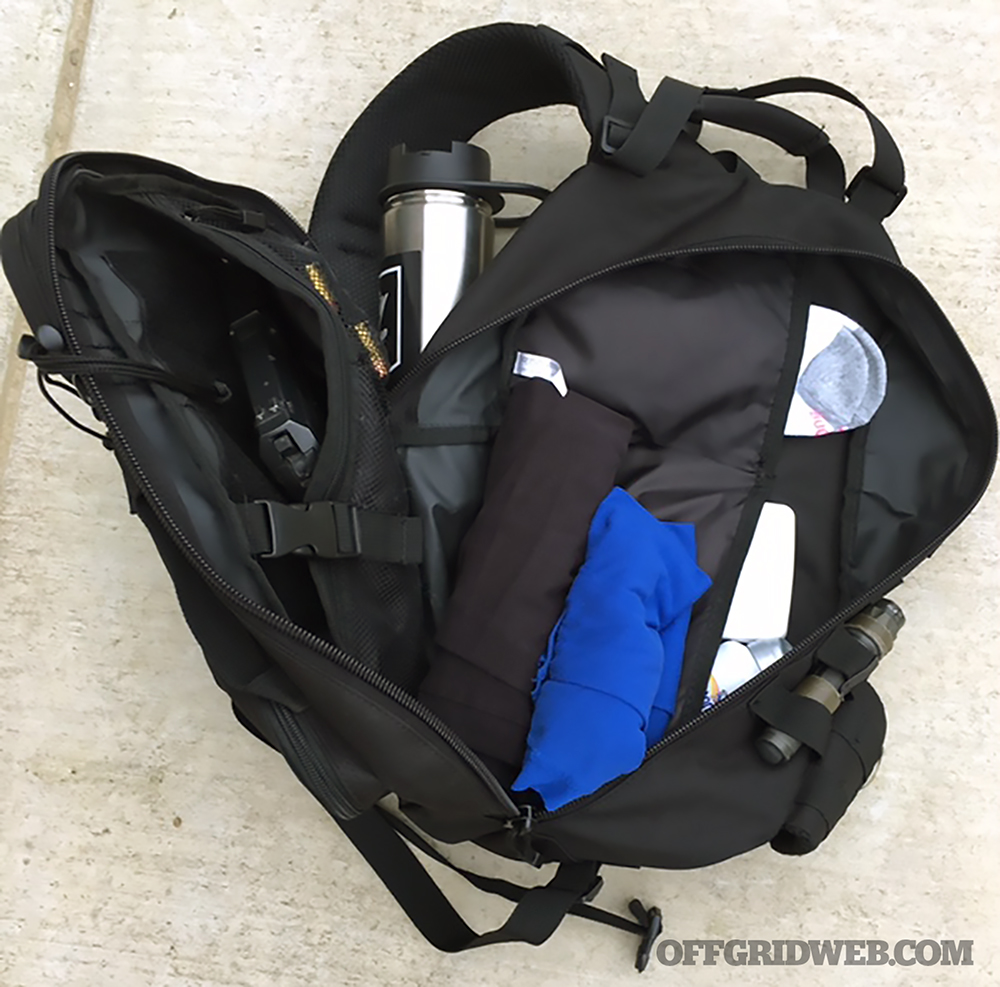
My first trip with this pack was a 10-mile summer hike, and it was hot as hell out. The ALFTP has a padded, cool-mesh back, so it didn’t seem to generate additional heat beyond what I was already experiencing during the trek. Conditions on that initial hike were temperatures of 90+ degrees in the direct sun. I liked that I could slide the bag around to reach my water bottle and sunscreen (a frequent necessity) or whatever I needed from one of its many storage pockets and pouches (of which there are many).
The bag is concealed-carry compatible, so it features a large easy-access 7”x7” main pouch that easily fits my HK USP .45 (though I did not take it with me — I live in gun hating “Republik of Kalifornistan” after all) and of course extra mags. Total capacity is 1,200 cubic inches, meaning you can store quite a lot for such a relatively compact bag.
In lieu of the pistol and spare magazines, I carried a permissible weapon (more on that later) and an extra water bottle. The pack is hydration compatible, so you can use it like a CamelBak, but I’ll admit to a certain pickiness. I don’t like the plastic taste the water takes on in those soft pouches, so I stick to hard Nalgenes and the like.
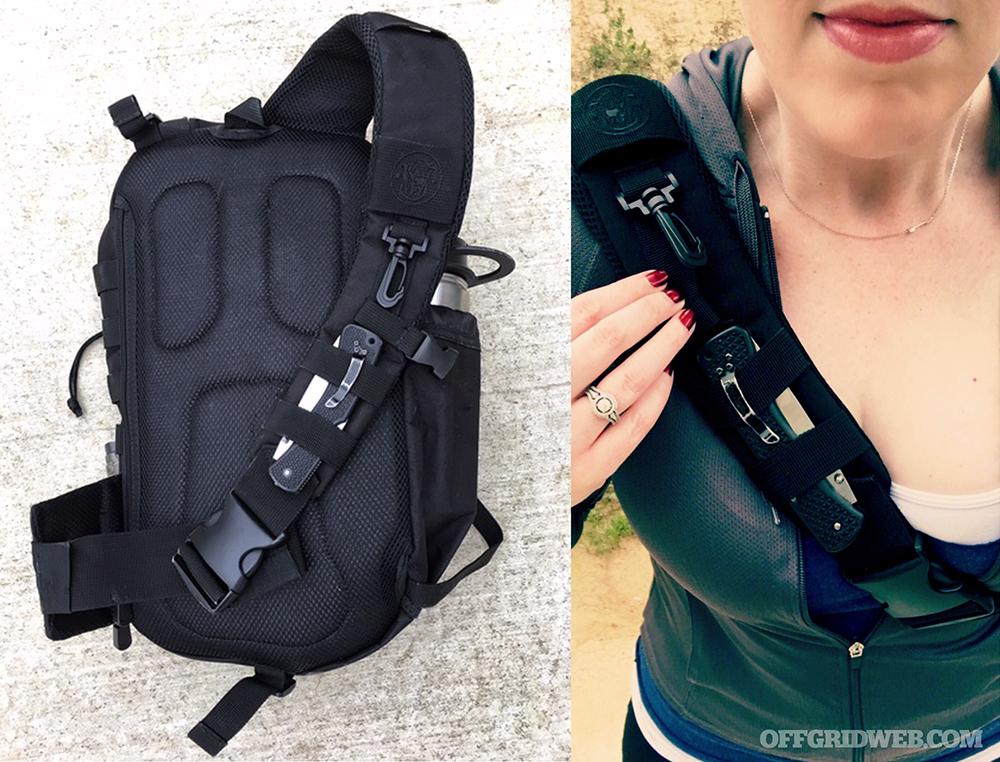
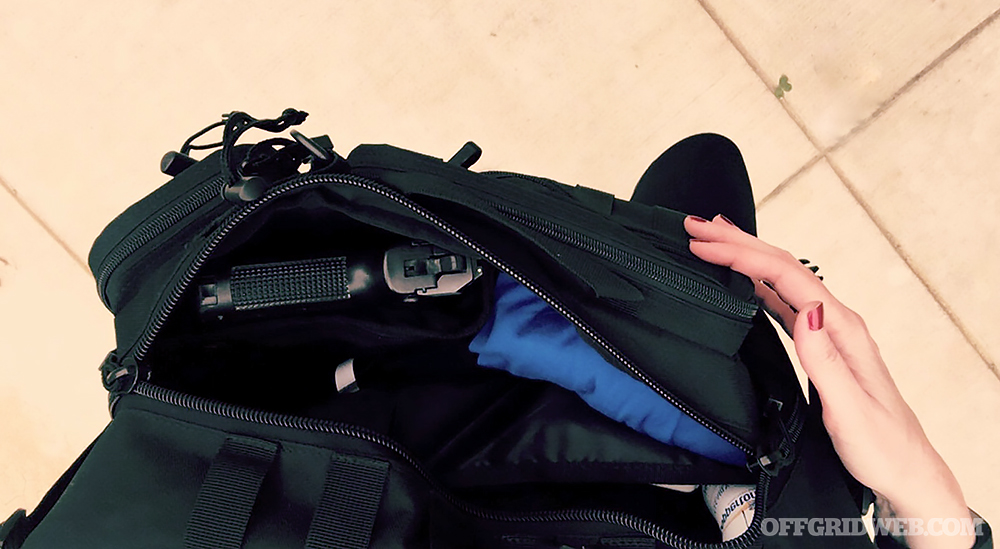
I used the zippered mesh pouch for my extra socks and some first aid supplies, with room left over. There was easily sufficient space for a light jacket (okay, more like a zip-up workout hoodie), a rolled up pair of yoga pants and an extra tank top. I used the large exterior pouch for my wallet, keys, and my ZAP Double Trouble stun gun.
Yes, a stun gun. It beats harsh words and a rape whistle.
The pack can accommodate a concealed handgun, but due to restrictive laws in California, the author carries a stun gun instead.
The pouch has a nice exterior security feature where you can loop a snap tab attached to the MOLLE-compatible webbing through the zipper before securely snapping it in place. That should make it more difficult for someone to slip up behind you and unzip it, unless of course they’re a ninja or something.
The PALS (MOLLE-compatible) loops on the outside of the strap were perfect for my knife and small flashlight. The large V-shaped compression strap on the front kept everything tight and secure across my torso. There’s also the obligatory velcro section on the rear, allowing me to run my Wonder Woman morale patch and name tape. Cool!
At the basic level the bag is very functional. The designers appear to have put a substantial amount of thought into the design process.
A Pain in the Neck
Now, for the reason why I advised against this bag — this is the salient point for some of you newcomers who might be reading this. Based on my experience, sling bags are just not comfortable to wear long-term. Those of you who’ve lived out of your pack for long days and miles are no doubt nodding your heads now, but it was a lesson I needed to learn myself. Even with the padded adjustable shoulder strap, I found that after a few miles my right shoulder strained by the weight.
Unlike backpacks, the weight is not evenly distributed to both shoulders, and any advantage the design provides for access is outweighed over the long term by the awkward way it carries weight. It really begins to drag. I was sore after completing the ten mile trek, though not unbearably so — I earned my tough girl card giving birth twice without drugs.
Lessons Learned
Despite this experience, I like the Allen S&W Lite Force Tactical Pack. It’s functional, and thus far proving to be well sewn, but I particularly appreciated the affordable price point.
This pack’s MSRP is $60, and I picked it up for $40 on Amazon. This compares favorably to similar bags like the virtually-identical Maxpedition Kodiak Gearslinger, which run upwards of $150 retail. It’s a great choice for shorter hikes, the daily commute (it will accommodate a 15 in. laptop), or use as a concealed-carry bag, first aid/medic bag, get-home bag, or EDC bag.
You can find essentially the same bag listed online as the Allen Tactical Lite Force Sling Pack from Allen Company. In the future however, I will stick to dual shoulder strapped backpacks… and possibly give more consideration to some of the advice I get from my husband.
Humans often feel as though we’ve mastered the animal kingdom. After all, most animals are either domesticated and friendly towards us, or have learned to run and hide the moment they spot us. Also, the bigger and stronger animals don’t seem so scary when they’re at a zoo behind several inches of solid plexiglass, or displayed on TV in some nature documentary. Nevertheless, there are still a handful of predator species that can show us how feeble we really are — especially when we’re all caught off guard in their natural environment.
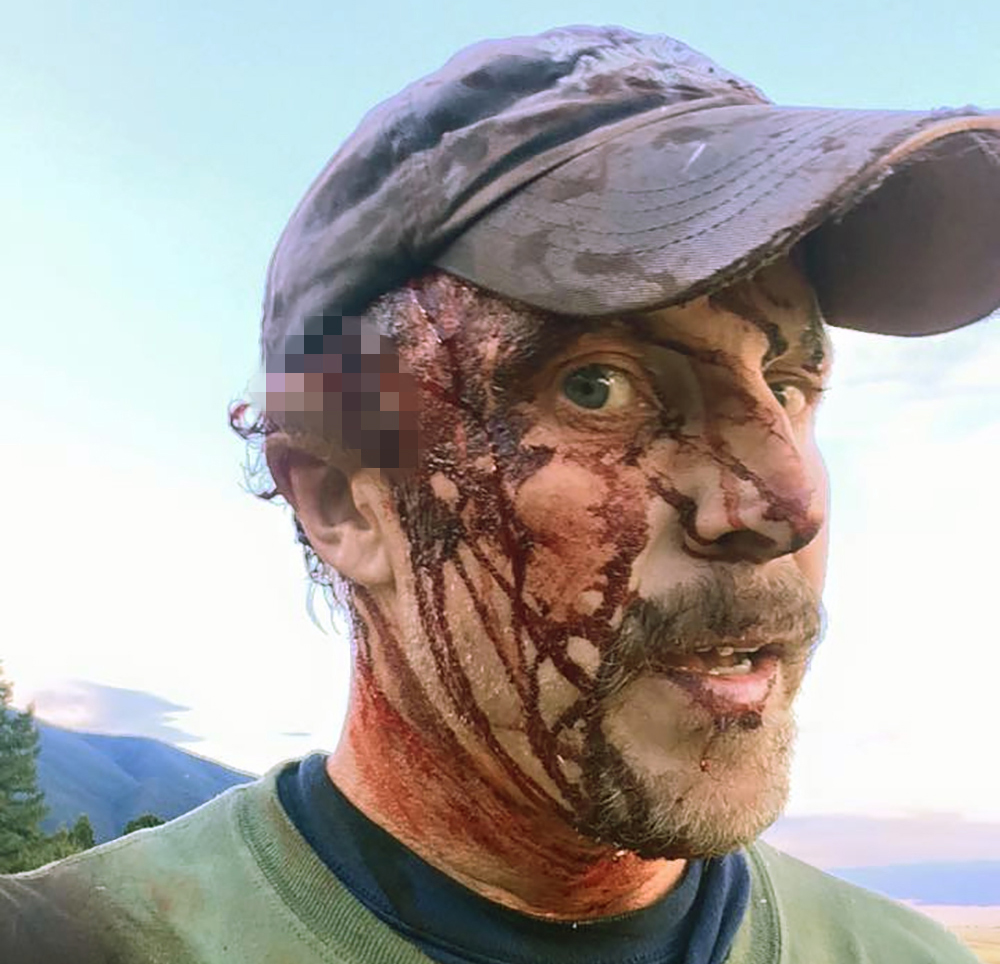
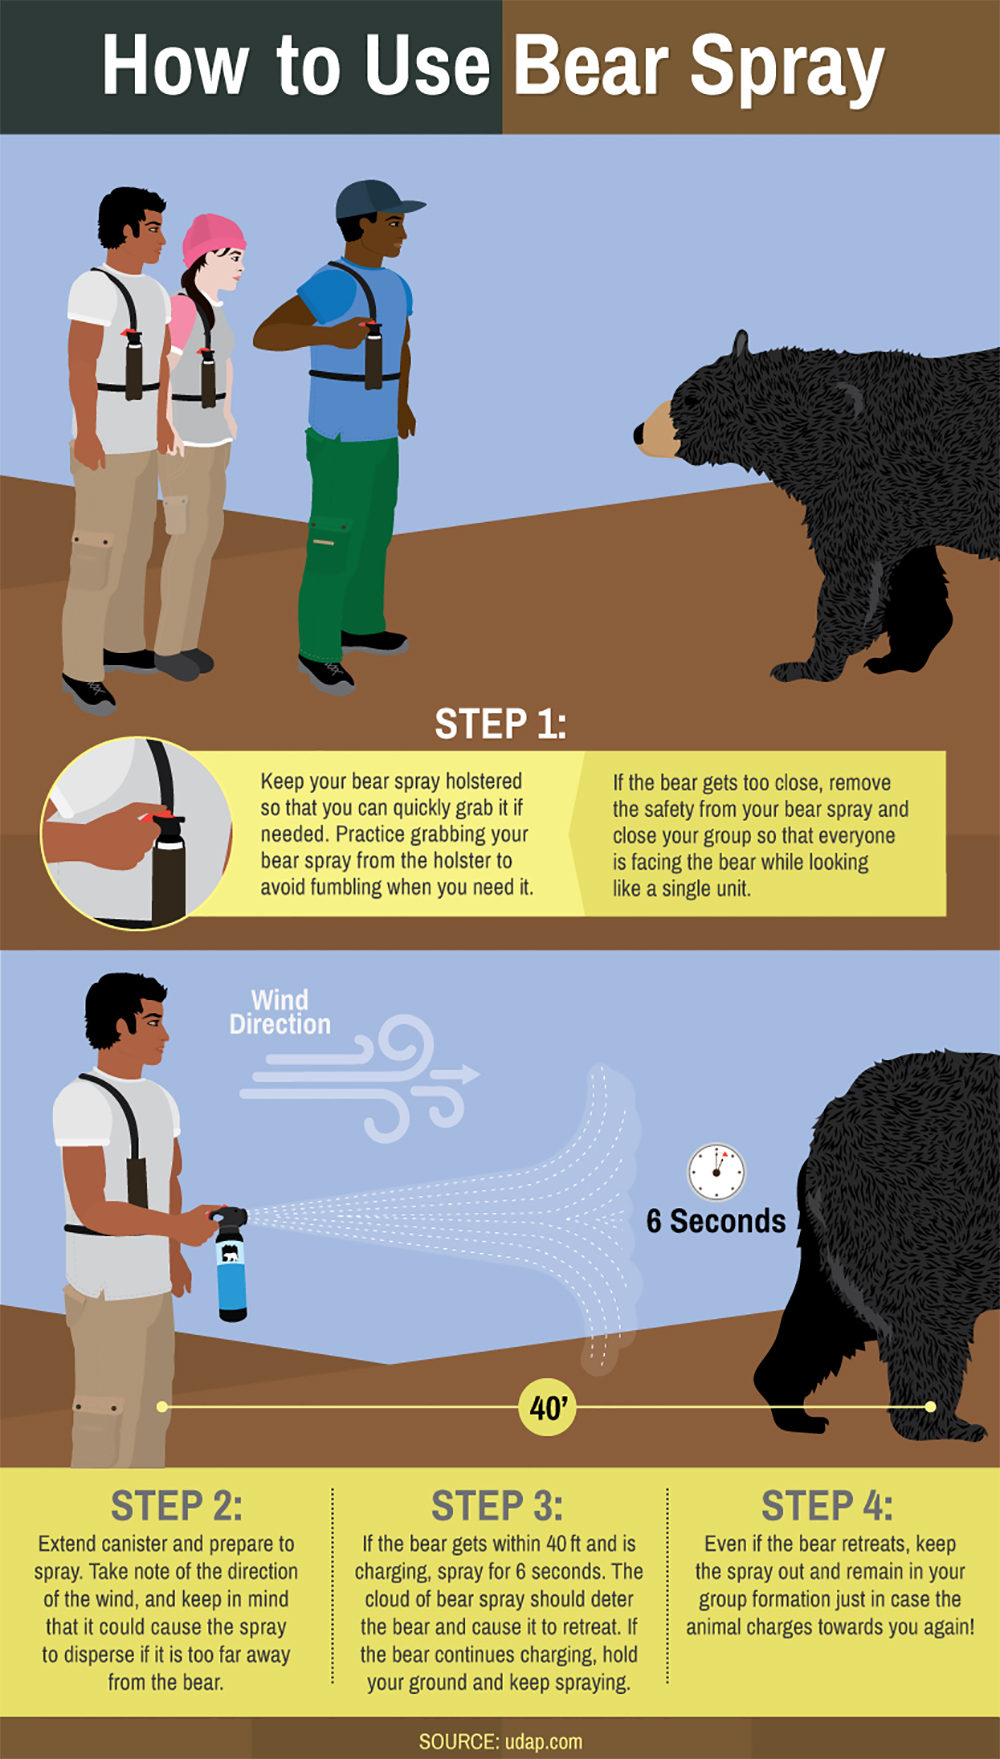
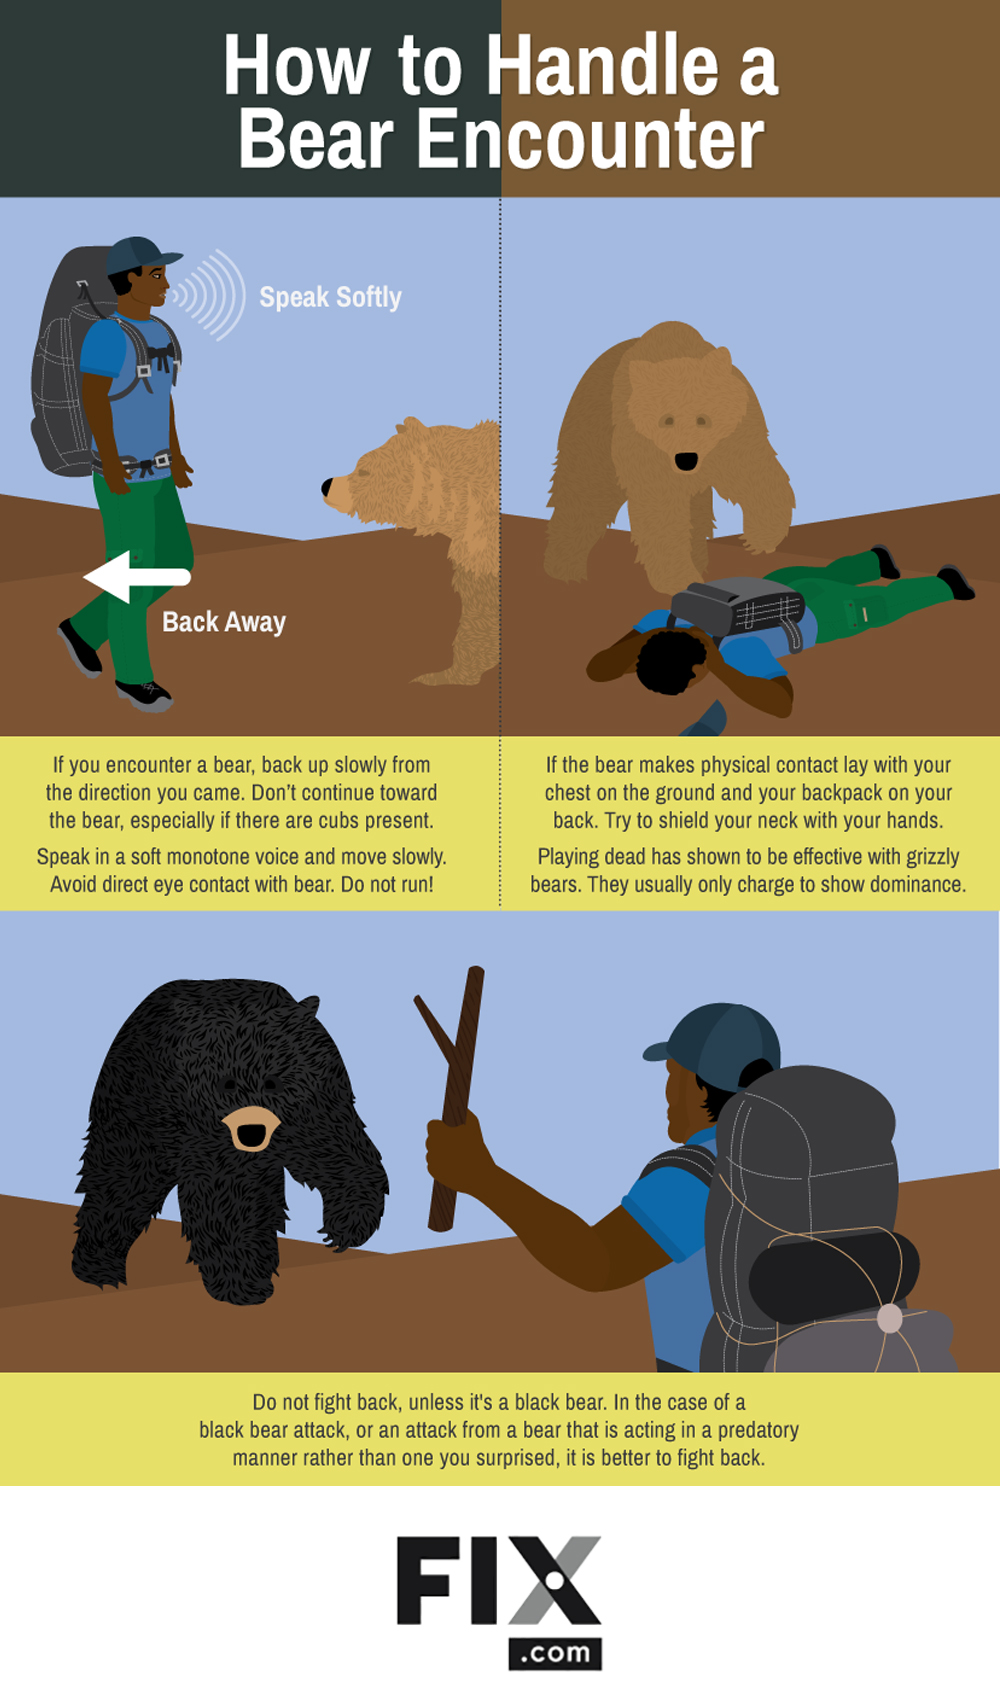
Bears are one such species. If you run into one in the backcountry and aren’t prepared to deal with it, you could end up having a very bad day. If you’ve got a strong stomach, check out this graphic video clip from Montana resident Todd Orr. He was scouting for elk before a hunt, when a mother grizzly bear charged him at full speed. The side of his head was sliced down to the bone, and his forearm was torn and punctured. Fortunately, he was able to walk back to his truck and call for help after it left him for dead.
Even prepared individuals like Orr can be attacked — he used bear spray, and followed the recommended defensive technique of laying motionless, yet was still severely attacked by the mother grizzly. However, preparing against bear attacks can reduce their severity, or help you avoid them altogether. In Orr’s case, his wise choices and determination to escape likely saved his life.
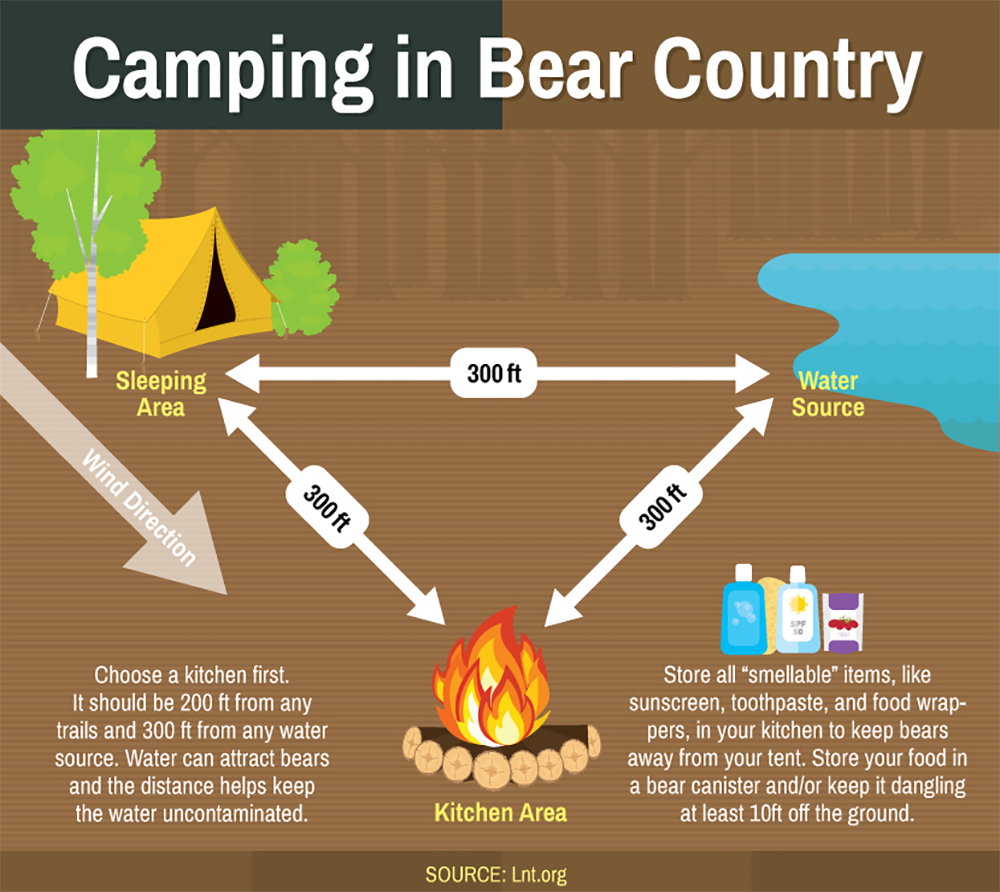
The infographic below from Fix.com shows the recommended steps for defending yourself in bear country. First, it helps identify the differences between black bears and grizzly or brown bears, and illustrates where each type is found in North America. Then it shows how to survive a bear attack, either with bear spray, body language, or defensive posture. Click here to download a full-size version of the graphic.
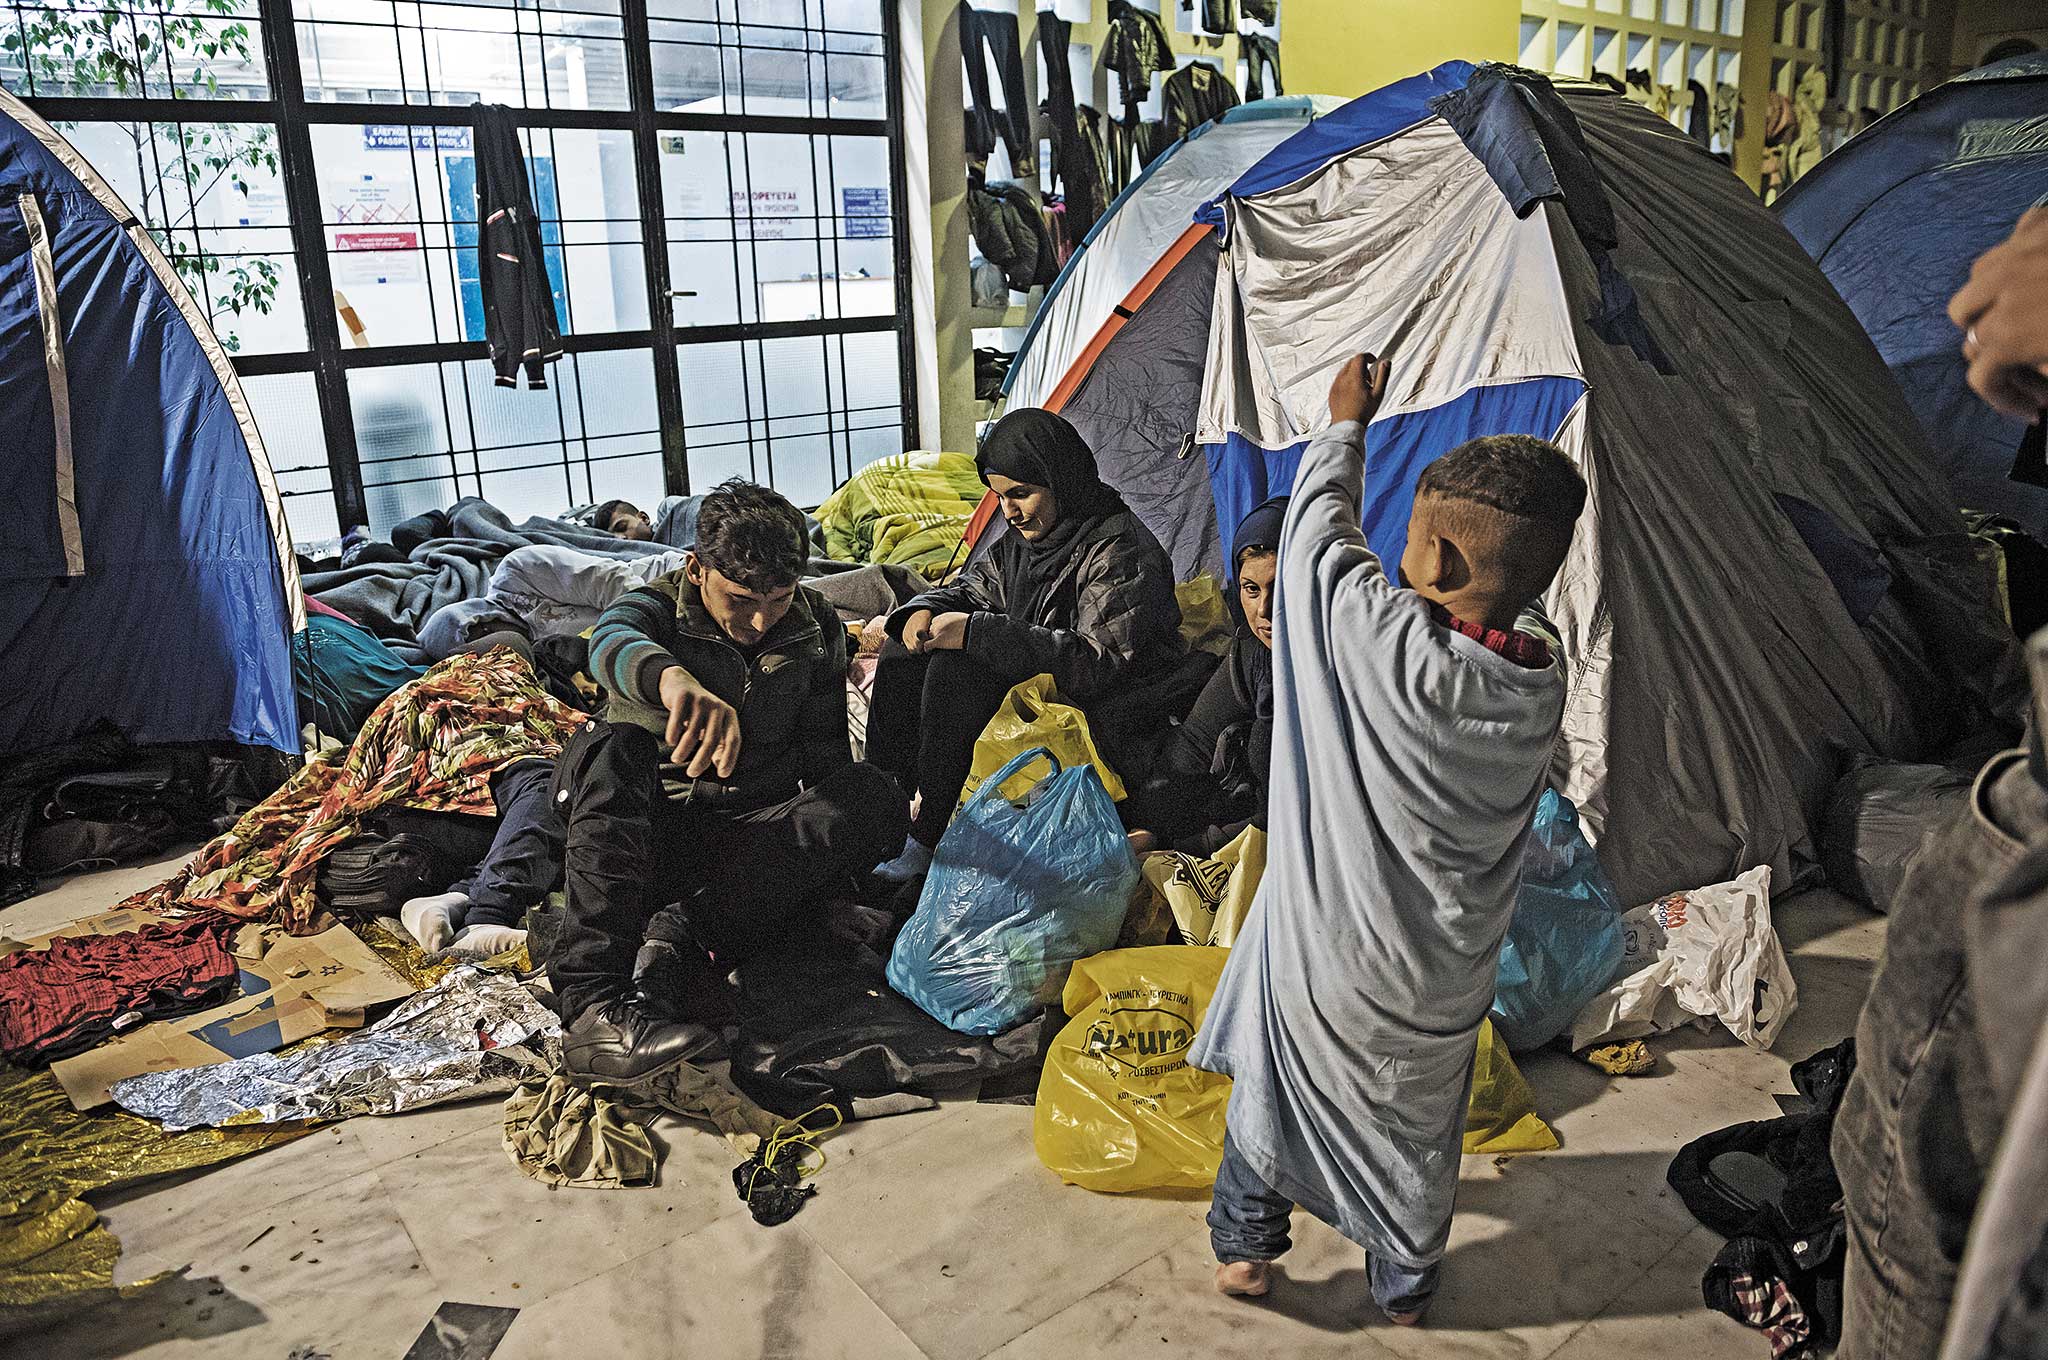
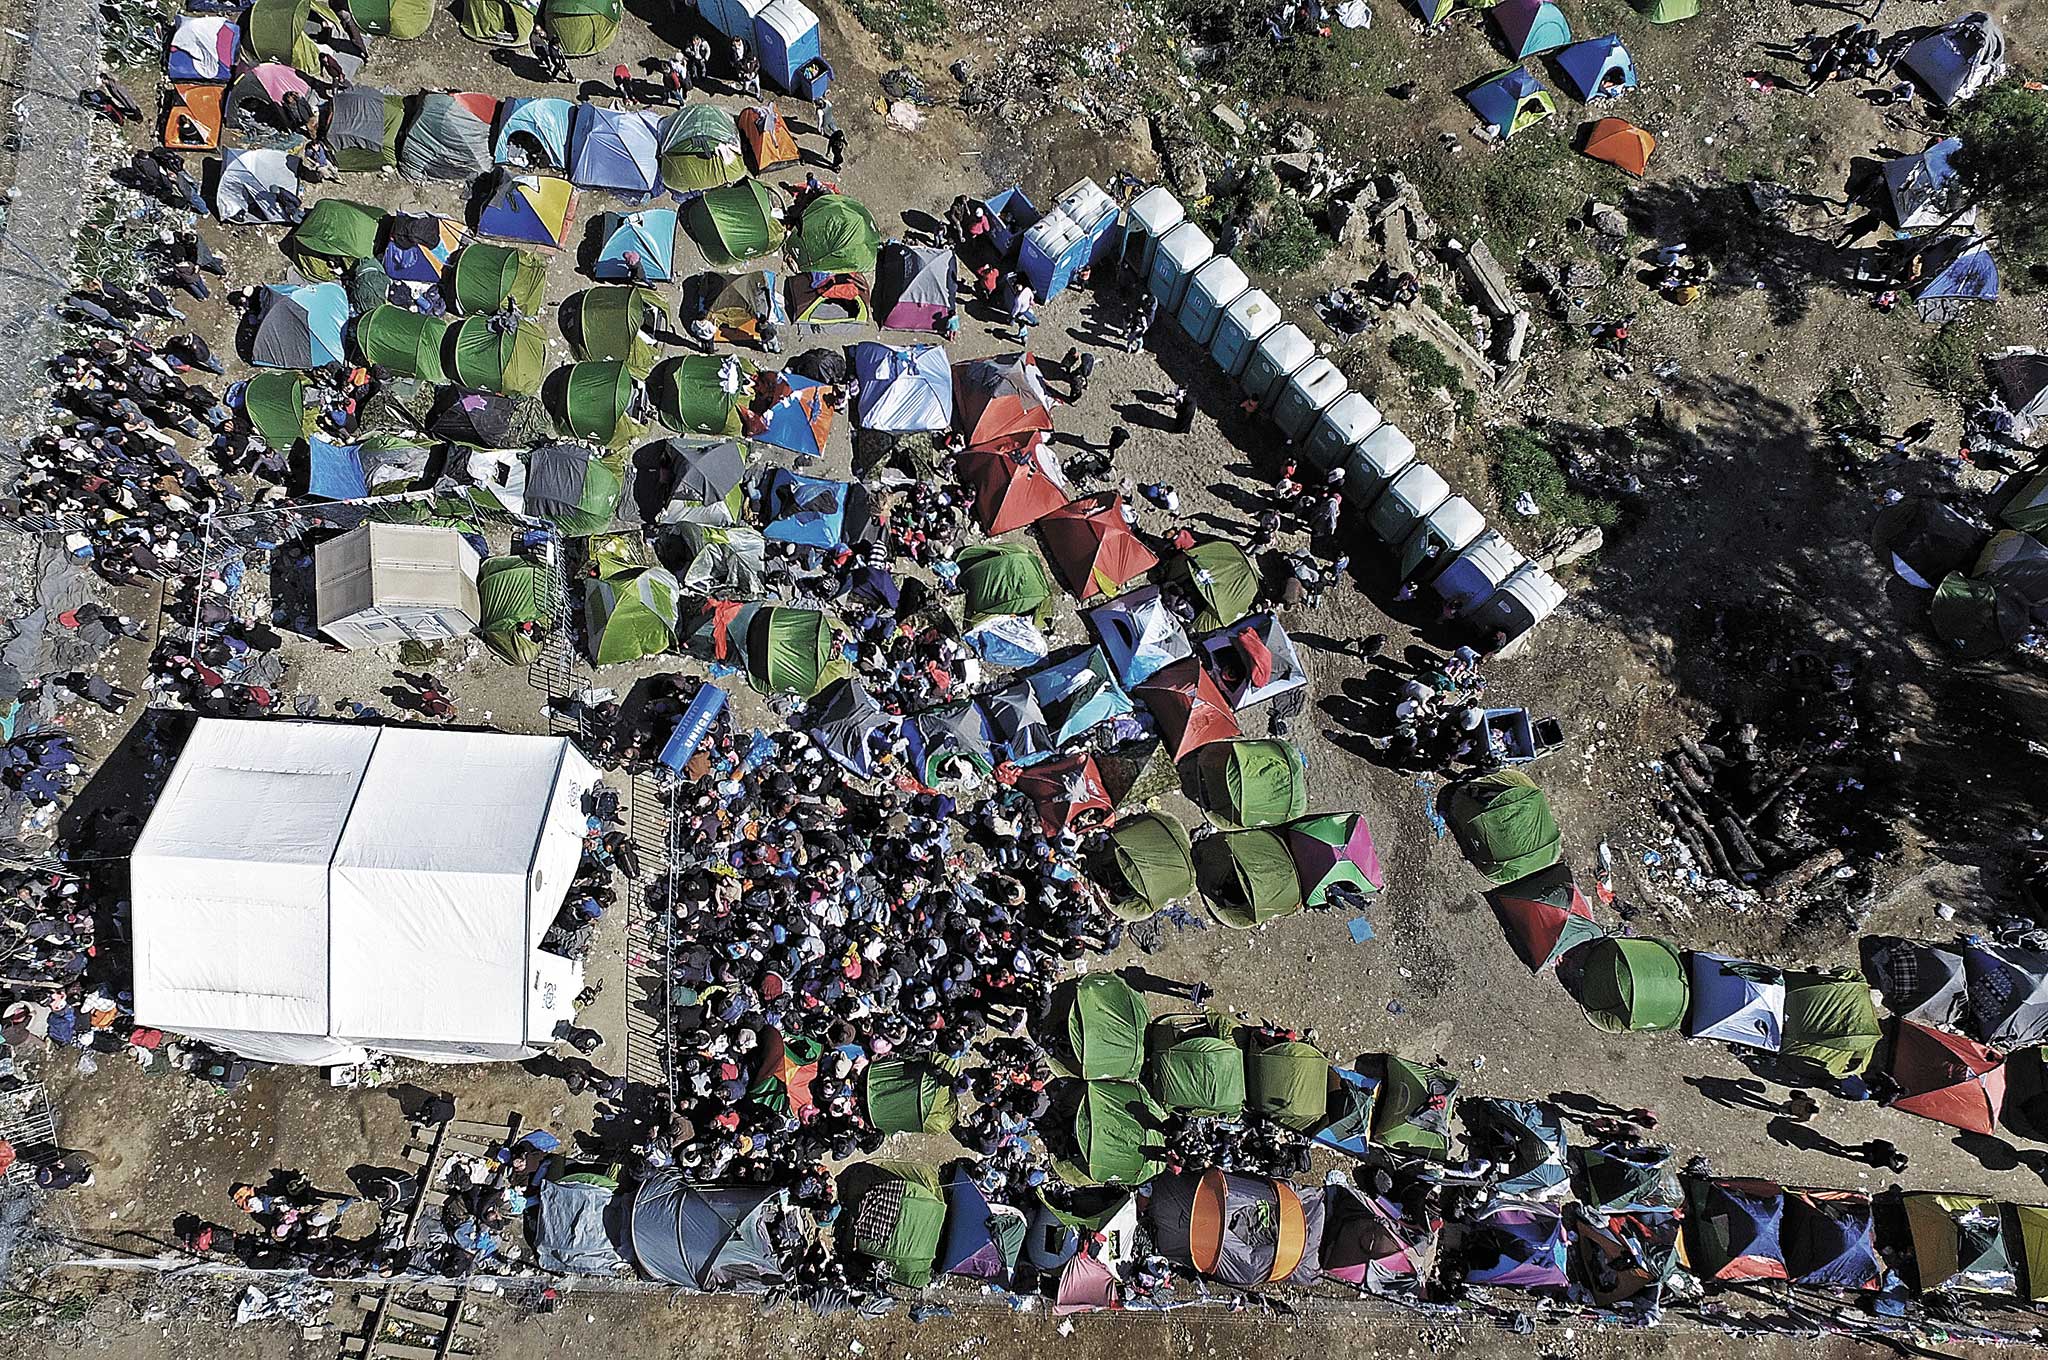
While surviving a disaster is never easy, for many it’s actually the aftermath that can be the most challenging. After a crisis, you may find yourself among a large group of people under some very difficult conditions. It might be in a private residence, a public school being used as a makeshift shelter, or maybe it’s the worse of the worst — thousands of people packed like cattle into a large public structure.
Think the Superdome during Hurricane Katrina in 2005, where hordes of tired, hungry, thirsty, highly stressed-out people were shoehorned into tight quarters for extended periods of time without adequate resources. Add in the sweat, the smells, the crying, the collective desperation, and you can understand how the situation can quickly get very ugly.
What is Close-Quarter Etiquette?
Many of us have heard the phrase close-quarter battle, or CQB. It’s a term used to describe combat in tight spaces — say, in a house or aboard a United Airlines flight — that severely limit movement and visibility which forces a change of tactics. In many respects, close-quarter etiquette (CQE) is similar.
We use the term CQE to describe interactions between people in small areas where movement is so limited that the everyday standard of interpersonal behavior may no longer be practical.
Think of it as a code of behavior, a series of common-sense guidelines for situations where groups of people are forced to coexist within a confined area for an extended period of time. CQE requires establishing and respecting boundaries, observing proper sanitation/hygiene and safety procedures, employing stress-management skills, and showing consideration and respect for others.
The Basics
Being cooped up with a bunch of people after a crisis can be nerve-racking, extremely uncomfortable, and even contentious at times. People generally have every intention of remaining calm and level-headed in the face of adversity, but after just a few days tempers can flare and folks may not be as agreeable as they were in the early stages of the crisis.
Just about now some of you reading this article may be thinking, “Who cares about being nice to one another when we’re all trying our best just to survive?”
CQE, however, isn’t about being nice — although being nice doesn’t hurt. Rather, it’s about finding ways to maximize cohesion within a group while minimizing the disputes, animosity, and conflicts that can distract from and erode the group’s chances for survival.
Mindset
Keeping a positive attitude and cooperating with those around you will goes a long way toward reducing stress, anxiety, and establishing an optimistic atmosphere. It sounds simple enough, but during postcrisis conditions, staying upbeat will be anything but easy.
Here are some tips to help you maintain a positive tone even under the most difficult circumstances:
Empathize: Understand and accept that the people will not be at their best; adjust your expectations accordingly. This may be their first experience with a full-blown disaster, and many will be overcome with panic, shock, fear, desperation, and anger. Others will be operating at their physical and emotional limits, and the slightest provocation can potentially push them over the edge.
Encourage: Reassure those around you that the situation will improve and that working together and staying positive are in their best interest.
Keep Calm: Although survival will always be the first order of business, try to keep your cool. Someone has to bring in buckets of water, but there’s no need to bark orders to get it done.
Speak Softly: The more you amp up the volume, the less people will hear your message. Effective communications require that you choose your words carefully and that you deliver them with respect. Be brief, be specific, and be positive.
Avoid Conflicts: Pick your priorities carefully. Any energy expended in disagreement can be better employed to ensure the group’s survival.
Boundaries
Setting and respecting personal boundaries is always important; however, after a disaster it becomes a top priority. During normal times it might be considered rude to overstep boundaries; in a disaster aftermath such an oversight can easily escalate into a heated argument or worse. Avoid these potential conflicts by establishing and clearly communicating all personal boundaries.
Start by agreeing on a realistic set of basic personal boundaries with those around you. For maximum cooperation, make sure everyone understands where these lines are drawn.
To be effective, boundaries should be appropriate to the circumstances and the limitations facing the group. In a temporary survival situation, establishing unrealistic expectations will only set up the group for failure. For example, asking someone not to snore when they fall asleep isn’t realistic; asking someone to keep their voice down while others are sleeping is.
Personal Space
Respecting personal space, that invisible bubble that surrounds us all, is a big deal for many of us and one of the most important rules of social behavior. Although every situation is different, in general, most consider personal space to be between 1.5 to 4 feet. Any closer and the reaction can be anything from discomfort to violence. In a crisis situation, this distance extends further, since many people will likely be on high alert.
A good rule of thumb is to keep extra distance between you and other people and to always ask for permission before moving in closer, especially when nerves are frayed. Even a simple bedsheet hung on a string between sleeping areas represents an important personal boundary and shouldn’t be disregarded.
Here are some additional tips:
Hands Off: Never touch anyone you don’t know well without consent. No matter how honorable, your intentions can easily be misinterpreted.
Announce It: When walking up to someone, always announce yourself from a reasonable distance to avoid surprising them. Don’t approach a person without their consent.
Daily Duties
Once the power fails and the clean, fresh water is in short supply, daily life will become significantly more difficult. Chores that were once easily performed by pushing a few buttons or turning a knob will now require a good deal of effort. Not everyone will be up to the task — the frail, elderly, or very young, for example, may be limited in what they can do, but everyone should pitch in within the limits of their abilities.
The goal is to spread out the responsibilities so that all members contribute to the group’s survival and no one is left out.
This distribution of responsibilities not only helps everyone feel useful, but it also keeps resentment to a minimum. Chores should be kept simple, nothing too complicated or elaborate, just what’s needed to keep the wheels of survival turning. Make a list of who’s in the group and detail the skills they bring to the table. Matching people and their skills with the right job ensures you get the best possible person for the job.
Sharing Resources
You may find yourself among family and close friends, but there may also be other people present whom you don’t know so well. In an ideal world, everybody contributes resources and sharing supplies only makes the group stronger.
In the real world, however, you can expect people will show up with empty hands and maybe even with a few extra mouths to feed. This is where advanced planning and preparation can make a huge difference.
When turning people away isn’t an option, and in many instances it’s not, you’ll need extra supplies, food, and water. When the moment passes, you can privately curse and complain about how your lazy cousin should have listened to you when you told him to store some basic food preps, but during a crisis isn’t the best time to call him out. Resources should be shared in equal portions, and meals should be eaten together as a group, but don’t force the issue. Set reasonable rules for food distribution and rationing, especially if food, water, and other supplies are in short supply.
Sanitation & Hygiene
After a disaster, clean water may be severely limited and largely reserved for drinking and food preparation. Lack of proper hygiene will not only have serious effects on your health, but it can also make being around you very undesirable. Everybody understands that during survival situations grooming will take a hit, but hygiene can’t be abandoned altogether. Illness and disease can quickly spread among a group confined to tight quarters.
With some planning and preparation you can still maintain a good level of hygiene and sanitation without compromising your water supplies. Here are some common sense CQE tips:
Prioritize: Make personal hygiene a daily priority, same as eating food and drinking water.
Conserve Water: Wash key body parts with a small amount of water or disposable wipes. A spray bottle can be used to minimize water use.
Be Considerate: Be mindful of all sanitation procedures and think of others. If there’s an area for relieving yourself, use it and clean up after you’ve done your business.
Separate Zones: Dispose of all human waste in a safe, well-marked area to avoid contaminating your living area, food, or water supplies.
Conclusion
Just because you find yourself in cramped and uncomfortable conditions doesn’t mean you shouldn’t do your very best to find balance and make the best of the situation. By establishing and respecting boundaries, employing people’s skills, showing consideration and respect for others, and maintaining proper sanitation/hygiene procedures, we can all improve our chances of surviving. Stay safe, be prepared, and be considerate.
About The Author
Richard is a practicing attorney, an urban survival consultant, a writer, and a firearms enthusiast. He’s the author of Surviving Doomsday: A Guide for Surviving an Urban Disaster and The Quick Start Guide for Urban Preparedness. For more, go to www.quickstartsurvival.com.
Cleanliness is Key
Most of us follow a set of unspoken rules that keep society functioning smoothly. When a disaster occurs, however, it seems that all sense of civility tends to disappear almost immediately. A fail here can seriously compromise your survival. Here is list of some of the worse CQE violations:
Poor Personal Hygiene: Body odor is just the start. An unwashed body is a breeding ground for bacteria that can cause all sorts of health problems. Improper hygiene can lead to illness, infection, and create a welcoming environment for all sorts of disgusting, disease-causing critters. In close quarters, illness and disease can quickly spread and affect all you come in contact with.
Unclean Hands: Hand washing is probably the single most important factor for preventing the spread of infection and disease, including the common cold, influenza, E. coli, hepatitis A, and a variety of other life-threatening nasties. Proper hand washing can significantly reduce the spread of germs and bacteria and can be easily done in under a minute with minimum amounts of clean water or anti-bacterial products. Prepare a wash station and make it as easy as possible for all to comply.
Uncovered Coughing and Sneezing: Cover your mouth with a tissue, use your sleeve, or cover your mouth with the upper portion of your shirt. Don’t cover your mouth/nose with your hands when you cough or sneeze, this will just help spread the germs even faster every time you touch something. Regardless of what you use to cover up, make sure to wash your hands as soon as possible.
Wash Station
Nothing you can do will ever be 100-percent effective, but taking some simple precautions will minimize the chances of spreading contamination among your survival group. A simple hand wash station can be easily set up with minimal supplies and effort. Here’s how:
Prepare a solution of three parts clean disinfected water with one part household bleach, and put the mixture in a spray bottle for sanitizing hands with minimal water.
Have another person spray your hands while you rub them together; use just enough of the solution to wet your hands.
Lather up with a small amount of liquid soap and scrub well.
Spray hands one last time to rinse. Air dry or use a paper towel.
Never use the spray bottle to spray your own hands since that might contaminate the outside of the spray bottle.
When it comes to survival firearms, we’re big fans of .22 LR. This caliber is very inexpensive, easy to find at most sporting goods retailers, easy to shoot accurately, produces low recoil, and it’s perfect for taking down small game in survival scenarios. Also, many of these rimfire weapons can be suppressed to produce an extremely soft muzzle report, which means you won’t alert everyone in your vicinity if you’re out hunting varmints or shooting targets.
The Browning Buck Mark Lite UFX includes a TRUGLO fiber-optic front sight and machined Buck Mark logo.
Browning has announced the expansion of its Buck Mark .22 LR pistol line with eight new models, ranging from the affordable Practical URX to the premium Field Target. The .22 pistol is made in the USA with a machined aluminum frame, reliable blow-back action, precise single-action trigger, and adjustable sights.
The Browning Buck Mark Field Target Suppressor-Ready includes a threaded barrel and cocobolo target grips.
The Field Target is available in either Suppressor-Ready (pictured above) or standard format. It includes an integral optics base, Pro-Target rear sight and blade front sight, and laminated cocobolo wood grips. MSRP for the threaded barrel model is $600, while the standard non-threaded model is $580.
The Buck Mark Lite Flute UFX (above) features a 5.5-inch steel barrel with lightweight fluted alloy sleeve. It also includes ambidextrous Ultragrip FX grips and TRUGLO fiber-optic front sight, with an MSRP of $560. The similar Buck Mark Lite UFX model has all the same features, but with a non-fluted barrel and lower picatinny rail for a light or laser. MSRP for the Lite UFX is $590.
Browning Buck Mark Stainless UDX
Finally, four models have been added to the Buck Mark Plus line: UDX, Stainless UDX, Rosewood UDX and Practical URX. The first three feature a 5.5-inch standard barrel, either with stainless finish or matte blued finish. The fourth Practical URX model has a tapered 5.5-inch bull barrel. Each features a picatinny optic rail, Pro-Target white outline adjustable rear sight, and TRUGLO fiber-optic front sight. MSRP is $550 for the UDX and Rosewood models, $600 for the stainless model, and $480 for the Practical URX.
Browning Buck Mark Plus UDX
For more info on these and other Browning Buck Mark rimfire pistols, go to Browning.com.
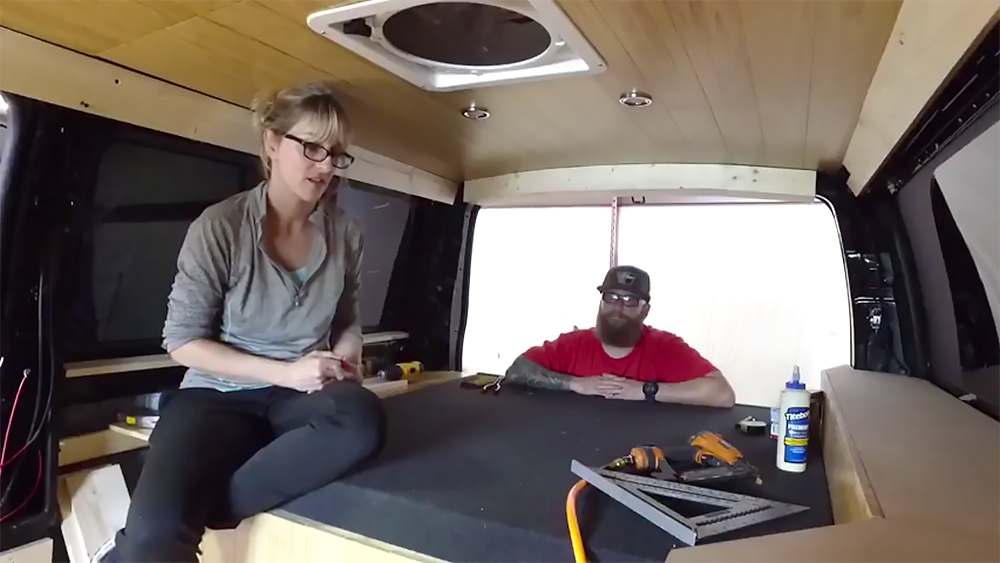
Two months ago, we introduced traveling photographer and videographer Sara Liberte and her new bug-out vehicle project, the Battle Van. If you haven’t already read the introduction to this build, we’d encourage you to do so now — here’s a link to that article.
The short version is this: Sara is building a 2017 GMC Savana cargo van into a fully-equipped all-terrain home on wheels, and we’re following along from afar to document the transformation. This isn’t some weekend warrior project that’ll be collecting dust in Sara’s driveway most of the year. It’s her every-day bedroom, kitchen, storage locker, and her transportation to remote photo shoot locations. She’ll be living in this van for extended periods of time, and using it to store her camera, firearms, emergency gear, and communications equipment as she drives from assignment to assignment.
A lot has already been accomplished since we last wrote about the Battle Van. First, Sara brought it to Pro Tint in West Virginia for some window tint to provide much-needed privacy.
Then she headed to Stillwater, Oklahoma, to meet David Adams at Clever Crow Fab. David lined the interior sheetmetal with DEI boom mat, which will dampen outside noise and vibration, allowing Sara to get some shut-eye even if the wind is howling outside. It’ll also improve the sound quality of the sound system (more on that below).
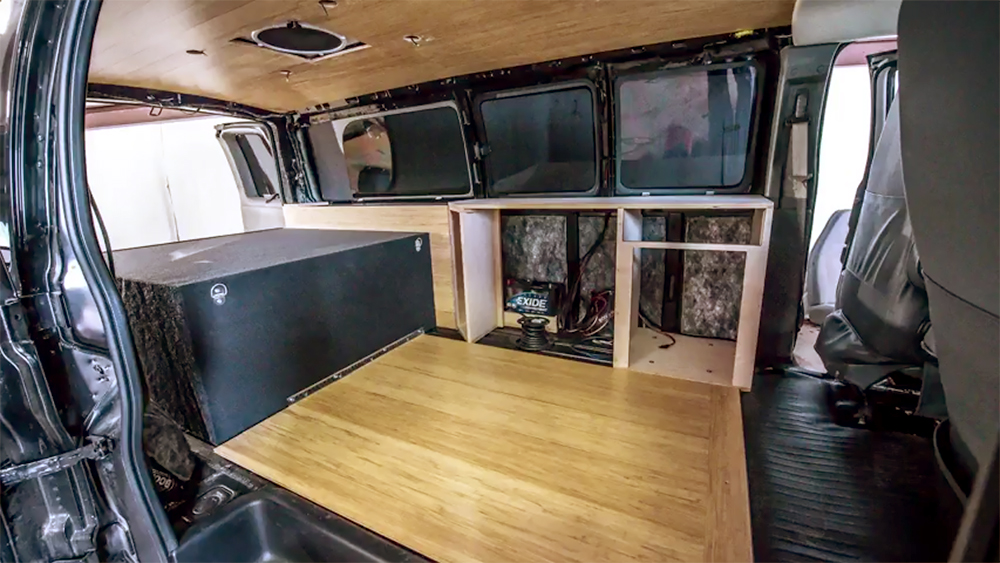
Next, a custom Truck Vault storage compartment arrived, and David hoisted it into the back of the van. It’ll serve as a platform for Sara’s mattress, and includes two slide-out drawers with massive capacity. It also locks securely, so Sara can keep her valuable gear inside and away from would-be thieves.
David also applied his fabrication skills to create wood countertops, cabinets, flooring, and a roof panel with inset lighting. An internal battery and electrical system is also in progress, and Kicker speakers will be installed to upgrade the weak factory GMC stereo.
An Aluminess Products roof rack was also bolted onto the exterior, and fitted with large solar panels from Zamp Solar. This will allow Sara to keep her computer and camera batteries topped off, and recharge the vehicle’s electrical system throughout the day, even when she’s in the middle of nowhere. She eventually plans to put in a backup generator to fall back on in emergencies — as the saying goes, two is one and one is none.
The Battle Van is already shaping up to be pretty dang cool, so we’re looking forward to see what’s next. We’ll keep you posted as the Battle Van receives more upgrades. In the mean time, check out Sara’s blog or follow her page on Facebook.
Human history has been a battle to overcome natural dangers, and we’ve come a long way in that regard. A few generations ago, we had a much more limited understanding of the dangers found in nature — hurricanes, volcanoes, earthquakes, and so on. Today, modern technology, engineering, and early warning systems have helped us understand these dangers and be more prepared to deal with them. Nevertheless, some harmful misconceptions still remain.
Multiple rip currents in Tunquen, Chile. Photo courtesy of Cecilia and Randy Lascody / NOAA.
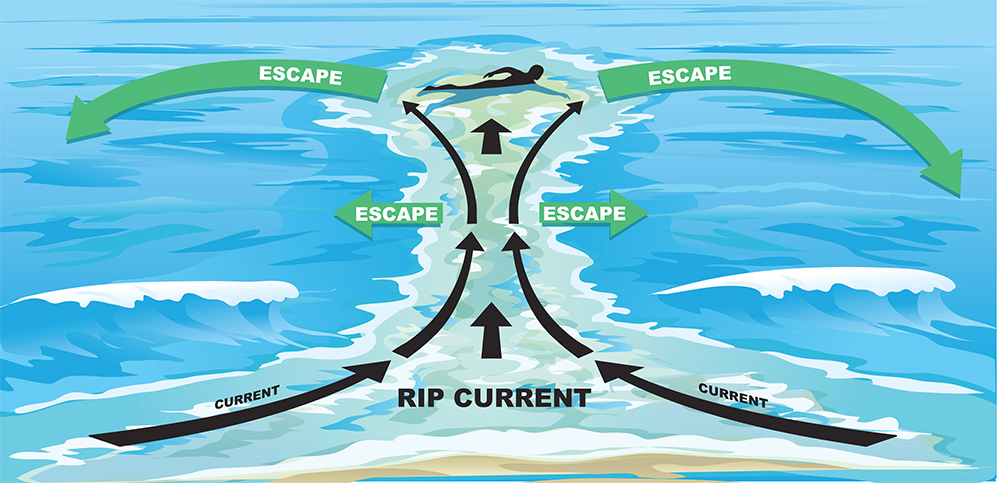
You’ve probably heard of a dangerous ocean phenomenon referred to as a riptide or undertow, but neither of these terms is technically correct. This powerful force is actually called a rip current — it’s not a tide, and undertow is a completely different phenomenon. Rip currents pose a serious threat to anyone swimming in the ocean near breaking waves, especially young, weak, or tired swimmers. In the first few months of 2017, the National Weather Service has already recorded 30 surf zone fatalities in the U.S. — more than half were as a direct result of rip currents.
Rip current in Florida after Hurricane Jeanne. Courtesy of Dennis Decker, WCM, NWS Melbourne, FL.
Aside from the confusion over these names, there’s some confusion over how rip currents actually endanger swimmers. Due to the undertow misnomer, it’s often believed that rip currents drag swimmers down below the surface, but this is untrue. Rips actually pull swimmers out away from the shore and beyond the surf zone. Many uninformed individuals react to this by trying to fight the current and swim back to shore, but fighting the strong current only exhausts them further, making drowning a serious risk.
A diagram from the National Weather Service shows how to escape a rip current.
So, what should you do if you’re caught in a rip current? Swim parallel to the shore, out of the path of the current. Once you’re out of the current, you can swim back in to shore. Most rip currents are 50 to 100 feet wide, so you shouldn’t have to swim too far to escape its pull.
It’s also wise to know how to identify rip currents before you enter the water. Look for a channel of smooth surface water where waves appear lower and whitecaps are less prominent — if you see one, that may be a rip, so you should try to avoid it. Check out the video below from NOAA’s National Ocean Service channel on YouTube:
Keep these tips in mind as you swim this summer, and share them with your friends and family. As we glean a better understanding of this natural force, we can prepare ourselves to avoid its danger. For more documentation on this and other oceanic dangers, visit RipCurrents.NOAA.gov.
Warning!The content in this story is provided for illustrative purposes only and not meant to be construed as advice or instruction. Seek a reputable self-defense school first. Any use of the information contained in this article shall be solely at the reader’s risk. This publication and its contributors are not responsible for any potential injuries.
Paracord is to the survivalist as ketchup is to French fries. Carried in hanks, bracelets, shoelaces, neck-knife lanyards, and all over, paracord is a staple piece of kit. But it’s one thing to have some on hand; it’s another to know how to actually use it. Many people look at paracord and see a piece of string. We look at paracord and see endless possibilities to increase our survivability.
This is knot your average cordage article. We were provided with plenty of paracord from Campingsurvival.com, and we’re here to take your skills and readiness to the next level with these RECOIL OFFGRID projects.
Paracord Project #1 – Trapo
Function: Weapon
Difficulty: 5 out of 5
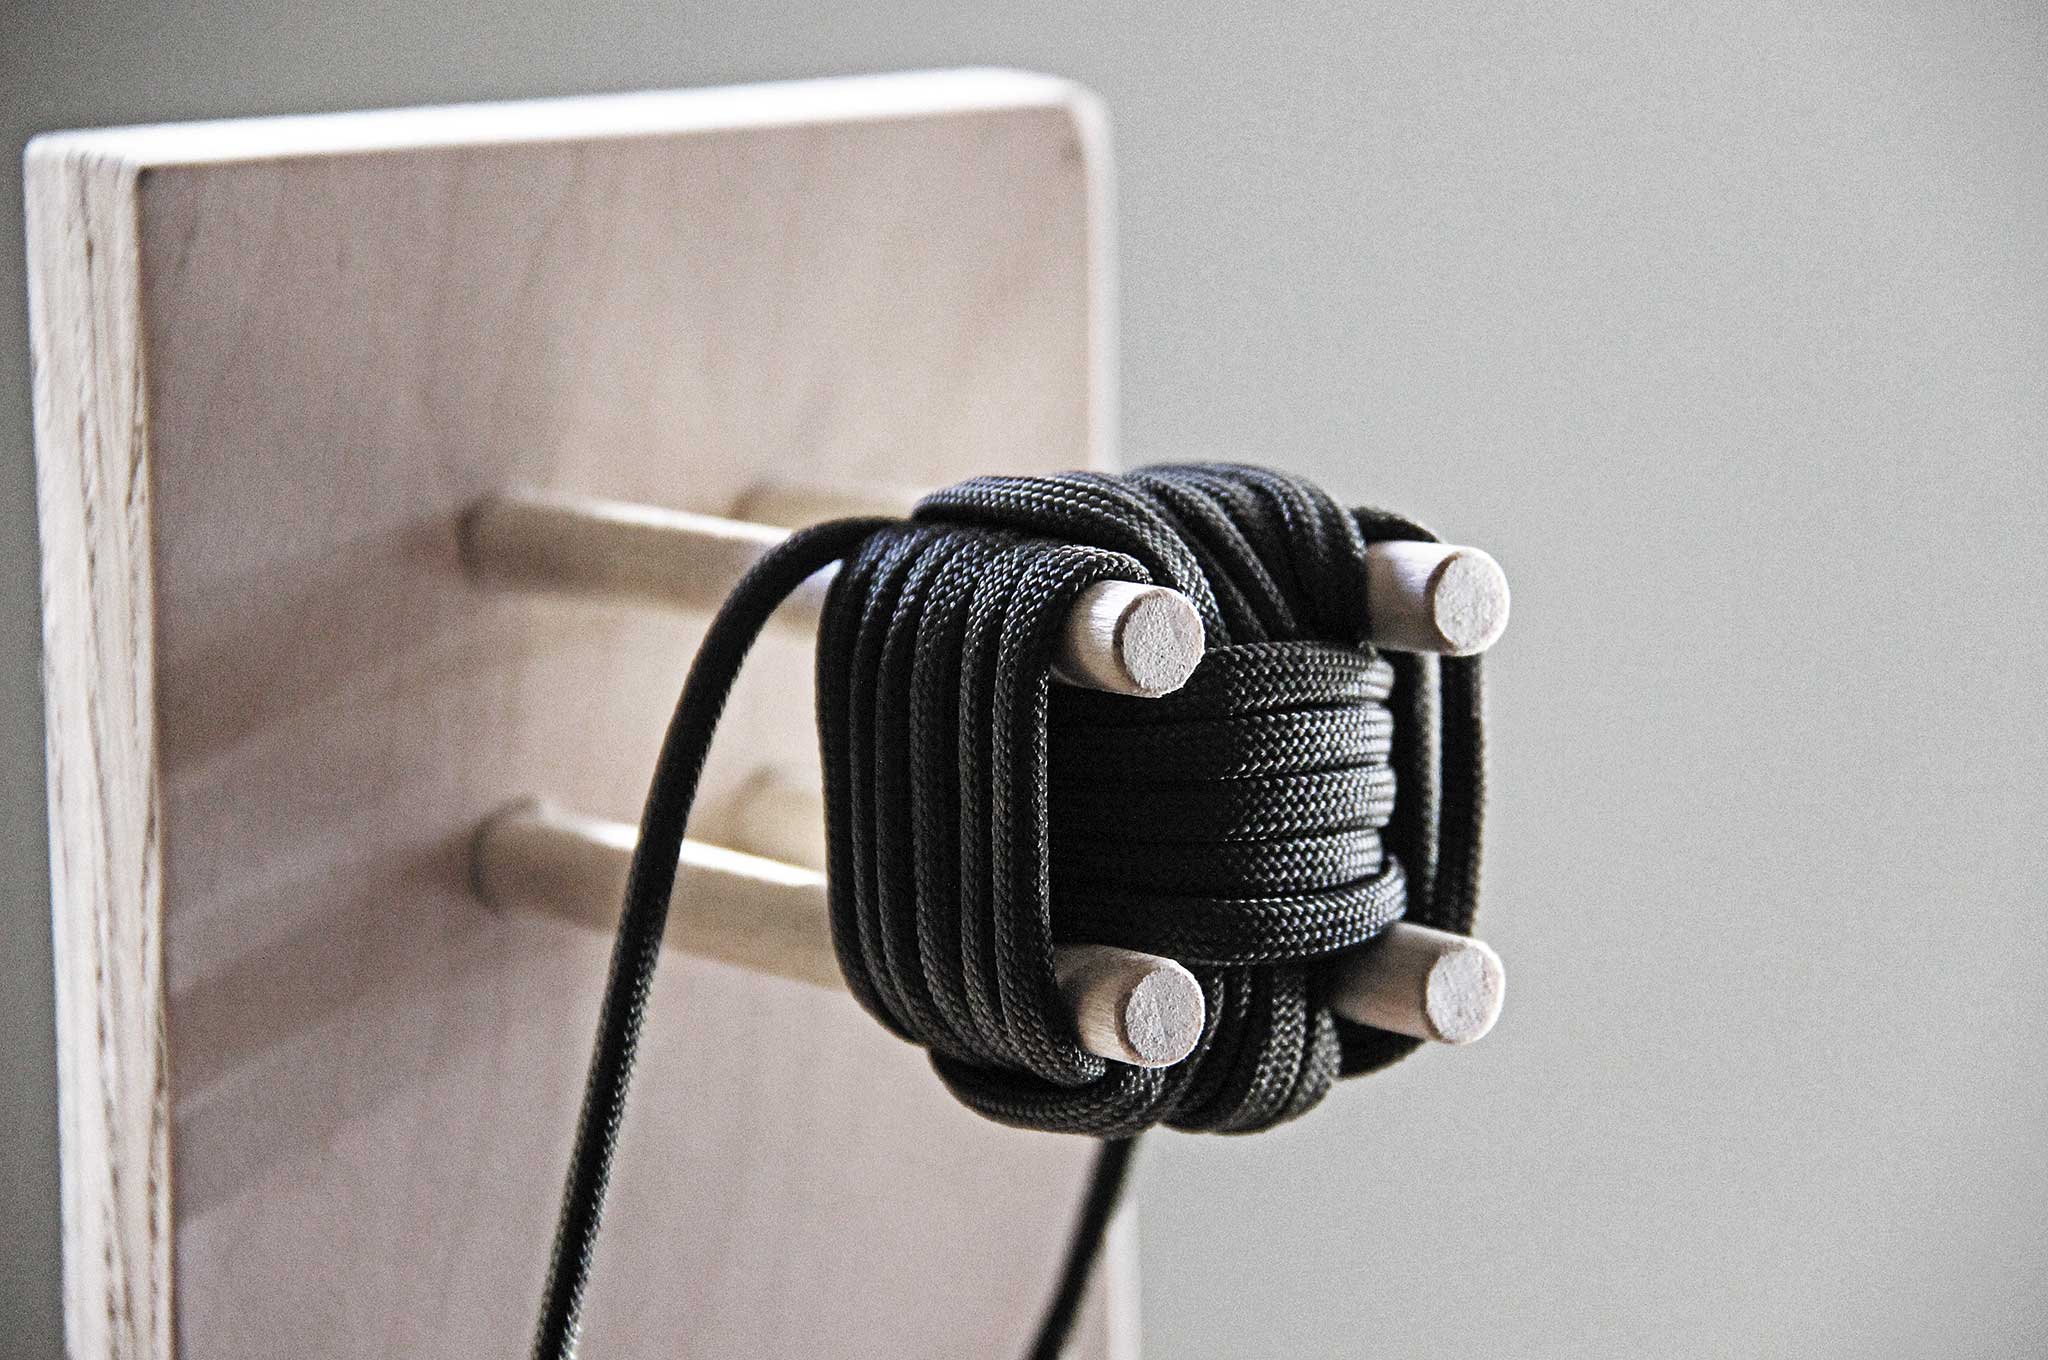
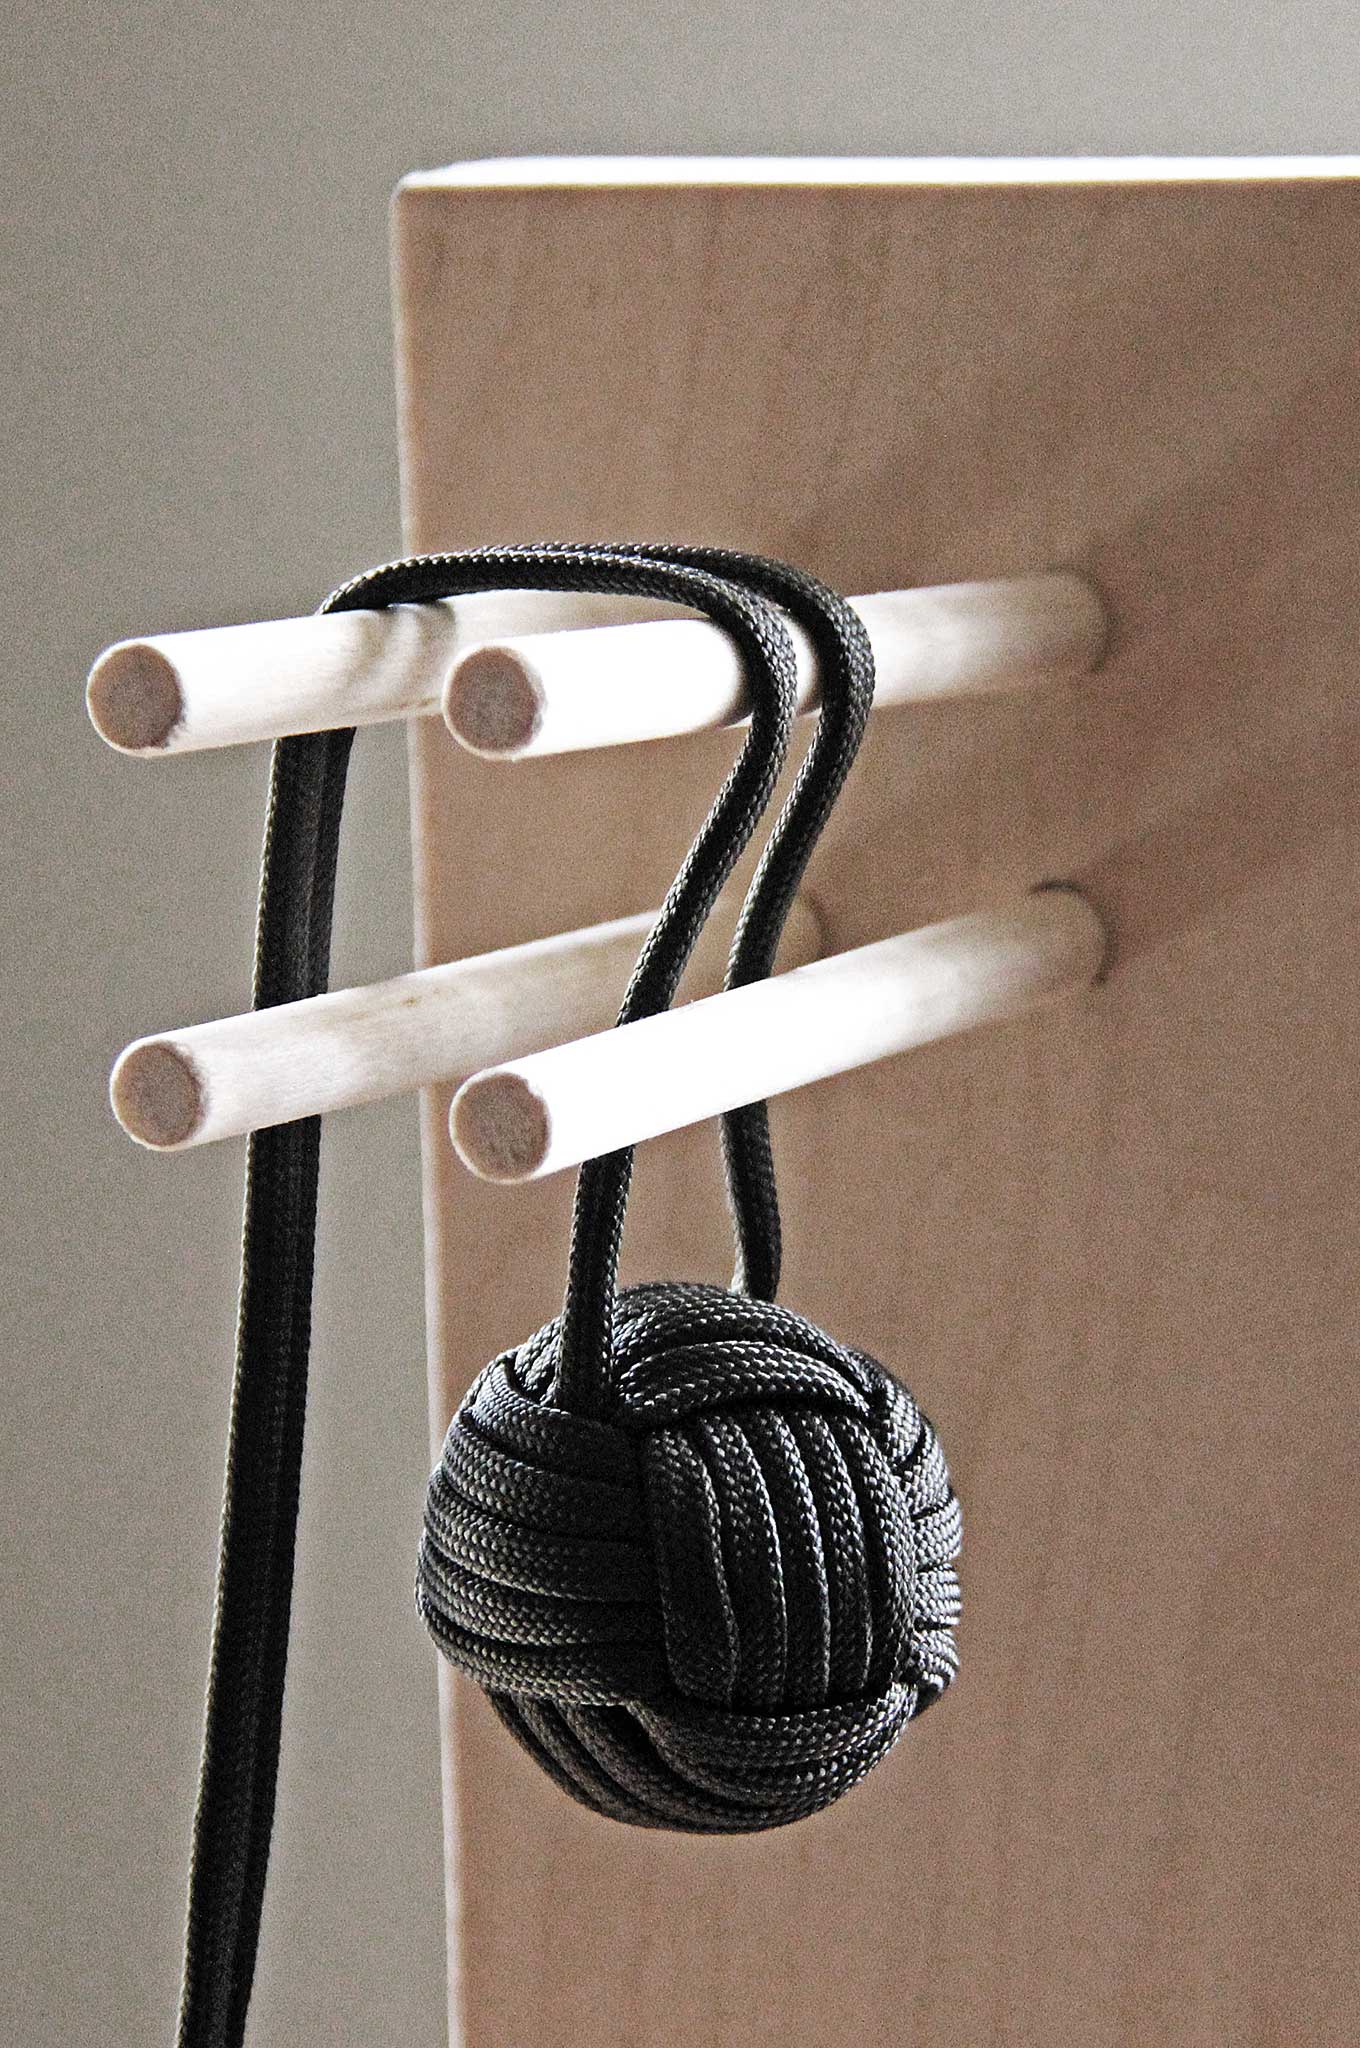
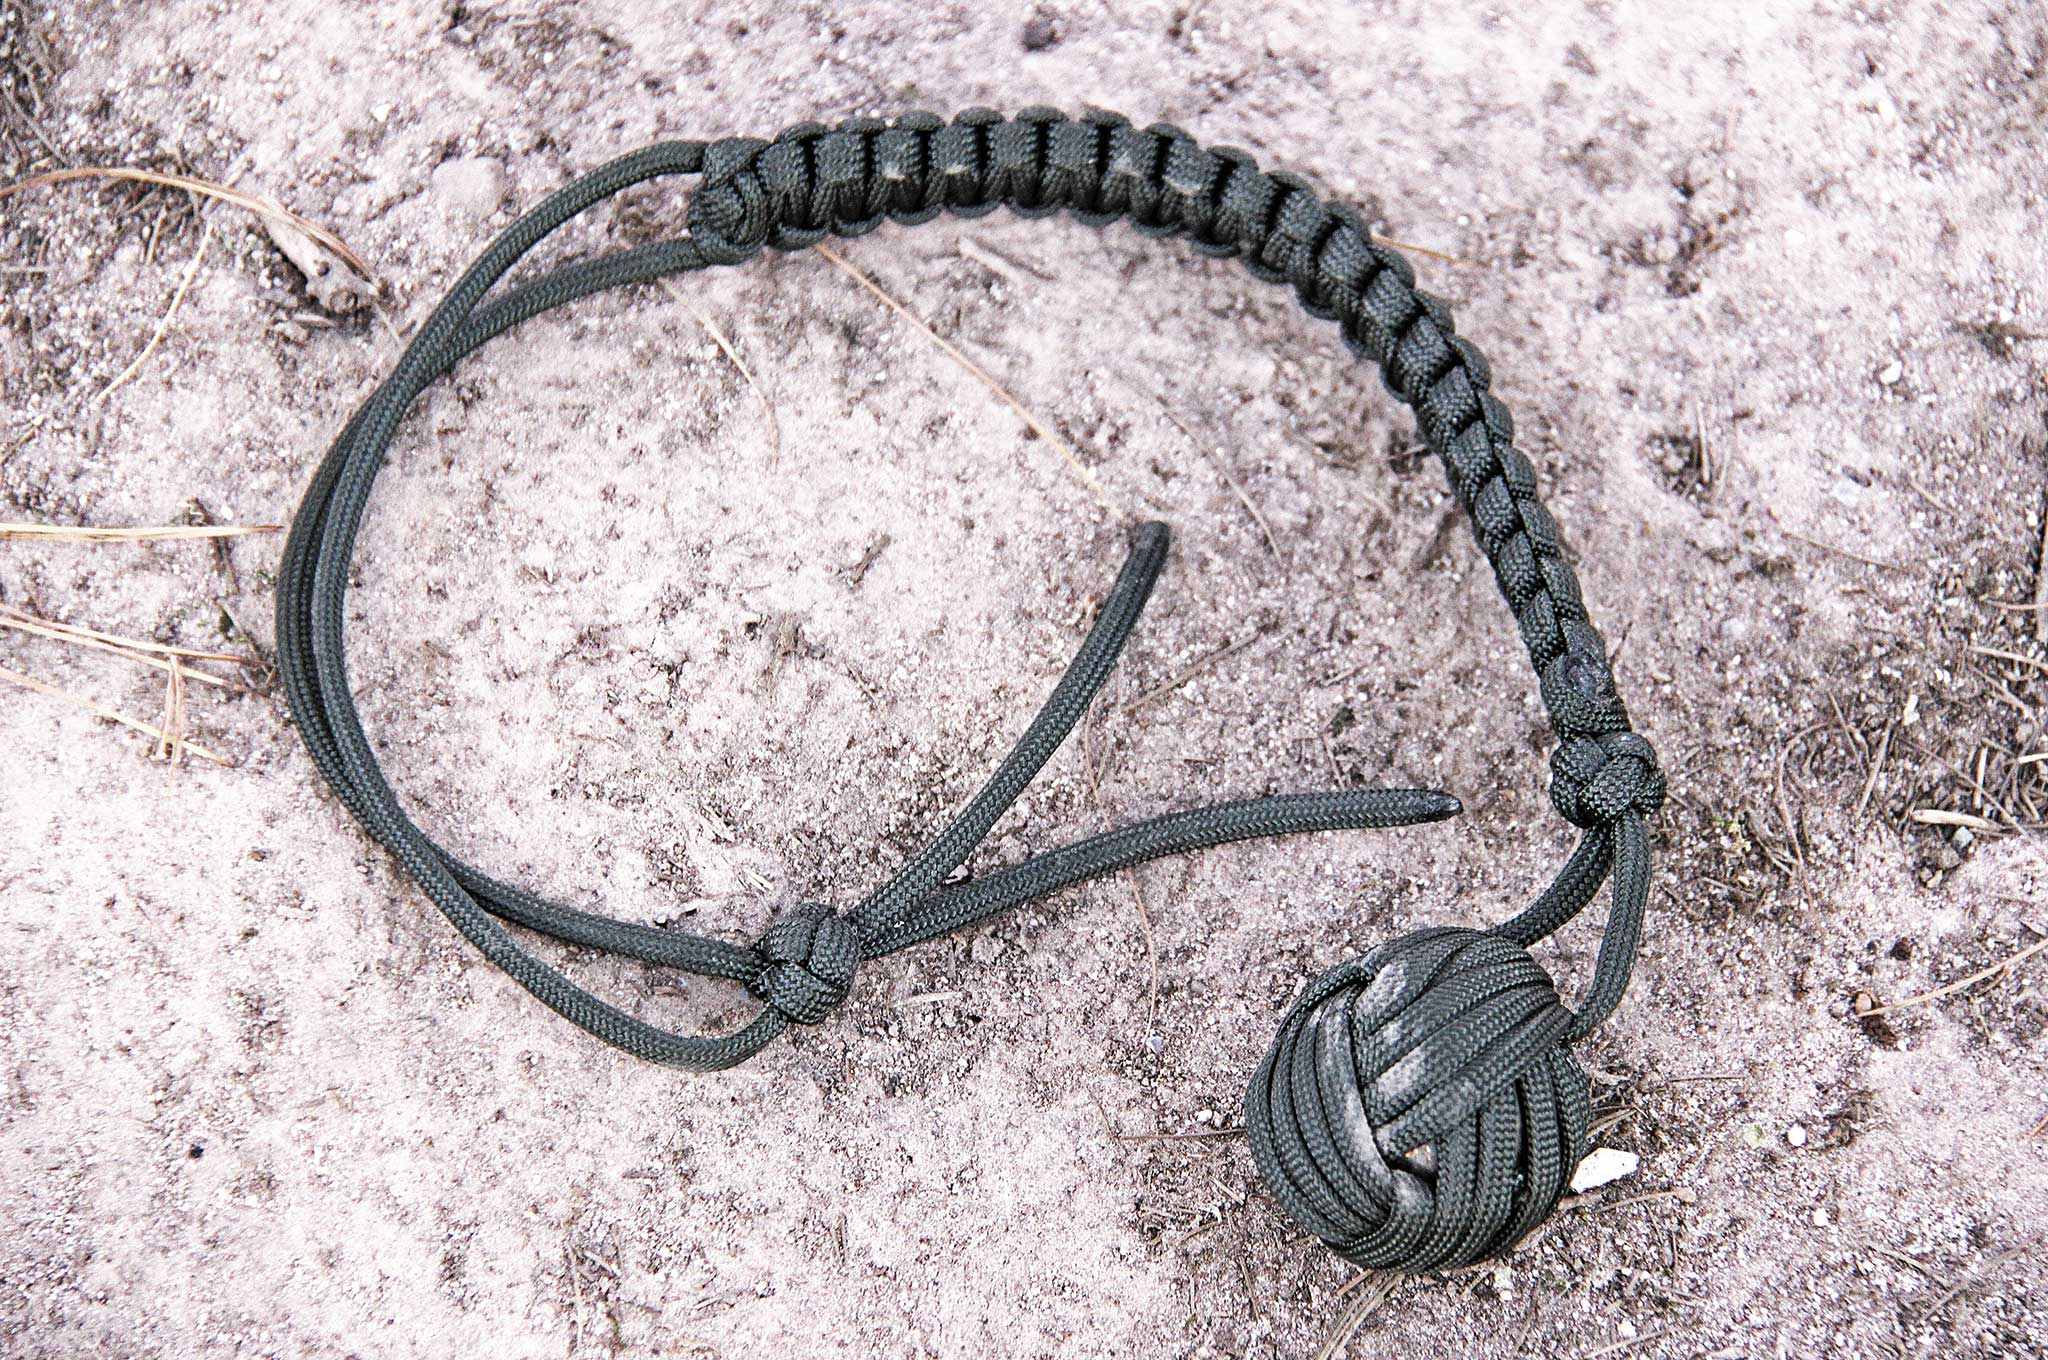
How To: Anyone who has seen the Steven Seagal movie Out for Justice knows what a rock in a sock is even if they don’t know why Ritchie killed Bobby Lupo. Here’s how to make one out of paracord with a ball bearing. This version requires knowledge of how to tie a monkey’s fist knot around a solid sphere.
Start by passing your paracord around the object enough times to cover it. For a 1-inch ball bearing, this is approximately six passes of paracord. Wrap your cord perpendicular to these passes six more times. Thread your paracord another six times to the inside of the second set of passes and around the first set of passes (there’s a reason for the difficulty rating on this one, and you just read it). Dress up the knot by pulling it here and there until it tightens around the ball bearing. Tie the ends into loop that can be slipped around your wrist and flail away.
Monkey fist knots can be tied by hand, but a simple jig made out of wooden dowels and a couple pieces of board make this task so much easier.
Notes: We’ve tied these by hand without a jig and must admit it’s worth the extra steps to assemble one. Not since puberty have you wished as much for an extra hand to help out in in the process. Just drill four holes, 1 inch square, into a wooden board and insert wooden dowels to hold your ball bearing for you.
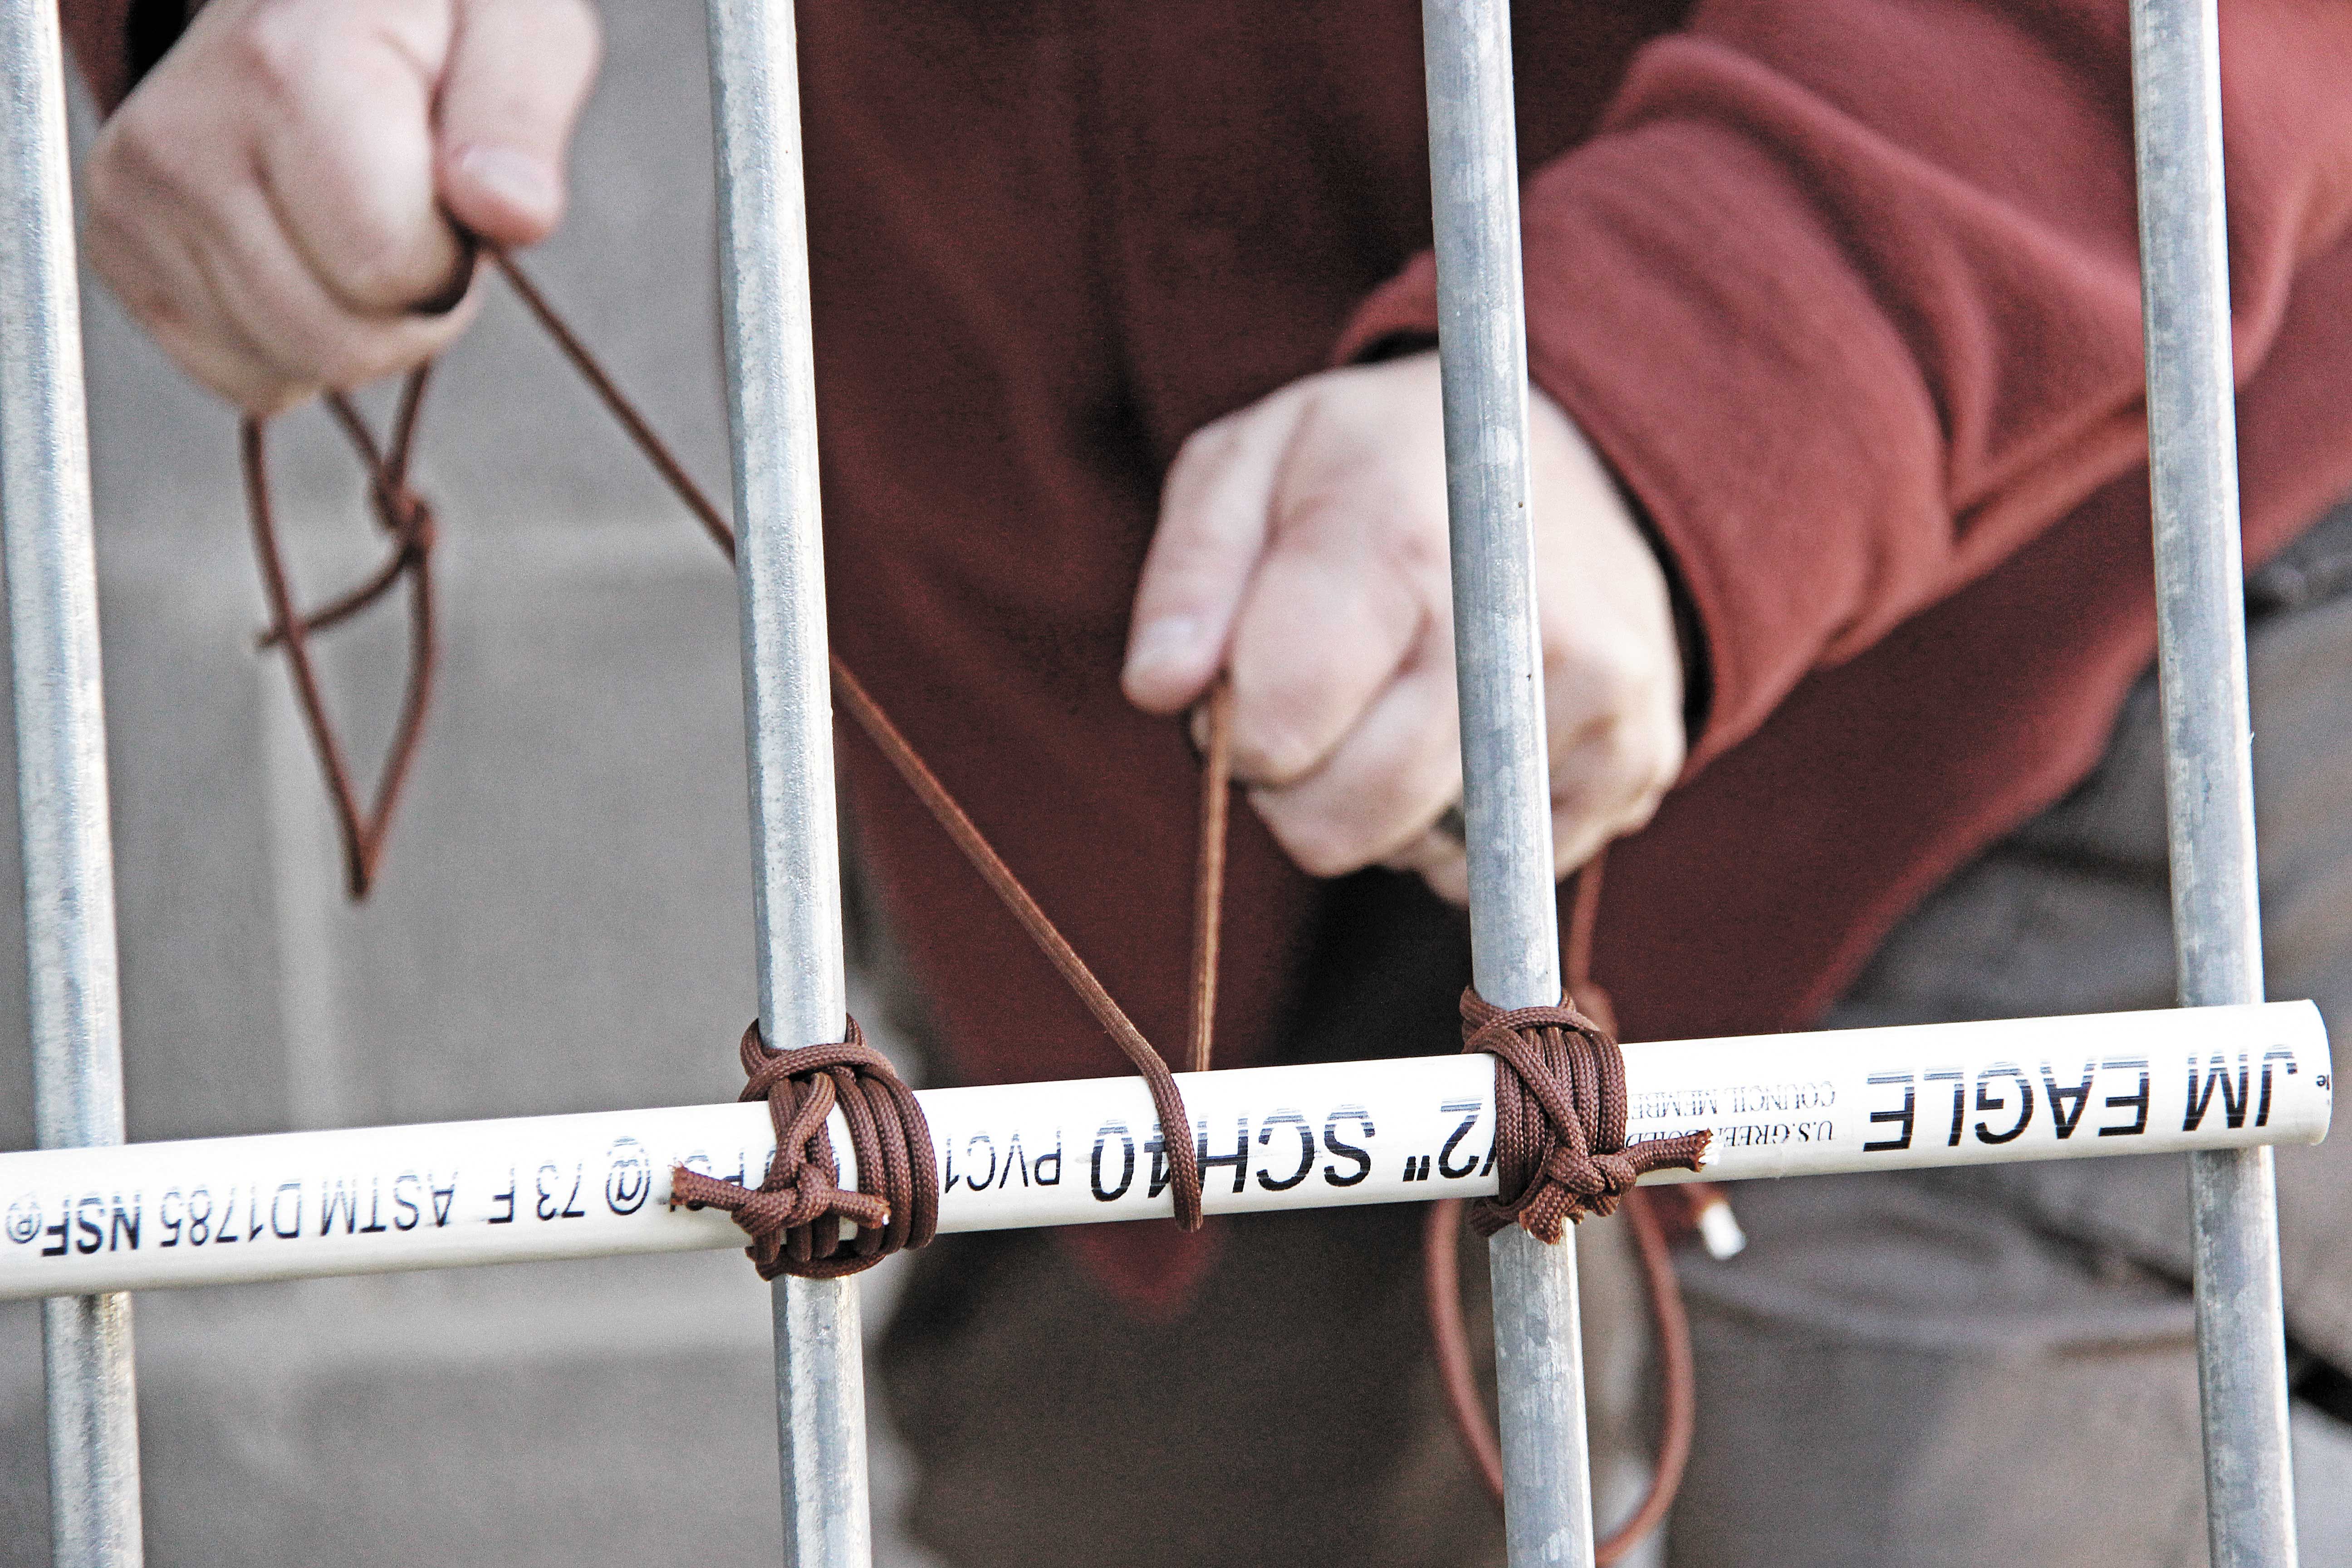
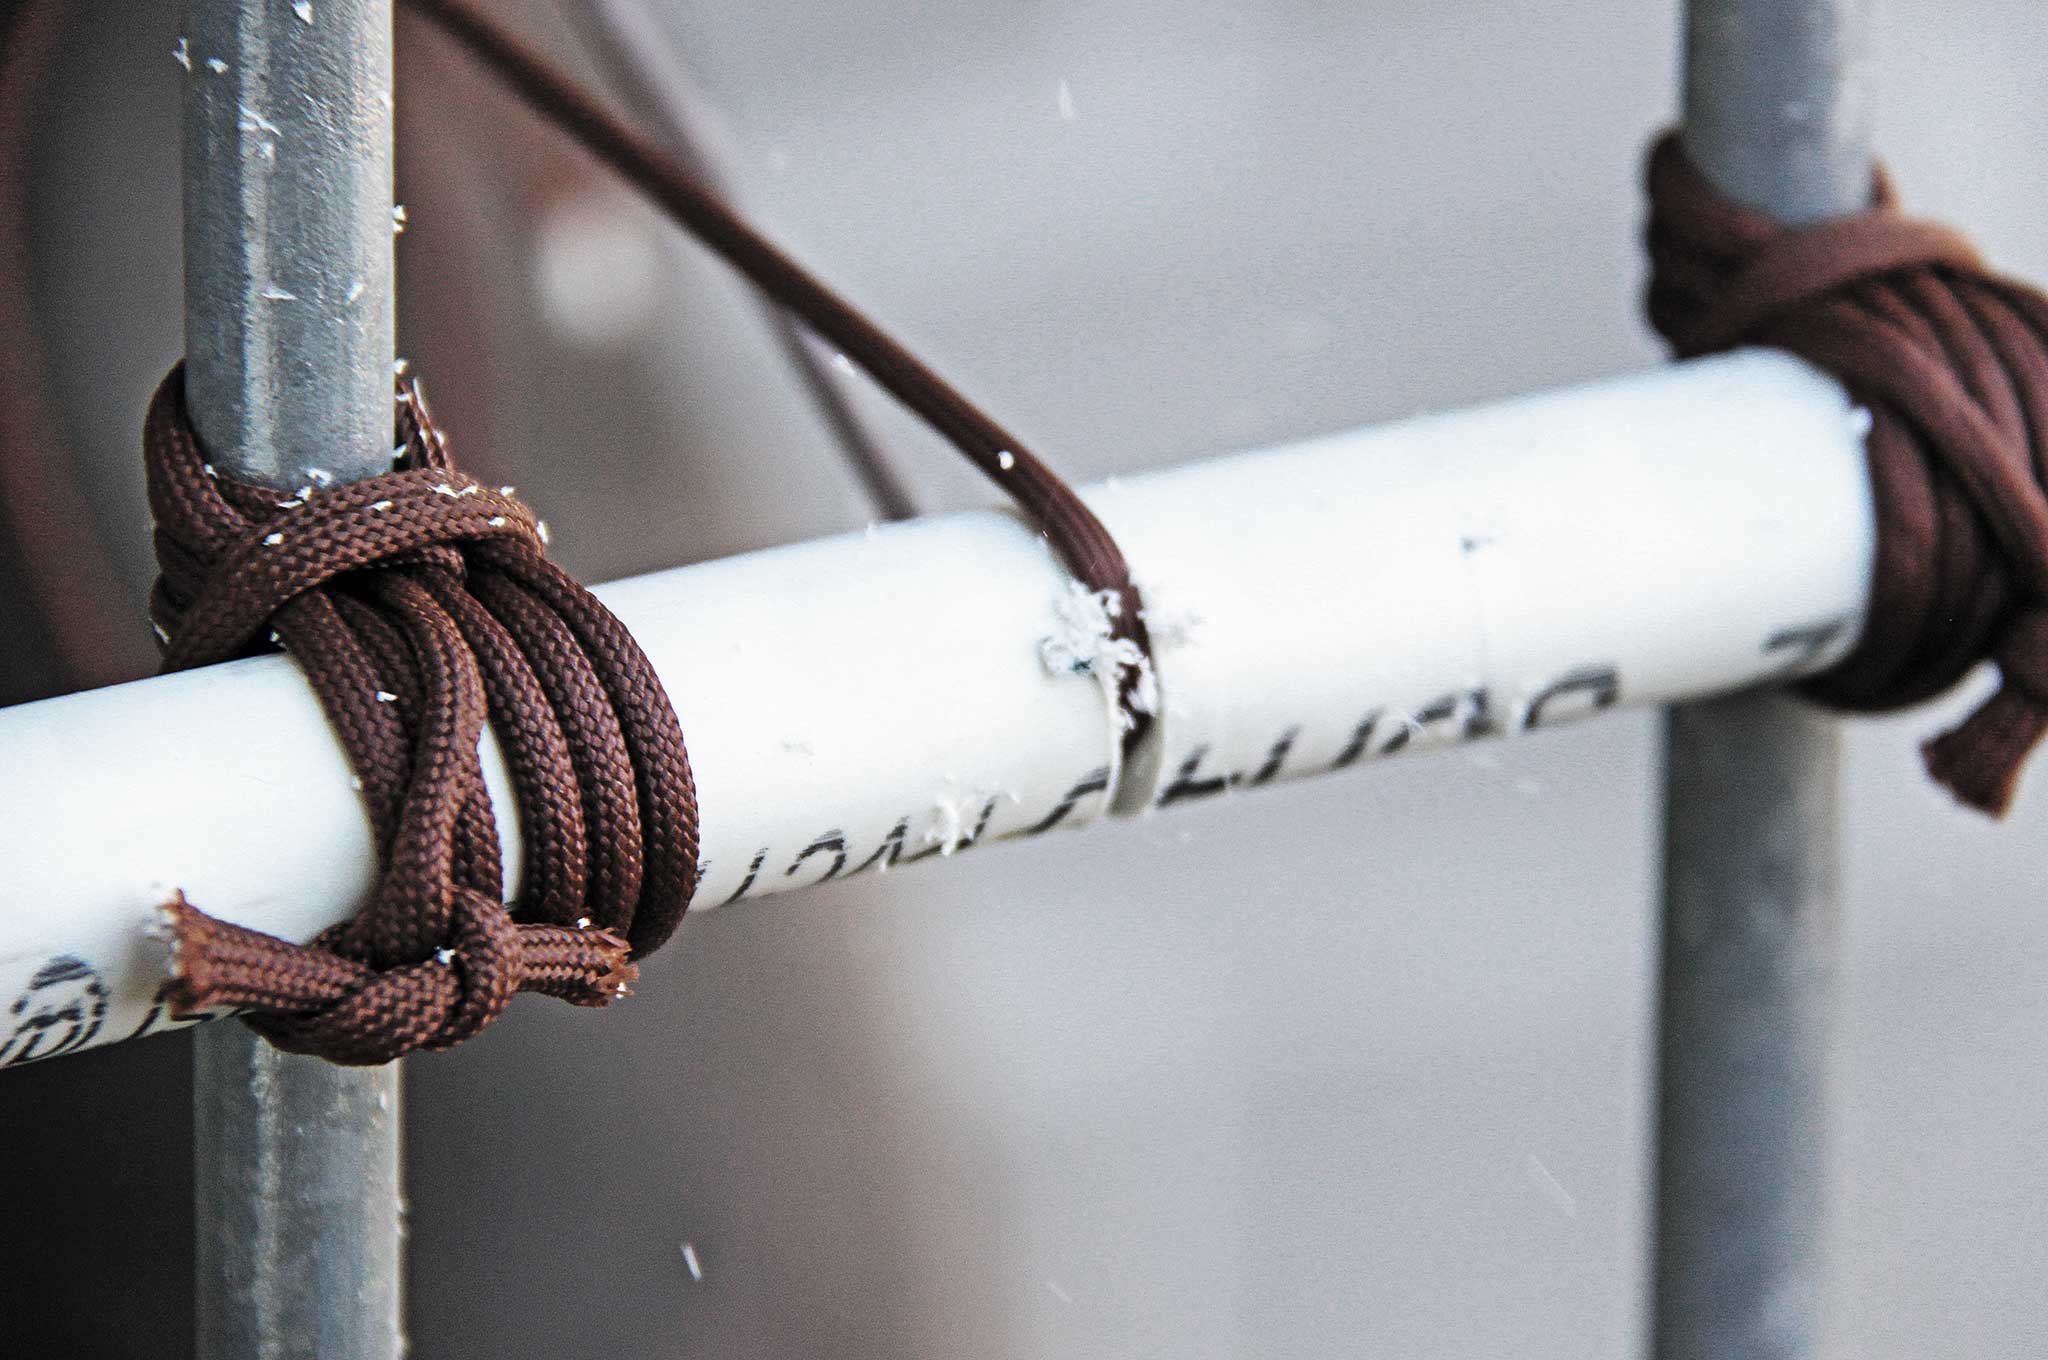
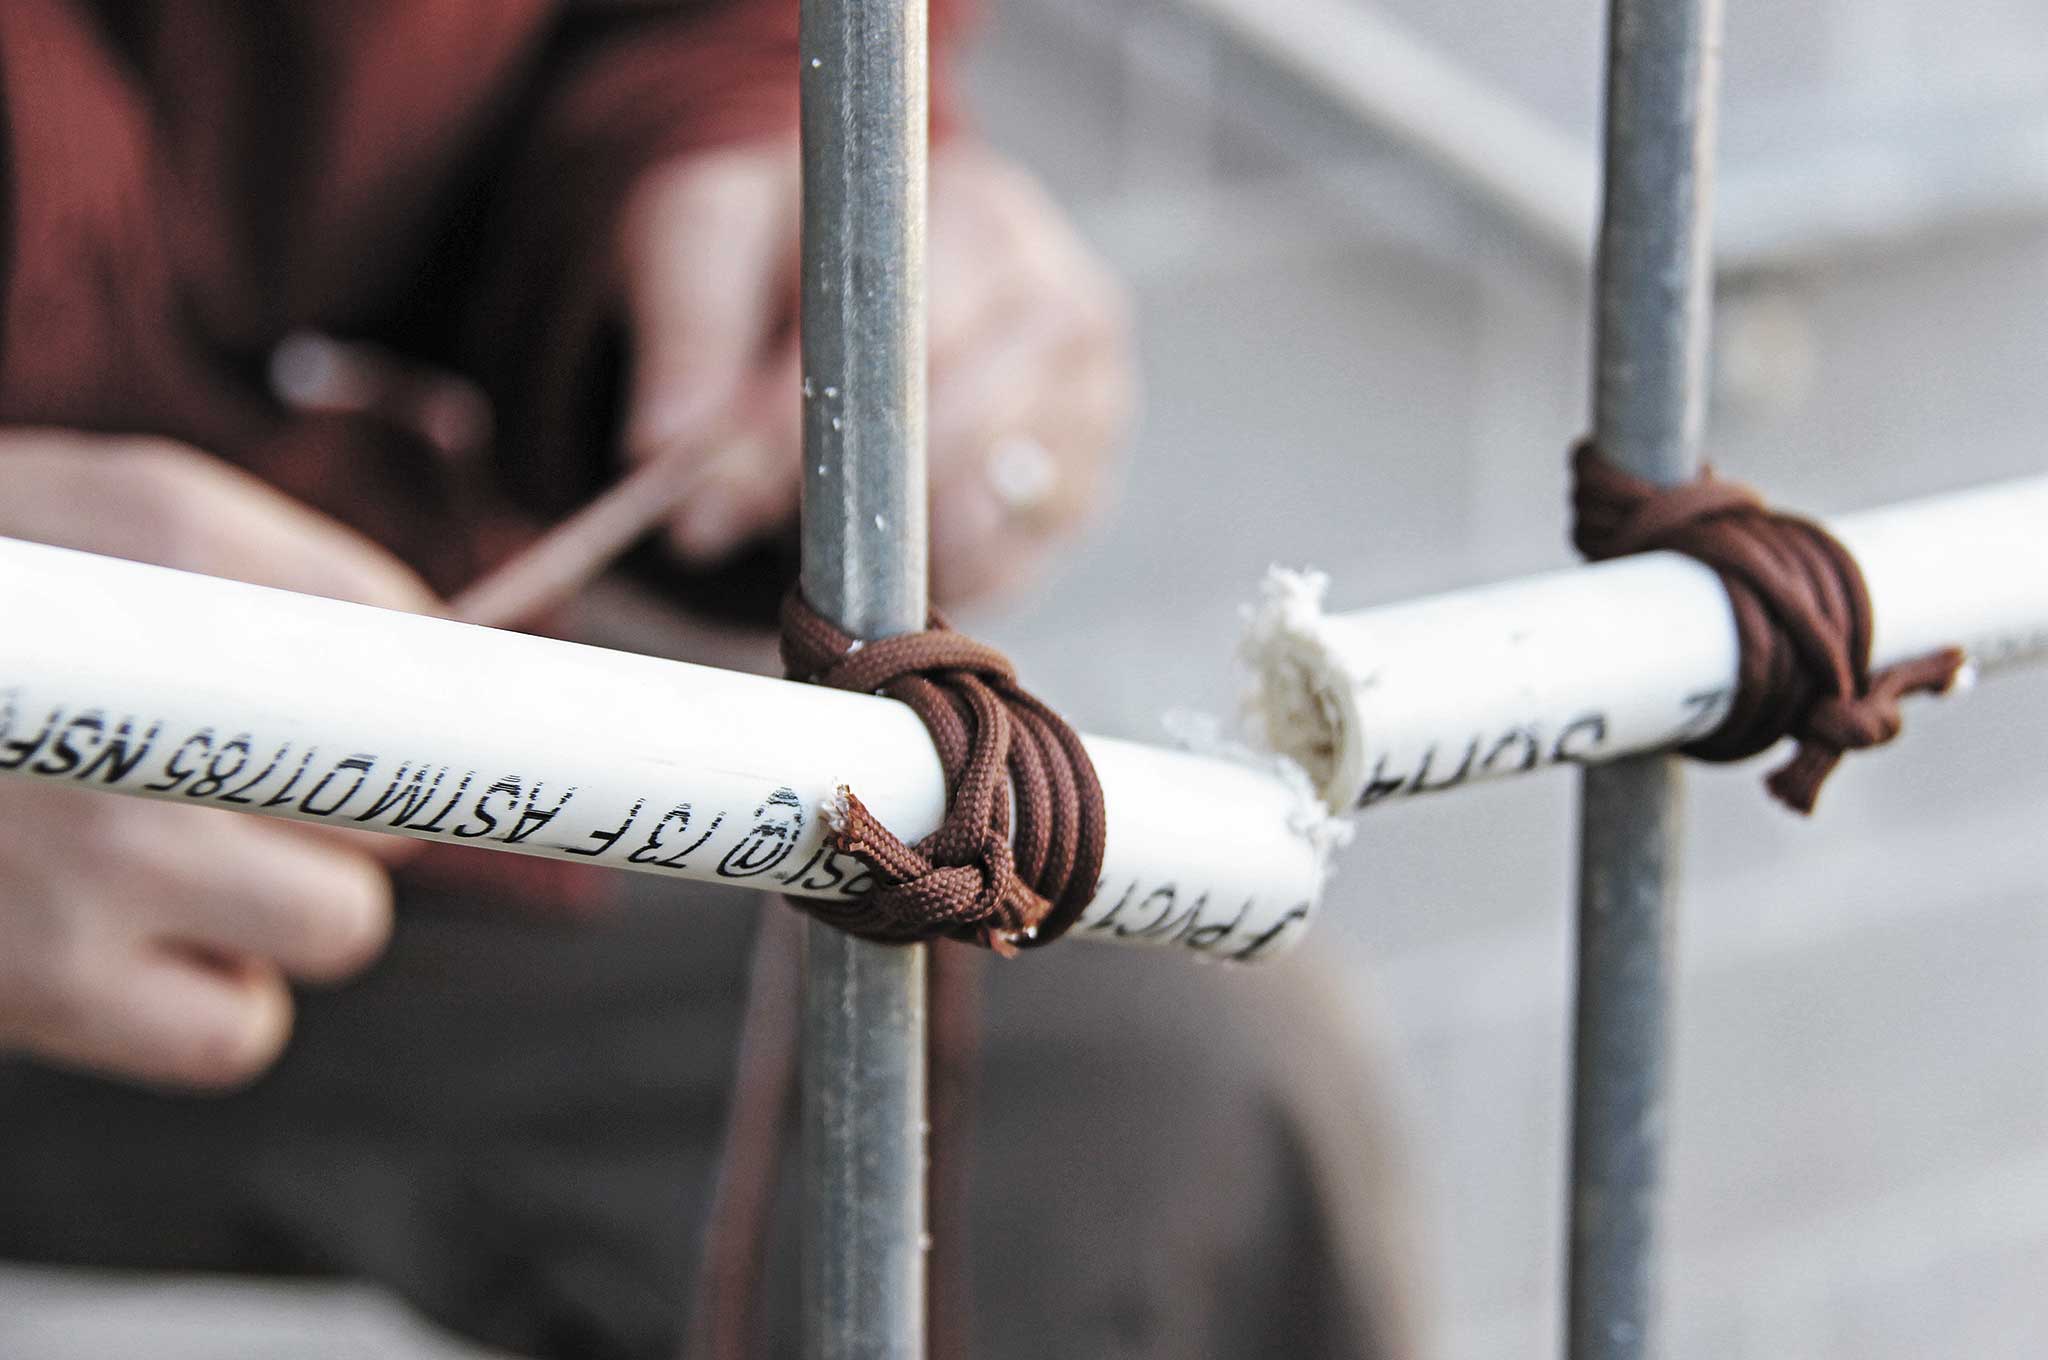
Paracord Project #2 – Friction Saw
Function: Cutting synthetic materials
Difficulty: 1 out of 5
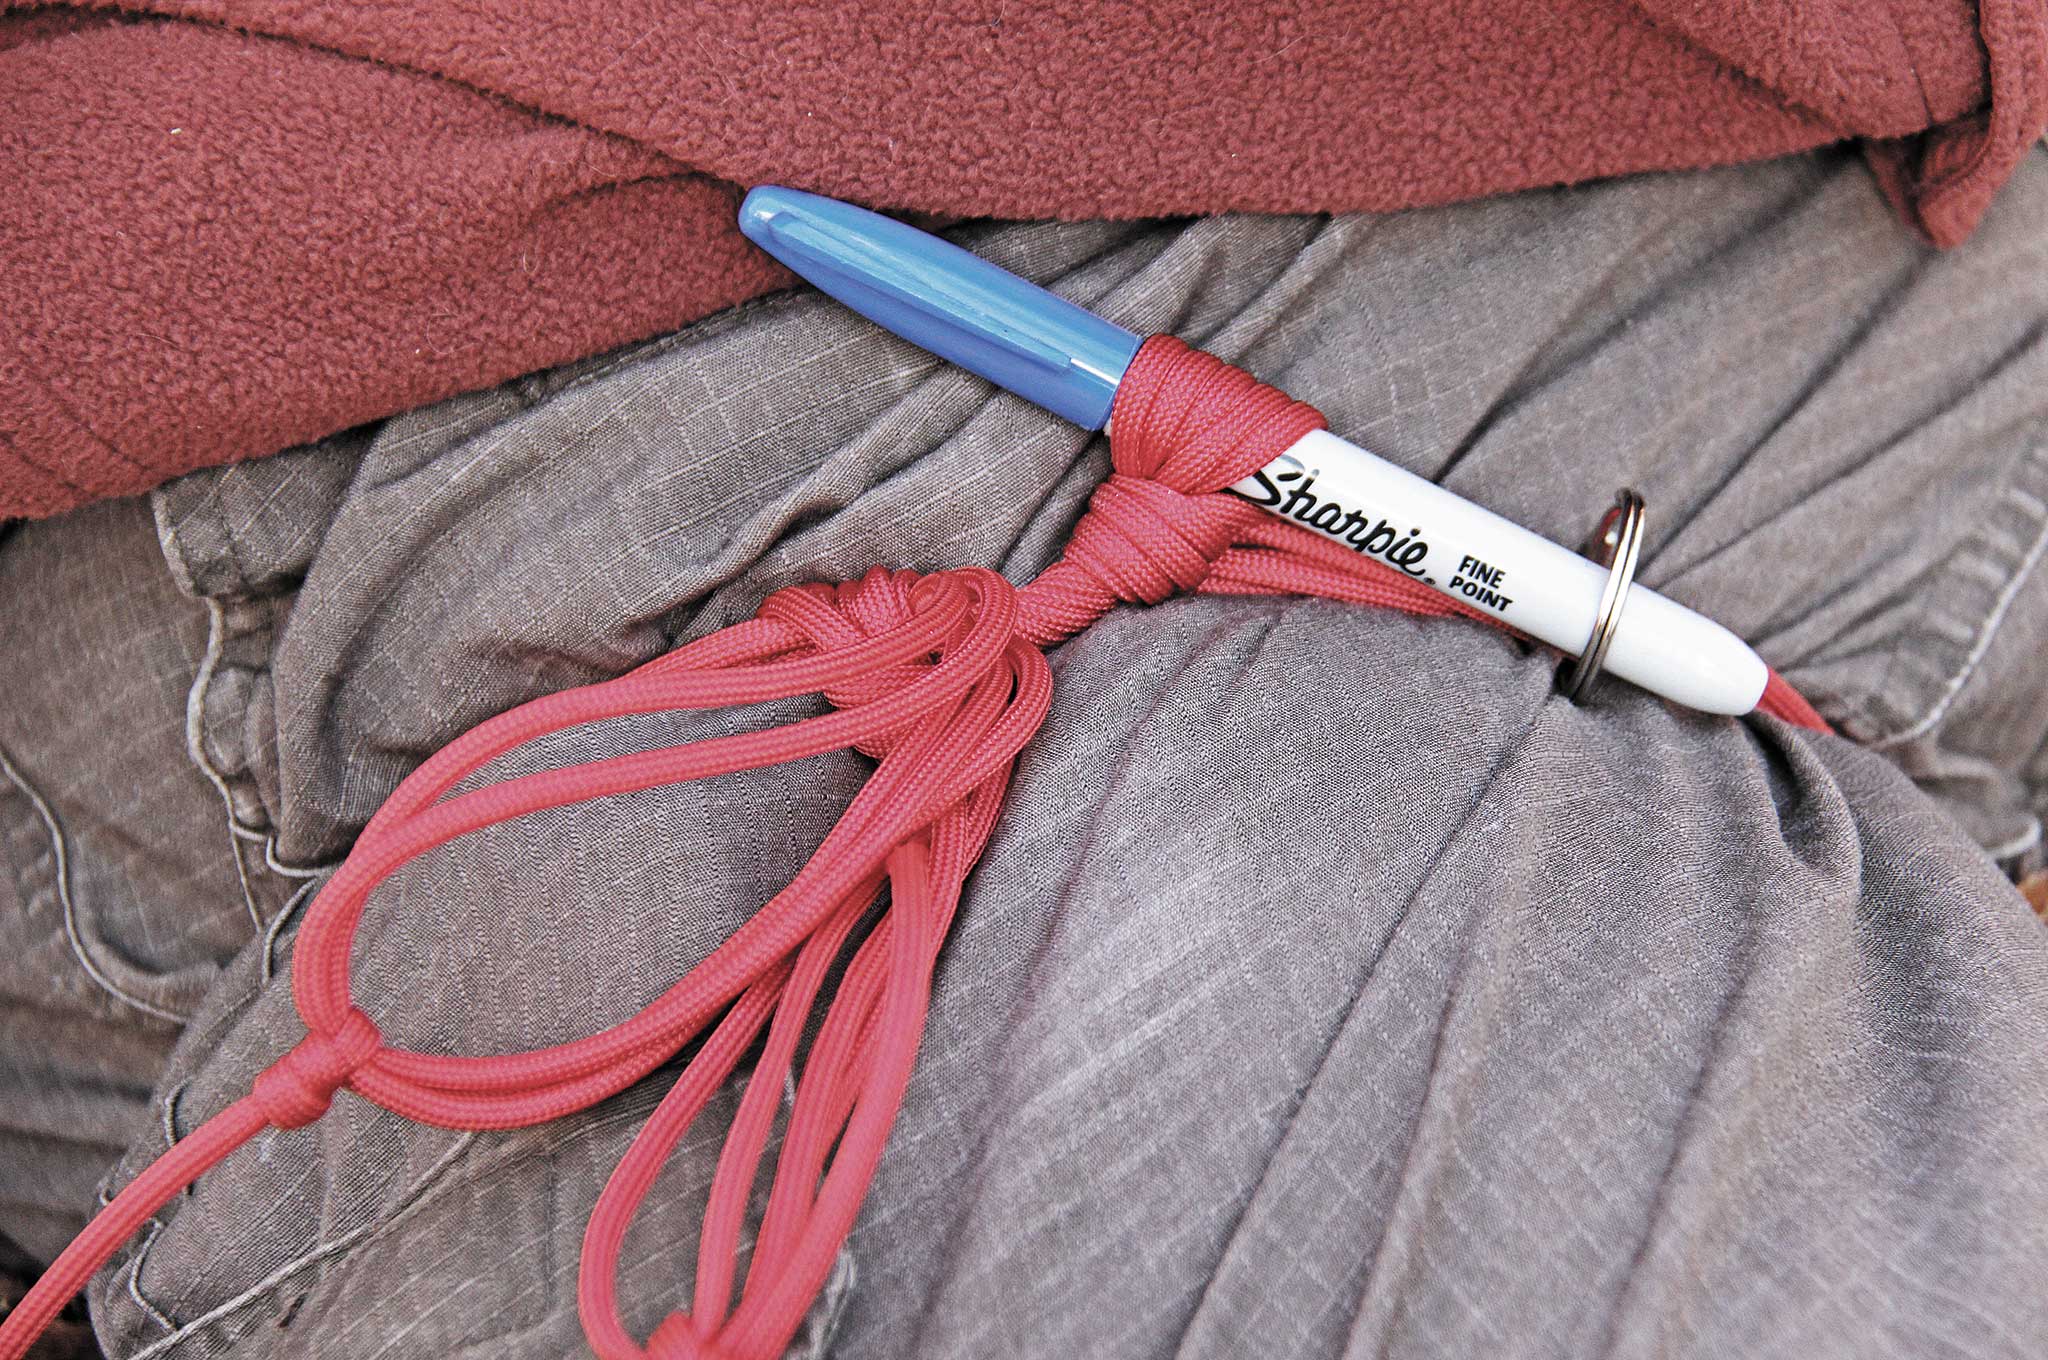
How To: All that’s needed to create a paracord saw is a length of paracord (braided Kevlar cord works well, too, and that’s why we carry it in our wallets) with a couple loops tied in each end, large enough for your hands.
With the saw tied, place it over whatever you plan to cut and run it back and forth, increasing the friction and heat on your work piece, while dispersing the heat over the length of the saw. This will cut through duct tape, webbing, PVC pipe, or just about anything synthetic.
A paracord friction saw works by running the cord over a synthetic object like this PVC pipe. With enough heat, the saw will cut through even the thickest tubing, webbing, or synthetic cordage.
Notes: Watch your hands with this one. Your saw will be hot when you’re done. The longer the saw, the more room to disperse the heat.
Paracord Project #3 – Improvised Tourniquet
Function: Stop bleeding
Difficulty: 2 out of 5
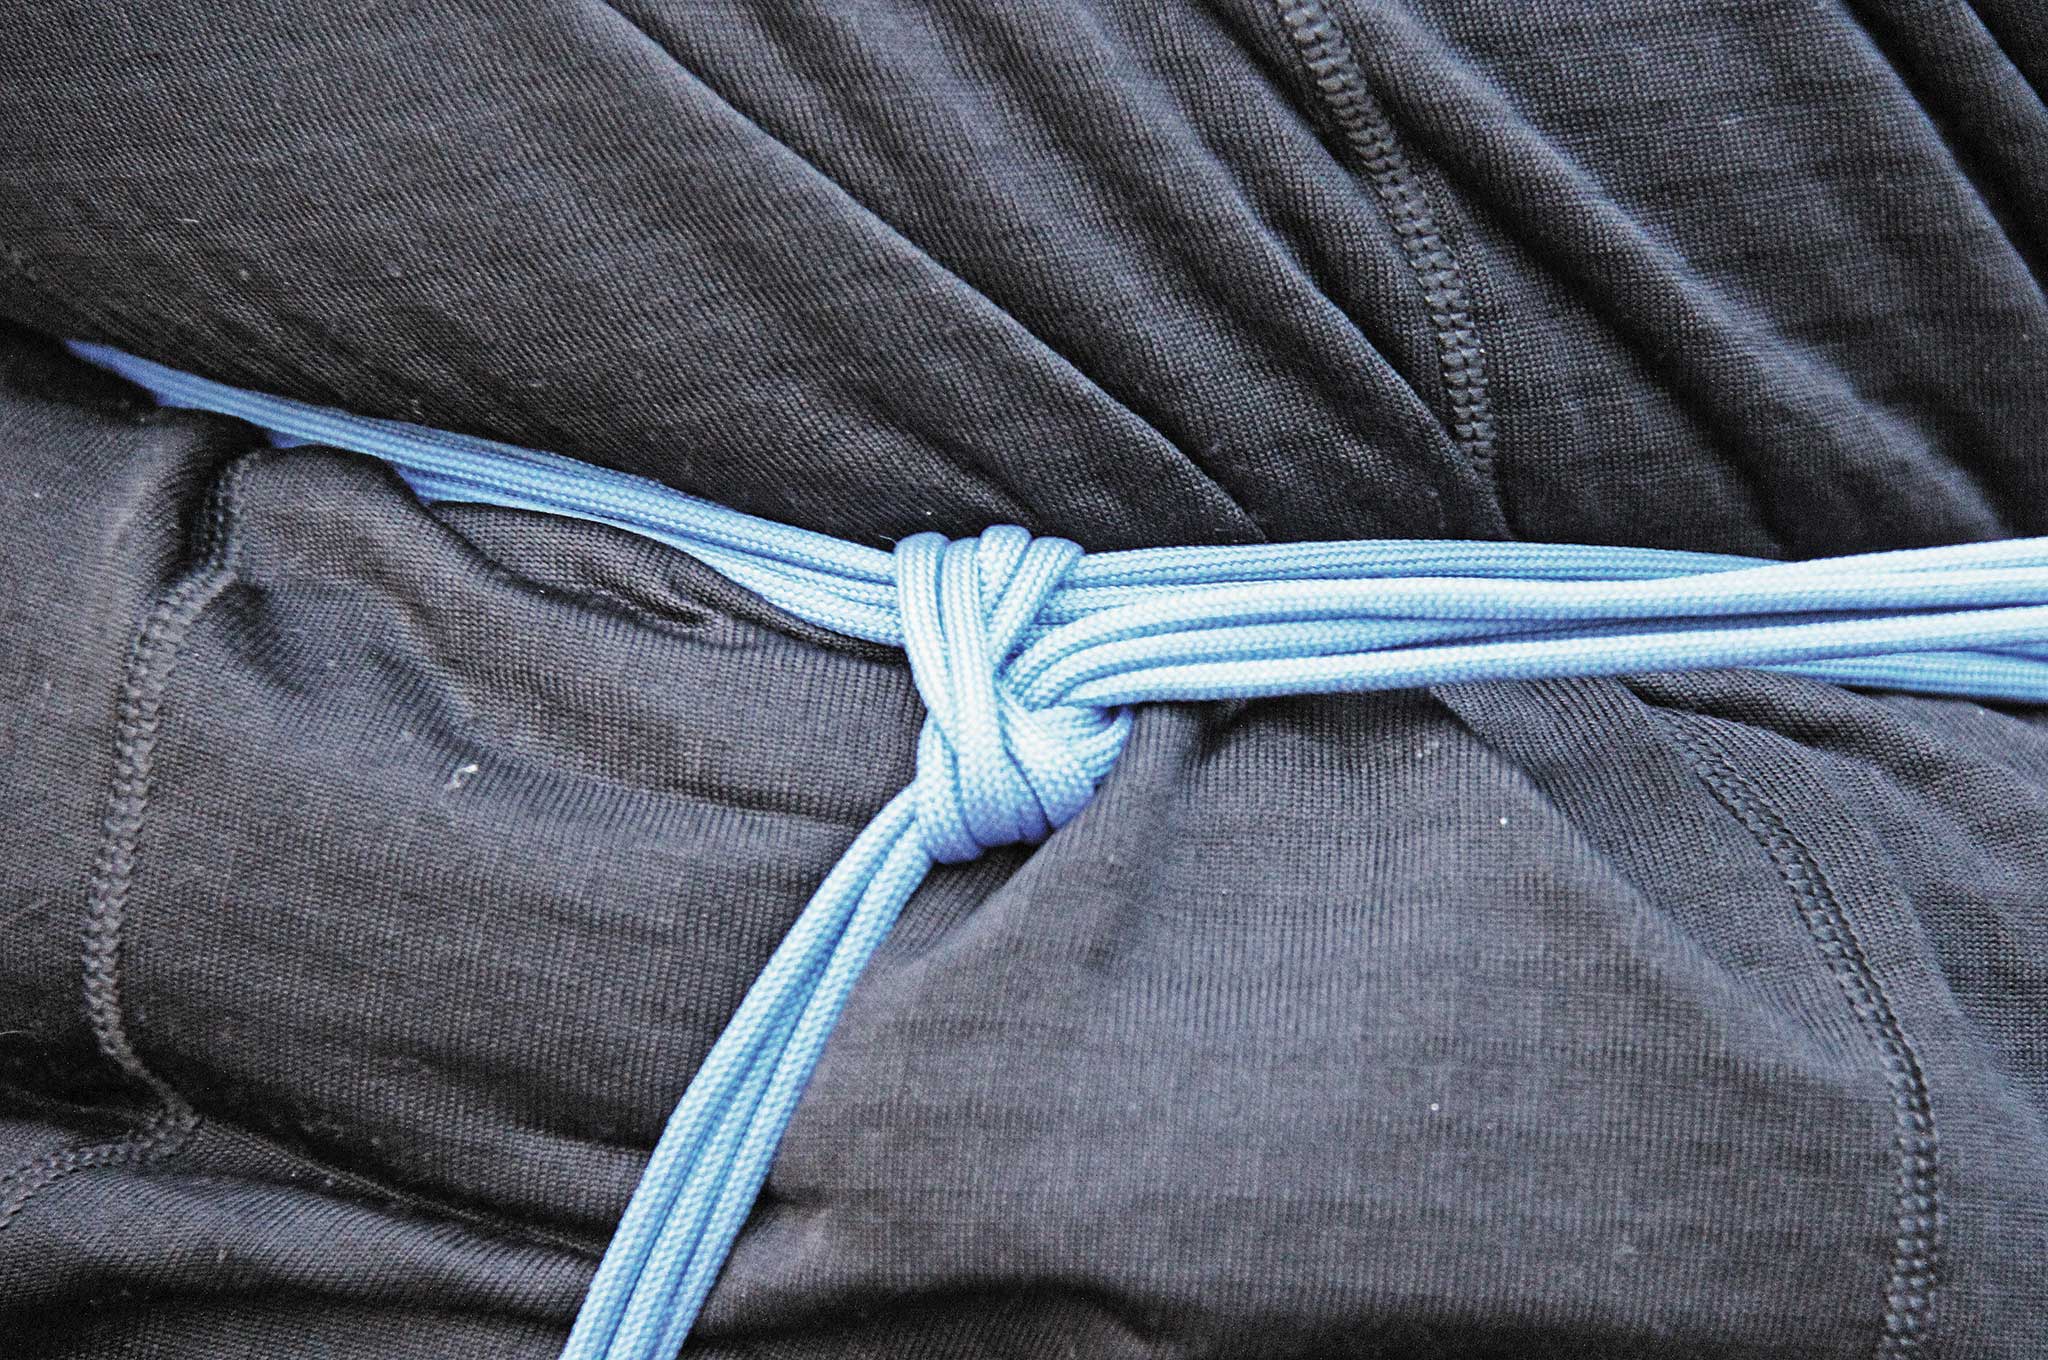
How To: A tourniquet should always be applied “high and tight.” That is, placed up high on the arm near the armpit or up against the crotch. In general, paracord sucks as a tourniquet, as it’s too narrow to avoid causing damage to tissue. However, when multiple strands are tied as one, it’ll work in a pinch.
Tie a single square knot with multiple strands by passing left over right, tying a knot then right over left and tying a knot. Insert a tactical pen (or something else that will serve as a turnbuckle). If you can, put a key chain split ring around the strands first so you have a place to tuck that pen once tension is applied. Leave it on, and get your buddy or yourself to the emergency room.
A single strand of paracord makes a horrible tourniquet. Multiple strands tied as one will work well to prevent bleeding out. Lock it all in place with a split ring and pen or similar object.
Notes: While you can do this with paracord, get in the habit of carrying a real tourniquet. They’re cheap and highly effective. What’s your life worth?
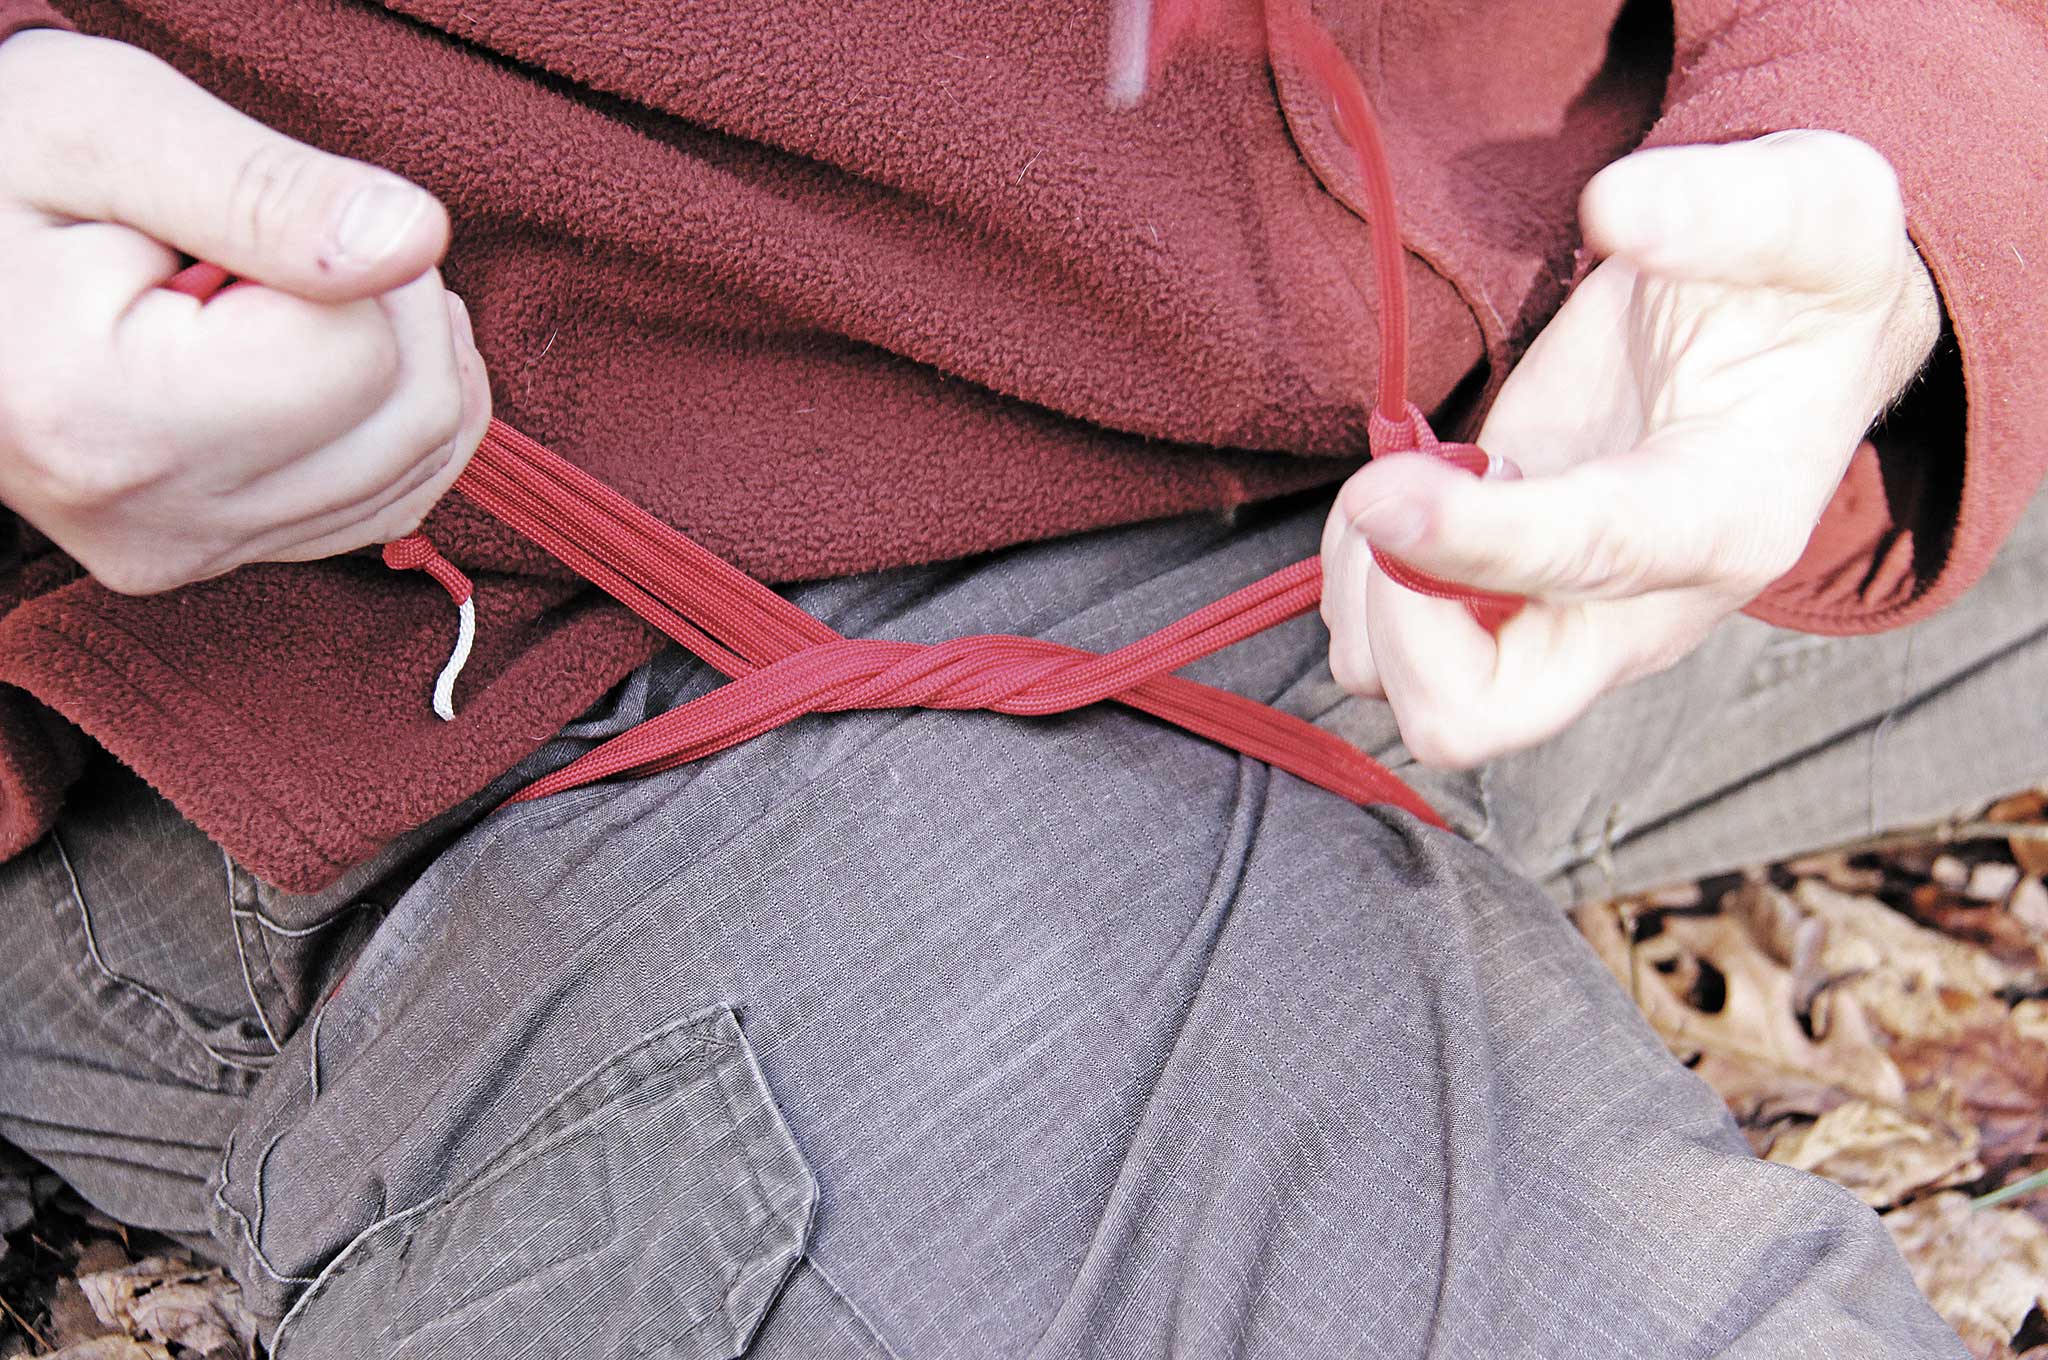
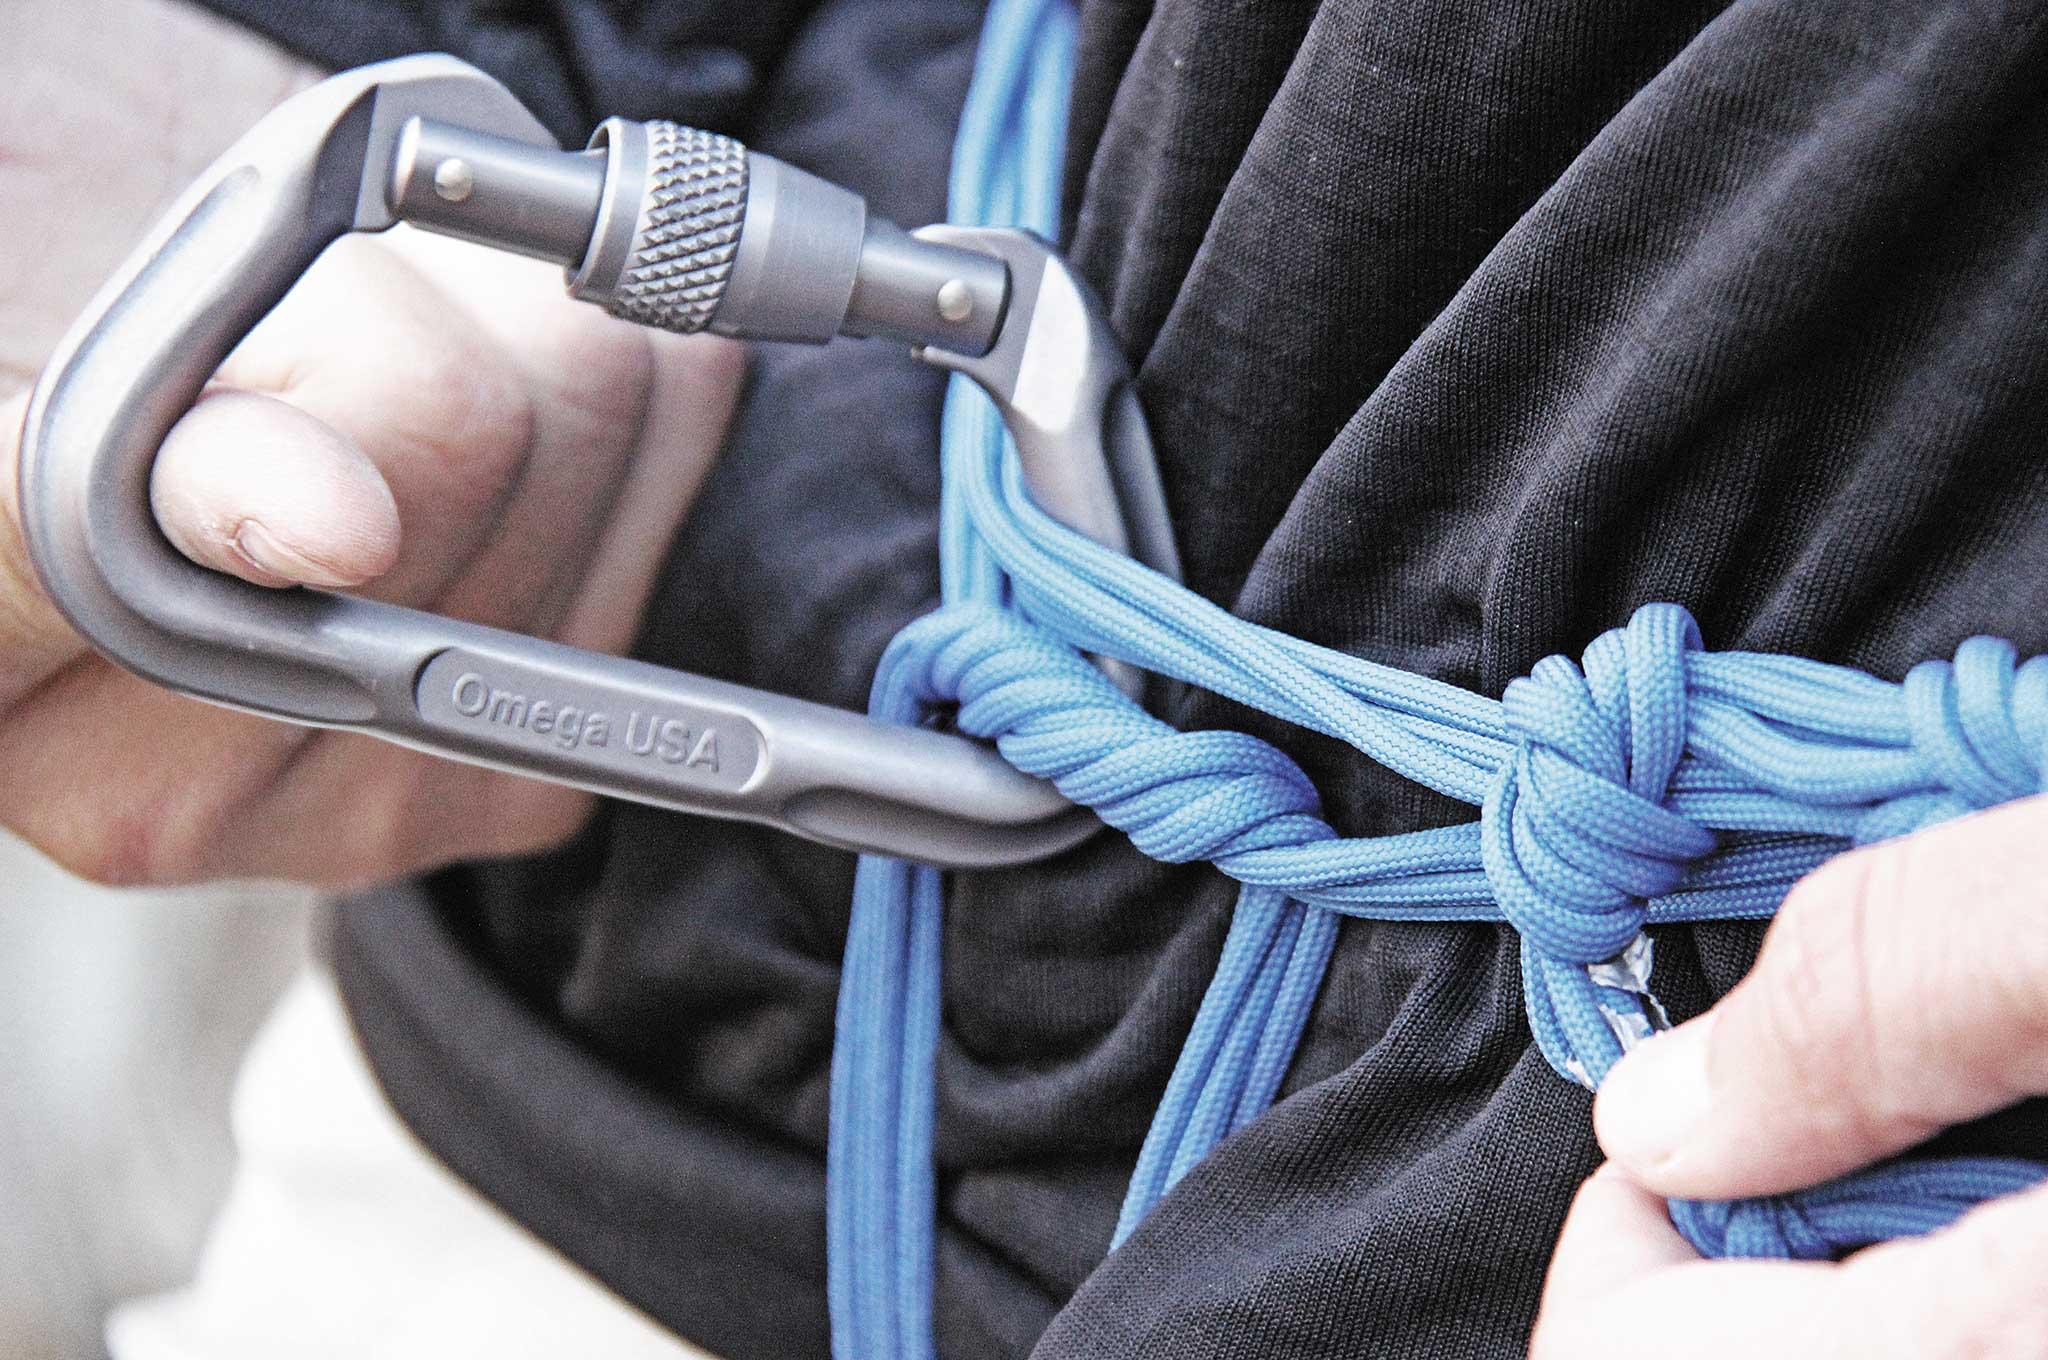
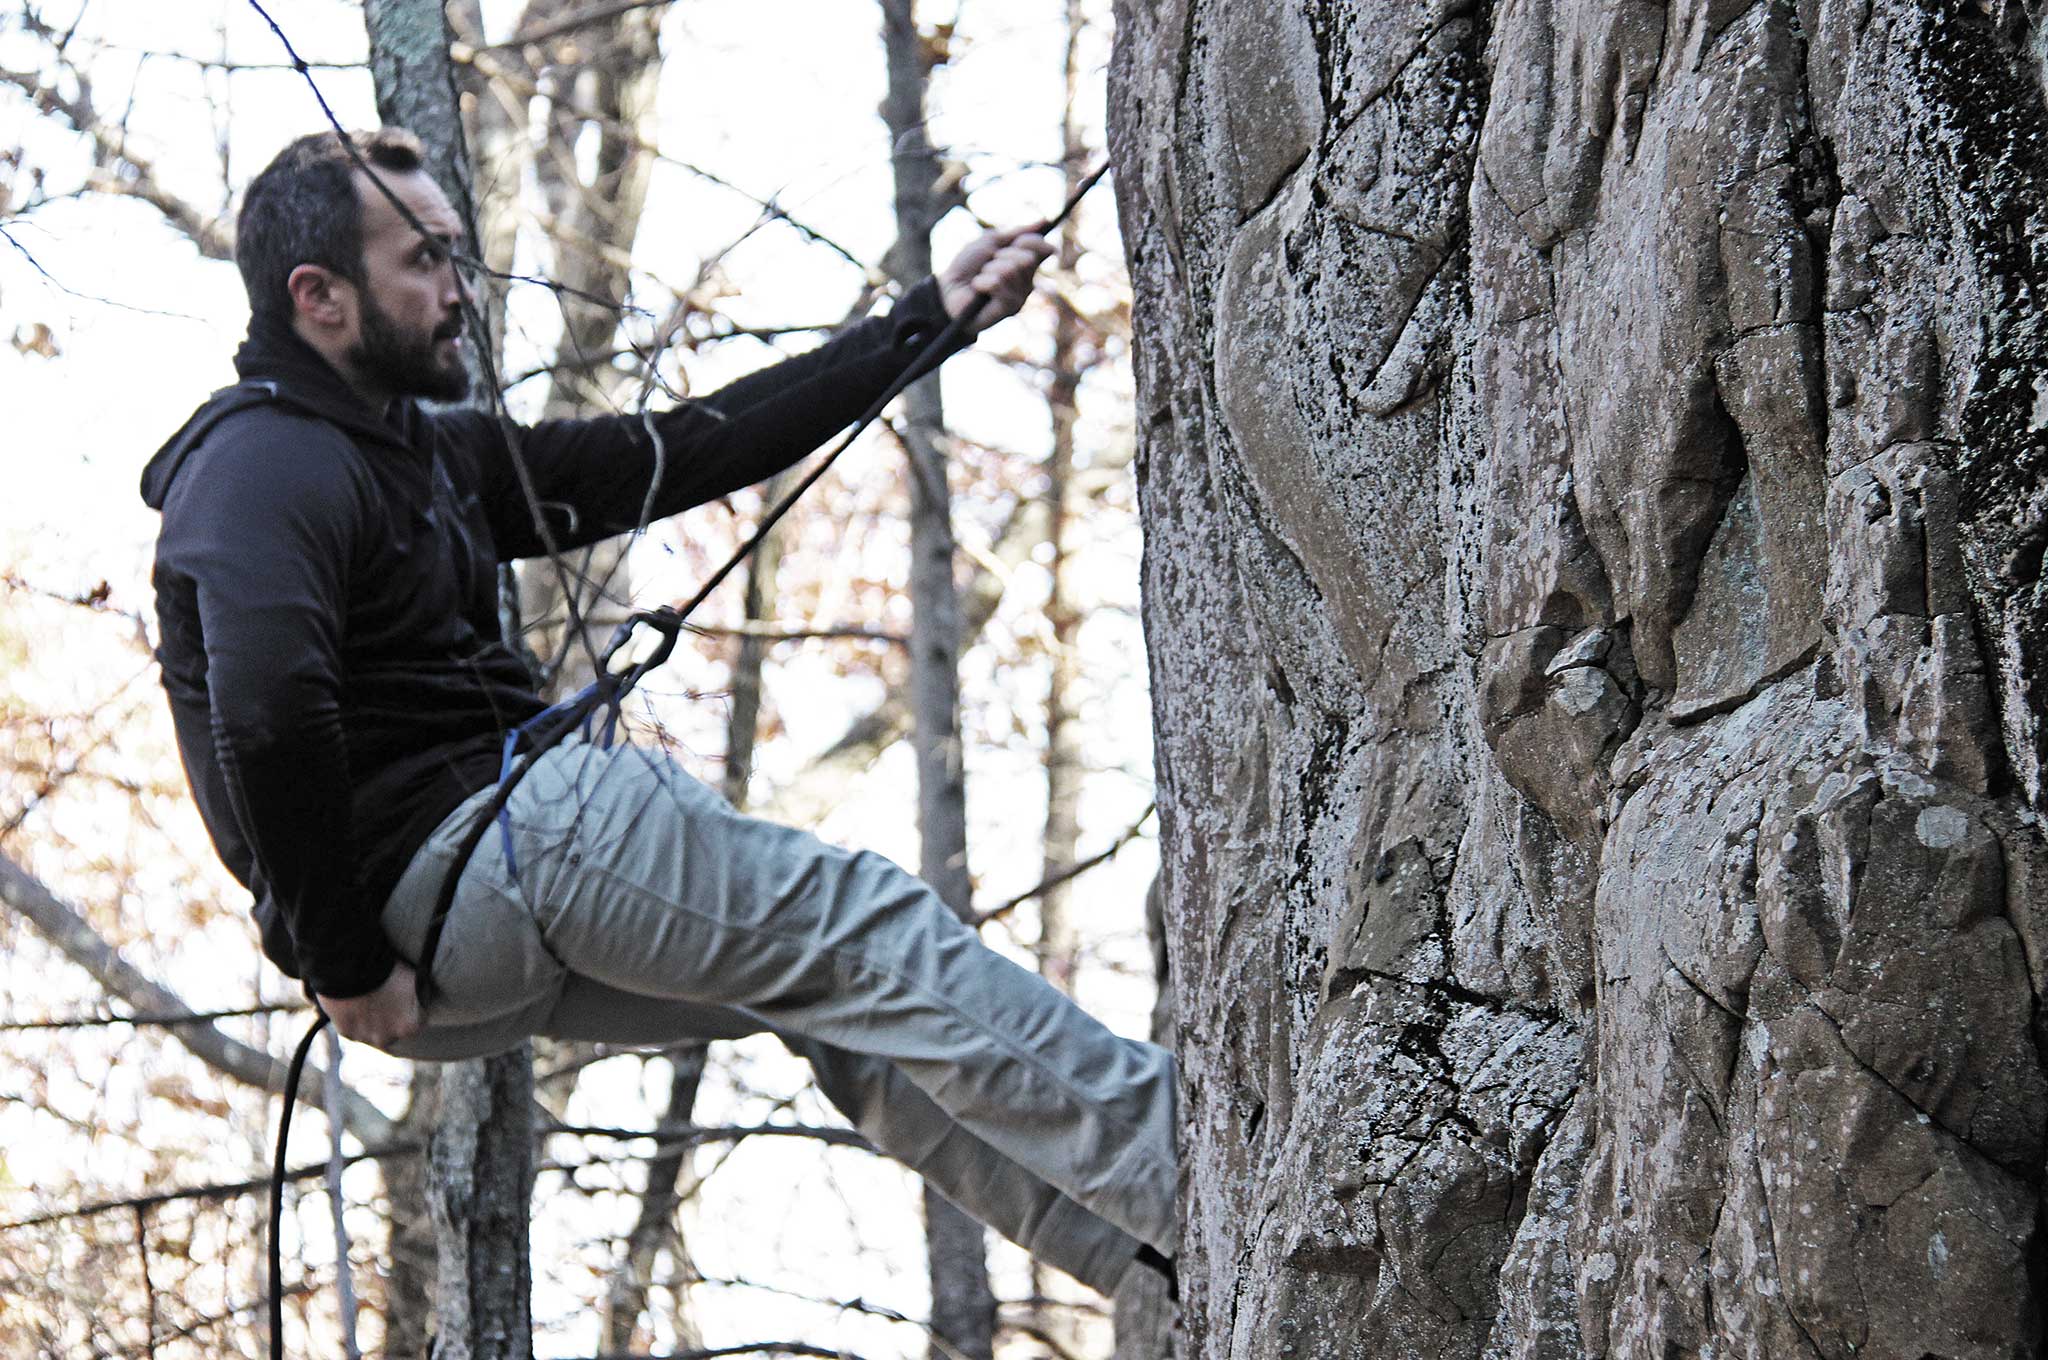
Paracord Project #4 – Improvised Harness
Function: Weight carrying (read advisory below)
Difficulty: 3 out of 5
How To: You may need to escape a high rise or descend a cliff. If you have no other option, here’s a solution. A traditional Swiss seat is tied with about 12 to 15 feet of flat webbing or rope. For comfort, you should use multiple strands of paracord unless you want that tourniquet effect from the previous project.
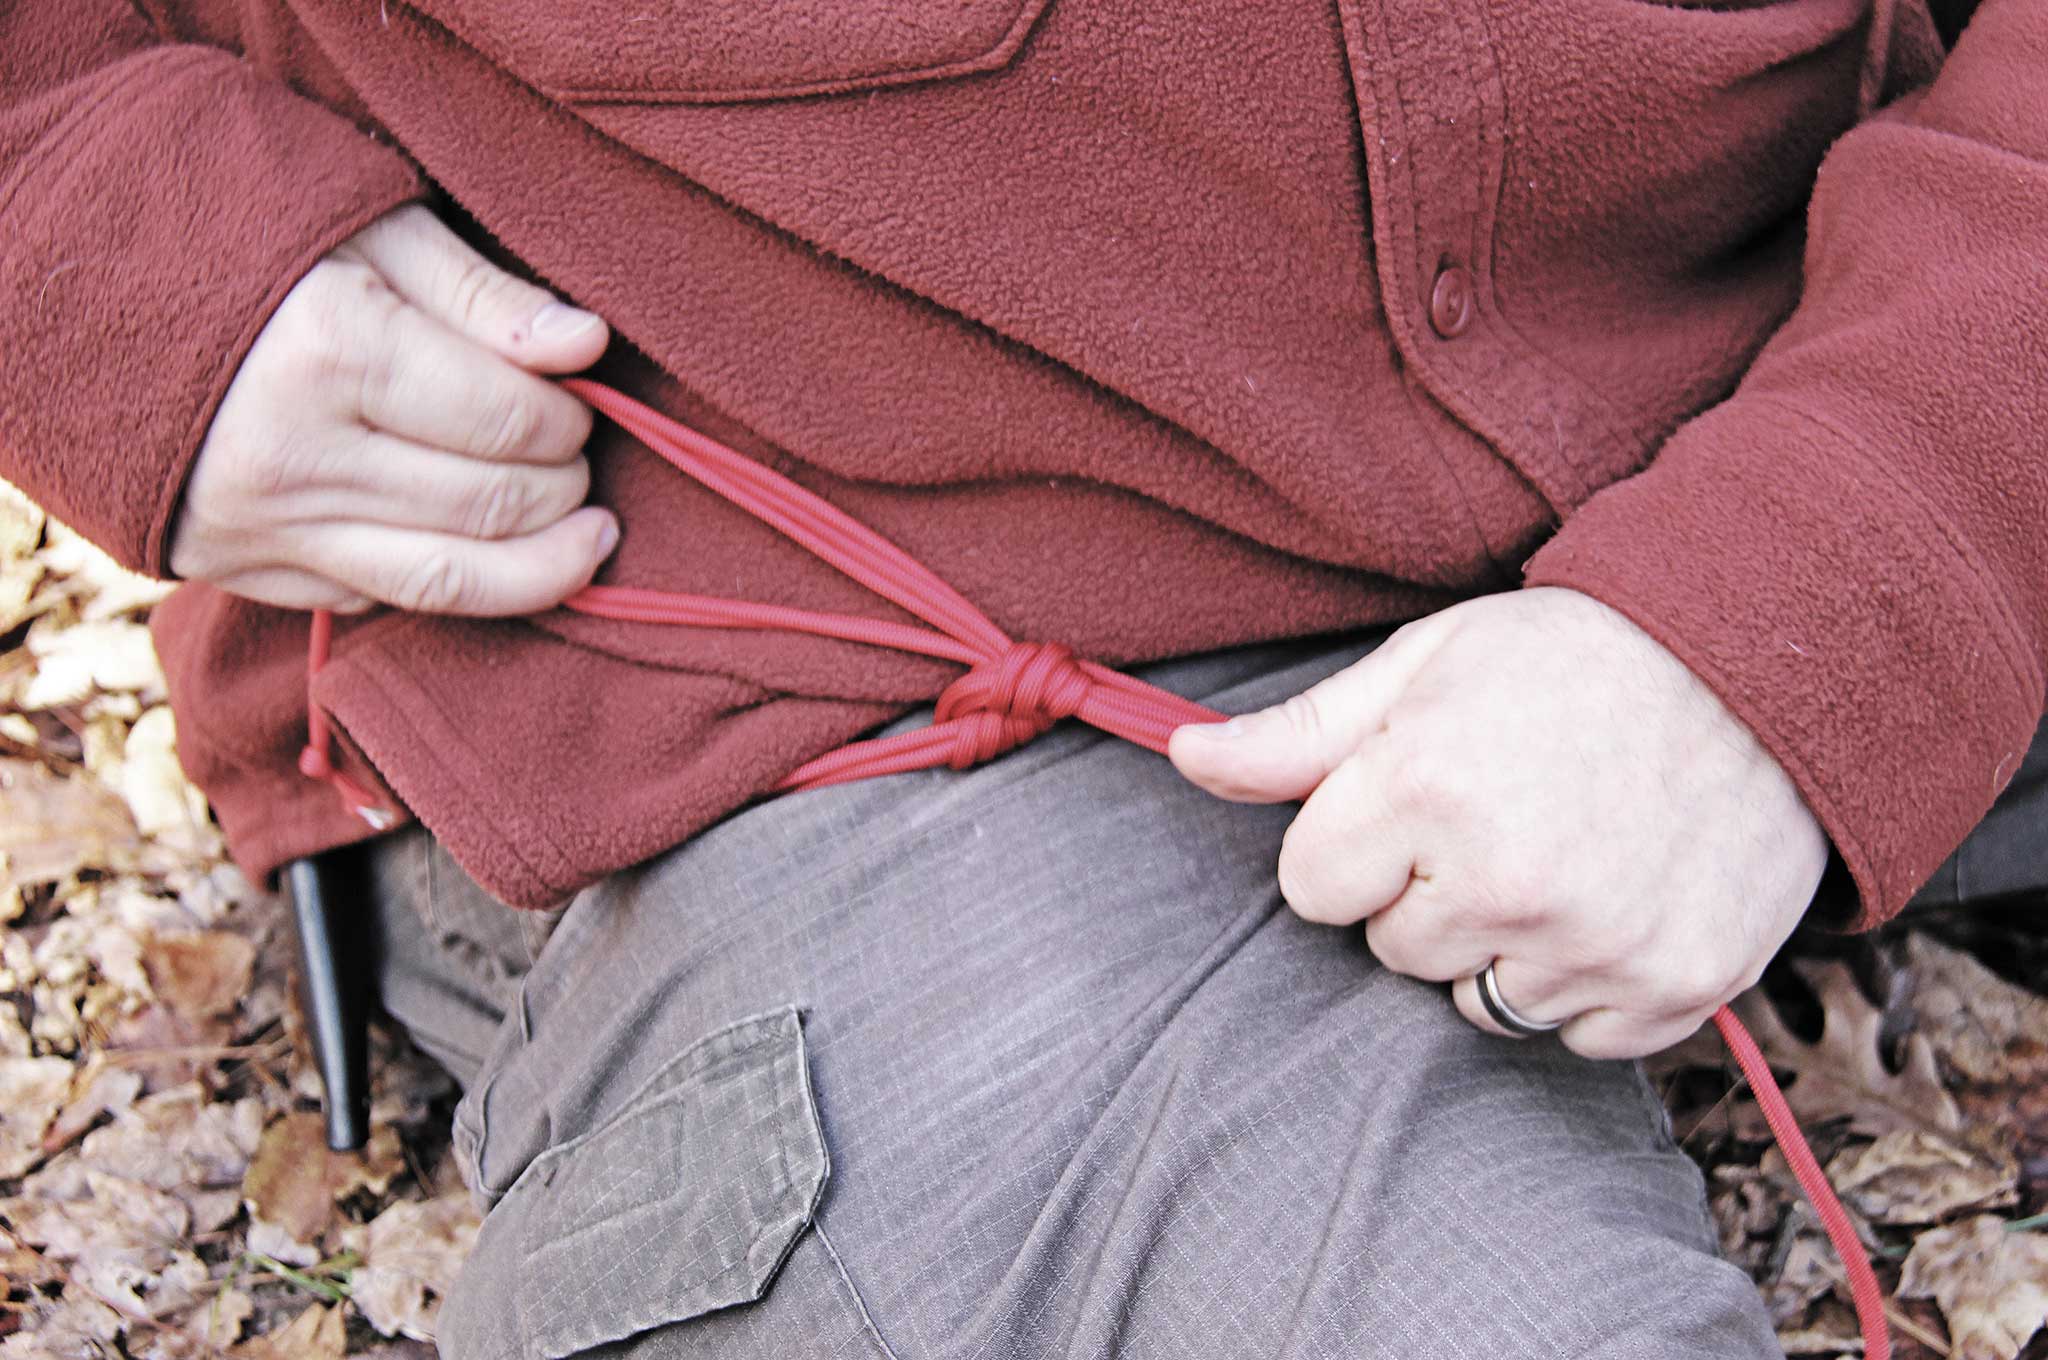
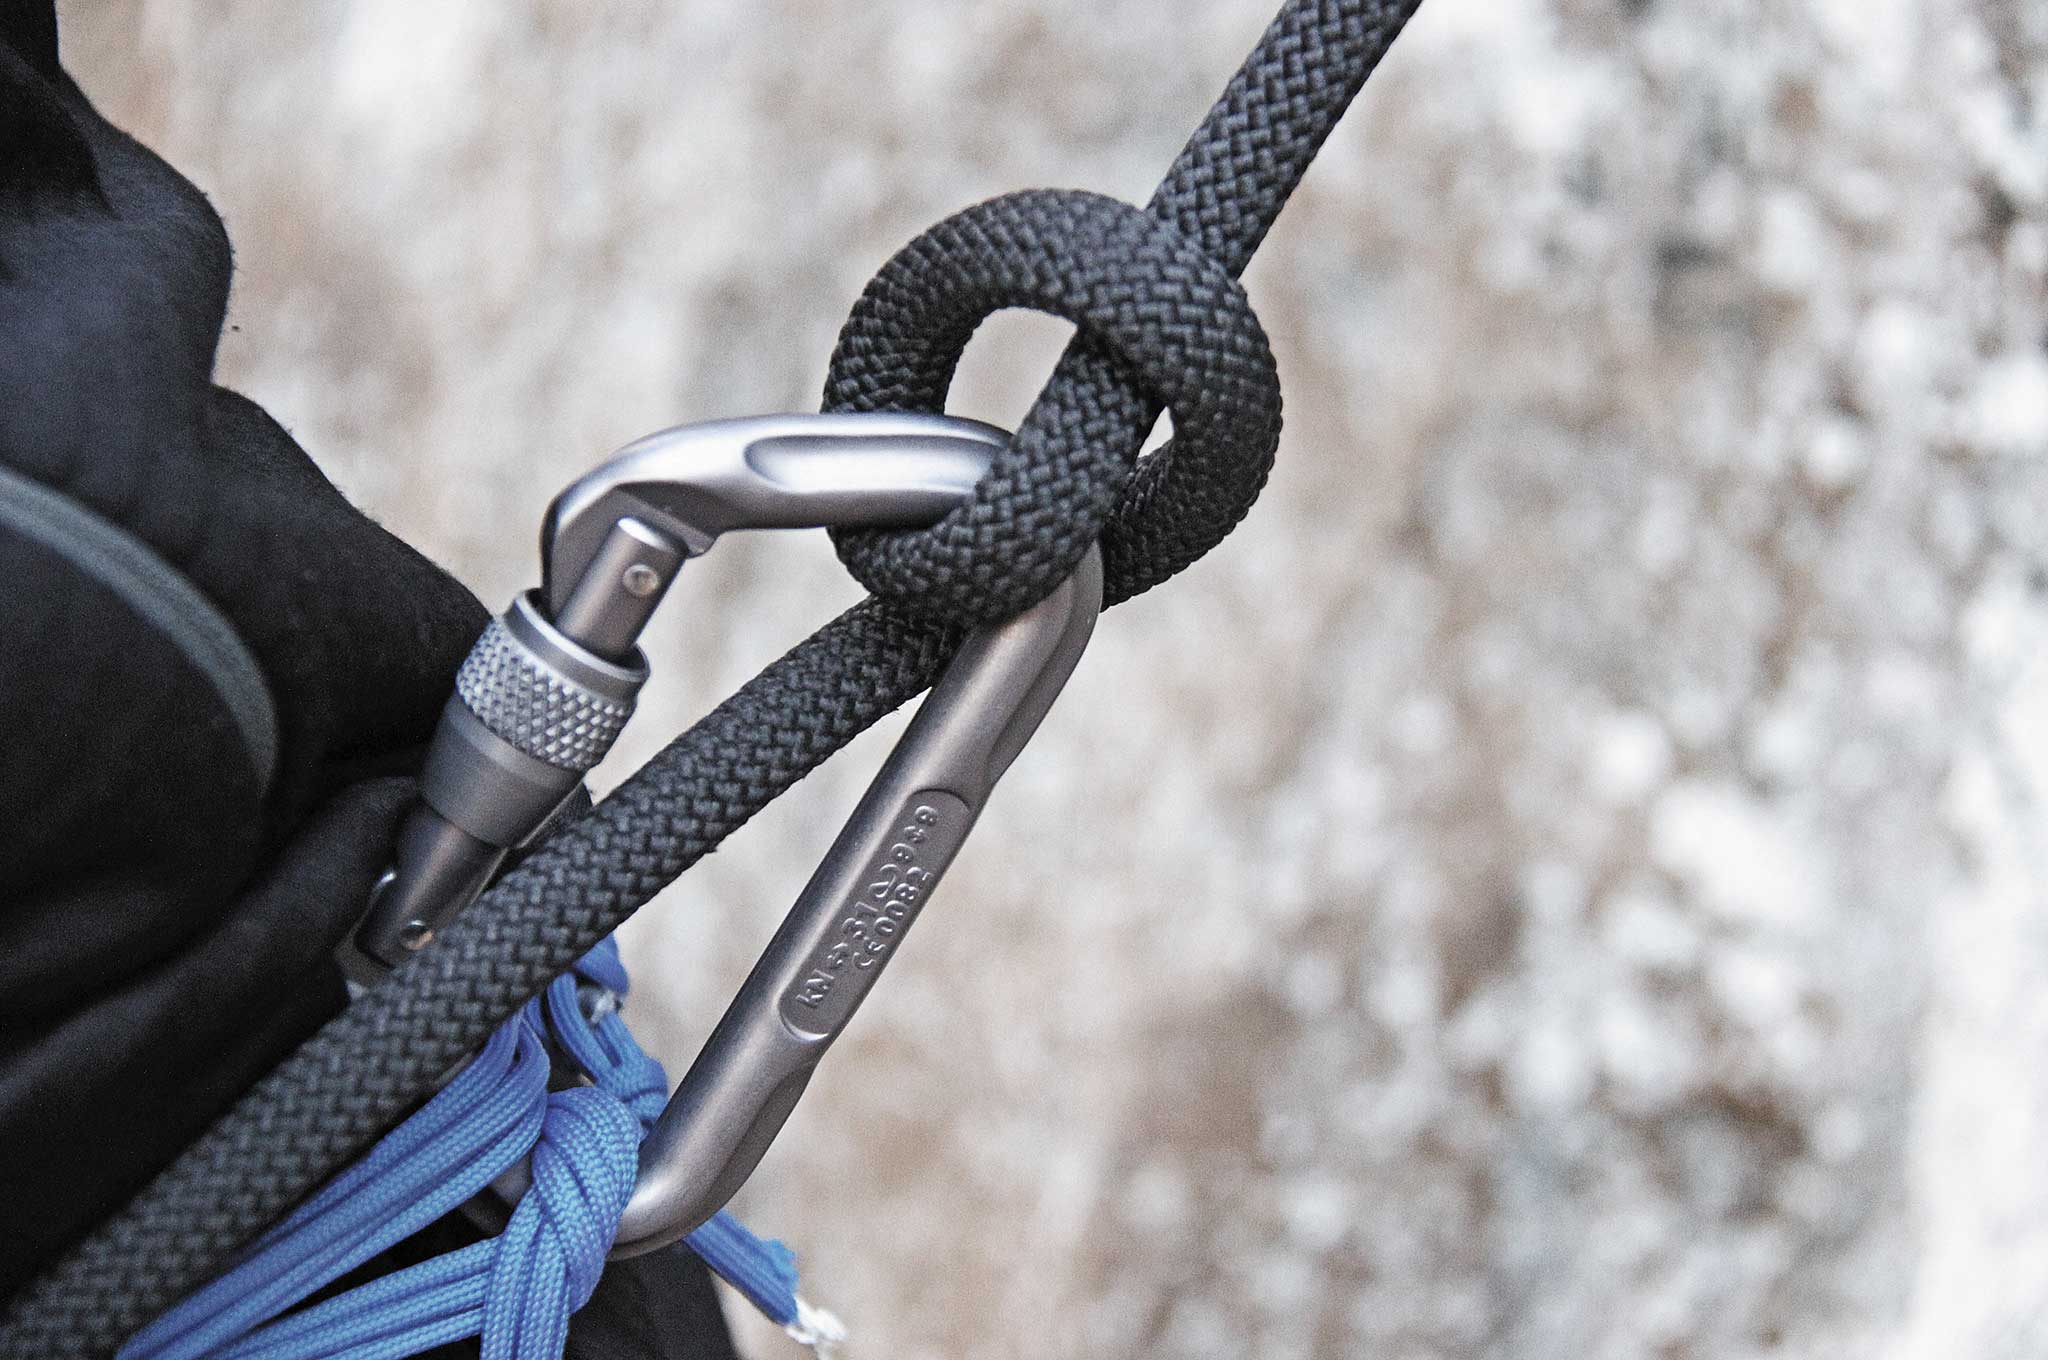
Once you have your cordage ready, find the center and hold it at your side by your waist. Pass one end around your waist and meet in the middle. Create a surgeon’s knot with the two ends. Take the two ends and pass them under your ass. Put the ends over your shoulders and stand up to pull them tight. Pass the ends back through the paracord waistband you made and tie each off with a half hitch. This is the point where you’ll feel a pinch between your legs. Remember, it’s life or limb – or in this case life or sack.
Take the ends of your harness and tie them off with a square knot and backup knots, to your left if you’re a righty and to the right if you’re a lefty. Make sure your knot is on the opposite side of your brake hand. If you’re wearing a sturdy belt, pass your carabiner through that too, making sure the gate opens toward you. The spine of the carabiner is where your munter hitch will be used for rappelling. The majority of your weight will be supported by your paracord leg loops. This works even better with flat webbing, but can work with what you have.
Keep the gate of your locking carabiner facing you when you clip in. This allows the rope to work against the spine of the ‘biner instead of against the gate when you belay or rappel.The author rappelling with a paracord harness. While you can do this, it isn’t nearly as comfortable as a dedicated harness.
Notes: Seek professional climbing and rope instruction before trying this one at home. Rappelling is inherently dangerous. However, even more dangerous than rappelling in an emergency is doing nothing when SHTF. That could lead to death.
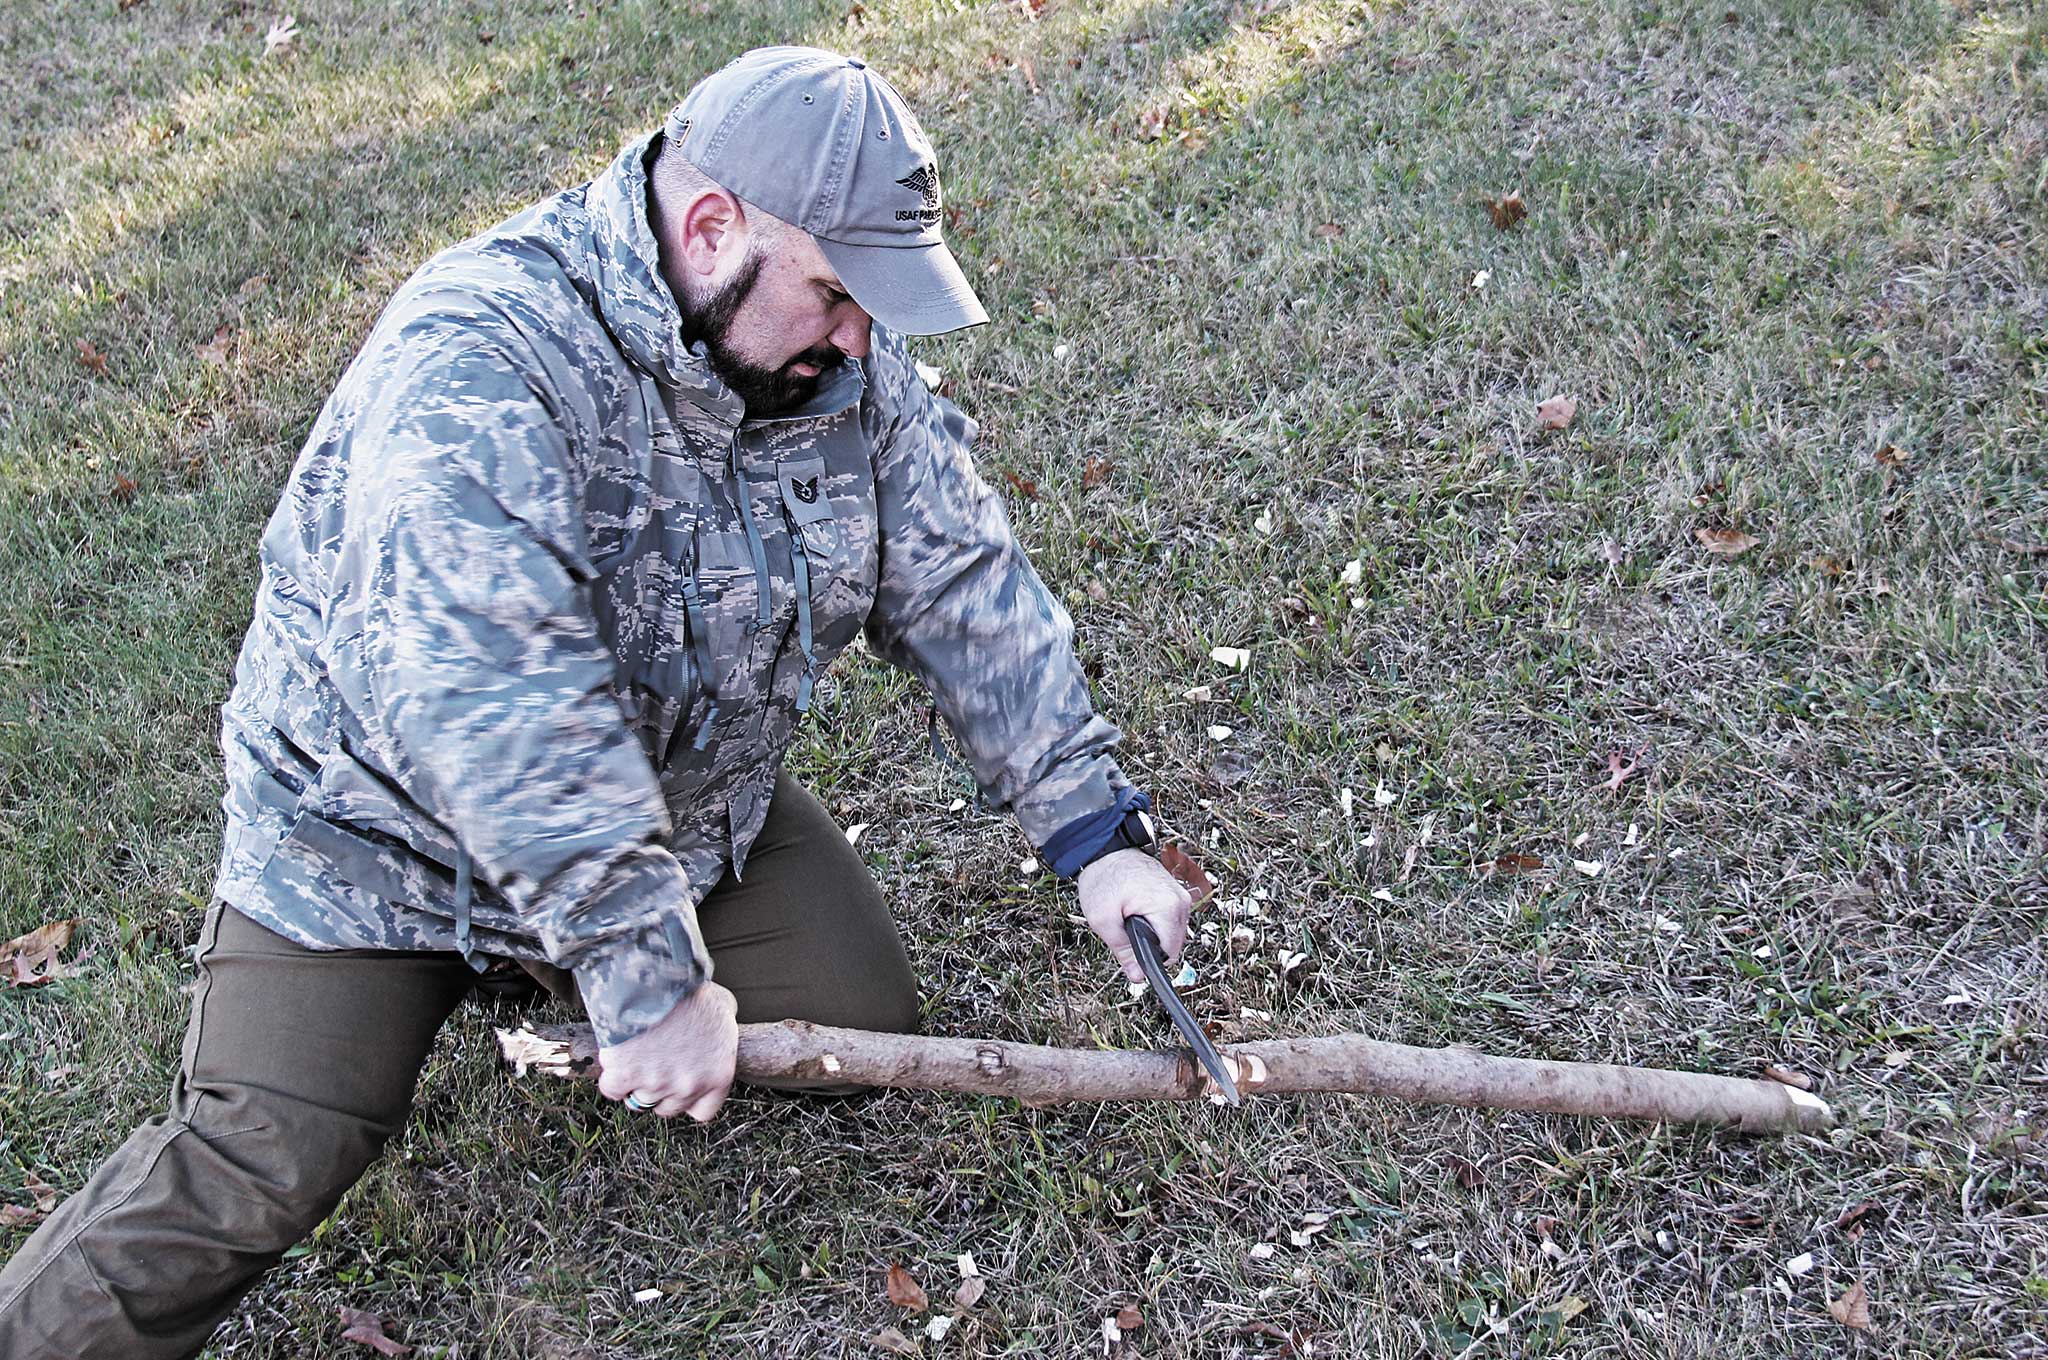
Paracord Project #5 – 1-2-3 Anchor
Function: Vehicle recovery anchor
Difficulty: 4 out of 5
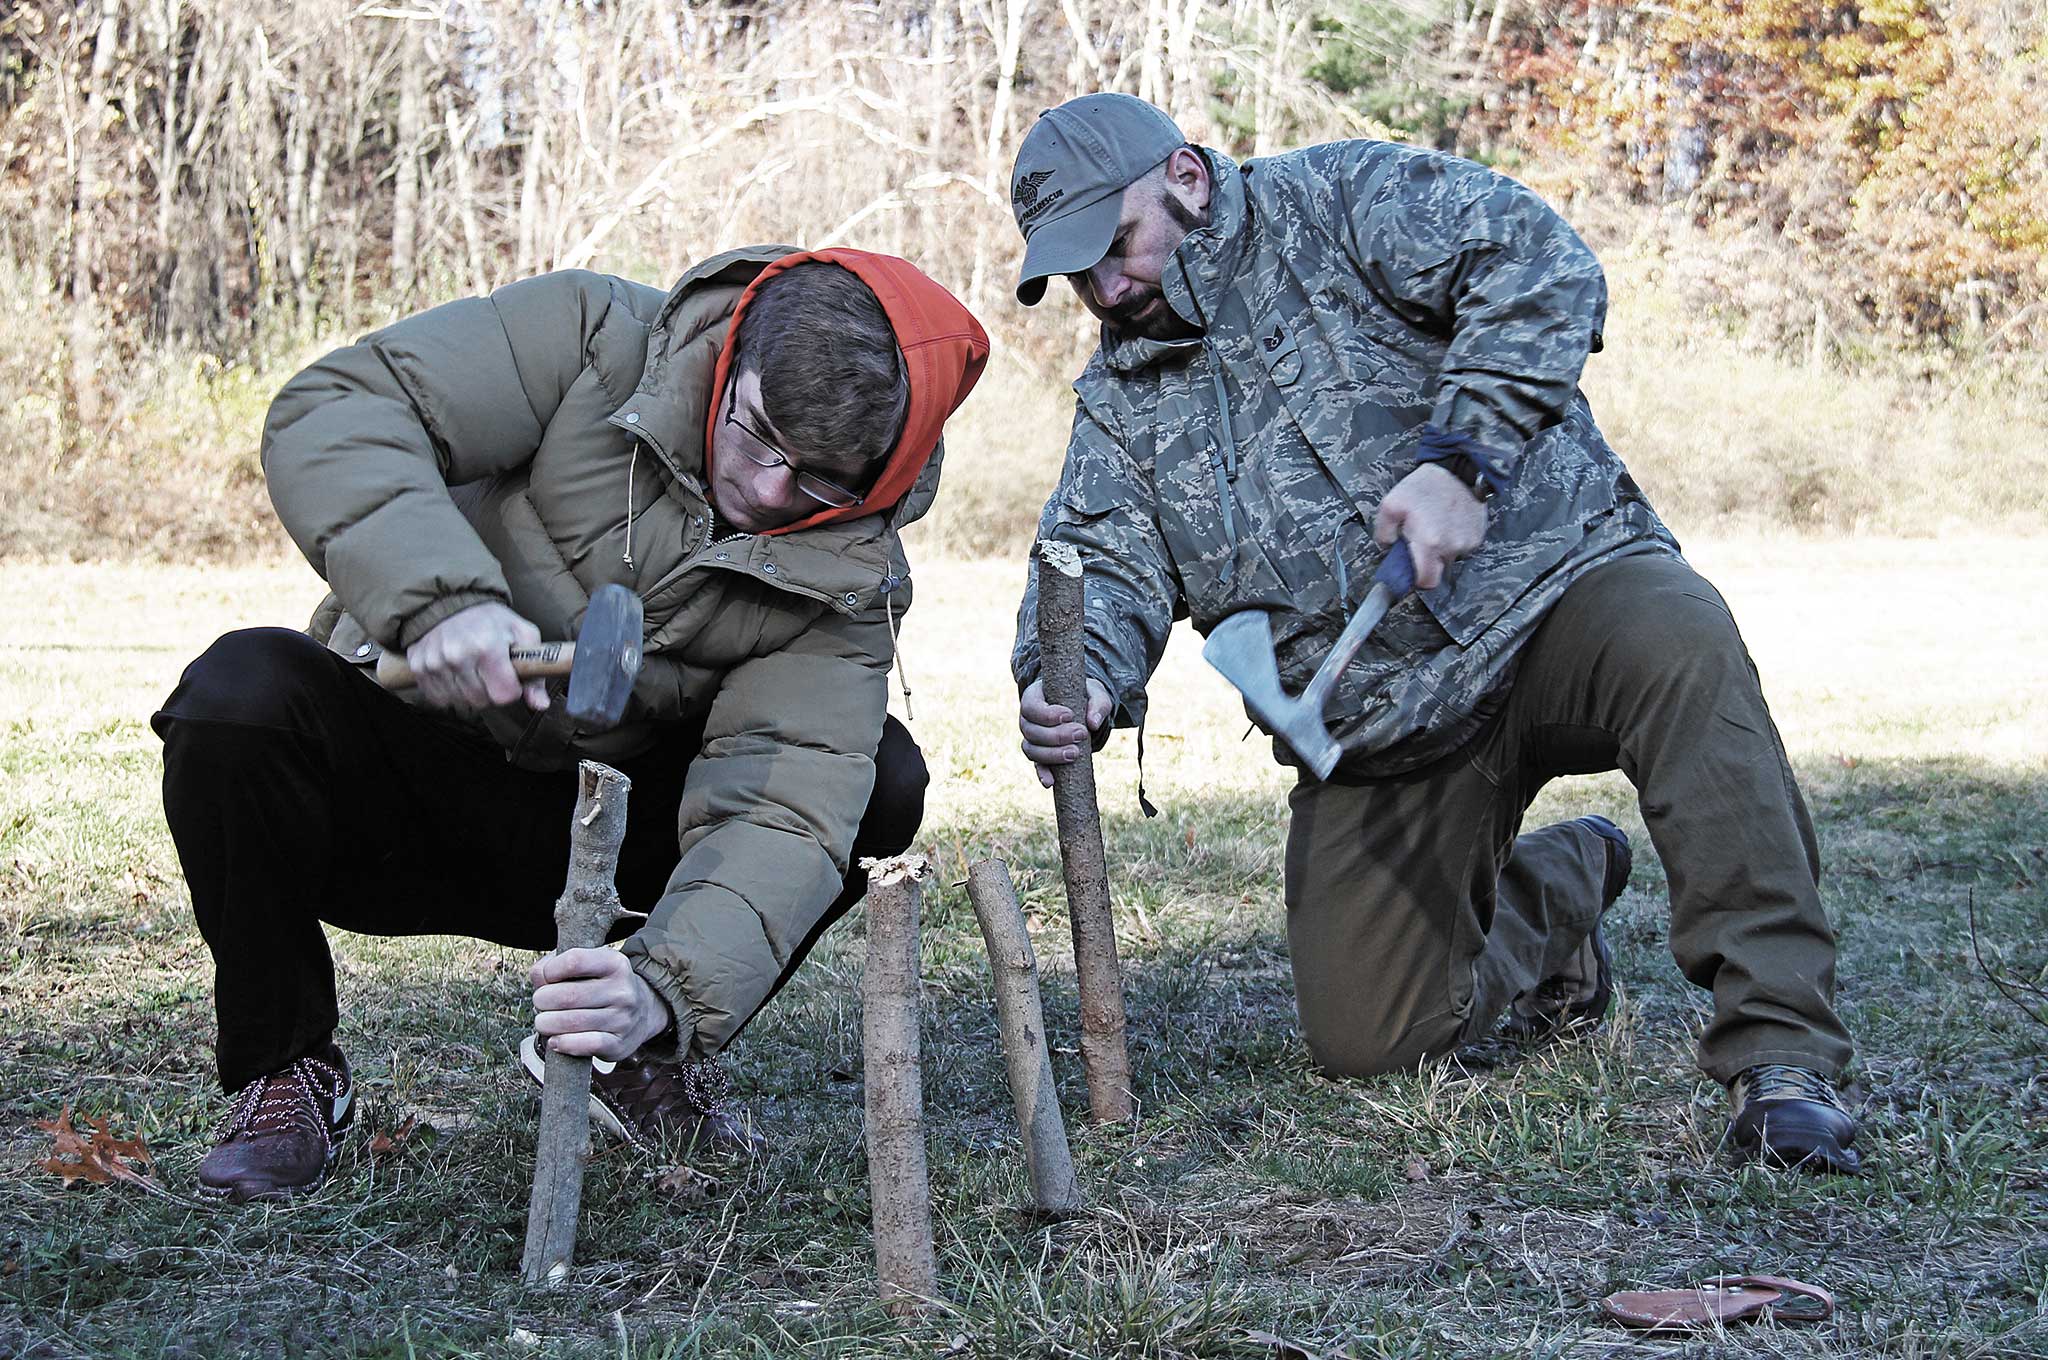
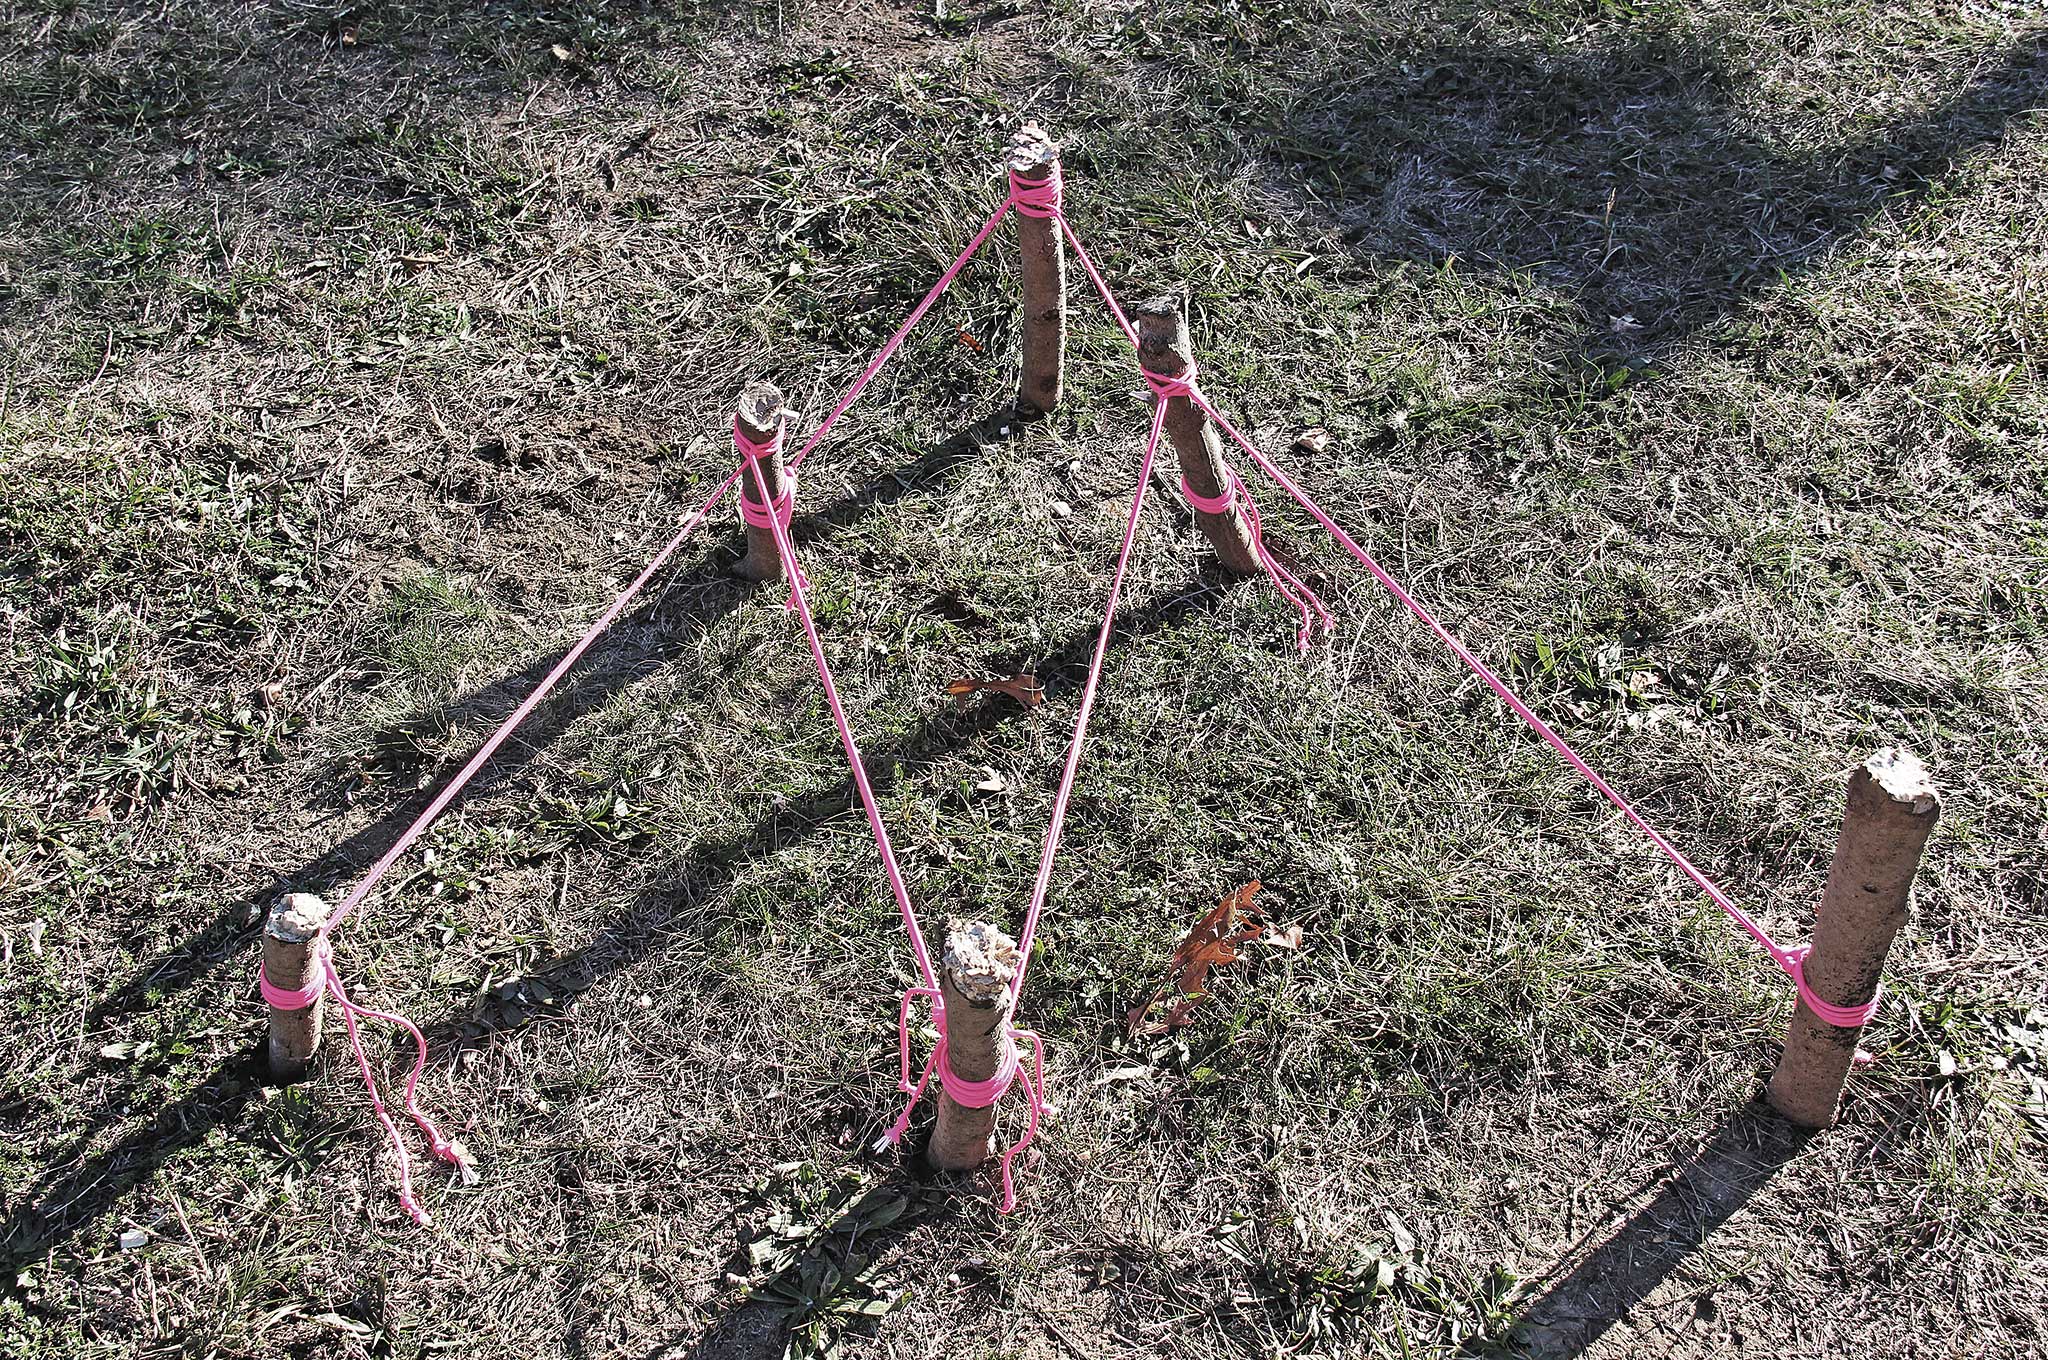
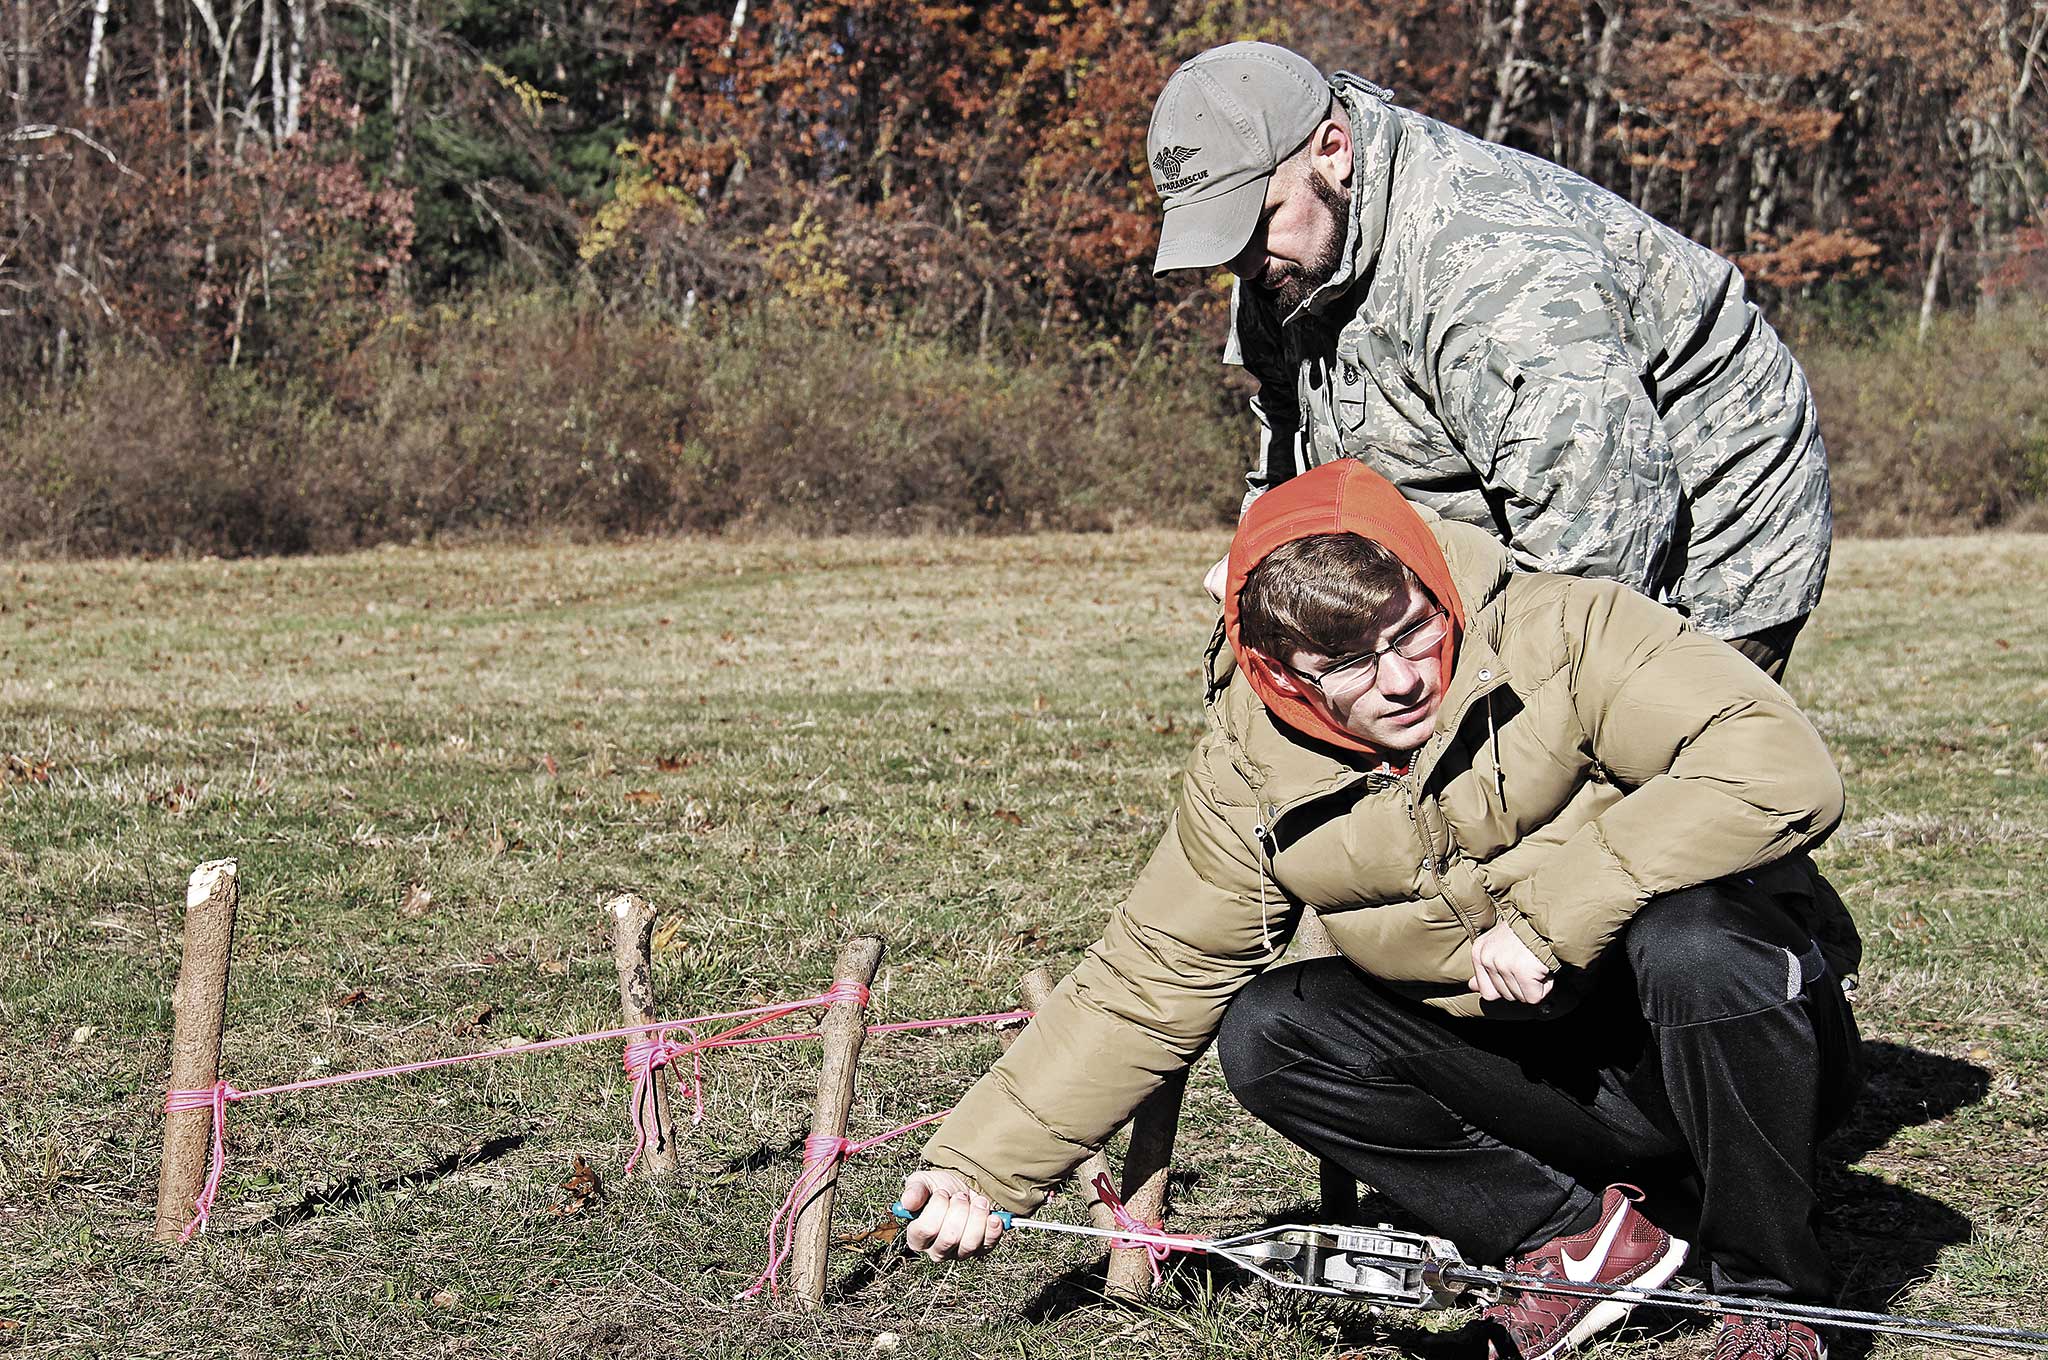
How To: Cut six 1- to 2-inch diameter wooden stakes, measuring approximately 18 inches long. Pound the first stake into the ground at a slight angle in the direction you want your stuck vehicle to go. Don’t make this angle too great. From your initial stake, pound the next two stakes about 1 foot further away on each side at 45-degree angles left and right.
From these two stakes, pound the final three stakes another foot behind, continuing in a pyramid pattern. For those of you who have played Beirut/beer pong, this will be a familiar pattern. Tie a length of paracord from the top of the first wooden stake to the bottom of the two stakes off to 45-degree angles.
Tie paracord from the second row to the third row in a similar fashion. You can use a lark’s head on the top and a rolling hitch and half hitches on the bottom. Attach your come-a-long to the first stake and to your vehicle. The 1-2-3 anchor works well since the stakes are supported by the following rows.
1-2-3 anchoring requires cutting multiple posts and pounding them into the ground in a triangle stack. Having the right tools – such as a hatchet or kukri, cordage, small sledgehammer, and come-a-long – make self-rescue easier.
Notes: Vehicle recovery can be quite dangerous, even fatal at times. Make sure your vehicle parking brake is on while securing your anchor and off when using it. A small hammer and come-a-long makes retrieval easier than resorting to a Spanish Windlass (the Spanish Windlass will be featured in a future issue of RECOIL OFFGRID).
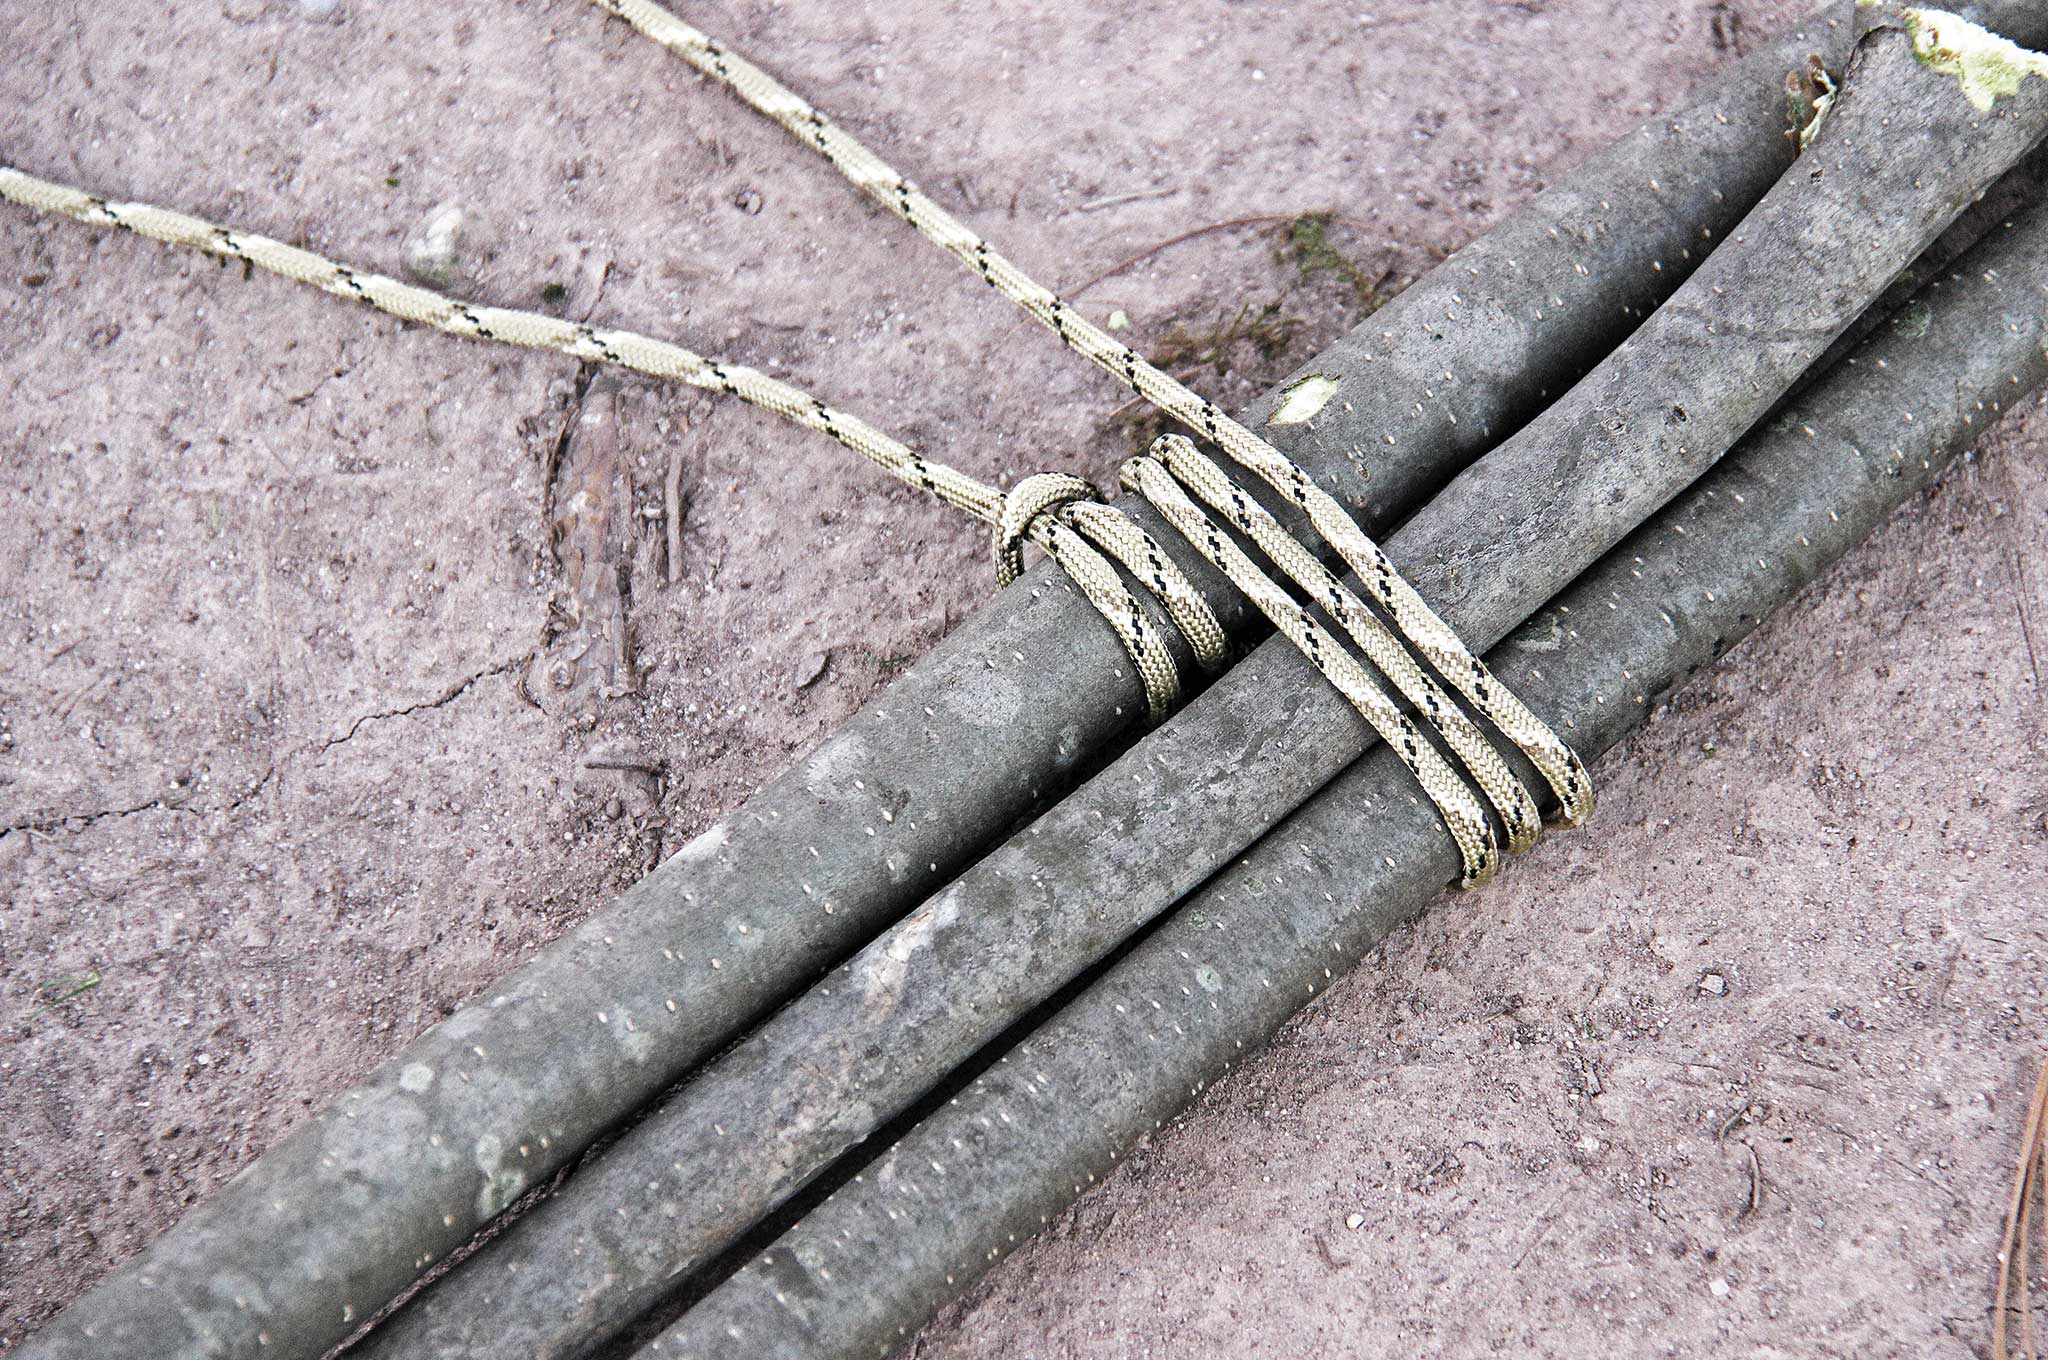
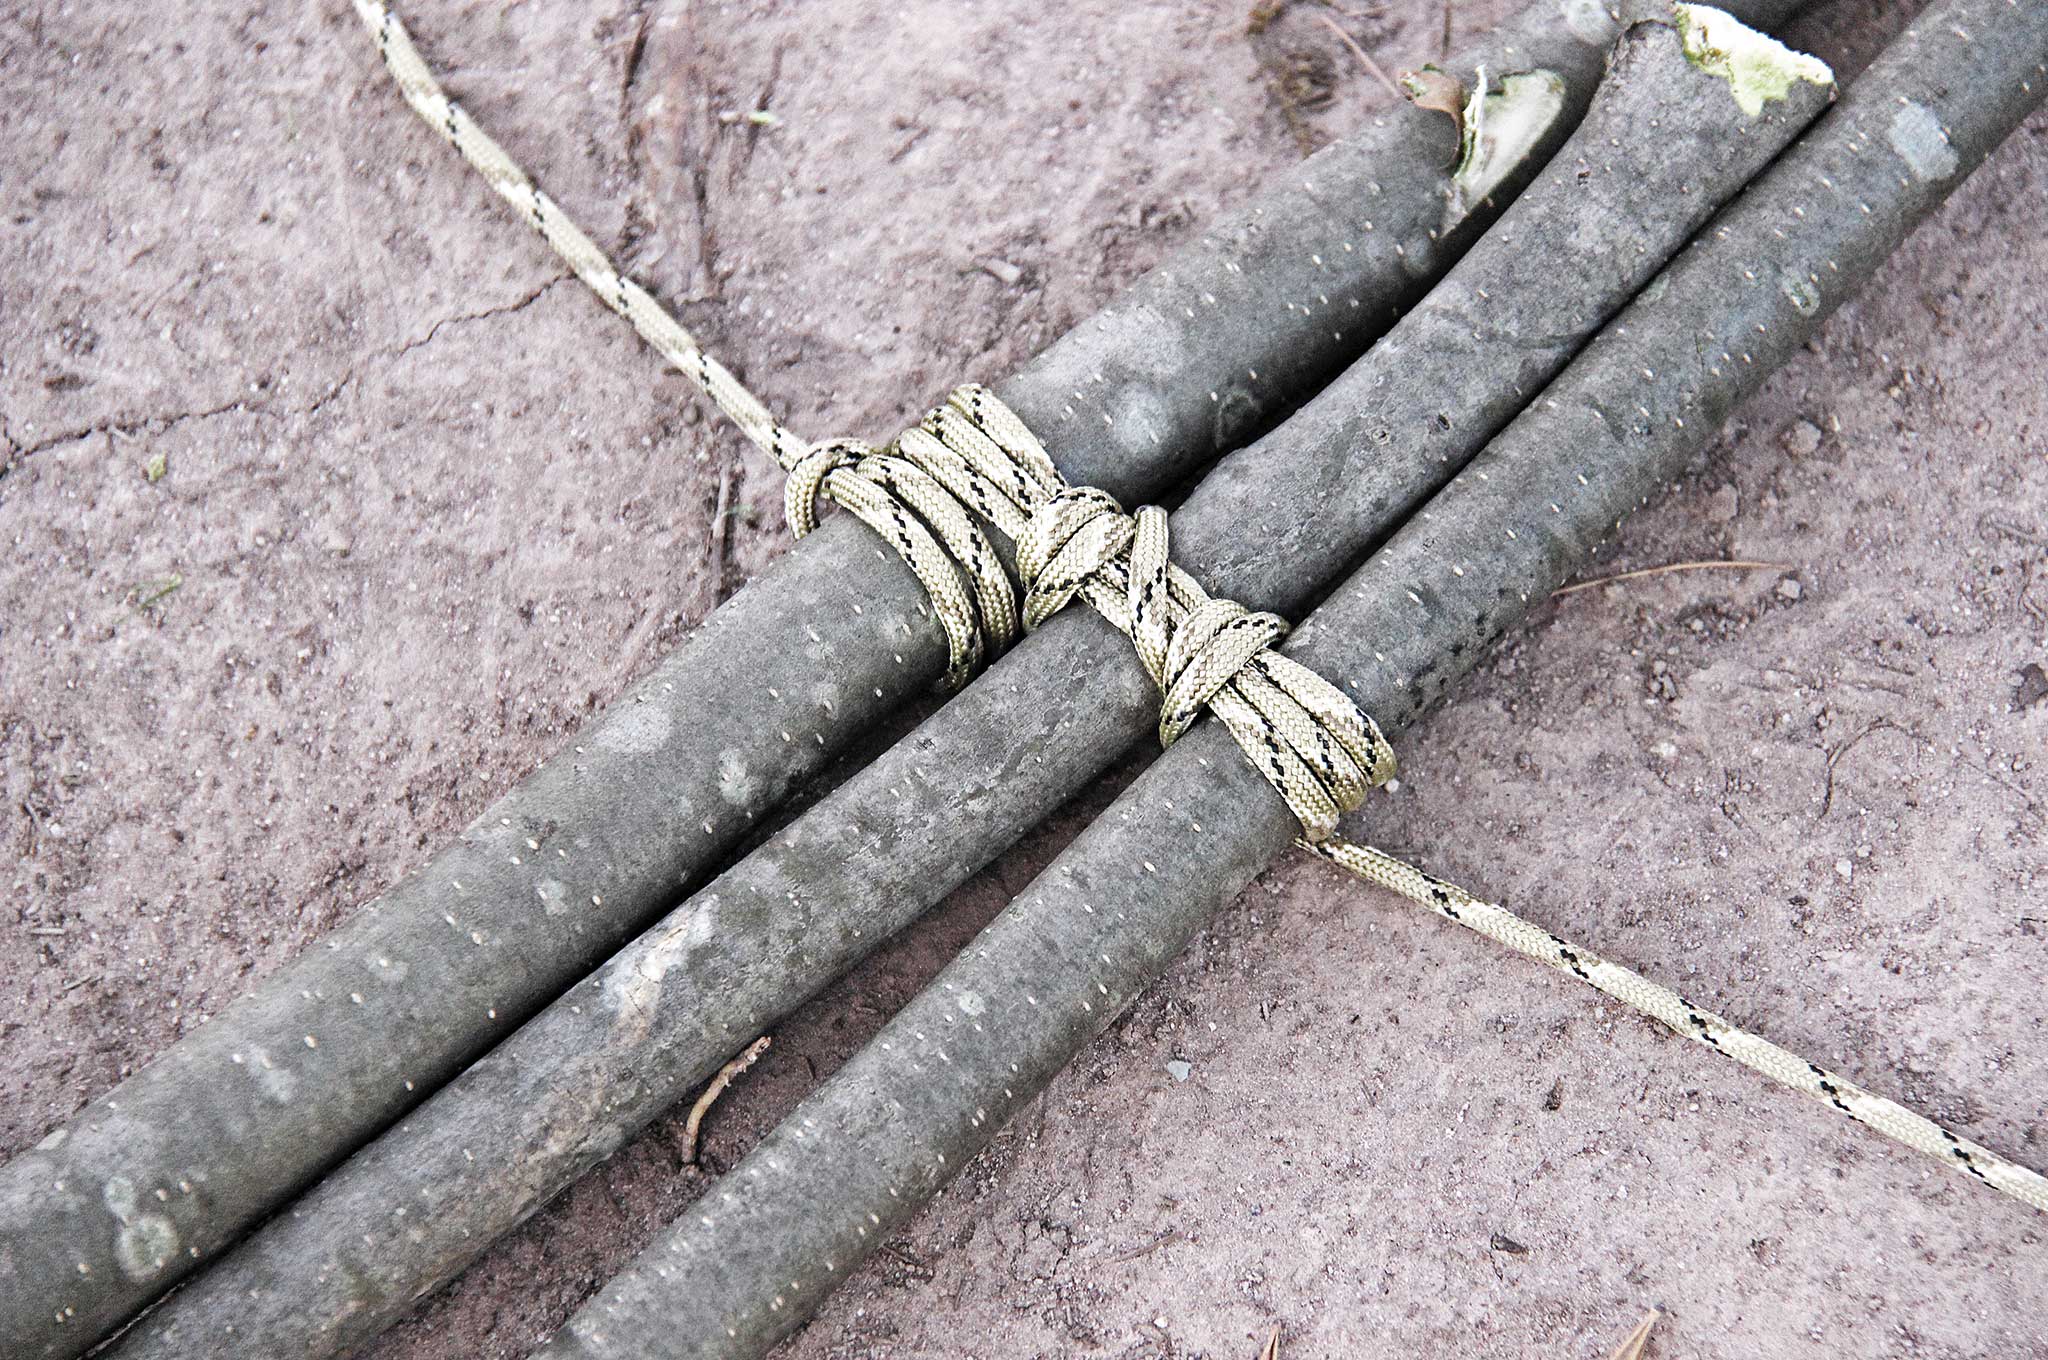
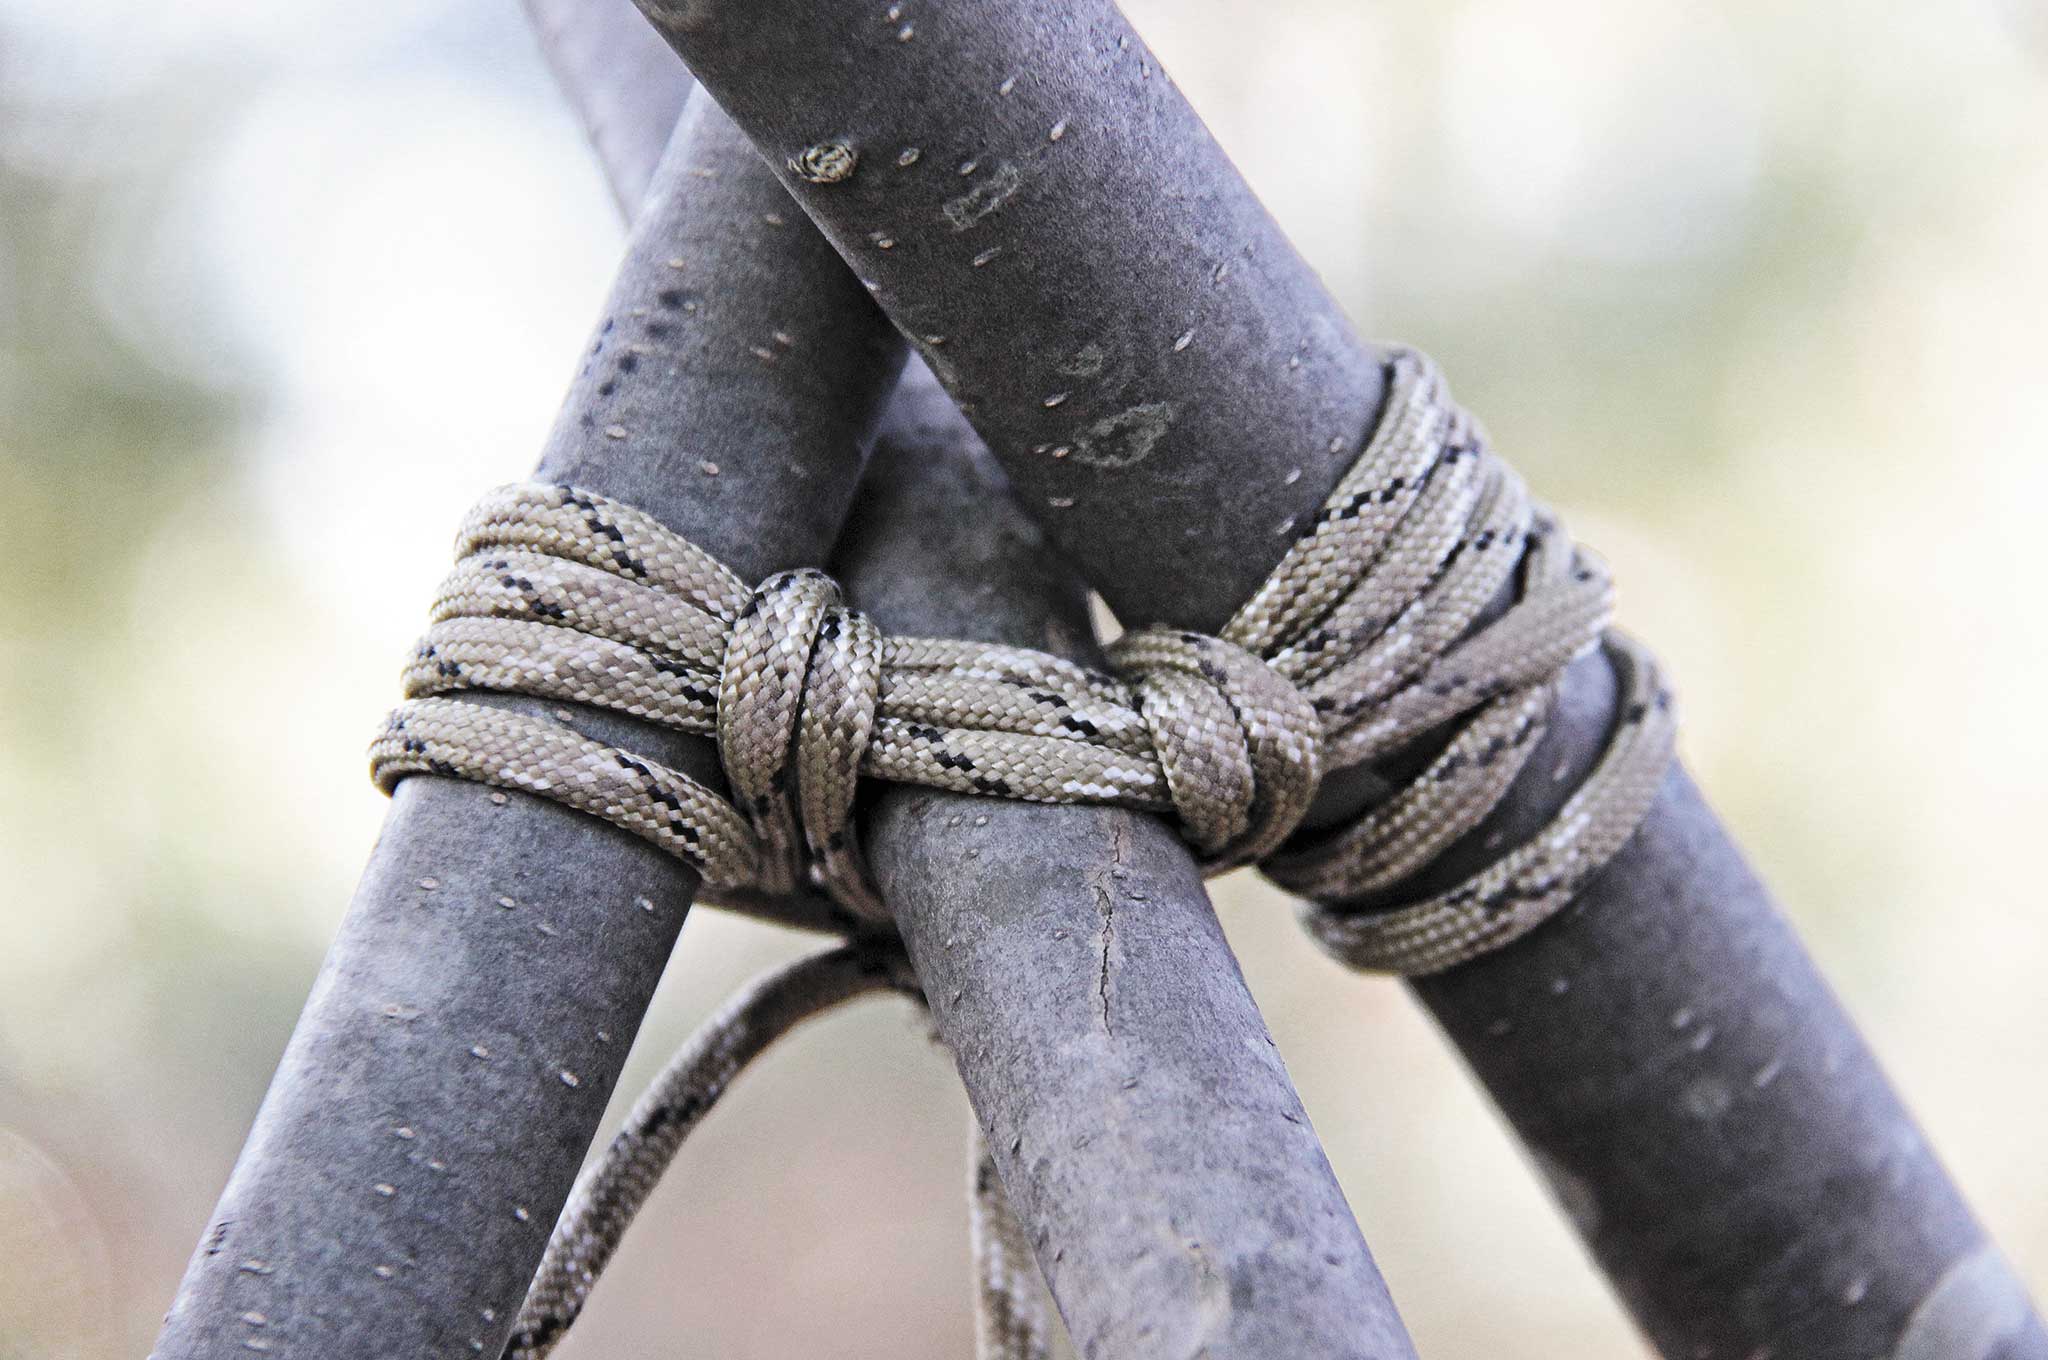
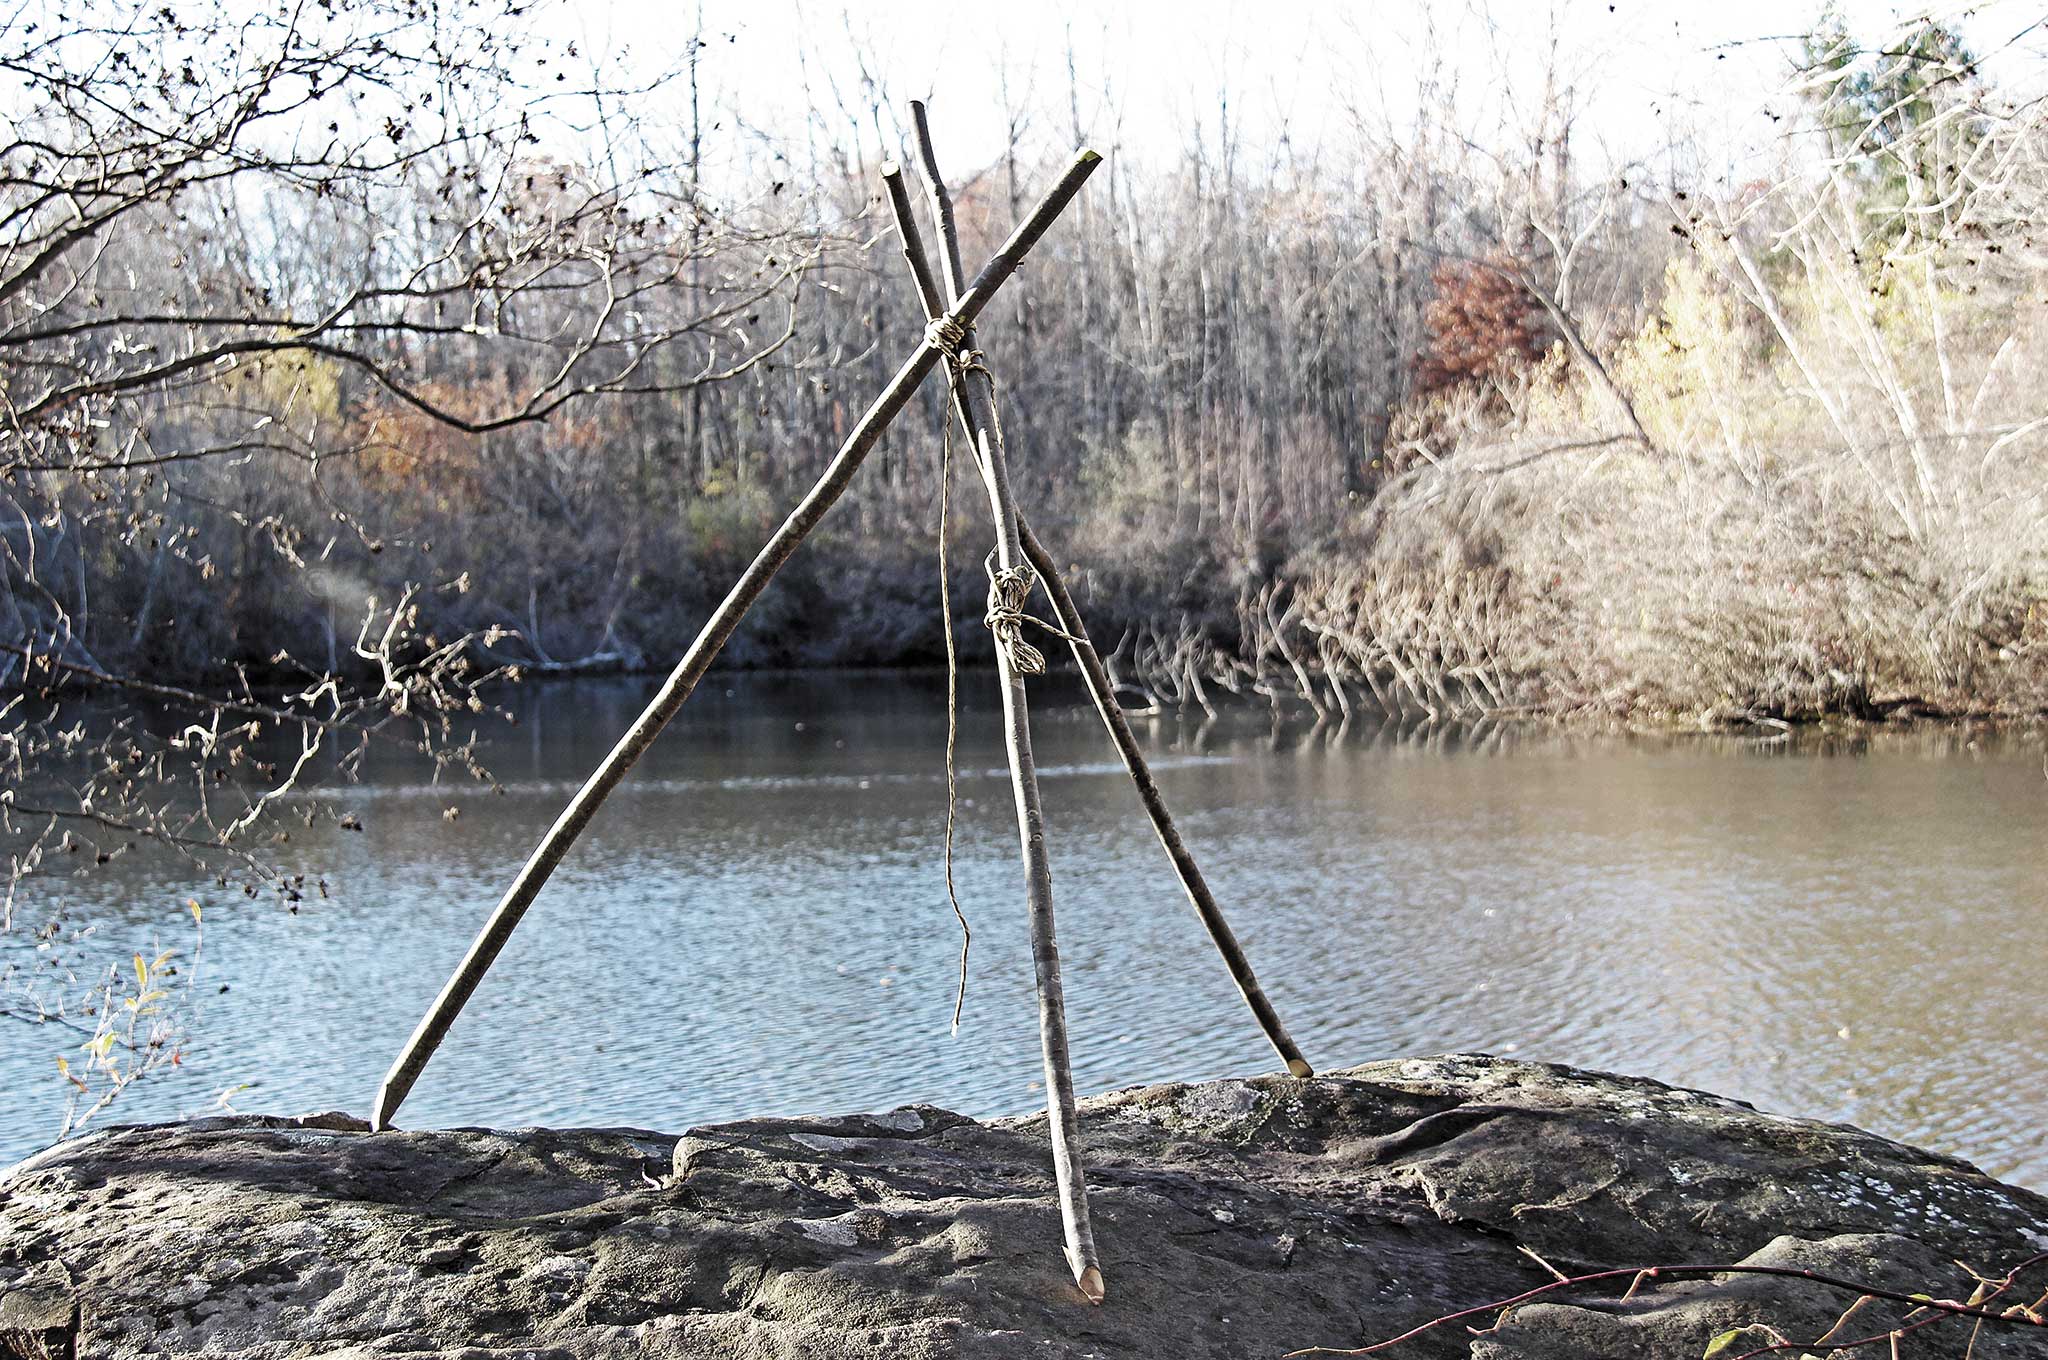
Paracord Project #6 – Tripod
Function: Suspending objects and much more
Difficulty: 3 out of 5
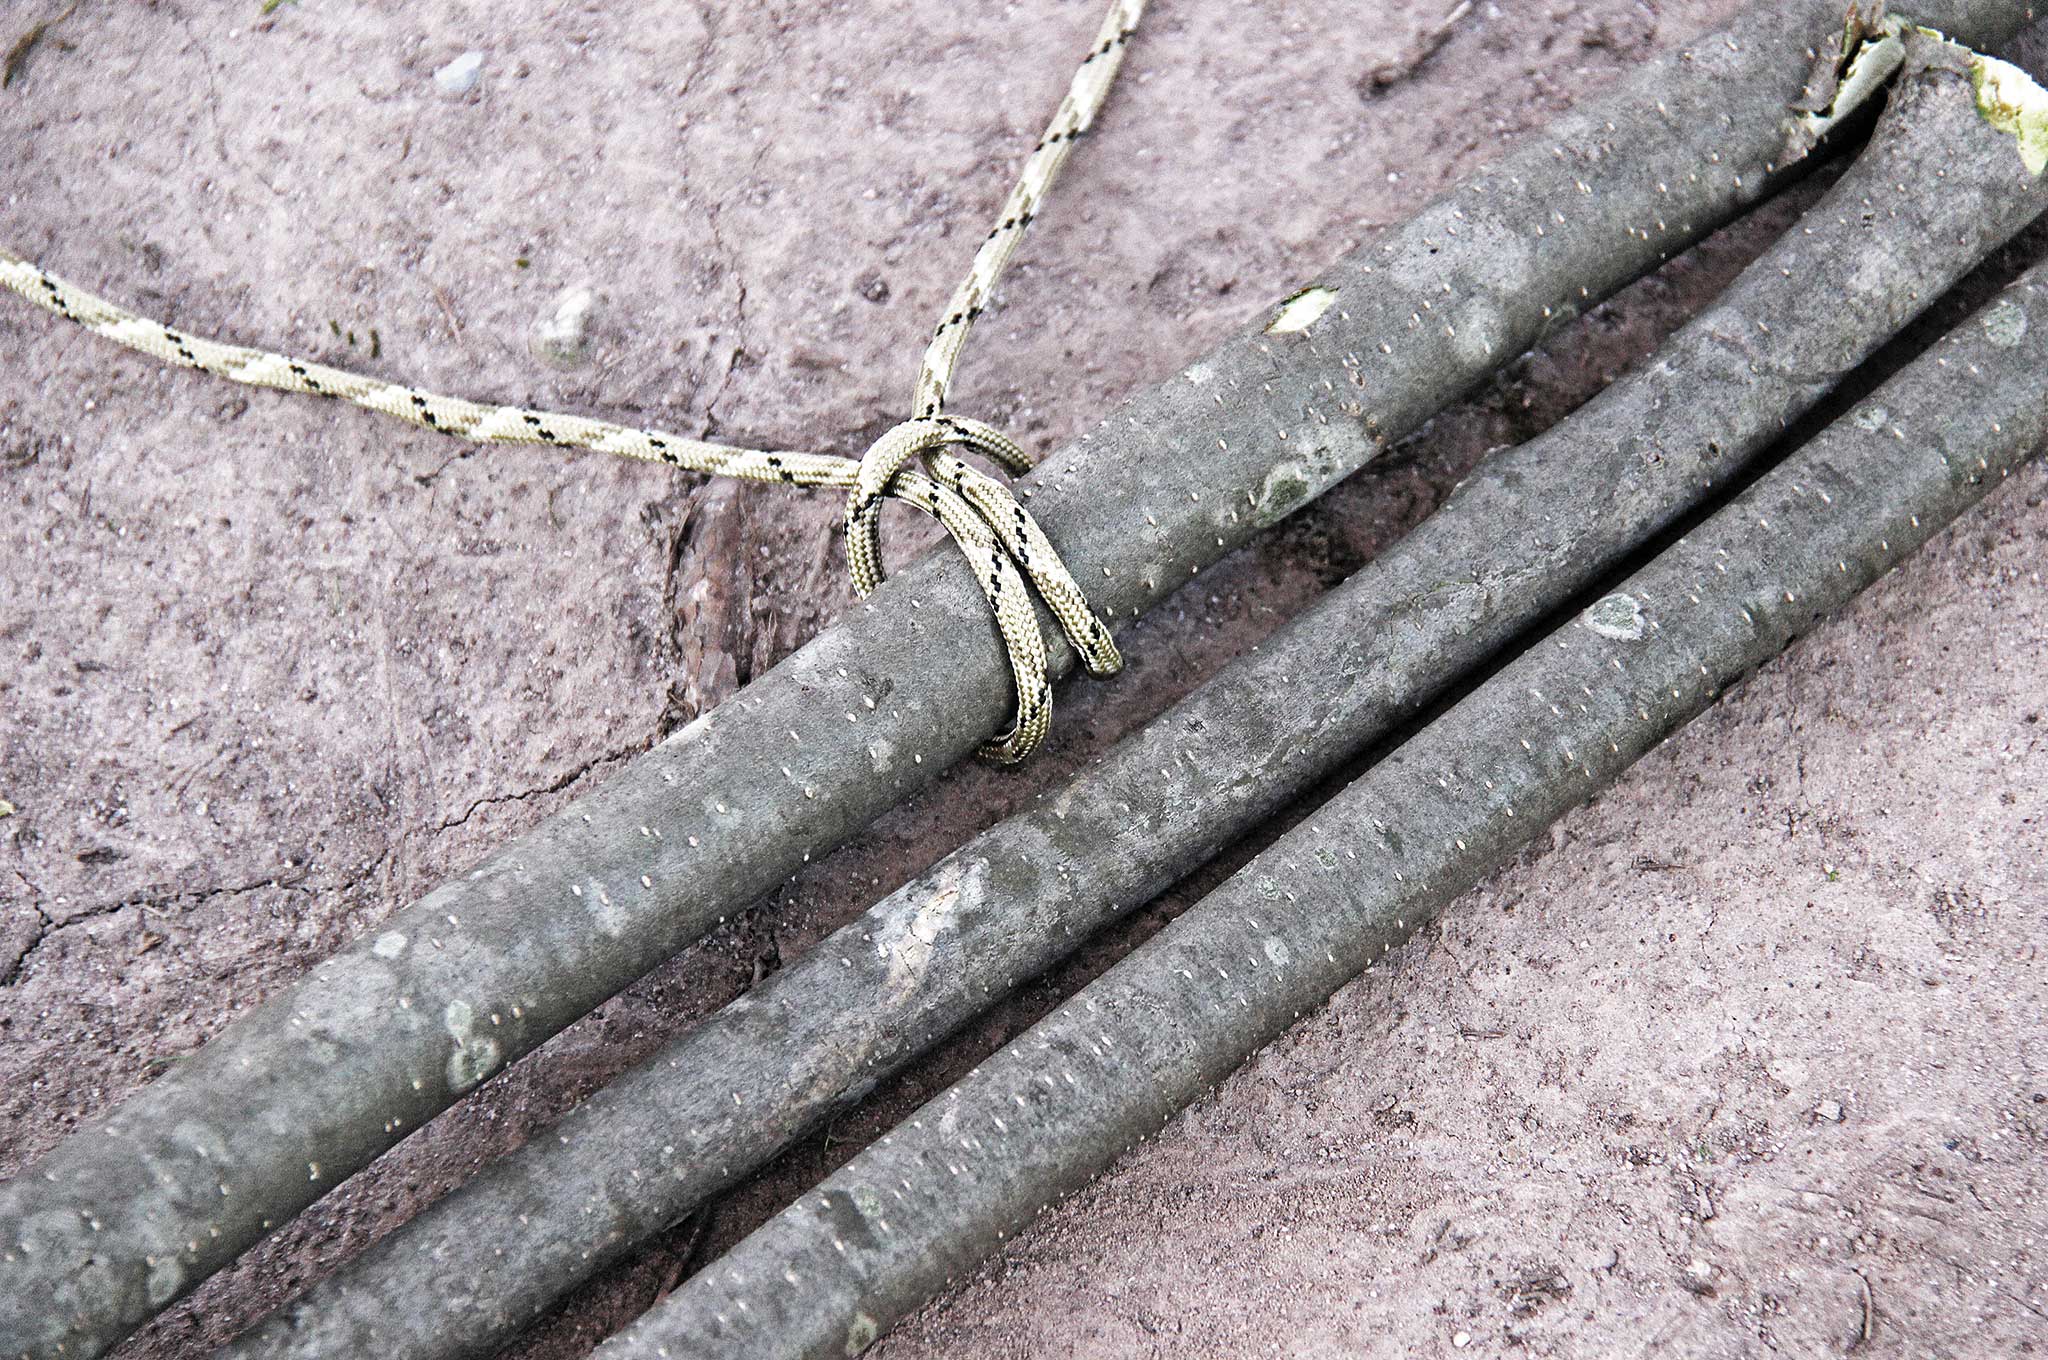
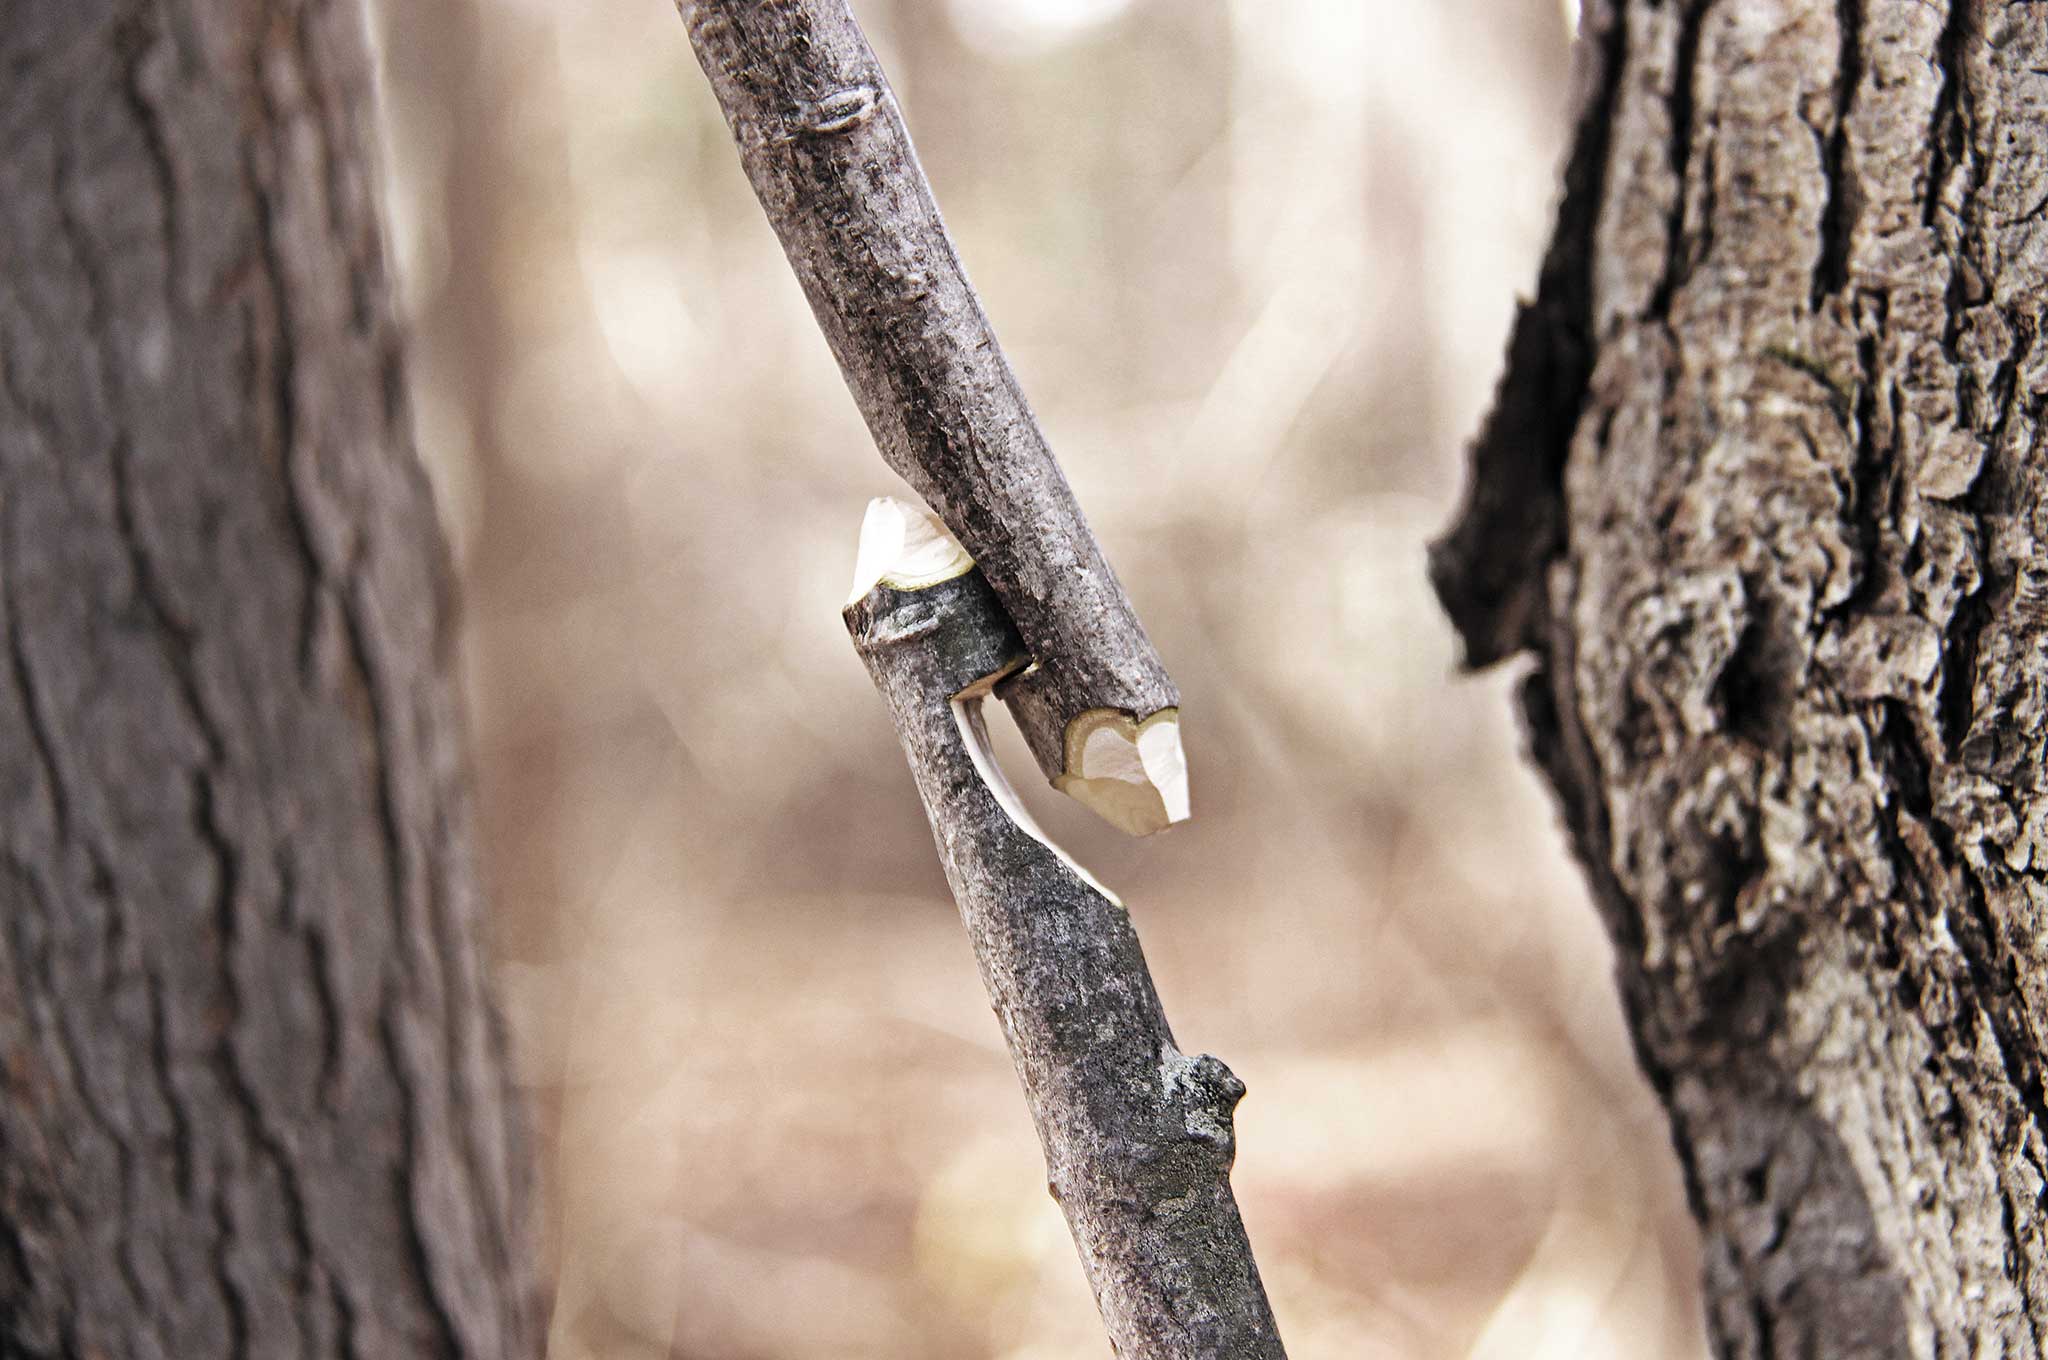
How To: Gather three poles and place them on the ground. They need not be the same length as the legs can be kicked out once assembled to make it stand straight. Wrap paracord around one of the poles with a lark’s head knot to start the tripod lashing. Then wrap the three poles three or four times.
The strength of the tripod lashing comes from frapping, when you pull the paracord in between the middle pole and pole closest to you and pull it tight to constrict on the wrapping on all three poles. Do it a second time between the middle pole and the pole furthest from you. Finish the tripod lashing by taking the end of the cord and securing it to the remaining end of the lark’s head knot.
Tripods are staples in traditional woodland basecamps. They can be used to create raised beds, camp kitchen potholders, camp seats, and jerky smokers.
Notes: Tripods can be used to suspend stew pots over the fire, to build raised beds in wet conditions, as camp furniture, or as the framework for a hauling “crane.” Anyone who wants to build advanced tripod projects should also know how to make a square lashing.
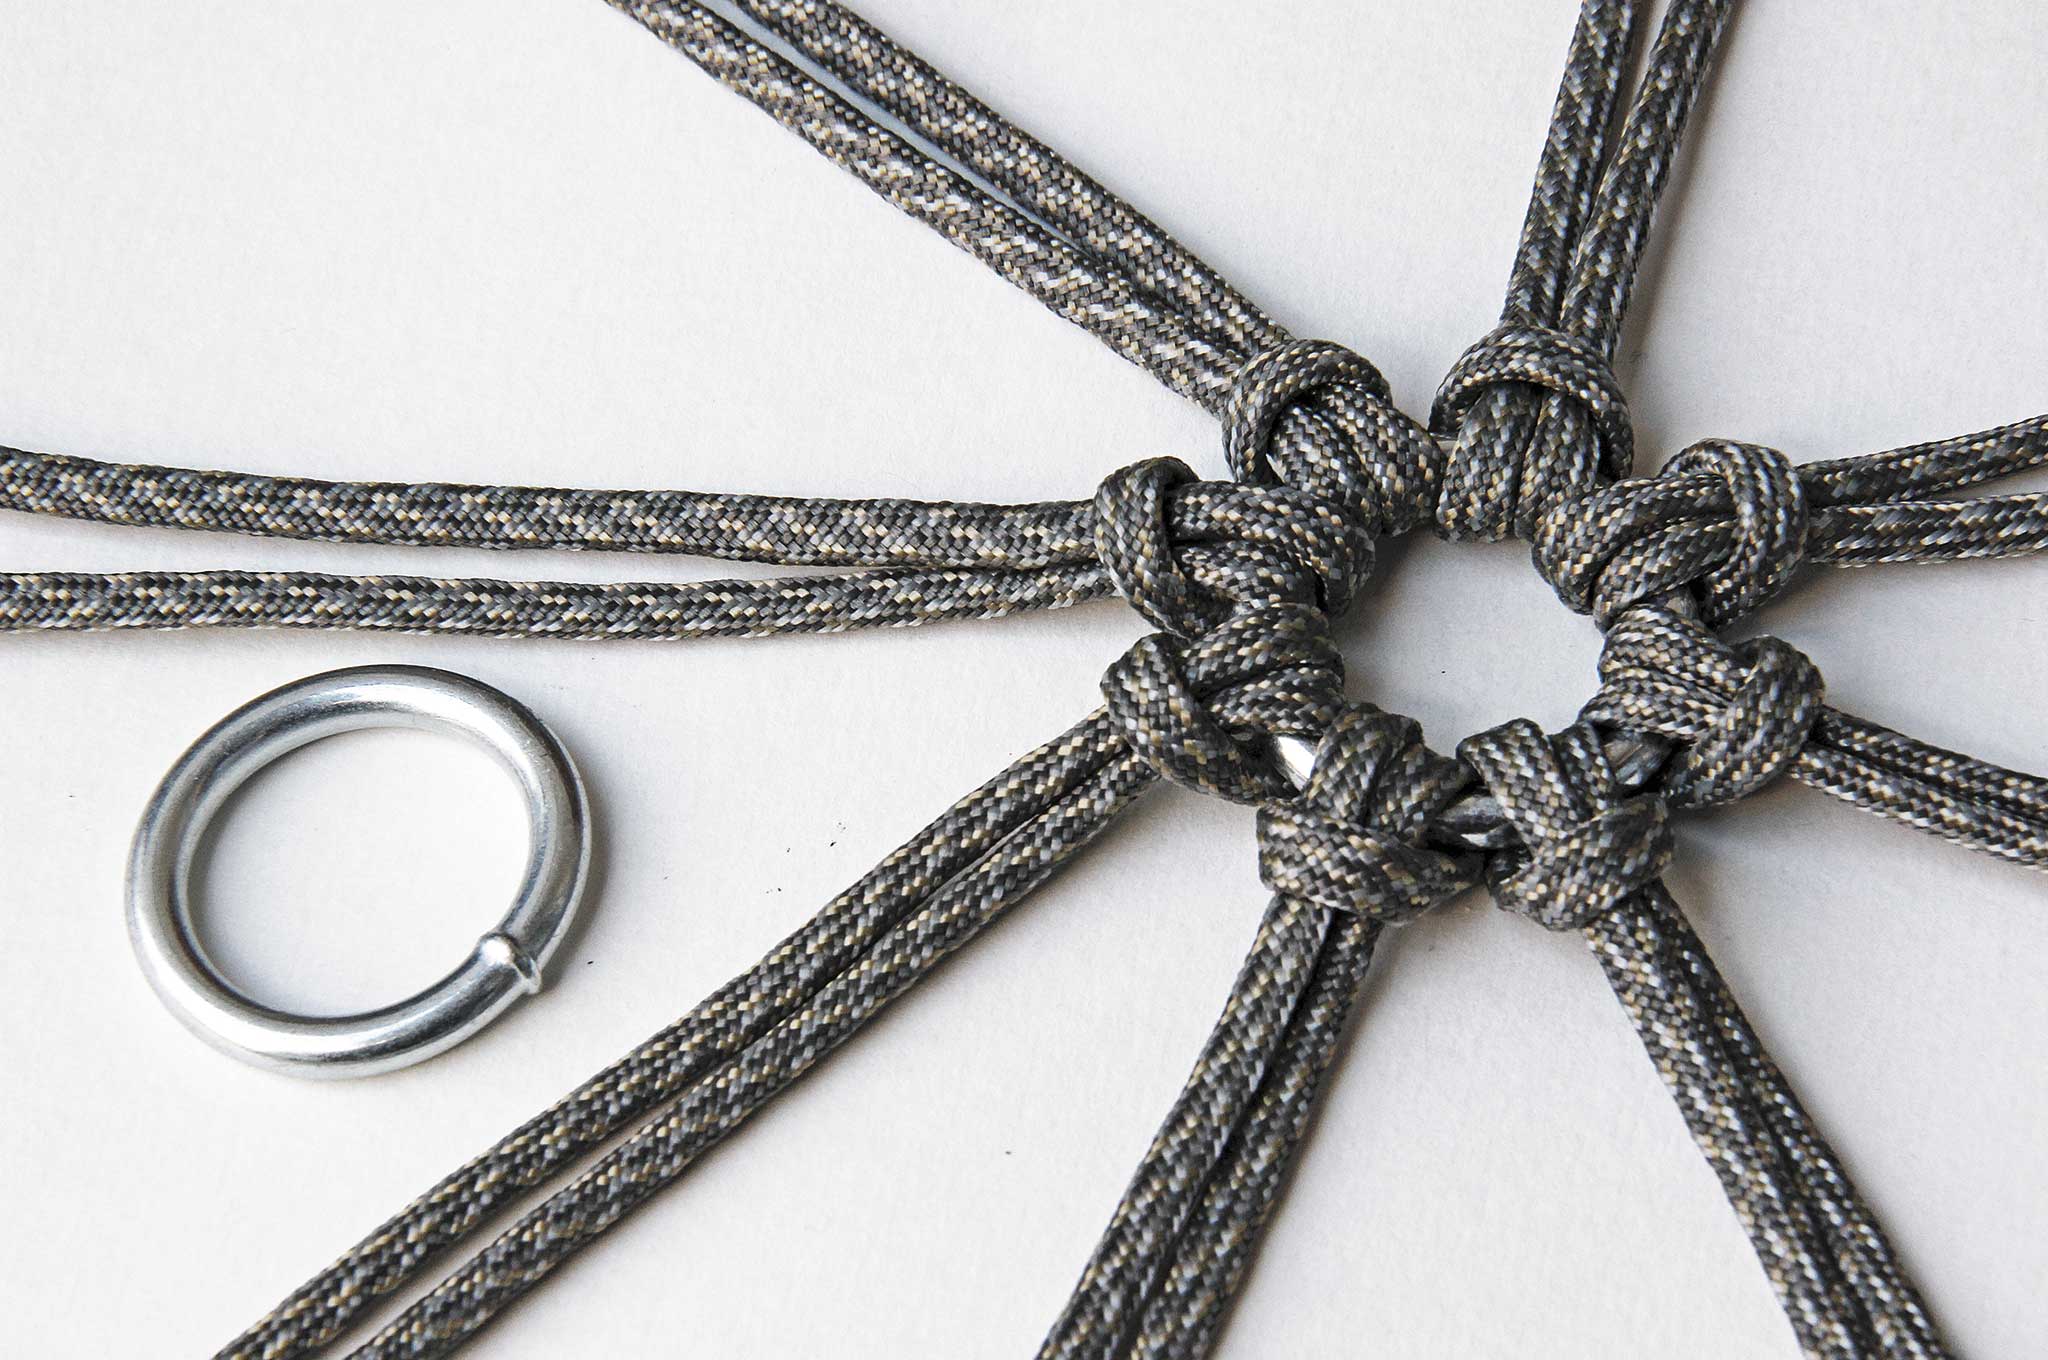
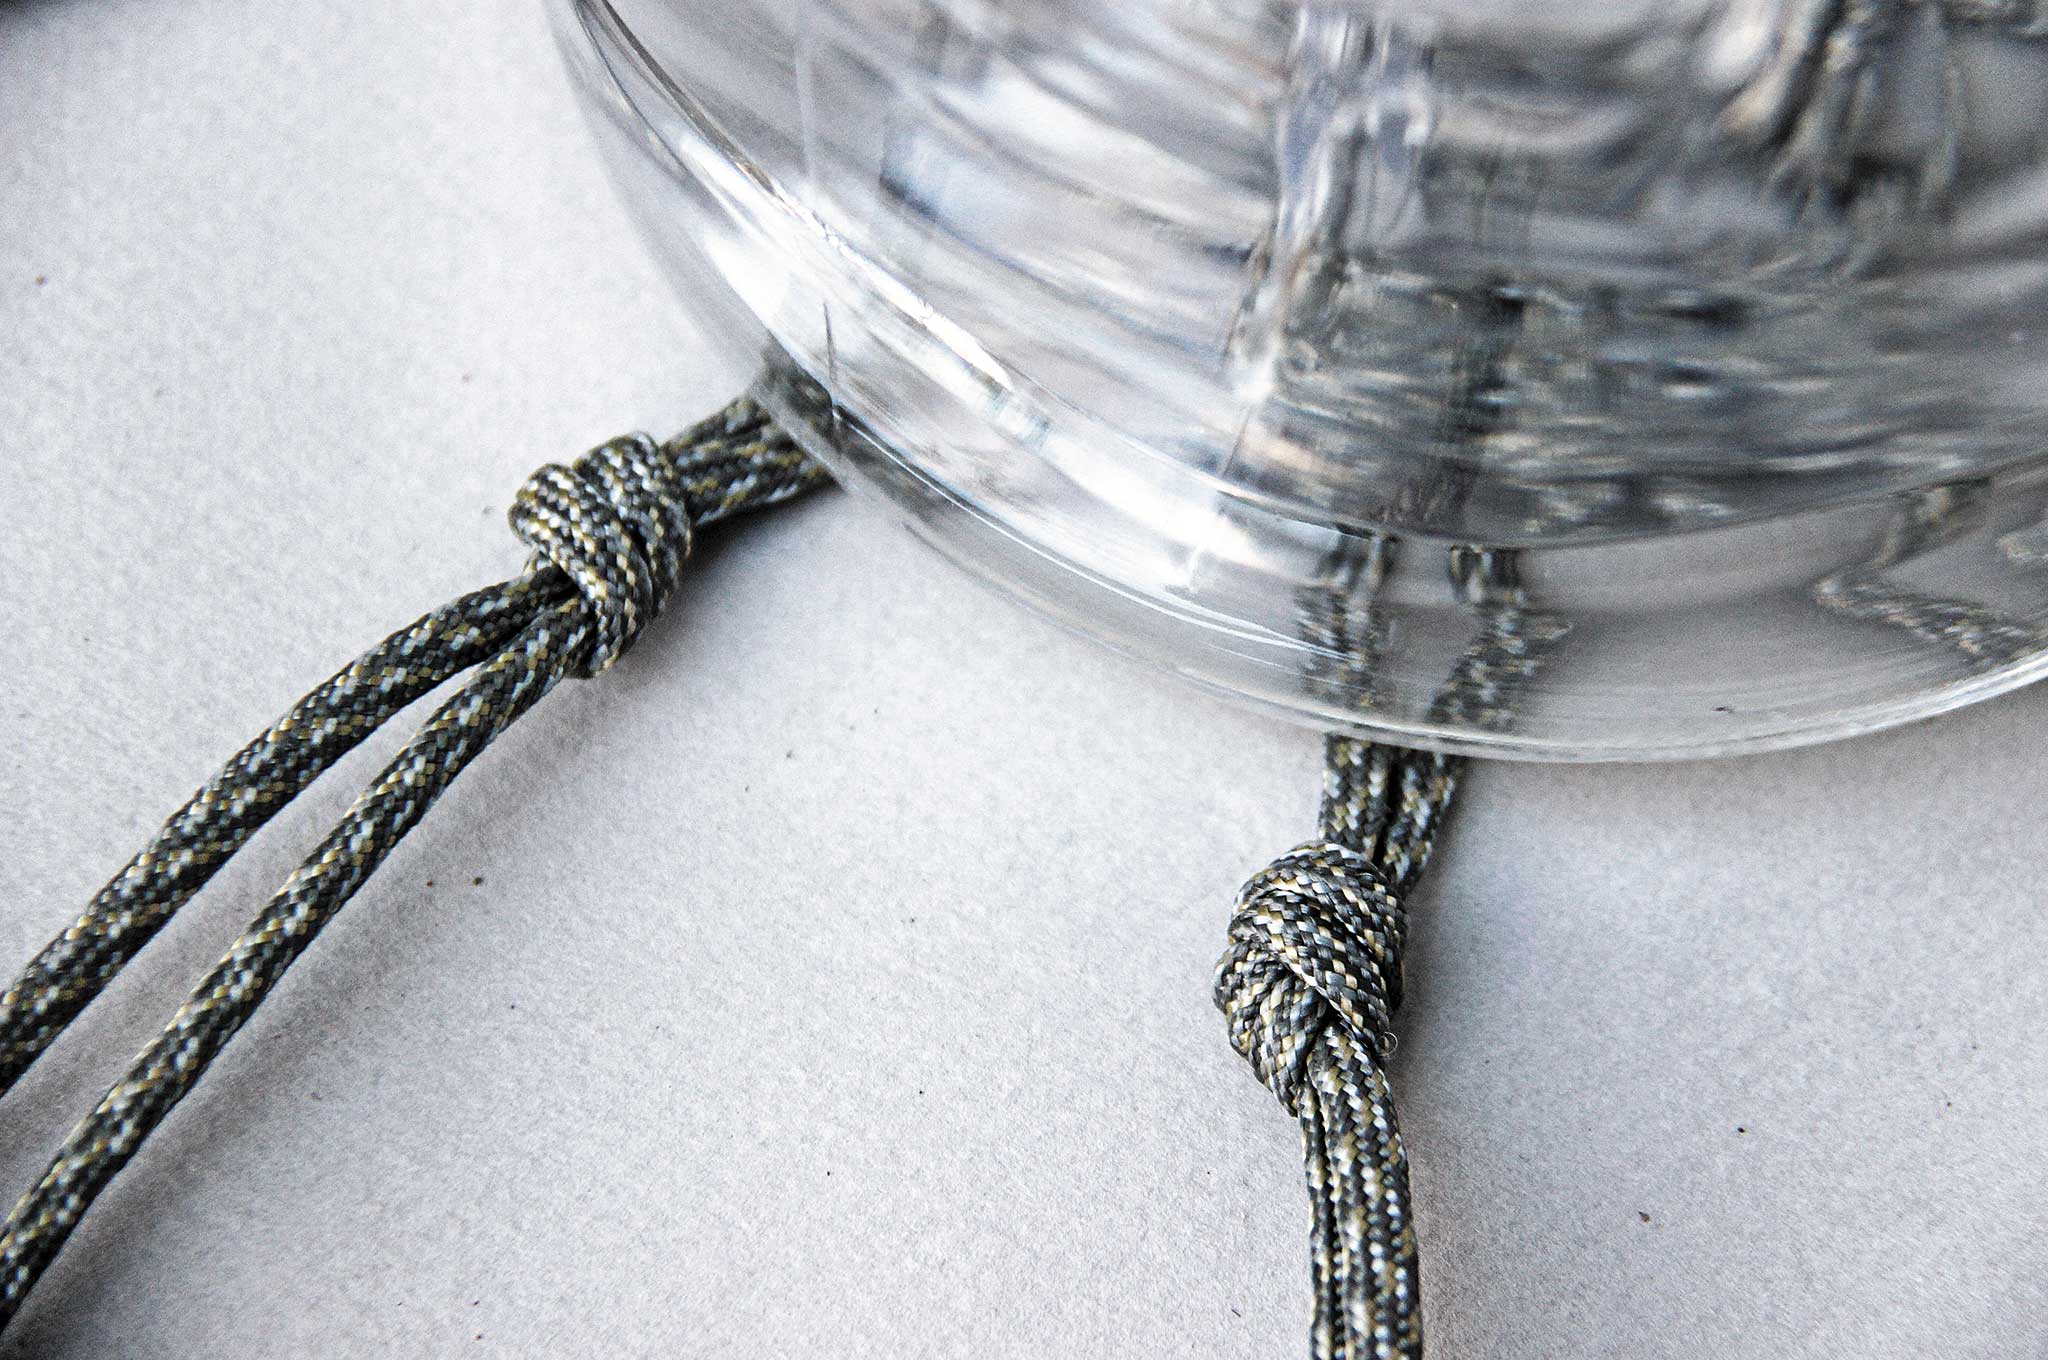
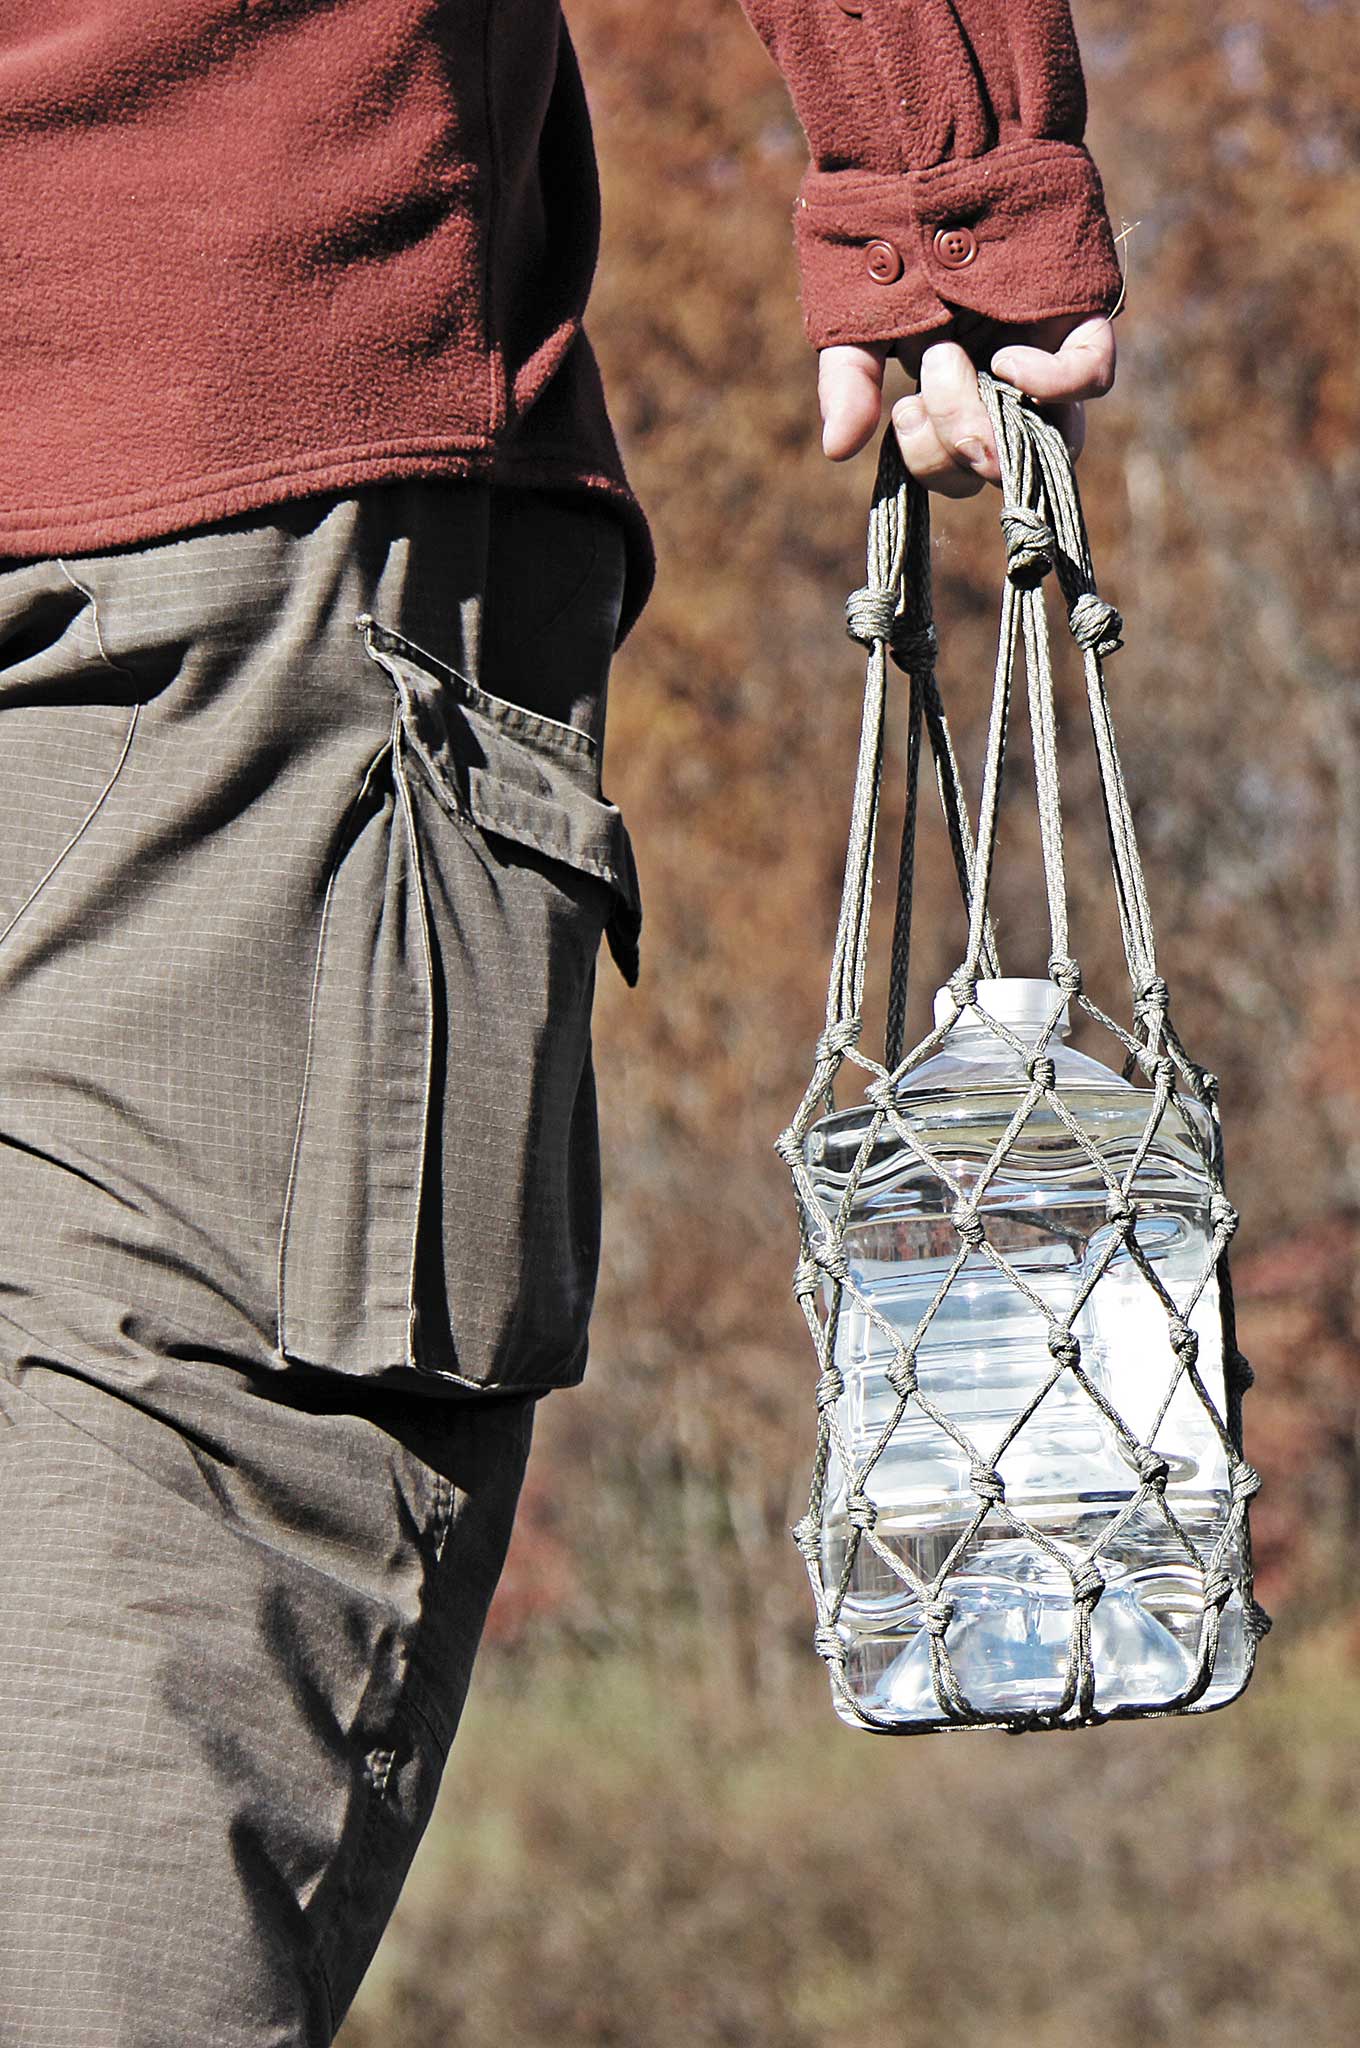
Paracord Project #7 – Bottle Carrier Net
Function: Holding bottles, containers, potted plants, etc.
Difficulty: 2 out of 5
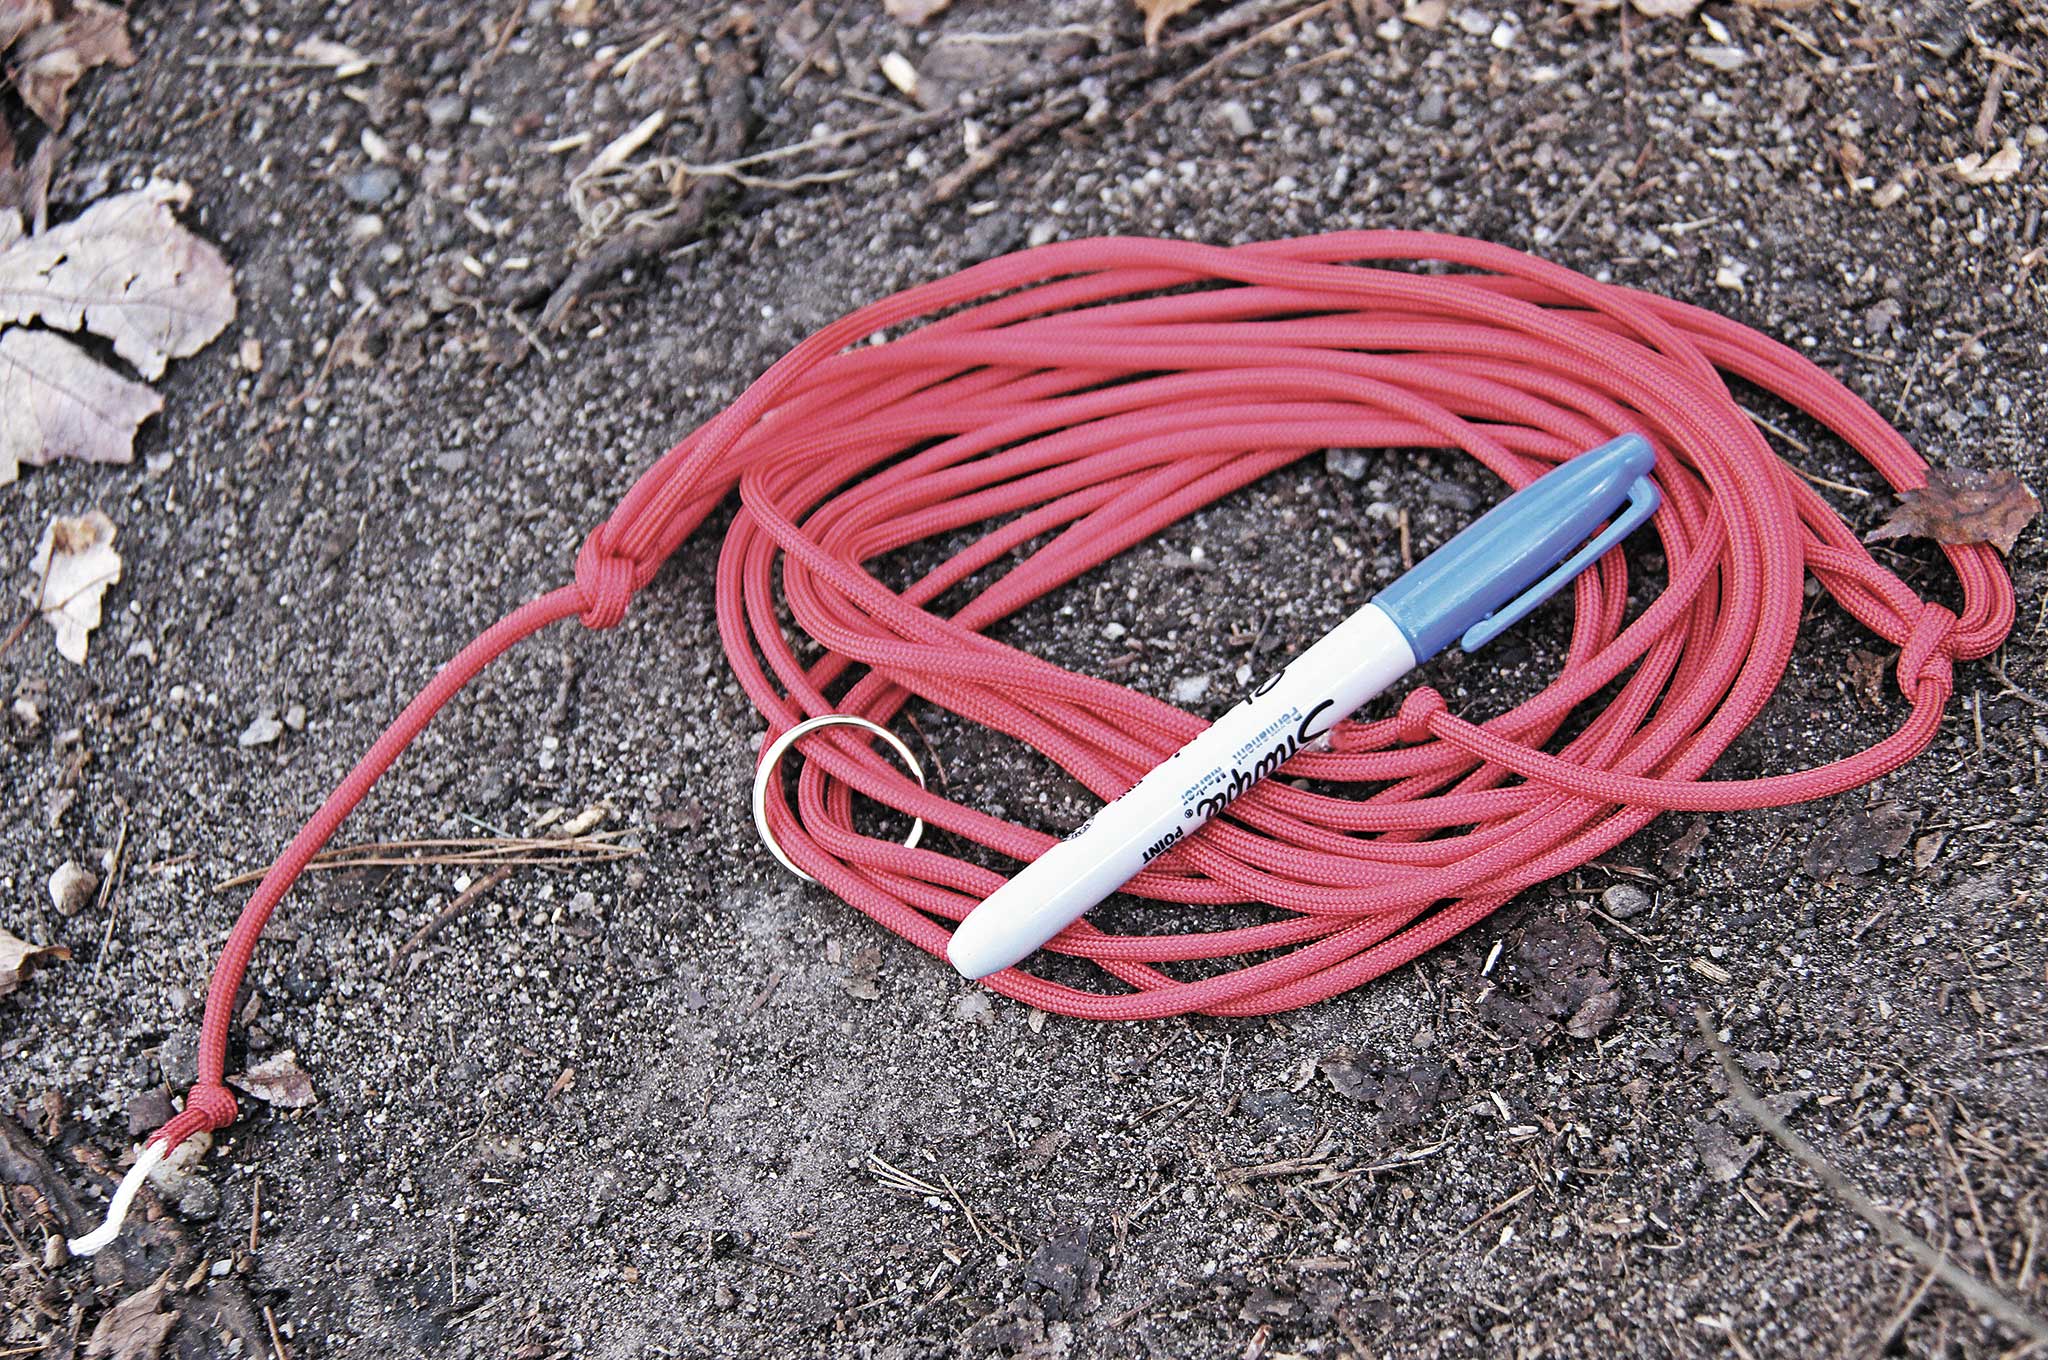
How To: Measure eight lengths of cordage by placing it under your bottle and holding the ends over it. It should measure approximately three times the height of your bottle. For the bottle used in our tutorial, this meant approximately 6 feet in length for each cord.
Cut eight lengths of cord out of a 50-foot-long hank. The last 2 feet will be used to create a handle. Attach the eight strands to your split ring with lark’s head knots. The trick to this bottle carrier is tying knots with strands of cord adjacent to one another.
Tie the first overhand knot tied 3 inches from the ring, putting the knot on the side of the bottle rather than under it. From here, each knot works its way up the bottle every 1.5 inches. Try to keep your knots spread out consistently or it’ll look like rubbish. Continue working up the bottle until you get to the top. Finish the carrier by tying four of the strands together as one handle and the remaining four as the other handle.
Water bottle net carriers are more time consuming to make than they are difficult. Make sure to make your knots evenly spaced; your first knots should be alongside your bottle, not under it.
Notes: This same pattern can be used on almost anything box-like or cylindrical in shape. Make sure your split ring can handle the weight, or use a welded ring available at hardware and boating stores. If you don’t like overhand knots, you can use square knots instead.
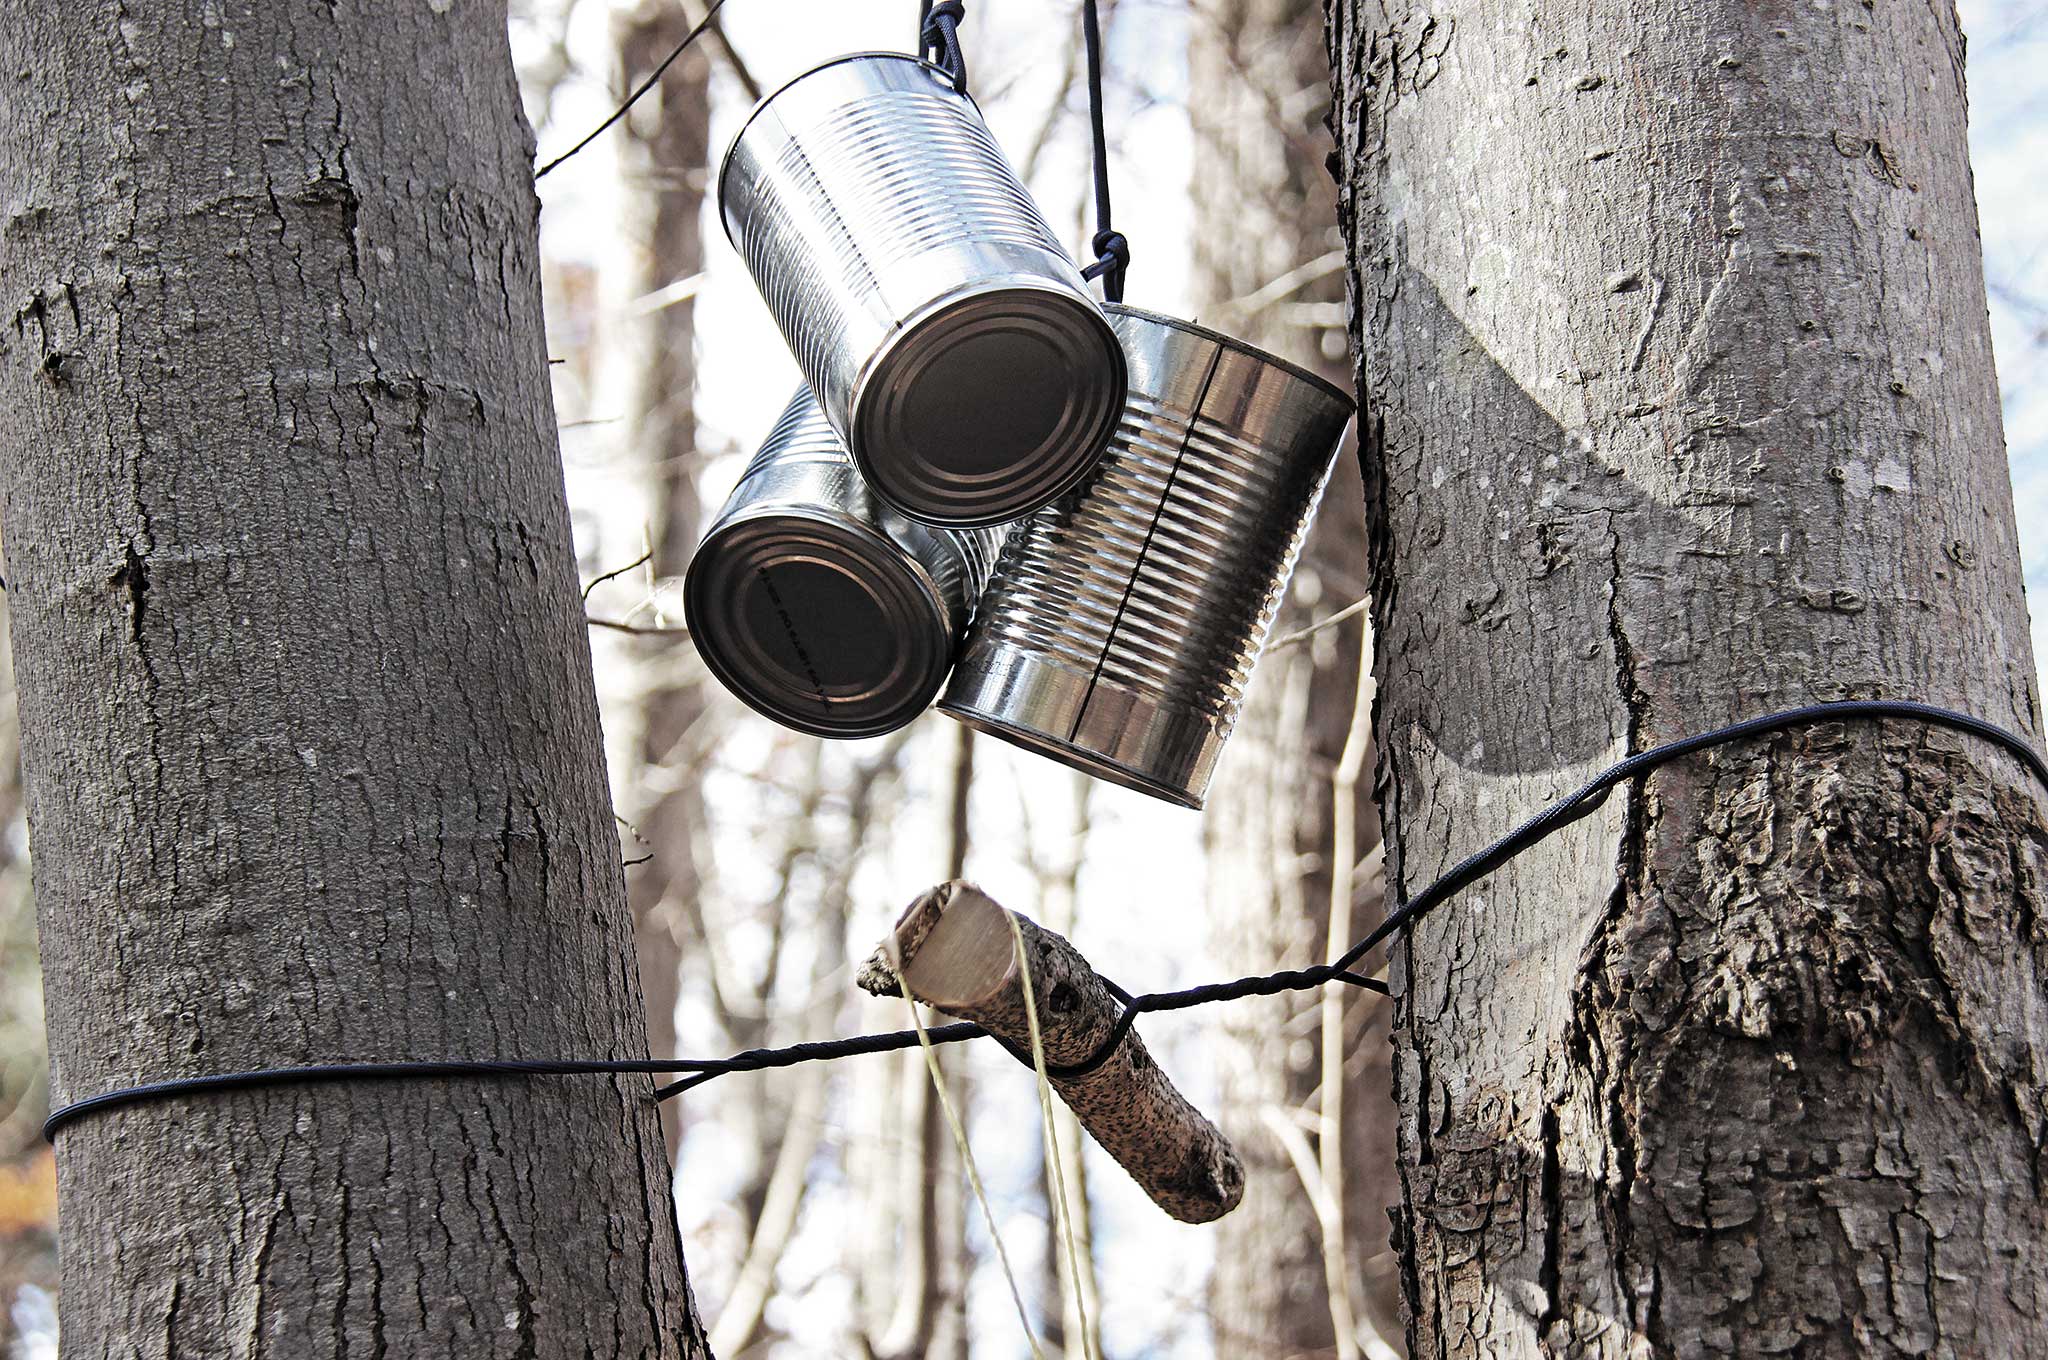
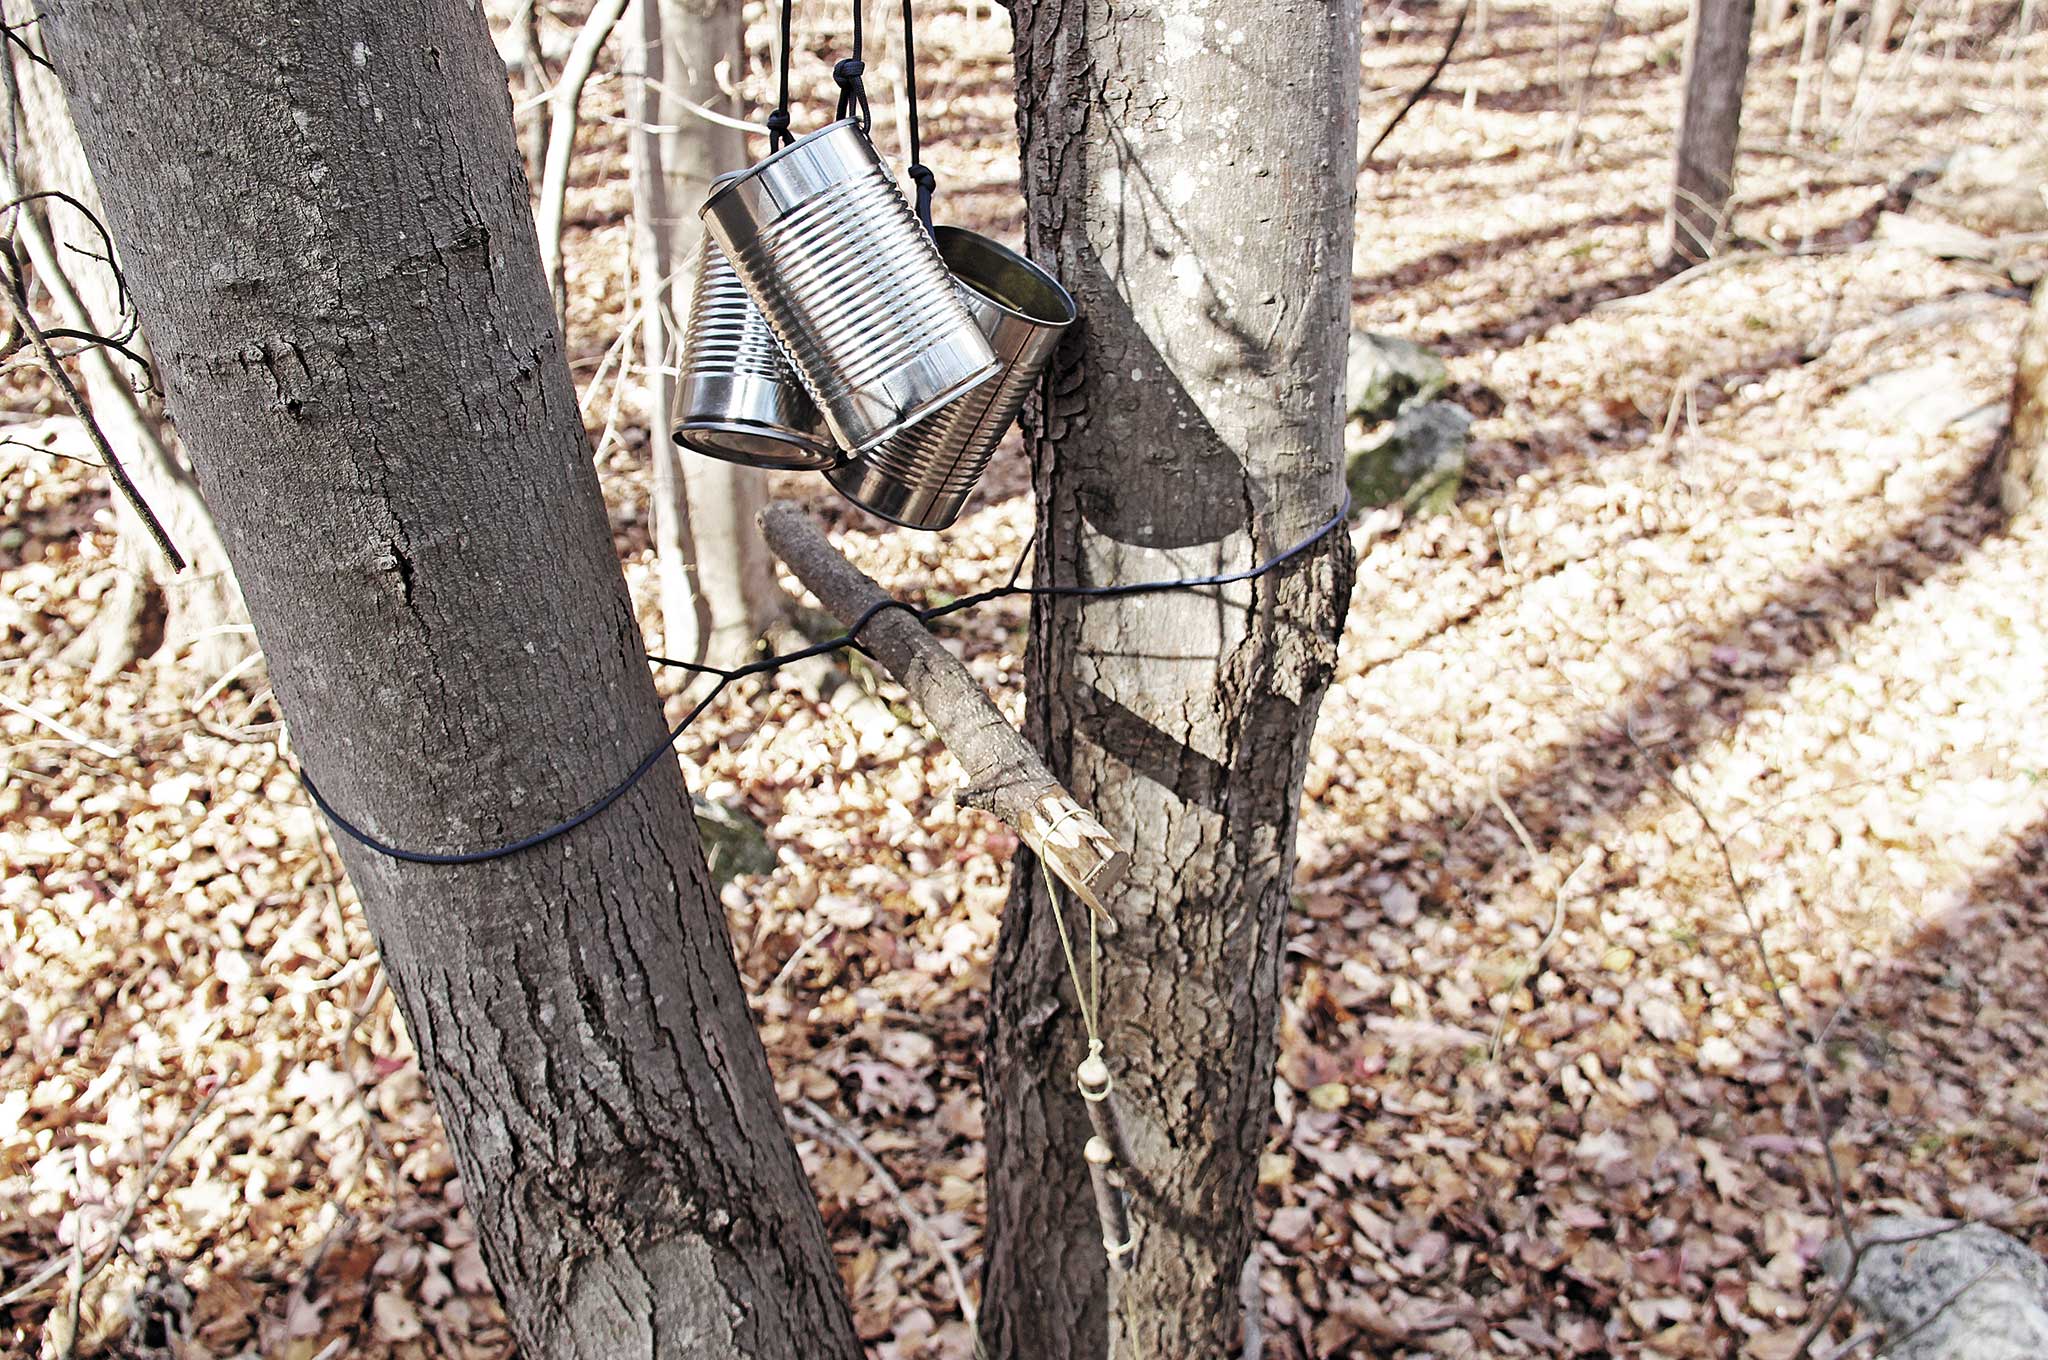
Paracord Project #8 – Turnbuckle Rattler
Function: Camp alert system
Difficulty: 5 out of 5
How To: When constructing the turnbuckle rattler, look for two sturdy trees with minimal flex in their trunks. This won’t work well with small diameter saplings. Take a length of paracord and wrap it around both trees. Tie an overhand knot in the paracord, leaving tail ends to your knot as well as very little slack in the loop you just created.
Just about one foot above the loop you just tied around the trees, tie another loop. From that, suspend a length of paracord down from the center in the gap between the trees and attach a few aluminum cans.
Cut a small wooden dowel from a tree branch or sapling. Put this dowel between the gap in the trees in the original loop and take up the slack in the loop by cranking the dowel end over end, increasing the tension. Slip a paracord loop over one end and attach it to a tripwire. When an unexpected guest enters your camp, they’ll trigger the turnbuckle rattler, striking the cans and alerting you to their presence.
Never be surprised in your camp by constructing a turnbuckle rattler with aluminum cans commonly found in the woods. Use the trigger and tripwire of your choice to set up this makeshift alarm system.
Notes: The difficulty rating in this trap is derived from the trigger and tripwire mechanism. A simple 90-degree toggle is all you need, but that requires knife carving knowledge and skill. When setting this alert system, watch your eyes. This device is under tension and disrespecting it can lead to accidental triggering.
Paracord Project #9 – Sling
Function: Weapon
Difficulty: 3 out of 5
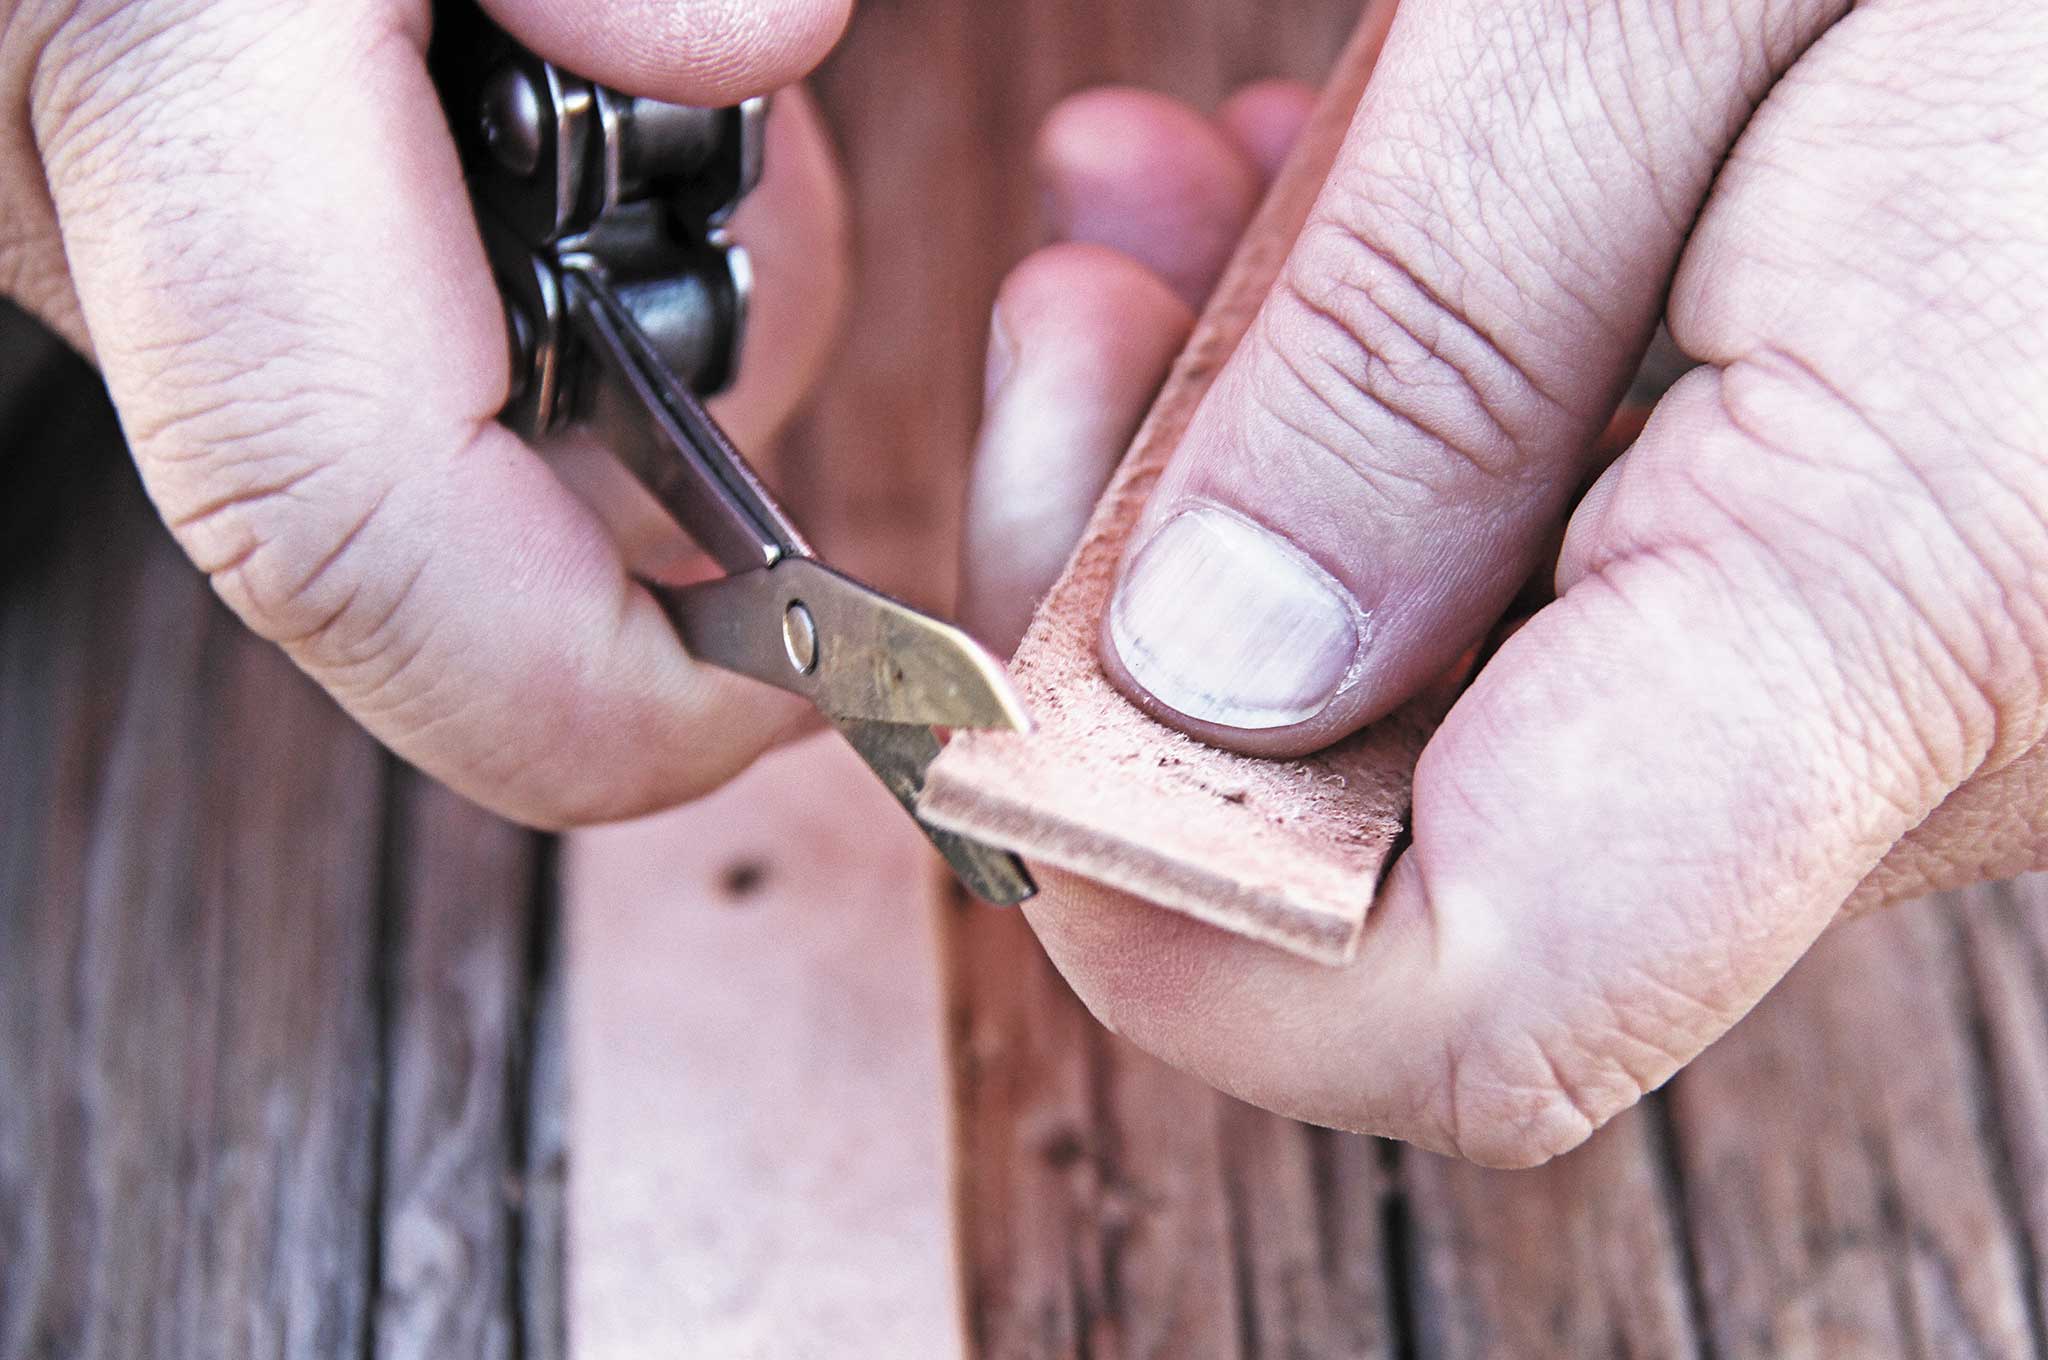
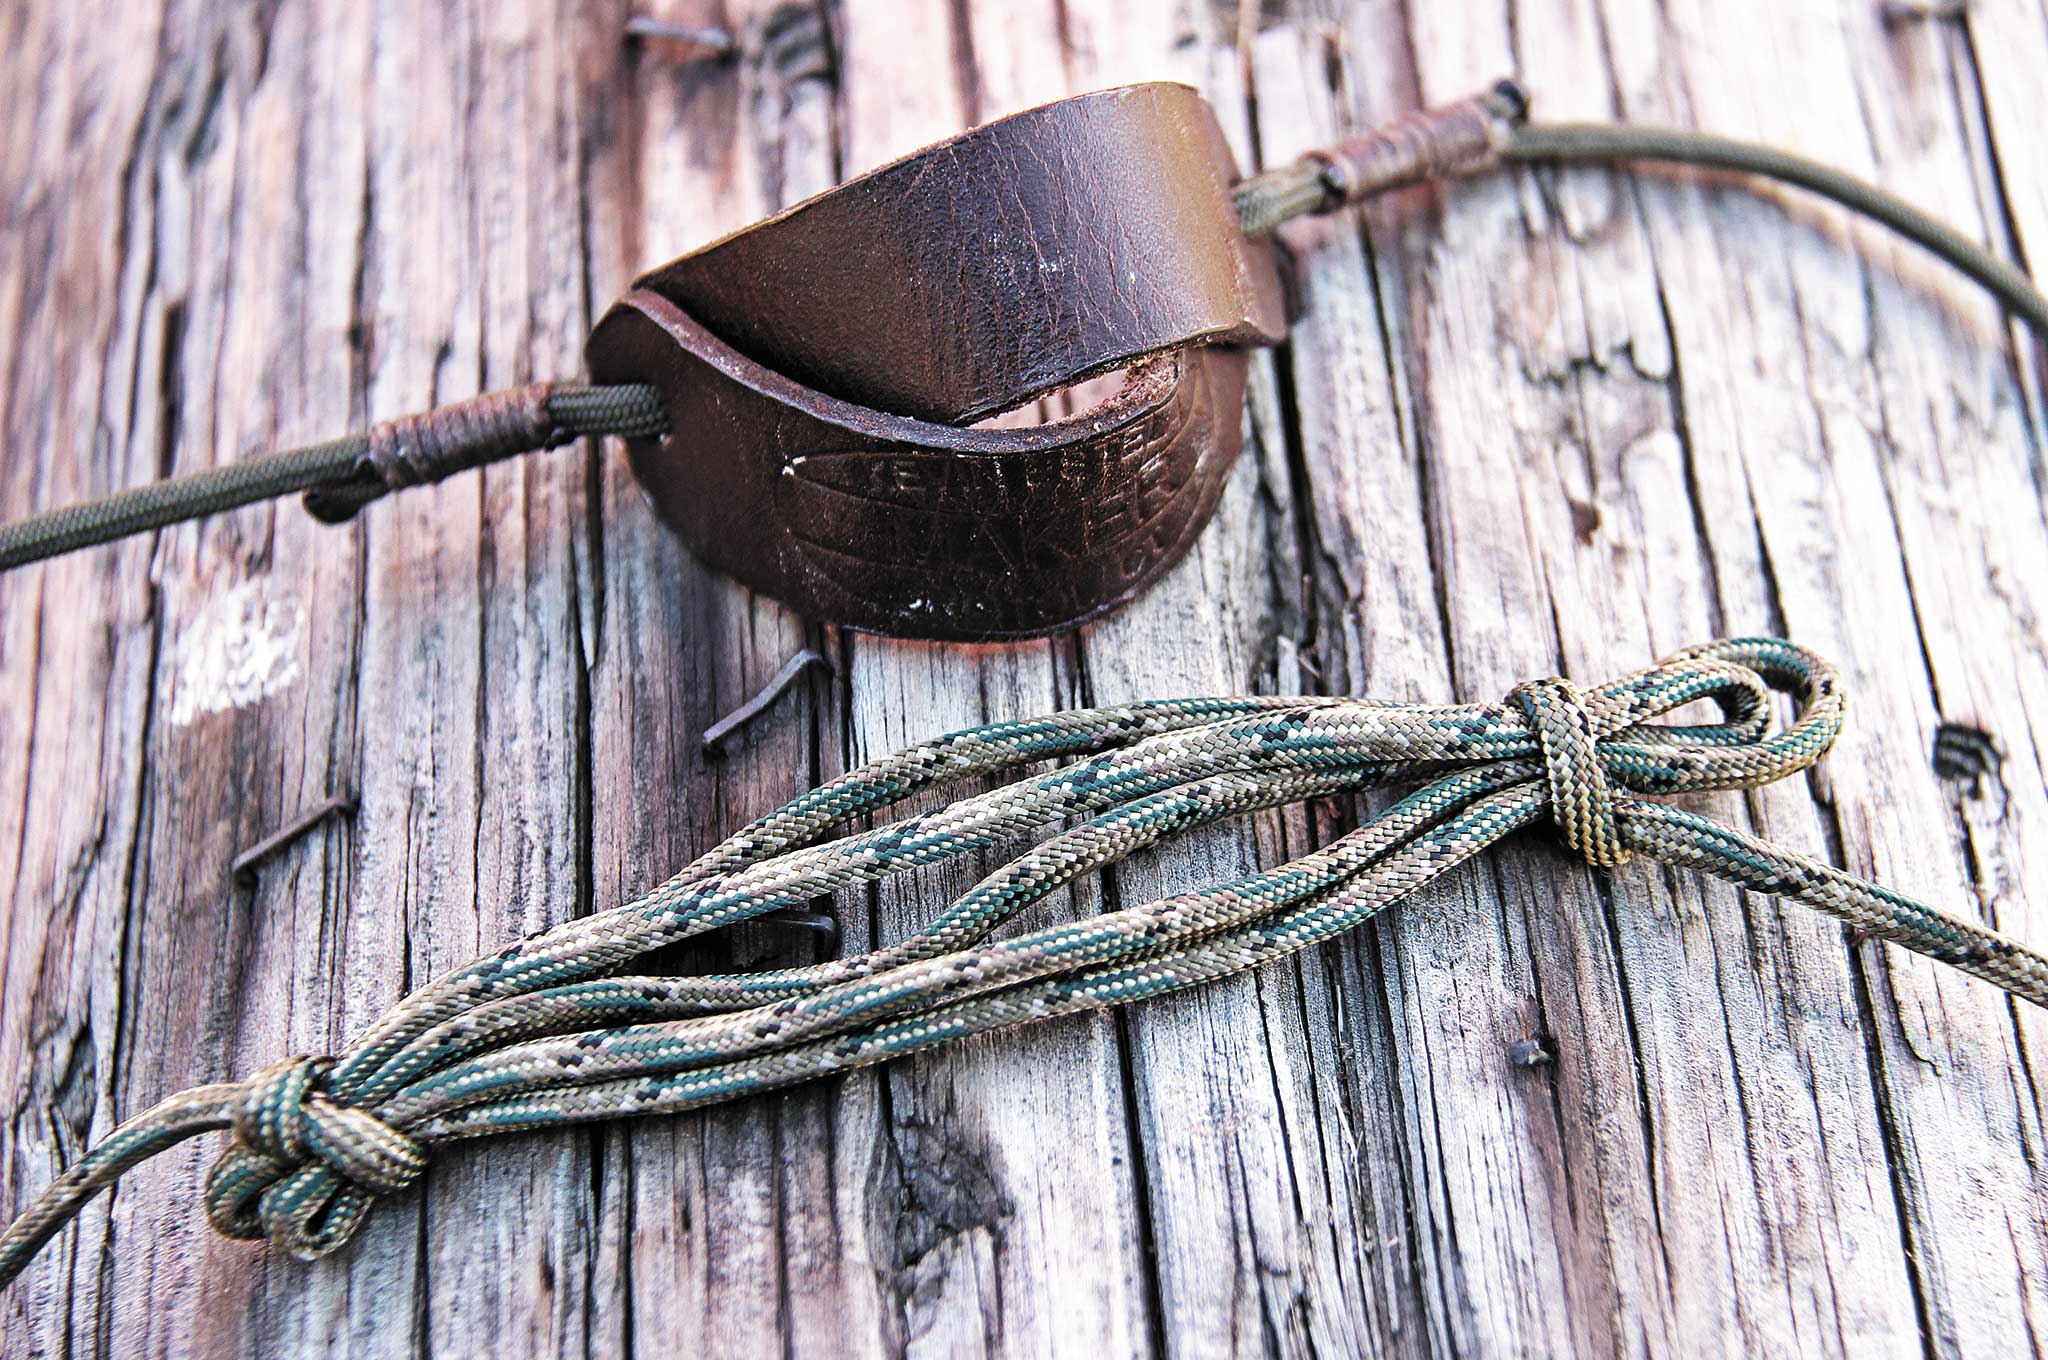
How To: Paracord makes a great sling. For starters, determine what you plan to toss. For this tutorial, we’re using golf balls. On one end, create a loop for your middle finger. About 2 feet from this knot, create a pouch out of duct tape, a couple pieces of leather, or flat webbing.
Tie a second piece of paracord to this pouch; make it as long as the other side with the middle-finger loop. On this end, create a knot you can pinch. If you’re skilled at braiding, an entirely paracord version can be made with a web pouch. To streamline it, you can whip the paracord to the pouch with the inner strands.
Slings can be made with leather, nylon webbing, braided paracord, or even duct tape. They’re centuries old and still extremely effective if they can be mastered. A word of advice: Wear eye-protection and duck when your friends try this for the first time.
Notes: This is easy to make but difficult to master. Try tossing this horizontally, vertically, or in a figure eight path. With enough practice you’ll be ready to kill that giant or challenge your skills.
Paracord Project #10 – Stretcher/Travois
Function: Moving an injured person
Difficulty: 3 out of 5
How To: Prior to starting, cut two poles at least one-and-half times the length of the person to be carried. If you’re making a travois, make them twice as long if you can. The poles should be sturdy and have minimal flex. Place them parallel to each other and as wide apart as your patient for a stretcher; cross them about a quarter of the way down in an “X” for a travois.
Tie your paracord to one pole, then directly across from it. About 25 feet should be enough to hold a patient. Don’t cut your cord! Continue zigzagging down your poles then back up again creating web work. Secure the end of your paracord and cover your web stretcher with a camping pad. It can be used without a pad, but for patient comfort, hook them up if you can.
Notes: A non-paracord version of a stretcher can be made with just a blanket and poles. Whether paracord or blanket, learn ways of helping your buddies out and teach them so they can help you in case you’re the one who screws up.
The 550 paracord is the industry standard when it comes to cordage. It’s a great baseline of comparison for other types of ropes. For example, tarred bank line is referred to as “thinner than paracord,” and jute twine is said to be “not as strong as paracord.” As outdoor enthusiasts, we hold 550 paracord in high regard, but there are times when other options may be better. Here are a few other cordage options to carry next to the hanks of paracord in your pack.
Braided Kevlar: This line is ridiculously tough. Thinner than 550 paracord, it has much more strength pound for pound. It’s harder to cut and knot, but the tradeoff is packability.
Jute Twine: You don’t always need 550 pounds of breaking strength, and there are times when you want to tie something up in camp and not worry about taking it down. Jute twine isn’t synthetic and can be left behind to biodegrade. That’ll make the tree huggers in your group happy.
SpiderWire Braided Line: This fishing line is the only type we trust. If you can catch a 50-pound freshwater fish, you’re a stud. All other fish can be landed without worrying about breakage with this super line. Rather than using one of the inner strands of paracord, use this dedicated line. Just watch your fingers if you hook onto a fish and it runs. It’ll slice your skin like a laser.
Dental Floss: Wicked strong, pre-rolled into cute spools, and dentist-approved, this is handy cordage. Waxed floss is great for whipping lines that’ll unravel, and it also works well for setting up traps. When visiting your dentist, ask for samples. Rip them out of the packaging and tuck them into your pack pockets.
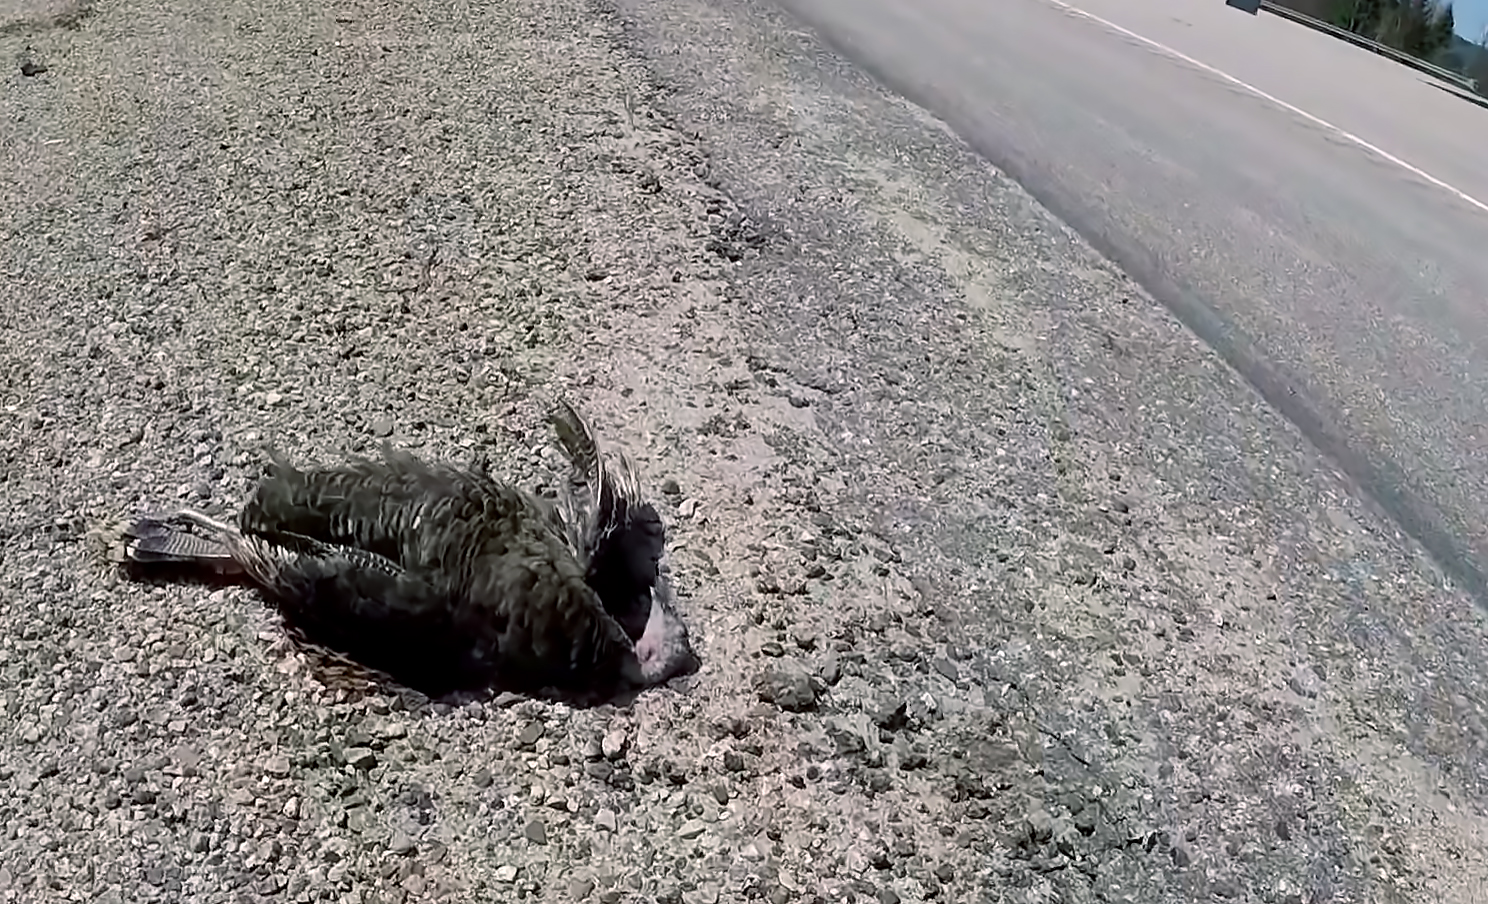
You eat, and by any means necessary, or you don’t, and you die… Life is an endless search for energy. Do you know where your next meal will be from?
This quote from a new video by The Wooded Beardsman reminds us about the harsh reality of finding food in a survival situation. As survivalists, it’s a topic we often insulate ourselves from. We may think: My bug-out bag is stocked with several days of freeze-dried food, I have a basement stockpile that’ll last for months, and when those run out, I know several places to scavenge in a nearby town. I have firearms to hunt with, tackle to fish with, and traps for small game. I’m prepared.
Roadkill isn’t glamorous or fresh, but it might be a viable food source in emergencies.
It’s reasonable to call someone who can make this statement “prepared”, assuming they actually have the skills and training to back up the words. However, there’s no such thing as 100% preparedness. Real preparedness is realizing that these steps only delay the inevitable return to a total reliance on nature. In an indefinite survival situation — i.e. the complete breakdown of society as we know it for the foreseeable future — all of these caloric preps will be helpful at first, but the principle of entropy tells us that they will eventually falter and fail. Stockpiles run out, shelves get picked dry, traps break, fishing lines snap, and weapons run out of ammo.
Sooner or later, you might end up eating like you’re back in the stone age. It’s wise to begin thinking about food accordingly.
As we’ve said before, one of the keys to survival is mental fortitude. When it comes to eating in a survival situation, that means overcoming your disgust to stay alive. Everyone has a different gross-out threshold. Will you forgo store-bought, sanitized, shrink-wrapped meat to hunt and butcher your own? Some would have a hard time with even this step. Will you eat sinewy sewer rats, wriggling grubs, or a cute animal which was once someone’s pet? These are bigger mental hurdles to overcome. Will you scrape maggots off a roadkill carcass to find morsels of viable meat? It’s a psychological battle to keep the dry heaves at bay and take that first bite.
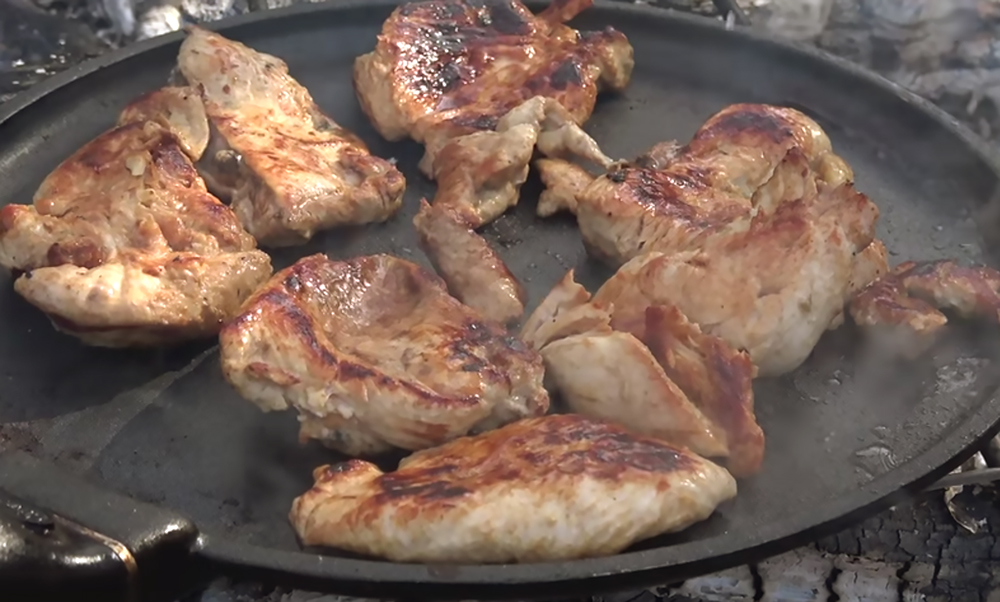
With proper preparation, something which looked disgusting may become much more appealing.
The point of all this introspection is to realize that what you can do and what you’re willing to do are two different things, even in a survival situation. If you can come to terms with this now, and gradually overcome the aversion to unconventional or unappetizing food, you’ll have a valuable element of long-term preparation to complement your short-term survival food stockpiles and tools. That’s what we call food for thought.
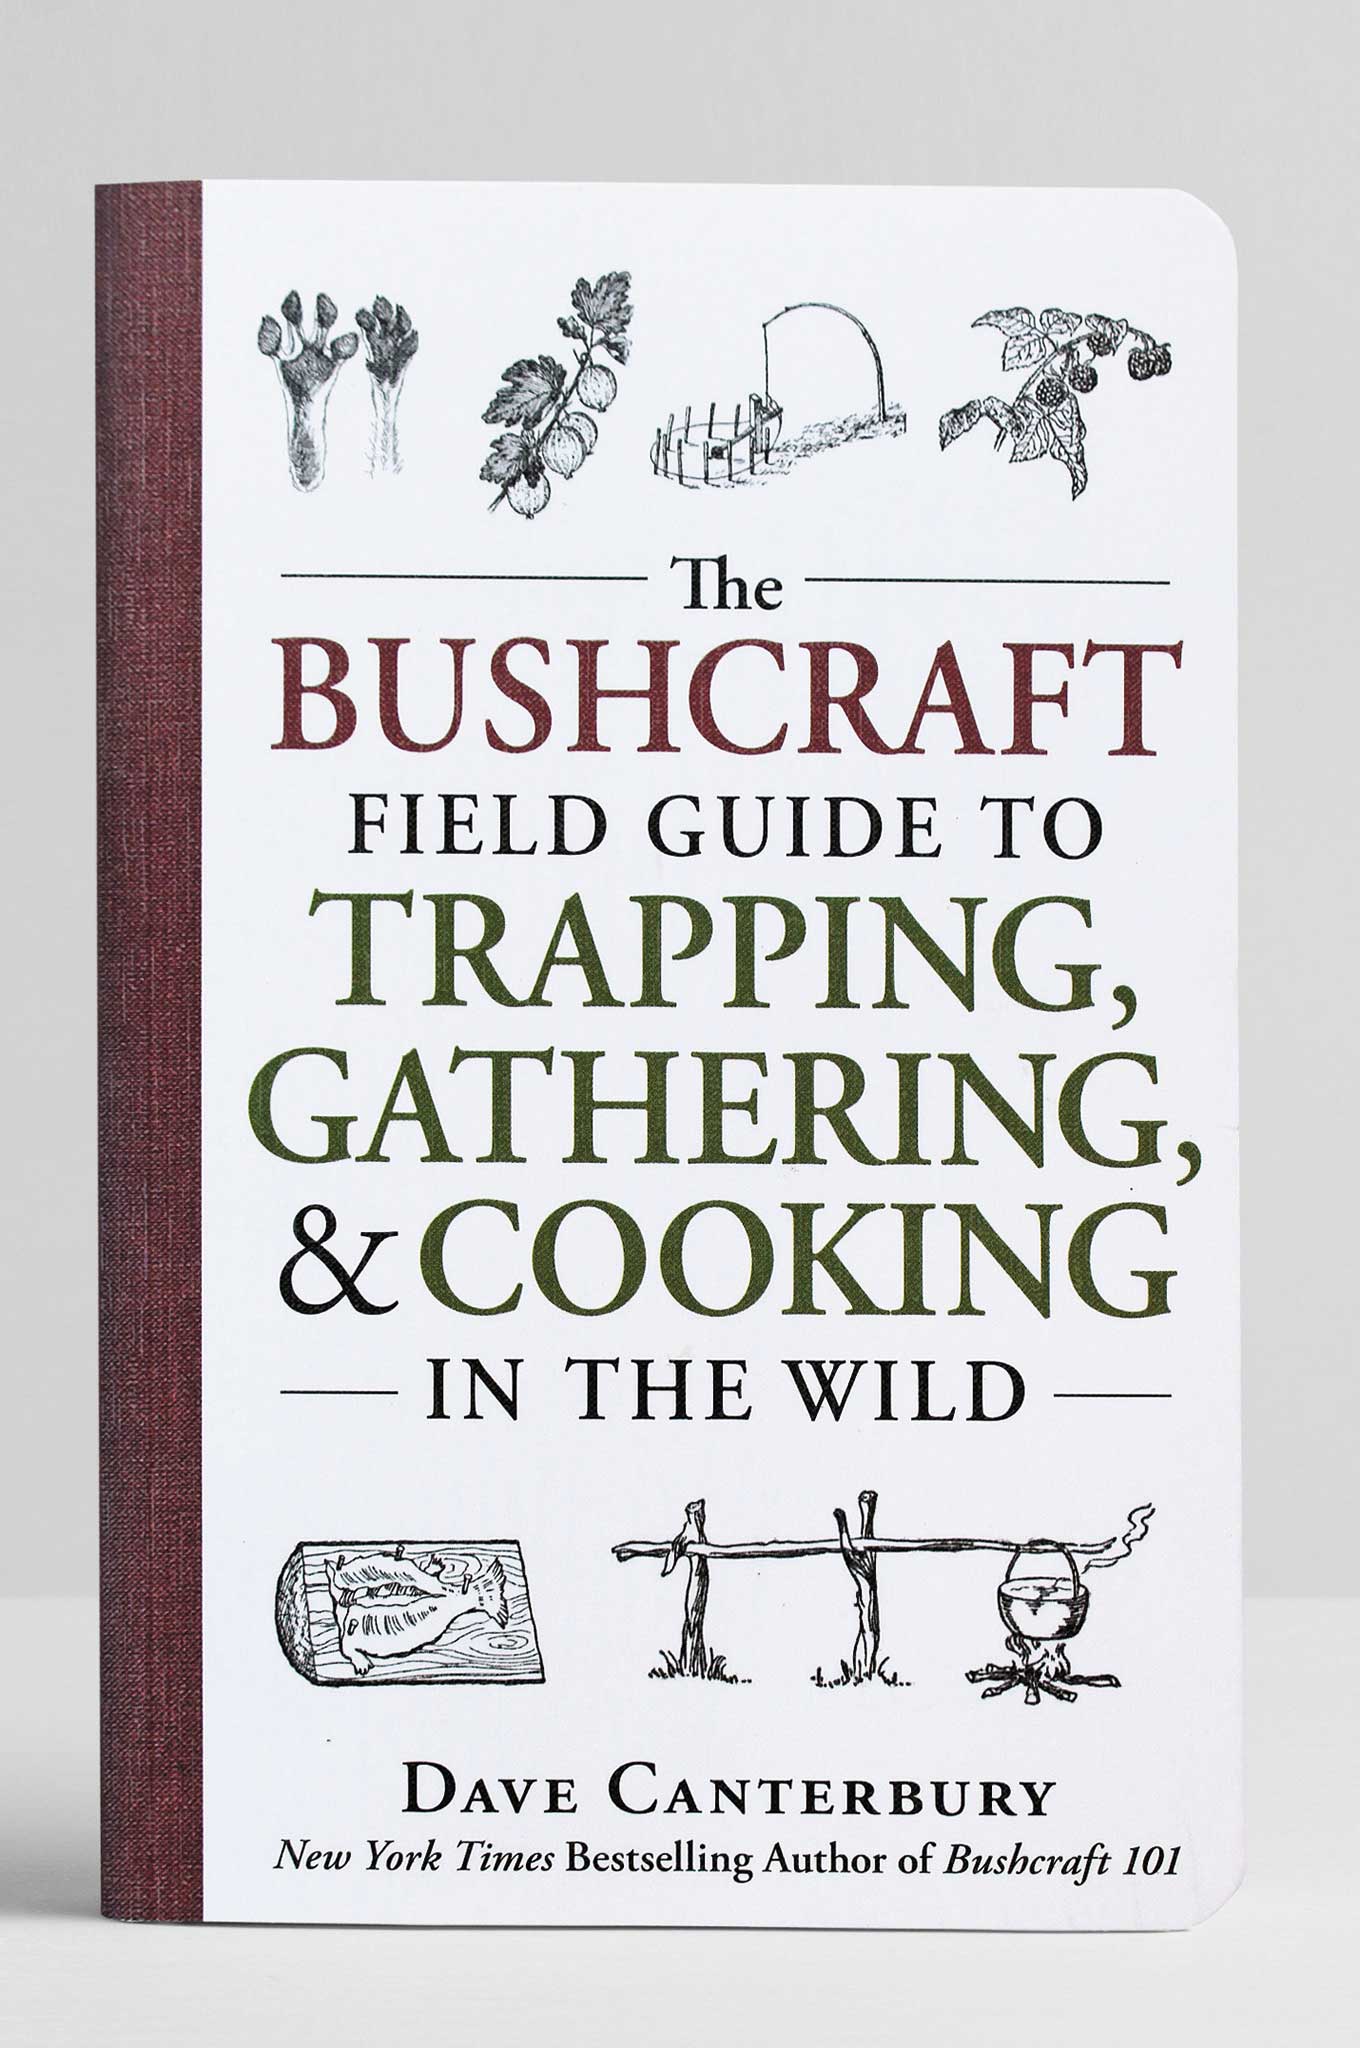
The Premise: As of this writing, four of the top five best-selling books in Amazon’s outdoor survival skills section are written by Dave Canterbury. His latest offering, The Bushcraft Field Guide to Trapping, Gathering, & Cooking in the Wild, is one of them. Upon initial gaze, this manual appears to go into great detail about how to procure and prepare foods when civilization is well out of reach. Canterbury’s straightforward approach is easy to read, and the text is laid out so you can find pertinent information quickly. But can the reader trust the source?
The 411: For those who didn’t follow the drama surrounding Discovery Channel’s Dual Survival, in order to land the role of cohost, Canterbury reportedly embellished his Army record by claiming that he served as a paratrooper and a sniper, among other things, when, in fact, he was military police. The ensuing dustup caused him to be fired after the second season. While misrepresenting one’s military record is an abhorrent act, one can still have strong survival skills in the woods.
This leads to the question: Can the merits of a book stand on their own despite the tarnished past of the author? It’s possible — but in this case, no, they can’t.
The Verdict: Despite being called The Bushcraft Field Guide to Trapping, Gathering, & Cooking in the Wild, the first 100 pages has little to do with bushcraft skills. Though the entire book is laden with useful snippets regarding general camping, food preparation, and gear needed to be comfortable in the outdoors, it falls short of its claims that it’s a field guide for bushcrafters. It’s more like a manual for casual campers.
Under the confines of “trapping, gathering, and cooking,” the book focuses too heavily on impractical recipes and doesn’t concentrate enough on the skills a real bushcrafter craves: tracking, hunting, fishing, foraging, water-sourcing, and container construction.
If you’ve picked up this book with the intention of learning about real bushcraft survival, skip ahead 129 pages to Chapter 11 (“Hunting and Trapping Game”), the first chapter that offers any discourse on dealing with life in the wild — but ironically it doesn’t deal with hunting or trapping game. Instead, it briefly introduces how to locate animals, but does so in a mere four pages. This includes a chart of animal tracks containing those that can be found within city limits (cat? dog? crow?).
A redeeming section, “Chapter 13 Trapping: Beyond the Basics,” is a thorough, nicely illustrated guide to various types of traps and snares, what they can be used for, and how to construct them, especially the section on primitive traps. It’s a well-thought-out chapter that would be useful when attaining fauna from the wood.
A blight, however, is Canterbury’s recipes at the end of some chapters (in addition to Chapter 16, which is chock-full of impractical dishes). Though they’re very creative and probably quite delicious — if you’re desperate enough to eat opossum, squirrels, and pond frogs — you’re unlikely to have a box of hushpuppy mix, Cholula hot sauce, or a jar of raspberry preserves tucked into your ruck sack.
Probably most damning, the book exploits the spirit of bushcraft, misrepresents the concepts, ideals, and essence of the skills needed, and poorly represents the general topics purported in its name. The title proclaims “…In the Wild” whereas most of this book relies on the reader having a fully stocked kitchen. Subjects are broached broadly and watered down for a general understanding of the concepts without giving the details needed to successfully employ them in the wilderness.
Ultimately, this book doesn’t have enough recipes to be called a cookbook, nor does it have enough information to be called a practical field guide. It lumbers incomplete somewhere in the middle, trying too hard to be too many things without succeeding at any one thing. In the introduction, Canterbury writes: “…we cannot go on a weeklong hunting camp and expect to live completely from what we can provide by rod and gun or even necessarily from traps and foraging.” Many would take umbrage with this claim, and an author who would make such an assertion probably shouldn’t write a book about bushcraft.
Novel & Author The Bushcraft Field Guide to Trapping, Gathering, & Cooking in the Wild, Dave Canterbury
Me gusta la biblioteca. ¿Que hora es y dónde está el baño? That pretty much exhausts our Spanish 101 language skills, but you don’t have to be un experto to recognize the name El Chapo. Chapo, meaning Shorty, is the alias of ruthless Sinaloa Cartel drug lord Joaquín Guzmán. This seriously bad hombre was once worth $1 billion US, was called “the most powerful drug trafficker in the world” by the U.S. Department of the Treasury, and escaped from prison twice before being extradited to the United States in January 2017.
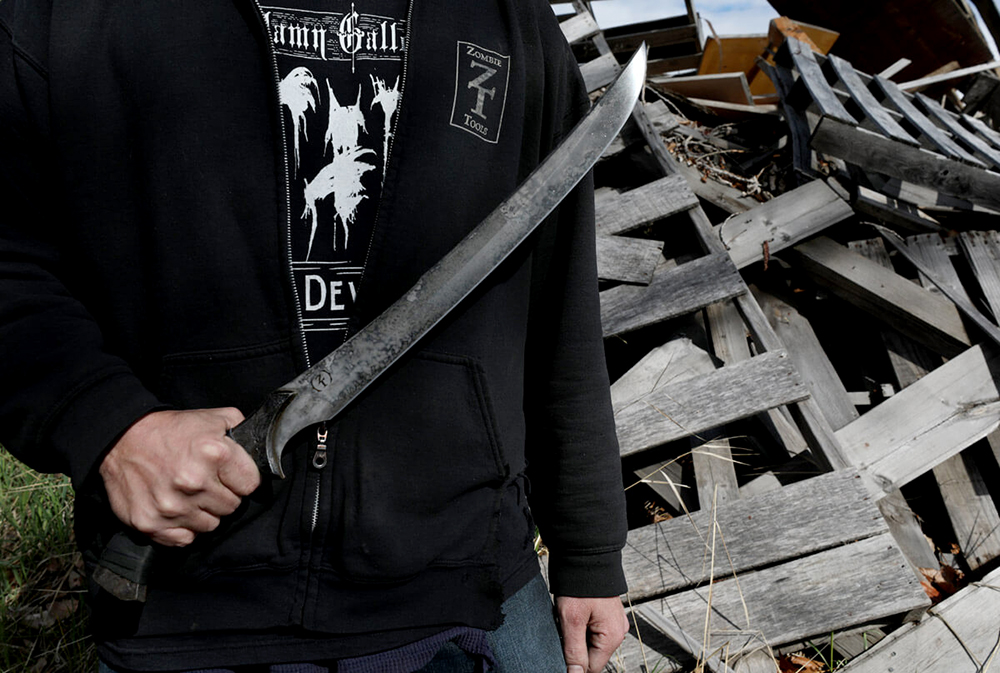
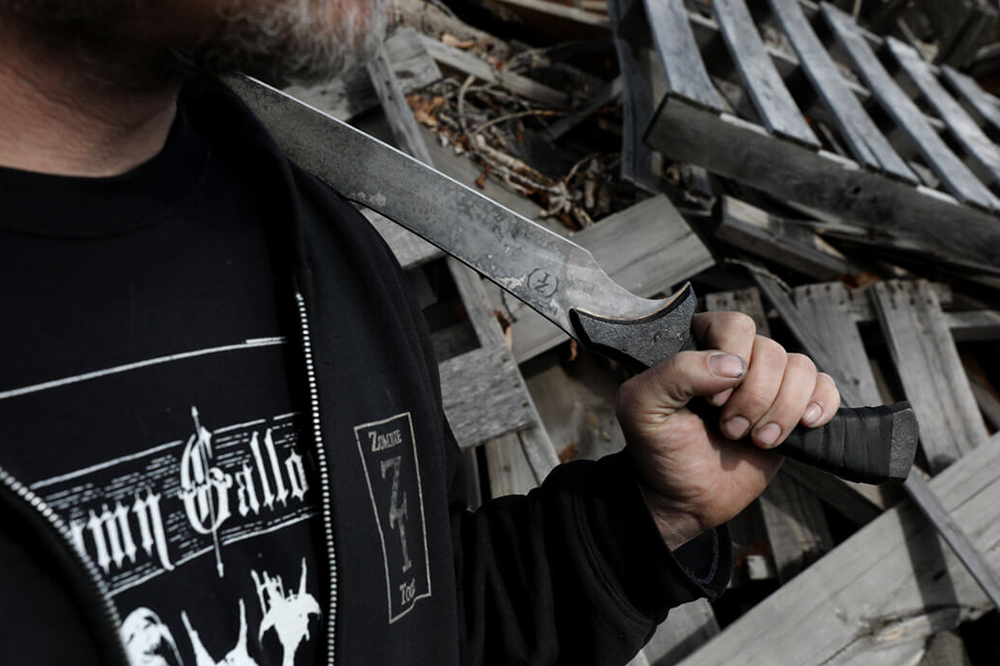
El Chapo’s fearsome reputation inspired the crew at Zombie Tools to name their latest blade El Choppo — we can’t deny it, that’s a pretty solid pun. ZT doubles up on the artful wordplay with its description of the new knife:
If you have the huevos to wander the narrow street of the barrio late, late at night, when tequila worms dream in the bellies of snoring whores, you can sometimes hear slurred songs stumble out the doors of certain cantinas, songs in the style of the narcocorrido, that tell the tale of the knife, El Choppo. Forged in the high mountains to a family that looked up to dirt, El Choppo was raised thwacking at banana trees and cane, chopping kindling for the stove, and fighting back a forest avowed to reclaim all fields.
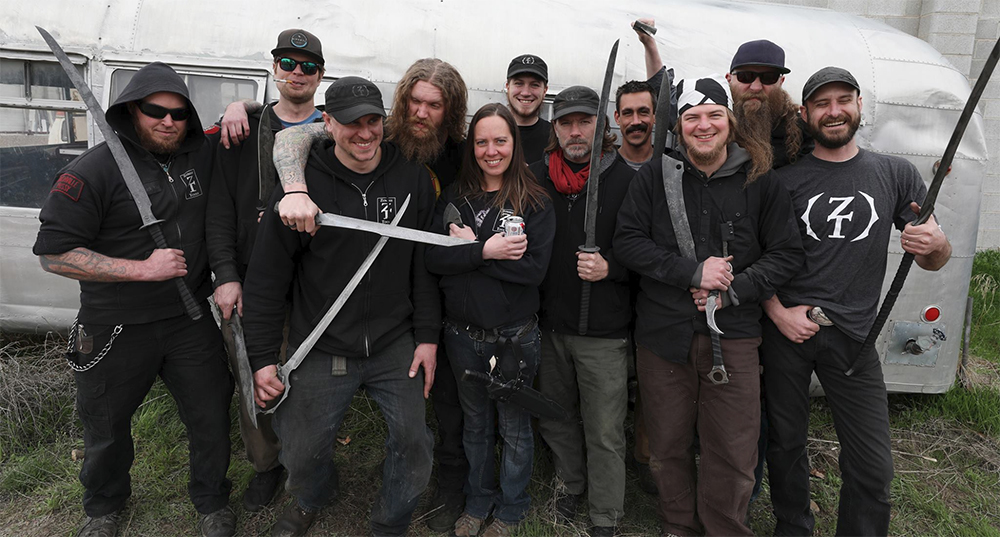
Putting aside the clever product description, we’ll get down to the facts. The Zombie Tools El Choppo is a 24.75-inch knife forged from sturdy 5160 steel. The 8.5-inch curved handle is clad in dark aluminum scales, and then wrapped in a strip of black leather. It includes a fitted Kydex sheath, and like all Zombie Tools blades, it’s handmade in America (specifically Missoula, Montana) from American materials.
The El Choppo will set you back $290, and it’s made to order, so there’s a 6-8 week wait time. However, if our past experience with the company’s Vakra kukri is any indication, this blade will be able to take a beating. For more information on the Zombie Tools El Choppo and other ZT blades, go to ZombieTools.net.