In This Article
Having a dedicated precision rifle in the safe can be an invaluable addition to a well-rounded preparedness plan. The ability to project firepower to 500 yards and beyond is a capability that can be directed to both game-getting and property protection. For those who are interested in building a skillset, the proliferation of the Precision Rifle Series (PRS) has made competing at these ranges more accessible than ever. The flipside of that coin is that the popularity of precision shooting and the purpose-built rifles that go with it has driven a market expansion that, on the surface, seems to have significantly raised the cost of entry. It’s frighteningly easy to spend five figures on a long-range rifle, quality scope, and ancillary equipment. While this may be a worthwhile investment for dedicated competition shooters (or those who are professionally sponsored), prepared citizens who are simply interested in expanding their long-range firepower capabilities with a budget bolt action rifle may be left in the dust. The temptation to dismiss a long-range rifle as simply too expensive to consider is great.
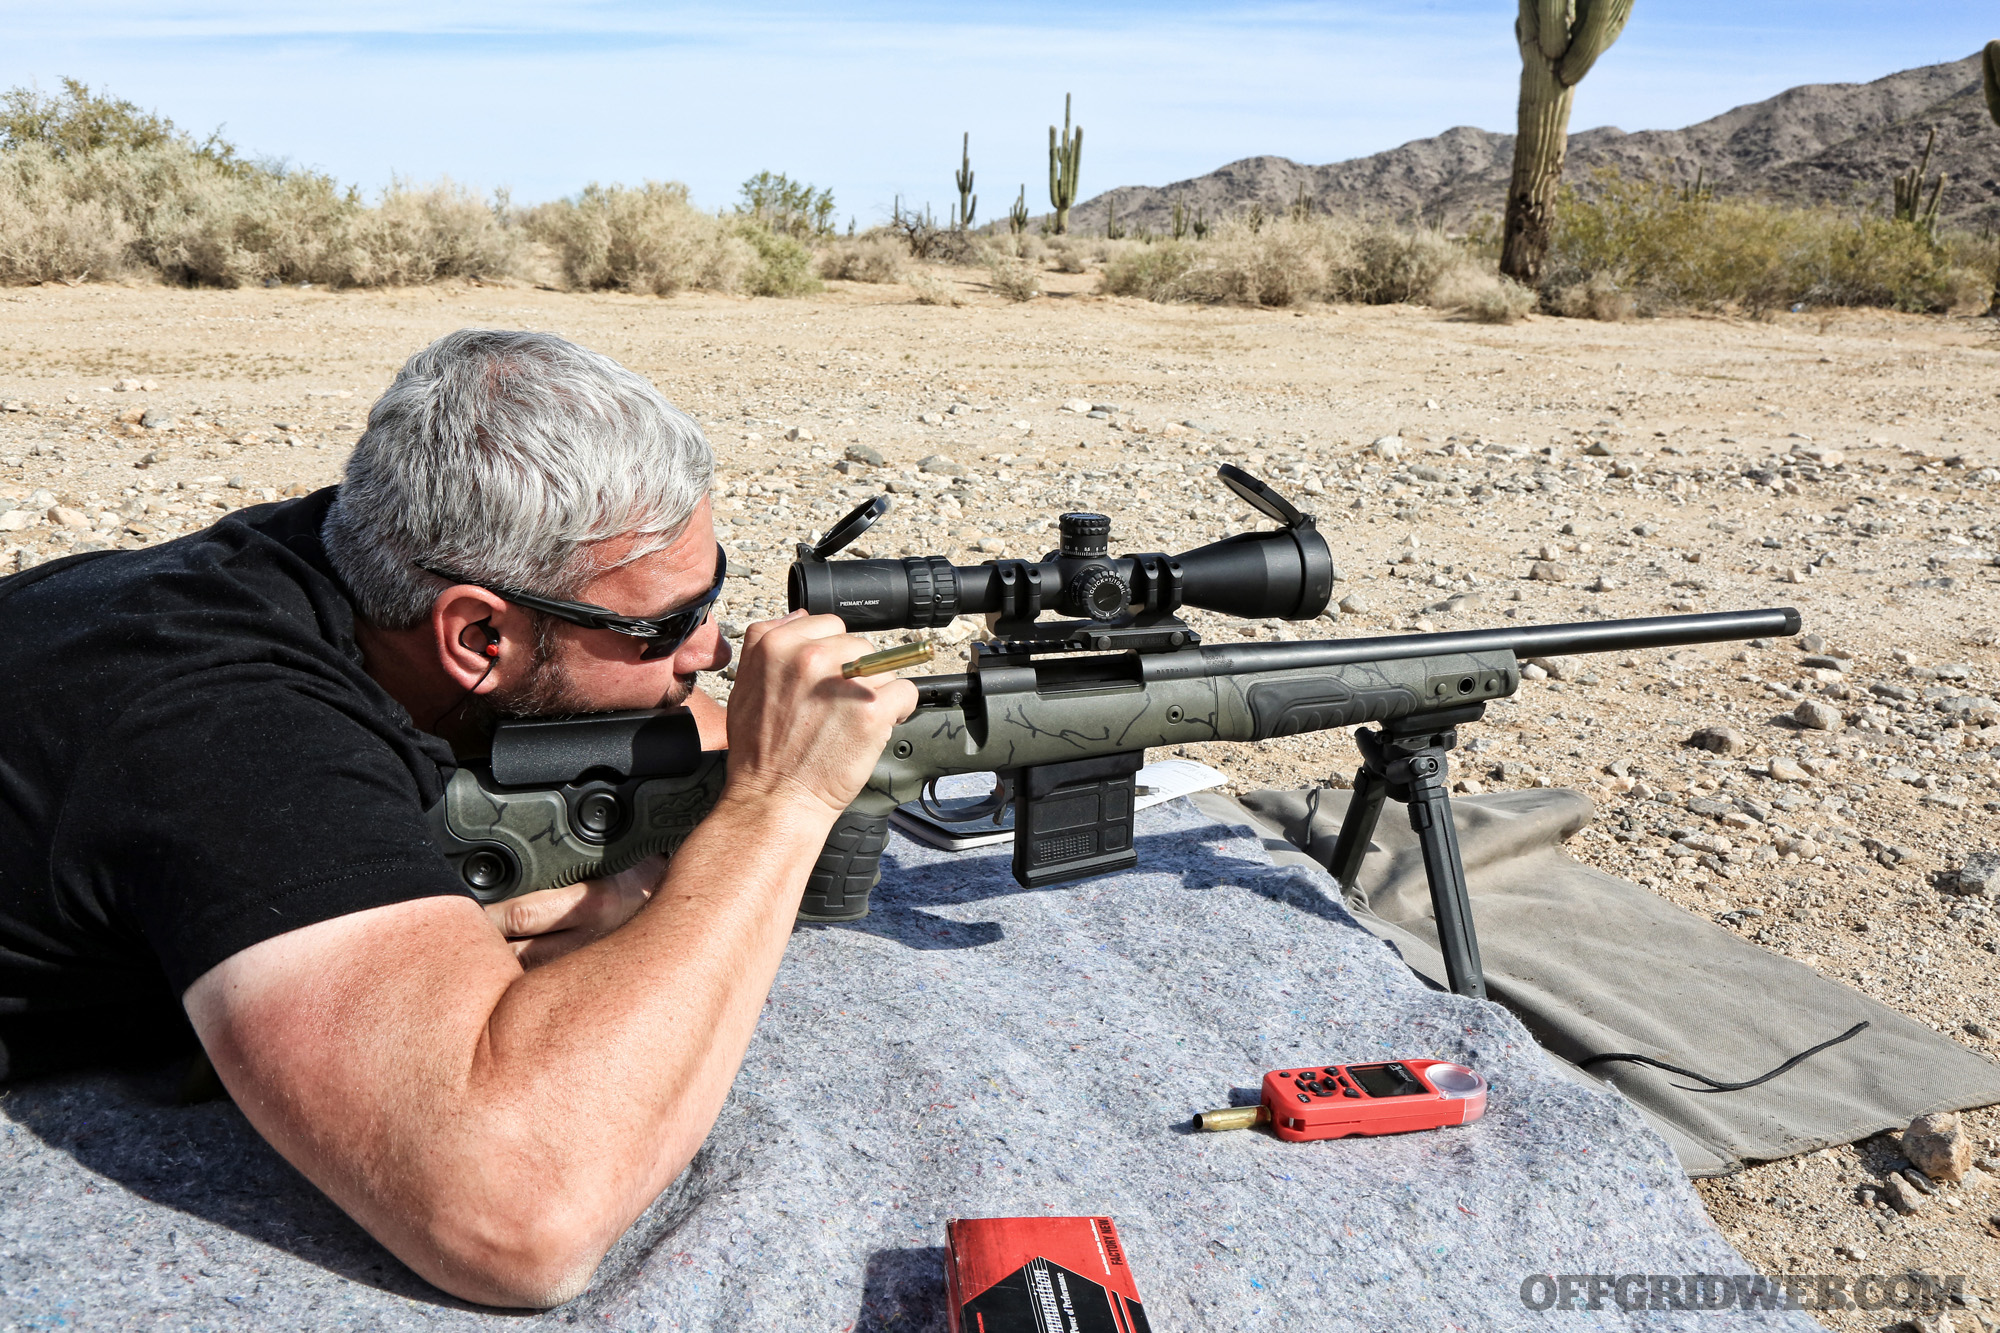
Above: Author fires his last round on a multi-range target drill. This build was able to deliver rounds on targets of varying sizes out to 880 yards. (Photos by Niccole Elizabeth and Patrick McCarthy)
So, we wanted to see exactly what kind of performance we could get for a fraction of that price. Notice we didn’t say “cheap” or even “inexpensive.” We set an all-inclusive project budget of $2,000, and came in pretty much right on the money, with some optional go-fast parts that could be sacrificed to pinch pennies if needed. That’s still a lot of money for most of us. But because we built our test rifle part by part, it’s easy to spread the cost over a period of months — or even a year or two — and make a project like this more attainable. The payoff for us was a dedicated long-gun capable of nearly 900 yards on a regular basis, and 800 yards consistently with just a little bit of training and practice.
Building Our Budget Bolt Action Rifle
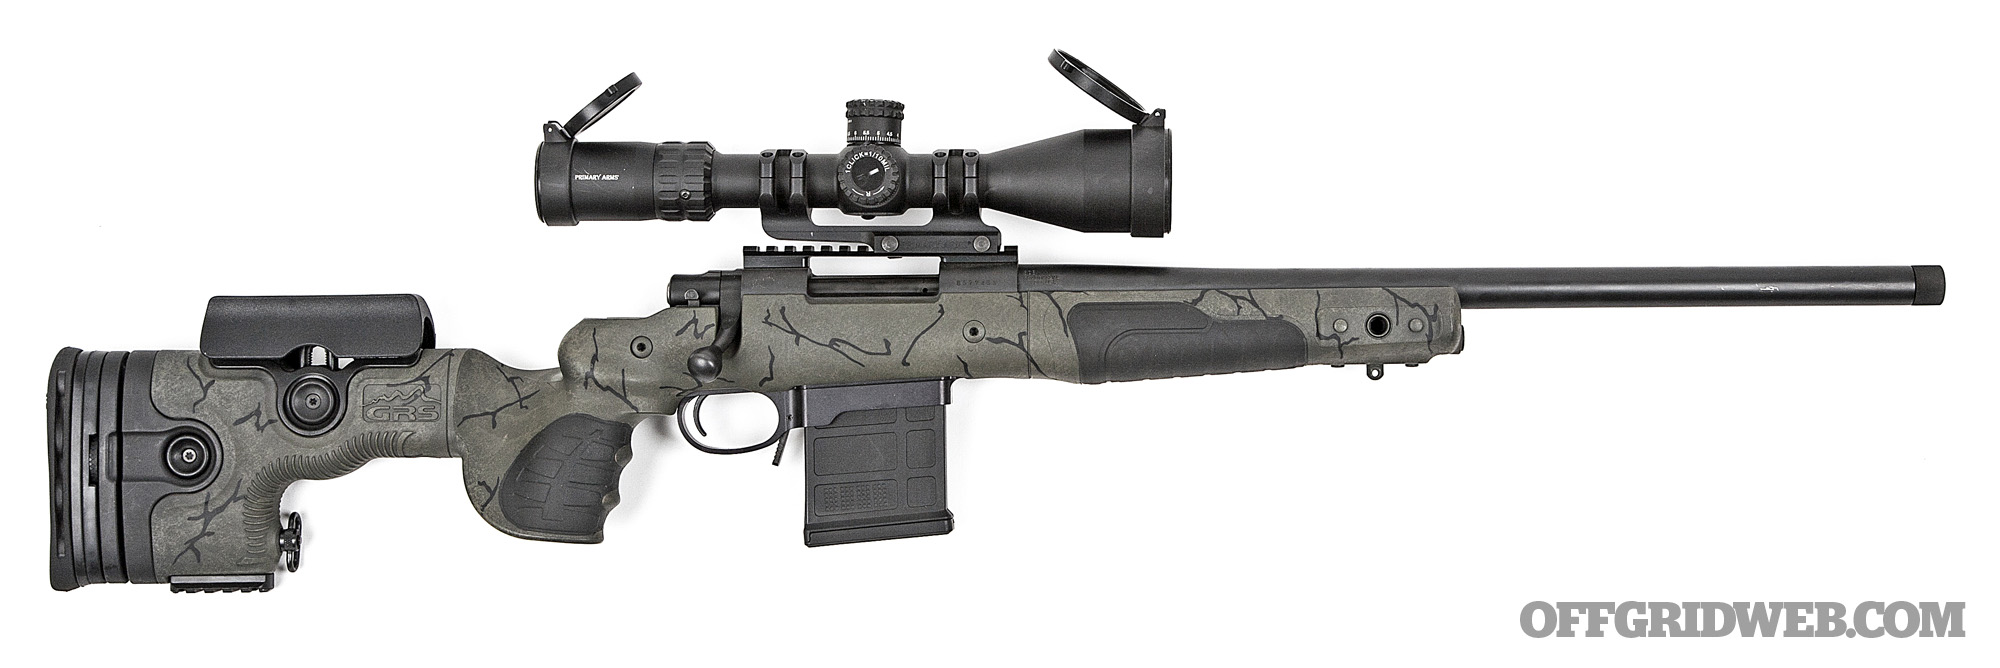
ACTION: The heart of any precision bolt gun is the barrel and action. While it’s possible to purchase an action and barrel separately, we wanted to reduce time, effort, and cost by using a barreled action with a good reputation. We settled on the Howa 1500 for this purpose. While not quite as popular as Remington 700 actions, the Howa is a diamond in the rough, capable of great results for its price point. It’s manufactured in Japan, imported by Legacy Sports International, and distributed through Brownells in a number of barrel lengths and calibers. We chose a .308 action, for availability and variety of ammunition, in a 20-inch heavy-barreled configuration. This barrel length is reasonably compact without sacrificing too much velocity. The barrel is rifled to a 1-in-10 twist, which is a solid middle ground to accommodate a variety of .308 bullet weights.
The biggest shortcoming we perceived with the Howa action is that, out of the box, it’s configured with a five-round internal box magazine. That means to reload the rifle, the breech must be open, and then the five rounds fed in by hand one at a time. Legacy Sports does have versions that are fed from detachable mags, but they use a proprietary pattern. So, instead, we picked up a detachable bottom metal conversion from Pacific Tool & Gauge. This unit converts the Howa’s feeding chute to run off Accuracy International Chassis System (AICS) short-action magazines. While factory metal mags from AICS can run three-digits apiece, Magpul produces a PMAG in this form that costs less than $40, so we got a few of them, courtesy of GunMag Warehouse.
The other change we made to the action was a trigger swap. To give all parties fair credit, the OEM trigger on the Howa 1500 action we received was absolutely up to the task. But since we had some room in our assigned budget, we wanted to push this build a little further and went with a Timney Triggers replacement unit. For less than $150, the Timney unit is available in black or nickel-plated finish in a variety of pull weights ranging from 1 1/2 pounds up to 4 pounds. We selected the 3-pound option in black.
Finally, we topped the receiver with a Warne Mounts 20MOA Picatinny rail scope base. The Pic rail option gave us a much wider variety of scope rings and mounts to choose from, with more flexibility in front-to-back placement to fine-tune eye relief. The 20-MOA bias is built in to give the scope a little extra elevation for extended-range shooting. Final fitting of all action upgrades as well as overall assembly was handled by Wright Armory in Mesa, Arizona.
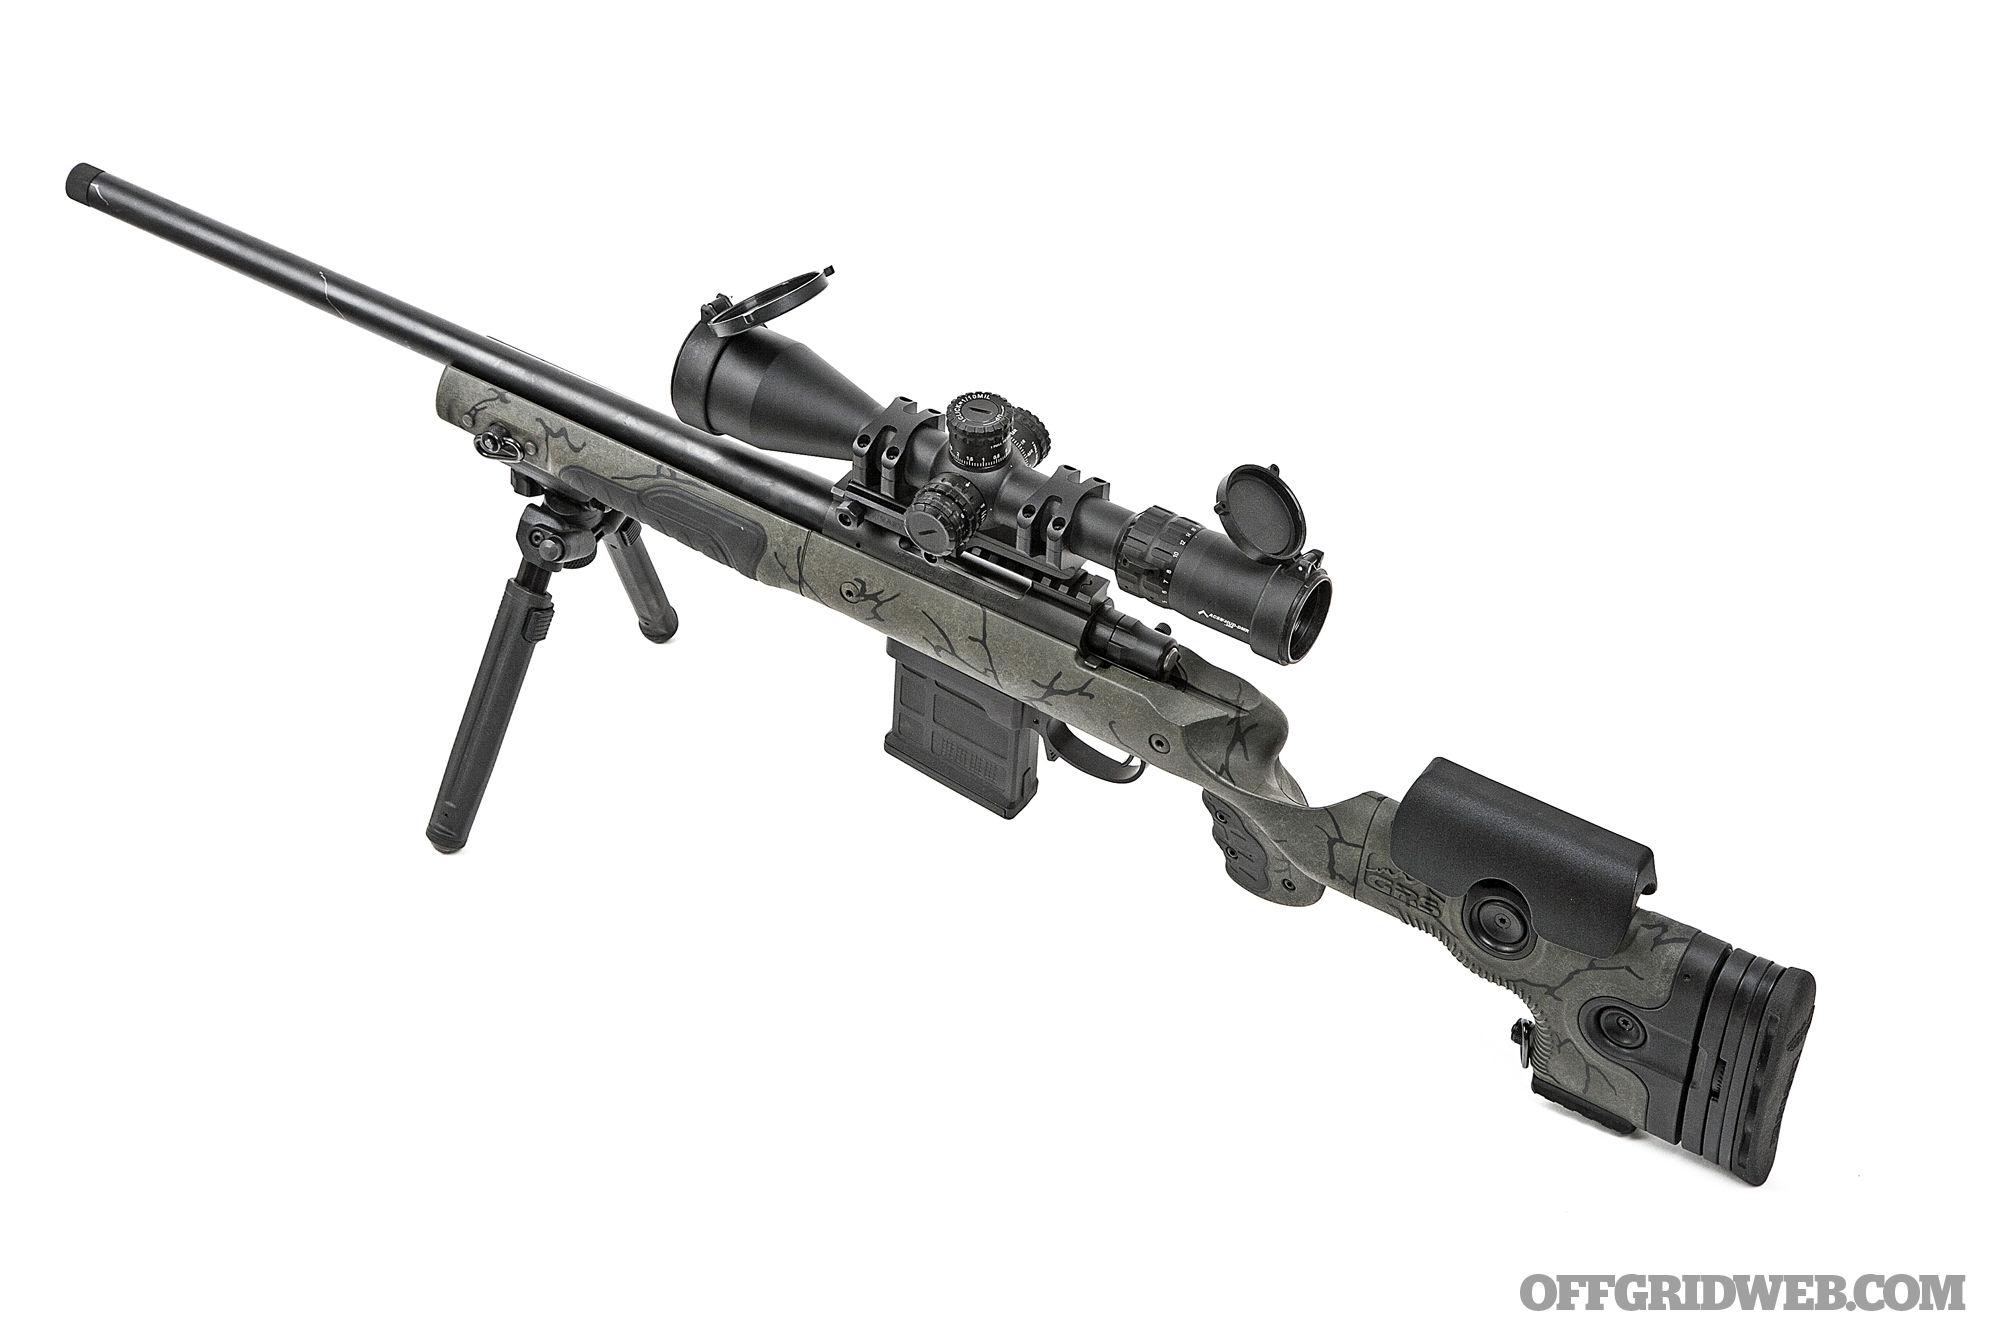
STOCK: Once we had all of the action parts assembled, we looked far and wide for a suitably priced stock that was sturdy and packed full of options. In fact, we looked even farther than normal and wound up finding GRS – a Norwegian company specializing in stocks for precision rifles and hunting rifles. What you see here is their Bifrost stock, which falls squarely mid-spectrum for available precision stock options. It offers far more adjustability than a traditional hunting or field stock, but falls short of the skeletonized modularity of a full-blown chassis system. The Bifrost offers a conventional forearm mated to a nearly vertical pistol grip (six-degree grip angle) that’s incredibly comfortable … if you’re right-handed. There’s no southpaw version of this that we know of, unfortunately.

Above: The GRS Bifrost stock is both lightweight and comfortable to shoot.
Behind the pistol grip, the stock itself is immensely adjustable. Cheek-piece height, length-of-pull, height of butt pad, and left/right cant of the butt pad can all be adjusted on the fly without tools using a clever push-button locking mechanism. The Bifrost also comes out of the box with a forearm stud for our Magpul bipod as well as QD sockets at both ends for a sling. The pistol grip area and forearm area are both rubber-armor-coated for extra comfort. All of this comes standard in a package that weighs less than 3 pounds and costs just over $500.
SCOPE: Keeping in mind budgetary constraints, as well as the utilitarian purpose of this rifle, we chose a Primary Arms SLx 3-18x50mm First Focal Plane scope. The SLx is Primary Arms’ flagship line. The specific 3-18x we chose came equipped with their ACSS-HUD-DMR-308 reticle. That’s a hearty bowl of alphabet soup just to describe what the crosshairs look like, so let’s break it down some:
ACSS stands for Advanced Combined Sighting System, a term that Primary Arms has come up with to describe a series of different reticle designs featured in multiple types of optics. The ACSS reticles are designed in-house by Primary Arms engineers, each one for a specific purpose or caliber, but they all share a common parameter. In Primary Arms’ own words, the ACSS system of reticles “utilizes bullet drop compensation correlated with a range estimation, wind, and leads in one simple-to-use system.”
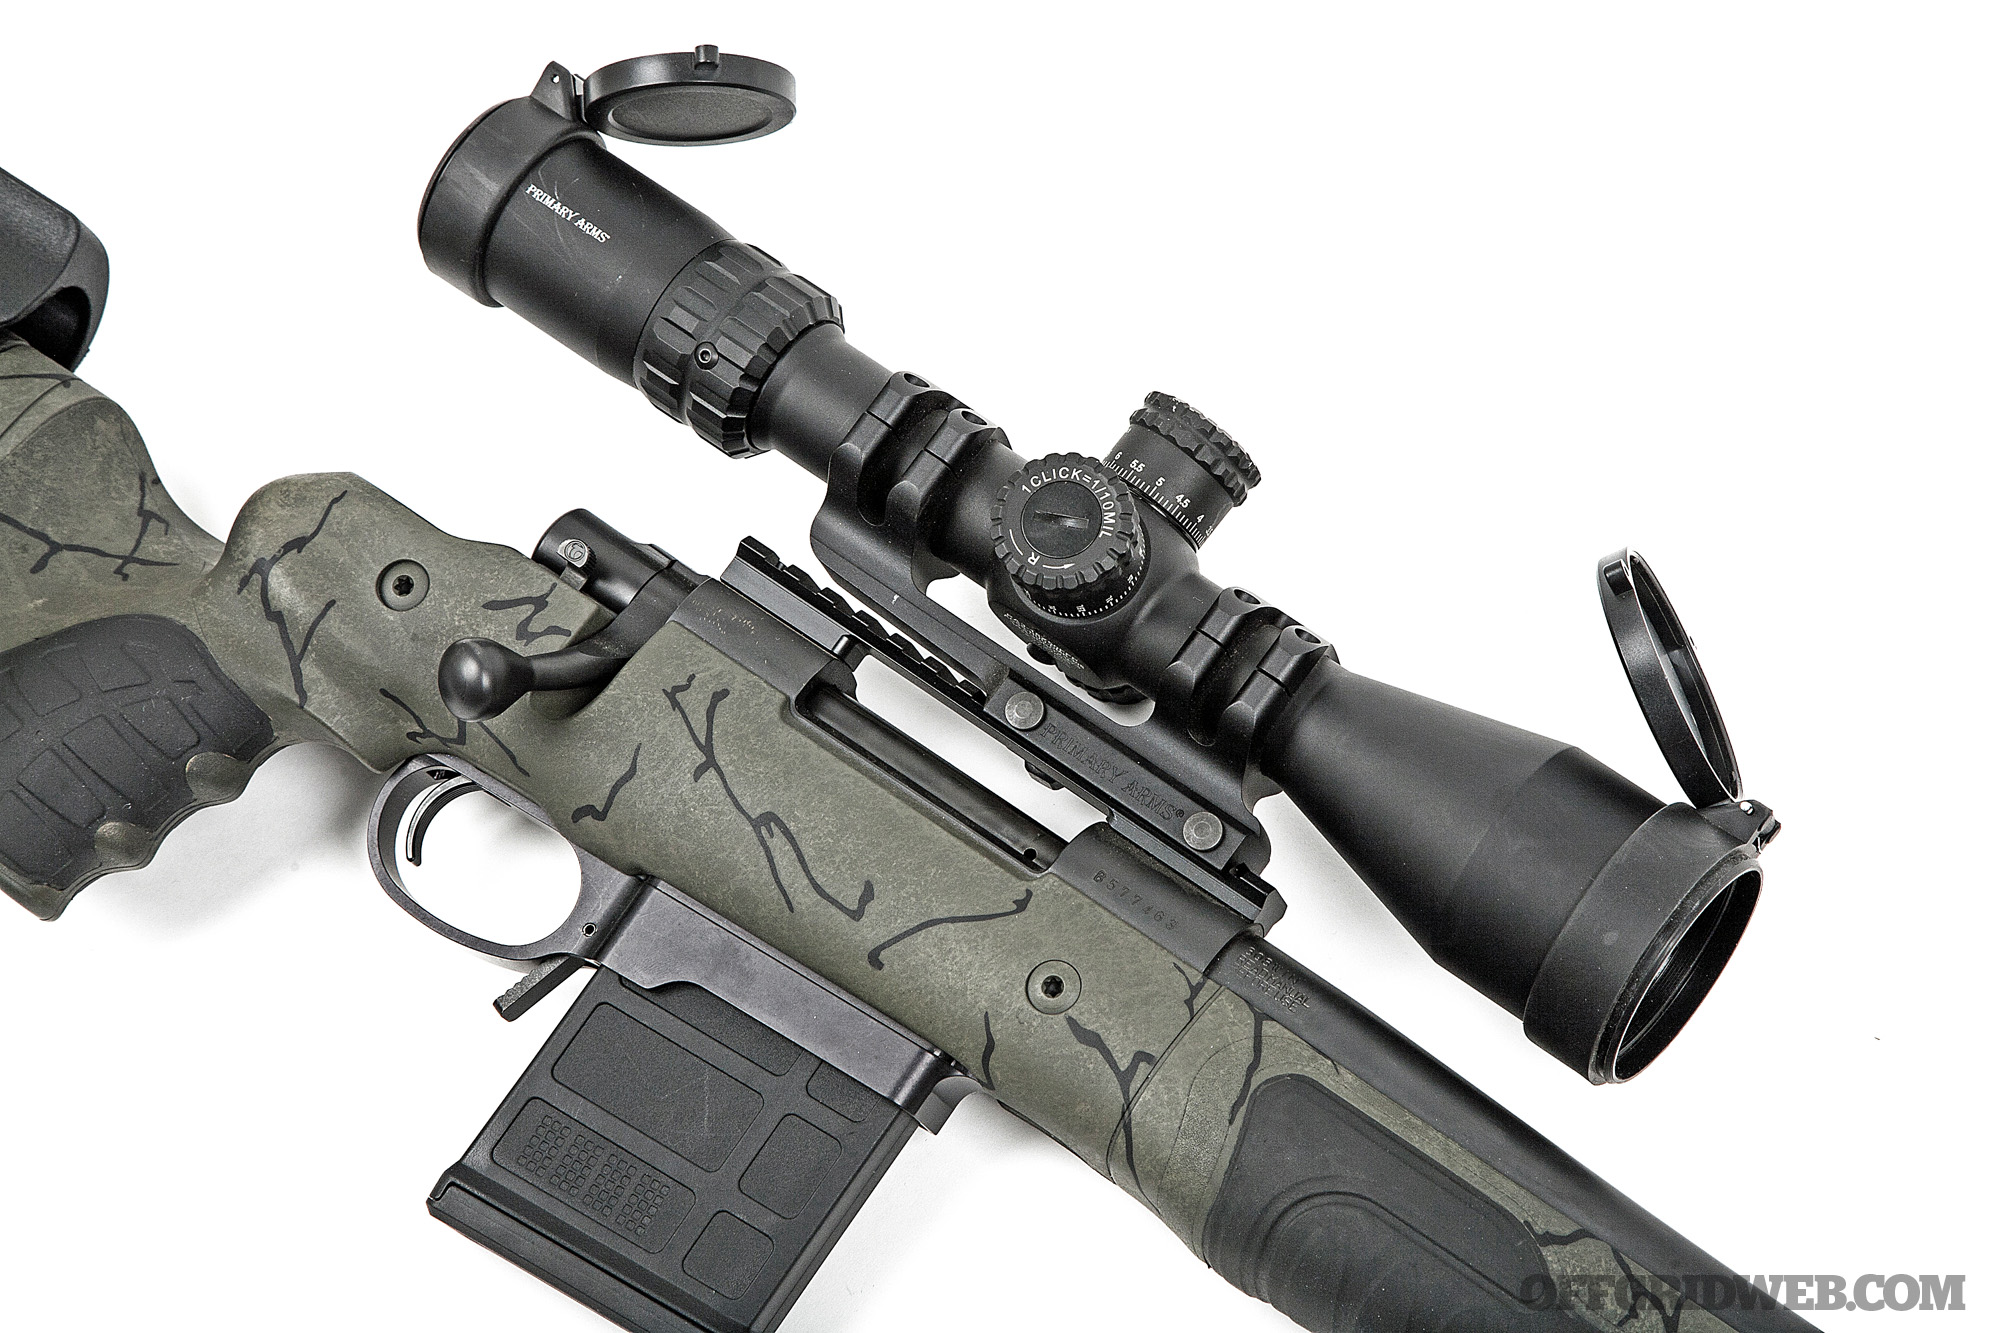
In lay terms, an ACSS reticle allows you to determine the range of an unknown target and offers a built-in elevation holdover for that range as well as pre-calibrated windage holds based on caliber. It also has markings that offer built-in leads for hitting a moving target. The various holds on an individual ACSS reticle are caliber-specific and, if paired properly, remove 90 percent of the manual calculations required to make a hit at distance. The system isn’t as precise as using a reticle with fine mil hash marks or an intricate “Christmas tree” style layout (such as Horus reticles) but for nonprofessional long-gunners needing down-and-dirty quick hits on meaty targets, the system is easy to learn and offers some serious tangible benefits.
As for the rest of the name, HUD stands for Heads-Up Display, DMR for Designated Marksman Rifle (meaning this reticle was designed with tactical or defensive use in mind), and 308 indicates the caliber to which this particular ACSS reticle is calibrated.
Detailed Specifications
| PART | MAKE | MODEL | PRICE | URL |
|---|---|---|---|---|
| Barreled Action | Howa | 1500 Barreled Action | $532 | brownells.com |
| Stock | GRS | Bifrost | $521 | brownells.com |
| Trigger | Timney | Howa 1500 Trigger | $140 | timneytriggers.com |
| Scope rail | Warne | Howa 1500 20 MOA Rail | $75 | warnescopemounts.com |
| Scope | Primary Arms | SLx 3-18×50 FFP .308 DMR HUD | $480 | primaryarms.com |
| Bipod | Magpul | QD Stud Bipod | $130 | magpul.com |
| Detachable Bottom Metal | Pacific Tool & Gauge | Howa 1500 DBM | $120 | pacifictoolandgauge.com |
| Mags | Magpul | AICS Short Action PMAG | $40 | magpul.com |
| Spotting scope | Leupold | Gold Ring 10-20x | $499 | leupold.com |
| Tripod | Leupold | Compact Aluminum Tripod Kit | $199 | Discontinued |
| Rear bag | Armageddon Gear | N/A | N/A | armageddongear.com |
| Soft case | Savior Equipment | Urban Warfare 42-inch | $205 | saviorequipment.com |
How It Shot
In order to put our home-brewed bolt gun to the test, we spent a couple days with Josh Reeves. Reeves is a former special operations sniper and current long-range competition shooter and firearms instructor. We were introduced to him through Independence Training in Phoenix, Arizona, and after explaining our end goal for this article, he agreed to spend a couple of days on the range putting us — and our test gun — through the proper paces.
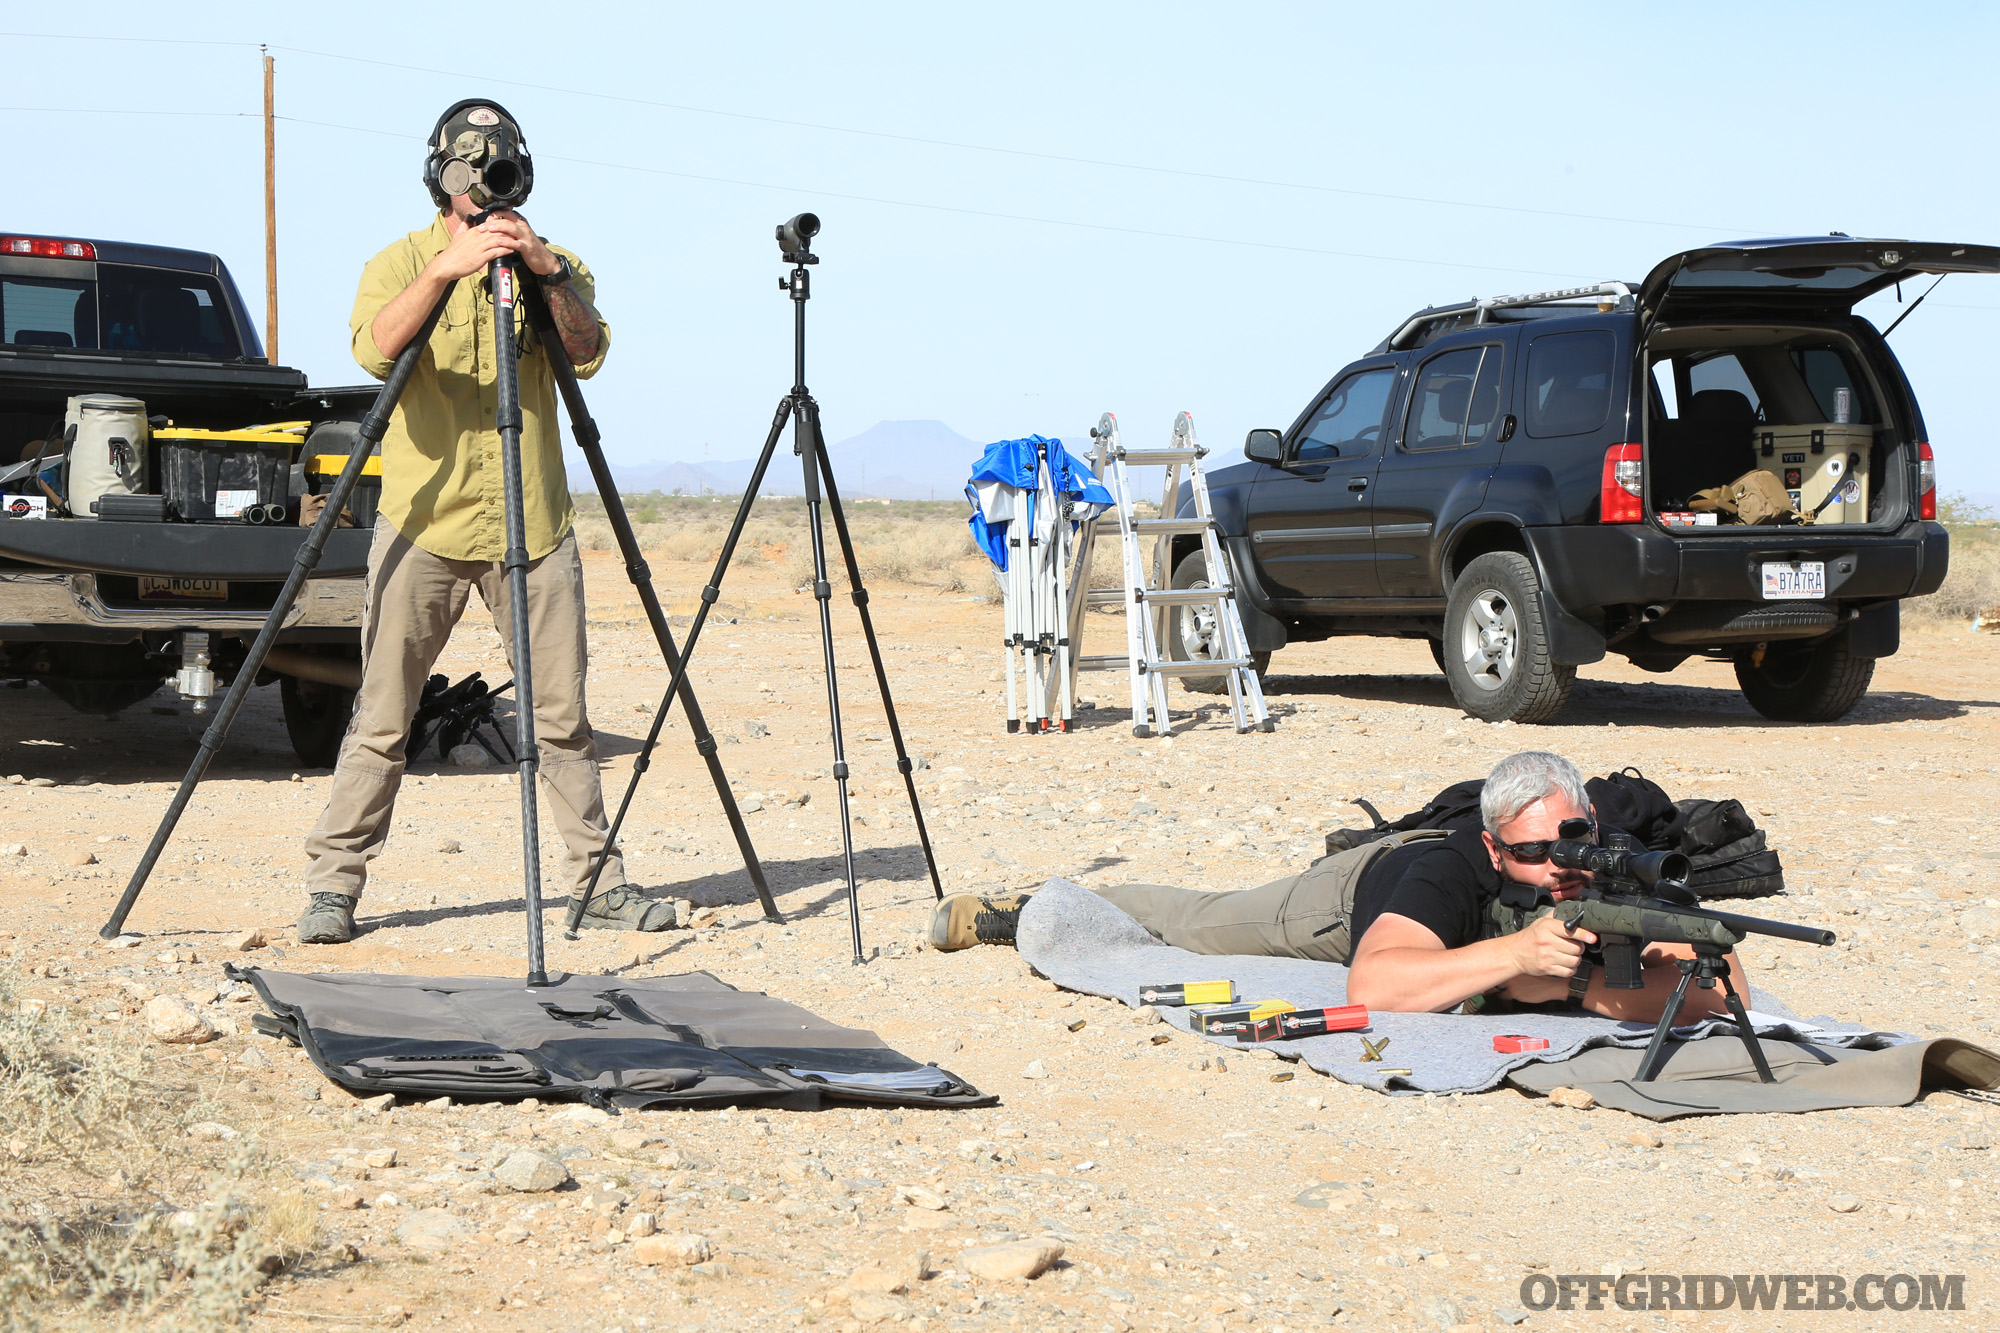
Above: Instructor Josh Reeves spotting for the author.
We started with a 100-yard zero. There are all kinds of theories and methods for zeroing your rifle at different distances, which fall outside the scope of this article, but we chose 100 yards to make use of the bullet-drop compensator built into the ACSS reticle in our scope. We zeroed the rifle, and did most of our shooting, with Black Hills 175-grain Boat-Tail Hollow Point. Black Hills has long held a top-notch reputation for accuracy and would wring maximum performance out of our rifle. Our initial groups with this load were consistently just over 1 inch end-to-end.
We tested three other Black Hills loads, using 168-grain Boat-Tail Hollow Points, 155 grain Tipped Match King, and 155-grain ELD-M bullets respectively, as well as one Federal Gold Medal load using 175-grain Sierra Match King Bullets. Our best results were with the two 175-grain loads, with our Howa barrel preferring the Federal SMK by a couple of tenths — it was the only load that gave us a sub-1-inch group, if just barely. As stated, the Black Hills 175 was just over 1 inch. As bullet weights dropped, groups opened up with the 168-grain bullets running about an inch and a quarter, and both 155 grain loads turning in groups of an inch and a half or larger.
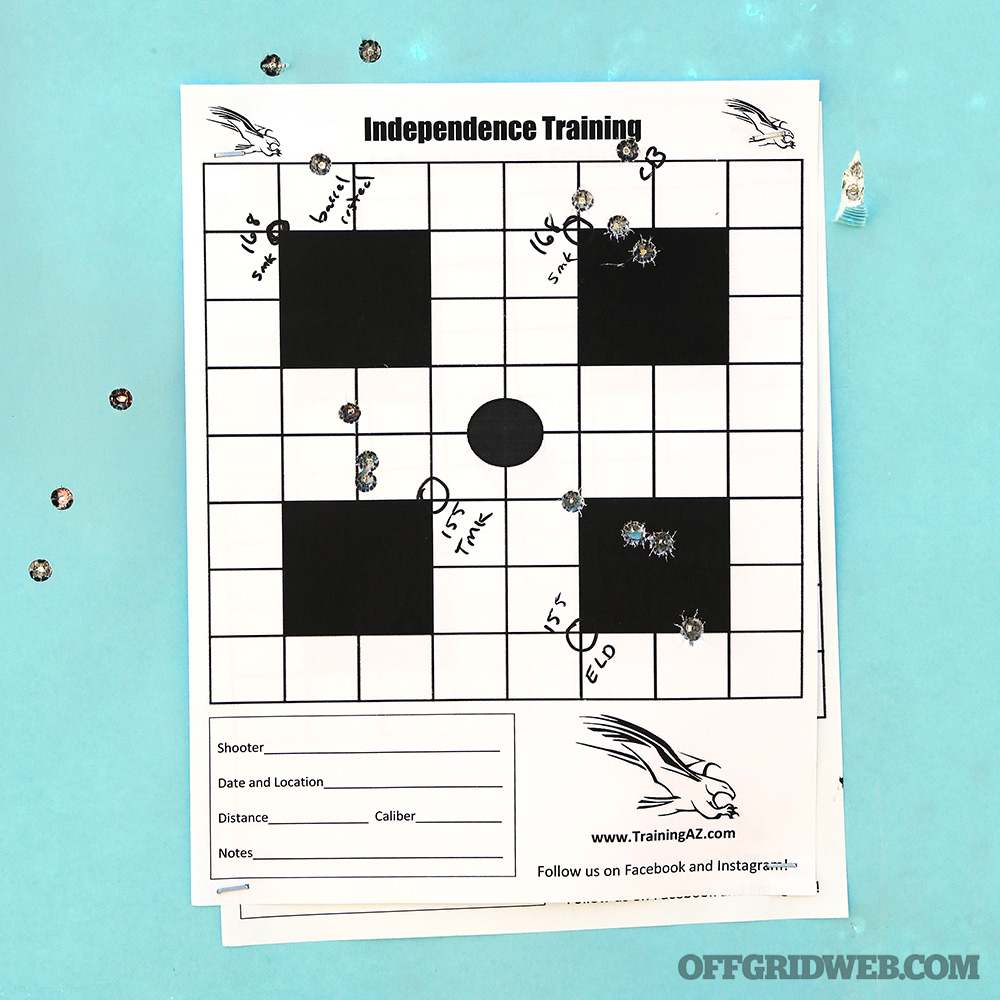
Above: This target shows the build’s performance with three different loads. The circled corner of each square was point of aim. We got the best performance with 168-grain SMK. The upper left square shows the error introduced by resting the barrel directly on a bag or barricade, instead of the stock.
The bottom-line data point to come out of this grouping exercise is that our combination of parts produced a 1- to 1.5-MOA rifle. This hardly qualifies as laser-beam level accuracy. But for a budget-minded, utilitarian rifle to use in a last-ditch defensive or game-getting capacity, 1.5 MOA is absolutely acceptable.
Once we established the baseline accuracy of the rifle, Reeves took us through a number of precision tradecraft exercises including target ranging, shooter-spotter communication, wind calls, and unconventional shooting positions. There were steel targets of varying shapes and sizes laid out as far as 1,100 yards. The farthest we were able to make hits with our test gun was 880 yards, but the farthest we were able to make consistent hits was 800 yards even — that’s repeated first-round hits, as well as multiple hits in a row, for multiple shooters.
Supporting Equipment
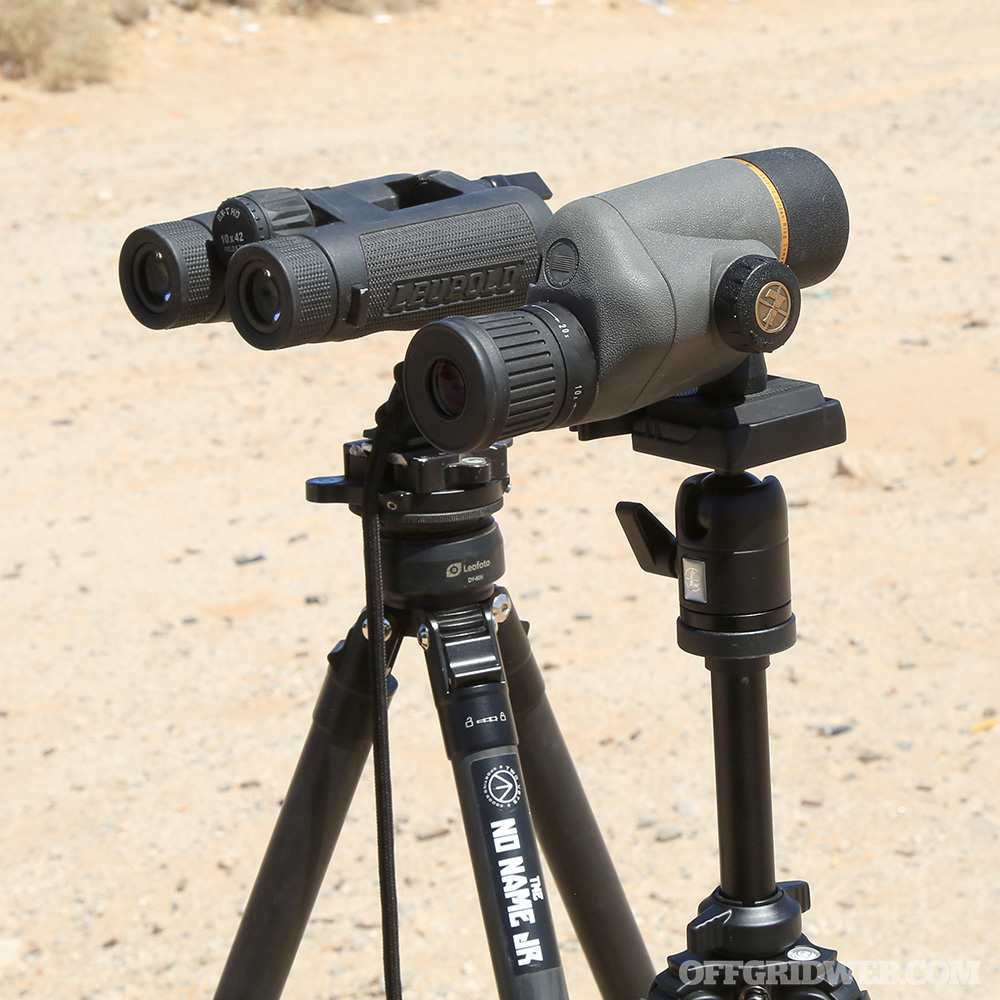
Part of what makes long-range shooting so expensive isn’t just the rifles and optics, but the ancillary equipment needed to support it. During our time training with Josh Reeves, we used a Leupold Gold Ring 10-20x spotting scope and a compact aluminum tripod. For $500, the GR 10-20x makes an earnest attempt to balance price point and optical capability. This model doesn’t have a reticle, which makes ranging and shot corrections a little more difficult. But having a reticle different than what’s in your rifle scope can also introduce confusion between spotter and shooter. The compact aluminum tripod is, sadly, discontinued but for sub-$200 offered a lightweight, packable solution for spotting.
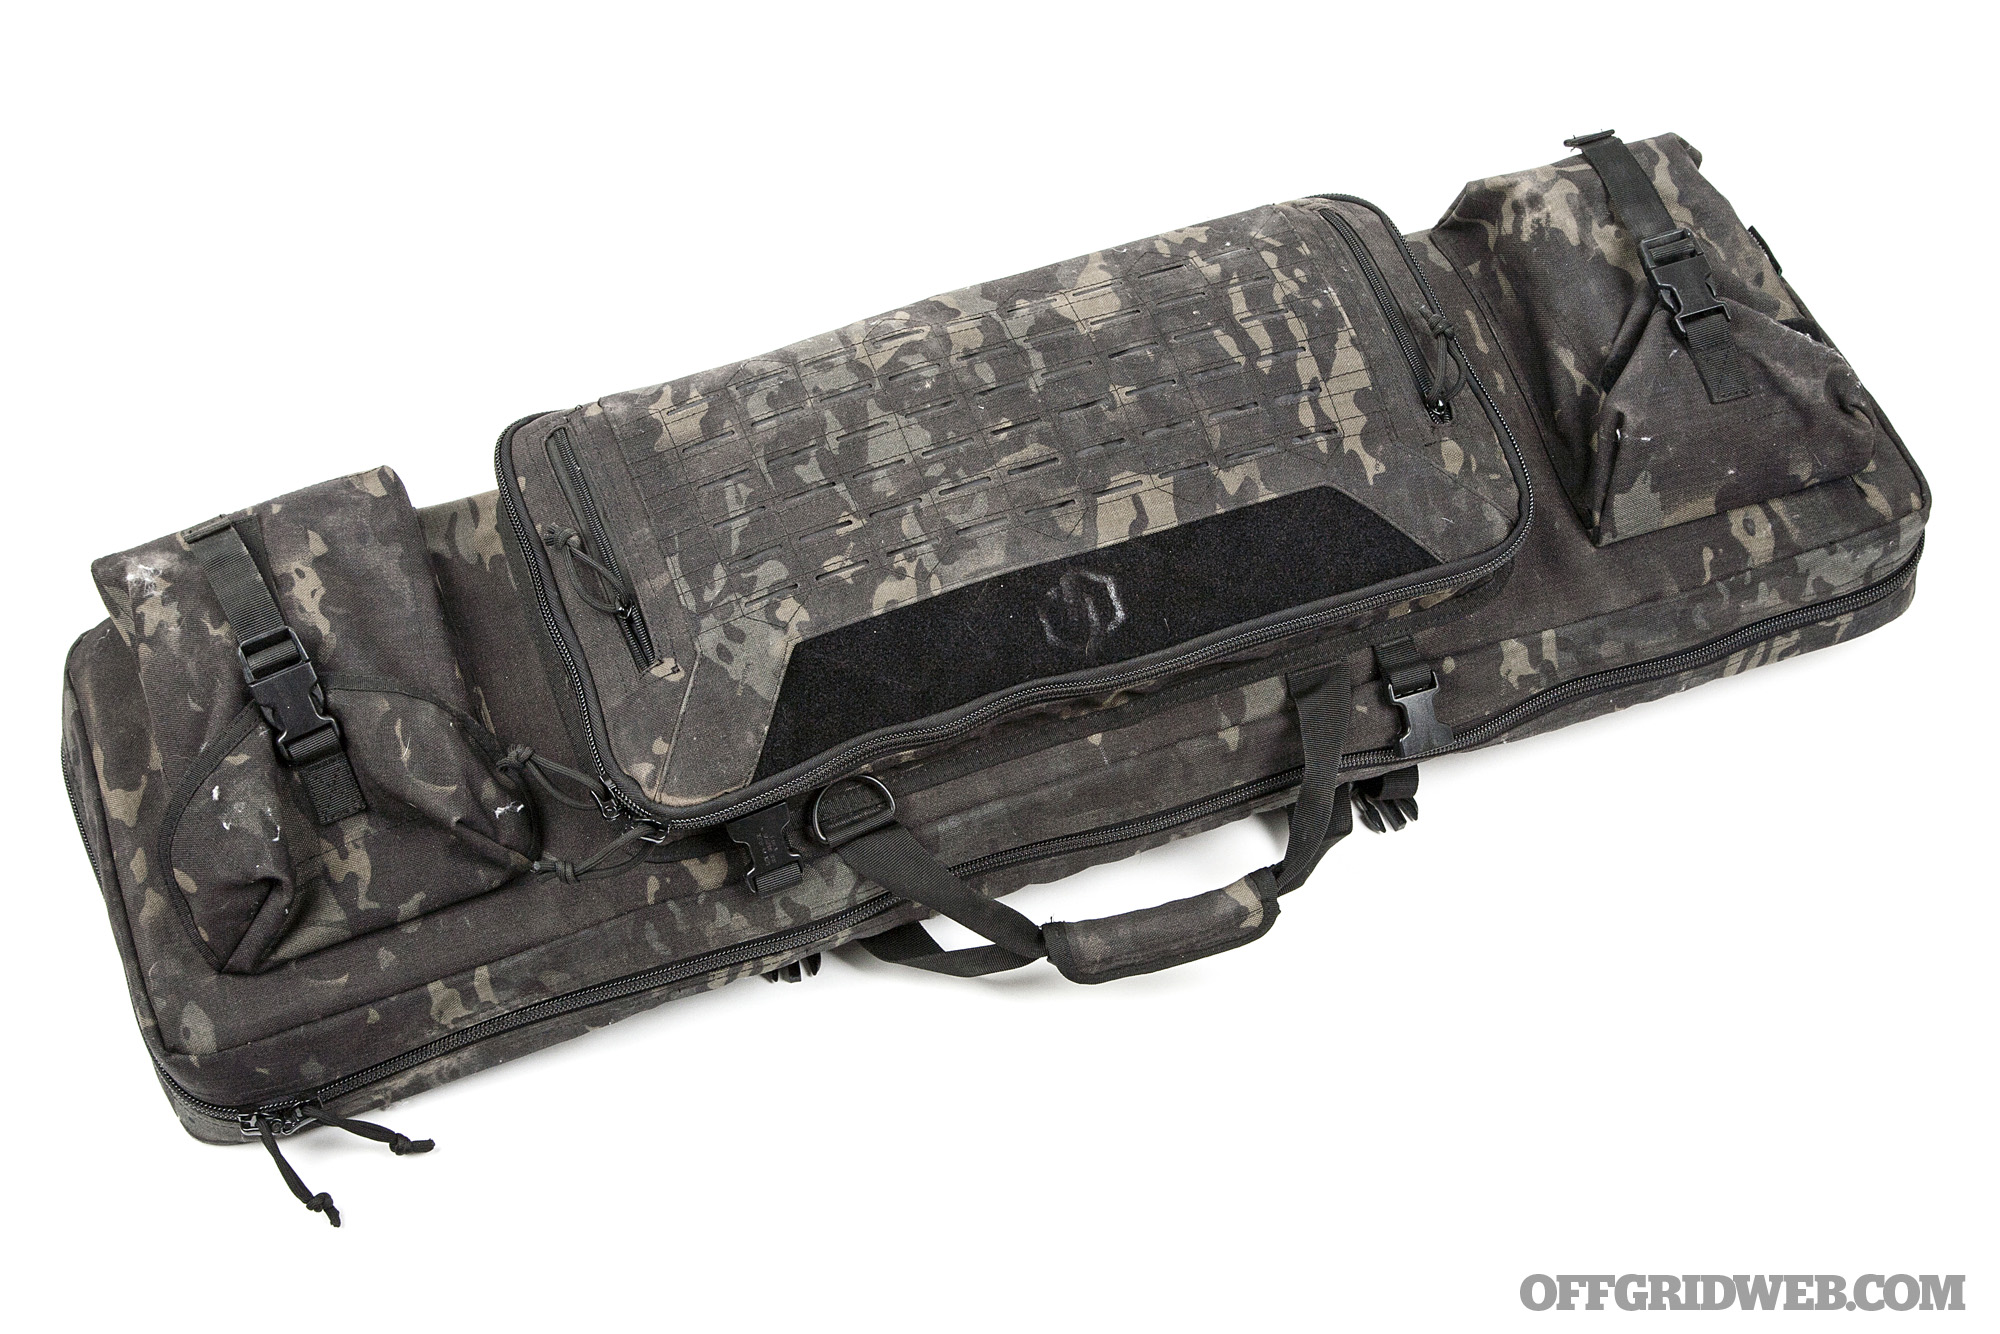
Above: The Savior Equipment Urban Warfare Case held our rifle, spotting scope, tripod, Kestrel weather meter, rear bag and several boxes of ammo with ease. This gave us a complete grab-and-go ready bag for precision rifle work.
Instructor Bio: Josh Reeves with Independence Training
Josh Reeves served in the 2/75 Ranger Regiment as a sniper and team leader with multiple combat deployment in support of both OIF and OEF. After his military service, he again deployed as a contractor multiple times and continued to train while attending an array of firearm courses. In 2011, he returned to the states full time and became a guest instructor for multiple training facility across the U.S. with Independence Training becoming his home institute in Arizona. He has taught courses to everyone from military special operations and conventional forces to law enforcement and the civilian hobbyists. He currently competes in multiple shooting competitions such as NRL, PRS, and USPSA 3/2 gun matches.
Lessons Learned From This Bolt Action Build
We only experienced one mechanical issue during our T&E period. Every time we’d fire the rifle, the magazine would fall out. Even though we ensured the release latch clicked into place every time (we could hear and feel it) and tugged repeatedly on the mag to ensure it was seated, it’d fall out every time we fired.
After much internet sleuthing and asking around within our circle of SMEs, we reached out to Scott Van Dorsten of Van Dorsten Custom Firearms. He specializes in custom bolt-action rifles and scout rifles in particular. He explained to us that sometimes, when using polymer PMAGs in conjunction with the Pacific Tool & Gauge detachable mag conversion, an extra power mag release spring is required to hold the magazine in under recoil. He sent us several springs cut to the task; we passed the springs on to the folks at Wright Armory, who installed them for us. Since then, we haven’t had any issues with mags dropped free — other than when we want them to.
All told, we were very happy with how this build turned out. We hit our $2,000 budget right on the nose, and that included some upgrades like a trigger and a detachable mag conversion. (Excluding just those two items shaves $300 off the build cost.) We also spent $200 on a nice soft case from Savior Equipment; if you already have a spare case, that’s another area where money can be saved. While we’ve personally shot and reviewed precision rifle setups costing north of $15,000, that kind of expenditure is not required to put long-range capability into your survival toolbox. Spending just 10 percent of that’ll give you a handy, accurate rifle that can reach ranges well beyond what most of us would ever need in a survival situation. There are a nearly infinite number of combinations of parts that can be assembled with just a little market research, but hopefully this sample build gave you some ideas on how to get started on the road to long-range.
