In This Article
Disclaimer: This article is for informational purposes only. Check all local, state, and federal laws before producing, consuming, or distributing alcohol. Also, improper sanitation or sealing of stored products could cause illness. If you choose to try the recipes here, be well informed and do so at your own risk.
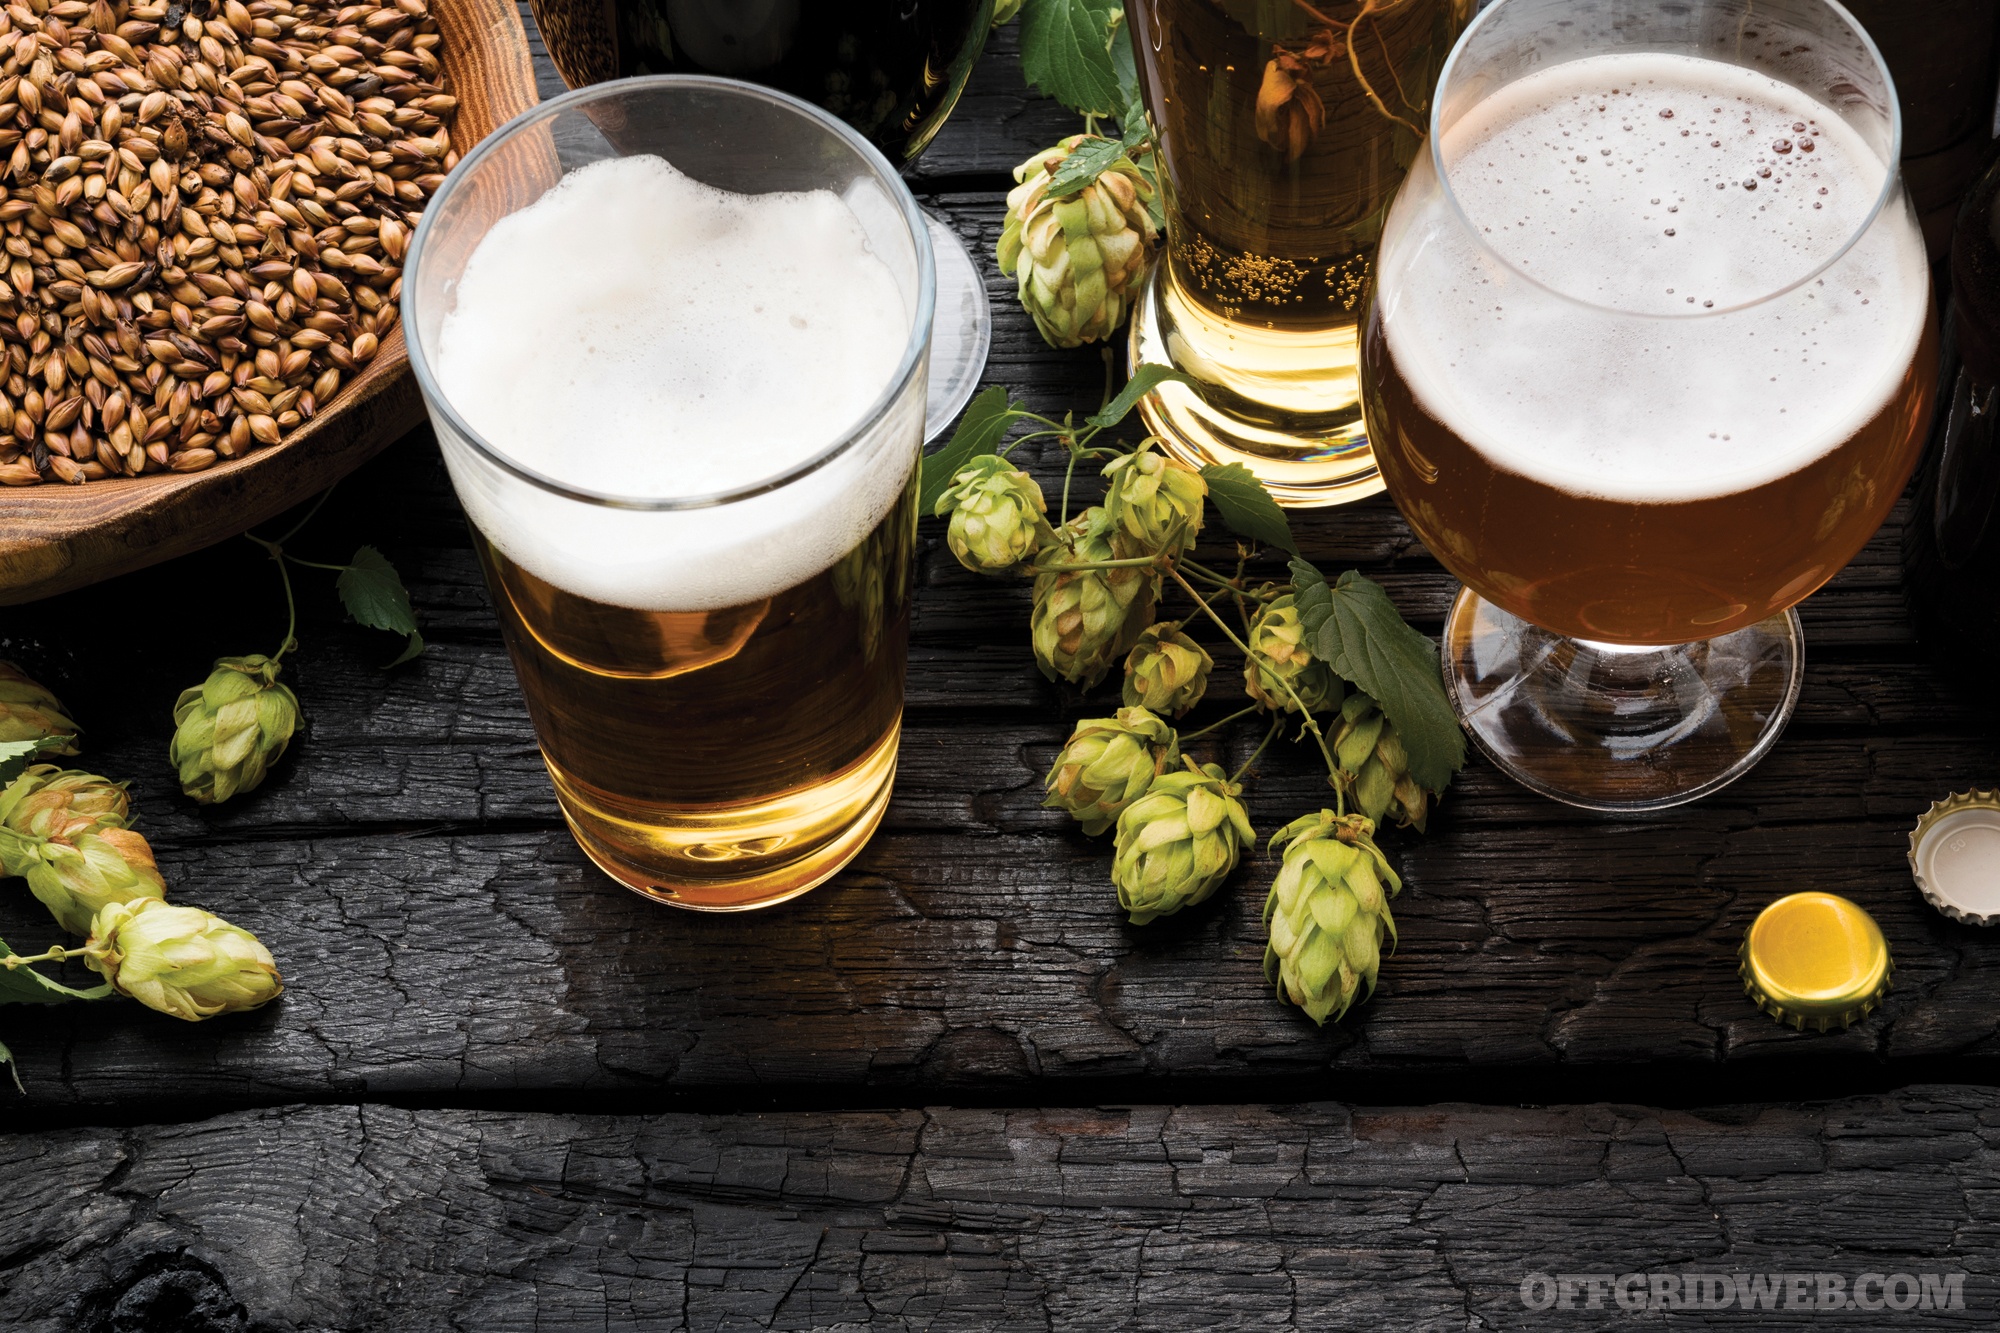
When preparedness enthusiasts start talking about SHTF barter items, the list almost always includes alcoholic beverages. Diversified preppers often stock up on liquor and wine, since they age well, and some even dabble in storing beer (which needs to be rotated, aka consumed, before it gets “skunked”). Since all good things come to an end, at some point your stocks would run out. In the event of a drawn-out economic crisis or grid-down scenario, the value and importance of alcohol would likely increase.
But what’s your resupply strategy? Have you ever thought about making your own wine or beer? It’s not as hard as you might think, and you don’t even need much in the way of supplies. I’ve been home-brewing beer, wine, mead, and hard cider for years, and even running an annual class on the subject here in Virginia. I can’t make any promises about the taste of your first batch, but I’ve been blessed with some very good home-brew batches over the years. With a little luck and diligence to the details, you’ll brew some good batches too!
Fermentation Basics
Before we launch into the nuts and bolts of creating your own alcoholic beverages, it’s important to understand the unsung hero of it all — yeast! This is a fungal organism, acting a bit like a plant and a bit like an animal. There are about 1,500 known species of yeast, with countless strains of each species. Our little friend Saccharomyces cerevisiae is the most important one for our purposes; since it eats simple sugars, burps out carbon dioxide, and excretes alcohol (when held in a sugary liquid in a favorable temperature range and low oxygen levels).
When the right yeast is added to water filled with grain malt sugar, it proliferates and consumes the maltose. The result is beer. When the right strain of yeast goes into fruit sugar water, you get wine. Beer is made with less “sugar” per gallon, and wine is generally made with double the “sugar.” This is why most beers are about 5-percent alcohol by volume (ABV) and wines are around 10-percent ABV.
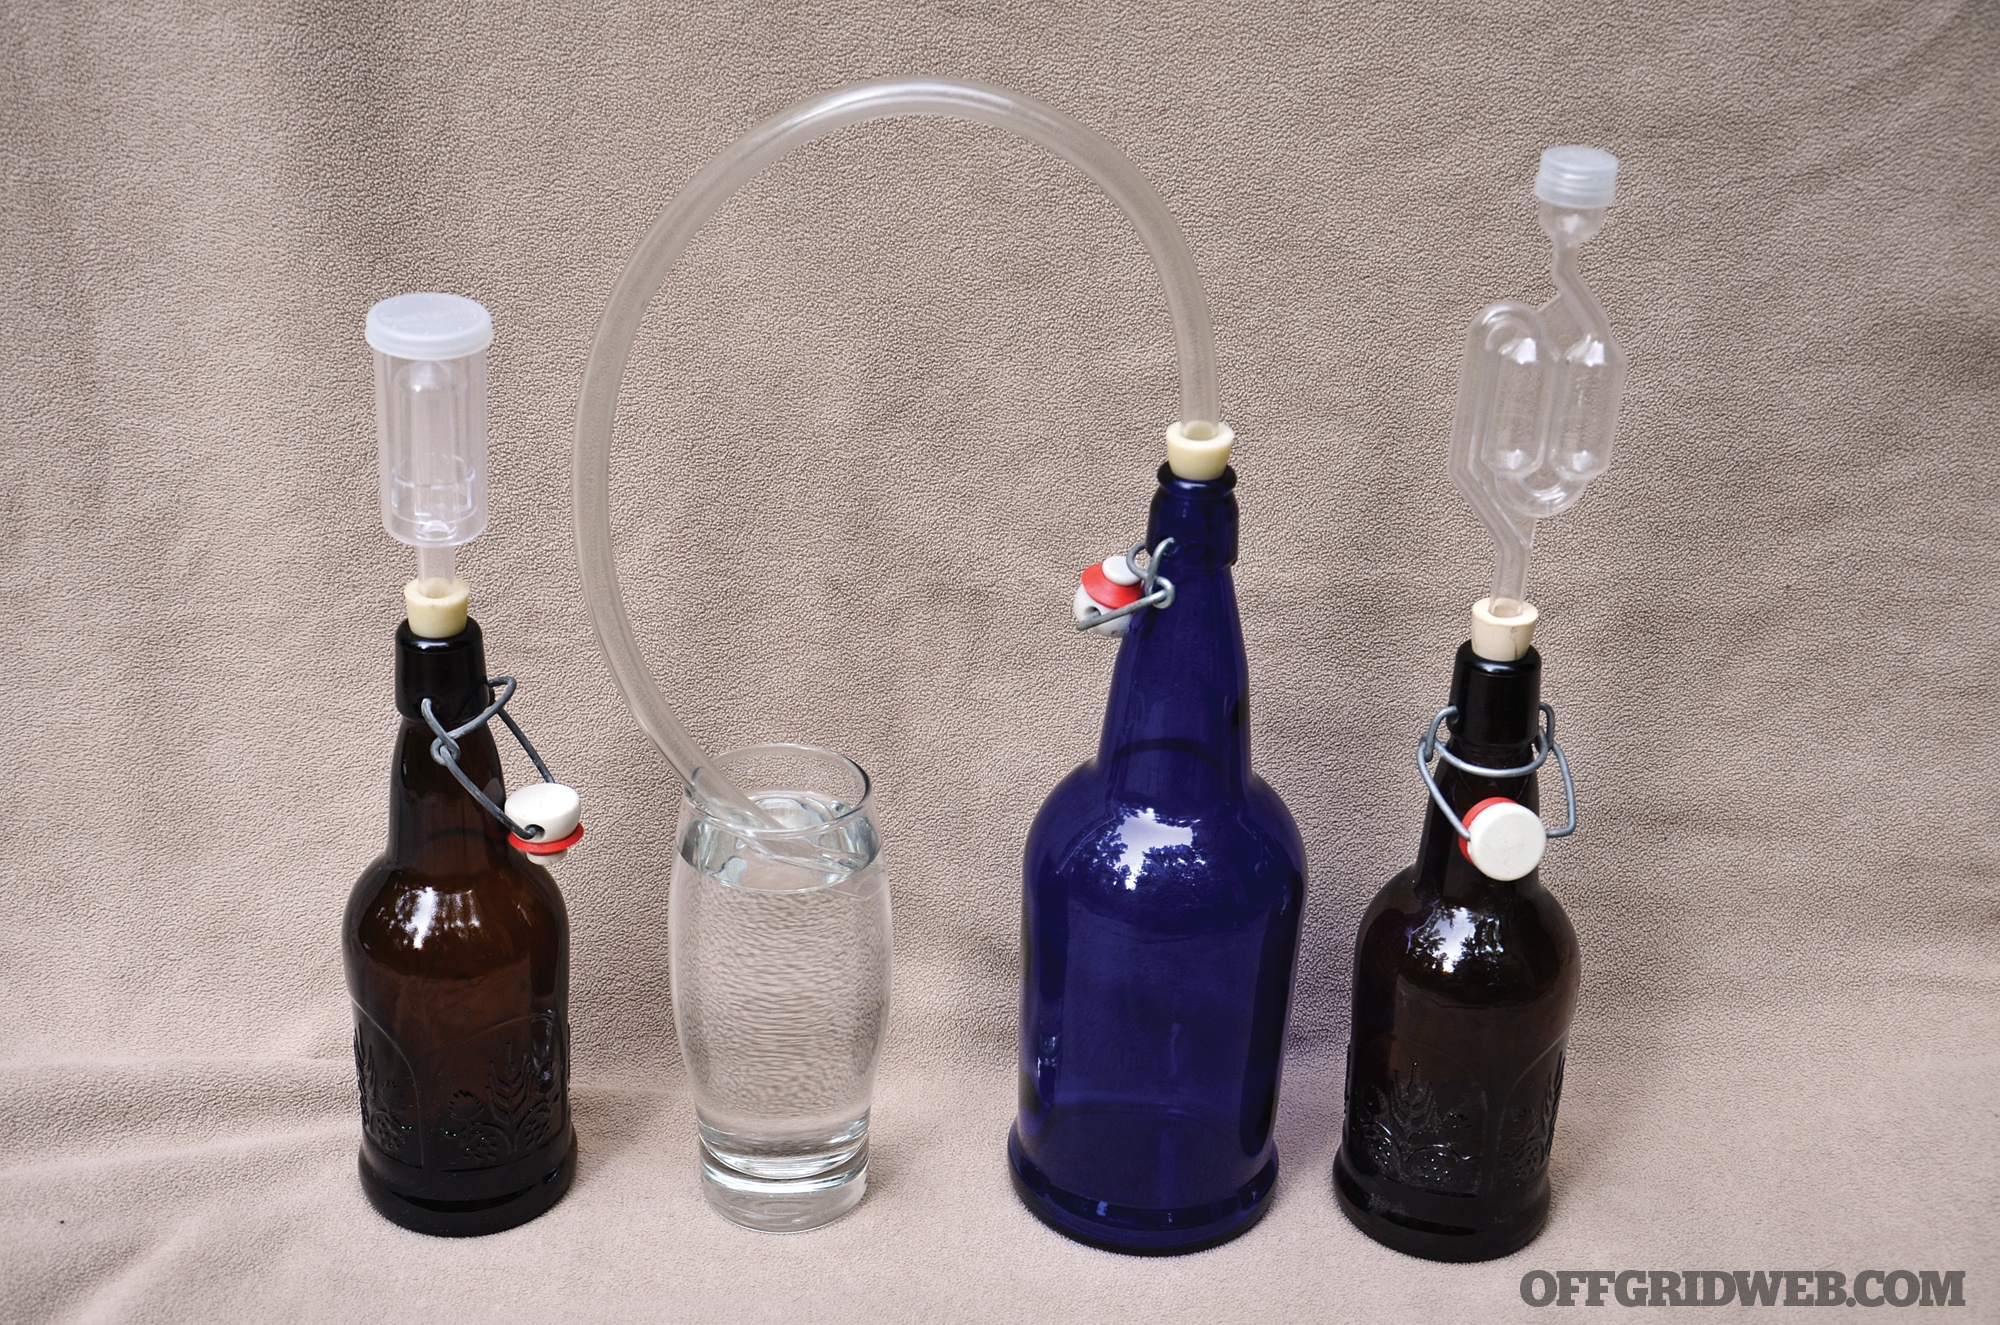
It takes roughly a month to initially ferment these drinks, during which time the excess CO2 must have a way to escape without letting in oxygen (that would make vinegar instead of alcohol). The job of letting CO2 escape is handled by one of the many forms of “wine lock.” When the alcohol tolerance of the yeast strain is reached in the sugar water and the yeast cells are, essentially, too drunk to work anymore, fermentation slows to a near stop. At this point we’d do separate steps for beer and wine — carbonate the beer and age the wine. Then, after the right amount of time, your work should yield a familiar product. For our purposes, we’ll start with wine, since it’s a simpler process, and work our way up to beer. Enjoy!
Fermenting Wine
Historic Roots: According to scholars, the production of wine dates back even farther than beer. It may have started with naturally fermented fruits, or it could have been watered down honey that turned into wine — commonly known as “mead.” Not only did this strange new elixir give our ancestors a good buzz, wine had the added benefit of being a practical way to preserve the calories of fruit. When you give it a try, go easy in the beginning and don’t be too hard on yourself if your first batch is a little weird. Remember there are thousands of wineries in the world making hundreds of styles of wine on a world-class level. And you’re just fermenting the juice from some berries by keeping it in a jug in your basement. Your results may vary.
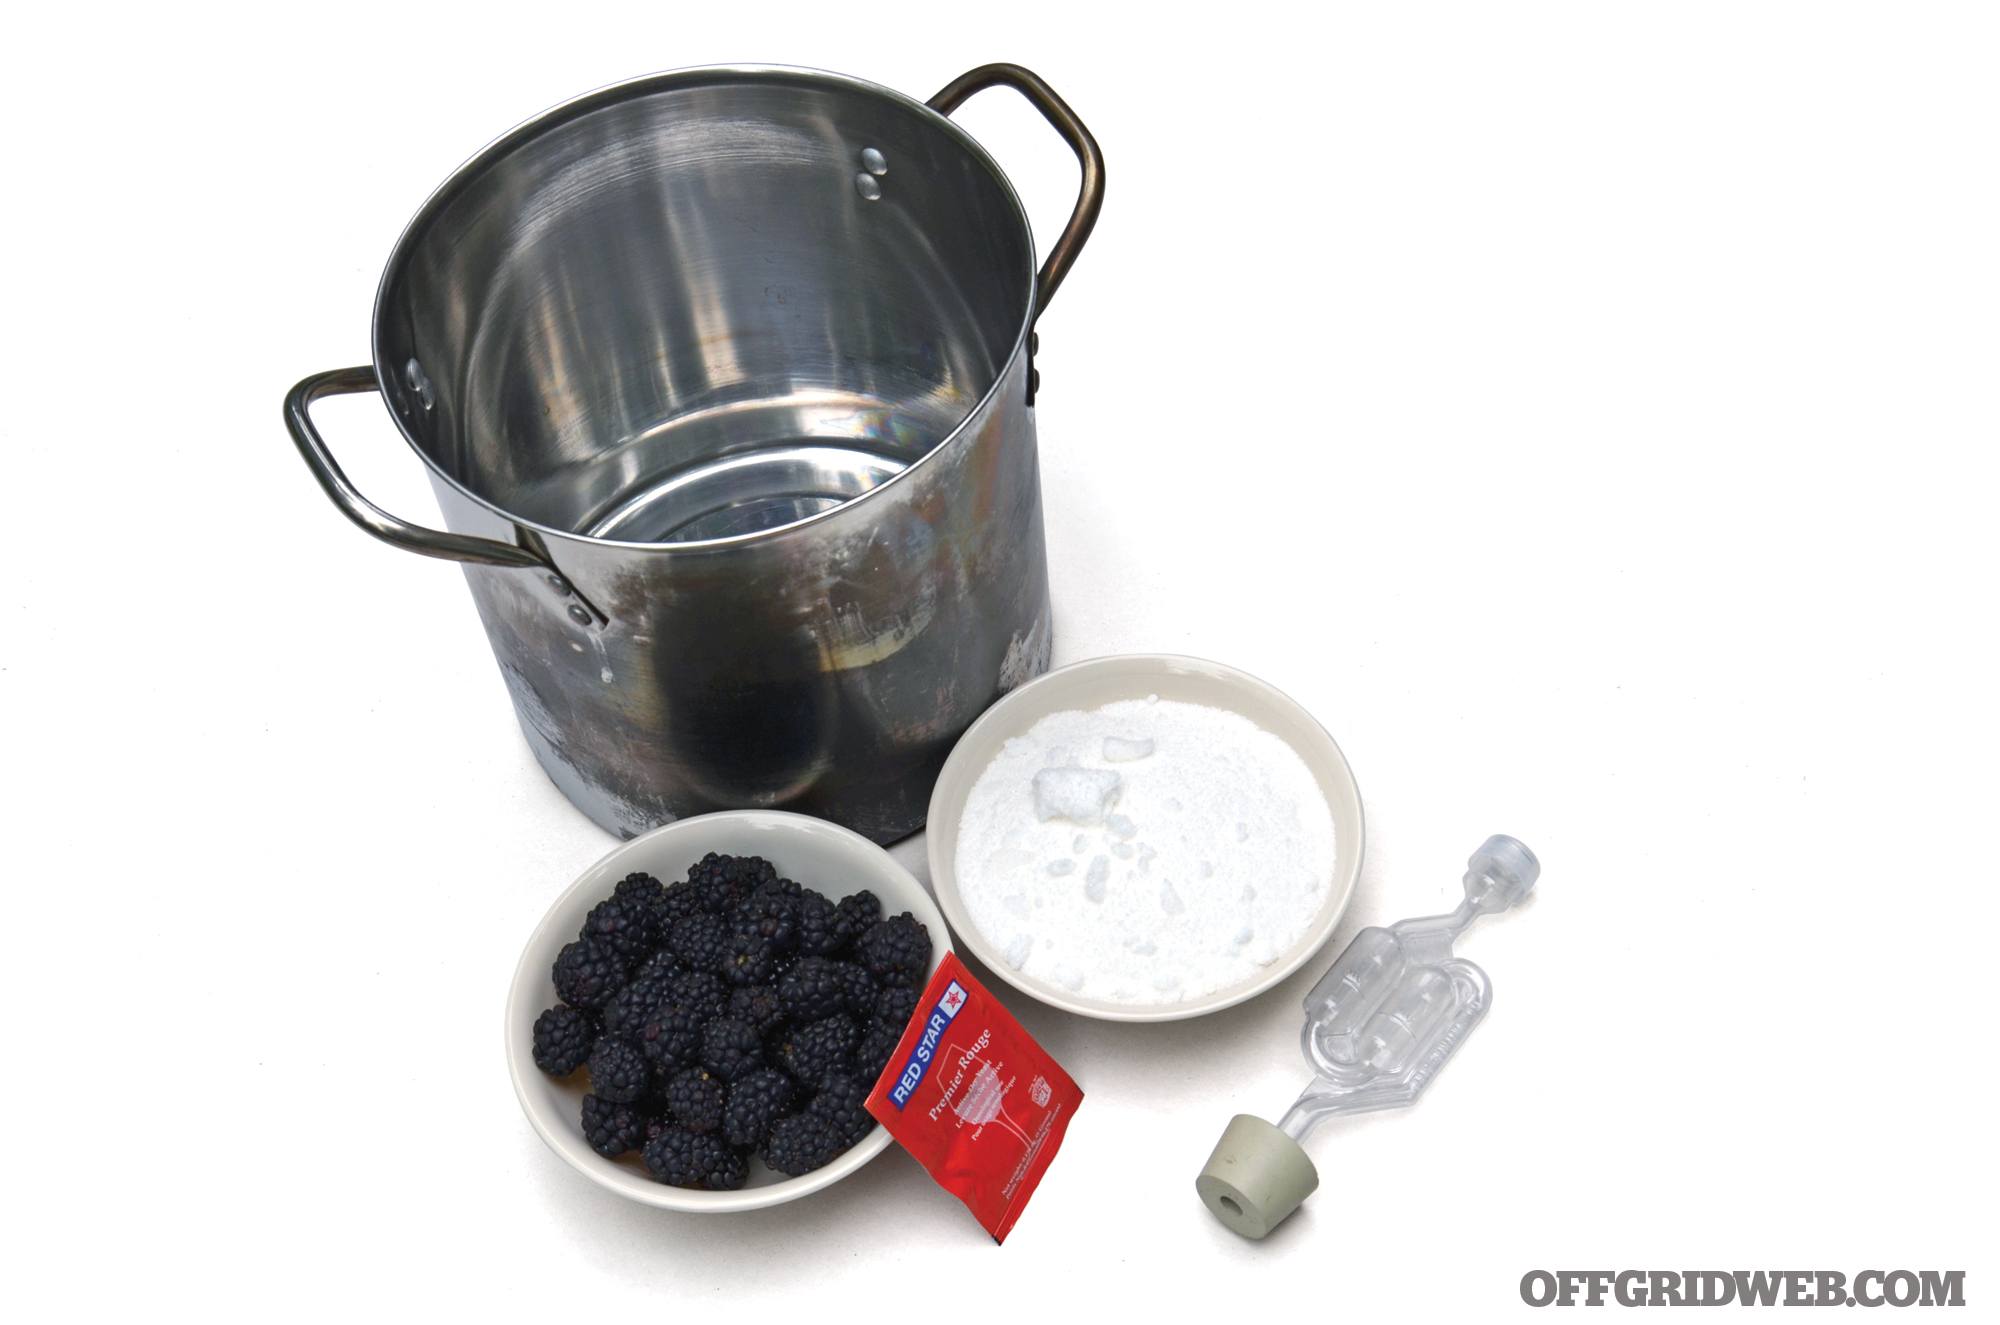
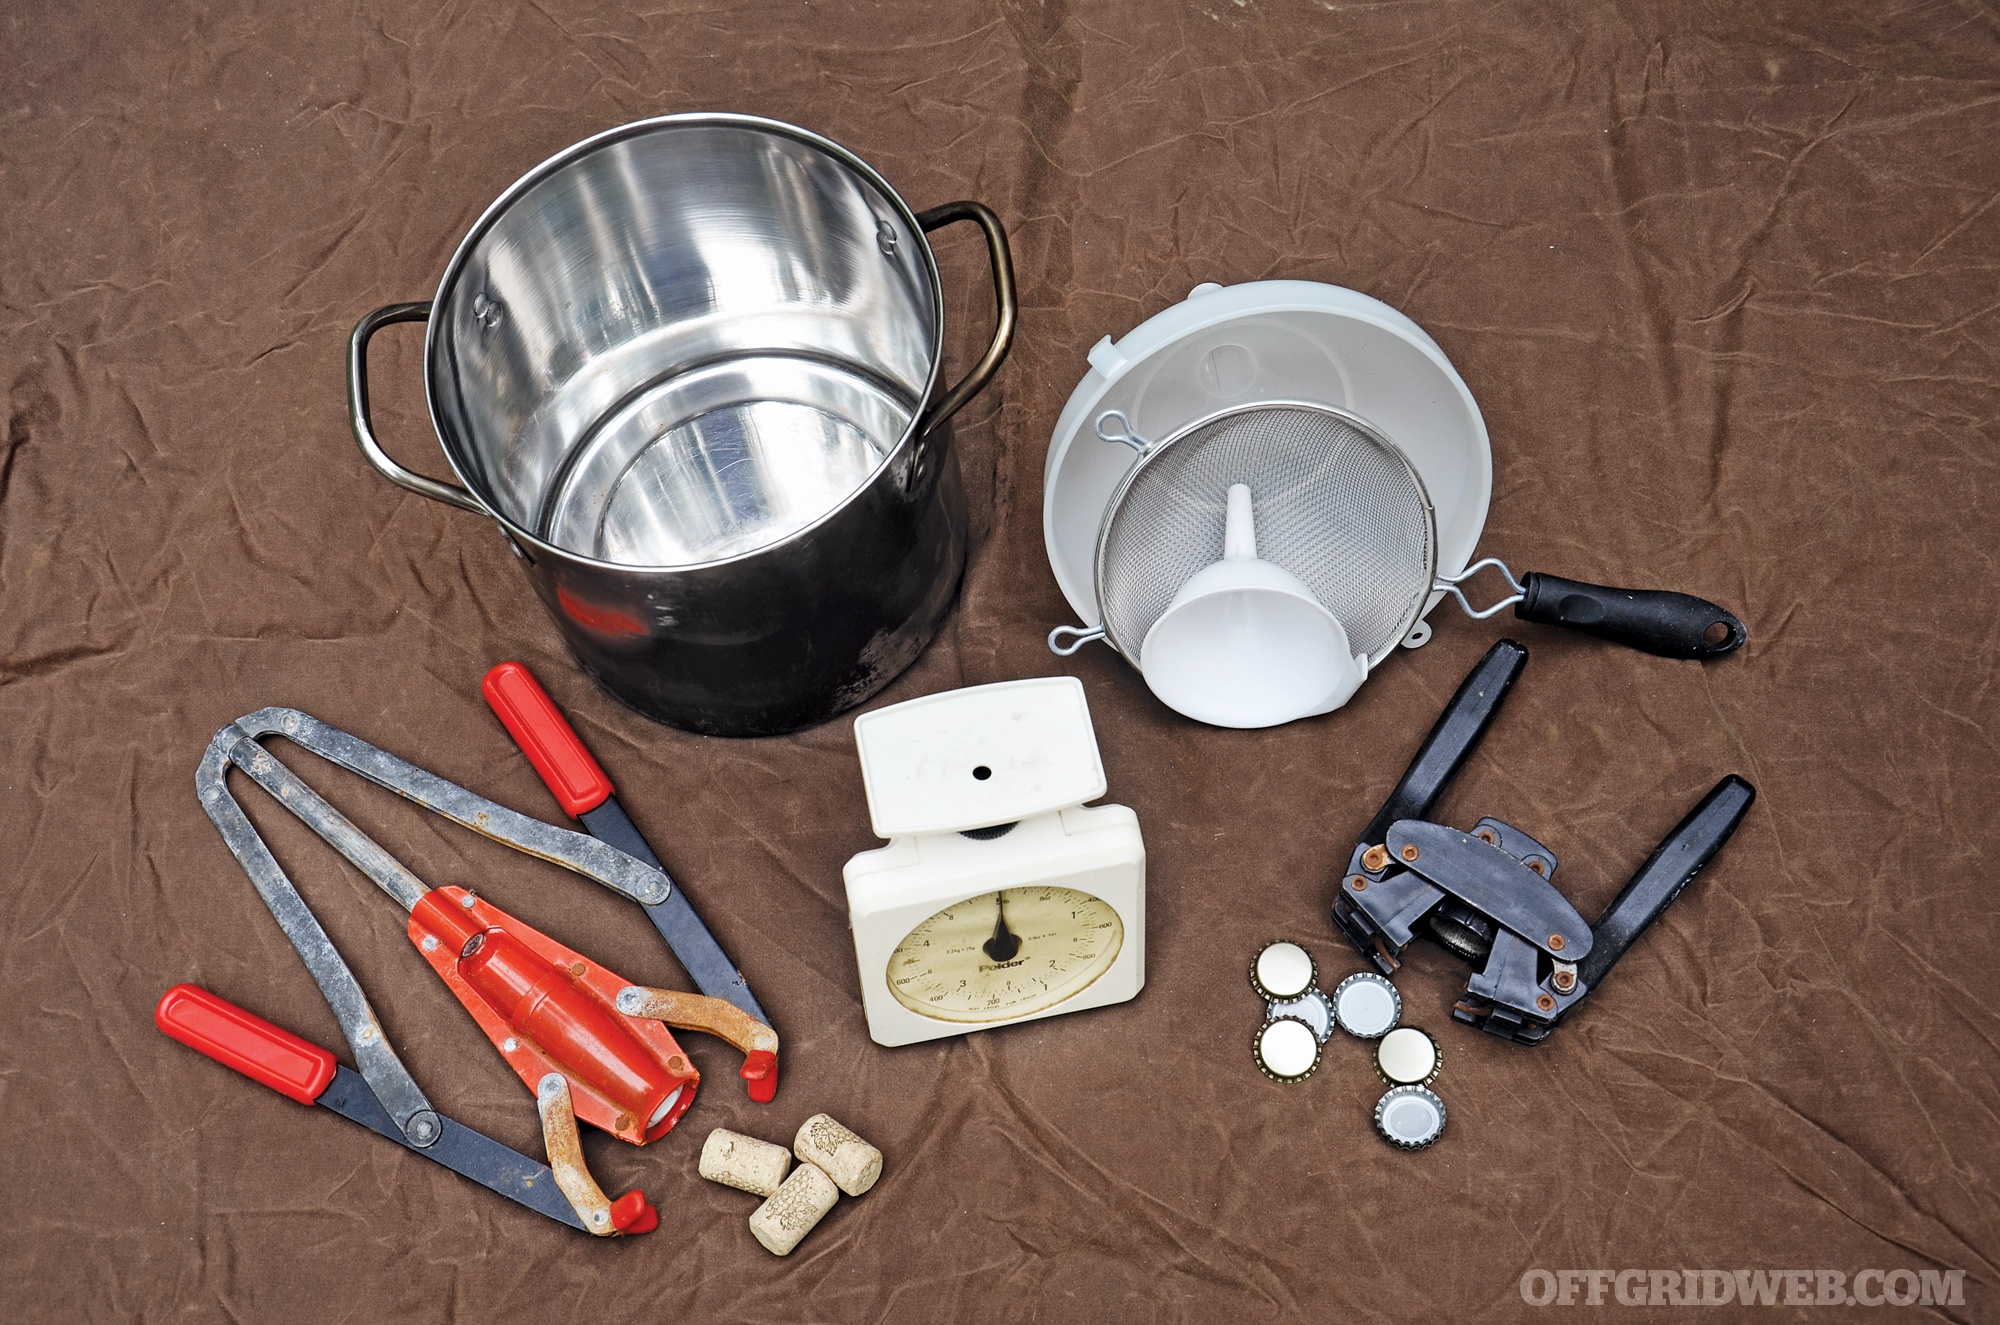
Ingredients: For the truest form of wine, you’d crush fruit and use only the juice to craft your vino — no added water or sugar. But that takes a hell of a lot of fruit. For a more prepper-friendly approach, use a shelf-stable sweetener like white table sugar to produce the alcohol and a small amount of fruit to flavor it. To do this, you’ll need wine yeast, a stainless pot, a 1-gallon glass jug, 1 gallon of spring water (or well water), a wine lock with tight-fitting jug stopper, a strainer, a funnel, a spoon, a thermometer, and sanitizing solution (I prefer One-Step No Rinse Sanitizer).
You’ll also need bottles and corks to store your wine for proper aging. If you’re able to visit a home brew shop or order online, you could also pick up pectic enzyme to help break down the fruit, wine maker’s acid blend for tartness, and yeast nutrient. All three of these are optional, but stand a good chance of improving your wine.
Directions:
Step 1
In a large stainless or enamel pot, combine the sugar and crushed fruit with 3.5 quarts of water. Boil this mixture for 20 minutes (to kill any stray organisms in the water or on the fruit). While the liquid is boiling, add some sanitizing solution to water (follow the package directions) and swish out your strainer, funnel, 1-gallon glass jug, the wine lock, and rubber stopper. You can also cleanse your thermometer. Ideally, all items should have at least two minutes of contact time with the solution. Shake the liquid from them and air dry.
Step 2
Set the pot of hot sugar water in a container of cold water (or an ice water bath) to cool quickly. Once below 80 degrees F, stir in the wine yeast and any optional additives you have.
Step 3
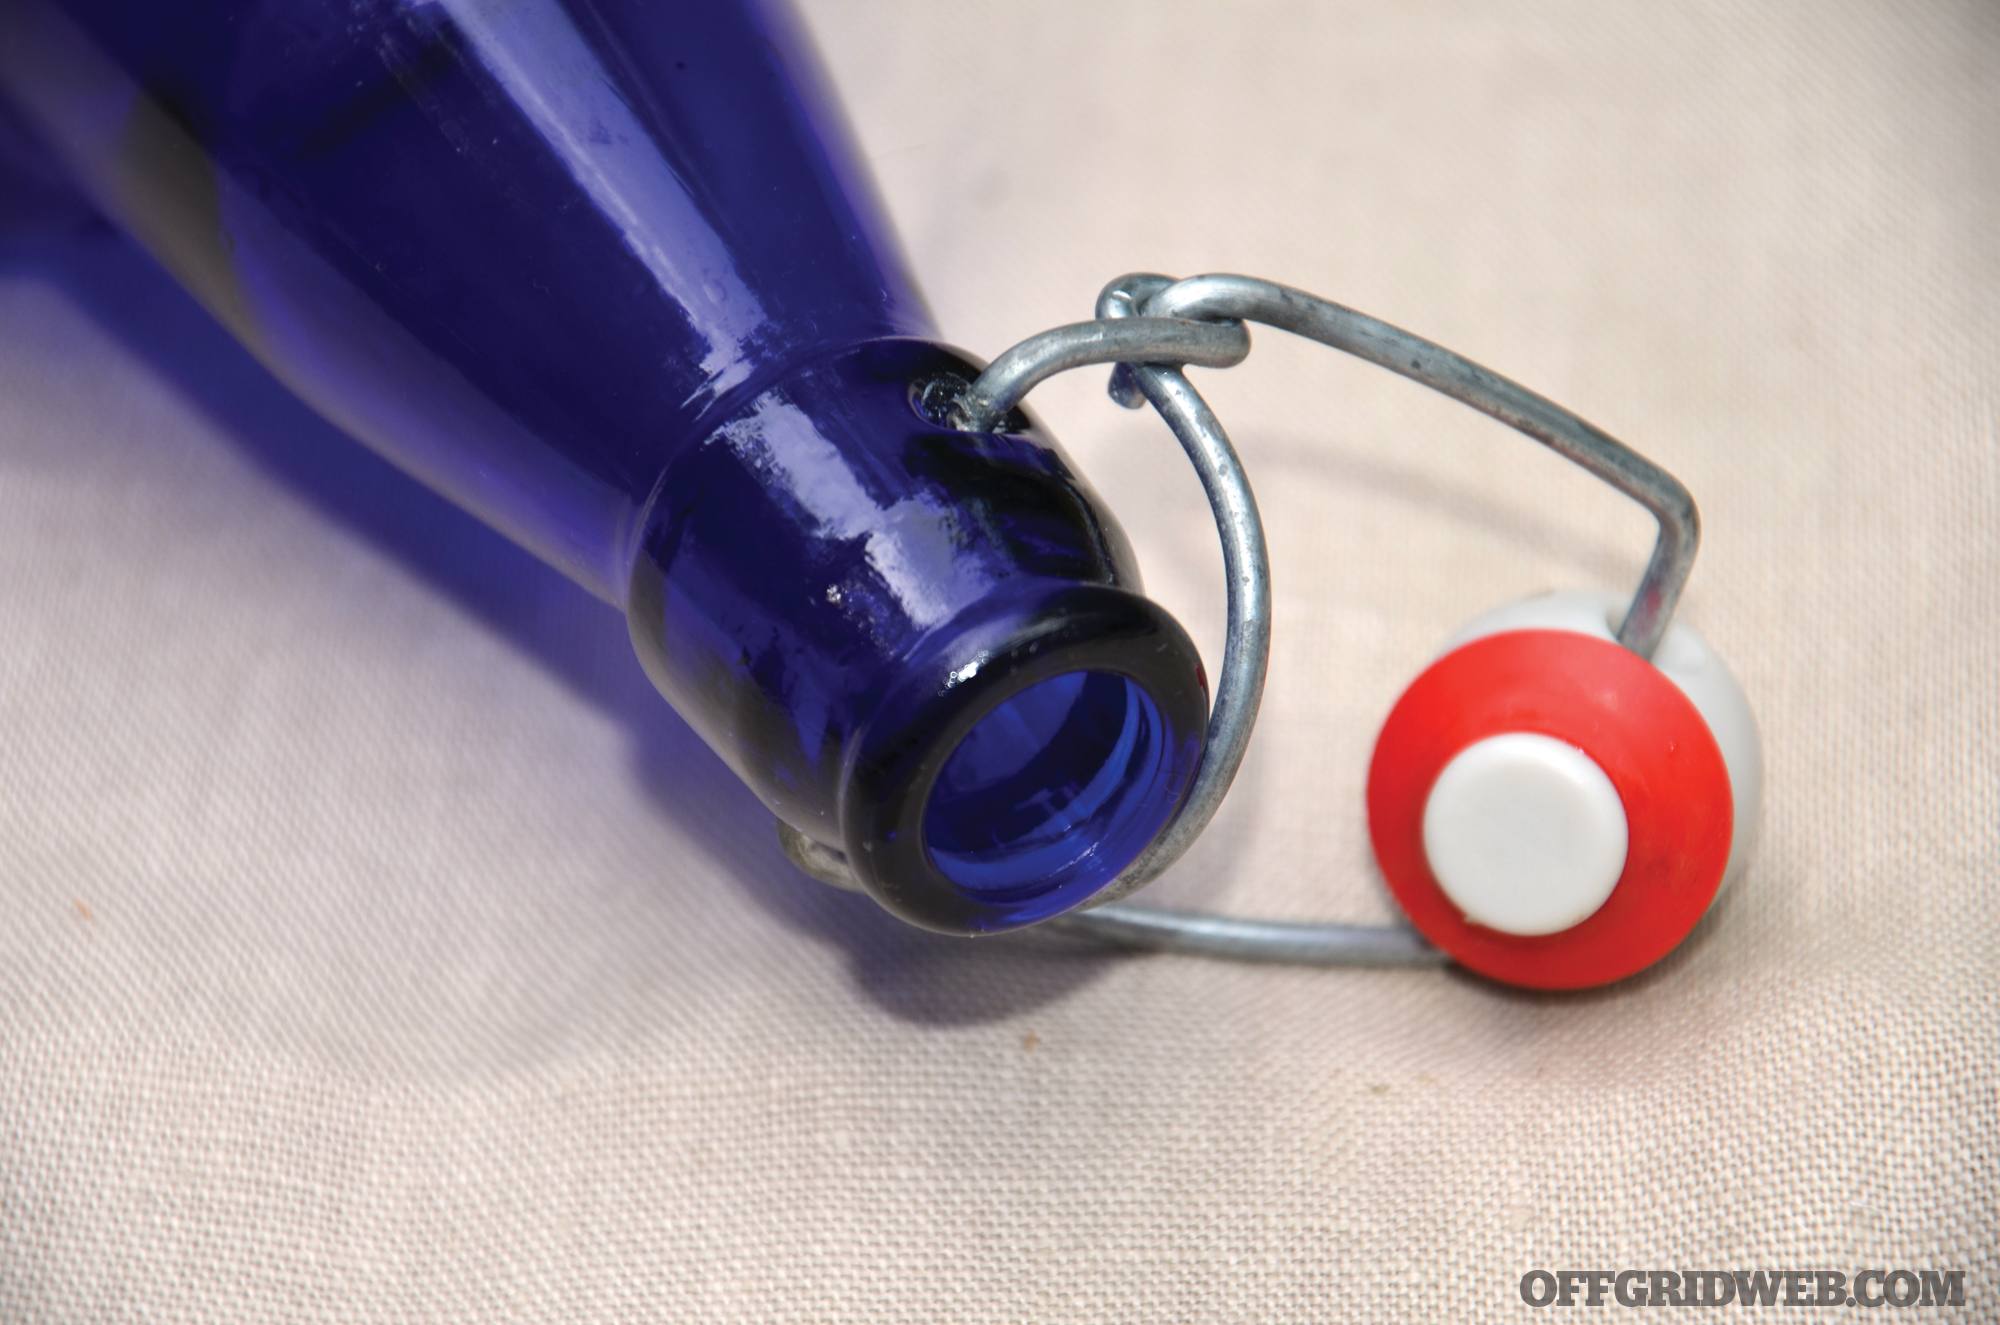
Use a sanitized funnel and strainer to filter and direct your sugary juice (technically known as “must”) into a sanitized glass jug that’ll be your fermentation vessel. Don’t skip the strainer. Even small seeds and bits of fruit skin can plug up your wine lock. This causes pressure to build, and it can blow the wine lock off the top of the jug (if the batch is foamy).
Step 4
Add the sanitized fermentation lock to the fermentation vessel. Place the jug in an open topped plastic bin (in case of spills) and store it in a dark location with a stable temperature between 60 to 70 degrees F. Watch carefully for the next few days. It should start bubbling (fermenting) within a few hours. If it doesn’t start bubbling within 24 hours, add more yeast to the jug.
Step 5
After a bubbly first week, your “must” should be milkier in color and beginning to form sediment. After a month, the sediment should be thick at the bottom of the jug, and the wine should be clearing up. Let it sit for another week or two, and when you can watch it for a long time without a single bubble jumping through the wine lock, it’s finished fermenting. Slowly decant the wine into sanitized bottles or another 1-gallon glass jug and seal them tightly. Fun fact: You can bottle your wine in beer bottles for single-serve packaging, but in beer bottles it’ll only keep for months, instead of years. Although drinkable now, it’s better to age your new wine for a few months in a cool dark place. When you can’t wait any longer, open and enjoy.
Recipe:
- 2.25 pounds of table sugar
- 2 to 3 pounds of fresh fruit (blackberries are my favorite for this, but any fruit will work)
- ¼ of a 5-gram package of wine yeast (red wine yeast for dark fruit and white wine yeast for light-colored fruits — save the remaining ¾ package for future batches)
- Optional additives: 2 teaspoons of acid blend, ½ teaspoon of pectic enzyme, and 1 teaspoon of yeast nutrient
Best Practices for Storage
Wine is best kept in a cool, dark, and slightly damp environment. If you don’t happen to have a wine cellar, a root cellar will suffice (or a cool basement). Just keep it away from heat and light while aging and while in storage. Bottles with synthetic or natural corks should be stored sideways to keep the corks wet for a tighter seal. With proper storage, your wine will last for decades, and will only improve with each passing year.
Shelf Life and Endurance
Since wine yeasts can keep working in higher alcohol solutions, this allows them to keep eating sugar when beer yeast would’ve been “too drunk” to eat or reproduce. This alcohol tolerant yeast, and the higher amount of sugar in the beginning will produce an alcoholic beverage with twice the strength of beer (on average). Typically over 10-percent alcohol by volume, wine keeps much longer than beer (years versus months). A nice glass of wine could be a great indulgence after a hard day of scavenging, and this fermented fluid can also help us sleep and be traded for needed supplies.
Brewing Beer
Historic Roots: Written records in both Egypt and Sumeria show that beer brewing started around 4,000 years ago — though I’m quite sure it dates back to the earliest days of agriculture. Some booze scholars even suggest we started farming so that we could have a regular supply of beer ingredients. And while a big Budweiser plant can turn out over 1 million containers of beer each day, the brewing of beer started in a much more humble manner. It’s likely that some grain that got wet and sprouted, which was then cooked into a porridge or watery soup. When the right strain of yeast blew into the leftovers, which sat for a few days, the world’s first beer began to foam, bubble, and ferment. And whoever drank that questionable leftover broth, liked it enough to try it again and again. For this article, we’ll focus on the beer style of ale. This beer is the easiest and quickest to make, since it ferments at room temperature and only takes three or four weeks. The other main beer is lager, which ferments at lower temperatures and takes about two months to ferment. Unless you have a brewing cave underground with a constant air temp of 56 degrees F (which is how the style originated), lager isn’t as practical for preparedness planning.
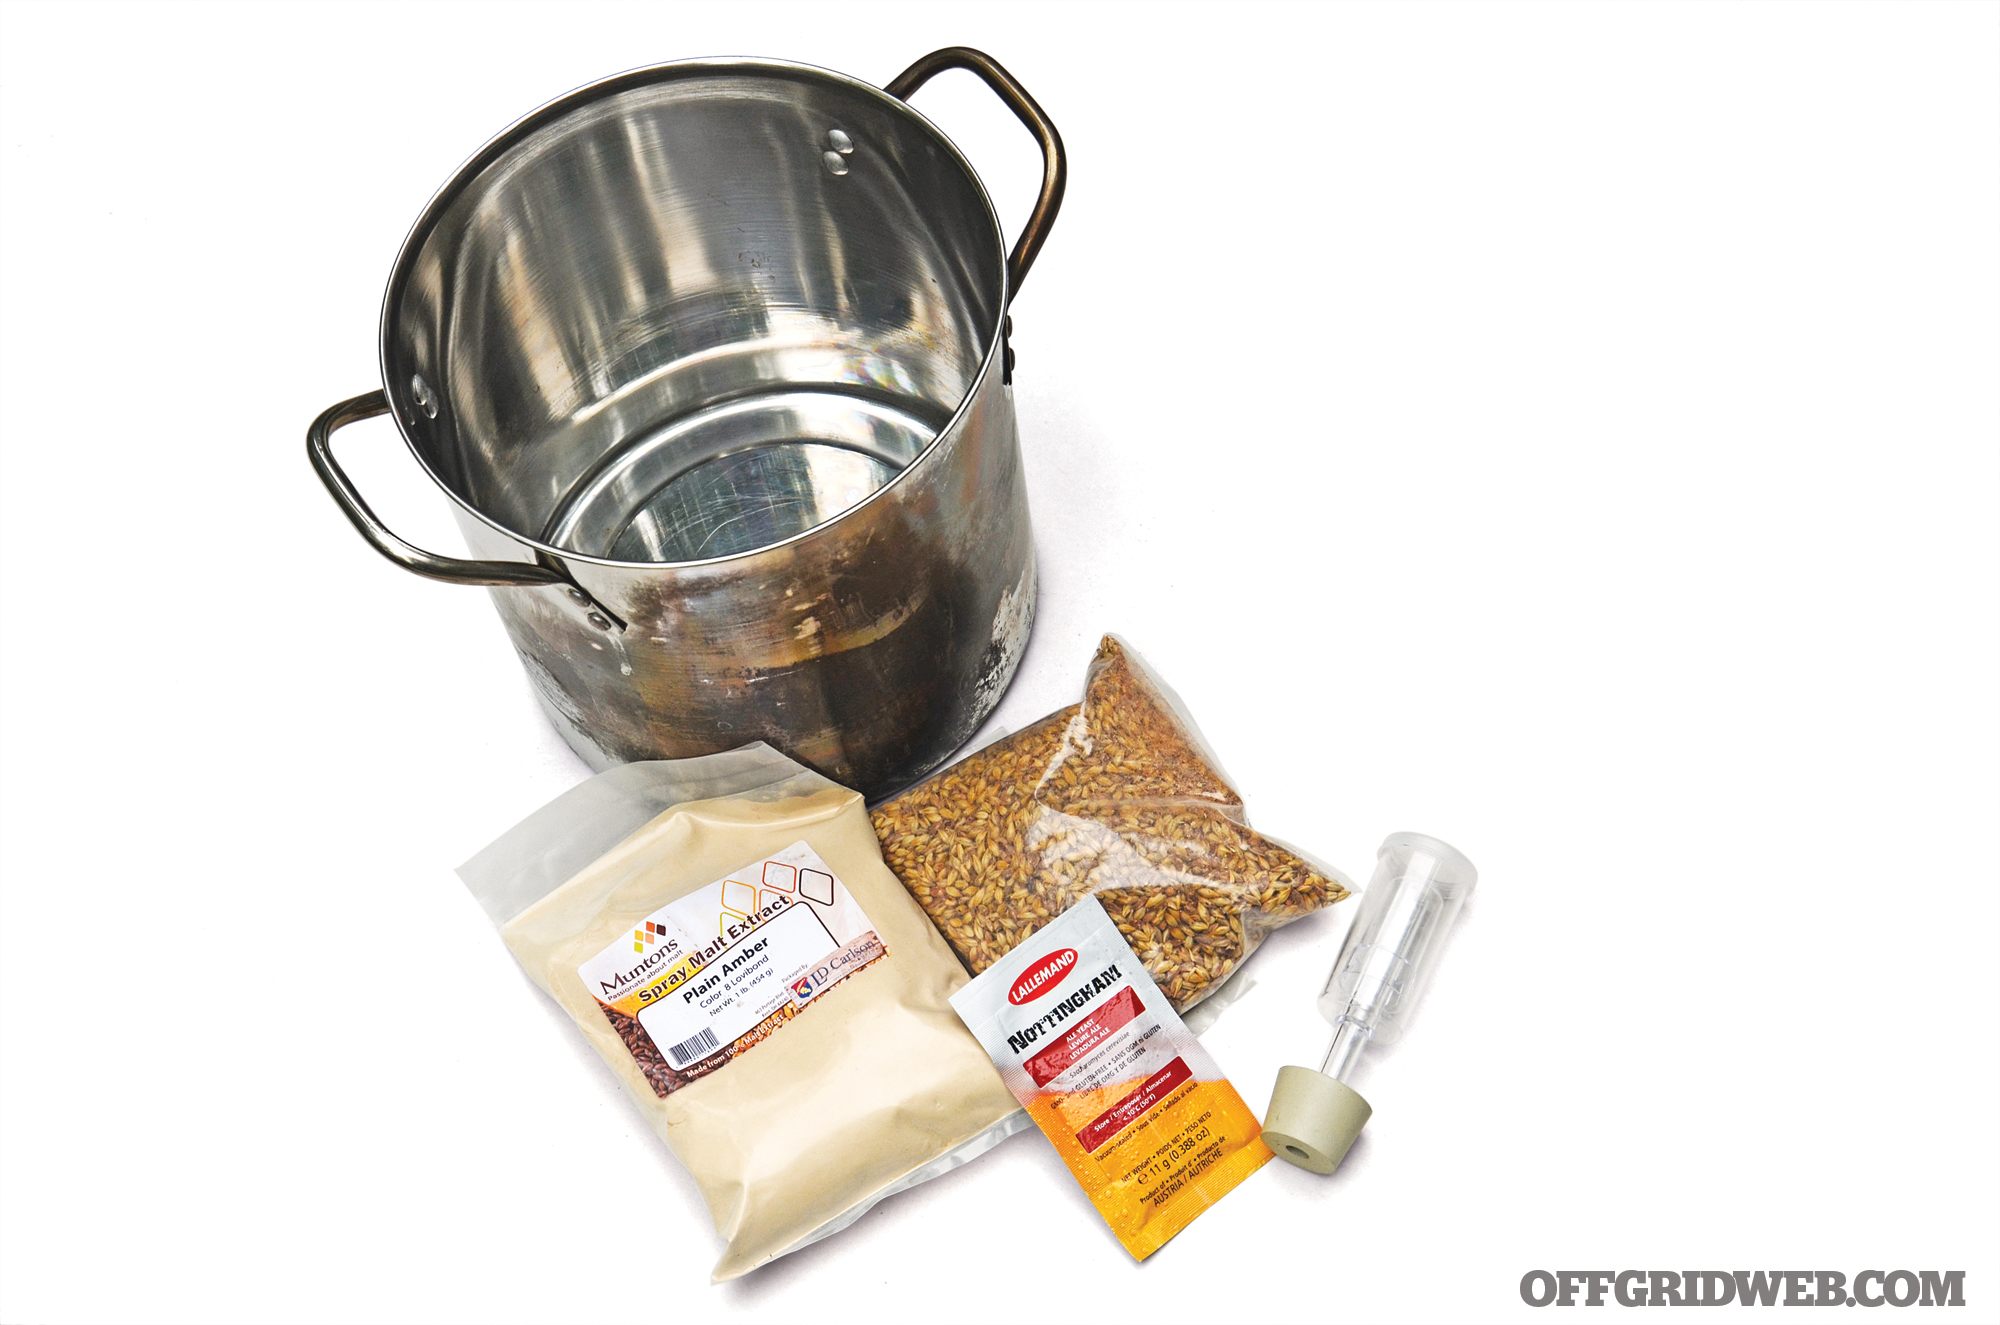
Ingredients: In the old days (and for “all grain” brewing today), home brewers would dampen barley seeds and keep them warm until they sprouted. This sprouting unlocked the malt sugar, and the grain would then be toasted to kill the sprouts and add more flavor. The toasted grain would be crushed and simmered in water to create malt sugar water. Today, you can follow the historic path of 100-percent grain brewing, or take an easier road. Dried malt extract sugar is available commercially, made from many different kinds of malt. This dried sugar powder will keep indefinitely (in a dry, dark, cool place) and is a great choice for preparedness. Skip the canned malt syrup products, as they can potentially lead to the presence of deadly botulism toxin after being stored long term (the cans will swell). In addition to your dry malt extract powder, you’ll need dried hops, ale yeast, a stainless pot, a 1-gallon glass jug, 1 gallon of spring or well water, a wine lock with jug stopper, a clear plastic or vinyl hose that fits the glass jug, a strainer, a funnel, a spoon, a thermometer, and sanitizing solution. When it comes time to bottle the beer, you’ll also need pressure-safe bottles with tight-fitting caps or lids, and a little table sugar to carbonate the beer.
Directions:
Step 1
In a multi-gallon stainless or enamel pot, boil 1 gallon of water with the dried malt extract, crushed grain, and hops for 60 minutes. This breaks down the malt sugar molecules into more “bite-sized” pieces for the yeast to eat. Use a big enough pot and be careful that it doesn’t boil over!
Step 2
Once the hour of boiling is over, cool the pot of liquid quickly by setting it in a container of cold water (ideally, an ice water bath). When the liquid is below 80 degrees F, pour in your yeast and stir. Then, place the sanitized strainer in the funnel and strain the gallon of malt liquid into your sanitized 1-gallon jug.
Step 3
Add your clear plastic or vinyl hose to jug plug, and then arrange the free end of the hose to be submerged in a glass of water. This assembly is called a “blow off hose,” and it’s perfect for dealing with the foamy mess that’ll erupt from your glass jug for the next few days. Place the jug and its accompanying glass of water in a plastic bin (for spills) and set it in a dark place with stable temperatures (ideally from 60 to 70 degrees F). Once you notice that no more foam is flowing through the blow-off hose, switch the hose for a water-filled wine lock.
Step 4
Watch your brew carefully for the first few days. If no bubbles or foam (fermentation) occurred within the first 24 to 36 hours, your yeast was dead in the package or your malt liquid was too hot. Try adding more yeast to save the batch.
Step 5
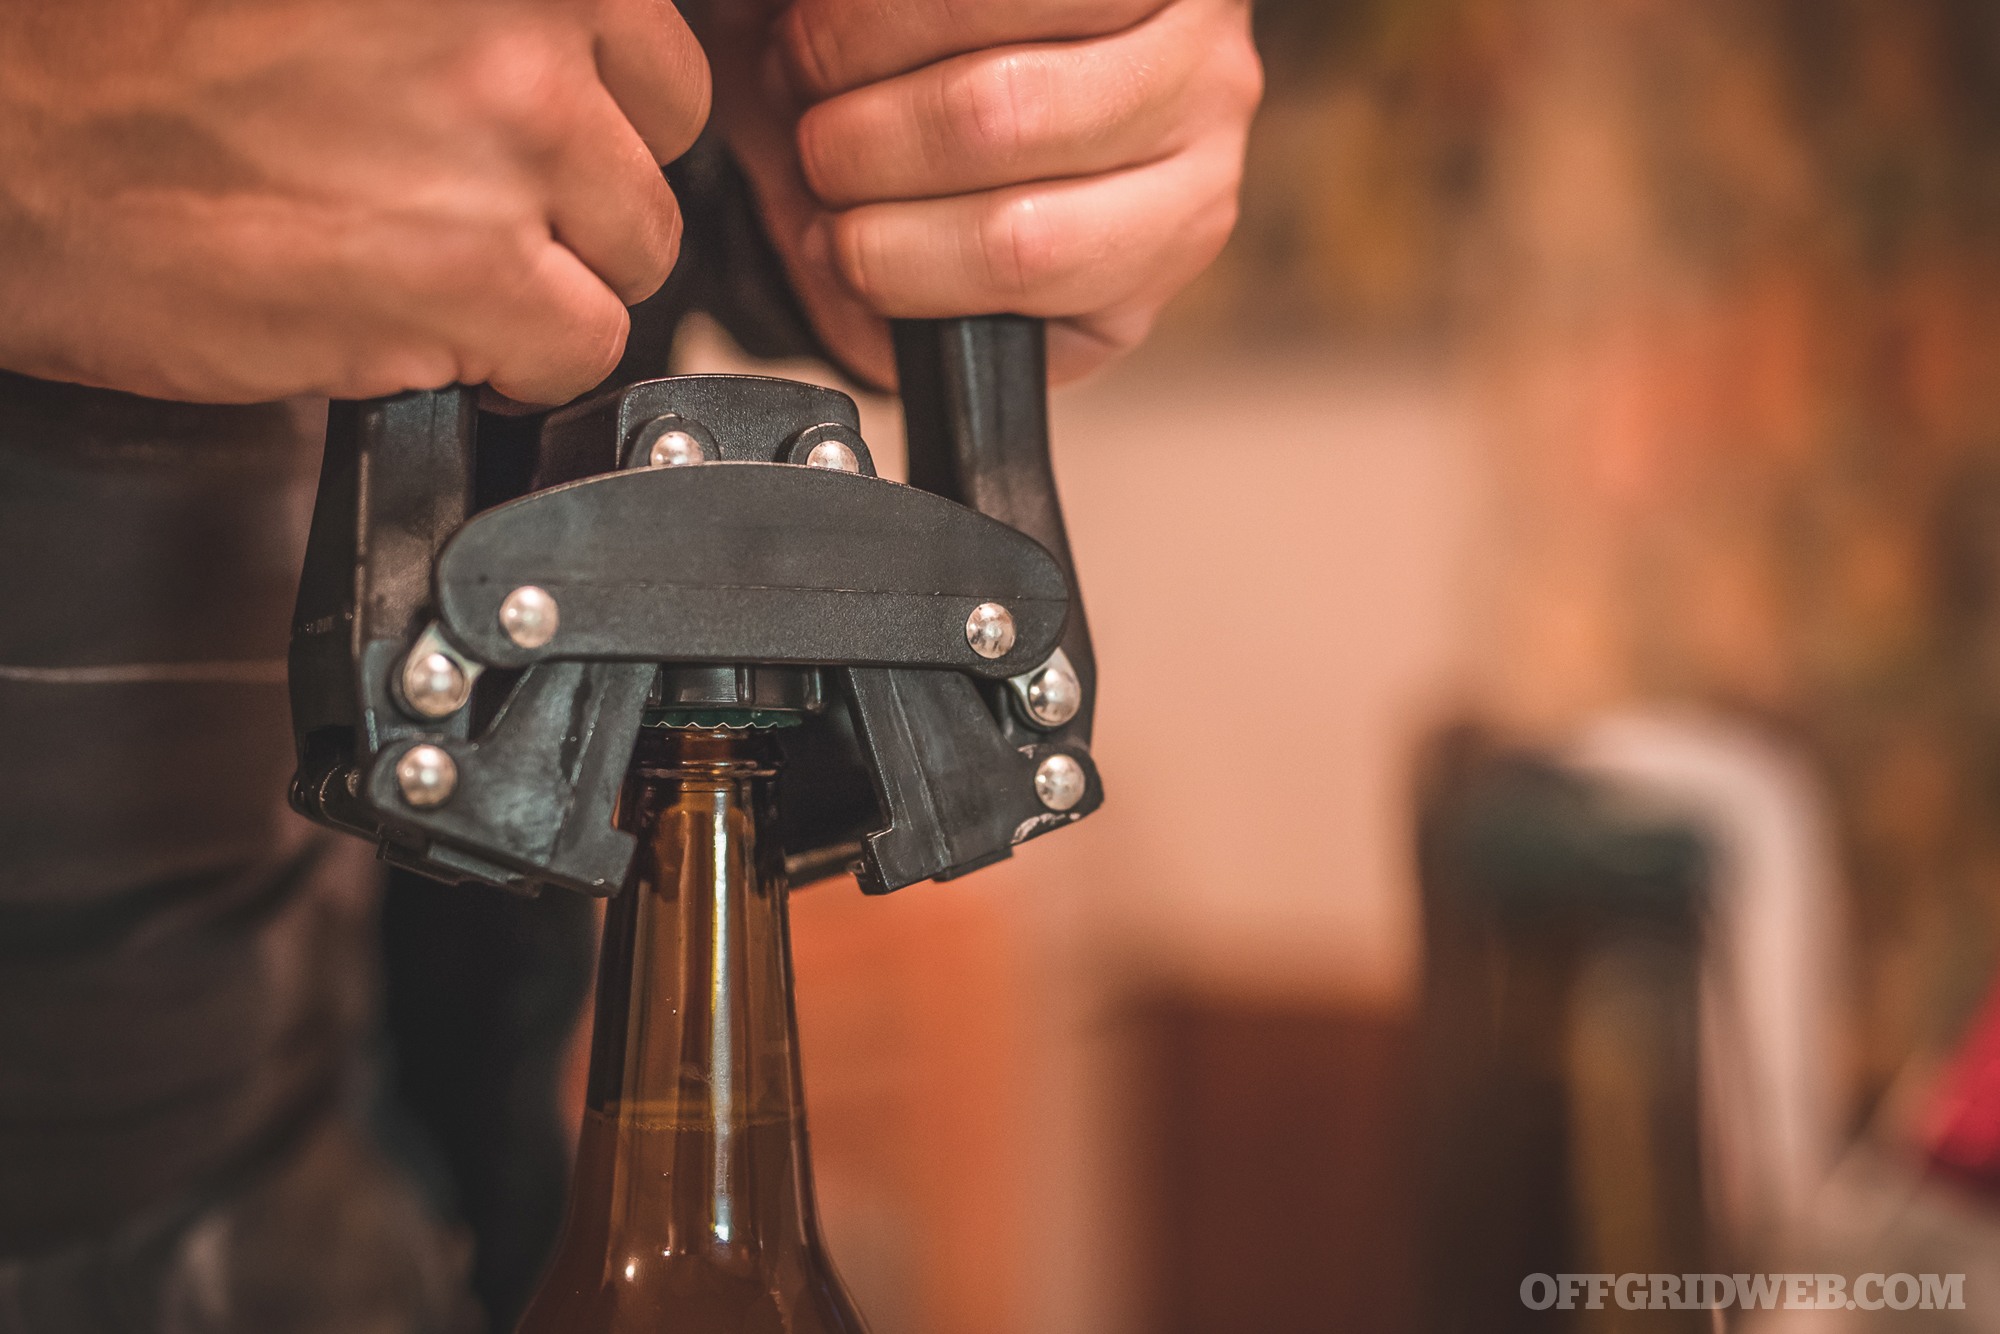
After three to four weeks, the sediment will be building up on the bottom of the glass jug, the bubbling will have stopped and the ale should be starting to clarify. At this point, carefully and slowly pour your beer into a sanitized container (to get it away from the sediment). Add the 1 ounce of table sugar and stir to dissolve. Prepare a small funnel, sanitized bottles, and caps for bottling. Bottle into sanitized bottles and cap them. You’ll need about 10 bottles (12-ounce size) and caps for 1 gallon of ale. You could also use soda bottles and their original caps, after sanitizing (however, you may notice the plastic taste). You could also use flip-top bottles, like Grolsch beer. Just make sure your bottles and caps are well-sanitized and keep your bottled beer in the dark at room temperature for one to two weeks. The yeast in the beer will consume the new sugar, and since the bottles are capped, the CO2 can’t escape. This gas actually carbonates your ale! After carbonation is done, chill your ale, and enjoy.
Ingredients:
- 1 pound of dried amber malt extract
- 6 ounces of caramel malt grain (crushed as best as you can)
- ¼ ounce of Cascade (or other variety) hops (whole dried flowers or pellets)
- ¼ of an 11-gram package of ale yeast (any style of ale will work — save the remaining ¾ package in the fridge for a future batch)
- 1 ounce of table sugar to carbonate the ale
Best Practices for Storage
Shelf life has always been the biggest problem for beer, and unless you have a high-proof strong ale or IPA made with extra malt and extra hops, it’ll get “skunky” in a few months. This is why beer was historically made in small batches and made often. Once you do have some excess built up, keep it in the coolest, darkest place you have. By the way, skunked beer is still safe for human consumption, but it’s just not as nice to drink. Your beer should retain its flavor and quality for several months, or longer if stored cold.
Benefits as a Survival Implement
Sometimes considered “liquid bread” by our forebears, beer gave our ancestors a way to store the calories of their grain without the vulnerabilities of grain. Beer wouldn’t mold in damp weather like grain. Insects, rodents, and pests weren’t interested in beer like they were with grain. Sure, some nutrients are lost in the brewing process — but without better ways to preserve food, beer made a lot of sense. And they felt great after drinking it! We still have all those advantages, and you can use beer for trading and nutrition. You may also be the only person in town who’s able to make beer (making you an even more valuable community member).
Alternatives
You can certainly make beer and wine using nontraditional ingredients and improvised equipment, but we have to caution you. Cobbling together some DIY brewing equipment isn’t too tricky, but getting weird with the ingredients can turn out some unpredictable results, and can even put you in harm’s way.
Create Some Wine Locks: You’ll need “wine locks” for both beer and wine, since they allow carbon dioxide to escape while preventing the abundant oxygen of our atmosphere from getting into the fermentation vessel. One of the simplest improvised versions is a balloon with a tiny hole pierced in it. Just stab an uninflated balloon with a needle to make one tiny hole (don’t punch all the way through it, you don’t need two holes). Stretch the neck of the balloon over the neck of your fermentation jug and add a few rubber bands around the neck of the vessel to help hold the balloon in place. As the balloon fills with CO2, the balloon expands until the pinprick hole opens and the CO2 escapes. Once the pressure drops, the pinhole closes. Leave this in place until the balloon hangs flaccid and isn’t moving anymore. That means your fermentation is likely to be complete.
Stalking The Wild Yeast: Our remote ancestors didn’t have a local homebrew shop (or Amazon) to provide them with hundreds of different yeast strains for wine, beer, and other fermented drinks. They had to get their yeast from the wild. You can too, but the results are a crap shoot. You know that whitish film that covers your grapes, blueberries, and other fruits? This film can be a natural source of wild yeast. There’s also wild yeast stuck to sappy pine and spruce branches. Wild yeast just blows on the wind pretty much everywhere on dry land. There’s even a species in Mongolia that allows fermenting milk to become alcoholic.
Prior to the understanding of microbiology, our brewing predecessors would make wine using raw fruit with the film-covered skin, or they’d strain their cooled beer through dozens of nontoxic evergreen branches (like a filter). They must have thought it was some kind of magic ritual or spell, but they were actually inoculating the brew with the necessary yeast to ferment it. They also knew that skipping those steps would keep the brew from fermenting. Today, we understand yeast and can experiment by adding filmy fruit skins to small batches of wine so we can see if the strains of yeast in the film will ferment and provide good flavors. We could also stir our pot of cooled beer with a live needle-covered pine or spruce branch to introduce wild yeast. Be warned! The wild yeast strains could create amazing flavors or gross ones, you’ll just have to wait and see. Some yeast strains produce esters with caramel flavors, while others produce esters that taste terrible.
A Recipe for Trouble: Those familiar with prison culture have probably heard of prison wine (aka hooch, pruno, or brown baby). This is a DIY alcoholic drink concocted by creative inmates to get a buzz in lock up. Here’s the problem, the pruno recipe is also a great way to make botulism. As you likely know, botulism is an uncommon but extremely potent toxin, attacking the body’s nervous system. With access to professional medical care and life support — meaning a ventilator — most victims recover. But without definitive medical care, botulism poisoning can lead to paralysis and death.
Pruno is typically made with any sweet food scraps the inmates can acquire, and fermented in a plastic bag for several days. The inability to cook the ingredients (and the questionable ingredients themselves) can allow the growth of the bacterium Clostridium botulinum that causes this odd poisoning. And because it’s a bacterially produced toxin (not the live organism) that makes you sick, the alcohol that forms will not kill the problem. Once the alcohol level exceeds 5 percent, most living organisms will die, but the poison they created will remain. Avoid this issue in your brewing by cooking your ingredients to kill all of the organisms they might harbor, and never use potatoes, oats, or food from bulging cans as home brew ingredients.
DIY Beer and Wine Mistakes
There are plenty of things that can go wrong with your homemade alcohol during preparation, fermentation, bottling, or storage. Thankfully, a lot of these faux pas are easy to prevent. Here are three beginner mistakes that I see all too often.
The Wrong Disinfectant: Bleach is a great disinfectant for many things, including drinking water, kitchen countertops, and fouled laundry, but that doesn’t mean it’s a good fit for brewing. The last time I used bleach to clean bottles provided me an experience I’ll never forget. There must’ve been some bleach residue in a bottle that I filled with some very promising ale. But upon tasting, I’ve never spit out a drink so fast in my life. As soon as the liquid hit my tongue, I sprayed it across the wall. The flavor was what I imagine a combination of molten plastic and toilet cleaner tastes like. Don’t use bleach to clean your bottles or other brewing supplies. Instead, use the brewing disinfectant we recommended, or high-proof vodka. You could also boil your non-melting gear in water for five minutes.
Too Much Light: Ever wonder why so many wines come in dark green bottles and many beers come in dark brown glass? Sunlight is needed to grow the grain and fruit that we’ll turn into beer and wine but after that, the relationship is over. As your liquids ferment and while they’re in storage, block all possible sunlight — especially if you’re stuck using clear glass containers. Sunlight can actually create many “off” flavors in your beer and wine.
Killing Your Yeast: There are several things that can kill your yeast, the little workhorses that turn sugar into booze. The most common culprit is that you add the yeast while the beer or wine is too hot. I know you’re in a hurry to make your beer or wine, but it’s going to be weeks before the beer is ready to drink and months for the wine. Wait the extra few minutes for your liquid to cool down to room temperature before “pitching” the yeast. Also be aware that many juices you might try to ferment have been treated to prevent microbial growth (which includes yeast). I know, that big jug of “preservative- free” apple cider is just begging to be turned into hard cider, but if it came from a store, it’s been treated. I don’t care what the label says, something has been added and your yeast will die. Don’t waste your time. If you want hard cider, go to an orchard and watch them press the apples and grab a jug of fresh unpasteurized juice. That’ll usually turn into a fine alcoholic cider.
Bring Your Utensils!
You don’t need too much gear to start home brewing, but here are a few grid-down brewing and distillation utensils you won’t want to be caught without.
Non-Electric Scale: For measuring sugar, hops, and any number of other ingredients and adjuncts, a little spring scale is a great choice. It’ll last for years, it doesn’t mind getting wet, and it’s EMP and CME proof, unlike electronic scales.
Thermometer and Spoon: Self-explanatory.
Stainless Pots: Don’t boil your brew in aluminum pots. Stainless is the best choice, unless you have unchipped enamel pots available. Cast iron, copper, tin, and aluminum can react with acid and sugar, creating some unpleasant tastes.
Bottle Capper and New Caps: You can keep using beer bottles over and over, so long as the bottle mouth is undamaged and they’re well cleaned and disinfected between uses. But you’ll need a bottle capping tool and new caps to keep the system going. These supplies aren’t expensive and easy to find from homebrew suppliers. FYI, you can’t recap twist-off bottles with new metal caps; you can only re-cap pry-off beer bottles.
Wine Corker and New Corks: Just like the beer bottle capper, you’ll need a corker and corks to store your wine. Neither is particularly expensive, and many different types of corks are on the market. Go with natural long-length corks if you want to age the wine for years (instead of months).
Stainless Mesh Strainer: Catch all the gross stuff before it goes into the fermenter.
Funnels: You can’t have too many funnels. Little ones are great for filling beer bottles. Big ones are needed to pour from cooking pot into a fermenting jug. Try to get a funnel big enough to hold your mesh strainer to limit the splashing and mess.
Conclusion
With the right combination of yeast, sugar, flavorings, water, and time, you too can join the honorable ranks of home-brewers worldwide. The main advantage to knowing this art form is your ability to resupply yourself and others. Drinkable alcohol has so many uses, that knowing how to provide it could make you an even more valuable player for your survival group or community. And the main disadvantage of this art is that everyone will always be nagging you for beer and wine, and growing impatient when you keep telling them “it’s not ready yet!”
Many of us like our alcohol and, as a species, we’ve been brewing for thousands of years. For the vast majority of that time, our alcoholic beverages were produced in the home or by local providers. These drinks have evolved from unique combinations of regional ingredients to become sophisticated beverage styles known around the globe. Yet at their heart, they’re still drinks that our forebears would recognize. No matter how complex your recipes may be, it’s still just fermented grain or fruit; you don’t need a chemistry degree to create home brew. You don’t need thousands of dollars of elaborate gear to create something tasty, either.
Pay attention to the recipe and the details, keep things clean, don’t rush the process, and have fun. Even if these skills are never necessary for your doomsday trading post and wine shop, they’re a lot of fun to practice and give us a chance to sample some of our oldest heritage products — one glass at a time.
