In This Article
Every successful relationship starts with communication. This mantra is important for us as prepared individuals, because no matter the circumstances, we need to communicate with our loved ones and those who rely on us. In a grid-down disaster or even just a back-country emergency, being able to talk to another human being can bring on a sense of calm and also get you out of a sticky situation. History has shown us that cell phones can be very unreliable, either as a result of overloaded cell towers or poor signal strength. Ham radio, on the other hand, doesn’t get overwhelmed and has proven extremely useful during crises. This is why it’s wise to carry a handheld emergency radio, either as a primary or secondary communication tool.
Getting on the Air with a Handheld Emergency Radio

We should get this disclaimer out of the way first: it’s essential to understand your radio’s capabilities as well as local and federal laws before you begin transmitting. The ever-popular Baofeng UV-5R or BF-8 are great radios for the price, and a wonderful place to get started on your ham journey, but they can also help you inadvertently break the law if you don’t know what you’re doing. For a more in-depth article on handhelds, check out “Can Anyone Hear Me?” in Issue 38 of RECOIL OFFGRID. Patrick McCarthy gives a nice breakdown of the bands used within the VHF and UHF range, which we’ve included below.
Family Radio Service (FRS): If you’ve ever used the walkie-talkies sold in blister packs at retail stores, you’ve probably used this service. FRS radios require no license but are limited to 2 watts of output power and can’t use a detachable antenna, so you’ll rarely see range beyond a mile.
Multi-Use Radio Service (MURS): Like FRS, this service doesn’t require a license. It’s slightly better due to the ability to use external antennas, but the FCC’s guidelines for MURS prohibit the use of repeaters to extend range.
General Mobile Radio Service (GMRS): This service is one step better for emergency communication purposes, since it can be used with repeaters. It requires a $70 license, but there’s no test required, the license lasts for 10 years, and it automatically applies to all members of your immediate family. However, power restrictions limit its range in comparison to ham radio.
Ham/Amateur Radio: Ham radio offers the most versatile capabilities and the most robust community of operators to communicate with. However, in order to legally use a ham radio, you’ll need to pass a test and get a license. There are three license categories: Technician, General, and Extra. The first is the most practical for general emergency preparedness; the associated 35-question multiple-choice test costs about $15 and can be passed easily after studying for about a week. The other two categories offer increasing levels of access to HF for intercontinental communication.
When you take a ham radio license test, you can find out immediately if you passed or failed. If you failed the test by only a few questions, you can often retake a slightly different version of it on the same day (you’ll need to get approval from the Volunteer Examiner who is proctoring the test and pay the fee again). After passing the test and waiting a week or two for processing, you’ll be assigned a six-character call sign. At that point, you’re cleared to begin transmitting.
Bringing Your Handheld Radio with You
Once you understand the different ways to use the radio, now comes the time to make sure you have it when you need it, and keep it accessible and secure.
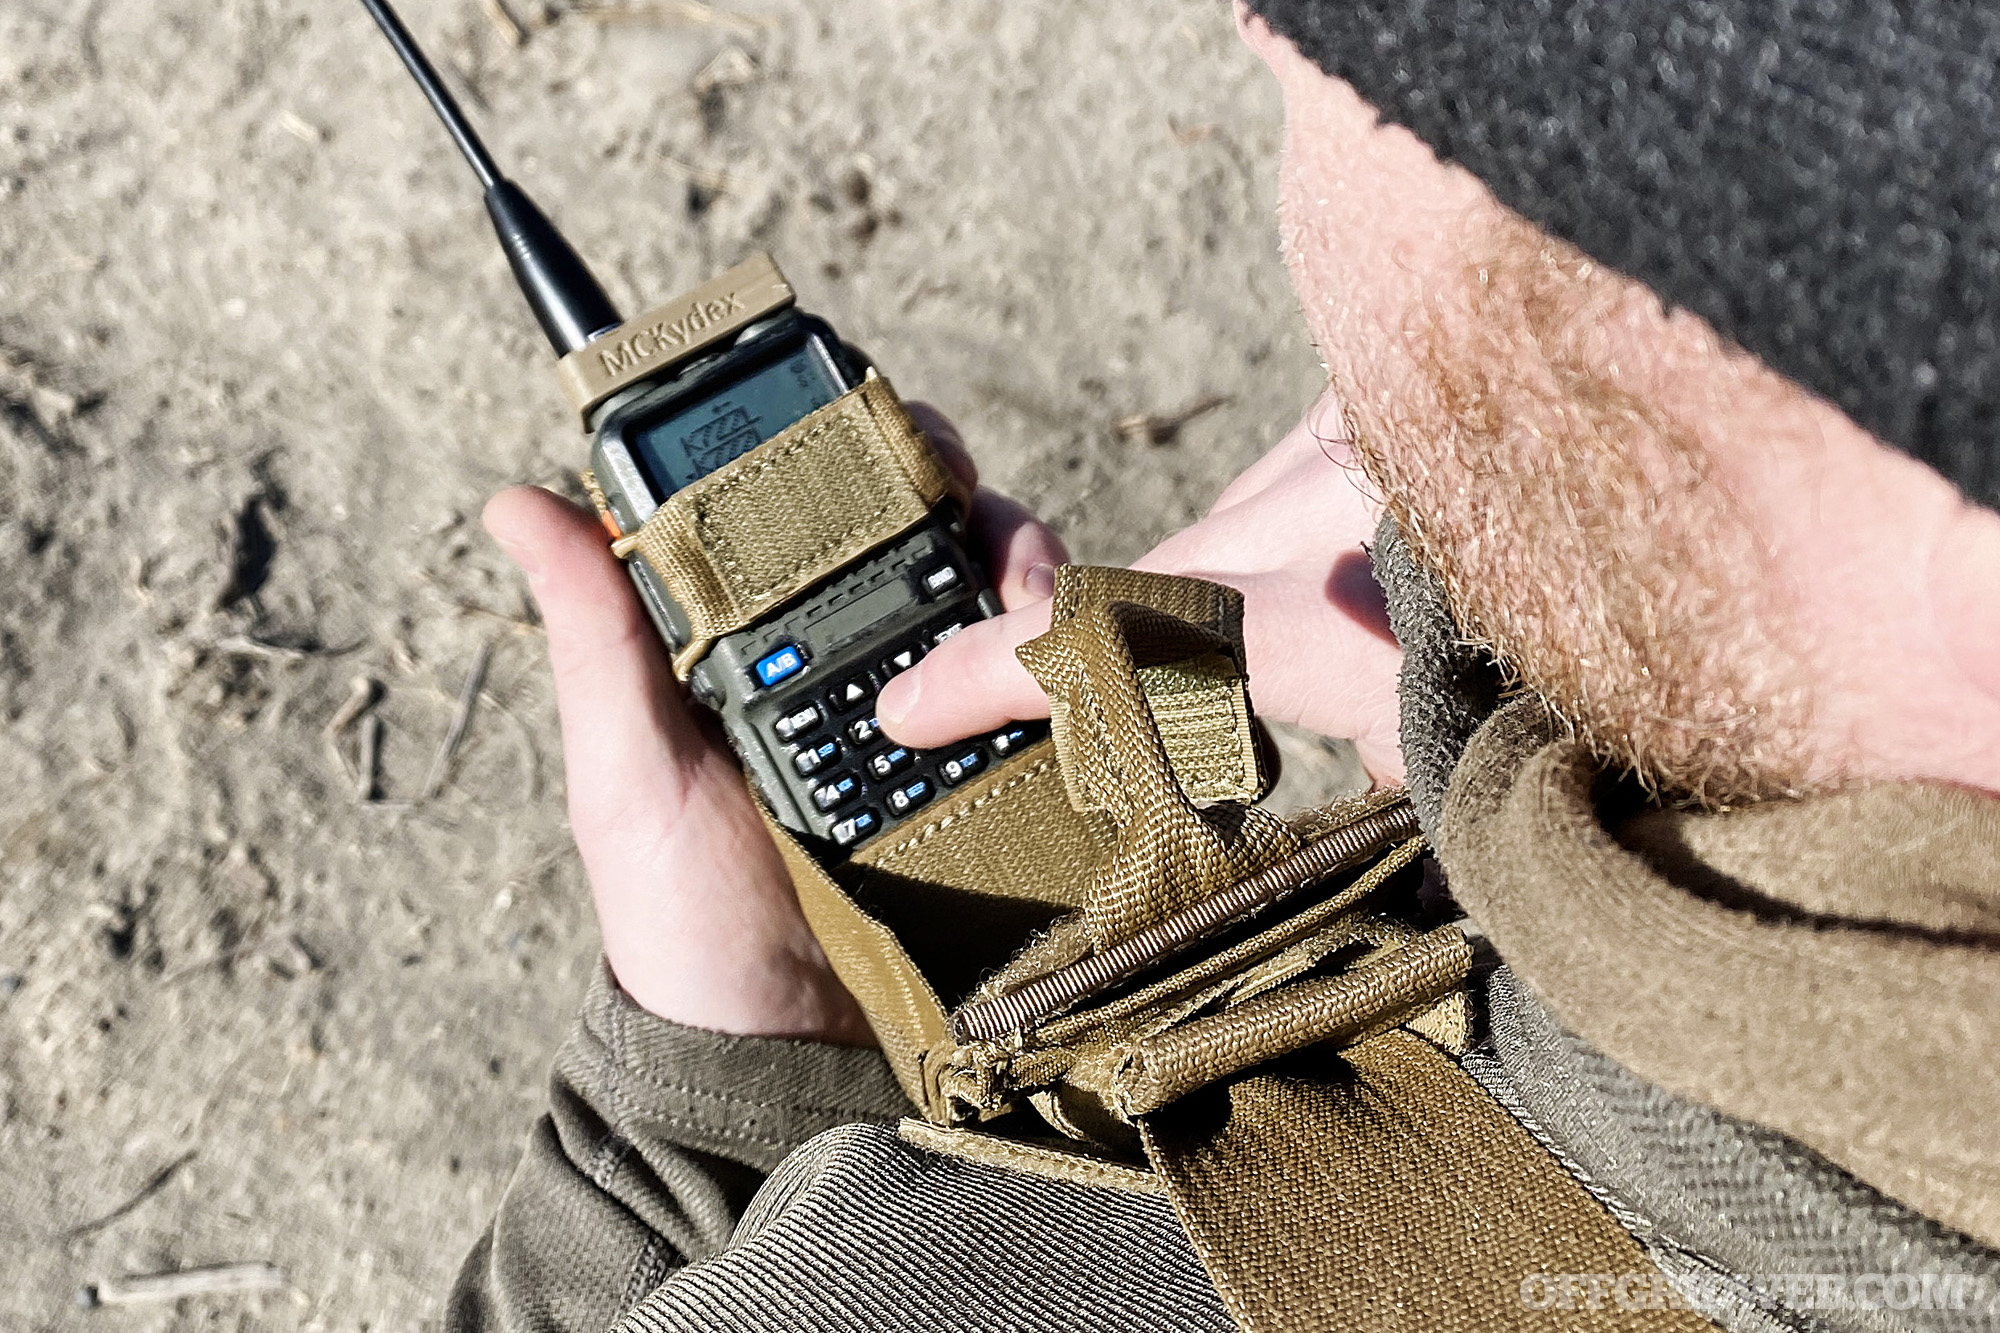
Above: This ITS Tactical 10-4 pouch offers access to the radio’s buttons without removing it from the pouch. It’s mounted on the shoulder strap of a Hill People Gear Kit Bag, and also has an MC Kydex knob protector.
There are numerous radio carriers on the market, and some offer more than others. The Tactical Tailor Small Radio pouch allows great adjustability for handheld (HT)radios and is MOLLE or belt compatible. Mounting on a belt with an earpiece keeps the radio out of the way; keeping the pouch on a backpack strap near the head can assist in hearing the built-in speaker and allowing the user to speak directly into the radio. Another option is the ITS Tactical 10-4 Radio Pouch. This pouch has several different mounting methods, places for a retractable tie down or spare battery, and you can “deploy” the radio forward to see the screen without having to remove it from the pouch. The downside to pouches like this is the knobs are exposed, which can lead to unwanted adjustments.
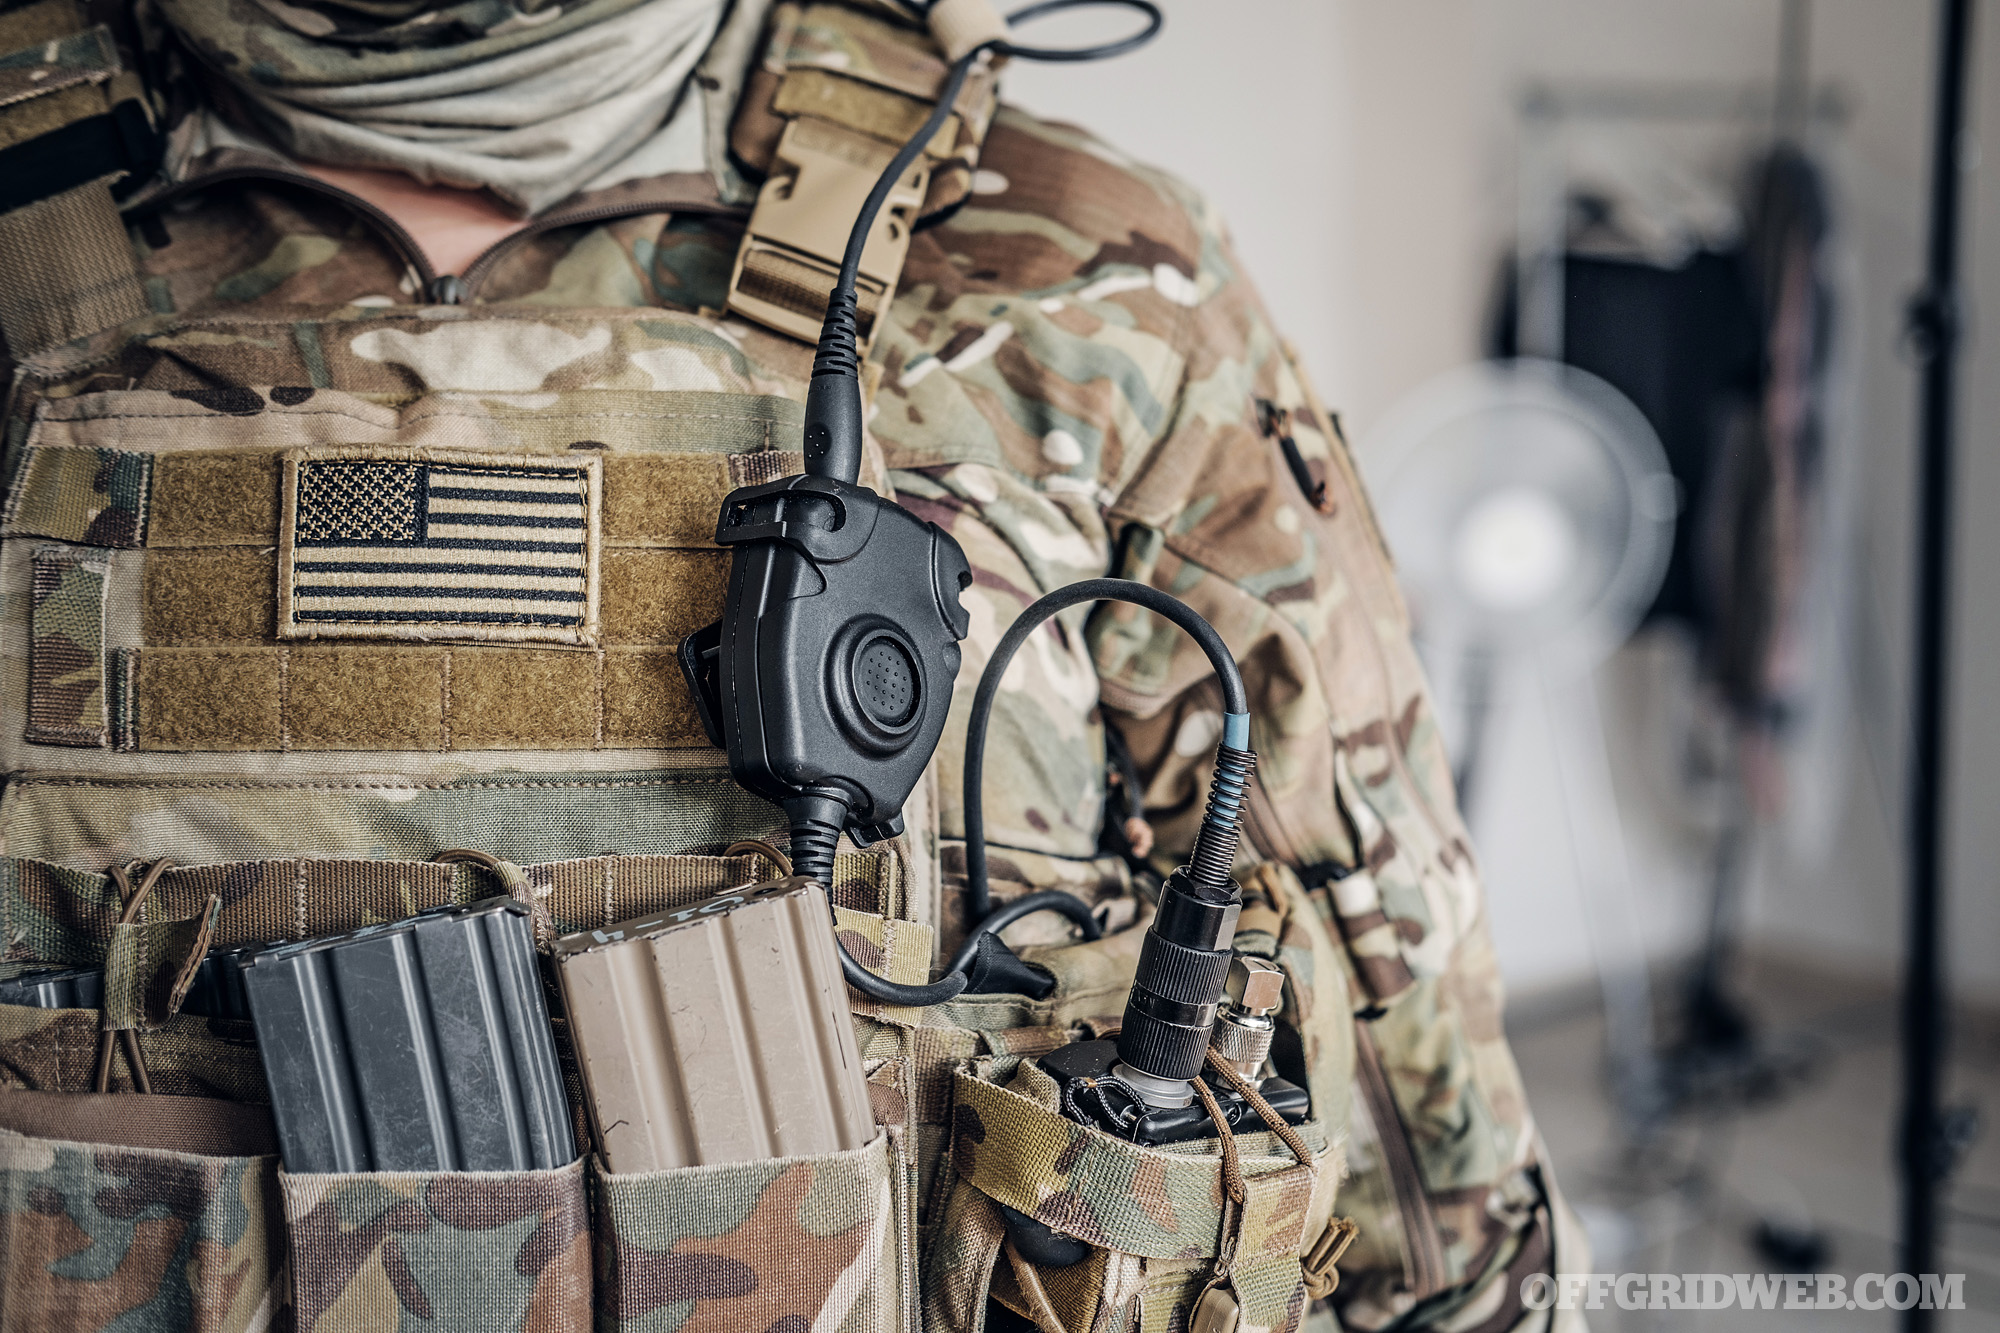
If you wish to incorporate the radio into a chest rig or plate carrier, besides the previously mentioned pouches, you can consider a wing system like the Ferro Concepts Wingman. These are large elastic pockets that hold your radio while velcroing to the back of many common chest rigs. The benefit to these is they are very tight and limit the chance of a radio falling out while also holding in any headset or PTT (push to talk) buttons. They also cover the faceplate, which can light up at night while receiving or transmitting. The downside is the lack of ability to make any changes to the radio without removing it from the pouch. Also, if other gear is mounted too close to these soft pouches, it can accidentally press buttons.
The other option covered for carrying your radio is a hard Kydex carrier. These offer a variety of mounting options as well as protection for the radio. Many incorporate knob protections also. The author’s favorite option is from MC Kydex, known as the Rapid Access Comms Carrier or RACC. This carrier is specific to the Baofeng UV-5R with extended battery and offers protection of the radio, access to the necessary attachment points, and a hinge that allows the user to access the front panel of the radio when needed, using a pull-the-dot button. The radio is secured with two elastic shock cords. However, further considerations are necessary for this type of carrier.
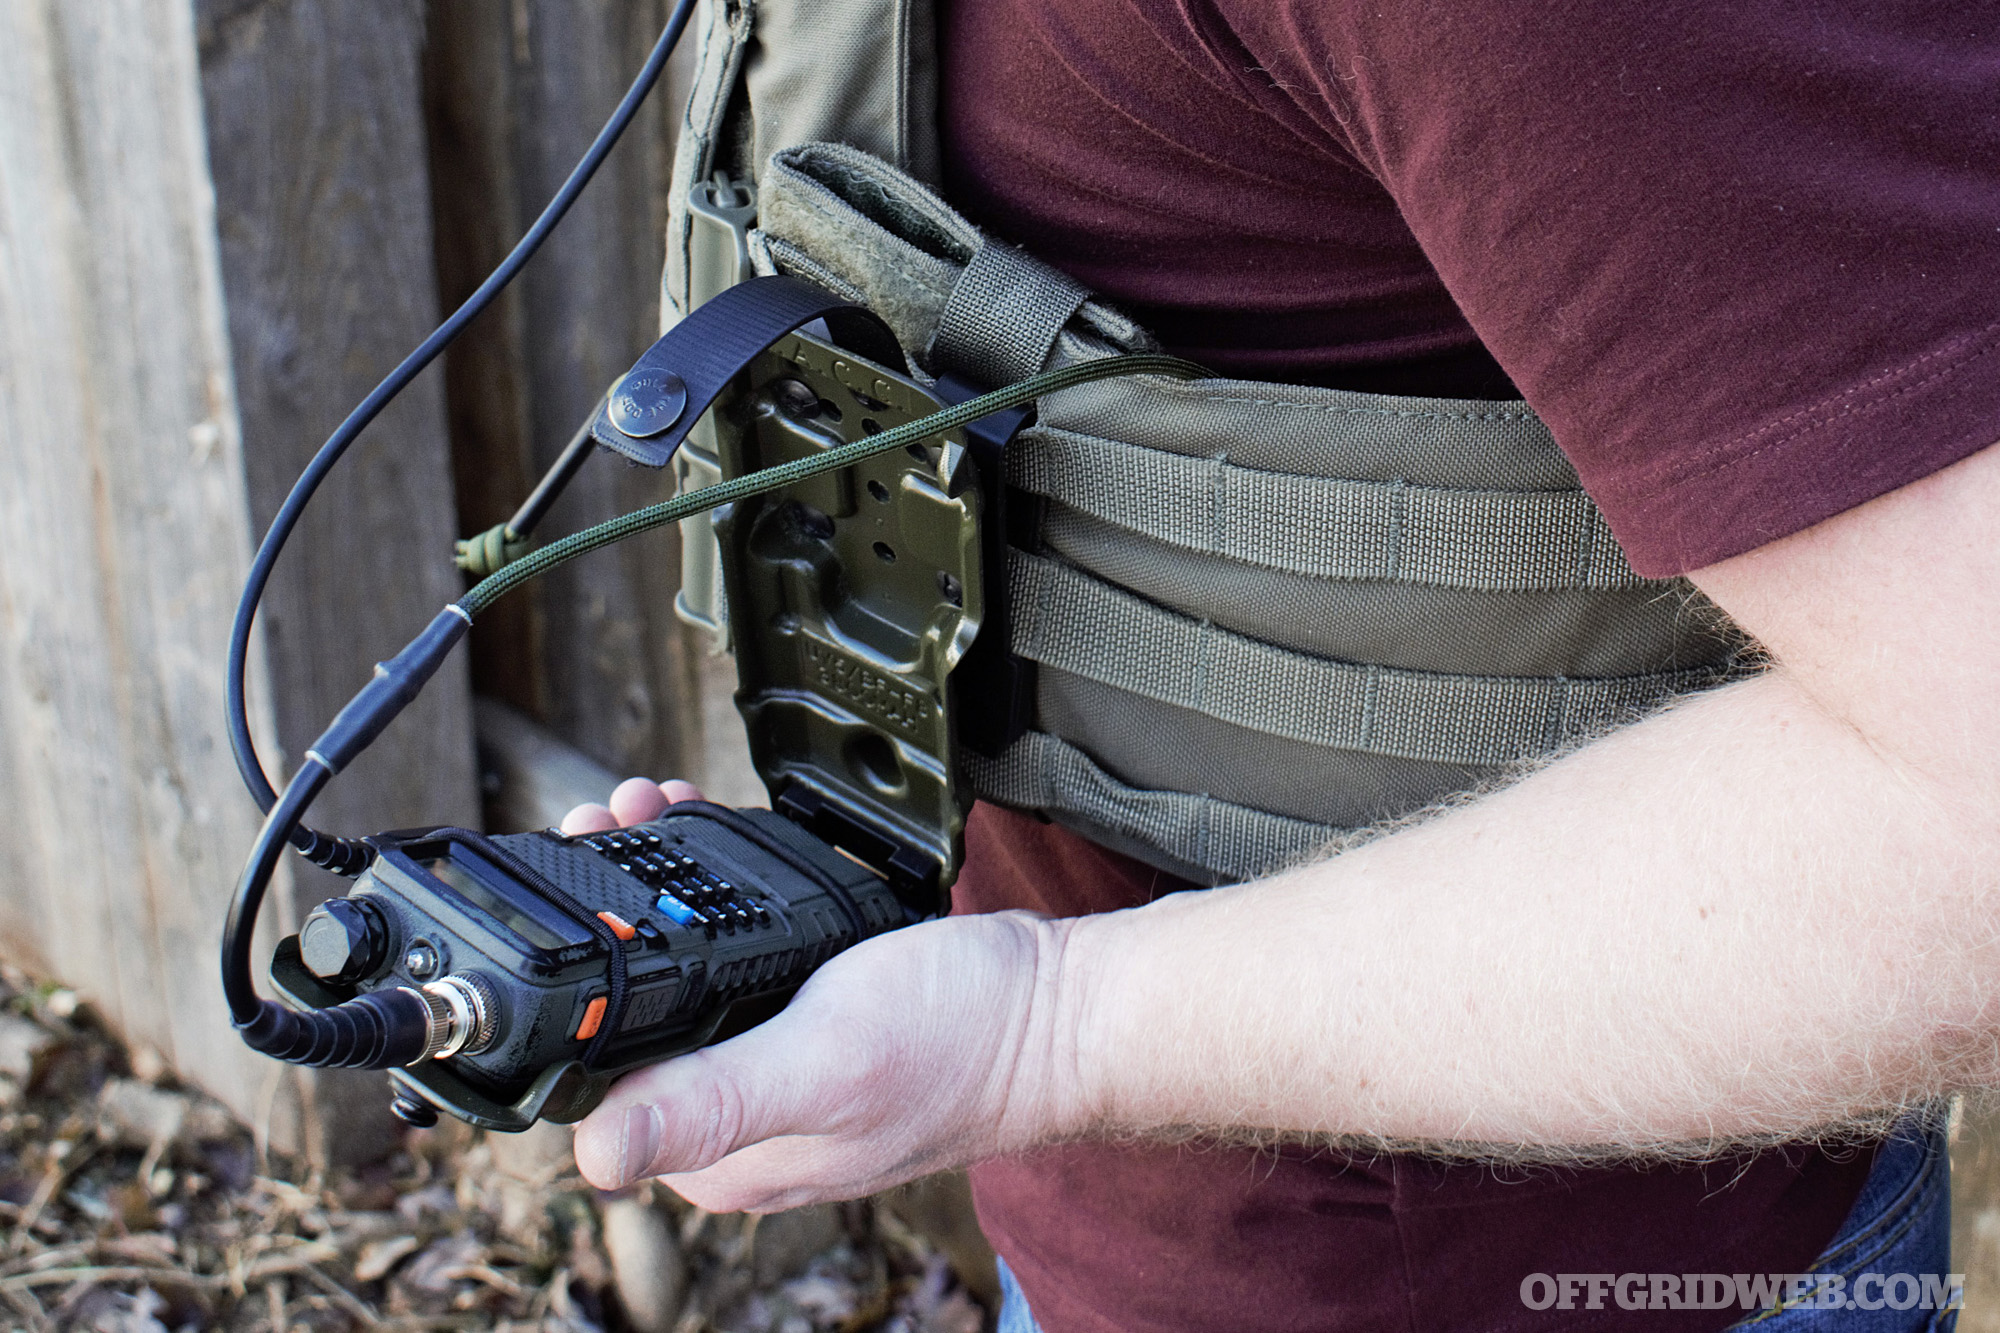
Above: The MC Kydex R.A.C.C. attached to a plate carrier. The CAATail antenna is routed along the cummerbund and up the back; the PTT is mounted to the chest and connected to a headset.
One final note on pouches — knob protection is important because the knobs on top of the Baofeng (or other radios) can get bumped and turned. At best, the volume goes up; at worst, it switches the channel or turns off the radio, and now you can’t hear or talk to anybody. Baofeng knob protectors can be 3D printed or purchased. Some are large and bulky; others are small and fit very tight. Some individuals add a small rubber O-ring to the knob to make it more secure, which is a cheap option and isn’t radio dependent. If your pouch doesn’t lend to keeping the radio inside it at all times, consider a dummy cord or some kind of retractable lanyard. Dropping your radio and breaking it or losing it would be a major bummer.
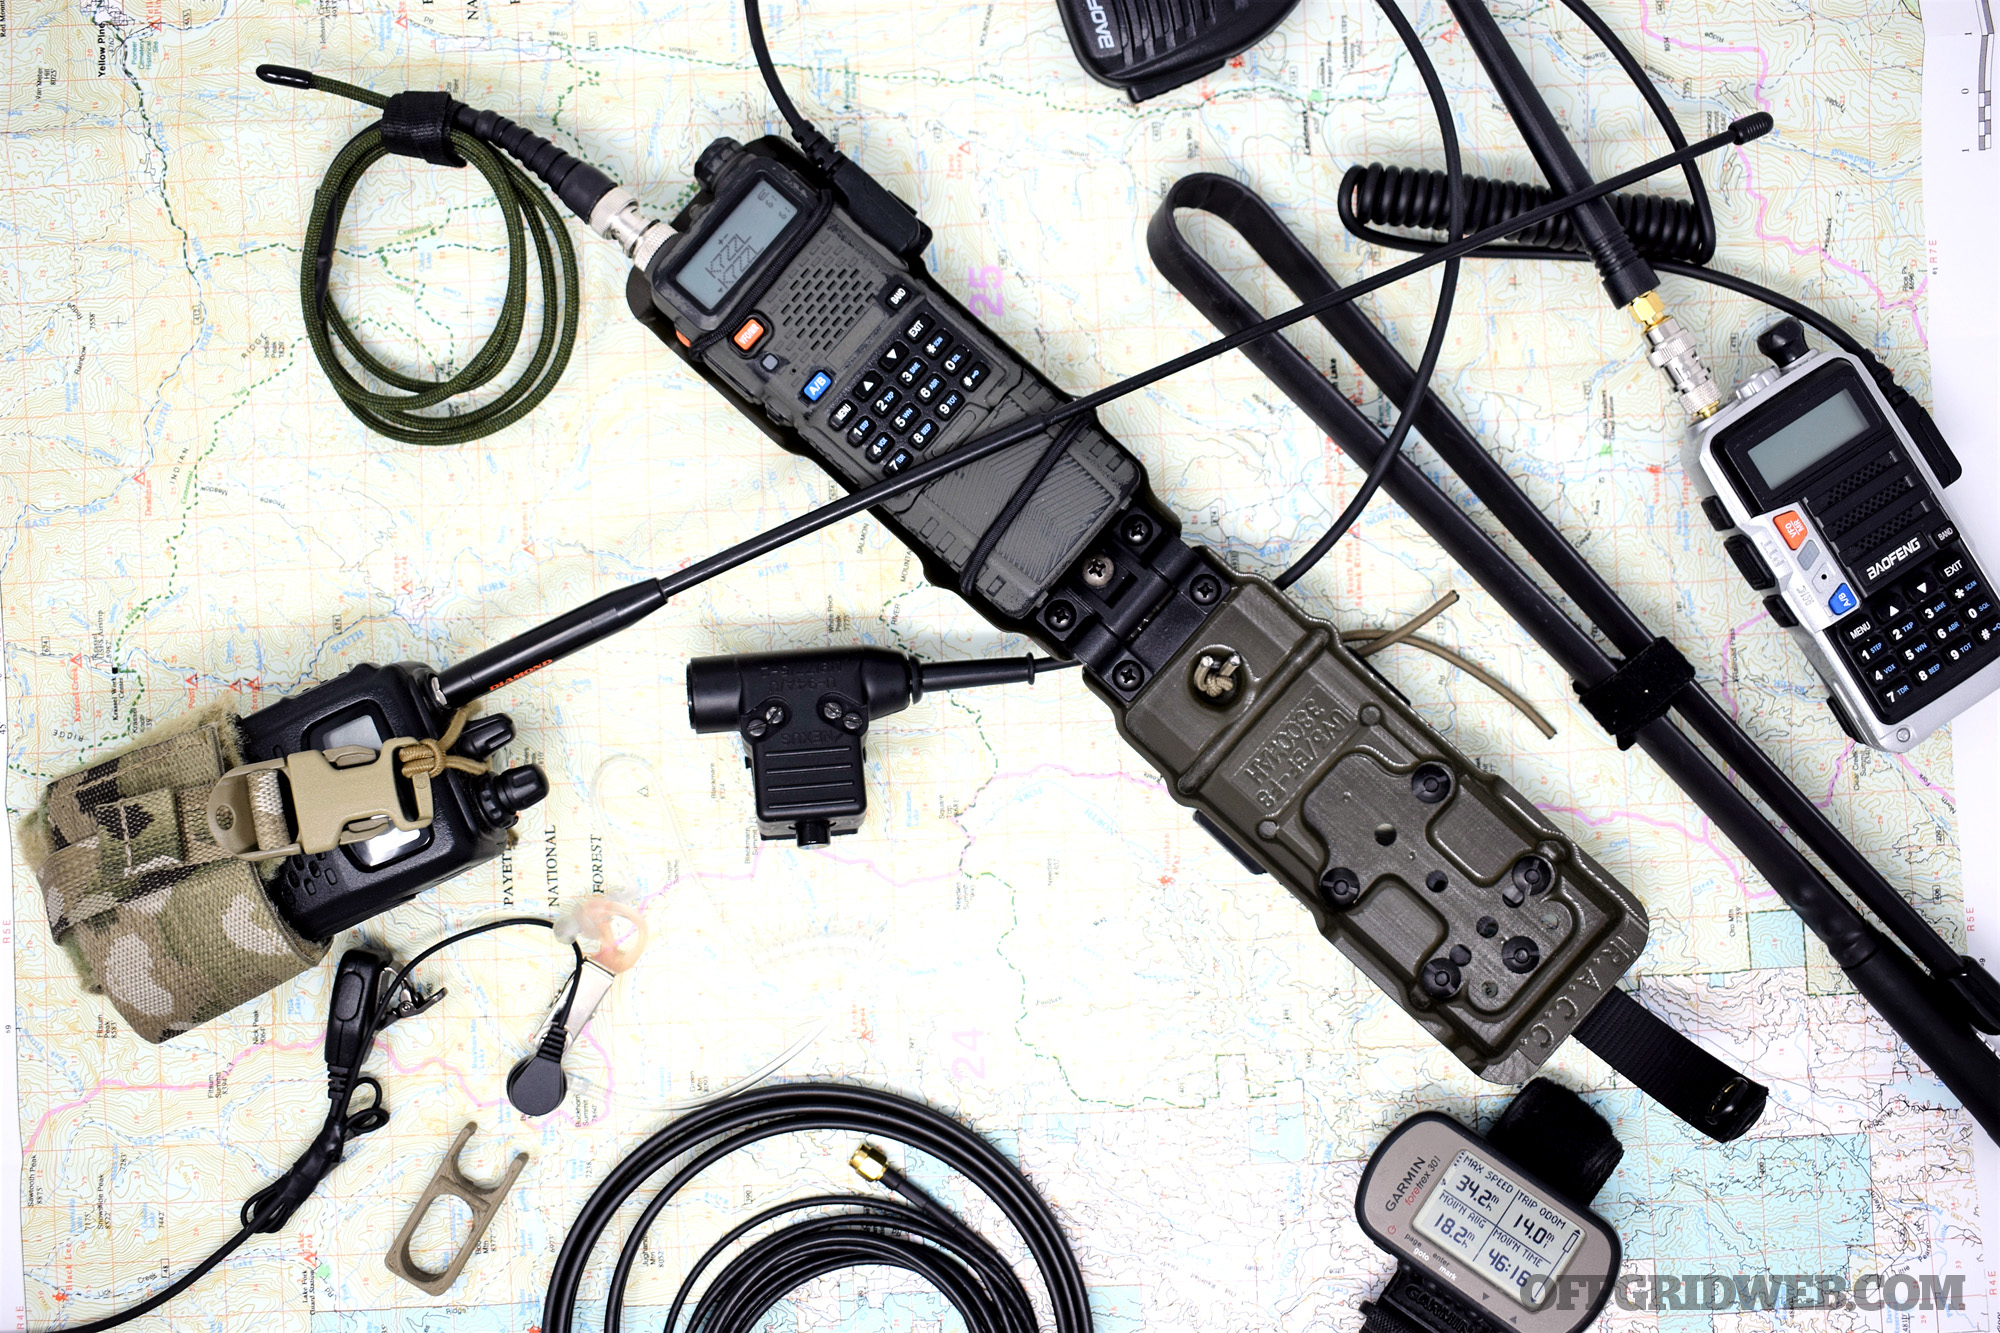
Handheld Radio Antennas
Antennas are hugely important for the capability of your radio. The market has provided the consumer with an incredible number of options to tailor to specific needs. Whip- or duck-style antennas are skinny, usually flexible, and vary in length. They’re a great option when wearing the radio on a belt or on a chest rig, and they can be tailored to fit within the given spaces. The foldable whips, like those from Abbree, offer the user a chance to extend the antenna as needed — some models are as long as 48 inches. Ham Radio Crash Course on YouTube did a great break down of these types of antennas and their effectiveness.
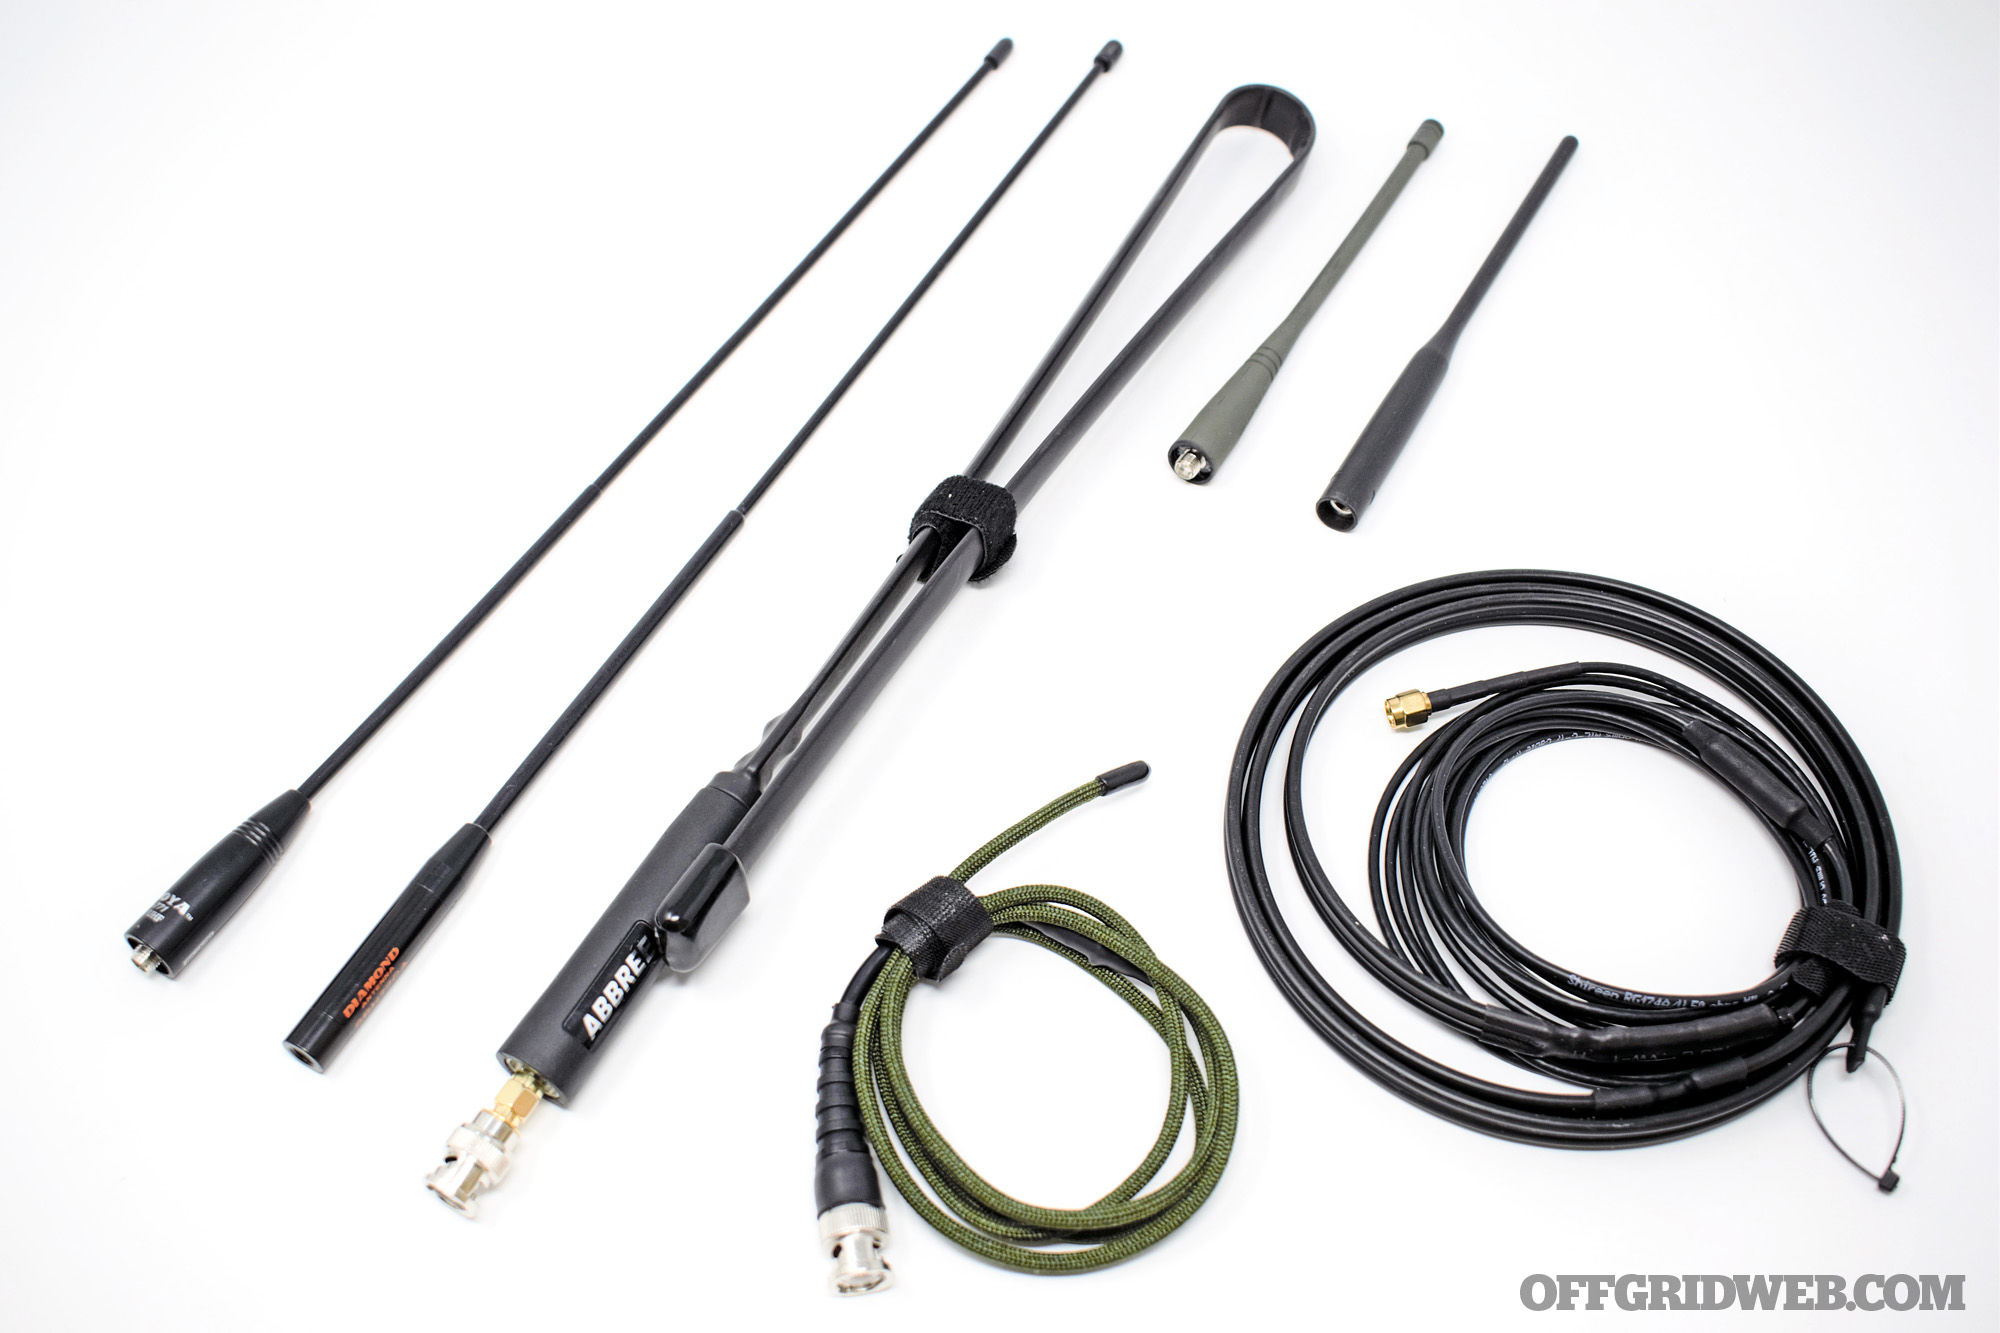
Above: Having multiple antennas helps tailor the radio to your needs. Pictured from left to right: Nagoya NA-771, Diamond SRH77CA, Abbree Whip, CAATail Antenna Baofeng Package, Nelson Antenna J-Pole. Top row: Factory Baofeng, Factory Yaesu.
Wearable antennas are very helpful when using a radio on a plate carrier. These are flexible antennas, usually with a sheath similar to 550 cord. They can be woven into PALS webbing, keeping them very low profile and out of the way when in full kit. CAATail Antennas offers several different colors and connections to best suit your radio. They have a Baofeng-specific kit for simplicity. These types can also be used to conceal the antenna when in a stationary place like a campsite or observation post. Remember that simply attaching a long antenna won’t automatically improve performance. To maximize performance, you’ll need to run it straight up in an area with clear line of sight to the target receiver.
The J Pole antenna isn’t intended to be wearable, although you could have it attached to the radio and mounted on a kit. It’s nice to have if you’re planning to spend an extended period of time somewhere that may be obscured, since you can suspend this antenna to help with radio performance. They’re lightweight and compact and will increase capability.
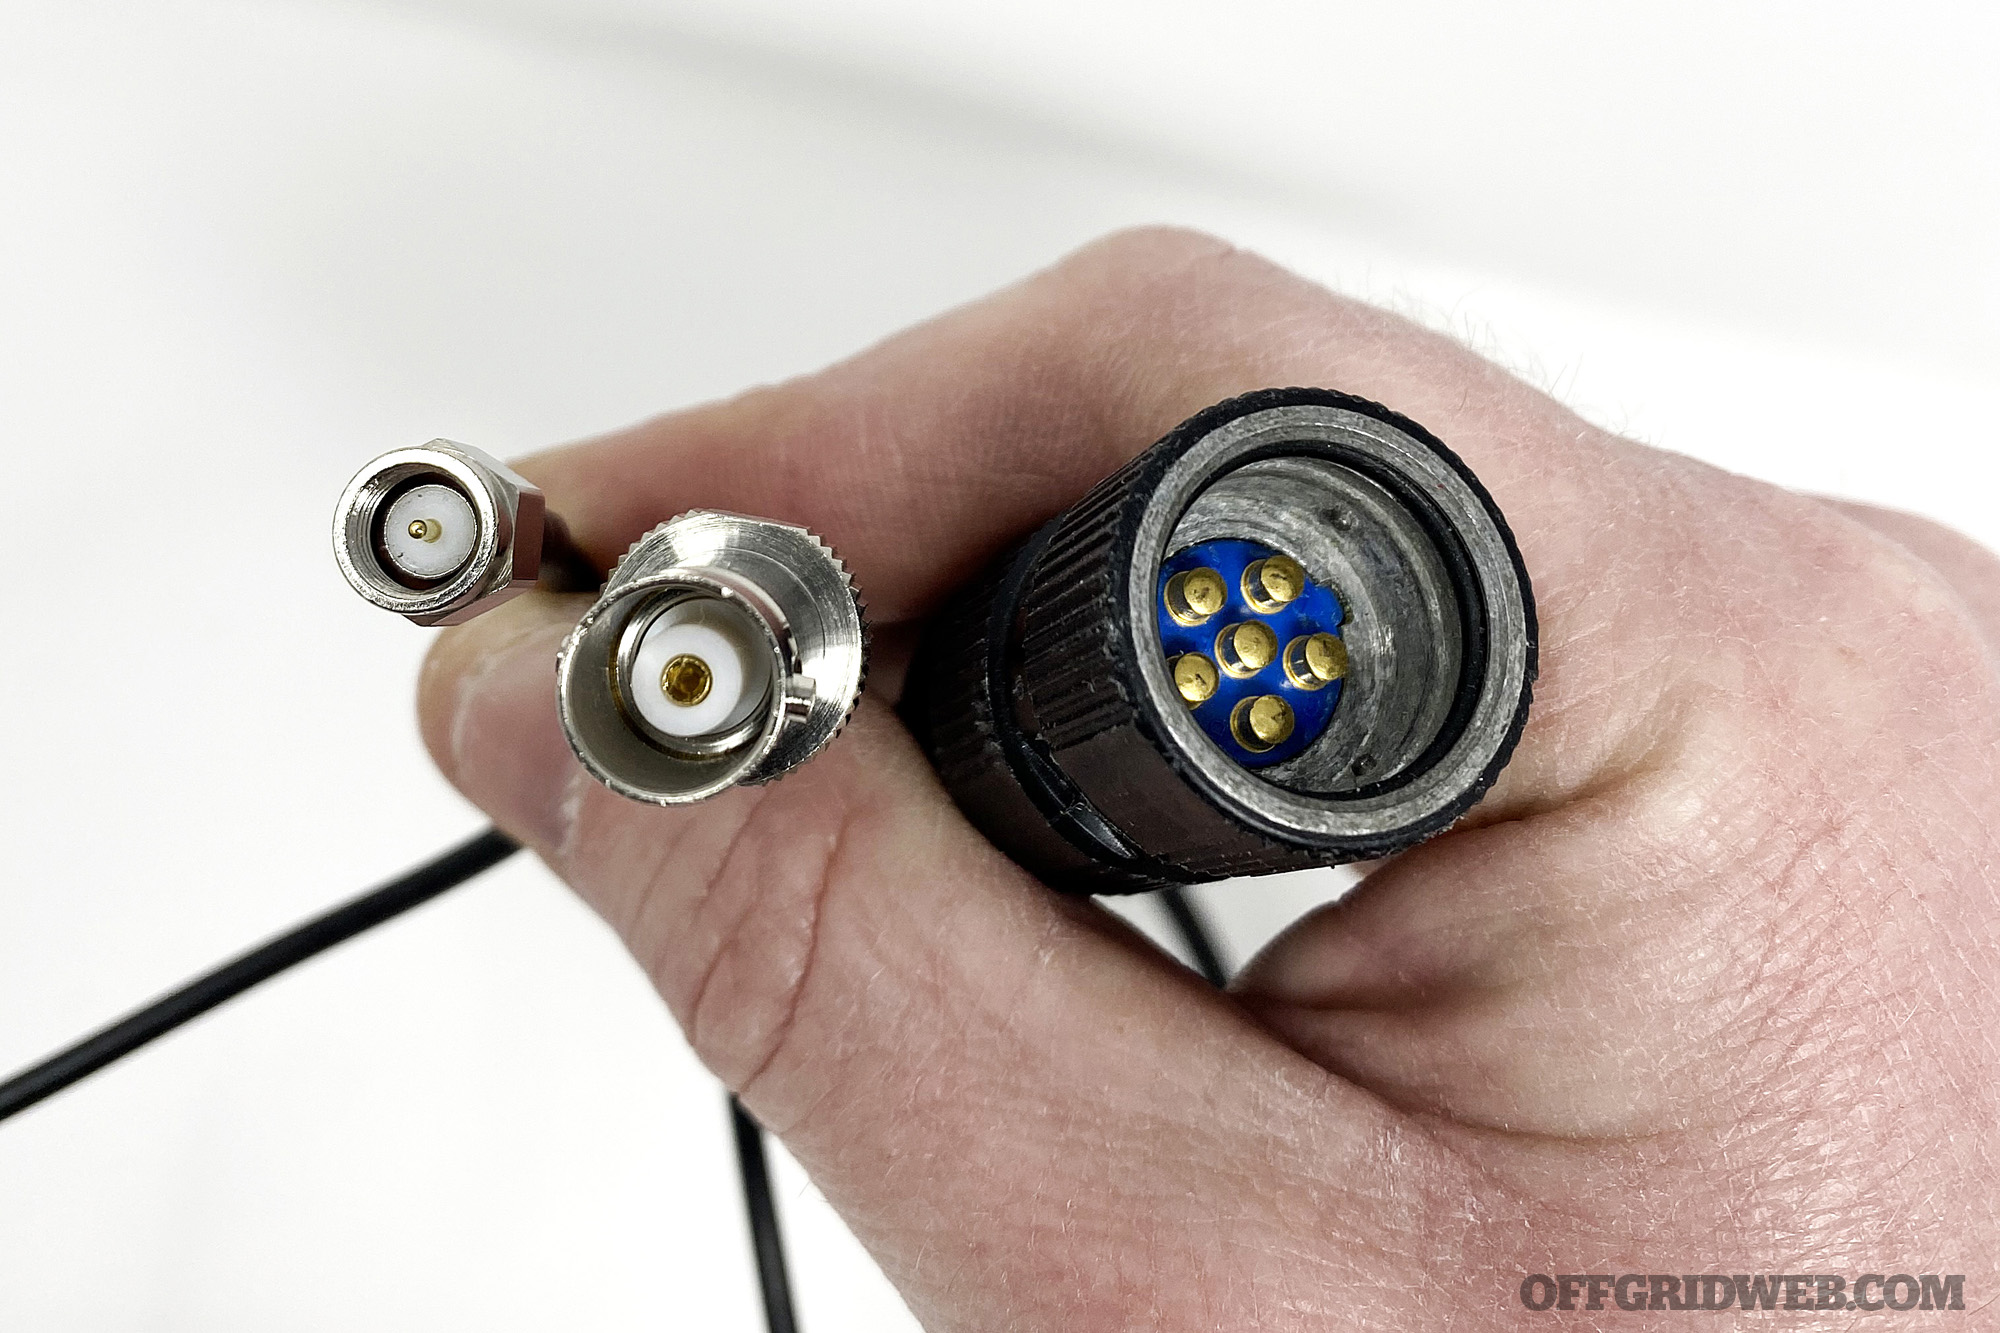
Above: Example of SMA, BNC, military six-pin connections.
A final note on antennas, outfitting your antenna and radios with BNC (Bayonet Neill-Concelman) connectors can help with using one radio in different applications. The connection becomes a simple push and twist instead of threading antenna on, saving time. Adapters are widely available.
PTTs, Mics, and Headsets
Headsets, earpieces, and push to talk (PTT) buttons are all great additions when putting a radio onto a loadout.
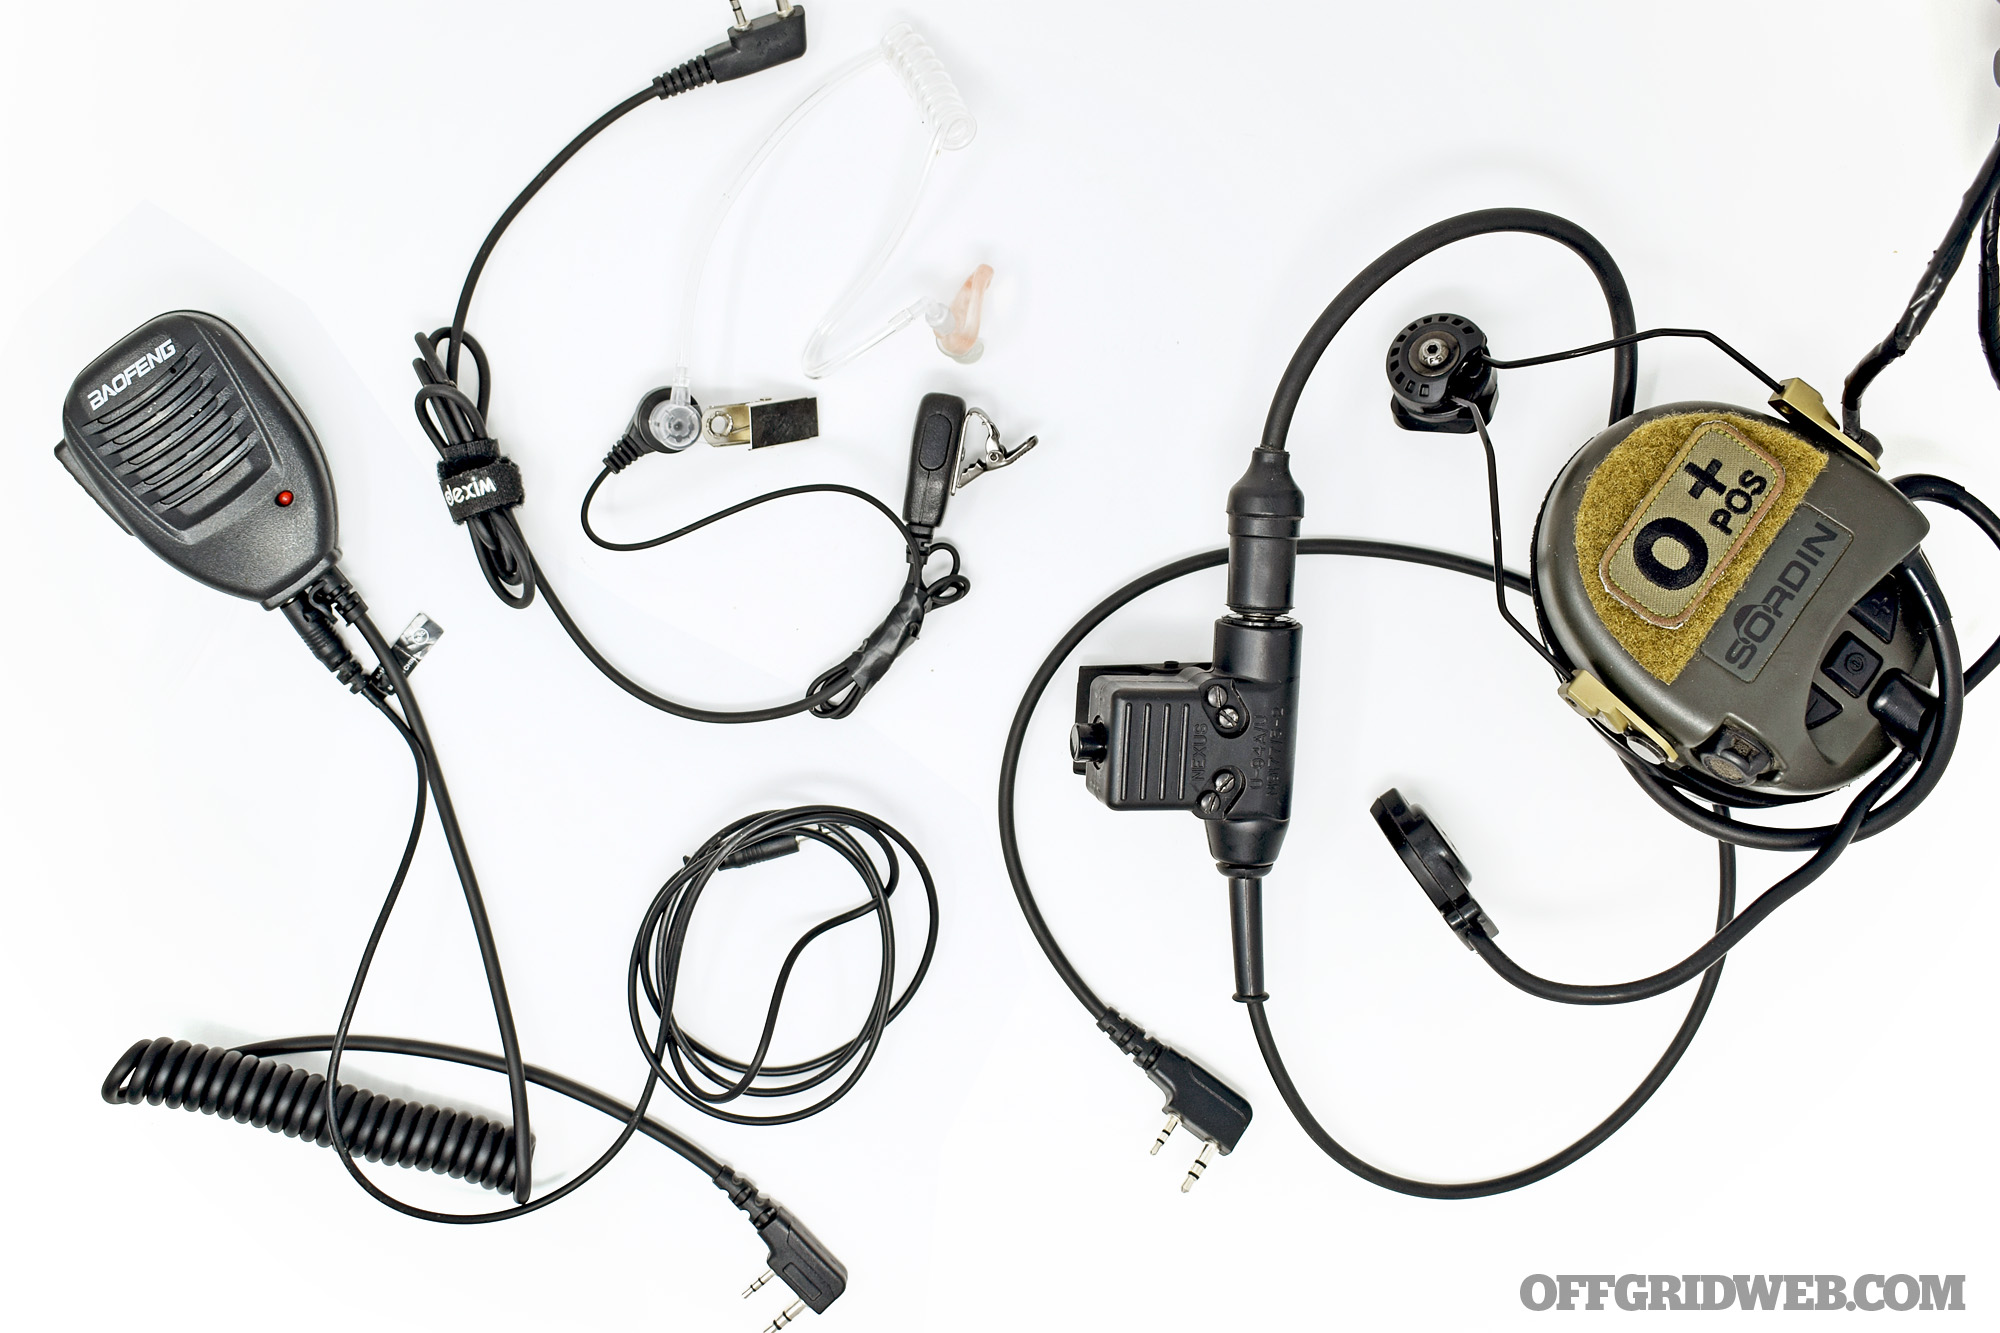
Above: Using your radio without taking it out of your kit is handy. Clockwise from left: Baofeng hand mic with 3.5mm output cord, cheap clear earpiece and PTT, Disco 32 U-94/A PTT connected to MSA Sordin ear protection.
The Baofeng in some cases comes with a cheap earpiece that also incorporates a PTT. These can be useful when trying to keep a lower profile than a hand mic because they can look like regular ear buds. The clear earpiece/PTTs, which you’ve probably seen in use by executive protection and security personnel, are available online as well. Many of these are low quality with poor sound, but they can be worn under ear protection as a budget-friendly option.
For using a radio while wearing hearing protection, the use of an amplified PTT is recommended. The Disco 32 U-94/A is an amplified PTT with a solid button depress that is compatible with the most common tactical communication headsets like Peltor, Ops Core, and MSA Sordin, among others. These don’t come cheap, and might be considered overkill with a $30 radio, but the sound clarity and simple plug and play makes it a worthy investment.
Other radios have Bluetooth features and can connect wirelessly, making them ideal for low-profile operations where the radio is out of sight and you’re wearing a common earpiece that brings little attention.
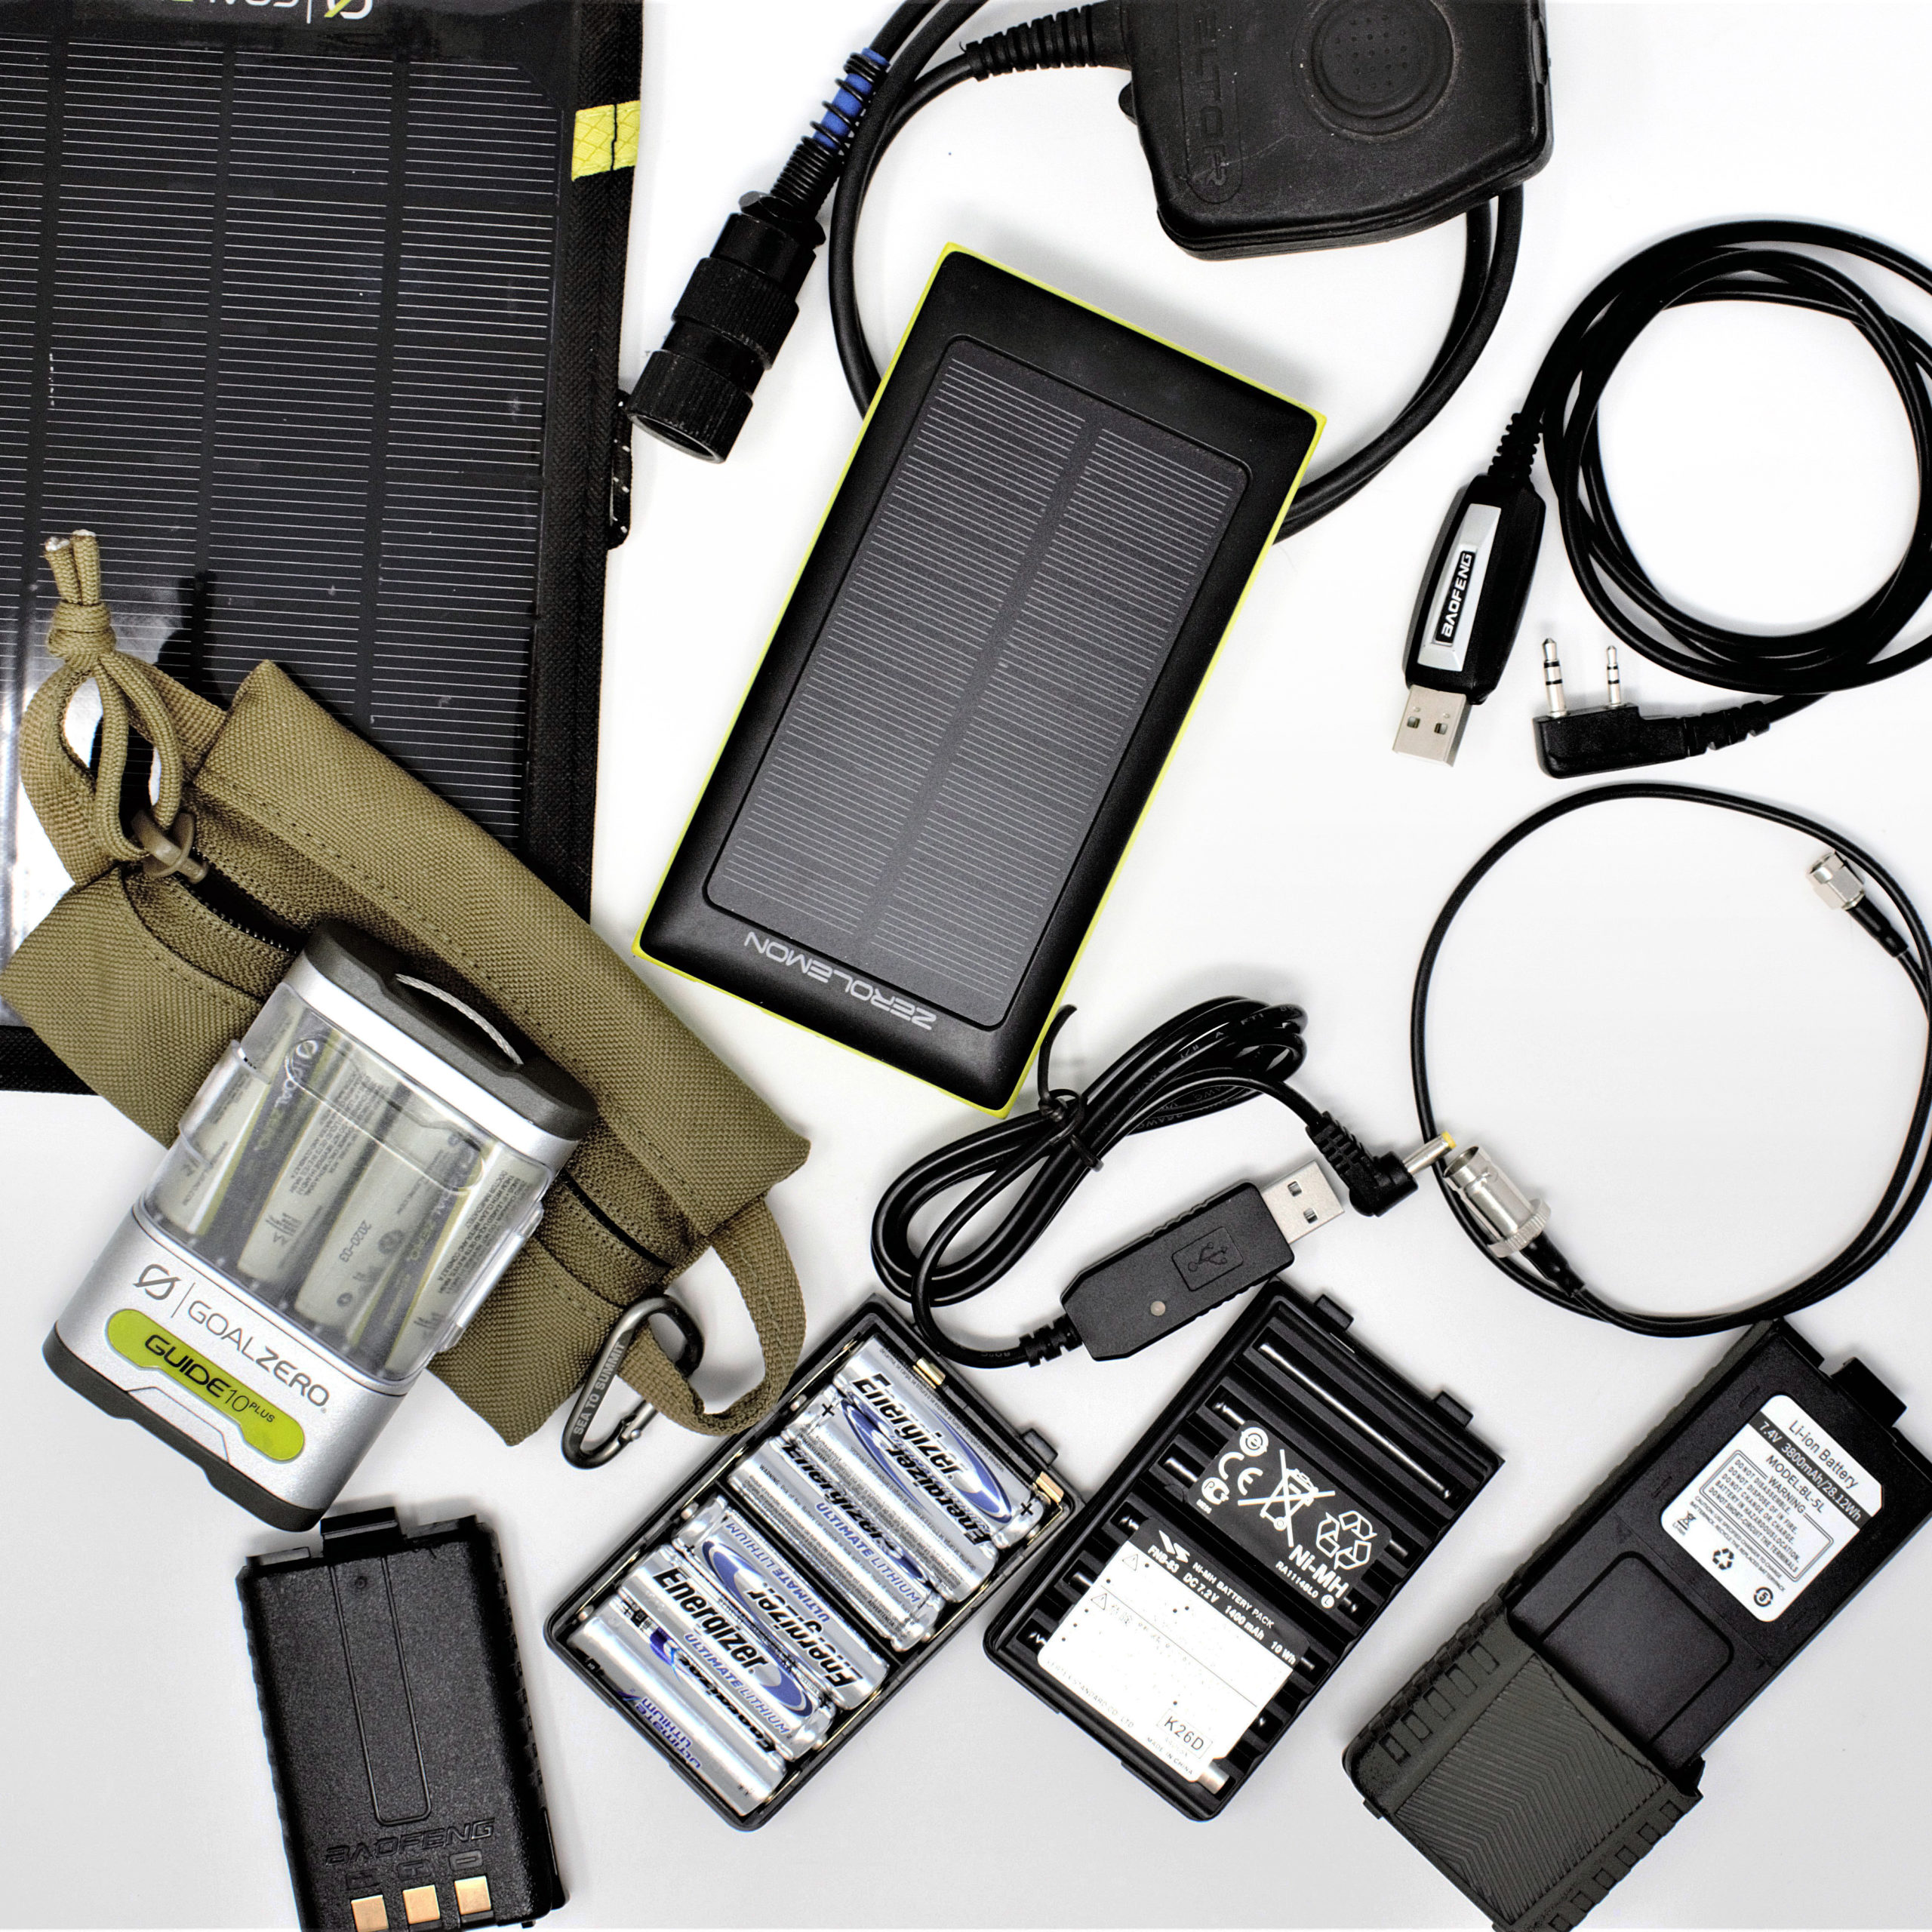
Above: Radios need power, extra batteries, and ways to charge that should be included in your EDC or kit.
Like all electronics, radios require power, so be sure that you have enough spare batteries or a way to charge the radio battery. Extra batteries can be inexpensive (at least for the Baofeng) and can maintain a charge for a considerable amount of time. Most radios charge from USB so an external battery pack can fit the bill with the proper wall charger. Make sure you have the correct cable, too. Some radios also offer a battery pack that can run off AA batteries. This is useful if you’re carrying other gear that uses these batteries, like flashlights or night vision devices.
Understanding radio connections will help you in the long run. Yaesu radios have a different connector than a Baofeng, which is the same as a Kenwood. This is important for things like microphones and headsets. Headsets like Sordins or Peltors may have a 6-pin connector or a TP120 (a gigantic headphone jack). The folks at SRS Tactical are knowledgeable and will be able to help you with connection questions.
Programming cables, while not usually included in your EDC or kit, are an important part of the radio. The Baofeng can be programmed using a PC and a free program known as CHIRP, but higher-end radios may require separate software. It’s usually best to buy the factory-made programming cable, since there are many unreliable bootleg cables on the market.
Copy My Last?
Communication is key, and events of the past have shown us on more than several occasions that your cell phone shouldn’t be your only tool. Factoring ham radios into your comms plan is smart, inexpensive (at first), and relatively easy (assuming you can study for a test for a few days). Be patient and take your time to learn — ham is a big subject. Much like upgrading your rifle to make it more efficient, upgrading your radios will make them better and give you capabilities you previously lacked. Ham radios come in all shapes and sizes and can be tailored to your needs. It’s easy to create a neighborhood watch and stay in touch within a 2-mile radius. Do you need to talk to your family across town? Hit a repeater, and you can make that happen with little effort. Lastly, when you go out shooting with your friends, it’s convenient to be able to stay in touch and call hits without shouting. You can also talk smack about your friends who don’t have a radio without them knowing.
For more information on ham radios and how to use them, check out these folks:
Ham Radio Crash Course on YouTube
@Aganz__ on Instagram
www.arrl.org
HAMSTUDY app
More Articles on Emergency Comms & Ham Radio
- Emergency AM/FM/Weather Radio Buyer’s Guide
- Handheld Radio Basics
- Intro to SDR: Software Defined Radio
- Ham Radio Fundamentals
- Short Range Comms: FRS & GMRS Radios
