RECOIL OFFGRID Preparation Covert Carry versus Concealed Carry
In This Article
What do you think of when you hear the term “concealed carry?” Your first thought might be the legal definition of carrying a concealed gun or knife, and the accompanying guidelines in your home state and city. Perhaps you think of skills you’ve practiced in self-defense classes, or you think of the equipment you’ve accumulated for the purpose of concealment — there are a nearly infinite number of handguns and holsters you can keep hidden on your person. No matter which subtopic crossed your mind first, there are many variables to carefully consider and research. This is compounded by the amount of information available through internet forums, gun-store counter jockeys, and local “gun guys,” which is both immense and rife with inaccuracies.
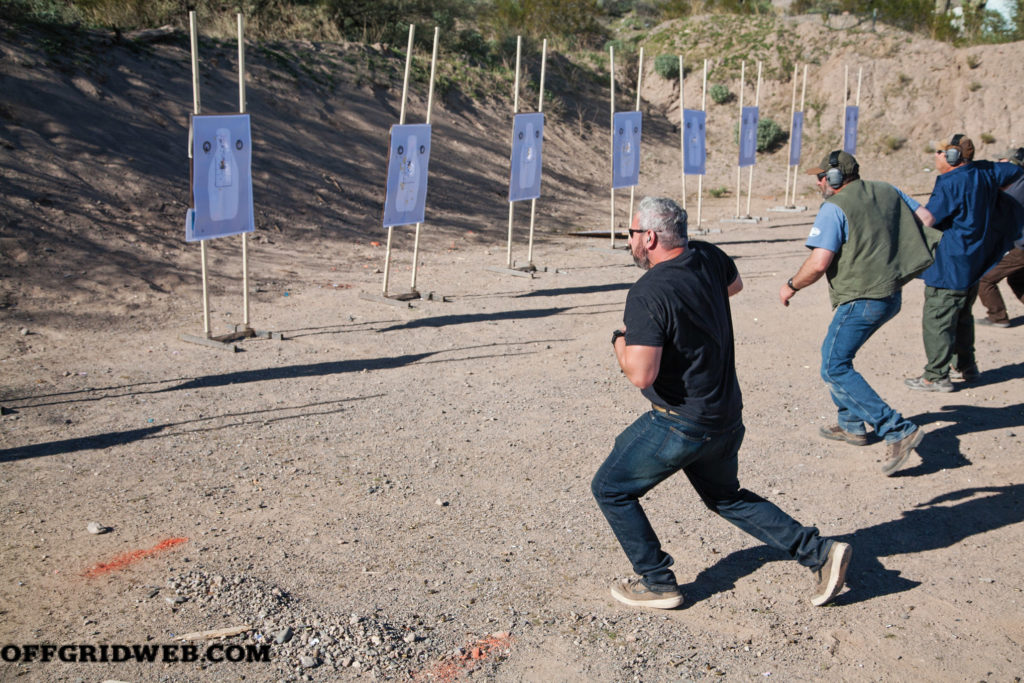
Above: Drawing from concealment while moving or changing position is a vital skill to responding with a covertly carried weapon.
In order to clear the air and find firm ground to start from, we sought out some of the best instructors we could find to teach us how to properly and responsibly carry concealed. We quickly learned that what we wanted to learn about was better defined as covert carry. What’s the difference? Merriam-Webster defines the two terms as such:
Concealed: kept out of sight or hidden from view
Covert: not openly shown, engaged in, or avowed
It may seem like semantics on the surface, but just because something is out of direct view doesn’t mean it’s truly hidden. If you live in an area where concealed carry is prominent, you may have seen someone else’s gun “printing,” or creating a noticeable silhouette through their T-shirt or jacket. Is the gun out of sight? Yes. Is it actually not showing? Different story.
The theory of covert carry comes primarily from the military and law enforcement community where appearing truly unarmed could be advantageous or required based on circumstances. For example, police officers in high-risk undercover roles or military personnel working in plainclothes special operations or intelligence-gathering operations. For private citizens, there are numerous reasons to want your pistol completely undetectable until needed. Having your weapon hidden provides certain tactical advantages. Having your gun exposed or readily visible may actually make you a target in some cases. For example, let’s say you’re standing in line at a convenience store, idly waiting to purchase a soda and some scratch-off lottery tickets, when someone enters the store to rob the register. If you’re open-carrying or your gun isn’t truly invisible, the robber may decide you need to be dealt with first. If you’re being targeted for a mugging, an exposed weapon may increase the level of violence used in an initial surprise attack, eliminating the option of simply handing over your wallet or watch, which, frankly, are probably not worth killing or dying for. Or you may be targeted specifically so that the bad guy can get themselves a nice new gun.
There are also potential legal pitfalls to incorrect concealment. In some jurisdictions, concealed carry of a weapon is legal, but open carry is not. Some of these laws are so stringent that if your gun is “printing” or pokes out of your cover garment when you bend over to pick something up, this can be legally defined as brandishing — an offense that can be prosecuted as a felony in some jurisdictions (especially those with prosecutors who aren’t fans of Second Amendment rights).
We strongly advocate that, if you choose to carry a handgun, you carry it covertly when you’re able to do so. The idea of your gun being a visual deterrent is a weak possibility at best. At worst, it’s an invitation to be harassed or attacked solely for having it on you. In order to enhance our knowledge and skills related to covert carry, RECOIL OFFGRID staff attended two courses focused on this topic and came away with a number of lessons that go well beyond what holster to use or where to put it.
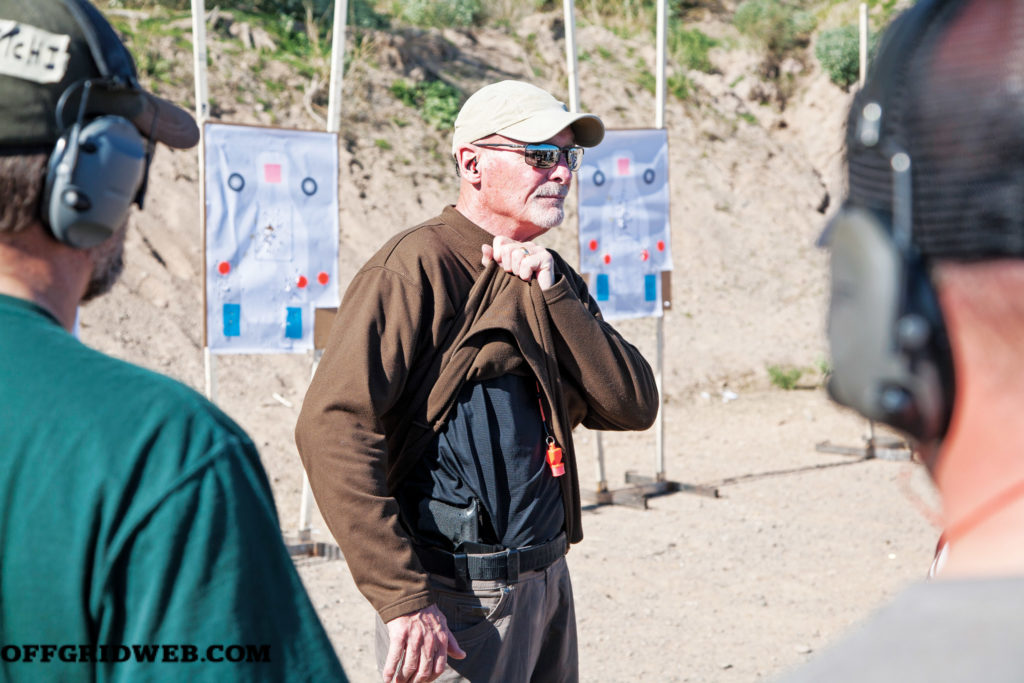

Above: Dave Spaulding demonstrates a closed-front garment sweep.
Dave Spaulding has been teaching duty and defensive handgun use longer than most of our staff has been alive. His company, Handgun Combatives, offers a dedicated Advanced Covert Handgun class that focuses heavily on the theory and practical lessons of covert handgun carry. He does an excellent job of presenting a literal lifetime of lessons and “carry hacks” that went a long way toward helping us make informed decisions about how and what to carry.
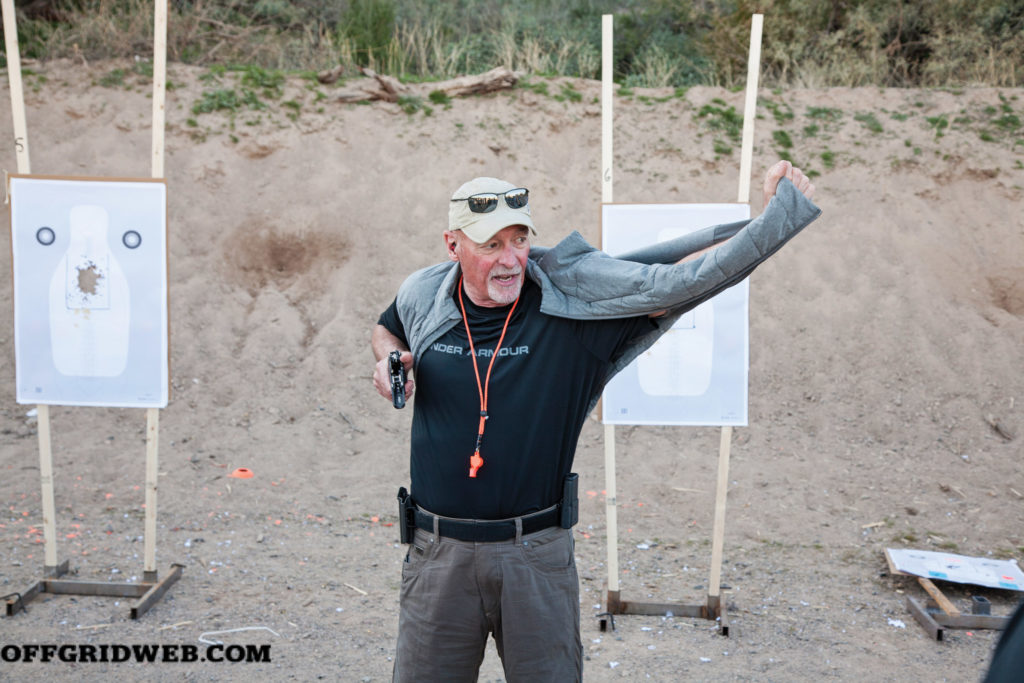
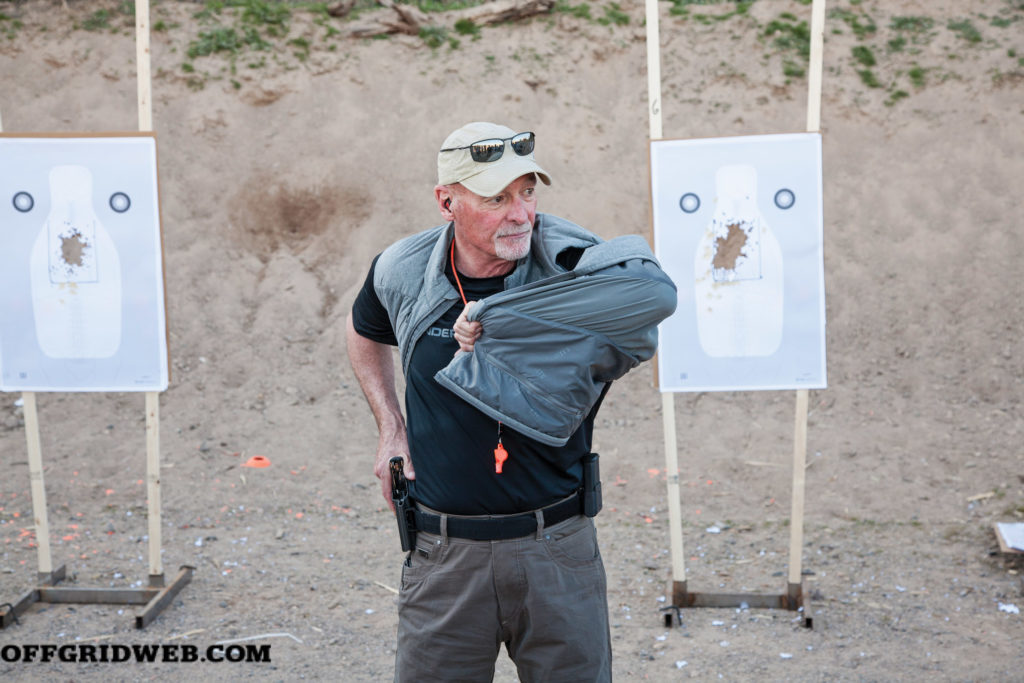
Above: It may look melodramatic in photos (hence the name), but it provides a way to move the cover garment with your support hand while drawing with your strong hand.
First off, it must be understood that the handgun you choose to carry is one part of a concealed carry system that encompasses your pistol, holster, belt, and cover garment. Let’s take a look at each of these and establish some selection criteria before we look at how to harmonize them:
Pistol: The size, shape, caliber, and capacity of the pistol you carry is a deeply personal choice. Spaulding doesn’t make any hard recommendations in this area, and neither do we. What we will say is that, in our opinion, you should carry the largest pistol you can comfortably conceal. If you choose to carry a super-slim, ultra-light, micro-machine of a pistol, do so with the knowledge that you will have fewer bullets, smaller sights, and (in most cases) stiffer recoil, with stiffer recoil springs that can make the slide harder to manipulate.
If you’ve made your peace with this, you’re restricted to this type of pistol based on local laws, or you’re absolutely certain there’s no other way to avoid printing, so be it. Guns that are uncomfortable to shoot or manipulate will simply be shot less often, resulting in a less-proficient shooter. So, whatever you pick, make sure you can get through a 100-round range session with it and not feel relieved to be finished. Our personal preferences as a team lean toward having the best-performing pistol we can make covert.
Red-dot optics, lights, effective ballistics, and substantial capacity are all advantages we want in a life-or-death encounter. Don’t choose a more “convenient” handgun that short-changes you on performance potential. If you need the gun, you’ll want every bit of help it can give you — in Spaulding’s words, you’ll be better off in any gunfight with a fistful of gun.
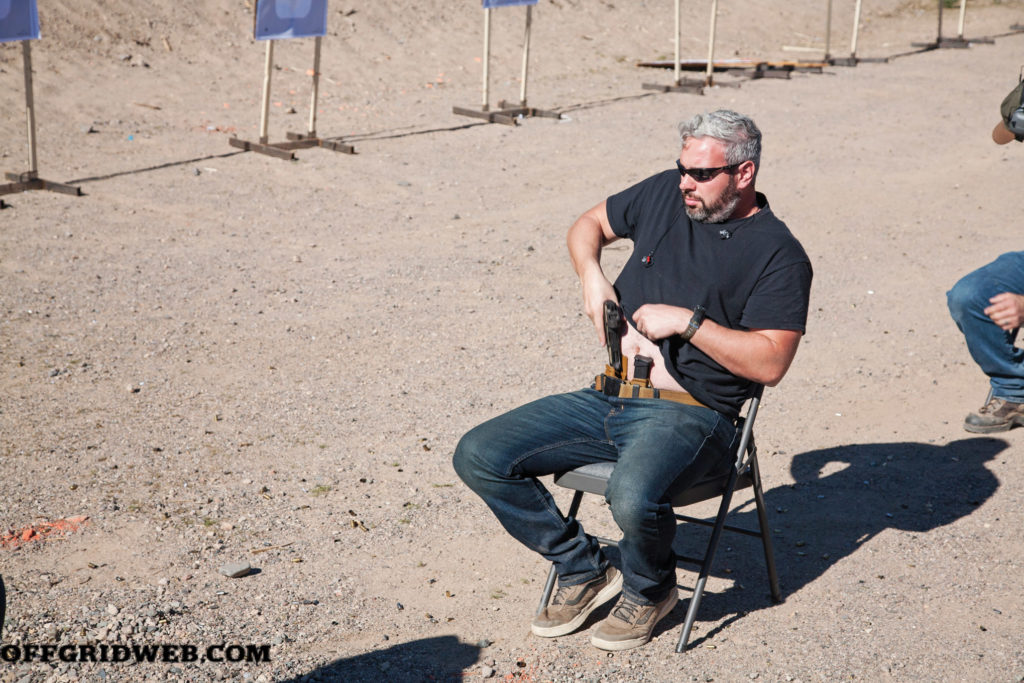
Above: A well-concealed pistol is no good if you can't access it. Rehearse your concealed draw from a variety of body positions.
Holster: There are a couple of simple factors to consider when selecting a holster. First, make sure your holster fits your gun. It sounds silly, but even in 2020, there are still generic holsters sized “small, medium, or large,” and big-box sporting goods stores sell way too many of them. Choose a carry gun based on your assessed needs and personal preferences. Then, choose a holster for that gun and only that gun.
The holster is your gun’s better half. It’s the place your gun returns home to after doing hard work. Choose accordingly. That includes proper level of retention (i.e. the ability of the holster to keep the gun securely in place). There’s nothing wrong with open-top holsters that use friction retention rather than a secondary lock or release mechanism. However, there should be enough friction that your pistol doesn’t fall out if the holster is turned upside down and jostled. On the flip side, the level of friction shouldn’t inhibit your draw stroke.
We don’t care if you prefer leather or Kydex, but conventional wisdom says avoid fabric and other soft materials at all costs. This plays to a point that Spaulding emphasizes in his class: Your holster should not collapse when you take the gun out of it. If you draw your gun, the “mouth” of your holster should not close or change shape at all. This issue is non-existent with Kydex or injection-molded polymer holsters due to the nature of the material.
While this used to be a risk with some softer leather holsters, most modern carry designs have overcome the problem by reinforcing the top edge of the holster with an extra layer of leather, additional rows of stitching or thin metal or plastic inserts underneath the leather layers, which provide rigidity and shape. Lastly, make sure your holster fits your belt. If you wear a 1.5-inch-wide carry belt, don’t settle for a holster with 1.75- or 2-inch belt loops. This will create sliding and tilting that’ll never be under control, and there’s a high chance your holster — and the gun in it — will not be where you want it when you need it.
We don’t care if you prefer leather or Kydex, but conventional wisdom says avoid fabric and other soft materials at all costs.
The Belt: The belt itself really only has to pass three tests: Does it support your carry load? Does it fit securely? Does it fit your wardrobe? Regardless of whether you prefer leather or nylon, the carry belt should be rigid enough to hold the weight of your pistol and spare ammo, but flexible enough to be comfortable. Spaulding warns that stiffer isn’t always better. There are some carry belts out there made from double-layer SCUBA strap webbing. Once you wear these belts a couple times, they’ll take a set so stiff that you can remove the belt and hold it out in front of you, and it’ll remain a nearly perfect hoop. While the load-bearing capacity of these belts is substantial, they can dig or cut uncomfortably into the hips and back while seated or during extended wear. Some leather carry belts feature a plastic strip sandwiched between two layers of cowhide, and these can produce the same problem.
Of course, all the carriage capacity in the world is useless if your belt doesn’t have an adequate closure system. Some modern belts feature a friction slide or open-bottom G-hook. These are convenient and quick but offer little assurance of holding their own if you wind up running, climbing, shimmying, or grappling. Some have buckles that snap positively into place but also have release buttons or levers that can be tripped just by bending over or sitting down. Finally, your belt has to make sense with your wardrobe. This is less about fashion and more about maintaining covert status by ensuring that your wardrobe portrays a consistent narrative. Pairing your navy blue pinstripe suit with a double-layer MultiCam nylon belt with AustriAlpin Cobra buckle is going to raise eyebrows to even the most pedestrian observer.
Cover Garment: Much like the belt, your cover garment must match your narrative — that is, the story you tell onlookers with your appearance. For many years, concealed-carry vogue was to wear your pistol outside the waistband and cover it with a vest. These vests could be found at any outdoors or sporting goods store and were typically marketed to photojournalists or fly fishermen. Usually, they’re black, khaki, or dark green. They zip up, but are always worn open, and adorned with beaucoup cargo pockets. These vests, paired with heavy denim jeans and hiking boots, essentially make you a walking advertisement for your gun. While these “shoot me” vests may indeed conceal your pistol, they’re not even remotely covert in today’s carry-savvy circles. Another common problem is cover garments that are either too tight or too short. The former creates the telltale “carry bulge,” and the latter lets your gun play peek-a-boo any time you bend over or reach up high. If you choose to wear your gun outside the waistband and use a flannel or dress shirt to cover it, make sure your shirt isn’t so thin that it’ll flutter open on a breezy day, turning you from a concealed carrier to open carrier in a single gust.
Now that we’ve got all the individual components outlined, we can combine these to create a couple of different carry styles. We’re only going to go in-depth on the carry positions we recommend. Then, we’ll touch briefly on some others, and why neither the RECOIL OFFGRID team nor the instructors cited recommend them.
Strong-Side Hip Carry: This is probably the most convenient carry position and stems directly from the duty-carry positions still used by military and law enforcement shooters today. While you can stick a holster anywhere on your waistline, a 3-o’clock hip position is most recommended (make it 9 o’clock for lefties). This position lends itself to a smooth, efficient uncover and draw. Since your arms naturally hang directly at your sides, and swing just fore and aft of your hips while walking, your hand is in natural close proximity to the gun through most normal daily body movements. If you’re a uniformed professional pistol carrier, chances are this is where your pistol sits on duty. Keeping your handgun in this spot while concealed reinforces consistency between on- and off-duty carry.
Even if this is not the case, inside the waistband (IWB) carry may not be comfortable or even realistic depending on your body type. If you carry outside the waistband (OWB), ensure that routine tasks like taking out your keys or wallet don’t inadvertently sweep back your cover garment. OWB carry is generally very comfortable when standing or walking around for a wide array of physiques. But if you spend a lot of time sitting, you’ll likely have to lean or bend to draw your gun. Also, if you spend all day behind the wheel of a car, and you’re a right-handed shooter, your seatbelt buckle is going to sit right over top of your gun. OWB hip carry permits a wide variety of cover garments from windbreakers and rain jackets to goose down vests, sport coats, and pearl-snap shirts.
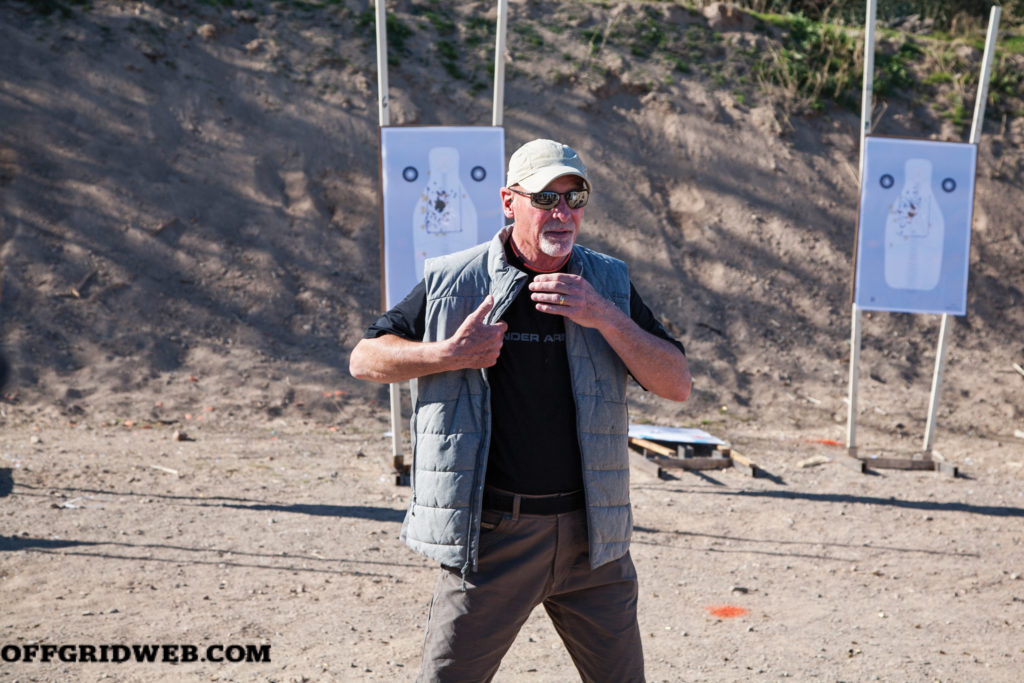
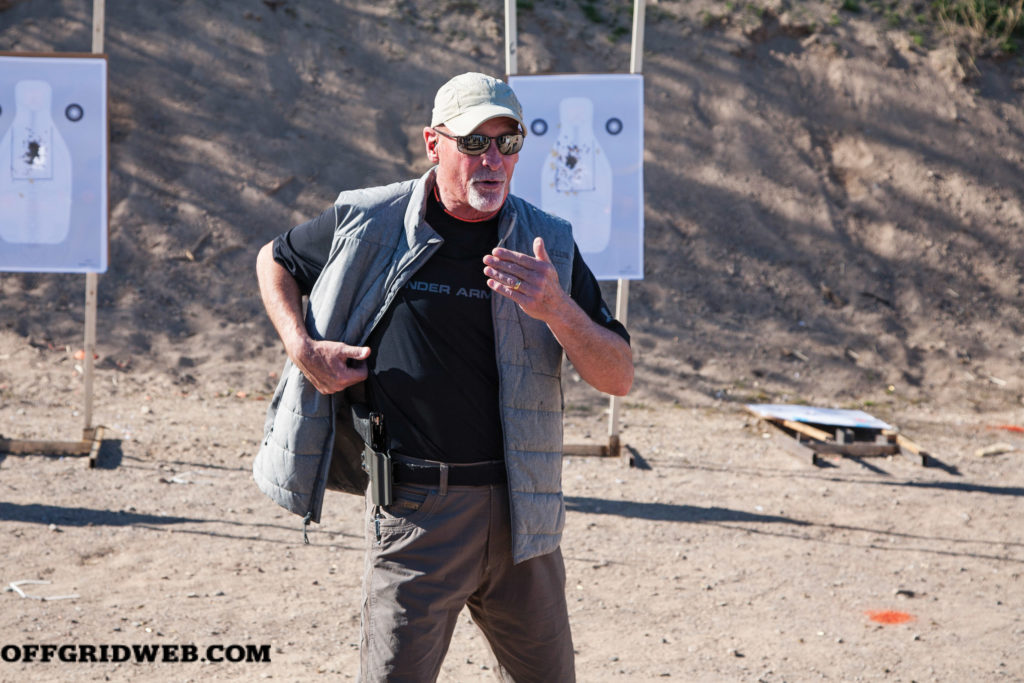
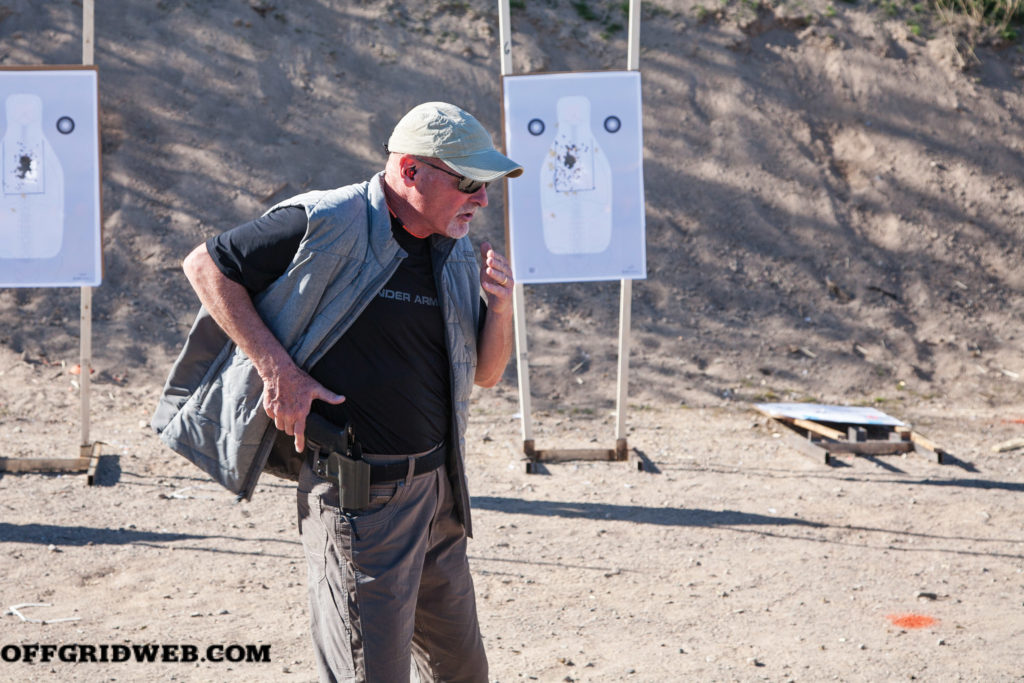
Above: The traditional strong-side garment sweep is one of the more commonly taught ways to access a concealed pistol while wearing an open-front cover garment.
Appendix/Abdominal Carry: The most covert methods of IWB carry can be split into two separate categories that are often lumped together in common vernacular. The terms “appendix carry” or “AIWB” (Appendix Inside the Waistband) have come to represent any style that sits inside your waist, forward of the hip bones. But, if we’re being specific, your appendix is roughly located just forward of your right hip. Carrying here takes advantage of the natural concave spot or “hollow” just inboard of the pointy part of your hip bone.
A properly designed appendix holster will fill this void without excess bulk and may feature an extra belt loop, bump, or “claw” feature to pull the butt of the handgun in toward that aforementioned pointy bone. Carrying in this spot is not new. In his Covert Handgun class, Spaulding cites examples of this carry spot being used as far back as the mid 1800s when derringers and small revolvers fit perfectly in this location.
What has become more common in modern times is what Spaulding categorized as abdominal carry. This technique places the gun much closer to the centerline of your body, usually just to the right (or left) or your belt buckle or belly button. The en vogue holsters of this category often feature attached pouches for a spare mag, knife, or tourniquet. We’ve personally seen people conceal a mid-size pistol, two spare magazines, and a knife in a custom rig that spanned the entire front half of their waistline.
That individual’s body type and the well-designed custom rig allowed all this gear to disappear under a plain T-shirt just one size larger than he’d wear unarmed. If you’re not looking to tote a full-combat load, this carry method will allow most people to conceal a larger handgun than they could with other carry methods. Several RECOIL and RECOIL OFFGRID staff members favor this position, and can comfortably conceal a Glock 19 equipped with both a weapon light and red-dot optic under an ordinary T-shirt.
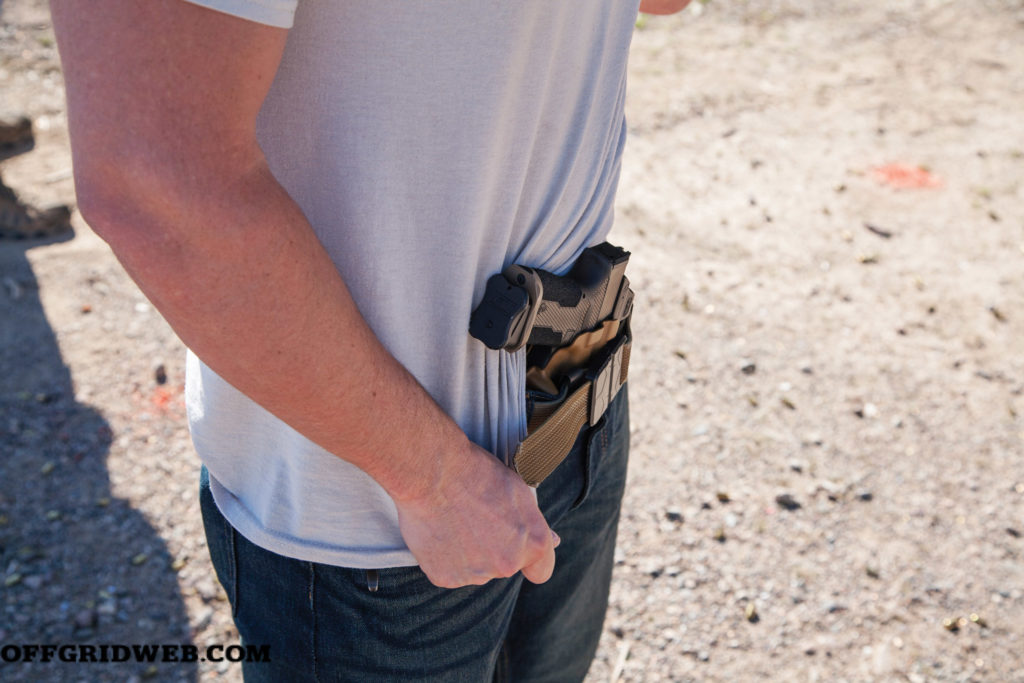
Of course, size isn’t all that matters. As already mentioned, the right combination of gear and body type can make a healthy-sized handgun disappear with very little effort put into cover garment choice. In this carry position, bending over poses little risk of revealing your weapon. Reaching up high only requires your shirt tail is long enough to allow some ride up. If you reach up and then lower your arm, or transition from sitting to standing, you may have to be conscious of your shirt bunching around the back of your slide, your rear sight or your hammer (if carrying a hammer-fired gun).
If you upgrade to a heavier button-up shirt, this situation becomes even less likely. Rapid access to your gun while sitting or driving is perhaps easier in this position than any other, if you don’t find it uncomfortable. Depending on your handgun and the local climate, hard metal resting against the softer skin of your stomach may cause chafing or scraping over the course of a couple hours. It usually isn’t an issue for us. If it is for you, wearing a thin undershirt will usually fix it.
Polymer handguns with aggressive frame textures are usually the most notable culprits. Your editor’s trick is to have the front and back straps of his carry guns aggressively stippled while having a lighter, smoother texture applied to the sides. Your mileage may vary, but it’s one way.
You might be tempted to lump fanny pack holsters into this category. While they routinely fall in and out of fashion in the carry crowd, we have some serious concerns about them. Most fanny packs use a two-prong pinch clip or Fastex-type buckle to keep the pack around your waist. If someone approaches from the side, from behind, or can reach around your hip, a two-finger pinch will instantly and completely separate you from your weapon.
There are a couple of carry-specific waist packs that have a more secure closure system, but this creates a juxtaposed problem. If your pack is truly secured to you with a heavy-duty nylon or leather strap that cannot be easily unbuckled, you have just equipped yourself with an external drag handle that runs all around your body’s largest natural hinge. All someone has to do is grab that strap and yank. One of two things will happen: You’ll lose your pack or you’ll be doubled over and thrown in whatever direction you’re being pulled from. Neither one is a great way to start a gunfight.
What’s Left: Behind the hip, sometimes known as FBI carry, or in the small of your back (SOB) have been used in both OWB and IWB configurations. However, these positions create additional complications on the draw stroke. Both are slower and less efficient. Additionally, imagine a scenario where you’re being pushed or grabbed from behind, or shoved into a wall or against the side of a car. From these angles of attack, it’s mechanically easier for your opponent to access your gun than for you.
Sitting or driving will not only be uncomfortable but will pin your gun against the seatback, meaning you’ll have to fight for your gun while fighting your attacker at the same time. It’s also much more difficult to tell if your gun starts printing or becomes uncovered during the course of your daily routine.
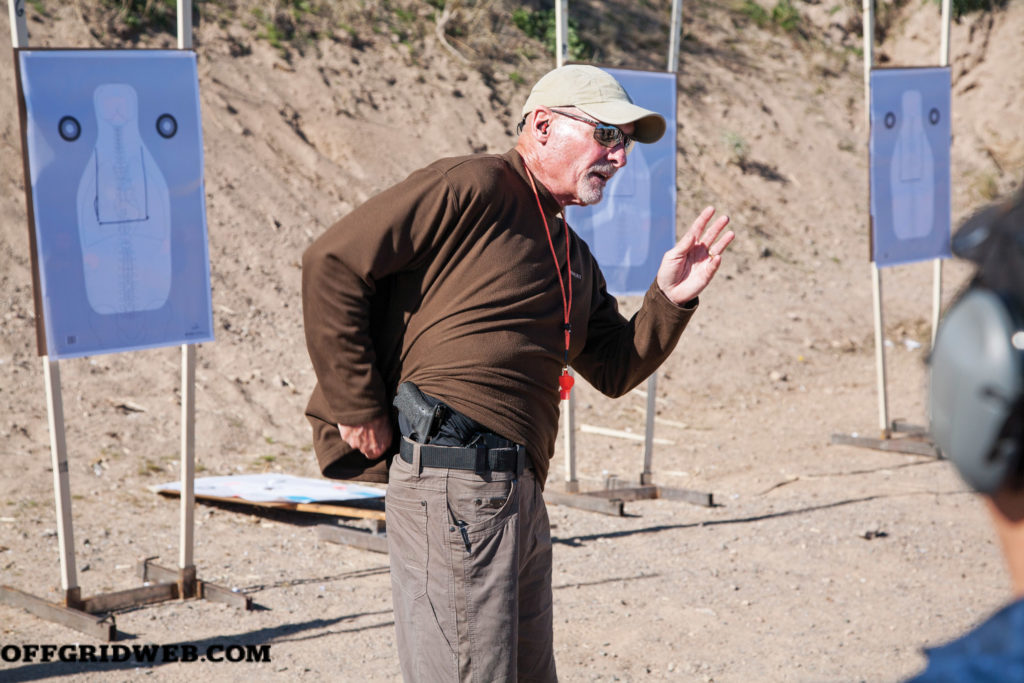
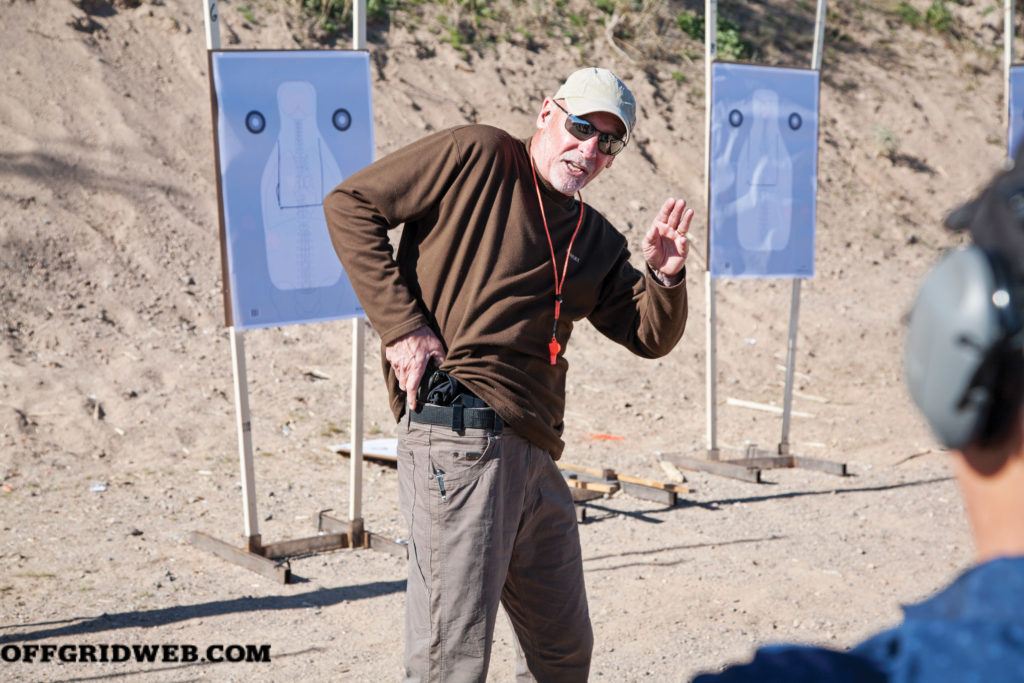
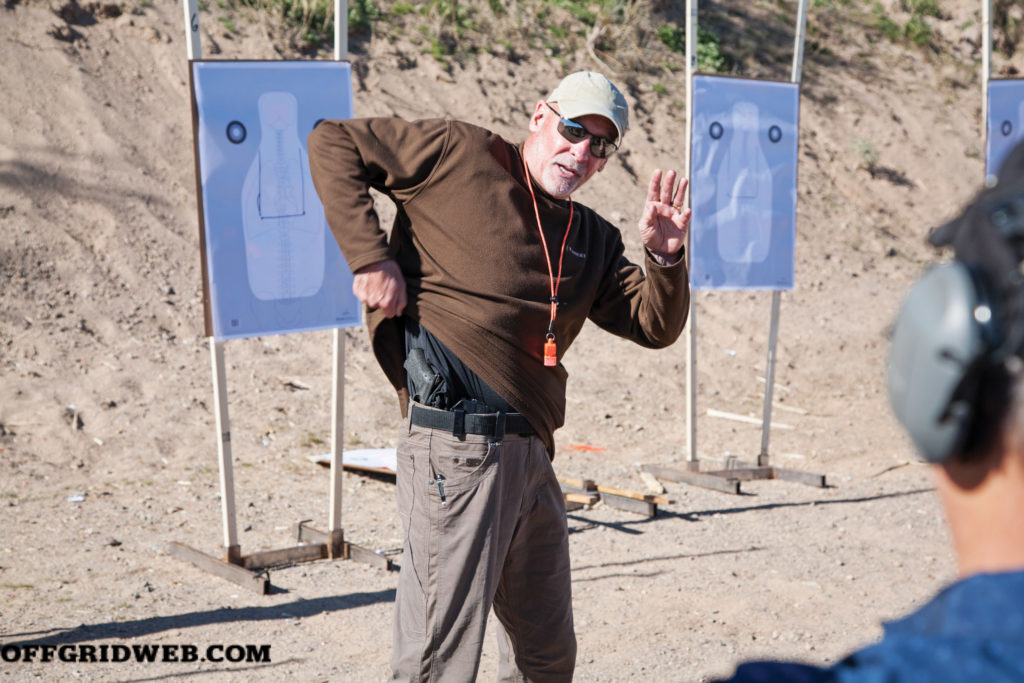
Above: If strong-side-only draw is required, you can tuck your cover garment behind the pistol to expose it before drawing.
Shoulder holsters only really conceal with very specific types of cover garments. Even then, concealment is only guaranteed if you close your jacket, which prevents access to your weapon. When you do draw, it’s nearly impossible to do so without pointing the gun at yourself or someone around you. Shoulder holsters put your gun into a very precarious position if you wind up in any kind of hands-on confrontation that require you to fight for your gun.
Shoulder rigs that orient the gun horizontally can essentially hand the gun to any potential opponent who’s ever picked a pocket or practiced a brush-pass. Opposite this are ankle holsters. Like their shoulder-mounted counterparts, ankle rigs require very specific wardrobe considerations. They also severely limit the size and type of gun you can carry, while placing that gun at the furthest possible point from your hands that’s still connected to your body.
Off-body carry in a purse, sling pack, laptop case, or backpack can be incredibly covert, although this comes at the expense of quick accessibility. In particular, off-body carry is excellent if you have a need to carry a compact carbine or rifle-caliber pistol in addition to a handgun. We’ll be covering this specifically in a future article.
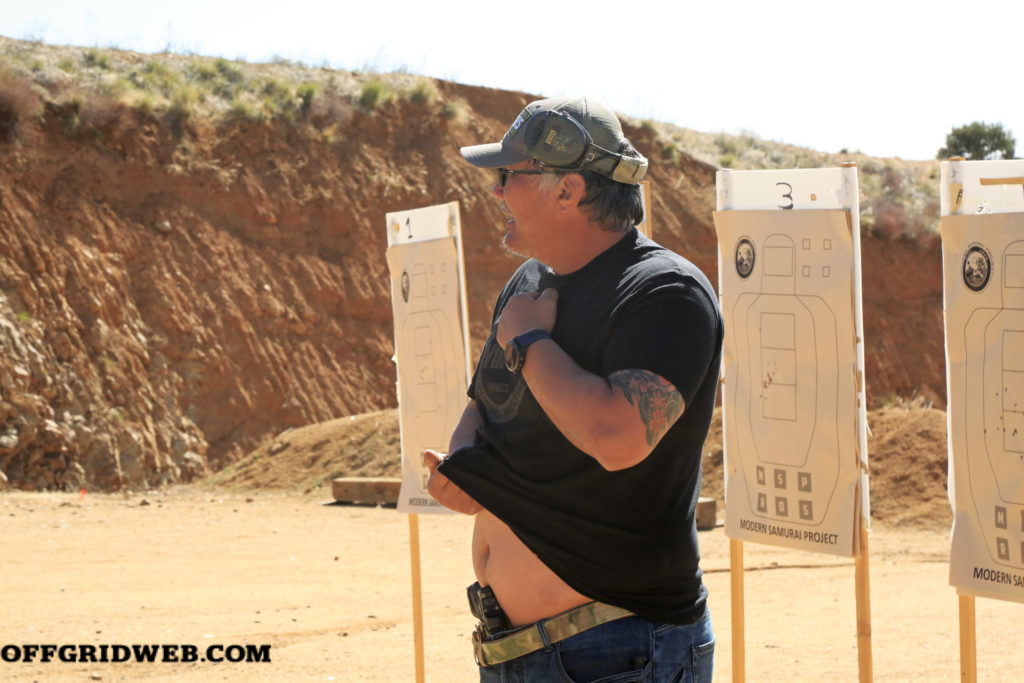
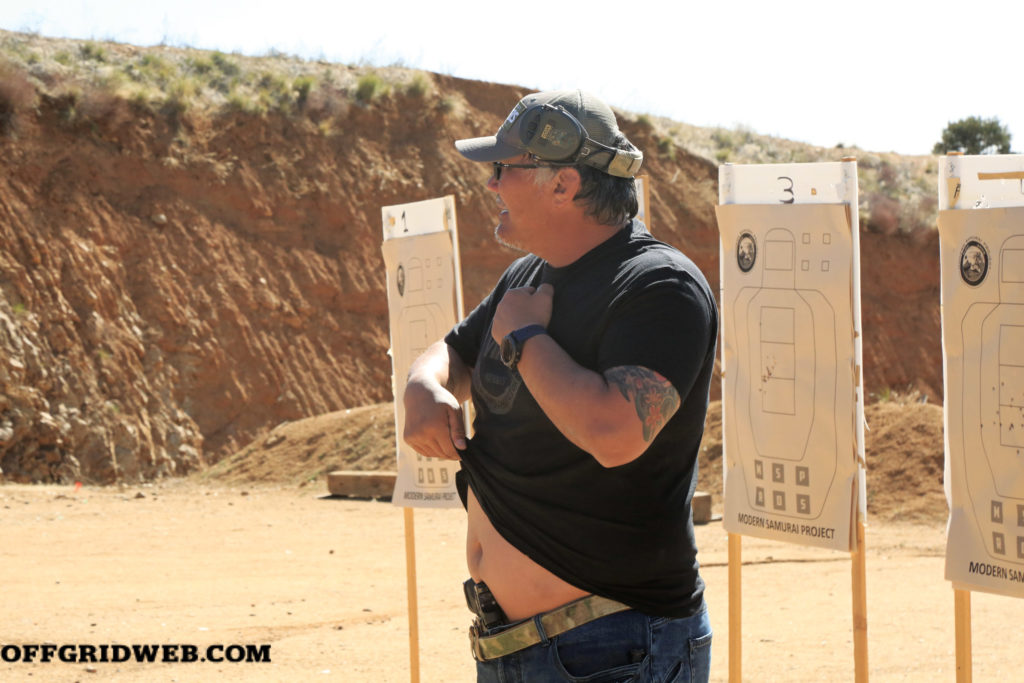
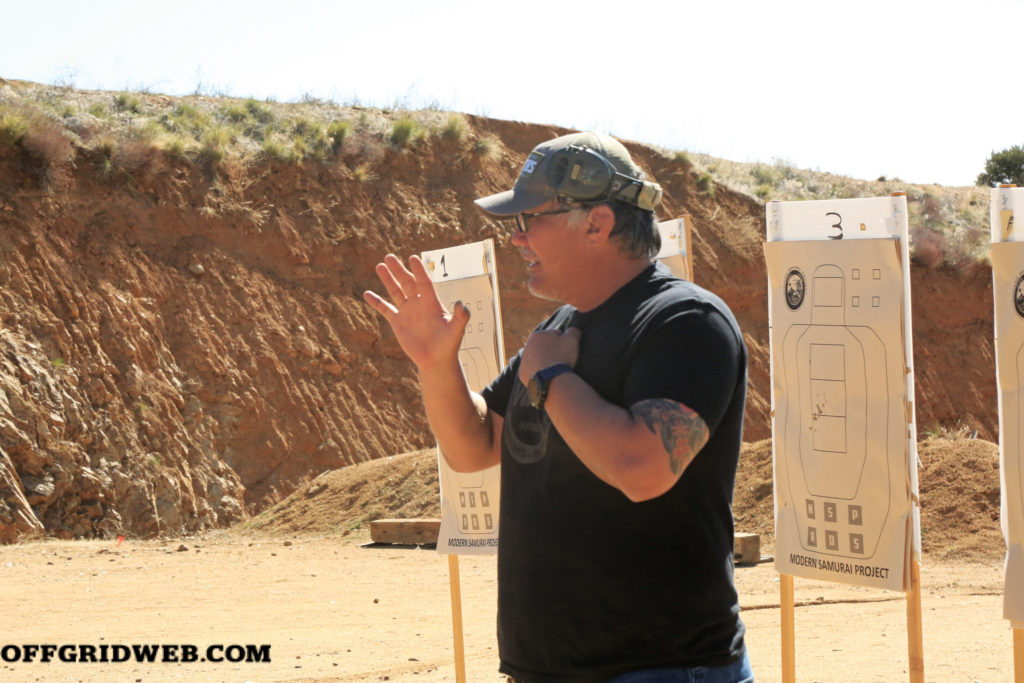
Above: An alternative to tucking the garment behind the gun for a strong-side-only draw, Jedi demonstrates pulling the garment up and then rolling your hand underneath it to trap it during the drawstroke.
A couple of months after we experienced Adaptive Covert Handgun, we had the opportunity to train with another subject-matter expert from an entirely different background. Scott Jedlinski, or “Jedi,” is a lifelong martial artist and master class competitive shooter. His company, Modern Samurai Project, is most well-known for teaching high-performance handgun shooting with red-dot-equipped pistols. But Jedlinski and assistant instructor AJ Zito also invited us to attend a one-day workshop that focused on optimizing abdominal carry performance.
Taking a high-intensity class (400-500 rounds in the one day) that specifically fuses covert carry and pistol performance taught us a couple of excellent lessons, and completely cemented our preference for abdominal carry. While you may not plant your flag on that method of carry, there are a couple of takeaways for those who favor it. These lessons, while intended for AIWB, can be adapted as examples for other methods of carry as well.
As we’ve already mentioned, your holster should be chosen with care, looking for overall quality as well as the specific features that best fit your mode of concealment. Jedlinski took some time to discuss holster modifications. One of the biggest issues people run into when using abdominal carry is the bottom of the holster digging into the pelvis.
Some Kydex holster makers have begun offering their abdominal holsters with adhesive Velcro strips and small blocks of foam precut in a variety of shapes to try and add some cushioning to the holster where needed. Jedlinski suggests cutting up a yoga mat for this purpose. These mats are cheap, readily available, and provide enough material to outfit multiple holsters, or at least try different shapes on the same holster.
Another concern many people have when carrying a gun at the center of their waist is that they’ll be walking around with a gun pointed directly at … well … their most intimate parts. A well-contoured piece of foam not only makes abdominal carry more comfortable, but also angles the muzzle outward and away from any part of the body, let alone sensitive ones. We learned a similar trick from Tom Matturro of One Chance Tactical Solutions. He recommended using a computer mouse pad.
We’re not sure if anyone actually has these at their desks anymore, but they’re still available at office supply stores and provide about a quarter-inch of padding. For the Editor, it’s a goldilocks level of fluff on the back of his chosen holster. We’re sure there are other things you could use, but the point is that a little padding goes a long way with abdominal holsters. Jedlinski also uses a small piece of foam at the top of his holster to create just enough space between the holster and his body to get a proper grip around the gun while drawing. But we’ll talk more about optimal AIWB draws in a moment.
Jedlinski and Zito cover five basic ready positions, which they describe as follows:
Surrender position: Hands held up in front of you, usually between your chin and your sternum, close to your body, elbows bent and pointed down
Arms folded: Mostly self-explanatory, with a couple of caveats for abdominal carry. Ensure that your strong arm is against your body with your hand flat on your torso. Lay your support arm over top, with your support hand flat against your strong side bicep. Many people tuck their fingers into the crook of the opposite elbow when their arms are folded. This will bind your hand up and impede the start of your draw stroke.
Hands in pockets: Again, mostly self-explanatory. But, when carrying a gun, there are only two ways to put your hands in your pockets. Either hook your thumbs in your pockets and leave your fingers flat against your pants, or put all four fingers inside the pockets but leave your thumbs exposed. Regardless, avoid placing your hands entirely in your pockets. If you have to draw your gun, you’ll be fighting the hems of your pockets to get your hands into action.
“Yosemite Sam:” This position is when you’re standing at a “soft ready” with your hands open, already hovering over your waist line.
Hands crossed: Let your arms hang loose at your sides. Now fold your hands in the middle of your body. Chances are your hands are hanging right in front of your belt buckle, which should also put them just below your AIWB holster. We found this position gave us our fastest first-shot times during the class. Whether that translates onto the streets remains to be seen.
Training how to react if a fight starts from any one of five given positions might seem like a daunting task. But one of the points that Jedlinski makes in his class is that if your weapon is on or near the centerline of your body, the draw stroke is essentially universal regardless of start position. This is not not true for other carry positions, but another advantage of abdominal or appendix IWB versus OWB hip carry is that hip carry typically requires the firing hand to clear the cover garment and then return to the holster. AIWB allows you to clear the cover garment with your support hand while your strong hand grips the gun. Being able to do two things at once, using both hands, could arguably be more efficient and save you time on the draw.
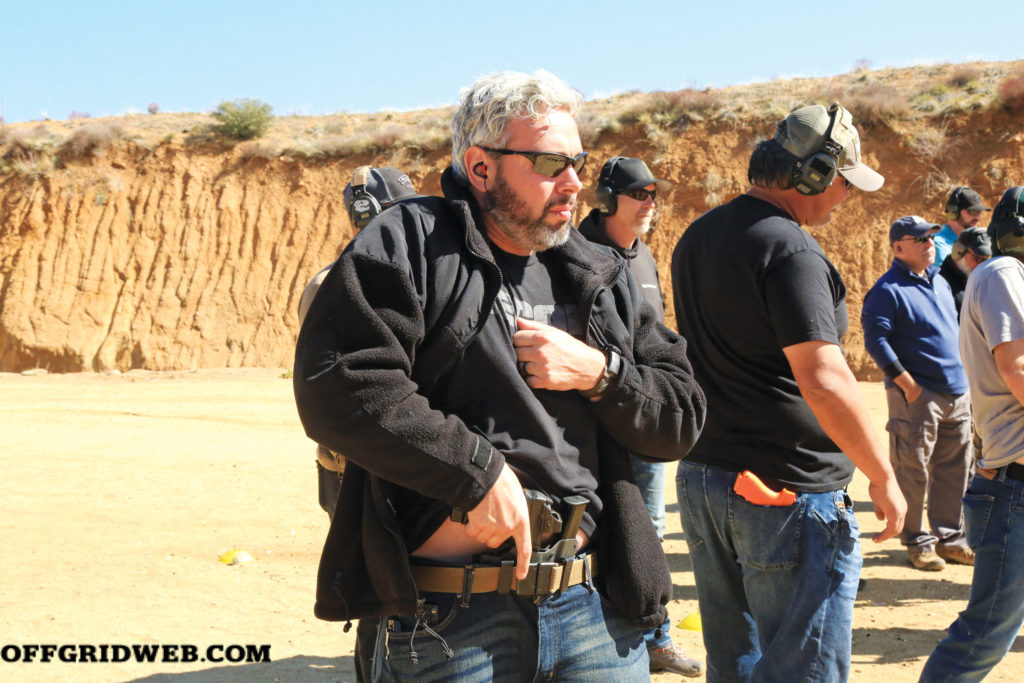
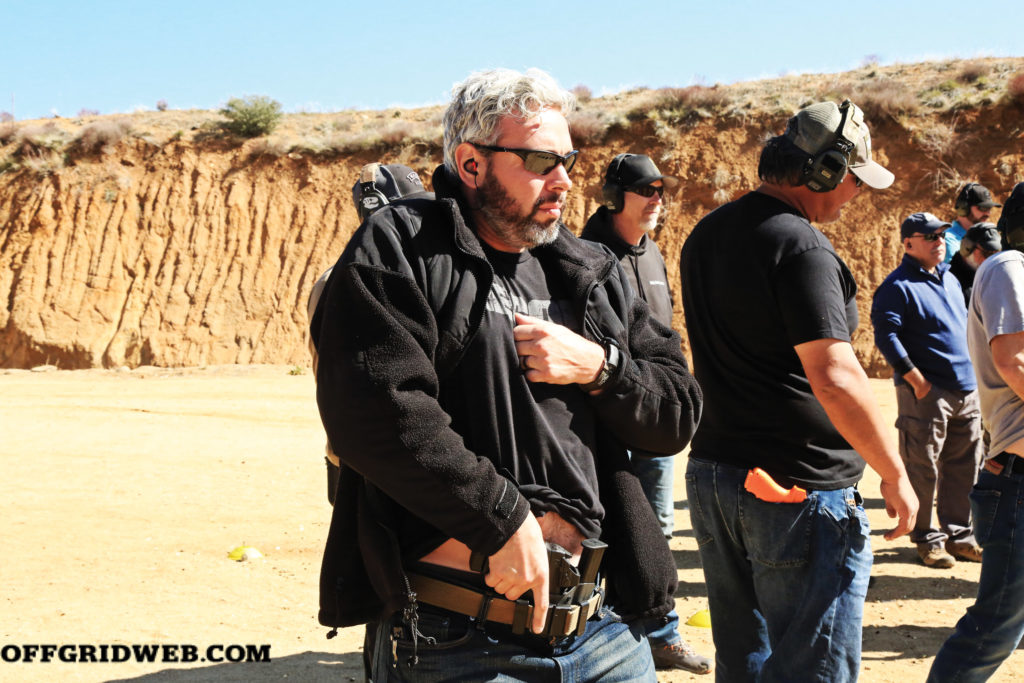
Above: Author practices the “downward stab” draw technique during Jedi's Path To Performance course.
There were two major takeaways about grip, as it relates to the draw that gave us substantial and measurable increases in speed out of the holster. The first is what Jedlinski calls the claw grip. When you first move your cover garment and go to place your strong hand on your pistol, don’t fight your own body to get a complete firing grip immediately. Since most of us keep some emergency calorie stores in our stomach area, there isn’t usually an open gap between our abdomen and the gun itself. Instead of trying to wedge your thumb in that space and wrap it around the gun, Jedlinski advises to stack your thumb on the back of the pistol.
He recommends touching your thumb to the rear sight as an index point. You may or may not be able to do this based on hand size and the pistol you’re carrying. For example, in his class we were shooting a Walther Q4 Steel Frame pistol and were not able to reach the rear sight due to the beavertail on the back of the frame. But on the Glock 19 we carry daily, that technique works perfectly. If you cannot reach the rear sight, lay your thumb along the inside edge of the back of the slide (the side resting against your body).
Then, as you draw, allow that thumb to slide further down to where it rests naturally. Once the gun cleared the holster, we didn’t spend any conscious thought on moving the thumb. It just wound up in the right spot as we reached the target. In the process, we became more efficient by not trying to force or dig our thumb in before clearing the holster.
The other tip has to do with how you grab the gun in the holster. Caveman logic led us to believe an upward-sweep type of motion with our arm, grabbing the gun on the way up, would be the quickest way to get our weapon into the fight. But the folks at Modern Samurai advocate a downward stabbing motion into the hand. We were skeptical at first, to say the least. Jamming our hand downward into the holster to pull the gun upward and out seemed counterproductive. But both Jedlinski and Zito are much faster shooters than we are, so we gave it a try.
What we found was intriguing. The downward stab turns into an upward rebound almost immediately upon making contact with the gun. The net effect is that, with a little practice, the gun seems to bounce out of the holster with forward momentum preloaded to carry you through the rest of your presentation. How well does it work? Prior to this class, the author averaged a 1.6-second first shot from concealment. By the end of our three-day class with Modern Samurai Project, we were down to a 1.2-second first shot, with consistent A-zone hits. Shaving an entire half second off your draw time in just 24 hours’ training time is a significant performance increase in relatively little time.
Is this important from a practical standpoint? The average human reaction time to a visual or audible stimulus is one-quarter second. If your reflexes are exceptional and you’re already primed to action, you might be able to get that down to 0.20 or 0.18 second. But most people walking around in their daily lives will be hovering around that 0.25 mark. That half-second off the draw potentially doubles the available decision-making time available to you.
Or, if you’ve already made the decision to shoot, you can now get three rounds on target as opposed to one in the same timeframe. According to trends being examined by several federal agencies, the first shot of most defensive gunfights is fired from within 5 yards, with the overwhelming majority of instances seeing all rounds complete within 7 yards. The bottom line is that, if it happens to you, you’ll likely have a bare minimum of time and space to react.
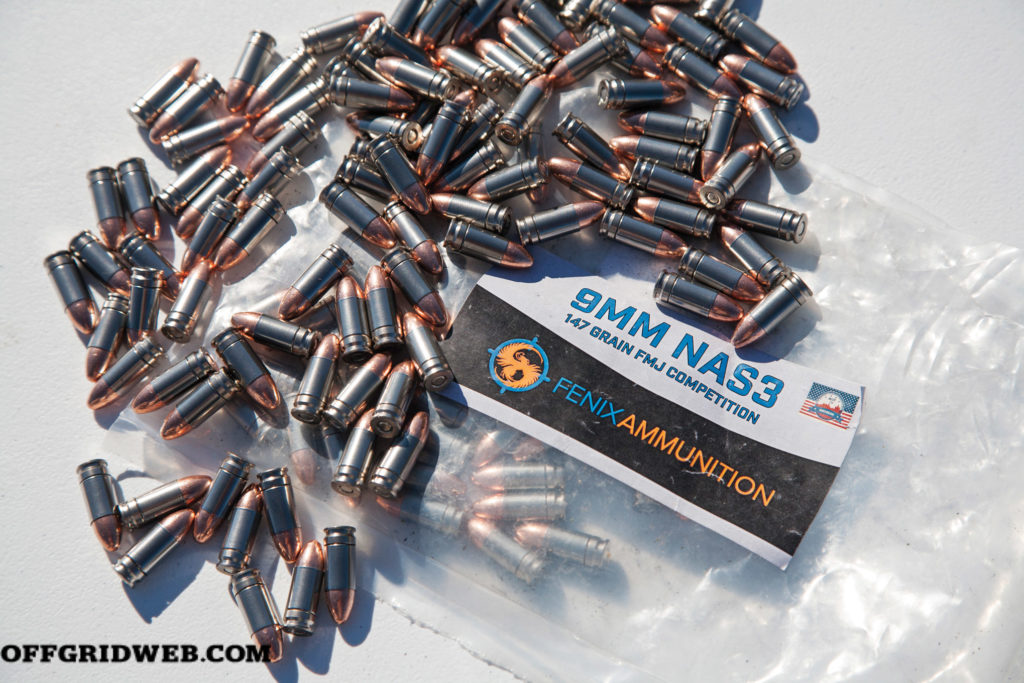
Above: Fenix Ammunition's competition load pushes a 147-grain FMJ bullet at a dainty 900 fps. During our train-up for this story, we shot thousands of rounds to gain proficiency and relied heavily on this load to reduce fatigue during back-to-back classes and high-round-count range days.
To paraphrase Jedlinski: “Does it matter? Well, if you have a 1.5-second problem to solve, do you want a 1.6-second draw or a 1.2-second draw?”
Carrying a gun for personal protection isn’t a decision to be taken lightly. Many people spend days, weeks, or even months researching the best pistol to carry. But all too often, their education stops when at the gun-store register. We argue the sales transaction (and state permit class, if required) should be the beginning of your concealed-carry education, not the end of it. Knowing how to carry, deploy, and employ a firearm for self-defense is even more important than knowing what to carry. Hopefully, this article serves as a primer for the kind of knowledge you need to have to be an effective and responsible armed citizen. But we urge you to seek out professional training when and where possible and commit to a level of practice commensurate with the gravity of the task. We hope you never need lethal force to protect you and yours, but sometimes you must choose between being safe and being ready. Make sure you have both options
Photography by Niccole Elizabeth and Patrick McCarthy
 STAY SAFE: Download a Free copy of the OFFGRID Outbreak Issue
No Comments