In This Article
You may find yourself asking, Six months of food? Do I really need that much? — especially when most people seem to be content with 72-hour go-bags and two-week disaster kits. But if you’re reading a magazine like RECOIL OFFGRID, you already know why long-term food storage makes sense.
A Katrina-level natural disaster, an economic collapse, or another Sept. 11-style attack — these and any number of similar catastrophes could wipe out your normal resources for food. In these types of situations, you’d have to rely on your own reserves, or devolve into a hunter/gatherer (and there are no guarantees with that menu plan). But maybe your problems aren’t so widespread. Perhaps you’re just suffering a personal crisis, such as a job loss or an injury that prevents work. For any of these situations, building a food reserve becomes a valuable insurance policy — one that you can actually eat.
Pick Your Food Plan
“Plan your work, and work your plan.” A project like this can be a daunting task, so planning is one of the most important parts. You’ll want to pay great attention to calorie content, methods of food preparation, storage conditions, and your own personal dietary restrictions. It’s also helpful to plan out the meals and create a meal rotation. You don’t need to plan 180 days of unique meals, but a two-week menu plan will give you some much-needed variety (unless you’re buying a pallet of MREs or mixed, freeze-dried foods).
Finally, you’ll need to decide which food preservation method best matches your plan. In this article, we’ll look at four different approaches to building a food supply: MREs, freeze-dried food, canned goods, and dry goods.
1 MRE: Meals Ready to Eat (MREs) are a quick solution to build your food reserves, but they’re expensive, bulky, and only last about five years. This approach is easy and no cooking is involved to prepare the food — it’s truly “ready to eat” as the name declares. Each MRE contains approximately 1,400 calories, so two per day provides an average of 2,800 calories. You’ll need 360 MREs (30 cases) for a six-month supply. For your daily ration, open up two MREs, pick through the contents to decide which items you want for breakfast, lunch, and dinner, then eat them when you’d like. Better MREs include a water-activated chemical heater, which would give you two hot meals a day. This is a great morale booster and perfect for those who are cooking-impaired.
Cost per day: $16
Cost for six months: $2,880, plus shipping (though discounts may be available for large orders)
Longevity: Five-plus years

2 Freeze-Dried Food: Mountain House and many other companies provide a wide selection of freeze-dried meals and food items. They’re even more expensive than MREs, but may last up to five times longer. Freeze-dried foods generally require hot water to prepare, and they’re as bulky as MREs (yet without the weight). They’re available in serving-sized pouches, larger cans, and even buckets. Four pouches a day will be needed to reach 2,400 calories. Oddly enough, the No. 10 entree cans only contain about 2,000 calories each, yet cost over $30 apiece. The greatest asset to freeze-dried food is shelf life, with 25 years or more expected. You’ll need about 180 cans or 720 pouches for a six-month food stash.
Cost per day: $25 to $35
Cost for six months: $4,500 to $6,300, plus shipping (though discounts may be available for large orders)
Longevity: 25-plus years
3 Canned Goods: Your average canned pasta, stew, and chili are more cost effective than MREs or freeze-dried food. They’re typically ready to eat from the can without the need for extra water, and cans are insect and rodent proof. Canned goods do come with a few drawbacks, though. They’re even heavier than MREs, and their life span is only about five years as well (maybe less for pop-top cans). Check the calorie count when planning meals with canned goods. You’ll need at least five cans per day to reach 2,400 calories. Roughly 900 cans will provide you with a six-month food supply, and these are the easiest foods to work into your normal meals.
Cost per day: $10 to $15
Cost for six months: $1,800 to 2,700, with no shipping costs if purchased locally
Longevity: Five-plus years
4 Dry Goods and Grains: Cooking these foods and preparing palatable meals from them may be a bit of a challenge, but if you’re familiar with cooking from scratch, this is the cheapest way to go. Dry pasta, rice, flour, dried beans, sugar, and many other staple foods can be stored for 30 years with negligible nutrient loss when properly packaged. They’re also relatively easy to work into your regular meals. The drawbacks are that you’ll need even more potable water than for freeze-dried foods, and you’ll need to know how to cook. You can purchase these staples already packed in cans or buckets with oxygen absorbers and Mylar liners for maximum longevity. Or you can save a few dollars by buying the food in bulk and repacking it yourself. Depending on the staple food item, a 5-gallon bucket usually holds over 30 pounds of dry goods, which can represent over 40,000 calories. This means that 10 five-gallon buckets will hold enough staple foods for your six-month supply.
Cost per day: $2 to $5, depending greatly on your menu plan
Cost for six months: $360 to $900, with no shipping costs if purchased locally
Longevity: 30 years
Package Your Own Dry Goods
One of the easiest ways to package your food is in 5-gallon, food-grade buckets. If your budget allows, buy new 5-gallon buckets with regular lids. Purchase a few gamma (screw-on) lids as well, handy for accessing foods that will be used often, like sugar. If you’re doing this project on a shoestring budget, ask for buckets from bakeries and restaurants — they may be free or only cost a few dollars a piece.
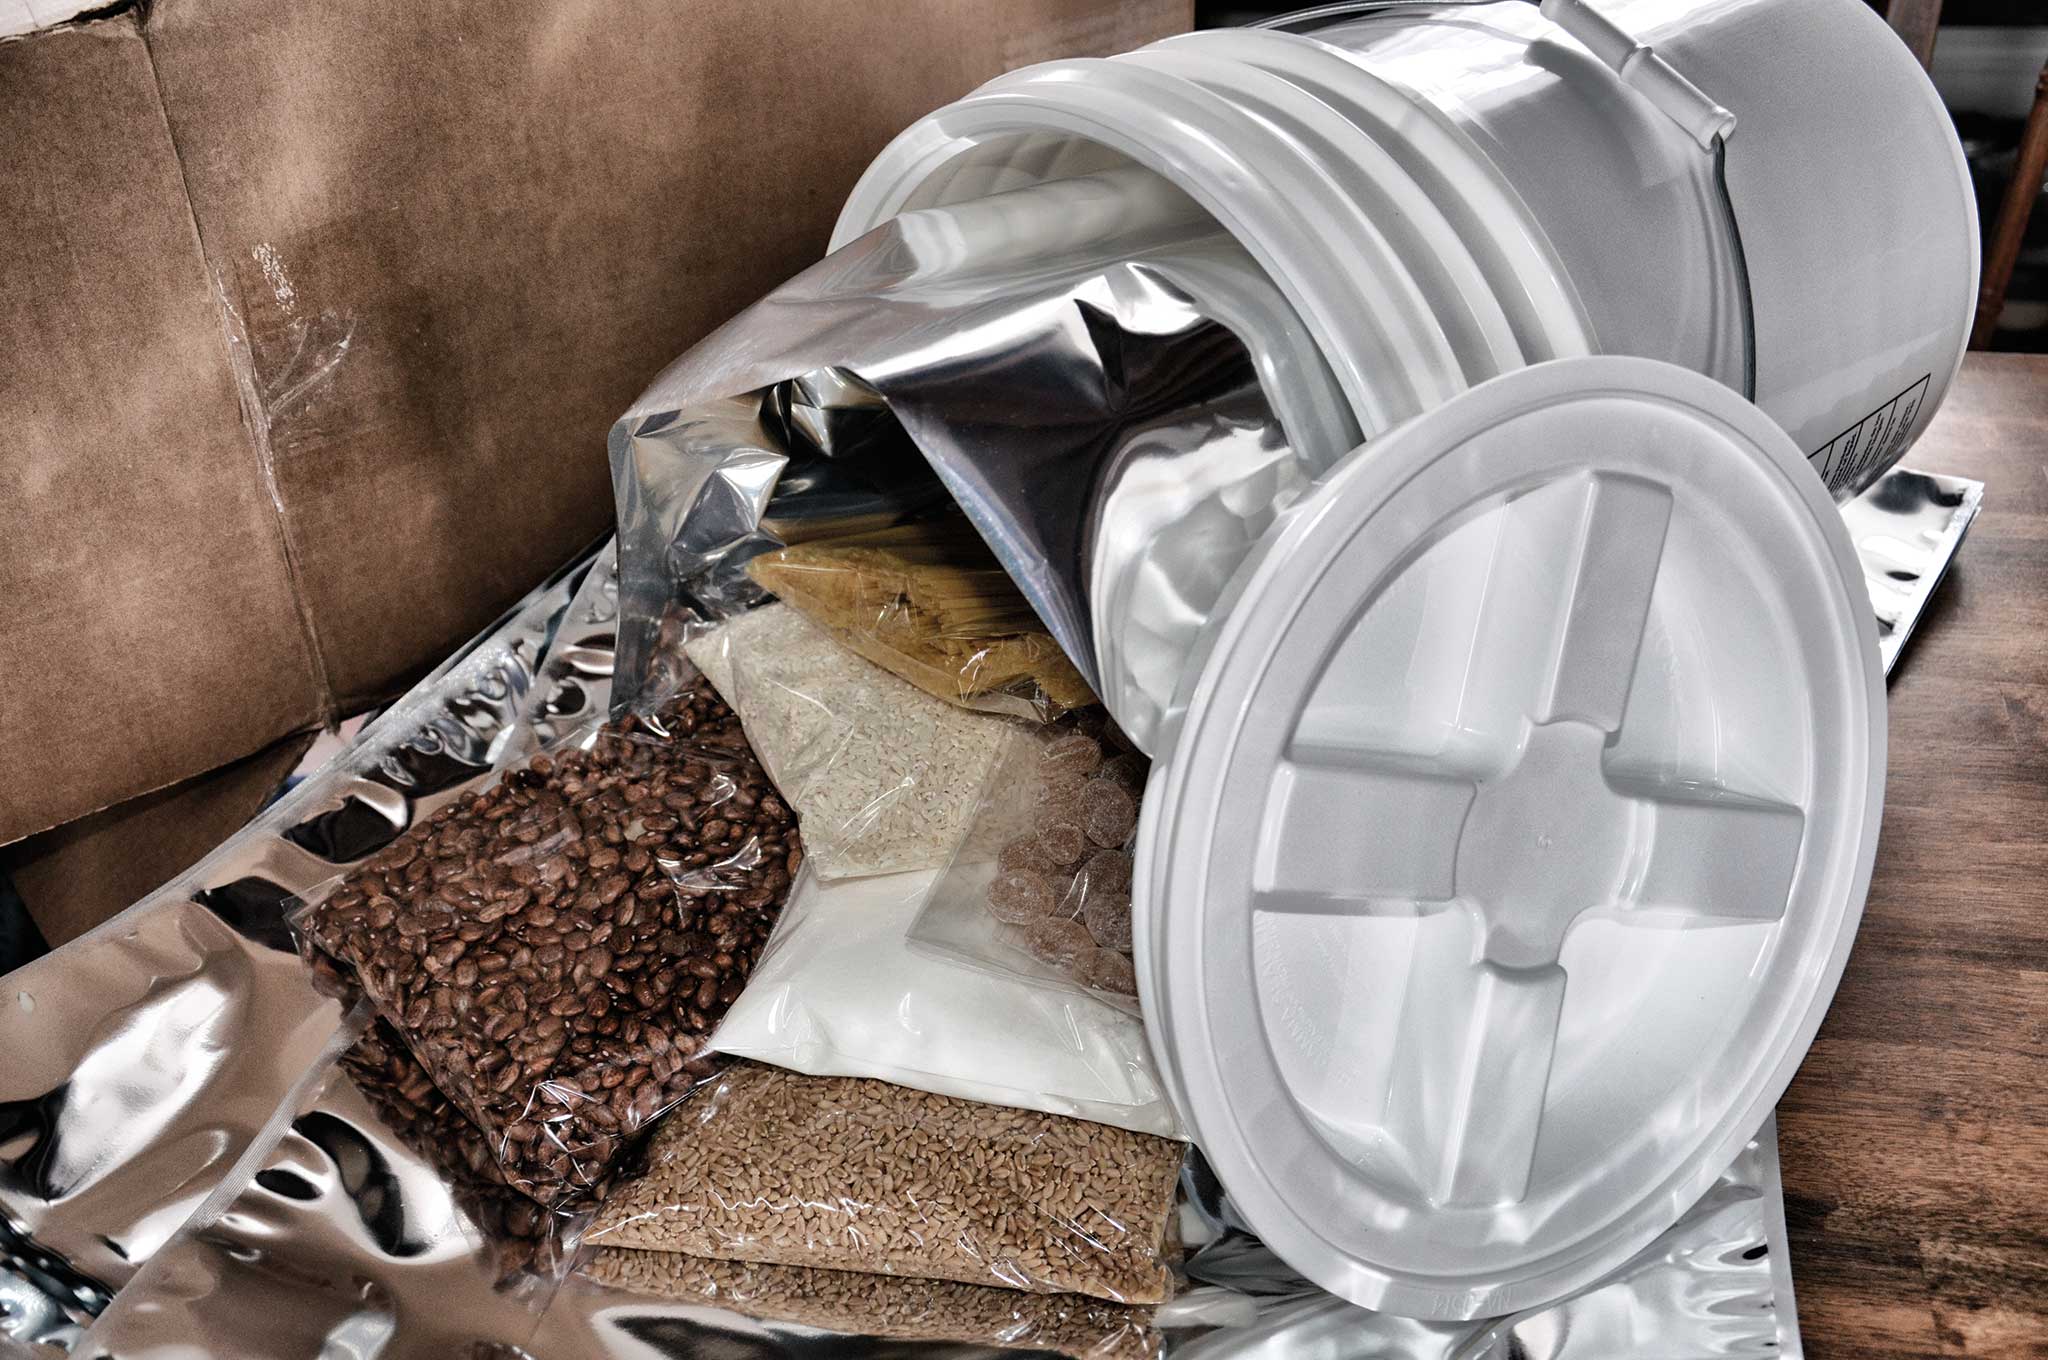
The bucket alone is good, but to still have edible dry goods after 30 years, you’ll also need Mylar storage bags and oxygen absorbers. Smaller bags and several 100cc absorbers are great for rationing the food and for modular storage. The large “bucket liner” bags and 2,000cc absorbers are perfect if you want to dump a big bag of grain into a bucket and call it done. You’ll need a total of 1,500cc of absorbers as a minimum for one bucket of grain, flour, beans, or pasta. You won’t need oxygen absorbers in sugar, honey, or salt. They don’t go bad, and sugar and salt will become a solid brick from the oxygen absorber (still edible, but you’ll need a chisel to chop them up). Once you’ve figured out which staple foods will be in your bucket, place the Mylar liner in the bucket (even if your food is in smaller packages with their own oxygen packs), and fill it near the top. Add oxygen absorbers to total at least 1,500cc for the entire 5-gallon bucket.
Press the liner bag together and expel any air you can. Lay a 2×4 board across the bucket and smooth out the bag mouth on top of it. Run a hot clothes iron across the bag opening to heat seal it (you could also seal the bag with a flat iron for hair; no need for the piece of wood). Seal the bucket lid tightly and store it in a safe storage spot.
Build a Dry-Goods Menu Plan
Staple foods are easy to plan, if you have a shopping list and a menu. Here’s a very simple menu, and the accompanying shopping list, for a three-week food supply that fits in a single 5-gallon bucket. Put together 10 of these buckets, and your six-month food plan is covered. Although a bit bland and monotonous, this basic menu provides 2,500 calories a day and only requires boiling to prepare, no oven baking required (which may not be an option in a grid-down situation). Just make sure that the shortening is stored outside of the buckets and rotated annually, as it will spoil. When packed with oxygen absorbers in a sealed Mylar bag, all of these dry goods should last for two to three decades.

Three-Week Menu Plan
42 Lunches and Dinners
- 10 Plain Rice
- 10 Plain Beans
- 10 Pesto Pasta
- 12 Beans & Rice
21 Breakfasts
- 7 Oatmeal
- 7 Grits
- 7 Cream of Wheat
Snacks
- Hard candy
- Sweetened beverages (tea, coffee, herb tea, etc.)
Shopping List for Each Three-Week Bucket
- 5-pound spaghetti pasta
- 11-pound white rice
- 11-pound mixed beans
- 2-pound sugar
- 1-pound hard candy
- 1-pound rolled oats
- 1-pound corn grits
- 1-pound cream of wheat
- 5 packs of pesto pasta mix
- 1 package of black tea, coffee, or herb tea
- 2 sticks of butter-flavored shortening (not stored inside bucket)
- Assorted salt, pepper, and dry seasonings as desired
Store it in the Right Spot
To get the maximum life span from your stored food, it’s critical to store it in a food-friendly location in your home or bug-out site. The traits of a good food storage spot include the following:
- Dark: Light can damage some foods and shorten their life span.
- Cool: Heat is one of the most destructive forces to food. A few months in a hot garage or vehicle will drop the shelf life of your MREs to just a few months. Cool temperatures are critical to storage, and it’s best if temps don’t fluctuate.
- Dry: Moisture can allow mold and bacteria to flourish in stored food. Pick a dry spot to begin with, and package your food to keep moisture out.
- Protected From Pests: Hungry rodents can chew through MRE bags and plastic food buckets in a matter of minutes. Set mouse traps and rat traps around your food storage area. For greater security, place the food in metal containers like job site tool boxes, steel barrels, or metal garbage cans.
A dry basement, cool closet, or secure pantry works in most cases, though these are likely spots to be searched if looting occurs after a crisis cuts off your shopping trips. Consider mislabeling some bins of food or hiding food in floors, walls, ceilings, or furniture to give you a backup if your home is pillaged. Buckets buried in the flowerbed are another option in food security. Although this is more vulnerable to moisture and rodents, it offers protection from both house fires and theft. Use regular bucket lids when burying buckets.
It’s All About the Calories
Consider 432,000 calories. In a world of dieting and calorie counting, this sounds like a huge number. But once you’ve done the research and the math, you’ll see that this seemingly large number of calories only supports a sedentary man between the ages of 19 and 30 for a span of six months, using the USDA model of 2,400 calories a day. Sedentary females (and males that are younger or older) will require fewer calories, and of course active people will need a higher caloric intake. Calories should be your major concern when building a food storage system. Read the labels and add up the calories for yourself. Ignore the “servings per package” notations as they’re often based on ridiculously small portions. For a short-term emergency, any food is better than none. But over a long-term crisis, a calorie deficit could have a major impact on your energy levels — and ultimately your survival.
Common Mistakes to Avoid
Mistakes are a natural part of the learning curve, but mistakes in food storage can be disastrous, leaving you with an empty wallet and an empty belly. Learn from the failures of others, and avoid these blunders yourself.
- Forget the water. Store several large containers of safe drinking water and the disinfection supplies to refill them over and over.
- Store dry and wet together. Jugs of water, cans of wet food, and any other containers of liquid should always be stored
outside of bins and buckets of food. If they leak, the food may get ruined and you wouldn’t know it until you needed the food (and opened it). I recently learned this one the hard way — a jug of water leaked inside a bin of dry food and converted it into a bin of black mold. - Food expires? Write the expiration date on food cans and packages with a marker for easier inspection, and check your food seasonally for aging items.
- Heap it up in a pile. Stock your pantry like a store does, placing new items in the back and pushing older items forward. This helps to create an easy rotation of goods.
