In This Article
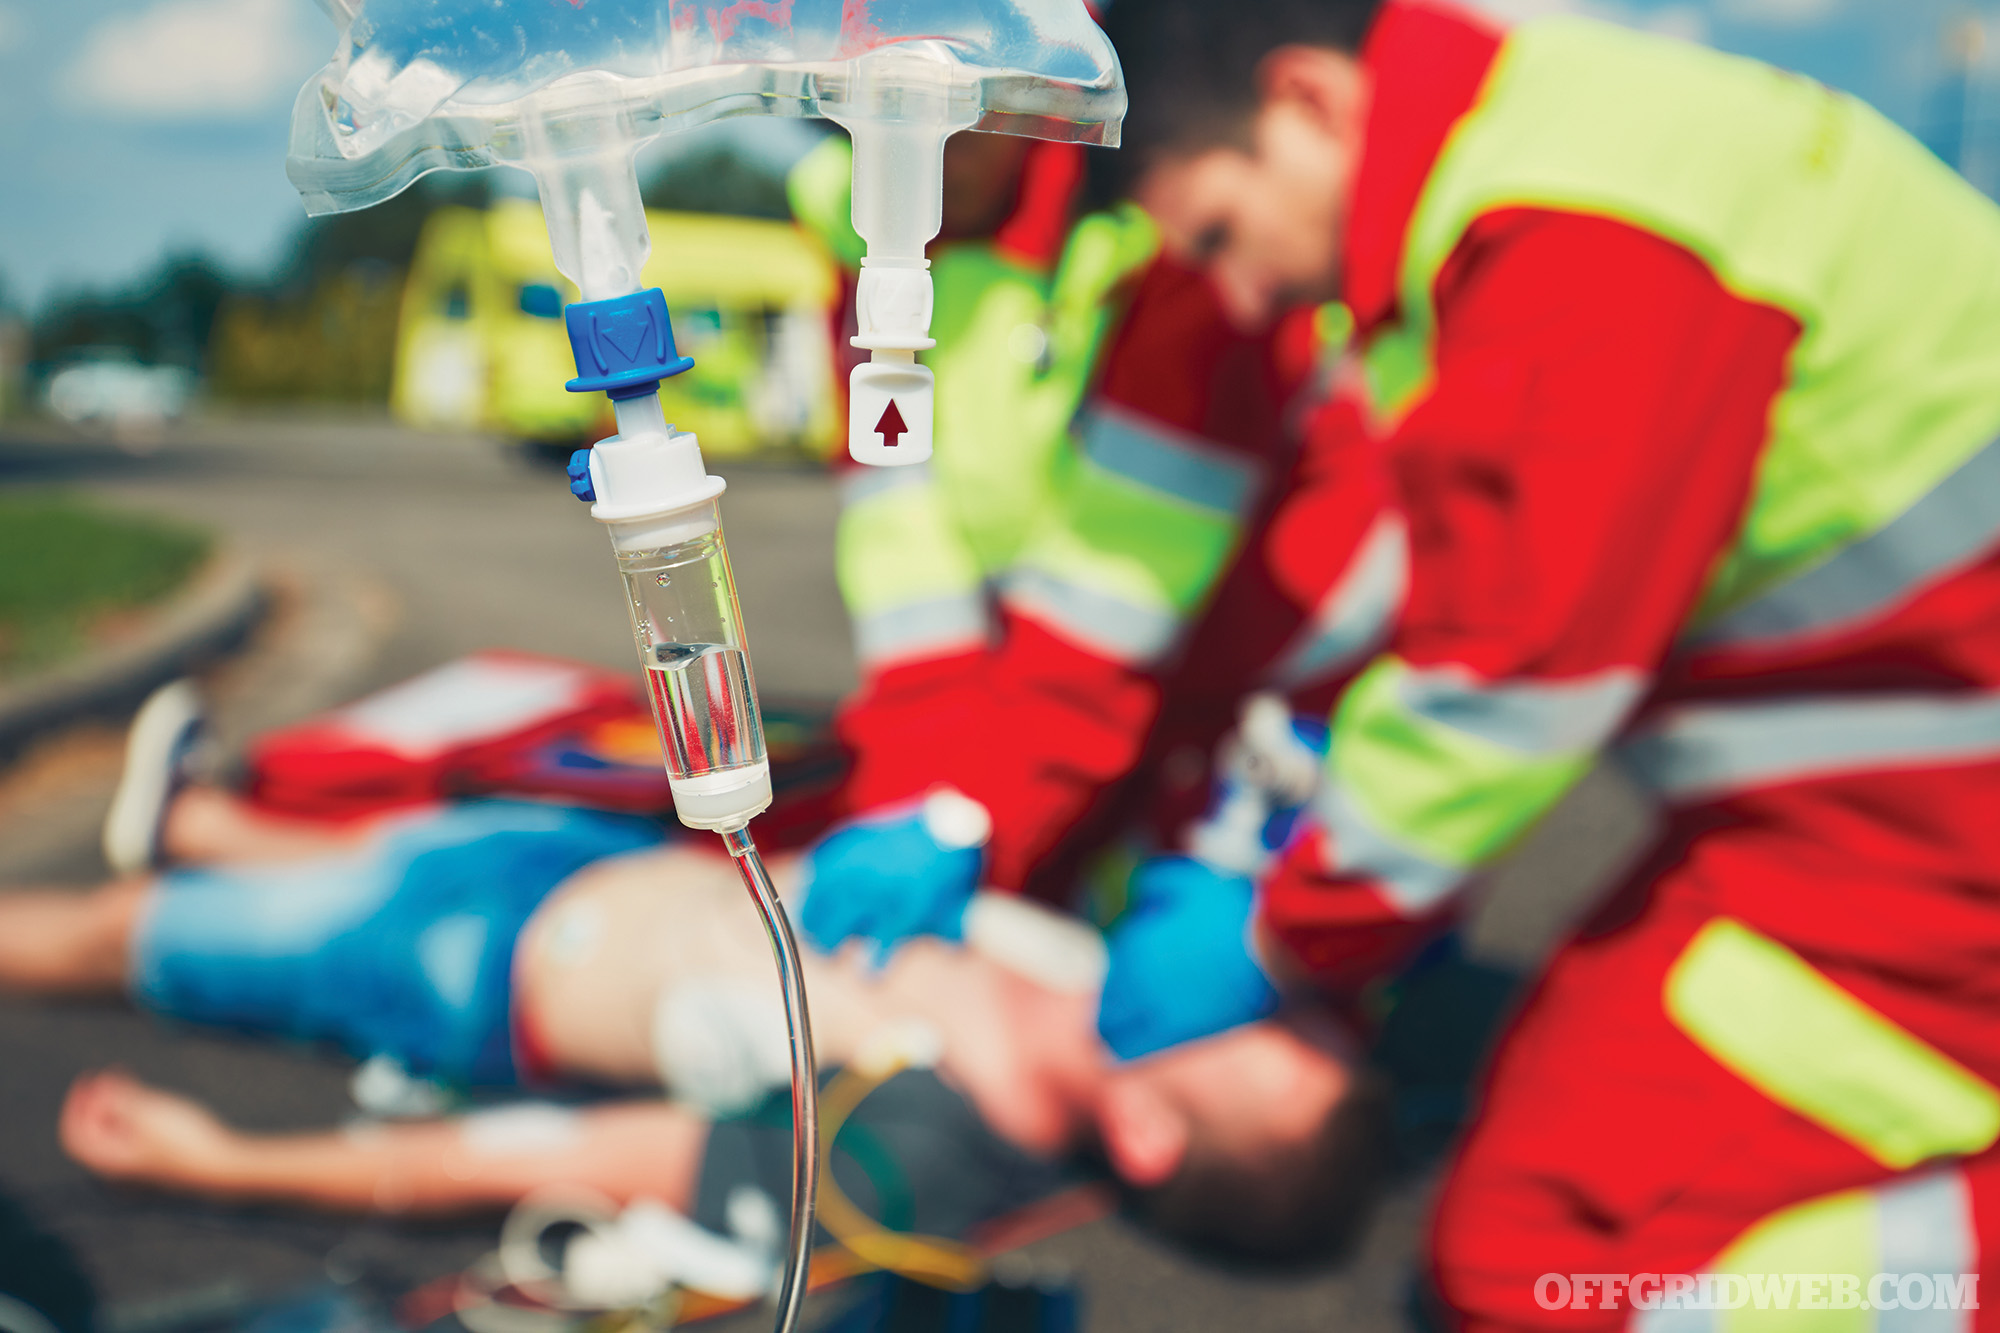
The off-grid medic has to deal with lots of medical issues. Bleeding, broken bones, burns, and infections can lead to major challenges when you don’t have modern medical facilities at your beck and call. Many of these problems result in loss of fluids from the body. Oral rehydration will replace what’s lost, but what if your patient is unconscious? In normal times, that’s where intravenous (IV) fluids come in. One study reported that almost 90 percent of hospitalized patients have an IV line placed. In a true long-term disaster scenario, hospitals will be few and far between, but injuries and infections will still occur. You’ll get by with oral fluids in most cases, but it’s a good idea to know some basics about IV therapy. In the right hands, IV infusions are used to maintain hydration, balance electrolytes, replace blood, give medicine, and even provide nutrition. IV fluids can save lives but can also cause life-threatening situations if used incorrectly. Proceed with caution.
Disclaimer: This is meant to be a brief overview and not a detailed guide on IVs. Please seek qualified medical training before attempting any of these steps.
General Types of IV Fluids

Above: Dehydration can usually be treated with oral fluids, but IV fluids can be used in more severe cases.
Giving fluids to a human is more complex than pumping gas into a car. To understand the basics of IV fluid administration, it’s important to understand some terms.
A “solute” is a solid that’s dissolved into a liquid. A classic example of a solute is salt in water. Salt is the solute that dissolves in water (a “solvent”) to form a saline “solut-ion.” IV fluids that contain solutes dissolved in water are known as “crystalloids.” They’re the options most commonly used to replace fluids and balance electrolytes.
Fluids in a blood vessel may be inside the cells (“intracellular”) or outside the cells (“extracellular”). The fluid in blood vessels outside the cells is called “plasma.” The concentration of solutes (“osmolality”) of a particular IV fluid affects the pressure balance (“tonicity”) of the plasma. Choosing the right IV fluid matters, as it affects whether red blood cells remain stable, shrink, or swell.
There are three main IV fluid tonicities: isotonic, hypertonic, and hypotonic.
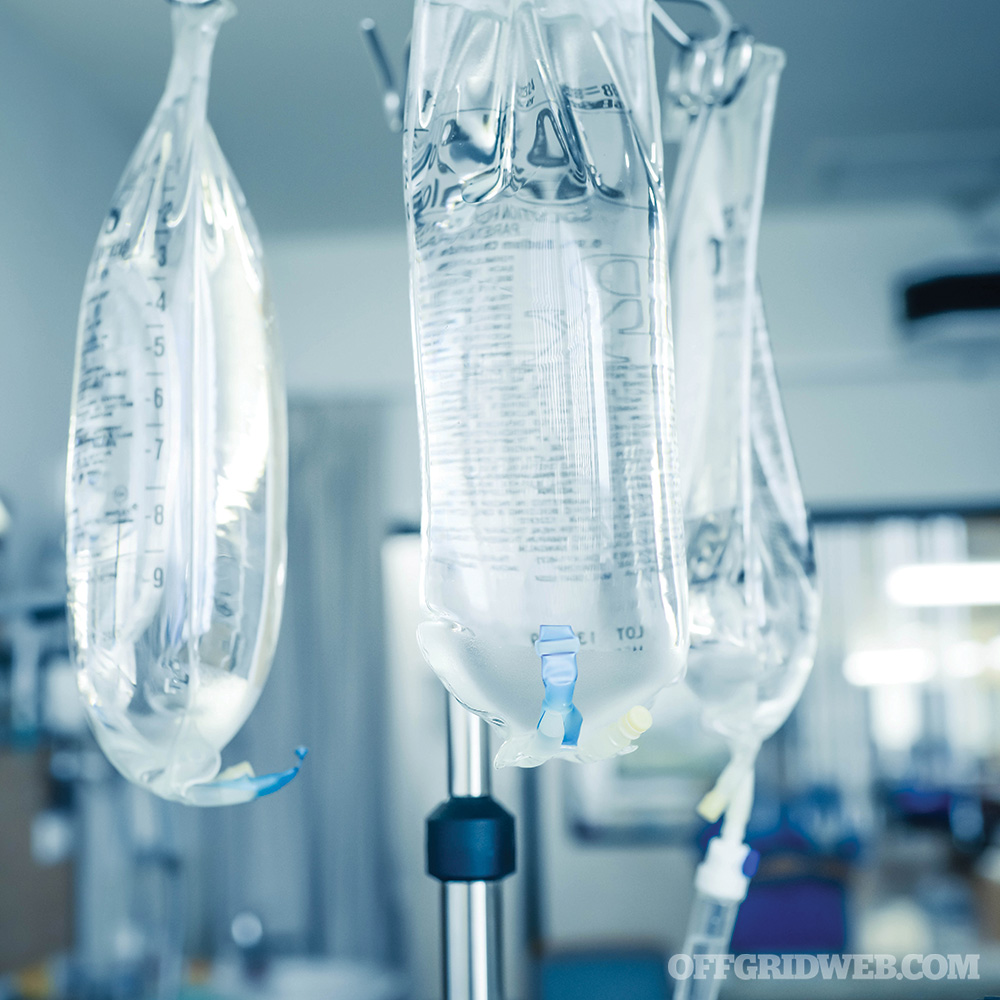
Above: Plastic bags have replaced glass IV bottles in modern medicine.
Isotonic fluids: These fluids have a similar solute concentration to that naturally seen in plasma, so they don’t cause significant pressure movement of fluid into or out of the patient’s red blood cells. IV solutions in this group include the most commonly known: 0.9-percent “normal” saline, lactated Ringer’s solution, and 5-percent dextrose in water. You’d use these to replace fluids lost from dehydration.
Hypotonic fluids: These fluids have lower concentrations of solutes than blood, resulting in a tonicity less than that of plasma. When cells in blood have more solutes in them than the IV fluid or plasma, they tend to swell as osmotic pressure drives water into them. Hypotonic solutions are used when a patient has very high sodium levels or a condition that dehydrates cells, such as diabetic ketoacidosis. Examples include “half-normal” saline (0.45 percent) and sterile water.
Hypertonic fluids: These fluids have a higher concentration of solutes than blood. They’re typically used in critical care to treat very low sodium levels, which can cause fluid in the lungs. The hypertonic solution will help remove excess fluid from red blood cells. An example would be dextrose 5 percent in 0.9-percent normal saline solution or even 3-percent saline.
Practically speaking, the family medic fortunate enough to have IV setups on hand and a supply of isotonic IV fluids will use them to replace fluids lost from dehydration or, perhaps, hemorrhage. Adjusting electrolytes like sodium with hypotonic or hypertonic solutions depends on knowing the level, usually identified by lab tests. With such tests scarce off the grid, this involves some risky guessing.
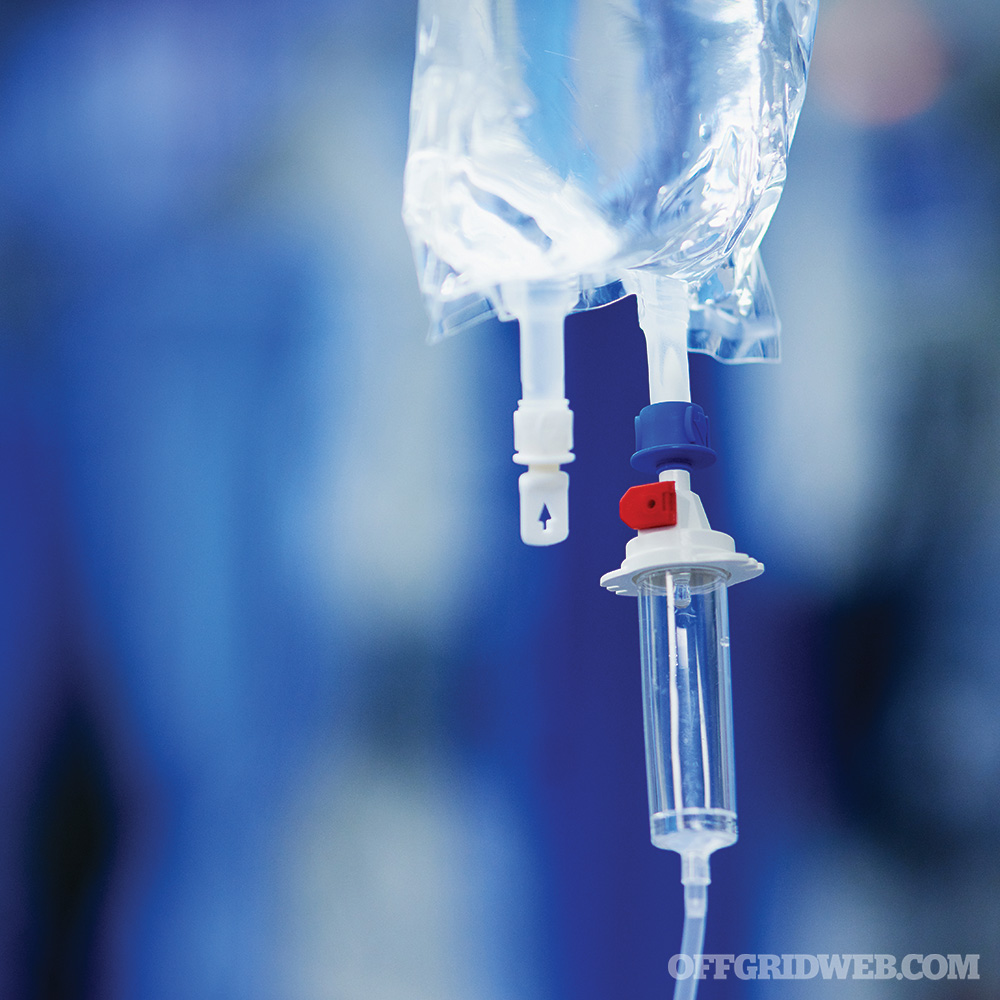
Above: IV bag ports and drip chamber
Deaths in survival settings from severe dehydration may be prevented by giving fluids like Ringer’s lactate or 0.9-percent normal saline solution. This is called “fluid resuscitation.” Ringer’s lactate is a mixture of water, calcium chloride, potassium chloride, sodium chloride, and sodium lactate.
Most cases of dehydration can be improved with oral fluids. To identify dehydration that requires IV resuscitation, look for these signs:
- Thirst
- Dark urine in decreased volumes
- Weak, rapid pulse
- Dizziness or fainting
- Dry mouth and lips
- Sunken eyes
- Fatigue
- Lethargy
- Poor skin tone (“turgor”)
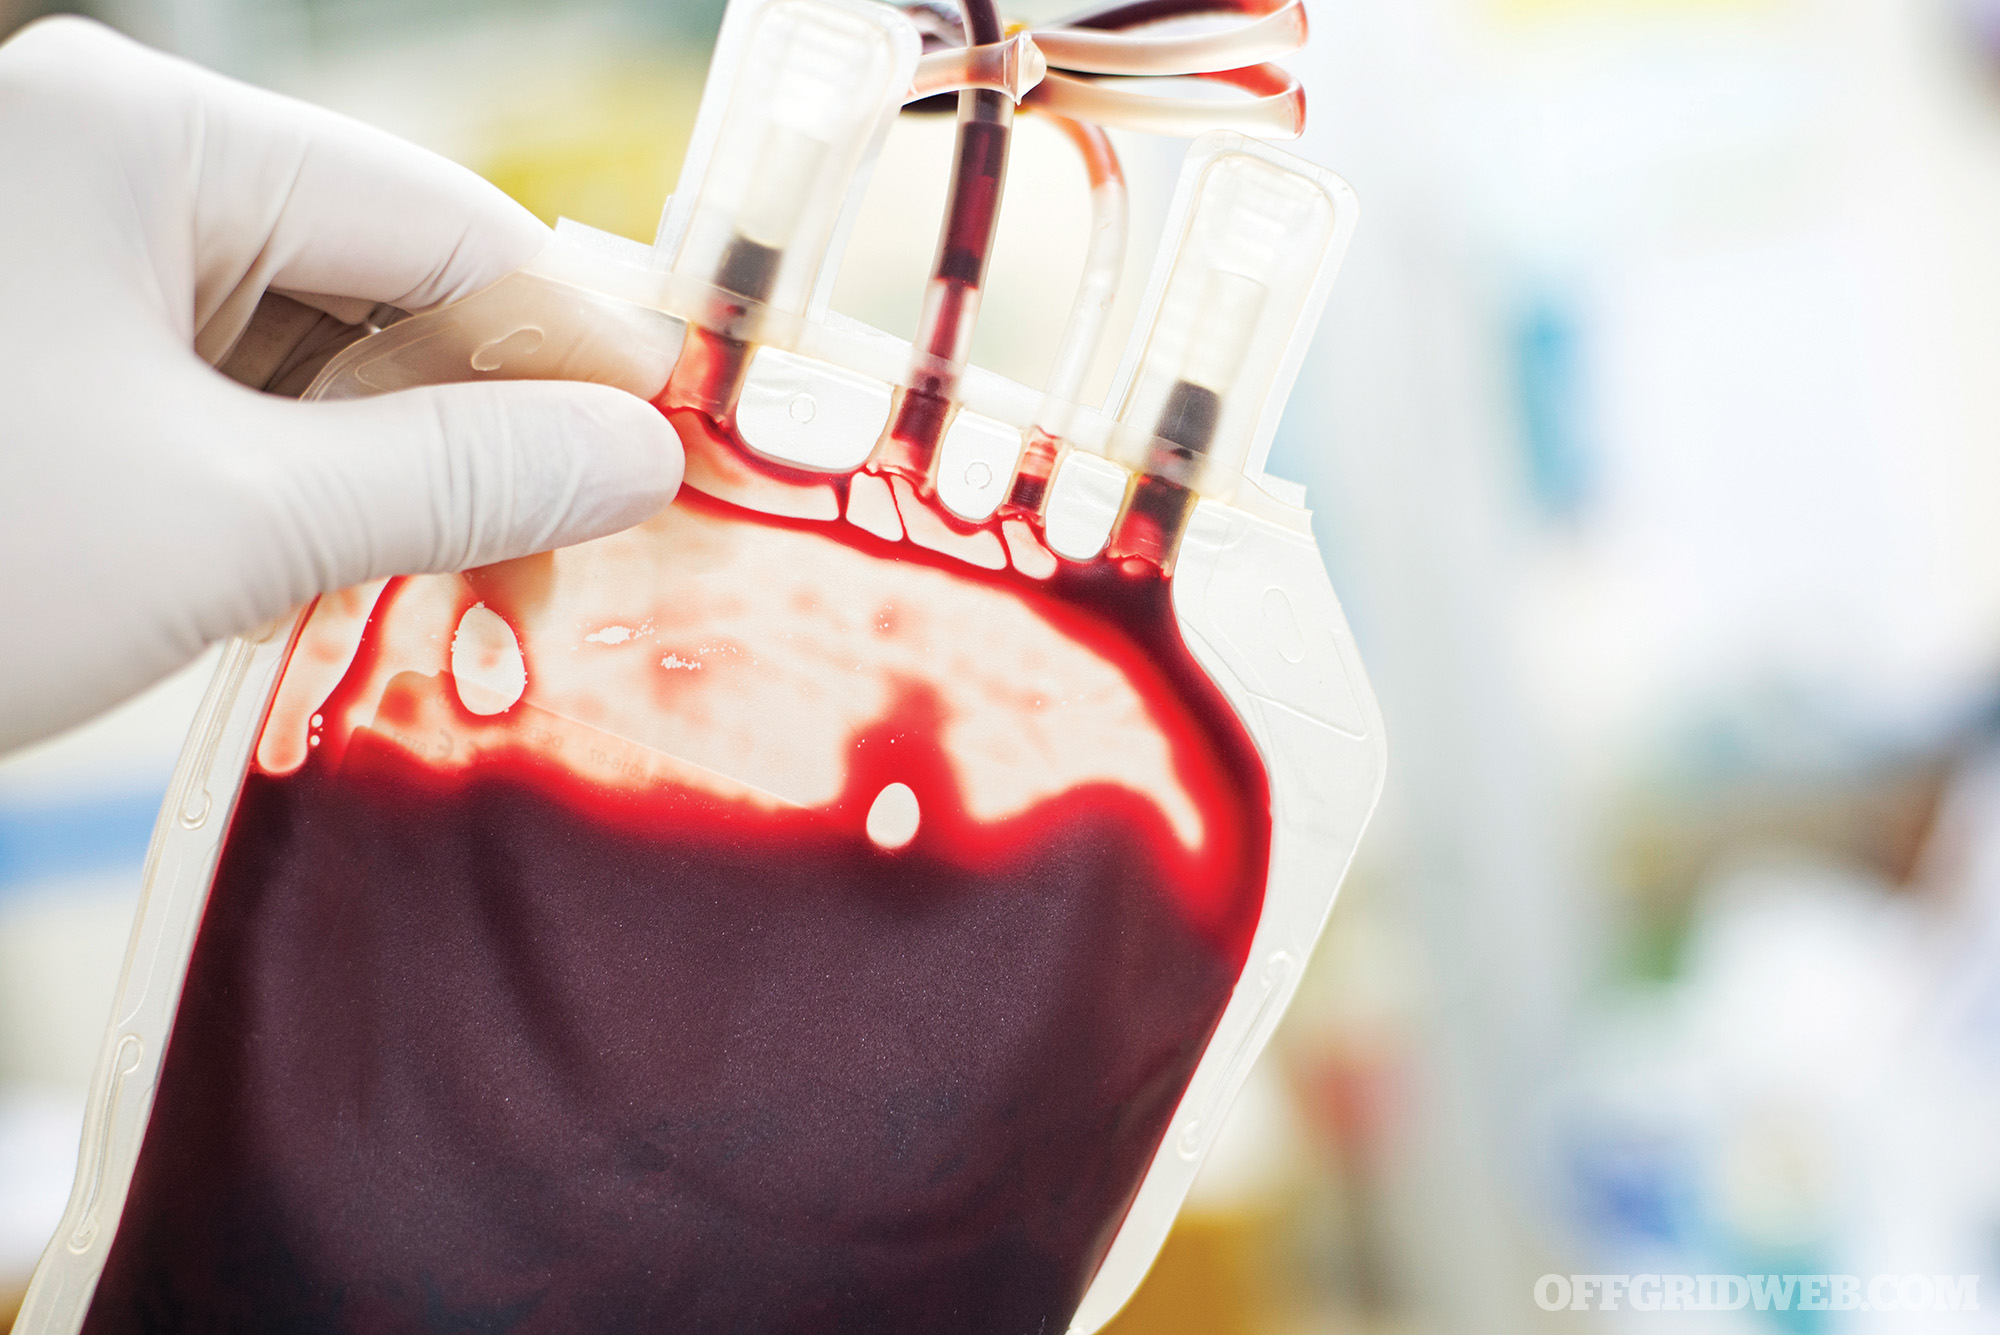
Above: Thicker fluids like packed red cells need larger gauge catheters.
To check turgor, pinch the skin on the forearm; normally, the skin snaps right back, but will remain “tented” in victims of dehydration. Dehydration is more commonly seen in people who have a high fever or are diabetic, vomiting, alcoholic, or overheated.
How much fluid should we give for dehydration? For those over one year of age, the Centers for Disease Control and Prevention (CDC) recommends 30 ml of Ringer’s lactate (preferred) or normal saline per kilogram of body weight (1 kilogram equals 2.2 pounds) in the first 30 minutes and 70 ml/kg spread out over the next three hours. If not improved, you can continue for longer periods. This might be necessary in someone with cholera, where huge amounts of fluids are lost as watery diarrhea. Signs of improvement include larger volume of and lighter-colored urine, stronger pulses, good skin turgor, resolution of vomiting, and less thirst. Once improved, the IV may be removed and the patient can switch to oral fluids.
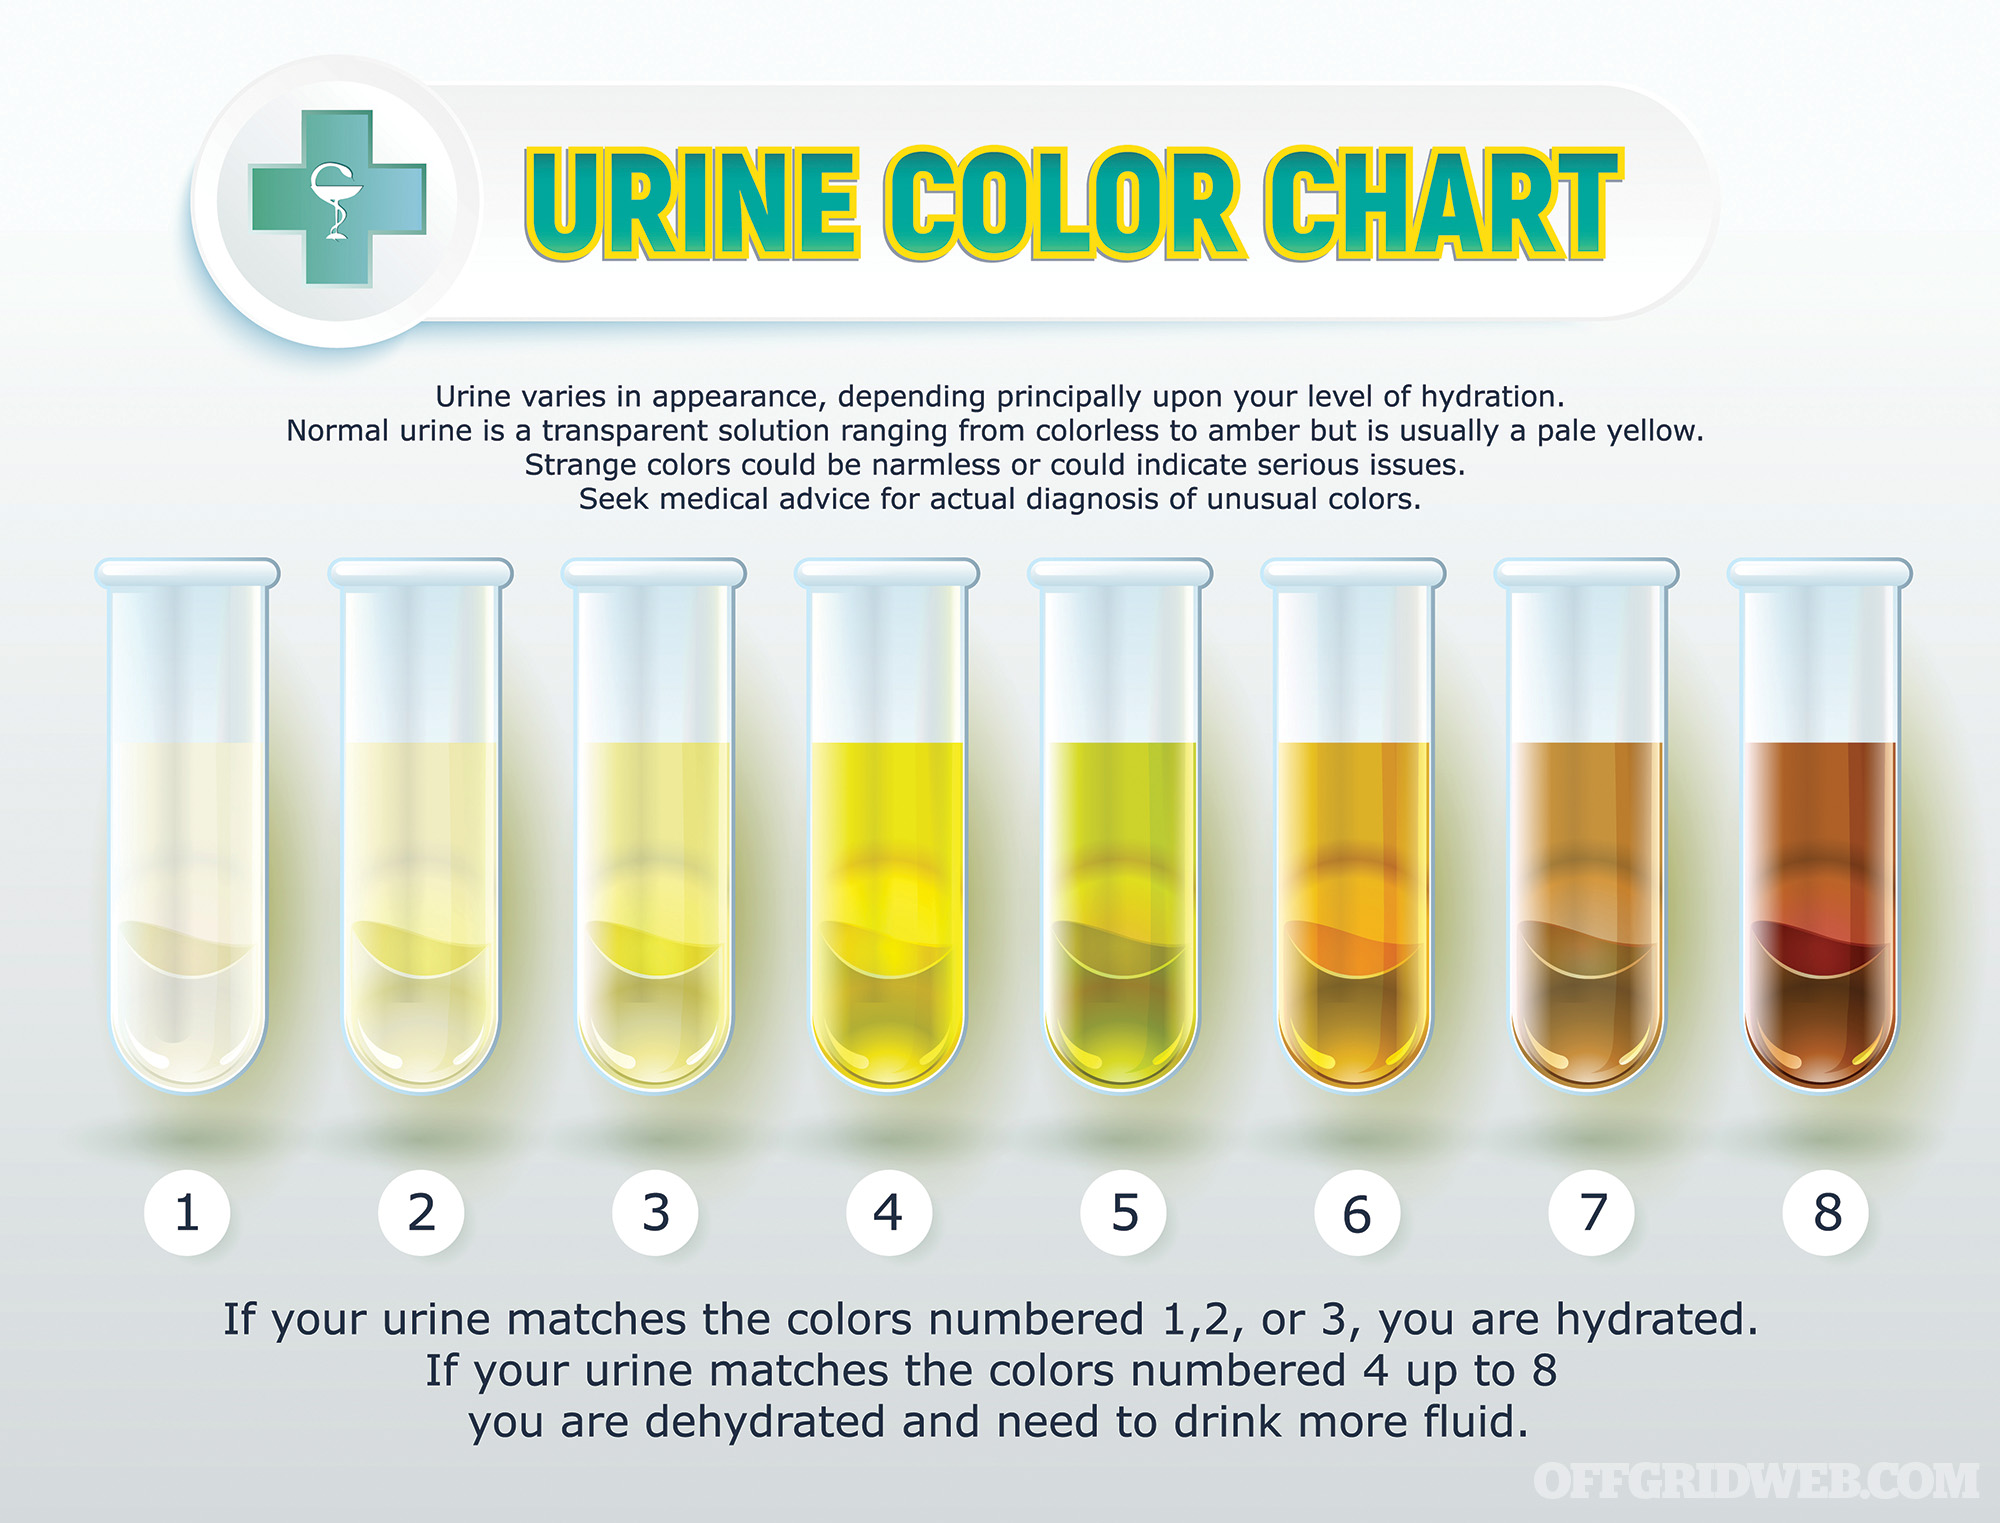
Above: Hydration status can be determined by urine color.
Oral rehydration salts are available commercially to mix with water, or you can make your own. The simple formula involves mixing 6 teaspoons of sugar and ½ teaspoon of salt in a liter of water. You may choose to add a small amount of salt substitute (potassium source) and a pinch of bicarbonate (baking soda) to the mixture as well. A flavoring agent may also be added to make the solution taste better. Those recovering from dehydration, vomiting, or diarrhea should start with frequent sips of the solution rather than gulping it down.
A Note on “Normal” Saline Solution

Why is 0.9-percent saline solution known as “normal” saline? In 1883, a Dutch scientist named Hamburger suggested that the concentration of salts in the human body was 0.9 percent. He said that a solution of equal concentration would be a “normal” content for IV fluids, and the name stuck.
Components of an IV Set
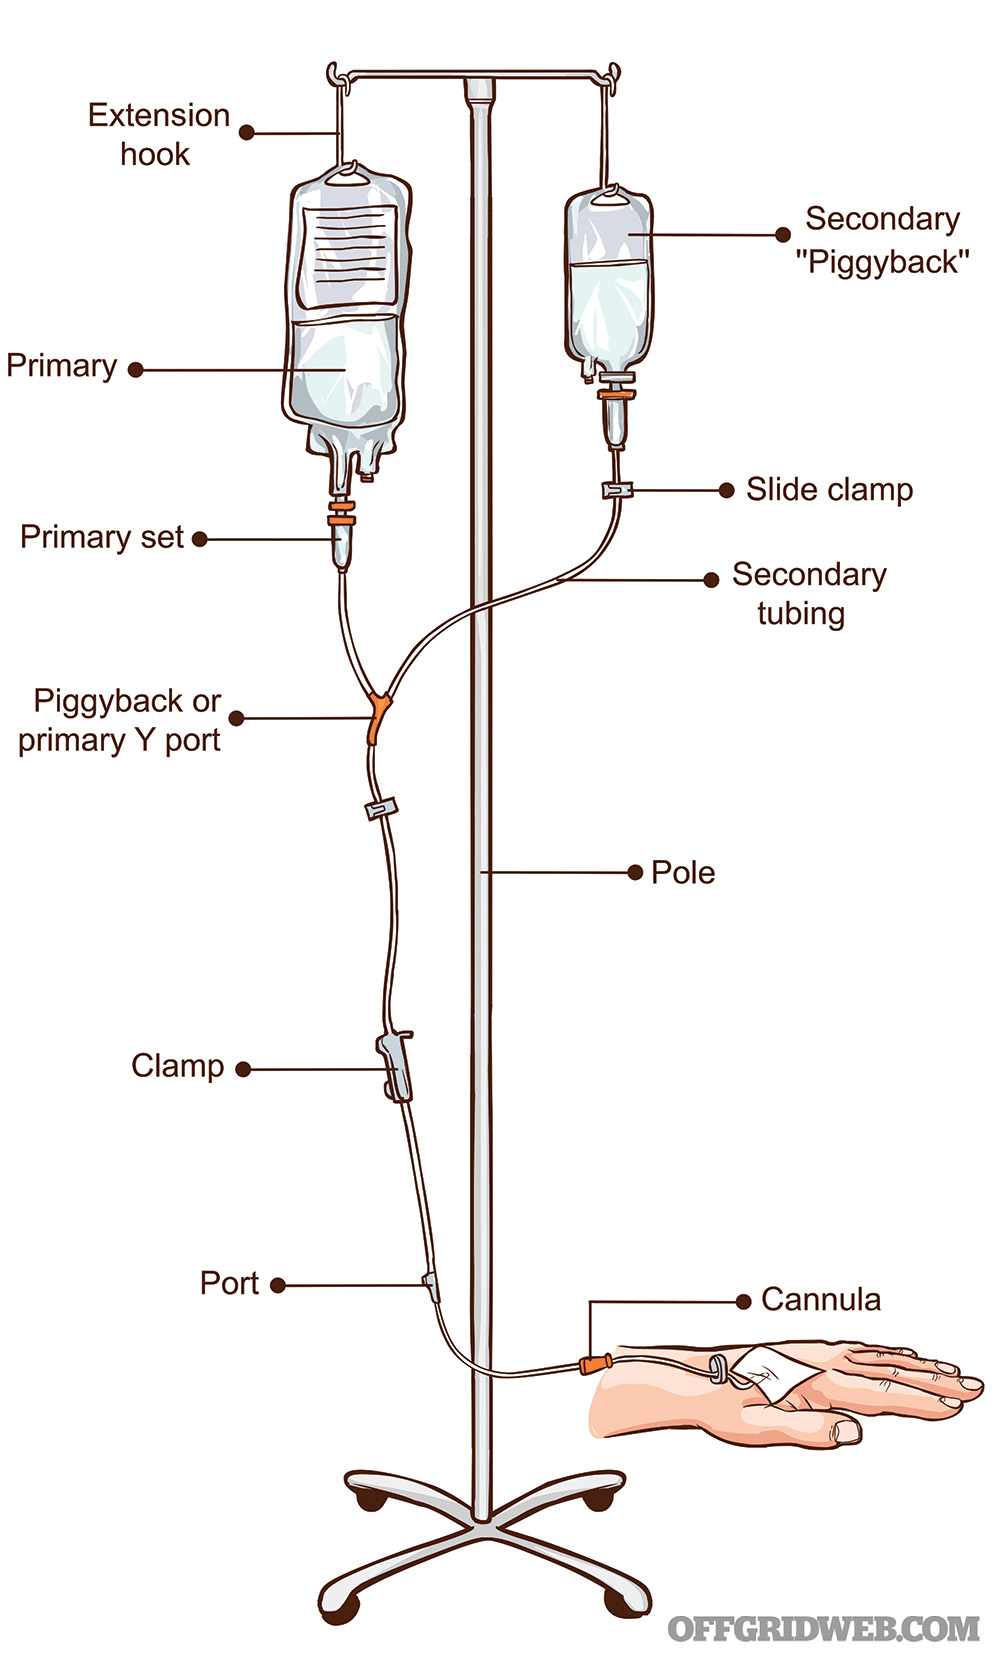
Special materials are needed for intravenous infusions. A typical IV setup contains a number of components for the insertion and maintenance of the therapy.
IV fluids: In the past, fluids like normal saline or Ringer’s lactate came in glass bottles. Today, they’re almost universally in sterile plastic bags. Bags may contain anywhere from 50 to 1,000 milliliters. For dehydration, liter bags are best due to the volume of fluids needed. Small bags like 50 ml are used to deliver dilute intravenous medications, although most IV bags have a port that allows injection of medications into the main bag.
IV catheter: The IV catheter is a hollow, plastic tube that’s pre-loaded over a hollow, beveled needle. The needle/tube is attached to a “hub” that remains above the skin. A small, transparent chamber is found behind the hub that allows the medic to see when blood from the vein flows into the catheter from a successful insertion. The catheter is then connected to tubing that attaches to the fluid bag.
IV needles typically range in size from 14 to 24 gauge, a measure that tells you the internal diameter of the catheter. The higher the gauge, the narrower the catheter. Saline can be infused through relatively small gauge needles, but thicker fluids like packed red blood cells require larger gauges.
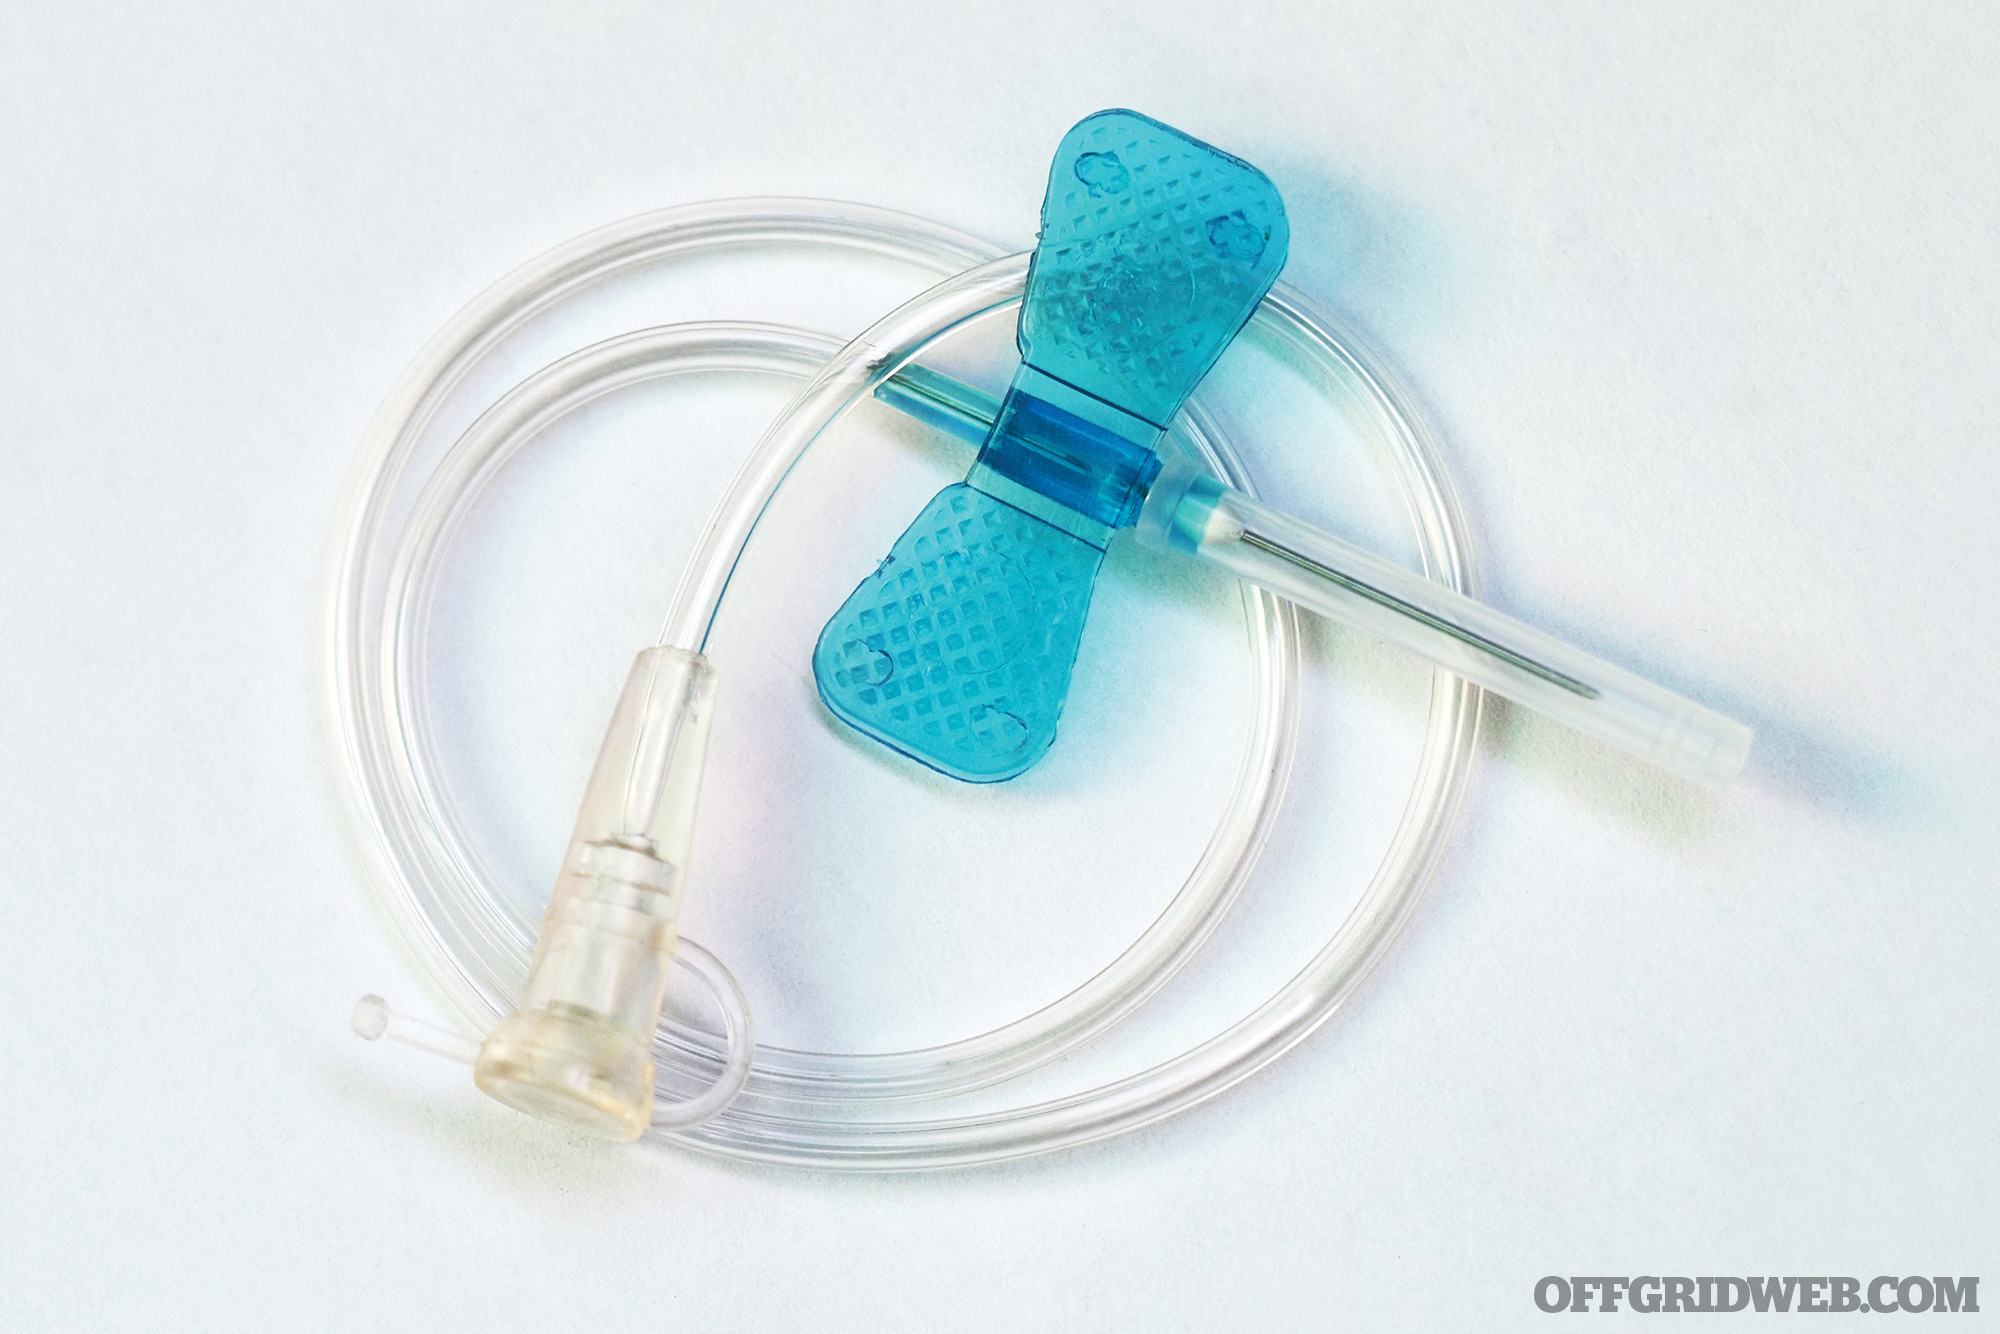
Above: Butterfly IV needle
IV tubing: Also known as primary infusion sets, this is the tubing that connects the IV bags to the IV catheter. The connection is usually a “spike” that inserts one end of the line into the bag. The set contains a “drip chamber” that allows you to estimate the rate of the IV fluids going down the tubing. It also allows gases to rise out from the fluid and prevents passage down the IV line. In order to control the rate of fluid going into the vein, a roller clamp is provided below the drip chamber. Primary infusion sets usually come with a port further down in which medications can be directly injected. Extension sets are available for when additional length is needed. The entire line is flushed with fluid to remove air before connecting to the catheter.
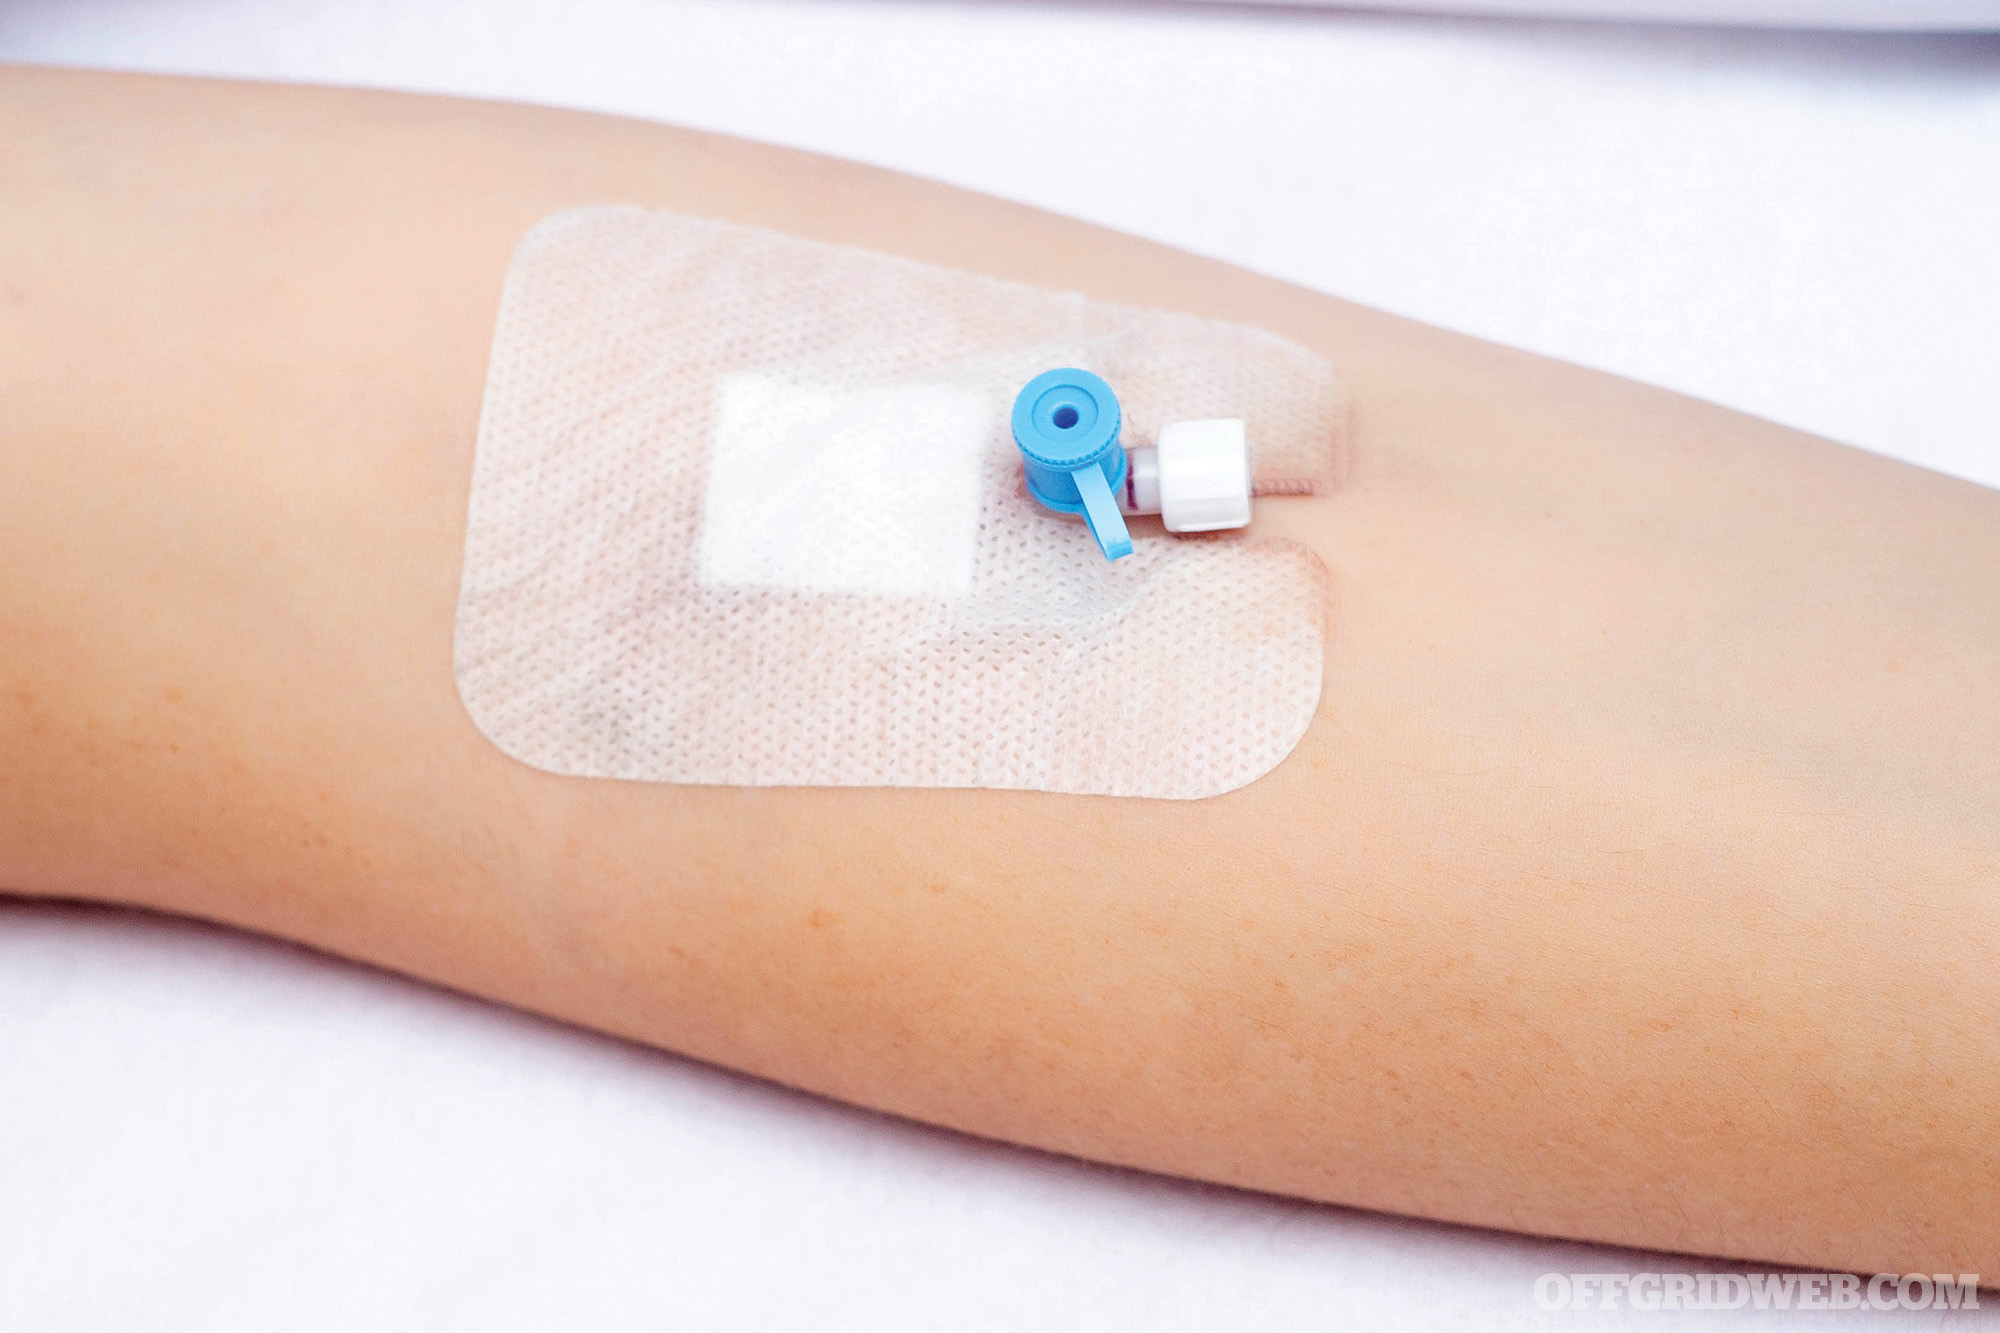
Tourniquets, tape, antiseptics: Alcohol or povidone-iodine wipes are used to clean the skin at the site prior to the procedure. A thin tourniquet band is used above the contemplated site for insertion to make the vein easily identifiable. Once the catheter is placed and the metal needle removed, Tegaderm or other adhesive is used to secure the line in place. Date and time of placement are noted.
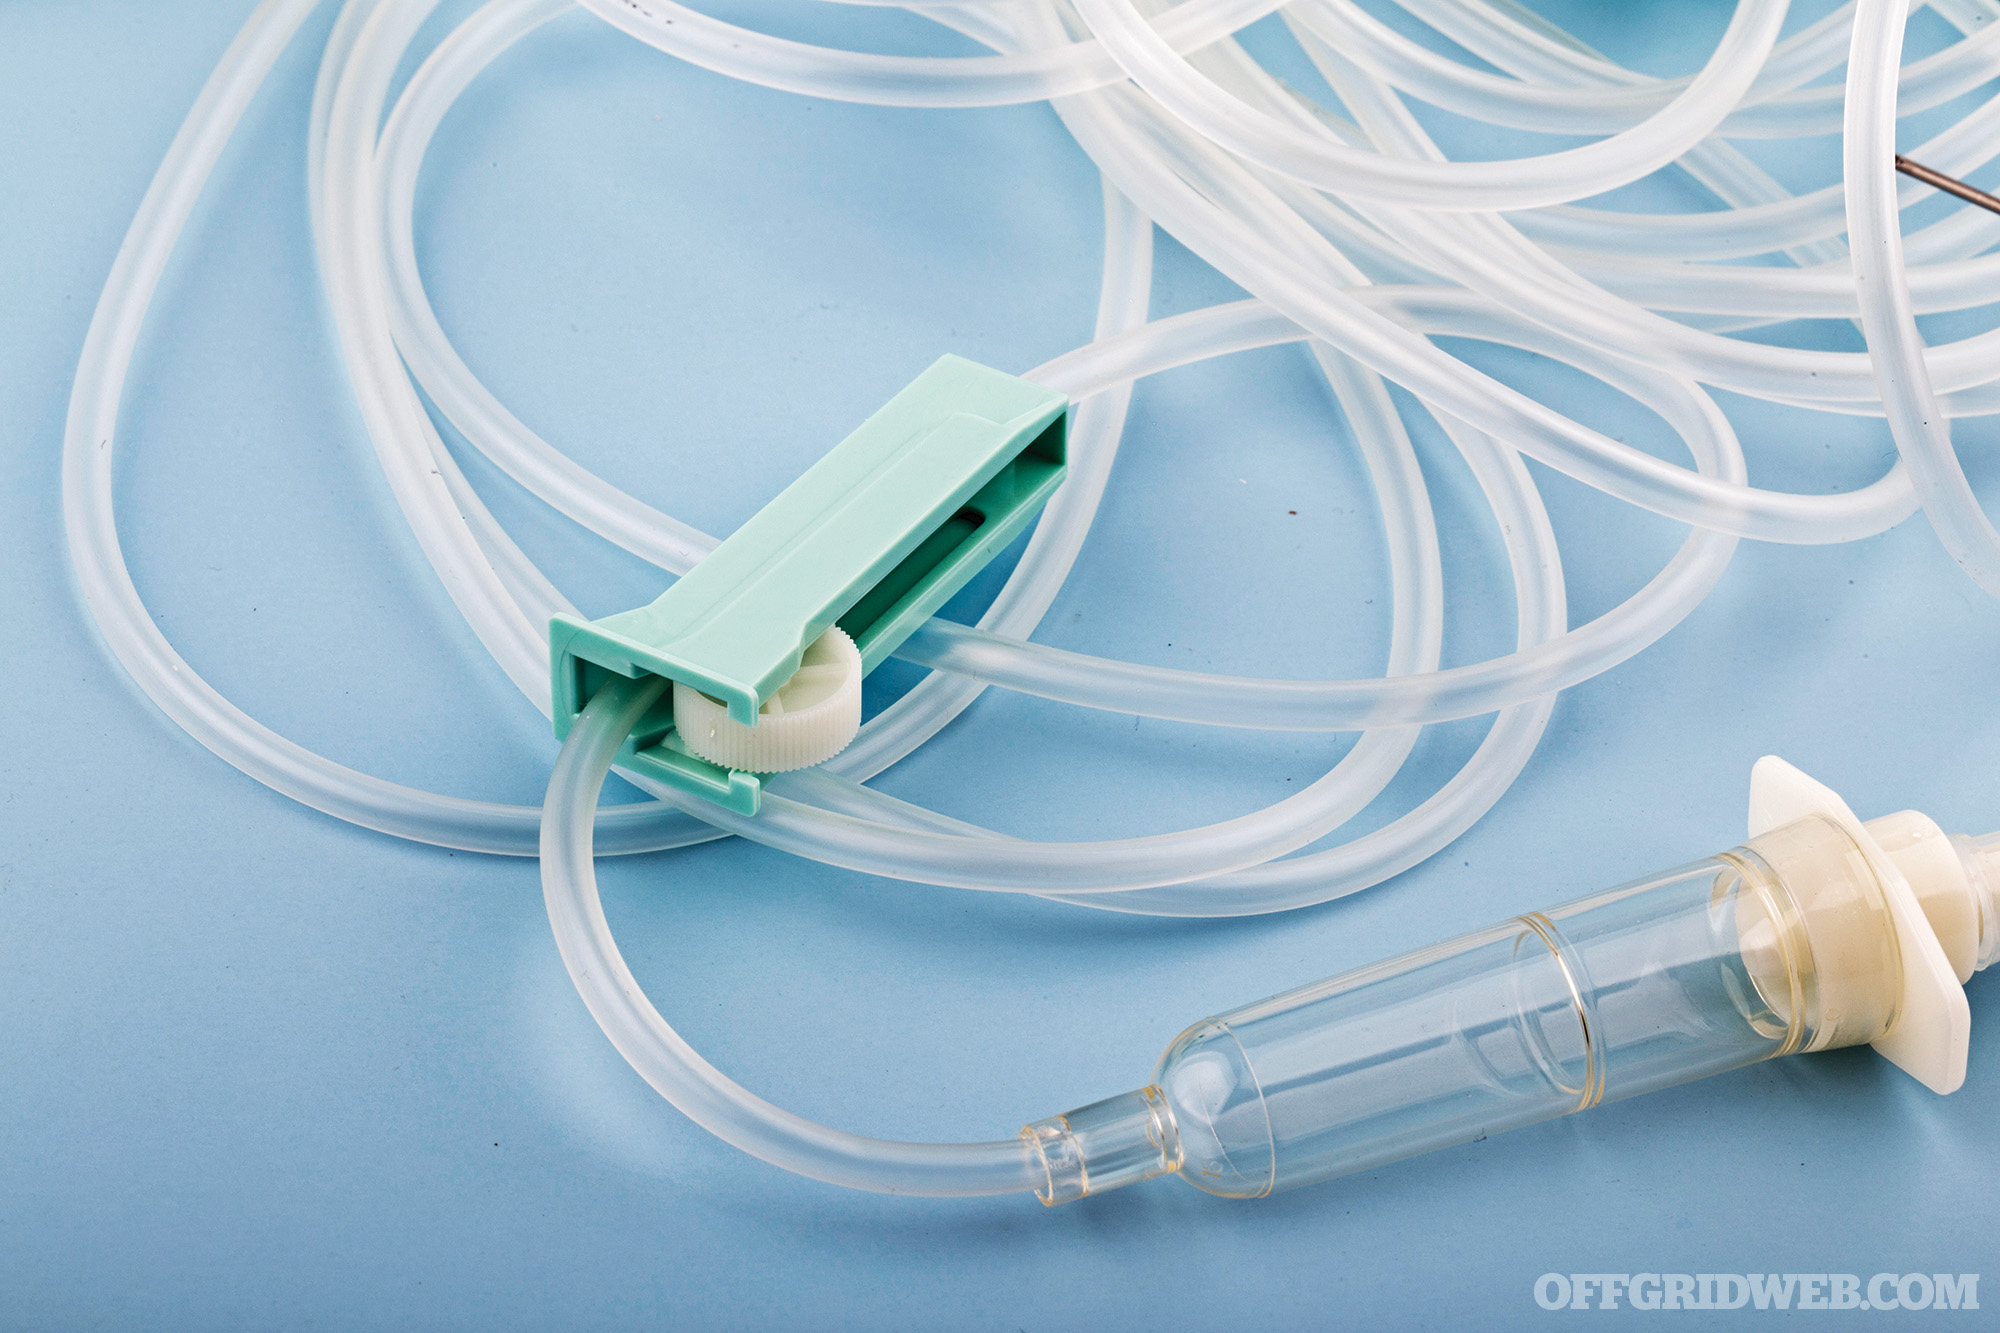
Above: Primary infusion set
Tips for IV Placement
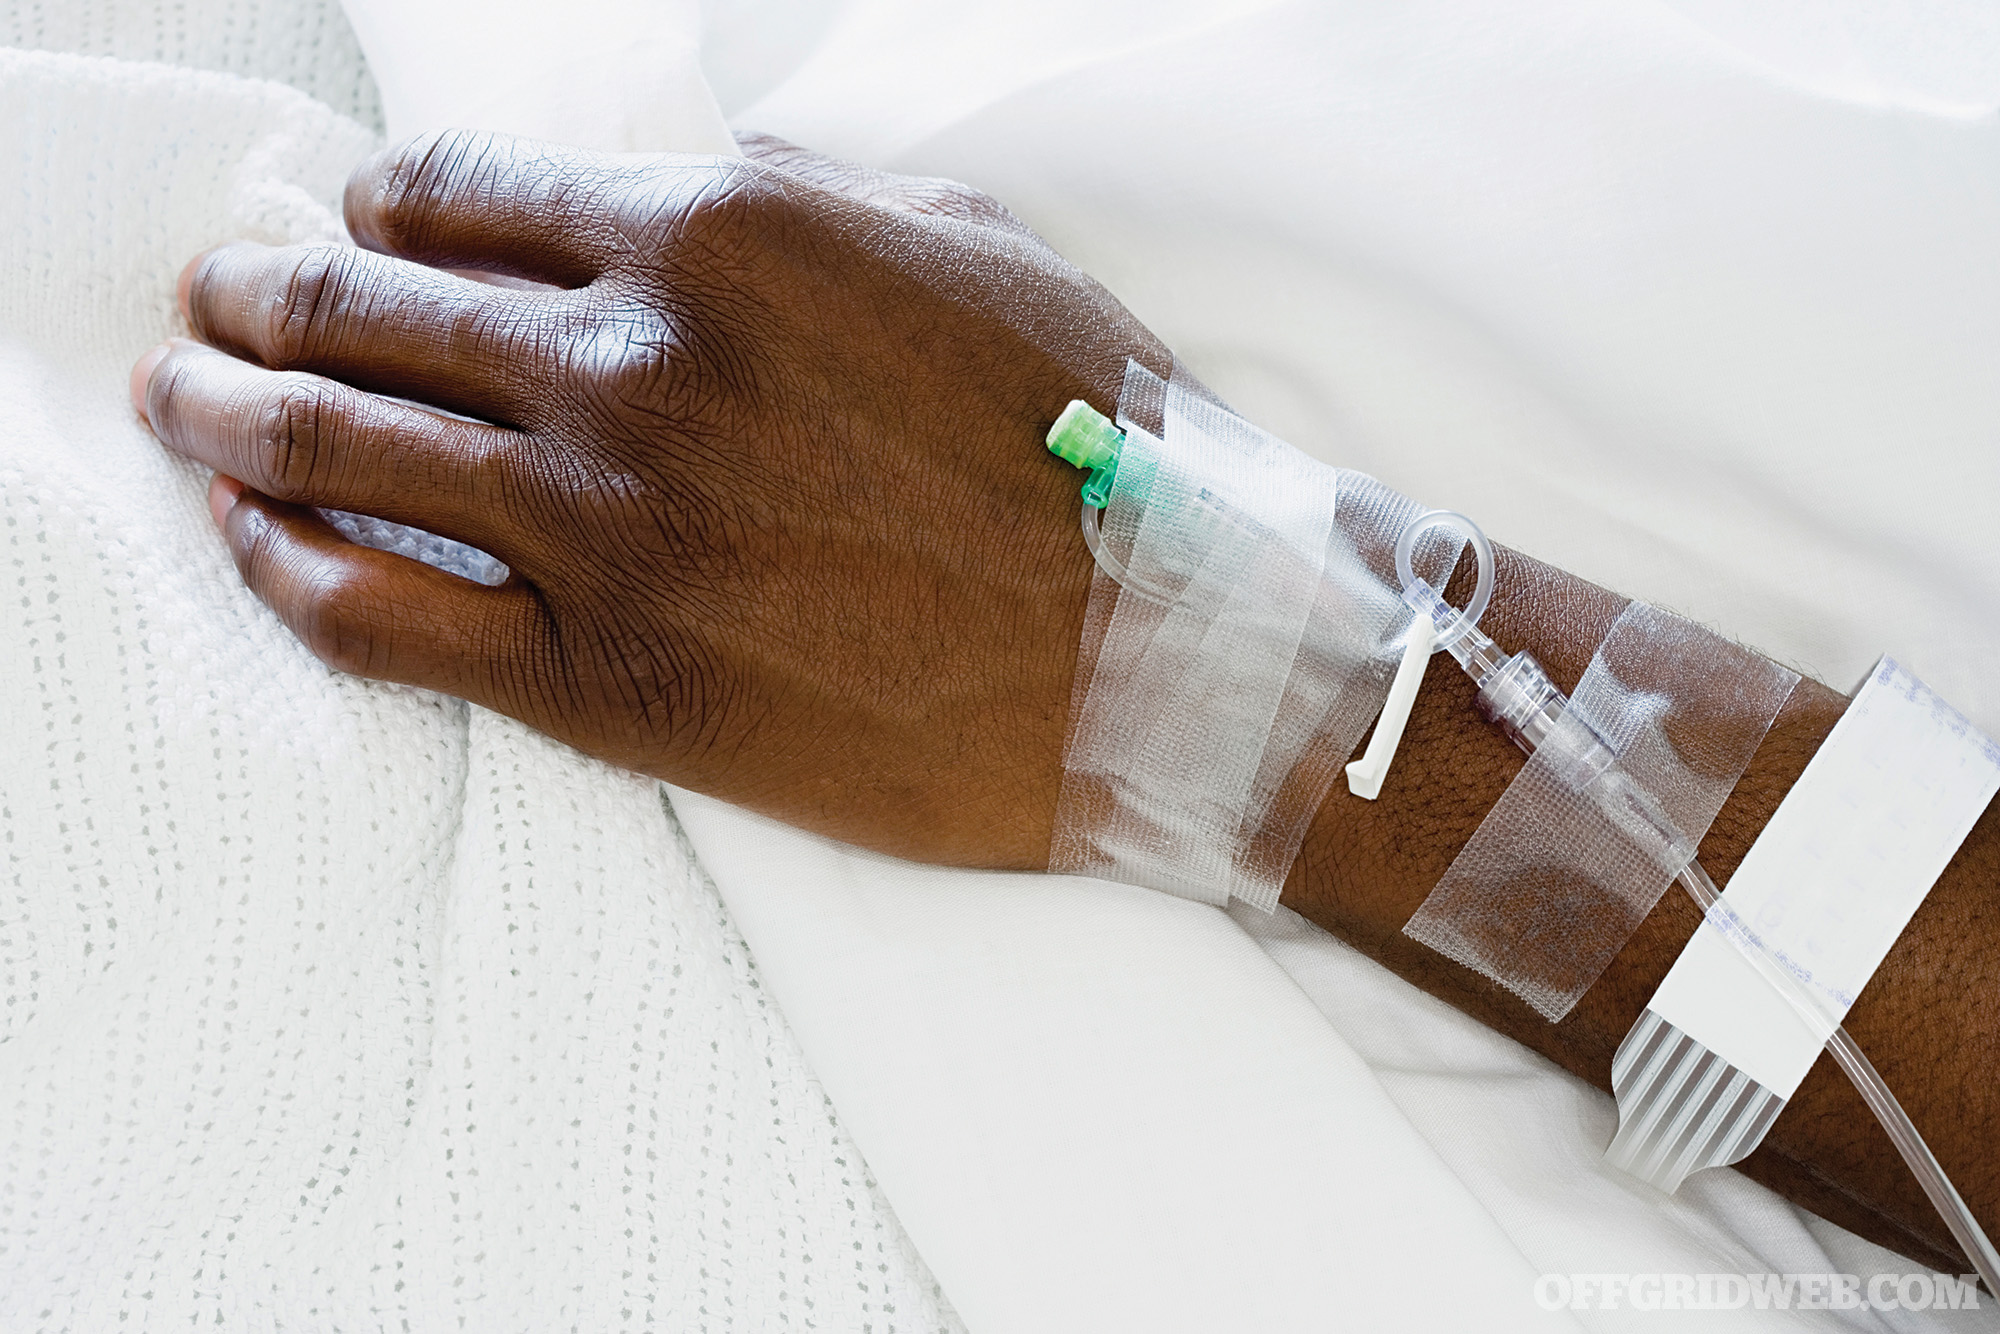
Above: IV line secured in place
- Put gloves on and connect IV tubing to the fluid bag. Flush the entire line with fluid.
- If the patient is right-handed, choose a vein on the left arm and vice versa.
- Start with veins farthest out from the torso and work upward, but if an IV is needed in an emergency, you may need to place it in the crook of the arm.
- Apply the tourniquet snugly, about 20 to 25 cm above the needle insertion site. Have the patient clench and unclench their fist.
- Feel the vein. It should seem “bouncy” compared to surrounding tissue. Don’t slap the vein; flicking it with your thumb and second finger may cause it to stand out.
- Disinfect the insertion site with an alcohol pad in the direction of venous flow.
- Once the alcohol has dried, pull the skin taut just below the entry site to stabilize the vein.
- Taking care to avoid touching the needle or catheter with your gloves, Insert the catheter at a 15- to 30-degree angle right on top of the vein. Going from the side can push the vein sideways and cause you to miss.
- Make sure the bevel of the needle faces upward to make it glide more easily.
- Once the catheter is within the vein, untie the tourniquet to prevent it from blowing due to an increase in pressure. Gently slide the needle back away from the catheter and out.
- Press a finger over the inserted catheter to prevent blood spillage while connecting the tubing.
- Tape the catheter securely in place and slowly loosen the roller clamp to begin the infusion.
Above: The fastest option for an IV site is often the crook of the arm, but it limits mobility.
IV Complications
There are many reasons why intravenous therapy may be necessary, but many people are now undergoing treatment with IV fluids in situations other than medical emergencies. Some go to “IV lounges” where cures for hangovers, colds and flus, and other issues are touted. While hydration is part of the answer to these problems, it’s important to know that there are several risks associated with any IV therapy.
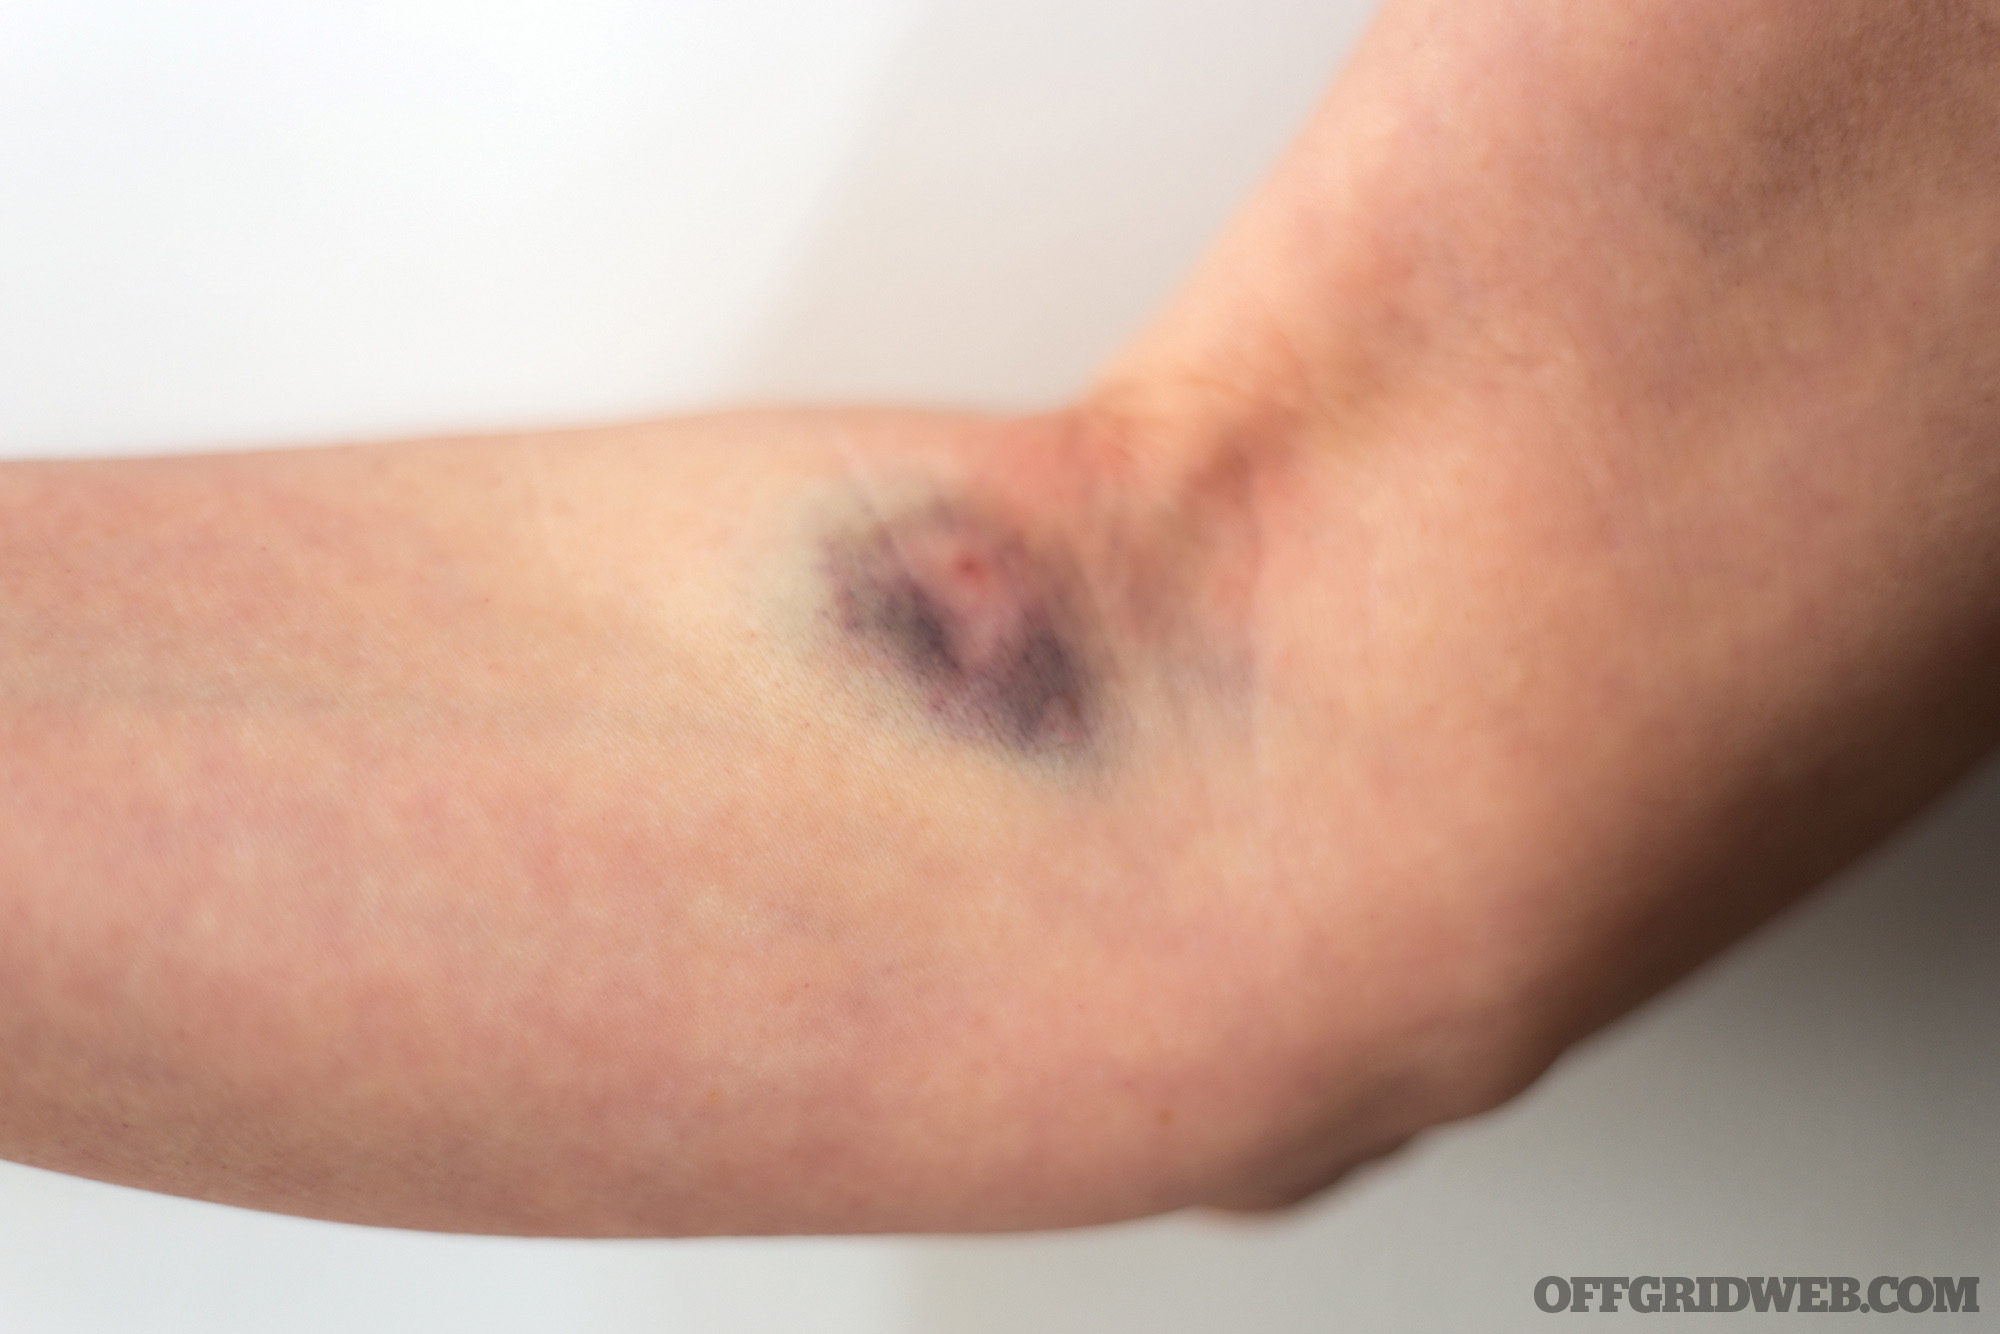
Above: This image shows a “blown” IV site.
Infiltration: Infiltration occurs when the tip of the catheter slips out of the vein. This can happen during a faulty placement or with excessive movement. The IV catheter passes through the wall of the vein, resulting in leakage into surrounding tissue. This tends to cause pain and swelling. Discontinue the IV and apply a warm or cold compress (there’s disagreement as to which is best) and elevate the limb.
Extravasation: Extravasation refers to infiltration into surrounding tissue of substances in the IV fluid, which can be hazardous, such as chemotherapy drugs. It causes swelling and pain. In the worst cases, it can cause death of tissue. Remove the IV line immediately.
Phlebitis: Phlebitis is inflammation of a vein. Improper insertion of the IV catheter can cause trauma that results in redness and pain and predisposes the area to infection. Remove the IV and treat with warm compresses and anti-inflammatory drugs. In some cases, phlebitis can lead to the formation of a dangerous blood clot (“thrombosis”).
Infection: Whenever skin is broken during IV catheter placement, the barrier to infection is weakened. Signs of infection include spreading redness, warmth, tenderness, and fever. Close observation of an IV site is imperative to nip these infections in the bud. Improperly sterilized IV fluids can also cause problems. An infection in the blood caused by a contaminated IV can spread to the entire body and can be fatal.
Overload: Without careful monitoring of fluids going into the patient, overloading may lead to “hypervolemia.” The overloaded patient will likely exhibit swelling of extremities, increased blood pressure, and respiratory distress, among other symptoms.
Proctoclysis: A Controversial Alternative
The survival medic is unlikely to find large quantities of prescription-only IV solutions and equipment in tough times. Thinking outside the box, we look to what was used in the past when an unconscious patient required fluids. During WWI, a now-controversial method was used: rectal rehydration, also called “proctoclysis.”
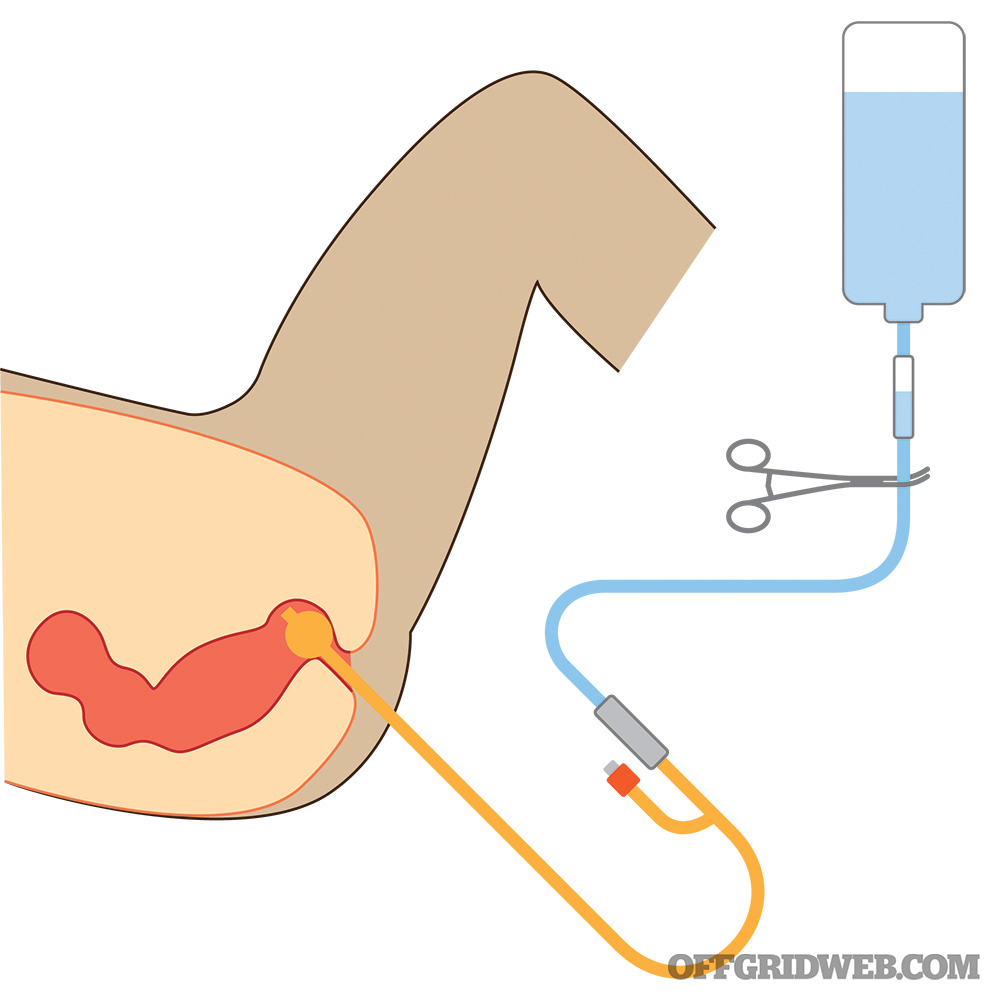
Above: Here’s a setup for rectal rehydration, only to be used in extreme settings.
The large intestine functions to absorb water, electrolytes, and vitamins (but not nutrients), leaving solid waste. It stands to reason that, if the colon can absorb fluid introduced from “above,” it should be able to absorb it from “below.” The benefit of rectal rehydration is that sterilized water or pre-mixed oral rehydration solutions may be used effectively via the rectum to improve fluid status. This provides an inexpensive and readily available avenue when intravenous therapy isn’t possible.
To perform proctoclysis, you’ll need the following:
- Sterilized water/normal saline/oral rehydration salt solution
- #22 Nasogastric (NG) tube or a #14 Foley urinary catheter with a 10 ml. syringe
- A reservoir container to contain the fluids
- Tubing to connect the reservoir container to the NG or Foley Catheter
- Gloves (wash your hands!) and lubricant
- A clamp or other method to regulate the rate of infusion (250 to 400 cc/hour)
- A way to secure the tube in place
- A “stand” to place the reservoir at a level higher than the patient
- Equipment to monitor vital signs
The fluids used should be warmed to normal body temperature to prevent excessive lowering of body temperature. Placing the patient on their left side decreases leakage. Closely monitor vital signs throughout the procedure.
If using a nasogastric tube, it can be inserted further into the large intestine than the Foley catheter, which might result in improved absorption. The Foley catheter, however, will prevent much of the leakage that you may find with the NG tube (Foleys have an inflatable balloon that can act as a “plug”). The nasogastric tube is inserted about 15 inches. The Foley need be inserted only about 5 to 8 inches before filling the balloon with water from a syringe and then pulling back gently until the balloon meets resistance. An enema effect may be observed if high volumes of fluids are given too quickly. If this is observed, stop proctoclysis immediately (the patient is losing fluids).
It’s important to know that proctoclysis is not for “feeding” and has even been used as a method of torture in the past. Never try this procedure if there’s modern medical help available.
Above: IV fluids can be a lifesaver, but it’s critical to seek training on how to administer them safely so you don’t make a bad situation even worse.
About the Author
Joe Alton, MD, is a physician, medical preparedness advocate, and author of the 2022 Book Excellence Award winner in medicine, The Survival Medicine Handbook: The Essential Guide For When Help Is NOT On The Way, and other books. Alton is the founder of the survival medicine website doomandbloom.net, with over 1,200 articles, podcasts, and videos on medical preparedness. He’s the designer of an entire line of quality medical kits and supplies at store.doomandbloom.net.
