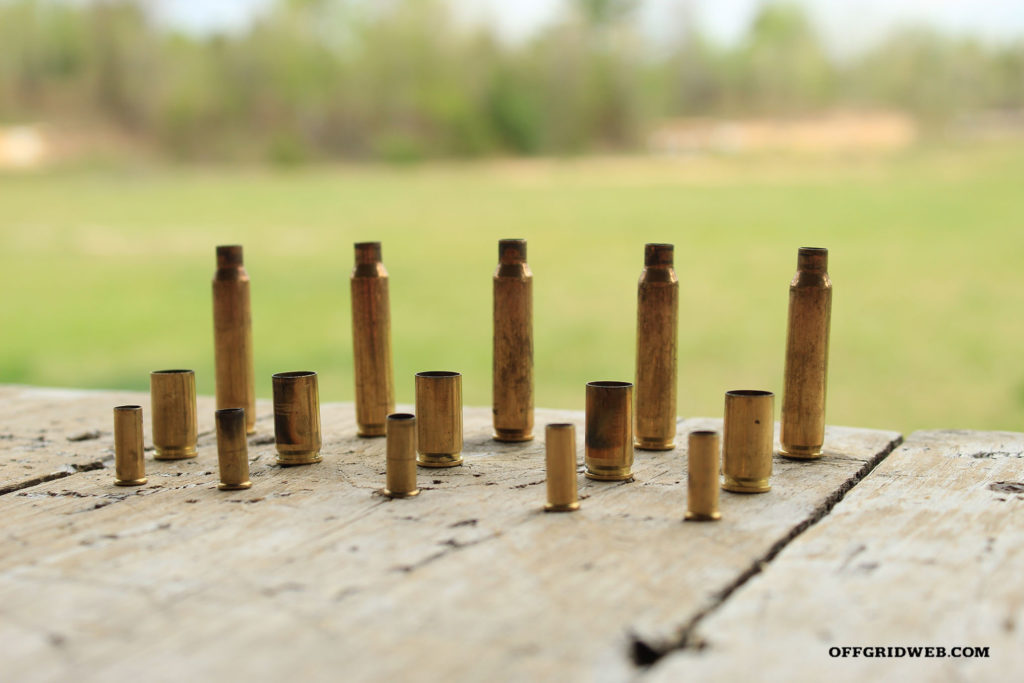
After spending hours at the range and (hopefully) cleaning up as many of your spent casings as possible, why waste all that valuable metal when you can put it to good use? Sure, reloading spent casings is always a great option, but there are other ways to make use of brass besides using them as décor for your belt or guitar strap. Compared to other metals, brass has a low melting point, lower even than silver or gold, making it the perfect candidate to turn into liquid and cast into something that is sure to impress. It is very important that all of the casings you collect for this project are brass, not another kind of alloy. So, grab a bucket, fill it with spent casings, and let’s get started casting a knuckle duster!
Design
To get started, you will want to flesh out a design on paper, or better yet, cardstock. Use a note card or the cardboard from a cereal box or case of beer. Just sketch out a brass knuckle duster design approximately the same size as you would have the finished project be. If you are artistically challenged, there is a plethora of brass knuckle outlines on the world wide web that you can use for inspiration or copy-paste-print. The design I am using is modeled after the UK military-issued brass knuckles circa WWII. When you are satisfied with the design, carefully cut the design from the paper, including all of the finger holes. This template will be used as a stencil for the following steps. Double-check that the cut-out template fits your hand, and make any modifications that may be necessary for a comfortable grip. I also suggest reading this article all the way through before starting, making note of any materials you will need to acquire. Careful preparation will reduce the risk of heating and pouring molten metal.
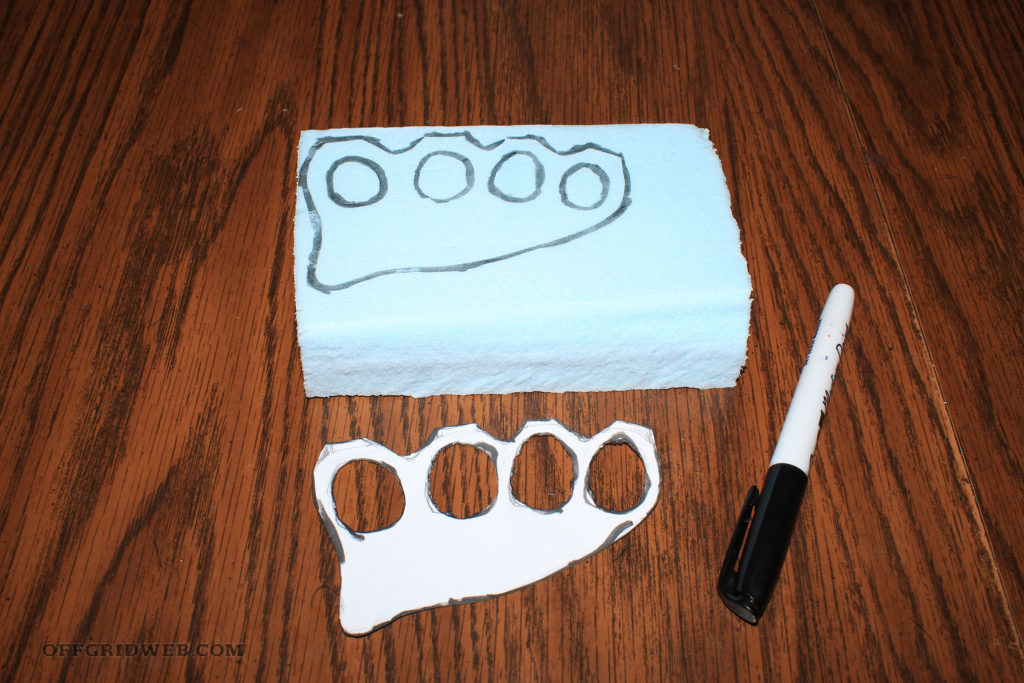
Next, you will need to find a piece of Styrofoam that matches your desired dimensions and use the template to stencil your design and cut away the excess foam. I used some scrap home insulation foam, but any rigid Styrofoam will work. Do not use the spongy foam used in mattress toppers or pillows. The result should be foam knuckles as close in shape and quality as you would like the finished brass knuckles to be. The fewer defects in your foam knuckles, the better the final product will be.
Prepping the Cast
Plaster of Paris, which can be found in most art sections of department stores, should be thoroughly mixed to a consistency slightly more runny than peanut butter. The smoother the mixture the better. Any lumps or inconsistencies could be a headache later on. Place the foam knuckle duster on a piece of aluminum foil with the most aesthetically pleasing surface facing up, and cover any exposed foam thoroughly with the plaster. Any exposed foam should be covered with ¼ to ½ inch of plaster. Let the plaster of Paris dry completely overnight or until you are sure there is no moisture left.
As the plaster is drying, you can prep the next steps. You will need a container wide and deep enough to hold your Styrofoam knuckles and at least three inches of sand in every direction. If you do some internet sleuthing on metal casting, you will find recommendations for products like professional casting sand and tutorials on how to make your own casting sand. Buying those products is not necessary for the sake of this project. A normal bag of sandbox sand will work. When you are sure the plaster is dry, you can carefully embed the plastered foam knuckles into the top of the sand, still leaving the top exposed. Be very careful not to crack or break the plaster.
Fire Up the Furnace
To heat and melt the brass enough to pour into the knuckle duster mold, you’ll need some kind of refractory to get the temperatures high enough. There are countless tutorials online on how to do this, and you can invest as much or as little time and money as you prefer. You can even build your own forge. Because I do some hobby blacksmithing, I just use my own — it isn’t ideal, but it’ll get the job done. Lastly, you’ll need something to use as a crucible, the container you’ll melt the casings in. A graphite crucible is ideal and inexpensive, but there are ways you can improvise. The key is to ensure your crucible’s melting point is much higher than that of the brass. A steel crucible will work in a pinch, but if your refractory gets too hot, the steel will melt, and you’ll lose all your melted brass.
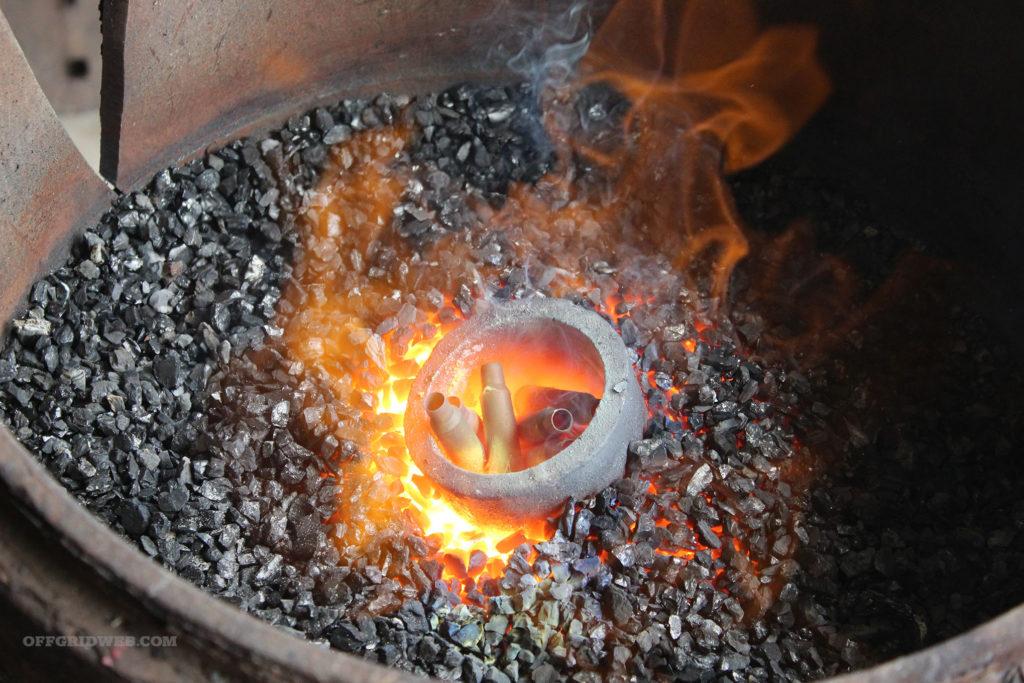
Now it is finally time to melt those spent casings, but before you heat them up, carefully inspect the bottoms and ensure the blasting caps have been fired. The last thing you want is for a blasting cap to pop while it is sitting a puddle of molten brass. Get your refractory fired up, fill your crucible with the casings, and carefully place it in the heat with tongs long enough to keep your hands a safe distance away. As the brass heats up, you’ll see the casings liquify. Estimating the necessary volume of casings with any degree of accuracy is difficult, so it is wise to melt more brass than you think you’ll need. This is also the time to make sure your plastered foam knuckle duster is set properly in the sand and nearby, so you won’t have far to move the crucible.
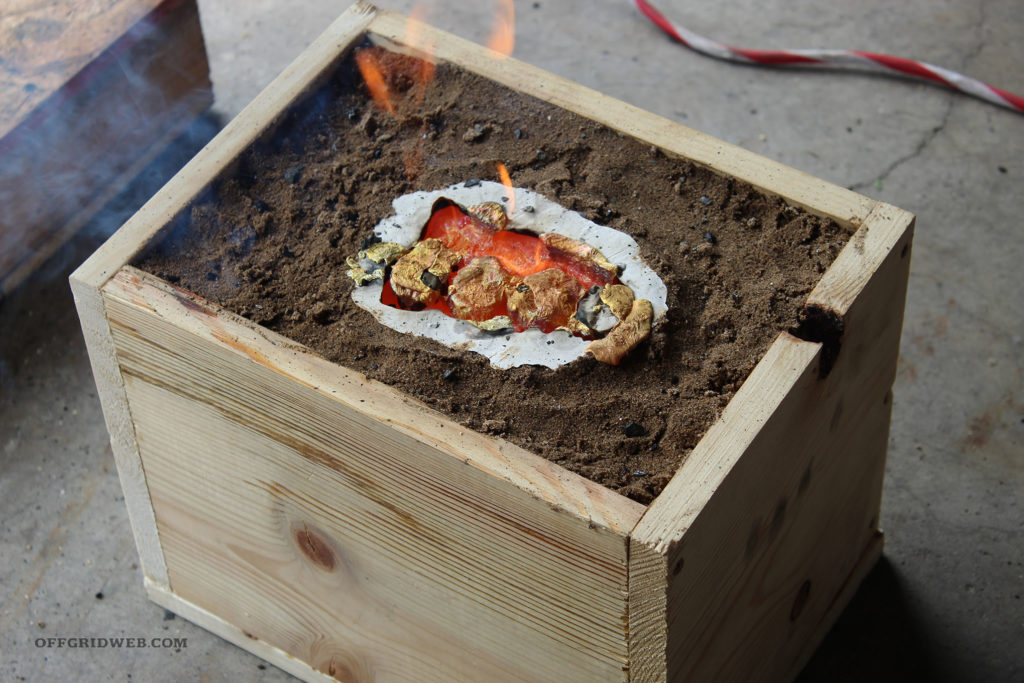
Brass is an alloy of copper and zinc, and as it melts, the zinc may burn and create smoke which, if inhaled, could cause flu-like symptoms. Also, if you melt it for too long, you will create a layer of yellow-looking dross, impurities which coagulate and collect as the metal burns. You may end up trying several times before you get the hang of it, but the rewards are worth the efforts! When the brass is melted, carefully pick up the crucible with the tongs and pour it evenly over the exposed foam. The foam will burn away and be replaced with the brass. Fumes from melting brass and Styrofoam are toxic, and these steps should be done in a well-ventilated area. Any precautions to safeguard your respiration should be taken. I also suggest wearing safety glasses, welding gloves, and a long-sleeved shirt and pants made of non-synthetic fiber.
Finishing Touches
It will be tempting to check your results as soon as possible, but resist the urge! Even after the brass solidifies, it will be hot enough to inflict serious burns for a while afterwards. To find out how hot a cast piece of metal was, I dropped it in a bucket of cool water ten minutes after the liquid metal solidified. The water began to boil instantly! Play it safe and let it cool for several hours before plucking it from the sand. When you are certain it is cool enough to inspect, clean or break off any plaster that is left over and admire your work. If there are any flaws or deformities, they can be corrected with files or grinders, and if it is to your liking, you can make it stand out with some sanding, buffing, or polishing. The best part about this project, is if you are not happy with the results, you can always prep another piece of Styrofoam, re-melt the brass, and try again as many times as you wish.
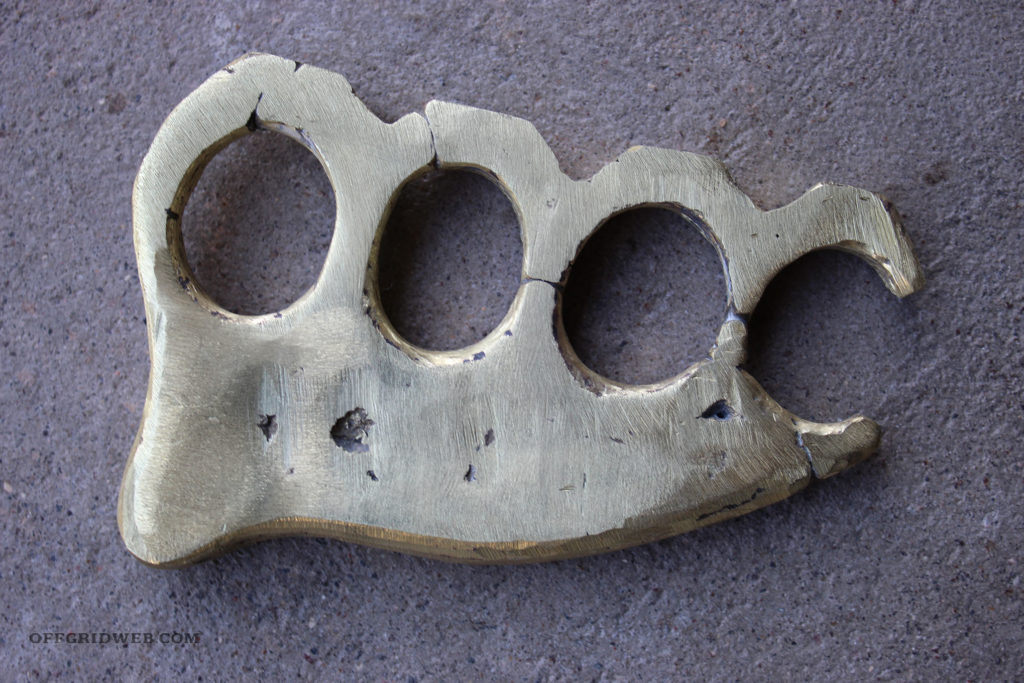
As you can see, my casting didn’t quite fill out as perfectly as I would like, and that’s okay. Because I’m using a forge instead of a refractory, the molten brass cooled too quickly and didn’t fill as much of the mold as I would have liked. On top of that, there were some impurities (dross) that I was unable to remove while it was in the crucible. But even though the last knuckle is not entirely enclosed, I would like to think of it as what Bob Ross would term “a happy accident,” and utilize the gap as a bottle opener! Next time, I will improve my method and make something more impressive. This project is not exclusive to making a knuckle duster — this same DIY casting concept can be used to make anything you can carve out of the Styrofoam. So, don’t throw away the casings of the ammunition you spent all that money on — put it to good use and create something!
Other Top DIY guides
- Making your own “Inferno” Survival Matches.
- A DIY 410 Pipe Shotgun featured in OFFGRID issue 37.
- For the woodworker, make your own Pump-Action Slingshot.
