In This Article
The original plan for this article was to outline how to set up a helmet for use with Night Vision Goggles (NVGs). However, there’s no sense in talking about what color to paint the walls of a house before the foundation is poured — first, we need to discuss how to choose a helmet that’ll serve as the host for NVGs and related accessories.
Ballistic vs. Bump
Your first decision is ballistic or non-ballistic. If the objective is just hog hunting or target shooting with night vision, then you can save a ton of money by procuring a non-ballistic or “bump” helmet. Just like the name implies, it won’t stop small arms threats or fragmentation, but it will stop you from getting a Flintstones-type lump on your head. These helmets are substantially lighter, and they’re also ventilated to allow better airflow, keeping you cooler and your lenses fog-free. The current crop of quality bump helmets look very similar to ballistic helmets — many of them even have built-in shrouds to accept NVG mounts. This means the plethora of NVG-supporting equipment for ballistic helmets will interface with bump helmets. Galvion also makes a Hybrid helmet that’s a bump helmet with armor appliques, but this is a trade-off with gaps in its protection. If you’re expecting to get shot at, a full ballistic night vision helmet setup is the answer.
Much like armor plates and plate carriers, there are a lot of manufacturers out there for ballistic helmets. I can’t name them all, and this article isn’t meant to be a dedicated helmet buyer’s guide. Suffice to say, if you’re going to invest in a ballistic helmet, ensure that it’s tested to the threat rating you want, and that the company itself is reputable. The following isn’t all-encompassing and in no particular order — Galvion (formerly Revision Military), Ops-Core, Team Wendy, Crye Precision, and MTEK are a few examples of companies you can trust.
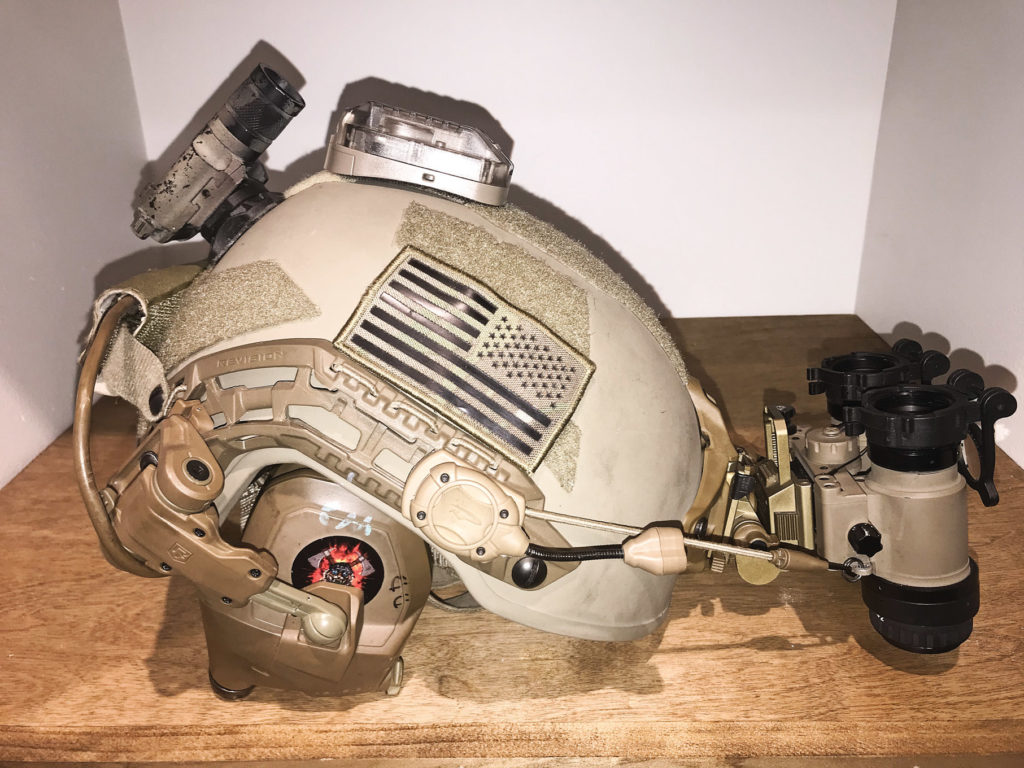
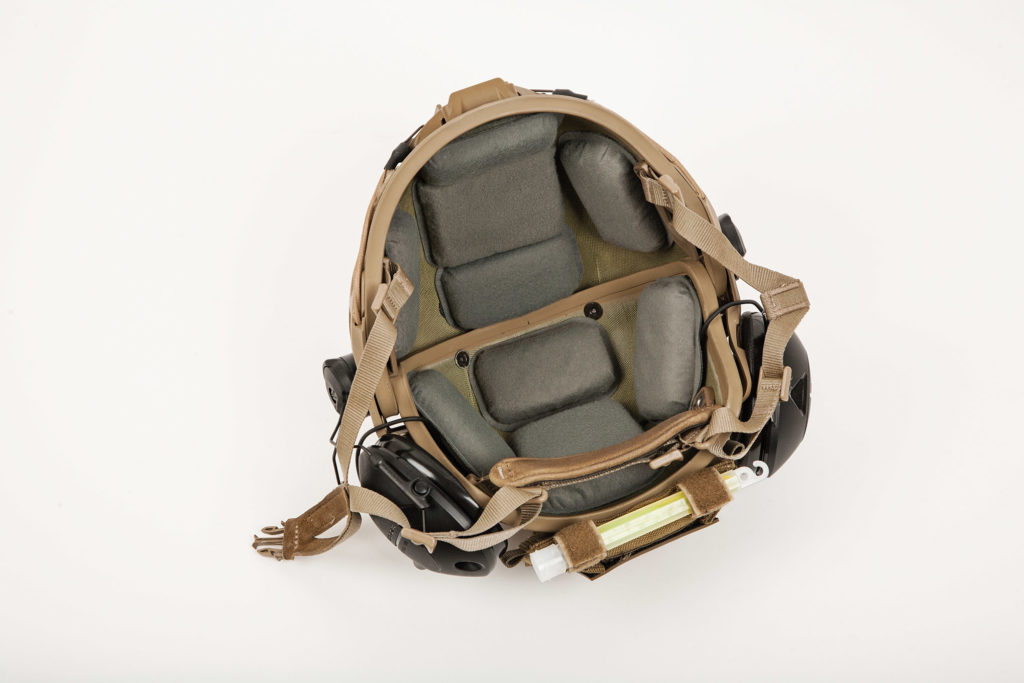
Make: Team Wendy
Model:Exfil LTP with 3.0 Rails
URL: www.teamwendy.com
MSRP: $303
Bump Helmet
The Exfil LTP, which stands for Lightweight Tactical Polymer, is a good representation of the bump helmet category. Without accessories, it weighs in at 1.6 pounds and features an array of ventilation slots to maximize airflow around the head. Team Wendy offers buyers a choice of 2.0 or 3.0 side rails — we chose the latter for its integrated Picatinny accessory rails. This helmet includes a built-in NVG shroud with Wilcox aluminum insert, two-layer configurable foam pad system, and a highly adjustable suspension system with BOA tensioner dial.

Howard Leight Impact Sport electronic ear pro is attached to each side of the helmet via Team Wendy Exfil Peltor Quick-Release Adapters. It’s worth noting this requires cutting the headband off the earmuffs, so they can no longer be worn without a helmet.
Lastly, a Mil-spec Norotos RHNO II “Rhino” mount was attached to the helmet’s shroud, providing an attachment point for night vision systems that use a bayonet-style interface. This is perfect for a monocular such as the PVS-14 we sourced from AGM Global Vision. AGM offers many models in the PVS-14 family; this particular sample features a Gen 2 white phosphor tube. Its included adapter clips directly into the bayonet mount and can be positioned for use with either eye.
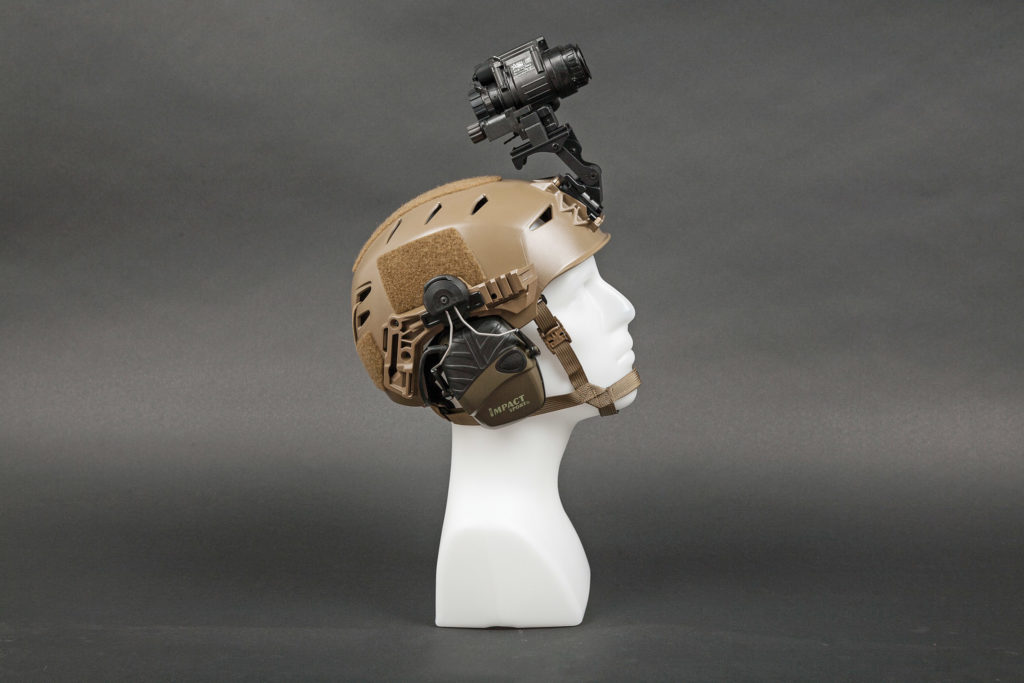
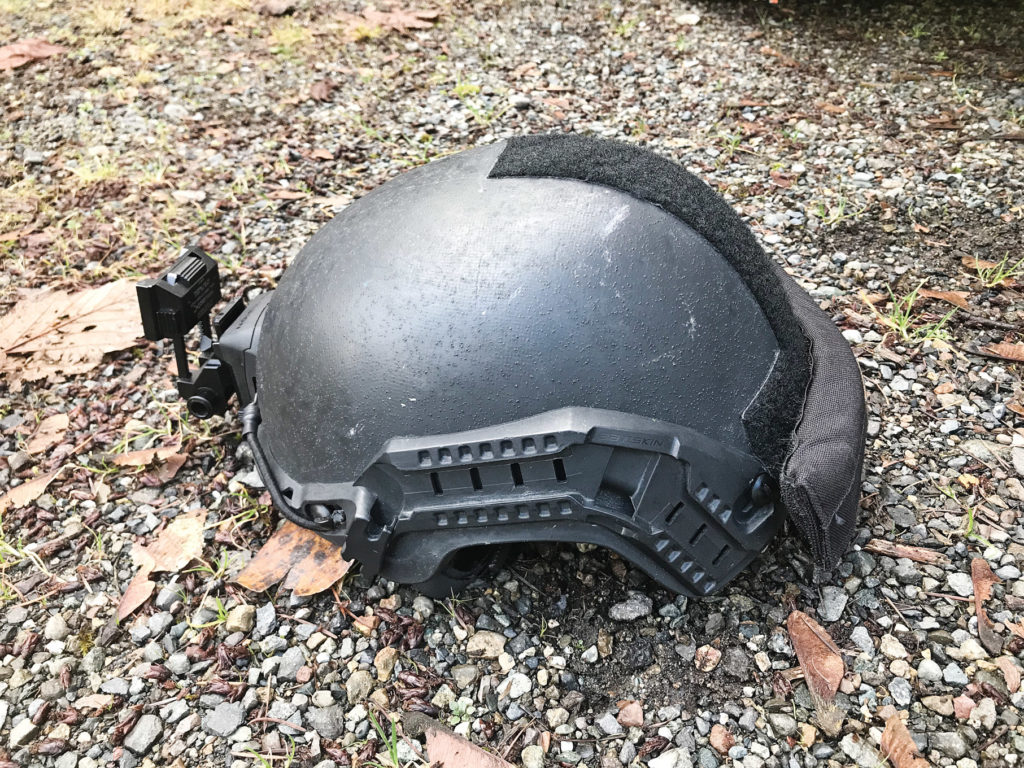
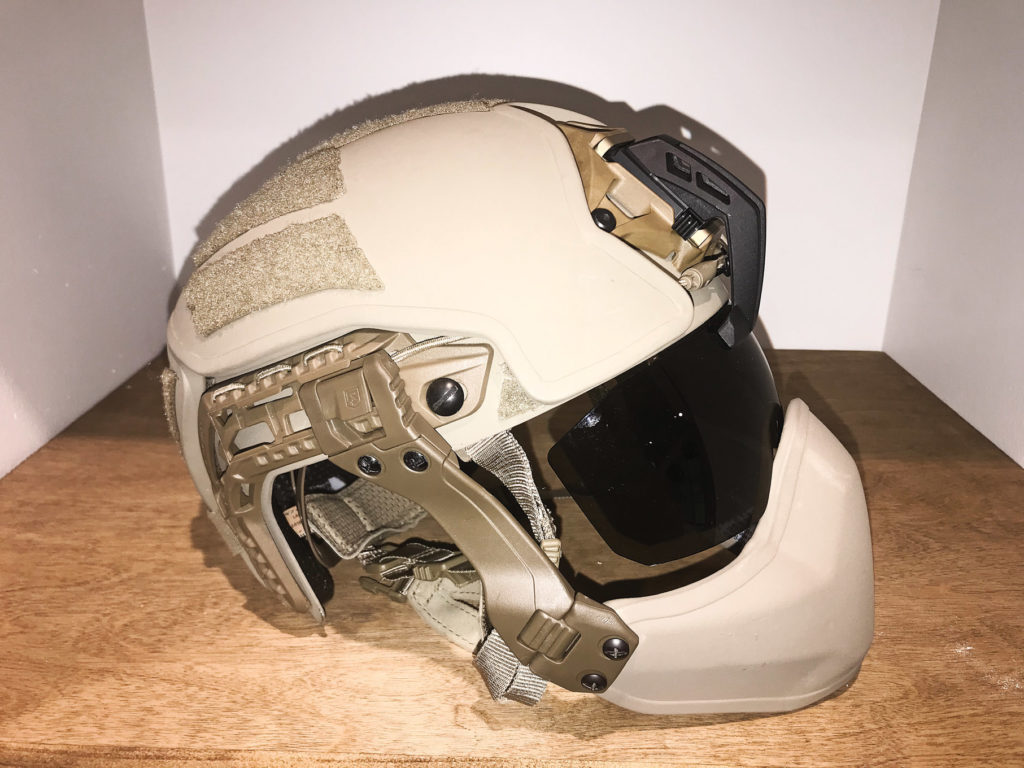
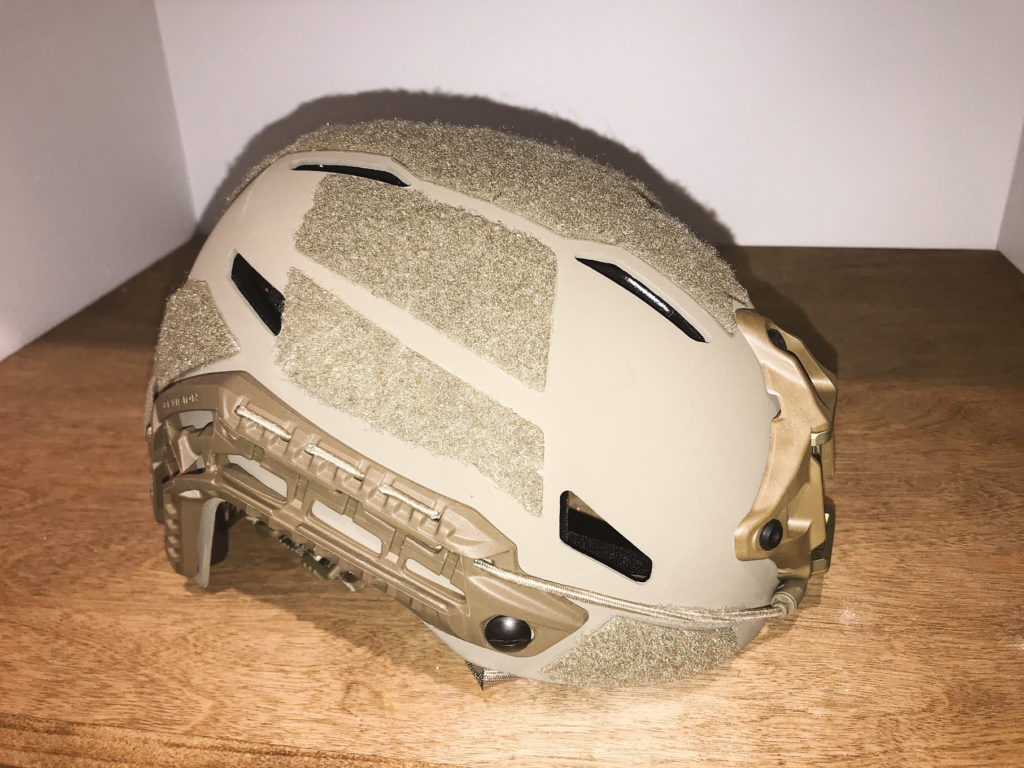
Make: Crye Precision
Model: AirFrame ATX
URL: www.cryeprecision.com
MSRP: $991
Ballistic Helmet
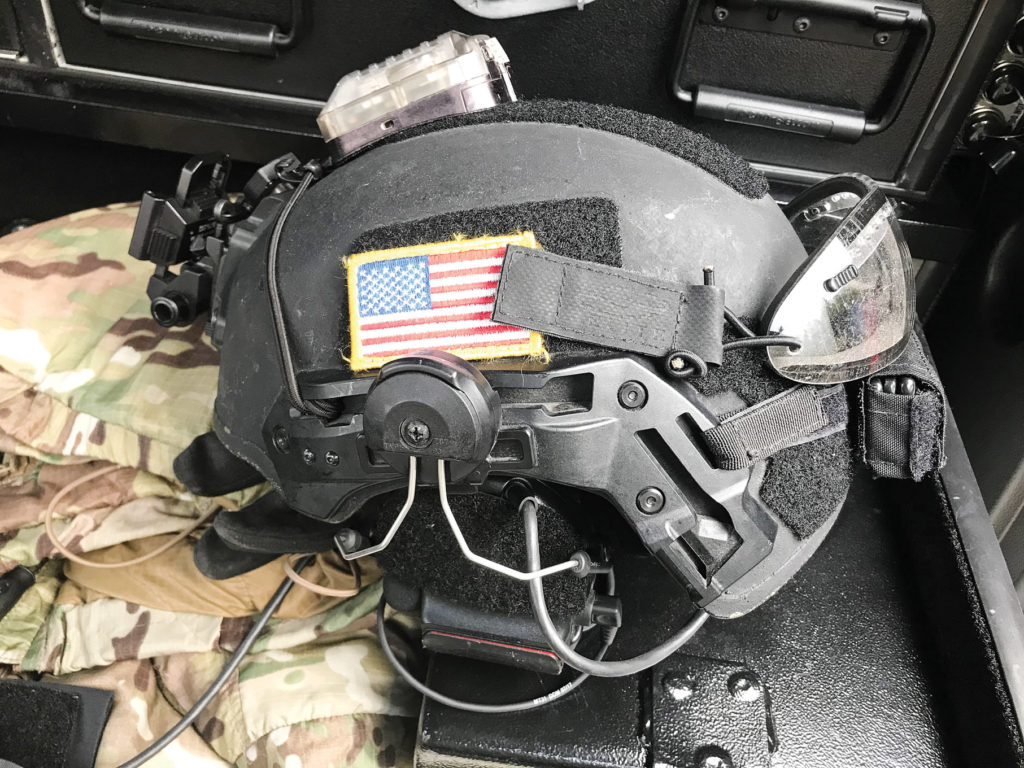
One of the most distinctive designs in the ballistic helmet market, the AirFrame uses a two-piece shell of armor that overlaps slightly at the midsection. This provides an obvious improvement in breathability over a one-piece helmet, and Crye also says it can mitigate head trauma if the wearer is hit by the pressure wave from an explosion. The ATX model meets NIJ Level IIIA ballistic requirements; our large helmet weighs 2.8 pounds. The helmet includes an Ops-Core H-Nape suspension system and cushy ¾-inch-thick memory foam pads. Our sample helmet came pre-drilled for a three-hole shroud, such as this Wilcox L4. It also includes optional AirFrame side rails and a stick-on Velcro kit.
We used Peltor ARC Rail Adapters to convert a set of Peltor Sport Tactical electronic earmuffs from headband configuration to helmet-capable (again, this requires cutting off the headband). An AirFrame Peltor Adapter Set ($8) is required to install the ARC Rail Adapters. We plan to upgrade from this consumer-grade ear pro to a professional-grade set of Peltor ComTacs in the future.
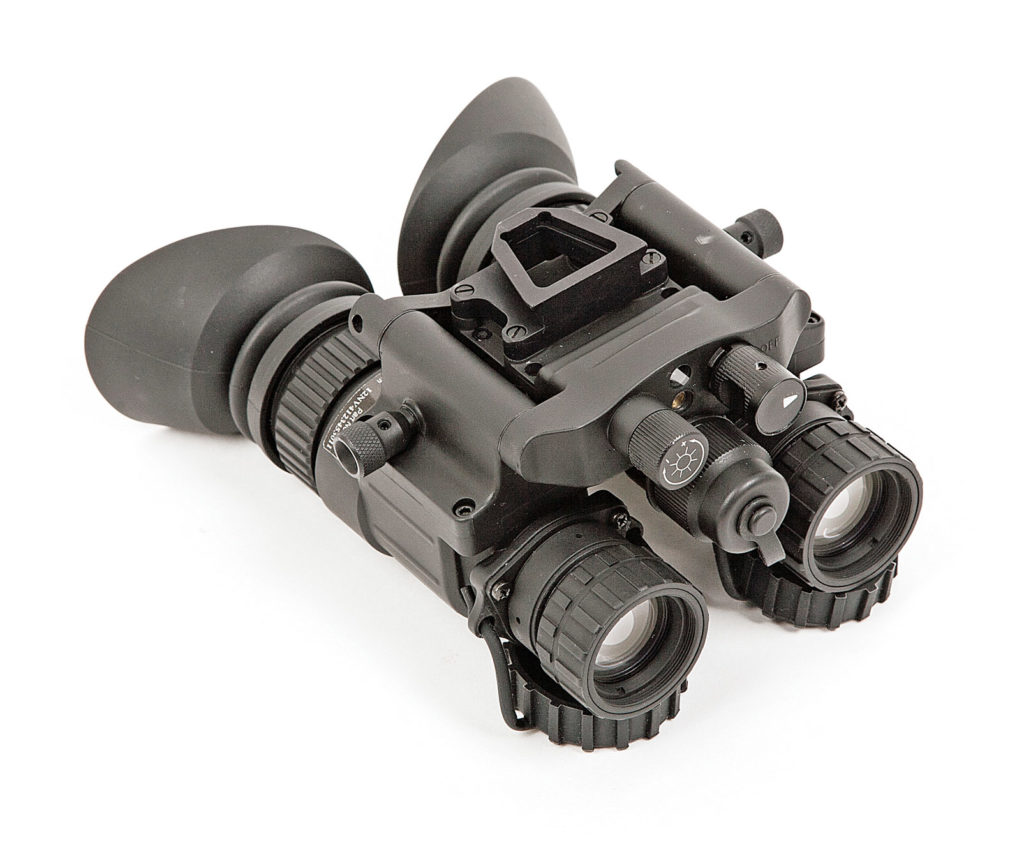
Our night vision system is a dual-tube NVG-40 3AL1 from AGM Global Vision. This system features a pair of Gen 3 green phosphor tubes, which are auto-gated to adjust brightness and protect the tubes from fluctuating light conditions. These NVGs include various attachment shoes; we chose the dovetail-style shoe and paired it with a Wilcox L4 G24 mount (anodized tan to match our helmet). This mount is highly adjustable and features a push-button locking pivot.
Unlike the lightweight monocular on the bump helmet, we felt this dual-tube setup would benefit from a counterweight, so we added a TNVC Mohawk system. It features removable lead weights, as well as retention points for replacement batteries and visible or IR glow sticks/IFF illuminators.
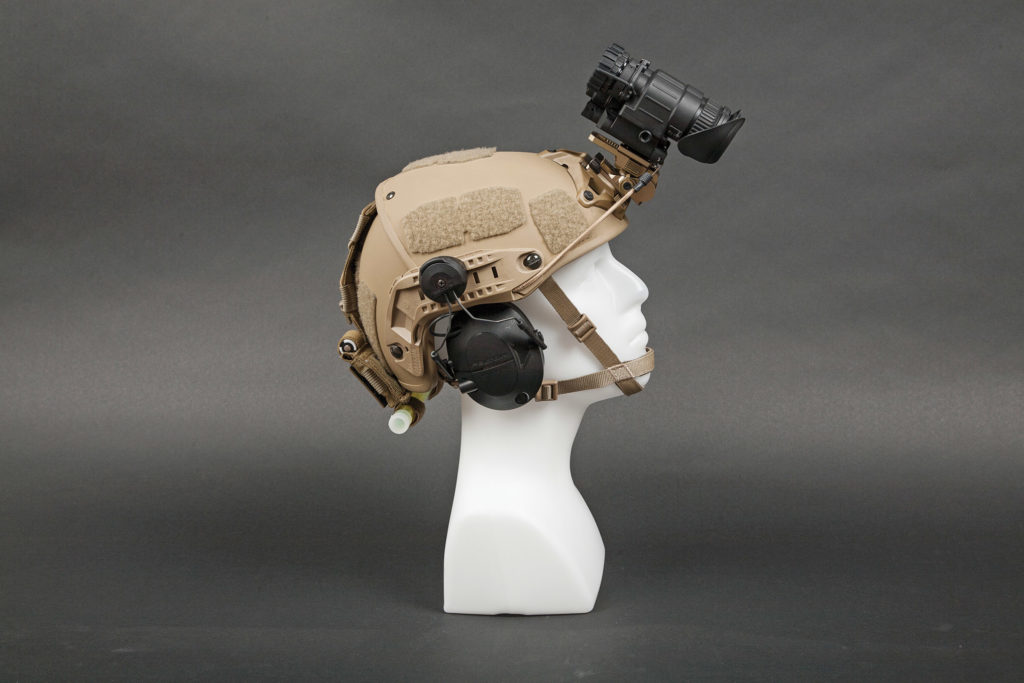
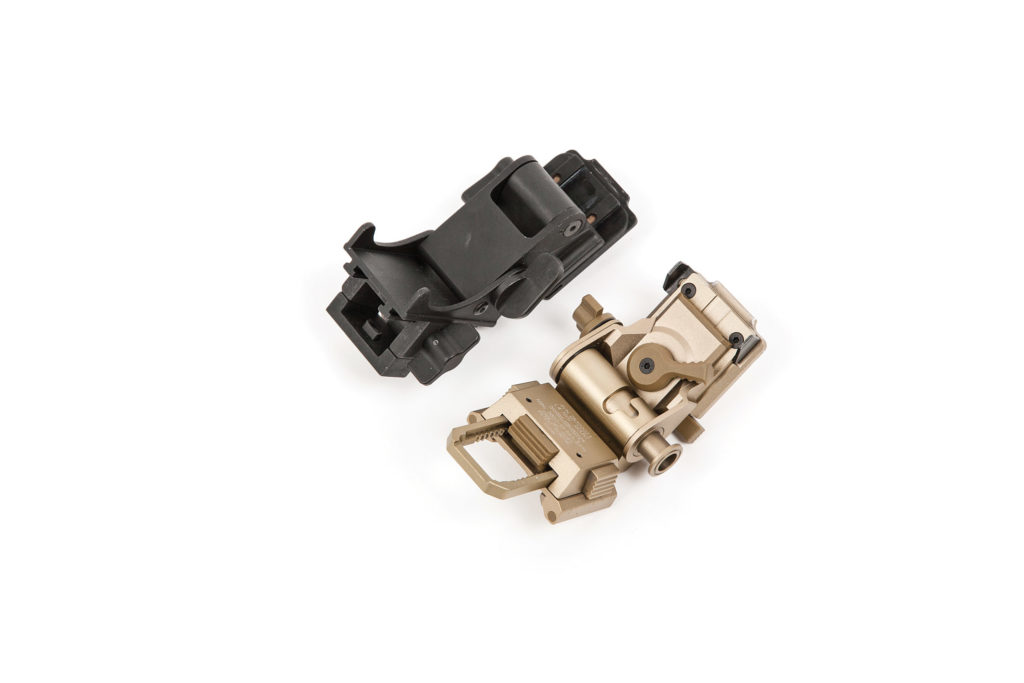
Shrouds and Mounts
The next consideration is: What are you using the night vision for? Levels of supporting equipment will vary depending on your activities and your budget. It doesn’t take much to get started with a basic setup but bear in mind that everything related to night vision is expensive. The first thing to look at is the mounting bracket on the front of the helmet, which is called the shroud. Most modern helmets will use a three-hole shroud. The NVG mount (the pivoting arm piece) locks into the shroud on the helmet, like the one pictured from Wilcox Industries. Norotos is another well-known and reputable brand. If your helmet has no holes for a shroud, it can be carefully drilled using the shroud as a template. There are shrouds that strap or clip onto helmets, but they’re less than optimal as a secure platform for a very expensive piece of equipment. Whatever shroud you select, make sure it’s compatible with the NVG mount you’re using, or that you have the appropriate adapter. Most will be universal.
Suspension Systems
The helmet suspension system (i.e. the strap around the head and chin) is often overlooked, but it’s a critical component to long-term wear and comfort. Current offerings that include a nape strap behind the head, and not just a chin strap, are beneficial in distributing the helmet’s weight and stabilizing it on your head. Old-school chin-strap-only designs allow the helmet to teeter-totter on the crown of your head. When you add NVG weight to the front, the helmet naturally wants to tip forward and the single strap does little to prevent that. A nape suspension system allows the user to tighten the nape strap to keep the back of the helmet down, while leaving the chin strap loose enough to talk.
Pads are another worthwhile consideration. Most helmets will come with a basic internal pad system, but this may be something to consider upgrading later for improved comfort, breathability, and configurability. Memory foam or gel pads are a big upgrade over hard Styrofoam-style padding.
Ear Pro and Comms
Helmet-mounted hearing protection is a thing to consider as well. Electronic ear pro with head bands can be made to fit by removing or reconfiguring helmet pads inside the helmet. If your application will include extended wear, this can become very uncomfortable and may induce headaches, but I know several guys who like this method and don’t have any adverse effects. Another option is in-ear hearing protection, but I personally like and use helmet-mounted ear pro. Most of the current offerings and adapters allow the user to pop the ears off your head when they’re unneeded. This is preferable to headband-style ear pro, where the pressure stays on until the helmet and ears can be removed. A side benefit of helmet-mounted ear pro is that it helps with stabilizing and reducing the weight of the NVGs without having to add as much counterweight. If you’ll be using radio comms, the addition of boom mics and adapters for push-to-talk buttons (PTTs) are more plentiful with ear-muff-style electronic ear pro.

Balancing the Load
Counterweights are a popular accessory — they add weight to the back of the helmet to balance the NVG weight on the front. My first counterweight was made from fishing weights that were melted down and poured into a homemade mold. Once the lead solidified, the mold was broken away and the lead “brick” was bent to conform to the shape of the helmet. Sticky Velcro and paint were added, and the whole thing just stuck to the back of the helmet. This worked as intended, but eventually, I switched to commercially made pouches with removable weights. I kept getting neck strain while using a lead counterweight, and eventually figured out the importance of the nape suspension system, as mentioned previously. I still have a pouch, but all of the lead weights have been removed and it only carries spare batteries now. Your mileage may vary, since some guys swear by counterweights.
Illumination Options
A forward-pointing white and red visible light is a handy item, regardless of your purpose. I have a SureFire XC1 on one side of my helmet and use it as a work light when giving off a white light signature is of no consequence. It’s more than bright enough to check targets, conduct first aid, or complete most other tasks. I could put a brighter light on there, but that adds weight and bulk that’s unnecessary in my opinion. On the other side, I have a Princeton Tec helmet light with white and red visible LEDs. They’re much dimmer than the XC1, so circumstances will dictate which one gets used. My last light source is a SureFire X300V mounted on the back of my helmet in a prototype mount. This light points at the sky and is set to either infrared (IR) or white output based on what I’m doing. The “umbrella” effect indoors casts its light off the ceiling and provides ambient light throughout the space that’s reflected, instead of direct. This is beneficial, as opposed to a forward-mounted light that only illuminates what it’s aimed at. A bright directional light can also be annoying if you’re looking directly at a friend who is also wearing NVG. For my purposes, this light was mainly for admin tasks like post-assault checks or prepping a training area for the next run. I’ve also used it operationally to add IR energy for explosive breachers setting internal charges, or to add visibility in extremely dark spaces where my NVGs needed a bit more IR. The mount design shown also allows me to pluck the light off the back of my helmet and use it as a handheld flashlight if necessary.
The last item to consider is a personal marking system or IFF. IFF stands for Identification of Friendly Forces, or Identification Friend or Foe, depending on who you talk to. I’ve always used the former, but regardless, it’s just a means to identify yourself. IFF can be passive or active; passive would include IR tabs or patches that reflect when IR energy hits them. Pretty simple and no batteries required. The downside is that it has to be activated with IR energy, which means someone is already identifying you with a laser or IR light before they see it. We required team members to have passive IR tabs or patches on the front, back, and on each side. Active IFF would include visible and IR markers and strobe lights. Different companies make really good strobes with different patterns and intensities. Core Survival and S&S Precision are both great companies making quality products. If you’re doing night vision hunting, alerting other hunters to your presence with an IR strobe just makes sense. In my case, the only guy strobing inside the house was the Team Leader so he was readily identifiable — this was less out of concern of being shot by teammates, and more about telling everyone the guy with the strobe is in charge. The strobe can be worn directly on top of the NIght Vision helmet so it’s visible in all directions, or 45 degrees rearward so it’s only visible if you’re behind the wearer.
Plan Ahead
As stated earlier, the night vision road is long and expensive. If your intent is to just target shoot as a hobby with minimal wear, then you can certainly get by with a bump helmet, shroud, mount, and nothing else. If your objective is to effectively work within a team conducting house-clearing work and fighting with NVGs, then almost all of this becomes a necessity instead of a nicety. The last thing I’ll bring up is that having the equipment only goes so far without training from reputable sources. It’s one more expense in an already expensive endeavor, but training from a reputable source may be the best money you’ll spend. NVG is a force multiplier like no other, whether it be checking your property, defending your home, or working in a team. It’s truly a superpower.
[Editor’s Note: This article first appeared in OFFGRID #43. Photos by Bill Blowers, Cameron Carden, and Patrick McCarthy.]
MORE ON NIGHT VISION, TACTICAL GEAR, AND FIREARMS
- Plate Carrier Types: To Each Their Own.
- Front Toward Enemy: Tyr Tactical Plate Carriers.
- Upgrading the Tyr Tactical Pico-DS.
- How to Set up a Plate Carrier.
- AR Mag Pouch Faceoff: No One Size Fits All.
- EDC, Range, and Battle Belt Setups.
- Sionyx Aurora Pro: Color Night Vision Review.
- Night Vision Goggles: A Double Primer.
- Night Vision 101, with Don Edwards.
- GBRS Group: Shadows that Bite.
