In This Article
- Knot Glossary
- Survival Knot #1: Figure-of-Eight Loop
- Survival Knot #2: Figure-of-Eight Follow Through
- Survival Knot #3: Overhand Knot with a Drawloop
- Survival Knot #4: Alpine Butterfly
- Survival Knot #5: Constrictor Knot
- Survival Knot #6: Pile Hitch
- Survival Knot #7: Double Fisherman
- Survival Knot #8: Simple Simon Under
- Survival Knot #9: Handcuff Knot
- Survival Knot #10: Daisy Chain
- Conclusion
- About the Author
- More From Issue 19
Most people begin learning knots at an early age. Once the shoelaces are secure, though, knot fluency usually drops like a rock. There isn’t much of a push to teach rope competency at any age beyond shoe tying. In fact, it’s safe to say the majority of people subscribe to the ever-popular “if you can’t tie a knot, tie a lot” theory.
In 1999, I became a firefighter and learned a handful of knots required for the job; then a few years later I joined our Technical Rescue Team. Being a part of a squad whose primary responsibility is rope rescue required me to up my knot game. When public safety depends on one’s knot-tying abilities, more skill is required than continually wrapping and tucking the rope until it looks like something that will probably hold.
Whether you’re a card-carrying prepper, an avid outdoorsman, or one who simply recognizes the potential need to tie, hoist, drag, or secure, proficiency in tying a few easy and key knots is a critical skill that should be learned.
So, which knots are the most important?
The answer is as hotly contested among rope purists as the Glock-versus-1911 debate is in the handgun community. This article is less about settling that argument and more about identifying 10 relatively easy-to-tie knots that offer a solid foundation for your knot-tying skillset. Read on to untangle any confusion you might have about survival tethering.
Knot Glossary
Bight: A curved section in the rope where the two sections lie alongside each other — think U-shape.
Loop: A circle placed in the rope with the ends crossing each other.
Round Turn: Two passes of the rope that make a complete circle.
Standing End: The remainder of the rope not involved in tying the knot.
Working End: The end of the rope used to tie the knot (also called the running end).
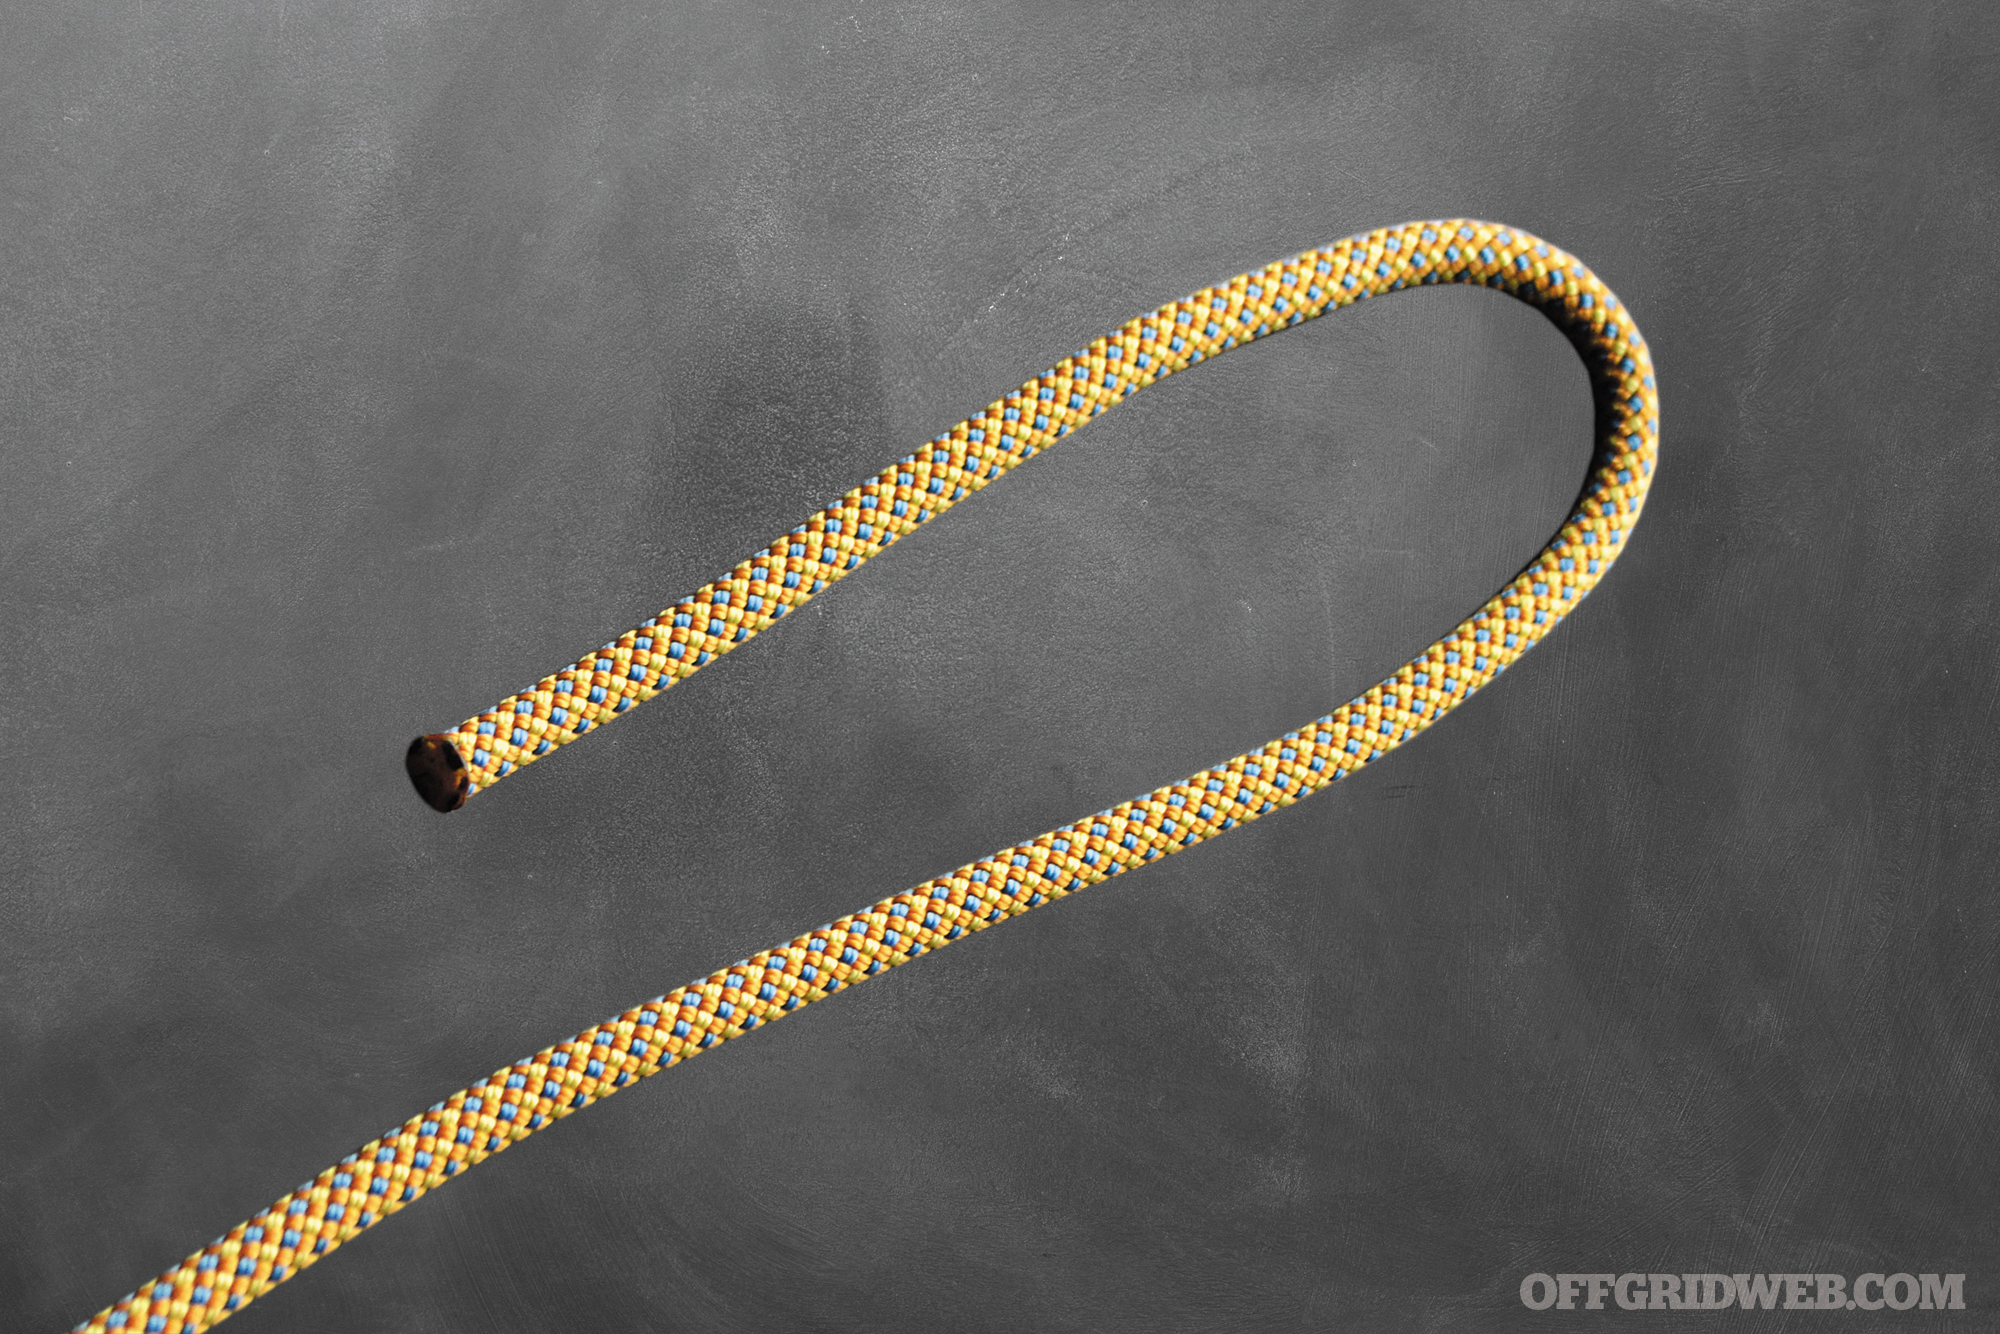
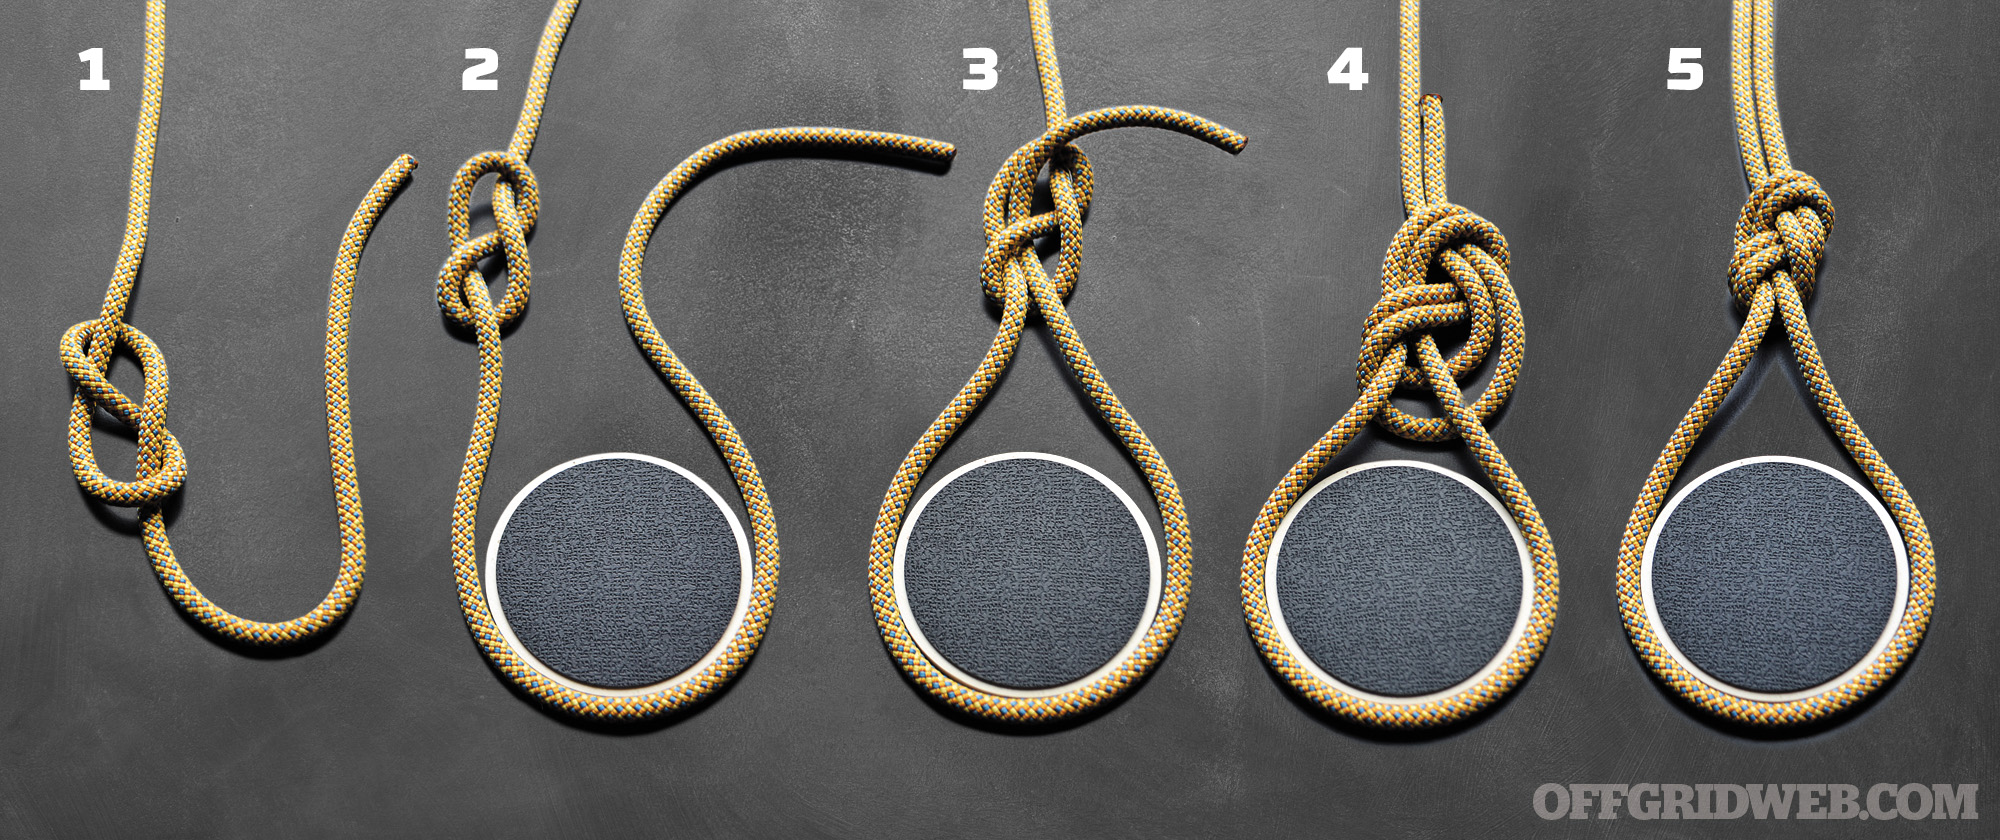
Survival Knot #1: Figure-of-Eight Loop
Difficulty: ★☆☆☆☆
Functions: This knot has virtually unlimited uses, such as hoisting gear, pulling limbs or debris, rappelling, and climbing.
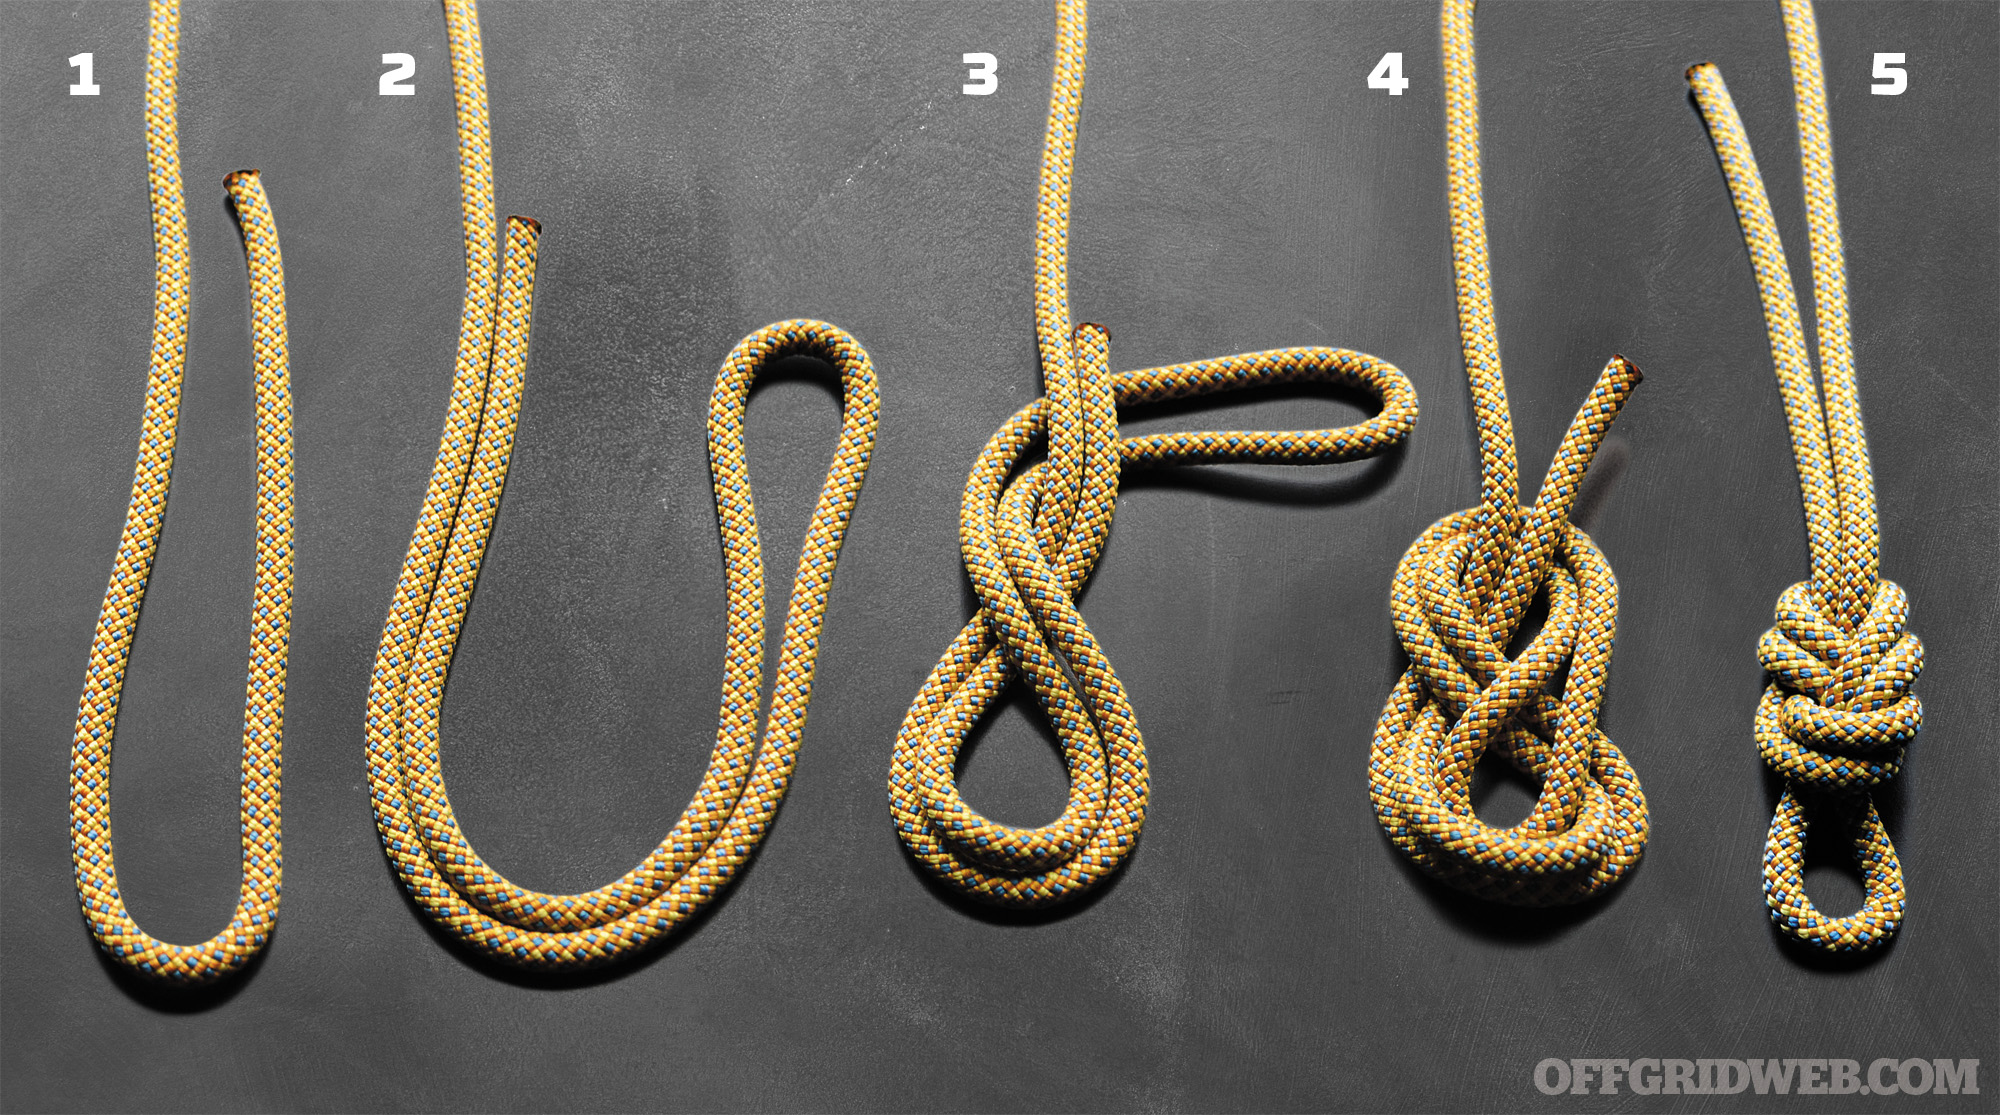
Directions
Step 1: Place a bight in the rope.
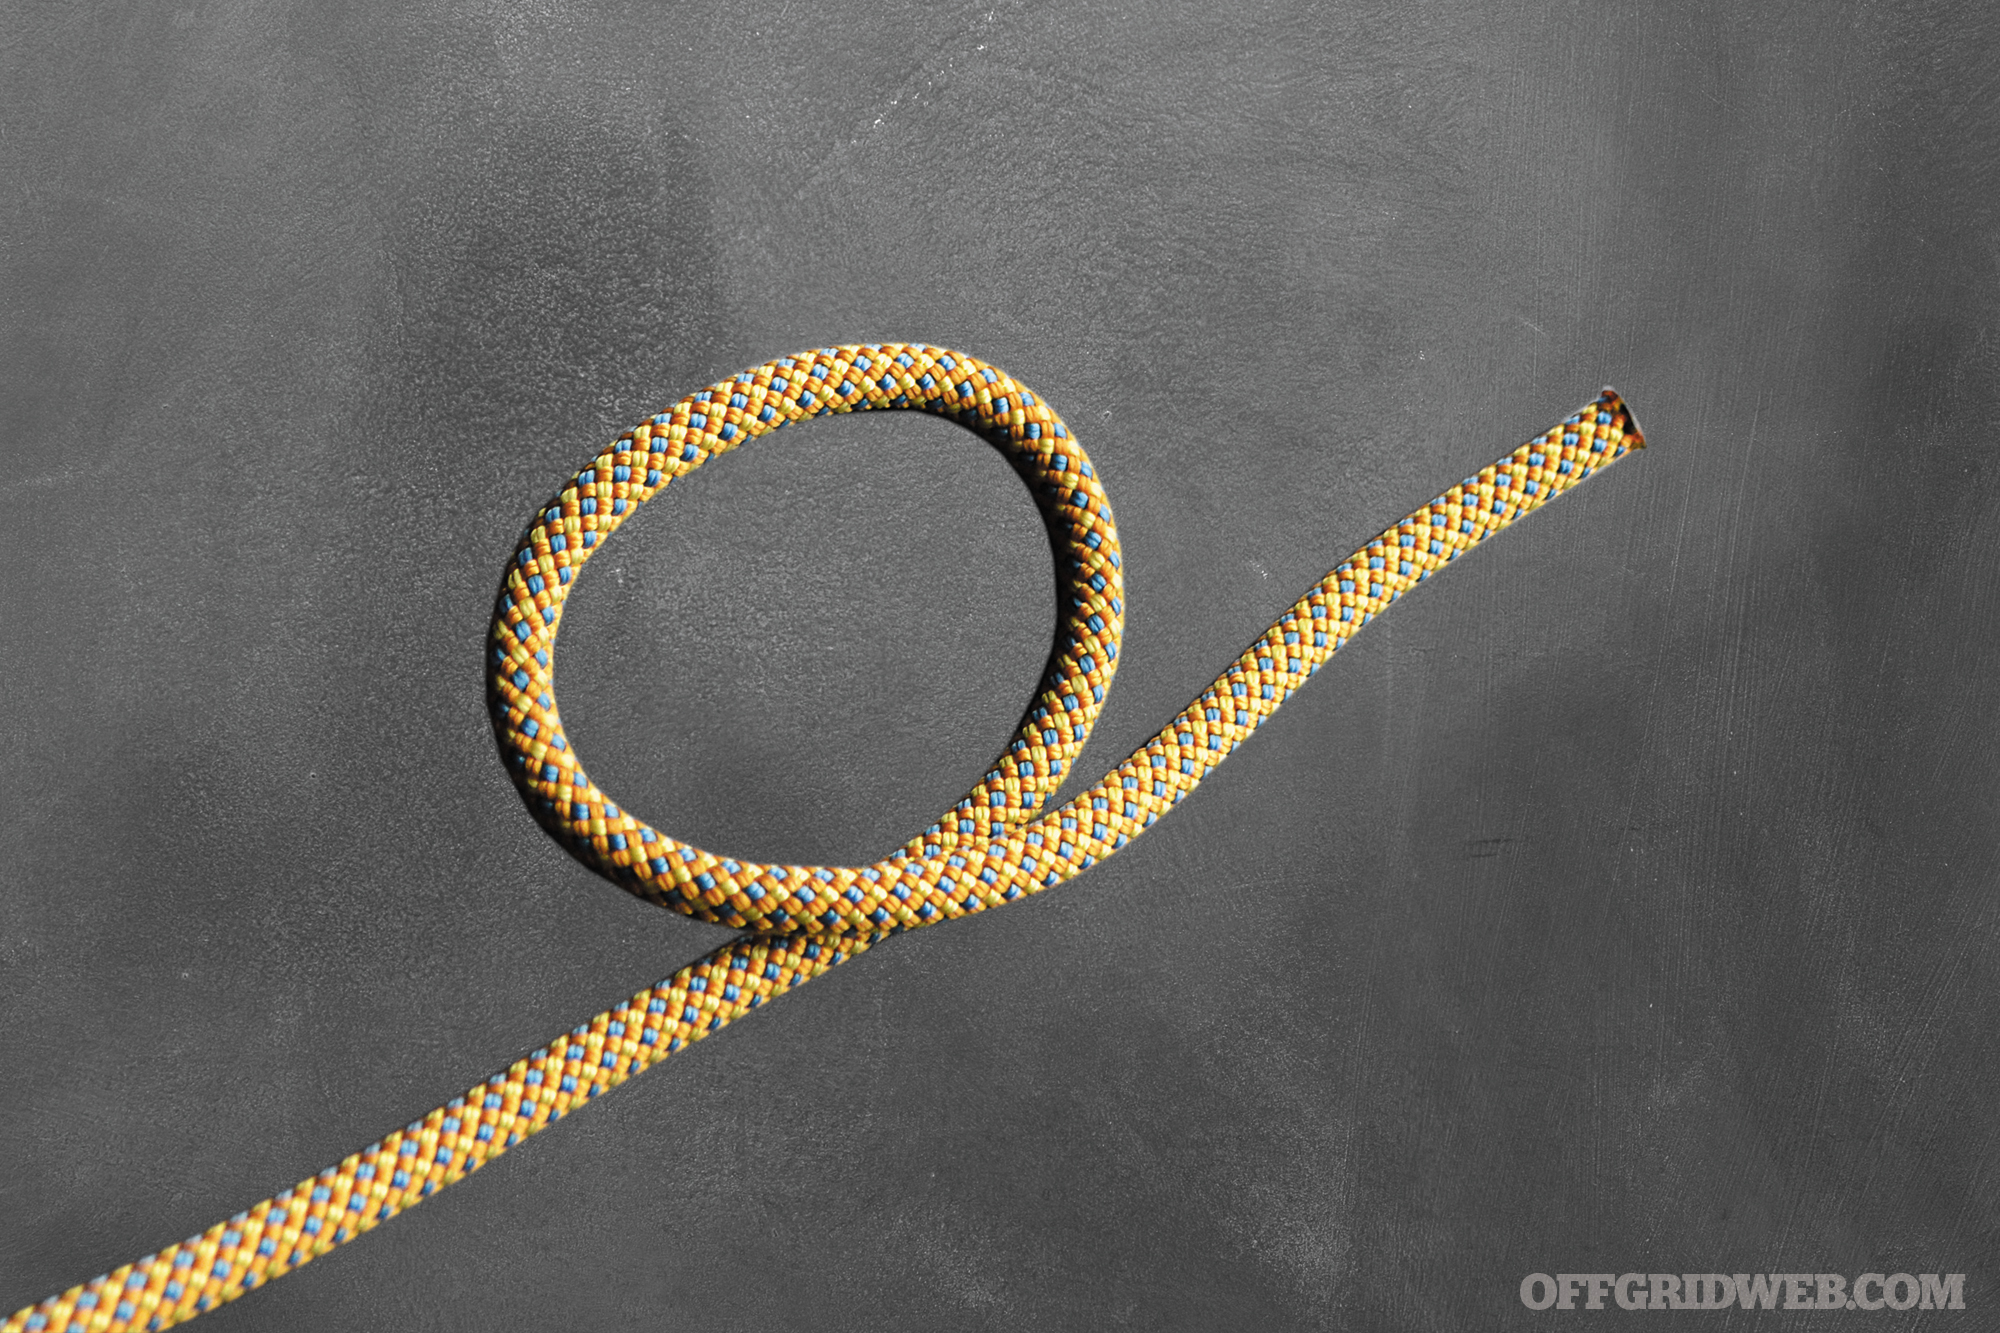
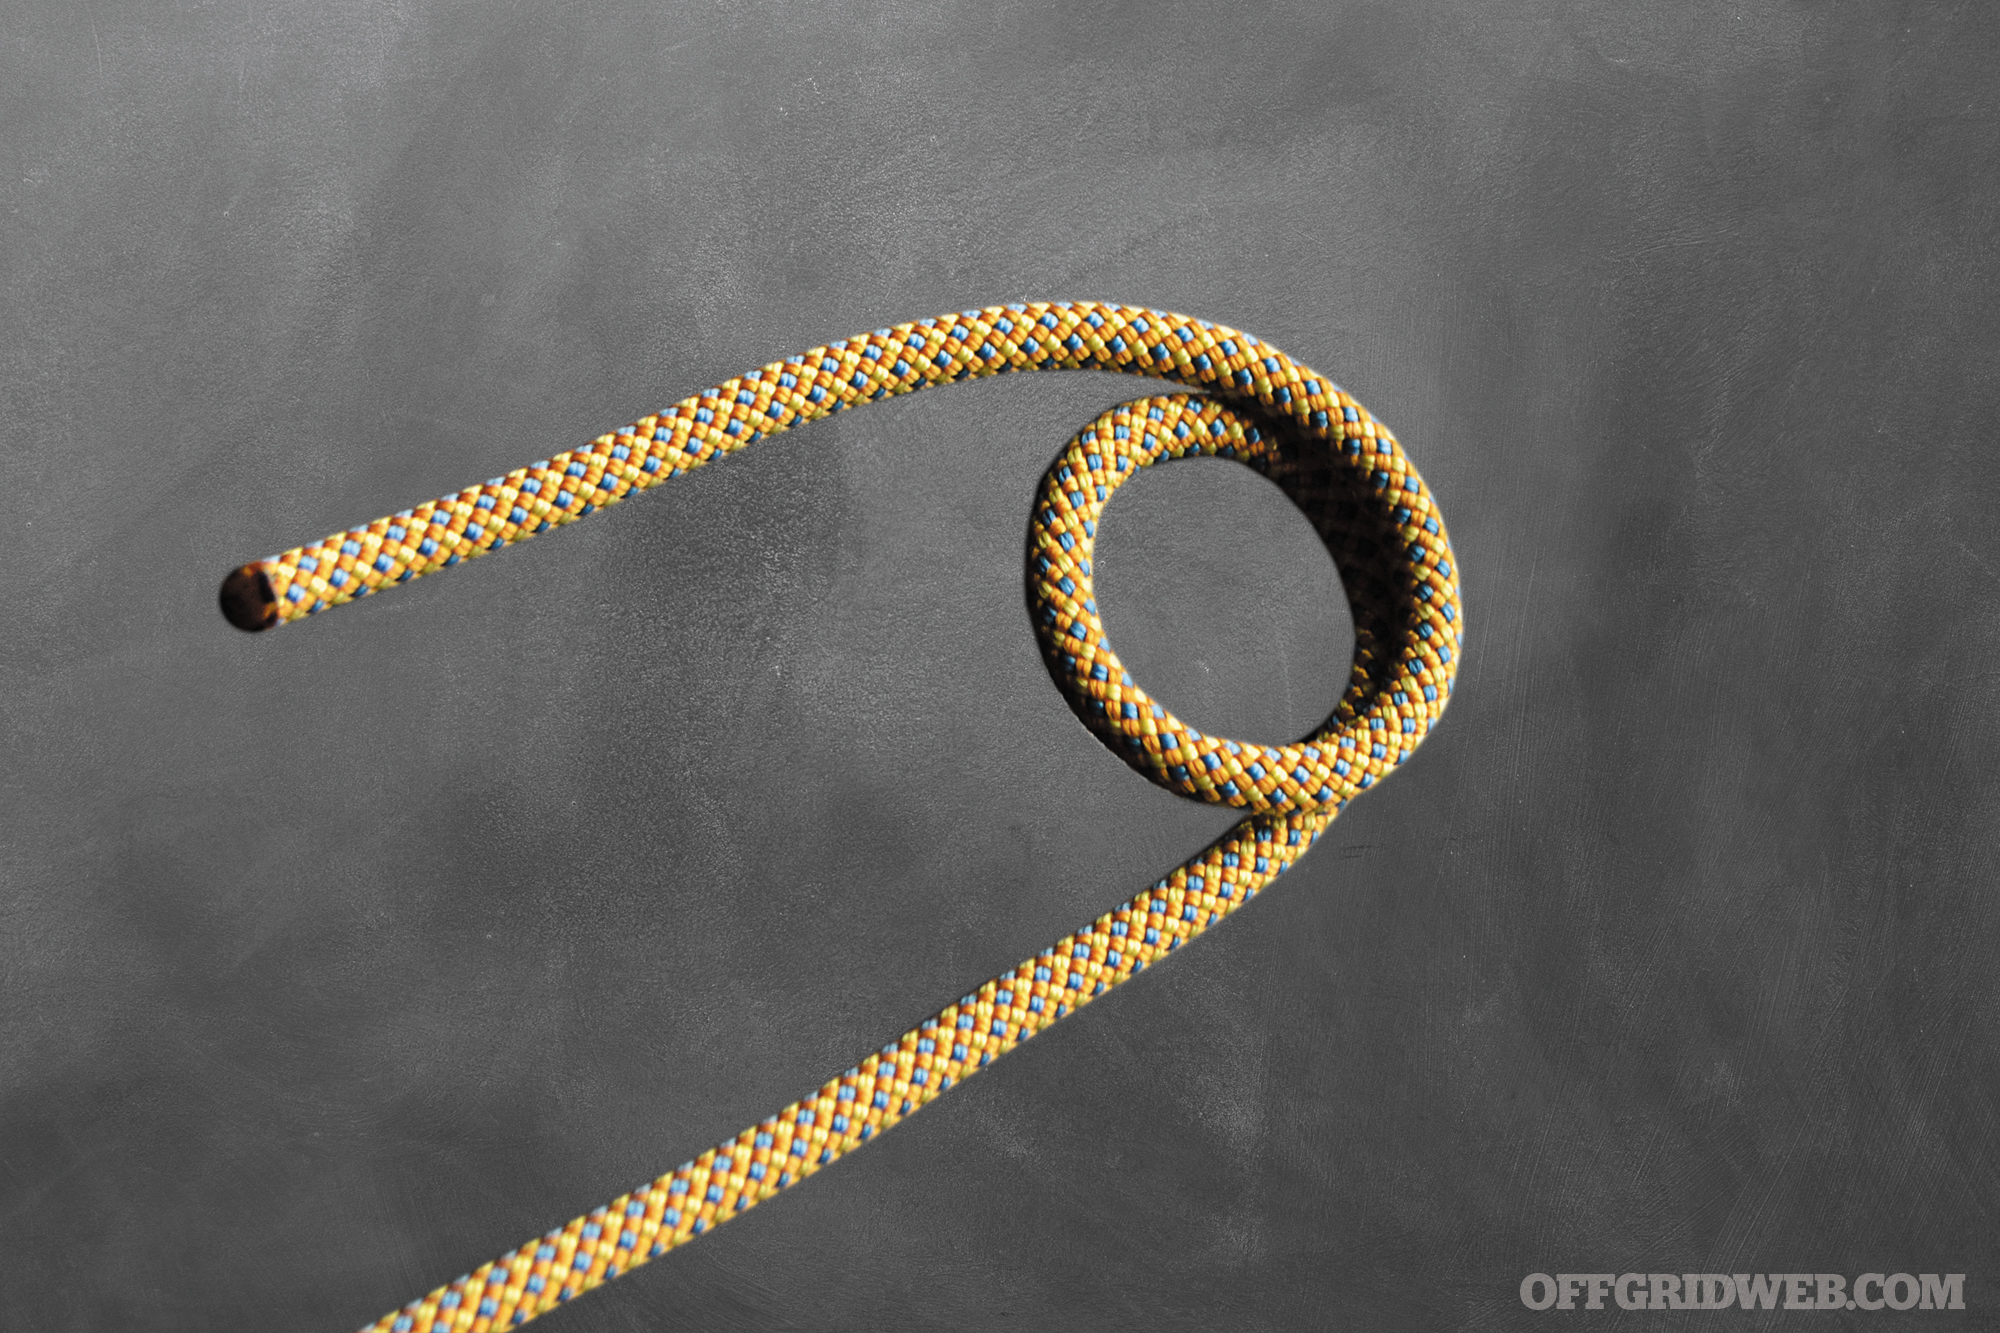
Step 2: Fold the bight over (in essence creating another bight).
Step 3: Wrap the bight one full time around both standing parts.
Step 4: Tuck the bight through the top of the knot (the second bight you created in step 2).
Step 5: Pull tight.
Survival Knot #2: Figure-of-Eight Follow Through
Difficulty: ★★★☆☆
Functions: As a variant of the first knot, this has the same vast variety of uses, but additionally allows you to tie the knot around an object when you don’t have access to the end of the object to loop the figure-of-eight over.
Directions
Step 1: Tie a Figure-of-Eight in the rope with enough working end to wrap around your anchor and trace back through the knot.
Step 2: Wrap the working end around your anchor.
Step 3: Place the working end against the standing end and trace the working end through the knot.
Step 4: Dress the knot so the turns don’t cross each other.
Step 5: Pull tight.
Survival Knot #3: Overhand Knot with a Drawloop
Difficulty: ★★☆☆☆
Functions: The draw loop is wrapped around the load (gear, animal carcass, human victim, litter, etc.). As the knot is weighted, the loop cinches tight, securing the load. When the load is relieved, the knot can easily be released by pulling the working end of the rope.
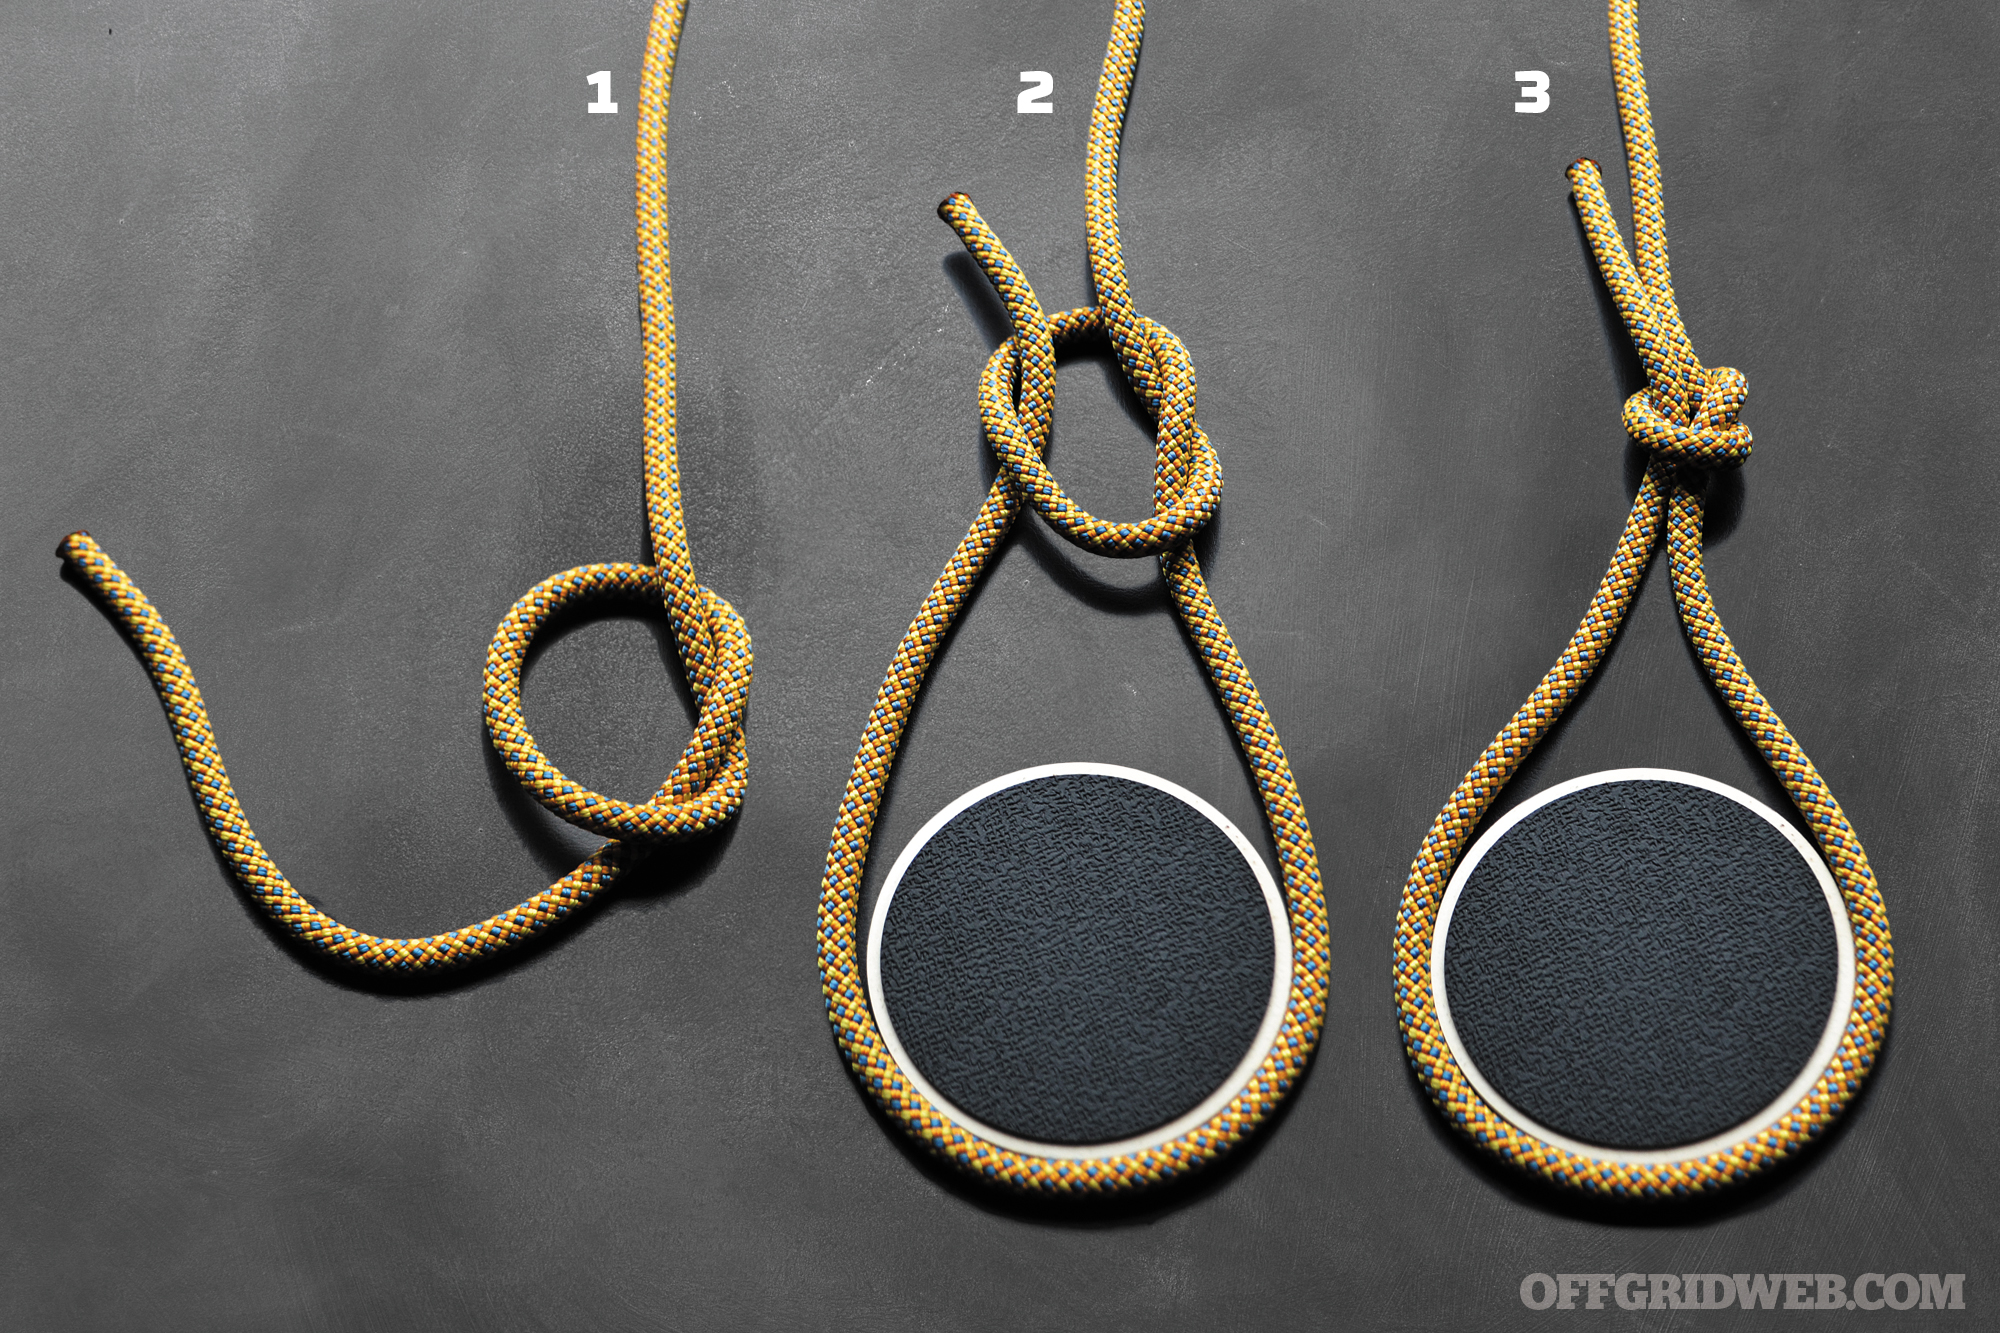
Directions
Step 1: Tie an Overhand Knot.
Step 2: Wrap the working end around the anchor and back through the loop created in step 1.
Step 3: Pull tight.
Survival Knot #4: Alpine Butterfly
Difficulty: ★★★☆☆
Functions: This knot offers a three-way pull. One can wrap a rope around an object and tie an Alpine Butterfly. Then, an object can be clipped or tied to the Alpine Butterfly — and it won’t compromise the rope or knot due to the three-way pull. The Alpine Butterfly can be used any time a loop is required in the middle of the rope, such as securing a shelter or elevating food away from wild animals.
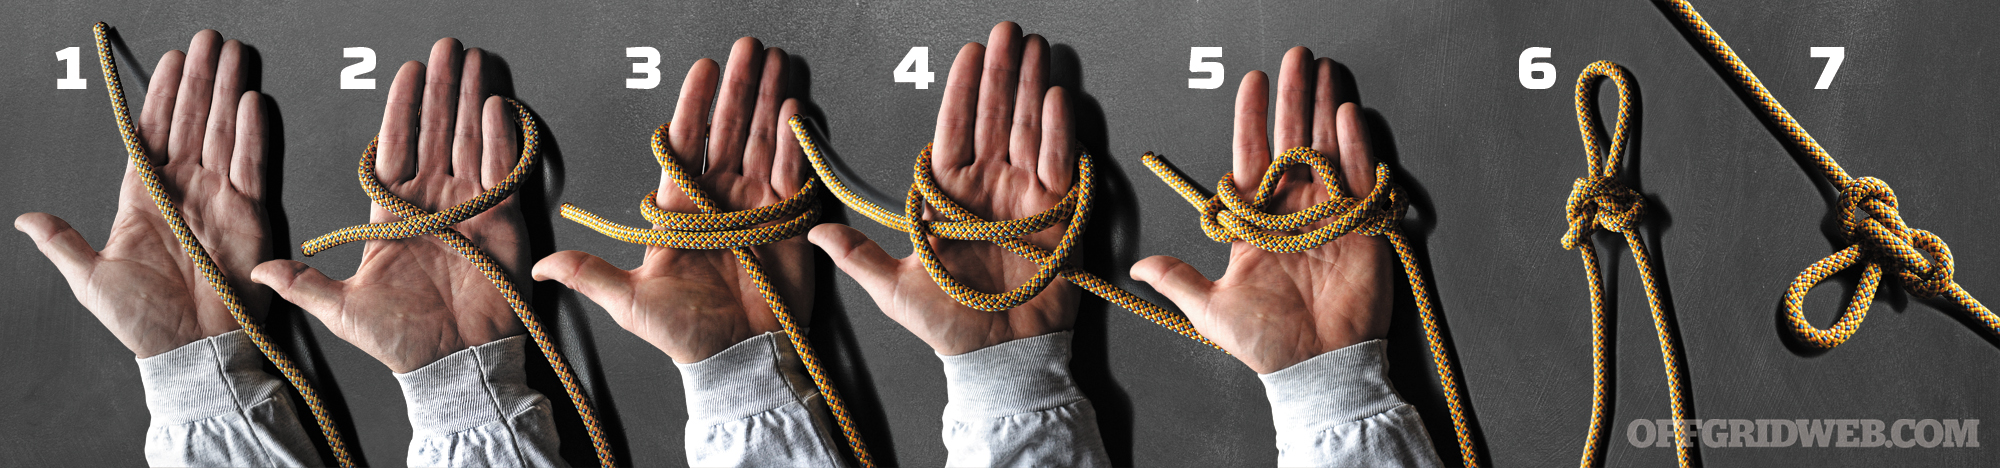
Directions
Step 1: Drape the rope over your open hand at an angle extending away from your thumb.
Step 2: Bring the rope around and over the front of the hand, crossing the first wrap and forming an X.
Step 3: Continue wrapping one more time around the hand, working closer to your thumb.
Step 4: Pull slack in the center of the three wraps and lay the loose rope on your hand facing back toward your wrist.
Step 5: Tuck that loop under the X toward your fingertips.
Step 6: Withdraw your hand from the knot and pull the standing ends in one direction and the bight in the other.
Step 7: The knot is complete when you pull the two standing ends apart from each other, popping the knot into its final position.
Note: As with many knots, there are multiple ways to tie the Alpine Butterfly. If this method doesn’t click for you, research other ways to tie this important knot.
Survival Knot #5: Constrictor Knot
Difficulty: ★★★☆☆
Functions: The Constrictor can be utilized as whipping at the end of a rope, a clamp to hold things down, or to hoist, drag, or grip around a group of objects. It can also be used in any scenario when you need to secure a rope to an object or an object to a rope, and doesn’t require access to the end of the object. This is possibly the most useful and common of the binding knots.
Directions
Step 1: Wrap the rope around whatever is to be tied.
Step 2: Lay the working end across its own standing part.
Step 3: Tuck the working end around the object again creating an X.
Step 4: Lead the working end beneath the diagonal part of the X that was just created.
Step 5: Tuck the working end under the first crossing turn.
Step 6: Pull tight.
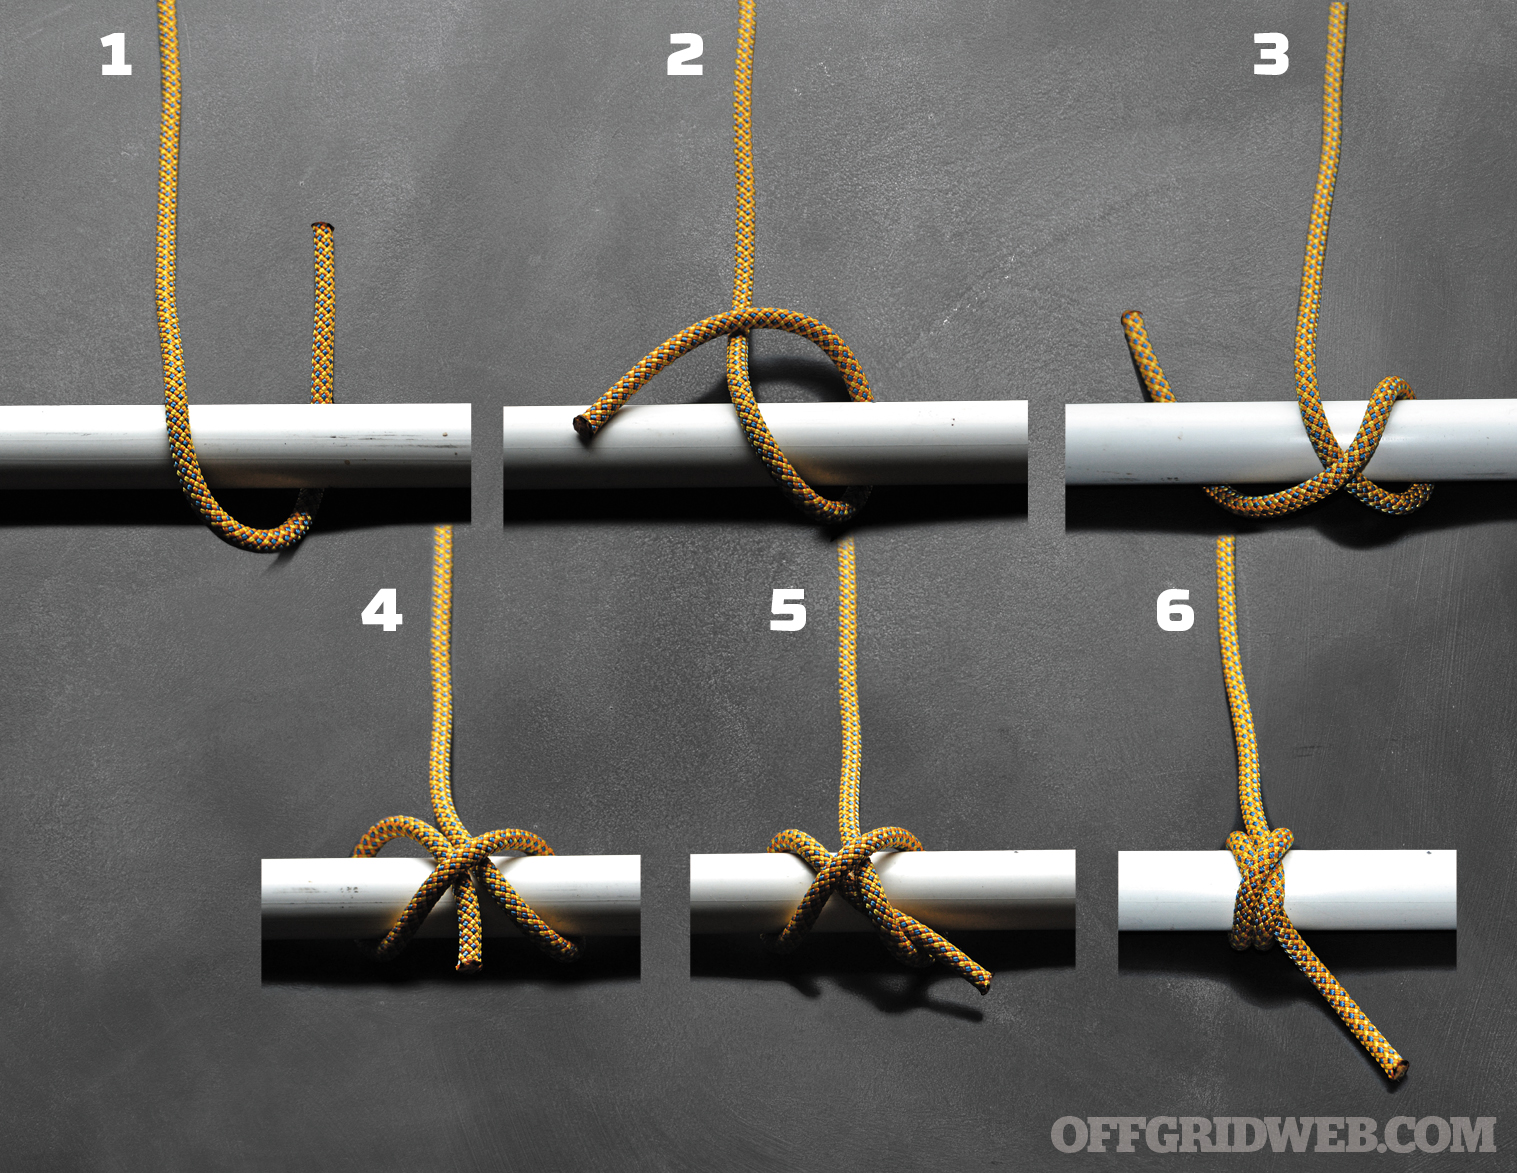
Survival Knot #6: Pile Hitch
Difficulty: ★☆☆☆☆
Functions: Used to quickly tie a rope to a pole, post, or tree. The Pile Hitch is often used to tie off a watercraft or to secure an animal. While it isn’t even considered a knot by some purists, this knot provides one of the easiest ways to tie a hitch.
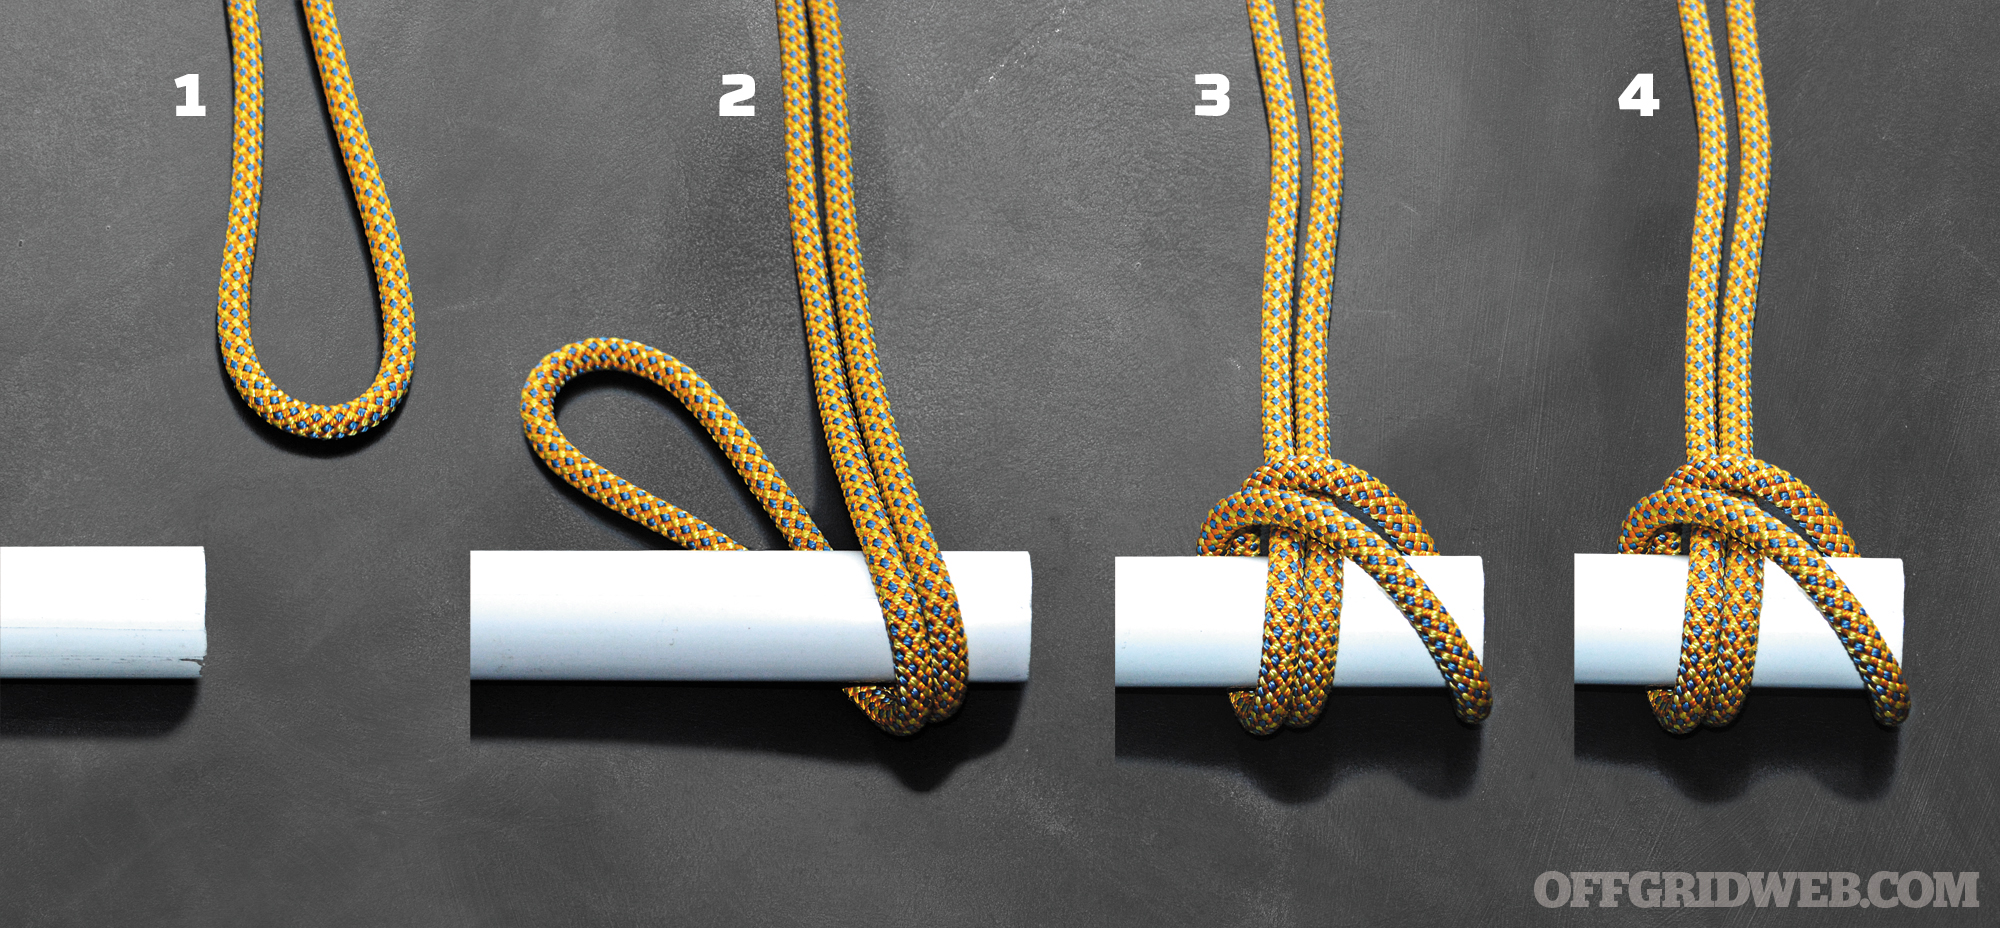
Directions
Step 1: Make a bight in the rope.
Step 2: Wrap the bight around the post or object, passing the bight underneath both standing ends.
Step 3: Pass the bight over the top of the post or object.
Step 4: Pull tight.
Survival Knot #7: Double Fisherman
Difficulty: ★★★★☆
Functions: A tad more difficult to tie than the rest in this bunch, this knot can be used to securely tie two lengths of rope together. Whenever a single rope is not long enough to accomplish a task, the Double Fisherman can potentially save the day.
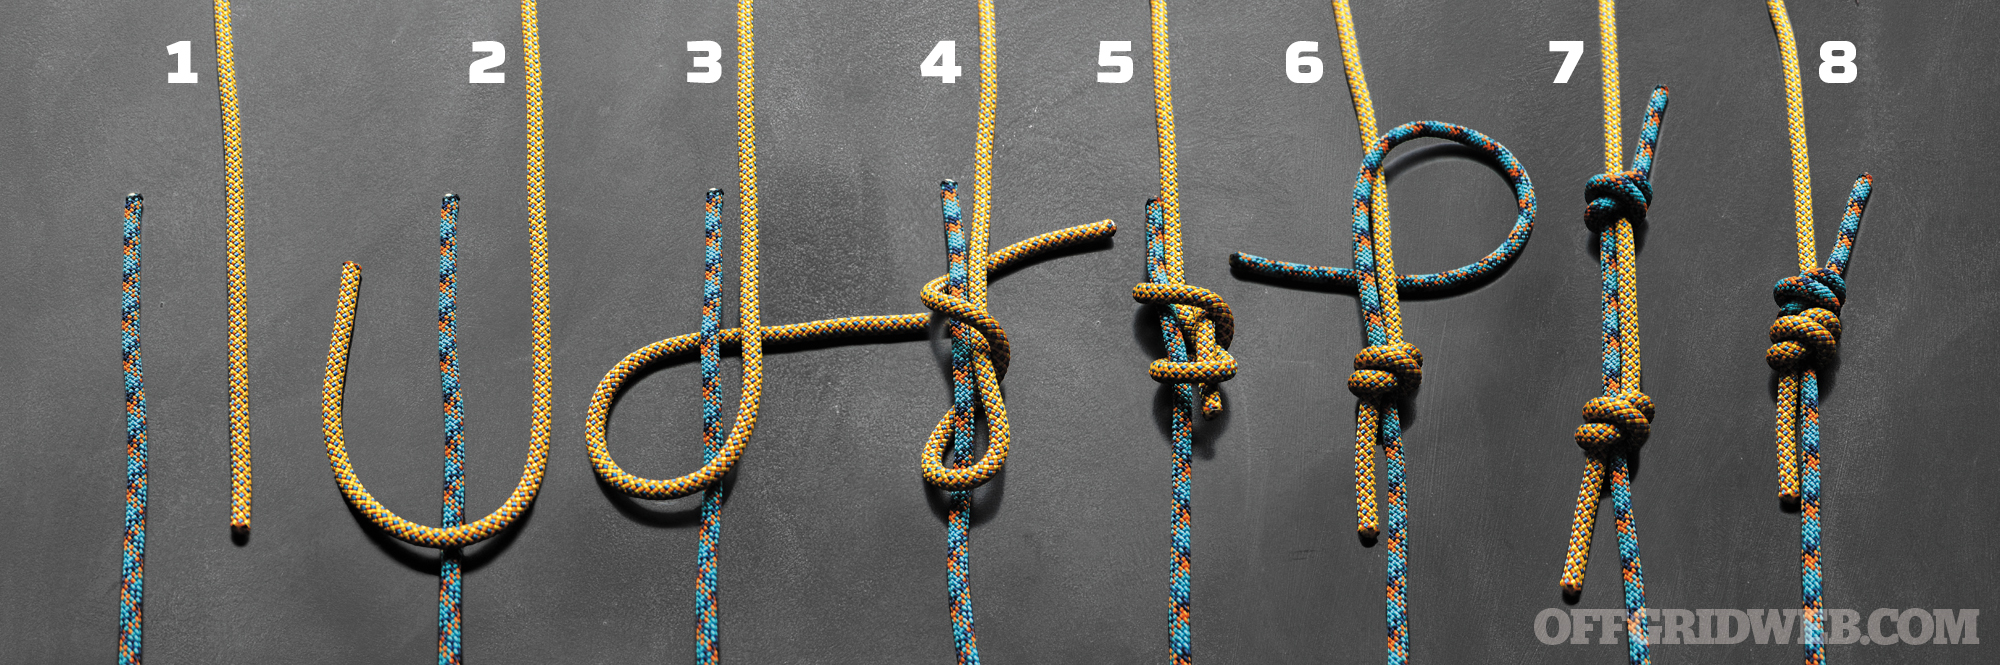
Directions
Step 1: Place the two ropes parallel to one another.
Step 2: Make a bight in rope No. 1.
Step 3-4: Create a figure eight working back toward its own standing end, making sure you finish it by tucking the working end under both ropes 1 and 2.
Step 5: Pull both ends of rope No. 1 to secure it to rope No. 2.
Step 6-7: With the working end of rope No. 2, repeat step 3, tying it around rope No. 1.
Step 8: Pull the ropes apart, drawing the knots in together.
Survival Knot #8: Simple Simon Under
Difficulty: ★★★☆☆
Functions: Another knot used to tie two ropes together, the Simple Simon Under is especially useful for tying wet, synthetic rope together.
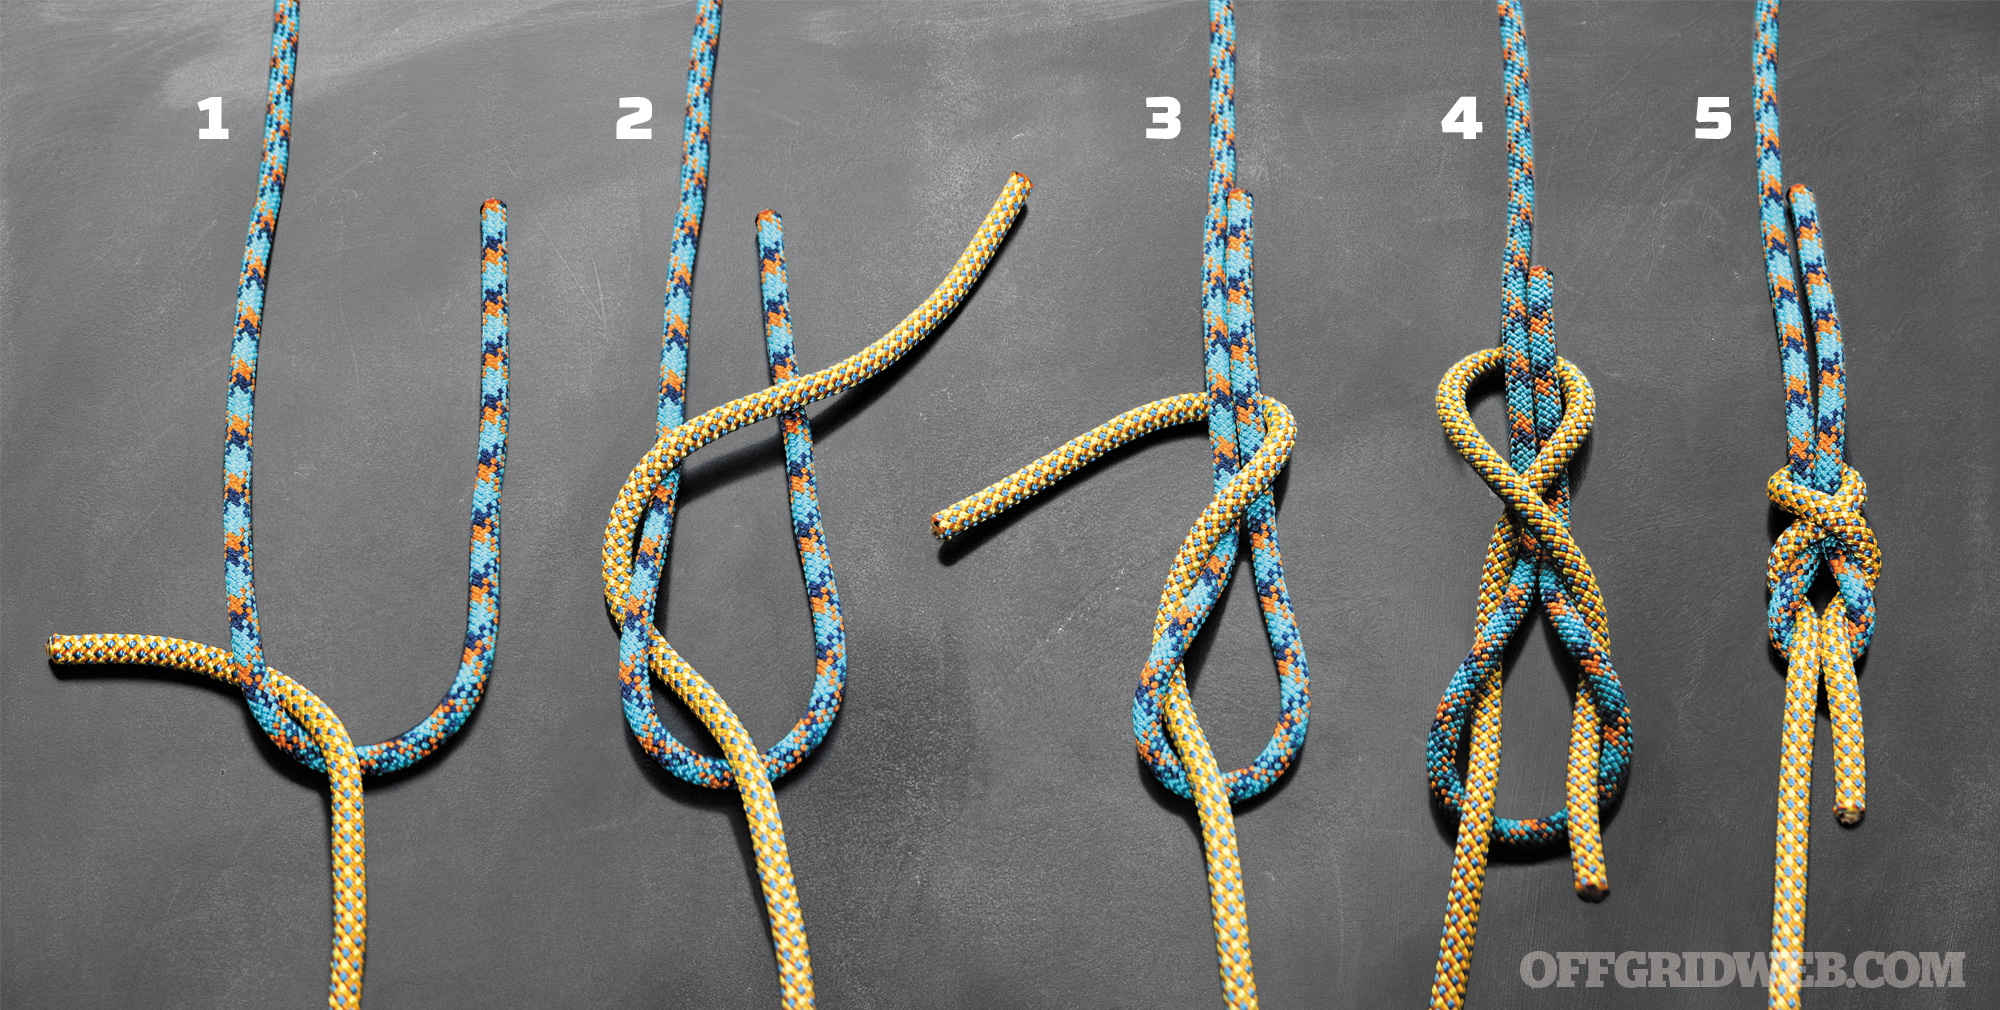
Directions
Step 1: Make a bight in rope No. 1. Tuck the working end of rope No. 2 through the bight in rope No. 1.
Step 2: Wrap the working end of rope No. 2 over both the working and standing ends of rope 1.
Step 3: Continue wrapping over the working and standing ends of rope No. 1.
Step 4: Crossing the working end under itself, tuck it back into the back of the bight in rope 1.
Step 5: Pull tight.
Survival Knot #9: Handcuff Knot
Difficulty: ★★☆☆☆
Functions: This can be quickly tied and placed around a victim’s wrists or ankles to remove them from harm or around an animal to drag it.

Directions
Step 1: Put two loops in the rope side by side, one clockwise and one counterclockwise.
Step 2: Partially overlap the two loops with the clockwise loop on the bottom (at this point, the knot will look like a pretzel).
Step 3-4: Pull the leading edge of the clockwise loop through the back of the knot and the counterclockwise loop through the front.
Survival Knot #10: Daisy Chain
Difficulty: ★★☆☆☆
Functions: Although not a knot, the Daisy Chain is an extremely useful method to store rope for rapid deployment.

Directions
Step 1: Locate the center of the rope.
Step 2: Create a Half Hitch.
Step 3: Pull both legs of the standing end up through the loop in the Half Hitch just enough to make a bight.
Step 4: While holding the newly formed bight, pull the standing end and the bight with the two rope ends.
Step 5: Place the two working parts of the rope up into the bight just far enough to make another bight.
Step 6: Continue tucking the two working parts of the rope up into the most recently formed bight just enough to create another bight. Do this until the entire rope is “chained.” To untie, simply pull the ends of the rope and the chain comes undone.
Conclusion
With these 10 knots, you can now use rope as a tool to enhance your life, bolster your survival skills, and wow your friends. Remember you were only able to learn how to tie your shoes by repetition. Cut yourself a piece of rope and, as you binge watch your favorite TV show, tie these knots over and over again. Create the muscle memory to afford you the ability to tie them under the stress of a disastrous scenario. It’s far better to learn them in the comfort of your chair rather than on your back in the throes of a disaster.
About the Author
Scott Finazzo has been a firefighter for more than 20 years and a longtime member of his fire department’s Technical Rescue Team. He has authored five books, including The Prepper’s Guide to Knots and the national bestselling The Prepper’s Workbook. He also wrote Why Do All the Locals Think We’re Crazy? about his kayak trip through the Virgin Islands. www.scottfinazzo.com
More From Issue 19
Don’t miss essential survival insights—sign up for Recoil Offgrid’s free newsletter today!
- All Tied Up: 10 Easy Survival Knots
- Book Review: “The Final Day” by William Forstchen
- Debunked: The Myth of the Retrofitted EMP-Proof Vehicle
- What If an EMP Rendered Your City Technologically Helpless?
- Portable Lumberjack: Pocket Hatchet Buyer’s Guide
- A Primer on Pocket Hatchets & Proper Technique
- 10 Lessons From an Urban Escape and Evasion Class
- Dehydrated Food Taste Tests – Dehydrated Delights
- Big-Battery Flashlights – Highlights
Read articles from the next issue of Recoil Offgrid: Issue 20
Read articles from the previous issue of Recoil Offgrid: Issue 18
Check out our other publications on the web: Recoil | Gun Digest | Blade | RecoilTV | RECOILtv (YouTube)
Editor’s Note: This article has been modified from its original version for the web.
