In This Article
We all have that one friend. Anytime you take him into the woods, the first thing he does is break out his knife and grab a stick to sharpen it into a “spear.” When you ask him what he’s doing, he usually responds with, “this is in case something jumps out at us” or “so I can stab a bear.” While the effectiveness of such a spear is questionable, there’s no doubt it gives your friend a sense of security — and for good reason.
The spear is perhaps the first man-made weapon; examples of sharpened sticks date back hundreds of thousands of years. Spears are just as effective today as they were in the days of primitive man. The practicality and purpose of different types of spears hasn’t changed, although the manner in which they’ve been presented over the years has. We did our research, coming up with six different types of pointed sticks you can use for protection and food collection.
Materials
Before you get started, you need a basic understanding of the wood you’ll work with. Wood can be broken down into two categories: green or seasoned and living or dead, respectively. You can work with either to make your spear, but understand that green wood will be easier to carve. The tradeoff is water weight and durability. Some of this weight and durability can be altered with fire hardening, but that’s generally done just to the tip.
Seasoned wood will be more difficult to carve as it will be harder, and it will also have less flexibility. Consider the type of wood you’re using too. Seek out good hardwoods (non-evergreens) in constructing your spears. Also, remember that too thin of a shaft will easily snap, while too thick will take too much carving to reduce down to a fine point.
If we had the choice and time, we’d select green wood we could fire harden while leaving some flexibility in the shaft to prevent snapping. We wouldn’t strip the shaft of all the bark, as the extra texture can serve as a handle. We would, however, remove any knots and high points to prevent injuring our hands in use and slowing down delivery speed if it slips in our hand.
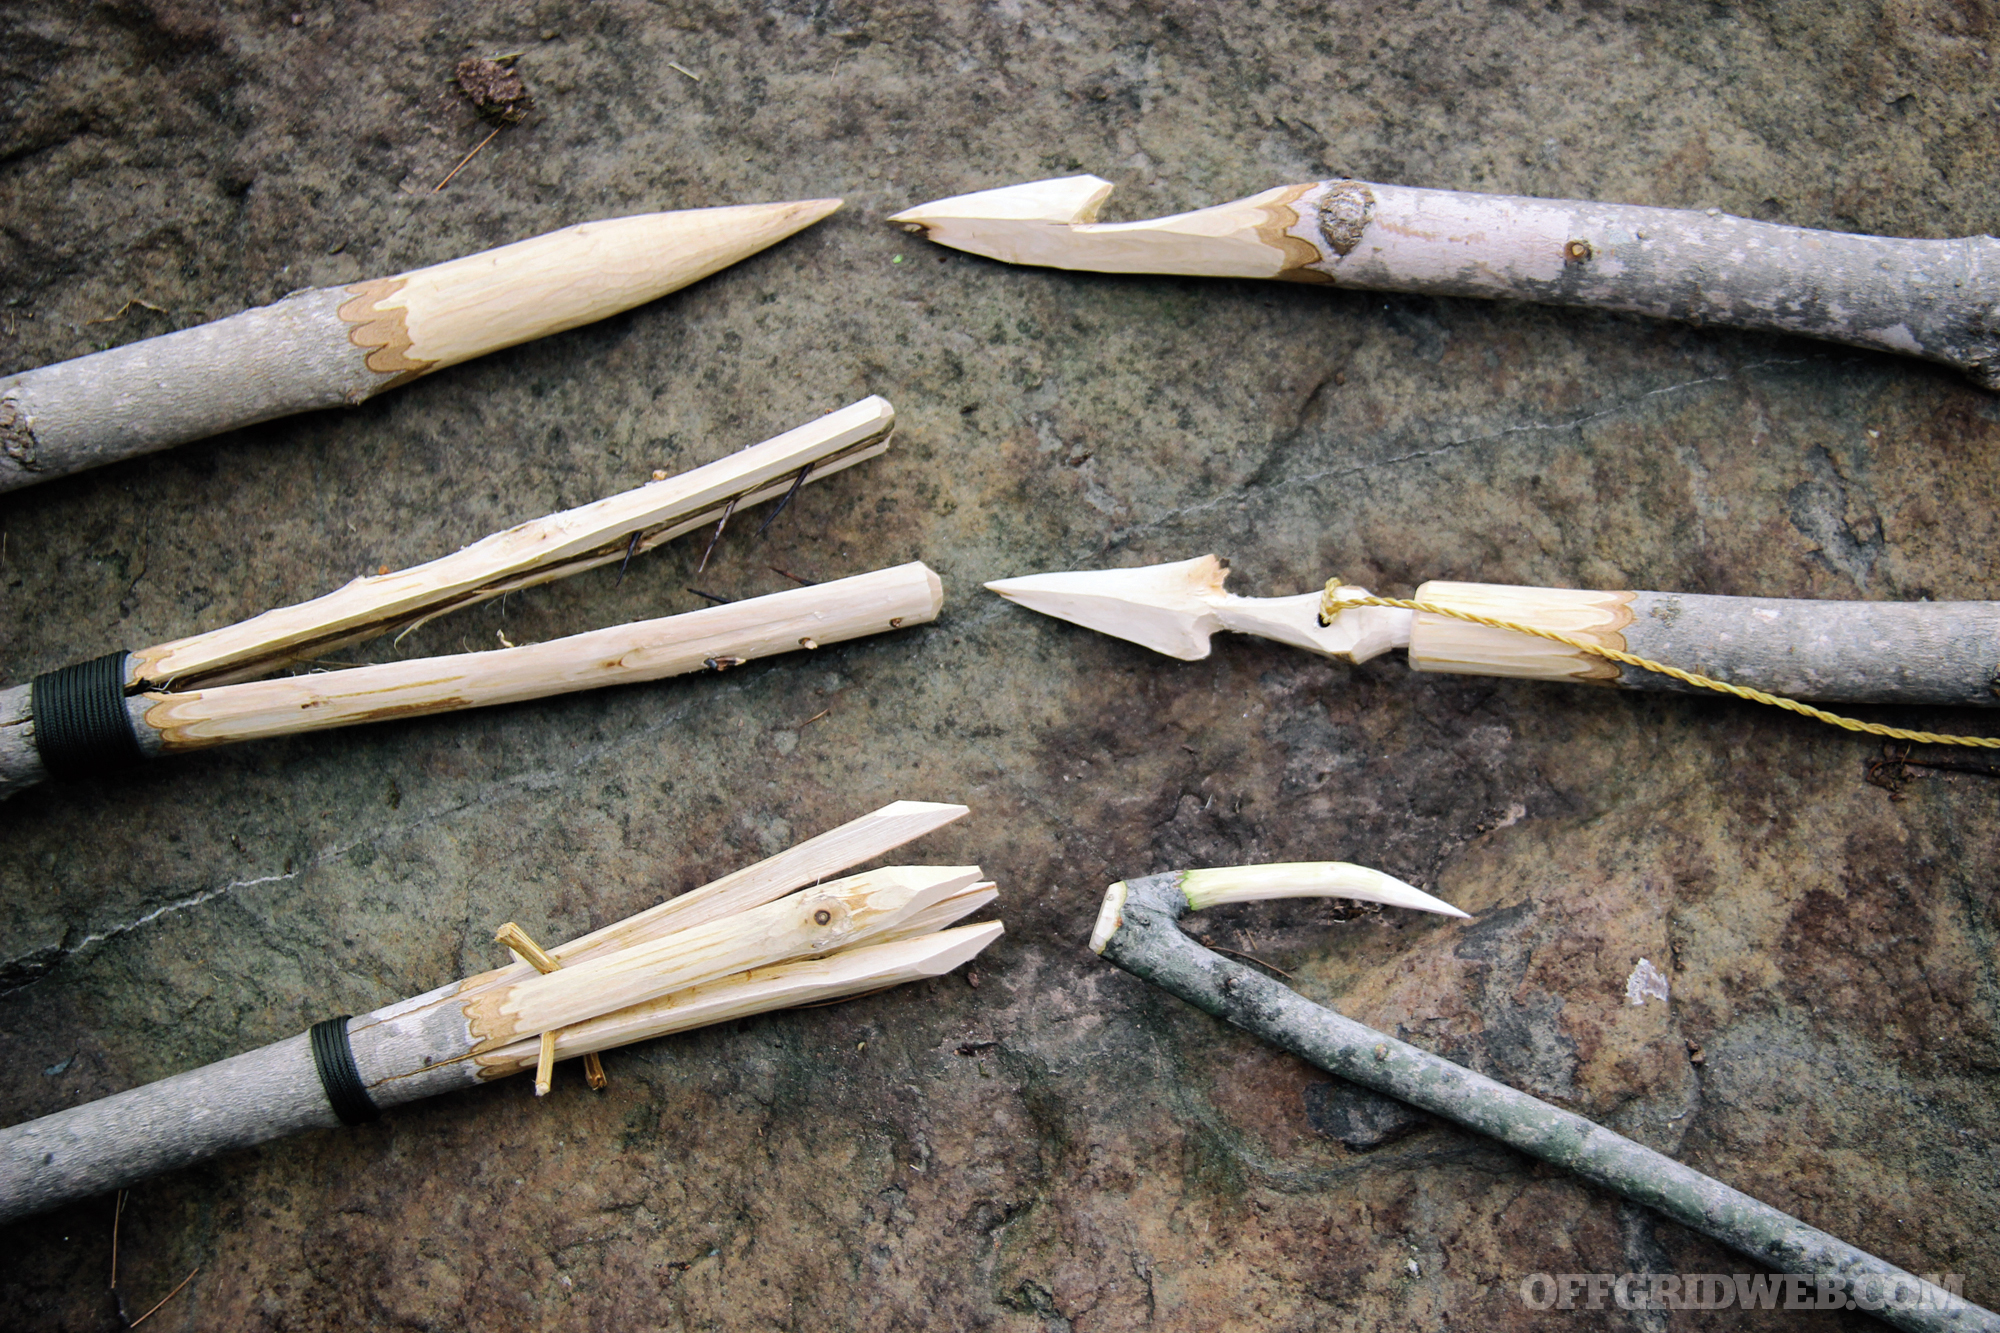
Spear/Javelin
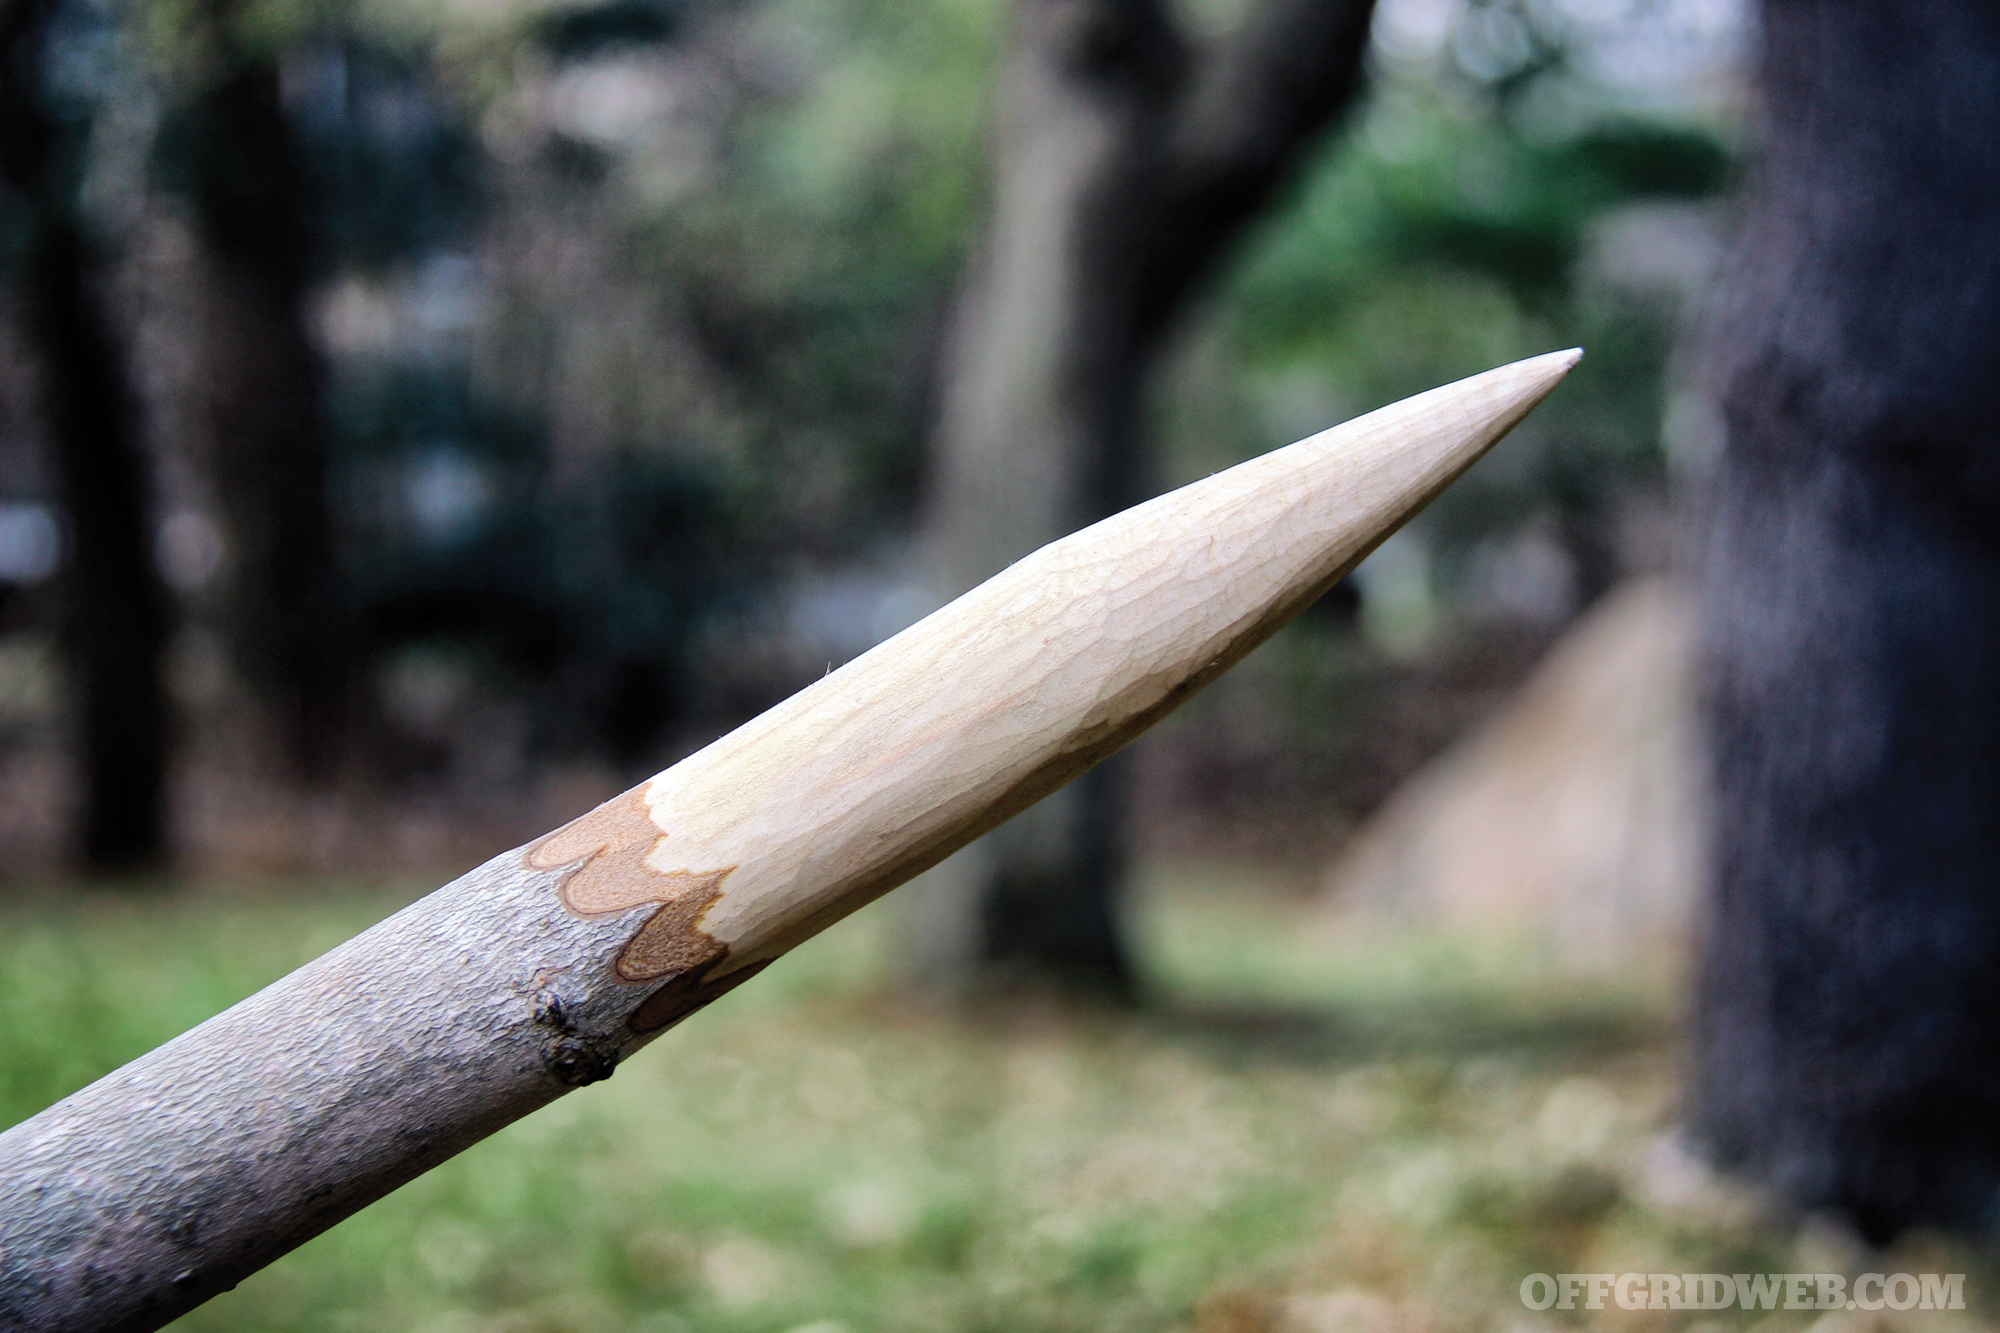
What that friend we all have probably makes when he sharpens a stick is a really crude version of a spear or javelin. As previously stated, there’s no exact date as to when primitive man first sharpened sticks into a tool or weapon, but the Clacton Spear, a sharpened wooden spear point, is on display in a London museum and dates back 400,000 years. Over time, shapes evolved and varied in length, thickness, and wooden materials used.
When making a single pointed spear, start with large power cuts to remove a significant amount of material as you rotate the spearhead around. Four to six good power cuts will give you a crude tip. Move your blade to the shoulders created where the power cuts meet and knock them off. Continue removing shoulders until your spear head is round. Depending on the type of wood, you can use the sapwood (the “spot” in the center of the wood with different coloration) as your center point. Continue to remove bark down the shaft until the point where you want penetration to stop.
Spears were used for combat and defense in many civilizations. Over time, stone and then steel heads replaced sharpened sticks. To this day, steel spears are still used on some boar hunts and in the hands of indigenous people in Africa.
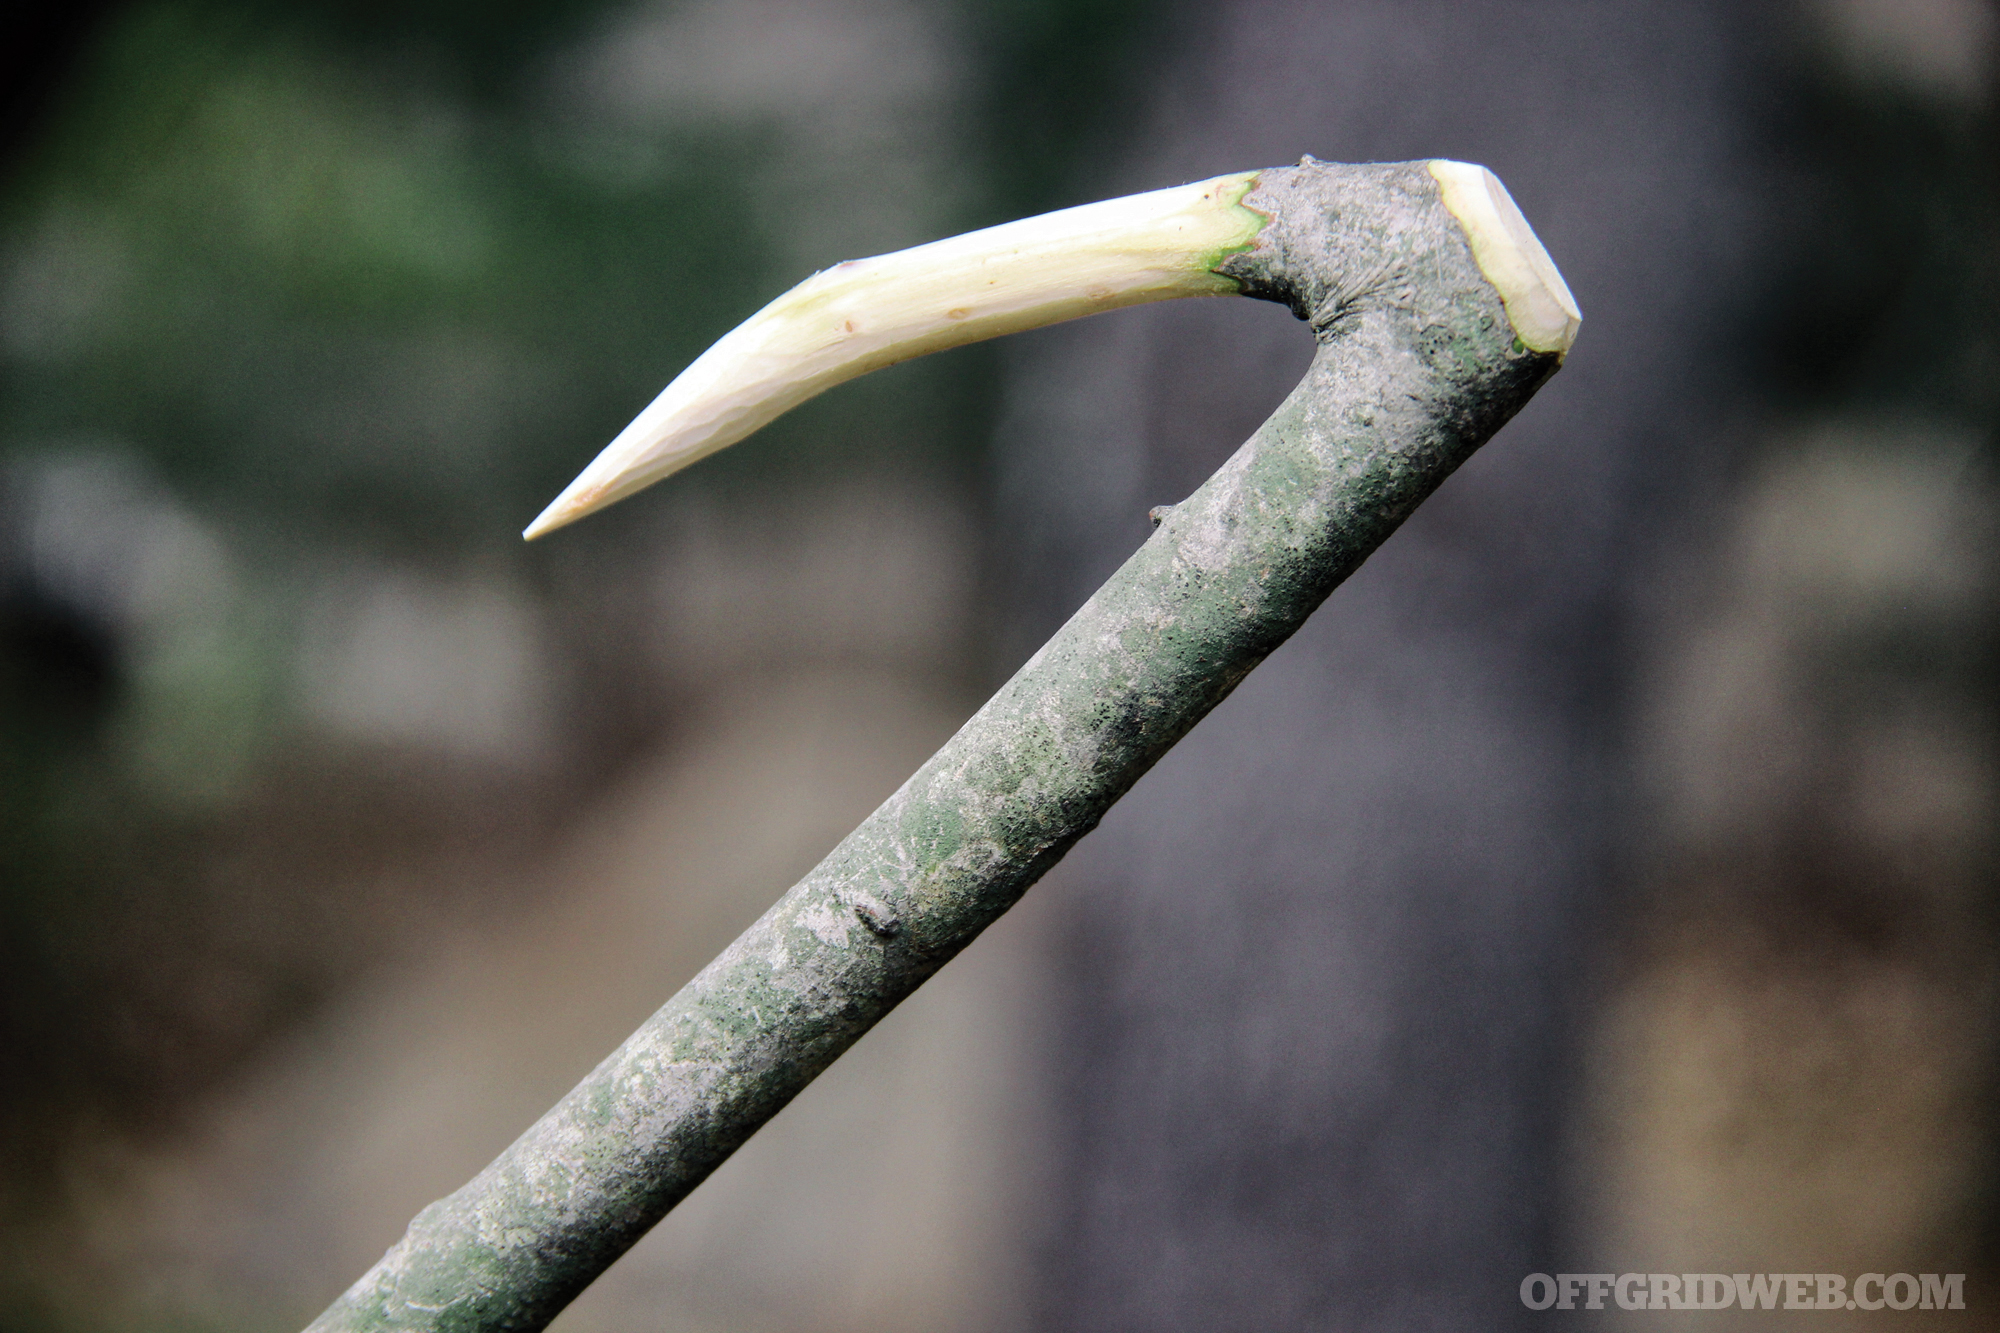
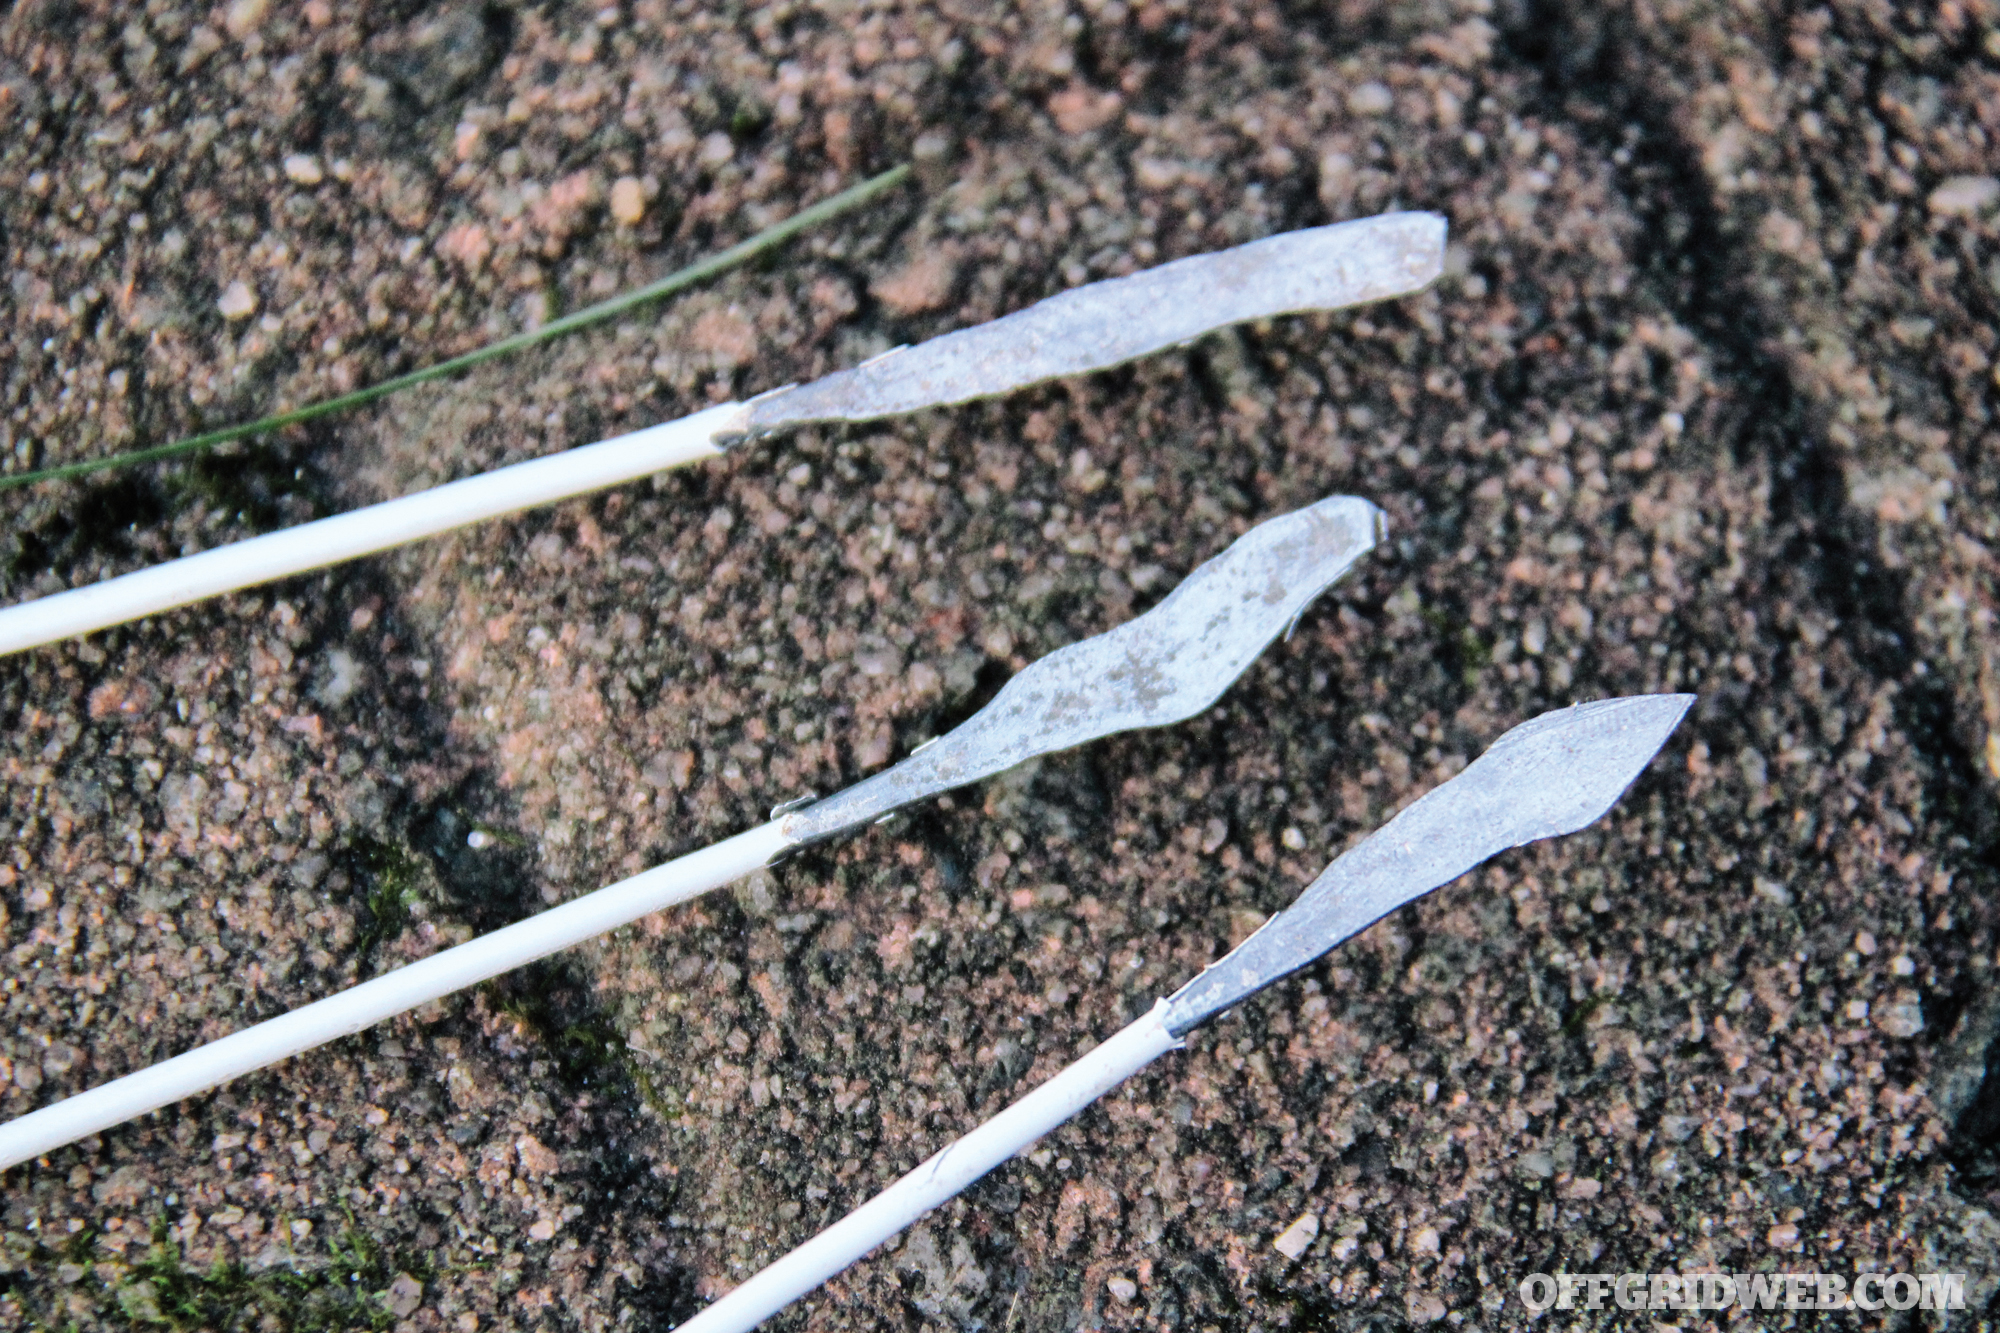
Straight Single Barb
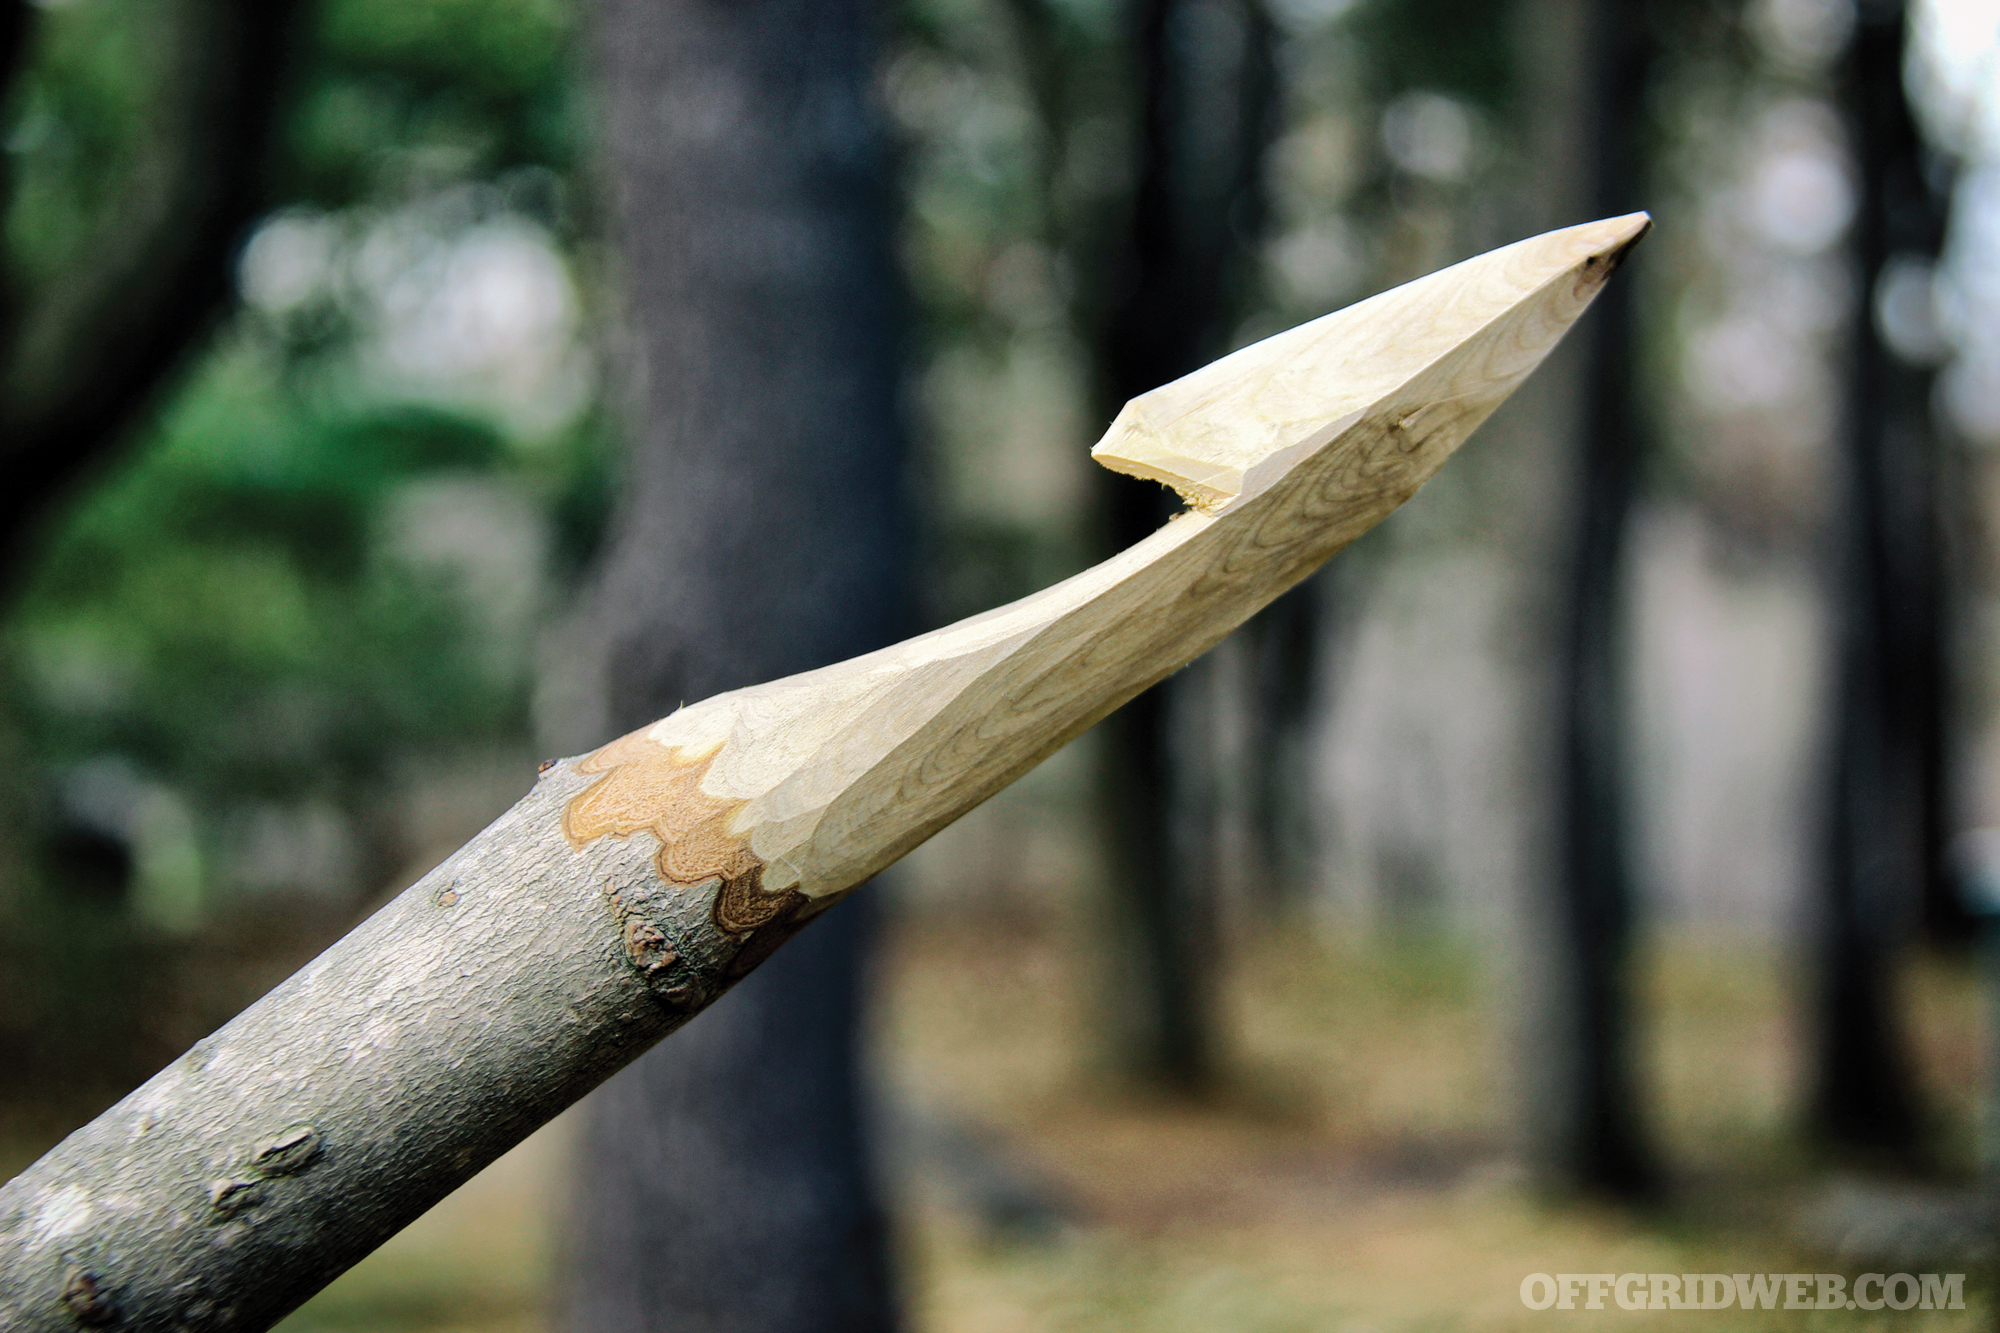
It’s uncertain when the innovation of the barb was added to a spear, but it was likely inspired by examples in nature. Stingrays, for instance, have a barbed spike, and some bird talons are barbed as well. Wherever it came from, a barb increases the retention attributes of spears by hooking into the prey’s flesh and bone, preventing it from escaping.
Carving a barb requires knowledge of a stop cut. This cut runs perpendicular to the spear shaft, with its depth dependent on how large of a barb you want. If you have a Swiss Army Knife or multitool equipped with a saw, this will make the process much easier. After a stop cut is carved into the shaft, take your blade and cut toward it in the direction of the tip. The stop cut will prevent the knife from cutting past it, and the barb will start to take shape. At this point, you can leave the point barbed with a shelf or undercut it to create a hook.
Many hunting spears from the Philippines have been made this way and show great variation throughout the 7,600 plus islands. Barbs can be created with wood, bone, and steel. Optimal barb size, shape, and quantity are largely determined by the prey hunted.
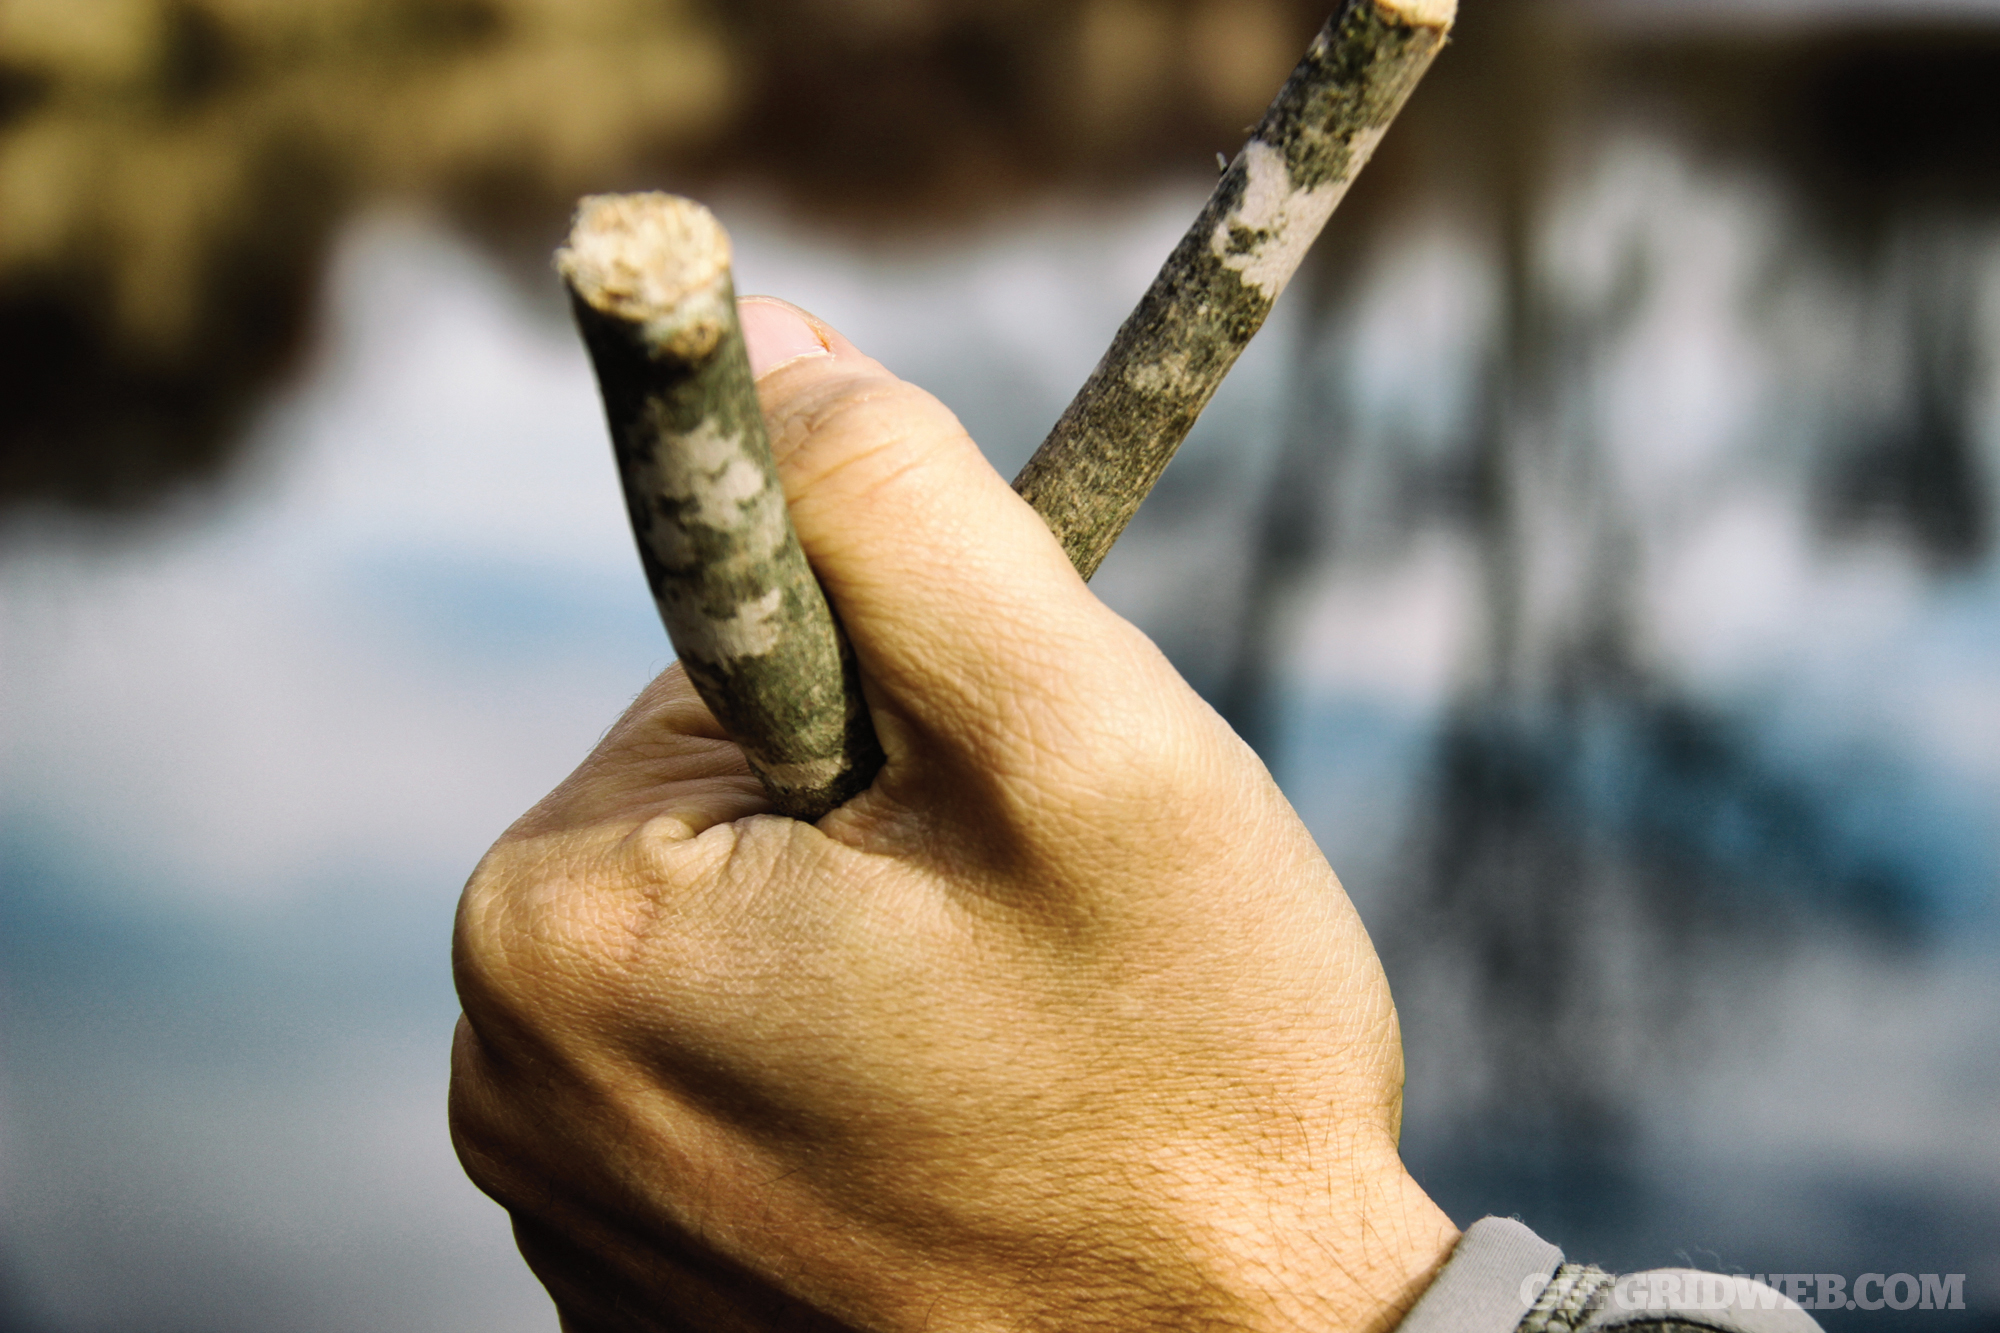
Above: The author utilizes a natural fork in the spear shaft as a thumb support. This greatly improves comfort and the amount of force that can be applied.
Harpoon with Detachable Head
A barbed spear drastically increases the chances of preventing prey from escaping. Should you be lucky or skilled enough to impale an animal, you don’t want to let go. Sometimes though, letting go is your best option. Take, for example, the Thule Inuit people who hunted Greenland mammals from kayaks. We can’t imagine how angry and violent a seal or whale becomes when stuck with a sharpened stick. This is why the technology of the harpoon was created. The harpoon is the reason why the Thule thrived in the North Atlantic, and the lack of harpoon technology is likely the reason why the Norse abandoned their efforts to settle in Greenland.
To create a harpoon, you need to make three segmented components: the barbed harpoon tip, harpoon shaft, and strong cordage. The tip is friction-fitted into the harpoon shaft. This can be accomplished by wedging it between a split in the shaft or a hollow made into the shaft that the smaller diameter shaft of the harpoon tip slides into like a cork into a bottle. The tip can be attached to the shaft with the cordage, or the shaft can be “disposable” and break free with only the harpoon stuck in the prey and cordage in the hands of a hunter, much like fishing with a hand line. The hollow is created with the tip of your blade and requires a relatively thick harpoon shaft.
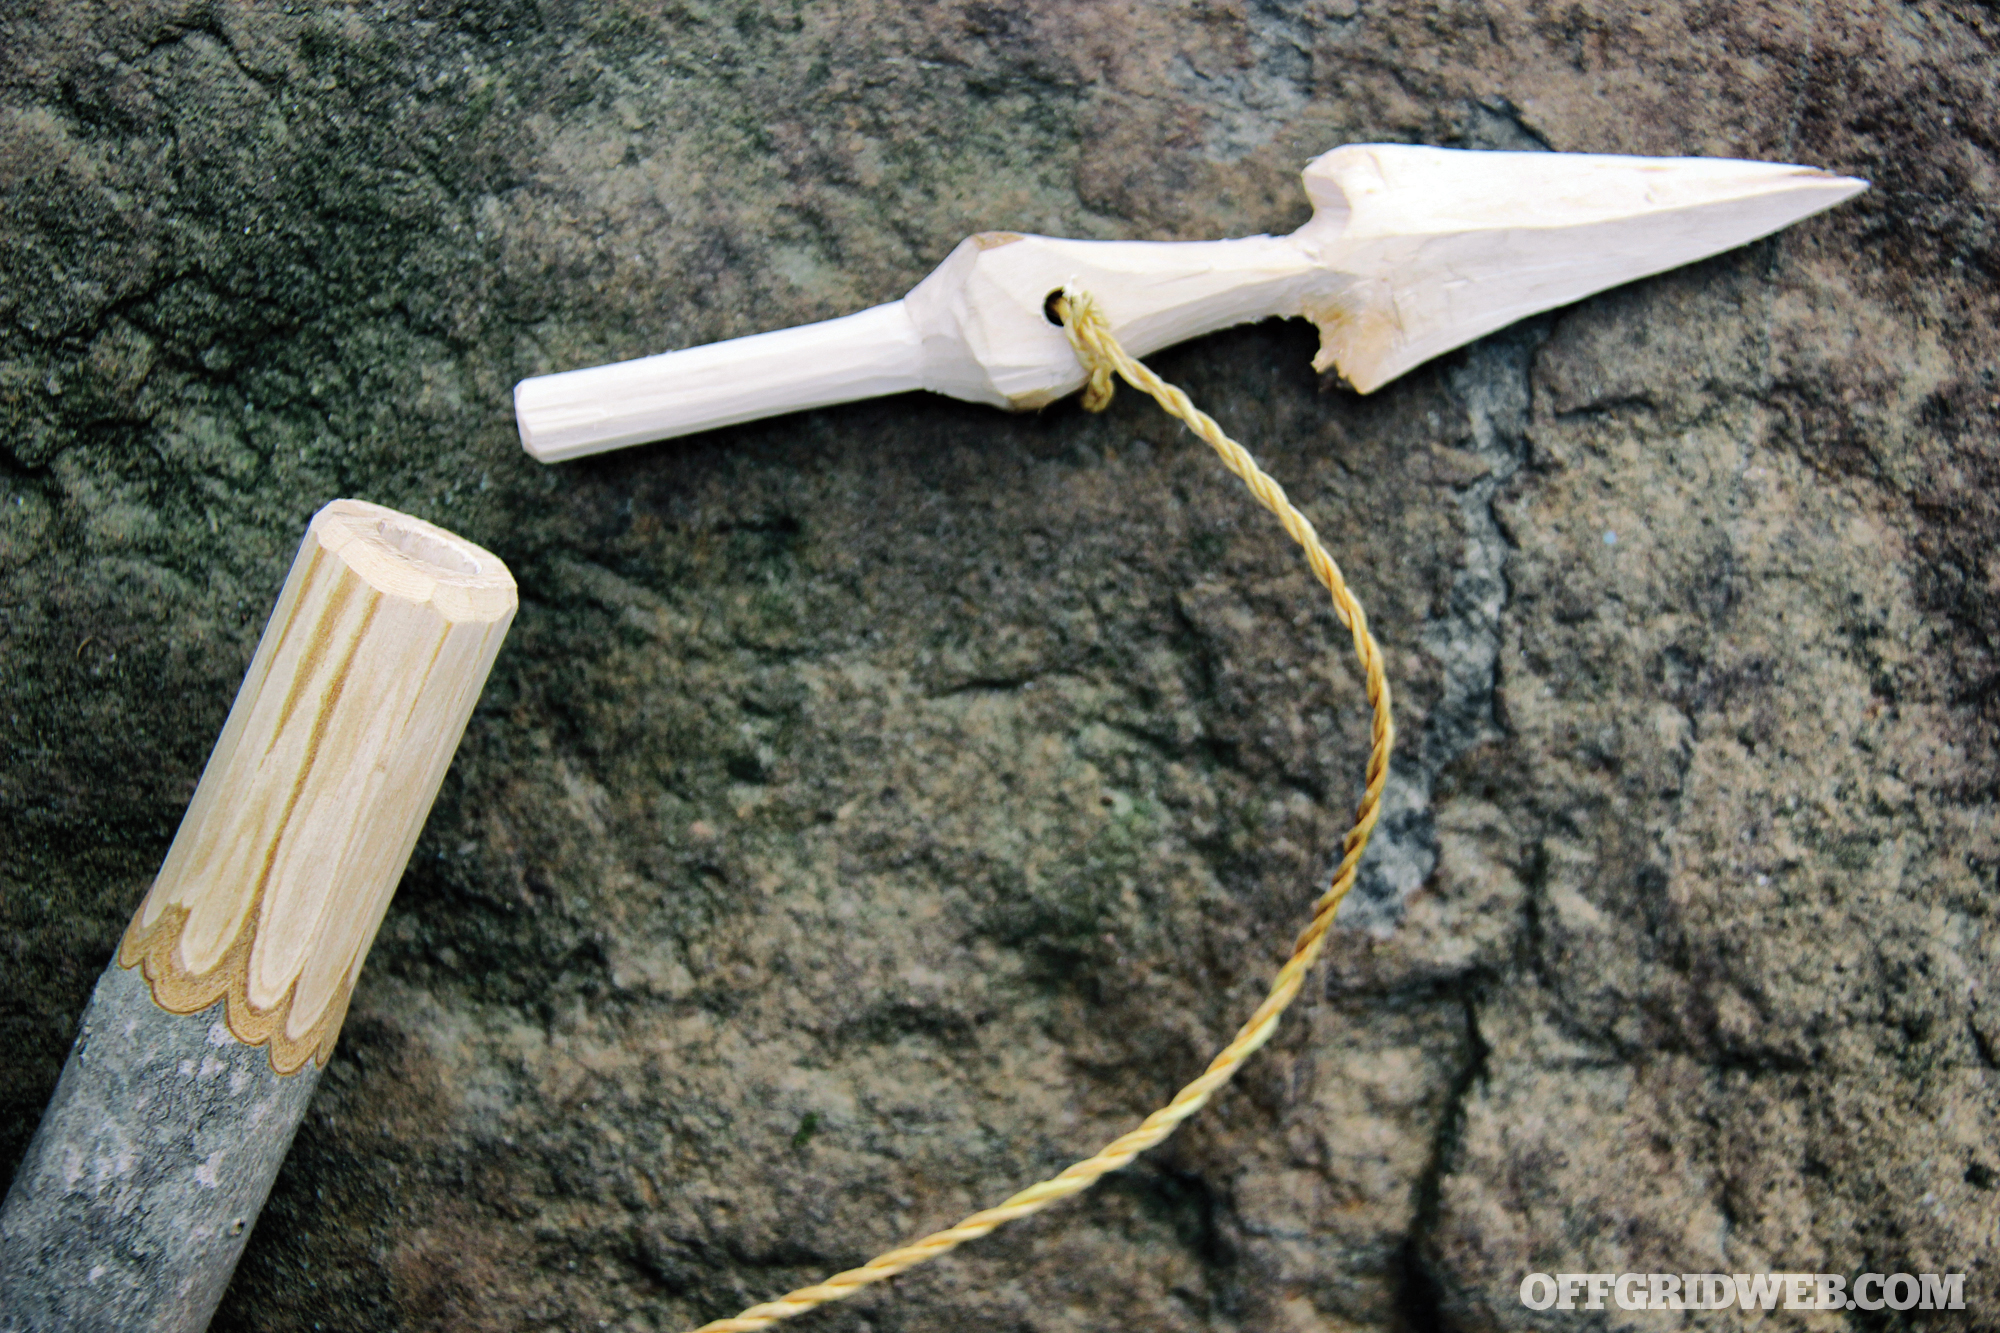
Check out historical examples of harpoons from New England whaling, and you’ll see flag-pole–sized main shafts. The wedged harpoon is much easier to create, although it lacks the same mass as the hollow harpoon shaft. The example we created for this article is made out of wood for demonstration purposes. In reality, bone or steel would be a better option for a harpoon.
The detachable-head harpoon should be used on animals that’ll likely thrash about when hit. The cordage tether will let you give it space and let it tire out as you close the distance and dispatch it with other means.
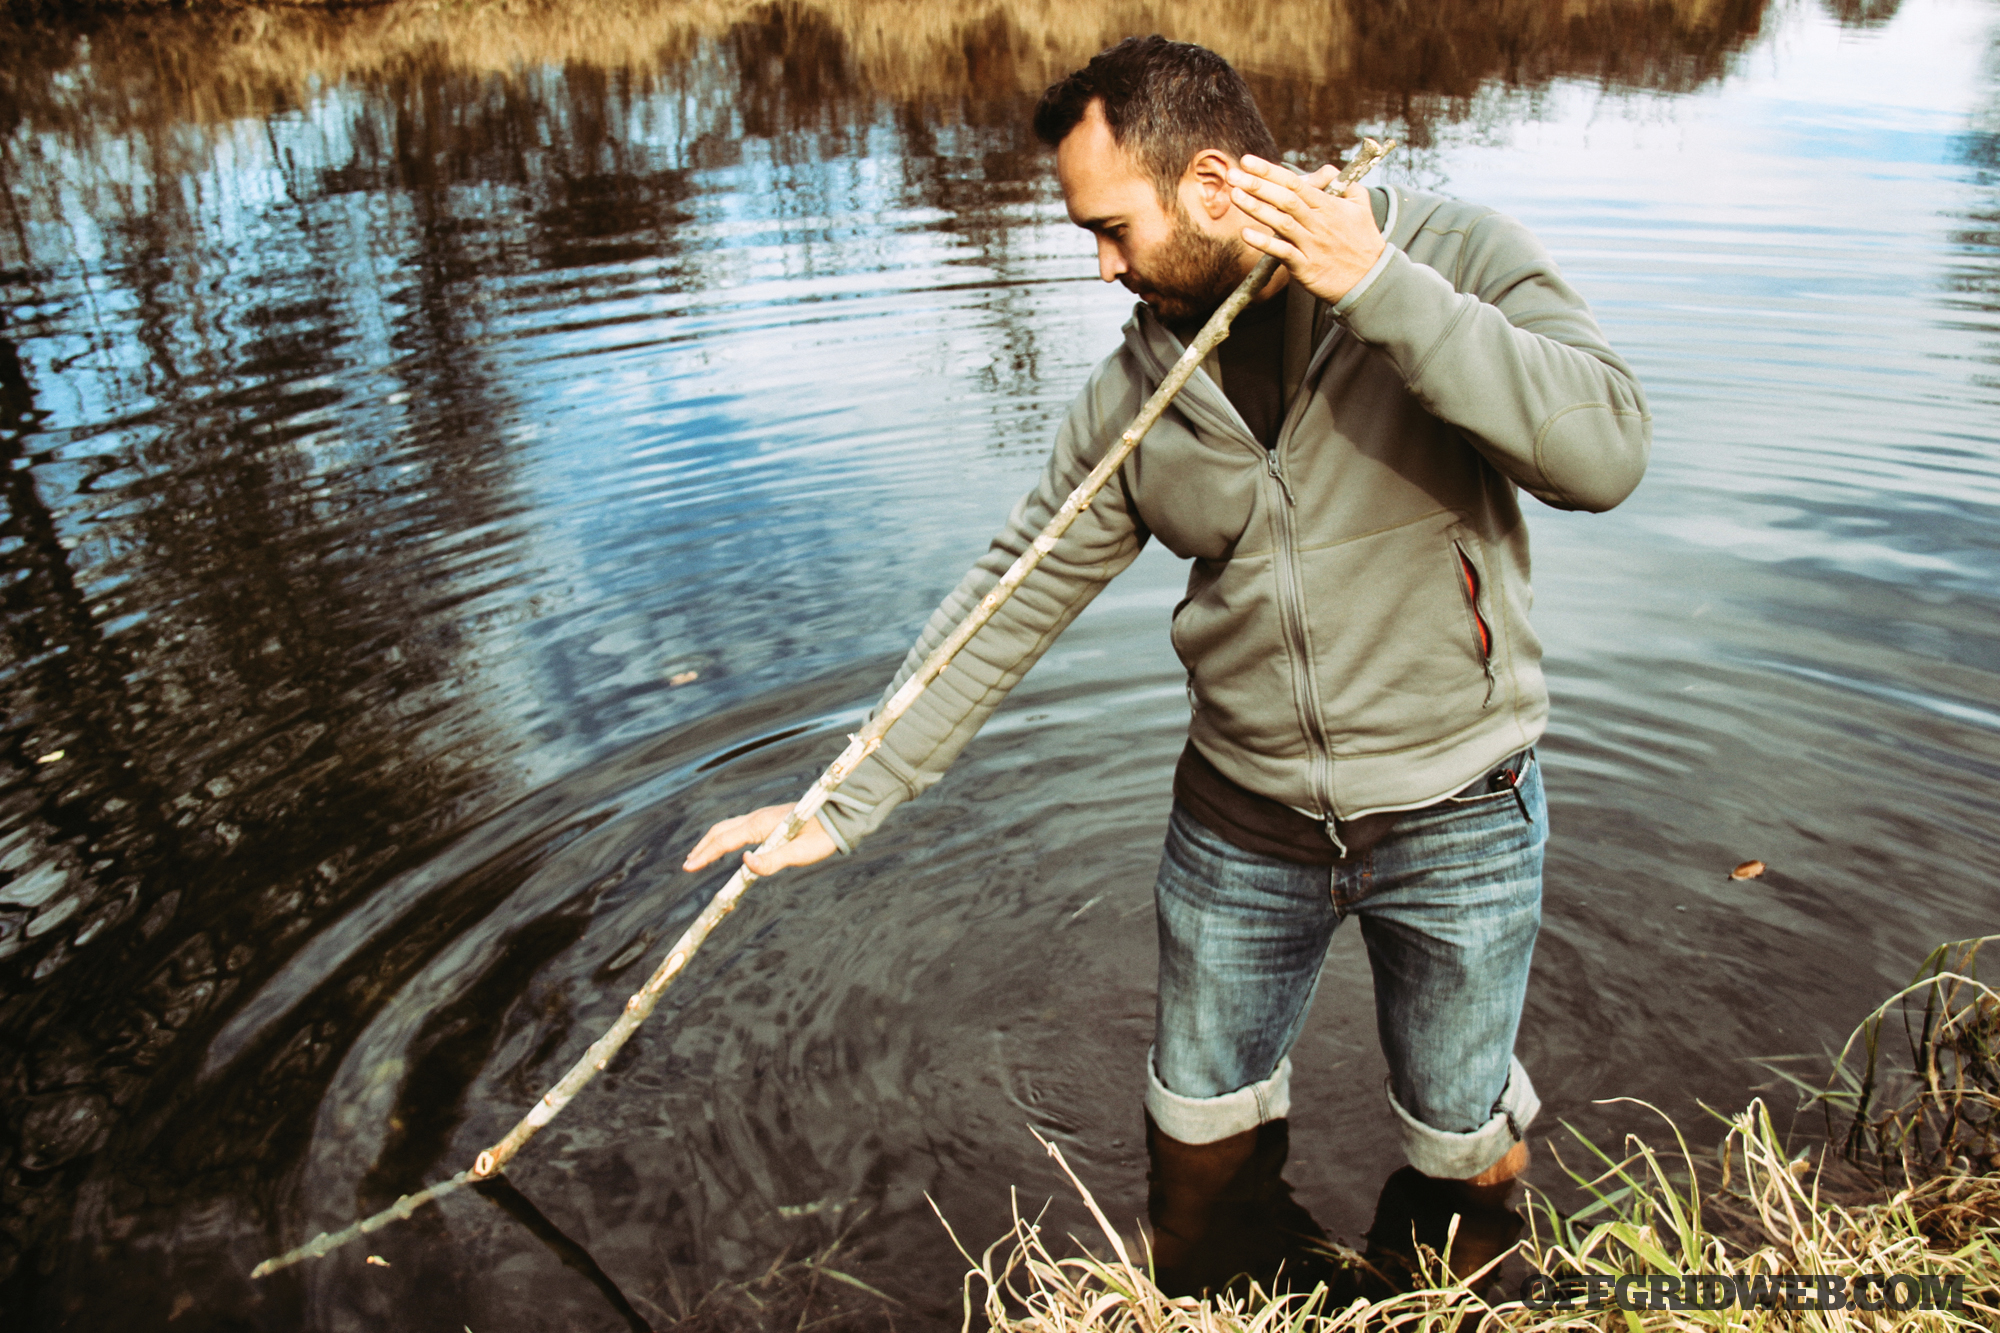
Split Pinning Spear
Large spears work on large animals, but with large animals come a greater chance for injury to the hunter. Smaller game isn’t as easily punctured with wooden tips; hide and fur can slow down and limit the penetration of a spear tip. Dishonest portrayals of spears being thrown through a small fish suspended in the water are a disservice and have been repeated over and over in movies and television shows. Fishermen will tell you that even with a sharpened metal hook, baiting small fish is difficult. Wooden tips aren’t as fine, sharp, and durable, and a swimming fish isn’t supported the same way it is when held by hand as it’s baited. A better option to puncturing spears is pinning spears.
A basic pinning spear is easily constructed. Cut a 1-inch-wide spear shaft to length. Ideally, it should be as tall as the hunter, if not taller. More compact “hand spears” can be useful if you’re pursuing prey that live in tight quarters and under rocks. Once the correct length is cut, wrap the shaft with cordage, tape, or another tight binding material about 8 to 12 inches from the thicker end.
If you wrap a green piece of wood, you’ll likely have to rewrap it as the wood dries, shrinks, and the binding becomes loose. Use the thicker end to put as much mass forward while pinning. After binding, remove the bark from the thicker end to the tip. At this point, use a blade with the assistance of a wooden baton to split the thick end down to the binding. The binding will prevent the split from traveling too far down the shaft. Bevel the edges of the forked ends to prevent them from splintering, and place a small twig or carved wedge in the fork to keep it open.
Variations of this forked spear include using hawthorn thorns as barbs or heavy blackberry brambles affixed with resin or thin twine. The spear is used by pinning the prey to the ground, where it can be picked up with your hands or dispatched with another tool.
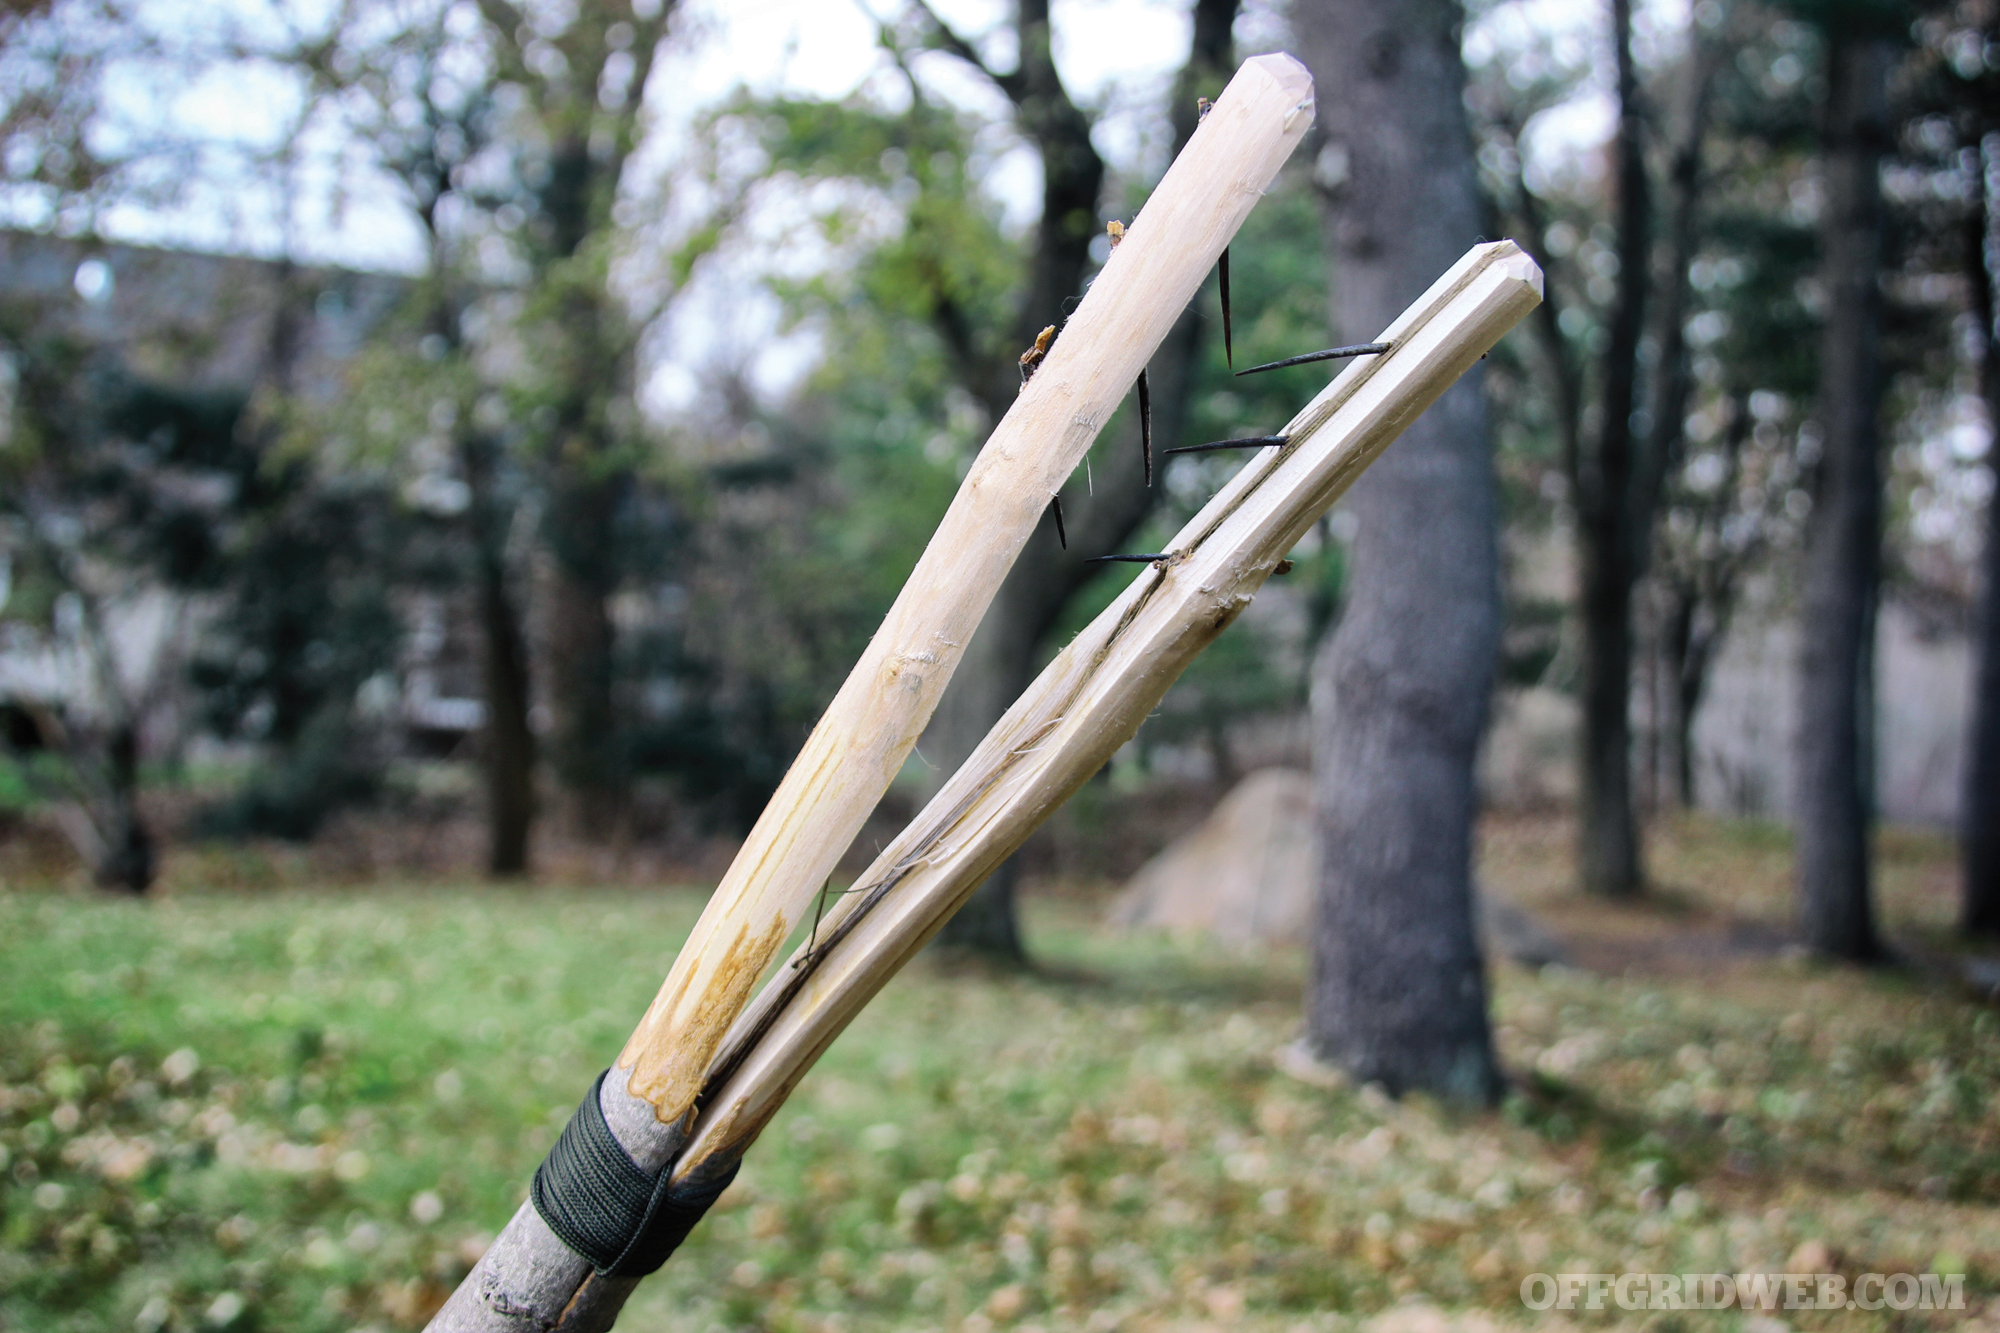
Four-Prong Pinning Spear
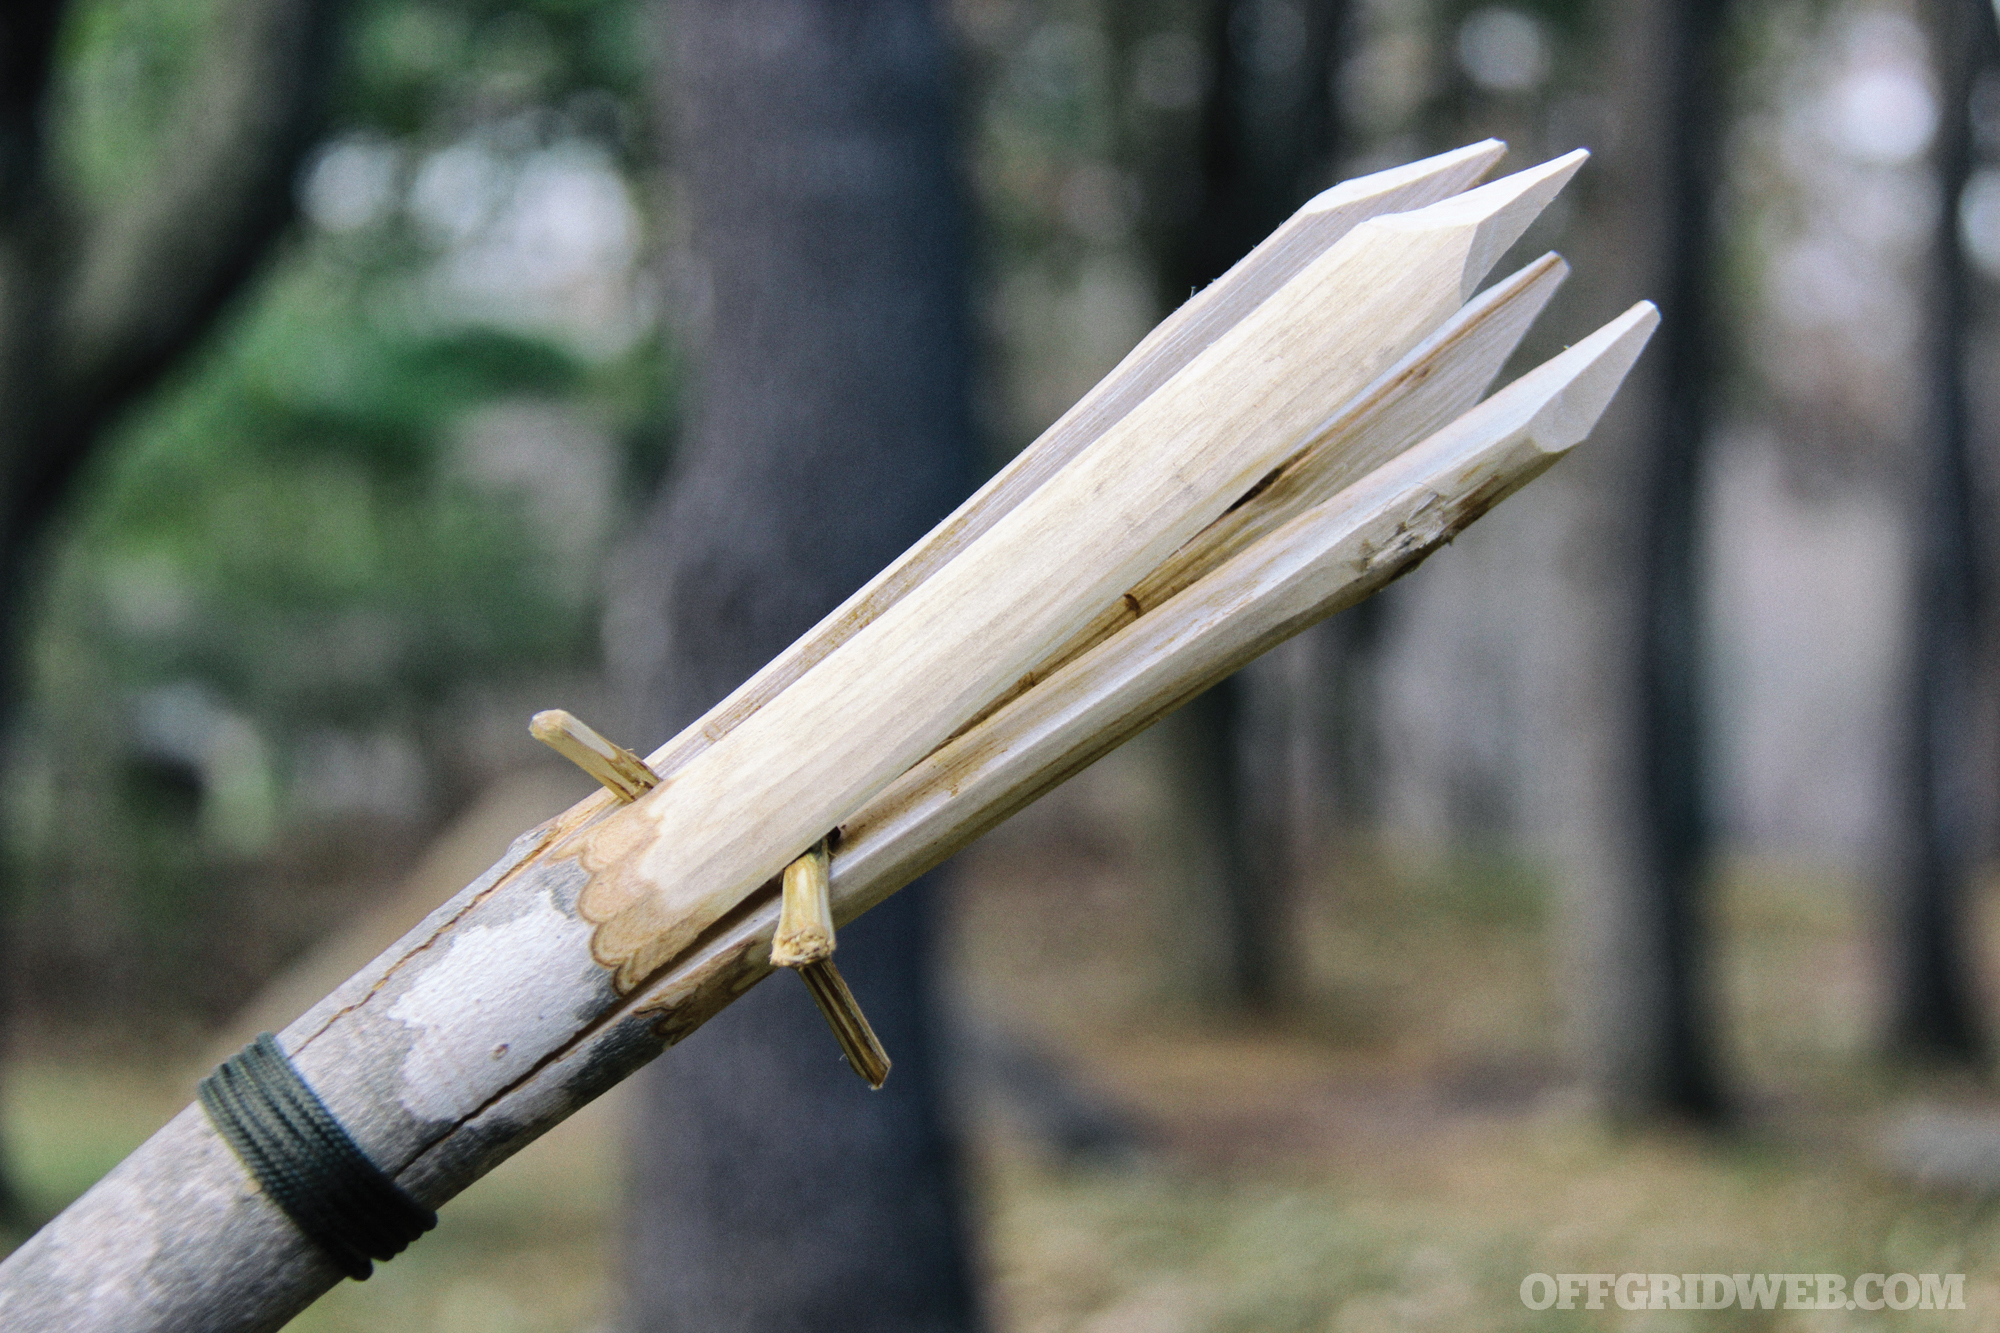
The split-tip spear gives you a chance to pin an animal between two points. With a couple additional steps, it’s easy to convert a split-tip spear into a four-prong pinning spear, increasing your chances of wedging an animal. Follow the same steps as the split-tip spear up until the shaft is split in half. At that point, take your blade and turn it 90 degrees on the split tip for the next split to run perpendicular to the first.
Once you split the tip down to the wrapped section, with both splits in the wood, squeeze the tip together and sharpen it to a point. Then, spread it open with a couple twigs. An optional step is barbing each of the four prongs. This type of pinning spear is slightly less durable than the single split tip spear, but it’s highly effective against small reptiles and amphibians. If the four prongs are sharpened to a point and used against a thin-skinned animal, it’ll create four separate wound channels.
Gaff Hook
This next one isn’t necessarily a spear, but it works at the end of a long shaft and applies the same skills as some of the previously mentioned tips. The gaff hook is different than a traditional spear — instead of thrusting out and away from you, pull it back toward you. Commercial fisherman use the gaff hook as large game fish come close to their boats, and this tool works exceptionally well to harvest fish and wild plant edibles just out of reach.
The most important material needed to create a gaff hook is a naturally occurring fork in a tree. If the fork is too wide, it can be lashed tighter and steamed or dried into a more parallel gaff hook and shaft. A forked tree limb can be cut at the joint, preserving the two forked branches. Cut one branch approximately 6 to 12 inches from the joint, leaving a “J” shaped piece of wood.
Sometimes, a growth of branches will create three branches originating from a single knob, and you can use two of the three branches as hook points. Sometimes, the hook will work as designed, and other times it’ll scoop instead. In either case, the objective is to bring the prey or harvest to you.
Above: The Crawford Survival Staff is a modern multipurpose spear. Available spear attachments include a single blade, triple-prong, and gaff hook.
Variations of Improvised Heads
Beyond carved wooden tips, a survivor can fashion a number of improvised heads from the surrounding resources. Early man moved from wooden tips to stone and eventually bronze and steel. Even the scavenged litter you find on your average hike can be converted into functional improvised spear heads. Here are three ideas for spearheads that you can easily fashion with some ingenuity and practice.
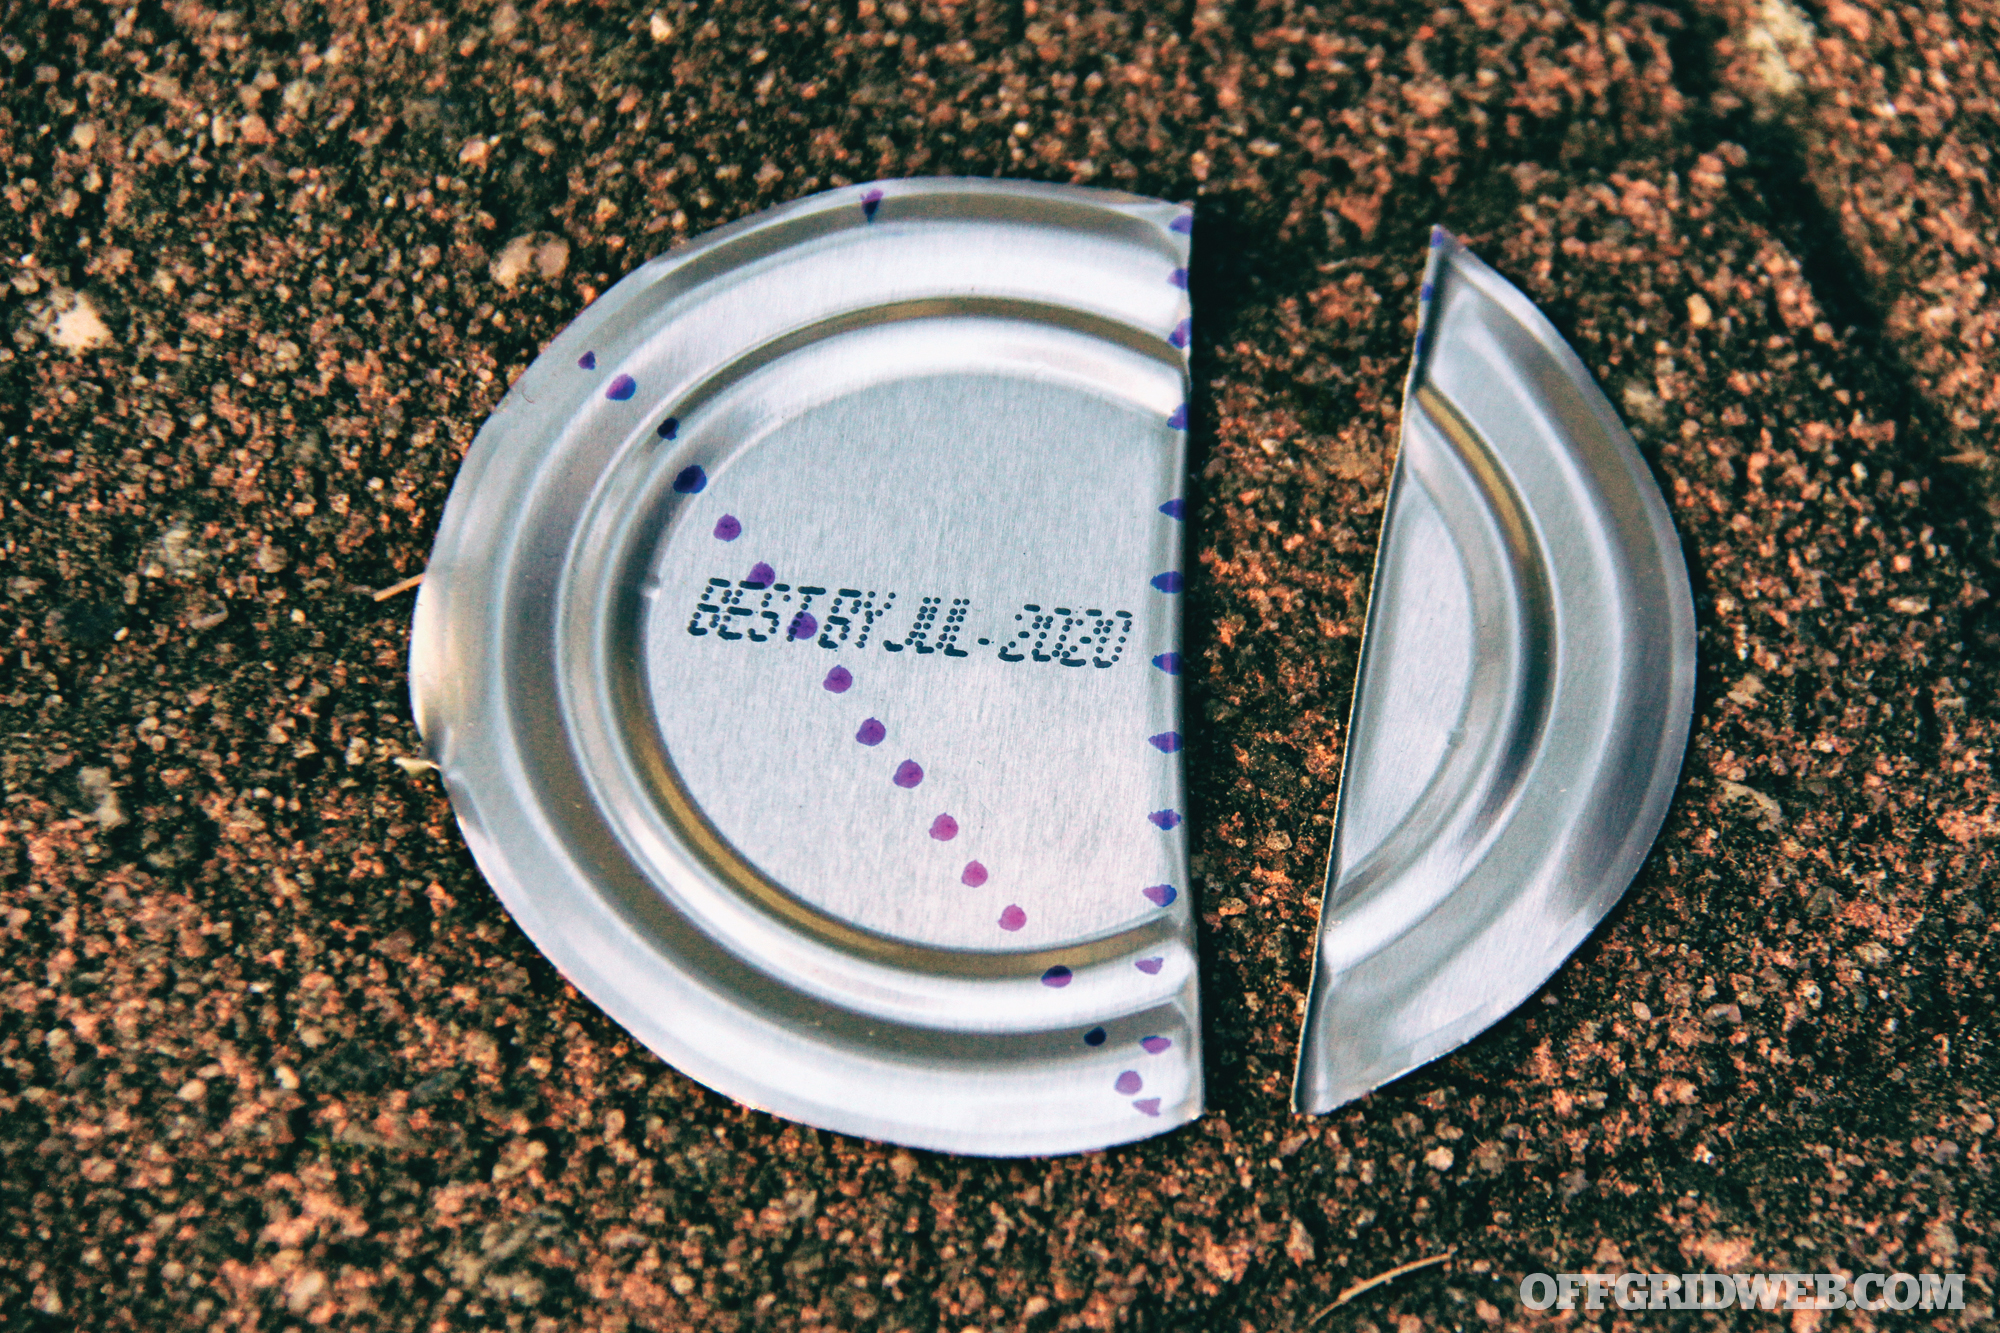
Metal Can Lid: Metal can lids, ideally steel rather than aluminum, work great as spear tips and arrowheads. Fold and break the metal at angles, creating a point. The edge can be sharpened or barbed with the assistance of a rock and/or multitool. Wedge it between a split branch and tie it in place.
Coat Hangers: The best coat hangers for improvised heads are the heavy-duty metal variety dry cleaners use for hanging pants. Use a multitool to clip the hangar into 12-inch lengths. Using a rock as an anvil and another as a hammer, pound the ends of the cut metal rods flat. Then cut the section you pounded flat in a similar manner as the metal can lid to form a point. Tie three or more metal rods to the end of a pole to use it like a forked tip spear.
Plastics: Plastic can be very brittle, but it can also be sharpened to a point and used with great effectiveness against frogs and thin-skinned reptiles. Even plastic wrap and bags can be melted and shaped into extremely sharp points. One only need to look at some of the clever prison shanks that are fashioned when no other weapons are available. Necessity is the mother of all invention.
Fire Hardening Process
Fire hardening is a process of rapidly removing moisture from green wood to make it hard enough for use as a tool or weapon. The easiest way to fire harden a wooden spear tip is to place it in the ashes (not coals) of a hot fire. Inside the ashes, the wood can’t burn as there’s heat present, but no oxygen. The heat pulls the moisture from the wood as it dries.
Fire-hardened wood has a much more distinct sound to it than green untreated wood when tapped with the back of your knife. We’ve fire-hardened beech and hop hornbeam to create digging sticks and digging adze tools that have stood up to years of abuse digging in rocky soil. Spear tips can benefit from the fire-hardening process, and if time and resources allow, this step is well worth the effort.
Conclusion
A true spear is much more than a sharpened stick. Learn to fashion various spear points and techniques to maximize the return on your investment of time and energy. Don’t just make something “in case you have to stab something.” Make a dedicated spear to function in exactly the way that you need.
More From Issue 28
Don’t miss essential survival insights—sign up for Recoil Offgrid’s free newsletter today!
- Debunked: The Myth of Water Divining
- Review: Wound Cube Medical Training Tool
- Book Review: “Cyber Mercenaries: The State, Hackers, and Power”
- Managing Dehydration: A Thirst for Knowledge
- Watch Your Back: Backpack Armor Buyer’s Guide
- Sticking Points: Creating Improvised Spear Heads
- Prep Your Pup: Readying Your Dog for Survival
- How to Survive a Financial Crisis
- Operation Dark Winter: Weaponized Smallpox
- Daniel Lombard Spotlight – True Grit
- Issue 28 Gear Up
- Review: PWS MK107 MOD 2-M 7.62×39 Pistol
- Pocket Preps: Individual First Aid Kits (IFAK)
- Fluid Thinking: Long-Term Water Storage for Survival
Read articles from the next issue of Recoil Offgrid: Issue 29
Read articles from the previous issue of Recoil Offgrid: Issue 27
Check out our other publications on the web: Recoil | Gun Digest | Blade | RecoilTV | RECOILtv (YouTube)
Editor’s Note: This article has been modified from its original version for the web.
