The core concept of a stove is pretty simple: it’s an enclosed space where fuel is burned, and heat is channeled in one direction. Just this week, we showed you the improvised “hobo stove” that can be made from a cut-up tin can. Now, we’re going to the opposite end of the spectrum, with a design that’s as high-tech as it gets.
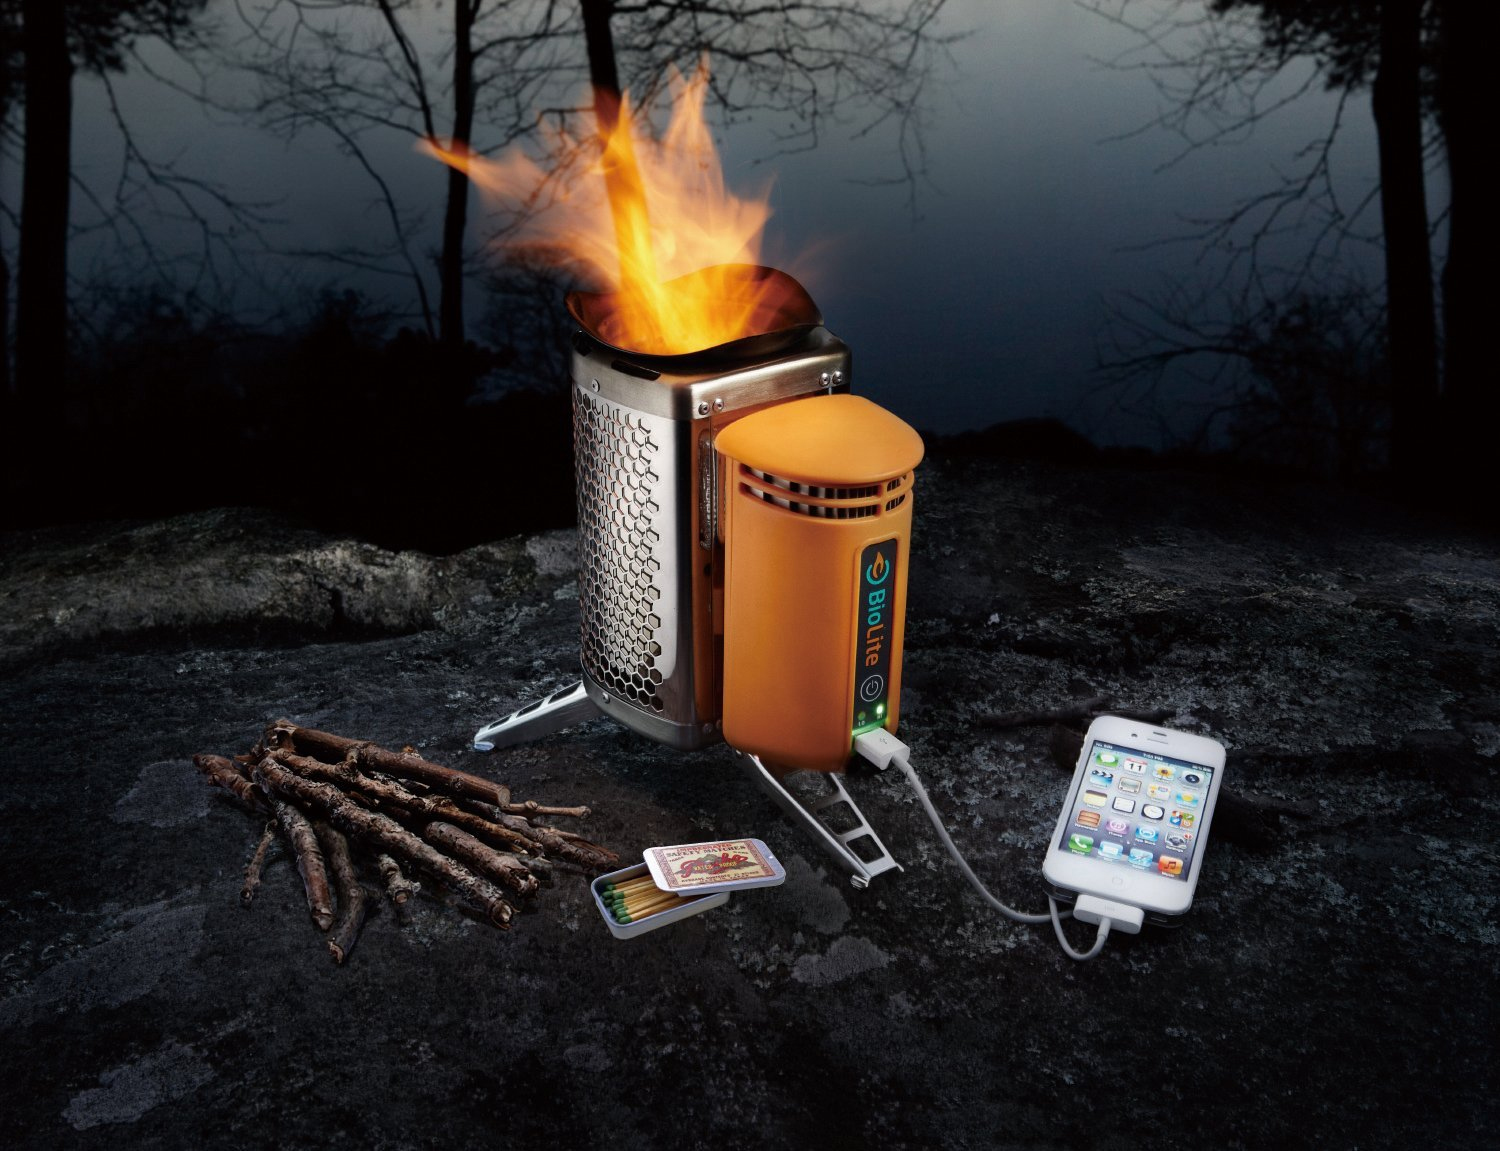
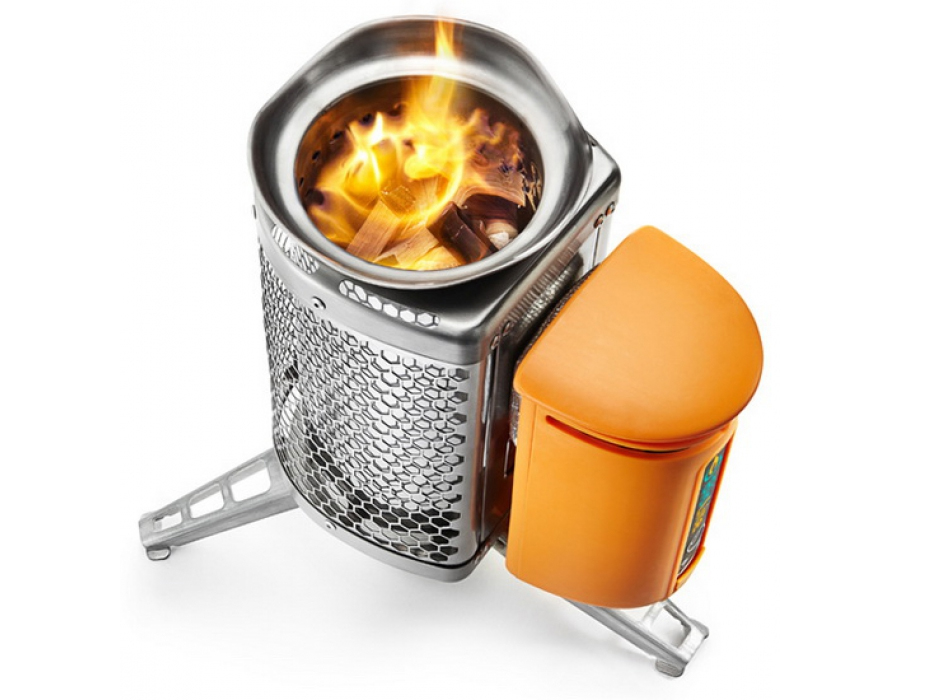
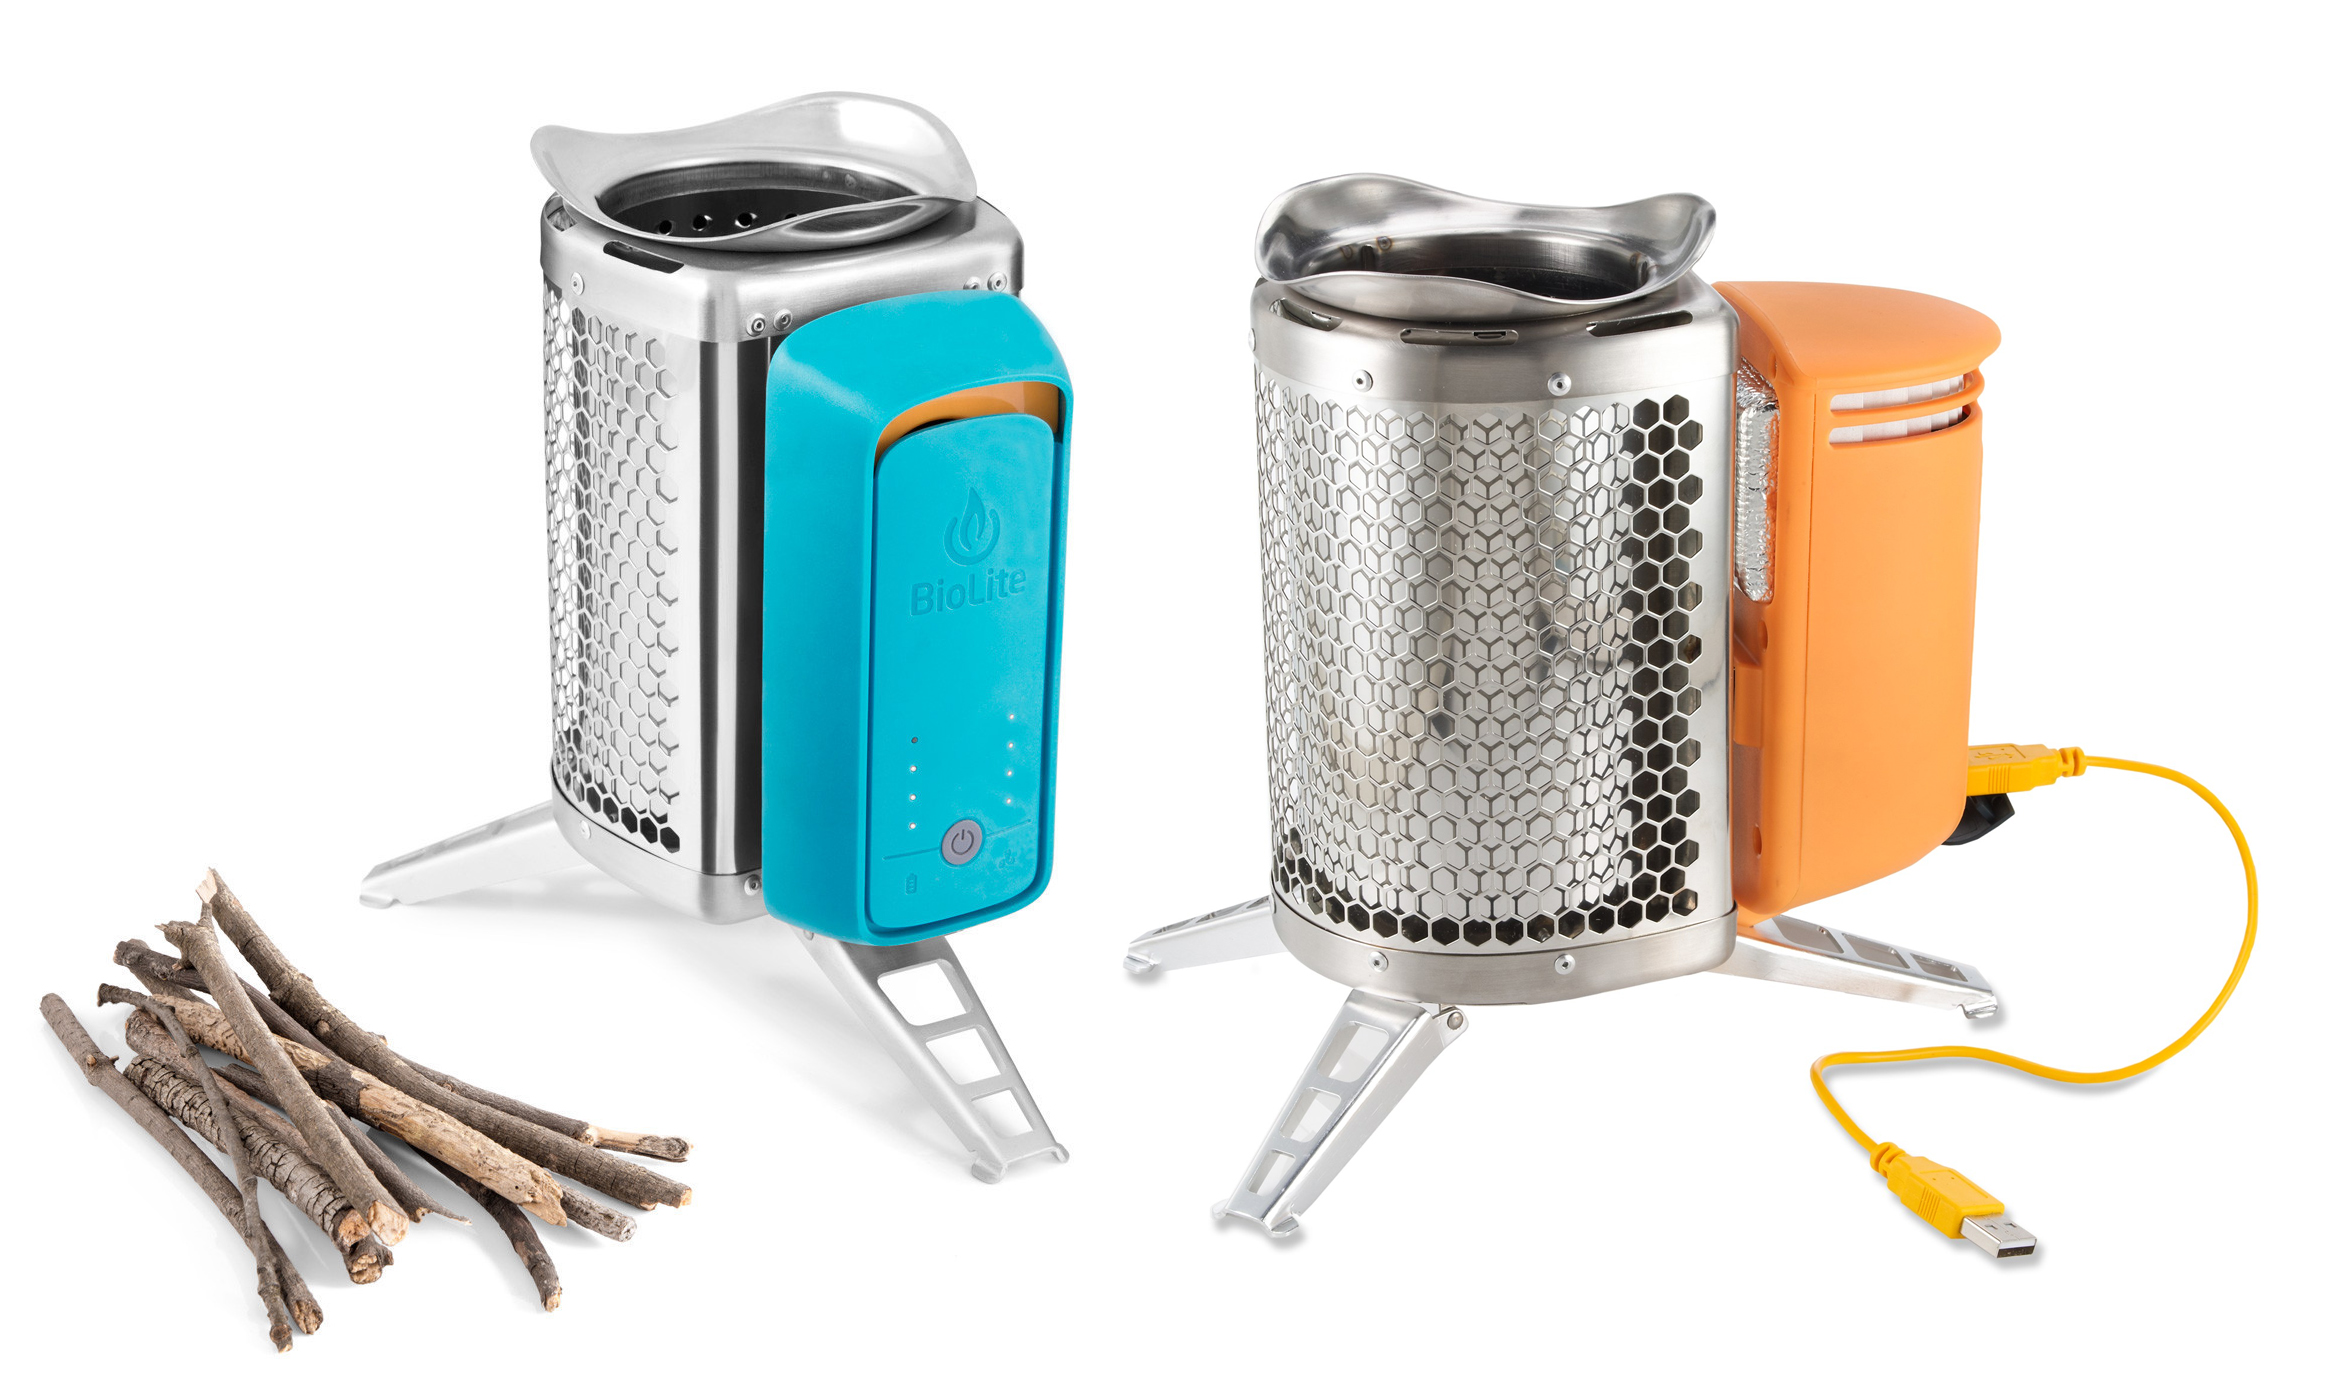
BioLite produces a pair of compact, portable wood-burning camp stoves. First, there’s the BioLite CampStove (not the most creative name we’ve heard). This model not only produces a small and efficient fire from twigs, it uses this energy to charge electronic devices via a USB port.
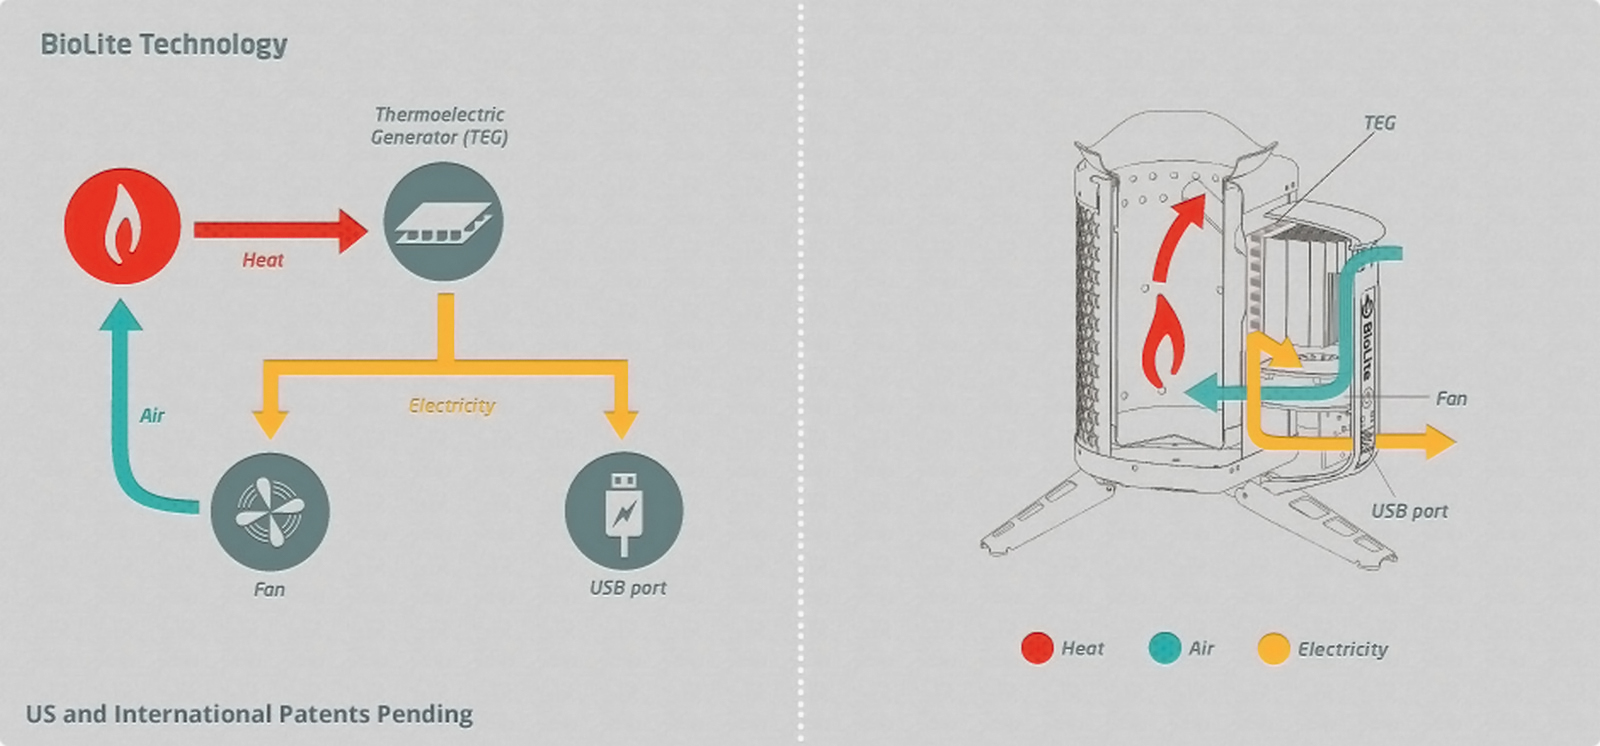
The CampStove design is ingenious because it recycles some of the heat from the fire, and converts it into electricity through a Thermoelectric Generator (TEG). Some of that electricity drives a fan that keeps feeding the fire with oxygen, but most of it powers a USB port, which you can plug small electronic devices into. If you don’t need to charge anything, it also comes with a USB FlexLight, which you can use for map reading or illuminating a work area.
The BioLite CampStove features an orange USB charger/fan unit.
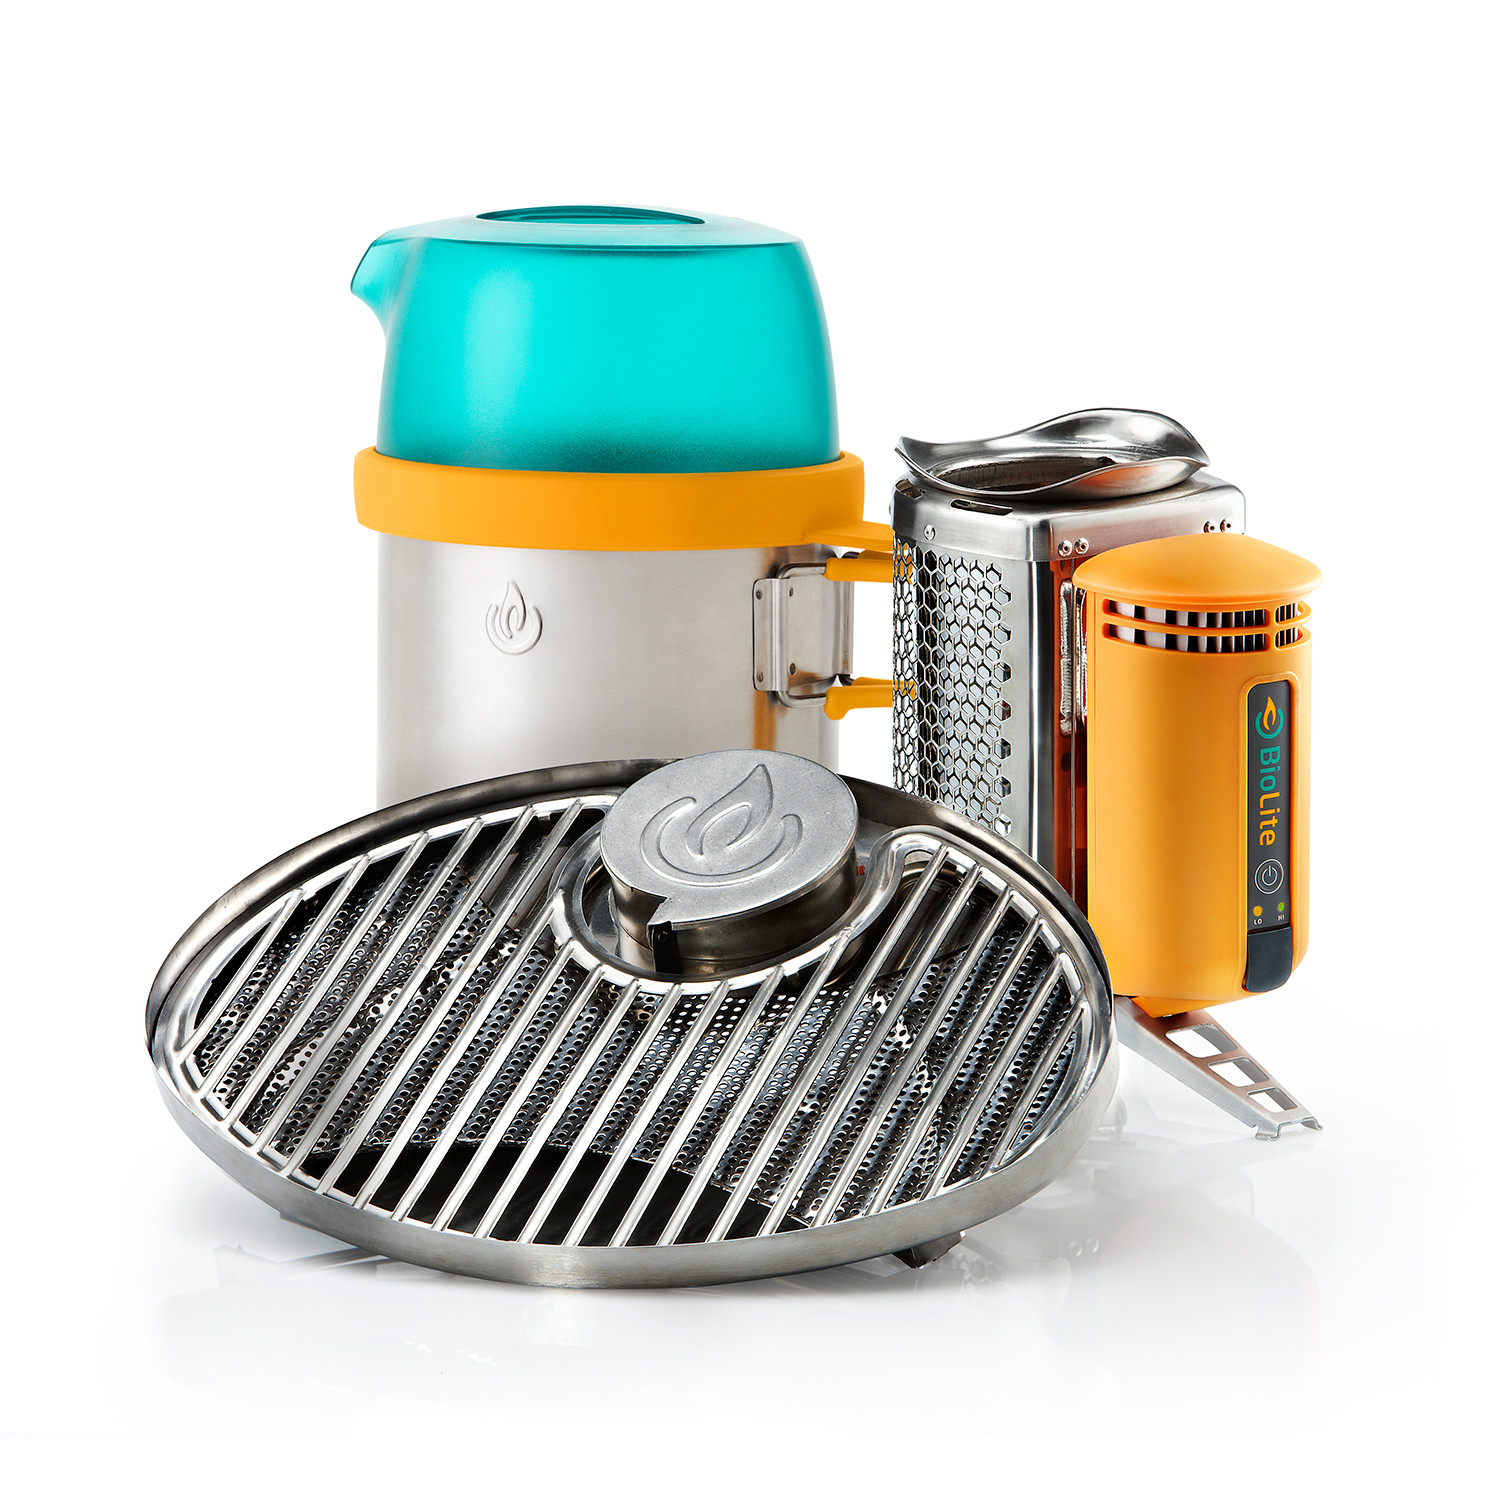
Turning wood into a toasty fire and an instant charger for your electronics or batteries—that’s killing two birds with one stone. Biolite also offers a KettlePot for boiling water on the stove, and a portable grill attachment.
More recently, BioLite has launched a second model of stove: the CookStove. This model is designed to replace traditional gas-powered camp stoves, and uses a USB-rechargeable battery pack to power a small fan system. The fan uses four adjustable speeds to alter airflow and flame size, allowing you to produce a calm smokeless campfire or a turbocharged fire for boiling water ASAP.
The new BioLite CookStove has a light blue adjustable fan unit with four speeds.
This means no more lugging around natural gas canisters for your stove, and no choking on the smoke from your campfire. The integrated fan’s batteries are said to last for about 30 hours on a single charge.
For survival purposes, we’d probably lean towards the versatility and USB charging abilities of the CampStove, but we could also see the smokeless fire of the CookStove being useful for concealment. The CampStove is sold for an MSRP of $130, while the CookStove is $100.
We hope to get our hands on one (or both) of these high-tech BioLite stoves in the future, and if we do, we’ll be sure to let you know if they work as advertised.
You’ve probably realized it by now: we’re pretty passionate about knives. It’s bordering on all-out obsession. In our defense, a good knife is extremely important to any survivalist, no matter the environment. Your knife is your shelter construction tool, your kindling-gathering implement, your cooking utensil, and even your self-defense weapon.
Choosing a good knife matters, and that’s why we talk about it as often as we do.
The TOPS Anaconda 7B is constructed of ultra-tough 1095 carbon steel.
So, how do you choose the right knife? Well, there are a lot of factors to consider, like size, shape, weight, folding or fixed blade, additional features, and cost. However, there’s one factor that might just top all the others: the steel. After all, a knife is essentially just a sharpened hunk of steel with a handle, so its molecular composition changes everything.
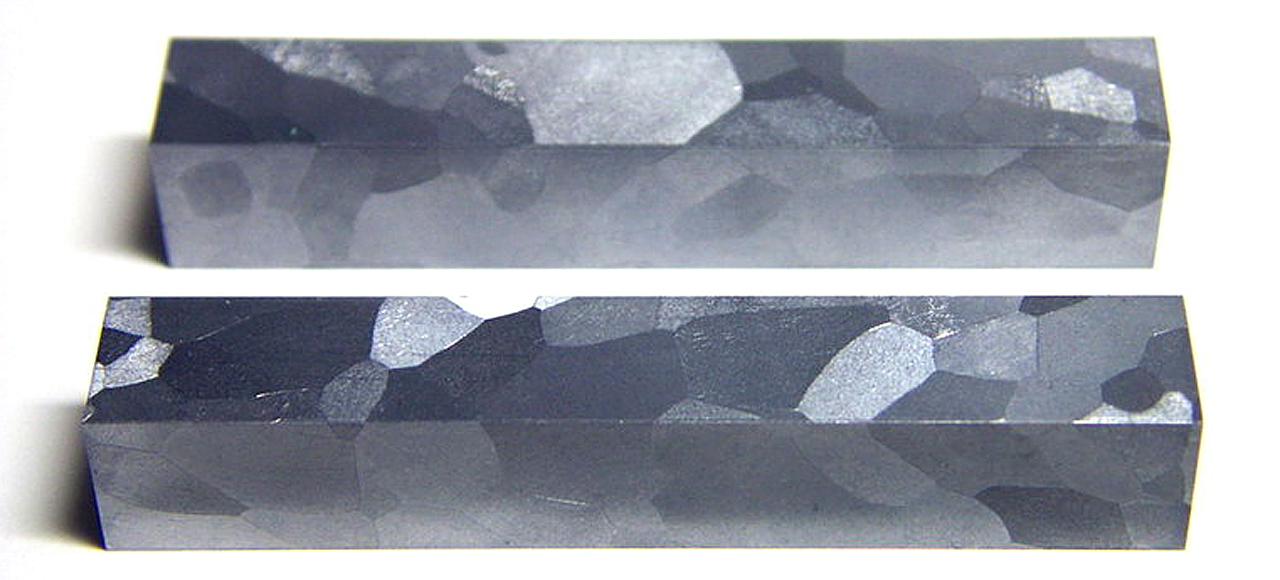
Vanadium (seen here in pure form) is added to many premium steels to improve wear resistance. Photo: Wikipedia
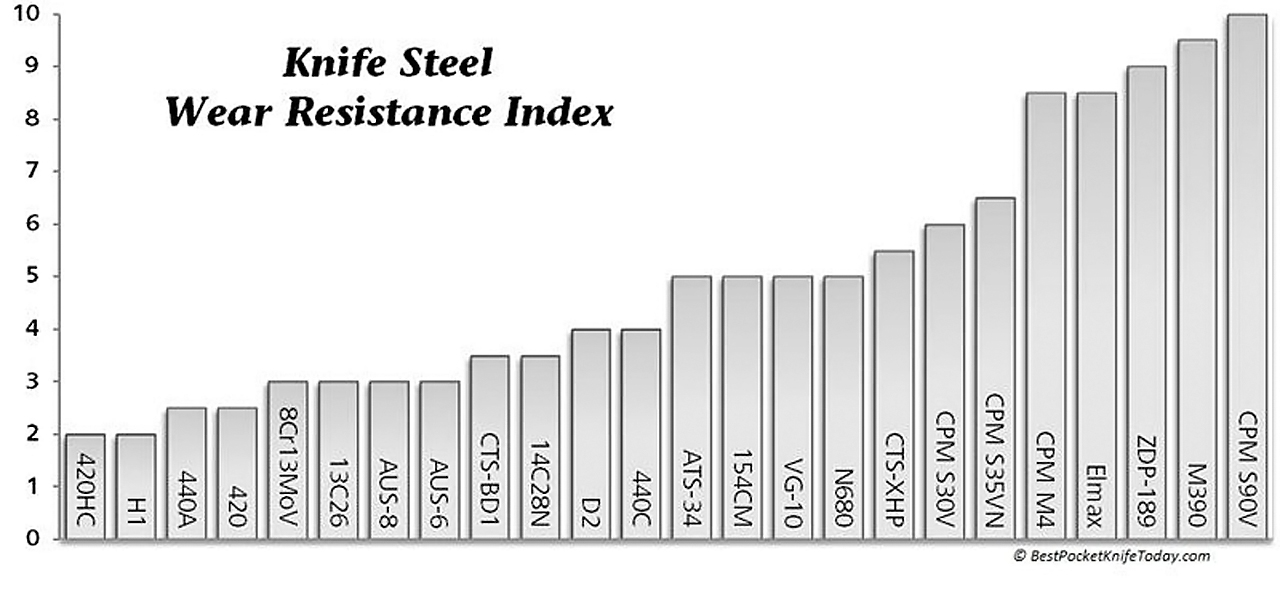
Trust us, analyzing knife steel is a deep rabbit hole. If you read enough about the metallurgy process, you’ll feel like you need a degree in Materials Engineering to understand it all. Fortunately for us, there are some tools online that make knife steel comparison much easier.
A chart from Knife Informer (formerly Best Pocket Knife Today) comparing common blade steel types.
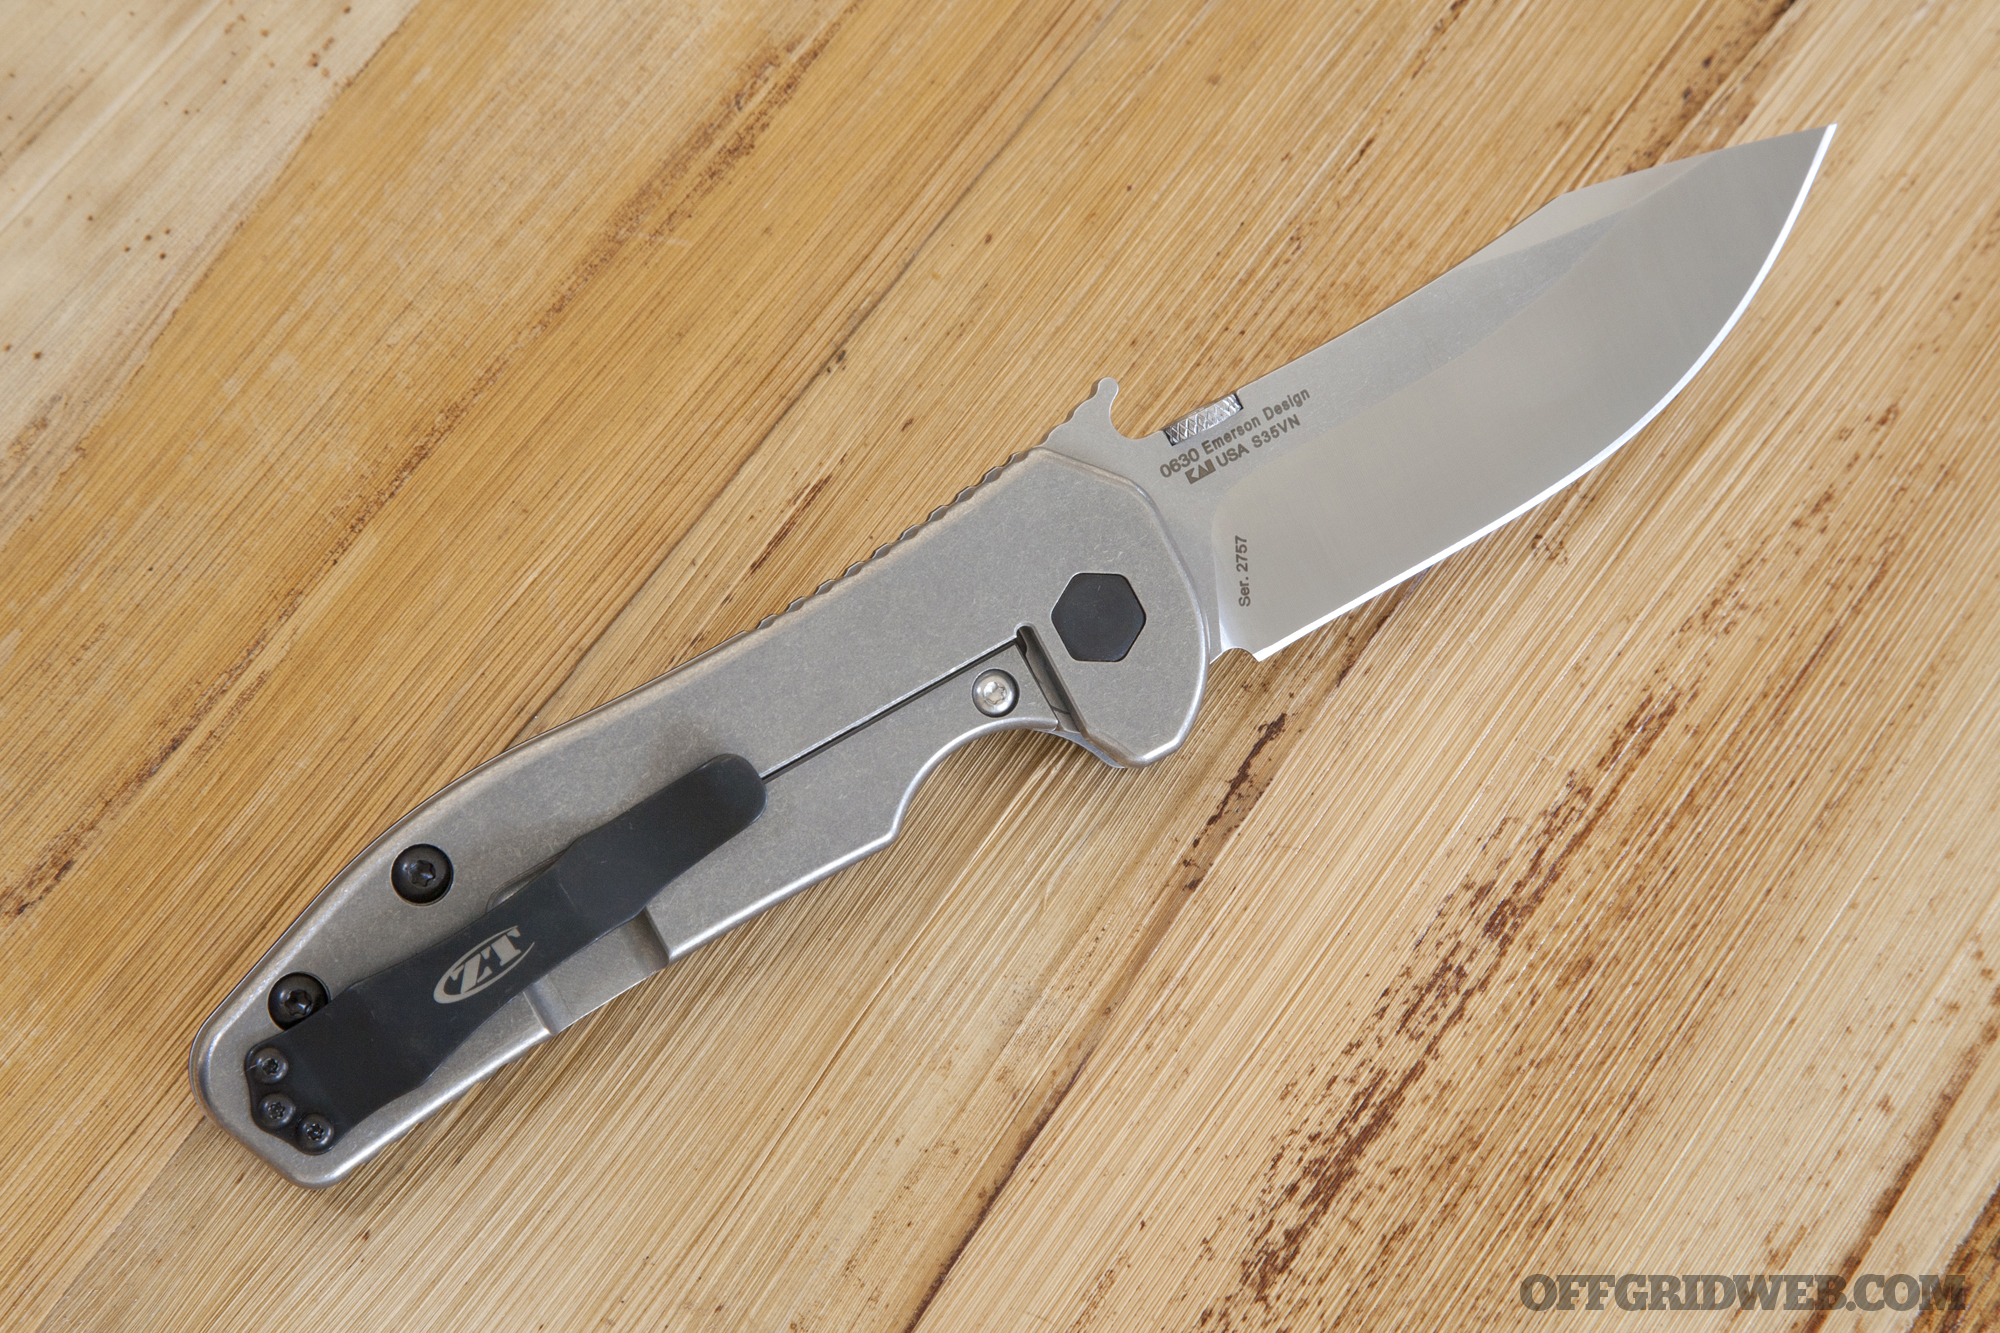
The Zero Tolerance 0630 uses high-end S35VN steel, but it comes at a premium price.
The guide also covers the differences between tool steel, carbon steel, and stainless. Then, it gives brief introductions to some of the most common knife steels, and their strengths and weaknesses.
Keep in mind that the guide’s “Ultra Premium”, “Mid-Range”, and “Low-End” labels are a subjective touch. It refers to 1095 carbon steel as “Lower Mid-Range”, but also mentions that its extreme toughness and ease of sharpening makes it one of the best choices for a fixed-blade survival knife. So, don’t rule out a knife based on that metric.
The Benchmade Triage uses Bohler N680, which features extreme corrosion resistance.
For a more in-depth look at knife steel composition, check out Knife Informer’s excellent Knife Steel Composition Chart. It breaks down the elemental composition used in each type of steel, for those who want to dive deeper into the technical side.
No matter what steel you choose, do your research beforehand. Otherwise, you might end up with an expensive, dull paperweight.
Special thanks to reader Sean H. for the tip about the Steel Composition Chart.
New-York-based premium blade manufacturer Steel Will Knives has released a new folding knife design, and it certainly caught our eye. It’s called the Apostate, and the company claims it offers excellent performance and materials not typically found in its sub-$200 price range.
The Apostate 1108 features a drop point blade, which is best for slicing cuts.
Specifically, the Apostate is offered for $175. So, what do you get for that chunk of change? Quite a bit, actually. It features a 4.1-inch S35VN powered steel blade, coated in a wear-resistant dark grey finish. We’ve taken a liking to S35VN lately, as we’ve found it can maintain a razor-sharp edge, and it resists the microscopic chips other steels (like S30V) can be prone to.
The 5.5-inch handle is composed of two materials: titanium with an integrated frame lock on one side, and textured G10 scale on the other side. This construction allows it to maintain a relatively light 6.3oz weight.
The Apostate 1113 features a tanto blade, superior for piercing.
The Apostate also implements a ceramic ball bearing pivot, and is said to open smoothly with one finger. Prospective buyers can choose from either a drop point (Model 1108) or tanto (Model 1113) blade shape.
For more information on the new Steel Will Knives Apostate folder, check out SteelWillKnives.com.
For anyone who needs to survive in the great outdoors, a good ax is one of the most important tools to own. It lets you fell trees with minimal effort, and quickly gather the necessary components for campfires and improvised shelters. However, an ax (sometimes spelled “axe”) isn’t just a crude wood handle with a sharp metal wedge at the end—there’s a lot more to this seemingly simple tool than you might think.
If you’d like to learn more about the long history and design elements of this important chopping tool, the U.S. Forest Service has an excellent resource called An Ax to Grind: A Practical Ax Manual. This 68-page document was developed in 1999 by the United States Department of Agriculture for the Forest Service, and covers some of the following topics:
A brief history of the ax, and its evolution in America
Types and patterns of axes (and adzes)
How to sharpen an ax, and how to hang the head (mount it on the handle)
Various examples of using axes
Where to buy a good ax
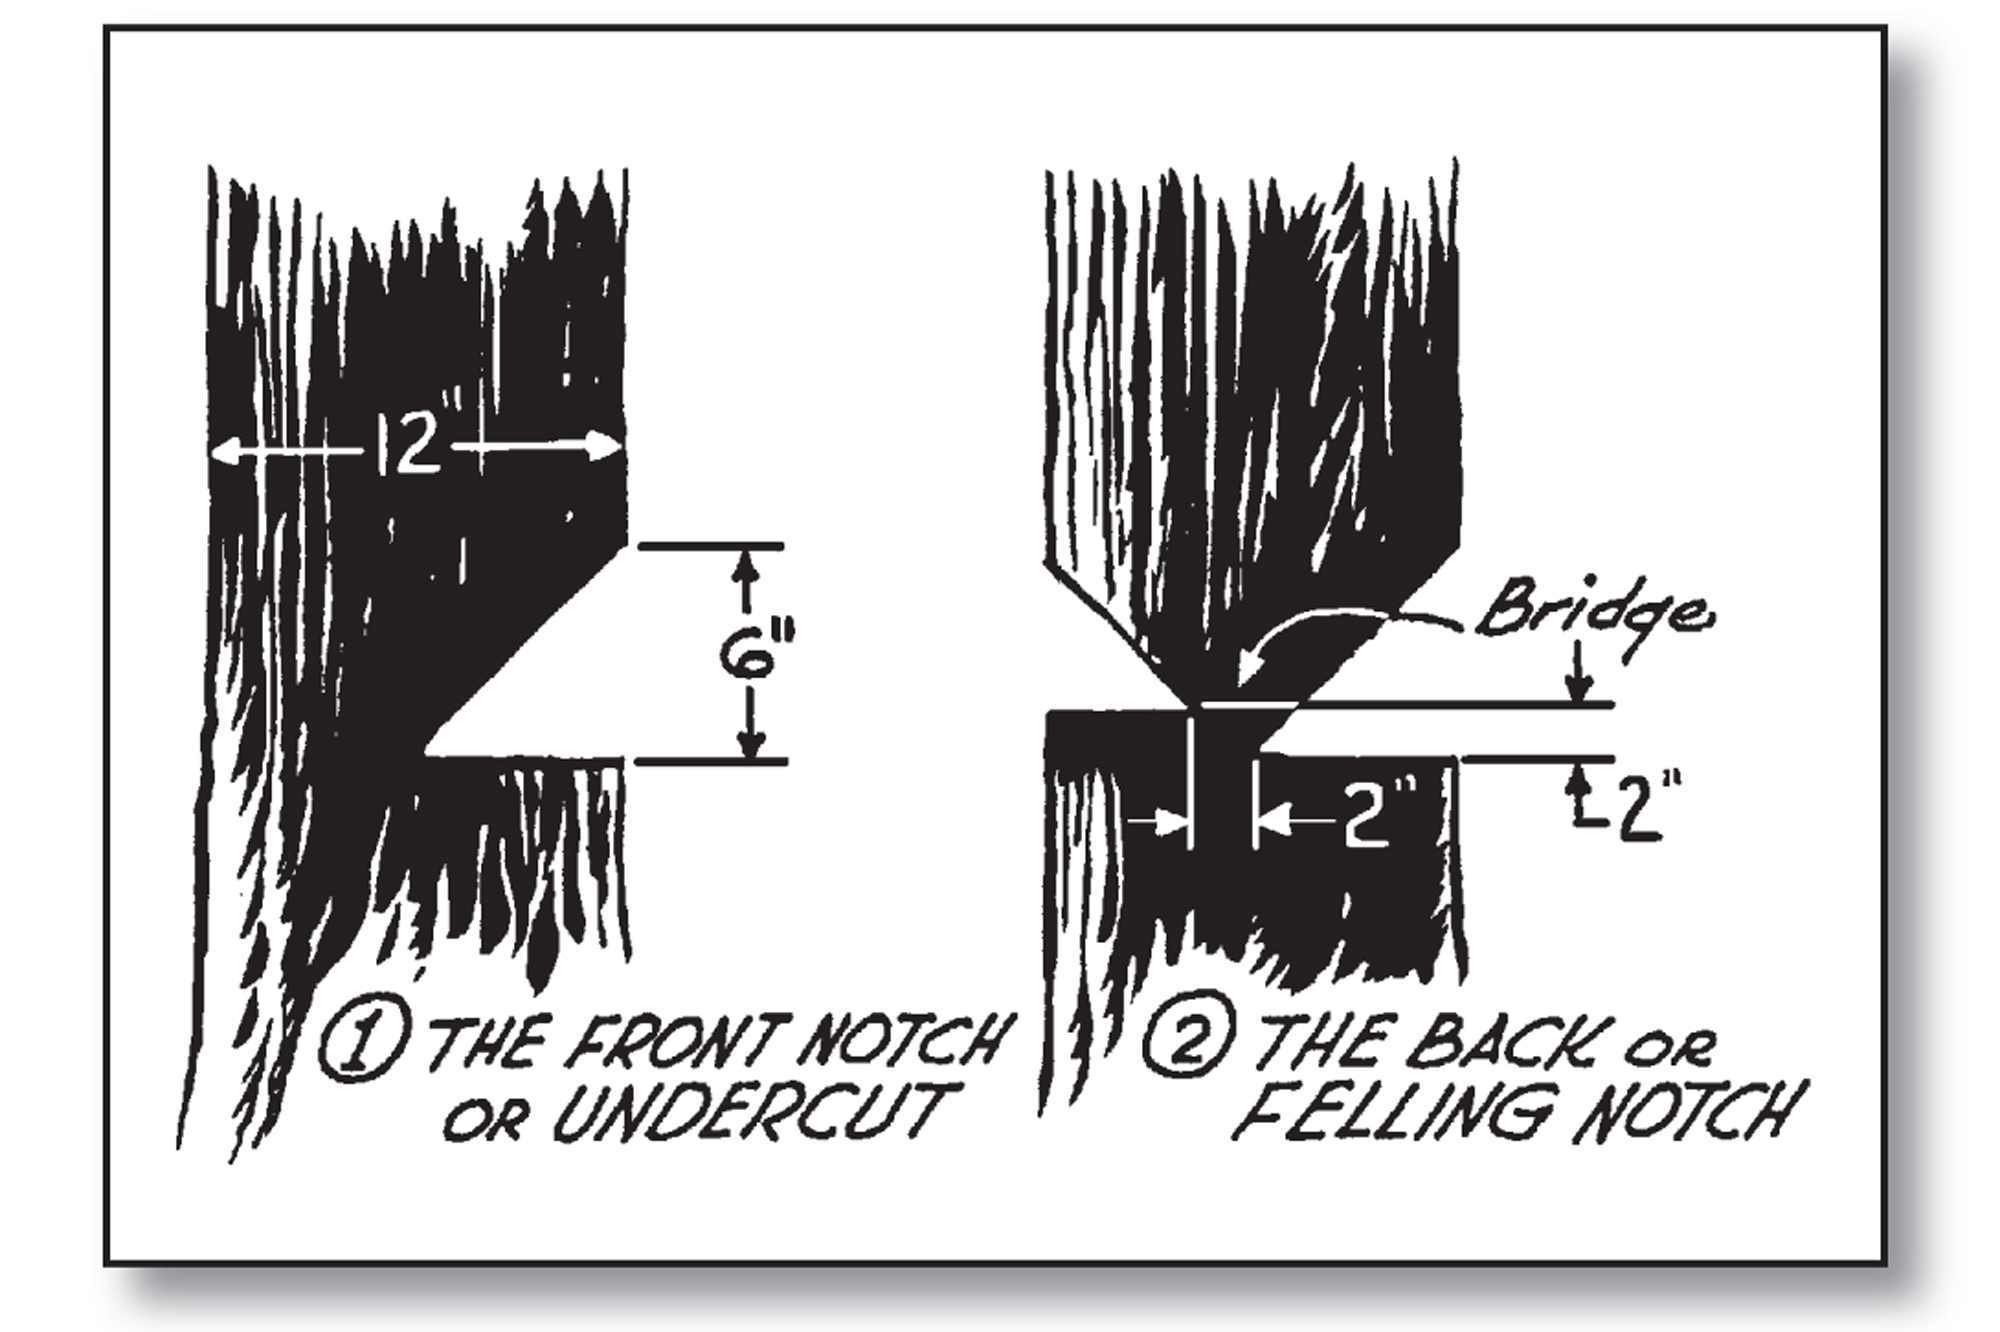
How to chop an undercut and felling notch, and safely knock down a large tree.
Trust us, there’s a ton of useful info and illustrations in the manual. Even if you only use an ax occasionally, you can learn something from it. We just found out that the phrase “can’t get the hang of it” originated from lumberjacks struggling to mount their ax heads correctly—interesting, huh? Well, with this guide, you can get the hang of your ax head.
A few of the multitude of different ax head designs, and their associated weights.
Possibly the most useful part of the entire guide is its commentary on ax safety, and how to chop limbs off trees without accidentally removing a chunk of your own limb. It’s essential for beginners and experts alike.
We’re always on the lookout for new and innovative survival products, and sometimes we’re truly amazed and baffled by what we see. Today is one of those days, because we just found out about “Somnambula”.
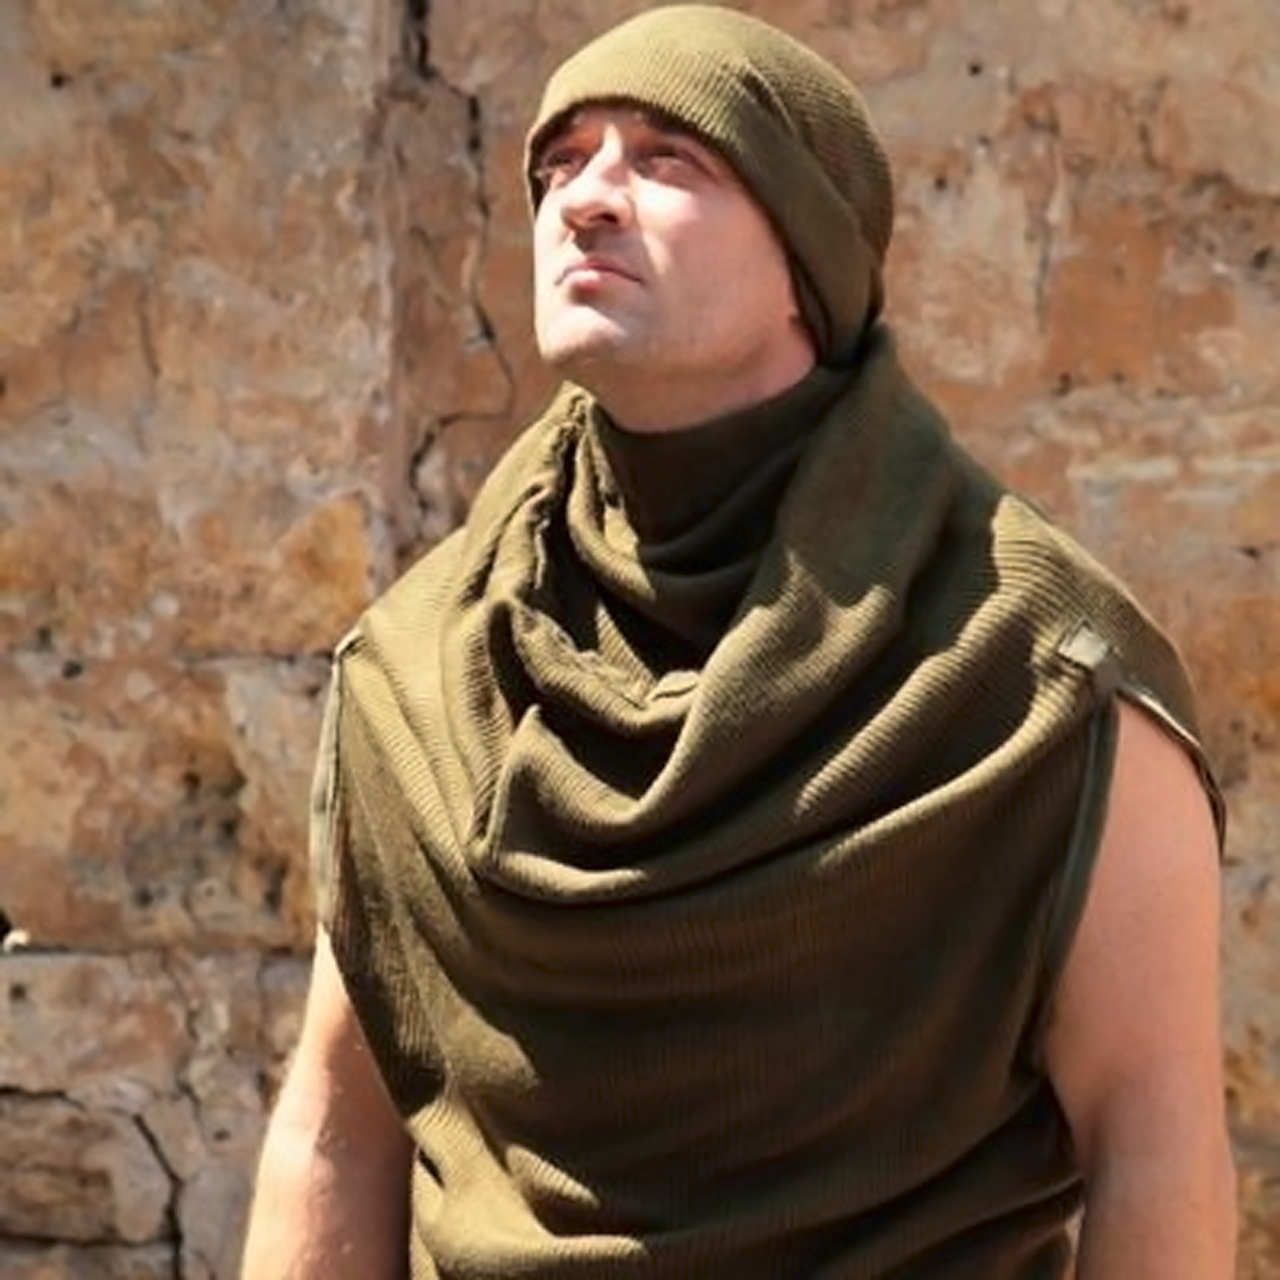
Somnambula—appropriately named after somnambulism, the medical term for sleepwalking—is a type of “multifunctional extreme clothing” that can be re-configured into anything from a vest to a sleeping bag. The product was developed by survival instructor Gleb Skorobogatov, who became popular for his Ukrainian-language survival video series Adapter Project (some of which are available with English subtitles).
A photo of Skorobogatov wearing the Somnambula.
The video below was released just a few days ago, as the very first demonstration of the things Somnambula can do:
According to the video description, Somnambula is essentially a tube of stretchy cotton fabric, with a number of strategically-placed zippers. These zippers allow Somnambula to be worn in “about twenty ways” including a vest, coveralls, hoodie, sweater, balaclava, head-to-toe sleeping bag, or even configurations that resemble a kilt.
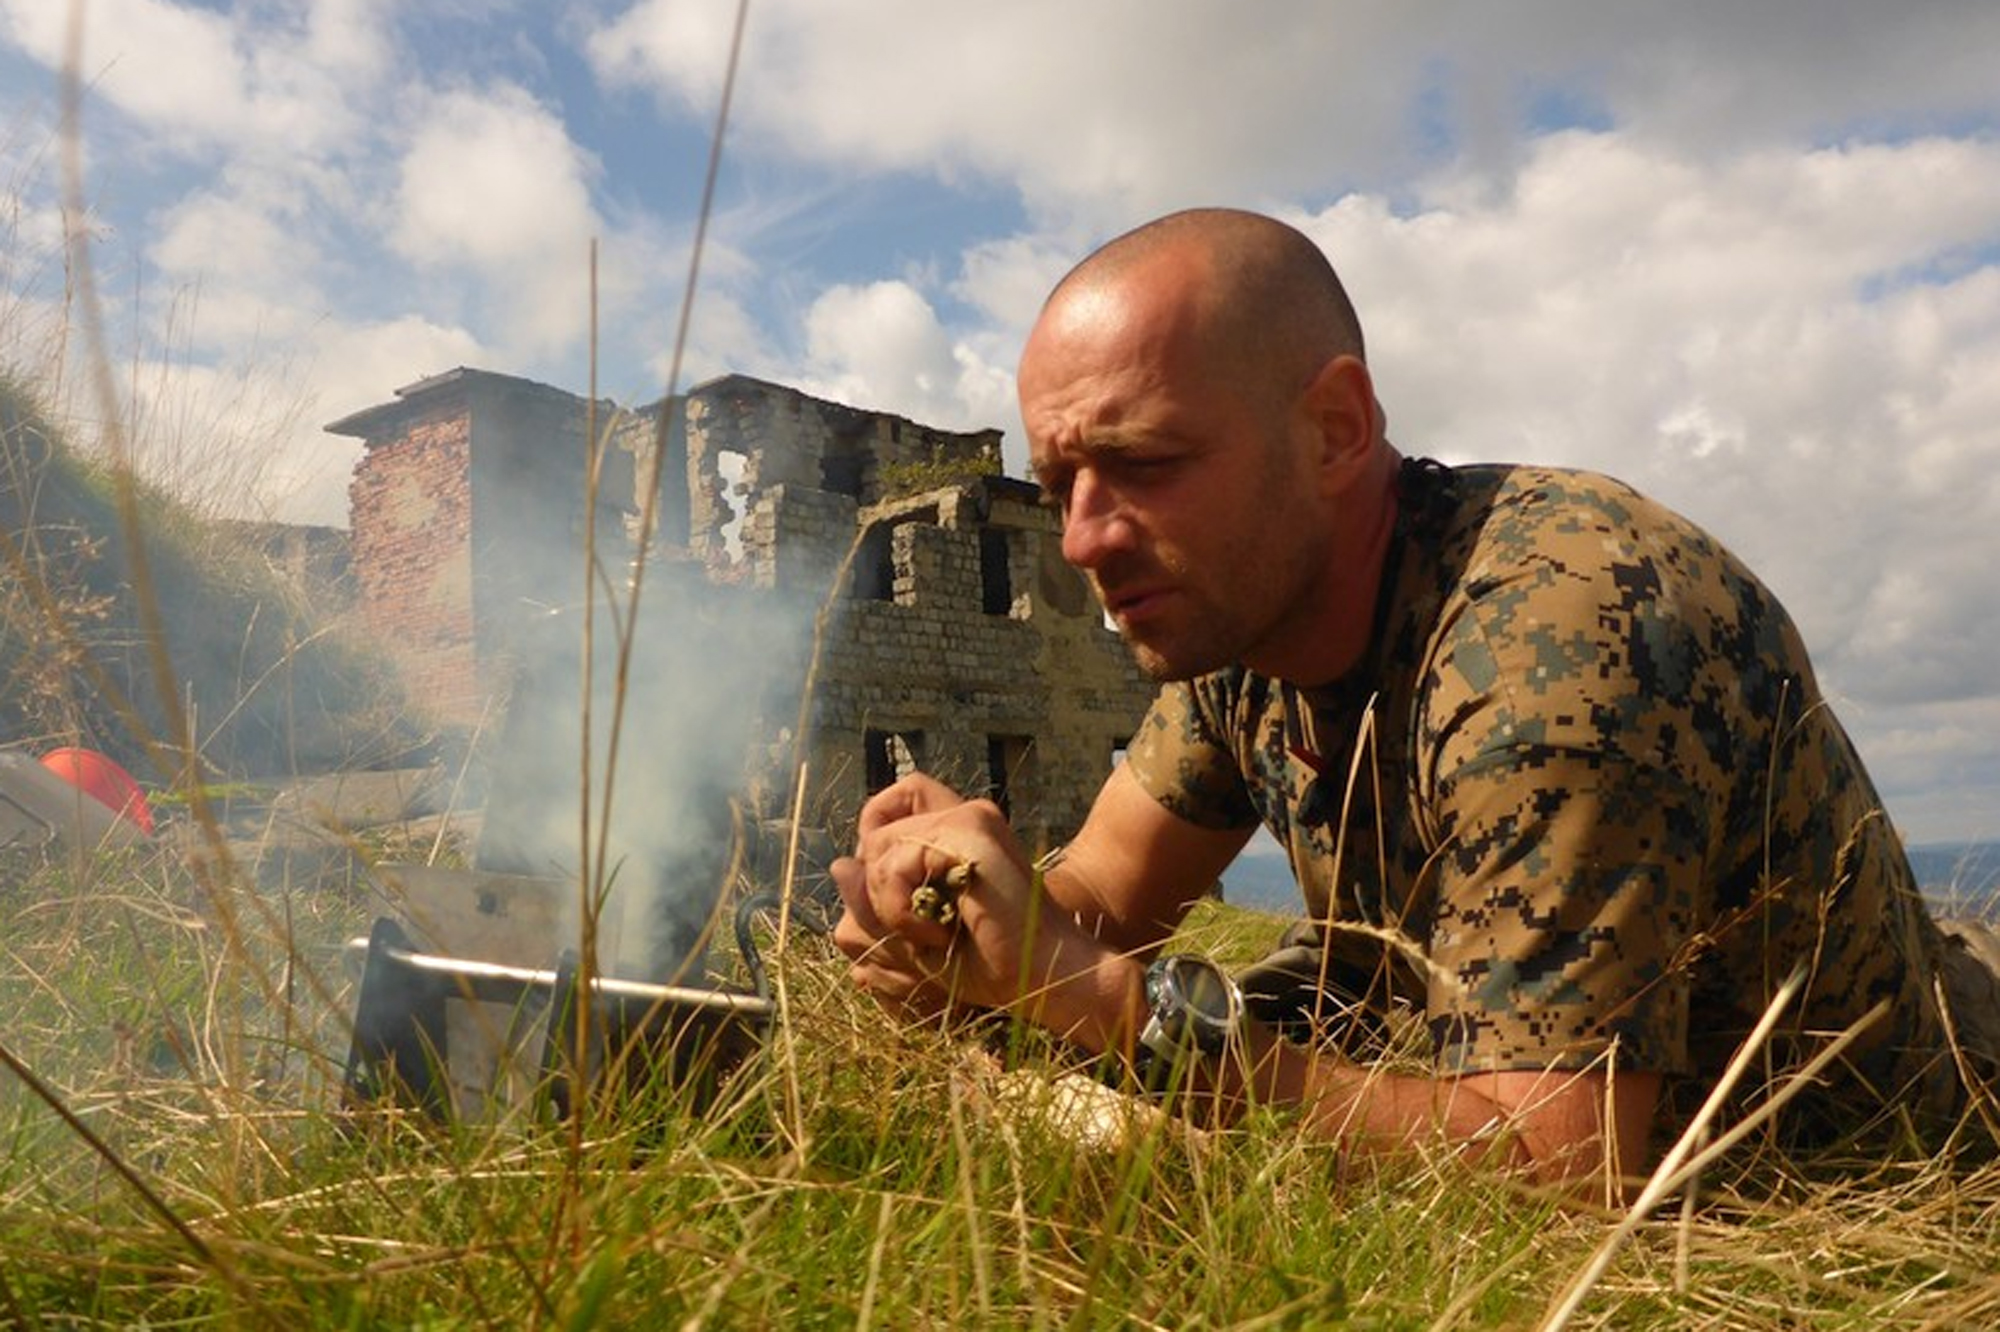
Skorobogatov demonstrating fire-starting techniques in one of his Adapter videos.
From a survival standpoint, it’s certainly wise to use gear that can be re-configured for a number of different uses, so we can see the value of this design from that standpoint. Skorobogatov also claims the Somnambula is lightweight, compact, and warm—all good things. However, we’d say his statement that it looks “extraordinary and trendy” might be up for debate.
These images and the video above give us a sneak peek at this creative apparel design, and Skorobogatov plans to unveil more details about it with the launch of a Kickstarter project in the near future. According to one interview, the Somnambula has already been in testing for several years, and has been worn extensively by Skorobogatov’s friends in the field.
So, from what you’ve seen so far, would you be interested in adding a Somnambula to your survival kit? Or is the design a little too “extraordinary” for your tastes?
A key tenet of survival is working with limited resources, and making do with what you have or what you can find quickly. In urban scenarios, this may mean scavenging or even dumpster-diving for supplies.
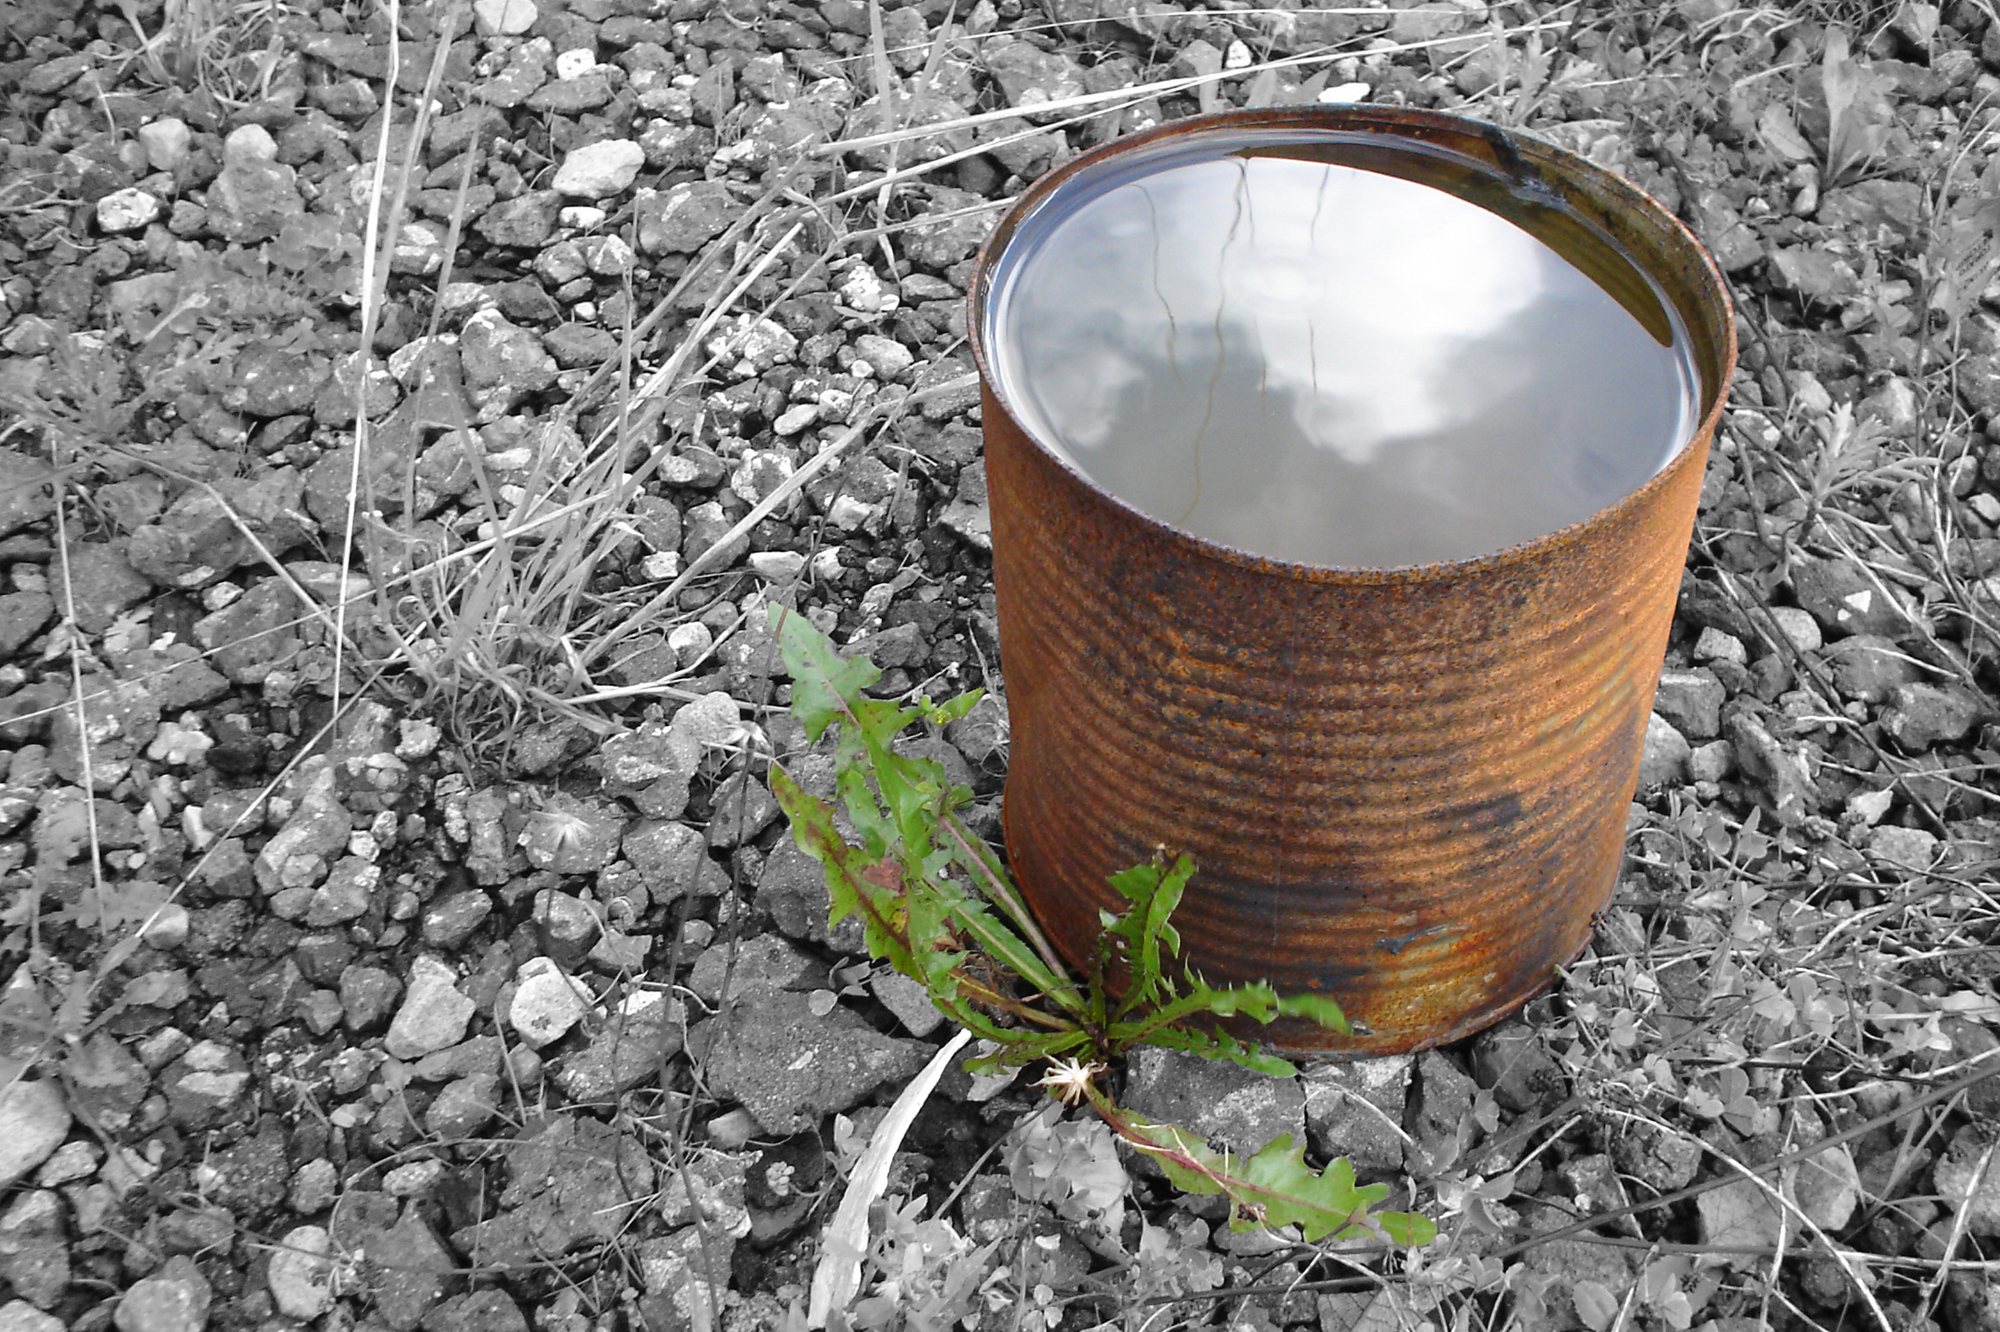
Obviously, unless you’re desperate, you probably won’t want to eat food directly from a dumpster—but there’s another important resource you can find in trash heaps: empty tin cans. One or two of these items can be used to create what’s known as a “hobo stove” for heating food or boiling water efficiently.
One man’s trash is another man’s treasure. Don’t be afraid to scavenge to survive.
The hobo tin can stove is about as simple as it gets. Find a large tin can, such as a coffee can or can of beans. If it’s not already open, you can remove the top easily in most urban environments with the concrete can opener method. Then…
Cut a hole in one side of the can near the bottom. You can use a knife—or better yet, tin snips—to do the cutting. This hole will provide access to add fuel, and also allow oxygen into the stove.
Next, poke or drill smaller holes around the top of the can. These will serve as exhaust vents, and you’ll want plenty of them so your fire isn’t smothered.
Optional: poke more air holes around the base of the can. These will provide additional oxygen to keep the fire burning.
Insert some tinder (such as char cloth) and kindling, then light it up. Have more sticks on hand to keep the fire going.
Set some tent pins or wire mesh on top of the can, to prevent your pot or pan from tipping over or falling in. Start cooking!
To some, a rusty old can is useless garbage, but that’s not true for a survivalist.
Here’s a video that demonstrates the basic hobo tin can stove. The host uses power tools to cut the fuel hole quickly, but you can easily do it with a knife or tin snips and a little patience.
The one downside to this simple tin can stove is that it creates a lot of smoke, and may give away your position to others nearby. If you want to avoid the smoke, you can modify the design to create what’s called a “gasifier stove”. Gasification causes the fuel to burn at a higher temperature, leading to cleaner combustion and less smoke.
To create a gasifier stove, you’ll be nesting a small tin can inside a large tin can, and drilling the holes more strategically. Here’s a demonstration of how to make a wood gas stove:
Regardless of how far you take this simple design, the fact remains that it uses only a discarded tin can (or two). That means it’s easy to create in the field, and even if you can’t build a full campfire, you’ll be eating hot meals again in no time.
Let’s say you’re hiking in a rural area, and you trip and break your ankle. If you can’t walk out, you may have to call for help on your cell phone—but how will emergency services locate you?
If you’re familiar with cell phone technology, you’d probably answer that the 9-1-1 operator can find your location automatically using the cell phone’s built-in GPS chip. However, most people don’t know that this location data delivery is currently extremely unreliable. Even the FCC admits that this method of emergency geo-location is “not always specific enough for rescue personnel to deliver assistance to the caller quickly.”
The Problem with Cellular Location Data
According to a recent article in USA Today, the FCC has indicated that cell phone location data can be transmitted to emergency services less than 40% of the time. In fact, the FCC has set a goal to reach 40% location data reliability in 2017, and 80% by 2021.
This means that the 9-1-1 operator will most likely not be able to locate you automatically via GPS, and you may be stranded unless you can explain your location in another way. Sadly, there have been many instances of 9-1-1 callers dying before rescue could arrive, as a result of missing GPS location data.
What About Latitude and Longitude?
Latitude and longitude (the light blue numbers above) can be viewed in GPS software like Google Maps.
Tech-savvy smartphone users will likely suggest an alternative method. Assuming you have cell signal, you can use GPS software such as Google Maps to pull up your location in latitude and longitude. While this is a valid method, it poses several problems:
Most map software requires a cellular data connection (such as WiFi, 3G, or 4G LTE) to work properly. In rural areas, you may have enough cellular signal to call 9-1-1, but no reliable data connection to use map software.
Latitude and longitude is a complex system based on degrees. It also has multiple versions, which can include decimals, plus, minus, north, south, east, and west components.
Latitude and longitude requires at least 12 digits to provide location accurate to within 36 feet. It can be difficult to convey all these digits accurately to emergency services.
If even one digit is misheard or transmitted wrong, or if the incorrect version of latitude and longitude is used, rescue teams can be sent tens of miles in the wrong direction.
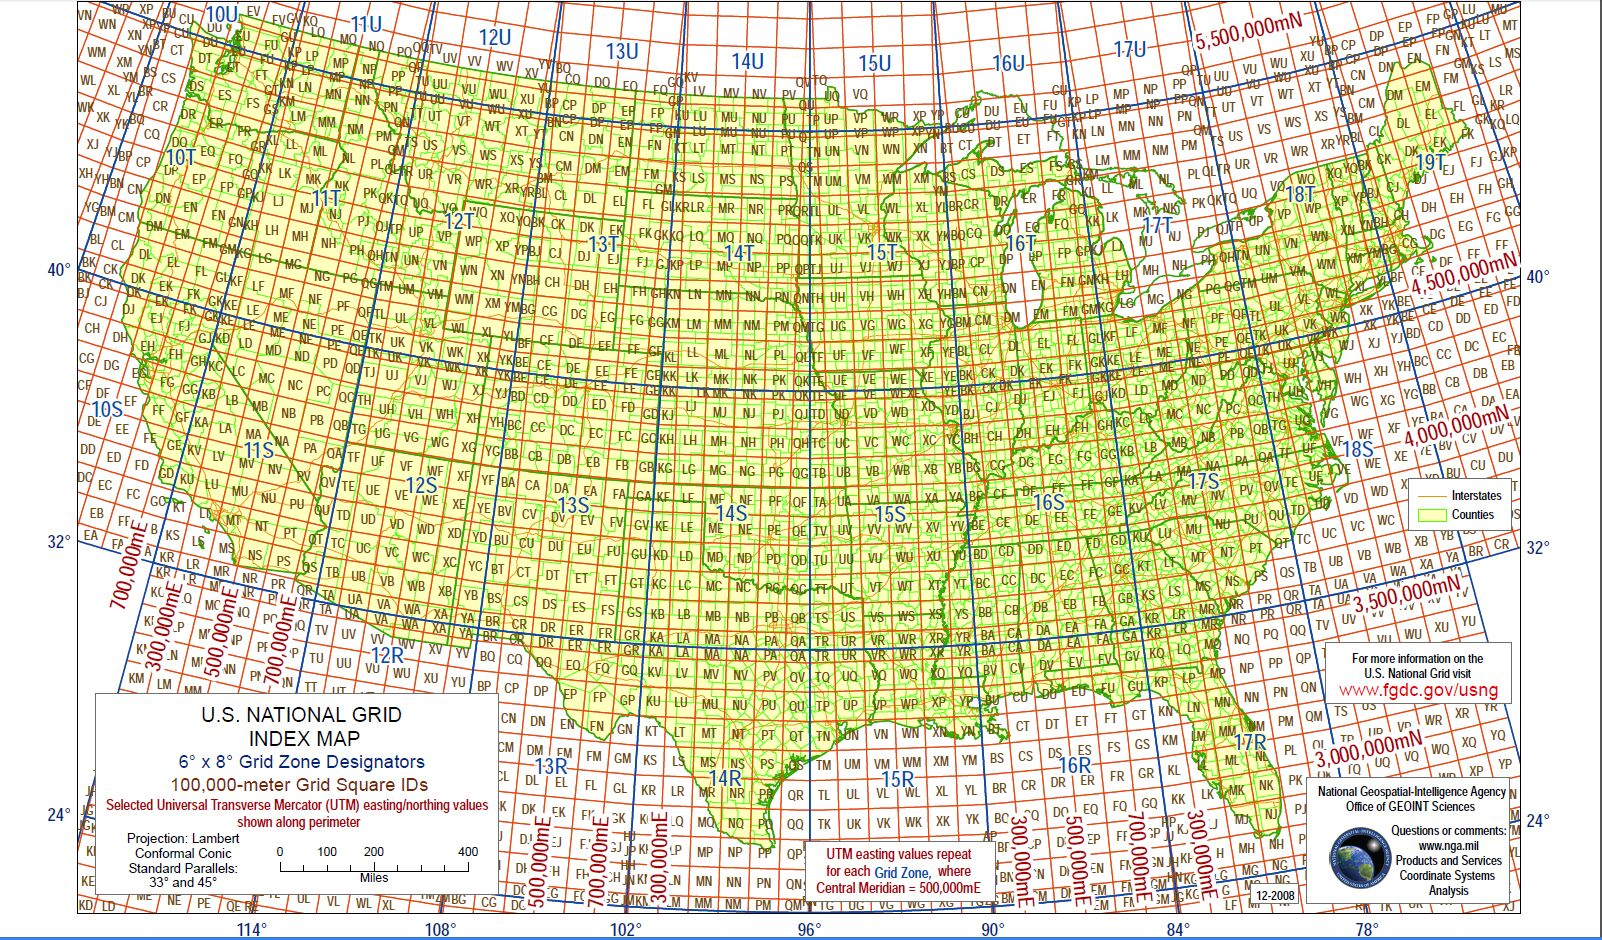
The U.S. National Grid
Fortunately, there’s a better system available: the United States National Grid. Despite the name stating “United States”, this coordinate system works anywhere on earth.
This system was developed in by the U.S. Federal Geographic Data Committee, and is similar to national grid reference systems used by many other countries. It also bears resemblance to the Military Grid Reference System (MGRS) used extensively by NATO military forces, and as of October 2015, it is now the official location system used by FEMA.
So, how can regular folks like us tap into the power of this new USNG location system? It’s easy, thanks to a new tool called the USNG App.
Currently, the USNG App is actually just a web site: USNGApp.org (although a proper downloadable app is in development). The site can be visited from any smartphone, tablet, or other device with internet connection* and a GPS chip. You can try visiting it on your home PC, but since it probably lacks built-in GPS, the location will only be accurate to a several-mile radius.
Why You Should Use the USNG App
A screenshot of the USNG App web site from a smartphone.
The USNG App has many advantages over latitude and longitude:
Instead of degrees and decimals, coordinates are in meters. This makes the system much easier to understand.
The USNG coordinates can be easily plotted on existing USGS topographical maps and gridded maps using a simple “read right, then up” convention. This makes finding your location on a printed map much easier.
Using 13 simple characters and no decimals, the USNG can provide a full location accurate within 33 feet (10 meters).
For local use, such as a 9-1-1 call, you only need to know 8 characters (in the app: 2 blue numbers with 4 digits each).
For use throughout the entire world, just add the 5 additional characters at the top of the screen (in the app: 2 white numbers and a letter, then 2 more letters).
The USNG App is smart enough to only display valid data. So, if your GPS signal is inaccurate due to tall buildings or other interference, the app will only give your location within 330 feet or 3300 feet, and will show red lines through the inaccurate digits. (With latitude and longitude, the numbers could be wildly inaccurate, and you’d never know it.)
An orange “Status” message at the bottom of the page will show the app’s current accuracy and last update time in simple terms.
An example of inaccurate USNG data, crossed out automatically by a red line.
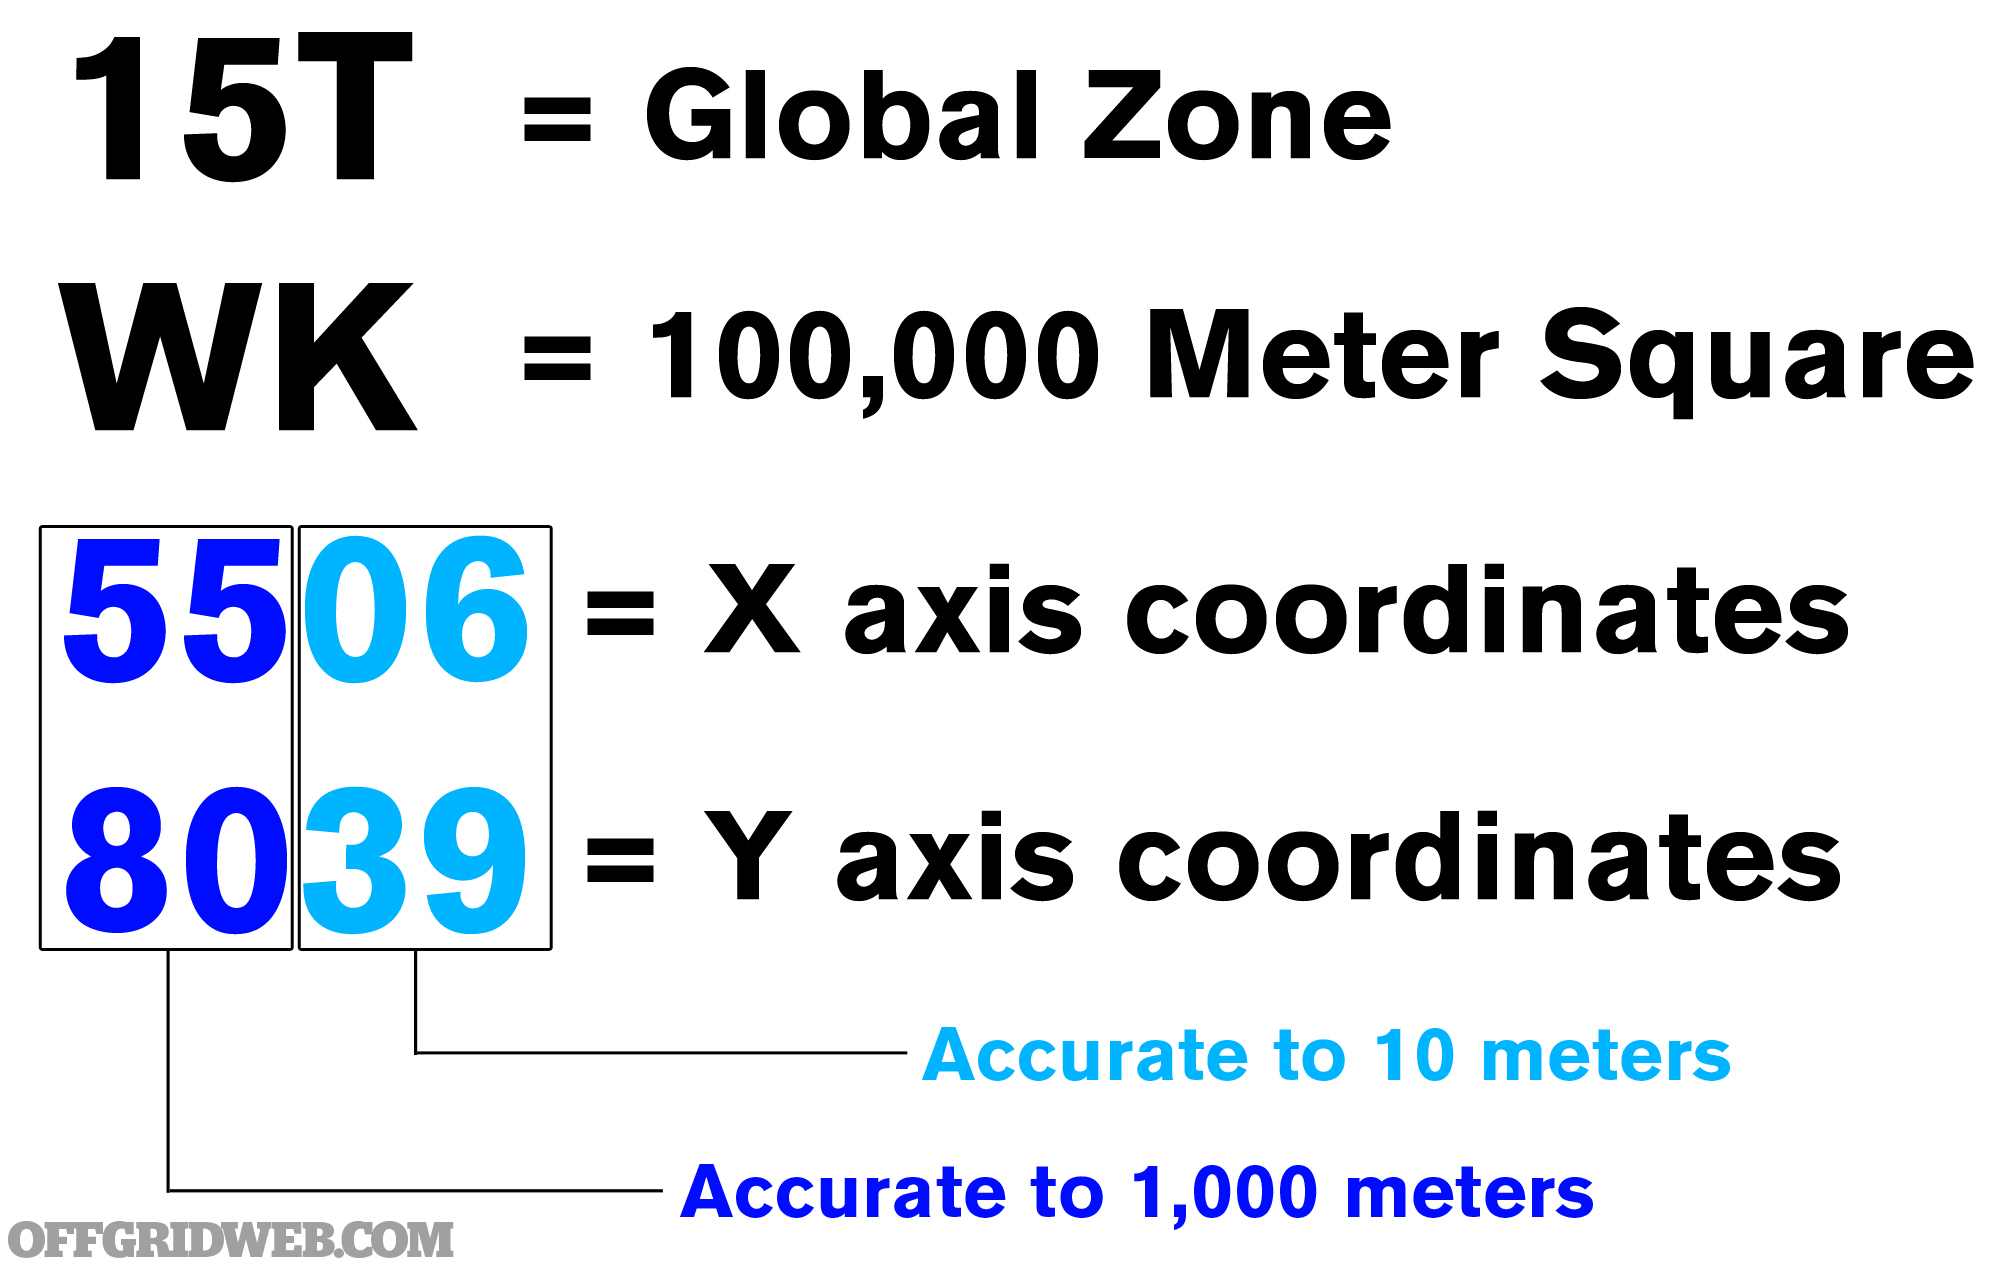
How to Interpret USNG Coordinates
We’ll be looking up these example coordinates on a map below.
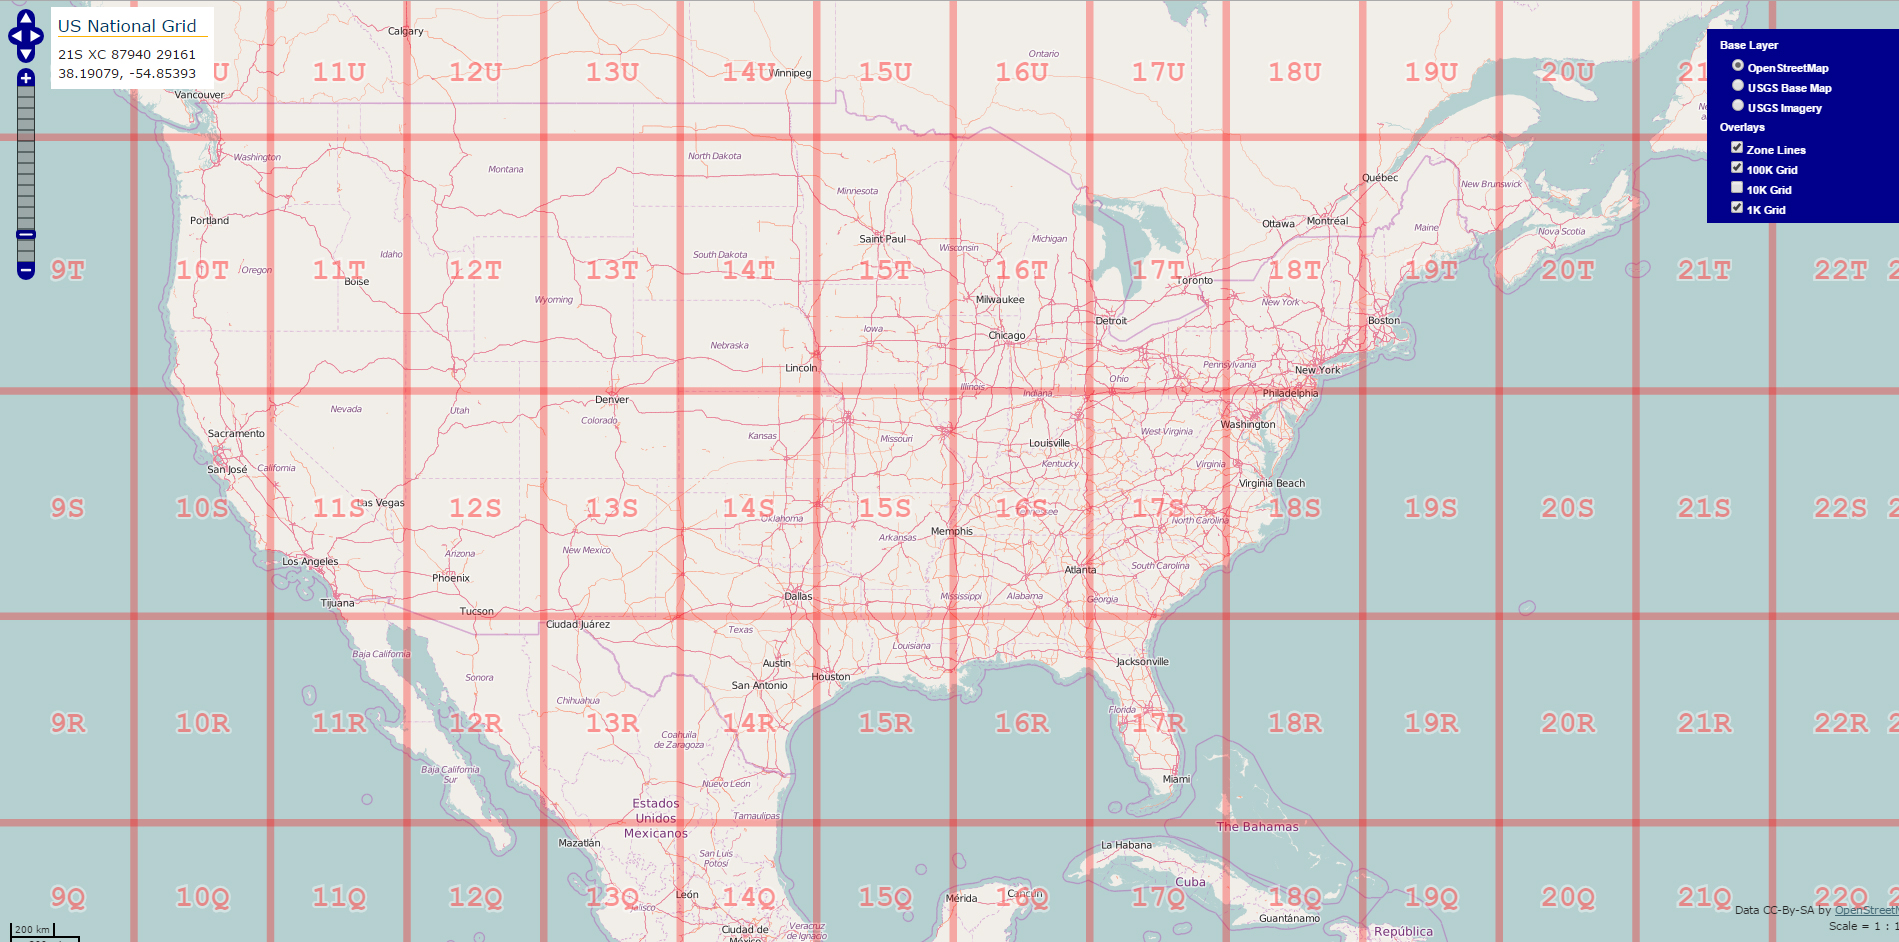
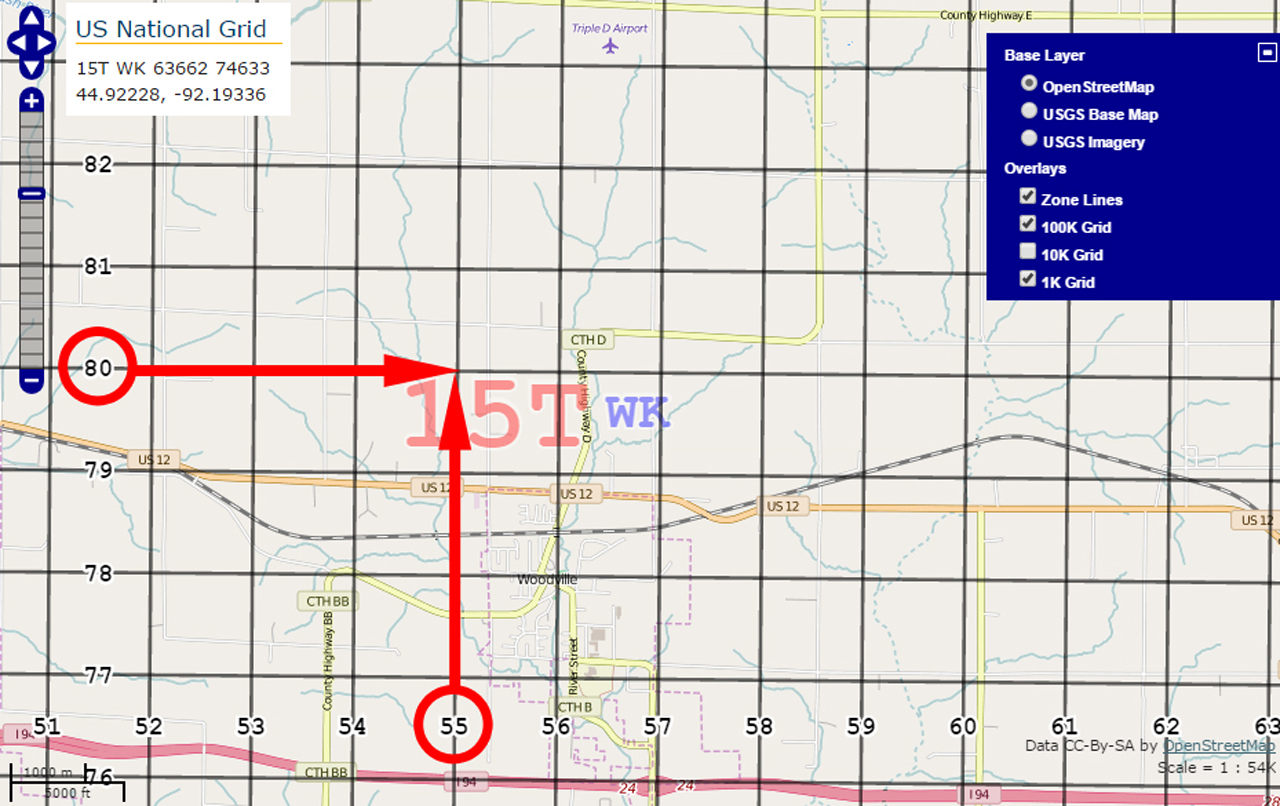
Here are the basic steps for interpreting USNG coordinates: 1) Use a USNG reference map, such as this one, to find the Grid Zone. These are the first 3 white characters you see at the top of the app. For example, 15T gives us the Minnesota/Wisconsin/Iowa area.
2) Zoom in further on the map, and find the second set of white characters you see in the app, the 100,000 Meter Square Identification. For example, WK gives us an area to the southeast of Saint Paul, MN.
3) Next, read the Grid Coordinates, which are the two blue numbers within the white square in the USNG App. Remember: “read right, then up”.
4) The first two digits will be on the X (horizontal) axis, so zoom in and look for 55 on the black 1000-meter grid.
5) Then, read up to find the next two digits, 80. At this intersection (aka 5580), you’ll be within 1,000 meters of the location.
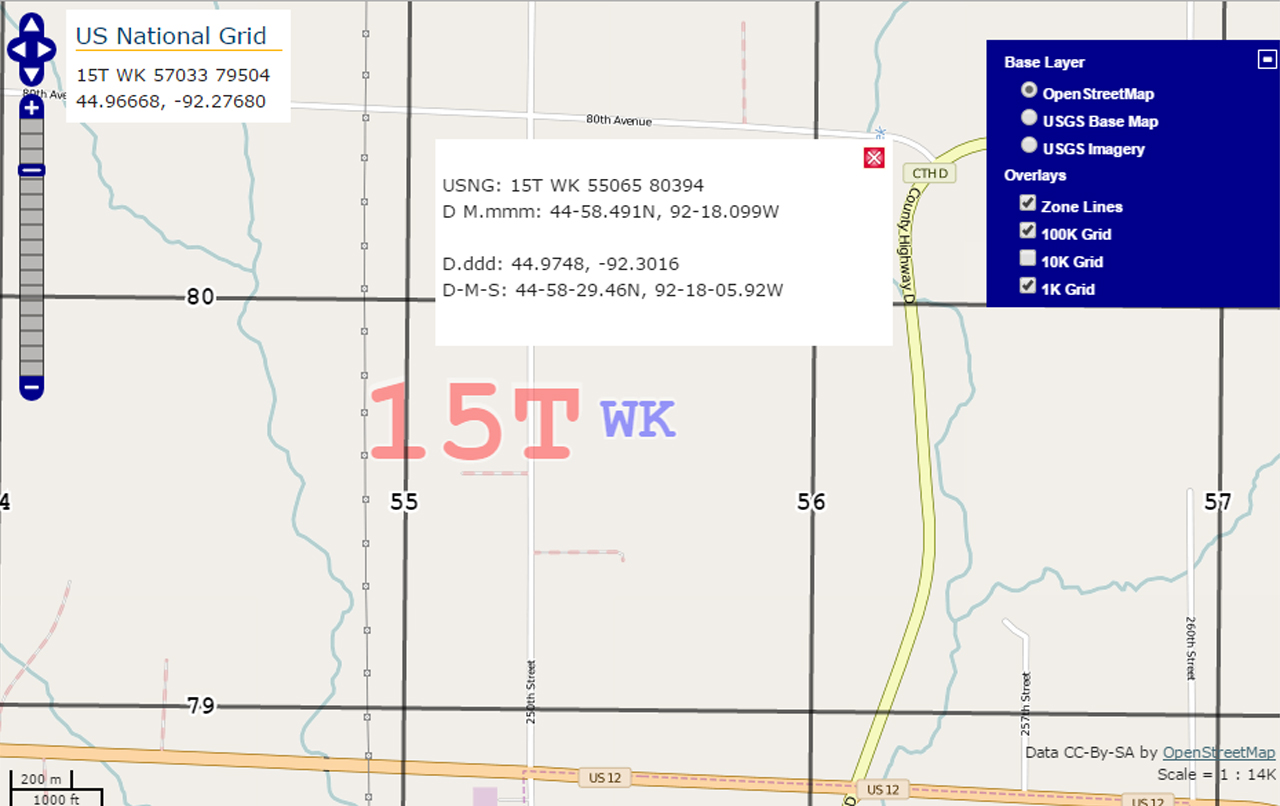
6) Zoom in more, and continue to “read right, then up” to find the second set of X,Y coordinates (aka 0639). This is accurate to 10 meters.
Did you notice earlier that we put an asterisk/* next to the phrase “with internet connection”? There’s a reason for that. The very best part about the USNG App is that you only need an internet connection the first time you visit the USNGApp.org web site.
After you visit the USNG App site once, the data that makes the tool work is cached (or temporarily stored) in your device’s browser. Then, as long as your GPS chip is functional and you don’t clear your browser cache, you can open the web page at any time and see your USNG coordinates. No internet connection or cellular data plan required, since everything required to run the tool is stored in your browser’s cache.
Don’t take our word for it—try it for yourself. Go to USNGApp.org on your smartphone. You may be prompted to allow access to GPS location data, so you’ll need to hit “Allow” for the tool to work. Then, close the page, and turn on Airplane Mode to disable your data and WiFi connections. Re-open your browser and go back to the USNG App page. The tool should still work, even without a data connection.
Final Thoughts
Even if you get nothing else from this article, get this: visit USNGApp.org today on your smartphone, and save it as a favorite. You may never end up needing to use the app, but in case you do need it, you’ll have quick access to accurate GPS coordinates for emergencies.
Special thanks to our friend and contributor Andy Schrader for telling us to check out the USNG App.
Here’s a challenge: right now, try to estimate what time the sun will set this evening within a 15-minute window. Unless you’ve been paying close attention to previous sunset times, you’ve been studying an almanac recently, or you cheated and Googled it, you’ll probably have a hard time estimating sunset time that accurately.
Well…. actually, that’s not necessarily true. There is another way to estimate remaining daylight hours, and it’s much more practical than any of the other methods we mentioned above.
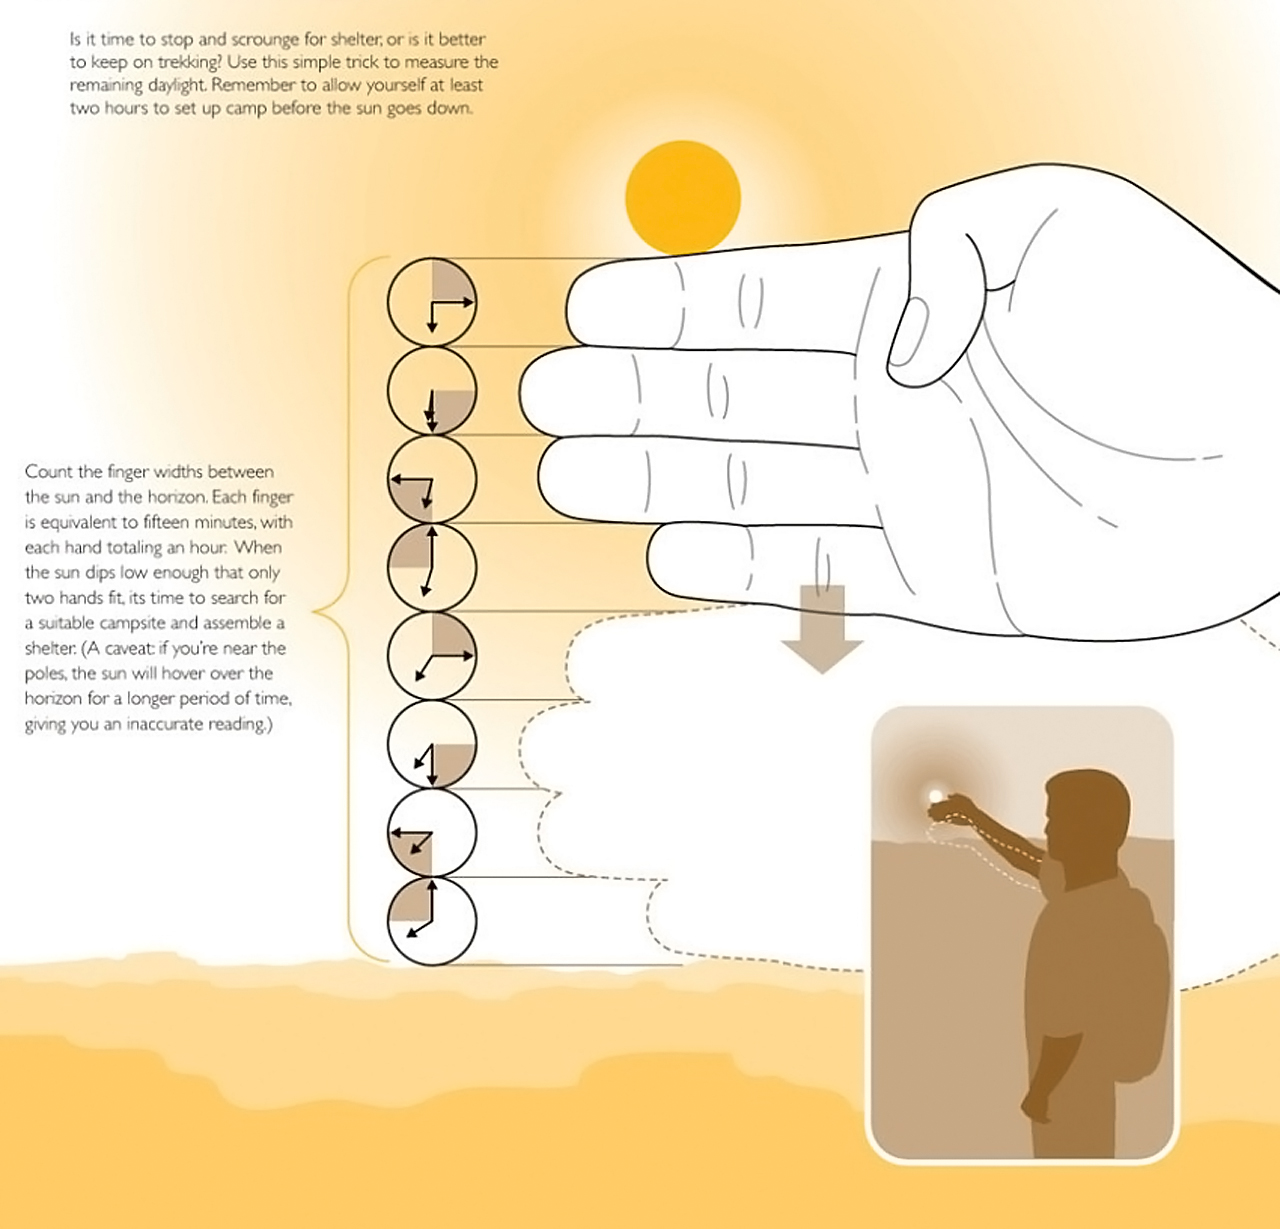
This extremely simple trick uses nothing more than your fingers and the horizon, and it takes mere seconds to do. It’s one of those skills that everyone should know about, even if you’re not a prepper or survivalist. It’s just a handy life skill in general (forgive us).
Simply extend your arm, and align the top of your index finger with the bottom of the sun. Each finger width between the sun and the horizon should provide about 15 minutes of daylight. This lets you figure out how long you have to make camp or gather firewood before sunset.
Of course, like the infographic above mentions, there are a few drawbacks:
It’s not 100% accurate, hence our use of the word “estimate”. If you have short and stubby T-rex arms, your readings may be thrown off a bit.
The accuracy diminishes the closer you get to the north or south pole, since the sun’s movement will appear to slow as it nears the horizon. Then again, some polar regions have sunlight for almost 24 hours each day, so you may not have to worry about sunset at all.
The accuracy also diminishes the closer you get to the tropics, but in the opposite direction. Near the equator, the sun will set faster than you might estimate using this method.
Obstructions near the horizon, such as low-lying clouds, can cause daylight to disappear faster than you might expect.
Some residual light will persist as the sun begins to sink behind the horizon.
To improve the accuracy of this method, get out there and try to estimate the remaining daylight where you live. After using this trick a few times, and paying attention to a wristwatch, you’ll be able to figure out more accurately how many minutes of light each finger represents in your region.
Ever stood on top of a precarious ladder, and thought about what would happen if you fell? Or, have you looked over the edge of a building, and wondered if you could survive the drop to the ground?
These questions (sometimes referred to as “the call of the void”) may seem morbid, but they’re a natural part of your brain’s inner workings. Also, knowing the answers can help us better deal with life-and-death survival scenarios when height is involved.
This way, rather than wondering about your chances of surviving a jump, you can make an educated guess about the falling injuries you might endure if you were forced to jump to survive.
According to the World Health Organization, falls are the second leading cause of accidental deaths worldwide, behind road traffic injuries. Falls cause approximately 424,000 deaths each year, but most falls are not fatal.
One of the easiest ways to understand fall risk is to look at LD50, or distance at which you have a 50% chance of fatal injuries. If you fell from 48 feet (about 4 stories), statistically you have about a 50% chance of survival. At 84 feet (or 7 stories), the mortality rate is 90%, meaning you’d be very unlikely to survive a fall from this height.
Despite the statistics, it’s still possible to be seriously injured or killed when falling a single story (or even less).
From a practical standpoint, it may seem unlikely to survive a four-story fall. However, keep in mind that many other factors contribute to these averages, including: how you land, how hard the surface is, and what protective gear you’re wearing (if any). There are also extreme outliers, such as one man who fell 18,000 feet from a plane without a functional parachute, and survived the landing with only a sprained leg.
So, now you know that you’ll be statistically more likely to survive falls of less than 50 feet. Then again, it’s far from a guarantee, and you should never try it unless every other option is more likely to kill you. Don’t blame us if you jump off a roof and get hurt, because you’re almost guaranteed to get hurt doing so.
What else can you do to reduce your risk if you’re forced to jump or fall from a high place in a survival situation? We’ll leave you with some quick pointers to remember:
Be extremely careful on elevated surfaces with slippery conditions (such as water or ice) or with uneven terrain.
Take your time and wear proper footwear, so you don’t trip or stumble.
If you’re forced to jump from a roof to the ground, hang from the ledge by your hands, then let go. This slightly reduces the distance you have to fall, improving your odds of survival.
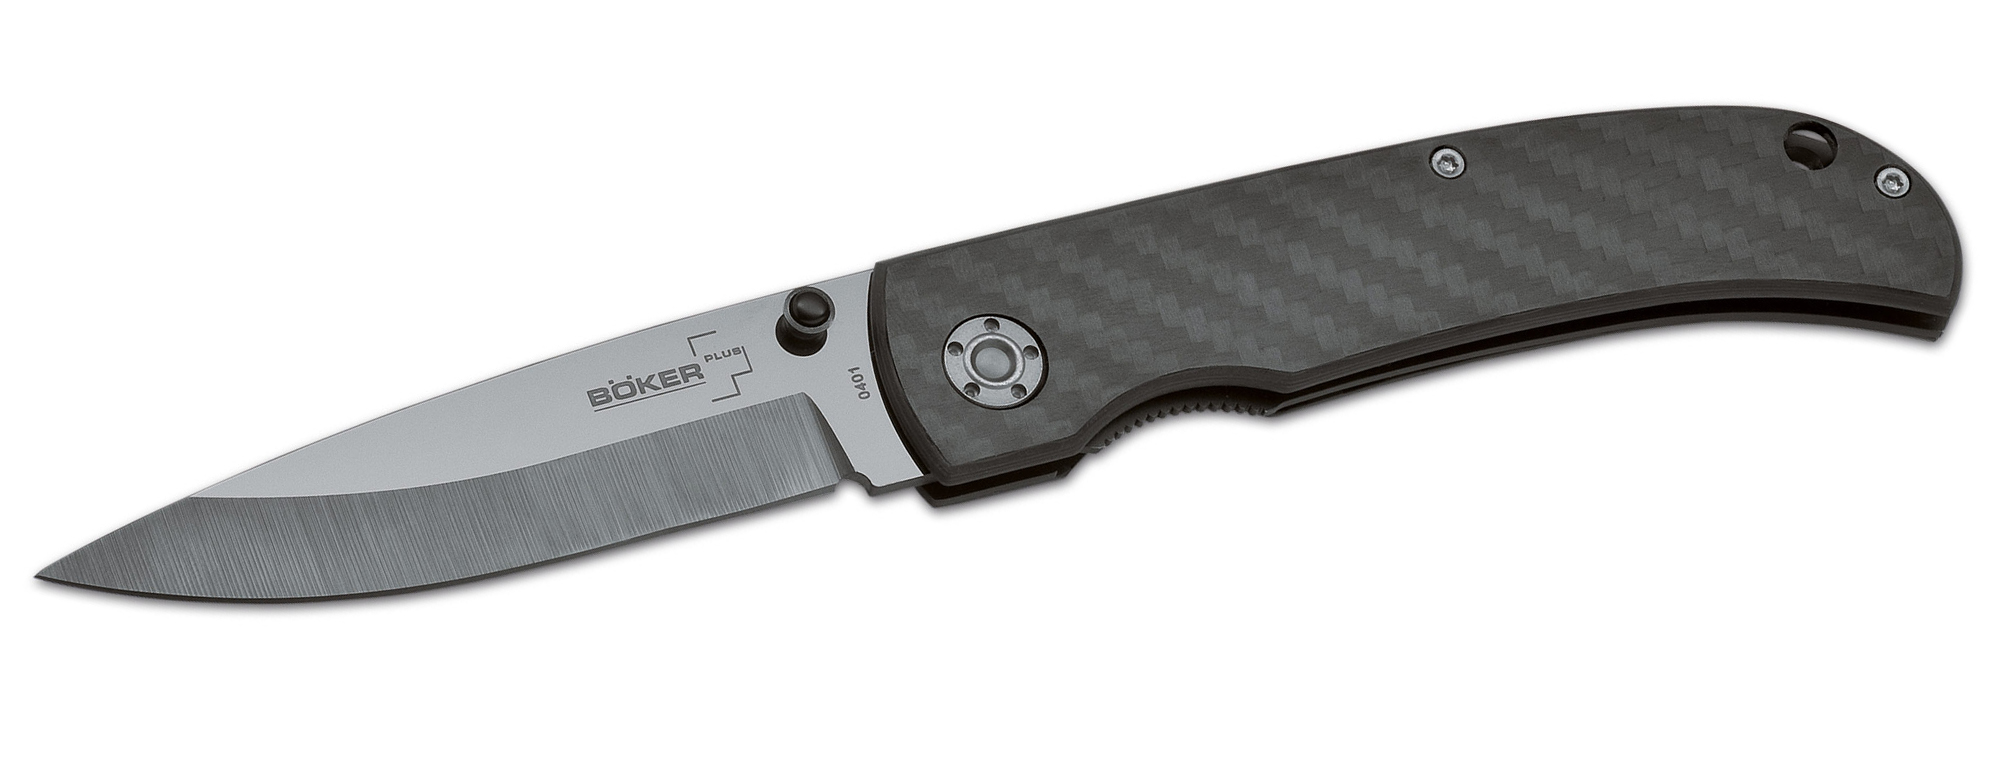
This Boker Antigrav ceramic knife uses a ceramic blade and carbon fiber scales to tip the scales at only 2.1oz.
As survival-minded individuals, it’s important that we never become complacent with our gear. Sure, using old-school and traditional tools for survival is a reliable option, but if you’re not constantly checking out new alternative technologies, you might be stuck using outdated gear that’s less effective.
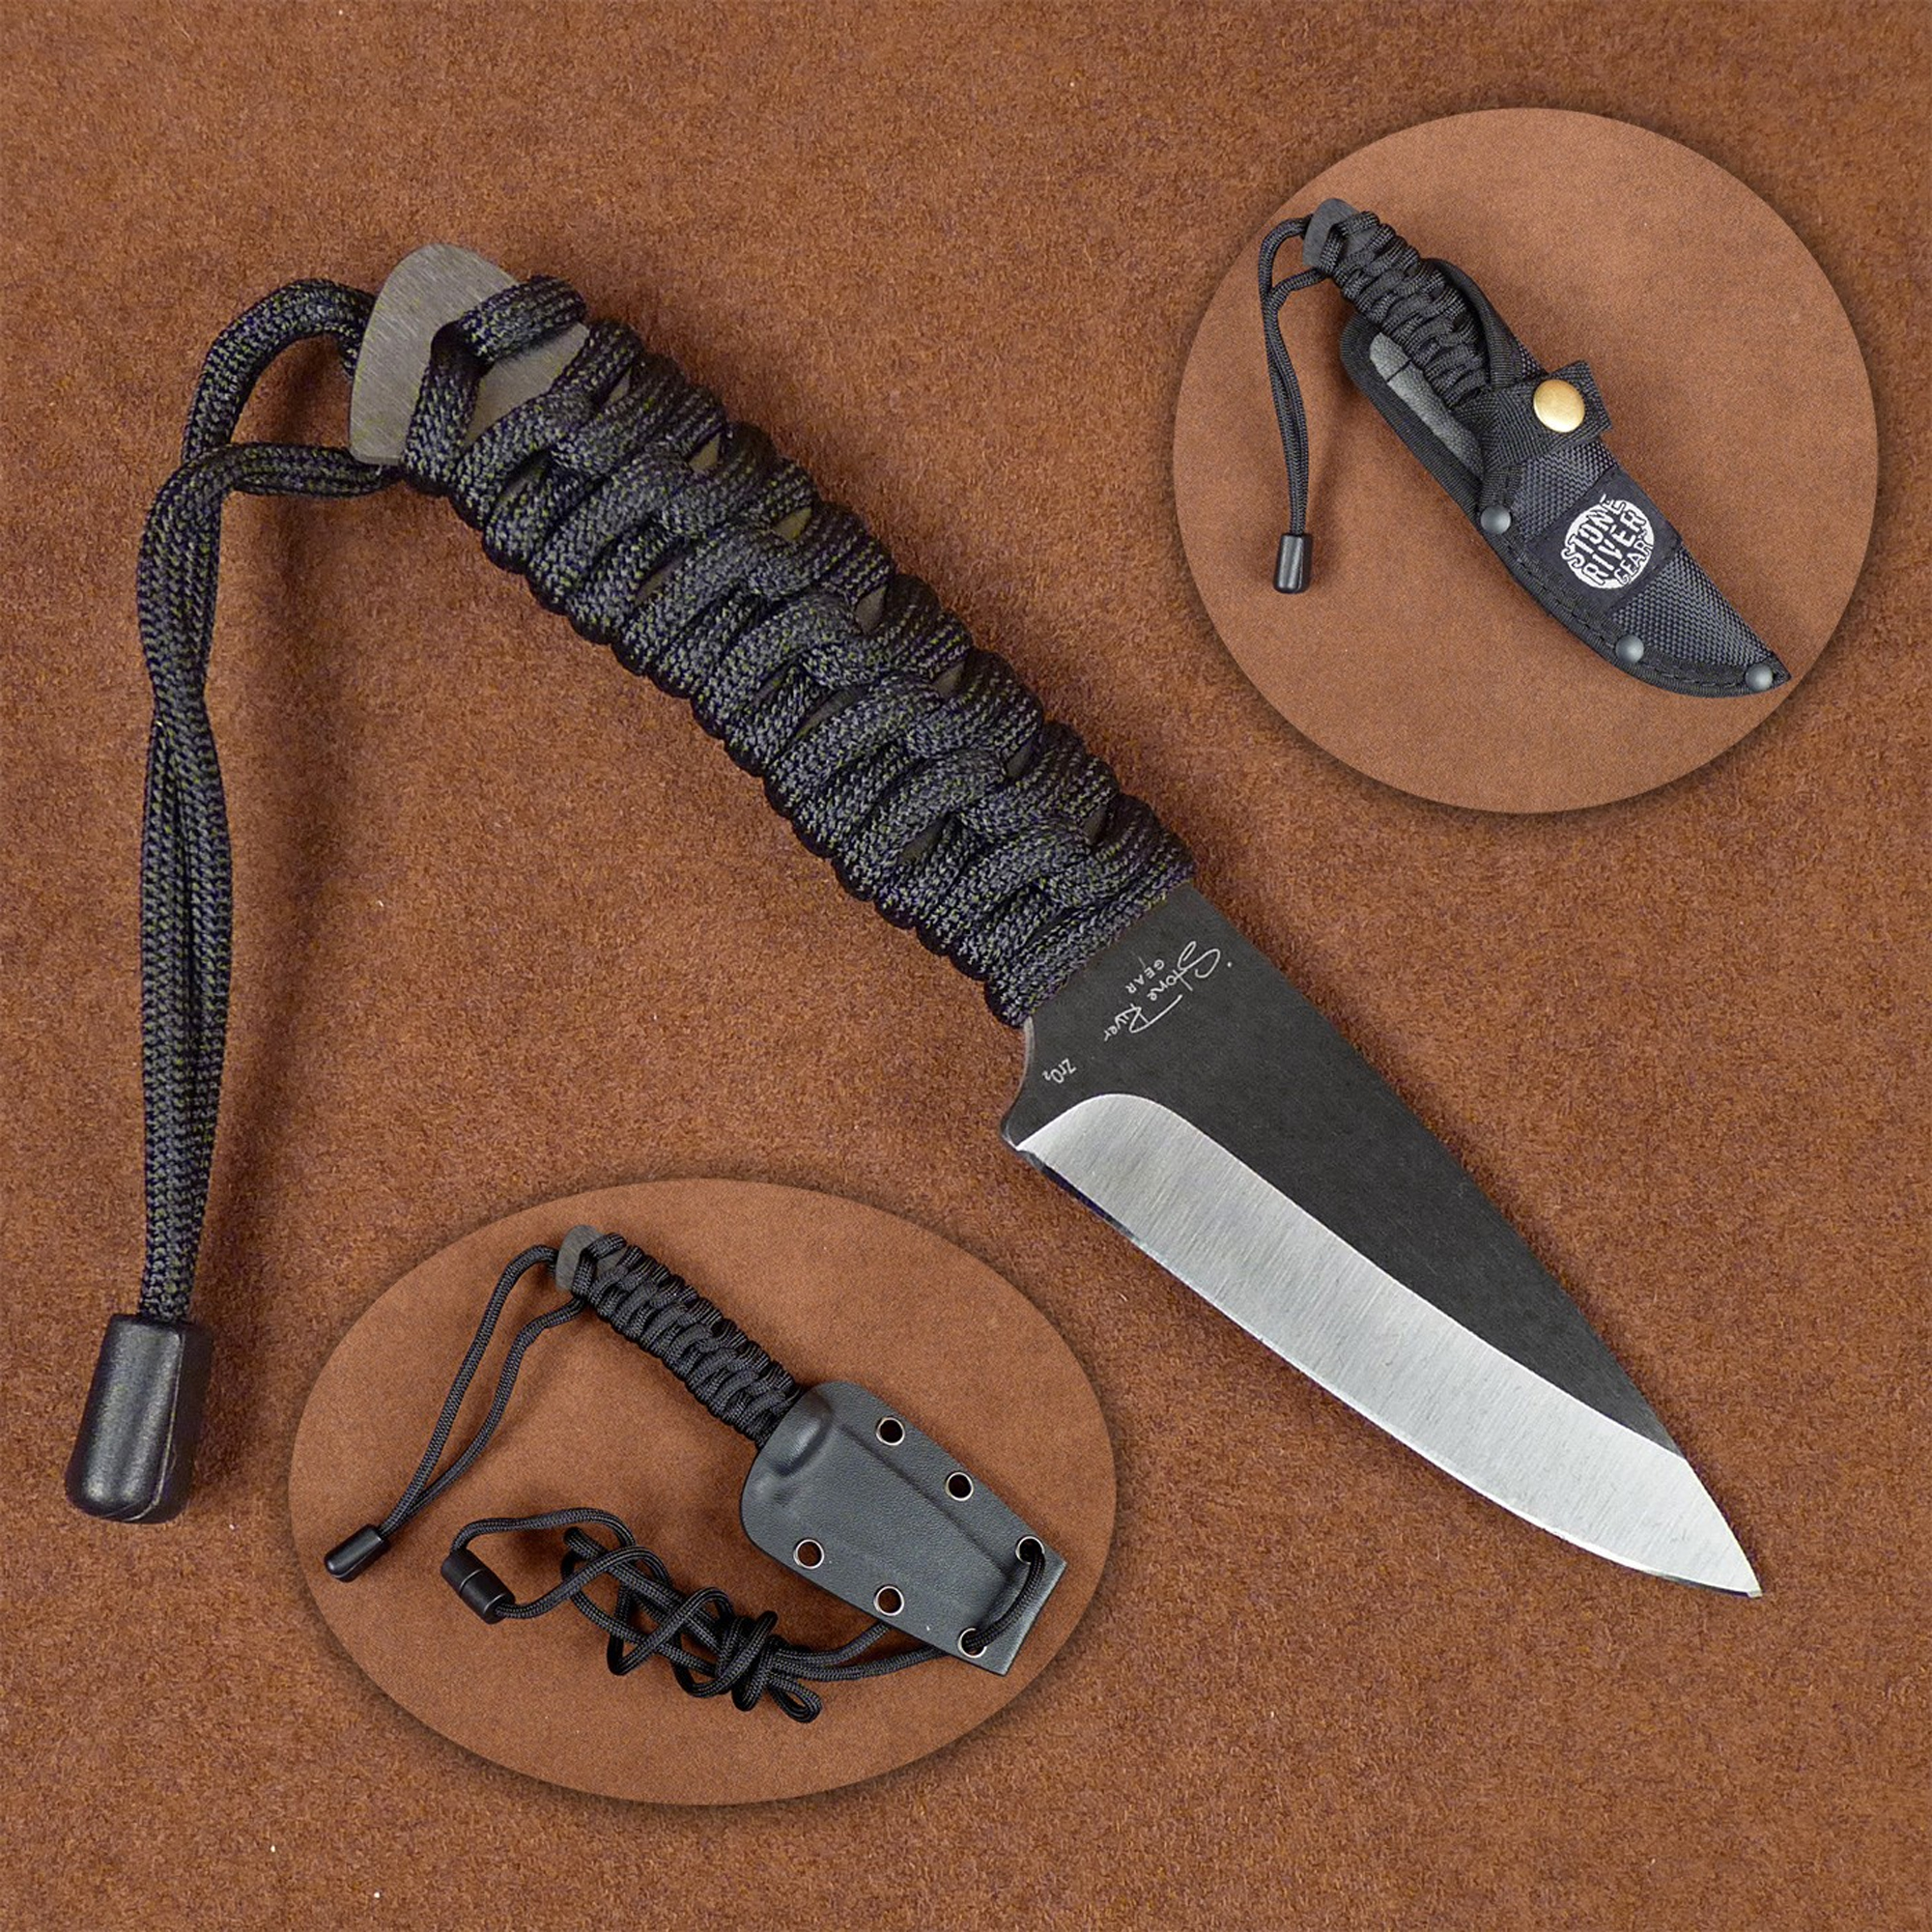
A fixed-blade black Zirconium Oxide ceramic neck knife from Stone River.
That said, we’re curious to hear what you think on the topic of ceramic knives. It goes without saying that most of us own at least one fixed-blade or folding knife, and the vast majority of those knives are made of steel. That’s the way blades have been forged for centuries, and some might say there’s no need to fix what’s not broken.
This Boker Antigrav folding knife uses a ceramic blade and carbon fiber scales to tip the scales at only 2.1 oz.
However, modern ceramic knives have come a long way, thanks to prominent manufacturers like Kyocera (from Japan), Boker (from Germany), and Stone River (from the U.S.). They also provide some interesting advantages when compared to ordinary steel knives. Here’s a quick list of general pros and cons to summarize ceramic knives:
Ceramic Pros:
Excellent edge retention. Ceramic can stay sharp 10 to 12 times longer than conventional steel.
Extremely light, about half the weight of a comparable steel knife.
More concealable, since they won’t be detected by metal detectors (obviously, we strongly advise against doing anything illegal with this knowledge)
Non-reactive and less porous, so they will never corrode or retain tastes/odors like some steels can.
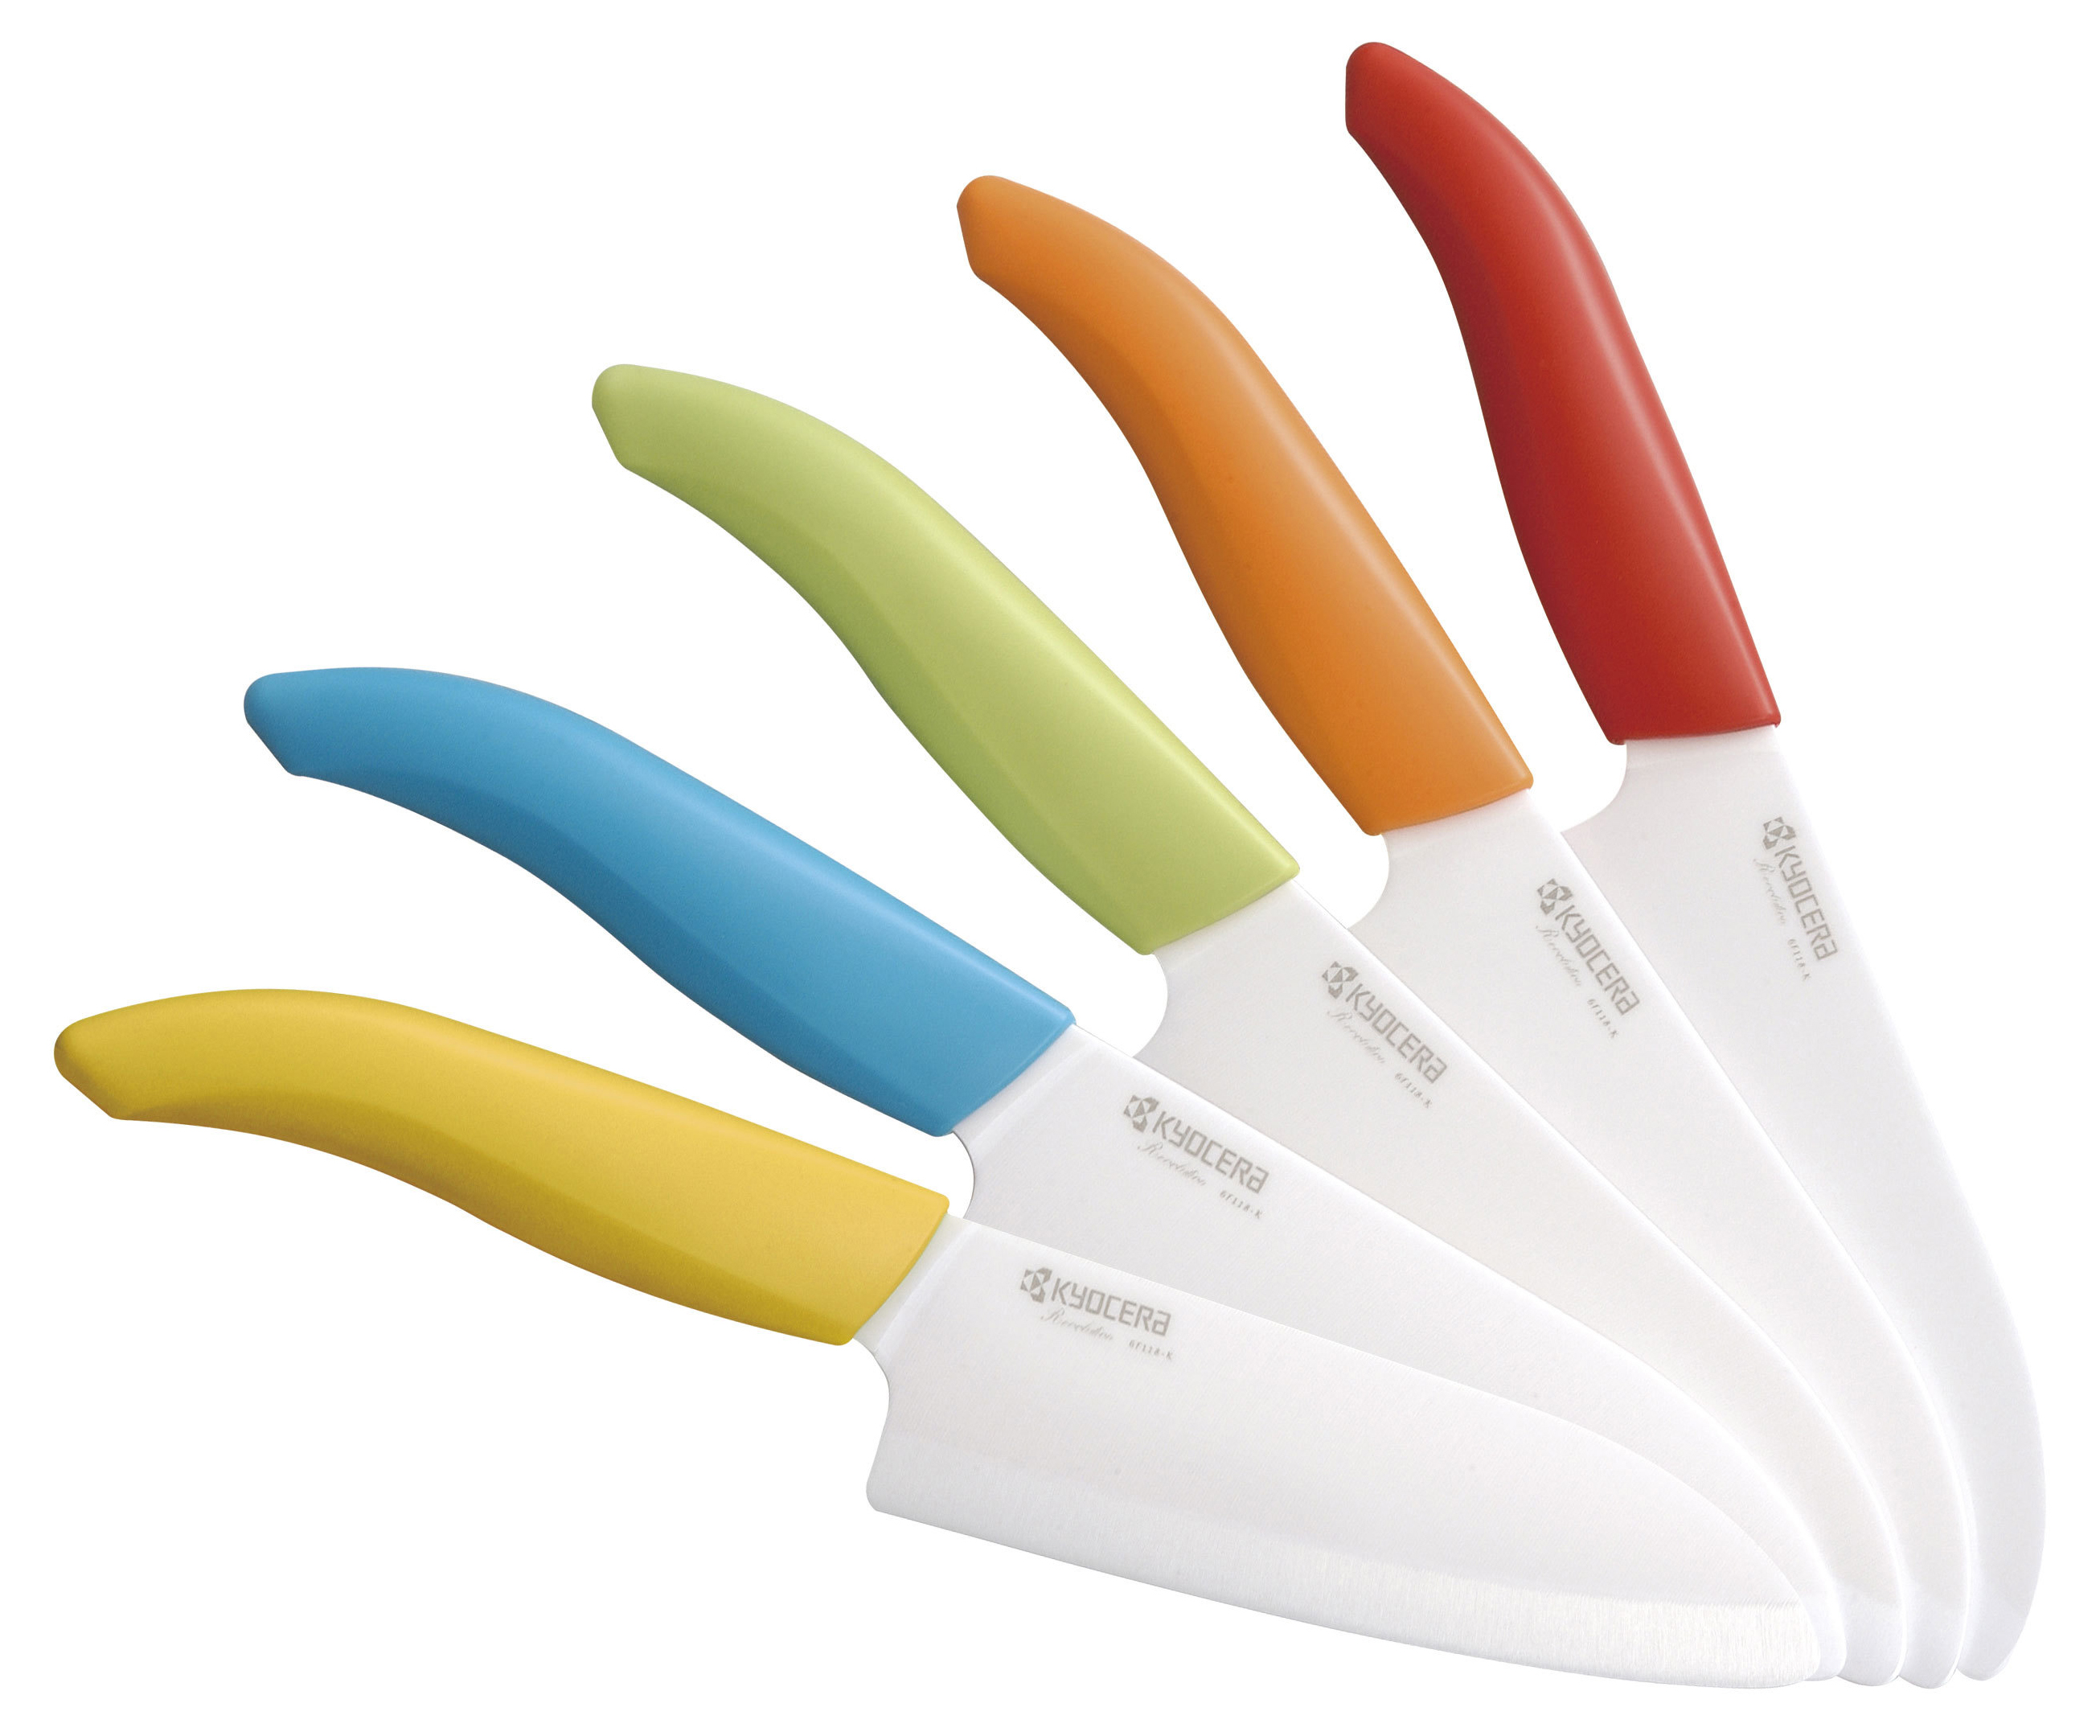
Kyocera, a leading manufacturer of ceramic kitchen knives, uses a proprietary material called Zirconia Z206.
Ceramic Cons:
Potentially brittle, and will shatter instead of denting or bending like steel.
Generally more expensive than comparable steel knives.
While great for precise slicing, ceramic won’t handle hard chopping or cutting against hard surfaces (like bone or glass)
When they eventually become dull, these knives are more time-consuming to sharpen.
Usually slightly less sharp than a perfectly-sharpened steel blade.
We mentioned in the last point that ceramics are usually very slightly less sharp, but when cared for correctly, they can still be as sharp as a razor. Here’s a video that proves it’s possible to shave with a freshly-sharpened Kyocera ceramic kitchen knife:
So, we want to hear your thoughts on this cutting-edge blade material (forgive the pun). Answer the poll, and let us know if you’d ever consider a ceramic knife. Feel free to leave a comment at the bottom of this page to explain your choice.