In This Article
Disclaimer: The exercises and content about optimizing movement for survival shared in this article are for illustrative purposes. Always consult a medical professional before attempting any physical activity or adopting a nutritional plan.
Movement is the essence of life. Top fitness experts emphasize the significance of optimal movement for a healthy, long life. Yet, many of us, due to sedentary lifestyles, overlook its importance. This guide aims to reintroduce the importance of movement, especially in survival situations, and offers tests and strategies to optimize it.
From infancy, movement plays a pivotal role in our development. However, modern lifestyles, characterized by prolonged sitting and minimal physical activity, have diminished our natural movement patterns. This not only affects our health but also our ability to respond effectively in life-threatening situations
Any physical fitness expert worth a dime will tell you that the ability to move well and be active are key components to a long and healthy life. As babies, we develop through movement. At some point in our lives, however, most people lose sight of that. Maybe it’s a result of our stuck-in-a-cubicle jobs and sedentary lifestyles. Sitting at a desk all day followed by lying in front of the TV all night just makes things worse.
What we need to discuss are some ways to test how well you move. Even better, we need ways to fix the issues that arise to prevent unnecessary injuries when you’re in a life-and-death situation — like evading roaming bandits.
So, how do you know if you’re moving well?
It can’t be overstated that staying healthy is key to survival. That doesn’t just refer to being disease-free — that also means keeping your body structurally healthy. Today, when all is well in the world, you could easily visit the doctor if your back hurts or your joints flare up. But what if tomorrow there’s a massive wildfire that obliterates your community and forces you to bug out on foot through miles of woodlands? Suddenly, a quick trip to the knee specialist doesn’t seem so likely.
Self-assessment and care are crucial. A hamstring pull will slow down your entire survival group, which will make traveling much more costly, possibly turning a short hike into a death march. Lengthy travel means more supplies, more time, and more terrain challenges. Plus, how will everyone feel when you’re slowing them down? Things may get heated, and anger certainly clouds judgment and causes in-fighting. Morale can plummet from this as well. Everything will seem a lot bleaker once injuries start popping up and travel becomes more grueling.
To make sure you don’t fall victim to a preventable injury, let’s take a look at five movements that will determine how likely you are to end up broken. They’ll test how well you move — and, if need be, we’ll outline a corrective strategy to fix you before you get wrecked.
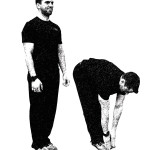
The Toe Touch
Seems pretty basic, right? If you can’t touch your toes, you’re at risk for some pretty rough back issues. You need mobility in your hips, and if there’s not enough, you’ll get that extra motion through your lower back. So, let’s take a look at your toe touch, and if need be, correct it.
Test: Stand with your feet together. Keeping your knees slightly bent, touch your toes. If you didn’t reach your toes, we’ll go through a simple progression to fix it.
Progression 1: Toes-Elevated Toe Touch. Stand with your toes elevated on a 2- to 3-inch surface, feet together, and a rolled up towel between your knees. Reach toward the sky, then bend forward. Once you reach the bottom position, crush the towel between your knees. Complete two sets of 10 repetitions. Once you can reach your toes comfortably with your toes elevated, we’ll move on to the next progression.
Progression 2: Heels-Elevated Toe Touch. Repeat the same three steps described previously, only elevate your heels this time. Complete two sets of 10 repetitions.
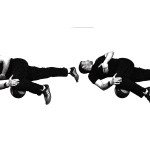
The Seated Trunk Twist
Slouching forward at your desk or while watching TV keeps you in a chronically slumped position. Over time, this causes you to lose motion in the mobile part of your spine. Since your shoulder blades sit on your ribcage, which is attached to your spine, is it any wonder that this posture yields lack of mobility, and, over time, can cause pain? A simple self-assessment is the seated trunk twist.
Test: Sit Indian-style facing a doorframe with your arms crossed, while holding a dowel on the front of your shoulders. Keeping your torso tall, rotate as far as you can while keeping the dowel on your shoulders. If you can’t tap the dowel to the doorframe while rotating in both directions, you’re going to need some help fixing that. Luckily, this progression will do just the trick.
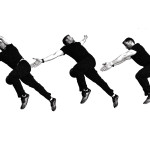
Progression 1: Rib Roll. Begin lying on your right side, with your top knee bent at 90 degrees and your bottom leg straight. Prop your top knee on something 4 to 6 inches high, such as a small ball. Grab your top knee with your right arm and the right side of your ribs with your left arm. Breathe in through your nose, thinking about expanding from your stomach. As you exhale through your mouth, push your left knee into the object, and drop your left shoulder toward the floor while gently pulling your ribs as you rotate. Complete two sets of six to eight repetitions on each side. Do twice the amount of sets on the weak side if an asymmetry is found.
Progression 2: Side-Lying Windmill. Once you’ve completed the first progression, and movement is nearly symmetrical on each side, we’ll move to a more challenging position. Begin in the same position as described in progression 1, but with your hands held together out in front of you. Breathe in through your nose, thinking about expanding from your stomach. As you exhale through your mouth, push your left knee into the object, and trace a big half-circle with your left arm as you rotate through your upper back to move your left shoulder toward the ground. Be sure to follow your hand with your eyes as you move. Complete two sets of six to eight repetitions on each side. Do twice the amount of sets on the weak side if an asymmetry is still present.
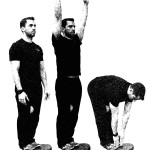
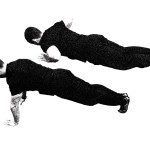
The Push-Up
The push-up is a great test of how stable you are through your core. When you transfer force through your body (think punching, throwing, or heavy squatting), you’ll need core stability to allow the maximum amount of energy to move between your upper and lower body. Here’s how we’ll test it.
Test: Begin lying face down with your hands under your shoulders, your legs straight and your toes pulled to your shins. Press yourself up to the top of the push-up position. Do not allow any movement in your body except for your arms and shoulders.
If you weren’t able to do the push-up, or you did, but your chest rose before your hips, we have some correctives for you to follow.
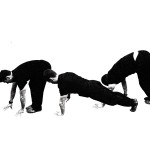
Progression 1: Hand Walk. Begin standing with your feet together. Bend forward and walk out to a push-up position, only using your arms. Return to the starting position, again only using your arms. Complete three sets of six repetitions.
Progression 2: Elevated Push-Up. Begin in a push-up position with your upper body elevated on a 6-inch to 2-foot-high sturdy object, such as a bench. With your elbows at a 45-degree angle to your body, slowly lower yourself to about 6 inches away from the bench. Push into the bench and think about reaching as you come to the top of the movement. Complete two sets of 10 repetitions. Once that is no longer challenging, lower the height by 6 to 12 inches and repeat.
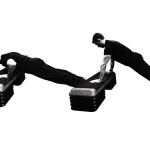
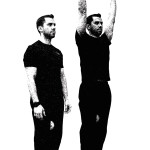
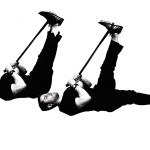
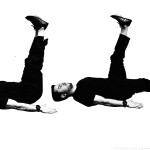
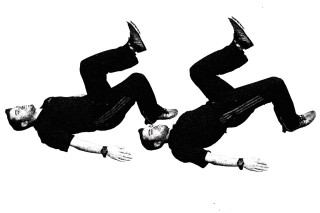
The Straight-Leg Raise
This is a deceptively complex movement that can reveal how well your legs function separately and how stable your core remains during that motion. If you can’t pass this test, any movement that resembles walking, running, or climbing is going to put unnecessary stress on your back and hips.
Test: Begin lying on your back with your feet together and toes up, with your arms out to your sides with palms up. Position your left mid-thigh next to a doorframe or stable vertical object. Keeping both knees straight, slowly raise your left leg as high as you can.
If you aren’t able to reach the object or doorframe with your ankle bone, you’re going to need some work to make this possible.
Progression 1: Supported Single-Leg Lower. Lie on your back with both legs straight and raised up in front of you. Wrap a towel or strap around your left foot and gently pull it toward you. You should feel a light stretch in your left hamstring. Slowly lower your right leg toward the ground, stopping when you are no longer able to keep your back flat against the ground and both knees straight.
Complete two sets of eight repetitions on each side. Do twice the amount of sets on the weak side if an asymmetry is present.
Once the first progression is fairly easy, we’ll move to a more challenging variation.
Progression 2: Unsupported Single-Leg Lower. Begin in the same position as the first exercise, this time without using anything to hold your leg up. Place your arms at your sides, with your palms pressed firmly into the floor. Keeping the left leg straight, slowly lower your right leg toward the floor, stopping when you are no longer able to keep your back flat against the ground and both knees straight.
Complete two sets of eight repetitions on each side. Do twice the amount of sets on the weak side if an asymmetry is present.

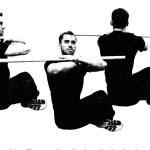
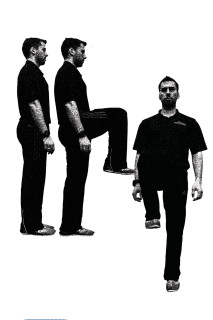
Single-Leg Stance
About 40 percent of a normal walking gait takes place on one leg. Every time we go up stairs, we’re on one leg. It’s safe to say single-leg stability is important to normal functioning. It’s no wonder, then, that we should take a look at how well you are able to stabilize yourself on one leg.
Test: To test this, simply stand with your feet together and raise one knee above your hip for 10 seconds. It’s best to do this in front of a mirror to make sure your hips remain level. If you weren’t able to hold each knee up for 10 seconds, or your hips weren’t level, here are two exercises to help.
Progression 1: Single-Leg Glute Bridge. Begin lying on your back with your knees bent to 90 degrees. Pull one knee up toward your chest. Drive your planted foot through the floor and push your hips to the ceiling.
Complete two sets of 10 repetitions per side. Do twice the amount of sets on the weak side if an asymmetry is present.
Progression 2: Balance Beam. The next progression is simply walking on a balance beam. The beam can be anything from a few 2x4s to a fallen tree. Find something that is wide enough to plant a foot, and ideally, not very high off the ground. Shoot for three sets of about 30 seconds to a minute of balance time.
Conclusion
Don’t beat yourself up if these movement tests gave you some difficulty. The point is to be proactive and test yourself regularly — by identifying areas that need improvement, you can proactively work on the progressions we’ve outlined above. A little prevention will go a long way to catch these issues before you’re traversing mountainous terrain to find shelter or climbing through rubble after a building collapse.
Sources
About the Author
Ryne Gioviano, a regular OFFGRID contributor, co-owns Welligee Personal Training & Lifestyle in Naperville, Illinois. With a master’s in exercise physiology and NSCA certification, he’s an authority in fitness. Visit www.welligee.com for more.
Related Posts
- Pain-Free Programming: Safely Train Through Injuries
- Patella-Dropping Puglilist: Knee Strikes for Self-Defense
- Boost Your Sprint Performance and Save Your Life
- Where Is Your Pain Coming From?
