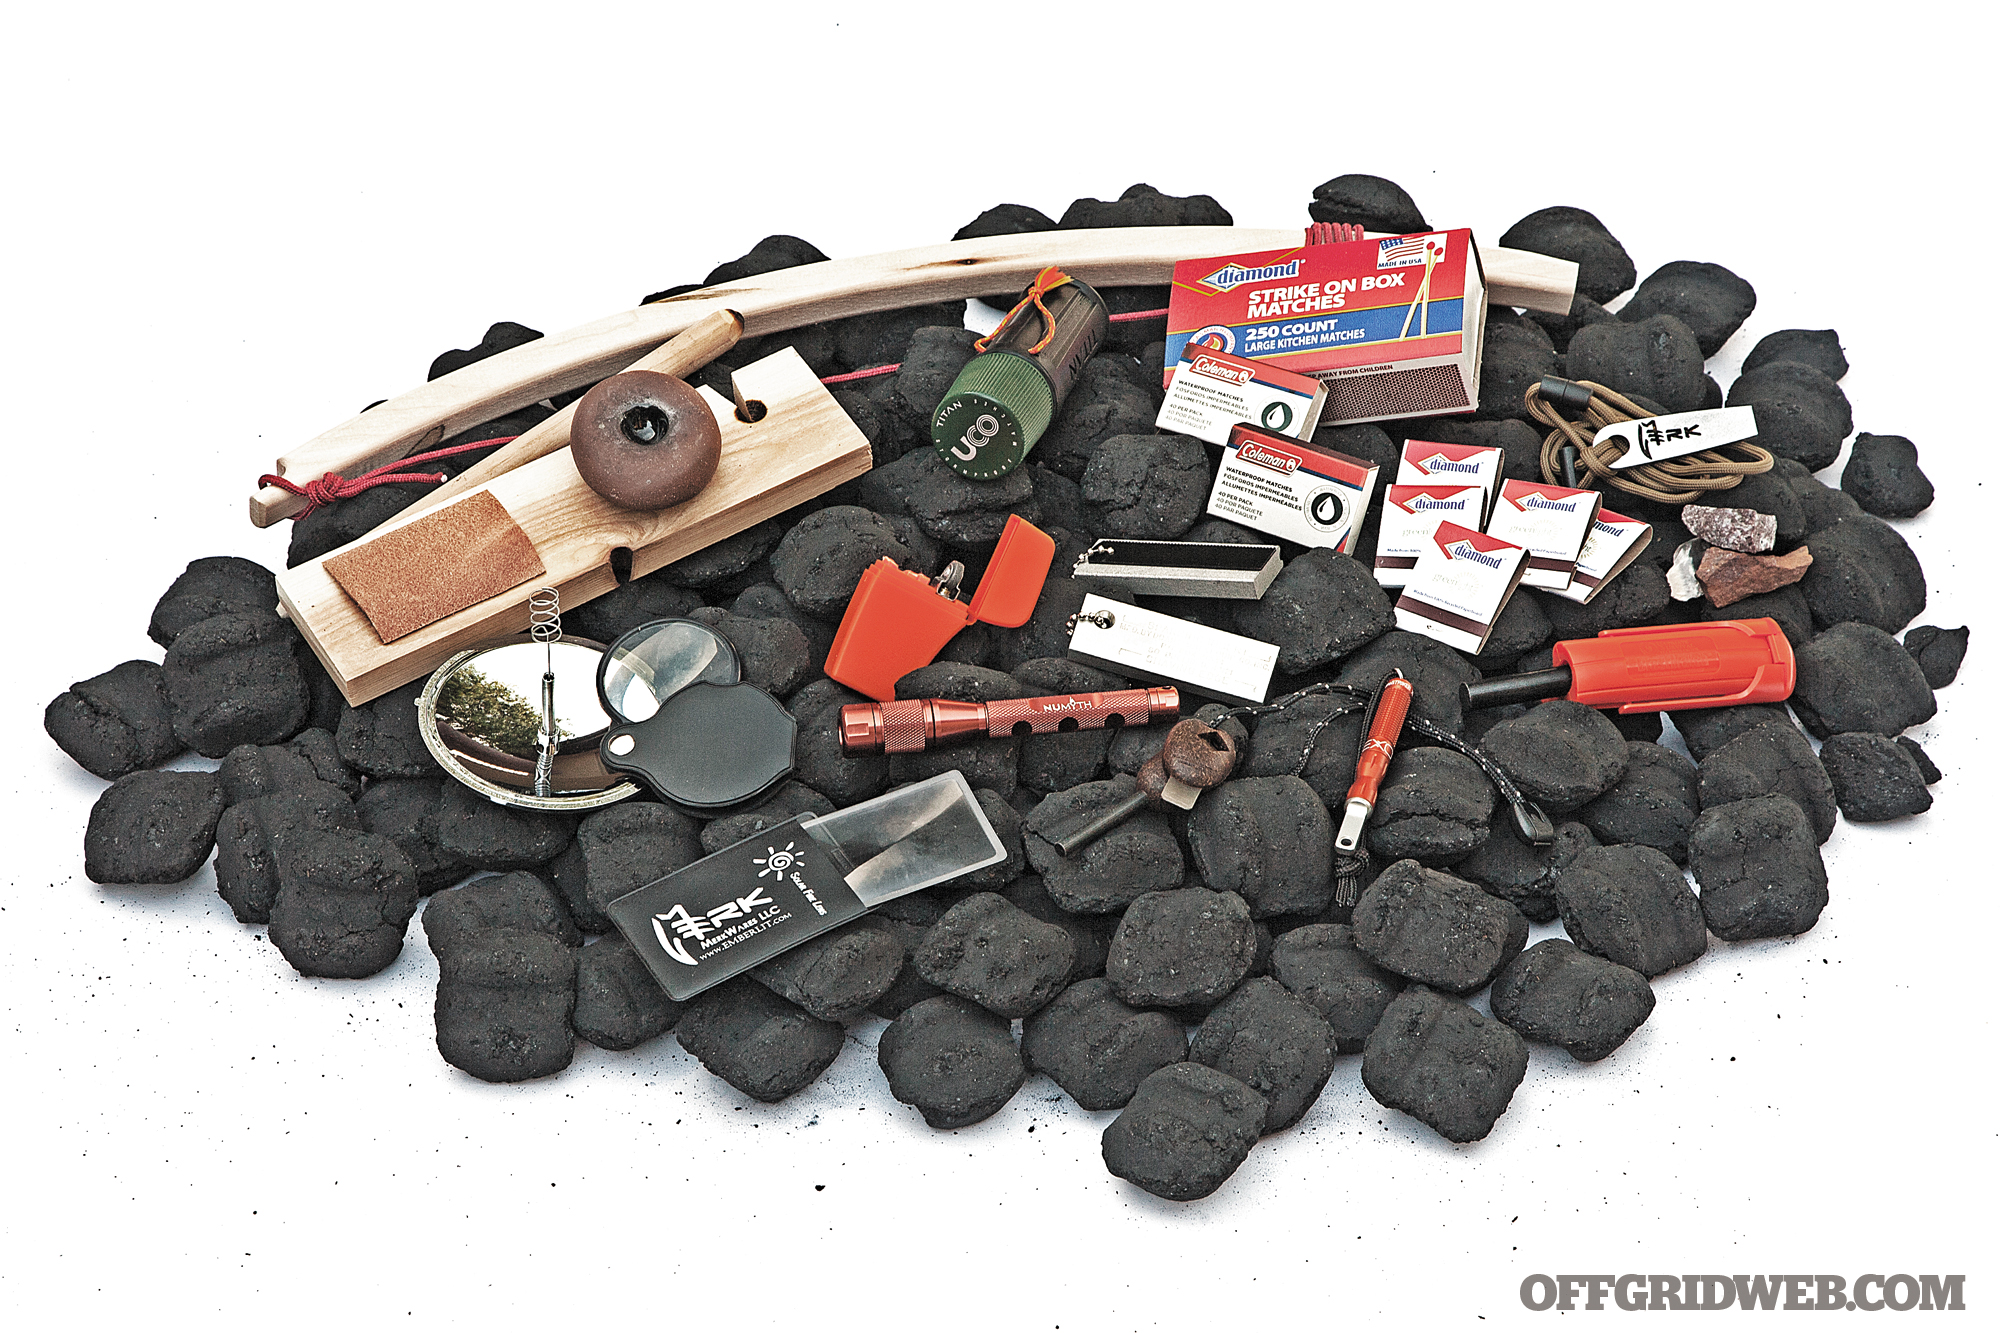
Minnesota-born novelist Sinclair Lewis once wrote, “Winter is not a season, it’s an occupation.” In other words, winter is not the time for complacency, especially for survivalists. But no matter the season, hypothermia can quickly set in as a result of rain, wind chill, or dropping temperatures after nightfall. In any survival situation, we need to view staying warm as a full-time job.
Layered clothing and a proper shelter can go a long way, but the cornerstone of warmth is knowing with complete certainty that you can quickly and reliably start a fire. This means your survival kit should contain a diverse and redundant set of fire-starting tools. Why? Because if you rely on just one, you’ll eventually learn the answer the hard way when it fails.
Whether you need to add a backup firestarter to your bug-out bag or you’re looking to replace an item in your incendiary arsenal, it’s beneficial to examine all the available options. We collected a wide variety of firestarters from six different categories, then tested each tool knowing that each type would have its own pros and cons. (For the purposes of this guide, we omitted lighters and torches — for these devices, refer to our Lighter & Torch Buyer’s Guide from Issue 23.)

And because you demanded it, we also include several budget buys to see how these affordable options compare to the brand names. That said, read on to hear our thoughts on each fire-starting tool and consider whether one or more deserves a place in your emergency kit.
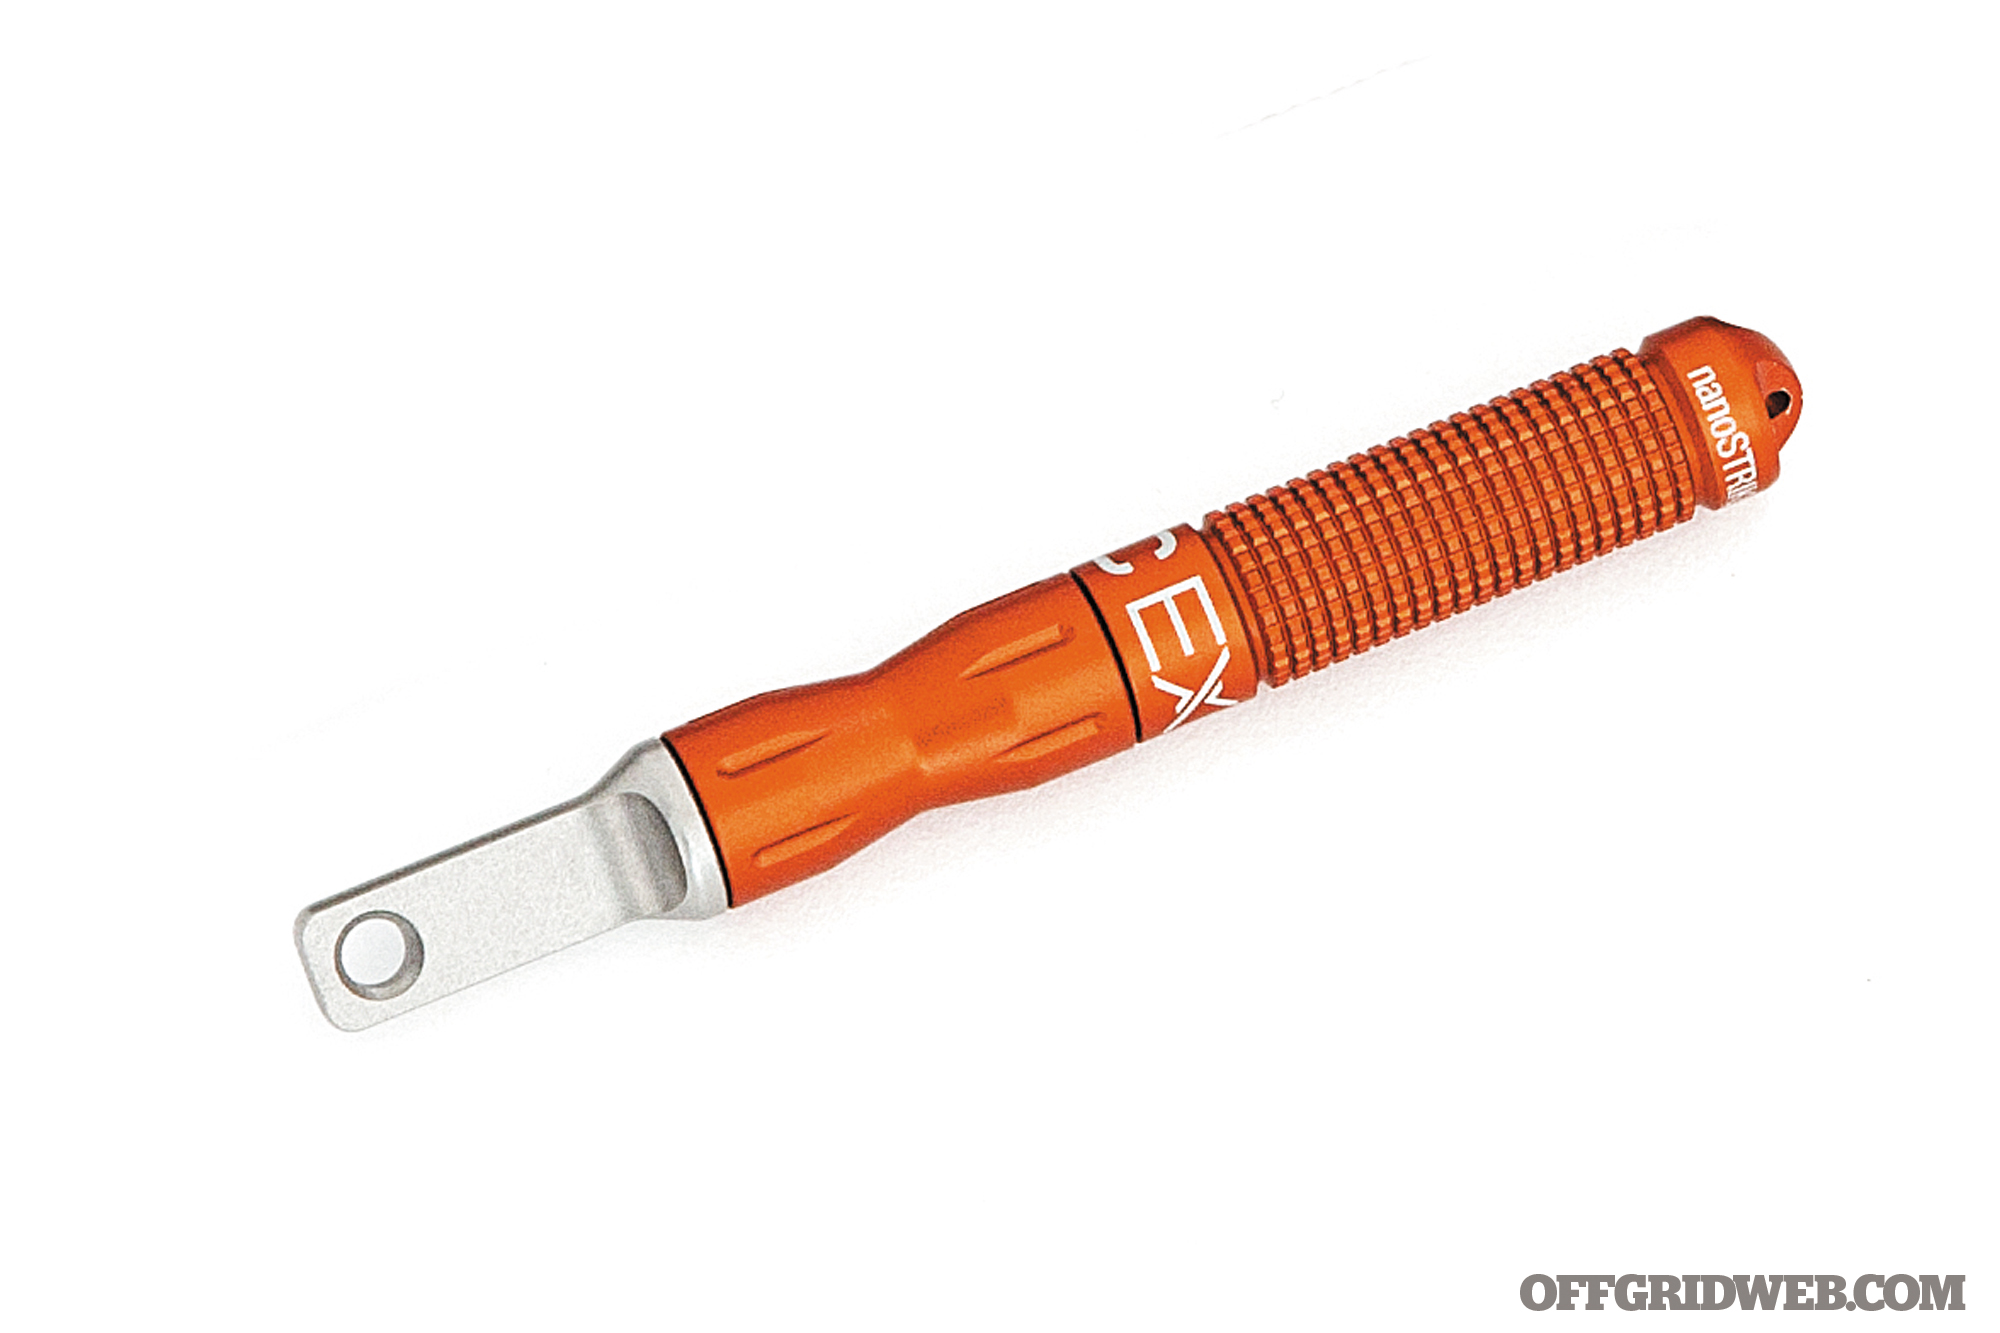
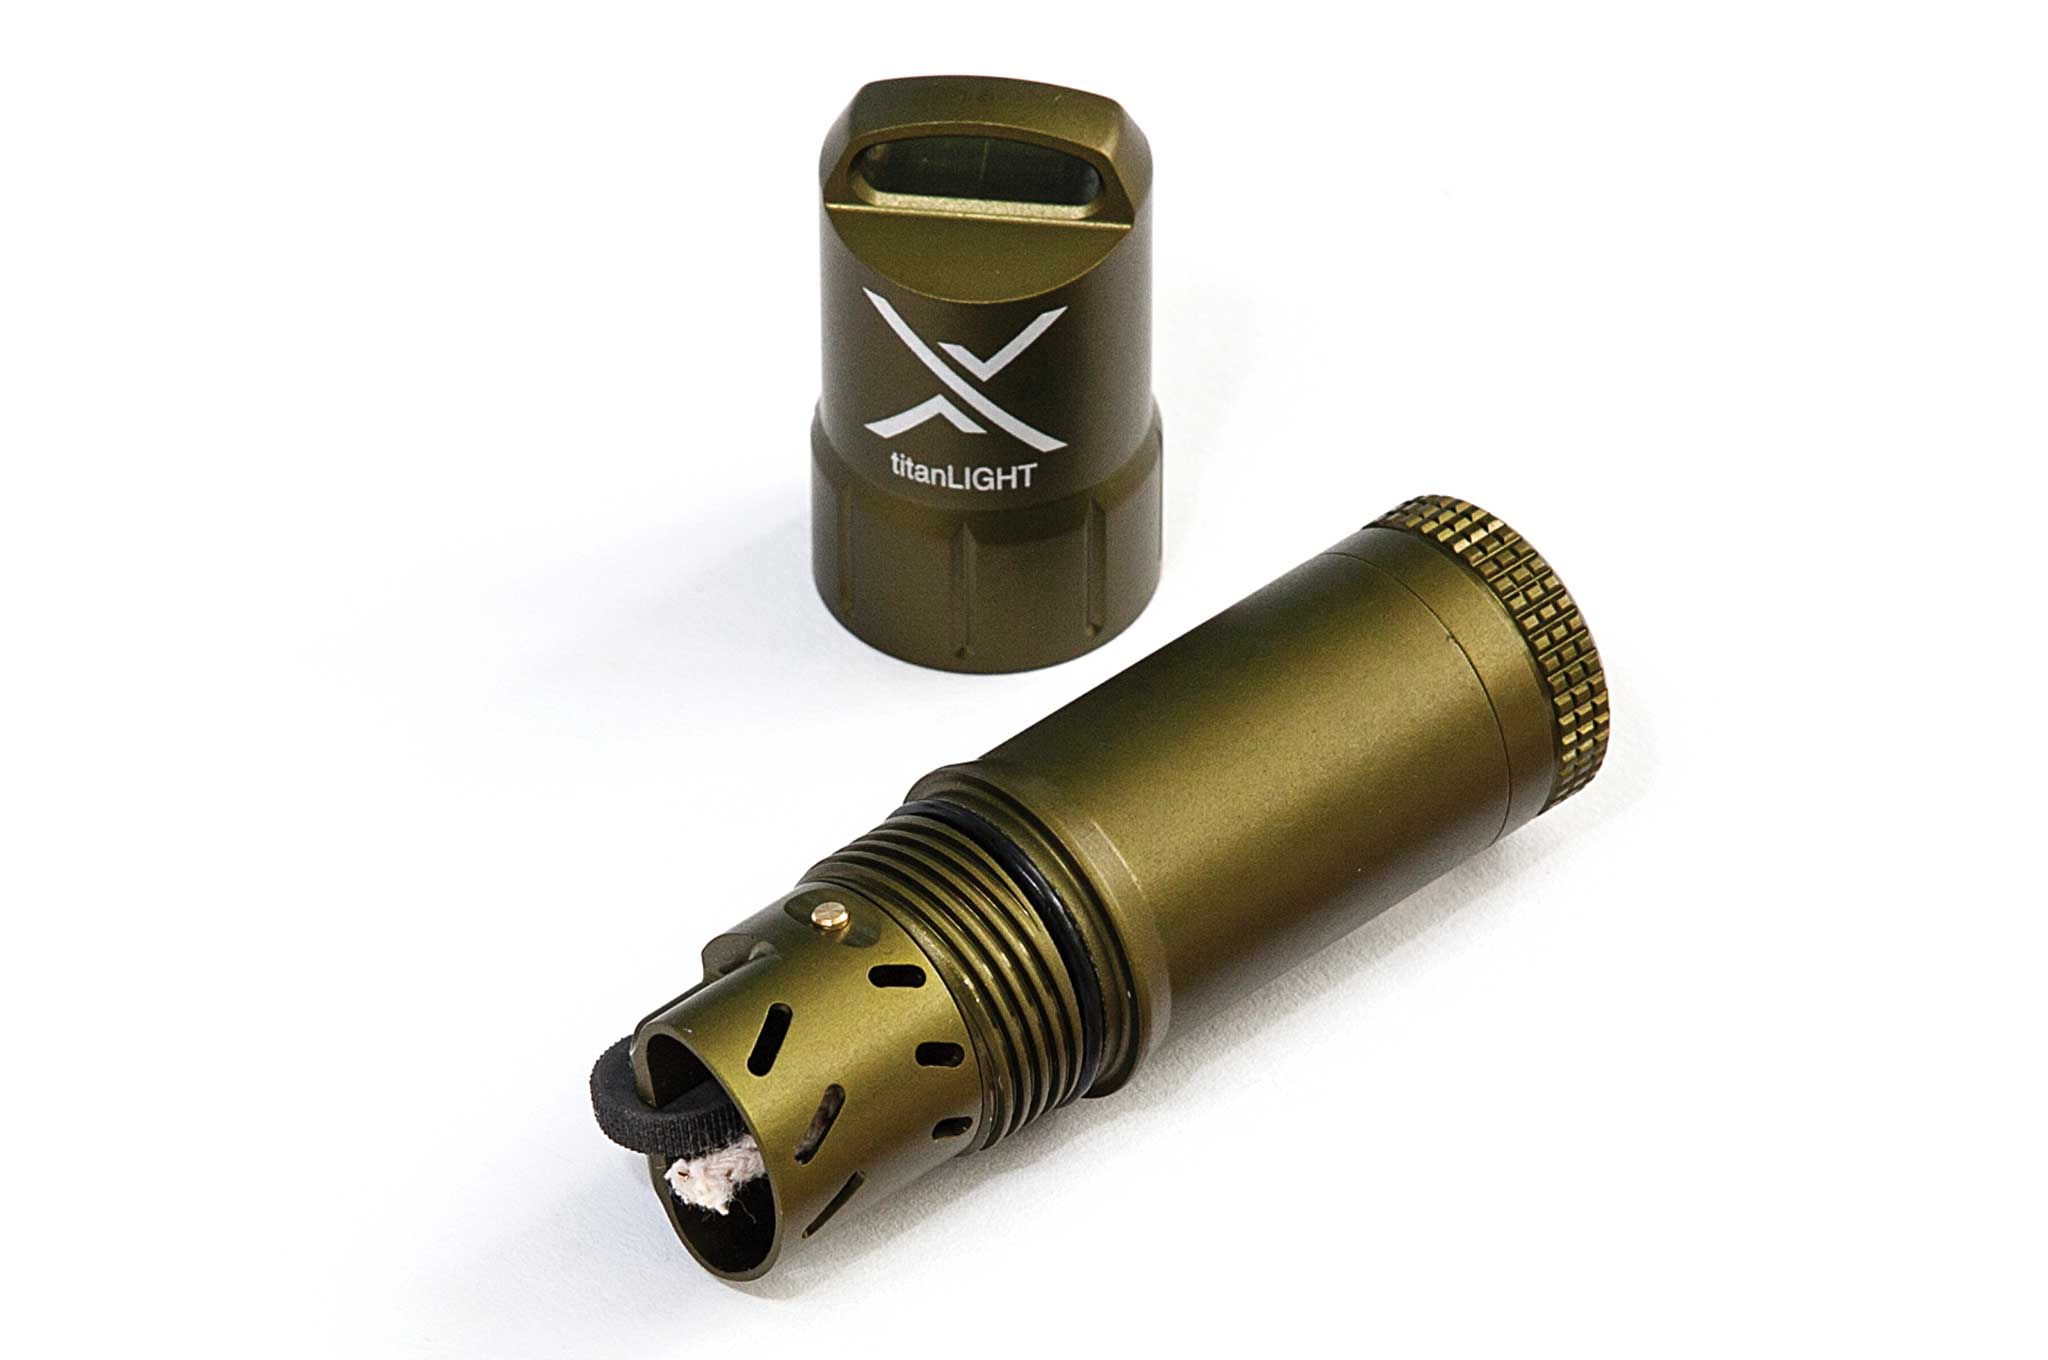
EXOTAC nanoSTRIKER XL

Type
Ferro Rod
Dimensions
3.7 inches long by 0.4-inch diameter
Weight
1 ounce
Components
Threaded aluminum body, ferro rod, tungsten carbide striker
Lifespan
3,000 strikes per replaceable rod
Special Features
Key ring, lanyard, waterproof O-rings, 4 colors available
MSRP / Recurring Costs
$29 / $7.50 ferro rod, $9 striker
URL
www.exotac.com
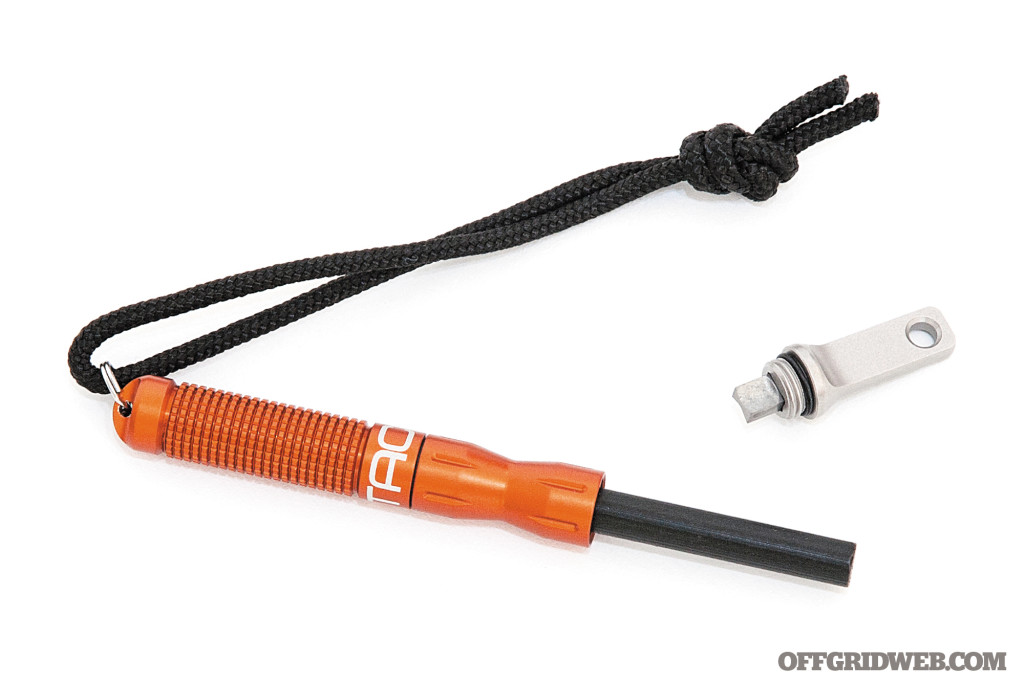
The XL in this product’s name may lead you to believe it’s gigantic — that’s not the case. This is a slightly enlarged version of the original EXOTAC nanoSTRIKER, but it’s still under 4 inches long and about as thick as a ballpoint pen. The company claims the XL threaded ferro rod will last for 3,000 strikes, approximately triple the lifespan of the discontinued original version. Using this three-piece ferro rod is simple. Just unscrew the components, thread the ferro rod onto the cap facing the opposite direction, and strike it with the carbide striker.
Unfortunately, the small parts can be difficult to assemble and use reliably in the cold, in the dark, or while wearing gloves. This firestarter would be terrific for everyday carry on a keychain, but it wouldn’t be our first choice for frigid wilderness survival.
Pros:
- Sleek, modern design that’s perfect for everyday carry (EDC)
- Made in the USA
Cons:
- Small striker takes finesse to spark reliably.
- Three-piece design risks losing components
Light My Fire Swedish FireSteel 2.0 Scout

Type
Ferro Rod
Dimensions
3 by 0.9 by 0.5 inches
Weight
1 ounce
Components
Ferro rod, stainless striker
Lifespan
3,000 strikes
Special Features
Emergency whistle, lanyard, nesting handles
MSRP / Recurring Costs
$15 / N/A
URL
www.lightmyfire.com

Just as the Swiss are known for their army knife, the Swedes are famous for FireSteel. This ferro rod design was developed for the Swedish Ministry of Defence for use by the country’s armed forces. Light My Fire still manufactures the product in a dedicated factory in Västervik, though the rod’s design has evolved since its inception. Version 2.0 comes with ergonomically improved handles and a built-in emergency whistle.
There are two variants: Army uses a heavy-duty 12,000-strike ferro rod; Scout (seen here) uses a lighter 3,000-strike rod. This particular model has handles made of polymer-encapsulated coconut shell fiber, contoured to nest side-by-side against each other. The FireSteel 2.0 makes starting a campfire or stove easy, thanks to the large shower of white-hot sparks produced with each strike.
Pros:
- Excellent striker produces sparks with ease
- Lanyard keeps rod tethered securely to striker
Cons:
- Storage options are limited due to odd shape. A sheath, pocket clip, or fitted storage pouch would be beneficial.
Ultimate Survival Technologies (UST) BlastMatch

Type
Ferro Rod
Dimensions
4.1 by 1.4 by 1 inches
Weight
2.3 ounces
Components
Orange plastic case, spring-loaded ferro rod, fixed carbide striker
Lifespan
4,000 strikes
Special Features
Locking protective cover
MSRP / Recurring Costs
$25 / N/A
URL
www.ustbrands.com
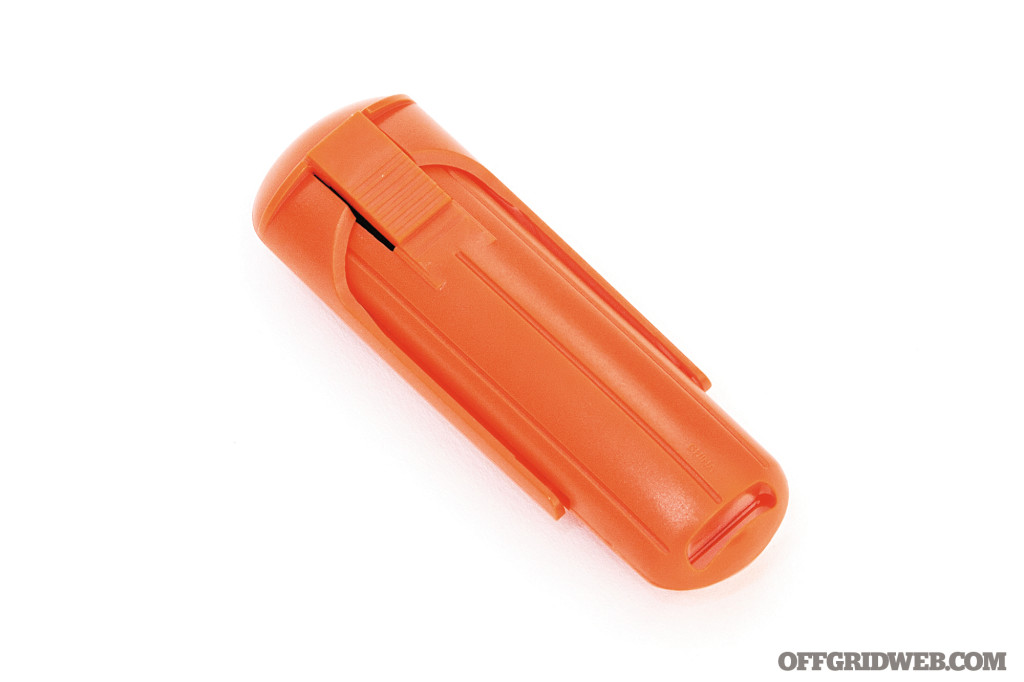
Heralded as a revolutionary patented improvement on the basic ferrocerium rod, the UST BlastMatch uses a stationary striker blade and spring-loaded rod in a polymer body. To operate the device, just pop off the protective cover, place the rod against your tinder material, and maintain firm pressure on the striker plate with your thumb. A quick downward push throws sparks directly at the base of the rod.
Unfortunately, we found that the BlastMatch works a lot better in theory than it does in reality. The rod needs to be in contact with the base of your tinder pile, requiring a forceful pushing motion that can scatter carefully positioned shavings or fibers. The BlastMatch can be used one-handed, a major advantage, but in most cases we’d prefer the simplicity and consistency of an ordinary rod and striker.
Pros:
- One-handed operation
- Large ferro rod can be struck manually with a blade.
Cons:
- Pushing motion tends to disturb tinder pile
- Hard plastic case with moving parts leads us to question durability
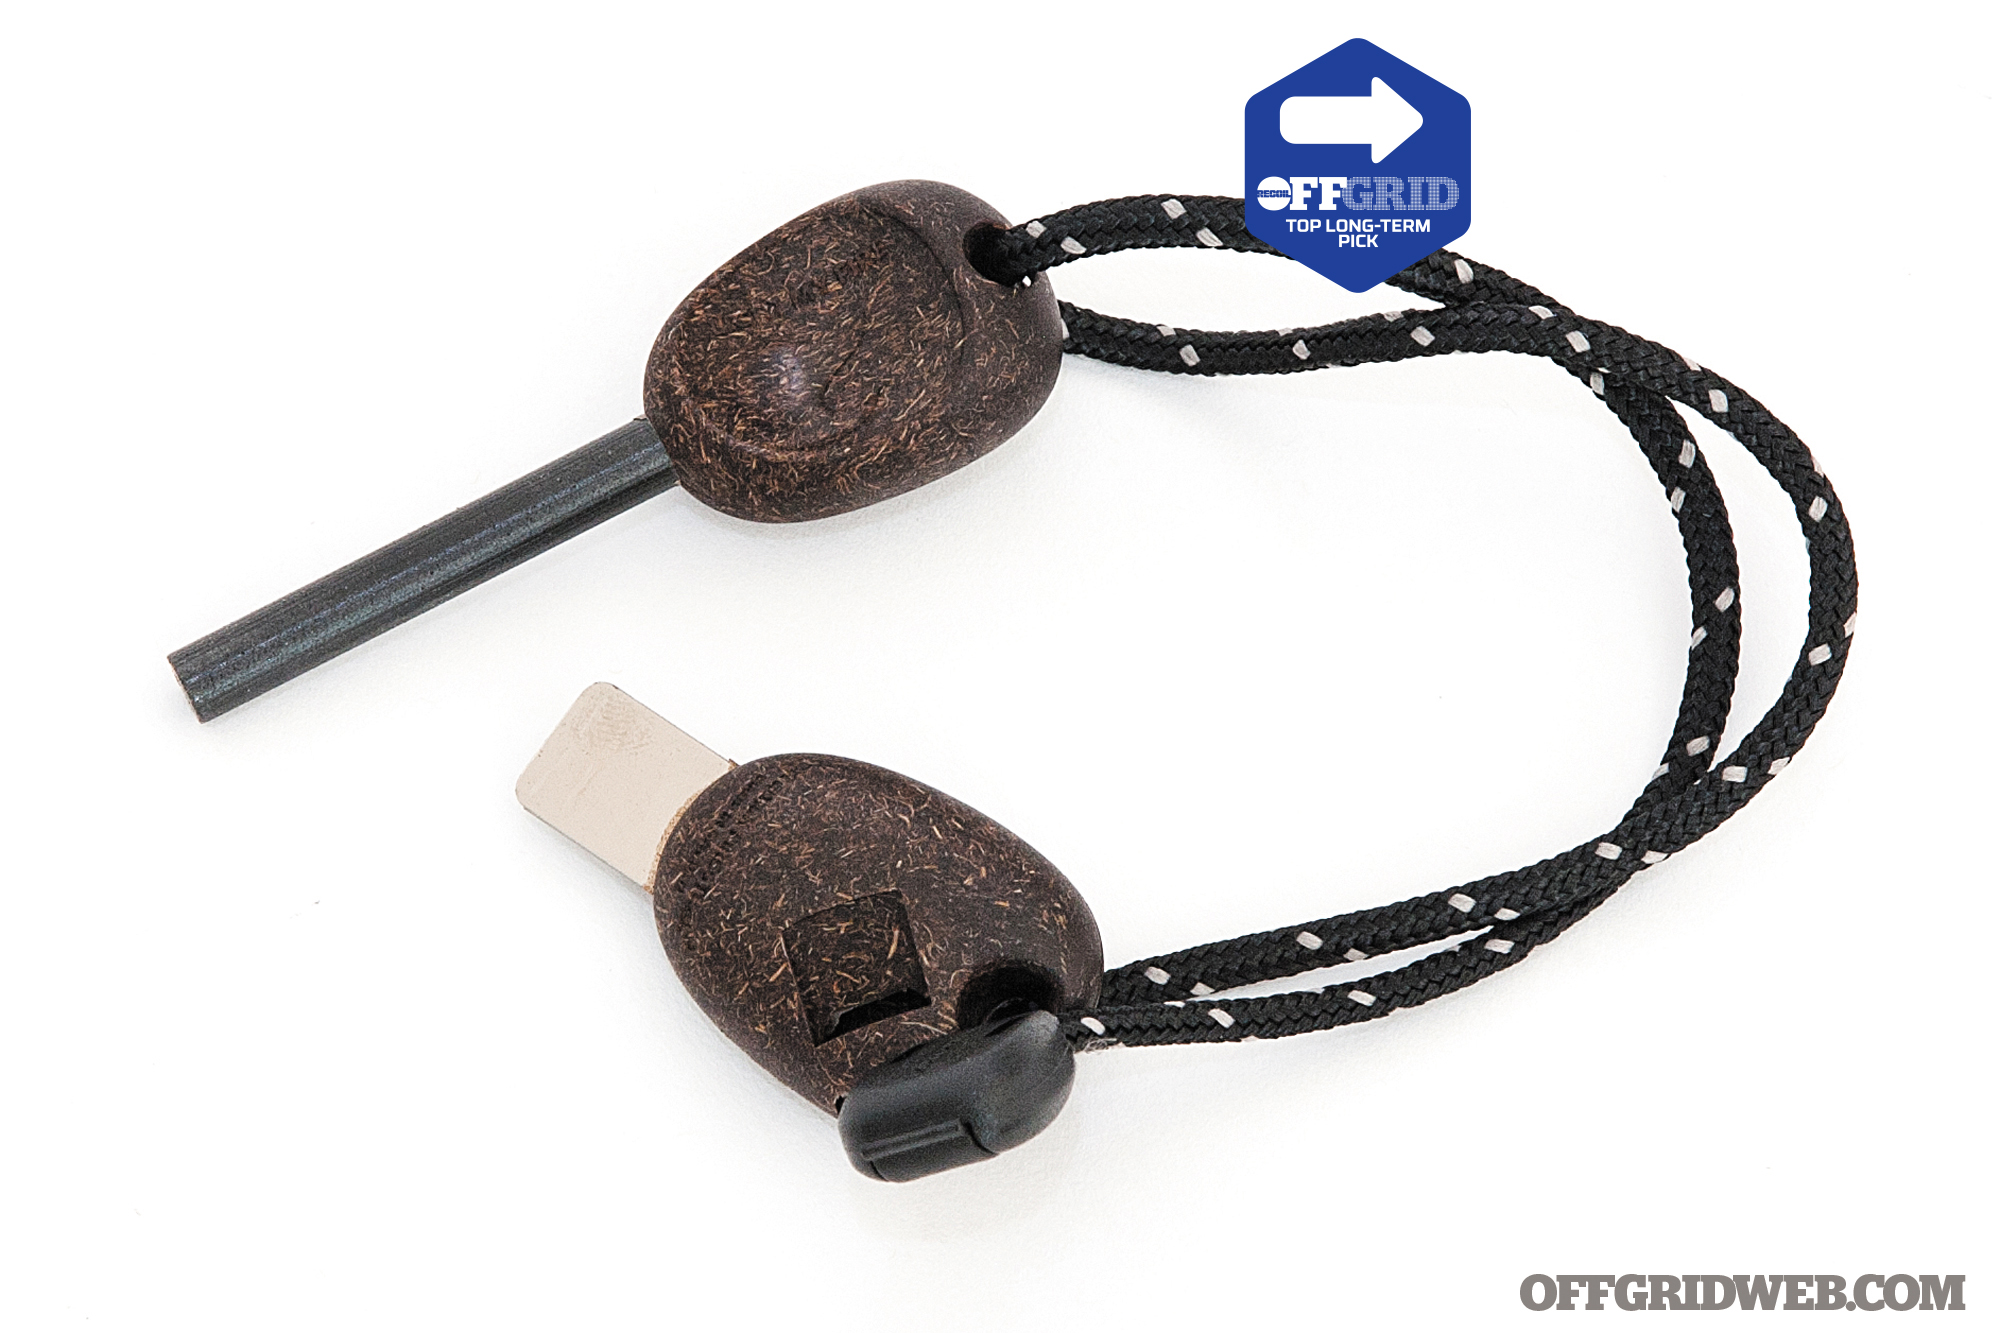
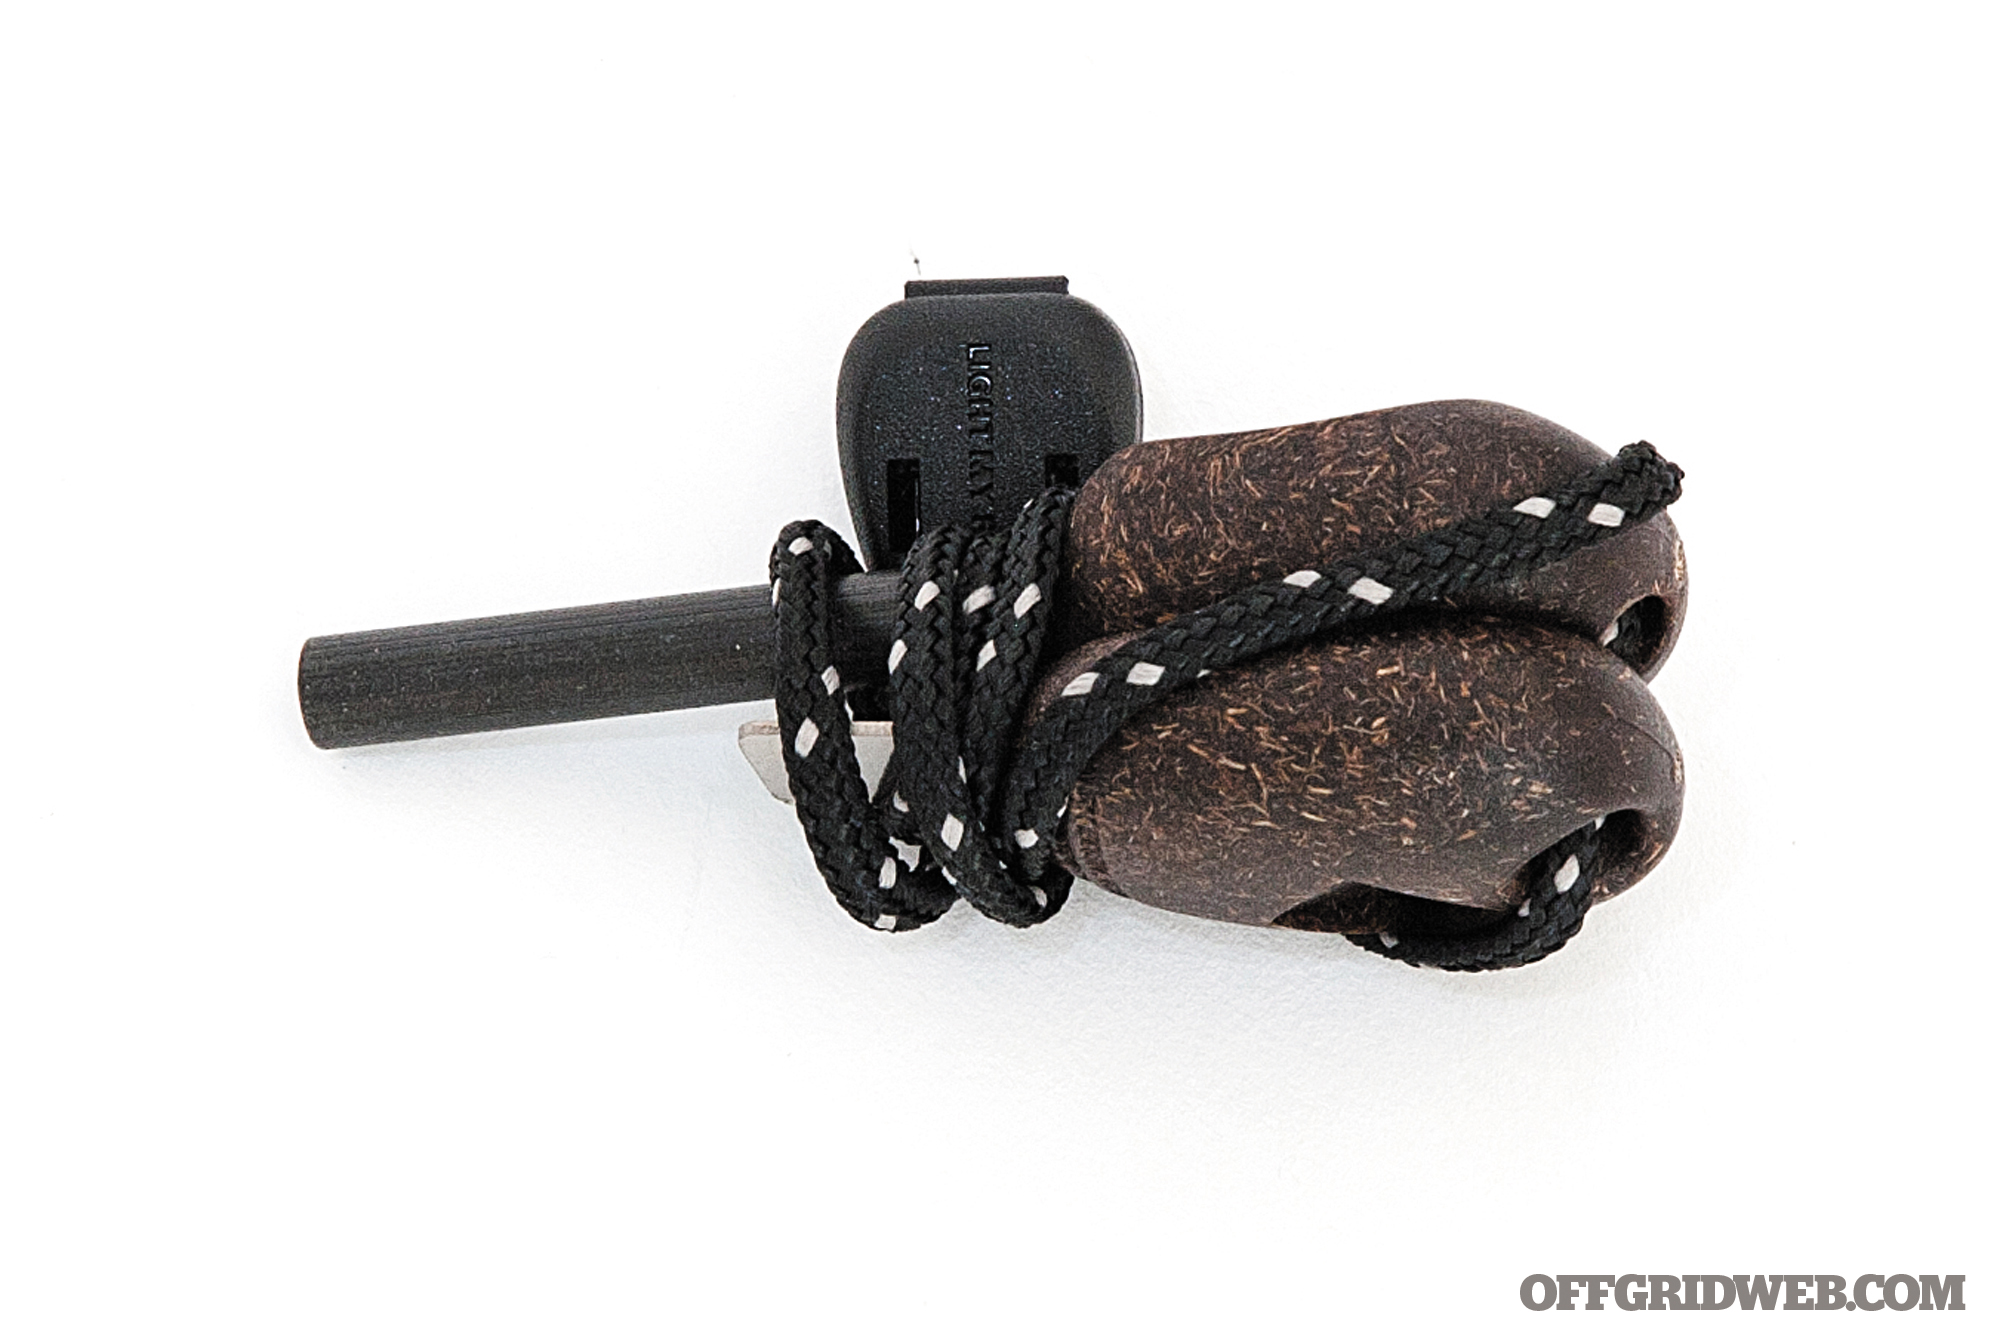
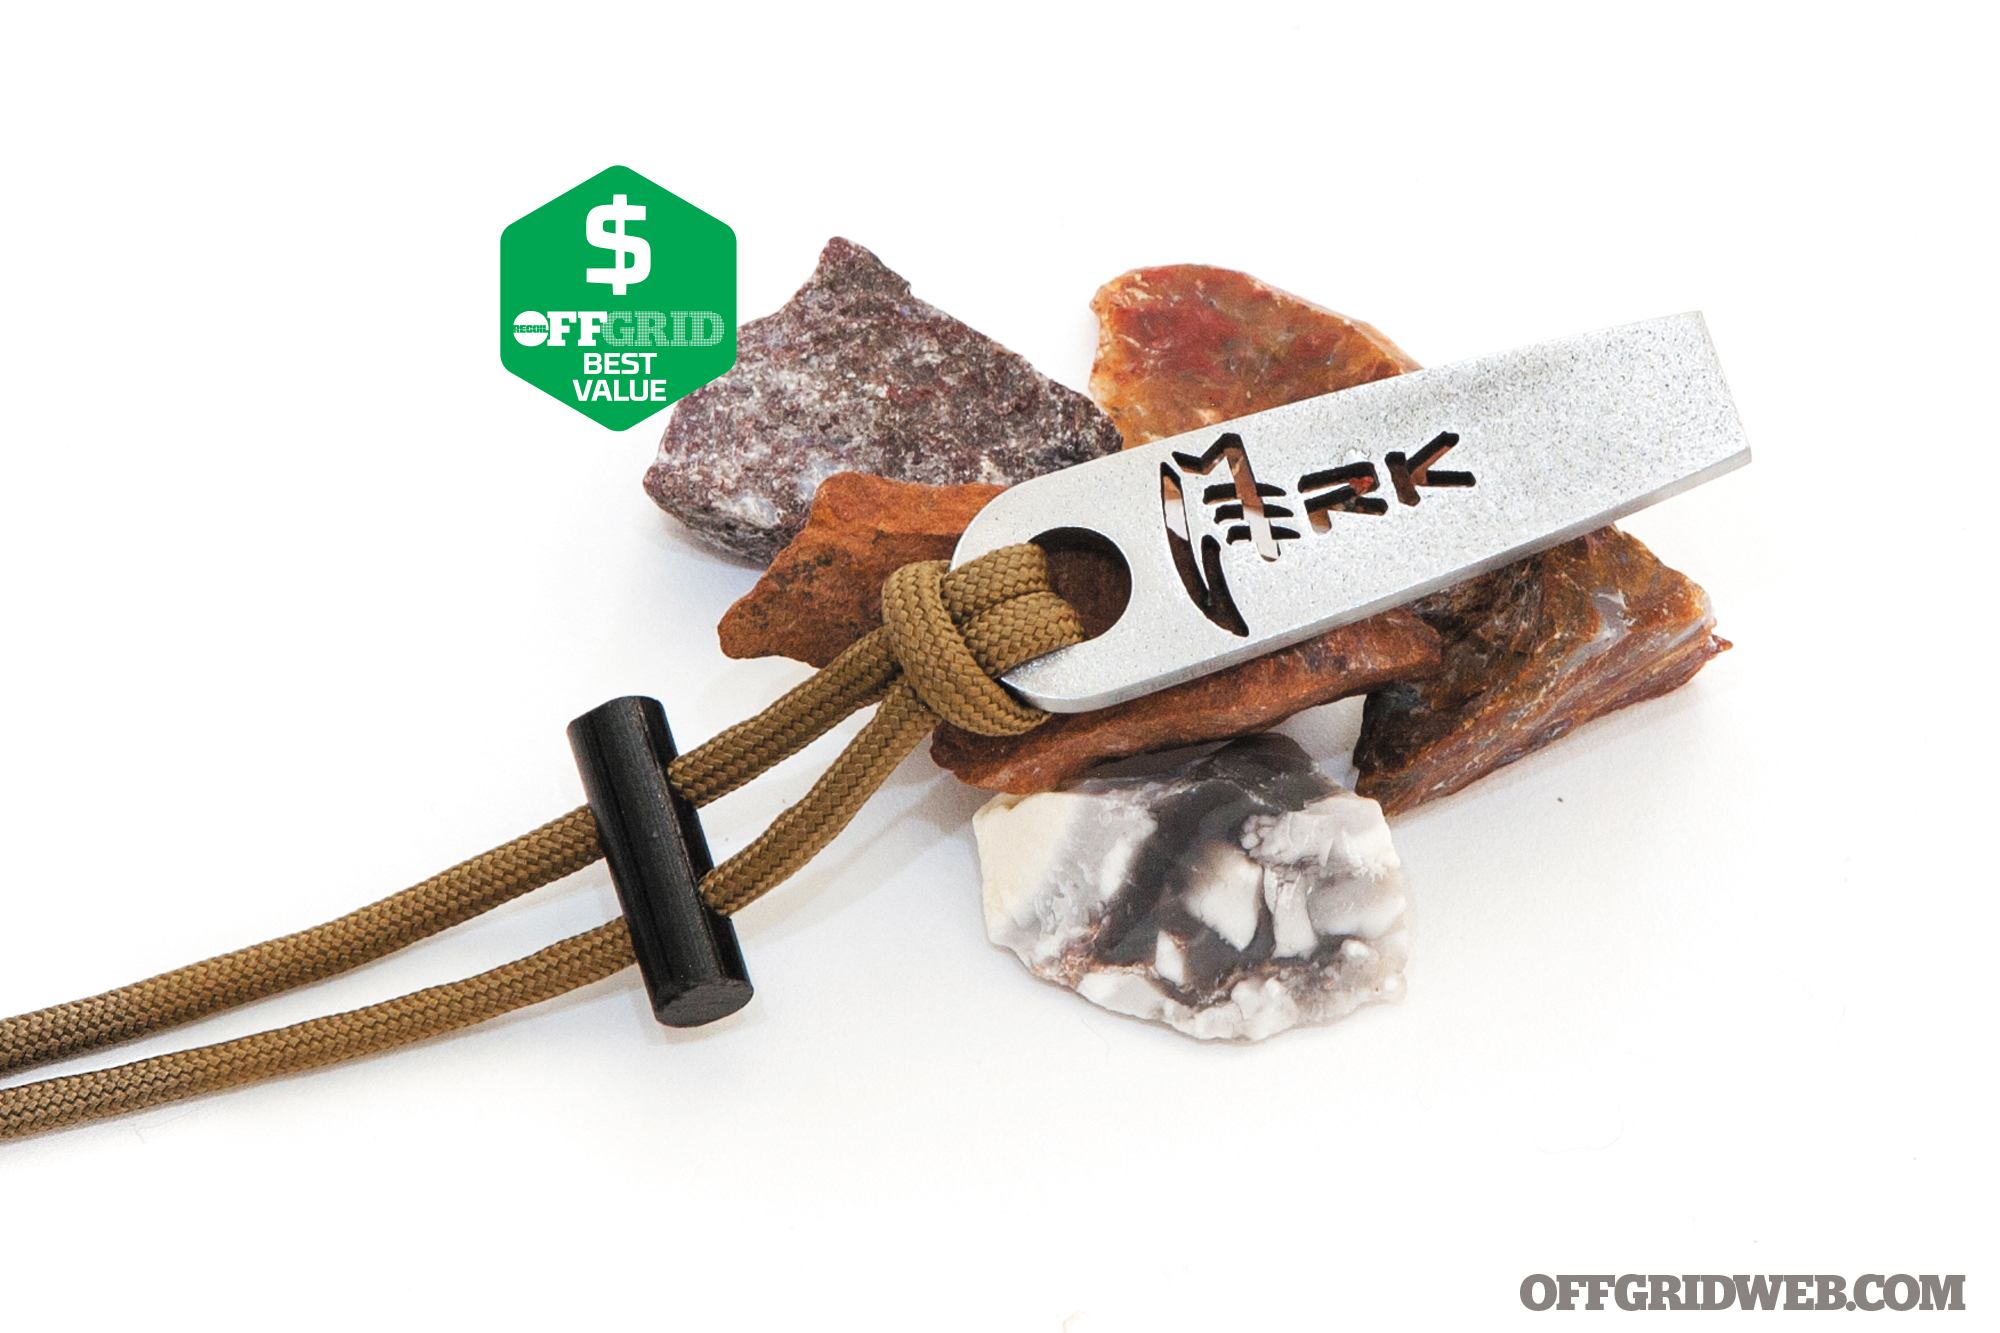
EmberLit / MerkWares Strike-a-Light Fire Starter Necklace

Type
Flint & Steel
Dimensions
Striker: 2.5 by 0.6 by 0.1 inches / Lanyard: 16.5 inches long
Weight
1.3 ounces
Components
EmberLit pendant steel striker, ferrocerium toggle, 550 FireCord lanyard, quick-release clasp
Lifespan
N/A
Special Features
Mini 1-inch ferro rod, combustible tinder strand
MSRP / Recurring Costs
$30 / $15 replacement FireCord (25 ft.), $1 flint rocks
URL
www.emberlit.com
This may look like an ordinary necklace to the casual observer, but it’s actually an ingenious combination of modern and ancient fire-starting gear. First, there’s the pendant, which is cut from 1/8-inch-thick high-carbon steel, bearing a cutout of the “tooth and talon” MerkWares logo. Many alternative pendant shapes are available at no extra cost, ranging from animal silhouettes to a Thor’s hammer symbol. This steel provides sharp edges, which can produce sparks when struck rapidly against flint, agate, or other hard stones (sold separately). The pendant can also be used to strike the small ferro rod toggle on the necklace. Even the lanyard contributes to fire-starting — it’s actually 550 FireCord, with seven braided fibers plus a waxed tinder strand inside the nylon sheath. In an emergency, the wearer can cut off a segment of the lanyard, ignite the tinder strand, and reposition the clasp to keep the necklace intact. This necklace provides all the ingredients for a survival fire — and looks good doing it.
Pros:
- Necklace configuration provides fast access to fire-starting tools.
- Good value considering its many components and uses
Cons:
- The flint/steel method requires serious patience and practice.
- Flint rocks may be hard to find.
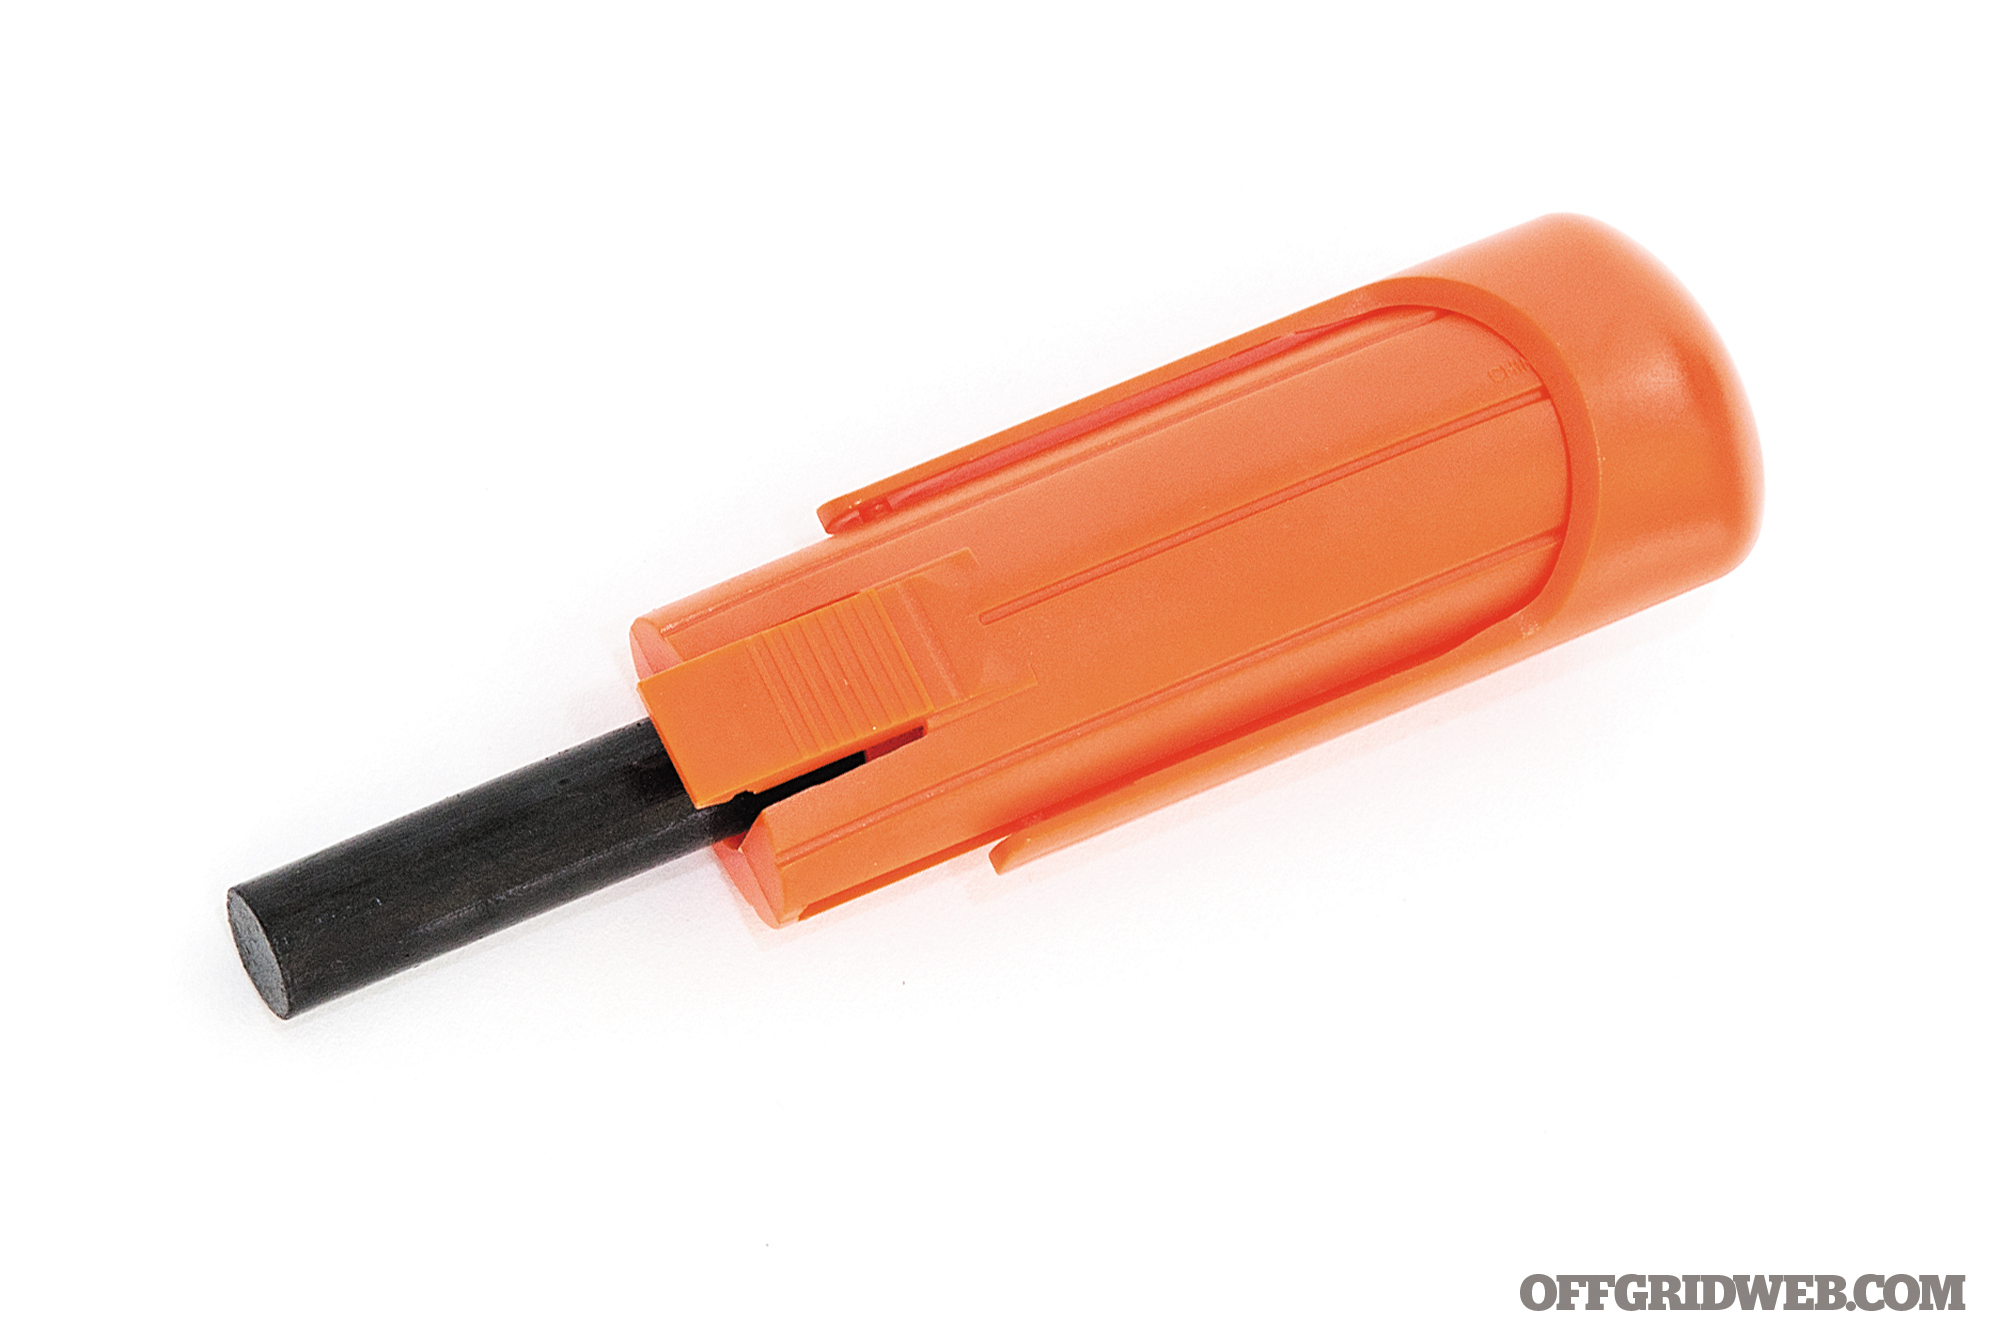
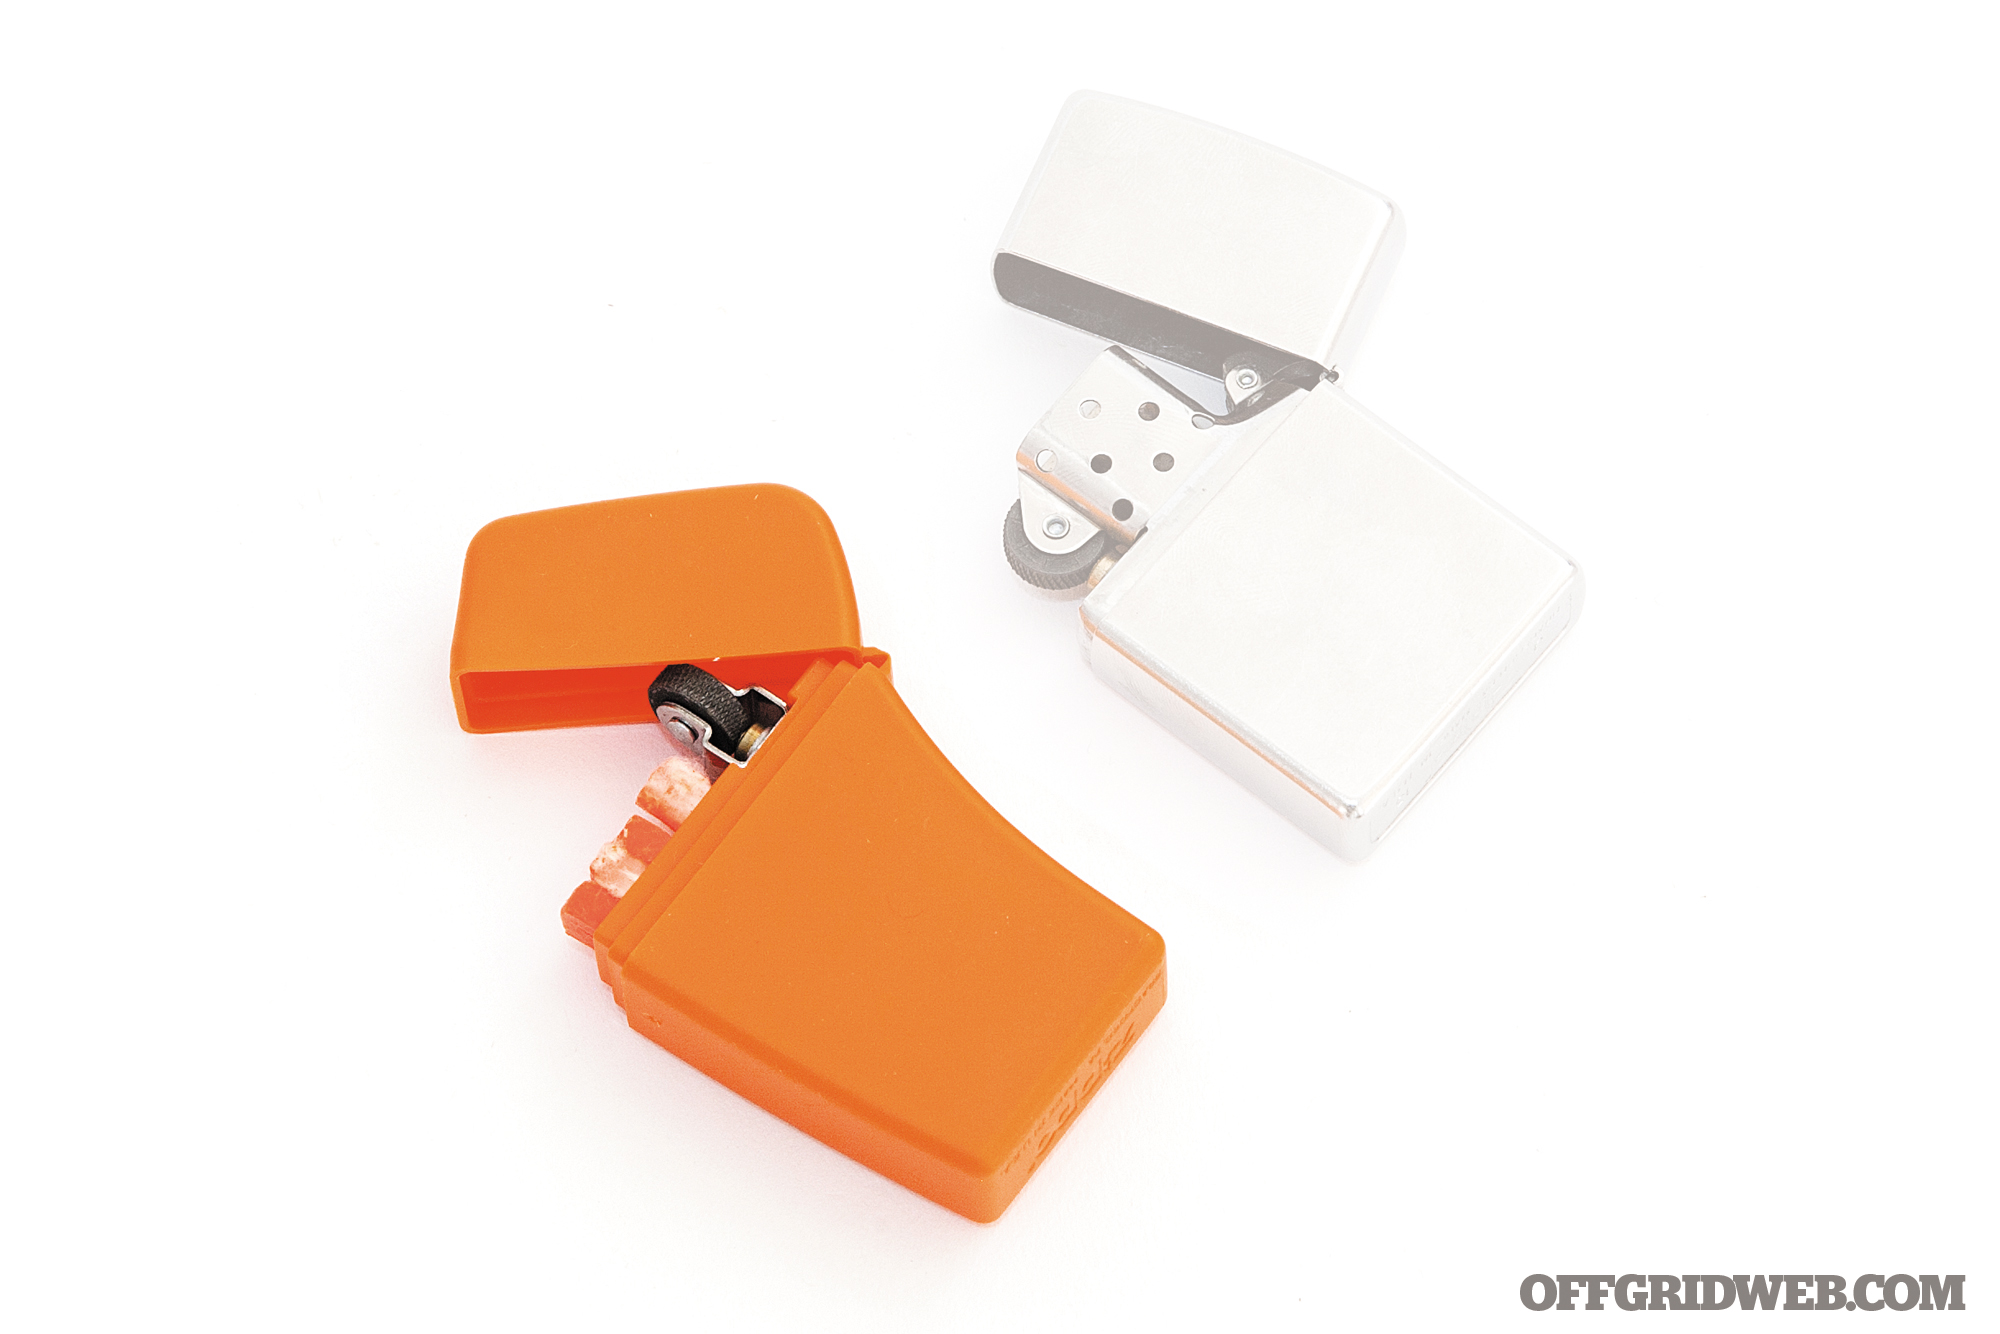
Zippo Emergency Fire Starter

Dimensions
2.5 by 1.7 by 0.6 inches
Weight
1 ounce
Components
Orange plastic case, flint wheel igniter, 4 waxed tinder sticks
Lifespan
Approximately 1,500 strikes per replaceable flint
Special Features
Water-resistant seal, rotating directional flint wheel
MSRP / Recurring Costs
$15 / $0.80 replacement flints (6), $5 tinder sticks (8)
URL
www.zippo.com
Ever tried to light a fire with an empty lighter? Ever wished you could relive that same experience during a survival situation? If so, the Zippo Emergency Fire Starter is what you’re looking for. Seriously though, for better or for worse, this tool is simply the wheel igniter from a Zippo lighter turned 90 degrees and transplanted into a lightweight plastic case. The sparks it creates are minuscule.
One upside is that the water-resistant seal protects a small cavity that contains four waxed cotton tinder sticks. So, you’ll at least have some dry tinder at the ready. It appears that Zippo used to make a tougher metal-cased version of this firestarter, complete with a waterproof O-ring. But even with those features, it’s hard to overlook the realization that this tool is marginally more useful than an empty lighter and some cotton balls.
Pros:
- One-handed operation
- Water-resistant tinder container
Cons:
- You might as well carry an empty Zippo lighter … or a full one.
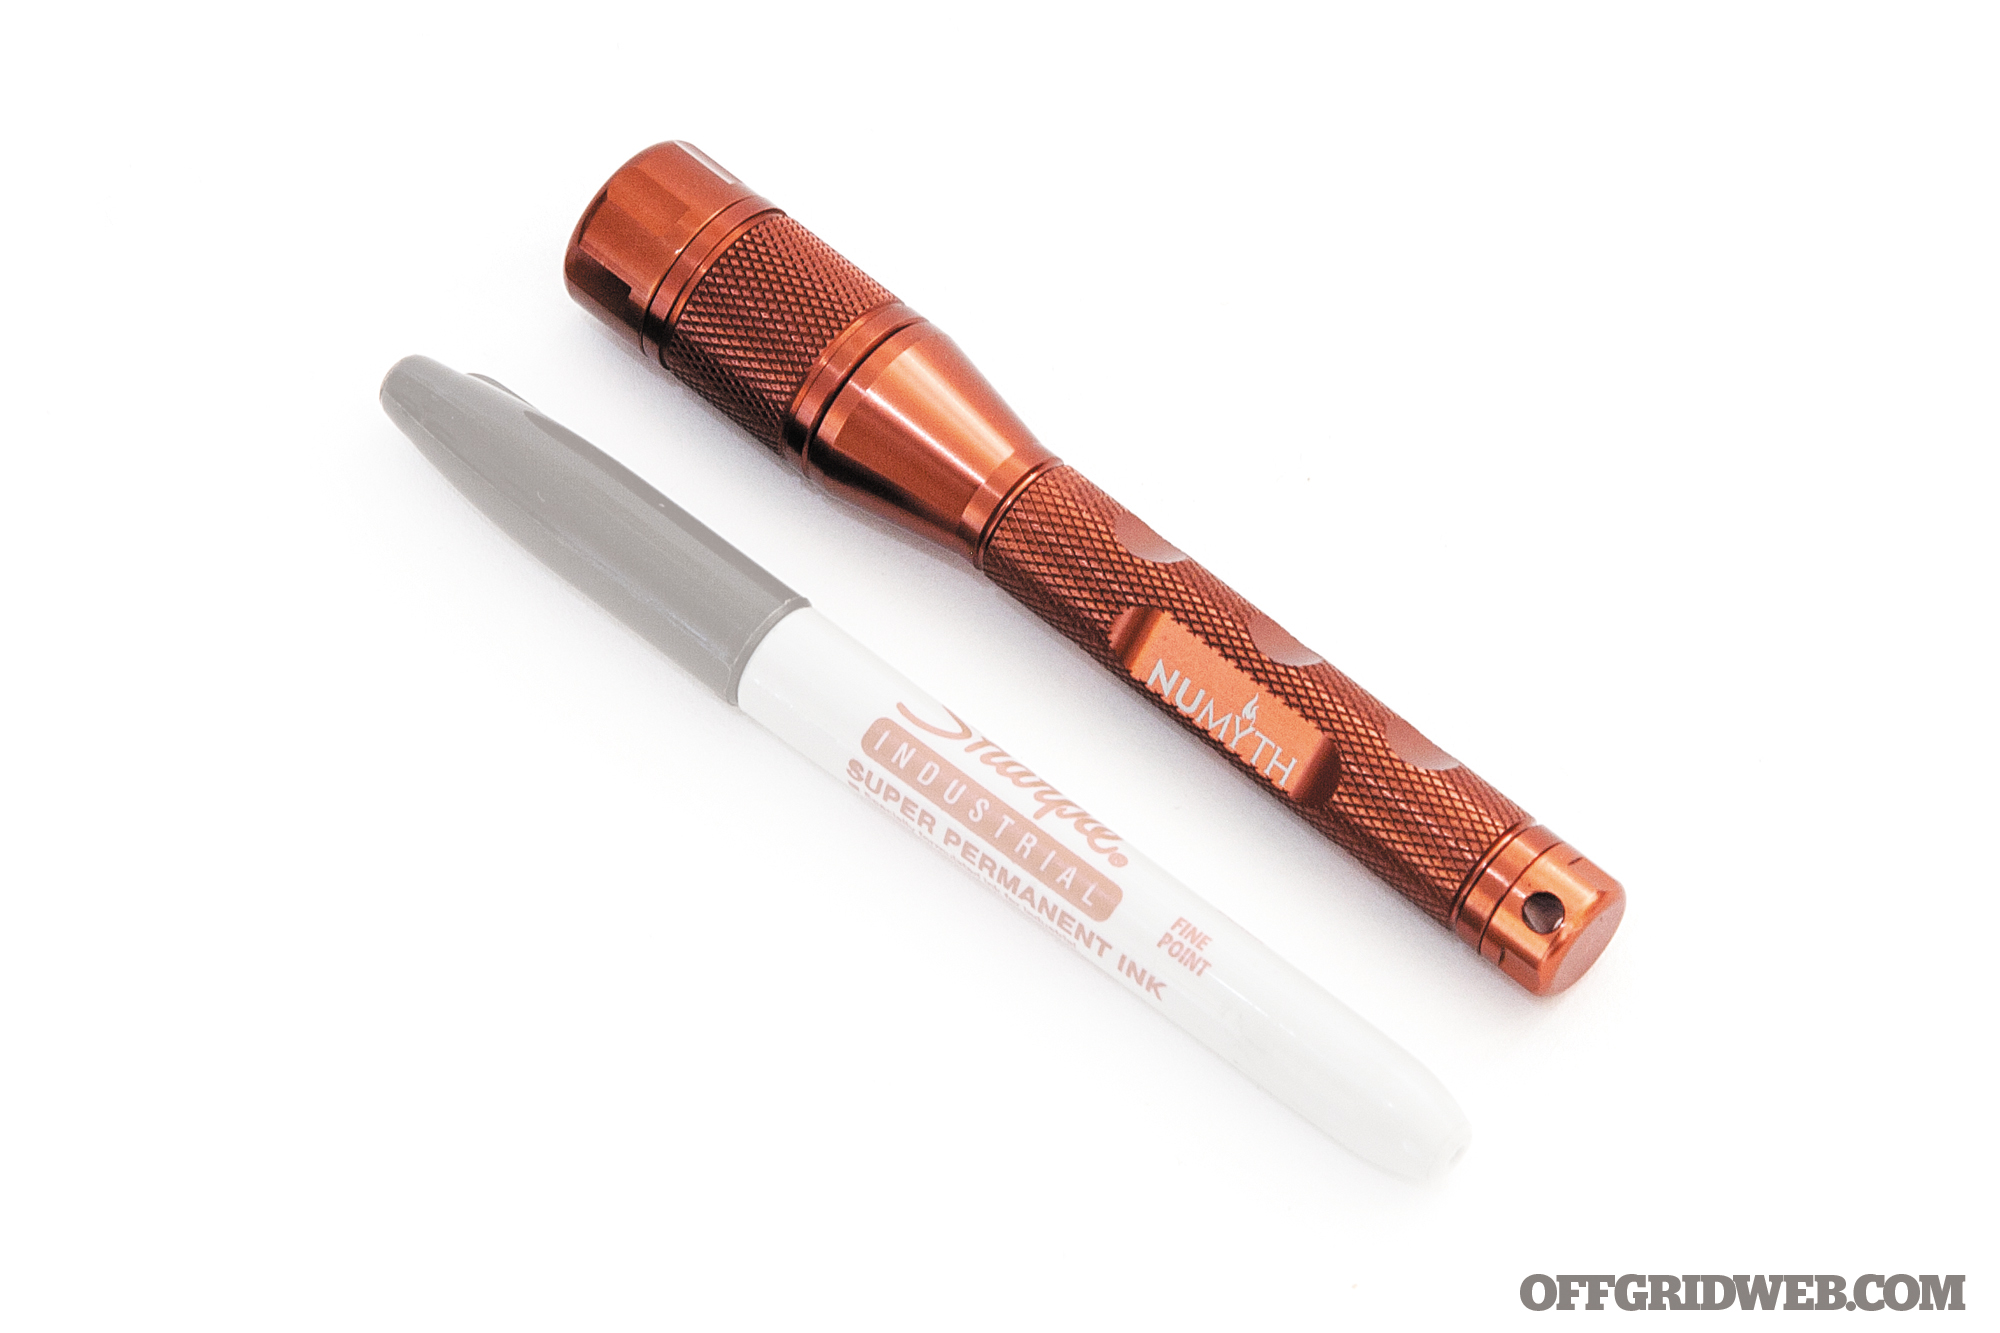
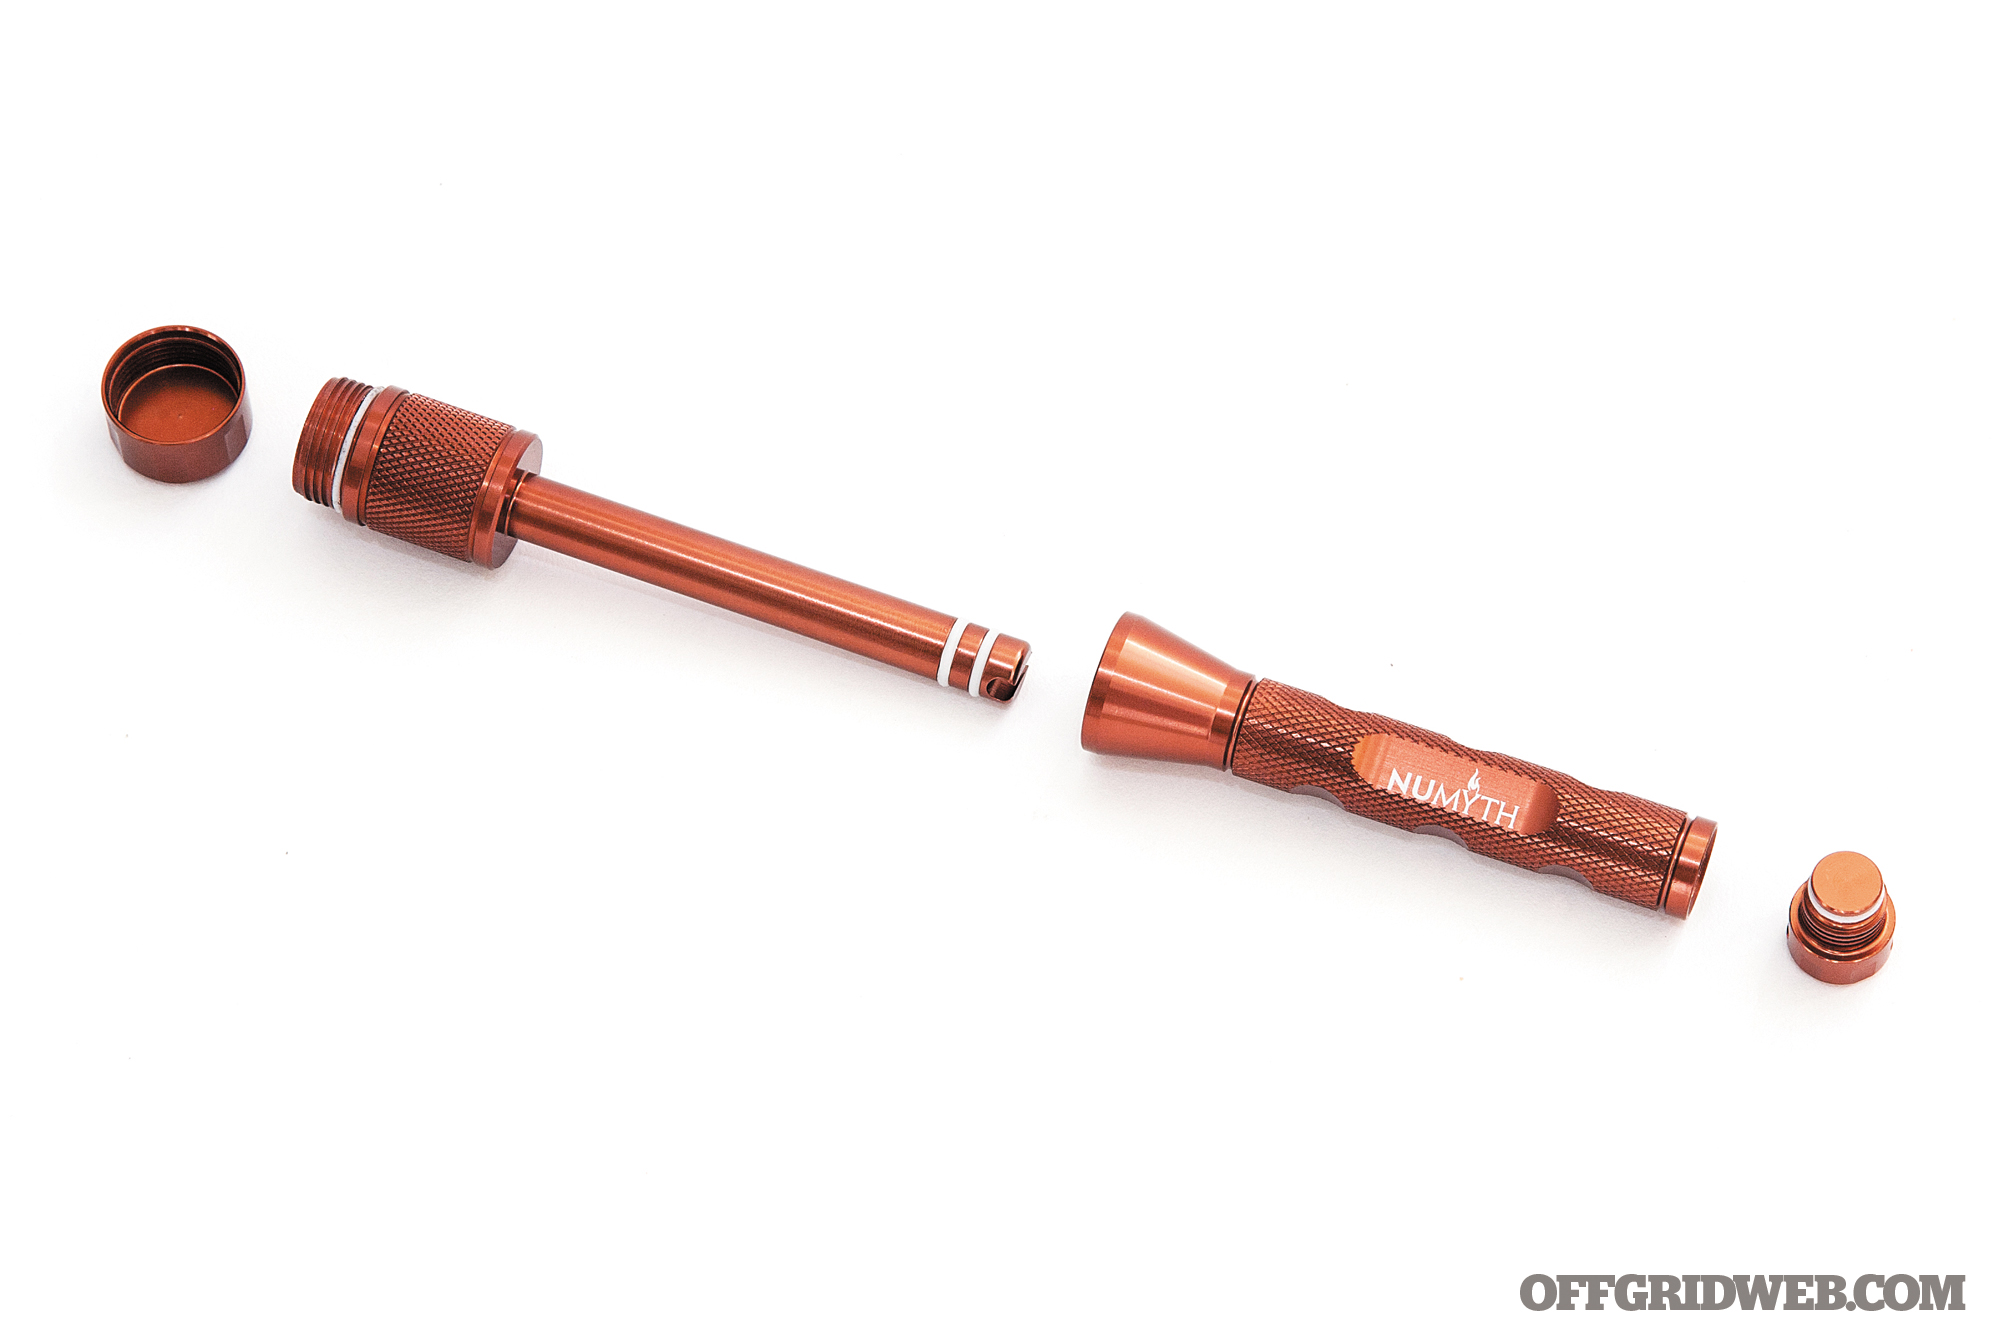
Numyth Vulcan Fire Piston V2

Type
Pressure / Friction
Dimensions
5 inches long by 0.7 inches diameter
Weight
1.8 ounces
Components
Anodized aluminum piston, cylinder, end cap, and tinder capsule; rubber O-ring seals
Lifespan
N/A
Special Features
Waterproof tinder container, replacement O-rings, gel lubricant
MSRP / Recurring Costs
$40 / N/A
URL
www.goinggear.com
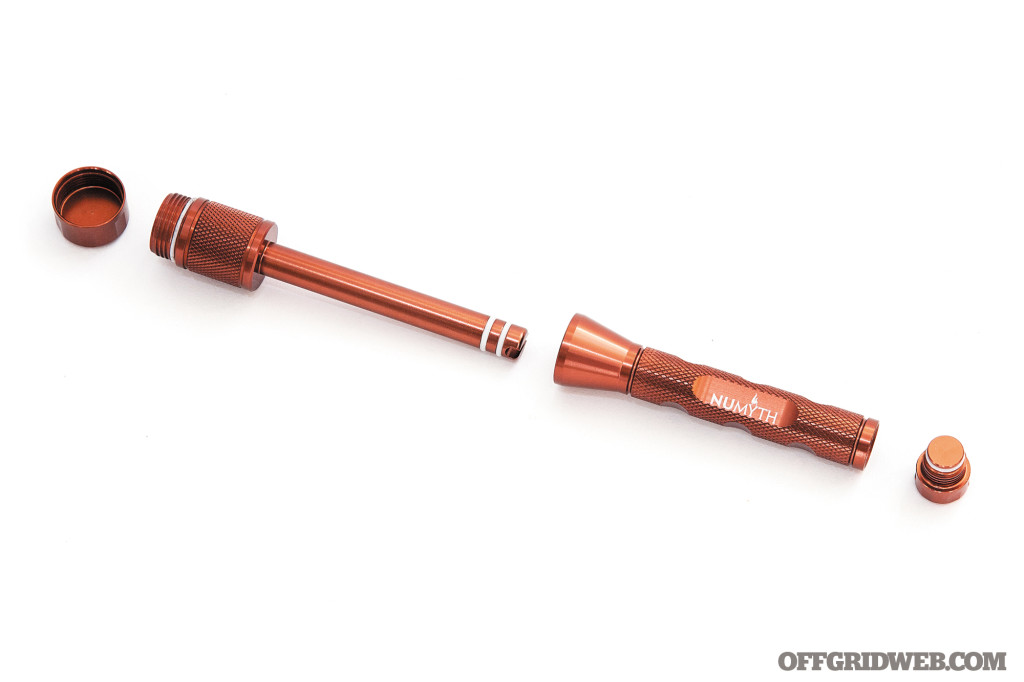
Sudden compression generates heat, forming an ember that can be nursed into a flame. In a nutshell, that’s how a fire piston works. The Numyth Vulcan consists of a machined aluminum piston and cylinder, sealed tightly with rubber O-rings and a light coat of lubricant. To use the firestarter, load a tiny pinch of tinder into the notch on the tip of the piston, then place it into the sealed cylinder. Slam the piston on a surface to compress it fully, and in a single swift movement, draw it out of the cylinder. If you’re fast enough, you’ll have a glowing ember to blow into a flame.
This requires practice, but most of all it requires a supply of specific tinder. Numyth recommends cotton char cloth or true tinder fungus. That’s the biggest drawback to the fire piston — you need to bring tinder, and if you run out, you’re in big trouble.
Pros:
- Fits conveniently in pen organizers and shirt pockets
- Waterproof tinder capsule
Cons:
- Temperamental — only works with bone-dry highly-combustible tinder
- Coordination and quick hands are mandatory
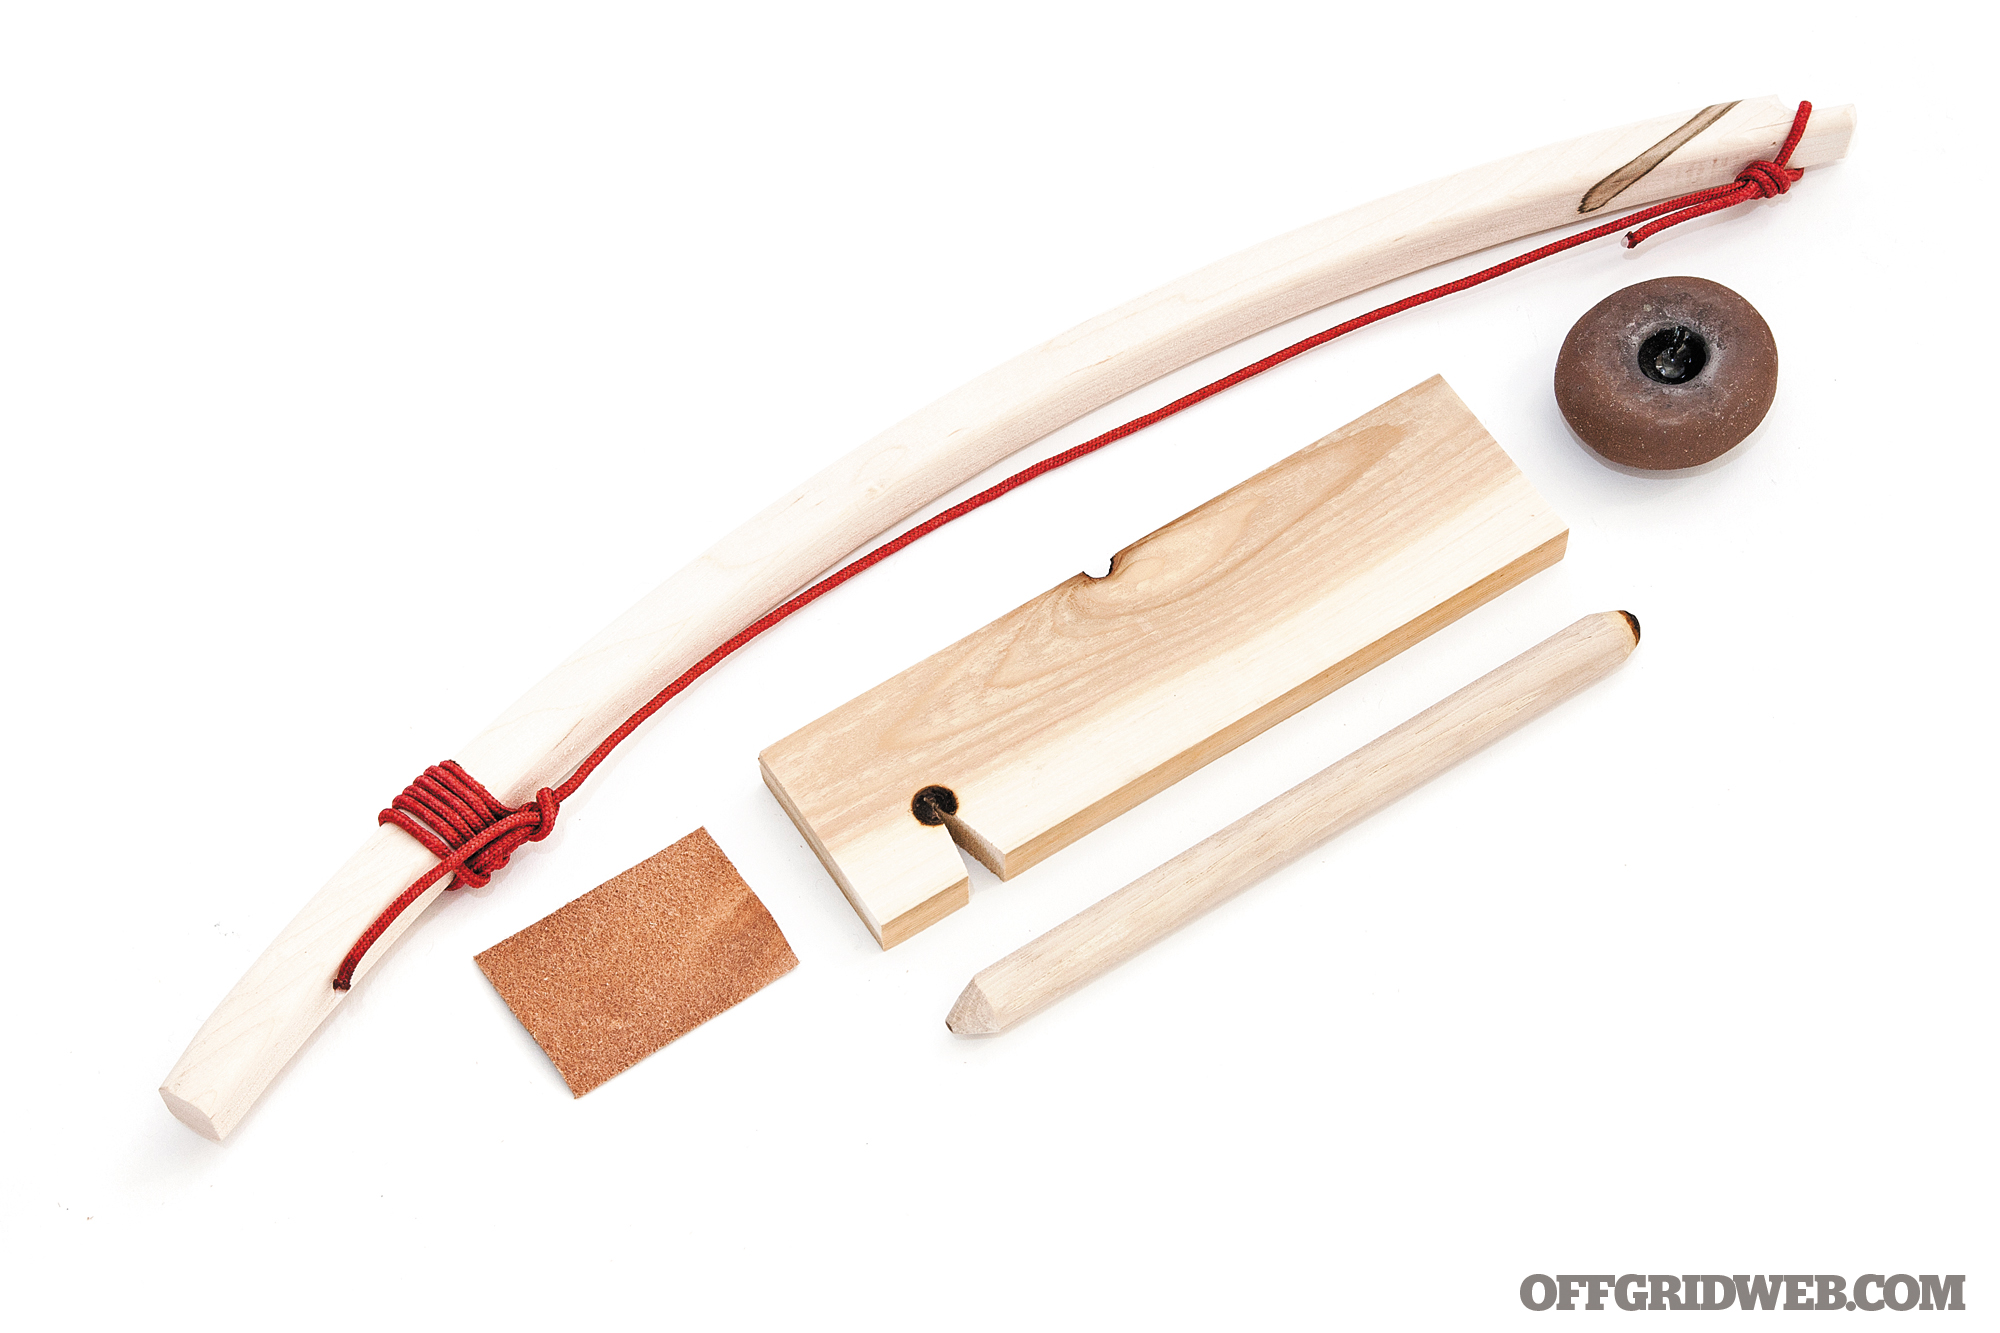
USAMM Scout Primitive Fire Bow Drill Kit with Upgraded Palm Rock

Type
Pressure / Friction
Dimensions
Bow: 21.5 inches long by 0.7 inch diameter / Board: 8.8 by 2.4 by 0.6 inches
Weight
13.1 ounces
Components
Red oak bow with bowstring, spindle, palm rock, pre-notched hardwood fireboard, leather coal catcher
Lifespan
N/A
Special Features
Ceramic palm rock with glazed spindle hole, instruction sheet with color photos
MSRP / Recurring Costs
$30 / N/A
URL
www.amazon.com
Normally, a survivalist would craft a primitive bow drill from materials found in the field, plus a shoelace or some paracord as a bowstring. That’s a tough skill to learn from scratch, so bow drill kits make the process more approachable for first-timers. We found this USAMM kit on Amazon.com, and it contains everything you’ll need except tinder. To use the drill, the spindle is twisted through the bowstring and seated in a notch in the fireboard. The pointy end of the spindle is supported by the palm rock in one hand, while the other hand draws the bow back and forth. Eventually, friction from the spindle generates an ember, which falls into the leather coal catcher below the notch. The ember is tipped gently into a tinder pile, and — voilà — you have fire.
This USAMM bow drill is well-built and works flawlessly, although we had to loosen and re-tie the bowstring. We’d consider this more of an educational resource than an actual survival tool because it’s not exactly practical to shove this into your bug-out bag when there are more portable options, but it’s quite affordable and fun to use.
Pros:
- Pre-assembled and tested
- Made in the USA
Cons:
- Larger and heavier than other firestarters
- Guaranteed to give you a cardio workout
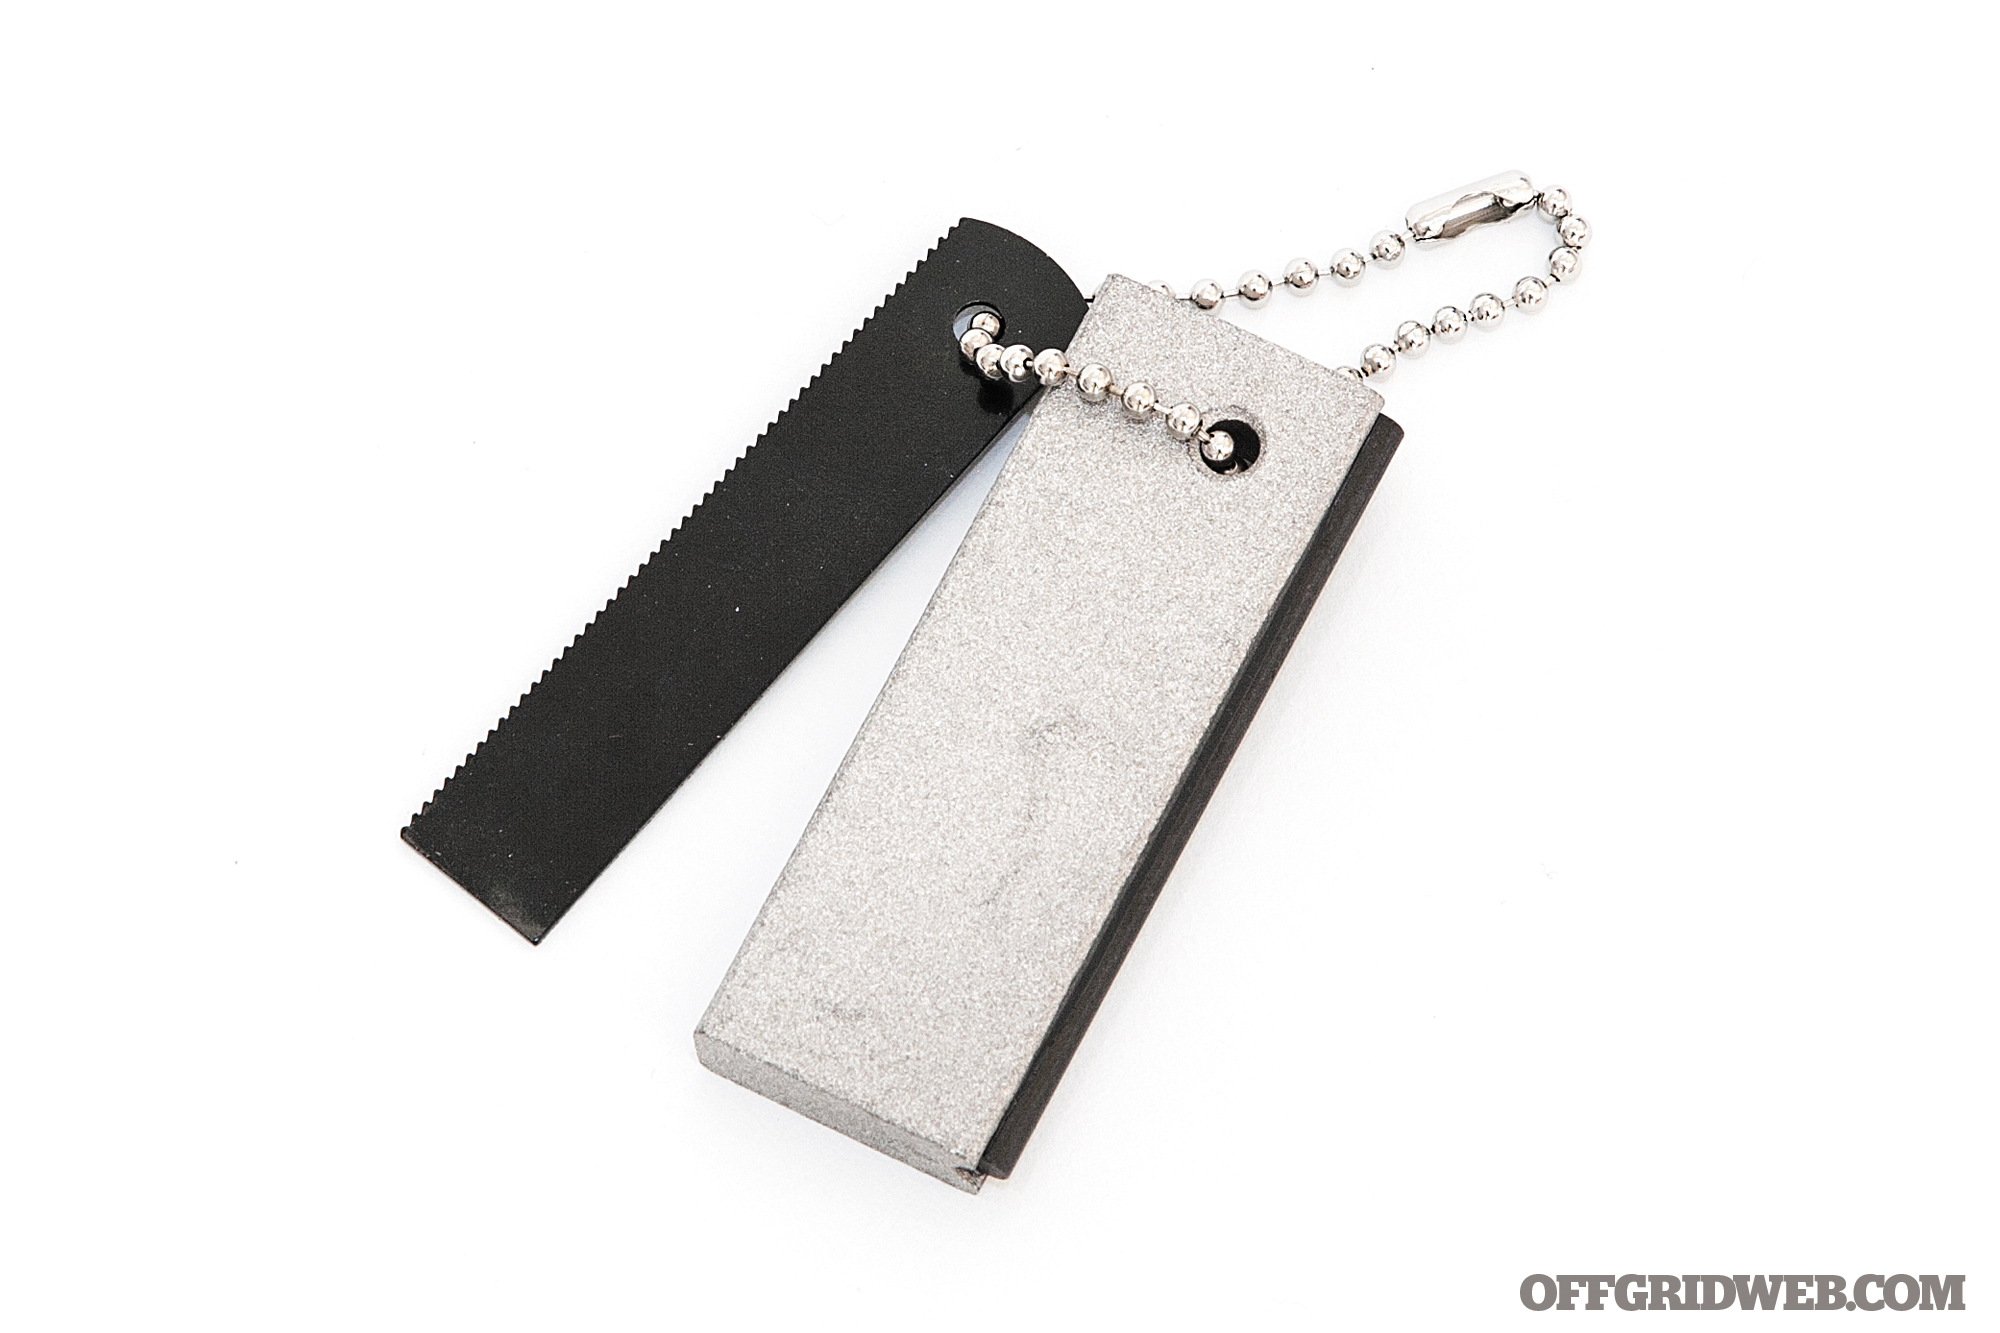
Doan Machinery & Equipment Magnesium Fire-Starting Tool
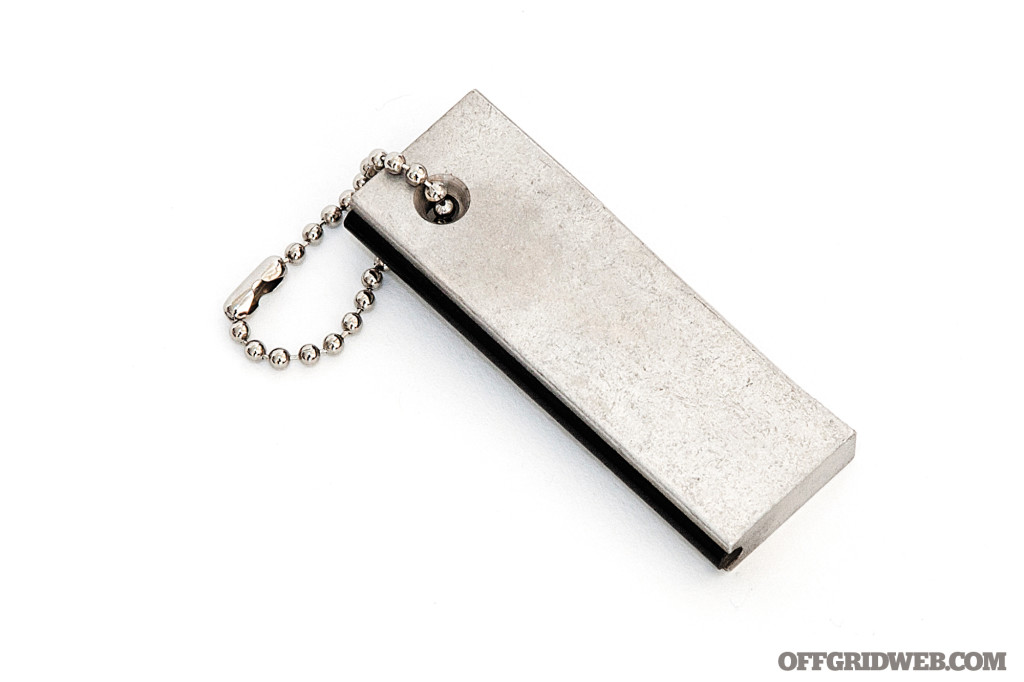
Type
Magnesium Bar
Dimensions
3 by 1.1 by 0.3 inches
Weight
1.4 ounces
Components
Magnesium bar, ferro rod sparking insert
Lifespan
N/A
Special Features
Bead chain
MSRP / Recurring Costs
$10 / N/A
URL
www.doanfirestarter.com
The magnesium bar has been used extensively by the military and civilian survivalists due to its combination of a sparking edge and highly-combustible tinder source. Doan Machinery & Equipment has been producing these bars for decades with a simple formula: a bar of solid magnesium with a small ferro rod glued into a notch on the spine. To start a fire, use a knife to shave off a pile of magnesium about the size of a quarter. Then reverse the bar and use the knife to strike the ferro rod, generating sparks that ignite the pile. Magnesium burns with a white-hot flame, easily igniting nearby tinder.
Our main complaint with this tool is the lack of a dedicated striker. The spine on some knives works as a scraper and striker, but not all. If you can’t use your knife’s spine, you’ll be forced to dull a portion of your blade as a result of shaving and striking the bar. The shavings from this bar also seem harder to ignite than those from other bars we’ve used.
Pros:
- Magnesium shavings burn energetically
- Made in the USA
Cons:
- Doesn’t include striker or scraper blade
- Shavings seem reluctant to ignite.
My Crisis Gear Magnesium Fire Starter
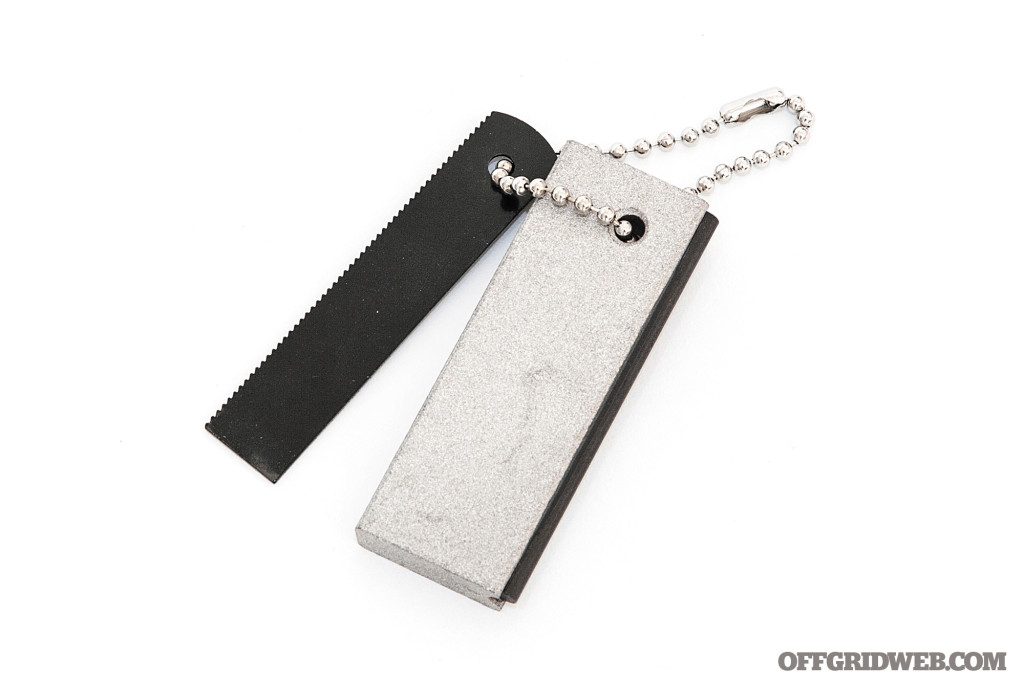
Dimensions
3 by 1.1 by 0.3 inches
Weight
1.8 ounces
Components
Magnesium bar, ferro rod sparking insert, scraper/striker
Lifespan
N/A
Special Features
Bead chain, hacksaw-style scraper/striker
MSRP / Recurring Costs
$8 / N/A
URL
www.amazon.com
Sold and packaged under the brand name My Crisis Gear, this magnesium bar has no identifiable markings. The company’s web site lists only seven products, and the magnesium bar is nowhere to be found — at the moment, it’s only available through Amazon.com.
Questionable origin aside, this firestarter is inexpensive and effective. While its dimensions are identical to the Doan bar, the material makeup is clearly different. The U.S.-made Doan bar is smooth and dense; this imported bar is rough and porous. This makes it easy to scrape off shavings, but we suspect the bar will have a shorter lifespan as a result. We greatly appreciate the inclusion of a steel scraper, flat on one side and serrated on the other. This eliminates the need to dull your knife blade and makes this an all-in-one fire-starting solution.
Pros:
- Porous material is easy to shave and ignite
- Magnesium shavings burn energetically
Cons:
- Imported off-brand product with unknown quality control
- Softer magnesium may lead to shorter lifespan
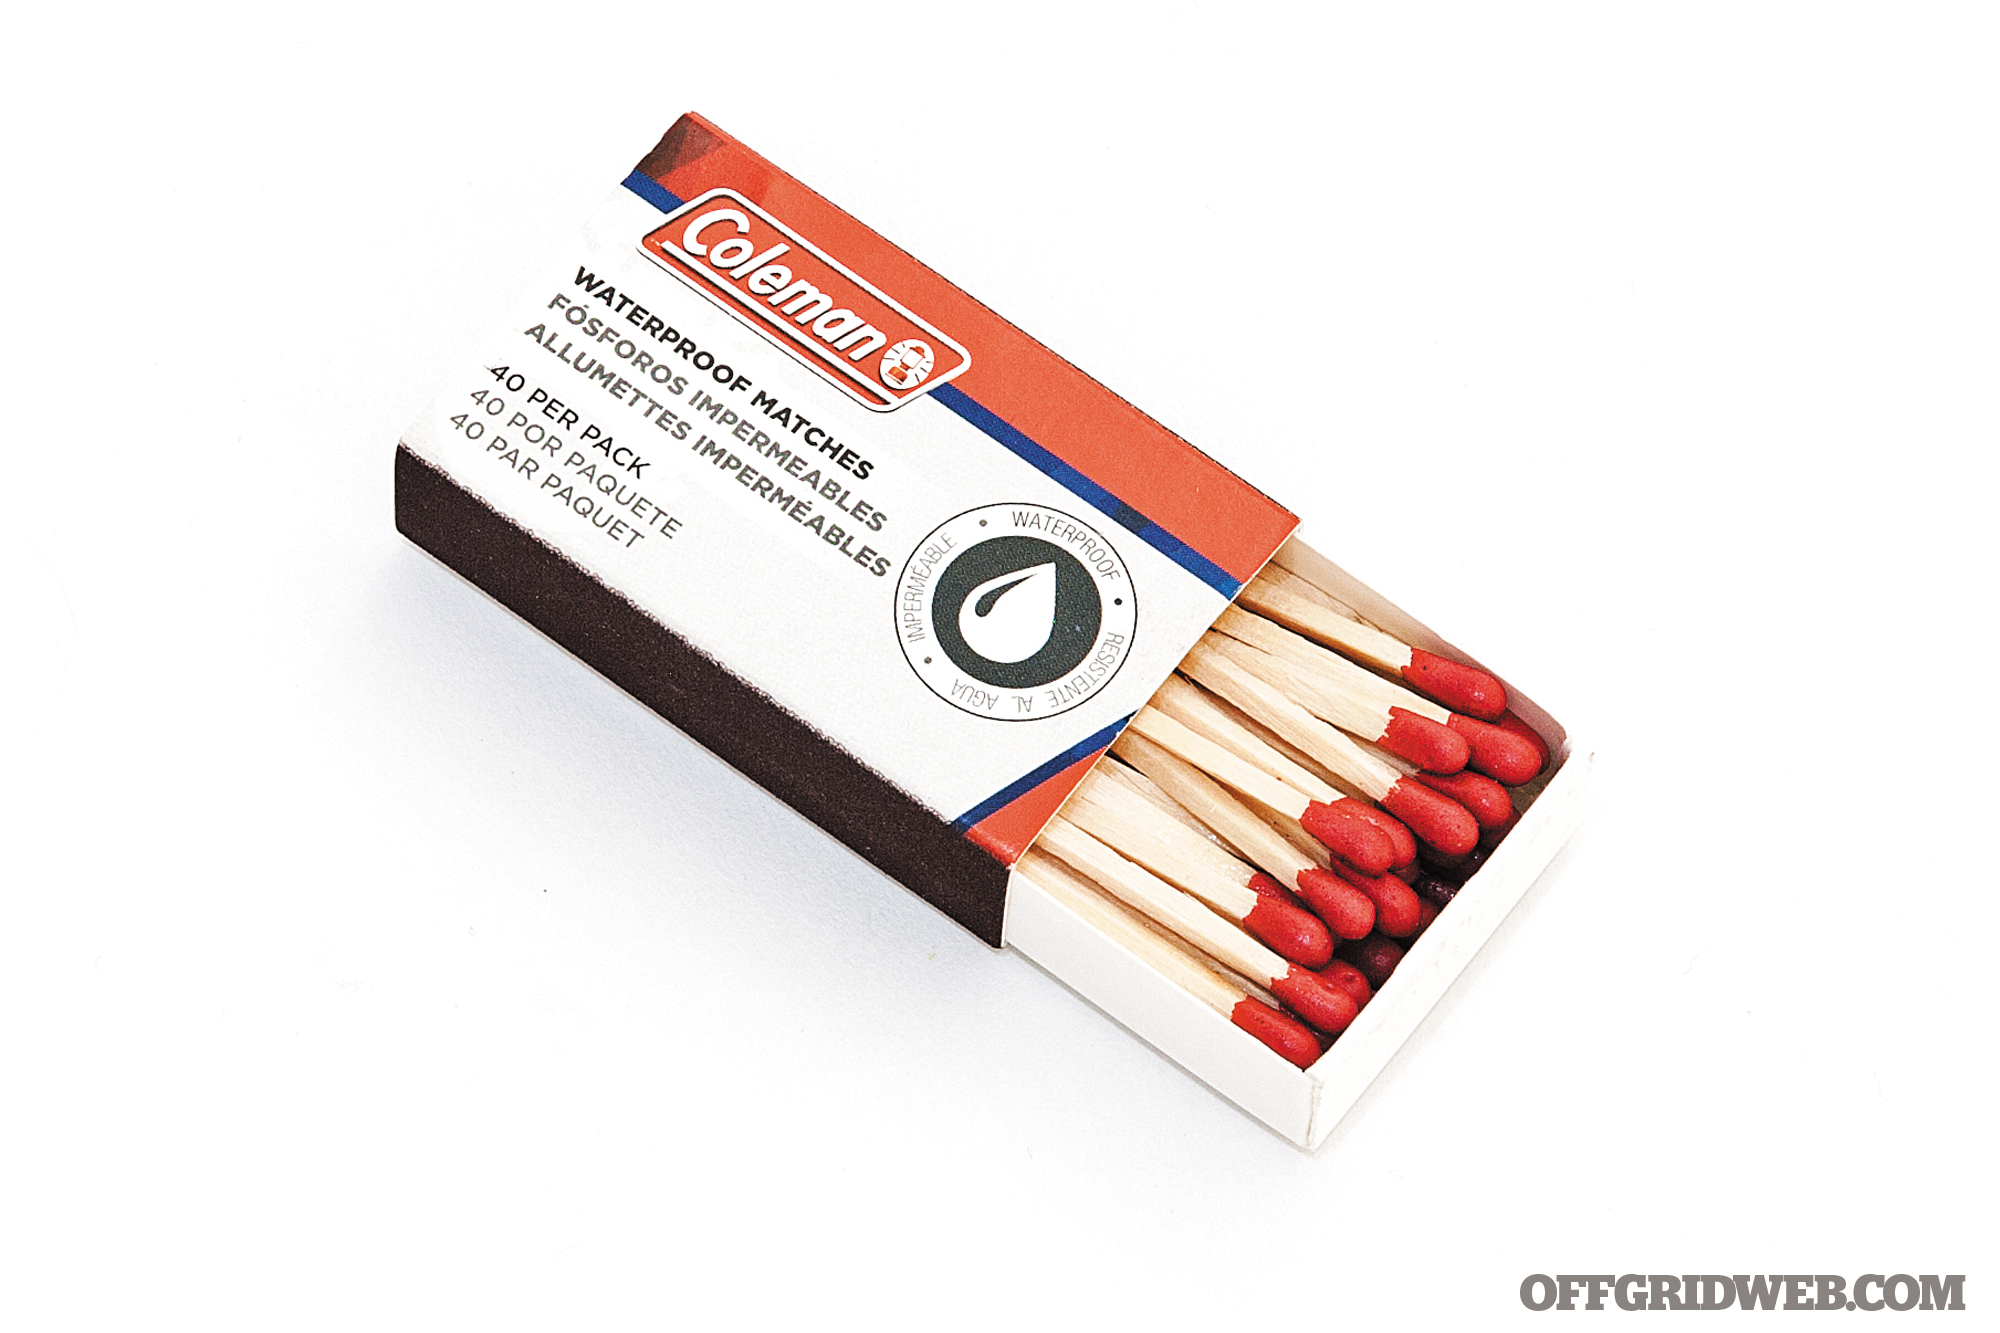
Coleman Waterproof Matches 4-Pack

Type
Matches
Dimensions
2.3 by 1.4 by 0.6 inches per box
Weight
0.4 ounces per box
Components
Four match boxes
Lifespan
40 matches per box, 160 total
Match Burn Time
21 seconds
Special Features
Dual “waterproof” striking surfaces
MSRP / Recurring Costs
$3 / N/A
URL
www.coleman.com
We found these waterproof matches in the camping section at Walmart for a mere $3. Each of the four boxes contains 40 matches, featuring striking surfaces on both sides. The 1/16-inch-thick wood matchsticks aren’t prone to snapping, thankfully. We can confirm these matches are waterproof, as they lit easily even after soaking in water.
However, the striking surfaces are another story — despite claims that they’re waterproof, we couldn’t even light a bone-dry match on a damp box. While they may be “waterproof” in that they don’t turn to mush when wet, they certainly won’t help you light a match under those conditions. Ironically, the box even instructs users to “store in a cool dry place.” As long as you can keep the striking surfaces away from moisture, these matches are a good option.
Pros:
- Matches light quickly, even when soaked
- Good value for money
Cons:
- Striking surfaces are useless when wet
- Powerful flame burns out quickly
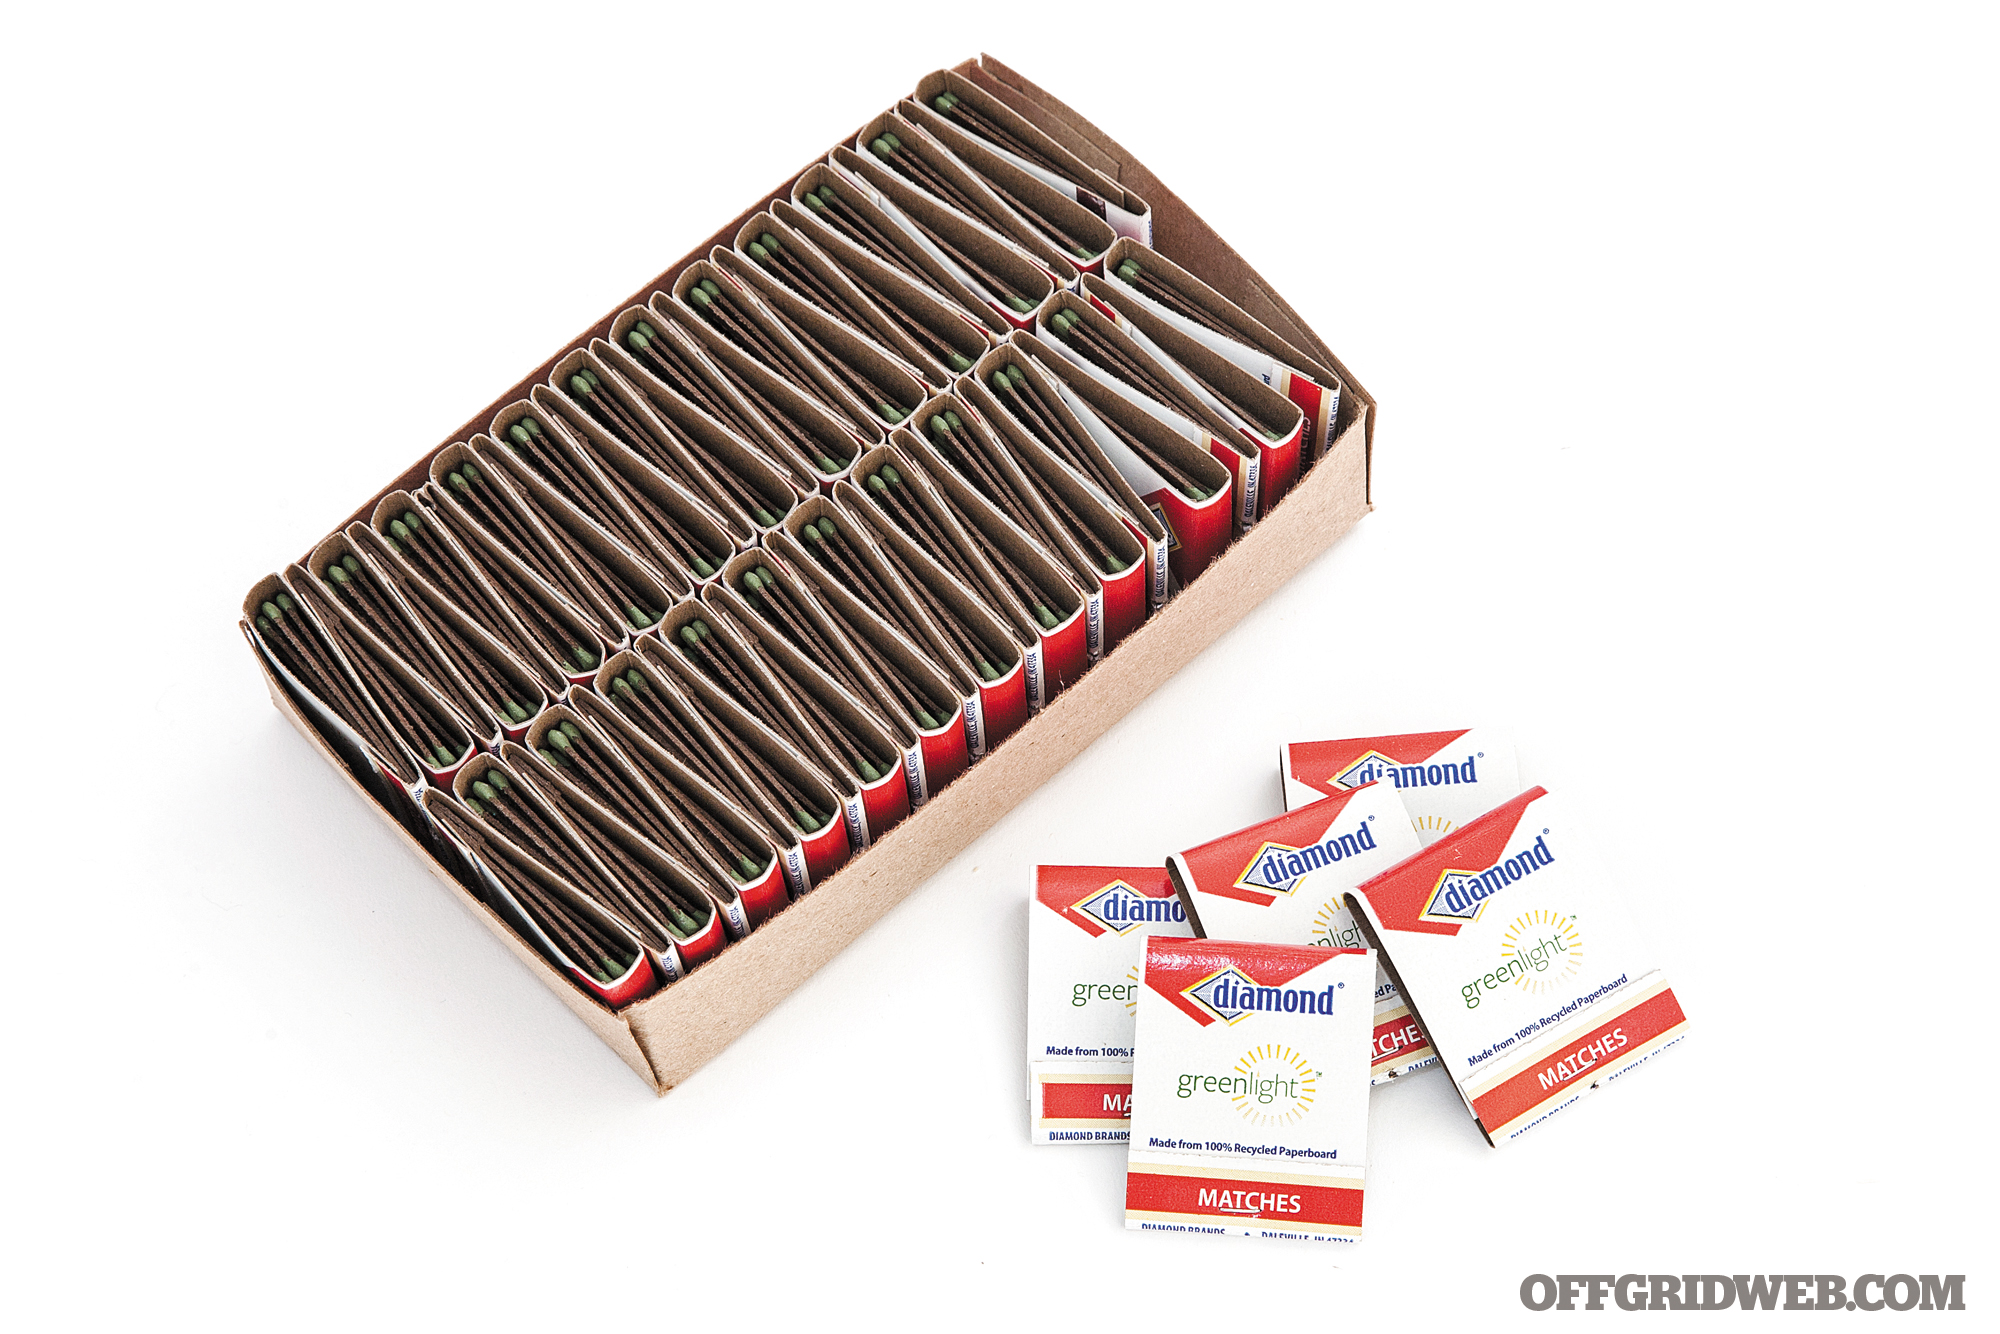
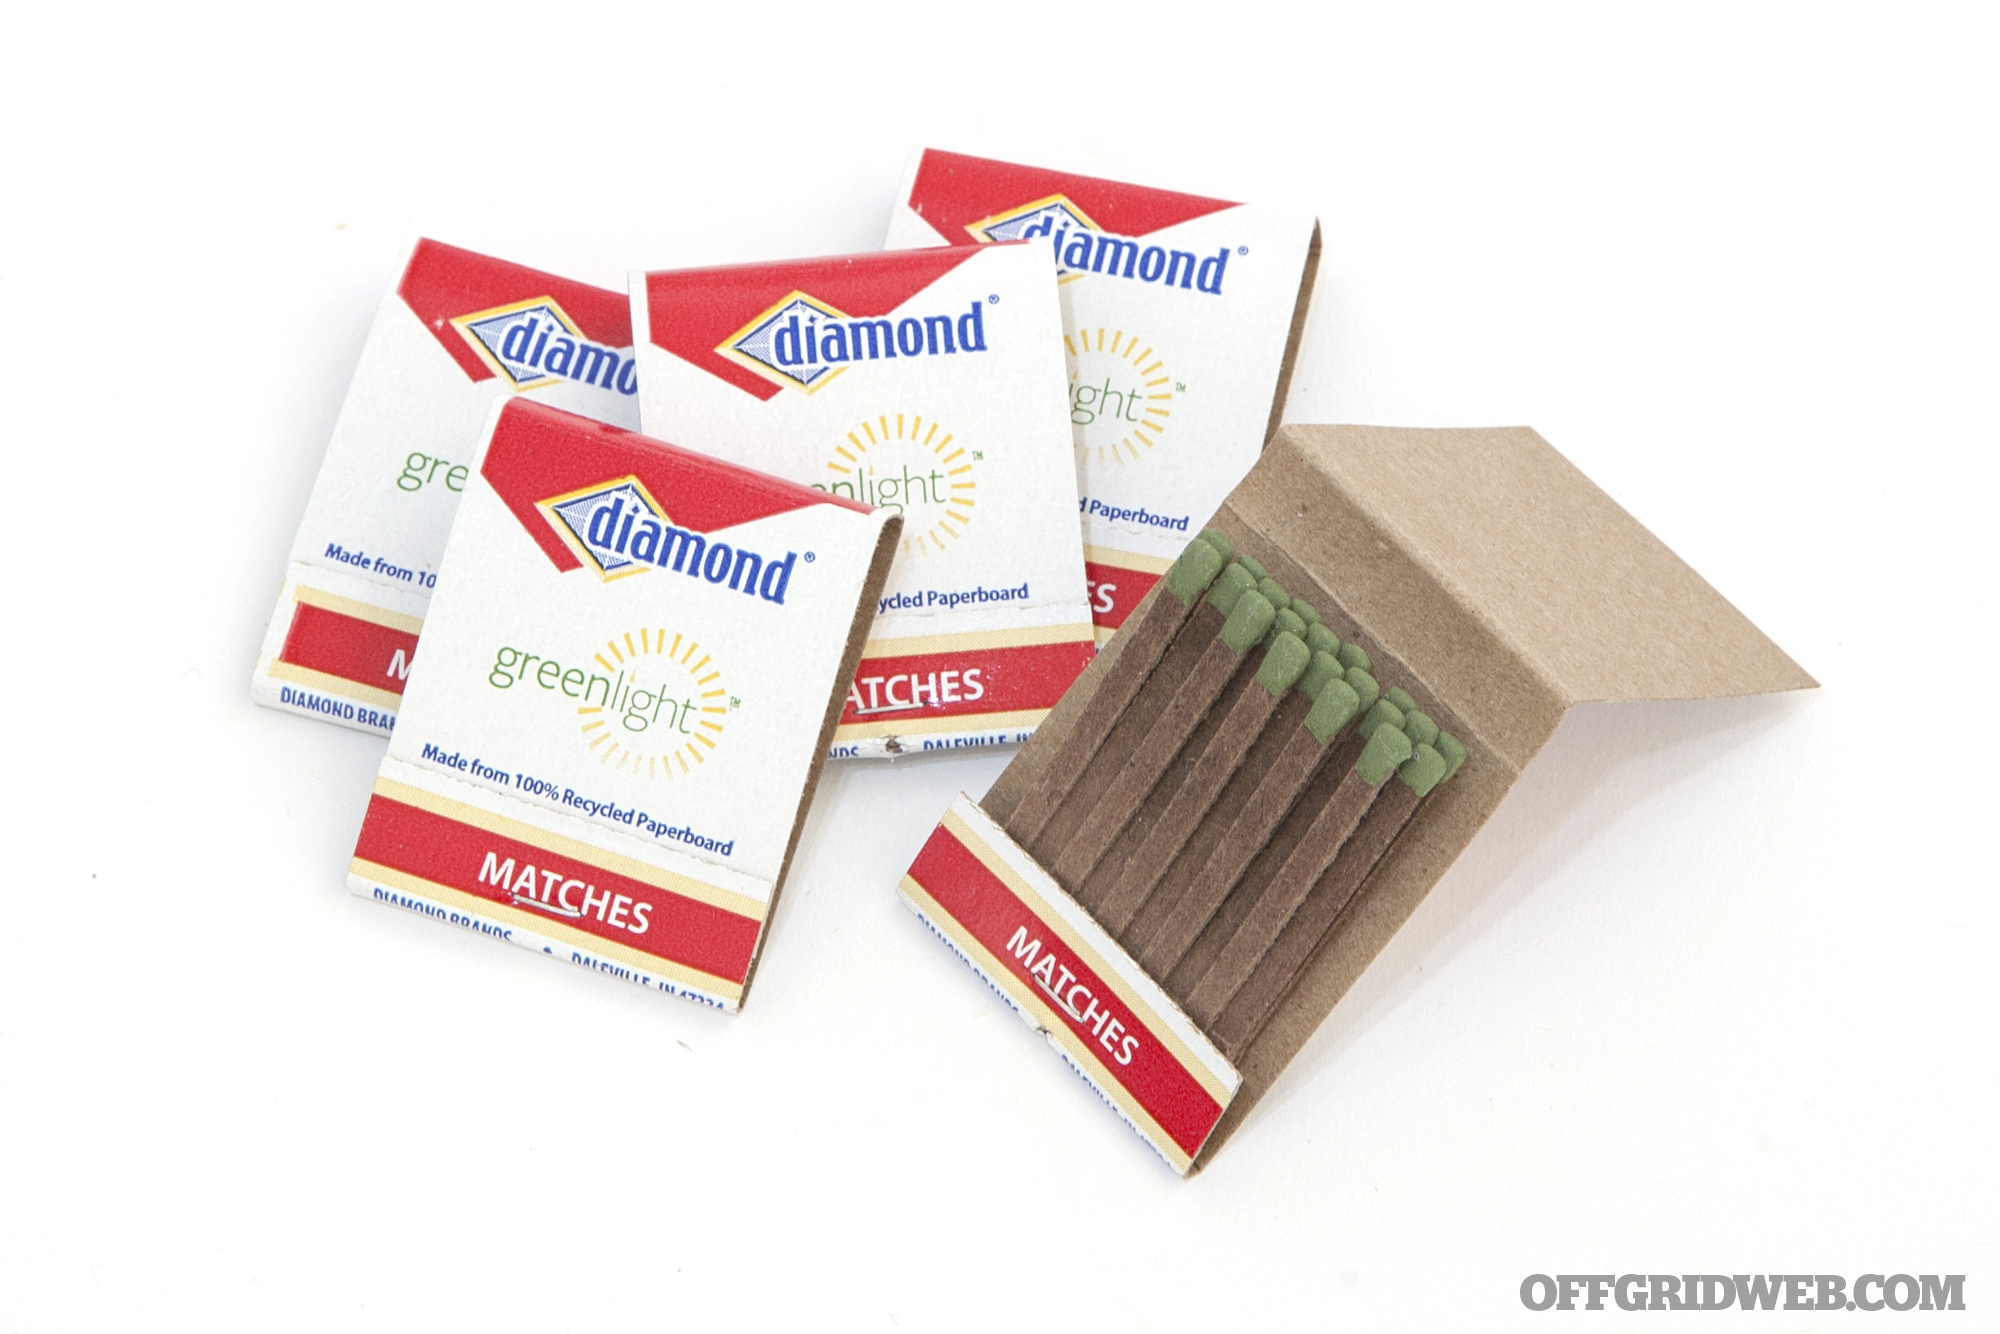
Diamond Greenlight Deluxe Match Books

Type
Matches
Dimensions
1.5 by 1.8 by 0.3 inches per book
Weight
0.1 ounces per book
Components
50 match books
Lifespan
20 matches per book, 1,000 total
Match Burn Time
39 seconds
Special Features
Striking surface on each book
MSRP / Recurring Costs
$3 / N/A
URL
www.diamondbrands.com
If you want to remain eco-friendly as you survive, these Diamond Greenlight matches may seem appealing. They’re constructed from 100-percent recycled paperboard, with match heads that are literally green, so all your survival buddies can see how much you care about saving Mother Earth.
Sadly, these matches are truly awful. The paperboard bends, tears, or disintegrates if you look at it wrong. And don’t even think about getting it wet. Once you manage to ignite one of these matches, the flame is tiny and fragile, though this at least yields a long burn time. On the bright side, even if it takes you 15 matches to light a fire, you’ll have 985 to spare. These are barely passable for lighting scented candles at home, much less for creating flames in an inhospitable winter wilderness.
Pros:
- Lots of matches for the money
- Made in the USA
Cons:
- Horrendous paperboard matchsticks
- Small, weak flame
Diamond Large Kitchen Matches
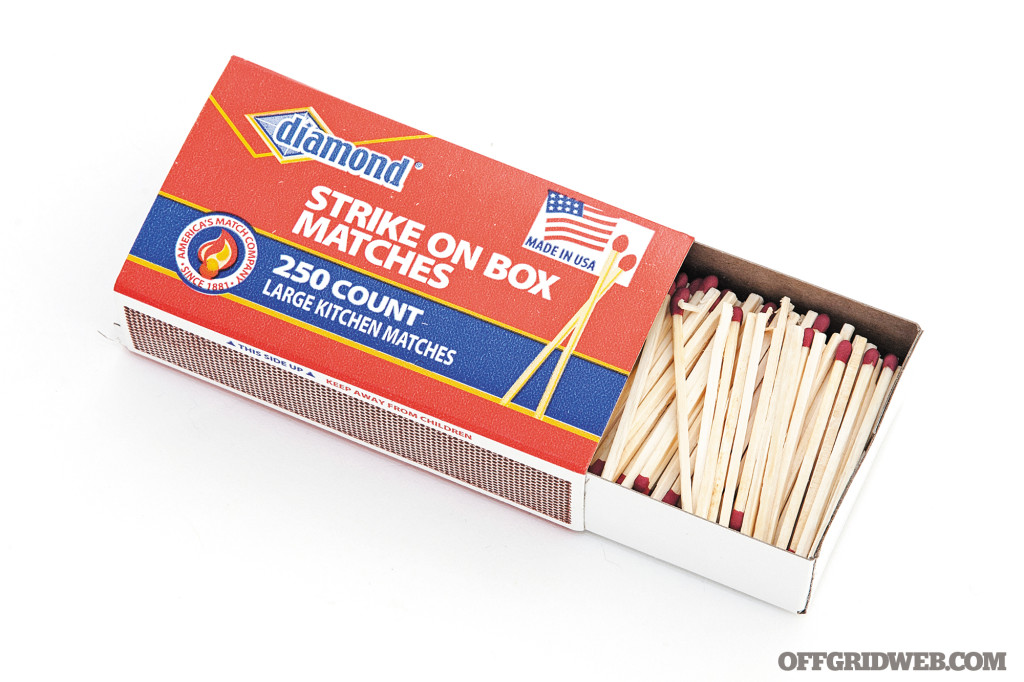
Type
Matches
Dimensions
4.8 by 2.6 by 1.5 inches
Weight
2.4 ounces
Components
N/A
Lifespan
250 matches
Match Burn Time
49 seconds
Special Features
Dual striking surfaces
MSRP / Recurring Costs
$1 / N/A
URL
www.diamondbrands.com
These are some of the most ubiquitous matches available, found for a dollar or less in retail stores throughout the country. Each box contains approximately 250 loose matches, with 2.3-inch-long wood sticks and small heads.
Despite being made in the USA, quality control appears to be an issue — our box contained several broken matchsticks, matches without heads, and heads of inconsistent sizes. Nevertheless, the matches light easily on the box and burn steadily. As you might expect, any amount of moisture will render these matches useless. They’re fine for home use, but we wouldn’t recommend them for survival situations.
Pros:
- Long burn time
- Made in the USA
Cons:
- Poor quality control
- Highly sensitive to moisture
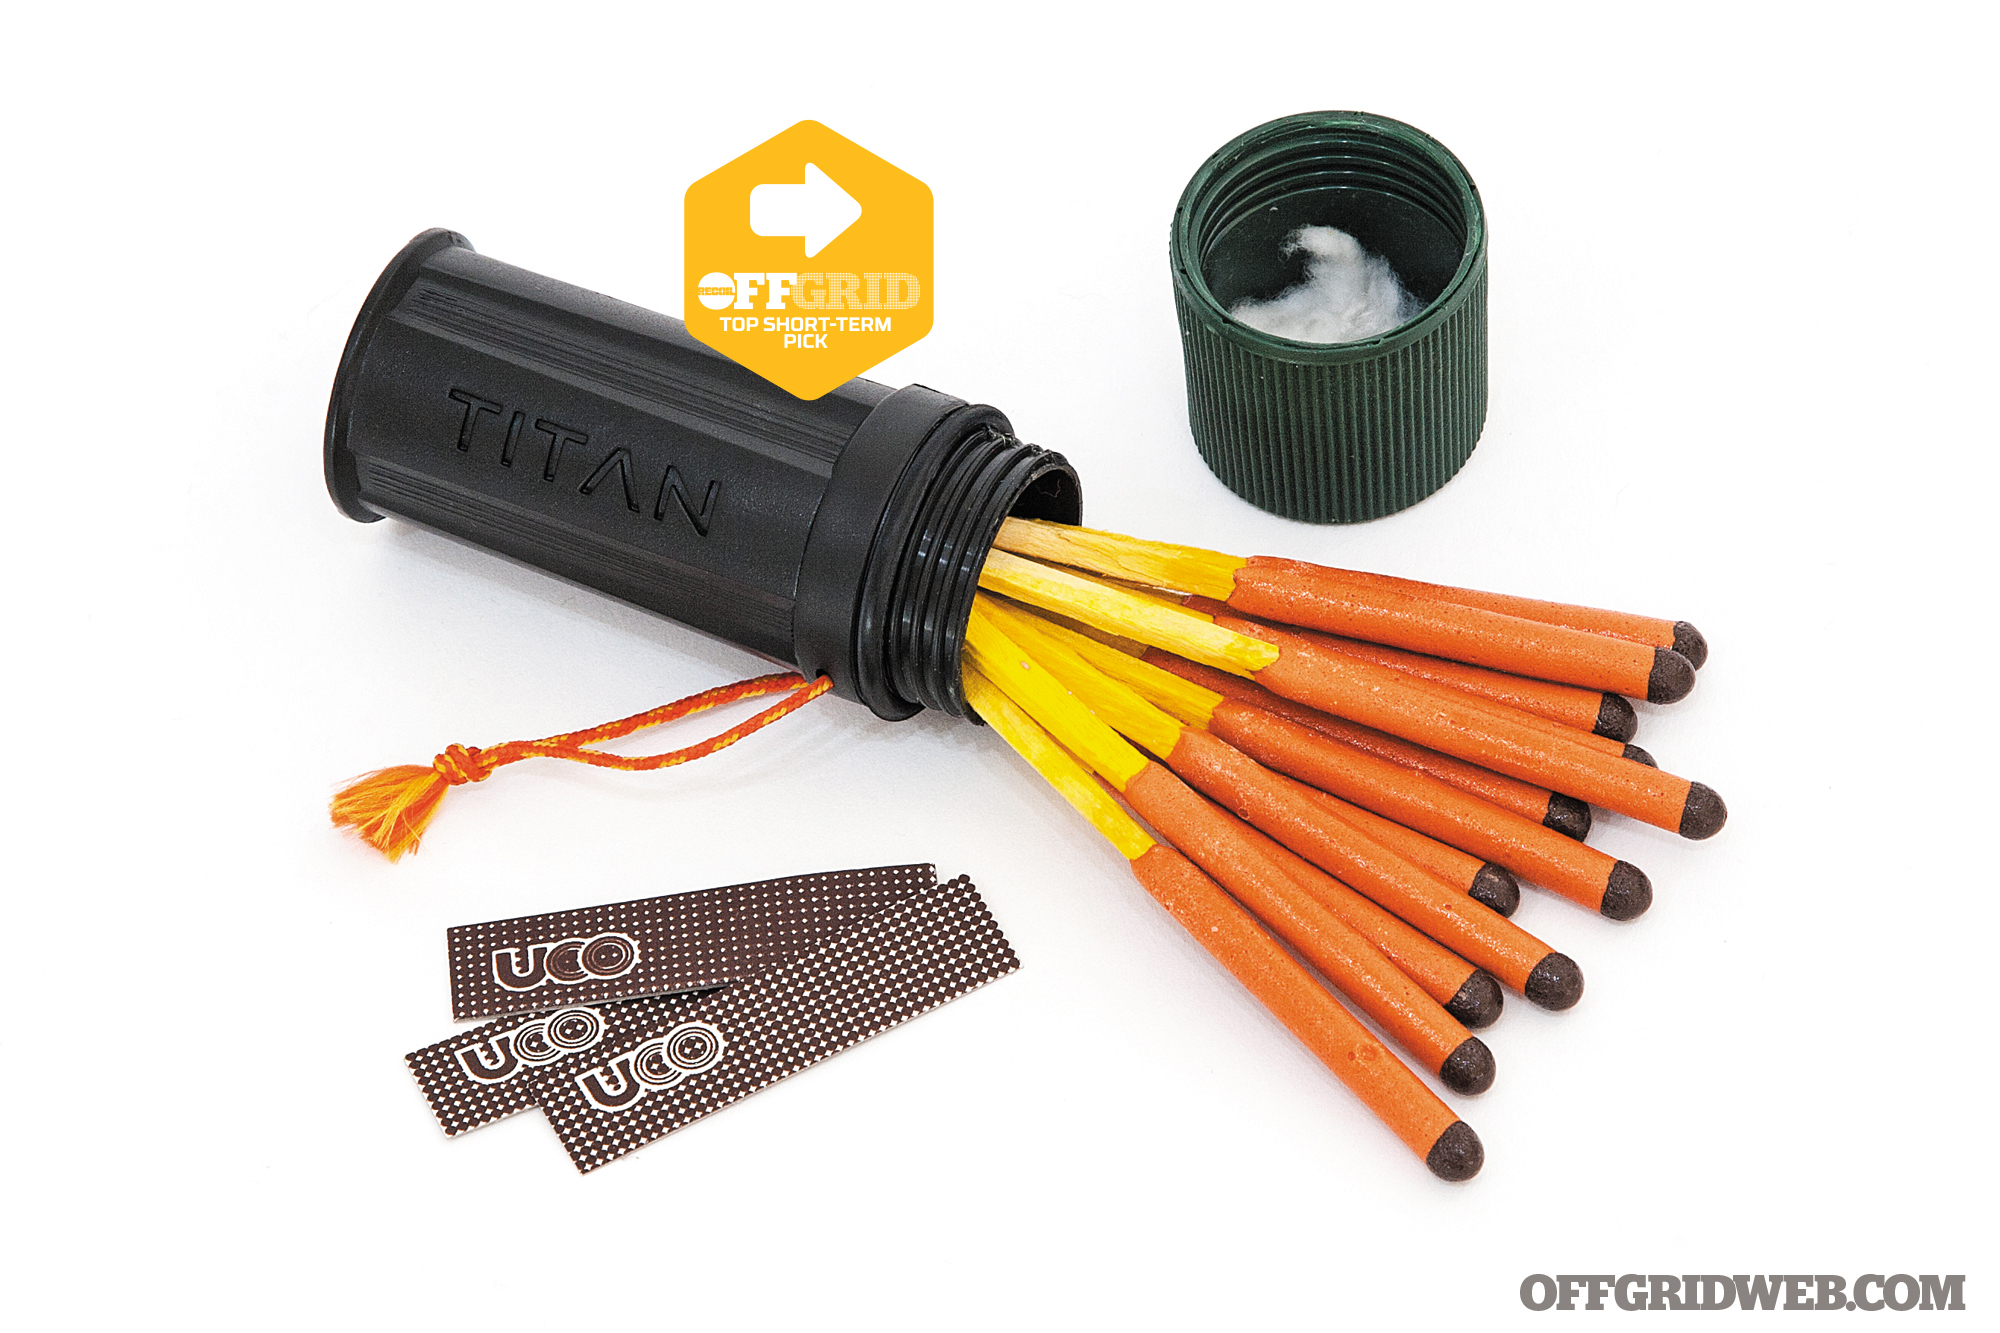
UCO Titan Stormproof Match Kit

Type
Matches
Dimensions
4.5 inches long by 1.5 inches diameter
Weight
2.7 ounces
Components
Titan stormproof matches, 3 striker inserts
Lifespan
12 matches
Match Burn Time
32 seconds
Special Features
Waterproof case with striker slot, high-visibility lanyard, cotton tinder inside cap
MSRP / Recurring Costs
$10 / $10 Titan stormproof matches (box of 25)
URL
www.ucogear.com
We have a slight problem with the nomenclature of this product. It uses the term “match,” but that name fails to adequately prepare the user for what happens after striking. Titan stormproof matches seem to have more in common with Fourth of July sparklers than kitchen matches. These 4.3-inch-long mega-matches don’t just burst into flames, they ignite with an audible crackle and intense jet of white-hot fire.
Surprisingly, a lit match can be fully submerged in water and, upon removal, still sputter back to life like a novelty birthday candle. If you can’t light a fire with one of these, you’re doing something very wrong. We wish the cardboard-backed striker inserts were a bit tougher; a minor nitpick on an otherwise superb survival firestarter.
Pros:
- Violently powerful flame
- Extremely difficult to extinguish
Cons:
- Cardboard striker inserts could be more resilient
- Short lifespan with only 12 matches
BreaDeep 5x Pocket Magnifying Lens (Set of 2)
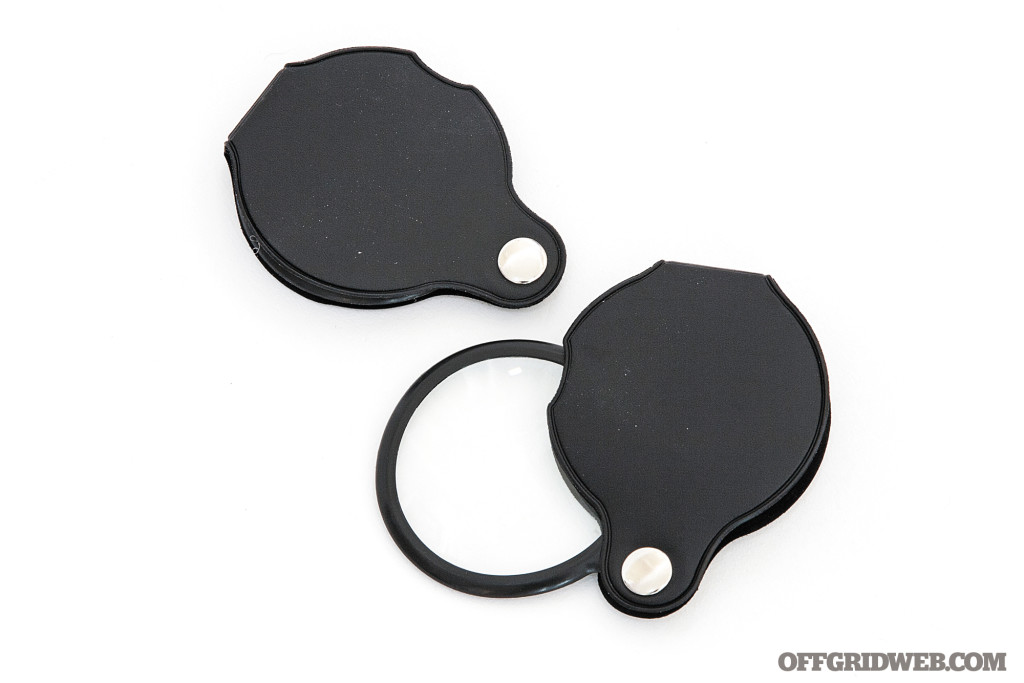
Type
Solar
Dimensions
2.8 by 2.2 by 0.3 inches per lens
Weight
1 ounce per lens
Components
1.8-inch glass lens with plastic rim
Lifespan
N/A
Special Features
Polyurethane “leather” carrying case
MSRP / Recurring Costs
$10 per pair / N/A
URL
www.amazon.com
This generic magnifying glass set came to us from China, by way of Amazon.com. Strangely, the boxes are labeled “Pocket Spiegel” in a combination of English and German. We paid $10 for two lenses, though they can be bought individually for $6. Each lens consists of convex glass with a 5x magnification factor, contained in a plastic rim with a rotating cover. The cover is marketed as “leather” but is actually thin pleather with a velvety inner layer. If you’re patient enough, the sun is shining brightly, and conditions are dry, this glass can be used to start a fire by harnessing the power of the sun into a concentrated beam onto some tinder. Its low price and compact size could make this a good addition to your tinder box. However, we’d recommend this as a backup option rather than a standalone tool.
Pros:
- Small and lightweight
- Affordable
Cons:
- Requires bright sunlight, steady hands, and patience
- “Leather” case feels cheap
EmberLit / MerkWares Solar Fire Lens
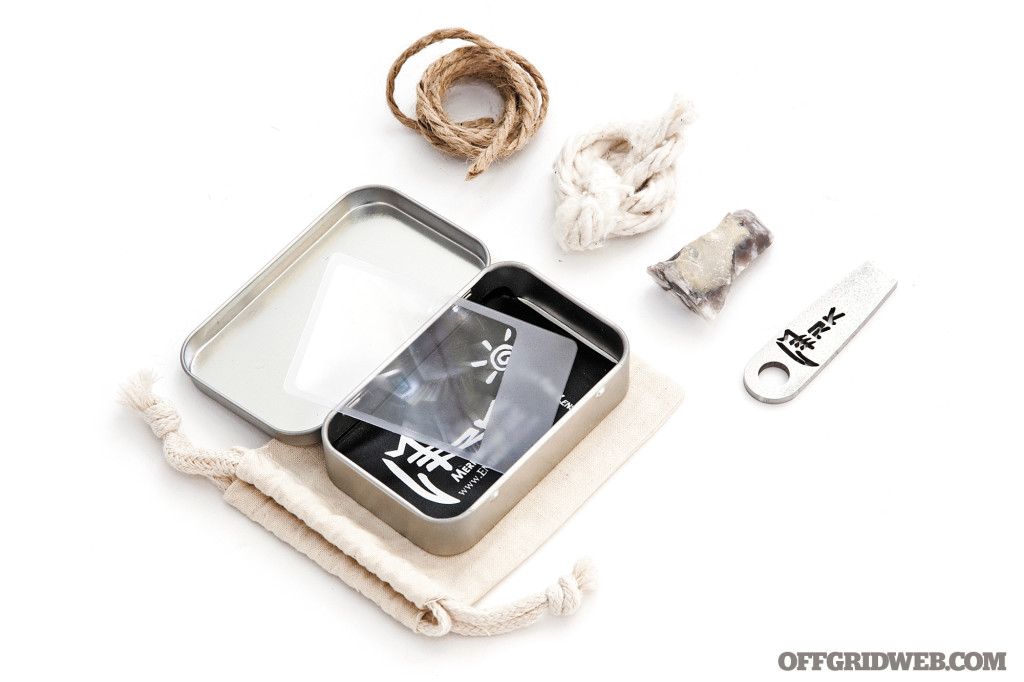
Type
Solar
Dimensions
2.3 by 3.4 inches including sleeve
Weight
0.1 ounces
Components
Flexible plastic Fresnel lens
Lifespan
N/A
Special Features
Plastic storage sleeve
MSRP / Recurring Costs
Included in $30 EmberLit Fire Starting Kit; not sold separately / N/A
URL
www.emberlit.com
While a conventional lens requires large curved surfaces to bend light, a Fresnel lens accomplishes the same goal through the use of dozens of tiny ridged sections. This creates a paper-thin profile that can remain flexible. This plastic Fresnel lens from EmberLit is included as part of the company’s Fire Starting Kit, along with a steel striker, flint rock, jute twine, cotton rope, hinged metal container, and canvas storage bag.
The lens is the same size as a standard business card, fitting easily into a wallet. The magnification factor isn’t advertised by EmberLit, but we’d estimate it’s about 3x — more than enough to get a fire going or char some tinder in bright sunlight. We love that this tool weighs virtually nothing and retains the fire-starting benefits of a traditional lens. The other items in the Fire Starting Kit add even more value to this solar firestarter.
Pros:
- Flexible and durable
- Weighs as much as a business card
Cons:
- Accumulates fine scratches easily
- Only sold as part of the EmberLit fire-starting kit
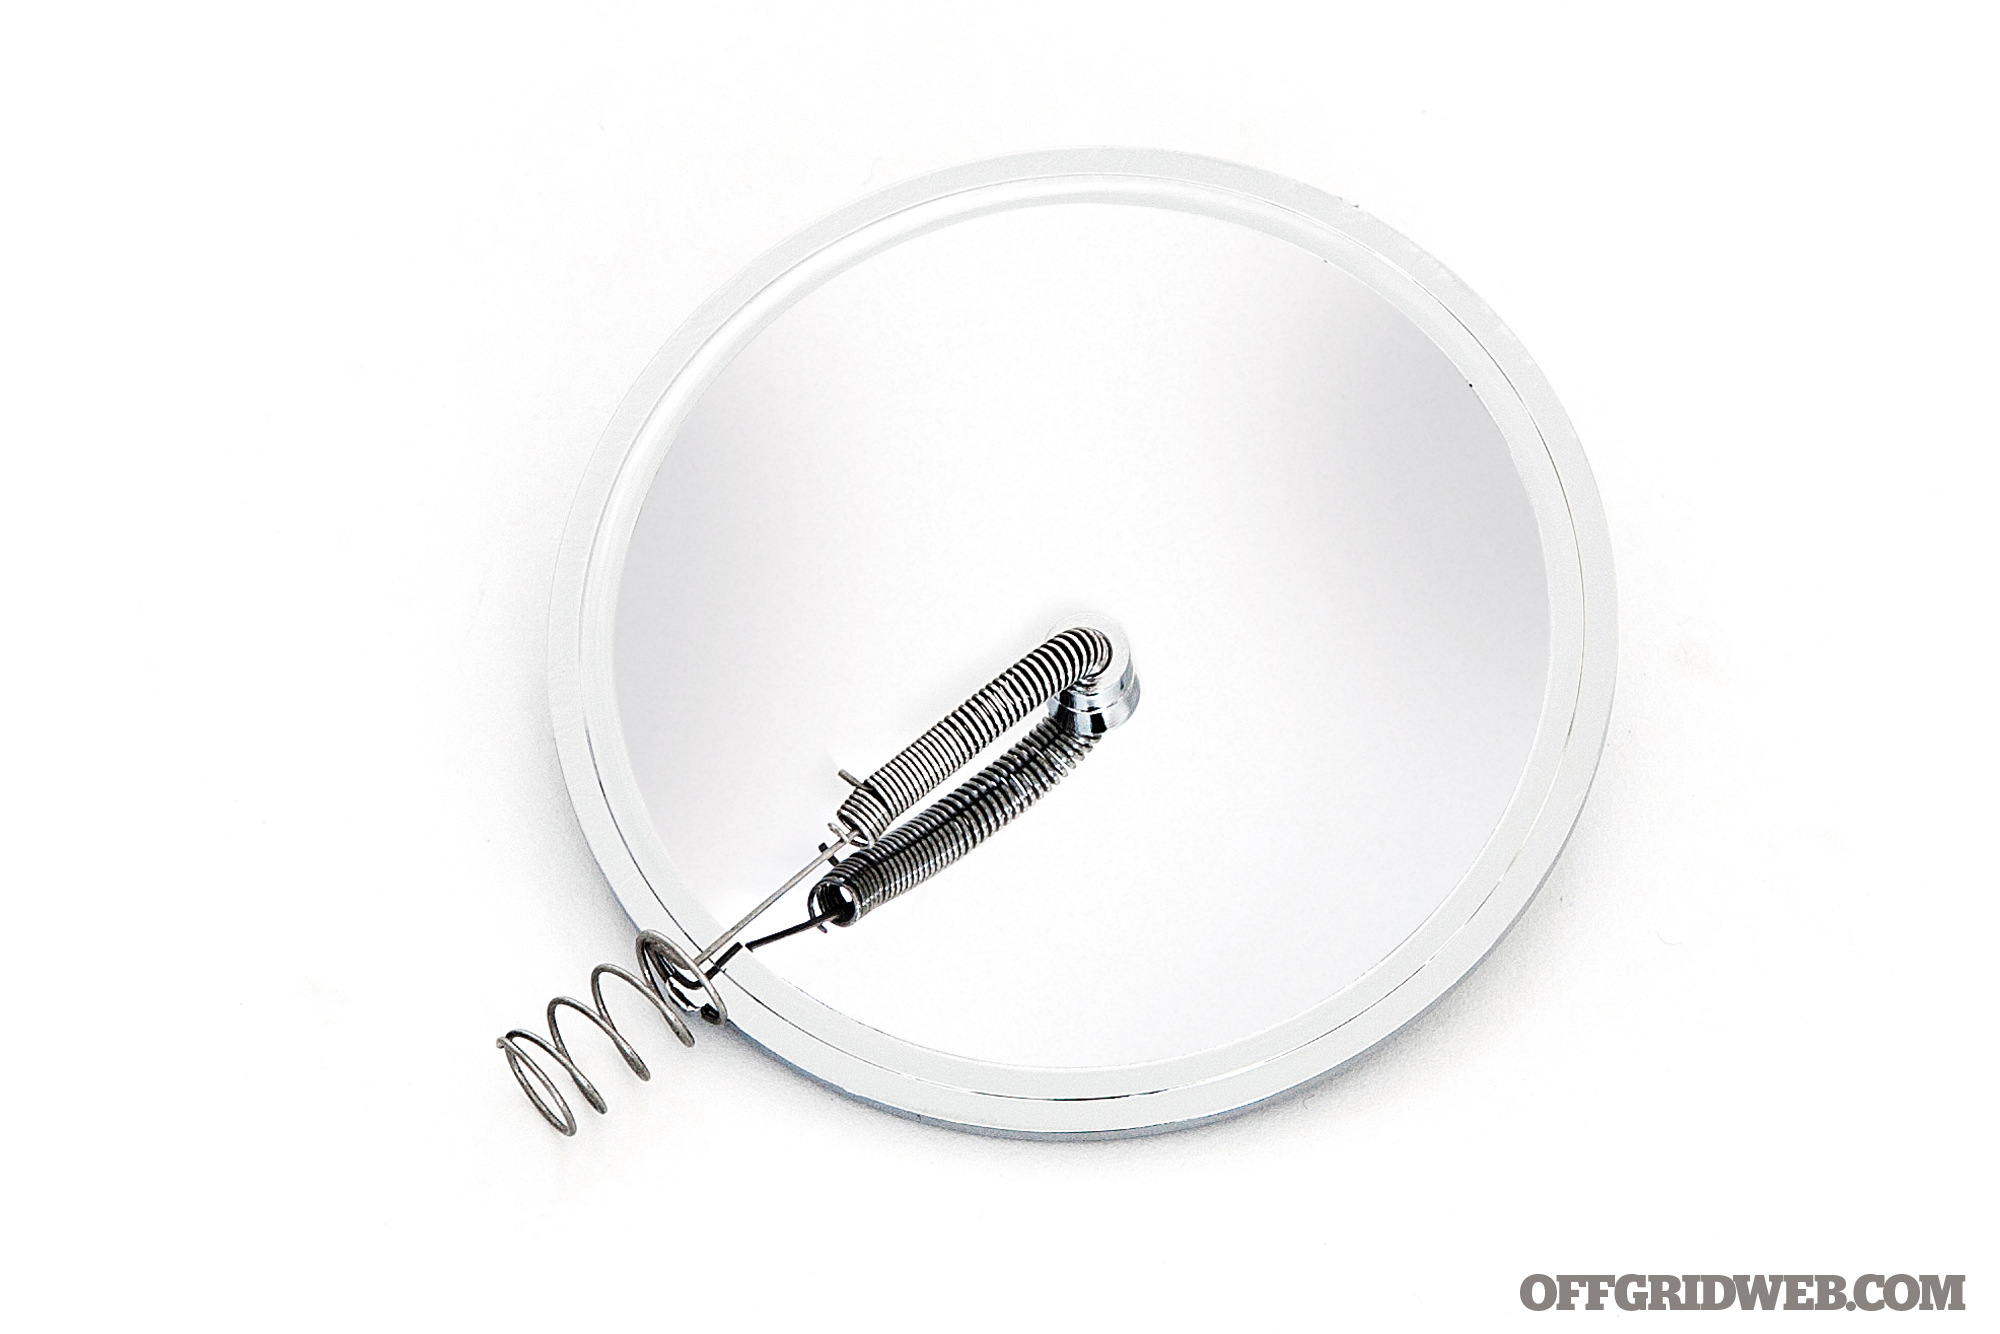
UEB Outdoor Emergency Cigar Starter
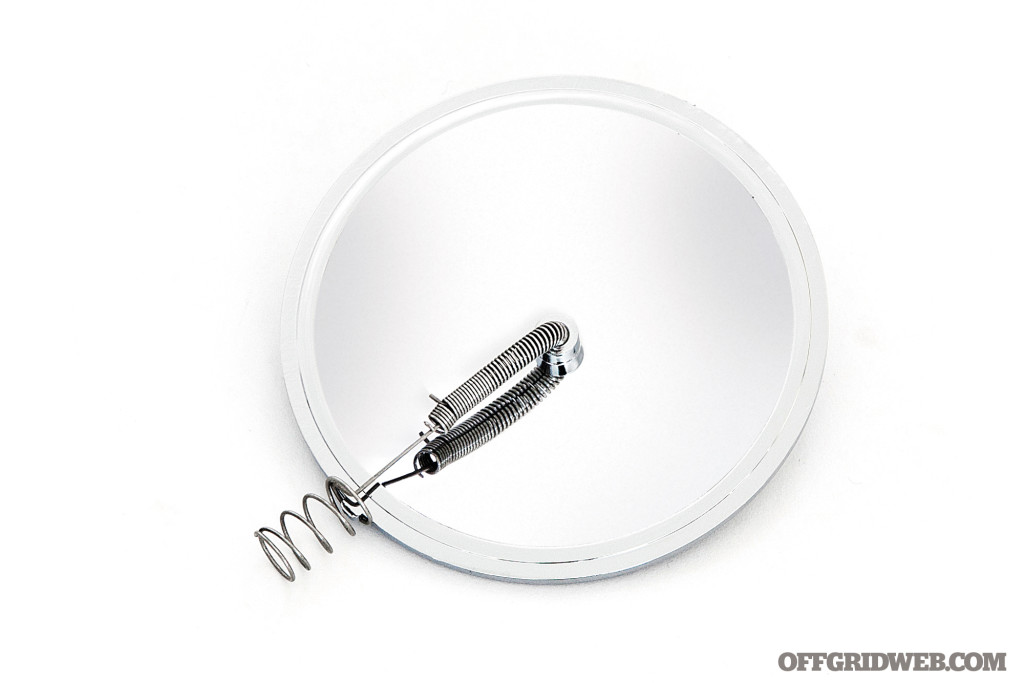
Type
Solar
Dimensions
4.5 by 3.8 by 0.5 inches folded flat
Weight
0.8 ounces
Components
“Waterproof and windproof” plastic mirror lens, aluminum tinder holder
Lifespan
N/A
Special Features
Folds flat for storage
MSRP / Recurring Costs
$8 / N/A
URL
www.amazon.com
Need to light a stogie in the backwoods, but forgot your matches? UEB Outdoors has the solution with this so-called “Emergency Cigar Starter,” which we found on Amazon. The seller also says it works “as a make-up mirror for ladies” — just don’t set fire to your face. Despite those ludicrous uses, the only thing we care about is if it can start a fire in a survival setting. Fortunately, it can.
The curved mirror focuses light at the metal tinder holder, provided you can position the mirror at the right angle in bright sunlight. When not in use, the tinder holder can be folded flat and clipped onto a tab on the mirror. Although we don’t plan to use it for lighting cigars, this tool works well for igniting tinder or as an emergency signal mirror.
Pros:
- Lightweight
- Doubles as an emergency signal mirror
Cons:
- Plastic chrome is susceptible to scratching or cracking
- Marketed as a cigar lighter, but it’s barely big enough to hold a cigarette
More From Issue 18
Don’t miss essential survival insights—sign up for Recoil Offgrid’s free newsletter today!
Read articles from the next issue of Recoil Offgrid: Issue 19
Read articles from the previous issue of Recoil Offgrid: Issue 17
Check out our other publications on the web: Recoil | Gun Digest | Blade | RecoilTV | RECOILtv (YouTube)
Editor’s Note: This article has been modified from its original version for the web.