When it comes to survival food, many of us gravitate to the idea of hunting or fishing. While a big slab of meat sizzling over the fire is certainly an appealing prospect, actively catching food often requires significant preparation and substantial effort — that means carrying added gear, and burning calories to obtain more calories. In some cases, there are sources of food in your surrounding environment that won’t put up a fight or escape your grasp. In these cases, you should consider foraging.
Black walnut trees can be found throughout most of the eastern United States. (Map via Wikipedia)
Sometimes, sources of food will be clear as day — a ripe ready-to-eat fruit dangling from a tree along your path, for example. In other cases, you’ll want to be extremely cautious when foraging for wild edibles. Certain types of mushrooms can be deadly, and may closely resemble edible varieties. This is why it’s wise to study and prepare yourself before you venture into the wilderness.
The brown walnut shells we’re familiar with must be removed from the green fleshy husk.
In the following video, YouTube survivalist The Wooded Beardsman shows how to process wild black walnuts from tree to table. These walnuts are an incredibly calorie-dense food source, with 100 grams (about 3/4 cup) providing approximately 618 calories. They’re also high in fat and protein, both important resources for energy-intensive survival situations. In his own words: “When [walnuts] are available, the survivalist — like a busy squirrel preparing for winter — should focus their efforts on collecting as many as possible before it’s too late.”
As the Wooded Beardsman aptly notes, “making a living from wild food is a very time-consuming and labor-intensive endeavor.” But if you know where to look and learn how to process them, these black walnuts can be an incredibly valuable resource for survival.
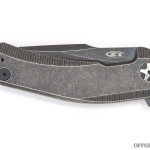
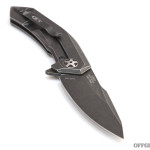
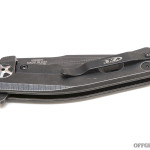
Is there such a thing as too many knives? Unless you’re going full mall ninja and carrying five at a time, we’d say that having more EDC knives to choose from is never a bad thing. That’s why we went all-out and requested knives from 24 companies for our ultimate folding knife buyer’s guide. Fourteen of these made it into our print article, which you can also read in its entirety online — check those out first if you haven’t already.
Part two of our EDC blade guide begins here and now. These ten knife reviews are exclusive to OFFGRIDweb.com, so read on for our thoughts on each of these folders.
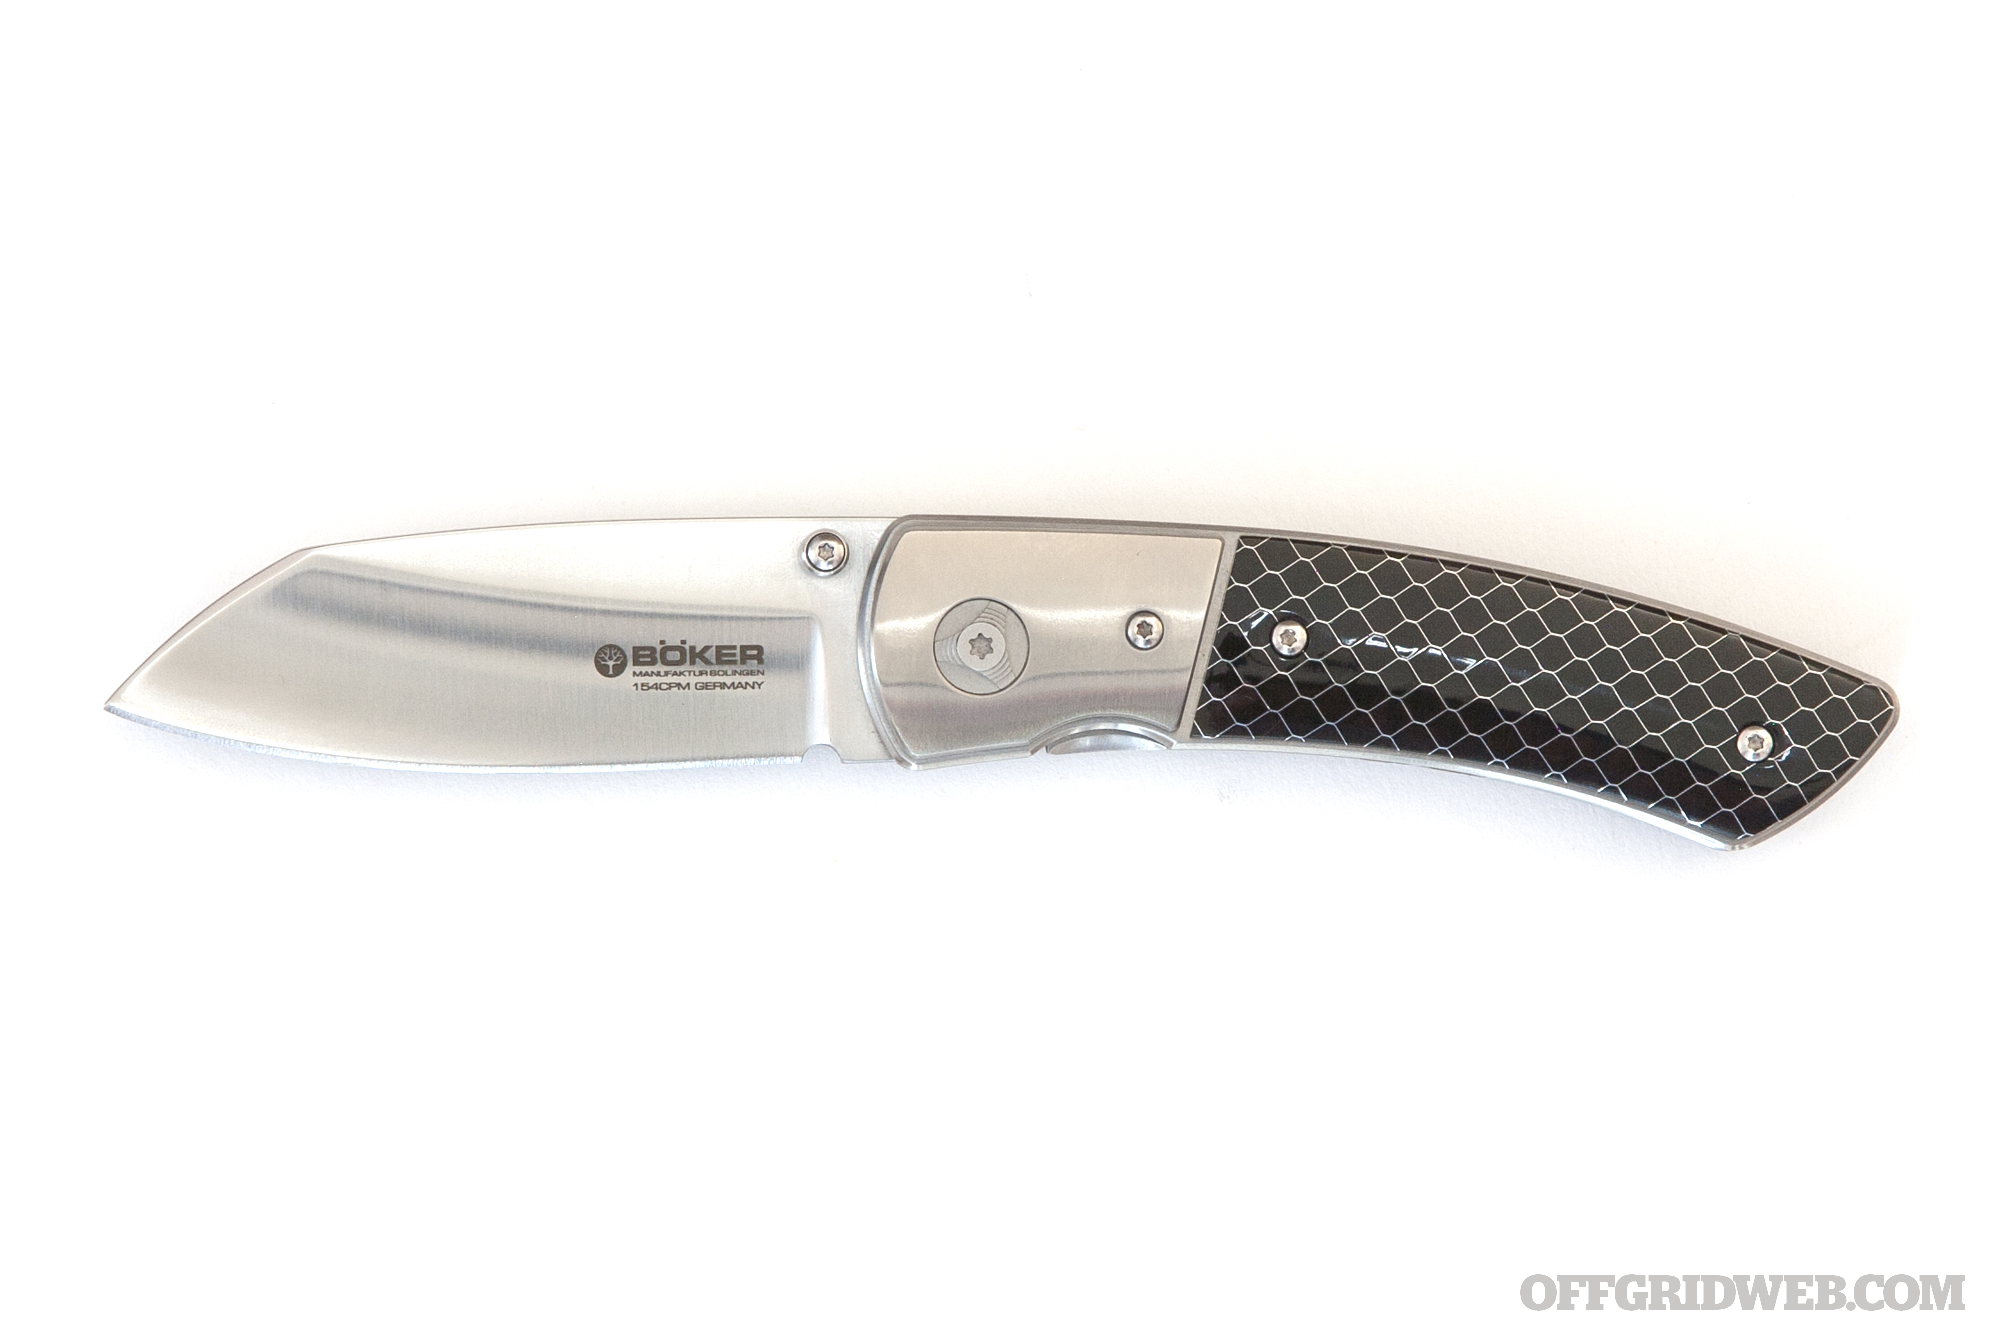
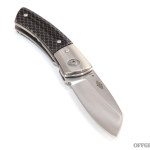
We’ve had previous experience with Boker Plus knives, a mid-priced line manufactured in Taiwan or China, and have generally been pleased with these blades. However, the Les-Voorhies-designed Model 10 CG is part of the core Boker line, manufactured in the company’s historic facility in Solingen, Germany. It’s apparent that substantial care went into this knife’s construction — the “CG” in its name stands for Collector’s Grade. The hollow grind on its CPM 154 blade is practically a work of art, and the titanium liner keeps it securely locked open. The handle is composed of C-Tek, a glossy resin-infused aluminum honeycomb, flanked by titanium bolsters. This knife lacks a pocket clip, but includes a microfiber drawstring pouch for storage.
Pros:
Gorgeous glossy finish and interesting choice of handle materials make this knife a real looker.
Modified wharncliffe blade is razor-sharp and highly effective for everyday cutting tasks in an urban environment.
Cons:
Considering its price and features, this knife doesn’t wow us from a bang-for-the-buck standpoint. It’s more of a collector’s item than a practical choice.
Lacks a pocket clip, and only has a one-sided thumb stud.
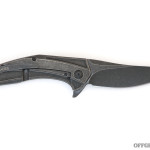
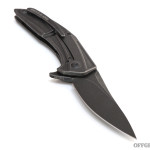
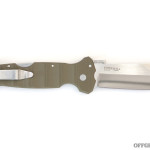
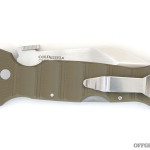
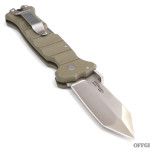
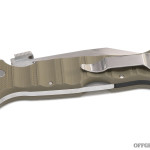
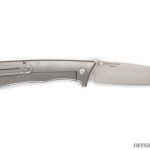
Looking like it escaped a biomechanical Engineer spacecraft from the Alien movie franchise, the Brous Blades Parallax is a sleek premium folder with a price some may consider equally out-of-this-world. This knife is available in four finish options — satin, stonewash, blackout, and acid stonewash. Our sample features the last and most costly finish, and we think the dark, weathered appearance perfectly complements its sinister shape. The handle is constructed from 3D-milled 6AL4V titanium, with a frame lock and ultra-smooth ceramic detent ball. The slim upswept 4-inch blade is formed from durable D2 steel, and includes a flipper for quick opening.
Pros:
Unique and beautiful design reminiscent of something penned by H.R. Giger.
Ceramic ball bearing makes flipping this knife open lightning-fast and smooth.
Cons:
Brous Blades couldn’t have picked a more boring font to etch onto the pocket clip, and it contrasts starkly with the aggressive knife design.
Lockbar release feels sticky rather than smooth. The Brous Blades site offers instructions on how to alleviate this through application of a Sharpie pen or graphite pencil, but in this price range, we’d expect it to feel smoother out of the box.
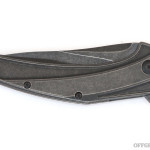
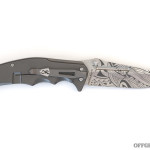
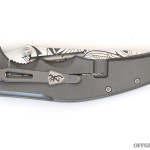
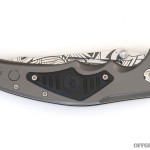
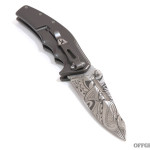
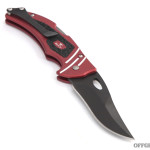
The Wihongi Attachment is a new model for 2017, and its etched tribal motif was inspired by New-Zealand-born martial arts instructor Jared Wihongi. The design was directed by Jared, penned by Russ Kommer, and manufactured in China to keep the price at an affordable $40. The hollow-ground drop point blade is constructed from 5Cr15MoV/7-Cr stainless steel, and the handle is aircraft aluminum with an interchangeable G10 or carbon fiber insert. It includes a removable tip-down pocket clip with the Browning Buck Mark logo.
Pros:
The handle design and jimping on the blade’s spine produce a secure grip.
The tribal motif creates a unique and eye-catching appearance.
Cons:
The frame lock on our sample failed to engage reliably when opening the knife slowly. This is a major safety concern, though it may be an isolated quality control issue.
The Chinese 5Cr15MoV/7-Cr steel is hard to pronounce and wouldn’t be our first choice for long-term durability, though it’s acceptable at this price point.
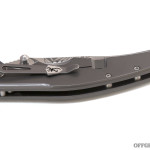
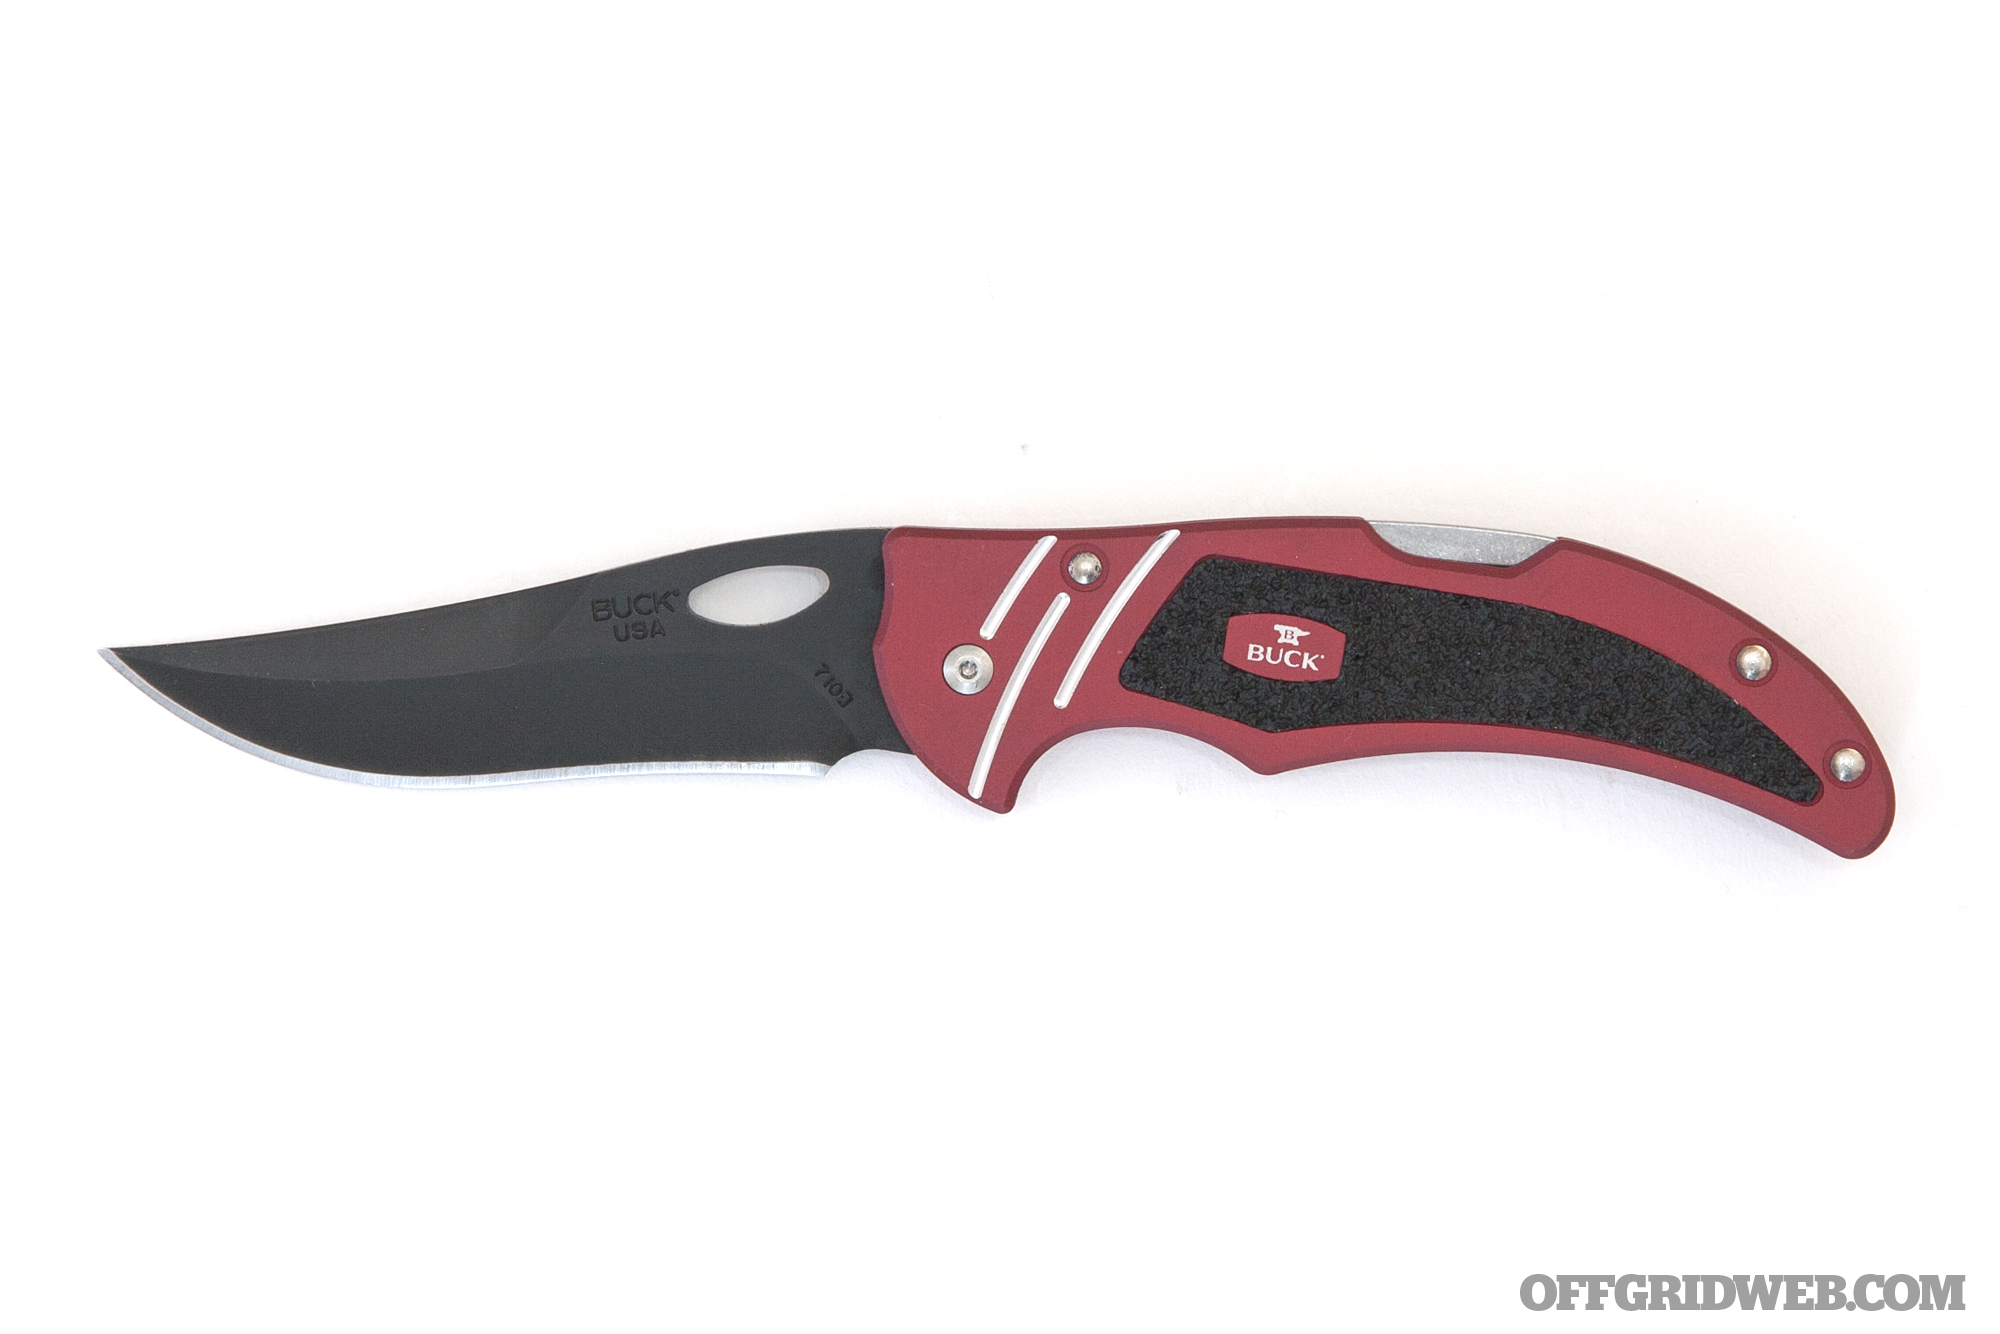
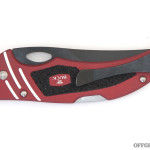
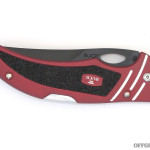
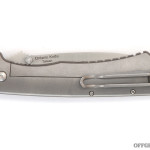
The Buck 710 Volt is an American-made folding knife with a recurved skinner shape inspired by the fixed-blade Buck Kalinga. The blade is constructed from 420HC steel with a black oxide coating and oblong thumb hole, and paired with an anodized aluminum handle. Textured inlays and milled ridges on the handle scales add grip. The backlock mechanism will be familiar to Buck fans, and produces a sturdy lockup. There’s also a removable black-oxide-coated pocket clip.
Pros:
Good ergonomics thanks to a large forefinger groove and textured handle inlays.
Slim and lightweight design makes it ideal for minimalist EDC loadouts.
Cons:
Backlock creates resistance in the closed position, making it tough to open the knife one-handed.
420HC steel dulls quickly, though it’s also relatively easy to re-sharpen.
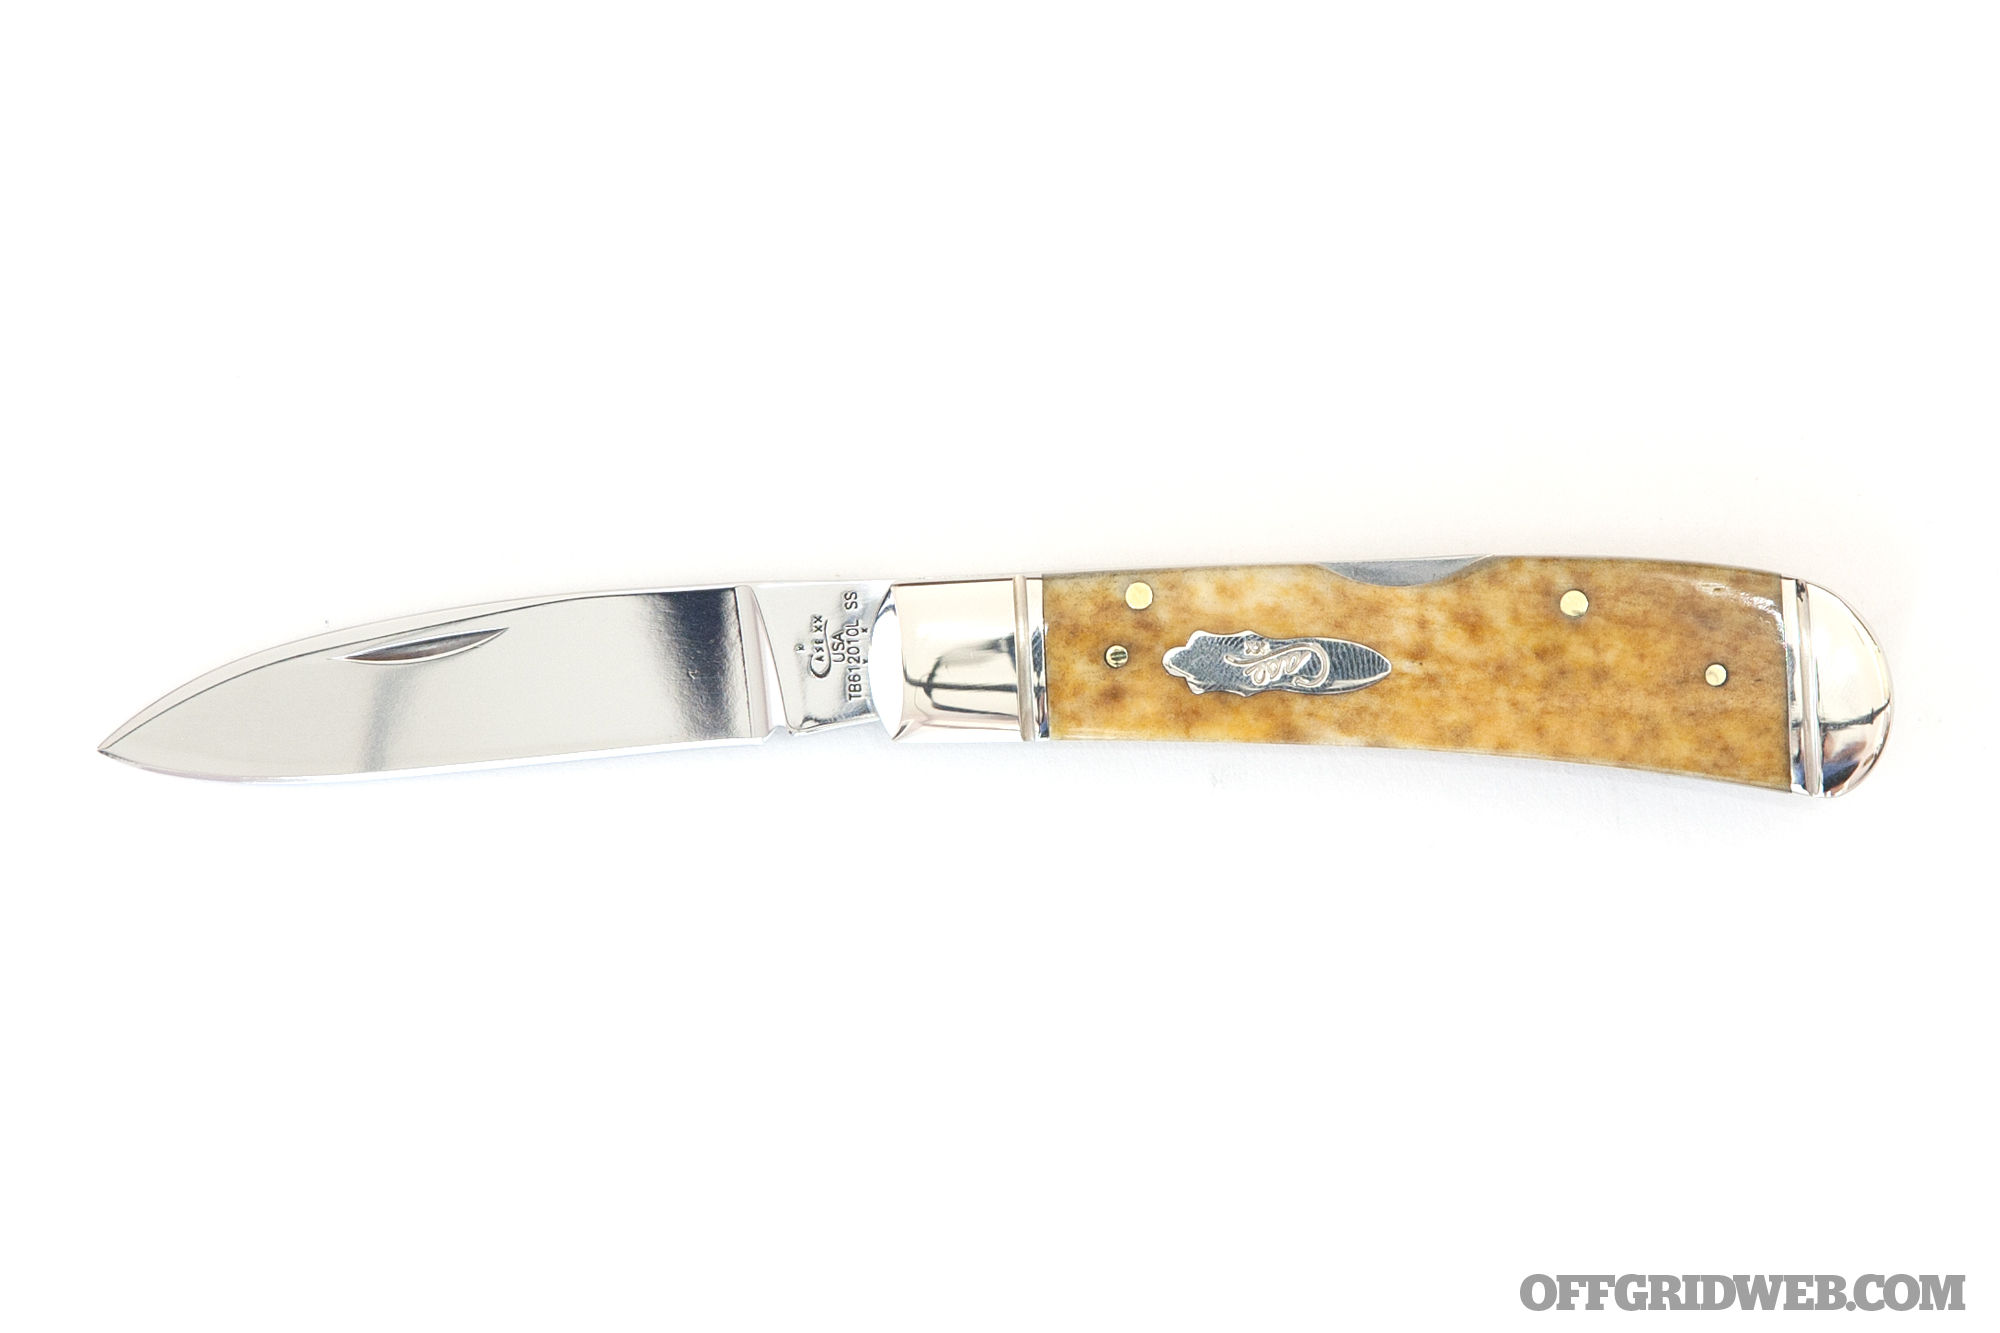
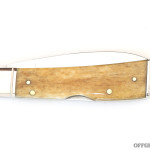
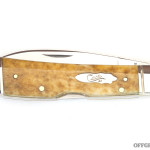
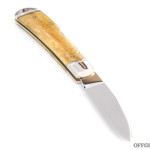
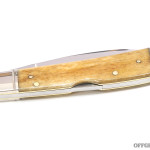
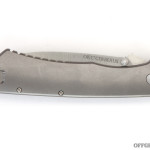
If you’re a real traditionalist, or simply want to add a vintage-style blade to your EDC rotation, the Tribal Lock from W.R. Case is an appealing choice. This American-made compact folder is simple yet classic, and features a mirror-finish stainless steel blade with a nail nick for opening. The handle is composed of a backlock sandwiched between more mirror-finish stainless steel, fluted bolsters, and the handle scale of your choice. Nine scale options are available; we went with smooth antique bone. It may not use high-tech materials or fancy blade geometry, but it’s a beautiful iteration of the timeless gentleman’s pocket knife.
Pros:
Nicely-crafted with excellent fit and finish.
You can practically use the flat of the blade as an emergency signal mirror — it’s that polished.
Cons:
Too small to be used for any sort of heavy-duty survival tasks.
Lack of a clip or key ring means you’ll need to be OK with this free-floating in your pocket.
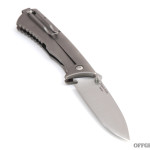
Cold Steel
Immortal OD Green Overall Length: 9 inches Blade Length: 4 inches Weight: 5.9 ounces MSRP: $200 URL:ColdSteel.com
Inspired by the Roman gladius sword shape and designed by Mike Wallace, Cold Steel’s Immortal folder is a huge and hefty knife. The company says its distinctive 4-inch blade is “almost like an extra wide tanto point, but with an angular chisel ground false edge”. It’s made in Taiwan from Carpenter CTS XHP steel, and fitted with a rectangular thumb plate and strong backlock. The handles are scalloped and ridged OD Green G10, though the knife is also available with Coyote Tan scales. The polished stainless pocket clip is reversible for left- or right-handed tip-up carry.
Pros:
Razor-sharp and impressively-durable CTS XHP steel.
The solid backlock and stout blade leave no doubts in our mind that this knife can take a beating.
Cons:
While the pointed blade shape excels at piercing, it’s less adept at delicate slicing tasks.
We’re not wild about the thumb plate, especially when paired with a stiff backlock. This knife is tricky to open one-handed.
It may not be apparent in the photos, but the BF0 CD knife is truly tiny. As the smallest of the Extrema Ratio Basic Folder series, this 2.1-inch blade fits nicely into the palm of your hand, but its small reversible clip allows it to be carried normally without remaining loose in the bowels of your pocket. The nylon polymer handle contains a small liner lock, and the stonewashed drop-point blade is made in Italy from high-quality Bohler N690 steel. There’s also a small lanyard hole so you can carry it on a keychain, if you prefer.
Pros:
Tiny and lightweight, making it ideal for carry in a shirt pocket or as a backup keychain knife.
Extrema Ratio didn’t skimp on the steel quality even though this is a small blade. Bohler N690 is also used on the company’s larger blades.
Cons:
The liner lock has a very small textured release lever, so closing the blade can be difficult, especially with wet or gloved hands.
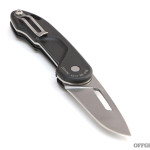
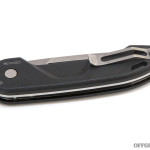
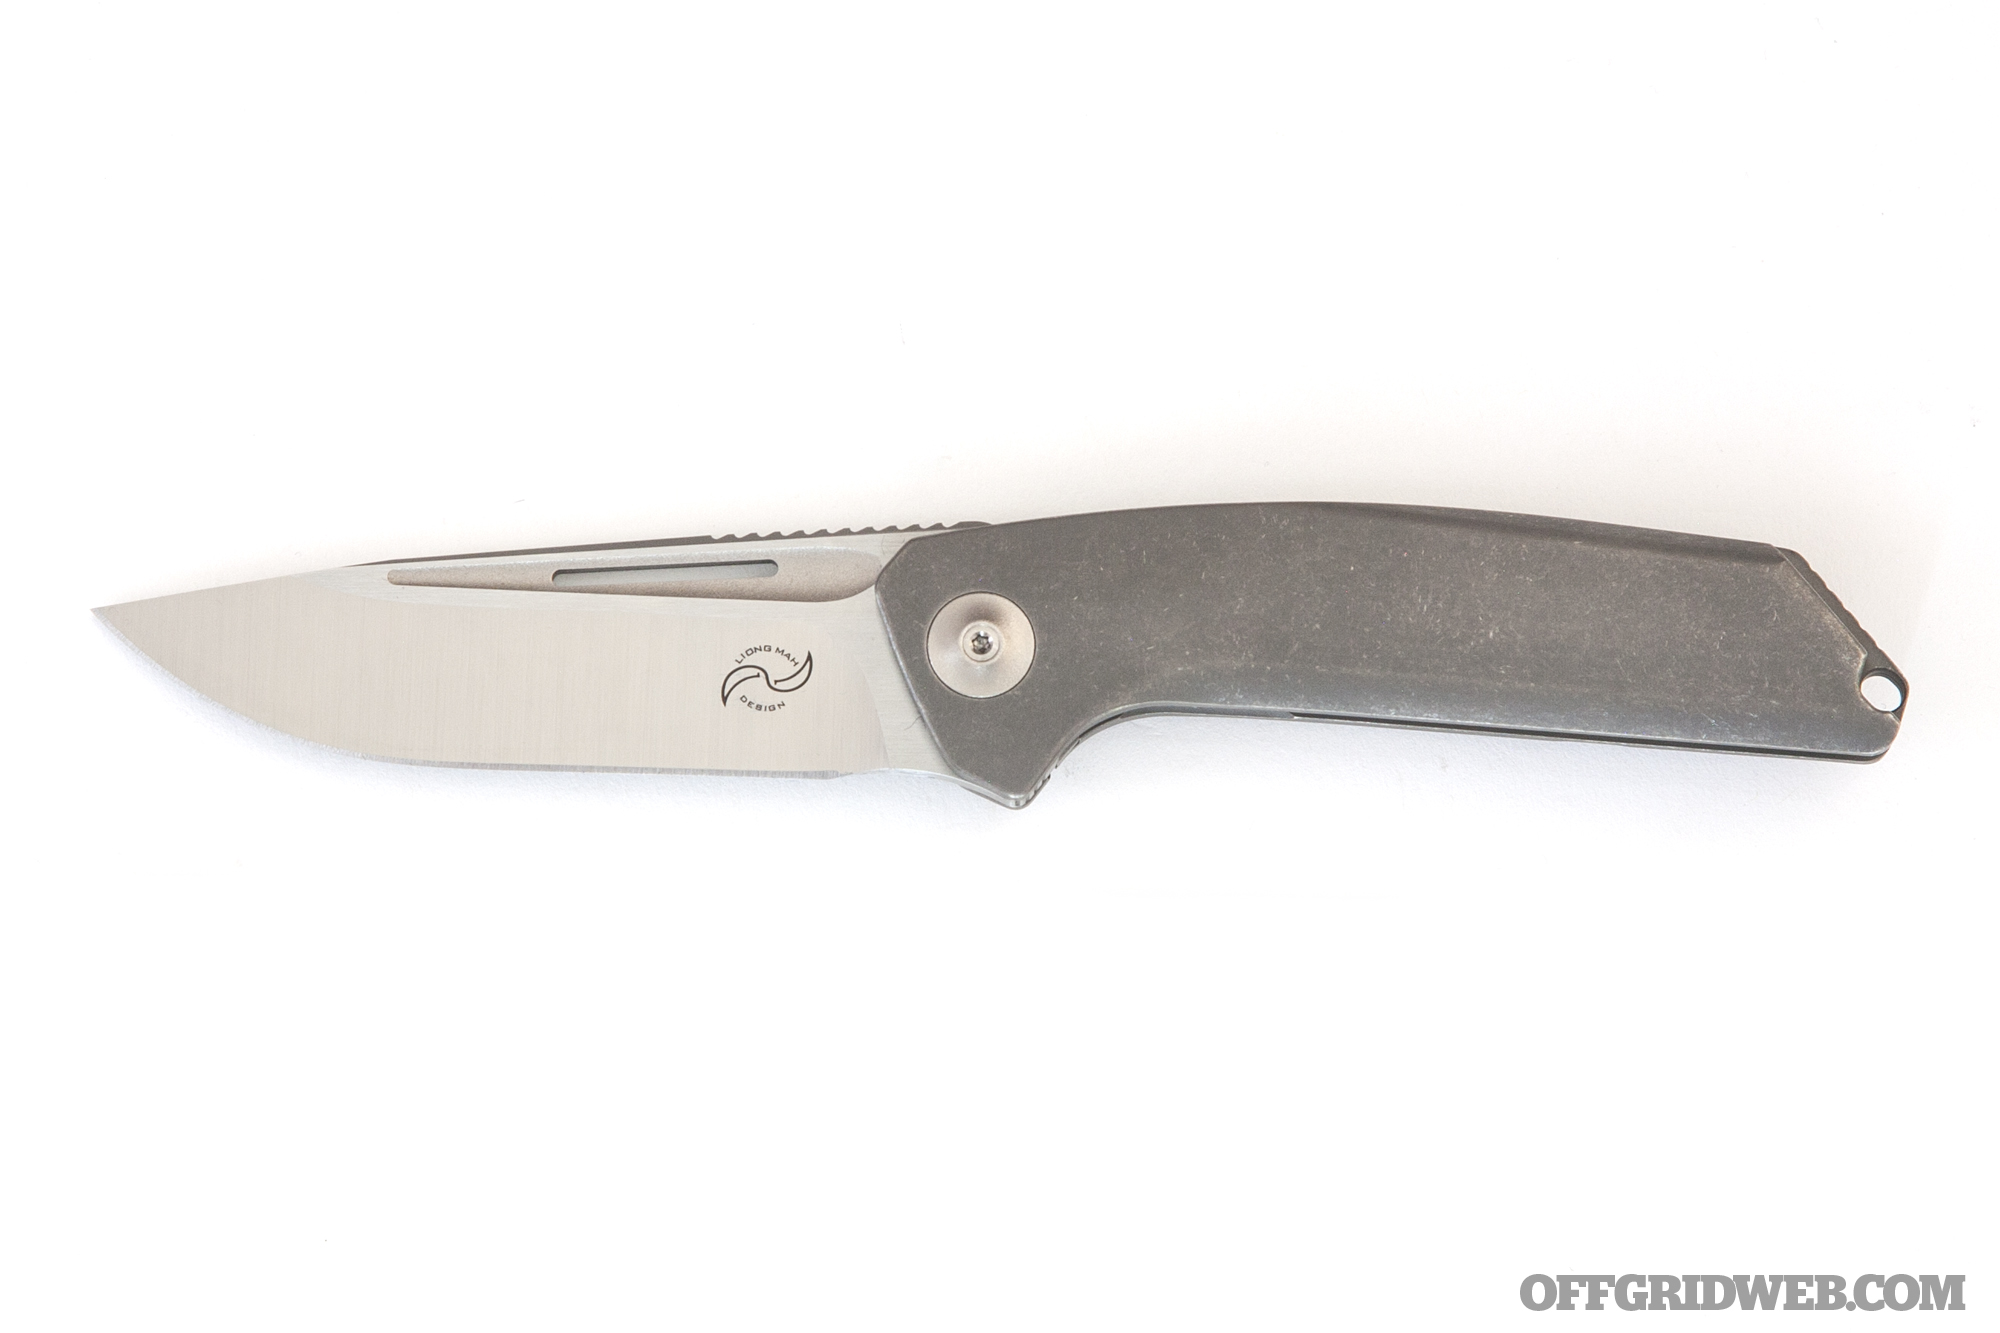
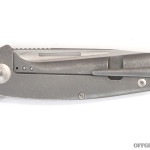
This American-made knife is the creation of legendary designer Liong Mah, who also designed the CRKT Remedy we featured in part one of our guide. The Endevour name appears to be a clever play on the words endeavor (an attempt to achieve a goal) and devour (to consume quickly). Its 3.8-inch blade is crafted from S35VN steel sourced from Texas, then hand-ground and finished. The Endevour can be opened via a textured recess and machined slot in the blade, or via a low-profile flipper which nestles into the handle as the blade pivots into place. Speaking of the handle, it’s machined from a half-inch-thick billet of titanium, and includes a titanium ball bearing and slick blind-screwed titanium pocket clip.
Pros:
Modern and elegant design with many cool details, such as the blind-screwed Ti pocket clip that blends almost seamlessly into the handle.
Highly functional blade size and shape makes this a practical choice for EDC, assuming your budget permits it.
Cons:
The low-profile flipper lever is a little too low-profile, and can be difficult to use reliably without concentrating and adjusting your grip.
Named after the three-headed hound of Hades in Greek mythology, the OKC Cerberus folder is not to be confused with the company’s Cerberus fixed blade, an unrelated design. This large knife is made in Taiwan from respectable materials — namely D2 tool steel for the blade and titanium for the handle. Said titanium features a simple satin finish, frame lock, and matching titanium backspacer. There’s also a reversible skeletonized pocket clip. The drop-point blade features a prominent thumb ramp and ambidextrous thumb stud.
Pros:
Thumb ramp provides added force and control for precise cuts.
Durable D2 steel and a simple drop-point blade make this a good choice for utility or combat.
Cons:
While we have no complaints about the materials used, the design isn’t what we’d call exciting. A little added texture on the handle would improve both appearance and grip.
The overall length of over 9 inches seems a bit excessive for most EDC applications, and makes the knife heavy despite extensive use of titanium.
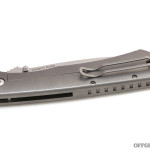
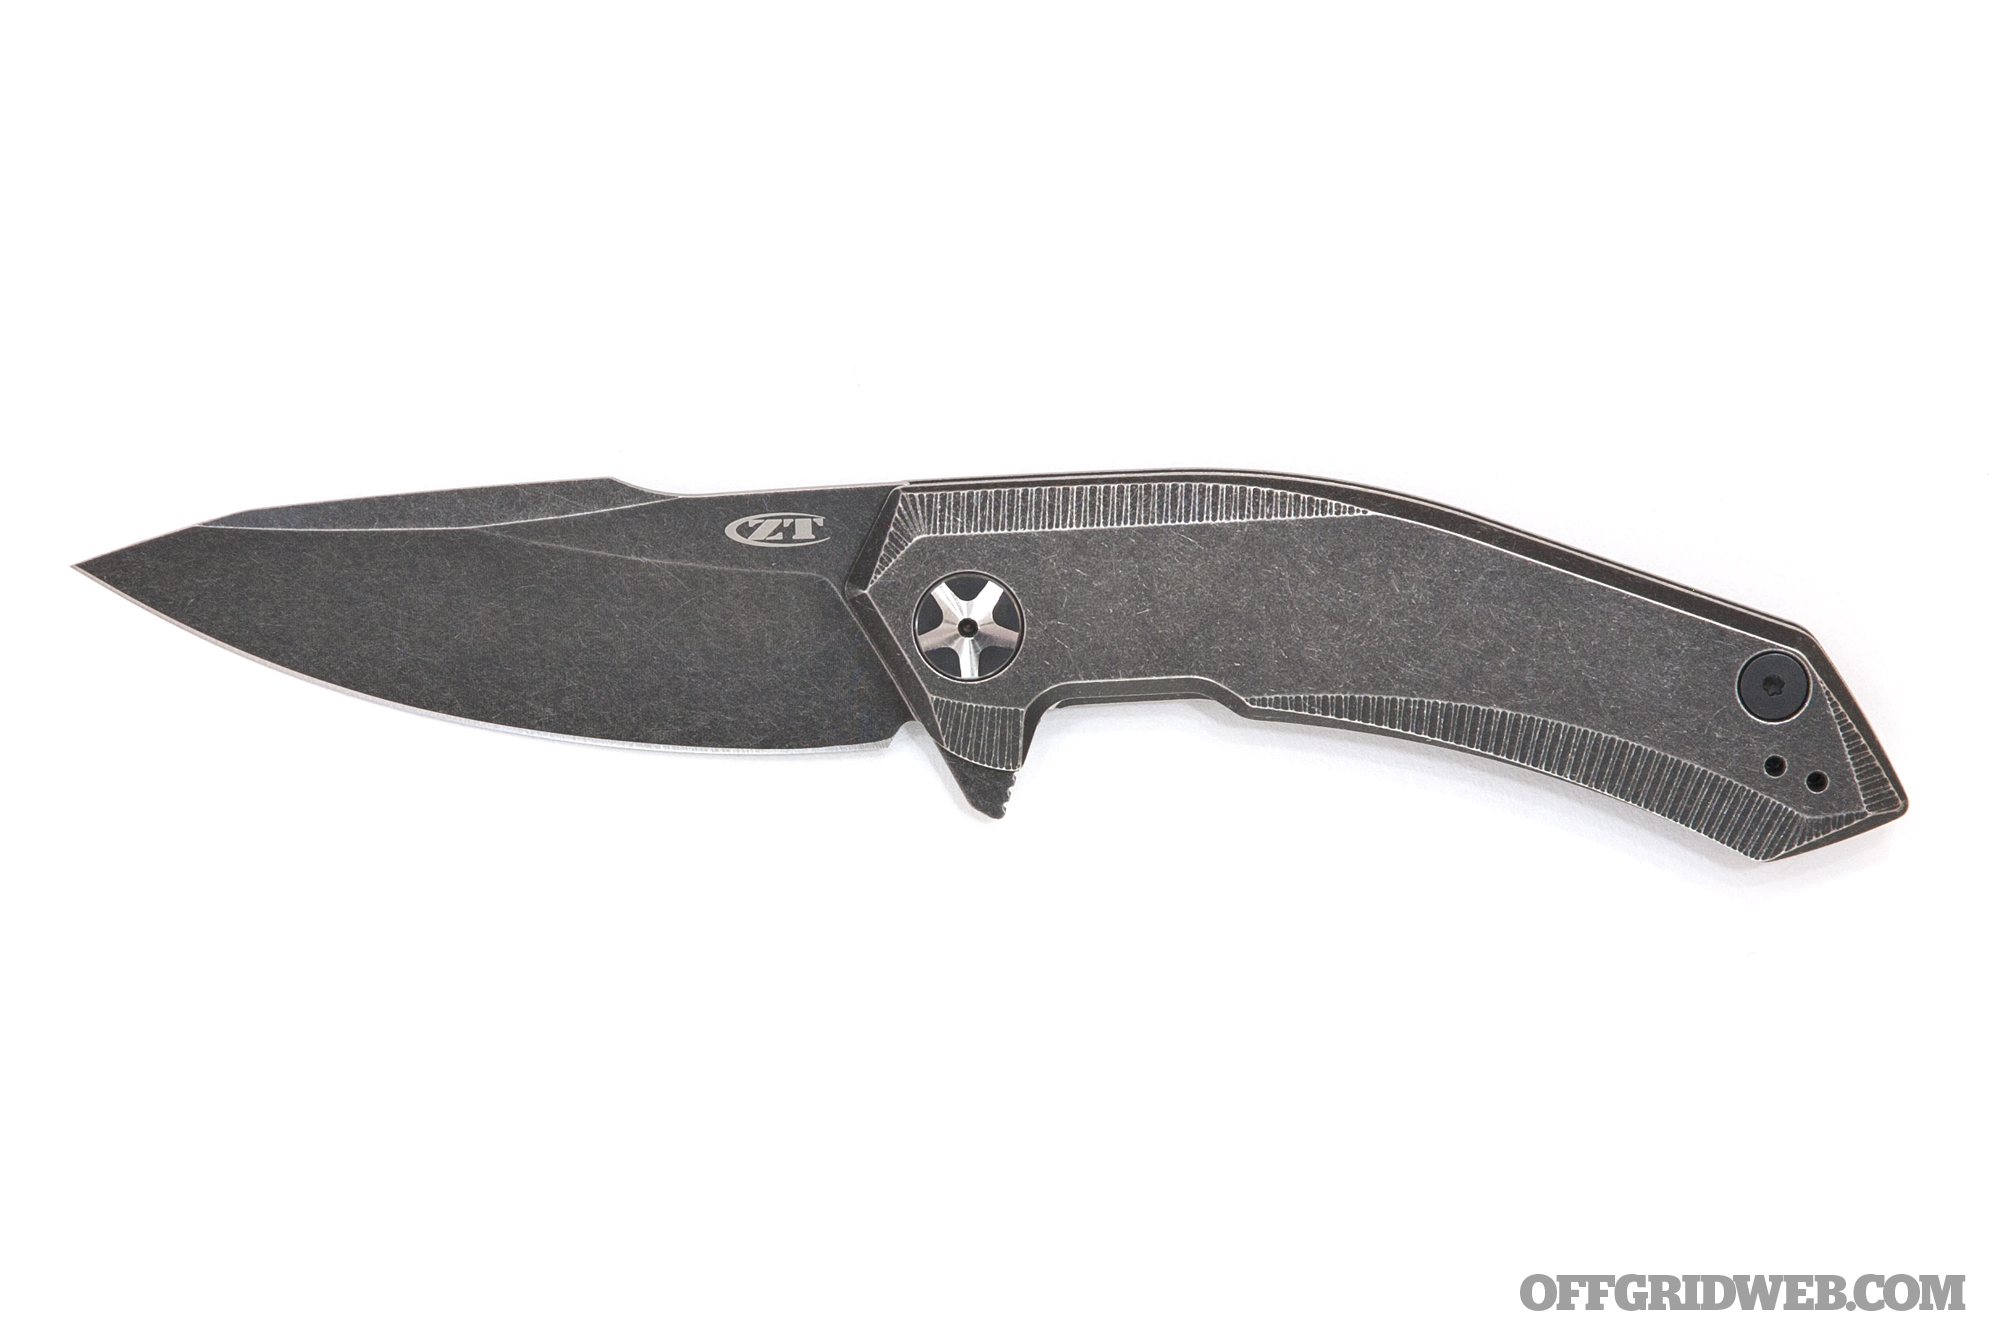
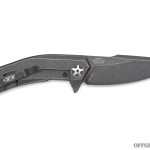
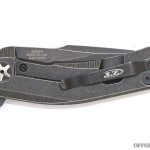
Zero Tolerance calls the styling of the 0095BW “dramatic”, and we agree. Its new BlackWash finish accentuates the aggressive angles of the titanium handle, and highlights details like the ridged milling marks on its perimeter and the machined hardware surrounding the KVT pivot bearing. Its frame lock includes a hardened steel lockbar insert. The blade is composed of S35VN steel, with a large flipper and a small thumb ramp on the spine. The pocket clip is reversible for left- or right-handed tip-up carry. Like all Zero Tolerance knives, the 0095BW is made in the USA.
Pros:
Of all the knives in this guide, this is the one I found myself carrying most consistently. It cuts beautifully, flicks opens smoothly, and quickly found its way into my EDC rotation.
With a cohesive blend of smooth curves, geometric angles, and a deep black finish, the 0095BW has visual appeal in spades.
Cons:
Out of the box, the detent felt excessively stiff, causing the flipper’s hard edges to dig into your finger as the knife opens. However, after a short break-in period, this improved substantially.
As a result of the handle and clip design, it rides fairly high in the pocket. A deep-carry clip would’ve been a welcome addition.
Anybody who stayed up too late in the mid-1980s remembers the cringe-worthy infomercial for the Showtime Rotisserie. This appliance cooked Flintstone-sized hunks of meat. Studio audience members bellowed like parrots, “Set it and forget it!” Seth McGinn’s CanCooker makes the same type of claims, suited for cooks on the go.
Inspired by the meals cooked in a 10-gallon cream can and served to ranch hands on his grandparents’ cattle farm in Nebraska, Seth McGinn wanted to replicate his childhood experience but had trouble finding a modern can that could handle the task. In 2009, he brought his own to market, allowing people to cook a lot of food with little effort.
Made from FDA-approved 1060 anodized aluminum, the CanCooker comes in three varieties: the 4-gallon Original, the 2-gallon CanCooker Jr., and the 4-gallon Bone Collector (which appears to offer nothing different than a dire name and a deer skull logo for a penny less than the Original). They’re 10 inches in diameter, but the Jr. is 3 inches shorter than the 10-inch stature of the other two.
All three, however, offer the same benefits. CanCooker makes a complete meal in about 40 minutes and can work on any heat source: stovetops, grills, fryers, camp stoves, campfires, and the Multi-Fuel Portable Cooktop offered from the company. The CanCooker’s insides are coated with a nonstick surface.
Food and Function
We reviewed the CanCooker Jr. Adventure Special kit, consisting of the CanCooker Jr. and a Multi-Fuel Portal Cooktop. Our sample kit also contained a small plank cutting board (normally sold separately for $18) and a couple examples of the seasonings. However, it didn’t include the optional two-piece rack, so we felt obliged to purchase one for $14 since every recipe in the manual suggested it.
The Multi-Fuel Portable Cooktop is a single burner unit capable of 10,000-btu output and can be fueled by butane or propane. It’s compact for a single-burner stove, but not entirely practical for bugging out. This is a basecamp stove, packaged with a hard-shell plastic case.
The concept of the CanCooker is simple. Put in the rack, dump in the food in a particular order (usually a bed of vegetables then meat on top), and add 12 ounces of a liquid (in our case, a Belgian ale). Clamp down the lid (which has a silicone gasket), and fire up the stove. Then walk away.
The CanCooker converts whatever liquids you put in there into steam, which thoroughly cooks the food. The concept of steam cooking started in the American Southwest about 7,000 years ago, and it’s considered a healthy alternative to frying or other stove-top cooking methods that involve oils.
We were apprehensive to walk away from the stove while it was spouting steam like an old-timey locomotive, but as a watched pot never boils, 3 pounds of sausage, peppers, and onions never cooks. So that’s what we did.
After 30 minutes of steaming and a 10-minute rest, everything was cooked to perfection. The sausage was moist and tender, and the seasonings had melted into the meat. The vegetables retained their full flavor and didn’t absorb any from the sausage, while the Belgian ale provided a subtle crispness to the whole dish.
Overall
The CanCooker — especially the Jr. — would be perfect for an RV or a remote cabin where the fuel may not be reliable and you would have to use different sources. The CanCooker can be placed directly on burning coals if need be (though you’ll stain the aluminum with soot). It’s a convenient and versatile tool — not to mention that our 2-gallon version prepared enough food to feed more than a few people.
This, however, is by no means a cooking vessel one could take in a bug-out situation … or on a hiking trip … or anywhere where space is an issue. It’s light, at 2.1 pounds, but cumbersome because of its girth (though it has a cinch sack). And forget its cooktop — we’re sure you can find a much smaller portable stove that could fit inside the CanCooker, should you choose to pack it with your survival cache.
Still, it’s a solidly constructed and well-designed piece of cookware, and it functions exactly as promised. We’re still baffled by the Bone Collector version (and the penny savings) though. Maybe people steam bones they’ve collected. Frankly, we don’t want to know. We’ll stick with the sausage, thanks.
Make & Model Seth McGinn’s CanCooker CanCooker Jr. Adventure Special
We all have that special person in our life who just doesn’t get it, right? They don’t understand EDC, survival, or anything even remotely related to our lifestyle. It seems like they have no interest in learning, either. It’s baffling at times to have a loved one repeatedly brush you off when you’re trying to arm them with information that could potentially save their lives in a worst-case scenario. One would think that just watching the news would light a fire under their butts.
As a wife and mother, I can attest that nearly all women already think about worst-case scenarios. They’re habitually the storyline of our nightmares and always lurking in the recesses of our minds when we’re awake. So even with that innate sense of concern, why then aren’t more women into survivalism?
Women are often afraid of confronting the issue because then they’ll have to deal with it —hence, why some women don’t want to talk about it at all. Ignorance is bliss? Fortunately, knowledge can combat fear.
From Adversary to Advocate
I’m not law enforcement or military, just a wife and a mother who happens to really enjoy learning and teaching survivalism and firearms. Having grown up in Alaska, I’m always mindful of personal protection. Whether you’re camping, hunting, or just being vigilant of the state’s drug and alcohol problems, you need to be aware or you could very well get killed.
Still, when I first got married, my husband was light-years ahead of me in this survival mindset. It seemed like the only things he wanted to talk about were everyday carry (EDC), firearms, and impending doom. This was a sore spot in our marriage until I bluntly told him that it scared me, and he needed to back off. Those conversations made me nauseous and left me wide awake at night.
Fortunately, my husband listened. He drastically reduced the amount of discussions about this topic, but did it in a way in which I could still ask questions. It took more than a year of processing this information before I was ready to dive in.
I liken it to learning how to drive a car. Sure, the excitement is there, but deep inside there’s that inner voice that’s terrified of getting in a wreck. Eventually everyone overcomes that hurdle and gains enough experience to make driving practically second nature. So, what changed? Knowledge. You learned how to operate that tool and became comfortable with it. Survivalism is the same way. The more knowledge one has on survival, the less daunting it becomes.
Converting Others
I’ve spent the last several years trying to get my close female friends and relatives interested in prepping and survivalism. It’s been challenging to say the least. There’s a certain fear or anxiety that women have when entering a role that’s traditionally seen as a man’s responsibility —providing the last line of defense for the family.
Here are five of the most common excuses I hear from women for not wanting to prep and train —and how to deal with them:
1. “Bad things will never happen to me.” I wish I could go back to this kind of naivete. Bad things can happen to anyone at any time. If you don’t believe me, find a first-responder —they’d surely have many stories to change your mind. More than likely, this is something that ladies will have to come to grips with on their own terms.
2. “I already carry so many things, why add more?” What some women don’t realize is that adding a few extra items to their purse, pockets, or diaper bag increases their survivability exponentially. A greater level of preparedness is worth a slightly larger or slightly heavier handbag. Fellas, you might need to go on a purse shopping trip —a win-win for both of you.
3. “I will never use those items.” That’s great! Hopefully no one will need them, but it’s better to have and not need, than to need and not have. EDC tools are much like a fire extinguisher or a firearm. There’s no substitute for some of these tools in an emergency.
4. “It’s the husband’s job to protect the family.” Many women think this way, but what they fail to understand is that husbands can’t protect them if they’re not there. Of course, husbands want their wives to be safe and sometimes that comes in the form of harping about bug-out bags, concealed guns, and the right mindset. Instead, be patient. Rather than lecture her, offer her a chance to ask questions or send her to the appropriate courses.
5. “I’m too busy being a mom to think about survival.” Being a mom and/or a wife is tough sometimes. There’s laundry, driving the kids, setting up play-dates, shopping, and the list goes on —not to mention our own careers. When a mother says, “Being a mom is my first priority,” she may not make the connection that the safety of the children also rests on her having the proper mindset, equipment, and training. Find a time where she isn’t distracted to approach her with this information.
Mothers make natural preppers, as they have to ensure not only their own safety but also that of their children. Some extra gear and training, and the right mindset, can keep everyone safe.
Training the Converts
If you’ve taken your time and eased up on the “sky is falling” tactics, there’s a strong possibility you’ll eventually seduce your significant other to the survivalism side. If she’s ready to prep and start learning, here are some ways to keep her interested:
Keep the Criticism Constructive: If you want the lady in your life to dive into this world, don’t make fun of her. There’s no better way to turn her off than to ridicule her questions or concerns. We didn’t grow up playing with G.I. Joe action figures or pretending to be cowboys and Indians. Most of us were given Barbies and baby dolls and groomed to be nurturers and caregivers. Keep the feedback positive and focused on improvement.
Don’t Do it Yourself: Most women don’t have that primal survivalist mentality, especially in the presence of their husbands or boyfriends. But if you split up the couple and the woman is put into the position of being the primary protector, her inner mama bear will come out. Oftentimes, she’ll be just as fierce, if not more so, than her male counterpart. So, if you’re a guy trying to teach your wife, it’s often more effective to ask a trusted friend to do so instead. It’s hard to go from equals as husband and wife to the power disparity of teacher and student. Better yet, sign her up with a reputable instructor or two who can teach her self-defense and survivalism.
Be an EDC Enabler: How do you get women to carry more survival tools with their EDC gear? Make it easy. My husband put together my first EDC kit. I can’t say that I knew how to use everything at first, but over time I asked questions and started doing research. When my husband was deployed with the U.S. Army and I became the sole protector of our children, I used this time to practice. I was given the space to process all the information and soon saw how much it benefited me.
Don’t Pink it and Shrink it: There isn’t a lot of tactical or survival equipment made specifically for females, relatively speaking. So, we have to tweak some things and make do with others. Many companies think that by making their products pink and small that they become female friendly. That’s just condescending. Don’t automatically assume women want the fuchsia-colored go-bag. Instead, give her the opportunity to try out as many different models of gear as possible until she finds one to her liking.
Don’t Convert the Diaper Bag: I’ve never been the kind of mom who just throws her wallet, phone, and keys into a diaper bag. I want a separate pack so I don’t confuse a diaper bag with my EDC kit. In a dire situation, if I need to leave an area quickly with my kids, I can drop the diaper bag and replace its contents later.
The author and her husband, a U.S. Army paratrooper, practice some fire-starting techniques.
The Sell Job
Getting the lady in your life into prepping isn’t rocket science. It just has to make sense to her. Start slowly and present it in a way that shows your concern for her safety. She’ll pick up on that. Perhaps start with a flashlight and a multitool. However, don’t be that guy. You may be thinking it, but save your hard-core prepper what-if sessions for your guy friends (for now).
Also, don’t be offended if she doesn’t want to learn from you. After all, it’s not easy to take someone seriously as an educator if you’ve already seen them in their birthday suit. Give your lady space to learn, ask questions, and process their journey to becoming a survivalist. Dont’ scare her to death, she needs time to associate the correct response with each potential situation, which is proper EDC and mindset. Remember, knowledge always trumps fear.
About the Author
Nila Rhoades is originally from Alaska, but currently resides in Northern Colorado. She is the wife of a U.S. Army paratrooper and has two handsome boys. She has spent the last several years researching firearms, prepping, and survivalism, and now teaches other women how they can help their family survive a worst-case scenario. She also loves peanut butter ice cream. www.milspecmom.com
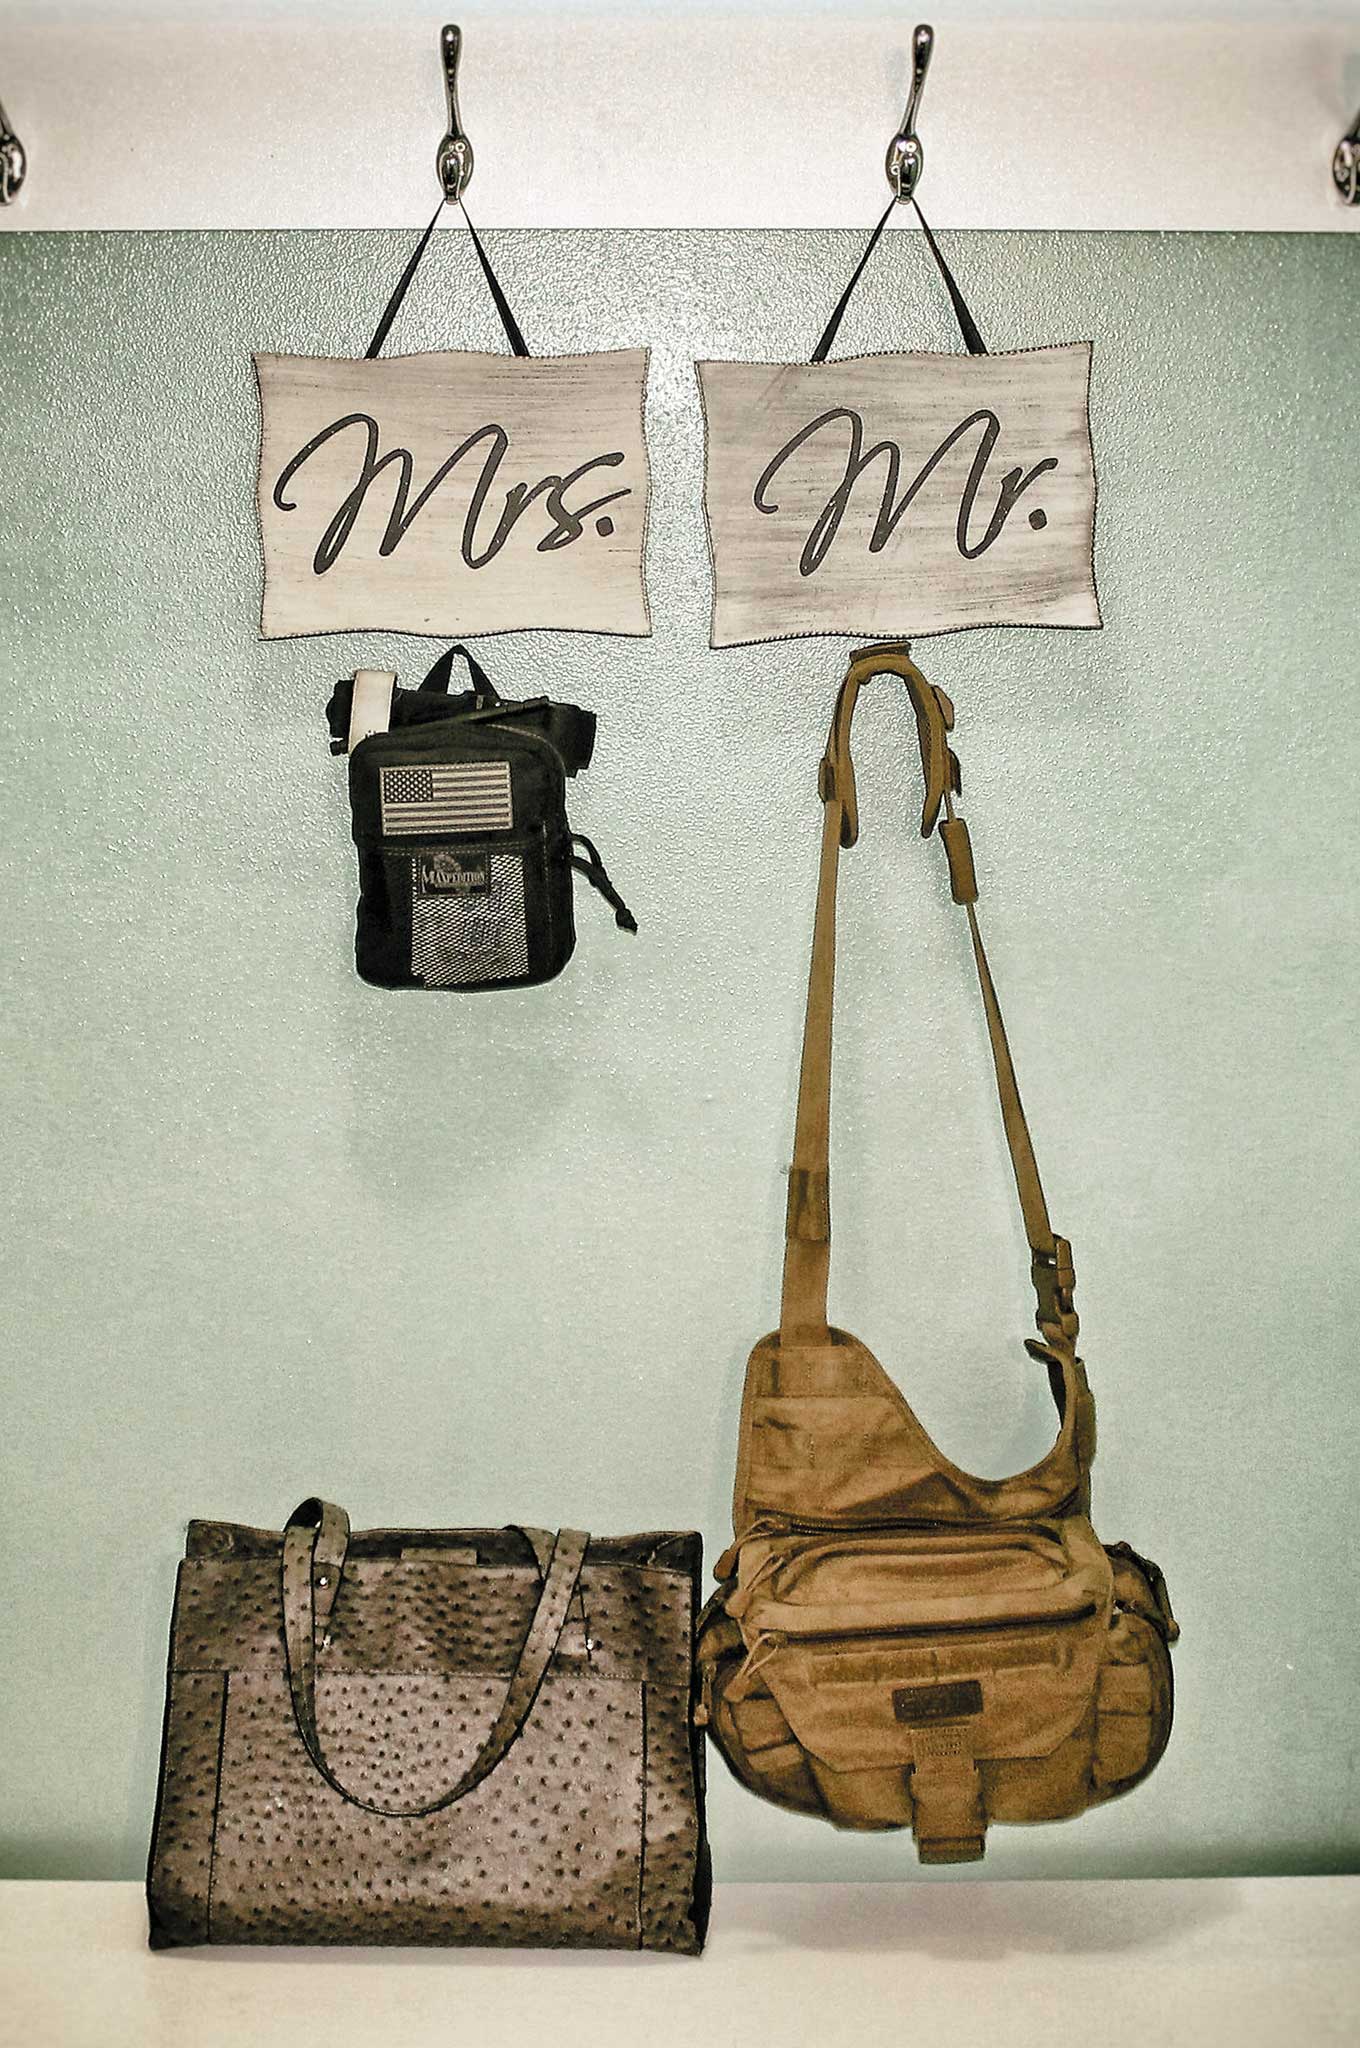
Female EDC
Whether you’re a woman looking to supplement your purse with more preparedness-minded accessories, or you’re a man trying to figure out ways to entice your lady to get into the survival scene, looking at everyday carry (EDC) gear is one of the most concrete ways to show the value of readiness.
My EDC Kit
Here’s a look at what I put in my Maxpedition Fatty Pouch, broken down by basic survival categories:
Water
Sawyer Mini Water Filtration System
Fire
Lighter
UST Little Sparkie Fire Starter
UST Wetfire Tinder
Shelter
Space blanket
Medical
QuikClot Combat
CAT tourniquet
Band-Aids
Food
Tuna pouch
Signaling Device
Signal mirror
Navigation
Compass
Hygiene
Hand sanitizer
Others
Duct tape
225/550 paracord
Superglue
Chem light
My Purse
Aside from my EDC kit, I also carry a purse. (Hey, I’m a woman after all.) I keep a few items in the main compartments because of the frequency of use:
Leatherman Wave: a multitool for, well, multiple purposes
TerraLUX TT5: a tactical flashlight with a strike bezel and strobe option
Goal Zero solar panel: While I carry a wall charger and a portable charger, this is a redundant method of charging electronics —and redundancy is good in survival situations.
These products don’t take up a lot of space. Sure, I wouldn’t be able to stuff this gear in a clutch, but not many women I know do carry a clutch on a regular basis anyway.
Any purse can be a concealed carry purse (even one from Target, like mine), but there’s one thing that it must have —a dedicated zipper pocket for those off chances that you might be carrying your firearm in your purse. It needs to have a pocket that nothing else goes in. Nearly all clothing and accessories can easily be tweaked to accommodate concealed firearm carry and EDC.
My CCW
My concealed carry weapon is a Glock 26. I love the simplicity of the Glock platform and because my husband’s carry firearm is a Glock 17 we can interchange spare magazines. I carry my Glock 26 in an Antero Pistol Holster from Long’s Shadow Holster. I’ve tried dozens of holsters, and this one is more comfortable and concealable for me than anything else I’ve found. It’s slightly curved, so it hugs the curves of a woman’s body. It won’t fall off your pants and skid across the bathroom floor when you use the restroom either.
My Phone
I always have my phone in a pocket. It’s easier to access if I need it. With it in my pocket I’m not rifling through my purse while walking to the grocery store. My eyes are up and on any potential threats, allies, cover, and concealment. Walking confidently and with full situational awareness makes me look like a harder target, too. After all, the best way to get out of a scary situation is to avoid it in the first place.
As survivalists, it’s important to consider the possibility of a martial law situation, and what you might do if direct military control was imposed in your country. It may seem like an unlikely scenario, but observing unfolding crises in other nations can help us better prepare ourselves at home or abroad — take the Philippines for example.
If you’ve been keeping an eye on world news lately, you’ve likely heard about the battle that’s currently raging there. The city of Marawi, located on the large southern island of Mindanao, has been under siege by militants known as the Maute group, a radical Islamist terrorist organization with apparent ties to Abu Sayyaf and ISIS. The Philippine military has clashed with the Maute group repeatedly since May 25th, reportedly killing as many as 89 of its members, but the remaining militants have reportedly taken civilian hostages, and the occupation of the city is ongoing.
Left: the island of Mindanao in the Philippines. Right: the city of Marawi, currently occupied by Islamist forces.
In response to this terrorist group and the potential growth of the Islamic State in the Philippines, President Rodrigo Duterte recently declared martial law on the entire island of Mindanao. Reuters reported that Duterte may keep the region under military control for a year if necessary, and “wouldn’t rule out placing the entire country under martial law if the threat of Islamic State spreads.”
So, what will the implementation of martial law look like in the Philippines? The leadership of the Philippine National Police (PNP) has issued a set of guidelines with the do’s and don’ts of martial law. These official guidelines are summarized in the infographic below, which was created by Philippine news outlet ABS-CBN. Click here to download a full-size version of this infographic.
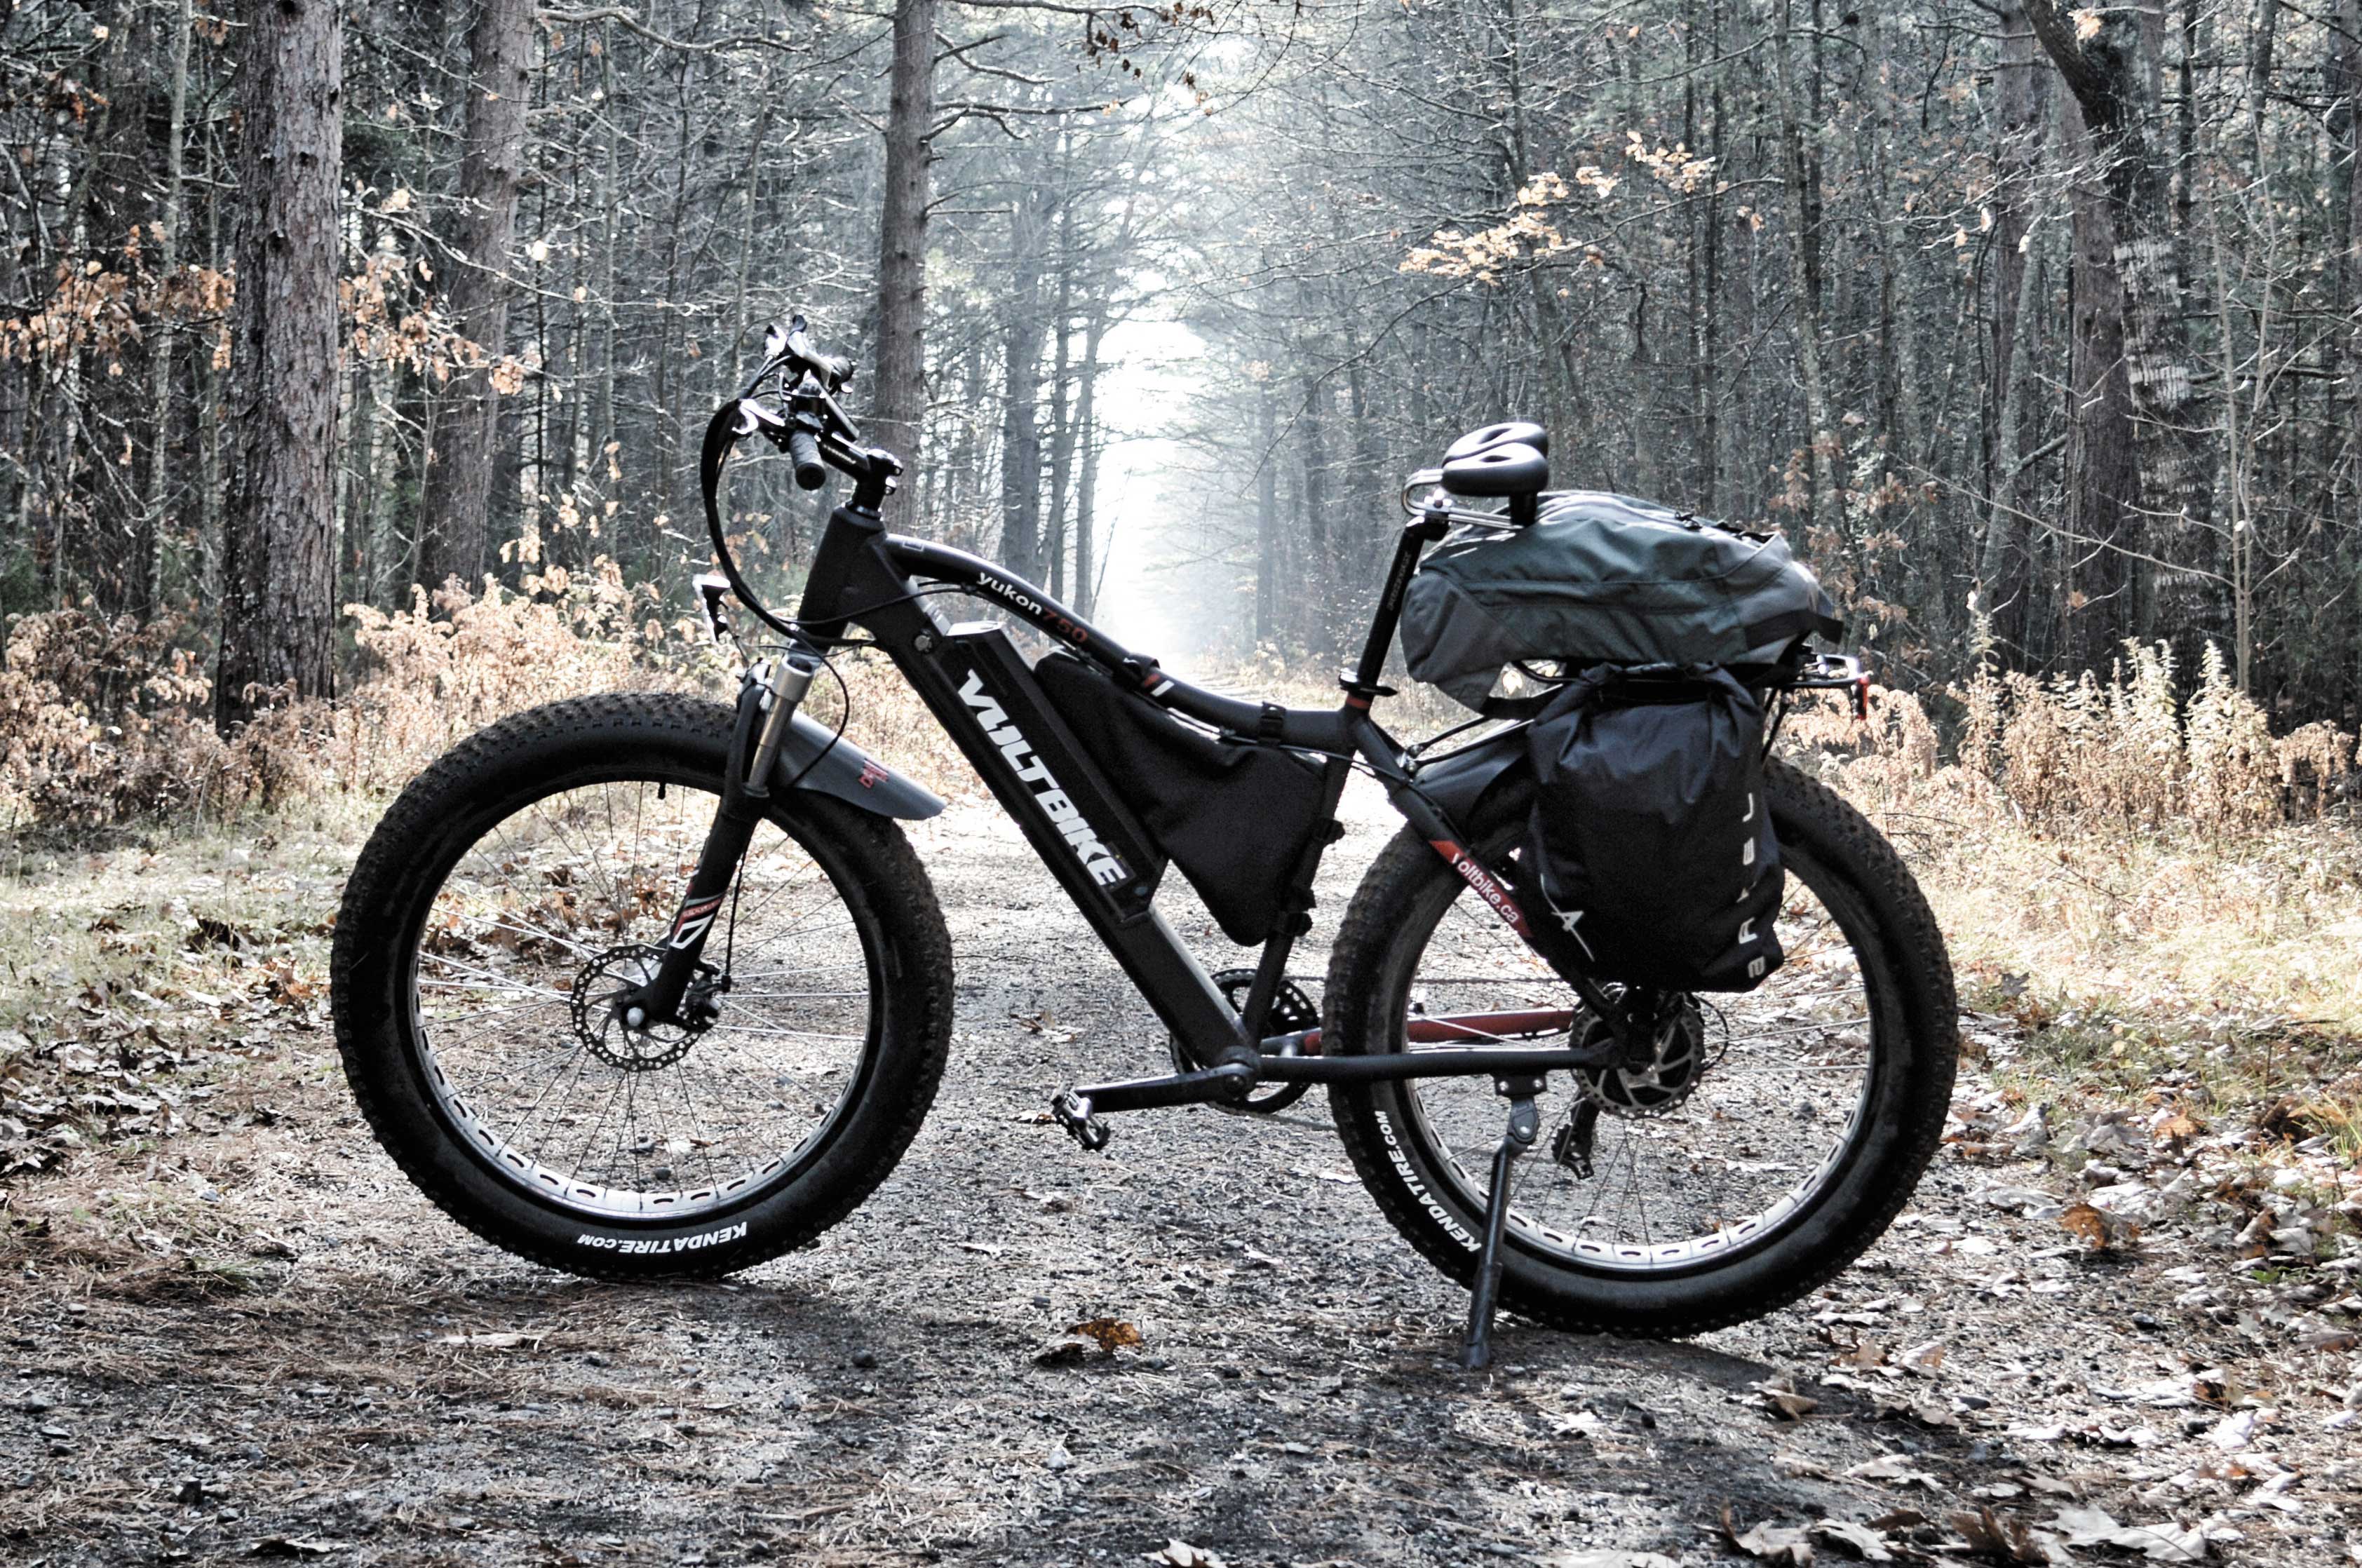
If you were to ask us about electric bikes 10 years ago, we likely would’ve just laughed. They looked downright silly, had pitiful range, and cost more than a motorcycle. Fast-forward a decade and technological advances have now made these oddities a viable mode of transportation — possibly even a bug-out vehicle.
As with any mode of transport, ebikes have their pros and cons. At this moment you’re likely asking, “What about EMPs?” Unlike with a gas-fueled motorcycle, a bicycle-style electric bike can still be human powered, whether it has any juice in its battery or has been hit by an electromagnetic pulse. [See Issue 19 for our debut Debunked column, which tackles this very topic.] War, fire, flooding, and economic collapse are far more likely to shut down your wheels than an EMP. After all, these other things are happening daily around the world already. For the ebike haters out there, consider this: If you rig up some solar panels or your bug-out hideaway is set up for solar power, you’ll have an almost unlimited fuel source for your ride.
Having said that, we reviewed a VoltBike to see if it can simultaneously be a cost-effective means of locomotion and a practical platform for bugging out.
Unlike conversions or purpose-built gasoline motorcycles, electric bikes make little sound. This means you can spirit yourself away and not draw the attention of the have-nots who want your supplies.
The Bike
Range: The VoltBike Yukon 750 uses a 750-watt Bafang motor to propel you up to 20 mph for about 25 miles on throttle-only mode. Under pedal assist you’ll get closer to 50 miles. (Mileage will vary based on a rider’s weight, cargo, and terrain.) These aren’t stellar numbers if you’re trying to flee a massive tropical storm. But they’re more than adequate if you need to evacuate a city center to get to your hidden survival cache in the outskirts of suburbia.
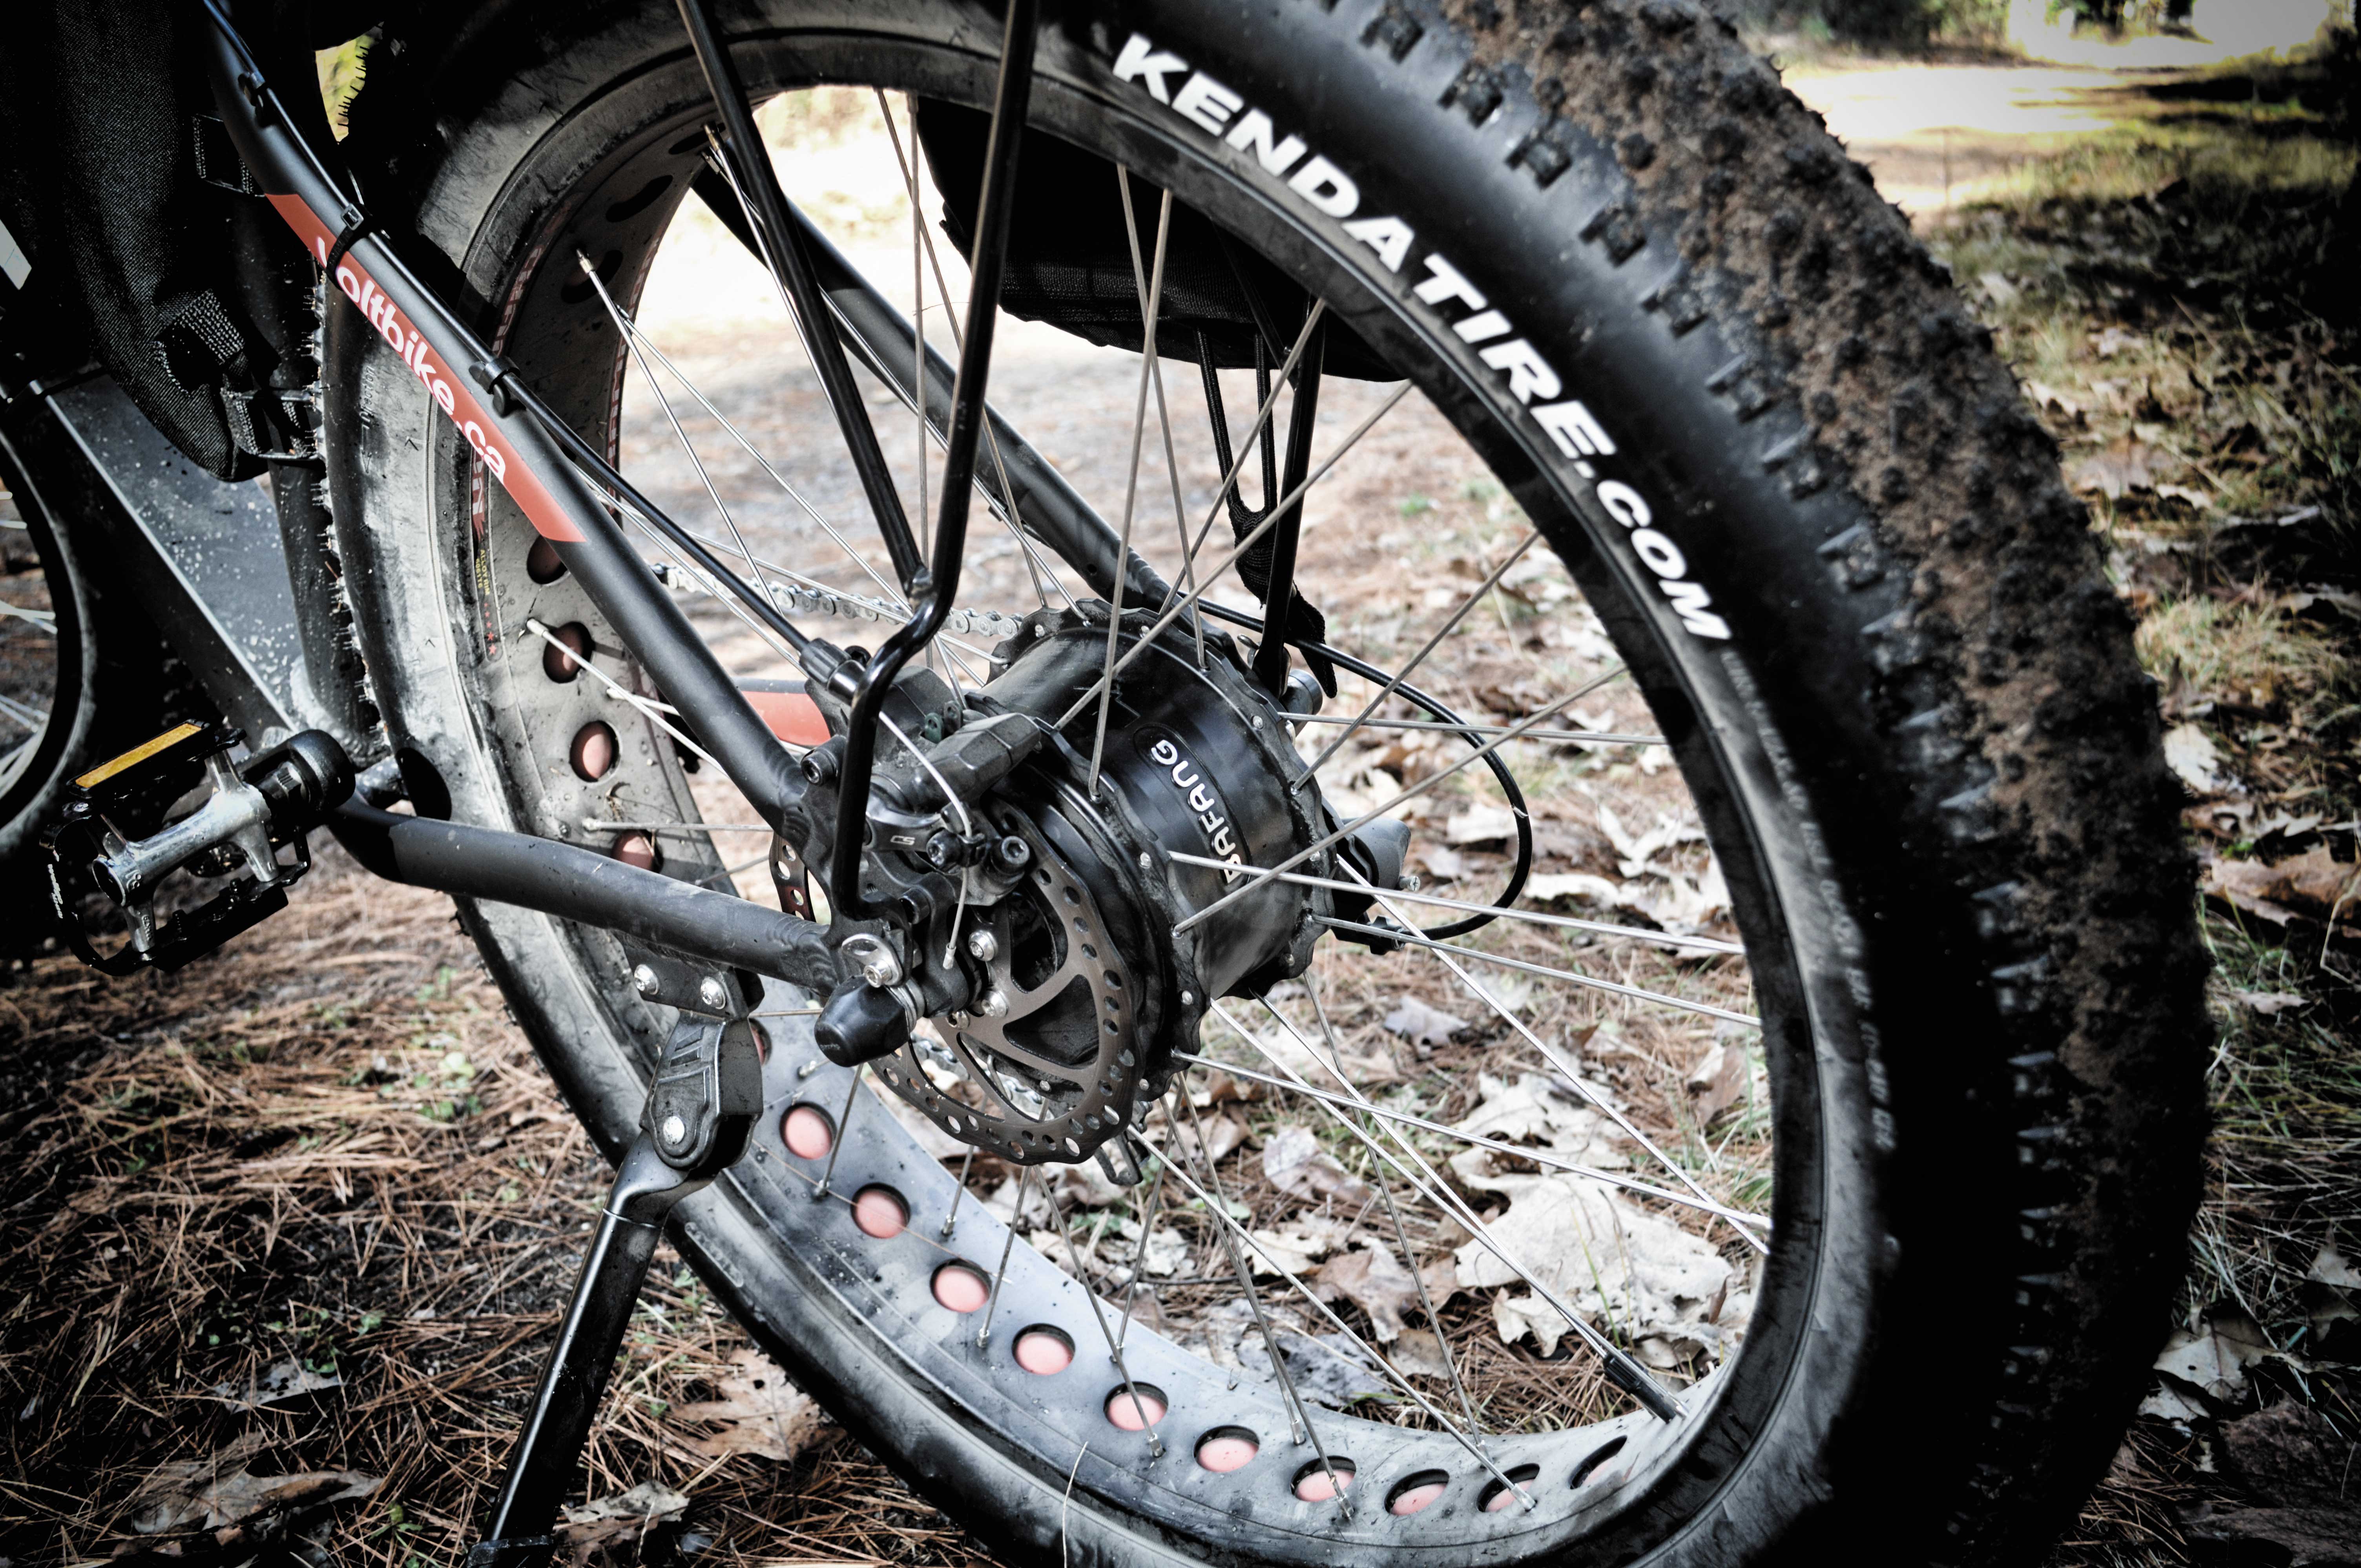
The 750 watt Bafang hub motor.
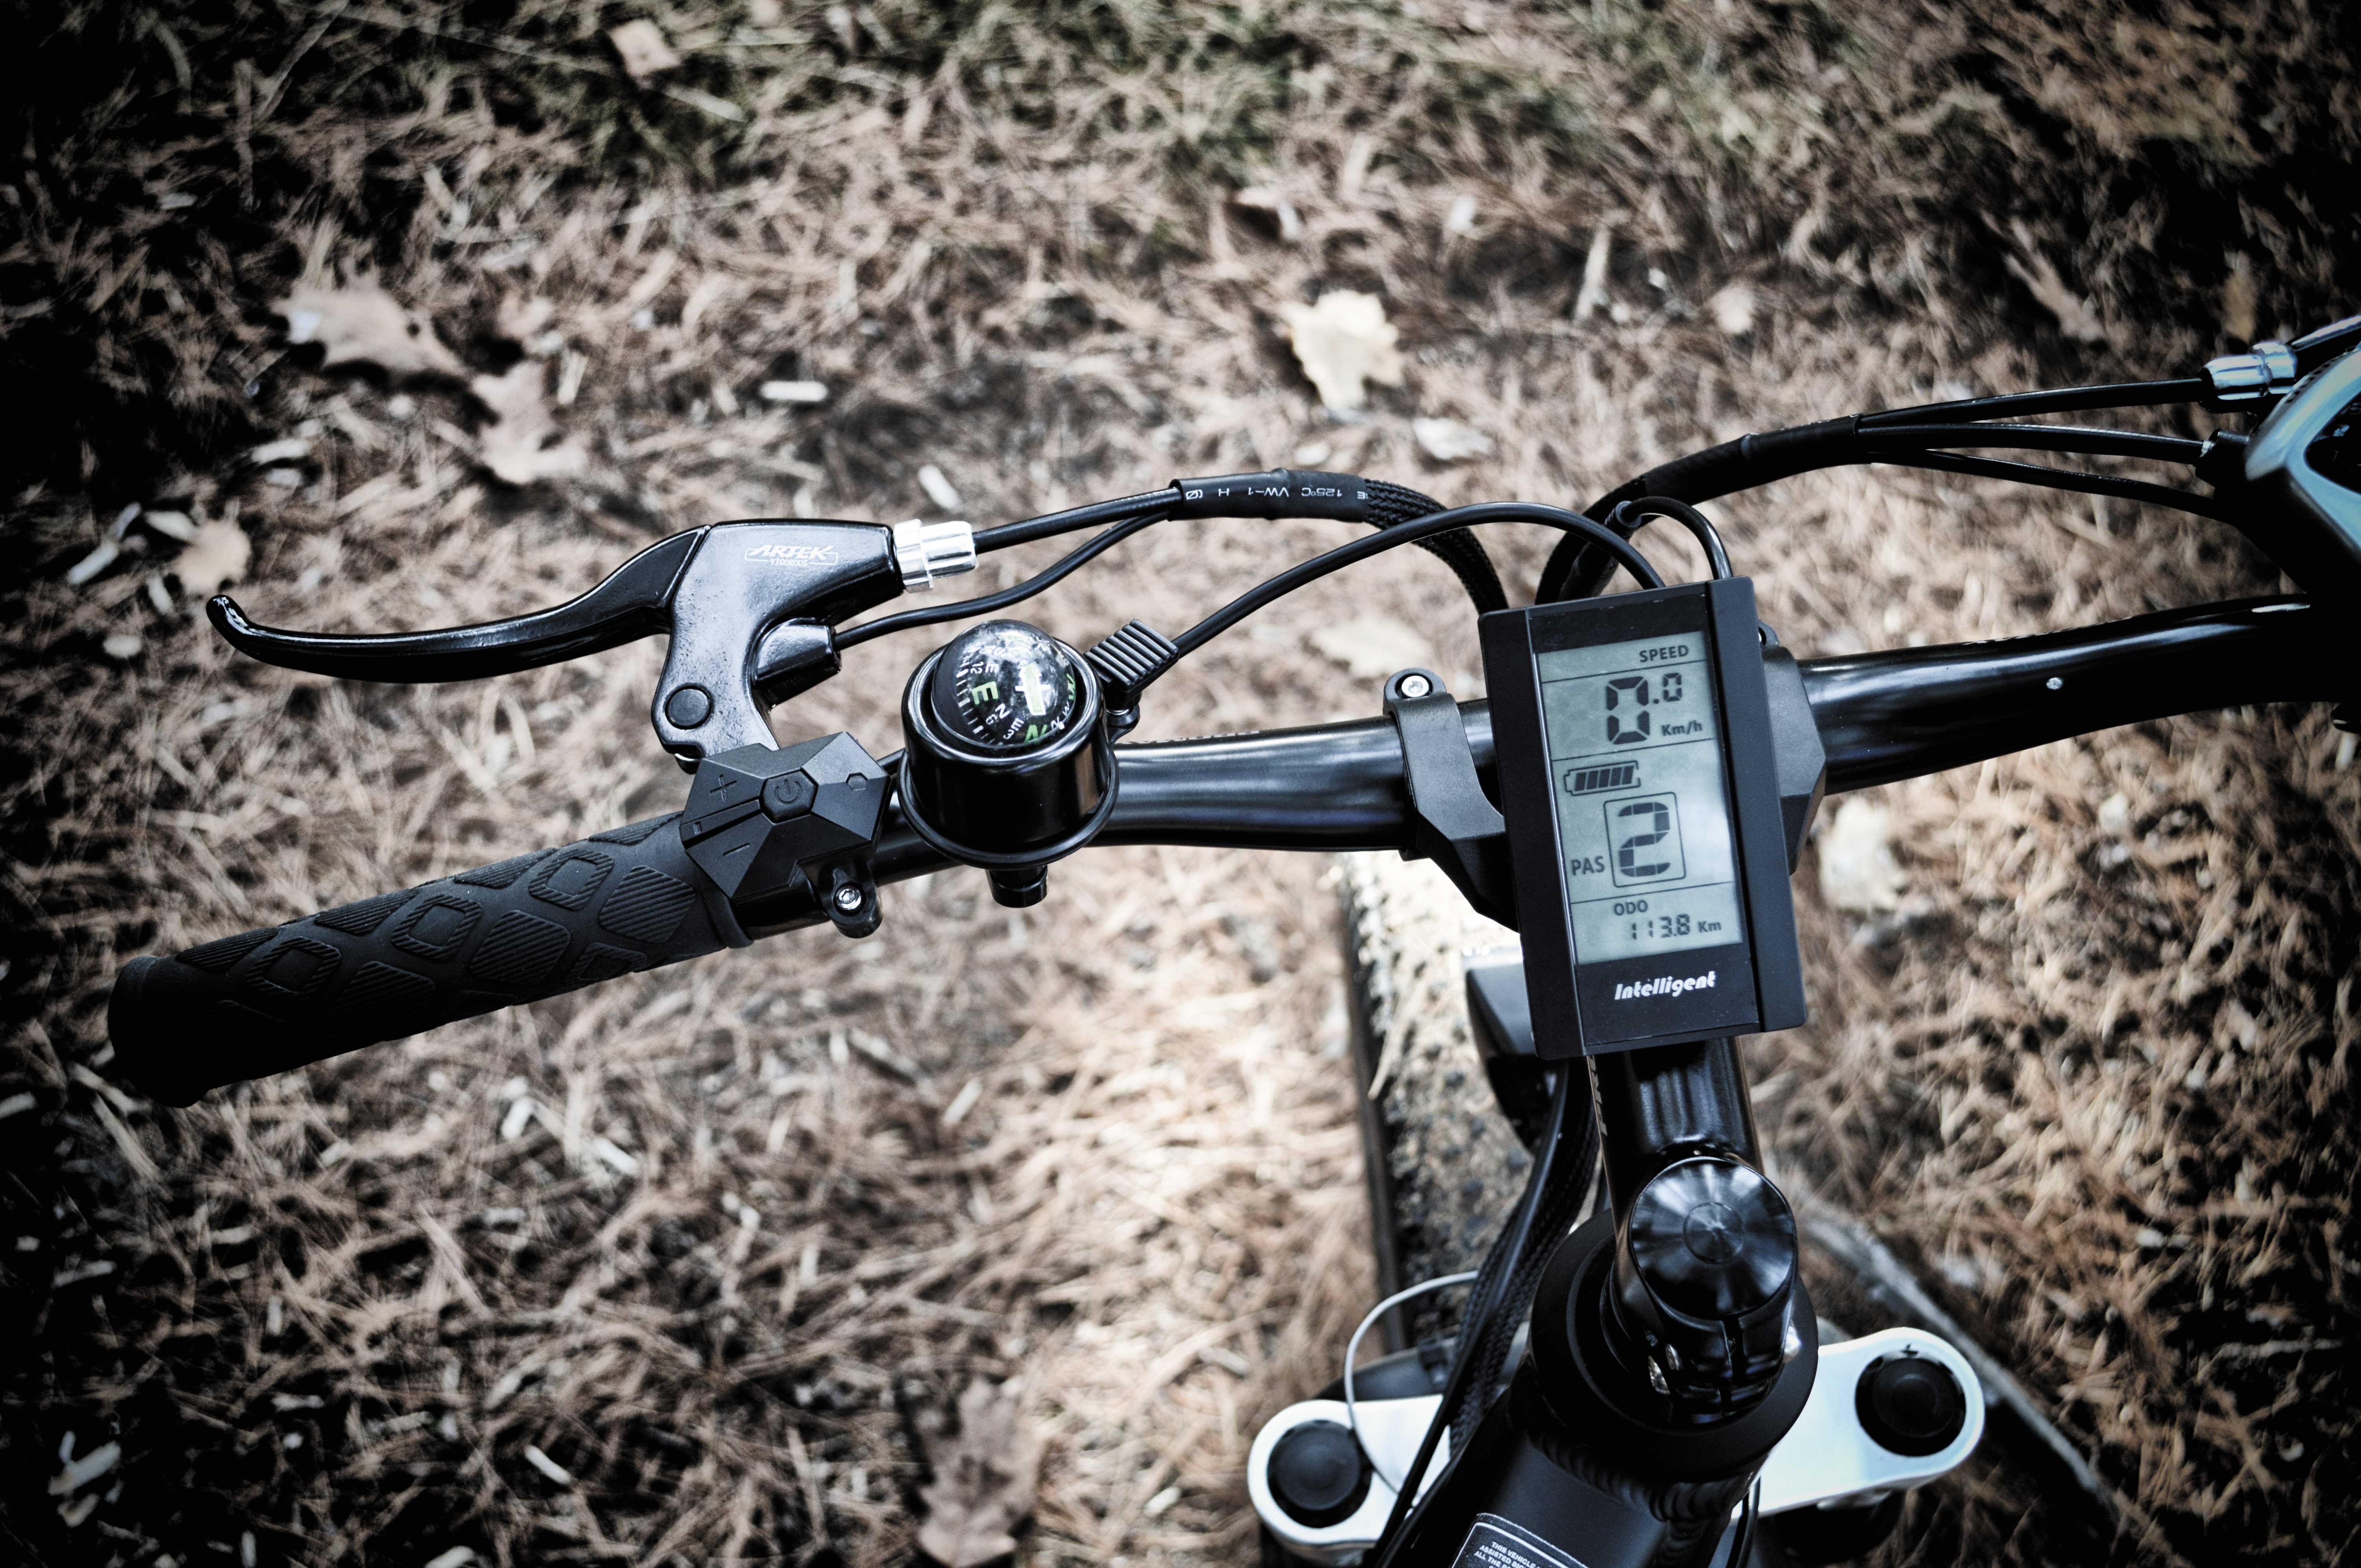
Controls: Throttle mode controls the bike much like a motorcycle, while the nine levels of pedal assist adjusts to how fast you’re peddling and uses the motor to give you that extra push. This allows you to go much further than you could on your own. It also means climbing hills or negotiating rocky terrain requires comparatively less effort. You most likely won’t rocket up a steep incline on throttle only; some peddling will still be required. The bike comes set with levels 1 to 9, meaning that you’ll always have some assist with the bike powered on. The manufacturer can help configure a level 0, providing you with speedometer and odometer readouts sans electric boost. (No word yet on whether the motor goes up to 11, though.)
Acceleration on a conventional bike can be slow because it depends on human leg power. However, on the Yukon, if you forget that you’re on level 9 and begin pedaling, you could be caught off-guard and thrown off your electric steed. Make sure to heed manufacturer’s instructions.
LCD control panel lets you pick one of nine levels of pedal assist, among other features.
When navigating downhill, the Tektro Novela brakes cut power to the motor to assist in deceleration. These aren’t hydraulic disc brakes, so applying them won’t send you flying over the handlebars, but they still provide sufficient stopping power when you need them most.
Holding the “minus” key down on the pedal-assist controller gives you push assist — a great feature when walking the bike up a steep hill. At nighttime, holding the “plus” key down activates the screen’s backlight and the bike’s front light.
Power Plant: We were impressed with the battery (Sanyo UR18650ZY cells), which performed as advertised. Also, it has a USB charging port to boost small devices like a phone or GPS unit. However, the cover for the battery-charging port failed to stay closed. A screw-on cap would’ve been a better idea than the finicky small rubber plug. The battery can be removed with a key, letting you place it closer to a charging setup or swap it out with a fresh battery if you’ve purchased an extra.
While it’s possible to rig up a DC charging system that’ll draw from solar or other renewable sources, a factory charger that offers input regulation would be a boon for preppers.
Wouldn’t it be nice to just plug this right into the solar panels for more juice on the run?
Suspension and Tires: Electric bikes don’t always include shocks. VoltBike listened to customer input and outfitted every Yukon with a TGS T10 alloy suspension fork, which has 90 mm (3.54 inches) of vertical travel. Having front shocks, combined with the Kenda Juggernaut Pro fat tires, gives a comfortable ride while still providing excellent control. The advantage of fat tires is increased traction over terrain like snow and sand, which can be daunting for conventional vehicles let alone regular street bicycles.
Bug-Out Accessories
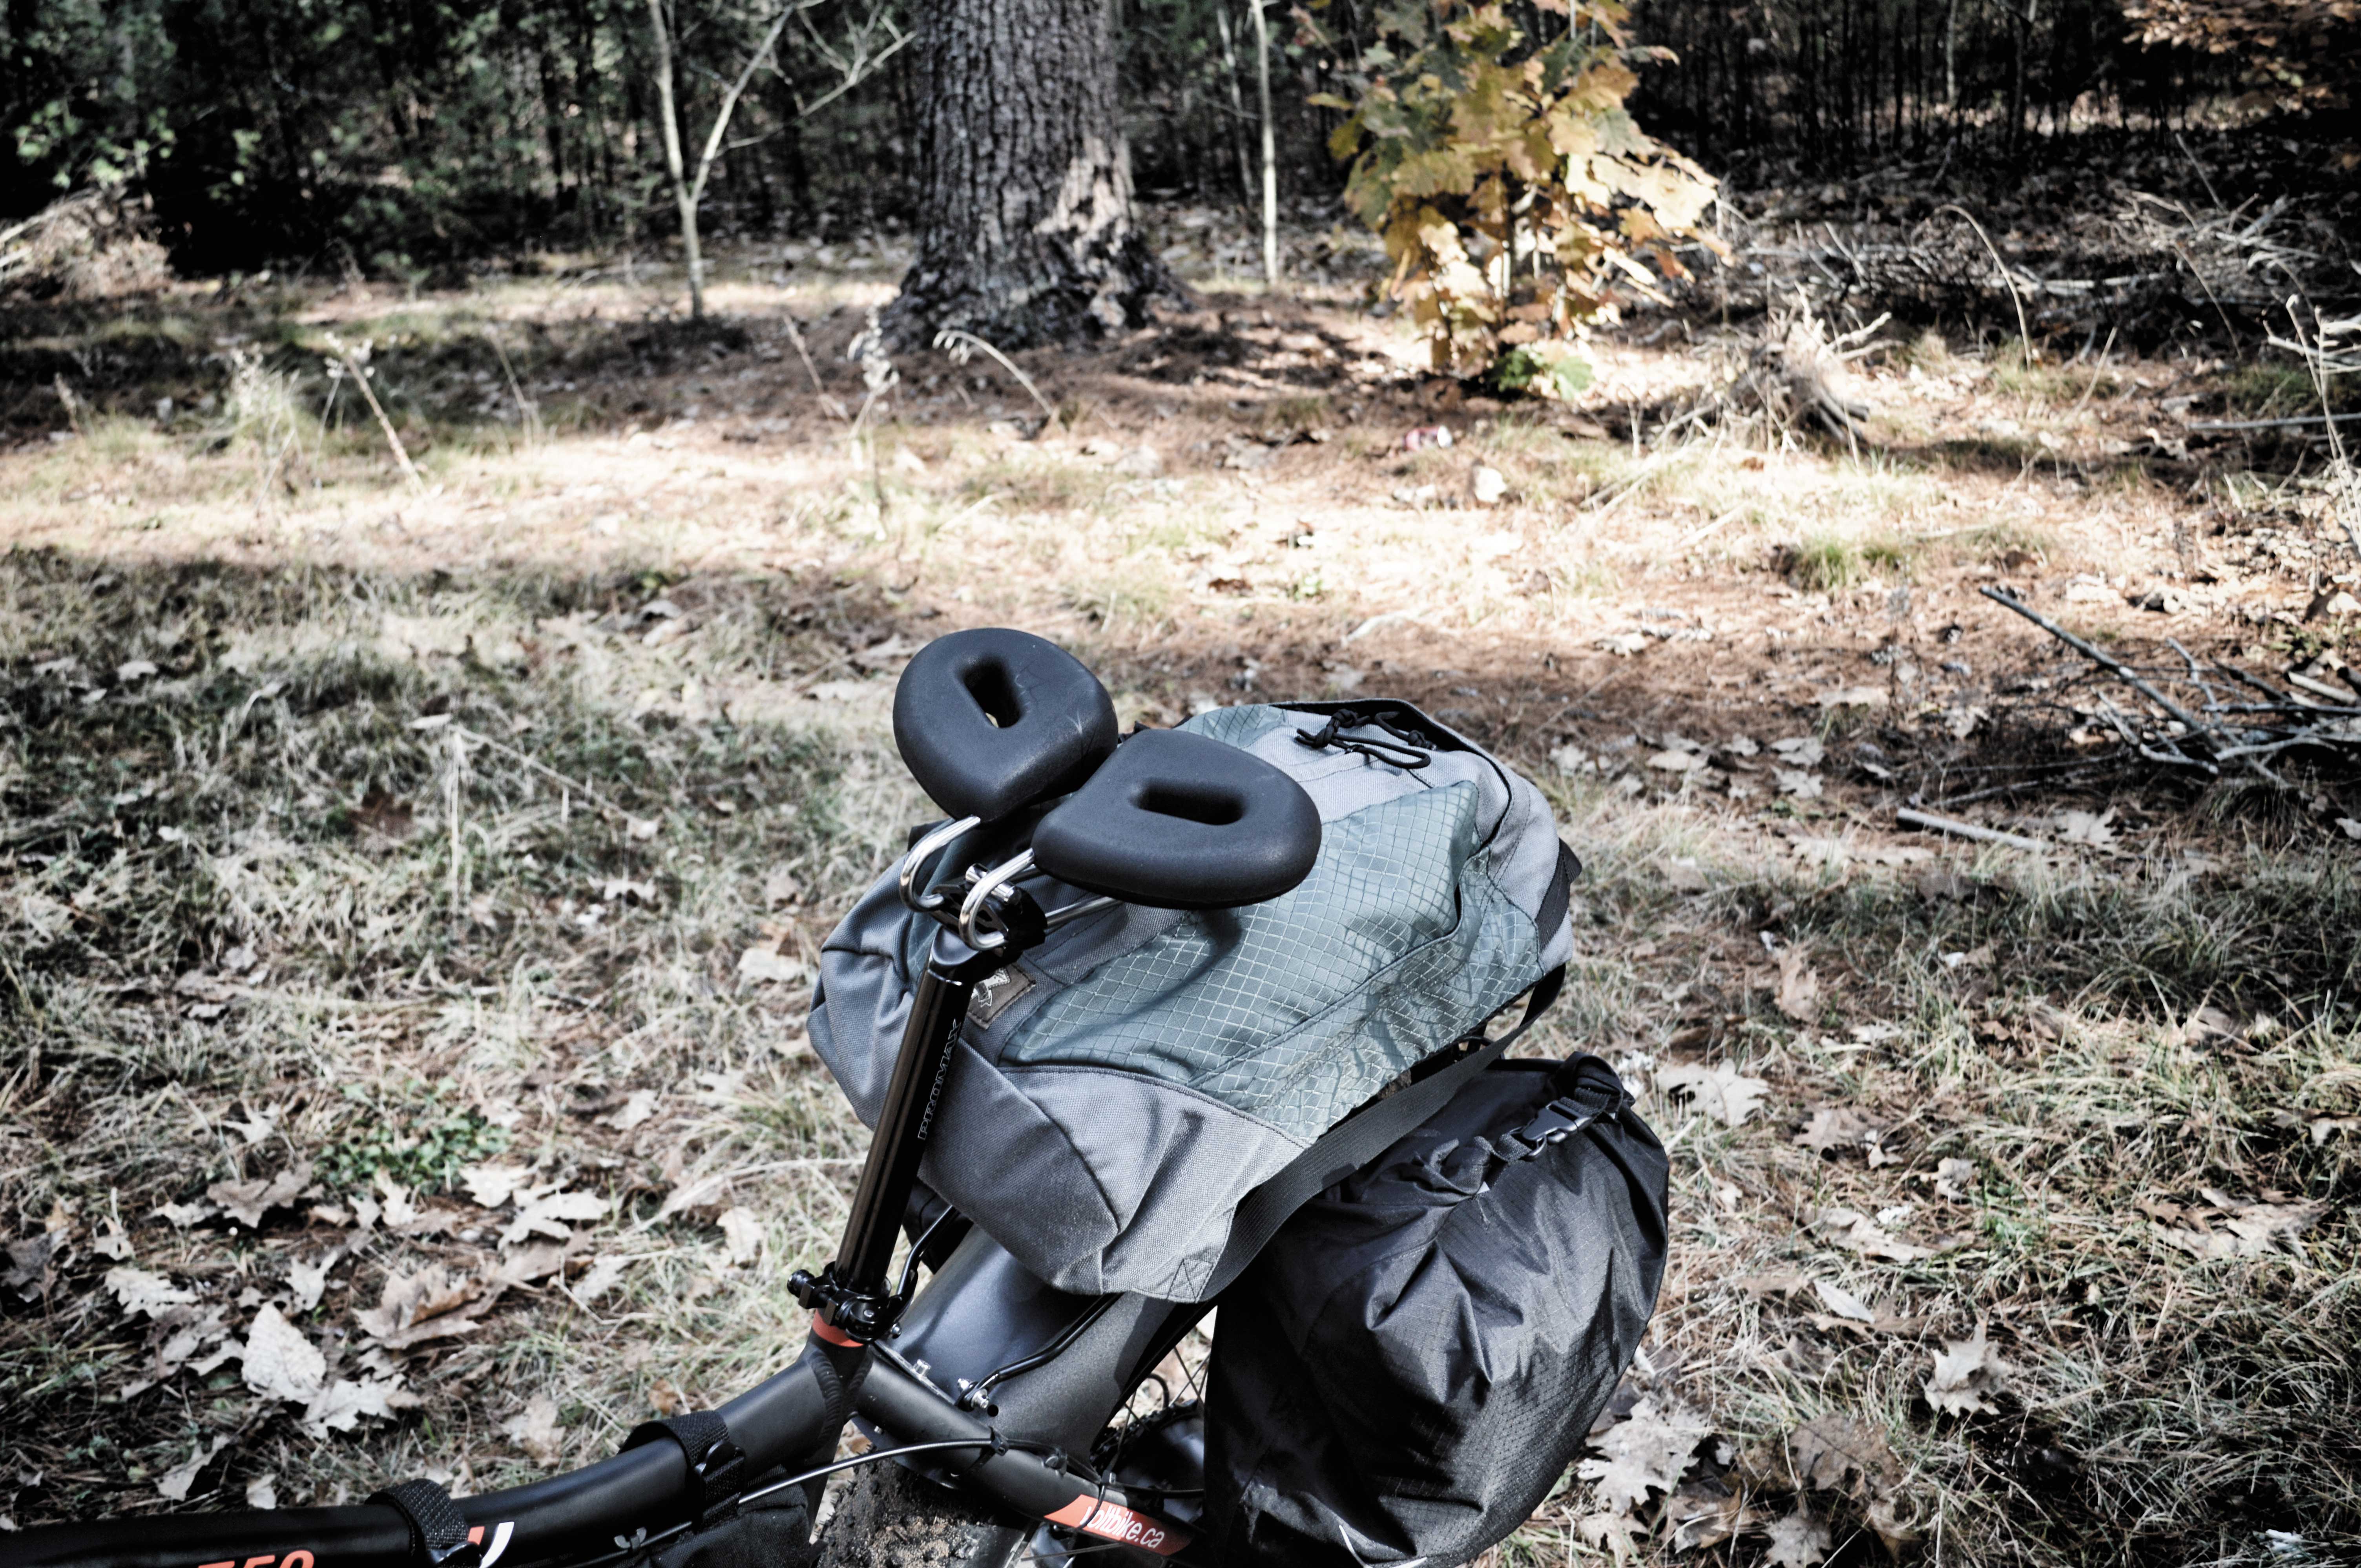
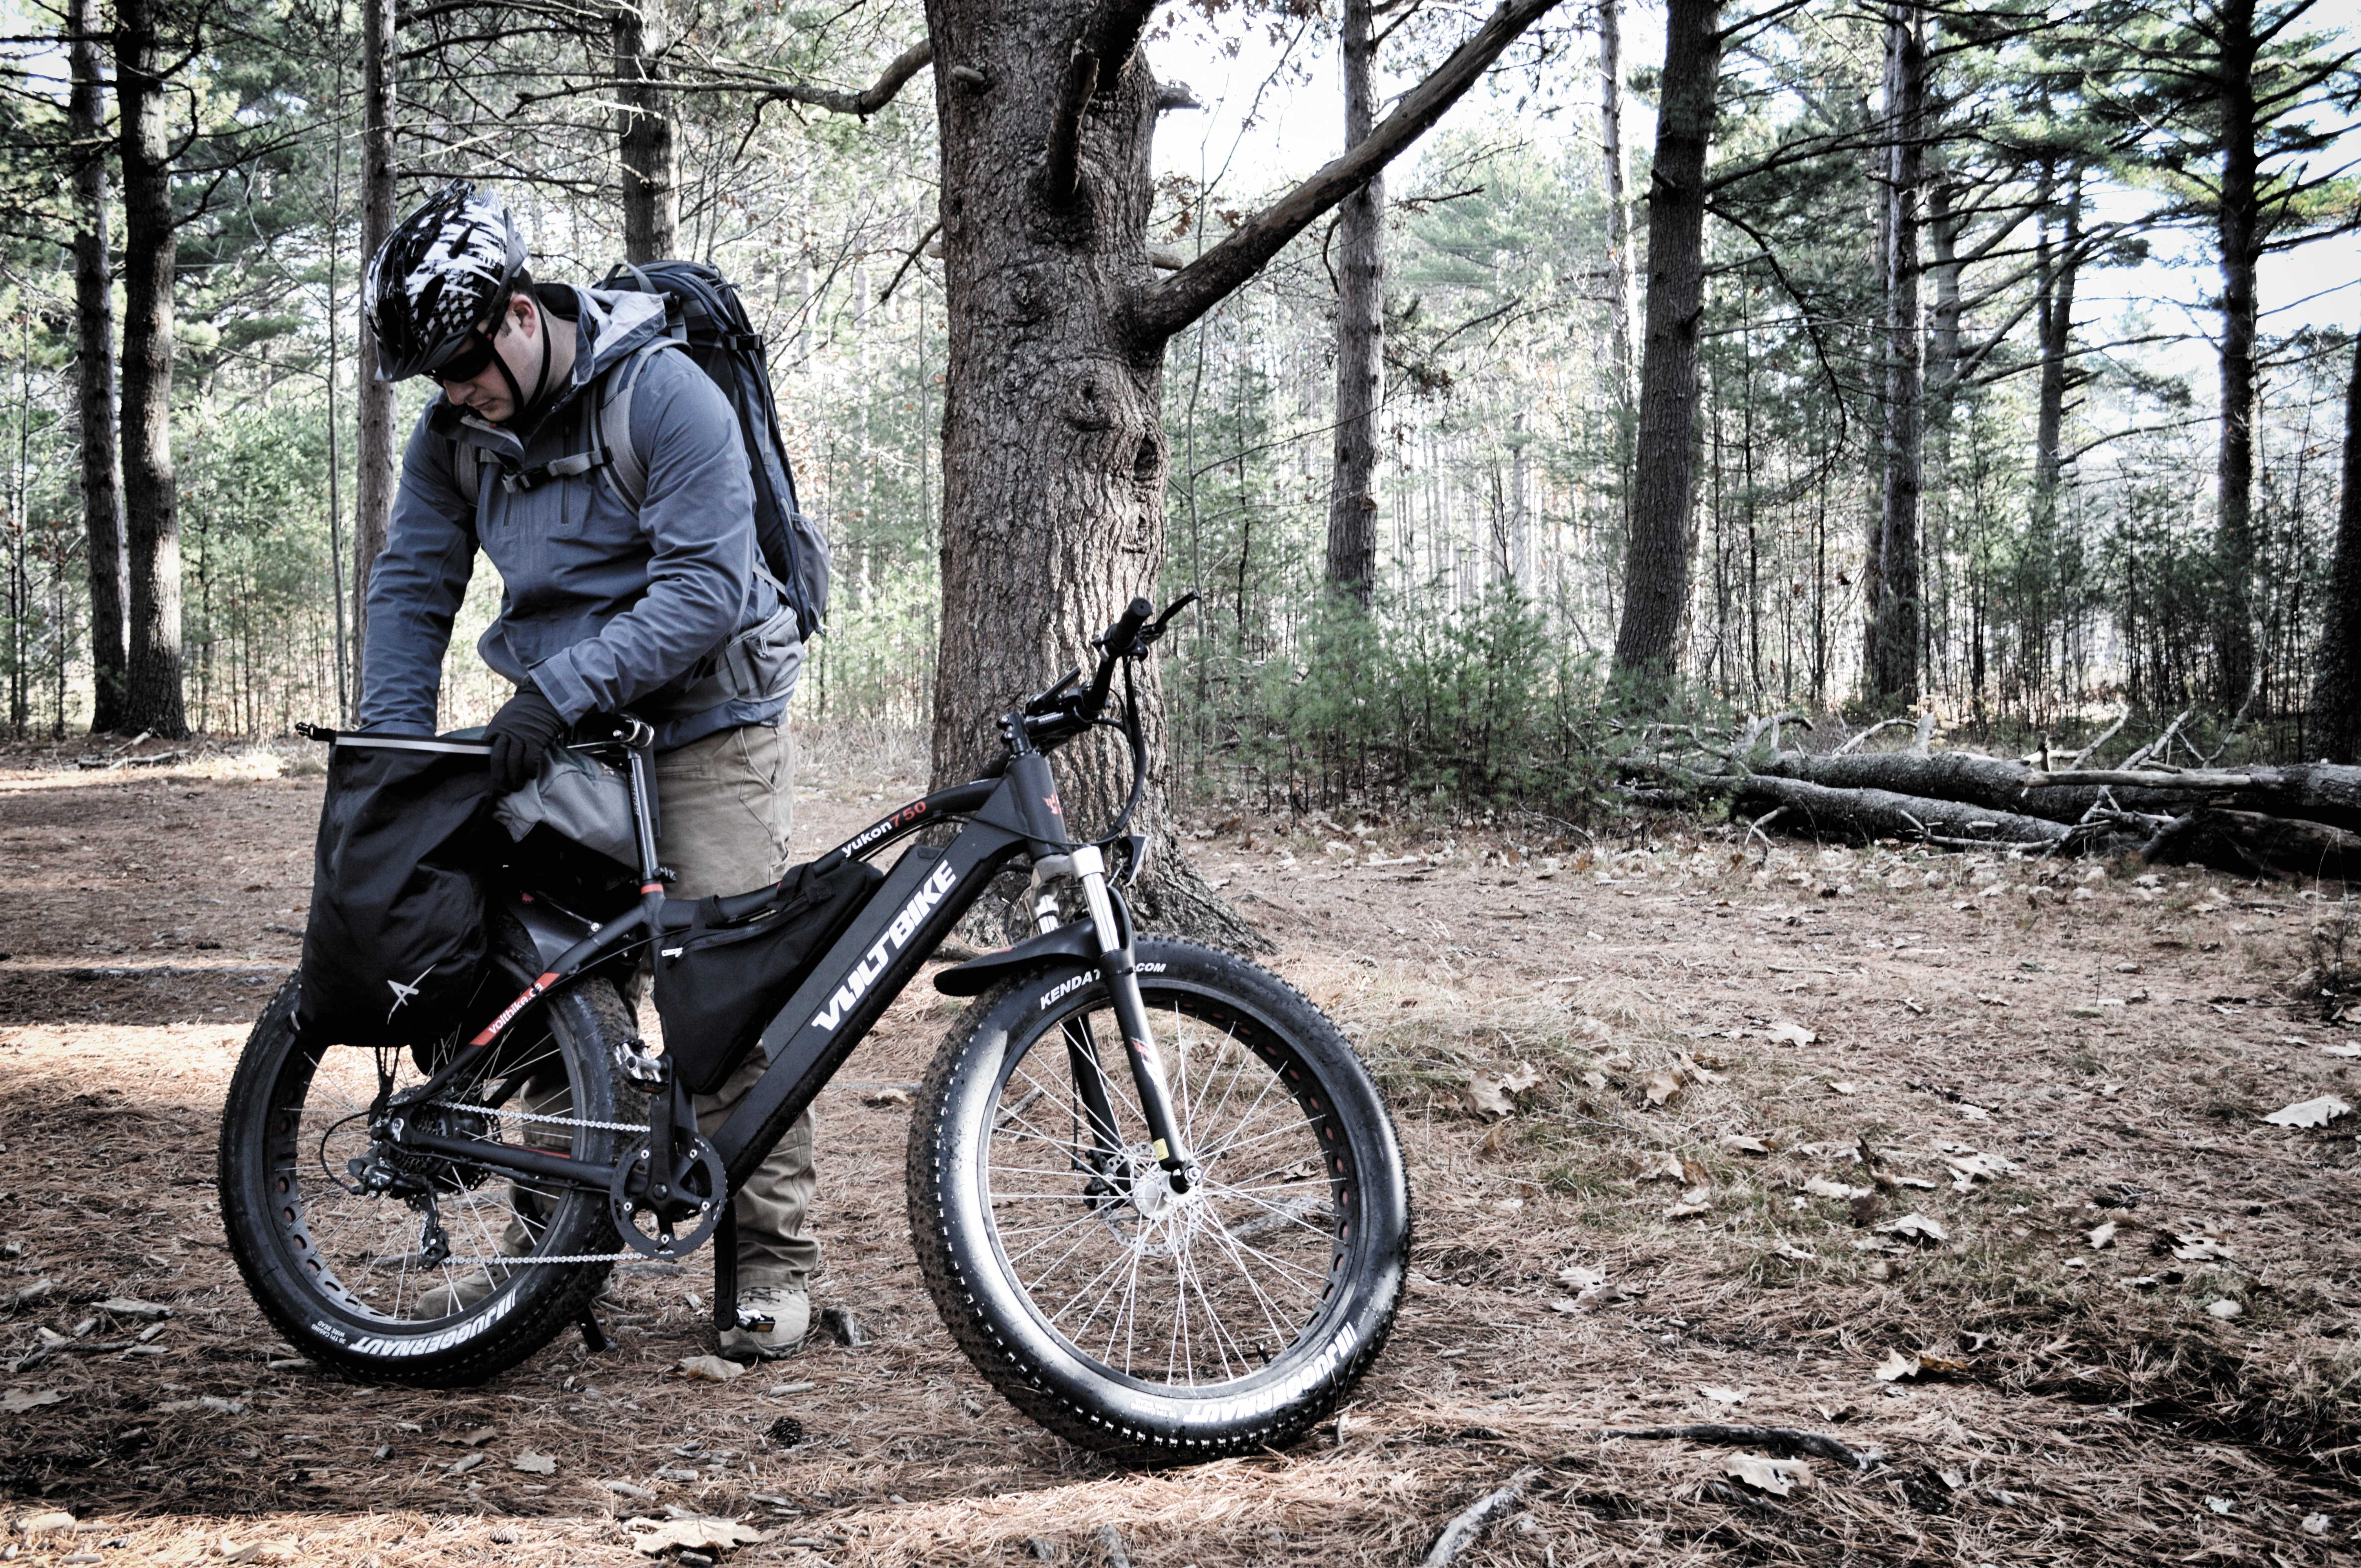
Seating Arrangement: A stock bicycle seat is analogous to the factory insole in most boots — it gets the job done, but there are far better options out there. The Yukon comes with a half-decent seat, but we opted to try out something considerably more ergonomic for long-term riding comfort. The Spiderflex seat we added has two individual butt cushions and leaves out the long nose in the center, which can cause a numb crotch after a long ride … and possibly erectile dysfunction after years of use.
The tradeoff with this type of nose-less saddle is the slight loss of steering precision when you might have to use one or no hands. But, hey, we’re happy to give up that up as long as we don’t have a numb nether region.
The author swapped out the stock seat for this ergonomic Spiderflex saddle.
Cargo Storage: We sewed up a frame bag to hold our tools, Lezyne Micro Floor Drive pump, patch kit, and tire levers. The frame bag is dedicated entirely to what’s needed to keep the bike running. We also added some Arkel Dry-Lites saddlebags on the rear rack, although we had to make two small tabs to attach the bags on the bike so they had something to hook into at the bottom. The VoltBike rack didn’t include these, but a few minutes with a drill, grinder, and some files resulted in our own handmade adapters. There are commercial versions available, as well.
A bicycle isn’t as roomy as an SUV, so any gear attached to the frame that isn’t intended for bike maintenance is extraneous. And any gear you can’t live without should be carried on your back. This may seem odd, until you have to ditch the bike and any gear attached.
On top of the rear rack sat a Grey Ghost Stealth Operator Pack. We tucked the straps into the hydration area, and then used the mouse trap-like hinge on the top of the rack to hold it in place. The bag runs into the seat post and requires grabbing the bag from the side to remove it. The top bag had a bigger tarp and some extra tools.
Staying Dry: The last things attached to the bike were some Beaver Guard mud guards. These were inexpensive, attached with zip ties, and very lightweight.
The only two concerns for this bug-out ebike when it comes to inclement weather are the sensors on the Wellgo pedals and the battery. On traditional bicycles, you wouldn’t even bother glancing at the pedals after use. But on these, you might need to wipe them down occasionally to keep the sensors clear and in top survival shape. And, it goes without saying that you should avoid getting water on the battery. Some duct tape and a garbage bag can provide rain protection, although we plan to make a silnylon cover in the future.
The Verdict
Electric bikes aren’t ideal for every prepper, particularly those with a family. It’s kind of difficult to pedal while balancing a spouse, two kids, a dog, and three days of supplies on your back.
They’re also heavy. Weighing two to three times that of your average mountain bike, you’ll need to be able to hoist 60 to 70 pounds if your ebike can’t clear larger obstacles like telephone poles downed by a storm.
And compared to a $100 Huffy, an electric bike’s price tag will seem excessive. However, it’s all about perspective and your personal needs. At almost $1,500 with flat-rate $70 shipping, the Yukon will seem like a great deal compared to other ebikes that easily cost twice as much. With models available in Canada and the United States, VoltBike has a direct-to-consumer approach that cuts out the middle man and the various profit margins associated with conventional sales methods.
Ebikes have come a long way since the turn of the millennium, and you’ll surely see more in the near future. Depending on your bug-out strategy, these can be viable options to get you and your kit to safety on the road less traveled. Unlike rumbling Ford Raptors or noisy dual-sport bikes, the electric bicycle allows for a quiet escape strategy and a range limited only by the user’s leg power. It’s one of those things that you might laugh at … until you try it.
Ryan Houtekamer might be a close relative to yetis and sasquatches because he actually enjoyed winter exercises while in the Canadian Army. He works on the “why use an axe when you can push the tree over” philosophy. Born and raised in Canada, he lives in a small town that has more trails near it than people living in it.
Protect Your Noggin
Riding any kind of bike may seem mundane, but falling off could end your bug-out plans and quite possibly your life. The same thing goes for cruising through a path in the woods and taking a tree branch to the eye. A helmet and some eye protection are just as important as tires and handlebars, so speak to a reputable bike shop about options, test out some models, and find the ones that are right for you.
Essential Gear
An ebike’s lack of cargo capacity can be boosted with panniers. The author rigged up some waterproof Arkel Dry-Lites saddlebags to hold his vital gear.
An electric bicycle can be a great vehicle during a crisis, but it can’t hold a large load. Pack supplies to cover your basic survival needs. You never know when you might need to make a detour or set up an impromptu camp. Consider carrying the following:
In a survival situation, you’ve got to make the most of what you have. If society as we know it comes to a grinding halt, grocery stores will quickly be picked clean and mass-production of food will cease. That’s why we recommend stockpiling survival food for emergencies — but what happens if this dire situation continues for months or years? Sooner or later, your supplies will begin to run out, and you’ll be left with some not-so-appetizing food options.
Carol’s cookies are praised on The Walking Dead, but we’re not so sure about this recipe. (AMC)
AMC’s popular TV series The Walking Dead has addressed the topic of survival cooking with limited ingredients, and zombie apocalypse notwithstanding, this is a very real and interesting survival conundrum. How creative can you get when all you have is a pantry full of undesirable canned items? Fans of the show may recall that Carol whips up a batch of cookies from acorns and beets. Specifically, analyzing the episode revealed that these cookies contain at least the following ingredients:
Canned beets
Foraged acorns, ground into acorn flour
Canned water chestnuts
Arrowroot (a natural leavener)
Cacao nibs (a form of crushed and roasted cacao bean, also a precursor to chocolate)
Mouth watering yet? Those aren’t conventional choices for baking cookies, but again, you work with what you’ve got.
First, Binging with Babish recreates the show’s exact cookie recipe in the video below.
One creative YouTube chef, Binging with Babish, has built his channel based on replicating food seen in movies and TV shows. He has previously tackled iconic meals like the Big Kahuna burger from Pulp Fiction, and the prison pasta sauce from Goodfellas. Most recently, he tried his hand at Carol’s acorn and beet cookies — both the original recipe from the show, and his own improved version. You may also recognize the cameo from the host of satirical survival channel Ashwin Enjoys Nature, who we previously featured here.
“They look terrible, they taste terrible, and I hate them” isn’t a ringing endorsement of Carol’s cookies, especially considering the host’s evident culinary experience. However, the revised recipe seems like a substantial improvement. In fact, the ingredient list sounds just funky enough to make it onto the menu at an avant-garde restaurant.
Have you come up with any unconventional recipes that make the best of a sparse pantry? If so, let us know in the comments.
You’d be right to think an ice chest has no place next to your bug-out bag. You’d be right to say that dragging a cooler over the scattered rubble of your last-known address would end in frustration and futility. You’d also be correct that there’s nothing in your emergency plans requiring you to schlep 40 pounds of ice in a plastic box just to keep something cold for a few extra days. Or would you?
One Cooler From Death
Perhaps the news comes from the ham radio, the weather band, or the internet, but the time to pack up and leave was 40 minutes ago. Your destination? Anywhere outside the city — but where you’re going there’s no amenities, no power, no utilities, no nothing but uncertain safety. Besides stuffing your truck with as much gear as you can, you break out a cooler or two and gut the fridge of whatever you think you’ll need in the next two or three days … maybe more.
Frozen ground beef, sausage links, bags of veggies, and ice. How about drinks? How about medicine that needs to remain cool, like some types of insulin and antibiotics?
Imagine you don’t make it to your fully stocked cabin tucked away amongst the trees. Imagine there’s too much traffic, or there are road closures, blockades, marauders, or any number of obstacles. What then? Who knows how long you’ll be delayed. Are you prepared for it? Perhaps, but wouldn’t it be nice to have a mobile cooler full of food and drink at your disposal? It might just save your life.
What to Buy?
Depending on the size of your cooler, it’ll weigh upward of 60 or 70 pounds when loaded. Do you really want to lug that, even if it’s a short distance from your house to the truck or from the truck up a trail to your cabin? Of course not. There’s no reason your coolers shouldn’t have wheels; even though navigating them over rough terrain can be cumbersome, it still beats breaking your back.
There are three different grades of coolers on the market today:
Traditional Coolers: These are for the masses, the day at the beach, and the tailgating party. They’re designed to contain ice, keeping it cold for a couple of days at most. They won’t win any design awards, aren’t terrifically durable, but are affordable.
High-End Coolers: These hit the market 11 years ago thanks to brothers Roy and Ryan Seiders, creators of the Yeti Tundra, the first money’s-no-object cooler. Since then, many other companies have entered the market, offering increased insulation, external latches, pinned hinges, rubber gaskets, and a variety of accessories that increase the cooler’s function. An integrated bottle opener? Brilliant.
Powered Coolers: These are basically portable refrigerators tethered to a wall or car socket. They can be pricey because of the electrical components involved, but most are inexpensively produced and lack much insulation because they’re constantly cooled.
Which you should get depends solely on your activities. If you’re hitting the beach and only want to keep a few drinks and sandwiches cold, an economical cooler is perfect. Or if you don’t plan to be far from electricity, such as near your RV, a powered cooler will keep your victuals refreshingly cold in perpetuity. However, if there’s a chance your cooler will tumble off of the cargo rack of an ATV while you’re tracking a herd of elk deep in the untamed Unita Mountains of Utah, you might be interested in purchasing a high-end cooler offering a greater degree of ruggedness and durability.
The Test
Let’s get this out of the way right off the bat: Such a diverse range of coolers can’t be fairly tested against each other on an apples-to-apples basis, considering that size, insulation thickness, features, capacity, and even color all have some bearing on whether they’ll keep their contents cool. Larger coolers take more ice to keep cold, while smaller coolers need less insulation.
Because of these fundamental differences, our test was simple: After acclimating each cooler to the ambient temperature of a warm spring day of 86 degrees F, we filled each one exactly halfway with ice. For example, into the 62-quart Coleman went 31 quarts of ice (by volume) and 25 quarts of ice were dumped into the 50-quart Rubbermaid. Nestled snuggly in the very center of each cooler was a 12-ounce glass bottle of beer with the hopes of chilled reward at the conclusion of our test.
Then we waited 48 hours. The high temperature over the course of the test steadily climbed to 92 degrees when we reopened the coolers.
First, the important part: Much to our delight, all of the beers were a crisp 35 to 38 degrees F. Once the single beer reached the approximate temperature of the ice surrounding it over the course of the test, all that affected the ice then was the temperature of the insulated walls. When we opened the coolers, there was a moat of water around the perimeter of the cooler, surrounding an ice island in which perched the beer. Removing the ice, we measured the water and calculated a percentage of how much ice had been lost from the original amount (list in order of largest loss to least):
Percentage of Ice Lost By Volume
Rubbermaid Extreme (25 quarts of ice): 32 Koolatron Kargo (16 quarts of ice): 30.3 Igloo Max (26 quarts of ice): 28.84 Knox Electric (24 quarts of ice): 28.12 Canyon Cooler Mule (16 quarts of ice): 25.78 Pelican (22 quarts of ice): 23.33 RovR RollR 80 (40 quarts of ice): 21.25 Coleman (31 quarts of ice): 20.16
The results were surprising and perhaps a little upsetting to a couple of the more popular brands on the market, Rubbermaid and Igloo. Both suffered as much ice loss as did the two electric-powered coolers (neither of which are really designed to hold ice, so we never expected them to perform very well in this test). Over the course of 48 hours, sitting in 90-degree temperature, the worst of the lot, the 50-quart Rubbermaid cooler, lost 32 percent of its ice, while the best performer, the larger 62-quart Coleman, only lost 20.16 percent of its ice.
However, look at this in relation to how much food a particular cooler can hold, how much ice can be placed in it, how expensive that ice is, and how much ice melted. You may be comfortable accepting a larger percentage of ice loss to water if the cooler fits your needs well. And the enormous 80-quart RovR lost just 21.25 percent of its ice, while still holding the contents of the Mule and Koolatron combined.
Of course, the real test is how each one measures up against reality — full of food, being jostled around in a truck, boat, or RV, sitting in the blazing sun, being opened and closed (or left open), and being pulled along a rocky trail. Cooler performance cannot be accurately tested under specific conditions, as there are too many variables. A cooler advertised to keep ice frozen for five days (e.g. Rubbermaid and Coleman) likely won’t under real-world situations.
Final Thoughts
Though it’s difficult to justify a rolling cooler for every conceivable situation, and it’s questionable whether a cooler of any kind has an esteemed place in your top-tier bug-out gear, it’s impossible to argue the finer points of fresh food, potent medicine, and better tasting drinks.
Though the Canyon Cooler Mule is too small to be used for anything more than fulfilling the needs of a single person, we’re naming it the Best Bug-Out Pick for just that reason: it’s compact, takes up less space, and performed well in our challenge.
Not only does Igloo’s MaxCold Quantum sound like a sci-fi movie, but its package size, wheel clearance, tie-down points, and robust telescoping handle means it’s a quality cooler that’ll serve well without breaking the bank. So, it wins our Best Value award.
Our overall Top Pick prize goes to the Pelican for its over-the-top ruggedness, well-integrated amenities, capacity, and engineering. The handle design is superior to all the others, tilting with little effort and placing the weight of the cooler as far back as possible while offering a stout thick grip that won’t tire your hand. Most importantly, this is one cooler that can take a beating and keep its cool.
Your mileage may vary, but at the end of the day, you want a cooler that’ll function properly for your personal needs and fit within your budget; as when buying a Cadillac, you still want funds leftover to fill the tank. The only thing more depressing than an empty cooler is a hot one.
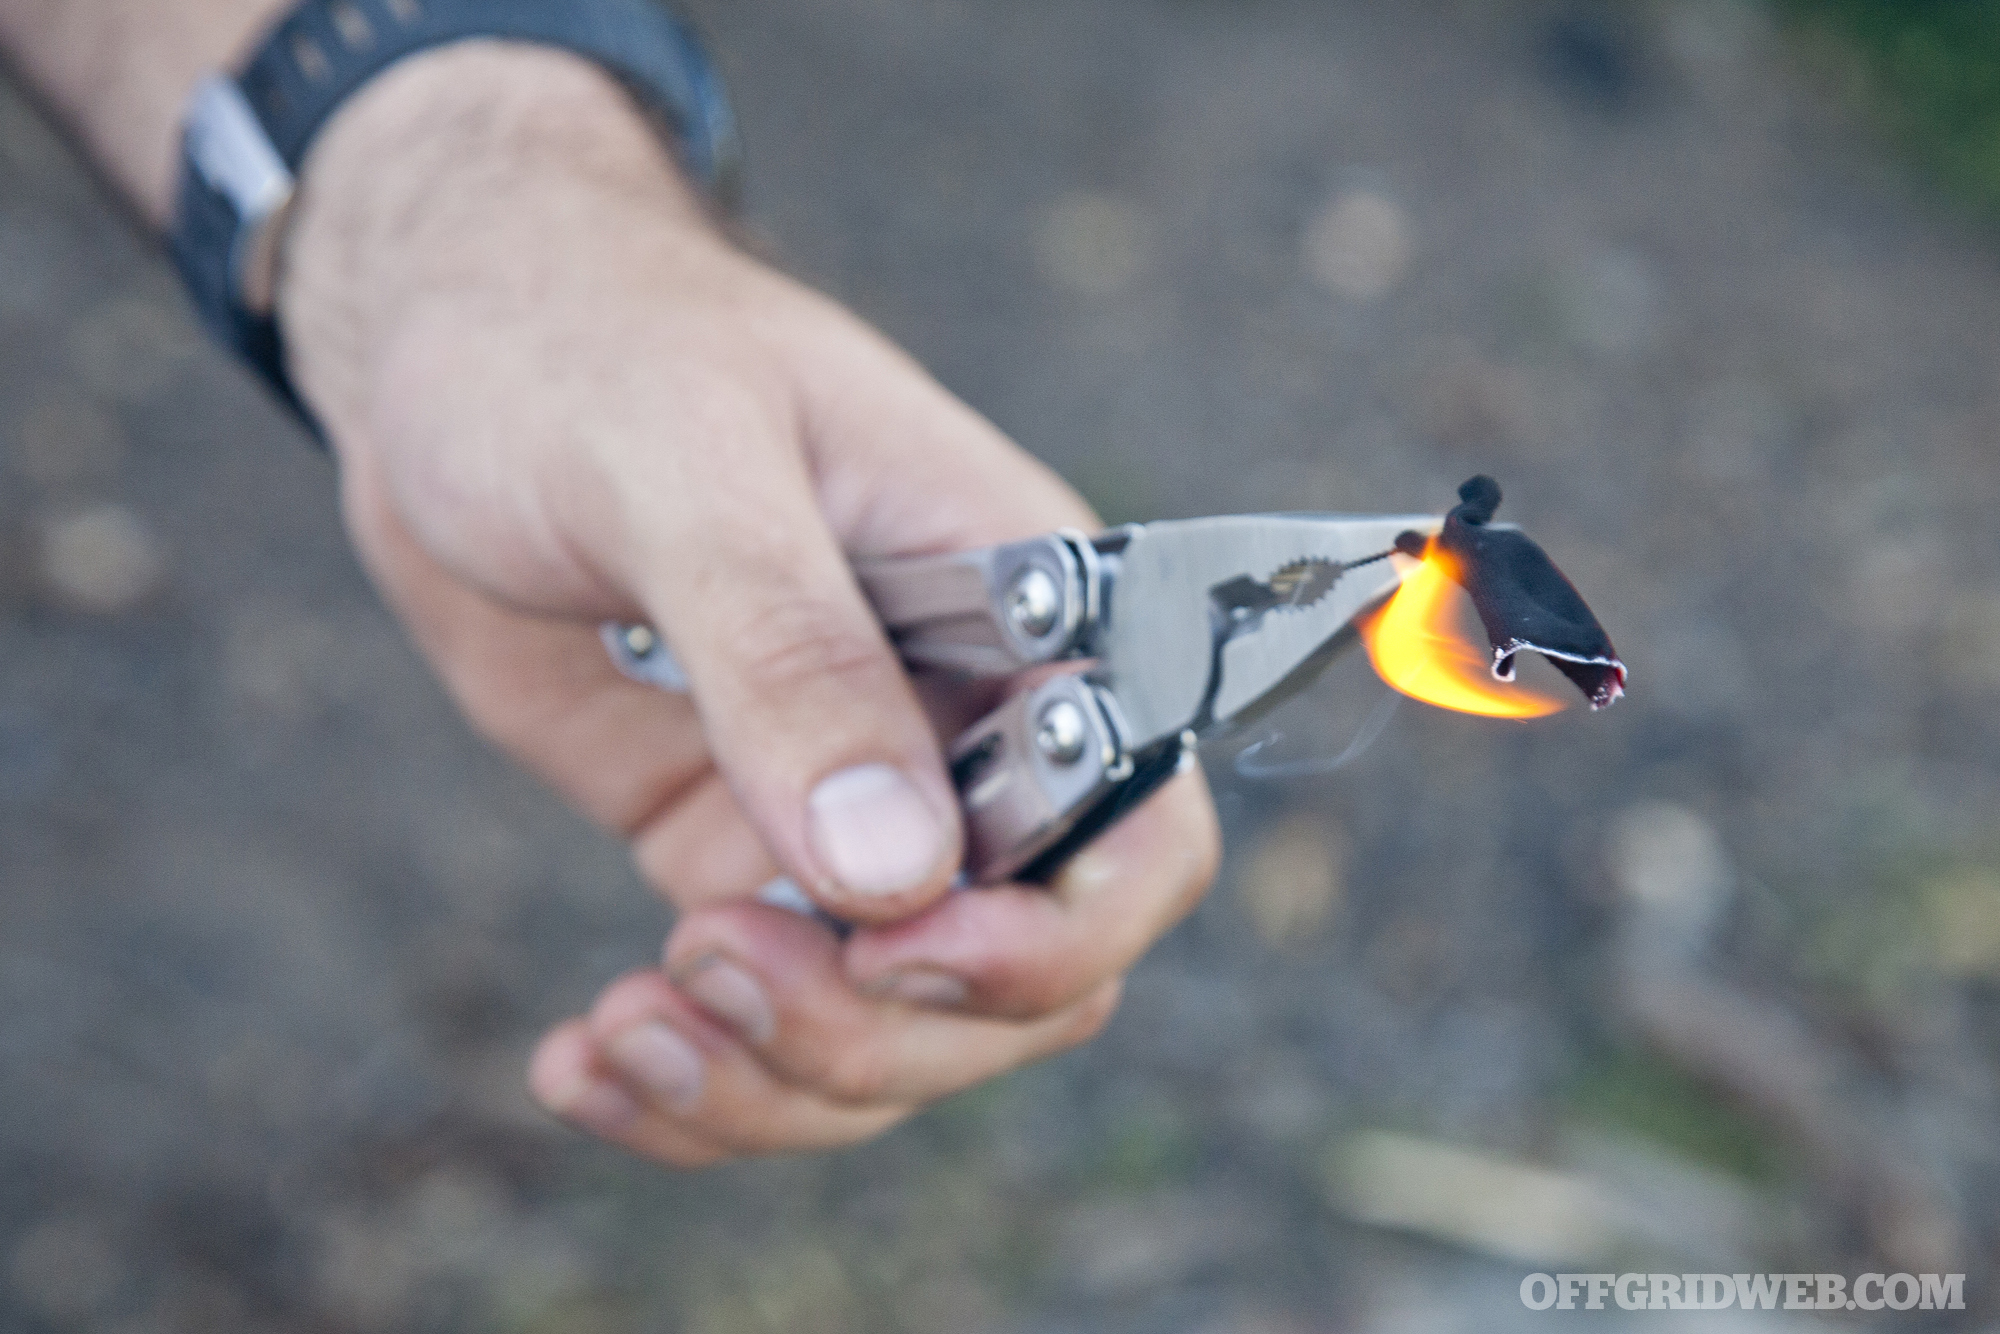
We often discuss the subject of fire-starting, and there’s a reason for this frequency: lighting a fire is one of the top priorities in a survival situation. It’ll obviously keep you warm, which is important during the colder months, but fire-starting is equally necessary during the warm spring and summer months. Fire boils water for drinking and cooking, boosts morale, and can even deter the insect pests that seem to be everywhere this time of year.
Char cloth is a great tool for fire-starting, but it’s not a naturally-occurring resource.
It’s always wise to add a few fire-starting tools to your bug-out bag or backpack before you head outdoors — these may include a lighter, ferro rod, matches, petroleum-jelly-coated cotton balls, char cloth, and a variety of other items. However, if all else fails, you may need to supplement your pre-made fire kit with items you can find in nature.
Fatwood sticks can be harvested and stored for tinder. Photo: Hustvedt / Wikipedia
Fatwood is one of the most valuable natural fire-starters, and it can be found in most forests and wooded areas where pine trees are present. This dense wood is impregnated with pine resin, making it hard, fragrant, and rot-resistant. The pine resin contains terpene, which is a flammable hydrocarbon and the precursor to turpentine. This causes it to ignite and burn energetically, making fire-starting far easier than it would be with damp bark.
To harvest fatwood, look for upright stumps of fallen pine trees, as there’s a higher density in this part of the tree. A knife or ax can be used to shave off the outer bark and reveal the fatwood. Keep an eye out for darker portions within the stump, and smell them to confirm the presence of fragrant resin. In the following video, Lonnie of Far North Bushcraft and Survival shows how he gathers fatwood during a short trek into the woods:
If you’re feeling lazy or can’t find pine trees nearby, you can purchase fatwood online, such as the Light My Fire TinderSticks. However, we’d encourage you to get out there and learn how to find your own — this skill may come in useful when your other tinder materials run out.
Have you ever held a fistful of change and wondered how much the coins are actually worth? We’re not talking about the 1¢, 5¢, 10¢, or 25¢ face value of the coins, as that would be easy to add up. We’re referring to a more complex metric known as intrinsic value. A coin’s intrinsic value is the value of the metal that makes up the coin. Essentially, if you were to melt down that handful of change, separate and purify all the metal elements, and sell them at current market value, intrinsic value is how much monetary value you’d end up with.
To understand what this means today, it’s useful to know a little about the history of currency. Back in the days of the Roman Empire, coins were formed from pure precious metals (such as gold or silver), and functioned as commodity money. This meant that the coin’s intrinsic value was the same as its face value. Eventually, carrying around chunks of gold and silver became impractical and unsustainable on a large scale, so we transitioned to representative money, which was made of materials that had less intrinsic value (e.g. copper or nickel) but directly represented a set amount of precious metal in a central reserve.
Today, we have moved to a system of fiat money, which has a set value as decreed by the government, but is not based on gold reserves or the materials it’s composed of. This is why a quarter is worth 25¢ wherever you go, even though the copper and nickel it’s made from are worth far less than that. For survivalists, this poses an interesting question: if SHTF and the government’s declared fiat value of our currency became irrelevant, how much money would our coins actually be worth?
Even at current precious metal valuations, the answer is not much, and that value could potentially fall further in the event of major economic collapse. If currency collapsed and everyone started melting their coins tomorrow, supply would increase, demand would decrease, and the value of the metals would likely drop dramatically.
(Note: Reddit users noticed there was a numerical error with the USD value of the Australian dollar, so we modified the infographic above to correct it.)
Now, this isn’t to say you should go trade all your money for gold doubloons, but it’s interesting to consider the huge gap between face value and intrinsic value of our currency. If the fiat currency system ever collapses, paper money might be rendered worthless, and coins wouldn’t be far behind.