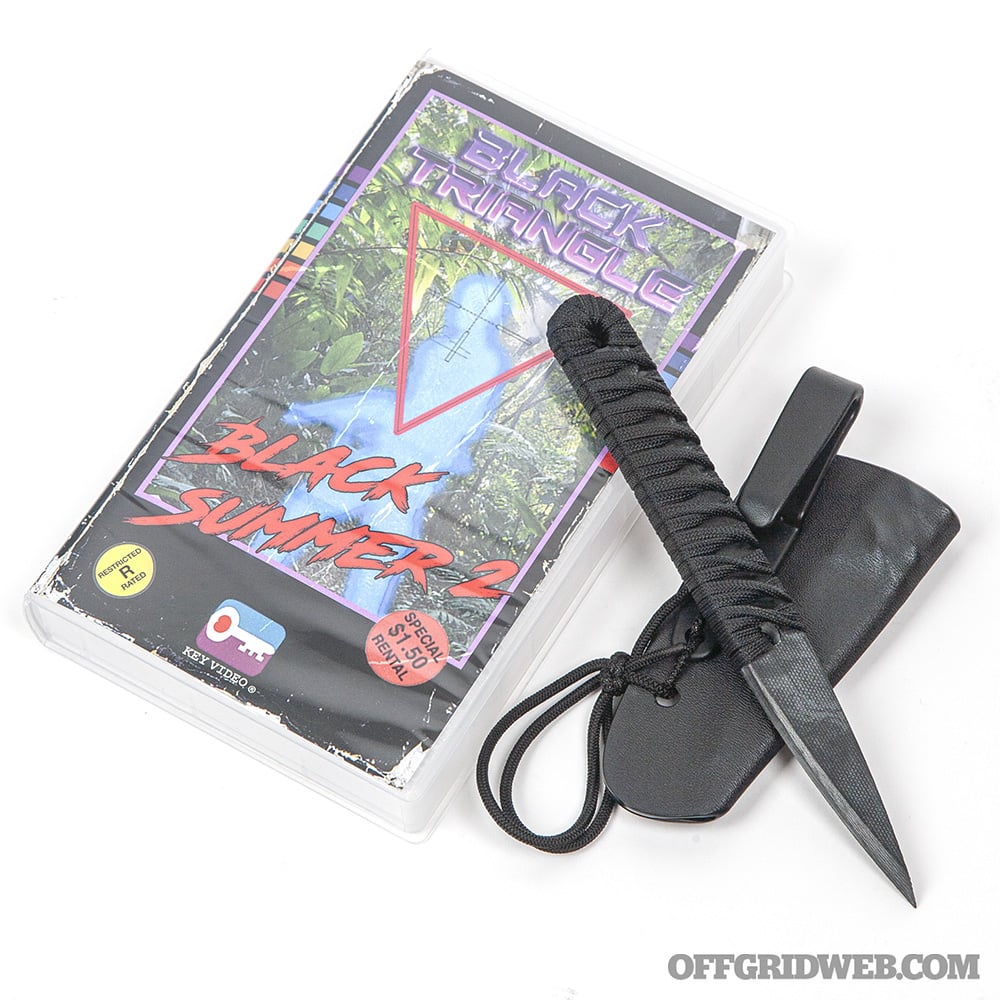
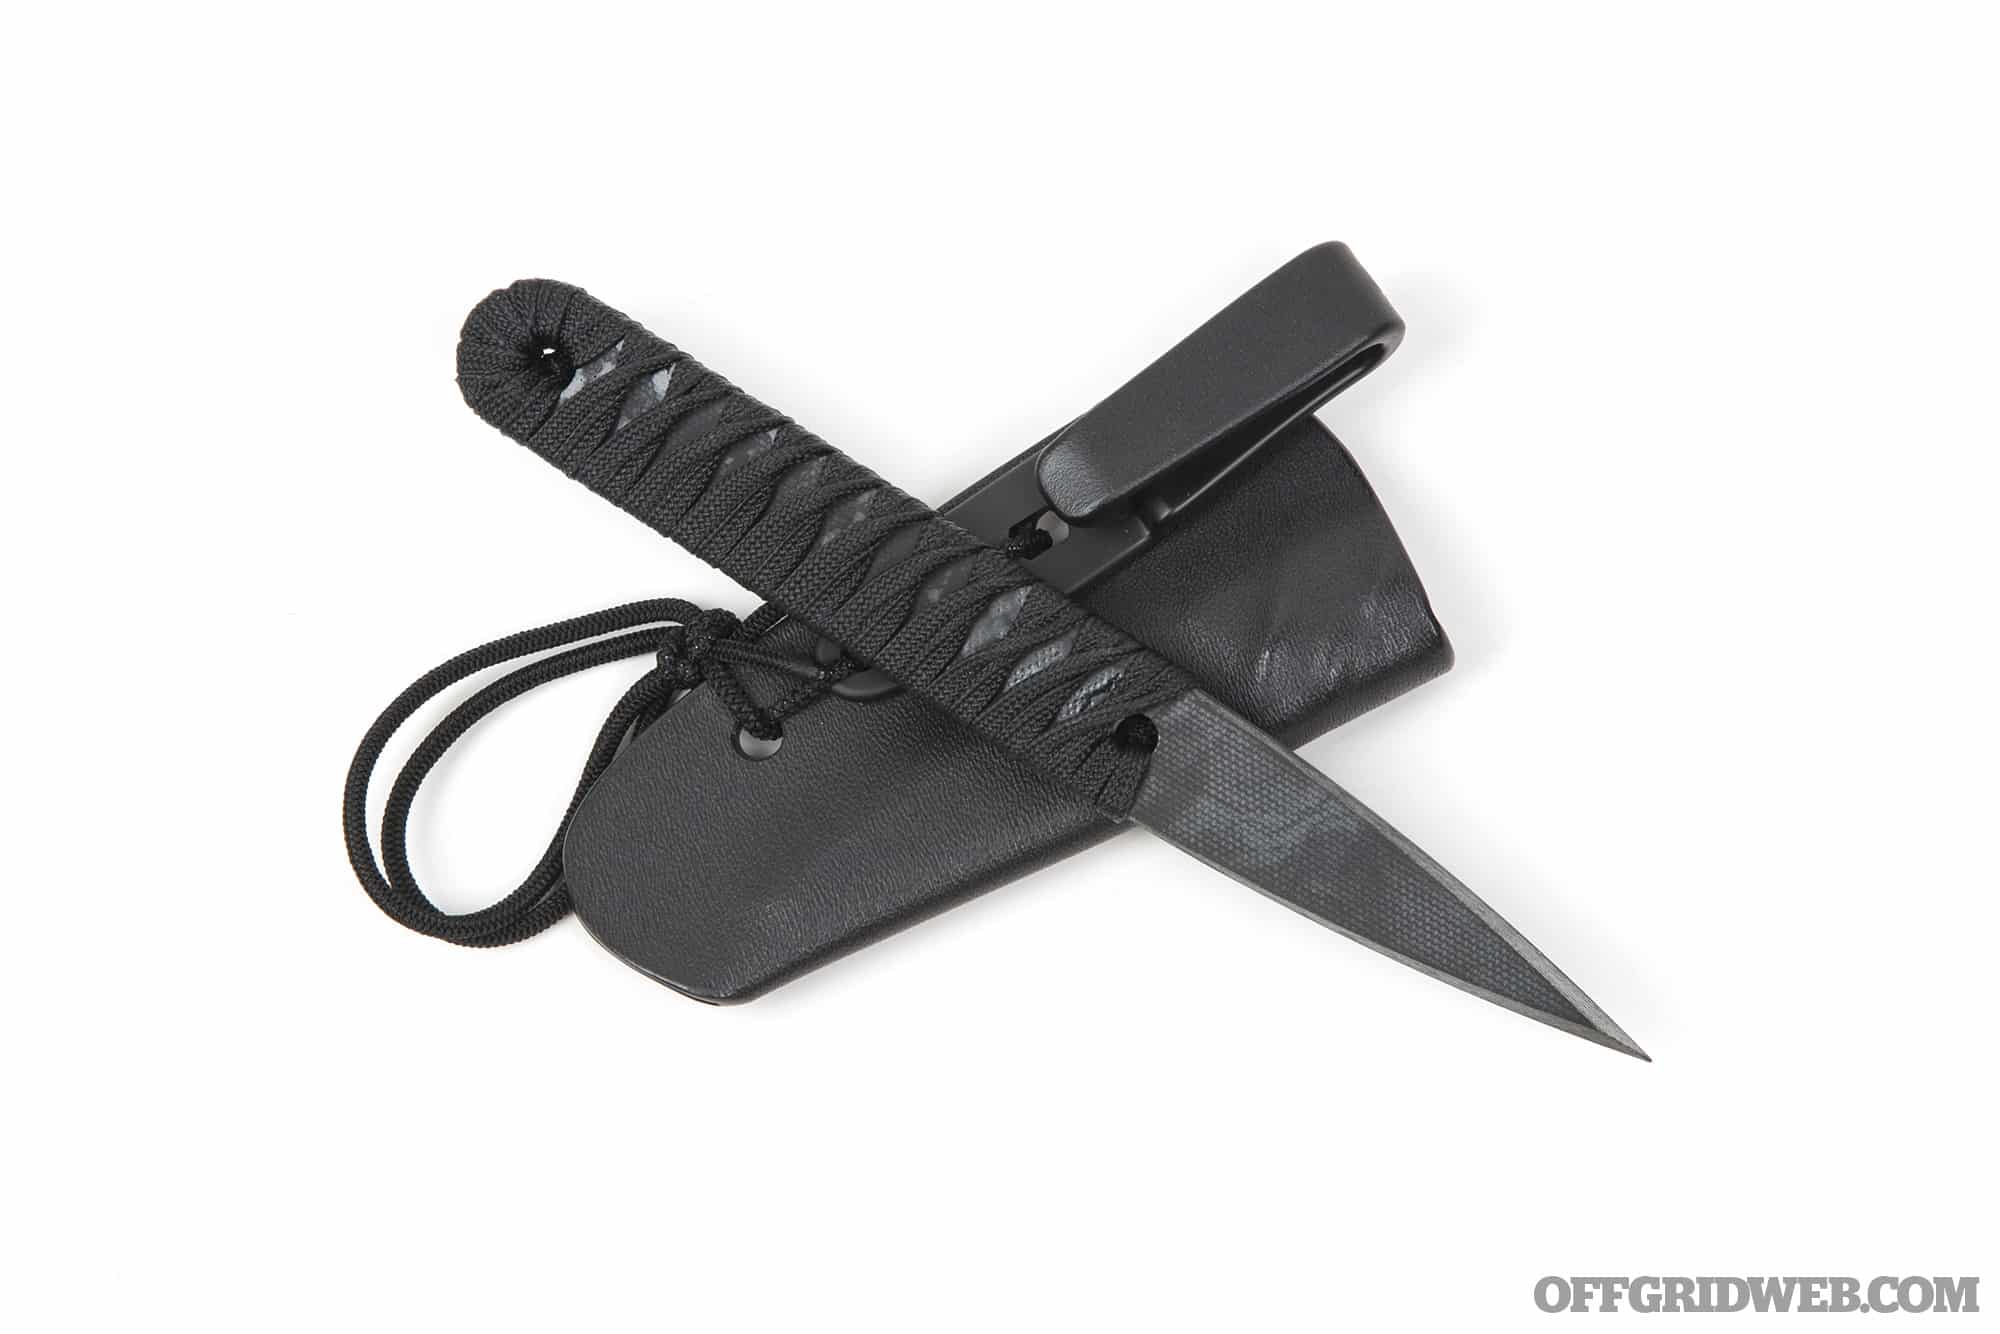
One of the more interesting blade styles is the Hawkbill blade. They have an old history and are used in everything from gardening to combat and personal protection. Of course, one of the more famous designs is the karambit. This time out we avoided ringed karambits, as they’re in a category all their own. Steve Tarani and others who specialize in karambits and the arts in which they’re used maintain that it’s the curved blade, even more so than the ring, that makes a knife a karambit.
Not popular as a chopper like a machete or Kukri, the Hawkbill blade excels at slicing and cutting. These knives have a pointed tip but typically aren’t used for stabbing like a dagger. Hawkbill knife blades in the West were most commonly fixed blades and slipjoints used for gardening and utilitarian chores such as cutting carpet or linoleum. The design would evolve over time, although we chose an example of the utility type knife as well.
Aside from self-defense or pruning, the Hawkbill excels at cutting rope, webbing, netting and line because the curved tip holds the object you’re cutting against the sharp edge. If there’s a drawback to these types of knives, it may be maintaining the edge on a curved blade. Whetstones and straight sharpening devices won’t work here. You can either send them back to the maker or manufacturer, visit or send to a professional knife sharpener, or invest in a round-shaped sharpening stone or rod. It’s a natural shape in that it often follows the same shape as the claws of raptors, big cats, bears, or other animals and that may be part of its inspiration.
The Hawkbill surely runs the gamut from minuscule to extra-large and from basic utility to self-defense. It may not be favored by everyone, but they definitely fill a niche for most knife users.
Kershaw Knives
Launch 10
Kershaw Knives is mostly associated with their speed-assisted knives, but they’ve been making autos for almost as long. The Launch 10, nicknamed “the Claw” by employees at Kershaw, is their take on the Hawkbill design. This is a sub-2-inch blade auto, which should make it legal in most areas, like California. It definitely packs a lot of cutting power into its small size and a Hawkbill blade makes complete sense for that reason.
Pros:
The blade is made from CPM154 — that means it’s tough, razor sharp, rust resistant, and sports an easily maintainable edge.
Very small and handy, this knife performed well as a cutter, and the factory grind was just about perfect.
Fires like a rocket every time like all autos should function
Cons:
The pocket clip is a bit too tight from the factory for fast access.
Although legal in California, it can be hard to find in some areas.
Spyderco’s Harpy may have been one of the first of the modern tactical Hawkbill blades put out by a production knife company. If you know the history of the company, this design pairs a classic knife style with Spyderco’s patented serrations, and it’s perfect for cutting rope, webbing, fishing nets, etc., particularly in a wet or maritime environment. Spyderco designed it for the commercial fishing industry. A hole in the handle helps the blade dry while it’s closed. One of the company’s most effective and influential designs, models such as the Merlin, Tasman Salt, and others followed in its footsteps.
Pros:
VG10 steel is easy to maintain, wear resistant, and rust resistant.
Lock-back mechanism offers strength and security.
The clip can be positioned tip-up, tip-down, left-handed, or right-handed.
Cons:
Can be hard to obtain due to demand
The stainless handle can get slick under wet conditions; some texturing would be welcome on this one.
Toor Knives is one of those companies that constantly surprises me with the quality of their offerings. The Karsumba is their take on the Karambit without the distinctive ring to make it more concealable. The Micarta handles offer a no-slip grip, and the look and feel of the FlexTech Kydex is nothing short of amazing. This is one of those knives that once you pick it up, you don’t want to put it down.
Pros:
Very comfortable in the hand, particularly in the reverse grip.
The blade is made from CPM 154; it’s tough, razor sharp, rust resistant, and sports an easily maintainable edge.
Although it’s obviously intended for self-defense, it performs all tasks well.
Cons:
Availability can be an issue. Toor Knives tend to sell out quickly once they’re in stock.
Mounting it on the belt for ideal placement and deployment took a bit of adjusting. I like how makers and manufacturers give you the options, but sometimes we need suggestions, too.
Böker USA is the American division of Böker Knives who has been making knives, swords, and hardware since the 18th century. The Hawkbill knife hearkens back to an older time period when the average pocketknife was the slip joint and the average Hawkbill knife was more of a utilitarian knife as opposed to a fighting blade. The jigged bone handles with stainless steel bolsters, shield embedded in the scales, slip joint, and a nail nick opener remind one more of the knives used in scouting. The hollow-ground blade is 440C and came decently sharpened from the factory.
Pros:
Very light and easy to carry in the pocket
A good starter knife for a young person who needs to learn knife safety by two-handed opening.
440C is a great steel that’s easy to sharpen and rust resistant. At one time it seemed to be the default steel for pocketknives.
Cons:
Slipjoint knives do not lock, so use care with hard-use-type tasks.
Some modern users may not like the lack of a clip. This just drops in the pocket or fits in a belt sheath.
Elvia is a knife design from the mind of Ed Calderon. You may have read his writing in the pages of this magazine or his online posting as “Ed’s Manifesto.” It’s based on the type of knife his mother used to carry; she could use it as a kitchen knife or as a fighting blade to protect her family in Mexico. A number of custom knife makers have produced the design on behalf of Calderon, but Emerson’s may be the only factory take on the knife. Emerson himself has joked about starting a knife company just to satisfy the demand for this model. It’s advised to take a class on the use of this knife with Calderon as it behaves a little differently than most folders.
Pros:
154CM steel is razor sharp, rust resistant, and sports an easily maintainable edge.
Excels at cutting and slicing, even in the kitchen
Strong titanium liner lock
Cons:
If you can’t wait for Emerson Knives, the secondary market will have a serious bite regarding price.
It’s only tapped for clip use for right-handed users. Emerson can tap the other scale for an up-charge.
Some knives grab you when you first see them from across the room, and the Grumpy by Bastinelli Creations definitely fits that category. It might not fit what you think of when you think “knife,” but it certainly fits the bill in more ways than one. The Grumpy is more of a sickle, scythe, or Japanese Kama-inspired blade. I was a bit hesitant to include it, but had to once I realized its utility and saw a role for it on my pack for wilderness excursions. Made of M390 with Micarta handles, it rides in a Kydex sheath. This piece won the Best Factory Tactical award at the 2022 BLADE Show West.
Pros:
M390 is a super steel that’s hard, exhibits great wear resistance, and probably the ultimate in corrosion resistance.
Razor sharp with a small, serrated section on top of the blade for added utility.
The rubber belt loop carry attachment works well for keeping the blade in an upright and ready-to-go position while remaining secure.
Cons:
May be large for concealment in urban environments
You may need to carry another knife for most EDC tasks.
Reese Weiland is a custom knifemaker from Florida known for his iconic Hawkbill blades. The Rastor is his signature knife, and this same blade style is used on many of his other models. Sharp readers will notice it is the profile for the Microtech Hawk. This example has a Twist Damascus blade and blued Damascus bolsters with pre-ban elephant ivory scales and scrimshaw by Presidential Scrimshander Michael Hasbun. A blue sapphire is set in the thumb stud.
Pros:
This is a true custom knife, and this model can be ordered in a variety of steels and handle materials.
The hollow ground blade slices like a razor.
No bearings, etc., yet the knife opens and closes extremely smooth
Cons:
This particular example may be a bit too much to have on as an EDC knife. However, the knife can be had in a variety of different ways.
No pocket clip or sheath for carry unless you have a sheath made
There may be a long wait for one of these or a high aftermarket price.
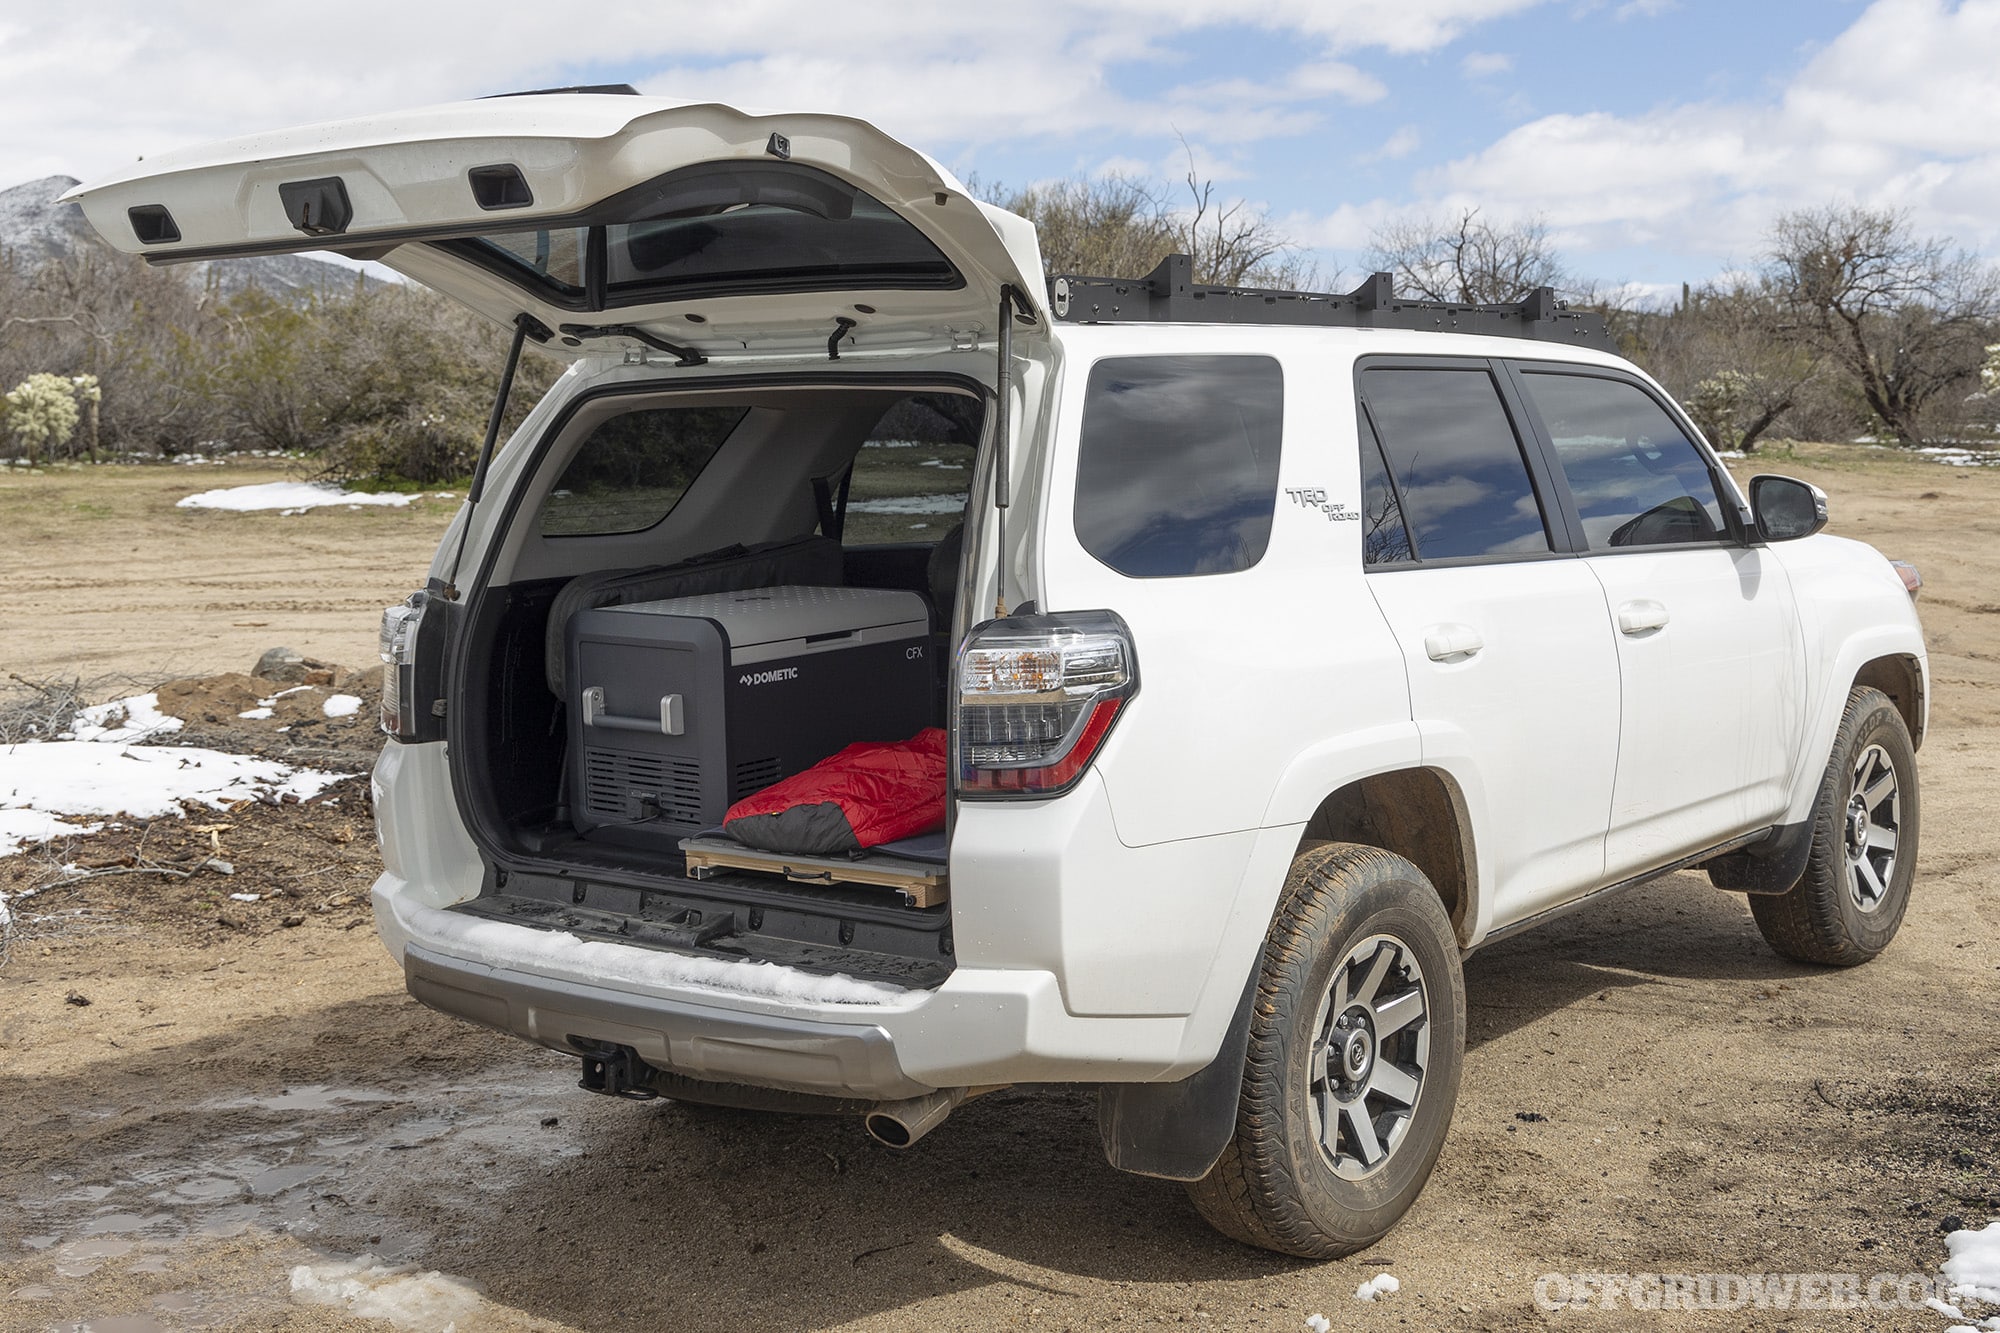
When you’re planning a road trip, food and drinks are a necessity. For trips on major highways, it’s easy to make a pit stop at a convenience store to buy sodas and snacks, or hit a grocery store or restaurant for larger meals. However, when you’re venturing off the beaten path — especially for multi-day off-road expeditions — you’ll need to bring all your food and beverages with you. While it’s true that you could rely entirely on shelf-stable MREs and freeze-dried camping meals, these items are often costly, unappetizing, and/or unhealthy due to high levels of sodium and preservatives. The ability to bring real food — fresh meat, eggs, cheese, fruits and veggies, and so on — makes every trip more enjoyable, whether it’s a half-day solo outing or a cross-country family expedition. Fresh food isn’t just tastier, it’s healthier and more cost-effective than vacuum-packed “camping food.” This realization led me to upgrade my 2022 4Runner overland vehicle build with a Dometic CFX3 fridge, which runs on AC power from a wall outlet or 12V DC power from a vehicle or mobile battery pack.
First, let’s take a look at the pros and cons of mobile 12-volt refrigeration.
Why Use a Fridge Instead of a Cooler?
Virtually everyone already owns a regular cooler or ice chest, whether it’s an old Coleman or a fancy new Yeti. These insulated containers can keep things cold for a few days with the addition of a couple bags of ice. That said, there are numerous reasons most American homes switched from insulated iceboxes to electric refrigerators nearly 80 years ago. Many of these reasons also apply to storing food at campsites and in vehicles. Here are some of the problems associated with ice-filled coolers:
Ice melts quickly. In warm climates, or if your cooler isn’t very well-insulated or sealed, your ice may melt in 48 hours or less. Then you’ll need to go buy more, which leads to our next point…
Ice must be re-supplied frequently. Buying ice is not expensive, but the cost does add up, and it’s certainly a hassle. More importantly, there are many places where you simply won’t be able to resupply — multi-day camping or hunting trips in remote locations, for example.
Food safety is a serious concern. Ice keeps your cooler extremely cold (maybe even too cold) at first, but the temperature gradually rises over time as the ice melts. In the beginning, you may freeze food inadvertently; at the end, perishable items such as meat and dairy may creep up into the >40°F “danger zone” where bacteria thrives. Nothing ruins a day faster than puking your guts out due to spoiled food.
Ice makes a mess. Once it’s melted, you’re left with a cooler full of tepid water that leaves remaining contents soggy. And if your cooler’s drain doesn’t seal perfectly, that water may leak and soak all your other gear.
Coolers can be surprisingly expensive. High-end, American-made coolers can easily set you back $400 to $600, especially if you want features like wheels and latches. You can always buy the bargain brand for a fraction of the cost, but it might not be as durable or as well-insulated.
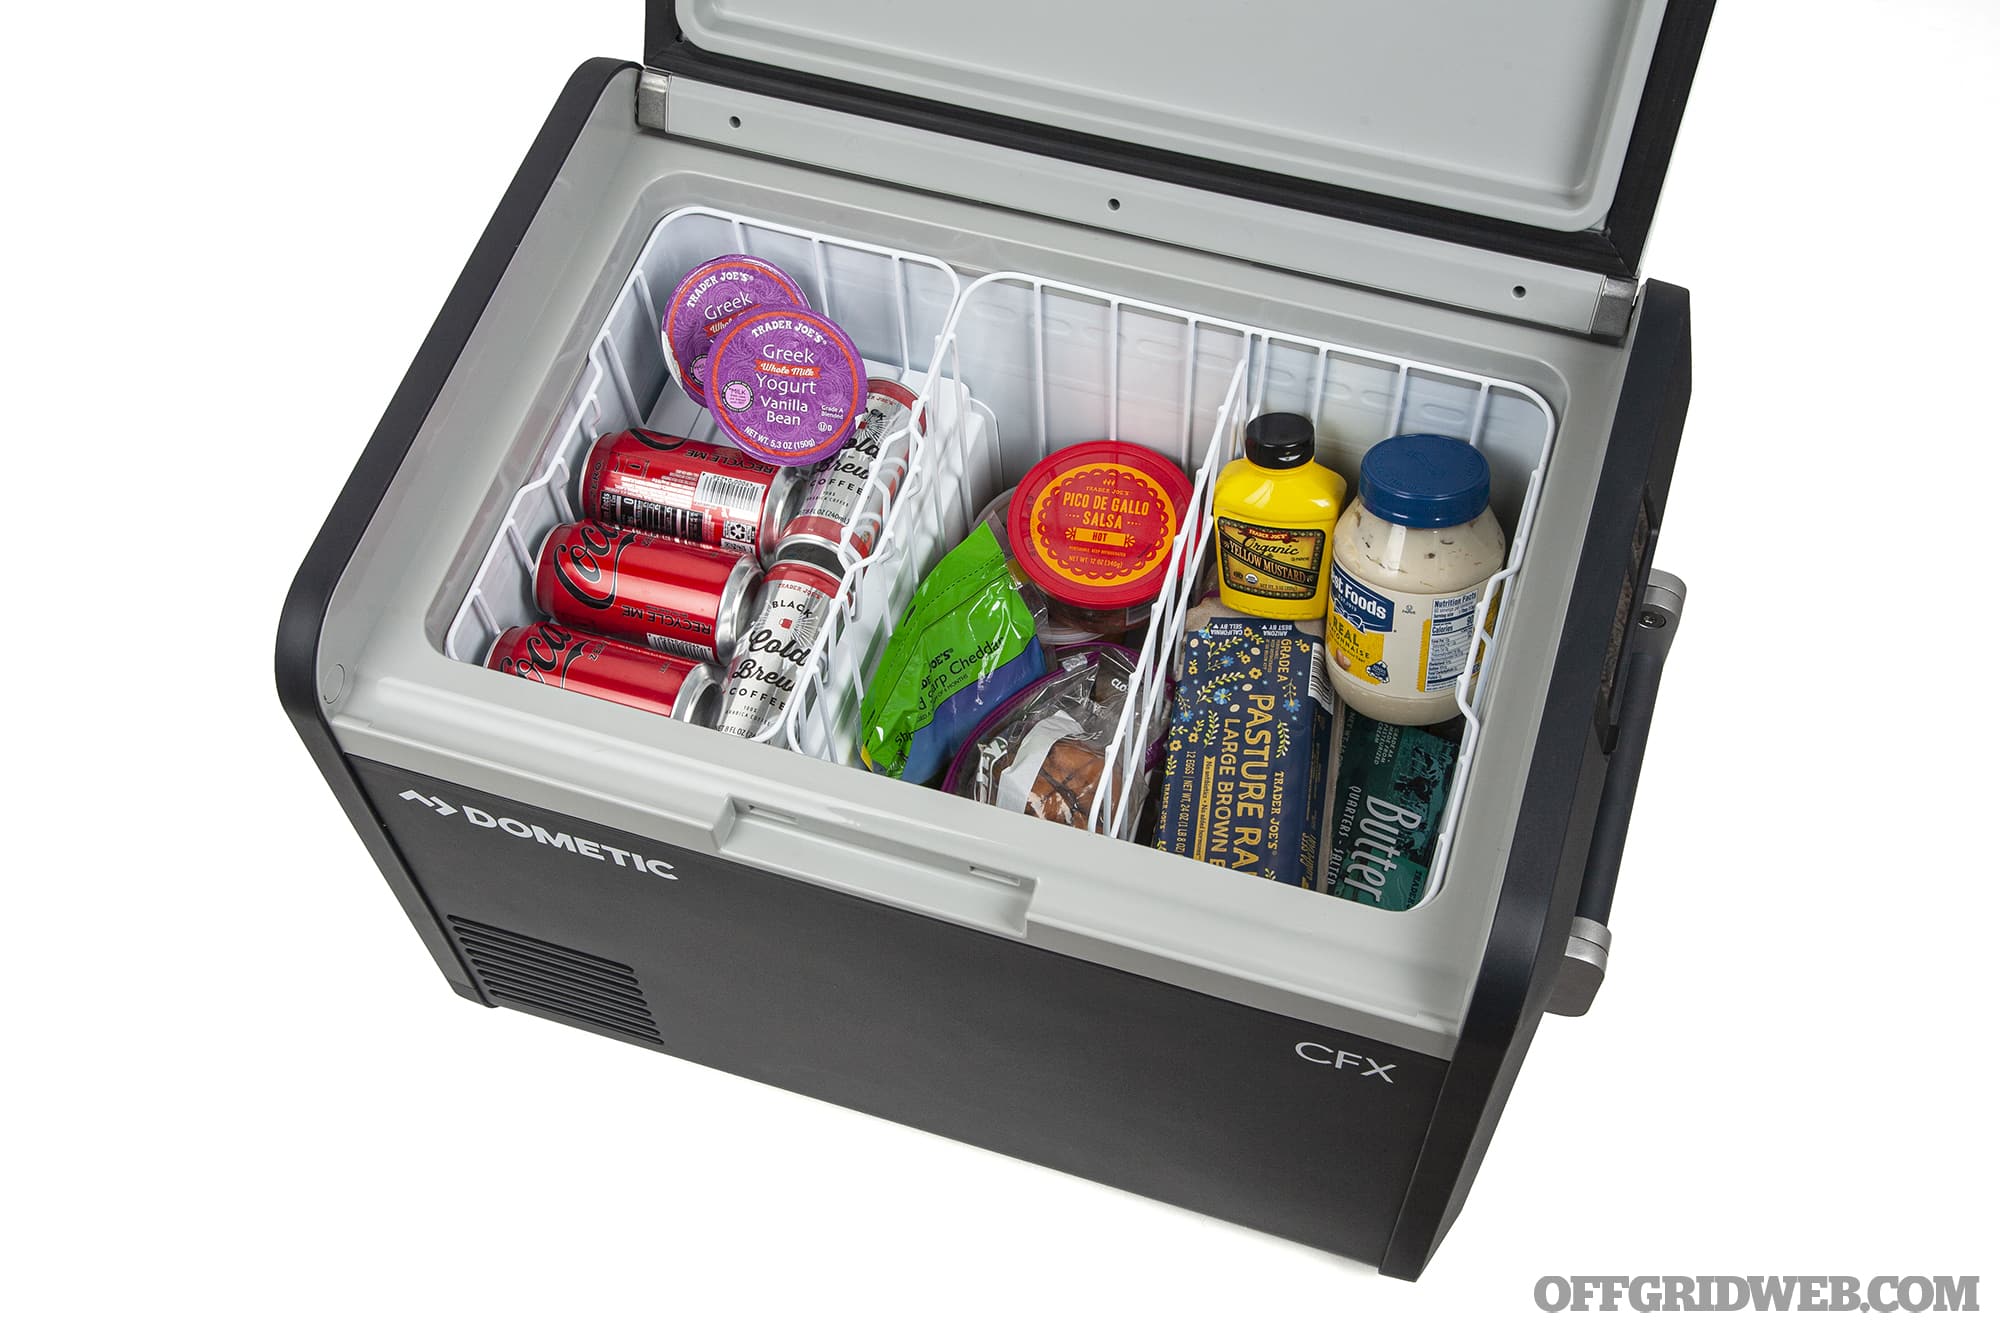
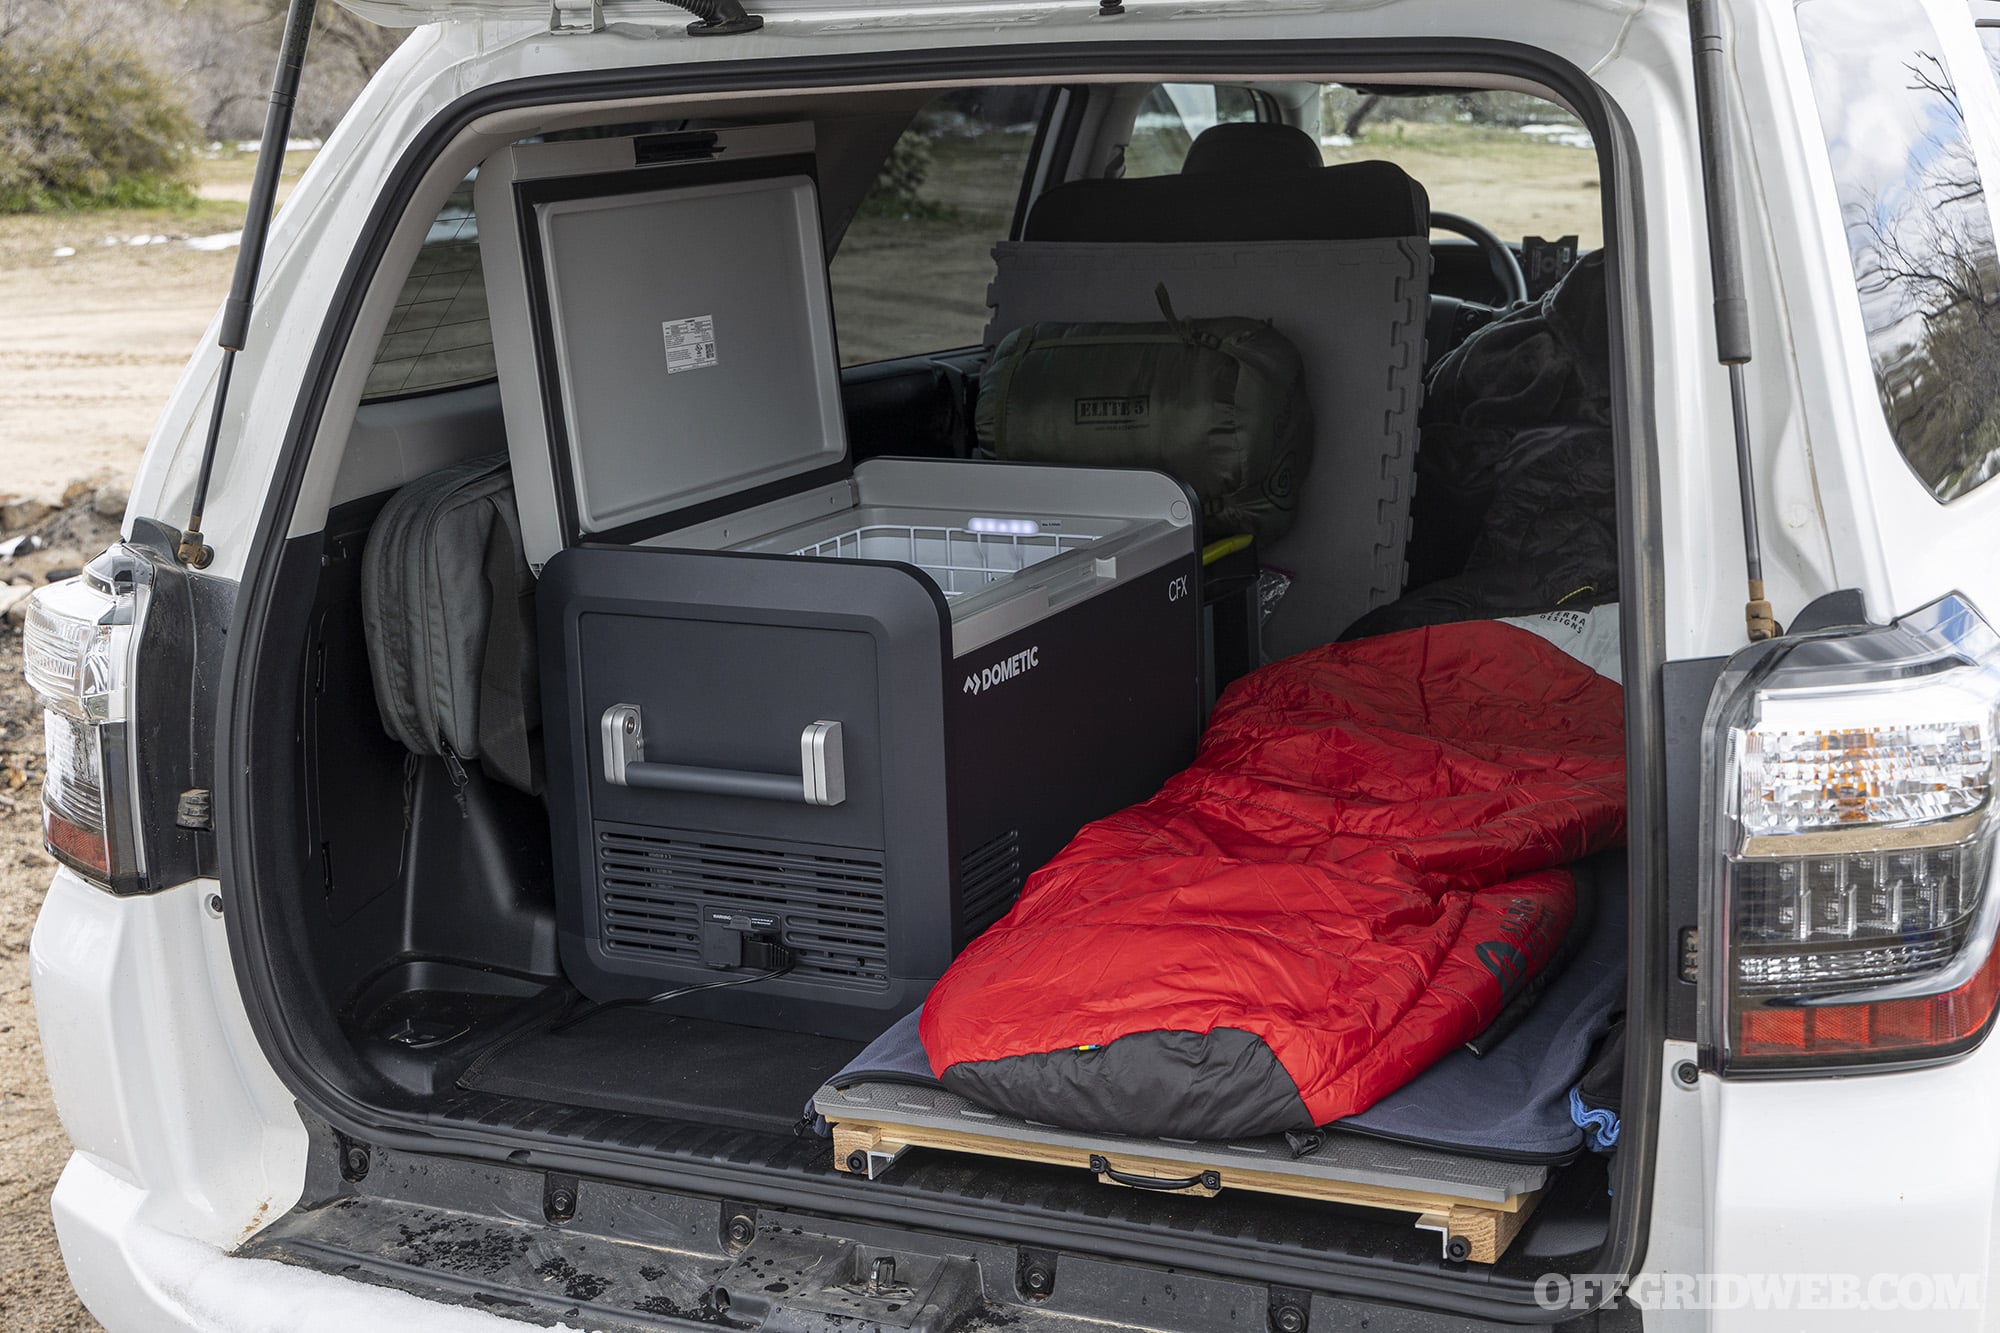
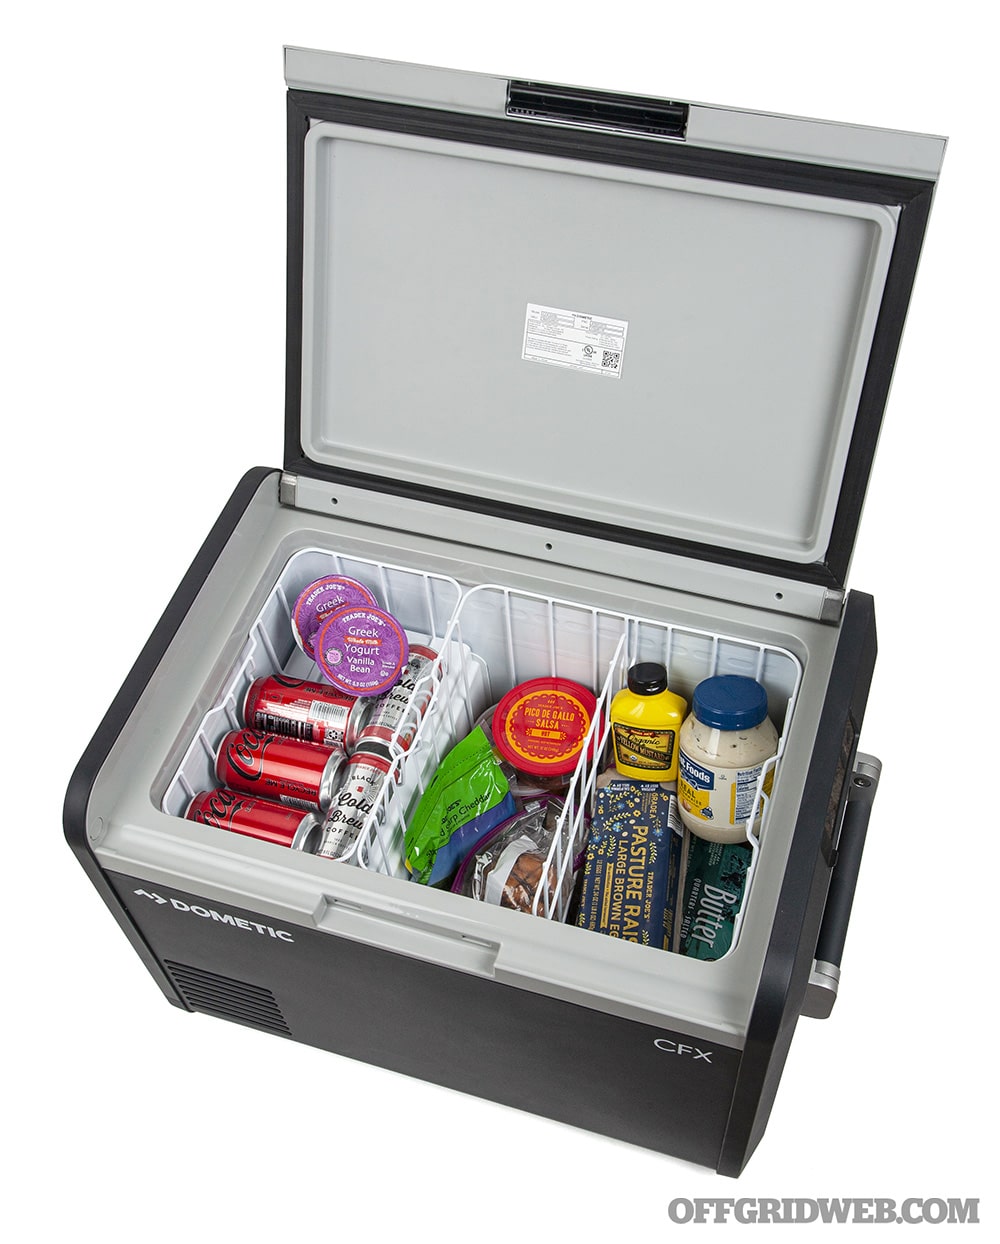
Above: All this food fit into our CFX3 55IM fridge, with room to spare and no concerns about melting ice. The removable baskets make loading and cleaning easy.
If you’re a serious camper, hunter, or overland enthusiast, 12-volt refrigerators alleviate many of the problems above, but they’re not without drawbacks. Here are some of the downsides to buying a mobile fridge:
High up-front cost. Fridges aren’t cheap, especially if you’re seeking one large enough to feed a whole family for several days. Dometic’s current offerings range from $500 to $1,400. However, we’d argue the long-term benefits outweigh the cost.
They’re only as good as your power source. In many cases, this is as simple as plugging your fridge into the 12-volt outlet in your vehicle, but those outlets typically only provide power when the engine is running. If you’re parking longer than a few hours, you should have a battery, power bank, or solar panel that can keep the fridge running and the food cold until you start driving again. (I’ll explain how I rectified this later.)
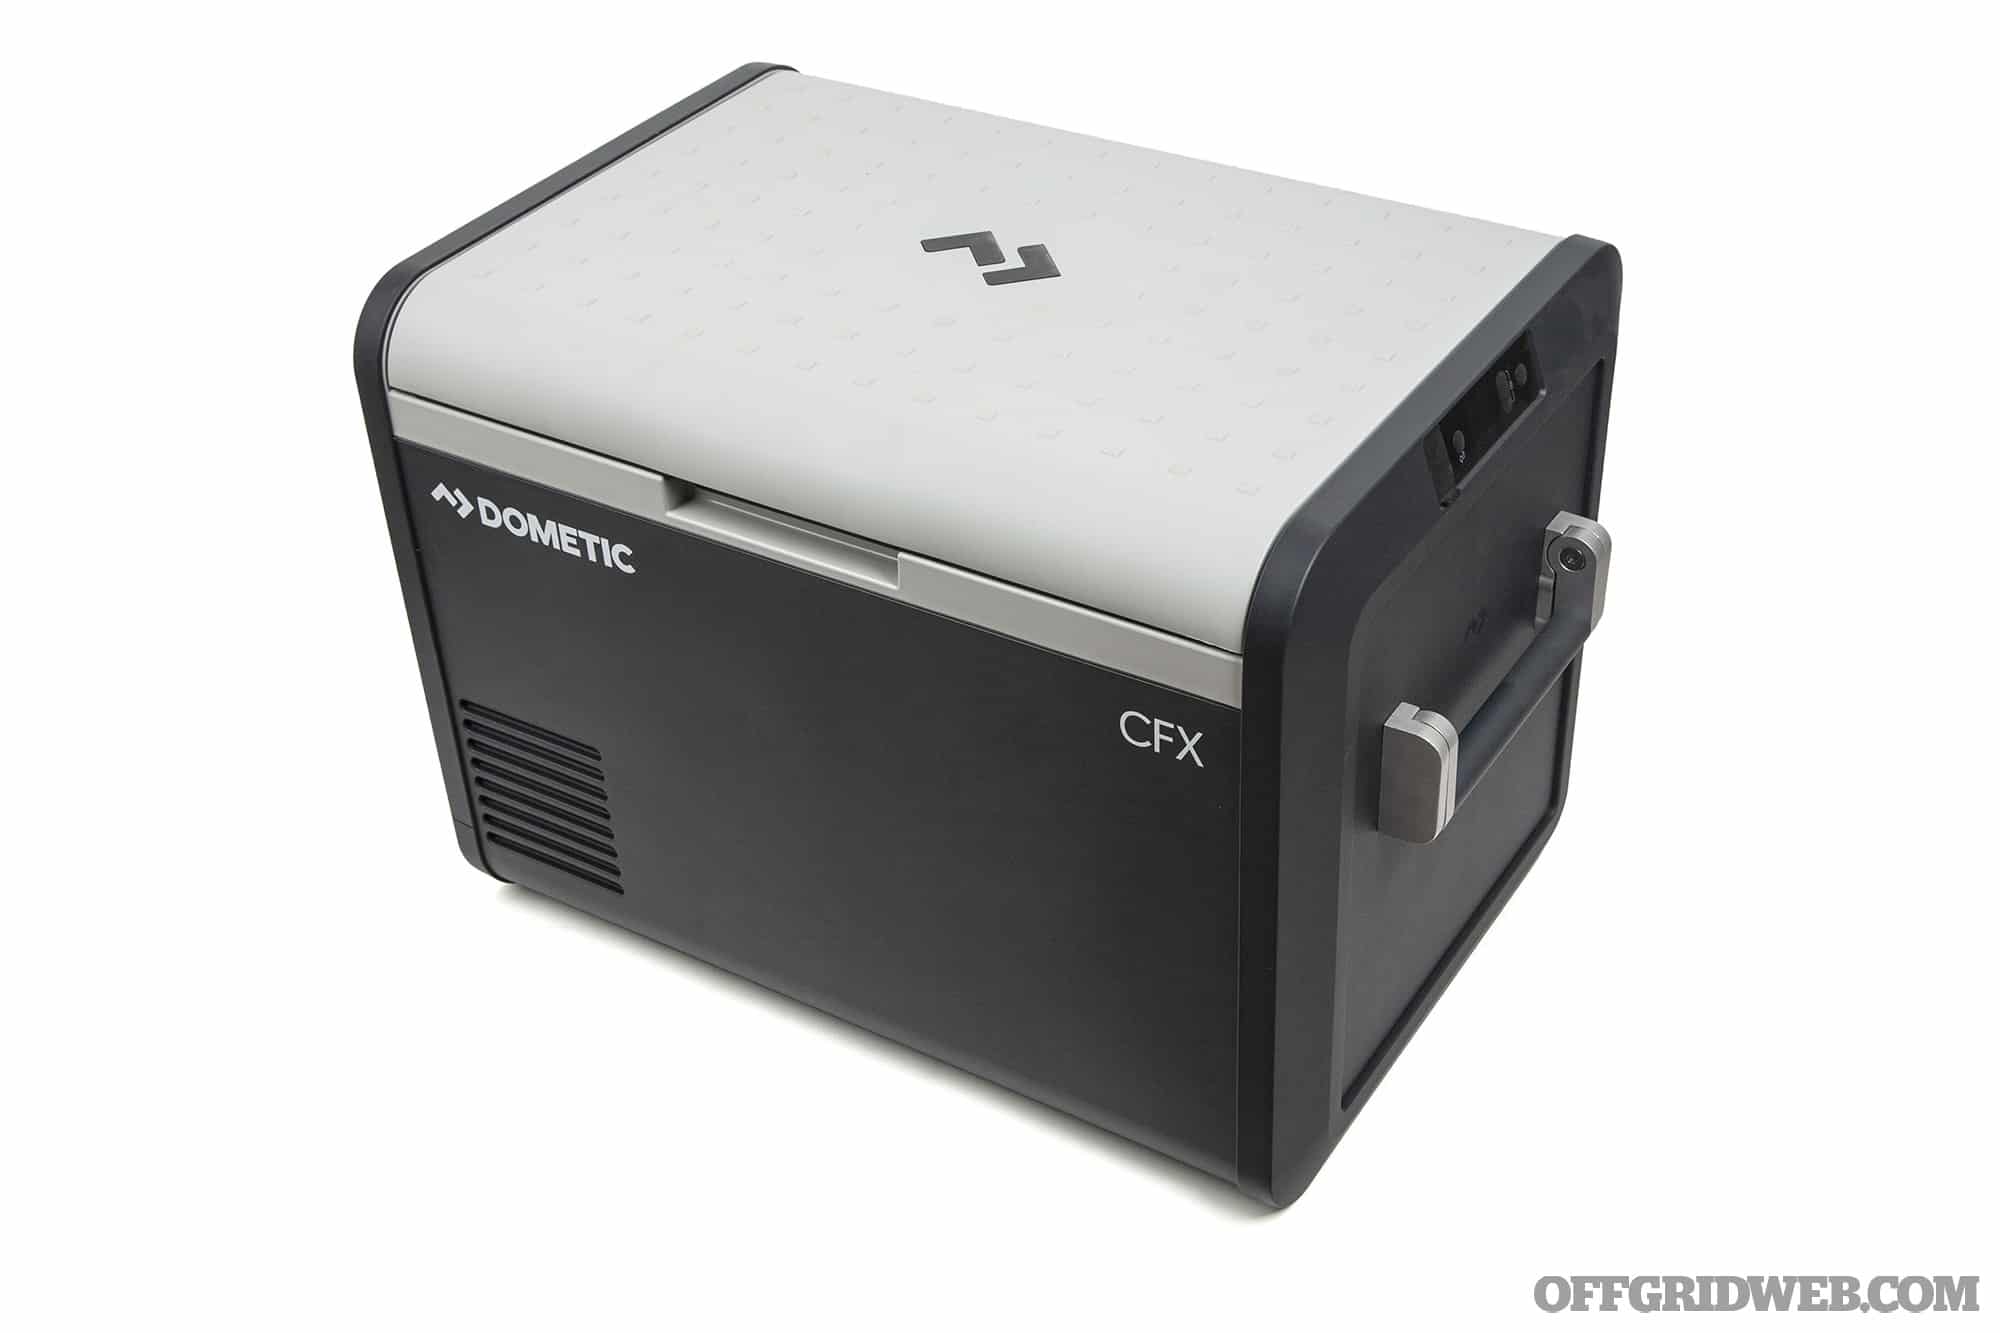
Dometic CFX3 55IM 12-Volt Fridge
Once I decided to pick up a 12-volt fridge for my 4Runner project, I quickly settled on Dometic, a company that has been a leader in mobile refrigerators since 1968. Dometic fridges are popular in the RV and “van life” markets among folks who live on the road for months at a time, so I figured they’d offer a dependable solution for the shorter camping and overland trips I have planned. Specifically, I chose the Dometic CFX3 55IM model, which offers a 53-liter storage capacity and built-in ice maker. That capacity is equivalent to 83 soda cans, and should have no trouble holding enough food for a small family for a week. MSRP for this model is $1,080.
Above: The ice tray contains two removable ice cube molds.
This fridge is a single-zone model, so aside from the small ice tray, it keeps all its contents at one temperature. It can be set as low as -7°F to keep food frozen solid, at a more typical 36°F for refrigeration, or as high as 50°F to conserve energy and keep non-perishable contents cool.
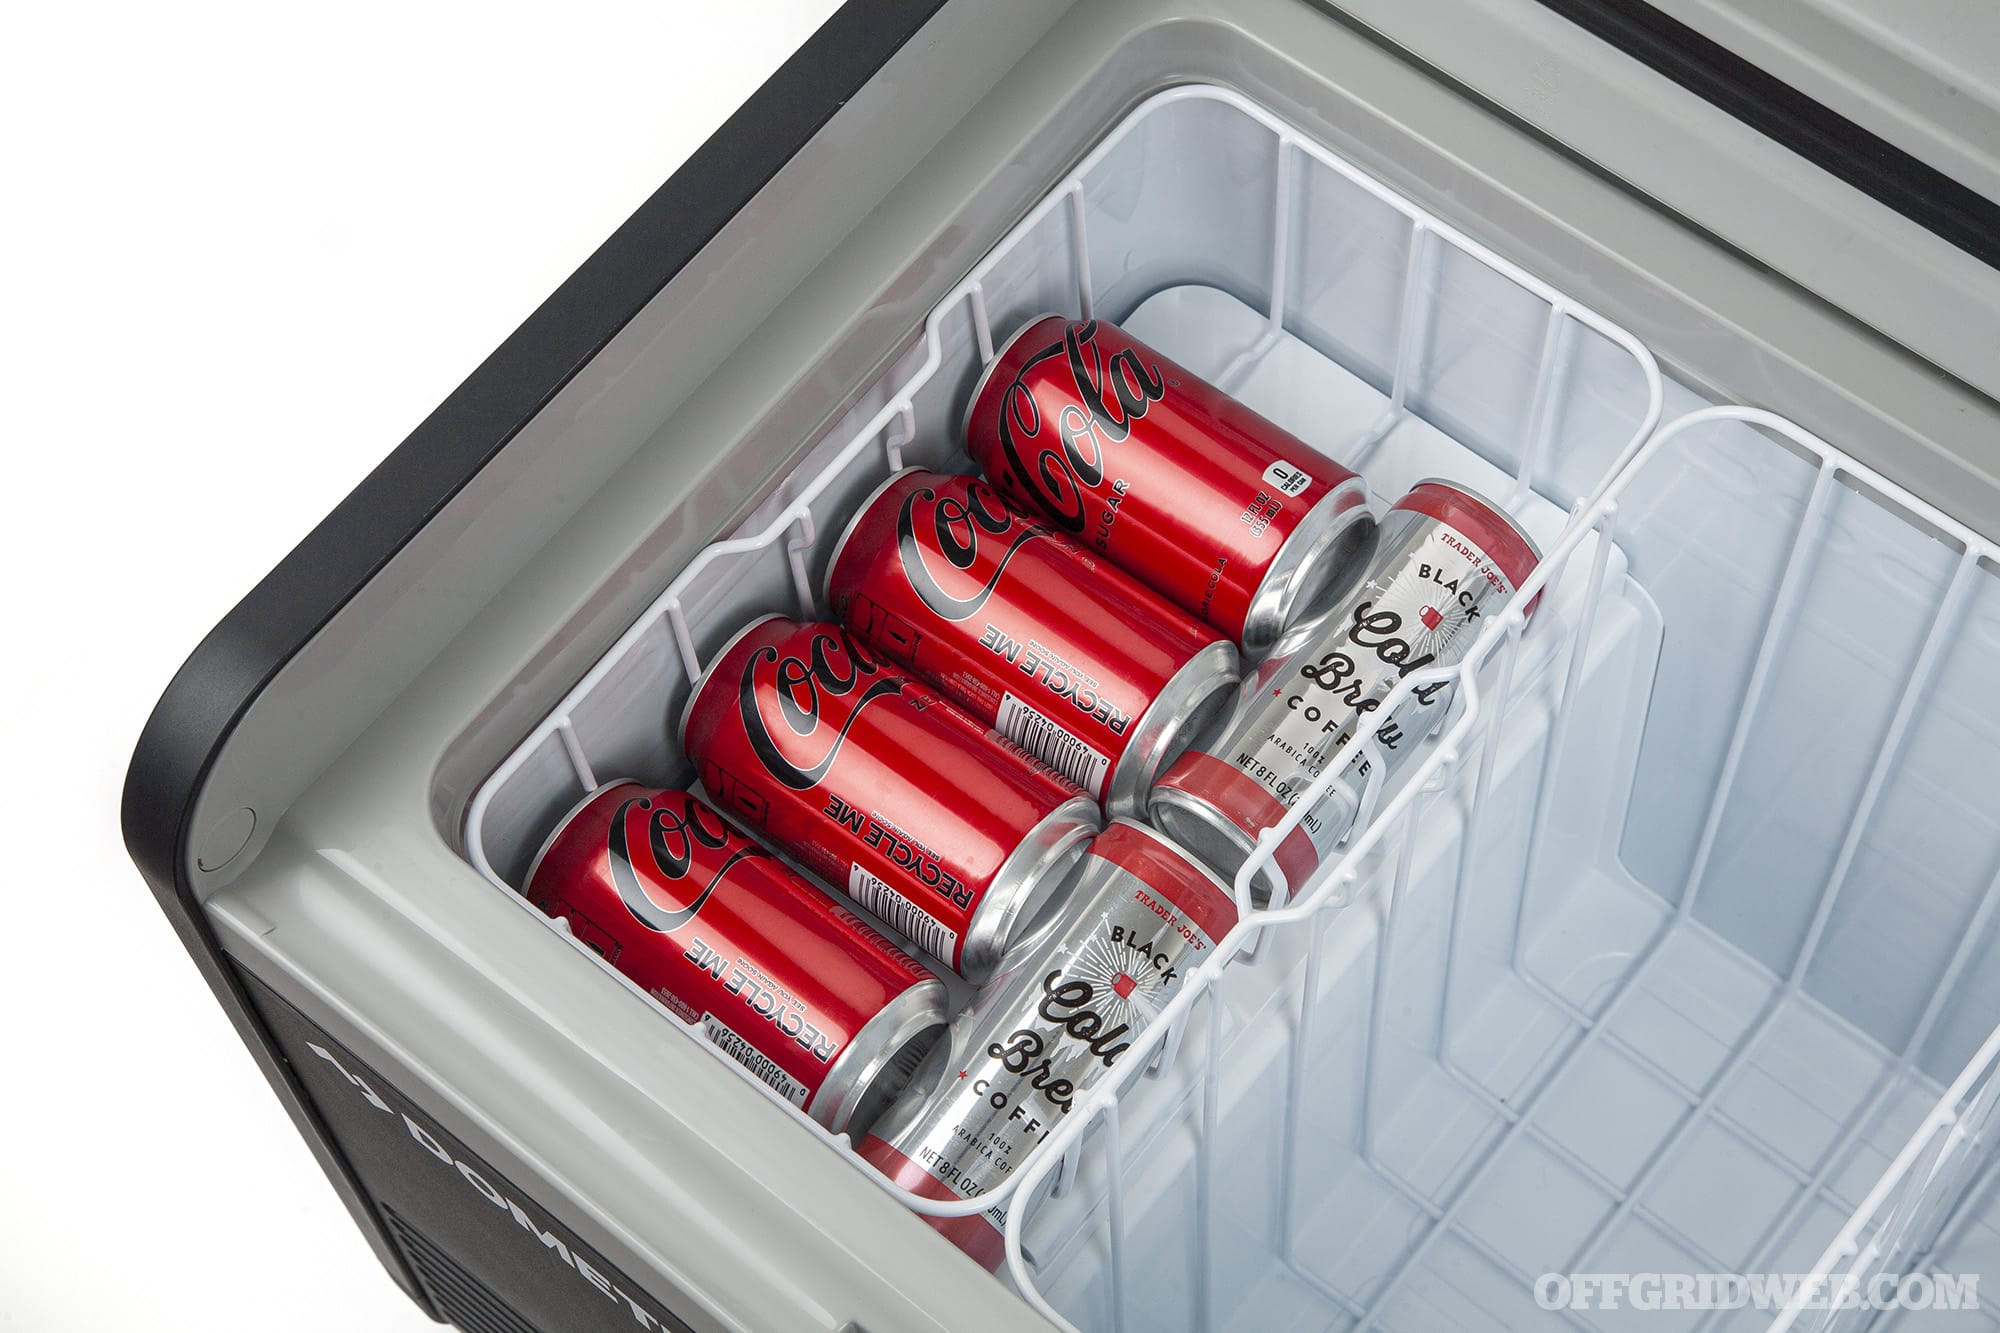
Above: The area above the ice tray is ideal for storing smaller items like canned drinks.
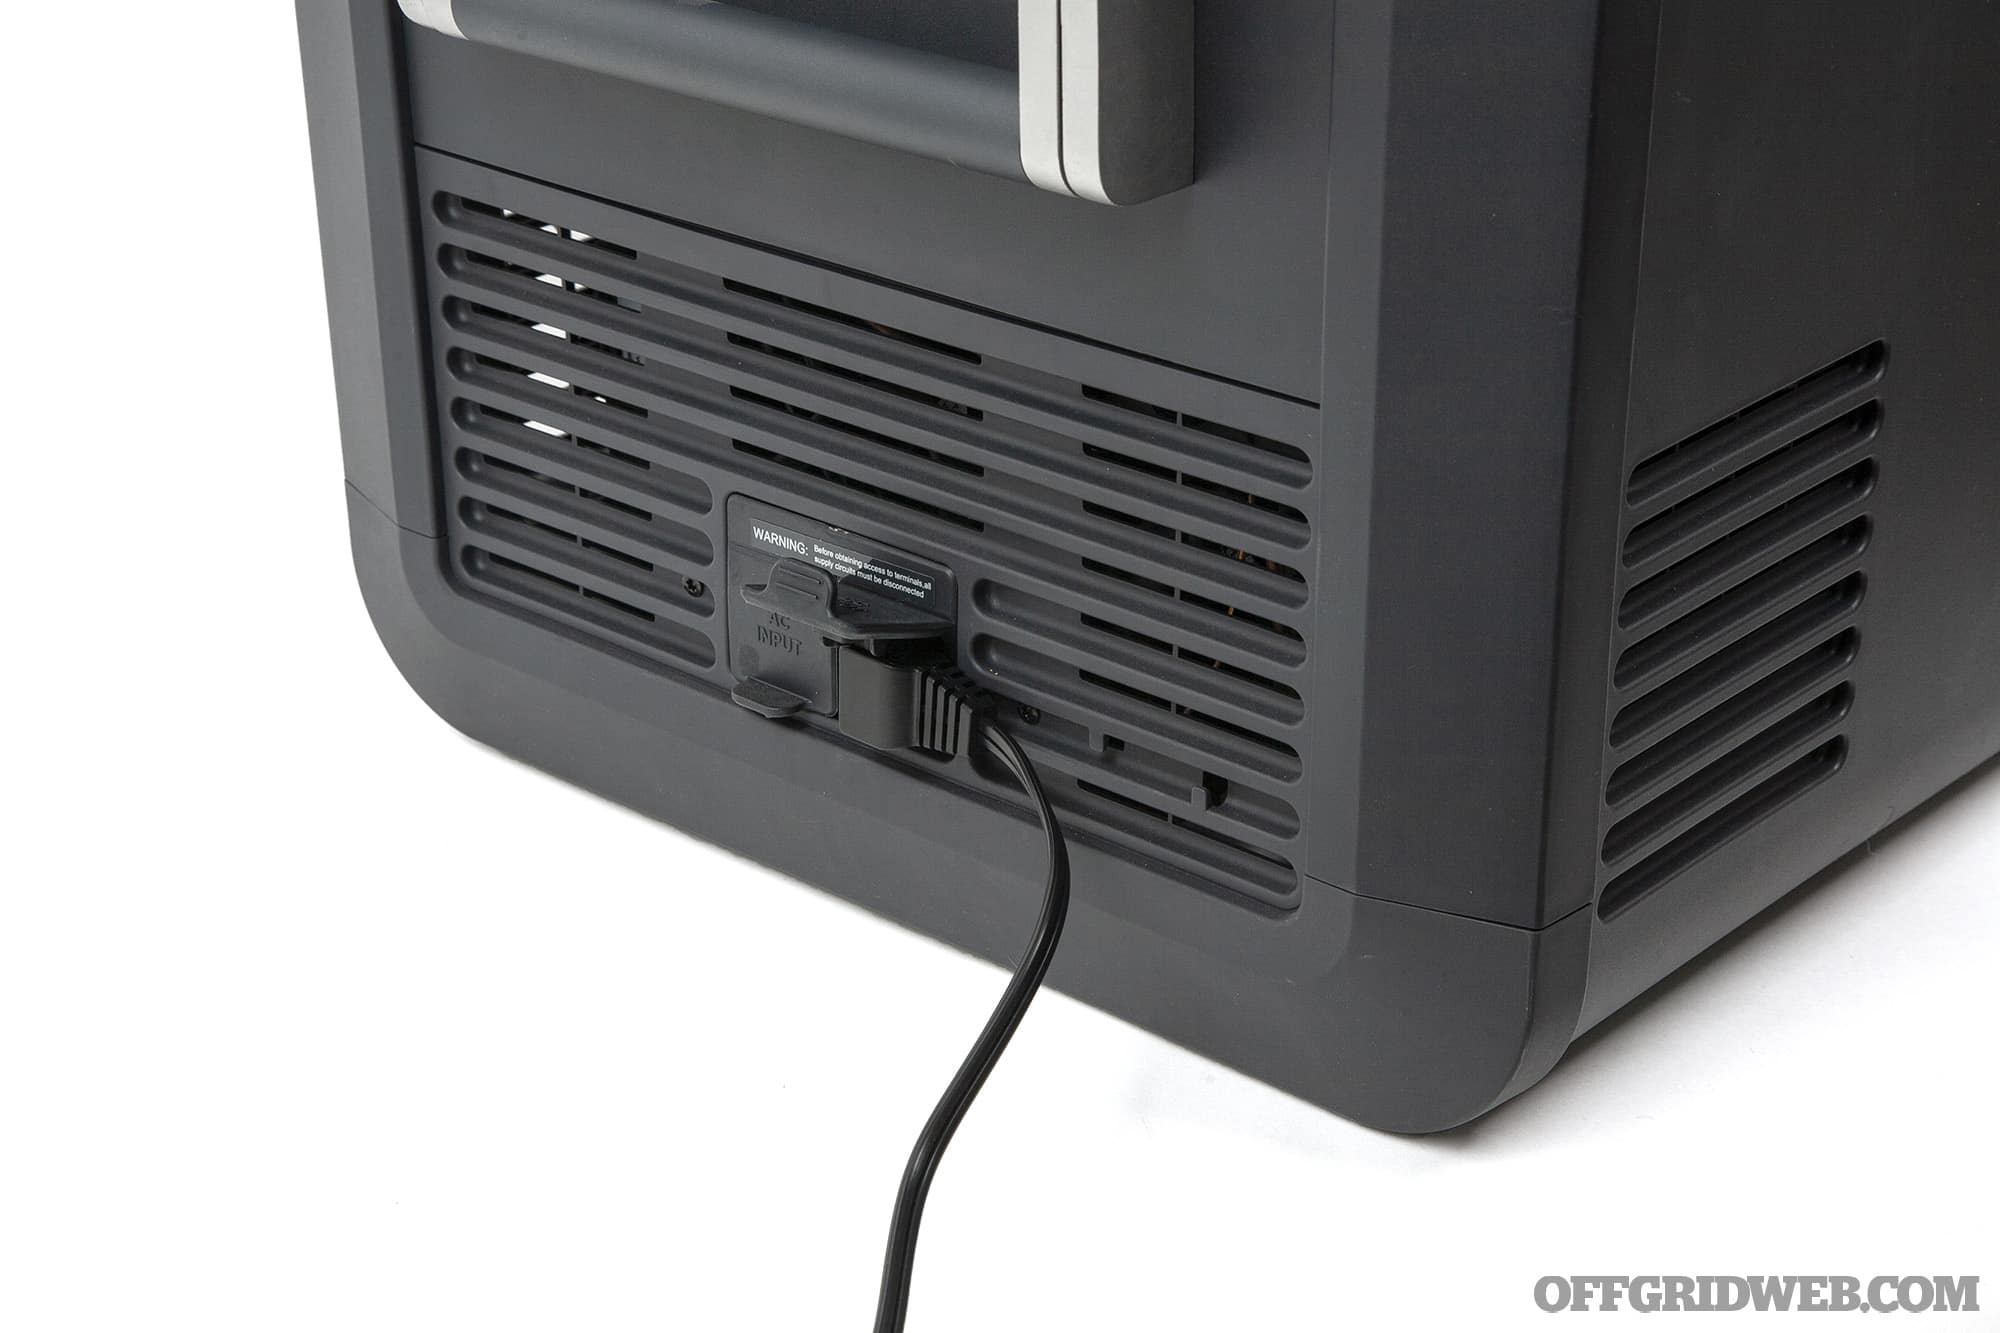
Dometic’s VMSO3 compressor uses standard R134a refrigerant, and can run on either AC power from a wall outlet or 12/24-volt DC power (rated at 8.9 amps) from a cigarette-lighter-style automotive outlet. A pair of 6.6-foot cables are included for each power source. Thanks to a vibration- and noise-reducing housing, the compressor is also surprisingly quiet; it’s rated at 48 dB(A), and I had no trouble sleeping in the 4Runner right next to it.
Above: A drain plug at the bottom of the Dometic CFX3 allows users to wash out the fridge easily.
Unlike residential fridges that get a constant supply of “clean” electricity from the power grid, mobile fridges are designed to run on vehicle alternators, batteries, and solar-powered systems that have much greater voltage fluctuations. The Dometic CFX3 has smart voltage regulation to deal with inconsistent or “dirty” power sources. Its three-stage dynamic battery protection system ensures the fridge will turn off before it fully depletes your truck’s battery — in a worst-case scenario, your food will get warm, but at least you won’t also be stranded. (For deep-draw dual-battery systems, you can limit or disable this safeguard.)
Ice Maker The “IM” in this fridge’s name indicates that it features an ice maker with two removable silicone ice cube trays. When the ice maker is turned on via a menu setting, it’ll produce 50 small cubes of ice in a few hours. It’s just right for a nice cocktail at the end of a long day on the trail.
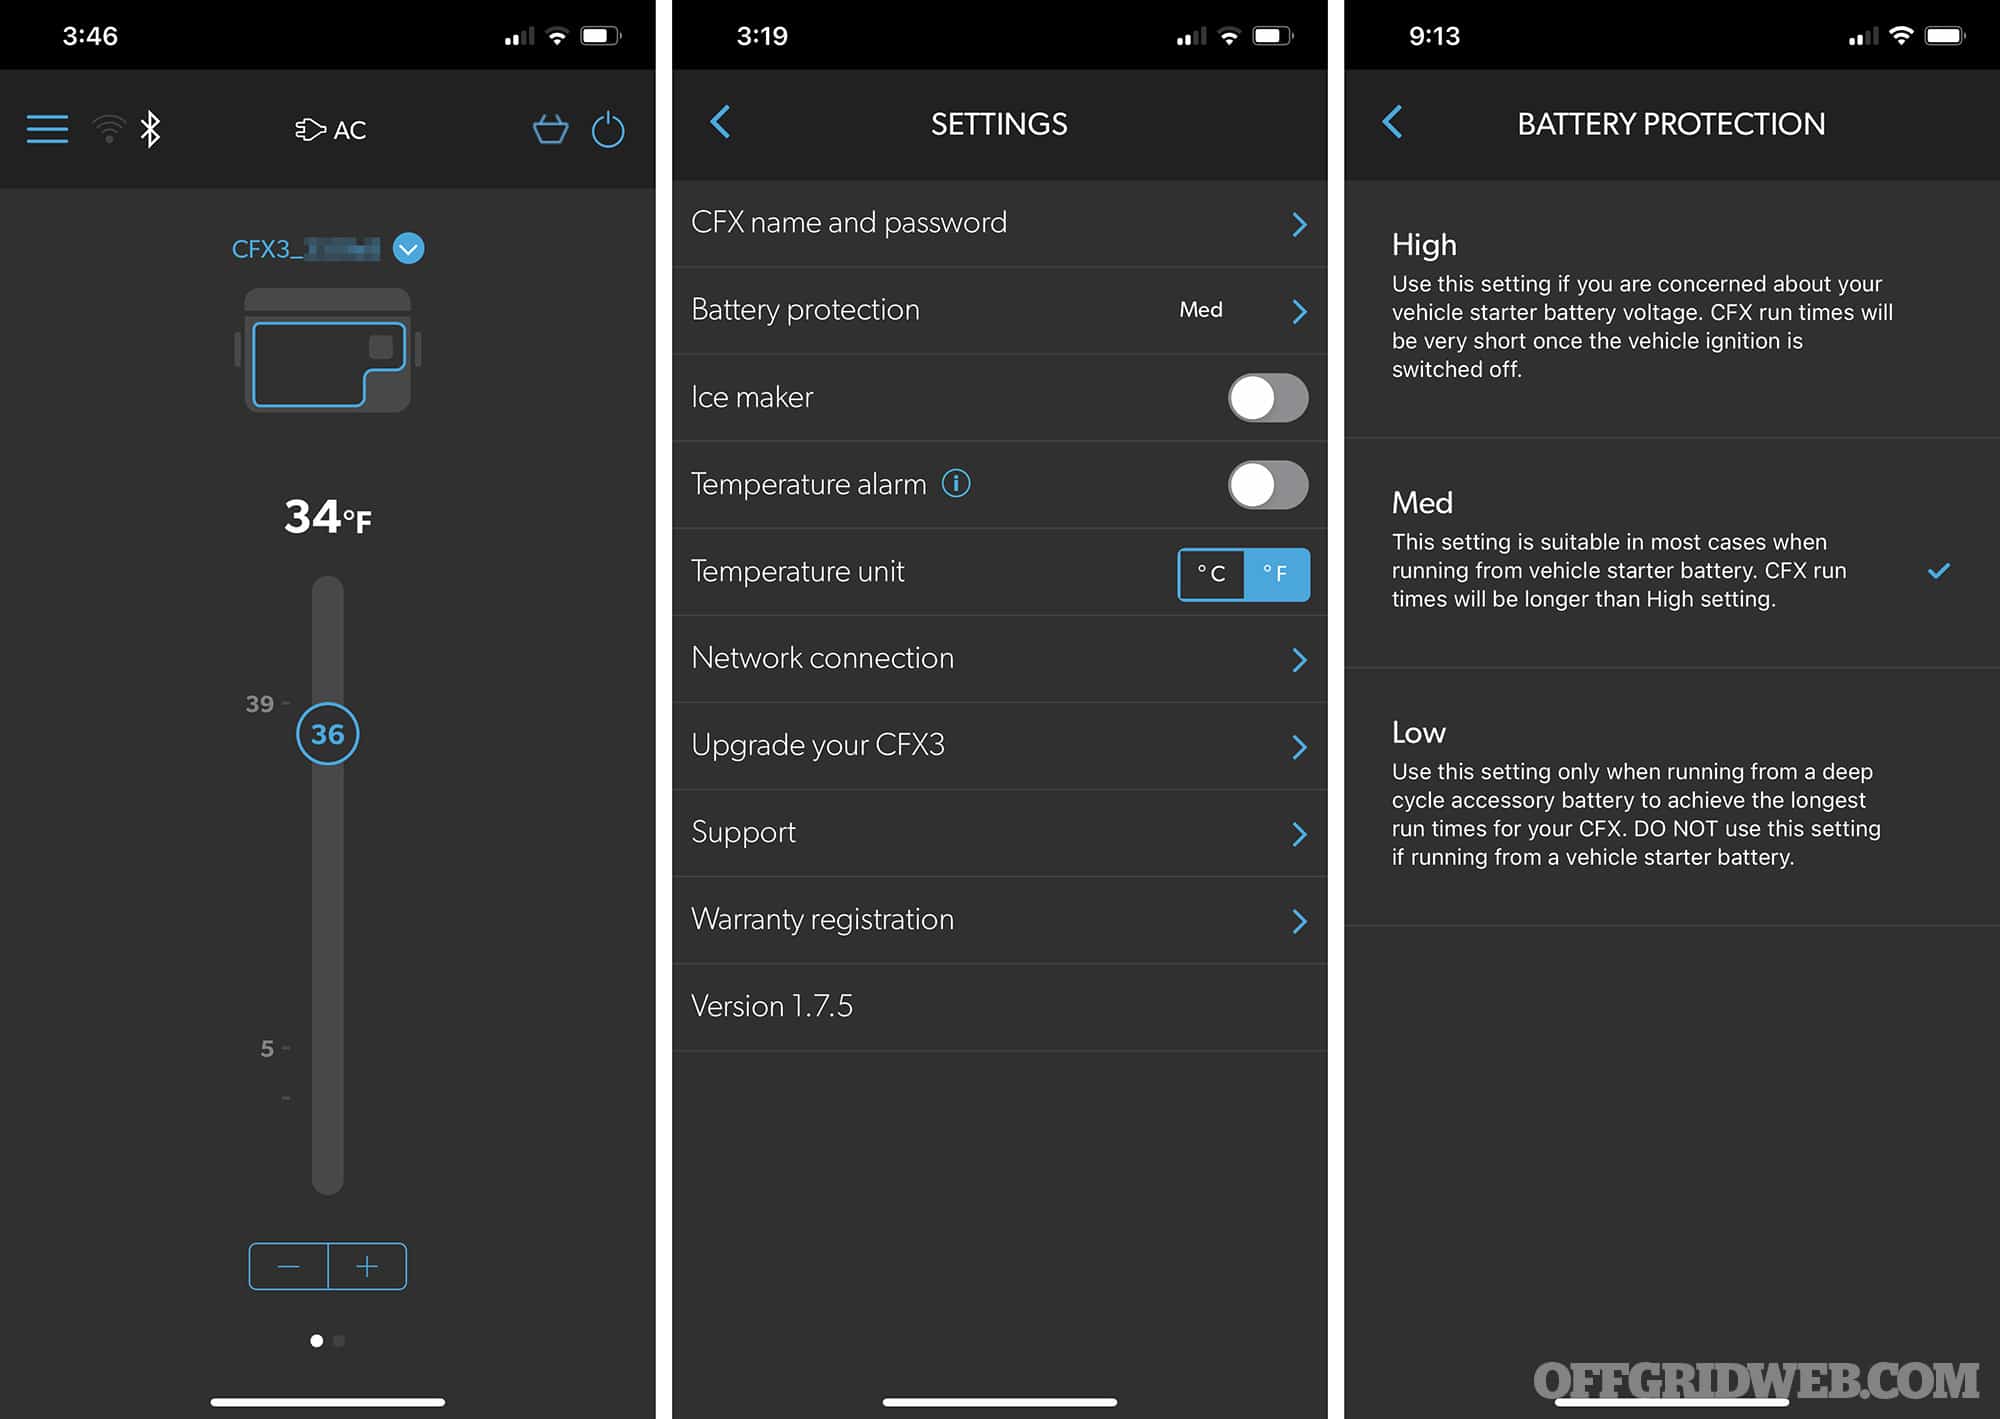
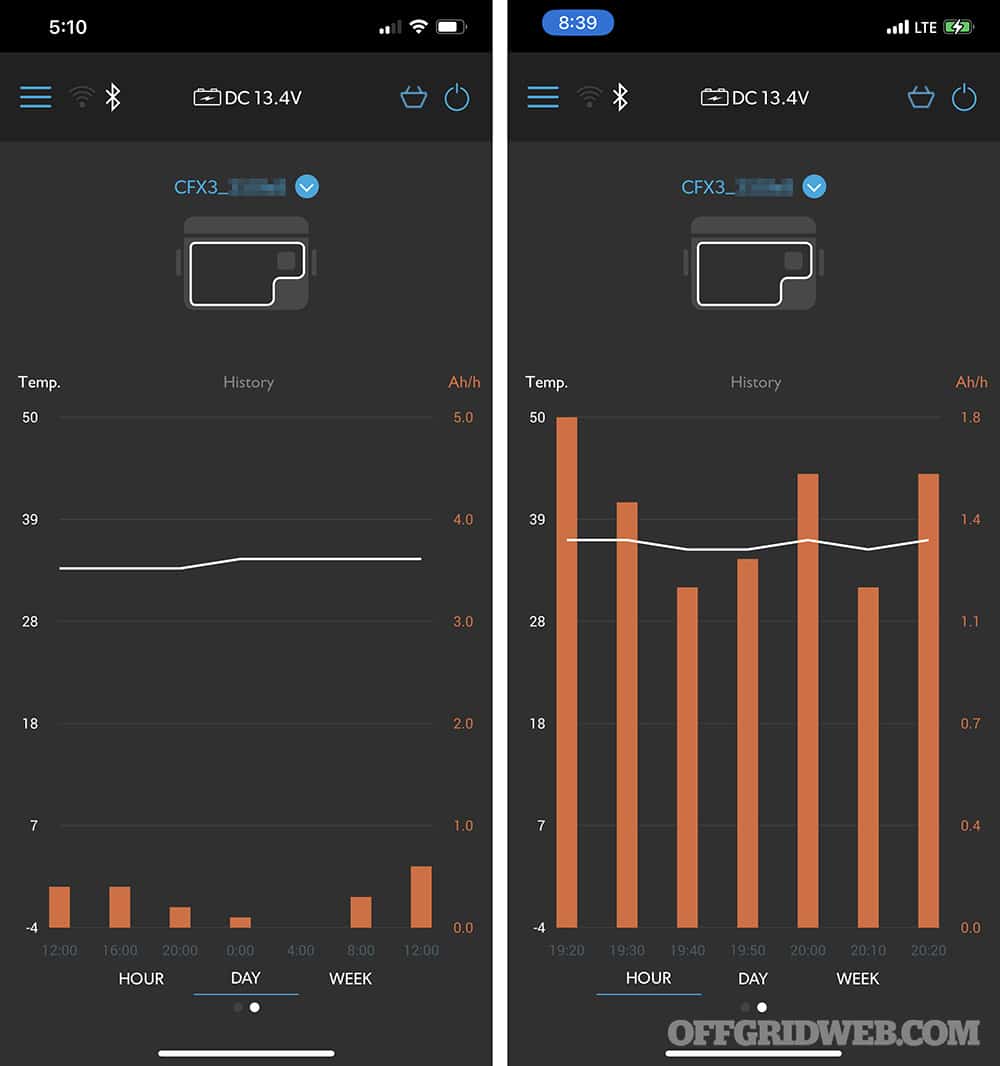
Controls & Monitoring Through the CFX3 mobile app for iOS or Android, users can connect to the fridge over Bluetooth (short range) or over a WiFi network (for remote access). This offers the ability to power the fridge on or off, see current DC voltage, and check temperature history in the last hour, day, or over the course of a week. On this same graph, energy consumption data (in amp hours per hour) is tracked to help you forecast how long the fridge will run under current conditions.
Above: The CFX3 mobile app offers control over all the fridge’s settings, including WiFi network access and battery protection level. If the fridge is connected to an external battery, the Low setting can be used to keep the fridge running until the battery drops to 10.1V, extending run time; Medium shuts off at 11.2V and High shuts off at 11.8V.
It’s possible to set an alarm at a temperature threshold, alerting anyone in the vicinity if the fridge starts warming up due to low battery or ambient conditions. The app can also send a notification if the lid is left open for more than 3 minutes.
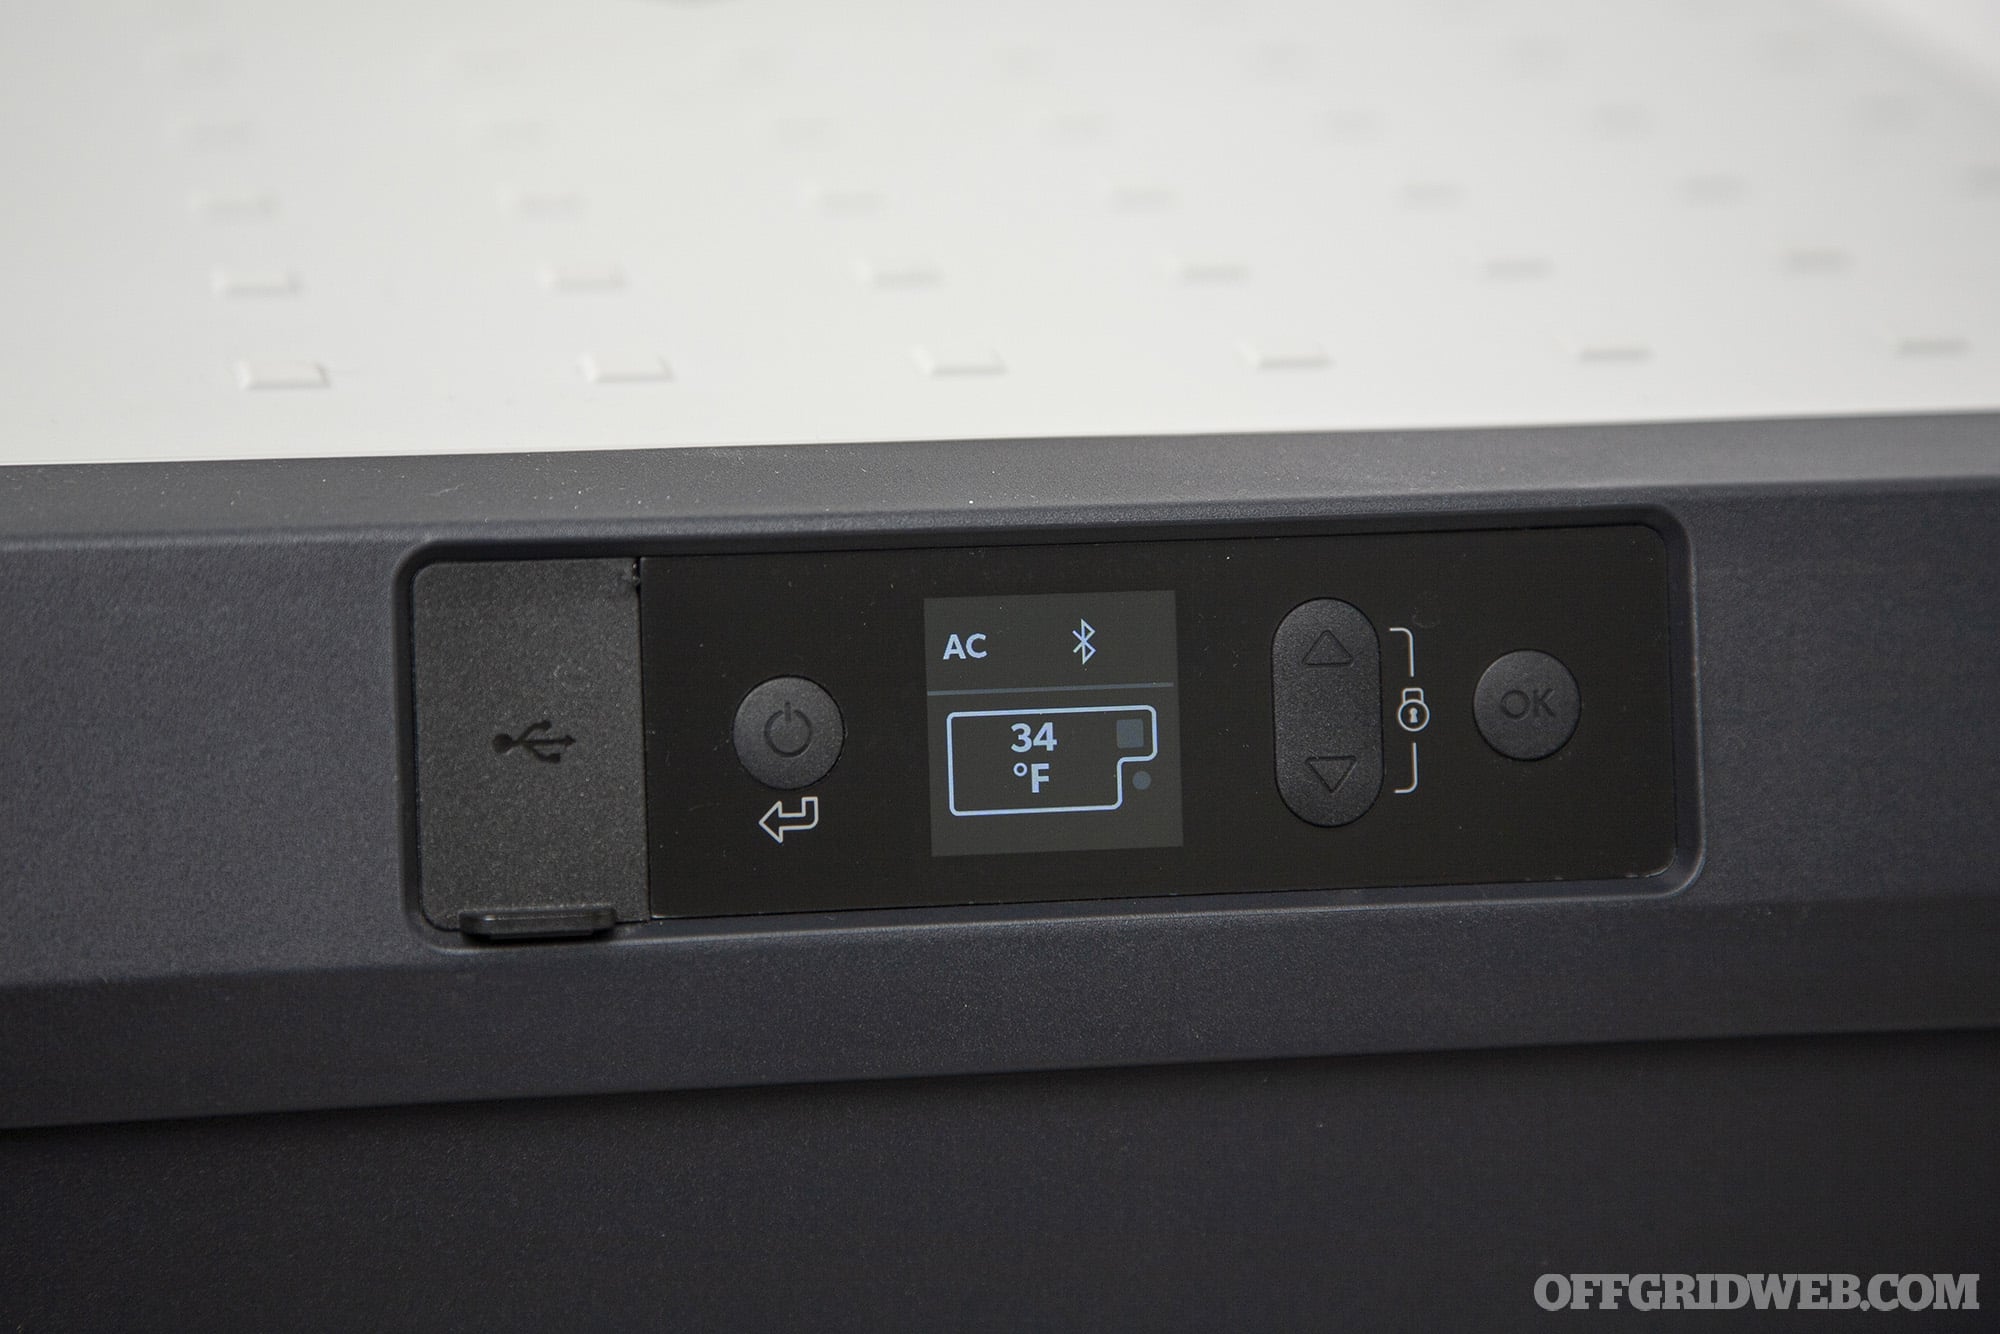
Without the aid of the app, the CFX3’s functions can be controlled through the built-in weatherproof buttons and color display. The display prominently shows input voltage, WiFi and Bluetooth status, current temperature, and any alerts or notifications the user has configured. A setup menu allows the user to turn the ice maker on or off, change temperature units, adjust battery protection level, configure wireless network settings, and more.
An Unpleasant Surprise: Warranty Exchange
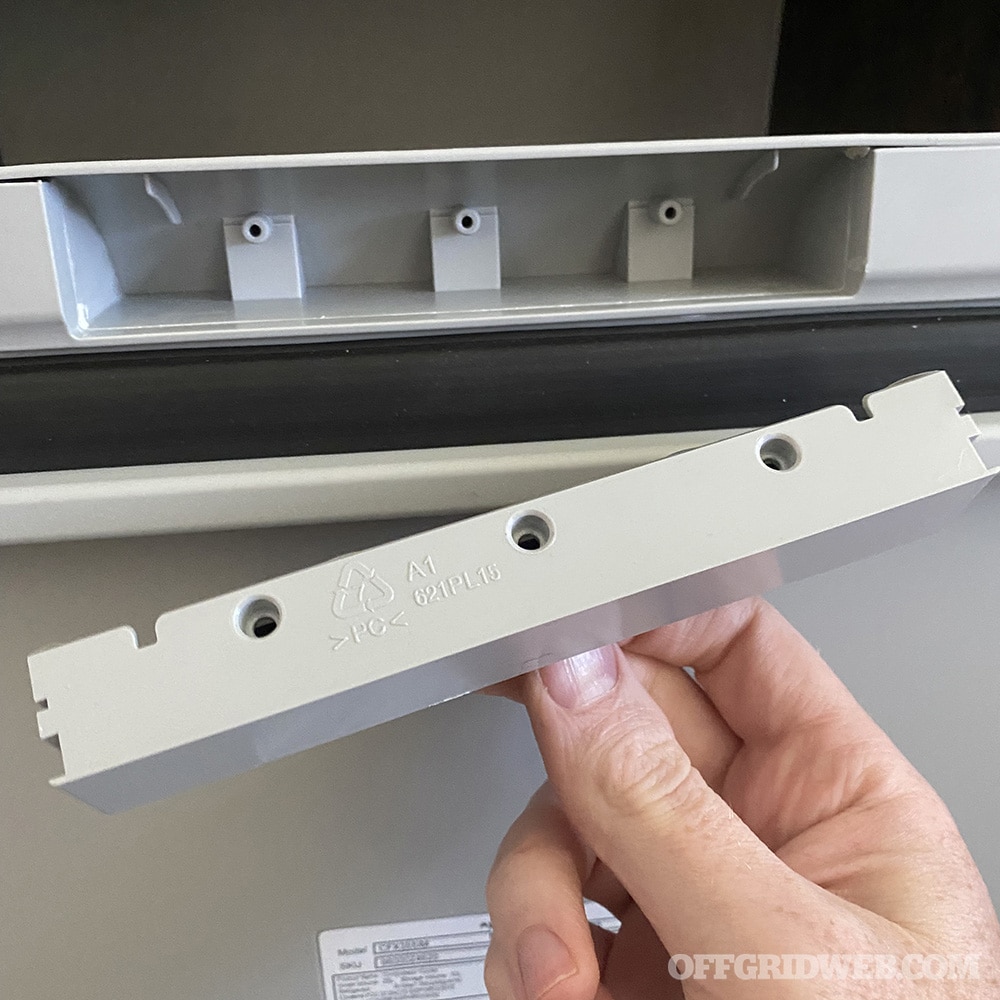
Above: The three screws that were supposed to retain the latch were seemingly never installed at the factory. This was only the beginning of the issues with the first CFX3 I received.
When I received the CFX3 fridge and excitedly removed it from its box, I noticed the latch on the lid seemed crooked. After taking a closer look, I realized all three of the small screws that were supposed to attach it to the lid were missing, and the latch fell out in my hand. I scoured the box, but the screws were nowhere to be found. This was mildly annoying, but I figured I could always ask Dometic to mail me some replacement screws — not the end of the world. But that was only the tip of this iceberg (no pun intended).
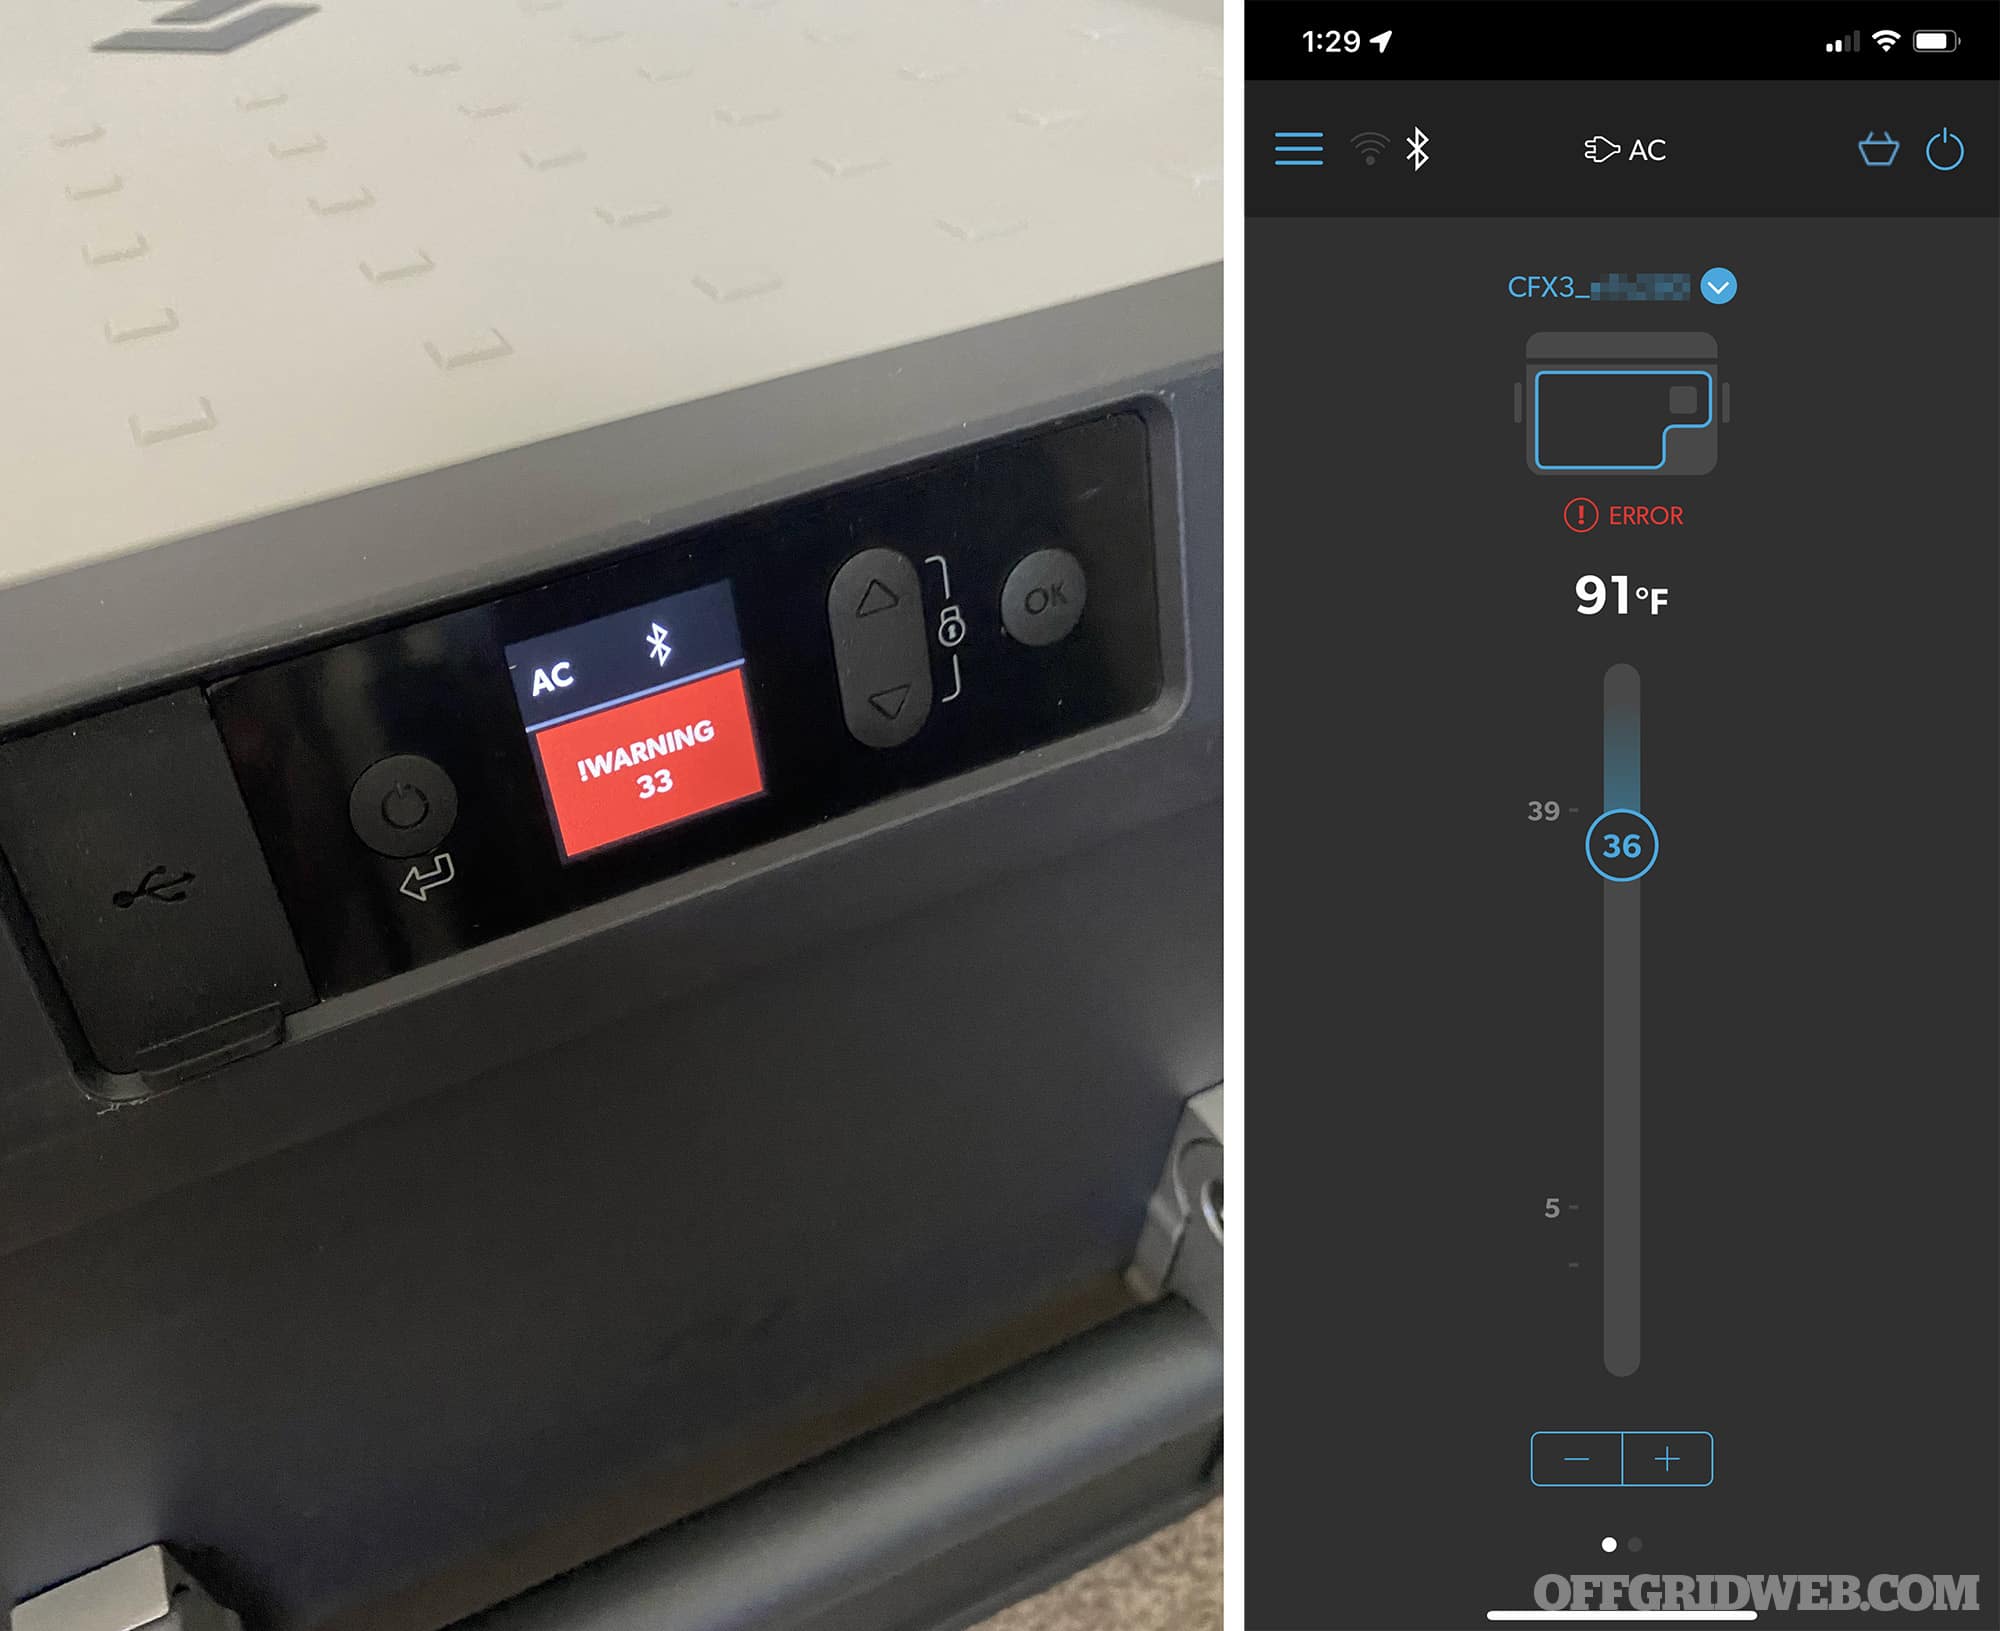
Above: Plugging in the fridge resulted in a bright red error message on the display as well as the mobile app.
As I plugged in the CFX3 fridge for the first time, the screen greeted me with a bright red message: !WARNING 33. After checking the manual, this warning code indicates compressor failure. I followed the instructions and power-cycled the fridge, but this error persisted and the compressor refused to start on AC or DC power. Thinking that this fridge must have been built at 4:50pm on a Friday, I picked up my phone and called Dometic customer service. A helpful and sympathetic young lady listened to my description of the issue and walked me through some troubleshooting steps, but eventually determined that the unit was defective and would need to be exchanged under warranty.
Above: Warning 33 corresponded to a compressor failure. This meant I had received a defective fridge and would need to exchange it under warranty.
Dometic provided an RMA shipping label, and I boxed up the fridge and dropped it off at a local FedEx store. Twenty-seven (yes, 27) days later, I received a replacement CFX3 55IM. Needless to say, this was a frustrating experience and certainly not what I expected from a $1,000 product from a well-known brand. However, this is a sample size of one, and I may have simply been very unlucky.
Thankfully, the replacement fridge had a properly-installed latch and a functional compressor, so I proceeded with testing.
In the Field
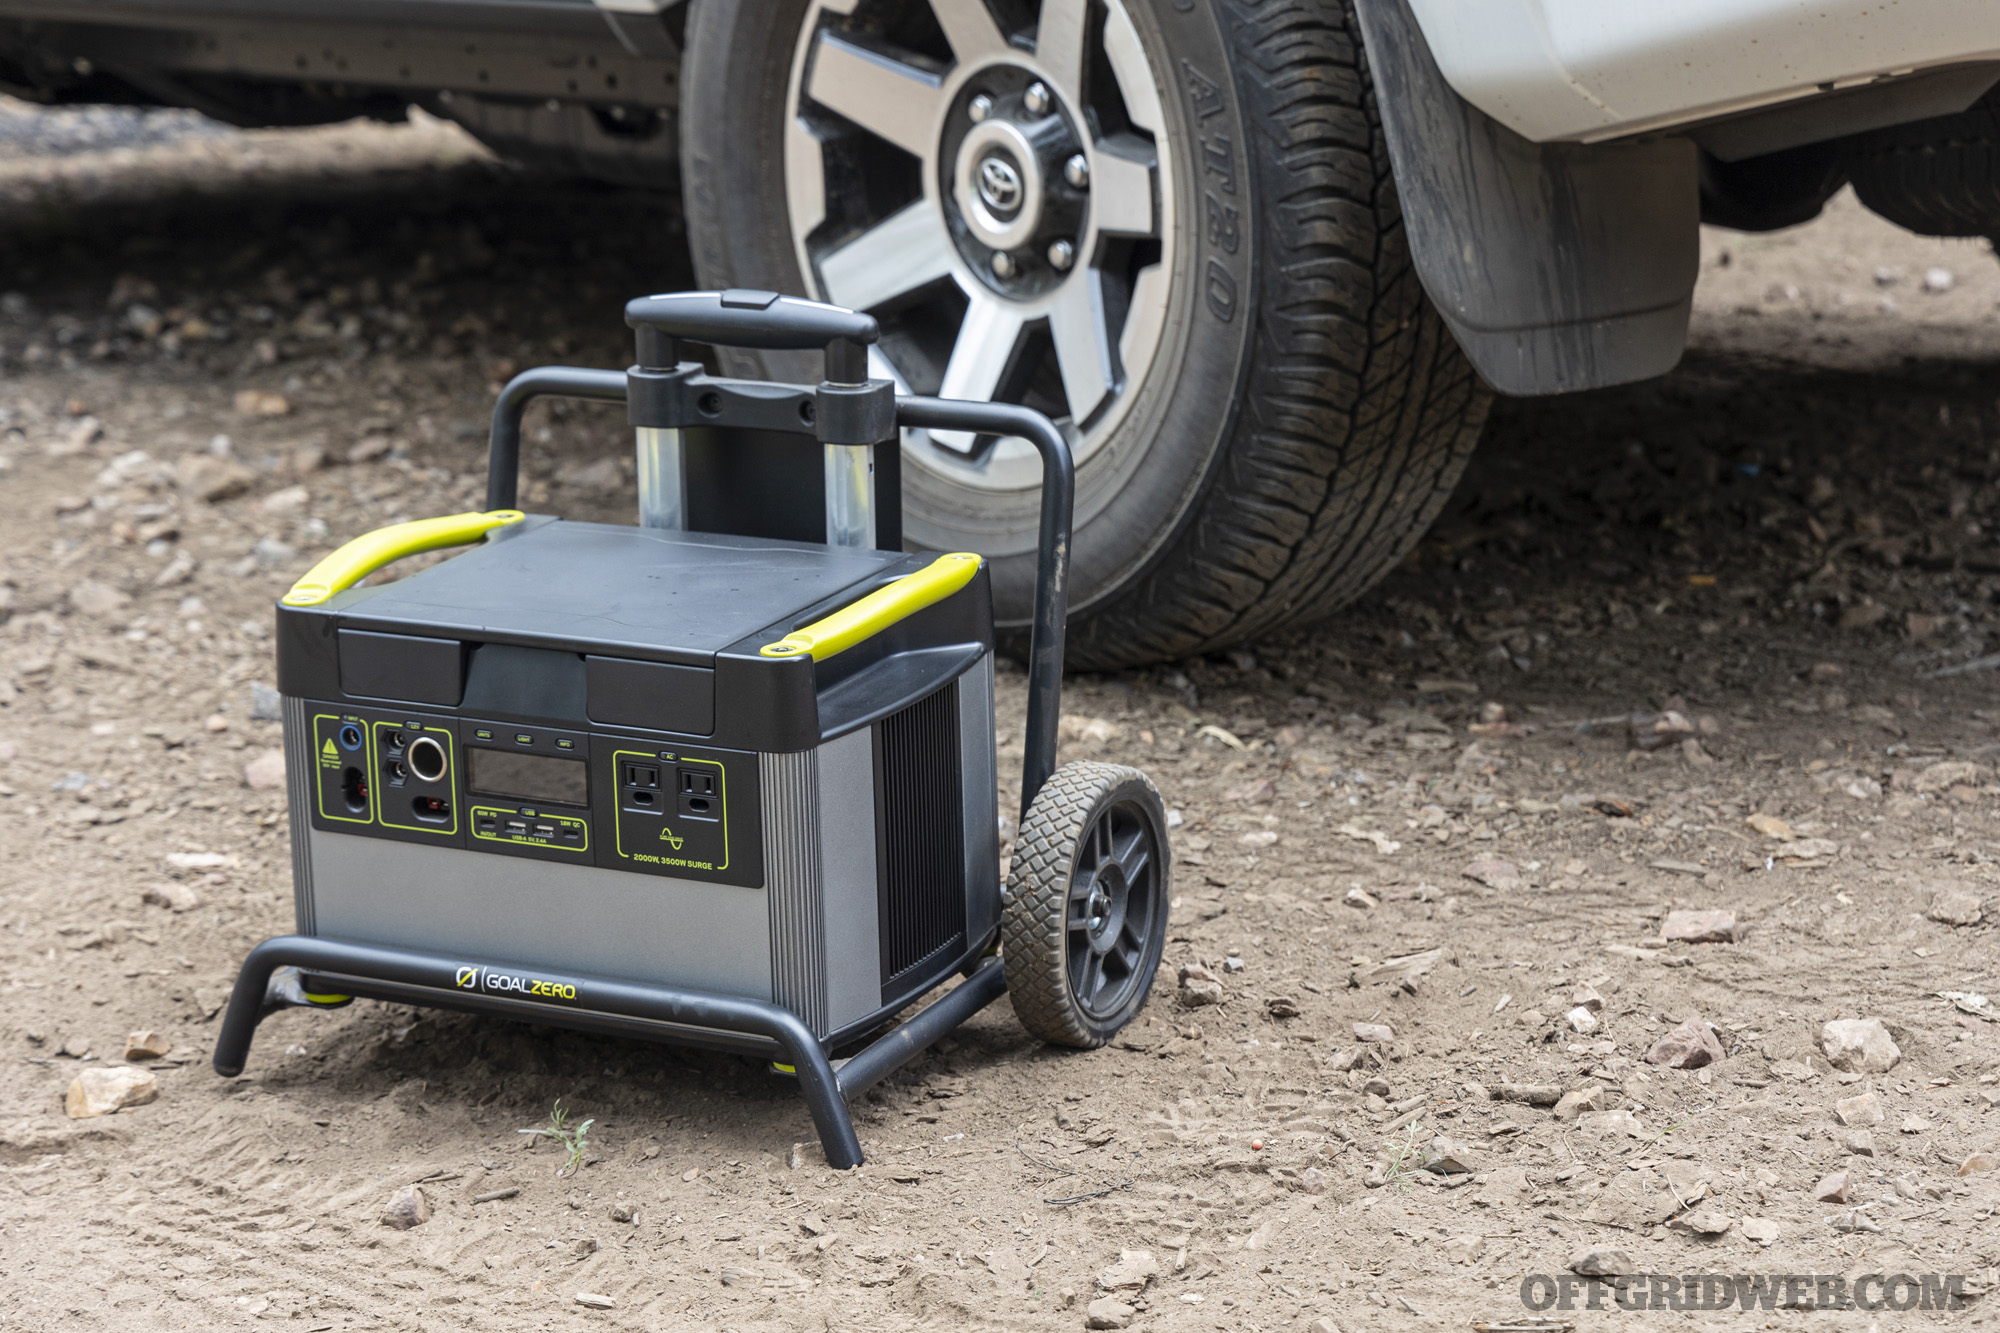
I took my new Dometic CFX3 fridge out on a three-day camping trip for some field testing. Ambient temperatures ranged from about 30°F at night to about 65°F during the day. Before the trip, I plugged the fridge into an AC power outlet at my house to “pre-cool” to my desired setting of 36°F, and then packed it with food. Next, I loaded it into the back of my 4Runner and connected it to the 12V DC plug on the front of my Goal Zero Yeti 1500X power station (as reviewed in Issue 52 of Offgrid). The Yeti was connected via a Yeti 12V car charging cable to a DC plug in the back of the 4Runner. When the truck is running, it charges the power station which provides stable power to the fridge; when the truck isn’t running, the fridge runs solely off the power station’s battery.
Above: The Yeti 1500X provided more than enough power for the fridge, as well as my other electronic devices.
During the trip, the CFX3 mobile app showed a stable internal temperature that only fluctuated up and down slightly as the compressor cycled on and off. The insulation appears quite good, and the latch clicks shut for an air-tight seal. If I’m being picky, it might be a little too tight, since I did have to remind my friends to give the lid an extra firm push to make sure it closed.
Above: Screenshots showing internal temperature and power consumption in 50-degree ambient temperature (left) and 80-degree ambient temperature (right). Note that the Ah/h graph scale is not consistent between the two screenshots; don’t pay attention to the height of the bars, only to the numbers they indicate.
My Yeti 1500X battery has a rated capacity of 1,516 watt hours, or 140.4 amp hours (Ah) at 10.8 volts. At a full 12V, that works out to 126Ah. During the trip, power draw hovered around 0.5Ah per hour on average, which equates to a total of 36Ah over the course of the 72-hour test.
In simpler terms, the fridge used a little less than 30% of the power station’s capacity in three days (about 10% per day).
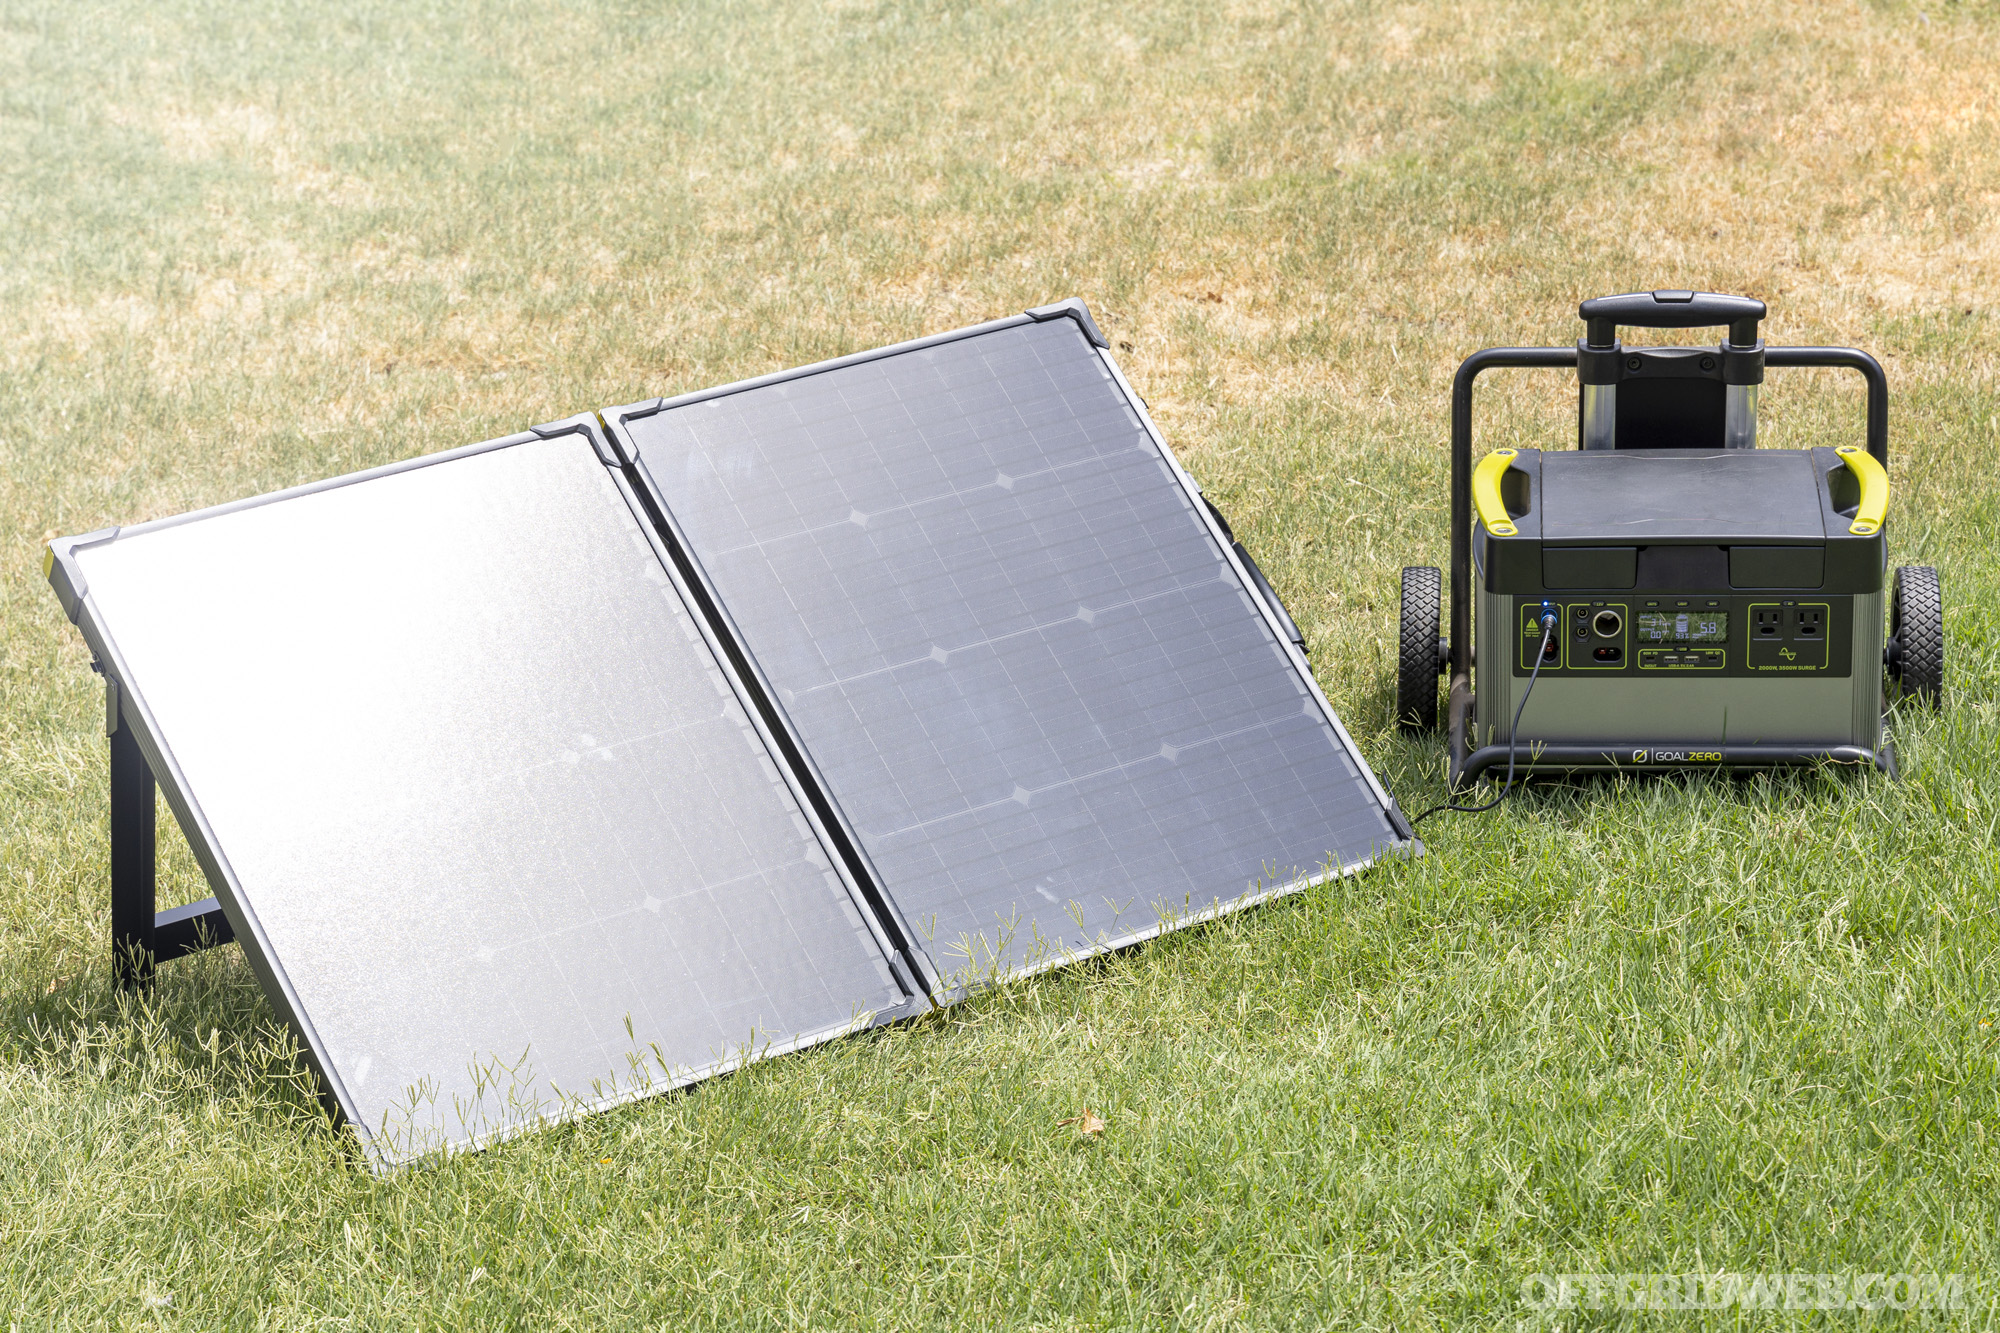
Above: In long-term off-grid settings, a solar panel can be used to recharge the Goal Zero Yeti during the daytime.
Granted, the cool to cold weather was ideal for this test. Later, I tested the CFX3 in 80-degree ambient temperatures, and it consumed about 1.4Ah per hour on average. Under these warm conditions, it will use roughly 72% of the Yeti 1500X’s battery in three days (about 24% per day). Keep in mind that opening the lid frequently will increase energy consumption. These run times may also be extended by changing the fridge’s battery protection mode to allow lower minimum voltage.
Regardless of the weather, I should have no trouble at all running the CFX3 fridge for several days on the Goal Zero battery without needing to start the truck’s engine or plug in a solar panel.
Closing Thoughts
Despite my frustration towards the defective unit I initially received and the delay in receiving a replacement, my experience with the CFX3 fridge improved dramatically once I got one that wasn’t a dud. The fridge feels sturdy and durable, fits nicely into the back of my 4Runner, and has tons of space for food and drinks. I loaded it with bacon, eggs, hash browns, and salsa for breakfast burritos, plus cream for the coffee I made in my JetBoil each morning. It held cold cuts, sliced cheese, and condiments for sandwiches at lunchtime. For dinner, we had more steaks, burger patties, and brats than we could eat. All that barely put a dent in the cavernous capacity of the CFX3 55IM — it’s amazing how much room you have for food when your cooler isn’t half full of ice.
I was pleasantly surprised by how quiet and energy-efficient the CFX3 was in the field. My Yeti battery had no trouble running it for several days, and should be able to manage a week of typical use in cool weather. And the ice maker, while not necessary, is an added luxury that impresses everyone when you’re 50 miles from civilization.
Any time it’s not sitting in my vehicle, I keep this fridge plugged in to the wall in my “man cave” as a mini-fridge for drinks. There’s also an emergency preparedness value to consider — if the power goes out due to a storm, I can load perishable items from my home fridge into the Dometic and run it off battery power. The food doesn’t spoil and the day is saved. Keep that one in mind in case you need to convince your spouse that your $1,000 fridge isn’t just for keeping beer cold.
For more information on the Dometic CFX3, go to Dometic.com.
Mounting the right optic to your firearm is one of the most important modifications you can make. When it comes to targets way out in the distance, a magnified optic can make shooting precisely much easier. The Sightron S1 4-12×40 G2 is waterproof, shockproof, and fogproof and will have you on target in no time. It features a variable magnification range of 4x to 12x, and a 40mm objective lens that provides a wide field of view. The multi-coated optics deliver bright and clear images even in low-light conditions. Built to withstand the recoil of most rifles, it features a nitrogen charged, O-ring sealed one-piece main tube constructed from aircraft-grade aluminum. With several reticle options available and 1/4 MOA adjustments, it can be fine-tuned to handle long-range tasks.
Looking for a modern twist on a medieval gauntlet? These gloves were designed to keep your knuckles from busting, while still being agile enough to thread a needle. Wiley X Durtac gloves are a type of tactical gloves designed for use in several outdoor and work environments. They’re constructed with durable leather and nylon, providing a high level of protection while still allowing for dexterity and flexibility. Knuckle protectors and reinforced fingertips add additional protection in high-impact areas. The gloves also feature a soft, synthetic leather palm for a secure grip and a hook-and-loop wrist closure for a snug fit. Designed to withstand harsh conditions, the gloves are ideal for anyone who routinely abuses their hands, such as law enforcement, military, construction, and industrial work.
Designed with a feminine fit, which contours to the body for maximum mobility and comfort, the Sitka Women’s Jetstream Jacket is a high-performance hunting jacket designed specifically for the ladies. It’s made from GORE-Windstopper fabric, which is both waterproof and breathable, keeping the wearer dry and comfortable in a wide range of weather conditions. Featuring recycled polyester fabric with polyester micro-grid fleece interior, a synthetic insulation material that’s both lightweight and warm, the Jetstream reduces bulk without diminishing the heat. Equipped with various pockets, including chest and hand pockets, the Jetstream provides ample storage space for hunting essentials. Pit-zips increase airflow when you’re on the move, reducing moisture buildup from perspiration. With a multitude of colors and patterns to choose from, the Women’s Jetstream Jacket is suitable for any hunting season and weather conditions.
COLORS
Elevated II, Laurel, Lead, Mud, Optifade Subalpine, Sitka Black
Easily one of the most overlooked EDC items, the right light will allow one to navigate when the lights go out or even temporarily disorient an assailant. Streamlight’s ProTac 2.0 is a compact, high-performance flashlight designed for use in a wide range of applications. It features a high-powered LED that provides up to 2,000 lumens of light output, with a beam distance of up to 262 meters. Powered by the Streamlight SL-B50 protected Li-Ion USB rechargeable battery pack and has a maximum runtime of up to 25 hours on low and up to 2.5 hours on high. The ProTac 2.0 features a multi-function push-button tail switch that allows for easy operation even with gloves on and has three different operating modes: high, low, and strobe. Constructed with 6000 series machined aluminum and coated Type II MIL-Spec anodized finish, it’s impact-resistant and waterproof. Compact, lightweight, and easy to carry, it’s perfect for hunting, camping, security, and other outdoor activities.
Way back when farming and food preservation was how most of civilization survived, people lived by the old saying “waste not, want not.” As inflation rises and food becomes more precious, finding ways to preserve the food we have before it goes bad is increasingly important. Fortunately, dehydration is the most simplistic way of keeping food around for a long time, and Chard provides an elegant tool to do just that. The 8 Tray Stainless Steel Digital Dehydrator is designed to dry fruits, vegetables, meat, herbs, and more. It has eight spacious trays with a total drying space of about 9 square feet, allowing you to dry large quantities of food at once. Equipped with a digital thermostat and timer, the dehydrator allows you to set the temperature and time for optimal drying results. The temperature range can be adjusted between 95 and 176 degrees F, allowing you to dry a wide variety of foods. Its clear tempered glass door lets you monitor the progress of your food without having to open the door and interrupt the drying process.
One of the biggest complaints about women’s pants and leggings is the deliberate lack of functionality. Varusteleka has developed a solution by designing leggings that offer more than comfort. The Särmä Adventure Leggings are a versatile and durable outdoor clothing item designed for rugged adventures and demanding activities. Made from a high-quality, abrasion-resistant fabric that’s both breathable and quick-drying, the leggings are comfortable to wear and easy to care for. Featuring multiple pockets, including thigh pockets for storage of essentials, a hidden key pocket, and belt loops for accessory clips, these leggings have plenty of storage space. Reinforced knees and seat for added durability will keep unseemly holes from wearing through the fabric. The waistband is adjustable, and the belt loops allow for a multitude of belt types, further increasing its versatility. These are a great choice for anyone looking for something more than gym or casual wear.
Even more important than a steady supply of food is a source of clean drinking water. And being able to filter water isn’t relegated to backcountry hikers and survivalists. If the power goes out and the water in your home stops flowing or there’s a contaminated municipal water supply, having a filter as a backup could turn a serious crisis into a mild inconvenience. The Sawyer One Gallon Gravity Water Filter is a portable water filtration system that utilizes gravity to filter water from sources such as lakes, rivers, streams, or even a faucet. It includes a 1-gallon water bag, a dual-threaded mini filter, and a cleaning plunger. The filter is capable of removing 99.99999 percent of all bacteria, such as salmonella, cholera, and E.coli, and 99.9999 percent of all protozoa, such as giardia and cryptosporidium. The filter is also incredibly easy to use; just fill the bag with water, hang it, and allow the water to pass through the filter into a container or hydration system below. It’s also easy to maintain, with the included cleaning plunger allowing for easy cleaning and prolonging the life of the filter. The Sawyer One Gallon Gravity Water Filter is a reliable and efficient way to filter large amounts of water for outdoor activities such as camping, hiking, and backpacking.
Footwear is literally the point where your own rubber meets the road, and what you choose to keep your feet in optimal condition matters. The Deckers X Lab G8 Boot is a high-performance boot designed for extreme outdoor activities such as hiking, backpacking, and mountaineering. In case you military folks were wondering, it’s AR670-1 compliant. Its fully lined upper with spacer mesh makes it breathable while keeping feet dry and allowing moisture to escape. The boot is designed to provide excellent stability and support, thanks to its lightweight Vibram outsole and high rebound PU midsole. The outsole is also designed to provide a good grip on various terrains, making it suitable for use in rugged environments. The G8 has a traditional lace-up design that allows for a customized and secure fit, and weighing in at 2.5 pounds, it won’t bog you down when a situation calls for speed and agility.
Helle Knives is a brand that has specialized in the fusion of beauty and functionality for three generations, and every blade they make follows in that tradition. The Nord, a traditional, fixed-blade knife, is a potent work of art crafted by this intrepid Norwegian company. Designed for outdoor use, such as hunting and camping, it features a 5.79-inch Sandvik 14C28N stainless steel blade that’s both strong and sharp. The wooden handle is made from stabilized curly birch and is designed to fit comfortably in the hand, providing a secure grip even in wet conditions. Each sheath that the Nord comes with is made from traditional leather and provides a belt loop for easy carrying. Polished to a near mirror finish and sharpened with a Scandi grind, it’s an elegant and practical tool that’s built to last.
Have you ever watched a movie of the Red Dawn variety and wondered to yourself, What would it be like if that actually happened? Well, wonder no more, because Rip Rawlings has wargamed a similar scenario that’s perfectly plausible and entertaining to boot. The Kill Box is Rawling’s second installment of a series that follows protagonist Tyce Asher, a Marine Corps combat veteran, on his relentless campaign to resist a Russian incursion on the American continent. As a Marine Corps infantry and Reconnaissance Officer with over 23 years of active-duty service, Lieutenant Colonel Hunter Ripley “Rip” Rawlings IV is able to infuse his writing with a vast amount of personal experience. Running the gamut between tense calm to explosive action, this series is sure to have you on the edge of your seat wanting more. Better yet, it might even get you thinking about what you might do in that situation.
As remote and hybrid work becomes increasingly popular, the need for a portable office is also on the rise. The Helinox Tactical Field Office is a versatile piece of outdoor gear designed for use in various outdoor activities such as camping, hunting, and military or emergency management operations. It’s a lightweight and compact table that can be set up and taken down easily, making it easy to grab from a vehicle or carry to a more remote location. The Tactical Field Office also features built-in organizers that include a large inner storage pocket, MOLLE loops, and tie-down points, allowing you to keep your gear organized and easily accessible. Compatible with other Helinox gear, such as chairs and cots, it’s easy to create a complete camping or hunting setup. Others have even used it for a mobile triage station, but it could also be a great way to move an office to the beach.
Not all optics are created equal, and it’s tough to find serious viewing power in smaller models. But ZeroTech has created some binos that are impressive in both capabilities and in price. Designed to withstand the harsh conditions of the Australian Outback, Thrive HD 8×25 binoculars are a high-performance set of binoculars that are both shock-resistant and waterproof. Featuring a compact and lightweight design, they’re easy to carry and handle without feeling like they are getting in the way. The HD’s comfortable and ergonomic design, rubber lens covers, and a center focus knob allow for easy and precise adjustments. The binos also come with a carrying case and neck strap for easy transport and storage. Equipped with multi-coated HD lenses, the Thrive HD provides a sharp and clear image, even in low light conditions. They have a magnification of 8x and an objective lens of 25mm, making them perfect for a wide range of applications.
Most of the training events we cover in this column are courses on how to shoot — whether it’s long-range shots with rifles, fast strings with pistols, or how to manage the oft-intimidating self-defense shotgun. This one is a little different. Last summer, we had the opportunity to attend two lectures put on by career LEO and firearms trainer John Hearne. Hearne has dedicated a significant amount of time to high-level academic research in some topics that may, at first glance, sound dry to the average shooter. These were full-day lectures, with zero range time and a lot of very in-depth technical and historical discussion. We don’t say any of this to dissuade you from his courses. On the contrary, we highly recommend you attend any of his lectures if you ever have the chance. The first was Who Wins, Who Loses, and Why — an in-depth look at a range of factors pertaining to how human beings are biologically programmed to react under life-threatening stress, and how to build effective training programs around those factors. The second was Defeating Violent Criminals, which focused on some historical case studies of the worst-of-the-worst bad guys, and how much a motivated criminal can accomplish when they apply their nefarious worldview and skillset.
Who Wins, Who Loses, & Why
In Who Wins, Who Loses … Hearne starts by peeling back the surface layers of some commonly overused training tropes. For example, many self-defense courses touch on the concept of the “fight, flight, or freeze” response. Almost none of those courses discuss how or why this decision-matrix is hardwired into the most primitive part of our brains. He goes on to explain that, in caveman days, man’s greatest threats-to-life were large natural predators: think lions, tigers, or woolly mammoths. Most of these creatures have vision-processing patterns based on movement, since they’re wired to chase fleeing prey animals like deer or antelope. So, in ancient times, freezing in the face of a perceived threat made a lot of sense. This evolutionary understanding can also explain phenomenon like auditory exclusion. If you have to fight off a massive four-legged animal with a spear, do you need acute auditory input to win that fight? No. This deep-set biological wiring is why, even today, soldiers or LEOs report having no recollection of hearing anything during a gunfight — because that neural processing power is re-routed to things like increasing blood flow to major muscle groups for fighting or fleeing. Likewise, tunnel vision is a side-effect of evolution being optimized for one-on-one encounters with a large predator on the plains, as opposed to squad-based movement in a 360-degree urban environment. This layered understanding of why the human body responds the way it does led to perhaps our single biggest revelation of the course, succinctly worded by Hearne as follows:
“The shift of an opponent from a rational response to an emotional one is arguably the most important point in human conflict. The fighter who can push his opponent to an emotional response while remaining in a rational response has the greatest probability of winning.”
This quote puts a much sharper biological point on why the famed OODA loop is so important to prevailing in interpersonal violence.
Defeating Violent Criminals
Defeating Violent Criminals is a crash course in the darkest parts of the human psyche. Hearne uses two main historical case studies to convey these lessons: the Newhall Incident of 1970, and the Miami FBI shootout of 1986. These are both high-profile incidents with wide pop-culture recognition and mountains of available background information, which makes them great teaching tools.
The rest of the course covers both Newhall and Miami in painstaking and immersive detail, focusing deeply on the human aspects of the perpetrators and officers involved. At various points, Hearne includes information from their childhoods, criminal or LE careers, accounts from family members and (un)professional resumes over the span of their respective lifetimes. He points out a disturbing but documentable pattern of these personality types operating in pairs or small groups to commit the most heinous of crimes. Newhall, Miami, North Hollywood, the Toybox Killers, the Murder Mac van killers, the Manson family … some of the most infamous crimes in history, all of which include teams of like-minded murderers who managed to find each other and team up to increase the magnitude of their crimes. Coming face-to-face with such a team may be one of the lowest-probability survival scenarios, but it carries one of the highest levels of danger for the intended victim — which, in our opinion, makes it an incredibly important scenario to prepare for.
Final Thoughts
We were immensely impressed with both the thorough research put into these courses, as well as Hearne’s low-key, approachable, and conversational presentation style. The availability of these courses is tragically sparse, but we hope to see his teaching tempo increase in the future, and look forward to bringing you some more content by and about him in coming issues.
Mix a mechanical engineer who used to design equipment for the military, with unquenchable passion for exploring wilderness, and you get: Outdoor Element, a company that specializes in unique and innovative outdoor gear. Each of their items comes with loads of versatility baked into their design, and here we are taking a closer look at their range of patented Multitool Firebiners.
What is a Firebiner?
A Firebiner is a variation of the commonly used carabiner. Carabiners come in a wide range of styles and load bearing capabilities, and are a commonly used piece of gear for many outdoor enthusiasts. From high-angle technical rope, to keeping a canteen in a handy position, there are endless uses for this simple item. But for one of Outdoor Element’s founders, Mike Mojica, the carabiner just wasn’t versatile enough. Multitools are often used as a common EDC item, so he decided to take carabiners to the next level by cleverly building a plethora of useful tools into the design. There are several models of Firebiner, and many colors to choose from.
For those of you ultralight hikers or campers meticulously weighing everything you carry, the original Firebiner weighs a mere ounce, and comes equipped with: a flathead screwdriver, bottle opener, utility blade, hang slots and has a 100lb carrying capacity.
Firebiner Variants
The Fire Escape Multitool Firebiner is much like the original but with a little more beef. This one has a dedicated seatbelt cutter, a tungsten carbide window breaker, an oxygen tank wrench, and can carry a load of 125lbs. Every style of Firebiner lives up to its namesake by having a built in EverSpark wheel that throws a directional stream of ferrocerium sparks on to the tinder of your choice. Engraved near the EverSpark wheel is an arrow which indicates which direction to spin the wheel. This arrow can also be used as an aiming tool by aligning the tip of the arrow towards the tinder you are looking to ignite. Being able to aim the stream of sparks is especially useful if time is a factor, or if the surrounding area is susceptible to unintentional combustion.
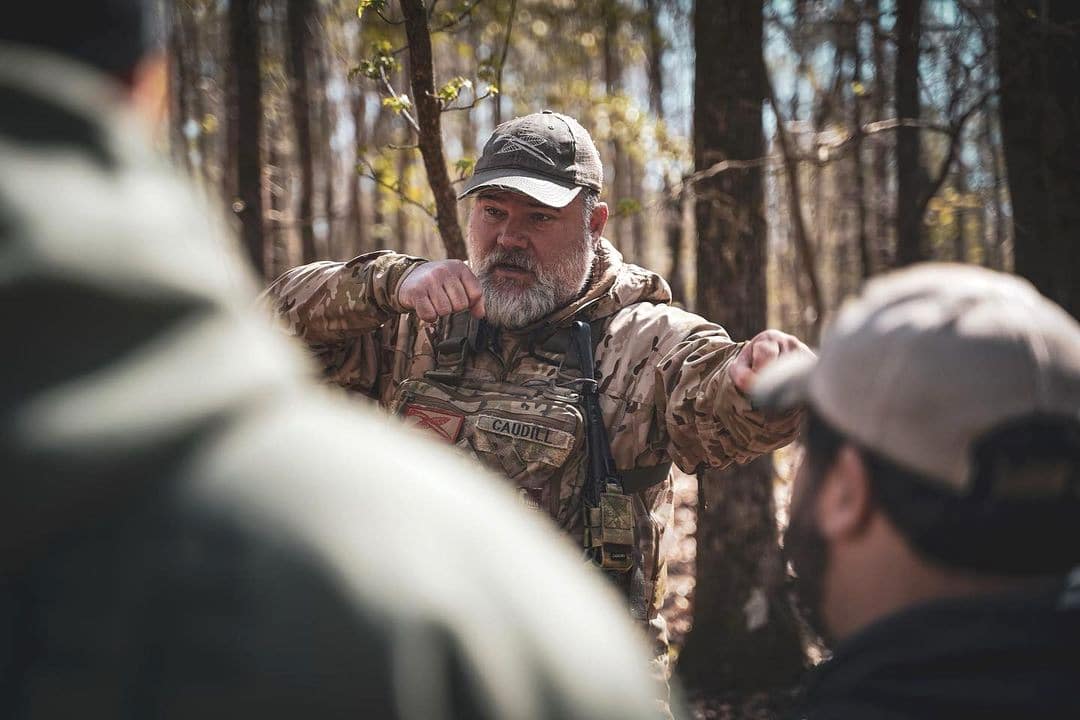
I recently attended a Fieldcraft Survival tracking fundamentals class taught by Craig Caudill, the Director of Nature Reliance School. A writeup on this class will appear in Issue 57 of our magazine, on sale in August, so keep an eye out for that. A couple days after the tracking class, I was able to connect with Craig on Zoom for an interview to get to know him a little better, and get his thoughts on topics related to the class, survival skills, and tracking in general.
RECOIL OFFGRID: I know you covered a little bit of this in class, but could you tell us about yourself and your background?
Photos courtesy of Craig Caudill / Nature Reliance School
Craig Caudill: I grew up in Kentucky and have been basically living in the same small town here in Kentucky ever since. I grew up doing hunting, fishing, and other outdoor activities, a whole lot of camping … I’m 52, so back during that time parents were like “get out of the house and come back tonight sometime.” And so that’s what we did — spent a lot of time outside. As I got older, I started challenging myself both from a hunting perspective and an outdoorsman perspective. I did a couple of 30-day trips into the woods with nothing but a knife to advance my skill set and actually learn where there were some deficiencies — some strong deficiencies — in my skill set.
That was my early 20s. So I spent the last 30 years improving upon those deficiencies and continuing to grow the skills that I already had. The Nature Reliance School, that is my school that I founded in 2006. And that primarily grew out of teaching some martial arts students. I taught martial arts full-time for a number of years and some of [my students] wanted to learn outdoor skills. So I started teaching them that. It just kind of snowballed in a good way when survival TV stuff started happening [like] Bear Grylls and Dual Survival. And that popularity started growing anybody that had a school. I was a benefactor of those shows because there was a lot of interest that was brought into it.
How long have you been tracking and teaching tracking specifically?
CC: Tracking my whole life, and teaching tracking about 10 to 12 years now. It used to be, I was teaching maybe once or twice a year. Now I’m teaching once a month, if not more. I love it. If I could teach tracking every day, I would.
Above: Craig Caudill’s book, The Secret Signs of Nature: How to Uncover Hidden Clues in the Sky, Water, Plants, Animals, and Weather, has been published in seven languages.
And how long have you been associated with Fieldcraft Survival?
CC: Affiliated with them for about a year. Kevin Estela, who is the Director of Training, and I have been friends for a number of years. When he went to Fieldcraft to work full time, Mike Glover asked him if there was anybody he wanted to bring on as instructors. He had four or five of us — he knew what our skill set was and he wanted to bring us on. And I was fortunate to be one of those guys.
Above: Longtime OFFGRID contributing writer Kevin Estela has been friends with Craig Caudill for many years.
So I know you’ve mentioned, even just now, a few other people that have survival schools. How would you say that your approach to teaching tracking specifically differs from some of the other big names in the space?
CC: That’s tough to answer and stay professional, but I will say this. In everything I teach — and particularly in tracking this comes out — I think I want everybody that comes to my class to become a tracker. And so there’s never a time, or at least I don’t feel like there is, where I feel like I want to overshadow the people in class. I want the people in class to become better at this, at the topic of tracking, before they leave, let alone after they leave. I want to help them develop their own skill set without me. The truth of the matter is I’m a big fan of tracking. I think it’s just enhanced situational awareness. It’s good for the world. So the more trackers I make out there, then the world’s a better place in my opinion.
From that perspective, to be a good tracker, you’ve got to put a lot of time in. And so the hardcore truth is that people typically are going to take the class and be done. But there’s also always one, two, three people in class who are bit by the bug and will become trackers for life, in an in-depth way. I’m not one to try and teach a class so that people will come to a level two. I’m not that guy. I am a guy who wants to teach people and give them as much as I can, such that it’s usable information in one class. And then if they come back, great.
Awesome. That touched on the next thing I wanted to ask: what do you think the difference is between a good tracker and a great tracker? Is it just practice, or is it something else?
CC: Two things, I would say. One is, yeah, practice. Putting dirt time in. You gotta put a lot of dirt time in. And one of my teachers, Cole, said that that the difference between a good tracker and a great tracker is that a great tracker knows when he or she’s lost the sign and is OK with it. And I’m paraphrasing there, but I really liked his definition, so I use it myself. You heard me say that in class recently — that it is, I think our ego really gets in the way of doing a lot of things, particularly when it comes to tracking.
You’ve got to set your ego aside and just let what happens on the track happen. Sometimes you’re going to lose the sign and you just are OK with it — not that you don’t want it, you want it, you want to acquire it and you want to stay on it as a tracker. But you also recognize that you’re going to lose it. It’s just a fact. And instead of being upset and seeing that as a problem, I think the difference is that great trackers are just okay with that aspect of tracking.
So, I know you do a lot of training for military and police and you’re about to go out with a fish and wildlife crew. Is there is a big structural difference in the class when you teach those groups, versus civilians?
CC: No, especially in a day-long class, there’s really no difference at all. The only difference that would be recognizable from somebody that was looking on the outside is typically those guys are carrying their firearms and kitted out because usually that’s what they’re going to be utilizing and carrying when they’re out performing the action of tracking. I usually have them practicing and training in that kit, and I don’t typically do that with your average ordinary folks. But the structure and the way of doing things is virtually the same.
There’s a couple of things we’ll do in a in a law enforcement/military type class that are needed by them, but not really needed by me and you, specifically as it relates to ID recognition.
And I’ll just briefly — just ever so briefly — touch upon small unit tactics. Typically my mode of doing that is I will ask somebody that’s there that teaches their small unit tactics to assist me when we get to that point, when contact is made. I know how other schools teach it, but a lot of those other schools have experience that I don’t have in making contact. I’ve trained in that, just like a lot of people that are freedom loving Americans. I do a lot of training on making contact, but because I haven’t had that experience, I would rather, when we get to the point of making contact … I want somebody on the inside that does that to teach that portion. And I don’t do that with the typical class that I teach, like for Fieldcraft, or even for my own school, Nature Reliance School.
I know one of the big points you made in class was that tracking is a science. So when you look at advances in technology around drones and sensors, do you see these having a major impact in tracking as a discipline, or not so much?
CC: Yeah, without a doubt, they’re a very useful tool in an actual track line. And when I say tracking, what me and you were talking about is visual tracking. There’s also canine tracking. There’s also technology tracking. And these are three categories where a lot of people who do what I do would break it down and focus and study on those different areas. But bringing them together is a game-changer. And whether technology is drone or ground sensors or whatever, it’s a force multiplier.
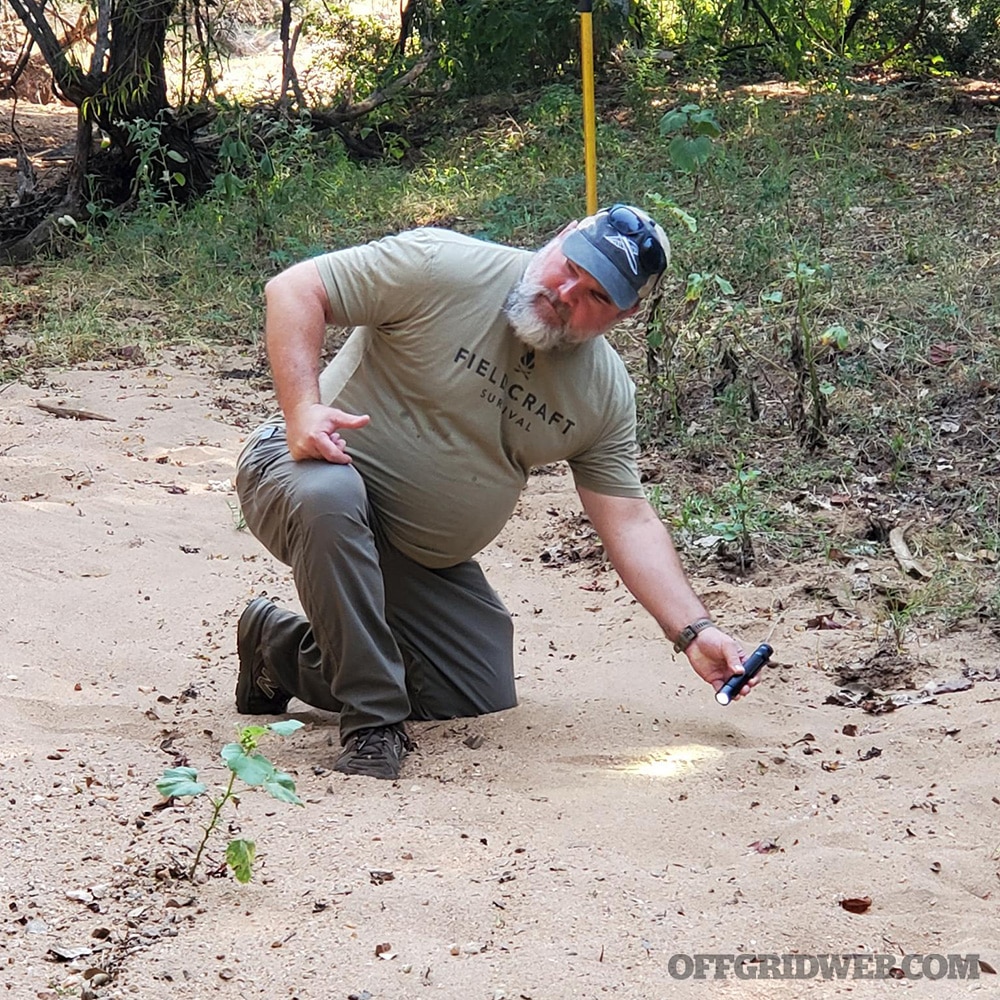
Above: Craig Caudill showed us various types of sign that can aid in tracking, such as this broken plant. It’s an obvious disturbance in the environment.
However, when I get a chance to work people, my particular ability lies within visual man tracking because that’s what I’ve done all my life. You know, I’ve tracked things — whether it be people or animals — all my life. And so being able to share that is where I stay within my wheelhouse. Let the intelligence gatherers and intelligence analysts gather that information from drones or sensors, and do what they do best and add that to the tracking and put it all together so that you’ve got a usable set of information.
So, what are the three most important things that you would hope a student takes away from attending one of your courses?
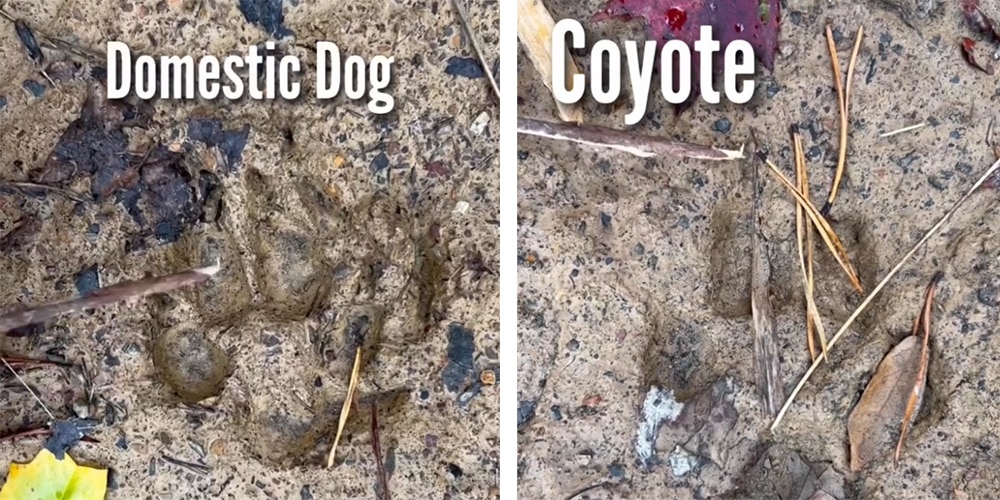
CC: About tracking specifically? OK, number one would be a heightened situational awareness of the outdoors. And because it doesn’t matter where I teach and what I’m teaching, if I’m teaching man tracking for a military or law enforcement crew, I’m still going to touch upon animal tracking so that they can recognize the difference between let’s say deer tracks and human tracks. That way they don’t get off on a set of deer tracks when they need to be on a human.
Above: In a video on his Instagram page, Craig Caudill shows some of the differences between a domestic dog track and a coyote track.
Number two, is the ability to track slightly. Well, I shouldn’t even say that. The ability to track as best as somebody can. When a person comes to me, I want them to leave a tracker or a better tracker than they were when they showed up.
And number three, the big thing that I want people to have when they leave is the ability to continue developing their skill set after they leave. Meaning I try to lay out the skills, techniques, and exercises people can do to develop the skill of tracking. I like to equip people with the skills or mindset necessary to continue tracking.
It’s often said that good things come in small packages, and when it comes to guns, we’re inclined to agree. Ever since firearms first appeared on the battlefield, there has been a gradual trend toward shorter and lighter fighting weapons. The American long rifles of the Revolutionary War era often had barrels that exceeded 40 inches; standing upright, they were nearly as tall as the men who carried them. The famous Sharps rifles, used extensively by “sharpshooter” marksmen in the American Civil War, were typically equipped with 30-inch barrels. By the turn of the 20th century, the M1903 Springfield had a 24-inch barrel, a length that would carry over to the M1 Garand. Although the standard-issue M16 still has a 20-inch barrel today, carbines with 16-inch, 14.5-inch, and shorter barrels have become increasingly popular for maneuverability in confined urban areas. Thanks to dramatic improvements in barrel and ammunition manufacturing, it’s possible to achieve excellent accuracy and effective range from these compact weapons, whether they’re configured as short-barreled rifles (SBRs) or braced AR pistols. Read on as we examine four compact rifle bag options that are designed for SBRs, AR pistols, and other compact long guns.
Finding the Perfect Fit for Your Rifle Bag
Above: With the right parts and quality ammo, modern short-barreled rifles can yield impressive performance. OFFGRID Editor Tom Marshall built this 12.5-inch suppressed SBR, and has achieved consistent hits with it beyond 800 yards.
Although the weapons we use have shrunk, it often feels like the cases we carry them in have remained the same size. If you walk into an average sporting goods store, you’re likely to see a wide array of cases designed for handguns and cases designed for rifles with 16-inch barrels, but not much in between. Sure, you can carry your 14.5-, 12.5-, or 10-inch AR in a standard rifle case, but you’ll be left with excess space for the gun to slide around, and excess fabric that folds and flops awkwardly. Why spend the time and money shaving inches off your gun if you’re going to carry it everywhere in an oversized case? Sure, you could take apart your upper and lower to fit your gun into a smaller pack, but that creates an opening for dirt and foreign objects to get into the inner workings, and it slows down your ability to use the weapon.
With this dilemma in mind, we sought out four rifle bags that were purpose-built for carrying short weapons. One is a relatively basic clamshell case design, while another is a full-fledged backpack with weapon-retention features. The remaining two split the difference, incorporating both case-style carry handles and backpack-style shoulder straps. Read on to see if one of these packs might be just right for your compact gun of choice.
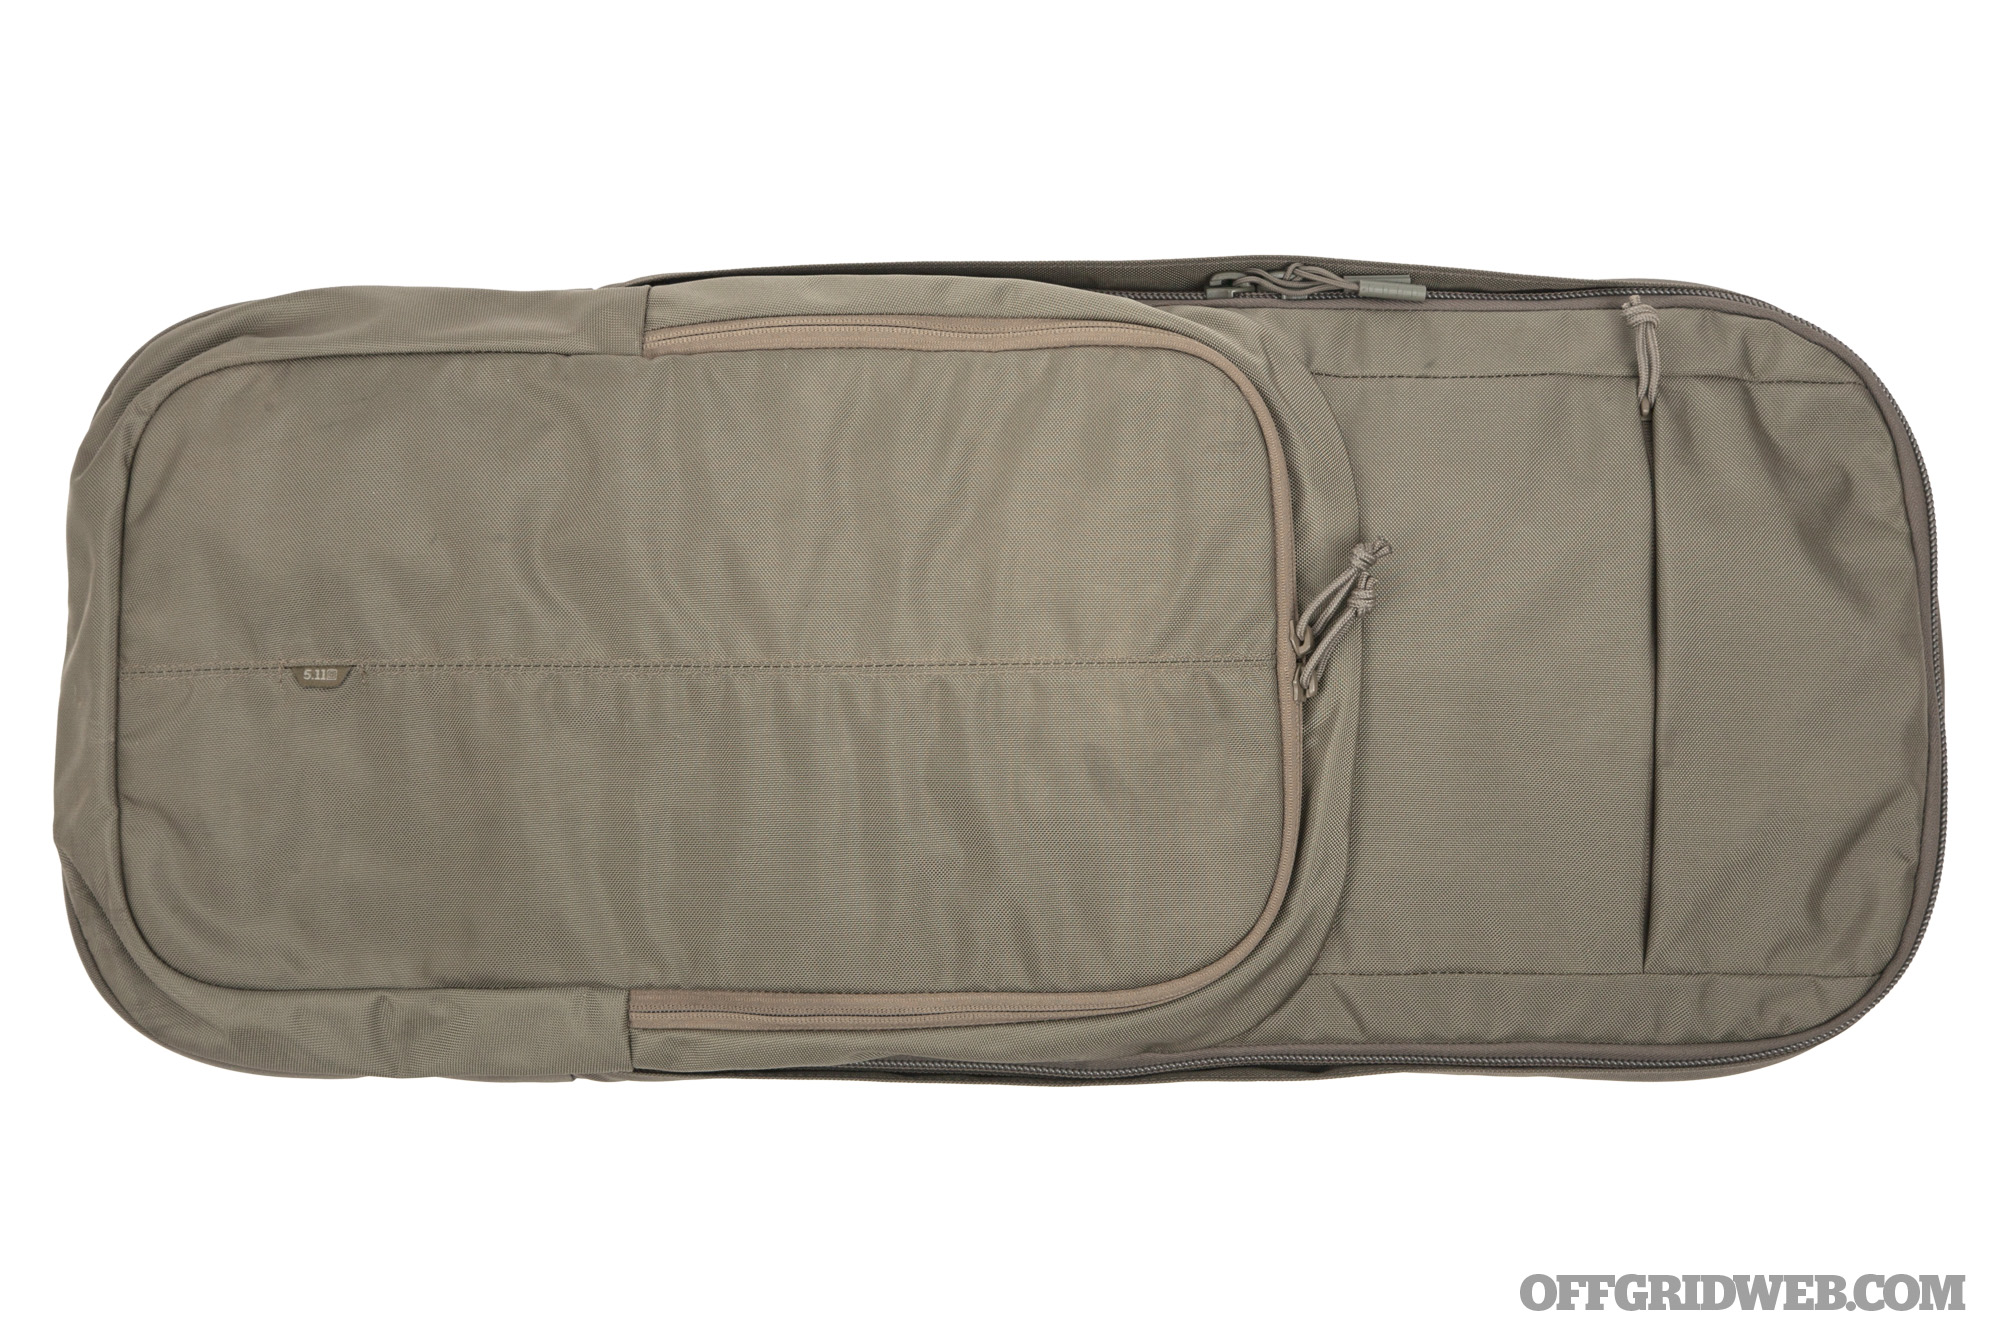
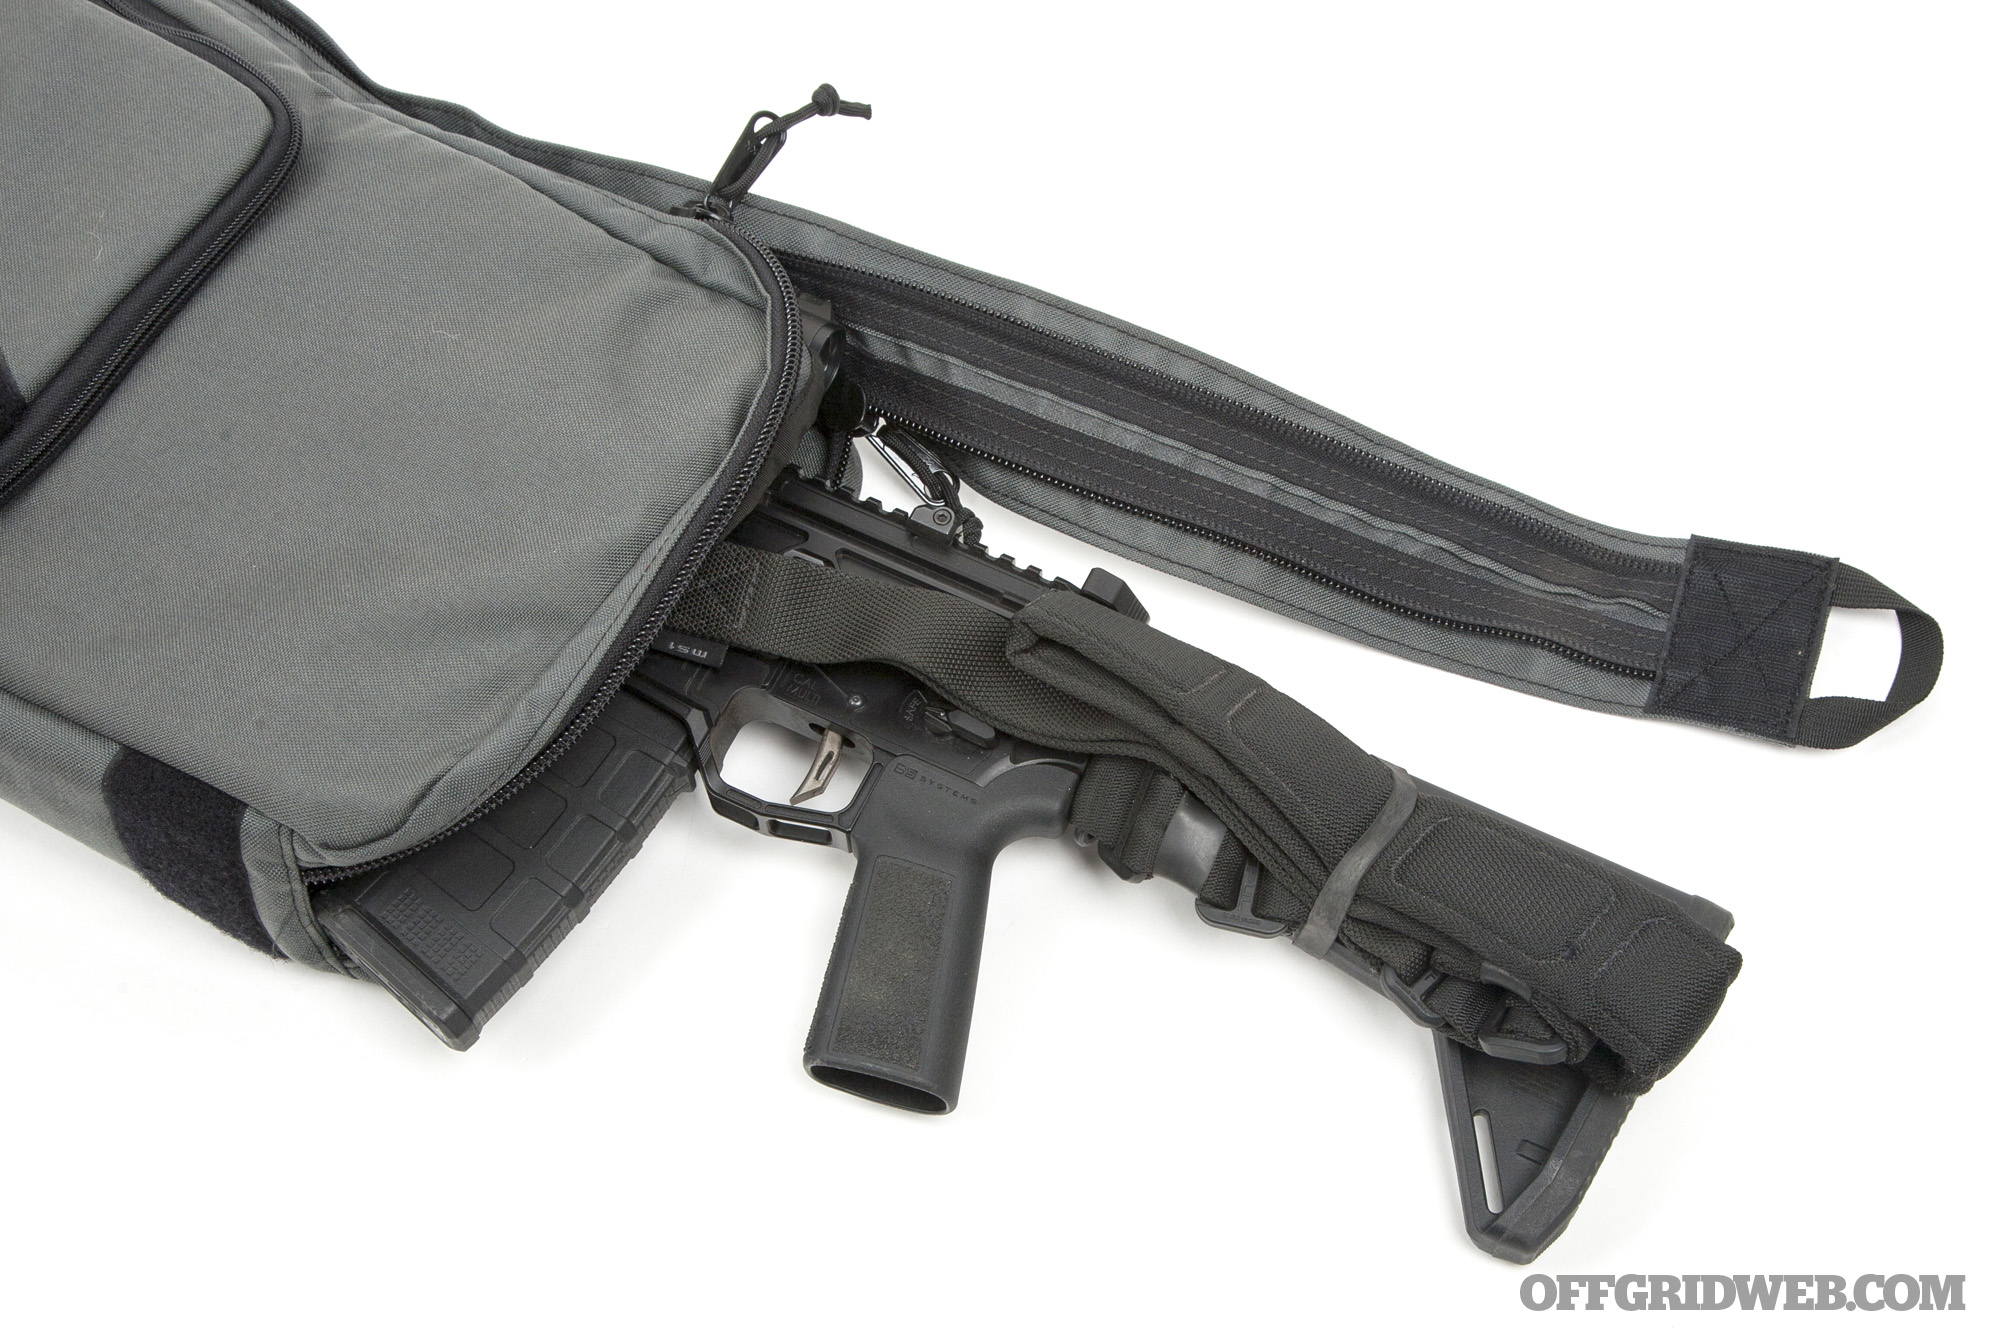
Notes As the most diminutive of the four packs we tested, the LV M4 Shorty is perfect for slim guns with sub-10-inch barrels. It fit our Aero Precision EPC-9 AR pistol with 8.3-inch barrel like a glove, even with the SB Tactical brace fully extended (a 27-inch OAL). Anything much longer or thicker will be a tight squeeze. Our 11.5-inch SBR almost fit with the buttstock collapsed (29-inch OAL), but the chunky Cloud Defensive REIN flashlight bezel near the muzzle prevented the zippers from closing the last few inches. Some side-folding guns fit, but it’s not optimal — a PSA GF-3 AK-47 side-folder with 16-inch barrel (28-inch OAL, 5 inches wide) did fit, but caused the case to appear somewhat round and overstuffed.
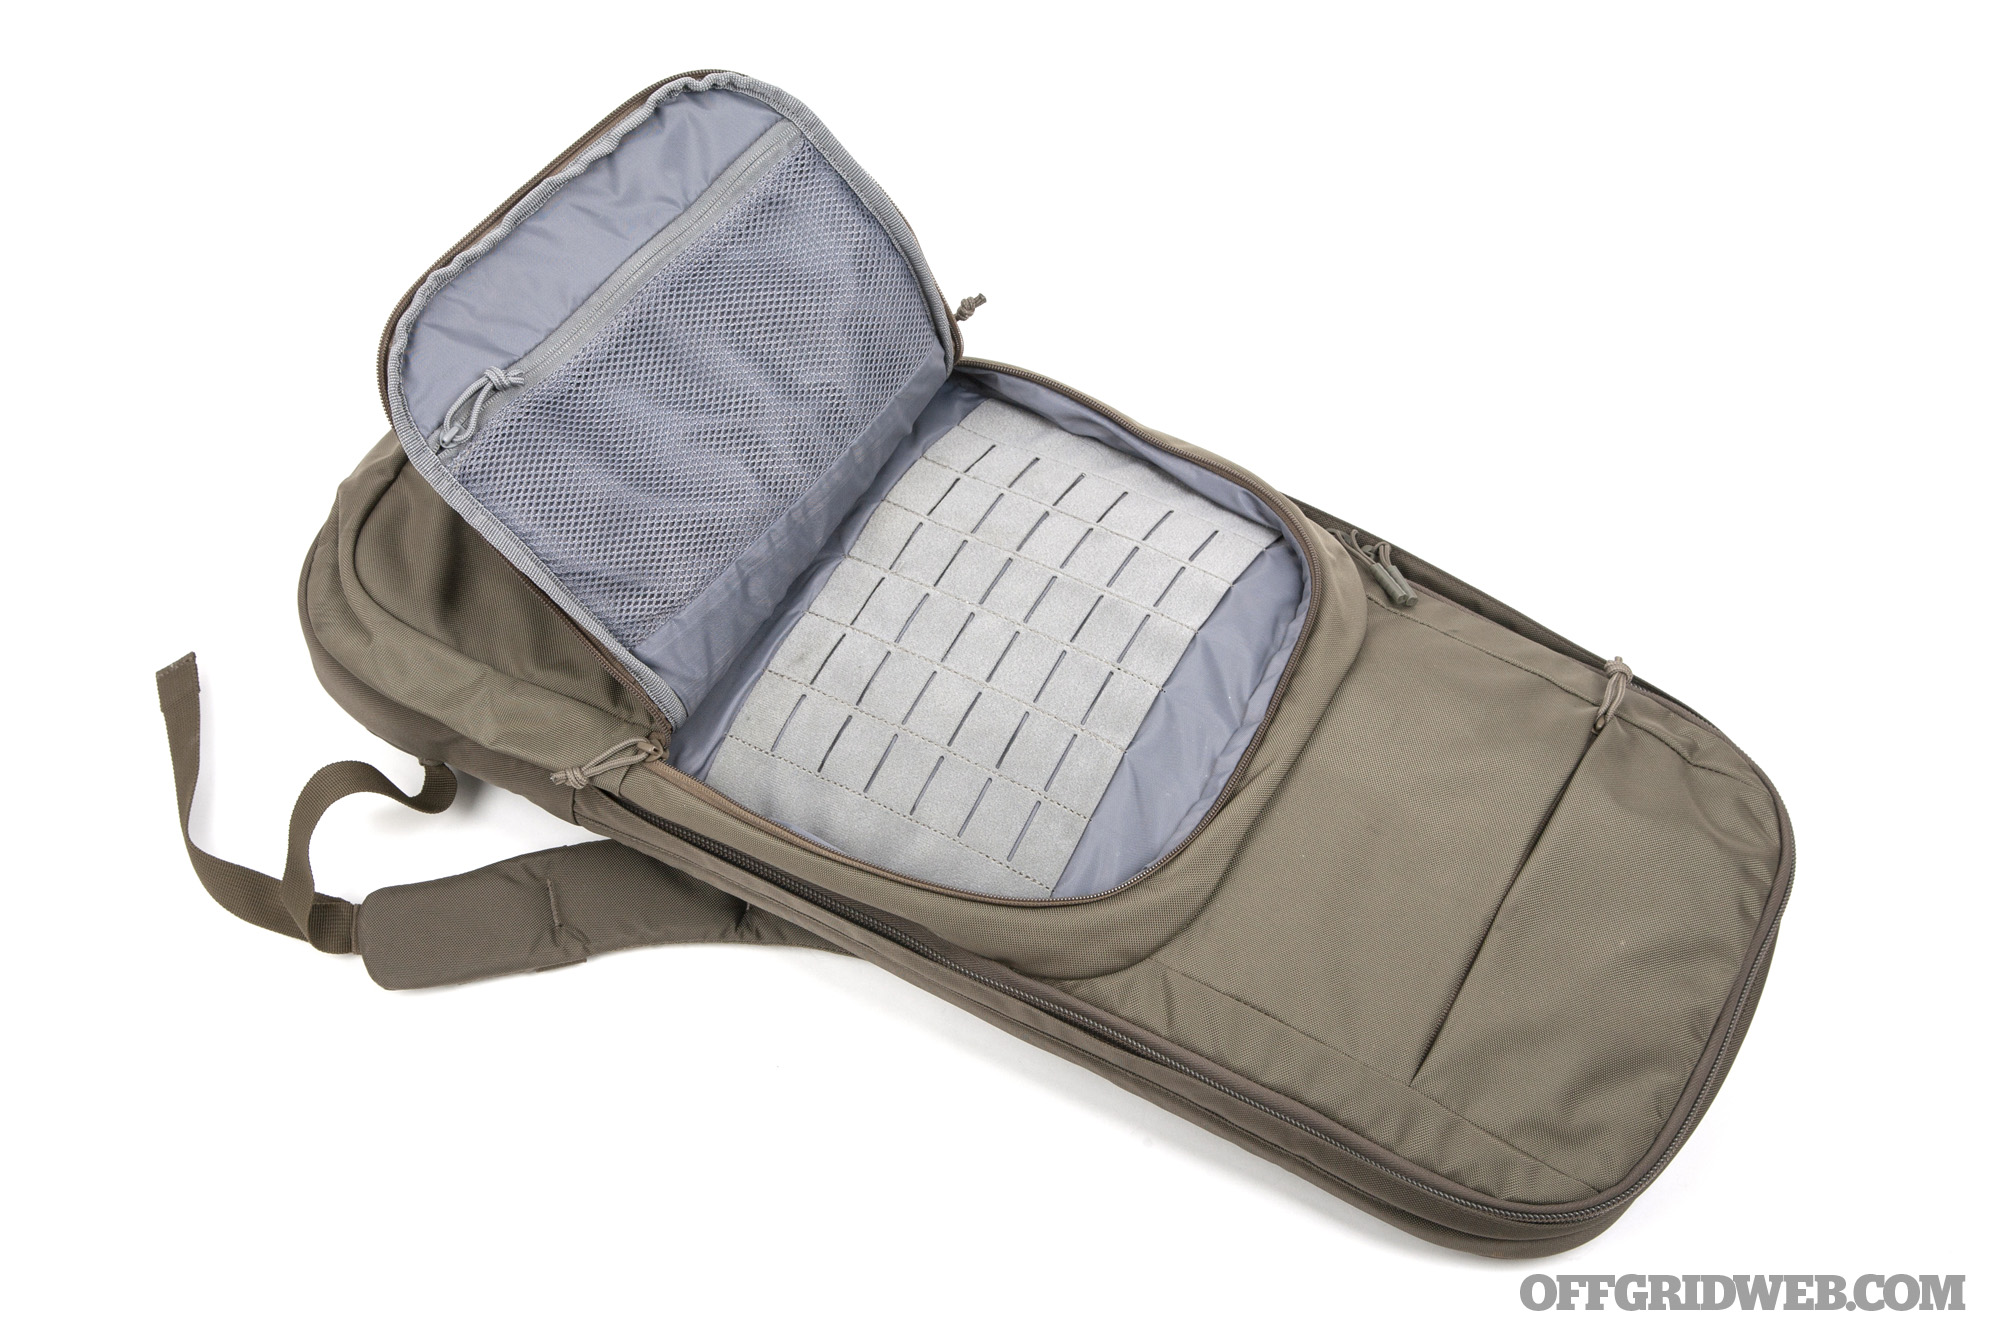
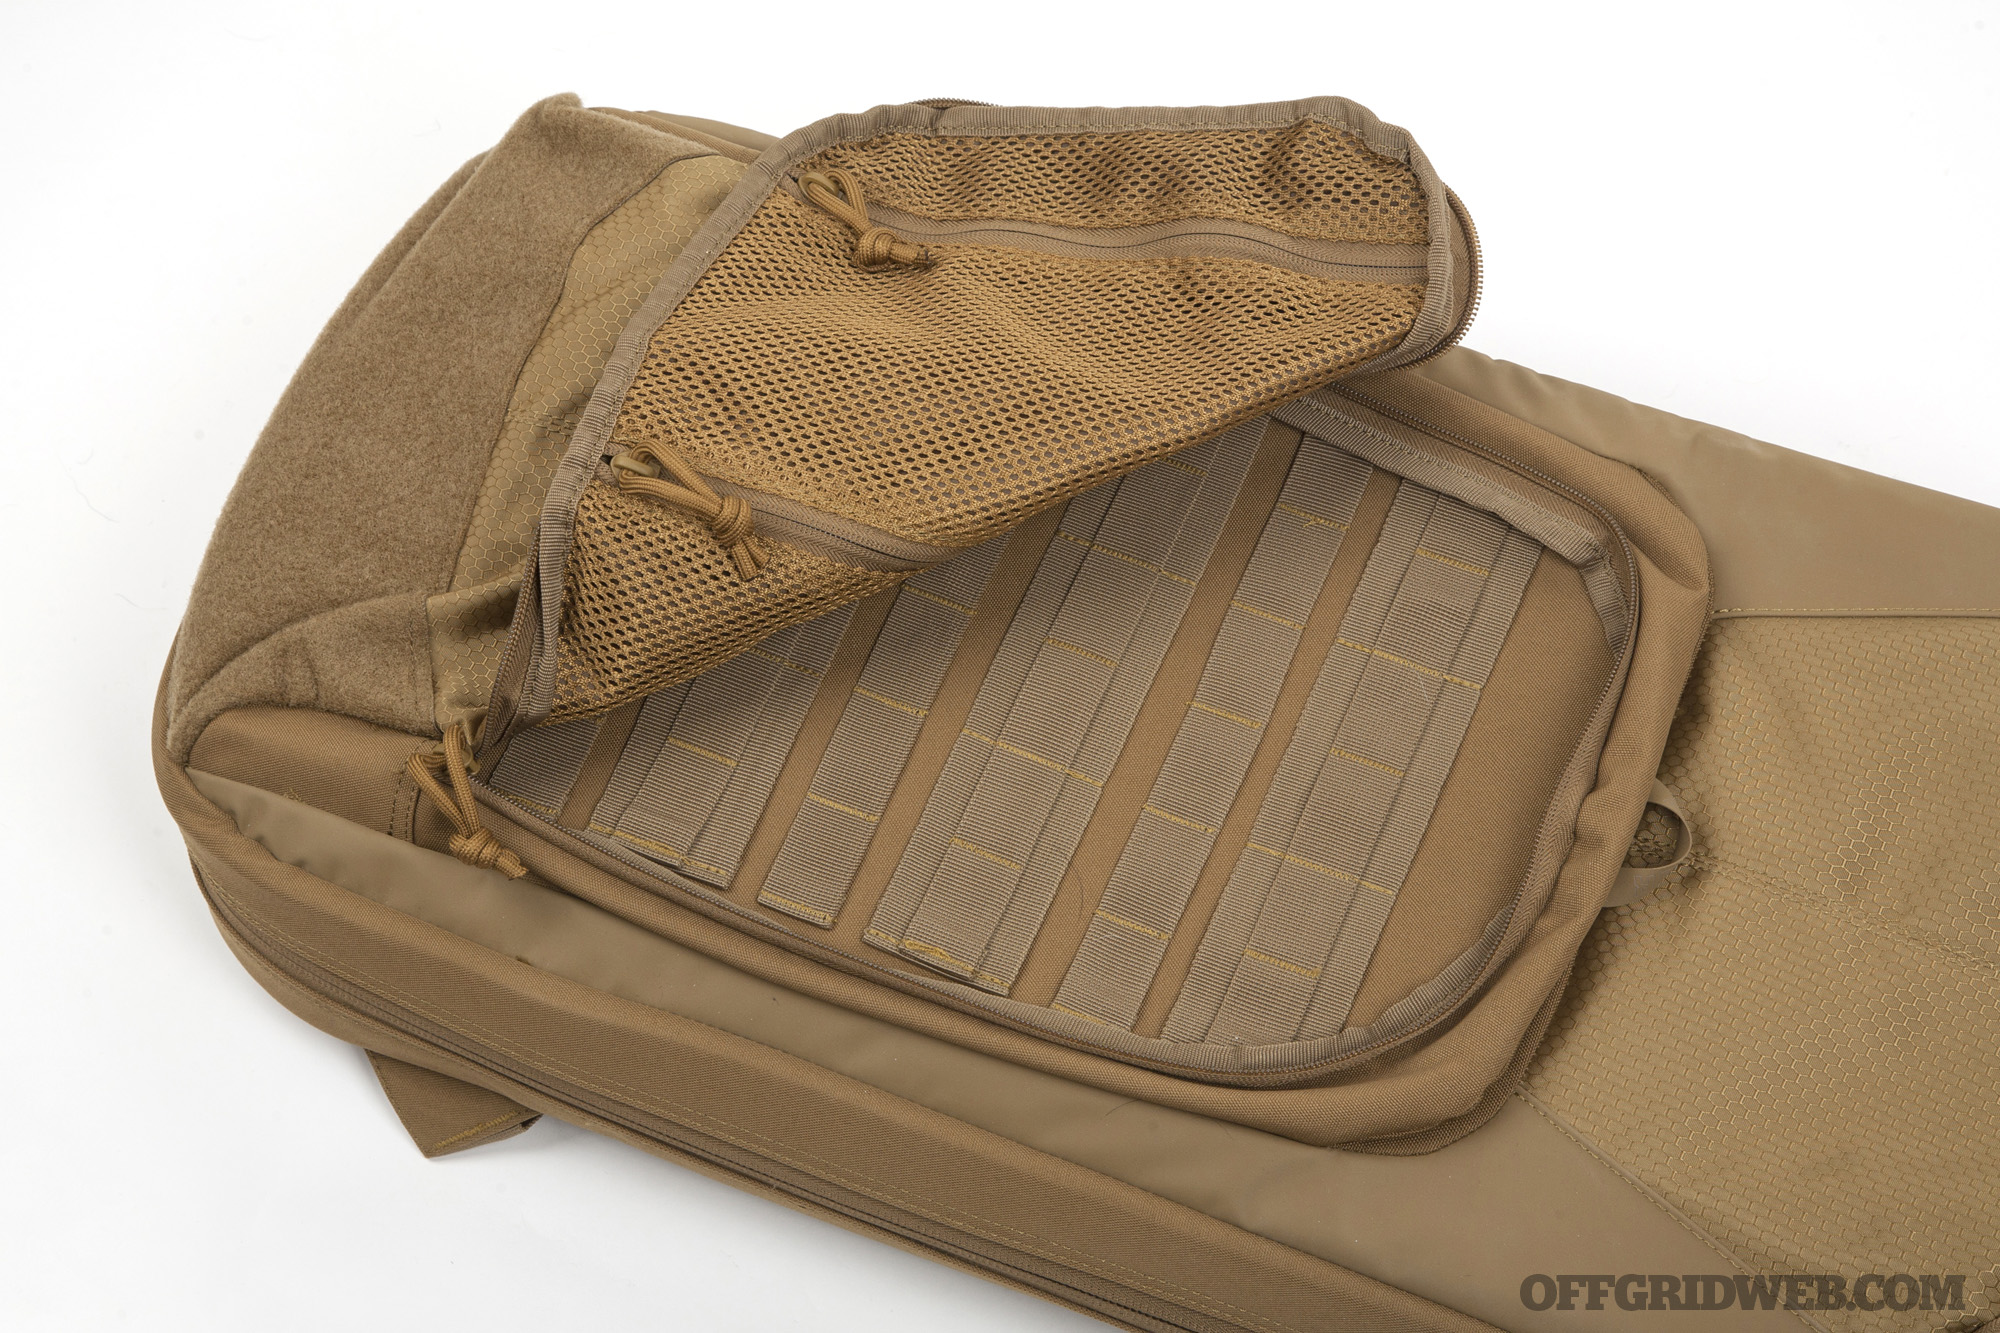
The main compartment is lined with slick 840D nylon, so it’s easy to shake out and keep clean. We also appreciate its light gray color, which makes it simple to find small items like sight adjustment tools and loose hardware. A 5×12-inch field of webbing provides attachment points for a hook-and-loop cuff to secure your weapon inside the bag. However, the compartment is small enough that we didn’t really need it.
Above: Laser-cut hook fabric inside the front pocket allows for the attachment of MOLLE or Velcro-backed pouches and accessories.
On the front of the case, there are two zippered compartments. The smaller one contains a soft lining that’s ideal for shooting glasses and other fragile gear. The larger compartment has laser-cut MOLLE-compatible webbing for attaching tools, mag pouches, or a small trauma kit; the opposite side has a zippered mesh pocket for other loose items. We found this half-zip front pocket to be the ideal size for storing a minimalist chest rig pre-loaded with three 30-round mags.
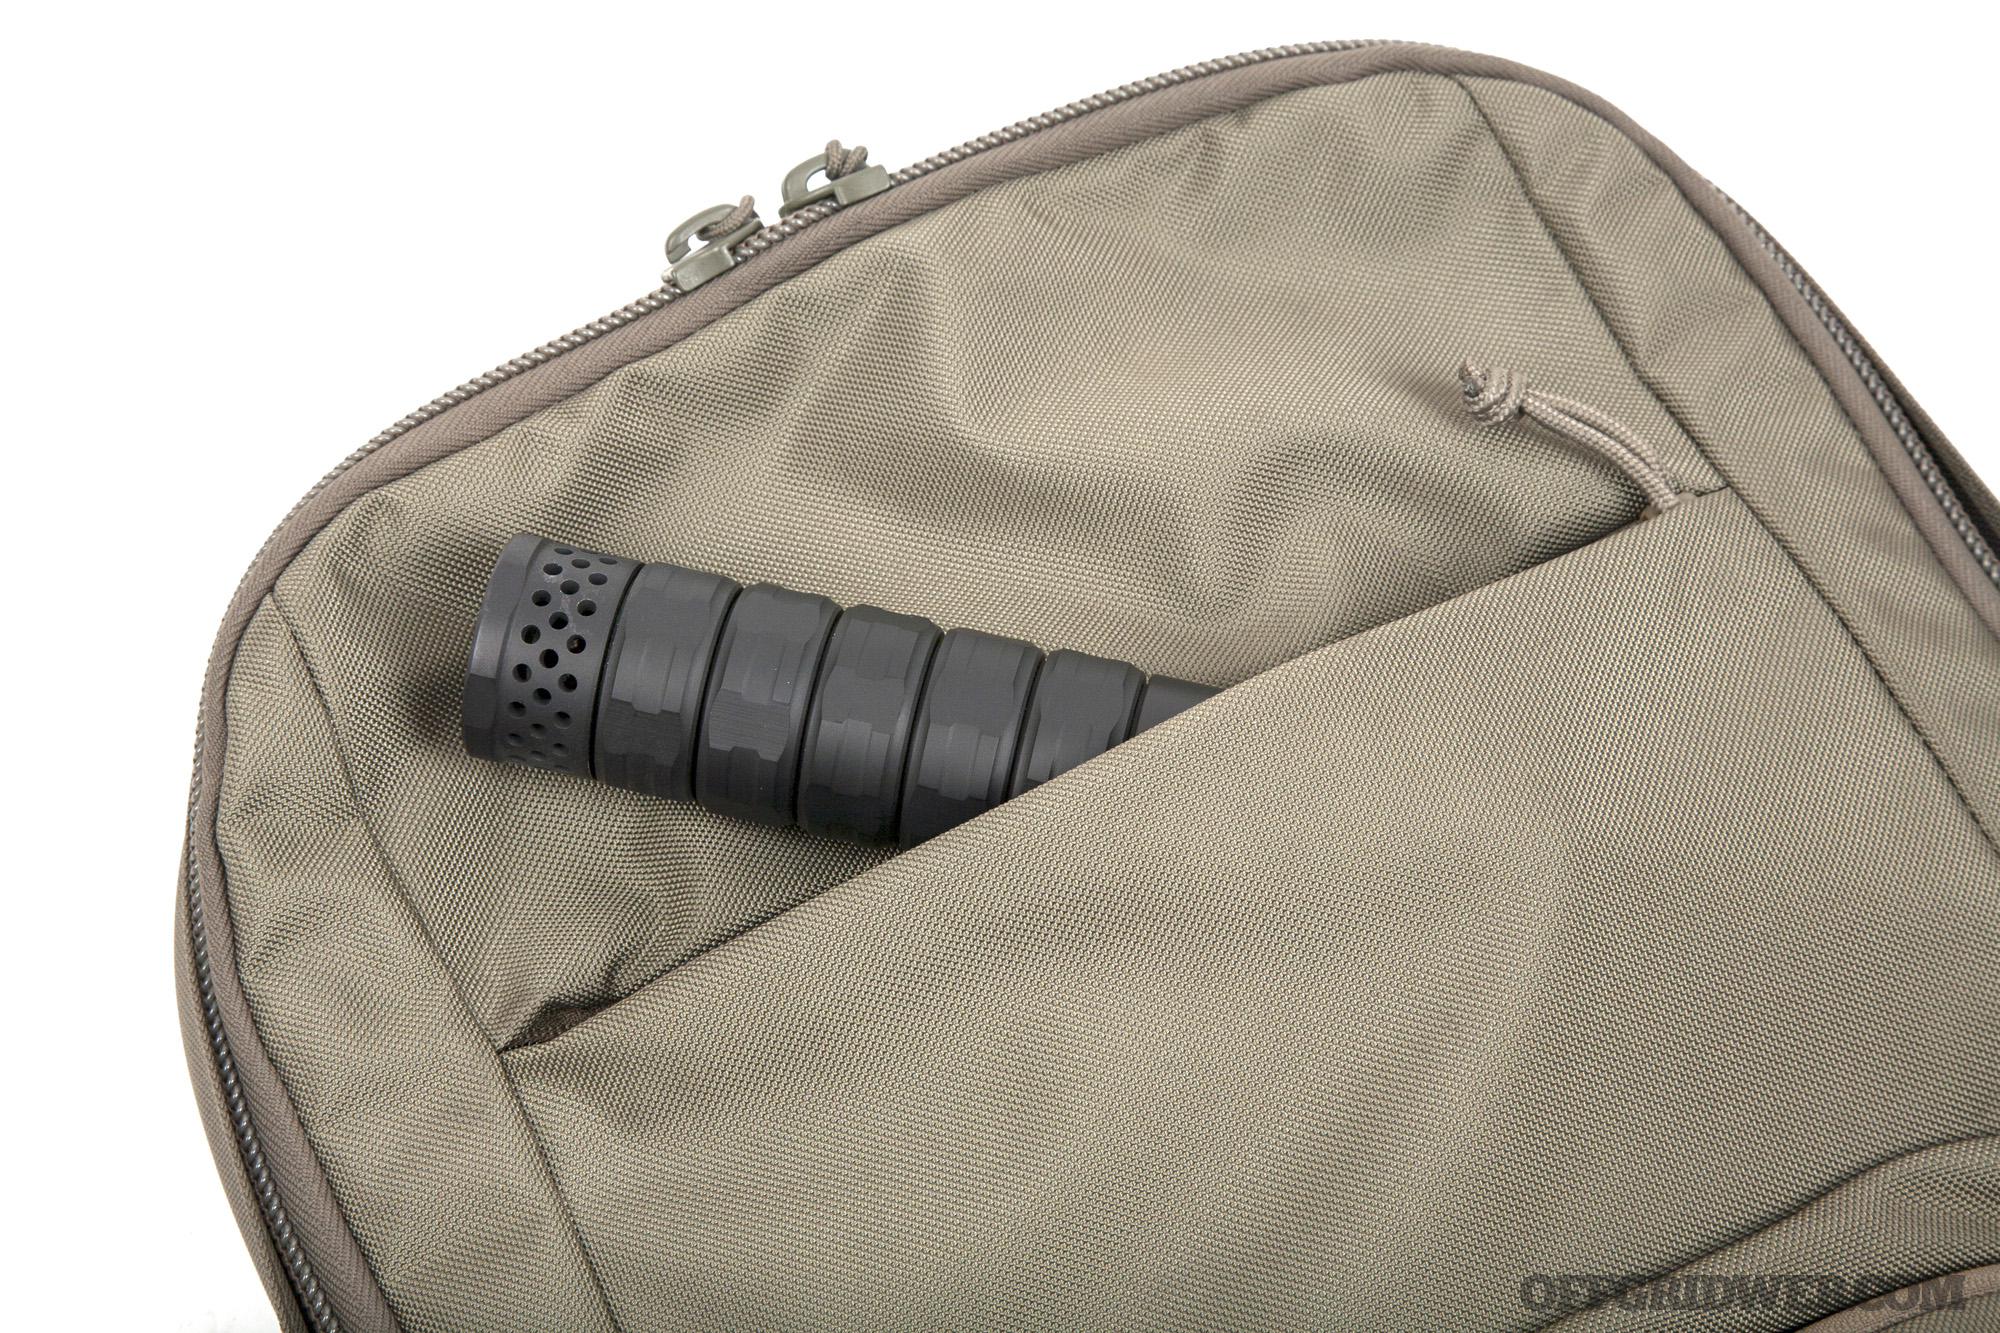
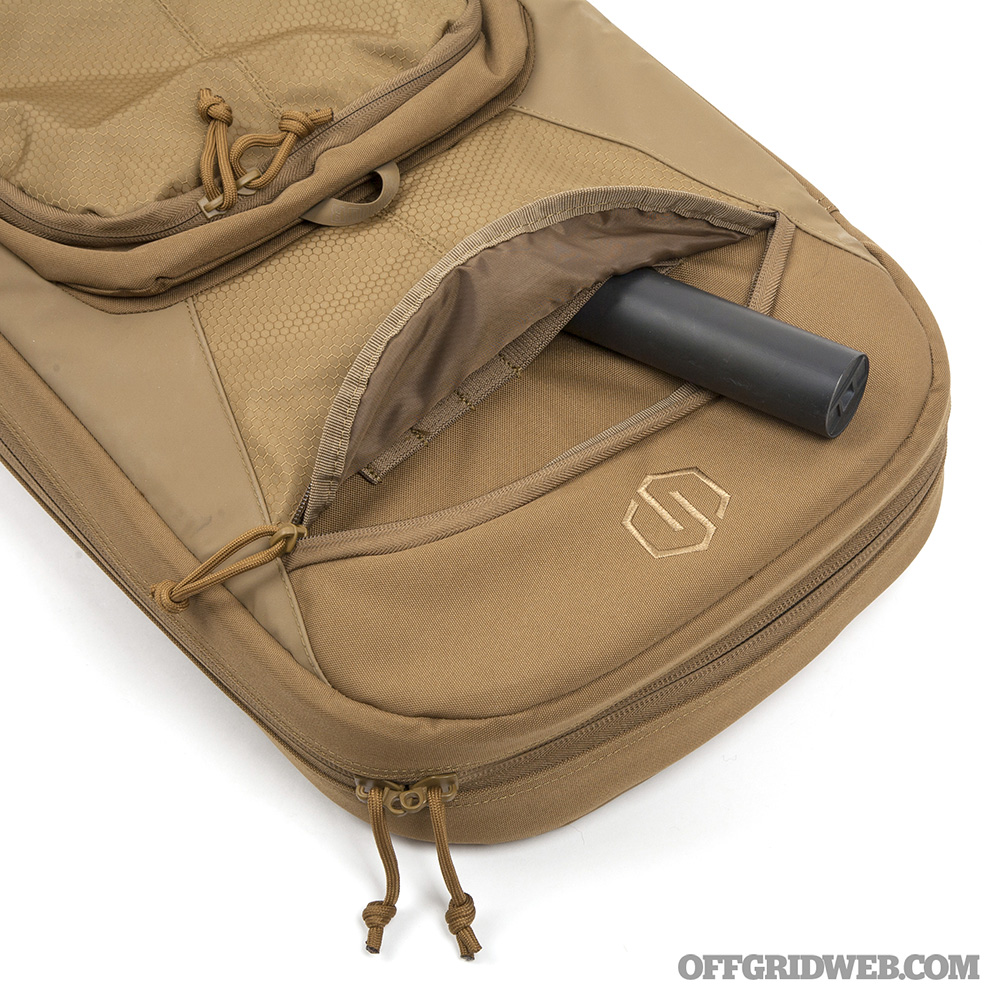
Above: A small zippered pocket up top fits anything from eye protection to this JK Armament Form 1 suppressor.
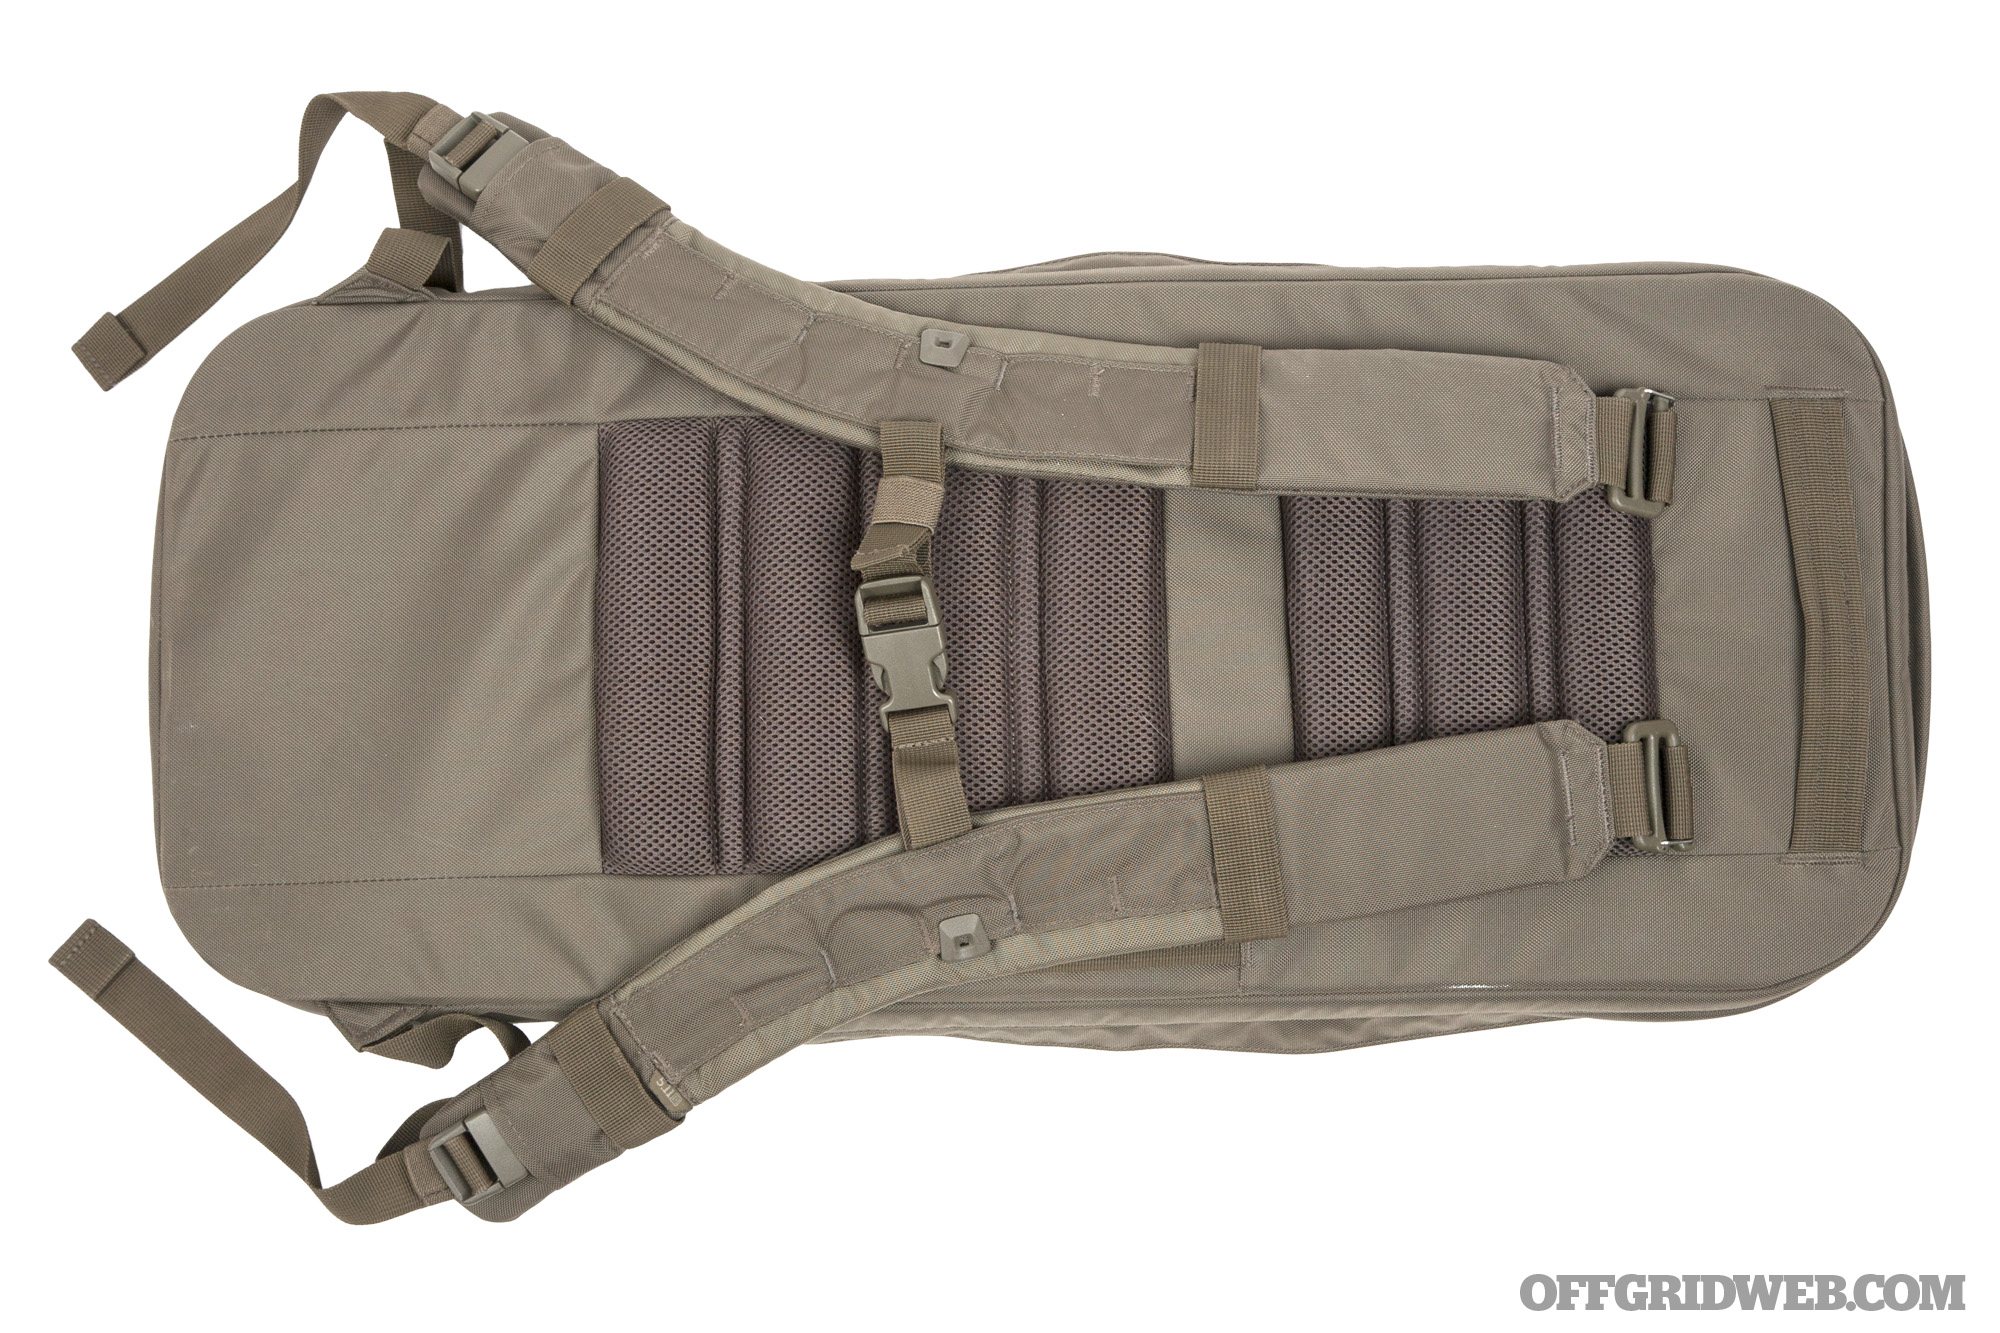
On the back of the case, you’ll find two low-profile grab handles as well as a pair of padded shoulder straps with sternum buckle. The padded portion of the shoulder straps can be removed via G-hooks and buckles, but this leaves a pair of foot-long dangling nylon straps. They’re sewn directly to the rifle bag and can’t be tucked anywhere, so it’s best to leave the shoulder straps on the case.
Above: The combination of a 1.93-inch red-dot mount and 33-round Glock mag on our Aero Precision EPC-9 pistol created a wide profile. It fit inside the rifle bag, but just barely.
PROS
Simple and effective, not loaded-down with excess pockets or features we don’t need
Discreet appearance without any external MOLLE webbing or patch fields. Even the 5.11 logos are stitched onto tags that can be tucked away for a sterile look.
CONS
It’s a tight squeeze for anything longer than 28 inches or wider than 3 inches. Many SBRs won’t fit.
Shoulder straps aren’t fully removable or tuckable
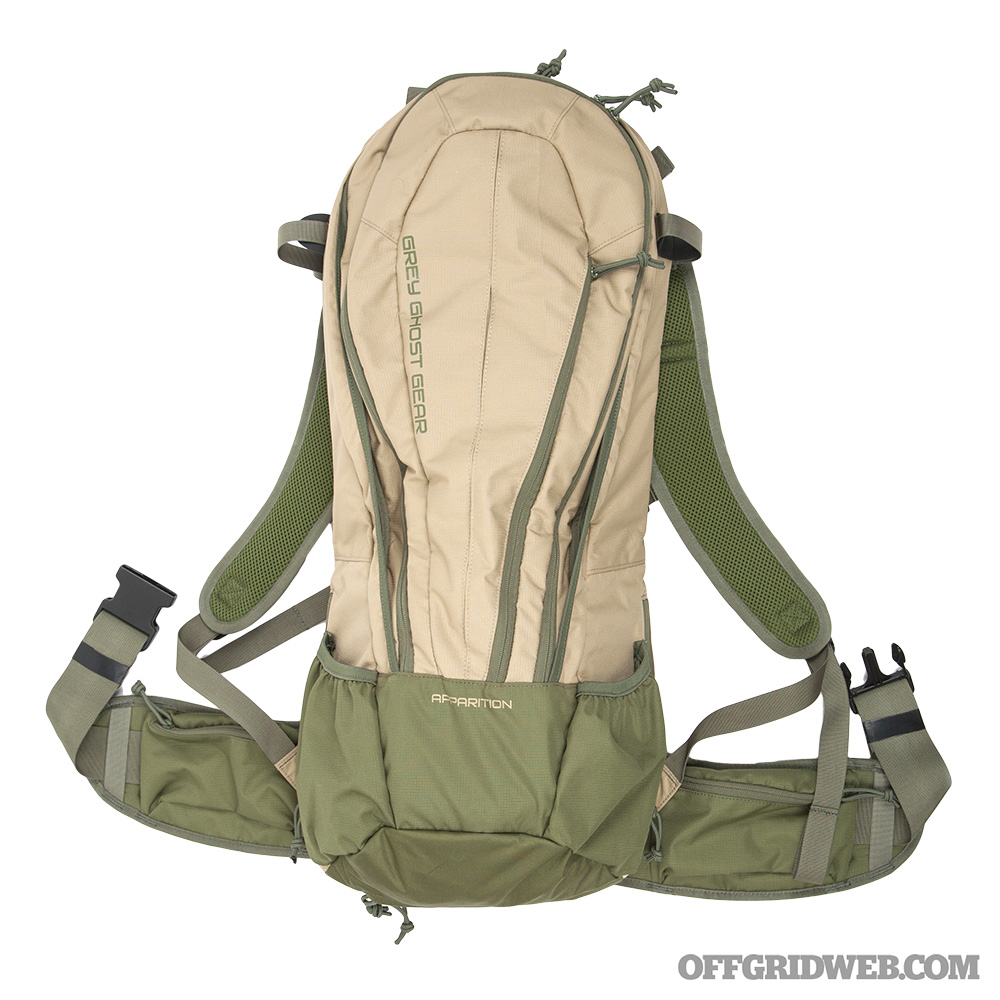
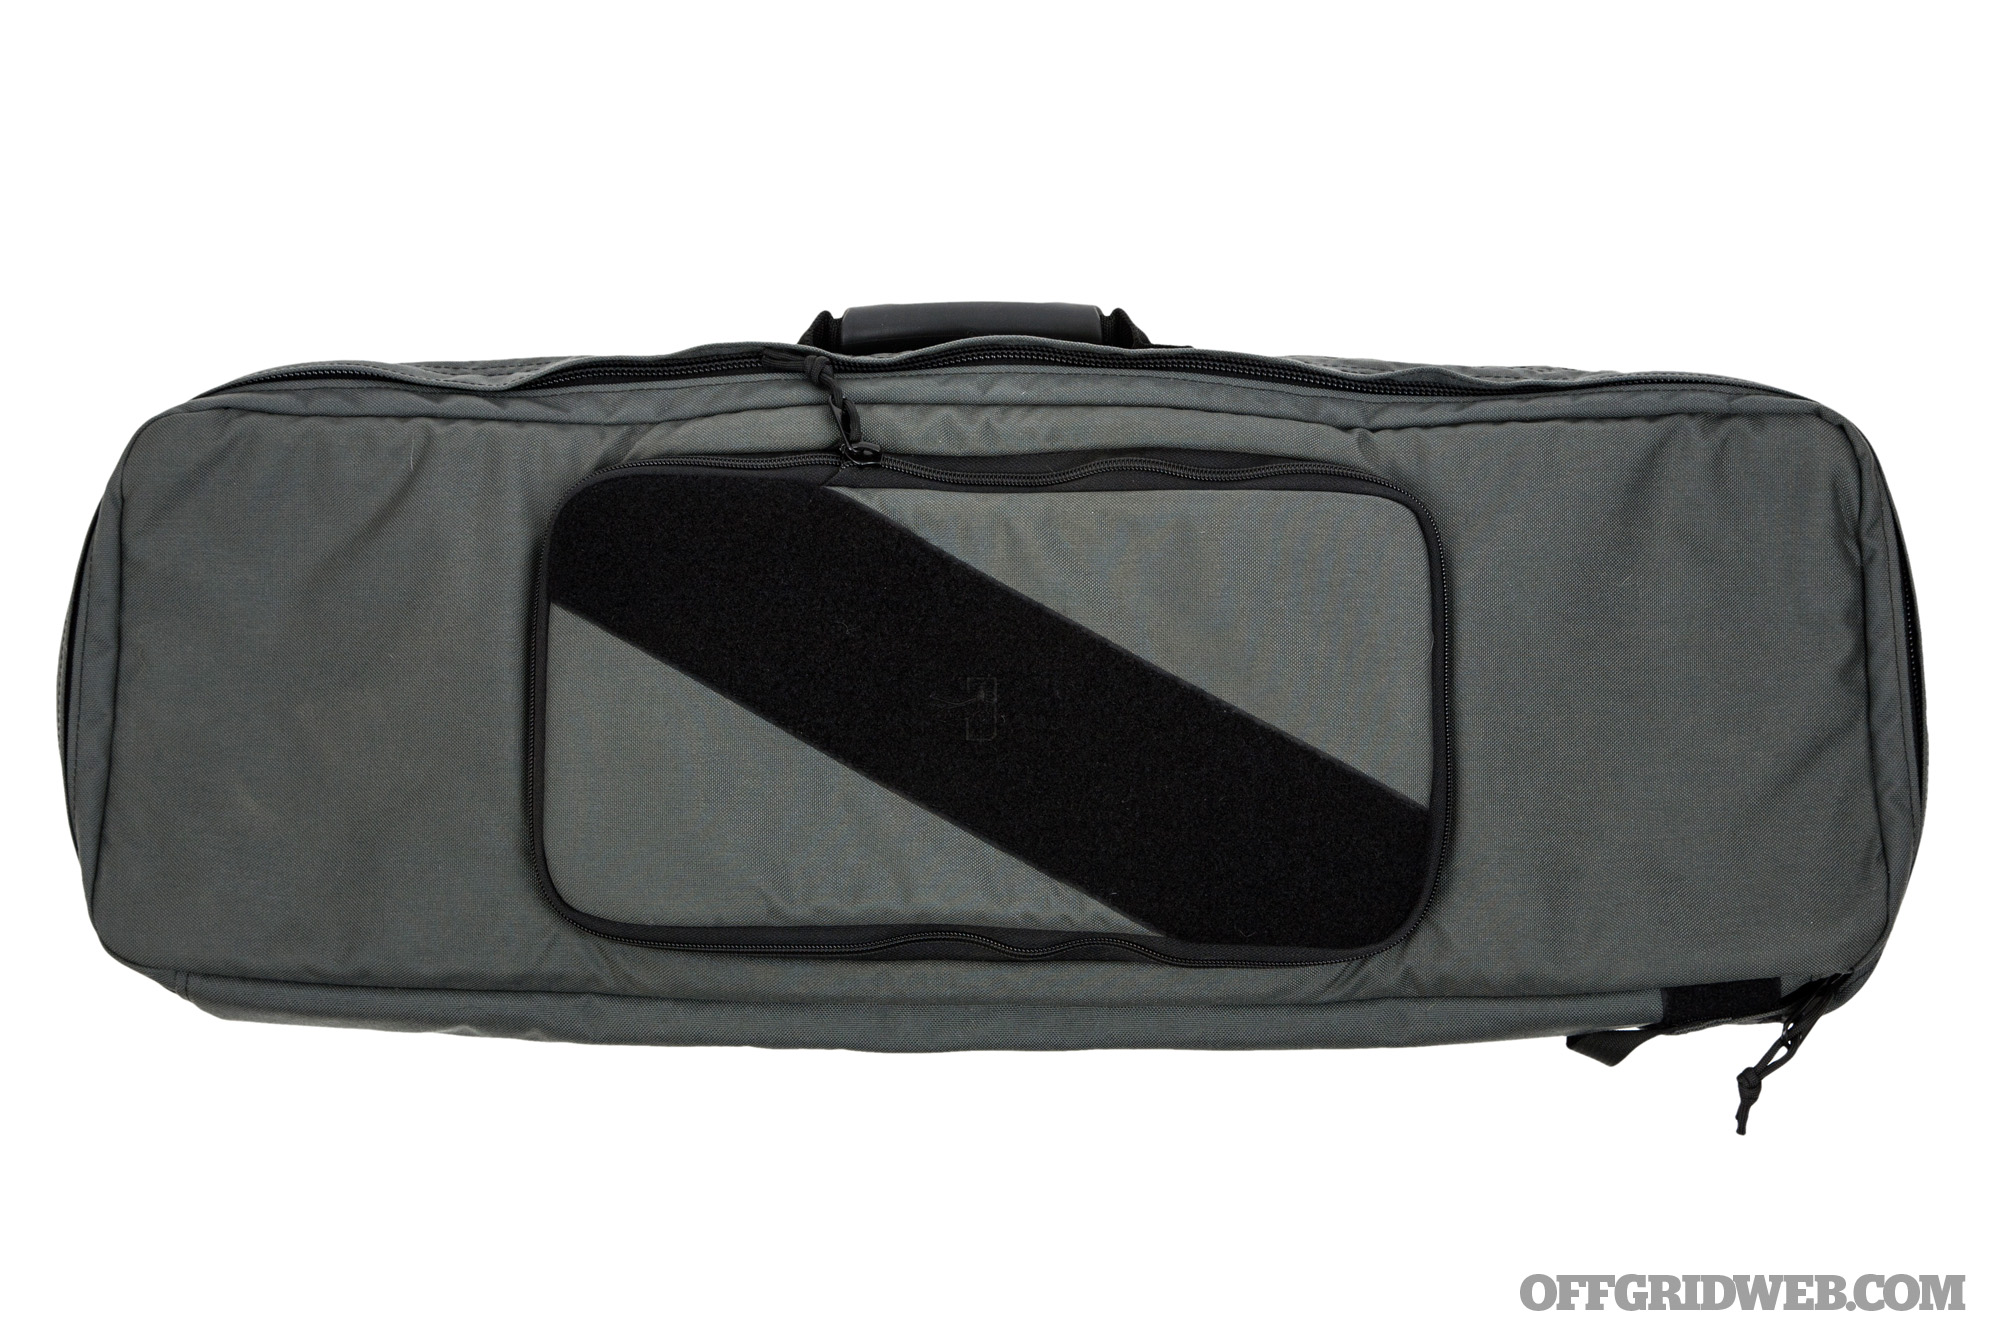
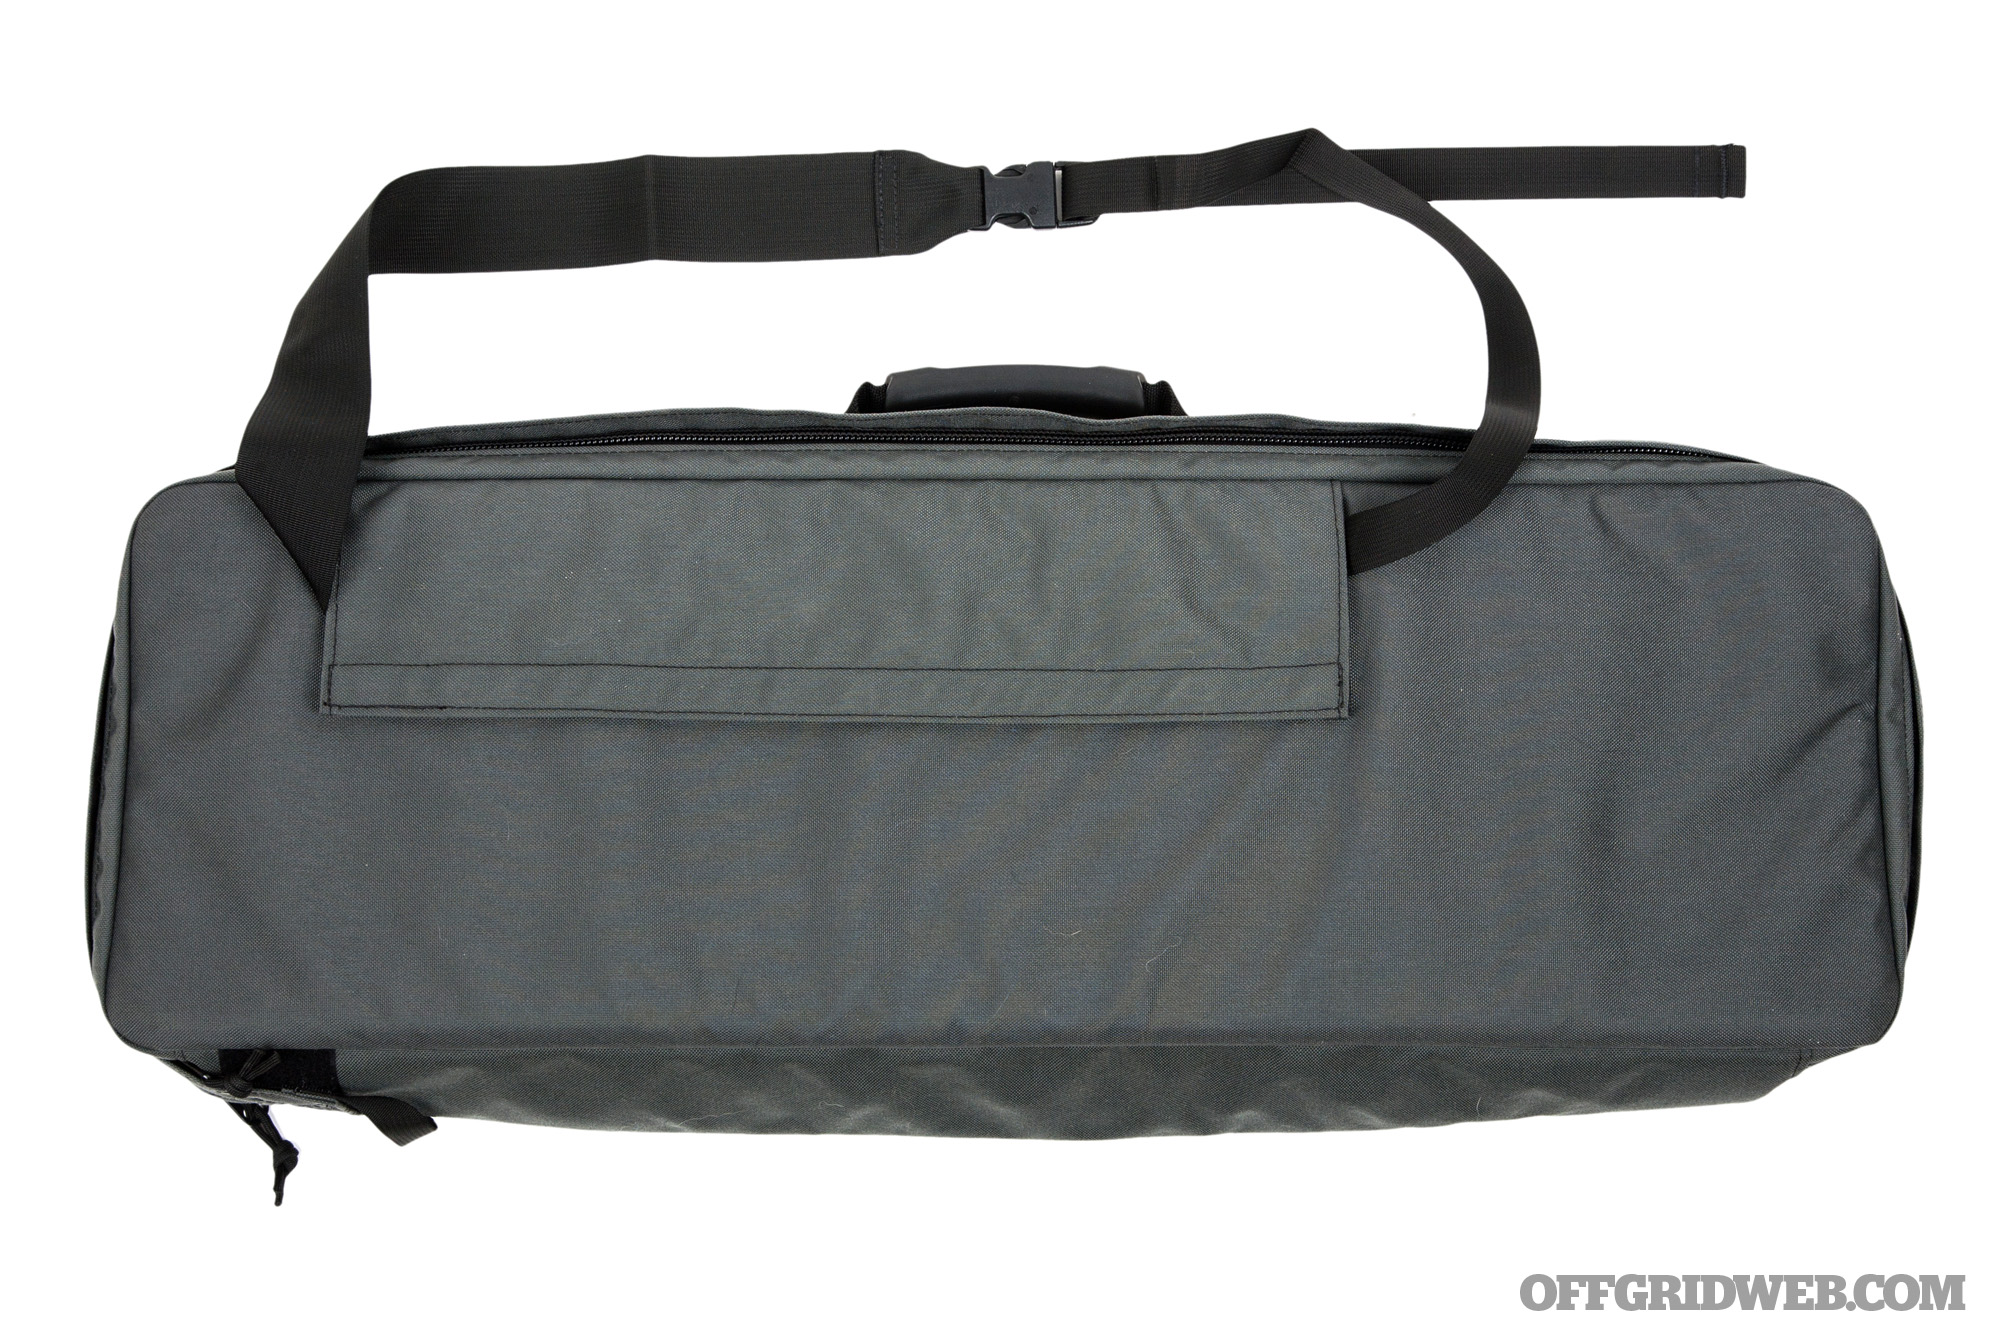
Grey Ghost Gear Apparition SBR Bag
Exterior Dimensions: 28 by 13 by 4 inches (expands to 34 inches long)
Maximum Capacity: 19.6 liters
Weight: 4.0 pounds
Colors: Black & Cyan, Black & Red, Brown & Black, Grey & Black, Tan & OD Green (pictured)
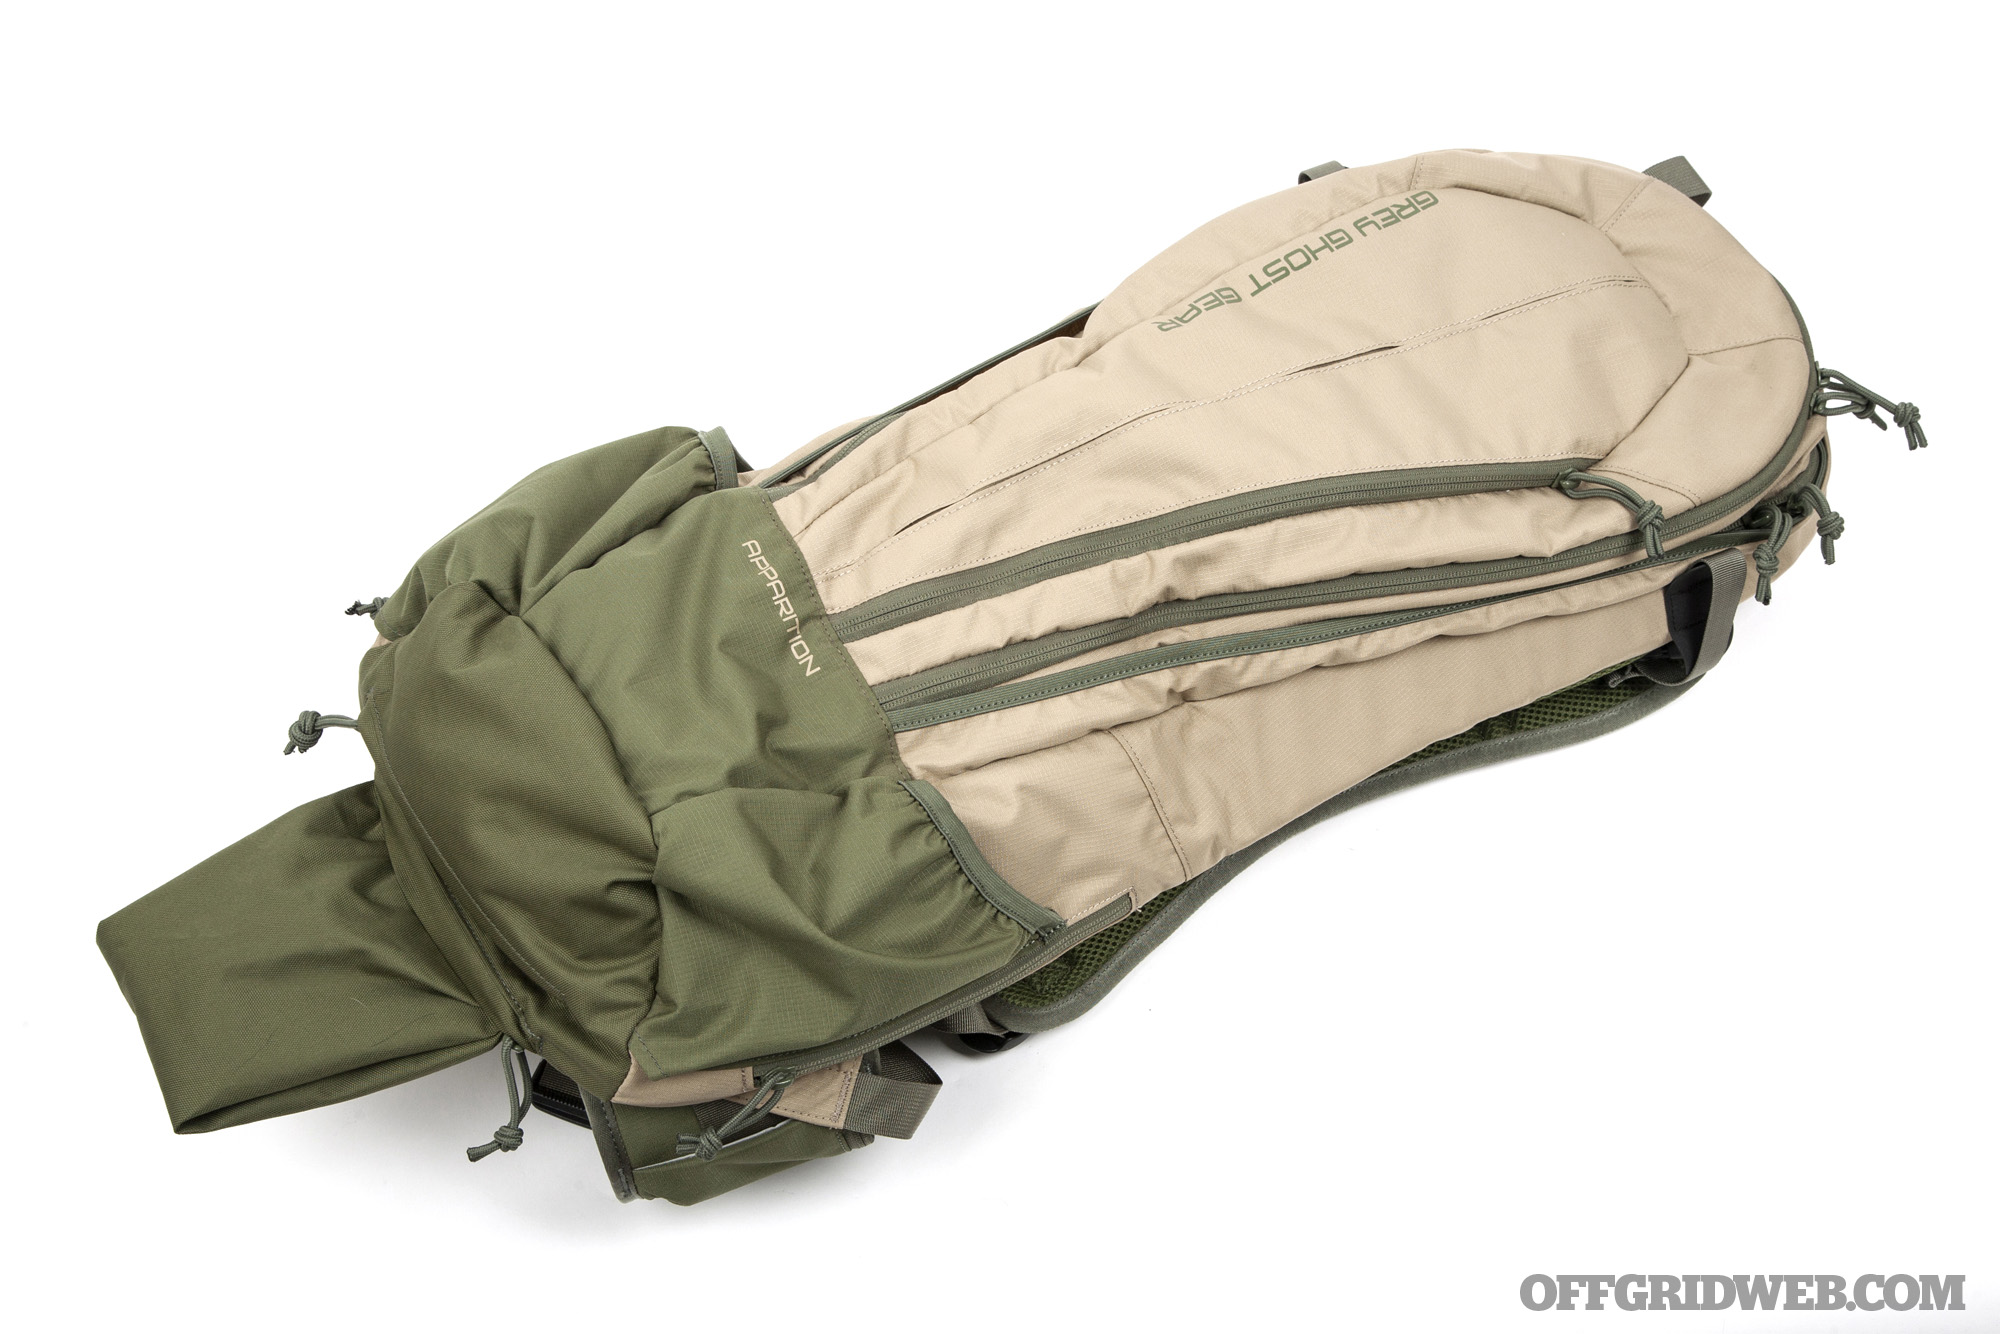
Notes On the product description page, Grey Ghost Gear says, “This pack can easily exist among all the other travel backpacks that are filled with flannel, yoga pants, beef jerky, and granola.” From the outside, it really does look like a run-of-the-mill light hiking pack, although this disguise would be more convincing in a high-vis pastel colorway. Regardless, unlike traditional rifle cases, you probably won’t raise eyebrows if you carry this in public.
Above: Although the rifle bag expands to fit longer barrels, doing so eliminates any sense of concealment and makes it obvious you’re carrying a rifle.
The Apparition is advertised for SBRs with 10.5-inch or shorter barrels. With its brace extended, our 8.3-inch 9mm AR pistol (27-inch OAL) fit with about an inch to spare; our 11.5-inch SBR (29-inch OAL) wasn’t even close to fitting unless we unzipped the expansion pocket at the base of the pack. With that pocket extended, the Apparition can fit guns up to 33 inches long. However, we weren’t wild about how tight the expansion pocket is — it accepts a naked barrel or the end of a suppressor fine, but good luck trying to cram a full-length handguard with flashlight into it. Our folded 16-inch AK fit with the expansion pocket open but wasn’t easily removable, since the front sight post got snagged inside the pocket.
Above: The Apparition is more backpack than rifle bag, and that may be a good thing depending on your needs. The adjustable yoke, load lifters, and ample padding make it comfortable for long-distance carry.
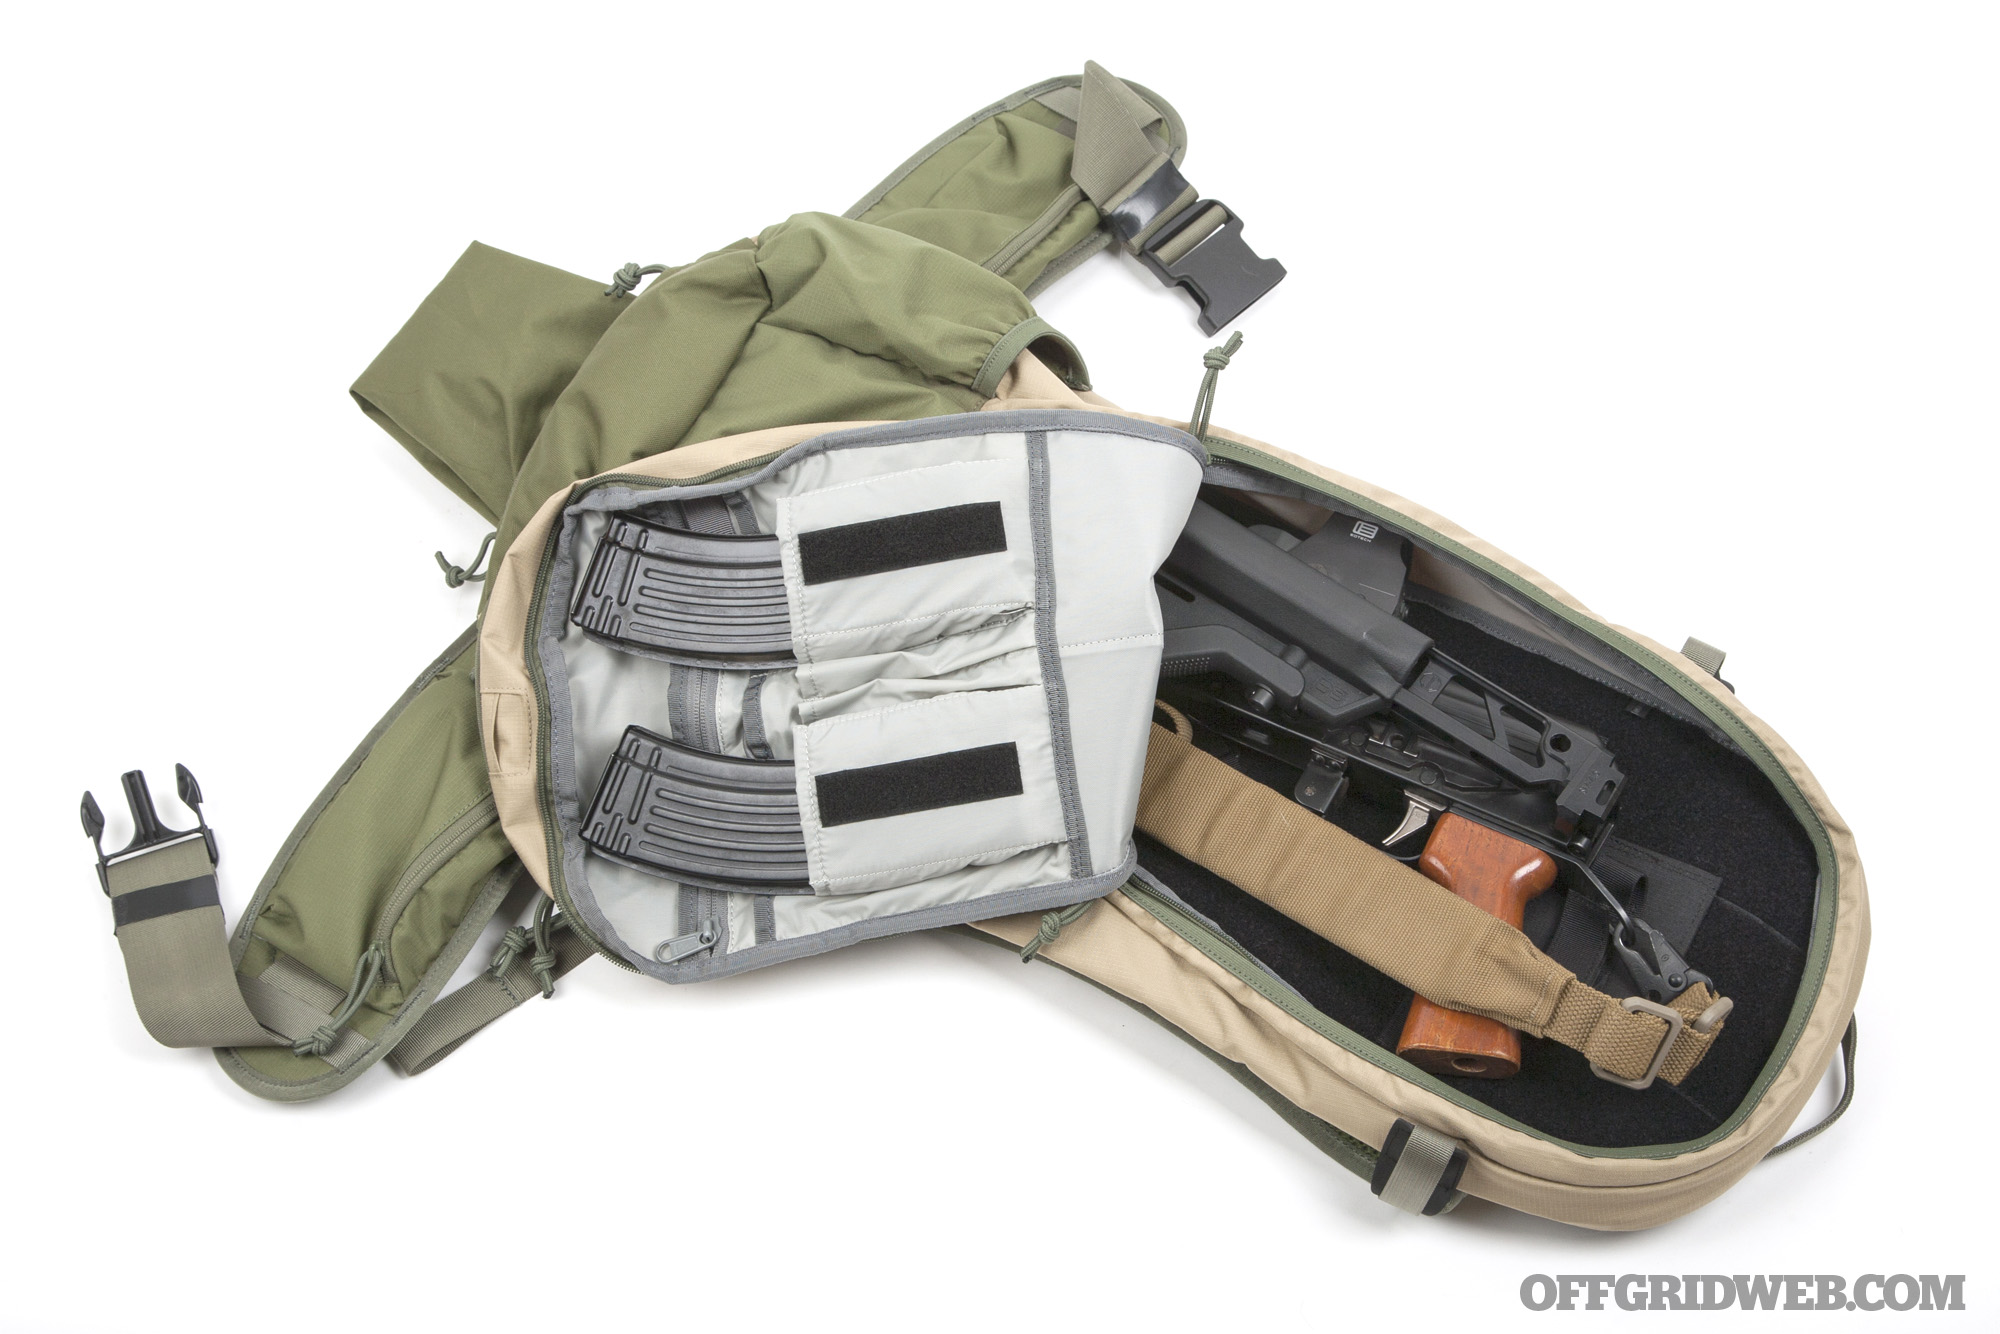
As a full-fledged backpack, the Apparition has many additional features. The coffin-shaped main compartment is lined with black loop fabric and has three retention loops to hold your gun in place. The inside of the flap features several pockets, including a zippered pouch and two magazine pockets with adjustable bungees. Moving toward the front of the pack, there’s another large zippered compartment lined with loop fabric — GGG says you can put a spare upper in here — plus a few more admin pockets and a zippered mesh pocket. A pass-through slit at the top of this compartment allows for a hydration tube or communications wires to be routed outside. One more zippered pocket on the front face of the pack offers storage for quick-access items.
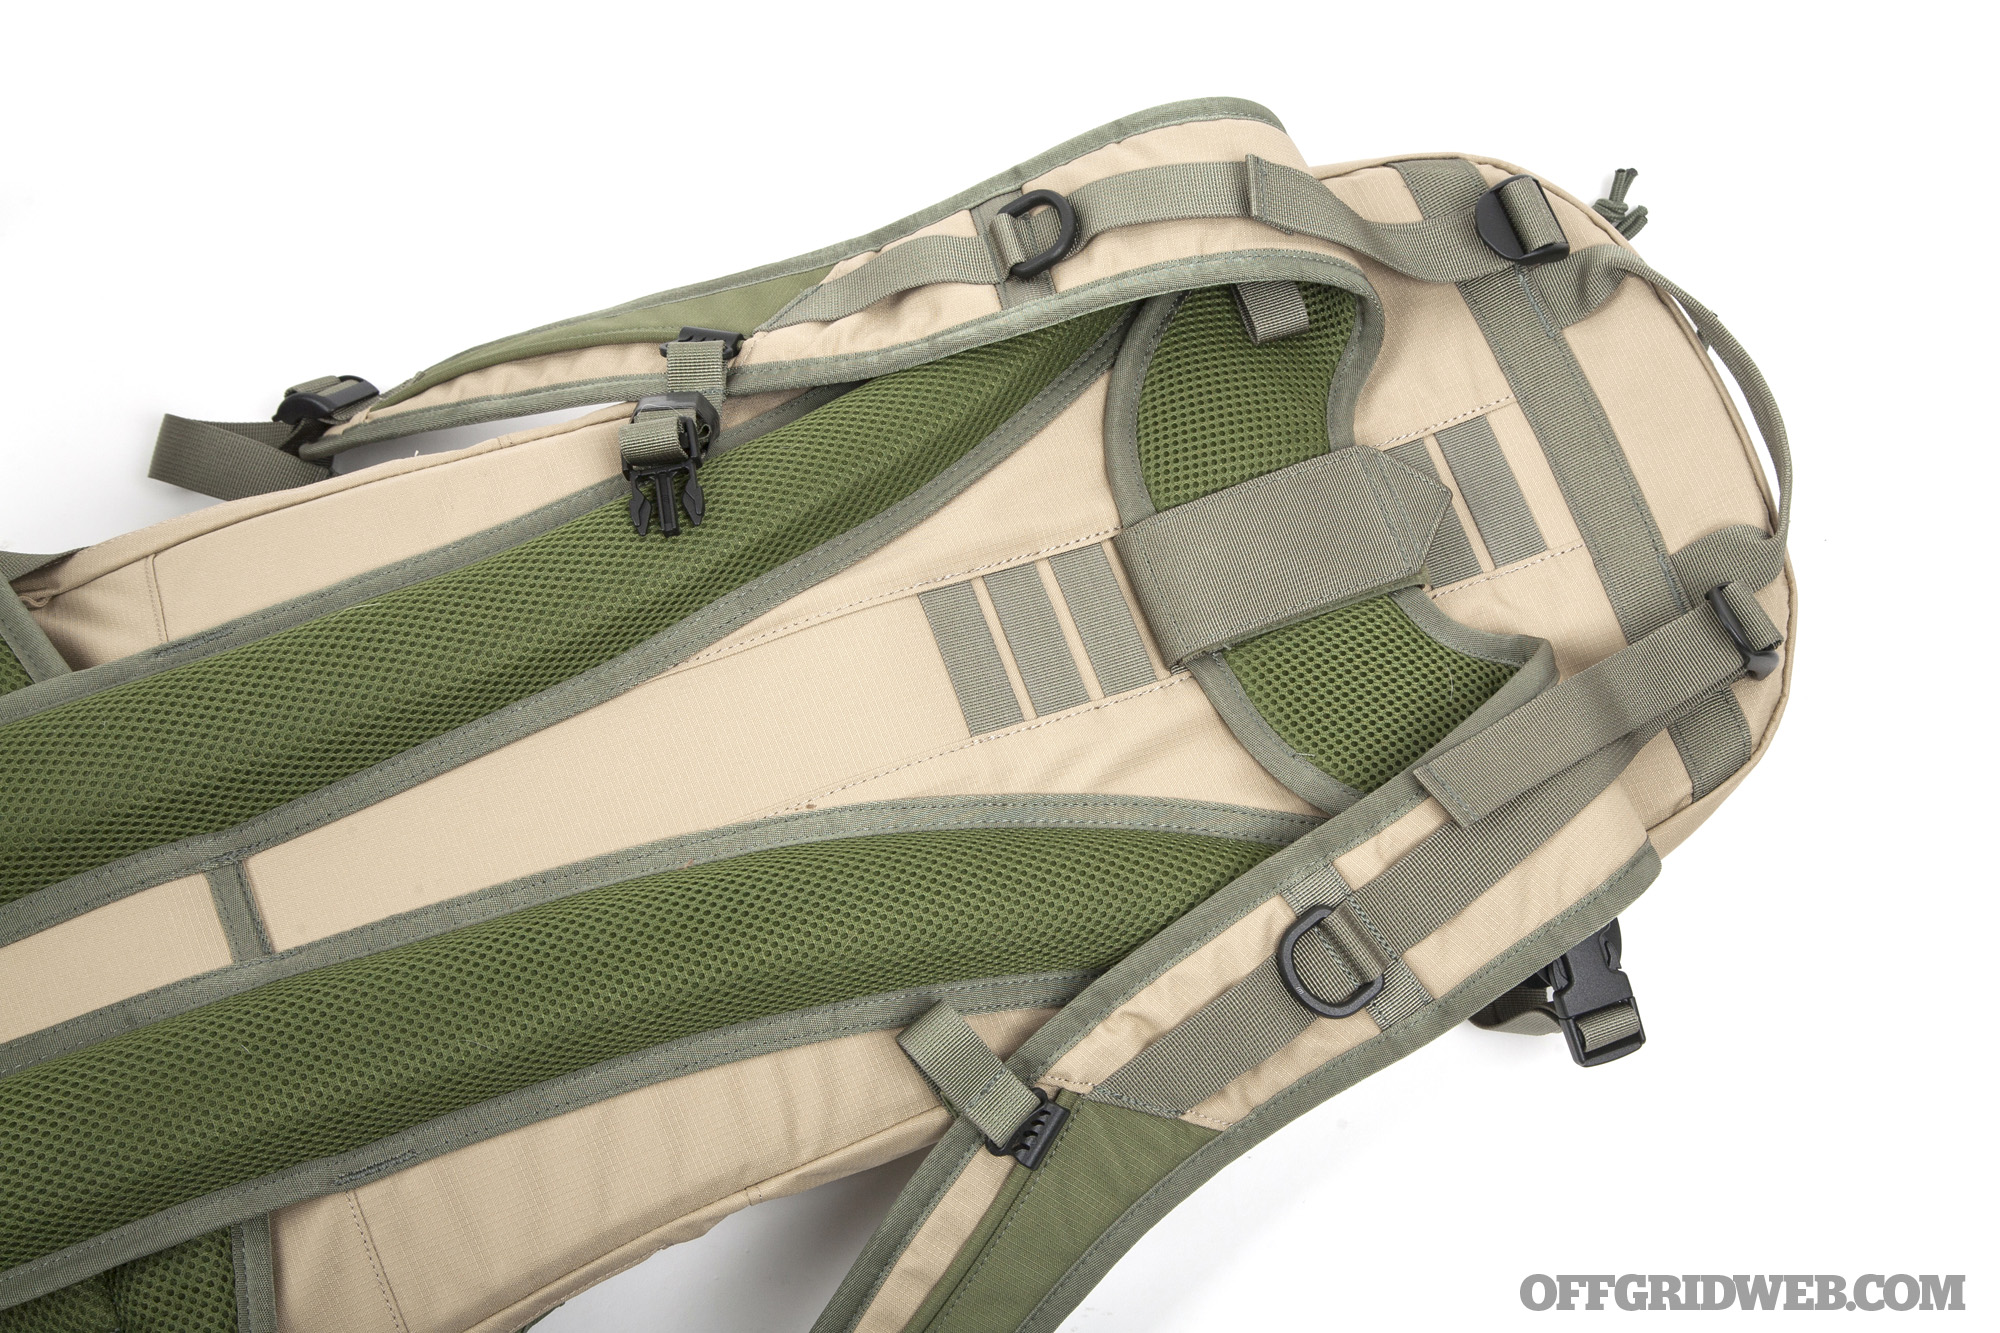
The base of the pack features two elastic water bottle carriers, two vertical-zip compartments that seem ideal for gloves, and two bottom zippers. One of these reveals a rain fly that can be placed over the pack; the other conceals the aforementioned barrel expansion pocket. On the back side of the Apparition, there are mesh lumbar pads, a removable mesh waist belt, and a mesh shoulder strap yoke that offers height adjustability and load lifter straps. All these touches make it clear that the Apparition was purpose-built as a backpack that can carry a gun, not a gun case that happens to come with backpack straps.
Above: Our AK was too wide to fit in the rifle bag with a magazine in the gun, but that’s not a problem. Two pouches inside the main compartment offer quick access to magazines.
PROS
It has the features we’d expect in a hiking pack, like load lifters, a comfy waist belt, and torso length adjustment. Even if you’re not carrying a gun, it’s a good backpack.
Main compartment has plenty of width for side-folders
Tons of organized storage for tools and sustainment gear
CONS
Don’t rely on the expansion pocket. It’s a tight fit for anything bigger than a barrel or suppressor, and it makes it fairly obvious what you’re carrying.
Coffin-shaped compartments feel inefficient — the bottom is always crowded and the top is always loose.
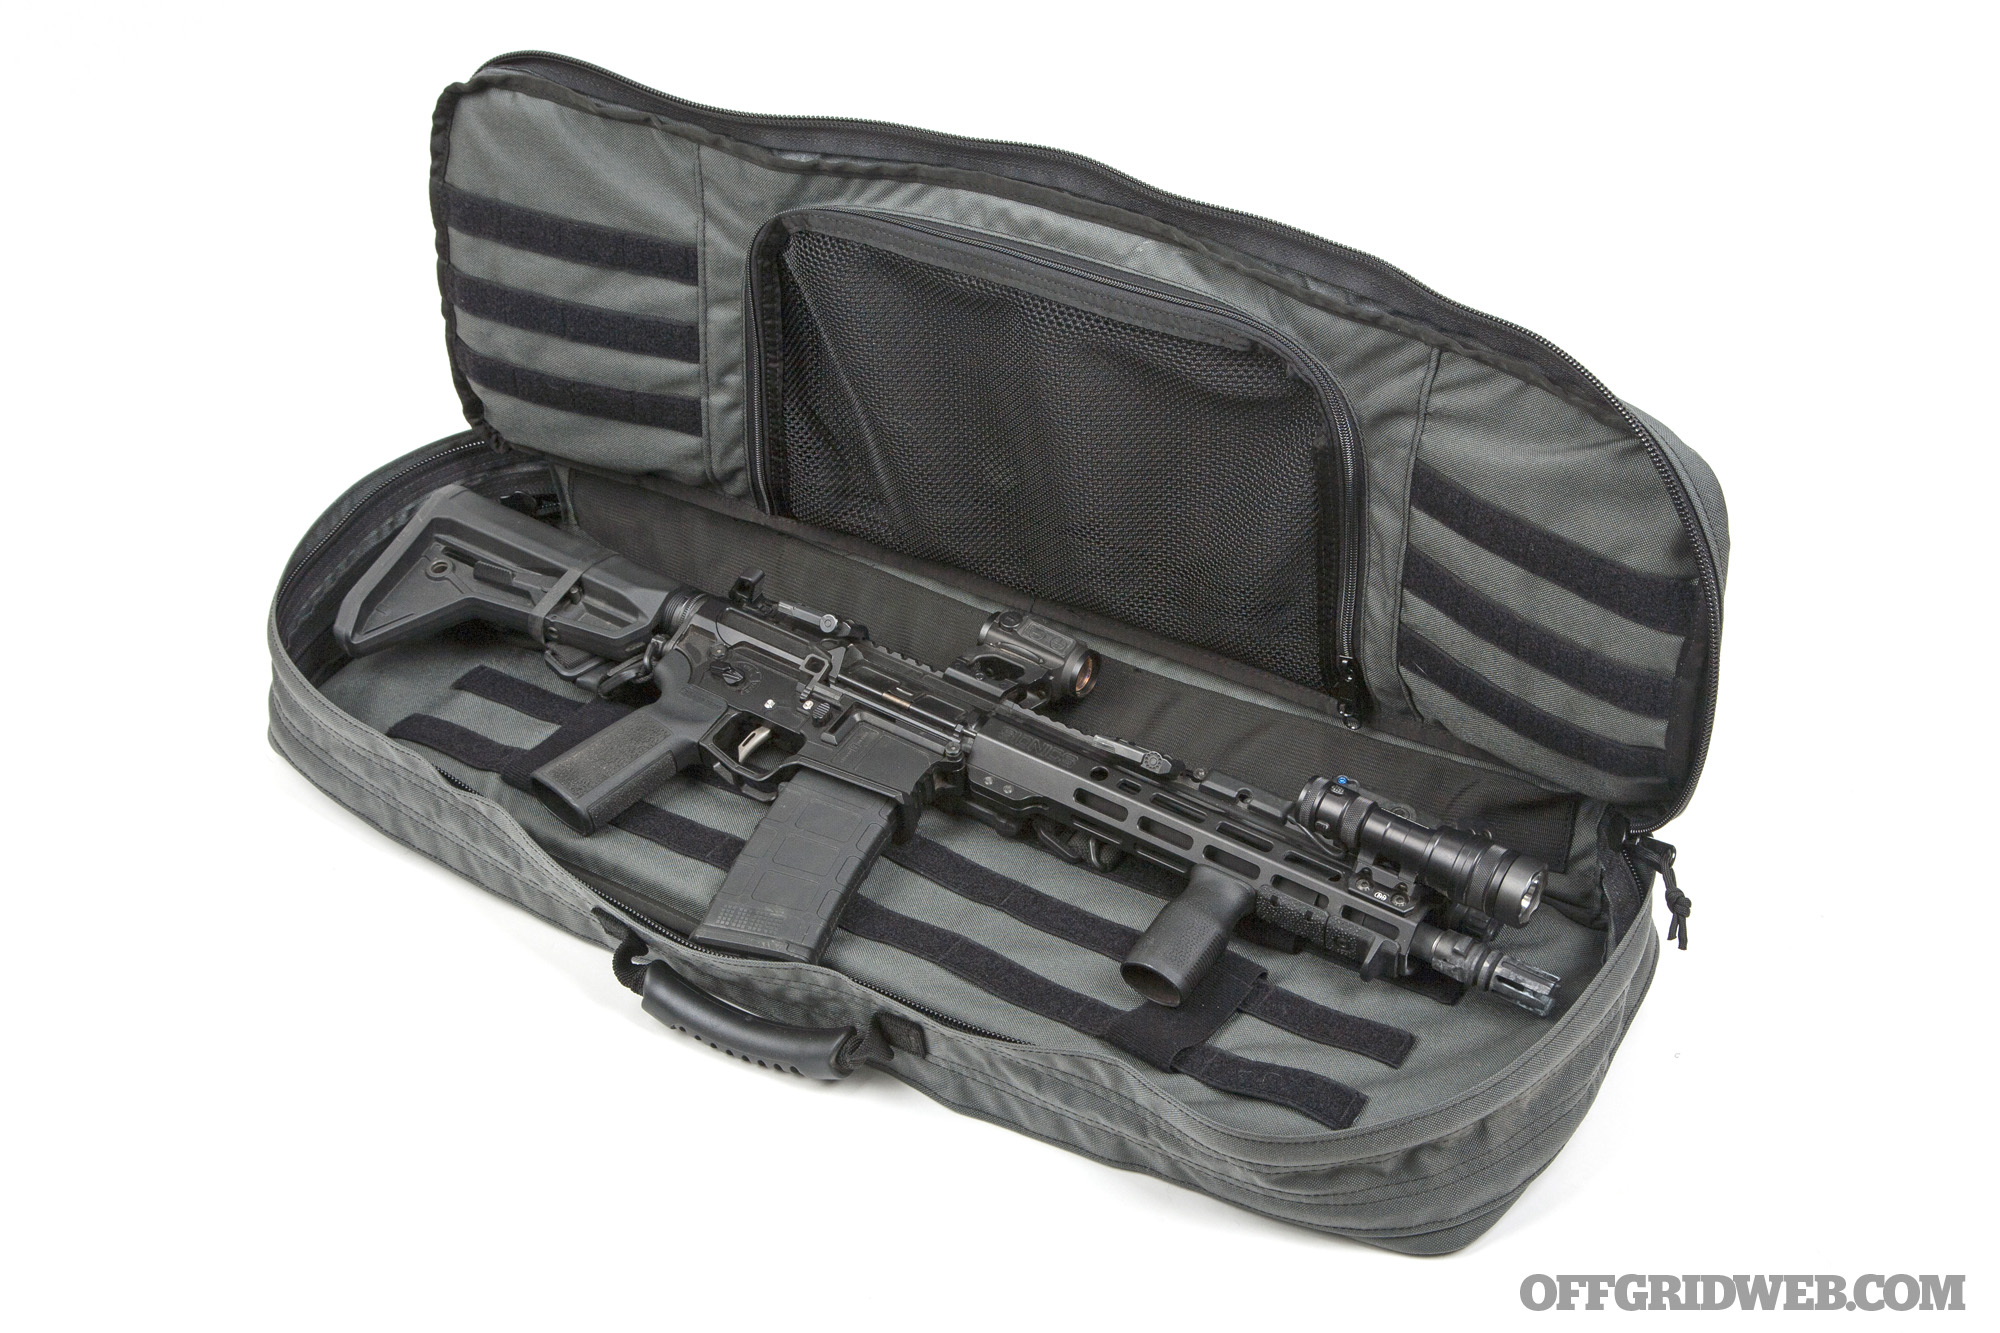
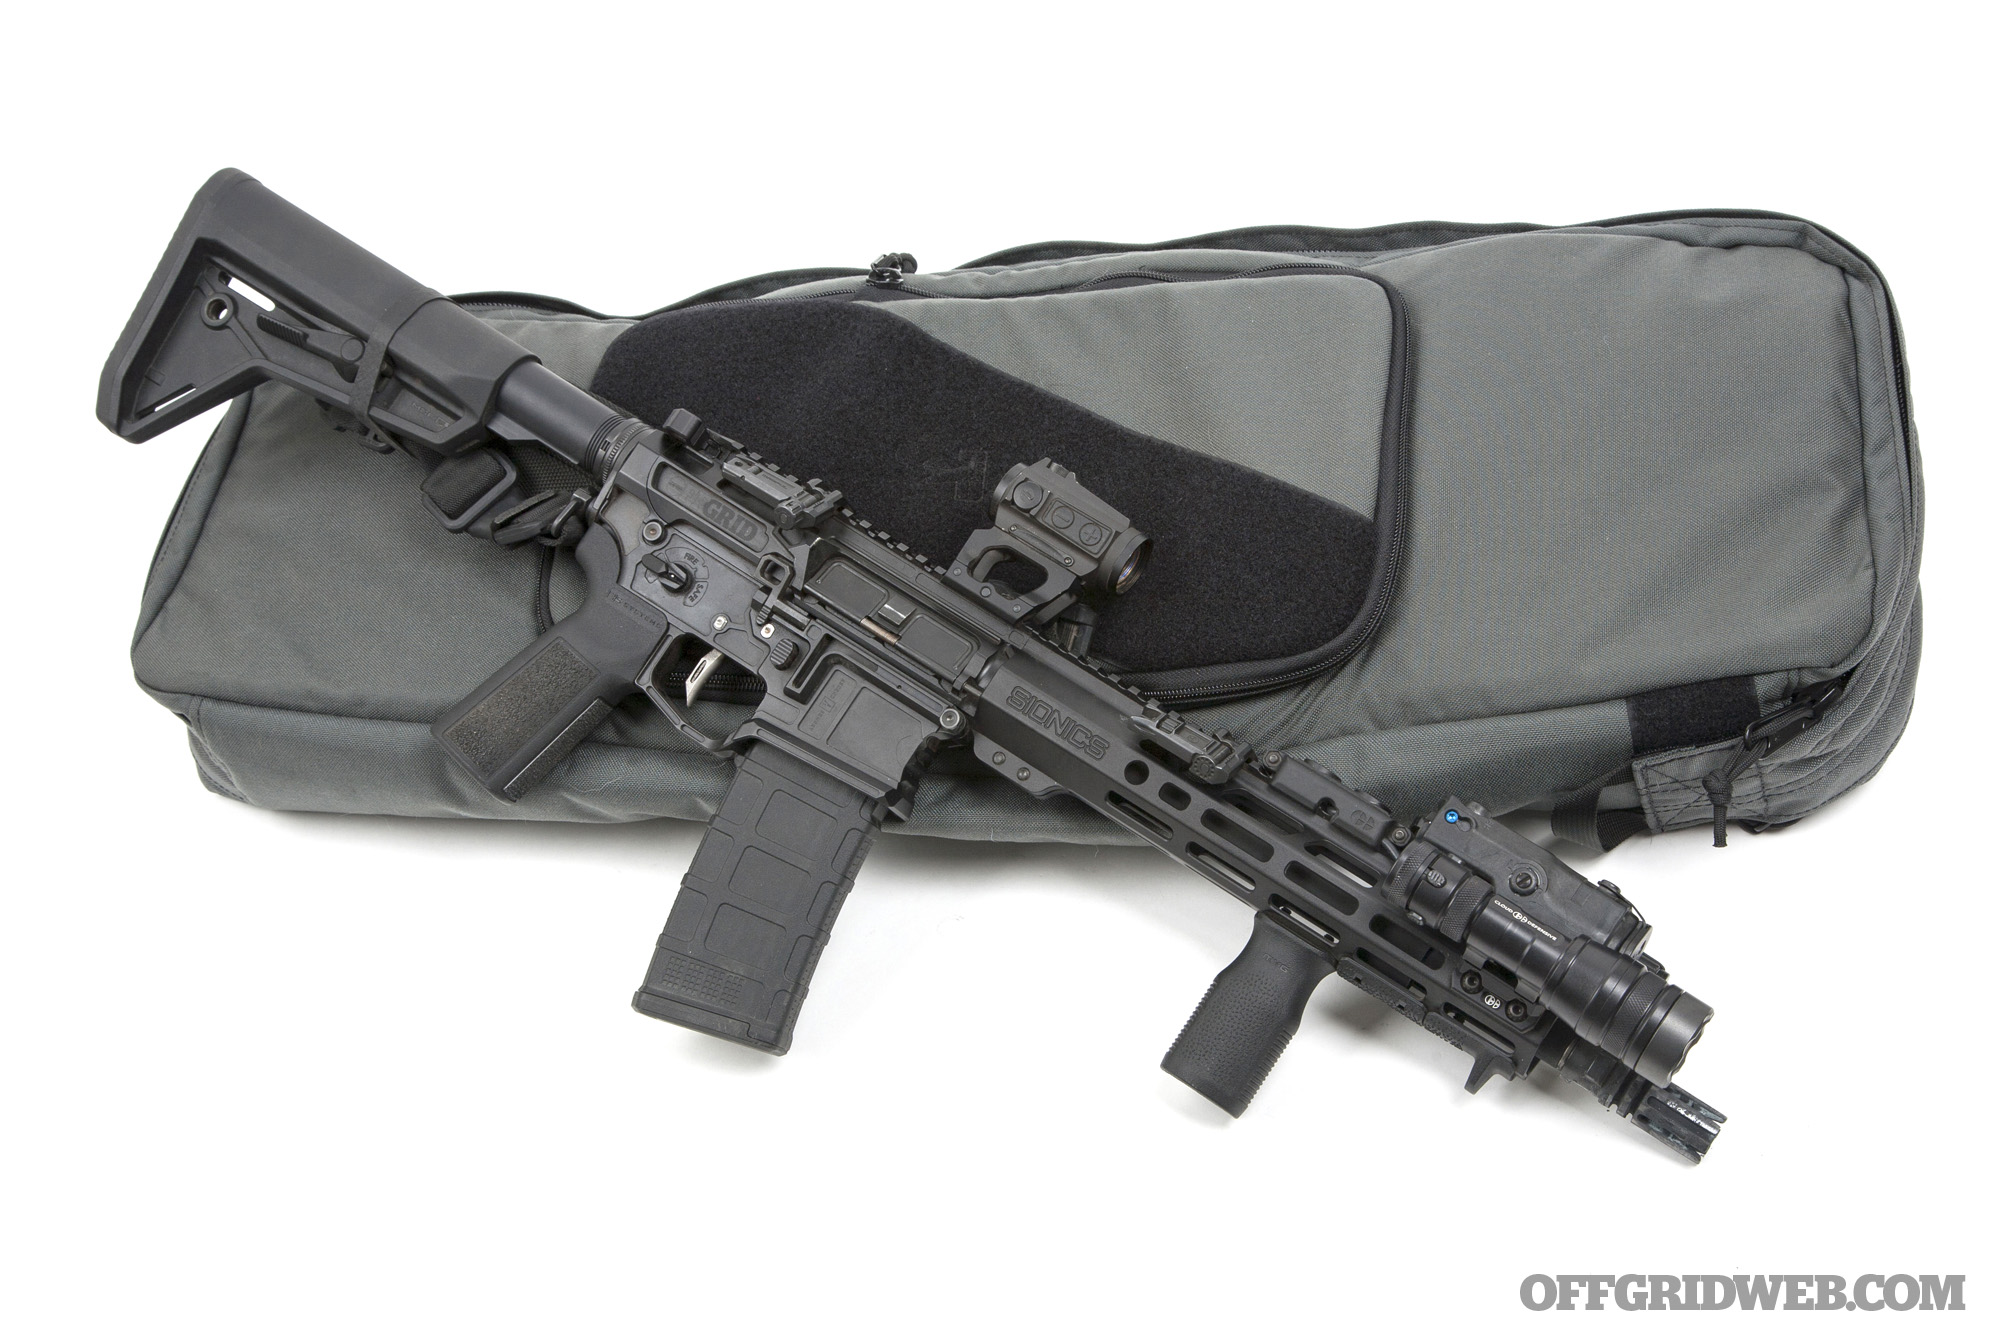
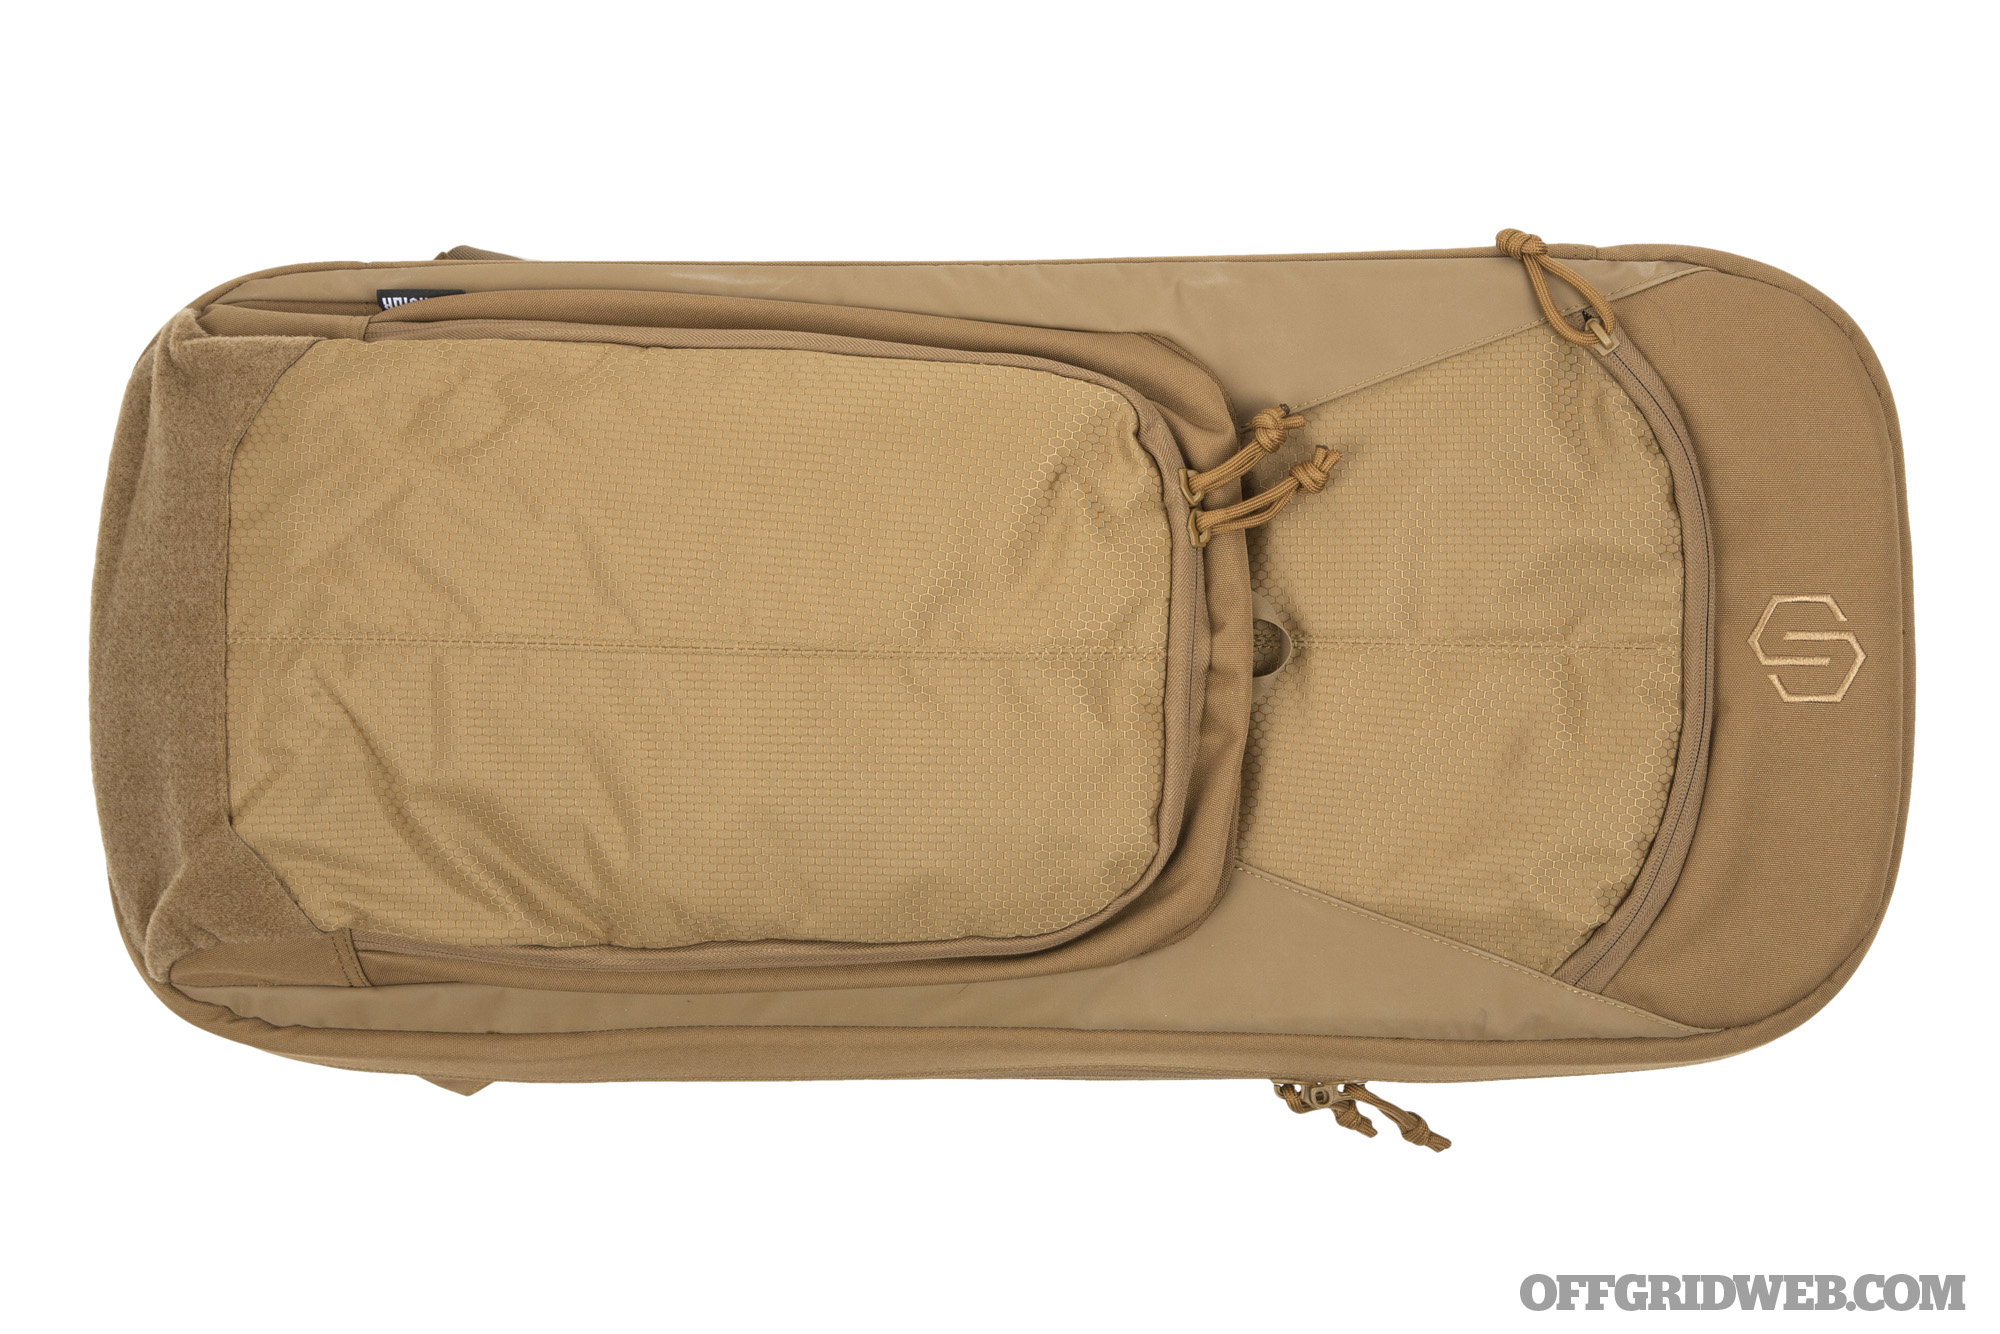
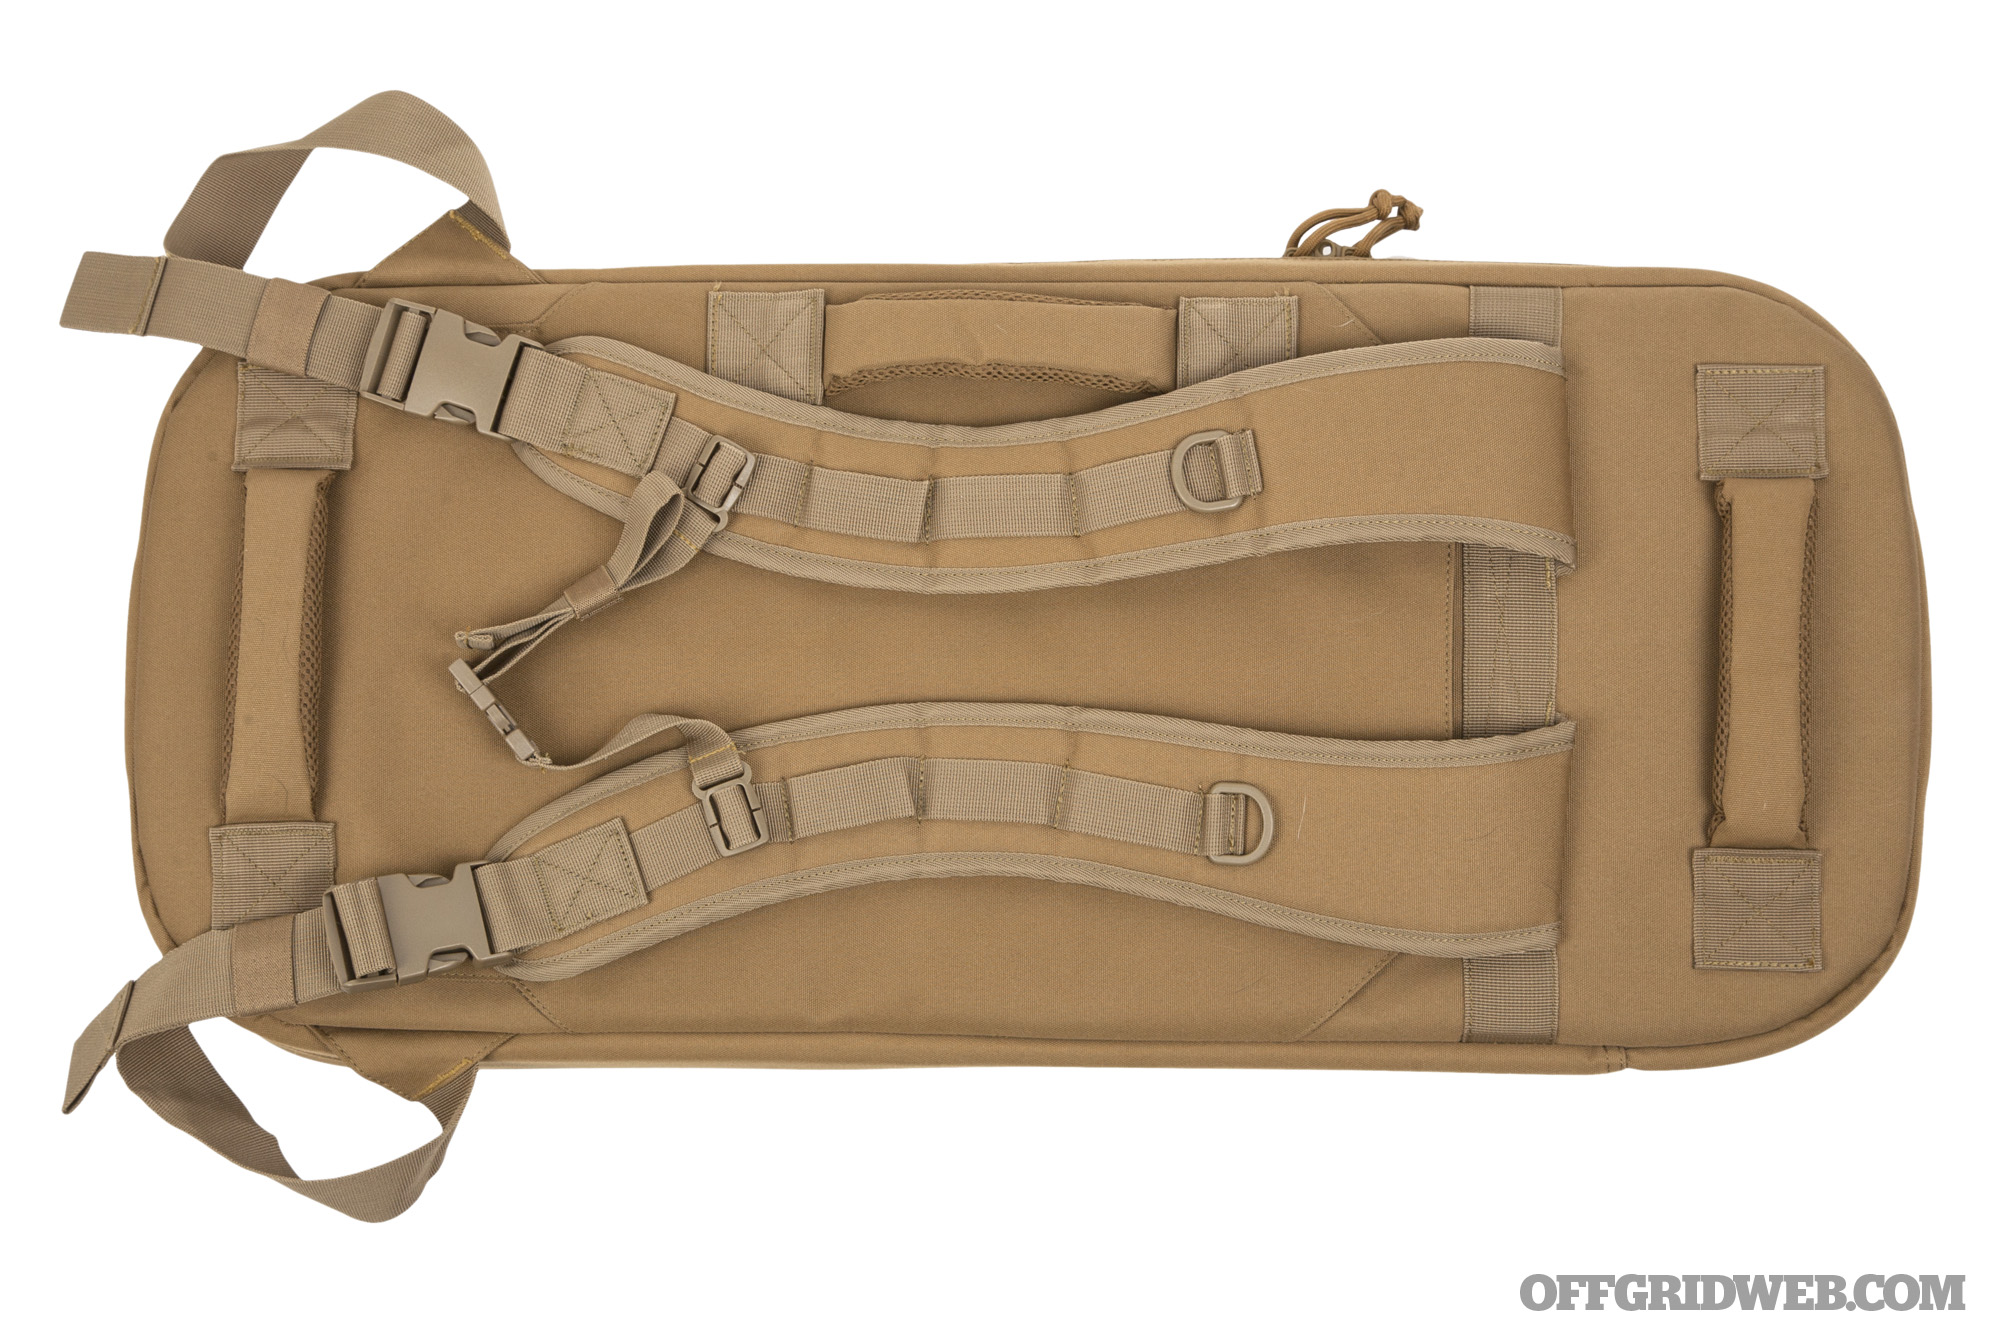
Notes Despite its incognito name, the Haley Strategic INCOG bears the closest resemblance to a traditional rifle case in this lineup. It features a rectangular footprint with three-sided zipper and clamshell opening. There’s no backpack harness, only a rubberized carry handle and an over-the-shoulder carry strap; the latter item can be concealed behind a hook-and-loop flap on the back of the case when it’s not needed. This rifle bag is only available in one colorway — Disruptive Grey with black accents. If you look closely at the diagonal hook fabric strip across the front pocket, you’ll see Haley’s signature dragonfly logo stitched in black thread. Although nobody is going to see this and think it’s not a rifle case, the subdued branding keeps it looking relatively generic.
If you need to access its contents quickly, the INCOG has a cool trick up its sleeve. Pulling the small nylon loop on one end of the bag tears two zippers open, creating an opening to retrieve the weapon within. This flap is held in place by a strip of hook-and-loop fabric.
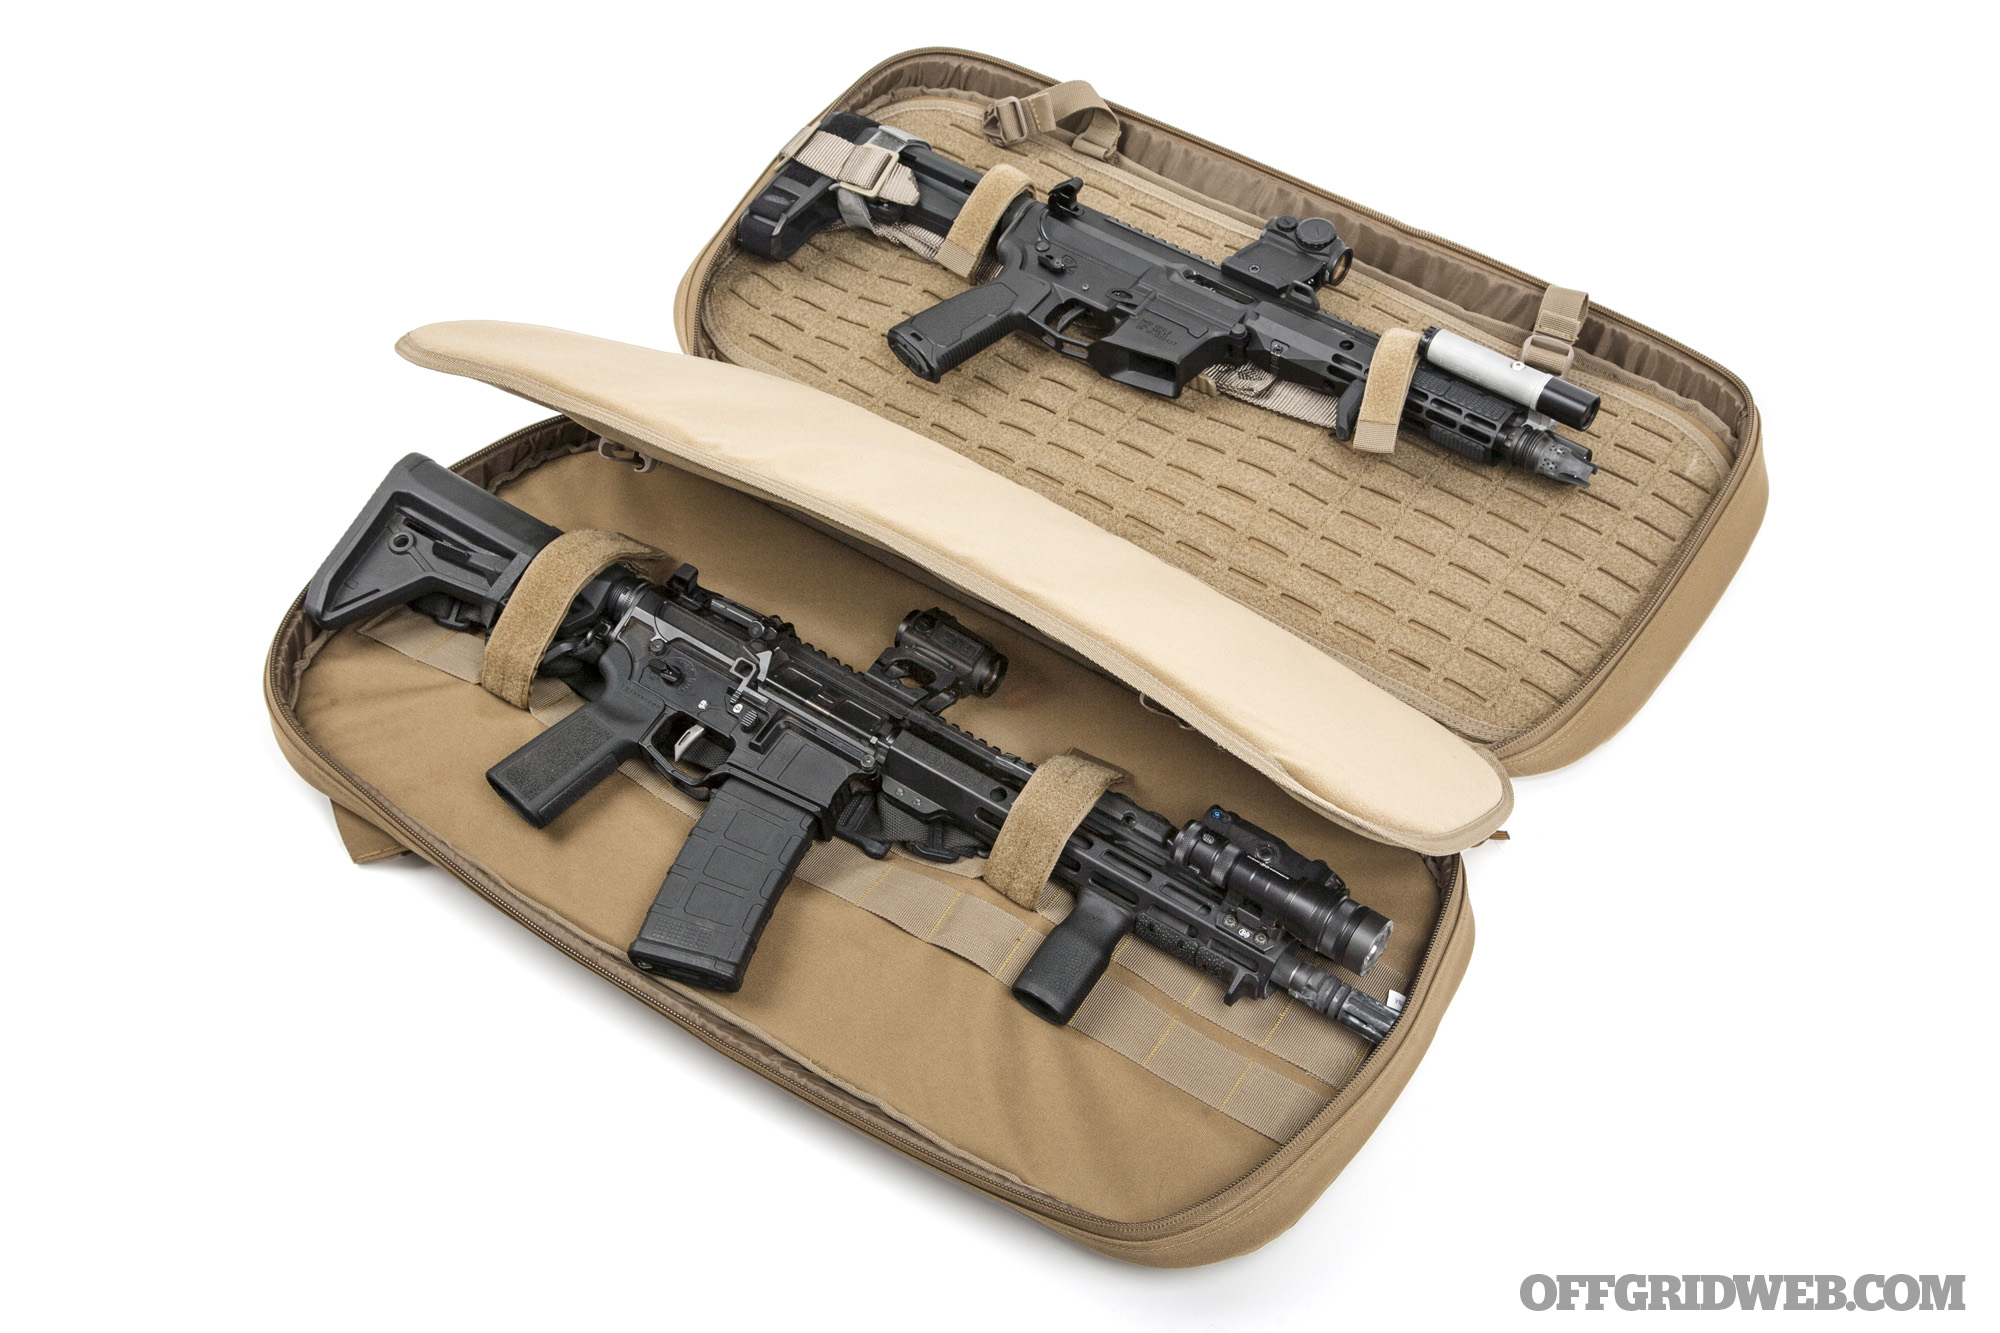
Above: The INCOG fit our 11.5-inch SBR like a glove, and its full-clamshell opening made it easy to pack and stow the rifle at the range.
This rifle bag doesn’t look much bigger than the competition, but it proved to be the perfect fit for our larger weapons. The 29-inch OAL SBR fit like it was built for this case, and so did the folded AK. The added width of a folding stock was no problem, since the INCOG’s boxy main compartment offers plenty of depth — you might even be able to fit two slim guns side-by-side, but there’s no divider to keep them from knocking against each other.
The interior of the main compartment is lined on both sides with webbing made from loop fabric, and four retention straps are included. These could be used to secure anything from a full-length disassembled upper and lower to a pair of very short AR pistols. There’s only one other zippered compartment to speak of, a 14×9-inch mesh pocket that’s only accessible from the inside of the case. The external zipper around this section doesn’t open it; instead, it allows it to expand out accordion-style to offer increased capacity. A small, soft pistol case or chest rig can fit into this space once it’s expanded.
Above: For fast access, yank this handle to quickly unzip one end of the rifle bag. The rifle can be removed without opening the bag fully, as long as you didn’t use the internal retention straps.
PROS
Easily fits a variety of weapons up to 30 inches long, even those with bulky accessories
Four retention straps provide a way to securely carry a full-length upper and lower, or an SBR with two uppers
CONS
Traditional rifle case shape isn’t as INCOG as the name implies
Single accessory pocket doesn’t provide organization for small tools and accessories
Only one colorway
Savior Equipment Specialist Covert 30
Exterior Dimensions: 30 by 13.5 by 5 inches
Maximum Capacity: Not advertised
Weight: 7.4 pounds
Colors: Dark FDE (pictured), Obsidian Black, OD Green
Notes We’ve learned to be skeptical about buying anything gun-related on Amazon, since that online marketplace is inundated with cheap off-brand products and counterfeit items. But every once in a while, we find something that offers impressive quality at a surprisingly affordable price — such was the case with Savior Equipment gun cases. We bought one of these cases a few years ago on a whim, and were surprised by how sturdy and well-built it was. We’ve acquired a few more since then, and even though they’re not perfect, they’re worlds better than we expected at this price point. The stitching is neat, the zippers are smooth, and the 600D ripstop polyester fabric is tough and thoroughly padded.
Above: Our 11.5-inch SBR was just barely short enough to fit in this bag with the barrel “bucket” removed. And although it’s advertised as a single rifle case, we found that the Specialist 30 can easily fit a second weapon.
The Specialist Covert 30 is advertised as a single rifle bag, but it’s clearly capable of hauling two sub-30-inch SBRs thanks to the center divider. This removable, padded panel is secured by two buckles on one side, and by a strip of hook-and-loop fabric on the other. The bag’s primary half contains two adjustable retention straps and a hard foam “bucket” to hold a weapon’s muzzle in place. Behind the divider, the other half features a complete field of laser-cut loop material with two more retention straps. Although you can easily stash a second rifle in here, it would also be a good fit for an extra upper plus MOLLE pouches full of medical gear, tools, and spare parts. We were able to pack either the folding AK or 11.5 SBR into the case alongside our Aero EPC-9 AR pistol, but couldn’t squeeze both the AK and SBR in at the same time due to their combined width. Savior Equipment offers a 34-inch version of this rifle bag if you need to carry longer weapons.
Above: A large front pocket offers attachment points for MOLLE pouches, plus two zippered pockets for small tools and accessories.
This rifle bag features three external pockets. The smaller zippered pocket contains elastic loops that are ideal for retaining suppressors or multi-tools; the larger full-zip pocket features webbing for MOLLE pouches on one side and two large mesh pockets on the other. The final pocket is hidden — pull the loop behind the top of the large pocket to rip open its hook-and-loop seal. It’s lined with more hook-and-loop fabric, providing an attachment point for a Velcro-backed pistol holster or sandwiched Velcro mag pouches. Three sturdy grab handles and a pair of tuckable, padded shoulder straps make it easy to carry this bag downrange.
Unfortunately, there’s one glaring downside to this pack: weight. It’s inexpensive, durable, and feature-rich, but weighs nearly twice as much as the next heaviest bag we tested. If you’re only planning to carry it a few yards from your car to the range bench, the extra pounds won’t matter, but it’s definitely worth considering if you plan to hike substantial distances with it on a regular basis.
Above: The top pocket is just the right size for this Gemtech Shield suppressor, and even includes an elastic band to hold it in place. Additional elastic slots fit pens, flashlights, or screwdrivers.
PROS
Surprisingly well-designed and sturdy given its sub-$100 price point
Capable of hauling two compact weapons with a divider in between, plus supplementary gear
Easy to carry thanks to three grab handles and fully stowable shoulder straps
CONS
All the extra features and durable materials add pounds — this bag is noticeably heavier than the competition.
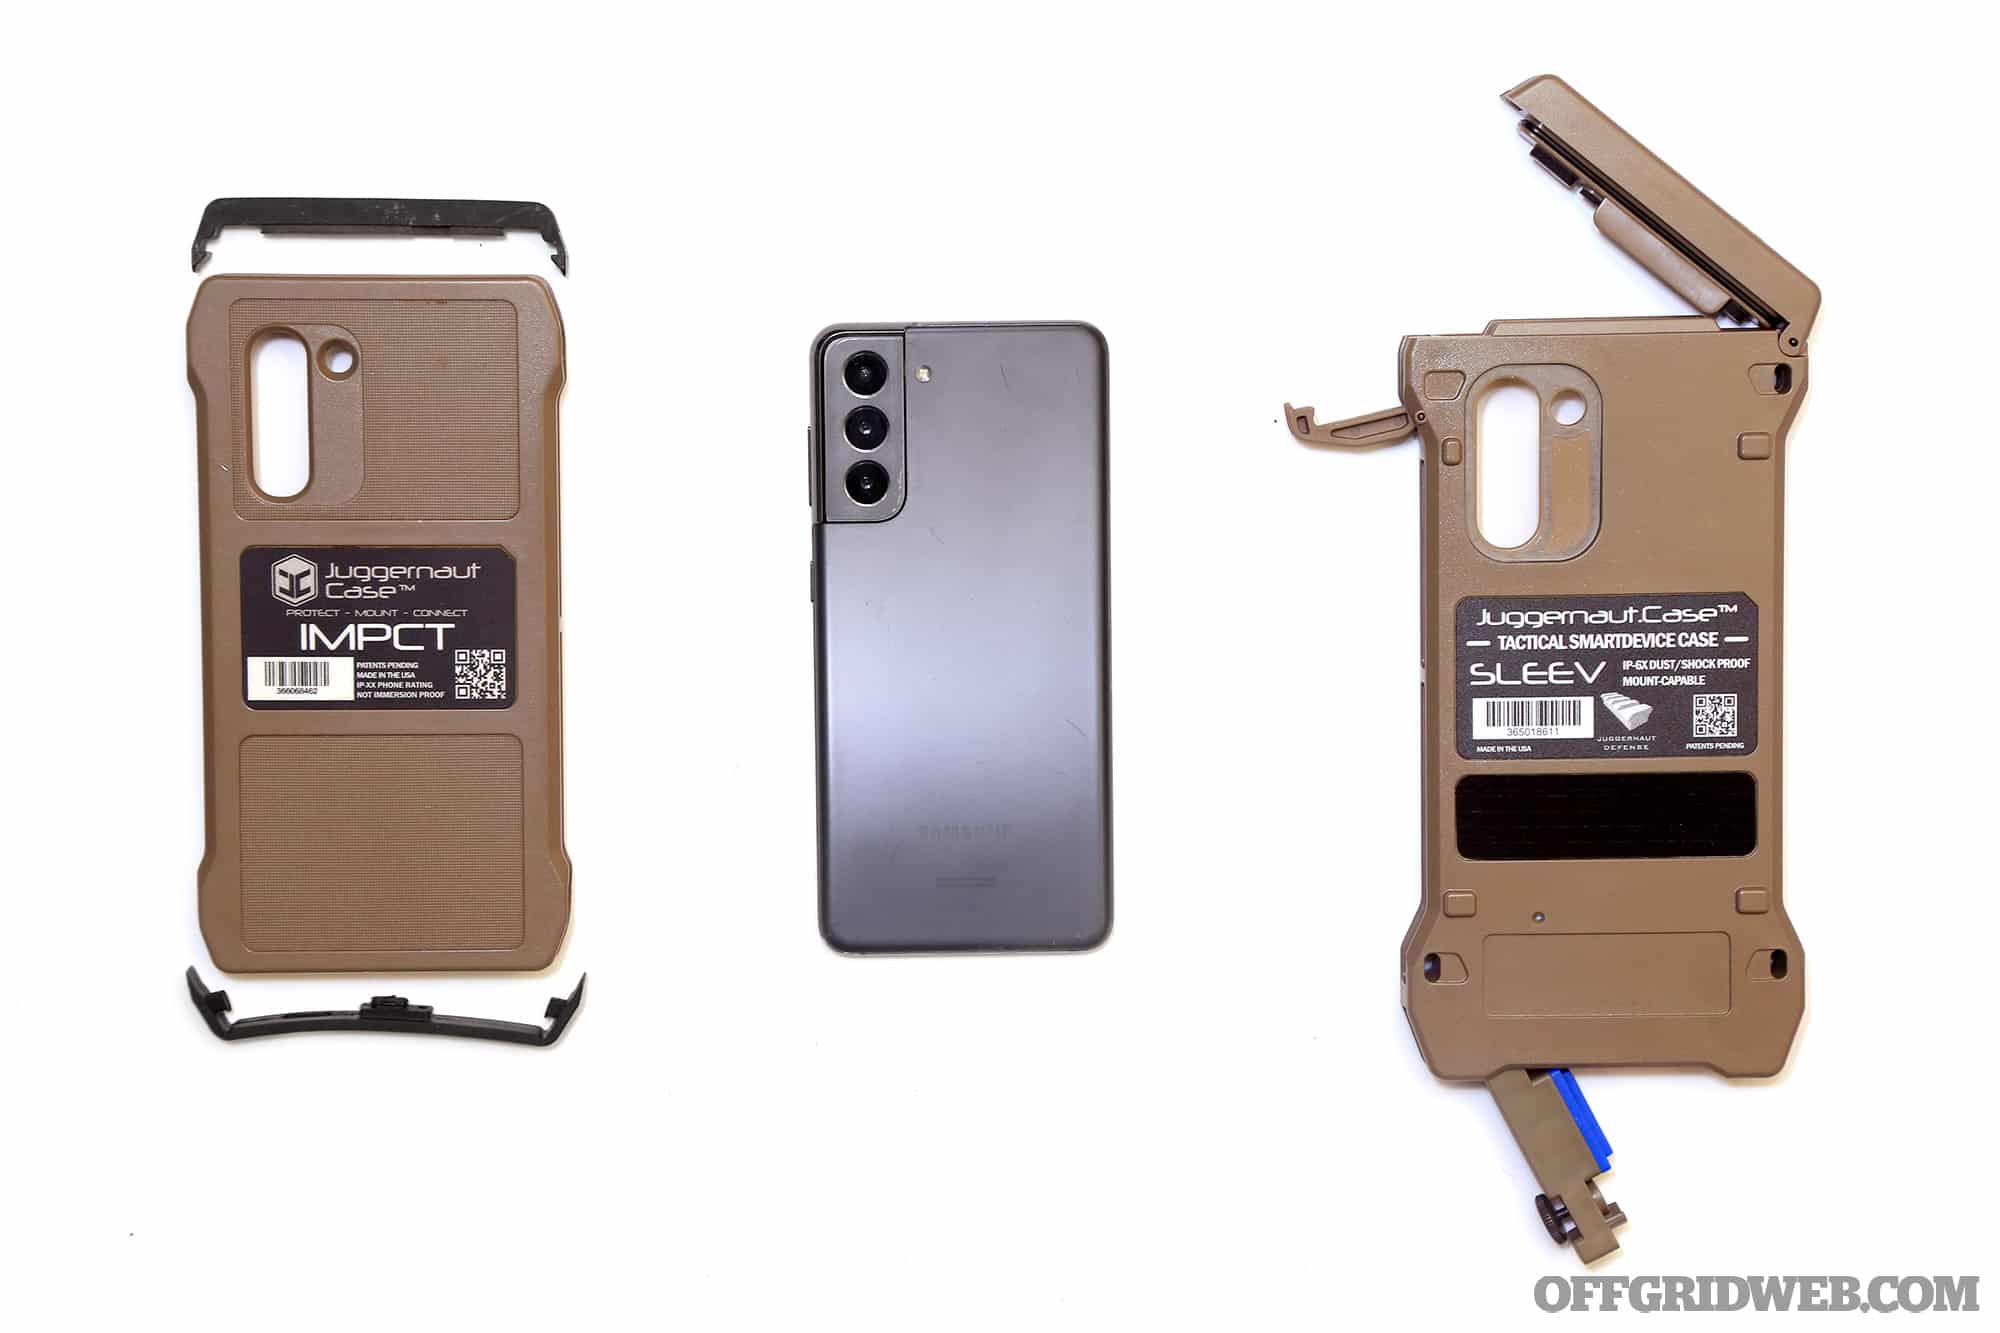
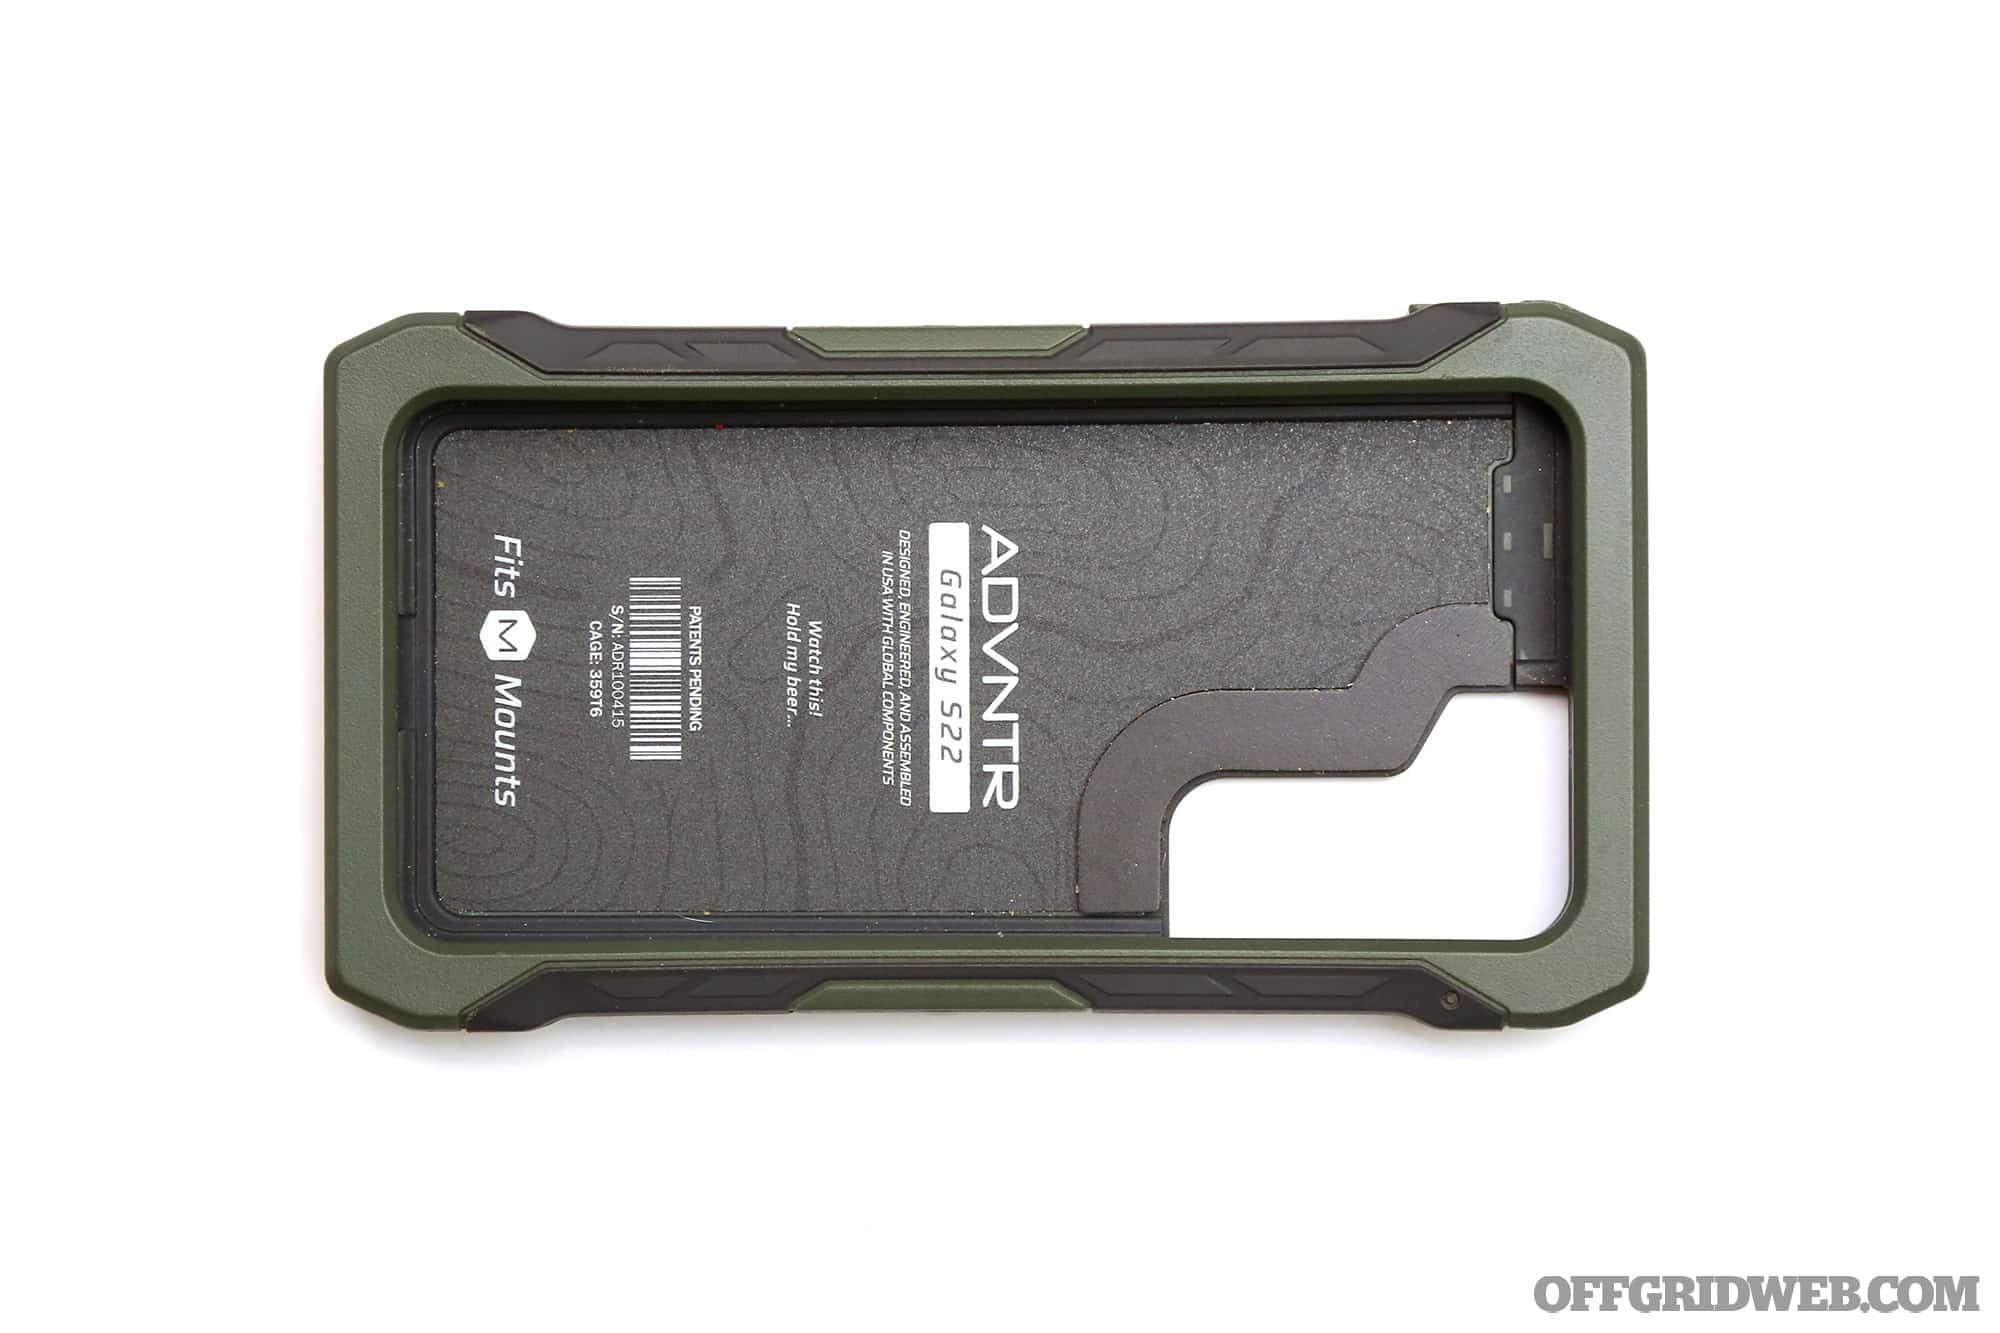
We recently completed a top-down review of the ruggedized Juggernaut phone cases and mounting ecosystem. Shortly after that article was complete, Juggernaut announced they would be releasing a new, expanded line of phone cases and mounts. Good news up front: both cases and mounts are backwards compatible. If you have a legacy mount, all the new cases will still fit in those mounts. Likewise, if you purchase one of their new-generation mounts, your existing phone case will fit into it without problems. (Our first look of the improved PALS plate carrier mount can be found here.)
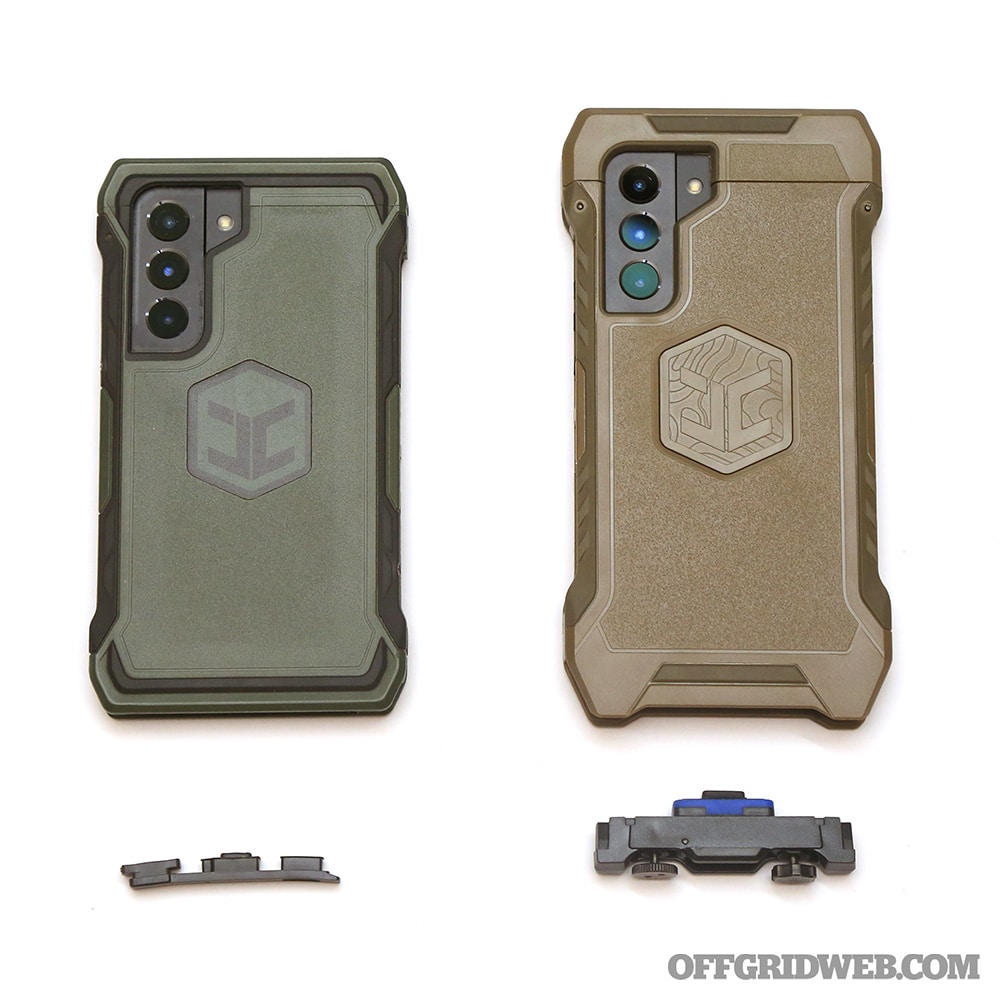
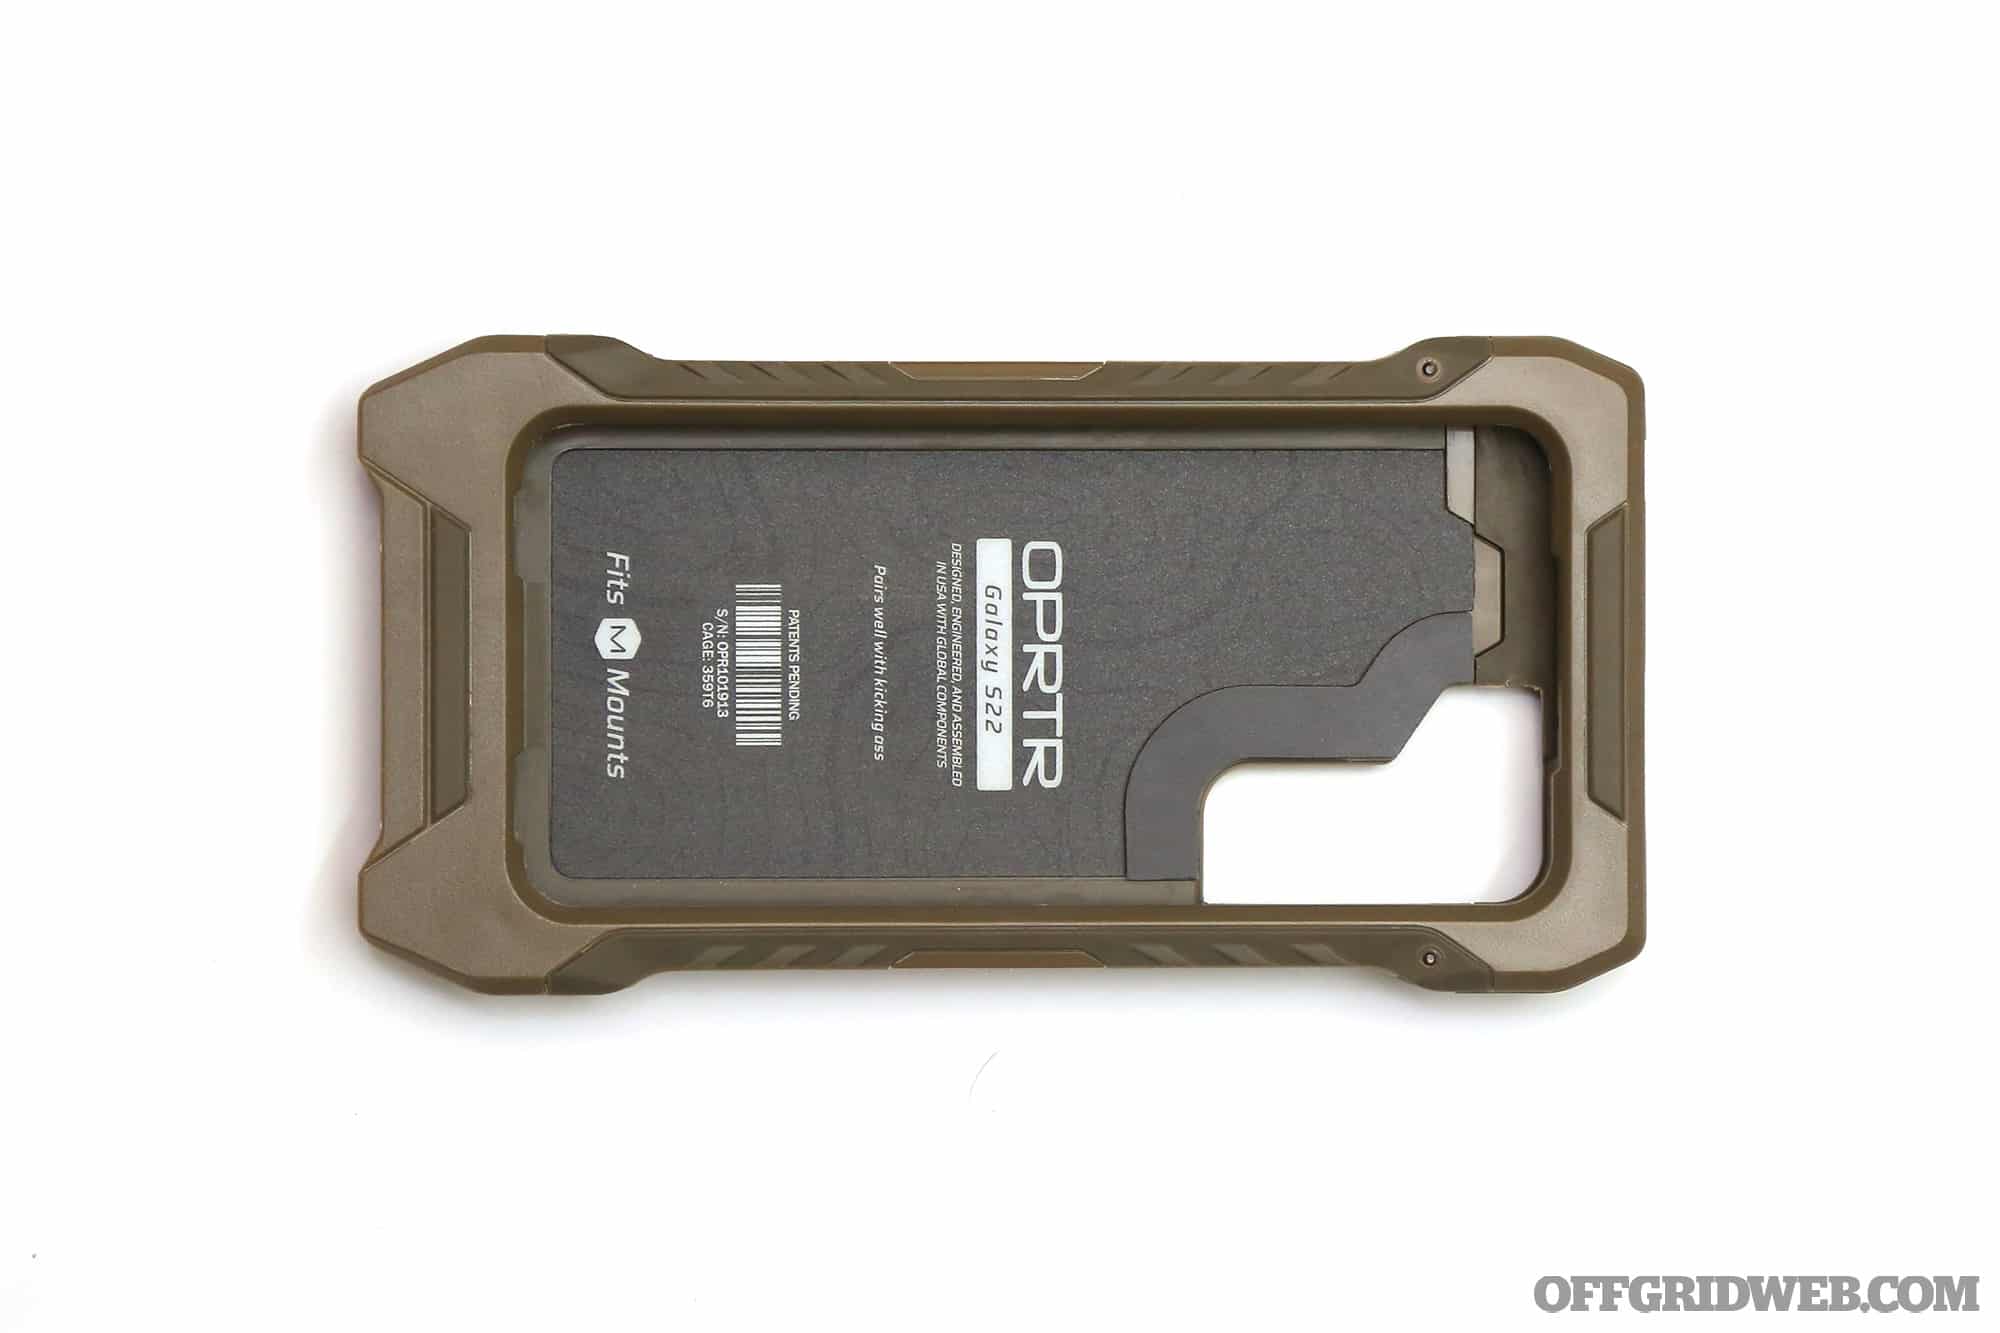
Above: The outgoing IMPCT and SLEEV cases offered two levels of protection; the new ENDVR, ADVNTR, and OPRTR families provide three levels to choose from.
Previously, there were two Juggernaut phone cases: the IMPCT and the SLEEV. The IMPCT was their “medium-to-hard” use case, with the SLEEV being up-armored even further for extra-rough handling, and optimization for Juggernaut’s line of power and data transfer cables. Their new line has expanded to include three case options, instead of two, to cover a wider range of use-cases.
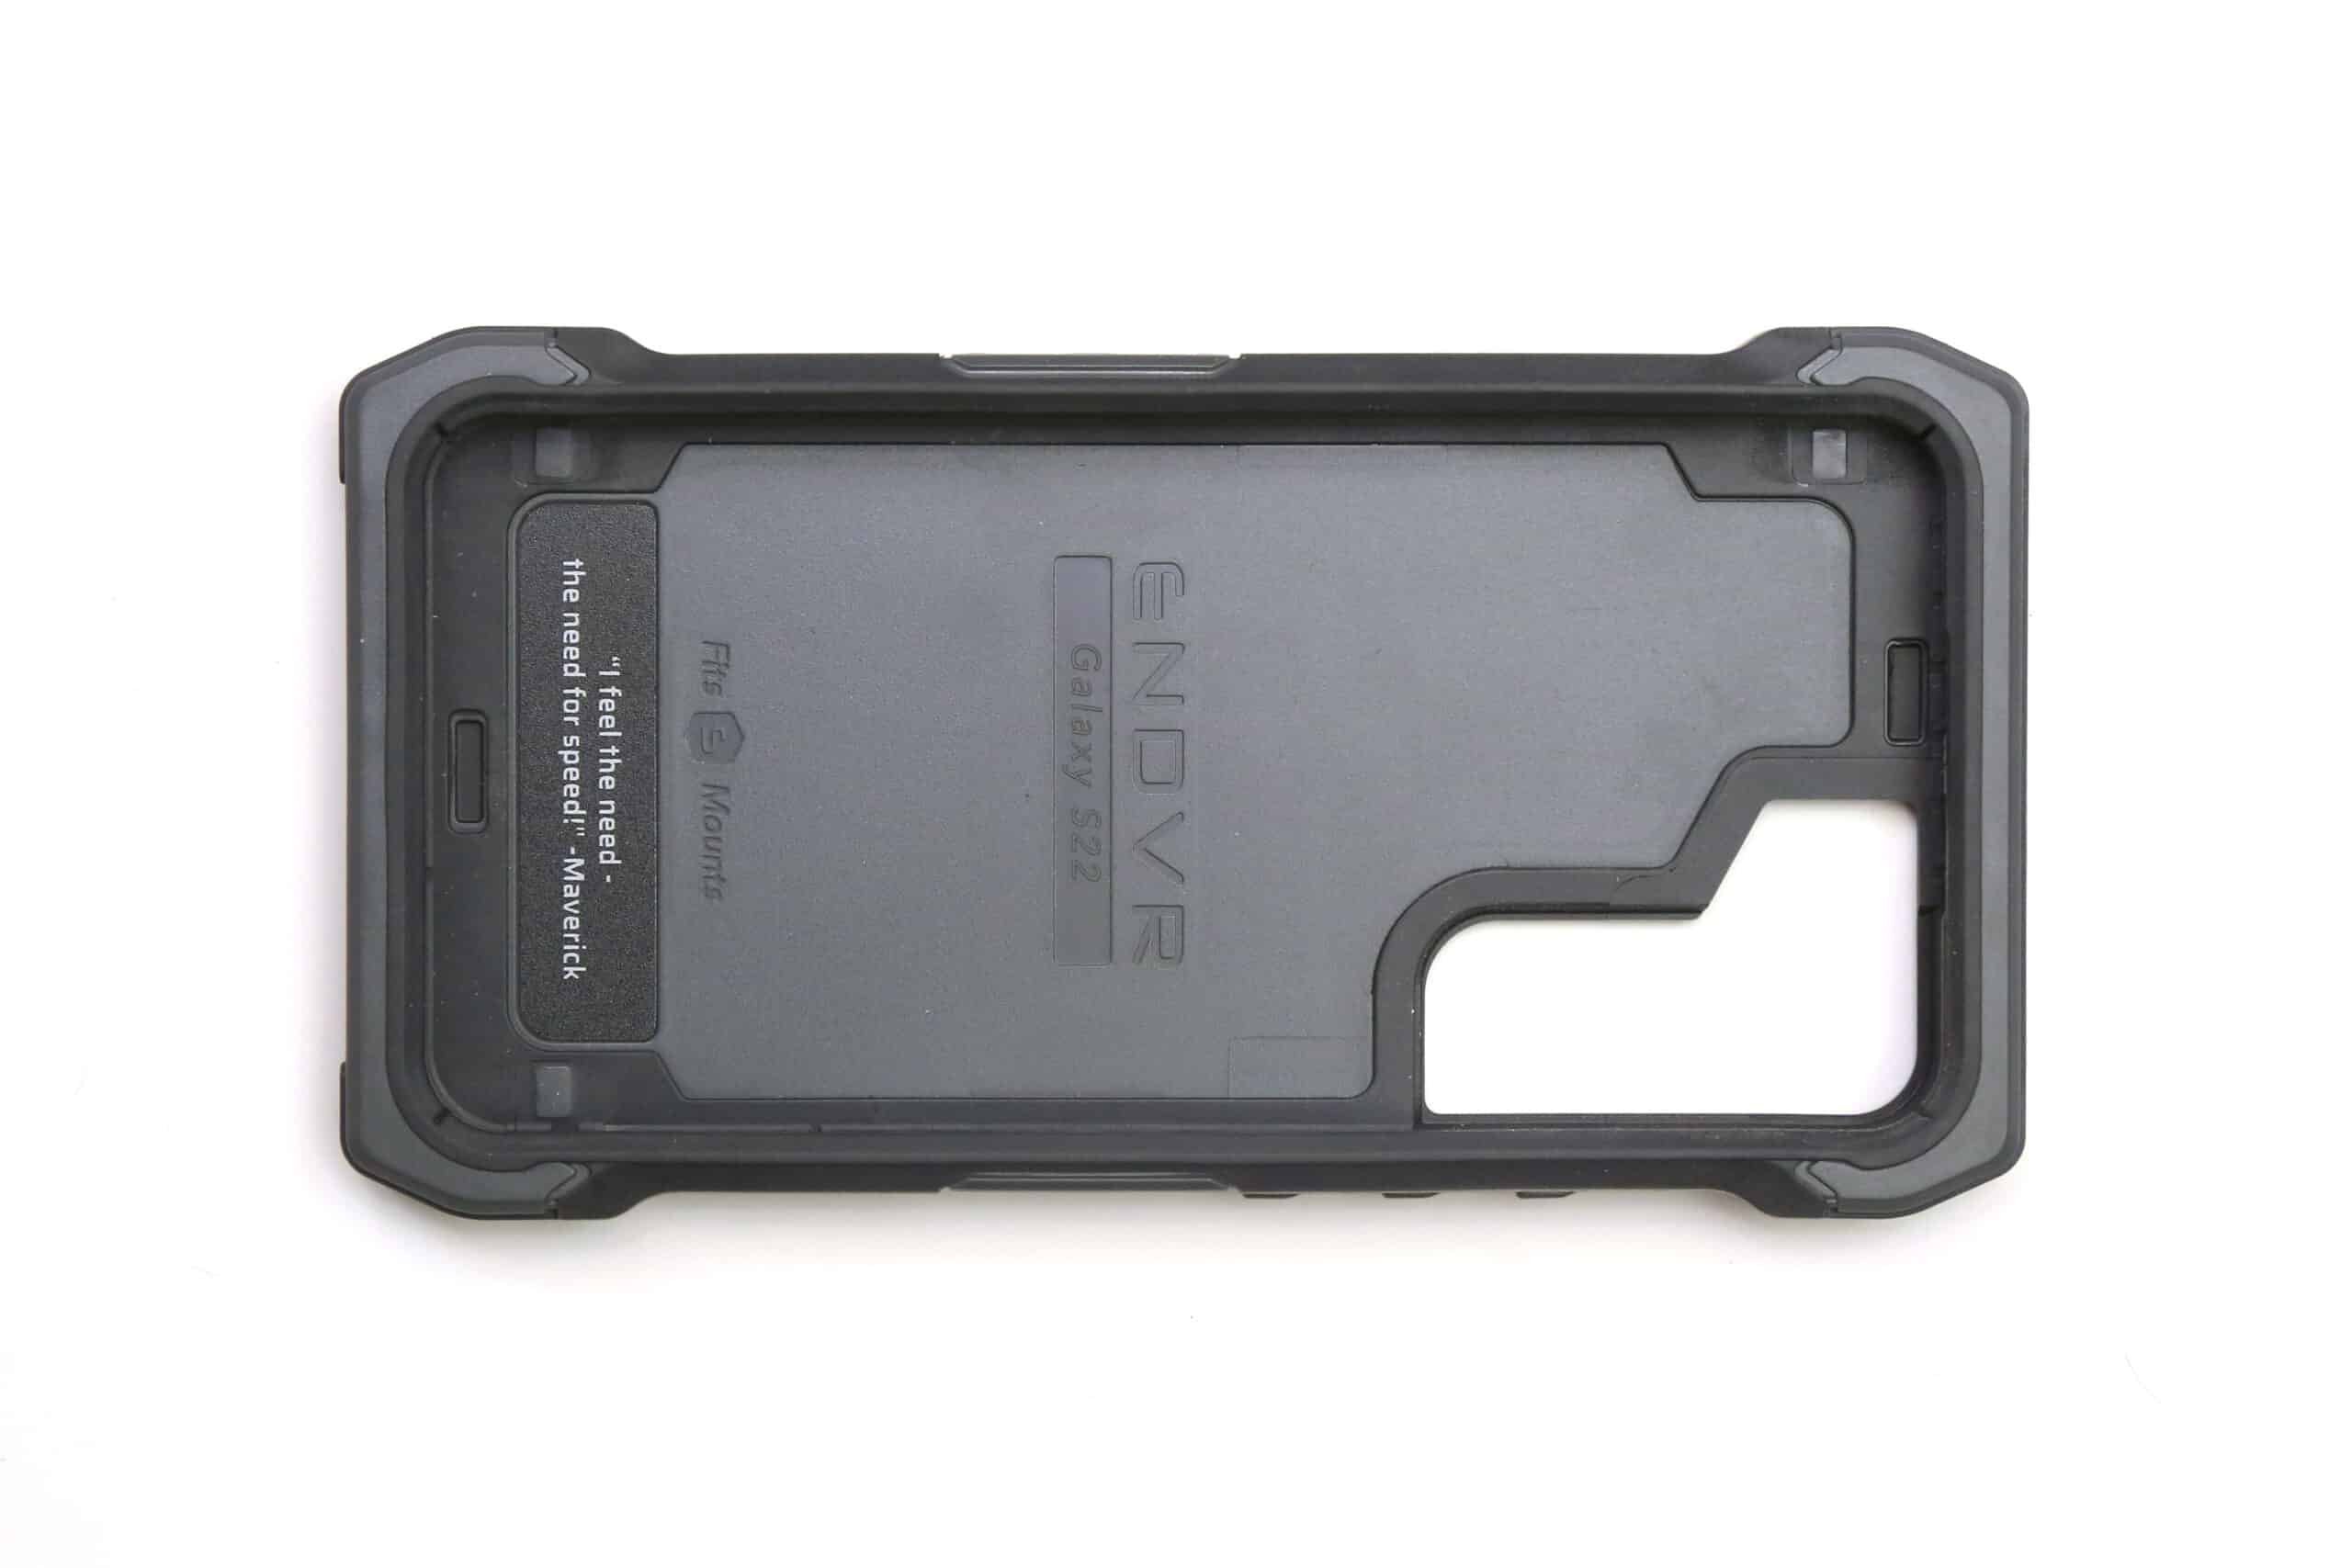
Juggernaut Case Everyday ENDVR
At the more casual end of the spectrum is their ENDVR case. The ENDVR is a front-load “snap on” case. Simply press the phone down into the corners of the case until it stretches and snaps down over the body of your phone. This is how most commercial phone cases work, but that’s pretty much where the similarities end.
Optimized for EDC and weekend warrior adventures, the ENDVR does not feature a port sealing mechanism like its counterparts. It does, however, still lock into Juggernaut mounts. Whether you want a belt clip for your work pants, a PALS pack adapter for your weekend trail pack, or a vehicle mount for road trips, the ENDVR will still fit securely into any existing Juggernaut mounting interface – with one caveat. The ENDVR’s design is so sleek that you will need to go down one mount size.
The sample phones used here are a Samsung Galaxy S22 and S22 Ultra. If I load the standard S22 into an ADVNTR or OPRTR case, it will need a medium-sized mount to ride in. But the same phone loaded into an ENDVR case, will use a small-sized mount. Fortunately, Juggernaut marks both their mounts and cases with size icons, and all of the new cases are explicitly labels with the required mount size for that case. If you plan on switching your phone in and out of the different cases, using different case models for work and personal phones, or have family members or co-workers using different-sized cases than you, you’ll have to bear that in mind as you shop for corresponding mounts. But this difference only applies to the ENDVR.
Extreme ADVNTR and Tactical OPRTR
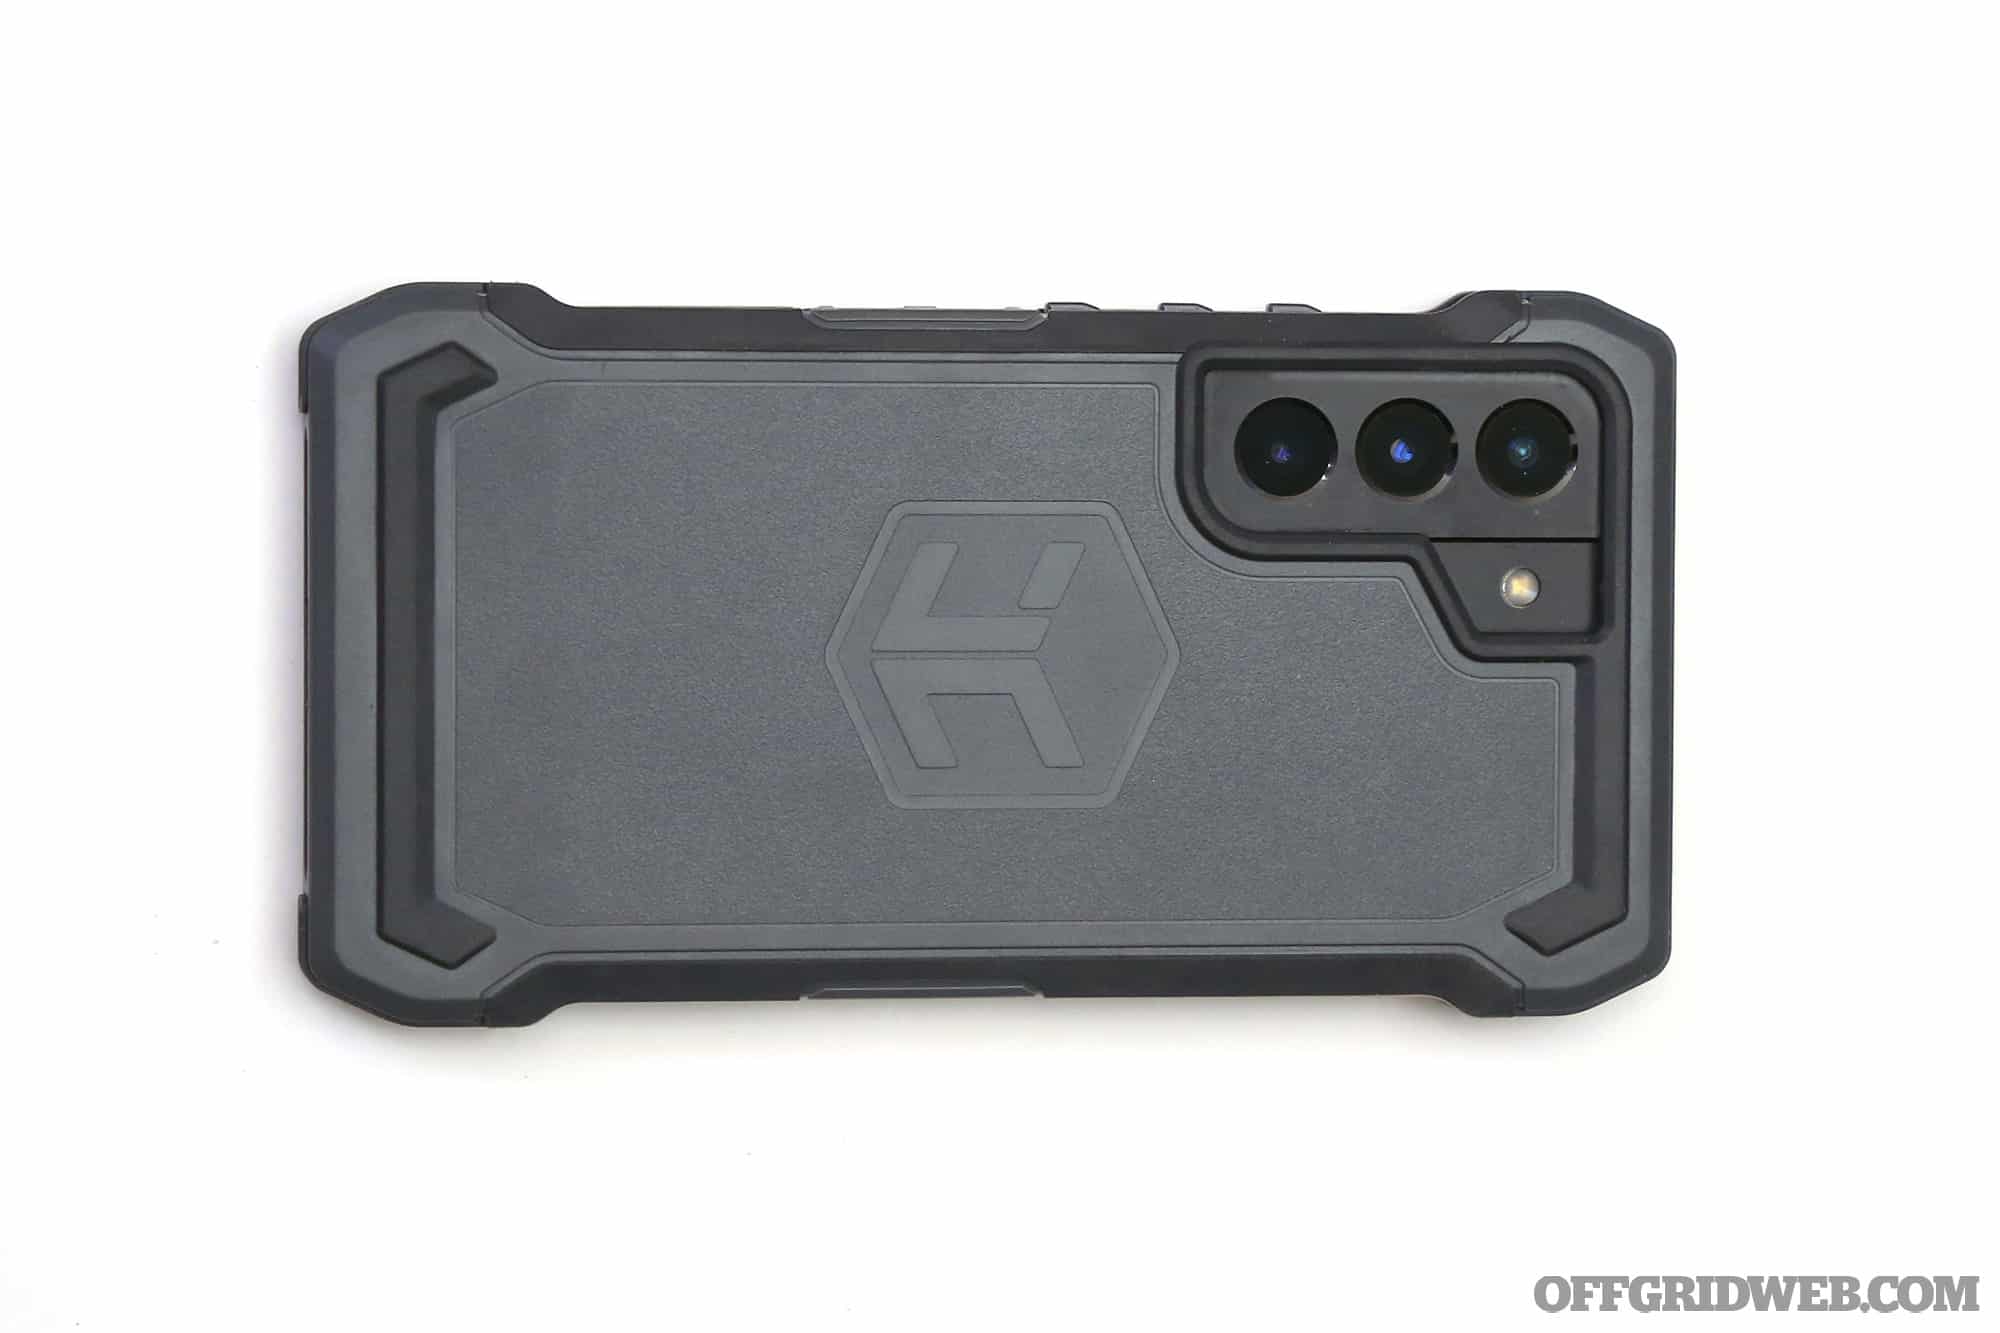
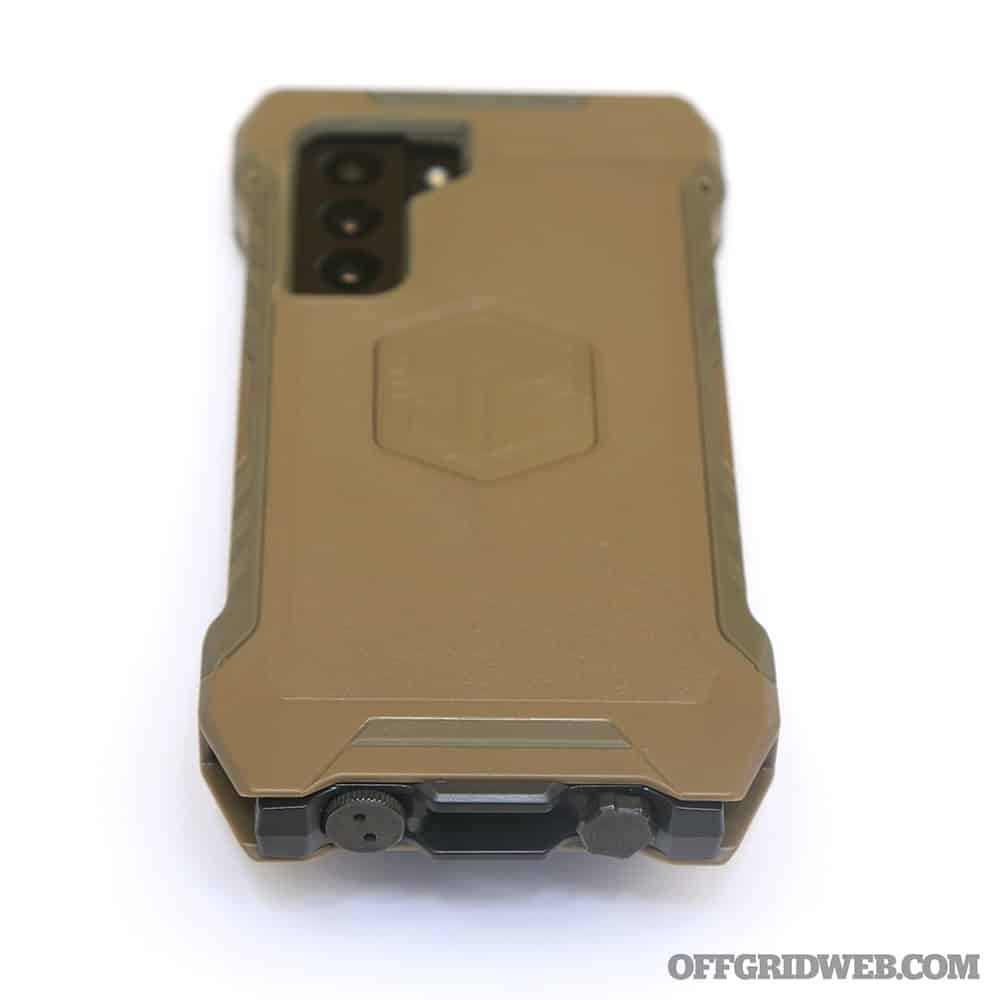
Above: The Juggernaut ADVNTR (left) and OPRTR (right) are top-loading designs with seals for the ports on the base of the phone.
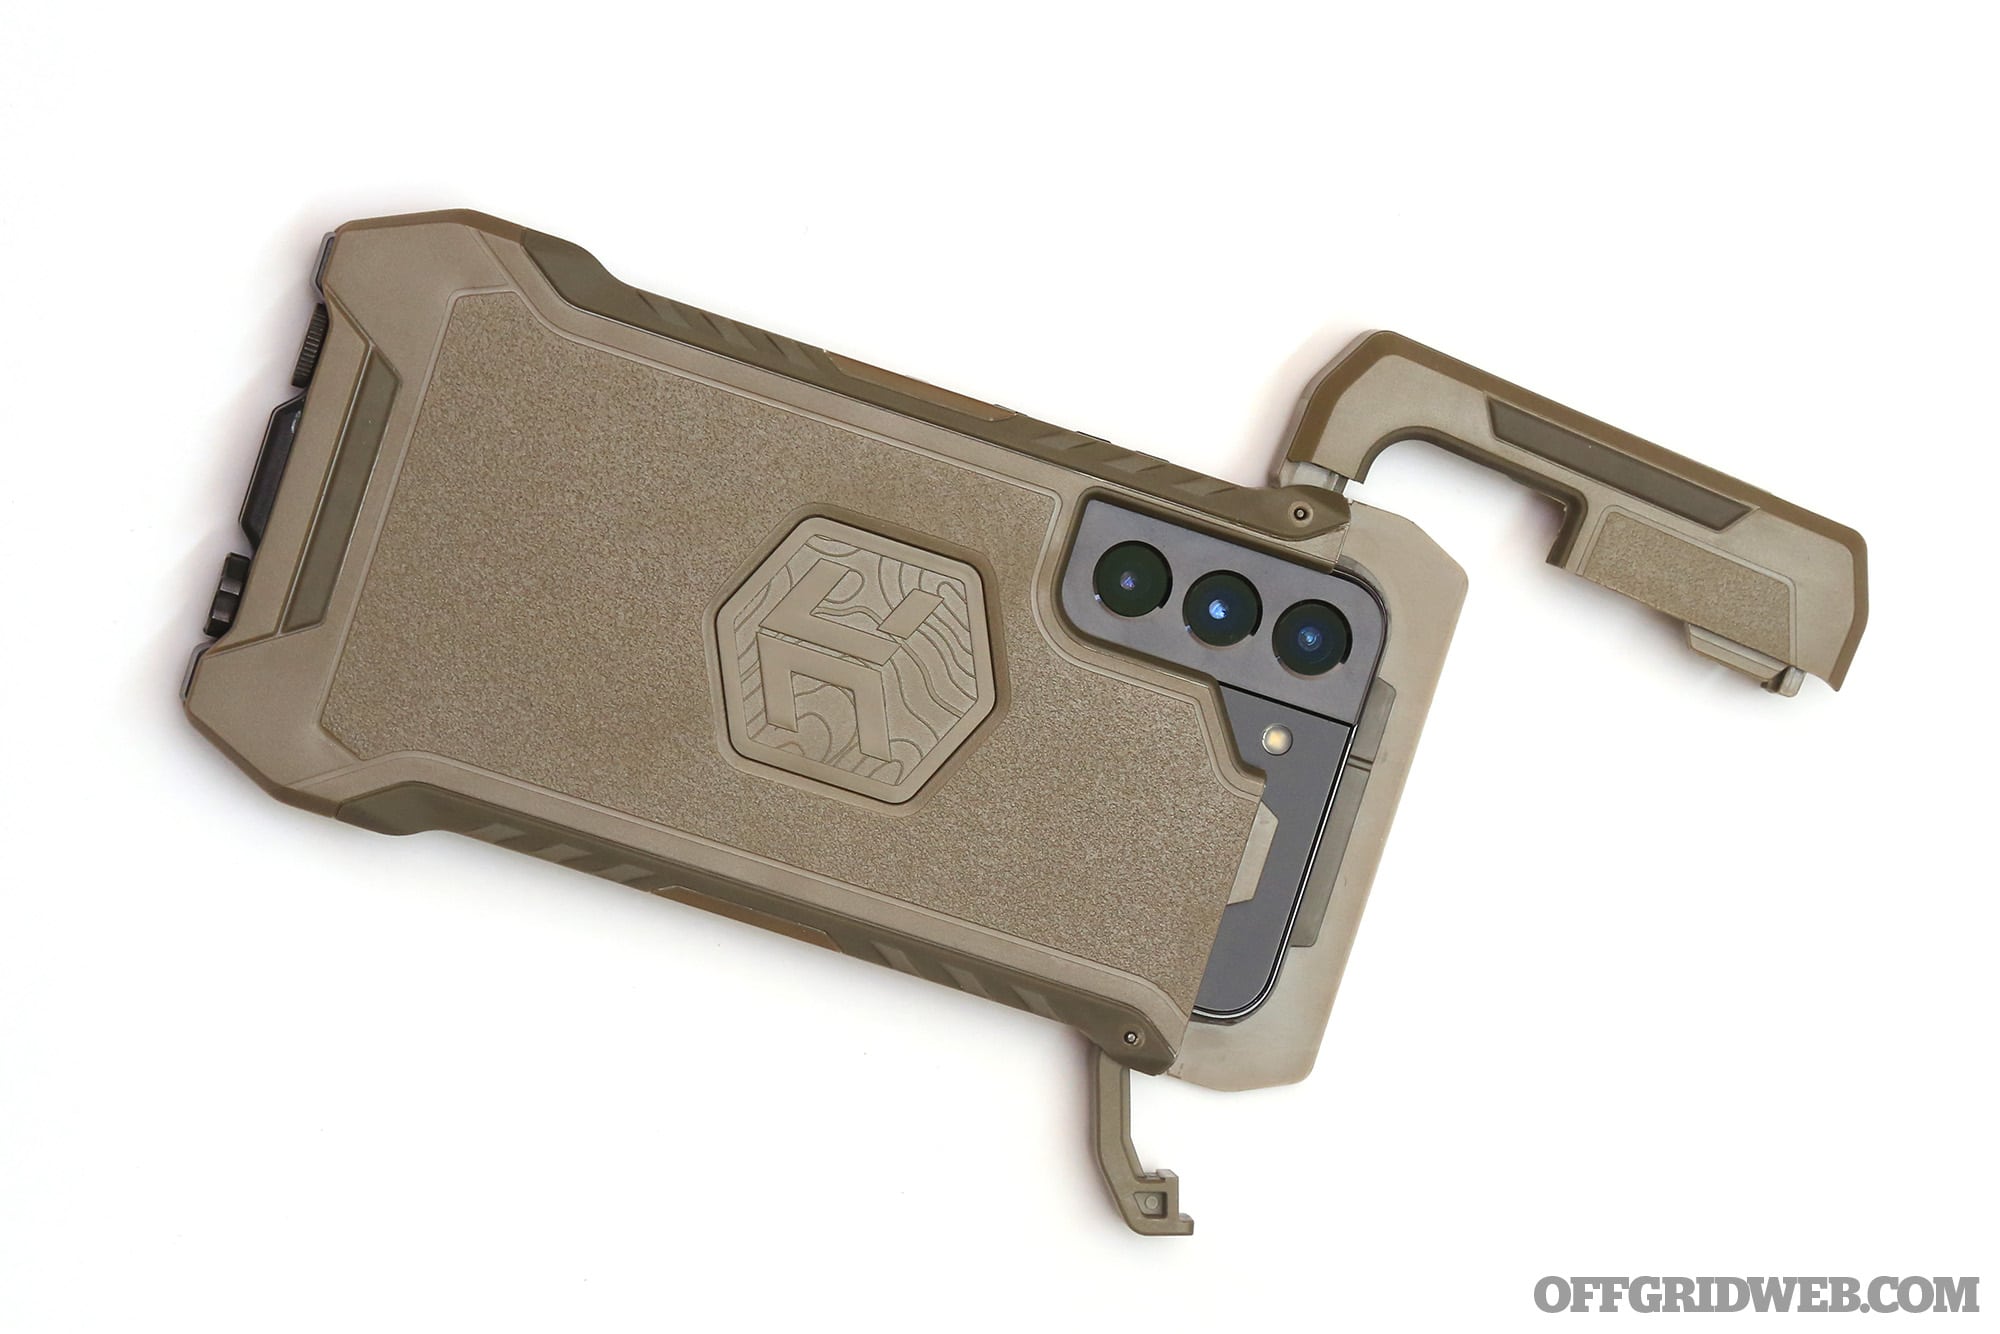
The larger ADVNTR and OPRTR cases are similar in form factor. Both are top-load cases, as opposed to snap on, with a hinged top cover. They both feature a port-sealing mechanism on the bottom. The ADVNTR seals with a pop-off rubber gasket, while the beefier OPRTR has larger, buffered bottom plate that secures into the case with two screws. Either one can be completely removed from the rest of the case and stowed if not needed for daily use.
The ADVNTR and Operator both feature more material built up around the edge of the screen, creating a deeper offset for the phone. This is good news if you’re prone to dropping your phone on its face, when that offset could save you from a cracked screen. Aside from that, the OPRTR appears to be an even-more-up-armored version of the ADVNTR, slightly taller with more material all around.
Our sample S22 did require more effort to load into the OPRTR than the ADVNTR, which indicates the use of additional shock-absorbing foam on the interior of the case. But make no mistake, both of these cases are fit for duty with law enforcement or military units. Also, the ADVNTR and OPRTR use the same size mounts – in our case, they both used medium mounts for the S22 and XL mounts for the S22 Ultra.
Design Improvements
We were big fans of the previous-gen IMPCT Juggernaut phone cases, with our editorial staff making extensive use of them in the field, and the new lines offer some distinct improvements. In addition to scalability of protection level, all three of the new case models make more extensive use of texturing and rubberized grip material around the edges of the case. We did notice that, on the older cases, as increased wear smoothed out the untextured plastic edges, our phones became a little more prone to slippage and drops.
Not so with any of the new case models. There is also the SHLD screen protector (not shown here) available. In addition to the additional protection for your screen, the SHLD is available in blue light blocking and privacy-protection variants.
There is also more attention to detail in design aesthetic. The large military-style labels have been moved from the outside to the inside of the case, which also feature subtle artwork resembling topographical lines on a map. The inside of each case also features a cheeky one-liner or movie quote. You’ll only see it once, when you load your phone into the case, but they’re good for a quick chuckle, and the combination of colors and quotes adds a degree of uniqueness and collectability to an otherwise utilitarian product.
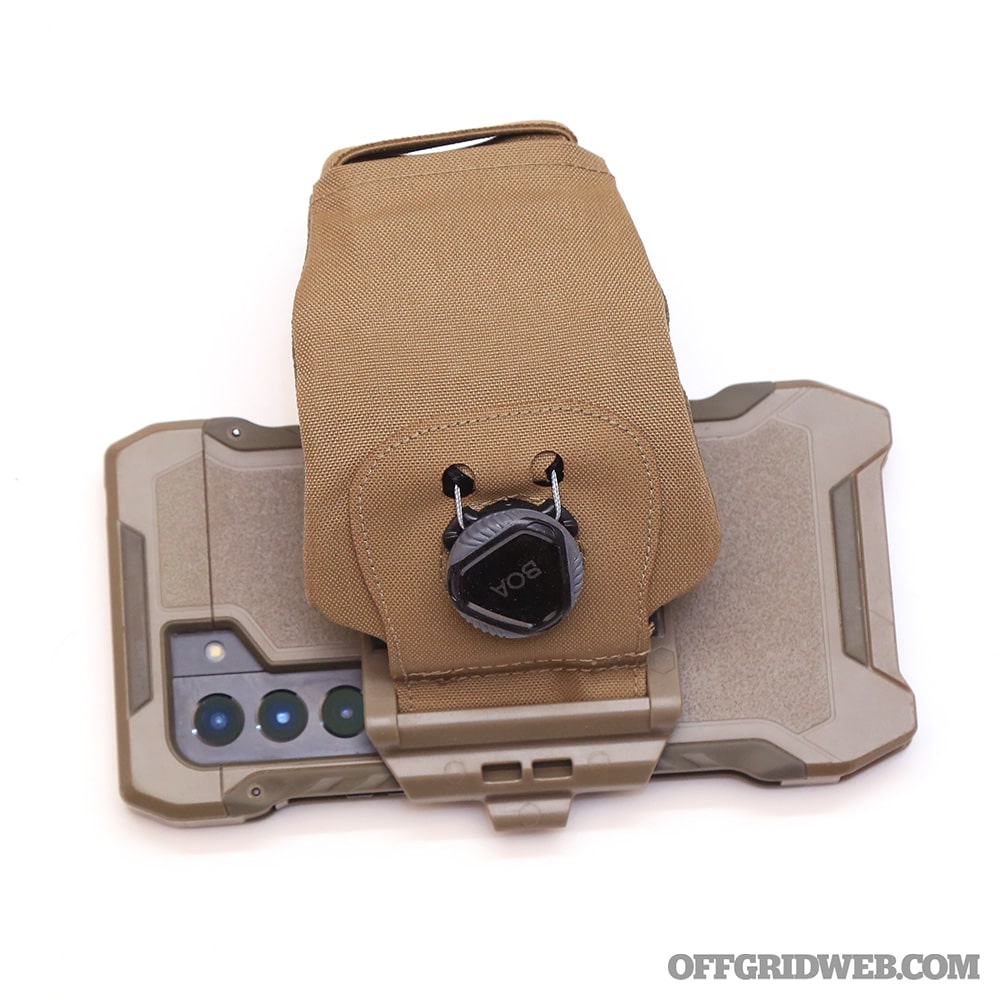
Above: The Forearm Mount features a ratcheting BOA dial for micro adjustment, ensuring it fits the wearer securely.
Speaking of colors, there are some additional options in that realm, as well. The ADVNTR and OPRTR are available in black, FDE, OD green, and Gunmetal Gray. The more urbanized ENDVR case is available in black, Stone Green, Gunmetal Gray, and a lighter limited-edition Tundra Gray. Pricing, like protection level, is scaled to the individual cases: $65 for the ENDVR, $80 for the ADVNTR and $145 for the OPRTR. The SHLD screen protector is an addition $50-$60 depending on model. Even maxing out the prices, you are still looking at just over $200 to not only protect your smartphone to the level of literal battlefield use, but also capitalize on the wide array of mounting and carriage options that can be integrated into almost any imaginable use case – from belt clips and dashboard docks to skydiving harnesses and body armor.
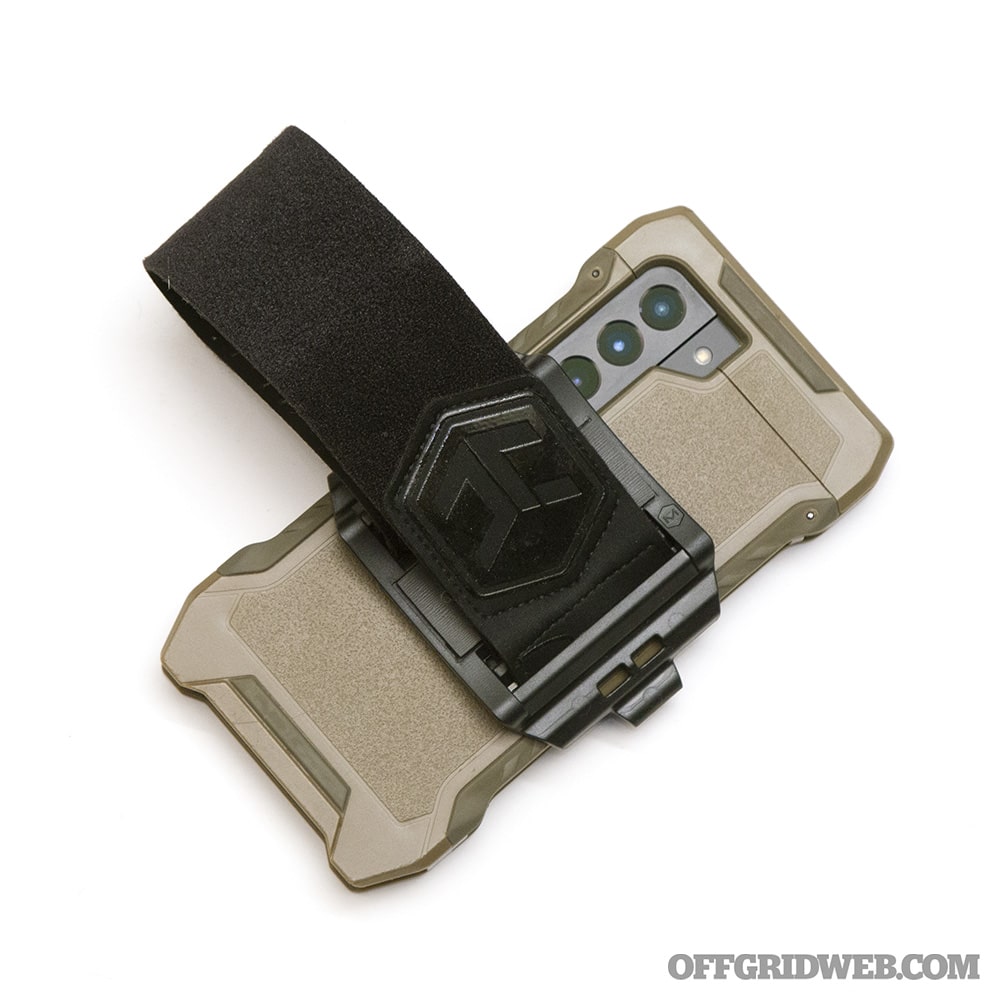
Above: The Armband Mount is made from stretchy Lycra with a topo-pattern grip material on the inside to reduce slipping.
At time of writing, these new case lines have only been released for Samsung Galaxy S22 phones, with limited availability for S22 Plus and Ultra models. Juggernaut has told us that iPhone 14 models are coming soon.
For more information on the new Juggernaut phone cases, go to Juggernautcase.com.
Protection is an individual right and an individual responsibility. This statement shouldn’t be controversial in the slightest, but in recent years, an increasing number of politicians and lawmakers have expressed a belief that protection is solely the responsibility of the state. “Don’t take matters into your own hands,” they say. “Just call 9-1-1 and wait for help to arrive!” Thankfully, most of you can see the fallacy behind this statement. Rather than resigning ourselves to helpless victimhood, each and every one of us should become a trained protector and a first responder, even if it’s only to buy a little time until law enforcement, paramedics, or other professionals arrive.
This mission statement formed the backbone of Protector Symposium, a multi-day training program that’s currently on its fifth iteration. In September 2022, we attended Protector Symposium 5.0 in Tucson, Arizona, with the goal of absorbing knowledge from renowned experts in the protection industry. Attendees included members of the military, law enforcement officers, EMTs, firefighters, executive protection specialists, cybersecurity analysts, and preparedness-minded civilians. The event’s website explains, “The Protector Symposium is specifically designed for those who have a heart for protecting others and understand the tremendous value that comes from investing in life-saving skills.”
The Mindset of a Protector
Before we headed onto the training grounds for practical exercises, the event began in the classroom with an opening statement by Protector Symposium and Protector Nation founder Byron Rodgers. This was followed by presentations from each of the instructors.
Craig “Sawman” Sawyer, a former Navy SEAL and founder of Veterans for Child Rescue (V4CR), opened with a frank discussion of the often-uncomfortable realities of being a protector. Sawyer reminded us of the old axiom, “evil prevails when good men do nothing,” but explained that simply doing something isn’t enough. As protectors, we must be righteously motivated and decisive. He continued, “Evil does not yield to mild suggestion. It never does. It takes and it destroys.” In practical terms, this means that those who are motivated to cause harm to others — rapists, murderers, and other ruthless predators — will not be swayed by polite requests or pleas for mercy. To reinforce this point, Sawyer shared an incident that rocked his family to the core. In 2017, Sawyer’s teenage daughter was abducted at knifepoint while walking out of a Subway sandwich restaurant in Tucson. Her abductor, later identified as 32-year-old Johnny Angel Salazar, forced her to walk with him to a dark and secluded area where he sexually assaulted her multiple times. Despite this horrific, life-altering event, Aspen Sawyer became a protector — a “right fighter,” as Sawman puts it. Today, she assists in V4CR operations to arrest predators and help victims of sex trafficking.
Sawyer left us with a powerful message: we should train hard to be better protectors because our lives depend on it, but more importantly, because others’ lives do. “There is a tremendous opportunity for you to make an impact and defend the defenseless,” he said.
Behind the Wheel
The next speaker was Rick Sweeney, President of SECFOR International and Director of the League of Executive Protection Specialists. With nearly 30 years of experience providing safety solutions for NGOs overseas, Sweeney has become an expert in vehicle-based operations in high-risk environments such as Bosnia, Iraq, Syria, and the war-torn Nagorno-Karabakh region.
Sweeney explained that many life-threatening scenarios, such as kidnappings and robberies, begin with a vehicle ramming attack or block-in tactics. To prove that this isn’t only a threat in foreign countries, he played a video of a 2022 armed robbery in Manhattan that began with a suspect using a stolen Mercedes to spin the victim’s car — not once, but twice — with a law-enforcement-style PIT maneuver:
Sweeney says in situations like this, your vehicle can serve as a powerful weapon as well as your best method of escaping to safety, but you’ll need to know how to use it effectively. Every driver is conditioned to avoid making contact with other cars, but you’ll need to get comfortable with trading some paint if you expect to escape this type of attack. In extreme cases such as those Sweeney has experienced overseas, it may also be necessary to PIT maneuver vehicles, evade obstacles at high speed, and push through roadblocks.
Above: Training vehicle used during the Protective Driving Course.
Protector Symposium 5.0 offered a two-day Protective Driving Course option that allowed students to practice evasive maneuvers and bumper-to-bumper “sparring” in specially modified Crown Victorias. However, this option overlapped with the two-day Hard Skills Intensive training we planned to attend, so we’ll have to take this course with Sweeney and the League at a later date. Stay tuned for an article about this program in the future.
Instructor Zero, a firearms training specialist and social media personality, also taught a training block related to fighting in and around vehicles.
Weaponology
Ed Calderon should be a name that’s very familiar if you’ve been following our magazine for the past few years. We interviewed Calderon about “Survival Lessons from South of the Border” back in RECOIL OFFGRID Issue 25 and published a dozen articles about his training courses since then. He has also written several original articles for us based on his experience working counter-cartel operations in Mexico. At one point in his career, his team was recovering 10 to 20 dead bodies every night, many of which were viciously mutilated or suspended from bridges as an intimidation tactic. Looking back at those nightmarish days on the streets of Tijuana, he recalled a quote: “enlightenment is a destructive process.” Those traumatic experiences helped him develop his protector philosophy and create courses to share real life-saving skills with other protectors.
Above: Ed Calderon used whiteboard drawings to show vulnerable areas on the human body. Defensive knife designs were also discussed at length; wide and ornate blades are generally ineffective, while simple paring knives and icepicks are brutally efficient.
Calderon’s hard skills training block focused on weapon-based combatives, a curriculum he refers to as Weaponology. During the introduction, he explained, “There’s no such thing as blade combatives or gun combatives. Don’t separate sh*t. It’s a fight — you use what you have.” In other words, during a real life-and-death scenario, you won’t be concerned with which tool you’re using because you’ll be using every tool you have to stay alive. That said, there are some key characteristics for edged weapons that Calderon prefers. The handle should be simple in its design and should fit comfortably into a full-fist “icepick” grip (tip down) or “hammer” grip (tip up). The blade should be roughly the length of the user’s outstretched thumb and terminate in a narrow piercing point; Calderon has a strong dislike for karambits and other ornate blades. He considers an inexpensive Morakniv fixed blade to be one of the best knives on the planet — “it’s made as a tool, and it won’t break.” Paring knives from the grocery store are another favorite choice for utilitarian self-defense; they can be acquired in non-permissive areas and tossed in a trash can when you leave.
For the practical segment of Calderon’s course, students stepped into a padded sparring area, and each was handed an aluminum training knife. In pairs, we worked various angles and targeted weak points such as the heart and femoral artery. Calderon also showed us some down-and-dirty techniques for disrupting an opponent:
Grabbing a knee and lifting to throw them off balance
Stepping forward rapidly to pin their foot onto the ground, and shoving to topple them backward
Pulling their shirt collar up over their head to completely block their vision
Quickly passing the blade from one hand to another to make it more difficult to trap the weapon
Above: Ed Calderon demonstrating how a disorienting shirt grab can be used as an opening to go on the offensive.
We also covered what Calderon refers to as “parting gifts” — attacks that can be used as you step past an adversary without slowing down, such as a quick eviscerating slash across the waistline. Some might look at these techniques and think, “These seem awfully brutal, more suitable for street thugs than self-defense. Why would you even teach this?” Calderon’s response is concise: “These techniques are already out there. If you’re not aware, you’re fighting yesterday’s war.” Also, whether you plan to use these methods or not, it’s important to experience them firsthand in training so you can formulate better defensive strategies. As for demeaning labels like “thugs,” Calderon offered another important lesson: “Never make the mistake of dehumanizing the enemy. It blinds you to his capabilities.”
Lone Operator Tactics
Let’s make something perfectly clear. CQB — close quarters battle, especially room-clearing — should be a group activity under ideal circumstances. Whether it’s a military unit or a SWAT team, there’s a reason you’ll see breaching teams stacked several members deep. When you’re attempting to clear a building all alone, you won’t be able to cover all the angles completely, and if you get injured, there won’t be anyone to return fire or drag you to safety. There’s no delegation of tasks or sectors of fire — it’s all on you. Knowing this, there are many who will say, “I’d never attempt to clear a building alone! That’s too dangerous!” To these individuals, we’d like to pose a hypothetical scenario.
You awake in the night to screams of terror coming from your 8-year-old daughter’s bedroom down the hall. As you sit bolt upright in bed, you hear a strange man’s voice shout “shut up, bitch” followed by more muffled screams. Your spouse is out of town, so you’re alone. There’s no way to know how many people are in the house, or if they’re waiting around a corner to ambush you. Do you: A) grab a gun and move swiftly to your daughter’s bedroom, or B) call 9-1-1 and hide until police to arrive, because solo CQB is too dangerous? There’s no question which option we’d choose. This is why it’s important to consider one-man CQB skills — it’s far from ideal, but there are situations where it may be necessary.
Kawa Mawlayee — an Afghan-born Green Beret and founder of 2Alpha Training Group, who we interviewed in Issue 52 — has developed a Lone Operator curriculum to teach students how to increase their survivability in a solo CQB environment. This skill is directly applicable to defense against home invasions, and it should be part of a cohesive plan that’s discussed in advance with everyone in your house. Typically, developing CQB skills requires weeks or months of continuous practice, so Mawlayee gave us a quick overview of the fundamentals during his Protector Symposium segment.
Above: Kawa Mawlayee spent an enormous amount of time practicing CQB skills as a Green Beret, and he takes pride in passing that knowledge to prepared civilians.
We practiced three approaches to checking doorways — non-entry, shallow entry, and deep entry. For a non-entry approach, we carefully walked up to one side of the doorway and leaned close to the wall to get as much view of the interior as possible. Then we moved slowly in a 180-degree arc to “slice the pie” and check for threats; a lean-step-lean-step motion was used to limit exposure. It’s critical to ensure the gun’s muzzle never protrudes past the threshold. We held our trainer guns barely below line of sight, ready to fire at a moment’s notice, and moved our guns in line with our eyes — in CQB, there’s no sense in moving your head to check an area without being able to shoot in that direction. More time and focus should be given to areas with dead space, such as large pieces of furniture someone could hide behind. If you decide not to make entry, you should keep moving as soon as you’ve established that the room is clear. Don’t get bogged down.
Above: Opening a closed door is a dangerous moment. Push (or pull) it open in one swift motion, using the precise amount of force necessary — too little and it’ll get in the way as you enter; too much and it’ll swing shut in your face.
With a shallow entry, you can establish a quick foothold in the room, buying yourself a few seconds to breathe and get out of “bullet funnel” areas like hallways. Mawlayee explained that bullets skip down halls like rocks on a lake, so you should avoid lingering there. We practiced arcing back to the center of the doorway, positioned a leading foot just outside the threshold, and then stepped swiftly through the doorway with body and gun at the same time, clearing the wall parallel to the threshold. Once that side was clear, we made a quick U-turn to clear the opposite wall and complete the shallow entry.
Deep entry can be used if you’re looking for a known threat or a specific asset (e.g., a trauma kit, a defensible place to barricade, or a path to an emergency exit). The process is the same as shallow entry, but after the U-turn, we moved along the perimeter of the room to look for points of dominance (POD; key areas you can control for a strategic advantage). Check for open and closed doors — open doors are a priority and should be cleared first — and also note the hinge placement to predict the entry/exit direction. If you need to open a closed door, stay close to the wall, open it quickly and completely, and immediately step back. Anyone inside may fire blindly into the doorway or the wall next to it, so you don’t want to be where they’ll expect you.
Above: Airsoft guns may be marketed as toys, but they’re great tools for practicing force-on-force scenarios in close quarters.
After practicing these techniques, we put on masks and loaded up airsoft guns. Each student was tasked with clearing a series of rooms, with randomized configurations of opponents and bystanders inside. If a bystander approached, we gave clear verbal commands to stay back, show hands, and leave through a safe area, never allowing them to get close enough to snatch our guns. Some of the “bad guys” in our scenarios were instructed to hide for an ambush, surrender immediately, fire blindly, or retreat further into the structure after first contact. We learned firsthand how solo CQB situations are unavoidably dangerous, but we also saw that good visual awareness, wise decision-making, and violence of action can improve your chances of survival.
Hands-On with a Handgun
It should come as no surprise that self-defense shootings typically occur at “conversational distance” — less than 7 yards, the distance at which we usually interact with other people. Most of us also know how easy it is for a motivated attacker to lunge forward and close that gap. This leads to a high likelihood that an adversary will try to block you from drawing your gun, redirect the gun, or worst of all, attempt to take it from you and shoot you with it. Most shooters are not adequately prepared for this hands-on fight.
Raul Martinez Jr. is a U.S. Army veteran, former undercover narcotics officer with the Chicago Police Department, and founder of Rogue Methods, a combatives training organization. He leveraged his experience in Iraq and on some of the roughest streets in America to teach us how to deploy, retain, and recover a firearm at contact distance. He made it clear that a hands-on fight with a gun in play is a worst-case scenario, but also one you must be prepared for if you carry a gun.
Above: Raul Martinez Jr. demonstrates one “off-body holster” method to protect and control a firearm — wrapping the support hand’s palm over the bore — if you realize a hands-on fight is imminent.
Training began on a live-fire range, where each student learned how to deliberately induce a malfunction in his or her handgun. Why? If you’re about to get into a knock-down drag-out fight with someone, it’s surprisingly easy for your opponent to shoot you with your own gun — something we learned the hard way later with Simunition rounds — and putting it into a non-functional state temporarily might prevent that. Additionally, knowing how to induce a malfunction in your opponent’s gun while you’re grappling can put them at a huge disadvantage. We accomplished this by clamping the slide in a static position with our support hand before pressing the trigger. If the slide is pressed slightly out of battery, the gun won’t fire at all; if it’s held in place, the gun will fire one round but won’t eject it, resulting in a dead trigger. Racking the slide can clear the malfunction once you have control of the gun again.
Aside from the ability to induce malfunctions, gripping the slide with your support hand offers much better control over the firearm — Martinez calls this an “off-body holster” technique. Two methods were demonstrated: thumb over slide with elbows tucked in, and palm over slide with support side elbow up. The former keeps both arms and the gun tight against the body, making it almost impossible for an opponent to wrench the gun from your grasp. The latter allows you to use your elbow to protect your head from punches and create more defensible space. In either case, the trigger guard should be fully covered by your hands, and both hands should remain firmly on the gun. A similar grip around the slide and trigger guard can be used to forcibly “holster” an opponent’s gun during a fight, preventing them from getting a finger onto the trigger.
Above: After a few hours of grappling, every student was battered and exhausted. At this point, Martinez started adding Simunition training guns to the fray, dumping a whole new level of adrenaline into each fight.
After our brief live-fire segment, we headed inside and spent the next few hours grappling on padded mats. At first, we did hands-off, head-to-head drills to focus on footwork and learn how to push an opponent off balance solely with body weight. Next, we put on gloves and started punching our sparring partners as we grappled. Then, inert training guns were added to the mix, and students were forced to fight to maintain or take control of the weapon. For the final exercise, students paired up, stood head to head, and started grappling. At some point during the struggle, a training gun loaded with Simunition rounds was tossed into the fray, and both students dove for it. In some cases, the students struggled over the gun for an agonizing 30 seconds, but neither was able to shoot it; in other cases, one student took control of the gun immediately and shot their adversary at point blank — a painful but memorable lesson. We finished the Rogue Methods training block sore, bruised, and thoroughly winded, but it was a stark reminder of how challenging a contact-distance gunfight can be.
Closing Thoughts
With a wide variety of lessons on mindset, edged weapons, firearms, and tactics, the Protector Symposium 5.0 covered a lot of ground in only 72 hours. More importantly, we didn’t just listen to PowerPoint presentations or discuss these topics in the classroom — we experienced the drills and lessons firsthand. If you take the responsibility of being a protector seriously, you owe it to yourself and your loved ones to seek hands-on training from qualified instructors. It’s a worthwhile investment in a skill set that will leave you with far better options when disaster strikes than to simply call 9-1-1 and wait.
Editor’s Note: This Black Triangle G10 knife review was originally published in Issue 24 of our sister publication Concealment.
WHAT IS IT? It’s a G10 knife with a nonmetallic sheath designed for discreet self-defense.
WHAT GOT OUR ATTENTION? Every Black Triangle knife comes in a retro VHS tape box, complete with a custom-printed, faux-aged insert that looks like it belongs on a late-1980s Blockbuster shelf next to Predator and They Live. Packaging is usually a throwaway item, so we were interested to see if this attention to detail carried over to the box’s contents.
HOW DOES IT WORK? For those who aren’t familiar, G10 is a hard fiberglass composite material that’s commonly used for handle scales on metal knives. The Creeper MK1 Mod 2 is constructed from a solid piece of ¼-inch-thick G10 ground to a sharp point. Its handle is wrapped tightly in gutted black paracord, and it includes a fitted Kydex sheath. The polymer belt clip is bound tightly to the sheath with elastic cord, eliminating the need for any metal hardware. The end result is a G10 knife that’s completely invisible to a metal detector, so it can serve as a self-defense tool in environments where a traditional knife or firearm might not be permissible.
We also received a sample of Black Triangle’s matching MK1 trainer ($42), which is made from easily identifiable blue G10 with a blunt tip. A fitted sheath is also included with each trainer.
HOW WELL DOES IT WORK? Many nonmetallic tools still register on a metal detector due to carbon-fiber construction, metal sheath hardware, or other overlooked elements. Thankfully, that’s not the case here — we passed a wand over the Creeper repeatedly without a single beep. Note that nonmetallic tools can still be found by density scanners or a simple pat-down, so there’s no guarantee it won’t be noticed, but it’s much more concealable than a metallic blade.
WHAT WE LIKE: The Creeper’s handle is large enough for a full-fist grip, and the twisted cord wrap offers plenty of slip-resistant texture. Sheath fit is just right; the knife clicks securely into place but is easy to draw quickly. The belt clip accommodates a standard 1.5-inch belt, and the extra loop of elastic cord attached to it provides an alternative retention method. It can be tethered to a belt loop, the inside of a pocket, or any other fixed point to ensure the sheath stays put as the knife is drawn. That versatility is helpful.
Black Triangle has a lifetime guarantee for every G10 knife, so if the tool or sheath is broken or damaged, they’ll fix or replace it.
We appreciate that Black Triangle offers a trainer that perfectly replicates the size, shape, and weight of the “live” blade. Too many of the trainers we’ve used in the past feel like featherweight toys compared to their real counterparts. We’re also glad it includes a fitted sheath that allows you to practice the drawstroke realistically. An inert trainer is an important add-on for anyone who wants to practice edged weapon techniques safely against a human partner.
WHAT WE DIDN’T LIKE: The edge geometry of any knife is a compromise between sharpness and durability. A fine edge slices effortlessly, but dulls or chips quickly. This is especially relevant for G10, a material that’s less durable than steel. Black Triangle grinds each G10 knife to be strong enough to puncture repeatedly, acknowledging that they’re “point-driven, meaning they are not meant for cutting.” The Creeper won’t be effective for slashing, but that’s not a problem as long as your fighting technique matches this design.