In This Article
How hard can it be? After all, if you want to go “up” on a map, you just follow the direction that your compass is pointing, right? Well, navigation is actually a bit more complicated than that.
There are three different “norths” — true north, magnetic north, and grid north.
True north refers to the very top of the globe (the North Pole), magnetic north is where the north-seeking arrow of your compass points, and grid north is the direction the vertical grid lines on your map point. Why are they different, and how does this affect your ability to navigate accurately? Follow along to find out.
True North and Magnetic North
True north and magnetic north are different because, despite what many believe, the North Pole isn’t magnetic and your compass doesn’t point there. Instead, your compass points to a giant ore deposit in Northern Canada. Therefore, depending on where you’re standing in the world, your compass may actually point off to the side of true north.

Above: True north (top of globe/earth) versus magnetic north (where your compass points). Compasses don’t actually point at the North Pole; instead they point at Northern Canada.
For example, in parts of Tennessee and Alabama, magnetic north and true north are in line with each other so there’s no perceptible difference between the two at that location.
However, the variance gets worse the further east or west you are. For example, in parts of Georgia, your compass will indicate a few degrees west of the North Pole. In Maine, your compass will be a staggering 16 degrees west of true north.
Going the other direction produces opposite results. In Louisiana, your compass will point a few degrees east of True North, and in Alaska, your compass might point a whopping 25 degrees to the east of true north. So if you’re in certain parts of America and want to walk to the North Pole by following “north” on your compass, you’ll never get there.
To make this more difficult, magnetic north actually shifts. Year to year, the location to which your compass points changes slightly. Therefore, it’s important to know the current values for your specific location. It doesn’t move much, so if you use information from last year it may not make much of a difference. But if you use data from 10 years ago, it may be enough of a change to cause you to miss your mark.
The difference between true north and magnetic north for a given location is called magnetic declination, measured in the number of degrees of variation and the direction (east or west). More on declination in a bit.
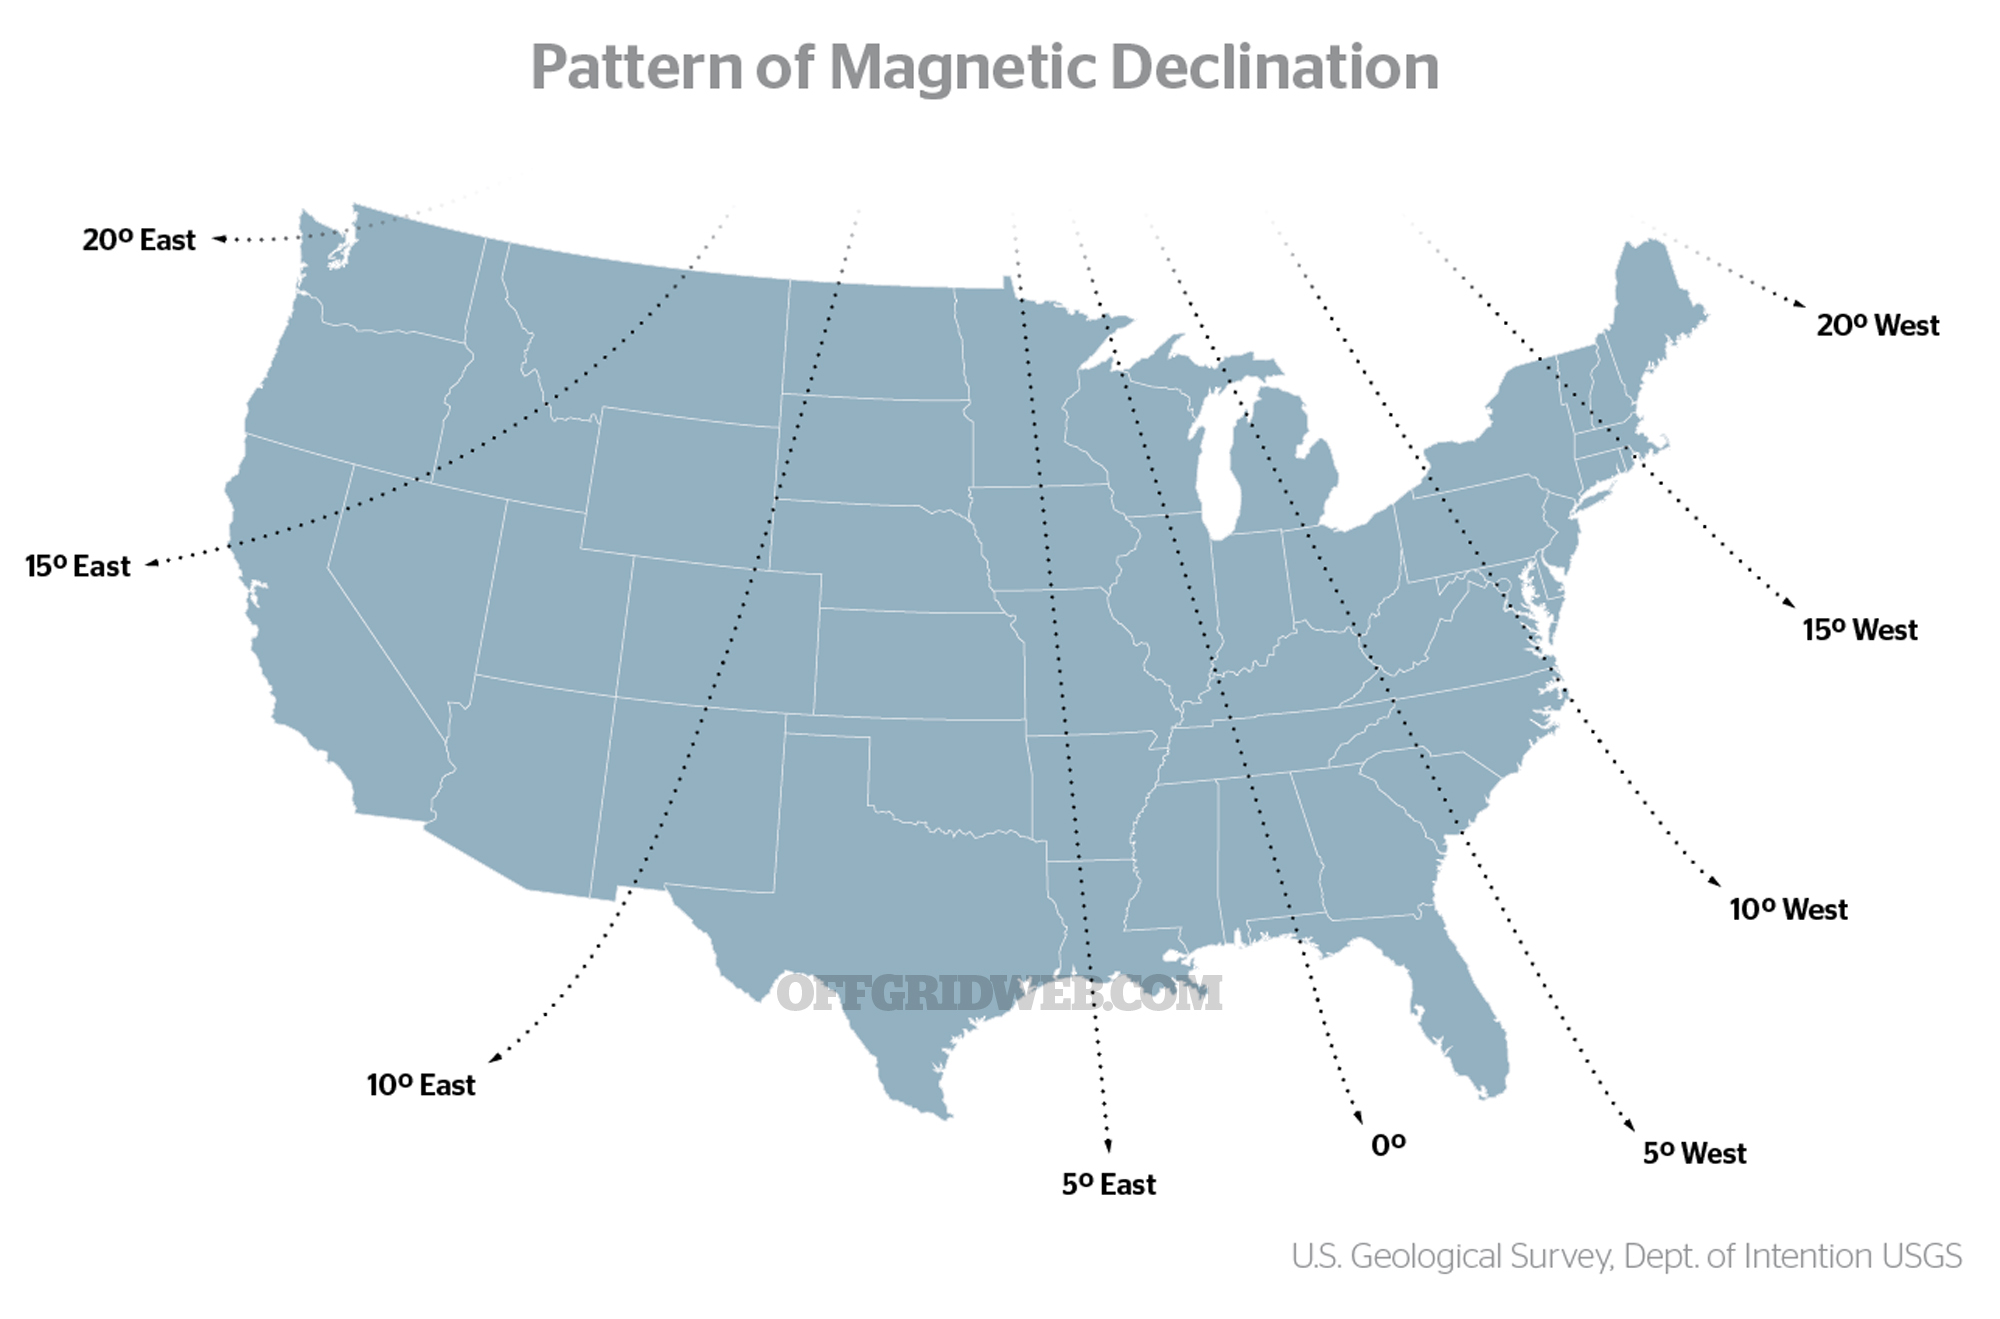
Above: These lines show how magnetic declination varies across the United States. The lines curve because a map, as shown, is flat but the Earth isn’t.
Grid North
Grid north refers to the orientation of the gridlines on a map and often diverges quite a bit from true north and magnetic north.
Why don’t the gridlines on a map point to true north? Well, let’s start with a fact that may upset some diehard conspiracy theorists — the Earth is spherical. If you’ve ever tried to cover a bowling ball with postage stamps (don’t ask), you’ll know that a bunch of square shapes don’t fit nicely on a sphere, especially toward the top and bottom. The same is true with trying to create a bunch of square representations (maps) of our Earth. Therefore, to keep our maps square, we have to fudge a bit on the orientation of gridlines.
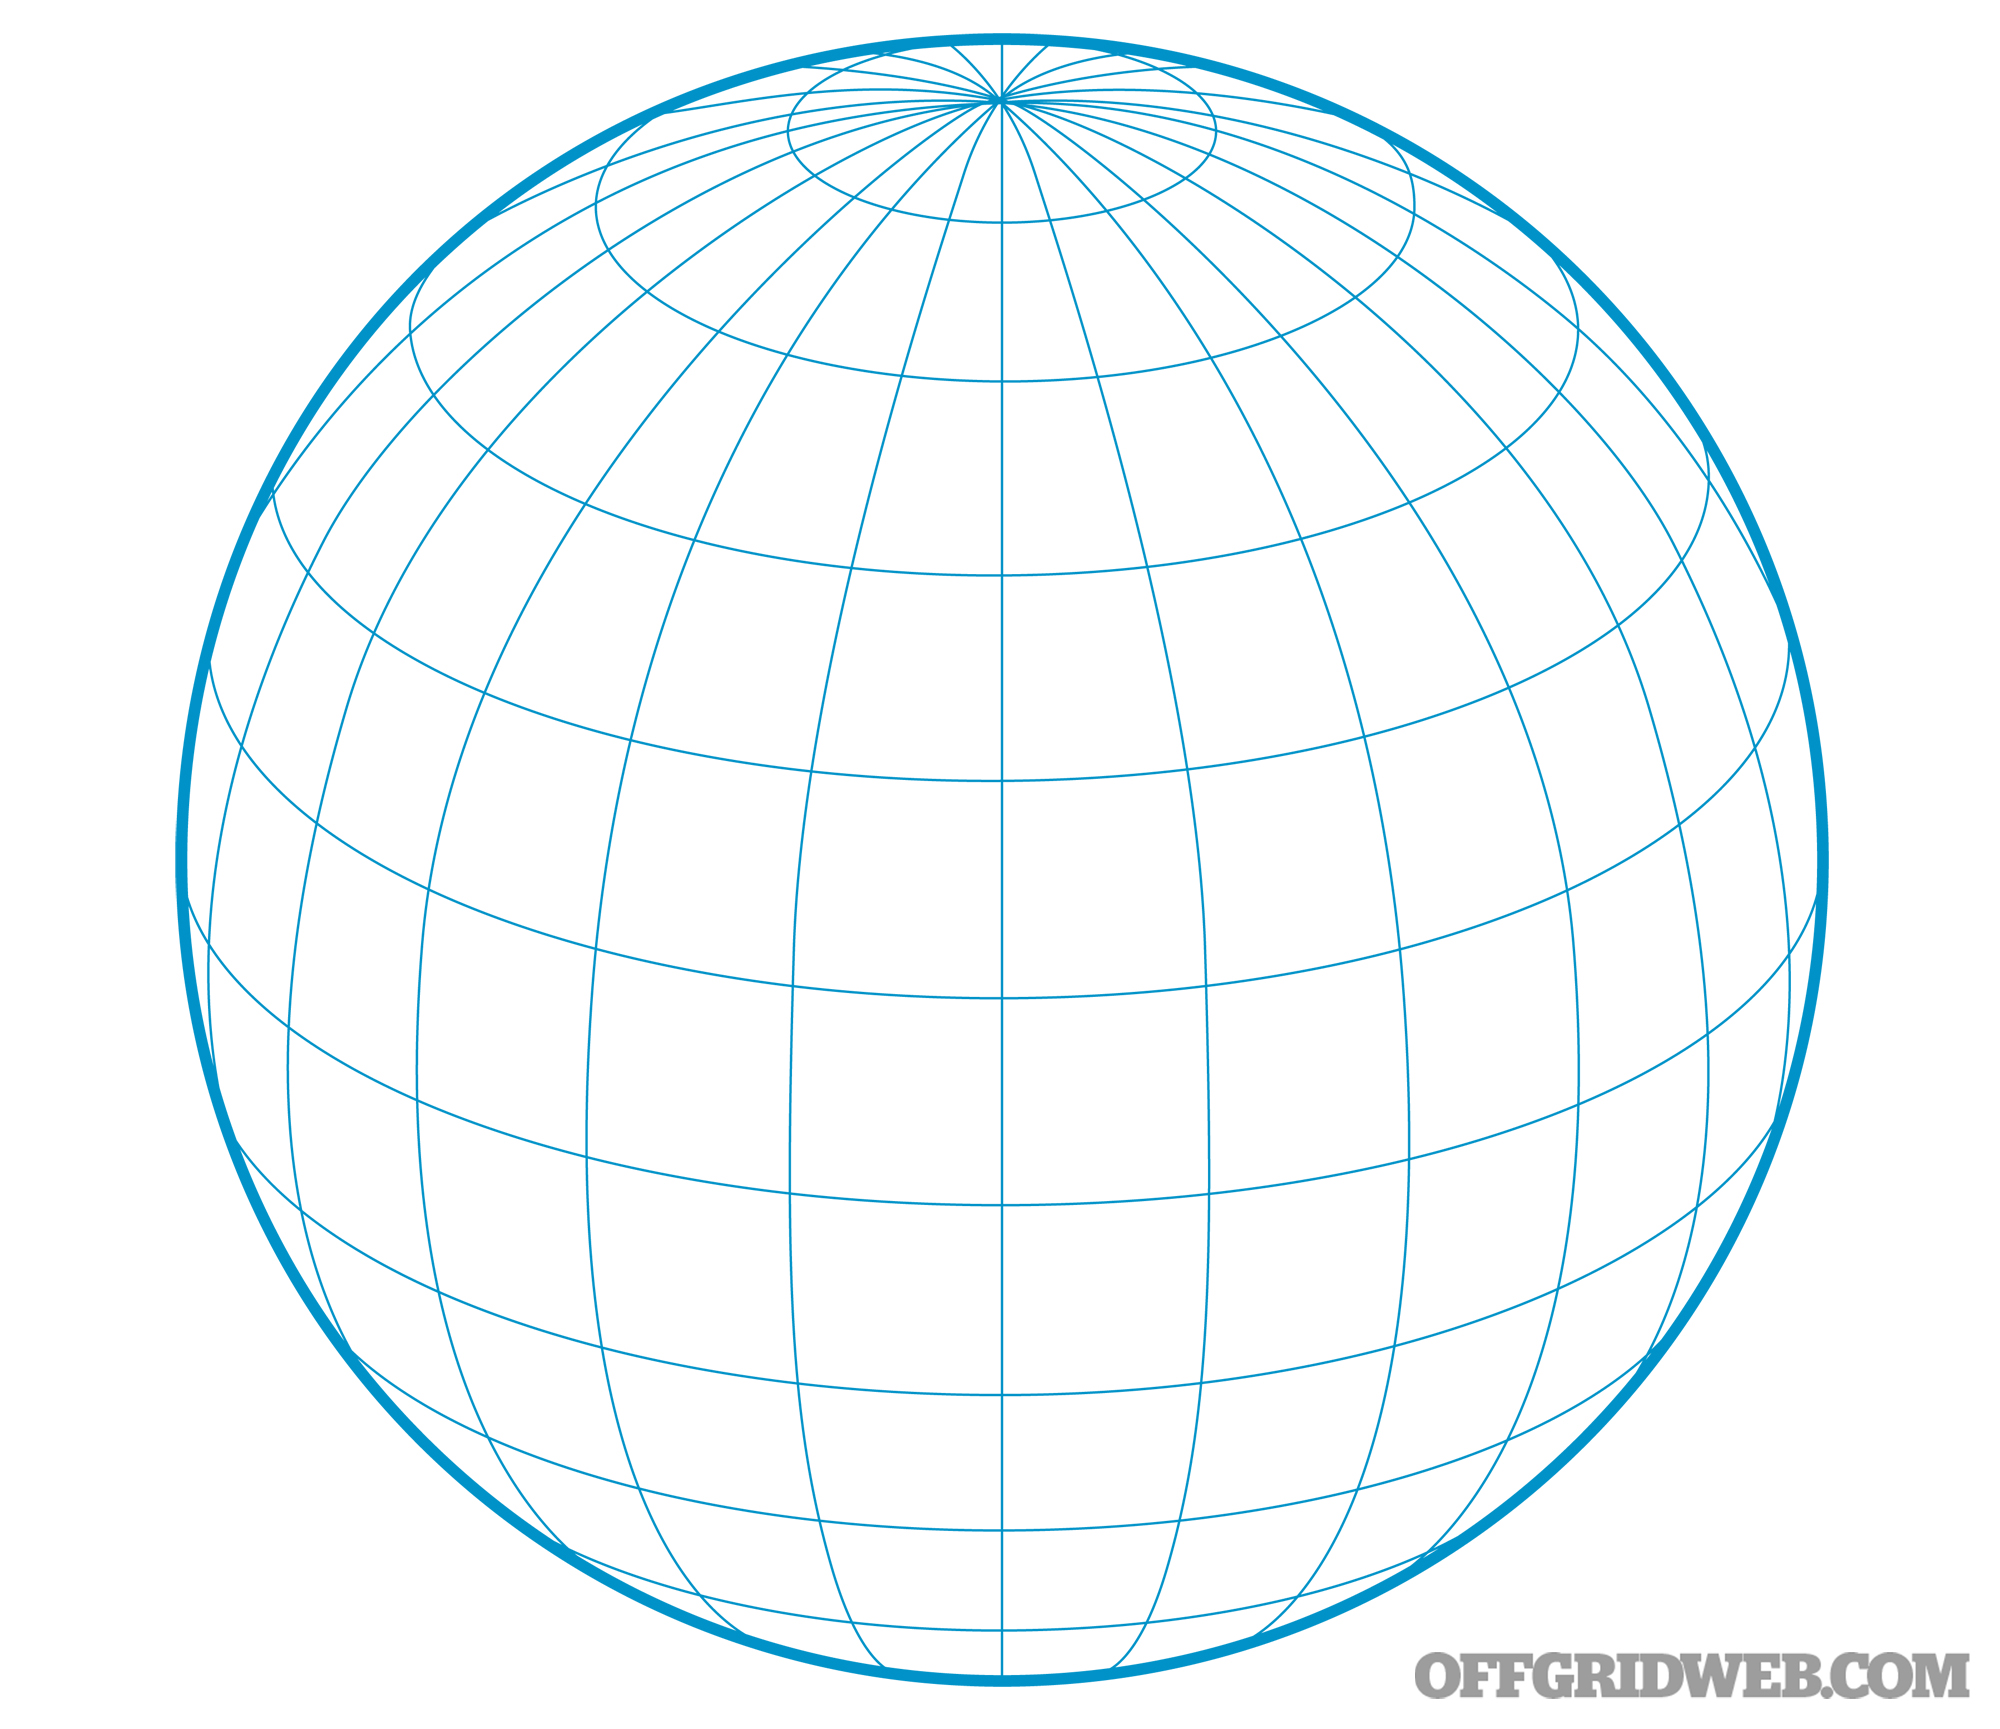
Above: Square maps might work around the equator, but notice how the shape changes closer to the poles.
The current system used for U.S. Geological Survey (USGS) maps is called Universal Transverse Mercator (UTM). That’s just a really fancy way of referring to the layout and number of gridlines on our globe. This methodology is very similar to the Military Grid Reference System (MGRS) used by the U.S. Armed Forces.
The UTM concept is metric-based, in that grids are broken down into tenths to determine a location on the map. Once you’ve learned it, it’s an incredibly powerful system that can utilize varying numbers of digits to signify different levels of accuracy. For example, a four-digit grid number refers to a square kilometer (1,000 meter square), while a 10-digit grid number is used for accuracy down to 1 square meter.
Understanding and using this system could easily be a subject for its own article, so we’ll leave it at that for now.
Why Should You Care About the Three Norths?
Well, if you look on a map and see a fresh water source or road you need to reach directly above your current position, it’s essential to know which north is “up” and how to make your conversions to get there.
Although we refer to these as the “Three Norths,” it’s really the three types of directions or azimuths. An azimuth is the direction of an object/location from an observer represented in degrees. Whereas, a bearing is the direction you’re traveling. For example, “I confirmed that the water tower was behind me at an azimuth of 90 degrees before I continued on my bearing of 270 degrees.”

It’s common to refer to an azimuth as “measured” when it was determined a map, and “shot” when it was determined from using a lensatic compass. Shooting an azimuth is accomplished by aiming at a visible landmark through the sights of a lensatic compass, much like you would with the iron sights of a gun. For example, “I measured an azimuth of 45 degrees from the map. I confirmed the direction of the hilltop by shooting an azimuth of 45 degrees.”
For example, there’s 90 degrees (east) on your compass (magnetic 90 degrees), a right turn from true north (true 90 degrees), and straight to the right on your map (grid 90 degrees).
That isn’t meant to confuse you or make it sound excessively complicated. Instead, it’s important to picture three different orientations of an entire 360-degree circle. Each circle’s north points to a slightly different location, and it’s important to know which system someone is referring to when they tell you to travel 5 kilometers with an azimuth of 180 degrees. If you’re in Acadia National Park in Maine and they gave you a grid north azimuth and you use a magnetic azimuth, you’ll end up almost 1.5 kilometers away from where you intended.
Declination
When using a map and compass, it’s often necessary to convert between a grid azimuth and a magnetic azimuth. Although we introduced the concept of the deviation of magnetic north from true north, it’s not very common to convert between them. The two norths you’ll likely be most concerned with are grid north and magnetic north because those are the two norths that correspond with the tools in your hand — the map is a grid while your compass is magnetic.
When converting from one to the other, you must either add or subtract the difference in degrees depending on whether magnetic north appears to the left or right of grid north from your current position.
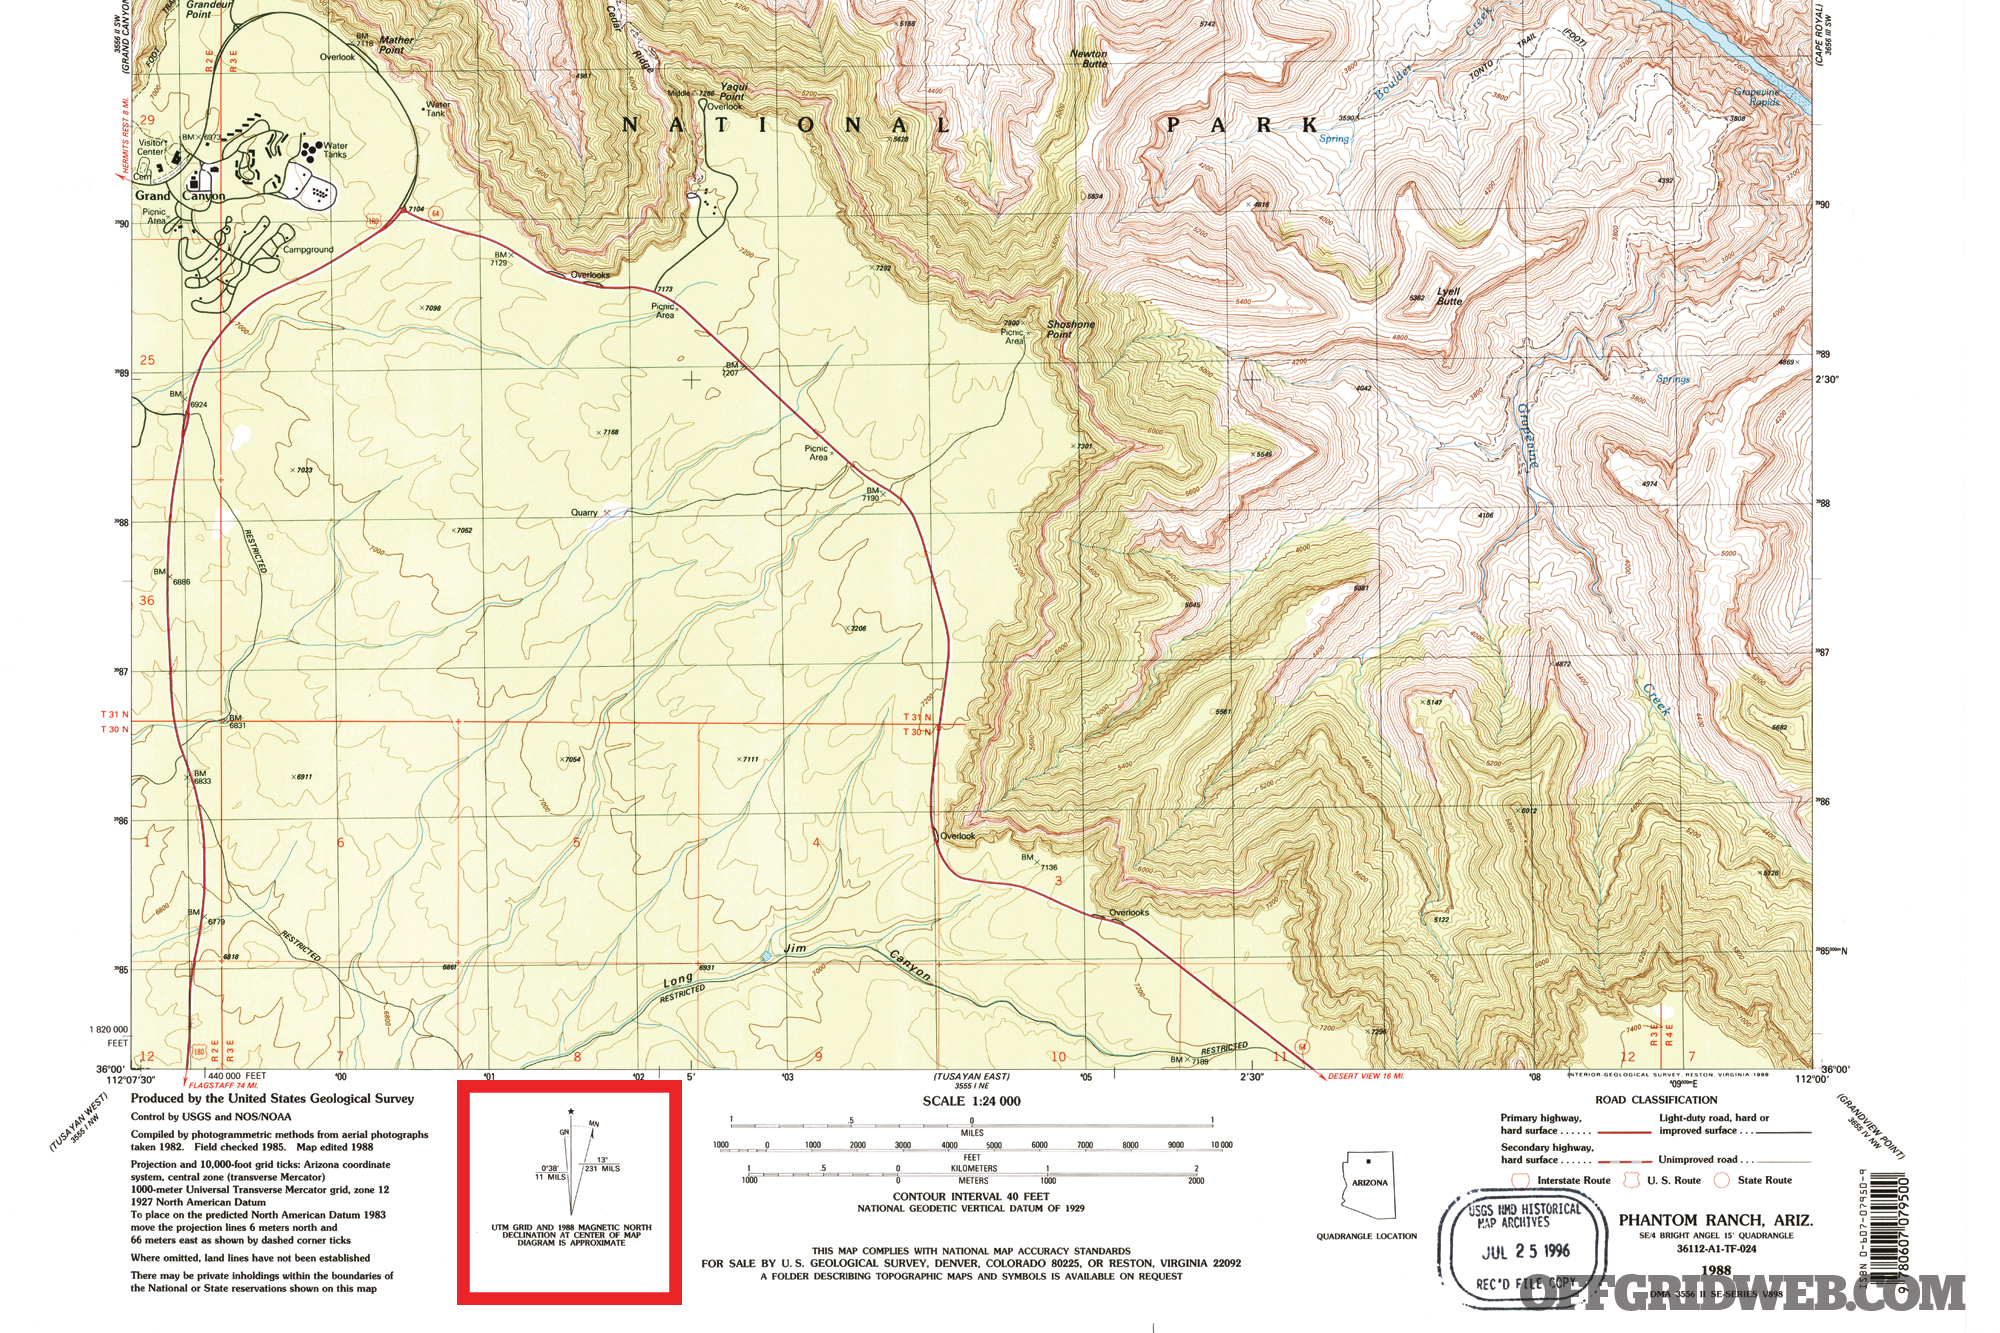
On USGS maps, you’ll find a declination diagram at the bottom of the map (highlighted above). This diagram will represent the difference between each of the three norths from the center of the map on a certain date. Be sure to check the date! If it’s too old, you should look up the current declination numbers for that map.
Here’s an example from an older map of the Grand Canyon. From this diagram, we can see that our compass would point to magnetic north a little over 13 degrees to the right of “straight up” on the map (grid north). True north is represented by a star.
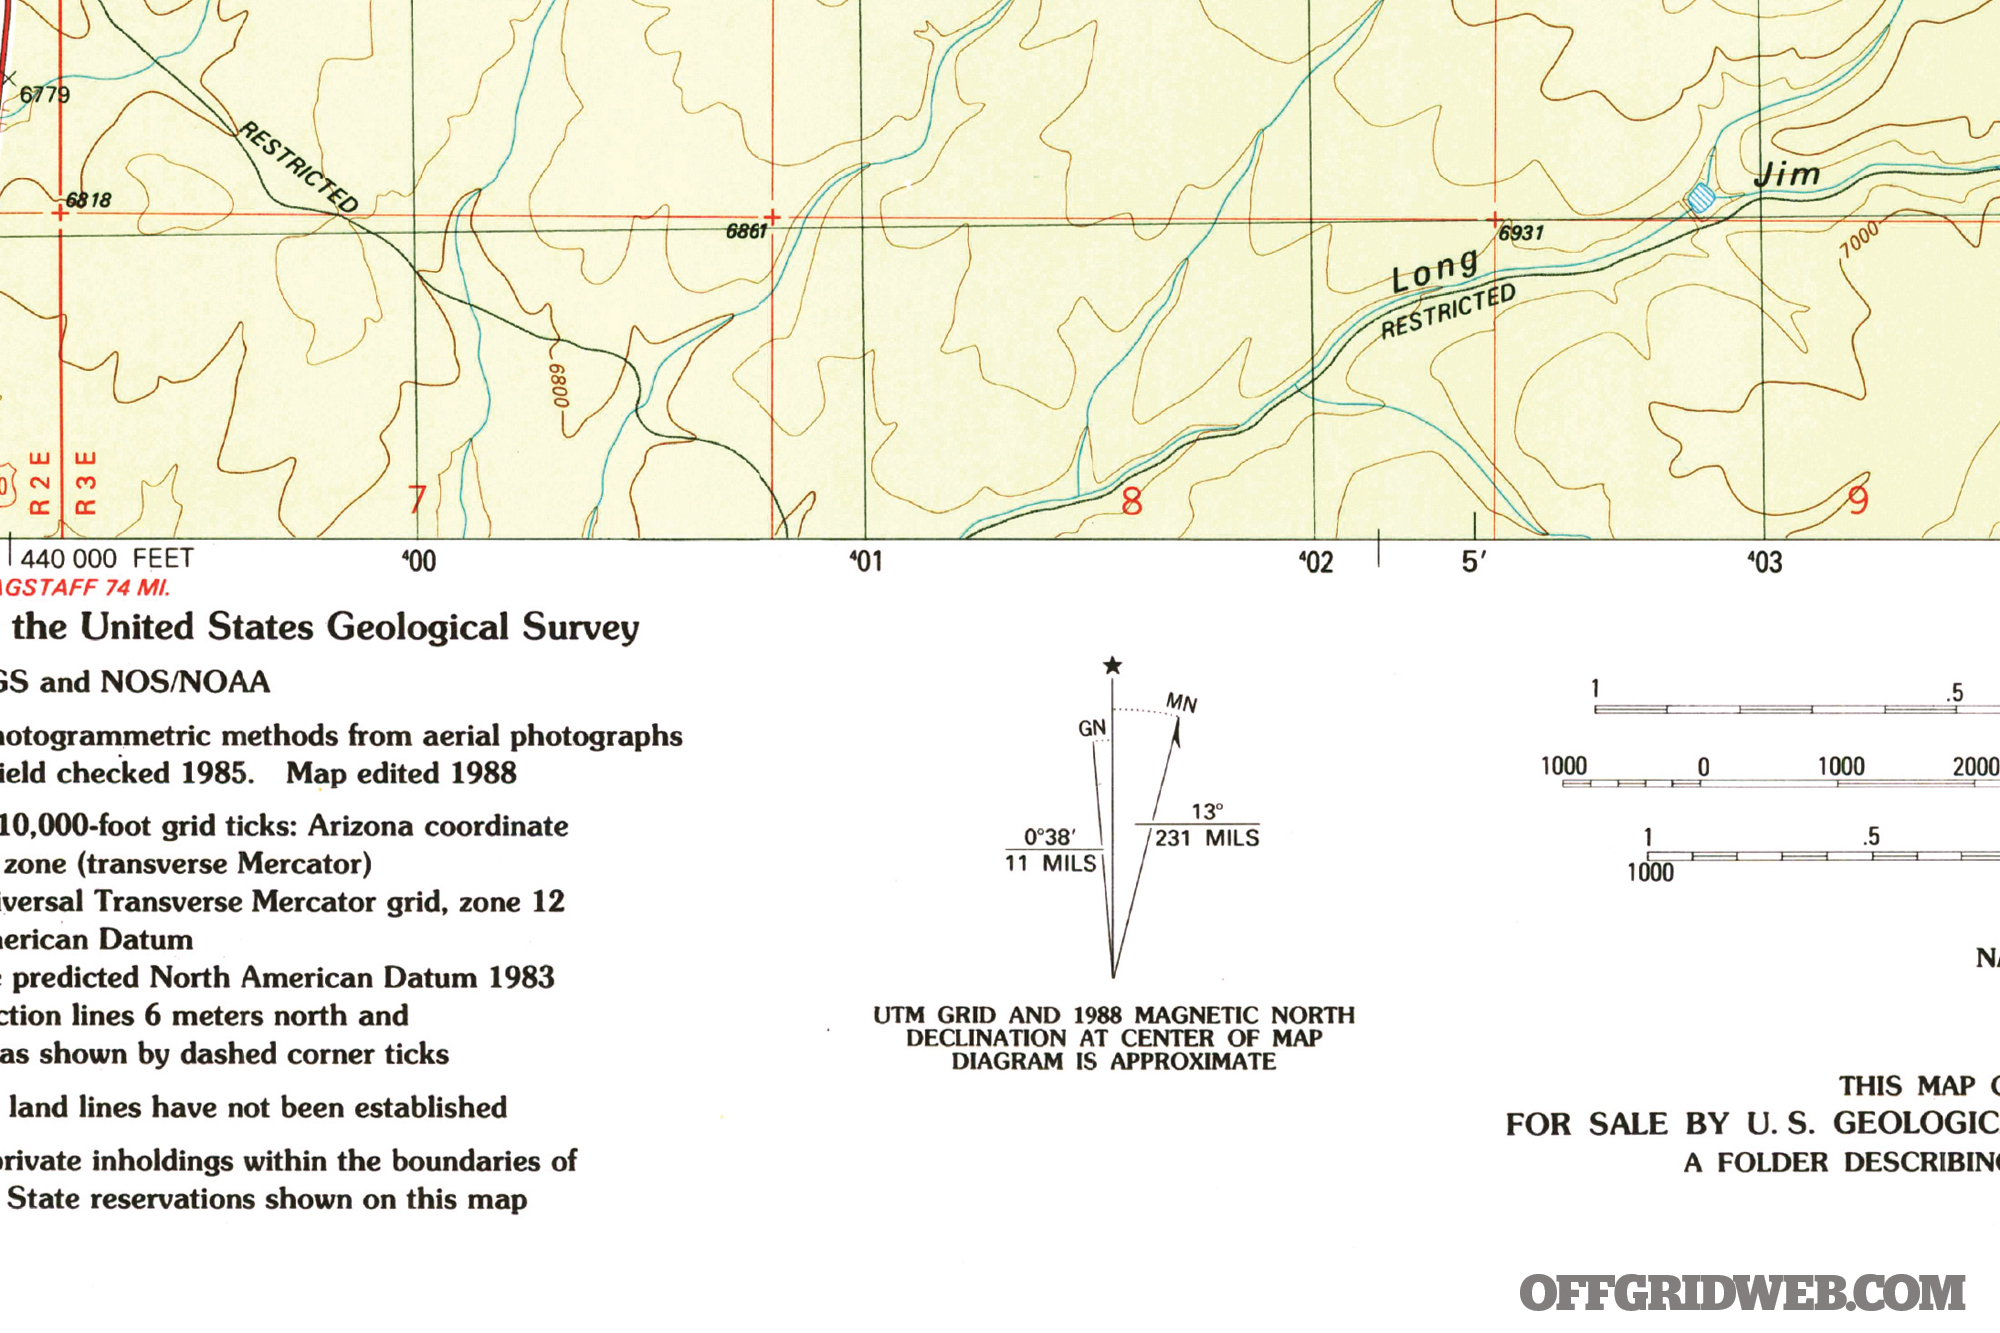
Above: For this example in the Grand Canyon, grid north (“GN”) differs from true north (the star) by 38 minutes and from magnetic north (“MN”) by another 13 degrees. Grid north is what you’d see on your map, and magnetic north is what your compass would indicate.
Note that the difference between magnetic north and grid north in this diagram is 13 degrees and 38 minutes (slightly over half a degree because there are 60 minutes in a degree). It’s 13 degrees from magnetic north to true north and then an additional 0 degrees and 38 minutes from true north to grid north.
For this example, I wouldn’t worry about the additional 0 degrees and 38 minutes. After all, I’d be planning to walk across terrain — I’m not surveying property lines. However, it’s important to note because it is a significant figure on some maps. Let’s just assume an even 13 degrees for the rest of this example.
Conversions
From any azimuth using this map, there’ll be a 13-degree difference between the azimuth on the map and an azimuth shot with your compass. There are a few mnemonics to help you remember when to add or subtract the difference (we’ll give you an example shortly). Also, some compasses have tools that help account for declination.
If you’d like to set the declination in your compass, follow the instructions for your particular model compass. By doing this, you can offset the direction the compass points in relation to where the magnetic needle points. This can be handy for many; however, there are good reasons to convert declination in your head and to leave the settings on your compass alone.
First, you’ll never forget your settings on your compass and accidentally use an old/incorrect declination setting. Second, many compass features involve perfectly orienting a map, aligning a compass edge for your path, and then aligning the needle within certain marks as a guide for your azimuth. This is a good way to use a map and compass. In fact, it’s probably the most recommended and taught method. However, I like to use a map and compass “on the go” and don’t always want to stop and spread everything out.

Also, I like to employ advanced techniques, such as intersection and resection, that require a good understanding of what’s going on. Using rotating bezels and guide marks to help you with your path are handy, but they often remove some of the important basics, such as understanding how to convert azimuths and what you’re actually doing.
A great mnemonic to convert for declination is “LARS,” which stands for “left add, right subtract,” because it’s simple and doesn’t require you to know whether you’re in an area with easterly or westerly declination (more on that next).
To use the LARS mnemonic, you simply look at, and use, the declination diagram on the bottom of your map. If you have a magnetic azimuth at the Grand Canyon and you want to convert that to a grid azimuth, place your finger on the magnetic north arrow and note that you’d need to move your finger left to get to the grid north arrow.
Using LARS, we know that going to the left means “add” — therefore we add the 13 degrees to convert from magnetic north to grid north. To convert from grid to magnetic, we’d move our finger to the right so we’d subtract the 13 degrees.
Let’s jump to an example to see how this works and also to see a real-world example of when you might need to do this.
Grid to Magnetic: Imagine that you know your position on the map, and you’d like to walk to a road intersection on the map that measures 35 degrees from your position. As you now know, you can’t just find 35 degrees with your compass and walk that way because you’ll be 13 degrees off-course … but which way? We have a measured grid azimuth of 35 degrees, but we need to shoot a magnetic azimuth for our compass. On this map, we move to the right to get from Grid North to Magnetic North on the declination diagram so we use the LARS mnemonic and know that we have to subtract the 13-degree difference for this location. We end up walking a bearing of 22 degrees with our compass to get to a point on our map 35 degrees from our location.
Magnetic to Grid: Now imagine that you’re sitting on a hilltop and see something in the distance. You use your compass and determine that the object is 270 degrees from your position, but you’d like to see where the object is on your map. Because you used your compass, you now have a magnetic azimuth and you need to convert to a grid azimuth. On our example map, your finger must move to the left as it transitions from the magnetic to the grid north arrows in the declination diagram, therefore using the mnemonic LARS tells us to add the 13-degree declination to our magnetic azimuth to get our grid azimuth of 283 degrees.
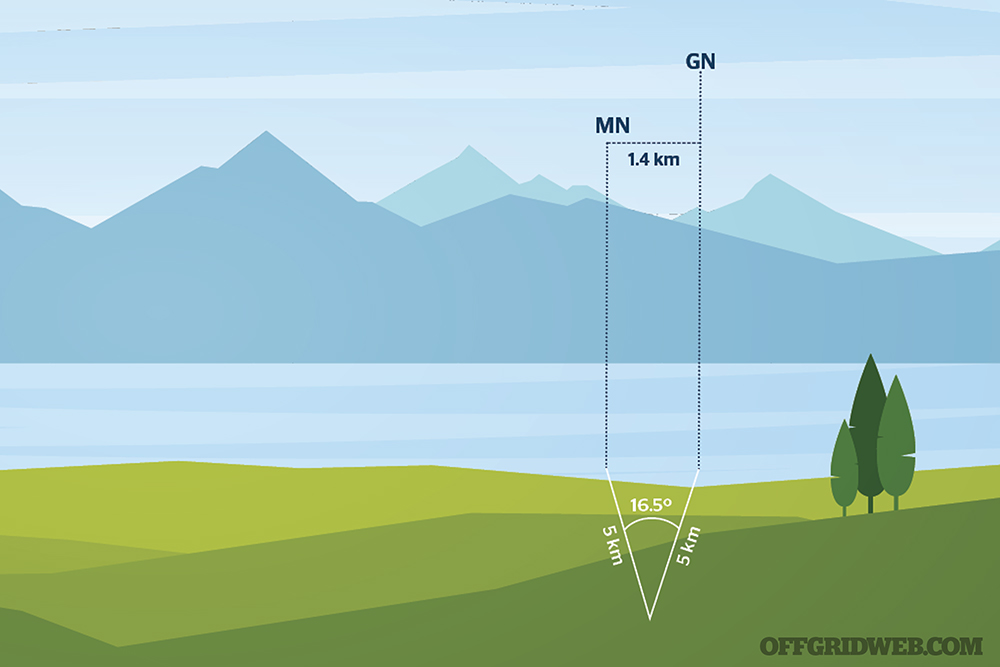
Above: Acadia National Park, Maine. The difference between magnetic north and grid north is 16.5 degrees; failing to account for this on a 5km trek will make you miss your target by
1.4 km.
Another popular mnemonic is “west is best, east is least.” The trick here is to add the difference (best) with westerly declination and subtract it (least) for easterly declination. There are two reasons why we don’t recommend this one.
First, you need to remember that the declination is east on the west half of the U.S. and west in the east. Yes, you read that right. Second, you need to remember that this is only for converting from grid to magnetic (and not the other way around). The modified mnemonic “from map to field the proper yield is east is least and west is best” can help you recall this conversion, but even then, it’s ripe for confusion.
Drop the GPS
This may have been a lot to absorb. Apologies if it was. However, we hope that this encourages you to learn more about the critical skill of land navigation with a map and compass.
About the Author
Ryan Cleckner is a former special operations sniper and sniper instructor. Currently, he’s a firearms law attorney, best-selling author, university lecturer, Trigger Words podcast host, and entrepreneur. He runs RocketFFL, which helps people get an FFL and stay compliant, Mayday Safety, a software/app company that helps protect schools and other organizations, and his newest project, online firearms courses at GunUniversity.com.
More From Issue 29
Don’t miss essential survival insights—sign up for Recoil Offgrid’s free newsletter today!
- Review: Crawford Survival Staff
- Parental Preps Issue 29
- Understanding Energy Drinks & Their Ingredients
- Book Review: “Gray Man: Camouflage For Crowds, Cities, and Civil Crisis”
- Vanishing Act: 5 Tips for Surviving a Kidnapping
- Take Your Best Shot: Prepper’s Slingshot Roundup
- Doug Marcaida Spotlight – Into the Fire
- Review: 10 Emergency Apps for iOS and Android
- Point the Way: Survival Compass Buyer’s Guide
- Old-School Navigation: How to Use a Map and Compass
- Review: Veritas Tactical VT-16 5.56mm AR Pistol
- Disaster Insurance: Hedging Your Bets for SHTF
- What If Your Flight is Hijacked by Terrorists?
- Pocket Preps: Wallets
- Issue 29 Gear Up
Read articles from the next issue of Recoil Offgrid: Issue 30
Read articles from the previous issue of Recoil Offgrid: Issue 28
Check out our other publications on the web: Recoil | Gun Digest | Blade | RecoilTV | RECOILtv (YouTube)
Editor’s Note: This article has been modified from its original version for the web.
