In the age of information, we often turn to the internet for quick answers to our questions. But what happens when the information we rely on is not only incorrect but potentially life-threatening? This is the issue mushroom enthusiasts are facing with the rise of AI written foraging guides on Amazon.
According to a recent article by Tech Times, Amazon’s marketplace has been flooded with books that appear to be written by AI chatbots. Titles like “The Supreme Mushrooms Books Field Guide of the South-West” and “Wild Mushroom Cookbook: From Forest to Gourmet Plate, A Complete Guide to Wild Mushroom Cookery” have sparked controversy and concern among experts.
Why It’s Risky Business
The issue isn’t just about AI taking over human jobs; it’s about the potential risks involved. Professor Myron Smith, a fungal expert at Carleton University, called these AI-generated materials “totally irresponsible.” The problem lies in the fact that identifying edible mushrooms from toxic ones often requires experience and expertise that a chatbot simply can’t replicate.
The Bigger Picture
While mushroom foraging might seem like a niche topic, the implications are far-reaching. AI-generated content is infiltrating various industries, sometimes even impersonating authors. This raises questions about the reliability of information in an era where factual accuracy is crucial. Amazon has yet to clarify how they intend to handle this growing issue, but for now, it’s buyer beware.
What Can You Do?
If you’re into foraging or just love reading about it, make sure to buy books from known authors and experts. Your life could literally depend on it. And hey, while you’re at it, why not support your local bookstores? They could use the love, and you’ll be sure you’re getting quality information.
Final Thoughts
In a world where AI is becoming increasingly sophisticated, it’s essential to remain vigilant about the sources of our information. Whether it’s mushroom foraging or any other specialized activity, let’s make sure we’re getting our facts from reliable sources. Because when it comes to matters of life and death, there’s no room for error.
In recent times, a new form of criminal activity has been making headlines, particularly in California. Known as “bank jugging,” this crime involves criminals observing individuals as they leave financial institutions, visibly holding cash. The criminals then follow their targets to their next destination, seizing the opportunity to either burglarize the vehicle or commit robbery directly.
The Anatomy of a Bank Jugging Crime
The Fontana police department in California recently took to Instagram to warn residents about the escalating number of bank jugging incidents. In a typical scenario, a person leaves a bank holding cash, drives to another location, and becomes a victim of theft or robbery. For instance, in July, a man left a Fontana bank with $1,060 in cash, drove to a nearby Walgreen’s, and while he was inside, thieves broke into his car and stole the money.
Not Just a California Problem
While California has seen a surge in these incidents, the problem is not confined to the Golden State. The Orlando Police Department in Florida also warned of a “major uptick” in bank jugging cases. The alarming part? It takes mere seconds for these criminals to complete the robbery.
Safety Tips to Consider
The police have offered some safety tips to help you avoid becoming a victim of bank jugging. These include being vigilant for people loitering around financial institutions, avoiding distractions like using your phone, securing cash in a nondescript bag, and being conscious of any vehicles that might be following you. If you suspect you’re being followed, call 911 immediately or head straight to the nearest police or fire station.
The Importance of Awareness
While it’s essential to be cautious, awareness is your first line of defense. Knowing what to look for and how to react can make all the difference. So, let’s be vigilant and look out for one another because safety is a collective responsibility.
Ah, the great outdoors of Montana—majestic mountains, sprawling forests, and the kind of wilderness that makes you feel alive. But for anyone unfamiliar with its vast landscapes, it can also be a bit intimidating, especially if you’re not prepared. That’s why events like the Backcountry Skills Summit are a goldmine for anyone looking to level up their survival game. Hosted by the TREAD Agency, this three-day event a few hours north of White Sulfur Springs, MO was a crash course in wilderness survival and a great way to connect with leaders in the outdoor industry. Attendees from CarbonTV, Outfitter Services, and other industry professionals shared a campfire with subject matter experts to learn and to share their expertise.
Above: Base Camp being set up the first night of the Backcountry Skills Summit.
The Experts and Their Wisdom
Over the course of the summit, several classes were taught to help level up our survival skills and impart a deeper appreciation for the Montana wilderness. Subject matter experts from popular TV shows, federal agencies, and several outdoor companies put together well thought out and relevant instruction.
Laura Zerra: The Survival Kit Guru
You might recognize Laura Zerra from the show “Naked and Afraid,” but let me tell you, she’s anything but afraid when it comes to survival. Her session on what to pack in a survival kit was eye-opening. From cutting tools to fire starters, she emphasized the importance of being prepared for any situation. Laura also touched on the psychology of survival, explaining that a calm mind can be your best tool in a crisis. She even discussed her own experiences where she had to rely on her survival kit to make it through tough situations. It is interesting to note that her survival kit was small, light weight, and versatile enough to provide essential needs during an emergency. Laura also has her own show called “Decivilized” which overs a myriad of survival topics on CarbonTV. (URL: https://www.carbontv.com/shows/decivilized)
Above: Laura Zerra imparts her survival wisdom periodically during the hike to the top of the mountain.
Amber Kornak: Bear Safety 101
Amber Kornak from the U.S. Fish and Wildlife Service not only survived a grizzly bear attack but also taught us how to protect ourselves from these majestic yet dangerous creatures. Her advice? Carry bear spray and know how to use it! Amber shared her personal story, which added a layer of authenticity and urgency to her tips, and proceeded to instruct on the proper techniques to carry and shoot bear spray at its intended target. She also discussed the importance of understanding bear behavior to avoid encounters in the first place. Since the Montana wilderness is home to a large population of bears, this advice was potentially life saving. (URL: https://www.fws.gov/staff-profile/amber-kornak)
Above: Amber Kornak discusses bear behavior and how to protect yourself during a bear attack.
Jordan Jonas: Shelter Building
Remember Jordan Jonas from History Channel’s “Alone”? This guy knows his way around a tarp and some paracord. He showed us how to build a survival shelter that could withstand the elements, and it was surprisingly easier than you’d think. Jordan emphasized that the skills for building a shelter can be adapted for several survival scenarios, in a multitude of environments. He also gave us a rundown on how the tarp can be folded to keep pesky mosquitoes from disturbing a good night’s rest. Plus, he threw in some pro tips on how to make your shelter more comfortable, because let’s face it, if you’re stuck in the wild, a little comfort goes a long way. (URL: jordanjonas.com)
Above: Jordan Jonas teaches some quick shelter building techniques with the use simple items like cordage and a tarp.
Tyler Beck and Doogie Courvreux: Guzzle H2O
Clean water is a must in the backcountry, and the guys from Guzzle H2O have developed a device that pumps and purifies water on the go. It’s a game-changer for anyone who loves to venture off the beaten path. Tyler and Doogie explained the science behind their water purification system, and demonstrated how easy their system was to deploy. In fact, all of our potable water during the Summit was provided via Guzzle H2O from a nearby river. For city folks, they pointed out that having a portable water purification system can be invaluable during natural disasters when tap water may be contaminated. (URL: guzzleh20.com)
Above: Guzzle H2O’s water filtration system is quick to deploy and simple to use.
Derek Jerrel: Winchester Ammunition
Self-defense is crucial in the wilderness. Derek Jerrel from Winchester Ammunition introduced us to their new “Big Bore” hollow point ammo, which is optimized for personal defense and hunting applications. Derek went into the technical aspects, explaining the engineering behind the ammunition’s effectiveness. He also discussed the ethical considerations of using firearms for self-defense, emphasizing the importance of awareness and decision-making. For urbanites concerned about self-defense, Derek mentioned that understanding the basics of ammunition can be useful, even if you’re not in a backcountry setting. (URL: winchester.com)
Above: Winchester ammunition being used during long range marksmanship.
Scoute Arms: Precision in the Wilderness
When it comes to long-range shooting, the team from Scoute Arms are the experts you want to learn from. Led by Creighton Greene, John Torres, Justin Rassmusen, and Trent McMurtrey, their workshop was a masterclass in precision and technique. They broke down the complexities of long-range shooting into understandable lessons, covering everything from the basics of rifle setup to advanced wind reading. Their hands-on approach allowed attendees to get real-time feedback, making adjustments on the spot to improve accuracy. But it wasn’t just about hitting a target; Scoute Arms emphasized the ethical considerations and responsibilities that come with wielding such a powerful tool. (URL: scoutearms.com)
Above: Scoute Arms instructors discuss the proper use of tripods during long range marksmanship.
Montana’s Open Arms
Mitch Staley from the Montana Department of Commerce spent some time with the group, and gave us the lowdown on why Montana is a great place to live and explore. From tax incentives to a welcoming community, Montana is extending its arms to adventurers and settlers alike. These perks seem to be working, given that the state is currently seeing a boom in new residents. For outdoor enthusiasts, Montana has countless opportunities. (URL: commerce.mt.gov/)
Gear Up
Shiftpod: The Future of Tents
Shiftpod provided the shelters we slept in each night. The company is taking camping to the next level with its space-age composite fabrics and quick setup. These tents are designed to withstand extreme conditions, from scorching desert heat to icy snowstorms. What’s more, the tents are insulated and UV reflective, and have plenty of ventilation ports, ensuring a comfortable environment inside. (URL: shiftpod.com)
Above: Shiftpod tents look like something you might find on the surface of Mars, but they are tough and well insulated.
Coast: Light Up Your Adventure
For both visibility and cutting tools, Coast provided the gear every camper needs. Their range of LED flashlights and hands-free lighting solutions are designed for performance and durability, with some products boasting up to 5,300 lumens and a beam distance of over 500 meters. Coast also offers a variety of knives for any survival kit. (URL: coastportland.com)
Mystery Ranch Backpacks
These aren’t your average backpacks. Mystery Ranch provided attendees with 40L Coulee backpacks that are both durable and adjustable. The technology behind their ergonomic design distributes weight more evenly across your back. Various compartments designed for specific gear, such as the zippered pockets on the hip strap, make it easier to stay organized. (URL: mysteryranch.com)
Above: Gear provided during the Backcountry Skills Summit covered many of our outdoor needs, including cutting, illumination, and storage.
The Experience
The Backcountry Skills Summit was more than a series of workshops; it was a full-sensory journey that began in a river valley and culminated at the summit of a mountain. The first night set the stage with Steve Christman from Xman’s BBQ serving up a roasted boar. The smoky aroma mingled with the fresh mountain air, creating an atmosphere that was as rustic as it was inviting. The second night was a culinary escapade led by Tyler McManus from Velma Elaine Catering. We feasted on elk, bison, beef and chicken, each dish a culinary masterpiece that seemed to capture the essence of Montana’s untamed wilderness. Gear companies were there to augment the event by showcasing their models
Above: Xman’s BBQ served up a feast for the first night of the Summit.
But the real showstopper came when we hiked from the river valley to the mountain summit. As we reached the peak, we were greeted by a sunset so stunning it seemed as if the sky itself was ablaze. The hues of orange, pink, and purple reflected off the clouds, casting a magical glow that made the strenuous hike worth every step.
Above: Montana is also home to some amazing vistas.
Conclusion
As the Backcountry Skills Summit wrapped up, it was clear that the event was more than a crash course in survival — it was a lesson in life readiness. The experts didn’t just share tips; they imparted wisdom that applies to anyone, anywhere. Each piece of gear showcased, from Shiftpod tents to Coast lights and Mystery Ranch backpacks, were not just products but essential tools for navigating life’s unpredictabilities. Leaving the summit, attendees were better equipped not just for outdoor adventures, but for the challenges that lie ahead, wherever they may be.
A flashlight is one of the most useful items you can add to your vehicle, but simply tossing one into the glovebox or center console isn’t always ideal. In those locations, it may end up rolling around and getting buried under other items you’ll have to rummage through. More importantly, you’ll have to remember to charge or replace its batteries periodically, otherwise Murphy’s Law says the batteries will be dead when you really need a light (ask us how we know). So, how can you guarantee you have a flashlight that’s always within arm’s reach and always fully charged? That’s the problem we set out to solve by installing a hardwired Maglite ML150LR in our 2022 4Runner project truck.
About the Maglite ML150LR Rechargeable LED Flashlight
Above: The Maglite ML150LR is available in gloss or matte finish, each with various wall/car/hardwire charging cable configurations. A shorter ML150LRS model is also available for those who prefer a more compact light.
If you grew up in the ’80s or ’90s, you’re probably familiar with the old D-cell and C-cell Maglite flashlights with incandescent bulbs. They were great for their time, but flashlight technology has come a long way since then. Thankfully, Maglite isn’t just resting on its laurels. The ML150LR features a 1,082 lumen LED powered by a LiFeP04 rechargeable battery. It’ll run for 3 hours and 15 minutes in high-output mode, or can be switched to 138-lumen low mode for an 18-hour runtime. There’s also a 25-lumen eco mode that boasts 79 hours of runtime.
The included charging cradle locks securely around the flashlight when it’s pressed into place, and will only release it if the red release button is pushed. The charger can replenish the battery from 0% to 80% in 30 minutes.
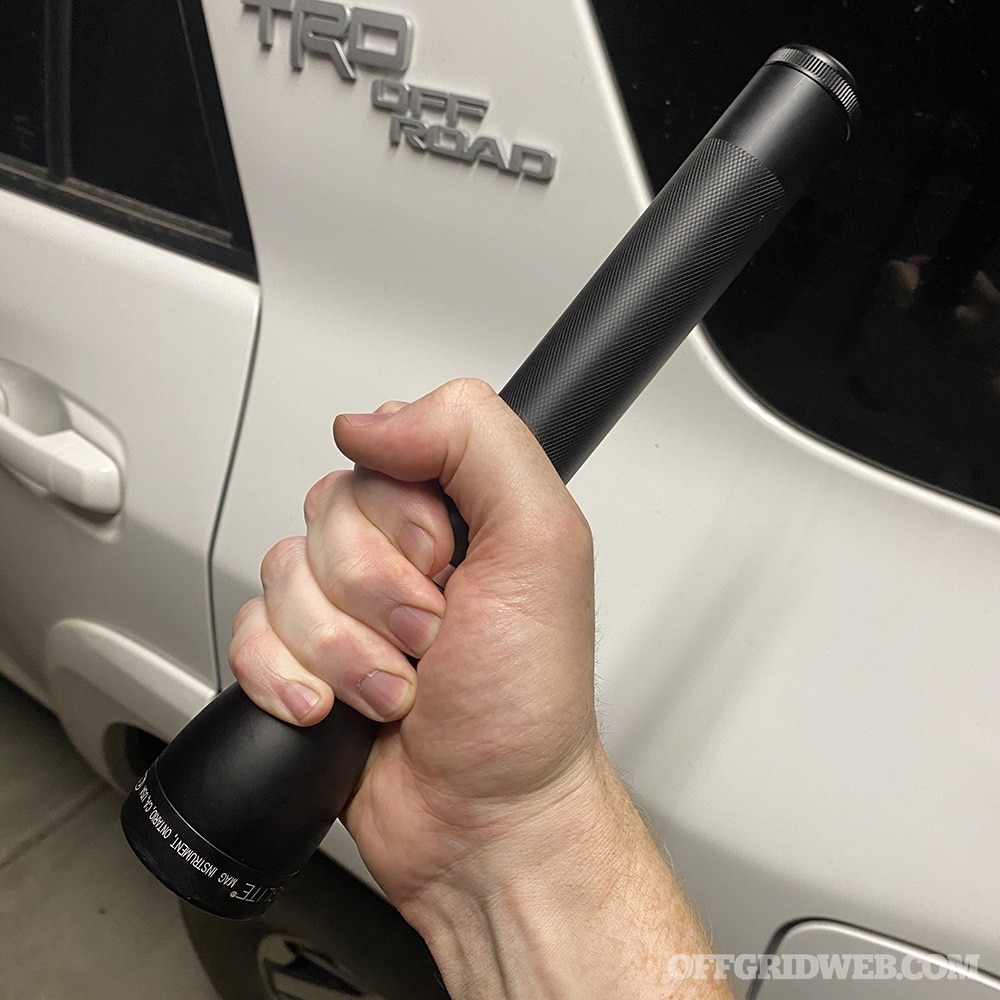
Above: The ML150LR is comparable in size to one of Maglite’s classic 3 C-cell alkaline models. The large size offers extended battery life and allows it to double as an impact tool in a pinch.
The ML150LR can be configured by the user in one of four function sets. Secondary and tertiary functions are accessed by quickly tapping the activation button two or three times.
General — High, low, eco
Outdoor — High, low, strobe (our preferred function set)
Law Enforcement — Momentary, high, eco
Tactical — Momentary, high, strobe
Despite all these modern features, this is still a classic Maglite at its core. It’s constructed from impact-resistant aluminum, it’s IPX4 water resistant, and the head features Maglite’s twist-focus functionality. Maglites are also popular due to their ability to be used as an impact tool, glass breaker, or baton in defensive situations, and the ML150LR seems well-suited to those tasks.
Hardwired Maglite Installation
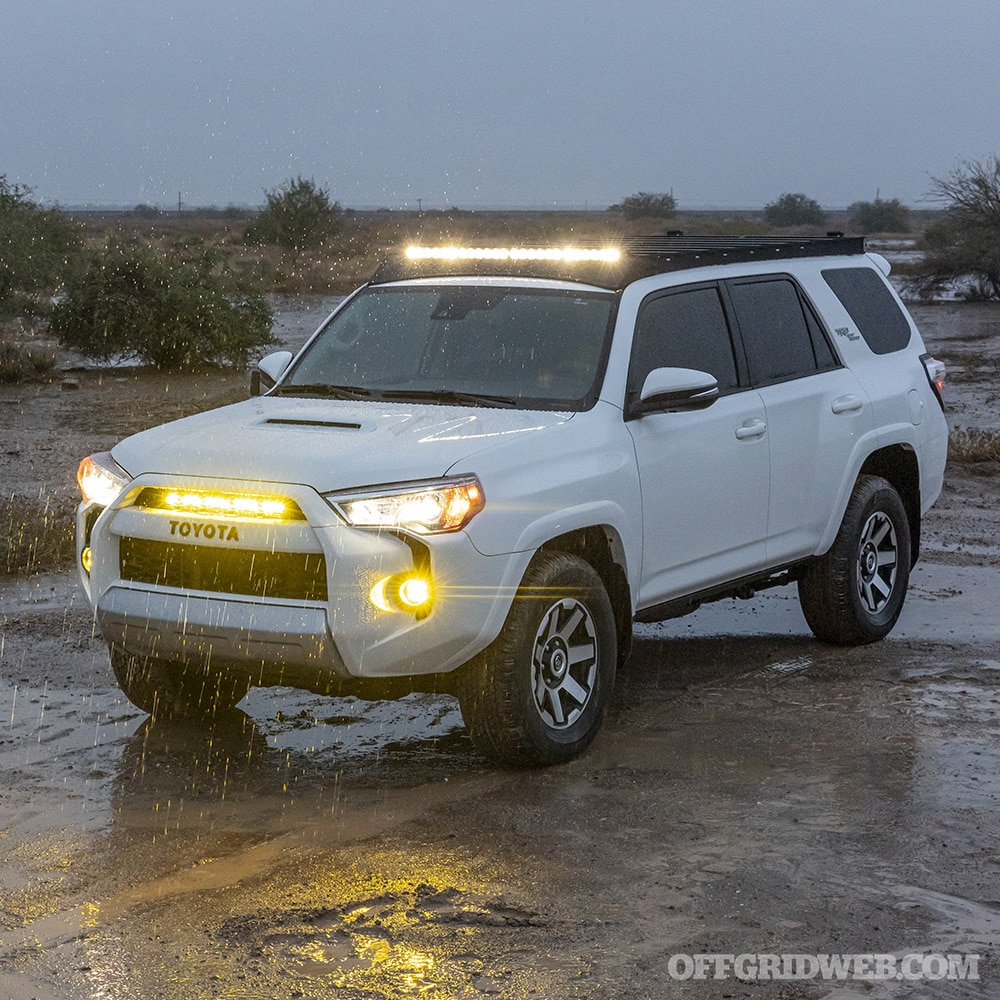
Above: Our 4Runner project truck has plenty of forward-facing and rear-facing Baja Designs lights to illuminate the trail, but there are many situations where we might need to scan out a side window or walk away from the truck. A handheld flashlight is a necessity for these instances.
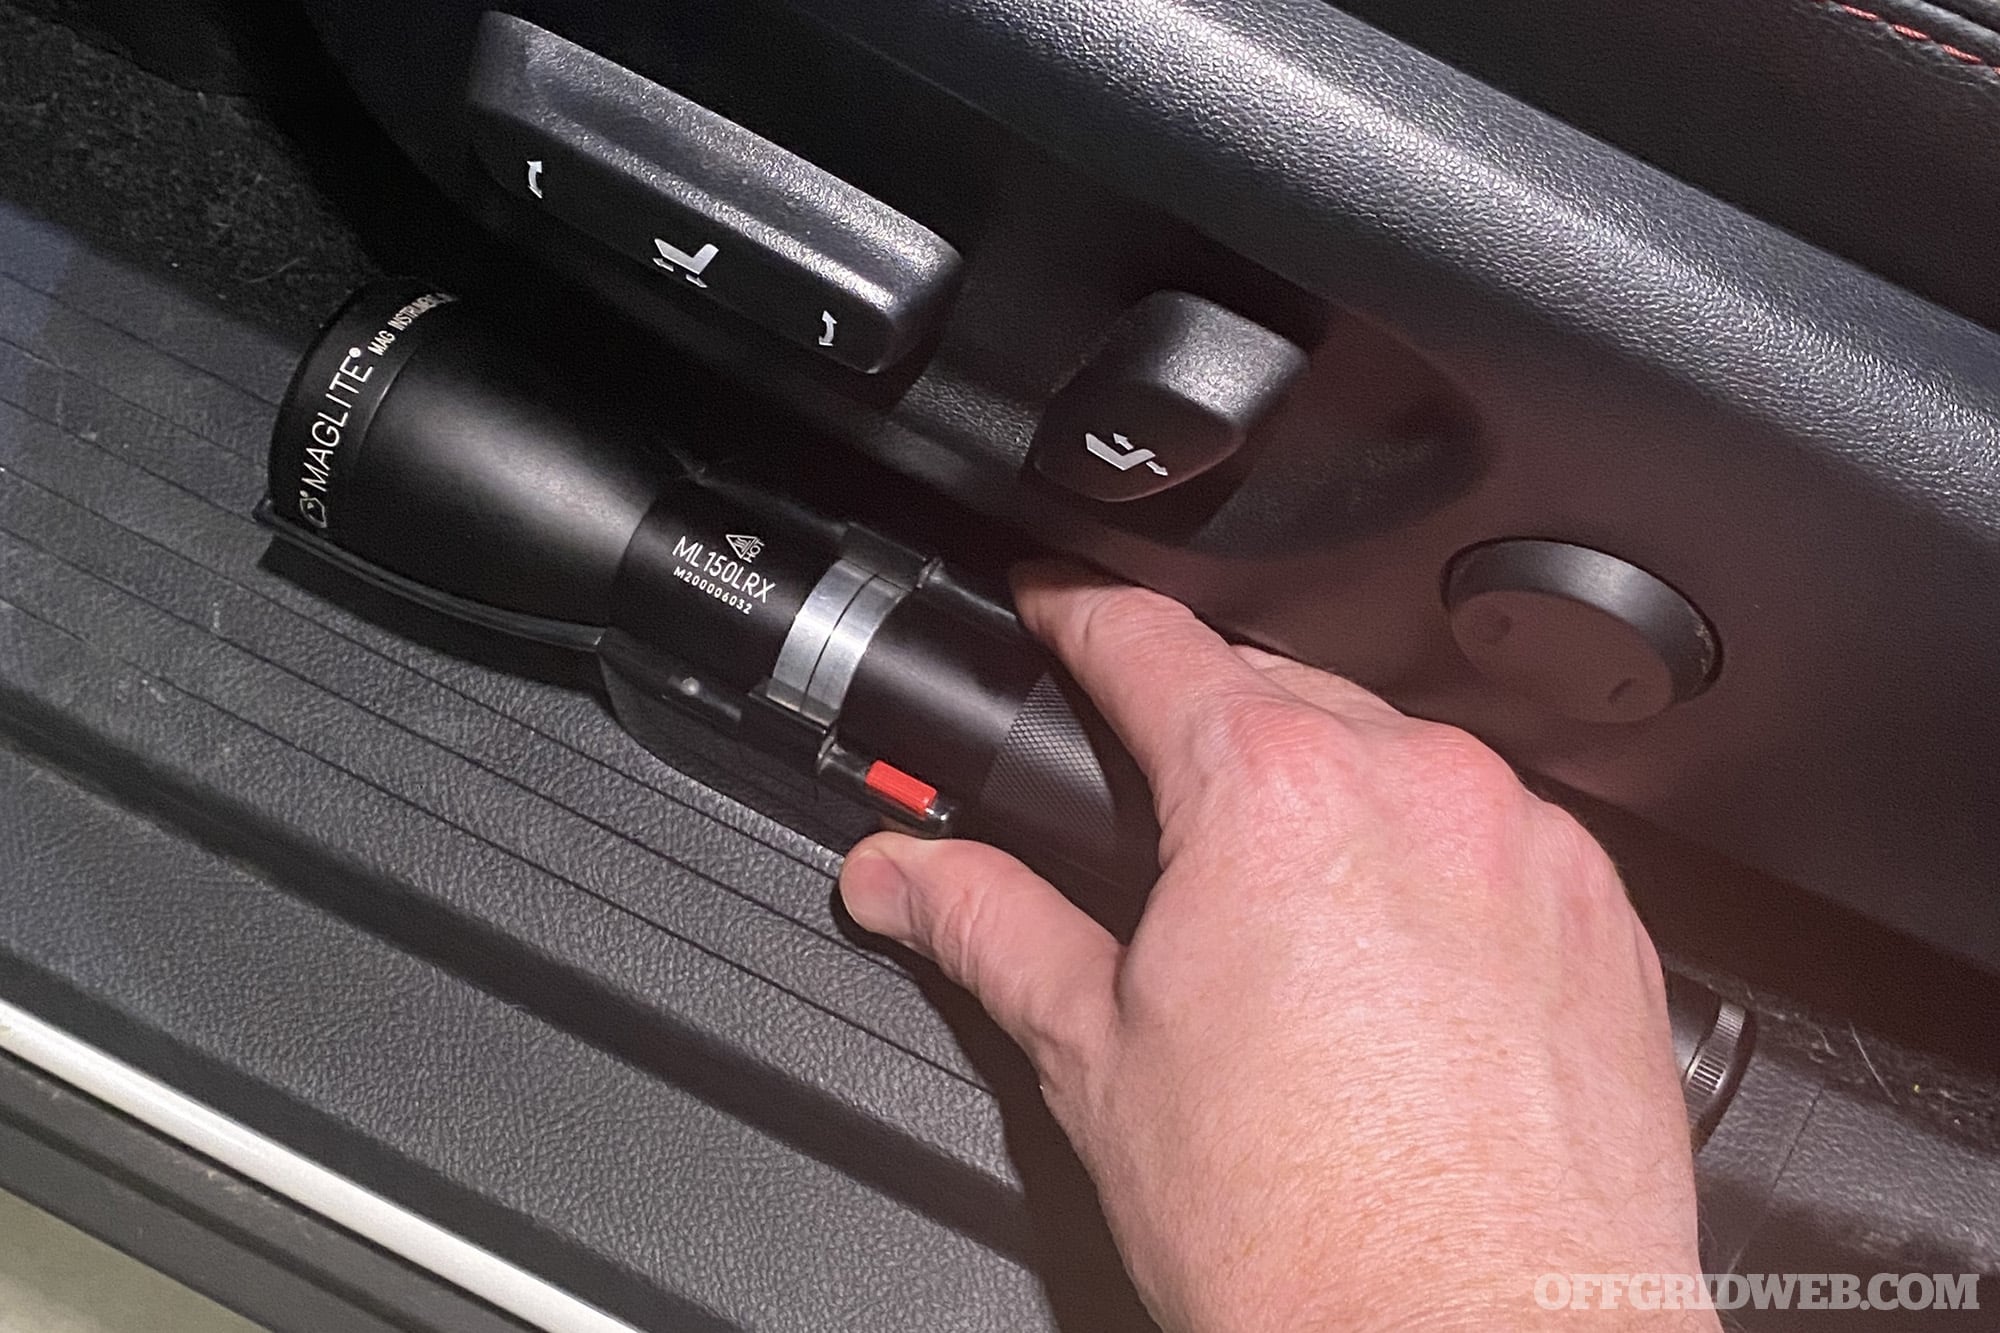
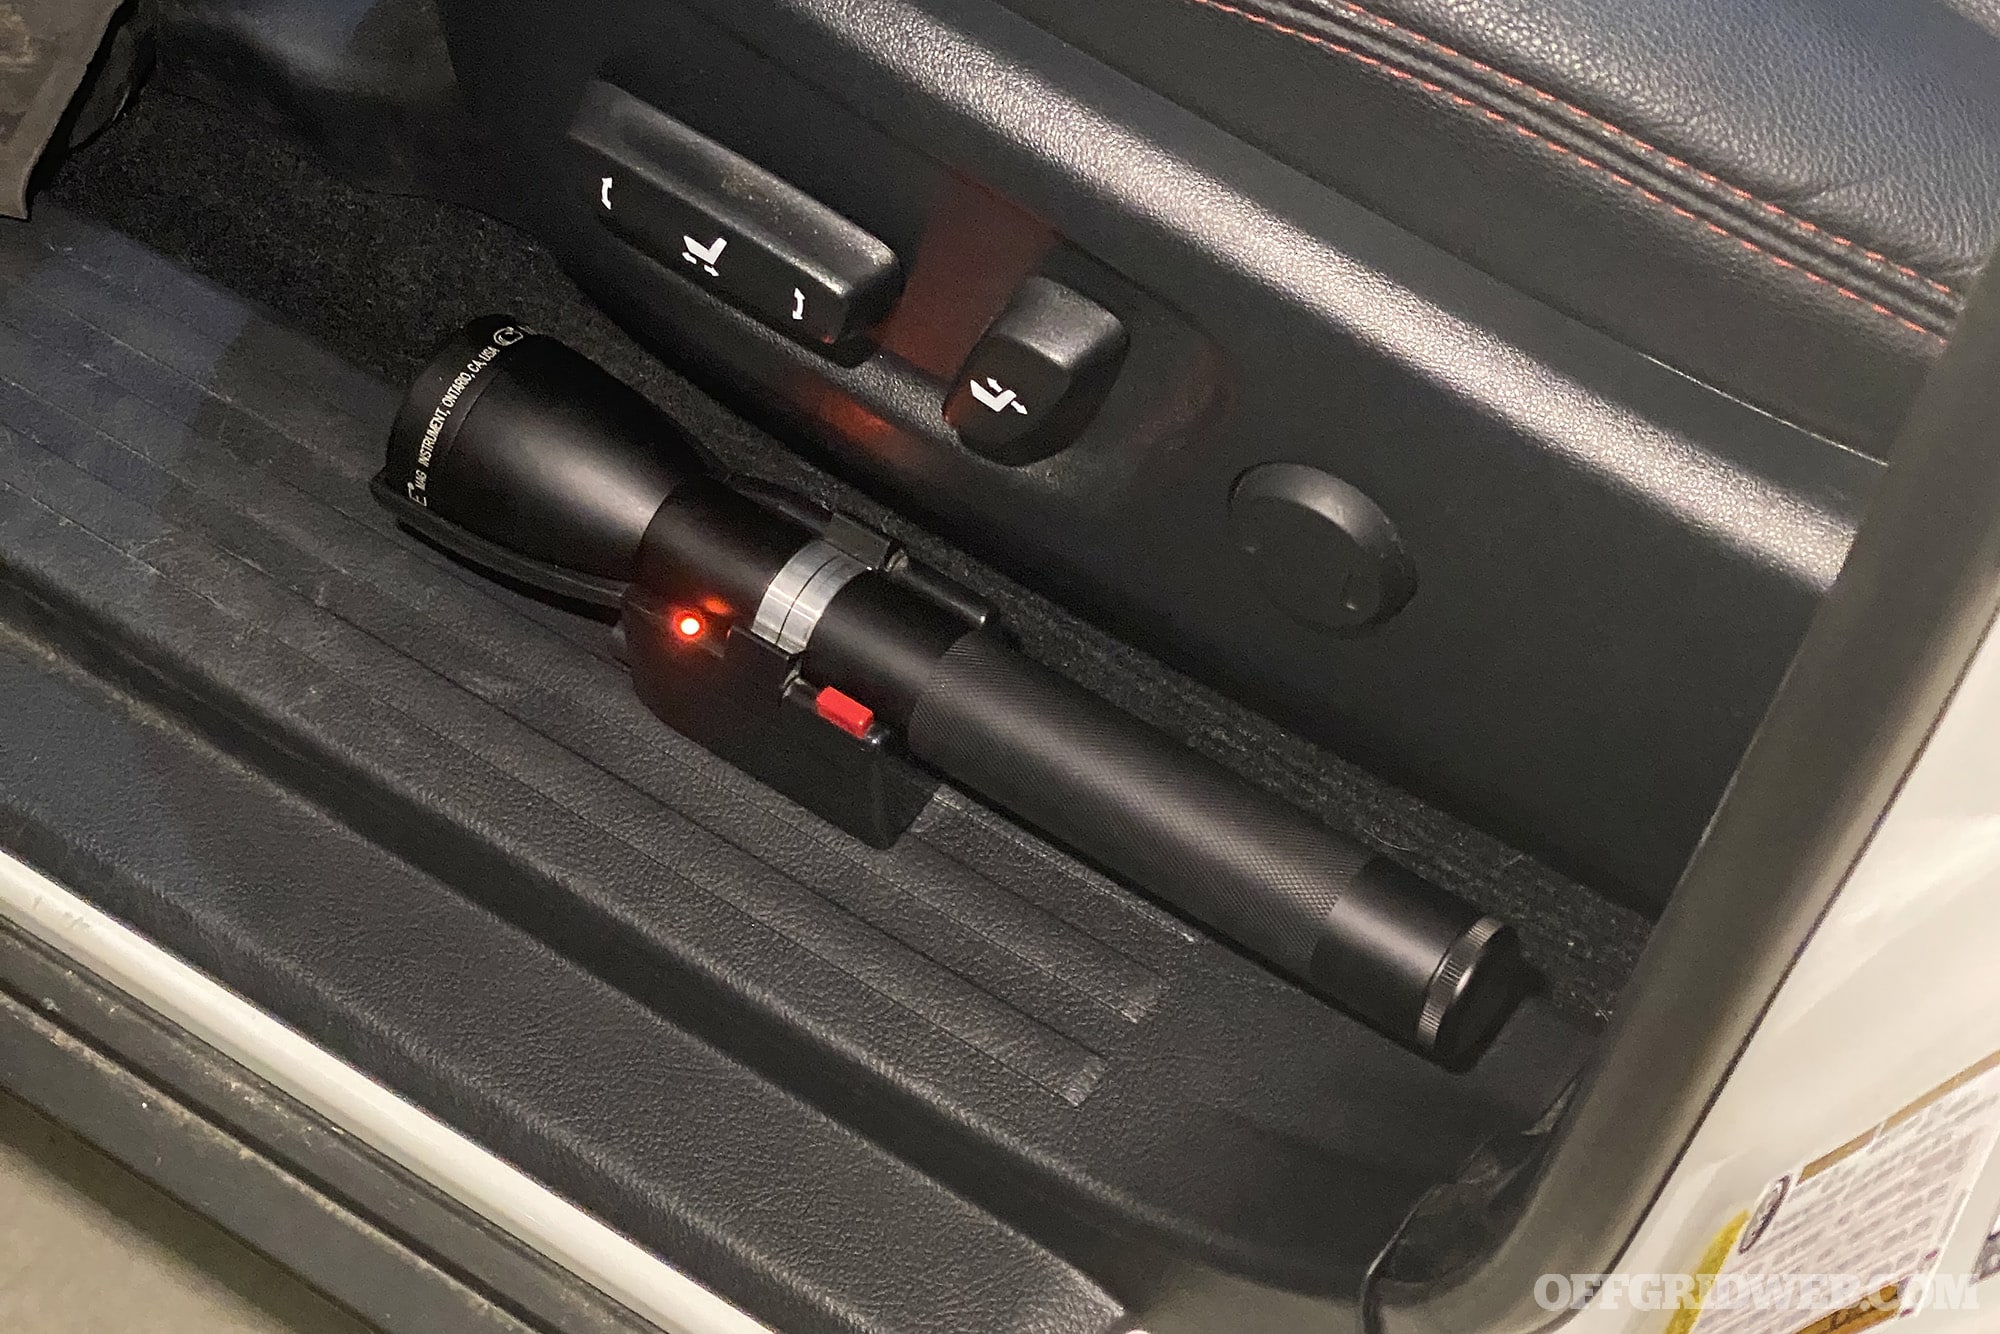
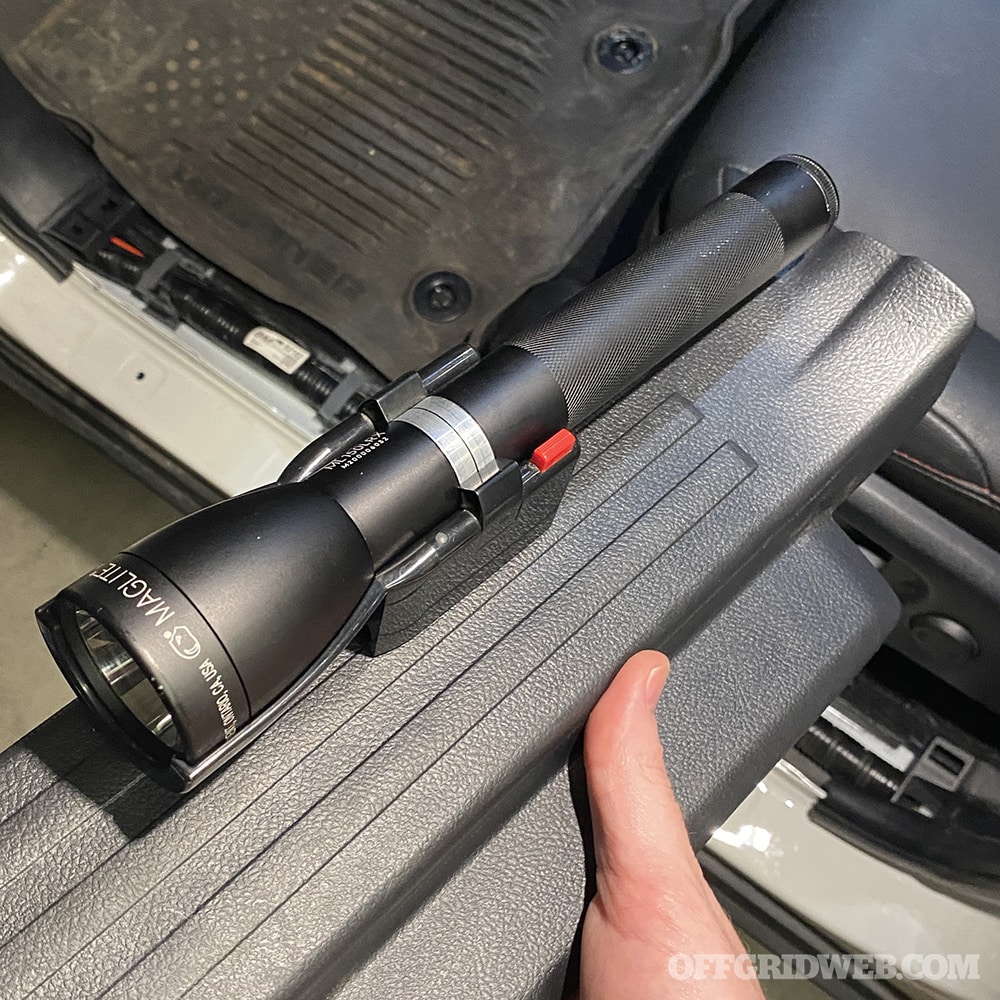
The first step is to determine where you’re going to mount the hardwired Maglite charging cradle. In our 5th Gen 4Runner, it fit perfectly between the driver’s seat and interior door panel, with about 1/2-inch of clearance on either side. We positioned it carefully and used a pencil to mark the outline of the charger onto the plastic door sill panel. Be sure to check clearance by shutting the door firmly and moving the seat forward/backward — nothing should make contact with the cradle or flashlight.
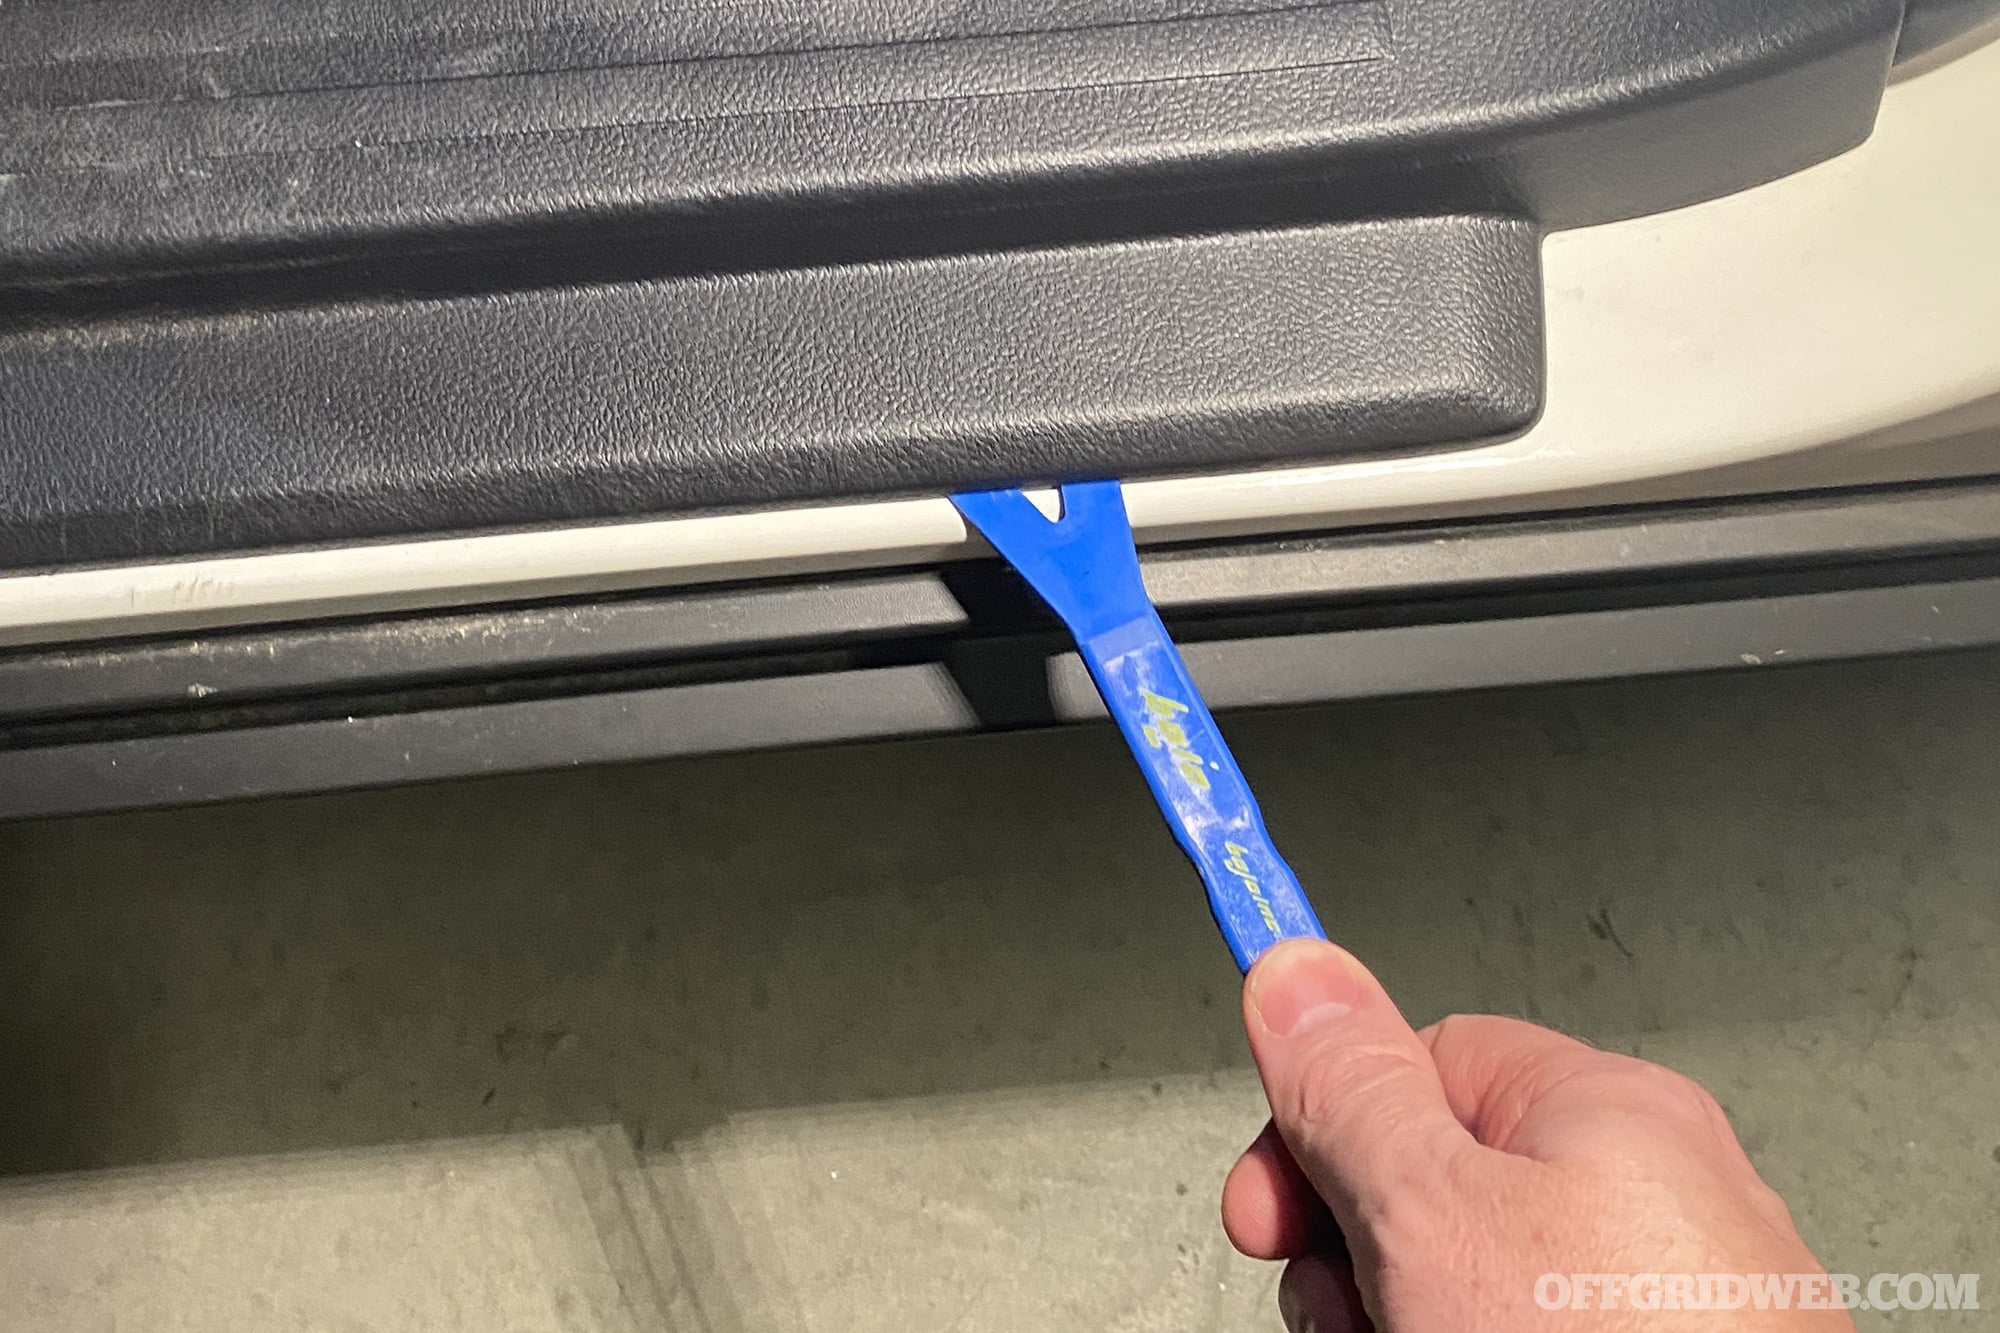
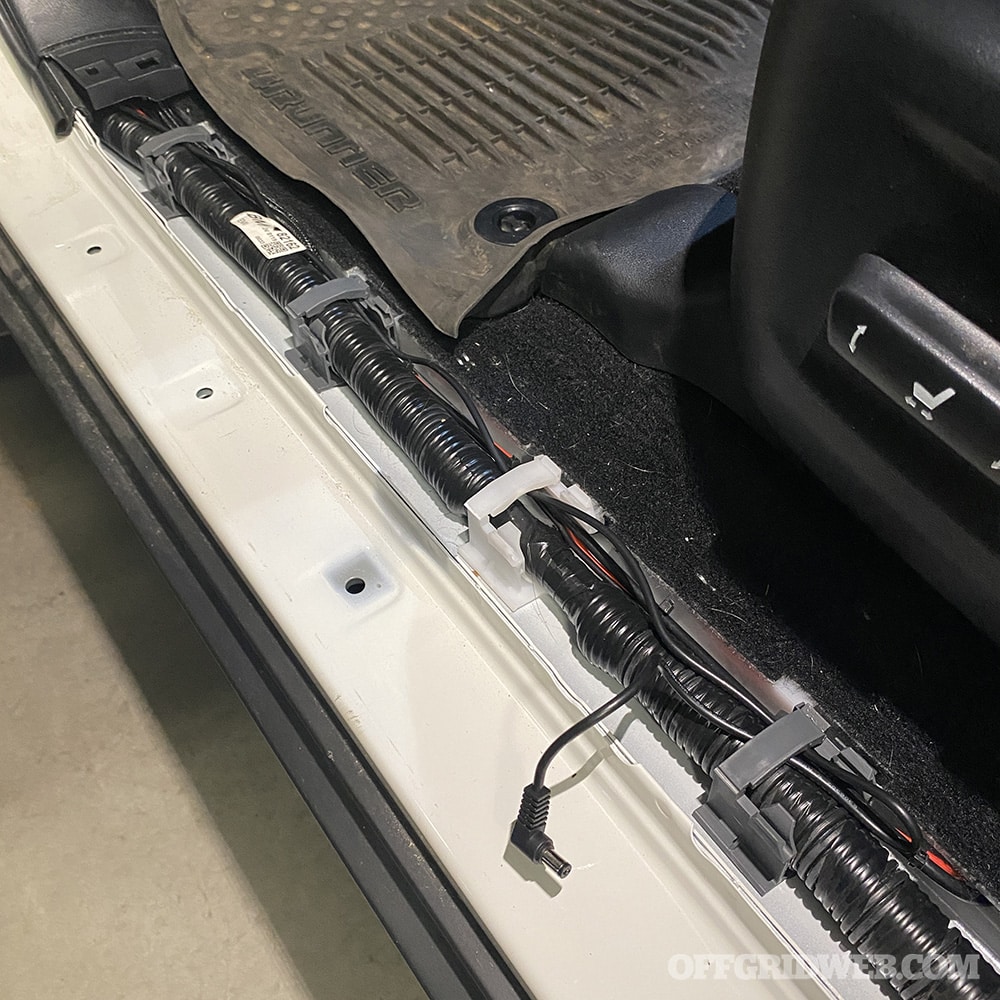
Once you’ve determined the placement of the charger, use a plastic pry tool to gently pry upward around the edges of the sill panel. The clips will pop out without too much effort, revealing a channel with a bunch of wires already running through it. This is where we ran the wires for our hardwired Midland GMRS radio, which is mounted under the driver’s seat.
Place the end of the charging cable next to where the cradle will be installed, then run the other end towards the front of the vehicle and up through the kick panel by the driver’s left foot.
We cannibalized the 12V car charger that came with our Maglite, snipping off the 12V DC plug and stripping the outer sheath to reveal positive and ground wires. If you don’t want to do this, Maglite offers a ML150LR Straight Wire accessory for $17, or you can buy the complete ML150LR package with a straight wire. Either way, you’ll want the positive and ground wires routed up through the driver’s side kick panel.
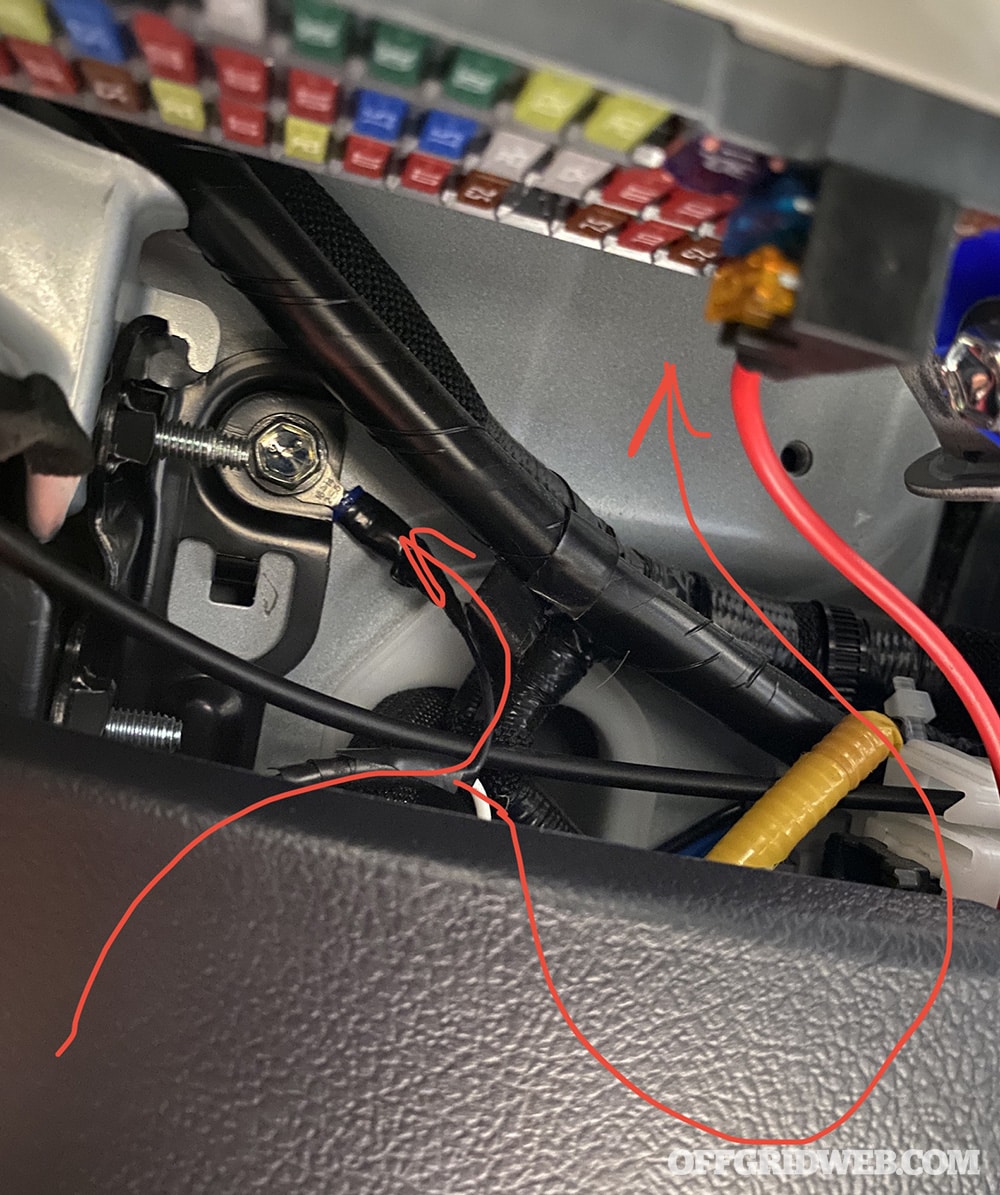
Above: Under the lower left side of the dash, the ground wire (originally bare, now protected by heat shrink and electrical tape) is connected to a grounded bolt via a spade terminal. The positive wire (white) is attached to a fuse tap, which connects to the interior fuse box a few inches away.
The ground wire should be connected to a ground point on your vehicle. We crimped the wire into a spade terminal and placed it under the head of a nearby bolt that attaches directly to the body. It’s important that the bolt isn’t attached to plastic or another insulated surface; bare metal is best for a reliable ground.
Next, the positive wire should be crimped into a fuse tap, which will be inserted into our 4Runner’s interior fuse box (located under the dash by the driver’s left knee). The fuse tap you use will depend on the type of fuses your vehicle has; our ’22 4Runner required a low profile mini fuse tap.
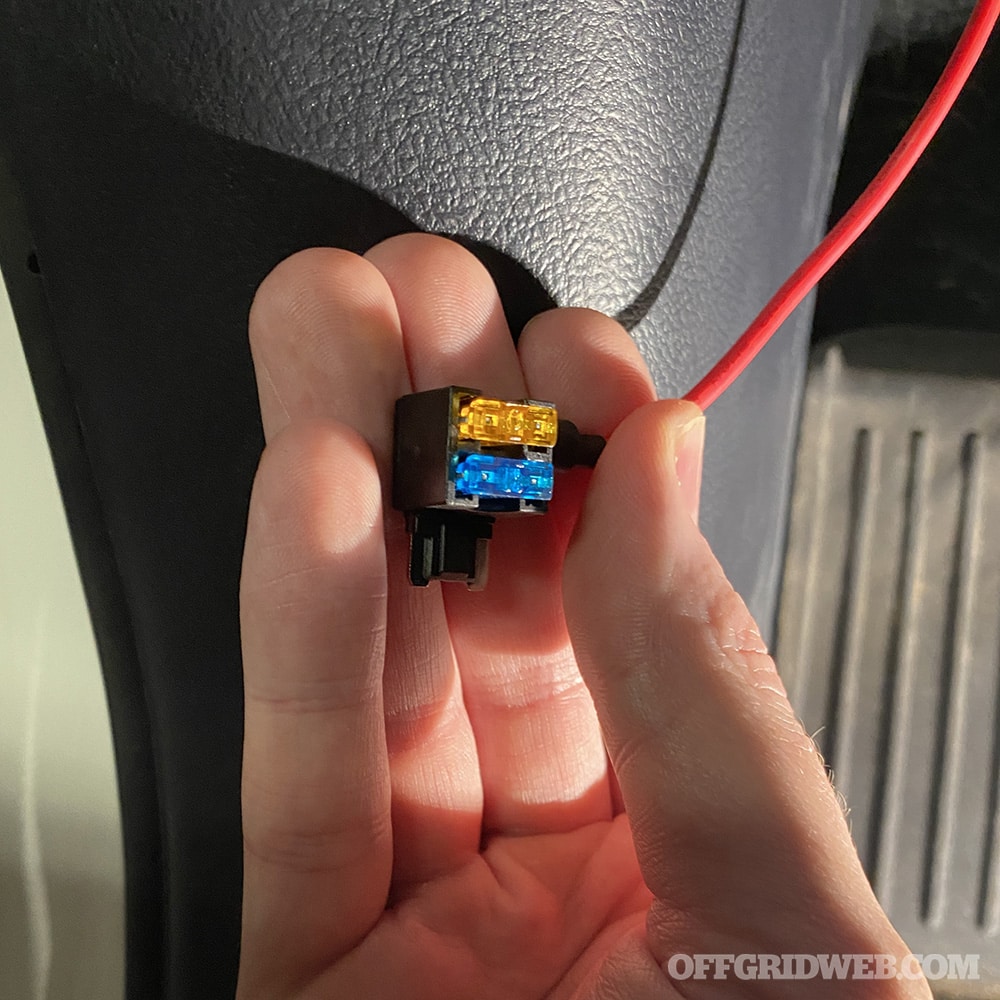
Above: A low-profile mini fuse tap. The bottom fuse (blue) is the fuse for the original circuit (the one from your fuse box), and the top fuse (orange) is the fuse for your new circuit (the hardwired Maglite).
Which Fuse to Use?
Above: The mini fuse tap with 15A and 5A fuses installed. The order of these fuses does matter, so be sure not to mix them up!
Since we want our Maglite to charge only when the truck’s ignition is turned on, we need to find a fuse for a circuit that gets ignition power. We’d recommend doing a Google search for “[your vehicle year/make/model] ignition fuse tap,” since someone online may have already found an appropriate fuse. If you don’t find the answer, or you want to be extra sure, you should use a test light or a multi-meter to check the circuit. Place the ground probe on the ground bolt, and touch the positive probe to the metal contact point on the fuse in your fuse box. With the vehicle’s ignition turned on, you should see roughly 12 volts; with it turned off, you should see 0 volts.
Above: The 2022 4Runner interior fuse box lid shows the amperage and purpose of all fuses. We selected this 15A power outlet fuse, and tested it with a multi-meter to confirm it’s powered by the ignition.
For our 2022 4Runner, we removed the 15A “P/OUTLET’ fuse and placed it in the bottom slot on our fuse tap. Then we added a 5A fuse to the top slot to protect our new Maglite charger circuit, and inserted the fuse tap into the fuse box slot where the 15A P/OUTLET fuse had been. Maglite’s manual recommends a 10A slow-blow fuse installed in-line on the positive wire, but we haven’t had any issues with a standard 5A blade fuse in our fuse tap. Just don’t use a fuse greater than 10A, since that could potentially lead to melted wiring or even a fire if the circuit shorts out.
Above: The orange light on the cradle indicates our ML150LR is between 0% and 80% charged. When it’s between 80% and 100% charged, the light blinks green.
At this point, you should plug in the Maglite charging cradle and turn on the ignition to confirm the charger status light illuminates. If it does, congrats — you’re done with wiring!
Mounting the Cradle
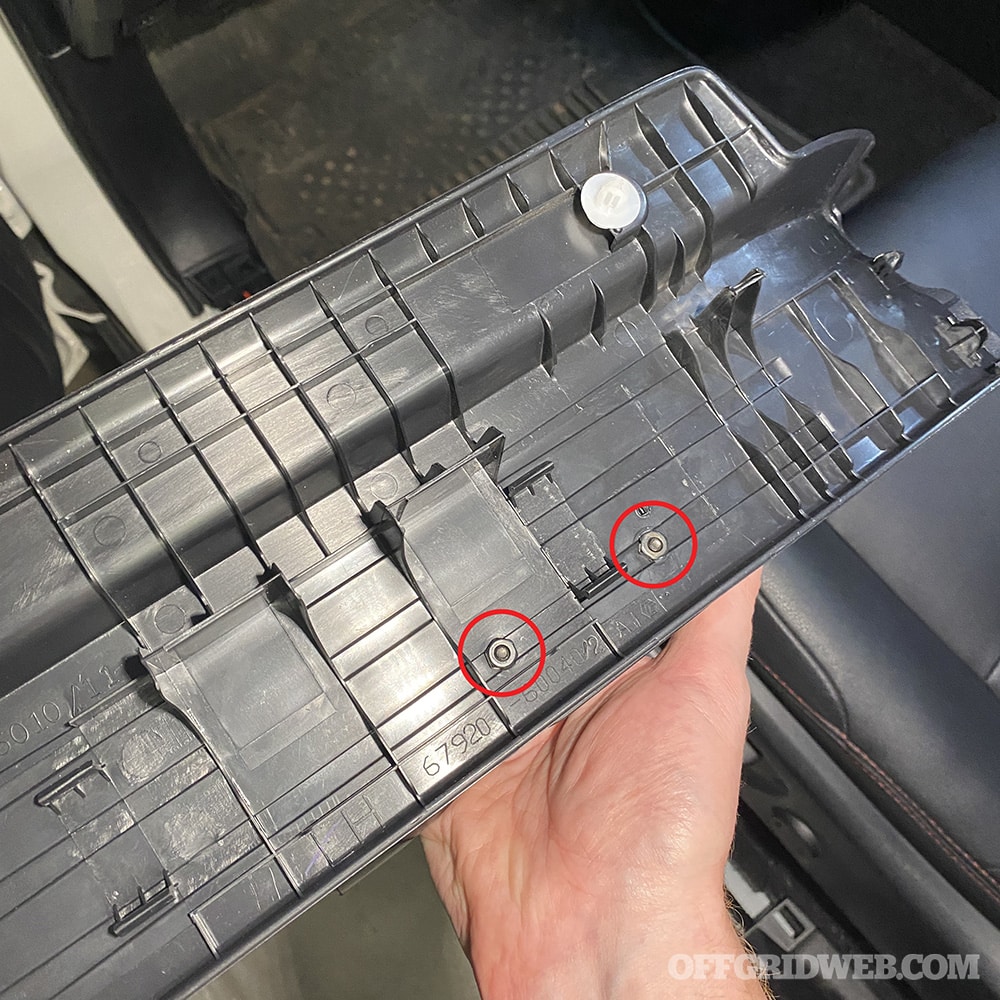
Above: Two 3/4-inch-long hex bolts attach the cradle to the sill panel. Strips of double-sided mounting tape were also used for a secure, vibration-free fit.
Now that our hardwired Maglite is working properly, it’s time to finish permanently installing the cradle. Using the pencil marks from earlier, we set the Toyota sill panel on our work bench and carefully drilled two holes through it in the appropriate locations. Maglite includes self-tapping screws for this purpose, but we definitely don’t want the sharp tips of those screws anywhere near the sensitive wiring harness that passes under this sill panel. So, we used some 3/4-inch-long #8-32UNC hex bolts and nuts. We also applied strips of 3M heavy-duty mounting tape to the underside of the cradle — this will prevent any noisy plastic-on-plastic vibration as we’re driving.
Once the bolts were tightened and the sill panel was pressed back into place, we stood back and admired our new hardwired Maglite setup. Now we’ll never have to wonder if our flashlight is fully charged or fumble around for it in the dark. It’s always nearby and ready to go.
For more information on the Maglite ML150LR and other duty-grade flashlights, go to Maglite.com.
Whether we admit it or not, the world seems pretty crazy, and warrants diving into a topic that’s as intriguing as it is unsettling. Scientists have been using computer models to predict when society might collapse, and the results are, well, a bit grim. According to a recent article by Jungle Creations, the clock might be ticking faster than we’d like to admit.
The Prediction
So, what’s the deal? A group of scientists from MIT used data patterns, factoring in things like natural resources, energy usage, and population, to model what society would look like in the future. Their analysis, published by the Club of Rome, pointed out “limits to growth” that could lead to an industrial collapse by the middle of this century. In simpler terms, they’re saying society could come crashing down by 2040. That’s just 17 short years from now.
Why Should You Care?
Now, you might be thinking, “2040? That’s ages away!” But time tends to go by faster than you think. Seventeen years can fly by, and no matter where your location on the planet may be, the collapse of society isn’t just a survival issue—it’s an everyone survival issue. The same principles of resource management and sustainability apply whether you’re in a concrete jungle or an actual jungle.
The Silver Lining
But hey, it’s not all doom and gloom. Dutch sustainability researcher Gaya Herrington is optimistic that the worst-case scenario can be avoided with appropriate action. She emphasizes that innovation in business, along with new developments by governments and civil society, can create a more sustainable world. So, there’s still hope, but it requires us to act, and act fast.
Final Thoughts
Nobody wants to be a doomsayer, but sometimes a wake-up call is necessary. Perhaps this prediction can be used as a catalyst for change. Science is not always correct, but sometimes it can help give us the correct heading to follow.
As humanity develops further into areas that were once wilderness, the chances of an encountering wild animals goes up. Ever thought about what you’d do if you came face to face with a mountain lion? No, I’m not talking about your boss on a Monday morning. I mean the real deal, with fur, fangs, and all that jazz. Whether you’re hiking in the Rockies or just curious about survival tactics, this one’s for you. I recently stumbled upon an article from The Manual that dives into this topic, and I thought it’d be cool to share some insights.
The Lowdown on Mountain Lions
First off, let’s clear the air. Mountain lion attacks are rare. According to Travis Duncan from Colorado Parks and Wildlife, there have been fewer than a dozen fatalities in North America in over 100 years. So, while the chances are slim, it’s better to be prepared than sorry, right?
Prevention is Key
The Manual suggests that prevention is your best bet. If you’re out camping, hiking, or mountain biking, making noise can deter these big cats. Think of it as the urban equivalent of not wearing headphones while walking in a sketchy neighborhood at night. You want to be aware of your surroundings and let others (or in this case, mountain lions) know you’re there.
What If You Encounter One?
If you do find yourself in a mountain lion’s personal space, don’t run. That’s like hitting the “chase me” button on a predator. Instead, make eye contact, talk firmly, and back away slowly. If the lion gets aggressive, throw whatever you can find—rocks, branches, your leftover lunch, whatever. Just don’t turn your back or crouch down.
Gear Up
The article also recommends carrying bear deterrent spray. It’s like pepper spray but on steroids. It’s effective on pretty much any land predator, including mountain lions. So, whether you’re in the city or the wild, having some form of protection can go a long way.
Final Thoughts
Mountain lions are more scared of you than you are of them. But, if you’re going to venture into their territory, it’s good to know what to do. Just like you wouldn’t walk into a sketchy neighborhood without some awareness, don’t walk into the wilderness unprepared.
Picture this. You’re in one of America’s beautiful national parks with your family for the weekend. With the family hauler packed and the sun beginning to set behind the mountains, you begin piloting the winding roads back to civilization. The radio suddenly gives off an intrusive shrill. Your gaze goes back to the road while in the background you faintly hear that calm voice reciting a message from the Emergency Alert System, only this time, it doesn’t say, “This is only a test.”
Highways are at a complete stop. All lanes in both directions jammed with cars going nowhere fast and with no end in sight. After an hour and a half with no information coming over the radio, people begin abandoning their cars to go on foot, carrying with them what they can. There are chirps and flashes of lights as car alarms are armed. Worried owners perform quick walks around their vehicles, making sure everything is secure. As they walk away, some look back warily at their parked cars as if to say: “Don’t worry. I’ll be back to get you when whatever this is all blows over.”
Rather than get stuck in the impromptu parking lot, you find a part of the shoulder that leads to an elevated parallel dirt road and pull off to collect your thoughts. The phone network is down, judging by the telltale busy signal, as well as the data connection, and the browser won’t refresh.
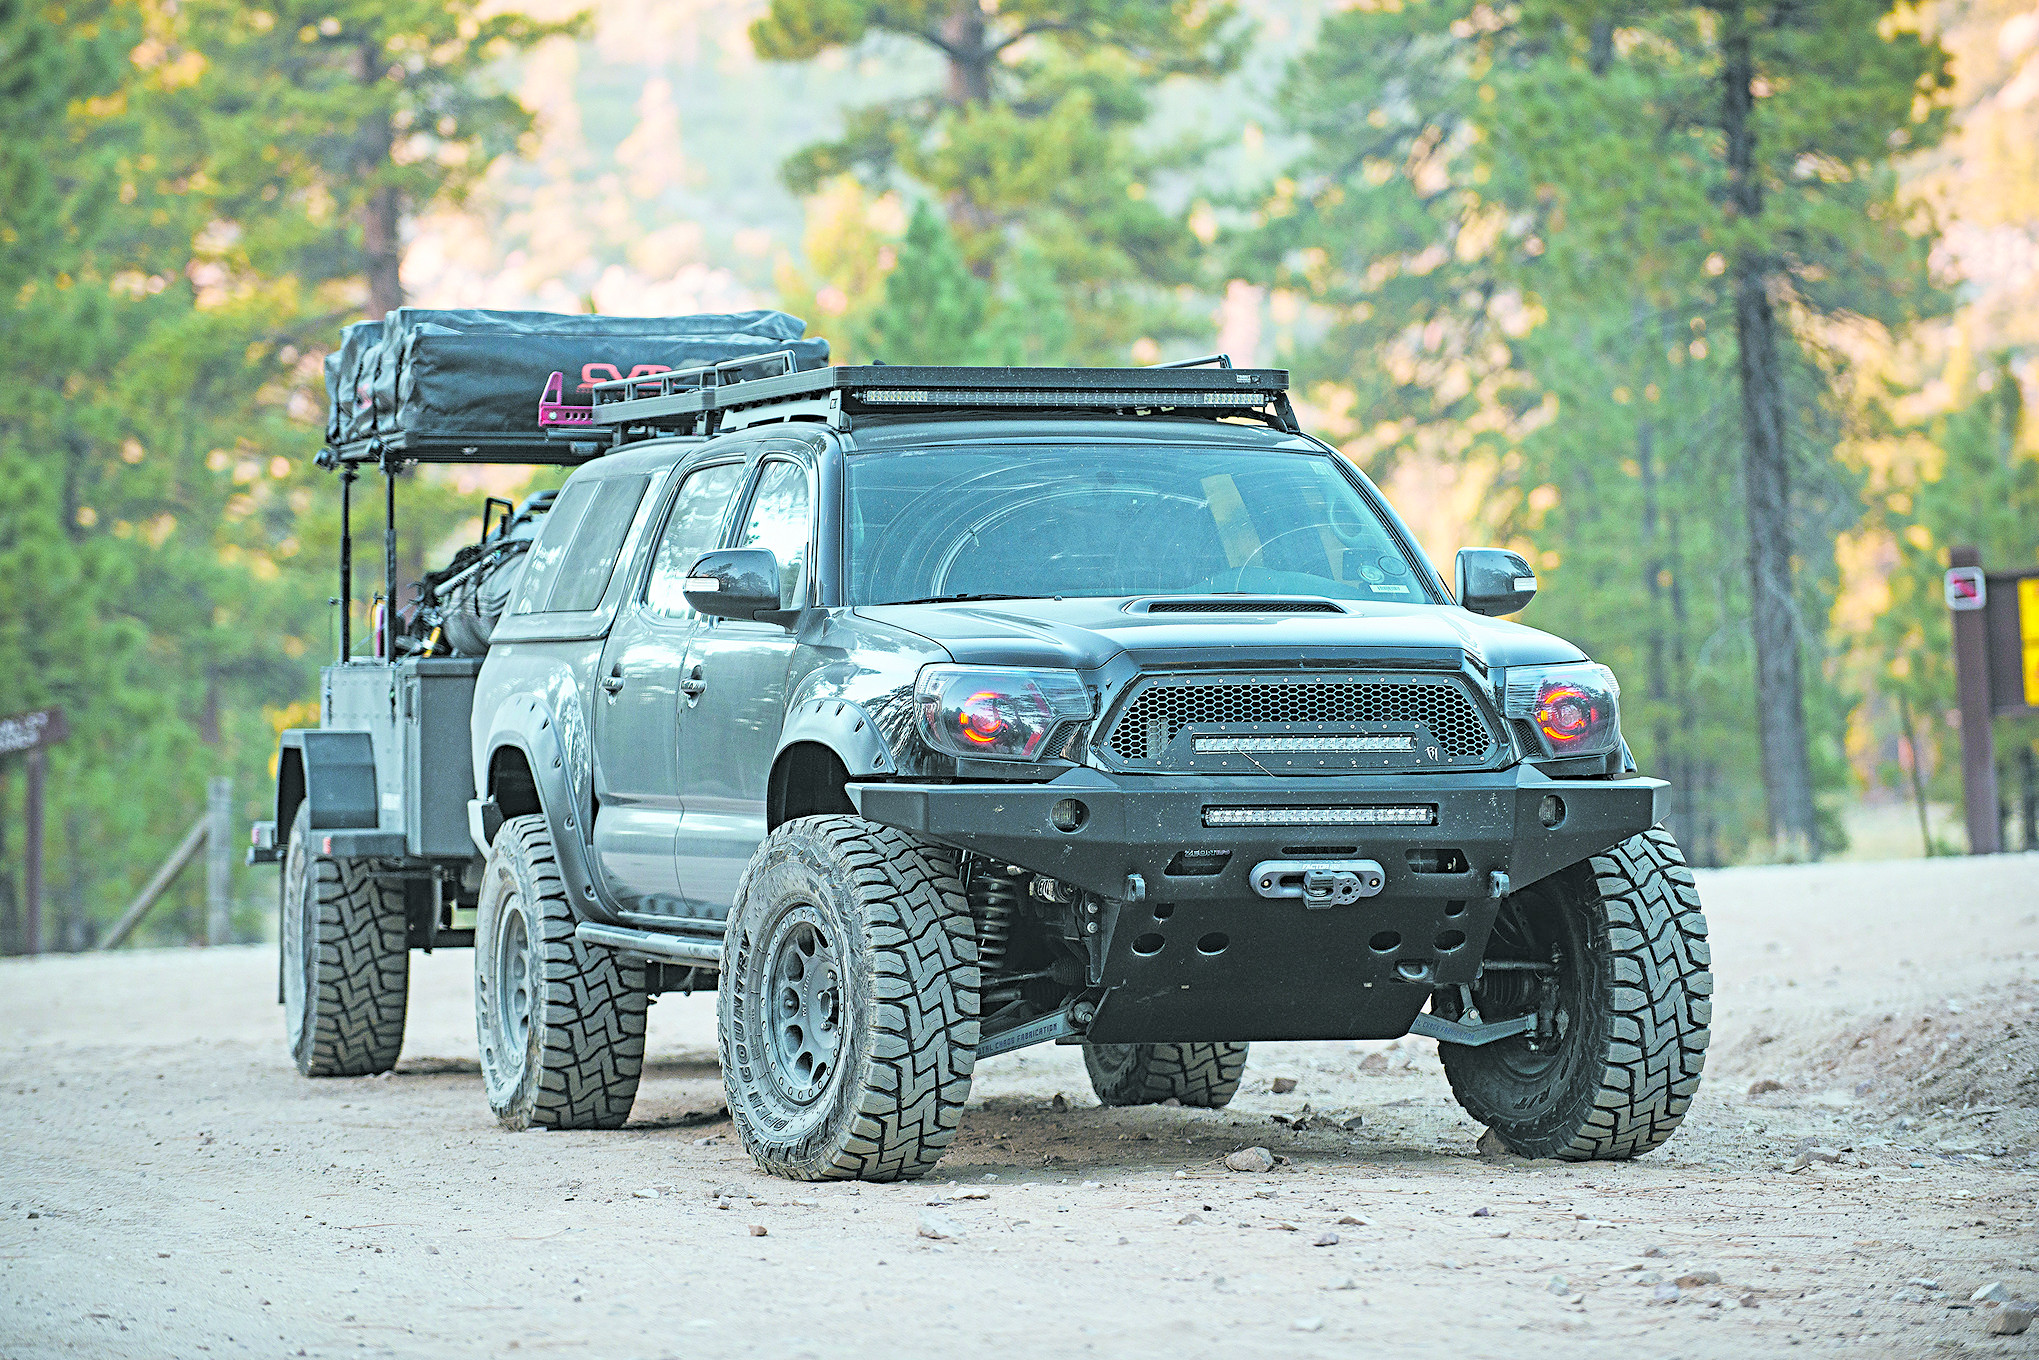
The Pelfreybilt Offroad lightweight aluminum bumper and the IFS aluminum skidplate also by Pelfreybilt provide protection from hazards. The bumper also hides a Warn Zeon 10-S Winch capable of pulling 10,000 pounds.
As you look off miles and miles away in the horizon toward the city, where home is, you see the unmistakable orange glow of fire, and it can’t be anything good. The pulsating glow and clouds of smoke is much too large to be localized.
This is widespread, you think to yourself. As you contemplate what to do next, a thick dark haze begins to form over the highway almost like fog. You squint to get a better look through the dying light and see several figures running toward your direction on the highway below. Seconds later a swarm of terrified people emerge from the haze darting in between the parked cars. Running for their lives. They are the ones who had abandoned their cars earlier.
Although the aforementioned scenario is fictional, almost reminiscent of a current popular cable television show, some can’t help but wonder, “What if?” For Sean Jennings, as unlikely as the scenario sounds, he’s not one to take chances.
An adventurer at heart, Jennings drew upon his experience in the U.S. Marine Corps and his two tours in Iraq, which put him in a mindset that being prepared isn’t a suggestion, it’s a way of life.
The Modifications
While this 2013 Toyota Tacoma was built for recreation, Jennings added that he chose the Tacoma’s midsize truck platform for Toyota’s unsurpassed reliability and felt that it would be a more than adequate bug-out vehicle if the need ever arises. Considering the modifications done to this Tacoma, we’re in agreement.
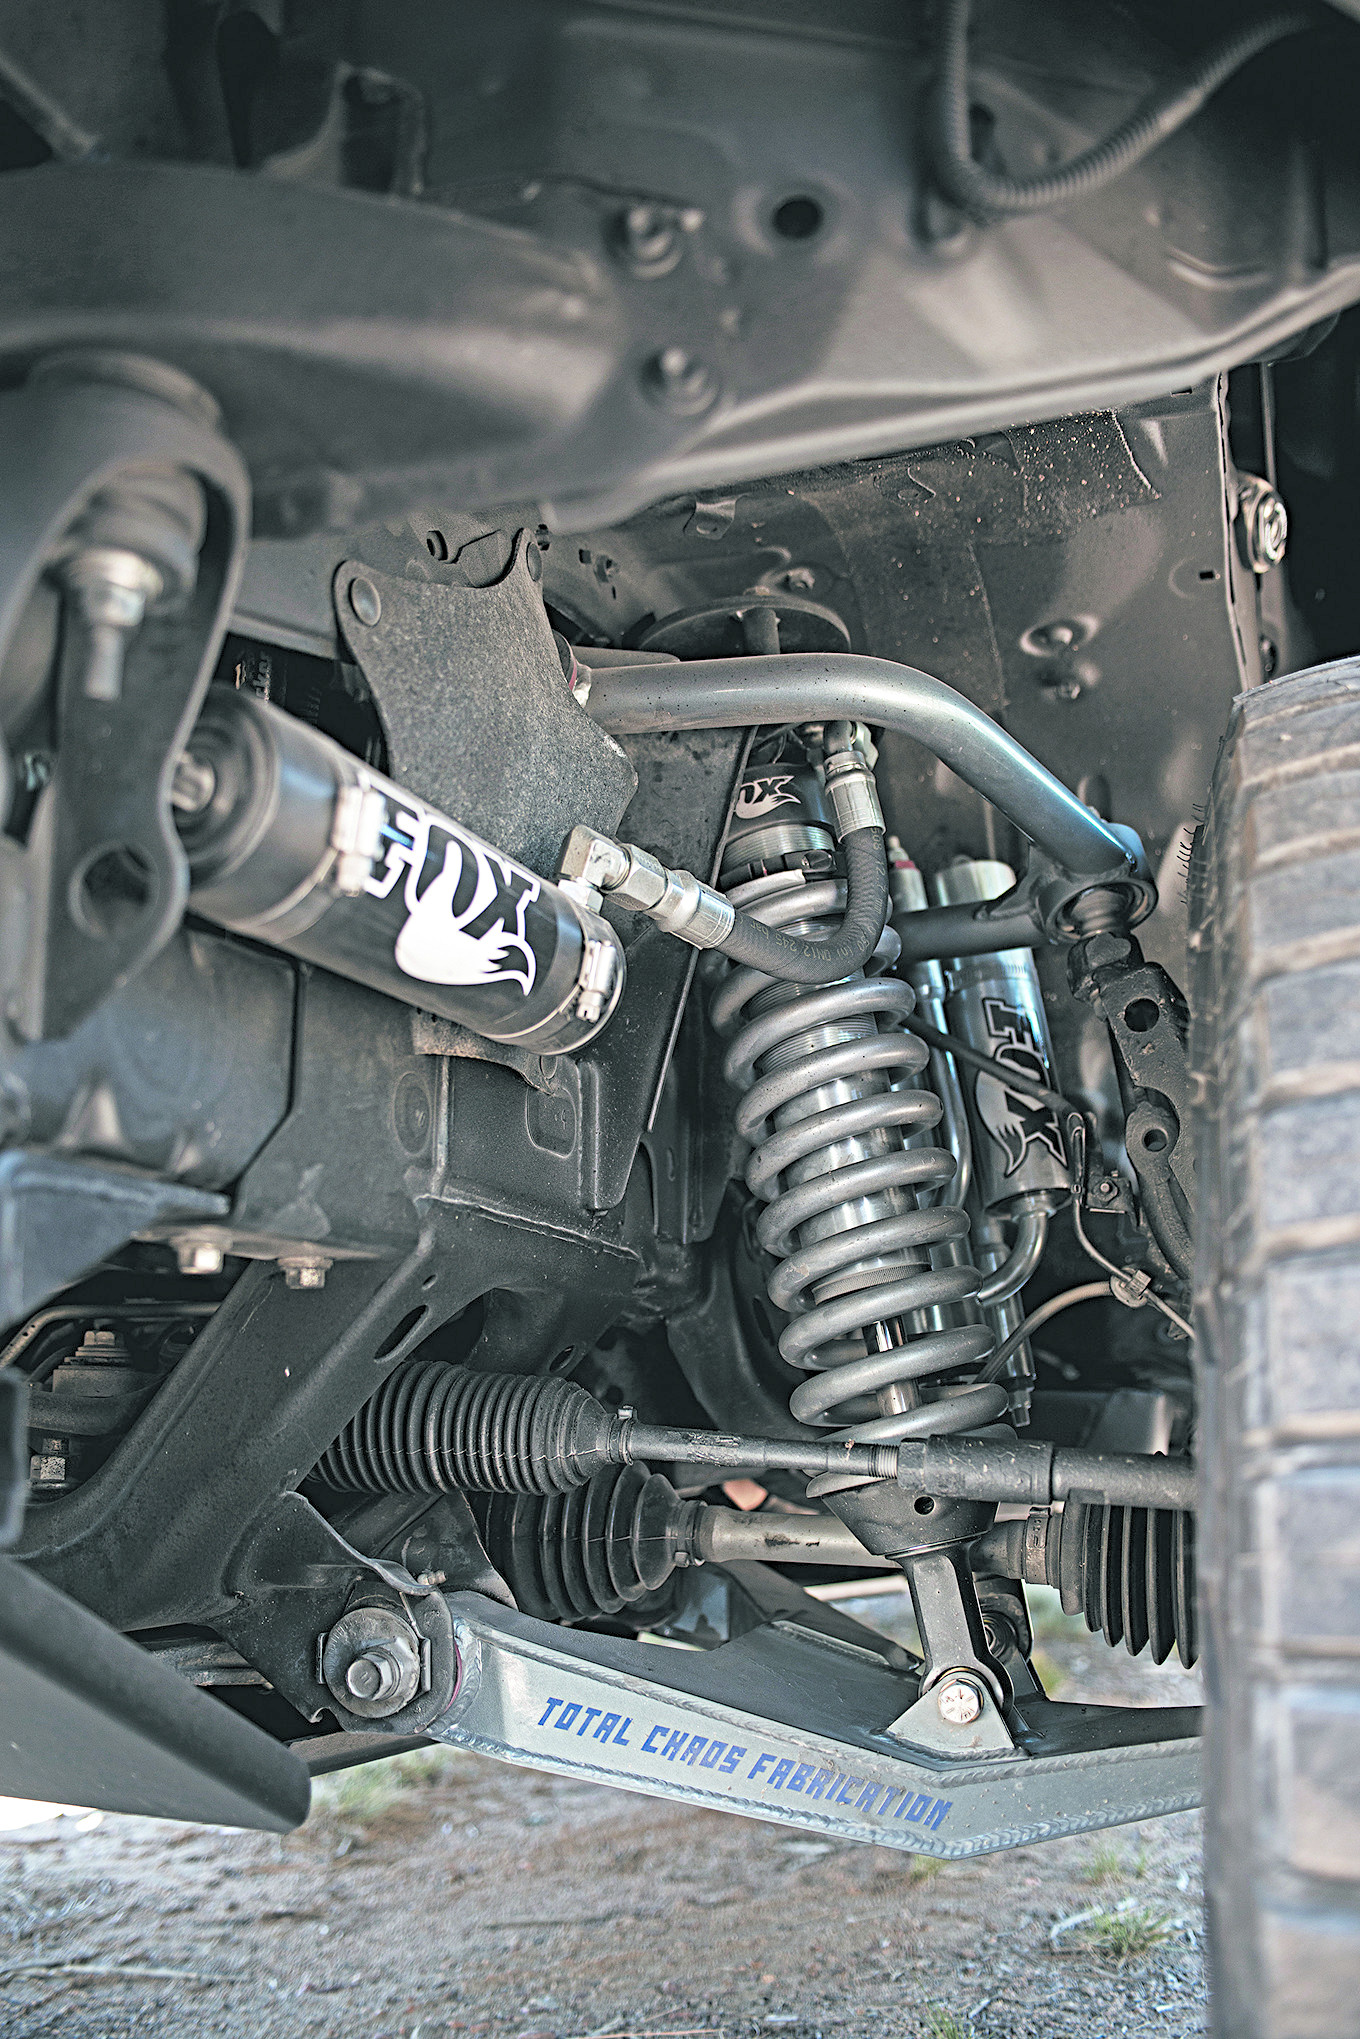
Since “Go anywhere” can literally mean just that, the Tacoma’s independent front suspension was outfitted and modified for long travel. Both factory upper and lower arms were swapped for the Total Chaos +2 Long Travel Race Series Kit complemented by Fox 2.5DSC coilovers. A Total Chaos secondary shock hoop was added to properly install the Fox Triple Bypass system. With the front suspension sorted out, suspension travel was no longer much of an issue. The rear suspension was upgraded with Fox 2.0 DSC extended travel shocks and bumpstops with Pelfreybilt shock relocation hoops welded onto the frame. The factory leaf packs were swapped for All-Pro Expedition units to withstand heavier loads.
Fox Triple Bypass shocks offer compression and rebound adjustments to further refine the ride.
Crucial to any overland build are tires. Having the right size tire — as well as the right kind — is important when you’ve got to run for the hills or if you’re just going on an off-road excursion with friends. Meaty sidewalls and the right track were important to Jennings, who opted for 35×12.50×17 Toyo Open Country R/T tires mounted onto Method Race Wheels’ 105 beadlock model. Although 35-inch tires are a great size for any overland rig, getting them to fit properly on the Tacoma is a slight challenge.
To achieve the proper clearance, a cab-mount chop was required. What this modification consists of is cutting a portion of the frame located on the backside of the inner fenderwell, allowing the tires to turn lock to lock without rubbing against the body and potentially causing damage to the tires and the truck itself. Further trimming and massaging of the front fenders, including the Bushwacker over-fenders, were required to ensure that the tires would clear under full suspension travel.
Four-wheel-drive enthusiasts have always relied on their rig’s drivetrains and their driving skills to get through any tough situation the trail throws their way. Jennings, having traveled with his Tacoma through many a trail, wanted to ensure the chips were stacked in his favor when out in the rough. Installed on both axles are ARB Air Lockers activated by an onboard ARB Twin Air compressor. When activated, the Lockers will lock both axles 100 percent, achieving even greater traction when the factory 4-Lo setting won’t do.
Jennings knows keeping the shiny side up on his rig is always ideal, but he also knows having body armor for the Tacoma was necessary for his build. Pelfreybilt Offroad was called on to outfit the truck with their line of products consisting of their aluminum front bumper and Hi-Clearance rear bumper. These components drastically improve the vehicle’s approach and departure angles while providing ample protection from the terrain and road hazards. The Tacoma’s undercarriage also received protection with an aluminum front IFS and transmission skidplate and Pelfreybilt’s rock sliders round out the Tacoma’s road armor.
Total Chaos Upper and Lower arms are part of their +2 Race Series Long Travel kit, increasing the track, suspension travel, and height. The Fox 2.5 DSC Coilovers with remote reservoir ensures no terrain is impassible.
The Interior
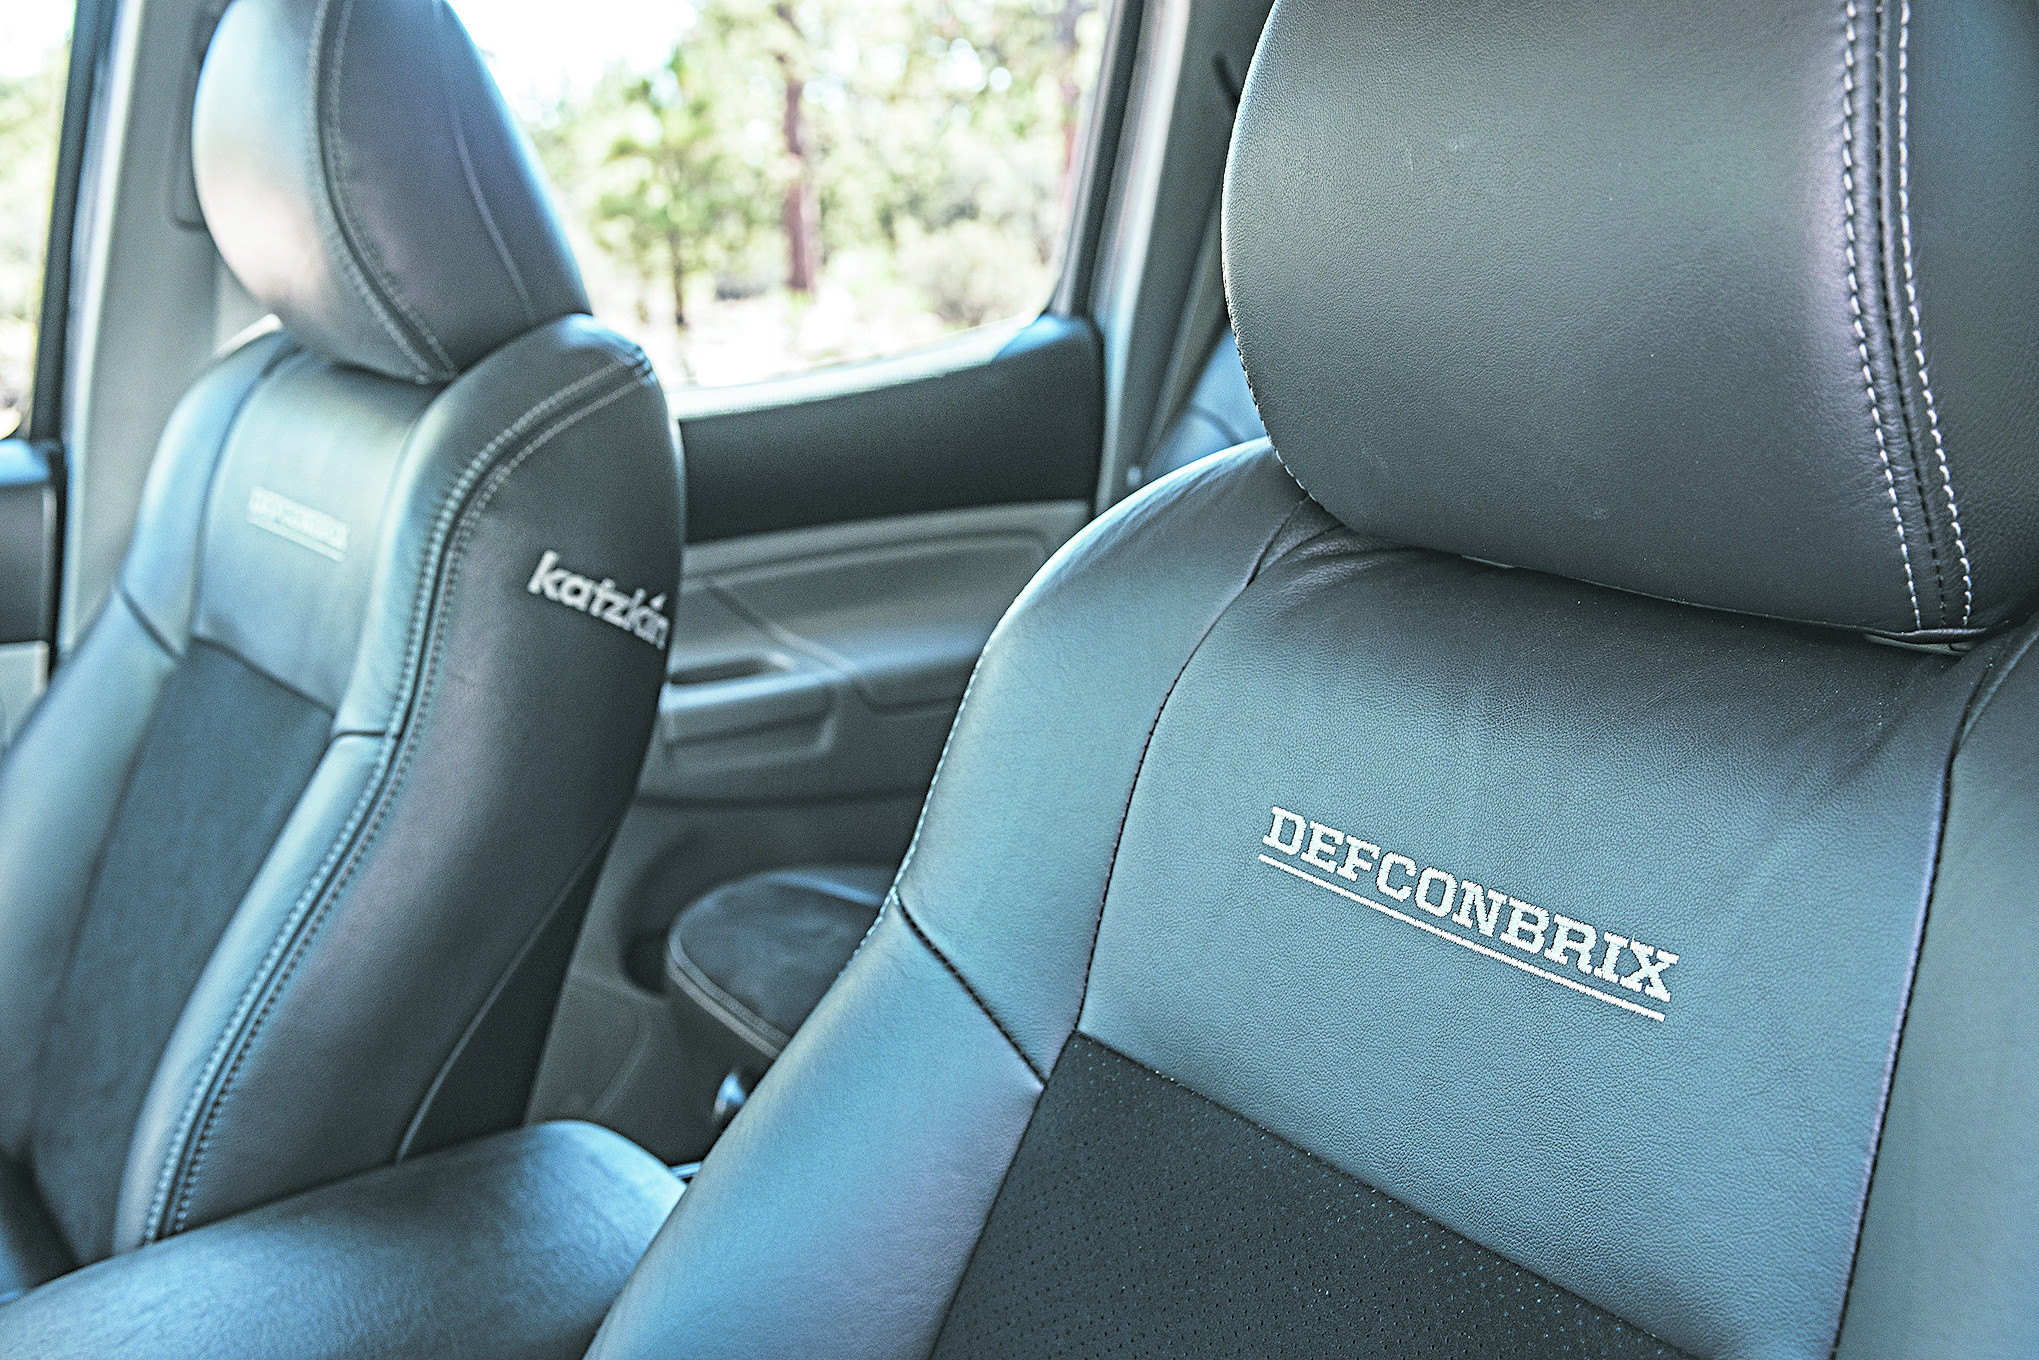
Inside, the Tacoma is decked out for long trips. The factory seats were redone with comfort in mind. Up front are heated and cooled leather seats with suede inserts by Katzkin. The rear bench also received the same leather and suede treatment.
Since a road trip wouldn’t be a road trip without music, a trick custom fiberglass enclosure was built for the audio system, consisting of amplifiers and a slim subwoofer, all tucked away neatly behind the rear seats. A trio of switches control different functions on the truck such as the onboard ARB Twin Air Compressor to actuate the front and rear ARB Air Lockers. What really caught our eye inside this adventure rig was the sPOD SE Touch Screen controller. This unit can act as switches for eight different auxiliary lighting systems; this one was wired up to the bevy of Rigid Industries LED lights outfitted on the truck. From the rock lights to the lightbars, they’re all controlled through the customizable touch screen.
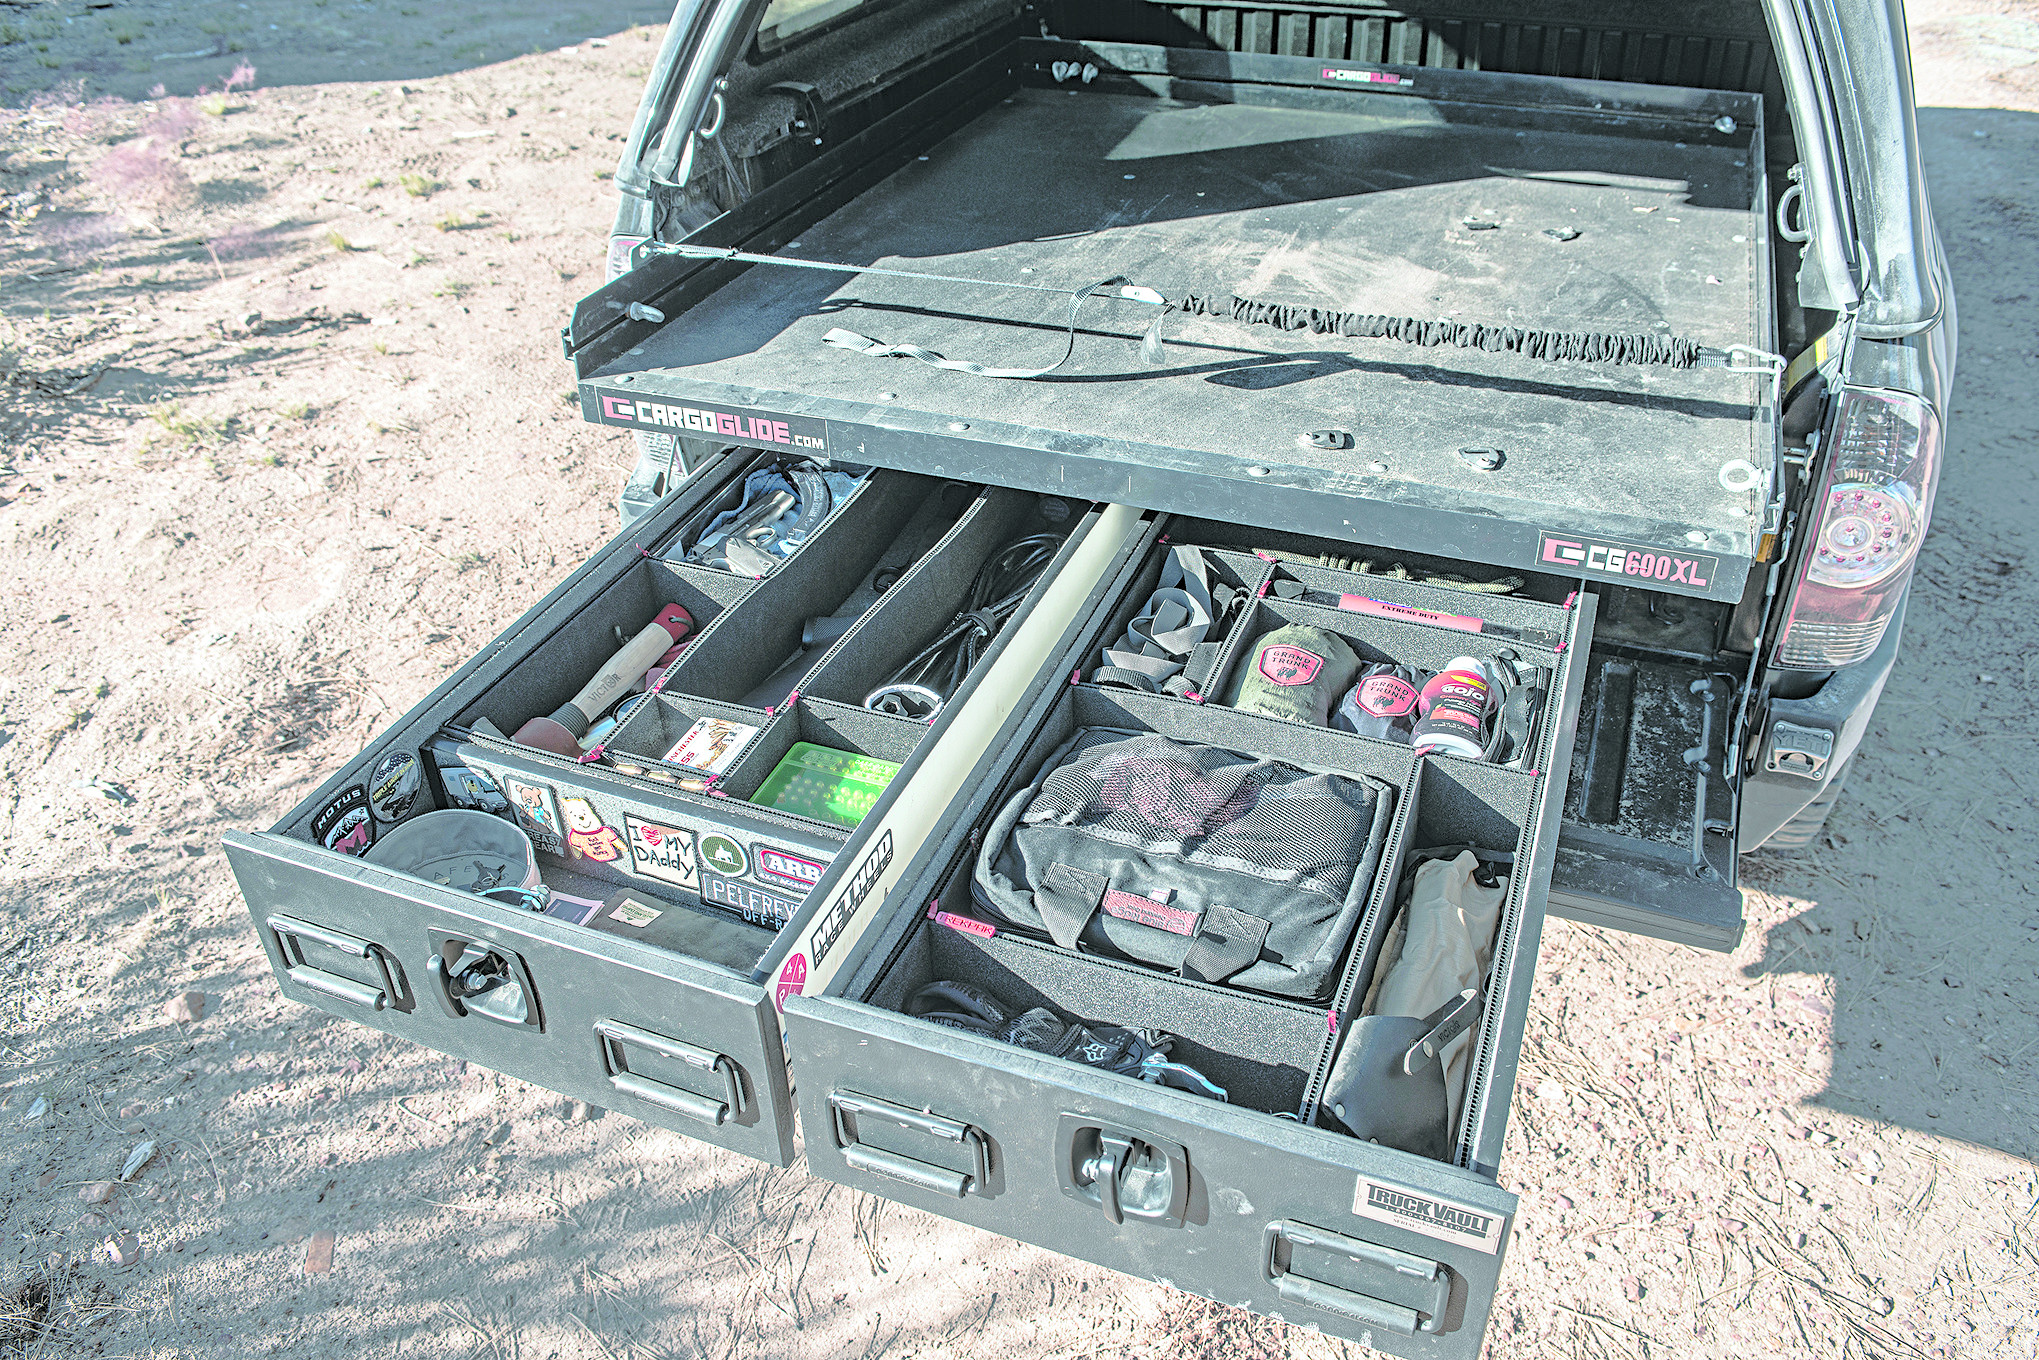
Storage was addressed with Truck Vault’s All Weather series two-drawer locking cargo system installed in the bed, in addition to a Line-X coated Cargo Glide 600XL shelf. The Truck Vault was essential for Jennings’ storage needs, as it would carry everything from his rifles to his recovery gear. The addition of an A.R.E. Z-Series truck cap keeps everything under lock and key.
Katzkin custom embroidered Jennings’ online handle, “Defconbrix,” into the heated and cooled seats for a personal touch.
The Shelter
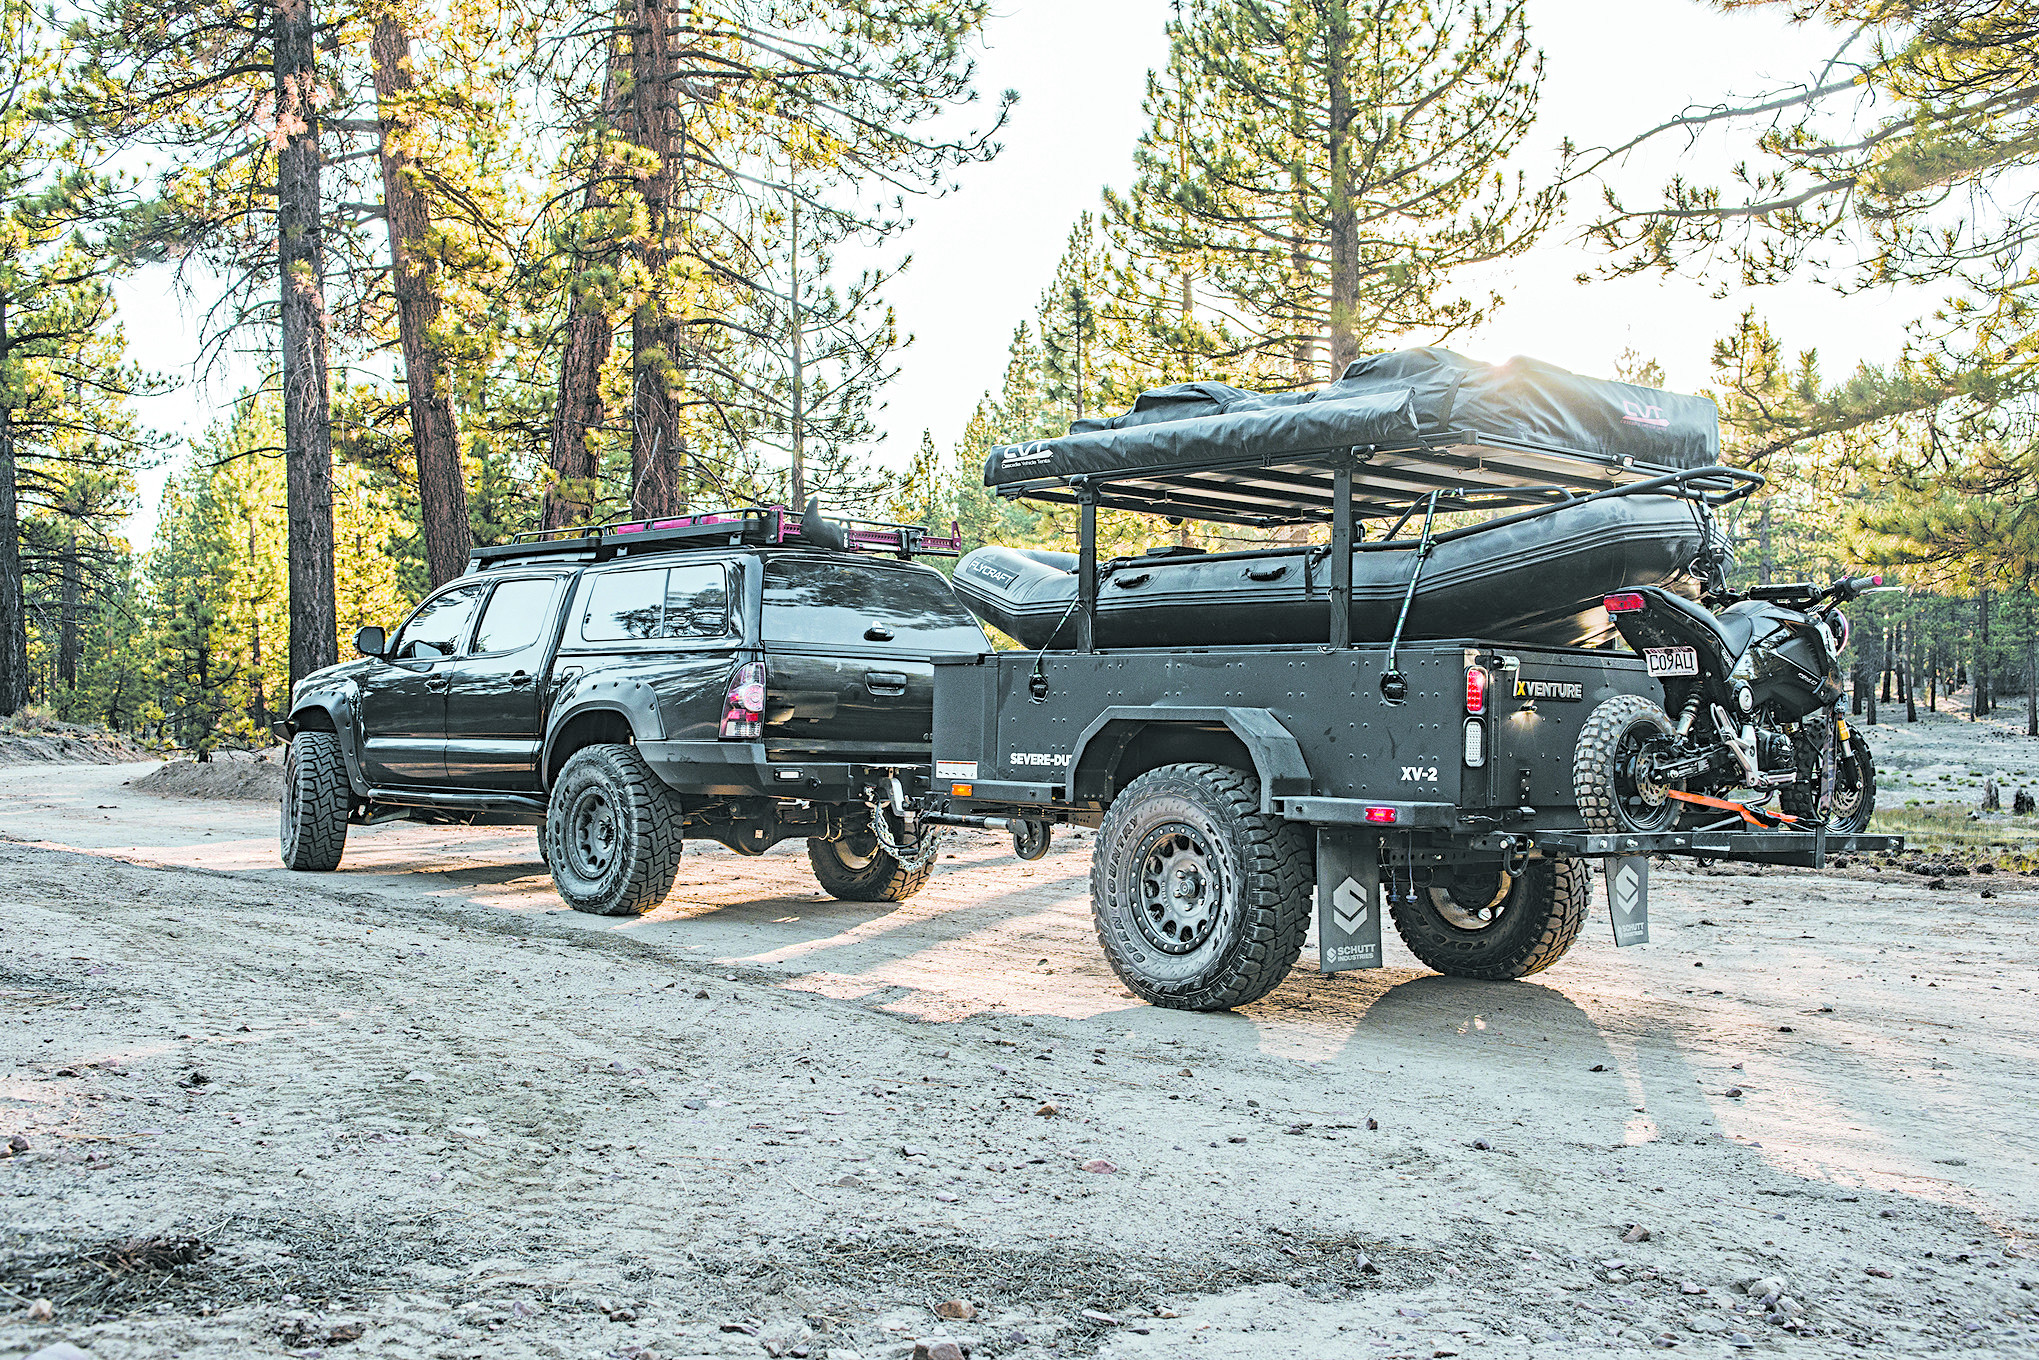
True to the overland theme, Jennings then added an XVenture XV-2 Off-Road Trailer complete with an 89×18-inch folding Galley table, which includes a three-burner range stove and sink. He then took it a step further and outfitted the trailer to be a sustainable shelter with a CVT Mt. McKinley Roof Top Tent. Capable of fitting four people, this tent ensures his family will stay out of the elements. A CVT 55-inch awning provides shade and the XV-2 is also outfitted with a 20L water tank with an electric pump and a propane water heater allowing the luxury of a hot shower.
The trailer also sustains it’s own power via a deep cycle battery and an onboard power distribution center, easily allowing Jennings to hook up additional lights or appliances such as the ARB 63-quart fridge/freezer tucked in the XV-2’s storage compartment.
The XVenture XV-2 Off-Road Trailer is a fully capable trailer especially the way Jennings has outfitted his. Equipped with the same Method 105 Series Beadlock wheels and 35-inch Toyo Open Country R/T Tires as the Tacoma, the XV-2’s overland capabilities are further enhanced.
Anyone who has fished likely knows that going out into a body of water allows you access to a variety of fish and fishing grounds versus being on the shoreline. Luckily for Jennings, he’s got that covered with his Flycraft inflatable fishing craft. The two-man vessel can also easily be an escape vehicle on water should options on land run out.
But say options on land call for two wheels instead of four or on foot, this Marine has one more trick up his sleeve. Jennings took a 125cc Honda Grom and outfitted it with knobby Maxxis Moto-Off Road Tires, giving the mini street bike a whole new level of capability. However, Jennings wasn’t finished there. From his experience being out in the woods, he knows it gets dark, real dark. With this the halogen headlight on the Grom was dropped in favor of a single custom-mounted ARB Intensity LED Spot light. This single light is capable of producing over 8,000 lumens and throwing light over 900 meters giving this Honda Grom enough light to ride confidently during the darkest of nights.
Now, it’s obvious this Tacoma didn’t get to this level of preparation overnight. There have been several iterations of this build before it got to where it is today. Many different parts were installed and removed in a game of trial and error. But in the end, Jennings found that this current setup was the right balance of what would encompass his needs for recreation and survival. While we’ve seen an overland rig or two in our time, Sean Jennings’ Tacoma definitely reinforces the saying, “It’s better to have it and not need it, than to need it and not have it.”
But don’t count on Jennings being done just yet. He still has plans for more upgrades to his ultimate survivalist rig.
Never leave home without it. Jennings’ Truck Vault drawers are filled with the essentials, from firearms to his Victor Axe and Hatchet to his ARB recovery gear.
Schutt Industries XVenture XV-2 Off–Road Trailer Length 151.1 Inches Widths 75 In. (52 In. W/Tires) Curb Weight 1,190 Pounds Water Heater Camp Chef Triton 5L Battery Deep Cycle Water Tank 20-Liter Propane Tank 20 Pounds
About the Author
Mike Shin is a commercial photographer, outdoors enthusiast, and an occasional writer. When not photographing assignments, he and his wife enjoy four-wheel trips and camping all around California. mikeshin.com
Invariably, when I read articles on bug-out bags and overlanding, the bags and scenarios revolve around a setting in the Western states and/or an arid, mountainous environment. Honestly, I feel left out. I reside in the Deep South just outside New Orleans, and we face a completely different problem — rather than a lack of water, it’s too much water. I have ridden out a half-dozen landfalls in my time here, including Hurricane Katrina. My experience after Katrina prompted me to put together a go-bag designed around my need to shelter in place, self-rescue, and/or extricate from the area. This bayou bug-out bag doesn’t cover food, water, or personal hygiene items — it covers the “heavy equipment” end of things, which is what I lacked on my first go-around.
About the Bag
I must admit I enjoy a bit of unfair privilege regarding bag selection — my employment as the director of medical programs for Blue Force Gear allows me access to some of the best load carriage gear available. Our product development shop recently began working on a bag for a military entity to carry heavy breaching and rescue equipment. I was lucky enough to get my hands on one of the prototypes. It has stowable backpack straps, a shoulder strap, and reinforced carry handles, as well as a fully opening top cover and side slit pockets for smaller items. I also appreciate the quality of construction, a characteristic we’ve put a lot of effort into. It’s light for its size yet strong enough to carry the needed equipment. While you won’t find this bag on the Blue Force Gear website, it’s available for special orders by mil/LE units (email military@blueforcegear.com for more info).
Tools & Recovery Gear
I’ve become highly reliant on rechargeable battery tech, and at the heart of my system is a 1,000-amp battery pack. It has USB ports to recharge my phone, can jump start a vehicle, and has a built-in air compressor. A small zipper bag of cords allows me to charge almost any device. Once my truck is running, the built-in power inverter can charge my larger tools.
The next largest item in the kit is a battery-powered Reciprocating Saw (what many people call a Sawzall). This tool has replaced a chain saw as my go-to tool, primarily due to the ability to quickly swap out blade types. I carry wood, carbon steel, carbide, and bimetal cutting blades. In the days after Katrina, I was climbing onto the second-story roofs of houses from a flat boat (the water was high enough I could just step onto the roof) in order to cut people out of their attics. Whether it’s downed limbs, fences, locks, cables, or other obstructions blocking my egress, I have yet to run across a cutting chore I was unable to perform. This same tool, paired with a side angle grinder and diamond blade, is utilized by the U.S. Air Force PJs for most of their rescue breaching tasks. I once saw them remove a hatch from a Bradley in under 2 minutes by cutting the hinges.
Despite my love for rechargeable tools, I’d be remiss if I didn’t account for the very real possibility of losing that capability. For that scenario, I have a Gerber Downrange Tomahawk Breaching Tool that functions as an ax, hammer, and prybar. Paired with the Gerber Doubledown folding machete, I’m ready for cutting if things go manual. In case my vehicle gets stuck in mud — a common occurrence in Louisiana — my kit contains a folded Glock Entrenching Tool. That and a 10,000-pound-capacity snatch strap have yet to fail me in removing a litany of vehicles from our Gumbo Mud.
Mother Nature doesn’t keep banker’s hours, and we humans are creatures of the light, so my kit includes both a flashlight and headlamp from the Streamlight ProTac 2.0 line. Each puts out a staggering 2,000 lumens in High mode and can run up to 25 hours on Low. Both lights recharge from a USB-C cord that I can plug right into my power station.
To keep everything running, including my rifle and handgun, I keep a smattering of hand tools and a Fix It Sticks “The Works” tool kit. I can’t say enough good things about this compact kit. It was primarily designed for firearms-related tasks, but with 24 different bits and a variety of other tools, it’s a multipurpose item. I also carry a roll of 100mph tape for those times that I can’t turn it with a tool or beat it with my breaching ax.
Did I mention that we have an abundance of water down here? Without a doubt, the most expensive item in my kit (and possibly the most important) is my Mustang Survival RATIS inflatable PFD (Personal Flotation Device). Prior to having this device, I struggled with having a water safety component in my kit. A standard flotation vest was too bulky to carry around, yet I often found myself working in or around water without notice. I grew up in the water and know that familiarity breeds contempt, and contempt can get you killed. The RATIS weighs a whopping one (yes, one) pound and is so small in its stored shape that you can work with it on all day long. When deployed, either automatically when submerged or manually by pulling the inflation handle, it offers 40 pounds of buoyancy. The RATIS can be attached to a plate carrier or, as in my case, can function as a stand-alone PFD via the included “BRO” harness system. This is a must-have item for me.
Medical Equipment
Speaking of safety, let’s talk medical — a subject close to my heart. One must understand the difference between a first aid kit and a trauma kit. They should be two separate things; I plan to address that subject in detail in a future article. This bag was designed around the heavy equipment tools concept and, correspondingly, I only carry a trauma kit in it, specifically the BFG Medium Trauma Kit NOW! It offers me enough gear to treat one to two critical casualties in the immediate aftermath of a traumatic incident. It’s not an operating room in a bag, but it’ll save a life in the short term. Notice the tourniquet attached to the lid of the TKN! and remember that your tourniquet (better yet, tourniquets plural) always belongs outside of your trauma kit. You shouldn’t be digging through a medical kit to access that device.
Rounding out my go-bag are a few other items. There’s a Seldon WaterStick for emergency water purification. In a nod to “snivel gear,” I also carry a lightweight packable rain jacket, a Kifaru ground cloth/shelter half, and a SOL two-person Emergency Bivvy (you never know when you might need to snuggle up). Lastly, there’s a hand-crank radio for National Weather Service reports and emergency USB charging.
Closing Thoughts
As I said in the beginning, this go-bag isn’t universal, and your needs may vary. However, this one has served me well for a while. If you live in a coastal area or anywhere subject to a natural disaster, I hope this helps guide your thinking toward what you might need to have on hand should the worst happen.
Saul Alinsky’s last book, or manual, Rules for Radicals: A Pragmatic Primer for Realistic Radicals, welcomes readers into revolutionary tactics and guidelines. This book is designed to assist organizers and activists in reshaping the world. In his first chapter, “The Purpose,” he specifically outlines his main accomplishment: “In this book we are concerned with how to create mass organizations to seize power and give it to the people; to realize the democratic dream of equality, justice, peace, cooperation, equal and full opportunities for education, full and useful employment, health, and the creation of those circumstances in which man can have the chance to live by values that give meaning to life.”
This might sound promising, especially when he reminds us of our own American Revolution. However, he soon explains, “today revolution has become synonymous with communism while capitalism is synonymous with status quo.” Although he claims this is “a revolutionary handbook not cast in a communist or capitalist mold,” he also expresses a strong desire to “use power for a more equitable distribution of the means of life for all people.” He leads his readers on a journey into the ethics of revolution, how to properly educate future organizers, and most importantly, the tactics in the fight for change. This is Alinksy’s playbook to power “for the Have-Nots of the world.”
The 411
The controversial book begins with Alinsky dedicating his work to the first successful radical who “won his own kingdom” — Lucifer. This book is a siren song for the glittering ideology of revolution; a step-by-step guide for inciting conflict in communities, organizations, and society in order to produce change. Much of Alinsky’s language is divisive using words like “us,” “they,” “comrades,” “we,” “the other side,” etc. Who are these “other” people he is referring to throughout his book? Well, he boldly states, “If we don’t encourage them to form alliances with us, they will move to the right.” He clearly illustrates the manual is intended for a certain audience, not truly for everyone.
Alinksy divides classes into the Haves, Have-Nots, and the Have-a-Little, Want Mores. He’s interested in the Have-Nots obtaining power. He begins establishing a plan in which they can be easily agitated if they feel they can obtain power over the Haves. Alinksy even says, “An organizer must stir up dissatisfaction and discontent; provide a channel into which the people angrily pour their frustrations” and “agitate to the point of conflict.” “He does not have a fixed truth — truth to him is relative and changing.” In his last chapter, “The Way Ahead,” the demographic he targets is “America’s white middle class” — previously their enemy and now an important ally. In this chapter, the tone becomes more pressing and urgent, more aggressive — a call to action for the average American to assist in this revolution — does any of this sound familiar yet?
Remember, words are vital for revolution. That’s why three of the most important chapters are “A Word About Words,” “Tactics,” and “The Way Ahead,” which all have the same eerie forecast of present-day America. “A Word About Words” sounds familiar to our modern conversation surrounding rhetoric. He reminds readers that words are powerful and can be molded into new meanings for revolutionary causes. “Tactics” is also an unsettling look into our present divided situation. He lays out 13 rules that are worth studying carefully (look them up). “The Way Ahead” lays out the road ahead from 1971 onward.
The Verdict
Rules for Radicals should be read by anyone who wishes to fully understand today’s intensely polarized social and political climate. Although the book is littered with dense, intellectual literary sources, sifting through Alinsky’s takeaways from each reference makes his message crystal clear. It’s important to analyze each point carefully and to continually reestablish Alinsky’s message on conflict: “[The organizer] must search out controversy and issues, rather than avoid them, for unless there is controversy people are not concerned enough to act.”
Make no mistake, this book is designed to ignite conflict, division, and revolution. But, if read and understood, it levels the playing field by offering insight into the “enemy,” as he so often refers. Alinsky is skilled in the art of rhetoric — at times, his words appear sympathetic and trustworthy, but do your best to read beyond the seductive veneer. As a tool, this book is helpful in understanding the mentality of the “movement” Alinsky promotes. If you read it with the intention of learning about radical ideology, it’ll better help you prepare for the possible outcome it’s trying to achieve.
About the Book
Book & Author
Rules for Radicals: A Pragmatic Primer for Realistic Radicals
President Biden famously said, “You don’t need an AR-15. It’s harder to aim. It’s harder to use. And, in fact, you don’t need 30 rounds to protect yourself. Buy a shotgun.” He continued, “If there’s ever a problem, just walk out on the balcony here … put that double-barreled shotgun, just walk out on the balcony and fire two blasts outside the house.” Politics aside, we shouldn’t need to tell you this is bad advice — in any defensive shooting situation, you’ll need to account for every round you fire, so blindly slinging buckshot off the porch is a terrible idea. Furthermore, I’d argue that a 30-round capacity, semi-automatic, low-recoil carbine is in fact an excellent choice for home defense. However, simply placing an low-profile carbine by your bedside isn’t enough to be fully prepared. If your carbine is your first-line defensive tool, you should also train with that carbine. More importantly, your training should be realistic to the scenario.
Rogue Methods is a training company founded by U.S. Army veteran and former Chicago PD undercover officer Raul Martinez Jr. — you can read more about him in my Spotlight interview inside this issue. Martinez aims to provide courses that teach realistic fighting skills, rather than the flat-range-focused, technical shooting skills found in many other courses. I recently attended Rogue Methods’ Low-Profile Carbine class, which takes a unique approach to teaching defensive carbine skills.
Above: Martinez’s own carbine of choice is a Cobalt Kinetics 11.5-inch SBR equipped with an Aimpoint Micro red dot.
The class began with a segment on a topic Martinez addresses in every one of his courses: first aid. Each student practiced applying a C-A-T tourniquet to their own limbs and to other students’ limbs. For the latter, we wrapped excess strap around the windlass to prevent quick removal — tourniquets are painful, and victims may try to loosen them, leading to preventable fatalities.
Next, Martinez discussed carbine setup. He covered topics including red dot brightness, cheek weld (bring the sight to your eye, not vice versa), stock position, grip (don’t break it when you’re working the selector), and sling configuration (something you can “swim out” of quickly to reposition). Speaking of slings, we removed them from our carbines at this point, since Martinez wanted us to get used to the feeling of using them in a “grab and go” bedside gun configuration. We also didn’t wear battle belts or chest rigs full of mags, since that’s not gear you’re likely to be wearing in a spur-of-the-moment self-defense incident. We loaded one mag into the gun, dropped a spare into a pocket, and stepped onto the range.
Each student worked in three- to five-round strings, learning to reset the trigger quickly under recoil and adjust point of impact based on optical offset at close range. We practiced the three ready positions — low ready, high ready, and muzzle up (aka high port) — to get a feel for the situational pros and cons of each. For example, the latter might be necessary to keep the muzzle pointed away from bystanders or family members in tight spaces. A variety of drills were conducted between 10 and 30 yards, leading us to vary our shooting cadence based on distance and target size. Accuracy and shot accountability were repeatedly emphasized, because as I mentioned earlier, you’re legally and morally responsible for every round you fire. That said, Martinez didn’t expect perfection from students, and reminded us that an effective hit is still an effective hit even if it’s slightly off-center. The key is the ability to get those hits on demand, under stress, and quickly enough to remain unharmed by an attacker.
Above: Martinez gave one-on-one advice to each student regarding grip, stance, and carbine setup at the start of the class.
Additional layers of difficulty were added as we walked and ran between positions and worked around barricades. We learned how to move swiftly up to cover, staying back far enough to fully extend the gun. To lean out from behind cover, the leading foot is planted, and body weight is shifted over that foot like the beginning of a lunge, yielding improved stability. Multiple targets were added to the mix, as well as “no shoot” targets, since Martinez emphasized that having enough restraint to know when not to shoot is critical.
I really enjoyed this Low-Profile Carbine class, and it served as a good reminder about the intricacies of training for home defense. For more information on upcoming Rogue Methods classes, go to rogue-methods.com.