Illustrations by Joe Oesterle
As a frequent flyer, you’d heard your fair share of commotions on airplanes. From fighting couples to drunken passengers — the cramped cabin of a crowded airplane was hardly a quiet place, even when most of your fellow travelers were being respectful. Yes, you’d been on noisy flights before, but this ruckus was different.
In the way that a parent can distinguish a child’s cry of pain from a howl of frustration, these raised voices conveyed alarm to you. Turning to your spouse, you asked, “Honey, are you hearing this?” She looked up from her book and turned a bit to listen. A moment later, a woman’s piercing scream tore through the low murmur of conversations in coach. It came from the front of the plane, behind the first-class curtain. You started to stand up in your seat, but your spouse pulled you back down. That was a good thing.
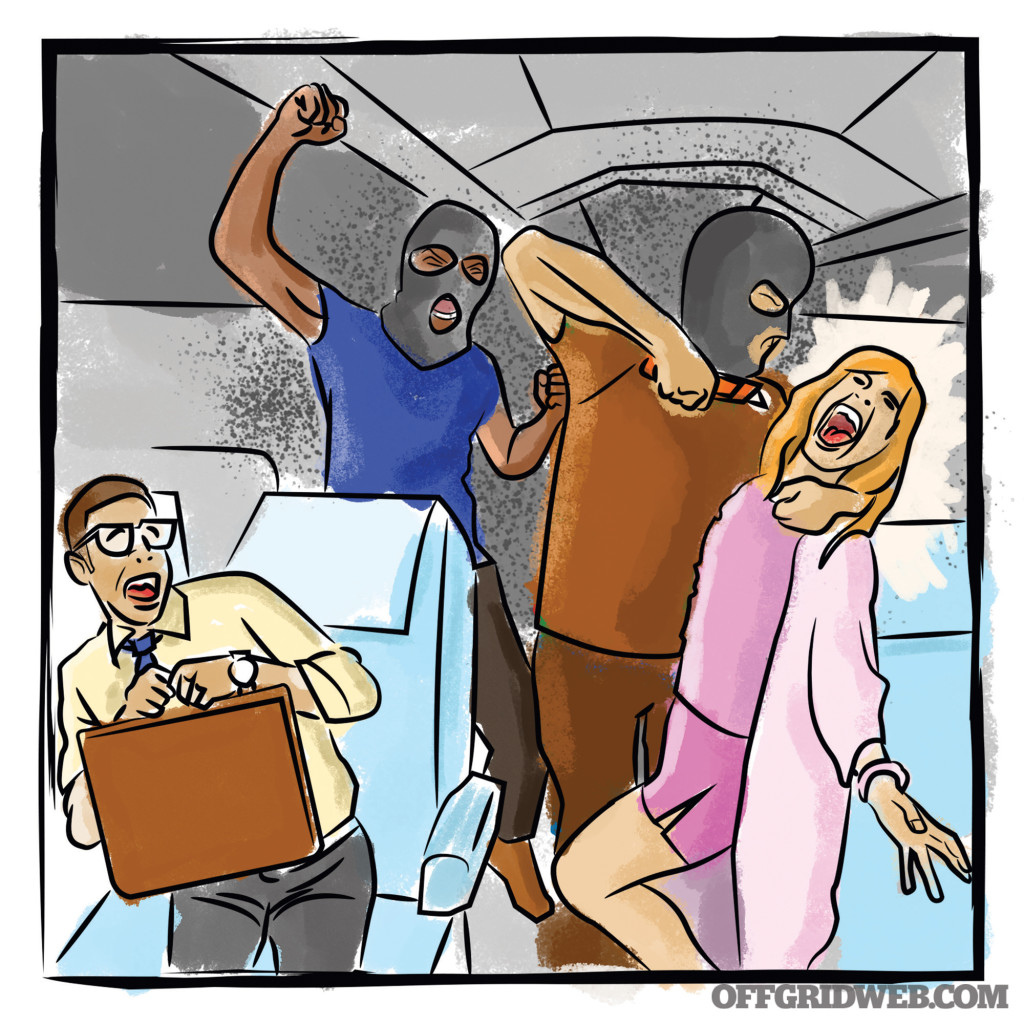
A loud and deep man’s voice boomed just behind you. “Stay in seats! We take this plane now!” Craning your neck to see over the seatback, you saw two men in ski masks, holding a terrified flight attendant. The speaker shouted again, so all could hear “You stay in seats or we blow up plane!”
For this installment of RECOIL OFFGRID’s What If? column, the editors have placed us in an airline hijacking scenario that pushes the boundaries of preparedness. And while this scenario is a painful reminder of the life-altering events of Sept. 11, it’s also a valuable teaching opportunity. Here we’ll share some potential strategies to fight back against fanatical hijackers, and we’ll discuss some of the preparations and strategies that you might need to employ, should you find yourself in such a dire situation. Most of us will never forget Sept. 11, and we should never forget that this kind of crisis can still happen, despite all of the advancements in airline security. You never know when one person may make all the difference.
The Scenario
Situation type
Airliner hijacking
Your Crew
You and your spouse, airline crew, and approximately 200 other passengers
Location
During flight from Boston to Los Angeles aboard a Boeing 737
Season
Winter, late December
Weather
Clear; high 47 degrees F, low 31 degrees F
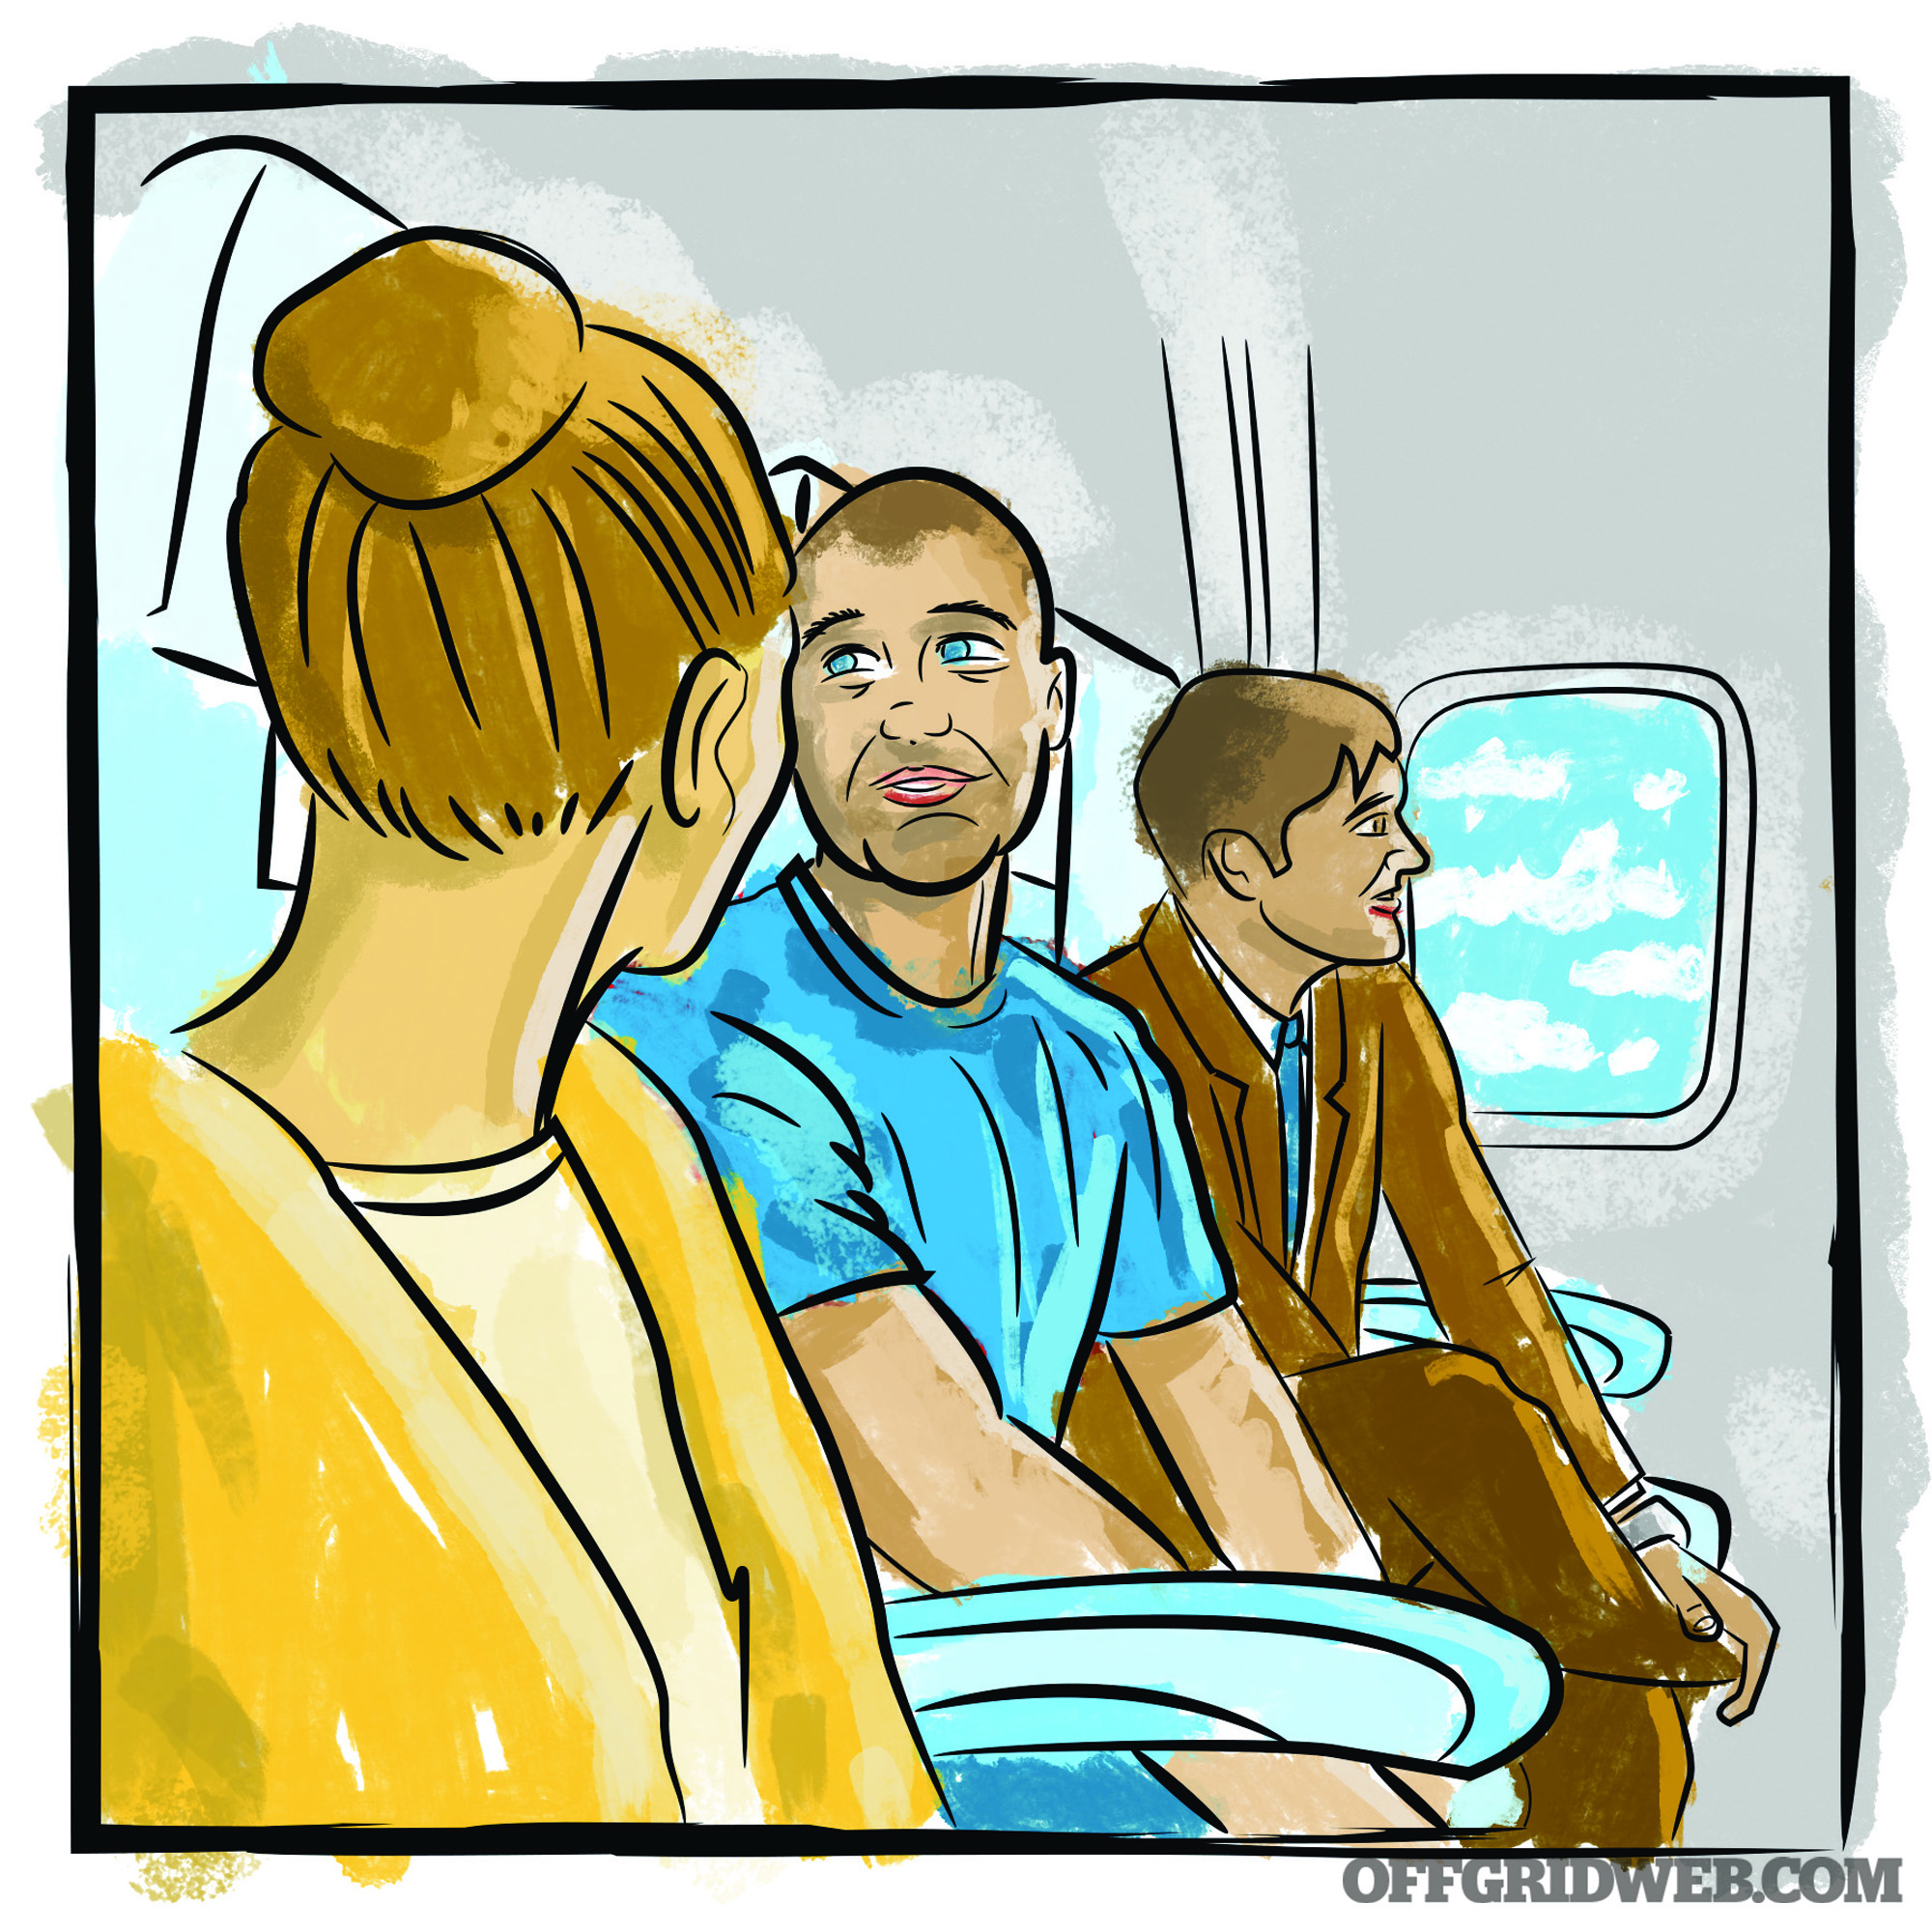
The Setup: You and your spouse are en route from Boston to Los Angeles to visit family for the holidays. Since two of the aircraft that were hijacked on Sept. 11 originated at Logan International Airport, security here is taken very seriously. As you prepare to board your flight, you feel confident that these protocols would prevent another such attack from happening at this airport. After the two of you take your seats, a well-dressed, middle-aged man sits down in your row’s third seat and nods hello. The flight gets underway without incident.
The Complication: About halfway through your roughly six-hour flight, the mood is still and quiet. Suddenly there’s yelling and commotion in the first-class section of the cabin. Initially, given all the cell phone videos posted on the internet of rowdy passengers, you think someone may just have had a little too much to drink. The commotion and arguing escalates, and you now hear screaming. People start to rise from their seats to see what’s happening.
Suddenly, from the rear of the cabin, you hear a shout and two men start addressing the passengers in broken English to remain seated or they’ll detonate a bomb on the plane. The two men are wearing ski masks, and one of them has a knife to a flight attendant’s throat. The men start yelling at the passengers to stay seated or they’ll be killed. The other man starts moving forward toward the cockpit with what appears to be a large, non-ferrous knife, while the first man remains in the rear holding the flight attendant as his hostage.
You’re clearly in a hijacking situation. You also feel that the plane may be descending and deviating from its previous course.
Former Federal Officer: Hana Bilodeau’s Approach
We just reached the anniversary of one of the most devastating terrorist attacks on American soil. You often hear individuals preach “never forget,” but I have to ask, are you living and preparing as if you’ll “never forget?” We need only to remember back 17 years to find evidence that evil is present and terrorism exists.
As Americans it’s our duty not only to never forget the lives lost but to also combat evil in the future. Preparation, and the wherewithal to survive, is a mental and physical exercise. Having worked previously in state and federal law enforcement, I understand all too clearly that crime can happen anywhere — even at 37,000 feet off the ground.
Being locked inside a flying metal tube with complete strangers doesn’t provide me with a high level of comfort. Knowing whether there’s a potential hijacker on the plane or not is inconsequential; there’s always a potential risk. When I prep for travel, I ask myself, “What if my airliner was hijacked?”

Pre-Prepping
I’m a planner by nature; checking a calendar and making a to-do list is a daily ritual. So when planning travel I like to schedule accordingly and do so well in advance. During holiday travel, the airports tend to be a bit busier, security parameters are a bit tighter, and flights are usually sold out if not over-sold. Because of this somewhat unpredictable combination of elements, I purchase my tickets well in advance, and I always pay extra to board early (more on that later). I’ve learned by doing this that flights typically cost less, and I have the luxury of being able to pick where I’d like to sit. Like any individual suffering from a touch of OCD, travel during the holidays comes with a fair amount of anxiety, so prepping really matters.
To-Do
Carefully review the available flights and airlines for your destination. Typically the plane used to travel from Boston to Los Angeles is a Boeing 737 — this is important because you can easily learn the layout of the plane. On a Boeing 737, there are typically 33 rows, with exit rows at row number 17. There are galleys in the front and rear of the aircraft, two restrooms in the rear of the plane, and one additional restroom just outside the cockpit. I prefer to sit somewhere in row 15 to 20, giving me a good vantage point. I’m a curious person by nature, and this location provides me with the best overall visibility of the entire plane, without cornering me in one position. When traveling with my significant other, I always book a middle seat and an aisle seat, or two aisle seats next to each other. This allows for easy movement and visibility, as well as the flexibility to get up if needed and access to the front or rear of the plane.
To Pack
When traveling, my carry-on bag is always a backpack because it allows my hands to be free, with easy movement when I’m entering and exiting the plane, and while walking through a crowded airport. Inside my backpack, I utilize the laptop pouch to secure a Defender level IIIA plate that can be carried through security. This plate is designed for a backpack and weighs just 1.3 pounds. It can help protect you from fragmentation, edged weapons, and physical strikes. Easily accessible inside my backpack, I have an amenity kit containing a flashlight, batteries, large zip ties, duct tape, a couple sturdy ballpoint pens, tourniquet, hemostatic-combat gauze, pressure bandages, and socks — I always have socks in my bag so I never have to touch my bare feet on the airport floor when going through security, and they can also be used as a blunt striking agent when filled with change or batteries.
On Site
I like to arrive to the gate area of my departing plane early. This allows me to watch and evaluate the other passengers I’m going to be locked on a plane with for several hours. During this time, I look for other passengers who appear to be physically able to defend themselves if necessary. Personal attributes I note: 1) haircut: a high and tight suggests that the passenger may have been former military or law enforcement, 2) physical stature: a larger male or someone who appears to be physically fit and wears clothing advertising martial arts, CrossFit, military, or law enforcement entities could be a potential ally in a hijacking situation. Once located, I mentally document the passengers who might be able to assist me in a crisis if needed. This is precisely the reason I always pay the extra money to board a plane early — so I can find my seat, get situated, and watch the other passengers I’ve identified as they board, mentally noting where they sit, in case their assistance is needed.
In this scenario, I’m traveling with my spouse, so we also maintain our awareness as other passengers are boarding and watch their behaviors as they enter the aircraft. Once we locate our seats, I take the middle seat and he takes the aisle seat. I push the armrest to the rear and undo my seatbelt when safe, to prohibit obstruction of movement. I never put my carry-on in the overhead, keeping it with me and accessible at all times.
My spouse and I both worked in the defense world and train together in physical fitness, and hand-to-hand/edged-weapon defense. We communicate regularly on mission preparedness. Because of this, we’re very good at nonverbal communication. From boarding to deplaning, we maintain awareness throughout the entire flight, which includes no noise-canceling headphones or ear buds, no sleeping, and no movies or entertainment that could divert our attention. We keep the lines of communication with each other open (for example: “I’m heading to the restroom in the front of the plane,” or “I’m going to get a water from the flight attendant in the back galley,” etc.)
Crisis
Midway through the flight, chaos erupts. It’s clear that the plane is being hijacked, and at this point in time, as hard as it may be, it’s essential to remain calm so you can assess, evaluate, and plan.
In the assessment stage I have three main concerns: 1) Is the pilot safe?, 2) Is there an explosive device on the plane?, and 3) How many hijackers are involved? Ever since Sept. 11, airline cockpits are locked, so if a hijacker has breached the lock it should be physically obvious. To identify the presence of an explosive device, visually inspect the hijacker’s hands to see if they have something that could be used as a detonation device. And finally, scan the passengers to see if you can observe any additional potential threats.
Once my risk assessment is done, I’ll evaluate the situation with my spouse and take note of our options. Can we rush the hijacker and end this situation? Are there other threats that need to be contained before taking on the hijacker? How do we create distractions? These are all questions to consider during the evaluation stage.
Now it’s time to plan. I’ll communicate with my spouse (verbally if possible, but non-verbal is always an option) and develop an actionable plan. In this situation, I’d suggest my spouse go to the rear of the aircraft due to his body size and immediate risk to the flight attendant’s life. Next, I’ll try to visually and physically communicate with the passengers whom I’ve identified to enlist their help to take down the hijackers. I’d also tell my seatmate about our plan (assuming I don’t suspect he might be in on it).
Because of the positioning of our seats, I’d ask our seatmate to watch the plane and to verbally get our attention if any other risks arise. Before moving from our seats, I’d access and divide up the zip ties and ballpoint pens. The pens can be used as weapons, and the zip ties can be used to help restrain the attackers. I’d position my backpack so I can use it with my defender plate to protect my torso while charging the forward most hijacker. Finally, before separating with my spouse, I’d discuss with him how to exit our seats and the need for it to be fast and violent in hopes of taking the hijackers by surprise.
Once we’re mobile, and our plan is in motion, I’d again make nonverbal cues to passengers I’ve identified as able to help, urging them to follow suit. Assuming we’re successful and the hijackers are subdued and restrained, I’ll scan the plane for additional potential risks, and have my spouse work with a flight attendant to gain communication to the cockpit. If the pilot or pilots are deemed safe, I’d relay pertinent information to him for communication to the ground for an emergency landing.
Nobody wants to fall victim to another Sept. 11 attack. If able, we’d all be willing to fight to ensure that doesn’t happen again. In every instance the passengers will outnumber the hijackers, and if you’re prepared, you have the ability to overpower them and take back control. In nearly every scenario, I’d make the conscious decision to violently fight back, because time is of the essence. It’s common knowledge that the longer an incident lasts, the higher the likelihood a device will detonate and/or hijackers will gain access to the cockpit. I believe in being decisive and acting with speed, violence, and the element of surprise to overtake those seeking to inflict harm.
If you don’t have the mental or physical wherewithal to survive, knowing whether or not a hijacker is on your plane is inconsequential. Taking accountability for ourselves and others is as important as acknowledging that harboring in place rarely has a positive result. At the end of the day, fighting for ourselves, fighting for others, and fighting for America is the only way to combat terrorism.
Survival Expert: Tim MacWelch’s Approach
Preparation
So how would one prepare for a flight where a hijacking might take place? It’s not like the TSA would let you on the plane with all your tactical gear and a parachute. But thankfully, we can rely on more than mere luck for protection. Knowledge is one of our greatest assets, and while it might be unnerving, a great deal can be learned from studying the past few decades of airline bombing attempts and hijackings (particularly Sept. 11). While we’re at it, I’d take some time to brush up on close-quarters hand-to-hand fighting, especially grappling and striking. I’d also read through the TSA-approved item lists at www.tsa.gov. Steel-toed boots are still allowed on planes, as well as leather belts with large metal buckles. Crippling kicks can be delivered with the boots. The belt can be used as a whip, or a restraint, as needed.
A tactical pen could be handy in a pinch, but why carry a little spike when you can still bring knitting needles in your carry on? The pen is cute, plus it writes on paper, but 14-inch hardwood or metal spikes can do a little more damage, most notably when shoved into a bad guy’s ear canal. All you need is a ball of yarn with some half-knitted booties, and you have your excuse to carry them. Of course, the final decision rests with the TSA officer on whether an item is allowed through the checkpoint, but knitting needles and crochet hooks are on the “OK” list (for now).
To continue my preparation, I’d let the air crash statistics govern my selection of seating for me and any companions. This has little to do with terrorism, and more to do with the speed you could escape a downed aircraft. Generally speaking, the safest seats on an airplane are the exit row seats above each wing and the adjacent seating nearby. Choosing these seats will give you first crack at escape. Conversely, the worst seats (statistically) are the window seats furthest from the exits. You’d have to climb over seats, and possibly people, to get out. You’ll also have to go further to get out of the plane. While we’re on the topic of seat choice, the first few rows can be a gamble. Sure, you’re close to the front exit, but these seats may be obliterated in a frontal crash. Whichever seat you choose (or get stuck with), make sure you know where the exits are located, even if you can’t see them. In a smoke-filled cabin, you shouldn’t be wondering which way to go.
One final prep would be communication. Your normal mobile phone won’t be of much use at 30,000 feet, plus Airfones have pretty much become a thing of the past and are rarely found on airliners anymore. The altitude threshold for cell communication is roughly 10,000 feet in the air. And it’s not just altitude that can limit your connection. Speed and “tower confusion” can also effect a cellular connection. Planes traveling more than 155 mph aren’t likely places from which you can make a call. At great height and speed, your phone will try to link to many cell towers for signal, confusing both the phone and the network. While searching, the phone will emit a stronger signal, and the FAA says that this heightened signal can affect the aircraft’s communications and navigational equipment.
Finally, when flying over rural areas, the towers will be fewer and farther between; and over the open ocean, there are no towers at all. So what’s your viable option? Pick a flight and airline that has in-flight Wi-Fi, so you can still communicate using your mobile phones or devices, or bring a satellite phone. If you could get a message out with any device, there’s no cut-and-dry answer for whom you should call. If the plane were low enough and slow enough to use your mobile phone and cell towers, you could certainly try 911. With a sat phone or working mobile, you could try the number for the airline you’re flying. On Sept. 11, flight attendants Amy Sweeney and Betty Ong called the American Airlines office to relate that Flight 11 had been hijacked. You could also plan ahead by getting phone numbers for Homeland Security and the FBI.
On Site
Once we’ve boarded and gotten underway, we’d keep our seatbelts fastened. This isn’t just to stay off the “naughty” list that the flight attendants are mentally compiling. Sometimes people die from injuries sustained during turbulence, and sadly, these broken necks and traumatic brain injuries could have been avoided by the simple use of a seatbelt. Roughly 60 people a year are injured from failing to wear their seatbelts on U.S. flights, and it’s usually a patch of clear air turbulence that launches people from their seat. Yes, it’s more comfortable to unshackle yourself, but do you take your seatbelt off in the car? No, you leave it on. And you should copy that behavior on a plane (except during in-flight bathroom breaks).
You’ve heard of the “wise old owl,” right? The less he spoke, the more he heard. One simple safety protocol for my family is to limit our own talking in crowded places. Instead, we listen to what’s going on around us. Of course, we’d look around a lot too, studying our surroundings as well as profiling the other passengers and even the crew. Our senses of smell can be valuable at certain times, too. As renowned tracker Freddy Osuna would say, “Weaponize your senses!” Plenty of people look nervous before flying, but unless potential hijackers have nerves of steel, they’re likely to look extra nervous. Whether it’s a copycat of Sept. 11, a hijacking for ransom, or some political statement, hijackers will have a lot going on internally, which may be visible externally.
Crisis
There has to be an evolutionary advantage to panic. Perhaps our remote ancestors survived unexpected attacks by bolting without hesitation and running in an unpredictable pattern. In our modern world of threats, panic isn’t very valuable anymore. As soon as the hijackers are spotted, each and every passenger should remain calm, quiet, and compliant, no matter how badly you want to twist their heads off. In the initial moment, I would do my best to not fight or panic. Even if I or my spouse were grabbed or taken hostage, I’d endeavor to comply. With my eyes down and no talking, I’d listen intently and gather information. I’d also prepare myself mentally for the long haul.
If the hijacking were for ransom, the ordeal could carry on for days. So I’d find out everything I could about my adversaries and bide my time. By doing my best to not appear as a threat to them or a challenge to their plan, I can better determine what that plan actually is, then make the best choice. With the threat of a bomb onboard, a hasty action against suicidal terrorists could get everyone killed. If it’s a hijacking for money, it’s in the hijacker’s best interest to keep everyone alive. If it’s some other plan, we may be facing our final hours of life. In that grim setting, then we’ll have to pick the right time and manner of attack. It might be worth the risk of communicating or coordinating with other passengers, if it could be done without alerting the attackers.
Since travel restrictions forbid firearms and knives on a plane, we’d have to get creative — improvising weapons, then attacking with surprise and savagery to retake control of the plane. Punch their throats, gouge their eyes, get them on the floor, and kick in their skull, or use a bootlace as a garrote. There are plenty of ways to fight without firearms or blades. If we managed to retake the cabin and the cockpit was never breached, the plane could make an emergency landing at the nearest airport. If the pilots are found dead, after retaking the plane, air traffic control may be able to walk someone through landing. There have been numerous successful landings by non-pilots, guided by air traffic controllers on the ground (many of whom have prior flight experience). And if you need to select a radio frequency for ATC, try 121.5 MHz (for civilian) or 243.0 MHz (for military use, also known as Military Air Distress), which air traffic control usually monitors.
Conclusion
There’s nowhere to run and no place to hide on an airplane. You’re caught up in the mix during any bad situation that happens in the air. Even if you sit still and don’t make a sound, you’re still an active participant in the events that are unfolding around you. That’s right, choosing not to act is a choice, and making a choice is an action. You’re still actively involved, and there are more actions to consider than just self-preservation that won’t improve your chances.
When it comes to preparedness and survival, many of us start out prepping with a concern only for ourselves and our loved ones. But sometimes, as a person’s survival knowledge grows, certain people realize that they need to help others survive as well. And this can be a crossroad in survival. Would you be able to sacrifice your own survival so that others might live? Some are willing to risk their life to save others, while some won’t make that choice. We all want to believe that we’re heroic, but you never really know for certain until you’re in a situation that calls for that kind of sacrifice. We pray that none of us ever have to find out the hard way, whether we’re craven or courageous underneath it all.
[meetourpanel]
More From Issue 29
Don’t miss essential survival insights—sign up for Recoil Offgrid’s free newsletter today!
Read articles from the next issue of Recoil Offgrid: Issue 30
Read articles from the previous issue of Recoil Offgrid: Issue 28
Check out our other publications on the web: Recoil | Gun Digest | Blade | RecoilTV | RECOILtv (YouTube)
Editor’s Note: This article has been modified from its original version for the web.