In case you haven’t noticed, there’s an ongoing theme to our Pocket Preps column: It’s helpful to carry the right tools for the job. If you’re trying to work loose a screw, a multi-tool with a built-in screwdriver will make it easy. Trying to use the blade of your knife, a coin, or your fingernail will not. If you need to see in the dark, you want a dedicated flashlight, not a BIC lighter or the tiny LED on your expensive and fragile smartphone.
When it comes to self-defense, your mind may automatically jump to a gun or knife as “the right tool.” While we’ve often emphasized the value of carrying each of these items, they’re not the ideal solution to every scenario. There are plenty of cases where carrying a gun or knife is impractical, or even illegal — but that doesn’t mean you have to face your attacker bare-handed, either.
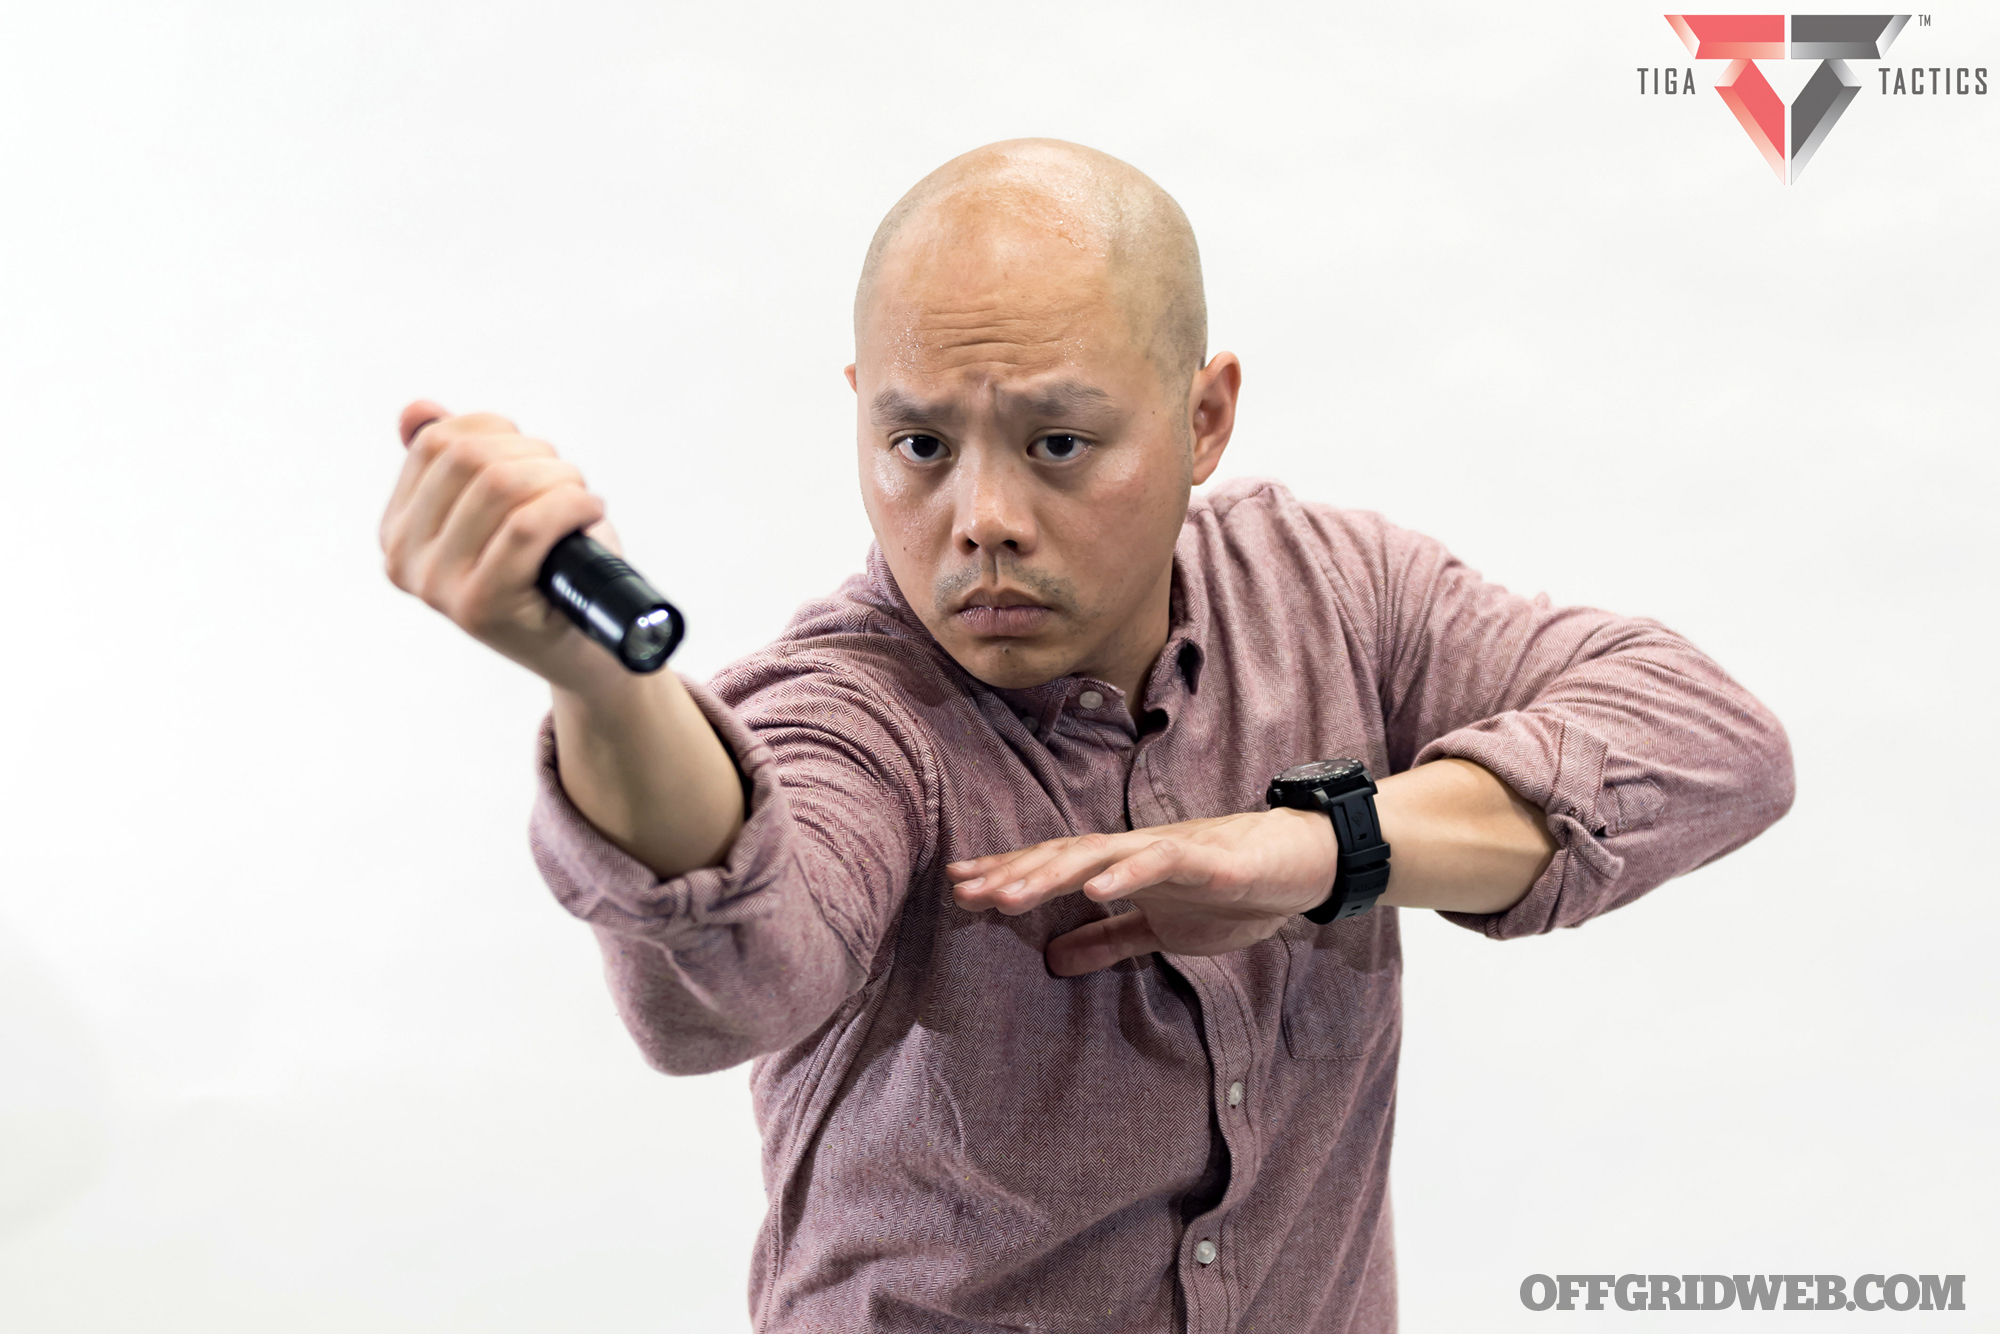
In a broader sense, impact tools can also include pens and flashlights. (Photo via Tiga Tactics)
Handheld impact tools serve as a less-lethal force-multiplier, amplifying the power of punches, hammer-fist strikes, and submission holds. These are commonly referred to as pocket sticks or self-defense keychains, and can be made from wood, metal, or hard polymer. Purpose-built tools such as the Kubotan (or genericized kubaton), yawara, and koppo stick also fit the theme. They can be used lightly to inflict pain and deter a threat, or slammed hard against flesh and bone to deal more lasting damage.
Although flashlights and tactical pens can serve as impact weapons, that purpose is secondary. So, today we’ll take a look at some pocket-sized tools that are more specifically oriented toward self-defense. Many of them contribute other helpful functions to your EDC loadout, and each offers an effective way to put the hurt on a bad guy. As always, check your local laws to make sure these are legal in your area before purchasing.
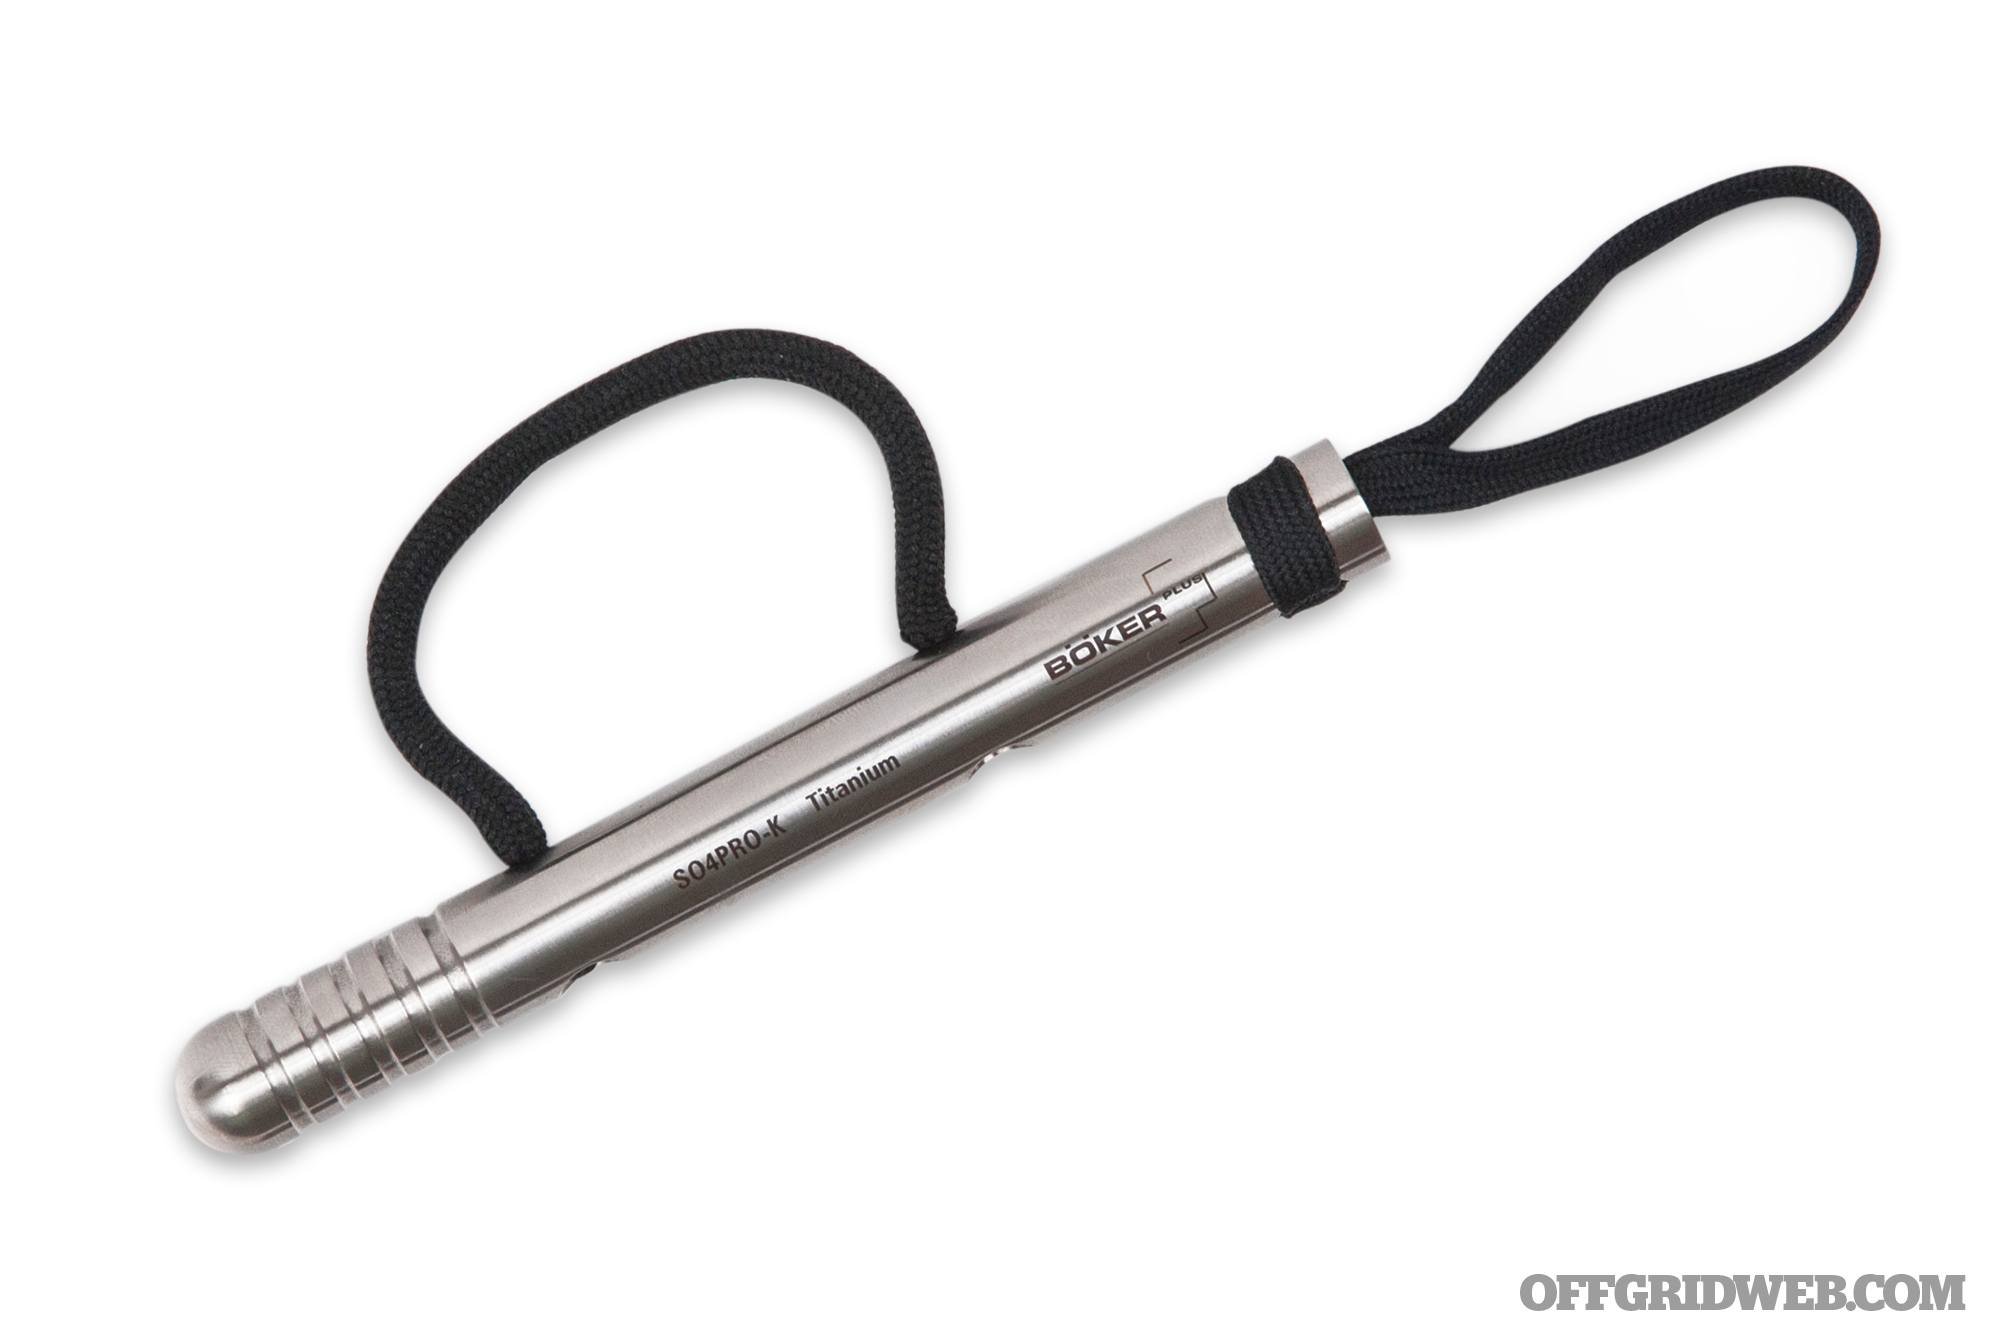
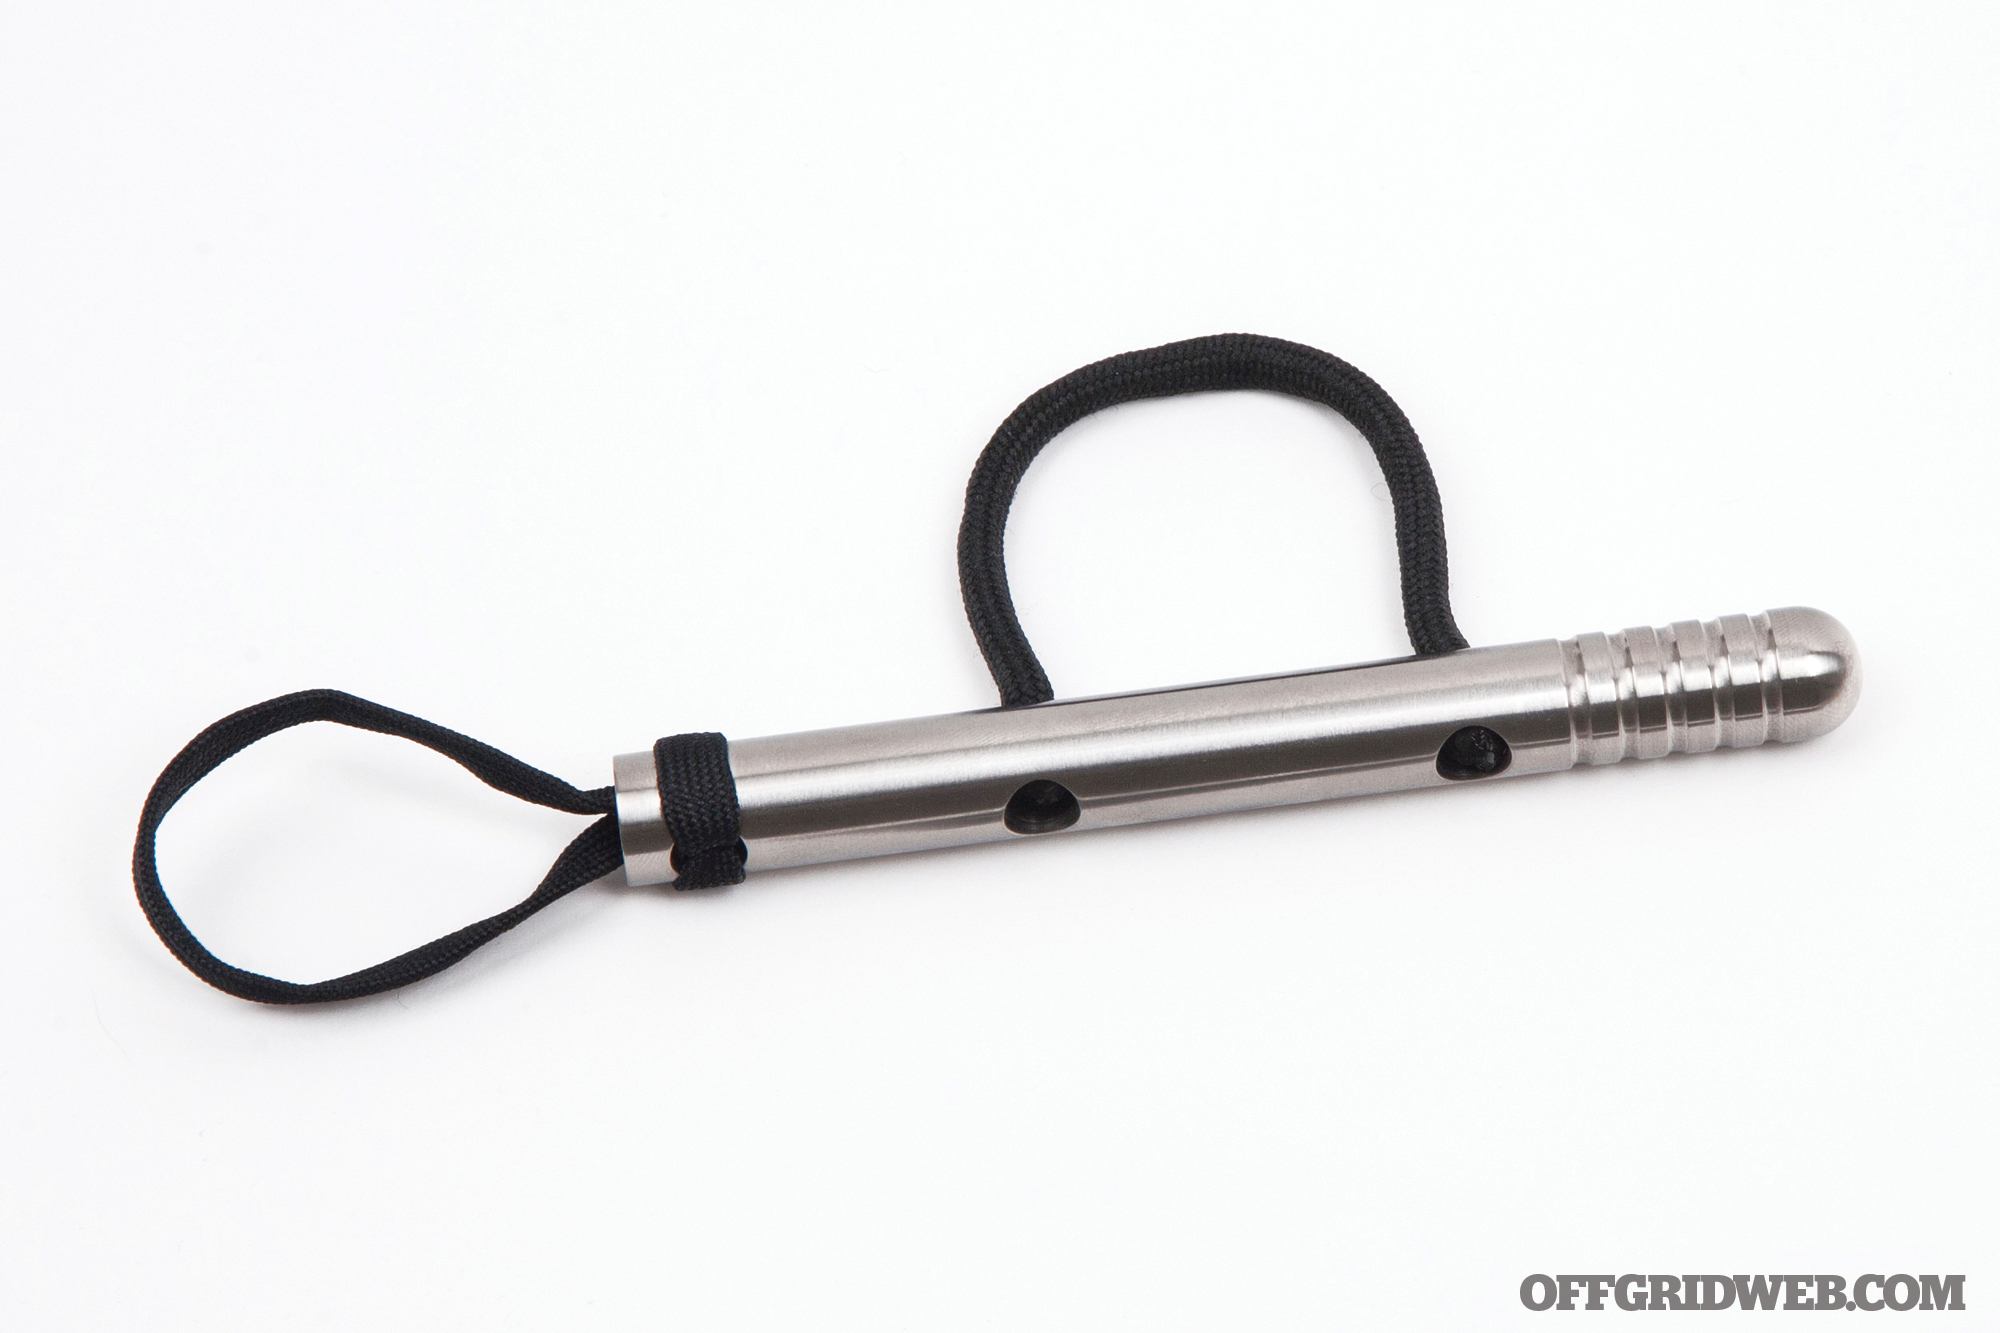
This impact tool was designed by Rainer Wenning as a modernized variant of the Japanese koppo stick, traditionally a wooden rod with a retention loop around the middle and ring fingers. Wenning’s version is constructed from lightweight Grade 4 titanium, with dual cord loops for the fingers and thumb. These help the user hold onto the tool, even when repeatedly striking adversaries with the round tip. However, this isn’t solely intended as a weapon — Boker says it was also developed as a massage tool for relieving muscle spasms and encouraging lymph drainage.
Pros:
Smooth, rounded tip is ideal for blunt impacts without cutting or piercing.
Although we don’t plan to use it for massages, we can see how it could be effective for that purpose
Cons:
Retention loops are excessively loose, and can’t be cinched down easily.
DUUTY Self Defense Keychain Kubaton Weapon
OAL: 5.5 inches Weight: 1.1 ounces MSRP: $8 for 6 / $1.33 each URL: amazon.com
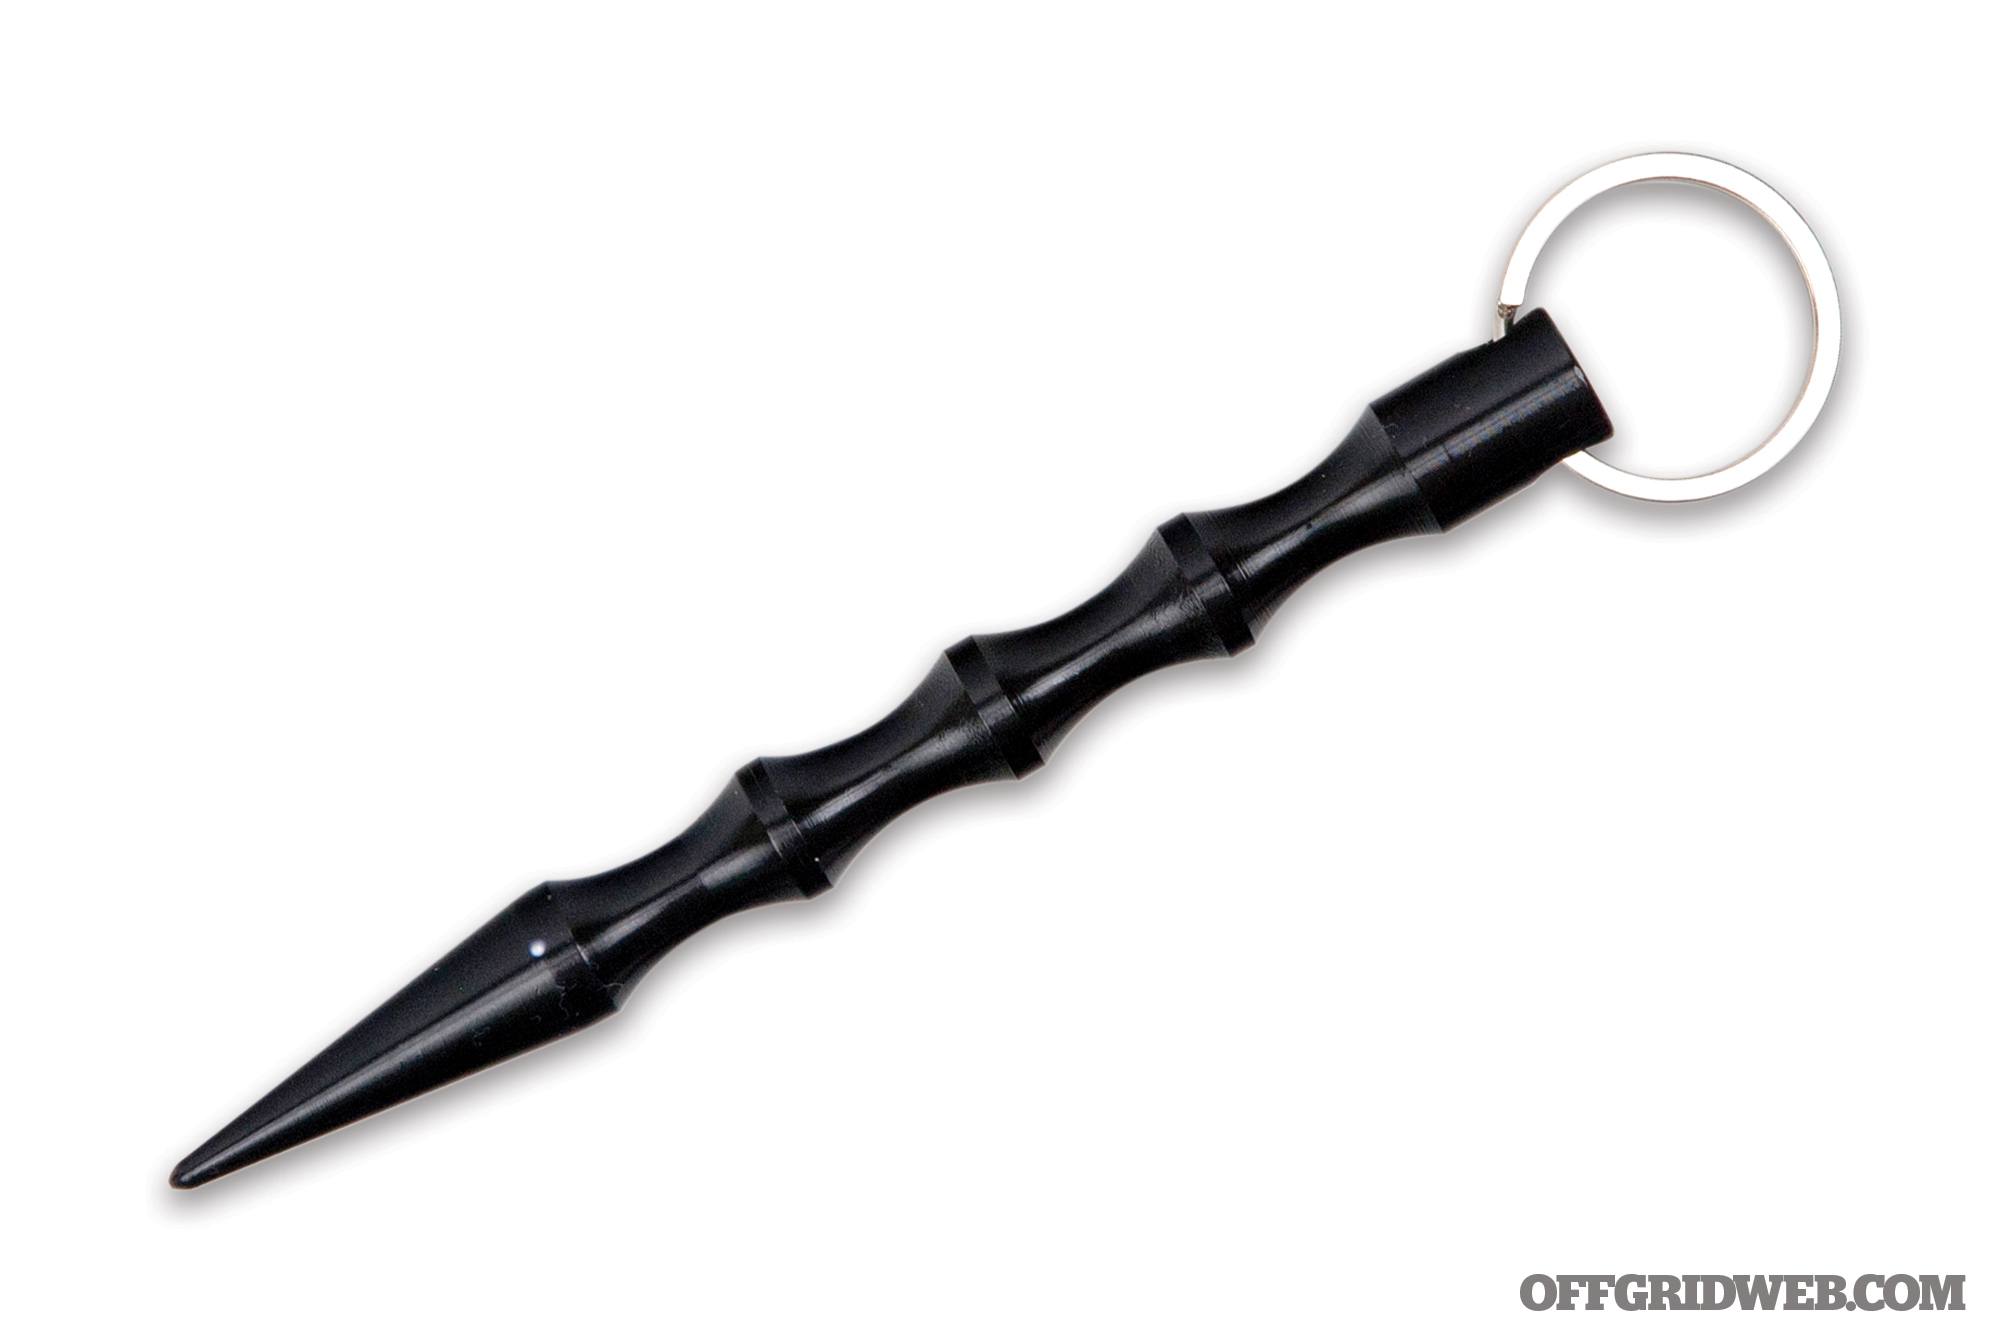
Hilariously described as an “aluminum anti wolf tool keyring for women teens man” on Amazon, this generic kubaton proudly proclaims its ability to “reject and resist hurts of life.” We purchased a six-pack for just $8, including free one-day shipping. The following afternoon, we received a plastic bag with the individually wrapped aluminum impact tools, each with a different anodized finish. Four finger grooves and a flat end offer a comfortable and secure grip, and the tapered tip is more than sufficient to inflict pain on an attacker. Key rings are included.
Pros:
While calling it an “anti wolf tool” is a stretch, it’s certainly sufficient for defense against humans.
Despite obvious quality-control issues, it serves the intended purpose at a throwaway price.
Cons:
Shoddy build quality — anodizing had bare spots, and one tool arrived with leftover machining scraps in the bag
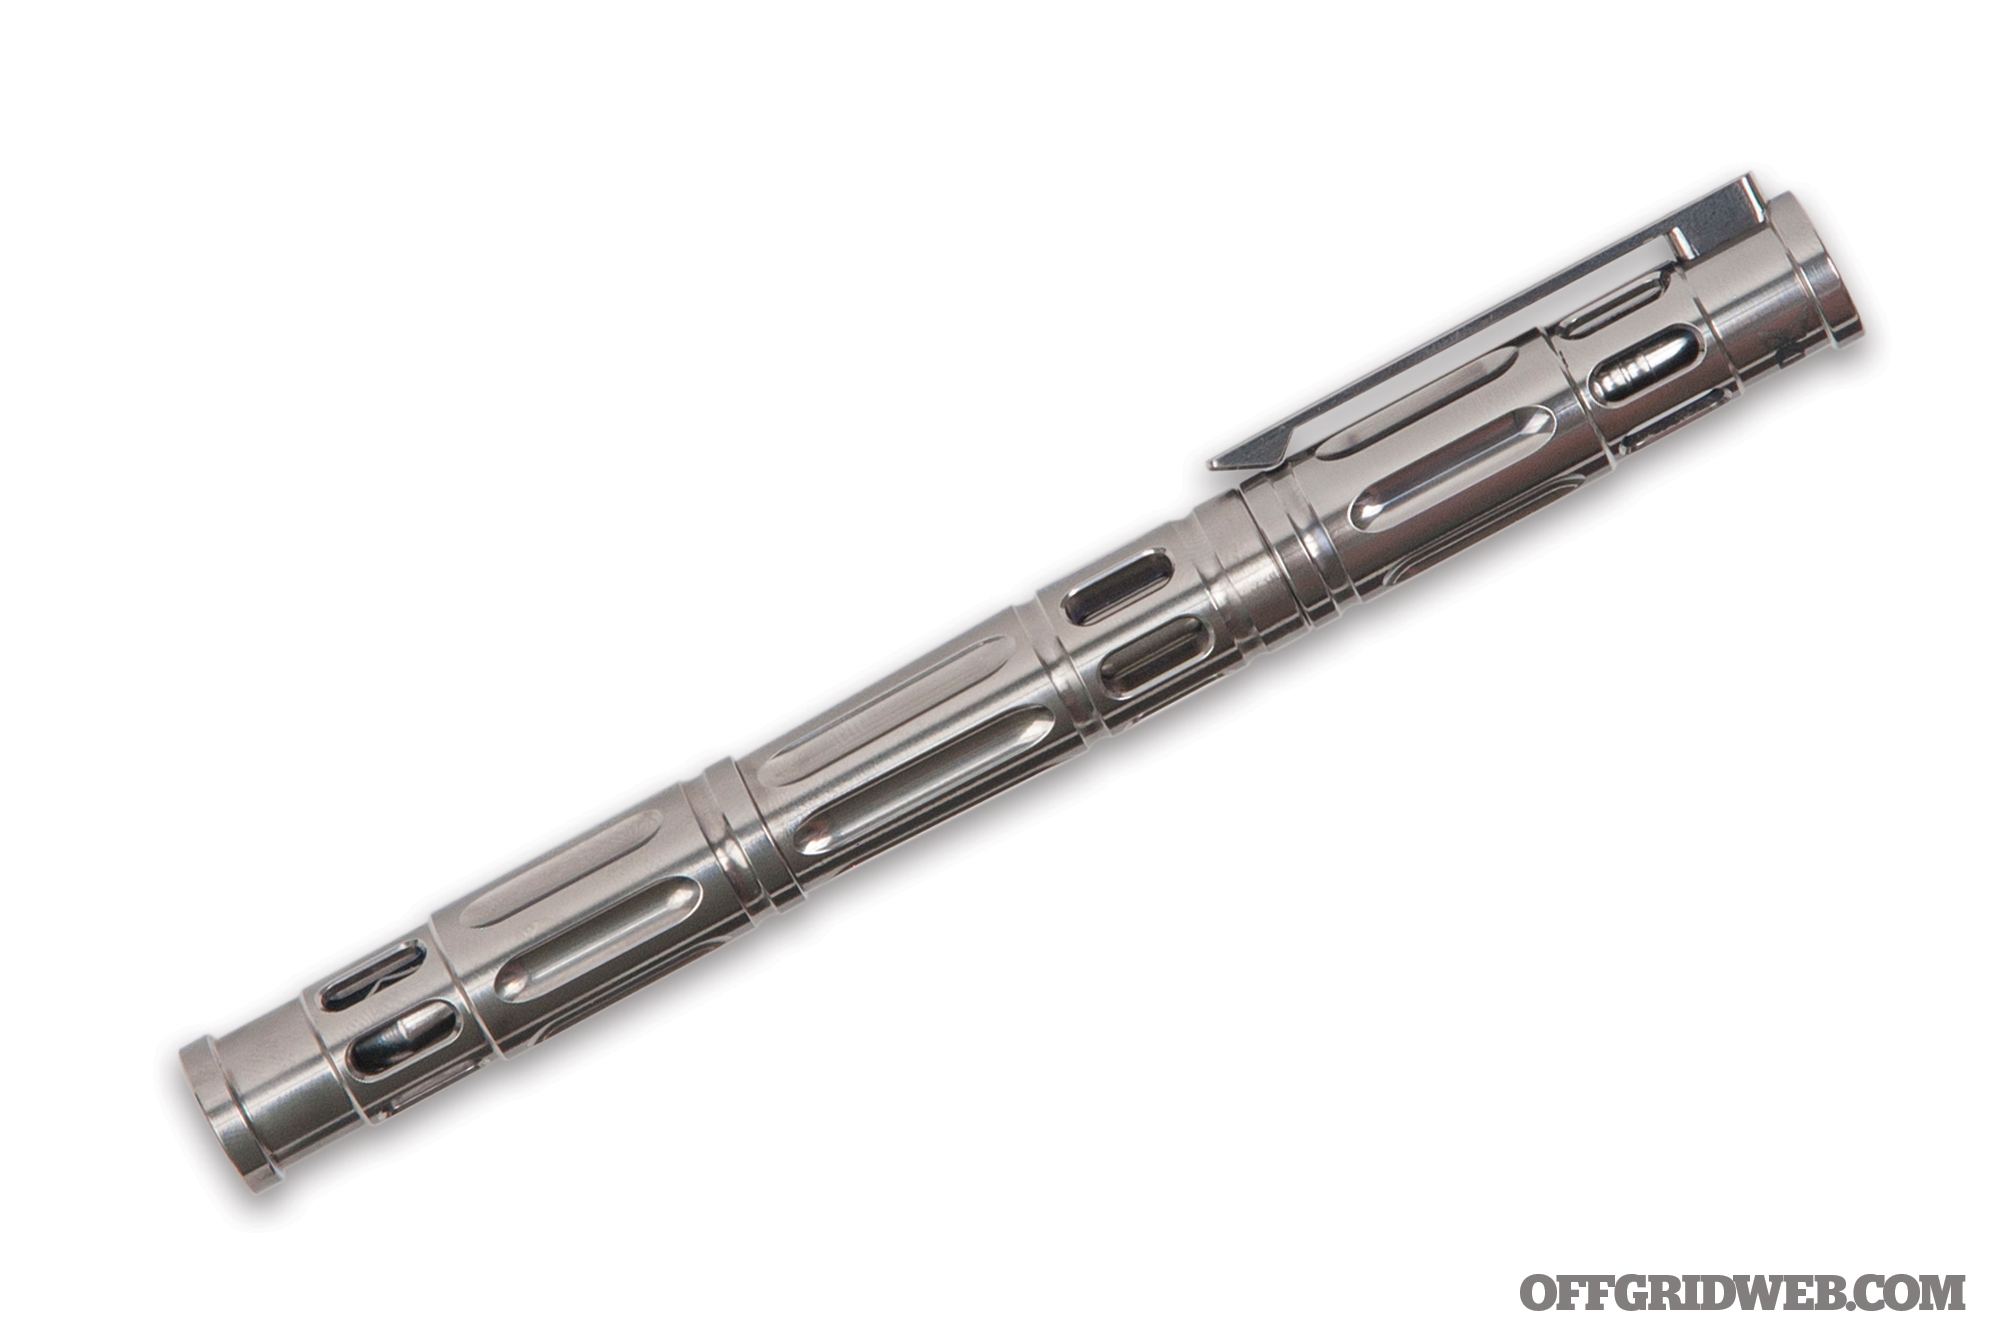
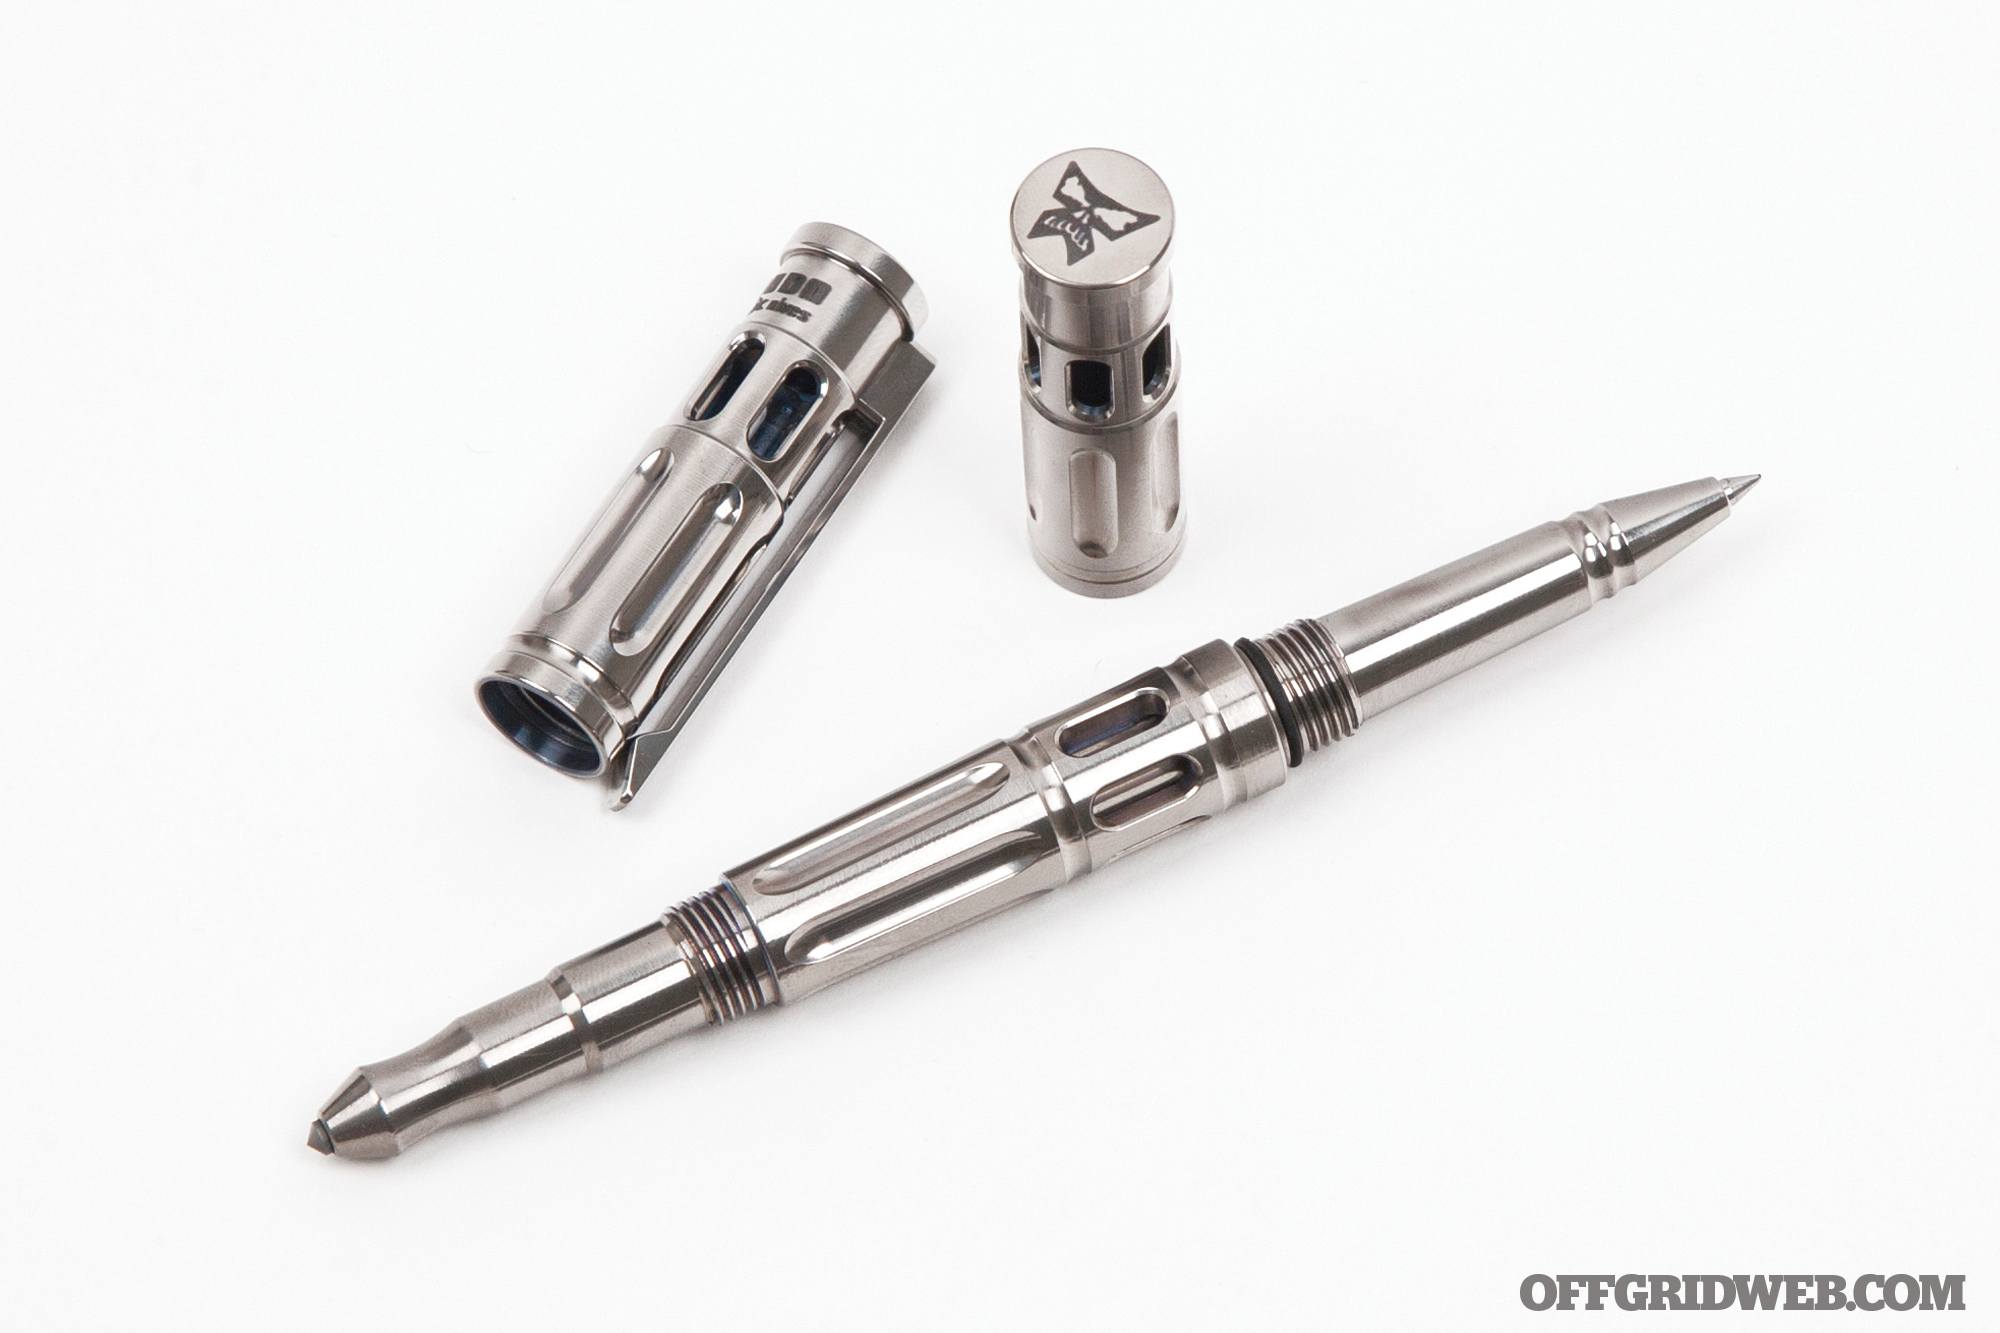
The Krubaton serves three functions. First, as indicated by the name, it’s a blunt impact weapon — or as designer Louis Krudo calls it, a “pain compliance tool.” At just under 6 inches long, the titanium body offers more than enough length to hammer an attacker’s weak points. Unscrew the cap on one end to reveal a tungsten carbide glass breaker; unscrew the other end to access a pen that accepts standard Parker ink refills. These caps are conveniently reversible, and one features a slim, removable pocket clip. Three finishes are available: brushed, matte blue, and matte gold.
Pros:
Intricately machined titanium construction looks cool and provides a secure grip.
Reversible caps allow it to be carried with either the glass breaker or pen at the ready.
Cons:
Cutaways in the caps and body are magnets for dirt and pocket lint.
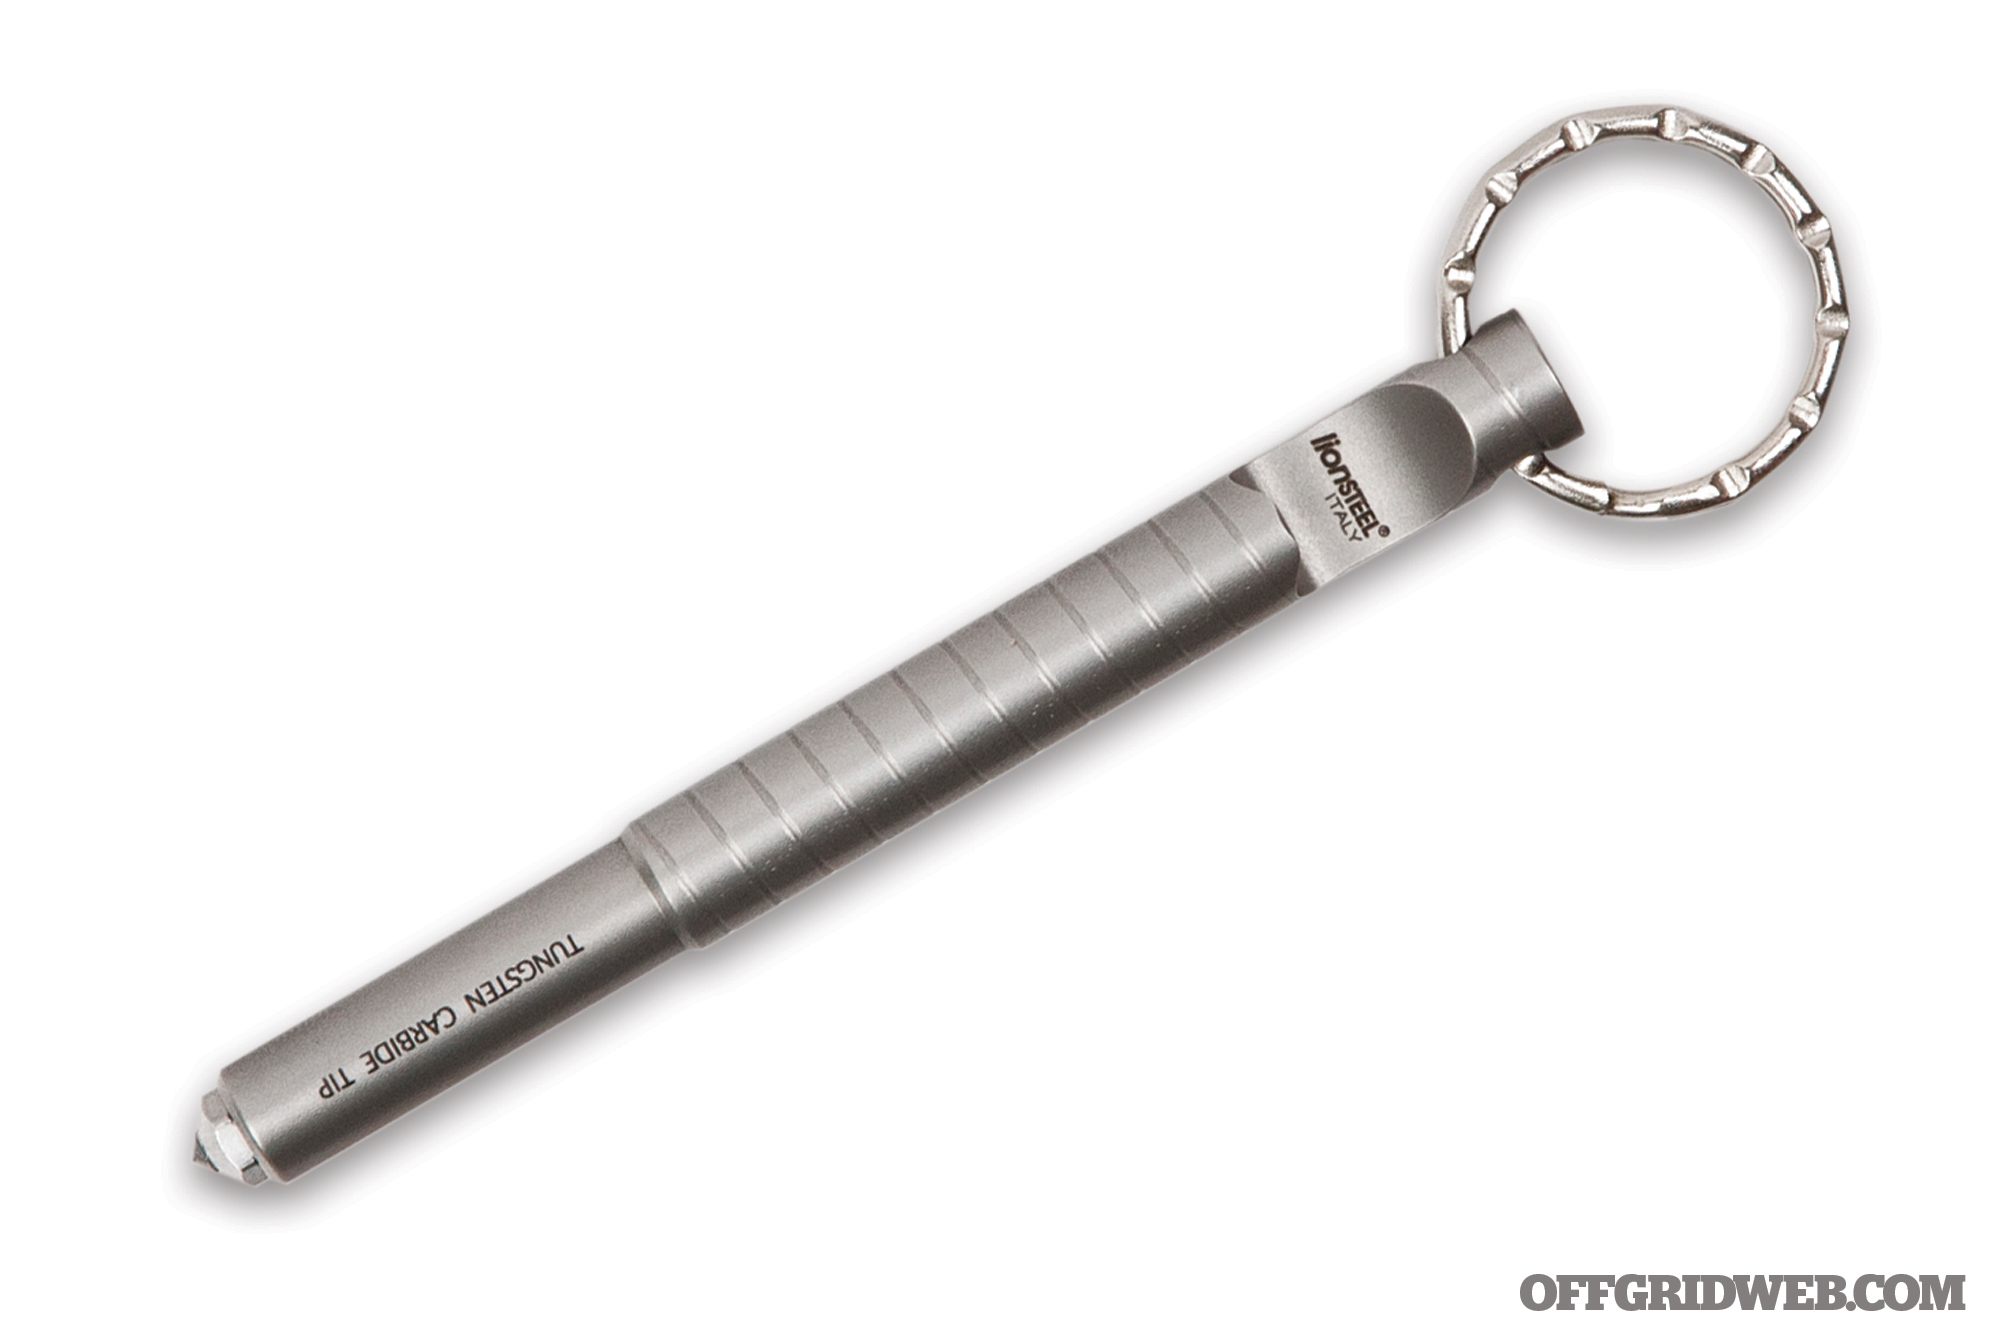
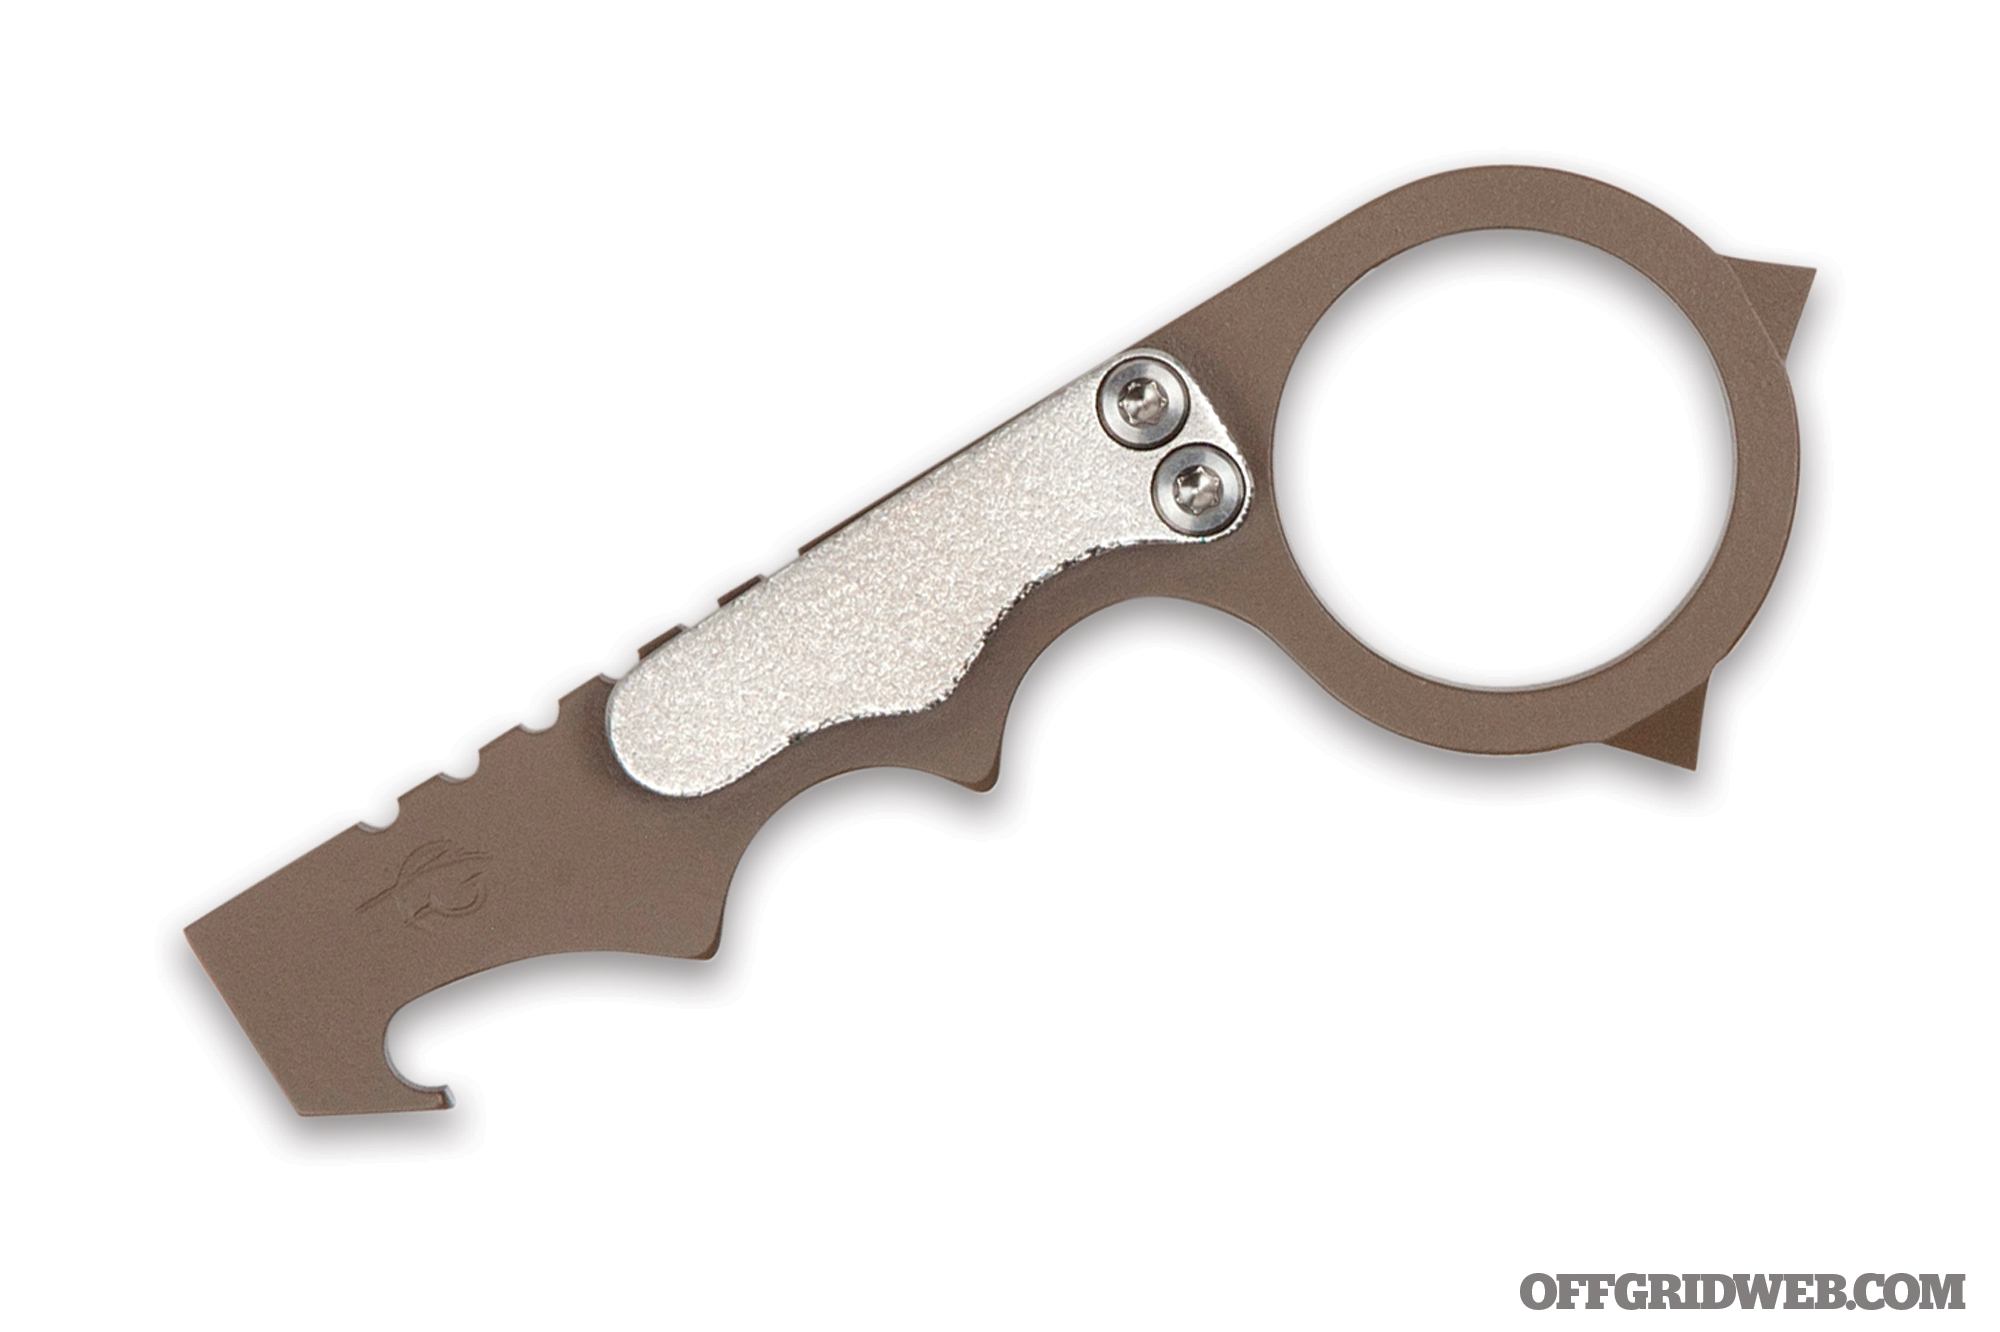
Italian knifemaker LionSteel created the Eskaper as a multi-function keychain tool with an emphasis on elegant aesthetics. The 303 stainless steel body is machined with a spiral pattern and bears a satin finish. At the top of the tool, there’s an included keyring and a bottle opener cutout. The tip is finished with a threaded tungsten carbide glass-breaker insert, which is removable and replaceable. As a dedicated self-defense impact tool, it’s on the small end of the spectrum, but would be sufficient in a pinch.
Pros:
Compact, understated design doesn’t look like a weapon
Glass-breaker tip can be removed with a ¼-inch socket, turning the tool into a blunt instrument.
Cons:
Although its small size fits comfortably on a keychain, it’s at least ½-inch shorter than we’d like for an impact tool.
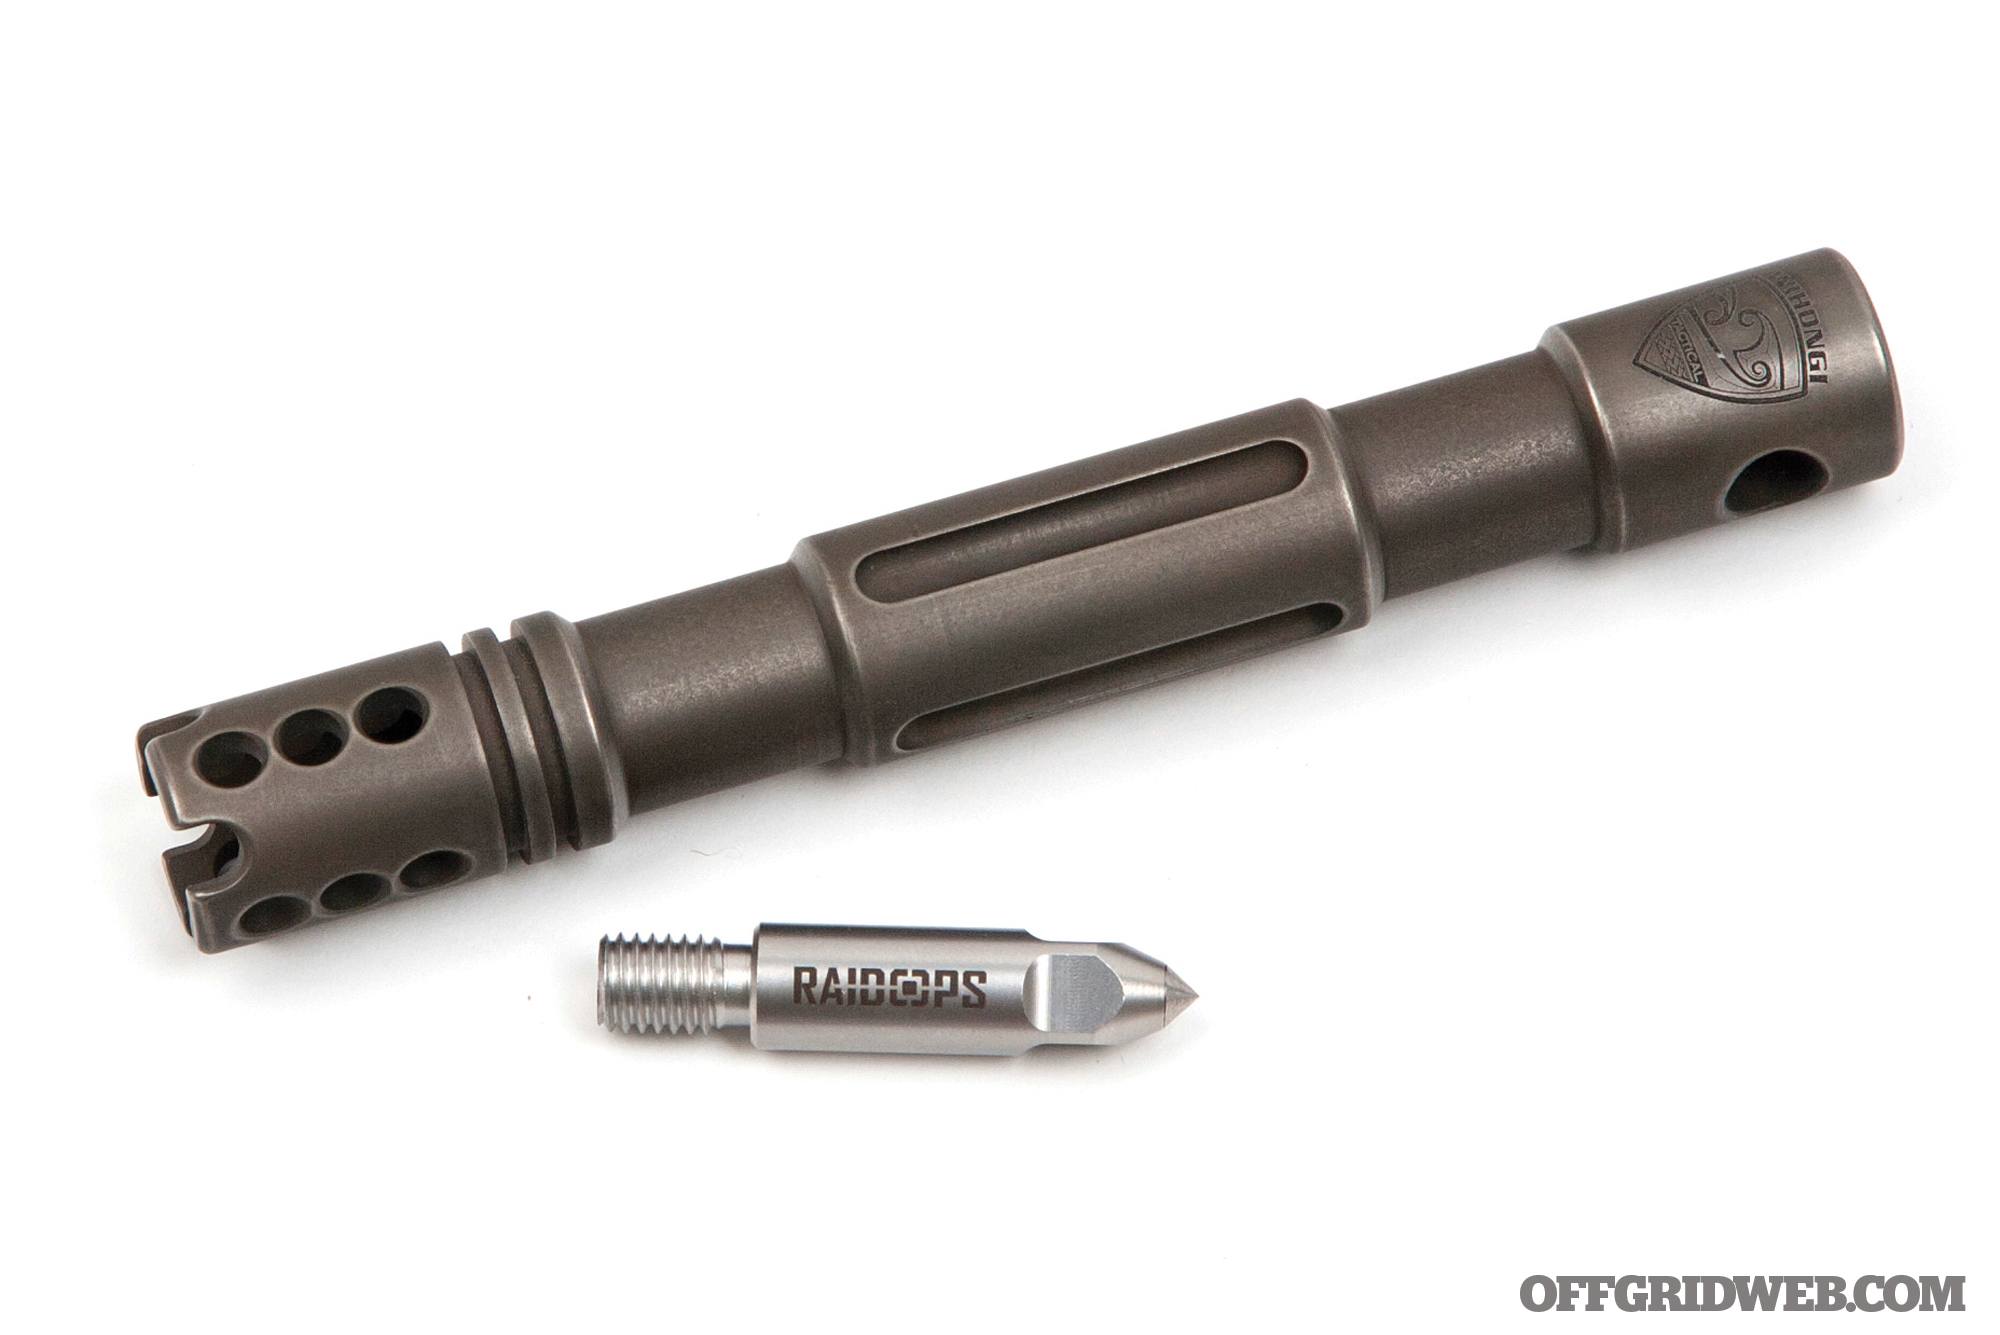
RaidOps Jared Wihongi Kubo Aro
OAL: 5.6 inches Weight: 2.2 ounces MSRP: $155 + $28 for tungsten tip URL: aperturefightfocused.com
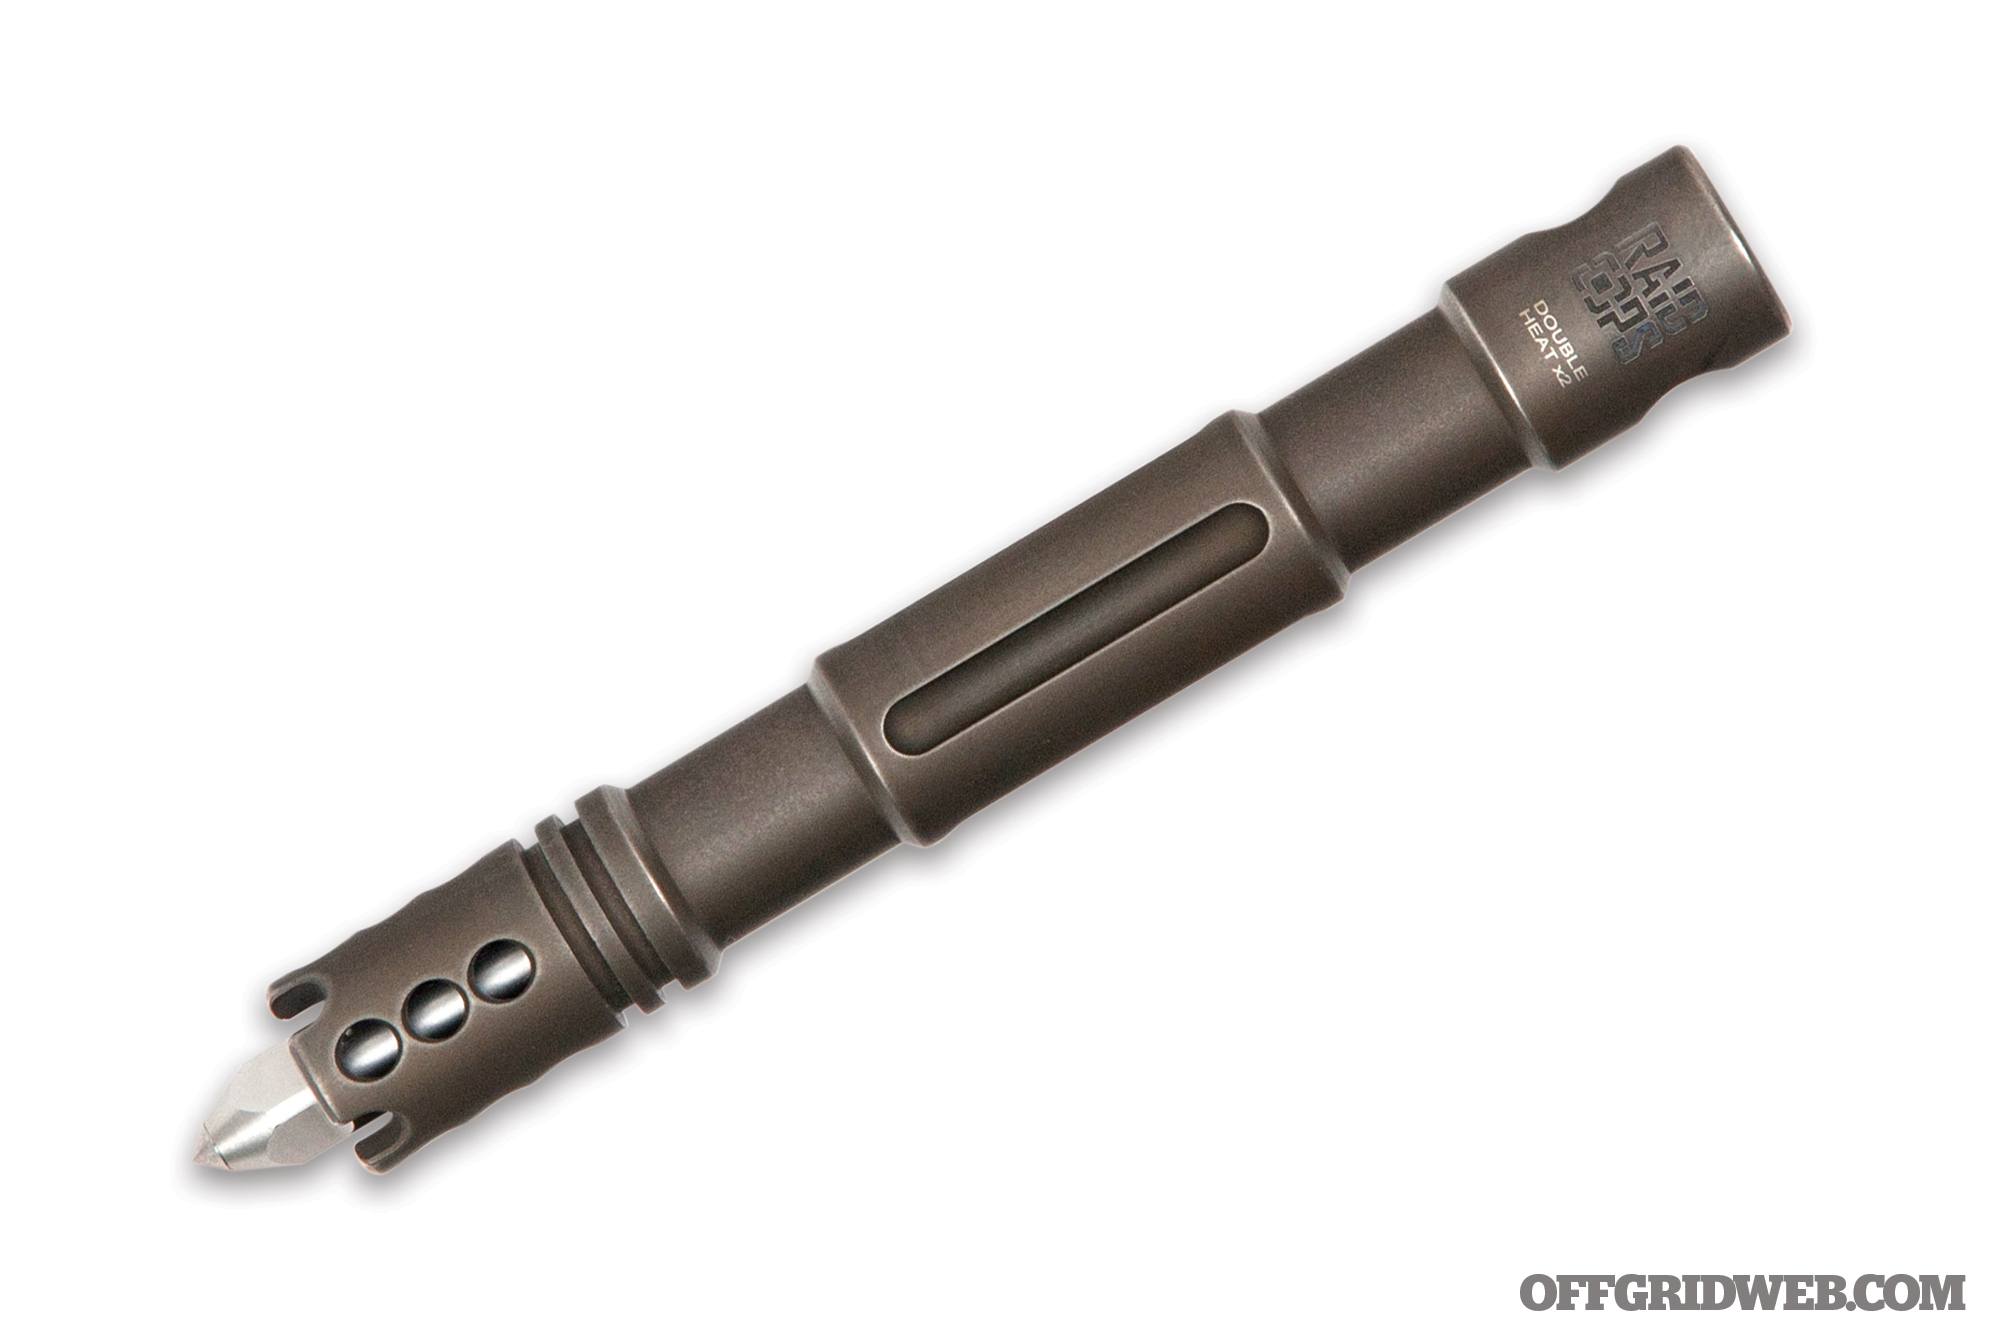
Contributing writer Jared Wihongi has spent decades studying the Filipino martial arts system of Pekiti-Tirsia Kali, which emphasizes edged and impact weapons. He teaches these skills to military and law enforcement organizations around the world. While working in South Korea, he collaborated with local gear maker RaidOps to create his signature edition Kubo Aro. It’s composed of solid Grade 5 titanium alloy, which is double heat-treated and finished in a subtle dark brown. The ¾-inch diameter is reminiscent of a flashlight, but its one-piece construction is far more durable. Recessed threads in the crenelated end accept an optional carbide tip.
Pros:
Exceptionally comfortable thanks to its large diameter and textured grip
Weight feels just right — heavy enough to deliver hard impacts, but light enough to remain maneuverable.
Cons:
Lacks a clip for pocket carry, though a Kydex neck sheath is available for $35
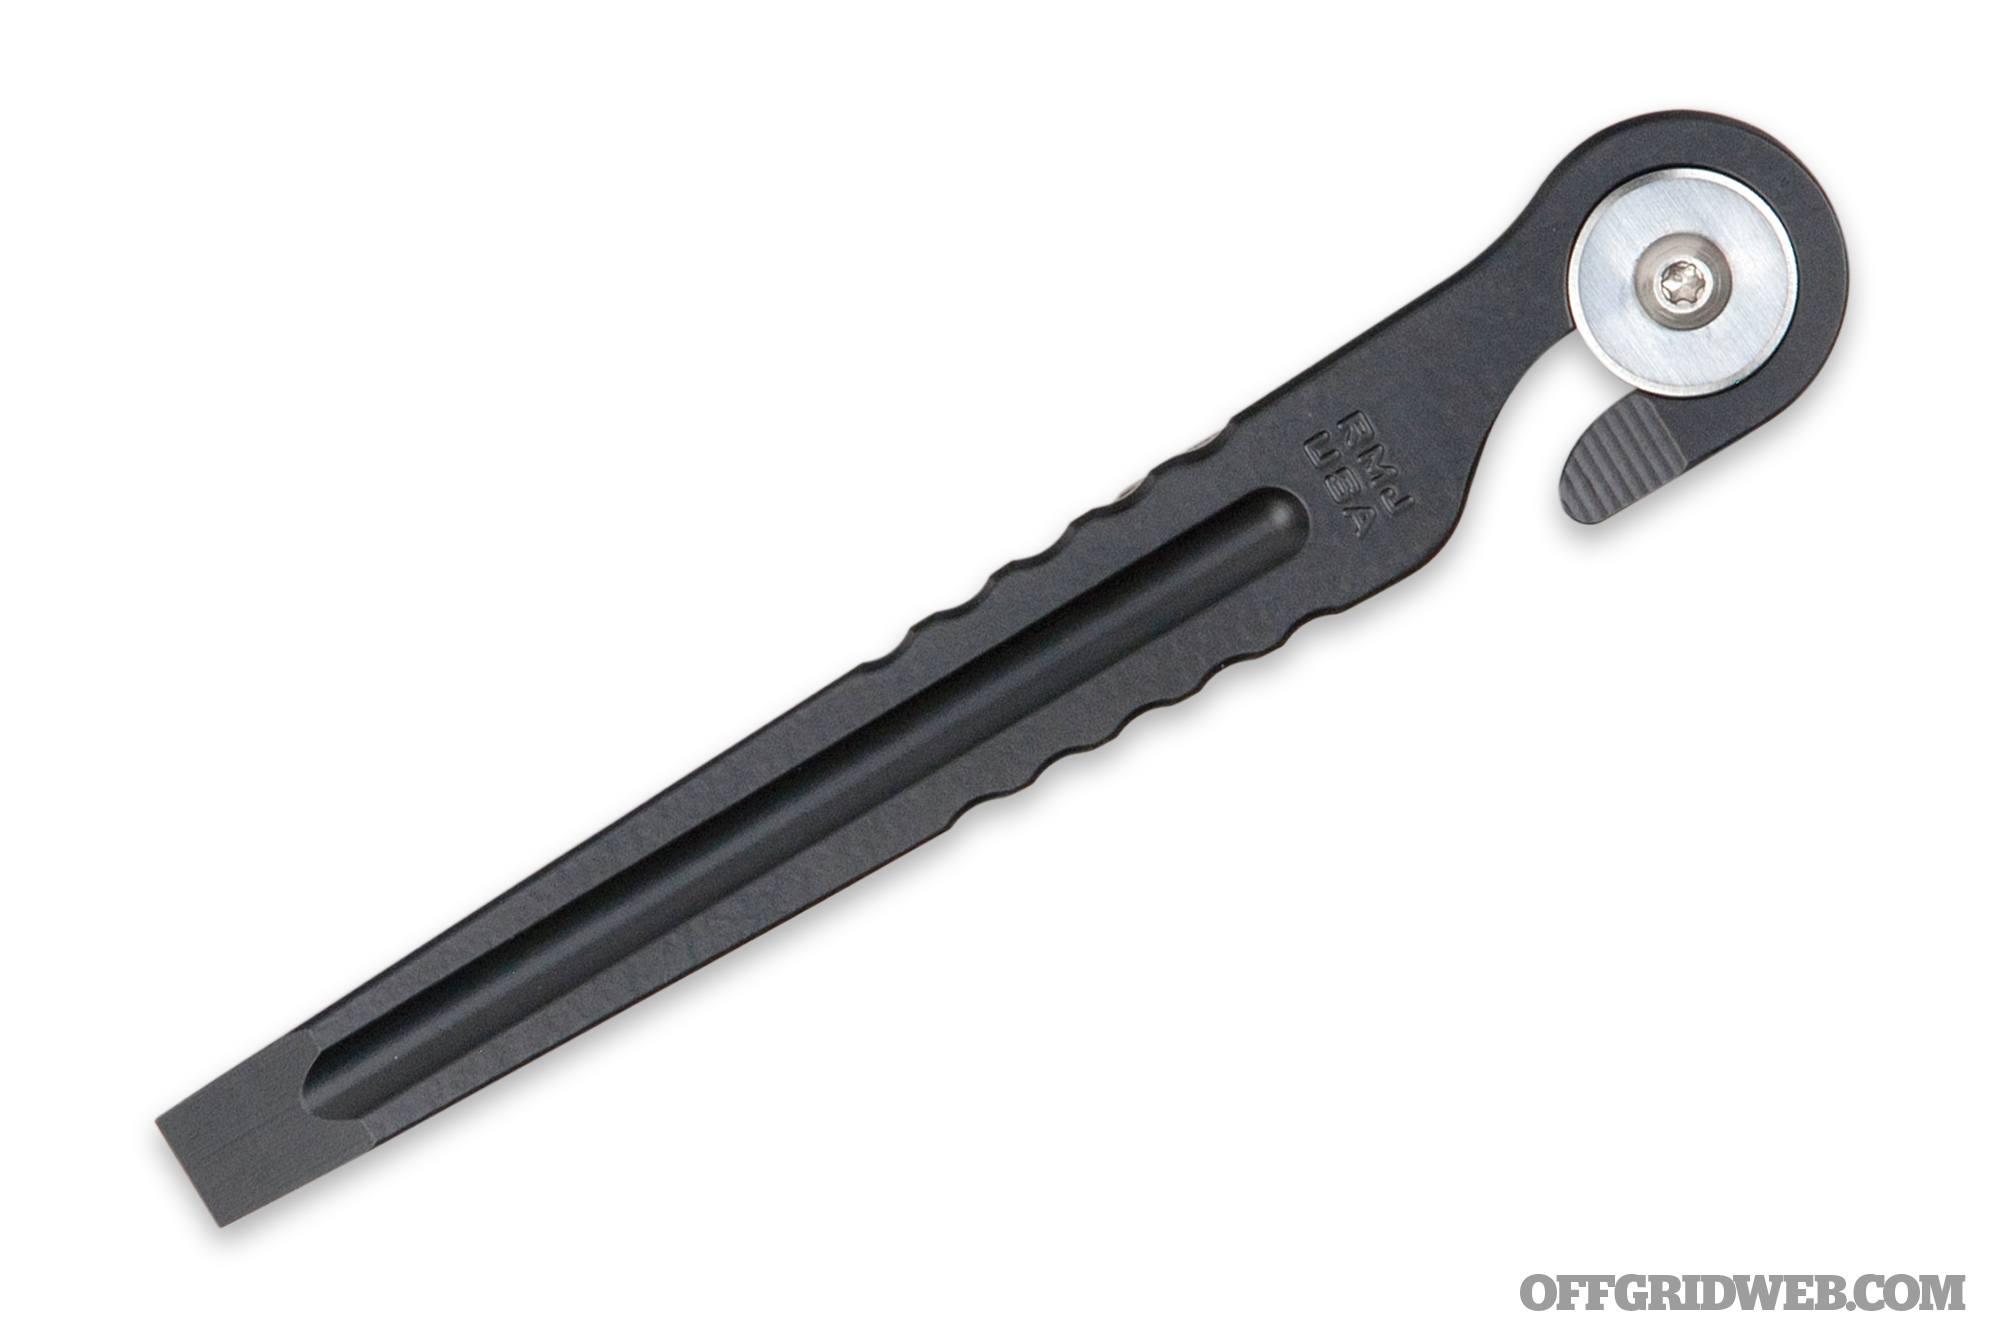
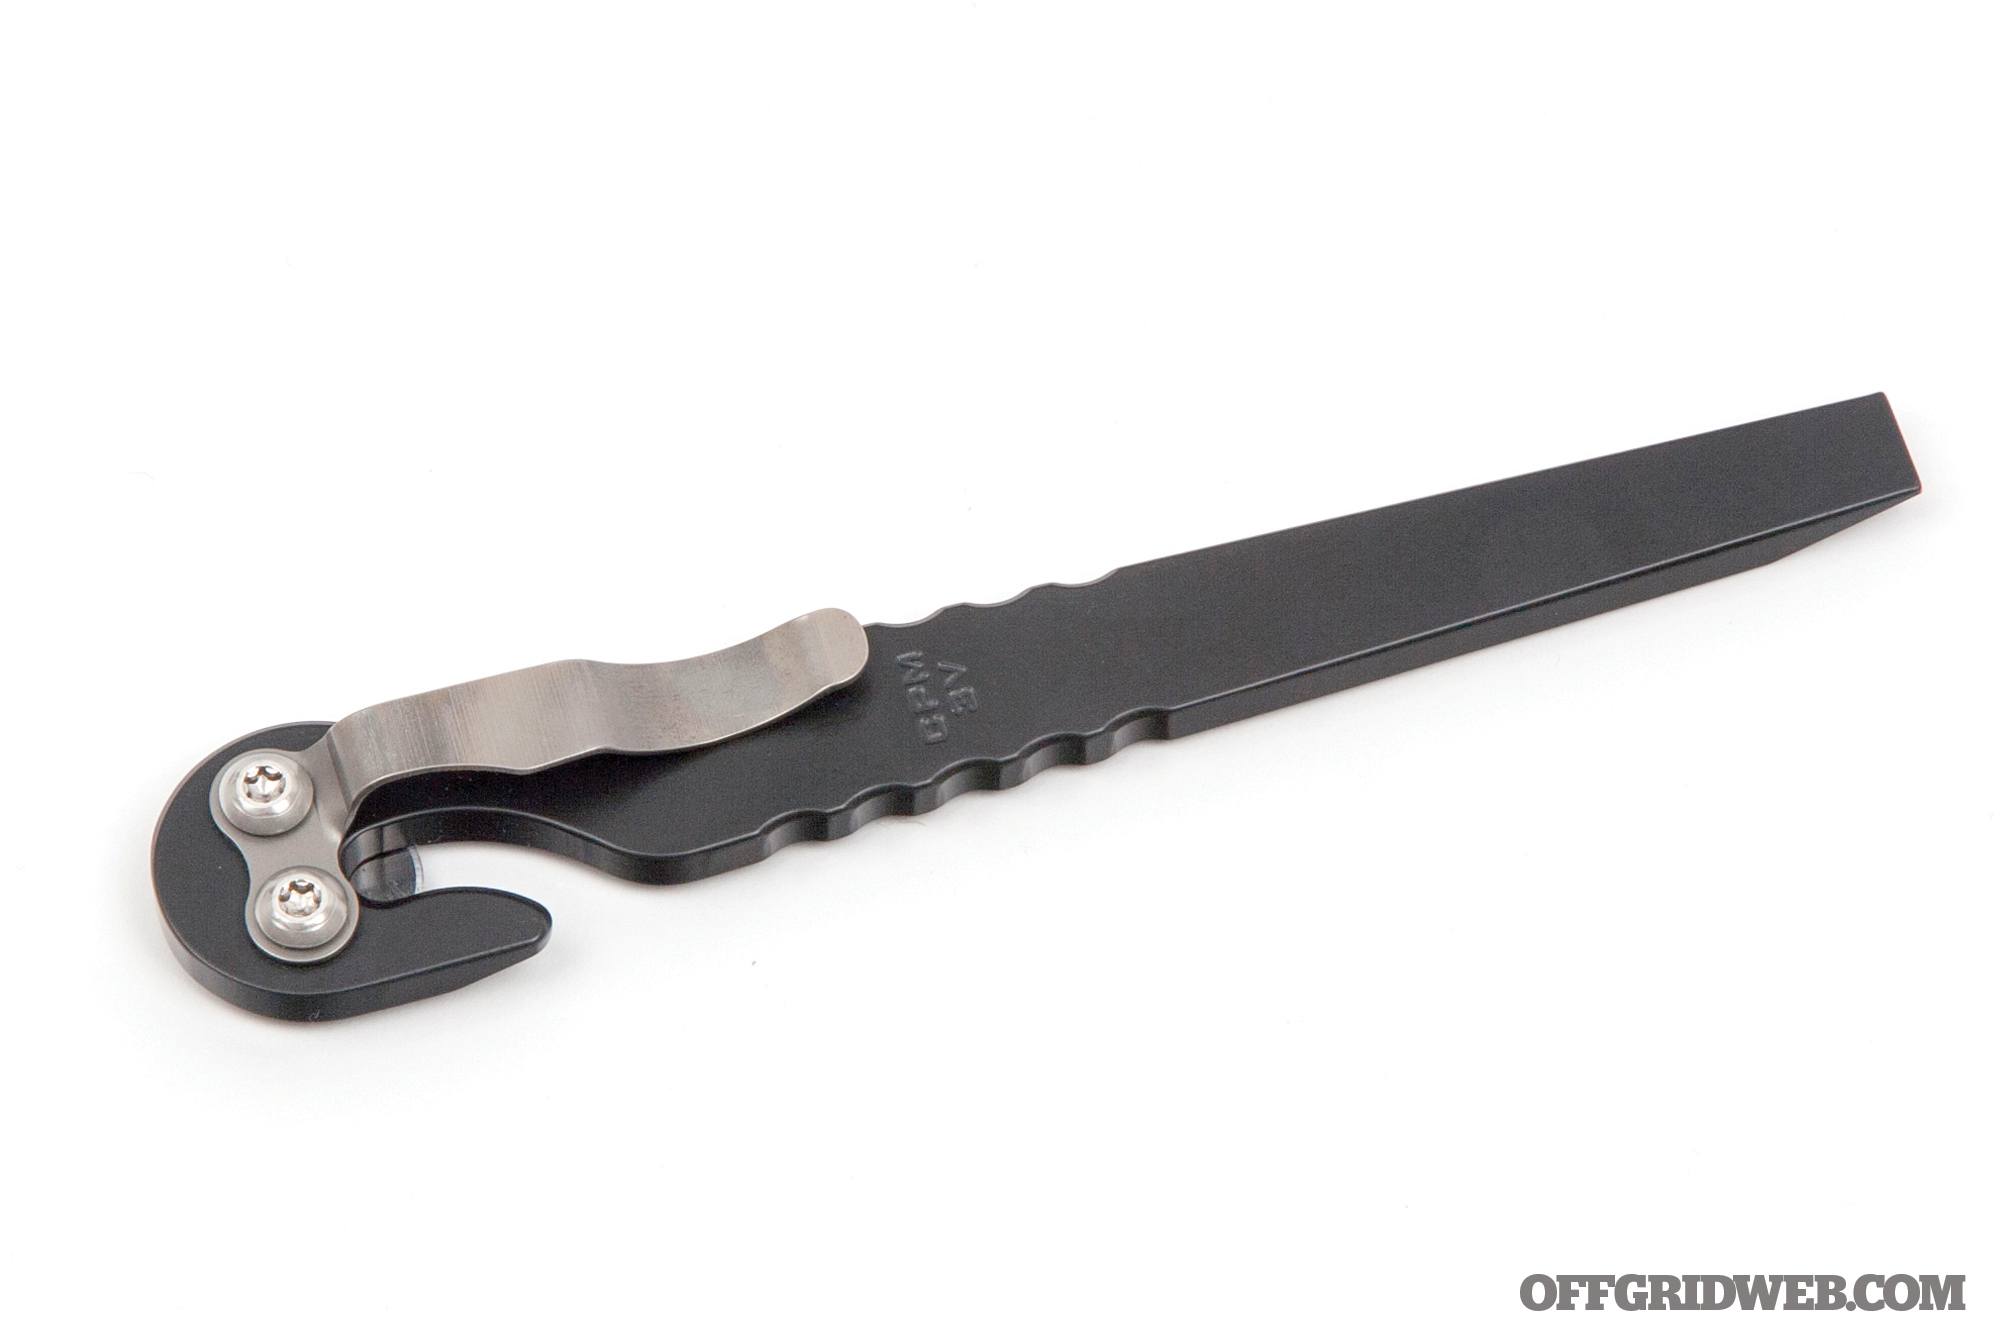
Made in America from a single piece of CPM-3V steel, the Tusk delivers the high-end build quality we’ve come to expect from RMJ Tactical. It features a chisel-like prybar tip on one end and a cord/line cutter on the other, as well as a removable titanium pocket clip. However, we have mixed feelings about the circular blade, which is surface-mounted atop a hook-shaped guide. There’s not much to protect its edge, especially if you’re tightly pressing it against your skin while using the tool.
Pros:
Chisel tip will generate immediate pain when jammed into a pressure point.
Blade cuts cord, strips wires, and opens letters with ease.
Cons:
The flush-mounted blade is too exposed for our liking. Its ramped hook guides objects onto the razor-sharp edge — good for cordage, bad for a pocket hem or the side of a finger.
Pingvin is the Norwegian word for penguin, and this tool resembles the side profile of that strange bird. The body is machined from a piece of super-durable O1 tool steel, and the “wing” is a Grade 5 titanium pocket clip — a variety of color and surface texture options are available for each. A large index finger ring enables the user to draw it quickly from a pocket and strike with two “attitude adjuster” knuckle spikes (they also function as glass-breakers). The base of the tool incorporates a bottle/package opener and prybar/scraper.
Pros:
A punch with the spiked ring is sure to ruin a bad guy’s day.
Designed to fit into MOLLE-compatible webbing with the index finger ring exposed for quick access
Cons:
We could do without the top spike — it’s not as easy to hit with, and restricts thumb placement for hammer-fist strikes.
One of the most versatile and arguably most important items in any survival loadout is a good fixed-blade knife. That’s why these tools are a frequent subject of discussion in our publications. Most knives will easily withstand cutting cordage or opening packages, but such menial tasks aren’t appropriate representations of the challenges they’d face in a real survival situation. For example, you might need to shave tinder, skin and section animals, spear fish, chop through saplings or small trees, defend against predators, and so much more. These tasks range from delicate precision to pure brute force, and must be accomplished reliably in a variety of conditions. The knife is central to every one of these needs.
While a good knife is essential, it’s not the only tool you need. What about a fire-starter? That’s just as valuable, if not more important in some settings. What about a way to keep your knife nice and sharp? A diamond sharpening stone will allow you to maintain its edge in the field, and preserve its effectiveness. Now pack that all into a concise package and you’ve got yourself a very handy survival kit. That’s exactly what Mora created with its Bushcraft Survival Knife, which the company calls its “ultimate survival knife.”
The Morakniv Story
The municipality of Mora, Sweden, has been a hub for cutlery manufacturing for over 400 years. Over the centuries, the knives of Mora have become world-renowned for their simplicity and durability. Morakniv is one of several companies with a rich knife making history that call Mora home. You may know Morakniv for its survival tools, but since 1891, the company has made knives for everything from cooking to industrial utility. They have taken what they learned over the past 128 years to ensure the knives they produce are the highest quality, and worthy of the Morakniv name and lifetime warranty.
We’ve tested various Morakniv blades over the years, from the inexpensive 511 Basic to the top-of-the-line Garberg Black Carbon. Most recently, we picked up a knife with a name that clearly conveys its purpose — the Mora Bushcraft Survival. Specifically, we chose the high-visibility orange model, which will be easy to spot in any outdoor setting. This package is billed as the ultimate bushcraft knife, however, is it comprised of more than a simple bladed tool.
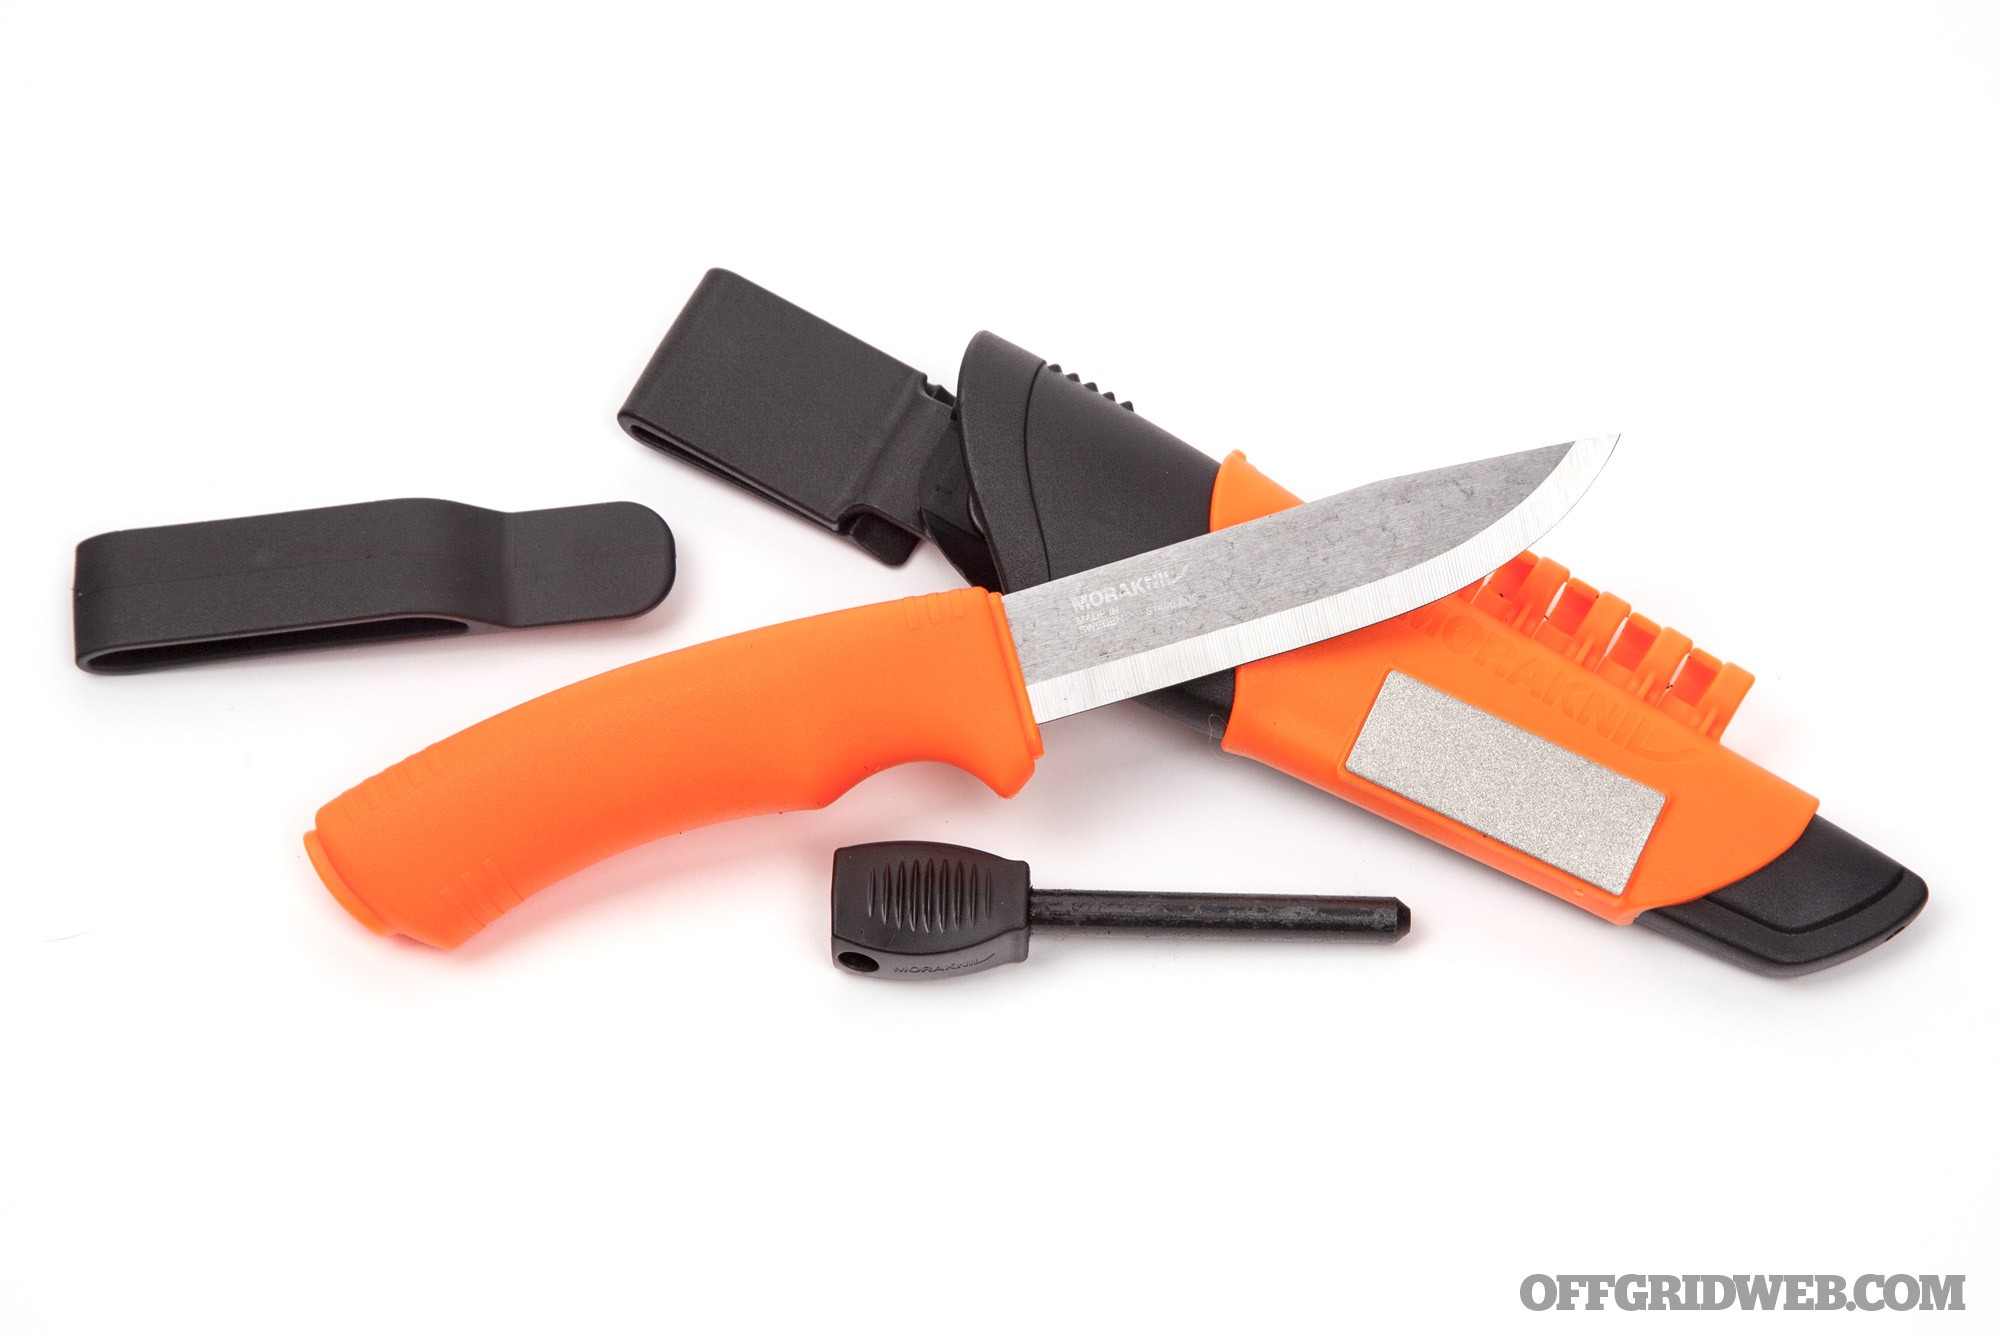
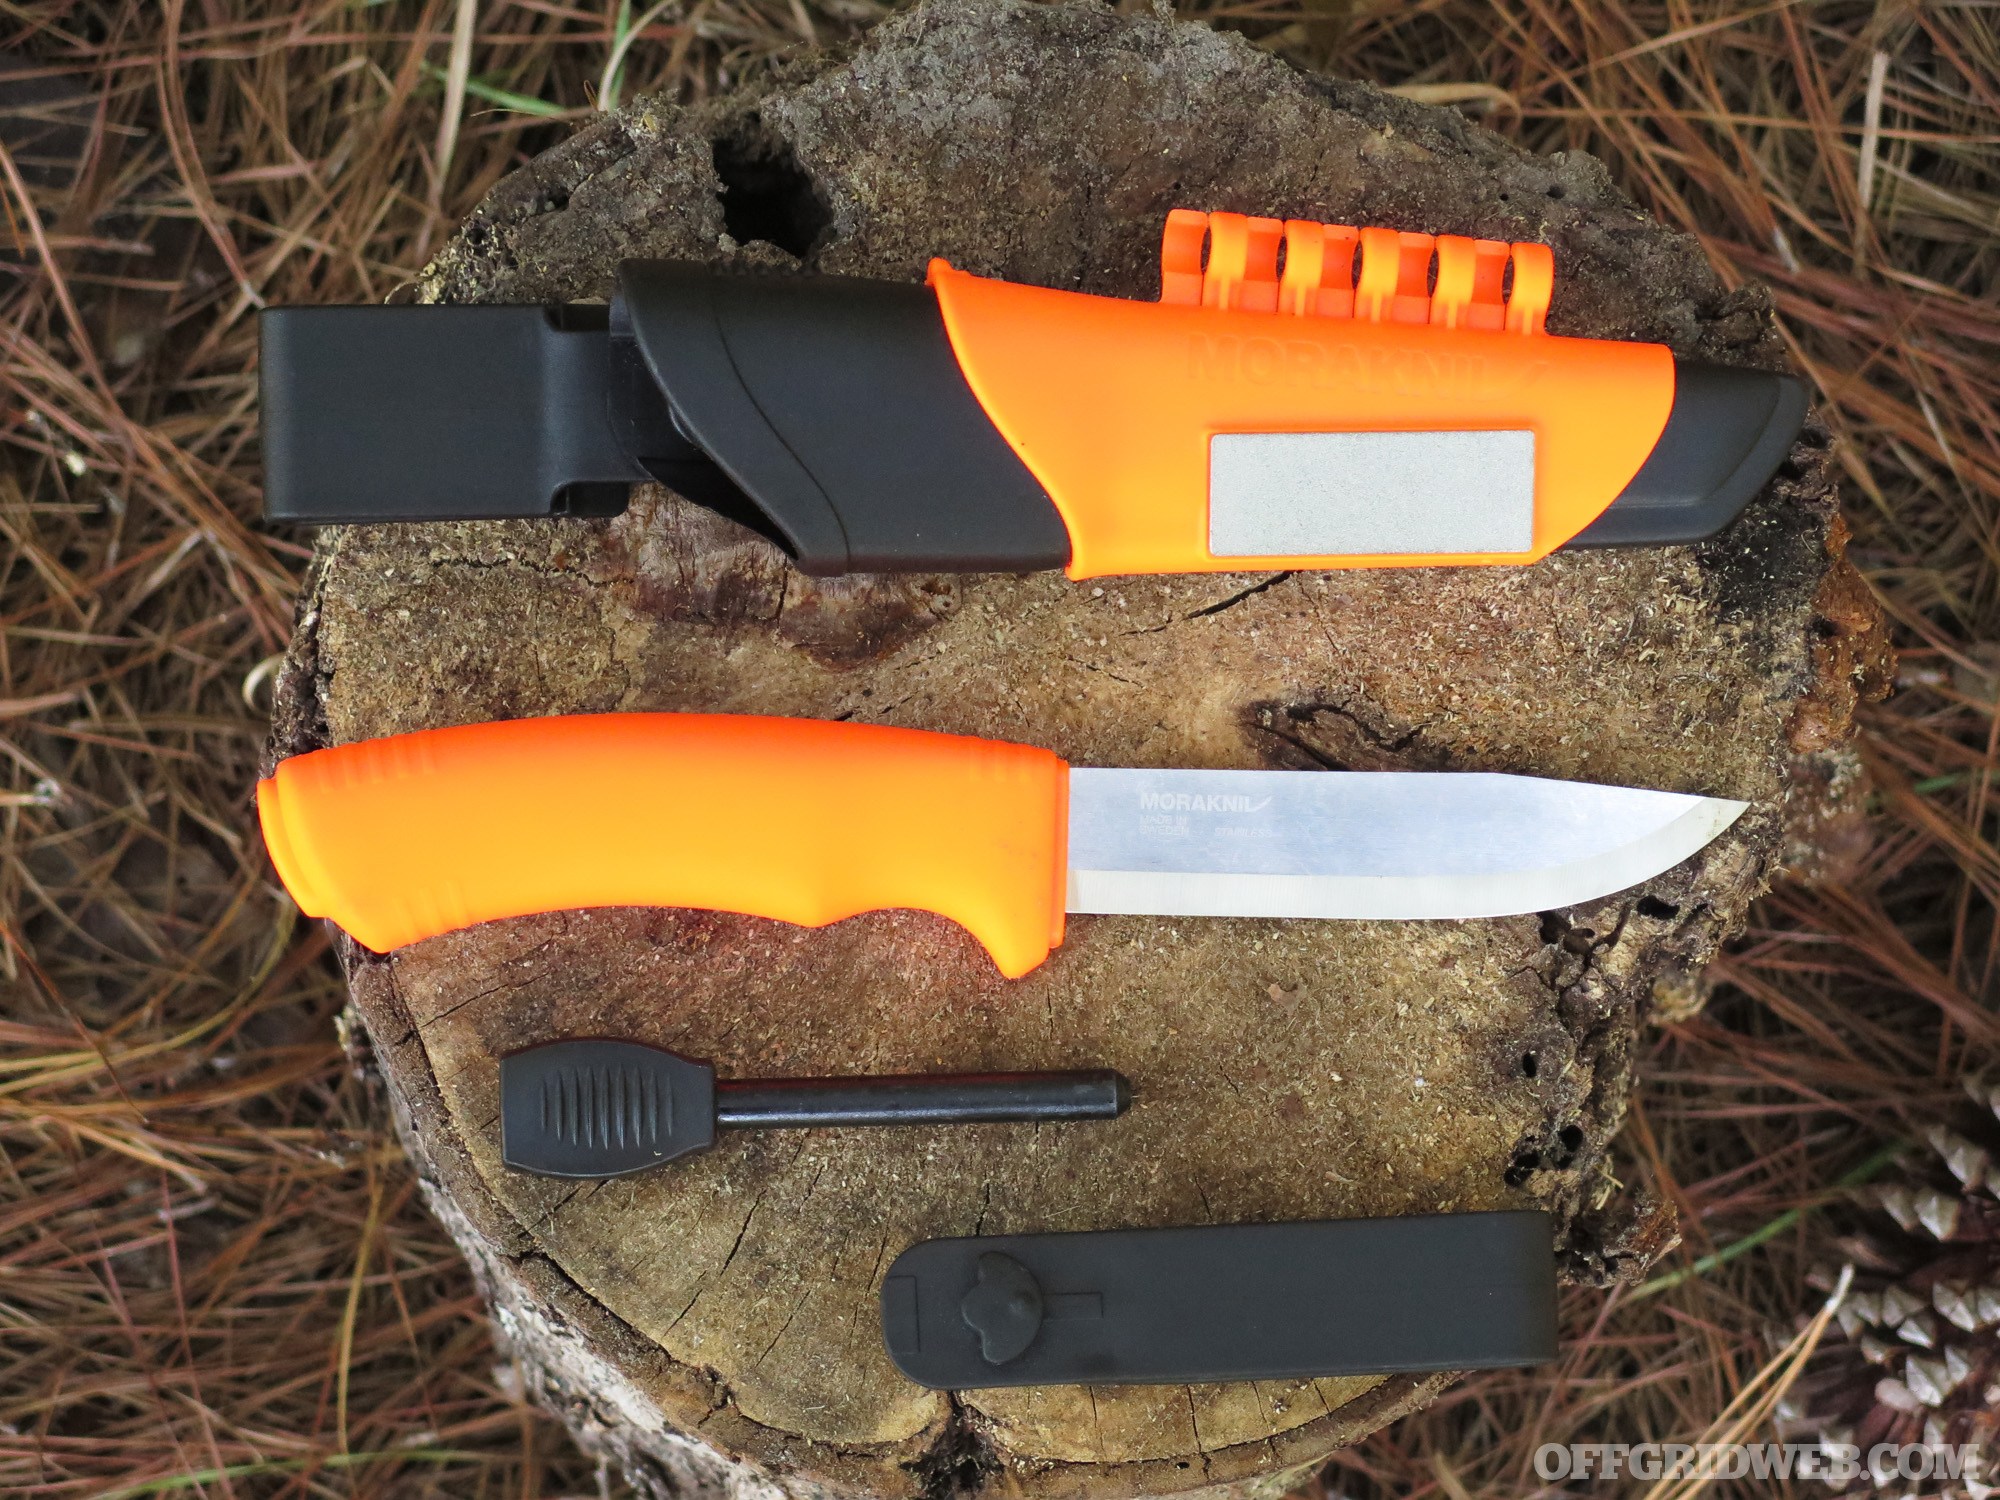
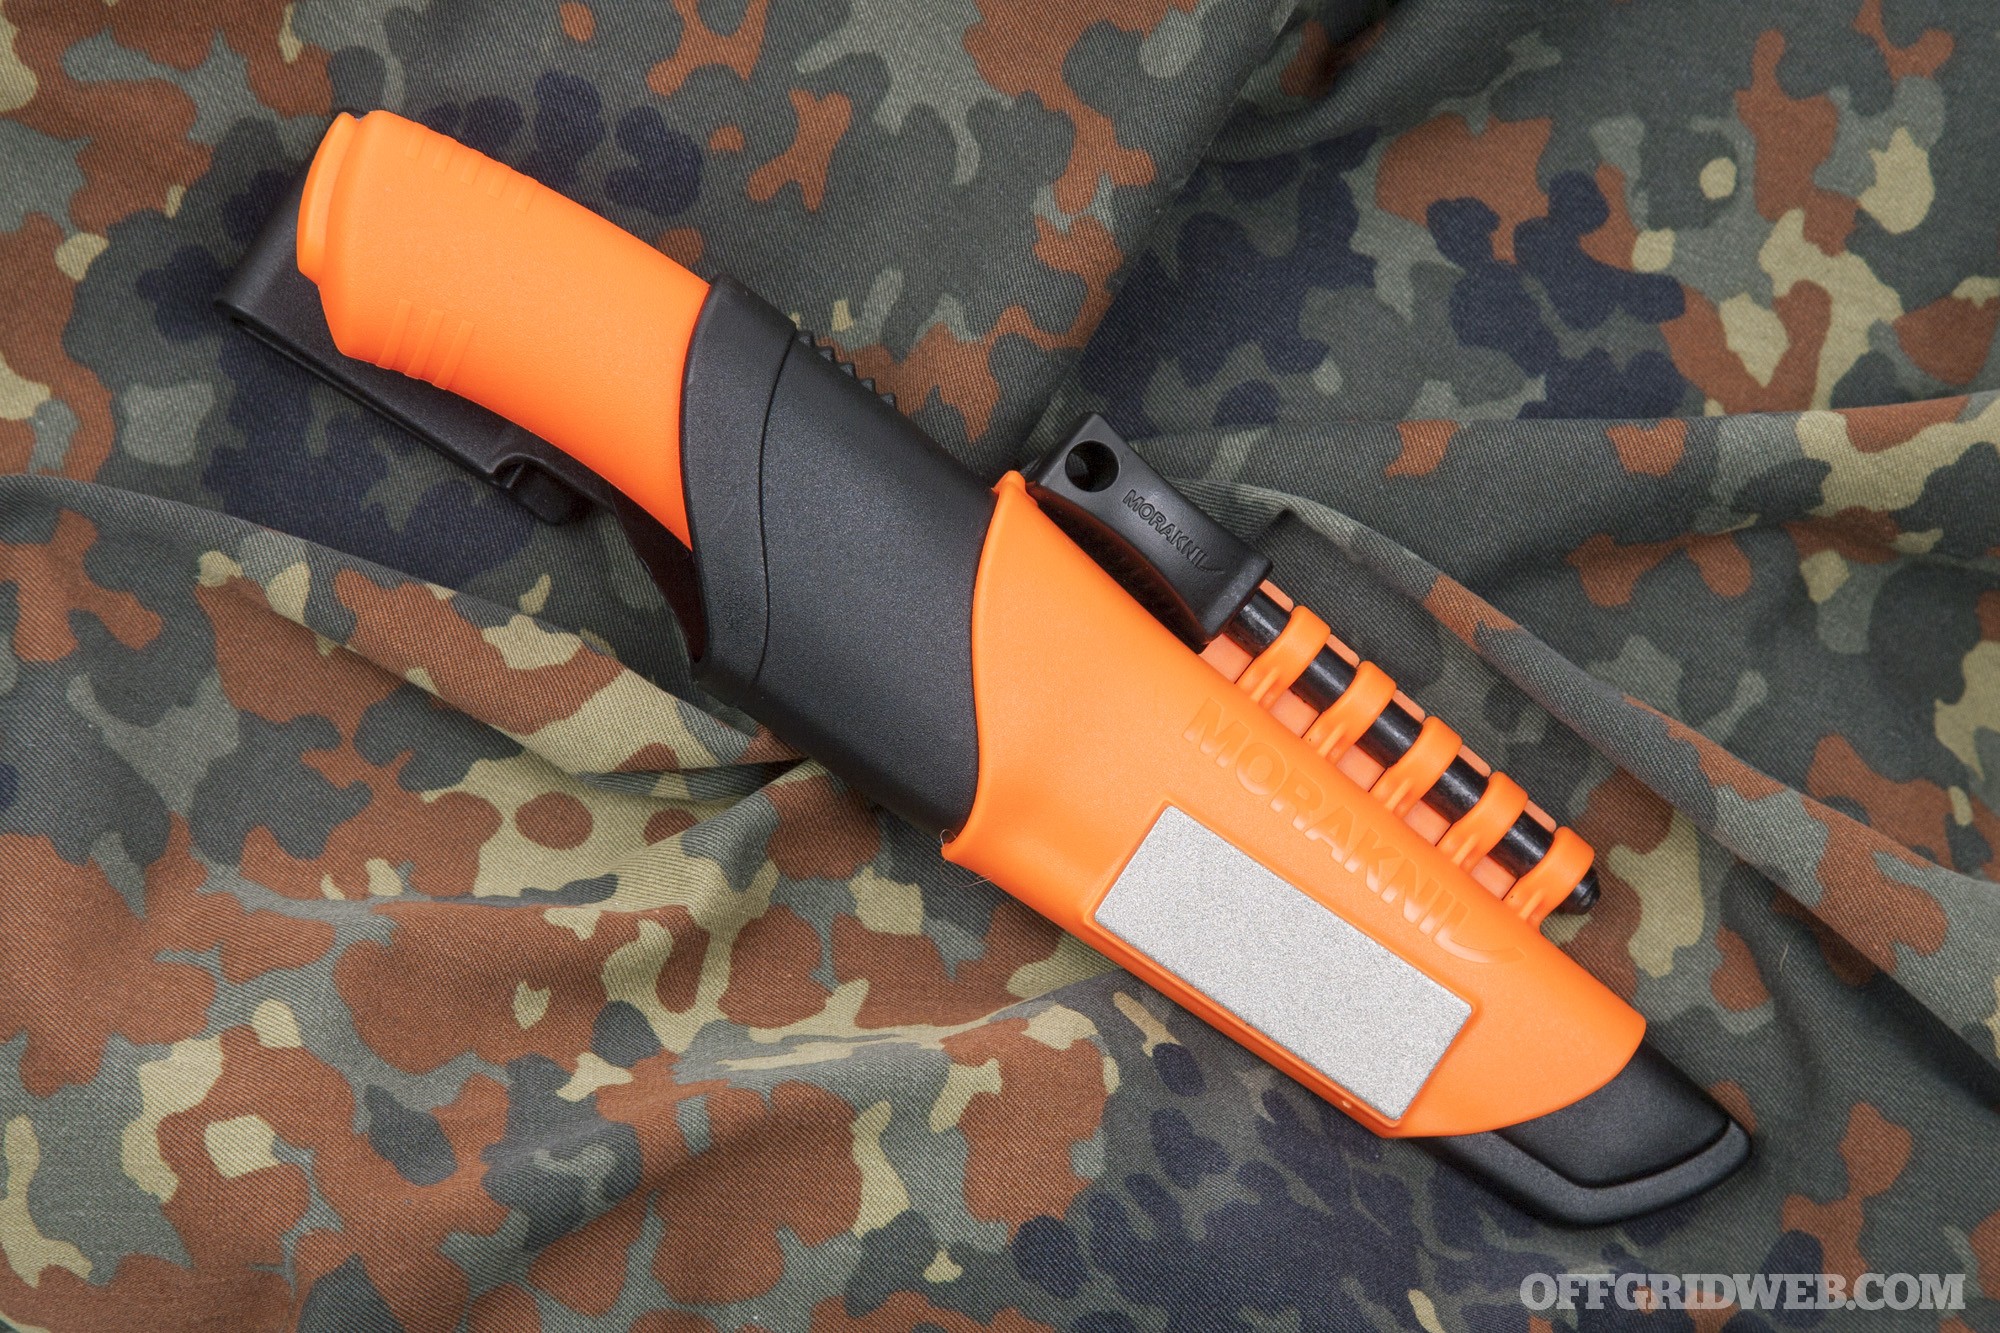
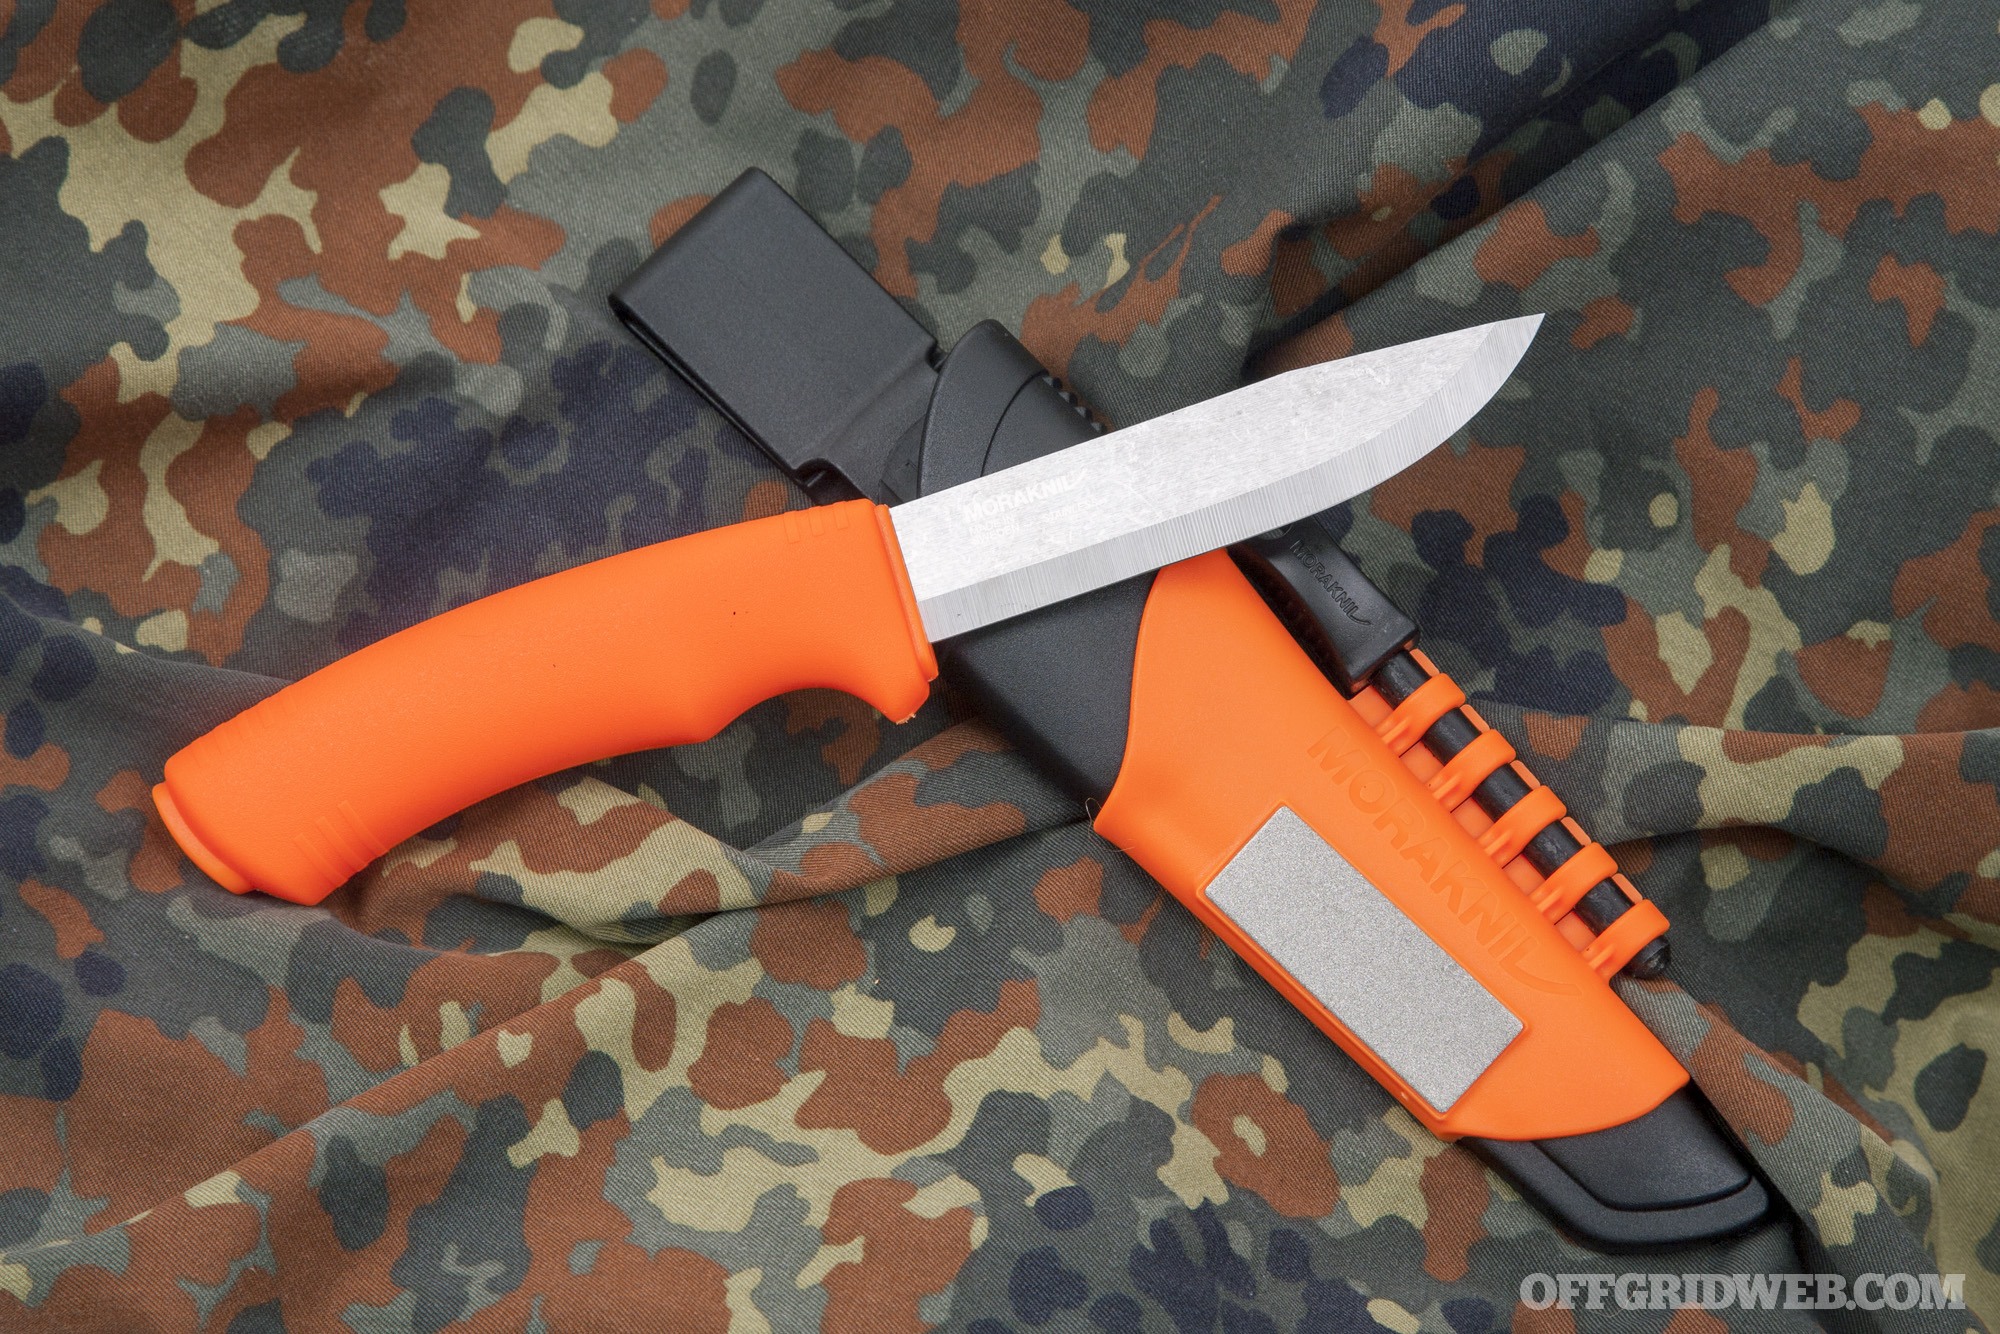
Mora Bushcraft Survival Knife
The knife itself is made from robust 3.2mm-thick stainless steel, ground to a modified clip point shape. The blade is 4.25 inches long, with the handle being right at 5 inches long. The knife itself weighs 4.2 ounces, or 7.5 ounces with the sheath and accessories.
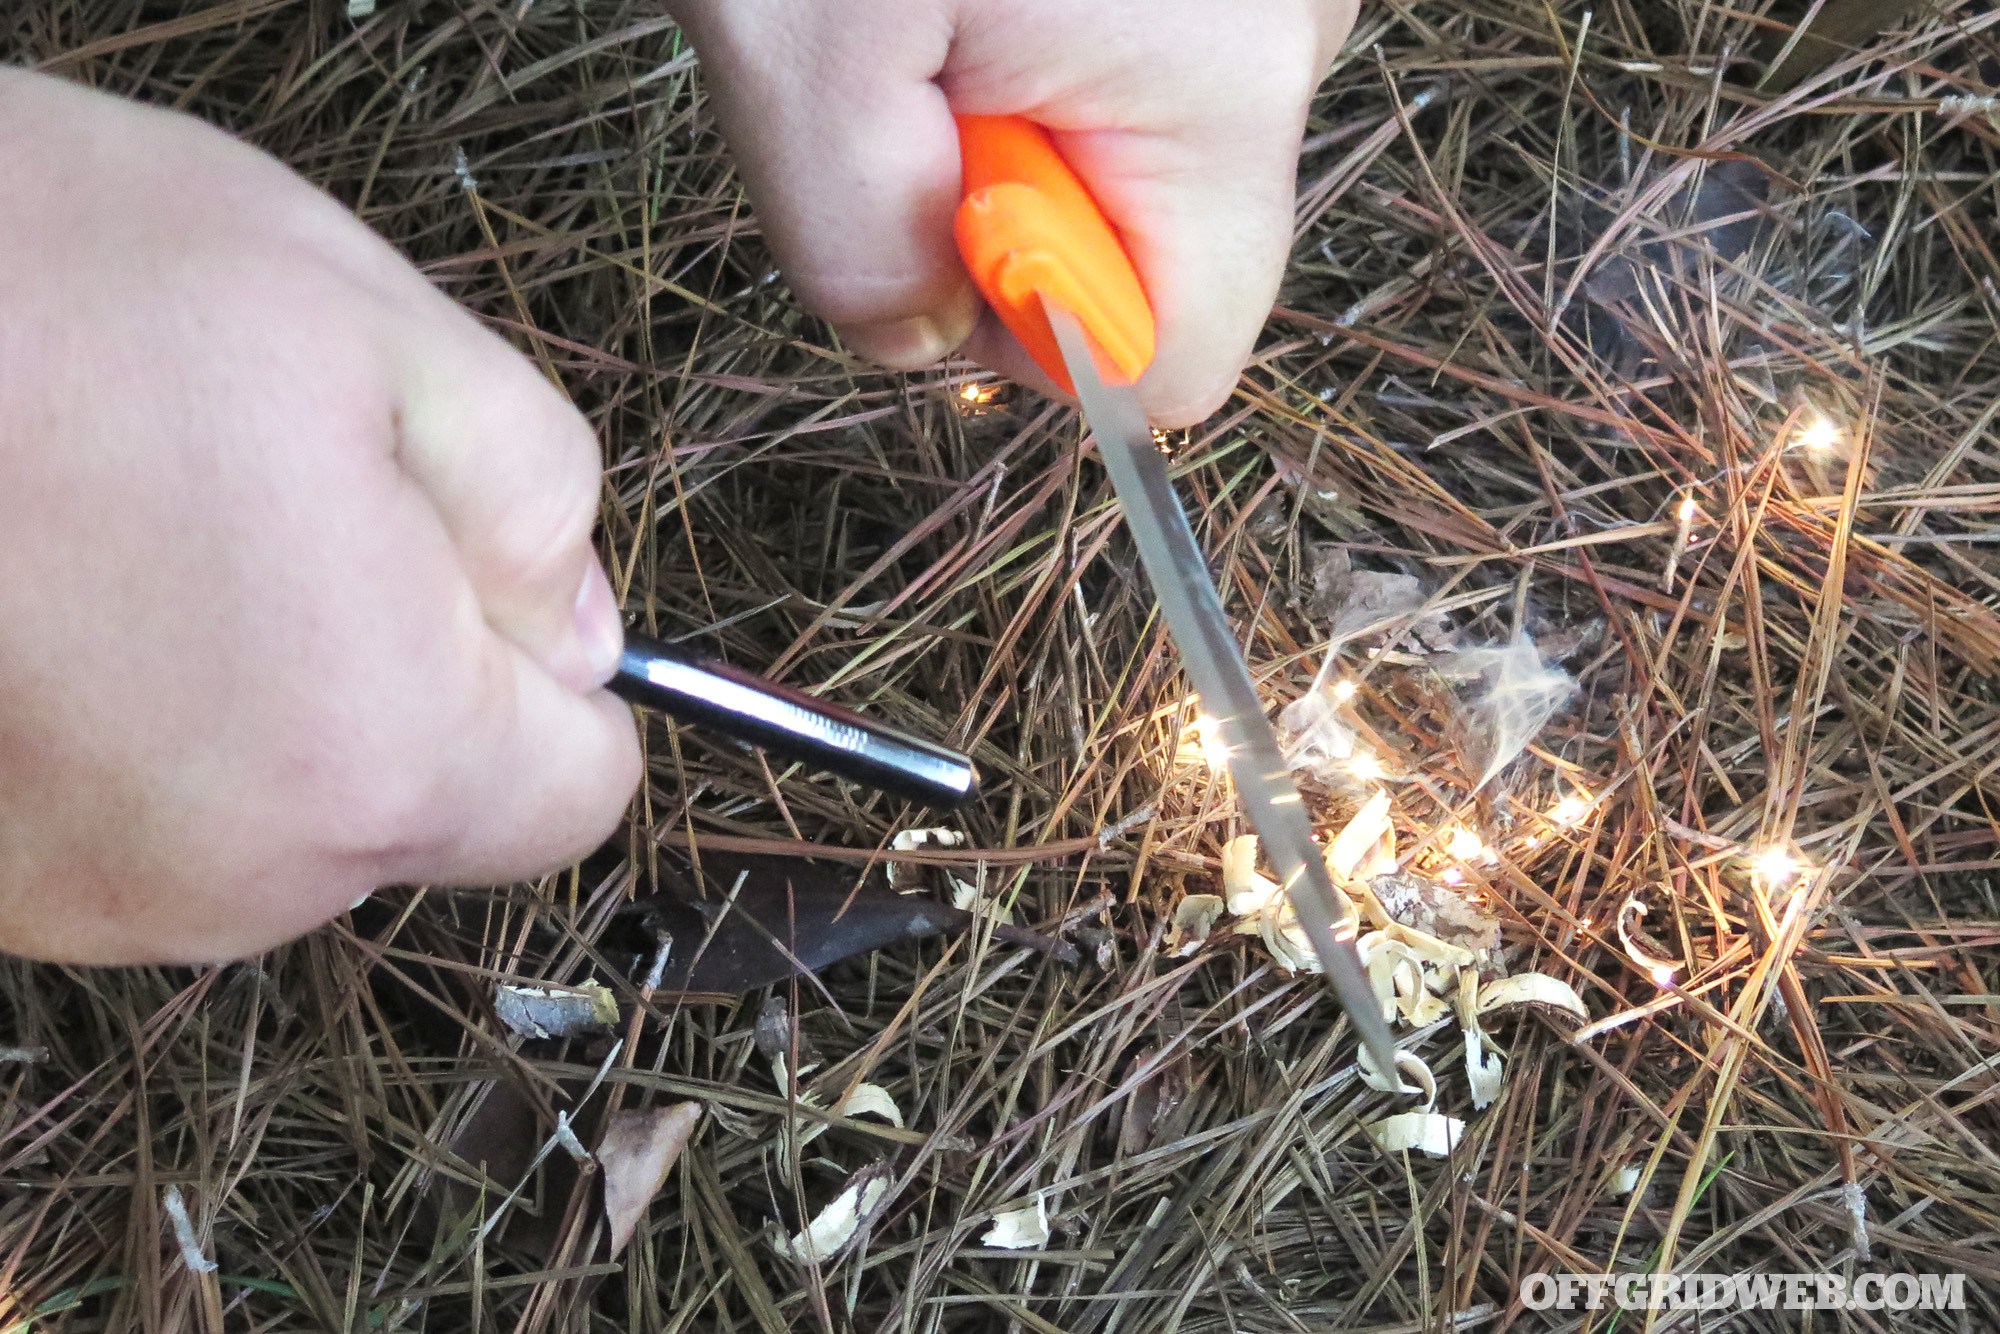
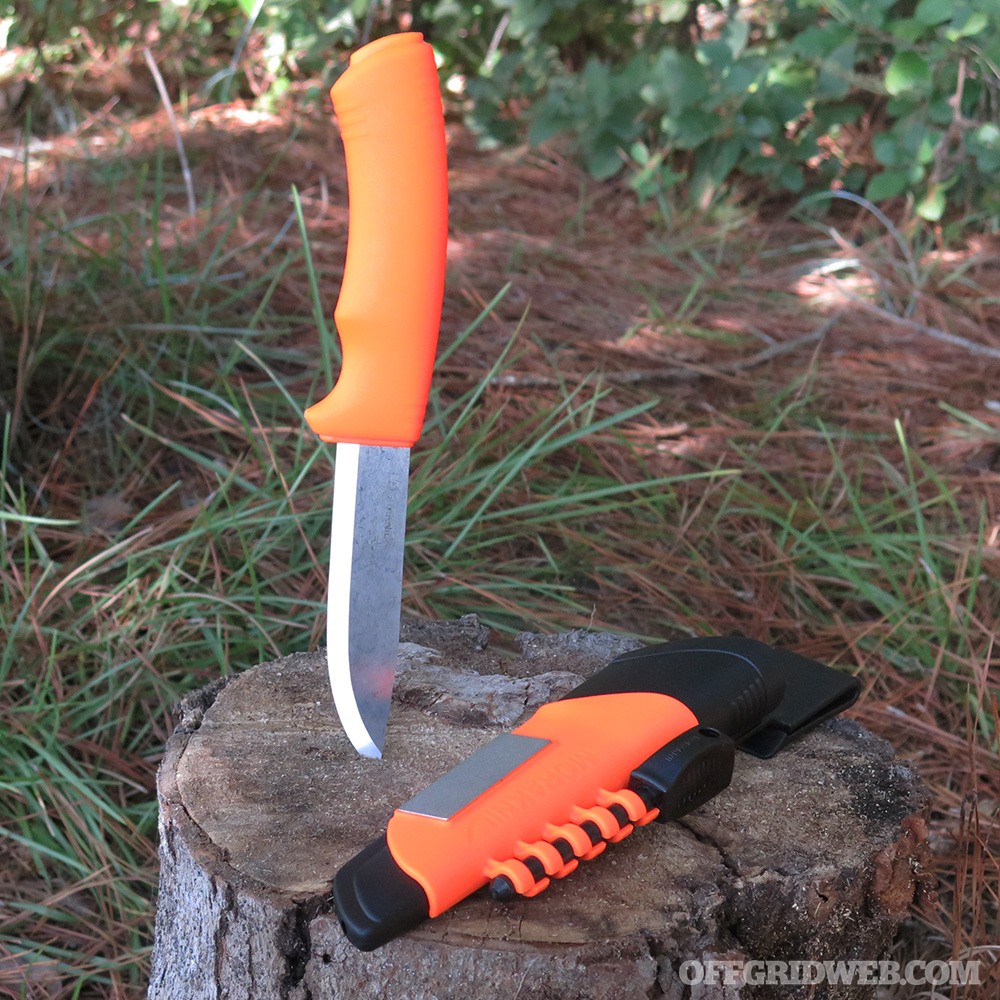
The thick spine of the blade is specifically designed with 90-degree edges to be used with a ferro rod, magnesium block, or other fire-starter. In fact, this Bushcraft package includes a ferro rod that attaches directly to the sheath, and is said to be good for 7,000 strikes. The sheath design locks it firmly in place to prevent it from falling out during intense physical activity.
The handle of the knife is made of a soft, grippy polymer. While the texture is subtle and feels good in the hand, it can be a bit slick when wet. A nice index finger guard, or quillion, helps keep the knife centered during use and helps to prevent finger damage during push cuts. The hidden tang extends through the handle and terminates at a hard polymer lug in the pommel. This is useful as an improvised crushing or smashing tool, and even though it’s not solid steel, it’s extremely sturdy.
The handle of this Morakniv is comfortable, even after long periods of use.
Sheath & Accessories
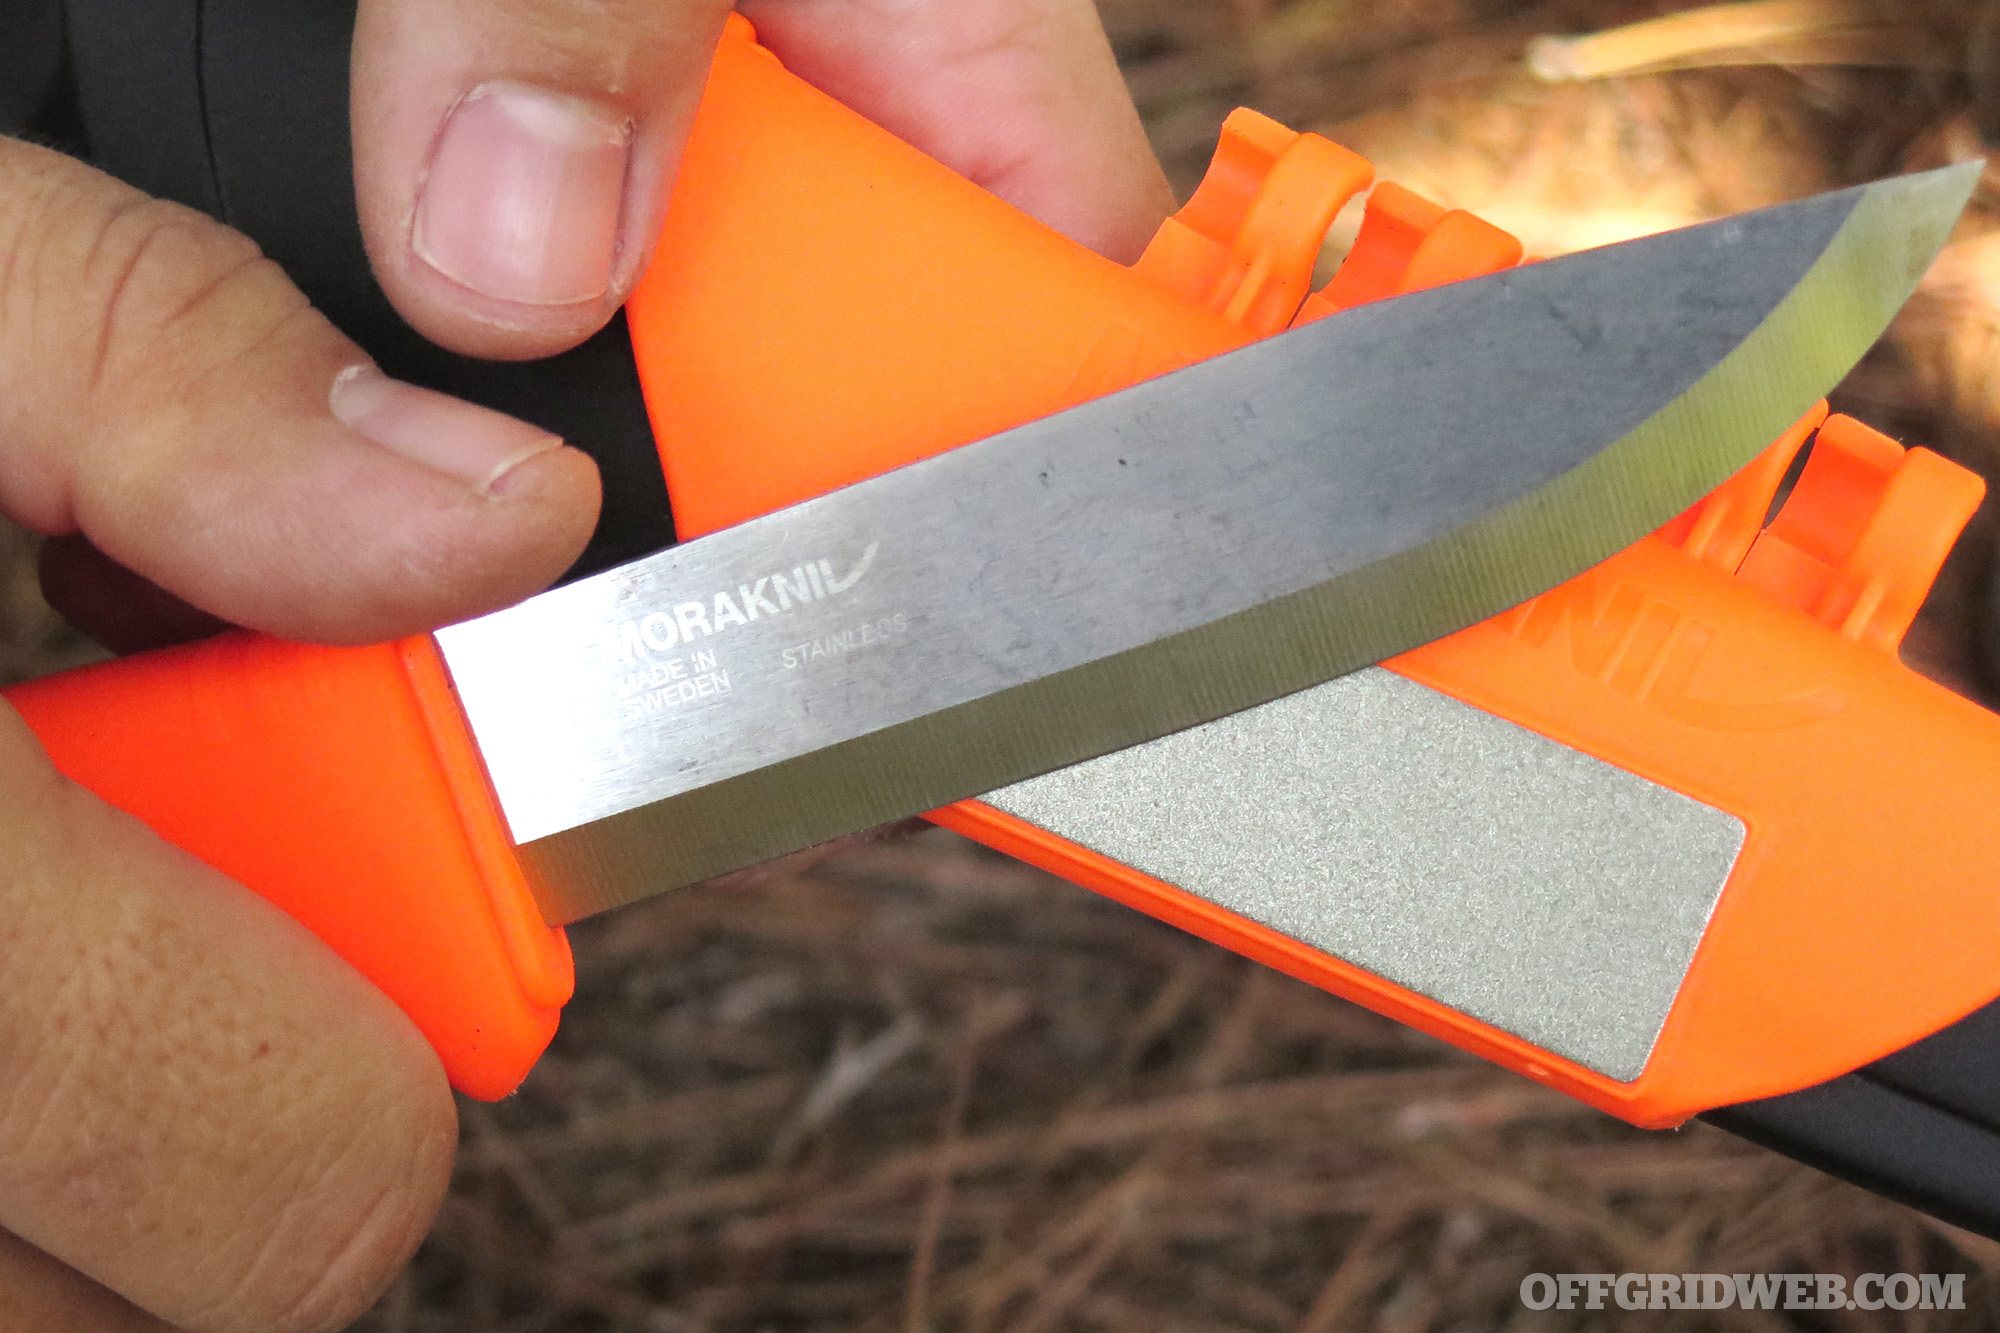
This knife comes with a hard sheath comprised of two-tone orange and black polymer. Incorporated into the sheath is a diamond sharpening stone. This ensures that you always have a sharp knife in hand. Knife retention in the sheath is solid, but does rely on tension as opposed to any type of secondary clip or strap that might be more secure for a survival knife.
A diamond stone built into the sheath ensures you have the opportunity to sharpen the blade at any time.
The high-vis orange colored knife handle and sheath allow the Bushcraft Survival knife it to be quickly located in your bag, around the campsite, or anywhere else you may need it. The sheath also features two different styles of clips: a standard molded tension-style pocket/belt clip and a one-piece belt loop. No matter what your loadout includes, there’s almost always a spot for this knife.
Testing the Blade
Scraping the sharp edges of the spine on the included ferro rod produced large sparks with ease.
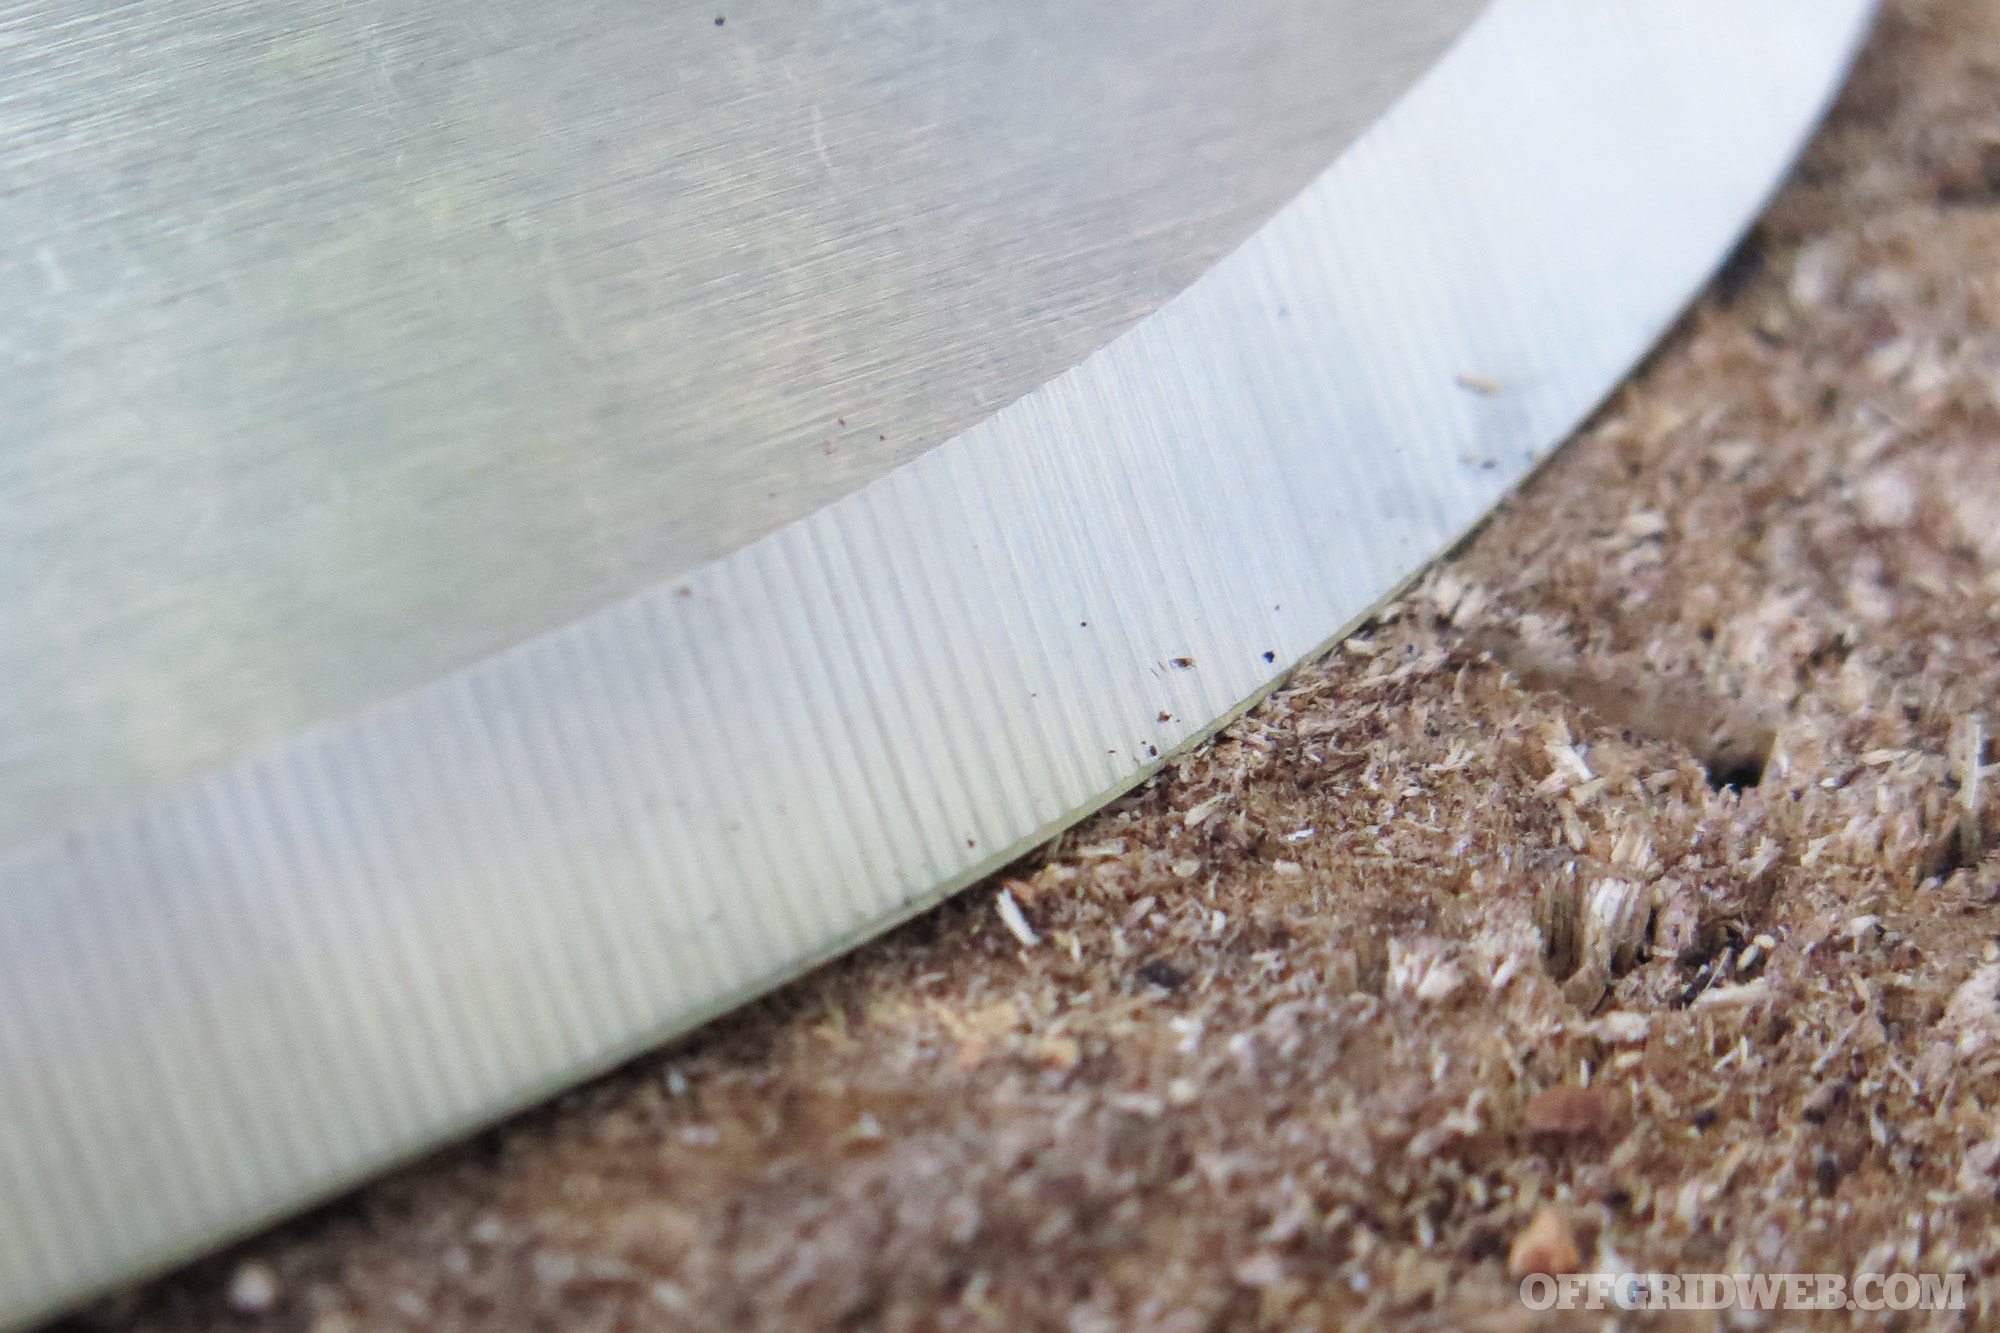
During use in the woods, the knife felt good in our hands. The soft polymer allowed for extended periods of use with little fatigue. Even with its sturdy blade and light handle, the knife balances well. Out of the package, it had a fine edge supported by the classic Scandi grind that Mora is known for.
The flat bevel is finished with a barely-visible deburring grind at the edge.
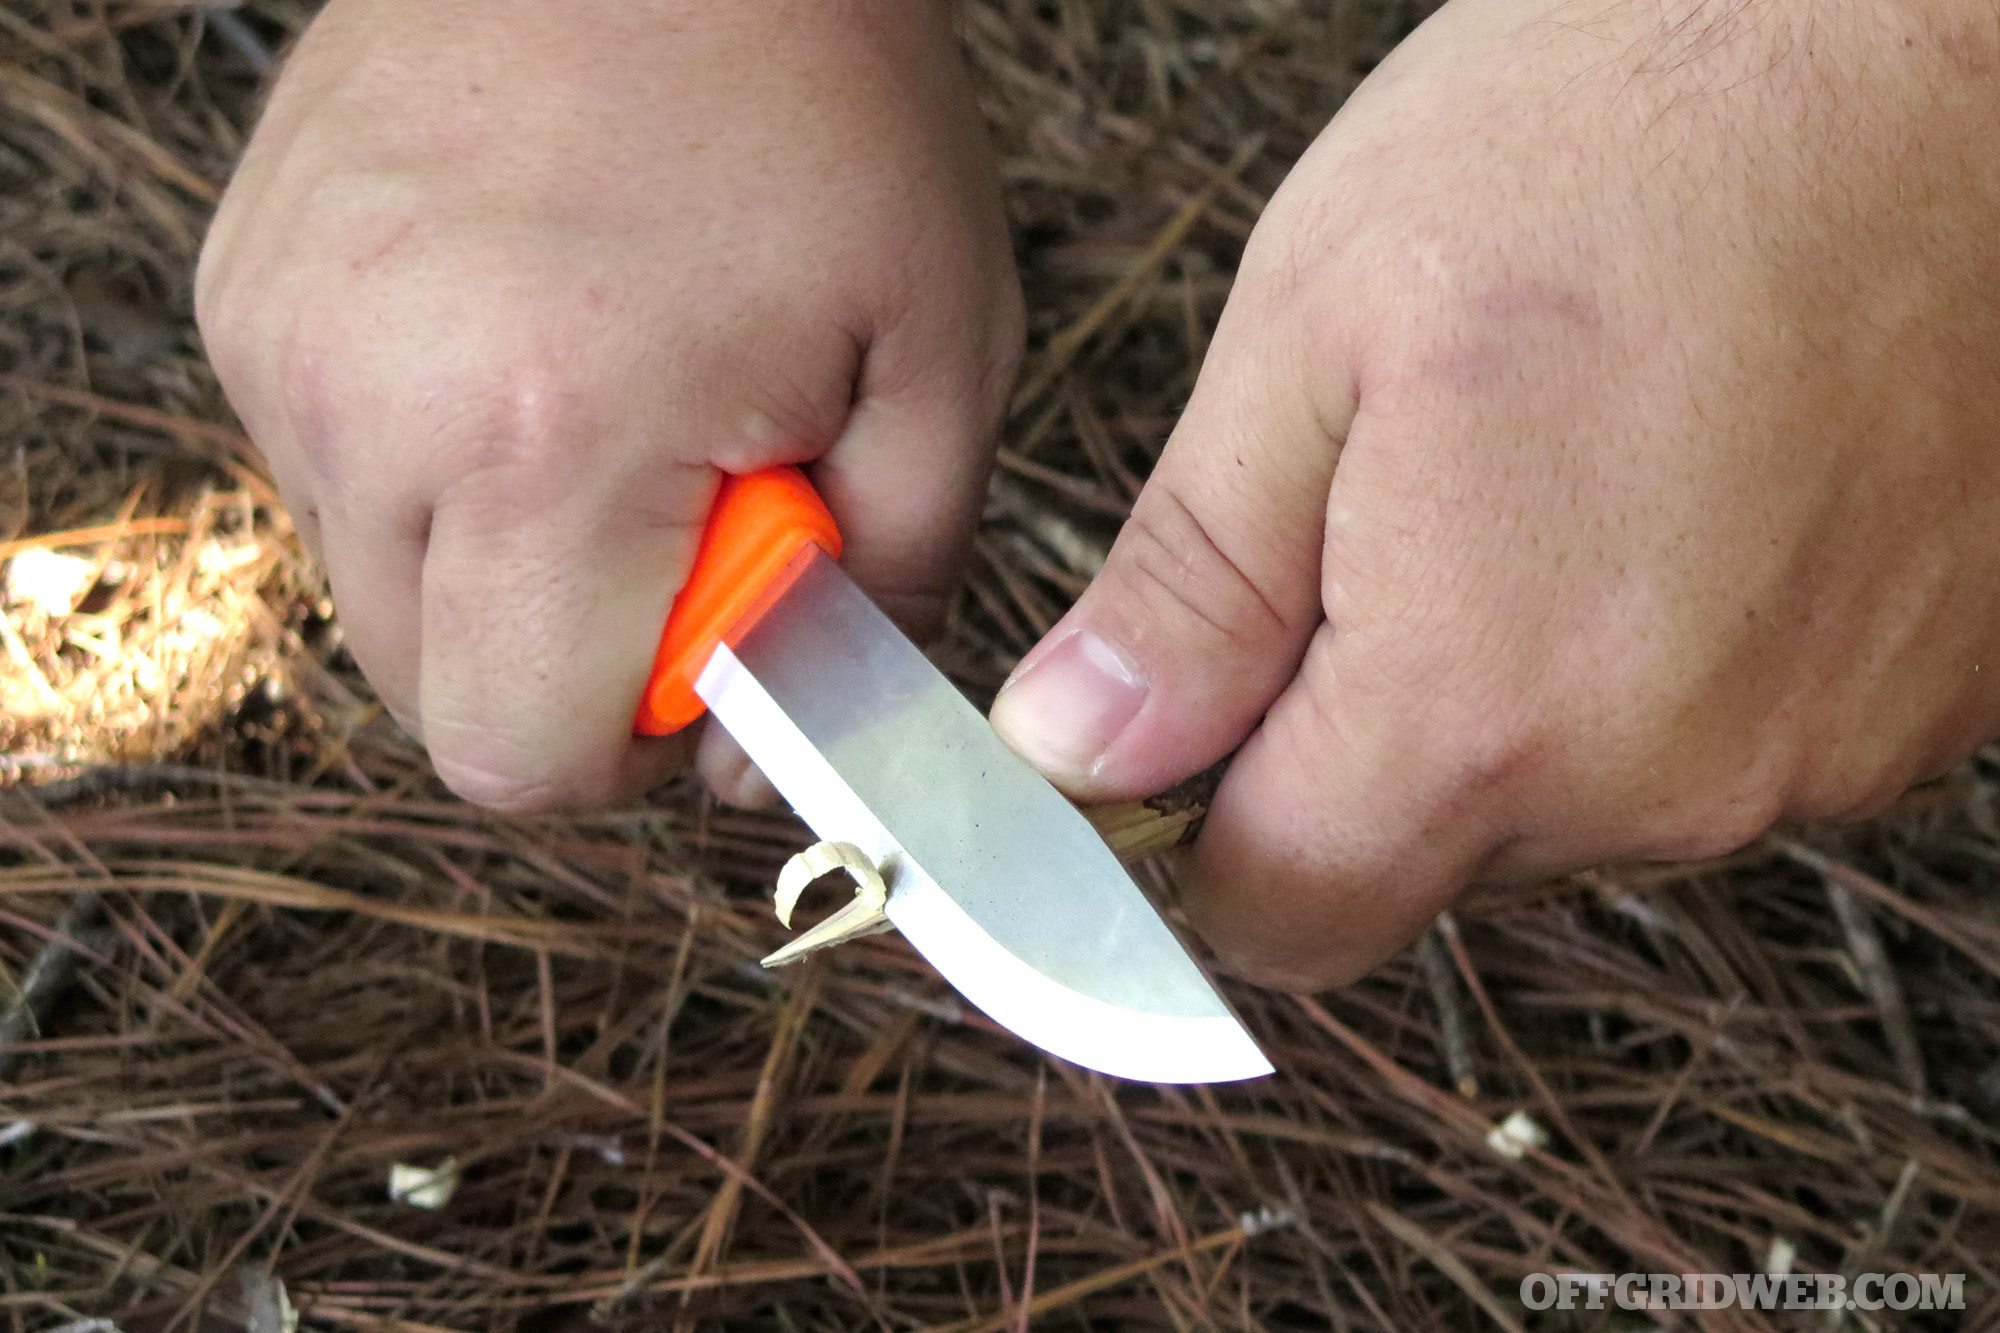
Cutting paper, various types of cordage, and cloth was almost effortless with the Bushcraft Survival knife. The same went for cardboard, straps, and thicker fabrics. However, where this Morakniv Bushcraft knife really showed its worth was in cutting branches and even small trees. The simple Scandi grind allows it to hold an edge well, and makes it easy to re-sharpen with a few passes on the diamond stone. The point was sharp enough to smoothly pierce hard wood. With the blade’s grind extending all the way to the handle, making precise cuts was a lot easier.
We were very pleased with the Morakniv Bushcraft Survival knife. The quality of the product is apparent during use, and you can tell the Swedes put considerable thought into its design and features. It’s especially important to note than this knife has an MSRP of $70 as well as a lifetime warranty. If you’re looking for a reliable tool that can take a beating without emptying your wallet, this is a difficult knife to beat.
Pros:
Well-rounded survival knife package
Strong, sturdy blade that keeps an edge even when beat on relentlessly
Solid sheath that keeps all the pieces together
Cons:
Rubberized handle can be slick when wet
A secondary retention clip on the sheath would make it more secure over the long term
For more information on this knife and the many others that Mora produces, visit them at MoraknivUSA.com.
“If necessary you should choose to disguise yourself as a shukke [monk], yamabushi [hermit], merchant or anything else that you feel is appropriate to the situation. Pilgrims have a good reason to move around shrines and temples. For this purpose, which is different from other cases, it may be better for you to move as a company of two or three people. In such cases, the technique of dakkō, to understand all the local customs and dialects, is used.” — Quote taken from the Shoninki, as written in 1681 by Master Ninja Natori Masazumi
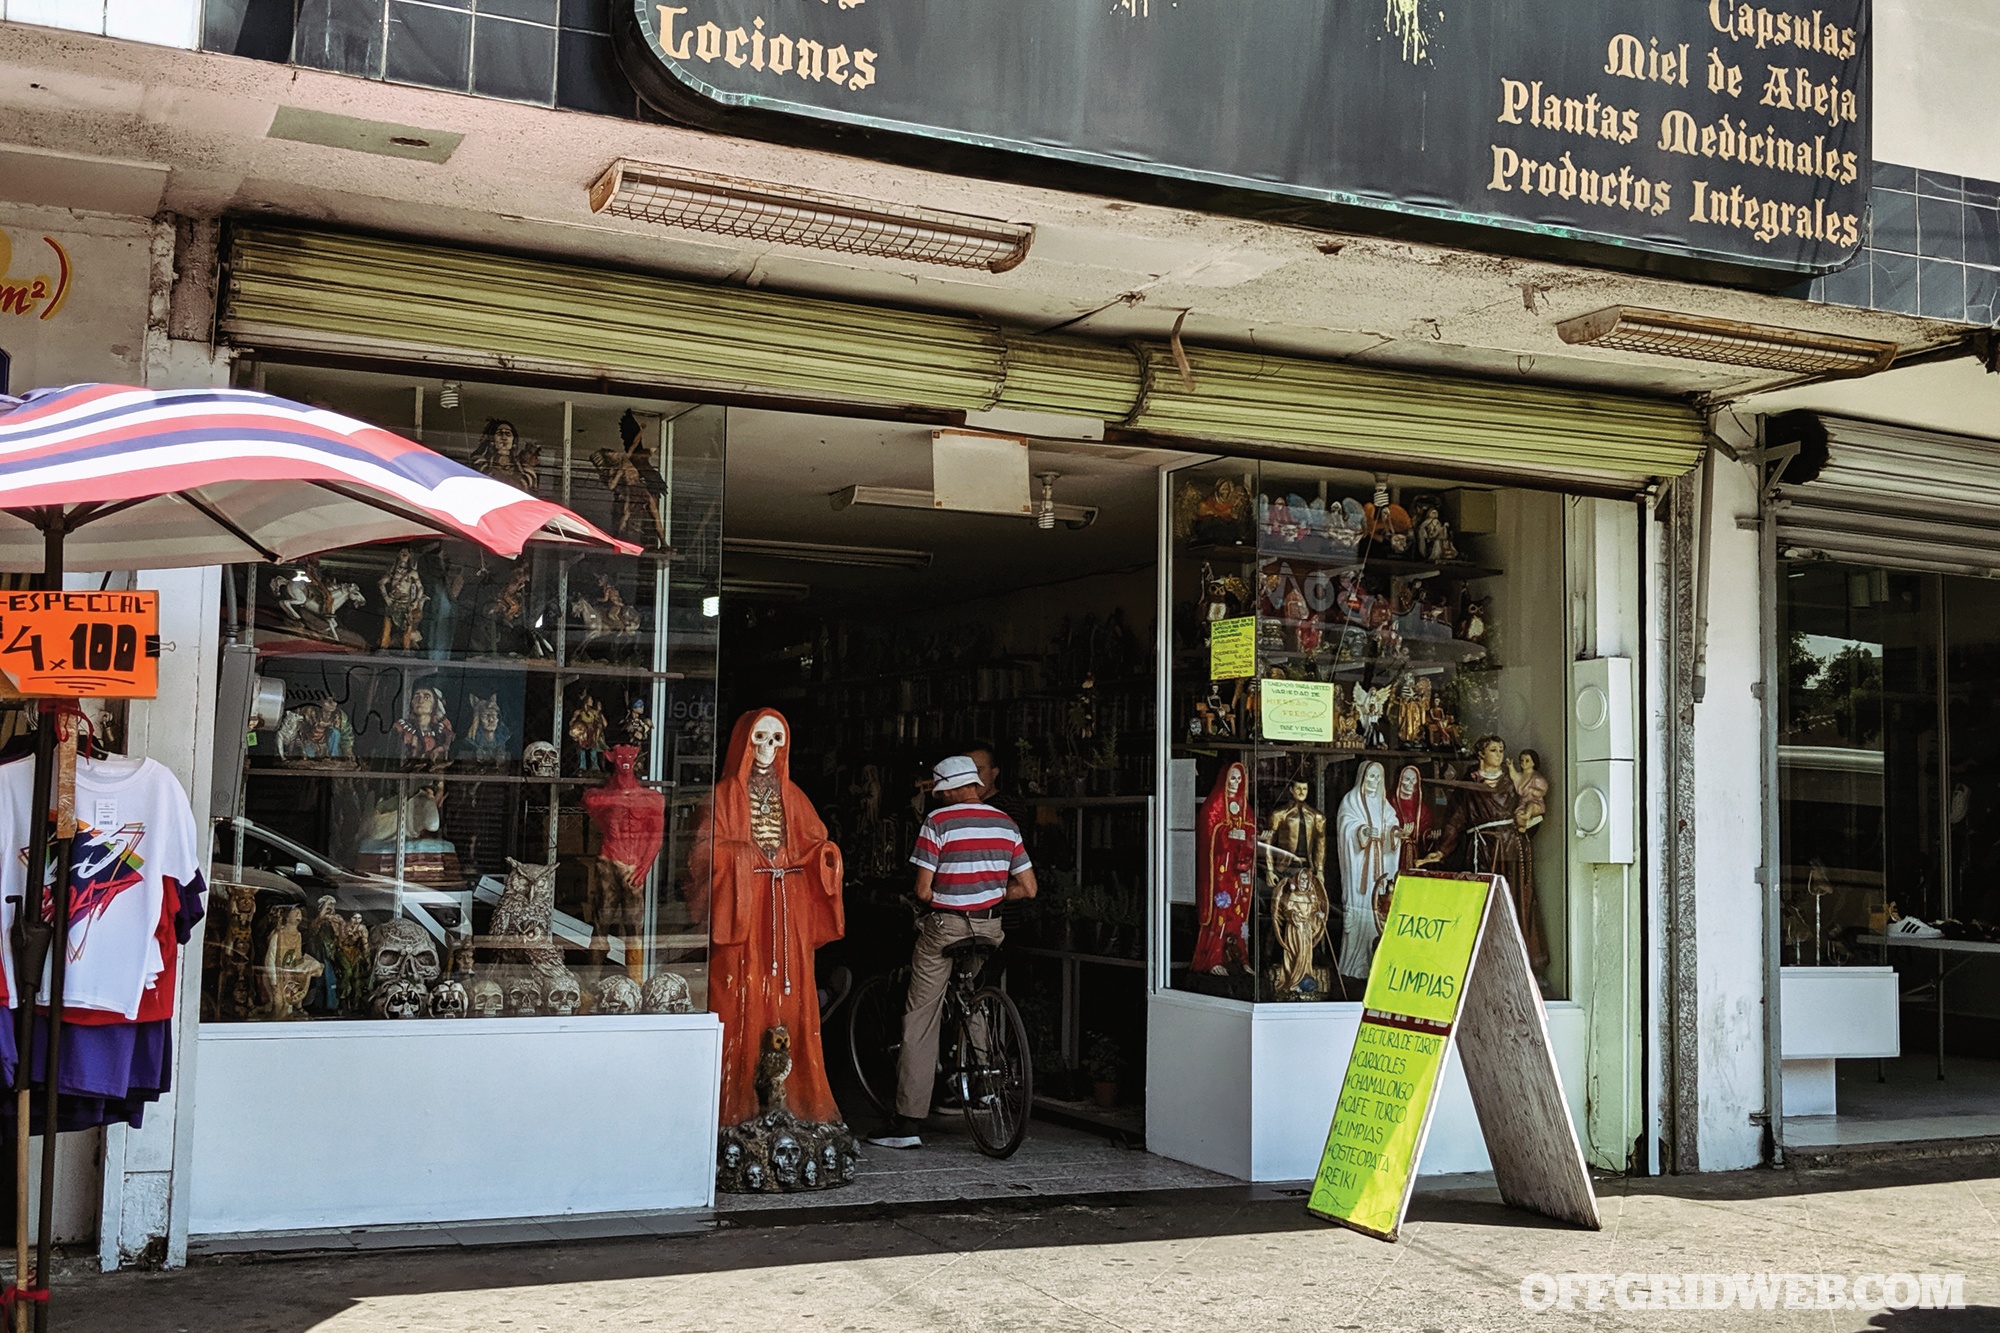
I recently found myself standing on a corner in downtown Tijuana, waiting for the light to change so I could cross the street, when I saw a man walking a donkey painted as a zebra. He was on his way to work at one of the famous picture stands on Revolution Avenue. Anywhere else on the planet, a man walking down the street with a donkey covered in zebra stripes would certainly draw attention. But the famed “zonkeys” of Tijuana have been a familiar sight in the tourist districts of this city since the 1930s, when gambling was outlawed in Mexico and the industrious local track owners had to find a new way to procure American dollars from tourists.
No one batted an eye at this spectacle, no one took a cell phone picture, no one looked and pointed. No one except an American standing next to me, that is. This zonkey was in its natural environment. It was part of the baseline normal and no matter how outlandish, the majority of the people around me didn’t even acknowledge it.
Certainly, nobody noticed the man leading it — and this is the way of the zonkey.
Adapting Your Appearance
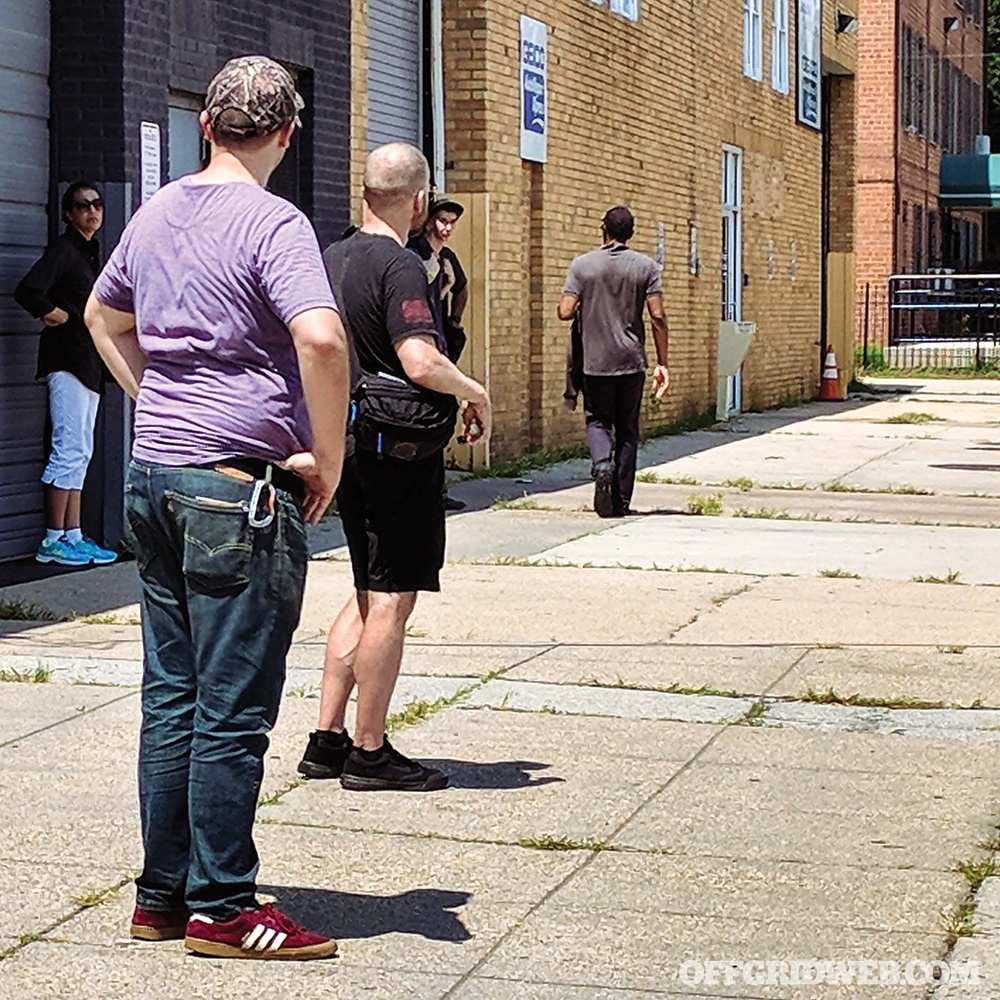
What can people know about you from the clothes you have on? From brand names and fabrics, to wear patterns and the detergent you use, every piece of apparel has a narrative to it. This is especially true when you’re abroad — the story your clothes tell can speak volumes when you travel. Blending in with tourists and blending in with the locals are two very different things, but it has been my experience there’s a midpoint between the two that’s worth trying to find. Rather than being single-minded in your approach, realize there’s a time and place for blending in and for sticking out. Both can deliver you from bad situations.
Above: Clothes are usually a product of their environment and the season. Pick local colors.
No matter which path you choose, deception is always a factor. Remember to keep any white lie or fib within the reality of your knowledge base or your ability to produce evidence of its truthfulness. For example, if you decide to play the part of a Canadian tourist without knowing a few basic things about that country and the region you claim to be from, then you’re setting yourself up for more questions and deeper inspection. Don’t lie if you don’t need to — this includes lying with your clothes. If your clothing is going to be a conversation starter, you’d better have good answers at the ready.
Adapting your outward appearance to fit in with the local population is difficult if it isn’t your own culture you’re trying to meld with. There are major things like skin color and morphology, and small details like your personal odor and dental work, that make being a “gray man” a truly difficult thing to pull off in a completely alien environment.
What’s out of place in this image?
The first question to ask yourself is: Am I truly trying to disappear into the background noise?
Start by realizing that becoming gray or just plain boring and unremarkable isn’t something everyone can do everywhere. By this I mean there’ll be factors that determine if this is a viable approach. Is your morphology, ethnicity, sex, and skin tone common enough in the environment to make it easy for you to blend into the crowds? This takes some honest self-assessment. and realistically, all the mute colors and common brands of clothes won’t help much when you’re a 6-foot blonde in the middle of southern Mexico. Zonkeys blend in well on Revolution Avenue, not in the middle of Ooltewah, Tennessee.
Above: One of the layers of urban camo are cultural. Don’t use any of these layers without knowing what they communicate.
Surveying the Population
Another thing to consider is that the environment itself sometimes has different crowds in it. For example, some places will be littered with pedestrian tourists as well as locals. What crowd are you trying to blend into? Tijuana’s Revolution Avenue, for example, will have at least three distinct sets of crowds moving through it at any given time:
1) The locals: A mix of people from Tijuana passing through on their way to work, or to grab a cab, or some of the locals joining in the nightlife and preying on the tourists. Is it possible to blend in with this group? A local soccer team jersey could do more for you than a gray T-shirt without any branding on it. Small elements like how to hold a cigarette, what cell phone brand you use, what you order to eat, and how you smell can make people skip taking a second look. It’s an art not many can credibly pull off, but it’s possible. Look around and get these details down, then gradually infuse yourself with these specifics. Want to smell local? Wash your clothes with locally sourced detergent, shampoo, soap, eat local, and avoid exotic perfume or deodorant. This may be hard to believe, but subconsciously, people will smell you before they look at you at times. Anything out of the normal may cause an observant local to examine you more closely.
Above: It’s about the crowds, not the background. We can wear whatever narrative we want to communicate.
2) The labor: People who work the shops and bars or have a work-related reason for being there. They’ll look exceedingly comfortable, as this is their daily environment, and project confidence in having a reason for being there. That’s something hard for many people to replicate, especially if you have a language barrier. Projecting confidence and acting like you belong in an alien environment is a skill set in and of itself, but it’s not impossible. For example, wear black pants and a black polo shirt at some of the bars in this tourist district and watch how many people try to give your their order.
3) The travelers: Not all tourists are made the same, so try to spot those who don’t belong next time you’re in a heavy tourist area. They may share a few commonalities as far as marveling at the sites and sounds that locals don’t even acknowledge. But other things might be different, such as clothes, diets, cell phones, and accents. American passports are not as popular as they once were in some places. Blending in with a non-American tourist crowd might be a lifesaving skill in some more inhospitable parts of the world. However, don’t forget the previous point about background knowledge before you claim to be a Canadian, Aussie, or Brit.
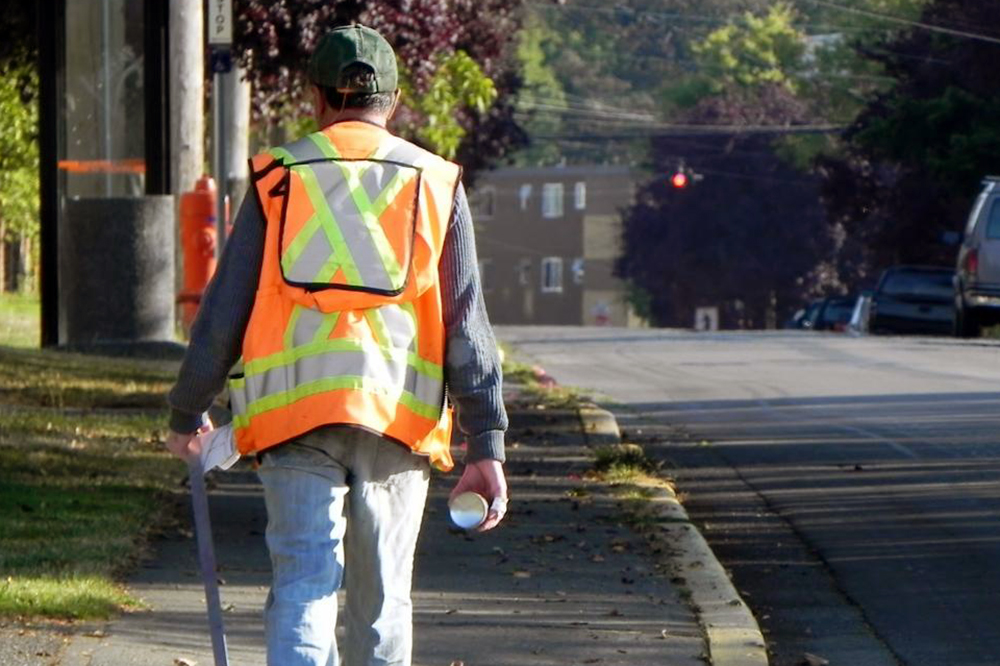
Try to focus on what’s possible. Some call this a baseline, but I like to think of it as endemics. What’s natural in the space you’re moving in? What will attract the least amount of attention? Or what will attract attention but can be used to your advantage? Wearing a construction vest near a major worksite will cast your unfamiliar face into an easily discernible narrative to any locals you may encounter. Social engineering techniques such as tailgating, pretexting, or diversion can help you avoid attention or redirect it elsewhere.
How to Build Your Narrative When Traveling
Keep in mind that small elements like local sport team apparel can change the narrative you give off to the casual observer. Nuanced things like using a locally sourced clothing detergent, eating local cuisine, and using a more common deodorant in that area will help you avoid turning the heads of more attentive individuals.
Above: There is such a thing as overdoing it. Usually the evasive individual will stick out in the unaware crowd.
To start with, lay your clothing out on the floor. Go to Google Street view or look up recent images from the places you’ll be moving through on social media. Look at the crowds in the area and note the most common color palettes you see. What are the people there wearing at various times of the year? Will your Hawaiian shirt stick out in the middle of Oaxaca?
There are people who talk about being a gray man, completely invisible to the common observer through selection of discreet clothes in plain colors. While this seems advisable on the surface, careful consideration will reveal that this two-dimensional approach isn’t always the optimal tactic. The aforementioned characteristics — the color of your skin, the quality of your dental work, your taste in food, and the language you speak will quickly betray your toned-down presentation, no matter how drab your fashion choices are.
I train people to manipulate the narrative they present through their appearance. Rather than blending in, I teach students to think more along the lines of being aware of what they’re wearing and the story it tells — it’s the difference between how a zebra hides in a group of zebras and how a chameleon hides in the leaves. Both need to be options in your toolkit.
Above: Planning and education starts before you even pack. Go on Google maps and start building your pallet.
If you’re planning to carry around something for offensive purposes, try to use the same thought process in choosing your weapon(s). Carry something that’s at home in the region you’re moving in. Not being allowed to carry something isn’t the same as not being able to. Stack the odds in your favor where you can. South Africa? Get an okapi knife, it’s very affordable and the most commonly available knife in the region. Carry what the locals would carry — it’s a good idea on many levels. And if you do have to cut some cheesecake in the middle of the Cape Town Flats, your knife won’t make people question you further.
A Few Simple Rules
Avoid wearing anything with logos or text on it that can tell an observer something about you, like where you’re from or where you went to school. Remember that all of these small elements, especially when combined with social media, will give someone a very deep insight into your life unless you scrub your physical and digital persona continuously.
Above: Normal is fluid. Find the normal baseline for wherever you are and learn what’s considered out of place. Look at how the locals react and use them as a reference.
Capabilities, training, skills, and prior military experience should be kept to yourself. Avoid wearing anything tactical or mil-spec when out in the world. I’ve had student traveler’s come back with horror stories about being questioned by local police or criminals over something as simple as carrying a tourniquet on a belt or tactical branded pants. Do an honest self-assessment of your clothes and the bags you are going to carry before you go.
If you’re going to lie with your appearance, be educated in that lie. If you’re running around with a soccer jersey, know what the score of their last match was and the names of their main players. Don’t dig yourself a hole you can’t climb out of.
If all else fails, keep moving.
And remember, none of this will work if you’re traveling with a group that isn’t in on the planning — the entire entourage should endeavor to present a cohesive narrative in everything they do. Using numbers and strategizing as a group, including having a backup plan for anything and everything that can and will go wrong, will greatly improve your odds if things go sideways. Stillness is death.
About the Author
For over a decade, Ed Calderon worked in the fields of counter-narcotics, organized crime investigation, and public safety in the northern-border region of Mexico. Learn more about his survival courses at edsmanifesto.com.
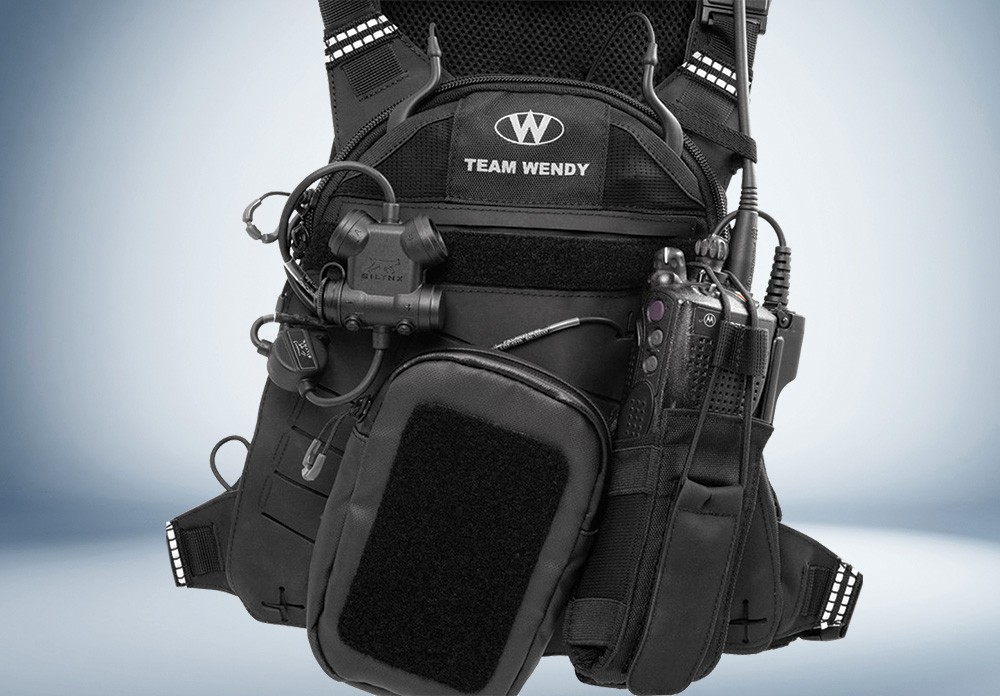
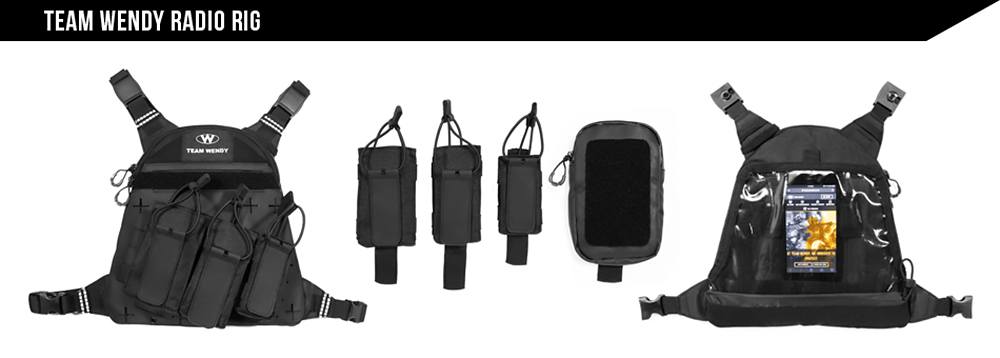
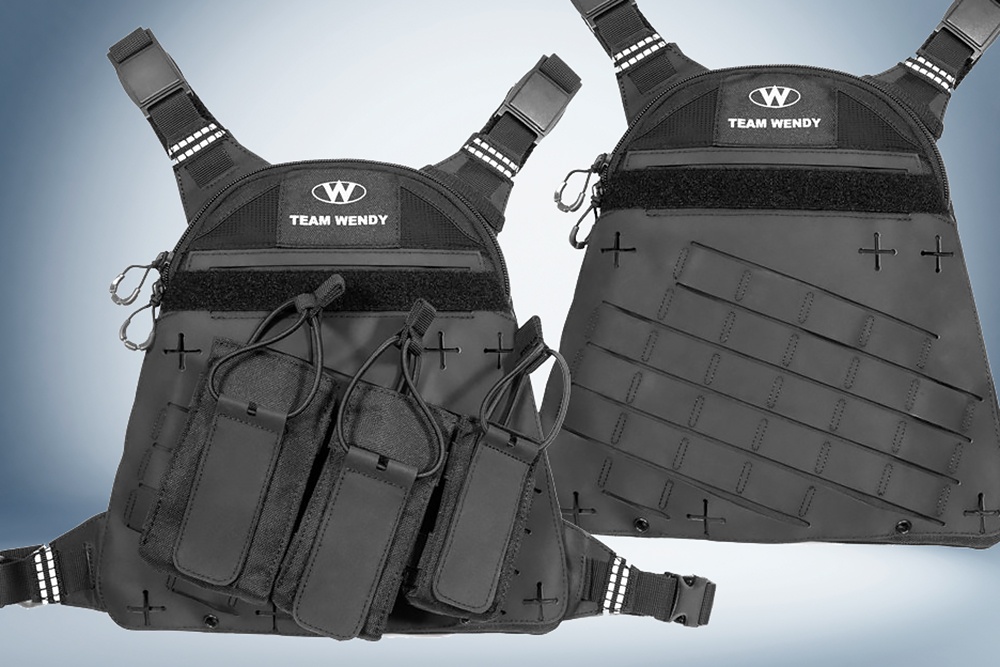
Team Wendy, a company probably best known for its line of ballistic and bump helmets, has released a new chest rig designed for use by the SAR (Search and Rescue) community. The new comms platform, which is fully compatible with PALS/MOLLE accessories, is known as the Team Wendy Radio Rig. It’s said to offer “an abundance of compartmentalization without compromising mobility,” and comes with three pouch sizes (small, medium, and large) to accommodate a variety of radios or GPS units. There’s also a weather-resistant zippered pouch to hold your smartphone or other more fragile portable electronics.
Team Wendy’s CEO, Jose Rizo-Patron, says: “We strive to provide our clients with optimal solutions by identifying gaps and filling unmet needs in the market. Through our ongoing engagement with several domestic and international SAR communities, it was clear to us that they needed a comfortable, purpose-built communications rig that includes a better approach for cable management. Our Radio Rig also serves as a complementary solution to our widely fielded EXFIL SAR helmets.”
Whether you’re a professional first responder or a prepper who’s looking for a better way to organize your communication equipment, the new Radio Rig should serve as a convenient host for a comms platform and GPS (though it’s still up to you to know where you are even if you do have a GPS). Its modular construction means you can spec it out however best serves your mission; throw a hydration bladder between your shoulder blades, carry a search and rescue drone, or add medical gear and magazine carriers.
The new platform consists of angled, laser-cut PALS webbing to accommodate the included pouches or other MOLLE-compatible gear. By releasing a pair of Fidlock magnetic buckles, the front panel of the chest rig folds forward, revealing a transparent, touch-screen compatible pouch that’s designed to hold a cell phone, maps, or documents. The zipper at the top of the front panel opens to an organized admin pocket and a cable management pocket with wiring pass-throughs. The pack is said to be slim enough to be worn under a backpack if necessary.
Team Wendy also partnered with comms gear manufacturer Silynx to develop a special version of the CLARUS XPR in-ear communications system wired specifically for the Radio Rig and EXFIL SAR helmet. It consists of an in-ear headset, control box, dual comm splitter, and your choice of a smartphone adapter or one of four radio adapters. The company says this setup is “compatible with 95 percent of radios on the market – including the Motorola APX.”
Learn more about the Team Wendy Radio Rig at TeamWendy.com.
In any survival scenario, situational awareness is critical. We often think of that term solely in the context of observing your surroundings — for example, looking or listening for signs of incoming threats. But situational awareness also extends to your every-day carry gear. Is your gun always in the same place on your body, and have you confirmed recently that it’s maintained, loaded, and ready to use? Is your flashlight battery dead? Is your knife sharp and ready to draw consistently? What about medical gear? These are questions you must answer before an emergency occurs.
In the following RECOILtv video, Bill Rapier of Am Tac Shooting discusses a technique he calls “the circle of awareness.” It was derived from skydiving, where each participant has to be continually scanning for external issues (e.g. other divers they might collide with) as well as internal issues (e.g. problems with the altimeter or chute handles). Overlooking either one of these factors could lead to a jumper making “a very insignificant divot in the earth,” as Rapier says.
The circle of awareness is “a lifestyle, a way of thinking about things continuously” as well as a means of loading a concealed-carry firearm. Rapier explains how it involves framing the weapon in an elevated work space, seating a magazine, racking the slide while keeping the muzzle on target, and confirming that a round has been chambered properly. Whether you’re going through these steps in your bedroom before leaving the house or during a chaotic firefight, they could mean the difference between being confident your gun will go bang and finding out the hard way that it didn’t.
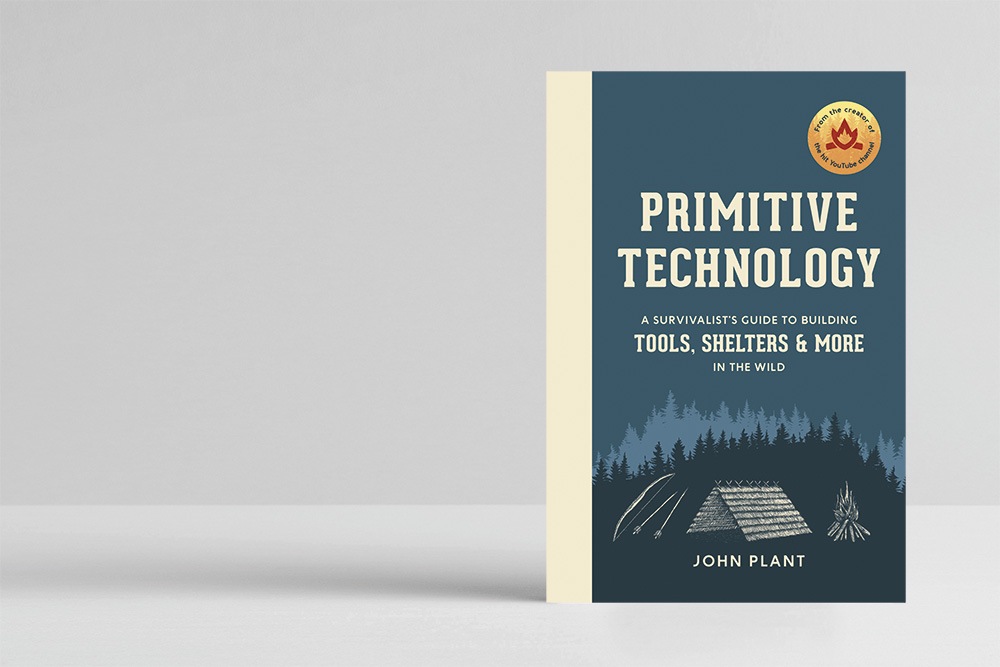
We’ve been following the YouTube channel known as Primitive Technology for several years now — the odds are good that you might be another one of its 9.8 million subscribers. Despite creating what some may see as simple content, devoid of flashy editing, music, or even narration, this Australian YouTuber has turned his hobby of teaching primitive survival skills into a successful full-time job. While streaming video is a great way to demonstrate these skills, it’s not readily-accessible in off-grid settings, so he has created a hardcover survivalist guide book you can bring into the backcountry.
The man behind the channel, who we now know as John Plant, wrote the following statement to announce the book:
“This video coincides with the release of my new book “Primitive Technology,” which releases exactly 4 years and 6 months since my first video post on this channel. This video compilation, as well as the book, outlines all the skills and achievements I’ve attained in this time period using research, hard work and trial and error. Writing this book is something I wanted to do even before making videos and launching this channel. I wanted to offer something tangible that benefited those who had the same keen interest in primitive technology as I do. With that, I thank each and every one of you for your continued support throughout the years, and I really hope you enjoy the book.”
At 192 pages, the Primitive Technology book is said to feature “50 projects with step-by-step instructions on how to make tools, weapons, shelters, pottery, clothing, and more.” It also includes illustrations, sidebars with historical background on the primitive skills, as well as tips for finding materials and constructing components. This book is available today, October 29th, in hardcover form for $14 or as a Kindle ebook for $10.
For more information on Primitive Technology: A Survivalist’s Guide to Building Tools, Shelters, and More in the Wild, go to PenguinRandomHouse.com.
Some of you may be familiar with Robert Burns’ poem “To a Mouse” since one of its lines became the title of the Steinbeck novel Of Mice and Men. It tells of a farmer who inadvertently digs up a field mouse’s winter home with his plow and apologetically consoles the mouse as it trembles before him with fear. He ruminates on how the mouse, who instinctively burrowed to build a home for the winter, is now temporarily without shelter. His observation continues about how mice and men are alike in that their plans can often be disrupted without notice, but he’s somewhat envious that the mouse lives in the present. Meanwhile, humans often remain anchored to the regret of their past and look with apprehension and uncertainty about what the future holds.
Perhaps we can learn a bit from the survival reflexes this animal has honed, as well as its complete absence of self-pity. It’ll quickly rebuild its home, while a larger, more technologically advanced human would likely be an emotional wreck if his or her home were suddenly destroyed. When you spread that woe-is-me mentality across the entirety of a major metropolitan area, you quickly have a recipe for desperation — one that could’ve been avoided, had the right mindset been taught to those affected by the crisis.
Herein lies the ongoing struggle of the survival community and its purveyors. How do you convince the average fragile human of the value of preparation without sounding like some Chicken Little, the-sky-is-falling paranoiac? As it’s been said before, preparation is largely a matter of attitude and knowledge. What good are your supplies if you’ve never practiced with them in a realistic context with stressors and time constraints? Hardware will only get you so far if you don’t have the software to use it and remain level-headed when the moment of truth is upon you.
Tom Marshall has not only lived the lifestyle of preparation, but continues to study it and espouse his distilled brand of survival to those who need it. Whether it was as a U.S. Army Captain, overseas contractor, or as RECOIL OFFGRID’s newest editor, he believes in instilling people with both the confidence of self-sufficiency and the no-punches-pulled insight of using the right tools for the right job. We welcome Tom to the editor’s chair and wanted to pick his brain a bit more to understand his approach to the “I think, therefore I am” outlook that’s critical to facing adversity when the proverbial plow upends your life.
Tom Marshall Interview
RECOIL OFFGRID: Where did you grow up?
Tom Marshall: Yonkers, New York. It’s about 10 to 15 minutes outside of Manhattan.
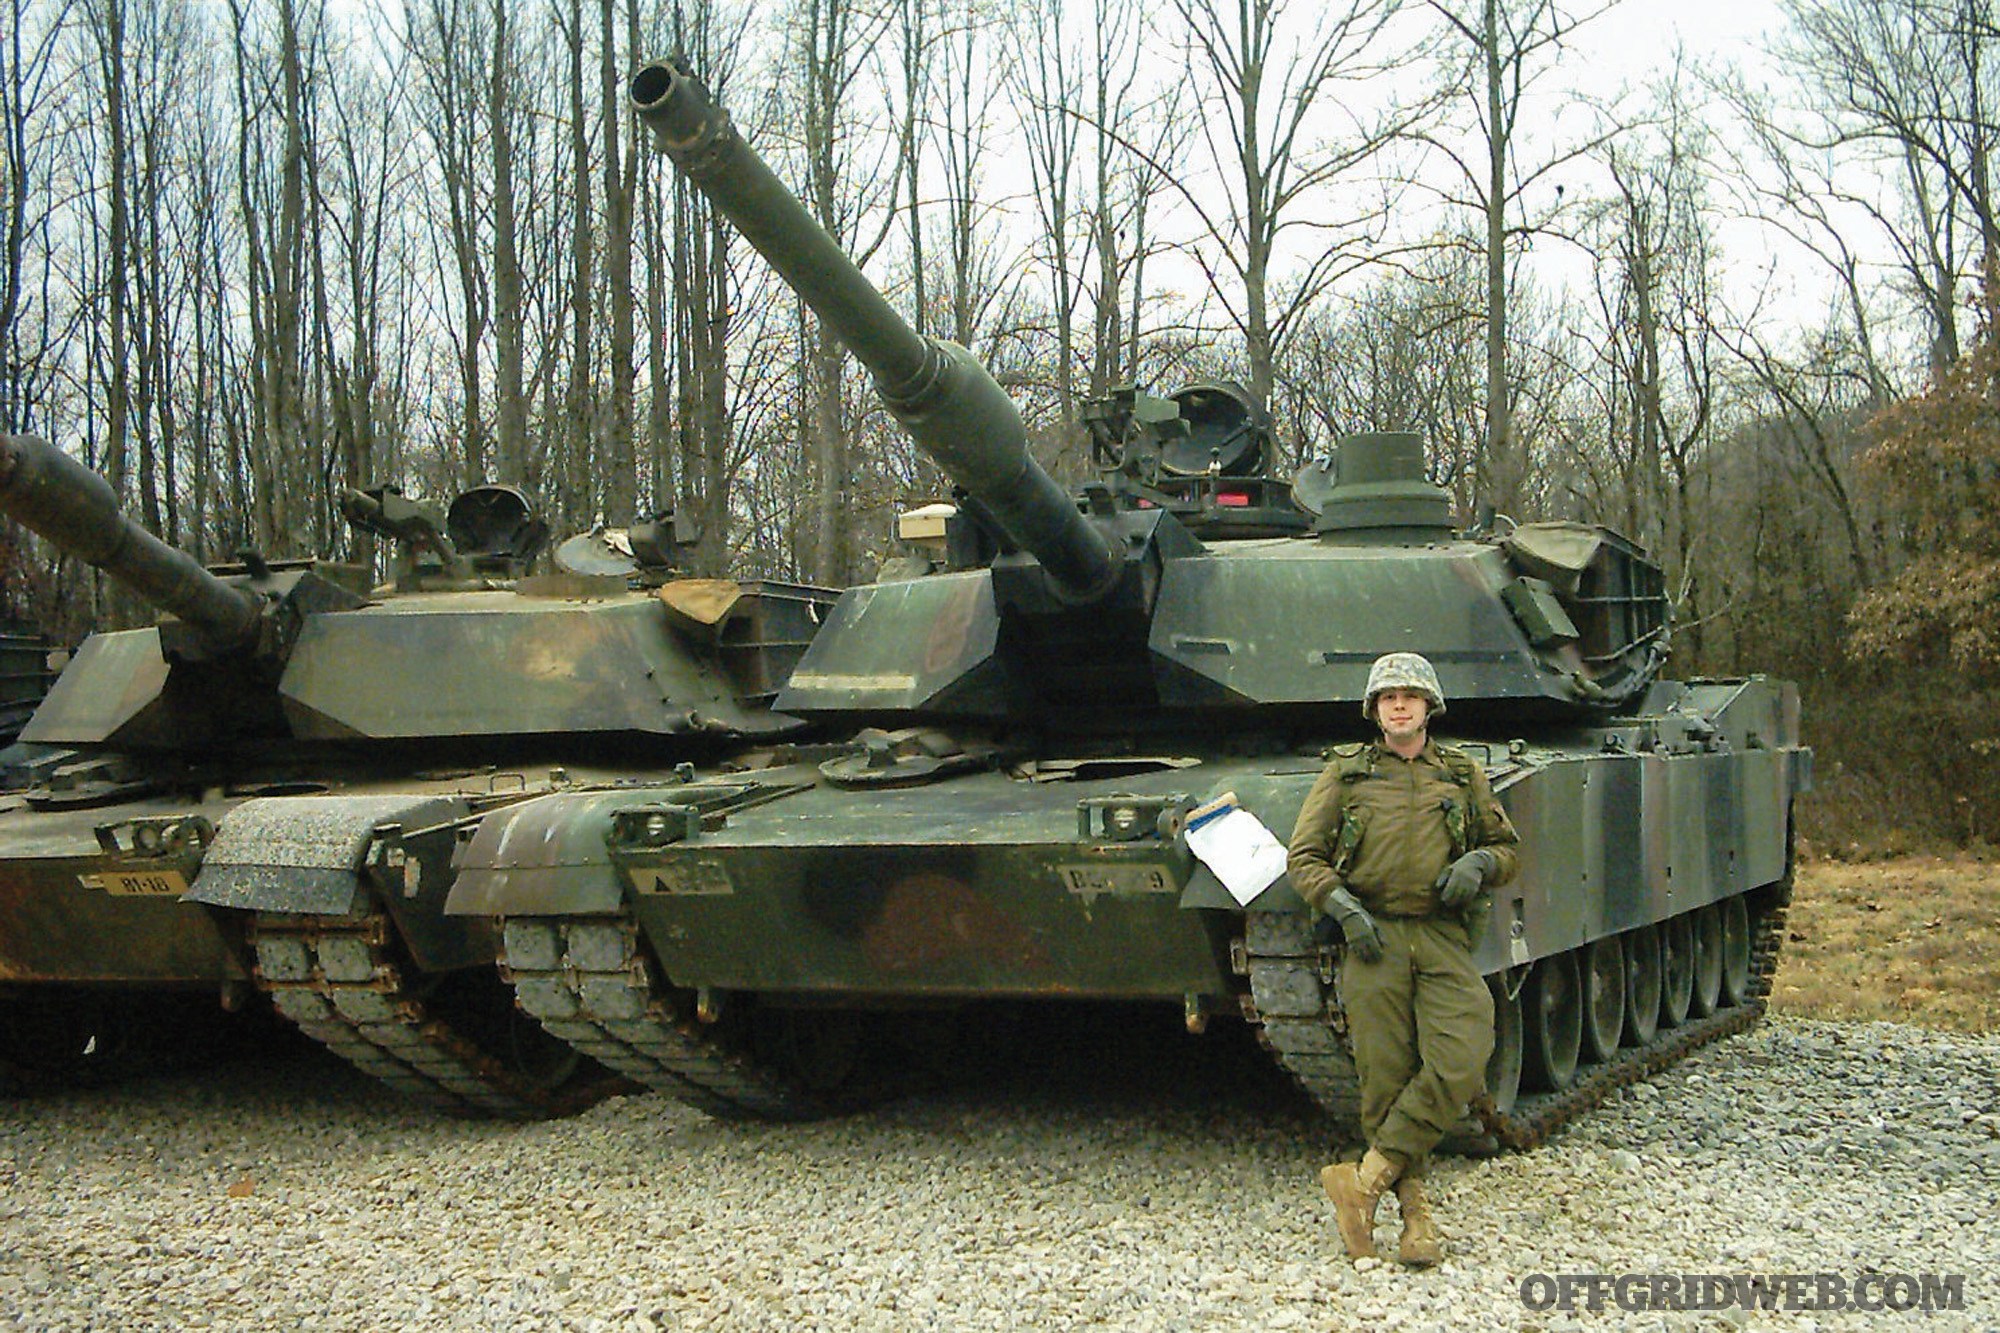
At the helm of an M1 Abrams battle tank during his uniformed service career.
How were you initially introduced to firearms?
TM: You know, for having grown up in a place where firearms were so taboo, they were kind of always around for me. I think my first actual trigger time was in Boy Scout Camp when I was in middle school. We had single-shot bolt-action .22s made by Sears. I didn’t stick with the Boy Scouts, but went on to work with the Civil Air Patrol, New York Search and Rescue, and the New York State Guard. All of those organizations were heavily populated with law enforcement officers and military folks, so I was exposed to firearms pretty consistently, despite being in a part of the country with a pretty negative view of individual liberty.
Tell us about your military and private security background.
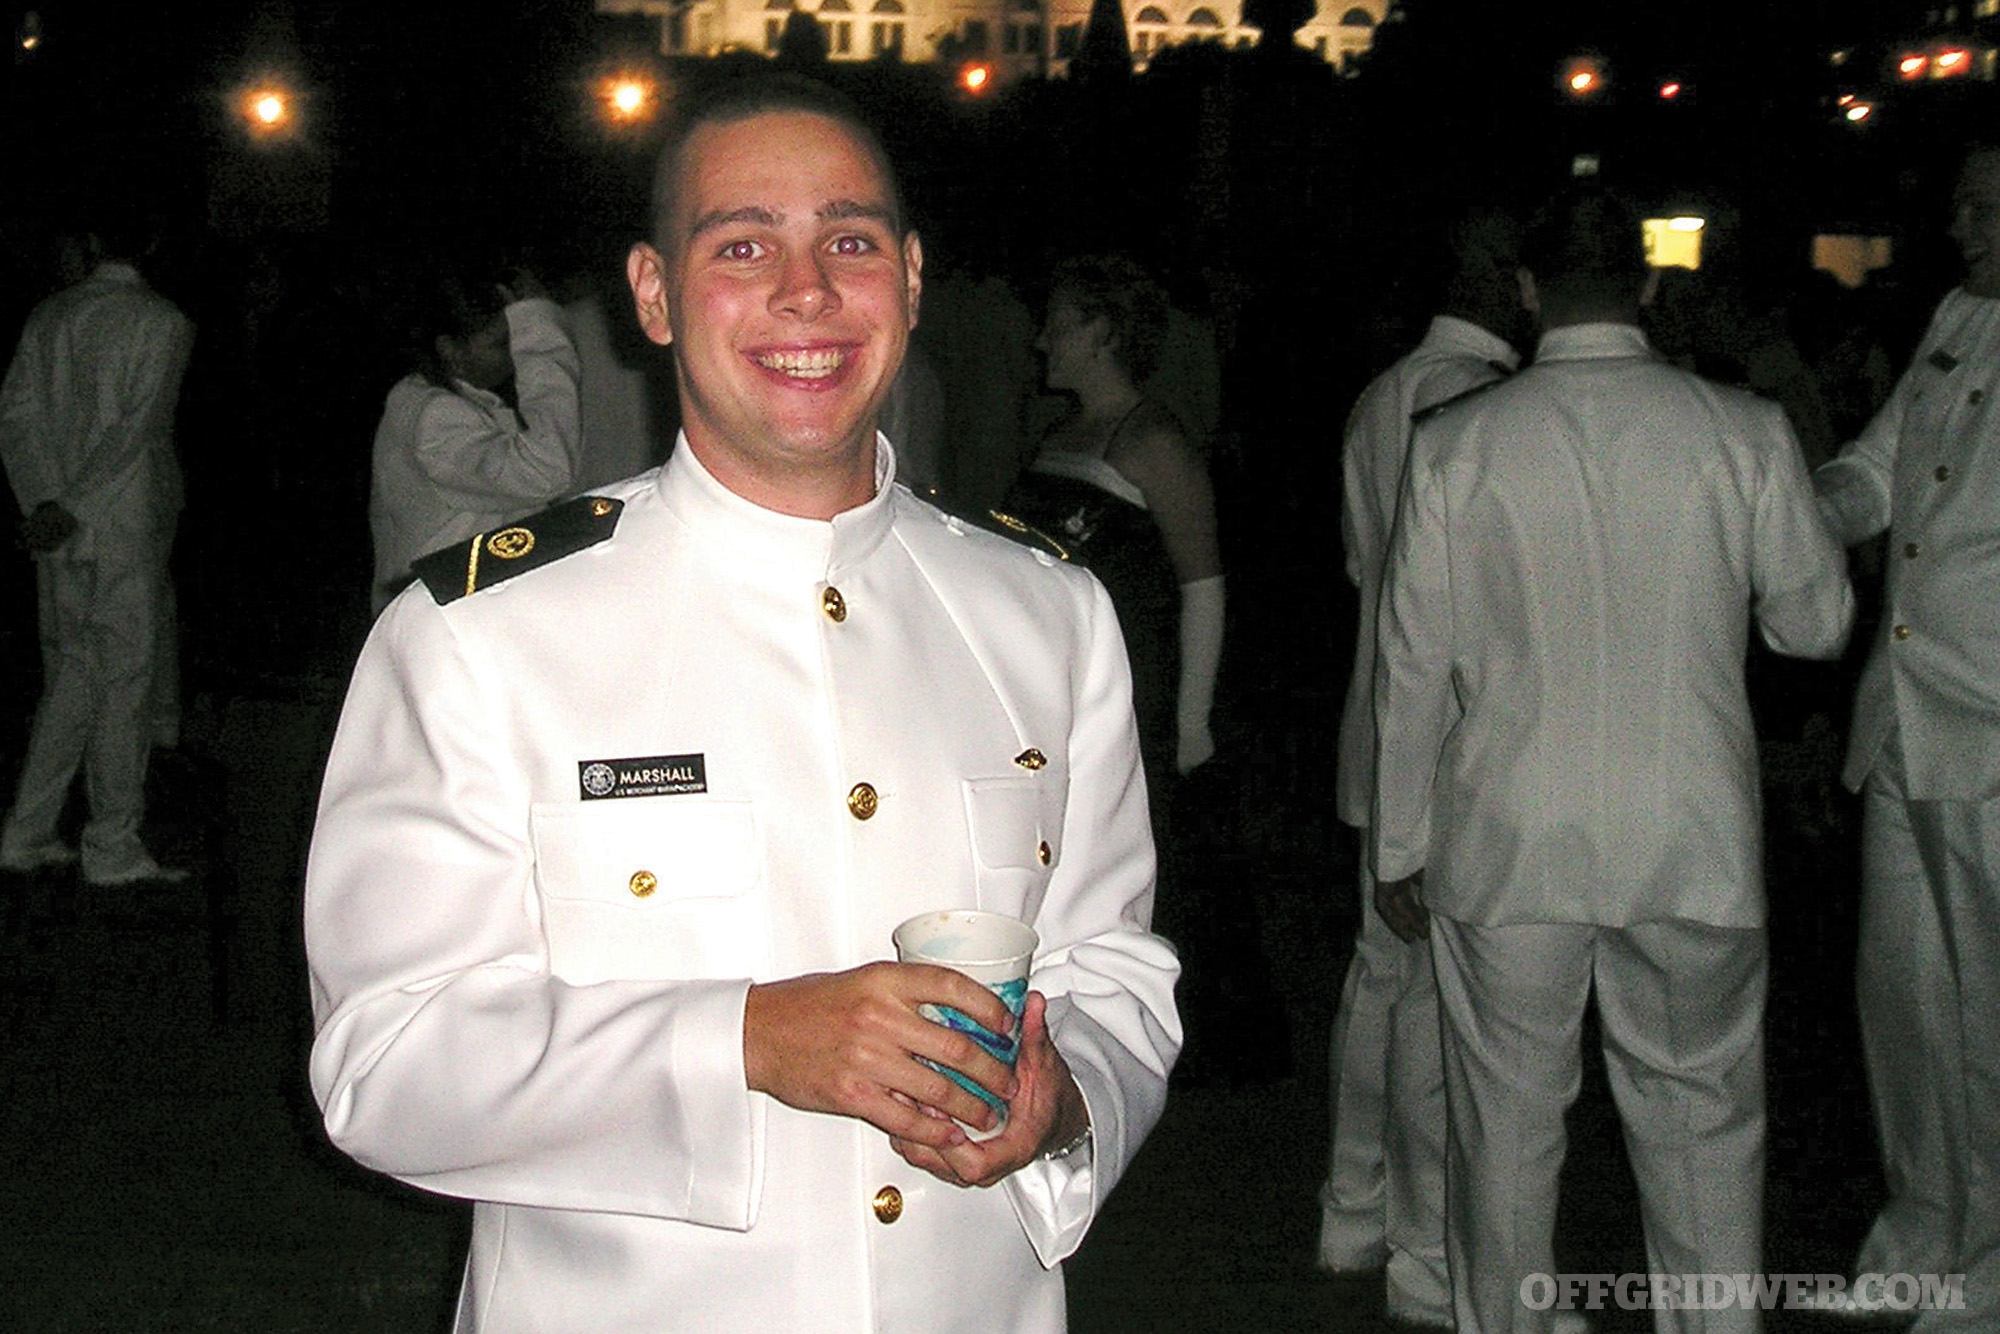
TM: After high school, I attended the U.S. Merchant Marine Academy (Kings Point, New York). It’s a graduation requirement for all Midshipmen (students) there to not only take a commission in the armed forces, but to also successfully complete all the requirements for a Merchant Mariner’s License as either a 3rd Mate or 3rd Assistant Engineer. Before you can even take the test for this license, you have to spend 360-plus days at sea.
In Navy whites during a formal at the U.S. Merchant Marine Academy.
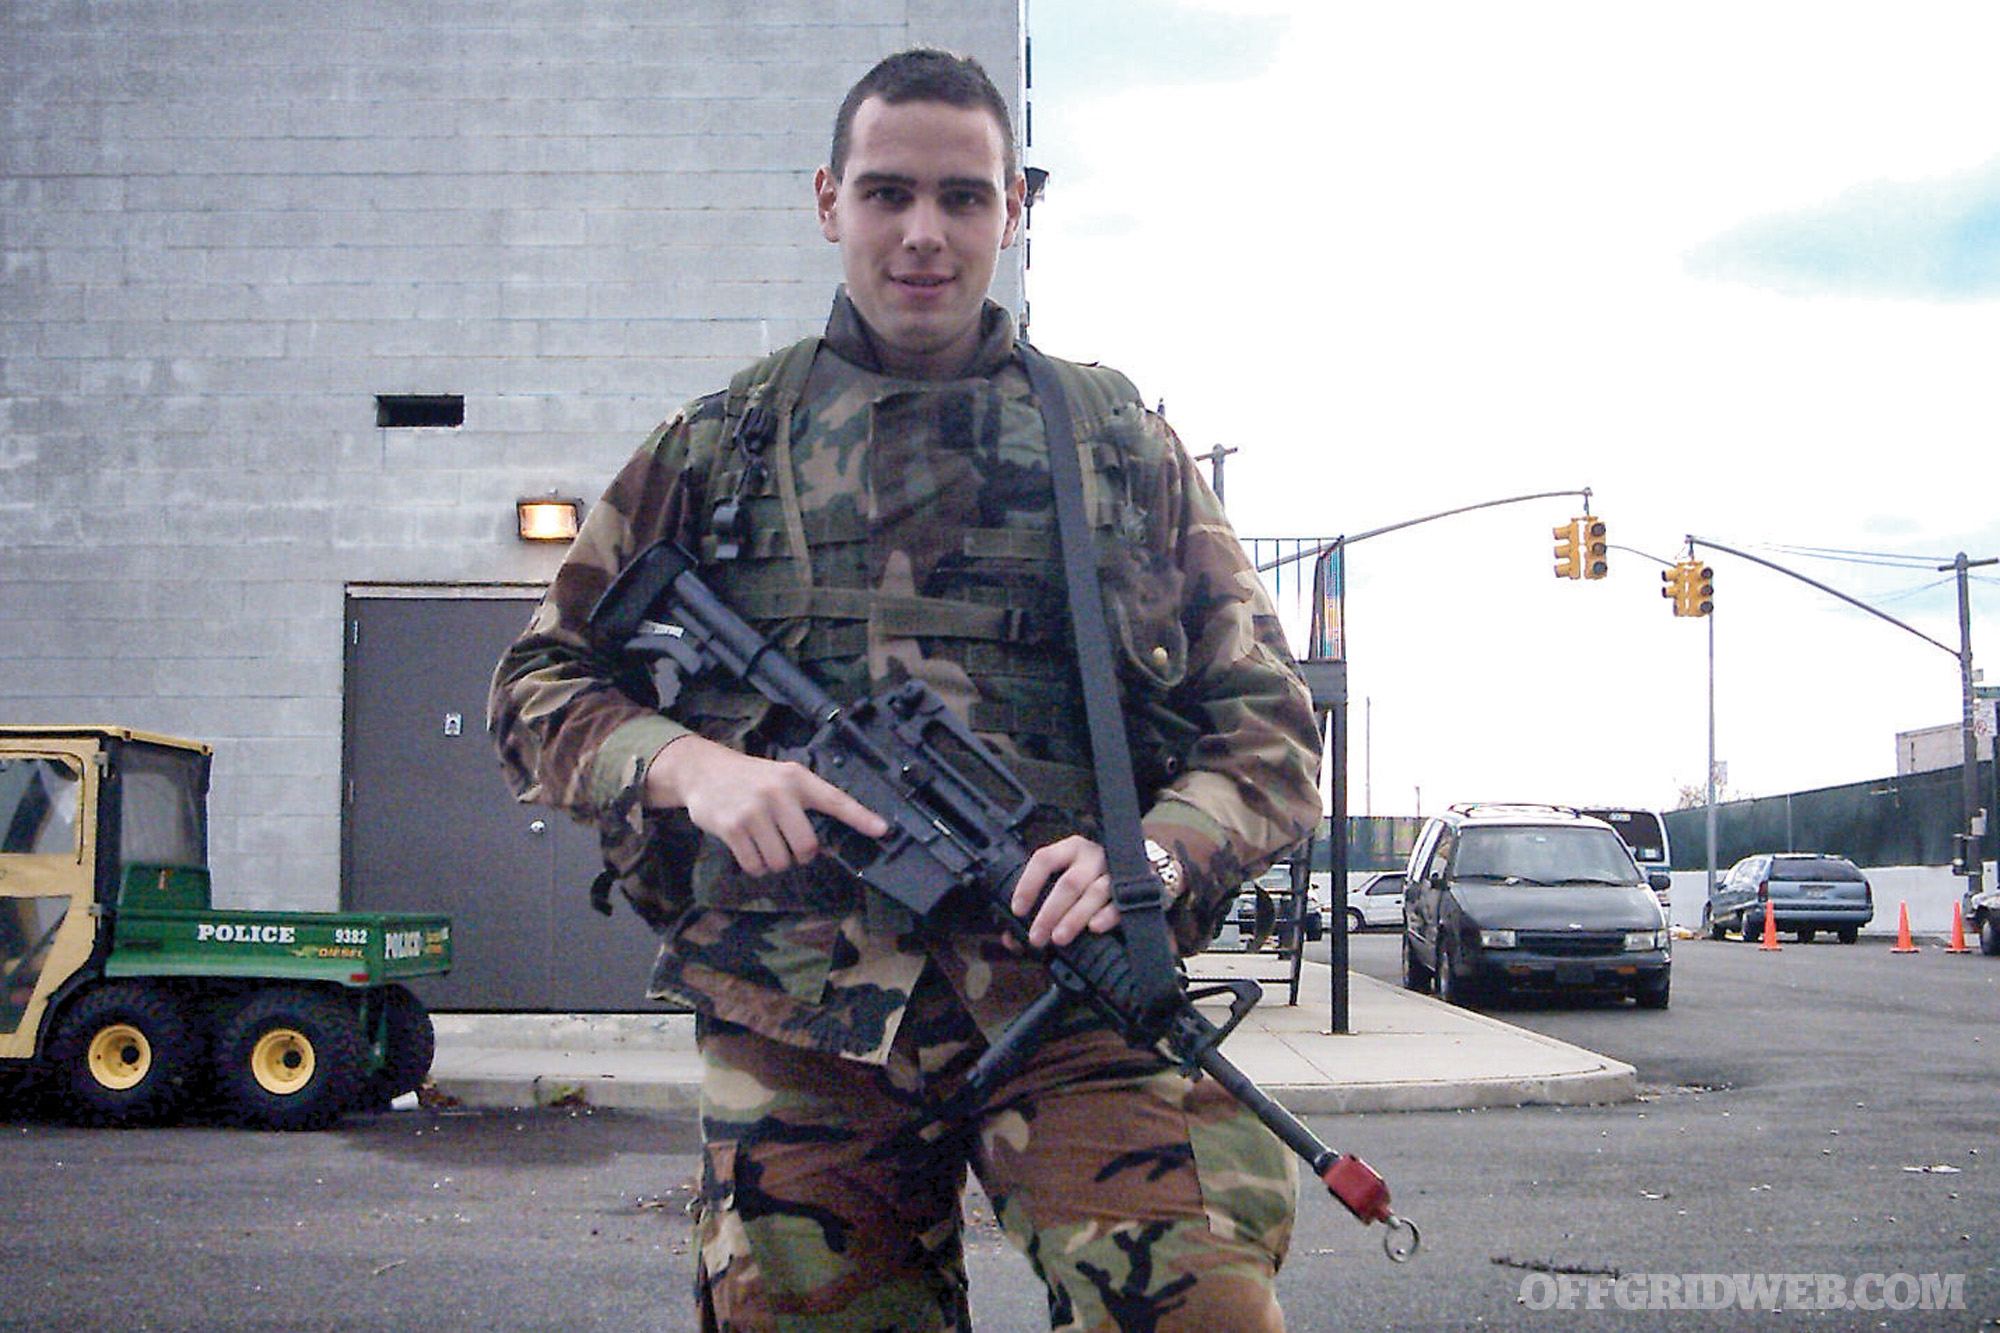
By my 21st birthday, I’d been to 15 countries on three different continents — a few more by the time I graduated with a degree in logistics, my 3rd Mate’s License, and a commission as a 2nd Lieutenant, U.S. Army. I branched cavalry and was assigned to a Stryker Brigade RSTA (Reconnaissance, Surveillance, Target Acquisition) Squadron at Fort Lewis, Washington. I worked as an Assistant Operations Officer, Recon Platoon Leader, and finally as Headquarters Company Executive Officer. I spent a year of that time in Iraq and separated from active duty as a Captain.
Afterward, I worked briefly in corrections before going back overseas as an Independent Contractor, providing security services for a federal agency with officers stationed downrange. I logged 13 separate deployments in four years with that gig, before returning stateside full-time to accept a staff position here with the RECOIL and RECOIL OFFGRID family.
On break during an urban warfare exercise.
What are some experiences you had that you felt were pivotal moments for you?
TM: When I was a Merchant Marine cadet, I was on shore leave in Souda Bay, Greece. I went out with a couple of the other crew members. I got handed way too much to drink and, shortly thereafter, a fight broke out between us and a couple of local longshoremen who had been very clumsily shadowing us for much of the evening. I got separated from my shipmates in the scuffle and, long story short, wound up wandering the streets for most of the night before finding a taxi to take me back to the port. From there, I hitched a ride back to my ship (anchored off-shore) in a Navy patrol boat about 30 minutes before I was due to start my shift. The other guys made it back safely, too, though it could’ve gone very differently.
My year in Iraq was one giant experience in survival all by itself. There are probably too many individual experiences to count, but I certainly learned a lot about the mental and physical skills that will save your life under adverse conditions.
What survival lessons did you glean from those experiences?
TM: There were some big lessons that I took from the street fight in Greece — at a very early age, relatively speaking. One was that I allowed myself to become impaired to a point that I couldn’t effectively look out for myself. Major no-no. And I’ve never let it happen again. The other lesson there was that I didn’t have any plan for myself in the event of getting separated from my group, which is exactly what happened. Most people think of escape and evasion in terms of being actively chased by bad guys. This was not the case for me but, even still, I basically had to depend on the good will of some locals to get me where I needed to be. And I had to do it totally alone in a foreign country with a language barrier.
The only thing I had on me besides my clothes were my wallet and a pocket knife that, in reality, would have failed at anything more than mundane household use. Even if your plan includes working as a team or group, having the ability to operate alone is priceless. True self-sufficiency, whether in the woods or a seedy neighborhood, hinges on mental toughness, a broad set of “hard skills,” and keen awareness of both the physical and human environments.
One of the biggest lessons I took from Iraq relates to gear selection. Before we deployed, I bought a whole slew of personal gear that I thought would serve me better than what I was issued. But I purchased all of it through military surplus stores and eBay. Within the first 90 days of a 12-month deployment, all of that gear had broken down and fallen apart. The adage “buy once, cry once” proved all too true for me. Take the extra time to pinch pennies and spend what you’ve got on sturdy, high-quality equipment. Trying to replace hardware on the fly from the other side of the planet is way more trouble than it’s worth.
When it comes to preparation, what rules do you live by?
TM: “Pack light, move fast, hit hard” — I can’t remember where I heard it, but I’ve always liked it. I try to carry less and make the most of what I’ve got.
“Software over hardware” — I try to spend more time training and developing skillsets than I do drooling over gear.
“Equipment selection is a form of mission analysis” — I guarantee the equipment I do use regularly was painstakingly thought out. Before you put something on your kit or in your pack, rigorously examine what exactly you’ll be doing and what exactly that piece of gear will do for you in that context.
I’m sure there’s more than those three, but those are definitely some of my go-to gold nuggets. I’m also a huge fan of mental rehearsal. War-gaming or what-if-ing is vital to keeping your brain warmed up for quick reaction in an emergency situation.
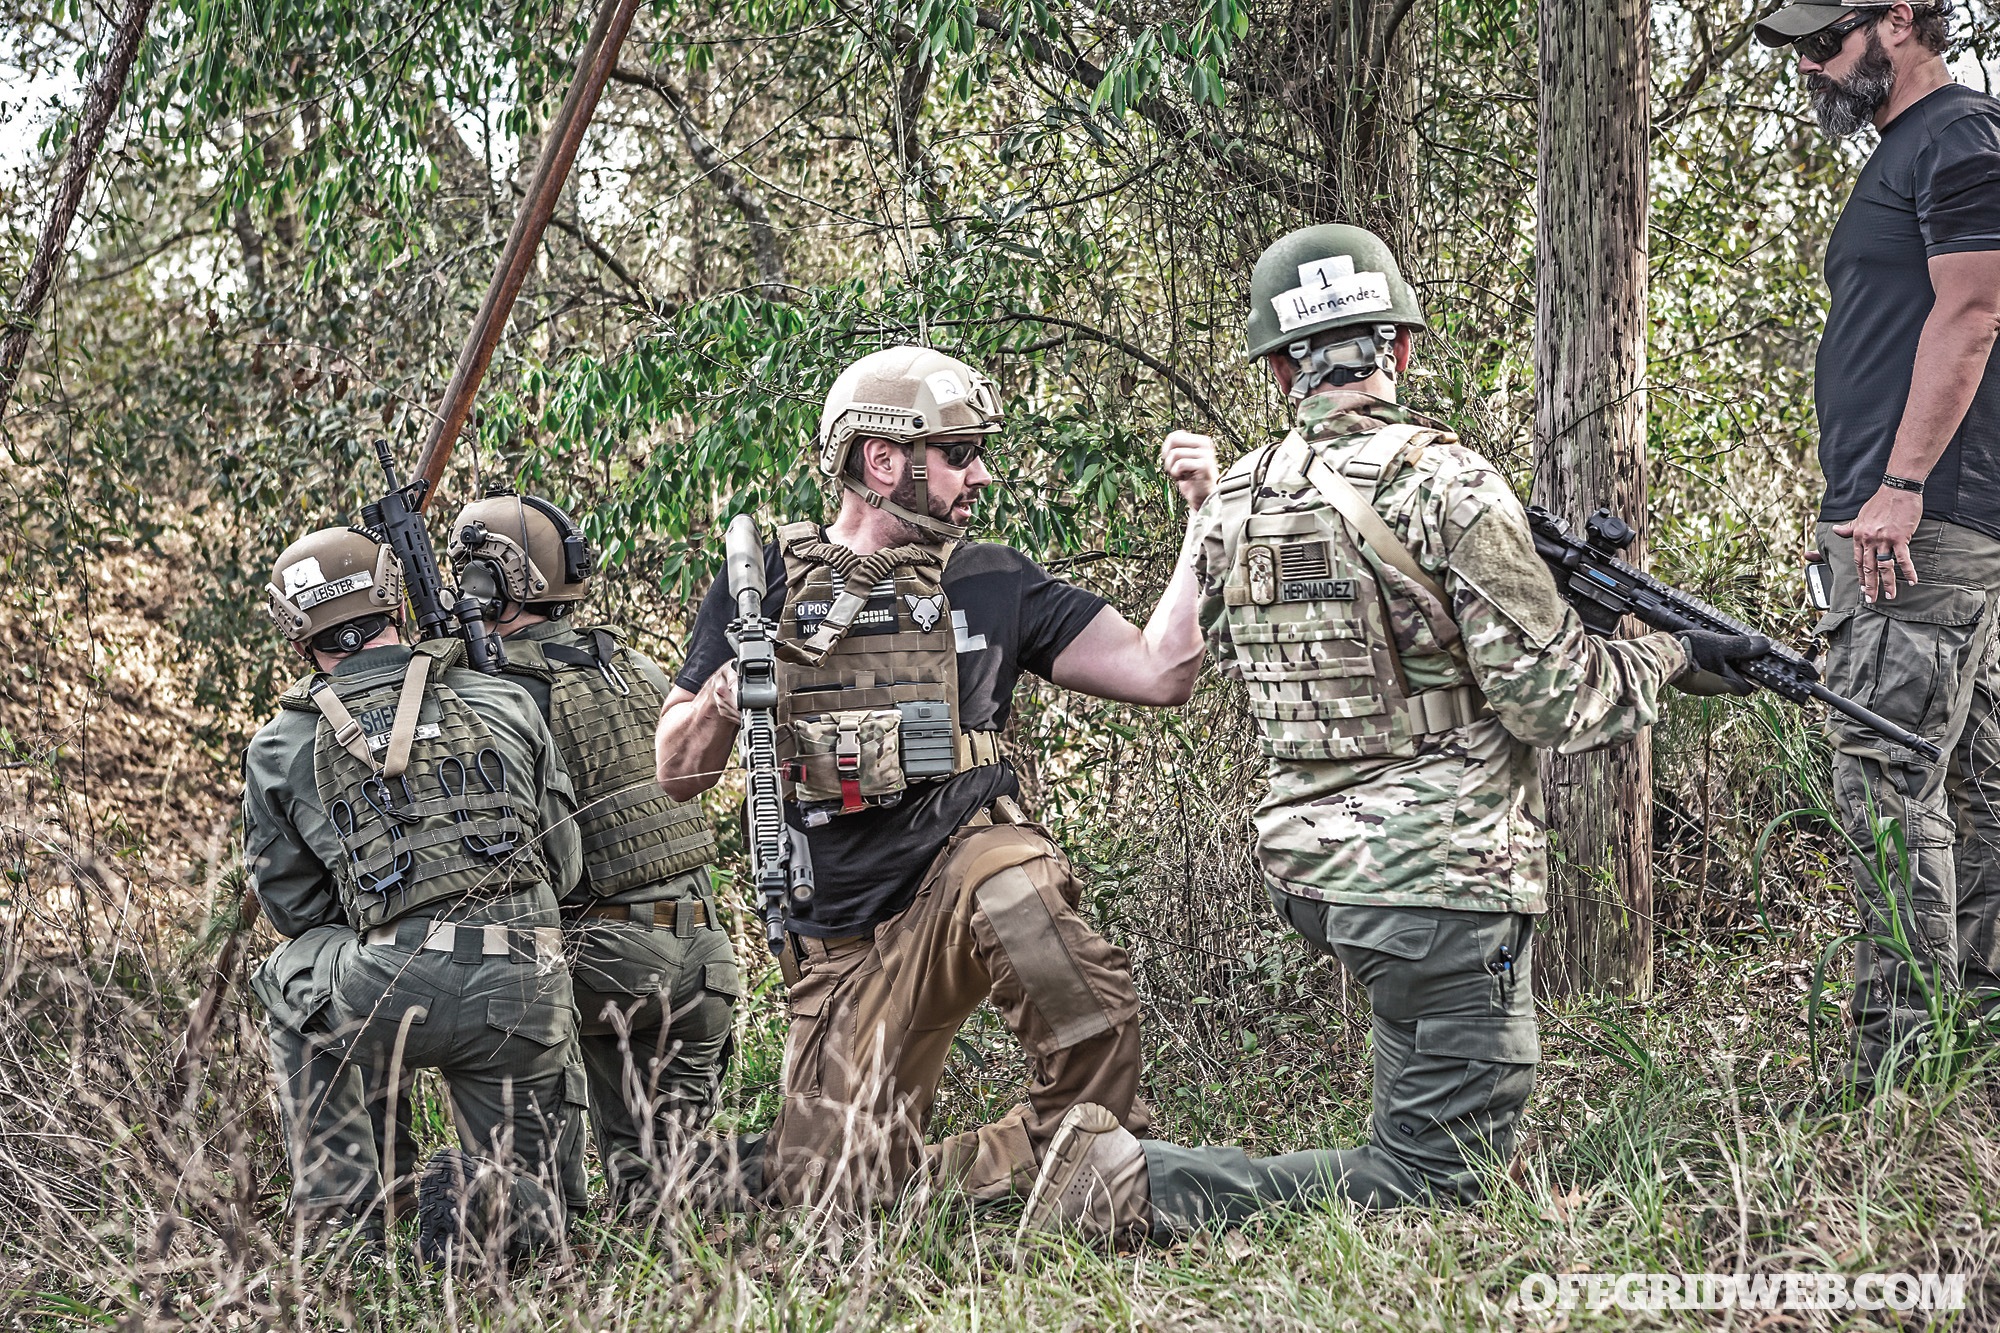
Above: A self-proclaimed training junkie, Tom routinely uses classes to field test gear. This photo is from the Law Enforcement Basic Parachutist course with Dynamic Solutions Training Group.
Where do you think mainstream media typically fails in its portrayal of survival and preparation?
TM: The “survivalist” in any group of movie or TV characters is always crazy. They’re typically portrayed as over-the-top, paranoid, slightly unstable, and just sort of an overall wahoo. One of my personal favorite examples of this is Burt and Heather Gummer, from the movie Tremors. No matter how hard Hollywood tried to ridicule their basement full of guns and home-brewed pipe bombs, it just made me jealous. It may be fun to chuckle at, at first. But the truth is that this archetype, fed to us over and over throughout mainstream media, only serves to marginalize and stigmatize those who choose to practice even a modest level of preparation. Which is kind of bullsh*t, really. At the end of the day, what’s wrong with wanting the capability to provide for yourself and your loved ones? Isn’t that why our parents and teachers and guidance counselors all harangued us about studying hard and getting good jobs? The goal was to provide for our own and contribute to the common good wherever possible. It’s no different today.
The irony here is that, in a lot of those shows, it’s the “crazy prepper” who winds up saving everyone’s ass.
What do you think people passionate about survival can do to educate their non-survivalist friends about preparation?
TM: Ease them into it. Nobody wants to be pushed out of their comfort zone straight into an underground bunker built inside an old missile silo. If you can convince someone to keep a couple protein bars, a gallon of water, and a first-aid kit in their trunk, that’s something. The great thing about prepping is that it’s entirely self-paced and small steps are totally acceptable. Not everyone’s going to have the means or motivation to build up a 12-month food store or run bug-out drills with their in-laws. Some will realize an undiscovered passion and go all-out, and that’s awesome! But when dealing with true skeptics or those who are intimidated by the stereotypes, I would simply encourage them to learn one thing they no longer have to call someone else to do for them. That’s the underlying goal for all of us — a lifestyle that breeds self-sufficiency. A lot of people, when they get that first taste of I-can-do-this-all-by-myself, realize a level of empowerment and self-confidence that most of modern society trades away for convenience. There’s almost a rush to it, and I think that has the potential to be an incredibly powerful teaching tool.
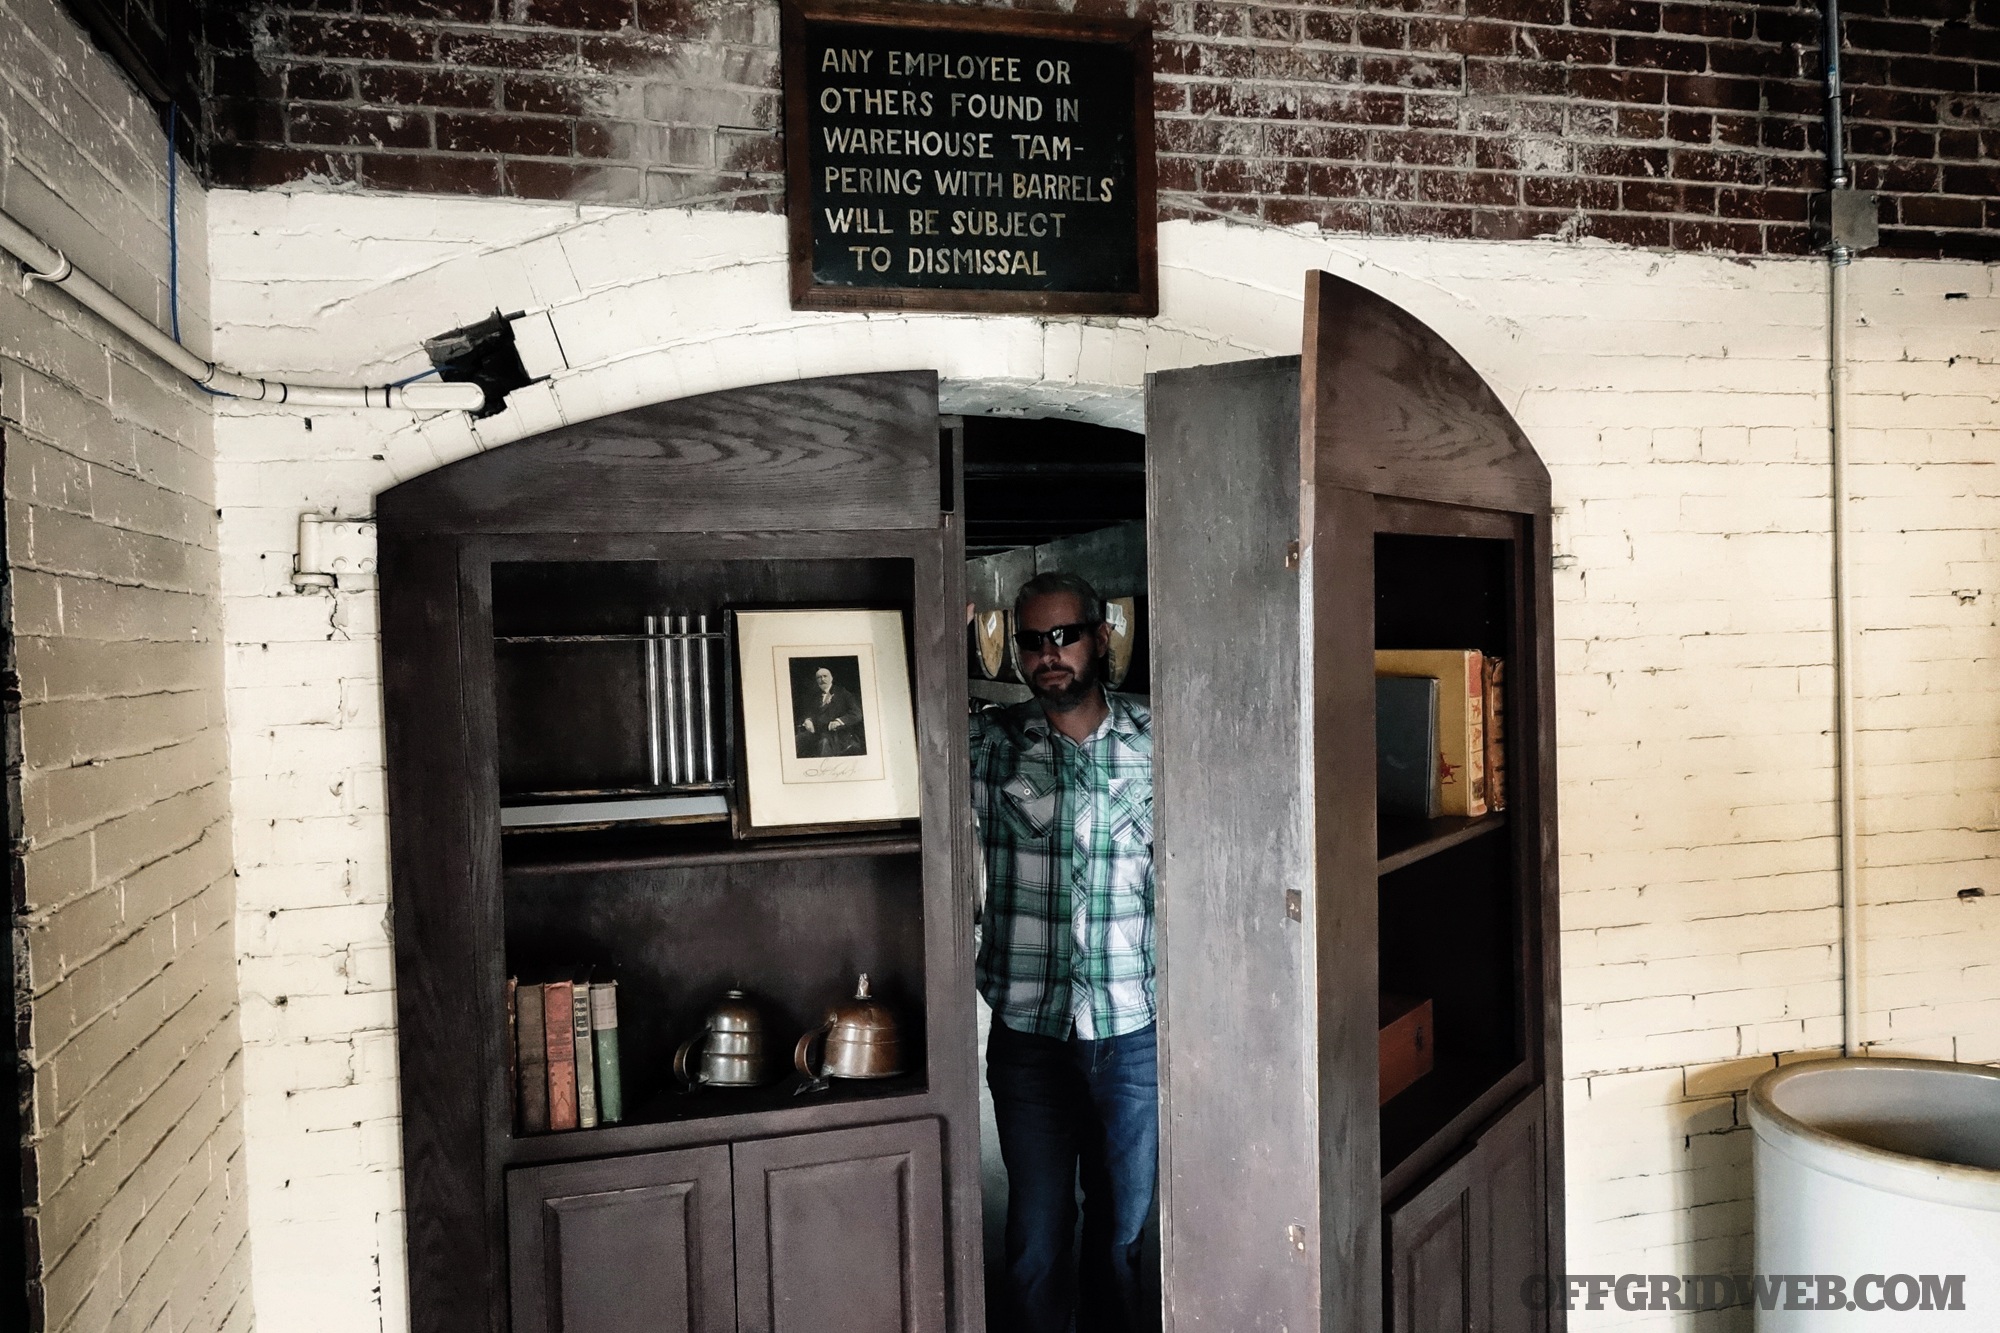
Above: In addition to his military/tactical background, Tom also doubles as RECOIL OFFGRID’s resident bourbon expert. Photo from a field assignment to Buffalo Trace distillery.
Why do you think so many people look at survival and preparation as a negative thing?
TM: I think there’s a couple of things going on here. I’ve personally heard a lot of people talk about survival and prepping in context of a certain scenario they think will take place, or a certain path they think society is on. Some of those scenarios have the potential to become politically charged, which can turn people off. I also think when we discuss prepping strictly in terms of mass-impact events like dirty bombs, viral epidemics, or EMPs, you lose a lot of your “swing voters” — people who aren’t sure how they feel about prepping — because you only offer them a yes-or-no doomsday decision.
If you believe giant catastrophe X has good odds of happening in your lifetime, you should absolutely prep for it. If you don’t believe that, why bother? But a true survival-focused lifestyle has, I would argue, more to do with everyday problems than cataclysmic events. You can prep for getting a flat tire on the way home from work, or for getting dysentery in Cancun, and those events are far more likely than an end-of-the-world situation. Being prepared only requires you to acknowledge that life doesn’t go according to plan, and to figure out how to handle that before you actually have to.
If you could wave a magic wand and change the K through 12 system, what sort of education do you think they should implement about survival?
TM: By the time kids get to high school, everyone should know how to start a fire, how to build a makeshift shelter, and how to tie a few basic knots. Some high school students in my area are actually being taught the Stop The Bleed trauma care curriculum, which is amazing. Medical knowledge is huge: CPR, splinting, tourniquets, and basic wound cleaning/dressing ought to also be mandatory. My home state of Arizona is also fortunate enough to have a wide selection of competitive shooting programs at the high school level. Basic firearms education used to be prevalent and should be brought back. While we’re at it, let’s bring back shop class and home economics too. I didn’t learn how to cook until my mid 20s. I also just started doing some of my own vehicle maintenance within the last 18 months, and that’s still under the supervision of someone who actually knows what they’re doing.
When I was at the Academy, I had to take welding and pipe fitting. I’m a huge believer in skilled trades — there’s an intrinsic emotional value in being able to make or fix something with your own hands that’s not only practical, but also deeply satisfying. While this may not be the kind of stuff people think of when they envision survival training, basic labor skills develop a well-rounded sense of self-reliance that’s useful before, during, and after a survival situation. If our society put a higher premium on getting sweaty and scraping your knuckles, we’d be a much more independent people. I also think we’d be less stressed out. There’s a lot to be said about the value of a hard day’s work.
Above: Tom believes preparedness should include preparing for “street level” survival situations like hijacking and kidnapping. Photo from the final exercise of Ed Calderon’s Counter Custody class.
What do you think the survival industry should be doing differently?
TM: I think there’s a lot of marketing through fear. That’s certainly not unique to the survival industry, but I think the subject of survival makes it the path of least resistance for companies looking to literally scare up a couple of sales. It’d be great for more companies to focus on the value their products provide across a variety of situations and not just “if the world goes to hell, you’d better have one of these!”
What disaster or survival situations do you think people are the most likely to face in their lifetime?
TM: In terms of disasters, I think there’s two primary issues to be concerned about: natural disasters and terrorism. Natural disasters are, of course, regionally biased. People in the upper Midwest are, hopefully, not losing any sleep prepping for a hurricane. But tornadoes, wildfires, earthquakes, and severe storms are all things that can induce a large-scale collapse of infrastructure at the local level. During the appropriate season, things like tornados and hurricanes can hit multiple locations in a very short span of time, creating a regional strain on first-responder capabilities.
The other is terrorism. Extremist ideology isn’t going away, and it’s no longer a danger confined to other countries. We’ve been very fortunate that only a small number of planned attacks were executed successfully in America. I once heard a quote that went something like, “The bad guys only have to get lucky once. The good guys have to get lucky every single time.” Our men and women in government service are doing a fantastic job, but it’s unrealistic to think they’ll foil every plot every time. I’m not sure what the next attack would look like, though I believe active shooters and small IEDs are the most cost-effective and gruesomely efficient solution for terrorists. I also have no doubt that multiple groups are engaged in a continual cycle of planning, assessing, and probing for exploitable weaknesses in our society’s armor.
There are, of course, plenty of other survival situations that aren’t so large-scale. When we think “disaster” most people envision a single event that affects millions of people. But what about the millions of events that affect individuals and their families every day? For Issue 29, I took a counter-custody class with Ed Calderon. That article contains some of the most unflattering pictures that have ever been published of me. I also saw a lot of kidnapping and hostage taking overseas. If you don’t think being kidnapped counts as a life-threatening disaster, or think it’s a rare occurrence, there’s plenty of grim statistics that prove otherwise.
What sort of situations do you see a serious lack of education about?
TM: Survival education, as a whole, is shunned by much of modern society, which forces many of us with a preparedness mindset to closet our ideas and information. The basic principles of survival are simple — even if they’re not easy. Whether you’re taking a trip to a foreign country, worried about street crime, or foresee the possibility of a large-scale terror attack in your hometown, being prepared is a critical thinking exercise: make an assessment of what potential disasters could touch your life, and come up with a plan on how you and your family will cope with it.
When you read this somewhere, everyone kind of rolls their eyes and slaps their forehead and says “yeah … obviously!” But talk is cheap, and we don’t teach this as a life skill. Medical professionals learn how to diagnose diseases. Scientists learn the scientific process for developing theories and testing them. But when people apply this kind of thinking in the context of natural or man-made disasters, they get labeled as crazy or paranoid. They get asked, “What are you so afraid of all the time?” This stifles any kind of education or open discussion about how to be ready for bad things that can happen in life.
How do you think technology is going to play into survival down the road, both good and bad?
TM: Let’s talk about the bad first — we’re all glued to our phones and tablets. They’re raising our kids and delivering our groceries and allowing us to say awful things to strangers who disagree with our politics. I think, on a large scale, it’s crippling people’s ability to put up with inconvenience or discomfort, a critical skill in any kind of survival situation. It’s also smothering people with useless distraction that allows us to digitally stick our heads in the sand about what’s happening in the world around us and what we can do to prepare for it.
Having said that, there are plenty of great benefits provided by technology in the context of survival. Lighter, more durable equipment. Smaller and brighter flashlights. GPS navigation. Not too long ago, we ran a review of emergency preparedness apps that put all kinds of news and emergency knowledge just a swipe or two away on your smartphone. The ability to leverage technology to save ourselves and persevere in the face of adversity is greater now than at any point in human history.
What is your advice to gun owners who think their rights and ability to protect themselves will continue to be compromised by political pandering?
TM: Just like other self-sufficiency skills, our right to self-defense and the tools associated with it shouldn’t be political bargaining chips. Get involved and stand up for your individual rights! Write letters, join advocacy groups, vote, donate if you can. If not, there’s always a need for volunteer assistance at the grassroots level. I know that everyone is strapped for cash and time, but these are surefire ways to ensure that our voice as a gun-owning community gets heard in public forum. The other thing I would stress heavily is being a good ambassador of gun culture. Don’t judge or talk down to people who are fearful or ignorant of the subject. It’s absolutely possible to change people’s minds on this topic. But you have to be sensitive to the stigma that pop culture has placed on the 2nd Amendment. It’s unfortunate, and it really shouldn’t be a thing, but it is.
What do you think are the terms or practices that tend to be a bit overhyped in the survival community and why?
TM: This is tough. One person’s “too much” is somebody else’s “not enough.” There seems to be a big push over the last few years for bunkers and compounds. Whether it’s burying a shipping container in the backyard or buying land two hours outside of the city and building an entire second homestead on it, I think this survival concept is way out of reach for most people. I also think the idea that society will begin eating itself at the first sign of trouble is way overblown.
I was living in New York on Sept. 11. With everything from cell service to the stock market being completely shut down, it was prime time for riots and leather-clad marauders. But there was none of that. Likewise, when that EF5 tornado hit Joplin, Missouri. In both cases, the community banded together and picked itself up, mostly as a team. Unfortunately, there are times when this hasn’t been the case. The aftermath of Hurricane Katrina is one example. So are the Watts and Rodney King riots in Los Angeles. But if you look at all the large-scale catastrophes that have occurred in America, I think coming together is the trend and falling apart is the exception.
What survival skills do you think are the most important to teach children?
TM: For young children, the most important thing overall is to be aware of your environment. I know that situational awareness is quickly becoming one of those overused phrases you asked about before. But it’s like that old saying — “an ounce of prevention or a pound of cure.” A child’s best chance of survival in any given situation is to simply keep away from serious threats as much as possible. Situational awareness also plays directly into their ability to scavenge for supplies, signal for help, figure out escape routes, and so on. Children lack the library of experience and mental shortcuts that adults have to quickly spot a dangerous situation, or to deduce improvised solutions to unanticipated problems. So teaching them to think critically about their environment — to be clever — will allow them to adapt to sudden changes in their world and overcome the hardship of those changes.
About Tom Marshall
Age: 34
Family: My awesome boy, my wonderful woman, and our five dogs: two Boxers, two English Mastiffs, and a Foxing Hound. Our youngest fur baby is 8 months; our oldest is 13 years. The English Mastiffs are 125 pounds and 200 pounds, respectively.
Hometown: Yonkers, NY
Education: Bachelor’s Degree in Logistics and Intermodal Transportation from U.S. Merchant Marine Academy, Kings Point, NY
Military service: Four years active duty, U.S. Army (Cavalry)
Childhood idols: I always idolized a weird ensemble of novelists and famous military leaders. To this day, writing and shooting are probably my two biggest passions. On the literary side: James Byron Huggins, David Morrell, Fredrick Forsyth, Robert Ludlum, and Stephen Hunter. Military heroes growing up included: John Mosby, “Swamp Fox” Marion, Bill Donovan, Richard Marcinko, Billy Waugh, Hal Moore, and Carlos Hathcock.
Favorite firearm: Just one? If we’re discarding practicality for a second, some of my favorites are high-end 1911s, the Browning Hi-Power, M1 Carbine, M3 Grease Gun, HK G36, and 5.45mm AKs.
Required reading list: The Book of Five Rings by Miyamoto Musashi
Defensive Living by Dave Spaulding and Ed Lovette
Left of Bang by Patrick Van Horne and Jason Riley
Meditation for Warriors by Loren Christiansen
Blink by Malcom Gladwell
Dream car: ’68 Chevelle SS or an ’85 Buick Grand National
Favorite cigar: Drew Estate Liga No. 9
Favorite drink: Blanton’s bourbon, neat
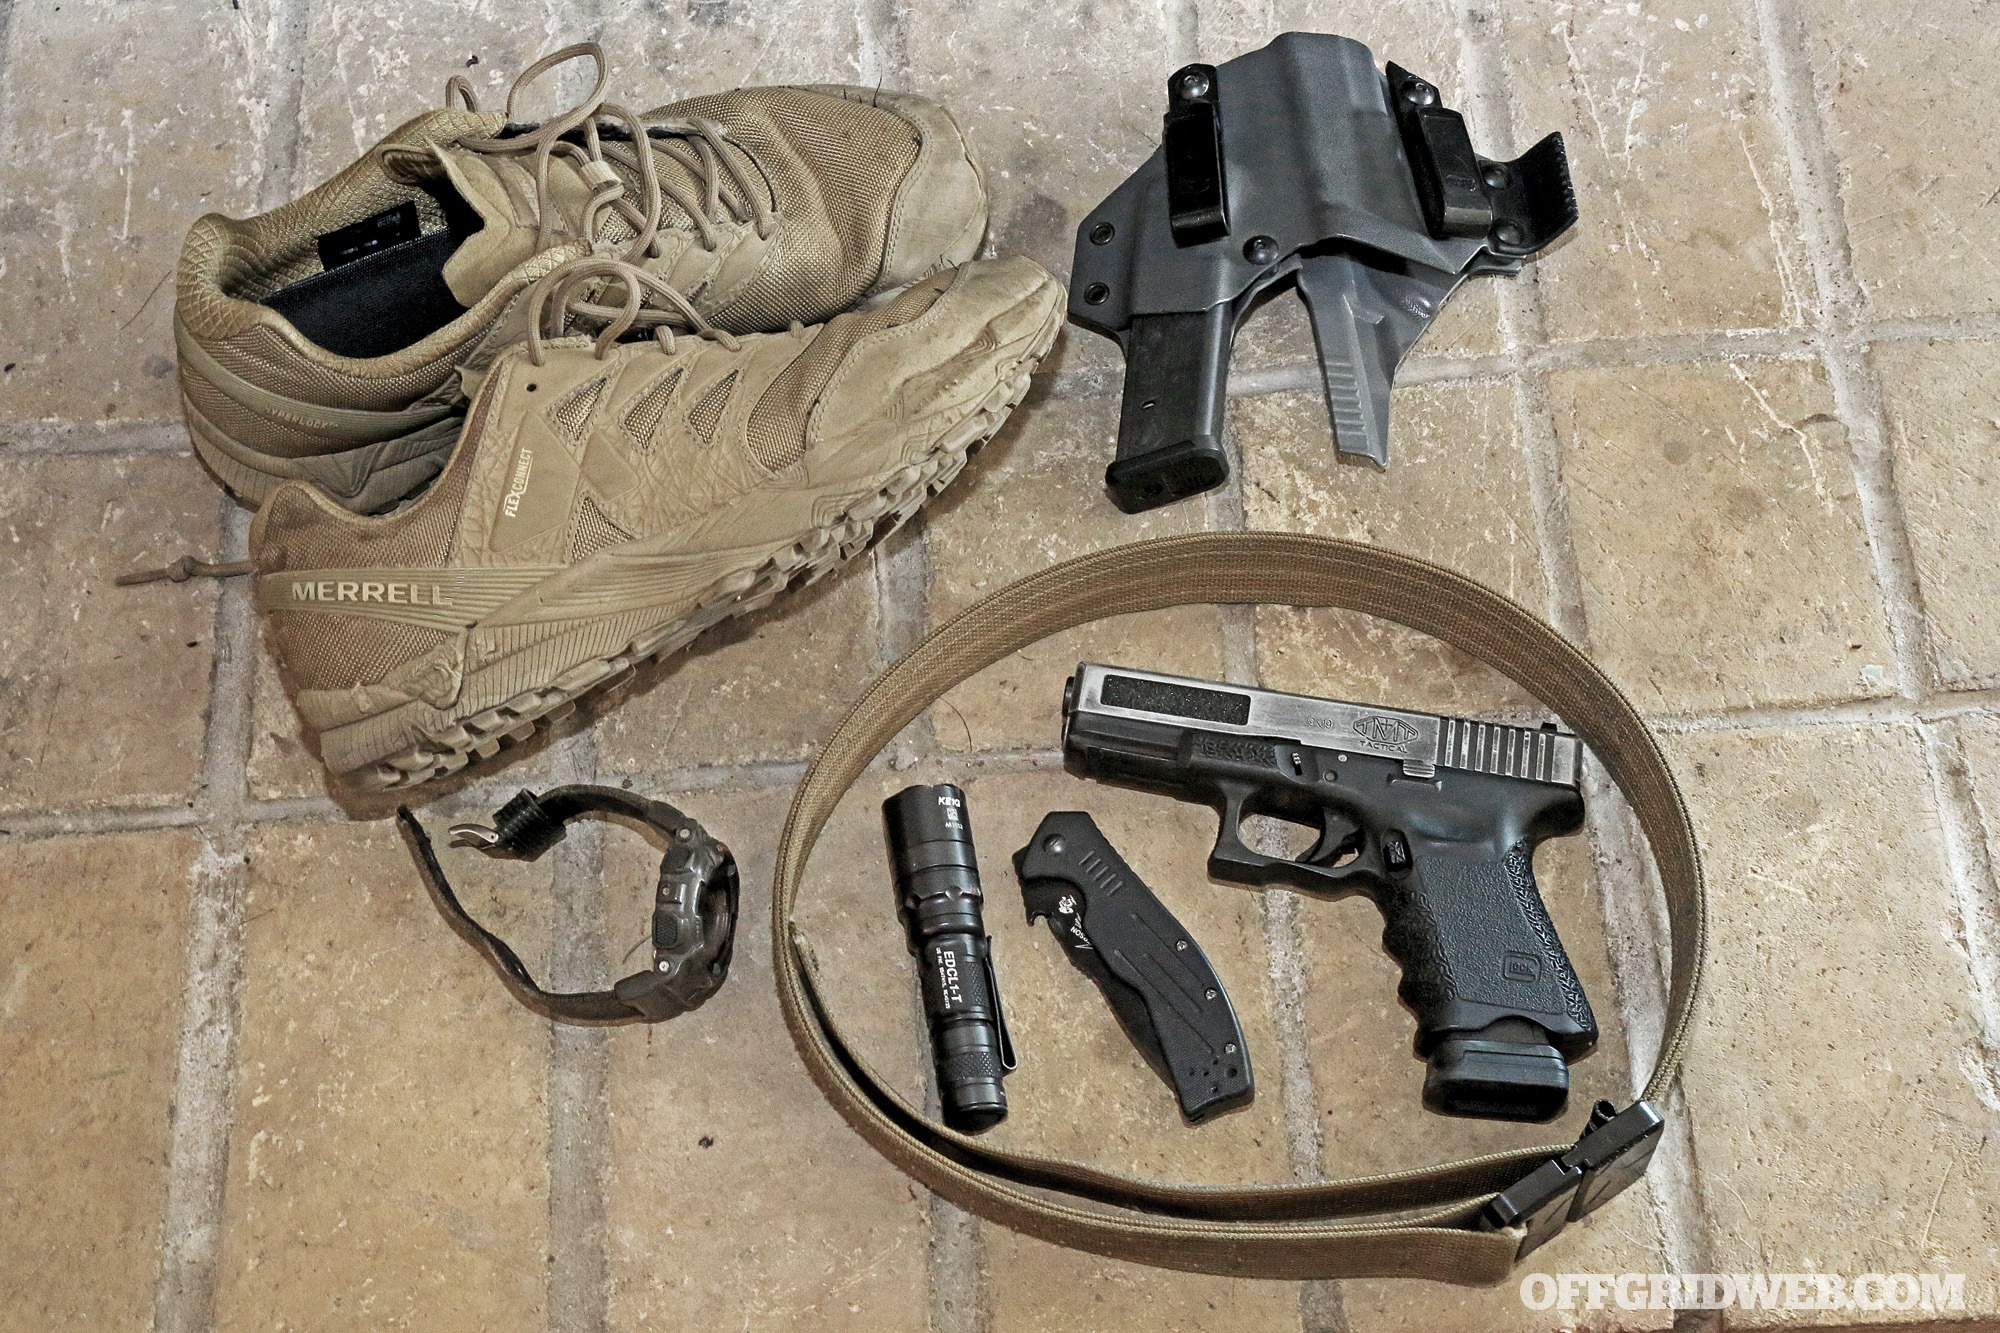
Tom’s EDC
SureFire EDC L1-T
Kershaw Emerson
CQC-7B
TuffWriter carabiner
Casio G-Shock watch
Phone
Glock 19 modified by TMT Tactical and Johnny’s Custom Glocks, loaded with Federal 124-grain HST.
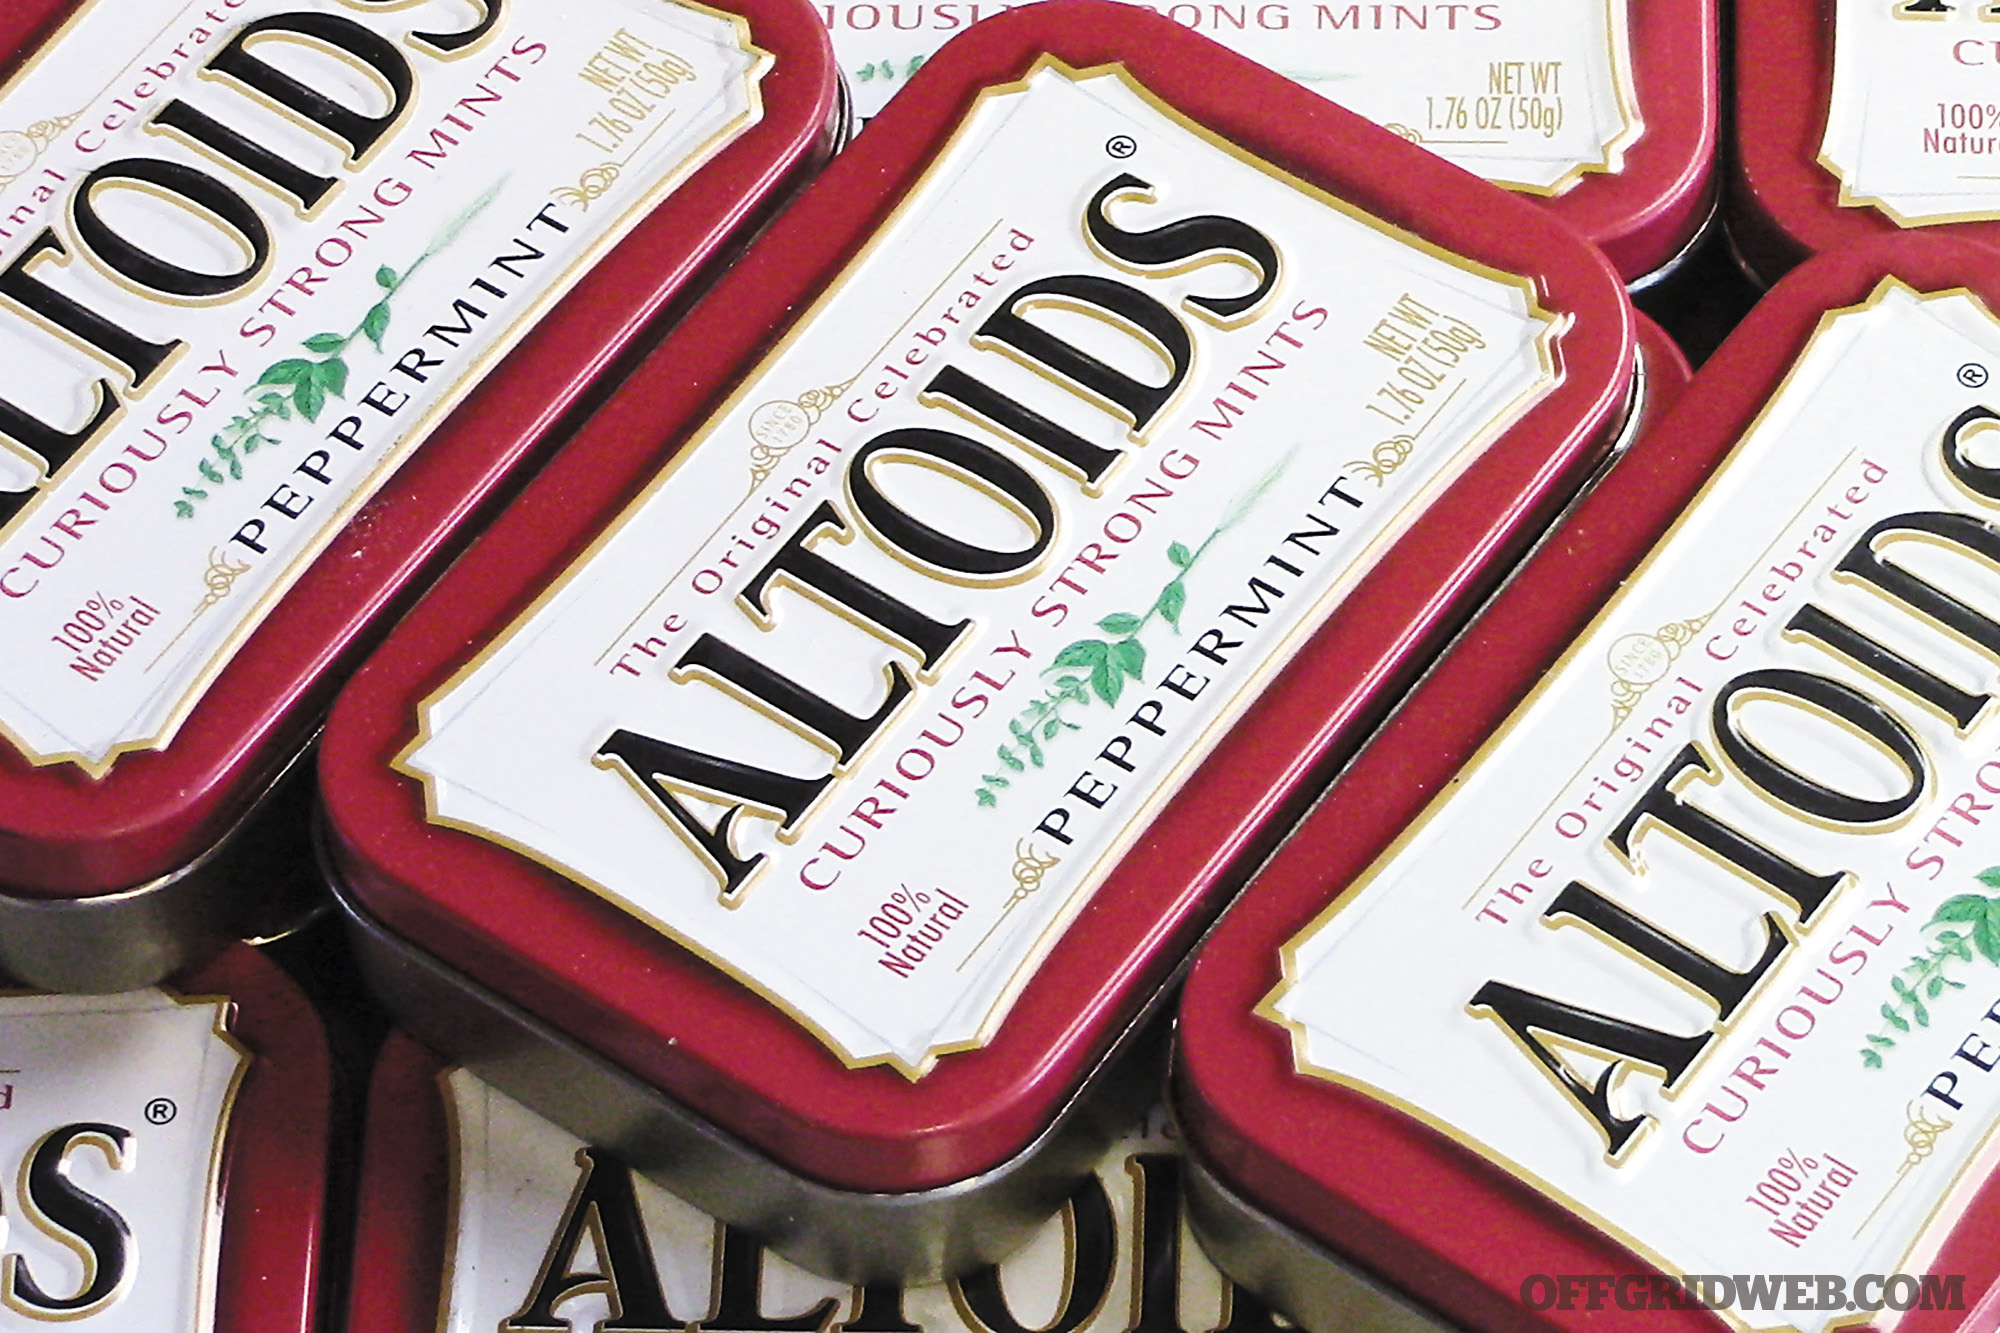
Over the years, we’ve seen countless variations on the concept of an Altoids tin survival kit. Whether the pocket-sized tin originally contained curiously strong mints, hard candies, chewing gum, or some other consumable item, they’re practically made to be repurposed once they’re empty. We’ve used them to carry fire-starters, fishing line and hooks, sewing needles and thread, water purification tablets, snare wire, Band-Aids and antiseptic, signaling equipment, or countless combinations of these (and many other) items. You can even turn one into an alcohol stove, punch a hole in it and use it to make char cloth, or pour wax into it to create a long-lasting packable candle. The possibilities are only limited by your imagination.
Ever since these convenient containers have existed, people have been repurposing them.
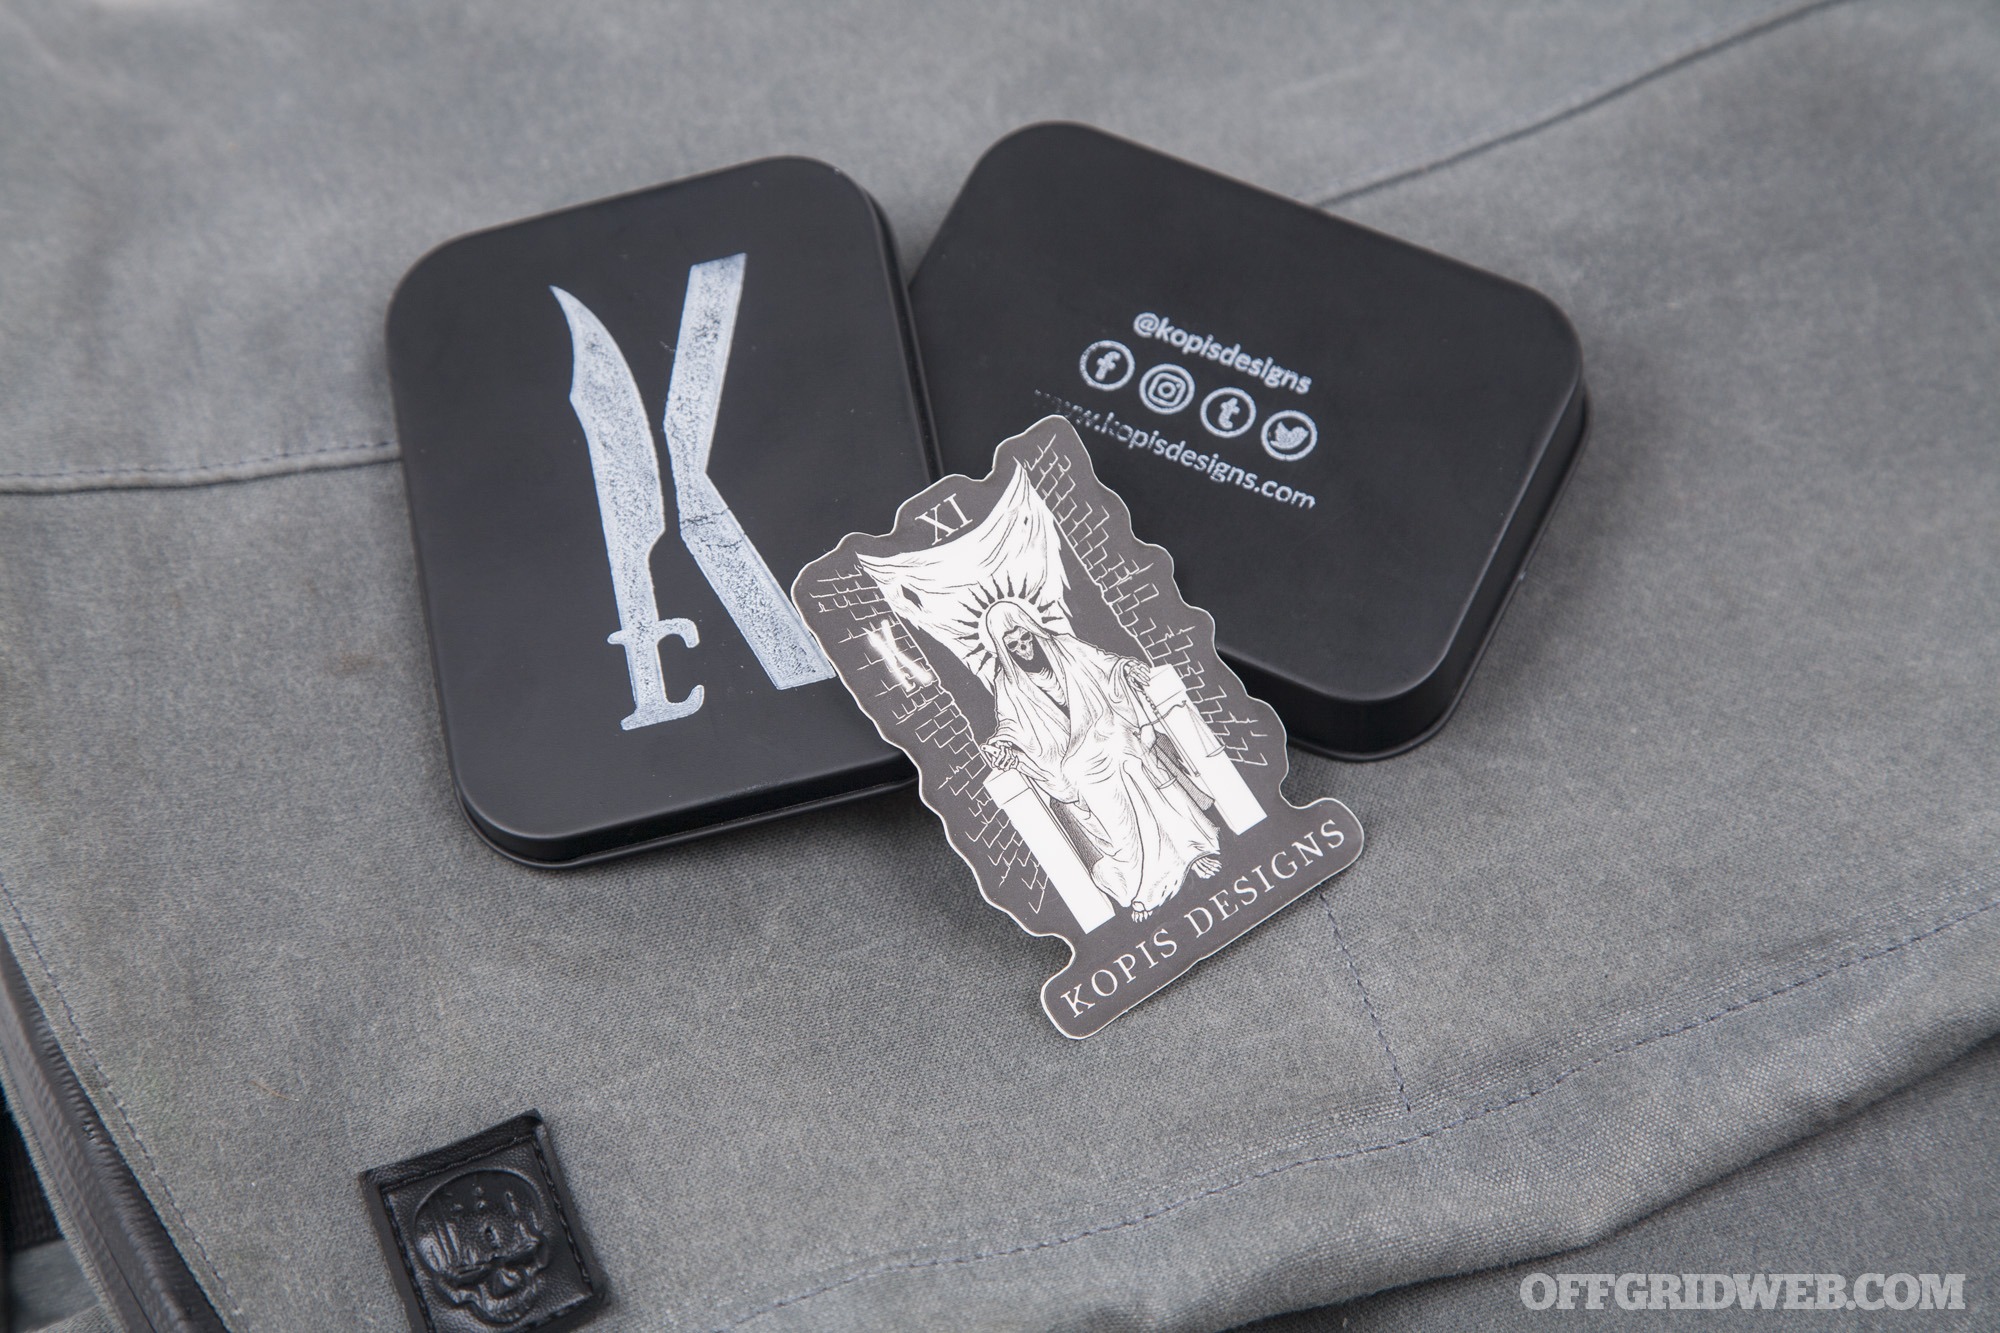
Kopis Designs La Caja
We recently learned about a more advanced, ready-made version of this concept from Colorado-based EDC gear maker Kopis Designs. Its founder, Jon Bahlatzis, has been crafting custom knives and pocket tools since 2014, and decided to create his own spin on the classic Altoids tin kit — a pocket-sized collection of tools suitable for an urban escape and evasion scenario.
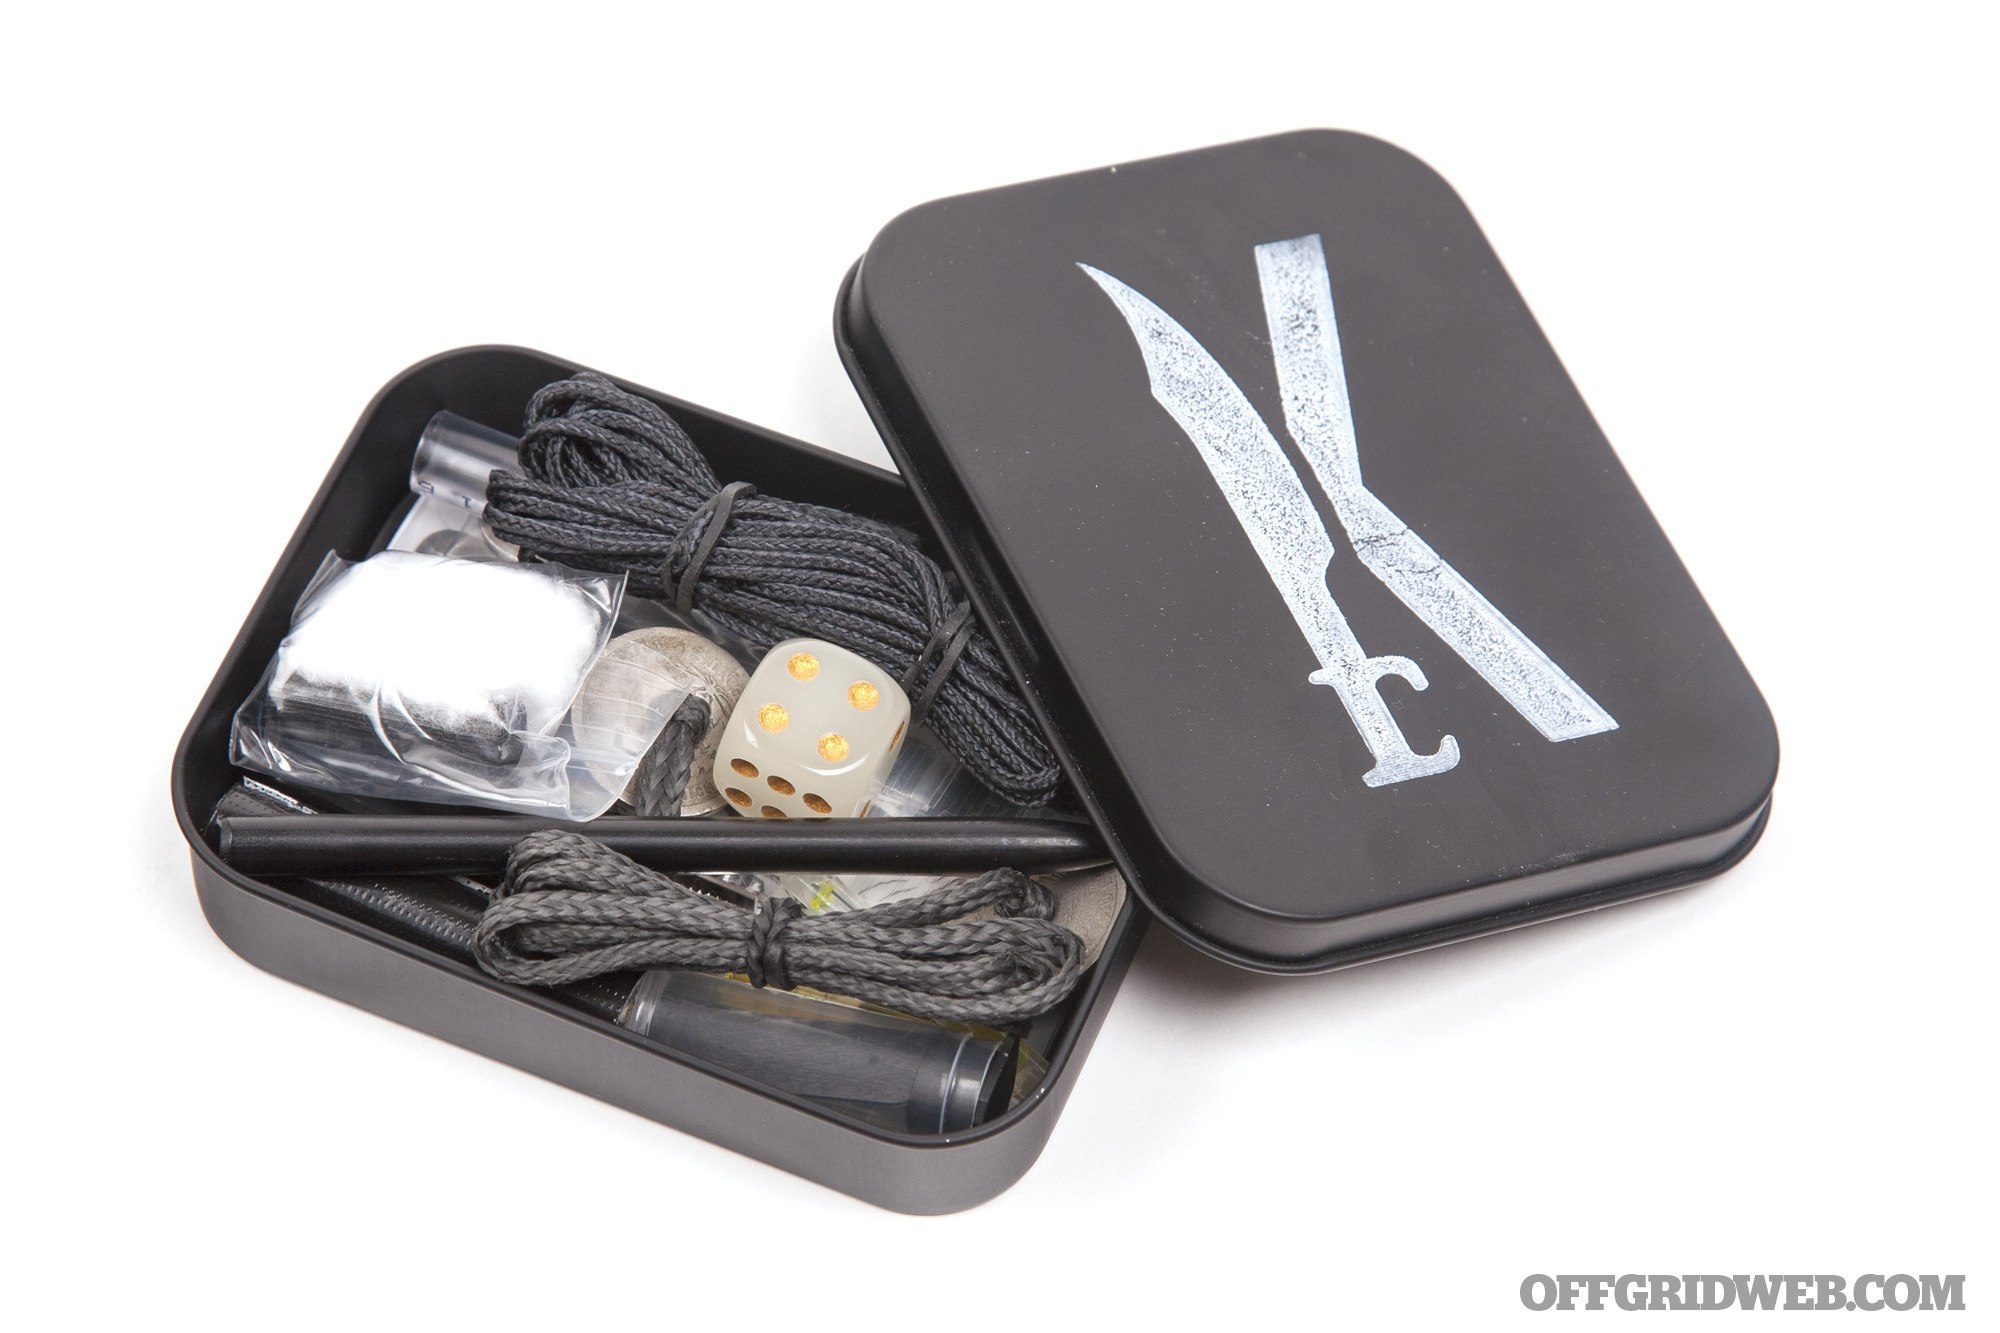
The result is known as La Caja — literally “The Box” in Spanish. It’s a mysterious-sounding name that matches the clandestine purposes of its contents.
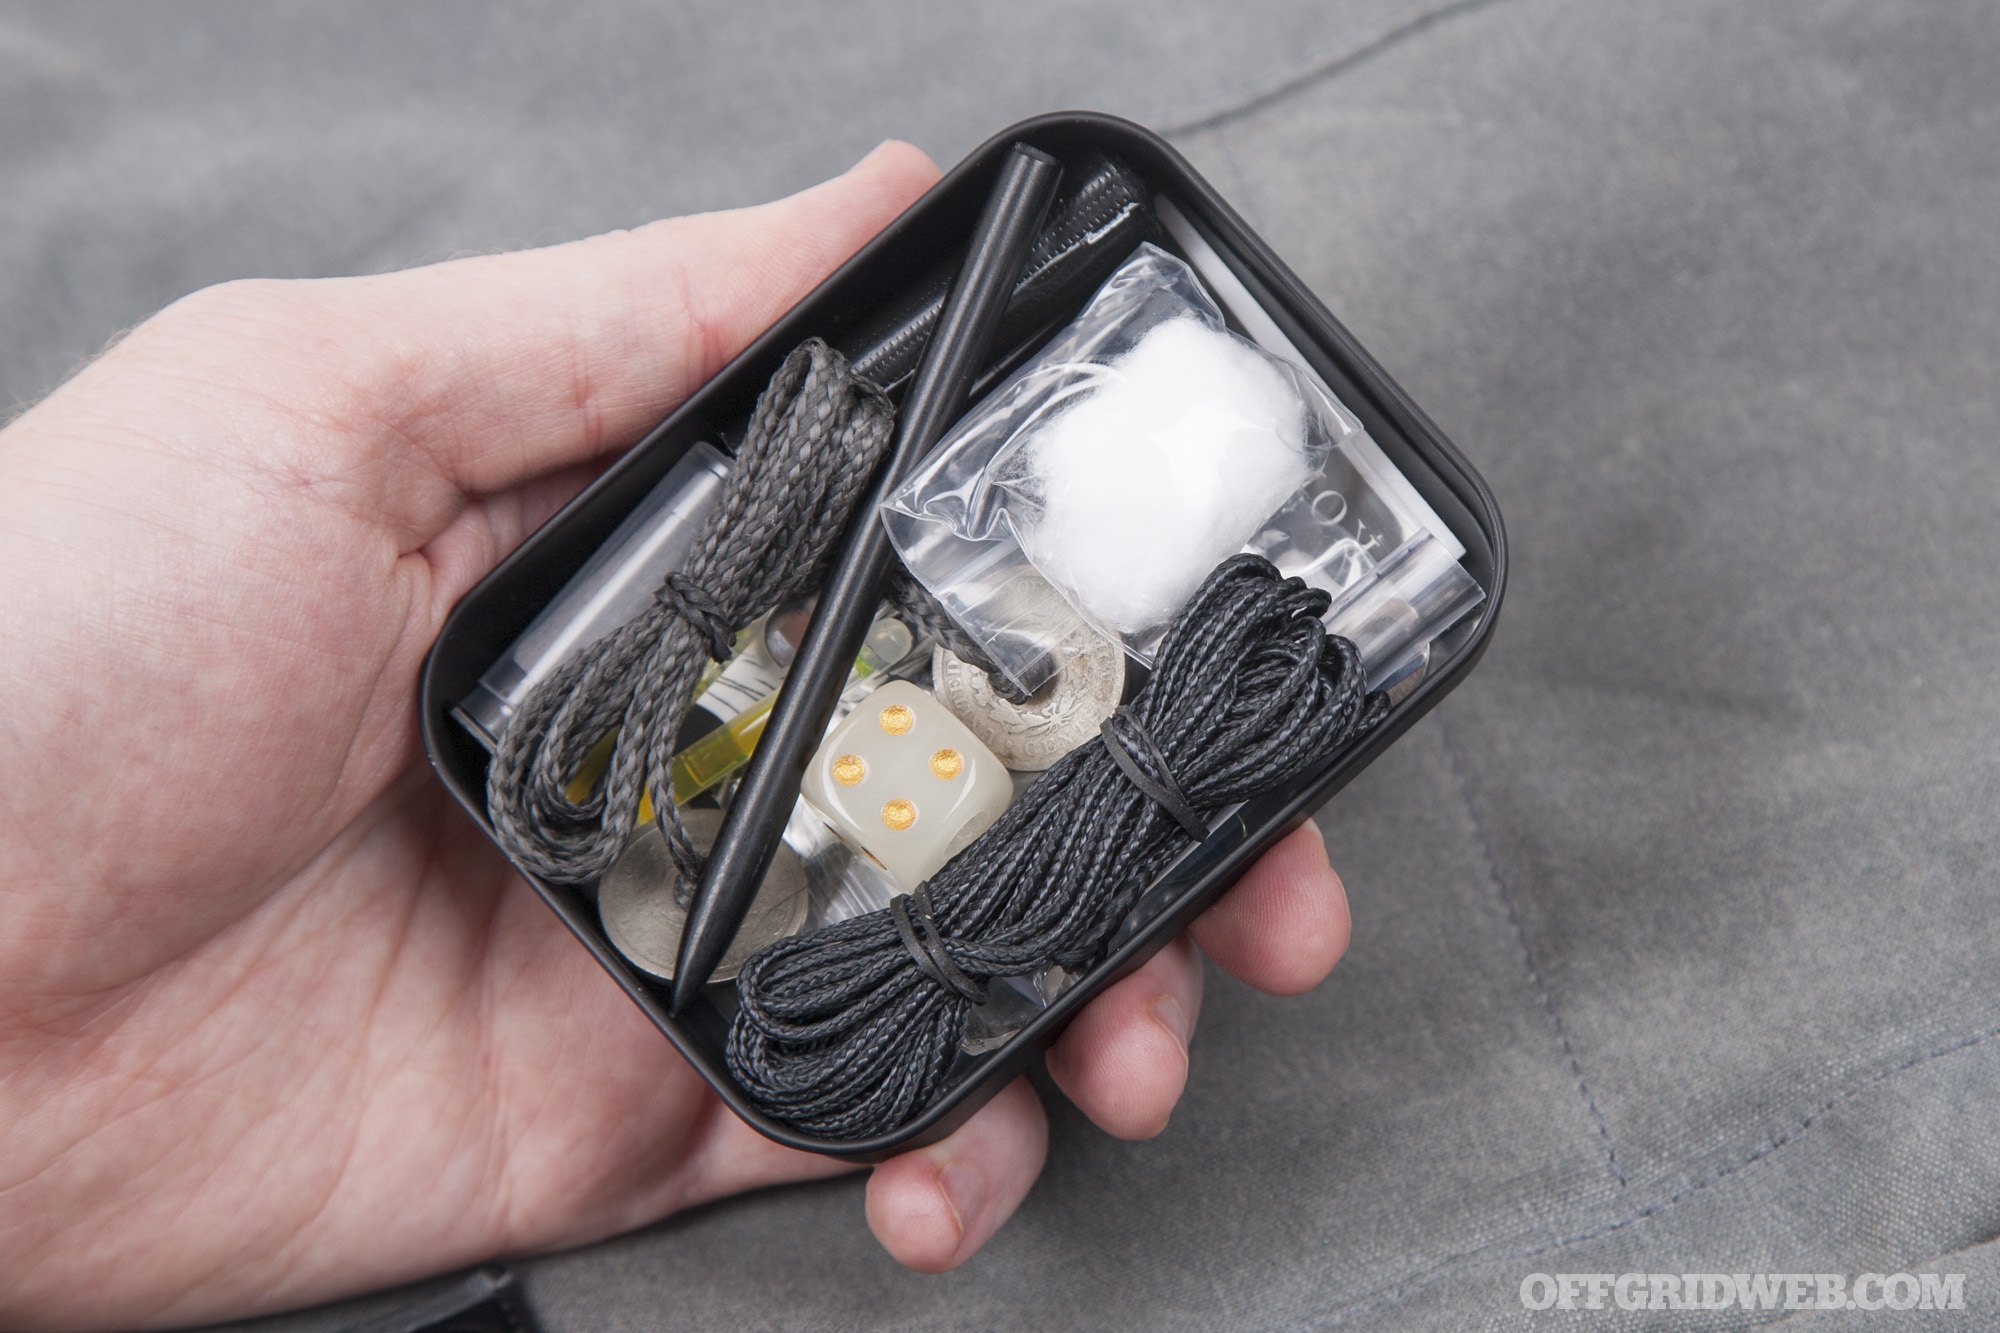
Bahlatzis developed La Caja with input from experts in the escape and evasion, covert entry, and counter-custody fields. These included the Serepick team and OFFGRID contributor Ed Calderon. Based on their feedback, this kit comes standard with 15 tools that can be used to escape handcuffs, pick locks, shim doors, cut through restraints, and even defend the user’s life.
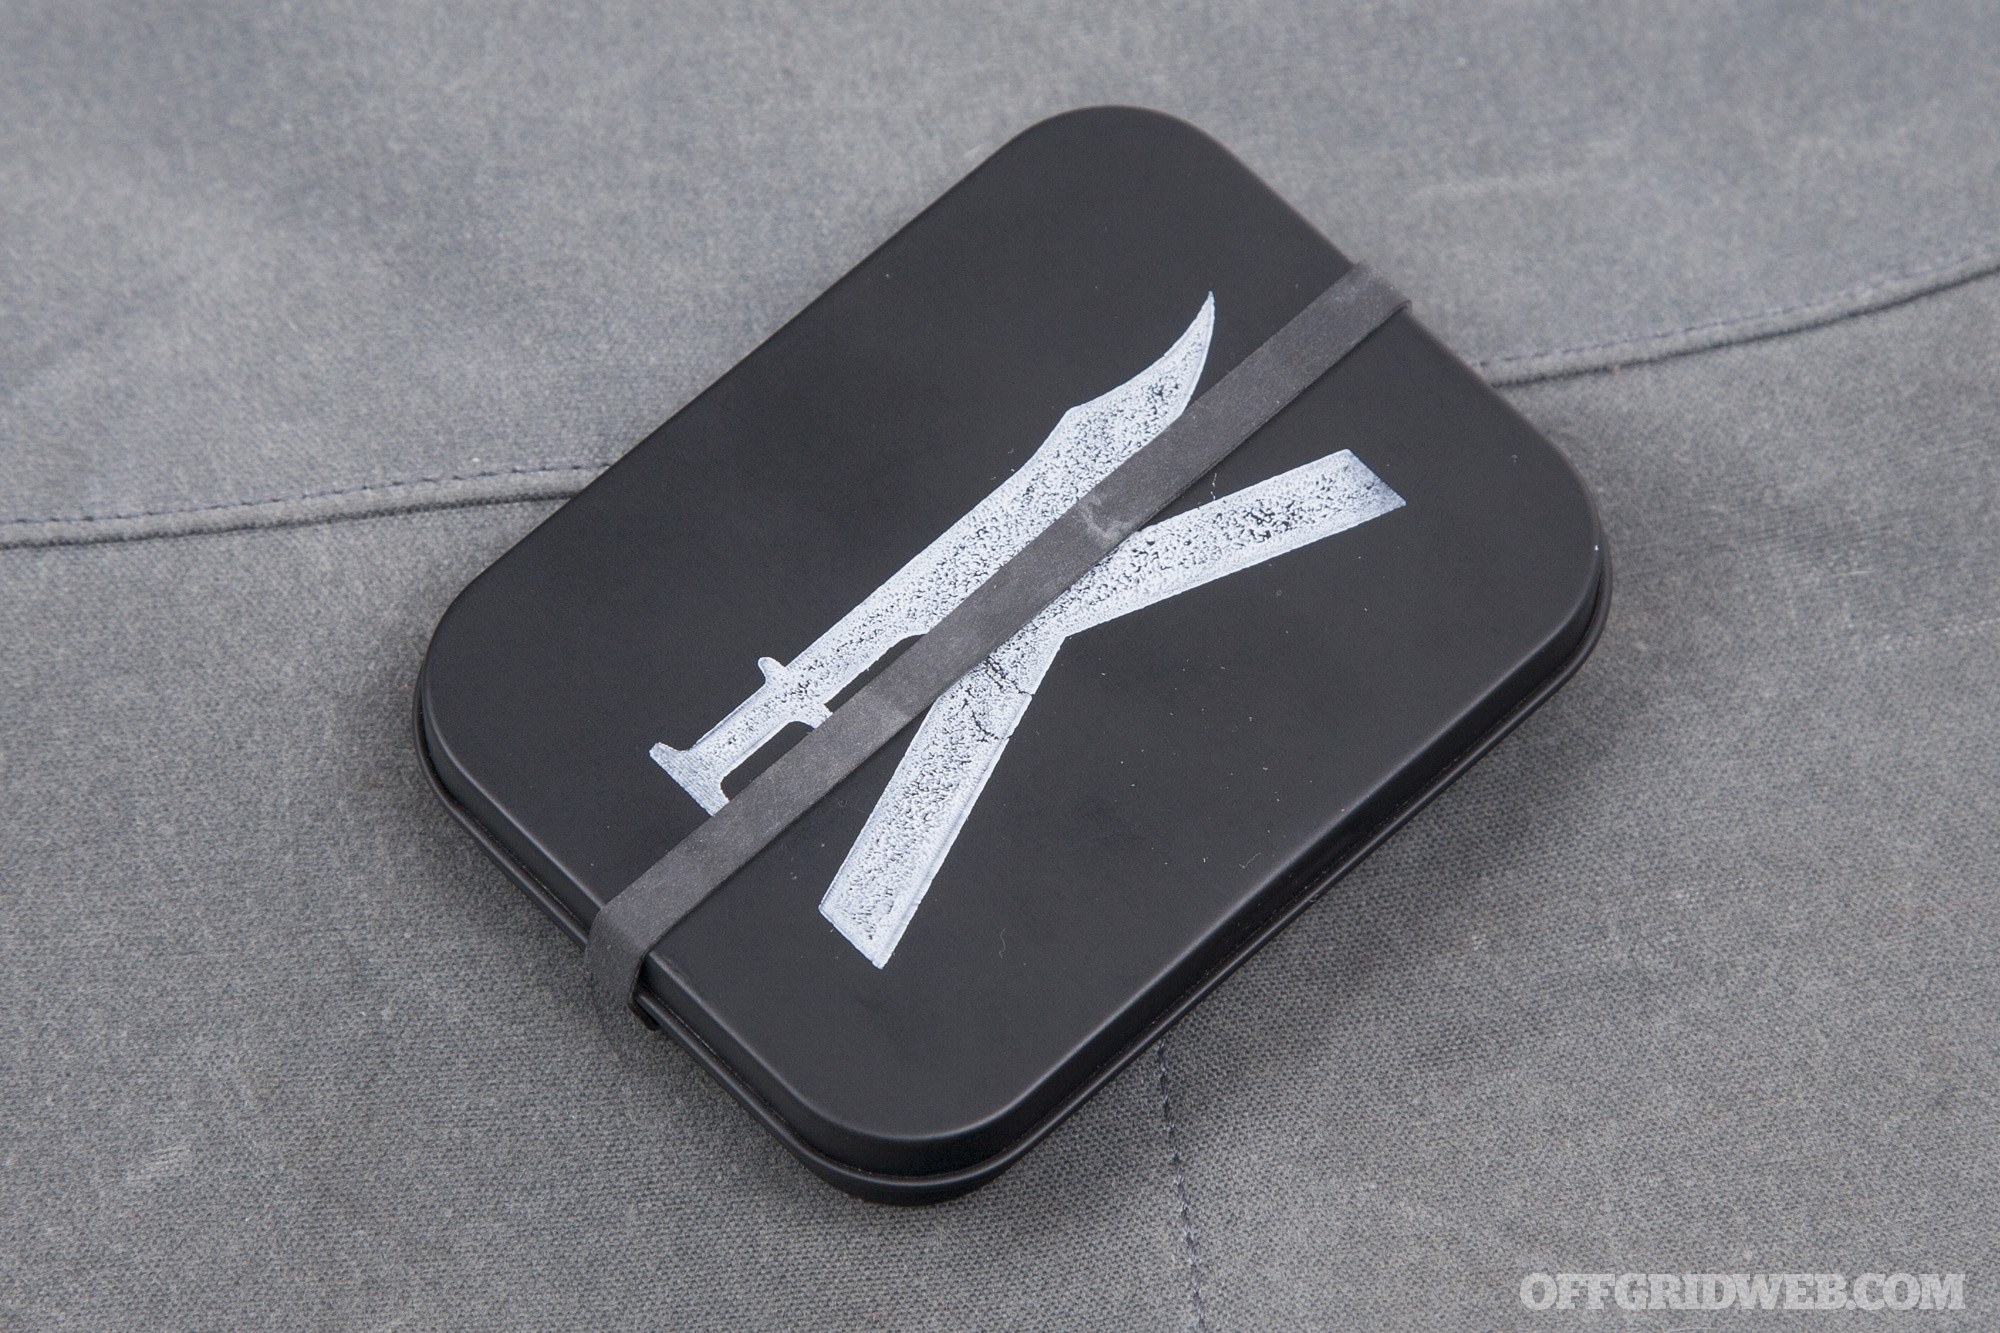
Rather than a cheap mint tin, this kit comes in a sturdy steel container that’s finished in a matte black coating with the Kopis Designs logo stamped on its lid. The lid snaps securely in place, but a black rubber band is included as an additional safety measure to make sure the contents don’t get scattered. Read on as we unbox and analyze each item inside.
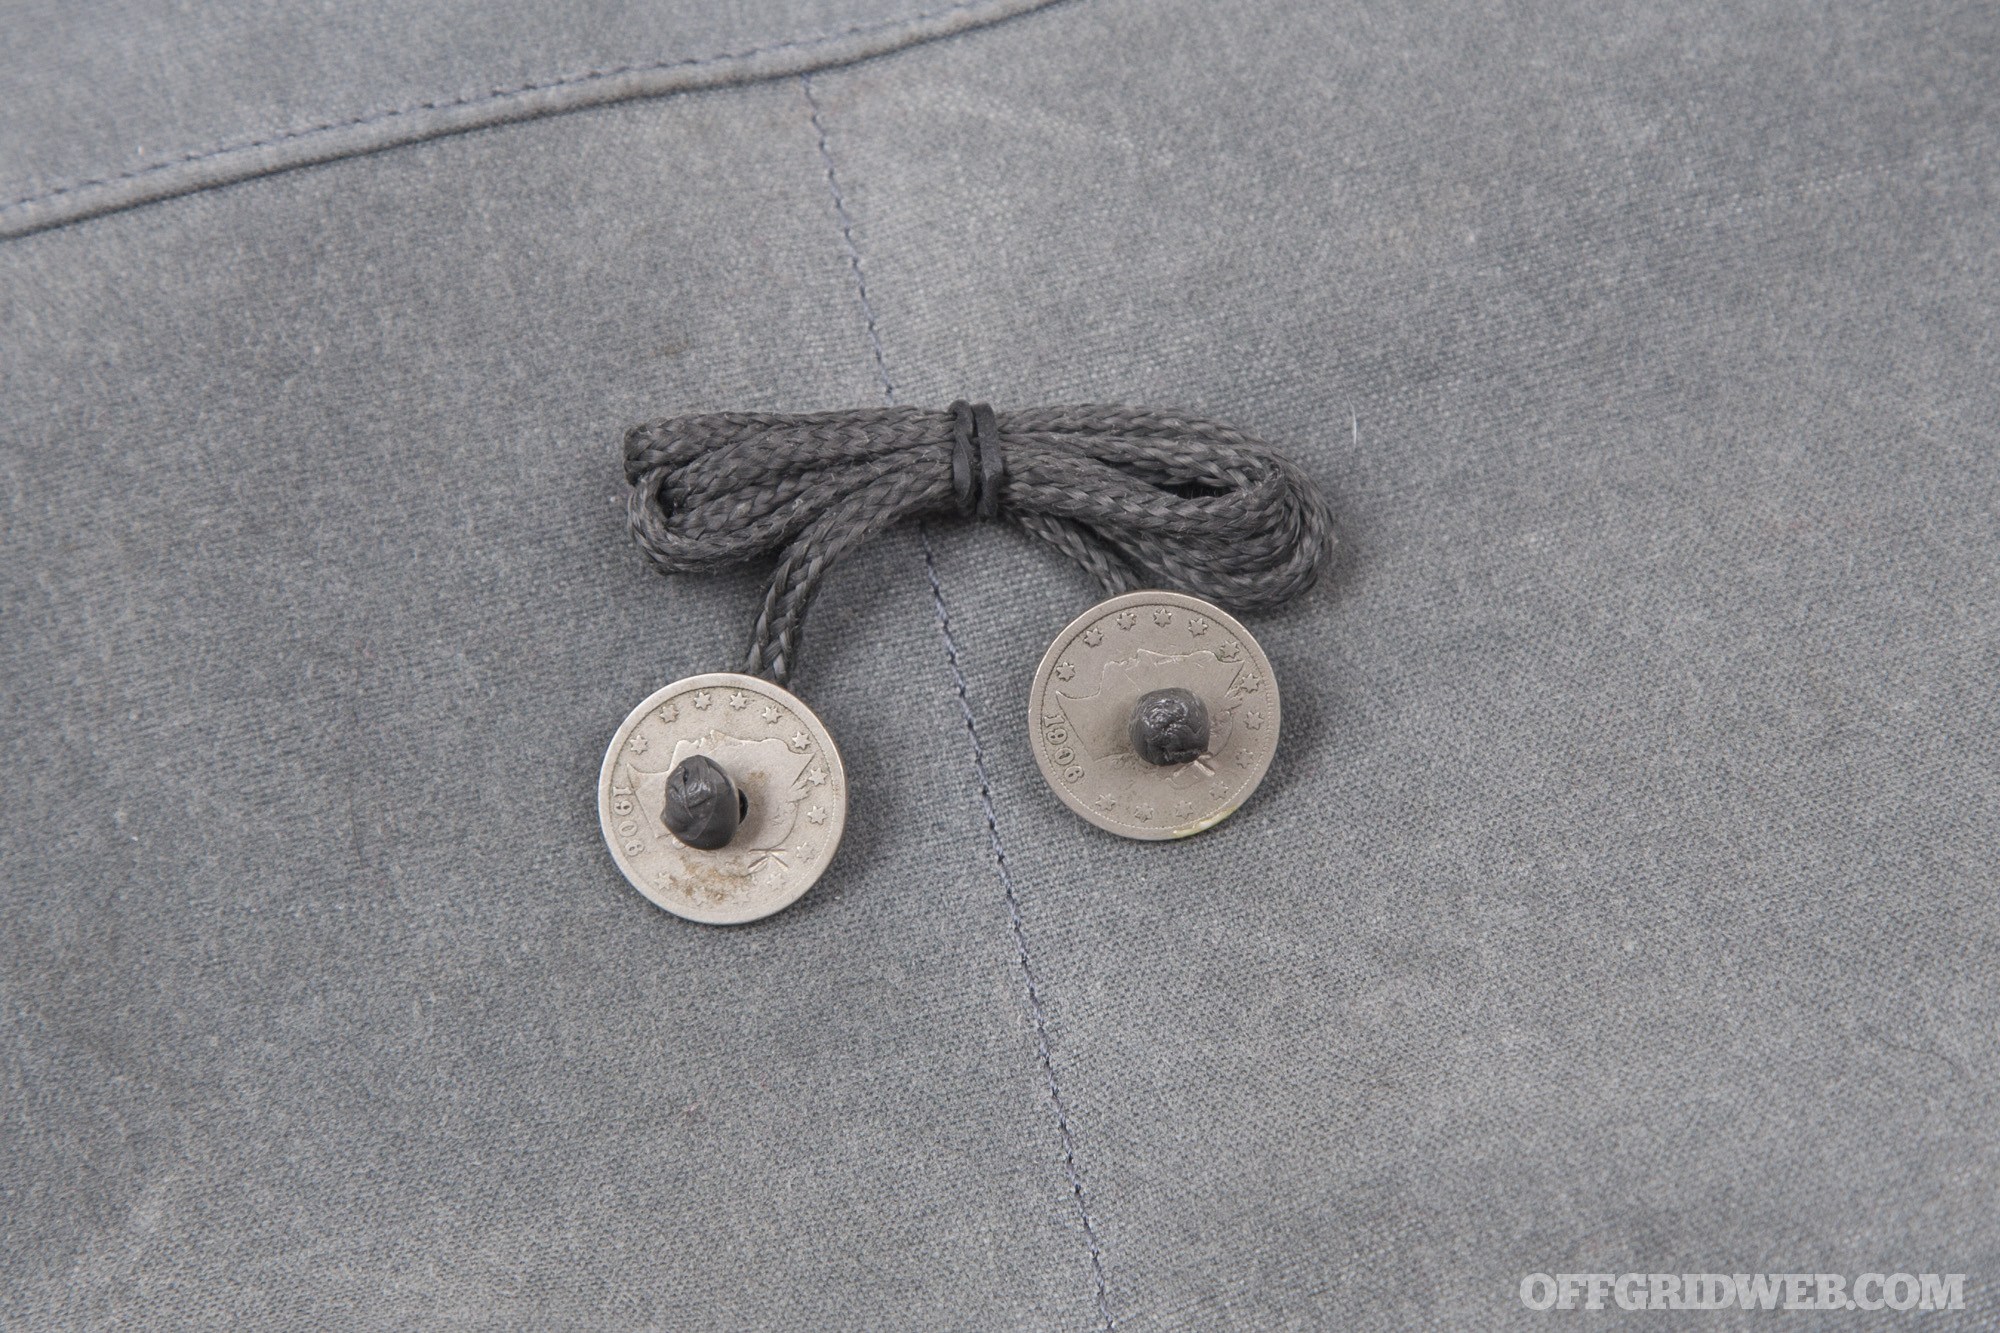
V Nickel “Bracelet”
You may notice our use of quotations around the word bracelet. Although you can certainly wear this tool around your wrist by looping it and tying a double fisherman’s knot, its purpose is more than decorative.
It consists of two early-1900s Liberty Head nickel (a.k.a. V nickel) coins connected by a strand of 900-pound-rated Technora cord. By wrapping each end of the cord around your hands, you could use it as a garrotte to silence an abductor in order to escape unlawful captivity. Alternatively, you could use it as a friction saw to cut through restraints, either with your hands or by placing the coins between your toes and moving your feet in a pedaling motion.
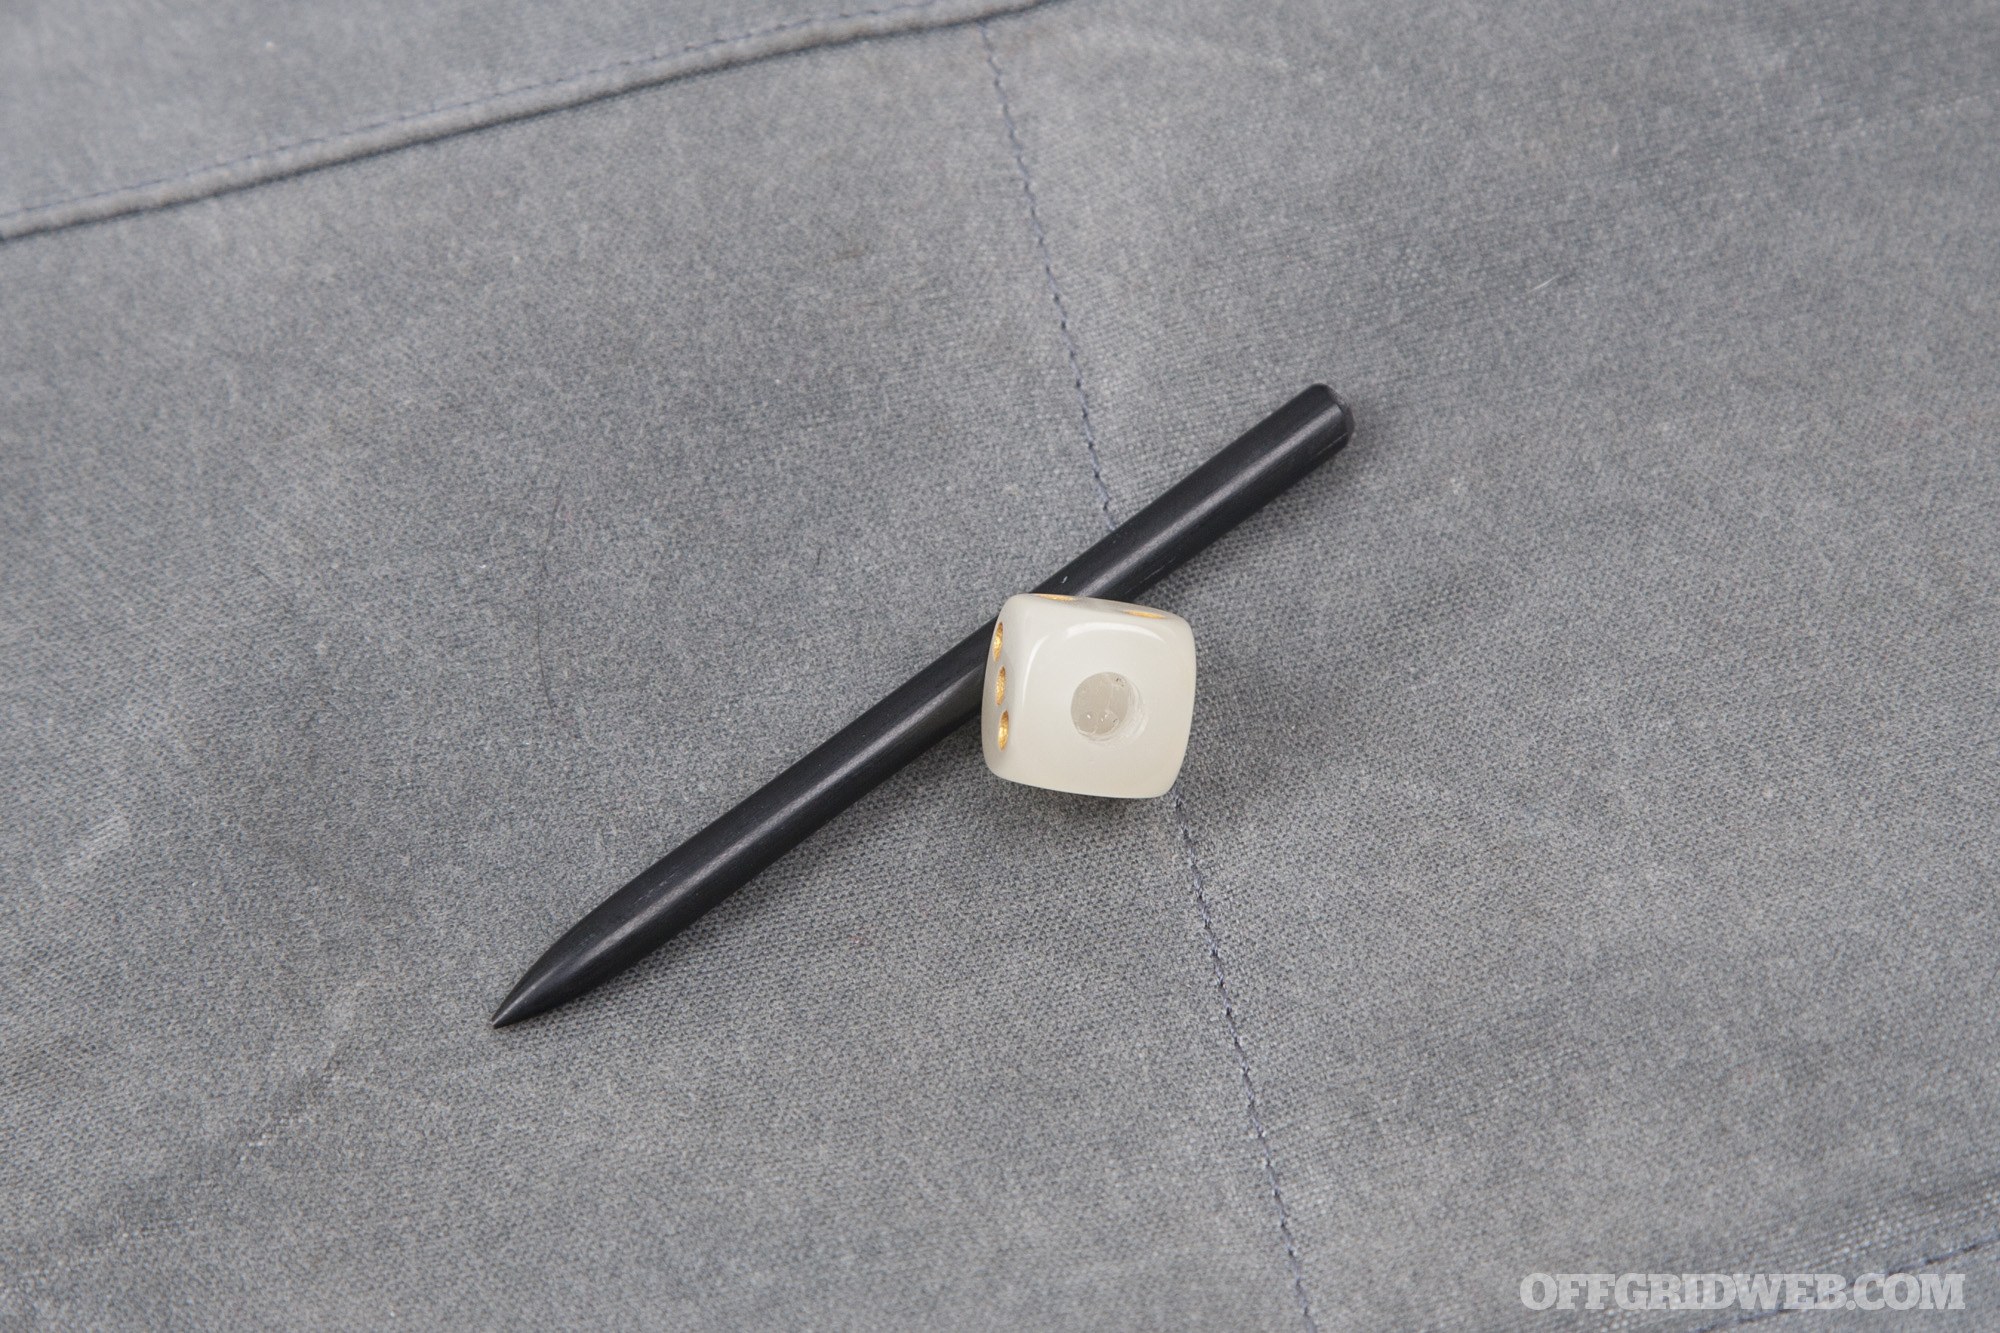
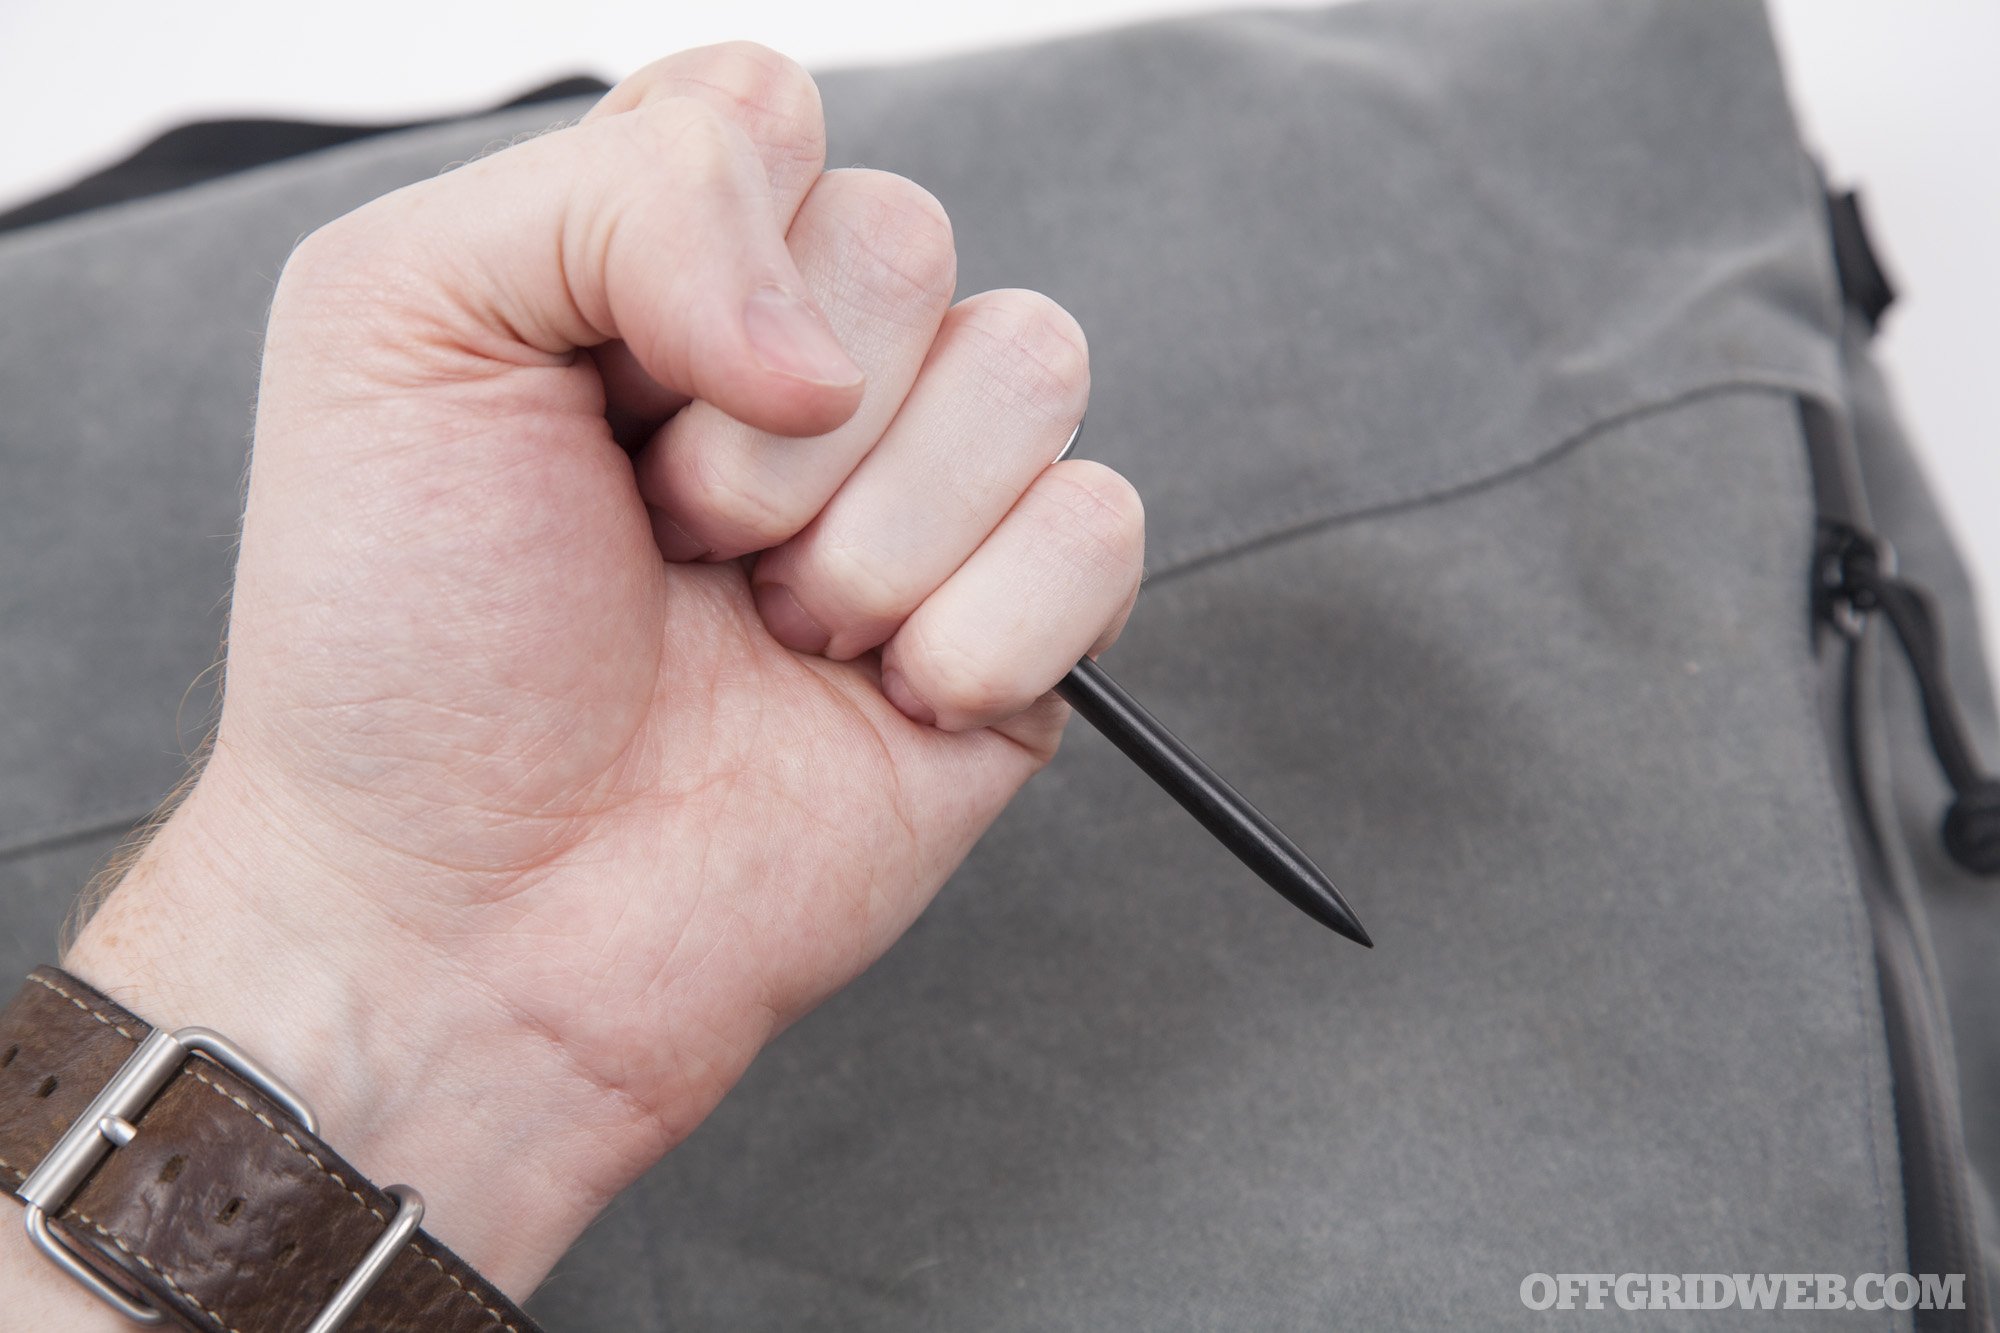
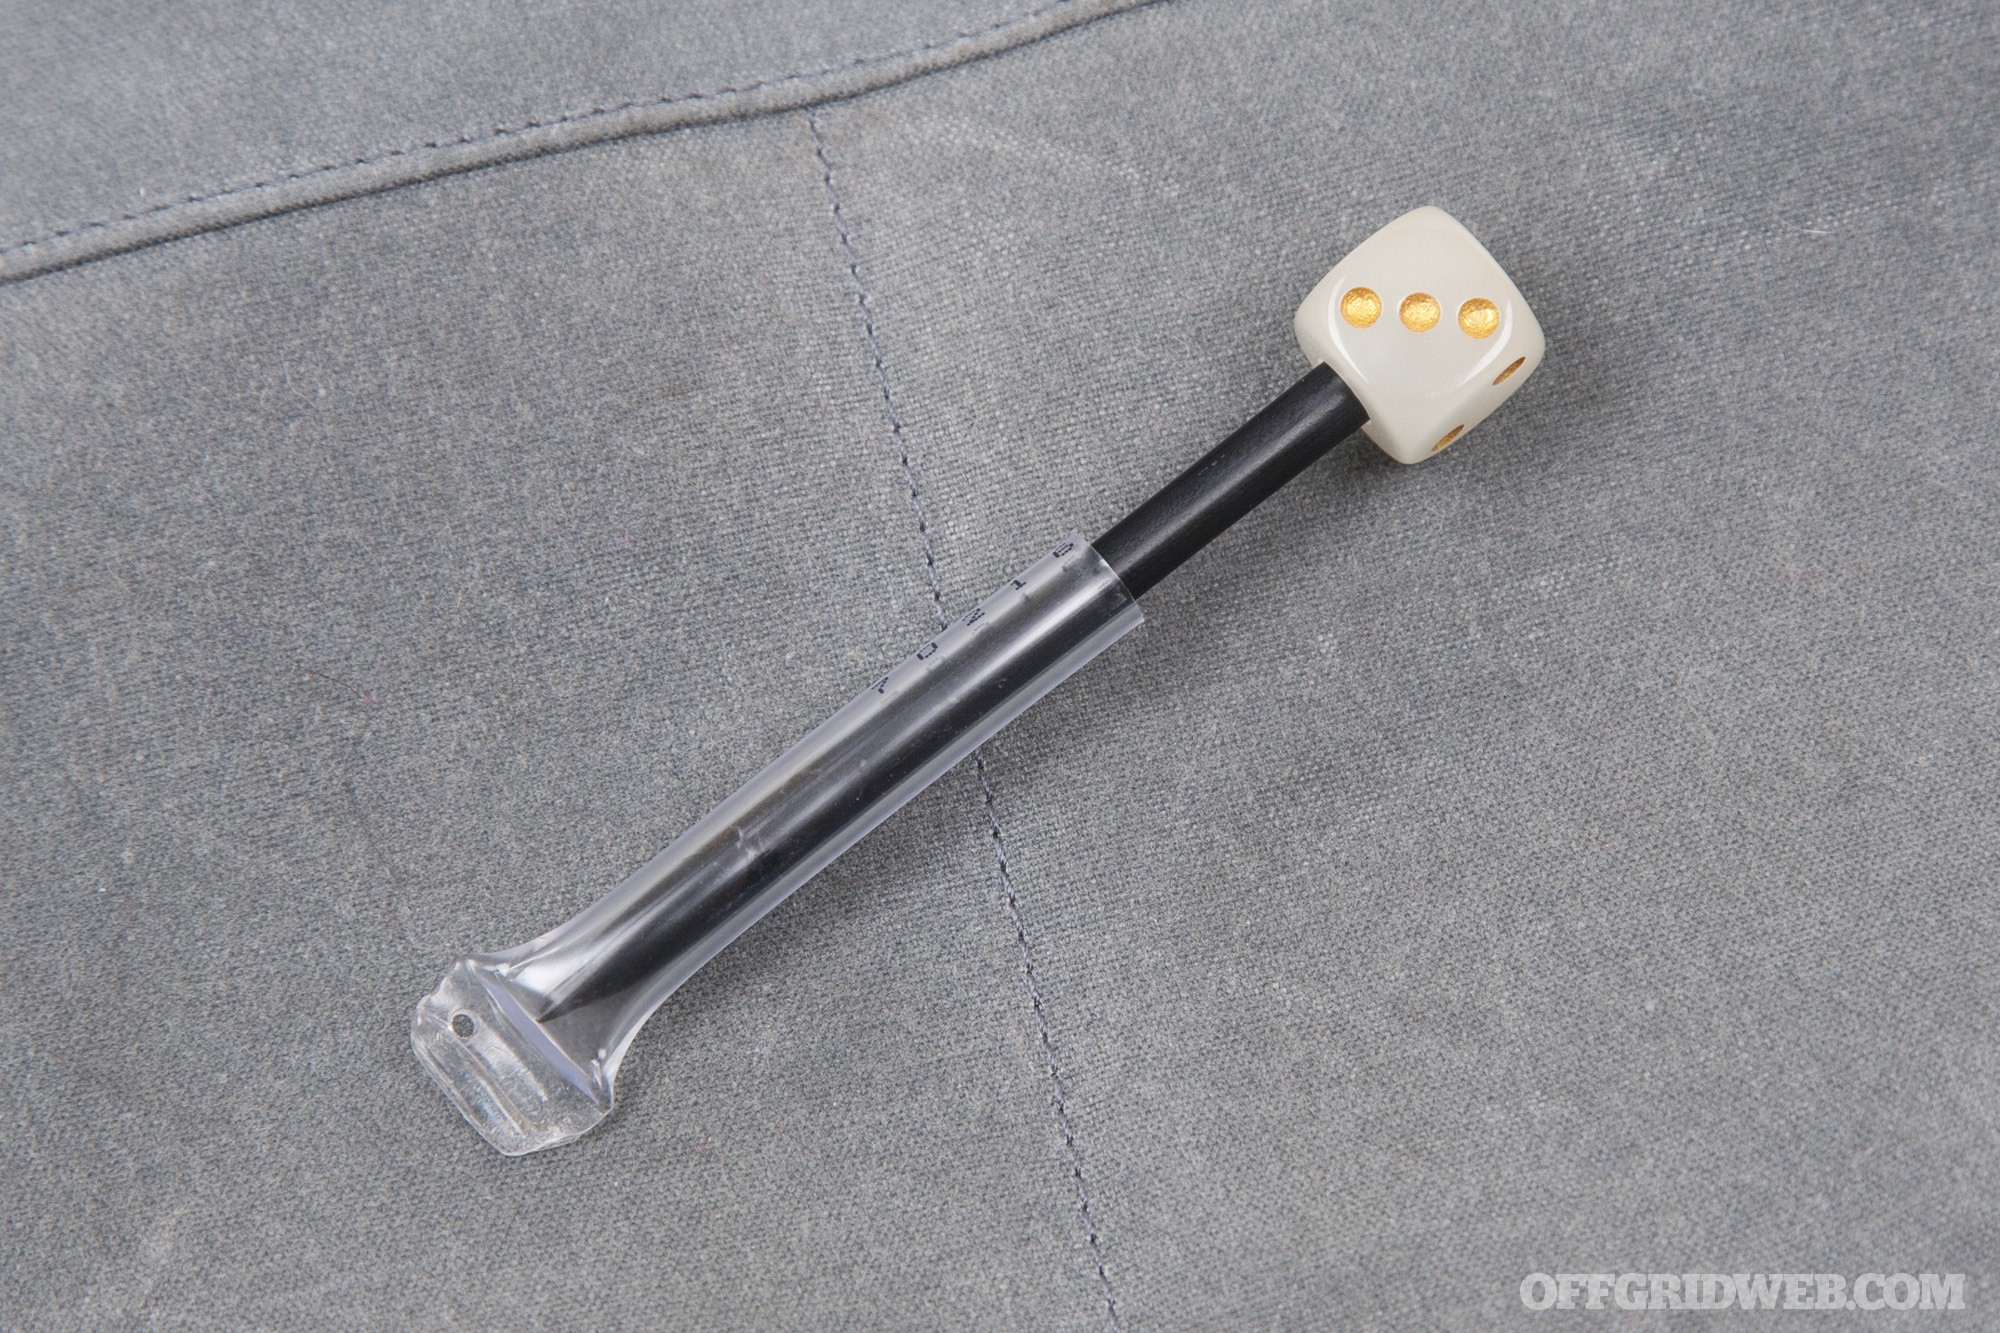
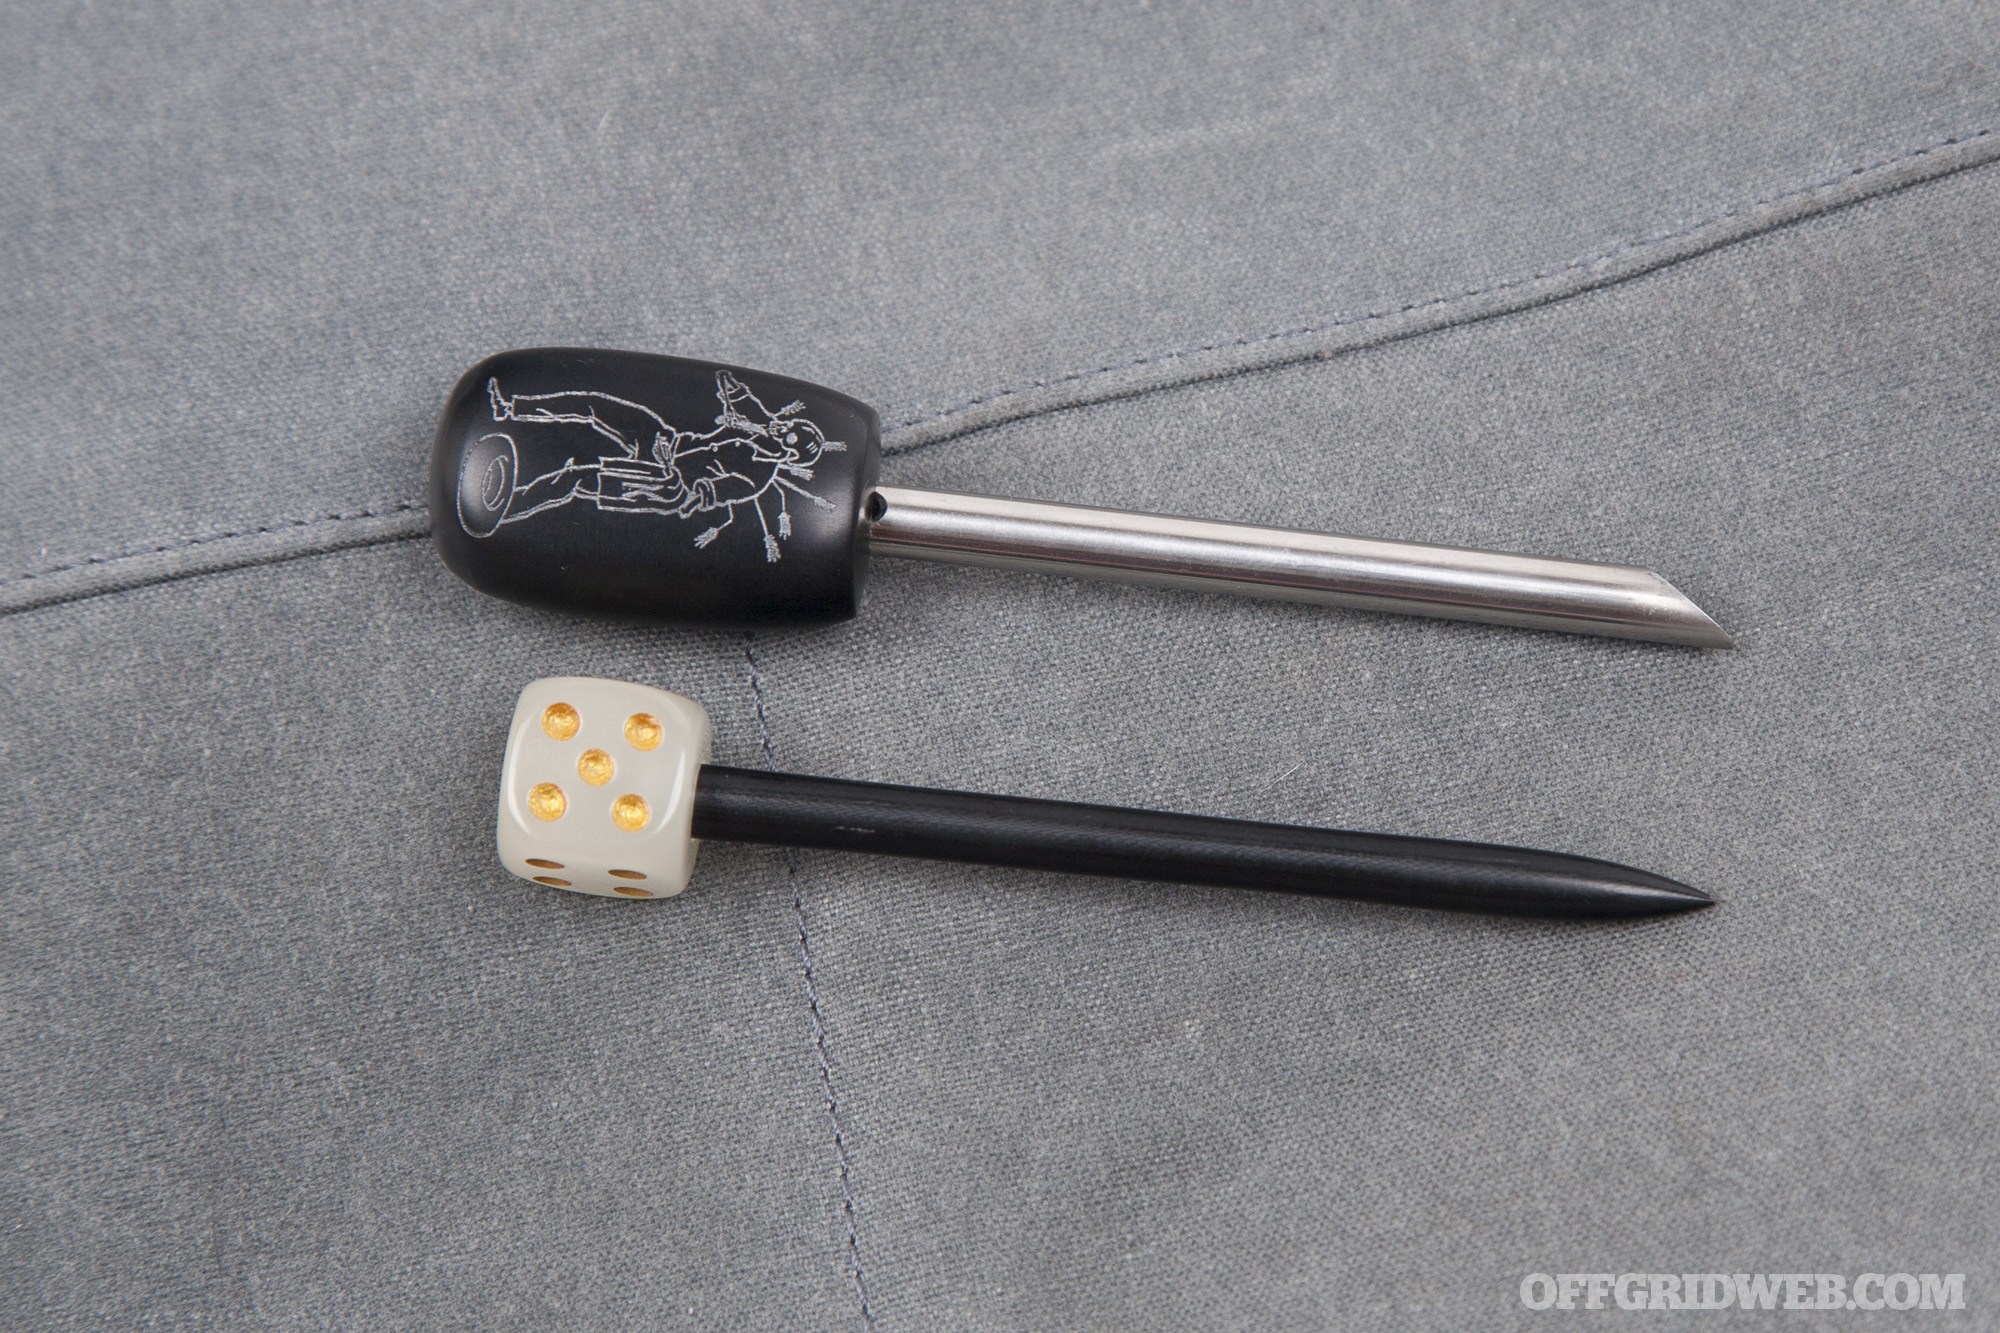
G10 Dice Pick
Next, you’ll find another defensive tool — a 3.5-inch G10 polymer spike with a glow-in-the-dark die. The latter piece has been drilled out to serve as a removable handle, creating a weapon that can be wielded like a punch dagger or icepick.
The spike small enough to hide inside a waistband or pocket, and it’s completely nonmetallic, so it can also be concealed past checkpoints with metal detectors. A simple sheath has been formed from clear plastic tubing, with one end crimped shut and punctured to accommodate a lanyard.
Kopis Designs’ site notes that this G10 spike “comes slightly blunted so it can be carried into a non-permissive environment and field-sharpened to personal preference on carpet, sidewalk, nail file, etc.” We brought it to a sharp tip in minutes using a scrap of fine-grit sandpaper. In a pinch, the spike could be discarded and replaced by any other 1/4-inch-thick sharp object that fits the die, such as a nail or drill bit.
If you’re looking for additional capability and aren’t concerned about metal detectors, Kopis Designs can swap the G10 spike for a steel “deflator” spike, such as the one paired with the El Valiente Micropick handle in the photo below. This hollow, slash-cut tube can be used to puncture tire sidewalls to disable a vehicle… or puncture arteries to disable an attacker.
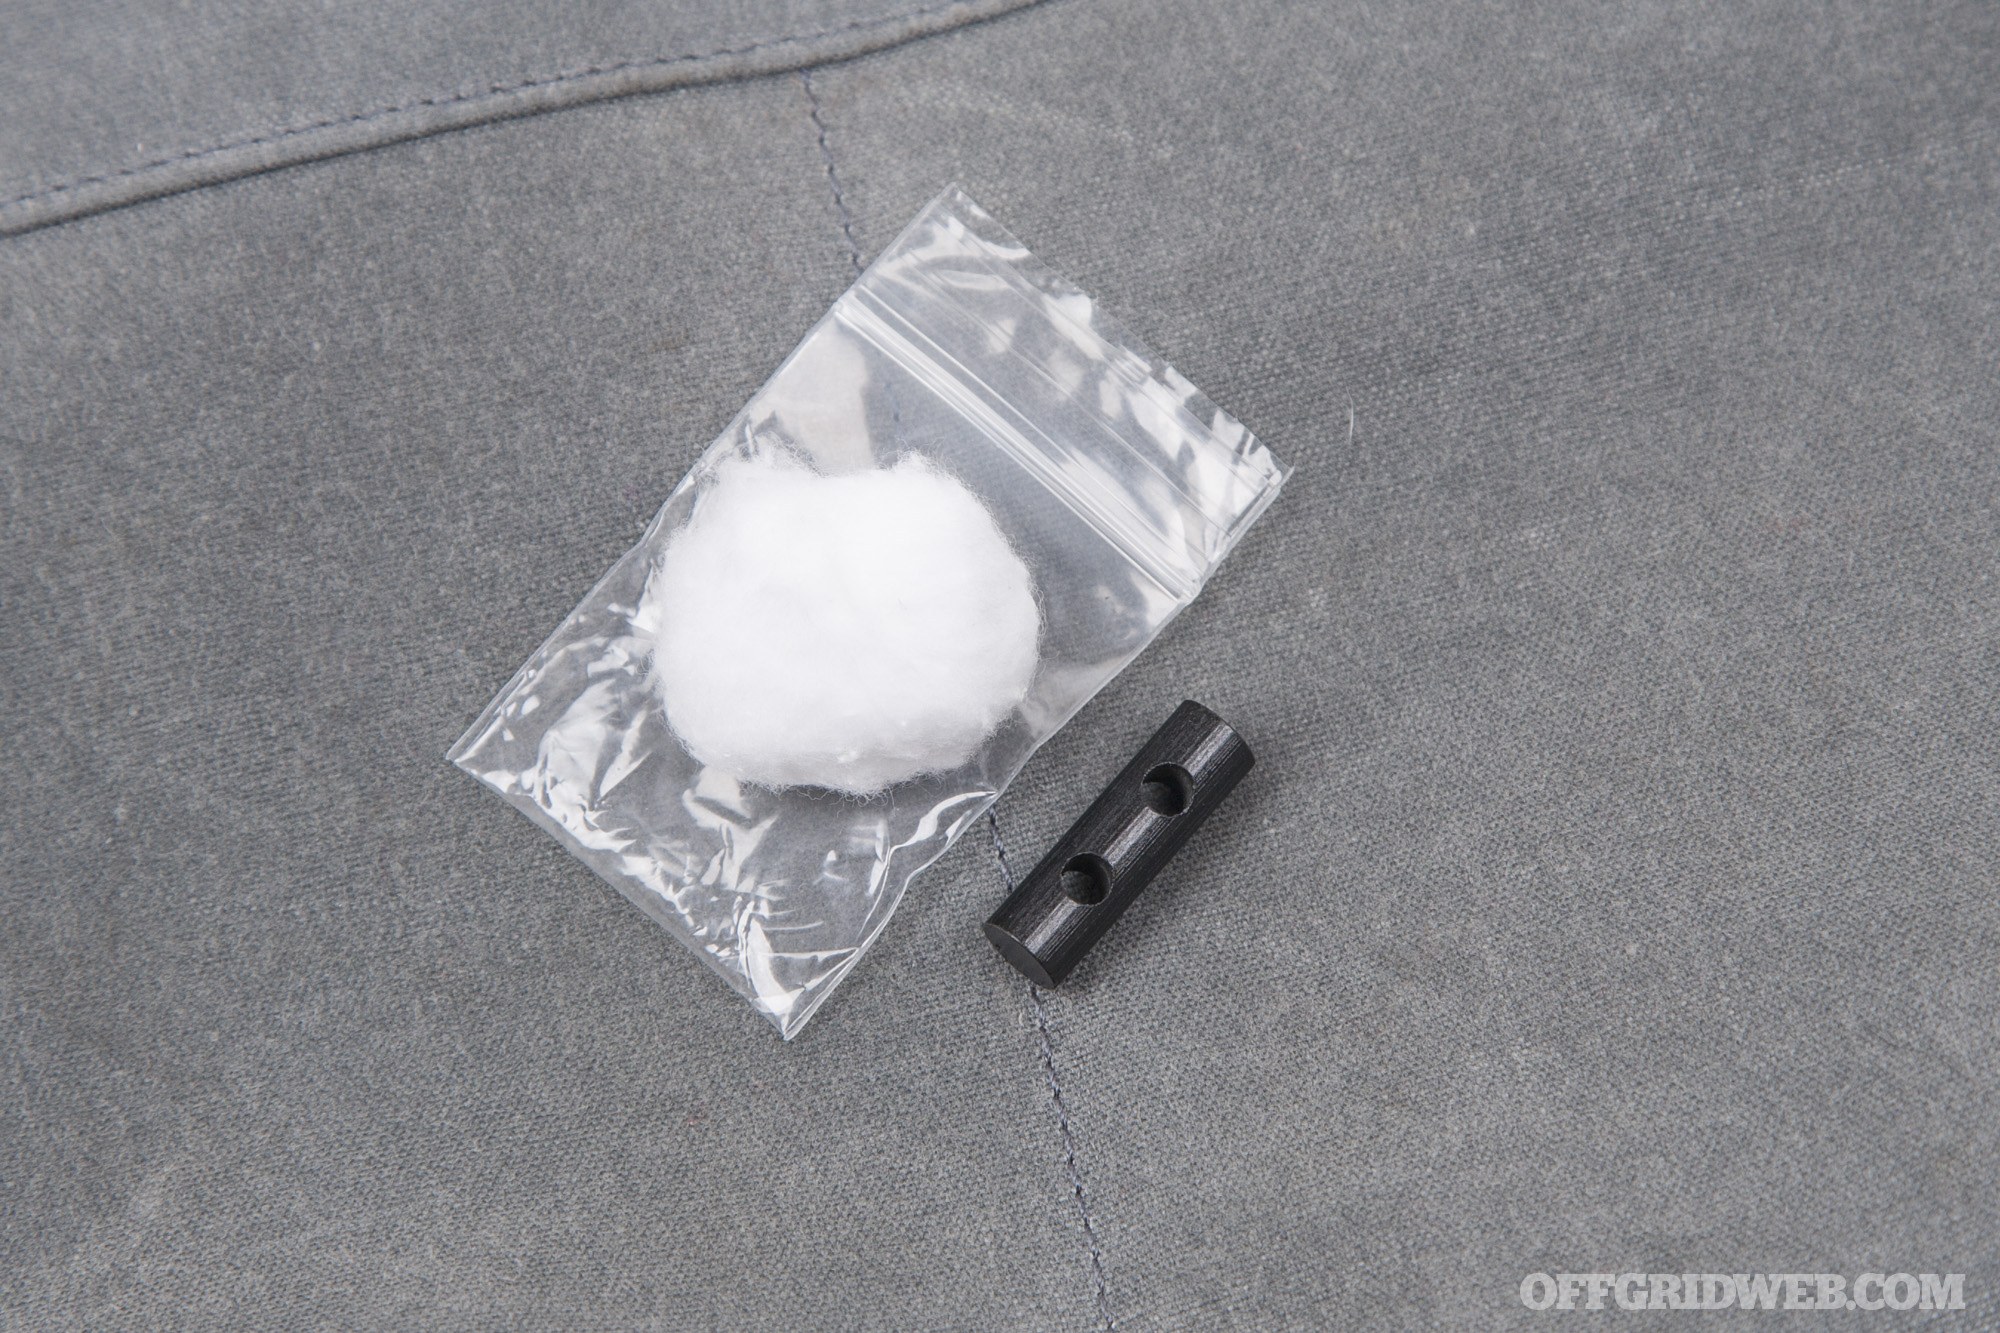
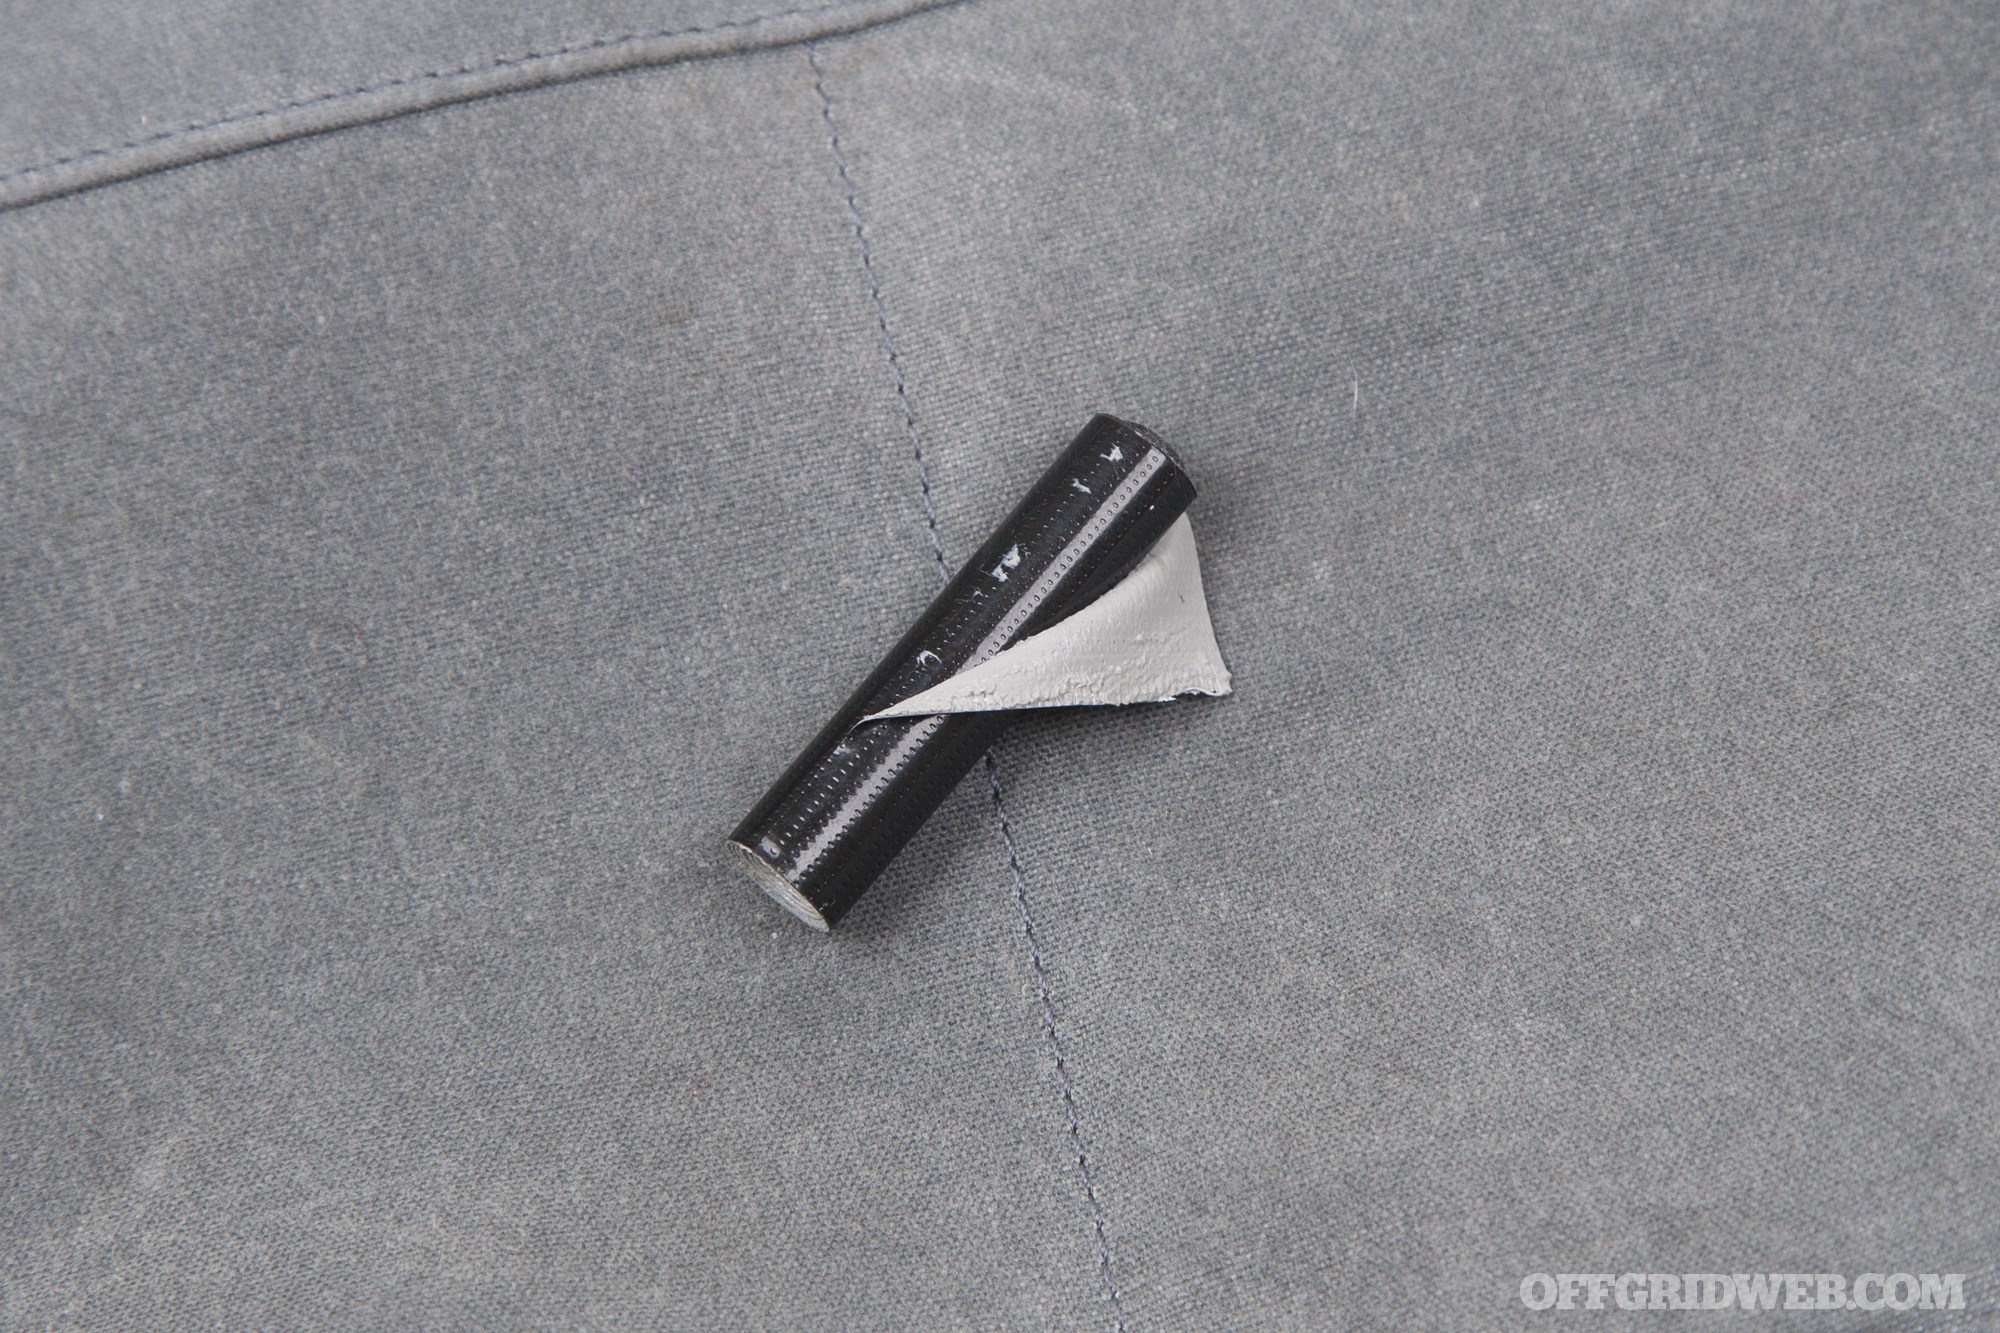
Ferro Rod Toggle and Tinder
Everyone knows that a fire-starting tool is critical for wilderness survival, but even if you’re in an urban environment where hypothermia isn’t a concern, it’s still a valuable resource. You could use the fire to signal for rescue during a disaster, trigger a building’s smoke alarm to create a distraction, or destroy sensitive documents.
The kit includes a small ferrocerium rod with two pre-drilled holes — these allow it to be attached to a lanyard, keychain, or shoelace, or used as a cinch toggle on a necklace. A cotton ball is also included in a plastic bag. We’d recommend smearing it with some Vaseline to help it take a spark more easily and burn more efficiently.
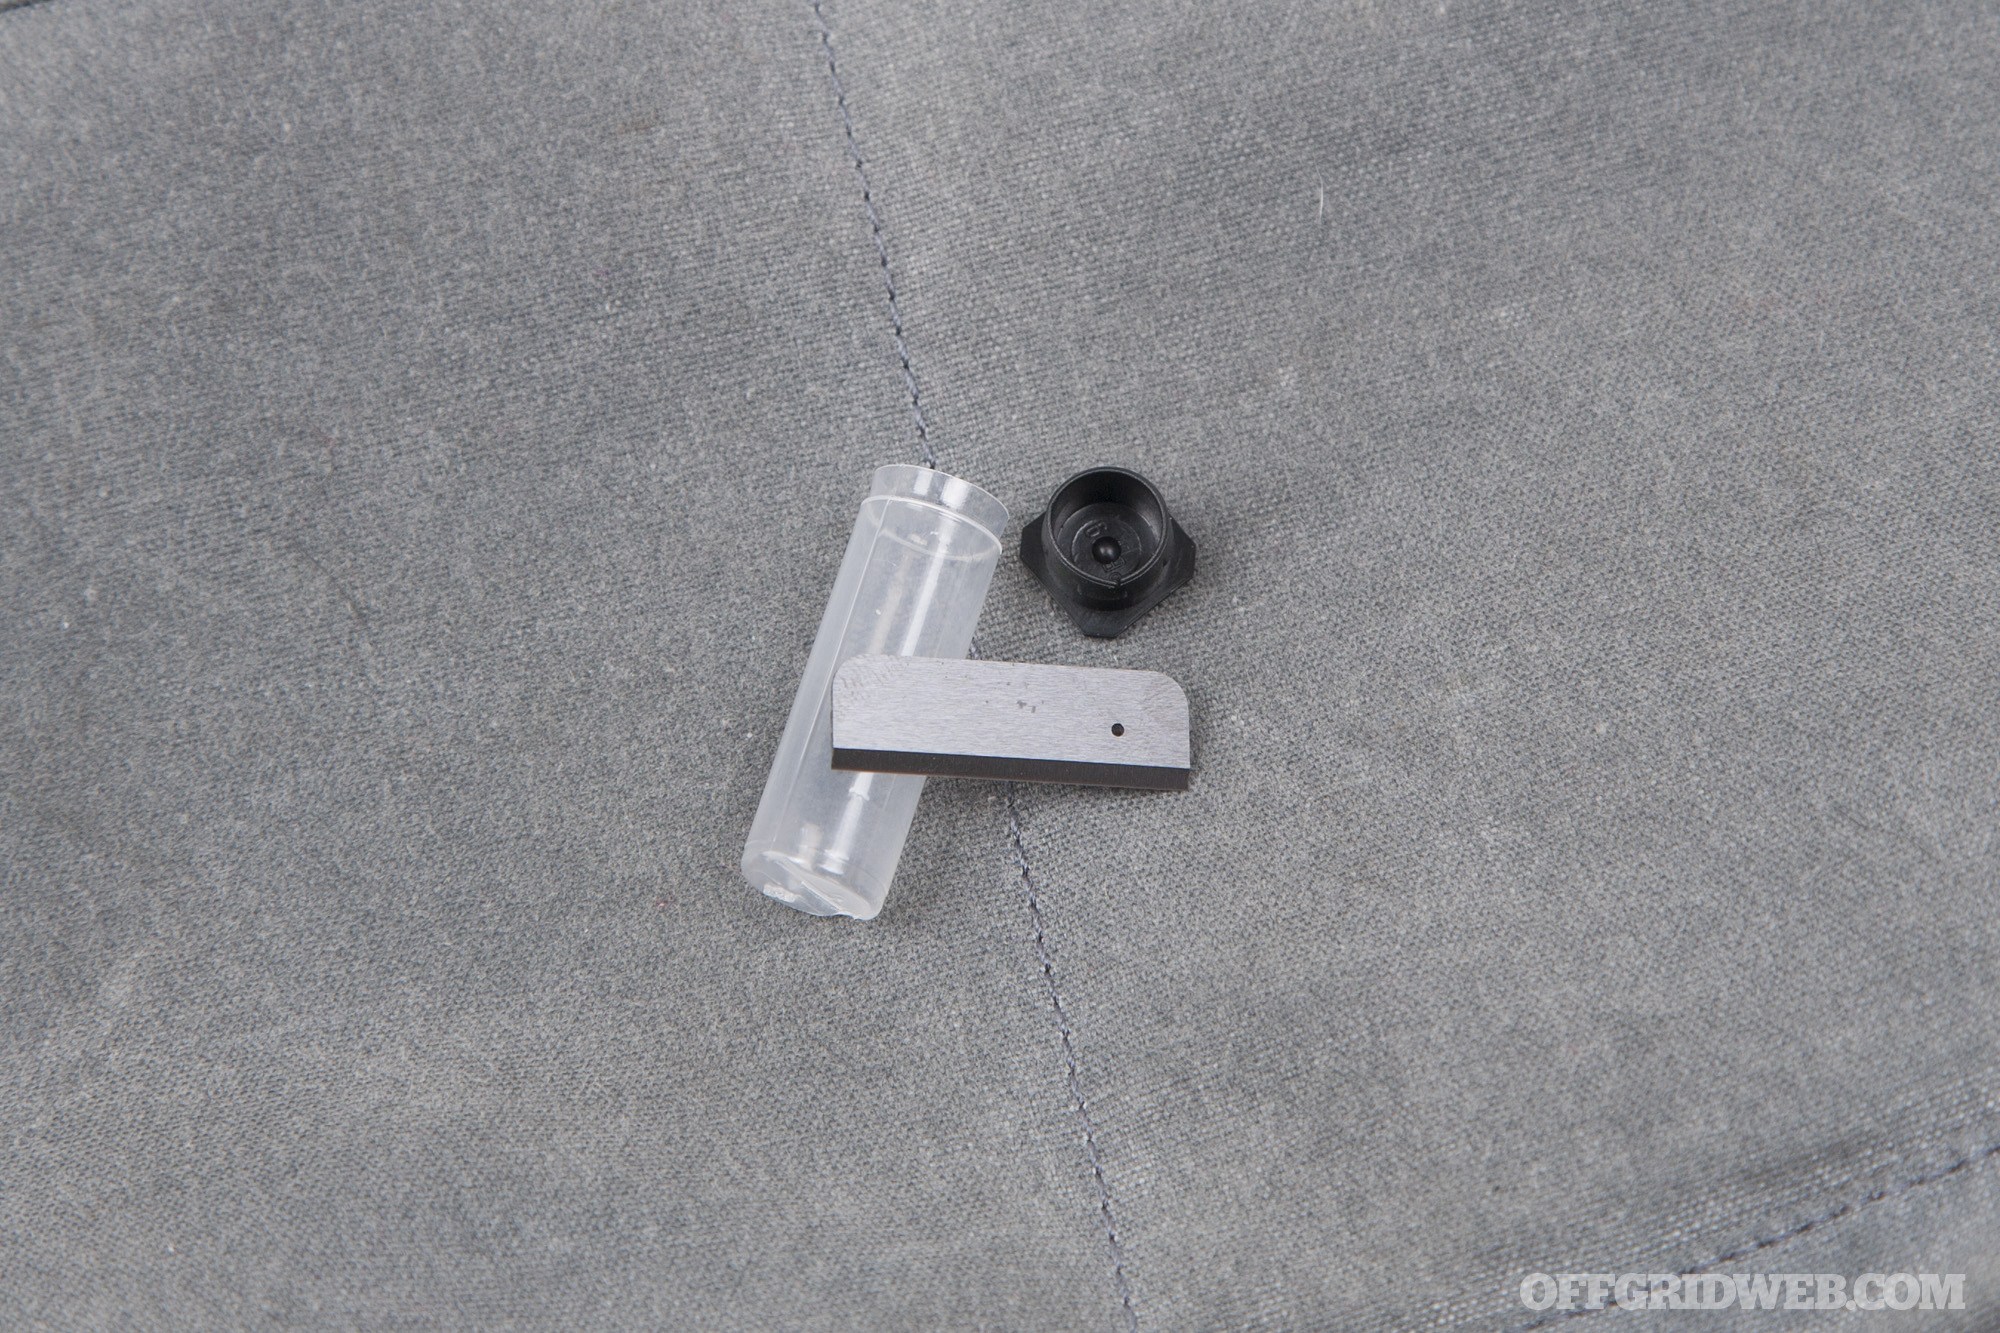
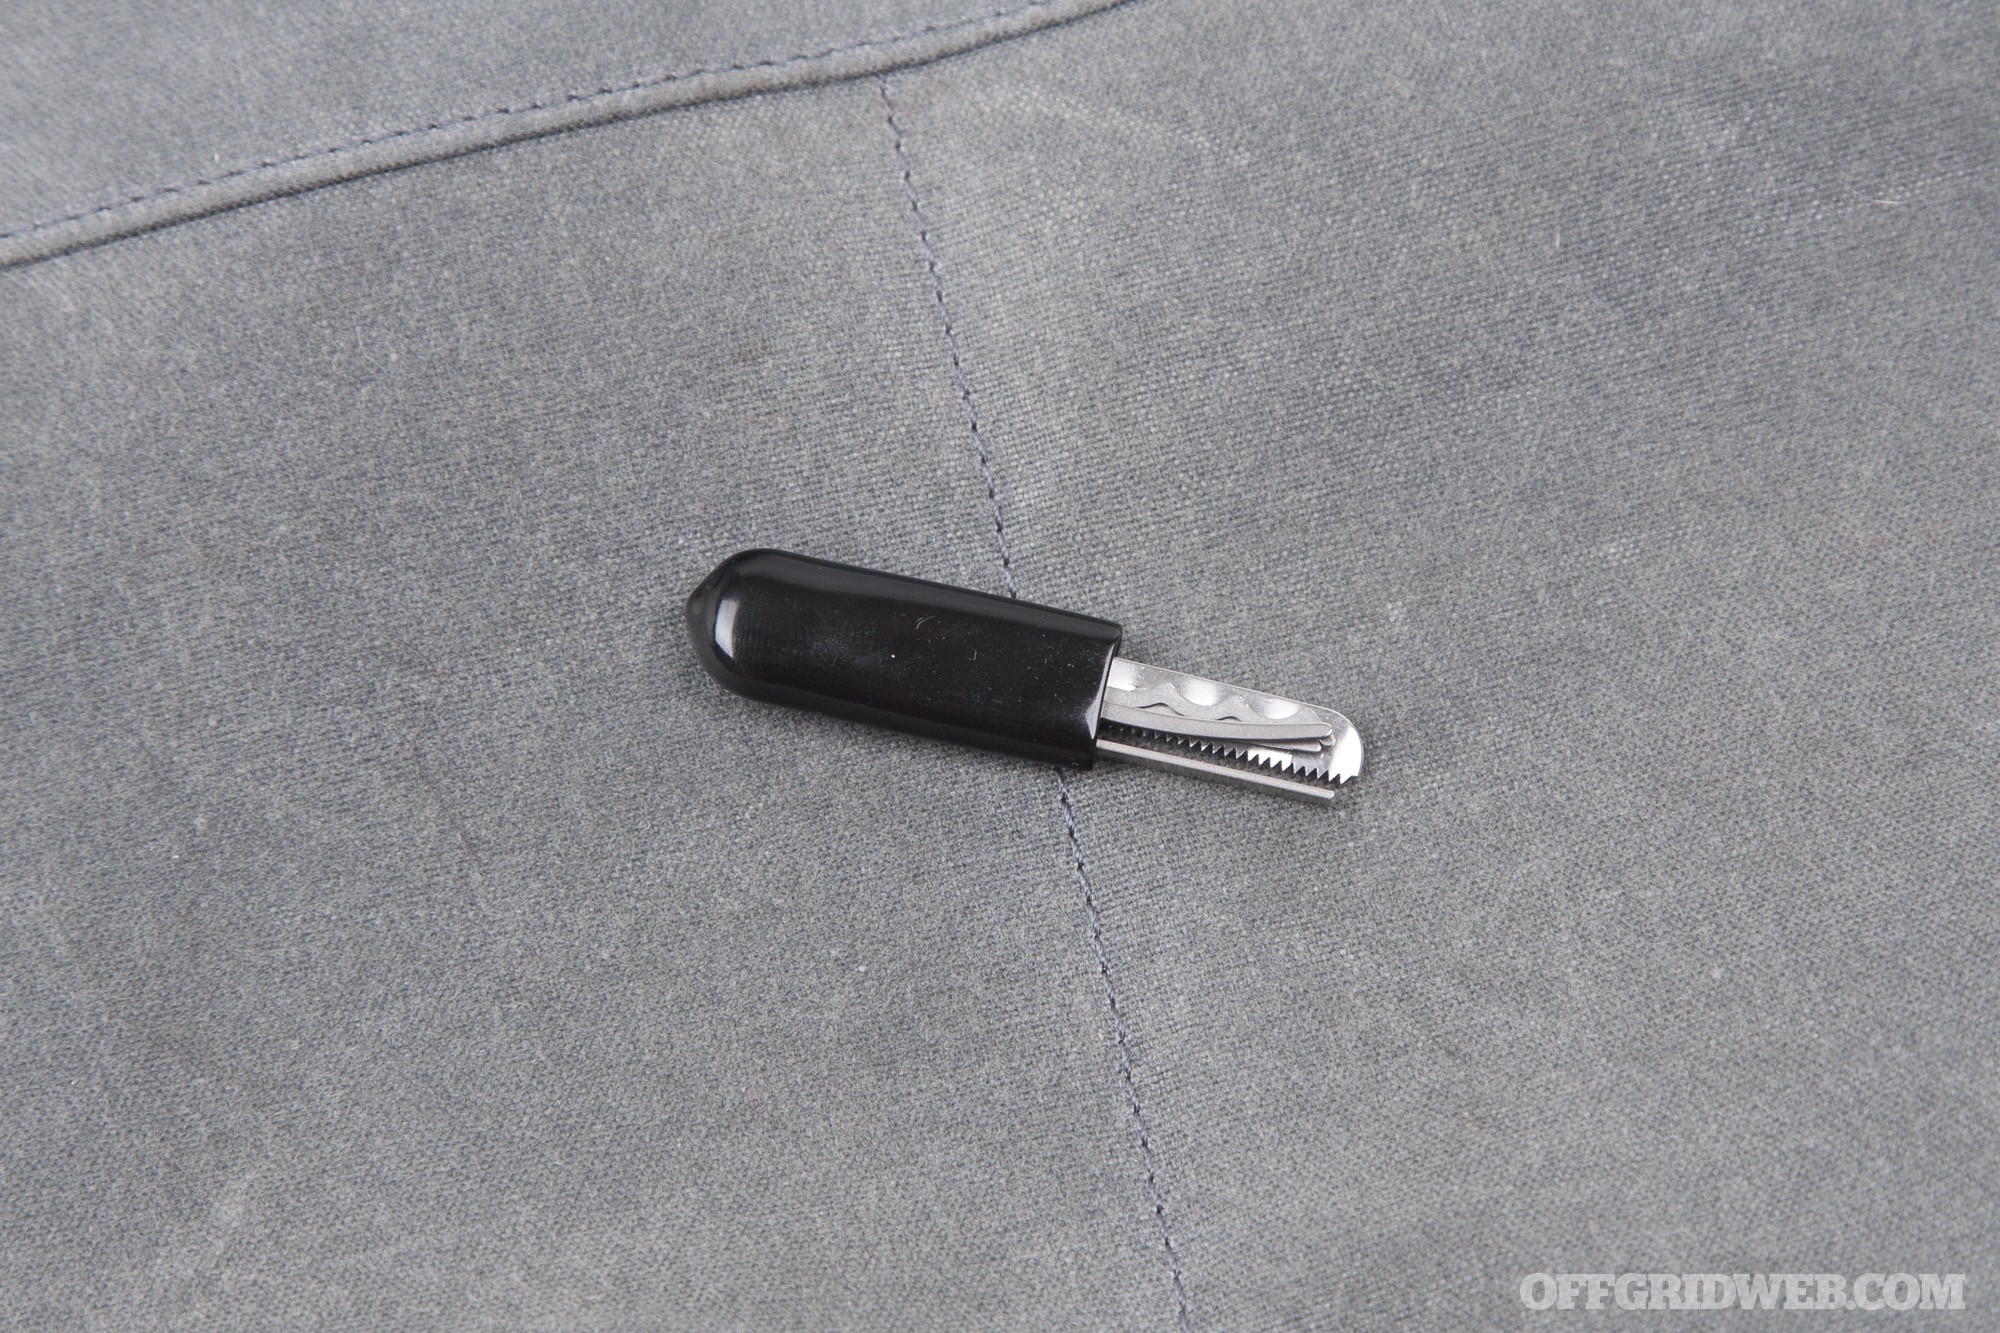
Ceramic Razor Blade
This tiny blade can be used as a striker for the ferro rod, or as a cutting tool for delicate tasks. Since it’s nonmetallic, it can also easily be concealed into non-permissive environments by slipping it into the waistband or hem of a pair of pants. A hole allows the addition of a lanyard, such as a piece of dental floss or thread — this can make it easier to retrieve if you’re restrained.
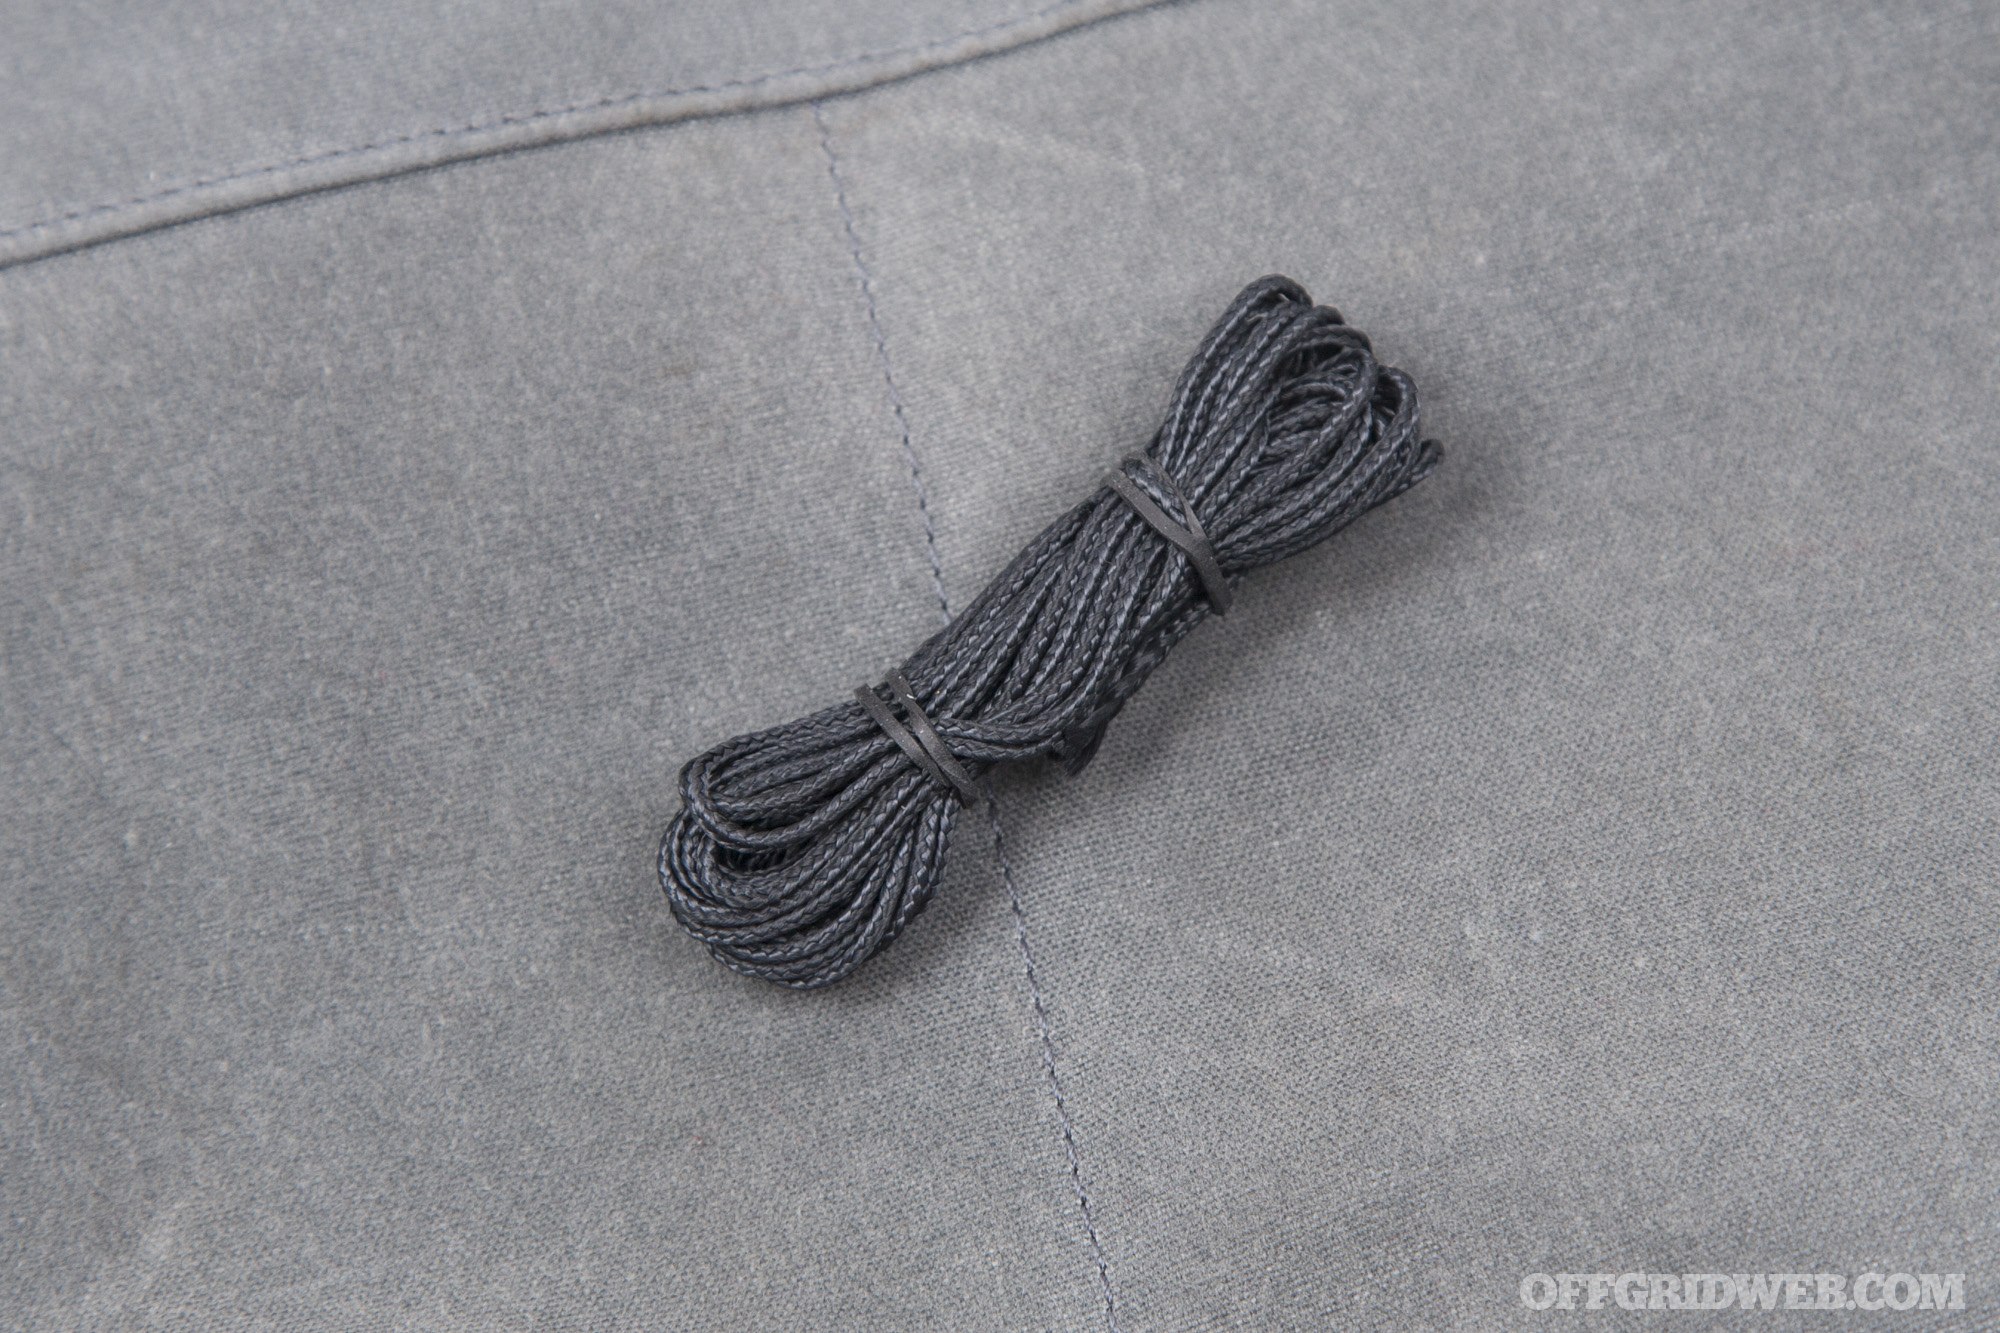
Braided Kevlar Cord
This cord may be thin, but it’s extremely heat- and abrasion-resistant and rated to hold 200 pounds. Kevlar cord is ideal for making a friction saw, but it’ll also work well for almost any other task that requires a strong binding implement. A 10-foot bundle is included in La Caja.
Here’s a bonus tip: if you’re ever looking to buy more of this special cordage, don’t buy the expensive stuff that’s marketed to survivalists. Instead, look for braided Kevlar kite line — it’s the same thing, but far cheaper and available in bulk rolls (i.e. 100 feet for less than $20 on Amazon). It can be purchased in a variety of colors and strength ratings.
Gorilla Tape
The value of duct tape needs no explanation, and Gorilla brand tape is one of the strongest and stickiest varieties on the market. One foot of black Gorilla tape is tightly rolled around a toothpick and included in the kit.
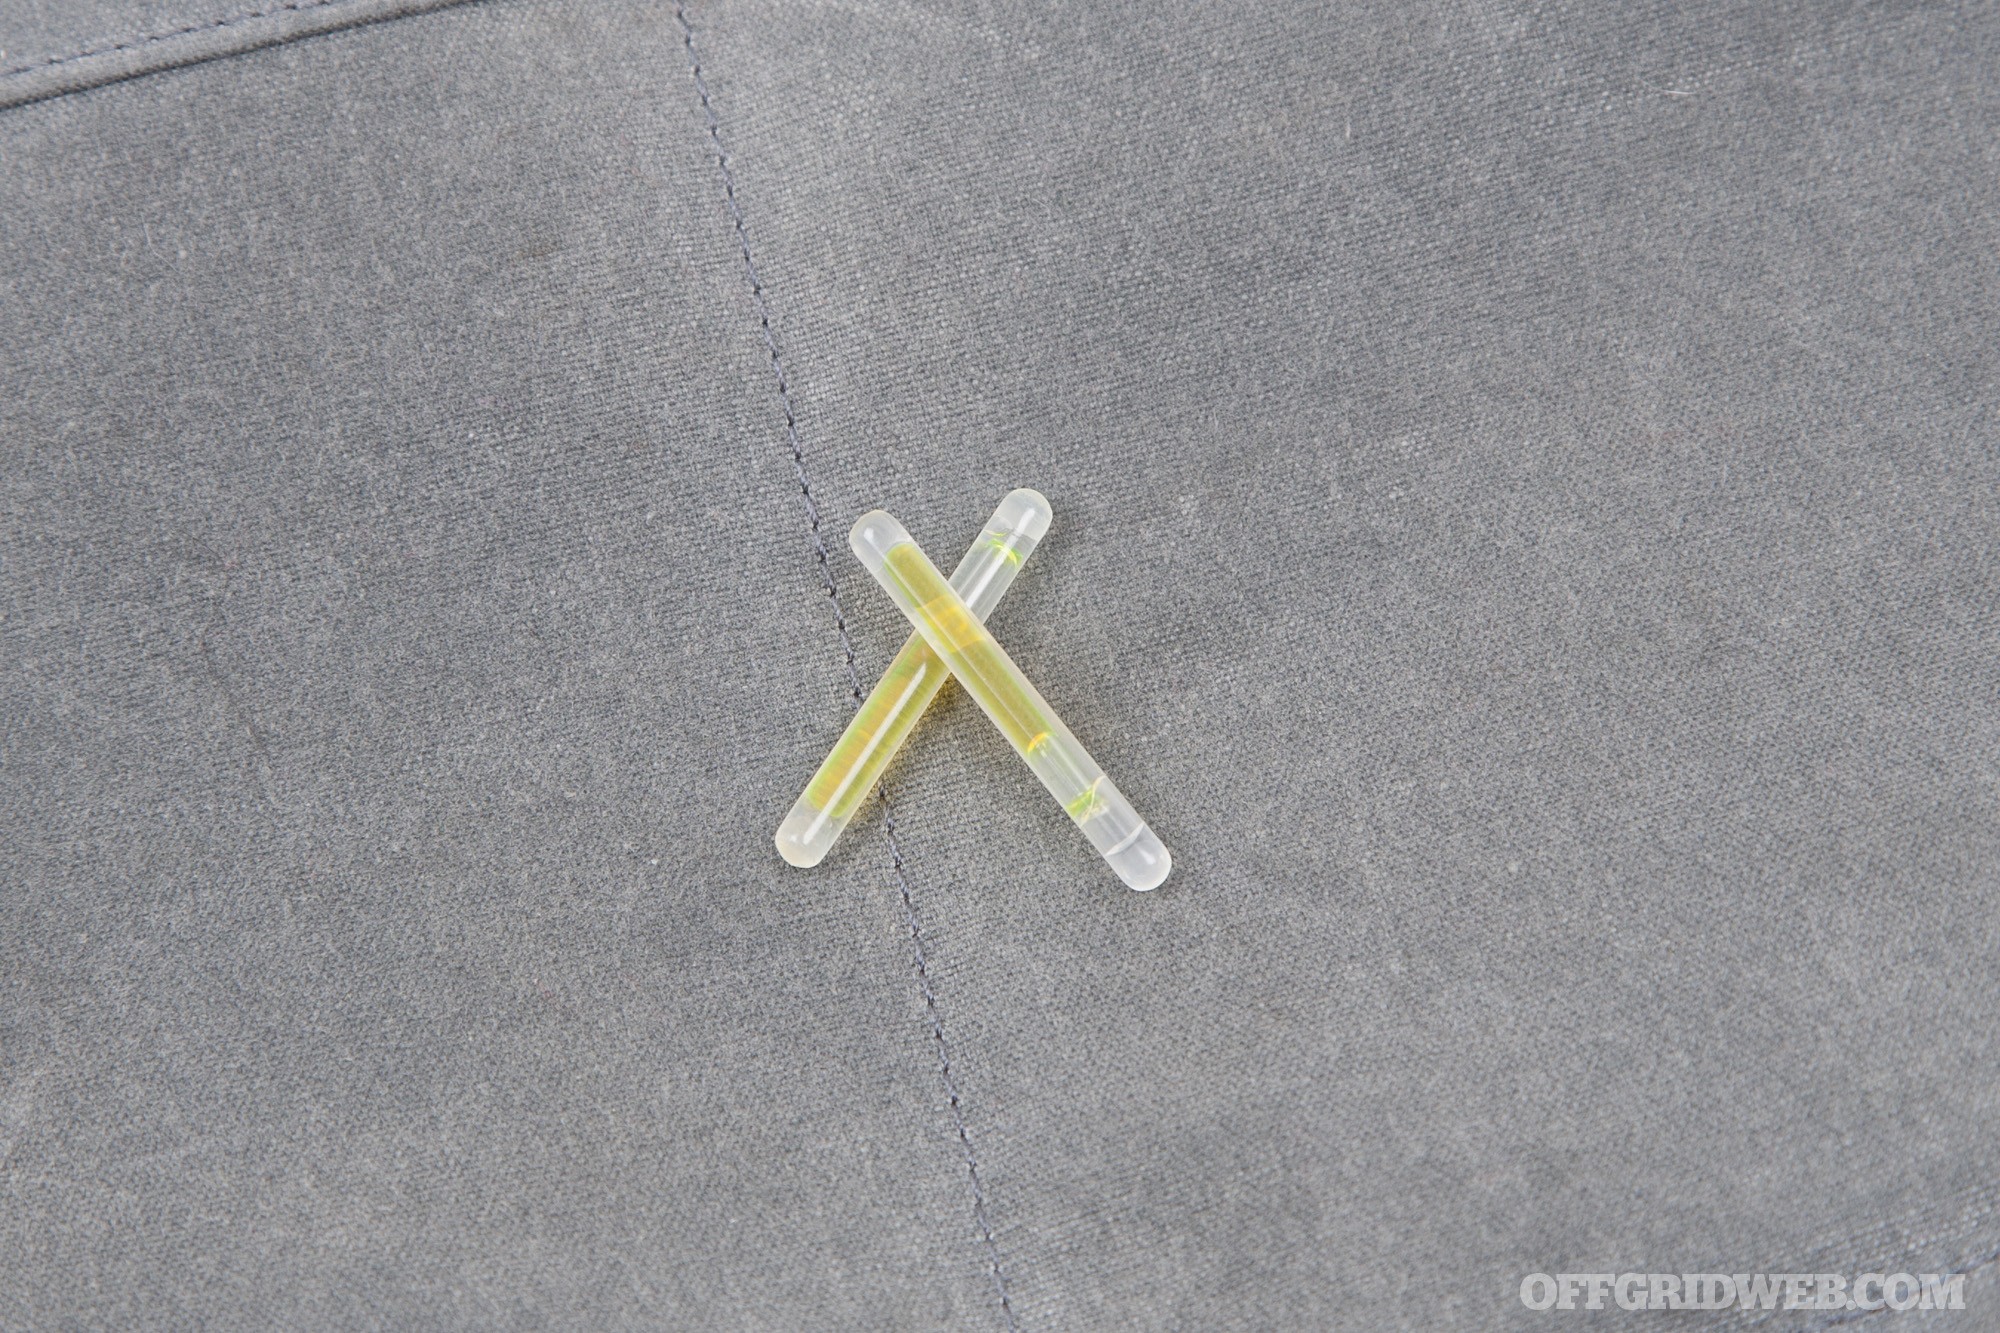
A pair of 1.5-inch mini glow sticks can be used to discreetly illuminate a map or notebook, tag a significant object or path, or leave behind breadcrumbs to help rescuers find you. We previously discussed the uses of these lights in our review of the Blue Force Gear MARCO dispenser. We plan to add some blue and red sticks to our kit to expand the signaling options.
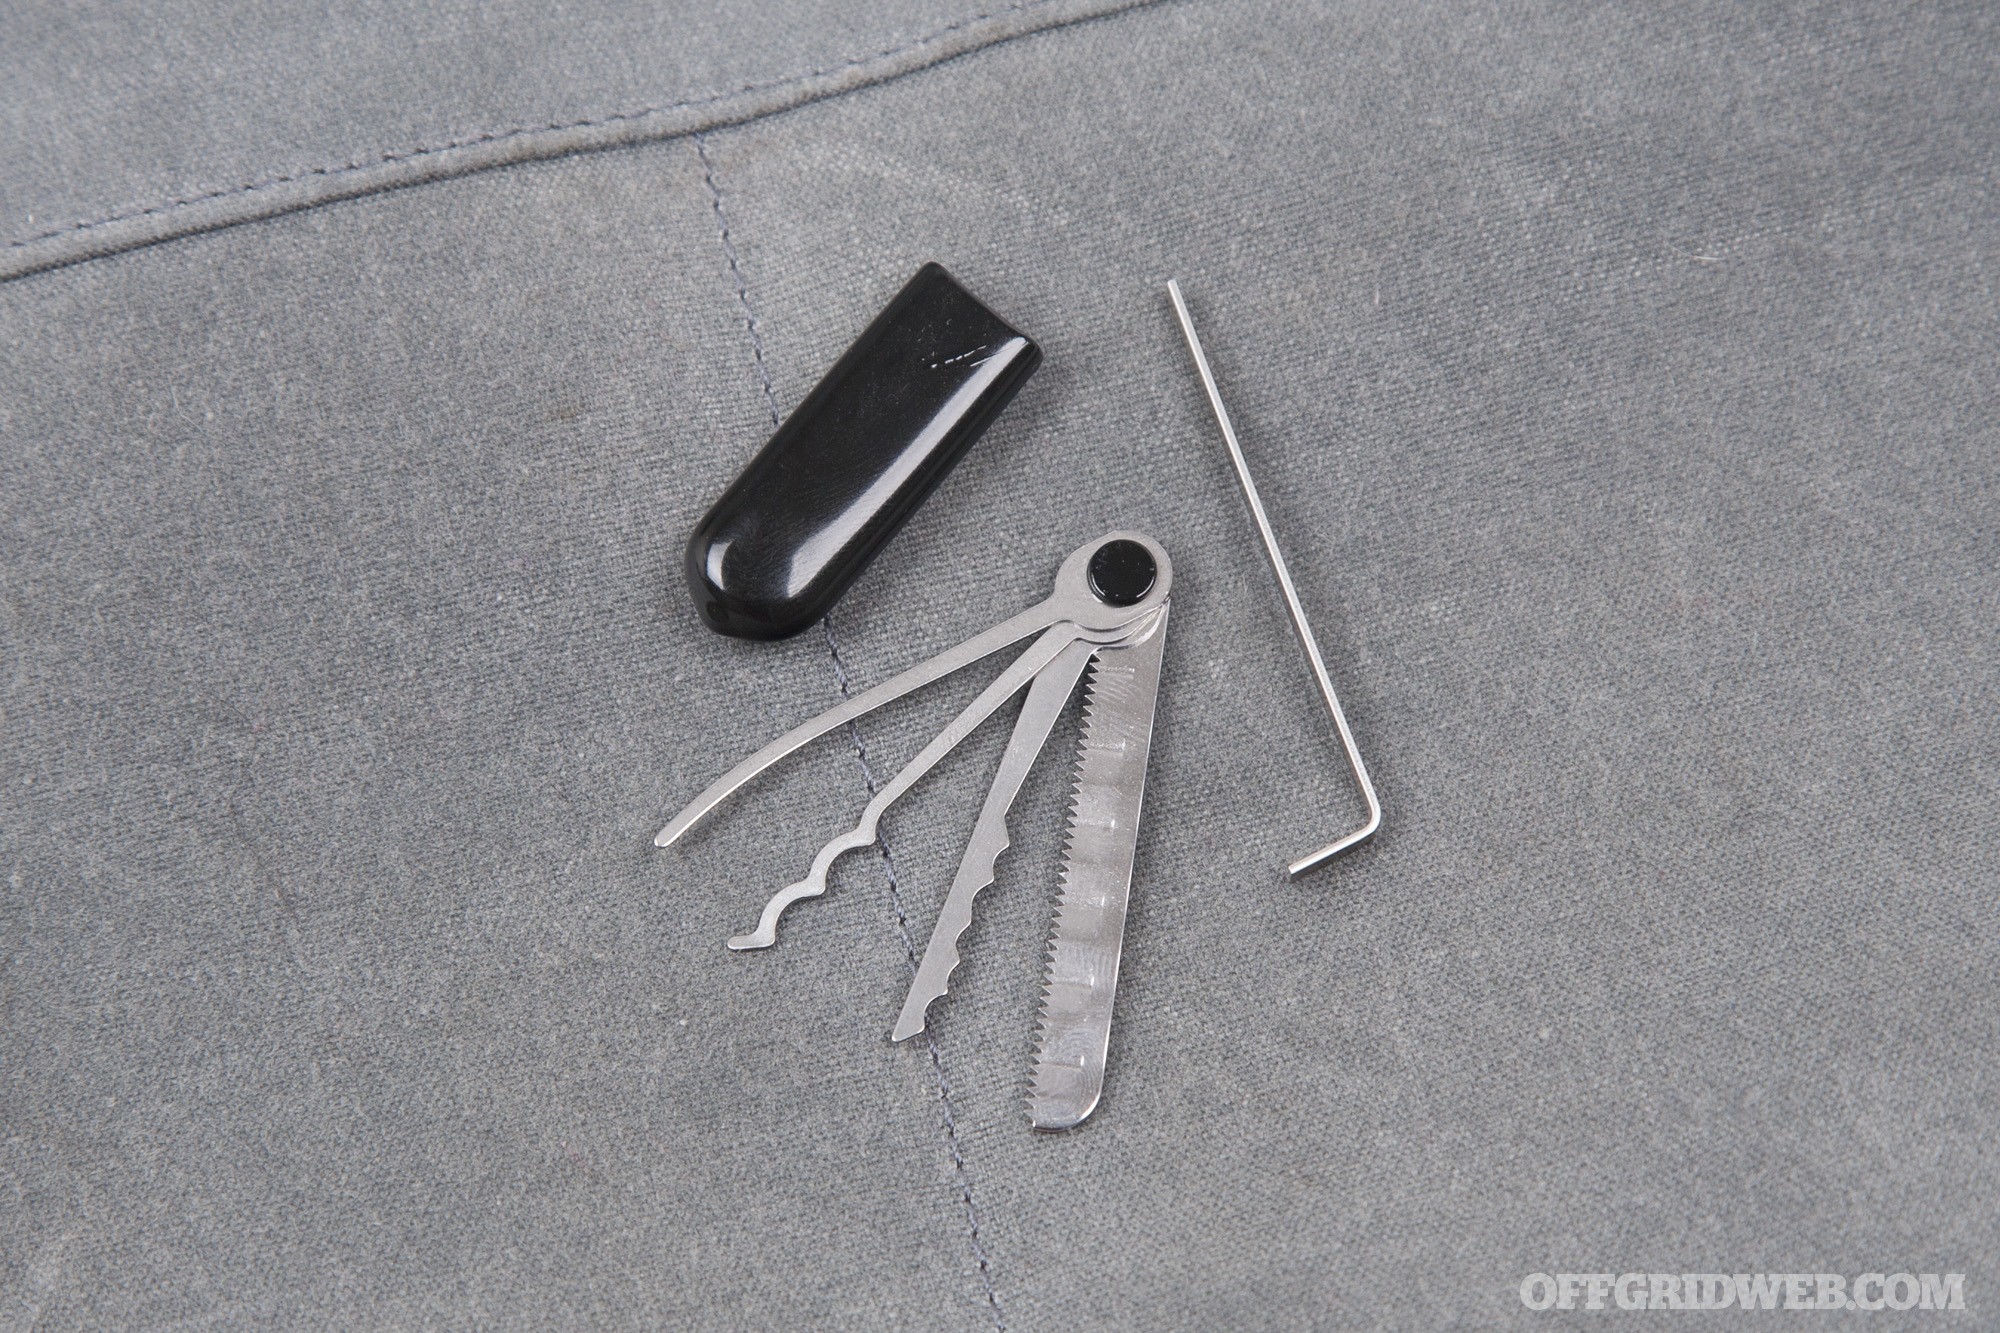
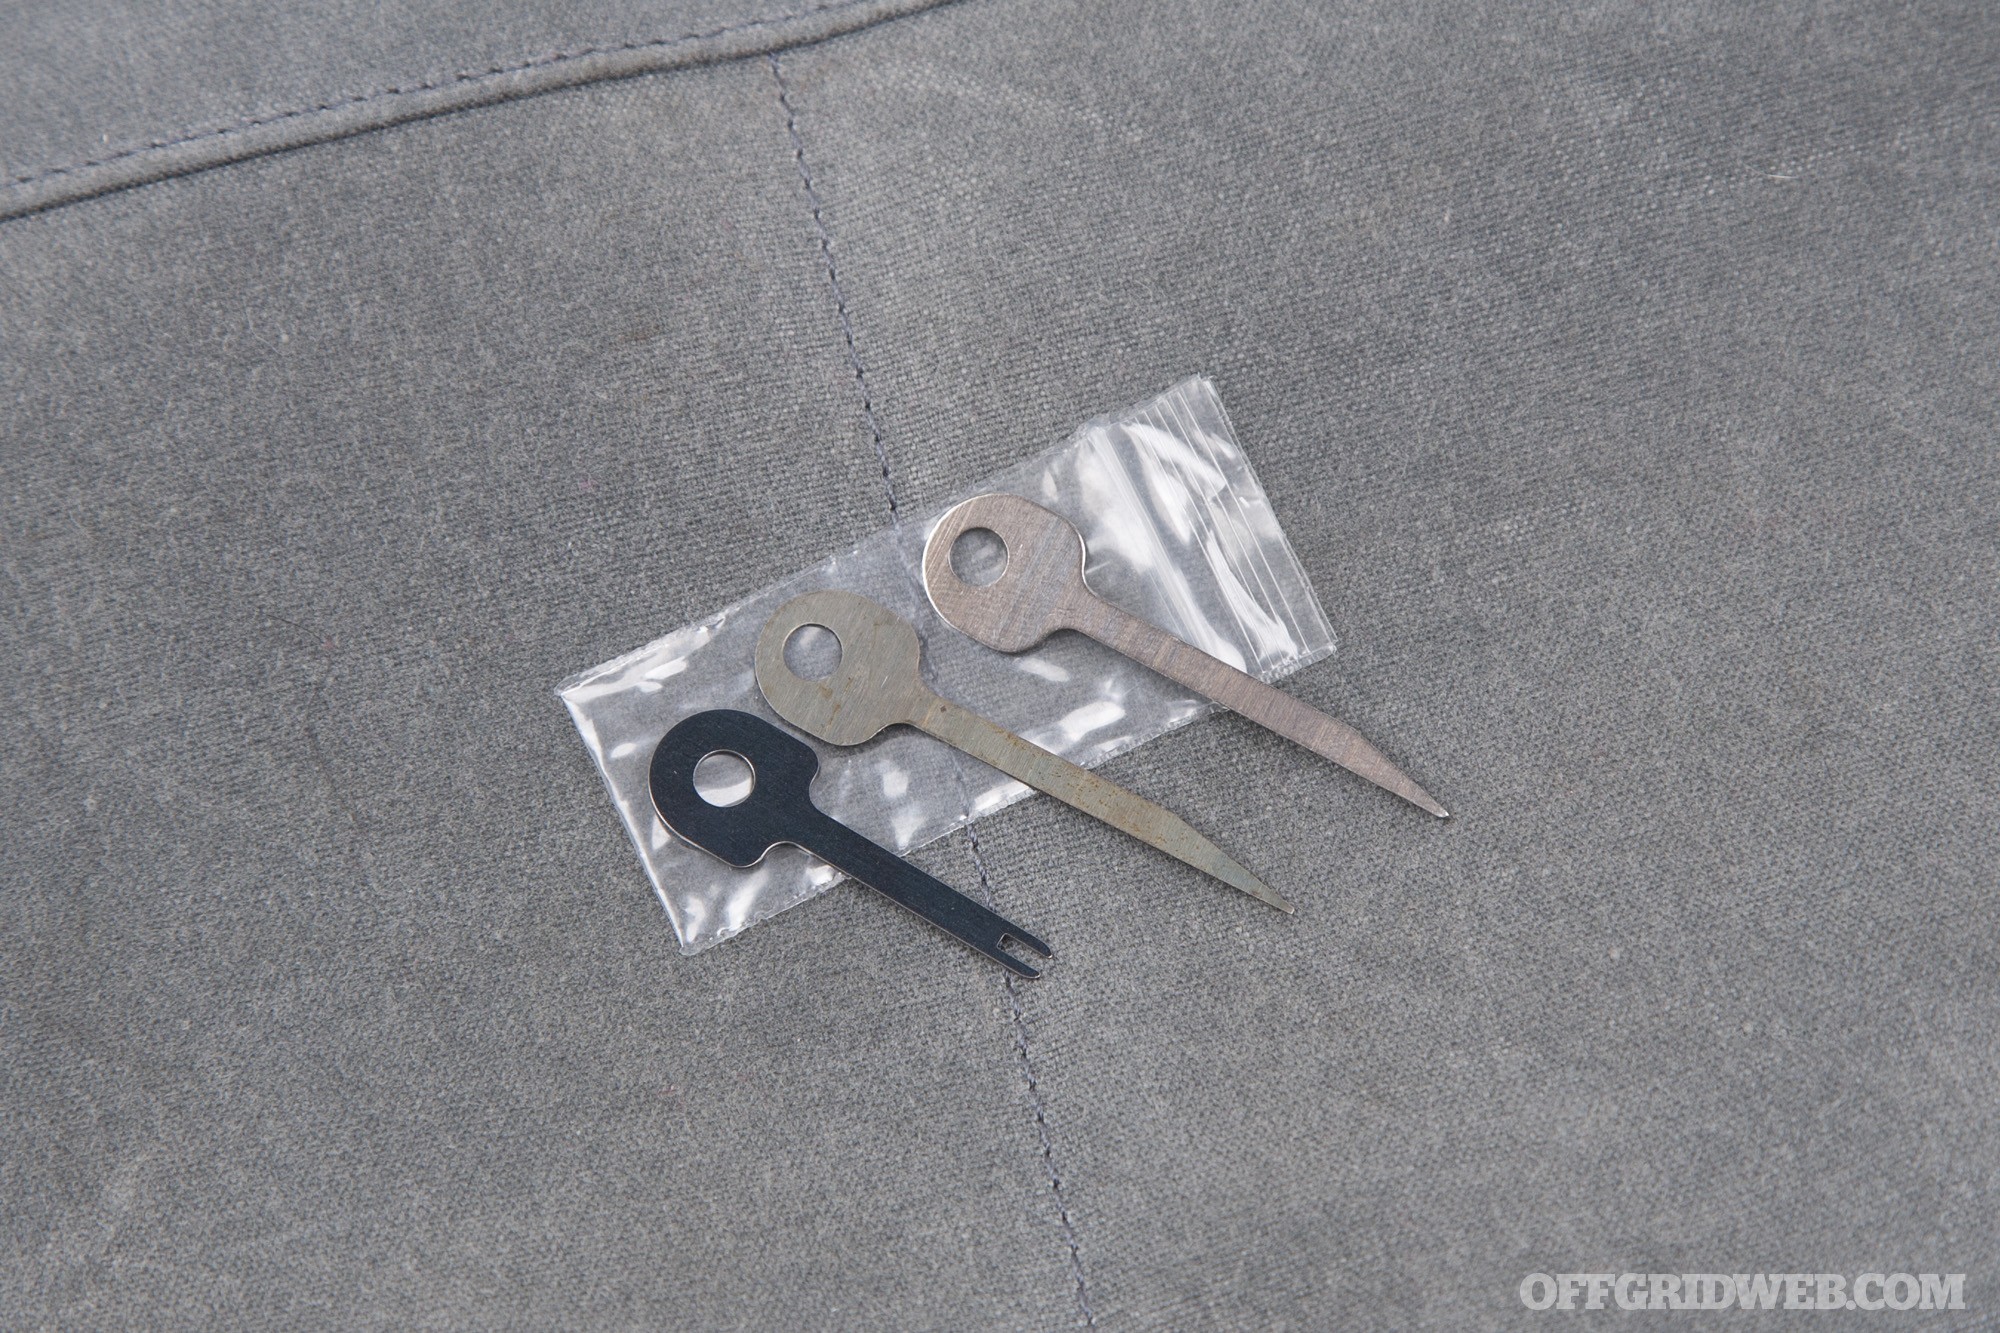
Serepick V 1.1 OSS Tool
Named after the Office of Strategic Services, America’s covert intelligence agency during WWII, this five-piece set is a modern recreation of a tool carried by actual spies during the war. The Serepick OSS tool features three lock picks (city rake, Bogota triple rake, and long reach hook) connected by a pivot.
Also attached to the pivot is a stainless saw blade, which can be used to cut through illegal restraints. The final component is an L-shaped tension wrench for use alongside the lock picks. A rubber sleeve keeps the pieces together.
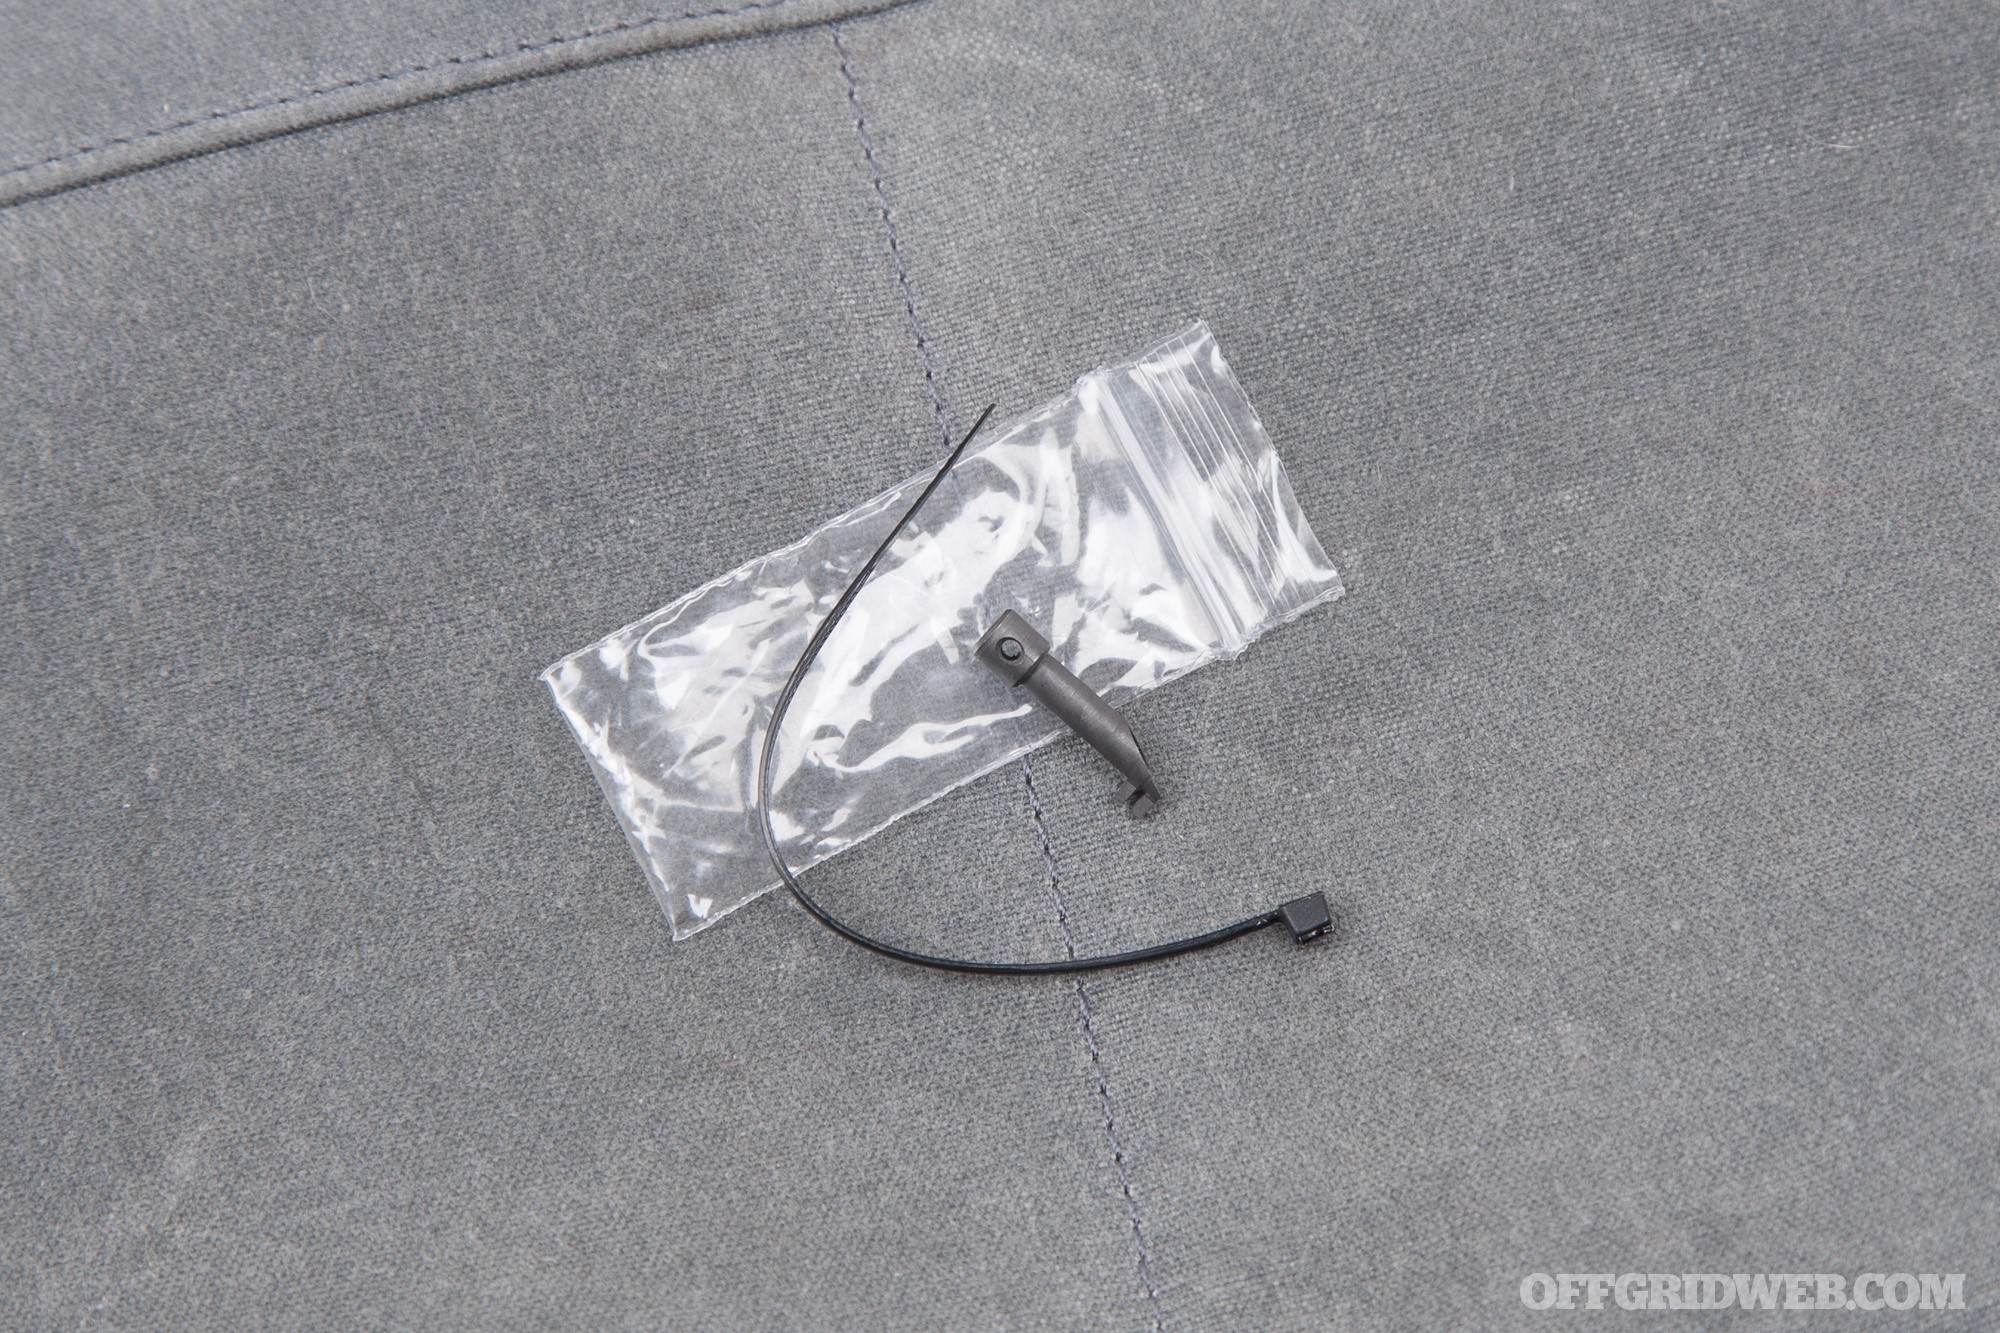
Handcuff Shim, Quick Stick, and EZ Decoder
These three flexible steel tools from Serepick allow the user to defeat various types of locks by slipping into the mechanism and interrupting its engagement. For a step-by-step demonstration of how the forked handcuff shim works, refer to the “Escaping Handcuffs” sidebar in our article on surviving a kidnapping.
Similarly, the Quick Stick is designed to defeat heel-and-toe locking dogs on inexpensive padlocks, filing cabinets, or tool chests (here’s a video demonstration). The EZ Decoder looks almost identical but is much thinner and more flexible. It is designed to defeat combination padlocks, luggage locks, and cash boxes (here’s another demo). These tools prove that some locks are so easily defeated that you shouldn’t even need to get out a set of picks.
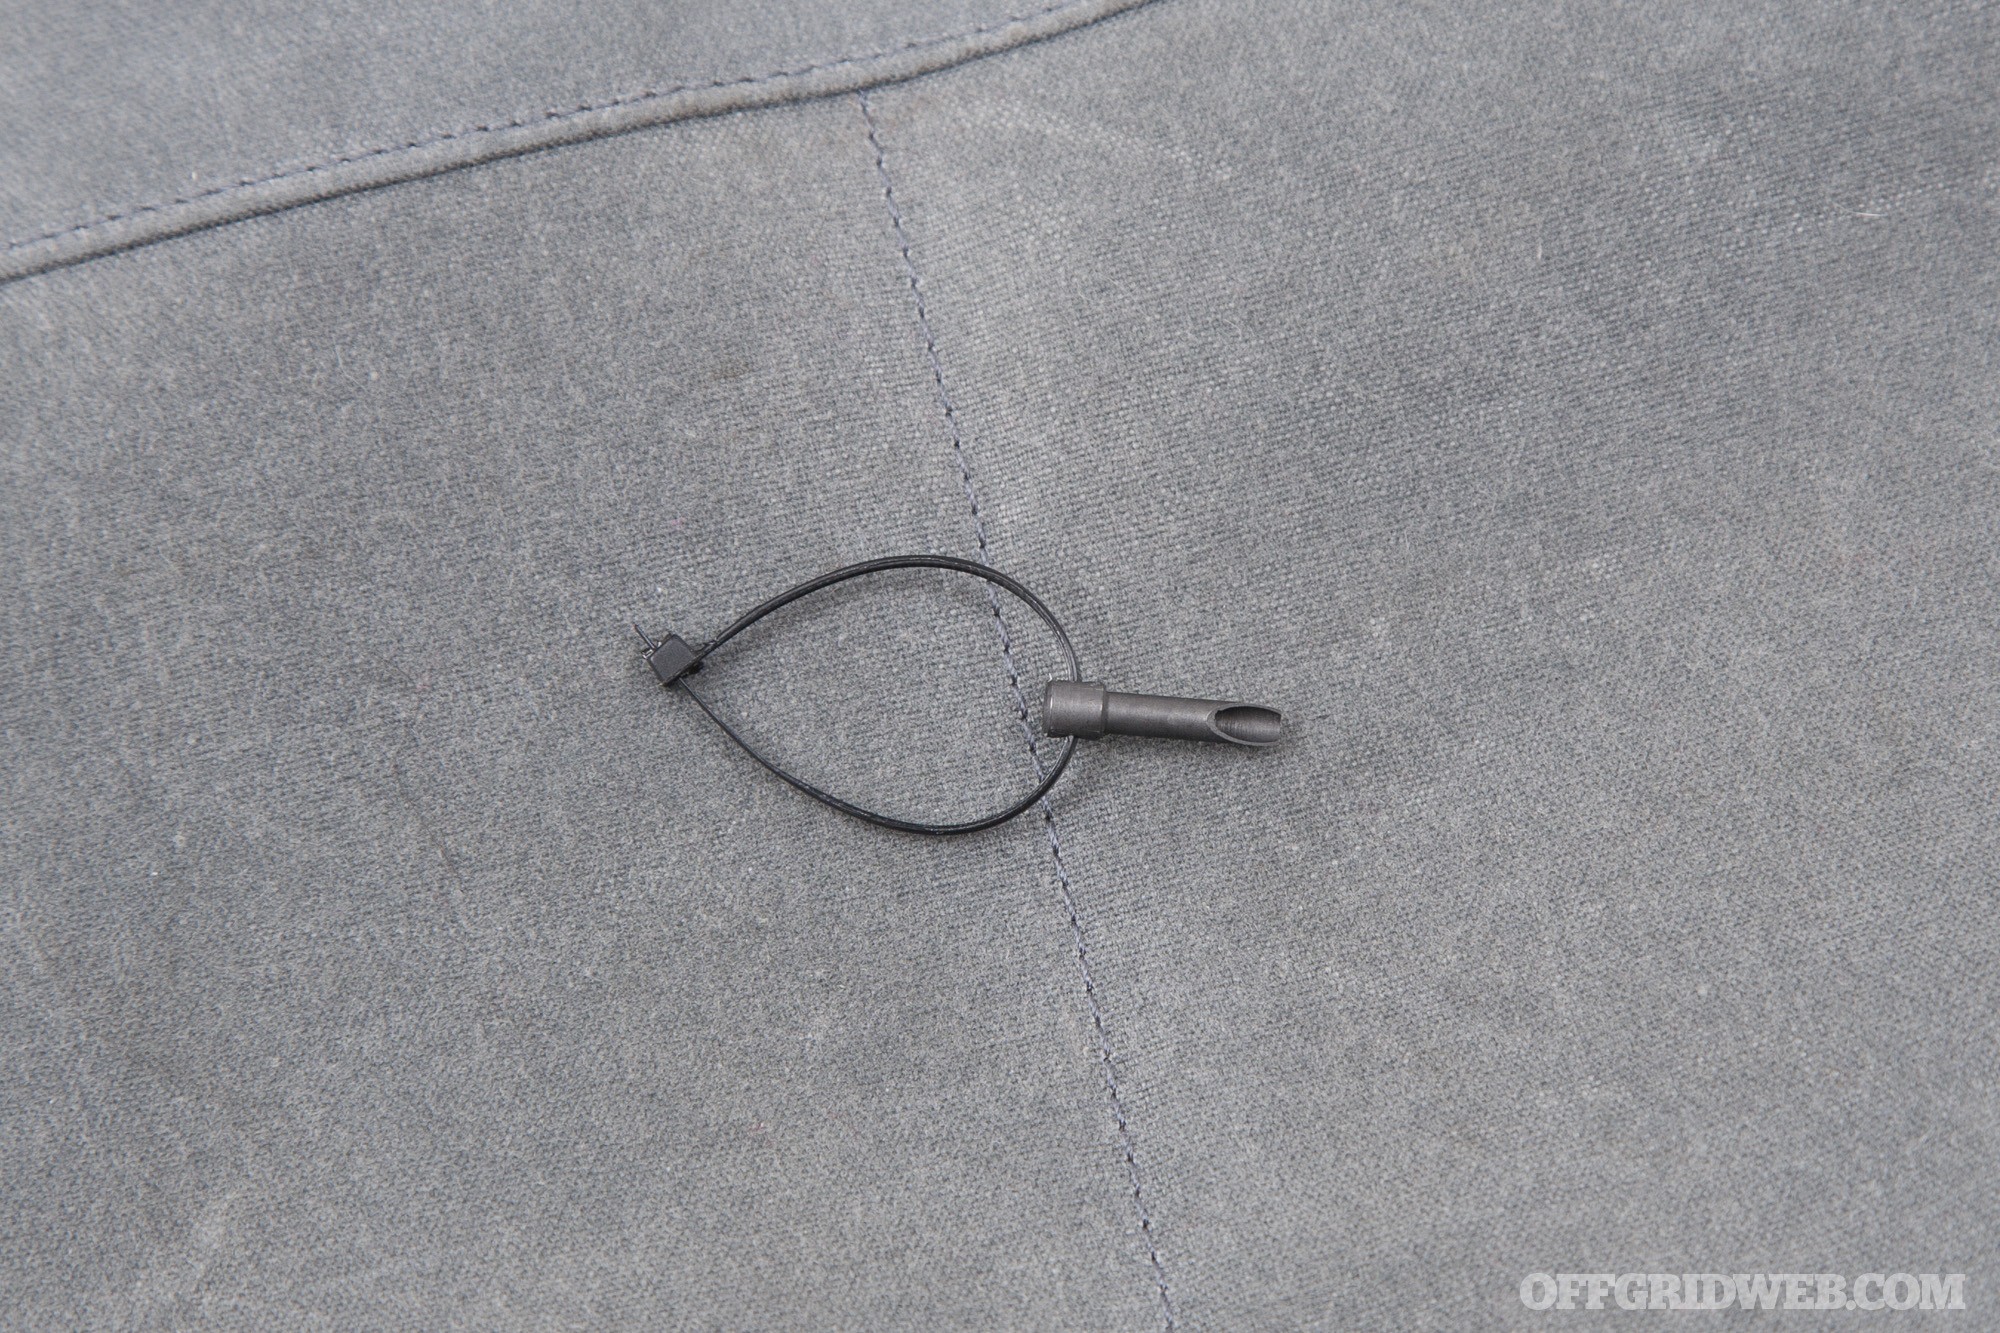
Serepick Delta Cuff Key
Kopis Designs calls this “the Cadillac of cuff keys.” It can be used on a wide variety of handcuff makes and models, ranging from common Smith & Wesson or Peerless cuffs, to more exotic international and high-security cuffs. The stainless steel key is cut at an angle to make it easier to insert while your hands are immobilized.
A small zip tie is included to attach the cuff key to a shoelace, belt loop, or other retention point.
If you’re taken captive by amateurs, you might find yourself restrained by zip ties, rope, or duct tape that can easily be cut with the Kevlar cord, saw, or ceramic blade. If your captors are using high-end equipment, a cuff key might be the only thing that saves you from painstakingly sawing through hardened steel.
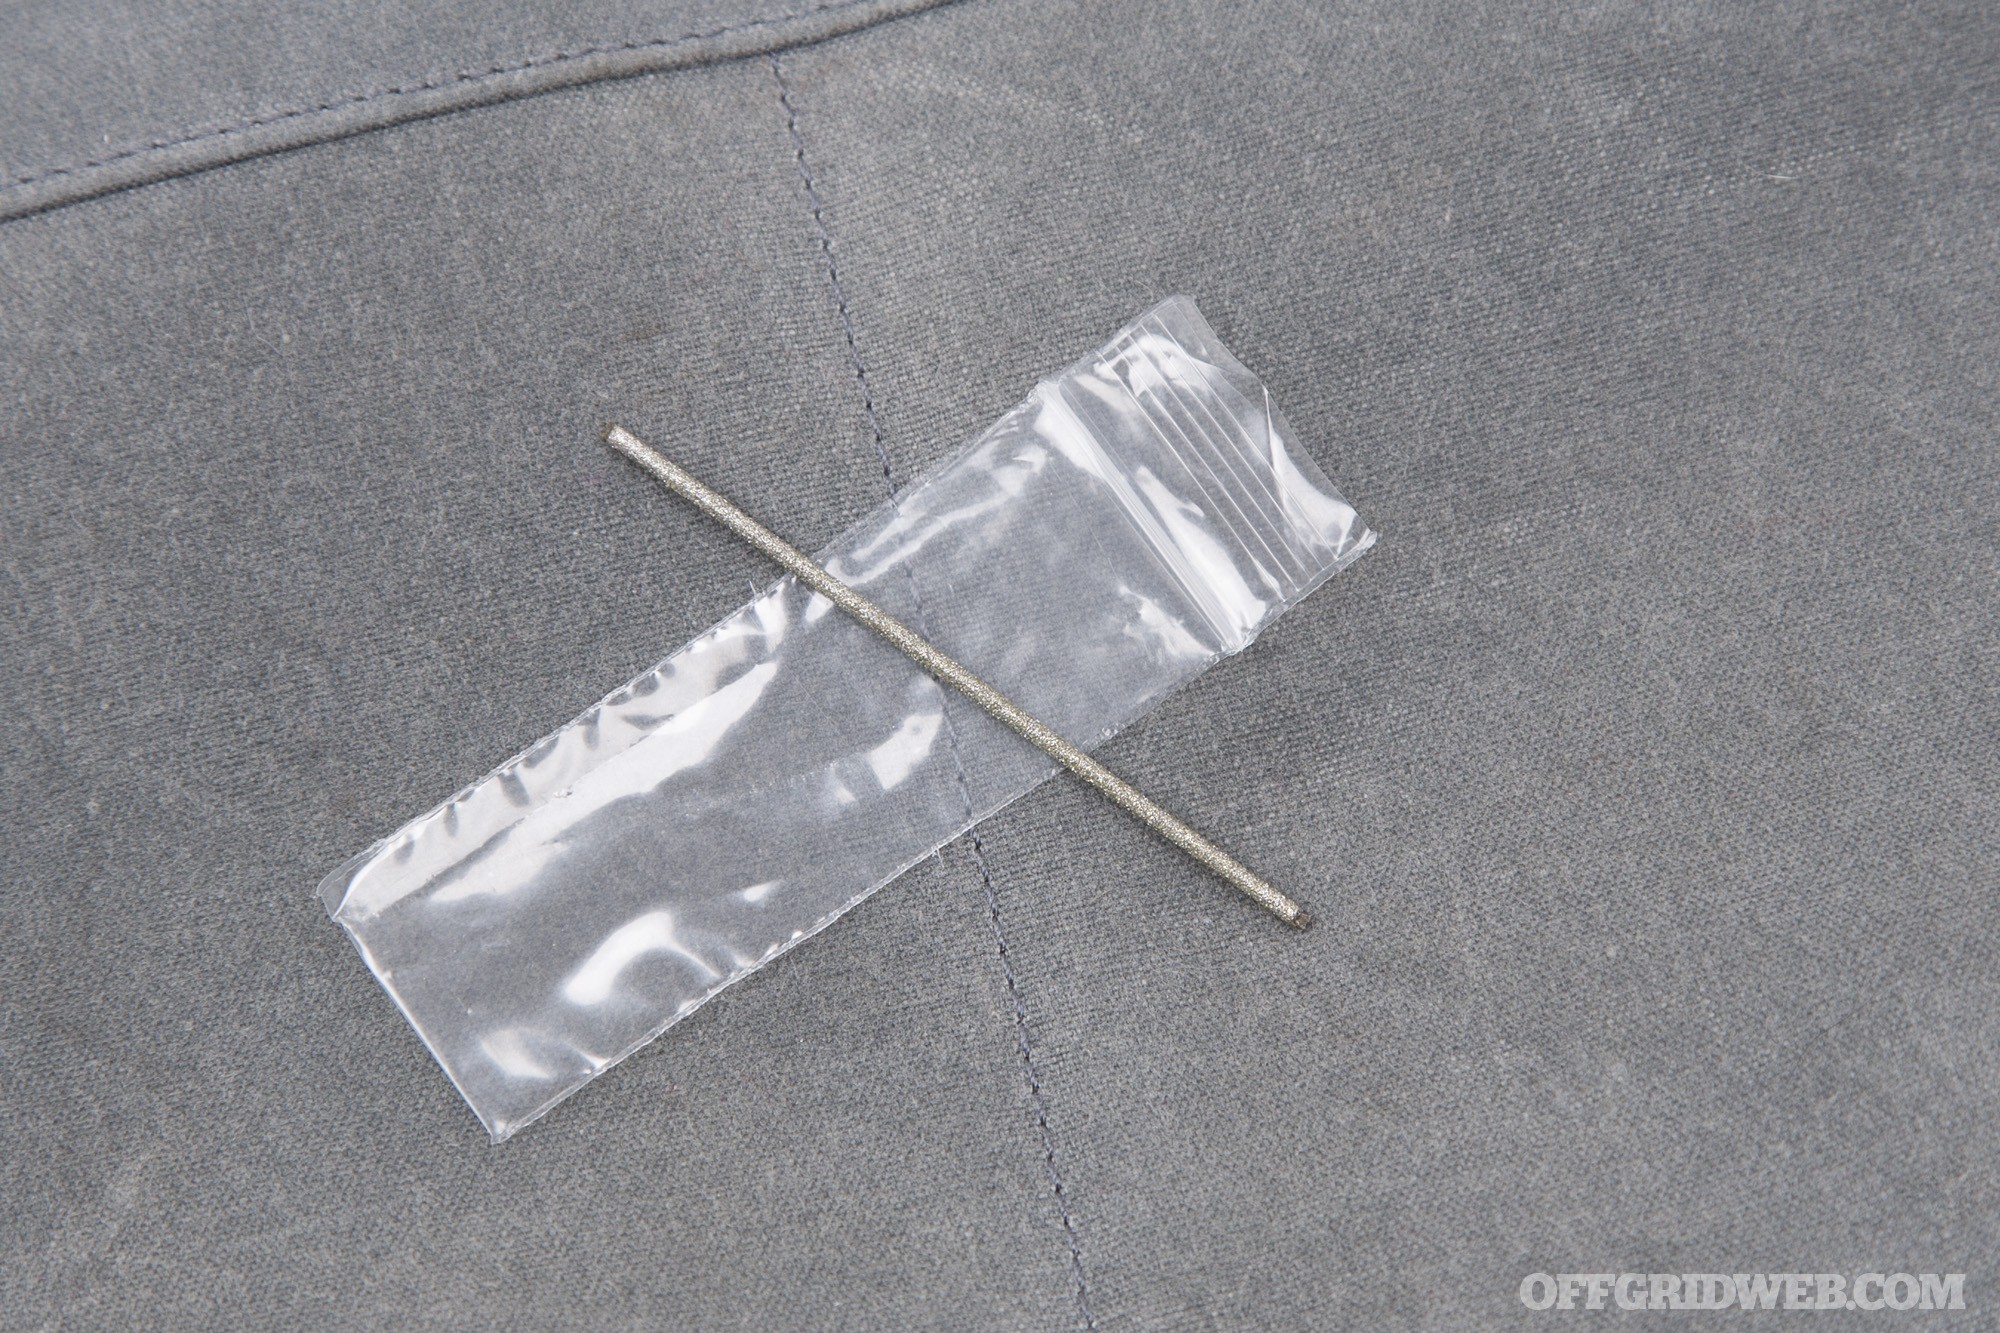
Diamond Wire Blade
This 2.75-inch wire is impregnated with diamond particles, and serves as an extremely durable abrasive surface. You can use it for simple tasks such as sharpening a knife, or as a means of slowly grinding through hardened metal such as handcuff chains. Lots of time and blisters are guaranteed to be involved, but if other options fail, it’s a valuable fall-back plan.
Card Shim
You may have heard of the old technique of “credit carding” door locks — this 0.02-inch-thick shim is a thinner and more flexible tool for the same technique. Slip the card between the door and door frame next to the handle, moving the door back and forth as you attempt to work the card into the latch. If it’s done correctly, you’ll open the door without needing to unlock it. (Note that this doesn’t work on doors that are deadbolted — you’d need to pick those locks before attempting the latch.)
Adhesive Strips
The final tool in the Kopis Designs La Caja may be perplexing to those who haven’t gone through counter-custody training. These two pieces of heavy-duty double-sided adhesive offer a means of attaching small items (i.e. shims, lockpicks, the ceramic blade, or even the G10 spike) to your body or in other strategic locations.
Experience in Ed Calderon’s counter-custody class taught us that taping items to your groin is a surprisingly-effective means of smuggling them past even the most thorough pat-downs. And while removal may involve the painful loss of some leg hair, it’s a whole lot better than attempting to use your “prison wallet.”
Conclusion
La Caja retails for $165, and as with most items from Kopis Designs, it’s made in short production runs. If you want one, you’ll need to keep an eye on the company’s site, Instagram page, and/or Facebook page to watch for availability. At the time of publication, La Caja is marked as “Sold Out” on the Kopis web store.
A Kopis Designs sticker is also included inside every kit.
The product page for this item rightly mentions that La Caja shouldn’t stay in its caja for very long. It defeats the purpose to keep all your eggs in one easily-confiscated basket. These items should be scattered across your body, your clothing, and your other gear. They should be woven into your waistband, slipped behind your fly, tucked into belt loops, attached to shoelaces, or adhered directly to your skin. That way, if you’re ever abducted, you’ll have a variety of options to escape. Your captors are unlikely to find all of them.
This pocket-sized kit should appeal to almost anyone with an appreciation for the history of espionage and the darker side of survival skills. Frankly, we suspect that many owners (ourselves included) may not use every one of the tools to their fullest potential in a real-world setting, but the select few who can will be a force to be reckoned with. Even if you’re not an international super-spy or E&E expert, the Kopis Designs La Caja serves as a comprehensive starter pack for clandestine urban skills.
Editor’s Note: The following article was originally published by our sister publication RECOIL, and appears here in its entirety with permission. For more articles on guns, training, and gear, go to RECOILweb.com.
As we enter fall and winter, and temperature and shooting conditions change, it’s critical to pay attention to ammunition storage. Ammunition isn’t exactly becoming any less expensive, and for the integrity of your weapon system, and your wallet, it pays to take care of this commodity. Proper storage can dramatically extend the shelf life of your ammunition.
The basic tenets to follow with ammunition storage are cool, dry, and dark. With those principles, there are other considerations and suggestions to follow such as storage container selection. Here are a few tips to help you preserve your ammunition as we approach a change in seasons.
Keep it Cool & Dark
Swings in temperature invite moisture, and moisture is not a friend of ammunition. Don’t keep your ammunition in locations that typically experience drastic swings in temperature such as a car, garage, or attic. These locations can reach temperatures above 100F on a warm day, and then even below 30F on a cold day, depending on the season. The basement, with a dehumidifier, is the perfect choice for ammunition to be stored as it is generally cool and stable in temperature. A dehumidifier unit will continuously pull moisture out of a damp basement. Ammo should not be placed on the floor of the basement but elevated on a shelf. Rain naturally soaks into the ground, contacts your home’s foundation, and this ground moisture is dangerous if allowed to accumulate. A dehumidifier will help remove any moisture in that cool, damp basement.
UV light is a destructive force to just about anything, including ammunition. Vehicles, for example, if left in the sun for years see a deterioration in its exterior metal and paint. Not surprisingly, you should keep your ammunition out of the light as well. This makes the basement, once again, a logical choice for ammunition storage. If you are without a basement, closet storage can work as well.
Keep it Dry
While the construction of ammo has improved considerably since the 1800s, the old Oliver Cromwell quote, ‘keep your powder dry’ remains true today. There is a considerable detrimental effect of moisture on ammunition. Not only will moisture eventually corrode the metal casings, primer, and bullet of your ammunition, but over time it will penetrate and deteriorate your powder, rendering the ammunition worthless. Wet powder will not ignite effectively, if at all.
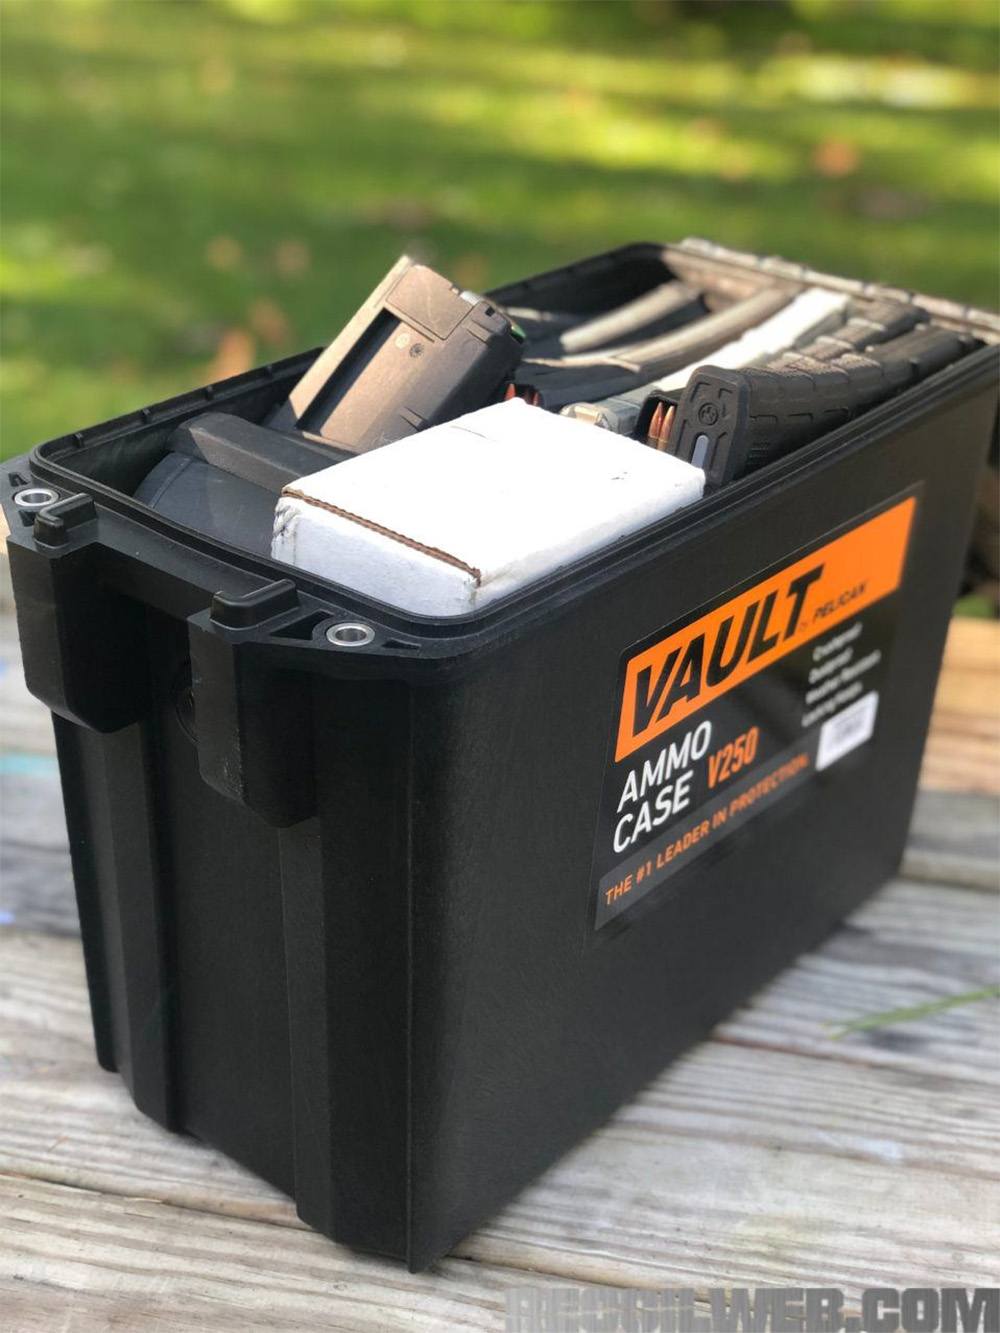
The Pelican V250 Vault Ammo Storage Case
The first step in keeping your ammunition dry is to find a suitable waterproof or sealed container. Historically, the military-issue green ammo can have been a popular favorite due to its simple and efficient design. But, there are some new versions of this classic option, such as the Pelican V250 Vault Ammo Case. The Pelican Vault line of products was designed with durability in mind, outfitted with stainless steel hasps, heavy-duty handles, push-button latches, and made from crush resistant polymer. With an interior space of 12.7×6.3×10 inches, similar to a .50 cal ammo can, the case is crushproof, dustproof and weather resistant. The Pelican V250 is a great functional option for long term or bulk storage and an upgrade from the long traditional military surplus cans.
In addition to the right container, using desiccants, silica gel packets, or even homemade moisture absorbents like rice and salt assist in keeping ammunition dry. Desiccants use osmosis to attract air moisture particles, trapping the moisture, allowing the remaining air inside the ammo container to be dry. Sodium bentonite and calcium bentonite are great clay desiccants and can be purchased in the form of Desi-Paks. Silica gel packets are another simple and low-cost option, and some silica packets change color when they’ve absorbed as much moisture as possible. The homemade option, rice and salt, will keep ammunition dry as well. Simply mix some rice with salt, tie up in a tissue or mesh, and place with your ammunition.
Transport
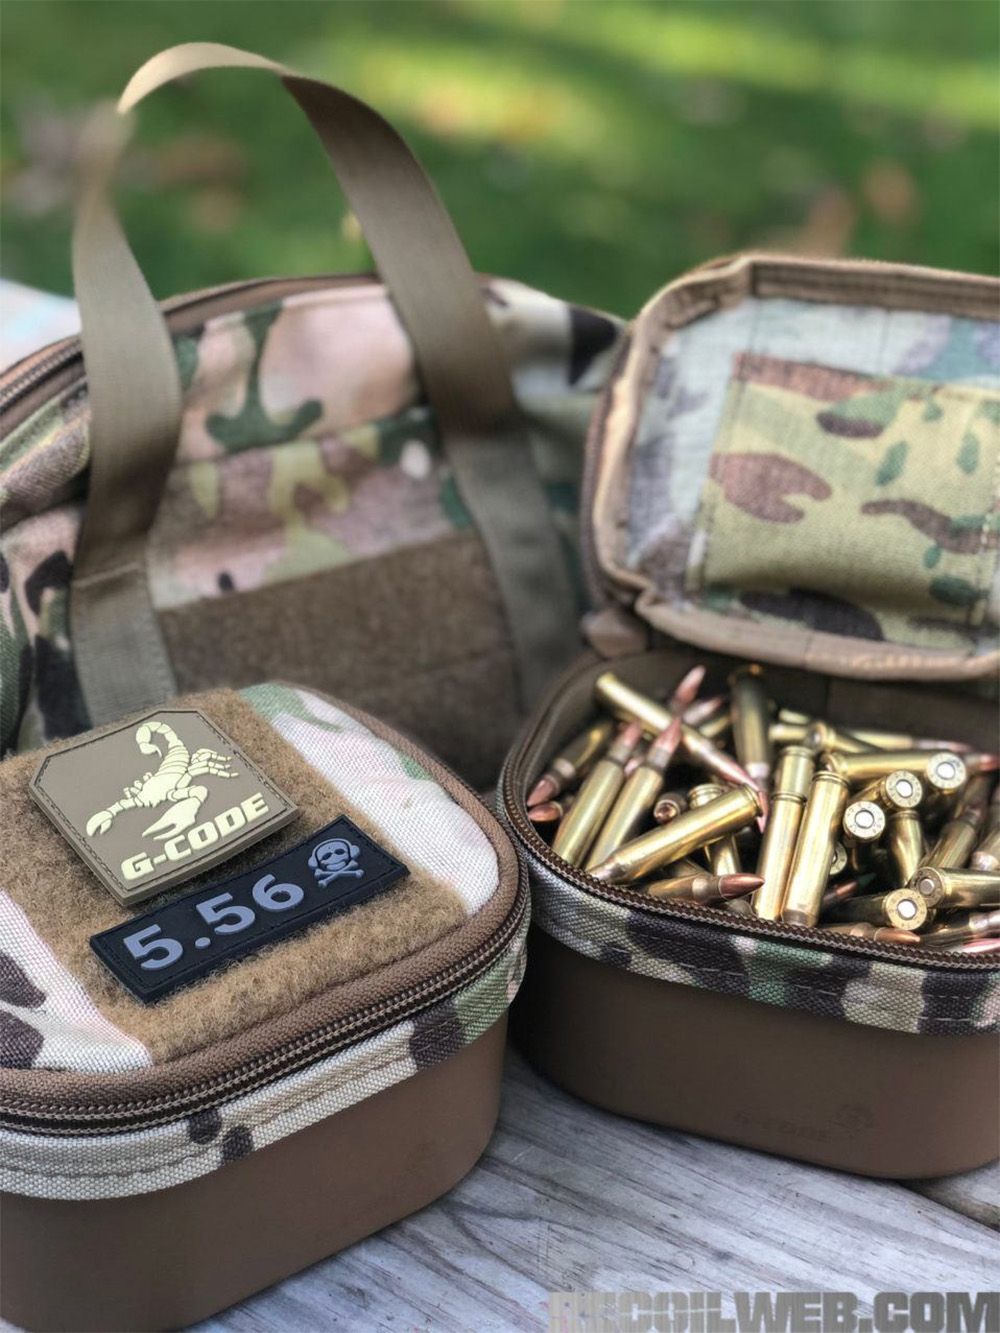
A large ammo container is ideal for the long term and bulk, but it’s also important to have a more convenient and practical container when headed to the range or on duty. One functional option is the Bang Box from G-Code Holsters. These small multipurpose storage containers have an easy to use, wide mouth, zipper opening that can hold about 100 rounds (depending on the caliber).
The Bang Box Ammo Storage Containers from G-Code Holsters
There are no sharp corners on the Kydex base and multiple color options are available. A cool feature is the Velcro strip on the outside top of the lid for placement of a PVC caliber patch, to denote the caliber inside. There is also the option of a carrying case that can hold up to three Bang Boxes. You can still fit in a desiccant into the small cases as well, helping with any moisture exposure on transport.
Care for equipment doesn’t just end at your primary weapon system. As a shooter, the concept extends to all components of your craft to include gear and ammo. Ammunition is a commodity growing more expensive by the day, and with some basic elements of care, you can preserve and extend its shelf life. Execute the basic tenets, and grab yourself proper long term and range ready storage containers. Your wallet and your weapon will thank you for it.
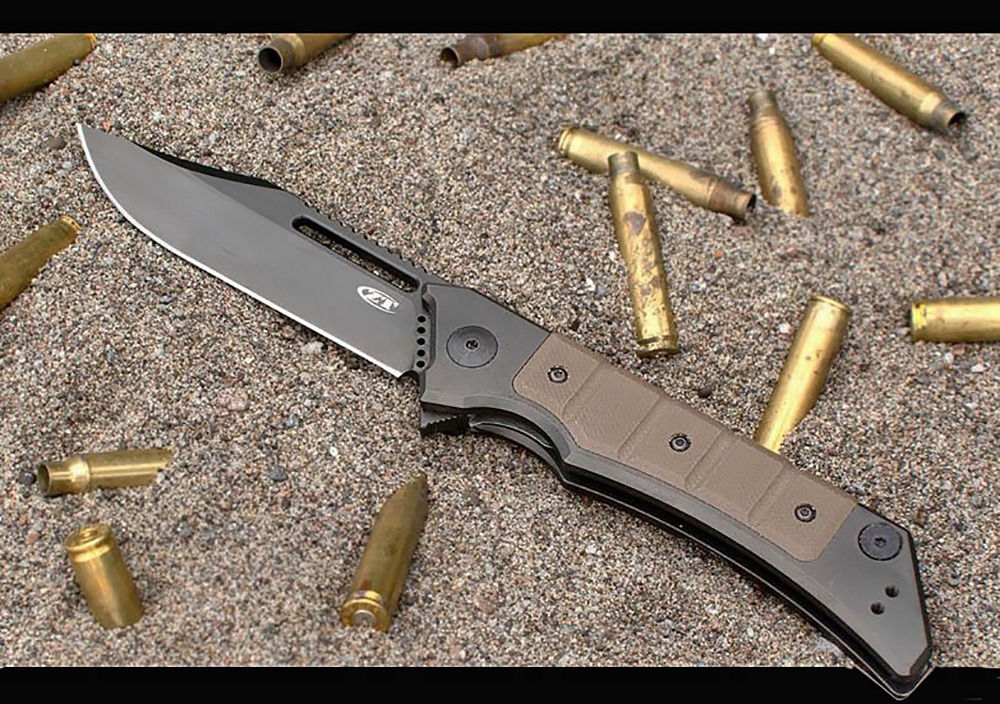
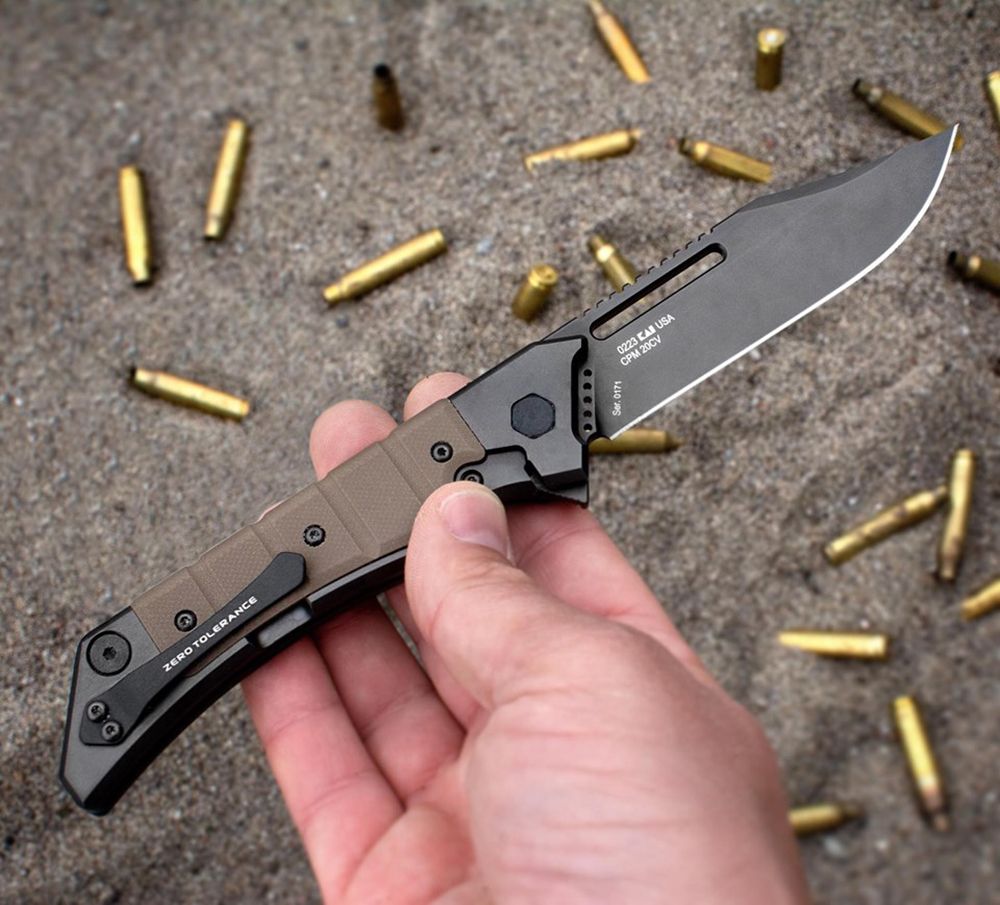
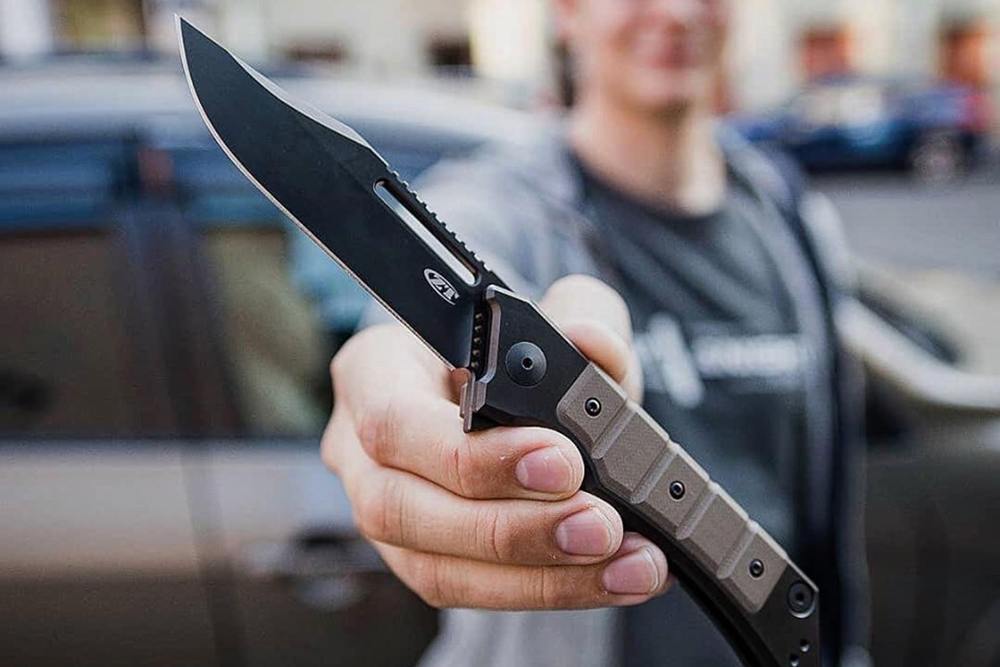
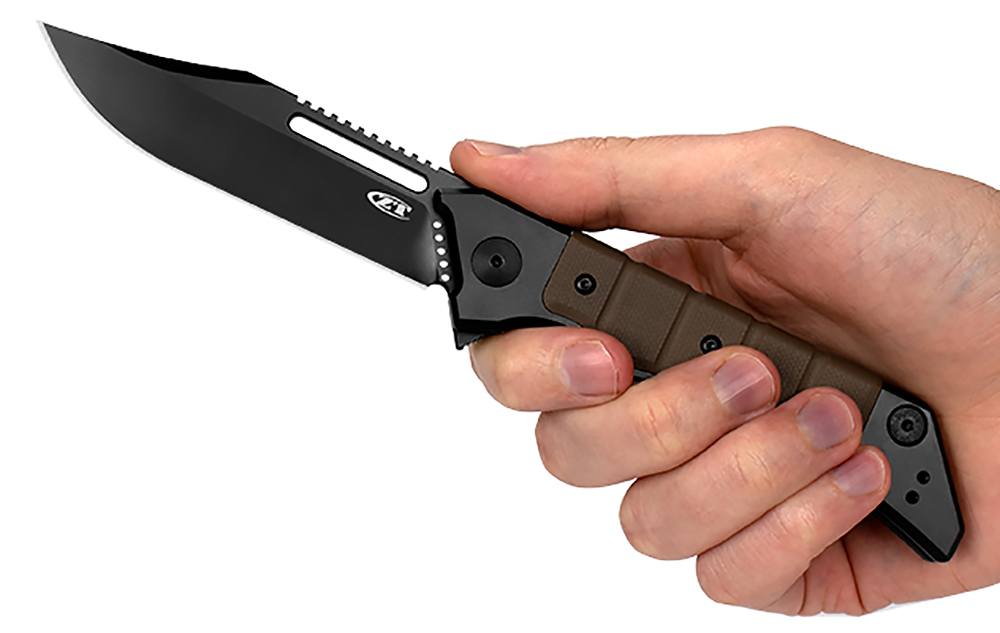
There’s seemingly not a lot of of overlap between fixed-blade combat knives and every-day carry folding knives. These are tools for two different jobs. However, despite their differences, sharing inspiration between the two categories can produce some interesting results. The new Zero Tolerance 0223 can be considered Exhibit A for this idea — the folder is said to be inspired by a “classic military knife,” which seems like an oblique reference until you take a look at the design. Its progenitor pretty much has to be the venerable Ka-Bar.
The ZT 0223 (a model number that’s a clear nod to .223 caliber, much like the ZT 0022 micro knife is a nod to .22 LR) was designed by Tim Galyean to echo that older aesthetic. It blends this with modern ZT knifemaking technology to make it suitable for contemporary EDC.
To that end, the black Teflon pocket clip is left/right reversible, there’s jimping on the spine, and it has a blade cutout to reduce weight too. In order to withstand the rigors of daily (as in everyday) use, the 3.5-inch blade is built with top-of-the-line CPM 20CV steel. That alloy has the highest level of chromium of any high-vanadium steel, giving it superior corrosion resistance to other metals. They add a black DLC (Diamond-Like Carbon) coating to that, along with a ceramic bead blast for a non-glare finish.
The Zero Tolerance 0223 features a titanium frame lock with hardened steel lockbar insert, ZT’s own KVT ball-bearing system, and what they describe as a “highly ergonomic flipper.” To pay homage to the original knife’s leather handle, it utilizes earth brown G10 handle scales (a few shades darker than FDE), which also provides for a secure grip. The Ti handle has also been DLC coated with a bead blast to match the blade. Other aesthetic, albeit functional, touches include a bronze-anodized titanium tube spacer in the handle and decorative holes drilled in the ricasso of the blade.