Working out in a survival scenario is beneficial in a number of ways. First, although it burns valuable calories, if you’re in peak physical shape, you’ll have more endurance for future tasks. Second, it makes for a good way to occupy time and maintain a positive mental attitude. It even improves your physical defenses in case you’re attacked by hostiles.
However, when most of us think about working out, we think about dumbbells, weight benches, and other equipment you might find at the gym. Unless you’re planning to hunker down in your basement or garage, you probably won’t have access to these items. So what do you do to stay in shape? Use the weight you always have with you—your body weight.
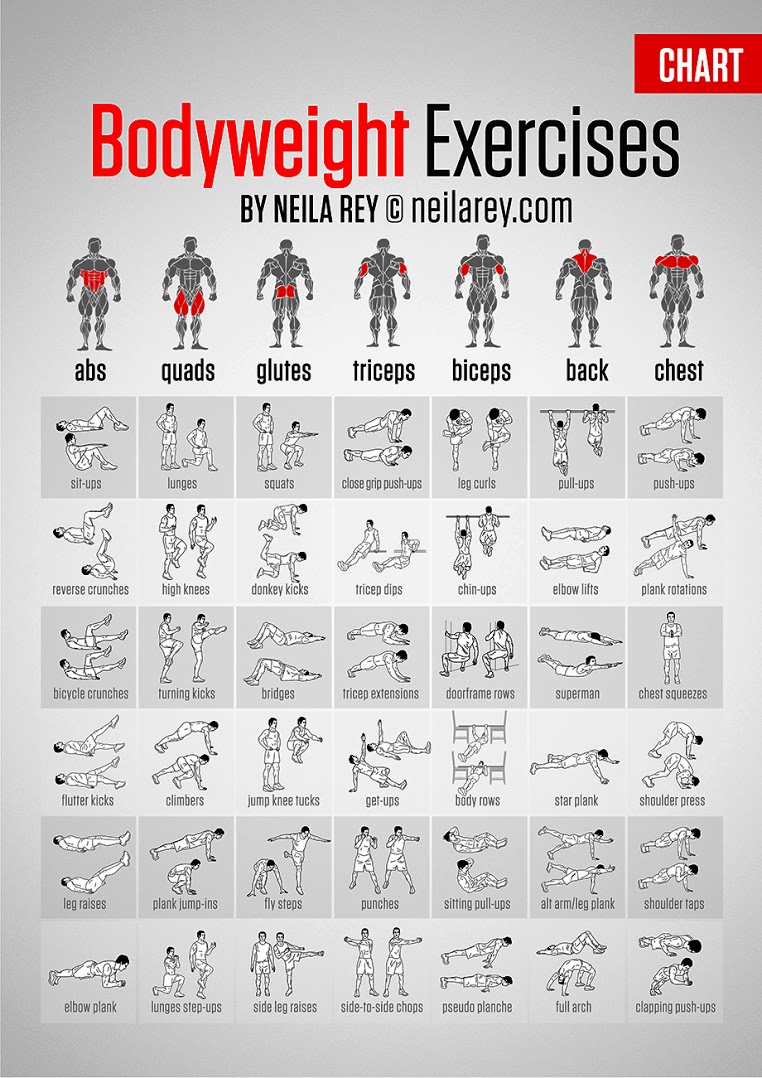
These body weight exercises from fitness trainer Neila Rey provide a good index for how to tone various muscle groups. Some are obvious, like push-ups and sit-ups, but others are more obscure. Try integrating some of these into your next workout, and if you’re feeling ambitious, make it a tic-tac-toe-style game to complete one exercise from each category.
Although modern technology has benefited our society, some might argue that our reliance on this technology has become an Achilles heel. If the grid shuts down, electronics cease to function, and we’re left to fend for ourselves, would we know what to do? This is a question that the United States Naval Academy recently addressed. Due to the growing risk of cyber warfare interfering with our GPS navigation devices, the Naval Academy has turned to more traditional methods of charting a course at sea—celestial navigation.
These techniques make use of the moon and stars, and have been in use since man first ventured into the ocean. Later on, ancient navigators made use of sextants and other instruments to approximate their position and stay on course. It’s not an exact science—even the best crew can only get within 1.5 miles of a target using celestial navigation—but it’s a tried and true method that doesn’t require any form of electronics.
Celestial navigation was originally phased out in the 1990s at the Naval Academy. However, it’s slowly making a comeback starting this fall semester, and while celestial navigation is certainly not as easy as learning to use GPS, it may be necessary in the near future. In an interview with The Capital Gazette, Captain Terry Caraway stated, “In the event that we had to go into a national emergency, we would probably have to shut the GPS down because it can be used by potential enemies.” When it really comes down to it, celestial navigation can get you where you need to go, and if you plan to spend time at sea in the future, you might look into learning this ancient skill.
Few survival situations are more imposing than being stranded alone at sea, since there are virtually no available resources. You can’t just start a fire to boil water, build a shelter, set a snare, or even forage for food. Even the sea around you seems to mock your odds of survival—perhaps you recall the famous line from The Rime of the Ancient Mariner, “water, water, everywhere, nor any drop to drink.” It’s something most of us wouldn’t wish on our worst enemy.
The SS Ben Lomond in 1906.Poon Lim received a warm welcome back to Britain after his ordeal.
However, there was one man who beat the odds, and survived an astonishing 133 days alone in the South Atlantic on a life raft: Poon Lim. This 24-year-old Chinese man was working aboard British merchant ship SS Ben Lomond during World War II, when it was sunk by a German U-boat on November 23, 1942. Tragically, 53 of the 54 crew members were killed as the ship sank to the bottom of the Atlantic, but Lim lived on. After floating in the frigid water for hours, he found a remaining life raft from the ship, and climbed aboard.
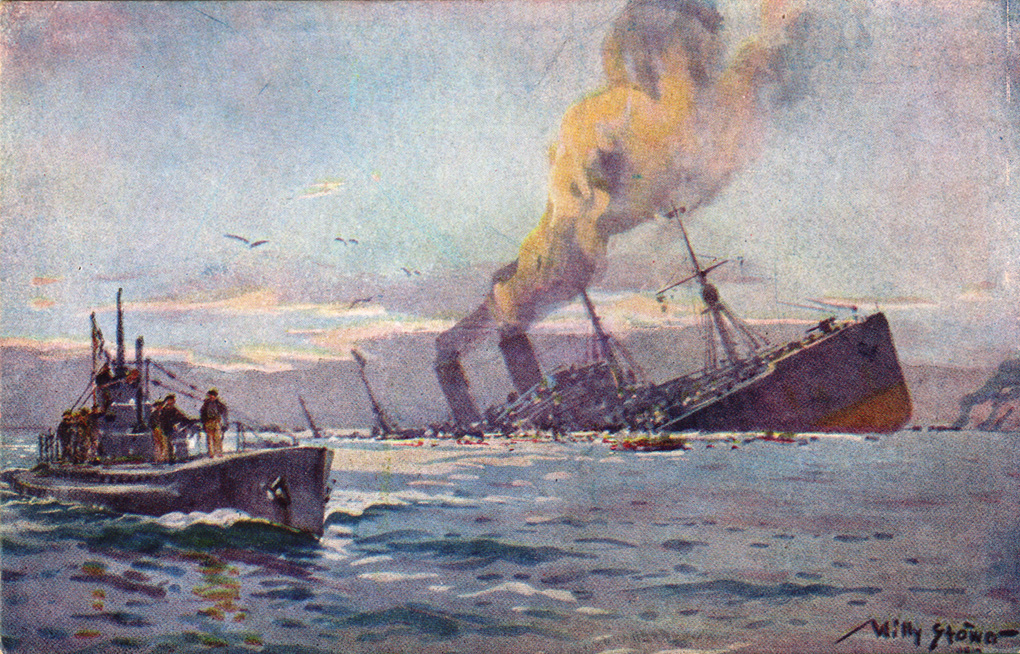
U-boat sinking a troop transport ship, painting by Willy Stöwer, 1917.
The life raft contained a few limited provisions, such as canned biscuits, 9 gallons of water, some chocolate bars and sugar lump candy, signal flares, and a flashlight. Although Lim rationed the items for as long as he could, they eventually ran out, and he ended up fishing using a wire from the flashlight as a hook and hemp rope as line. He also gathered rainwater, caught seabirds, and tied himself to the raft during storms—since he barely knew how to swim. After over four months at sea, he drifted near land, and was rescued by Brazilian fishermen. To this day, Lim’s 133 days of survival at sea remain the longest anyone has lived alone on a life raft in the ocean.
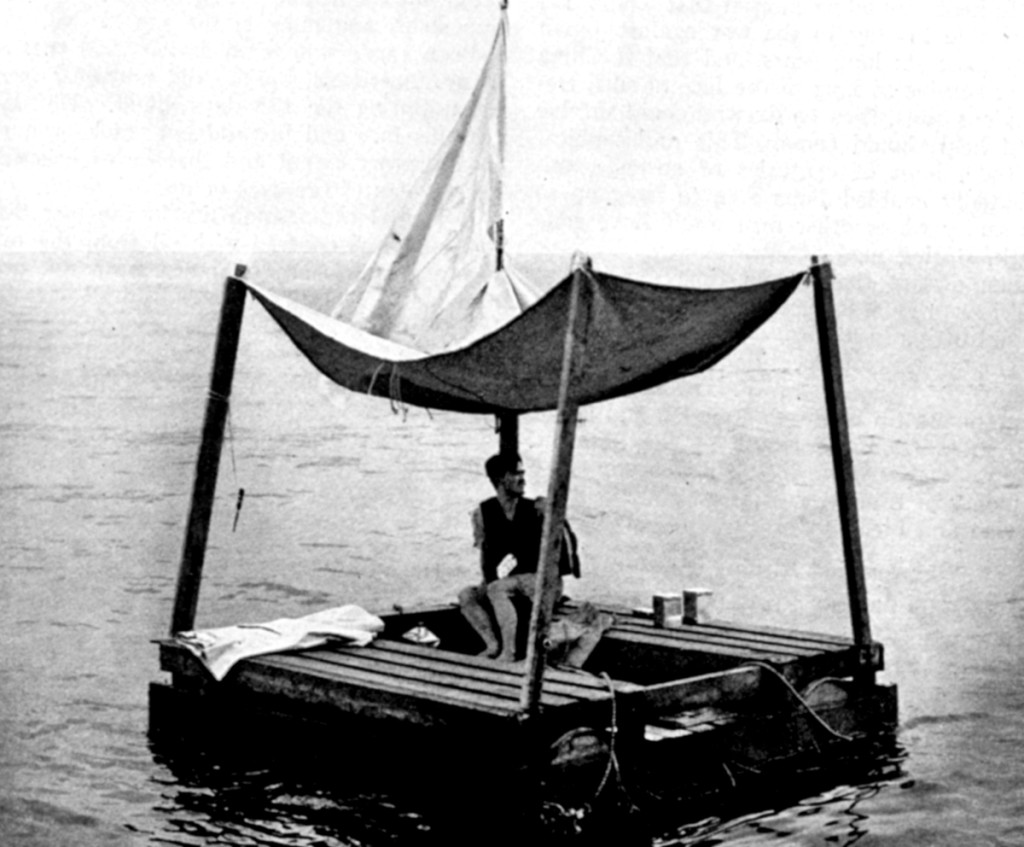
Poon Lim sitting on a reconstruction of his raft, built at the request of the U.S. Navy and President Truman.
Returning to Britain after his ordeal, Lim was honored by King George VI with a British Empire Medal, and his story went on to be incorporated into the Royal Navy’s survival manuals. Lim eventually moved to the United States, where he was granted special dispensation for citizenship, and lived to the age of 72 in Brooklyn, New York. His courageous determination to survive should be an inspiration to us all.
We have great respect for traditional regimented martial arts, but in a street fight, all those rules and regulations go out the window. When it comes to no-holds-barred street fighting, Krav Maga does an excellent job of teaching practitioners self defense. Since a head-level punch is one of the most common offensive moves in a street fight, we thought we’d share this video from Krav Maga Worldwide on how to deflect it.
Obviously this video’s experienced instructor makes deflecting a punch look easy, but with a little practice, this is a skill anyone can master. We also like that this technique sets your opponent up for additional offensive strikes. This holds true to Krav Maga’s philosophy of quickly disabling aggressors by always looking for an opening to counter-attack.
If you’re interested in learning more about Krav Maga for self defense, check out KravMaga.com.
If you’ve been reading OFFGRID for a while, you probably know how much we love paracord. It’s strong, durable, and has many survival uses. However, it doesn’t have to be wadded up in a tangled mess inside your bug-out bag. Instead, why not make it into something that looks cool, and is always on hand when you need it? That said, any time we come across a cool paracord technique, we’ll be sure to share it here.
The video below from WeaversofEternity on YouTube shows how to assemble a snake knot knife lanyard, but with a twist: adding beads or other items between the knots (a style often used by knife maker Chris Reeve). In the video, they add a polished stainless steel nut, but you could add drilled-out brass shell casings, glow-in-the-dark beads, magnets, wood beads, or various other decorative items. The beaded snake knot looks nicer than plain paracord, and gives the lanyard some weight, too.
So, do you use paracord lanyards for your knives? Do you want to see more of these type of techniques, or something different? We want your feedback—let us know in the comments below.
The U.S. military survival manuals are a treasure trove of information for anyone who spends time outdoors. Whether you need to plan a bug-out bag, treat injuries, build a snare, or even prepare yourself mentally for the rigors of solo survival, these manuals are packed with tried-and-true methods and advice. Previously, we showed you how to build an efficient Dakota fire pit using the U.S.M.C. Survival Manual—check it out if you haven’t already.
Today, we’re going to delve into identifying edible plants using a technique called the Universal Edibility Test. This method is found in the U.S. Army Survival Manual, and can help you identify plants that are safe to eat if you run out of other options. But first, a warning: the only way to avoid accidental poisoning with 100% certainty is to eat ONLY the plants you can positively identify. Use this technique at your own risk.
So, without further ado, here is the Universal Edibility Test from the U.S. Army Survival Manual:
Test only one part of a potential food plant at a time.
Separate the plant into its basic components -leaves, stems, roots, buds, and flowers.
Smell the food for strong or acid odors. Remember, smell alone does not indicate a plant is edible or inedible.
Do not eat for 8 hours before starting the test.
During the 8 hours you abstain from eating, test for contact poisoning by placing a piece of the plant part you are testing on the inside of your elbow or wrist. Usually 15 minutes is enough time to allow for a reaction.
During the test period, take nothing by mouth except purified water and the plant part you are testing.
Select a small portion of a single part and prepare it the way you plan to eat it.
Before placing the prepared plant part in your mouth, touch a small portion (a pinch) to the outer surface of your lip to test for burning or itching.
If after 3 minutes there is no reaction on your lip, place the plant part on your tongue, holding it there for 15 minutes.
If there is no reaction, thoroughly chew a pinch and hold it in your mouth for 15 minutes. Do not swallow.
If no burning, itching, numbing, stinging, or other irritation occurs during the 15 minutes. swallow the food.
Wait 8 hours. If any ill effects occur during this period. induce vomiting and drink a lot of water.
If no ill effects occur, eat 0.25 cup of the same plant part prepared the same way. Wait another 8 hours. If no ill effects occur, the plant part as prepared is safe for eating.
CAUTION: Test all parts of the plant for edibility, as some plants have both edible and inedible parts. Do not assume that a part that proved edible when cooked is also edible when raw. Test the part raw to ensure edibility before eating raw. The same part or plant may produce varying reactions in different individuals.
For more information on edible plants, check out Chapter 9 of the U.S. Army Survival Manual, embedded below via Google Books.
Most of us have a well-stocked toolbox (or two) at home, at work, in the garage, or in the workshop. But if SHTF, what tools from the hundreds you may already have should you take with you? Alternatively, what tools should already be in your vehicle, go bag, or bug-out bag?
First things first: this list is by no means comprehensive, and everyone’s list will be different. If you’re going to be working on a boat, you’ll have different tools than someone who’s working on a bicycle. If you’re carrying everything on your person, narrow down the list to smaller and lighter items. However, this list should provide what is, in our opinion, a versatile starting point for almost anyone.
Also, we’re not including consumables like duct tape, zip ties, or super glue, since they’re not tools in the traditional sense. We’re also excluding useful items like a fire striker, compass, or a first aid kit—despite their importance to survival, you wouldn’t normally find those items in an ordinary home toolbox. Now, without further ado, here are our top twelve survivalist tools:
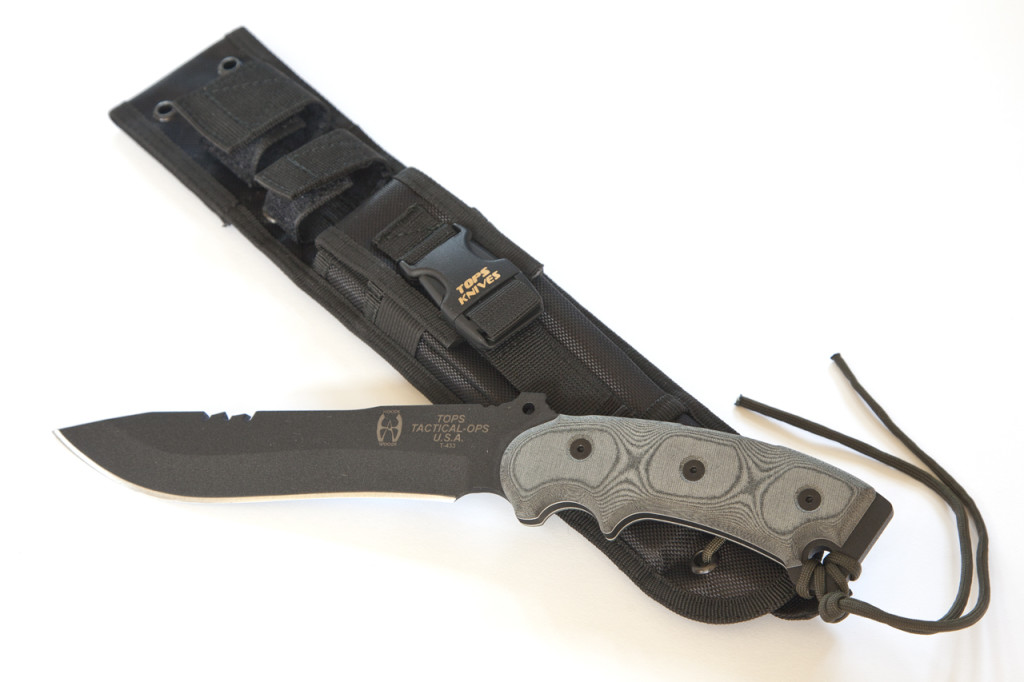
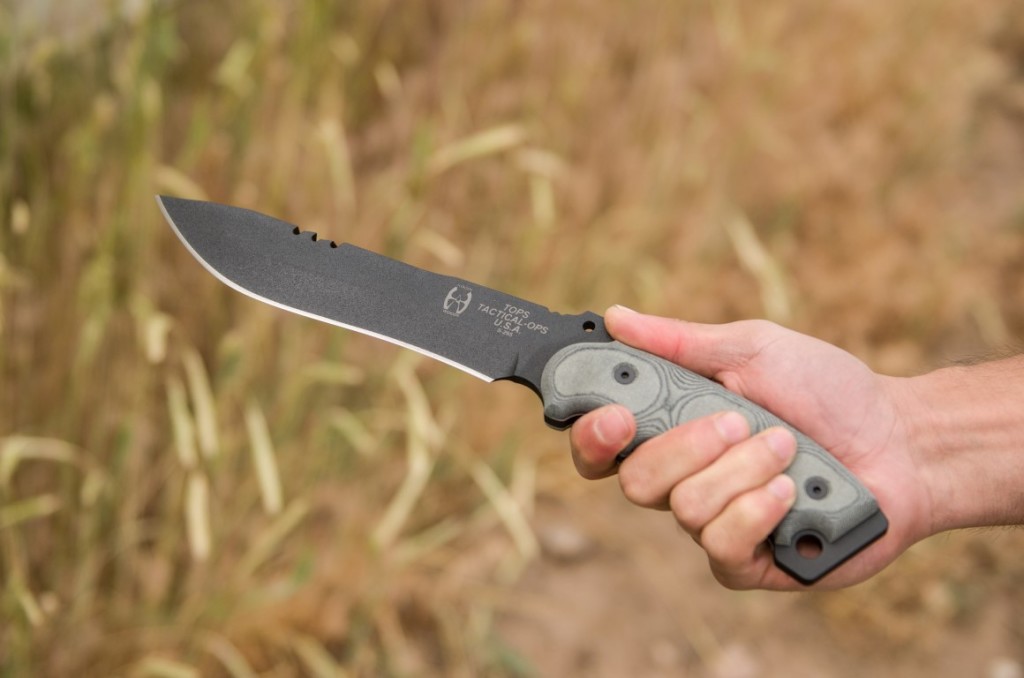
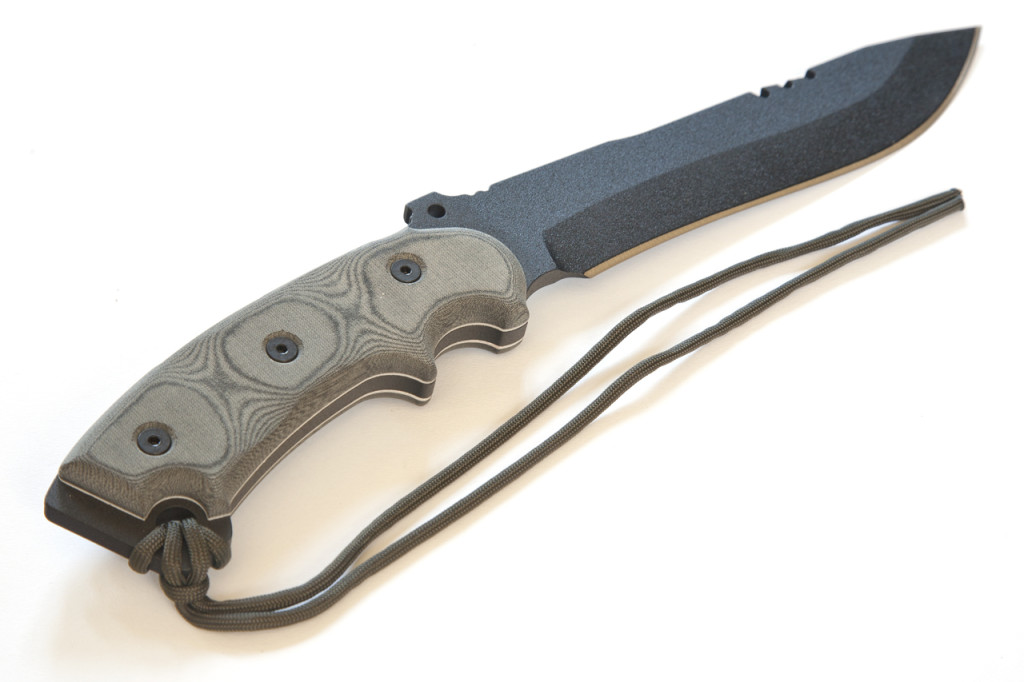
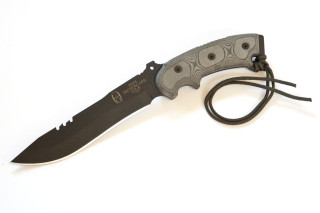
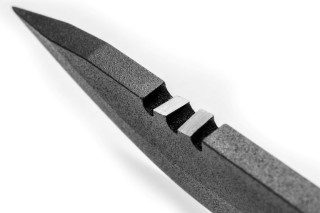
A fixed-blade knife is the single most important tool in your arsenal. So, don’t rely on a cheap knife from your local hardware store! Try a number of different knives, and find what works best for you. Whatever it is, it should be fairly large, sturdy, and have a durable sheath you can strap to your belt or pack.
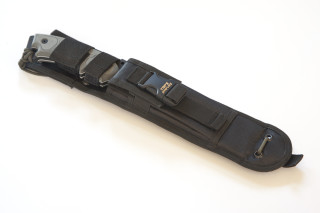
For this list, we chose the hefty TOPS Knives Anaconda 7B. With a 13.25-inch overall length, 7-inch blade, heat-treated 1095 high carbon steel construction, and grippy black linen Micarta handle, the Anaconda is a real workhorse. It’s nicely weighted, with a slight curvature that makes it perfect for hacking and chopping. However, unlike a full-size machete, this large knife is precise enough for more delicate tasks. Also, its hardened carbon steel is extremely strong and can hold a razor-sharp edge under heavy use, and that’s just what you’ll want in a survival scenario. The knife itself is a nicely-built piece, and even the included MOLLE-compatible nylon sheath feels high-quality. At $240, the Anaconda is certainly pricey, but when your life depends on it, a good knife like this one from TOPS is worth every cent.
Blade size and type come down to personal preference and geographic location—if you’re in a jungle or forest, a large kukri or machete might be ideal, while a concealable 4-inch fixed blade might be preferable in an urban setting. Whatever you choose, choose wisely, as this will be your primary cutting implement and should always be within reach.
A good fixed-blade knife will make most aspects of survival much easier.
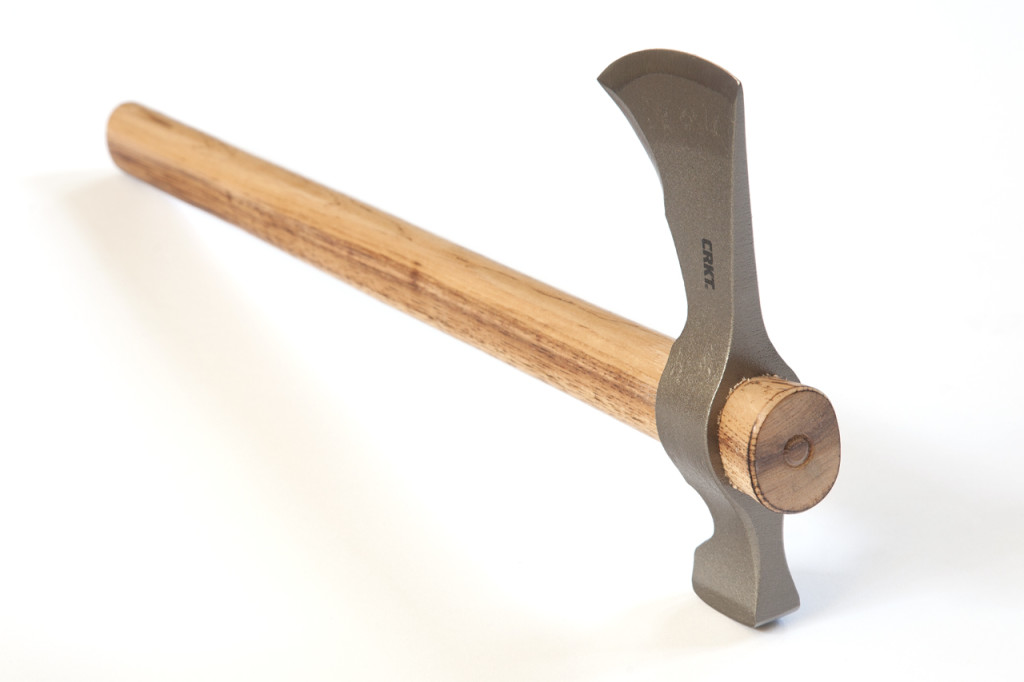
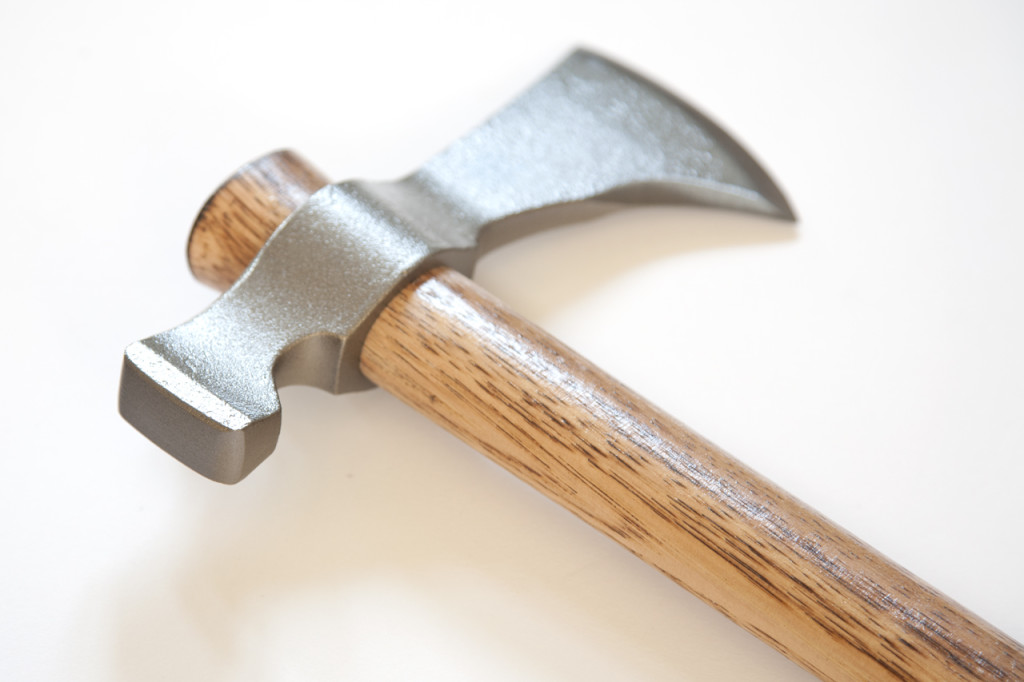
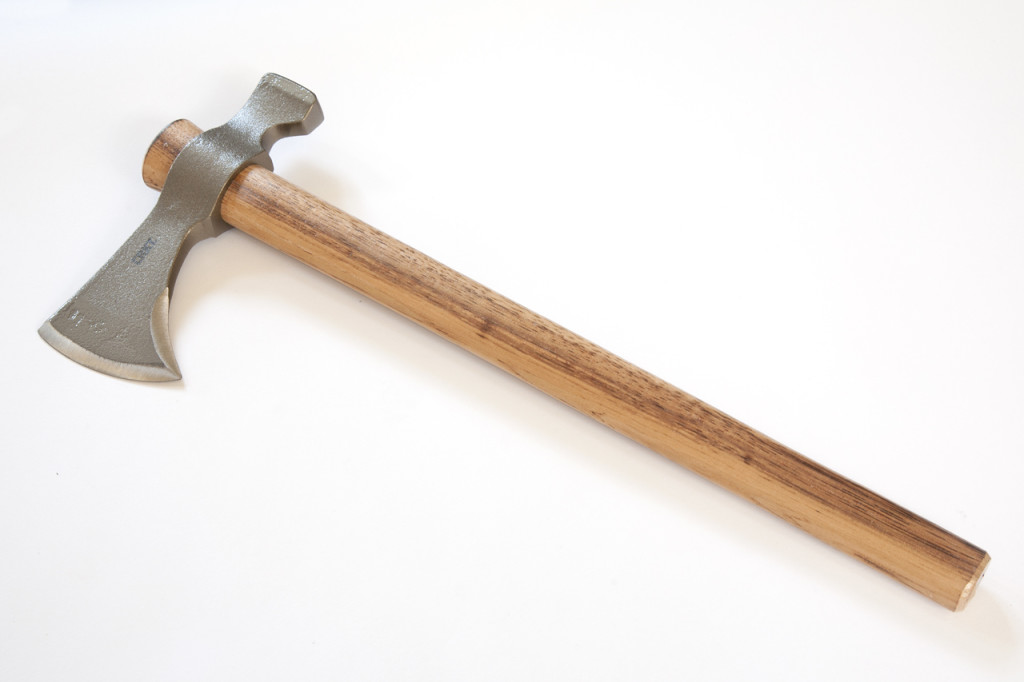
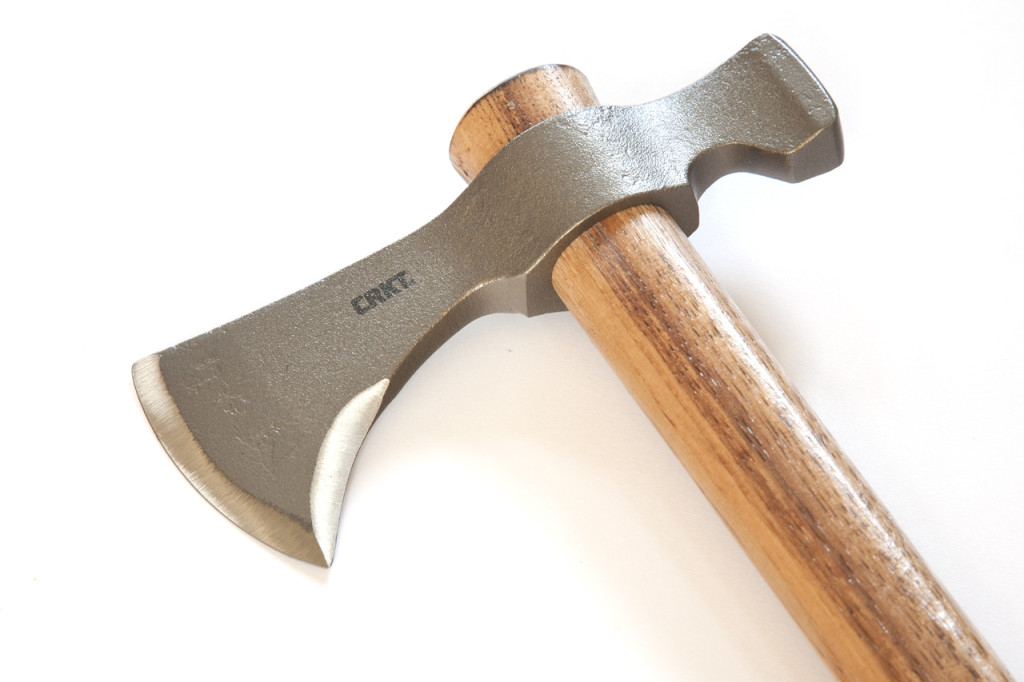
Hatchet or axe – CRKT Woods Chogan T-Hawk ($69.99 MSRP)
A hatchet or axe will serve as your second edged implement, alongside your knife. Thanks to its weighted head and longer handle, an axe can be used for chopping firewood, felling trees, hammering tent stakes, and as a weapon. To provide sufficient leverage and swinging power, we prefer something in the 15-25 inch range for overall length.
It’s up to you whether you prefer a smaller, lighter tomahawk or hand axe, or a full-size lumberjack-style log splitter. Again, consider your environment—lugging around a massive axe in the desert is probably unnecessary.
When it comes to axes, we really like the Woods Chogan T-Hawk from CRKT. Its 19.3-inch handle is made of tough lacquered Tennessee hickory, while the business end is formed from a chunk of rock-solid 1055 carbon steel. The length is just enough for two-handed chopping, and it’s perfectly weighted for one-handed use as well (or throwing, as you’d expect from a tomahawk). Opposite the blade, you’ll find a squared-off hammer head, which is great for pounding tent stakes. CRKT also offers a Woods Kangee variant of this T-Hawk, with a spike instead of the hammer head.
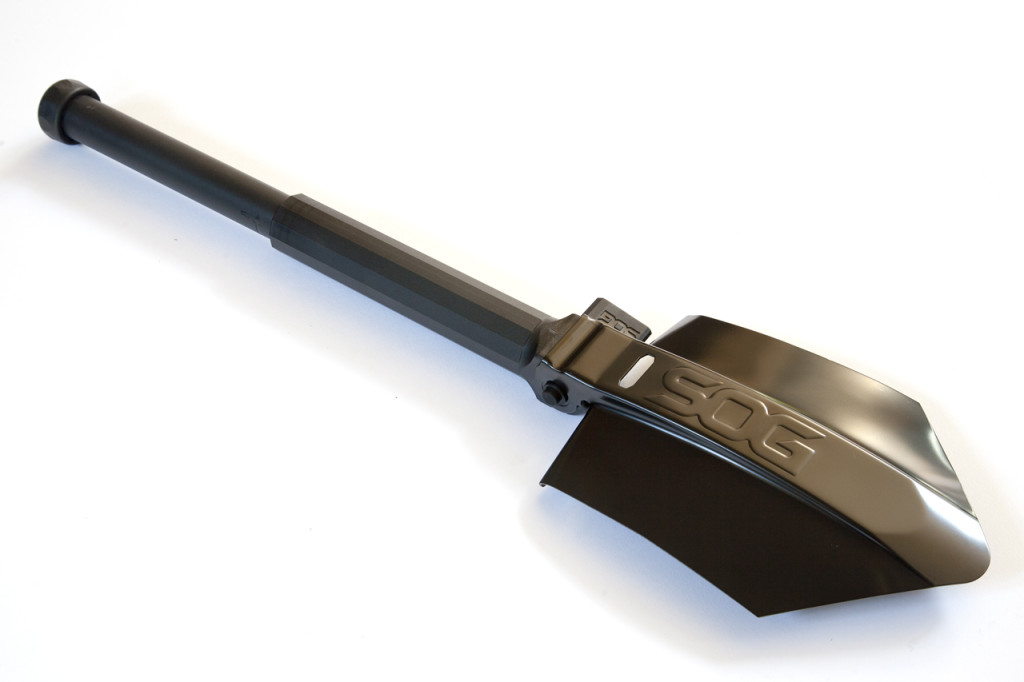
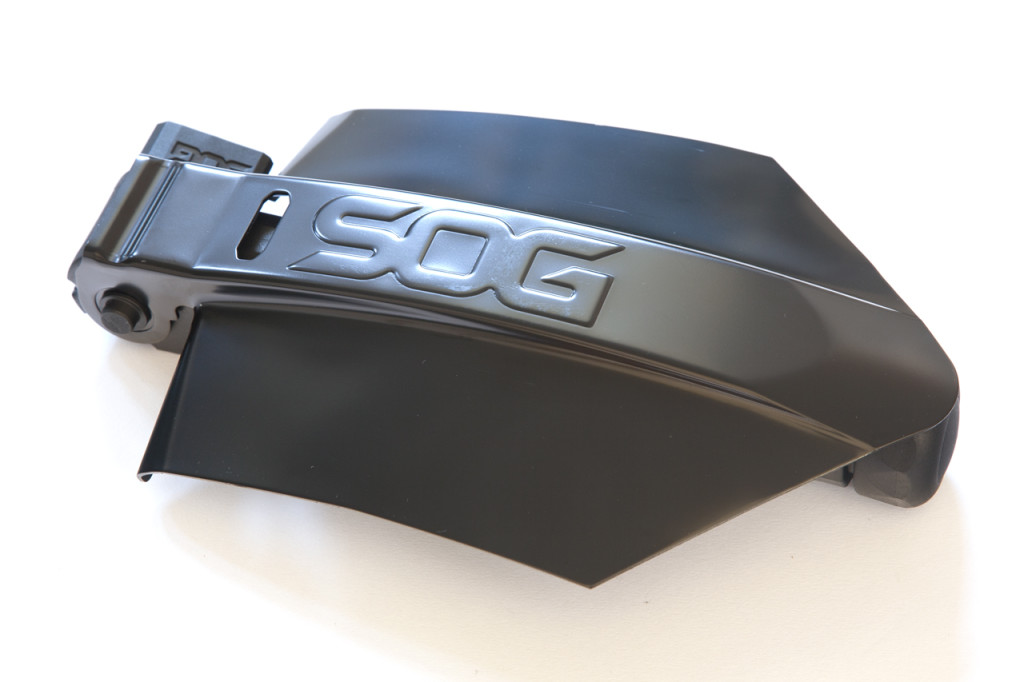
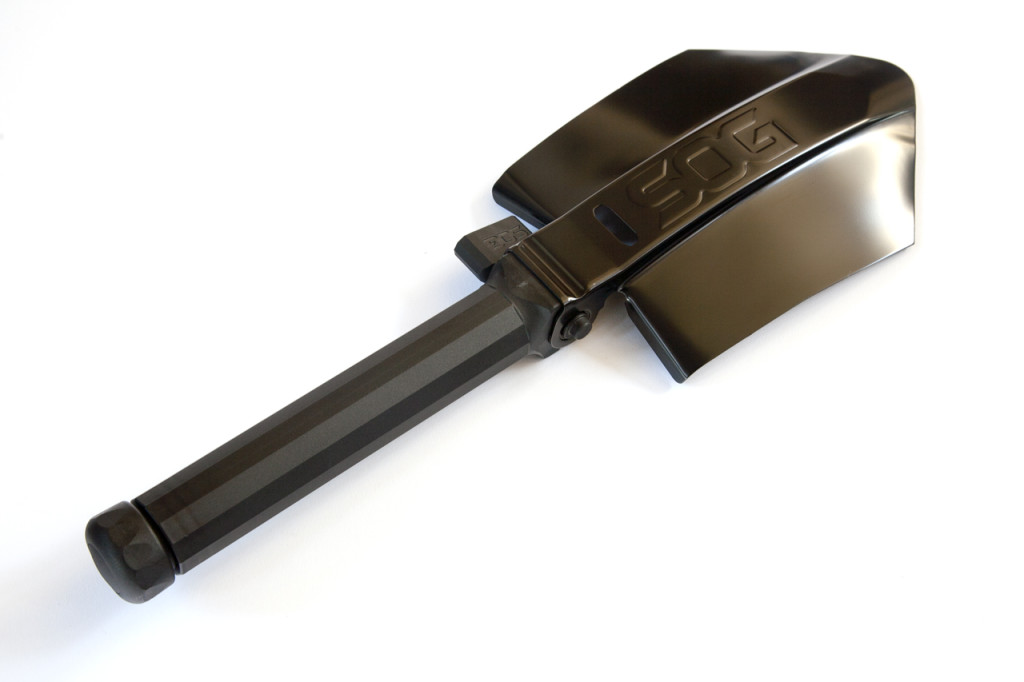
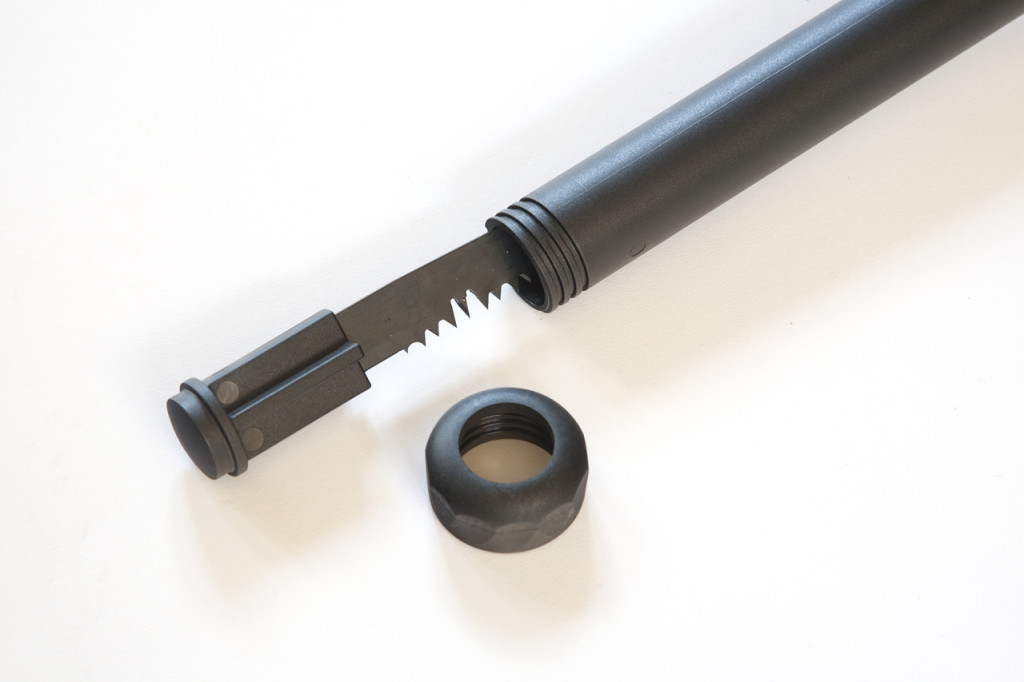
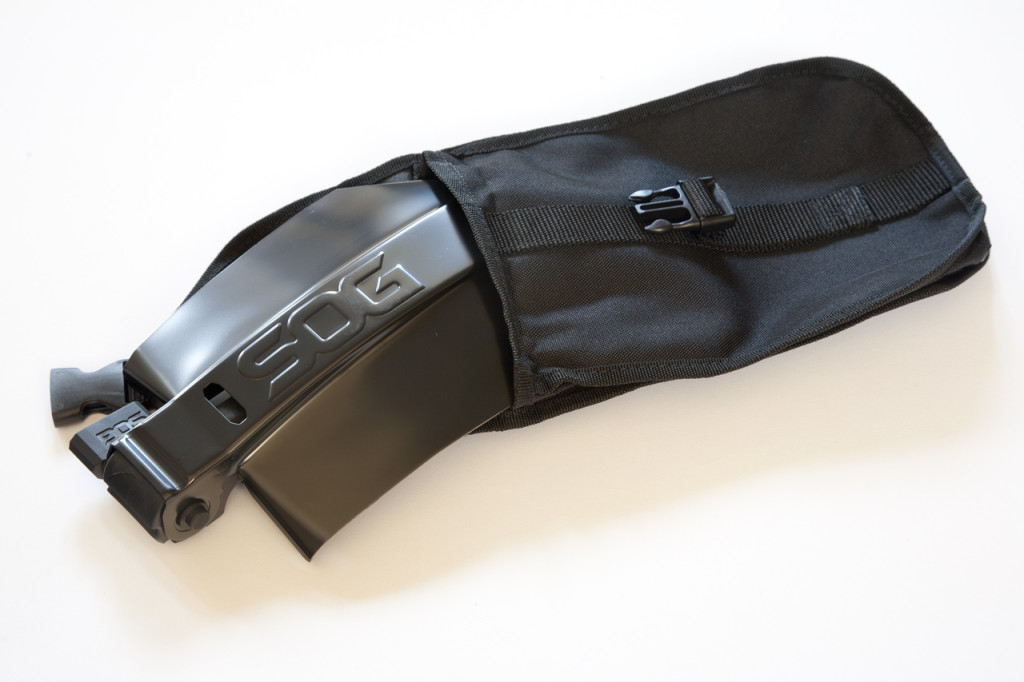
Spade or trowel – SOG Elite Entrenching Tool ($74 MSRP)
Necessary for digging shelters, fire pits, and more. You can even heat it over a campfire and use the metal as a cooking surface. A compact military-style folding spade is ideal if space is limited, and many offer serrated and sharpened edges for chopping, hacking, and cutting.
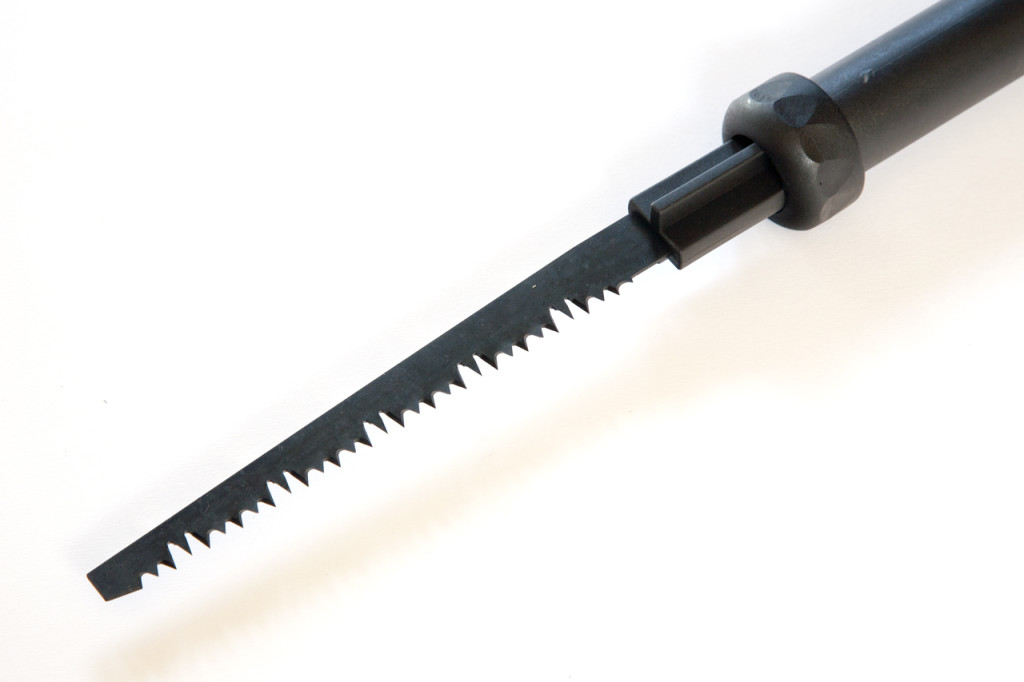
For this Top 12 feature, we picked up a SOG Elite Entrenching Tool, which has all the features you’ll need from a shovel in an extremely light and compact package. The SOG Elite E-Tool arrives folded into a 6” x 10.5” x 2” fabric carrying pouch, and with a few twists of the wrist, folds out and expands into a 26” long shovel. It’s sturdy with a 1075 carbon steel head, and a ultra-light composite handle that locks securely in place. A nice additional feature is the hidden reversible hacksaw within the E-Tool’s handle, which provides a great backup to our next tool.
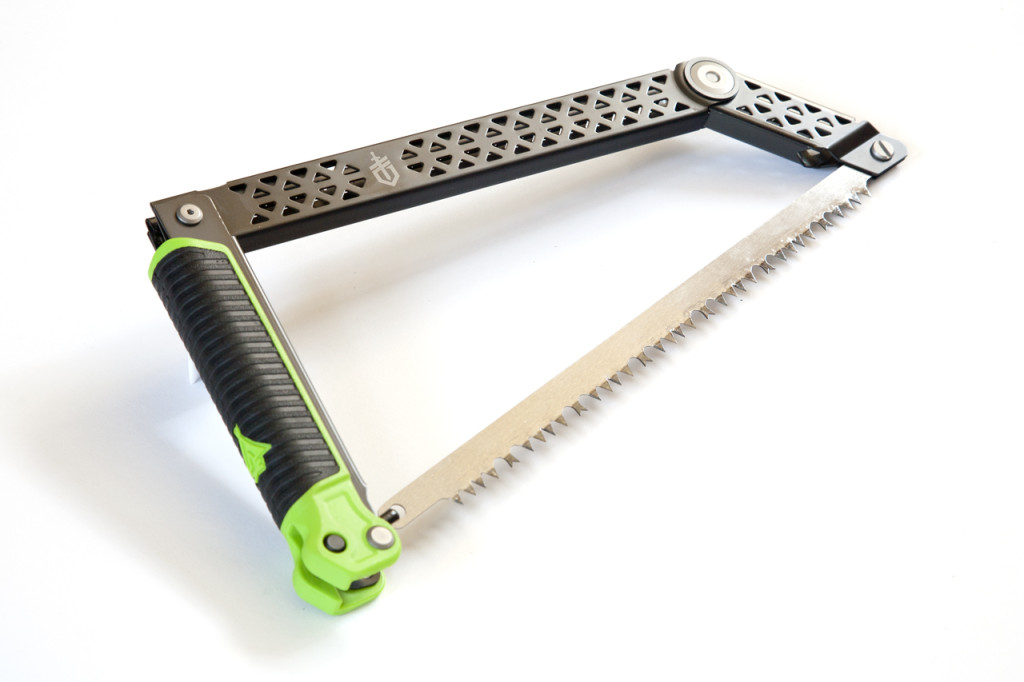
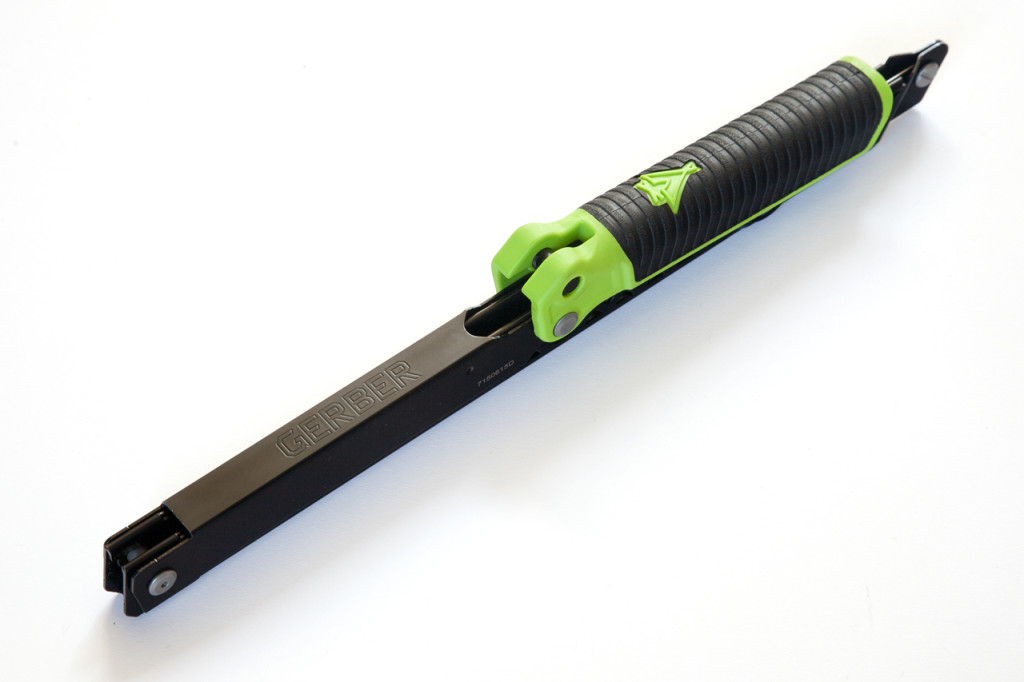
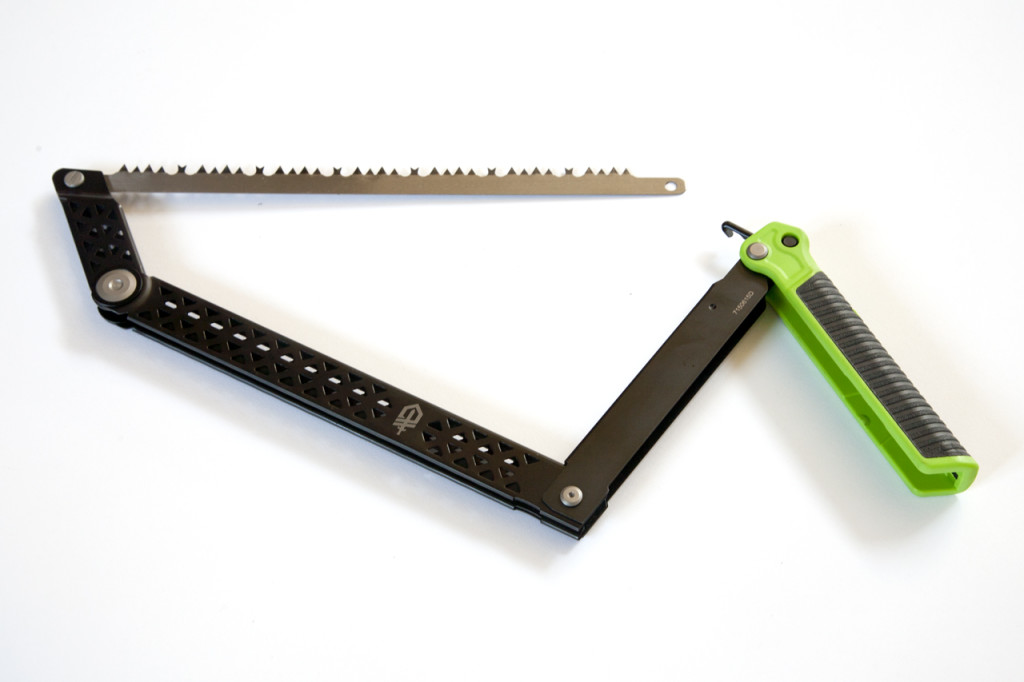
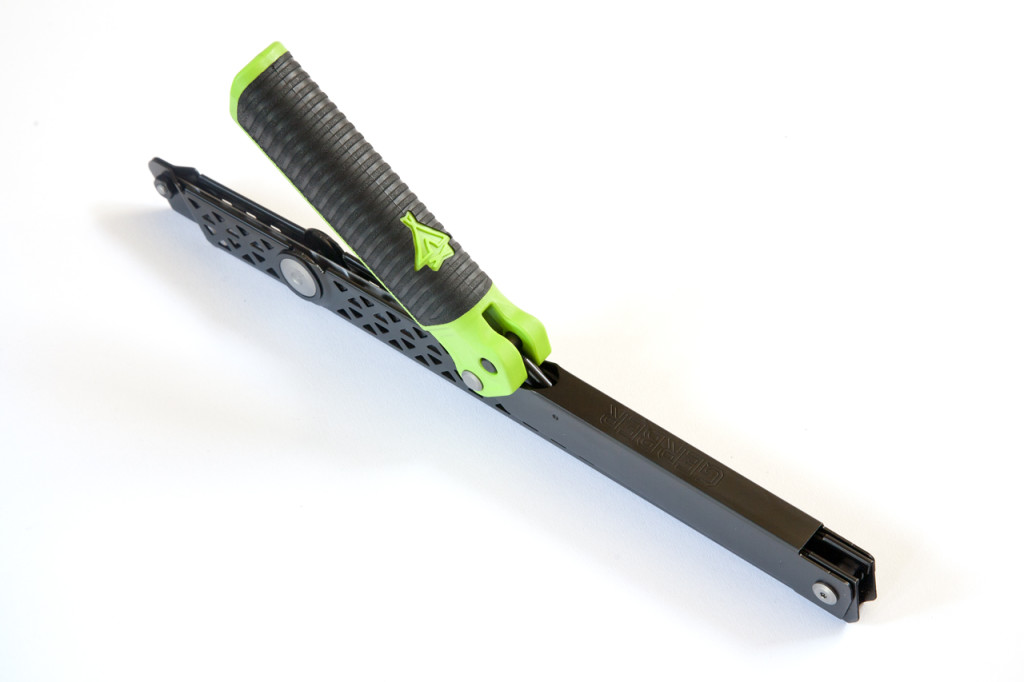
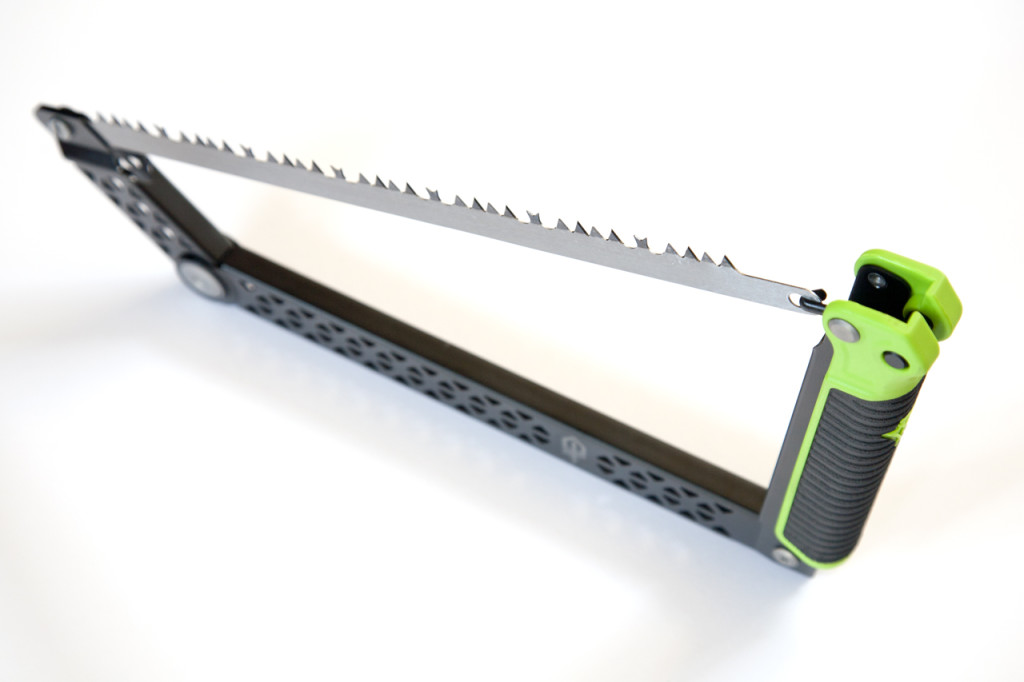
Just about everyone has a standard hacksaw sitting in their toolbox or on the wall of their garage. This tool cuts through wood, plastic, metal, and other items with precision and speed. However, a normal hacksaw doesn’t travel well, and you certainly don’t want to throw it in your bag with an exposed blade. That’s why we lean towards a folding saw for survival purposes—they’re nice and compact, they protect the blade, and they work just as well as the real deal.
After looking online for a folding saw, we decided on a Freescape Camp Saw from Gerber. This brand new design accepts standard 12-inch saw blades, so you can swap them out and cut different materials as needed. In compact form, it’s only 13.8” x 1.8” x 1.1”, which is perfect from a portability standpoint.
It also folds open in seconds, and snaps together to hold the blade tightly in place. We also liked the grippy rubber handle, which makes sawing with greasy or sweaty hands much easier.
Headlamp or flashlight – Black Diamond Icon Headlamp ($89.95 MSRP)
Most toolboxes have some form of work light, and for good reason—it’s essential to working at night or in low-light conditions. Some prefer an LED flashlight/flood light combo, and this is a good choice, especially with a magnetic base for mounting on metal surfaces. However, we like headlamps, since they’re totally hands-free, and the light is always focused right where you’re facing.
We chose a Black Diamond Icon headlamp, which is a high-end 320-lumen light that’s weatherproof and versatile. Its QuadPower LED spotlight is effective up to 100 meters in total darkness, and four SinglePower white and red LEDs (two each) provide up-close fill light. It even has a quick-access mode that illuminates the red LEDs first, so you can operate discreetly and not wipe out your night vision. We also like that the 4x AA battery pack sits on the rear of your head, distributing weight evenly.
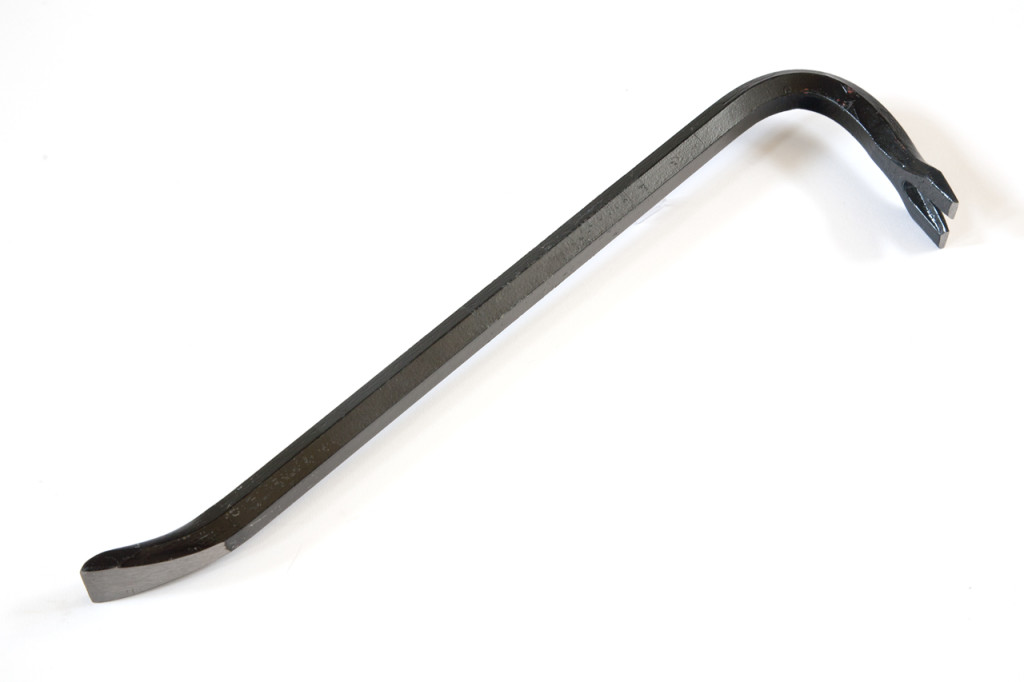
Pry bar or crowbar (under $10)
We call this “the persuader”, since it’s perfect for breaking loose stubborn items. Pry open doors, bash through glass, remove stuck nails, use the sharpened end as a chisel, or use it as a blunt-force weapon in a pinch. Look for a 2-foot model if you plan on carrying it, or a longer bar if you’re stowing it in a vehicle. Try to find one that’s sturdy without being too heavy. Keep in mind that many people will view this as a burglary tool, so avoid carrying it openly in public.
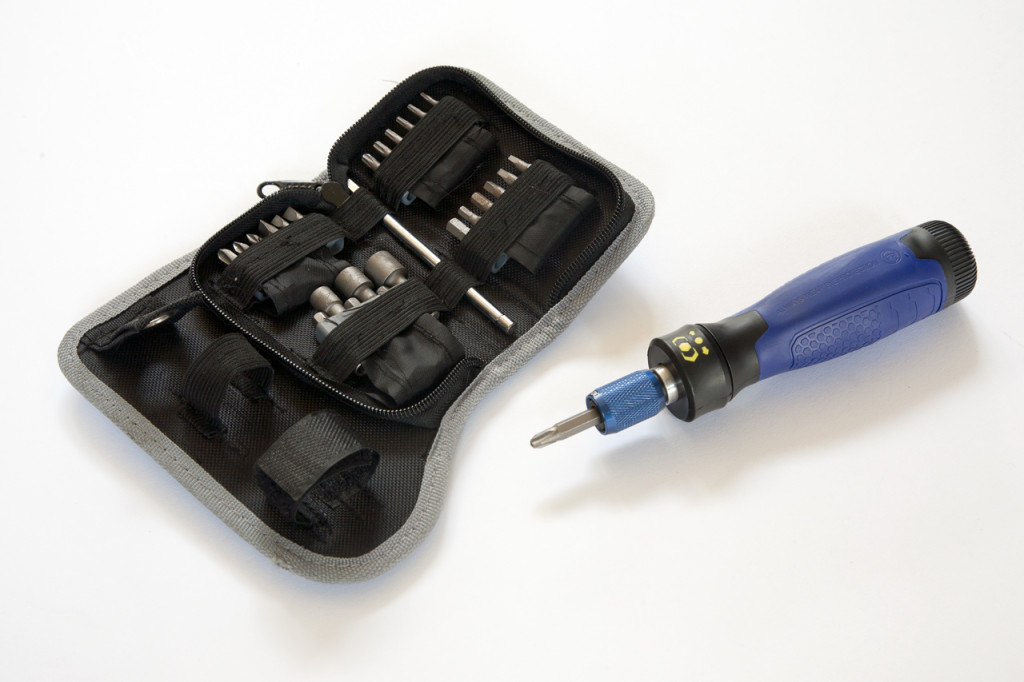
Multi-bit screwdriver (about $10-$30)
A good screwdriver is key for working on anything electronic or mechanical. Look for one with Phillips, flathead, hex, and Torx bits, stored in the handle or an attached zip-up pouch. Ratcheting action is good to have, but remember that there’s a possibility this feature can break, rendering your tool free-spinning and useless.
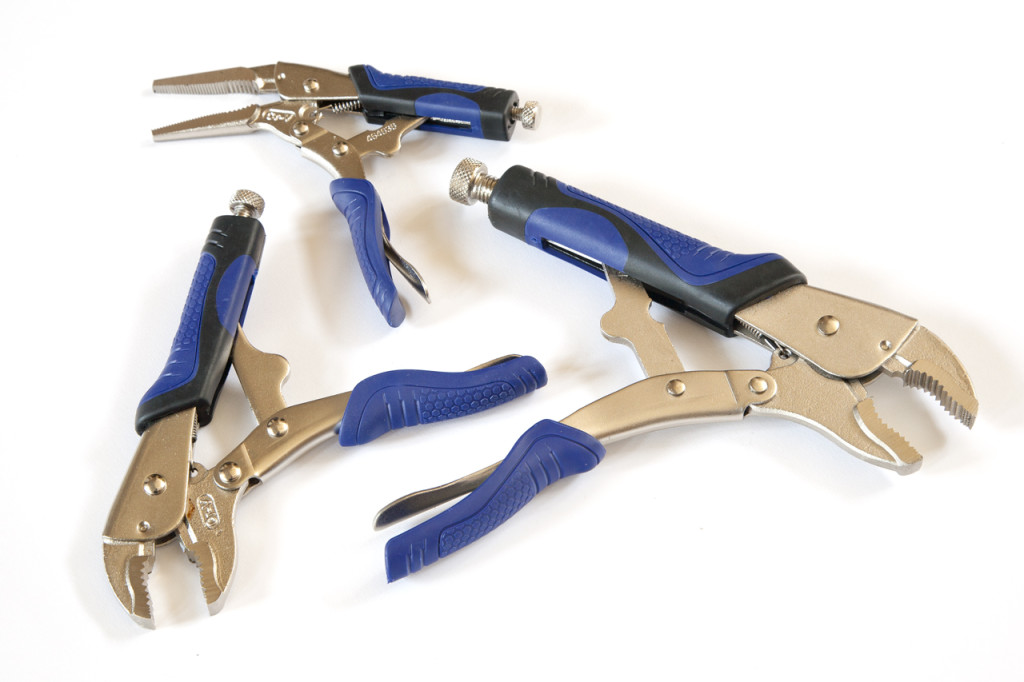
Locking pliers or vise grips (about $10-$30)
Locking pliers (pictured above) can be used as traditional pliers to grasp objects, but can also clamp items in place while you work. We recommend the needle-nose variety for versatility. Alternatively, you could consider a set of vise grips or jaw locking pliers (pictured below). These don’t clamp in place like locking pliers, but they can be adjusted to fit a variety of different diameter objects that are too big for locking pliers.
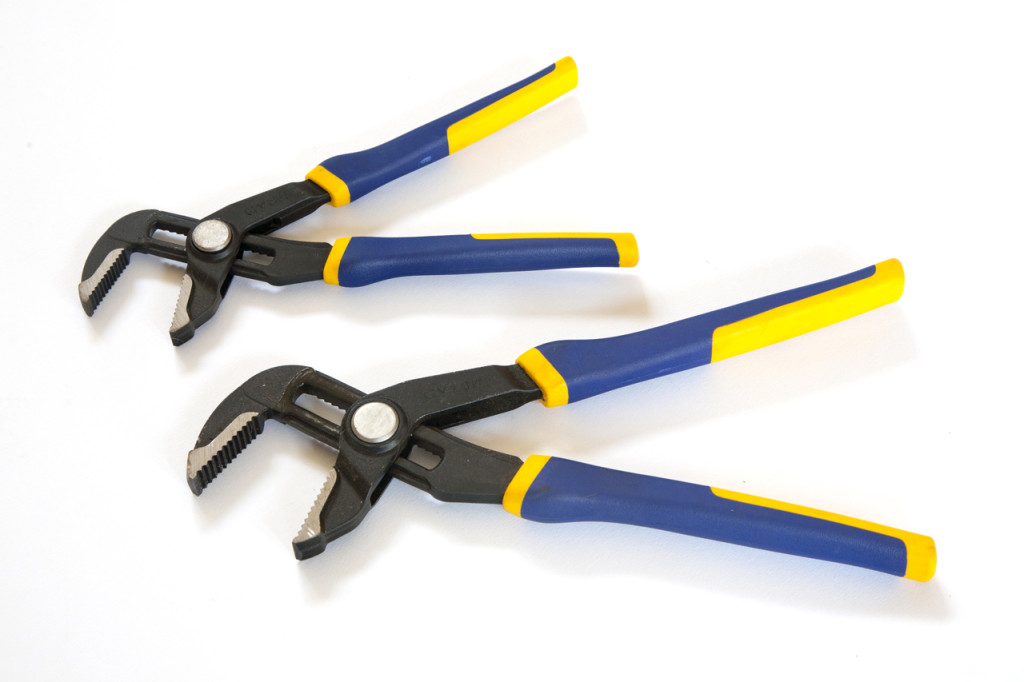
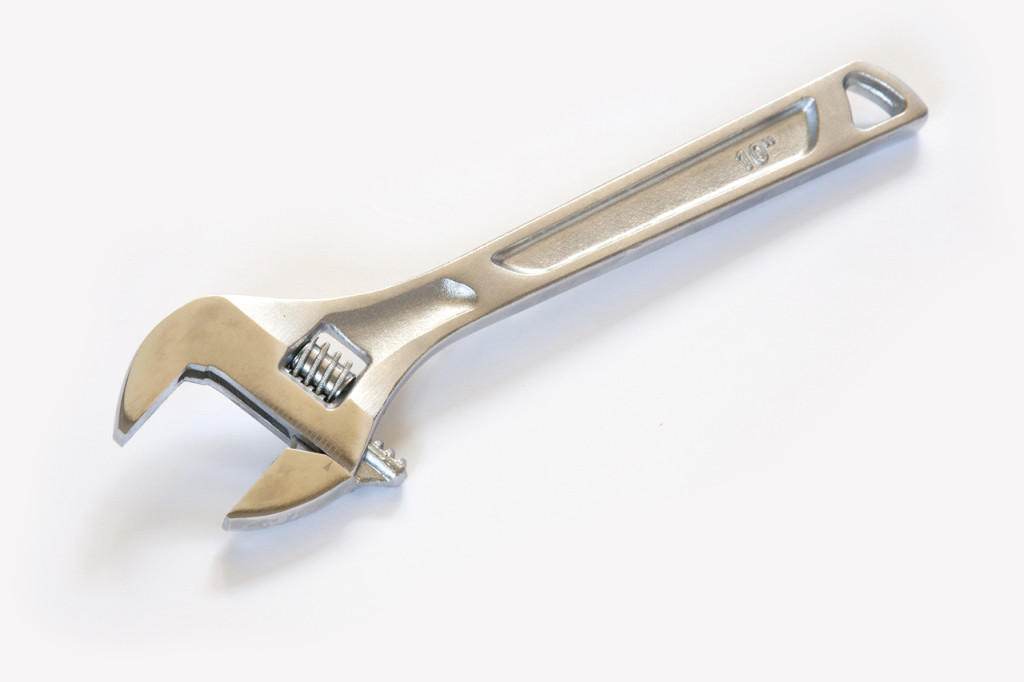
Large adjustable crescent wrench (about $10-$15)
Often you’ll need to work with large bolts while repairing vehicles, plumbing, and machinery, and this is just the tool for the job. It sure beats carrying around a full set of box wrenches, and if you don’t have a large wrench handy, some tasks become impossible.
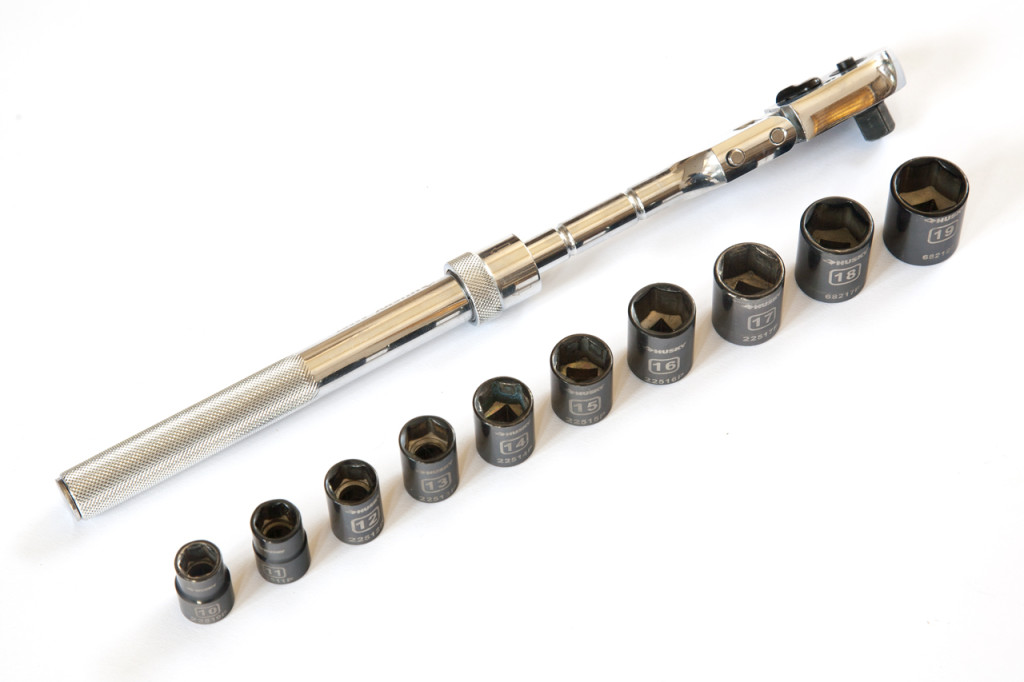
3/8-inch ratcheting wrench and socket set (about $40-$80)
Although you might get by with just the adjustable wrench, a ratcheting wrench will make working on cars, generators, and other small machinery ten times easier. Also, there are many instances where you need a socket wrench, such as loosening car lug nuts or removing a small bolt in tight confines. A mid-size 3/8-inch ratcheting wrench gives you more precision than an adjustable wrench, and will reduce the risk of stripping small nuts and bolts. We like the extendable/pivoting type pictured above for versatility and extra leverage. Almost all newer vehicles and light machinery uses metric hardware, so a set of sockets from 8mm to 21mm will cover most tasks.
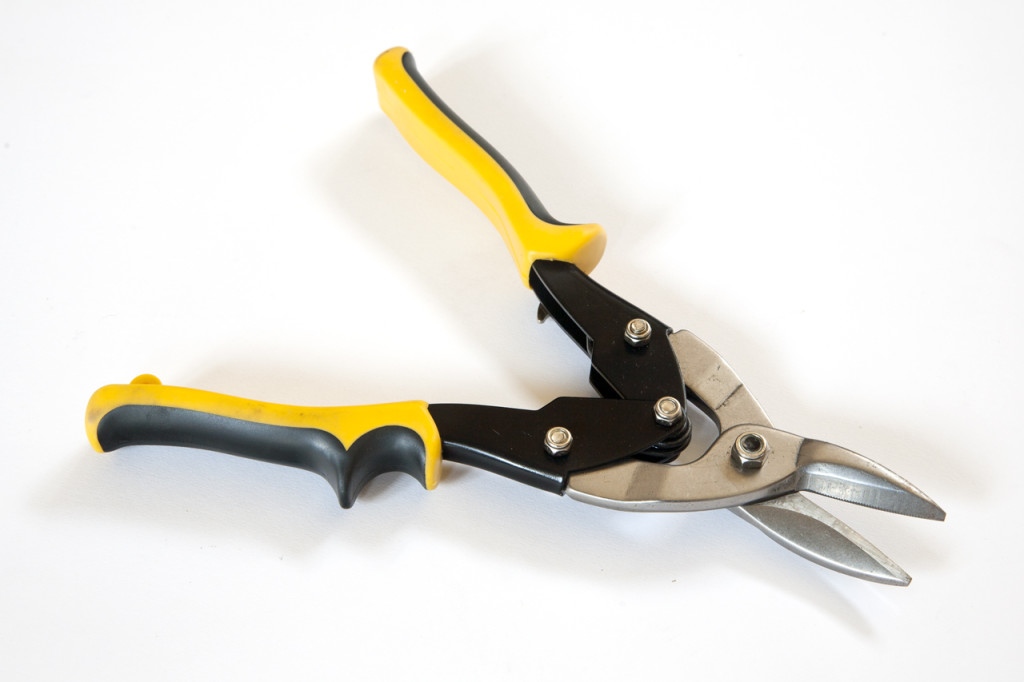
Tin snips (about $10-20)
Think of these as scissors on steroids. Tin snips will cut almost anything—rope, cables, chain link fence, barbed wire, zip ties, fabric, tape, and thin-gauge sheet metal. It’s extremely convenient to be able to slice through metal like butter.
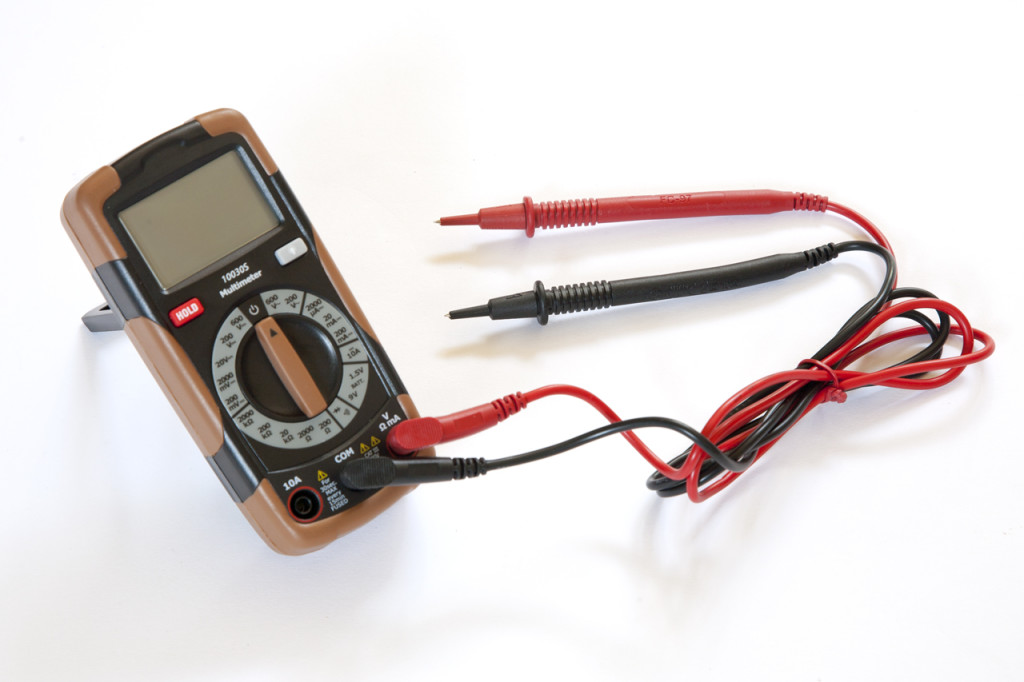
Electrical multi-meter (about $30)
If you’re working on or troubleshooting anything electronic, a good multi-meter is absolutely essential for finding power, ground, and checking voltage and resistance. Unless you like guessing where live wires are, and scratching your head when your electronics malfunction, get a small multi-meter and learn how to use it. If you plan to work on electronics frequently, also grab some various-gauge loose wire, splice and terminal connectors, and a crimping/stripping tool.
All these tools for survival should fit in a small tool bag or duffel, and will cover most basic mechanical tasks, from constructing a shelter to troubleshooting a car. If you have different ideas or suggestions, we want to hear them! Post them in the comments below, or visit our Facebook page.
A well-maintained firearm is an accurate and reliable firearm—and we all know how important that is for survival. Looking to simplify firearm maintenance, Birchwood Casey recently released a new line of universal gun cleaning kits for rifles, pistols, and shotguns. These kits cover a variety of different calibers, and are made in the USA.
Each Birchwood Casey firearm maintenance kit includes the appropriate length stainless steel cleaning rod, a Dual Axis cleaning rod handle, a patch puller, several high-quality phosphor bronze brushes, 25 textured cleaning patches and a Silicone Gun & Reel Cloth. Check out the video below for more information, or visit www.birchwoodcasey.com.
Ever hear of STUXNET? If you haven’t, you should read up on it—this ultra-high-tech computer worm is one of the most sophisticated cyber weapons ever discovered. It’s theorized that it was designed by the U.S. government in conjunction with Israel to target and digitally sabotage the Iranian nuclear program. The code was delivered to a single computer via an infected USB flash drive, and then proliferated itself across the network, accomplishing its mission in secrecy. It was even programmed to erase itself to avoid detection.
This may all sound like some exaggerated Hollywood sci-fi film, but sometimes truth is even stranger than fiction. We’re barely scratching the surface of this new form of warfare—cyber warfare—and there remains enormous potential for destruction. If government agents were able to infiltrate secure computer systems in Iranian uranium enrichment facilities using STUXNET, it’s entirely possible for a terrorist group to do the same, and potentially trigger a world war.
“We are not talking about a new battlefield, but almost a whole new dimension of combat when it comes to cyber warfare. It is such a fast developing, dangerous, accessible and exotic form of warfare that we need people capable of totally thinking outside of traditional military contexts in order to defend against it and/or have offensive supremacy within its realm… Like nuclear weapons, we are naive or even in denial of just how big of a game-changer cyber warfare is, and a cyber arms race is already fully underway.”
Recently on our Facebook page, we asked what your go-to SHTF gun is, and many of you said a 22-caliber rifle. We’ve always liked the Ruger 10/22 for its simplicity and versatility, but if you want to take it one step further, the 10/22 takedown model is a great choice for a survival weapon. It can easily be broken down and concealed, or transported in your bug-out bag.
YouTube user hickok45 posted the following video of the Ruger 10/22 takedown model, and the intro to the video really proves our point on concealment. The 10/22 fits effortlessly into his belt, and within seconds, it’s assembled and ready to fire.
If you haven’t decided on a dedicated survival weapon, try out the 10/22 takedown. Or, if you’ve already chosen something else, let us know in the comments below!