Vanquest is a small U.S. based company that specializes in making top quality soft goods including backpacks, slings bags, and organization pouches. Beyond having a passion for excellent craftsmanship, each piece of gear Vanquest designs has a goal of providing solutions for common gear hauling problems. The IBEX series is a perfect example of the Vanquest ethos.
The IBEX series is available in a 26 and 35-liter options – as I was using this for my Get Home Bag I opted for the 26-liter option to avoid over packing. At first glance the IBEX looks similar to many hiking style packs with its tall narrow design, waist belt, and numerous external gear mounting options. This design style is ideal for safely managing a heavier pack as the weight is better distributed and the hip belt allows the weight of the pack to be taken off your shoulders and moved to stronger muscles groups in your hips and legs. The shift in weight off your shoulders improves balance, reduces fatigue, and decreases the likelihood of muscle strain injuries. Like high quality hiking packs, the IBEX has excellent padding on the straps and a stiff but breathable back for structure and comfort.
Above:The high quality YKK zippers combined with Spartan Loops makes opening and closing the pack a breeze.
What makes the Vanquest IBEX unique is that it successfully blends the comfort and safety of a well-designed hiking pack with the toughness and organizational benefits often found in tactical style packs. Unlike traditional hiking packs which employ a thin lightweight nylon, the IBEX is primarily built with ultra durable Cordura nylon that is both wear and tear resistant. The external Molle Panels are made from Hypalon which is resistant to the elements, continuous UV rays, and chemicals. Vanquest uses high quality YKK zippers paired with Spartan zipper pulls that make rapidly opening or closing the pack easy in high stress situations.
Above:The side pockets of the IBEX feature bright ripstop nylon interior and a loop panel for adding accessories.
In addition to the Molle panels that pouches or gear can be lashed to, the exterior offers two pockets on either side that can house quick access items and even expand to fit larger items. The pockets contain hook and loop panels where optional accessory pouches can be added. The top of the pack offers one large pocket that also can provide access to the main compartment without having to unzipper the whole pack. The exterior also offers a number of attachment points that can be used to lash on items like trekking poles and hatchets.
Above:The interior offers a generous back pocket that also has loop /molle webbing for adding pouches and organizers.
The main compartment offers one opaque zipper compartment and a pocket a zipper providing secondary access to the top exterior pocket. There is a back pocket that can easily fit a laptop or water bladder, and molle/hook and loop attachment points for additional organization pouches.
Vanquest IBEX-26 Real World Performance
Under heavy load the IBEX-26 is one of the most comfortable packs I have carried both in urban and wilderness scenarios. The design works exactly as it should, distributing weight to the hips and legs, significantly reducing muscle strain and fatigue during all day carry.
Above:The thick waist straps offer support and provide attachment points for quick access gear.
The IBEX materials held up well to the elements. While not entirely waterproof, while trekking during light rain and short periods of moderate rain the water resistant Cordura did a good job of my interior items safe and dry.
The organizational features of the IBEX are excellent. The built-in pockets provide plenty of room to organize your essential items that remain in the pack no matter how you are using it, while the ability to attach pouches via hook and loop or Molle webbing allow for quick and easy roll changes based on your activities. Having the ability to know where items are for ease of access is far better when compared to cavernous main compartment typically found in a hiking style bag.
Above: The back padding of the IBEX offers comfort and breathability under heavy loads.
While the IBEX is packed with the features that you normally find in a tactical style bag its design gives it a low-profile appearance, so it easily blends in with any other hiking style pack in the wilderness or the day packs found in urban areas.
When carrying lighter loads or trying to maintain a low profile the hip belt can be stowed or removed all together.
Final Thoughts
The Vanquest team truly brought the best of two worlds together when designing the IBEX Series. By combining the low-profile nature and load bearing prowess of a hiking pack with the durability and organizational features of a tactical pack, Vanquest has created one of the most versatile packs I have used.
Above:One of the many optional accessories offered by Vanquest that can attach to the loop panels.
Compromises are surprisingly few in the IBEX series. If you are used to a traditional hiking style pack, the only notable drawbacks are the lack of external water bottle pockets and the increased base weight of the pack. Those used to carrying tactical style packs may have to adjust to the difference in weight distribution and accessing gear may not be ask quick without the addition of a few add on organizers. While Vanquest’s IBEX packs are not the most budget friendly option – the innovation, build quality, and versatility are definitely worth the asking price.
Vanquest IBEX-26 Spec Sheet
Capacity: 26 liters
Weight: 3.86 pounds
Frame: Internal
Hardware: YKK Zippers, Duraflex Buckles
Materials: Water Resistant Cordura, Hypalon, Ripstop Nylon
Overall external measurements: 23” (H) x 13.5” (W) x 6.5” (D)
Interior main compartment: 21” (H) x 10.5” (W) x 5.5” (D)
Interior top zipper pocket: 7.5” (H) x 9.5” (W) x 3” (D)
When the lights go out, the rules vanish. 45 Miles of Hell by Stathis El Greco imagines the terrifying aftermath of an EMP strike that erases modern civilization in seconds. What follows is a raw, unflinching tale of survival as one man, Stathis, finds himself cut off from home and everything he loves. Only 45 miles away, yet separated by a city in chaos, his path is filled with gang-ruled streets, desperate survivors, and impossible choices.
This debut survival thriller leans heavily on realism, pulling from the author’s tactical training and military experience to craft a tense and believable scenario. The world is not just dangerous but predatory, forcing survivors to decide who can be trusted and what must be sacrificed. It is as much about the psychology of survival as it is about combat and grit.
The Breakdown
The novel opens with the EMP strike, plunging the modern world into instant ruin. Communication collapses, power is gone, and the fragile structures of order shatter. Stathis, a hardened soldier with survival skills, quickly grasps the reality of the new world. His mission is simple in concept but perilous in execution: Make it home. The challenge lies in the distance, a mere 45 miles that have been transformed into hostile territory.
The characters he encounters define the journey as much as the obstacles themselves. An ex-Marine with his own scars, two police officers bound by duty, and Stathis’ uncle form an unlikely alliance. Each member brings both strengths and flaws, and it is this dynamic that fuels the heart of the story. Trust, loyalty, and betrayal weave into the struggle, making every decision weighty. Readers are reminded that survival is rarely about going it alone; it’s about who stands with you when the world burns.
The gangs that now control the city represent civilization’s fall into primal brutality. Their violence is not just a threat but a constant reminder of how quickly humanity can unravel when consequences vanish. Yet the book does not settle for shallow depictions of “good versus evil.” Instead, it digs into the murky space where morality is tested. Who deserves saving? What lines must be crossed to live another day? These questions resonate long after the last page.
The novel’s pacing is relentless, mirroring the urgency of its world. Each chapter builds tension as the group pushes forward, encountering ambushes, betrayals, and brief moments of fragile respite. The realism of the tactics and survival scenarios ground the action, making the book feel more like a cautionary vision than simple fiction. For readers who crave authenticity in their post-apocalyptic thrillers, this authenticity is one of the novel’s greatest strengths.
The Verdict
45 Miles of Hell delivers a hard-hitting debut in the postapocalyptic survival genre. Its authenticity and grit set it apart, while the characters’ emotional weight prevents it from being just another action-driven tale. The blend of survival tactics, moral dilemmas, and relentless pacing ensures it will grip fans of EMP thrillers, prepper fiction, and gritty urban survival stories.
For readers who enjoy survival thrillers that feel both thrilling and disturbingly plausible, this one is a standout. It is not a comfortable read, but it is a rewarding one. When the lights go out, and the world becomes hostile, 45 Miles of Hell makes you ask the hardest question: How far would you go to make it home?
About the Book
Book & Author: 45 Miles of Hell by Stathis El Greco
CANCON, the world’s largest suppressed range day with try-before-you-buy opportunities, runs twice a year and always attracts a crowd. People come for the suppressors, the satisfying “ping” of rounds on steel, the gear, and the chance to get hands-on with rifles they usually only see in videos. Over time, the event has grown, shifted, and evolved. This year hit a new stride, with the November event in South Carolina drawing the largest crowd yet (estimated over 4,000!).
OFFGRID Basecamp stepped forward with its second iteration, drawing people from the suppressed noise of the firing line, and into a world of skills that reach far past a weekend of shooting.
Basecamp brings with it a great opportunity to mingle firearms enthusiasts with survival skills. People walked in curious and walked out with a plethora of new ideas. It became the part of the event where prepping questions turned into conversations, and strangers became students.
OFFGRID Basecamp Breakdown
Basecamp works because it never feels like a presentation. People flowed in and out all day, drawn by movement, gear on tables, or the sound of an instructor showing a small group how to solve a problem. Participants could practice packing a wound, run a rifle drill, or learn a variety of survival skills, all without leaving CANCON’s footprint. It felt like a small survival school tucked inside a larger festival.
The magic sauce was how Basecamp brought together instructors, authors, and makers who carried real-world backgrounds and years of training experience. Many had prior service as Green Berets or other military roles. Others came from wilderness survival, trauma medicine, or backcountry tracking. Their combined knowledge turned Basecamp into one of the most valuable parts of CANCON.
Alan Kay bringing the smolder, and the kukris, to OFFGRID Basecamp.
Alan Kay, winner of the first season of the History Channel’s popular “Alone” series set the tone with calm, grounded teaching. He offered survival insight shaped through real hardship and a lifetime outdoors. He also represented Knives By Hand, a small family-run Nepalese forging shop known for kukris and working blades. People drifted to his table for the steel and stayed for the instruction.
Gorilla Medical and Gorilla Ammunition displaying the goods.
Gorilla Medical and Tactical Rifleman teamed up to teach TCCC, carbine fundamentals, and stress management. Their sessions gave people hands-on reps with tourniquets, wound packing, and movement under pressure. Students left each block with clear steps they could repeat on their own.
Chris Weatherman chatting with some fans.
Angery American (Chris Weatherman) drew steady traffic with his well-known Survivalist Series. He talked through the mindset behind his writing and showed how stories can prepare readers to think with more intent.
Russ Sawyer brought his Hanging Creek Chronicles, which mixes fieldcraft, rural knowledge, and storytelling. His presence gave Basecamp a campfire feel minus the fire.
Pete Robertucci shaking hands with an enthusiastic reader.
Pete Robertucci, author of the Sierra Hotel Tango Foxtrot (SHTF) series, rounded out the writing corner of Basecamp. His work explores conflict, loyalty, and survival through a perspective shaped by real-world experience, and many attendees walked away with signed copies.
Bob “T” Toombs discussing his event with the CANCON crowd.
Mountain Readiness used their space to share the culture behind their event, which focuses on preparedness, self-reliance, and family-centered training. They aren’t just promoting dates. They are building a community.
Khyber Optics on display in the OFFGRID Basecamp.
Brushbeaterstood out with comms gear and their Khyber Optics line, which drew steady attention from shooters who wanted rugged glass without inflated price tags. The company was built by disabled veterans from Afghanistan and Iraq who understood what a dependable optic needs to survive. Their scopes use high-quality Japanese glass and a construction style meant to take abuse without losing zero.
Auxiliary Manufacturing’s new Pocket Bowies on display.
Auxiliary Manufacturing displayed custom knives shaped through years of field knowledge. No display pieces. No wall hangers. Just hard-use blades built by people who know how to avoid failure in the field.
Custom platforms guranteed sub-MOA accuracy courtesy of Black Armor Guns.
Black Armor Guns introduced attendees to their custom AR platforms built for sub-MOA accuracy. Their rifles stood out because they combined performance, reliability, and clean build quality without stepping into inaccessible price territory. Shooters appreciated the attention to detail and the fact that these rifles were built to run.
Troysgate set up a display at Basecamp that walked attendees through the science and physiology behind their patented live-fire training system. A monitor ran footage of real participants moving through controlled deadly-force scenarios inside Troysgate shoot houses. Viewers could watch how stress, decision-making, and loss of control unfold in real time when people face unpredictable conflict with live ammunition.
A group like this doesn’t appear often. Their shared experience gave Basecamp a depth that went beyond gear or marketing. People came to learn from men who had done the work for real, and it showed. By the end of each day, Basecamp carried its own small community of returning students who wanted more time with the instructors.
While the main range ran strong all weekend, Basecamp offered a space where people could slow down and focus. There was time to talk, practice, and think. It balanced out the action of the event and gave CANCON something that other shooting festivals often miss. Skills outlast a weekend. Gear comes and goes. The lessons learned at Basecamp stick long after the tents pack up.
VIP and Industry Day
VIP Day has become one of the most sought-after parts of CANCON. Only a small number of tickets are released, and they disappear within minutes. Those who manage to grab one get access to the entire range before the general crowd arrives. The pace is relaxed and every lane is open. It feels like having a private range with a few dozen like-minded shooters instead of a packed event.
Glen Castle announcing the VIP bag goodies.
The real benefit of VIP Day goes beyond the empty firing line. VIPs receive exclusive instruction from the OFFGRID Basecamp team. It sets a tone for the weekend and gives VIPs a chance to work closely with instructors before the rush of the main event.
Everyone walks away with a prize cache that turns heads. Each VIP receives a firearm, a suppressor, and a spread of quality swag that makes the ticket feel like a serious score. For many, the bag alone would be worth the price.
VIP Day ended with Galactic Clay shooting in the dark.
At CANCON South Carolina, we also hosted local and regional FFLs along with industry guests throughout the day. It created a relaxed place to connect, talk shop, share ideas, and build relationships without the noise of the weekend crowd.
VIP and Industry Day was brought to you by Master FFL, whose support helped make the experience smooth and memorable for everyone involved.
Pros vs Joes
One of CANCON’s most popular events, Pros vs Joes put everyday shooters up against seasoned professionals. The lane stayed busy all weekend. People jumped in to test themselves under stress while crowds cheered them on. Some walked away surprised at how quickly pressure changes everything. Others walked away hooked.
This is one t-shirt you have to be courageous enough to earn.
The prize table didn’t hurt either. Sponsors showed up with some serious gear, turning every run into a chance at something worth talking about on the drive home. Giveaway items included:
The lane stayed full of energy all weekend, and several shooters walked away with prizes that turned their run into a story worth telling. Winners included:
11:00 a.m. – Maxim Defense Winner #1: Luke Baxley
11:30 a.m. – Maxim Defense Winner #2: Brian Gregory
1:00 p.m. – Meprolight Red Dot Optic Winner: Steven Bowman
1:30 p.m. – LWRC International 9mm Rifle Winner: Devon Christie
Each name got a strong round of applause from the crowd, and every win added to the momentum of the event. It reinforced what Pros vs Joes is built on—regular shooters stepping up, taking a shot under pressure, and sometimes walking away with gear they never expected to own.
Moore Helicopter Services (d.moore.rhp@gmail.com) brought their MH-6 Little Bird to showcase during the event. Occasionally, a dramatic fly over drew the eyes of everyone in the crowd.
Barrett Mile Challenge
The Barrett Mile Challenge stayed busy throughout the weekend. Participants paid a small fee for the chance to take a single shot with a Barrett rifle chambered in .416 Barrett, at a target set a full mile (1760 yards) from the shooting platform. Anyone who made the hit earned a limited challenge coin that marked their place among the handful of shooters who pulled it off. It became one of the most talked-about attractions at CANCON because the format was simple, the stakes were clear, and the reward carried real bragging rights.
Atmospherics make hitting targets a mile away extremely challenging.
Gunwerks 1000-Yard Range
Gunwerks set up their long-distance lane and gave people the chance to stretch out further than they ever had. Shooters stepped up cold, dialed in with guidance from the crew, and made hits at distances that looked impossible from the staging point. It opened a lot of eyes to what precision shooting feels like when the tools and instruction line up.
The Proving Grounds
This course rattled people in the best way. Quick movement. Target transitions. Reloads without warning. It forced attendees to keep their heads on straight while moving through a short burst of chaos. Most came off the line with that same wide grin common to anyone who enjoys a challenge.
Blade Show Tactical (BTAC)
The Blade Show Tactical table stayed steady with people wanting to handle blades, talk steel, and learn what makes a working knife dependable. Makers explained geometry, heat treatment, and design choices without turning it into a lecture. Legendary bladesmiths featured their wares, and this year’s BTAC even had Forged In Fire judge Jason Knight greeting the crowd.
BTAC brings out the best blades to compliment the 2A community.
Gear and Vendors
The vendor areas always draw a crowd, and this year was no different. Suppressors, rifles, optics, armor, communications gear, and packs shaped the event. People drifted from booth to booth comparing setups and asking questions.
A serious thank-you goes out to Ammoman for providing ammunition support during the event, and to T&K Outdoors for their participation.
Looking Ahead
CANCON remains a major event for anyone interested in suppressed shooting, precision work, and new gear. OFFGRID Basecamp adds a layer that brings purpose to the weekend, and will continue to grow during this event. It’s always a bonus when people come to shoot, and leave with new skills!
For those wanting to attend the next CANCON, information and 2026 tickets will be available through the event page: https://canconevent.com/
Christmas is a time for warmth, wonder, and if you’re like us a dash of wilderness grit. Once the lights have been strung and the hearth is ablaze take a moment to slip into the relentless cold under a star cast sky twinkling brighter than your holiday tree. It’s there the frigid wind blows and gasps telling stories older than carols and time. Out there among gently falling snow settling on pine bows are distant frozen trails calling to us for adventure.
Survival isn’t simply about skills or gear; it’s also a celebration of self-reliance and respect for the wild and wooly places often unencumbered by man’s footfalls. This year I’ve taken much of the guess work out of shopping for your favorite outdoor adventurer and preparation minded loved ones. From stocking stuffers to show stopping main gifts. I’ve spent time in the field with these items, used them in my daily life, and visited some of the facilities where they’re made. After much consideration thereof have found them worthy of your trust and use on the next calling to adventure.
A Holiday Gift Guide for the Preparedness Minded
The preparedness enthusiast in your life doesn’t want another sweater – get them (or yourself) what they need! To help you out, the Offgrid team went out to Santa’s Workshop to test the latest survival gear. The result is this Holiday gift guide with some of the best survival gear we tested!
We have items for every budget, and each one is sure to please the survivalist, prepper, hunter, or outdoor enthusiast in your life!
Santa isn’t checking in with Mrs. Clause with a HAM radio. He’s using his Satphone. To be positive you’re not tracking his whereabouts he tosses his device in a GoDark Faraday Bag For Satellite Phones. Whether you’re blocking signals to stay under the radar, protecting your privacy from piracy, or simply to protect stored electronics GoDark has you covered. GoDark shields against wifi, bluetooth, GPS, cellular, EMF, and EMP. The Satellite Phone Bag features water resistant durable 600D shell, a padded felt lined interior and dual Molle straps for a multitude of mounting options.
Pros / Cons Snapshot
Pros
Rock solid build quality
Multiple Mounting options
Simple and functional
Cons
High Cost
Only one color option
Armament Systems and Procedures
Defender MK-3 Level 3 and Defender DECON MK-4 – MSRP: $20 each
Black Friday deals can be very attractive to a lot of people. The problem is that there are often desperate people out looking to take advantage of those of us who are only looking to take advantage of sales. Not every violent encounter should be responded to with lethal force oftentimes regular force such as pepper spray can be the answer you’re looking for. This option gives the benefit of maintaining distance from an assaulter while being defensive. Choose from gel, spray, or fog contents. The DECON is important to have on hand in case you’re the victim of a ne’er-do-well who uses pepper spray to assault you. The elements combined in the DECON aid in breaking down active ingredients in pepper spray to reduce recovery times.
If your wife and kids are like mine they can’t seem to wait to find out what you’re getting for Christmas. That’s why I started hiding every gift possible behind a lock and key. This In Wall Safe Tall by SnapSafe has a 16 gauge steel body and 8 gauge door. The locking mechanism makes full use of interior space. At 44” tall and 4” deep you can choose to secure anything from jewelry to your battle rifle. On the outside of the safe you’ll find a programmable electronic lock powered by 4 AA batteries and a backup mechanical locking should the unthinkable happen where you need to manually retrieve your treasures.
If you’re going to stretch the truth about how good you’ve been this year at least use a nice pen to do it. County Comm has breathed new life into the 25 year old bolt action pen design from MaxMadCo. This meticulously crafted brass bar stock pen has a stout grade 5 Titanium pocket clip with torques head button screws and is tough as it is alluring. Measuring 5” x 0.37” and weighing 1.56 oz. you know you’ve got a quality item in hand as soon as you put pen to paper. County Comm chose to use a German made Schmidt 9000M ink cartridge which are generally known to be excellent and provide a smooth and consistent writing experience. Make a statement this season with your own MaxMadCo pen.
When the big guy can’t get down all the side streets with the reindeer driven sleigh he’ll send out his army of silent mechanized elves to get the light work done. Buzz Ebikes Drone is a Moto-style Ebike for those that want to ride in comfort and style .With a top speed of 20mph and a range of up to 40 miles the Drone is perfectly capable of transporting riders 4’10”- 6’1” and a payload up to 300lbs. Charging takes 4-6 hours so consider buying an extra battery to swap out should you plan on not using the manual pedal regenerative drive too often. Take advantage of that great big comfy saddle as it is going to be much more plush compared to your typical bike seat.
When the elves need to keep small game parts and pieces close at hand what do you think they reach for? You’re right! Santa’s little helpers go right for the PNW Bushcraft Waxed Canvas Travel Tray. These are great to toss in your overnight bag or camping kit for the same reason the elves use them. Made of 10.1 oz canvas with Martexin Wax that is environmentally friendly and non-hazardous feel free to set Santa’s cookies right inside yours. It’s up to you whether or not to fasten the antique brass snaps. After some use this piece will begin to show a patina only fun and love will expose.
The “Big Guy” may be hitting every house on the planet in one night, but he still has to follow the law. When he’s running the latest and greatest “Don’t shoot your eye out!” He has to keep them cased up. That means all long guns that fit the 38” mark will be toted via Plano Outdoors NEW Diverge 38” Rifle Case. It’s a TOUGHSHELL, but not a hard shell. It’s soft enough to dampen impact noise and hard enough to keep from being crushed. DROPZONE work station molded trays on the case lid act as a catch for loose ammo and small parts. Lockable zippers and non-slip shoulder pads to keep things in place as they head down the chimney.
No one wants socks for Christmas but EVERYONE WANTS socks for Christmas! Sikta stalked in to secure the shot as the number one sock this year. Luckily they got word in time from the North Pole to up production on the OTC and Crew medium and heavy weight versions of their merino wool toe cozies. Made with Cordura reinforcements at the heel and toe box to reduce wear and extend the life of your favorite outdoor socks. No need for thick bulky wool socks when Sitka is weaving in PrimaLoft yarn for added warmth and cushion for added comfort over rugged terrain and spilled Legos.
Santa is bringing the goods this year from Montana Knife Company! We’ve been working hard and we’ve been good! No more struggling to get your harvest ready for the freezer with a hunting knife or run of the mill kitchen blade. This is a purpose driven precision tool to make the most of the animal you’ve taken. Ethical hunters understand that not wasting any usable scraps of meat is what sets them apart from Elmer Fudd. Working with AEB-L steel MKC offers an 11” over all length full tang construction, 5 ⅞” blade, and at .090 thick this blade will get the smoothest of slices out of your meat not only for a better overall yield, but also for a beautiful plate presentation at Christmas dinner!
When Krampus rears his ugly head trying to get a taste of one of Santa’s 9 reindeer Santa cannot compromise their safety with the wrong tools. Ravin has armed St. Nick with the uber compact and venerable R18. Perfect for a packed and cramped sleigh measuring in at just 25” in overall length the R18 is a Crossbow in name only. The limbs lift up instead of out horizontally and the stock can be removed to drop the length to just 18” to shoot the R18 as a pistol. We made sure Ravin ran him through a quick training course on the use of the R18. When every shot counts there is no compromise.
As an added precaution Mrs. Klause has snuck a bit of fire power into the sleigh this season. After all, keeping the reindeer team safe and in the air is top priority. The EAA Influencer X 10mm and is as close to a sure thing you’re likely to see when the delivery team finds themselves under attack from flying monkeys, rouge elves, or Krumpuses legion of goons. Fitted with a bull barrel, full light rail, competition style iron sights, and factory cut to accommodate a micro reflex sight. The Influencer X is a single stack 1911 style pistol that brings all the flair and innovation of today and mixes it with the class and reliability of the old classic war horse 1911 of years past.
Let it never be said that a fixed blade knife doesn’t come in handy on Christmas day or at holiday parties. I may have to split packing tape, break down kindling for the fireplace or maybe even carve the Christmas bird. Leatherman has brought a line of fixed blade knives this season that includes the Pioneer. Features like a Magnacut sabre grind blade with a stonewash finish and tapered Blaze Orange G10 scales make for a winning combination on this seemingly do-it-all bushcraft knife. The sheath is a hybrid of a Kydex front and leather backing and snap loop to keep the Pioneer riding where you want it.
We’ve all tried staying up late to catch a glimpse of Santa or his reindeer. Not even a jingle have I heard, yet the Christmas tree always had gifts spilling out from underneath. This year we can all be ready with Streamlight’s brand new MEGASTREAM! You could land a jumbo jet with this thing. On high the MegaStream pushes out 1,350 lumens and 310,000 candela for 2 hours. Megastream can really throw that light too. It looks like a single lane highway in the sky. If you’re looking to sneak around to see if presents have been delivered without waking anyone use the low setting at only 145 lumens.
Christmas morning growing up at my house always started with a pot of coffee. Nothing and I do mean nothing happened before the first cup of coffee was poured into mom and dad’s cups. That same sentiment has carried over to my home. On Christmas morning you want your coffee to be right. Starting with good beans is key, but what is so often missed is making sure you have the right amount by weight. Don’t chance eyeballing this key detail on Christmas morning. Get a VSSL Nomadic Coffee Scale. The Nomadic Scale is powered by a rechargeable internal battery with a USB-C cable and has an easy to read LED backlit display. Just like Santa this scale can go anywhere.
Real Avid has been an industry leader in innovation in the gunsmithing and armorer world for years. No wonder Santa tapped them to help get torque specs right on so many toys this year. The Adjustable Limiter & X3 Driver Kit is not only great for working on firearms it’s also great for the causal backed out deck screw catching socks, drooping pre hung door, or Christmas morning spent assembling the gifts delivered by the jolly man in red. This Smart Torq kit comes with a variety of commonly used bits used by armorers and gunsmiths and as rumor has it most of the fasteners on the sleigh.
It’s time for a hayride to pick out a tree! Grab the best folding saw available this holiday season and get a Brautigam Expedition Works Titanium Folding Camp Saw. This saw is made from high strength tubular titanium alloy and packs down into a tidy package and rests inside a coyote brown canvas case. Don’t worry about your hands getting cold. Titanium will stay as warm when working through the trunk of your freshly cut tree. These are fully welded construction with no pop rivets waiting to fail and render your saw worthless. Available in 21, 24, 30, and 36” you could cut a runway for Santa if you had the notion to get it done. I can almost smell the pine!
Watching everyone tear into gifts on Christmas morning is a memory I cherish. If I could do it over I’d have had a time lapse camera set up to catch those precious moments. Zeiss has a rock solid and lightweight tripod perfect for cameras, binoculars or your favorite hunting rifle. Made for the back country the Pro-Series Tripod Kit Lightweight weighs in at just 4.6 lbs. Zeiss uses 10 layers of rigid carbon fiber for the three section legs which have three adjustment angles being 25, 55, and 85 degrees which gives a lot of leeway to get the right setup. The fluid head pans 360 degrees and tilts to give freedom of movement when tracking moving targets.
Other people’s cooking can oftentimes be found lacking. Sometimes dinner will be too bland, over cooked, or from a can. Terrible Christmas meals might make for funny family stories years later, but they’re a real bummer at the time. Do yourself and those close to you a favor and grab a Spice Tube from Father Nomad. I’m filling mine with salt, pepper, and maybe a mix of cayenne pepper and garlic salt when I shove off to the in-laws house this jingle bell season. Made from food grade material and 3D printed by Father Nomad himself the Spice Tube has two shaker vessels and one open ended container to hold larger spices like rosemary, thyme, or parsley.
The power is out on Christmas? Not to worry. Grab your Nebo Intrepid, plug in the tree, and get the gift giving underway. While solar generators can certainly be used during emergencies they’re also handy for overlanding, regular old car camping, or running power tools on a job site. The Intrepid has 15 different ports to send out power if your power needs are high. Power input is a two way combined maximum of 1200W. The Reliance Solar Panel has a high efficiency 22% energy conversion, lightweight, and can charge multiple devices at once. Water proof and foldable, the Reliance also has a storage pocket for various charging cords.
Staring into the night sky looking for a team of flying reindeer pulling a sleigh can be a daunting prospect for your eyeballs. If you want to catch a glimpse of Santa in flight consider picking up a set of Image Stabilizing Binoculars from Sig Sauer. The Zulu6 ISB offers great light transmission through clear HD-X glass for higher resolution and great edge to edge clarity. Scan the night sky with Sig Sauer’s Zulu6 and engage the ISB feature to steady your view. The Zulus require two AA batteries which should be in heavy supply during the Christmas season.
Years spent staying up late at night need not go to waste. With the Matrix 2.0 Trail Camera you will finally be able to catch the kindest B&E artist the world has ever known. Definitive proof of who is eating those cookies might come in handy down the road. Muddy has cellular plans starting as low as $4 a month to view who or what is walking around in your neck of the woods. If your main concern is to spot that prize game animal or to keep an eye on a far off property in the North Pole you should opt for the solar battery option to remove the need for 16 AA batteries.
Weather reports are important to know before and during any flight. This goes for sleighs as well as planes. At the rate they’re going up there Santa needs to have weather reports fast at hand. Kaito gives you several ways to stay on top of important information. Made for everyday use or emergencies, the Voyager Pro can be powered by the internal battery, 180 degree tiltable built-in solar panel, 2 AA batteries, or even a crank handle. This radio receives AM, FM, short wave, long wave, NOAA weather stations, and has a built-in flash light flashlight.
Christmas morning never seemed to be complete without an awesome game or a gun as a young man. It was always the gift that was held for last especially if it was a new BB or pellet gun. GAIM checks both those boxes. The stock is incredibly nicely done and is what you’d expect to see on some of the pricier production long guns. You’ll need a Meta VR headset to use this training aid slash gaming system. Once you’ve got an account set up you’ll be able to choose from different steel shooting and training scenarios as well as a variety of hunts. This is something for the entire family to take turns on.
When the mercury drops and the snow flies some of the first things you’re going to need are a top hat, scarf, carrot, and a couple charcoal briquettes. No snowman is complete without a scarf though. Combat Flip Flips didn’t end the fight when they left the frontline. These shemaghs are loomed from cotton by the ladies of Afghanistan. Providing work and helping to ensure the little girls of the nation receive an education. Summer, winter, or fall there is no wrong time for a shemagh. Use it to retain heat in the frigid cold, shade yourself from the blistering sun, or allow your imagination to run wild with possibilities in survival mode.
Some smartaleck put a lock on the sleigh or a boot on Rudolph’s hoof? That’s not a problem with the Vennox from Sparrow Lock Picks. Sparrow has chalked this set full of picks, rakes, tension wrenches, and even the full set of custom laser engraved picks. This set is great for anyone who wants to learn about lock picking and bypassing. My own little elves have learned this skill with Sparrow gear over the last few years. If for no other reason than to learn about what locks are quality versus what are easy to remove without keys; this is a great set to snap up!
This is the reflex optic Santa mounts on his pistol before takeoff. When speed and target acquisition are at the top of the list Holosun delivers. Your gear needs to instill confidence when it’s time to lay down fire to protect his small airborne herd of reindeer. Holosun offers the HE507K-GR X2 in a concealed carry size and footprint. A 2 MOA reticle dot encased in a larger 32 MOA circle aids in faster target acquisition and the green light further assists in that speed by rapidly drawing the eye in. With a battery life of 50,000 hours you won’t have to swap it out for around 5 years or more with the shake awake feature baked in.
No one likes cleaning up after a big meal. Not at camp and definitely not after a holiday dinner. Make life easier on yourselves and grab a Scrub & Scrape from Outdoor Element. Meant for the camp kitchen, but is still useful in grandma’s kitchen. A dual edge metal scraper makes quick work of baked on and uneaten food to prepare for cleaning. Grab your silicone mildew resistant sponge to sanitize dishes, pots, and pans without worry of scratching surfaces. Finally grab the fast drying micro fiber towel to finish the process. This is a great stocking stuffer for your favorite outdoorsman.
Building snowmen, hanging Christmas lights, or shoveling the driveway the ThermoNeutral Down Jacket from Forloh should be your first choice this frigid blustery season. From design to construction, manufacturing, and testing everything is done inside the borders of the USA. Water resistant, breathable, and down filled the ThermoNeutral Down Jacket traps the heat. At only 21 oz it is lightweight and the gusseted under arm panels allow for ease of mobility. A 40D ripstop shell gives you peace of mind should you find yourself walking through brambles and briers on a hunt. Add this puffer jacket to your daily repertoire or stuff it into your pack.
Pros / Cons Snapshot
Pros
Extreme Warmth
Strong performance in harsh conditions
Cons
Limited to low temperature use
Premium Price
Aimpoint
Micro T-2 w/Unity Tactical FAST Mount – MSRP: $1207
A 2.26 inch riser might seem pretty high until you consider you’re likely using this setup with a helmet and night vision. Covering Santa Clause under NODs has its distinct advantages. AimPoint’s Micro T-2 has 4 night vision settings, 8 daylight settings, 1 off setting and runs off of only 1 CR2023 battery. Weighing in at only 6 Oz. for the mount and the optic is incredible. Submersible up to 25 meters you wont need to worry about a little rain or snow affecting your optic. The Unity FAST Mount has a set of backup sights just under your optic. Should the unthinkable happen and you need fixed sights they’re standing ready. The Unity FAST Mount comes standard with rail-grabber clamp mounts.
Mystery Ranch is a name that is known and loved among the hunting, hiking, and military communities. No wonder it’s the preferred day pack this Christmas. The Sawtooth is a low profile pack perfect for securing your morning haul of Christmas gifts to your gingerbread house or helping keep you under the radar when on the move in the woods. While function is the goal with this pack, comfort was not at all out of focus. Thick air mesh shoulder straps and belt give you a big upgrade from most packs in this price range. Offered in three color combinations, this well thought out design makes for a pleasant trek through thick woods, on trails, or uneven terrain.
Christmas morning comes with a lot of wire fasteners, plastic packaging, and zip ties to contend with. XShear uses stainless steel blades coated with titanium to not only be a robust set of shears, but to also deliver shears sharp enough to shave with. Made for first responders to zip through motorcycle gear, fireman’s turnout gear, winter clothing, or wet suits. With a patented blunted tip and curved design the XShear is a gnarly cutting tool when it comes to removing gear to get to the patient, but smooth as silk and gentle on the skin. Finished off with a soft touch liner for superior non-slip grip and comfort. Upgrade your IFAK or make it part of your daily medical kit.
If you’re planning to “Ranger Up” and take an airfield for the big man to have a secure landing zone you’ll want the best plate carrier you can get. Modularly means you get to set up gear the way you need it. Defense Mechanisms offers the Mission Essential Plate Carrier or MEPC in 16 colors and camouflage patterns with 5 bag sizes to accommodate your preferred plate size. Laser cut for precision and comfort the MEPC has chest MOLLE/loop field for ID patches or navigation boards, 3D mesh liner to augment comfort, QASM buckle for placard use while allowing G-hook placard capability. When you choose your separate cummerbund do yourself a favor and upgrade to the FIRSTSPEAR TUBES to make jocking up a breeze.
So grandma got run over by a reindeer on Christmas Eve? While that is a real bummer you and gramps have a Dark Angel Medical Hard Case in the trunk of the car. Along with some in person training with Kerry Davis and his group of highly experienced cadre, you’ll likely pull her back before she goes towards the light. Sealed in a durable air and water tight floating hard case is the gear you want when responding to the smallest issues like Christmas morning paper cuts or witnessing a reindeer trampling on your way out for eggnog. Simplicity under stress is the key to good medical gear and training.
The Wicket family of knives from Knives by Nuge has something for everyone. The Wicket is a small EDC friendly neck knife, the Wicket XL is a pocketable fixed blade with some serious outdoor capability, and if you need a full-sized Camp Knife the Big Boi has you covered! Both the Wicket and the Wicket XL are regularly available and come in a variety of handle styles and blade grinds to fit a number of personal preferences. Any knife in the Wicket family is a great option for the hunter, fisherman, bushcrafter, wilderness survival enthusiast, or just someone who appreciates a well-executed fixed blade!
If the grid is down or you are in a place with no web connection, how do you access a wealth of survival information? With Prepper Disk! Prepper Disk incorporates thousands of survival manuals, emergency medical information, repair guides, geographical maps, Morse code decoders, sustainable living videos, the entire English Wikipedia, and more into a palm sized device. The Prepper Disk quickly connects to any Wi-Fi enabled device with the need for an internet connection. The Prepper Disk is an ideal addition to any survival or preparedness enthusiasts tool kit!
Communicating with others can be challenging when the grid is down or navigating the wild – but with ZOLEO you can easily stay in touch with other and contact emergency services if needed! ZOLEO is a compact, rugged, weather resistant communication device that is connected to the Iridium Satellite network. As a stand-alone device, it can alert emergency services to your exact location using the built in SOS button and with it’s mobile device app allows you to text and email your contacts, medical professionals, and emergency first responders.
Auxiliary Manufacturing has been making premium tactical fixed blades for over a decade and recently adapted the Iconic Pocket Bowie fixed blade into a premium production folding knife. Any knife Enthusiast will appreciate the premium titanium frame, M390 super steel blade, superb action, and strong lock up. Those who are more tactically inclined will be happy to find the excellent ergonomics and piercing blade point that they have come to love in the fixed blade Pocket Bowie are also found in the new folding version. The Pocket Bowie folder is available in a durable black DLC coating for a sleek discreet look or an uncoated satin finish for a classy look.
Pros / Cons Snapshot
Pros
Top of the line materials
Excellent Build Quality
Compact and Functional Design
Cons
Premium Price
Badger Claw Outfitters
Sidekick Wallet – MSRP: $24.95
OFFGRID HOLIDAY EXCLUSIVE DISCOUNT: Use code offgrid15 for 15% off at check out
Badger Claw Outfitters is known for crafting premium nylon, leather, and waxed canvas gear for outdoor, hunting and shooting enthusiasts. The Sidekick Wallet serves as a minimalist EDC wallet or a spare cartridge holder while on the hunt. The interior of the Sidekick features two pockets to keep cards and cash organized. The Sidekick is available in a nylon version with a belt loop or a classy waxed canvas version with brass snaps and leather accents -You can also snag a limited-edition duck camo variant while supplies last! No matter which version you choose, the Sidekick is built to last and will be a versatile addition to anyone’s EDC.
Knowing how to use and carrying basic medical equipment can mean the difference between life and death in an emergency. While Tuff Possum is responsible for your training they have created a slim pouch for your trauma essentials that can easily slip into a bag or backpack! The EDC Trauma Kit Trifold roll provides the perfect amount of storage for chest seals, gauze, gloves, and a CAT or SOF-T Tourniquet. The simple layout keeps everything organized so you won’t be worrying about fumbling through a large kit bag to find exactly what you need when seconds count.
The Paratus 3-Day Operator’s Tactical Backpack brings the kind of reliability you want when life decides to throw a blizzard at your plans. Built from tough 600D PVC-backed polyester, it shrugs off rough weather and rougher handling while keeping your gear dry and ready. Padded straps and a supportive waist belt keep it comfortable, even when you pack it like you’re preparing for the in-laws to visit. Three detachable components, including a Rapid Deployment Pack, make grab-and-go gear simple, and the modular layout keeps everything organized instead of becoming a festive yard-sale inside your bag. A padded laptop sleeve and hydration compatibility round out the design, making this pack ready for cold-season travel, hunting trips, or that 72-hour kit you swear you’ll finish before New Year’s.
The Anchovy cutting pendant may be only 2.5 inches long, but it slices far above its weight class. This tiny neck knife hides surprising capability, slipping under a shirt like a stocking stuffer that actually earns its keep. Its flared pommel and deep handle recesses give you confident control for real cutting tasks, even though it looks small enough to hang on a tree next to a candy cane. Designed by someone who grew up chasing fish, carving wood, and collecting blades from Swiss Army folders to KA-BAR classics, the Anchovy reflects a lifetime of knife knowledge distilled into a pocket-sized tool. Stainless construction, quick-draw neck carry, and years of bushcraft and coastal influence all come together in a blade that vanishes until you need it. Perfect for everyday carry, trail use, or opening holiday packages without shredding the wrapping paper.
Khyber Optics built the 3-18×50 MPVO for shooters who expect clarity, ruggedness, and precision without the fuss. Born from nearly a decade of real time downrange, this optic brings the evolution of battlefield glass straight to your rifle. A 50mm objective lens pulls in light like it’s collecting Christmas cookies, while the First Focal Plane reticle stays consistent across the entire 3-18x range. Japanese ED glass, locking 1/4 MOA turrets, and a 10-setting illuminated reticle keep everything crisp from dawn patrol to late-season range days. The 34mm single-piece tube handles recoil and rough handling, so you won’t need to baby it like that fragile holiday ornament you regret hanging every year. Whether you’re running an AR, a bolt gun, or something wild in between, this MPVO brings reliable performance in a tough, purpose-built package.
The MK2 Angkhola Mark 2 brings the spirit of a WWII Gurkha blade into modern hands with the kind of authority that makes opening holiday packages feel like a ceremonial event. Hand forged in Nepal from 5160 leaf spring steel, this full tang 12 inch khukuri hits that sweet spot of history, power, and practical camp use. A 7mm spine tapers forward for heavy work, and the rosewood handle with steel bolster follows the same style used when brass was reserved for wartime needs. The traditional scabbard arrives with a karda and chak mak, so you stay sharp during any seasonal chaos. At 24 ounces, this blade swings with confidence but still feels balanced enough for fine tasks. Collectors appreciate the WWII inspired handle pin pattern, and anyone who uses blades will enjoy the honest, hand forged character that shines through every detail.
The Pivot 2.0 is the kind of everyday carry upgrade that turns your pocket chaos into something tidy enough to impress even the most judgmental holiday guest. It holds up to eight keys and EDC inserts inside a compact chassis, while faceplates and modules snap onto both sides for a fully personalized setup. The locking mechanism clicks every 90 degrees so your keys stop flopping around like loose ornaments on a windy December night. Build out your Pivot one component at a time with modular tools, custom faceplates, and accessories ranging from carbon fiber to festive camo. Keyport’s lost-and-found service adds peace of mind for anyone prone to misplacing keys during the seasonal rush. Designed by a Navy veteran and built from years of EDC innovation, the Pivot 2.0 brings Swiss Army utility, smart-tech potential, and clean pocket organization into one clever platform.
The ANKA EDC Neck Knife brings simple utility in a tiny, clever package. Built around a replaceable standard broadhead, it gives you a sharp edge whenever you need it without the hassle of specialty blades. It hangs light around your neck, staying out of the way until it’s time to open boxes, trim cordage, or tackle one of those holiday chores you promised you’d get to. At only forty bucks, it feels like the rare stocking stuffer that actually earns its place. The makers behind it come from a deep bench of veterans, outdoorsmen, firefighters, and leatherworkers, each pouring their own background into the craft. The result is a practical tool with roots in service, outdoorsmanship, and hands-on skill.
The Mako, once known as the Baby Shark, packs a surprising punch in a compact 4 inch frame. Crafted from 3/16 80CRV2 steel with a two inch cutting edge, it’s the kind of everyday carry blade that vanishes on your belt yet shows up big when you need it. The rugged stonewash finish gives it a work-worn look straight out of Santa’s tougher workshop, and the included Kydex sheath offers adjustable retention for a secure fit. Concealment is easy thanks to its low profile, making it a handy companion for chores, quick cuts, or opening holiday packages without shredding the gifts inside.
The Kosac push dagger is built for moments when you want confidence packed into a small, fast tool. Its T shaped handle sits naturally in a closed fist, giving you secure control while the 2.75 inch blade pushes forward with serious authority. The compact size makes it easy to carry without printing, and it disappears into a pocket or waistband like that one gift you hid so well that you forgot where you put it. Crafted from tough 80CRV2 steel with a G10 handle, the Kosac feels solid without adding bulk. A black retention sheath keeps it ready for quick access during training or real world carry. Designed by Kyle Gahagan and made in the USA, this push dagger blends durability, simplicity, and purpose into a tool that can ride with you every day while staying light enough for holiday errands and cold weather layers.
Pros / Cons Snapshot
Pros
Compact and concealable
Strong 80CRV2 steel
Secure T handle grip
Cons
Very short cutting surface
Not suited for utility tasks
The End?
Nope, not really! We will be adding more items to our 2025 Holiday Gift List! Be sure to check back often to see more throughout November and December!
When disaster strikes having your bug out bag ready at a moments notice will ensure your safety and security in the hard days ahead – right?
The answer to this is not as simple as we think. Bug Out Bags are just one type of Go Bag and may not be ideal in all situations. It’s not just about having a good bag with reliable gear. It is about having the right bag and gear for the situation you are about to face!
A great wilderness bag may have little application in an urban setting. A fully stocked bug out bag may slow our movement when seconds matter. Choosing the appropriate bag and gear for the unique emergency you are facing is essential to improving your survival odds.
We know it can be difficult to plan for the unknown – that is why RECOIL OFFGRID has partnered with ARC to give you the tools and knowledge you need to get your kit dialed in.
Combining ARC’s expertise with the latest technological innovations has led to the creation of a powerful tool that will help you build the ideal Bug Out Bag, WUSH Bag, INCH Bag, or Get Home Bag for the emergency situations you are likely to face in the area you are living in or operating in.
This tool goes beyond providing a generic packing list – it takes emergency type, expected duration, climate, threat level, speed of egress, and much more into account while putting together your ideal kit packing list.
Your Custom Go Bag List is Just the Beginning
Having an ideal Go Bag for your unique needs is valuable, but having the knowledge and skill to use the tools in your Go Bag in a real emergency will give you the edge you need to not just survive but thrive!
RECOIL OFFGRID has curated topic specific content to provide you with recommendations on gear, teach you vital survival skills, provide advice to enhance your mindset, and offer guidance to keep in you in peak physical condition.
Expert Advice to Trust Your Life With
Every aspect of this program has been created by industry experts with the intention of removing gimmicks and fluff to provide sound recommendations based on real world experience.
American Reconstruction Concepts was founded by Michael Caughran a U.S. Air Force SERE Instructor that has survived in the world’s harshest environments and hostile locations. Today American Reconstruction Concepts trains civilians, law enforcement organizations, and military professionals the art and science survival, evasion, resistance, and evasion.
The RECOIL OFFGRID team has a diverse range of skills deriving from military experience, wilderness and urban survival expertise, firearms instruction, and more. OFFGRID’s rigorous standards for gear testing and article content ensure the readers are getting the best in equipment recommendations and up-to-date survival knowledge in each article.
Grab Your Bag, It’s Go Time!
Are you ready to take the first step to becoming more prepared to handle the uncertainty of a chaotic world? Click the links below to learn more about different types of Go Bags utilize ARC’s free tool to build your ideal Go Bag. Remember, one bag can’t handle every situation. Use ARC’s Go Bag building tool to help you put together Go Bag kits for different situations!
Familiarize yourself with different bag types, learn more on how to properly utilize your go bag resources and see our recommendations for bags and the gear that goes into them!
When disaster strikes being ready to move quickly and efficiently with the equipment and supplies you need is essential to ensuring the safety of you and your loved ones. To accomplish this many novice preparedness enthusiasts look into building a Bug Out Bag, or B.O.B for short. The Bug Out Bag is a style of Go Bag that has become a mainstream term thanks to popular media – but understanding when it is appropriate to use a Bug Out Bag or when to utilize one of the lesser-known types of Go Bags can mean the difference between life and death in an emergency. To help people become better equipped to understand exactly what they need in an emergency Recoil Offgrid has partnered with American Reconstruction Concepts to create a state-of-the-art tool to build your Ideal Go Bag system to ensure you are ready to not just survive but thrive in an uncertain world!
What is a Go Bag?
Before building a Go Bag it is important to understand exactly what a Go Bag is, the types of Go Bags, and what situations call for specific types of Go Bags. Simply stated a Go Bag is a survival kit that is designed to be taken with you while on the move containing all the things you need to survive in an emergency.
Common Go Bag Mistakes
While the concept seems simple, the reality is much more complex as many people do not truly know what they need in an emergency. Chances are if this is your first time thinking about this concept you will make one of the two major mistakes – under packing or over packing.
The Dangers of Under Packing and Over Packing
Under packing leads to not having essential survival items. Often forgetting these essential items is an oversight as modern living has made things like the ability to obtain clean drinking water, healthy food, or light in the darkness a second thought. The fear of under packing can lead to over packing – while the better safe then sorry mentality may seem to make sense, adding weight and bulk can slow movement when every second counts. In addition to slowing movement, many people are not physically acclimated to having to carry a heavy bag on foot over long distances which can lead to discomfort and injury.
Choosing the Right Go Bag Setup
The first step in choosing the right Go Bag setup is understanding the 4 types of Go Bags and their unique applications. As we go through each time of bag you will see some example packs and gear that I rely on, while each Item is a great choice there are many reputable Items on the market to choose from!
WUSH Bags are built to maximize speed when seconds count. Compact bags like this GORUCK Bullet ruck are an Ideal choice for creating a quick grab and go pack that won’t slow you down.
WUSH Bag
Application: Grab and Go
Duration: Immediate
Primary Benefit: Quick movement in an emergency
Build Style: Minimalist
The WUSH (Wake up, Stuffs Happening) bag is designed as your grab and go solution. It is designed to be light and efficient to ensure you can move quickly in an emergency. WUSH bags are ideal for quick evacuations in situations like a building fire and can be easily kept on or near your person daily. While the WUSH will not sustain you over the long term it can provide supplies you need until support arrives.
Communications
Phone
Signaling Device: Whistle
Back Up Power: Power Bank
Health
Basic First Aid Supplies: For minor cuts and scrapes
Over the Counter Preventative Medicines: Advil, Tylenol, Allergy
The VERTX Gamut is a versatile pack that maximizes organization with a slim profile and subdued appearance making it a great choice for a Get Home Bag that you may have to carry in public places.
Get Home Bag
Application: Support while getting to a secure location
Duration: 12-24 hours
Primary Benefit: Versatility without impacting movement
Build Style: Balanced
As the name indicates, Get Home Bags are designed to provide supplies needed to get you home or another well stocked location in a emergency. Get Home Bags are often stored in a vehicle but are light enough to carry on your person comfortably when on foot for an extended duration if needed.
Communications
Phone
Satellite Communicator: Grid down, traveling outside cell coverage area
Signaling Device: Whistle
Back Up Power: Power Bank
Health
First Aid Supplies: Minor Injuries, Trauma Kit
Over the Counter Preventative Medicines: Pain killers, Allergy
Prescription Medication: 1 day worth
Additional clothing suited for being outdoors during the season if needed.
Protection
Weather Protection: raincoat, seasonally appropriate for night time.
Shelter: Emergency Blanket, Tarp and paracord
Personal Protection: Self-Defense Item
Extended Light option: Head lamp, small lantern
Sustenance
Water Purification: Filter or chem tabs
Food: Shelf Stable items with a days’ worth of calories
Drinkable Water: Filled Water bottle 1-2 liters
Travel
Navigation App
Non-Cell Based Navigation: GPS Unit, Compass
Foot Care Items: Extra Socks, Mole Skin, comfortable walking or hiking shoes if you wear other footwear.
EDC Basics
Pen
Notebook
Folding Knife
Lighter
Flashlight
Multi-tool
Basic Vital Documents
Wallet
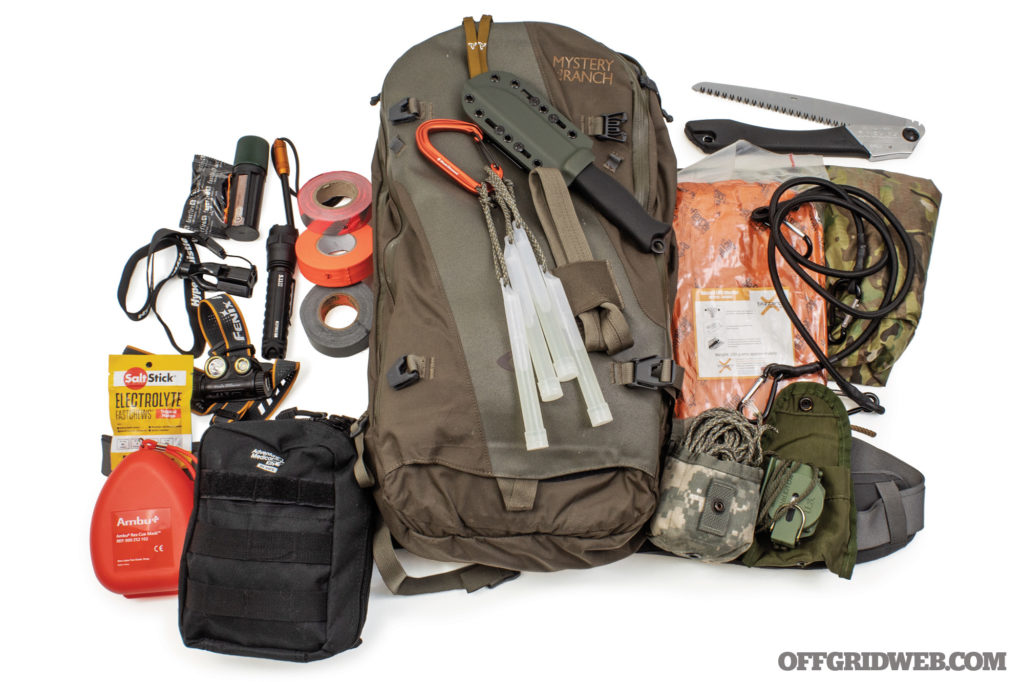
The Vanquest IBEX shares many features with hiking packs including a supportive suspension and waist belt making it an excellent choice for heavier Bug Out Bags that may have to carry over long distances.
Bug Out Bag
Application: Multi-Day Survival System
Duration: 24-72 hours
Primary Benefit: Supplies for extended emergencies
Build Style: Comprehensive
Bug Out Bags are designed to provide up to 3 days of survival equipment and supplies and are often used in disaster situations that require evacuation. In addition to emergency equipment and supplies, Bug Out Bags will often contain spare clothing and other comfort items to sustain you for a few days. The comprehensive nature of these bags prioritizes supplies over speed.
Communications
Phone
Satellite Communicator: Grid down, traveling outside cell coverage area
Signaling Device: Whistle
Back Up Power: Large or multiple Power Banks, compact solar charging options
Health
Advanced First Aid Supplies: Minor Injuries, Trauma Kit
Over the Counter Preventative Medicines: Pain killers, Allergy, electrolytes, bug bite/sting relief
Prescription Medication: 3 days worth
Additional clothing for 3 days
Basic Hygiene items
Protection
Weather Protection: raincoat, seasonally appropriate outerwear for changing conditions.
Shelter: Emergency Blanket, Tarp and paracord, bivvy sack, compact tent.
Personal Protection: Self-Defense Item, Back up
Extended Light option: Head lamp, small lantern, back up light
Sustenance
Water Purification: Filter, chem tabs, empty container for storage.
Food: Shelf Stable items with 3 days’ worth of calories.
Drinkable Water: Filled Water bottles and/or Water Bladder 3-6 liters
Non-Cell Based Navigation: GPS Unit, Compass, local maps
Foot Care Items: Extra Socks, Mole Skin, comfortable walking or hiking shoe if you wear other footwear.
Tools and Other Essential Items
Pen, pencil, maker
Notebook
Robust Fixed Blade, Back Up Cutting Tool
Lighter and Back Up Fire Starting tools
Flashlight
Robust Multi-tool
Important Documents: Wallet, medical info, Identifying documents for children.
The 5.11 Tactical RUSH packs may not be discreet, but they make up for it in functionality and carry capacity. The Rush 24 has a large 37-liter carry capacity and the Rush 72 is a cavernous 55-liter pack making a great option for INCH bags.
INCH Bag
Application: Supplies in situations where returning home may not occur
Duration: Indefinite
Primary Benefit: Contains everything needed
Build Style: Tool Focused
If you are grabbing your Inch (I’m never coming home) Bag, you don’t plan on coming back! Where the INCH Bag is different from the Bug Out Bag is the focus shifts to long term survival and will rely more heavily on tools to help you accomplish your survival goals rather than short term supplements. The comprehensive nature of these bags makes them very large and heavy which can dramatically slow movement if traveling on foot and are better suited for vehicle travel.
Communications
Phone
Satellite Communicator: Grid down, traveling outside cell coverage area
Signaling Device
Back Up Power: Solar charging options, Large Capacity Power Banks
Health
Extensive First Aid and Trauma Kit
Over the Counter Preventative Medicines: Pain killers, Allergy, electrolytes, bug bite/sting relief, Durable Medical Equipment
Prescription Medication: As much as possible
Additional clothing focused on durability varied weather and temperature conditions.
Long term Hygiene items
Nutrition Supplements
Protection
Weather Protection: Outerwear for Multiple seasons
Shelter: Durable Tents, Tarps, Cordage, and Repair Supplies
Personal Protection: Self-Defense Items and Back up.
Extended Light Options with multiple power sources.
Sustenance
Water Purification: Multiple Filters, chem tabs, empty containers for storage.
Food: Shelf Stable items as much as can be reasonably carried with a focus on obtaining food from outside sources.
Drinkable Water: Filled Water bottles and/or Water Bladder with a focus on having to replenish from other sources.
Durable Cook Wear: Portable Stove/pot/utensils
Travel
Navigation App
Non-Cell Based Navigation: GPS Unit, Compass, local maps
Foot Care Items: Extra Socks, Mole Skin, additional footwear for multiple seasons.
Tools and Other Essential Items
Pens
Notebook
Robust Fixed Blade Knife with maintenance Items, Back Up options.
Hatchet
Compact Saw
Multiple Fire Starters
Tools for hunting, Trapping, and Foraging
Flashlight
Multi-tool
Important Documents: Wallet, medical info, Identifying documents for children, passports, financial documents.
Using The ARC Bag Building Tools to Create a Custom Survival System
Each of us has a unique situation based on our physical condition, family size, geographic location, and climate conditions. In most cases everyone should have multiple bag types to accommodate different situations, and the contents of these bags will be determined by your own unique needs – but understand where to start and what your priority items are can be challenging. That is where ARC’s Bag Building Tools come in!
Using ARC’s bag building tools take Michael Caughran’s extensive experience as a US Air Force SERE (Survival, Evasion, Resistance, and Escape) instructor and condenses it into an easy-to-use format to provide a detailed custom tailored survival packing list for your unique needs.
Take the first step into becoming more prepared by clicking the link below to access ARC’s free Go Bag Tool! The process is simple -answer a few questions to help identify your unique needs based on your location, climate, personal capabilities, expected emergency type and the number of people you will need to support. From there you will receive a detailed list of everything you need to build your ideal Go Bag!
Building your kit is just the beginning! Every piece of equipment is only as effective as your ability to use it! Utilize the numerous resources available on offgridweb.com to enhance your knowledge. Practice using the gear in your kit to perfect techniques and build muscle memory. Take training courses with reputable and experienced trainers through ARC or any of the trusted trainers found in the pages of our magazine or on offgridweb.com!
Glow Rhino entered the market making aftermarket parts for other knives using Tritium, a radioactive isotope, to add a glow that requires no “charging” and will glow independently for many years. Since then, they have introduced glow fobs and their own line of production folding knives. Don’t let the radioactive element scare you off, Tritium’s short wave lengths can not penetrate human skin and are commonly used to illuminate many items including watches and compasses.
One of Glow Rhino’s latest offerings in the knife market diversifies their line up with their first fixed blade – The Bohr. Like all their knives the Bohr has a tritium insert in the handle that is rated to glow for over 12 years!
Visible and Utilitarian
One of best features found on all Glow Rhino knives is the Tritium tubes they work into the blade handles, allowing for quick identification when operating in dark environments. If you misplace your knife when working around camp at night you will never have to worry about disrupting your natural night vison with a bright light to find it because the bright glow of the Tritium inserts stands out even at a distance. I also found it useful when I was storing the knife in my pack as the Tritium glow made it easy to quickly identify and grab.
Beyond the exceptional night time visibility, the Bohr has a very utilitarian design making it a great all-purpose fixed blade. With an overall length of just over 8 inches and a 3.75-inch blade, the Bohr hits that sweet spot between compact and full sized that many users are comfortable with. The Bohr weighs in just over 5 ounces making it very comfortable to carry on your belt or in your pack without adding much weight. The blade is made from DC-53 tool steel, an upgraded version of the more common D2 tool steel.
Like D2 steel, DC-53 is known for being a rugged and durable steel. That durability comes with a trade off of being more prone to corrosion due to the reduction in chromium found in stainless steel, but Glow Rhino mitigates with black PVD coating to prevent corrosion. The Bohr is equipped with textured G10 handles that will hold up well to the elements and provide great grip in both wet and dry conditions. The handle scales are offered in black for a sleek look or blaze orange if you really want to up your visibility game!
The Bohr’s lightweight nature and handle design make it easy to use and control when performing precise work. The inclusion of jimping on the spine allows for superior grip when focused on truly detailed tasks.
The blade itself offers a prominent belly making it ideal for slicing and game processing tasks and the tip does a fine job with piercing tasks without being overly delicate. Thanks to the utilitarian blade design and durable steel choice the Bohr performs well in a variety of camp and wilderness tasks while also tackling your everyday cutting tasks.
Carry System
The Bohr ships with a kydex sheath that offers great retention and easy drawing. The sheath comes equipped with a mounted Tek-Lok clip but can easily accommodate soft loops or other mounting options to fit user preferences.
Best Uses for the Glow Rhino Bohr
The Bohr is an excellent do-all outdoor knife. The Tough steel makes it a good choice for harder use tasks, yet the size allows for great control when doing detailed work. The significant belly makes the Bohr a solid option for camp cooking and would perform well in skinning and game processing tasks. While I definitely see the Bohr at home in a hunting camp or in your hiking pack, the utilitarian design and sub 4-inch blade makes it a good choice for daily carry in your EDC bag or on your belt in permissive areas.
The Tritium insert is where the Bohr truly shines, allowing for easy identification when spending nights in the wilderness, operating in dark environments, or easy your go to fixed blade in the event of a power outage!
The participants who signed up for RECOIL OFFGRID Undisclosed knew very little about what they were getting into. They knew that they were signing up to be part of an immersive tactical training event that would last approximately 36 hours somewhere in the vicinity of Pittsburgh, Pennsylvania — and they knew that we had selected some of the best instructors in their respective fields to train them.
On arrival, Undisclosed VIPs hit the Lodge, got the mission brief, split into teams, geared up, and prepped for what was coming next. The night set off with a trauma care overview, a primer for the training to follow. The evening was spent getting to know one another, the instructors, and the support crew over good food and easy conversation. Still, unease lingered. Details of what was coming remained vague. None of the VIPs realized this would be their last chance to relax for the next 30 hours.
Each block of instruction was approximately an hour long. This meant they had to pick up the fundamentals quickly and apply them immediately.
Drinking from a Fire Hose
Training day kicked off at 7 a.m. with a quick grab-and-go breakfast. After a bite to eat, the participants were told to gear up in their full kit, and the group rucked down to the Ben Franklin Range shoot house. From there, the two groups split up for a marathon of training that went from 8 a.m. to 5 p.m. with only a short break for an authentic MRE lunch.
Over the course of nine hours, the participants covered several vital tactical and survival topics and learned to utilize the gear they received the day before. Each class offered the opportunity to get some practice time for each skill. Following the completion of the day’s classes, the weary participants returned to the lodge for dinner and were encouraged to ask the instructors to clarify anything they learned that they didn’t fully grasp.
Reacting to this breakneck pace mimicked the velocity a real-world situation can force on an individual. It was a controlled environment where VIPs could learn how to control themelves in potential do-or-die scenarios.
Close Quarters Combat
At Ben Franklin Range’s multi-story CQB building, RECOIL’s Editor-in-Chief Iain Harrison taught an introduction to close quarters combat for Undisclosed VIPs. The class set clear expectations from the start and stayed focused on fundamentals. The goal was a fast primer that put movement before theory. Every block designed to be simple, repeatable, and immediately useful.
Participants worked in four-person teams throughout the session. Harrison defined what each position in the stack was responsible for during an entry. Teams hear how duties shift based on who is the one-, two-, three-, or four-man in the stack. That shared understanding framed every rep that followed.
Teams began by pieing corners around corner-fed and center-fed rooms. They practiced reading angles and adjusting movement to match their place in the order. Reps stayed tight and controlled to reinforce clean footwork and spacing. The emphasis was on exposing as little of yourself as possible, while maximizing your own visibility of potential targets.
After a few runs with no rounds, teams cleared rooms with simunition. The switch kept the same fundamentals in place while adding training speed. Entries remained structured around position and room type. The class ended with concise takeaways that align with the drills they just performed.
Injury treatment was explained in simple ways, reducing the time spent thinking, and increasing the time spent acting.
Ballistic Trauma Care
Kristopher Hasenauer used his extensive experience as a Special Forces Medical Officer to train the Undisclosed participants in the essentials of ballistic and battlefield emergency care. This course covered common firearm and combat-related injuries and the equipment and techniques used to treat these injuries.
Hasenauer discussed prioritizing injury types using the Tactical Combat Casualty Care (TCCC) and how to utilize the head-to-toe method for identifying injuries.
TCCC Injury Priority:
Massive Bleeds
Airway
Respiration
Circulation
Hypothermia
Traumatic Brain Injury
As a crash course, Hasenauer focused on treating massive bleeds, discussing the science of blood clotting, the importance of applying pressure to wounds, and the appropriate situations to use tourniquets, quick clots, pressure bandages, and gauze. He demonstrated how to use different types of tourniquets and how to create improvised tourniquets.
Having a selection of the most effective medical equipment to treat traumatic injuries gave VIPs practical, hands-on experience.
Most importantly, he dispelled many of the myths around tourniquet use and reminded the participants that the best tourniquet is the one you have on you. The participants all experienced having a tourniquet put on them so they could understand the proper tension and got the opportunity to practice using them.
Following massive bleed treatment, Hasenauer covered treating airway and respiration discussing methods of clearing the airway and discussing the use of commercial chest seals, how to make improvised chest seals, and needle decompression to treat tension pneumothorax.
Some time was spent discussing circulation injuries, hypothermia prevention, and identifying traumatic brain injuries followed by treatment of non-life-threatening injuries and the usage of common first aid equipment including splints for arm and leg injuries.
Throughout the course, Hasenauer discussed the differences between military and civilian trauma and first aid and answered many of the questions the Undisclosed participants had. While the course run time was relatively short compared to the extensive training programs, the participants left with a great deal of knowledge and a basic understanding of how to utilize the equipment found in their supplied Gorilla Medical Trauma kits.
CQB can be a useful skill, but it also presents a high amount of risk. Learning how to reach out and touch someone puts life-saving distance between you and a life-threatening target.
Long-Range Shooting
Harrison also plied his marksmanship expertise to teach an introduction to long-range marksmanship for Undisclosed VIPs. The class set expectations early and stayed on fundamentals. The goal was a fast primer that built a repeatable shot process. Each block was simple, focused, and immediately useful.
He broke the shot sequence into clear parts. Students built a stable position they could return to every time. Instruction covered natural point of aim, sight picture, trigger control, and follow-through. Shared language kept everyone aligned on the same steps.
Work began with short dry-fire reps to groove the routine. Dry practice set the cadence for breathing, prep, and release. Coached strings followed to put the same steps into practice. Students focused on calling shots and making small adjustments between reps.
The session closed by sending rounds downrange to transform theory into live range time. Students left with a concise set of reminders that mirrored the sequence taught. Emphasis stayed on repeatability and clean fundamentals. Fifty minutes of clear instruction and focused reps set a solid foundation for longer work.
Navigating an area alive with threats takes deliberate planning to stay unseen.
Land Navigation
RECOIL OFFGRID Senior Editor Patrick Diedrich taught a land navigation course that did not rely on a map or a compass. He opened with a story about a failed missing person’s case from a place he once called home. That moment became his call to action to apply his military know-how to help his local search-and-rescue organization. He set the tone by tying skills to real outcomes. The aim was clear and practical from the first minute.
He then covered major and minor terrain features. He explained how identifying those features could help others home in on your location if you were lost. The same skill set could orient you and shorten the path to safety. He kept the focus on what you can see and describe. Students learned to use the ground as their guide.
He also taught how to use the OnX app, since everyone has a phone that can be used as a potent navigation tool. He discussed key points from Lost Person Behavior that affect how people move and how they are found. He outlined methods to hold a straight line when the sun was covered or when visibility was low. The guidance stayed simple and usable under stress. Each point supported navigation without extra tools.
The session culminated in a practical exercise around the Ben Franklin Range. Undisclosed VIPs applied the same techniques discussed in class to move from point to point. The route demanded attention to terrain and consistent direction keeping. The drill reinforced the connection between observation and movement. Students finished with a working framework they could repeat on their own.
The best clandestine shelter does not look like a shelter at all to the casual observer.
Escape and Evasion
In the escape and evasion course, Michael Caughran covered the basics of defeating illegal restraints and how to evade hostile forces when making your escape from an area both individually and as a group.
The course opened with Caughran discussing a variety of restraint types that are commonly used including zip ties, rope, duct tape, and electrical tape. With the help of Hasenauer, who used these methods to restrain Caughran, methods of defeating each were shown to the Undisclosed participants. Through the demonstration, Caughran discussed using passive resistance and proper body position while being retrained to provide an advantage when defeating the restraints.
Caughran explained that the more aggressive you are when being restrained the more the abductor would work to restrain you. By remaining calm and compliant, it can lull the abductor into a false sense of security when retraining and guarding you. While remaining compliant you should take note of any information you can gather such as building layout, people within the area and their movements to provide an edge when escaping. Caughran emphasized that the best chance of escape will be shortly after you are taken as you will not be worn down from poor conditions and potential integration. Following the demonstration and discussion, the participants got the opportunity to practice defeating each of the restraint types before moving on to the escape portion of the evasion part of the course.
During the evasion portion of the course, the participants had to escape from the lodge area into the woodland trails behind the building. Caughran emphasized the importance of “getting off the X” as quickly as possible and putting as much distance between the escape point as possible. During this portion, the participants were taught to move quickly as a unit and how to use terrain features to cover their movement. Caughran and Hasenauer covered the best times to move, avoiding areas where patrols are likely, and generally avoiding the easy route in favor of areas that are less likely to have hostiles moving about.
The course is wrapped up with a discussion about the importance of pre-planning meeting points for your unit when operating in an area in the event of separation. This is contingent on having a good knowledge of the lay of the land before entering the area.
Early warning is an important aspect of maintaining security at a clandestine shelter site. Caughran discussed several techniques that could be used.
Clandestine Shelters
Caughran’s course covered building a variety of survival shelters using the participants supplied Rab tarps and paracord. While this skill is commonly taught in Wilderness Survival 101, Caughran kicks it up a notch using his USAF SERE experience to teach the Undisclosed participants how to build effective concealment shelters from the resources around them.
The class kicked off with a discussion of some of the concepts around concealment shelters and their use to evade those tracking you and to gather information on an area or building. In the case of evasion, Caughran emphasized the importance of understanding the tracking capabilities of those pursuing you. He discussed methods of ensuring that enemy forces cannot see you while remaining visible to friendly forces.
After the discussion, Caughran took the participants around the training site to attempt to identify shelters he had built the previous day. He also strategically placed distraction devices in the area to throw the participants off. After explaining the uses of distraction devices, Caughran revealed his shelters. The first looked like nothing more than a pile of discarded building materials but he demonstrated the interior space being large enough to fit his body and give him a great vantage point on the hypothetical target he was observing. The second concealment shelter Caughran created utilized natural plant materials found in the area. The only significant tell was that some of the day-old plant material he picked was starting to wither. Caughran reinforced the importance of using longer-lasting plant materials so as not give away your hide site. He also noted that the best concealment shelters are found not built.
Following the demonstration on concealed shelters, Caughran showed participants common devices that could be used as perimeter alarms, distractions, and deterrents to warn of incoming hostiles or throw them off track.
The course wrapped up with building a variety of tarp shelters and various knots and hitches that can be used while building non-concealment survival shelters. After that the participants had the opportunity to practice building shelters.
VIPs built their own ghillie veils, tweaking and adapting them as the environment shifted.
Camouflage and Sensory Defeat
In this course, Freddy Osuna covered the art and science of personal camouflage and discussed how to move silently and discreetly through the environment. This course blended Osuna’s professional experience as a Marine Scout Sniper and extensive knowledge of the environment to provide the Undisclosed participants with a unique approach to the topic.
The course started with the students following a trail behind the lodge to meet up with Osuna in a stretch of tall grassland in the woods. The participants found him The course started with the students following a trail behind the lodge to meet up with Osuna in a stretch of tall grassland in the woods. The participants found him waiting on a section of trail by a small tree housing an active wasp nest. As the participants glanced apprehensively at the nest, Osuna was completely unphased by them. He began the course with a brief discussion about the history of camouflage and then pulled out a collection of different types of camouflage to discuss the history and innovations throughout history.
The next section of the course went into the usage of camouflage paint on the body. Osuna explained different methods of applying camouflage paint with local plants as brush and stressed the importance of using it to reduce the visual appearance of facial structures. He also explained how the reflective nature of skin stresses constant reapplication of camouflage paint to maintain the effect.
Throughout the discussion, Osuna talked about the science of vision and how the human eye detects things. He went into the differences in how humans see and how animals see and why certain types of camouflage work on animals but not humans.
Next, Osuna covered movement through the environment and how erratic movement such as swatting at bugs around or on your body can quickly give away your position. He also discussed how the shape of the human “V” and contrast between the background and foreground are highly detectable to the human eye. Osuna demonstrated how to use local plants and terrain features to conceal yourself while moving.
Participants learned multiple camouflage techniques, chose what worked best for them, and put those ideas to the test once the mission went live.
Osuna focused on the importance of understanding the environment around you and being familiar with the plants and animals within it. He explained how having a healthy respect for the land will allow you to survive longer and move more efficiently. To wrap this section, Osuna offered the participants the most valuable piece of advice when it comes to camouflaged movement: “It’s not what you are wearing; it’s how you move.”
The final section of the course covered creating ghillie suits using bits of camouflage material scraps and local plants. The participants were then tasked with creating their own ghillie veils using their provided hats, camo scraps, and natural materials.
Breaks were short, but carried flashes of humor that kept spirits up.
A Short Reprieve
With the marathon of training classes ending around dusk, the weary participants shuffled into the lodge to eat dinner. They talked amongst themselves about the day’s events and discussed what their thoughts on tomorrow’s training may bring. They were given the opportunity to ask the instructors questions about the day’s training. It wasn’t long before the instructors and support staff discreetly started moving out of the room. Suddenly, the participants’ relaxation was interrupted by the sounds of shouting and gunfire in the distance. Diedrich went into the kitchen and called the participants into the briefing room for an emergency meeting — the official mission of Undisclosed was about to begin!
Could the difference between life and death be determined by a boot print in the dirt? Or a single broken blade of grass? I’ve learned firsthand that it very well could be. Your tracking skills, or lack thereof, could be the determining factor in whether your quarry escapes and you fail to put food on your family’s table. Or whether a child lost in the woods isn’t found. Or an escaped fugitive isn’t apprehended and remains free to cause more harm to others. Simply put, tracking is a skill that saves lives. It’s a skill that was once necessary for our very survival and was passed down through generations so our bloodlines could carry on through the ages. But now, as humans seek comfort in modernity and move further away from nature, man tracking is becoming a dying skill. Freddy Osuna, Founder and Lead Instructor of Greenside Training, seeks to return this valuable craft to our modern-day warriors in the military, law enforcement, and civilian populace.
Freddy Osuna’s closing words at the end of the man tracking course.
From an early age, Osuna faced and overcame significant hardships. Those challenges forced him to quickly learn, understand, and adapt to both natural terrain and human terrain. This early resilience became the framework for developing and honing his skills as a tracker. A skill set that would later serve him well as a United States Marine deployed overseas, as well as an instructor for the Corps’ Combat Hunter program.
Freddy Osuna teaching his first lesson man tracking, analyzing a single footprint.
His abilities as a tracker have also been put to the test far beyond the battlefield. He has helped search and rescue teams near his home in Arizona find lost children. His teachings have been credited by law enforcement agencies around the world in the apprehension of dangerous armed criminals. As I learned under Osuna’s tutelage, tracks aren’t always obvious, and tracking can be difficult and exhausting. One instance in particular had him tracking for over six hours. When fatigue set in and his focus began to dwindle, he had to draw upon strength from deep within, and from forces greater than himself, to keep going. As a tracker, he has saved lives. Now, his mission is to teach others this valuable skill so they may have the ability to do the same. And with that comes Greenside Training.
Group photo at the end of the man tracking course.
From June 21–22, 2025, a group of students gathered at The Ranch TX near Dilley, Texas, for Osuna’s weekend-long Weaponize the Senses man tracking course. This sprawling 300-acre tactical training facility in the South Texas brush is home to multiple firing ranges, shoot houses, K9 kennels, and driving tracks. But for this weekend, it hosted its very first tracking course. Students included active law enforcement officers, military veterans, hunters, prepared citizens, and even a mother who was seeking more ways to protect her children. Several staff members from The Ranch TX also took part, including Founder and CEO, Chad Timney.
Upon arrival on the first day, Osuna and Co-Instructor Manny Tellez led the students deeper into the property for their first lesson: examining a single footprint. “Every track is a word, a set of tracks is a sentence, and the trail tells a story,” said Osuna. He pointed out a vast array of details about the track. Details that left the students bewildered yet fascinated. He also explained what he referred to as the “time shadow effect,” where a low angle of light reveals details that may otherwise be less visible. This makes early morning and late evening the best times to conduct tracking.
Manny Tellez showing the students sets of tracks.
When it came to analyzing track details, students were taught to look for a specific set of criteria: the size of the impression, the type or shape of footwear, any distinguishing patterns, and the age of the track. Osuna explained that at least two of these criteria must be determined, and one of them must be the age. By analyzing the size of the impression and the type of footwear, certain deductions could be made. A large impression might suggest a larger person. Footwear style offered additional clues: did they look like hiking shoes, indicating outdoor competency and perhaps athletic ability? Or were they boots that could suggest prior military experience?
Manny Tellez preparing a student for the final test.
Osuna also explained how the age of a track could be assessed by examining the shape of the outer ridges and the hue of the soil. Outer ridges are formed from the displacement of air and dirt when someone steps into the soil, creating raised edges around the footprint. These ridges begin to wear down over time due to the elements. Additionally, fresh tracks typically expose darker soil due to retained moisture, which lightens as it dries out. He went on to highlight what he considered the most important detail in the track: the toe dig. By lining up the toe dig with the small dirt mound kicked up behind it, trackers can determine direction. Once direction is established, your senses, weapon, drone, team, dog, and other assets can be oriented accordingly.
Freddy Osuna starting the second day.
Students then moved on to examining different sets of tracks, where they were tasked with determining who they were tracking. Were the footprints closer together or spread farther apart, indicating whether someone was walking or running? Did the footprints have a wide straddle, which could suggest the person was carrying a heavy load? Furthermore, students were taught to put themselves in the shoes of their quarry and think as such. “There’s a person at the end of the trail,” said Osuna. He emphasized the importance of considering who you might encounter and being prepared for that encounter.
A student about to start the final man test tracking alongside Freddy Osuna, Manny Tellez, and The Ranch TX staff.
Osuna didn’t make the training easy. Much of the ground throughout The Ranch TX consisted of densely compacted dirt, making footprints much more difficult to see after steps had been taken. “This is what it’s going to be like,” he said, making sure the students were well aware of how challenging tracking can be. Tracks aren’t always readily apparent and easy to spot. Therefore, sharpened senses, coupled with the techniques being taught, are crucial to tracking successfully. To further emphasize this point, Osuna put the students through an exercise in which they were divided into two different groups. One group would conduct a scenario and walk through an area in a particular way. The other group would then have to analyze the tracks and try to determine what might’ve taken place. Not only did this serve as a means for the students to practice and develop their own individual tracking skills, but it also taught them how to track as part of a team.
When night fell on the first day of training, the students returned to The Ranch TX for Osuna’s nighttime tracking demonstration. He showed how different colors emitted from a flashlight could be used for tracking in various ways and environments. For instance, blue light is good for showing contrast, making it ideal for tracking blood as it’ll appear darker while the surrounding foliage appears lighter. Green light works well for providing contrast at a longer range, making it a solid choice for tracking in the snow or on other light surfaces. Red light helps a tracker retain night vision and is less likely to spook animals. The demonstration concluded with Osuna showing the students how they could even track at night using a laser, yet another thing that left them fascinated.
The students also learned about various animal tracks they might encounter in the wild. Osuna explained how animal tracking could be done for various reasons. The obvious being hunting, though he also shared that he likes to track animals for recreational purposes as well, such as wildlife photography. The first tracks the students were shown were ungulates: hoofed animals such as deer, elk, moose, and bighorn sheep. This part of the training drew great enthusiasm from the hunters in the group. The students were also taught how to identify the tracks of predators, such as coyotes, big cats, wolves, and bears. Even small critters like raccoons made the roster of animal tracks covered in the training.
It wasn’t just practical tracking skills the students learned during the weekend. Mindset was another critical aspect Osuna instilled in them. “Tracking is a search for the truth,” he said, explaining how personal bias could negatively affect one’s ability to track effectively. Students were told to keep those biases in check so they could see what is actually there, not what they’d like to be there. He also explained how the skills learned during the course could be plugged into each stage of the OODA loop. By Observing with enhanced senses, Orienting with track direction and context, Deciding based on quarry profile, and Acting with the right tactics, techniques, and procedures (TTPs). Osuna also emphasized that the skills learned during the course could be applied to other aspects of life. Using the senses, staying focused, and removing distractions allows people to be more present with their families and friends, in their careers and businesses, and when out in the world.
The course culminated on Sunday afternoon with a final test: an individual exercise in which students would, one by one, traverse down a trail armed with an AR-15 rifle repurposed to fire simunition paint rounds. They had to use their eyes, nose, and ears in unison to recognize anomalies on the trail and engage targets lying in wait. Each student was graded on their ability to determine the direction of sounds, smells, and sights they encountered. This also allowed students to combine their newly formed tracking skills with marksmanship skills. It took many by surprise, and they had a lot of fun doing it.
At the end of the course, Osuna presented each student with the Greenside Training arrowhead patch as a mark of completion. He also awarded one student the coveted “Black Wolf” patch. A tradition established to honor Osuna’s friend and fellow Marine, Josh Robinson, a highly skilled tracker who was tragically killed in Afghanistan in 2011. Robinson was the first Black Wolf, and now the title, along with a solid black arrowhead patch, is presented to the highest-scoring student at each course. This time, I was awarded that honor.
Greenside Training arrowhead patches and a single Black Wolf patch.
Weaponize the Senses wasn’t about gimmicks. It was about helping students reclaim their innate human capabilities and sharpening them with intention. By the end, I walked away more connected to my environment, more confident in my perception, and more aware of the gaps in my own abilities, which was exactly the point. Though Weaponize the Senses is just one of several courses offered by Osuna and Greenside Training, he also teaches tactical tracking, urban tracking, anti-tracking, and more. Each is designed to give students a faster and more intuitive grasp of the OODA loop through deliberate sensory engagement.
To learn more and sign up for a course near you, visit GreensideTraining.com. To explore the variety of other training opportunities at The Ranch TX, visit RanchTX.org.
In a crisis, information is everything—and light is information. Our friends at RECOIL are giving away the SureFire XC3, a compact handgun light built for durability and situational awareness.
Why the XC3 Fits a Preparedness Kit
500 lumens / 7,200 candela with a Hybrid Beam to ID threats and navigate cluttered spaces
Front-loading 123A battery for quick swaps—no tools, no removing the light
Ambidextrous momentary/constant-on switching you can operate under stress
Aerospace-grade aluminum, Mil-Spec hard anodized, and water-sealed to 1m/30 min
Universal/Pic rail mounting and compatibility with many existing holsters
How It Works
Drop your email and agree to receive sponsor newsletters to claim your first entry
Increase your chances by following the sponsors on social and referring friends
Timeline
October 13–19, 2025
Single winner receives the XC3
Tap the entry link via RECOIL and get your name in the hat. Stay ready, stay informed.