Five years ago Reiff Knives hit the outdoor knife scene with their F4 model – a full sized American Made premium fixed blade that was designed for rigorous outdoor use in both survival and bushcraft tasks. The original F4 was and its larger cousin the F6 were a success that helped establish Reiff Knives as respected name among discerning outdoor enthusiasts and professionals.
Since the initial launch of the F4 and F6 Reiff has released numerous outdoor style knives, and few EDC sized knives, and most recently their first foray into tactical knives with the thoughtfully designed and incredibly well built Vicon.
Always Improving
While the original F4 has seen some variants over the years including a scandi grind and Magnacut steel variants, the knife remained largely unchanged from its original form factor. As someone who was fortunate enough to receive one of the pre-release production prototypes and has relied on it ever since then I can honestly say the original F4 is an exceptional knife.
Why did Reiff make changes to the F4?
If you spend any time talking to Stu Shank one of the founders of Reiff Knives you will quickly learn that “good enough” is not a phrase that exists in his vocabulary. Stu is one of the most discerning and detail-oriented knife enthusiasts I have ever encountered – and that mentality definitely came with him when he launched Reiff Knives.
Every model Reiff releases has gone through extensive prototyping until everything about the model is up to Reiff’s high standards and even after Stu spends a great deal of time speaking with industry professionals who use their knives to help make changes in future iterations that could make an already amazing tool even better!
What’s New in the Reiff F4 Gen2
The most obvious change in the F4 Gen2 is the higher saber grind, but what you won’t see with the naked eye is also tweaks in the edge geometry. The thinner edge and higher saber grind can significantly improve slicing tasks. The choice to use CPM-3V helps ensure the thinner edge and reduces the chance of chipping and as a bonus CPM-3V is far easier to sharpen in the field compared to Magnacut.
Reiff also made some minor changes to the blade profile and handle profile that improve overall comfort and usability. The handle scales are changeable and feature and new texture pattern that significant enhances positive grip during hard use tasks.
The sheath has been updated to a custom modular ambidextrous sheath very similar to the to what is found on Reiff’s Vicon Tactical Knife. The custom clip is excellent for belt carry, but any number of mounting options can be used with the sheath.
Customization Options
The Reiff Knives F4 Gen2 is launching in three available finishes – classic stone wash, black DLC, and flat dark earth PVD. For handle materials you have the option of black or OD green G10 and black or green canvas micarta.
Reiff F4 Gen 2 Specs
Overall Length: 9″
Blade Length: 4″
Cutting Edge: 3.8″
Blade Width: 1.11″
Blade Thickness: 5/32″ or .156″
Blade Material: CPM 3V
Hardness: 59-61 HRC, Cryo Treated
Blade Style: Drop Point
Edge Type: Plain
Blade Grind: Flat Saber Grind
Finish: Stonewash
Handle Length: 5″
Handle Width: 1.1″
Handle Thickness: .95″
Weight: 6.9 oz
Country of Origin: USA
When Will the Reiff F4 Gen2 be available?
The Reiff F4 Gen2 will be released on May 1st 2026 and can be purchased directly from Reiff’s official website www.reiffknives.com
When the Constitution becomes a casualty and martial law sweeps the nation, survival means more than staying alive. The Hanging Creek Chronicles: Shadows of Martial Law by Russ Sawyer plunges readers into a fractured America, where political upheaval has transformed ordinary communities into battlegrounds.
The story centers on Cole, a 20-year Air Force veteran who has built a quiet life on a rural South Carolina farm. When the President is impeached and the Speaker of the House seizes power, declaring martial law, Cole’s world transforms overnight. The interstate becomes a no-man’s-land of military checkpoints and lurking threats. A sniper’s bullet that nearly claims his life drives home the brutal reality: The old rules no longer apply.
This debut novel draws heavily from author Russ Sawyer’s own experience as a retired Air Force Security Forces veteran and firearms instructor. The authenticity permeates every tactical decision and every moment of hard-won survival wisdom.
The Breakdown
At its heart, this is a story about family and community under siege. Cole must protect his wife, Nora, his son, Colby, and a tight-knit network of neighbors bound together by grit and defiance. The rural South Carolina setting becomes both sanctuary and trap, offering cover while limiting escape routes.
The novel excels in its portrayal of uncertain allegiances. Shadowy figures like Dobbins and Joe-Dee materialize from the pines, their motives tied to deeper conspiracies. Trust becomes currency more valuable than ammunition, and Sawyer masterfully ratchets up tension as readers question every new character’s true intention.
What sets this book apart is its emotional grounding. Cole’s fight transcends mere survival — it becomes a stand for freedom against treachery. The psychological weight of each decision resonates: When do you help a stranger? How do you maintain humanity when protective systems have collapsed?
The Verdict
The Hanging Creek Chronicles delivers a compelling entry into the political collapse subgenre. Its blend of military authenticity, rural resilience, and family centered drama will resonate with fans of preparedness fiction and dystopian thrillers alike. As the first book in a planned series, it establishes a rich world and compelling characters while delivering a satisfying arc. For those who appreciate survival fiction that asks hard questions about loyalty and sacrifice, this one belongs on your shelf. When martial law falls, what would you fight for?
About The Book
Book: The Hanging Creek Chronicles: Shadows of Martial Law Author: Russ Sawyer Publisher: Independently Published MSRP: $15 Paperback Pages: 371 Rating: Thrive | Survive| Die
I had a dinner reservation at 6:45 p.m. I showed up 15 minutes early, because that’s what you do when you’re meeting someone at a nice restaurant on the row between the Palazzo and the Venetian. I was standing outside Milos, minding my own business, when I heard the shouting.
Two guys, shoving each other. One of them threw a wild hook. My first thought was that they were just being idiots — maybe playing around, maybe a little drunk. Someone on the sidelines yelled that they were brothers, which only reinforced the impression. Knuckleheads. No big deal.
I decided to break it up before somebody did something stupid and ended up spending the night in a holding cell. I’ve spent thousands of hours on the mat — judo, taekwondo, jiujitsu, kickboxing, a little wrestling thrown in for good measure. I started around age 19 and training seriously until about 25. The gym I came up in had several pro fighters. When you spar with people like that, separating two untrained guys on the sidewalk doesn’t feel like a tall order. I figured I’d get between them, use some control if I had to, and everyone would walk away annoyed but intact.
Then, everything changed.
The victim of the stabbing is being treated on sight to control the flow of blood loss.
Silver Flash
As soon as I got my hands on them, both guys tangled on the ground, I saw it: a silver blade. Not a threat. Not a brandish. A stab. I watched it go into the other man’s forearm. I was close enough to feel the movement.
People ask me what changed mentally in that instant. The honest answer is not much. I didn’t freeze. I didn’t panic. I just knew I needed the knife. I remember a single thought passing through my head — I hope I don’t get cut — and then I was already on the wrist.
I used a C-grip, a jiujitsu hold that’s extremely strong and very hard to break and got two hands on his one. Two-on-one. All things being equal, I win that exchange. But the key is that none of this was a conscious decision. That’s the whole point of training: You want technique to become instinct, because in a moment like that, you don’t have time to think. You need to have already prepared for what needs to be done. It’s kind of a remarkable thing, honestly — all those hours on the mat, finally applied in a real situation.
I smashed his wrist and hand against the concrete and kept repeating it: Drop the knife. Drop the knife.
The Bystander Who Changed Everything
About 10 seconds in, the attacker tried to close the folding blade — I still don’t know why. I adjusted the angle, bearing down harder on his wrist. Eventually, he let go. That’s when a man, older, maybe late 50s, stepped in and put his foot on the knife. Simple as that. Foot on the blade. It sounds small, but it changed the entire calculus. With the weapon pinned under someone else’s shoe, I didn’t have to worry about it being picked up again by either party.
I’m very grateful for that guy. If he hadn’t stepped in, I would’ve had to transition to a full pin on the attacker — rolling him onto his back, controlling his arm — which would have left me exposed to the victim, whose mindset I couldn’t read either. That bystander quietly removed the most dangerous variable from the equation.
Once the knife was neutralized, the attacker’s whole demeanor shifted. He wasn’t fighting anymore. He was trying to flee. I let him go. I didn’t know what his other hand was doing, didn’t know if he had a second weapon, and I didn’t see the benefit of trying to hold him when the guy beside me was bleeding badly. The priority had changed.
Caleb didn’t realize how much he was exposed to the victim’s blood until after he had a chance to calm down.
A Garden Hose Pointed Upward
The victim stood up, and his arm started spurting blood. Not dripping. Spurting. It was a pumping spray — like a garden hose on low, arcing upward, splashing on the concrete. He kept insisting he was fine. He was not fine.
I told him to take his shirt off and press it against the wound. I’ll be transparent about something that sounds ridiculous in hindsight: I didn’t want to take off my own shirt because I still had that dinner reservation in the back of my mind. That was genuinely what I was thinking. The brain is a strange machine under stress.
He pressed his shirt to the wound, and a few seconds later, a group of guys showed up who clearly had more medical training than I did. They elevated his arm and started real first aid. I found out the next day, through a Facebook post, that they were from a company called NOVOX Research. I stepped back and let them work. Then, I looked down. My hands and wrists were covered in blood. My left pant leg was soaked. I hadn’t even noticed.
I went and washed my hands about three or four minutes later. Looking back, I wish I’d washed them 10 times longer.
The Part Nobody Warns You About
Fast-forward to the next day. For cops and paramedics, getting someone else’s blood on you is probably routine. For me, once the adrenaline wore off, a new kind of anxiety crept in — the slow, grinding kind. Bloodborne diseases. HIV. Hepatitis. The words started cycling through my head on repeat.
I reached out to law enforcement, asking if they could tell me anything about the victim’s bloodwork. The answer was immediate and final: HIPAA. They can’t release medical information. Period. So even though I stopped a stabbing, there’s no mechanism for me to find out if the man whose blood soaked through my clothes was carrying anything transmissible.
I wasn’t too worried the night of the incident. I didn’t have any open cuts. I don’t think blood got into my mouth, eyes, or ears. But I was wrestling on the ground with a man holding a knife and inches from an arterial bleed. I wasn’t exactly tracking every droplet.
One officer told me that without open wounds or mucous membrane exposure, the chances of transmission were extremely low. I get that. I understand the math. But I was about to fly home to my wife, and I couldn’t bring myself to kiss her — because even if the chance was small, it was still a chance.
Thirty Days to Three Months
As soon as I got home, I went to the hospital to get my blood drawn. That’s when I learned the cruelest detail: even if I had been exposed, nothing would show up in bloodwork for 30 days to 3 months. The only immediate option was PEP, post-exposure prophylaxis. I’m skeptical of hospital drugs under the best of circumstances, so I declined. Now I have a medical bill and no answers.
I’ve been trying to figure out how to test the dried blood on my clothes. I still don’t know the victim’s name. I’m trying to find out so I can reach out to him directly. Not for thanks, not for closure, but for a simple yes-or-no answer that the system apparently can’t provide.
What I Want You to Know Before You Jump In
I’m writing all of this so that anyone reading it understands the full picture. Not just the heroic 30 seconds, but the frustrating weeks that follow. When I ran toward that fight, I had no idea a knife was involved. I wasn’t scared of getting stabbed. I wasn’t scared of getting cut. Anyone who’s even looked at knife-fighting training knows how easy it is to get sliced. I found out afterward that the inside of my left dress-shirt sleeve had a small cut in it. I never felt it happen.
What I wasn’t prepared for, what no amount of mat time prepares you for, is the aftermath. The blood on your hands that won’t wash off in any meaningful sense. The phone calls that go nowhere. The HIPAA wall. The look on your wife’s face when the story shifts from exciting to uncertain.
My wife doesn’t want me to do something like this again. I understand that. She is the most important person in my life and making her worry about something that affects her too is not something I take lightly. But I also know there are worse things than danger. Becoming a man who watches bad things happen and does nothing may be worse than any risk I took that night.
I keep thinking about that video that went viral last September, the one where a man stabbed a young woman on a train while bystanders stood by. We don’t want to become a society of spectators. Every truly awful thing that has scaled in human history has done so because of the bystander mindset. Edmund Burke said it best: “The only thing necessary for the triumph of evil is for good men to do nothing.” I’m not calling myself a good man. I’m far from it. But I know that doing nothing, all the time, when bad things are happening, is absolutely bad.
If It Were You Tomorrow
Even though the situation was an extreme pain in the ass — and caused real stress for my wife and I — I’d go back and make the same choices. There’s a quote often attributed to Edmund Burke: “The only thing necessary for the triumph of evil is for good men to do nothing.”
I believe that. When we see bad things happening, we have a responsibility to step in and do what we can. I’m not saying you should risk your life recklessly or wade into something you have no training for. But if you have the skills, the ability, or even just the opportunity to help, doing nothing is a choice too. And it’s one that lets evil win. Sometimes doing the right thing means taking a risk. It means stepping off the easy path. Because if enough people choose comfort and safety over action, the consequences eventually catch up with all of us.
History is full of examples: Mao’s China, Stalin’s Russia, and Hitler’s Germany. There were many good people living in those countries. At certain moments, if enough of them had stood together, they might have stopped the evil before it grew beyond anyone’s control.
But in the moment, it’s always safer to stay quiet, stay in line, and don’t stick your neck out. The problem is that silence feeds the thing it’s trying to avoid. Evil doesn’t stay the same size. It grows. And, eventually, it comes back with a fury far worse than the risk it would have taken to stand up early.
We never want those kinds of atrocities to happen here at home. But they can — if good people choose to do nothing.
Forty-four veterans die every day by suicide or drug overdose.
Not in combat. Not downrange. At home, after the war is supposedly over. That number comes from researchers at Duke University Medical School and the National Association of American Veterans, and it is almost certainly low. When you account for homeless veterans who die off the radar and overdose deaths that never get coded as veteran suicides, the actual toll is worse. The “22 veterans a day” statistic that gets cited everywhere? Outdated. The real number has been climbing.
Four men decided they were done sitting with that fact. They built a team, found a boat, named it Overwatch, and they are going to row it across the Pacific Ocean.
What Is Team Foar the Brave?
Team Foar the Brave is a four-man crew competing in the World’s Toughest Row 2026, a 2,800-mile unsupported ocean race from Monterey, California to Hanalei Bay, Kauai, Hawaii. The race starts June 6. No motors. No sails. No outside help. Two men row at a time in two-hour shifts while the others rest in a pair of small cabin compartments barely big enough to lie flat. They do that around the clock for somewhere between 45 and 65 days, depending on conditions.
They are doing it to raise money and awareness for veteran suicide prevention. One hundred percent of proceeds above operational costs goes to vetted, results-driven charities that are doing real work on veteran mental health.
Who Is on the Team?
Every man on this boat served. This is not a celebrity stunt.
LTC Joe Leach
LTC Joe Leach put in 26 years with the 75th Ranger Regiment and Special Forces. He rowed the Atlantic in 2023 in the same competition series. He knows what it costs and he signed up again.
LTC Ian Pienik
LTC Ian Pienik is a Green Beret. Twenty-four years in the 20th Special Forces Group, with deployments to Iraq, Africa, the Sinai, and Jordan. He is currently stationed at US Special Operations Command and retires in May 2026. Four weeks after he hands in his equipment, he pushes off from Monterey.
John Pallasch
John Pallasch brings 25 years of public and government service. He runs outreach and fundraising for the team. He understands systems that help people and he understands what it means to stand beside the people who served.
Steve Robinson
Steve Robinson spent 25 years as a Federal Aviation Administration controller. He handles boat mechanics and systems. The work nobody sees that keeps everyone alive.
What Is the World’s Toughest Row?
The World’s Toughest Row is an ocean rowing race series run by Atlantic Campaigns. The 2026 Pacific edition is 2,800 miles of open water between Monterey and Kauai. Competitors row race-class ocean boats with no outside assistance, no resupply, and no rescue unless conditions become life-threatening.
For context: a previous team in this competition series had their boat, the Woobie, hit by a 30-foot swell in the Atlantic. It sank. The crew spent 22 hours on a punctured life raft before a cargo ship pulled them out of the water. The boat washed ashore in France weeks later.
These men know the water they are getting into.
Why Veteran Suicide? Why Now?
Ian Pienik has buried soldiers. He is not rowing the Pacific because it sounds meaningful. He is rowing because he has watched men he served with lose the fight after they came home, and he is not willing to accept that as inevitable.
The numbers behind this mission:
2.1 million US veterans live with one or more mental health challenges as of 2023
15.3 percent of veterans experience PTSD, depression, or substance abuse
44 per day die by suicide or overdose, a rate 52.3 percent higher than non-veterans
The team’s core message is not complicated: get people through the moment. Not a policy framework, or an awareness campaign that asks nothing of anyone. It’s the intervention, the phone call, the person who shows up before the crisis becomes permanent.
If you can get someone through the acute moment, the odds of survival climb sharply. That is what the money funds. That is the mission.
What Charities Does Foar the Brave Support?
All proceeds above race operational costs go directly to organizations the team has vetted:
The team is also finalizing a partnership with a Cleveland, Ohio-based organization that works specifically with homeless veterans. A population that accounts for a significant portion of the undercounted suicide toll.
The Race Timeline
The 2026 World’s Toughest Row Pacific puts the crew at sea during some of the most significant dates on the American calendar.
June 6 — Race start, Monterey, CA
June 14 — Flag Day
June 21 — Father’s Day. Four men who are fathers, mid-ocean.
July 2 — Halfway point
July 4 — Independence Day, 250th anniversary of the United States
July 12 — Final stretch
July 17-22 — Estimated arrival window, Hanalei Bay, Kauai
Track the boat live during the race using the YB Races app. Real-time position, stroke by stroke.
How to Support Team Foar the Brave
The team needs partners. That word is deliberate. This is not a tip jar. There are structured sponsorship tiers with real deliverables, because every business that backs this mission should get something back beyond a good feeling.
Major Sponsorship Tiers
Level
Amount
Key Benefits
Elite Title
$100,000
Full-length boat logo, lifetime website placement, elite social media coverage, Fourth of July event video, signed race-used oar
Gold
$50,000
Half-length boat logo, Father’s Day video, signed oar, social media package
Silver
$25,000
Quarter-length boat logo, team video, social media features, signed oar
Commodore
$10,000
Prominent boat logo, speaking opportunity at fundraising events, team photo
Captain
$5,000
Prominent boat logo, social media features, merchandise package
Navigator
$3,000
Boat logo, event acknowledgment, live race social shoutouts
Bosun
$1,500
Logo placement, social media post, live race shoutouts, merch
Ambassador
$500-$1,000
Live race shoutouts, merchandise package
In-Kind Equipment Needs
The team has specific gear requirements with dollar values assigned. If you make or distribute any of the following, this is your opening:
Rowing seats: $15,000
Racing gear: $12,000
Food for the crossing: $10,000
Oars: $8,000
Comms and GPS: $5,000
Solar power: $3,000
For food specifically, the team needs 65 days of provisions at 6,000 calories per man per day. If you are a nutrition or outdoor food brand and want your product featured in editorial coverage of this event, this is the conversation to start.
The Boat: Why “Overwatch”?
In military doctrine, overwatch means someone is holding the flank. They are positioned, alert, and ready to intervene when the threat comes from a direction no one else is watching.
The veterans dying every day are not failing. They are fighting without backup. Nobody is on overwatch. The team named the boat to make that point explicit. The mission is not observation. It is intervention.
In August of 2024 Naugatuck Valley in Connecticut was hit with an unexpected storm that dumped over 16 inches of rain into the region over an 8-hour period. The rivers and streams in the region were unable to handle the massive increase in water and quickly overwhelmed drainage infrastructure that ultimately destroyed roads, bridges, buildings, and utility infrastructure. I was fortunate enough to live in a high point that was not impacted by flooding, but the rising water had cut off my access to resources for several days until the water receded – fortunately my family was prepared with a home emergency kit to provide the supplies we needed!
Why you Need a Home Emergency Kit
This storm is just one example of weather-related disasters that are becoming more common around the world, wreaking havoc on communities and slowing down the flow of supplies globally. Beyond natural disasters – war civil unrest, and economic uncertainty have also impacted our fragile supply chain.
Depending on where you live the likelihood of certain types of emergencies may be increased. Urban areas have a higher incidence of civil unrest and rural areas are often hit harder by supply disruptions. Certain regions have been plagued by wildfires while others experience hurricanes and tornados.
Understanding the threats in your area will clearly demonstrate the need to create a home emergency kit – but even if you live in an area that has a lower risk freak occurrences can happen just like they din in Connecticut in 2024.
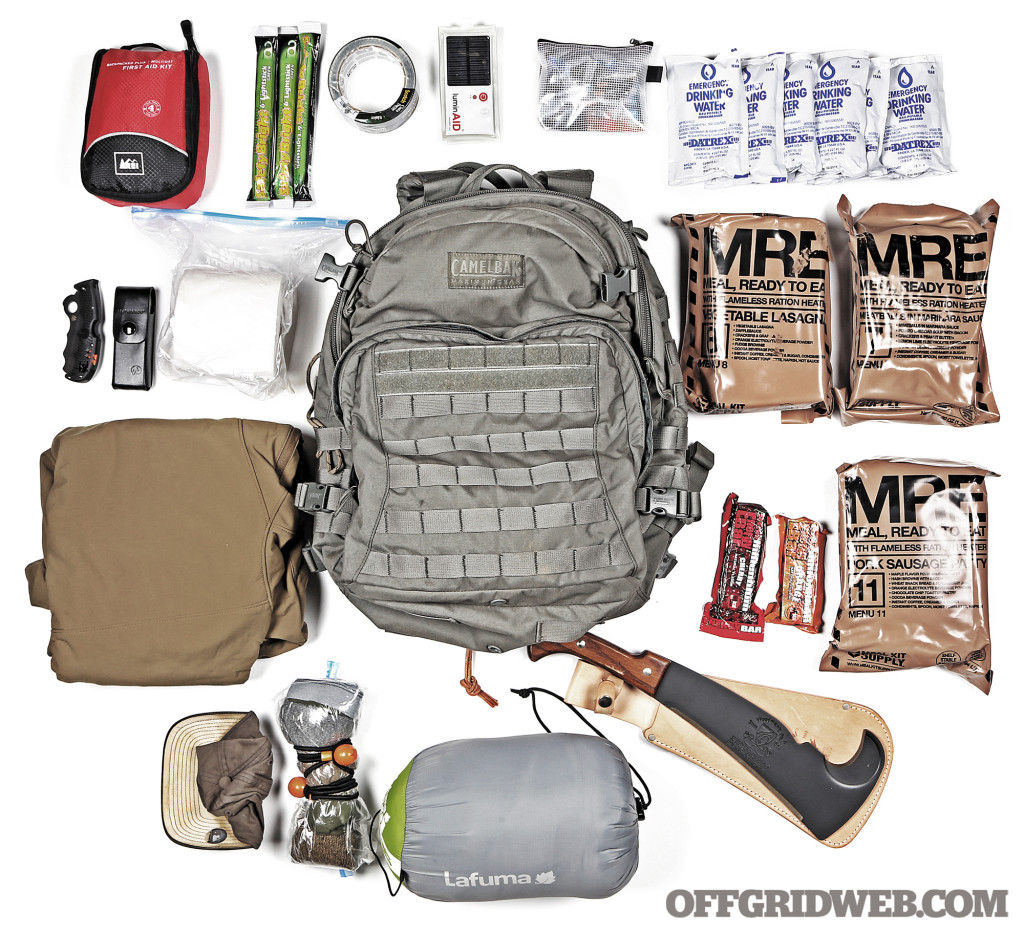
Home Emergency Kit vs Bug Out Bag
Both a home emergency kit and a bug out bag are designed to provide 72 hours’ worth of supplies in an emergency – but they are not one in the same!
Bug Out Bag: Minimalist emergency supplies while you are evacuating.
Home Emergency Kit: Comprehensive supplies for sheltering in place.
Your home emergency kit should do more than just provide the basics – it should be a kit that allows you to continue life in as comfortable way as possible for a short time.
Your Home emergency kit and your bug out bag are two pieces to your survival puzzle. Having your home emergency kit will give you the items you need to continue to live in your home and your bug out bag should be ready to go at a moments notice should evacuation be required
How to Build the Perfect Home Emergency Kit
The first step in building your home emergency kit is evaluating your household, ensuring you have enough supplies for all the members of your home and ensure any special needs are accounted for.
Common specialty needs include:
Baby Supplies: Food, diapers, etc.
Specific Medication and Equipment: Prescriptions, common over the counter medicines for specific medical issues, durable medical equipment.
Pet Supplies: Pet food, litter, medicine, etc.
Child Entertainment: Non-electronic games, books, coloring supplies, playing cards etc.
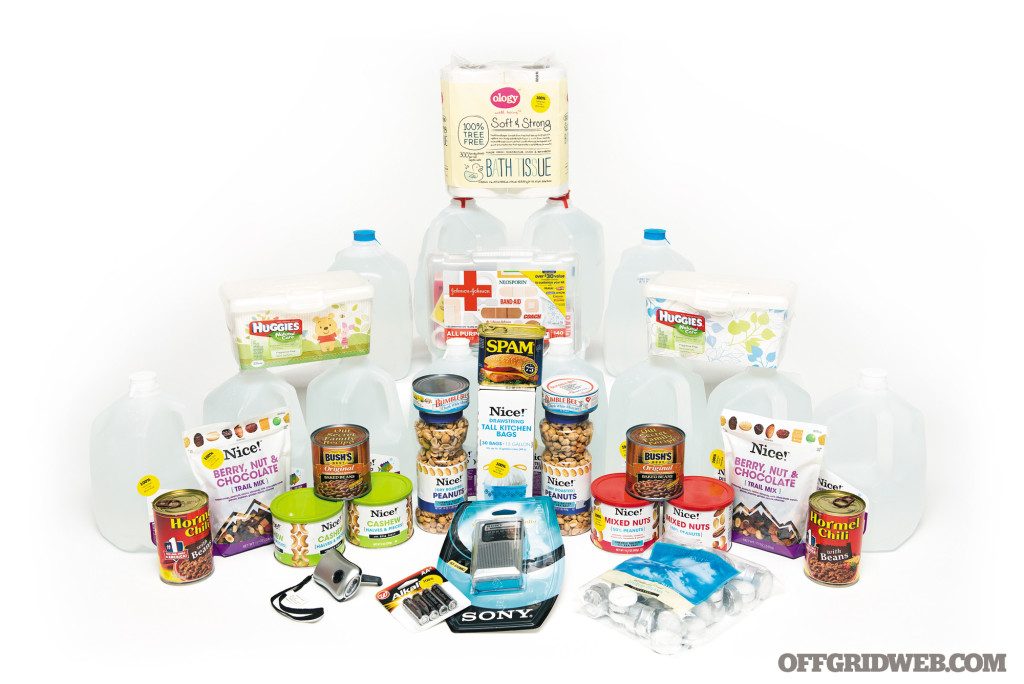
The second step is storage planning. Many emergency supplies should be kept in an easily accessible location that is protected from the elements. Watertight containers are a good option for home emergency kits that are being stored in a shed or garage.
Once your plan is in place it is time to obtain your supplies the following section contains a basic supply list, this should be combined with whatever specialty supplies your family needs to create your 72 hour home emergency kit.
Essential Items for Your Home Emergency Kit
Water & Food (72-Hour Minimum)
Water: 1 gallon per person per day
Non-perishable food, manual can opener
Infant formula, pet food (if applicable)
First Aid & Health
Comprehensive first aid kit
Prescription medications (extra supply)
Over-the-counter medicines, sanitation items
Tools & Lighting
Flashlights, extra batteries, hand-crank radio
Multi-tool, duct tape, plastic sheeting
Power bank, solar charger
Communication & Documents
Emergency contact list
Copies of important documents (IDs, insurance, medical records) in waterproof bag
Battery-powered or hand-crank radio
Warmth & Shelter
Blankets, sleeping bags, emergency mylar blankets
Extra clothing and sturdy shoes
Hygiene & Sanitation
Toilet paper, moist towelettes, garbage bags
Hand sanitizer, soap, feminine products
Cash & Miscellaneous
Small bills and coins
Local maps, whistles, dust masks
Home Emergency Kit Maintenance & Storage Tips
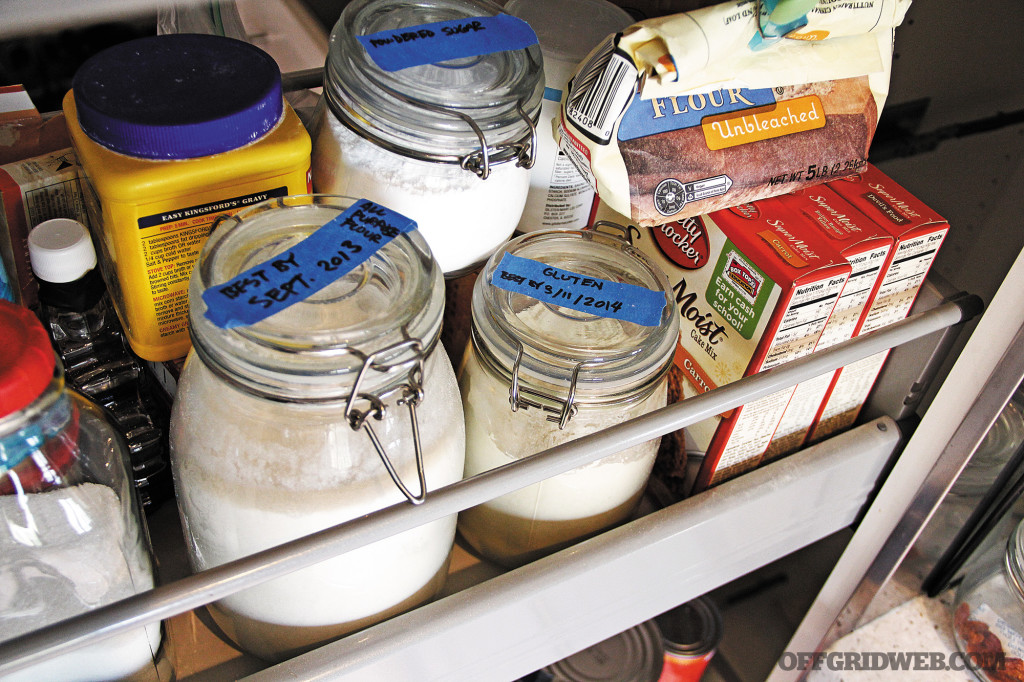
Ideally most of the items in your home emergency kit should be durable and long lasting, however you will still need to actively maintain your kit to ensure functionality should disaster strike.
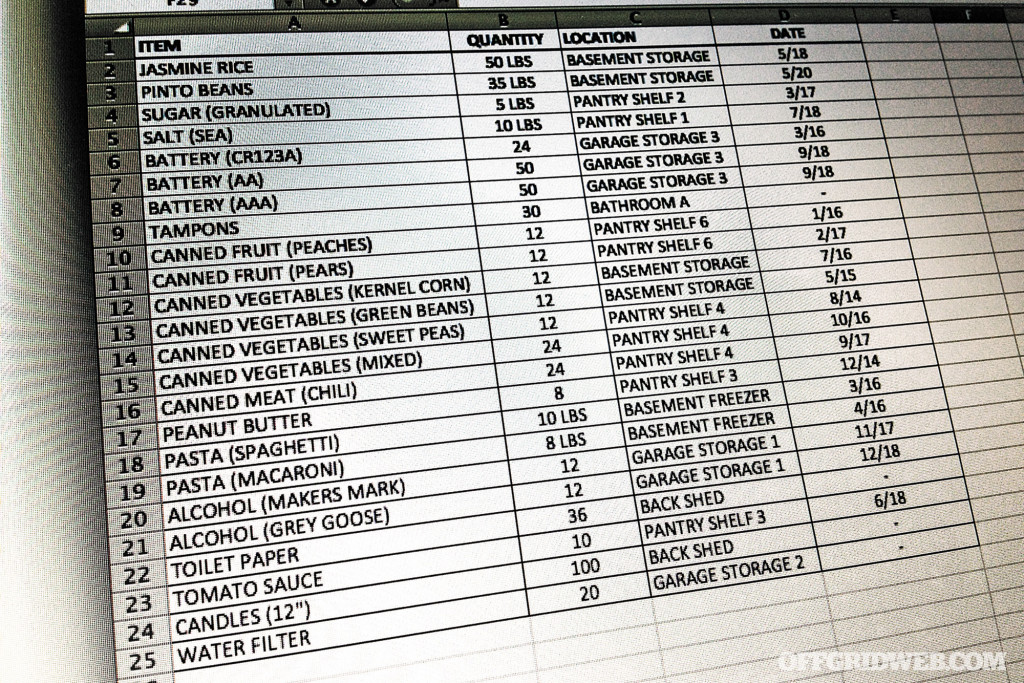
Food and Medicine Expiration: Both food and medicine can expire while some may be usable after the date other items will be unsafe if used beyond expiration. Making a list of expiration dates and reviewing regularly can aid in ensuring your kit is up to date.
Electronics Charging: Battery packs, loose batteries, and electronics all lose charge over time. Power banks and rechargeable electronics should be topped off every 3 months to ensure they are at full capacity. Traditional batteries have expiration dates that should be rotated out and replaced.
Storage and Security: When space allows your kit should be kept inside your home in an easily accessible area to avoid damage from the elements or increased likelihood of theft in an unsecured shed or garage.
Going Beyond The Basics
This guide provides the basics for 72-hour home emergency kit – but upgrading your kit for long term emergencies can be helpful. Adding more supplies and more advanced equipment can help prepare for long-term events. We will update the resources section of this article periodically to help those who wish to build a more comprehensive long-term home emergency kit.
FAQ
What should be in a home emergency kit for 2026?
A complete home emergency kit should cover at least 72 hours of self-sufficiency while sheltering in place. Key categories include: Water & Food: 1 gallon of water per person per day, non-perishable food, and a manual can opener (plus infant formula or pet food if needed). First Aid & Health: A comprehensive first aid kit, prescription medications, over-the-counter medicines, and sanitation supplies. Tools & Lighting: Flashlights, extra batteries, hand-crank radio, multi-tool, duct tape, power bank, and solar charger. Warmth & Shelter: Blankets, sleeping bags, extra clothing, and sturdy shoes. Hygiene & Documents: Toilet paper, hand sanitizer, copies of important documents (IDs, insurance, medical records) in a waterproof bag, emergency contact list, and cash in small bills. Customize the kit based on your household’s unique needs, such as baby supplies, pet items, or medical equipment.
How do you build a home emergency kit step by step?
Building an effective home emergency kit in 2026 involves three main steps: Evaluate your household — Consider the number of people, ages, pets, and any special needs (medical conditions, infants, or disabilities). Plan storage — Choose an easily accessible location protected from the elements, using watertight containers if storing in a garage or shed. Gather supplies — Start with the basic 72-hour list (water, food, first aid, lighting, etc.) and add personalized items. The kit complements a bug out bag for evacuation scenarios and should be reviewed regularly. Focus on comfort during sheltering in place rather than minimalism.
What is the difference between a home emergency kit and a bug out bag?
A home emergency kit is designed for sheltering in place at your residence during disasters like storms, floods, or power outages. It is more comprehensive, allowing your family to live relatively comfortably for 72+ hours with bulkier items like extra blankets and full food supplies. A bug out bag, by contrast, is a minimalist, portable pack for quick evacuation when you must leave home. It focuses on mobility with lightweight essentials. The article recommends building both as complementary parts of your overall preparedness strategy.
How often should you update or maintain your home emergency kit?
Check and maintain your home emergency kit at least every 6 months, or quarterly for electronics. Key maintenance tips include: Rotate or replace expired food, water, and medications. Test and recharge power banks, flashlights, and solar chargers. Replace batteries according to expiration dates. Review and update important documents and emergency contact lists. Adjust supplies as your household changes (e.g., new baby or growing children). Regular upkeep ensures everything works when you need it most, especially amid increasing weather events and supply chain risks.
How do you customize a home emergency kit for your family?
Customization starts with assessing your specific household: Infants: Add formula, diapers, bottles, and baby wipes. Pets: Include pet food, water, medications, litter, and a carrier. Medical needs: Stock extra prescriptions, specialized equipment, and relevant over-the-counter remedies. Children: Pack non-electronic entertainment like books, games, or coloring supplies to reduce stress. Location-specific risks: Add items for local threats (e.g., dust masks for wildfires or extra warmth for winter storms). Combine the article’s basic supply list with these specialty items to create a tailored kit that fits your family’s size, health, and environment
Gahagan Customs is owned by Kyle Gahagan an ABS Journeyman Smith, US Army Veteran, and lifelong outdoorsman. Gahagan’s passion for knife making took root in his youth where he would shape various materials into functional tools and began to train with knife makers to hone his skills. Years later after serving in Afghanistan and Iraq with the US Army’s 1st Ranger Battalion Gahagan settled in North Carolina with his wife and rekindled his knife making hobby in his garage. What started as a hobby became a full-time business that is Gahagan Customs. In addition to running his own knife business, Gahagan founded Resilience Forge, an organization that helps provide community and a sense of purpose for Veterans through learning the skills to shape metal into functional tools.
Gahagan’s fixed blade designs are versatile covering compact everyday carry designs, robust outdoor knives, and functional tactical knives. Regardless of which style you are looking for Gahagan’s life experience and passion for thoughtful and functional designs is evident in every knife he makes. Gahagan design ethos is centered in making knives that fist a specific need or solves a problem the person carrying it may have – Gahagan’s Warrior Edge Series is a definitive product of his design ideals. The Warrior Edge Series currently has three models with common design elements.
Ground Branch Tactical Knife
Gahagan designed The Ground Branch Tactical Knife (GBT) in collaboration with Jospeh Teti a Special Operations Veteran with over 20 years of professional experience. One look at the GBT and it is evident that this knife was designed as a functional tactical knife for military and law enforcement use. The GBT comes in at 10 inches over all with 4.76-inch blade finding functional in-between size a compact EDC knife and a full-sized field knife. Though smaller and lighter when compared to a typical field knife the GBT packs many of the same combat and utility features found in its larger counter parts.
The GBT is made from a single piece of .16-inch 80CRV2 high carbon steel ensuring durability in hard use or high stress tasks. The blade offers plenty of functional cutting edge and the blade tip and top swedge ensure optimal piercing performance. The top of the blade offers a serrated portion that can be used to cut through fibrous materials including rope and seatbelts if needed. Behind the serrated area is a nice sized “thumb ramp” that can be used to provide control when performing more detailed tasks. The rear portion of the blade offers guards on both the top and the bottom to ensure your hand isn’t accidentally slipping onto the blade during use.
The handle is contoured and features textured micarta handles ensuring durability and grip even when wet. The rear of the hand offers a textured striking area that doubles as a retention point in some grip styles. The contoured handle feels good in the hand with or without gloves.
The kydex sheath has excellent retention but provides a smooth draw. The sheath offers a textured area that allows you to push your thumb down on making blade draw easier and serves as a reminder that that is the top of the blade, so you know exactly where your edge is when unsheathing the knife. The Sheath is configured to accept numerous attachment point options that allow versatility in carry style.
Spec Sheet
Overall Length: 10″
Blade Length: 4.76″
Blade Thickness: .16″
Overall Weight: 6.49 oz
Blade Steel: 80CRV2
Handle Material: Canvas Micarta
Sheath: Black Retention Sheath
Manufactured: Made in the USA
Combat Applications Group Knife
The Combat Applications Group Knife retains many of the features that make the GBT shine with some distinctive design changes. The CAG comes in at 10.5 inches overall and features a 5 3/8th inch Wharncliffe blade.
Wharncliffe style blades provide a straight cutting edge and a fine tip. The Wharncliffe fine tip allows for more precise cutting in detailed applications and has excellent piercing capabilities. The sloping of the Wharncliffe blade provides some tip reinforcement combined with tough 80CRV2 steel makes it durable for tactical applications. The straight edge of the Wharncliffe may not be ideal for angled slicing tasks or processing game, it does perform very well for cutting, carving, and slicing on flat surfaces. The straight edge is also easier to sharpen compared to blades with a prominent belly.
In addition to the longer Wharncliffe blade the CAG also offers a few more handle material options including a variety of micarta and G10 colors. Like the GBT, the CAB knife has serrations on the spine, blade guards, textured striking surface on the handle, and a versatile kydex sheath.
Spec Sheet
Overall Length: 10.5″
Blade Length: 5 3/8″
Blade Thickness: .165″
Overall Weight: 6.5 oz
Blade Steel: 80CRV2
Handle Material: Canvas Micarta or G10
Sheath: Black Retention Sheath
Manufactured: Made in the USA
Regimental Reconnaissance Company Knife
The Regimental Reconnaissance Company Knife (RCC) comes in at the same overall size as the GBT knife at 10 inches overall – the major difference is the RCC’s 5-inch tanto blade. The tanto provides an incredibly durable tip for piercing tasks and a strong angular blade. Tanto-style blades are almost exclusively used on tactical knives for their durability. Beyond combat applications Tanto blades can provide a host of utility functions. Tanto’s perform well in scraping and digging tasks. The reinforced tip can pierce hard or dense materials while reducing the likelihood of major blade damage this can include cans and car doors. The secondary edge is helpful in detail work and like the Wharncliffe tanto’s perform well in flat surface cutting. Best practices will tell you not to use a knife as a pry bar, but in a pinch, I’d use a tanto blade over other blade styles. The Tanto blade angles are also easy to sharpen in the field.
All the benefits to the tanto’s blade style are further enhanced by Gahagan’s use of tough 80CRV2 steel. Like the other knives in the Warriors Edge series the RCC has the blade guards, textured strike surface, textured handle scales, partially serrated spine, and versatile sheath.
Spec Sheet
Overall Length: 10″
Blade Length: 5″
Blade Thickness: .165″
Overall Weight: 6.62 oz
Blade Steel: 80CRV2
Handle Material: Canvas Micarta or G10
Sheath: Black Retention Sheath
Manufactured: Made in the USA
Final Thoughts
Gahagan’s Warriors Edge series offers the versatility of a full-sized tactical field knife in an easier to carry package. Ranging from 10 to 10.5 overall inches, none of these knives can be considered small but their slim design makes them easier to conceal if needed. The thick blade stock, durable 80CRV2 steel, and well thought feature set provides enough functionality to make any knife if the Warriors Edge series an excellent addition to your chest rig or plate carrier.
Each model in the series has its merits and choosing the right one for you truly depends on how you plan to use it. The GBT is likely the best choice for someone looking for a larger EDC fixed blade that can be used in the widest variety of situations. The CAG’s added half inch really makes the knife feel much larger and is a good option if you are looking for something that is closing in on the full-sized range. If hard use durability is what you are looking for the RCC and its strong tanto blade style will be a good option.
No matter which knife in the Warriors Edge Series you end up choosing you will have a versatile and durable tool designed by people who have seen some of the world’s harshest and most hostile environments – and these knives are built to get through it!
There is a long and storied connection between warfighters and their watches. The regimented precision of military life, and of modern combat operations, dictates that most everyone on the battlefield be aware of the time at all times. Some watch brands have become accidentally synonymous with certain men, missions, or units. Others exist specifically because of this lineage. Praesidus Watch Co, whose is derived from the Latin word for “protector” was established in 2019 with the specific goal of producing rugged, unpretentious field watches to replicate or commemorate service members throughout history.
Last year, on the 80th anniversary of the battle of Iwo Jima, they released a watch as tribute to that historic battle. This year, they have expanded on the theme with their latest release – the Pacific Front watch. Instead of focusing on a single battle, the Pacific Front pays homage to the “Island Hopping” campaign undertaken by US forces in the wake of the Pearl Harbor attacks. Dates and locations are subtly but clearly displayed on the dial, along with a map-like path of progression. The dial is also embedded with real black volcanic sand taken directly from Iwo Jima.
But this is not strictly a showpiece. Built on the proportions of the original A-11 Field Watch—itself an iconic World War II timepiece—the Pacific Front uses double-domed K1 mineral crystal glass with Sapphire and anti-reflective coating, and sports 10ATM water resistance. The movement is an Ameriquartz 6130. A 20mm rubber strap is mated to the 38mm case that’s just over 13mm thick. Overall, the Pacific Front presents as a compact, lightweight package that keeps time without being burdened by extraneous features.
Our team wore the Pacific Front on several range days and a field training excursions—including a two-day man tracking course with Greenside Training—finding it to be unobtrusive and convenient with a barely-there feel that provided a notable sense of relief from feed-stream of data coming out of our larger more tactical smart watches. Even the packaging is understated, elegant, and befitting of a wearable war memorial. The Pacific Front watch is available in several band and color configurations, including the volcanic orange (sometimes also known as Higgins orange) shown here. At $320 MSRP, this horological historical tribute is priced to fit most budgets while still presenting a thoughtfully executed narrative of not one battle, but an entire strategic campaign.
Purchase yours here, direct from Praesidus Watch Co.
Survival skills are essential in uncertain times. Prepping ensures that you and your family can handle emergencies with confidence. This emergency preparedness guide explores survival prepping basics such as urban survival, wilderness survival, and general emergency preparedness. This is more then a prepping for beginners guide, it is a compressive prepping checklist to get you started! You’ll discover practical advice, tools, and training to build your emergency preparedness skills and readiness.
Q: But aren’t Preppers Crazy?! A: No! Why: Sadly, the media has done a great job connecting the term “prepping” with those on the fringes who go over the top and make them look insane for doing so.
Disclaimer: Ask anyone who has taken a trip down the rabbit hole of survival and emergency preparedness “what is the best way to start prepping?”, and most likely you find the answer to be, “it depends.” The truth about prepping is: there is no single best way to do it!
Since no two people are experiencing the exact same life circumstances, we can not expect how we prepare for the unknown to be the same. If that sounds potentially overwhelming, do not despair, here are very similar places to start! When you boil prepping down to things that are necessary to live, what you arrive at is a handful of basics at which most people can start.
– Water (1 gallon per person per day) – Non-perishable food for 3 days – First aid kit – Flashlights with extra batteries – Multi-tool and duct tape – Emergency blankets
NOTE: This table is only A way to build a prepping foundation, not THE way. Everyone’s preparedness journey is unique, individualized and highly situationally dependent.
To those who are new to prepping and need a quick prepping for beginners guide (or maybe you want a refresher), this section provides a concise survival prepping basics to help you build your foundation. Follow these steps to begin preparing for emergencies effectively and efficiently.
To build a solid foundation, you must The first step on your prepping checklist is to make sure you’re in a good place, physically, mentally and financially.
Survival Prepping Basics
Take Care of Yourself First! Your physical and mental health is at the top of your survival prepping checklist. If everything was taken away from you in an instant, you’d be left with the physical state of your body, and the mental resilience of your mind. If you do not feel comfortable with this knowledge, it may indicate that you need to prioritize self-care before thinking about bug out bags and survival rifles.
Physical Preps: Get a physical exam done by a doctor if you haven’t recently had one. This is a crucial step since it will help identify if you are healthy enough for more rigorous training. It may even uncover any underlying health conditions you need to be aware of. Once you get the green light from the Doc, start training so you can physically handle adversities! Don’t know where to start? Check out this intro to Fitness Basics from Mayo Clinic.
Dental Preps: Oral Health is often overlooked in Emergency preparedness guides. We take this one for granted these days, but nothing gets in the way of daily activities like the agonizing pain of a toothache. See a dentist and get any problems taken care of so you don’t have to worry about them later. Here is a helpful guide in case you might need a dental hygiene refresher.
Mental Preps: This is more important than anything else! Being able to carry a loved one to safety, or moving from point A to point B with all your gear without getting winded means nothing if you do not have the mental fortitude to do so. The will to live is a powerful thing, and has successfully guided people through the most horrific survival scenarios. If mental health is something you struggle with, work on building that resiliency, or get the help you need from a medical provider. There are a ton of resources out there on the subject, but this article from Stanford about Mental Health Hygiene might be a good place to start!
Financial Preps: Many emergency preparedness guides forget to discuss the importance of finances. Taking care of your finances is an essential aspect of your prepping checklist because it ensures you have the resources to handle emergencies, adapt to unforeseen circumstances, and invest in long-term resilience. Although it may seem overwhelming at first, Financial Education is easily self-taught and pays dividends (pun intended).
A solid financial foundation allows you to acquire necessary gear, build a well-stocked emergency fund, and secure insurance for potential risks. It also provides the flexibility to relocate or respond quickly to a crisis without being burdened by debt or financial instability.
By managing your money wisely, you gain peace of mind, reduce stress during emergencies, and empower yourself to focus on survival strategies rather than scrambling for resources when they’re most needed.
Create a Basic Emergency Kit The next item on your survival prepping check list is your basic emergency kit. Making a basic emergency kit is a cornerstone of preparedness, providing the tools and supplies needed to respond to unexpected situations effectively. A well-stocked kit ensures you have access to essential items like water, food, first aid supplies, and communication tools when normal resources are disrupted.
Whether facing natural disasters, power outages, or sudden evacuations, an emergency kit gives you the ability to maintain safety and self-sufficiency for at least 72 hours. It also reduces stress during crises, allowing you to focus on critical decisions rather than scrambling to gather supplies.
A basic kit is not just a collection of items—it’s a proactive step toward protecting yourself and your loved ones when it matters most. Try to assemble the following items:
Water: At least one gallon per person per day for three days.
Food: Non-perishable, easy to prepare meals for three days.
First Aid: A comprehensive first aid kit with bandages, antiseptics, and medications.
Lighting: Flashlights with extra batteries or solar-powered options.
Tools: Multi-tool, duct tape, and a whistle for signaling.
Shelter: Emergency blankets or a lightweight tarp.
Develop an Emergency Plan Having a plan in place is vital part of your survival prepping basics. Developing an emergency plan is critical because it provides a clear roadmap for how to respond during a crisis, reducing panic and confusion when time is of the essence. A well-thought-out plan helps ensure that everyone in your household knows their roles, communication methods, and safe meeting points in case of separation.
It also prepares you to navigate specific challenges like evacuations, power outages, or medical emergencies. By identifying potential risks and creating actionable steps ahead of time, an emergency plan increases your ability to protect yourself and your loved ones, minimizes delays in decision-making, and boosts your overall resilience when faced with the unexpected. Some things to consider are:
Contact Information: List emergency contacts and share them with all family members.
Evacuation Routes: Identify exits from your home and alternate routes in your area.
Meeting Points: Set up two locations where everyone can regroup, one near your home and one farther away.
Communication: Use text messages or apps like Zello for communication during outages.
Learn Essential Survival Skills Any good emergency preparedness guide will emphasize the importance of skills! Developing practical survival abilities is vital because it equips you with the knowledge and confidence to adapt and thrive in challenging situations, even when resources are scarce or unavailable.
Skills like building a shelter, purifying water, starting a fire, and navigating without GPS can mean the difference between safety and danger in emergencies. Beyond physical survival, these abilities foster self-reliance and reduce dependence on external systems, empowering you to take control when systems fail.
These capabilities also enhance problem-solving and decision-making, helping you stay calm and focused in high-pressure scenarios. Investing time in gaining these skills is not just practical—it’s an investment in your ability to face the unexpected with resilience and capability. Some essential survival skills to learn are:
Fire-Starting: Practice using matches, lighters, and ferro rods.
Water Purification: Learn to use water filters, boiling, and purification tablets.
First Aid: Take a basic first aid and CPR course.
Navigation: Understand how to use a compass and read maps.
Helpful Resources for Fire, Water, First Aid, and Navigation
Stockpile Long-Term Supplies Supplies is often a priority in every prepping checklist. Building an appropriate stockpile of long-term supplies is crucial for maintaining self-sufficiency and resilience during extended emergencies or disruptions. As every household situation is different it is difficult for an emergency preparedness guide to tell you exactly what you need – however, a well-thought-out stockpile ensures access to essential items like non-perishable food, clean water, medical supplies, and hygiene products when normal supply chains are compromised.
It provides peace of mind, allowing you to focus on critical decisions without worrying about immediate necessities. Tailoring your stockpile to your household’s unique needs, including dietary restrictions or medical requirements, ensures that you are adequately prepared.
A carefully managed supply also reduces dependency on external assistance, giving you the flexibility to remain secure and comfortable, no matter how long a crisis lasts. Some important items to gather and store long-term are:
Food Storage: Invest in freeze-dried foods and MREs.
Water Storage: Store larger containers of water or install a rainwater collection system.
Energy Solutions: Have solar chargers, generators, or battery backups.
Defense Tools: Consider self-defense training and tools that fit your local laws.
Not too long ago, our ancestors took steps to avoid an early demise. It wasn’t called prepping back then, it was simply called living.
Prepping for Beginners: What Is Prepping?
Prepping involves planning and preparing for potential emergencies. This includes gathering supplies, learning survival techniques, and creating strategies to overcome challenges. Prepping helps individuals become more self-reliant in scenarios like power outages, natural disasters, or supply chain disruptions.
Books and Guides: Resources provide instructions on survival techniques and planning.
Plans: Prepping plans outline evacuation routes, communication methods, and resource management.
By addressing these elements, you can build a solid foundation for preparedness.
An emergency situation can strike at any time, with or without warning. What steps have you taken to ensure a successful outcome for you and your loved ones?
Survival Prepping Basics: Emergency Preparedness
Emergency preparedness is prepping for beginners 101 – it involves planning for large-scale disasters, such as hurricanes, earthquakes, or pandemics. It requires organization and attention to detail to reduce risks and ensure safety.
The prepping checklist below will cover the survival prepping basics for emergency preparedness.
Emergency Kits
72-Hour Kits: Include food, water, clothing, and basic tools for three days.
Vehicle Kits: Store jumper cables, flashlights, blankets, and a first aid kit in your car.
Home Supplies: Stock non-perishable food, water, and backup power sources.
Go Bags: Essential tools and equipment to sustain you in short term emergencies while on the go.
Planning for Disasters
Evacuation Plans: Know escape routes and have transportation ready.
Communication Plans: Establish ways to contact loved ones during outages.
Community Involvement: Work with neighbors to coordinate resources and information.
Preparedness allows you to respond to crises with confidence and efficiency.
Disasters are not relegated to wilderness areas. In fact, places with higher population densities will experience an exponential level of problems compared to their rural counterparts .
Survival Prepping Basics: Urban Survival
Urban survival focuses on navigating emergencies in densely populated areas. Challenges include limited resources, crowded spaces, and heightened security risks. While you may not live in a city urban survival is a must for any emergency preparedness guide – emergency situations can strike at any time not just at home!
The prepping checklist below will cover the survival prepping basics for urban survival.
Urban survival requires adaptability and knowledge to protect yourself and others.
Remote locations mean that help takes a long time to arrive. Help may not be available at all. What self-reliance skills do you posses to circumvent the need for outside assistance should the need arise?
Survival Prepping Basics: Wilderness Survival
Wilderness survival skills allow you to stay safe in natural environments. These skills are crucial for outdoor enthusiasts, hikers, and those seeking to be self-reliant in the wild. While not everyone spends time in the wilderness these skills are essential for an emergency preparedness guide as many wilderness skills such as foraging, fire building, and improvised medicine can apply in any environment.
The prepping checklist below will cover the survival prepping basics for wilderness survival below.
Prepping is a continuous process of learning and adapting. The next section of our emergency preparedness guide will focus on some deeper concepts to help you build an on going developmental prepping check list and take you beyond survival prepping basics.
Every season, climatic region, and ecosystem comes with its unique set of survival challenges.
Emergency Preparedness Guide: Seasonal Prepping and Survival Considerations
Most people do not live in areas where the weather and temperatures are uniform all year long. When looking at survival situations and how we can best prepare for them we must take into account seasonal temperatures and weather conditions. The prepping checklist below will cover the survival prepping basics for cold weather below.
Cold Weather Prepping and Survival
Winter brings frigid temperatures, snow, ice, and high winds to many areas. Cold temperatures and extreme weather makes any survival situation much more challenging.
Having the right gear and skills to prepare for these conditions is vital.
Cold Weather Hazards
Hypothermia: Prolonged exposure to cold temperatures without adequate protection can cause hypothermia, a dangerous condition where the body loses heat faster than it can produce it.
Frostnip: Early exposure to cold can cause frostnip, a mild form of frostbite that temporarily affects the skin without causing permanent damage.
Frostbite: Prolonged exposure to freezing temperatures can cause frostbite, a condition where skin and underlying tissues freeze, leading to potential tissue damage.
Chilblain: Repeated exposure to cold, damp conditions can cause chilblain, a condition where small blood vessels in the skin become inflamed, leading to redness, itching, and swelling.
Immersion Foot: Prolonged exposure to cold, wet environments without proper drying can cause immersion foot, a condition that results in numbness, swelling, and tissue damage in the feet.
Trench foot: Prolonged exposure to cold, wet conditions can cause trench foot, a serious condition where the feet lose circulation, leading to tissue damage and potential infection.
Road Hazards: Poor or dangerous road conditions caused by snow, ice, and downed trees.
Cold Weather Survival Gear and Skills
Winter Go Bag: A easy to carry bag with all you need to survive the cold for 24 hours.
Winter Car Emergency Kit: A survival kit to keep you and your vehicle running in winter driving emergencies
Cold Weather Clothing and Outerwear: Having the proper clothing, outerwear, and footwear to protect you from the elements.
Adapting to cold weather is not impossible. Humans have learned to exist in arctic regions long before power grids, climate control, or synthetic fibers.
Hot Weather Prepping and Survival
Summer brings high heat in many areas. Some locations experience increased humidity while others may experience draught. In either case these conditions increase the strain on our bodies. Summer can also bring its fair share of extreme weather. Understanding the effect of heat on the human body and how to handle heat and weather emergencies will provide a leg up in survival situations occurring in the warmer months.
The prepping checklist below will cover the survival prepping basics for hot weather below.
Hot Weather Hazards
Dehydration: A lack of sufficient water intake or excessive fluid loss leads to dehydration, causing the body to struggle with normal functions like regulating temperature and maintaining energy.
Hyperthermia: Prolonged exposure to high temperatures can cause hyperthermia, a condition where the body absorbs more heat than it can dissipate, leading to dangerously elevated body temperature.
Heat Cramps: Muscle spasms caused by intense physical activity in hot conditions are known as heat cramps, often resulting from dehydration and electrolyte loss.
Heat Exhaustion: Prolonged exposure to high temperatures combined with dehydration can lead to heat exhaustion, a condition characterized by heavy sweating, weakness, and dizziness.
HeatStroke: When the body’s temperature regulation fails due to prolonged heat exposure, heat stroke occurs, causing a dangerously high body temperature that requires immediate medical attention.
On the other end of the temperature extreme, hot weather prevents your body from cooling. and can lead to fatal injuries. (Photo: Flickr.com/ruba)
Emergency Preparedness Guide FAQ
Q: What is the meaning of prepping?
A: Prepping is a proactive approach to ensuring personal safety, well-being, and self-reliance in the face of emergencies, disasters, or unexpected disruptions. It involves gathering essential supplies, learning survival skills, and creating plans to handle situations that could threaten basic needs like food, water, shelter, and security. Prepping isn’t about panic or paranoia—it’s about being ready to face life’s uncertainties with confidence and resilience. From natural disasters to power outages or economic hardships, preppers focus on minimizing risk and maximizing their ability to adapt to whatever comes their way.
Q: Is it “prepping” or “preparing”?
A: Both terms refer to getting ready for future challenges, but there’s a subtle difference in how they’re used. “Preparing” is a broad term that applies to any kind of readiness—getting ready for a trip, a test, or an event. “Prepping” specifically refers to getting ready for emergencies, disasters, or survival situations. Prepping often involves long-term planning and stockpiling essential supplies like food, water, medical gear, and learning practical skills to handle worst-case scenarios. So while all prepping is a form of preparing, not all preparing is considered prepping. Think of prepping as preparing for the unexpected, with a focus on self-reliance and resilience.
Q: What does “prepping” mean in slang?
A: In slang, “prepping” usually refers to getting ready for something specific—whether it’s a big event, an exam, or even a date. For example, someone might say, “I’m prepping for the weekend party” or “I’m prepping for finals.” It’s a casual way of saying you’re preparing for an upcoming situation. In a more niche context, “prepping” in slang often refers to survivalists getting ready for doomsday scenarios, natural disasters, or societal collapse. It’s shorthand for a lifestyle focused on readiness and self-sufficiency.
Q: What is prepping and survival?
A: Prepping and survival go hand in hand, but they aren’t exactly the same thing. Prepping focuses on getting ready before a disaster or emergency happens—stockpiling supplies, learning skills, and making plans to deal with anything from power outages to large-scale crises. Survival, on the other hand, is what happens during or after an emergency. It’s about using your knowledge, tools, and mindset to stay safe, secure essential resources like food and water, and make it through tough situations. Think of it this way: Prepping is what you do to get ready for the storm. Survival is what you do when you’re in the thick of it. Both require self-reliance, adaptability, and a calm, practical approach to problem-solving.
Final Thoughts
Prepping is about more than collecting supplies. It’s about building the skills and confidence to handle emergencies effectively. While our emergency preparedness guide will provide survival prepping basics, valuable survival prepping checklists it is just the beginning! Whether you focus on urban survival, wilderness skills, or emergency planning, the right tools and training can make all the difference. Start your journey today by creating a plan and assembling your gear. Your preparedness ensures safety and resilience for you and your loved ones.
This emergency preparedness guide is always growing and expanding! while it was initially designed to be a prepping for beginners guide it can serve even a seasoned prepper with helpful information valuable resources, and timely reminders – Check back often!
Oleoresin capsicum spray, commonly called OC spray or pepper spray, is an inflammatory agent that was originally designed to repel animals in the 1960s, using the natural inflammatory agents found in peppers. By the 1980s, federal agencies began adopting the OC spray as a nonlethal deterrent on humans, and law enforcement agencies adopted the use of OC spray a short time later. Today, pepper spray is widely available to the public and remains a popular self-defense tool throughout the United States due to its ease of use and low cost.
There are numerous pepper spray options on the market today, but few offer the innovative deployment tools and potent formulations found in Armament Systems and Procedures Defender line.
How Pepper Spray Works
Before diving into the ASP Defender line, let’s cover some pepper spray basics. The active ingredient in all pepper sprays is capsicum, a naturally occurring compound found in some varieties of hot peppers. Capsicum is an irritant and inflammatory agent that in high concentrations causes a burning sensation and swelling in the eyes, throat, and mucous membranes of the nose and mouth. Capsicum can also cause coughing, choking, and breathing difficulties.
To create pepper spray, the capsicum compound is extracted from peppers, combined with carrier liquids, and put into a pressurized canister that can be deployed.
Pepper Spray vs. Tear Gas
The term pepper spray is often mistakenly used interchangeably with mace but they are two different things:
Capsicum is a natural compound found in peppers that acts as both an irritant and an inflammatory agent.
Tear gas is an engineered chemical that only acts as an irritant.
In many cases, pepper spray has been shown to be far more effective than chemical-based sprays that do not produce the same inflammatory effect. This is particularly evident when being used against individuals who are under the influence of drugs or alcohol.
The ASP Defender Series Pepper Spray
Armaments Systems and Procedures, or ASP for short, has been committed to developing and producing reliable law enforcement equipment for decades. Their Defender line of pepper sprays is a testament to this mission — and has expanded into providing an exceptional nonlethal defense tool for civilians. The Defender series offers the Defender LE line, featuring traditional deployment options in a variety of standard-sized cans with several spray patterns. ASP’s innovative Metro Defender and Sport Defender models offer discreet everyday carry and an intuitive deployment method. Both deployment options offer the same high concentration formula.
ASP Pepper Spray Formulation
ASP pepper spray formulation contains 1.4 percent capsaicinoids as well as an invisible UV dye. Most pepper spray products have anywhere from 0.18 to 1.33 percent capsaicinoids, making the ASP formulation more potent than a majority of civilian and law enforcement OC sprays. The UV dye allows for easy identification of an assailant by law enforcement using an ultraviolet light.
ASP Defender LE
ASP’s Defender LE line is designed for law enforcement use that is offered in MK-3, MK-4, and MK-9 size options. The MK-3 and MK-4 deploy the spray using a push button situated on the top of the cannister, while the MK-9 option has a ballistic grip with pull pin safety.
All three sizes are offered in three different spray patterns:
Fog: Cone-shaped fog spray with a 15- to 18-foot range. Fog allows for less precise aim, covering a wider area, but is most susceptible to cross-contamination.
Gel: A heavier pinpoint spray with a 20- to 25-foot range that greatly reduces cross-contamination and sticks to the target better.
Stream: A liquid stream with a 20- to 25-foot range that’s benefits and drawbacks fall in between the gel and fog.
All sizes and spray varieties are offered in inert version to ensure safe use during practice or training activities.
ASP Metro Defender & Sport Defender
ASP’s Metro and Sport Defender series is built for discreet EDC carry for both off-duty law enforcement and civilians. Their innovative design makes carrying and using the spray as simple as possible.
Both the Metro and Sport Defenders are designed similar to a compact EDC flashlight — the main difference between the two option is the material.
The Metro is made from aerospace-grade aluminum, and the Sport is a durable polymer. While the Metro is the heavier of the two, it benefits from a superior machine textured grip, and it can double as a blunt striking weapon in a pinch. The Sport is a lighter option that can easily be attached to a key ring. Both options have strong steel pocket clips and brass actuators and can be attached to a key ring.
Both the Metro Defender and the Sport Defender are available in two different sizes; the D1 is 4.5 inches overall, and the D2 is 5.75 inches overall. Both versions and sizes come with the same high potency formulation found in the Defender LE Series.
Operating and Performance of the Metro and Sport Defender
At first glance, the Defender has a similar form factor to an EDC-sized flashlight, complete with a pocket clip for ease of carry. Much like a flashlight, the method of deploying the spray involves pressing a button on the top of the Defender’s body with the spray coming out the bottom.
This horizontal deployment is a major departure from traditional canister styles, allowing for a much more natural grip and use while in a defensive stance and easy single hand use. The safety latch sits just below the deployment button, and it disengages easily with a quick thumb flick, but is secure enough not to be accidentally flipped when carrying it.
When deployed, the Defender Spray produces a small mist-like cloud with roughly a 5-foot range. Depending on the size of the canister, you can expect 6 to 10 seconds of a fog spray with a roughly 5-foot range.
ASP Defender Decon
Rounding out ASP’s Defender pepper spray lineup is Defender Decon, which isn’t a pepper spray at all. It is a spray designed to reduce the effects of pepper spray and shorten the duration of its effects. The unfortunate reality of training with active pepper spray or using pepper spray in a self-defense scenario is cross-contamination being a common occurrence. The active ingredients in pepper sprays are oils, and they can be difficult to get off your skin for some time.
ASP’s Decon is designed to absorb the oils and lift them off your skin, which can provide relief in as little as 15 minutes as opposed to the hour-plus it may take for the effect to wear off on their own, making it a must-have for organizations and individuals who are working with pepper spray. Decon is available in the MK-4-sized canister for personal use or a 32-ounce spray bottle for group training activities.
Final Thoughts
ASP combines a potent formulation with versatile sizes and spray patterns to their Defender LE line that fit the specific needs of law enforcement agencies in several different scenarios. The inclusion of inert training units in all sizes and spray patterns in their lineup ensures training scenarios can be as true to life as possible.
The innovative Metro and Sport Defender provide the same powerful formulation in an easy-to-carry and simple-to-use platform that gives off-duty officers and civilians a viable nonlethal self-defense option. The reusable nature of the Sport and Metro Defender body makes them a cost-effective option, and the inclusion of inert inserts in the lineup allows civilians the opportunity to train properly with their self-defense tool.
The addition of Decon to ASP’s lineup adds a layer of protection to both law enforcement and civilians who may be using pepper spray and is a great addition to any medical or tactical kit.
As winter starts to break across the United States, comfort creeps back in and that’s when people get soft. Bitter cold and cutting winds have spent months trying to pin us indoors, numbing us with screens and convenience. This is when it is important to push back.
Late winter is where weaknesses show. It’s the proving ground for your body, your mindset, and your gear. Dust off your cold-weather kit, load your pack, and step into the elements. Go far enough to find the cracks where layers fail, where systems break down, and, most importantly, where you do. These lessons are imperative.
Hunters, campers, and anyone serious about self-reliance knows this truth: Readiness isn’t built in comfort. It’s forged in bad weather, heavy packs, and long miles when quitting feels easier than continuing. The work you put in now reduces the work you’ll have to do when conditions turn against you.
So, layer up. Cinch your straps. Shoulder the weight and move. Winter isn’t done yet and neither are you. Keep these simple truths in mind and you’ll go far.
NOTES Of all the bags I’ve slept in over the years, the Hamelin is easily added to my short list of favorites. A weight-efficient contour shape is exactly what you need if you flip from your side to your back as much as I do. After spending a solid week sleeping in the Hamelin trying the multitude of features, I’ve settled on a few favorites. Not only is there a full-length double slider zipper on the right side, but there is also a 1/4 zip on the left side. This means you can have an open footbox to allow for air flow to regulate
Temperature while still having an access point on the left to exit the bag. There are also snaps located in the collarbone region if you like your arms to be free. Simply run your zippers down to your liking and snap up to have freedom of movement.
NOTES Comfort is number one when it comes to footwear for long days on the trial or even a little jaunt to the deer blind. Meindl’s Comfort Hunter 400 is a mid-height boot at 9.25 inches with good ankle support as well as mobility, a wide toes box to accommodate movement, and a cork footbed that will mold to the user’s foot over time and miles logged. 400 grams of insulation may sound like a lot, but if you find yourself standing stationary or slowing down your toes will get cold in the snow rather quickly even with a good pair of wool socks.
The plus side is the Gore-Tex lining will keep your feet nice and dry. I’ve spent the last few weeks wearing the Comfort Fit Hunter 400s hunting in the woods of Michigan. They’ve been great, but the cold cuts the fun off early.
NOTES Demer made the right call choosing Pelican to house their system, considering they are crushproof, waterproof, and the most trusted polymer box brand on the market. At 94dB, Demer’s Bluetooth D2 pumps out serious sound. It’s not only the sound I find so appealing, but also the tone and bass are on par with other high-end portable speakers that are typically much larger.
The interior of the Demer can become a dry well with the use of the port plug as well as a charging station for phones and gadgets via a USB-C port. As we’re used to seeing with Pelican, this box comes with two ports to accept padlocks for securing your tunes. Available in 11 colors.
NOTES Knives of Alaska have been around for a long time, but the Alpha Wolf is my first touch point with them. I’ve field dressed two nice-sized deer with this one and have not yet found the need to sharpen the 3-inch MagnaCut blade. The thin blade glides through hide, muscle, fat, and connective tissue that lends confidence while working.
A full tang construction with black Suregrip scales fitted with brass pins and lanyard hole gives the Alpha Wolf a refined look. Scalloped-out finger grooves are not usually to my liking; however, Knives of Alaska did a great job on this model. No fixed blade is complete without a sheath, and this one is nicely done. Vegetable-tanned brown leather with a belt loop keeps your skinning knife at hand and ready for work.
NOTES It’s only getting colder here in the Midwest. My Pnuma Vintis Jacket has been getting a lot of use based on a few key features. One of my favorites is the Pnumablock to cut the wind and seal in the warmth without feeling like I’m wearing a tarp. Next is the Whisper-quiet microfleece outer to keep my sound signature low when stalking deer in the woods and fields.
Lastly is the cut of the jacket. I wouldn’t call this an athletic cut, but it is a bit more form fitting than what you may be used to, and I love it. Baggy coats make room for wind to swirl around, and that is a no-go for me. Best for mid to late season hunting, the Vintis Jacket also has pair of pants to complete the ensemble should you be so inclined to match your camo and comfort. I recommend you consider making it a set.
NOTES These may quickly turn into your favorite lightweight hunting, outdoors, or everyday pants. The XKG Acro Pants are loaded with features. Starting with four-way stretch material that moves with you to the low-profile streamlined zippered cargo pockets.
If you’ve spent any time in the field, you’ll know how irritating it is to have wind going up your back when you sit down. Built into the waistband of the Acro is a grippy section to help keep your shirt tucked in to keep out the draft. These are functional outdoor pants disguised as casual daily wear. Available in XK7 camo, charcoal, or dark khaki.
NOTES Coming to the table 30-percent lighter than other models of a comparable size is a considerable accomplishment. Not just lightweight and compact, but also incredibly rugged with a clear image, Zeiss developed a coating called LotuTech that is their permanent version of RainX on the lenses of Zeiss binoculars and spotting scopes to ensure a clear unhindered view in all weather and elevations.
The SmartFocus concept makes it possible to dial in your binos to infinity in 1.4 turns of the focusing wheel so you don’t miss that elusive bull elk or rare-to-see island scrub-jay. I found the SFL 8×50 accompanying me on my forays into the field more often than any other handheld optics I’ve got for these simple reasons: incredibly clear image and color differentiation, lightweight, and comfortable to use.
NOTES This system and way of hunting will change the way you see being in a tree. With a little imagination you can find ways to use your saddle setup for uses other than hunting. What if you need a mobile lookout post? Don’t have a drone, but need to survey the area? This is a very well-built system and is much safer and more stable than you may want to believe.
Think of this as an outdoorsman’s version of a lineman’s belt. Once you’re clipped in, it’s difficult to fall to the ground. No more dragging out your ladder stand and ratchet straps or coming out to see someone took your gear. I can be up a 15-foot tree, back down, and packed up in less than 20 minutes, and with practice, I think you can be faster than me.
NOTES No need to put this game camera away simply because hunting season is over. Not only is this a set-it-and-forget-it camera for game animals, but it’s also ideal for use as a security camera around out buildings, property lines, penned-in animals, and driveways. Moultrie’s Solar Edge has a 100-foot range, and all images will be caught in 40mp, video in 1080p, with a trigger time of 0.40 second.
Featuring the Turn and Tilt function, the Edge Solar opens up mounting possibilities by focusing your camera where you want it while aiming the solar panel where it needs to be. The built-in antenna pulls from all four main cell carriers in the USA and chooses the strongest signal in your area to keep you up to date on movement in your area.
NOTES As cool as it is to have a ballistic helmet, the odds are you can likely save your money and go with a high-quality bump helmet. The exception of course is going into harm’s way either as your profession or you spend an inordinate amount of time in training classes where it’s necessary to run a ballistic helmet. The Ops-Core FAST Bump Helmet may be the best on the market. Weighing in at only 1.02 pounds, the FAST offers protection from blunt-force trauma and features modularity based on the ARC Rails system, allowing you to mount up a headset and manage cables.
Helmets can get tiresome to wear over time. I’ve not found this to be the case with the FAST. I believe that is due to the light weight, Vented Lux Liner, and Head-Loc retention system. If you’re looking to protect your brain case, run your NODs, and be comfortable doing it might, I suggest the Ops-Core FAST Bump Helmet.
NOTES One of the items that appeared on my “Don’t go to the woods without …” list is a quality headlamp. Multiple light colors give you options when it comes to how much light you need depending on your task. At full power on white light, the Vizz 550 RGB throws light about 90 meters as opposed to the blue light that gets out to about 5 meters.
Running on your choice of either alkaline or lithium-ion, the Vizz 550 RGB takes three AAA batteries. I suggest lithium-ion, as they do better in the cold. With a lifetime warranty, this waterproof headlamp is sure to perform at a high level of satisfaction. I’ve spent a few hours under mine, walking the woods and gravel pits in my area. Available in black, multicam, olive darb, and tan.
NOTES Forscher collaborated with Ben Garwood, formerly of the British 22 SAS to devise a rugged and stylish 41mm Ronda Swiss 775 quartz-driven watch to keep you on mission, as well as on pace while covering ground or getting to meetings on time.
A subtle stencil font at the 3, 6, 9, and 12 o’clock positions quietly pays homage to Garwood’s military history, while other features like orange accents on the bezel and flat black dial make for an understated confidence in this timepiece. Water resistant to 200 meters, Garwood and Forscher designed the Patrol to withstand the toughest terrain in the harshest environments.
NOTES Regardless of the task, the Oakley Alpha Kit has you covered. Great for motorcycles, shooting sports, snowmobiles, or flinging yourself out of an airplane, the goggles have a hook Velcro strap to securely attach to the back of your bump or ballistic helmets.
You can even change the lenses to fit your specific needs. Also included in the kit are a set of Ballistic M Frame Alpha Arrays with gaskets. These are great when you want the protection of goggles but are running sans a helmet. This kit comes in a semi-rigid hard case to keep your eye protection policed up and in one place.
NOTES Keep heavily used items close at hand or anything your little heart desires in the Paladin 33 Mk4, and it will get the job done. This is the largest chest kit Paladin 33 has made to date — so much so that it has its own drag handle. Well, it’s really a carry handle, but you get the picture.
Being that the MK4 is constructed of Cordura, you’re not going to have to worry about rips, tears, or abrasions as you may with other materials. You can load your EDC pistol in the dedicated back pocket, tourniquet to the bottom, and other support gear to the large main pocket to have a robust EDC chest or hip carry kit.
NOTES Over the years, bino harnesses have proven to be an integral part of a good hunting or observation kit. Kifaru offers this Deluxe Bino Harness in small, medium, and large main pouch sizes, or buckets as they’re called in the community.
The Deluxe comes equipped with a range finder pocket and an additional accessory pouch. One-handed operation allows you to keep your eyes on the prize while retrieving your optics. It has an adjustable hood with two small pockets and a minimalist MOLLE field to add on additional gear such as navigation pouches. Available in three colors: Ranger green, multicam black and tan.
One Mile at a Time
Time in the field matters to me. The more time I spend outdoors, the better I feel and the more honest, nuanced feedback I can give on the gear I’m featuring. Experience sharpens opinions and gear earns its reputation one mile at a time.
The Meindl Comfort Hunter 400 boots have proven to be exactly that, comfortable and dependable. They’ve handled everything I’ve thrown at them and remain a solid option when paired with the right warm socks. That said, I wouldn’t lean too hard on the 400 grams of insulation alone to keep your toes warm while standing on ice for long periods or in sustained temperatures in the teens or 20s. Know their limits and plan accordingly.
Zeiss has long been a leader in optics. Look at the equipment your optometrist uses to examine your eyes — there’s a good chance it’s Zeiss. That same level of precision carries into the field. When I put glass to my eyes, I expect true-to-life color, strong clarity, and reliable light transmission. The SFL 8×50 binoculars deliver exactly that, meeting every expectation I have for serious field glass.