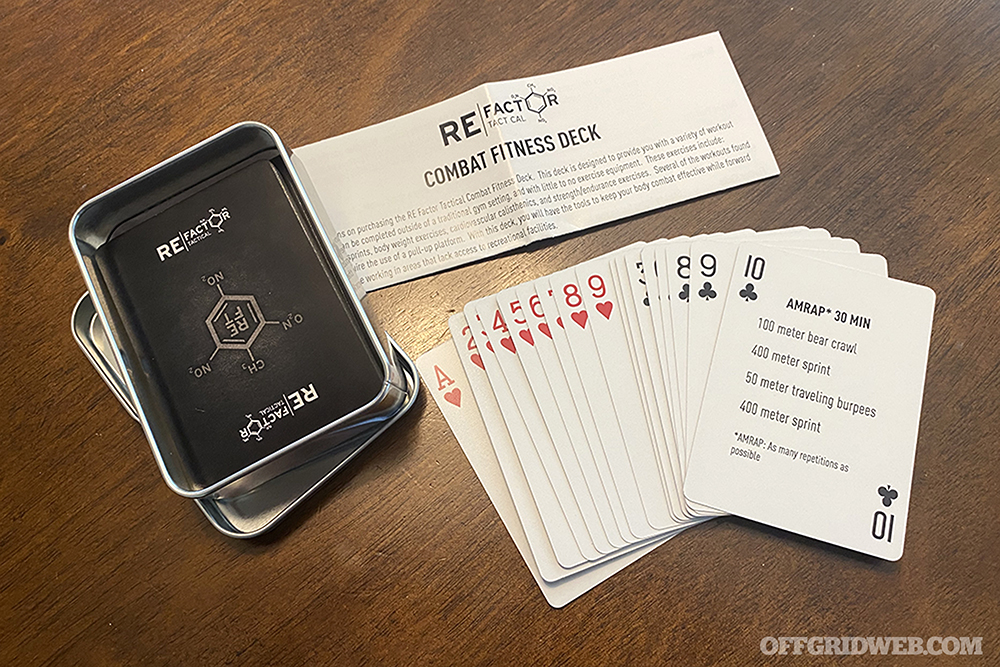
There are many reasons to consider an at-home survival workout plan. The most timely of these is the COVID-19 pandemic, and the associated lockdown that has left many of us cooped up in our houses. Although some states are beginning to reopen businesses, it may be a while before densely-packed gyms are officially open again. In the mean time, working out at home (or in the backyard or neighborhood) is a great way to stay in shape and healthy. It’s also affordable and convenient. But rather than settle in to a monotonous workout routine, you might consider a home workout system such as the RE Factor Tactical Combat Fitness Deck. This deck contains playing cards with 52 different high-intensity survival workouts, ranging from simple to challenging.
Draw a Survival Workout from the Deck
Like a regular deck of cards, the RE Factor Tactical Combat Fitness Deck has number and face cards. Each card features a single survival-oriented workout designed to be completed in less than an hour. No special equipment is required, aside from a pull-up bar and a sandbag for certain exercises. This is essentially a twist on the classic “Deck of Pain” workout that is supposedly used by convicts in prison.
Lower value cards feature less-strenuous survival workouts. Twos are warmup cards, such as the following two of hearts workout:
Threes and fours are easy, sixes and sevens are moderate, and so on. Face cards are more difficult, and kings are group workouts for at least two participants. Aces are the most extreme of these workouts. For example, the ace of spades features a “1776” survival workout:
If that sounds exhausting, that’s because it’s supposed to be. But don’t worry, there are plenty of entry-level survival workouts in the Combat Fitness Deck that can help you work up to that level gradually. There are also a pair of Joker active recovery cards, which feature less intense workouts for rest days.
Maintaining Combat Fitness
RE Factor Tactical says the Combat Fitness Deck is designed to “provide the tools to keep your body combat effective while forward deployed, or while working in areas that lack access to recreational facilities.” If you’re brave, you can shuffle the deck and pick a card, but don’t be surprised if you end up doing several hundred squats. We’d suggest starting at the low end of the deck and gradually escalating to the more intense survival workout cards.
Each Combat Fitness Deck is made in the USA and retails for $20. For more information on this survival workout system, go to REFactorTactical.com.
Self-reliance is a term that gets thrown around a lot in the emergency preparedness community, but it’s also a term that seems to be frequently misconstrued. A self-reliant individual takes every feasible step to avoid unnecessary dependence on outside resources. This means that if a problem arises, we should have a plan to solve it on our own, and backup plans in case Plan A falls through. However, that doesn’t mean we should endanger ourselves by stubbornly refusing to call for help if a situation gets out of control. Emergency signaling devices can help.
Let’s say you’re out hiking when the ground underfoot gives way and sends you tumbling down a ravine. You’re bruised and disoriented, and you think your leg might be broken. Would your first instinct be to crawl back to the trail, improvise a crutch, and hobble back to safety on your own? This might seem like the most self-reliant option, but it’s hardly the safest one. We should never allow our pride or determined sense of independence to prevent us from accepting assistance, especially when going without it might mean putting yourself into an even more dangerous situation later.
Electronic communication devices such as cell phones, radios, satellite phones, and personal locator beacons are some good primary tools for calling for rescue. We’ve discussed each of them in previous issues of RECOIL OFFGRID. But these devices can easily lose signal, malfunction, or run out of batteries. In that case, you’ll want something analog to fall back on. Your best course of action may be to pop smoke and call for rescue — literally.
Emergency Signaling Devices
Today, we’ll be covering six emergency signaling devices that can easily fit into a pocket or pack. We’ve specifically focused this guide on visual signals that can be used over long distances; these tools can be complemented by audible signals, such as a whistle or air horn. Just like fire-starters or any other critical survival tool, you should always have a variety of options to choose from in the event that things go awry.
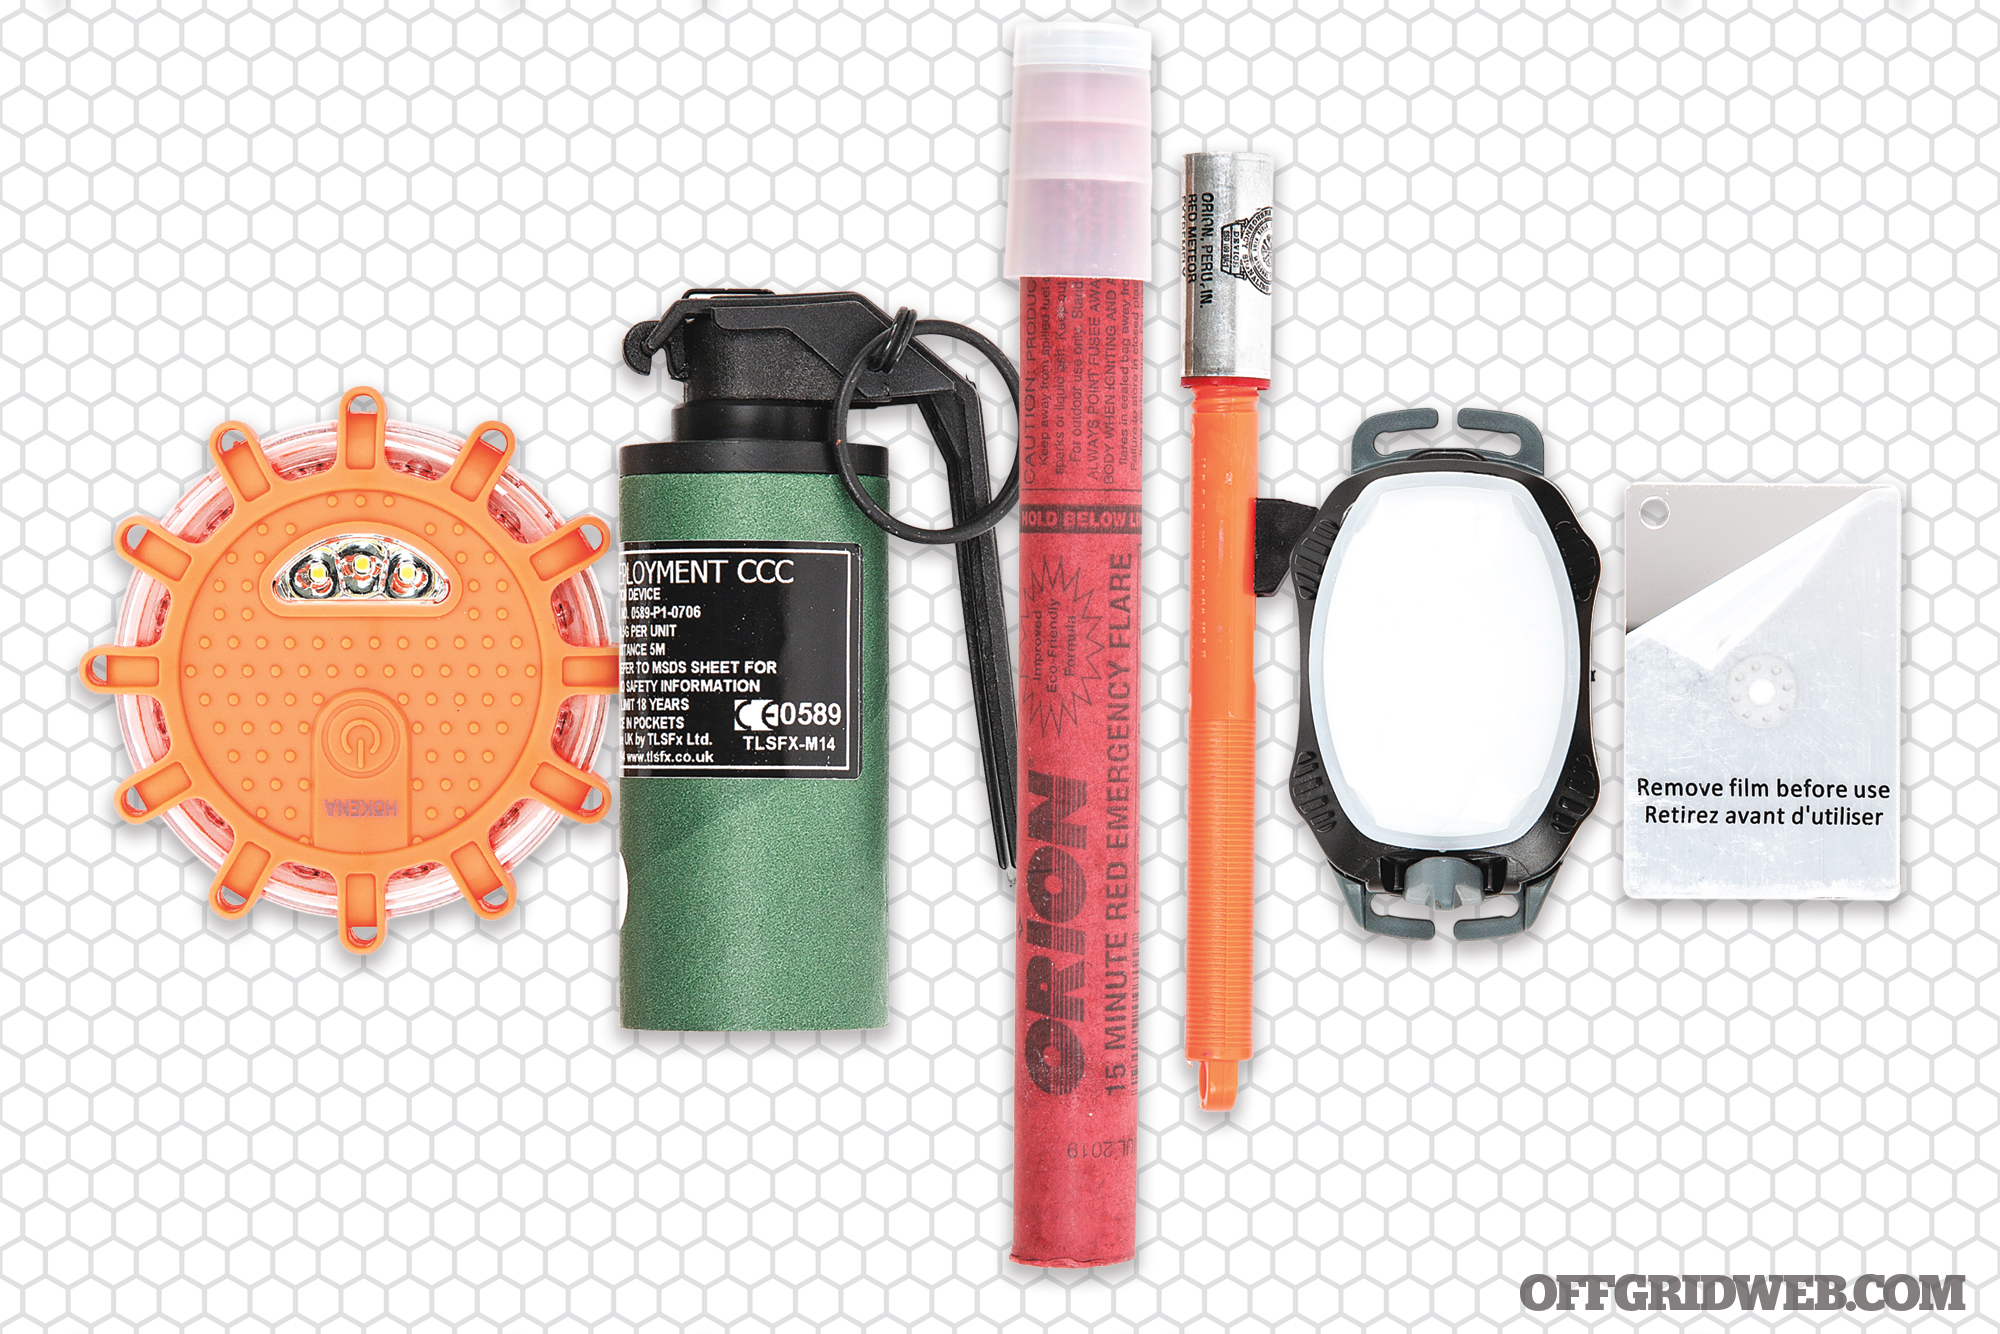
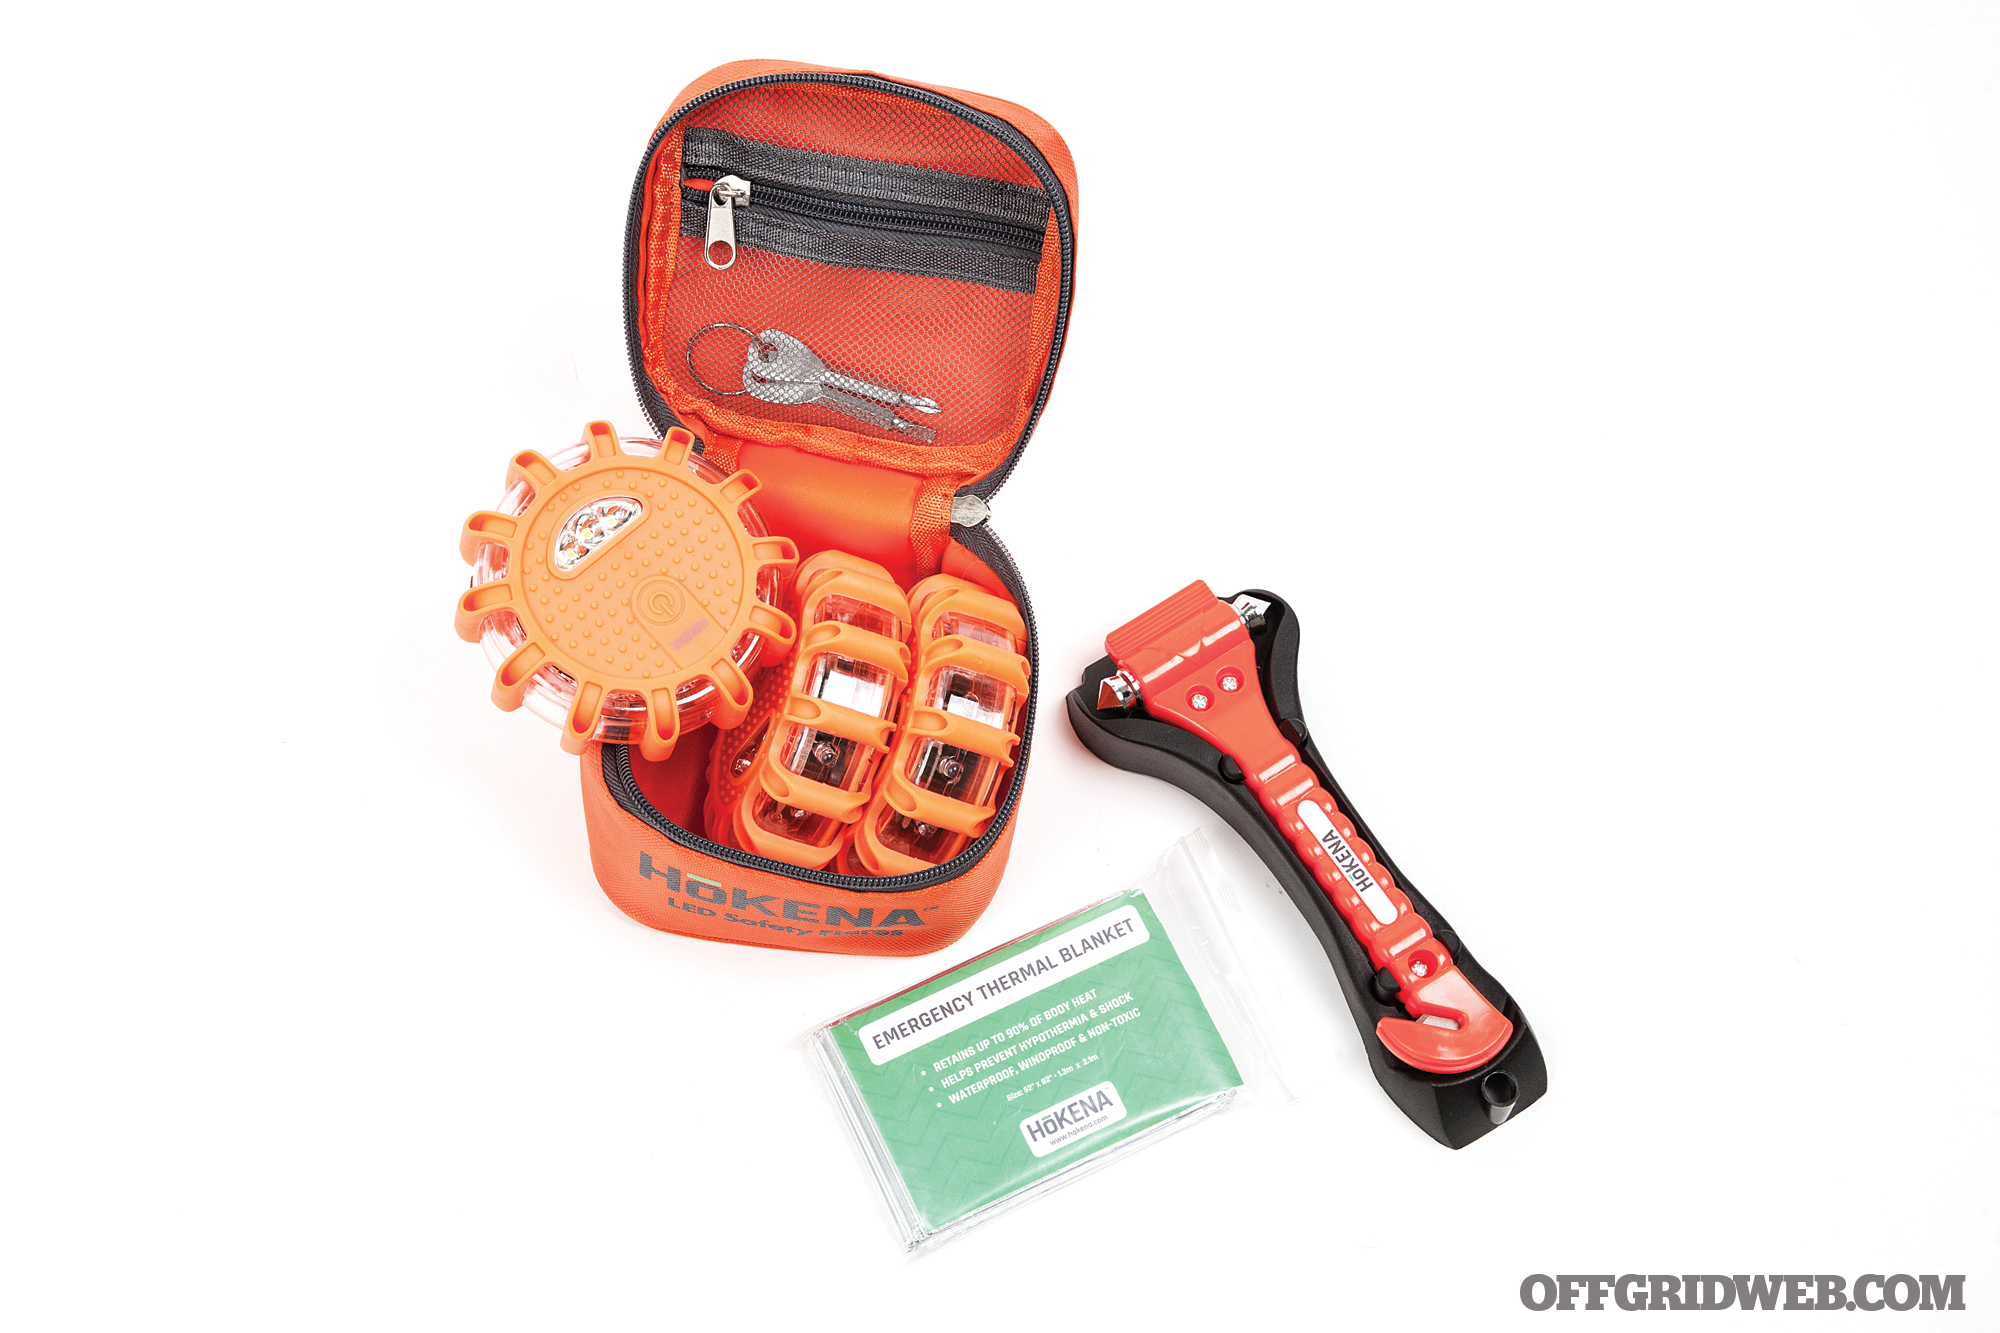
Hokena LED Road Flares Emergency Kit
Dimensions: 4 by 4 by 1.3 inches Weight: 5.5 ounces per light / 1 pound 3.7 ounces with 3-pack carrying case MSRP: $33 URL: amazon.com
Notes We found this seven-piece road safety kit on Amazon as a “#1 Best Seller.” It includes three hockey-puck-sized LED “flares” as well as a zippered carrying case, screwdrivers for changing batteries, two mylar emergency blankets, and an escape tool with glass breaker and seatbelt cutter. Each disc is made of clear plastic with a bright orange rubber overmold. One side has a power button that activates the 12 orange LEDs in a series of patterns including spinning, flashing, and constant-on. The final setting activates three white LEDs on the front as an emergency flashlight. The back of each disc includes a folding hang hook and rare earth magnet. The lights are powered by AAA batteries and are said to have an approximate maximum run time of 35 hours.
Pros:
Strong magnet allows these lights to be stuck directly to your vehicle, greatly increasing its visibility on dark roads
High-vis storage case fits nicely in a glove box or trunk
Good value considering everything the kit includes
Cons:
Visibility is excellent at night, but not very good on a sunny day
The included escape tool and mounting bracket feel cheap and plasticky
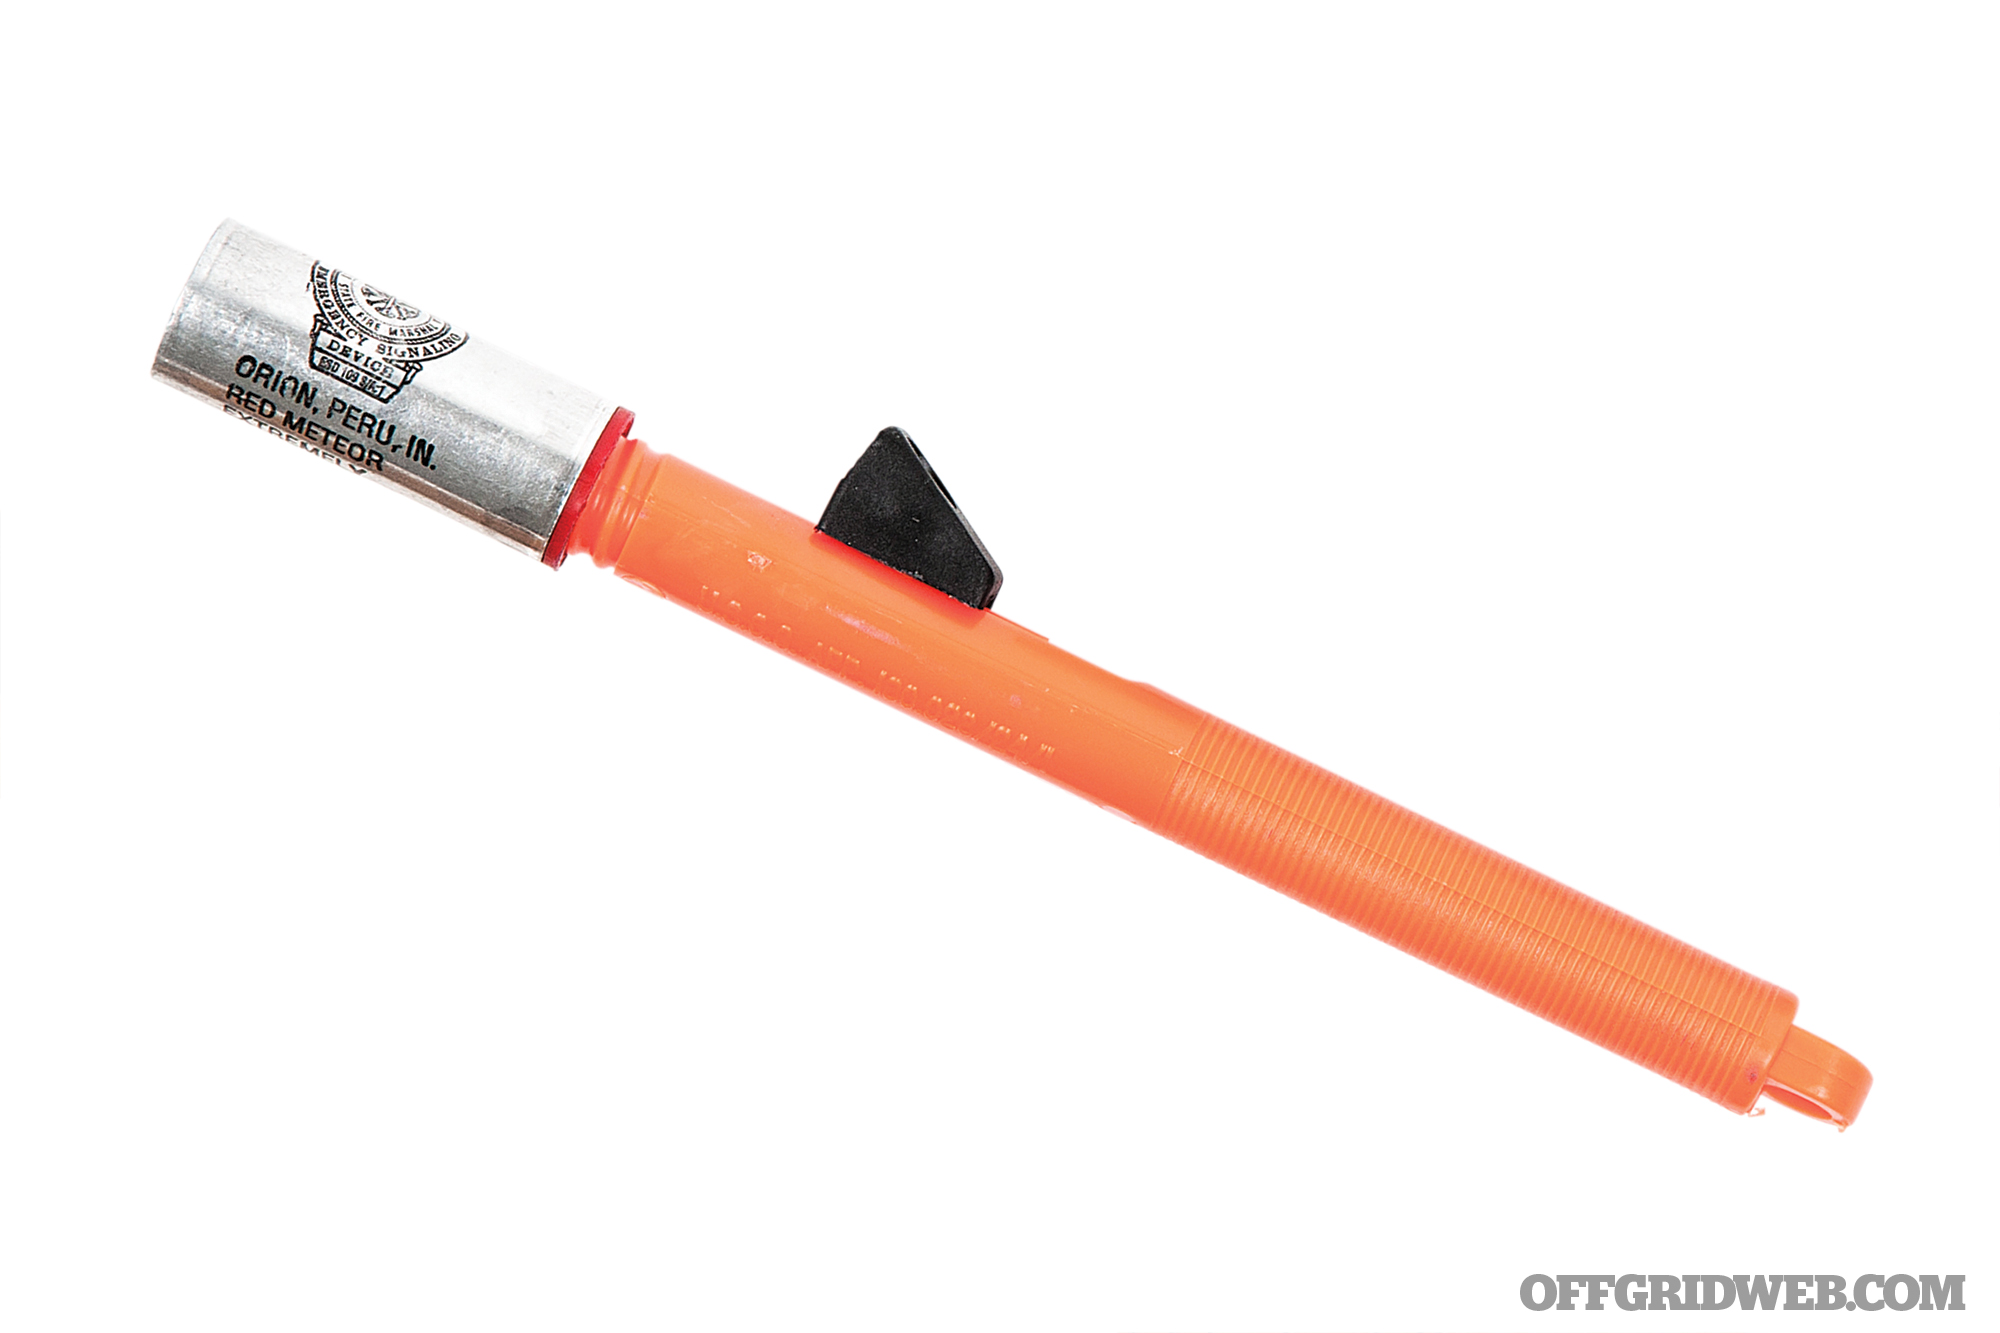
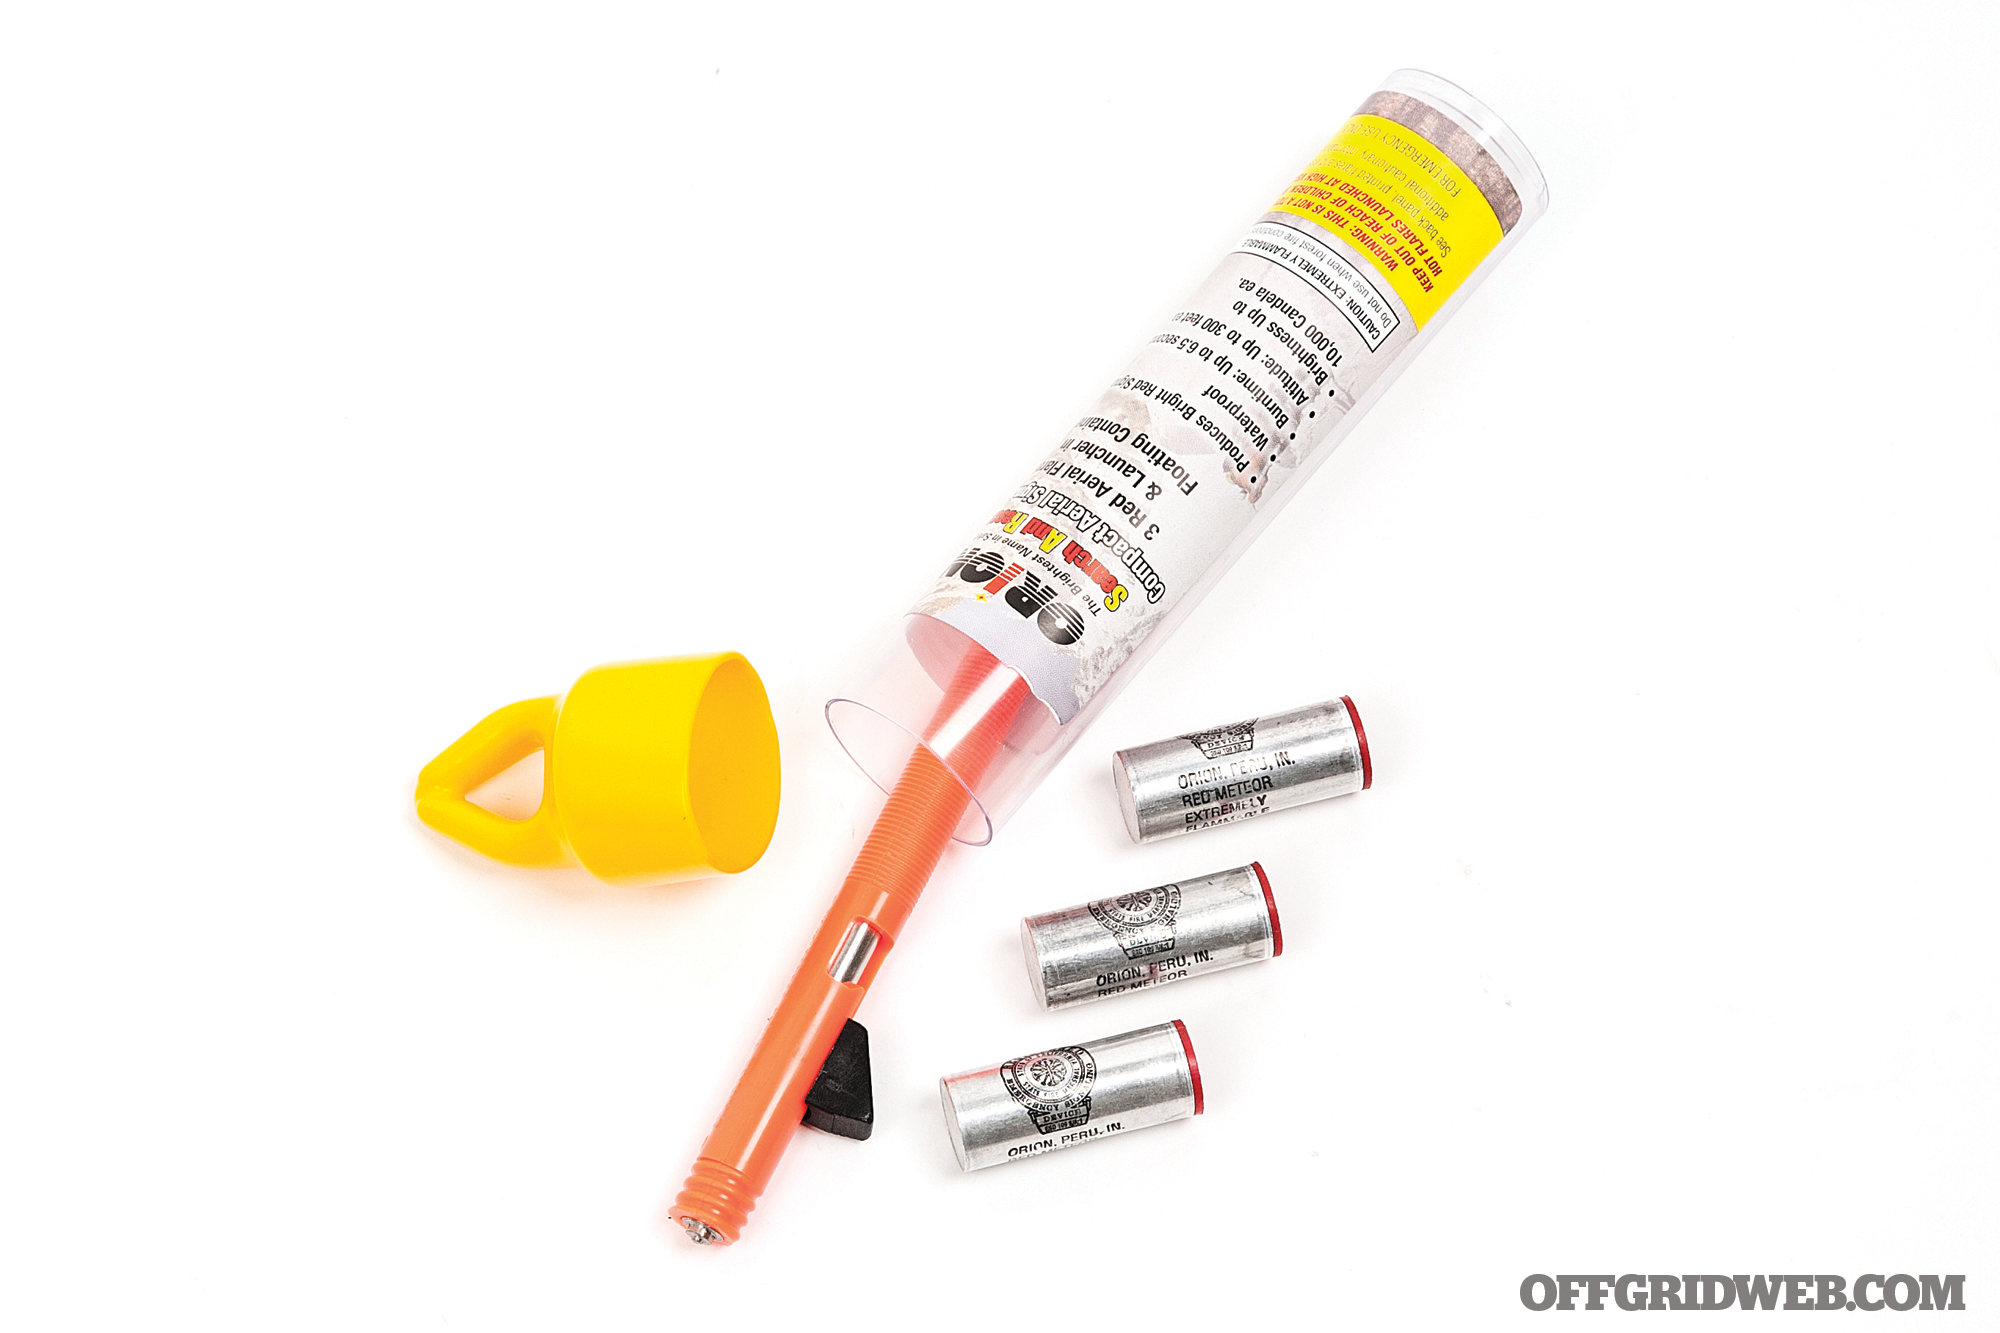
When you think of aerial flares, you probably envision the classic orange flare guns found in life raft survival kits. The Compact Aerial Signal Kit serves a similar purpose in a much smaller package. It’s housed in a floating plastic container and comes with a pen-shaped launcher and three red flare cartridges. To fire a flare, screw it tightly onto the launcher, then pull back the firing button to rest in the notch. Snapping the button out of the notch strikes the flare with a firing pin, launching it up to 300 feet as it burns for 6.5 seconds. We were unable to safely test-fire these flares due to the wildfire-prone conditions in our area, and this is a factor you must keep in mind as well. The last thing you want is for your emergency signaling devices to make you responsible for starting a devastating forest fire. Made in the USA.
Pros:
Aerial flares can be seen in all directions, and can be used to reach above trees and other terrain obstructions
Offers three attempts to get rescuers’ attention in a pocket-sized container
Cons:
Primarily designed for boating; not ideal for use in arid environments due to the risk of wildfires
6.5-second burn time means these can be easily overlooked if your target is distracted
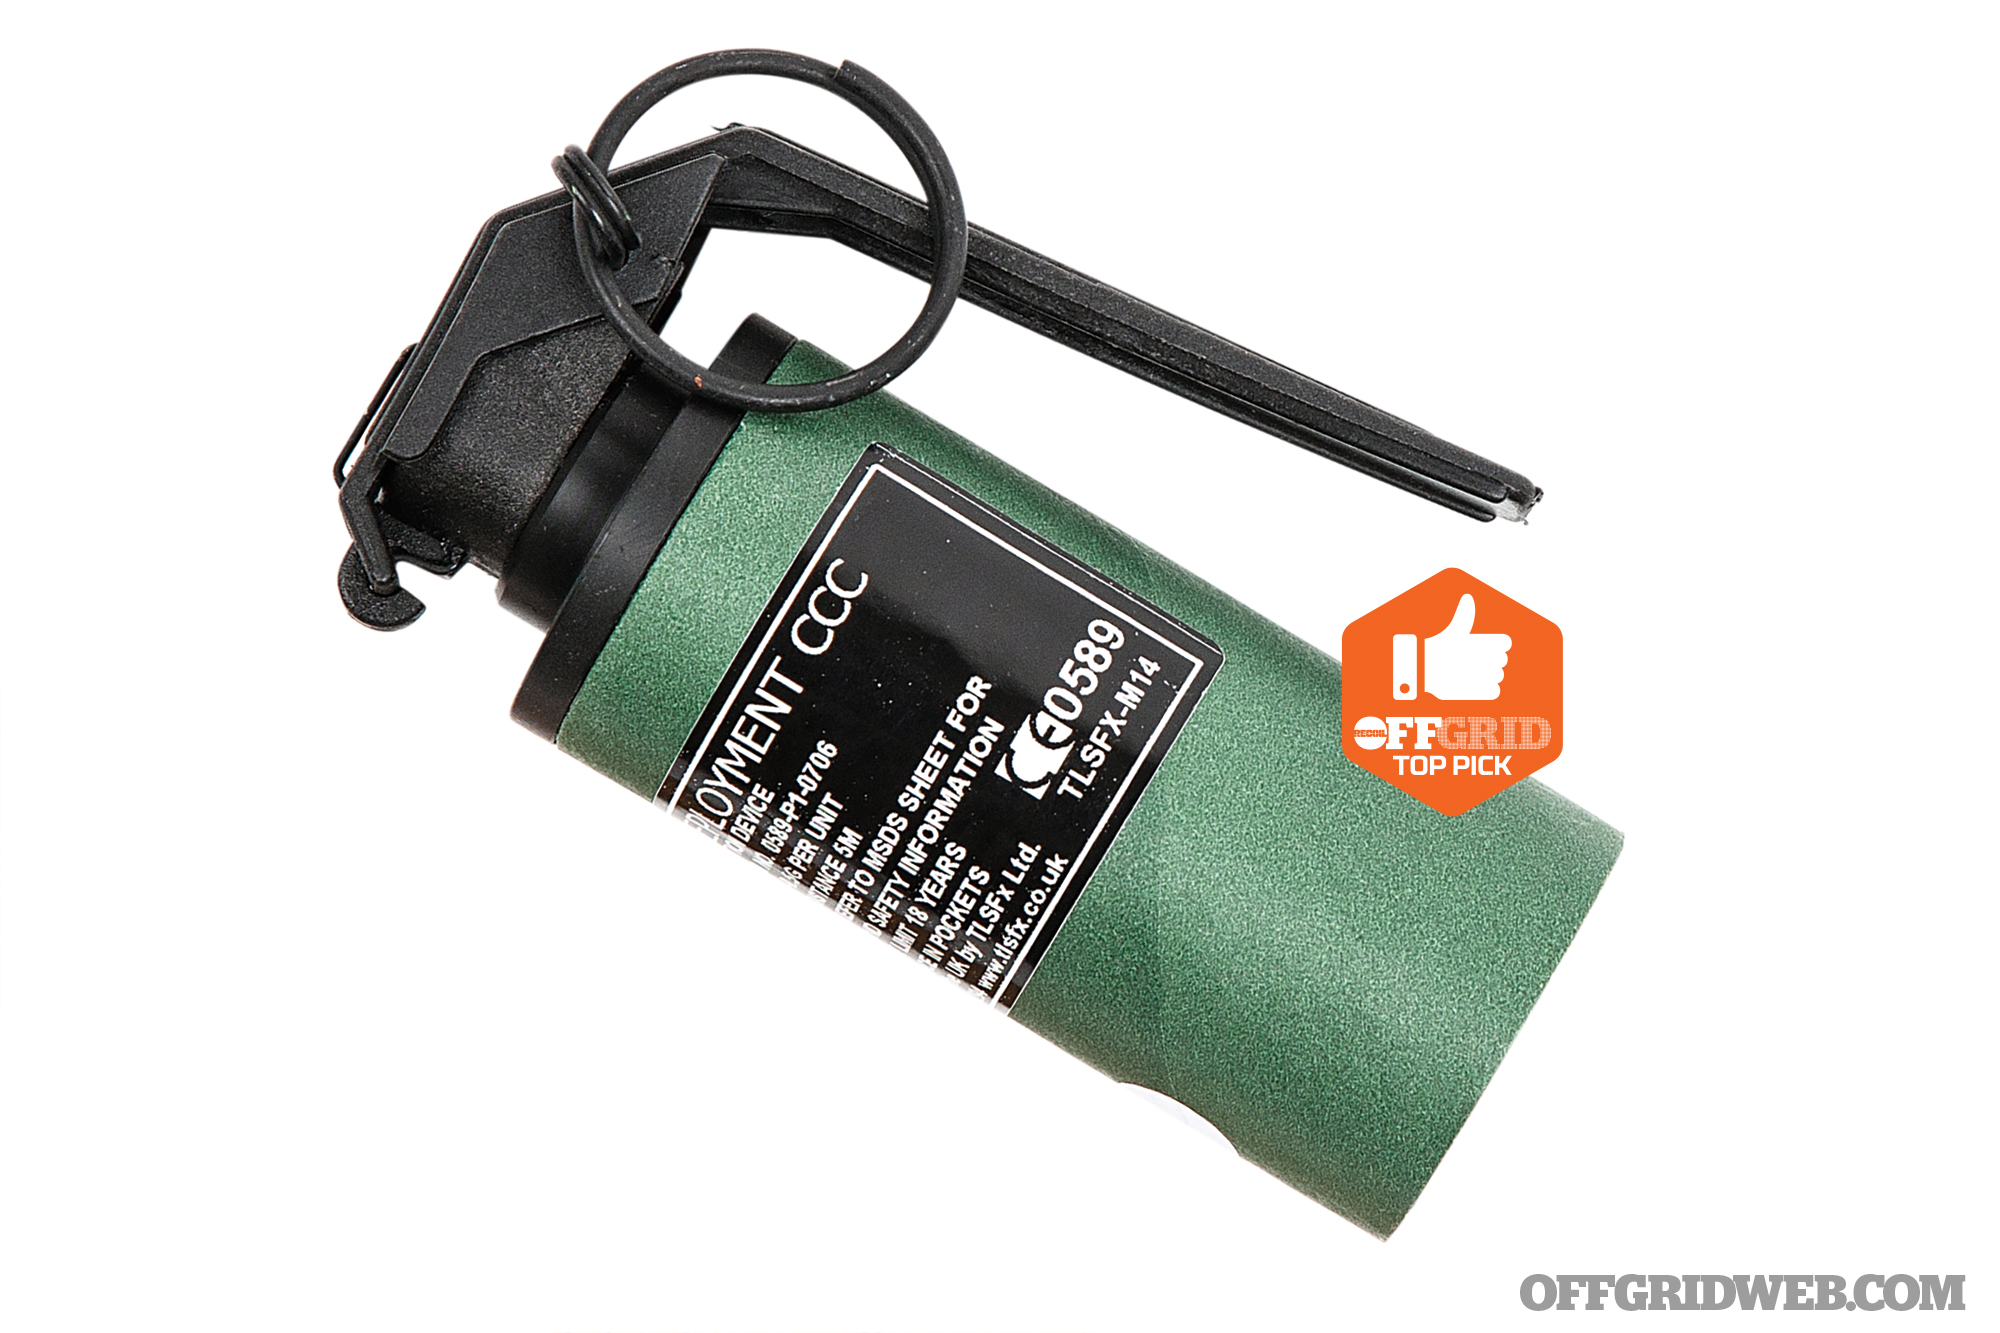
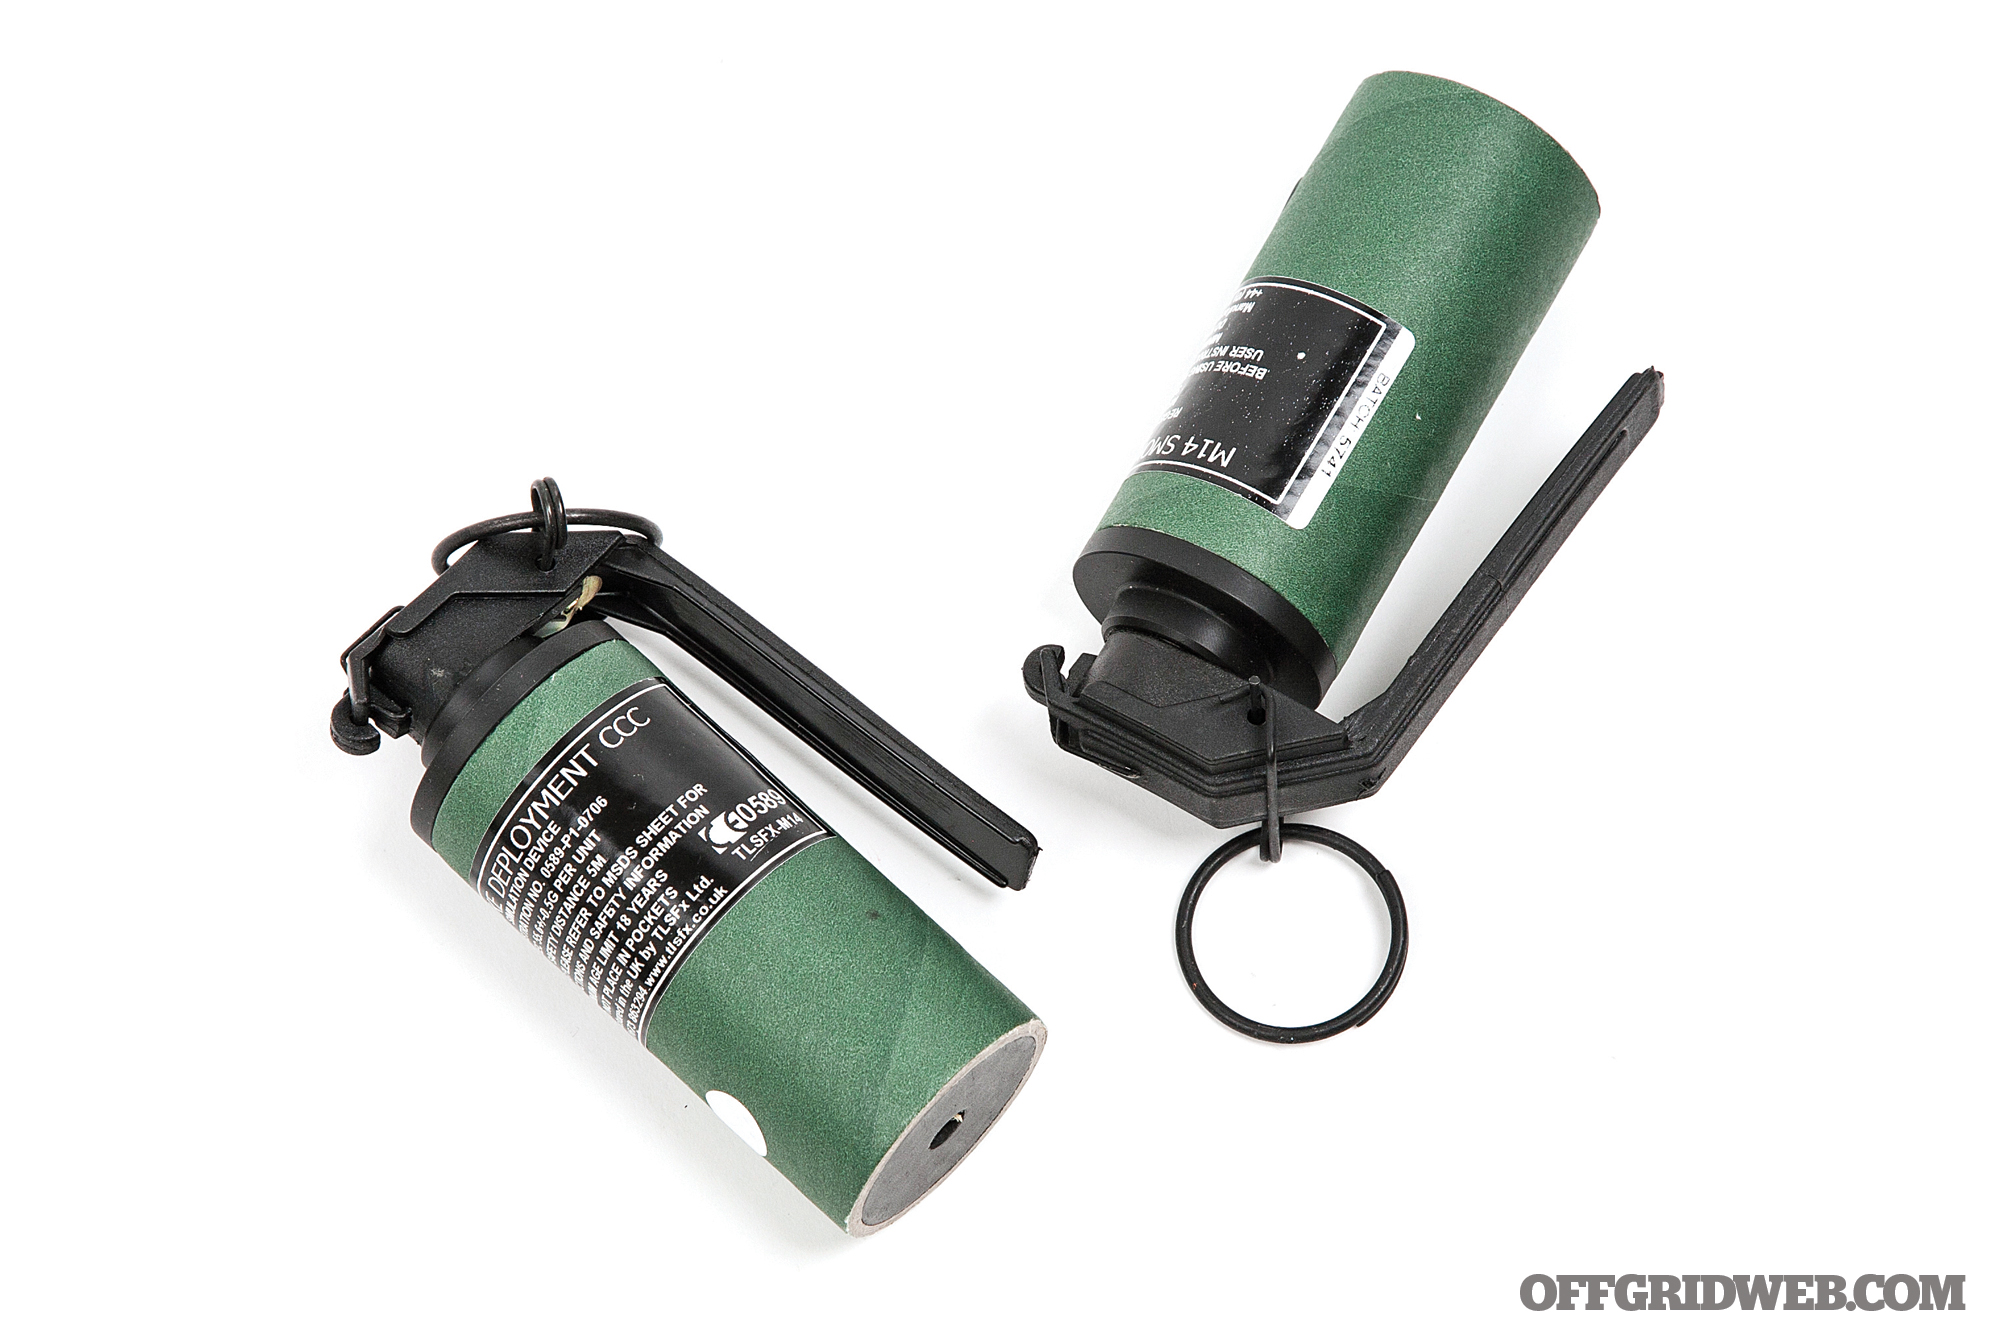
IWA International M14 Smoke Grenade
Dimensions: 4.8 by 2.6 by 1.8 inches Weight: 5.4 ounces MSRP: $34 URL: iwainternationalinc.com
Smoke grenades are widely used by military personnel for identifying extraction zones, hence the use of the term “pop smoke” to mean “let’s get out of here.” The M14 smoke grenade (or “Smoke Deployment Simulation Device” according to the label) is made in the UK by TLSFx; IWA International imported them to the U.S. and got them approved by the ATF. Operation is simple: Grip with the lever against the web of your hand, twist the ring to disengage the safety, pull the pin, and toss to release the lever. After a 3.5-second delay, the M14 will emit thick smoke for 60 seconds through a vent port in the bottom of the housing. The latest-generation M14 is currently in production and features dual vent ports for better smoke dispersal.
Pros:
If you’re attempting to get the attention of an aircraft overhead during the day, there are few better tools
Available with white, red, green, or blue smoke, so you can select a color that will stand out in any terrain
Cons:
Single-use item — you may want to carry an additional reusable signal device
Windy conditions will cause smoke to disperse more quickly
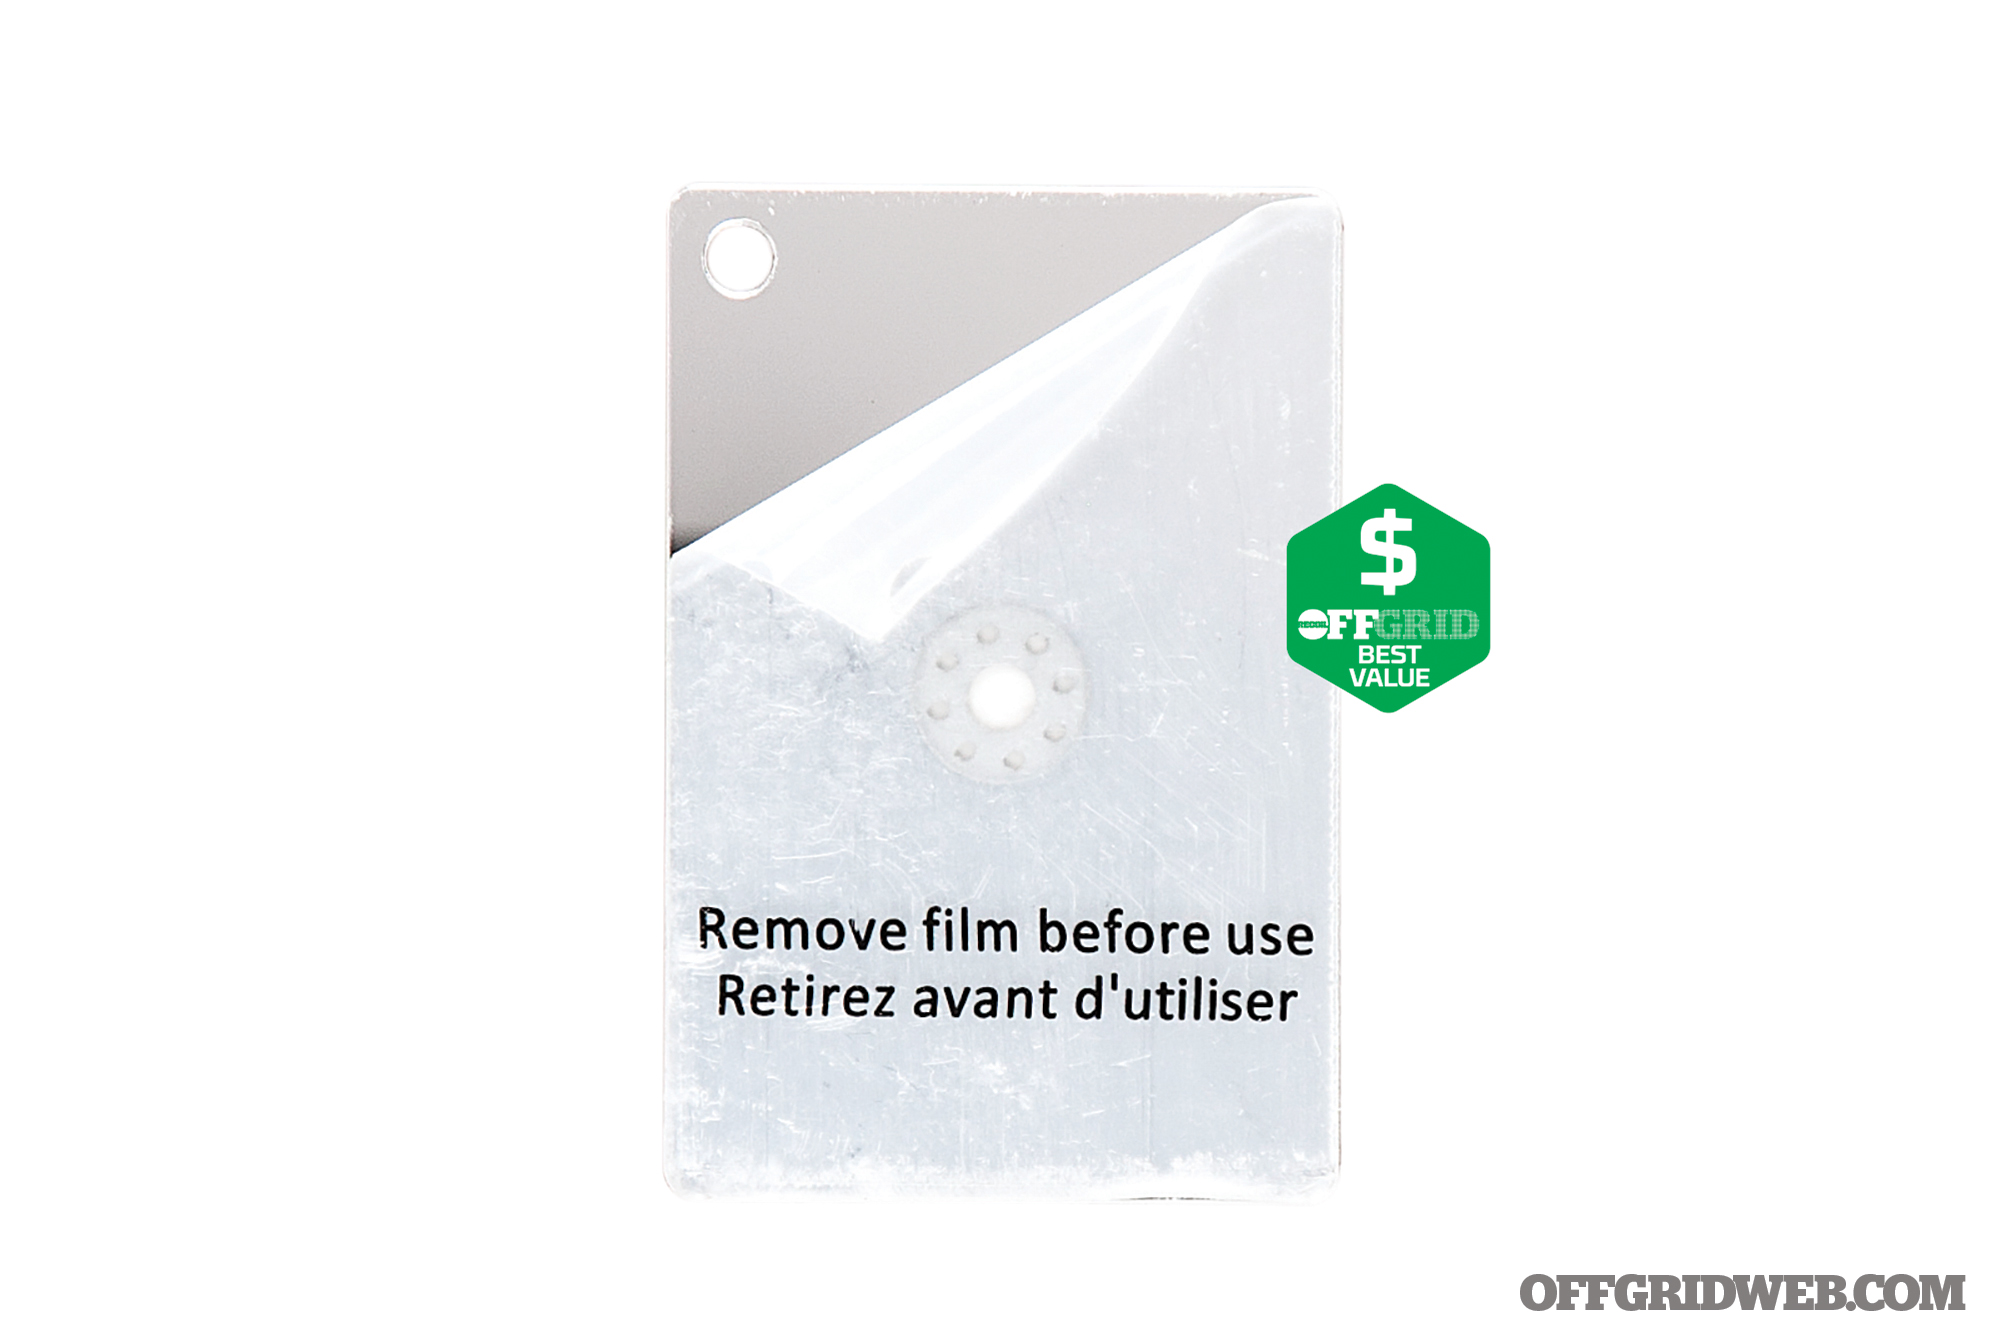
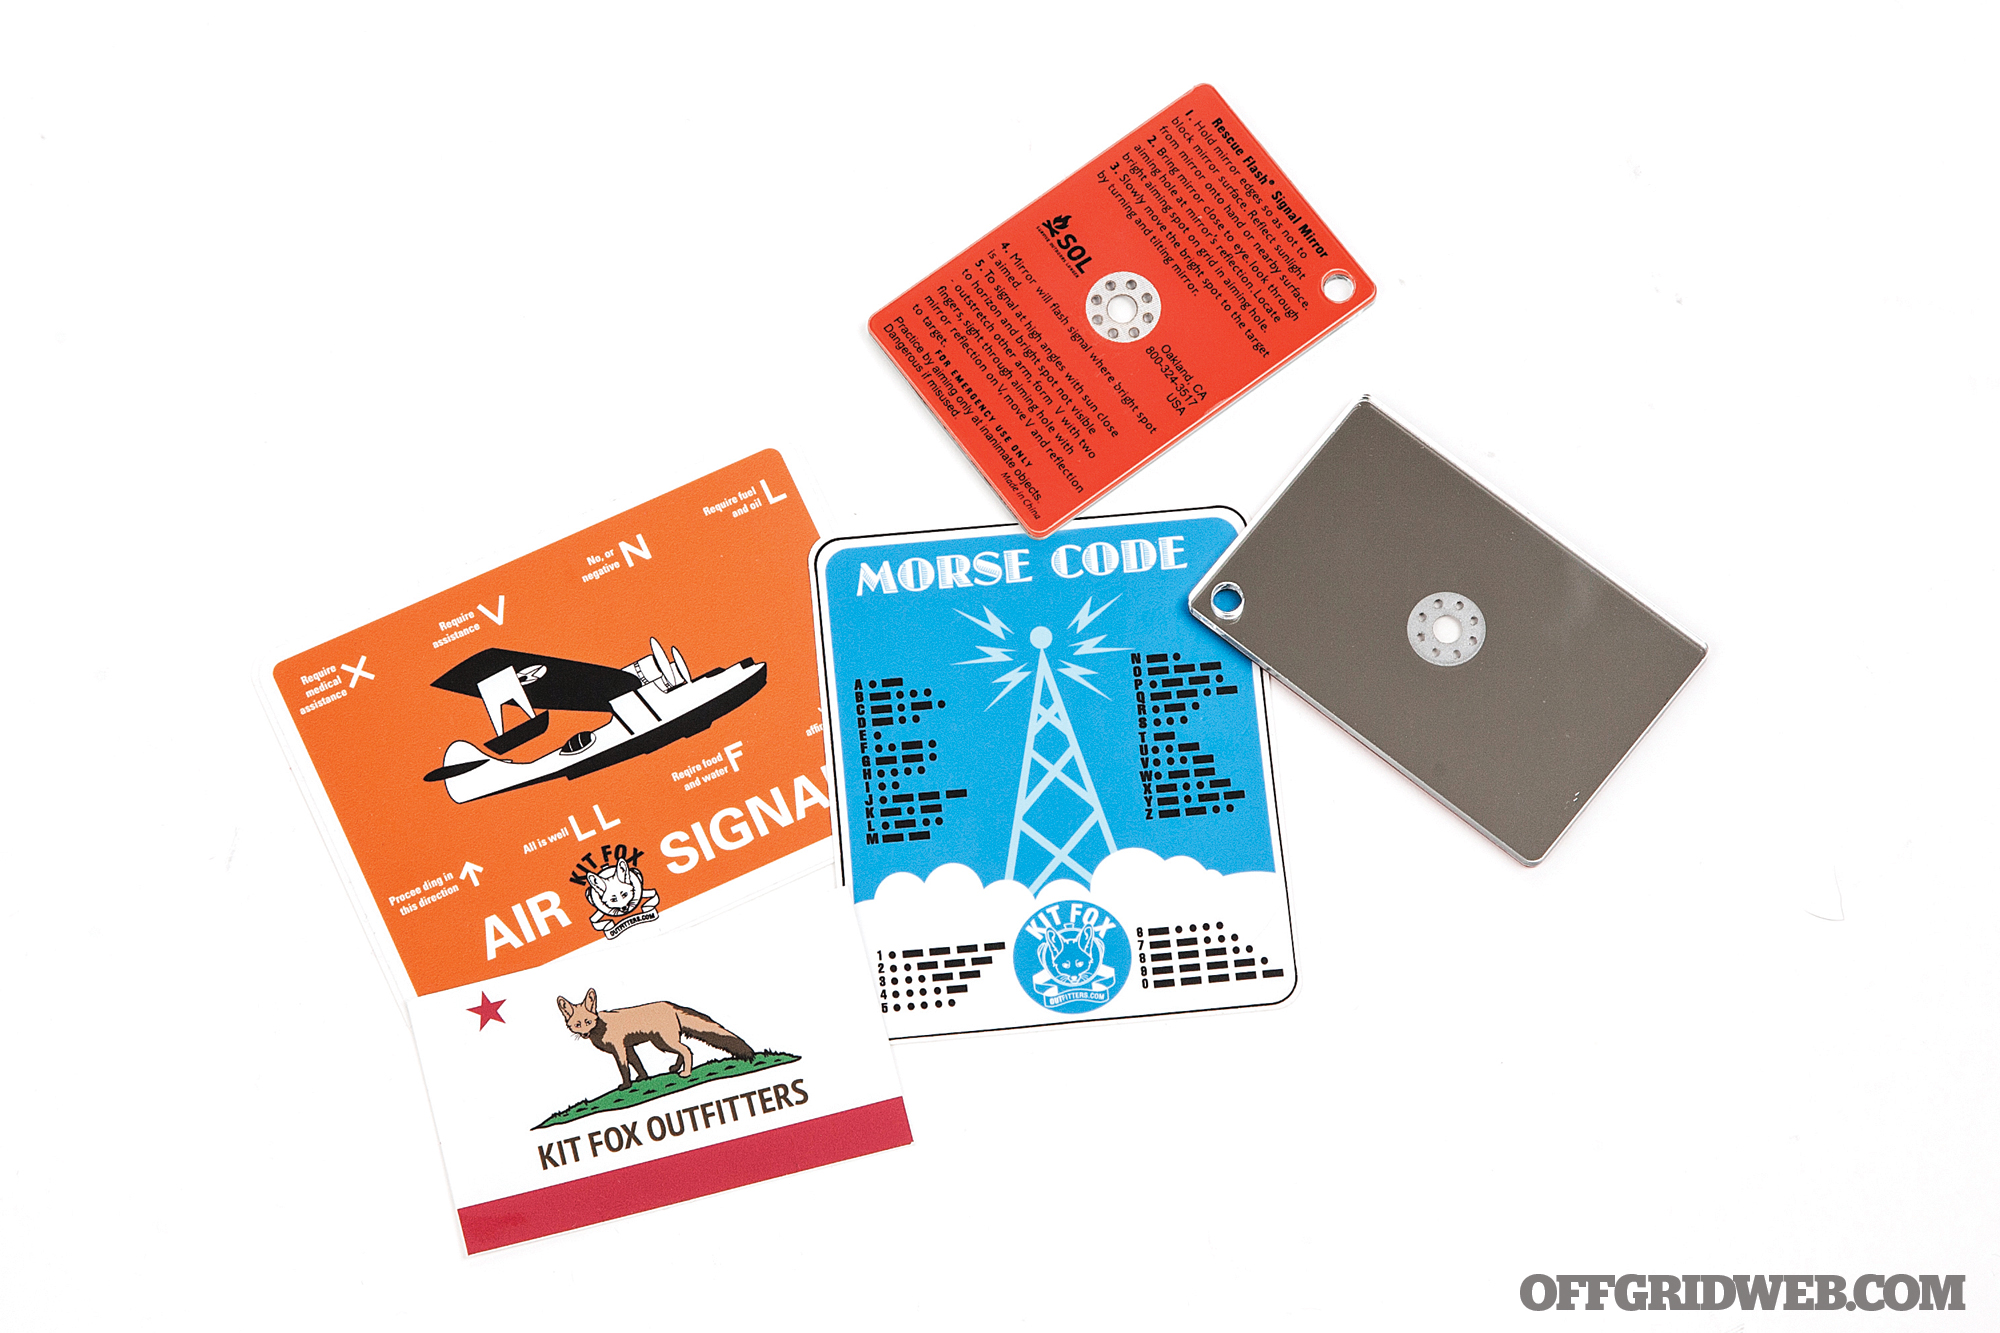
SOL Rescue Flash Signal Mirror
Dimensions: 3 by 2 by 0.2 inches Weight: 0.6 ounce MSRP: $10 URL: kitfoxoutfitters.com
Even if you also carry other items from this guide, a small signal mirror is a tool we believe no backcountry emergency kit should be without. The SOL Rescue Flash mirror fits in the coin pocket on a pair of jeans, weighs next to nothing, and offers a powerful signal over long distances (up to 30 miles according to the package). Instructions on the back side clearly explain how to aim the mirror using the central sight hole and an outstretched arm with “V” fingers to form a sight post. It’s constructed from durable polycarbonate that won’t break if dropped. We picked up our test sample from Kit Fox Outfitters, who also provided some cool stickers that show the basics of Morse code and ground-to-air emergency signaling — two other valuable skills for sending a distress message.
Pros:
Lightweight and compact enough to be forgotten until you need it
Easy to use and aim precisely, even over very long distances
Cons:
Can only be used on a clear day, and requires the sun to be on the same side of the sky as your target
Once the protective film is removed, the mirror must be stored carefully to avoid scratches on its glossy surface.
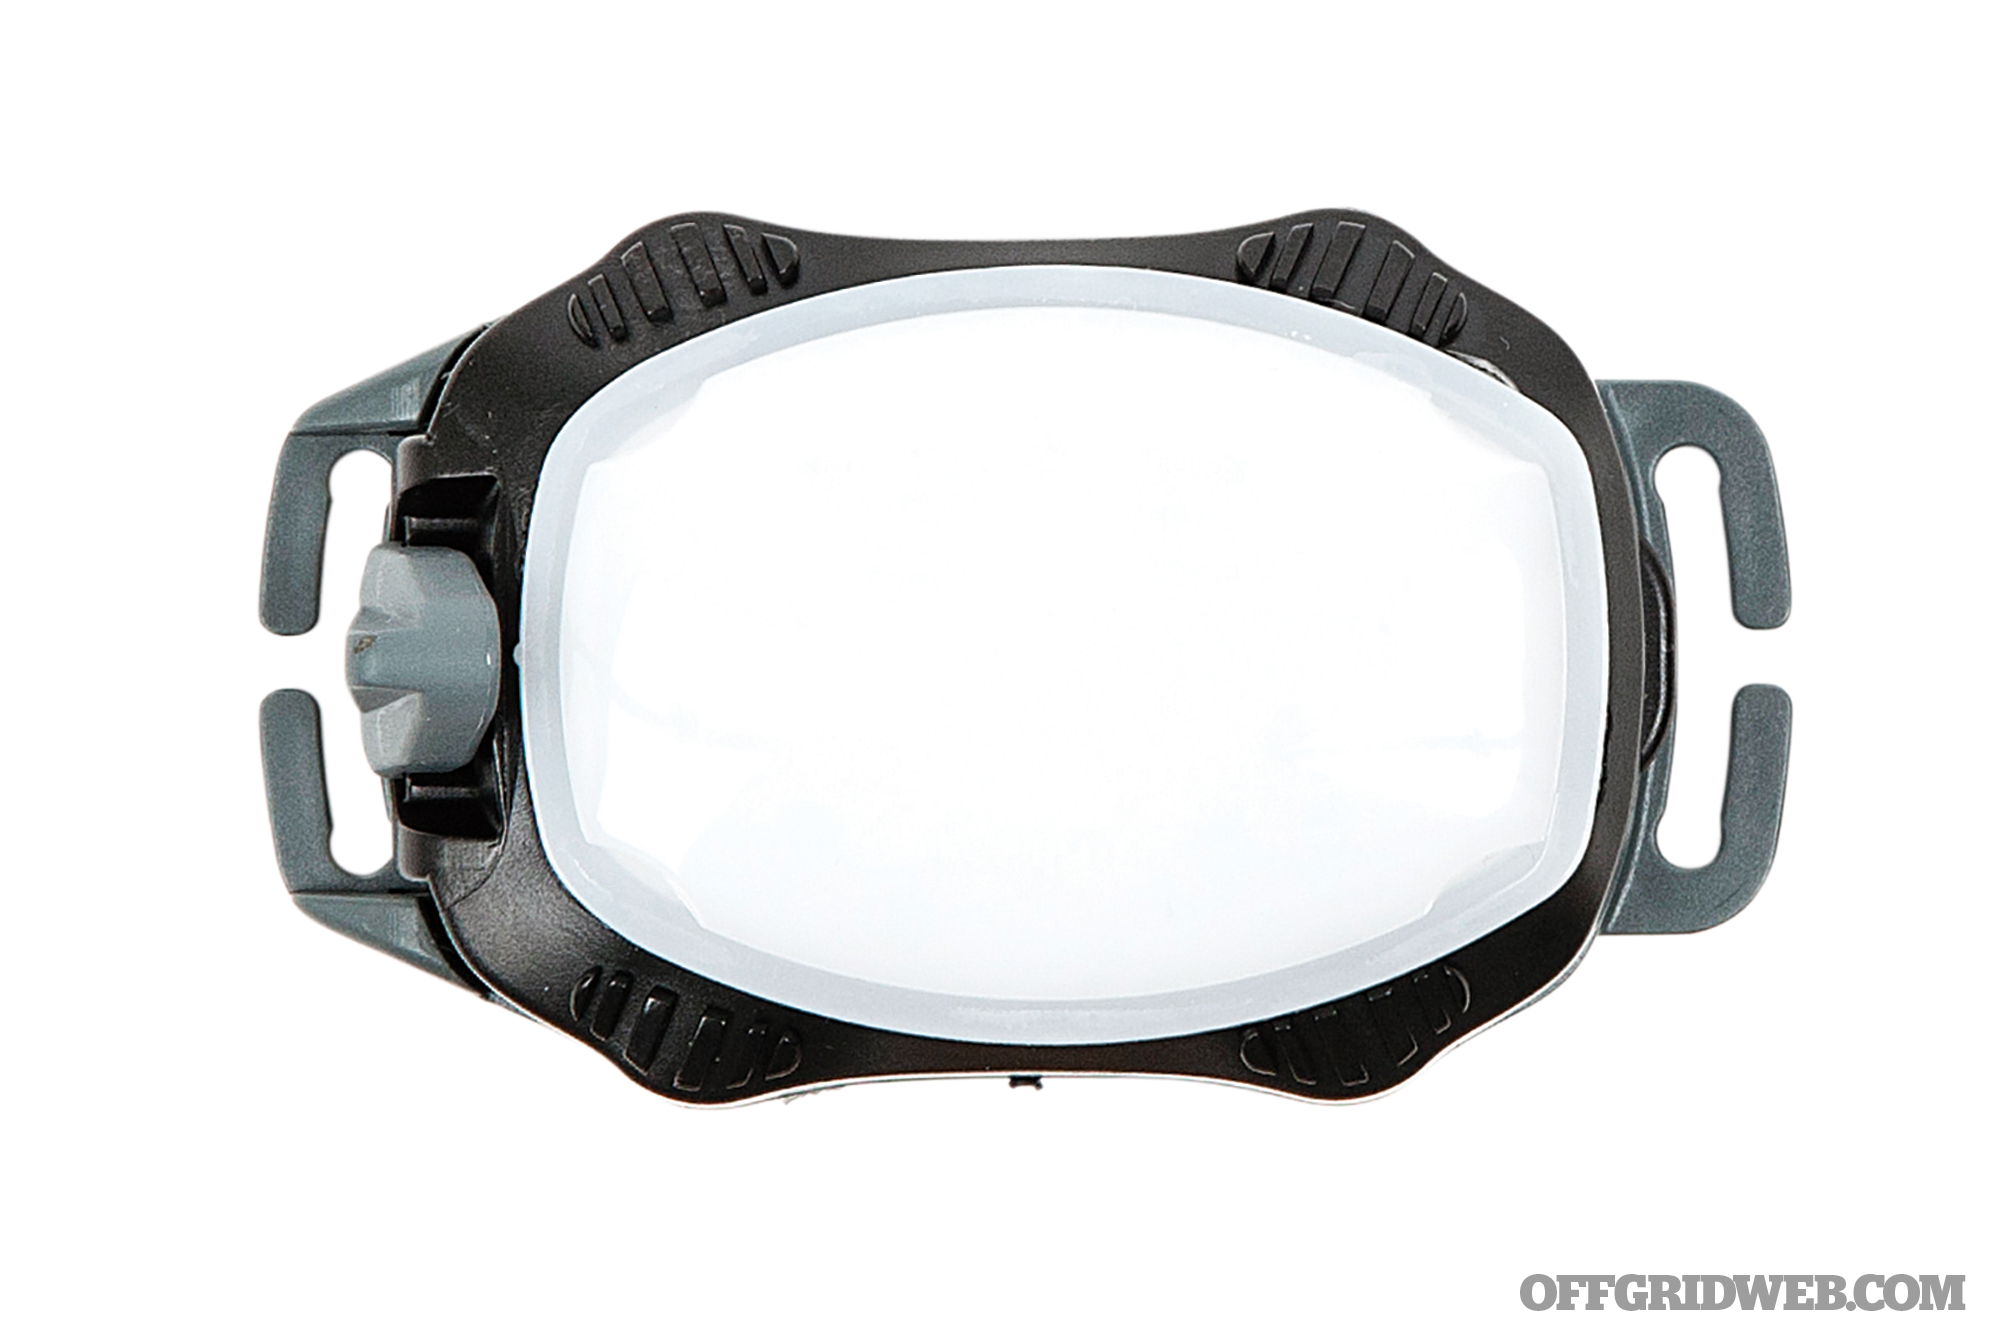
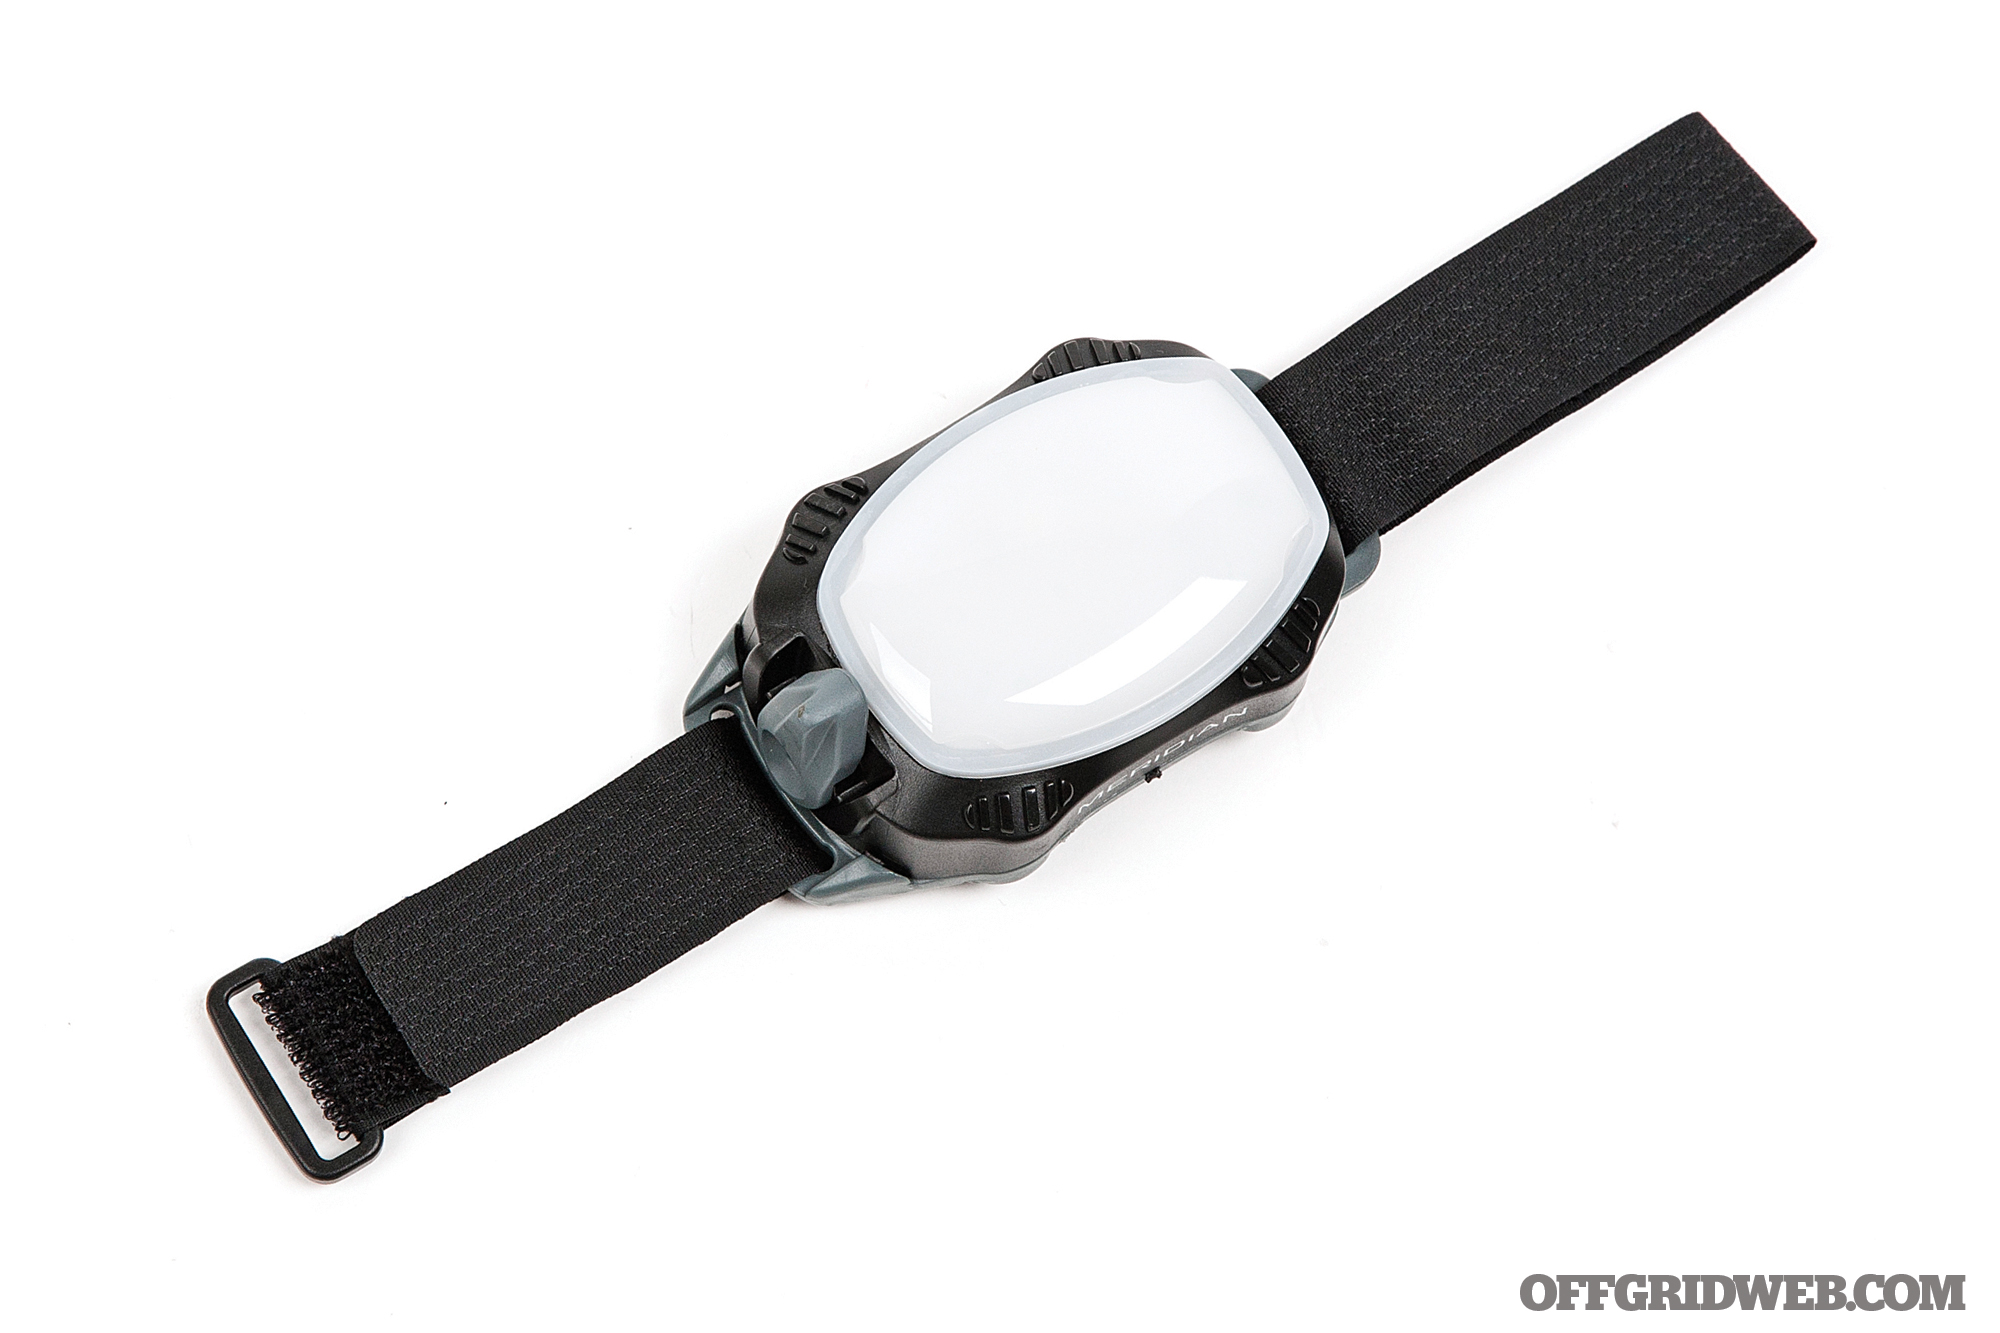
Princeton Tec Meridian Strobe/Constant Light
Dimensions: 3.8 by 2.2 by 1.1 inches Weight: 3.5 ounces MSRP: $30 URL:www.princetontec.com
Princeton Tec is a well-known supplier of lighting devices for law enforcement, military, and search-and-rescue personnel. The Meridian was designed as a locator light for use in these applications, as well as low-light industrial work and diving. It’s powered by 3 AAA batteries and offers a maximum runtime of 100 hours. A large switch allows toggling between two modes, depending on the model you choose — white strobe and white constant, or white strobe and red beacon. We picked the former so it can be used as an emergency lantern or map-reading light. Each is available with a high-vis yellow or black housing and features low-profile clips that hook onto 1-inch PALS webbing, plus an included Velcro wrist strap. Made in the USA.
Pros:
IPX8 rated as fully submersible — SCUBA diving is a recommended application
Directly compatible with PALS webbing found on MOLLE-compatible packs
Switch is designed to be activated with gloves.
Cons:
Testing revealed the switch to be very touchy in strobe mode. A slight bump to the switch will deactivate the light, even if it doesn’t click the lever fully to “off.”
Changing batteries requires a screwdriver.
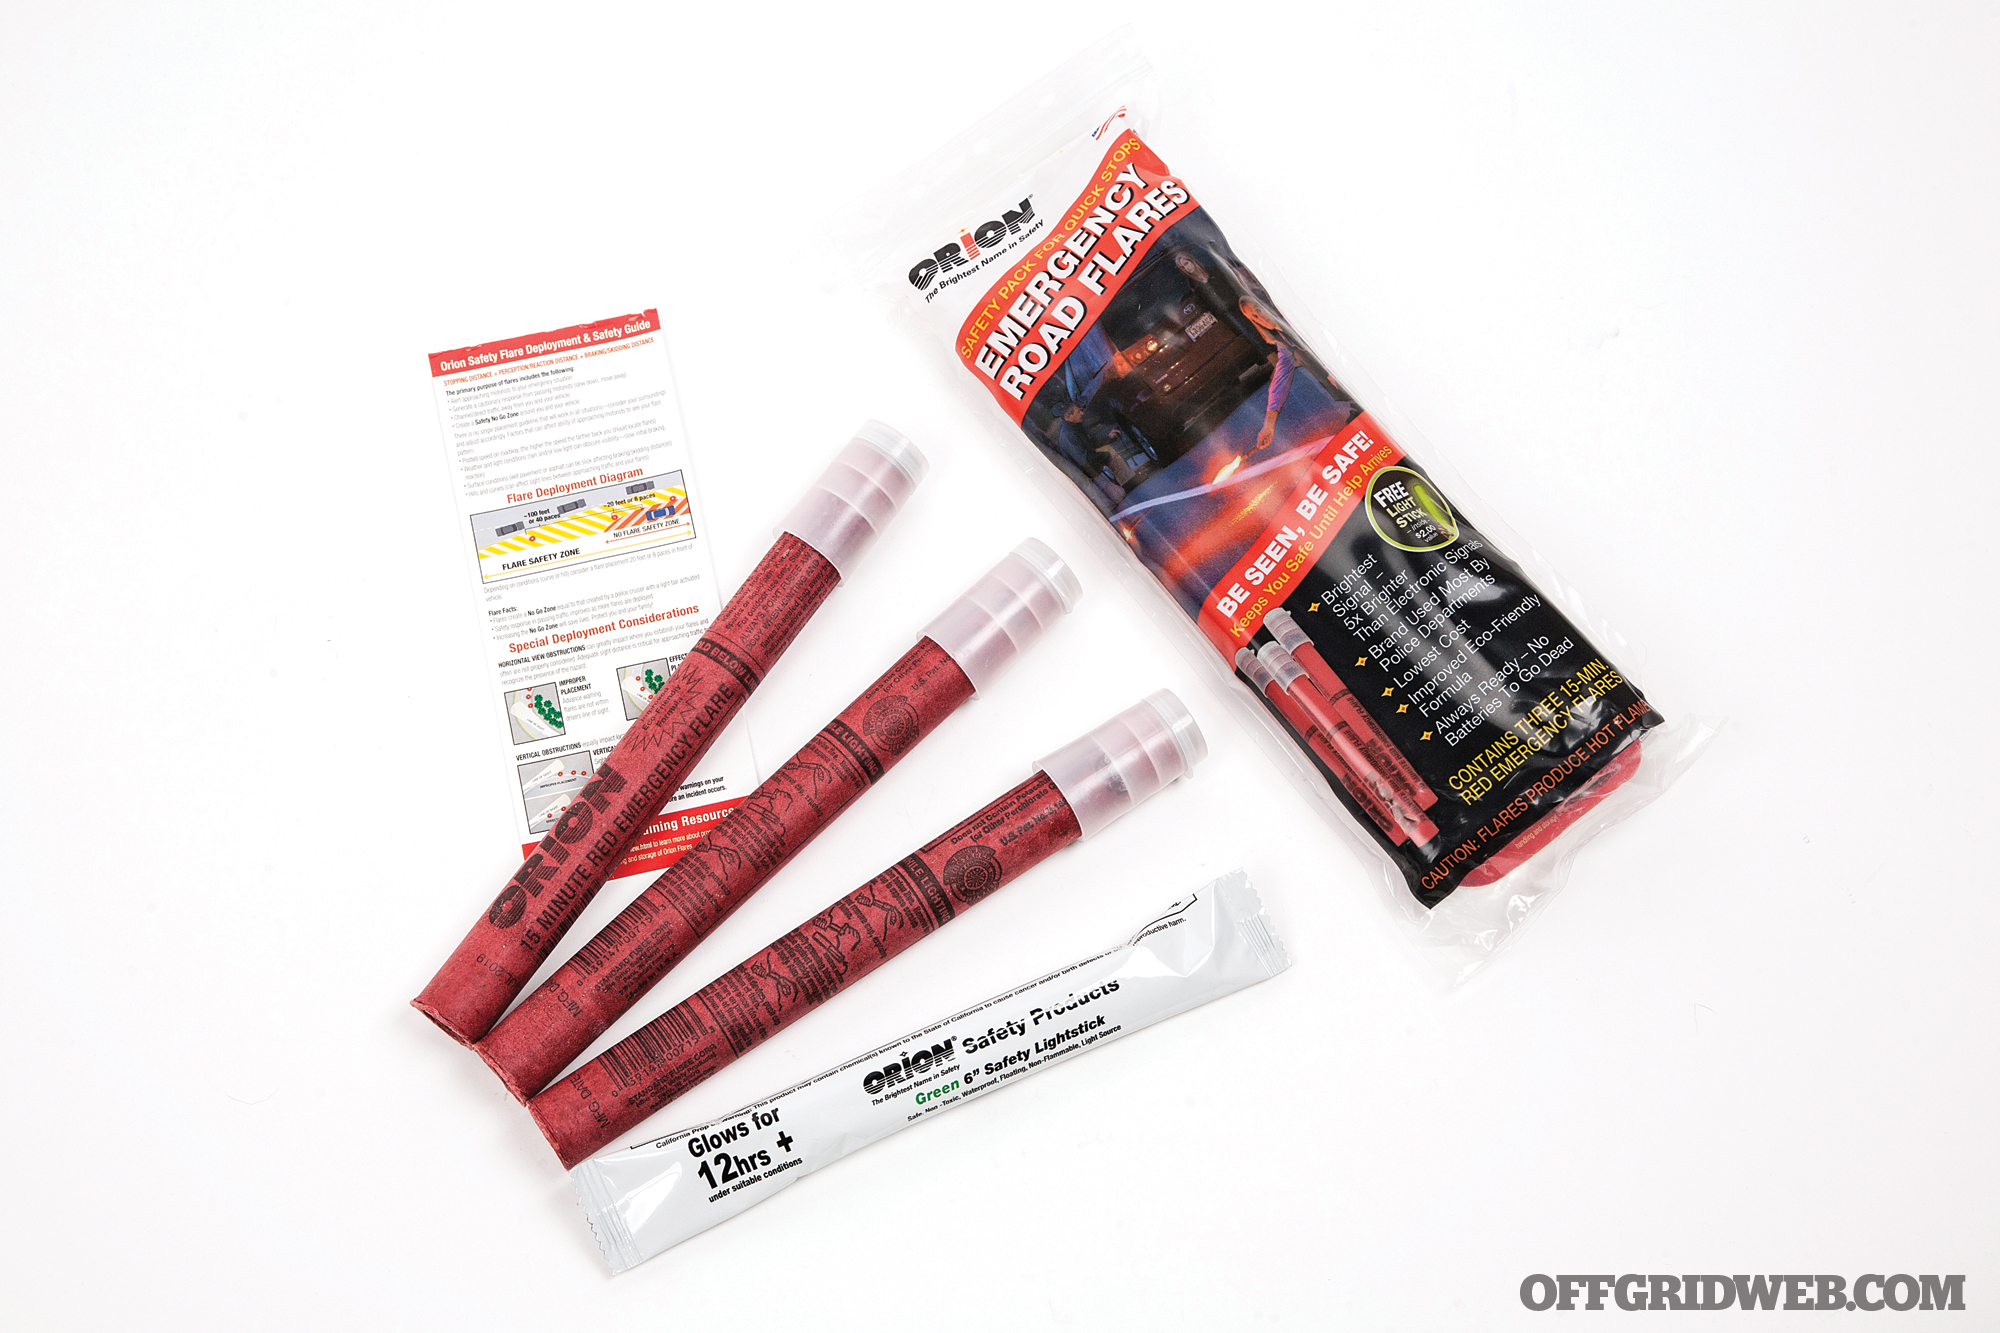
Orion 15-Minute Road Flares
Dimensions: 9.2 by 1.1 inches Weight: 6.6 ounces per flare / 1 pound 5.6 ounces per pack MSRP: $20 for 2 packs of 3 flares URL: orionsignals.com
If you’ve witnessed a severe car crash, you’ve probably seen law enforcement personnel throwing down road flares or waving them to guide traffic around the obstruction. These simple devices send an immediate nonverbal message of “watch out!” This also makes them an effective means of signaling distress over short distances in other situations, such as flagging down a passing car. These Orion flares are available in 15- or 30-minute burn times; we chose the former due to its more packable size. Each of the three-packs we purchased comes with a protective bag, detailed deployment guide, and a free chemlight. Orion also offers detailed training resources on its website, so you can teach your family how to safely and effectively use flares. Made in the USA.
Pros:
Ideal for roadside emergencies — every motorist is used to seeing them used at accident scenes to redirect traffic
Waving a bright red flare makes you immediately visible, even during full daylight
Cons:
Their size and weight make them better-suited to storage in a vehicle rather than a backpack
Not the most effective of our lineup of emergency signaling devices during the day
What would your ultimate overland Jeep build look like? Each of our answers will be a little different, but they’ll probably share some common ground — mud tires and increased ground clearance for overcoming obstacles, a winch and other recovery tools for getting un-stuck, auxiliary lighting for visibility on dark trails, onboard communication and navigation gear, and plenty of storage for gear and supplies. Brownells teamed up with builder and fabricator Yeti Built to create their vision of the ultimate overland Jeep, dubbed the Adventure Dream Rig (ADR).
Last year at Overland Expo, Mike Glover and the RECOILtv film crew caught up with Brownells CEO Pete Brownell to take a closer look at the Adventure Dream Rig. Brownell drew an interesting comparison between modifying the Jeep and modifying common gun platforms like the AR-15. Each serves as a blank canvas for a slew of aftermarket accessories and upgrades, many of which can be installed in your garage or home workshop.
Photo via Yeti Built
The Brownells ADR overland Jeep build was stripped down to the chassis and a Corvette LS3 V8 was installed, along with heavy-duty 8-lug axles and suspension parts from Teraflex. It then received sheetmetal bumpers, KC Hilites lighting, 40-inch Mickey Thompson tires on 17-inch beadlock wheels, a 10-inch body stretch, a custom all-aluminum hardtop, and internal and external roll cages. That’s barely scratching the surface. For an even more detailed look at the Brownells ADR Jeep, check out the video below:
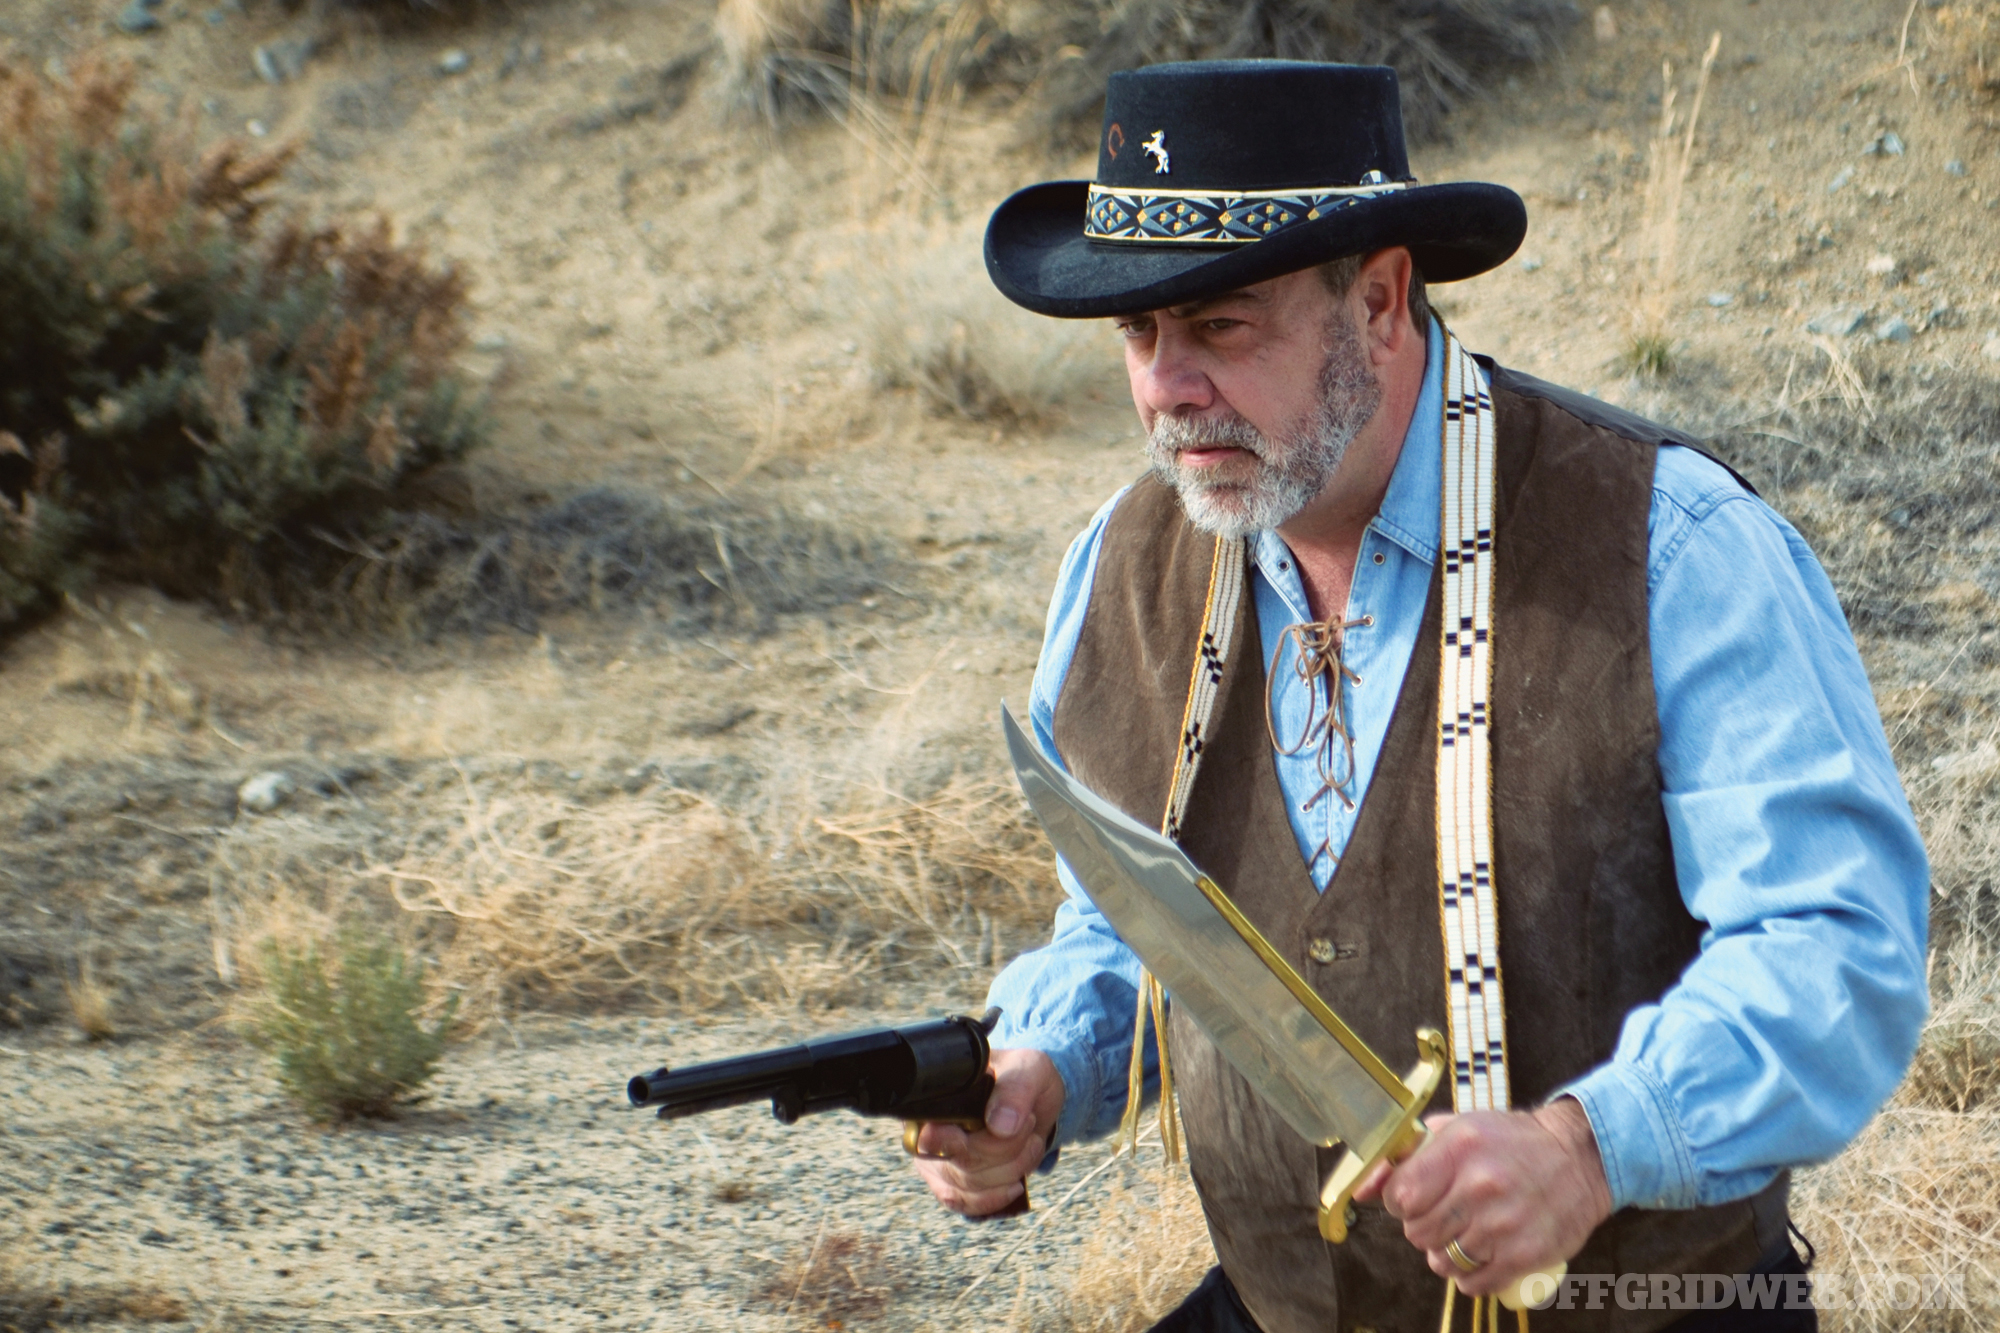
If there was ever a quintessential American knife design, it would have to be the Bowie knife. Its murky origins have a mysterious shroud, but once word of this knife got out, people had to have one. When westward expansion began and folks had to survive in the harsh realities of pioneer life it became, in a way, the first modern survival knife. Read on for an overview of Bowie knife history, characteristic features, and modern variations on this classic design.
Bowie Knife History & Origins
The Bowie knife first rose to prominence because of a duel in which Jim Bowie was an observer. It took place on Wednesday, September 19, 1827, on a sandbar outside of Natchez, Mississippi. Although the two duelists in question fired their shots and settled the dispute with a handshake, the other 15 attendees engaged in a brawl known today as “The Sandbar Fight.”
Above: As firearms became better, the Bowie became smaller. Pictured: Cold Steel 1917 Bowie (top) and Craig Camerer Damascus Bowie (bottom).
Bowie had a reputation as a fearsome brawler and was specifically targeted. Exact accounts vary, but Bowie was allegedly shot at least three times, impaled with a sword cane, had a pistol broken over his head, and stabbed between four and seven times. All eyewitness accounts do agree that he didn’t start the fight, but he matched and bested multiple opponents single-handedly with a large knife.
The knife in question has been described as being “9¼ inches long, 1½ inches wide with a single edge and a straight blade,” by Texas historian William Kennedy in an 1841 history on the Republic of Texas. It was said to have been made by Bowie’s brother, Rezin Bowie, although some sources (including Bowie family members) state that Rezin only supervised the blacksmith who made it. Still other sources claim it was a large butcher knife in the “Spanish design.”
An alternate claim, backed by some, is that after the Sandbar fight in 1830, Bowie hired a blacksmith named James Black to craft a formidable fighting knife for him based on Rezin’s design. Black was said to have made two of these knives with a clip-point type of blade — one with an unsharpened top edge, the other with the top edge sharpened. He asked Bowie to choose one. Bowie chose the one with the sharpened top edge.
Accounts vary, but most of the time the knife was depicted as having a coffin-shaped handle. Most versions had a cross guard to prevent the user’s hand from sliding forward onto the blade. Many blades had what was described as a Spanish notch cut near the hilt. Like the cross guard, it was said to have been intended as a “blade trapper,” but more than likely performed a more mundane function such as a reference point for sharpening or as a means of stripping sinew.
This knife’s pattern became known as the Bowie knife. Even though Jim Bowie never made one, he became the owner of this iconic design.
Above: Bowie knives were more commonly used as a weapon as opposed to a tool on the frontier.
Between the Sandbar Fight and Bowie’s legendary knife fights afterward, everyone wanted one of his knife designs. This was a time when unreliable single-shot black powder firearms ruled the roost — it would be a good 20 years before we’d see the first Colt revolver. Most personal combat was resolved by knife, sword, or hatchet at the time.
A March 1847 article by J.C. Robertson in The Mechanics’ Magazine referred to the Bowie knife as “a wearable, convenient, close-combat weapon — a short sword much shorter than the saber or other swords of the day, yet still possessing a heavy blade. This cleaver-like blade had enough weight to give the blade sufficient force in a slashing attack, while permitting the use of cut-and-thrust sword fighting tactics.”
These qualities were beneficial as a “survival knife” in the old west. Arkansas historian Russell T. Johnson describes the qualities of a Bowie knife: “It must be long enough to use as a sword, sharp enough to use as a razor, wide enough to use as a paddle, and heavy enough to use as a hatchet.”
As stories in dime novels about explorers and western heroes using Bowie knives intensified, so did the desire for readers to own one. Perhaps the most famous use in literature was in Bram Stoker’s Dracula. Contrary to what’s shown in movies, the vampire meets his end by means of Quincey Morris’ Bowie knife and Jonathan Harker’s kukri rather than by a wooden stake through the heart.
American blacksmiths couldn’t keep up with the demand, and quality Bowie knives from factories in Sheffield, England, soon flooded the market and kept America in good supply for well over a century.
Legalities of the Bowie Knife
Bowie knives were often condemned as the “assault weapons” of their day. They were outlawed by name in states such as Louisiana, Virginia, Mississippi, Tennessee, and even the Great State of Texas. The most extreme of these “Anti-Bowie Knife Ordnances” was the state of Alabama, which passed a law in 1837 imposing a $100 transfer tax on Bowie knives ($2,679.25 in today’s dollars) with the added caveat that if a Bowie knife was used in a physical altercation resulting in death, regardless of self-defense, the owner would be convicted of premeditated murder.
As these laws would pertain to butcher knives, machetes, and other working blades, they were mostly not enforced. The primary goal was going after the practice of dueling. Eventually, many of these laws were repealed. Ironically, the last state to do so was Texas, where Jim Bowie is regarded as a founding father. In 2017, Bowie knife history came full circle when Texans could once again legally carry this knife. Always check local laws before carrying any type of knife.
Does Size Matter?
Above: Gil Hibben Expendables Bowie and a prop knife from the 1992 film Dracula.
Buffalo Bill Cody was said to have carried a Bowie knife with a 16-inch blade, and Confederate troops in the U.S. Civil War were said to have carried D-Guard Bowie knives of that length and sometimes longer. In a time when a good knife represented a somewhat sizable investment and it had to perform a variety of tasks, most Bowie knives were on the large side, with 12 inches being the maximum blade length.
Its versatility as a tool saw it replace the tomahawk that had been so popular in the eastern United States as settlers moved westward. Primarily intended as fighting knives, brass spines welded to the back of the blade and hand guards or knuckles appeared here and there. However, as firearms technology improved, the size of the Bowie knife seemed to become smaller, and by the 1880s, it seemed to be more of a handy and useful tool as opposed to a “sidearm” as it had been in the previous half-century.
That’s not to say that the knife ever dropped from common use. On the contrary, throughout Bowie knife history, its design went on to influence other knives and the men and companies who made them.
The sharpened top edge seemed to disappear as it was a detriment to skinning game, and certain states outlawed double-edged knives, but the clip point remained. To this day, it may be the most obvious sign that one is looking at a Bowie knife. Still, knife catalogs from the 19th century reveal dagger-type blades being advertised as “spear-point” or “San Francisco” Bowies.
Legacy of the Bowie Knife
Above: The influence of the Bowie is popular in military knives such as the KaBar (left) and SOG Bowie (right).
When we think of a modern survival knife, that thought can encompass many different designs from the sawtooth spines on Rambo knives of the 1980s, to modern bushcraft knives that appear more Scandinavian in design, to machetes and kukris.
Bowie knives are still manufactured today as reproductions of the originals or a maker or manufacturer’s interpretation of the original. Yet we can see the influence of Bowie knife history in other knives, including the aforementioned “Rambo knives.”
The Bowie’s clip point inspired the legendary Ka-Bar knife, the U.S. Air Force knife, several Randall models, and a unique military knife made for Special Operations Forces in Vietnam known as the SOG Bowie. Even the Rambo knives we mentioned previously from the forges and workshops of custom makers like Jimmy Lile and Gil Hibben have the Bowie influence. Buck Knives designed a fixed blade model in 1942 in response to the U.S. Military’s request for knives for use in World War II. That Bowie-inspired design is still going nearly 80 years later as the Model 119. There are even pocket knives inspired by the Bowie, from Buck’s legendary 110 that has been in production for over 50 years to newer designs by Emerson, CRKT, and Spyderco.
Above: The Bowie has decreased in size for modern EDC users, but the blade shape is still very useful. (Left to right: Spyderco Ed Schemmp Bowie, Buck 110 Automatic and SOG Pillar.)
The Forged Blade
Be it pattern-welded Damascus or some other type of steel, Bowie knives that are forged as opposed to made by the stock removal method represent some of the most sought-after knives for use and collectability. This is particularly true for those made by a member of the American Bladesmith Society (ABS).
One of the qualifications to become a Master Smith from the ABS is to forge a pattern-welded (Damascus) Bowie knife with a maximum blade length of 10 inches and a maximum overall length of 15 inches with a stick tang. After this knife is judged on appearance for fit, finish, and artistic merits, it must pass a series of tests including cutting a free-hanging 1-inch-thick piece of Manilla or sisal rope, hacking through a 4-foot-long construction-grade 2×4 and shaving arm hair to demonstrate its ability to retain an edge after the wood hacking. Subsequently, the knife is bent in a vise to see if it will return to place without deforming or breaking.
This testing is based on the legendary qualities of the Bowie knife, and although it’s an arduous test, many bladesmiths are successful. In 1988, the ABS founded a Bladesmithing School in collaboration with Texarkana College, the Pioneer Washington Foundation, and the Arkansas State Parks Department on the grounds of Historic Washington State Park in Hempstead County, Arkansas. This school was located near where historians believed that James Black may have forged his first Bowie knife.
Is a Modern Reproduction Bowie a Viable Survival Knife Today?
In the realm of reproductions, there have been a lot of subpar knives throughout Bowie knife history. They may have the size and shape down pat, but often the materials are questionable.
Sure, they can have stag (or stag-like) handles and be emblazoned with the American flag, bald eagles, or other artistic renderings of patriotism. However, as with any knife, read labels carefully, especially if you’re going to actually use it. Be cautious of imported knives at a low price point, too.
Luckily, plenty of companies from Cold Steel to Spyderco make reproduction Bowies that are true workhorses. Custom knifemakers affiliated with the American Bladesmith Society and Knifemakers’ Guild routinely turn out high-quality knives that are not only stunning to look at but will perform as the best of the lot.
Of course, the price typically reflects this.
As an aside, when I served as a U.S. Marine a lifetime ago, I was an avid knife collector and had a number of Bowie-inspired survival-type knives that were popular in the 1980s that I chose instead of my issued Ka-Bar, which had a completely unserviceable edge. After a few outings to the field, I found their weight and bulk to be more of a burden than they were worth for most of my cutting chores. I opted to carry an extra canteen of water and a smaller fixed blade in the form of a privately purchased Ka-Bar or SOG Bowie. These knives have the same qualities of the legendary Bowie in a much lighter package.
A Bowie knife can vary in size, materials, and even in blade shape to a degree, but somehow, we all know one when we see one. From its days on the frontier to its uses today it is, in essence, a melting pot of design. From the Alamo to Afghanistan or from Dracula to The Expendables, whenever we see one, no matter its shape, size, or country of origin, we can’t help but feel a twinge of American pride after learning about Bowie knife history.
We’re always on the lookout for new survival gear, and we publish an overview of our findings in each issue of RECOIL OFFGRID. In Issue 37, we took a quick glance at new survival gear from 12 companies, ranging from knives and tools to hunting weapons, shelter, and apparel. Read on for more details on these products.
Notes At first glance, you might think the Enigma is an aptly named object. After all, its purpose in life isn’t immediately apparent. But upon closer inspection, it becomes clear what this clever device can offer. The one-piece multi-tool has a set of wrenches (in metric or standard), a prybar that can also work as a screwdriver in a pinch, and not one but two bottle openers (for both pry-off or twist-off caps). And the slit in the main body allows you to slide it onto your belt loop, acting as a suspension clip for your keys so they’re not sitting in a big pile at the bottom of your pocket. And because it’s made of titanium, the Enigma is super strong yet amazingly lightweight. Made in the USA.
Notes The Pocket Shot revolutionized the slingshot genre when it arrived a few years back. Its plastic ring and elastic pouch allowed you to shoot a wide range of projectiles at two to three times the rate of a regular slingshot. Now there’s the Pocket Shot 2.0. This next evolution has a silicone grip around an aluminum chassis, which works on a set of three gimbals that swing and pivot for greater accuracy. It can shoot anything from marbles and smooth rocks to 1/4-inch steel slugs — up to 350 feet per second. While it might not bring down deer during the end-times, it can take small game and varmint. Plus, this little weapon can pack down into your pocket or the included carrying case. Made in the USA.
Notes Can’t decide between a huge fixed blade and a more modest folding knife. Split the difference with the 0223. It combines the aesthetics of a classic military knife with the design of an EDC blade. The result is a gorgeous specimen that harkens back to its vintage battlefield roots but functions brilliantly with modern practicality. The titanium frame-lock handle is wrapped by brown G-10 scales, which increases “grippyness” while reminding us of the leather handles of old-school military models. The premium 20CV blade steel is crazy sharp, incredibly tough, and highly corrosion resistant — all the while holding a mean edge. Plus, with a push on the flipper tab, the 3.5-inch manual blade flies out smoothly as if it were spring-assisted. Bonus points for the pocket clip being adjustable for righties and lefties.
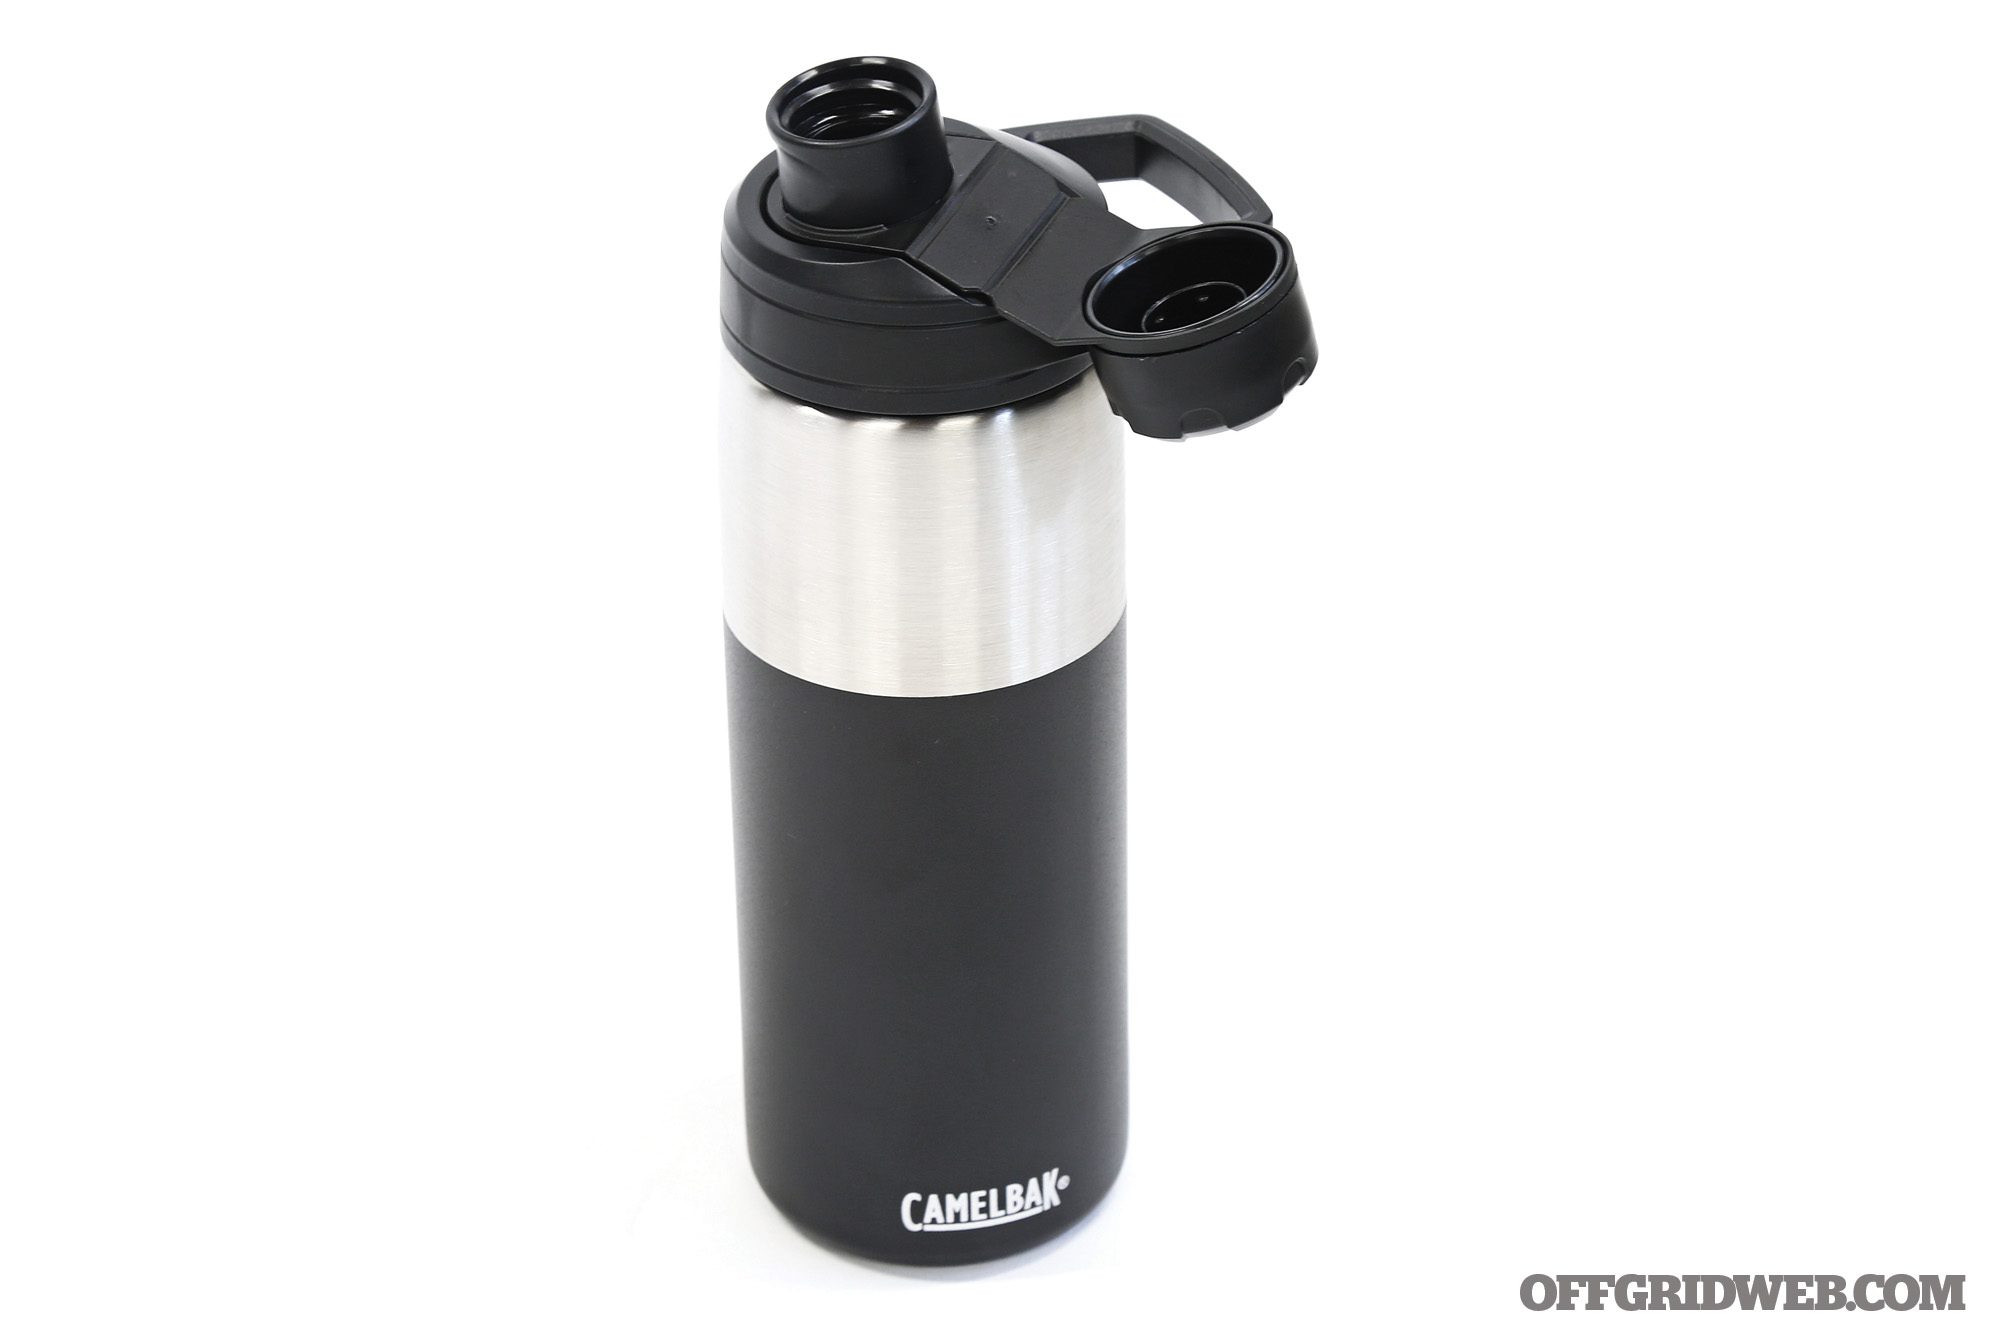
Notes Anyone who’s ever used a water bottle with a screw-top cap knows how annoying it can be to have the lid accidentally slip out of your hands and fall in some dirt or roll under your driver seat. The Chute Mag from CamelBak fixes that common problem by not only having the leak-proof lid stay attached when opened but also stows it securely out of the way, thanks to its integrated magnetic top. The cap is also compatible with CamelBak’s other popular bottles, such as the Eddy. Made from 18/8 stainless steel, the Chute Mag is double-walled vacuum insulated to keep your hot drinks toasty for six hours and your cold drinks chilly for 24 hours. It’s BPA, BPS, and BPF free.
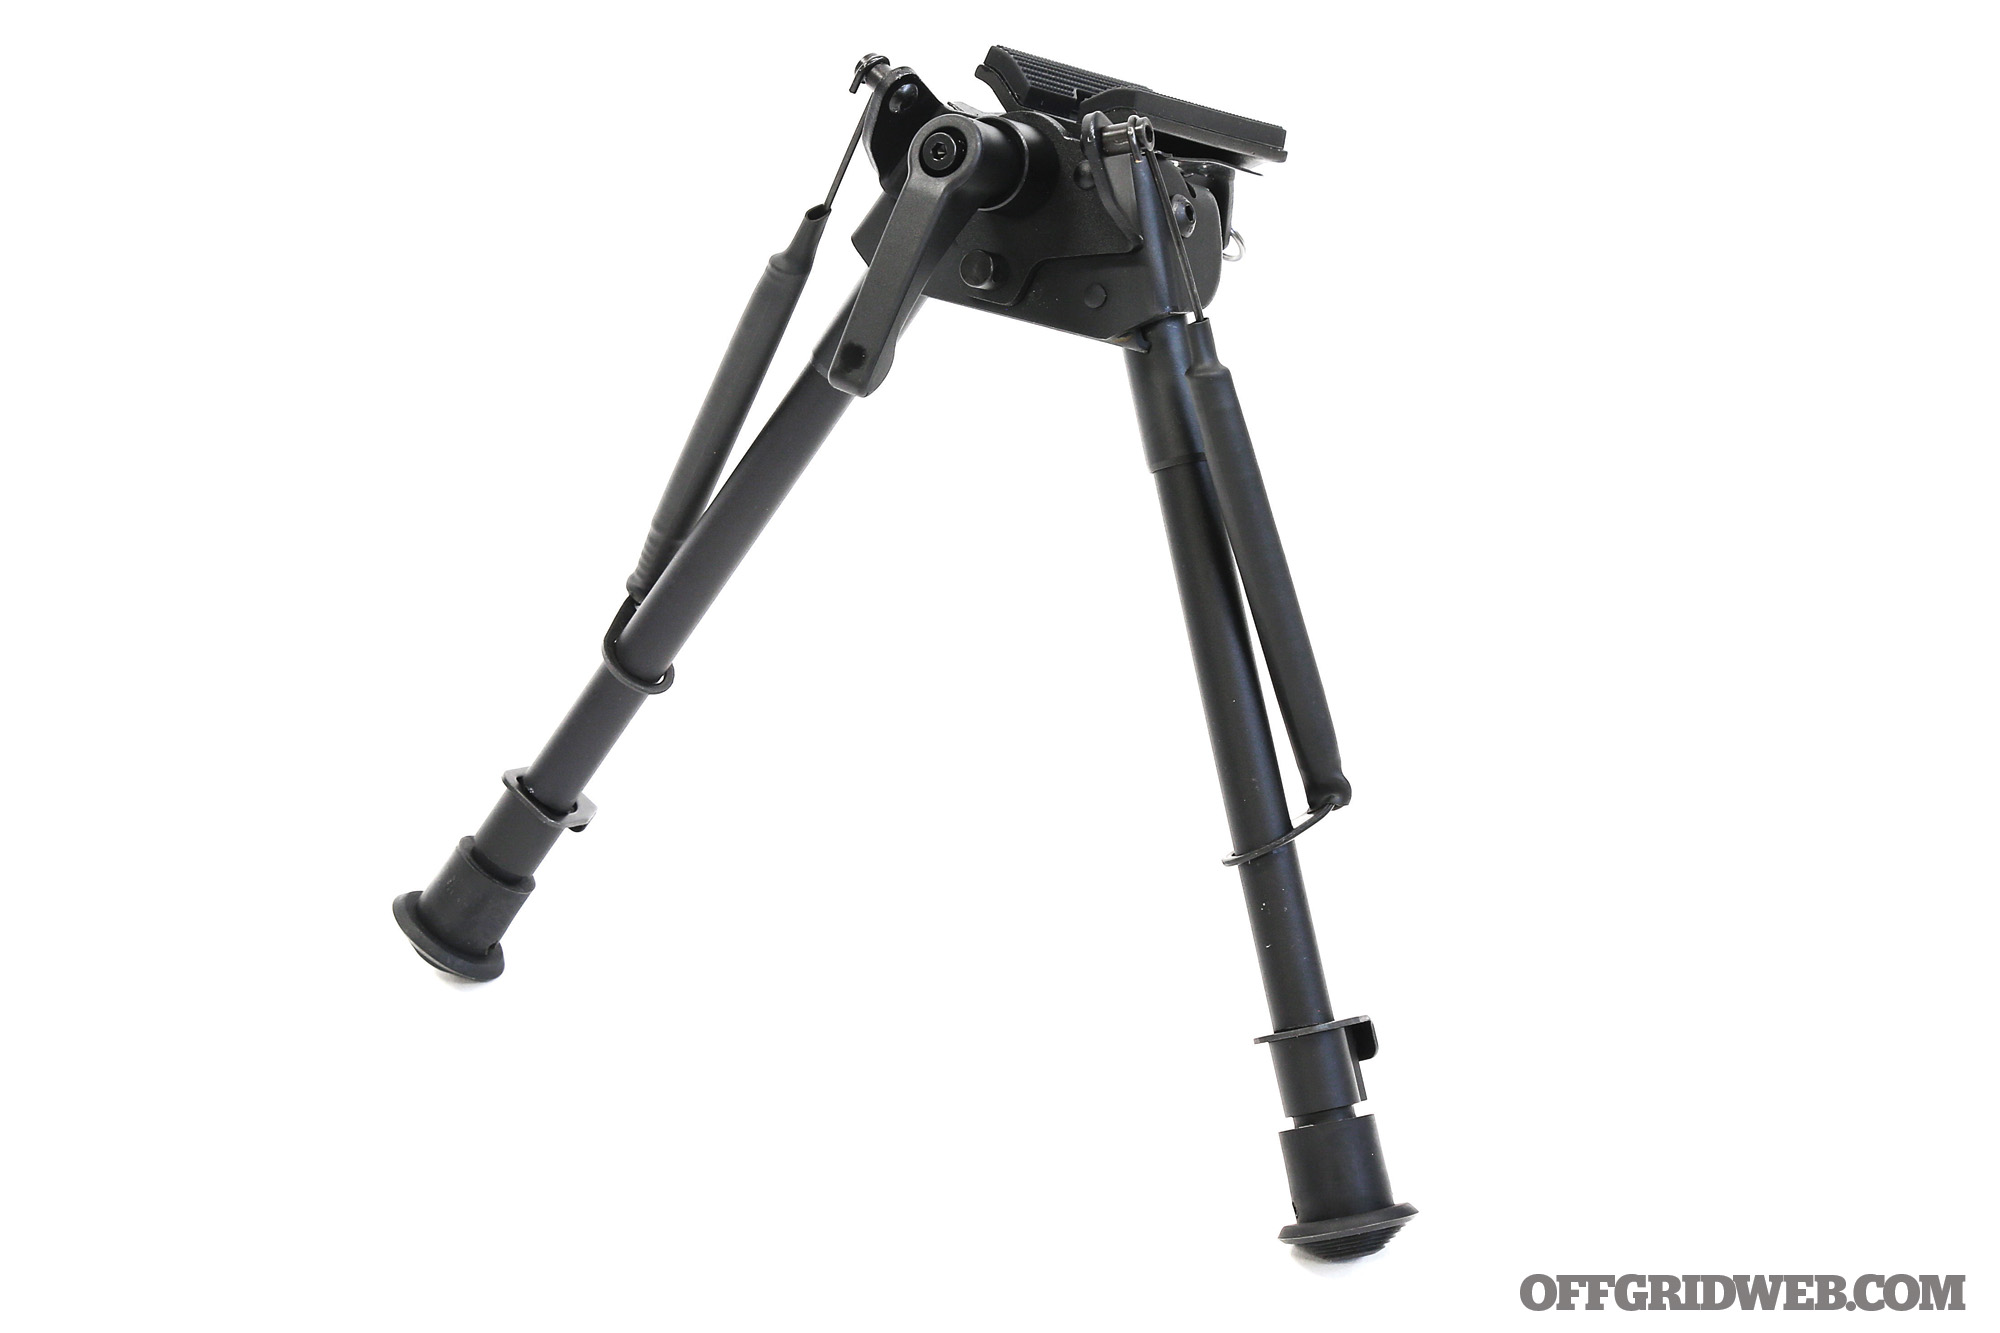
Notes When it comes to taking down game — big or small — a long-gun will be far more advantageous than a handgun. And a long-gun with a bipod is even better for accurate shooting because it stabilizes the weapon on two axes: laterally and up and down. It also lets you rest in a more comfortable position, which is key if you’re in a hide or need to wait awhile for the perfect shot. This Hawke model provides an affordable yet reliable bipod with height-adjustable, spring-loaded legs that can stretch from 9 to 13 inches, allowing you to level your rifle on most terrain. It attaches easily to a swivel stud and works with a rifle sling attached, making the Tilt Bipod both useful and easy to use.
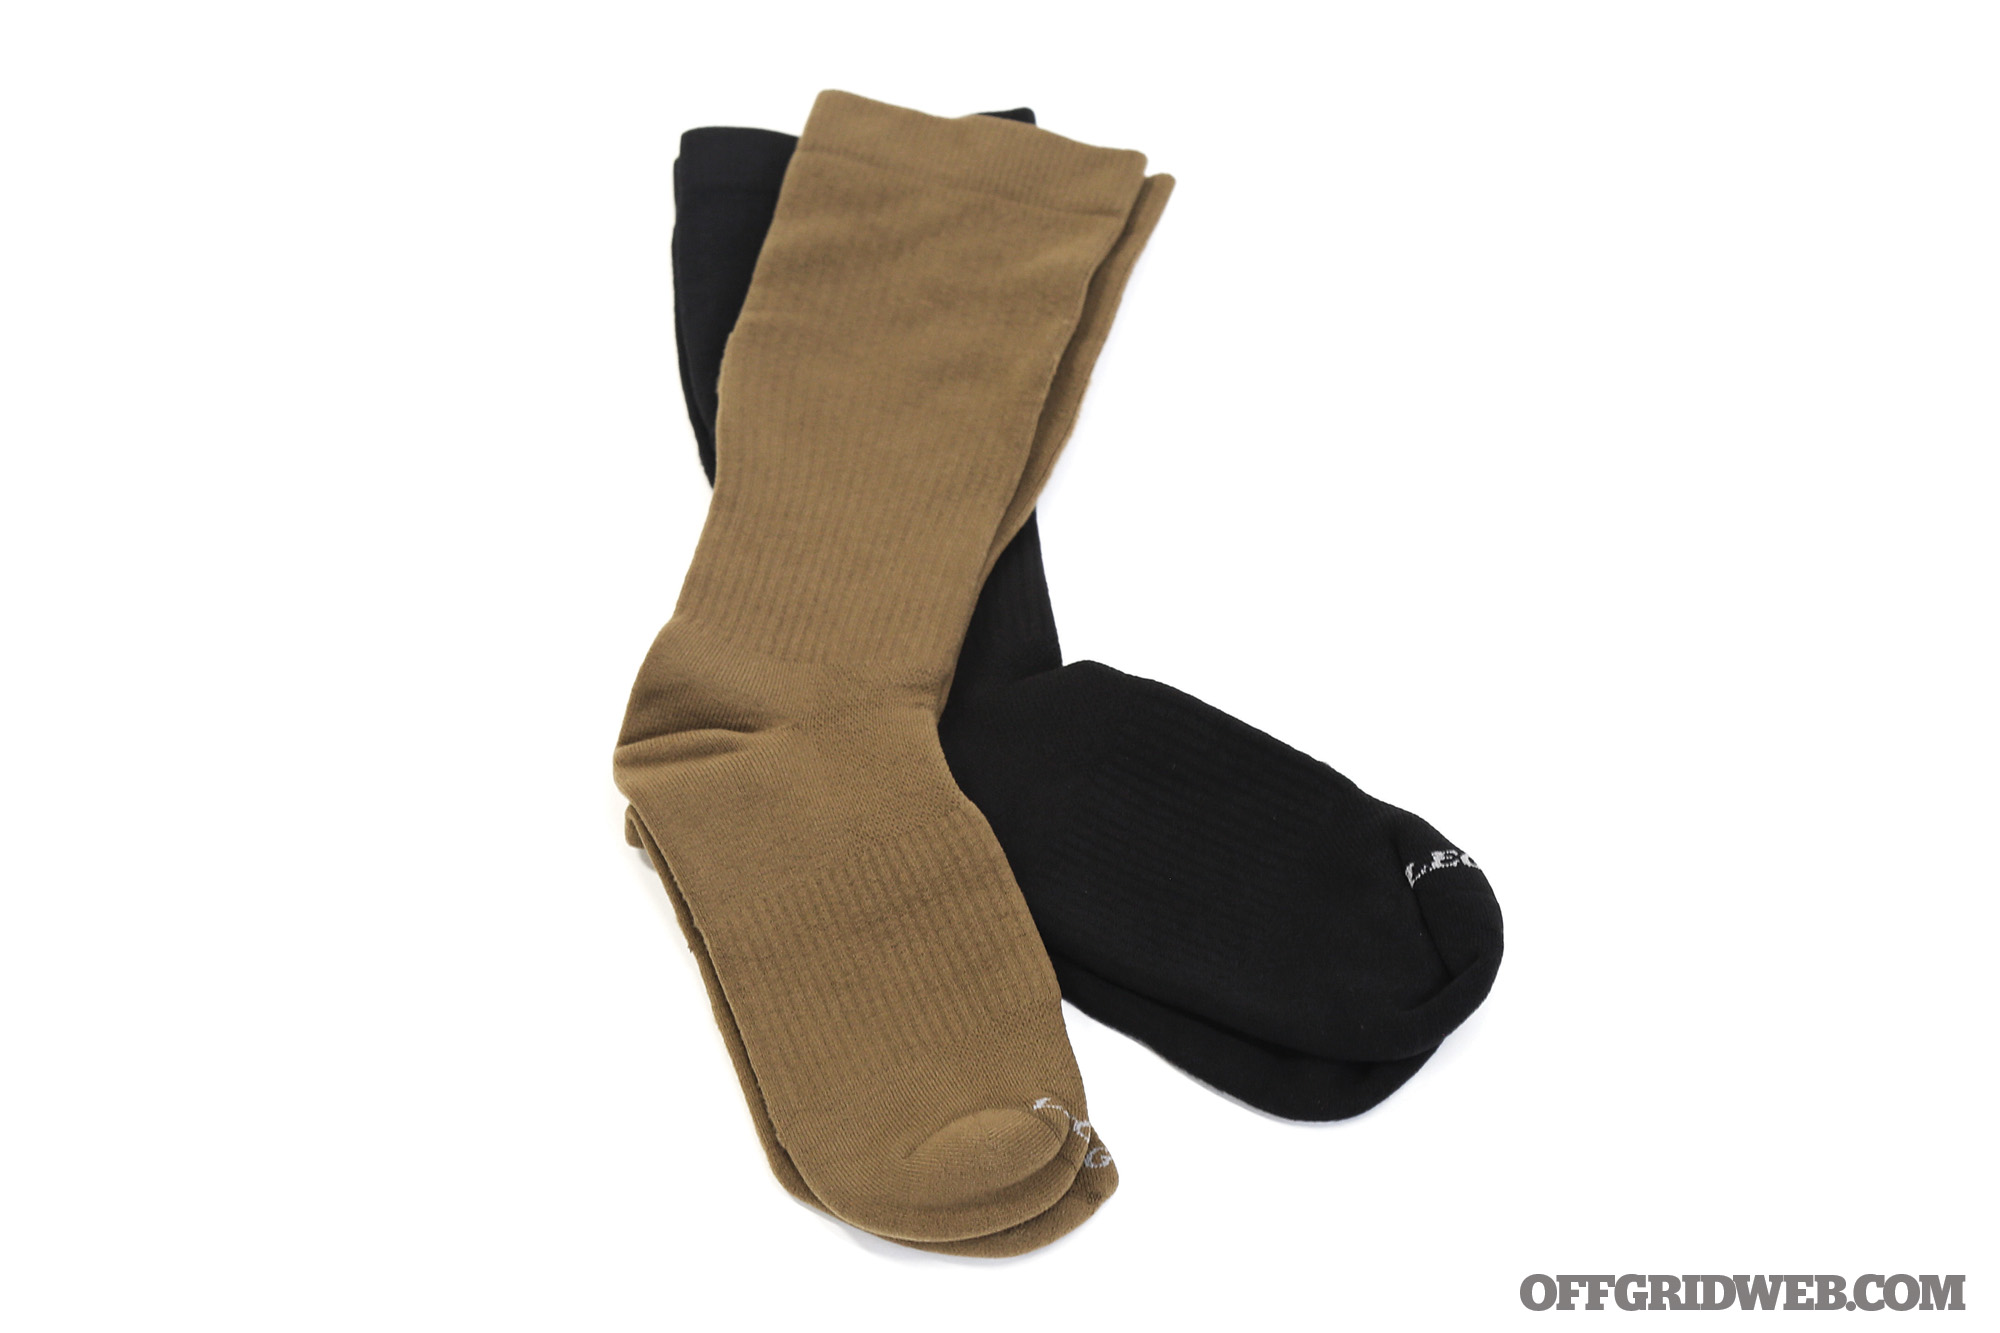
Notes Anyone who’s ever hiked or marched for any serious amount of time knows the first point of failure is usually your feet. And that can be exacerbated by wet or thin socks. Enter the Warm Weather Compression Tactical Boot Socks from Legend Compression Wear. These socks offer both superior wicking ability to stay dry and compression to improve circulation and reduce achiness. The midcalf socks are made of 95-percent nylon and 5-percent Spandex and have extra wide arch support, providing a good mix of comfort and durability while absorbing and then evaporating moisture away from the skin. Legend makes all of its socks in North Carolina and provides socks to various military and law enforcement units, including members of the U.S. special operations forces.
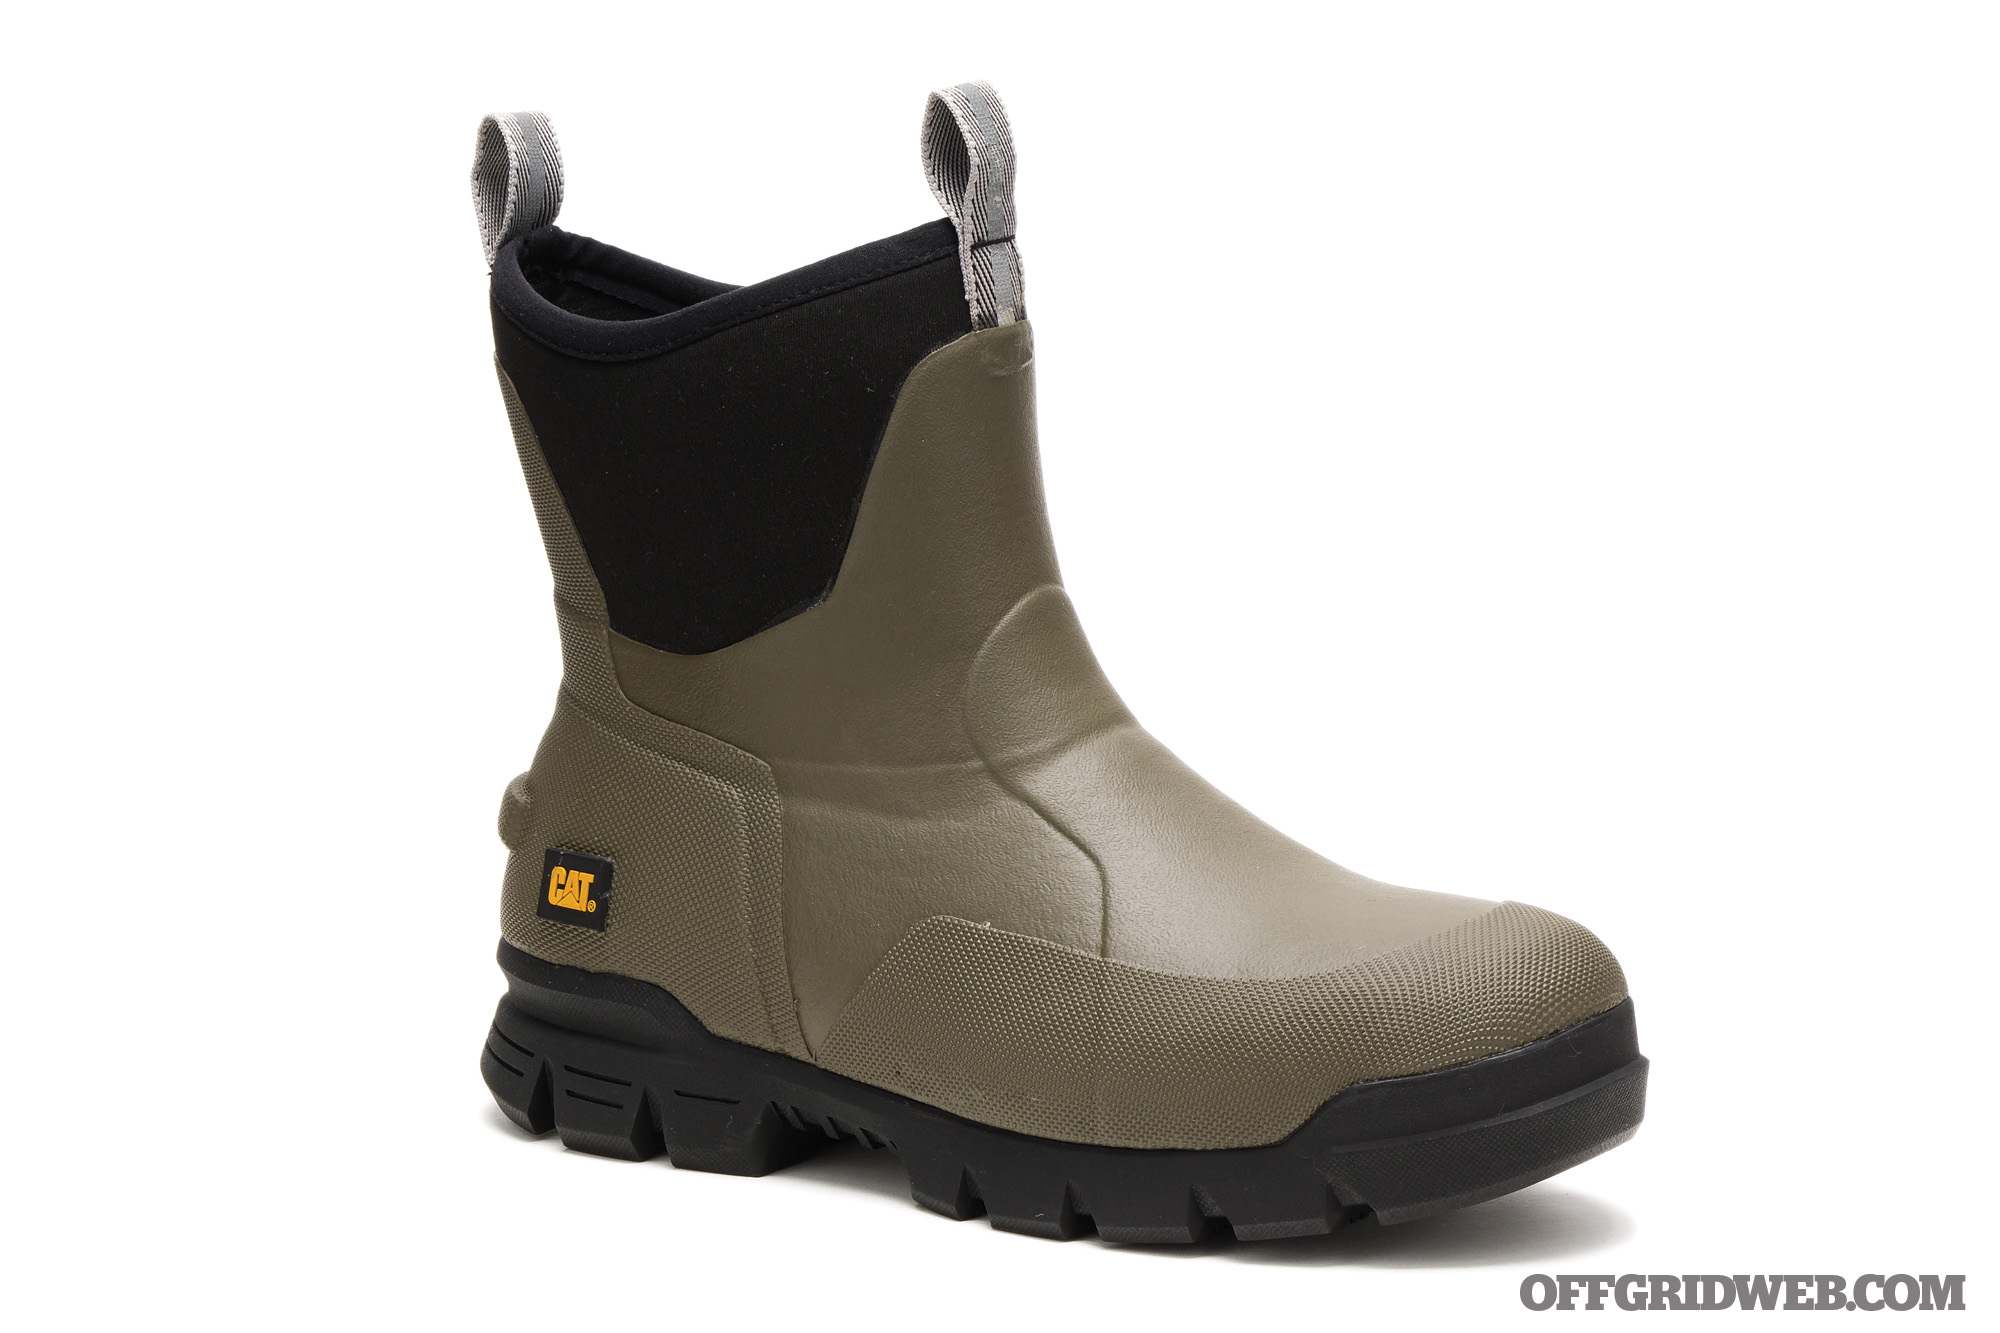
Cat Footwear Stormers 6” Boot
Colors Black, Cat Yellow, Dark Pink, Light Blue, Light Purple, Olive Night
Notes You know what brings May flowers, right? So, you better have the proper footwear for the deluge that’s to come this spring. Sure, not every region will experience flooding or torrential rainstorms, but rubber boots can still be handy for trekking through ravines or working in your backyard. And the Stormers have the added benefit of being rated to protect against open circuits up to 600 volts in dry conditions, making them reliable for work sites, too. The waterproof boot features multilayered vulcanized rubber for extra moisture protection and increased durability while its outsole offers both traction on uneven terrain and ergonomic flexing that moves with each step. It’s available with soft or steel toes and in 6-inch or 11-inch styles.
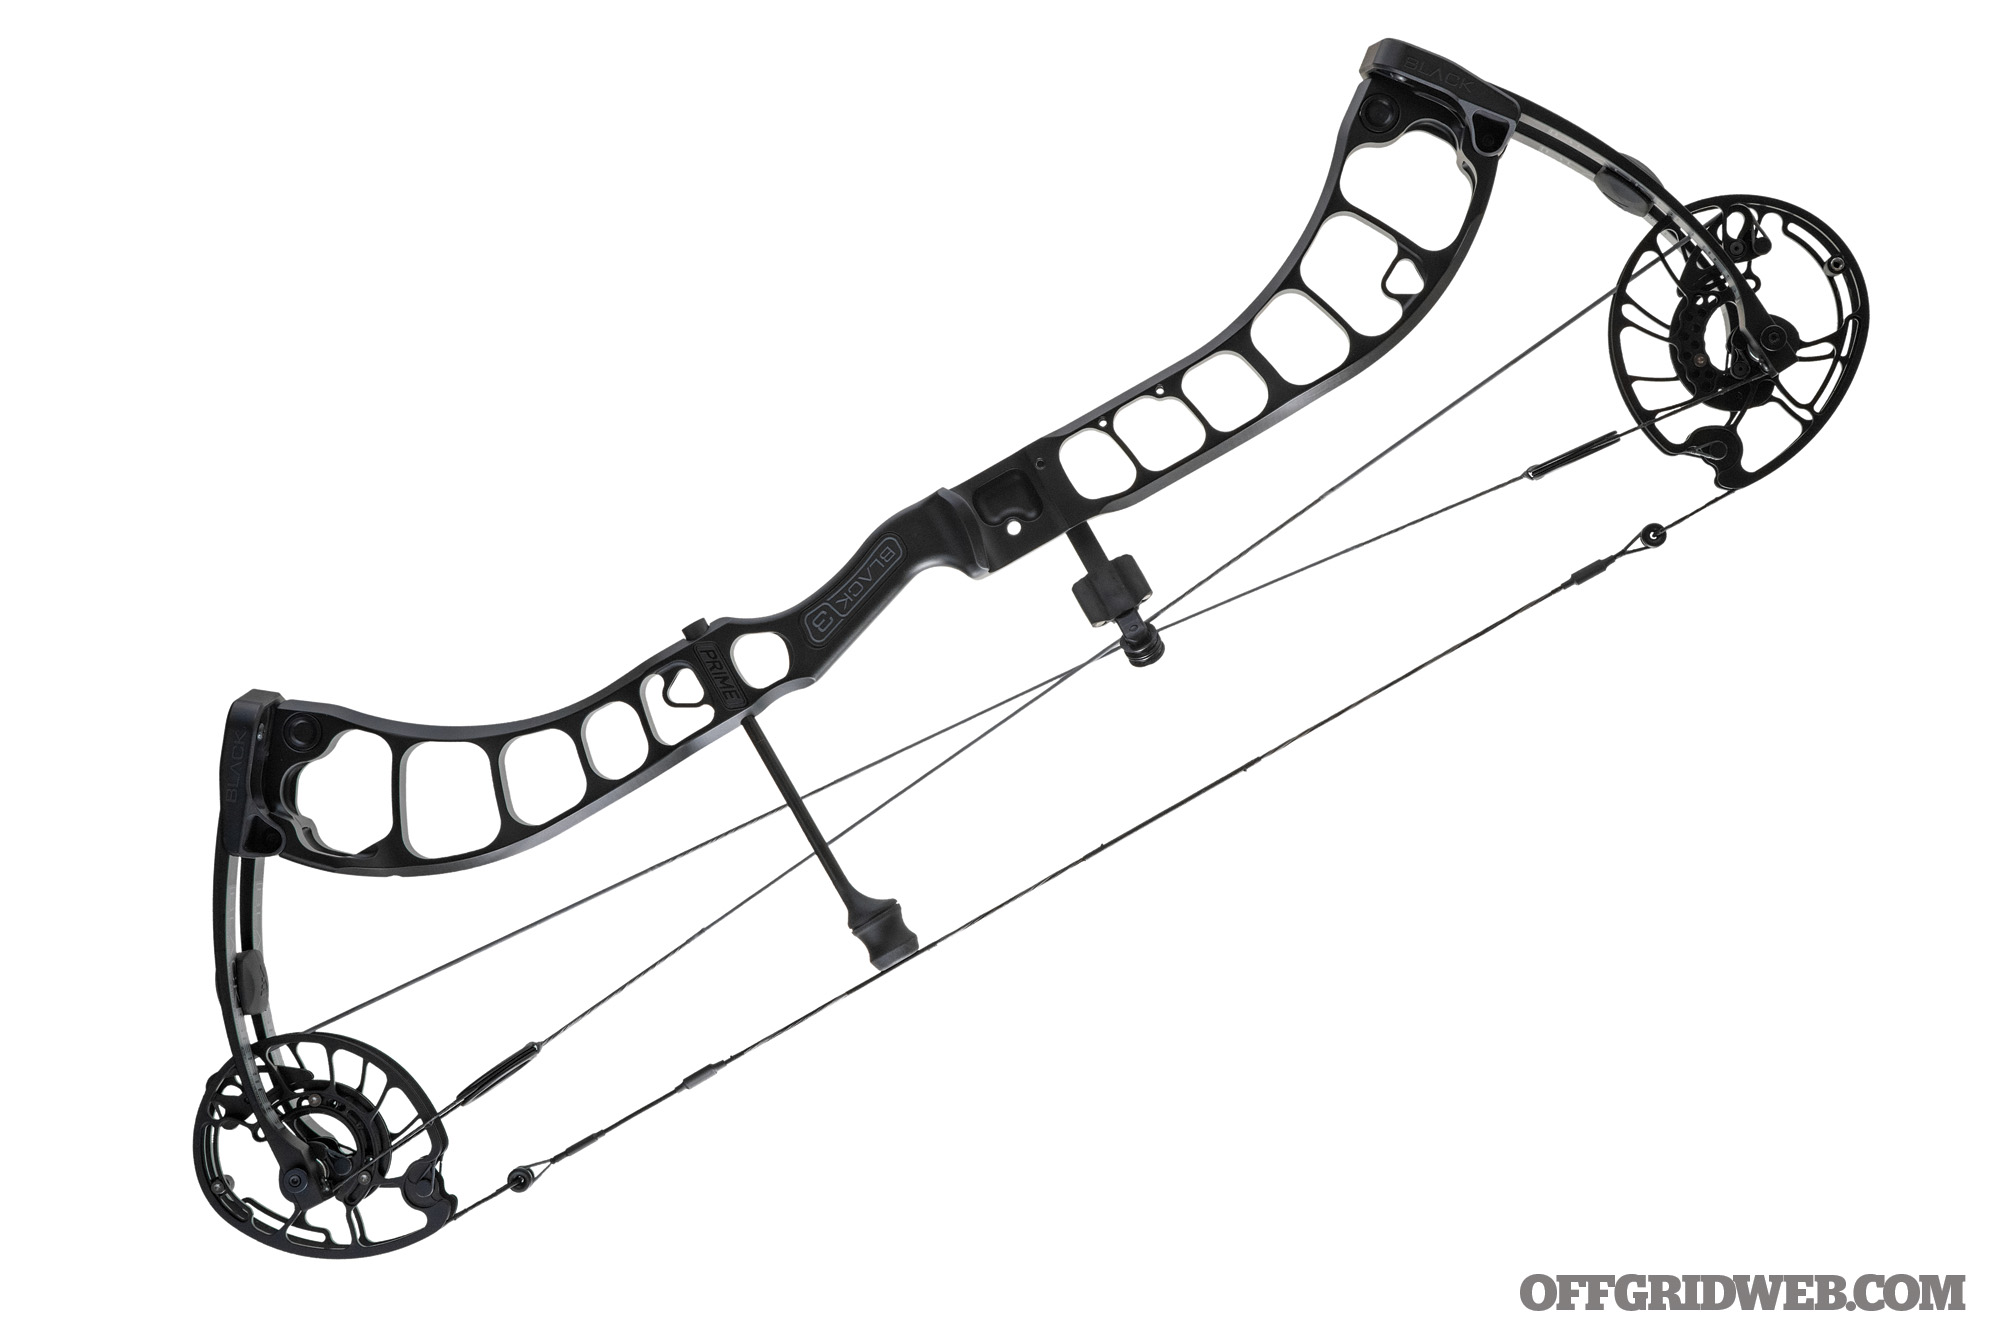
Notes A bow might be based on an ancient platform, but it’s by no means an out-of-date weapon. Take for example Prime Archery and its recently released Black Series of compound bows. The Black 3 features quality materials and Prime’s state-of-the-art Roto Cam technology, which has a rotating module on the cam that allows for easy and precise draw length adjustments. The archer just needs an Allen wrench to adjust the bow in half-inch increments. With a velocity of 337 feet per second, axle-to-axle length of 33 inches, and draw weights of 40, 50, 60, 65, 70, or 80 pounds, the Black 3 is a slick bow with a cutting-edge design and a premium price. But you’re certainly getting what you pay for.
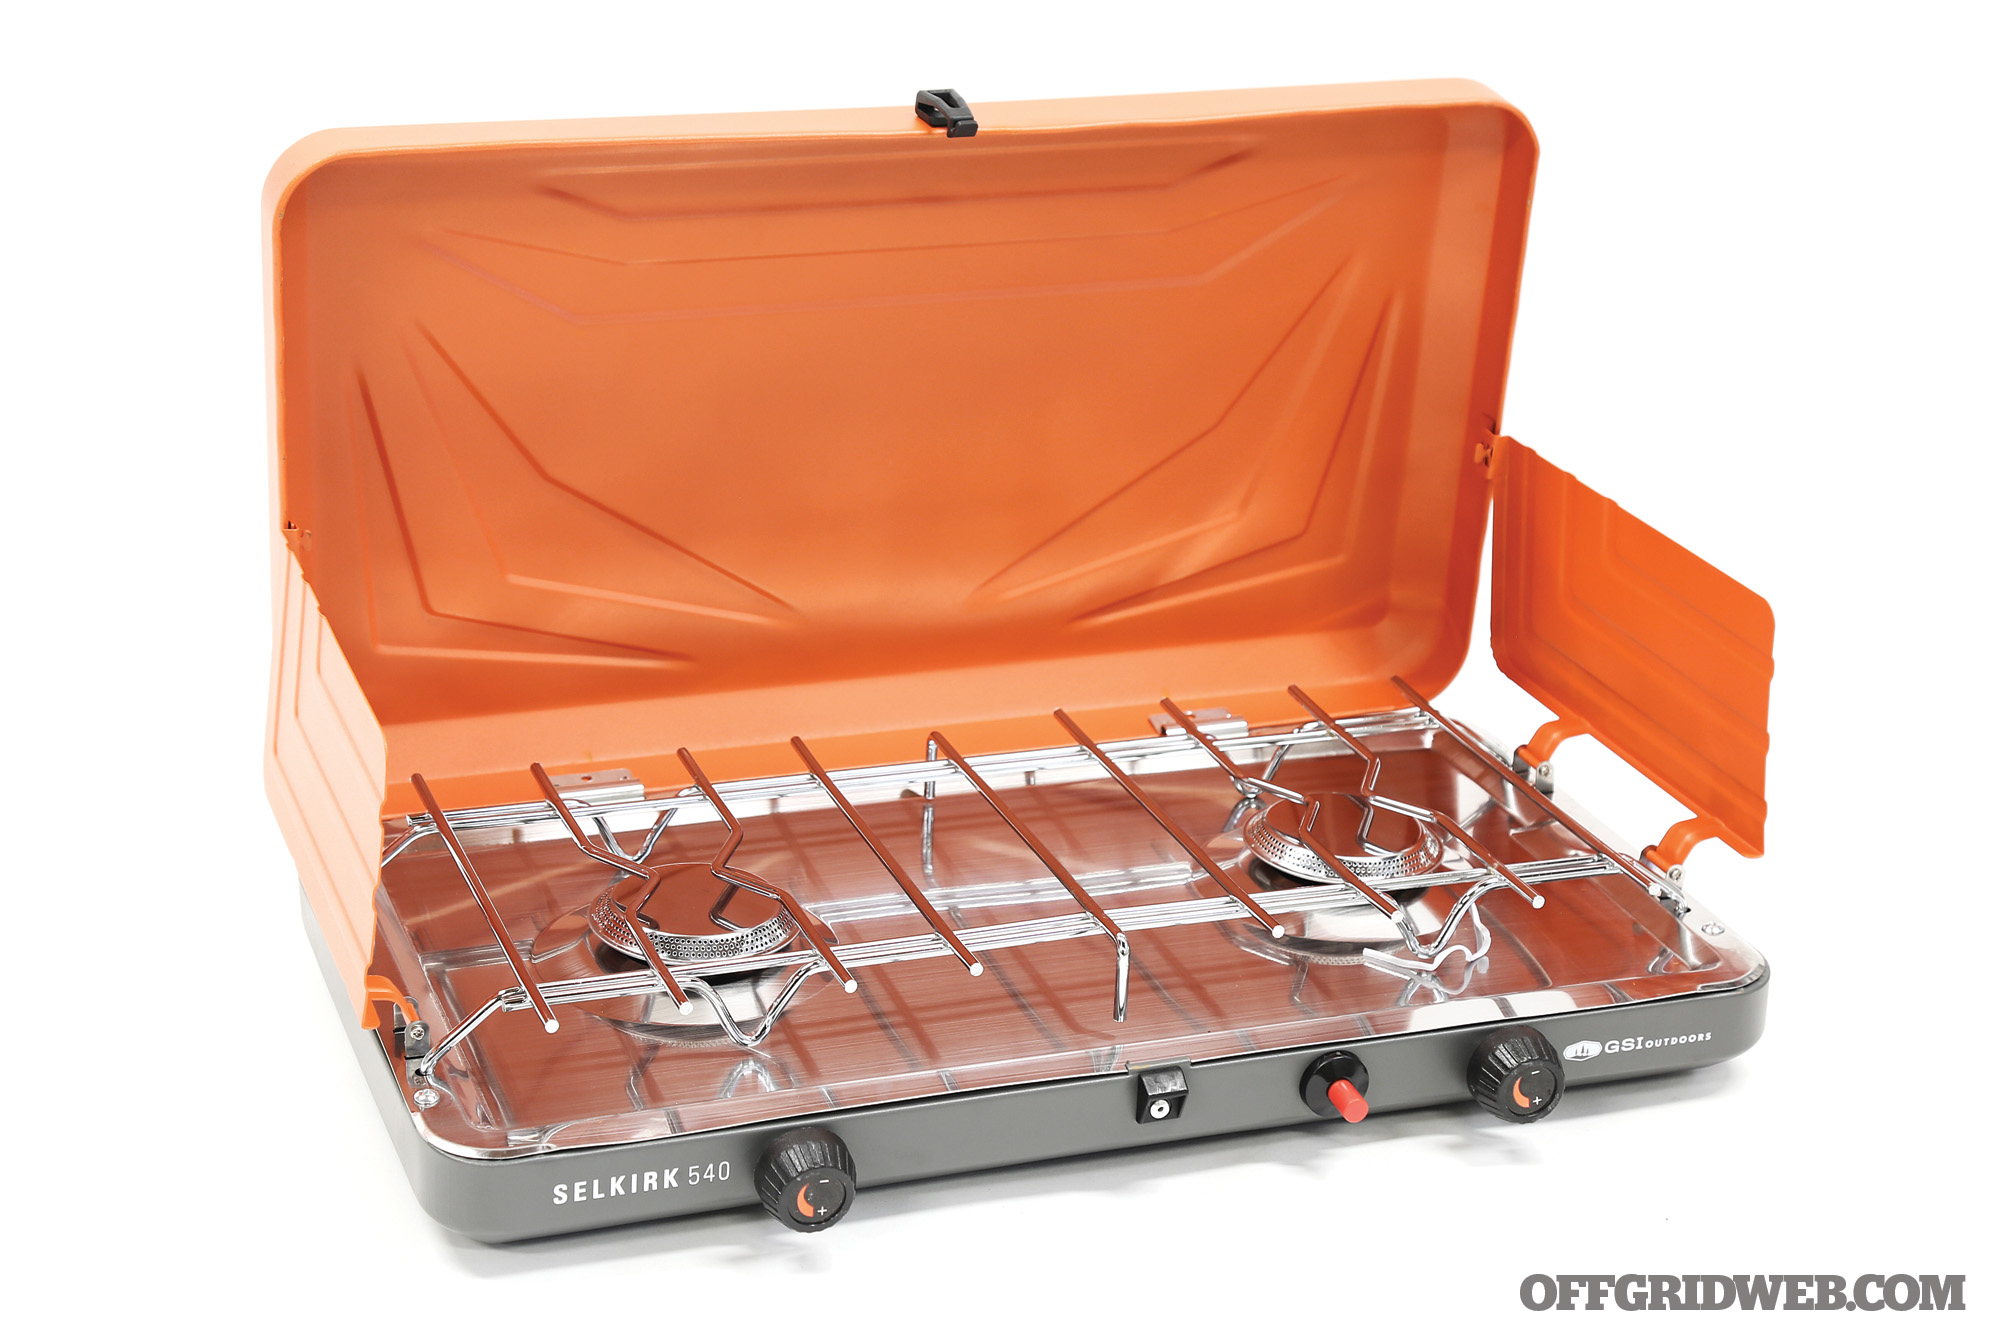
Notes As much as we love testing our survival skills by roasting a fresh kill over an open fire that we built with a hand drill, we’re far more likely to use technology to our advantage. So the Selkirk 540 Camp Stove is a welcomed addition to our outdoor gear. It houses two 10,000 BTU/h burners, allowing you to cook with two pots or pans simultaneously. Each burner has an individual control valve, so you can boil water quickly on one while letting your food simmer on the other. Perhaps the best part is its slim design. The wraparound windscreens keep the wind away from the burners when open, but can fold down flat quickly, while the integrated carry handle boosts its portability.
First Lite Men’s Fuse Henley
Colors Black, Conifer, Dry Earth, First Lite Cipher, and First Lite Fusion
Notes It’s hard to beat wool because it’s nature’s super fabric. In cold weather, sheep’s clothing will retain heat even when wet (while cotton will just freeze). It’s naturally breathable and moisture wicking so — despite the misnomer — it can help keep you cool in warm weather. And it’s odor resistant! The only downsides are that it can be itchy, and it doesn’t last as long as other materials. Which is why First Lite combines its merino wool with nylon fibers, boosting durability and eliminating itchiness. Its Fuse Henley is a great example of this. The lightweight shirt works great as a base layer for those cold spring mornings or as your only layer when the sun comes out.
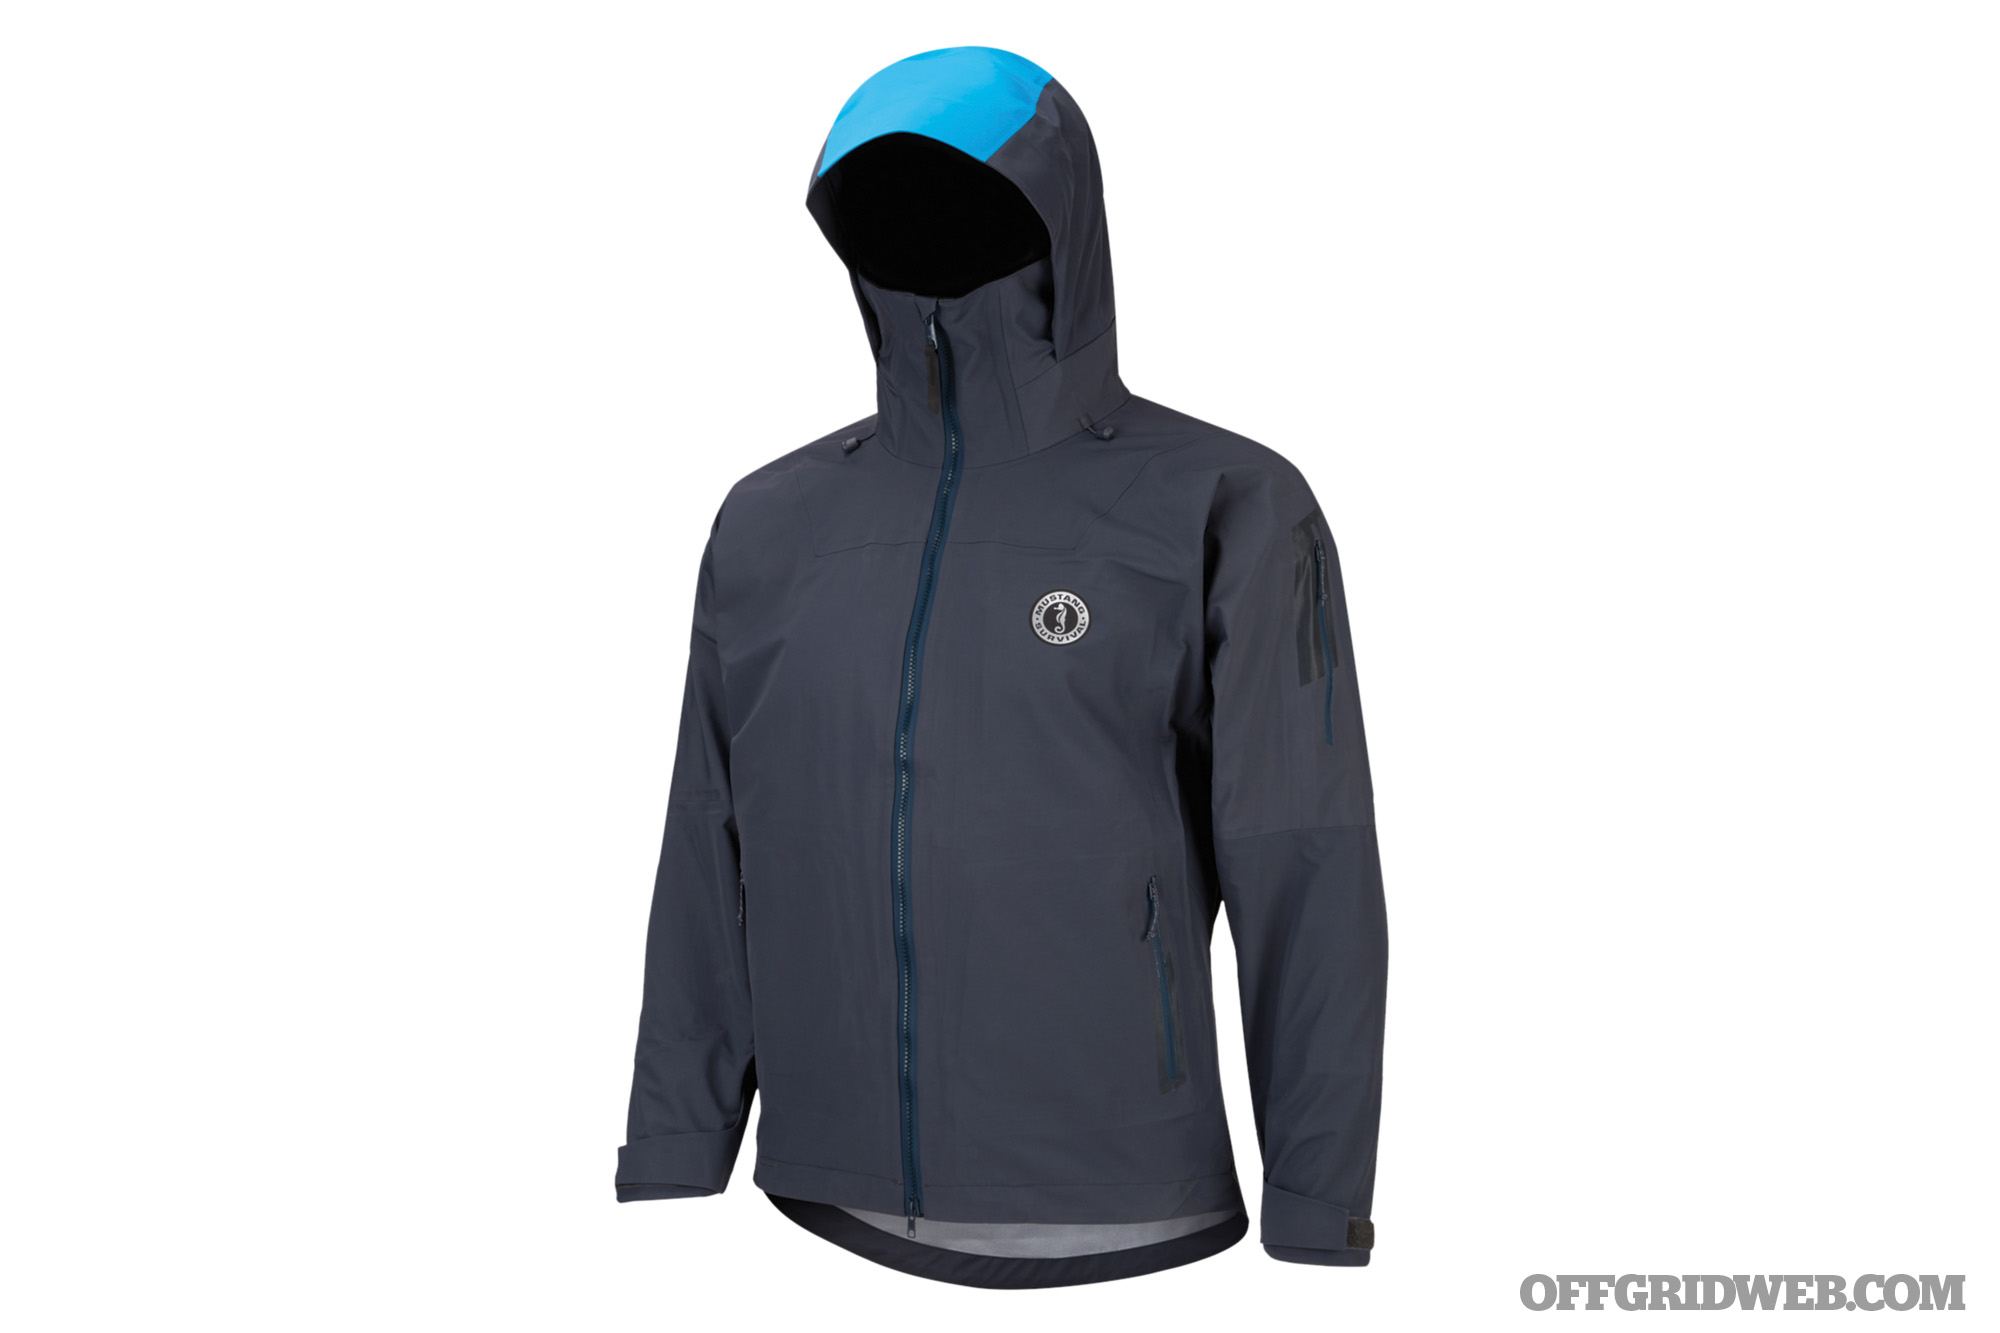
Notes There are raincoats and then there’s the Taku Waterproof Jacket. As its name denotes, it can shield you from precipitation something fierce. But so can a garbage bag. The difference is that the Taku is meant for hard use, thanks to its streamlined design that reduces bulk and articulated shoulders and elbows for increased mobility. It features Mustang Survival’s trademark three-layer Marine-Spec fabric, which is lightweight and breathable yet tough enough for harsh salt-water environments. The low-profile pockets — which include an internal chest pocket — are snag free, while the neoprene wrist cuffs allow for a tight but adjustable closure to keep water out. And the fitted hood turns with the head to maintain peripheral vision.
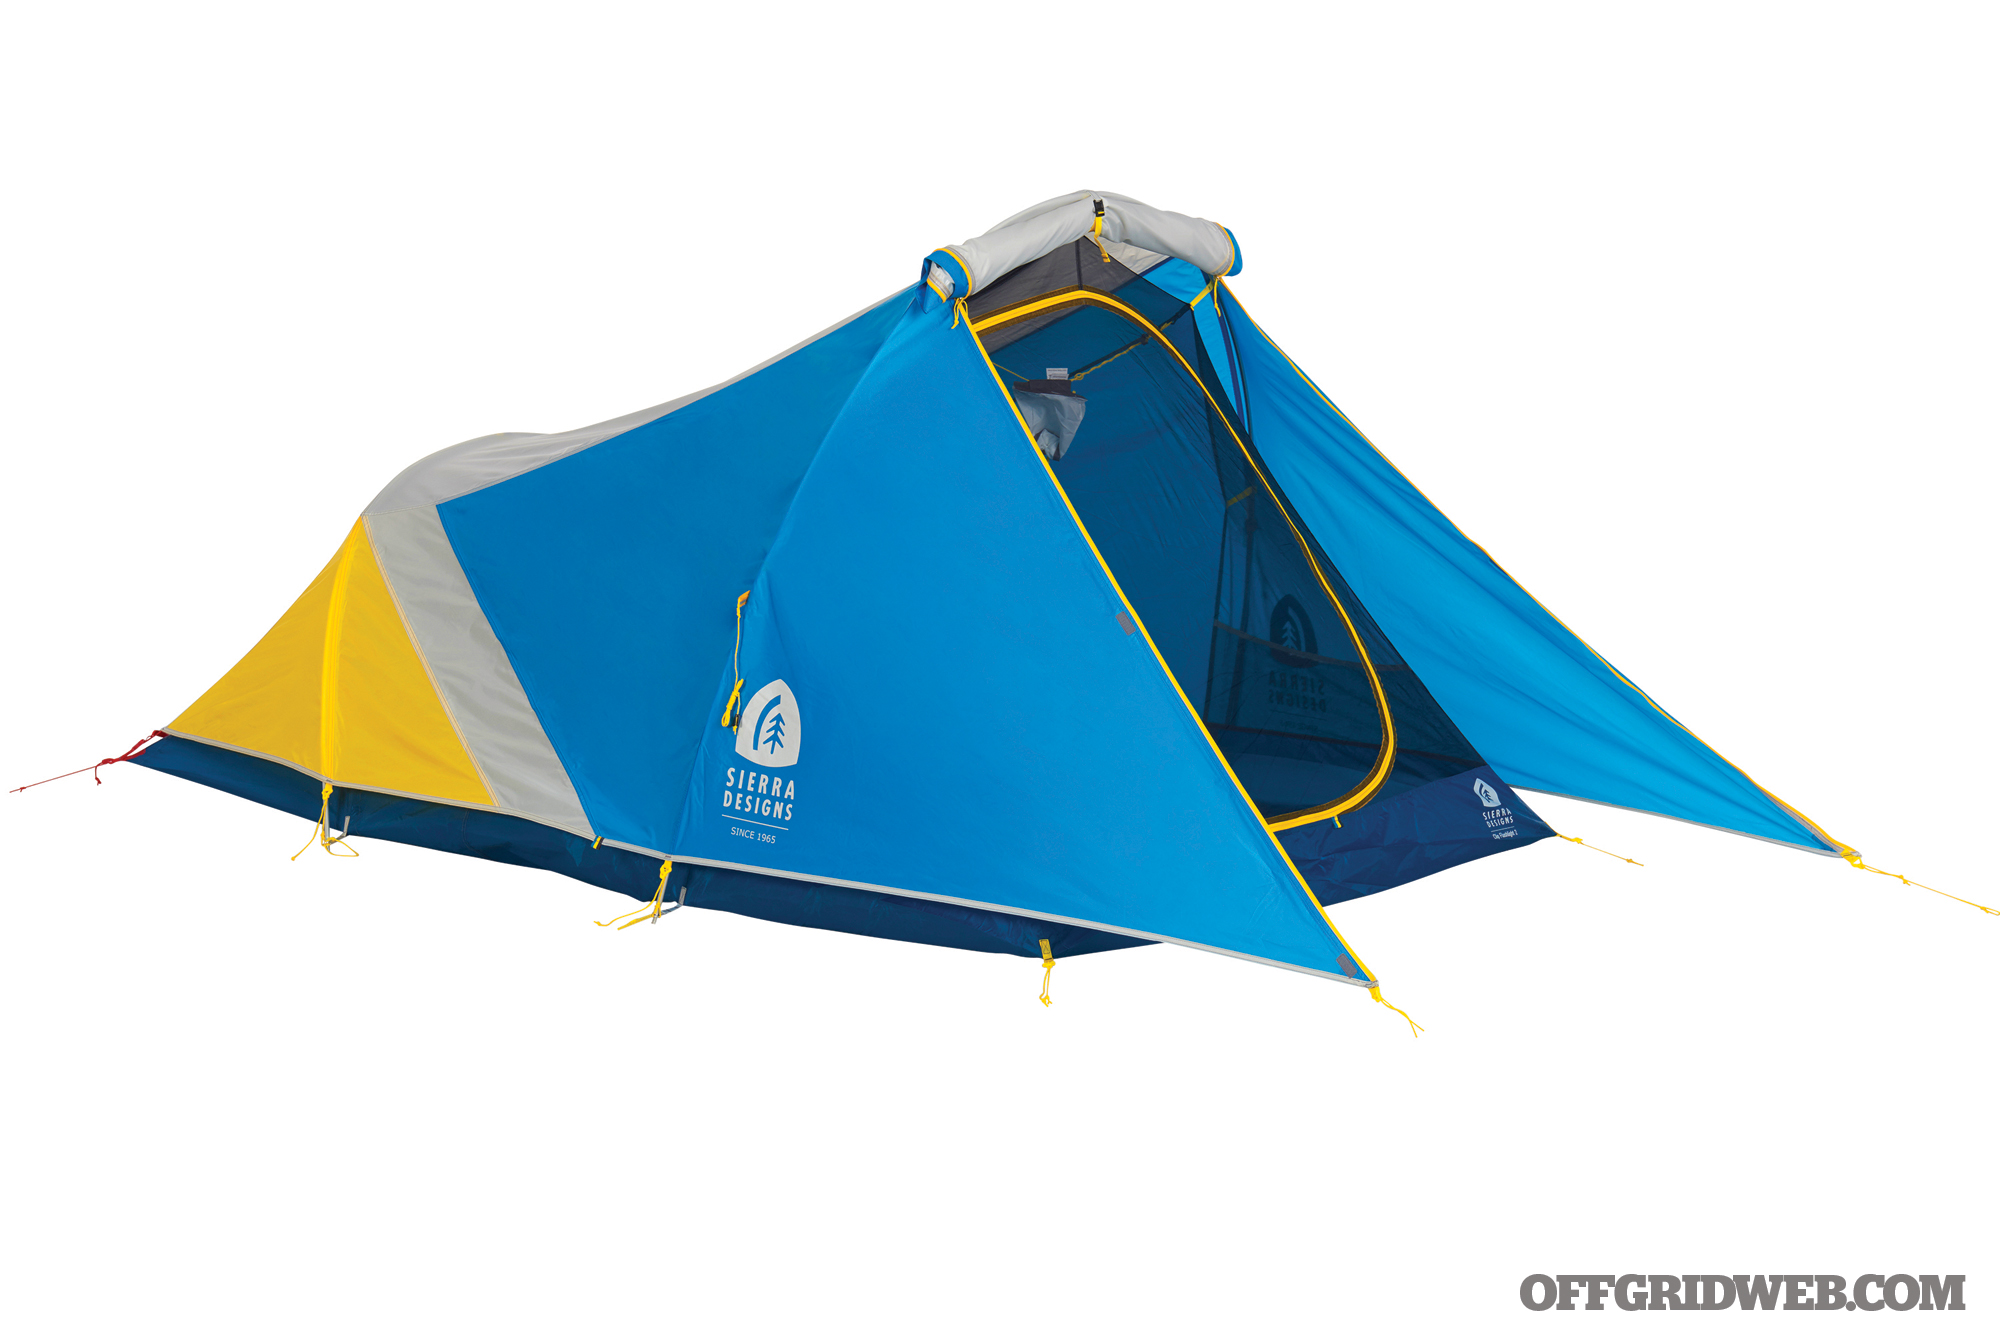
Notes Whether you’re a backpacker keeping gear to a minimum or a bushcrafter who doesn’t want to spend an hour or three building a shelter from tree branches, the Clip Flashlight 2 could work well for various types of outdoor adventurers. Why? The smart design allows for a quick setup using just two poles. Though it’s a two-person tent, there’s a decent amount of room, with roughly 30 square feet of floor space and a peak height of 42 inches. Moreover, the fly can unzip to act as an awning, protecting gear that doesn’t need to be inside. And thanks to aluminum poles, a nylon floor, a polyester fly, and a No-See-Um Mesh body, the Clip Flashlight 2 is relatively lightweight and easy to pack up.
The hero in our apocalyptic thriller has survived the outbreak and taken up residence in an abandoned hunting shack. Soon, that antique radio will be dusted off, and efforts will be made to reach out to other survivors — if there are any. In the meantime, there’s a pristine stream nearby and lots of wild game roaming the woods. Our hero just has to redevelop those hunting and survival instincts that were sacrificed in favor of a more urbane skill set. But what if the mysterious pathogen at the root of it all didn’t just show up at the airport? What if it isn’t coming from zombies or aliens or terrorists? What if it’s carried by the deer, elk, rabbits, and squirrels, and it lurks in rodent nests in the cabin or in the stream outside? This brings us to the topic of zoonotic diseases.
Above: Deer are known carriers of chronic wasting disease (CWD). Like mad cow disease, it cannot be destroyed by temperature during cooking. Contaminated meat requires specialized disposal.
What Are Zoonotic Diseases?
Zoonotic diseases are those that aren’t species-specific but can be passed from animals to humans (or vice versa). No, there aren’t any zoonotic diseases on the horizon that are expected to end civilization, but some can cause serious illness or even death and have left a dark shadow on the history of the world. Hunters, trappers, and farmers have sufficient opportunity to be exposed to these illnesses, but so does anyone who may find themselves cleaning out a storage shed or buying milk or meat from neighbors.
Rabies
Rabies is the first example in any discussion about zoonotic diseases. It’s one that we first heard mentioned in movies and TV shows when we were kids, and while few of us know someone who’s contracted this deadly disease, it’s a big deal globally.
An estimated 24,000 people die each year in Africa from rabies. Asia sees about 32,000 deaths annually, and worldwide, 99 percent of human cases are transmitted by domestic dogs. It’s a different picture in the U.S., where there were only 23 human cases from 2008 to 2017, and thanks in part to aggressive pet vaccination campaigns, only 65 dogs and 250 cats test positive for the rabies virus in any given year, according to the Centers for Disease Control & Prevention.
Wild animals are the primary carriers of this zoonotic disease. Rabies may be endemic in your region in skunks, bats, raccoons, or foxes, depending on your location. In the East, for instance, the U.S. Department of Agriculture’s Animal and Plant Health Inspection Service (APHIS) is undergoing a program to halt the western expansion of raccoon rabies by dropping vaccine packets from aircraft.
The rabies virus can be transmitted to humans, pets, and livestock via an infected animal’s saliva, normally through a bite, but it’s also possible to contract the virus through mucous membranes. Flu-like symptoms will appear first in a human host, possibly accompanied by itching at the site of the bite. This will quickly progress to anxiety, confusion, agitation, and delirium. Symptoms may show up one to three months after exposure, although incubation periods of up to nine years have been documented. In some cases, so much time has passed from the transmission to the symptoms that victims don’t even recall the wildlife encounter.
Rabies can be successfully treated with one dose of immune globulin and four doses of rabies vaccine over a two-week period if action is taken immediately. Unfortunately, once symptoms begin, death is practically imminent, so it’s important to report any encounters with potentially rabid animals to a physician as soon as possible.
Testing for rabies in animals requires tissue from the brain stem and cerebellum. Therefore, the animal must be euthanized. In humans, testing can be performed with a combination of saliva, serum, spinal fluid, and skin biopsy specimens. However, preemptive treatment is wise if exposure to the virus is likely.
Above: Nocturnal animals that appear listless and disoriented, especially if seen during the daytime, may be infected with rabies.
Hantavirus
In 2004, a graduate student became ill shortly after collecting wild rodent data in West Virginia. It’s believed that sometime during the course of that fieldwork, he inhaled dust stirred by the disturbance of a rodent nest. He died three days after his symptoms appeared. The cause: hantavirus.
People can become infected with hantavirus through exposure to rodent feces, urine, or saliva. In the U.S., it may lead to Hantavirus Pulmonary Syndrome (HPS), a severe respiratory infection, with such early symptoms as fever, fatigue, muscle aches, nausea, vomiting, diarrhea, and stomach pain, from one to eight weeks after exposure to the virus.
No vaccine, treatment, or cure for hantavirus currently exists, but those who are diagnosed early enough can be given an oxygen treatment in an intensive care unit to help their respiratory systems deal with the infection. The Centers for Disease Control and Prevention reports a 38-percent mortality rate for HPS.
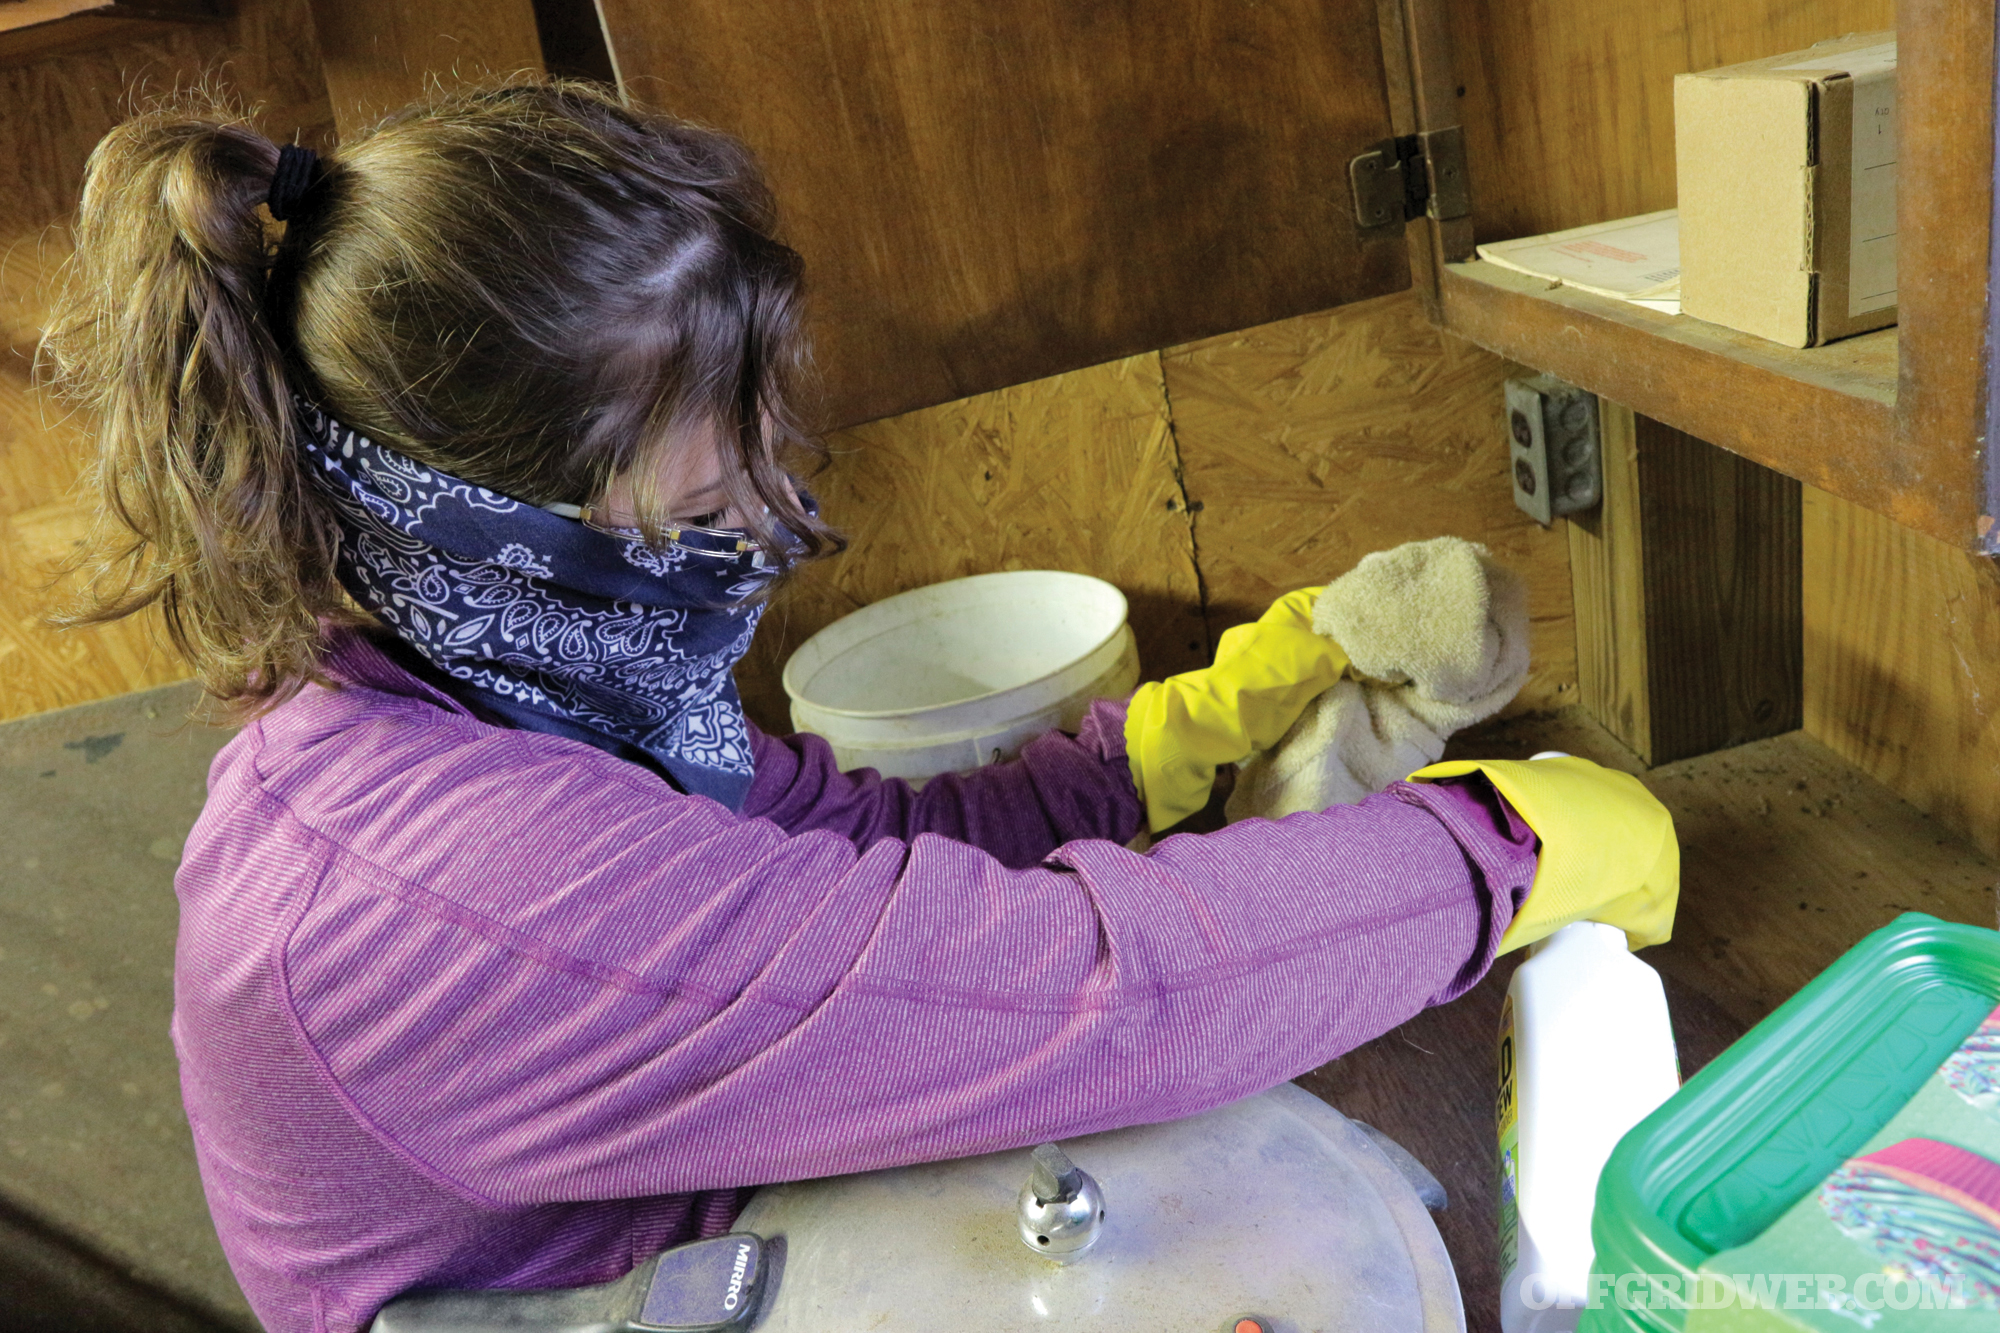
Above: Gloves, masks, and a bleach solution are good defenses against hantavirus.
People are at risk of exposure to hantavirus whenever they’re cleaning up areas where mice and rats have been, like cabins, barns, or storage sheds.
Director of the University of Maine’s Veterinary Diagnostic Laboratory, Dr. Anne Lichtenwalner advises the use of a dust mask in those types of spaces. She further recommends opening a door and letting those structures air out for a half hour before going in, then spraying things down with a bleach solution.
“The CDC is developing better recommendations for people who clean up heavy rodent infestations,” she says, “with the primary idea to reduce the tendency to stir up the dust, since that increases the chance of inhaling the virus before sunlight or disinfectants can inactivate it.”
Chronic Wasting Disease
Two things make chronic wasting disease (CWD) unique in our list:
It’s caused by a neither a bacteria, nor a virus.
It doesn’t fit the definition for zoonotic diseases, at least not at the moment.
The causal agent in CWD is a prion — a type of protein that causes normal proteins in the brain to fold abnormally. Just like with another well-known prion disease, bovine spongiform encephalopathy (“mad cow disease”) and mad cow’s human version, Variant Creutzfeldt-Jakob Disease, those folded proteins result in rapidly progressive symptoms such as drastic weight loss, stumbling, listlessness, and nervousness. The disease always leads to death.
CWD is highly contagious among deer, elk, and moose, but at this point, there’s no evidence that it can be passed to humans.
Dr. Bryan Richards, Emerging Disease Coordinator with the U.S. Geological Survey’s National Wildlife Health Center in Madison, Wisconsin, explains that much laboratory work and computer models have looked at variables that could move CWD from animals to humans. Some of those models have been successful, but others have not.
“At the end of the day,” he says, “one would have to conclude that the species barrier is robust, but the chance of a human being infected isn’t zero.”
He adds, “And individual risk may change over time as the zoonotic disease passes from deer to deer to deer. After a time, it will reach a stable state, where it’s more likely to pass to an alternate host.”
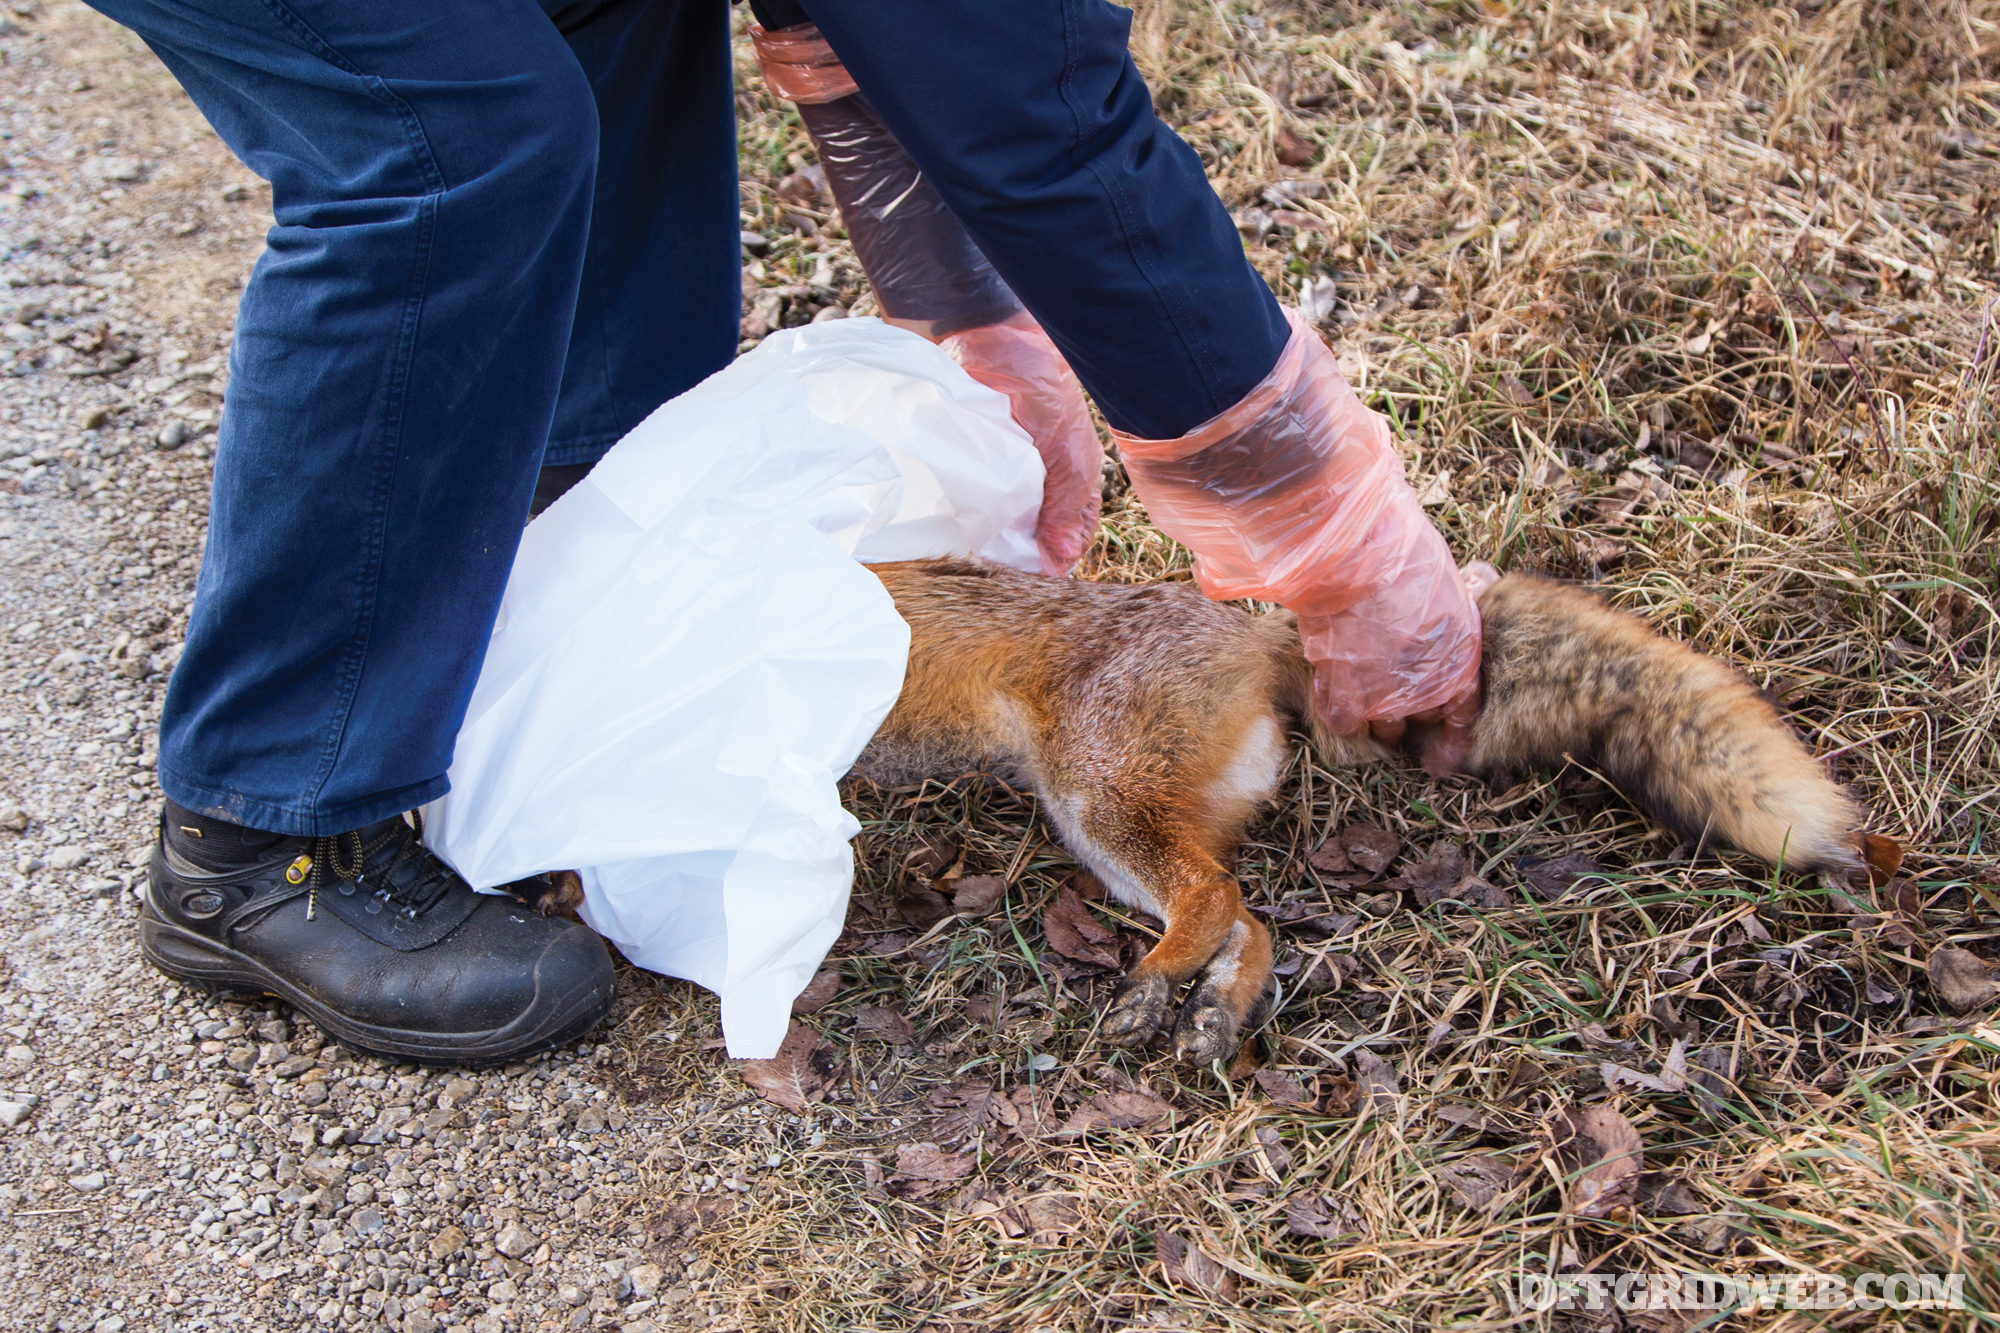
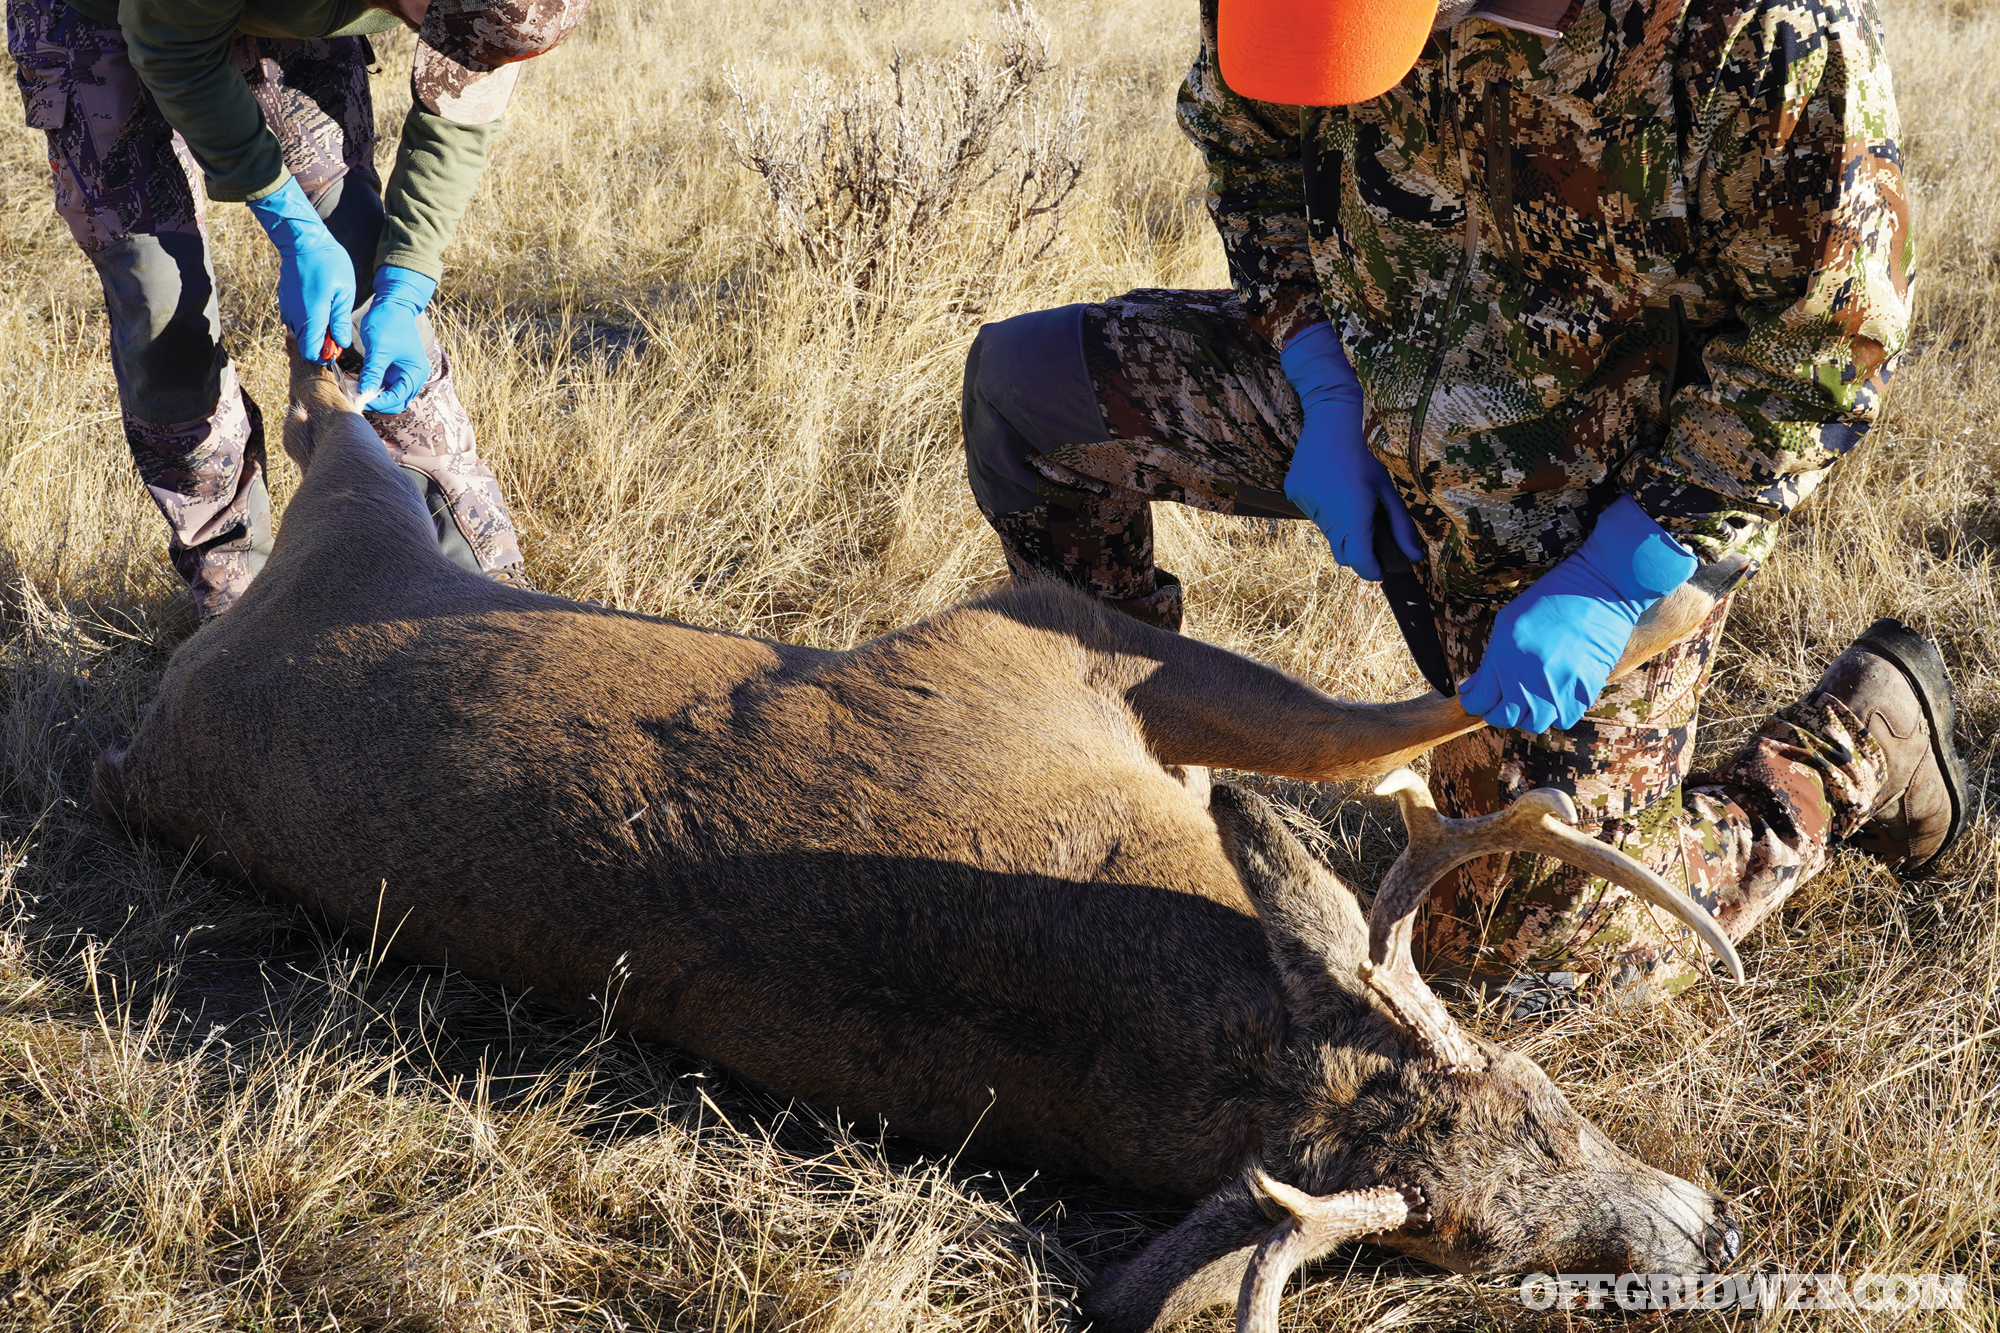
Hunters and consumers of venison are the most likely candidates to come into direct contact with the prion, and the CDC lists a number of safeguards to lessen exposure. First and foremost, hunters should avoid harvesting deer or elk that appear sickly or are acting strangely. Wear latex or rubber gloves while field dressing or processing the animal. Minimize the handling of organs, especially the brain and spinal cord. Consider having a harvested deer or elk tested through the state’s wildlife management agency, especially if taken from an area with a known disease occurrence. Of course, if the animal tests positive for CWD, don’t eat the meat.
Richards points out that disposal of the carcass after processing can be an issue in and of itself, especially for those who process their own. Many landfills won’t accept deer and elk remains, but to put them back into the environment would open a door for further exposure. So, it’s advised that hunters check with their state’s department of natural resources on the best practices for disposing of carcasses.
Brucellosis
Debates about the legality of raw milk are common in self-reliant circles, and a word that eventually gets brought up is brucellosis. Brucellosis is a bacterial infection marked by night sweats, fatigue, anorexia, headaches, joint pain, and fever. (Human brucellosis is sometimes called undulant fever, because the intensity of the fever rises and falls.) These symptoms appear after an average incubation period of 7 to 21 days, although that’s highly variable and can be as long as several months.
The zoonotic disease is relatively rare in humans in the United States. On average, there were just over 100 cases of human brucellosis reported annually from 1993 through 2010, according to the CDC.
Dr. Terry Conger, a veterinary medical officer with USDA APHIS Veterinary Services in Little Rock, Arkansas, explains that there are three species of the pathogen infectious to humans: Brucella melitensis (normally found in goats and sheep), B. suis (pigs and reindeer), and B. abortus (cattle, elk and bison). The greatest number of human infections in the past several years have been due to B. melitensis.
“Greater than 95 percent of the human cases in the U.S. have been due to the consumption of unpasteurized goat cheese imported or brought in from Mexico,” says Conger. “The other 5 percent of the cases have been due to people travelling to Mexico or other countries where B. melitensis is endemic, where they are exposed to infected goats or sheep or consume unpasteurized dairy products, and coming back to the U.S. with the disease.”
Wild hog hunters are also at risk of exposure. The bacteria can be transmitted through fluid splashing into the eyes during butchering or by eating undercooked meat.
According to the CDC, once a physician confirms Brucella in blood, bone marrow, or other bodily fluids, antibiotics can be prescribed. Only 2 percent of human cases prove fatal.
Tularemia
During outbreaks of tularemia, also known as rabbit fever, rabbits, hares, and rodents may die in large numbers in an area. Tularemia is highly infectious, and anyone who comes into direct contact with rabbits or rodents has the risk of being exposed to the bacteria. Beyond direct contact, it can be spread via tick, mosquito, or deer fly bites. Furthermore, if hay equipment or mowers contact an infected carcass, the pathogen can become airborne and has the potential for infection via inhalation.
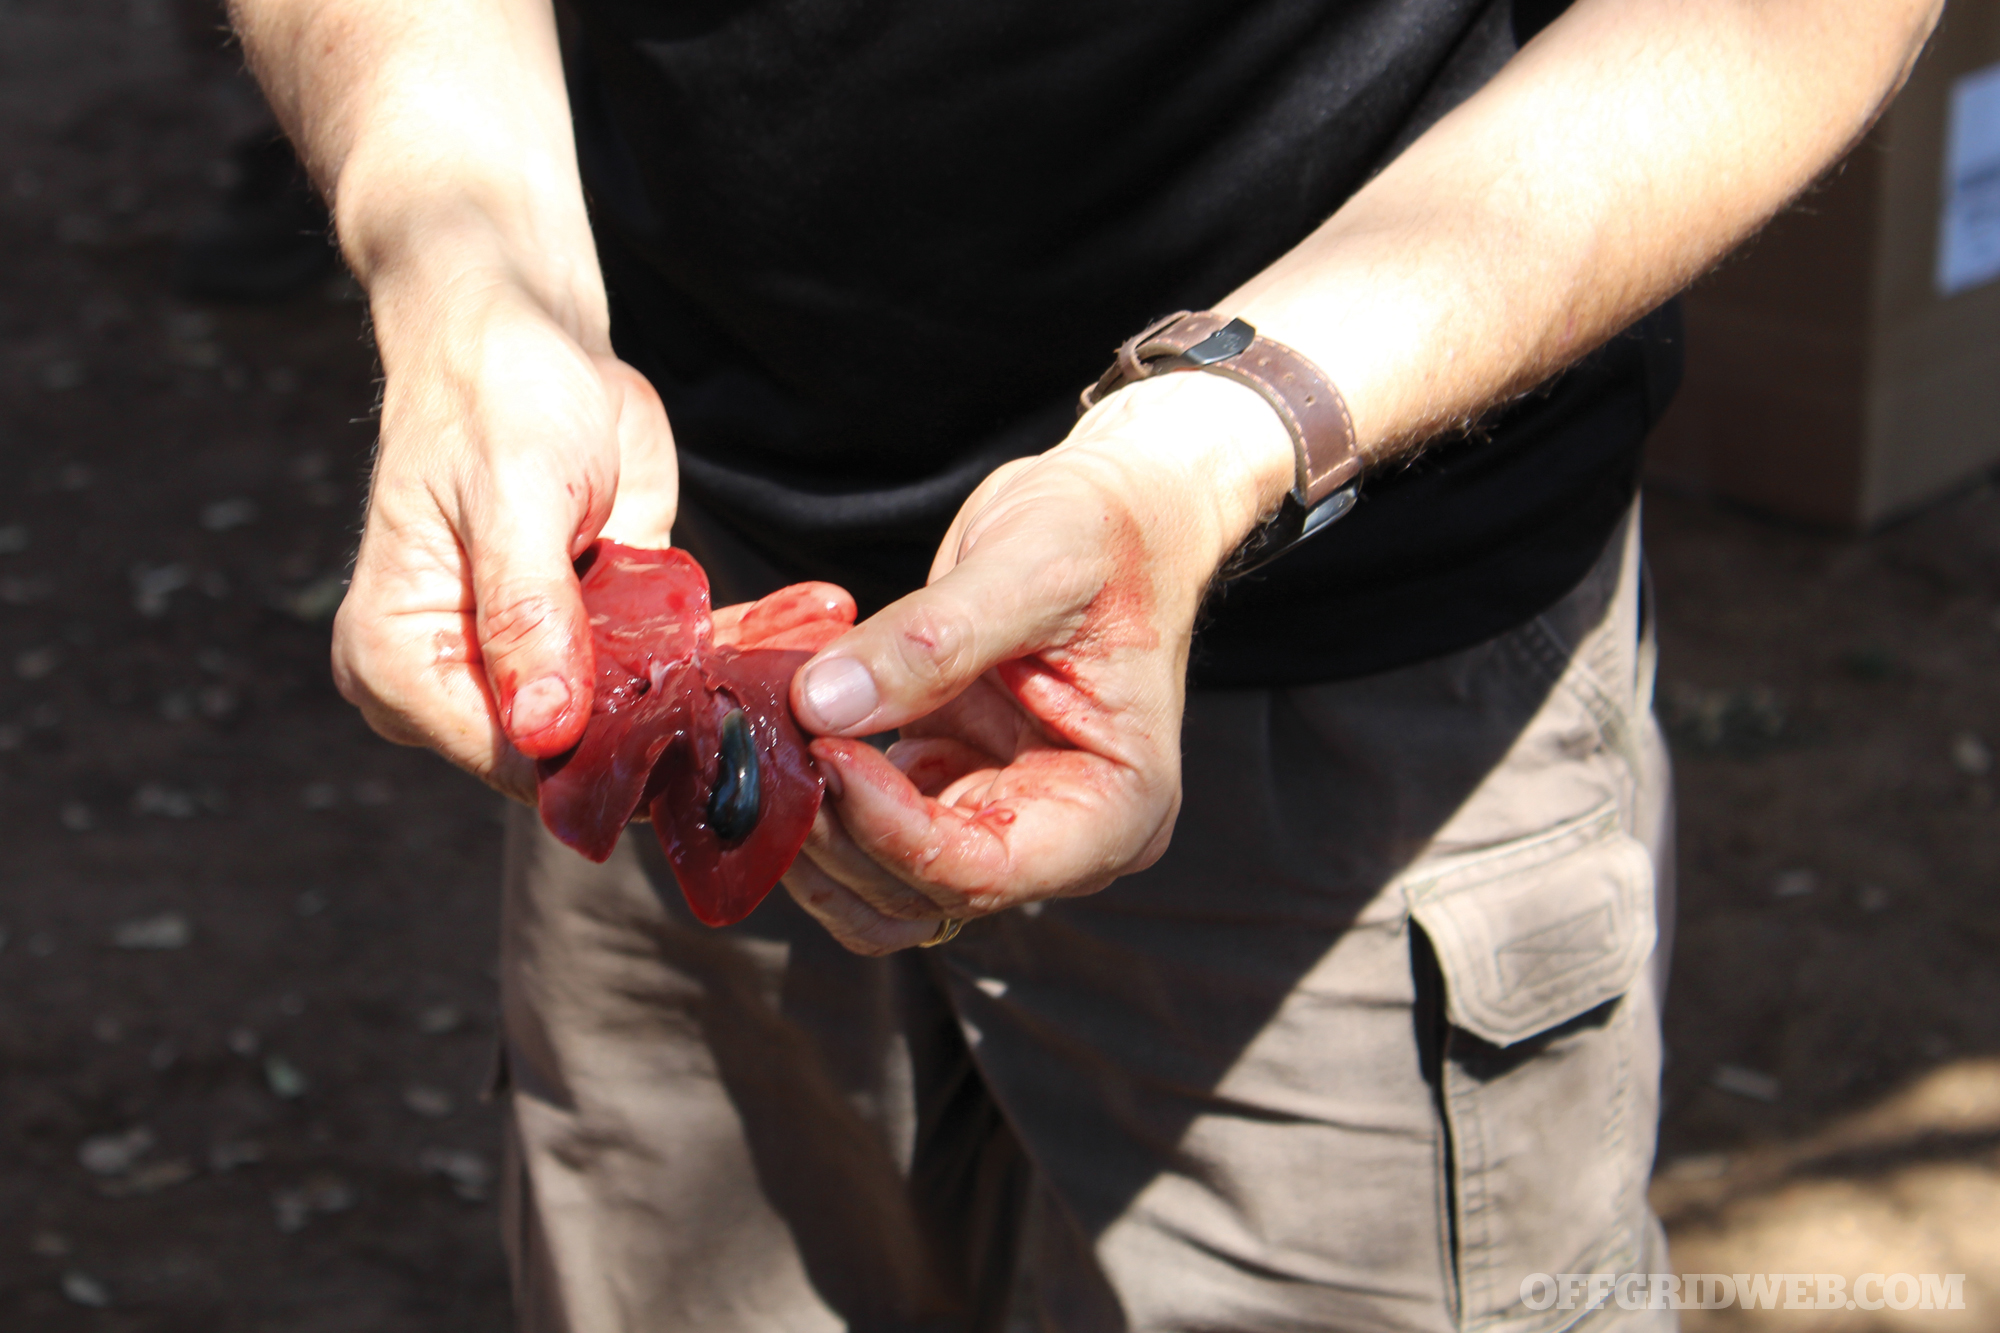
Above: When cleaning game, white spots on the liver or spleen of infected animals is one obvious indicator of tularemia.
According to the Center for Food Security and Public Health at Iowa State University, there are six forms of tularemia in humans, many of which manifest flu-like symptoms, swollen lymph glands, or skin lesions. Of the six forms, typhoidal tularemia is considered the most severe and can often lead to pneumonia.
The incubation period for tularemia can range from three days to two weeks, according to the Centers for Disease Control and Prevention. The disease can be treated effectively with antibiotics, but preventing infection is the best defense. Use insect repellents appropriately to avoid bites by vectors. Avoid touching dead animals, or wear gloves when processing small game, and cook wild game thoroughly.
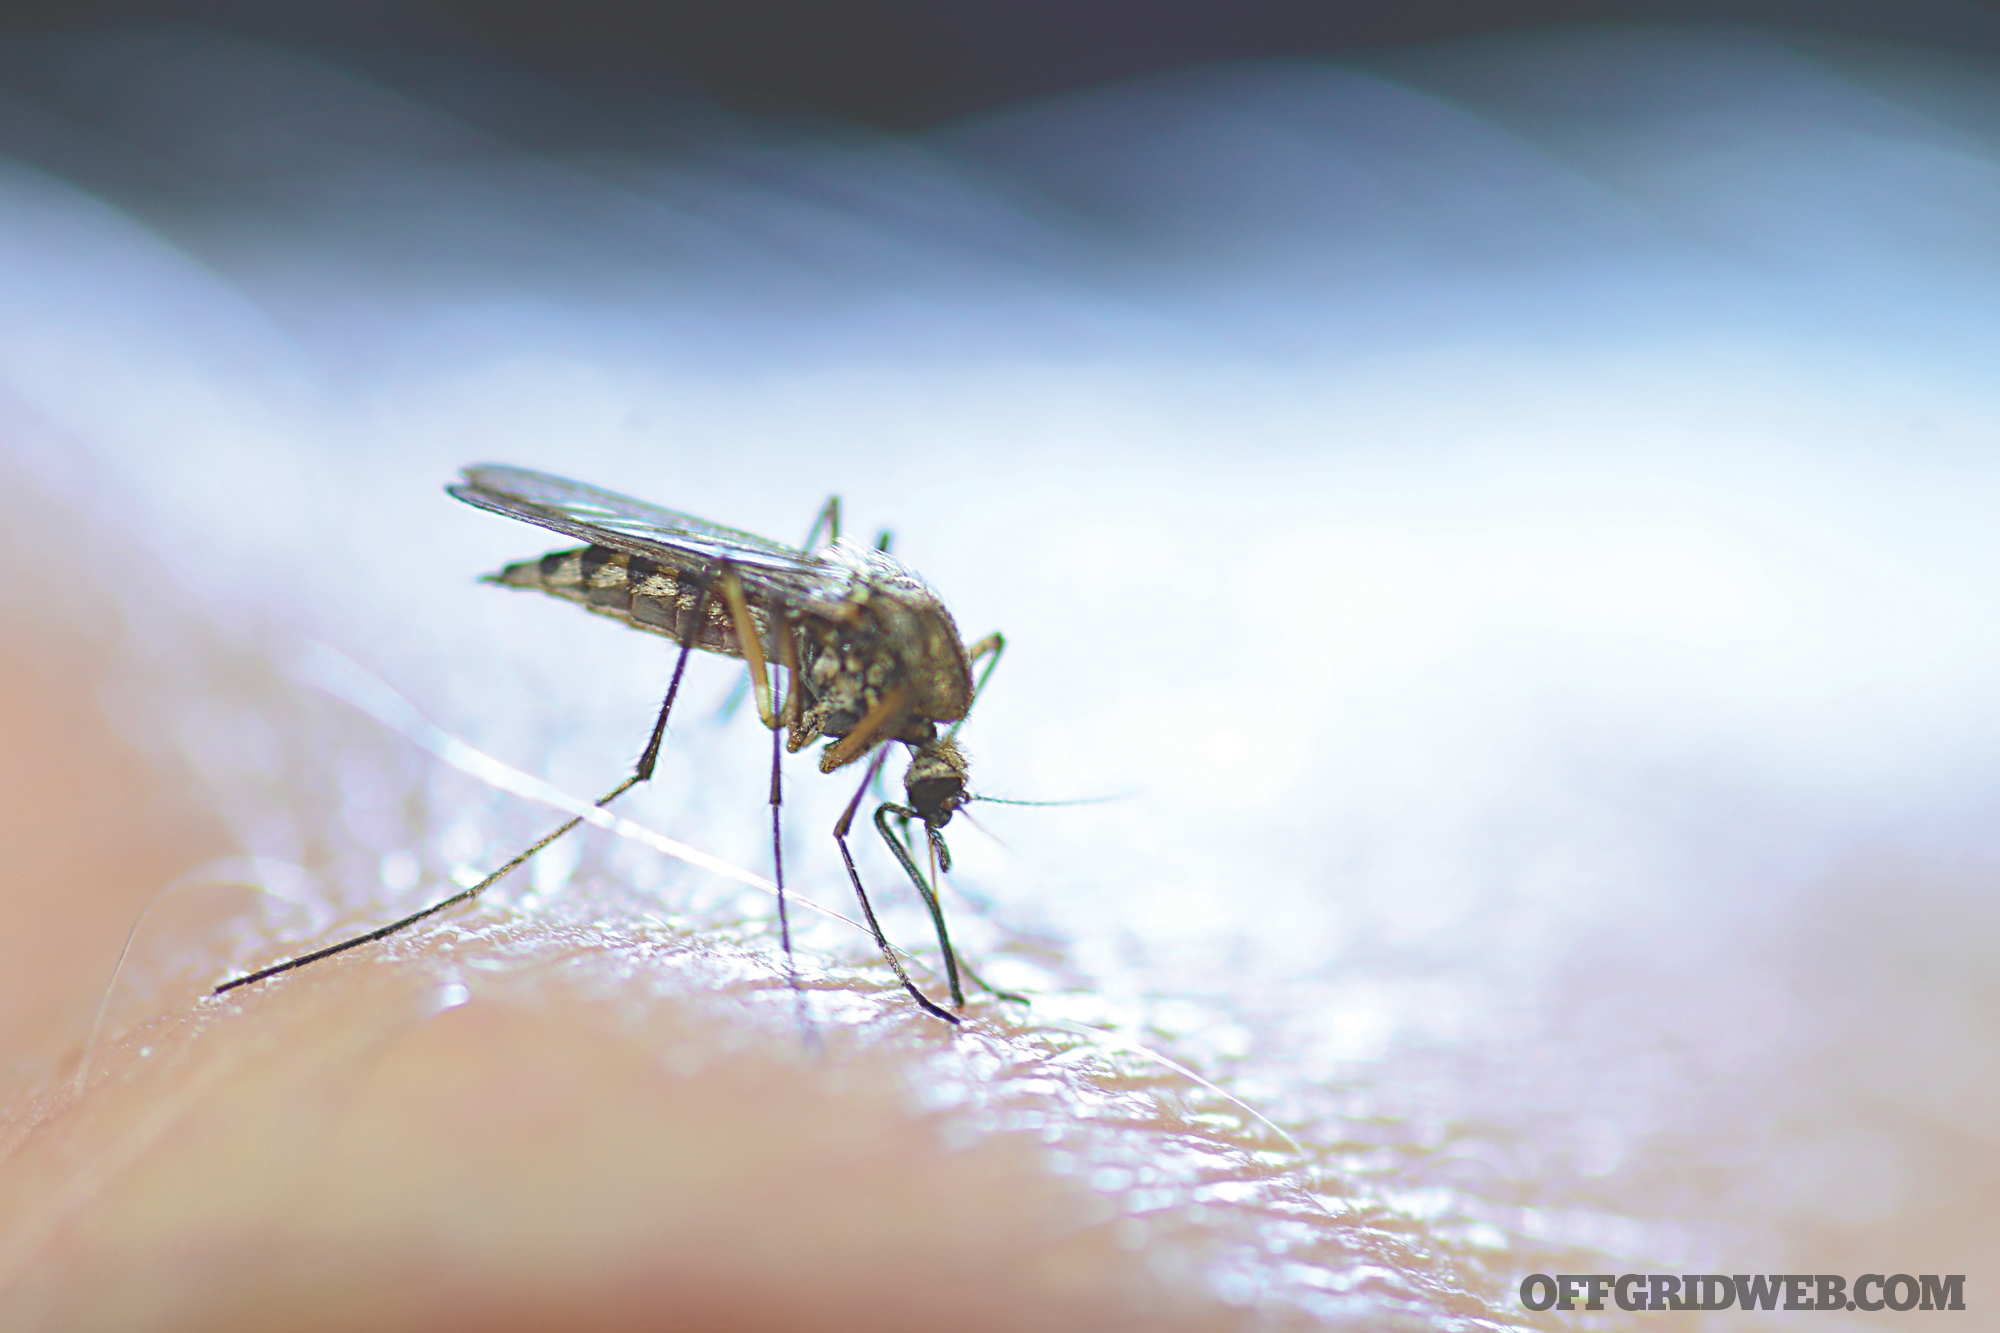
Above: In addition to rodents and hares themselves, mosquitoes can also spread tularemia.
A relatively small number of the bacteria can cause zoonotic diseases, and tularemia is therefore among the list of pathogens that anti-terrorism entities are watching as a potential biological weapon. It can be grown relatively cheaply and easily in a laboratory and is capable of infecting a large population if the bacteria is dispersed via aerosols or other means.
Plague
One of the zoonotic diseases earmarked in human history is plague, but despite its dark reputation, human death by plague is quite rare in the U.S. today. It’s as dangerous as ever, but early diagnosis and treatment normally results in full recovery, as plague can be combatted with commonly available antibiotics.
“Nearly every year, we see large mortality events in wild rodents — prairie dogs and ground squirrels, primarily,” says Dr. Tonie Rocke, a research epidemiologist with the USGS National Wildlife Health Center in Madison, Wisconsin, “but human cases are rare: 5 to 10 a year — 15 cases in a bad year.”
Humans can contract this bacterial disease through direct contact with infected animals, but the more common means of transmission is via flea bites. Once transmitted in this way, a patient will begin to exhibit symptoms in less than a week.
“One common route of transmission to humans in recent years,” explains Rocke, “is via their pets (mostly cats but occasionally dogs) that contract the disease after consuming or contacting an infected rodent. The disease can then be transmitted to their owners either via flea bites or close contact.”
Human symptoms of plague can include fever, chills, headache, weakness, and swollen and tender lymph nodes. The tissue on extremities may turn black and die. If infection reaches the lungs, pneumonia can result.
Diagnosing plague isn’t always easy, unless the patient remembers a flea bite or displays the telltale swollen and painful lymph glands (known as buboes), but chances for successful treatment are good once the disease is confirmed.
Setting Boundaries for Zoonotic Diseases
One point of connection between many of these zoonotic diseases and humans are the four-legged members of our families. Dogs and cats can tangle with infected wildlife and then carry pathogens right into your lap.
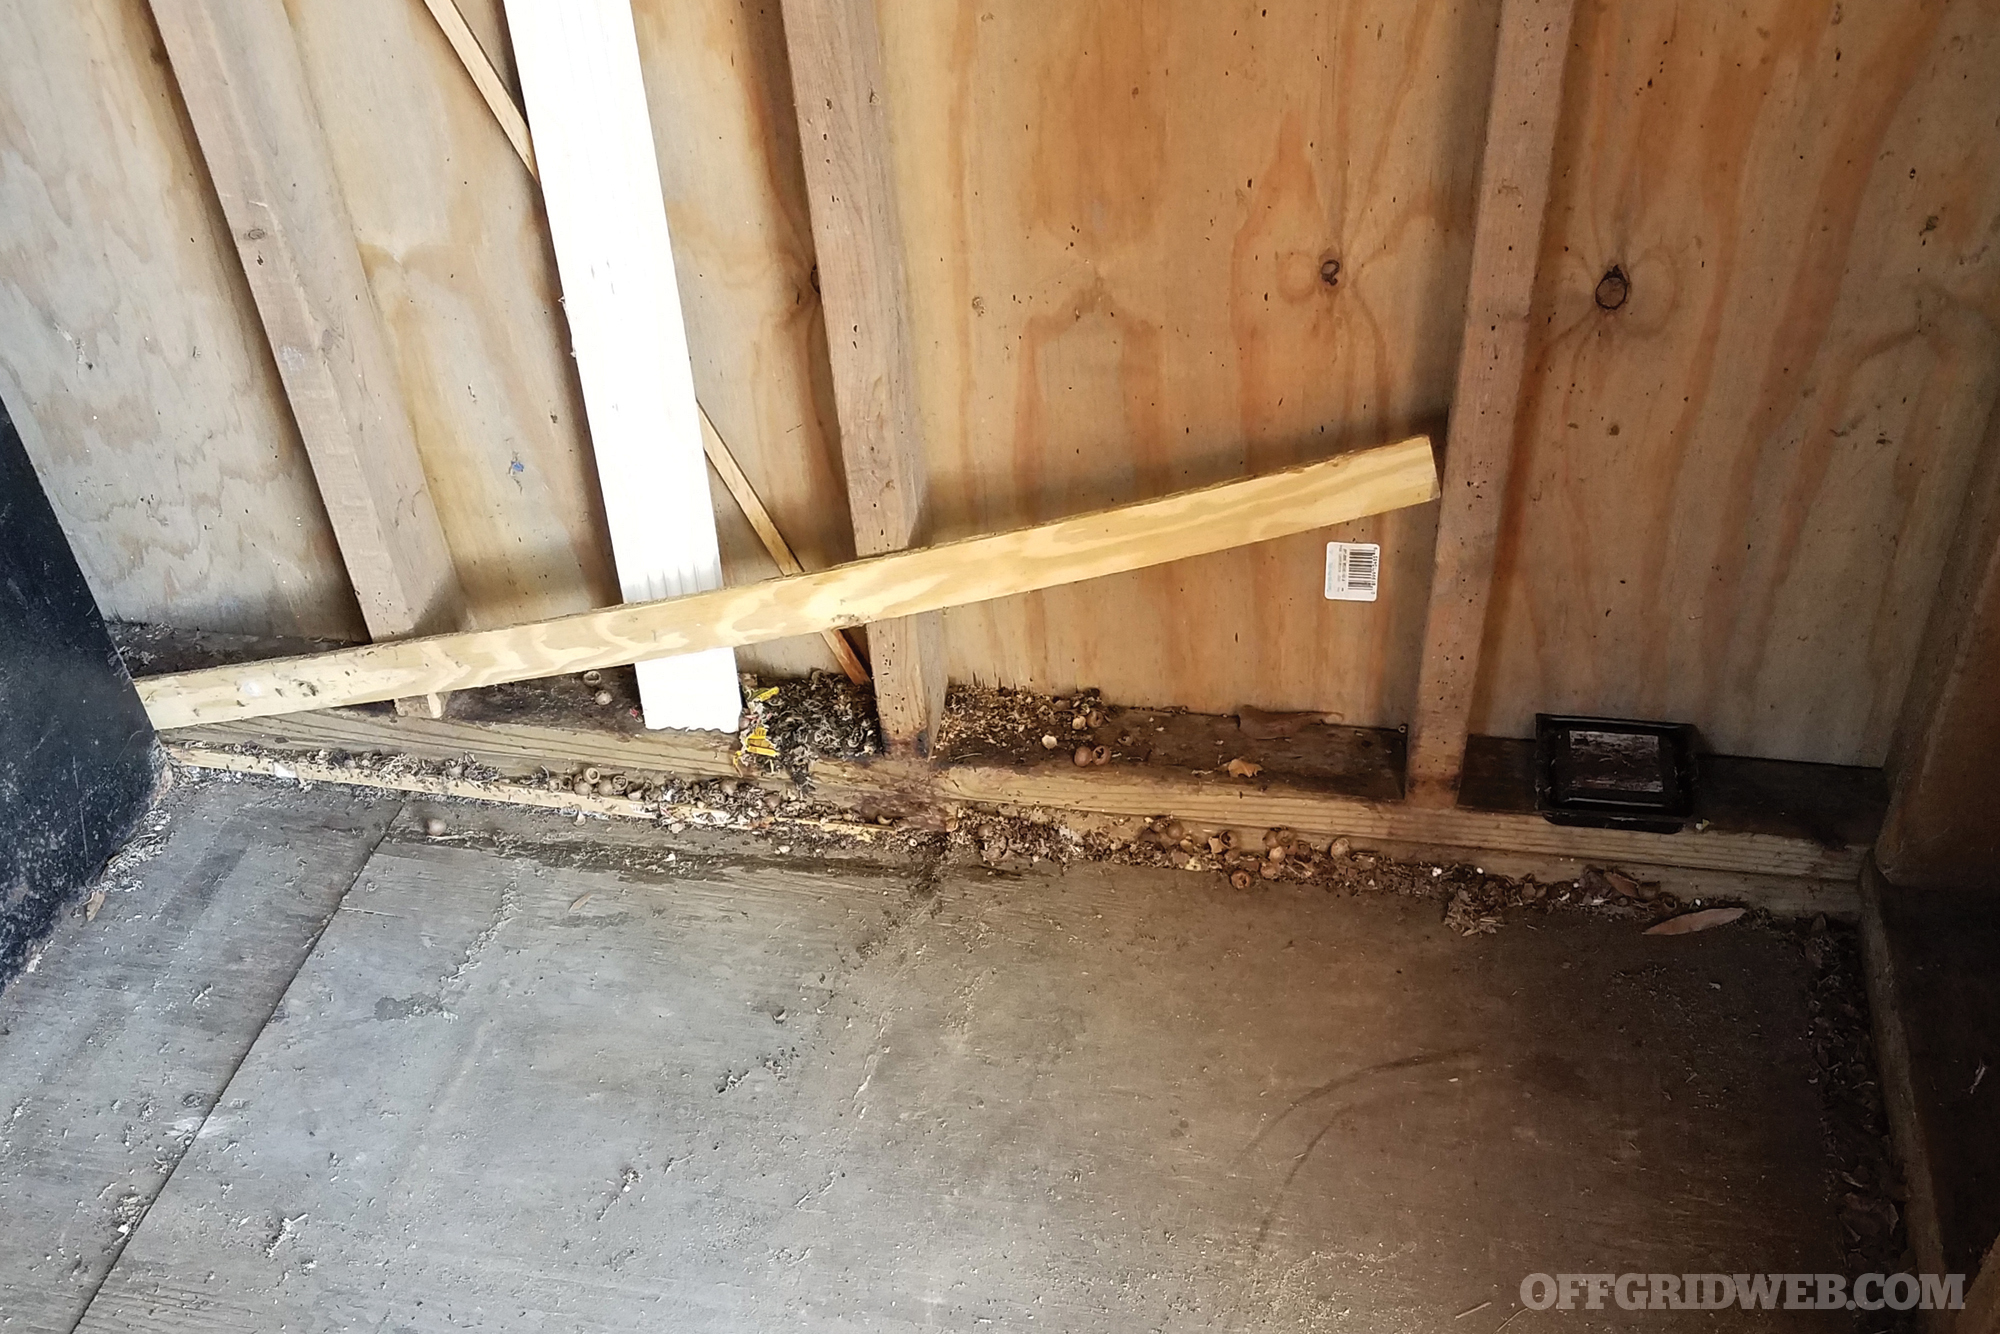
Above: Old barns and sheds can harbor rodents and any zoonotic diseases they may carry.
Always note any unexplained changes in your pets or livestock — physical or behavioral. Keep vaccinations up to date. As difficult as it may be to accept, keep in mind that saliva from your pets can carry pathogens, so consider limiting “kisses” from Old Roy.
Similar precautions would apply to livestock, and it’s worth noting that “behavioral changes” can be as telling as the behavior itself. For instance, in the case of rabies, livestock can display either the “furious form” or the “dumb form.” The former is marked by aggression, while the latter manifests as uncharacteristically calm, unafraid, or even friendly behavior.
Zoonotic diseases don’t fit well into SHTF, world-ending narratives. They’re rarely capable of human-to-human transmission beyond a few isolated cases, and they’re relatively easy to avoid with a few common-sense precautions. However, if you live or hunt or farm where wildlife roam, you’re on the front lines, and it pays to be vigilant in protecting yourself and loved ones.
About the Author
Phillip Meeks is an agriculture and natural resources educator originally from Tennessee, but now based in the mountains of Southwest Virginia. He likes to spend his weekends hiking, gardening, beekeeping, fishing, and mushroom hunting.
Most of us are experiencing the ongoing impact of COVID-19 on our personal lives and employment. For the fortunate employees that have been working from home the last few weeks, the transition from working behind company firewalls and secure servers to working from your home office or kitchen table can be a challenge. For many of us, the adjustment is a daunting task, coupled with the chaos of balancing kids’ home school schedules, video chats, and navigating through multiple stores looking for toilet paper. There are a number of helpful cybersecurity lessons and tips to keep your data and business as secure as possible.
1. Keep your security software up to date. This includes antivirus applications, VPN or video conferencing software, your internet browser, and your computer’s operating system. These updates often eliminate recently-discovered security vulnerabilities, making you a harder target. Norton, McAfee, and Kaspersky are all great options. If you want a standalone VPN, Express VPN is a great option.
2. Use unique passwords that are at least 12 characters long, consisting of upper and lowercase letters, numbers, and special characters. Never share these passwords with anyone, even coworkers who might say they need them to help out with a project.
3. Verify your home network uses WPA2 or WPA3 encryption. The encryption scrambles information, causing potential hackers to look for easier targets. Refer to our previous article “Digital Home Security: 5 Easy Ways to Protect Your Home WiFi Network” for a detailed guide on this subject.
4. Keep your computers, tablets, and phones password protected – walking away from your device without a screen lock will put you at risk if anyone gets physical access to it. That might be one of your children, one of their friends, service personnel, or a burglar.
5. Shred your trash – do not throw away anything with sensitive data that would allow someone to use the collected information against you. If someone went through your trash can, could they determine your bank, insurance company, kids’ schools, or any other details about your life or work? For tips on what to shred at your home or office, refer to this article from ShredIt.
Hackers have an abundance of tools to target complacent individuals that may believe sensitive data is protected. Various online tutorials and free software gives anyone the tools to target unsuspecting individuals for easy data collection. Bank account information, social security data, and other sensitive data can easily be collected by a motivated hacker.
Victimization & How to Avoid It
Cybercrime is more profitable than the global illegal drug trade, according to a study by Cybersecurity Ventures. The most common goals of a hacker are:
To grab enough personal data to obtain access to financial information to sell or use for goods and services
Obtain sensitive data to use or sell
Common mistakes to help avoid becoming a potential victim or easy target:
Reusing the same password for all accounts. Using “password123” for everything from online banking to your Netflix account is not a great strategy!
Keeping copies of Social Security Numbers, Drivers License photos, bank info, and tax documents on your computer can be potential targets – consider saving paper copies in a safe deposit box, fireproof safe, or encrypted file storage.
Assuming that a firewall, VPN, antivirus software is bulletproof. These hurdles are momentary obstacles for seasoned hackers that are motivated to breach their intended target. As with any other form of security, there’s an arms race between protective measures and the breaching techniques used to defeat them.
Spread the Word
In today’s challenging environment, hackers are getting faster and moving through various inventories of tools at their disposal. Some of us tend to be aware of our physical security and situational awareness, but we also need to consistently evaluate our digital environments with these cybersecurity lessons in mind.
Discuss these threats with your family members as well. You can develop good habits in your daily digital world – you might not expect it, but a spouse or teenager could inadvertently open your stable environment to an array of exploitation attacks on the same network. Discuss the danger of email phishing scams, catfishing, and the dangers of sharing personal data with anyone online – even someone they trust. You may think you are having a conversation with a friend online, responding to a coworker’s email, or participating in a harmless quiz on social media, but each of these scenarios could be a creative hacker fishing for information.
Frank Aguilar has worked in a variety of industries over the past two decades, ranging from IT in the financial sector to electrical testing in the utilities sector. His array of hobbies include camping, off-roading, shooting, and tinkering with electronics.
By the time you read this, spring will be upon us in full force. In most places, the snow will be gone, the grass will be green, and many of us will be anxiously planning our first camping trips of the season. Over the last year or so, we’ve had the chance to evaluate a couple of different camping products but, of those, we got the most intimate with a pair of items from Klymit. These are specifically designed for you and your significant other to enjoy the great outdoors as a couple — or at least you and a really close friend. The KSB Double is a purpose-built two-person sleeping bag designed for three-season use. For testing, we paired the KSB with Klymit’s Double-V sleeping pad. For as much time as we spend talking about things like knives, water purifiers, and weatherproof fire-starters, maybe talking about why we’d review a product like this is a reasonable concern to address.
As I’ve said before, and will likely say again (for those who didn’t pick up the last issue), prepping is a family affair. If you have a spouse, and you do talk about prepping, this isn’t how the conversation goes: “OK, honey, if anything terrible ever happens here, we’ll each grab our respective go-bags and take off and use our skills to survive the aftermath and link up with each other when society rebuilds.”
If there’s kids involved, this is probably also not how the conversation goes: “OK, honey, if anything terrible ever happens here, I’m going to grab my camping pack and head up in to the mountains. You stay here with the kids and the emergency rations, and I’ll be back for you once I’ve built adequate shelter for all of us.”
The point being, you and your significant other are going to make plans to survive as a team. If that plan involves some kind of fallback or overland movement, you’ll want gear optimized for doing it as a couple. One of the benefits of the KSB is that it packs down smaller than two single sleeping bags. For a couple on the move or a family with multiple children, a double sleeping bag can save space, weight, and money.
The other reason is that not every outing into the woods needs to be about conquering nature or evading hordes of leather-clad raiders. Sometimes we venture into nature to spend quality time with our loved ones and maybe practice a couple skills or work on our physical endurance in a relaxed, pressure-free setting. So, why wouldn’t you want to curl up with your partner-in-crime at the end of a long hike or after an evening of failed attempts at traditional fire-starting?
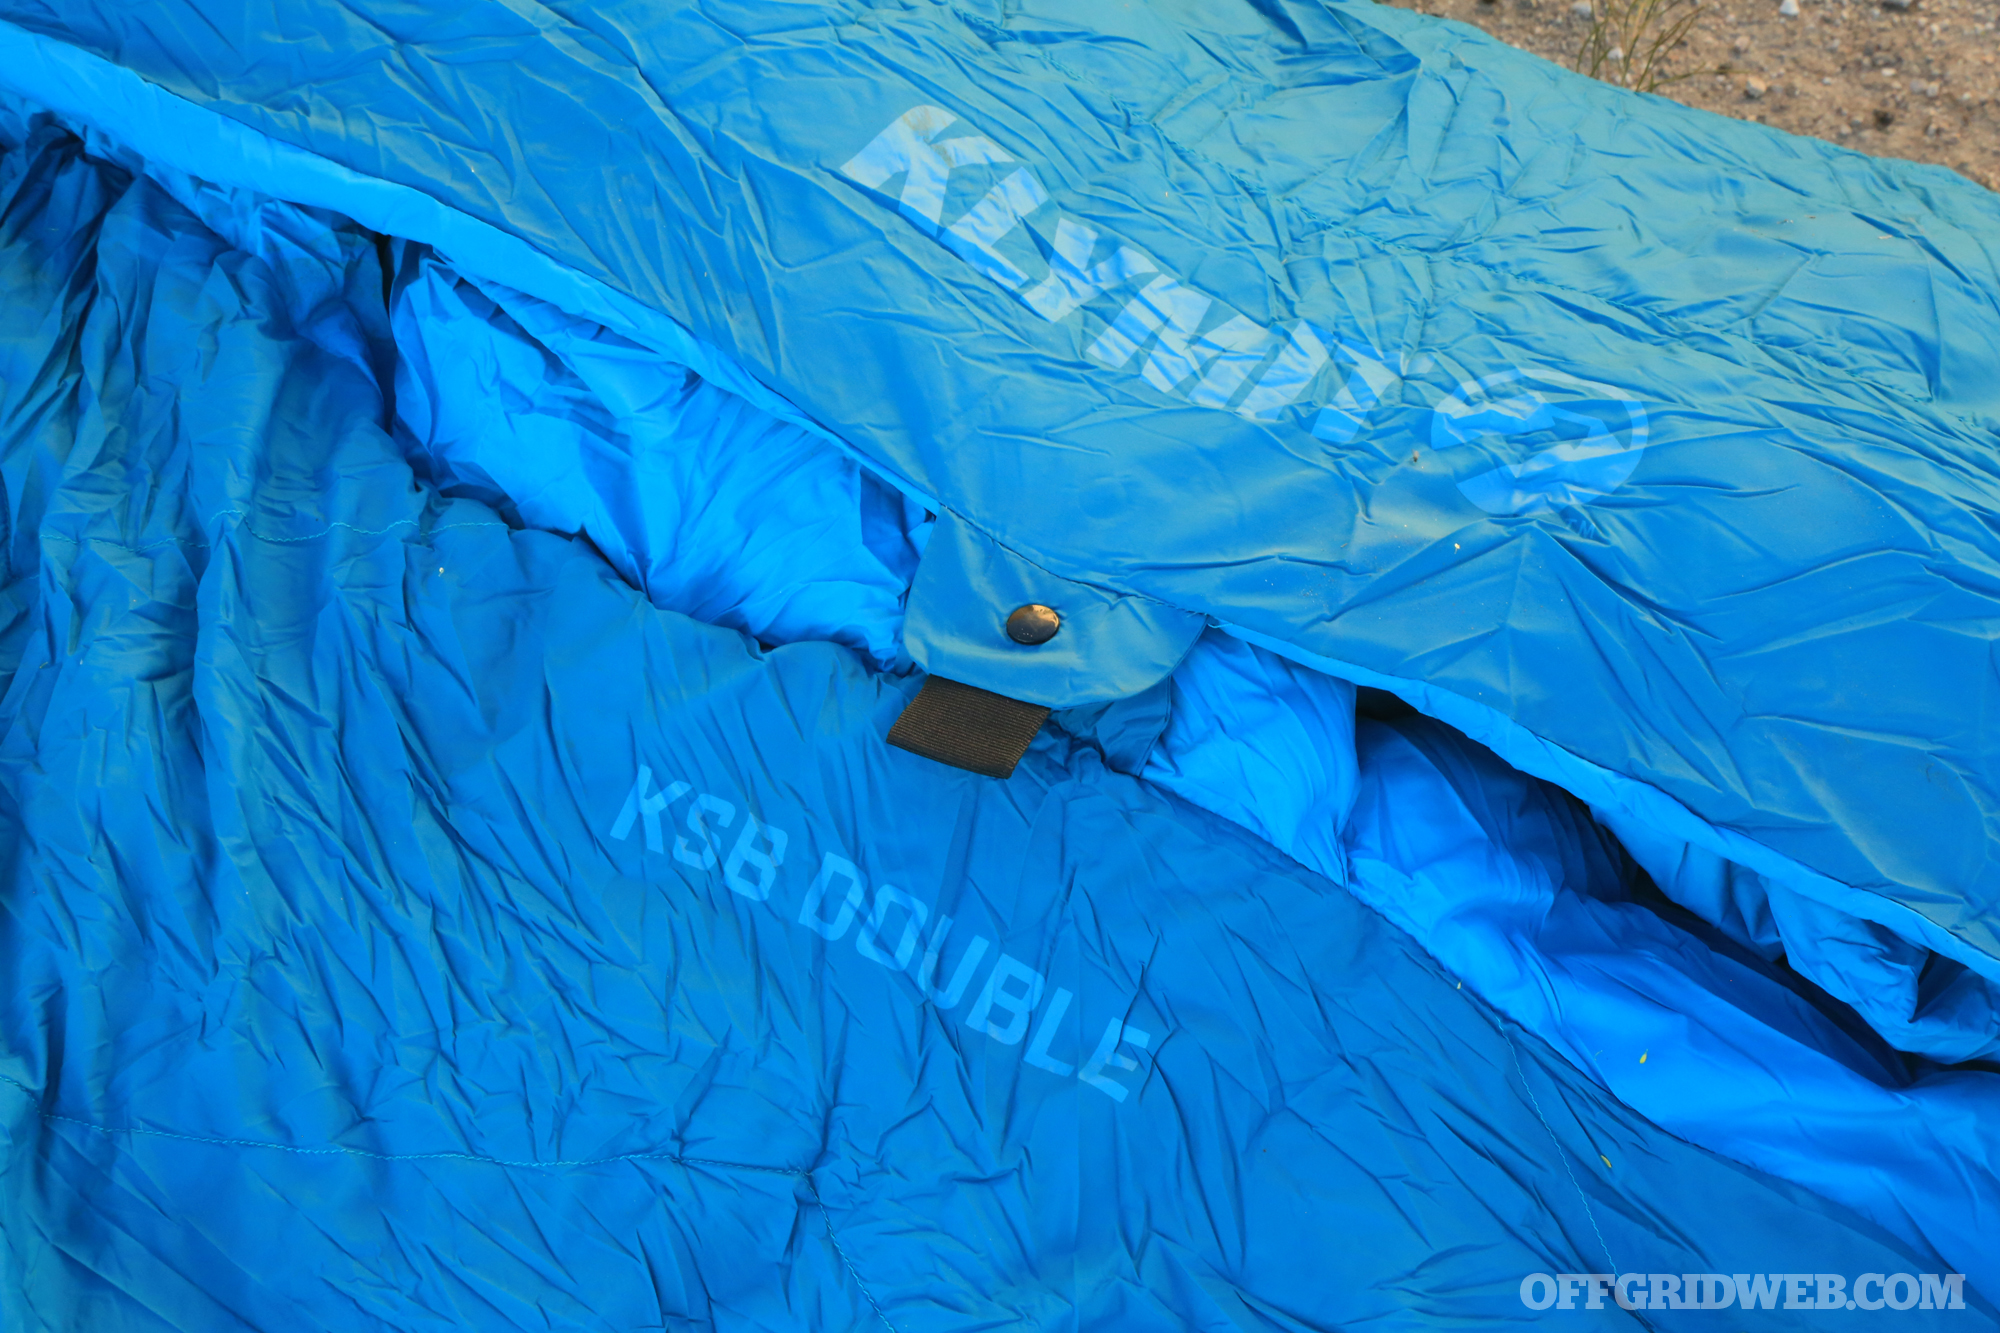
Above: A snap in the center of the KSB Double sleeping bag serves as a divider and helps to trap warm air inside.
KSB Double Features
The KSB is a two-part bag. The top layer is stuffed with 650-fill power down (80/20 grey duck), and the bottom uses fully synthetic fill. According to Klymit, this combination optimizes the KSB’s warmth-to-weight ratio.
Everything about the bag is built from the ground up for paired sleeping. There are individual draft covers to allow each person to control the temperature on their side. It’s like dual climate control without having to buy a luxury sedan. To the same end, the built-in hood has a center snap that cuts draft between the two sides and also creates two separate compartments “in case you prefer a personal hood,” according to the website. We think it probably doubles as a fail-safe in case you and your spouse get into an argument before bed.
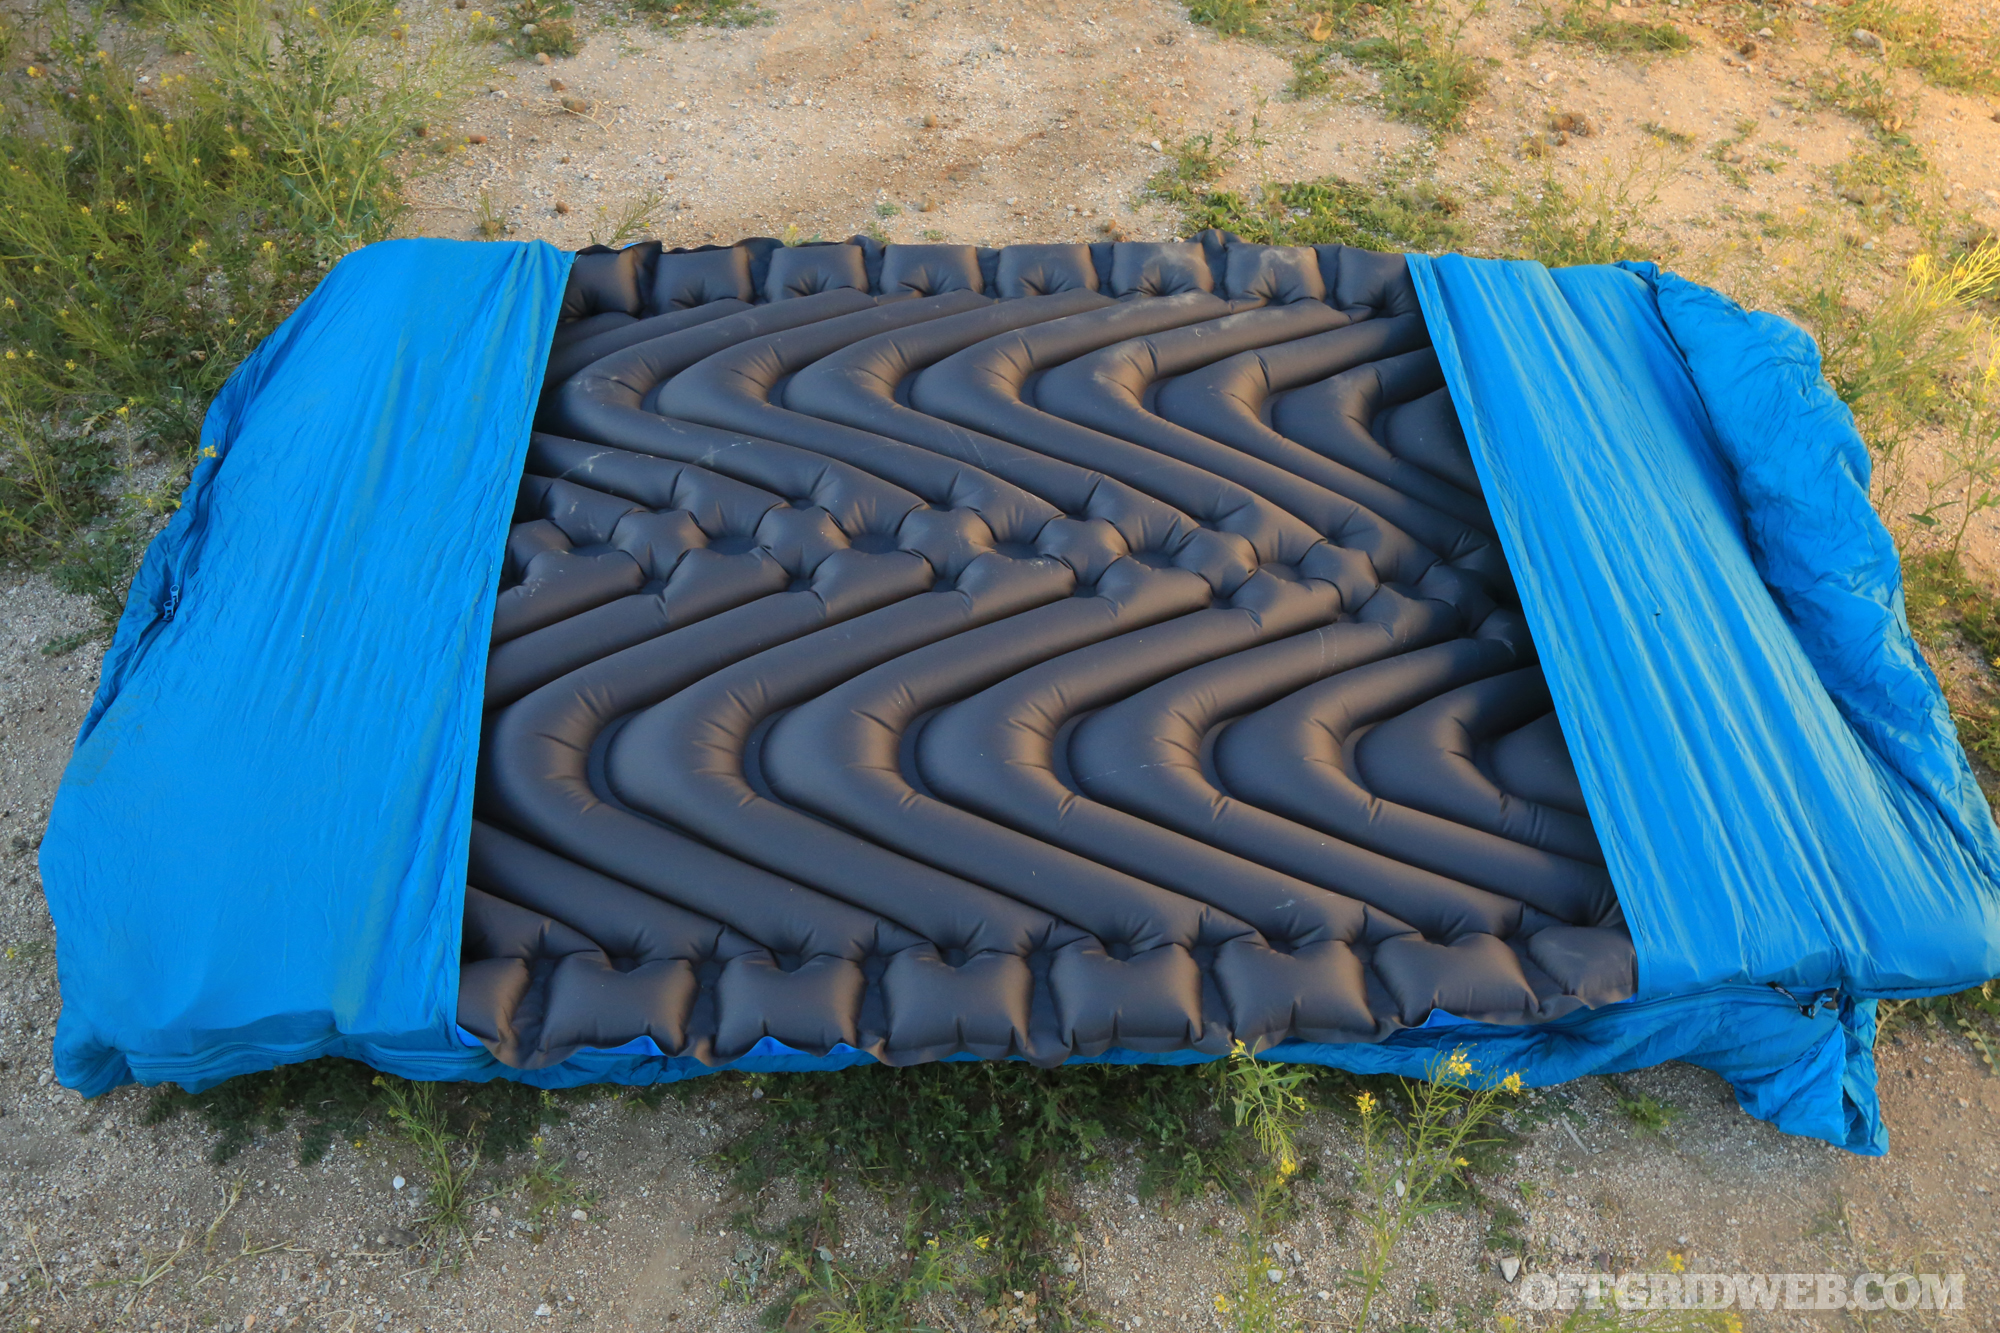
Above: Pockets on the underside of the KSB Double wrap around the Double V sleeping pad to hold it in place.
The bag is somewhat modular, as the top half can be completely unzipped and used as a standalone down comforter if desired. The bottom of the KSB includes a sleeve to hold a sleeping pad in place. It can either take two single-size sleeping pads or Klymit’s own Double V sleeping pad, which is what we used for this review. As the name implies, the Double V is an inflatable pad sized to pair with the company’s two-person sleeping bags. It’s made up of two rows of V-shaped air chambers in order to limit movement of air from one side to another. The idea is that even if one of you tosses and turns in your sleep, the other won’t be kept awake by it.
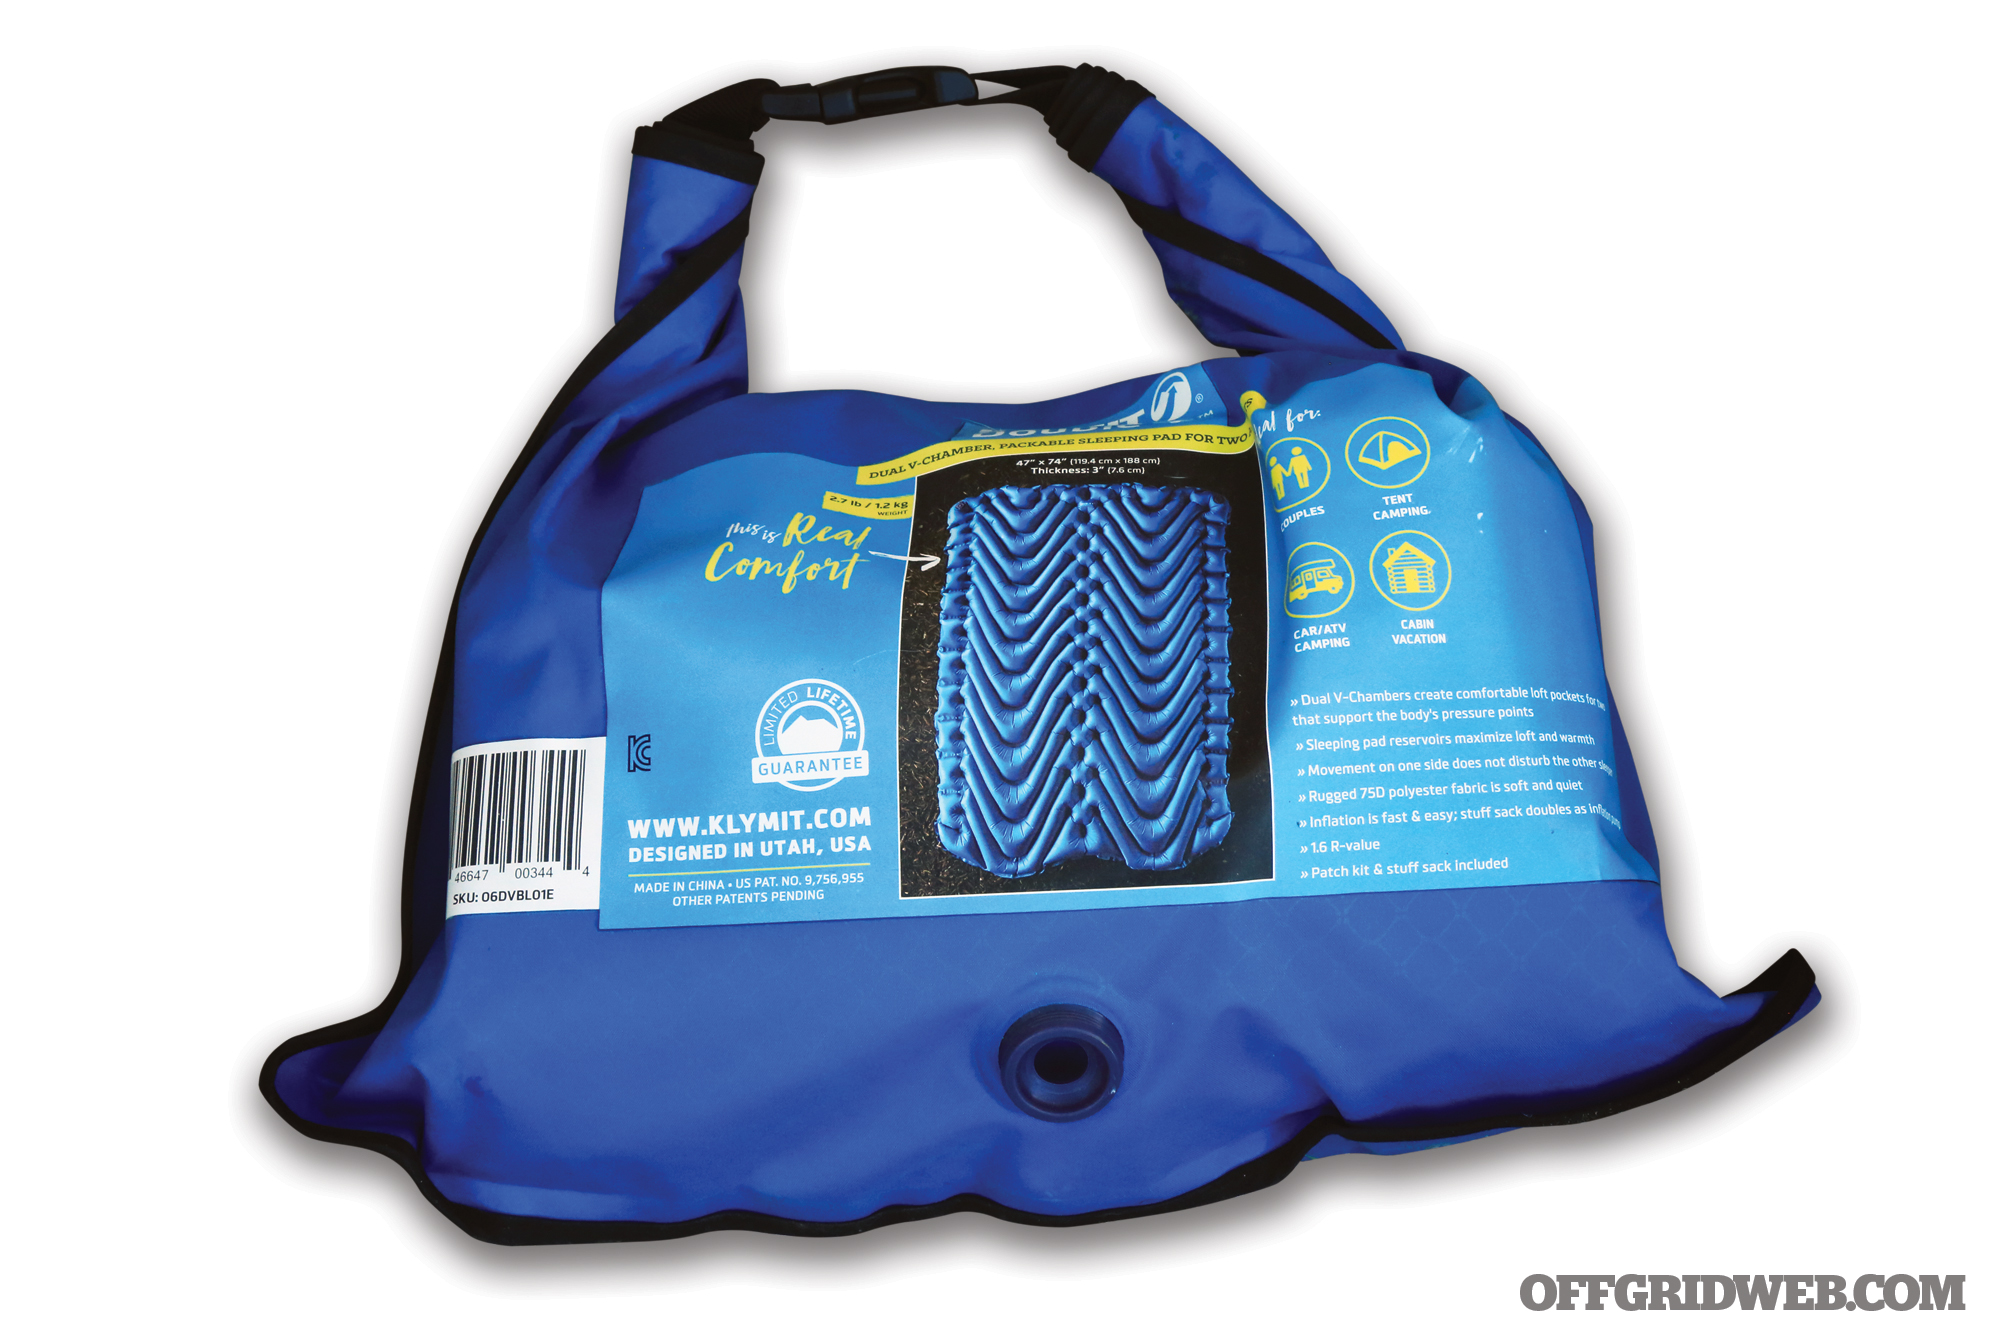
The Double V pad comes in a buckle-closure bag that includes a built-in pump nozzle in the bottom corner of the bag. Simply attach the nozzle to the valve in the pad and roll up the carry bag until you squeeze air into the pad itself. Then, unroll the bag and repeat until full. Klymit says you can fill the whole pad in 10 “pumps.” We found it faster to just inflate the old-fashioned way — blowing into it. Setup and breakdown took about 3 minutes, and the sleeve on the bottom of the KSB kept the pad securely in place.
A Night’s Rest
We have had the chance to set up the Klymit KSB/Double V combos on a couple different trips with conditions ranging from pouring rain and ankle-deep mud in west Texas to subzero temperatures in the mountains of northern Arizona. Each time we used a Slumberjack Daybreak three-person tent for shelter.
The Klymit system held up well to the mud and moisture. Where we did run into an issue was on the late-winter trip to Prescott National Forest in Arizona. It was during the RECOIL/OFFGRID staff trip that consisted of a three-day endurance test of a number of loaner vehicles on a completely-off-road route from Phoenix to Prescott. (Refer to offgridweb.com/transportation/bug-out-challenge for a detailed recap of this trip.) While camping overnight at 5,000 feet elevation in early March, I wound up in the KSB double sleeping bag alone. I closed the draft guard and hood snap to most closely approximate a single sleeping bag. But, while those features help regulate the temperature for two sleepers, there’s no way to create a hard barrier to segment the sleeping bag for one person. This led to some significant issues keeping warm overnight. I wound up closing the hood and relying on my breathing to warm up the bag. Unfortunately, I fell asleep like this and woke up in an icy puddle of my own breath, which had been steadily condensing against the inside of the sleeping bag throughout the night. The KSB is rated as a 30- degree bag. The temperature that night was definitely lower.
This isn’t a criticism of the KSB as much as a cautionary tale of choosing the right gear for the job. Packing a two-person bag when you know you’ll be sleeping alone might give you lots of room to stretch out (it does, which is glorious in fairer temperatures), but having all that additional airflow may become an issue based on the environmental conditions. Our only other issue with the KSB bag was with the stuff sack. Our three-day overland trek through northern Arizona had us strapping the KSB to the outside of our Roxor off-road vehicle. The rough ride left the KSB stuff sack pretty chewed up by the end of the journey, which required some significant patching up with duct tape as evidenced in the lead photo. In all cases, the Double V mat was incredibly comfortable, even with rocks and rough ground under the tent.
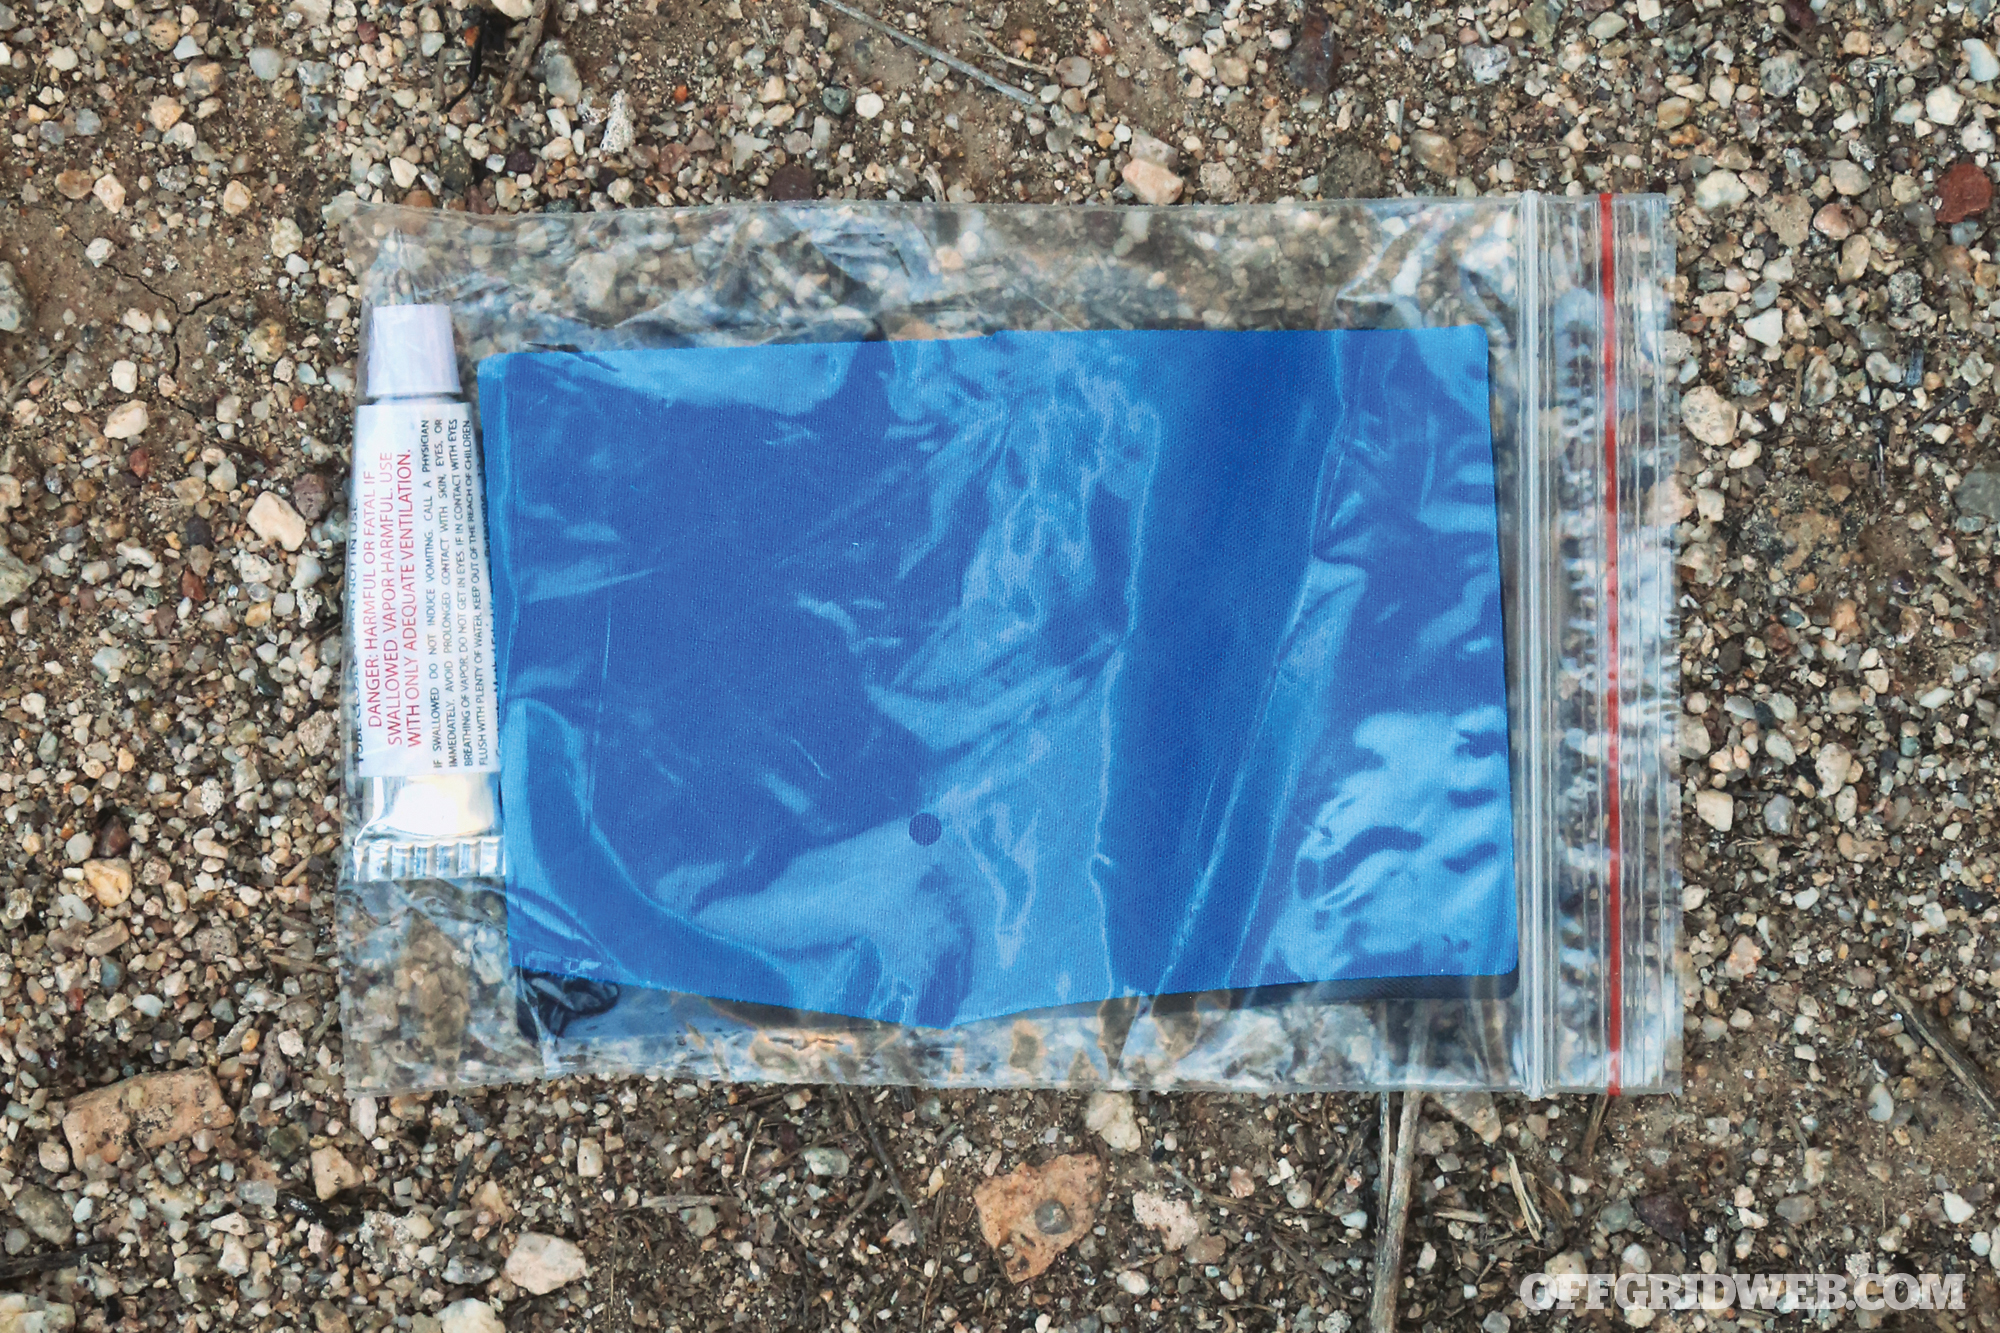
A patch kit is a helpful inclusion in case the inflatable pad someday springs a leak.
The sleeping bag itself weighs in at 5 pounds, with the pad adding another 2.5 pounds. The KSB has an MSRP of $380 — which, admittedly, caused a little sticker shock at first. But when you consider that you’re buying for two people, the price becomes somewhat more palatable and is at least on par with the cost of two single-serve sleeping bags, if not a little cheaper. Likewise, the $130 Double V pad breaks down to a pretty reasonable per-person cost.
If you and your sweetheart love the outdoors and hate having separate bags, or cobbling a couples’ bag together out of quilts and air mattresses, then stop by Klymit’s website and take a hard look at both the KSB and Double V line.
In a day and age with such advanced technology at our fingertips, securing our most valuable assets, including our families, is critically important. If you don’t have some sort of home security camera system, now is definitely the time to consider changing that. Camera tech continues to become more affordable, and a decent surveillance or door-monitoring setup is far more attainable than it was just a few years ago. On top of that, there are many options that you can install by yourself with basic tools. Luckily for consumers, gone are the days of expensive monitoring solutions with monthly plans for a few security cameras and an alarm (and the sign in the front yard!). These days, it’s a buyer’s market. The ease of DIY home security has driven the price of monthly subscription plans down, so depending on which side of the deal you’re on, it’s always important to be intelligent about your options.
Mapping Out a Security Camera System
So, why take the plunge? Well, it’s not as challenging as it may seem. Some of the easiest targets rest outside of your home, so at a minimum, that’s where coverage should start. With the popularity of convenient home delivery services like Amazon Prime, nefarious “porch pirates” regularly steal packages from doorsteps. And if you don’t park in a garage, your vehicle is always a target regardless of its own security alarm. Starting here is a great way to monitor two critical areas that are a liability. In some cases, security cameras on your porch can pick up folks who may be scoping out the residence, stealing mail and packages, or even conducting surveillance on pets. As for your vehicle, there are many concerns outside of security. In the event of an incident while the car is parked, it’s always great to have footage for insurance agencies — whether due to storm damage, a drunk driver slamming into it, or, of course, theft. You can also double-up on the protection by installing a motion-activated dash cam in your car itself, hardwired to the battery so it’s operational when the vehicle is parked — we plan to address this topic in a future article.
Aside from the outdoor perimeter and the two aforementioned areas of focus, other critical zones are entry and exit points to the ground floor of your home, including entryways into the basement. If something bad happens, it’ll start and end at these places, so reinforcing coverage is a must. When selecting spots for security cameras, consider that outdoor cameras on exterior doors can be tampered with, so outward-facing cameras placed indoors is best practice. This also cuts down on cost, as all-weather outdoor cameras are significantly more expensive than indoor-only cameras.
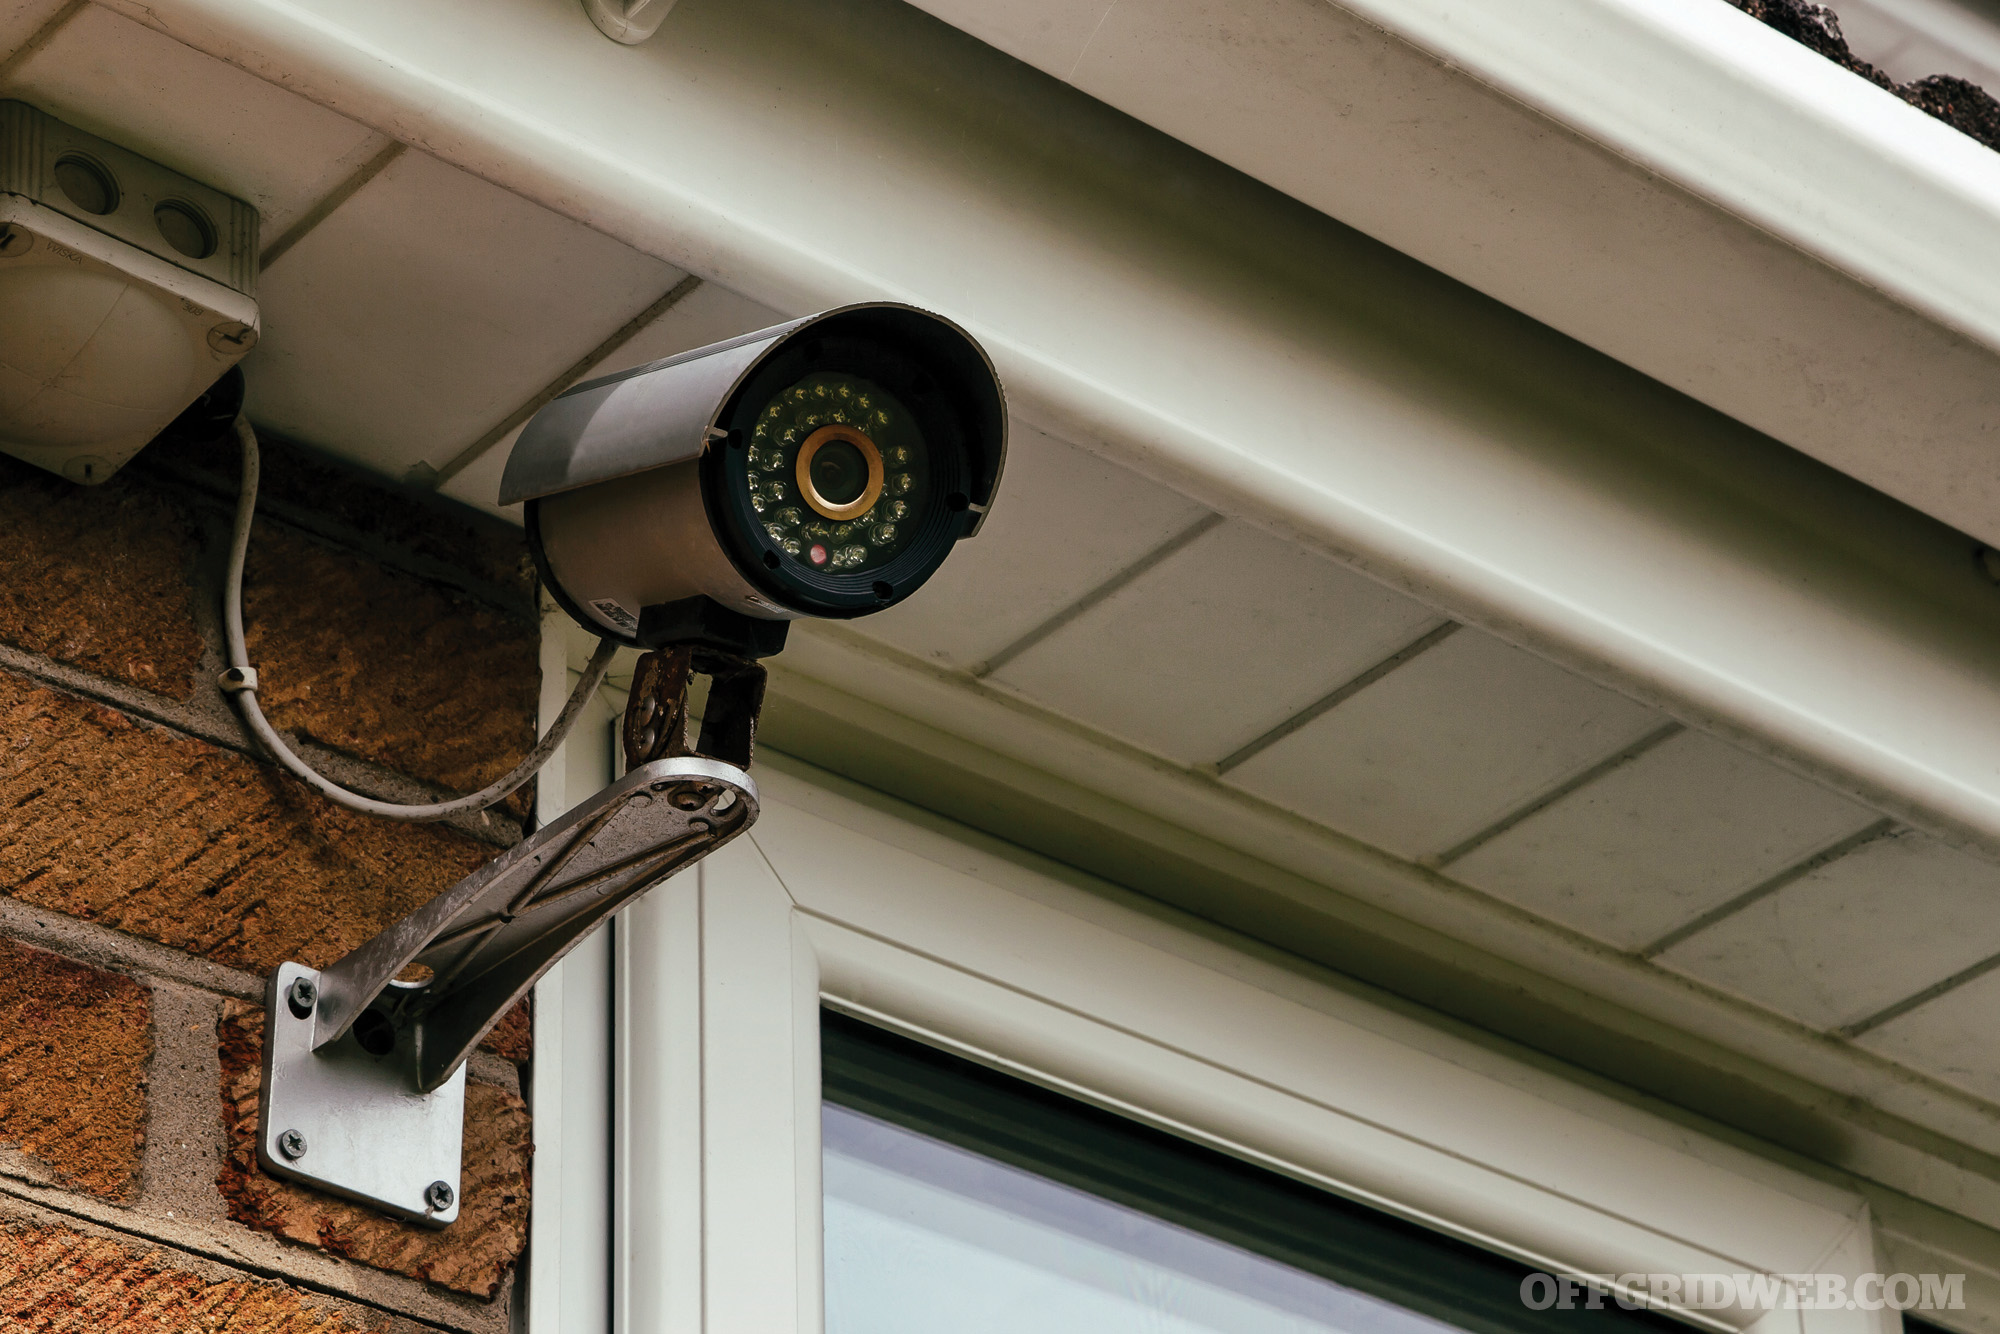
Above: Externally mounted security cameras can be easily tampered with or disabled, so it’s wise to mount outward-facing cameras indoors whenever possible.
Beyond the obvious, there may be other indoor areas of the home that you’d want to monitor for both security and safety reasons. If you have kids at home, you may want something in their rooms to make sure they’re OK at night or while playing during the day. In addition to this, security cameras in various gathering areas of the home are popular as an added safety precaution for not only kids but also babysitters, repair personnel, or the occasional cable-guy.
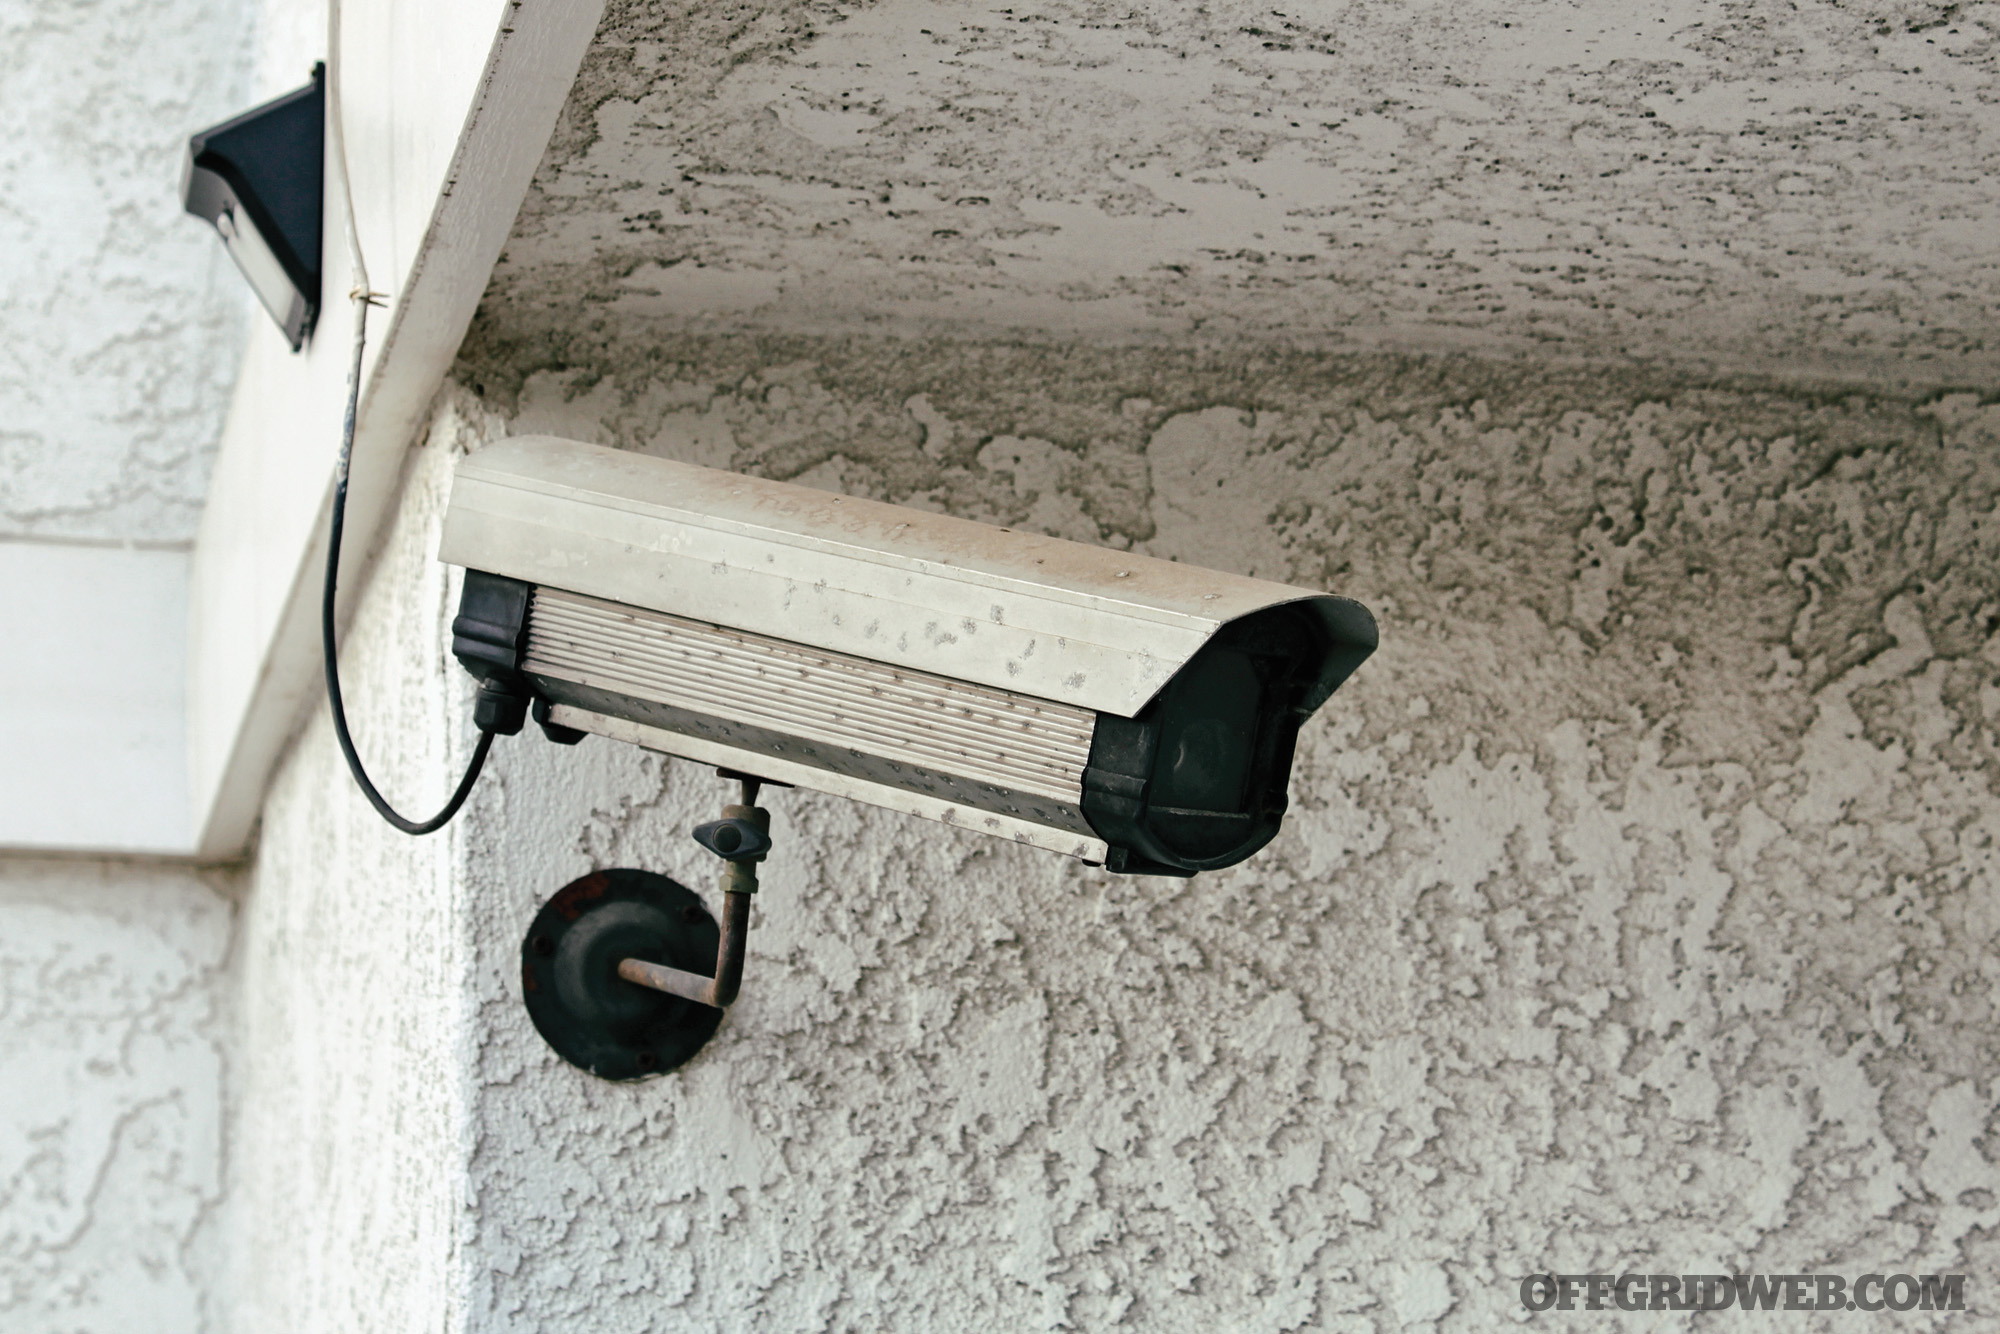
Above: Another example of a readily-accessible exterior camera, which wouldn’t be hard for a criminal to cover or disconnect.
Aside from little humans and safety factors, it’s common to have a camera aimed at gun safes and ammunition. For many, a gun safe contains much more than firearms, including passports, Social Security cards, birth certificates, and the like. Firearms are guaranteed to be one of the most desirable items in your home to any burglar, so it’s wise to have a multilayered protection plan for them when you’re not around. It goes without saying that you certainly don’t need blanket coverage of your home like a casino floor, but critical areas are just that, so it’s wise to protect them as such.
There are many ways to secure your home — strategically placed security cameras are one of the most simple and effective methods. They’re a good start, but they’re also far from an all-encompassing solution. Other aspects of a comprehensive home security system could include various elements of physical security, such as centralized burglar alarm systems, door position switches, window break sensors, and motion sensors. These can potentially report to the same system that monitors your security cameras as well — this expansion capability is definitely important when selecting a surveillance camera system.
Selecting the Hardware
Above: Wi-Fi cameras are simple to set up, but may be vulnerable to remote access by tech-savvy criminals.
Once the decision is made, where can you start shopping? There’s an overwhelming saturation of products on the market nowadays, making a purchase decision tough. The first, and perhaps largest, consideration is whether to go old-school or with new technology. The difference is simple. Older-style CCTV systems are just that — closed circuit television. This means no one can remotely view or intrude upon the system in any way, shape, or form, unless they gain access to it physically. These systems are still actually fairly expensive and send analog signals over coaxial cabling hardwired from a digital video recorder (DVR) to each individual camera, set up channel by channel — just like old televisions. As for storing video, it all depends on the hard drive capacity of the DVR. Just like an old DVR you may have had on your TV, if you have enough space for 30 days, you’d better save anything critical before it gets overwritten, because then it’ll be gone forever!
Above: With an old-school CCTV system, hackers are not a concern.
On the flipside, new tech is all over the place. Whereas I love the security of knowing no one could remotely hack my system, I’m no longer using a coax-based CCTV system. Instead, I’m using a network-based system on my home Wi-Fi. Granted, there’s a slight risk of your security cameras being hacked, but very few have the knowledge to do so — those who care to target you specifically, that is. These systems are typically much less expensive than analog systems, simply because less hardware is involved.
Digital systems can be wireless or IP-based. Your choice will depend on preference and pocketbook. The first is the simplest to install, and most home systems are set up this way due to the close proximity to Wi-Fi access points. These systems are controlled by an app or graphical user interface (GUI) and can automatically connect to cameras once you complete a few simple steps to bring them onto the network. Most notably, this is how Nest, Ring, WYZE, and other wireless-based systems are configured.
Aside from wireless, the other digital approach is to have a system of IP, or internet protocol, cameras. This is typically how large enterprise businesses or military installations configure their systems. These security cameras run on software platforms and large servers or network video recorders (NVRs) that offer data storage for 90 to 360 days of coverage, recording constantly or on motion only. The cameras can sometimes be wireless, but in most cases are hardwired to the servers via a network cable. The cameras are then assigned IP addresses (think 102.92.10.4 as an example) and added to the NVR. Although this is typically more secure than a wireless setup, the features (such as remote viewing) are the same, assuming that you can have remote access to the network where they’re placed via a virtual private network (VPN) or other method. These systems definitely run up in cost close to an analog setup, but are a far more modern and sophisticated solution — that’s why large enterprises have made, or are making the migration.
Based on the current trends and my experience designing and implementing various types of systems, wireless systems are currently the most approachable option for homeowners. A business or government organization can afford to employ on-site 24/7 security officers or surveillance personnel, but unless you’re a billionaire, this just isn’t feasible for a residence. Monitoring your security system can’t be your full-time job. Fortunately, a few key features can cut down on the workload involved with your system.
Important Home Security System Features
Be sure to select a system that has some sort of remote viewing capability on your phone, tablet, or laptop. In addition, set up email, text message, or app-based alerts if your system offers them. These alerts are hugely important to the homeowner, since after all, we don’t actively monitor our phone or computer every second of the day.
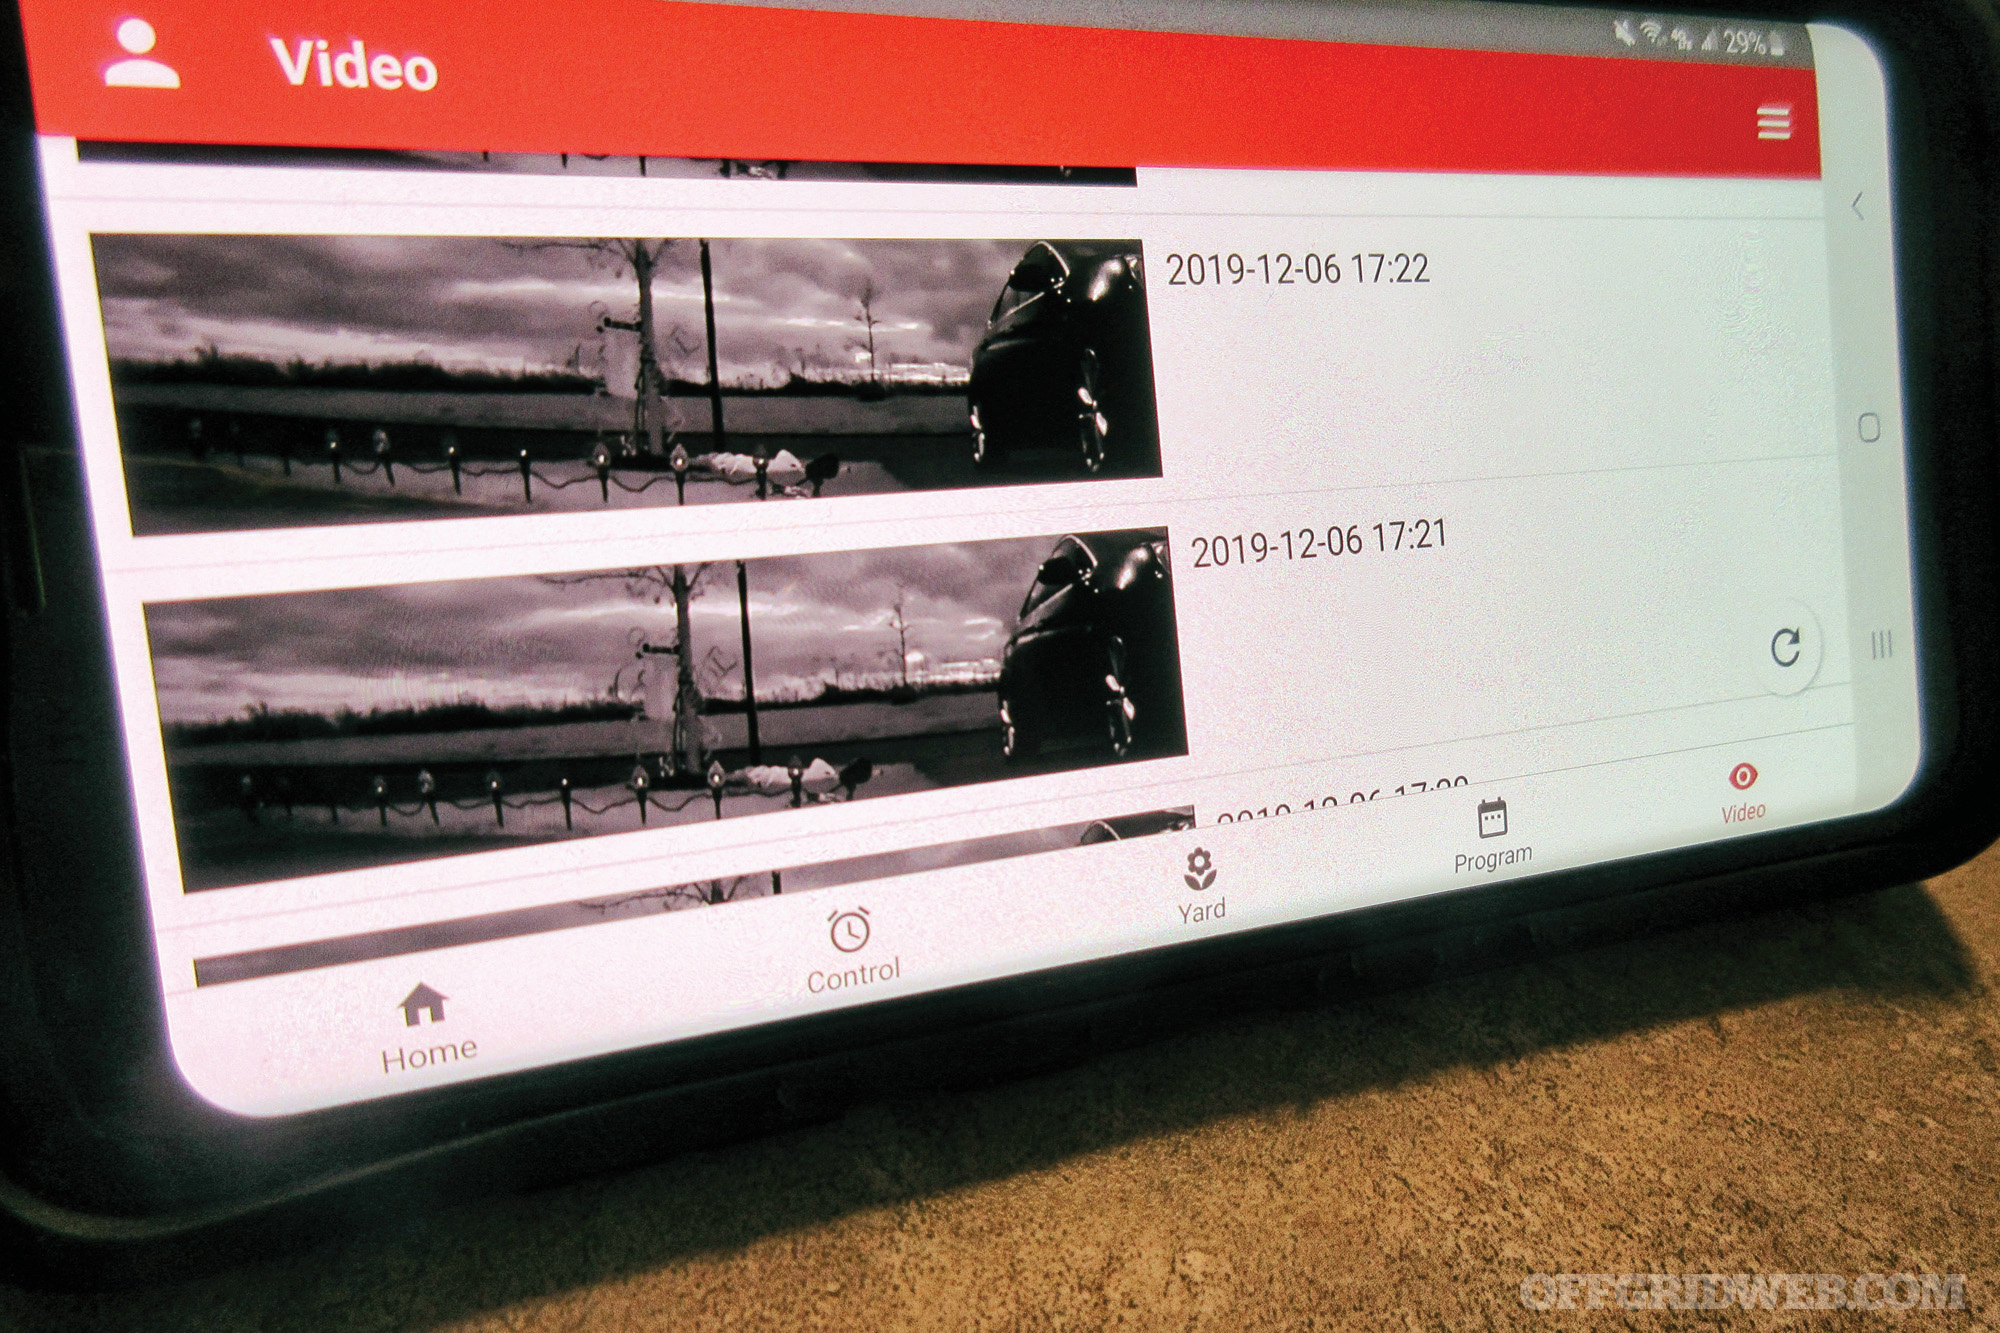
Above: Choosing a system with motion detection capability will dramatically cut down on the amount of footage you’ll need to sift through.
Typically, recording should only begin when the security cameras sense motion to save space and hassle. However, this can be a challenge when they’re outdoor cameras, or if pets or curtains move around inside of a home. To combat this issue, many companies have enabled artificial intelligence features in order to differentiate relevant motion from leaves or trees blowing in the breeze. If you’re buying a new system, look for this feature. As opposed to watching live feeds or scrolling through hours of saved footage, reviewing specific motion events is a very efficient way to ensure no compromise to security has occurred.
You’ve probably seen “pan and scan” cameras that sweep back and forth across an area. These can certainly be beneficial; however, due to their movement, they record continuously rather than selectively. To avoid storage concerns, it’s better to go with motion-activated fixed security cameras. Wide-angle lenses, high-resolution sensors, and camera positioning can alleviate concerns about blind spots and ability to discern details in footage.
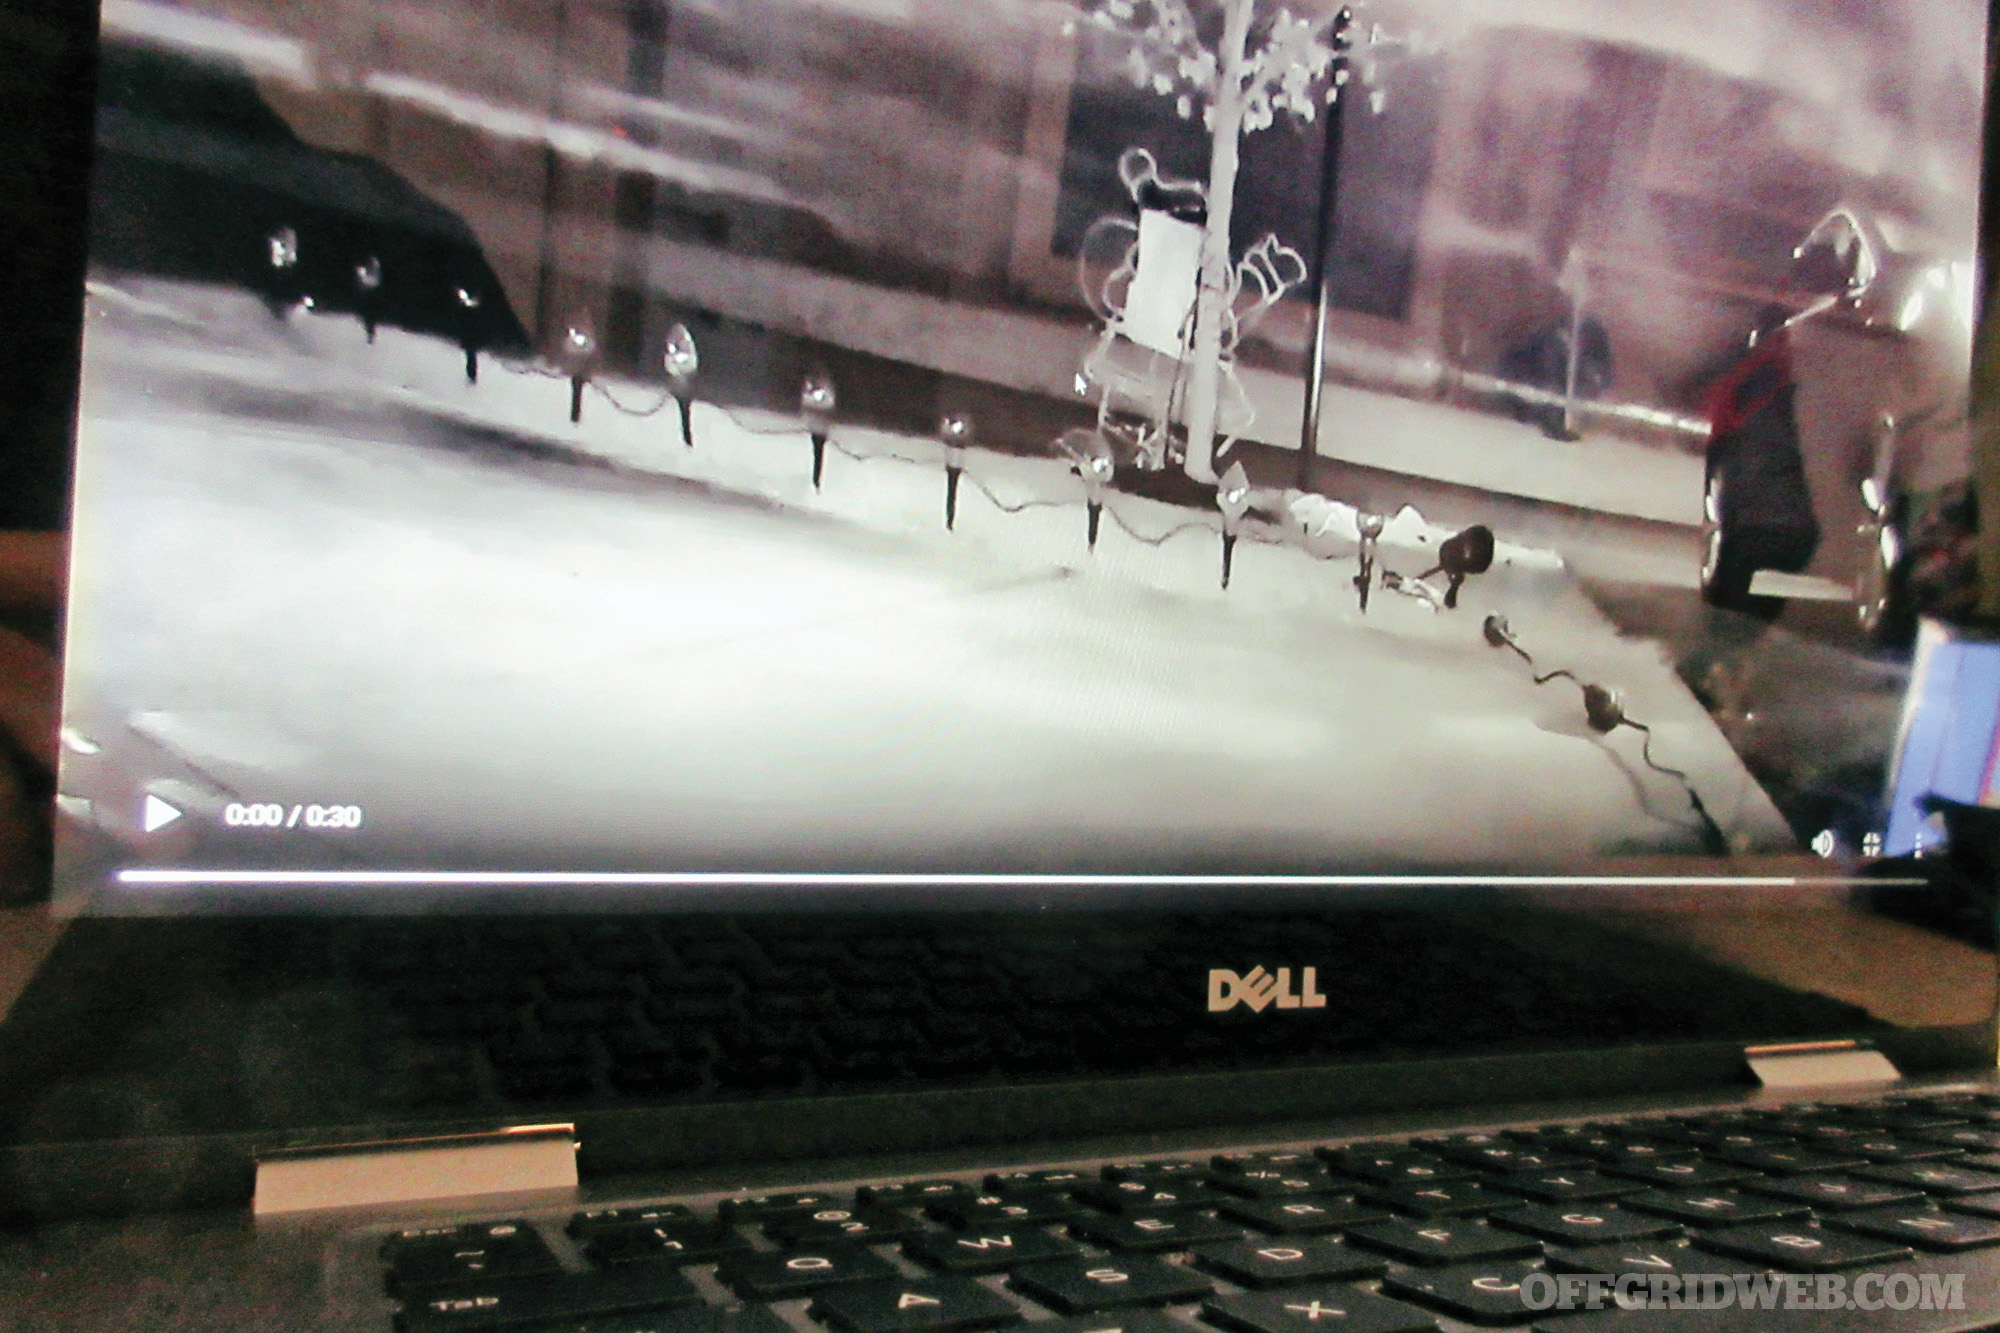
Above: Mobile apps offer a convenient means of checking on your home while you’re away.
Another incredibly crucial feature isn’t only to have infrared night vision, but good night vision. A lot of camera manufacturers get this terribly wrong, so make sure that the reviews are solid on the system you’re scouting. A decent night vision system will be able to flip from IR to natural light conditions quickly without a lengthy “shock” or “wash” on the screen — for example, if you turn on a light in a dark room to investigate a disturbance. It should also have sharp edges around objects without distortion or visual noise. Get security cameras that have microphones for sound, both indoors and out. For indoor cameras, this can be great to hear kids, but it’s especially critical in the event of a burglary or home invasion. Key details of what’s going on can be picked up as evidence, which can be applicable to outdoor cameras as well, if one decides to go that route.
Above: Criminals often use the cover of darkness to conceal their actions. This is why an effective night vision mode should be a top priority.
Storing the Footage
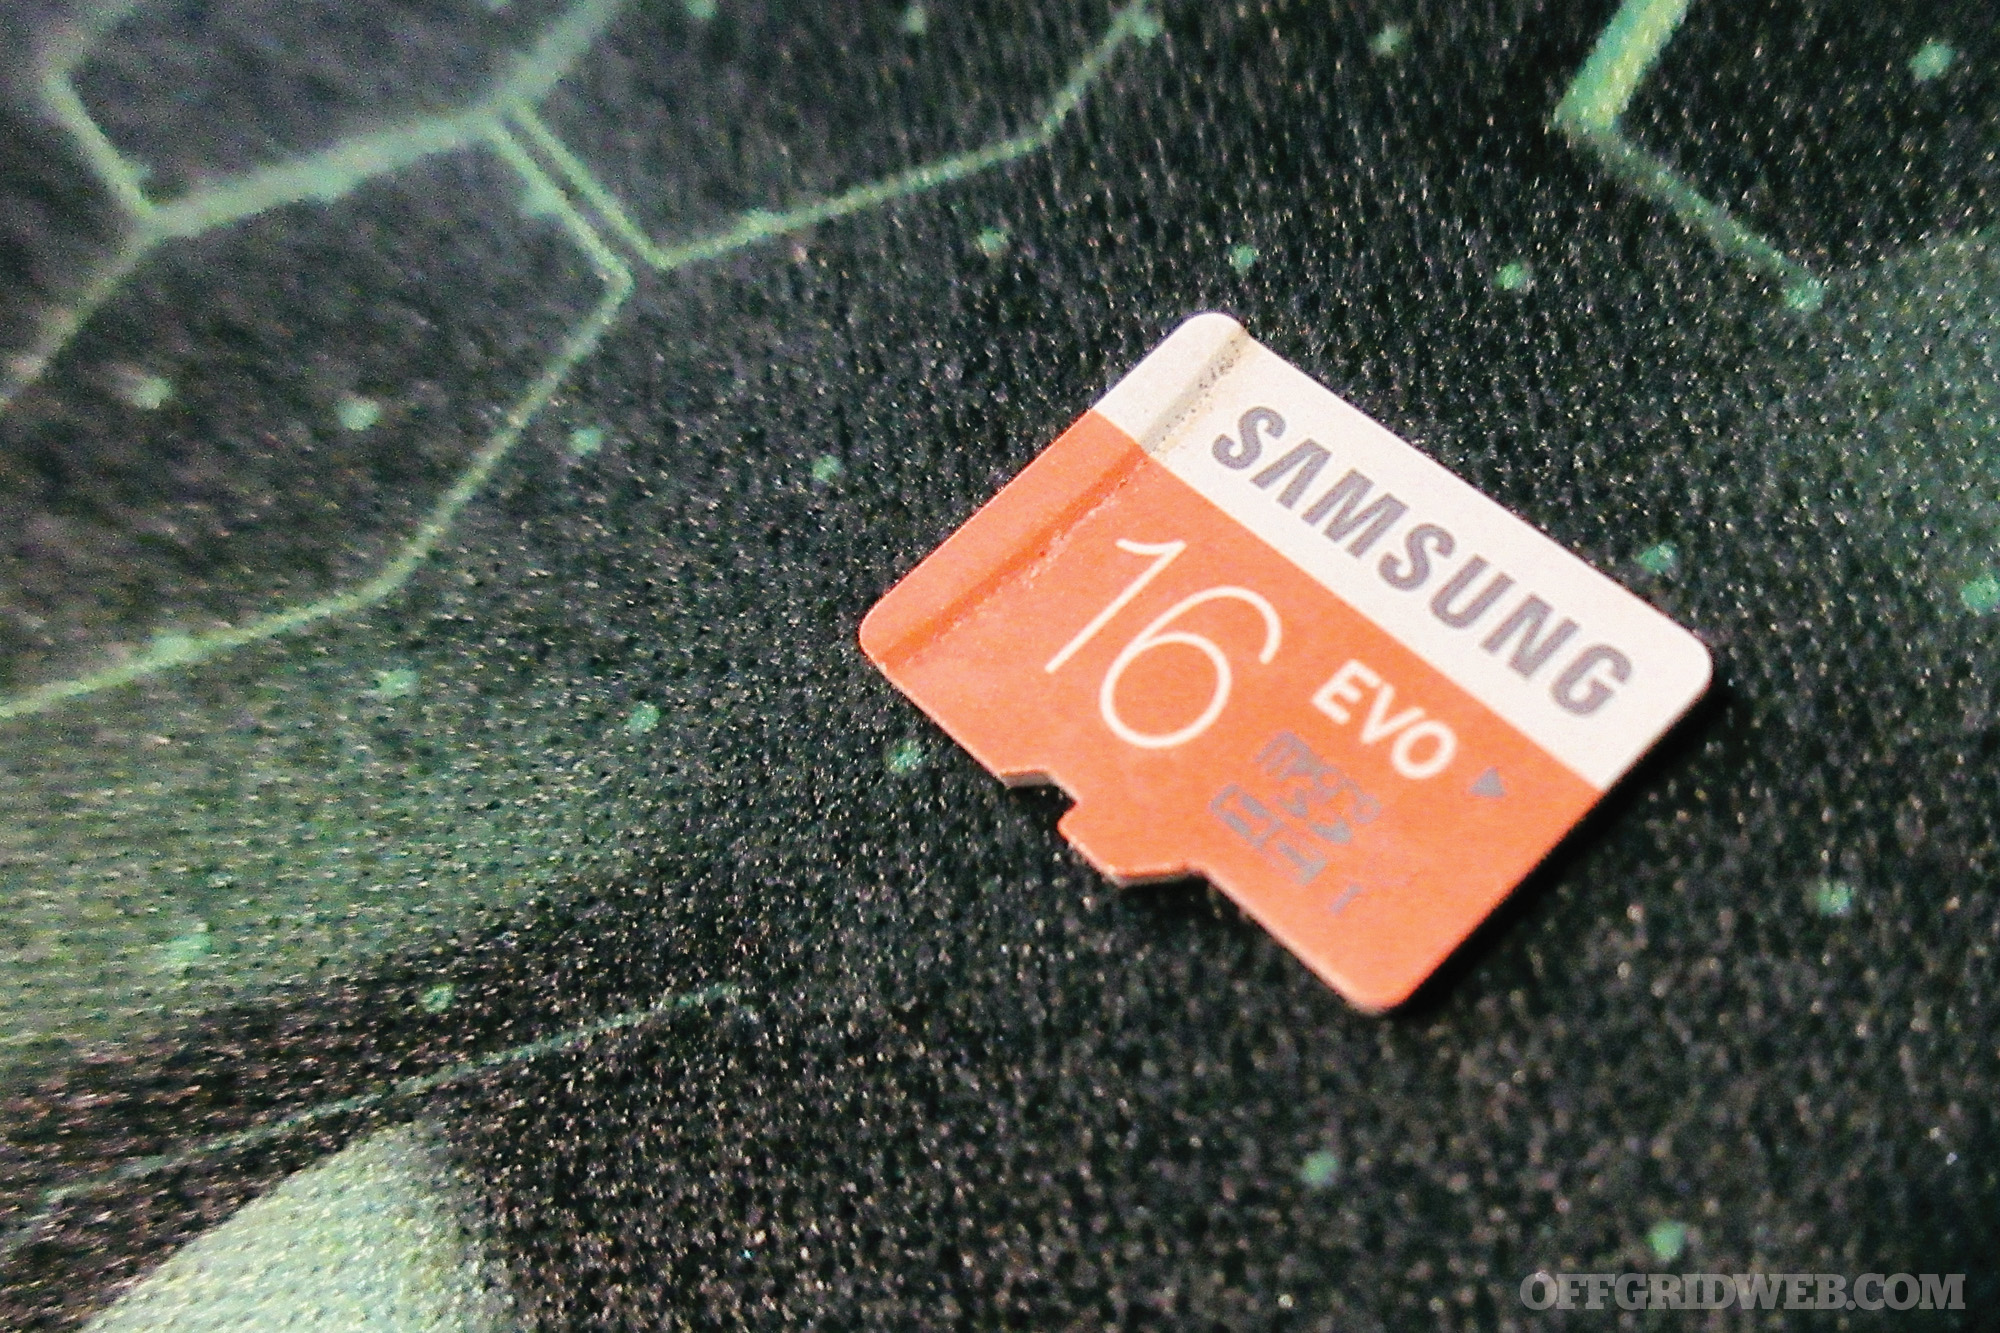
Most of these features are worthless unless you have a reliable, easily accessible storage solution. For a homeowner, you can certainly rack up a ton of recorded events. This is precisely why selecting a home security system with local (SD card or hard drive) and cloud storage is important — even better that the cloud storage doesn’t involve recurring monthly fees! I strongly prefer a cloud-based system with a local backup recording option (such as the SD card). This way, if a data loss or a connection blip happens during an upload to the cloud, recordings will still be available. On the other hand, if your local storage becomes corrupted or lost, you’ll still have your footage on the cloud. Overall, a system that incorporates cloud storage is the way to go.
Above: Footage can be simultaneously uploaded to the cloud and backed up locally on an SD card.
Oftentimes, a week or so of free cloud storage comes with your product, which is usually fine for most homeowners. If you want to take things a step further, you can pay for more storage space, which the manufacturer hopes you’ll do. Or, if you’re a tech-savvy type, you can set up a home server to house your data locally. A backlog of 30 days of footage is generally more than enough, although some strictly controlled business and government applications require up to 90 days of saved footage.
Preventing Unauthorized Access
A main concern around all of the above internet-based systems is definitely security, or force protection of the data and system. To most, I’d say “have no fear,” but there are plenty of cases in which IP or wireless cameras get hacked and video feeds siphoned. Hopefully, you can avoid this by following a few best practices:
Above: Even if you’re not using Wi-Fi cameras, it’s critical to secure your wireless network with a strong password and encryption protocol.
Use the most secure Wi-Fi encryption: Make sure your wireless connection is configured with the WPA2-AES encryption protocol. This can be enabled on your home router, and most modern hardware will set it up by default. If you have an old router or home gateway, check it to see if you’re running an old, less secure encryption protocol.
Strengthen the password for your wireless gear: Don’t be the guy using “admin/admin” as the username and password on his router. Throw special characters in, use a long passphrase, and make sure it’s something that you can reset with a secure email address if you get locked out.
Check what’s on your home network: Using your router’s web interface or mobile app, you can view what devices are connected. If you happen to see something strange, be sure to look into it yourself or alert your service provider.
Don’t forget the actual cameras: If your cameras are connected directly to each other by Wi-Fi, rather than through your internet router, nefarious individuals can easily crack basic encryption and view live feeds, no matter how strong your Wi-Fi protection is. Make sure the password and security configuration for each camera is strong.
More WiFi Security Tips
Surveillance system vulnerabilities are far from the only reason your home Wi-Fi network should be secured. For five easy tips to protect your wireless network against common attacks, refer to our web-exclusive guide.
An Important Note on Backup Power
In my industry, cameras are no good if the power goes out, so we need an answer for that scenario. Homeowners may not have the luxury of a backup generator specifically for home security, due to the fact that such backups are typically used for refrigeration and heating or cooling the home. With that in mind, keeping your security system alive during long blackouts or periods of unrest could be the difference between safety and harm or burglary. During the Northeast blackout of 2003, many businesses in that region of the United States fell victim to looting and burglary when both analog and network-based security and CCTV systems lost power. This reportedly resulted in a rise in theft and property crimes.
Although it may be difficult to keep your system up and running during a long-term outage, it’s much easier to prevent this on a smaller scale. Most popular surveillance systems can be backed up by an uninterruptible power supply (UPS). These systems are basically battery backups that automatically trigger, without lag, in the event of a power blip or total outage. A decent UPS used for computer systems can be connected to a DVR, NVR, or Wi-Fi router and cameras, typically starting at around $90. Granted, these systems may only be good for a few hours. Having multiple UPS units is a best practice, and can keep you up and running for over a day.
This is definitely a concern for enterprise-level controllers and homeowners alike, so if you’re so inclined, be sure to scout a good UPS system that can provide the electrical load that your system draws for at least an hour.
Awareness is Preparedness
Staying informed of potential home security threats, where they may come from, and how to respond to them are the first steps in making a short list of surveillance systems. Home security is definitely no joke in today’s landscape, and it requires careful forethought to set up your systems in an optimal manner. Taking the knowledge we’ve discussed and applying it to a setup that protects your most valuable assets — whether you’re watching live or not — can be tough, but you’ll be glad you did. There are many best practices for the operation of the system, but as an end user, it’s on you to make the decisions that work for you when selecting and setting up a system, monitoring and reviewing it, and taking corrective actions where you might have gaps. In the end, the result will be a robust security or surveillance system that makes you feel a lot better, no matter if you’re inside your home or thousands of miles away.
About the Author
Jim Henry is a physical security and surveillance expert who has spent his professional career working to keep people out of places they shouldn’t be and locating hard-to-find individuals. Prior to his current employment in the private sector, where he works in risk management, Henry was a government security contractor and surveillance investigator. Over time, he has built a diverse portfolio of countersurveillance, critical infrastructure protection, and cyber threat detection skills. Even though the specifics of his current work can’t be disclosed, Henry is passionate about topics such as emergency preparedness, family safety, and geopolitics.
Editor’s Note: The following article was written exclusively for OFFGRIDweb by Morgan Atwood of NoOneComing.com. If you haven’t already read Atwood’s previous article, What You Need to Know About Masks for COVID-19, we highly recommend you do so — it provides guidance for safety outside the home, while this article focuses on safety inside the home.
The world is currently in the grip of a pandemic illness, COVID-19 caused by the SARS-CoV-2 virus. In these times keeping a clean home environment is common sense. However, questions arise about what defines clean when a virus is concerned. How do we keep our home disinfected from a highly infectious virus we cannot see?
(Graphic: CDC / Alissa Eckert, MS; Dan Higgins, MAM)
To answer this, we must first understand how the virus is transmitted. The SARS-CoV-2 virus is transmitted directly between people, and indirectly by contact with contaminated surfaces. When SARS-CoV-2 infects someone, the virus invades cells and replicates. This replication causes viral shedding, where the virus is carried out of the body on secretions from the nose, mouth, and eyes. These particles of mucous, saliva, and rheum carry active virus, and can be passed to others by contact, inhalation, or landing in an opening like the mouth.
Surfaces become contaminated when these expelled particles land on them. Contaminated surfaces, or objects, can then transfer the infection to people or other surfaces by contact. To reduce our potential for infection we need to prevent not just direct transmission but also indirect transmission. The recommended practices for hand washing, covering coughs, and avoiding touching our faces goes a long way toward this. The remaining piece is keeping the home disinfected, and disinfecting things that come in from outside.
The Potential for COVID-19 Contamination
Transmitting the virus from outside the home to inside is probably the most concerning to many people. We have all seen those in public who wear no mask, look by touching, and sneeze and cough openly. It’s easy to picture those folks contaminating surfaces or objects. The SARS-CoV-2 virus has a limited survivability outside of a host, but that varies depending on where it is. Aerosol particles can survive for at least 3 hours, but once they land the virus can survive for different lengths of time on different surfaces. On copper the virus only survives for about four hours. On cardboard and paper, the virus can survive for about 24 hours. On plastic and stainless steel, that survival extends to at least 72 hours.
The package you received today probably has no surviving particles from its origin point. The bag of frozen broccoli you bought, however, may still have viable virus on the surface from a sneezy shopper before you. Any handling those items received before coming into your hands could also be a source for contamination. The checker at the grocery store, or your mailman, may feel fine and have no symptoms, but could still be infected and shedding viral particles. Current medical thinking is that many infected are asymptomatic, and that many others begin viral shedding before displaying any symptoms.
Inside the home, many will feel more confident that the risk is lower, but we shouldn’t be careless about things. Given the potential for asymptomatic spread, prudence should compel us to disinfect the home as well. Home disinfection also provides a redundant strategy to prevent infection, reducing the likelihood of bringing infectious material into the home while also actively targeting any that came in anyway.
How Should You Disinfect Your Home?
One of the most important things to know about SARS-CoV-2 is that soap and water effectively kill it. SARS-CoV-2 is an enveloped virus, meaning the viral RNA is protected by a lipid layer. This fatty shell is destroyed by soap, exposing the virus to be rapidly inactivated. Our fundamental tool against this virus is soap and hot water. Beyond that, we do not need exotic disinfectants or extraordinary measures to disinfect surfaces. As the medical community has grappled with the COVID-19 pandemic, much research has been done on disinfectants. Leading the way are three household staples: alcohol, hydrogen peroxide, and common household bleach (sodium hypochlorite).
Alcohol, as commonly found in medicine cabinets across the country, at concentrations of 70% or more, is effective at inactivating the virus, with 1 minute or more of exposure time. Exposure time means allowing the disinfectant to dwell on the surface long enough to be effective.
Bleach, in as low a concentration as 0.1%, has a similarly rapid ability to inactivate the SARS-CoV-2 virus. Mix 4 teaspoons of bleach to 1 quart of water, and use to disinfect surfaces, leaving for at least one minute before wiping away. Bleach solutions quickly lose potency, so do not pre-mix and leave for later use.
Hydrogen peroxide, another family medicine cabinet staple, is also an effective disinfectant against SARS-CoV-2. At a concentrations of 0.5% or higher, hydrogen peroxide is effective with at least one minute of contact.
Other disinfectants can be effective as well. The EPA has published a complete list of commercial disinfectants that are effective against the COVID-19 virus. Included on the list are disinfectants appropriate for soft surfaces, like carpets and furniture, that can’t be wiped with bleach or the like. Also included are most disinfecting wipes from well recognized brands. Wipes do not require preparation, and are perhaps easiest to use, just wipe down and let dry. Also take note of things that aren’t on the EPA list of disinfectants. Although commonly touted, cleaners like vinegar and ammonia do not appear on the list.
Cleaning and disinfection are not the same. Cleaning removes pathogens and dirt from materials, disinfection inactivates pathogens. Surfaces that need cleaning should be cleaned, then disinfected. You should wear disposable gloves when cleaning and disinfecting, and then wash your hands thoroughly when finished. Take care with disinfectants, as various household cleaners and disinfectants do not mix well. You should never mix bleach with another household cleaner, or disinfectant, as many toxic gases can result. Other combinations, such as hydrogen peroxide and vinegar, can produce similar toxic gases. Refer to manufacturer directions for all cleaning and disinfecting products, and research them prior to any combinations, or avoid combining altogether.
What Should You Disinfect?
The most frequently touched surfaces and objects are the first thing we should focus on disinfecting. If we accidentally bring SARS-CoV-2 into our home, or a family member is shedding viral particles, these things are the most likely to become contaminated. Disinfect the following regularly:
Door and cabinet knobs and handles
Light switches
Tables
Chairs
Sinks
Toilets
Remote controls
Phones
Tablets
Keyboards
Touch screens
Trash cans
Laundry hampers
Reusable cleaning supplies like cloths
It is important to note that devices are a high priority for disinfection, but are also sensitive electronics. Many manufacturers have guidelines for how to clean their devices, but >70% alcohol can be safely used on most electronics if it is not allowed to pool on the surfaces.
The next thing we should be disinfecting is anything that comes into the home from outside. Different methods will be appropriate for different items: You wouldn’t want to wash a package, but you would wash apples. Things to disinfect before, or as soon as, they come inside include (but aren’t limited to):
Packages
Cans or containers of food
Drink bottles/cans
Individual items of produce (wash)
Other store purchases
Daily carry and work equipment
Masks worn outside the home
Clothes
Disinfecting common household items can reduce your risk of bringing COVID-19 home.
Ideally, as many items as possible should be disinfected outside the home before bringing them in. All store purchases could be put into a plastic tub, brought to the front door/garage, then disinfected and set to the side for the disinfectant to evaporate. Shoes, similarly, should be taken off and disinfected outside. Clothing is more challenging, unless a secluded entryway is available, but should be carefully removed as soon as possible and washed. Be very careful in handling items like clothing, as shaking can aerosolize infectious particles off the surface.
Disinfecting Your Vehicle
The other outside the home object to disinfect is our vehicle. If we or objects we transport have been potentially contaminated with SARS-CoV-2 particles, contact contamination of the vehicle is likely. We can minimize this risk with a few steps, such as hand washing before reentering the vehicle, avoiding extra touching, and using washable seat-covers and washing them regularly. Any purchases or pick ups should be placed outside the passenger compartment if possible. Placing these items into a plastic bin in the trunk or cargo area, which can be removed entirely and disinfected, would further limit contamination risk.
Cleaning out your vehicle periodically is another way to reduce the risk of spreading germs.
Disinfection of the vehicle after use is similar to home disinfection: Clean surfaces with soap and water, and then disinfect with an appropriate disinfectant. Wear personal protective equipment, and open the doors and windows to allow airflow to vent both infectious particles and cleaning fumes. Focus on the most frequently touched surfaces, handles, steering wheel, knobs, and controls, and any area that has had contact with outside items or people. To disinfect screens and displays, use alcohol or a manufacturer recommended disinfectant wipe. For fabric upholstery, use an EPA recommended disinfectant appropriate for porous surfaces.
Closing Thoughts
Fundamental home cleanliness goes a long way to maintain health at any time, but becomes truly essential during a pandemic. As more and more people fall ill, good overall habits of cleaning and housekeeping with these few additional steps of disinfection performed regularly can make the difference for your family.
About the Author
Morgan Atwood has taught and written about survival, field medicine, and protection for over a decade. His website, NoOneComing.com, offers survival gear, training opportunities, and educational articles based on his 25 years of experience living and working in remote places. Atwood has worked as a wildland firefighter, anti-poaching consultant, and knifemaker, and is the author of several books, including “Civilian Tactical Self-Care Guidelines,” “How To Stay Alive Down There,” and “Good Medicine for 96 Bad Hours.”