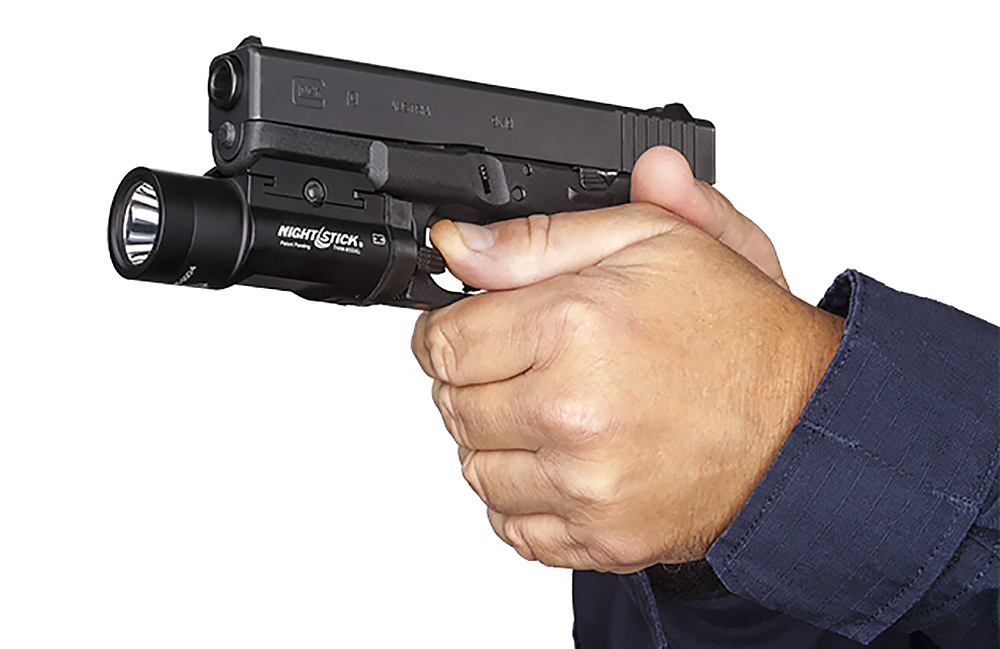
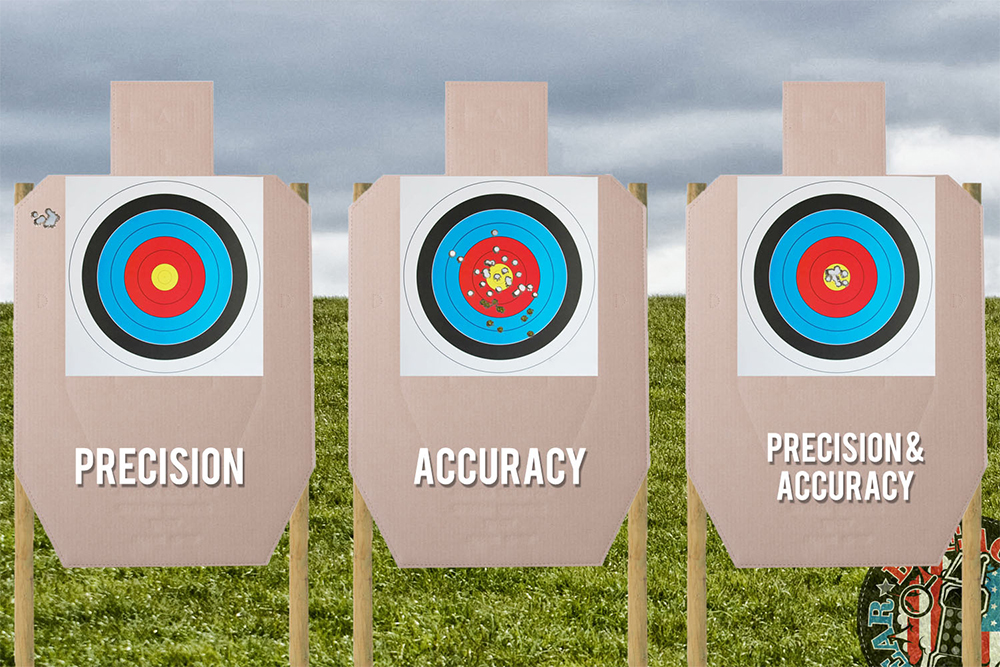
Let’s say you’re at the shooting range with a 2×2-foot target at 10 yards. You pick up your handgun and fire at the target 15 times, but your shots scatter unevenly across a 1.5×1.5-foot area on the target. Seeing this group, you might think you aren’t very accurate with that pistol. But ironically, your accuracy was flawless — your use of the word “accuracy” wasn’t.
Before you go thinking that we’re just being pedantic grammar nerds, hear us out. Much like the terms MOLLE and PALS, accuracy and precision are words with two very distinct meanings. Using them interchangeably leads to confusion, and this can negatively impact your firearm training and performance at the shooting range. To become a better shooter, you need to be both accurate and precise, and understanding the meaning behind each of these words can help you learn how to correct problems with either.
Editor’s Note: The following article was originally published by our friends at Breach Bang Clear. It appears here in its entirety with their permission. For more from the Mad Duo and crew, go to BreachBangClear.com or follow them on Facebook or Instagram.
Today we’re taking a slight deviation from our normal format of Language Lessons and covering two different words. They’re so closely related that it’s very difficult to talk about one without bringing up the other — which is one of the reasons they’re so often confused and used interchangeably instead of independently. A thesaurus will even list them as synonyms. But in the context of firearms (and science) synonyms they are not, as you will soon see.
Terms: Accuracy & Precision
Category: Shooting Terminology
Application(s) of Use: Shooting of all kinds, and any projectile weapon
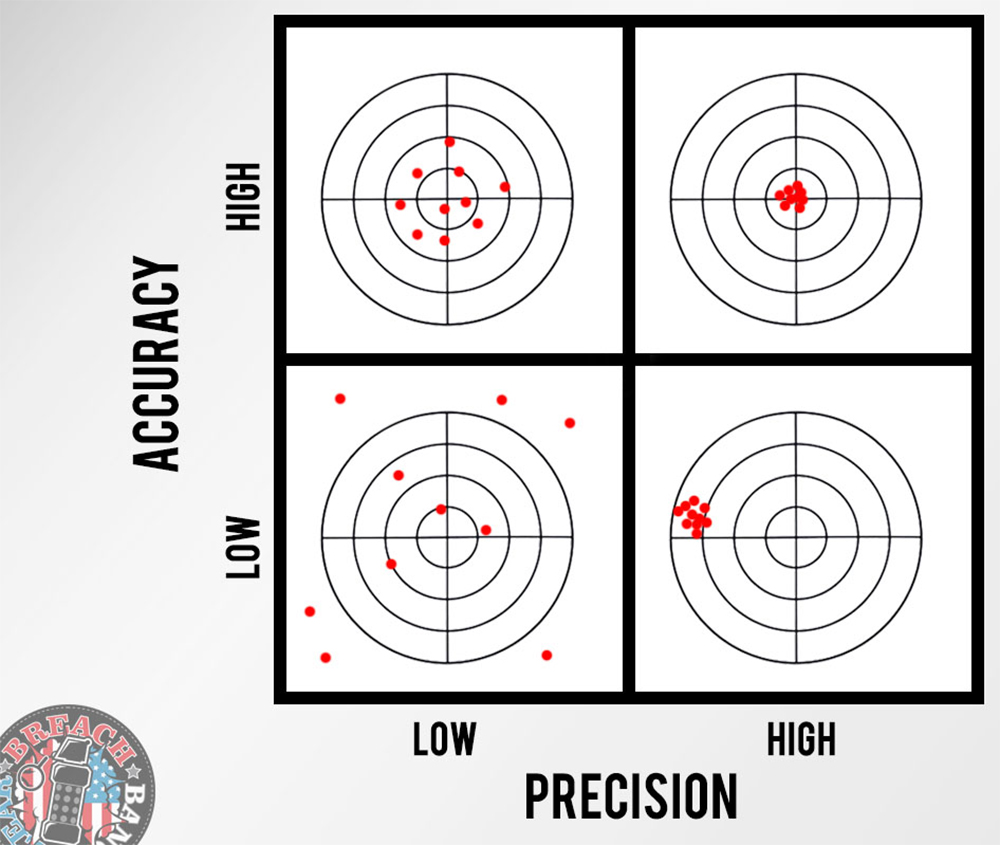
Definition (Accuracy): The closeness of a measured value to a standard or known value. I.E. How close a shot is to the desired point of impact. Definition (Precision): The closeness of two or more measurements to each other. The closer together each measurement is, the more precise the instrument is. I.E. How close individual shots are to one another, regardless of point of impact.
Why it Matters: You can have high accuracy and low precision, vice versa, and everything in between. If you’re shooting for the smallest group possible (such as during initial zeroing of an optic), precision is what you’re looking for. You want a tight group with a clear median in order to determine the required adjustments to bring you to your desired point of impact. Actually hitting that target is accuracy.
Into the Weeds: High accuracy combined with high precision is definitely something to strive for, but what degree of each one needs is totally dependent on the desired or required outcome. A higher degree of both is needed for a sniper or long range shooter, versus what’s required of a machine gunner, infantryman, or artilleryman. For this reason snipers and long range shooters have rifles and ammunition capable of far more precision than your mass-issued M4 and M855A1. Similarly, a pharmacist requires a more precise and highly calibrated (accurate) scale for measurement of medication relative to what Rosie O’Donnell would use to track her [attempted] weight loss.
If your zero is off (which can happen for many reasons) you may well find yourself in a situation with high precision but low accuracy. Thankfully, this plight can usually be remedied with a re-zero, especially if you know your DOPE. Running down a bug regarding precision is the stuff of nightmares for long range shooters, as there are seemingly endless variables that contribute to its degradation.
In summary, precision and accuracy are closely related, but independent terms. Being high in both categories is always a positive, but not a requirement for all situations.
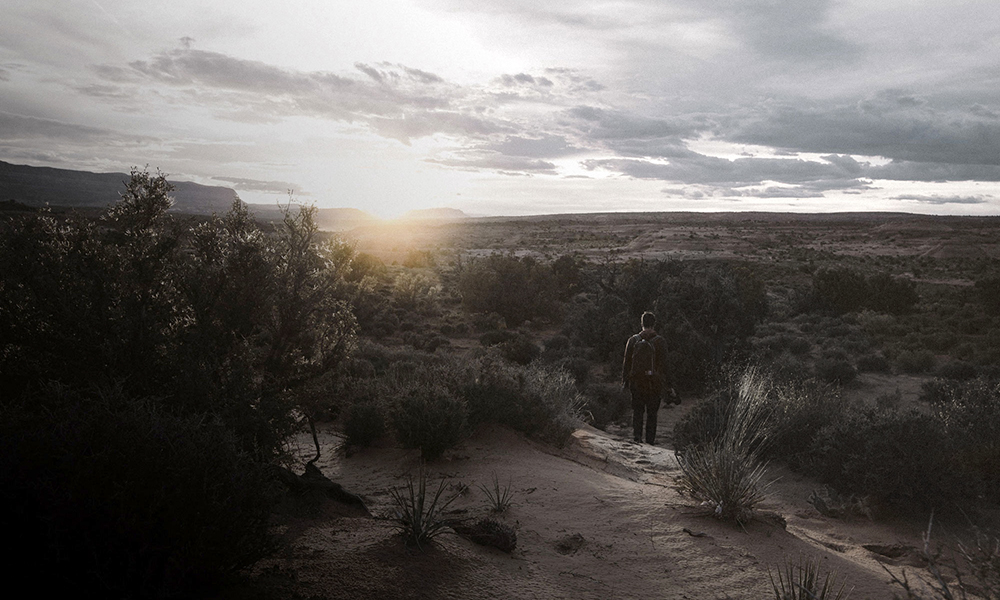
If you had to give up one of your five senses, which one would it be? For most of us, eyesight would be at the bottom of the list. We rely on our sense of sight to walk, drive, read, write, recognize loved ones, and identify threats. If you suddenly lost your vision during an emergency, your odds of survival would undoubtedly be low.
Learning to navigate blindly would be a real challenge during a survival situation.
Those of us who have poor eyesight know all too well how difficult it can be to go about daily life without corrective lenses — either glasses or contacts. In an emergency, these items can be lost, damaged, or become inaccessible. Disposable contact lenses will eventually be used up and thrown away. If you’re prepared, you’ll have backups of these items or will save up for laser surgery, but it’s still wise to have a fall-back plan in case things really go south and you can’t see clearly.
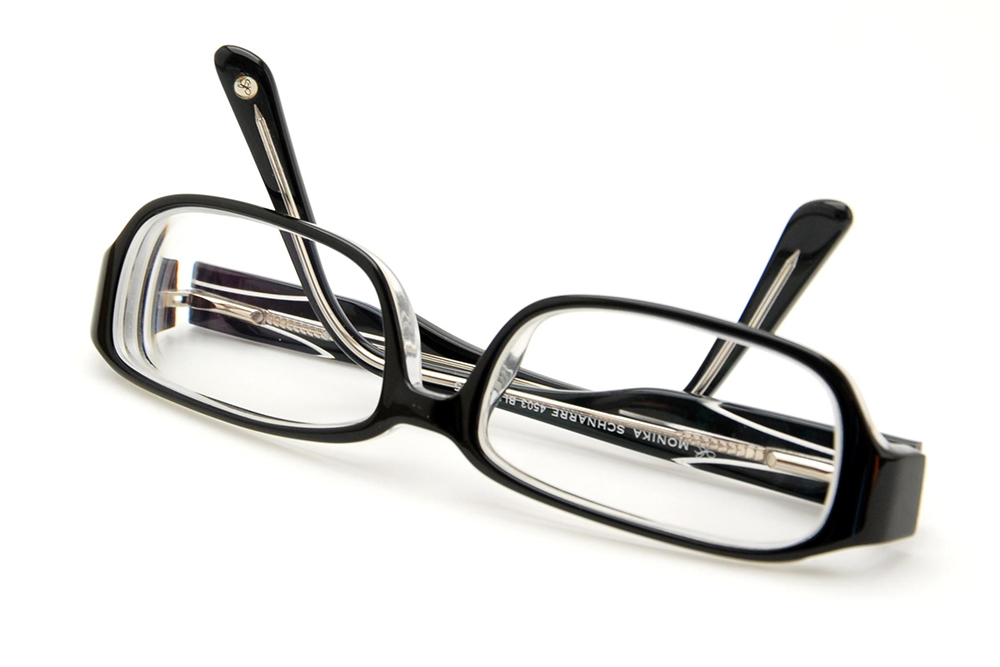
Unless you’re a trained optician with a full set of working equipment, it’s not exactly feasible to make a new set of lenses that match your eyes. However, there’s another much simpler option: pinhole glasses. Instead of concave or convex lenses, these glasses use tiny holes to allow through very narrow beams of light, much like the pinhole camera you probably made in elementary school science class. This effectively increases depth of field and gives you sharper vision.
Off-the-shelf pinhole glasses contain evenly-spaced pinholes in opaque plastic. Photo: Wikipedia
If you’re curious about the value of this pinhole effect, you can test it easily at home. Just grab a sheet of dark paper and poke a pinhole through it. Then take off your corrective lenses and hold the paper with the pinhole just in front of your eye. Your vision will be far from perfect, but you should still see a dramatic improvement. More pinholes will allow in more light and provide peripheral vision.
Another method of testing this pinhole effect is to form a loose fist, and hold it up to your eye like you’re holding an invisible telescope. Tighten your grip until only a pinhole of light is visible, and watch as once-blurry objects come into focus.
Like eyeglasses or contacts, pinhole glasses are only a temporary fix for poor vision. However, these are much easier to improvise in an emergency — just black out some cheap sunglass lenses and carefully punch some holes. You can even make them out of aluminum foil, as long as you don’t mind looking like a low-budget version of Cyclops from X-Men. Either way, improvised pinhole glasses can give you a fall-back option in case your glasses or contacts are unavailable in an emergency.
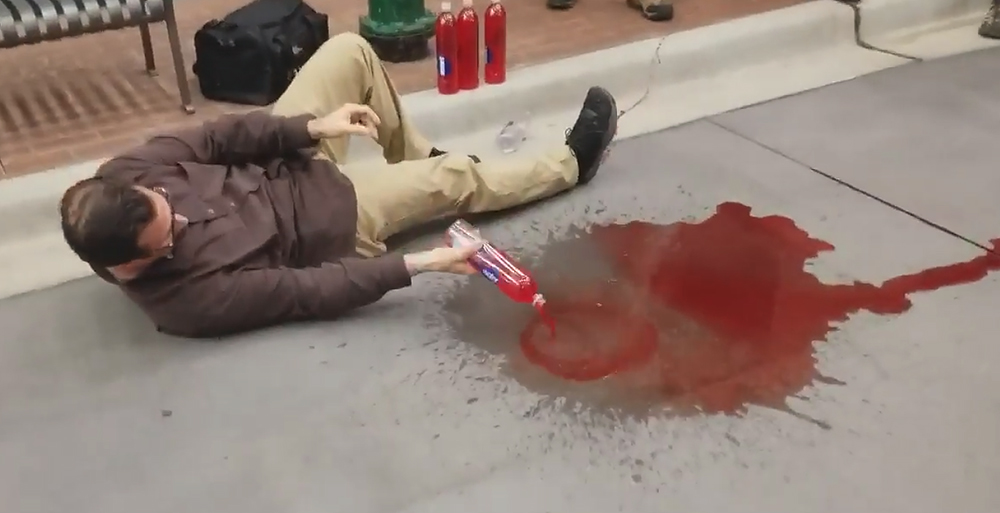
For those of us who don’t work as emergency medical personnel, observing a traumatic injury can be completely overwhelming. Even if you don’t freeze up or suddenly become ill, it’s a natural human response to start to panic when there’s blood gushing everywhere. This panic is amplified exponentially when the one who’s bleeding out is a close friend or family member — it might even be your own blood splattering on the ground.
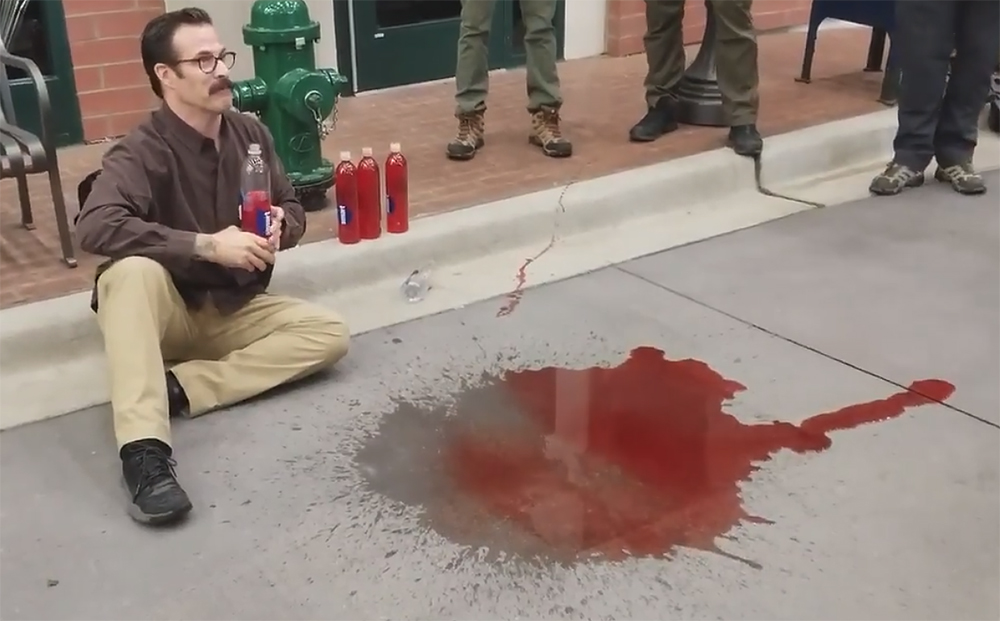
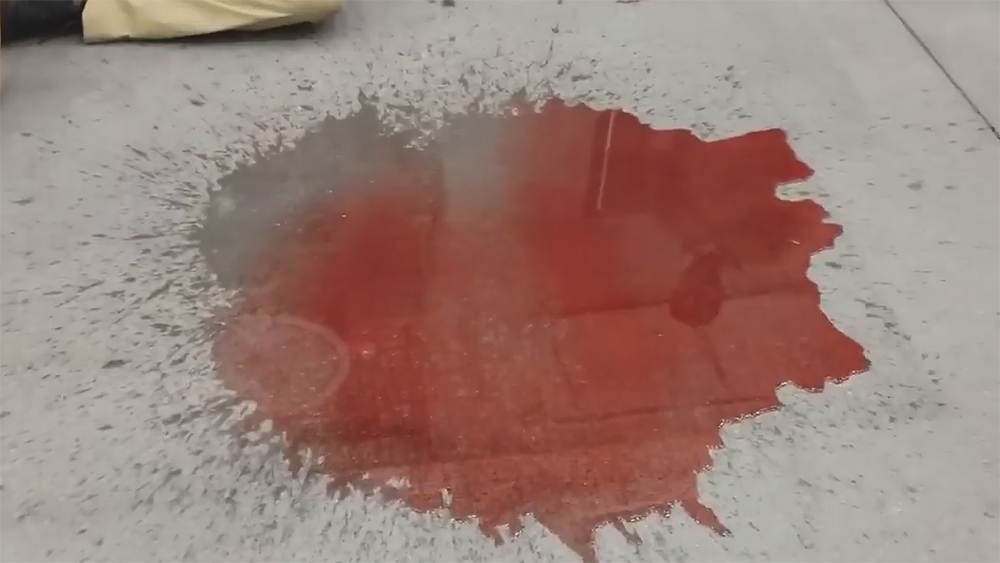
Fortunately, by preparing yourself mentally for this physical trauma, you can snap yourself out of the panic and take action. Even if there’s a huge pool of blood surrounding the victim, there may still be time to save their life. The following video was posted by North American Rescue on Facebook, and shows a demonstration of just how much blood can be lost before the victim becomes disoriented or loses consciousness.
You may have heard that a typical adult body contains roughly 5 liters of blood — that’s 10.5 pints. The instructor in this video demonstrates by filling five one-liter bottles with red liquid. As he pours out the contents, he describes what effects the victim will experience. When a full liter of blood loss has occurred, he says “it’s bad, but not as bad as you think.”
Even after losing a full liter — that’s 2.1 pints, or 20% of total blood volume — the victim should still be physically able to focus, assuming the psychological shock doesn’t cause them to pass out. As blood loss increases past 1.5 liters, the instructor says vision will start to “tunnel in” and the victim may become unable to distinguish friends from foes.
Check out the full video below. It may help you keep some perspective if you ever witness a traumatic injury (or experience one firsthand). Of course, this also reinforces the importance of having a tourniquet on hand to stop the bleed ASAP. Note: This video contains some not-safe-for-work language.
Thanks to contributor Cameron Carden for letting us know about this video.
As a weekend tripper, you know the importance of bringing the right pack for the adventure. You need enough space to equip yourself for whatever nature may throw at you. And space fills up quickly. Just as necessary is to make sure that your pack is comfortable for the long trip ahead. With the Fully Loaded Tactical Military Style Backpack, you can be sure you’ll be suited for any situation.
Made of lightweight yet durable nylon, this backpack comes with plenty of space for the essentials, and then some, with 3 outer pockets. Speaking of the essentials, this carryall features a flashlight and 480mL water flask bundled in. In addition, you can buckle up the chest strap for all-day hikes. Or, if you’re staying in town, you can travel safely with your laptop thanks to an additionally padded inner pouch. Plus, it comes in 3 colors—black, green, and khaki—so you can buy one for the whole crew. With all the space and support this backpack possesses, you can be sure to fit everything you need, and might even be able to fit the kitchen sink too.
If you’re on the hunt for a backpack for your next epic escapade, look no further than the Fully Loaded Tactical Military Style Backpack. You can nab one for just $39.99, a savings of 59%.
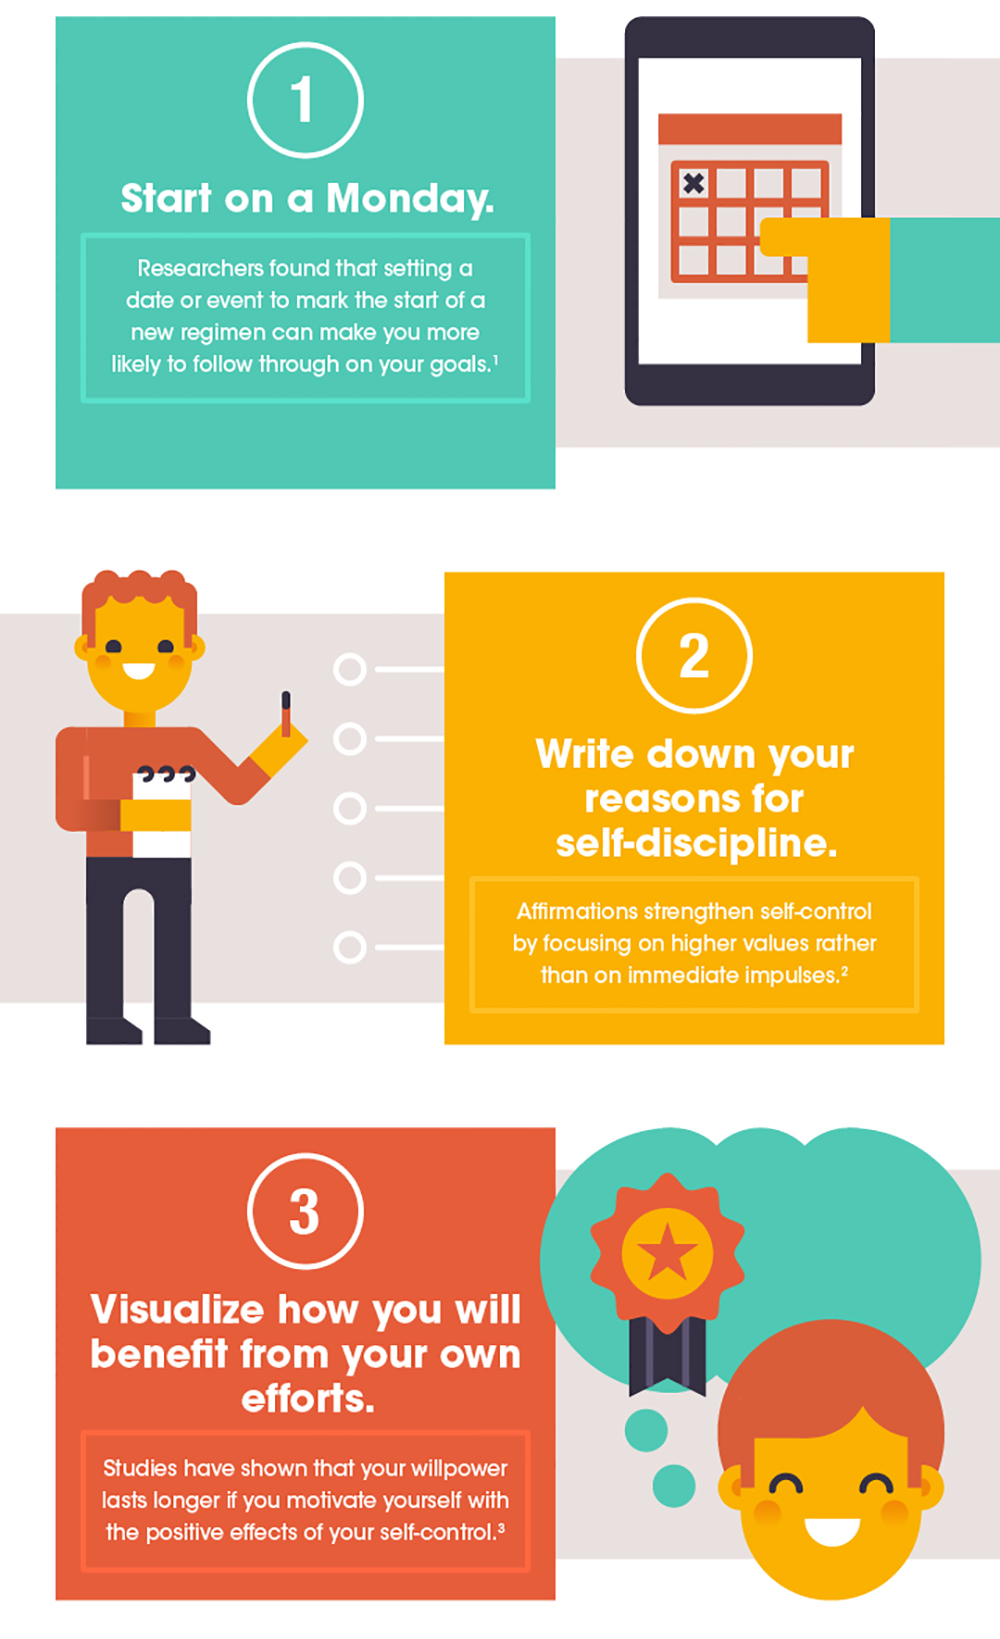
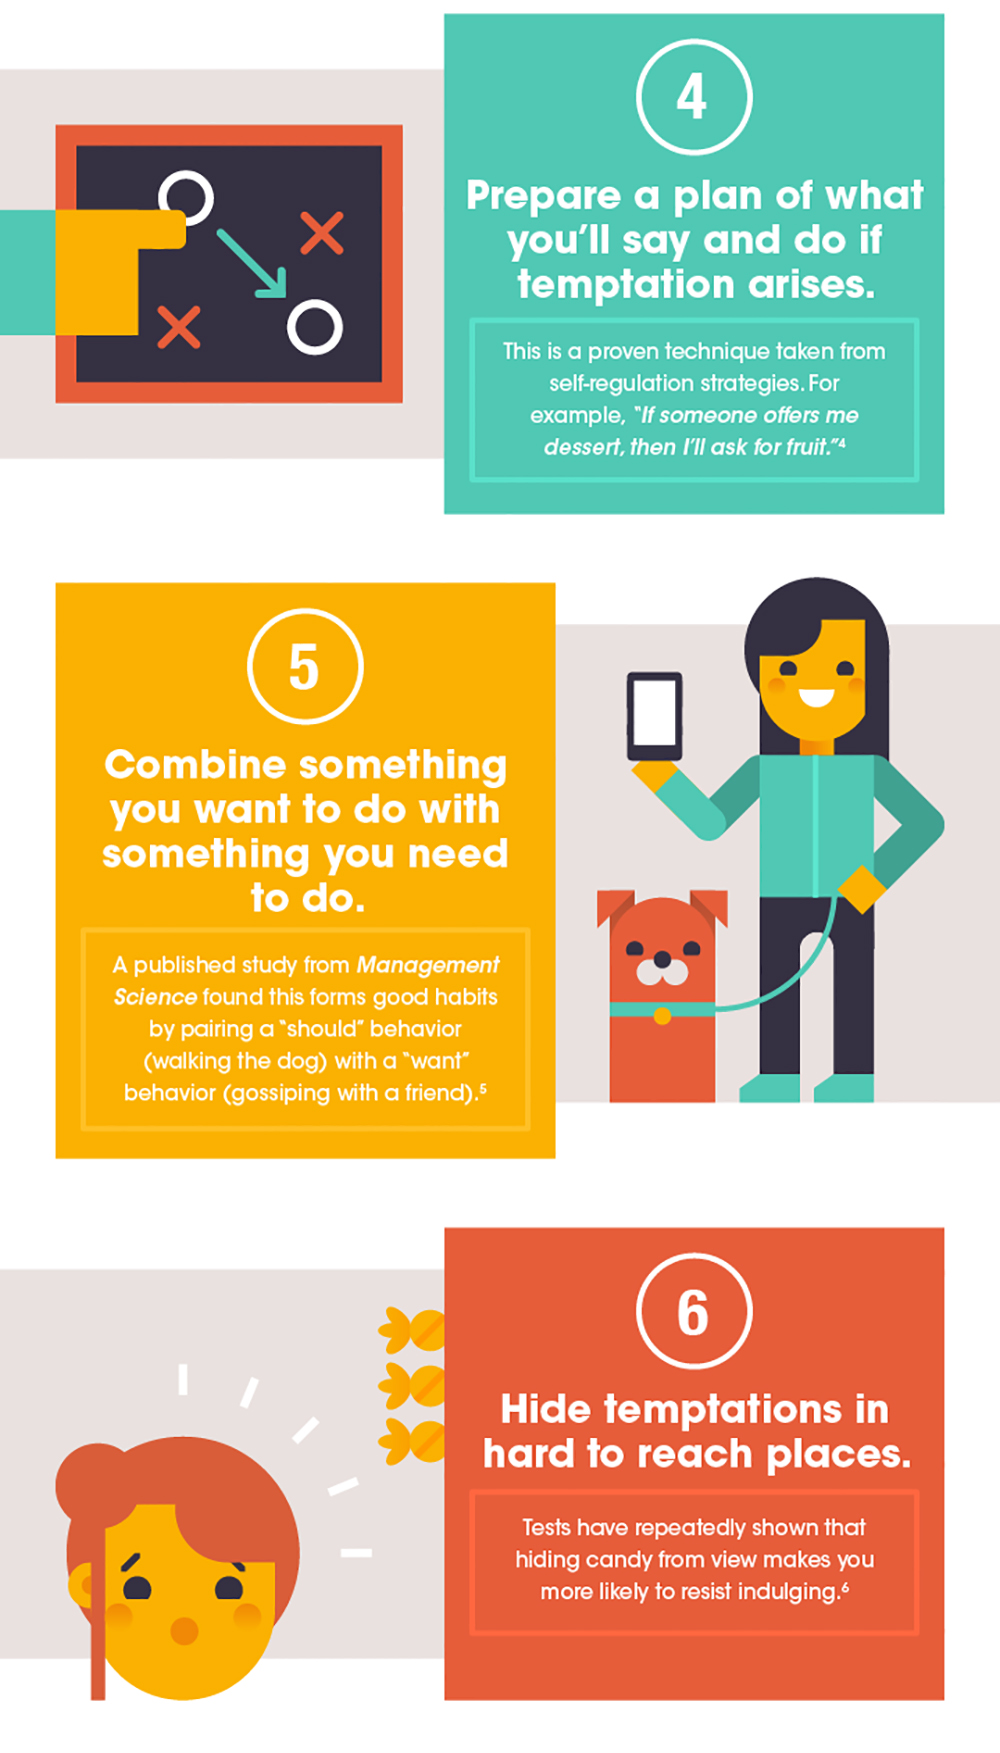
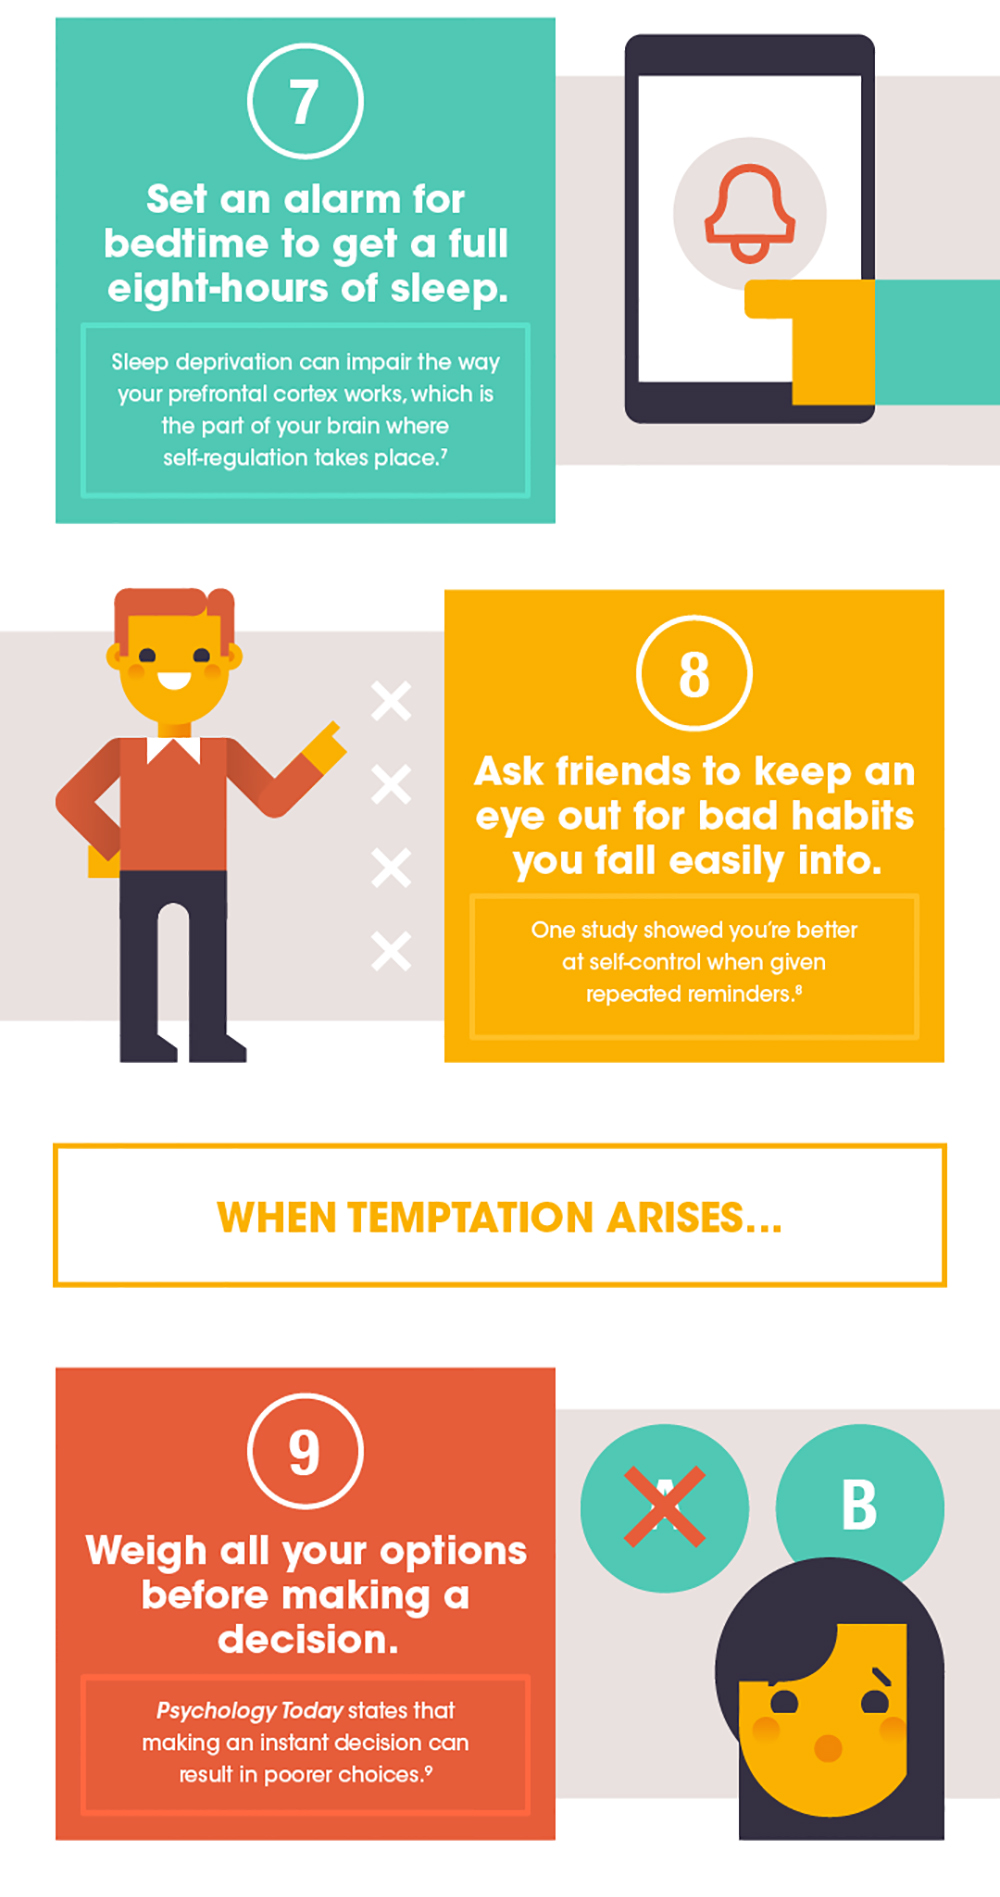
January is approaching fast, and you may already have some new year’s resolutions in mind. Whether you’re planning to grow your emergency stockpiles, learn a new skill, quit smoking, lose weight, finish a household project, or get back the six-pack abs you had in high school, you’re going to need considerable determination to get there.
Unfortunately, there’s a reason these resolutions have become synonymous with over-promising and under-delivering — it’s not easy to stay disciplined and achieve your ambitious goals. If it were, we’d all be muscle-bound millionaires with no bad habits. So, it’s beneficial to take some steps to improve your self discipline, thereby improving your emergency preparedness. The person who preps by thinking “I’ll do that later” is usually the same one who’s in serious trouble when disaster strikes.
The following infographic from CashNetUSA outlines 14 tips which can help you improve your self discipline in 2018. Each tip is supported by scientific research — see the list of sources at the end of the graphic or click here for a list of web links. A full-size version of this graphic can be downloaded here.
Admittedly, the catch-22 here is that you’ll need enough discipline to study and apply these tips to your life in order to improve your discipline. But if your willpower needs a little boost, give them a shot. They may help you be happier, healthier, and better prepared for survival.
Hypothermia sets in quickly during bitterly cold winter weather when you’re unable to maintain your body heat. But even in warmer environments, a harsh wind chill or clothing soaked by an unexpected rainstorm can lead to a dangerous and potentially fatal drop in core temperature. For these reasons and many more, a reliable source of fire is an essential part of any emergency kit, and something you should consider and test thoroughly.
You certainly don’t want to learn about a flaw in your fire-starting plan when you’re already shivering, numb, and losing muscle coordination.
Last winter in Issue 18, we featured a buyer’s guide for manually operated fire-starters, including ferro rods, magnesium bars, several types of matches, and even a primitive fire bow. This time around, we’re focusing on tools that can create an instant flame.
Lighters vs. Torches
These two devices share many similarities, but can be differentiated easily by observing their flames. Lighters produce soft and flickering orange flames from flammable fluid or liquified gas, while torches release a fine stream (or streams) of gas at higher pressure to generate intense blue jets. Some of these fire-starters blur the line, offering a manual adjustment that can achieve either type of combustion.
Both lighters and torches can easily ignite a campfire, and many share the same butane fuel, but there are functional differences as well. Lighters generally offer even heat, and simple ignition and fuel systems for long-term durability. Torches generate more powerful and focused heat — enough to solder wiring, braze metal pipes, vaporize moisture, and brulee fancy desserts — but their fuels and Piezoelectric ignition systems may be more sensitive to environmental conditions.
We obtained three lighters and three torches, and evaluated each based on ease of use, reliability, power, features, and cost. Read our impressions and decide if one of these fire-starters is hot enough for your bug-out bag or winter survival kit.
Most of us have heard the common idiom “rub salt in a wound”. According to the Cambridge Dictionary, the phrase is used to describe making a bad situation even worse. For example, if you just lost your job and started clearing out your desk, only to have a coworker walk up and brag about his new promotion, he’d be rubbing salt in your metaphorical wound.
The origin of this idiom is easy enough to ascertain. If you’ve ever gotten seawater in a fresh cut, you’ll know that literal salt in a wound can be physically painful. However, you may also recall that saline solution is used for wound irrigation in hospitals around the world. This got us thinking: it’s obvious that rubbing salt in a real wound is painful, but is it really making a bad situation worse? Or could the salt make the situation better in the long term and prevent infection, becoming a viable technique for backcountry medicine?
Note: This article is not a comprehensive first-aid guide. Professional medical treatment should always be sought first before attempting any improvised treatments.
Historical linguists have indicated that the idiom came from a time when salt was used as an improvised antiseptic. “During the earlier centuries, when England was establishing its navy, most sailors were forced into service. While at sea, punishment was often lashes with a cat’o’nine tails. These whippings would almost always break the skin, and salt was rubbed into the wound to prevent infection. In this way, “salt in wound” was a very literal, stinging phrase.”
However, just because it was seen as a viable antiseptic back then doesn’t mean it still is today. After all, we certainly don’t use blood-letting, mercury, or lobotomies to cure our diseases these days.
In our search for an answer to this question, we found the following statement from Walter Sipe, M.D. of the University of California, San Francisco. He wrote the following response in 2006 in an Ask a Scientist column for the Howard Hughes Medical Institute:
Let me start by saying: Do not put salt on your cut. The single most important aspect of wound care in the backcountry is vigorous and copious irrigation with clean water (filtered or chemically treated so it is drinkable). You can generate a high-pressure stream by filling a zip-top plastic bag with water, poking a tiny hole in a bottom corner of it with a needle, and then squeezing the bag so water comes out through the hole. For dirty wounds, vigorous scrubbing to remove foreign bodies is also important. Exposing wounds to iodine, alcohol, peroxide, and pure salt is no more effective than water irrigation at preventing infection and can potentially damage tissues. The safest way to slow bleeding is to hold direct pressure on the wound until the bleeding stops.
Before you go thinking a dip in the ocean might be a better way of salting your wounds, scientists have found that rinsing a wound in seawater is harmful due to the presence of marine bacteria. Additionally, many dangerous bacteria have an extremely high salt tolerance and thrive in salty environments — Staphylococcus aureus, the bacteria behind potentially-deadly MRSA staph infections, is one notable example.
Finally, while it’s true that sterile saline solution is used in many medical facilities, this solution contains a very small amount of dissolved salt for the purpose of mimicking your body’s natural conditions. With regard to saline’s antiseptic properties, multiplescientificstudies have found that saline solution is no more effective for preventing infection than distilled water or even clean tap water. In fact, studies indicate that water may be preferable in some cases.
Distilled, boiled, or purified water can be used to irrigate wounds and reduce infection risk.
So, the conclusion is clear: next time you hear the phrase “rubbing salt in a wound”, remember that its metaphorical use of “making a bad situation worse” is also true in a medical context. It is not a viable technique for treating wounds in the backcountry. Doing so is likely to be very painful, may further irritate the wound, and it will not kill all the bacteria which might lead to a dangerous infection. Instead, keep the salt for your next meal, and irrigate your wounds thoroughly with clean purified or distilled water until you can seek professional medical treatment.
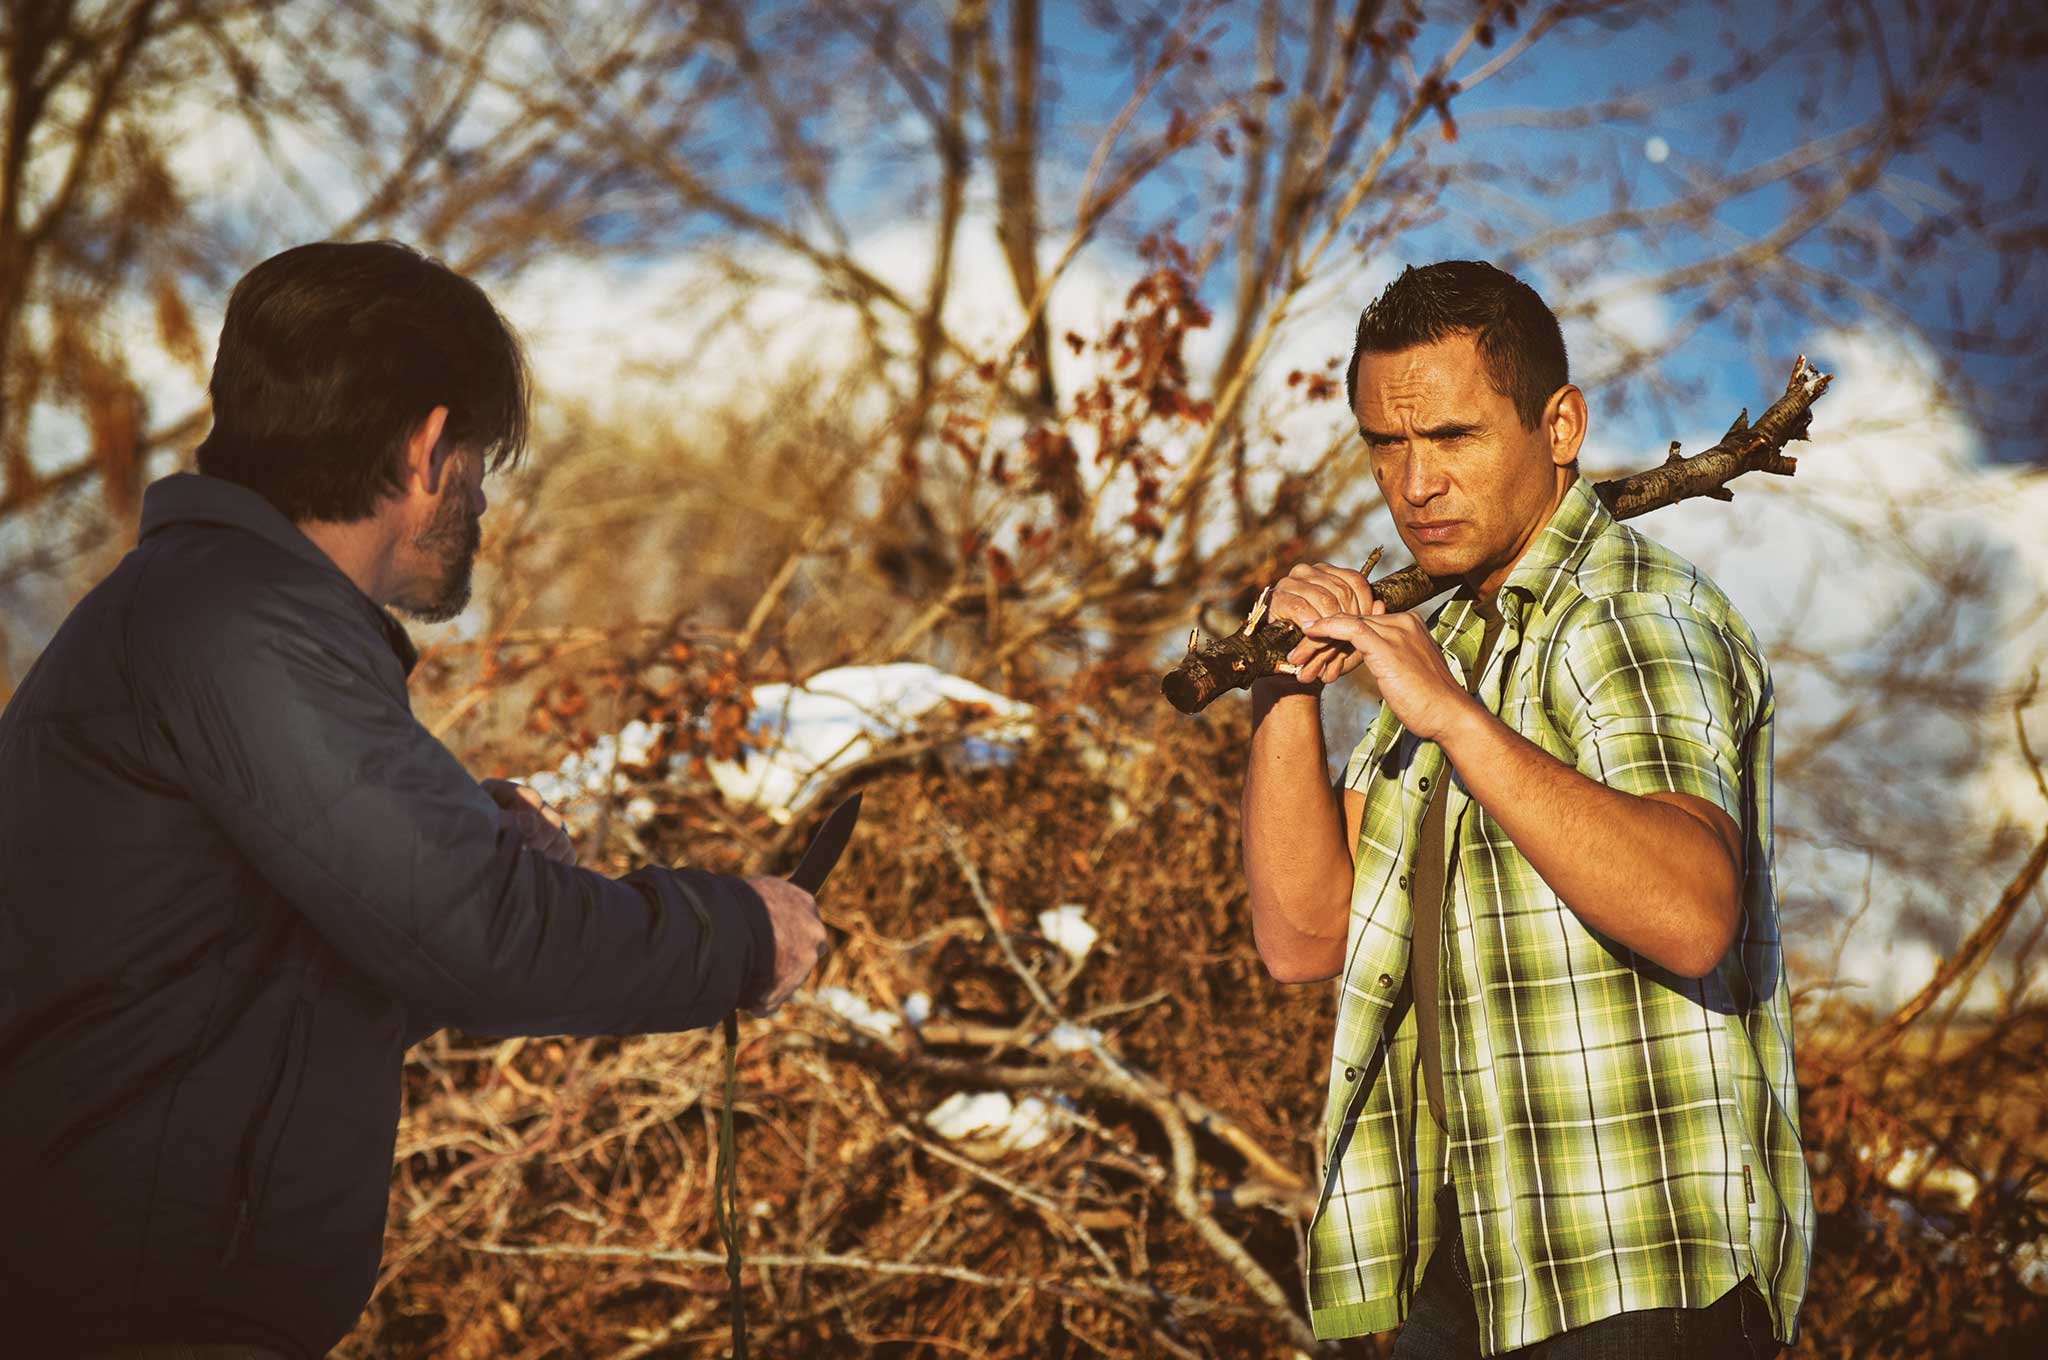
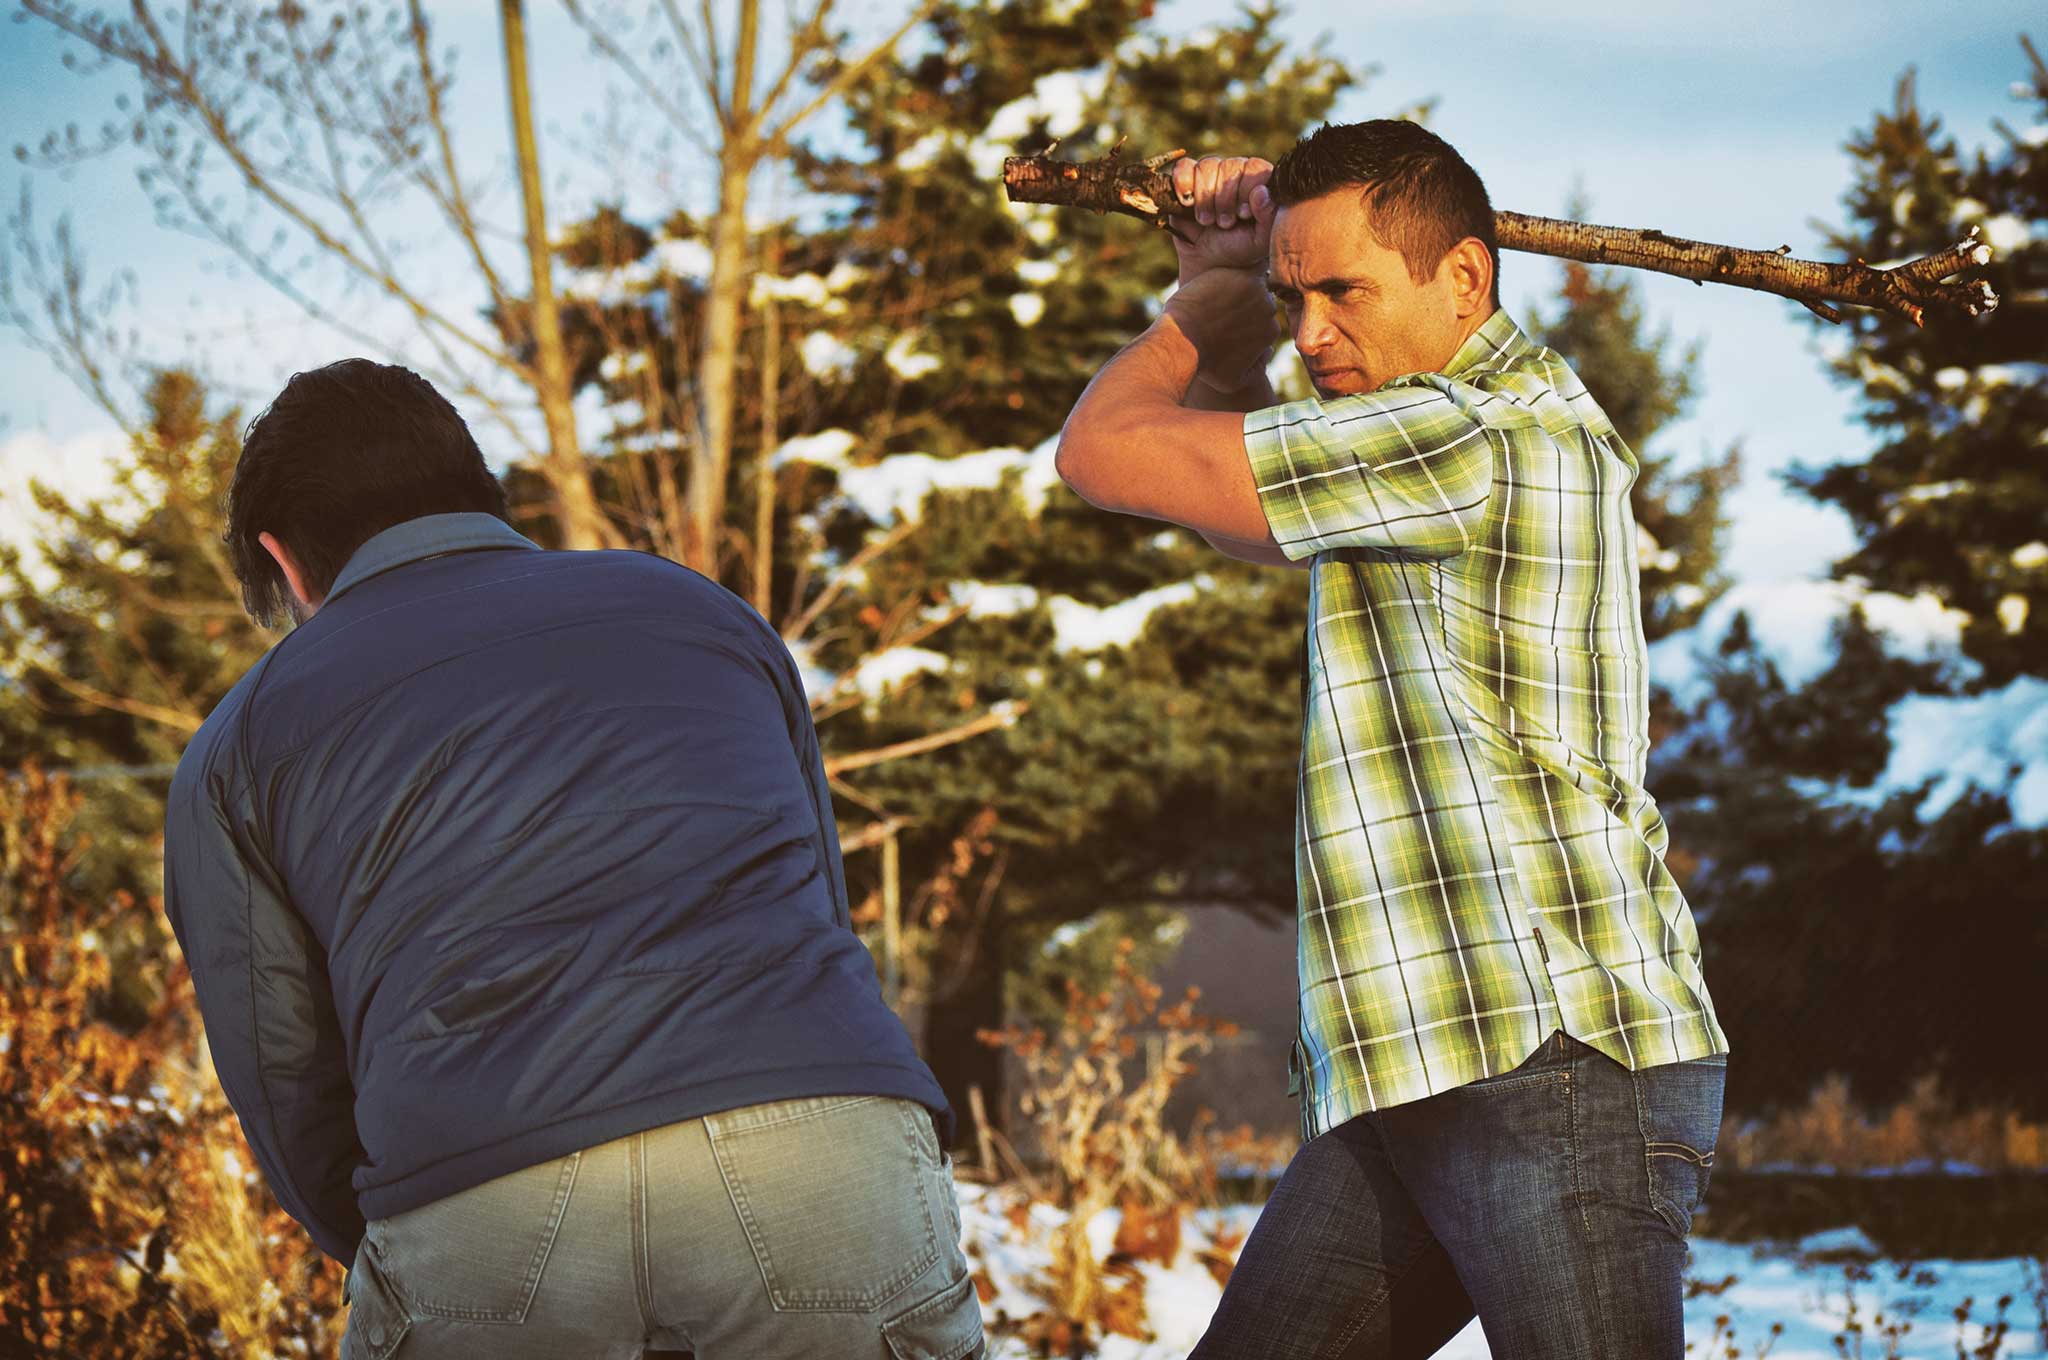
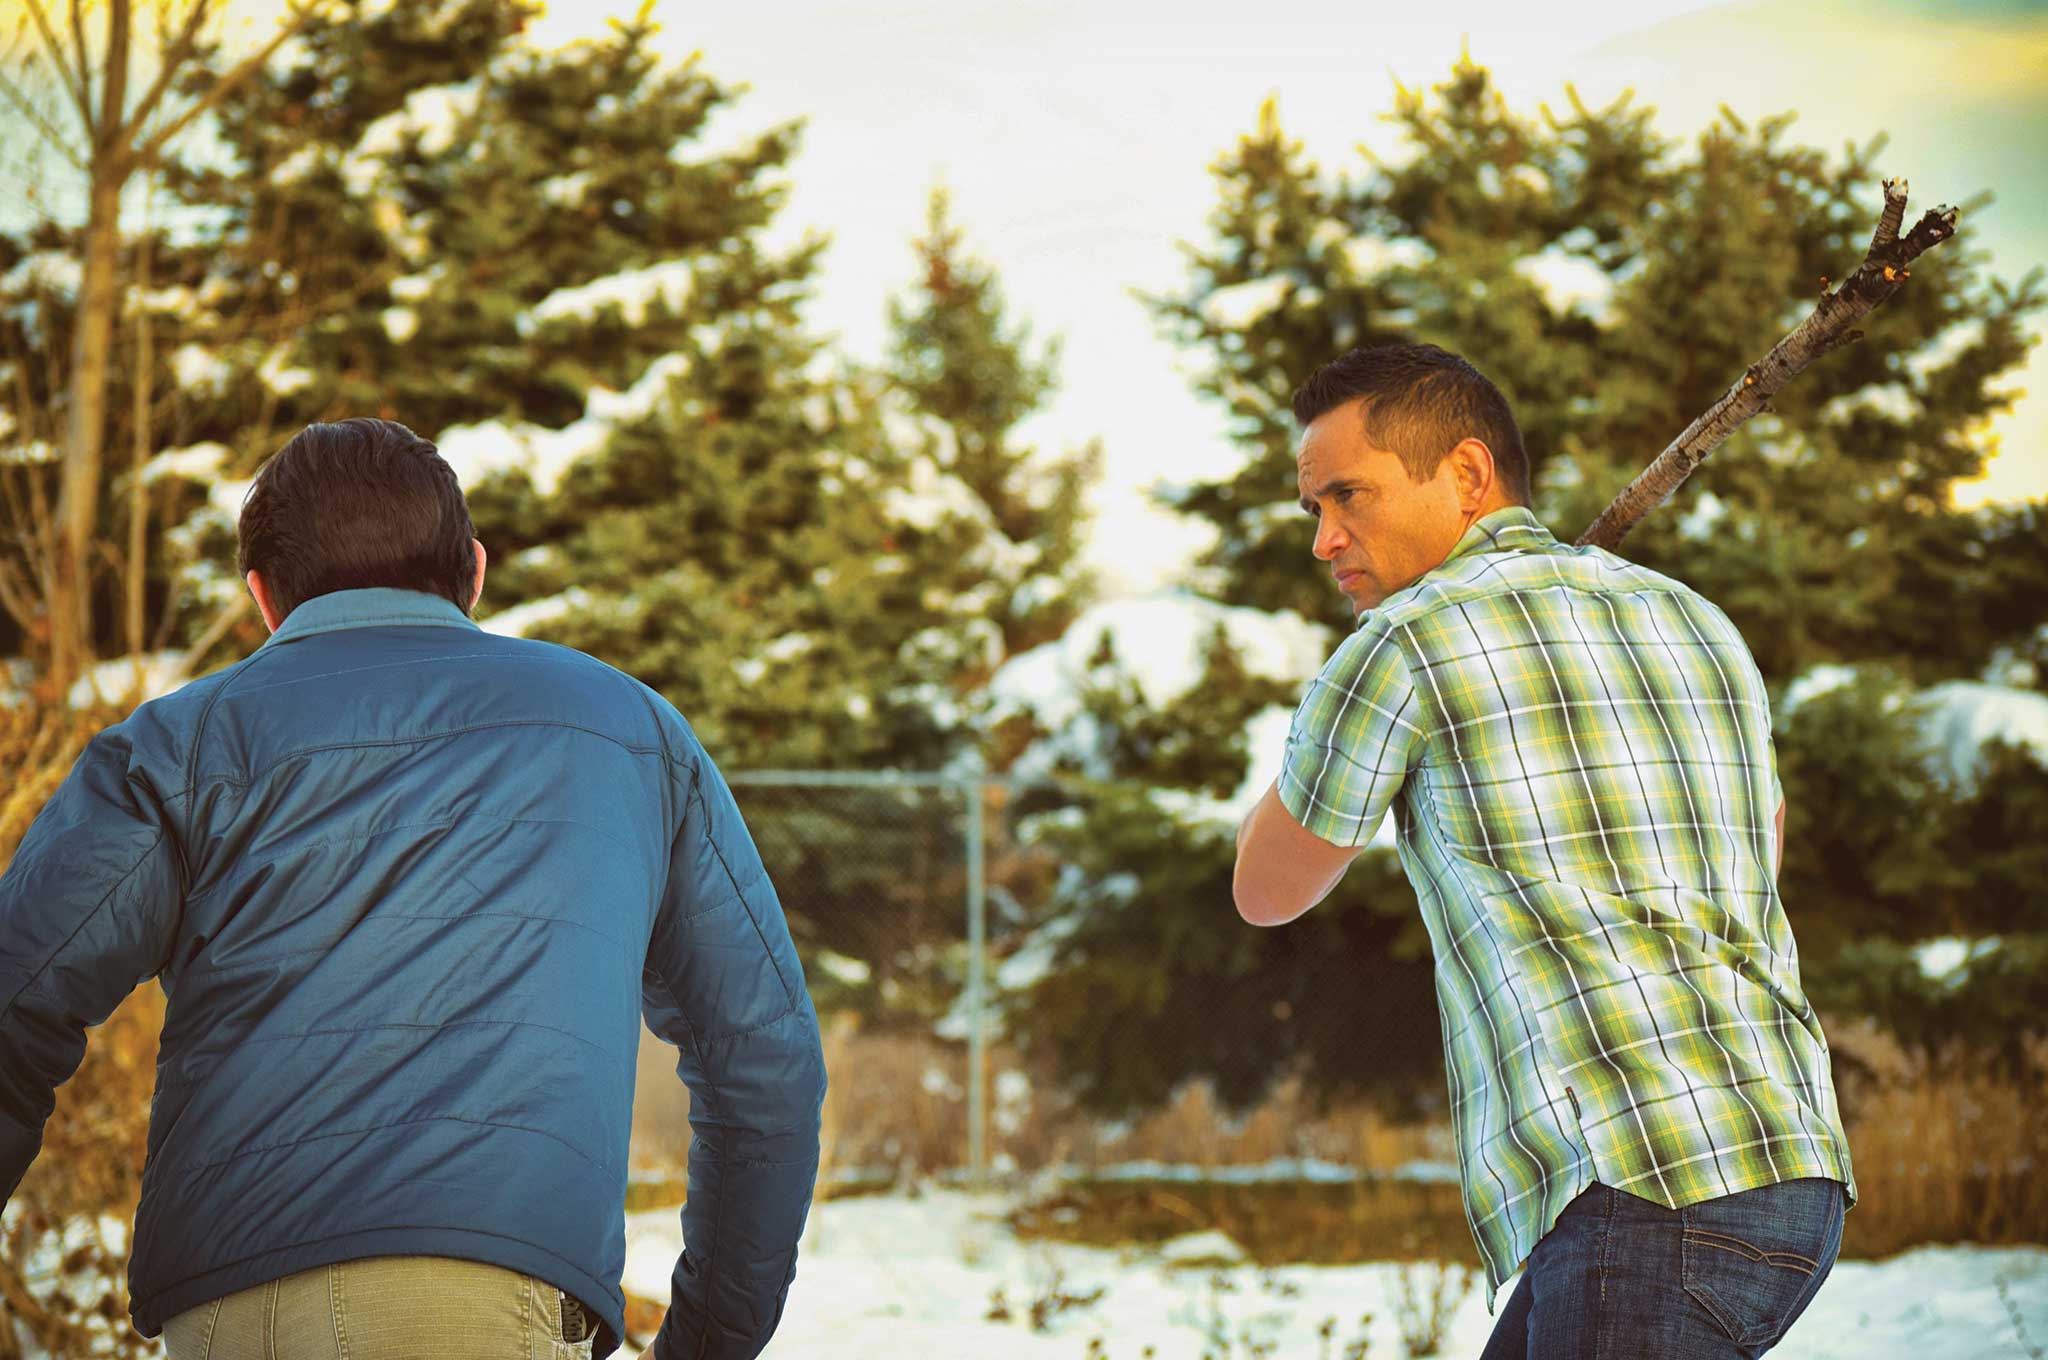
Warning! The concepts shown here are for illustrative purposes only. Seek professional training from a reputable instructor before attempting any techniques discussed or shown in this story.
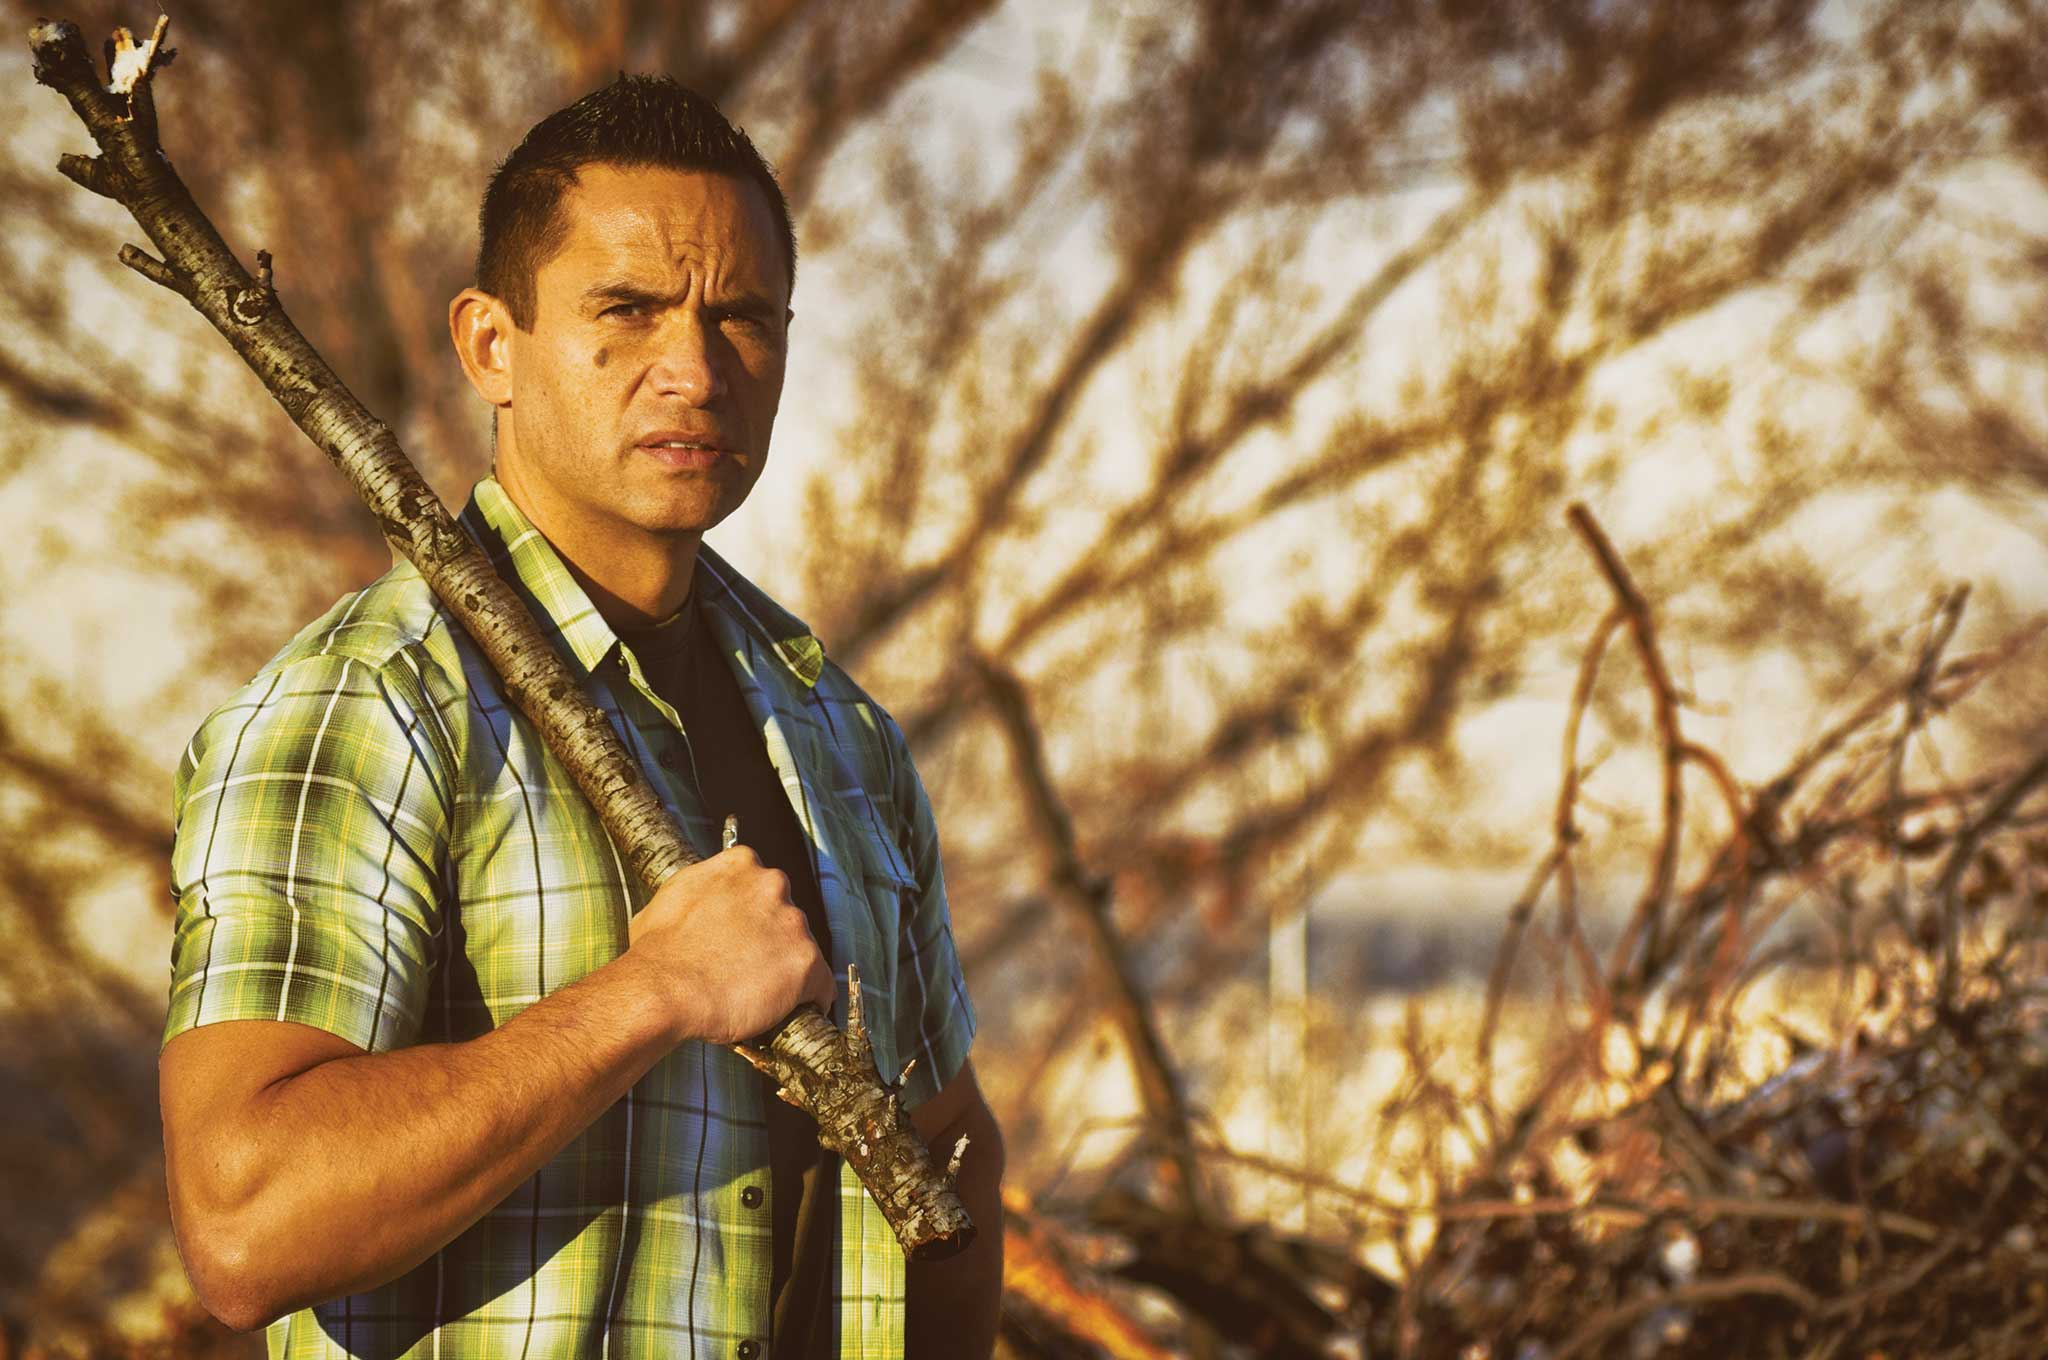
Sticks and stones may break your bones… period. Imagine a cataclysmic scenario — there’s been a criminal or terrorist attack during your vacation, and you’ve been forced to flee into the wilderness before making your way to a safe zone. Or an electromagnetic pulse or act of God has put emergency services out of commission while you’re away from home, and opportunist looters are on the street. Maybe it’s something simpler — you’ve encountered trouble while out on a camping trip with your family.
Whatever the case, so long as there are branches, trees, timber, or bamboo-type grasses around, there will always be an effective weapon waiting to be recognized and formed.
Nature’s Weapons
It’s not much of a stretch to assume that a stick was likely the first weapon wielded by mankind. Even apes can be found smacking each other (and other animals) with them in the wild. The number of cultures that developed intricate fighting systems or martial arts throughout history to enhance their ability to defend and attack with sticks is staggering. These systems extend much further than East Asia, where most people typically associate martial arts of this kind.
Origins
As a young man growing up in New Zealand, I was fortunate to have had the opportunity to train in an age-old martial art developed by the native Maori people called Mau Rakau or “art of the wooden weapon.” The primary focus of this art is a medium-length wooden staff called Taiaha, which is typically 5 to 6 feet long. I also had the opportunity over two decades ago to spend two years living in the Philippines, where I discovered and began studying a Filipino martial art commonly called Kali.
Those familiar with the Filipino martial arts are aware that their training methodology starts with sticks and blades, as opposed to the initial empty-hand focus of most other martial arts. The arts that hail from areas of the Philippines where the Spanish once exercised greater control seem to put more focus on sticks, as their Spaniard overlords prohibited the practice of fighting arts with blades during much of their 300-year colonization.
The likes of Bruce Lee and Ed Parker found the Filipino stick fighting arts so effective that they not only trained in them, but assimilated elements of these arts into the fighting systems they developed during their lifetimes.
Categories
When procuring a good branch or piece of wood to form into a weapon, there are two categories that you can generally put stick weapons into, each with advantages and disadvantages: one-handed and two-handed weapons. Although long staffs can be found in some of their arts, the Filipinos found that the ideal length for a fighting stick was around 24 to 31 inches in length.
Much shorter than that and the stick begins to lose the torque that can be harnessed with a good one-arm swing. Much longer than that and the stick starts to become unwieldy as a one-handed weapon, requiring the use of two hands. For the purposes of this article we’re going to focus on the strengths of using a stick that can be manipulated with one or two hands for survival.
It’s very possible in a pinch that the old adage beggars can’t be choosers may very well apply when choosing a branch or piece of wood to become your survival stick. For defensive purposes, any rigid stick you can hold and swing is better than empty hands. But if you are in an area where sticks are plentiful, you may be able to choose and shape your own ideal survival stick. So what should you look for when hand-crafting one of these implements?
What to Look for
The first step will be finding a stick that’s as straight as possible, with a circumference that is close to matching your hand size. When gripping the stick, you will want the tip of your thumb to reach somewhere between the tip of the index finger and the first knuckle of the same finger. Wood can come in a variety of weights and densities. A heavier stick will be slower and more cumbersome to wield, while a lighter stick will transfer less kinetic energy on impact. Just imagine the chances of stopping a threat with a balsa wood staff.
You’ll want to find some middle ground -— this will be different for everyone based on your size and strength. It’s very possible that you’ll need to remove twigs or other protrusions from a smaller branch. If a simple knife is available to utilize, you can shape your ideal stick from a larger stronger branch or piece of wood. The last thing to decide is the length. Again, people come in all shapes and sizes and so should your custom survival sticks.
As a good measuring reference, stretch your arm out directly to the side and place the stick in your armpit parallel to your arm. A good stick length will measure from the armpit to about the tip of your fingers or just a little beyond. At this length you can typically wield it with one hand comfortably, or can also put two hands on it for additional power if necessary. If you have a pocketknife and want to enhance the defensive capabilities of your stick, try sharpening the end of your stick into a point that can be used for thrusting.
As you train to use your stick defensively, keep it simple. Regardless of the grip you use, downward 45-degree-angled strikes from right and left in a figure-eight motion can be used offensively and defensively. Centerline thrusts can also be used preemptively or as quick counterattacks.
These three attacks are all you really need to build a solid foundation. If you have time to train you can get more elaborate than that in steady progressions, or seek out the instruction of a good Filipino martial arts instructor. At a fundamental level of defense, if you want to be able to stick it to ’em, it’s best to stick to the basics.
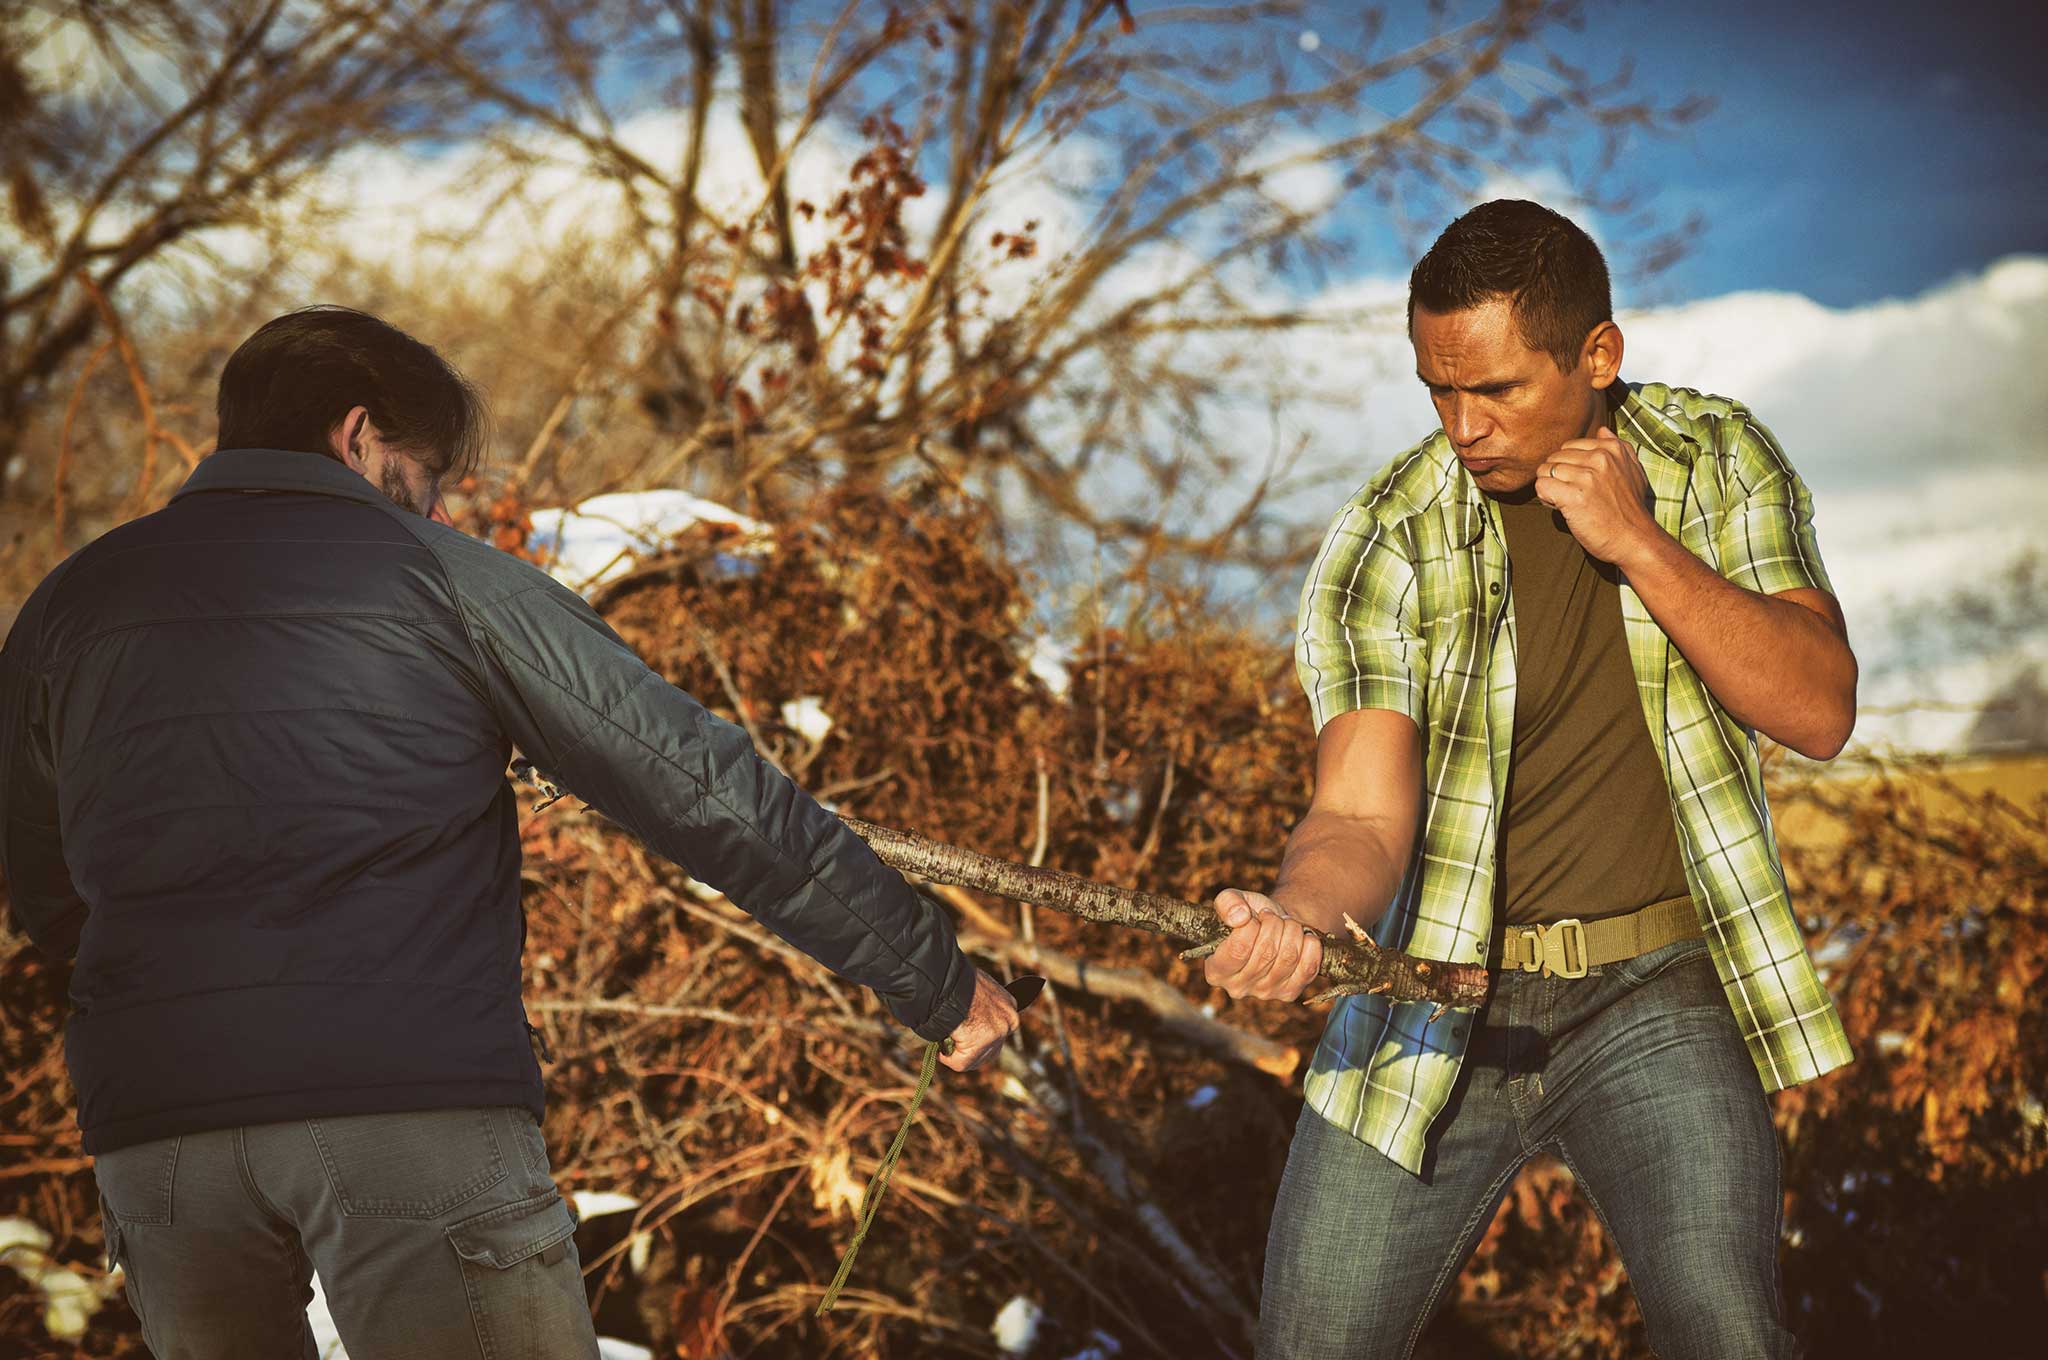
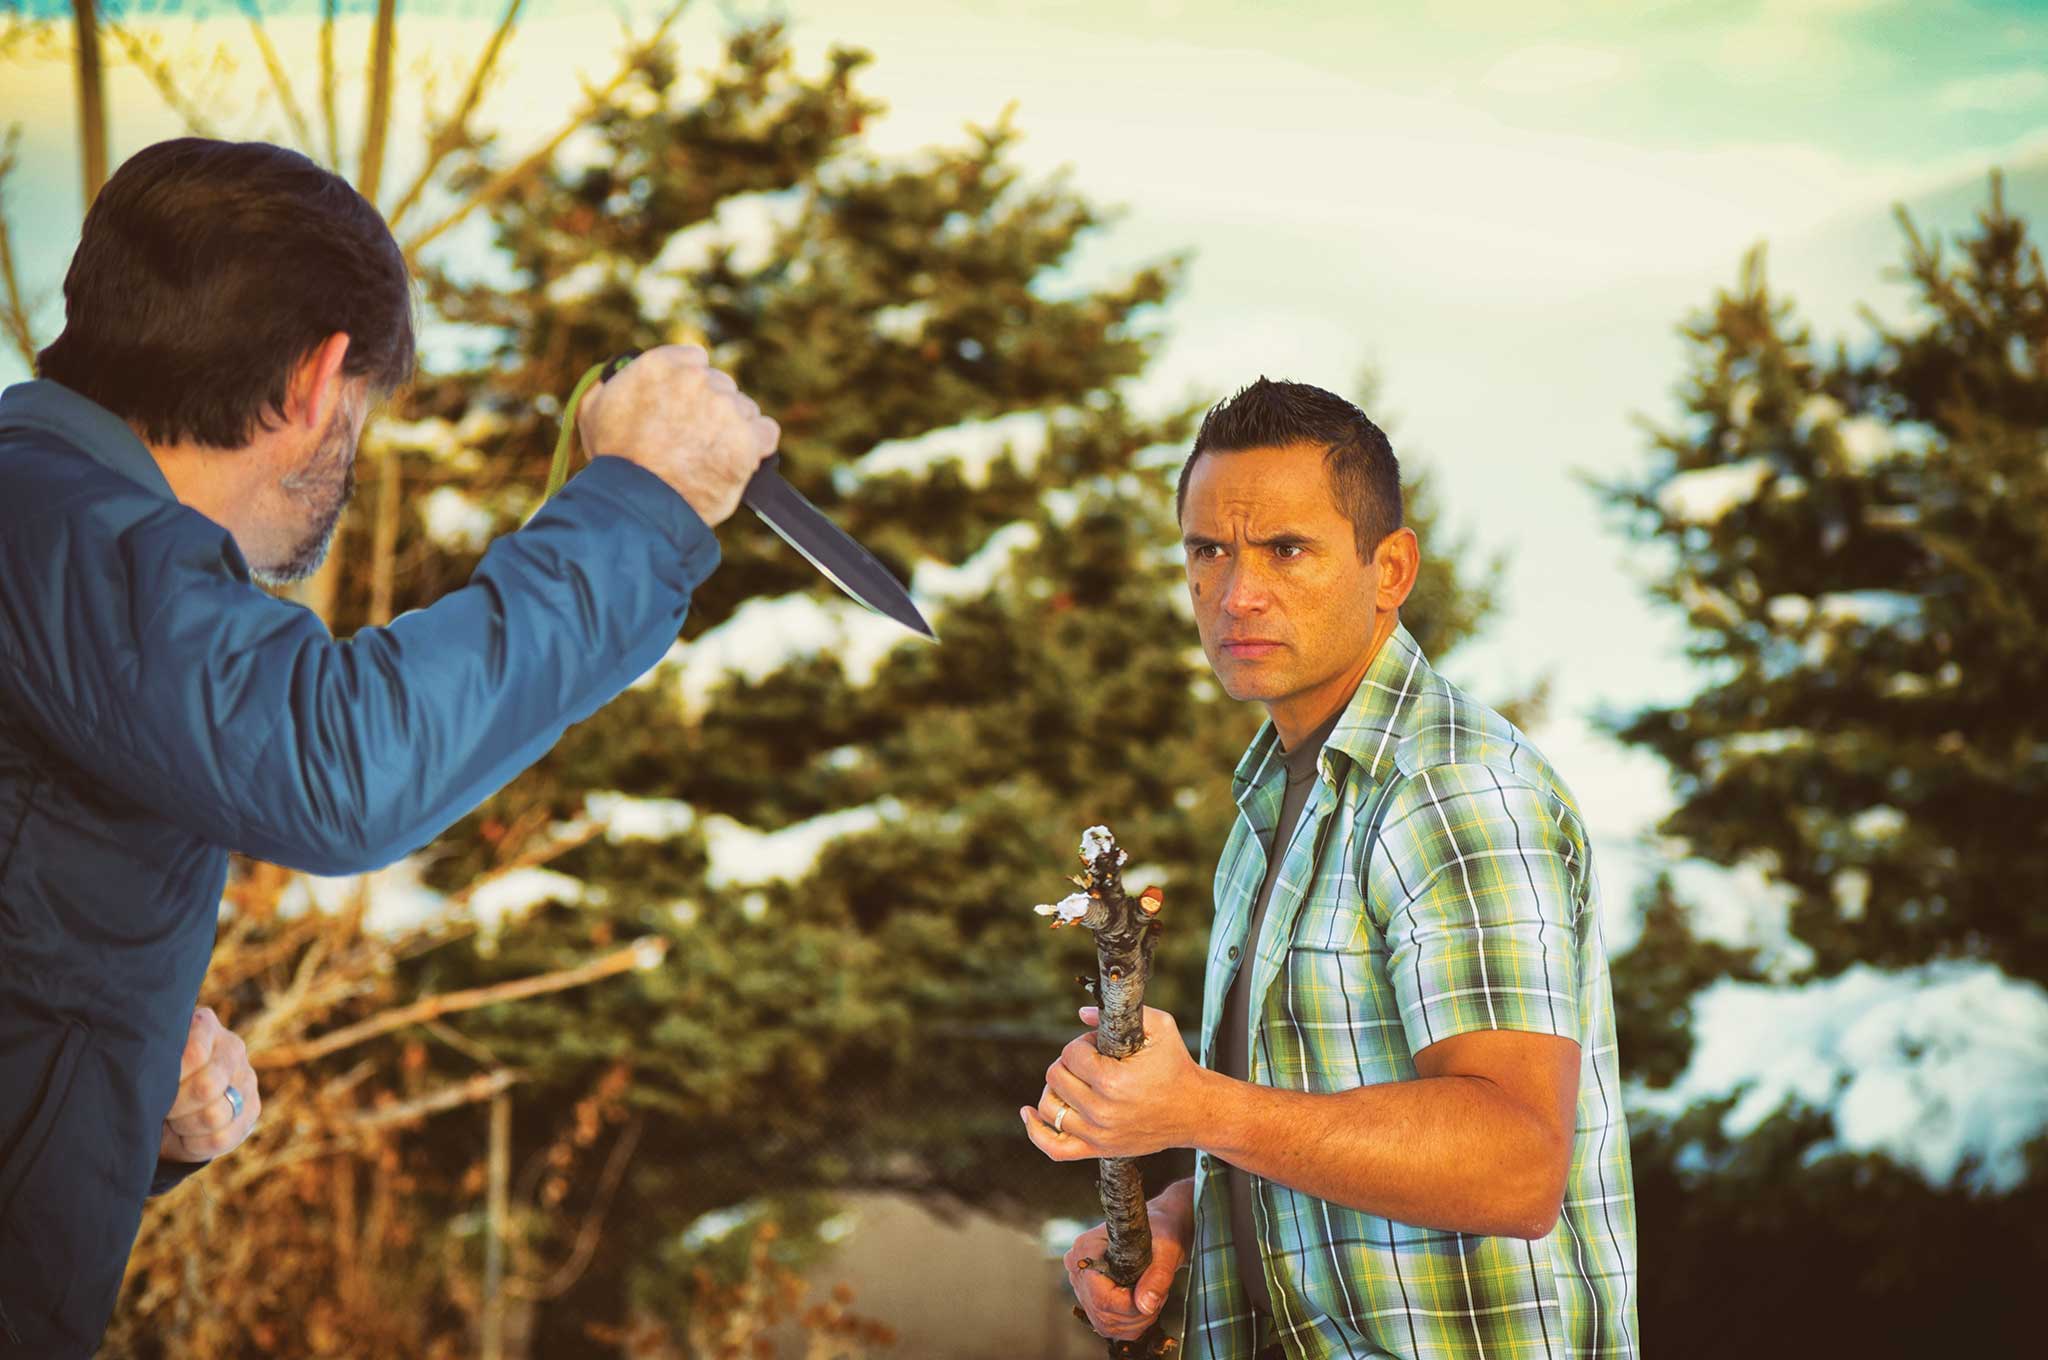
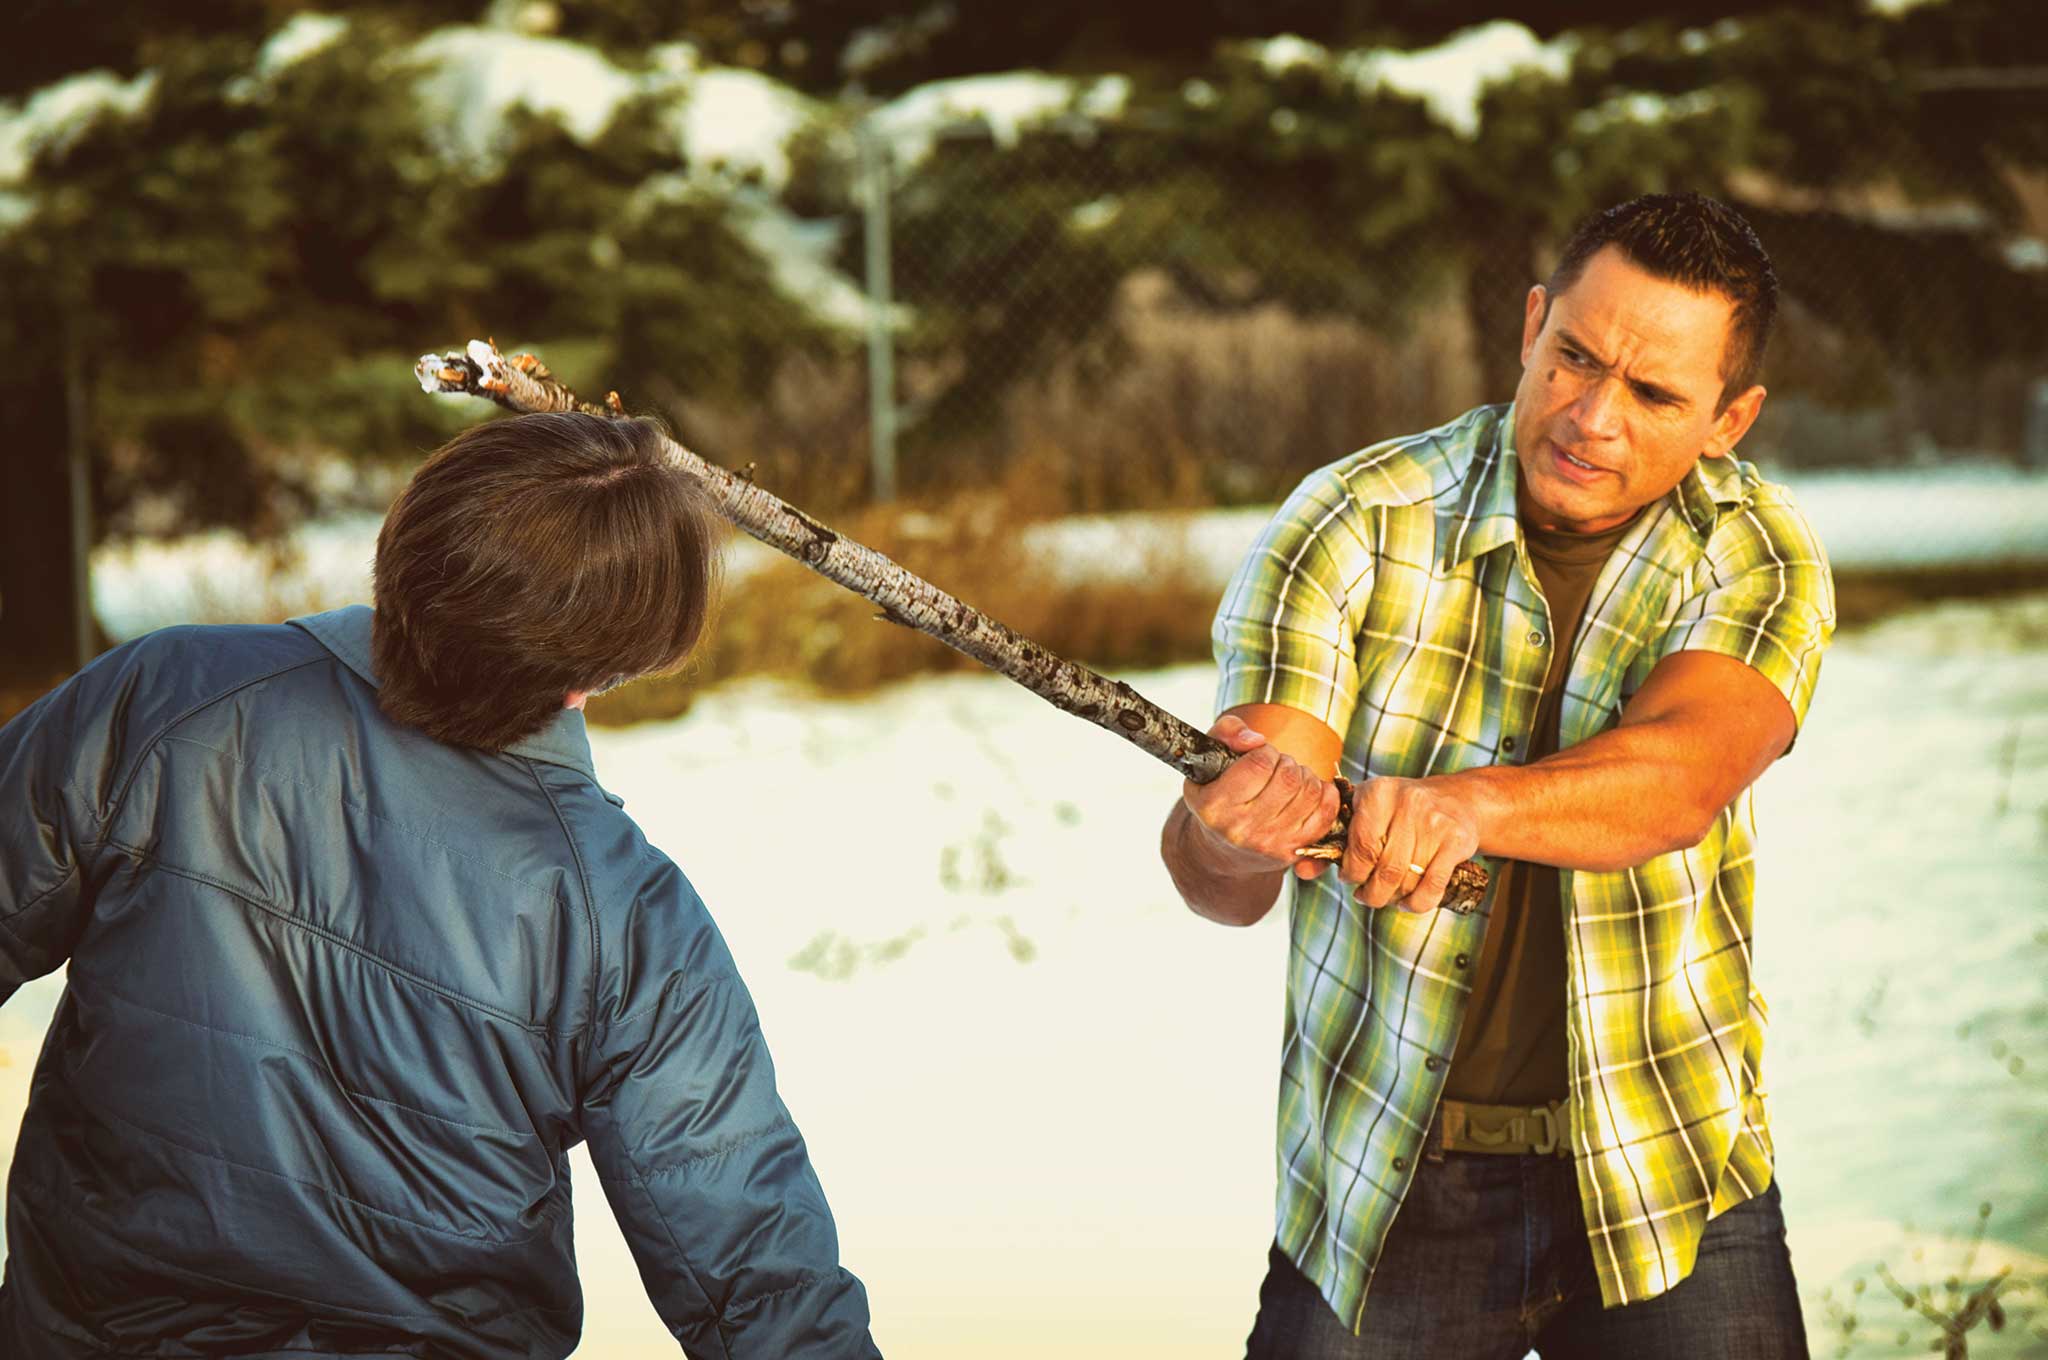
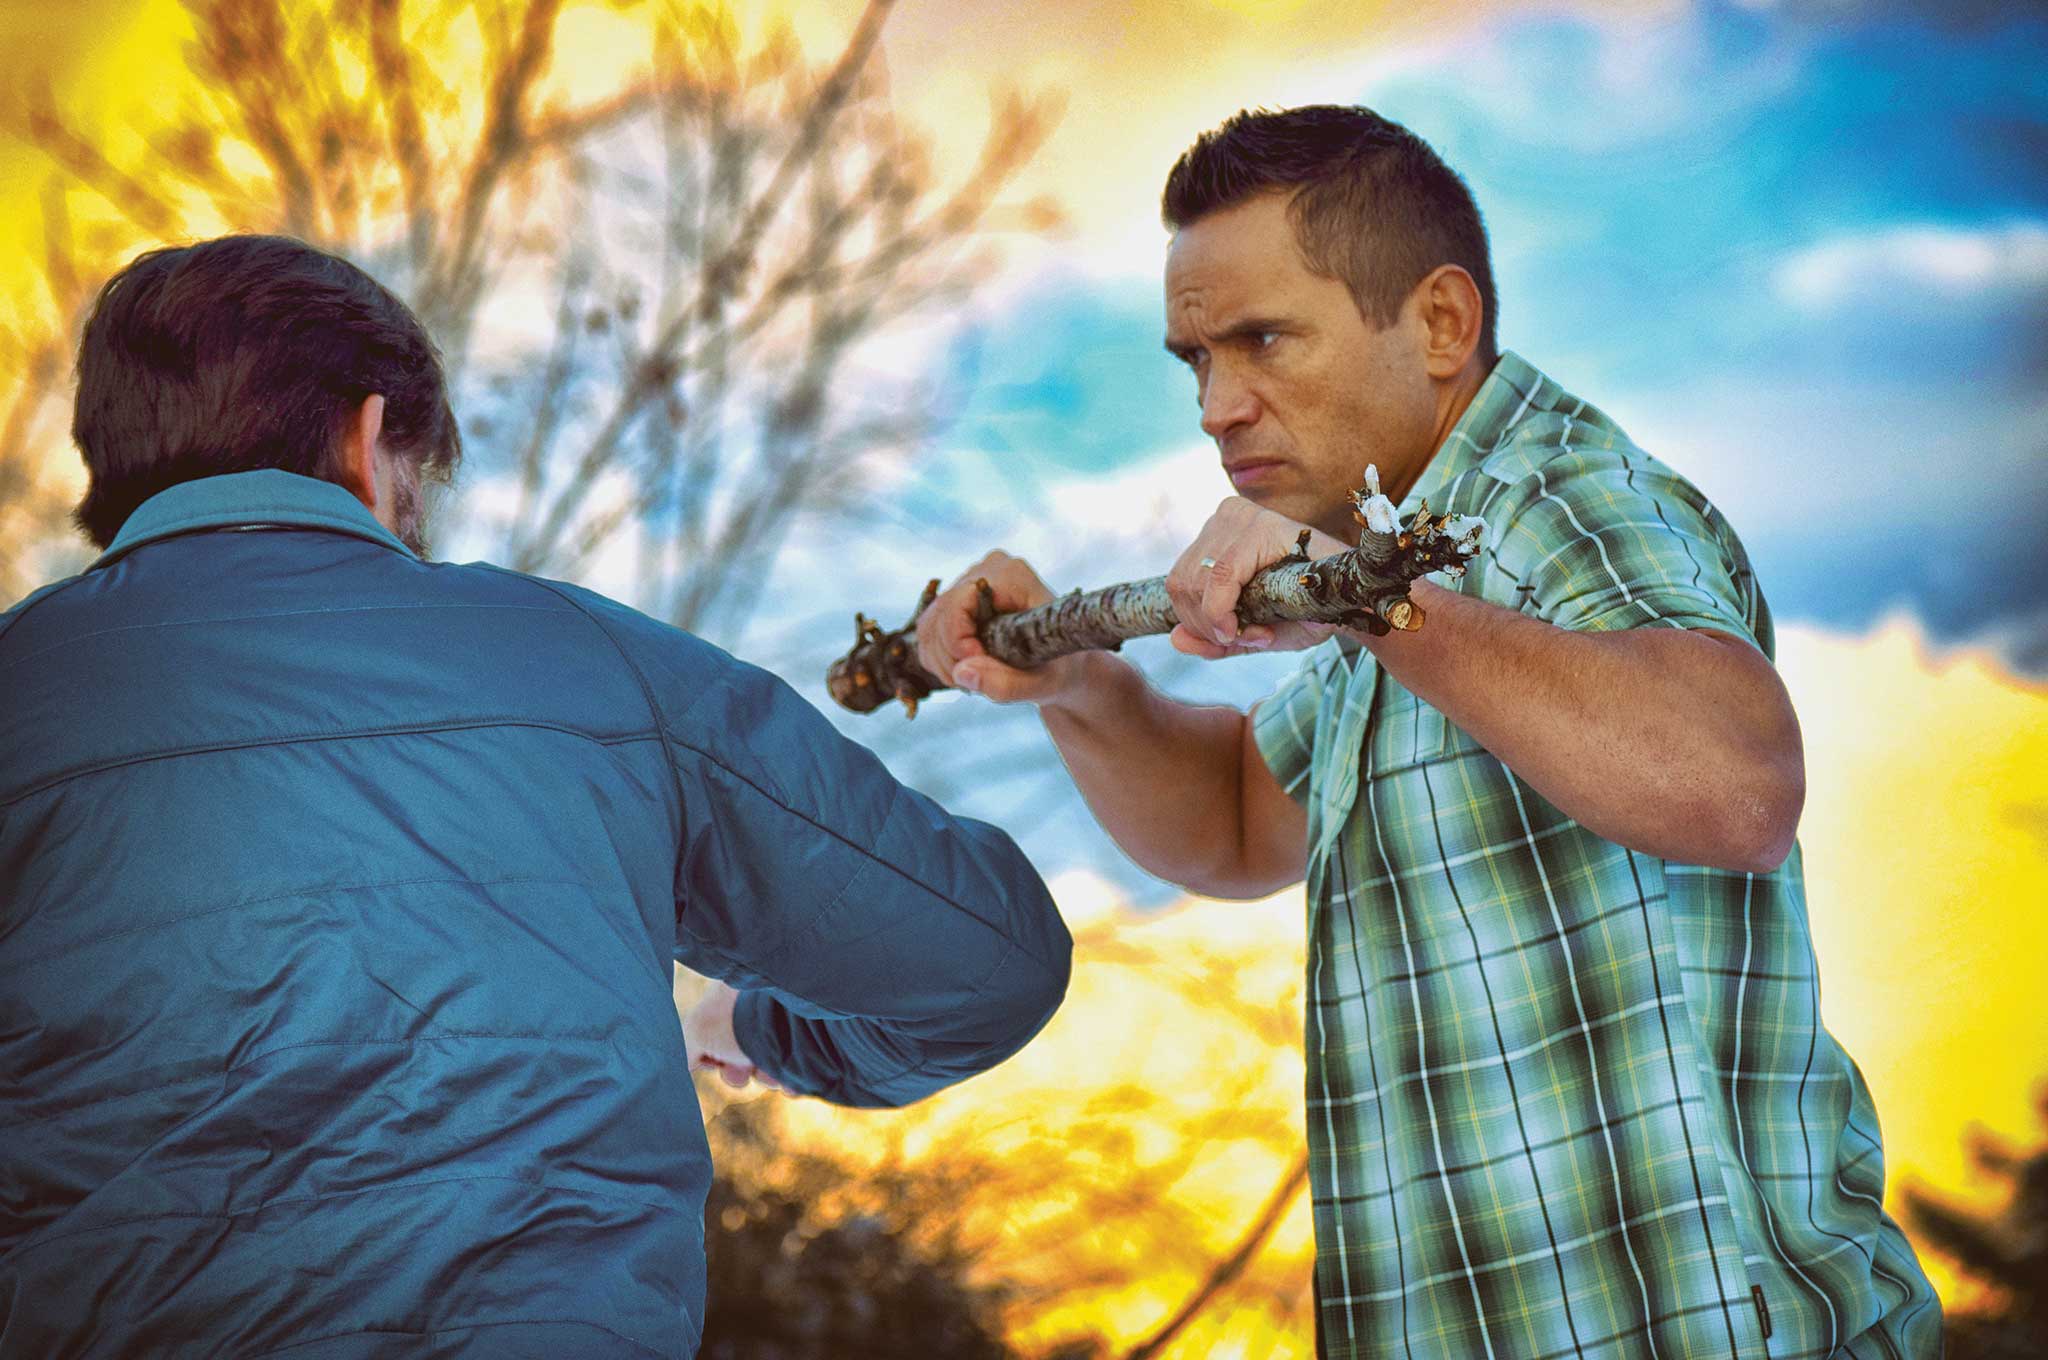
DEFENSE SEQUENCE 1: One-Handed Combination
1. Defending against a shorter weapon such as a knife, keep your distance and use your reach to your advantage.
2. Aim to attack the weapon-bearing limb. This allows you to maintain the maximum distance possible while disrupting the assailant’s ability to cause you harm.
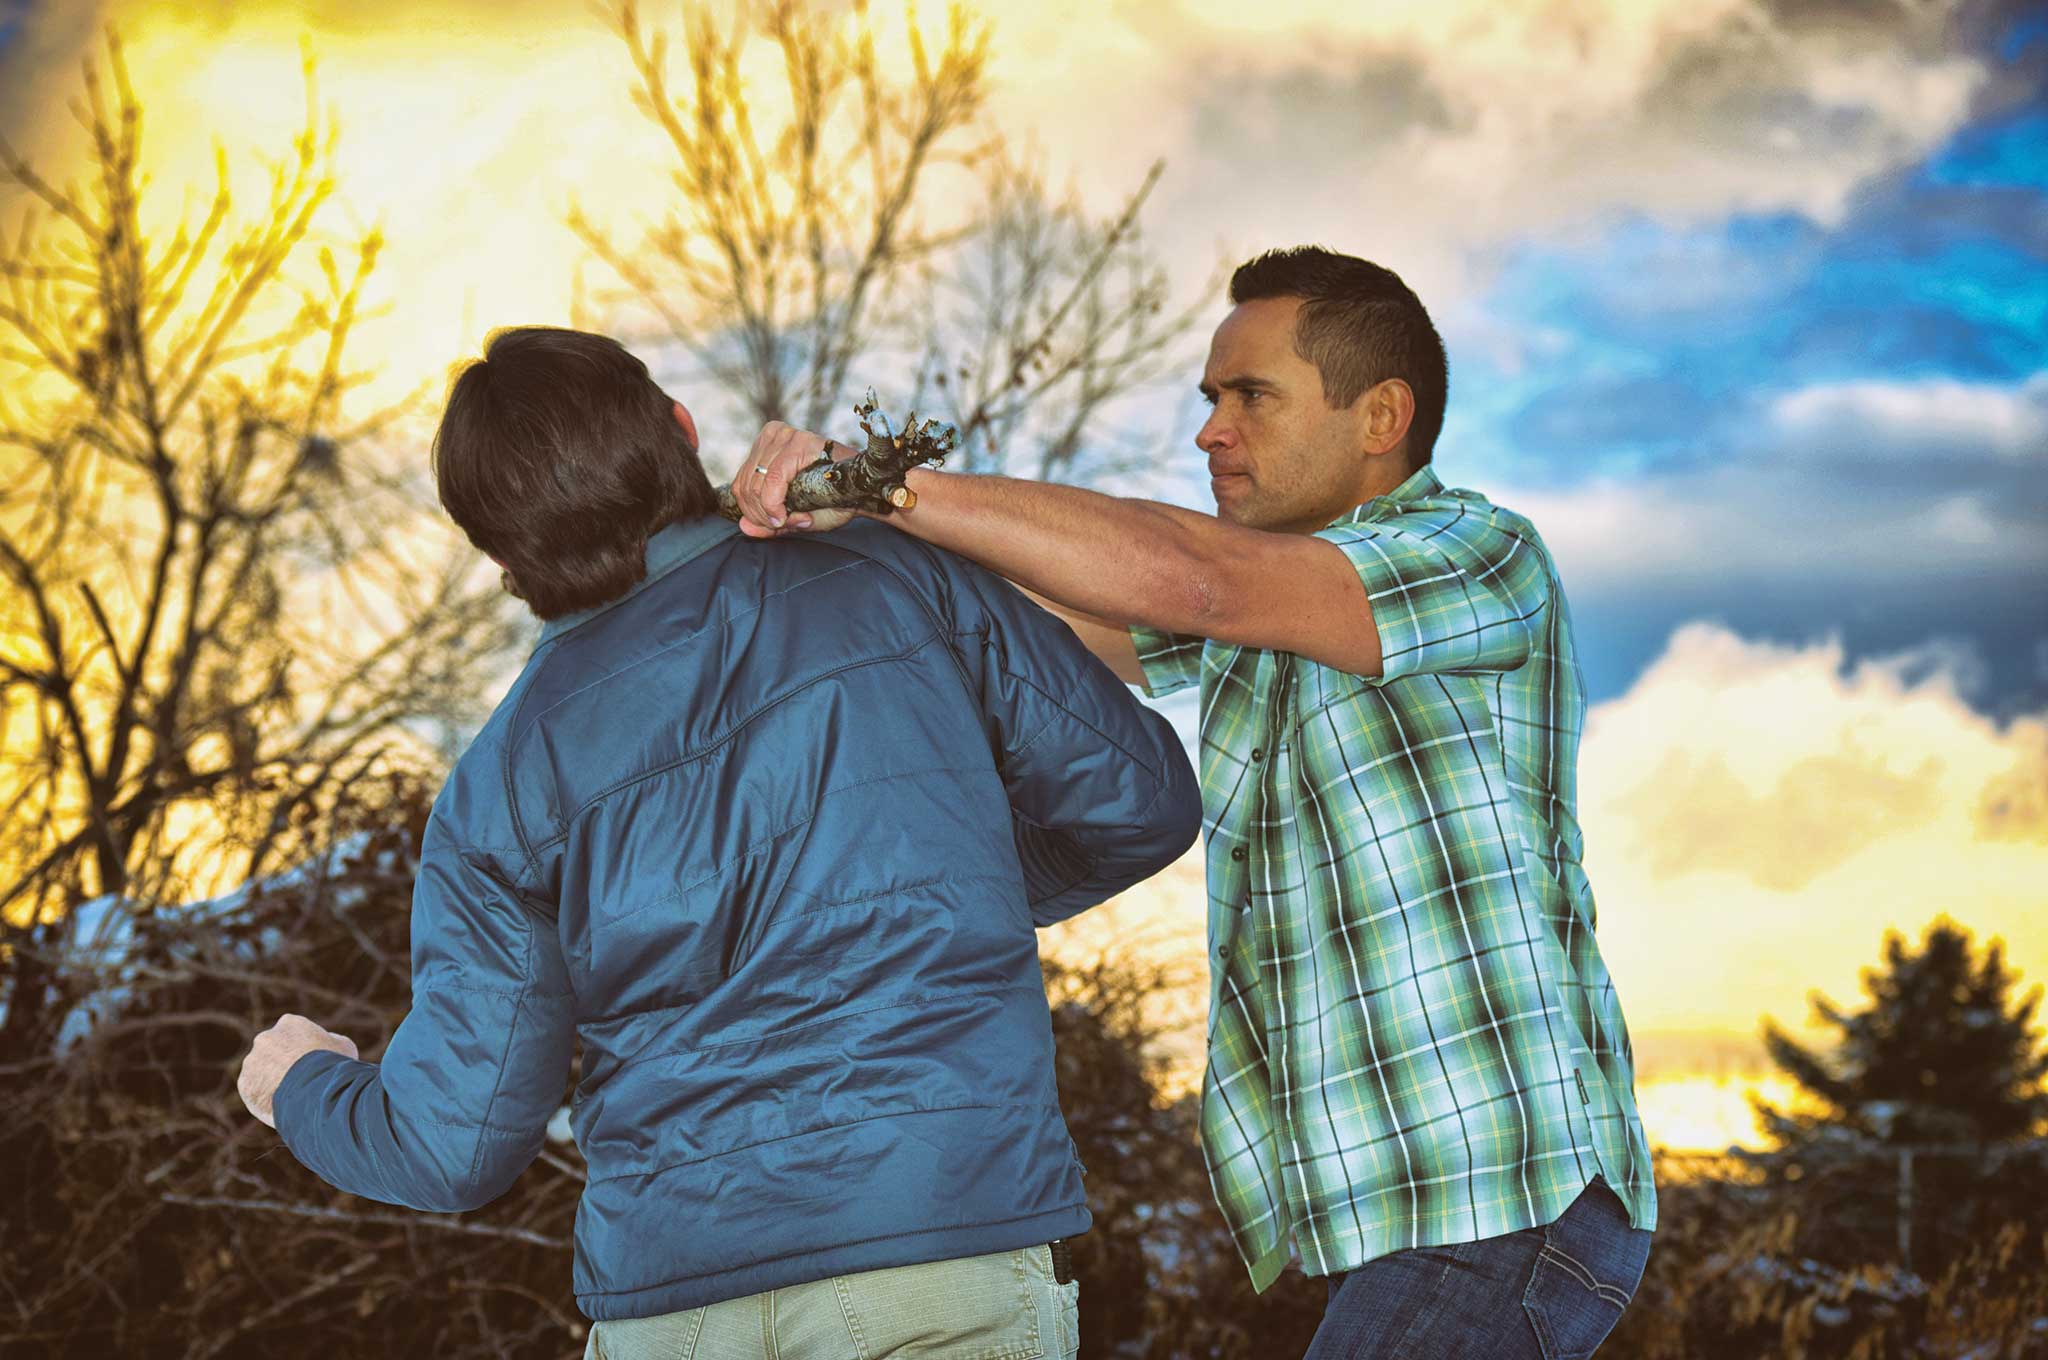
3. Wind up for a follow-up strike. With a backhand strike, you can push to your wrist with your support hand to add power.
4. Aim for areas that have the highest probability of neutralizing the threat, as is reasonably necessary.
5. As necessary, follow backhand power strikes with forehand power strikes for economy of motion.
6. Continue targeting vital areas.
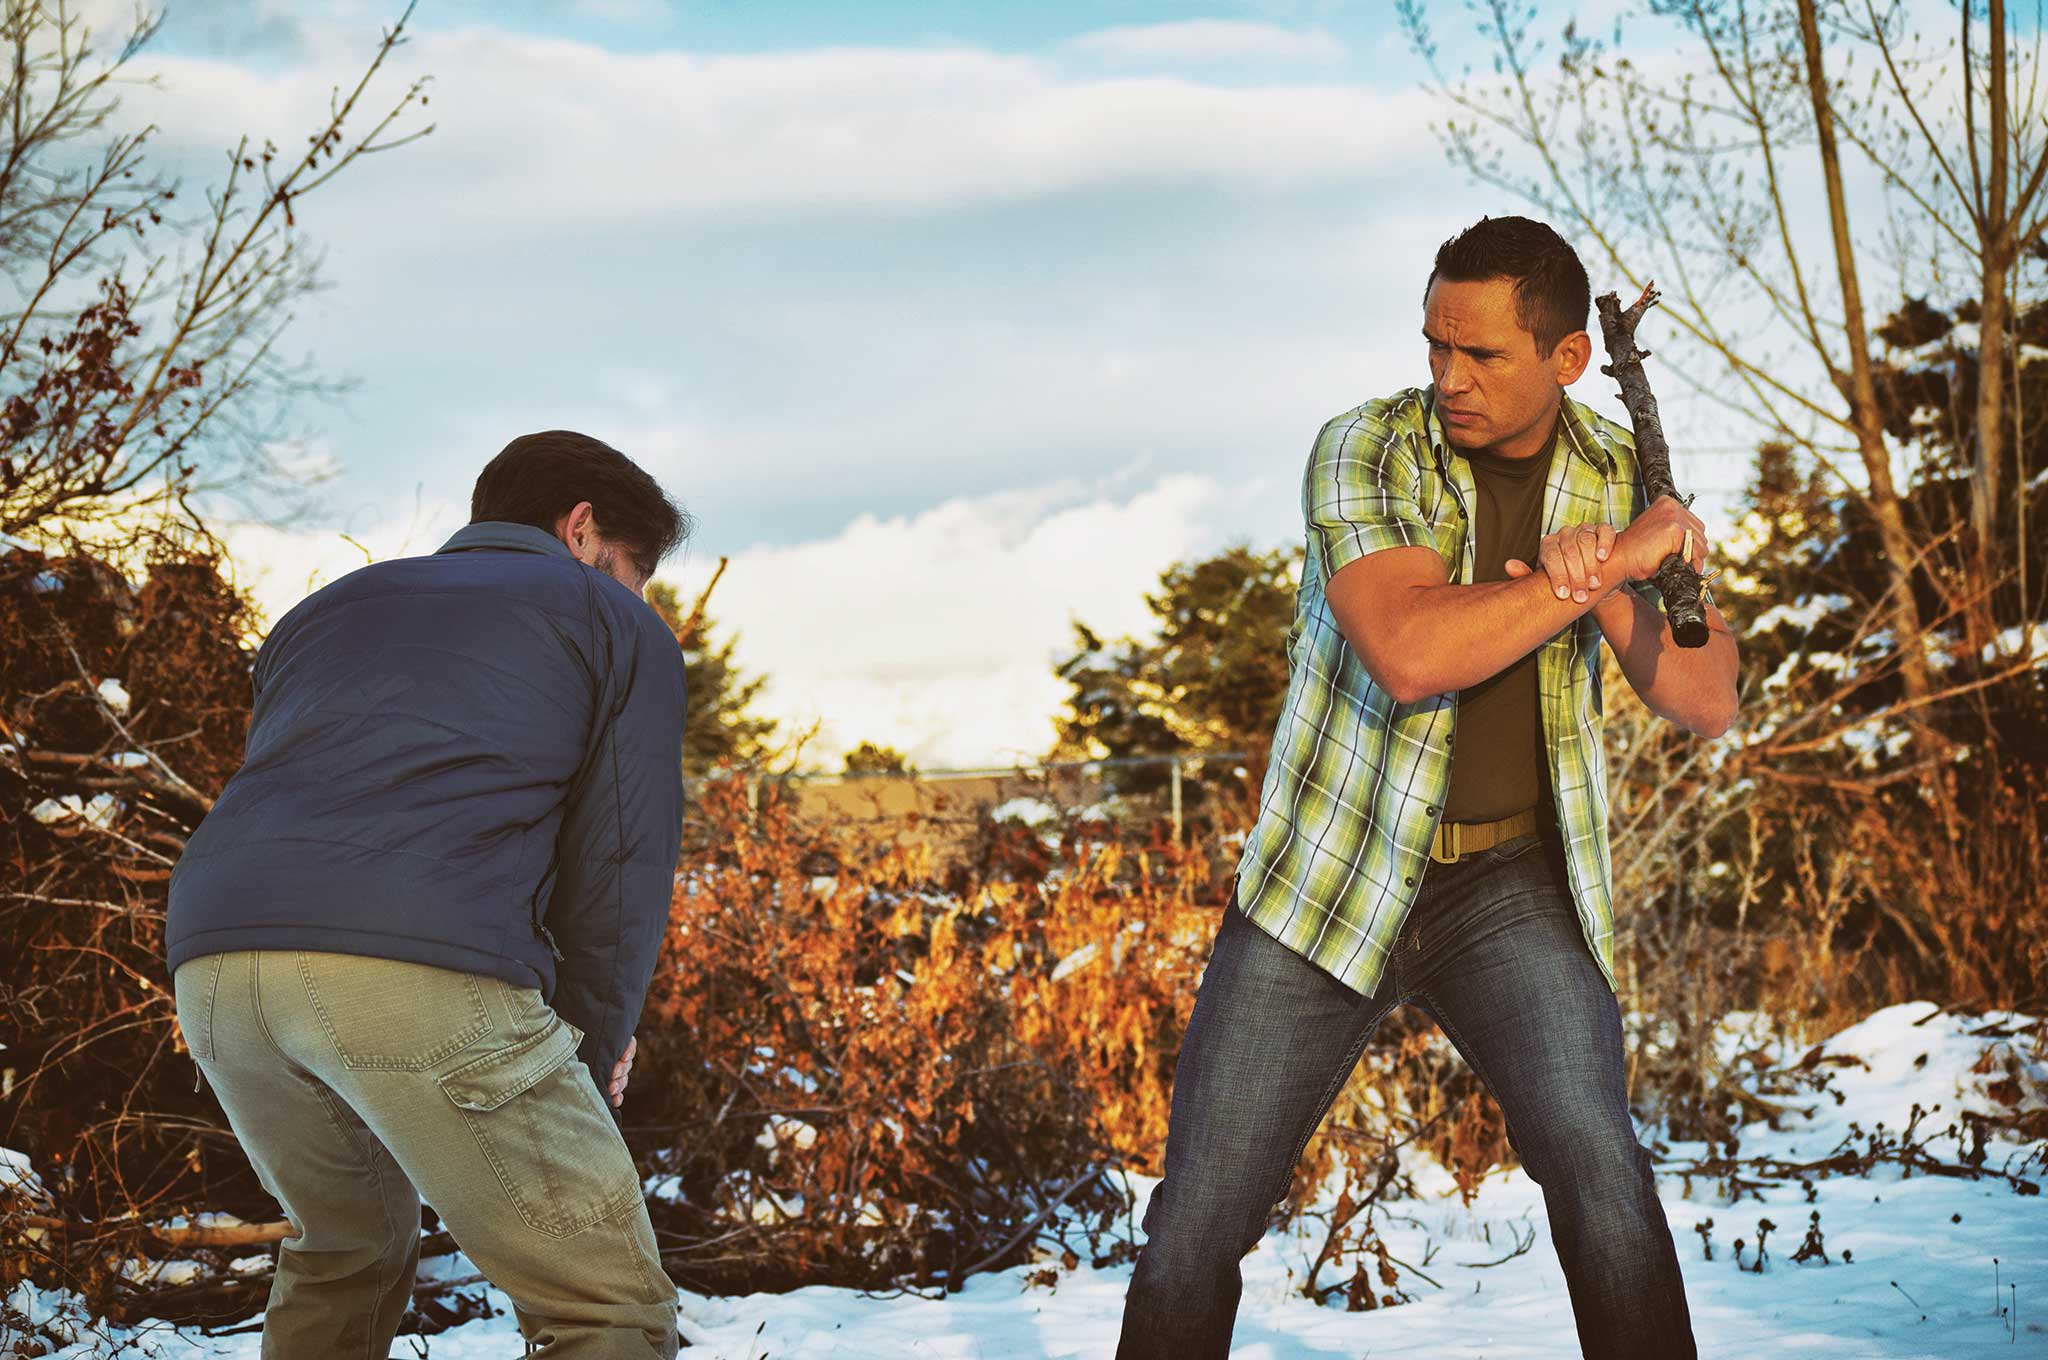
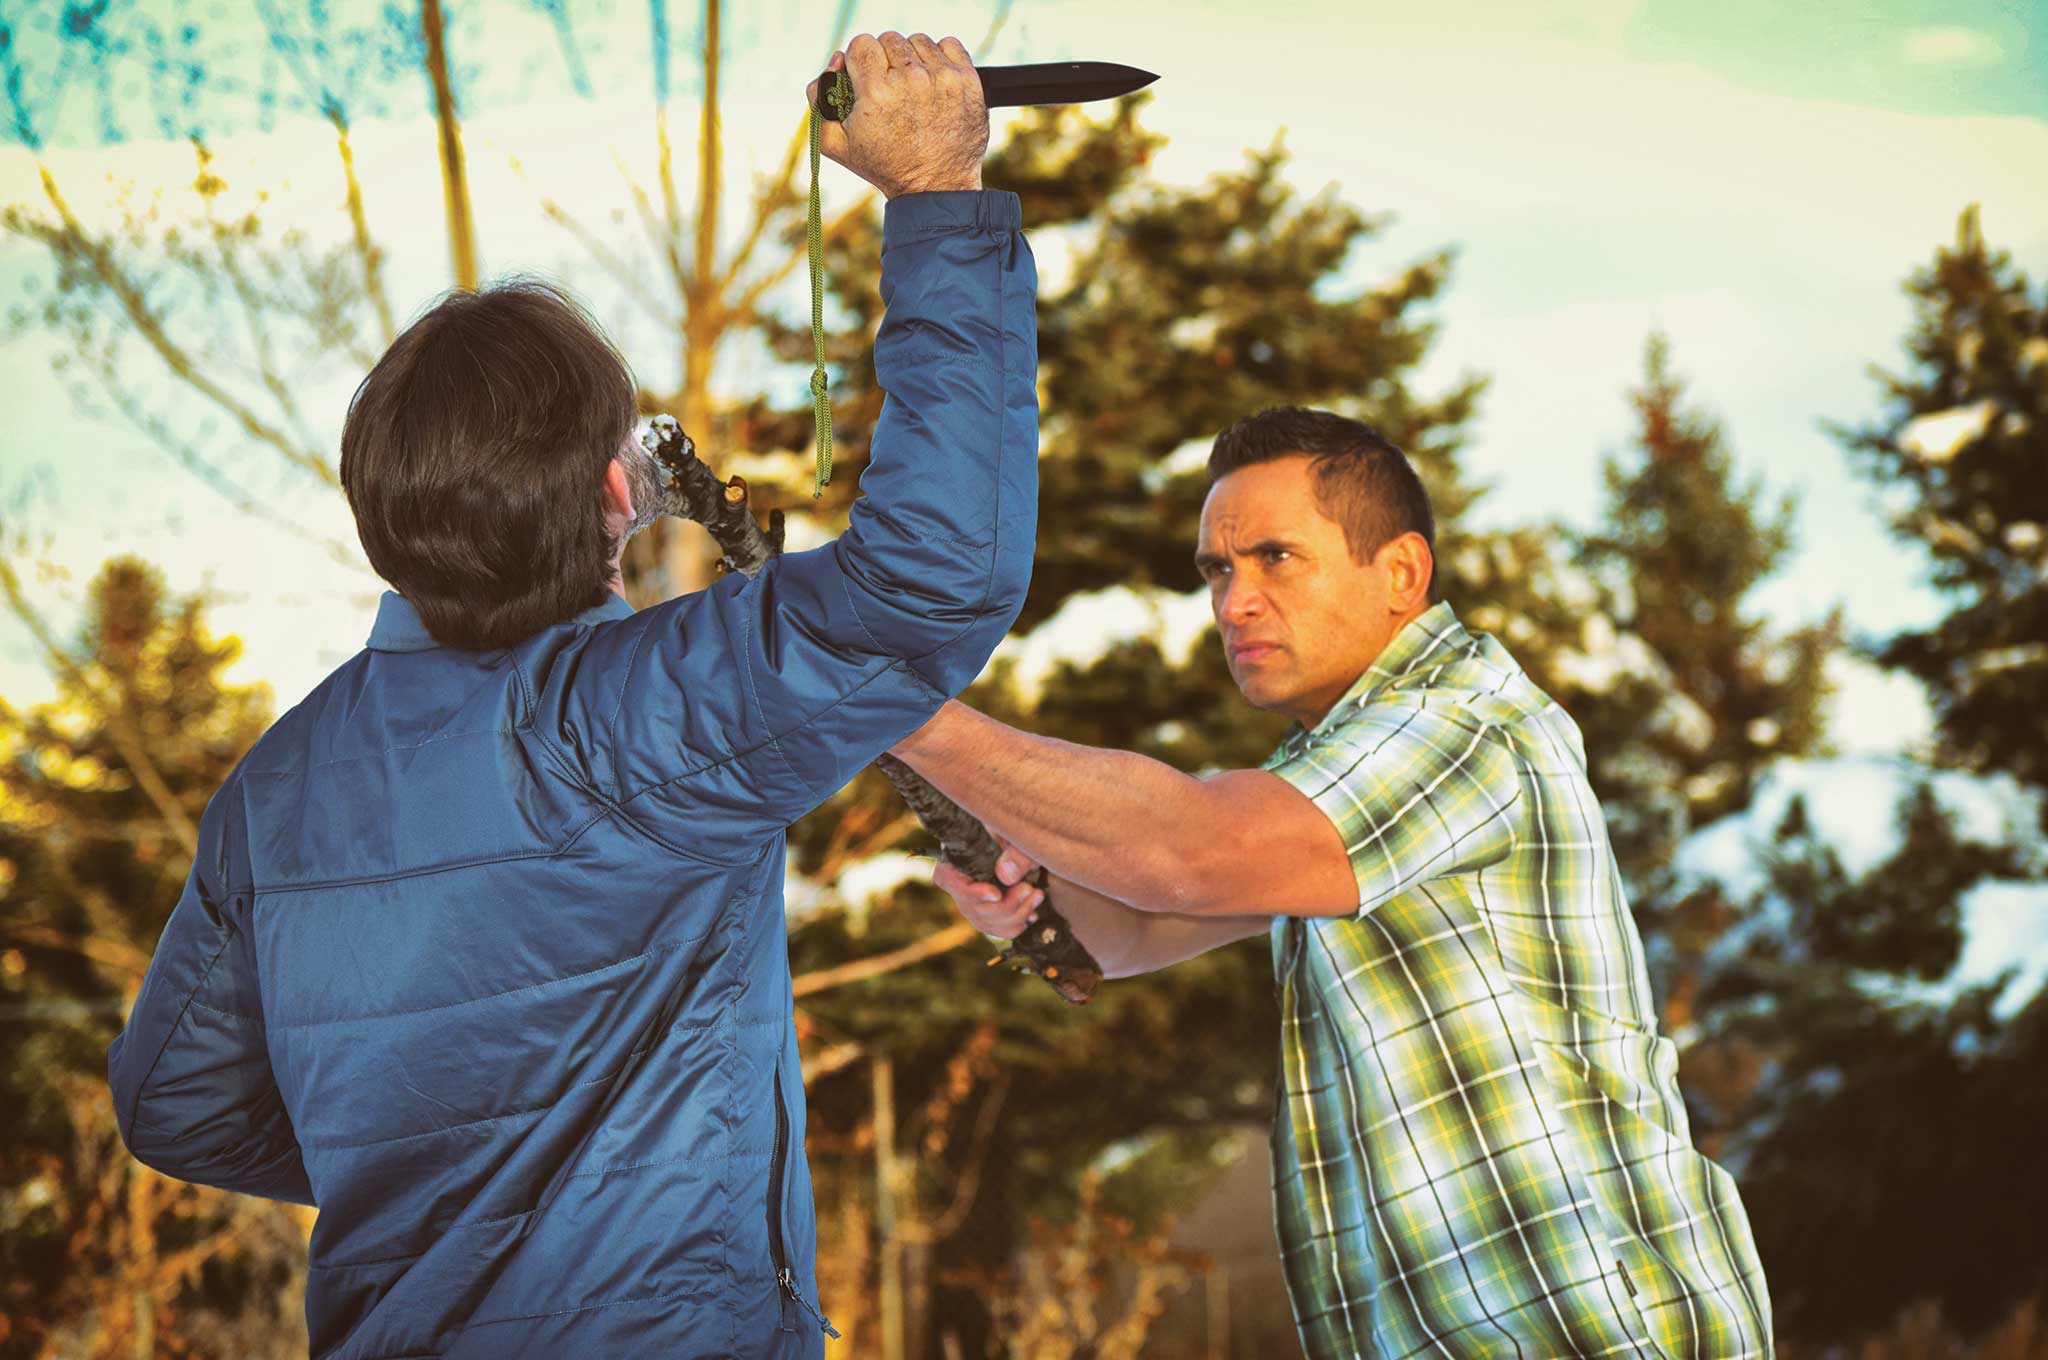
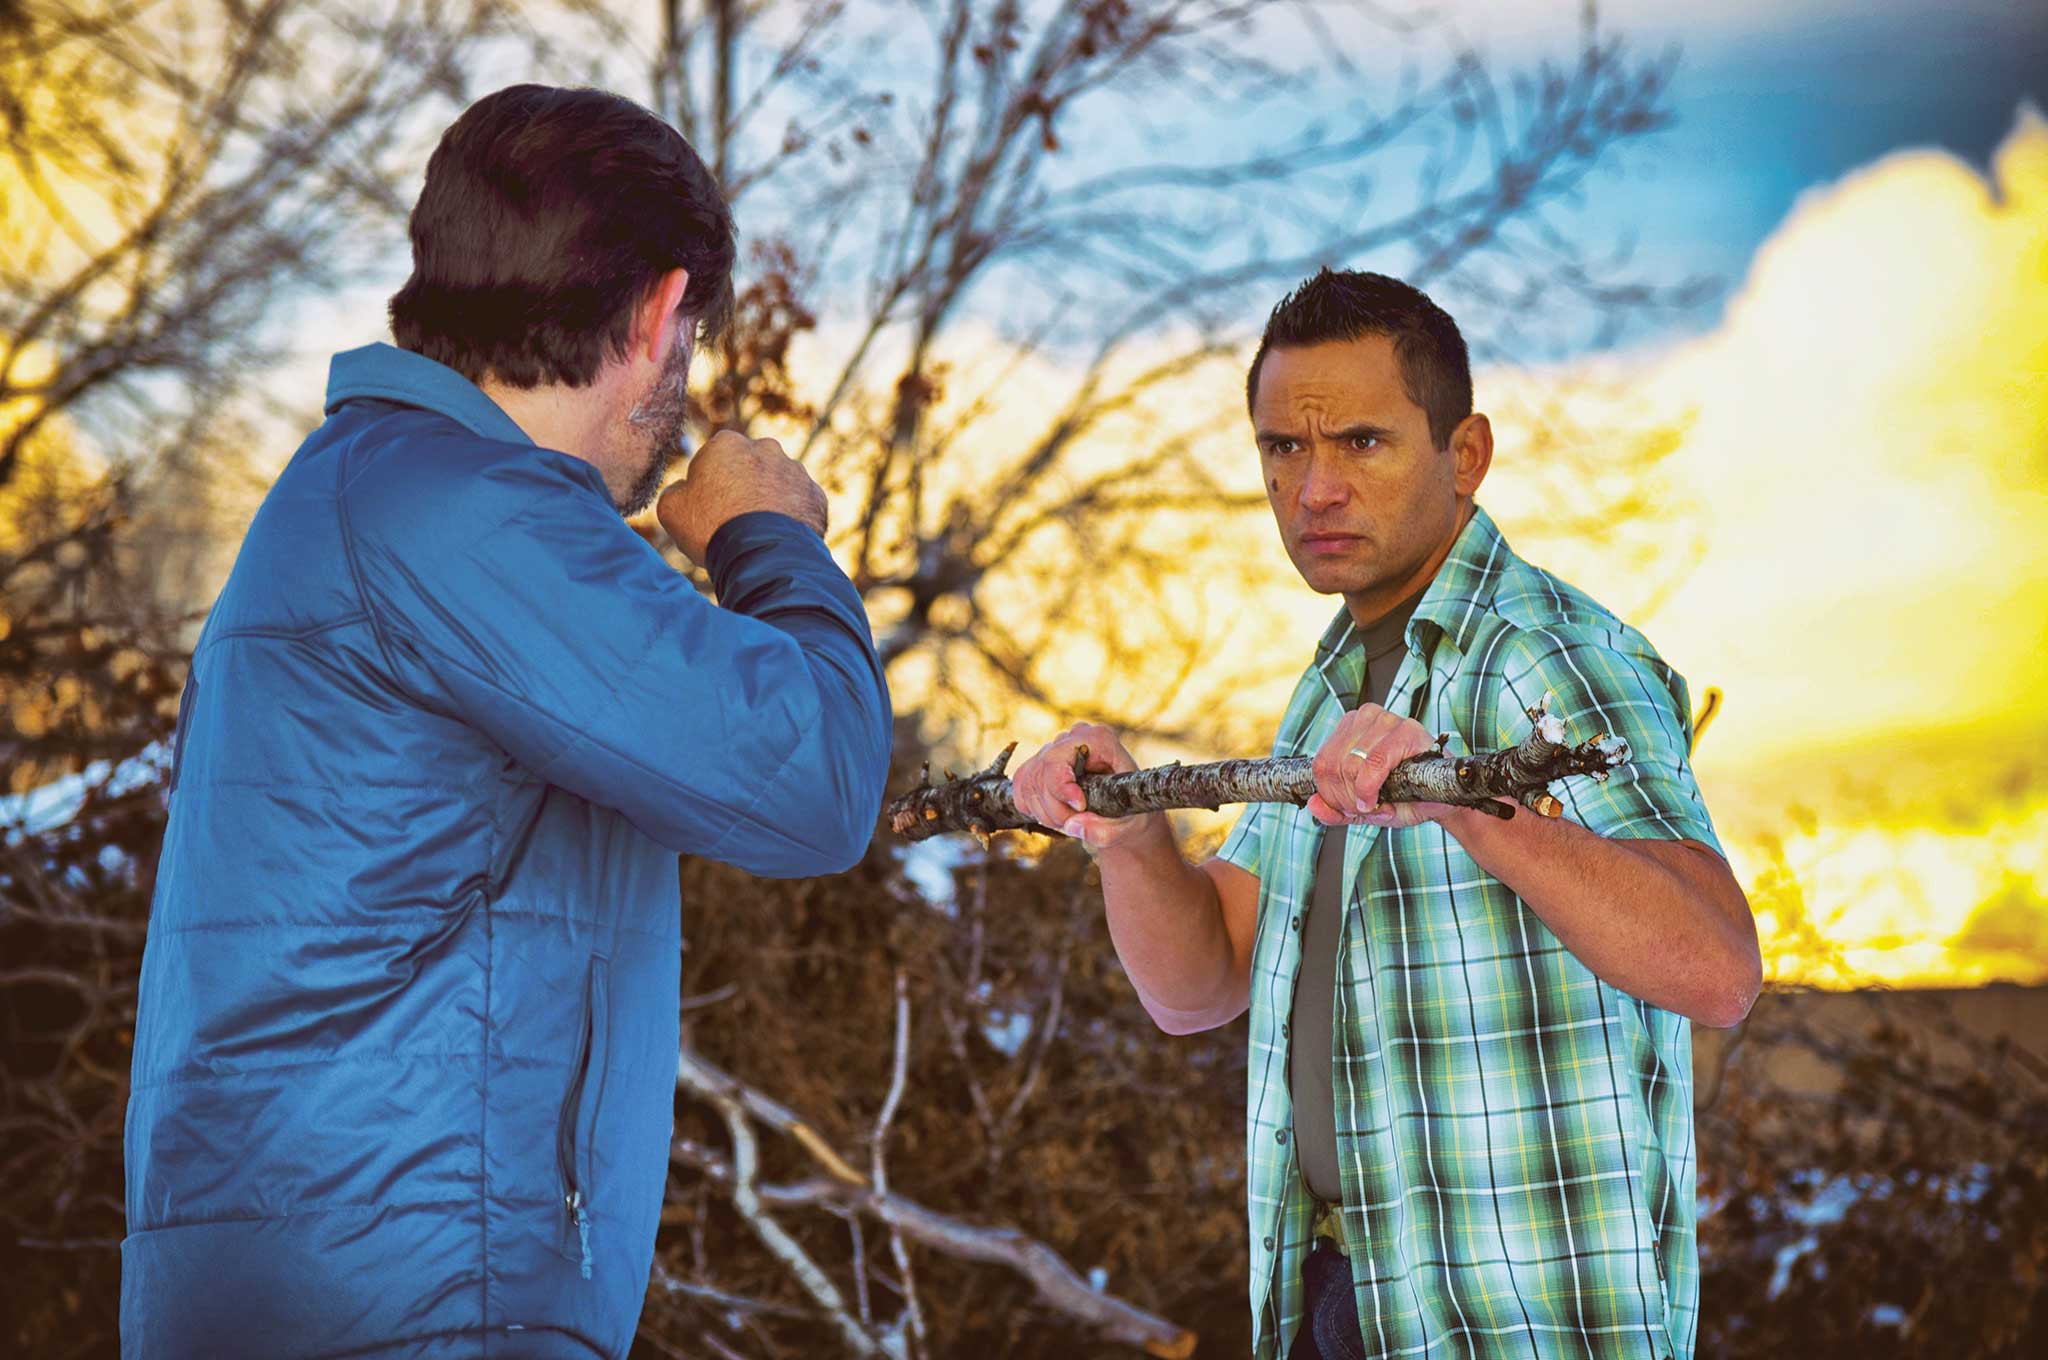
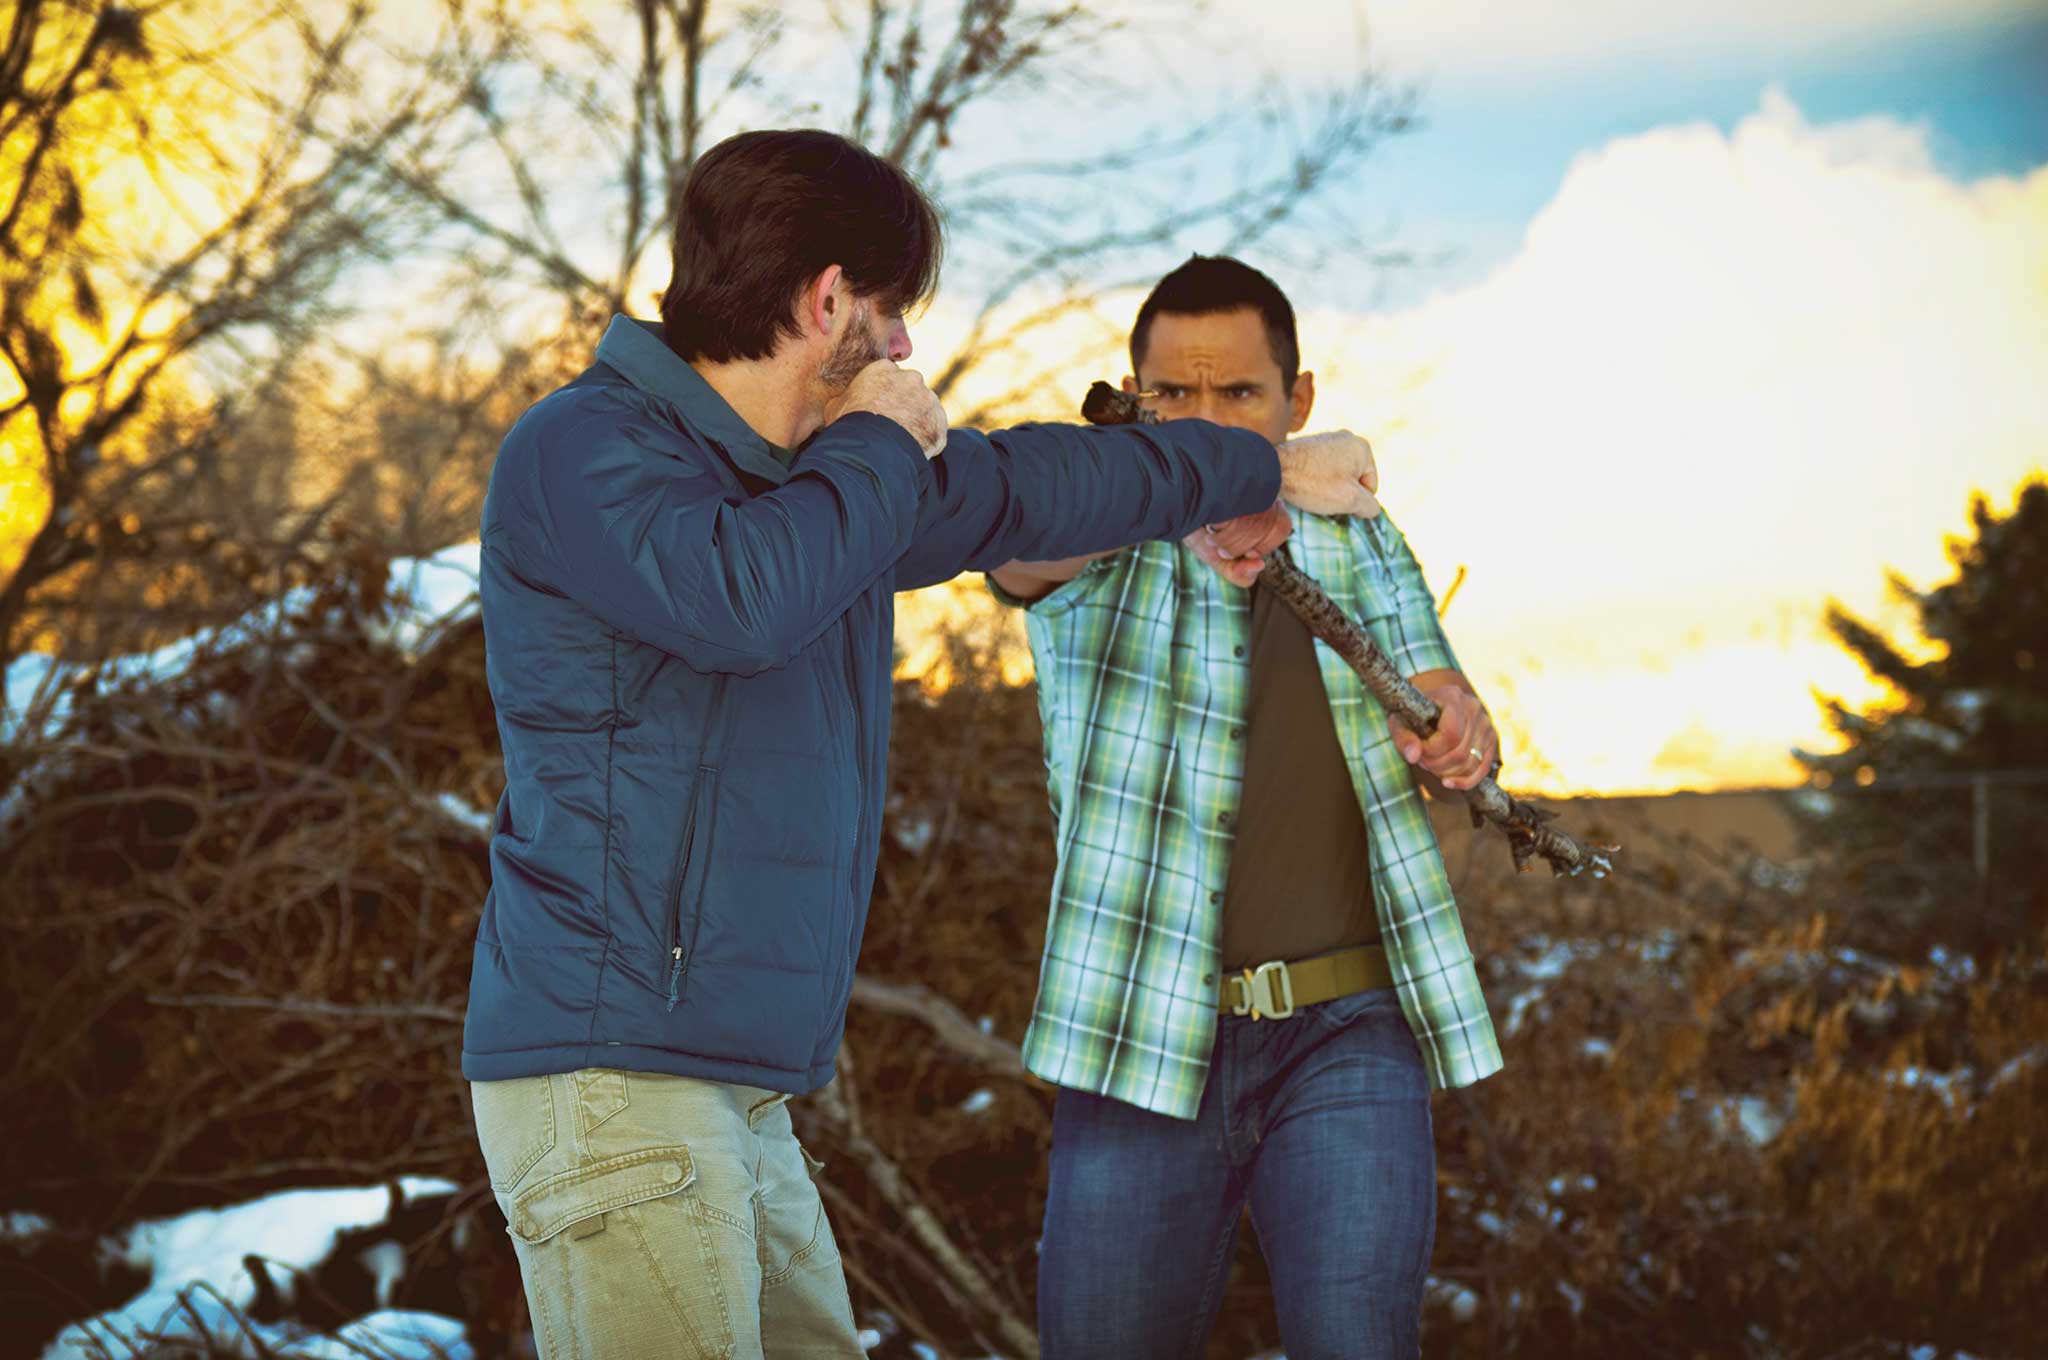
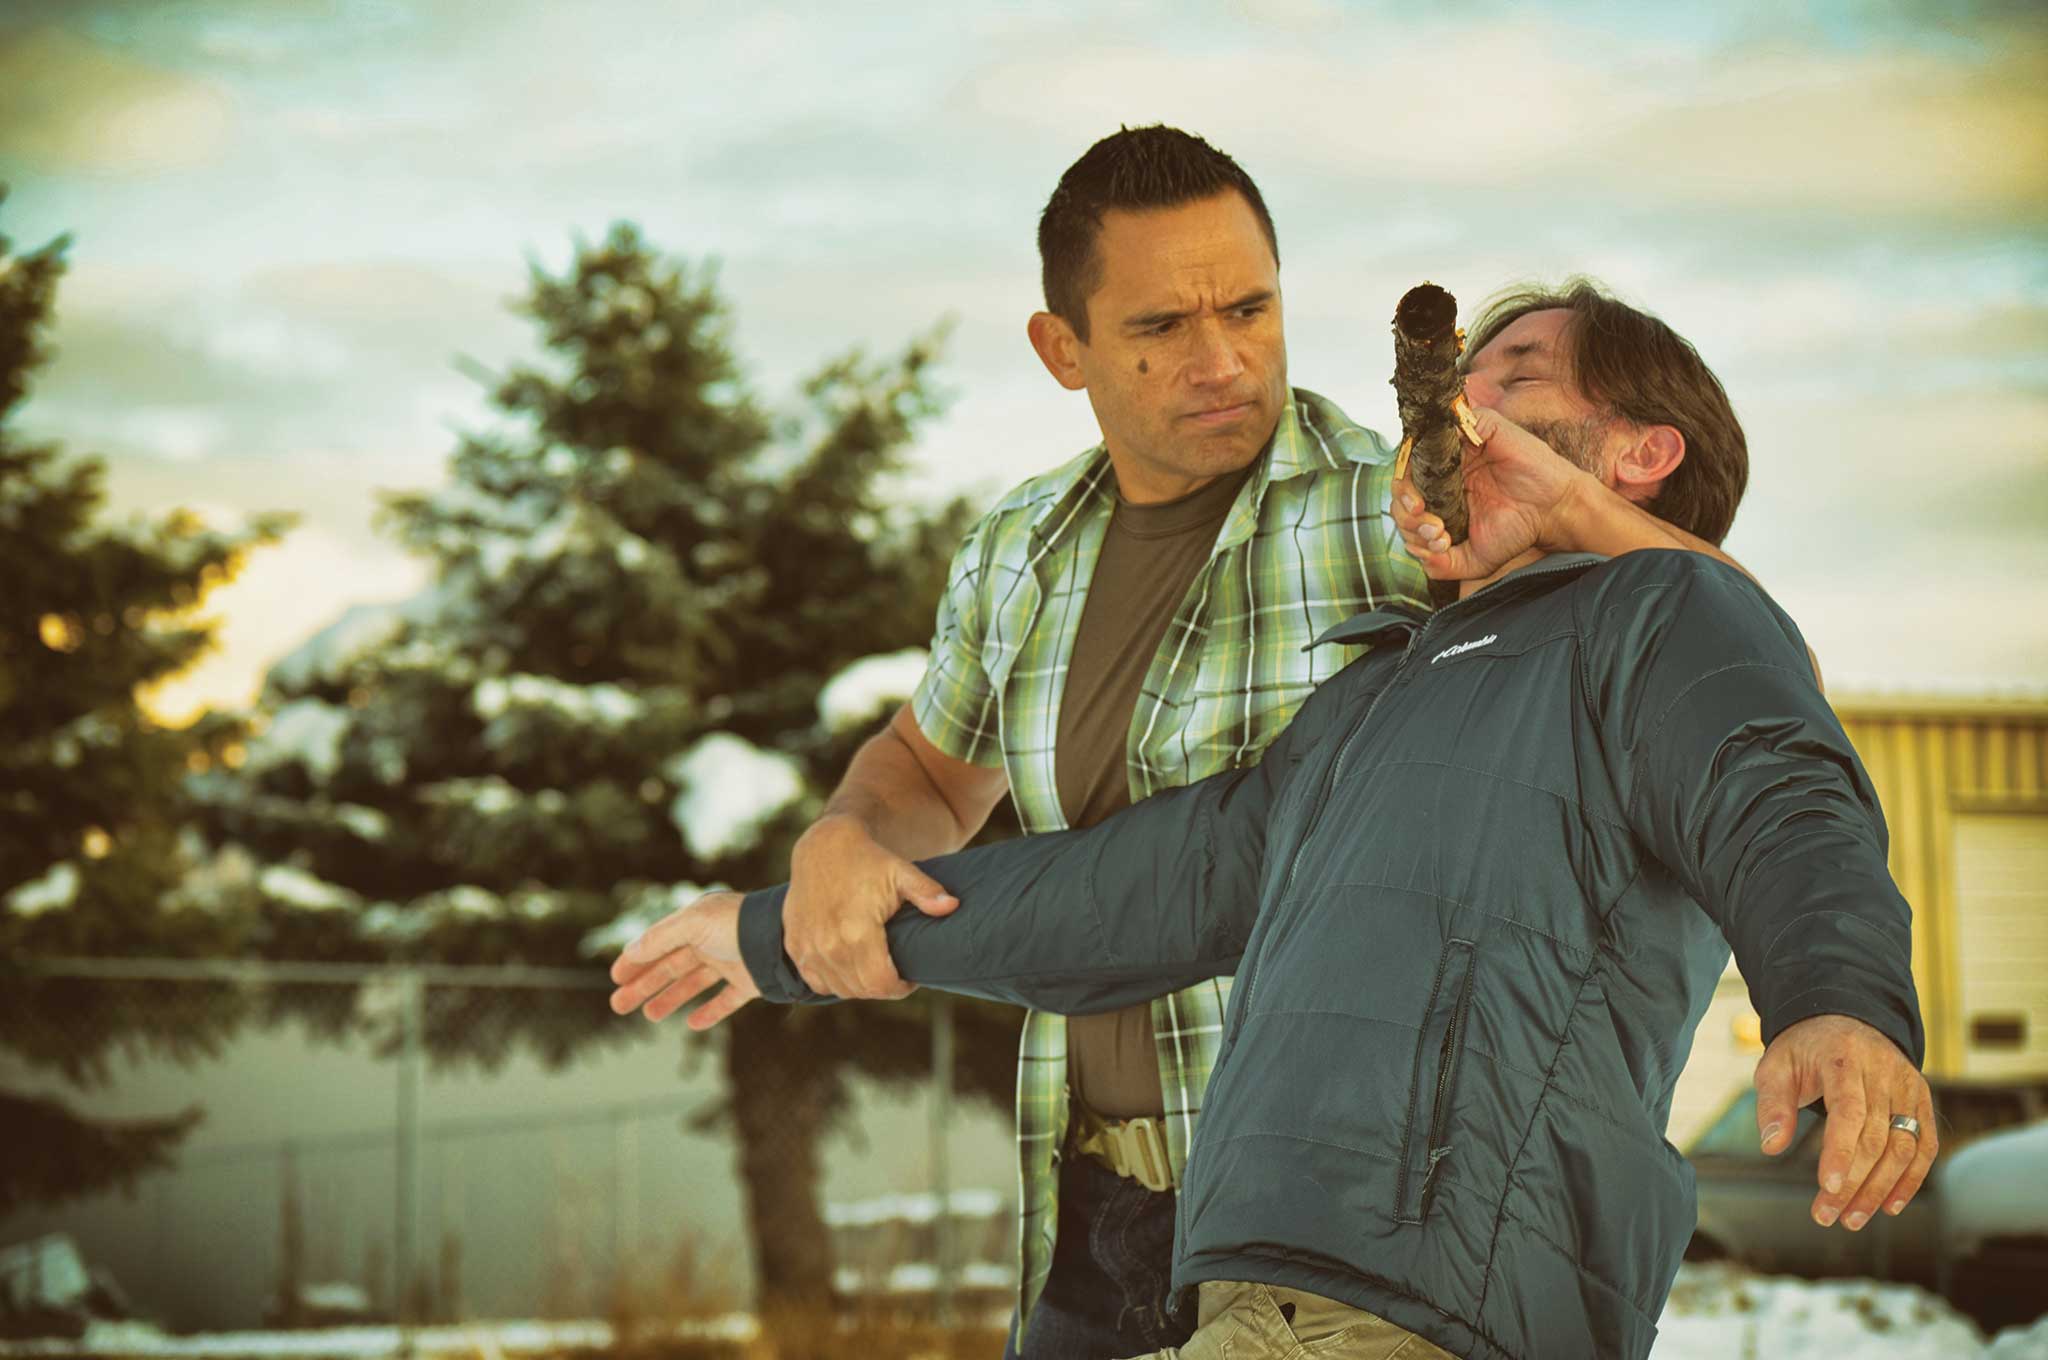
DEFENSE SEQUENCE 2: Over-Under Grip
1. Hold the weapon in the rifle grip, with support hand forward of the strong hand.
2. Quick straight-line thrusts can be used to preempt an attack.
3. Use the forward end of the stick to parry an attack downward while positioning yourself to the outside line.
4. Quickly change the support hand to the baseball bat grip while winding up for the coup de gras.
5. Hit a home run to finish the fight.
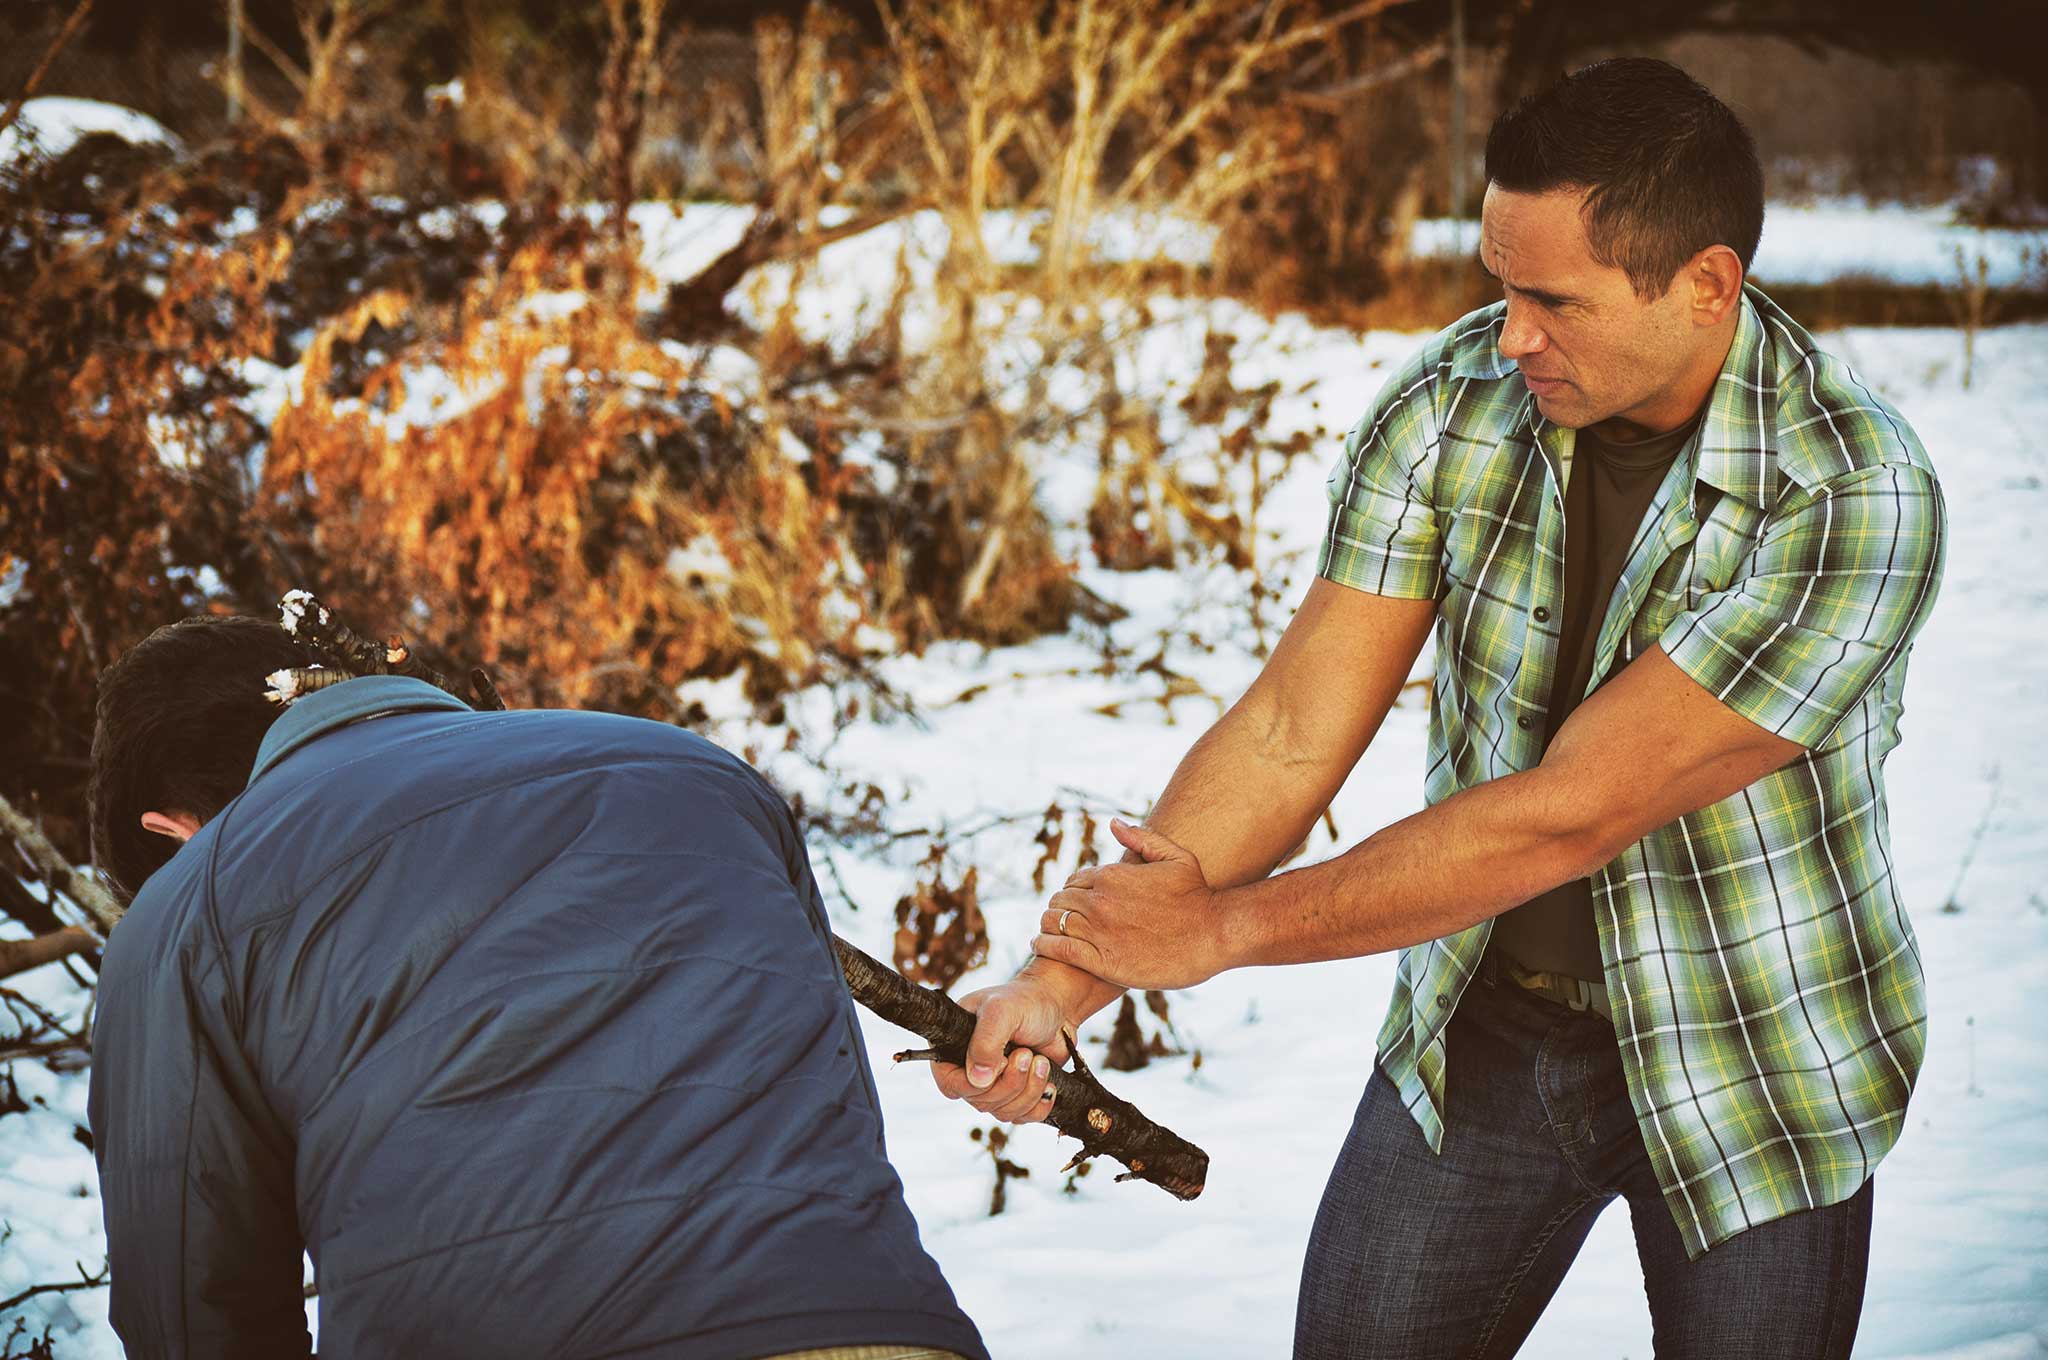
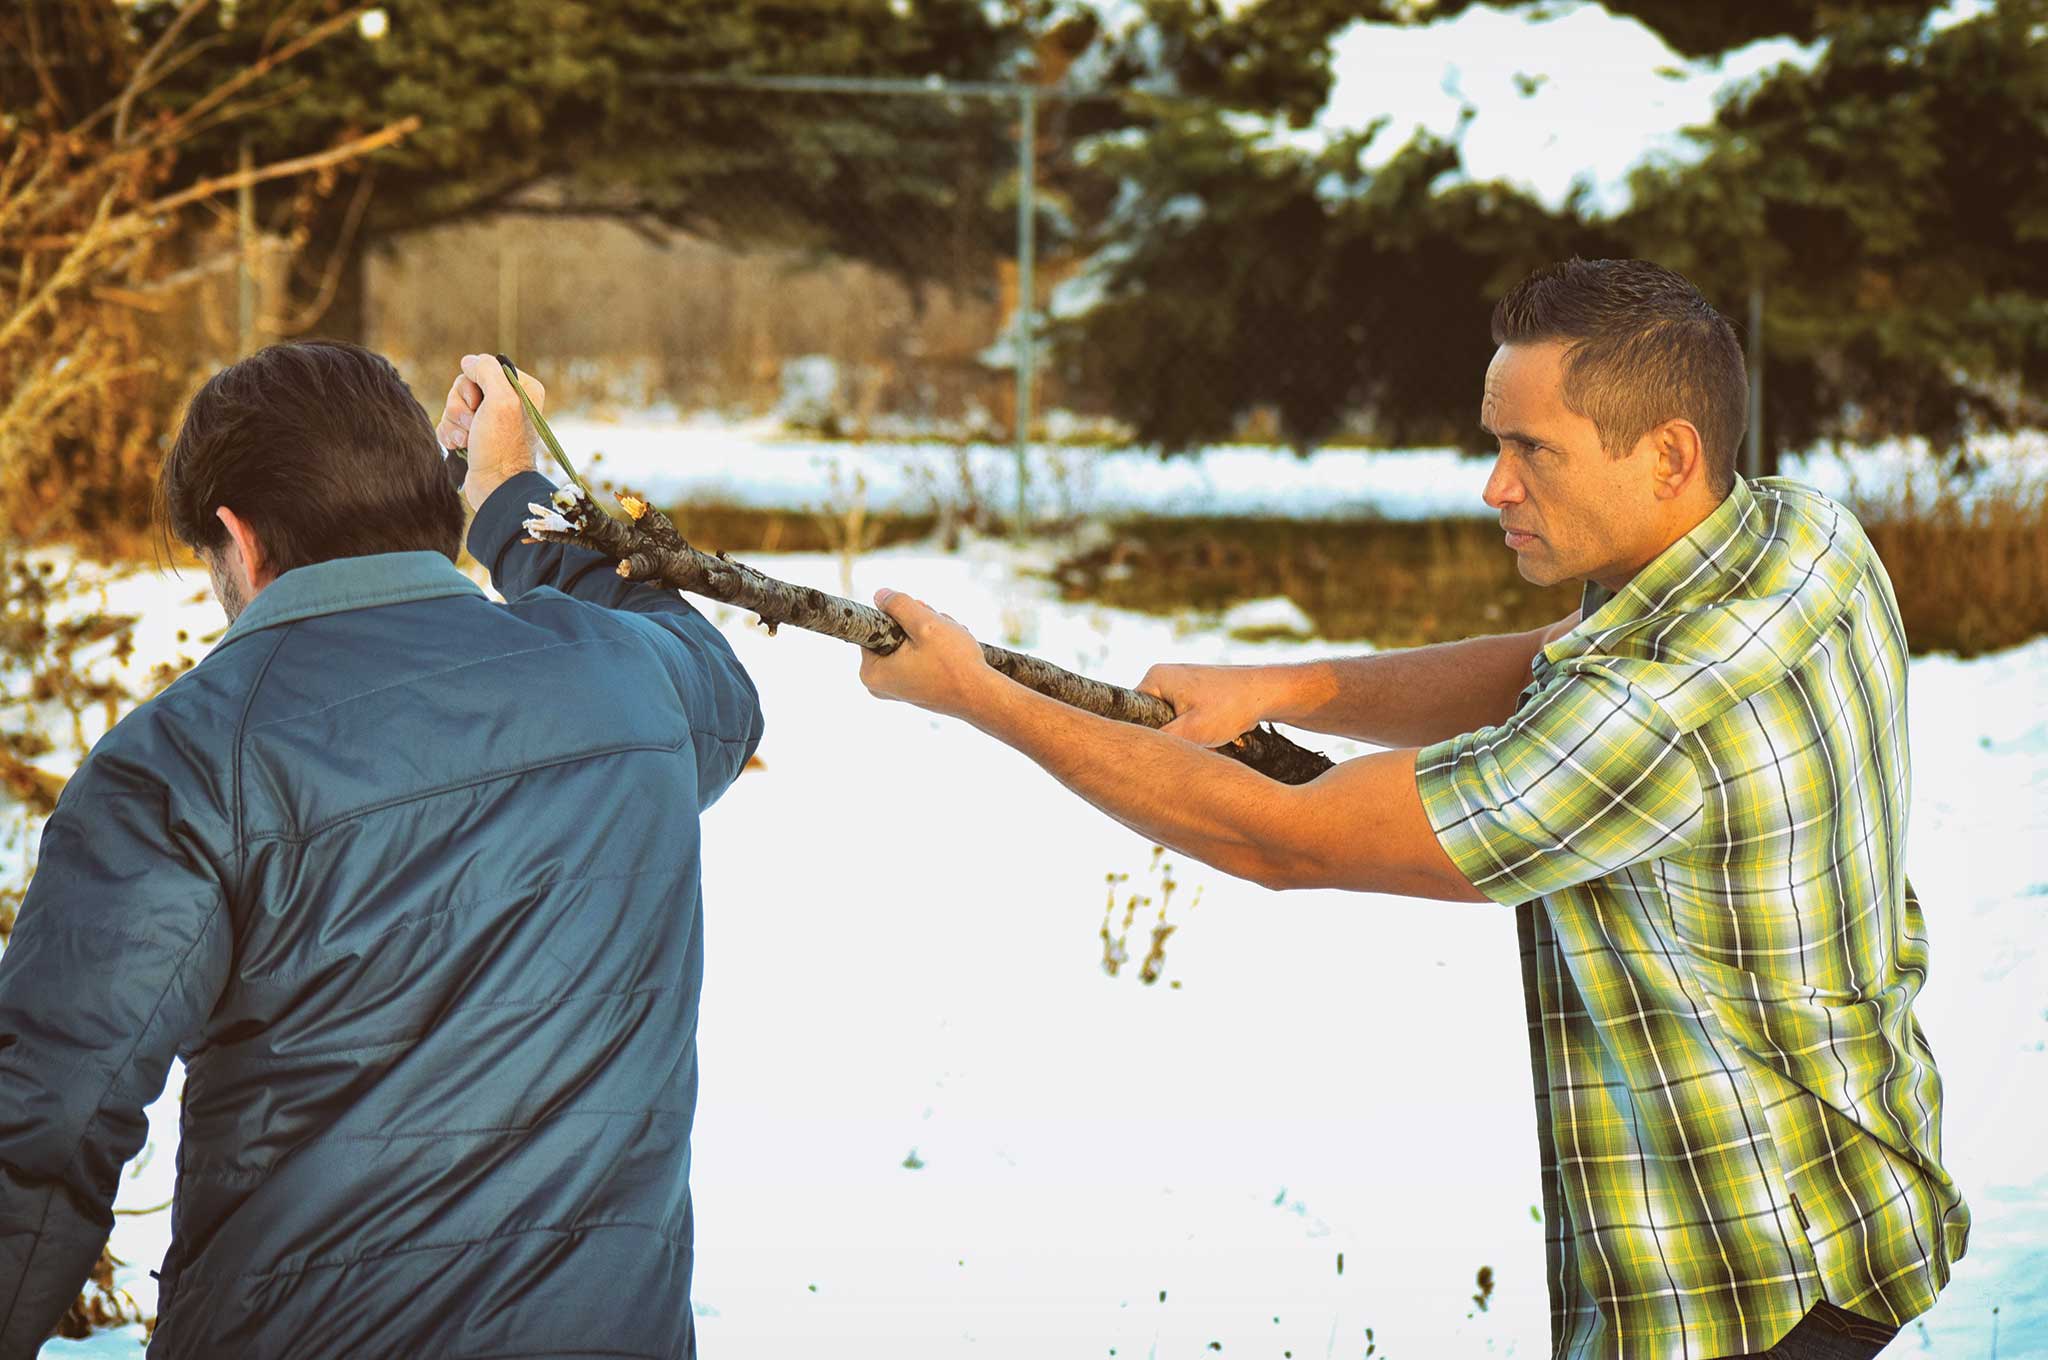
DEFENSE SEQUENCE 3: Double-Over Grip
1. Hold the stick in a kayak paddle grip, hands about shoulder-width apart.
2. Use the end to strike inward, parrying the straight-line jab.
3. Repeat on the other side to the straight-line cross.
4. Use the center of the stick between your hands to deliver a power strike to the jaw line.
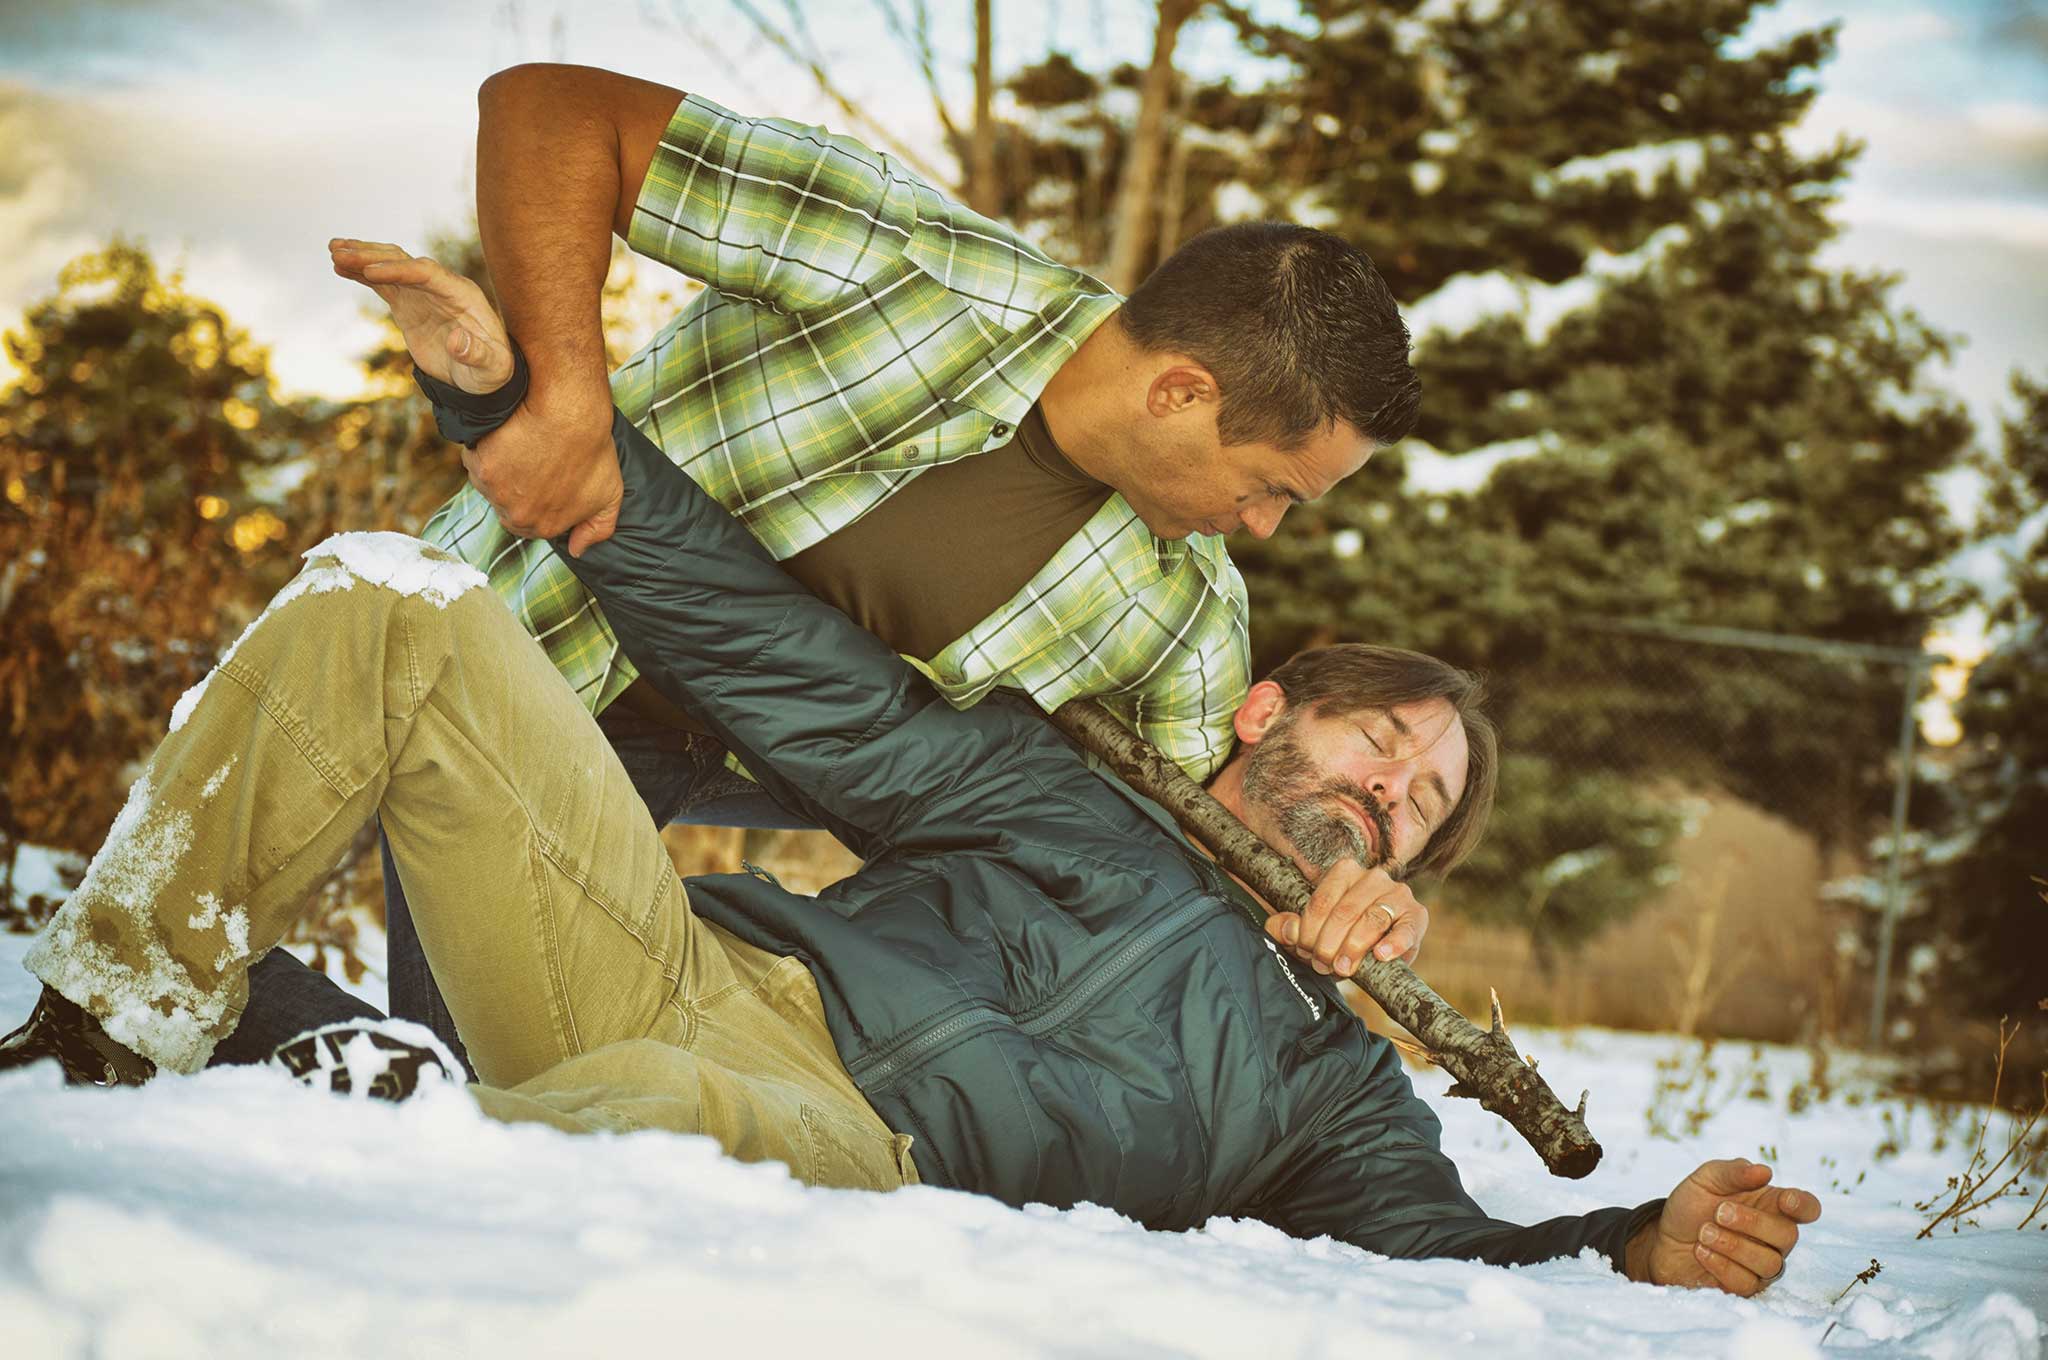
5. If the assailant is taller than you, pull down to their collarbone area to bring them down a little. Reach over the top of your stick and behind their neck with your left hand. Grab the stick on the other side, leaving the stick under your left armpit.
6. Control their arm with your free hand, and pull backward on their neck with the stick. Keeping the space small where their neck is will sink a choke in.
7. Pivot your left leg back, go down to your left knee and pull them backward down to the ground.
8. If the choke doesn’t sink in fast enough, deliver a few strikes to disrupt any attempted counterattack.
About the Author
Jared Wihongi is a 16-year veteran law enforcement officer with considerable time serving in the SWAT community, a specialist in close-quarter combatives, and one of a handful of master-level instructors of the Filipino combat art Pekiti-Tirsia Kali. Moreover, Wihongi has more than a decade of experience instructing armed forces around the globe. He’s the tactical consultant and frontman for Browning’s Black Label line of knives. Learn more about him at www.jaredwihongi.com.
Pros and Cons of a One-Handed Survival Stick
PROS
Hand-free transport, it can easily be packed in a ruck or slung sword-style on your hip.
Non-cumbersome. Less likely to be snagging on branches or walls as your move from A to B.
Second hand can be free to grab, defend, attack, hold other equipment or wield a second weapon.
Easier and less clumsy to wield with little practice.
It’s harder to enter inside the effective range of a shorter stick and better suited to close quarters.
CONS
Longer weapons give you a greater standoff distance. This is a good thing in an open space environment.
The power of a two-handed swing can be … you guessed it, about twice as strong as a one-handed swing.
Hunting provides a means of survival in emergency situations, but it’s also more than that. It can be a catalyst for testing other survival skills, a powerful bonding experience between friends, and even a form of group therapy for individuals who have struggled to overcome difficult experiences. Iain Harrison, the editor of RECOIL Magazine, covered all these bases on a Caribou hunting trip last year.
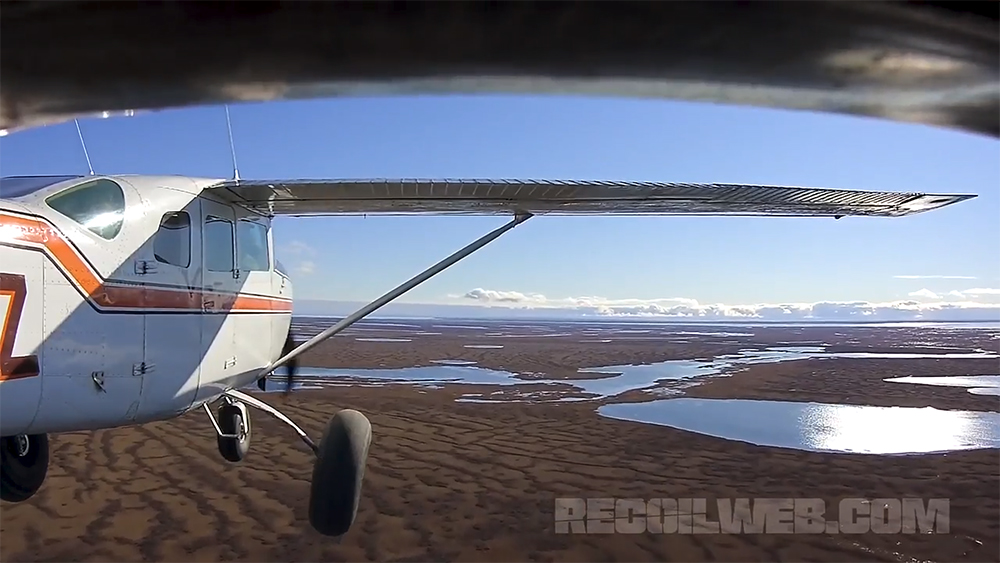
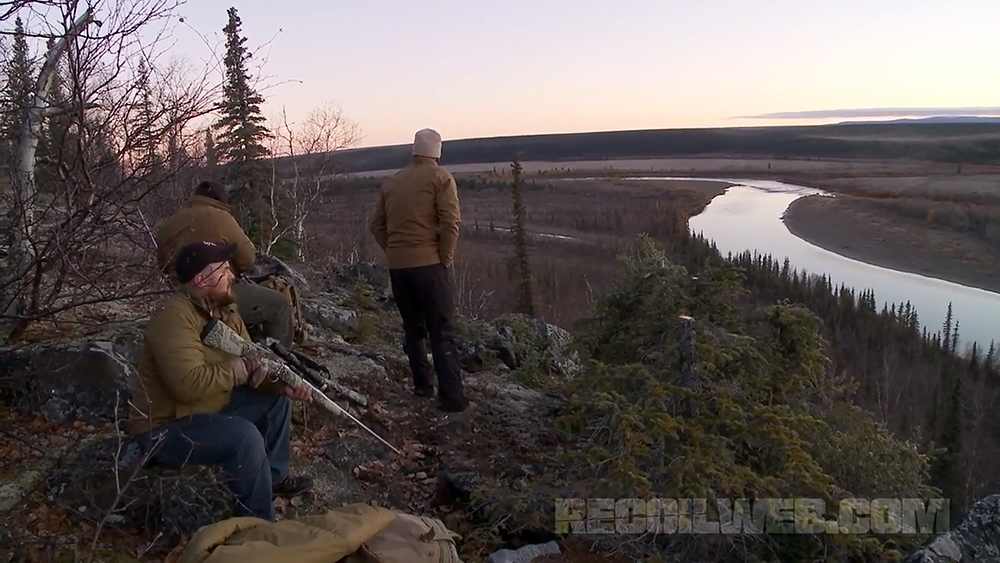
Harrison teamed up with the non-profit organization Camp Patriot to bring a group of three wounded veterans on this hunting trip. The group traveled via small bush planes to a remote spot in Kotzebue, Alaska, only a few miles south of the Arctic Circle. After landing on a small gravel bar at the edge of a river, the men set up camp and started scouting for a nearby herd of caribou.
From a position on the mountainside, the men could see approximately 4,000 caribou — they just had to position themselves strategically and wait for a clear shot. Check out the full video below from RECOILtv. It discusses the results of the hunt, as well as the individual stories of each of the three veterans who joined Harrison on the trip.
A knife is a tool, and like any other tool, it must be engineered from the outset to handle a specific set of tasks. Some knives are big, heavy, and overbuilt in order to withstand the rigors of hard outdoor use. Other knives are made of exotic materials and designed to be both functional and elegant, like a finely-crafted watch. There are small blades for opening packages, large blades designed for combat, and blades with blunt tips made for use in rescue situations.
The Benefits of Losing Weight
One knife category we feel doesn’t get as much attention as it deserves is that of the lightweight knife. Knives in this category have a variety of useful applications. Steel is heavy, so a lightweight knife will go a long way to reduce the load in your pack — as the saying goes, ounces equal pounds, and pounds equal pain. Like a scalpel, a light blade also offers increased precision and maneuverability. And if you’re heading out for a run or some other fast-paced physical activity, you don’t want a heavy blade bouncing against your leg with each step.
As a general rule, people tend to associate the term lightweight with three others: small, fragile, and expensive. Admittedly, this is often the case — just put the word ultralight in front of any piece of gear you’re looking to buy, then watch as prices increase and durability decreases. However, with the proper forethought and application of materials, this doesn’t have to be the case.
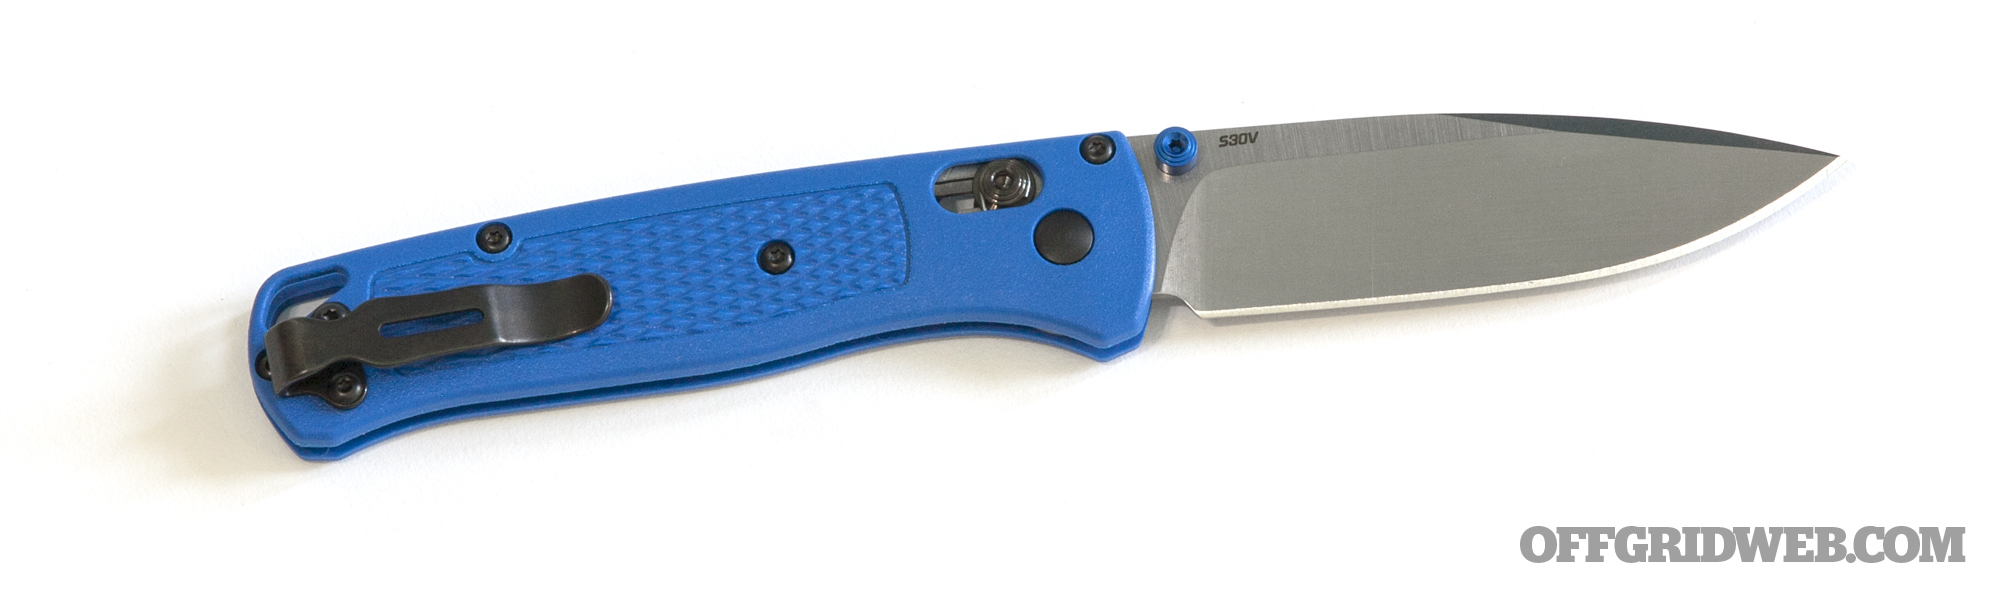
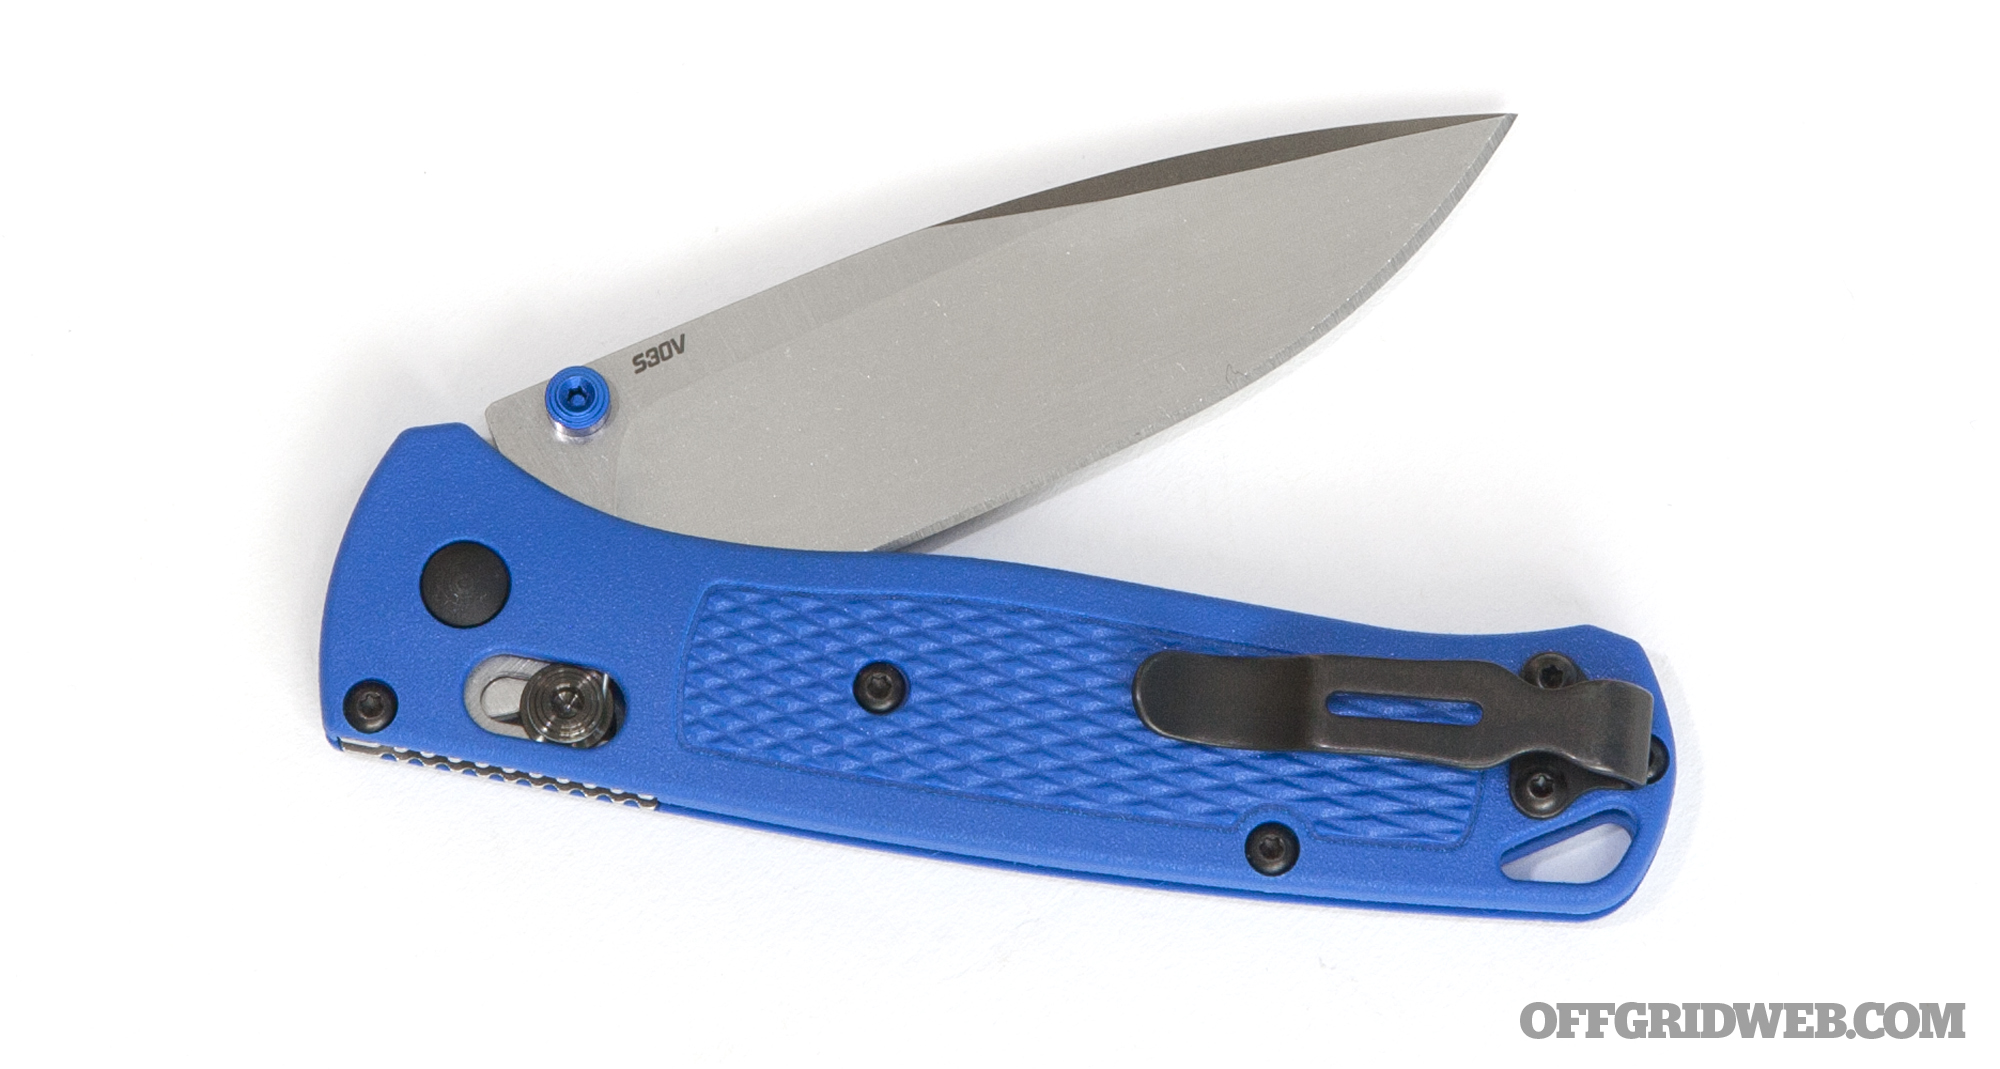
Benchmade Bugout
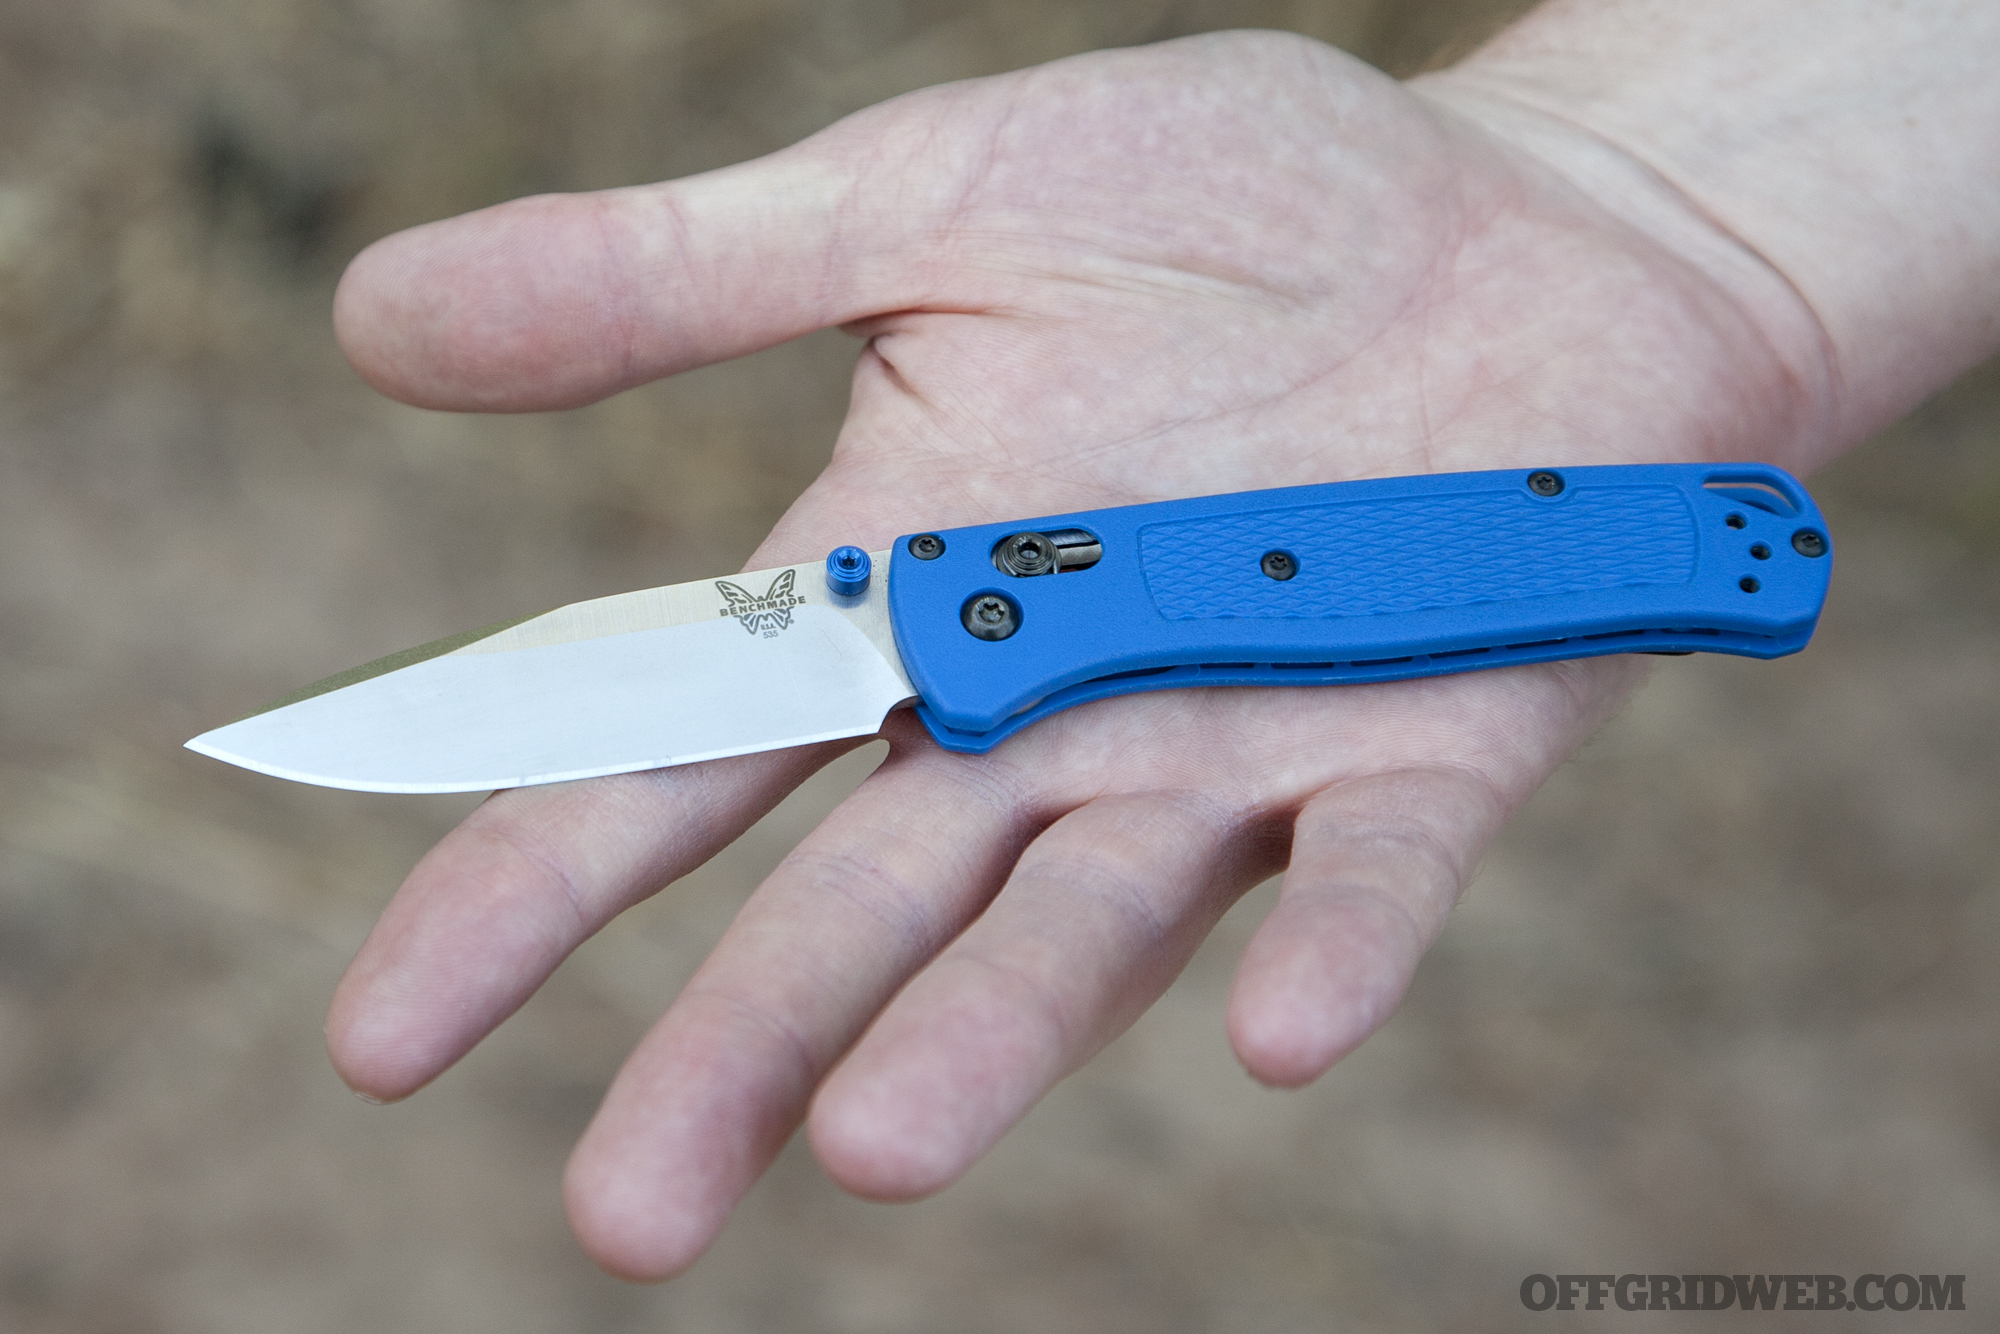
Earlier this year, Benchmade set out to develop a folding knife that would remain as light as possible without substantially impacting durability or cost. The easy way to do this would be to simply make a very small knife, but that would limit its functionality, so Benchmade aimed for a much more practical 3+-inch blade. The end result of this challenging task was the new Benchmade Bugout.
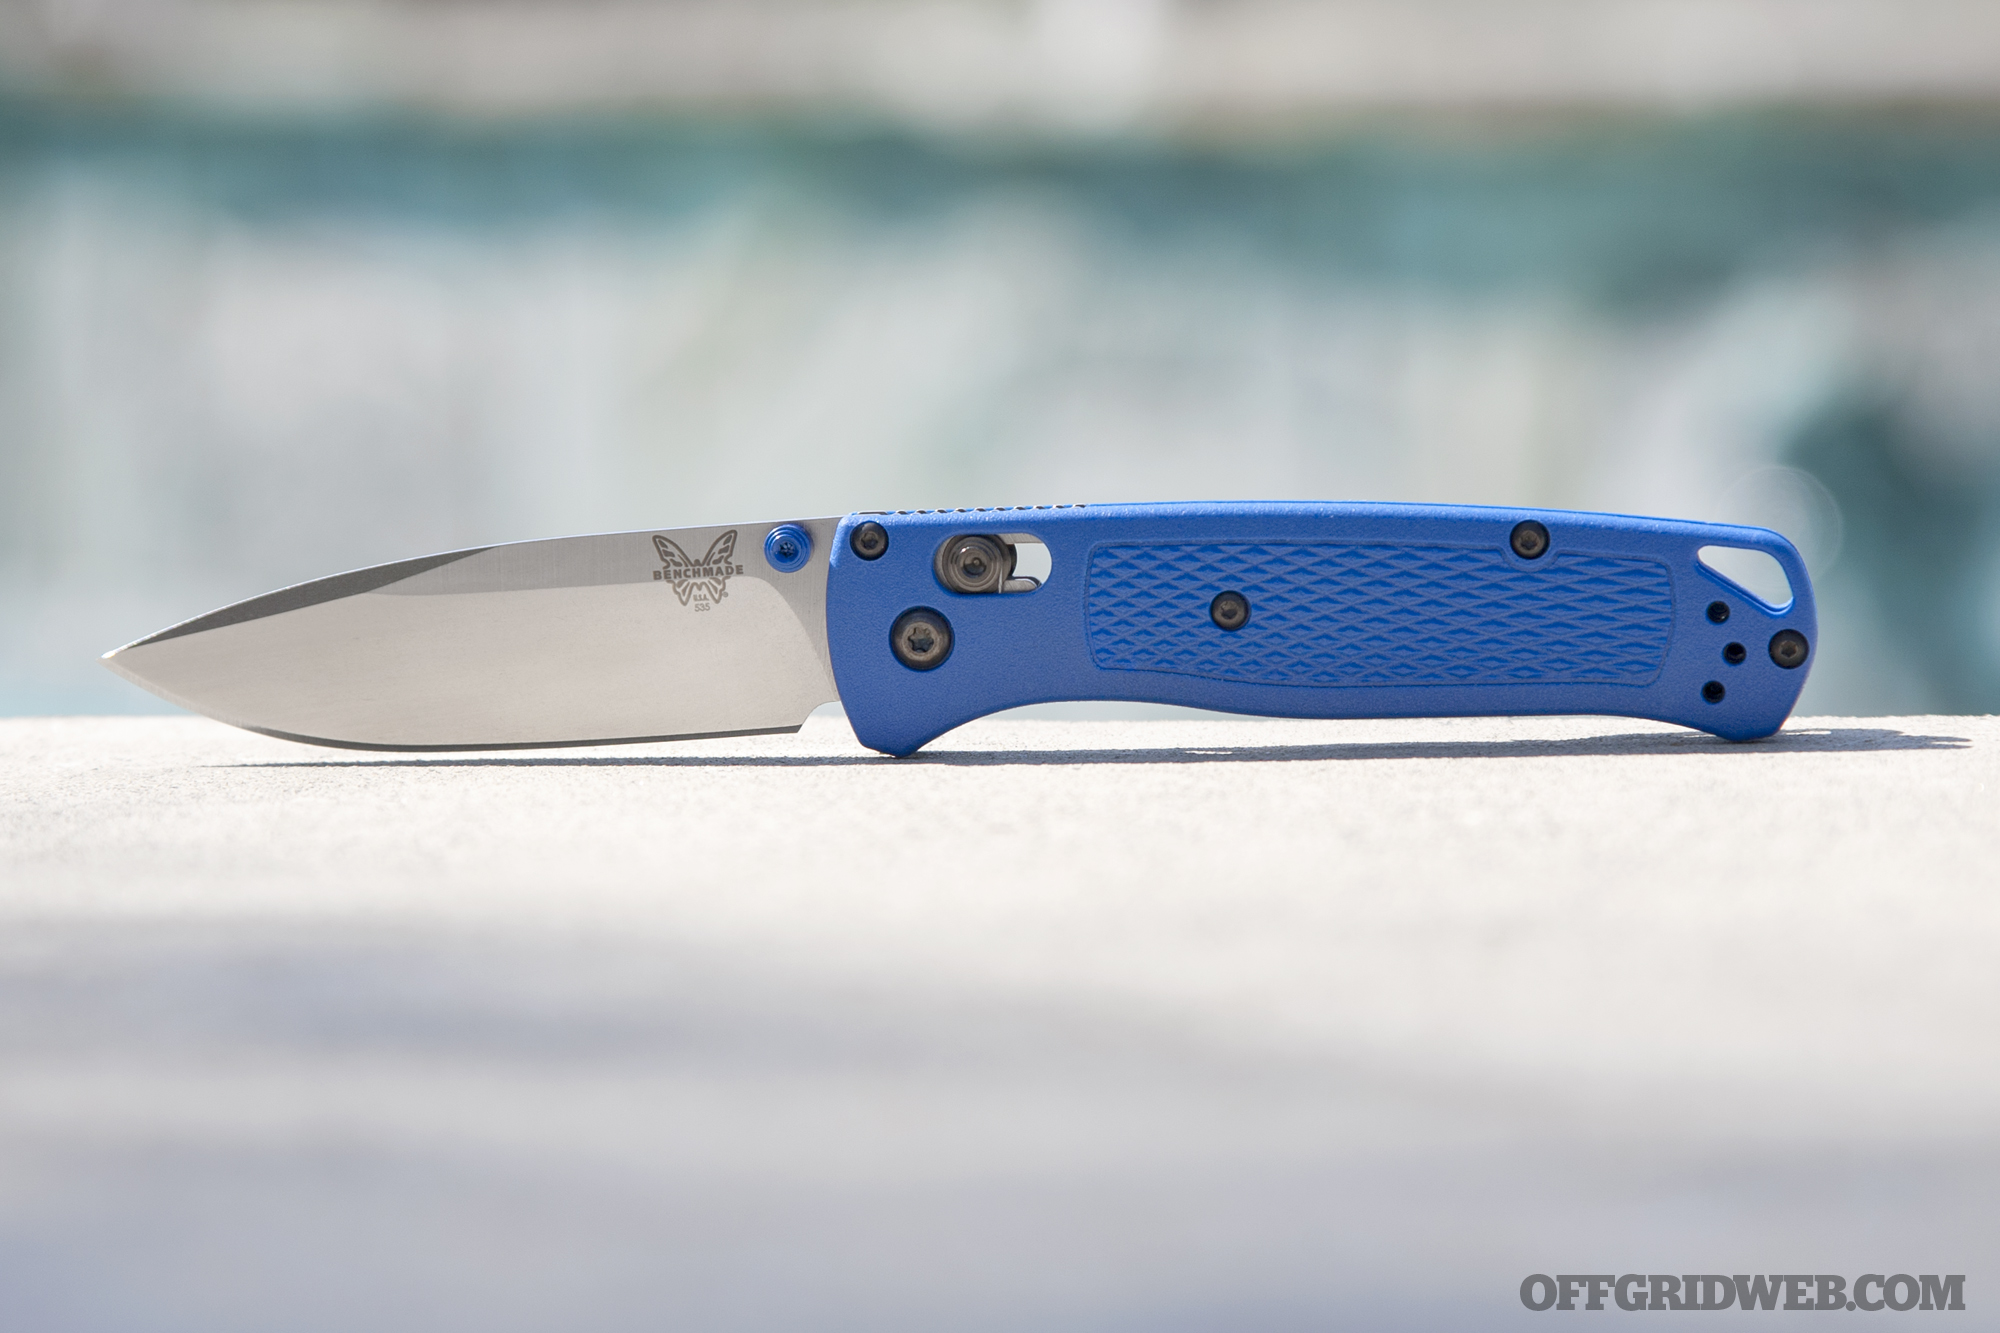
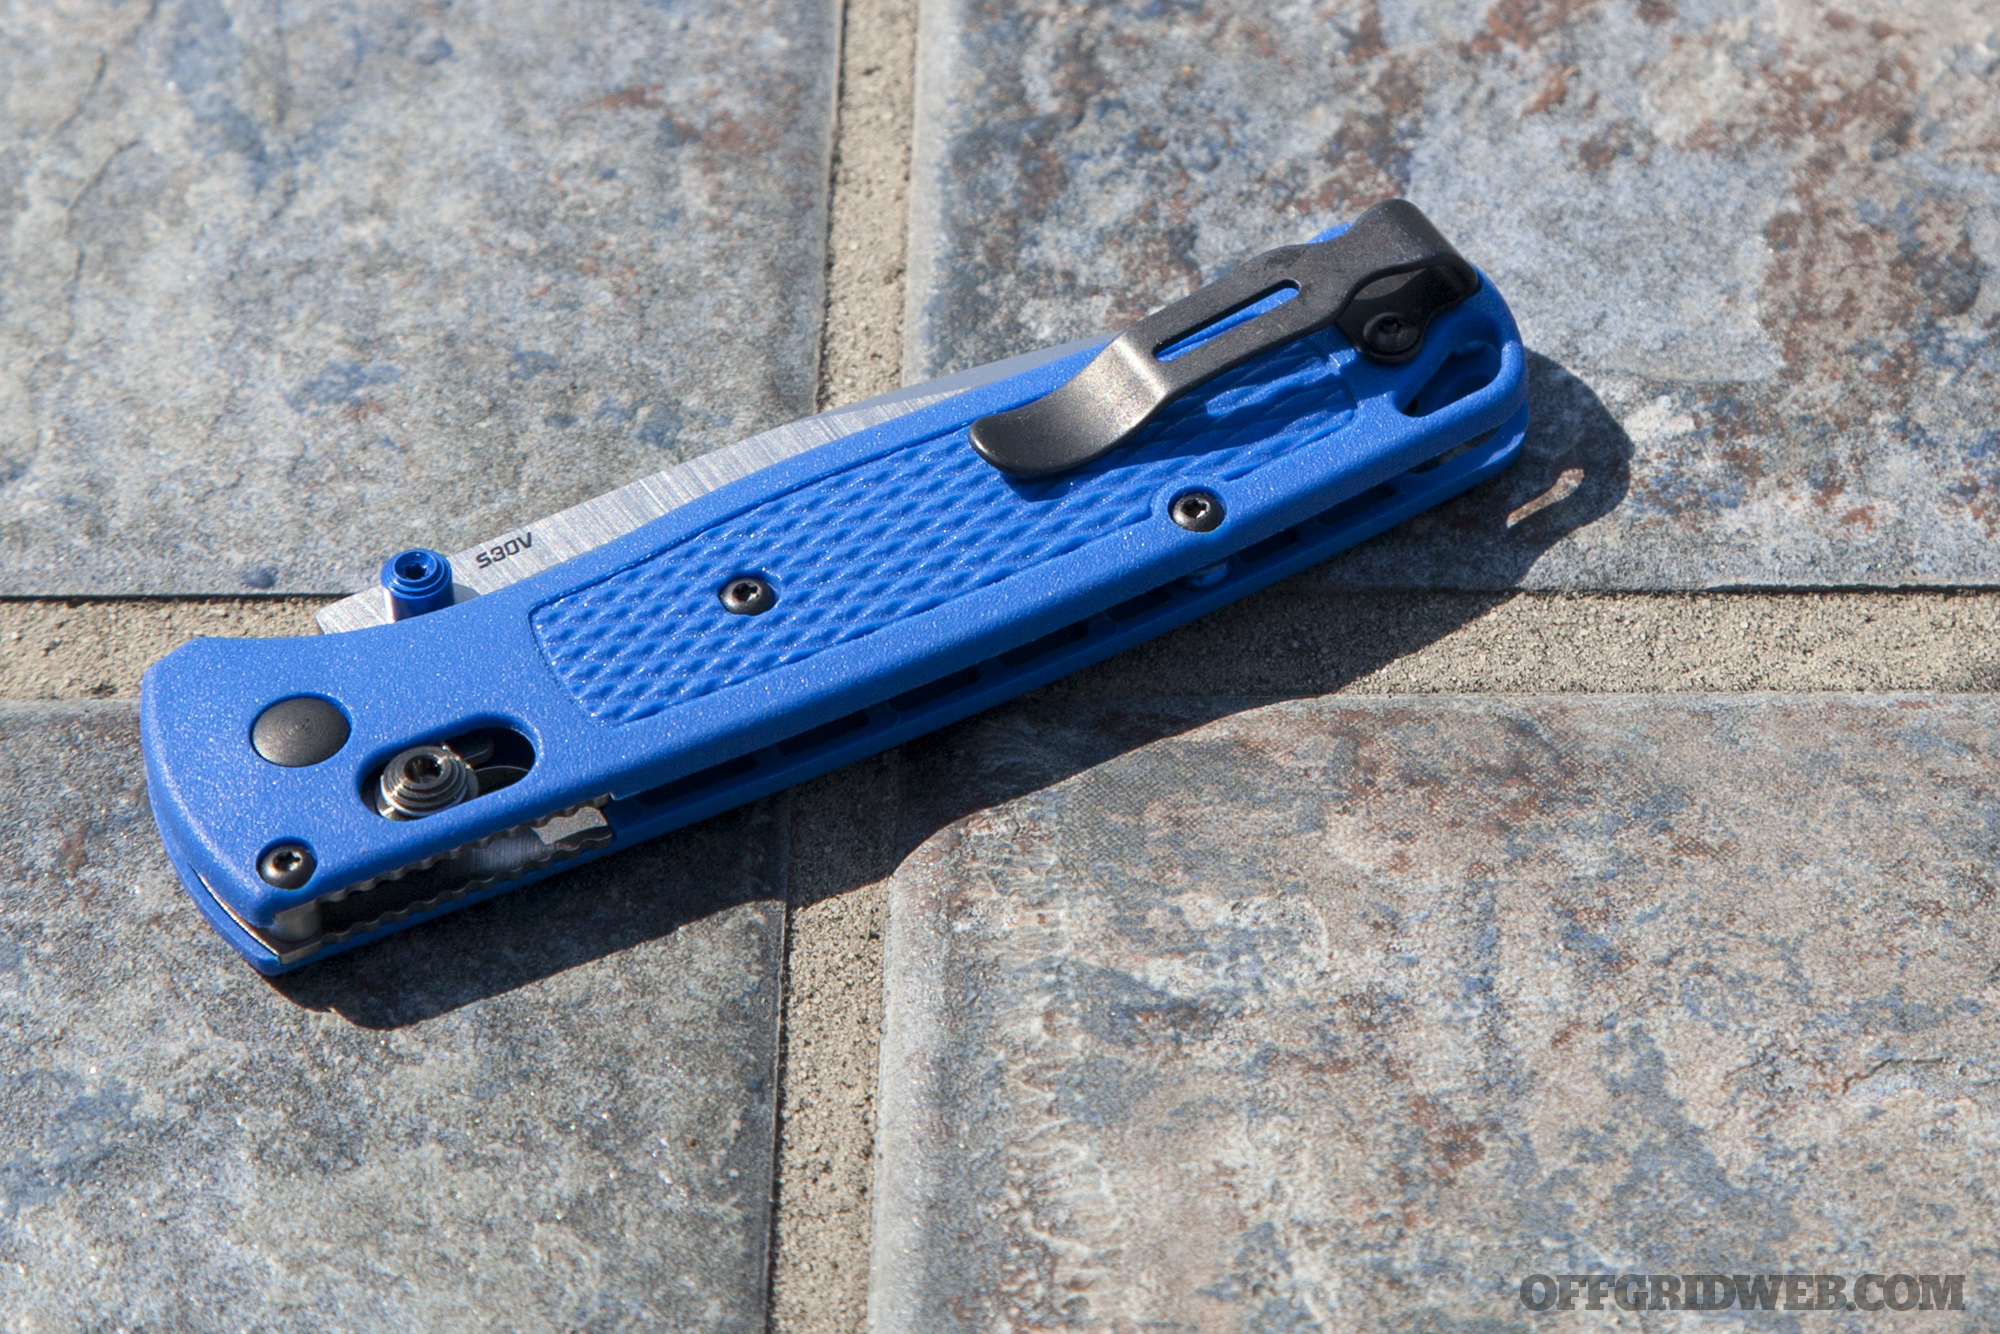
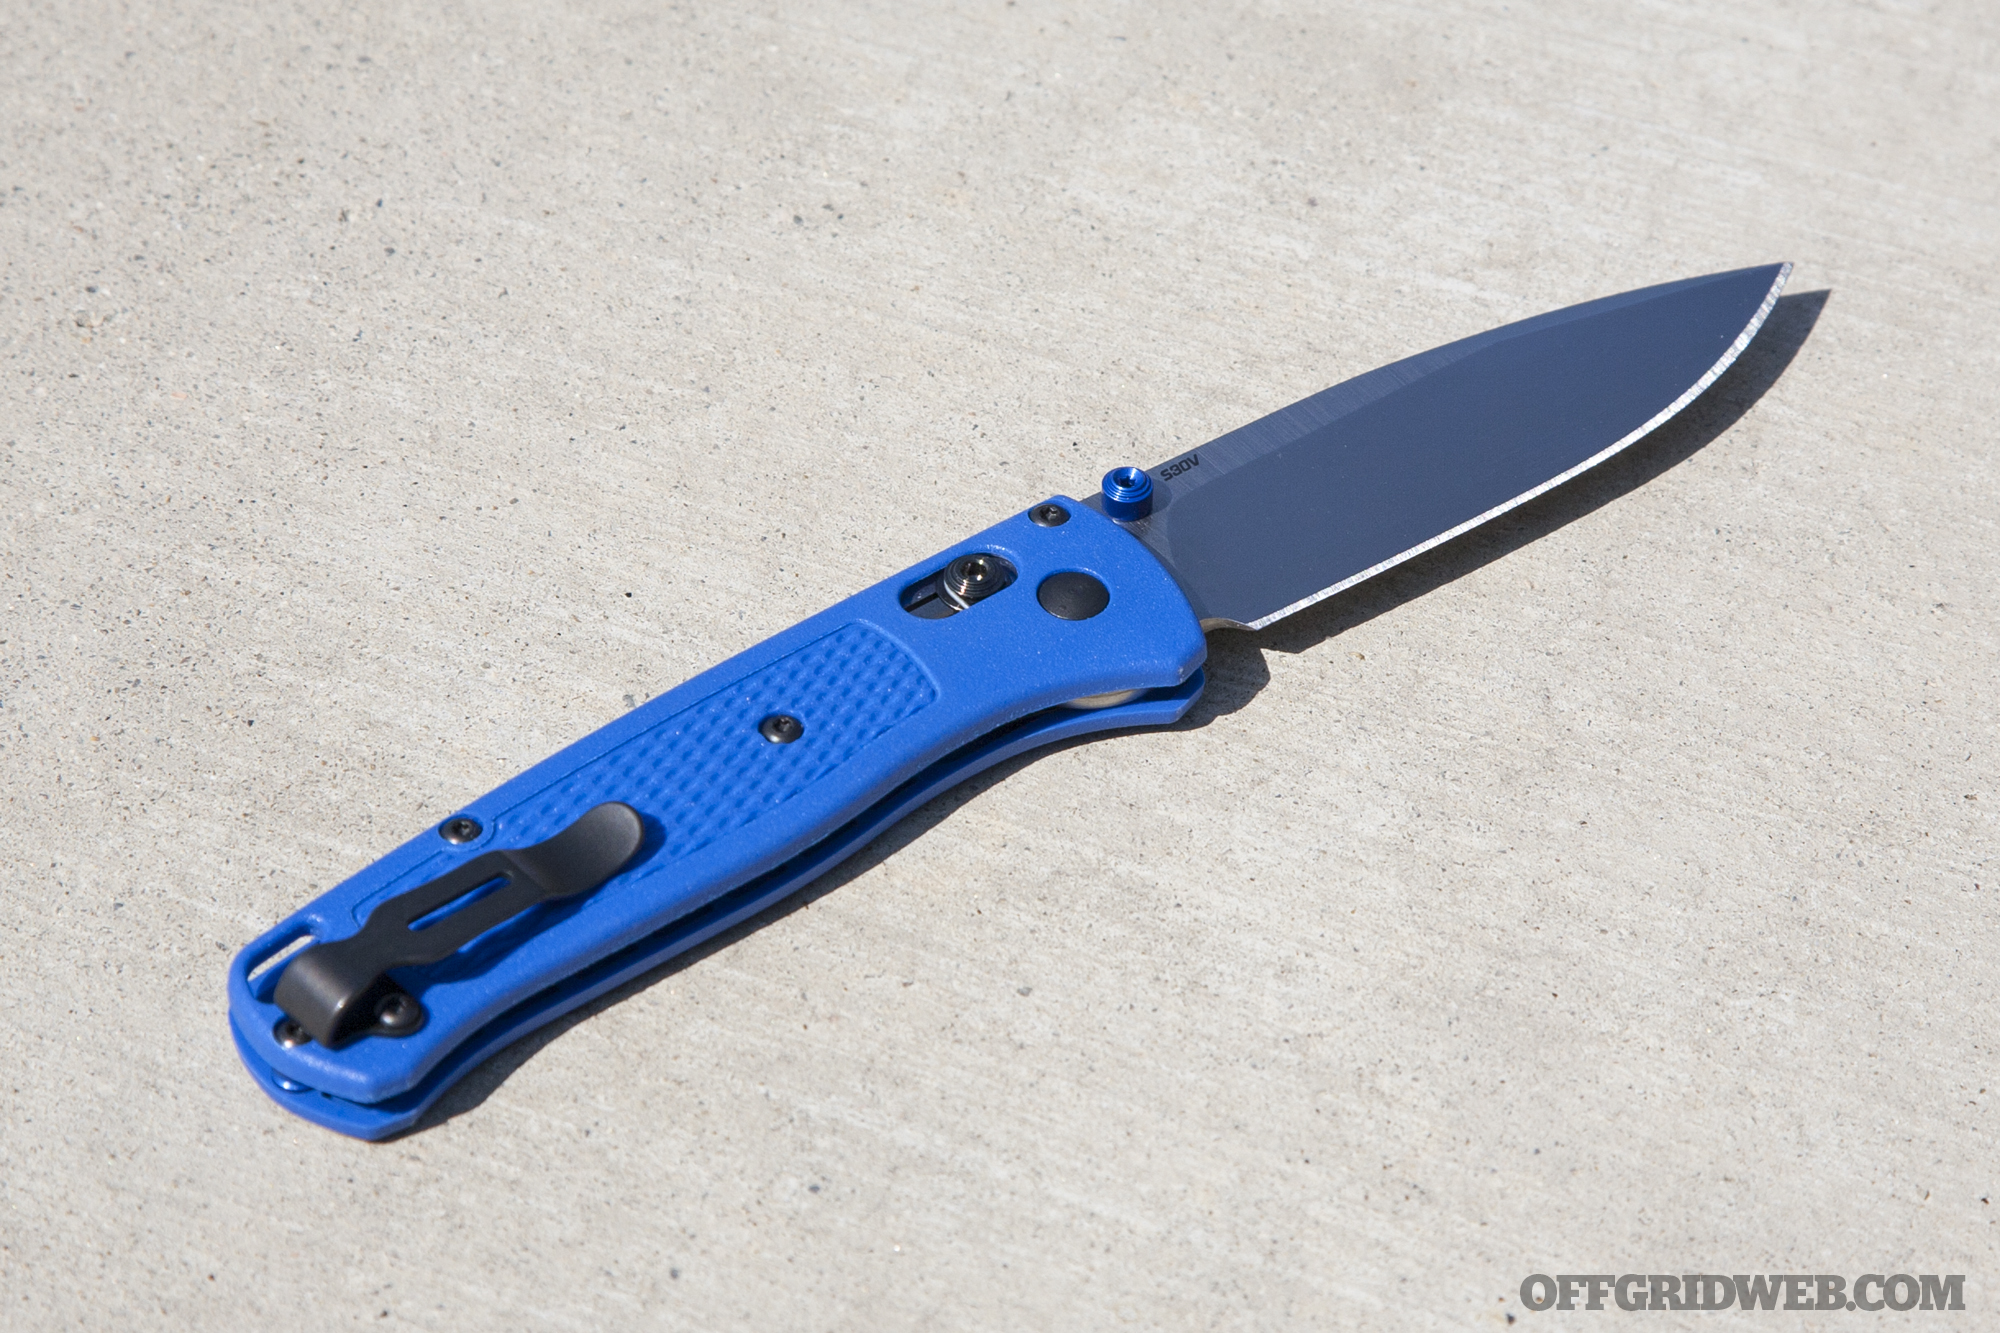
The Bugout, also known as the 535, combines a slim steel blade with a tough polymer handle and Benchmade’s signature AXIS lock mechanism. Every part of this formula was adjusted with lightness in mind, and examining the knife closely shows this attention to detail.
First and foremost, the blade had to be addressed. Benchmade’s design team knew that using an exotic steel would lose some weight but also drive up the price. Instead, they stuck with the company’s new mainstay, CPM S30V. The Bugout’s satin-finished drop-point blade is 3.24 inches long, barely shorter than the company’s popular Griptilian line, so that’s not the source of the weight savings either.
Taking a look at the spine reveals the secret — it has been shaved down to just 0.09 inches thick (2.29mm). The blue anodized aluminum thumb studs are also shorter than other Benchmade knives, and match the width of the slim handle (more on that below). The blade is finished off with a high primary grind line and prominent swedge, further reducing its weight by removing more steel.
Moving to the pivot of the knife, anyone familiar with Benchmade will recognize the AXIS lock. In case you’re unfamiliar, this sliding steel lock bar is held in place with a pair of tension springs. Pulling back on the bar allows the knife to swing open or shut freely with a flick of the wrist. A stop pin at the corner of the handle prevents vertical blade movement when the knife is open.
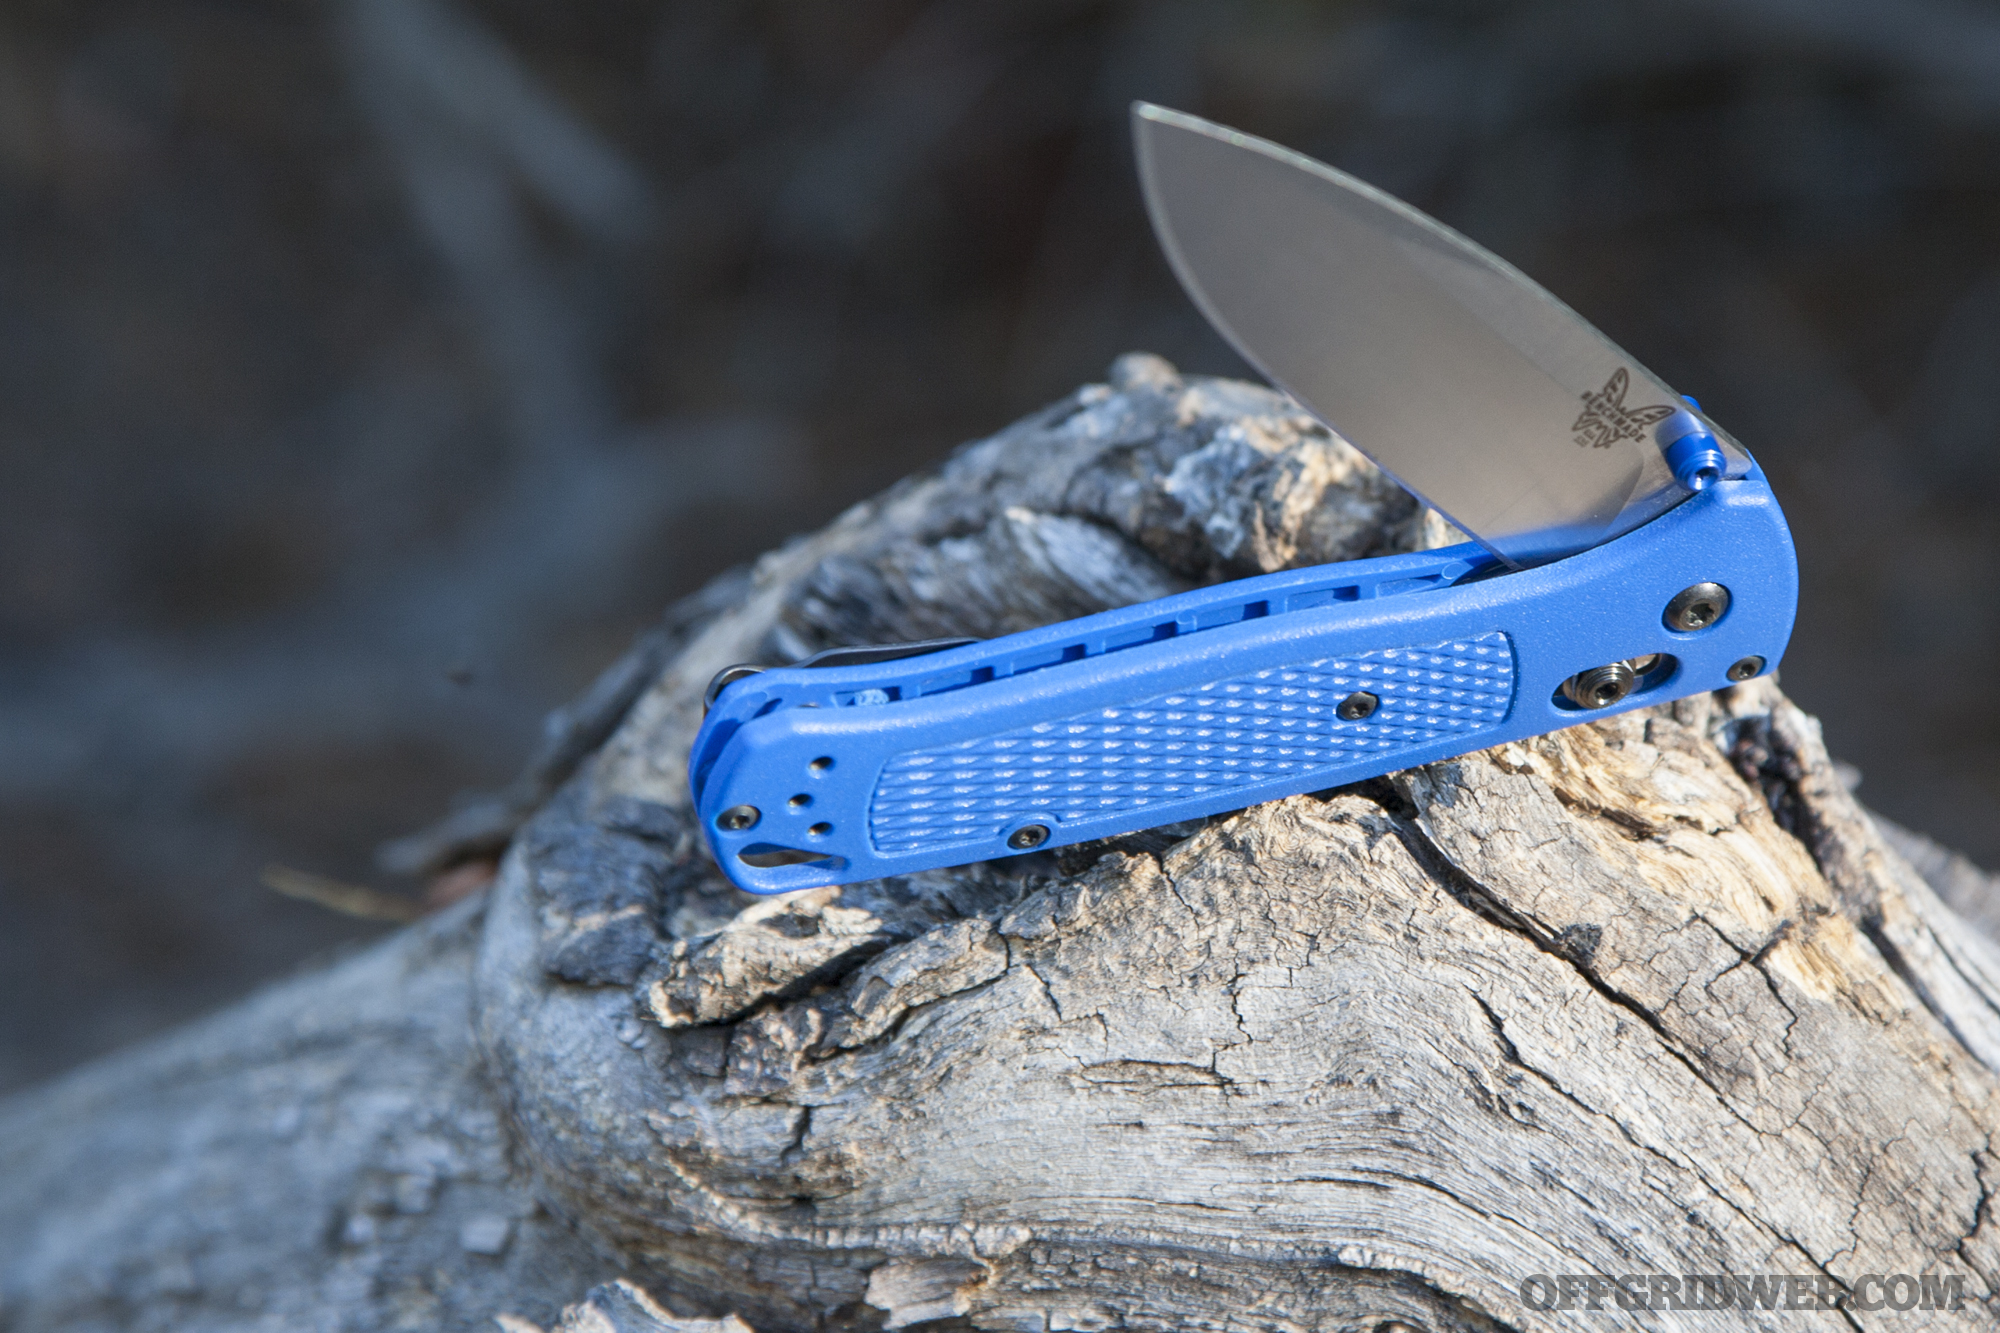
“Metal Replacement” Handle
One feature that’s unique to the Benchmade Bugout is its lock housing. Like all AXIS-lock knives, the handle contains two metal plates that hold together the lock bar, springs, pivot washers, and stop pin. Other Benchmade knives integrate this lock housing into metal liners which run the entire length of the handle, providing a rigid structure and mounting points for handle scales. But the Bugout is different — it has no full-length metal liners.
Only part of the Bugout’s handle is reinforced with metal, highlighted above. The rest is solid polymer.
The metal structure in the Bugout’s handle runs from the stop pin and pivot point to a pair of screws near the mid-point of the handle. The remainder of the handle is constructed from Grivory, a type of fiberglass-reinforced nylon that is touted as a “metal replacement” polymer due to its extreme toughness.
Though this material is already light, Benchmade used as little as possible to construct the knife. Pockets were machined out from all along the inside of the handle, and a large lanyard hole was cut into the end. Overall thickness of the handle is just 0.42 inches.
Benchmade chose a distinctive shade of bright blue for the polymer material. Its color nicely matches the blue anodized aluminum thumb studs, as well as the two anodized standoffs that hold together the rear of the handle. The rest of the knife’s hardware is black, including the pressed-in metal threads for the reversible pocket clip.
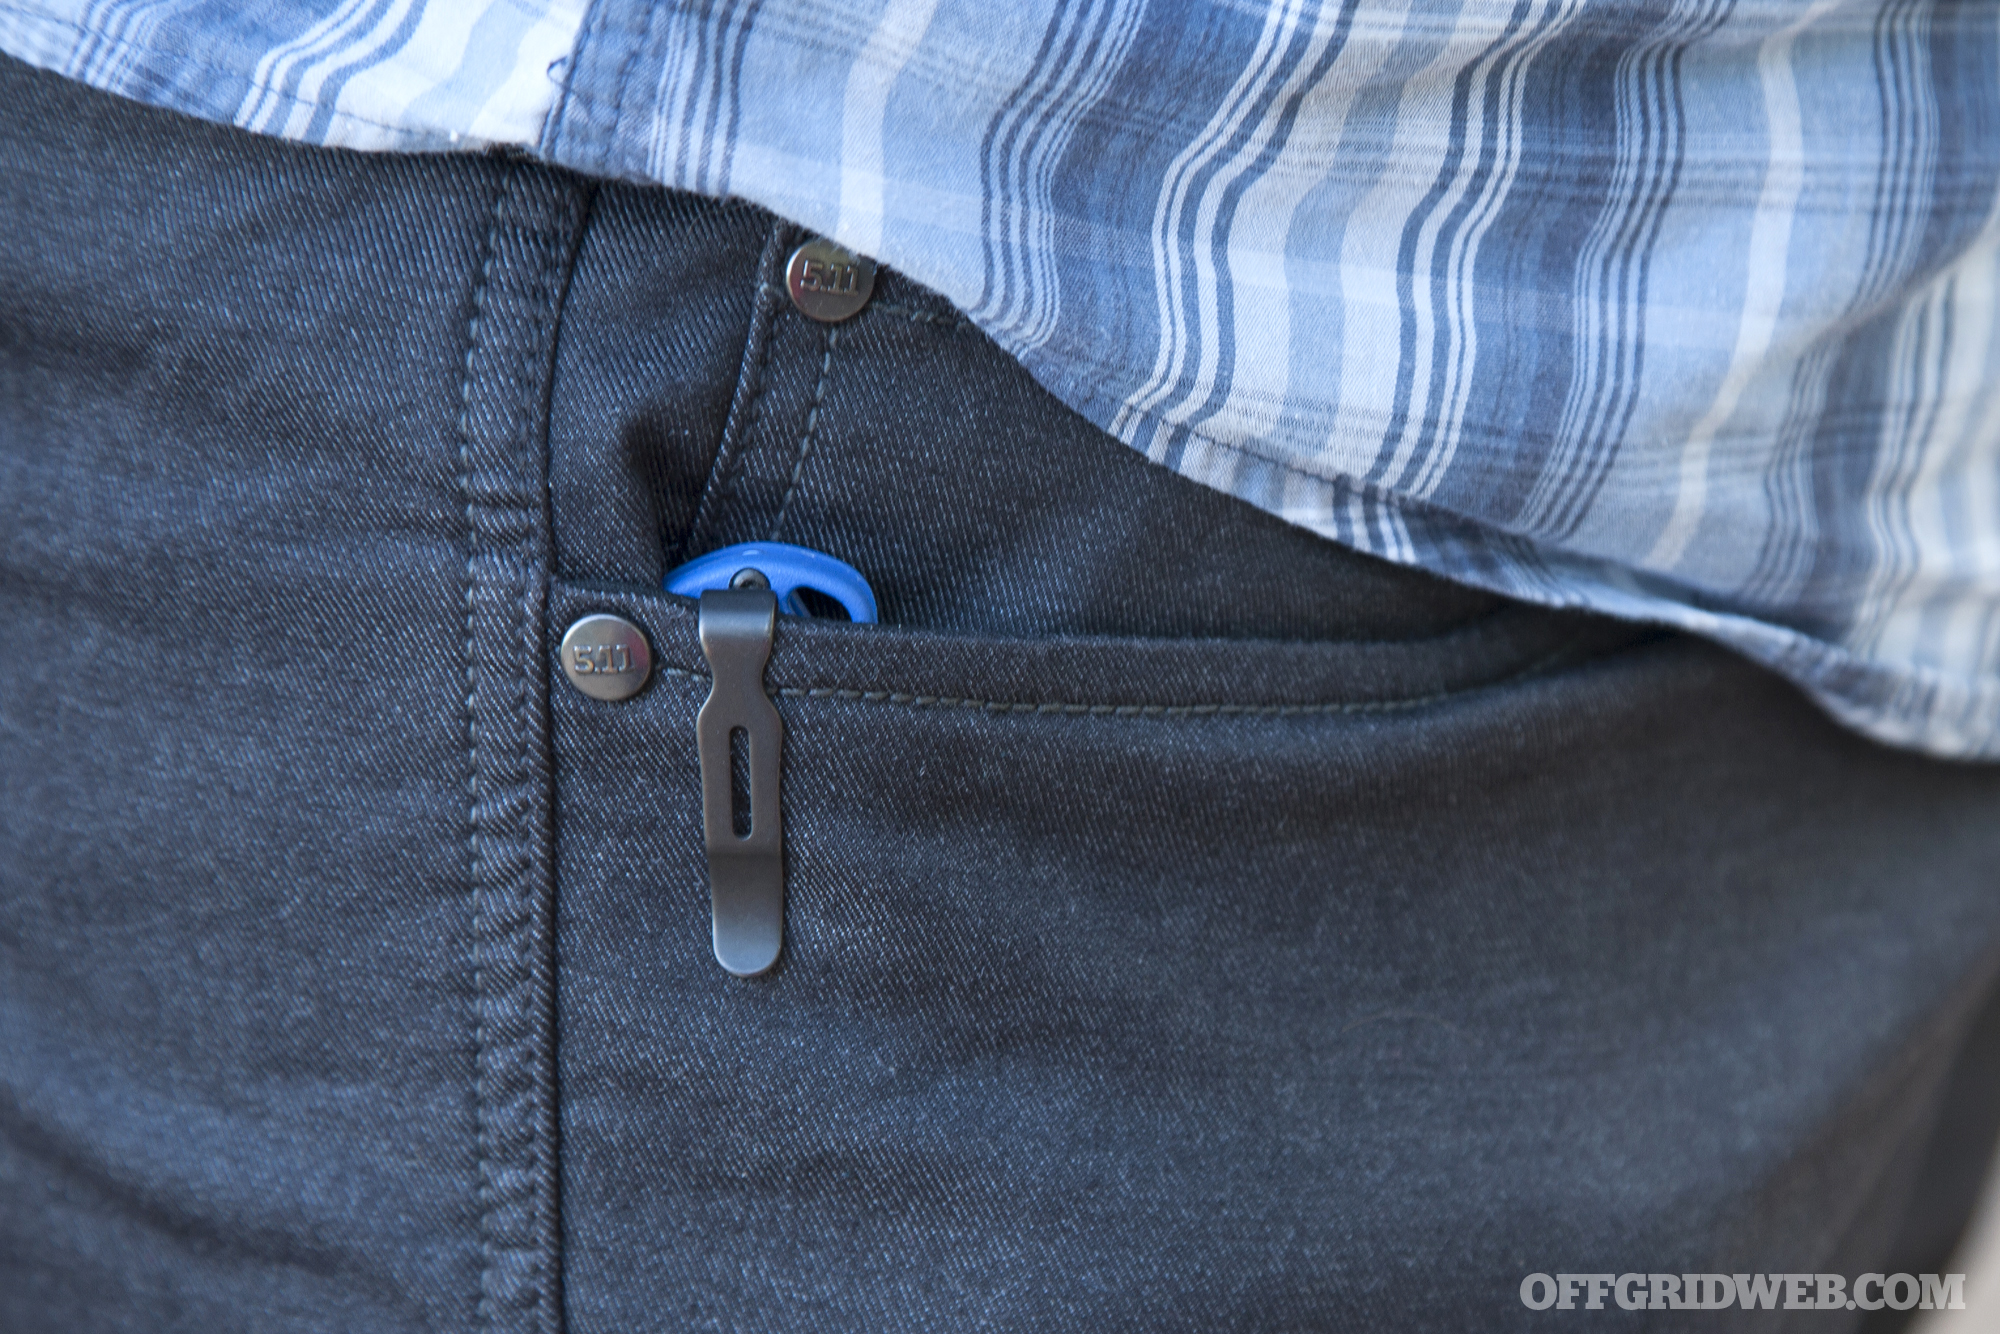
Speaking of the pocket clip, it too is unique to the Bugout. This deep-carry clip has been slotted and shortened to 1.6 inches in an effort to minimize its weight. Benchmade was serious when they said they took every opportunity to reduce the weight of this knife.
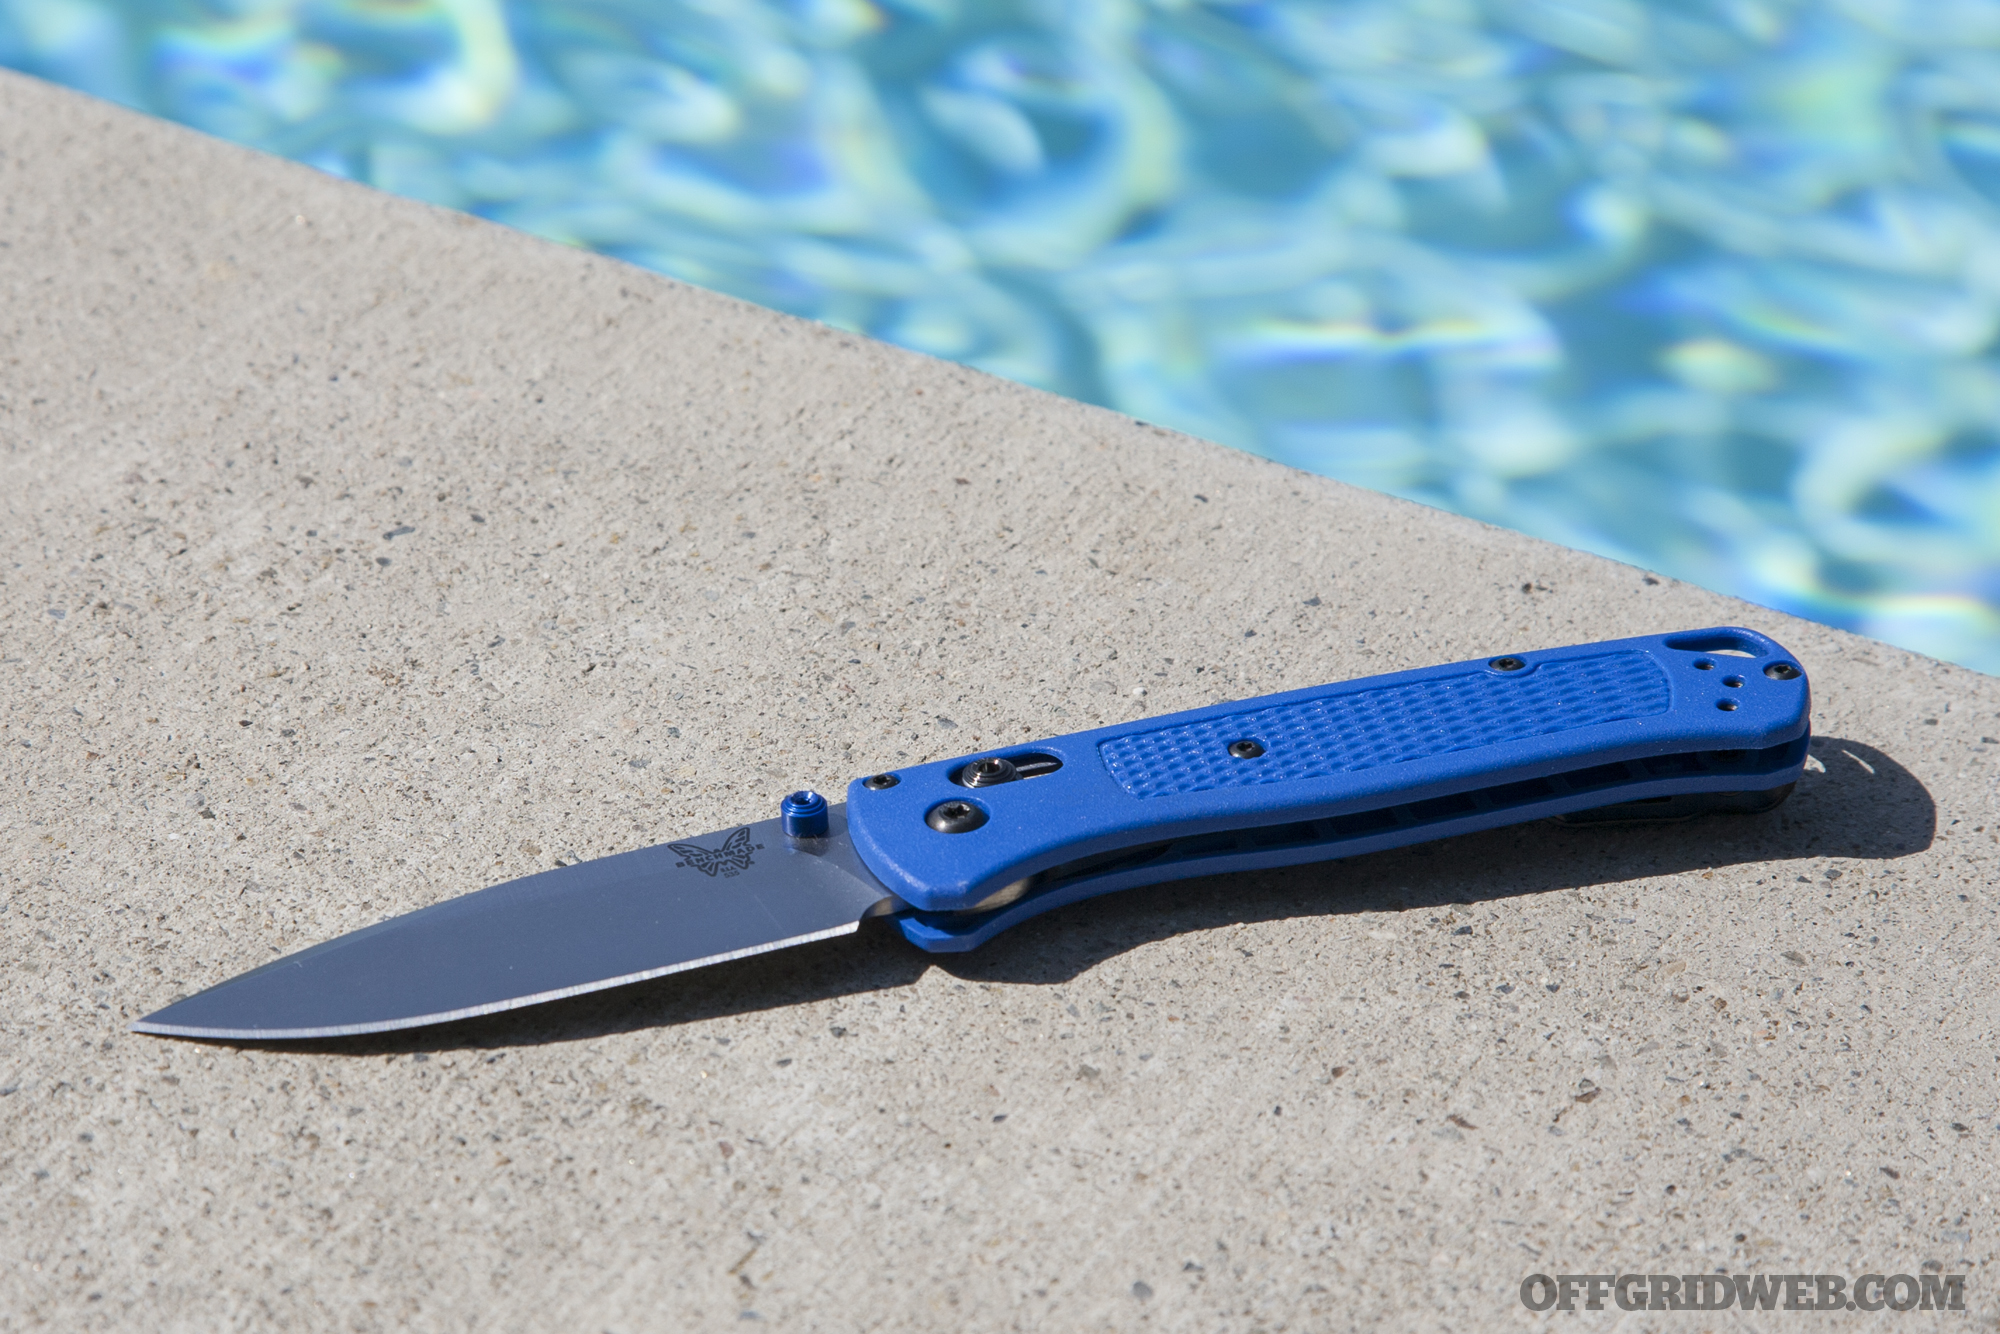
The end result is a folding knife that’s 7.46 inches long but weighs an incredible 1.85 ounces. Most other folding knives this size weigh two or three times that much. For its size, the Bugout is easily one of the lightest folders on the market, and its $135 price makes it one of the least expensive Benchmade models available today.
Our Impressions
We first got our hands on a sample of the Bugout at the Outdoor Retailer Summer Market show in July. The name certainly caught our attention, and its lightweight design was appealing, so we eventually requested a sample to test out in the real world.
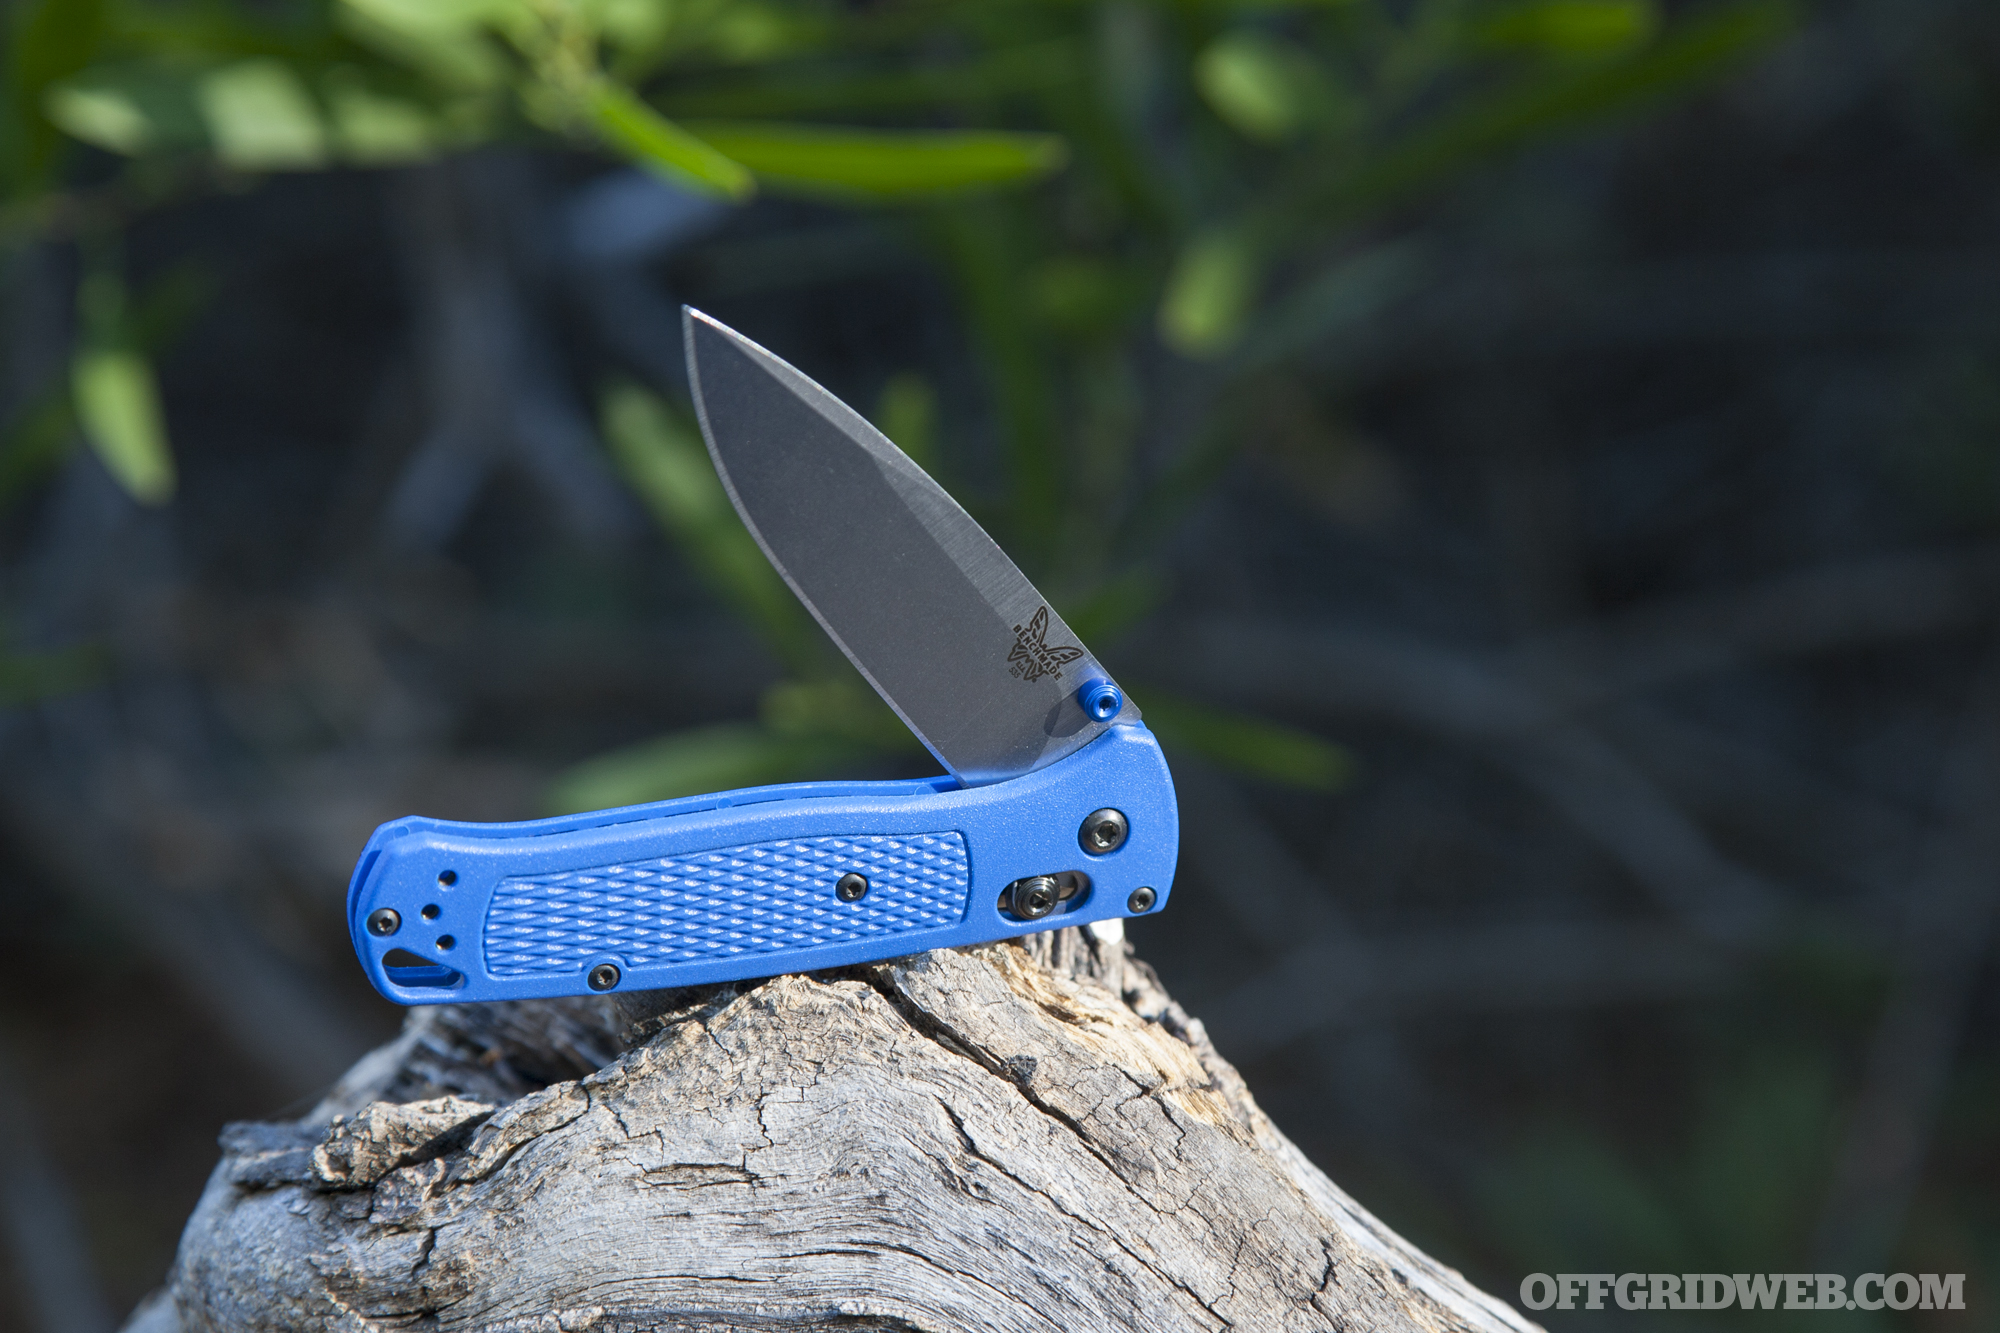
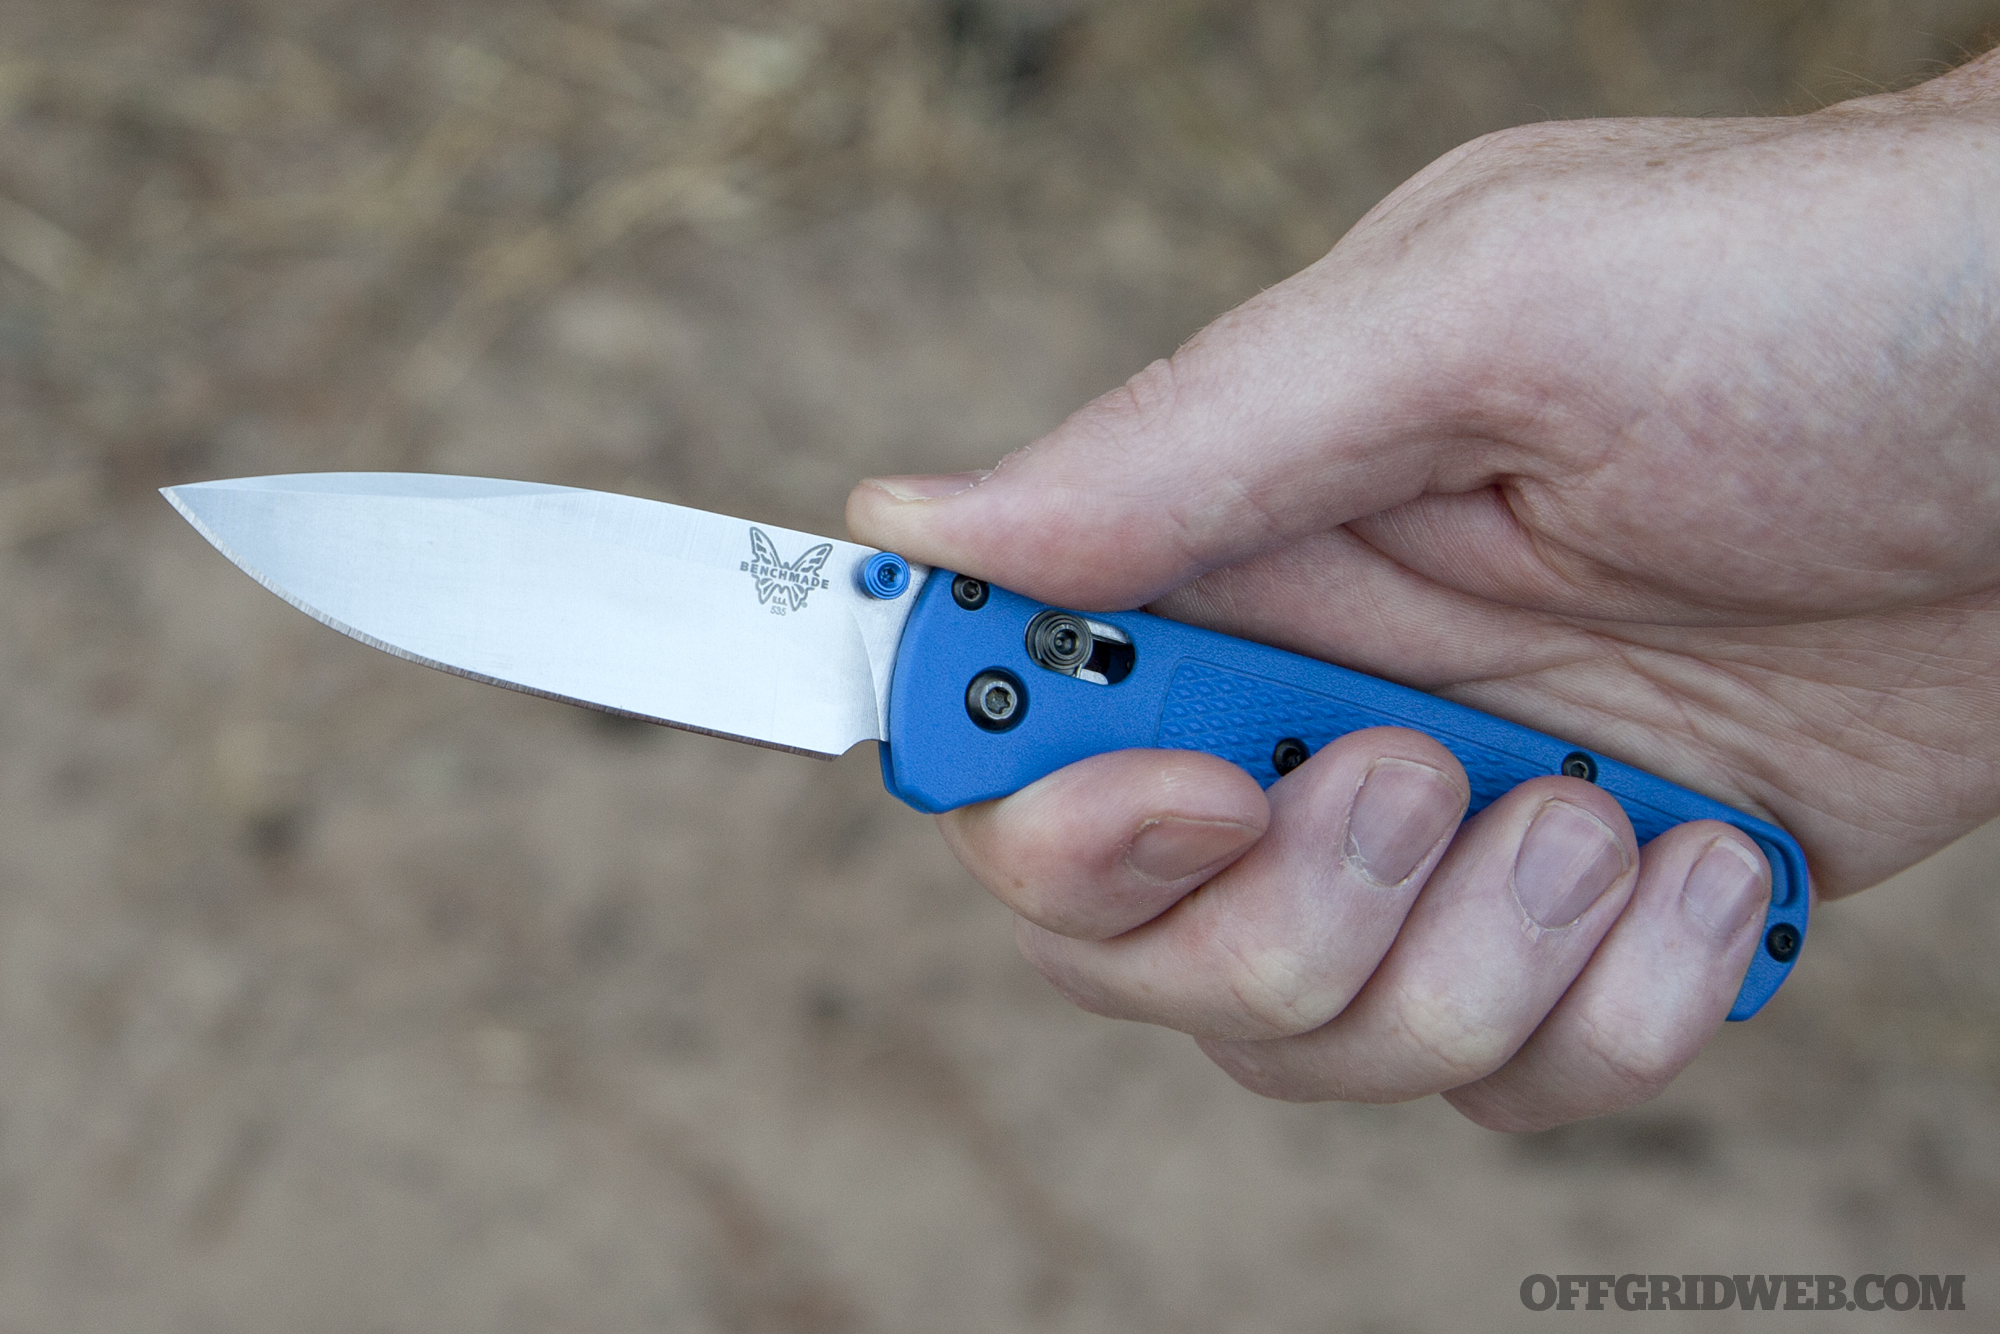
After a few months of using the Bugout regularly, we can say it’s a solid little knife for EDC. The AXIS lock really lends itself to quick one-handed use — you can easily flick it open and flick it shut without placing a finger in the path of the blade. In that regard, it performs just as you’d expect a Benchmade folder to perform, and we consider that a good thing.
This knife is also incredibly light, almost to the point of feeling like a trainer or toy. You may end up forgetting it’s clipped to your pocket, even if you’re wearing light running shorts, and it’s easy to manipulate for precise cuts. We can’t imagine it getting much lighter than this, unless Benchmade skeletonized the entire handle to an uncomfortable degree.
The Bugout has held up well to normal use in an urban environment. It’s great for cutting tape, zip ties, cordage, fruit, plastic packaging, and the like. The S30V has good edge retention, and despite being thin, showed no signs of chipping or deformation. Lockup is solid with little to no play.
That said, this clearly isn’t the sort of knife you’d want to use for high-impact tasks like batoning wood, chopping through bone, or prying open a metal can. There are plenty of other knives better-suited for those tasks.
We appreciate the deep-carry clip which tucks the knife discreetly into your pocket — despite its short length, it feels quite secure. The lanyard hole is also a nice touch.
Unfortunately, if you don’t like blue, you’re out of luck for now. At the time of publication, the Bugout is only available in this blue color, though buyers can customize the knife with a plain or serrated edge and additional lasermarking on the blade.
While Bugout is a cool name for a knife, we’re not entirely sure it’s fitting for this particular design. It’s appropriate in that it’s not heavy enough to slow you down as you run for the hills — we get that. But when we think of a bugout knife, we think of something extremely rugged and durable that’s ready for months of continuous abuse away from civilized society. Ironically, this Bugout seems more fitting for every-day carry than for long-term bugout.
Nomenclature nitpicks notwithstanding, the Benchmade Bugout is a seriously impressive featherweight knife, and one we wouldn’t hesitate to carry regularly.
For more information on the Benchmade Bugout, go to Benchmade.com.