Bursting into its Seventh Season, the survival Series Aloneupped the challenge by requiring contestants to last 100 days on Northern Vancouver Island. Where before, contestants fought against the environment to survive, and their own mind to stay in the competition, not knowing how long their challengers had lasted, the new condition for victory also came with a greater prize. The winner would walk home with One Million Dollars. Here’s a recap of the Alone Season 7 Contestants just in time for tonight’s big finale.
Unique in the survival Genre, Alone presents a very personal, in the moment example of what long-term survival looks like as contestants are allowed to take a limited selection of equipment out into the field while they self-document their experience and strategy. Each player an expert in their trade, the selection of gear often doesn’t vary as much as could be expected. Rather, it is the mindset that chooses who wins and who taps out.
Growing up amidst the El Salvador Civil War taught Amós the way of the wilderness, and how to remain alert in times of conflict and confusion. These experiences crafted his understanding of the world, with a volcano as the backdrop for building the skills to teach primitive living courses.
All around adventurer, trapper, hunter, and guide in the far reaches of Alaska, Roland set out to make Alone Season 7 his latest conquest. The antiquated tone of his living has given him the ability to say “I have done everything I ever wanted and nothing I don’t feel like.”
Living a nomadic life as an Ancestral Living Skills Instructor in the Flathead Valley of Montana, Callie has already walked away from the urban. Callie is a scavenger-gatherer who lives nomadically following the seasons and wild food. She is always striving to understand the role humans play in the intricate web of life. Starting in 2010, she has lived in the wilderness, continually honing her backcountry and survival skills with a herd of pack goats.
Correy Grew up with a bow in hand, and after his time as a U.S. Marine, he returned home to launch his own business crafting primitive bows, arrows, and quivers. His skillset continues beyond the draw, however, as he has looked to Northern Vancouver Island to be his rite of passage.
Joe began a career in the U.S. National Park Service, where he lost his home to the 2018 California Wildfires. Yet that didn’t sideline him, instead, he continues to work in research and land management. Bringing with him experience as a wilderness traveler, fisherman, builder, horticulturist, naturalist and geographer, Joe brought a well rounded skillset to the arctic.
A world traveller of 40 countries, often reaching remote locations by sea, Joel’s first bushcraft experience began in Tanzania, East Africa. Having taught celebrities, military, families, and children, he’s trained with herdsman and hunter-gatherers across the world.
For a member of the American Mountain Men, an organization with stringent requirement for living off the land and using equipment from the decades before the civil war, the occupation of homesteader sounds much less strange to a man who already lives the life. With the exception of the challenge of the arctic, and surviving alone instead of with his wife who lives with him on the bank of the Ohio River, Keith’s long time in the brush has already included winter. His overall motto is “Do good, don’t die”.
A native of Northern Ontario, Keilyn’s business is teaching through long experiences in the wilderness. With respect, not fear, of the winter, her optimism for the challenge of Northern Vancouver Island is tempered by already living where the closest neighbors are 10 kilometers away.
A 10-year veteran of U.S. Marine Corps who partook in special operations, Mark is now the lead instructor at Branded Rock Canyon, near Grand Junction, Colorado. As a Marine, he taught cold-weather mountain operations, he started International Mountain Survival, where he concentrates on sniper, survival, rappelling, and tracking.
Inventor of the “Settler’s Wrench,” Shawn runs an online survival channel called “Shawn with the Wild.” His educational approach, paired with the smaller-than-small-town living in Tennessee, as a contender he looks to the arctic as both a challenge and a dream come true.
MINDSET and Alone Season 7
With 90 days being the longest for any contestant to last so far, the new requirement of 100 days in the field hasn’t gone unnoticed. Neither has the $1 Million reward for Alone Season 7.
Unique in that Alone is filmed, not by crews, but by the contenders themselves, each person knows that if they don’t capture it on camera, it might as well not happen. On top of water, food, shelter and heat, the additional responsibility of managing a camera brings its own complications. Imagine stalking a deer for sustenance, only to be thinking of where the camera could catch the right shot. Without any directors or script each scene captured shows its authenticity, so long as the survivor has the presence of mind to get the film rolling.
Across the cast, and across the episodes we’ve seen that Mindset comes into play just as much if not more than the physical skills each cast member brings tot he table. But for all the conversation on mindset, it can be tough to nail down. Examples abound, as each time a food is harvested, a genuine gratitude followed, and for those who kept a positive attitude, it payed off in the long run. Having a strategy, and a proactive approach to maintaining both mind and body is what makes a survivor thrive, especially when alone.
Alone Season 7 is set to finale today, August 20th, 2020, at 8/7c.
To see the contestants from Season 6 of Alone, go here.
Knowing how to shoot doesn’t necessarily mean you know how to fight. You might be able to drill holes in a bull’s-eye consistently at the range, but real fights generally don’t involve an assailant standing motionless, 20 yards away, in front of a dirt berm. They’re high-stress confrontations in less-than-ideal circumstances, and they often happen with only a few feet separating you from your attacker. Luckily, Independence Training in Arizona has a course to augment shooting skill with fighting knowledge.
In order to learn more about integrating shooting skills into a real self-defense situation, I attended a 1.5-day Close Contact Handgun course hosted by Independence Training in Arizona. Instructors Cecil Burch and Glen Stilson began the class at an unusual time: 7 p.m. on a Friday. As the sun set, students paired up in a dimly lit parking lot and practiced approaching one another with realistic lines such as “Hey man, can you spare some change?”
For those being approached, one of the first lessons was related to footwork — backing up blindly can lead to stumbling; moving in an arc around the oncoming individual is a safer way to keep your distance. While moving continuously, students practiced verbal de-escalation in three stages: ask (“I don’t have any change. Can you please give me some space?”), tell (“I’ve got nothing for you. Stay back.”), and command (“I SAID STAY BACK! Don’t come any closer!”).
Escalating tone, volume, and body language will make your defensive posture clear to the individual and any nearby witnesses. If they continue to approach despite direct commands, it’s likely that they’re looking for more than just some spare change. This information can be combined with other pre-threat indicators you observe, such as nervous glances or furtive hand movement, to determine if a fight is imminent. Much like a heart attack, identifying the telltale symptoms and reacting quickly will greatly increase your survival rate in a self-defense situation.
On the morning of day two, students lined up at the range with our EDC guns holstered. Burch and Stilson demonstrated four positions for drawing from concealment:
1. Clear cover garment; securely grip weapon.
2. “The Elevator:” Draw weapon up until side of thumb is indexed against chest. Keep wrist straight, elbow high, and shoulder muscles tense. Muzzle will be angled downward.
3. “The Escalator:” Move weapon across chest, joining with support hand at center of sternum and remaining close to body. Muzzle should be level.
4. Fully extend arms into a normal shooting stance.
On the range at Independence Training students stood directly in front of cardboard targets, drew and fired from position two, stepped back and fired from position three, and stepped back again to fire from position four (see photos). This taught us how to switch stances based on an attacker’s distance, rather than defaulting to full extension and allowing the assailant to grab or deflect the weapon.
After about 200 rounds of live fire, the remainder of the day was spent in role-playing scenarios that incorporated all of the skills taught in the class. Students were provided with Ultimate Training Munitions (UTMs) — chalk pellets fired hard enough to sting and leave a visible mark on clothes. In these scenarios, some hostiles backed down after verbal commands, while others drew concealed weapons and started shooting. Difficulty ramped up as additional characters entered the scene, acting as bystanders, good Samaritans, or accomplices.
No student walked away unscathed, and valuable lessons were learned from every welt. As it turns out, it’s a bit more challenging to shoot the bull’s-eye when it’s returning fire. For more information on future classes from Stilson and Burch and more at Independence Training, go to independencetraining.com and iacombatives.com.
Keep an eye out for a recap of another training experience in the next edition of The Final Weapon. Until then, get out there and work on sharpening your own skills — when the time comes to use them, you’ll be glad you did.
Many of you who are regular readers of RECOIL OFFGRID know the tactical landscape quite well by now. You could easily procure clothing and equipment of various contexts to persuade the uninformed that you have scepters of authority and special privileges. In fact, if you read “The Crimson Perception” in Issue 35, you’d have a working knowledge of how, combined with a convincing story, you could easily fool many into thinking your disguise was the real deal.
What if someone used this trickery for nefarious means and attempted to pull you over in what looked like an actual squad car or law enforcement motorcycle? Their badge and clothing might appear official. How would you know if it’s an actual police officer or an imposter? What are your rights to verify credentials or refuse to comply if you think your life’s in danger? How far can you go without being charged with resisting arrest if you’re wrong? In this edition of What If, we’ve asked attorney Jason Squires and former law enforcement officer Hana Bilodeau to weigh in on what your options are if you think you’re being spoofed.
The Scenario:
The Setup: For years, the news has reported situations where people have been pulled over by individuals impersonating law enforcement officers. Sometimes it’s merely a self-righteous vigilante attempting to issue phony parking tickets. Unfortunately, there are other situations where someone has procured a car or motorcycle with law-enforcement-oriented features, badges, and duty gear, then confronted an individual under the pretense that they’ve committed a crime. In these rare situations, the imposter has often been a deranged individual using the guise of law enforcement to abduct, rob, or kill their unsuspecting victims.
The Complication: After a Friday night out with friends, you’re driving home after midnight when you notice you’re being tailgated. You can see it’s a solid-color American sedan with dark paint, a visible push bar, and a spotlight on the A-pillar. You think you may have been slightly over the speed limit, but you haven’t been drinking, so you’re only mildly fearful that you’ve broken any laws. Suddenly, you see red/blue flashing lights flicker on inside the windshield and grille of the car behind you. You’re driving through an industrial section of town where there are no open businesses, foot traffic, or other vehicles around. You think this may be an unmarked squad car, but are suspicious since you can’t see the exempt symbol on the plate or any other markings. You’re apprehensive about pulling over in this area, so you attempt to buy time by driving under the speed limit for a few more blocks.
When you refuse to pull over right away, the tailing car blips a siren, turns its spotlight on the back of your car, and uses the loudspeaker to command you to pull over immediately. You’re still not positive it’s a cop, but stop ASAP because you don’t want to get charged with evading. You pull over in a secluded part of this industrial area, and a man gets out with what looks like typical duty clothes: tactical pants, duty belt, radio, button-up shirt, holstered pistol, and boots. He asks you to roll down the window, shines a flashlight in your face, says he suspects you’ve been drinking, and asks for you to provide him your license and registration. You comply, and he goes back to his car, mutters inaudibly into a hand mic connected to the radio on his belt, and returns to your vehicle. He then asks you to get out of the car so he can conduct a field sobriety test.
As you’re not convinced this is legit, you ask for the officer’s credentials. He quickly flashes a generic-looking badge. You continue to question his credentials and ask him to call a supervisor, but he says that’s not possible right now. He becomes increasingly irritated, and says you’ll go to jail if you resist his orders. You remain suspicious, but consent to the test since you haven’t been drinking. After performing the tests by following his pen with your eyes, reciting the alphabet backward, and walking a straight line, the officer tells you to turn around and put your hands behind your back, then audibly gets out a pair of cuffs. What are you entitled to demand in order to protect yourself from unlawful incarceration from someone who may be masquerading as a police officer? Do you attempt to flee or fight at that point if there’s any doubt in your mind? Do you wait to use a hidden cuff key to escape later on if it becomes clear you’re dealing with an imposter?
Every now and then we hear a news broadcast about a report of an individual impersonating a police officer, followed by speculation as to why someone would do such a thing. We’ll never know what makes these criminals tick, but one thing we do know is that a person who is posing as a police officer is doing so to gain some sort of power over someone else, innately putting that person at risk.
Preparation
Living with a defensive mindset requires preparing for the unknown. Scenario-based training is the best way to determine whether or not you’re mentally and physically prepared for a situation where your life or safety may be compromised. Designate a couple minutes a day where you can mentally run through a scenario to figure out where you may be vulnerable. While out for your nightly jog, ask yourself a couple of questions. If someone were to attack me at this moment, what would I do to protect myself? As you’re driving to work and stopped at a light, ask yourself, if someone were to attempt to carjack me at this moment, how would I survive? While wandering through the mall with your family, ask yourself, if an active shooter event were to transpire, how would I get myself and my family to safety? If the answers to these simple hypothetical scenarios leave you questioning your safety, you now know you have to make alterations to your day-to-day routines to better equip yourself should your safety be compromised. Now that we’ve started turning the wheels on our mental preparation, let’s move back to the scenario at hand.
Step 1. Research: Do some research on your geographical area. Who has jurisdiction in the city and towns you frequent? Is it the sheriff’s office, state police, local police, or federal law enforcement? Once you have the answer to that question, do a simple online search of the residing department’s badge and patch, which is typically openly displayed on their daily uniform. Become familiar with what the badge and patch looks like for each of the entities that represents the jurisdiction in which you reside. Researching the badge and patch versus the uniform of the entity is advisable because most departments have multiple units, and each unit’s uniforms may be different based on their job assignment.
For instance: duty uniform, dress uniform, detail uniform, summer uniform, winter uniform, bike unit, motorcycle unit, plain-clothes unit, and the list goes on. One thing remains the same across the board: Each department has a patch representing the entity. This patch is either proudly displayed on each shoulder of their uniform shirt or just one of the shoulders on the issued uniforms. Each officer is issued a department ID card and badge with a badge number. These are widely used as a means of primary identification. It’s common policy that the officer is required to carry each of these items with them when on duty.
Step 2. Know your rights: Although each state and municipality will have differing and unique laws and procedures regarding traffic stops, it’s important to know that there are certain rights at the federal level that are common across the United States.
The “plain view doctrine” prohibits law enforcement officers from investigating inside a vehicle or anything else outside of plain view without a warrant. You don’t have to answer an officer’s questions during a stop, although this may be frustrating for the officer. In most cases, you’re only required to provide license, registration, and insurance information if applicable.
Step 3. Practice your verbal cues: Questioning your safety doesn’t need to come across as combative or confrontational, especially if the person you’re dealing with is actually a law enforcement official. The job of a police officer is very difficult. The reasons they do things at times may not be readily understandable for the average person; most likely they’re acting in a manner to protect themselves and others. Be sure to practice verbal and physical restraint even if you feel agitated. Hopefully, this will allow you and the person of authority to come to a common ground.
On Site
You’ve properly prepared your defensive mindset, and you’ve identified that the vehicle, area of stop, and officer all appear suspicious. Let’s take a look at how to safely mitigate this uncomfortable situation.
When the officer approaches, only roll the window down enough to pass your personal effects out to the “officer.” If you don’t see proper identifiers — name tag, badge, badge number, or department patch, politely address the officer: “Good evening sir/ma’am. I didn’t see a name badge, what is your name? What department do you work for?” You can even bring up the elephant in the room. “This is a rural area, and I’ve never seen an unmarked cruiser like that. I didn’t see identifiers on your uniform. What department do you work for?”
The hairs on the back of your neck are still standing. If you have cell service, the next step would be to call into the department and request a second unit or a supervisor to respond to your location to confirm the identity of the officer. If you don’t have cell service, when the officer returns with your personal documents, in a respectful manner while maintaining your safety inside your vehicle, explain to the officer that you don’t feel comfortable with the circumstances of this traffic stop. Request the officer have an additional unit or supervisor car dispatched to the area for your safety. Remember, you’re not obligated to exit the vehicle at this point if you believe your safety is a risk.
Every jurisdiction will either have additional officers on duty or a mutual aid agreement with surrounding towns or the state. Be persistent and respectful in your request for an additional unit, stating that you will comply with every lawful order once the officer’s identity is confirmed and an additional unit arrives. Remind the officer you’re not resisting his/her commands and that, no matter the time frame, you’ll patiently wait in your vehicle for the second unit to identify the initiating officer. Once that occurs, you’ll fully comply with what is being asked of you.
Crisis
The pressure is now on. Even though you’re politely and respectfully communicating with the officer, he/she is now agitated and threatening additional charges and/or physically removing you from your motor vehicle. What steps should you take now that things seem to be taking a turn for the worse?
Stay strong: Continue to calmly and respectfully request that the officer have a secondary unit respond to the traffic stop to identify him/her as an active LEO and witness the traffic stop. If the officer doesn’t have appropriate identifiers on their person, such as a department ID, badge, and badge number, they’re most likely breaking one or more of the department’s policies. Most departments have a policy stating that when an officer is working in an official capacity, they have the duty to appropriately identify themselves to the individuals at hand to get them to comply with the lawful order.
Even with the impending threat of additional charges, if it’s proven that the individual is actually an officer, you’ll have your time to answer to any additional charges and explain that your behavior was to ensure your safety.
Repeat No. 1: Stay strong. Listen to your gut. If something doesn’t feel right, it’s probably not right. Escalating your demeanor to meet the level of another never ends well. Remain calm and strong in your request for proper identification and a witnessing unit for the remainder of your interaction with the officer.
The best advice I can give when it comes to personal safety scenarios is: “Get comfortable with the uncomfortable.” The average person will never feel comfortable when faced with having to disobey a person of authority. If you’re acutely aware of your surroundings and do your diligence to keep up to date on what your local/state municipalities offer for modes of safety, you’ll know if something isn’t right. If an officer is behaving in a manner that makes you feel uncomfortable, you definitely should err on the side of caution until your suspicions are either confirmed or refuted. It’s an officer’s job to keep you and the public at large safe. In doing so, they must make sure your rights and needs are met during their interaction with you, no matter how egregious of an offense you may or may not have committed. Not everyone puts your safety at the forefront, which is why it’s even more important for you to stay aware, trained, and diligent in your endeavors of survival.
Preps
In my vehicle, I have my driver’s license, registration, and proof of insurance. I keep all the information up to date and contained in a single folder. I don’t want to fumble for documents and give an officer the impression I’m confused or possibly impaired. I also have my cell phone with a full charge. I have absolutely no contraband in my vehicle and keep it orderly and tidy. I want to convey that I’m organized and lucid during any encounter, especially after midnight on a weekend.
I’ve consulted with an attorney regarding what exactly “reasonable suspicion” means in layman’s terms. This is the minimum standard by which a law enforcement officer is allowed to initiate a traffic stop. The officer under this standard must ask themself, “Do I have a reasonable suspicion that a violation of the law has been committed?” Notice the law doesn’t require reasonable suspicion that a crime has occurred. So, the vehicle code is a completely acceptable reason to initiate a traffic stop. What’s the vehicle code? It’s the annoying set of laws or city ordinances that describe exactly how you must make a left-hand turn, maintain functioning lights, and so on. I always make sure my vehicle has all exterior lights functional, and I always wear my seatbelt. This is good preparation to avoid unnecessary law enforcement encounters. So, if I get a crack in the windshield, I must get it fixed to be compliant with these laws.
I keep a functioning flashlight in the car with fresh batteries. The glove compartment is free of clutter and has the flashlight and registration and current proof of insurance in an envelope. My license is in my wallet. I have tools to fix flats, and my wallet contains multiple forms of proof to establish my identity. I have debit cards, credit cards, gym membership, etc. Law enforcement can be somewhat suspicious when a person only possesses a driver’s license and no other form of identification. I also carry a firearm, as is legal in my state (Arizona).
The Stop
The car travels unusually close to my rear bumper. In previous law enforcement encounters, the officer didn’t follow so closely. I’m immediately concerned and suspicious because if I made an abrupt stop, this person would hit me. It makes sense that a true police officer would maintain a safe distance. This person, maybe an officer, isn’t being safe — that’s a red flag.
The emergency lights are activated. Damn. I see blue and red light emanating from his front grille. This tells me I’m not dealing with a normal police cruiser, and I begin to wonder whether this person is really a member of law enforcement. I notice that the lights don’t flicker or pulsate the way normal law enforcement lights in my area do. And the lights I’m seeing are very different. However, I notice the large push bumper, like squad cars sometimes have for traffic patrol. So, I’m seeing an undercover police car that looks just like a normal police car without the normal markings — another red flag.
I want to pull over, but I’m concerned. This is a bad part of town. I’ve noticed red flags and I’m suspicious. I realize that law enforcement has the power to stop cars and detain individuals. I certainly don’t want to be charged with a crime merely because I have concerns. I slowly proceed as far as I can to attempt to get to a well-lit, well-traveled road or intersection. If it’s not available, I know I have to stop. The approach suggests law enforcement, so as a law-abiding individual I must comply.
The person gets out of the vehicle and approaches my car from the rear. It’s at this time that I look for overt signs of personal security. Meaning: I’m expecting the officer to shine his flashlight into the rear compartment to make sure there are no threats hidden inside. I expect the officer to position himself at the B-pillar (the spot where the driver’s seatbelt retracts into). Officers usually stand there initially to protect themselves from an armed assailant trying to swing a weapon around at them. This position allows them to immediately back up, putting the driver in the position of shooting over his shoulder. Unfortunately, this person does none of the things I expect him to. He walks right up to the car and turns and faces me near my driver-side mirror. He’s looking back at his car and looking around for some reason. He keeps his flashlight directly in my eyes to distract me. I notice he has the usual uniform that can be purchased at any surplus store.
This person asks me strange questions, like does anyone know you’re out here this evening? He asks for my license and never really looks at it. He appears to have a radio on the belt, and not the lapel-mic most have. I see no body camera on his person even though most agencies now require body-worn cameras. At this point I’m in a precarious position. If I follow the law, I might possibly endanger myself because I’m not sure he’s a police officer. So, I ask, “Are you really a police officer?” This enrages him. He’s more aggressive at being challenged. I ask to speak to a supervisor. He says there isn’t one available without making a single radio request. I have my firearm in my car, but I know better than to ever pull a firearm on a police officer or even a would-be police officer. My brain and my accelerator are my weapon, not my pistol.
The person orders me out of the vehicle. He didn’t go back to his patrol car and run my name like almost all officers do right away. For all he knows, I’m Ted Bundy. This is an extreme red flag. For their own safety, real officers need to know if I’m wanted in Kansas for murder, for example. They usually go back to the car and run my name to make sure there are no outstanding wanted notices or warrants anywhere in the nation.
He again orders me out of the car. I ask again for him to call for a supervisor. He says in a much louder tone, “Out of the car, now!” He’s definitely escalating the encounter. I say: “Officer, I don’t believe you are a true member of law enforcement, and I need proof you are who you claim to be.” He quickly flips a badge that I couldn’t read. I state again, “I need to have a supervisor here immediately, and I will wait patiently for the supervisor to arrive.” I notice there’s no backup present either — red flag.
Failure to obey a lawful order is a crime. Unlawful flight from a pursuing law enforcement officer is a crime. Resisting arrest is a crime. Being alive is not a crime. As a human you might have to balance these competing concepts with your survival. If you’re truly afraid and your fear is reasonable and articulated, you wouldn’t likely be charged with a crime. However, you’d better start laying the foundation for a defense by calling 911.
If the person made you believe — truly believe — that he’s not a member of law enforcement, and you believed that your life was in danger, you could argue that you had no choice but to flee and immediately dial 911.
“911. What is your emergency?”
“Please help me, please send help. There’s a man pretending to be law enforcement who just tried to abduct me. I am Jason Squires, I live at this address, and I’m heading eastbound on XYZ Street or wherever you direct me to find true law enforcement officers. I’m not running from the law. I’m running to the law for help. Please help.”
What if the person was a cop and you just sped away? You might be charged. There’s never a consequence-free option in this world. And pulling away from law enforcement will bring down the hammer. However, the 911 call you made will certainly help minimize your exposure. Calling your buddy before 911? You’re going to be in trouble. Calling 911, which is nearly always recorded, begins a new problem, and a sergeant will almost certainly be ordered to arrive. In fact, 911 will likely direct you somewhere and tell you to wait until a marked unit arrives, and by unit, I mean several units.
At that time, you’d better explain all the reasons why you felt like he was there to kill you pretending to be a cop. If you clearly and calmly describe all indicators that he was not a police officer, you might even get what we call in the industry a “street acquittal.” However, there are aggravators like speeding away and not doing everything 911 says. Don’t be the guy who says, “I was scared and went home.” That guy is going away. Don’t say, “I don’t trust any member of law enforcement, so I ran to my girlfriend’s house.” That person’s also going away. Remember, run to the law, not away from the law.
Let’s envision a place where you don’t have cell signal. The suspected imposter chose this area specifically because it’s a cellular dead spot. There are so many different examples of how this could occur. I might slowly (I said slowly) drive until I find a signal and immediately call for 911. I would calmly state that a person appears to be pretending to be law enforcement and give my name and information.
We cede tremendous power to law enforcement. Bad guys occasionally take advantage of the power law enforcement has over motorists. Retired patrol cars and motorcycles can be cloned to look like current law enforcement vehicles. Bad guys can use this approach to apprehend unsuspecting members of our communities. I will add that females possess great latitude when it comes to articulating fear. No, they’re not weaker. However, a woman claiming she’s afraid is more likely to be believed than a male counterpart.
Finally
Police officers must identify themselves. They must divulge their badge numbers. Officers must ask for supervisors if requested, or at a minimum backup officers. 911 is the most powerful tool to bring the real good guys to your location. A bad guy won’t wait for them to show up. Asking to proceed to a more lighted area or commercial parking lot is reasonable. Expressing fear is appropriate under some circumstances. For example: “Sir, your car doesn’t look like law enforcement and you have refused to provide a supervisor or additional units, I fear for my safety and I’ve called 911.” If the officer gets aggressive, wait until the good guys get there and be prepared to explain every single detail as to why you didn’t believe he was law enforcement. And lastly, always protect yourself from bad guys by using your brain. If it doesn’t seem right, call 911 immediately.
Conclusion
We’ve probably all heard about situations like this in the news or have seen YouTube videos of someone impersonating a law enforcement officer. While some are comical, others are much more nefarious. Kenneth Bianchi, also known as the “Hillside Strangler,” along with his cousin Angelo Buono, impersonated police officers using fake badges to lure women into complying with their commands during their crime spree. Remember, it’s not a crime to ask questions when something doesn’t pass the proverbial smell test.
Earlier this year, the shooting in Nova Scotia involved a gunman dressed as a member of the Royal Canadian Mounted Police who also drove a fake police car. Obtaining a used squad car or modifying one to have certain features that look similar to a legitimate unmarked squad car is easier than you might think, and to a certain extent it’s perfectly legal. Take some time to do an internet search on impersonating law enforcement and you’ll see how frequently this crime takes place. Know your rights, be cautiously cooperative, and stack the odds in your favor by having evidence recorded via a dashcam.
About the Authors
Hana L. Bilodeau has over 15 years of law enforcement experience, serving both locally and federally. Hana spent a large part of her local career in the detective unit investigating crimes against people, predominantly sex crimes. She was well known for her interview skills of both victims and suspects garnering multiple convictions. Hana has a wealth of knowledge in a number of different defensive modalities and presently serves as director of training and special events for SIG Sauer Inc.
www.sigsauer.com / hana.bilodeau@sigsauer.com /
Instagram: @hana.bilodeau
Jason Squires has been an attorney in Arizona for over 21 years. He has an emphasis on self-defense and firearms cases. During his off-time, he’s an avid three-gun competitor across the country. He’s also a collector of military firearms and vehicles. You can check out his practice at squireslawaz.com.
On any given Saturday, hiking trails are brimming with the seasonal and accomplished hiker or the friend who was dragged along for “fresh air” and “exercise.” The wilderness doesn’t discriminate between the experienced outdoorsman and the weekend warrior on doctor’s orders to reduce blood pressure; it’ll be just as rewarding and unforgiving to both. Sadly, we hear more about the unforgiving side, as tales of lost hikers splash across headlines. Their stories either end in miracles or tragedy as they’re exposed to nature’s harshest realities.
Surviving heat exposure in the elements boils down to one thing: preparation. Yes, that pack you spent hundreds (if not thousands) of dollars filling with survival blankets, first-aid kits, and tools is essential. However, preparation starts a little closer to the body; it starts with your clothing. The clothes you choose on every outing, in every season, could mean the difference between life and death. Yes, they’re that important.
Does this sound familiar? “It’s just a short hike, I don’t need my full pack.” Or, “I’m going with a group of friends, it’s fine if just one of us carries supplies.” “This is only exercise; tennis shoes are fine.” “Nothing bad will happen.” Then, the weather turns, your friend rolls his ankle, you can’t seem to reach that overlook you knew was just around the corner, and so you’re lost, thirsty, cold, wet, and that two-hour hike has now turned into a 12-hour ordeal before someone reports you missing. Suddenly, those leggings and tennis shoes weren’t such a great idea. Those wet shorts or jeans your friend is wearing are making things worse. Dress wisely, because your apparel could distinguish between an adventure you talk about later with friends over a beer and a tragic statistic that brings out all the Monday-morning quarterback survival specialists.
So, what does that mean? Survivalists will tell you to wear moisture-wicking, quick-drying, breathable, abrasion-resistant, UPF-rated clothing. Got it. But besides looking tacticool, what’s the point of wearing this high-speed, low-drag clothing? What do these clothes really do for you? Let’s break down some threats and see how appropriate clothing can aid in survival.
Sun Exposure
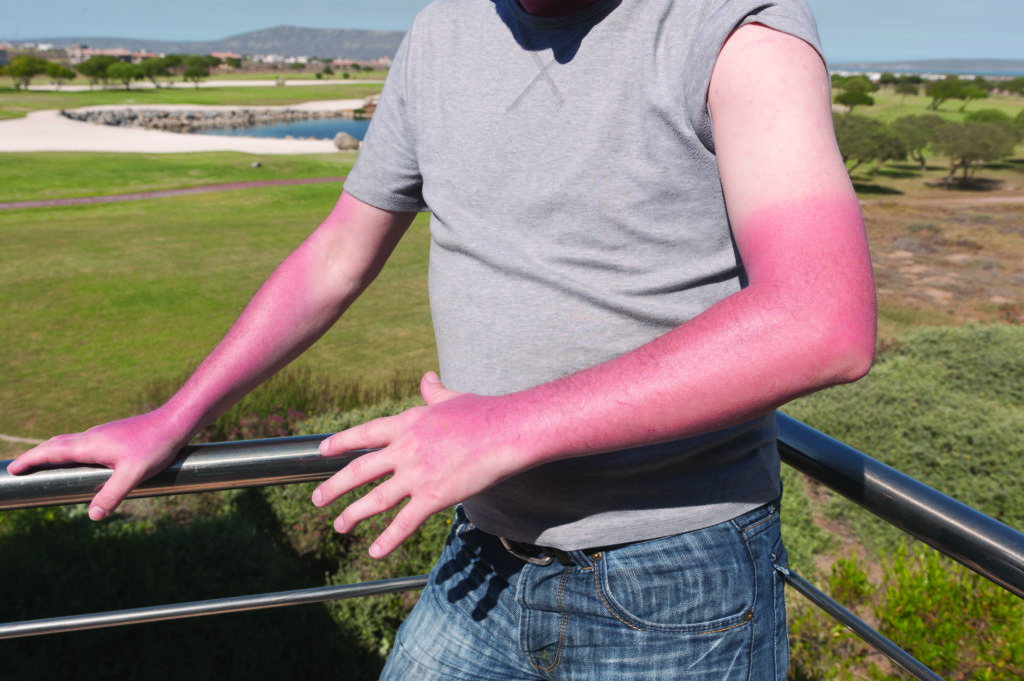
Sunburns in a survival situation can be a serious problem. Not only can the pain hinder your ability to perform simple tasks, but, depending on the severity, blistered skin can lead to deadly infections. If you think you’re safe in the winter, think again. Ultraviolet radiation can bounce off the snow, increasing sun exposure. Additionally, the thinner atmosphere at higher altitudes increases UV intensity. Wearing long-sleeved shirts and pants with an ultraviolet protection fabric, or UPF, rating can replace the sunscreen you may or may not remember to pack or reapply. Look for long-sleeved shirts with a collar you can pop up to protect your neck.
A bad sunburn can make even the simplest tasks excruciating. Unlike sunscreen UPF-rated clothing won’t wash off or need to be reapplied throughout the day.
Numerous companies offer shirts that work well in all seasons. For those who can’t imagine wearing long-sleeved shirts in hot months, just think how hot you get when your skin is directly exposed to sun during a summer day as opposed to wearing your cover-up around the pool. While it may sound counterintuitive, protecting your skin from sun exposure will keep you cooler. Look for breathable fabrics that don’t trap perspiration between your skin and clothing. Additionally, consider purchasing hats with fold-down fabric to protect your neck and ears.
Hypothermia
Many people assume hypothermia is only a winter concern. Hypothermia occurs when your core body temperature drops below 95 degrees. Thus, if your body is exposed to colder temperatures for an extended period in any season, you run the risk of hypothermia. Getting wet exacerbates this problem, since your skin cools as the water evaporates. Clothing is designed to trap warm air near your skin. You may have heard of the old adage: cotton kills. Well, more accurately, wet cotton kills. Otherwise, we wouldn’t love those warm flannel shirts in the winter. Survival experts warn you against cotton because of its fantastic ability to absorb and hold onto water. Think of your cotton towel that’s so good at drying you off in the morning, but still wet at midday.
Hypothermia isn’t only a concern in cold weather. A moisture-wicking base layer will keep your skin dry, reducing your risk of this condition.
When saturated, cotton loses its insulation properties and pulls heat away from your body. Wet clothing — whether from a surprise rainstorm, misstep crossing the stream, or sweat — can lower body temperature and lead you down the path to hypothermia. The exception to this is wool, which does insulate when wet. However, it also gets very heavy when saturated. You must decide if your morale can handle walking around in wet, heavy — yet warm — clothing. Otherwise, look for fabric that’s quick drying, such as nylon and polyester, or similar synthetics. These performance fabrics “wick” moisture away from the skin. Wicking works by pulling moisture from the body to the surface of the fabric. It not only keeps your skin dry, but also preserves the trapped air that keeps you warm. It works especially well within a system of layers, as the moisture continues to wick toward the outermost clothing surface, retaining your body heat.
Avoid material made from cellulose, which provides no insulation when wet and absorbs water even faster than cotton. These include rayon, viscose, Tencel, and lyocell.
Insect Bites/Rashes
This one is a tad more obvious. Long-sleeved shirts and pants provide a barrier between you and biting bugs or poisonous plants. Depending on your location, insects can carry Zika virus, Lyme disease, Rocky Mountain Spotted Fever, malaria, Dengue fever, or the West Nile virus, among others. On longer hikes, or anything that spans days or weeks, clothing will be a better choice for protection against insects. Consider insect repellent an addition, not a full solution.
What isn’t obvious is that, depending on the weight of the fabric, its weave, and how tight it’s woven, mosquitos can still bite you through your clothes. Many companies offer clothing treated with permethrin to protect against mosquito or other insect bites. Permethrin works as an insecticide rather than a repellent, killing or incapacitating insects once they land on you. Anecdotal evidence and consumer reports have shown permethrin to be an effective preventative measure. Repellents, such as DEET, are highly recommended. Whether or not you use permethrin-treated clothing, you should still use a repellent on exposed skin.
Heat Rash, insect bites, and allergic reactions all contribute not only to discomfort, but complicate any survival situation where medical attention is not readily available.
Poison ivy, poison oak, and poison sumac could cause more than just an itchy, uncomfortable week in a survival situation; this rash could greatly hinder your effectiveness in the wilderness. According to the American Skin Association, 85 percent of Americans are allergic to urushiol, the oil that causes weeping blisters and itchy skin. Depending on the location of affected areas, urushiol can be an annoyance or deadly; anytime it affects your airway, it can cause death.
The most common danger, though, is infection from scratching the rash. While winter may kill those leaves of three we’re trained to avoid, the vines and branches remain through the frigid weather as potent pieces of poisonous displeasure. The good news? It’s contact dermatitis, meaning your skin needs to come into contact with the oil for the allergic reaction to take place. The bad news? You can pick it up from indirect contact — your dog, your pack, etc. In fact, urushiol oil has been known to stay on clothing for up to five years. But don’t fret, one good washing will remove the oil. The point, though, is to wear long clothing so it doesn’t contact your skin in the first place.
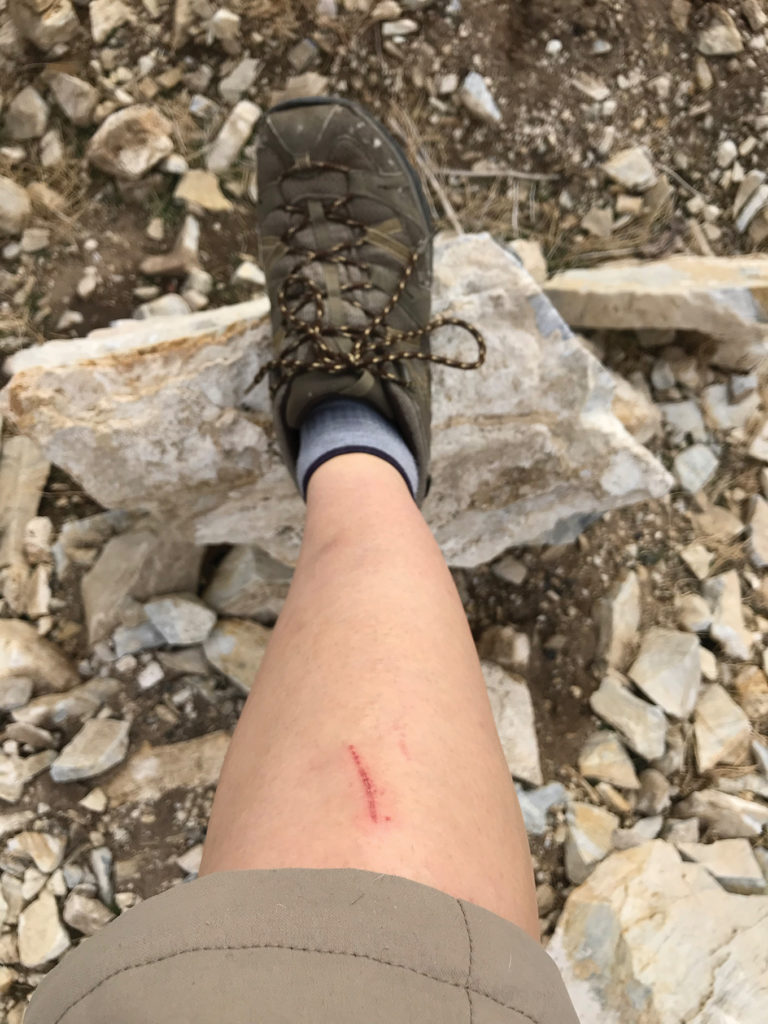
Scrapes
In a survival situation, as you’re trampling through the woods or making your way through the desert, a brush of a branch or rub against a rock can cut through bare skin leading to more than cuss-word-laden frustration. A simple scrape in the wilderness can become a deadly infection if left untreated as bacteria riding on flora and fauna particles enter your body. Soon, the skin around that little scratch is swelling, getting redder, and starting to ooze, turning an overnight camping trip into a medical emergency.
Scratches and scrapes may seem like no big deal at first, but without proper care these minor injuries can lead to serious infections.
Wearing abrasion-resistant, durable clothing helps prevent these scrapes and scratches. Again, look for synthetic fabric with strong fibers such as nylon and polyester. Another keyword to lock onto is “ripstop.” Ripstop clothing utilizes synthetic fibers woven in a unique way to resist tearing and ripping. The technical innovations in today’s fabrics mean durable clothes don’t necessarily equate to heavy clothes. Companies offer ripstop and abrasion-resistant long-sleeved shirts and pants in light or heavier weight, depending on your preference.
Footwear
It’d be remiss not to mention proper footwear on this list, and not only because absorbent tennis shoes are making a comeback on the trails. The benefits of proper ankle protection while traversing a countryside are four-fold: 1) ankle support prevents sprains, 2) no one likes rocks in their shoes when they’re walking, 3) wet socks and shoes lead to blisters and poor morale, and 4) snakes. Snakebites make for a bad day. While it’s not impossible to roll an ankle in boots, your ligaments have a much better chance of overstretching without proper support. In a survival situation, if you can no longer walk, you’re reliant on others to find or move you.
Low-cut shoes have a hard time repelling water, gravel, thorns, and other intrusive items. Over-the-ankle boots offer much better protection and support.
Additionally, low-ankle footwear tends to gather its local environment — whether dirt or rocks — in its heel. Stopping to constantly empty your shoes takes precious time as the sun is setting and the temperature drops. Even worse, when your tennis shoes get wet, your socks get wet. The heat, moisture, and friction combine to make some awful blisters, further limiting your mobility. Lastly, snakes want to avoid people as much as you want to avoid them. However, since you’re walking through their environment, it’s possible to disturb and surprise them, causing them to strike. Most bites occur below the knee. (Unless you’re in some countries in Africa where the black mamba can rise as high as 3 feet to strike. In which case, I hope you had a lovely life.) Do research on the prevalence of poisonous snakes in your area to determine if your over-the-ankle boots are sufficient, or if you should invest in snake-proof boots or gaiters.
Conclusion
You have the food, you have the water, you have all the cool gear in your pack required for your next hike or trip. So why stop there? Set yourself up for success by ensuring your clothes are held to the same survival standard as the rest of your tacticool playthings. There’s a reason outdoor recreation stores are stocked with special clothing dedicated to the outdoor enthusiast. Those who spend a lot of time outside learn quickly what aids and what hinders their recreational enjoyment. Beyond fun, though, proper clothing choice is essential for those “just in case” moments.
Now, this clothing isn’t a replacement for wilderness education or proper training; it also doesn’t contain magical powers to combat negligence or stupidity. You still need to follow the rule of three in every survival situation (see sidebar). Proper clothing does, however, increase your chances of surviving against the elements until help arrives or you finally find that trail home. Look for UPF-rated, nylon-blend, moisture-wicking, quick-drying, breathable long-sleeved shirts and pants, as well as proper footwear for your environment. Otherwise, you may end up asking yourself on Monday whether you would’ve survived if you had protection against the sun, or the cold, or the rain, and what would’ve happened if you hadn’t worn those leggings and tennis shoes.
“We are like a meal … when everyone’s done eating, into the dumpster we go, and nobody gives a sh*t.” This quote came from a 14-year-old girl who’d been trafficked for sex and later committed suicide by walking onto a freeway at night. Not only should this quote impress upon you this experience’s effect on the human spirit, but also the reality that you might see someone like her being trafficked every day without realizing it. It’s a world of psychological shackles.
In order to lift the veil of secrecy surrounding human trafficking, we interviewed several experts on the front lines. We hope to help you better understand how it operates and improve your ability to recognize it. In spite of what many believe, no one is immune to its reach, and it can happen in any community. As technology advances, so too does its ability to infiltrate people’s lives and exploit their vulnerabilities. It’s a worldwide, multi-billion-dollar business, and those involved will stop at almost nothing to protect their cash flow.
What is Human Trafficking?
Human trafficking is a type of slavery involving the illegal exploitation of a person. In essence, it’s been around for centuries, but the globalization of commerce, a thriving sex trade, and diversification of information sharing have also contributed to the growth of this form of enslavement. Human trafficking is different than “human smuggling,” which is helping someone illegally cross a border. In order to understand how it works, we must first define it according to the United States Criminal Code. The U.S. Department of Justice website states the following:
“Human Trafficking is a crime that involves exploiting a person for labor, services, or commercial sex. The Trafficking Victims Protection Act of 2000 and its subsequent reauthorizations define human trafficking as:
A) Sex trafficking in which a commercial sex act is induced by force, fraud, or coercion, or in which the person induced to perform such act has not attained 18 years of age; or
B) The recruitment, harboring, transportation, provision, or obtaining of a person for labor or services, through the use of force, fraud, or coercion for the purpose of subjection to involuntary servitude, peonage, debt bondage, or slavery. (22 U.S.C. § 7102(9)).
Human trafficking crimes, which are defined in Title 18, Chapter 77, focus on the act of compelling or coercing a person’s labor, services, or commercial sex acts. Coercion can be subtle or overt, physical or psychological, but must be used to compel a victim into performing labor, services, or commercial sex acts.”
What Are Trafficked Victims Used For?
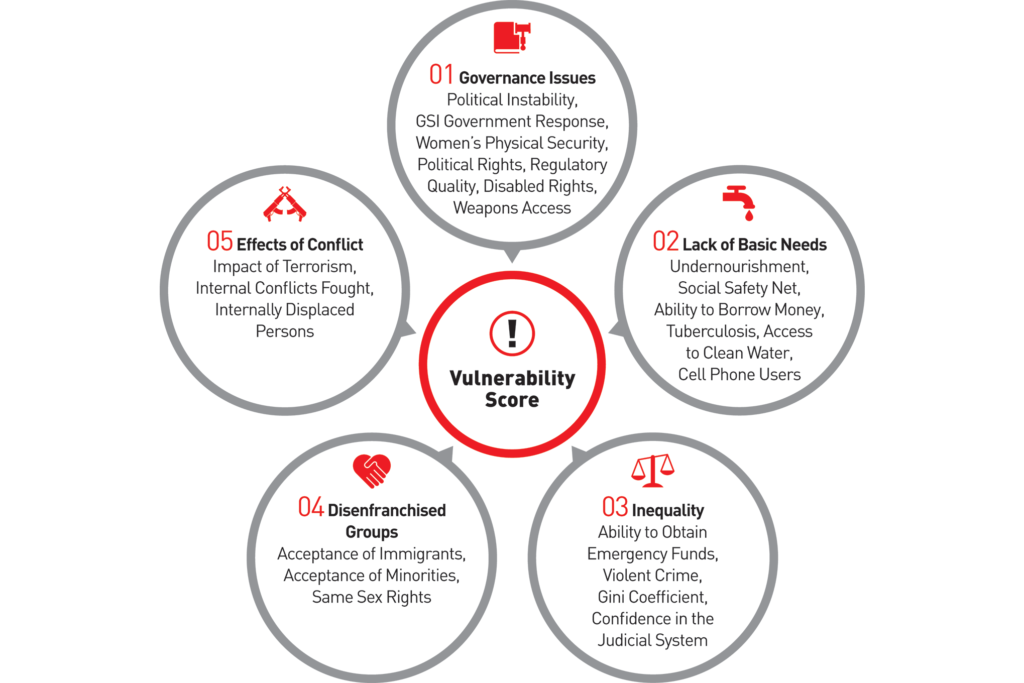
The Polaris Project, a nonprofit nongovernmental organization (NGO) dedicated to fighting human trafficking, has identified 25 types of modern slavery. The two biggest categories of human trafficking are sex trafficking and forced labor, which also overlap. The Global Slavery Index (GSI) provides statistics on countries’ level of trafficking, vulnerability to it, and governmental response rating. According to the GSI, in 2016, there were an estimated 40.3-million people in modern slavery, 15.4 million of whom were in forced marriage and 24.9 million of whom were in forced labor.
Forced Labor
The GSI reports that in 2016 the top five products at risk of involvement with modern slavery are:
1. Laptops, computers, mobile phones
2. Garments
3. Fish
4. Cocoa
5. Sugarcane
Other industries known to rely on slave labor include mining, restaurants/food service, landscaping, construction, cigarette factories, and bricklaying, just to name a few. According to a study done by the Polaris Project, the top three areas of labor trafficking in the U.S. for 2018 were:
1. Domestic work
2. Agriculture and animal husbandry
3. Traveling sales crews
In other words, many of the goods and services you take for granted may be provided by people forced to work against their will for little or no money. When was the last time you investigated the employment conditions of the companies that make the products you buy and what (if any) standards they’re held to?
There are many companies, both for profit and nonprofit, that work to evaluate and provide certifications for various products cultivated and manufactured with humane standards, but there’s no universal standard that all countries must comply with. In addition, many products rely on components being manufactured in many different countries, all with their own cultural norms and labor practices. The Minderoo Foundation’s Walk Free initiative, which also produces the GSI, is working to raise awareness of this ongoing problem to help bring about change.
Sex Trafficking
Sex trafficking is frequently confused with commercial sex acts. Anyone under the age of 18 involved in a commercial sex act is considered a victim of human trafficking. The average age a child enters sex trafficking is 15. This crime has been reported in all 50 states, and 99 percent of all buyers are male, according to a 2018 report by Demand Abolition. The Polaris Project lists these as the top three cases for sex trafficking in the U.S. for 2018:
1. Escort services
2. Residence-based commercial sex
3. Pornography
Victims of labor trafficking are also often used in conjunction with sex trafficking. For instance, a victim may fall into the hands of a trafficking setup where she’s forced to wash dishes during the day and perform sex acts at night. Venues and industries known to be commonly associated with sex trafficking include hotels/motels, spas/massage parlors, health and beauty salons, bars, and strip clubs.
“I’ve seen everything imaginable from restaurants, hotels, and hardware stores be fronts for sex trafficking,” says Bruce Ladebu, founder of Children’s Rescue Initiative, a movement actively rescuing human trafficking victims around the world.
“We were doing a rescue overseas and there were a few young girls, around 8 or 9 years old, being trafficked out of a restaurant. We sent an operative who knew the language and another guy who’s a combat vet in there to act like customers. They made observations and decided to try and make a purchase. He offered to buy a girl, but didn’t put money down. The woman who was working there said, ‘We don’t know you.’ That was enough to realize they were in the business but had customers that were already approved and weren’t going to make a sale to someone they didn’t know, so they’re pretty crafty. He then came out, told the team, and the team went in and rescued two little girls that were being rented out daily.”
Other forms of trafficking have been reported to include illicit adoption, mail-order brides, child soldiering, organ harvesting, and even satanic rituals linked to known traffickers like the infamous West Coast street gang, MS-13.
How and Where Does it Happen?
People often assume that human trafficking is a very sudden, violent act where someone is snatched off the street. Although random abductions by individuals unknown to the victim happen, grooming through social engineering is more common. Predators assess victims to find some kind of vulnerability. This is prevalent because a victim who has been kidnapped usually triggers a search. No one will search for someone in plain sight who’s secretly being blackmailed. It can happen anywhere from the internet to malls to schools. Manipulation can be slow, methodical, and calculated. Unlike drugs where a finite amount is sold and consumed once, trafficked victims can be sold repeatedly, depending on their desired use.
A pimp is the same as a trafficker; they span all age groups, races, genders, and socioeconomic backgrounds. While street gangs, larger mafias, and decentralized networks are frequent culprits, trafficking is also largely perpetrated among individuals within their own social circles. Traffickers also often collaborate internationally. Victims are constantly relocated within their own countries and overseas because of the unremitting demand for new ones, as well as to avoid detection. Anything from hospitals to shipping and trucking services have been used as a link in the trafficking chain. Individuals with access to private transportation can move about virtually undetected.
“In sex trafficking, there’s not necessarily a hierarchy,” says Jeff Tiegs, COO of Guardian Group, a counter-trafficking organization that relies on former military special operations, law enforcement, and intelligence community professionals to disrupt sex trafficking in the U.S. “Younger pimps are part of the pecking order and have often been mentored by older pimps, but then there’s just a social network that everyone has. When a trafficker is making a ton of money, who’s laundering it for them? Where’s he putting it? Who’s selling him cars paid for with cash and no other requirements? One of the devious tactics of a trafficker is he will deliberately get a victim pregnant, and they’ll have the child. He’ll hold that child basically for ransom while the girl is out working. So who’s watching that child? His sister, aunt, or mom maybe? There is, in effect, a network idea, but it’s much more societal.”
The profitability of this industry also allows access to resources many law enforcement agencies can’t match. Traffickers rely on anything from burner phones to secured texting on encrypted networks to stay off the radar. “What’s happening now, because there’s so much money to be made, is we’re seeing pedophiles and abductors become far more sophisticated. There are people who get paid a lot of money and have the same capabilities as Tier 1 Operators,” says Bazzel Baz, former CIA Paramilitary Operations Officer and president of Recovery of Children, an NGO that rescues trafficked children. “They know how to conduct surveillance, counter-surveillance, target, listen in, observe, and extract without any footprint contamination.”
Here are some examples of how people are deceived and can potentially become victims:
Coercion
The internet isn’t only a black market for buying and selling victims, it’s also the number-one place traffickers find possible targets. Social media, apps, music-sharing platforms, and even interactive video games are frequent methods of prospecting and recruitment. They change constantly and many parents are either unaware of or don’t believe that these environments offer potential exposure to predators.
Backpage.com was at one time a major repository for buying and selling sex until it was removed. However, there’s no shortage of escort and classified sites with ads for sex or labor hidden under a “jobs” section, or in personal sections such as “friends looking for friends.” Many of these sites are managed by overseas companies outside the jurisdiction of U.S. law. Dating sites are also commonly explored by traffickers to find unsuspecting users just looking for a love interest and for posting ads of trafficked victims.
Internet ads are often written in brevities that most viewers are oblivious to. While references like “new to town,” “fresh,” or certain emojis like a cherry can often be indicators, descriptions have become increasingly esoteric.
“It’s coded now. You have to understand the language — sadly, most law enforcement doesn’t. We’ll help interpret that for them and look at an ad to decipher what it means. Something like a 15-year-old girl who’ll be at a certain hotel at a certain time and that’s where you need to go if you want to have sex with her,” Baz says. “Here’s an example: you may see an ad for a ‘2001 Volkswagen with a great set of wheels, small headlights, and brown in color.’ Wheels could be a metaphor for legs, small headlights meaning small breasted, and brown meaning complexion, like dark Asian, African American, or Latina.”
In the digital age, targeting victims is easier than you think. “Traffickers look for children who don’t have a strong father figure in the home and are vulnerable. A lot of it’s through online interaction with a predator pretending to be a child of the opposite sex and same age,” says Craig Sawyer, former Navy SEAL and founder of Veterans for Child Rescue, a nonprofit organization that raises awareness and rescues children from trafficking.
“For instance, if an older man wanted an 11-year-old boy, he might pretend to be an 11-year-old girl who’s new to his school, flirt with him, share some pictures of a girl that are sexual in nature to substantiate the claim, and ask for an in-person meeting. They may also ask the child being targeted for explicit pictures or videos of their own as leverage. That way, after photos or videos are sent, if the child doesn’t continue to reciprocate or agree to their demands, they can threaten to expose, humiliate, and begin blackmailing them. Those photos and videos may then also be sold online. Many children don’t know what exactly these apps do and that they can also allow predators to geo-locate them.”
Traffickers use social media to find certain personalities and profiles to try creating relationships and build rapport as a confidant. They’ll look at posts to gauge the individual’s overall susceptibility, self-esteem, if they’re vocalizing unhappiness at home, and other personal information they can persuade them to divulge. Many will often take the lover-boy approach, also known as a “Romeo Pimp,” using romantic pretenses to date for a few months. This builds a false sense of security. They’ll work to create emotional attachment, entice the potential victim with flattery and gifts, and facilitate possible financial dependency. Ultimately, it’ll become a gradual breaking down of that individual’s will to separate them from friends and family and force them into prostitution or other illicit activities using threats, extortion, and violence.
“Victims have been brainwashed into thinking it’s their idea, but they’ve been coached how to post ads. Someone is taking them to these rendezvous, and is in charge,” says Theresa Flores, a trafficking survivor and founder of The SOAP Project. “It’s very similar to being in a cult. If she has a pimp which could be a ‘boyfriend,’ then she’s being trafficked. She might think she’s doing it to help her boyfriend, but what if she stops bringing home money? She has someone blackmailing and threatening her. That’s the majority of the cases.”
Another example is ideological recruitment. ISIS operates heavily on social media. Disenfranchised individuals have often been compelled by terrorist groups to join a cause they’re tricked into believing is altruistic. Through social networks, they can see who’s an easy target for conditioning with propaganda. The strategy is to divide and conquer. Conversations and steady, methodical indoctrination to isolate them from others who may interfere with the brainwashing is then followed by an invitation and possible paid travel to areas where they’re alone and unable to escape. The initial promises of taking up with a benevolent organization can then culminate in rape, torture, and videotaped execution. They don’t know the language of wherever they’ve been brought, the laws, and end up falling for deception very easily.
Fraud
Traffickers often pose as recruiters for free education or job placement, both abroad and in the U.S. “We just had a team come back from intelligence gathering in another country where we’d heard 80,000 girls had gone missing over the last year,” Ladebu says. “We found out the government was behind some of it. There were employment centers where a young girl would go in looking for work. They’d promise these girls jobs in other countries and give them documentation to show they were 18 and could travel legally. We discovered some of these operations were for organ harvesting, sex trafficking, and some of it was for labor slavery. We verified all this.”
In destitute countries with high unemployment, government officials and law enforcement may also be involved in the trafficking operations. The average citizen looking for a better life has little to no ability to vet businesses that are fronts for trafficking. Traffickers flock to regions where children have been separated from their families by natural disasters or conflict to abduct children.
“I read a story recently where a trafficker offered poor kids bicycles, and when they’d go to get it, they’d lure them into an alley where they were abducted,” Ladebu says. “I’ve even heard of kids being taken by traffickers offering free food. That’s more common in overseas countries.”
Force
In-person abduction can encompass spotters who may observe an individual who fits a certain profile through group homes, film production companies, daycares, drug rehabs, and shopping centers. As depicted in the movie Taken, it’s not unheard of for scouts to be at an airport, be on the same flight, or communicate with someone at the arrival destination about a potential target they’re watching.
“One thing I’ve learned from my work and those I work with is once a girl is abducted, she’s abused very quickly and for quite some time to break down her will and then put to work. A lot of times they’re given drugs to decrease their resistance,” Ladebu says.
Trafficking is also done by family members and people familiar to the victims. In impoverished countries, it’s common for families to sell a child for anything from slave labor to child soldiering. However, familial trafficking in the United States is also prevalent. “We have a young lady who got her master’s degree in social work and her dad was a Mason. My family was in Masons too, so it’s not specific to them, but her father trafficked her through all the Masons up in Michigan, so trafficking through family is big,” Flores says.
Links to Prostitution and Pornography
There’s a difference between sex work and human trafficking. “Only a small percentage of the whole prostitution population is doing it voluntarily,” Flores says. “I’ve had many conversations with those women, and they’ll tell you that everyone who’s doing it by choice now was trafficked as a kid. At some point as a minor they were forced to have sex with someone while someone else benefitted from it. It becomes trafficking when someone else is benefitting. If you have a 15-year-old and she’s having sex with someone for money, it’s never because she wanted to do it.”
“Prostitution in and of itself is like pornography in the fact that it has willing and non-willing participants,” Ladebu says. “For a lot of women who are prostitutes, in all outside appearances it may look like they’re willing, but in actuality they’re being forced. There’s a lot of crossover between the two. Prostitution can be a cover. In places where there’s legalized prostitution it’s much easier to hide sex trafficking. No one will go investigate it because it’s legalized.”
Although the battle rages on about the legalization of prostitution, ask any human trafficking advocate or survivor about the catastrophic effects it’d have on society and you may rethink your position on the matter. “You’d essentially be sending the message that it’s OK to sell people,” Flores says. “It’s not just that she could sell herself and not get in trouble; you’d also now make it legal to sell someone else. Why did we just fight slavery all these years and let all these people die in the Civil War? All that would be for nothing because it’s legitimizing slavery and financially benefitting off another person. Someone can still be sold who doesn’t want to be, but nothing would happen to the people behind it. There’s nothing good about that idea.”
Pornography is linked in several different ways. One survivor told Exodus Cry that she was trafficked into porn at age 14, and brutally abused by adult men and women on set for the next three years. She attests that this isn’t an uncommon practice in the porn industry, with countless complicit producers and distributors. Many sites offer user-generated content where nothing is required for verification. It’s very easy to upload anything and be anyone. Because there are genres known as “rape porn,” it’s very difficult to tell if it’s consensual and being acted, or if it’s being done against someone’s will and possibly using a minor. “There are even live-streaming services that will allow anyone who pays to dictate torture specifics and mistreatment of children,” Sawyer says.
According to the GSI, its Vulnerability Model “is built on statistical testing and processes to identify the factors that explain or predict the prevalence of modern slavery. The 2018 Vulnerability Model provides a risk score for 167 countries based on an analysis of data covering 23 risk variables across five major dimensions.”
Warning Signs
We have a tendency to dismiss questionable behavior as something innocuous. Being cognizant of the risk factors or possible warning signs of trafficking is crucial. Any drastic behavioral changes, loss of interest in academics or hobbies, STDs, unexplained injuries or sums of money, and sudden change in dress of any child should be looked into. While it could be a result of anything from bullying to drug use, there have been many cases of a child being trafficked while the parents were unaware.
Certain tattoos can be used to indicate ownership by a trafficker/pimp. Symbols such as bows, dollar signs, diamonds, roses, crowns, or someone’s name have all been associated with ownership. Anytime there are large public events, an element of crime will congregate there. Major sporting events, conventions, and tourist destinations are known to attract large concentrations of trafficking. Children seen being regularly brought in and out of hotels, rental homes, Airbnb’s, and drug rehabs are red flags.
“Look for specific behaviors of discomfort. Avoiding eye contact, making themselves appear smaller, and possibly clothing that doesn’t match the setting, context, or area,” says Yousef Badou of Emergence Disrupt. “Oftentimes you’ll see handlers moving women back and forth, so you might see behavior or interaction where the woman won’t be able to speak to anyone or, if you ask her a question, the escort might answer for her. Not being able to speak, not having physical access to passport or travel documentation, those are all possible behavioral indicators of trafficking.”
“It can look like a lot of different things such domestic abuse, child abuse, etc. A lot of times they’ll just get called a bad kid,” Flores says. “Among minors, they’ve changed their dress, friends, and their behavior from happy-go-lucky to withdrawn and jumpy, falling asleep a lot, running away from home, and coming home with things the parents know they didn’t buy them. They could excuse that away by saying someone’s letting them borrow it, but it’s hard to know. It’s crazy the things that survivors tell you of how obvious it was, like a kid who was seen hanging out around a hotel a lot, but yet nobody said anything. Why would a kid be hanging around a hotel a lot?”
If you suspect you’ve witnessed a possible instance of human trafficking, see the resources listed at the end of the article such as the Human Trafficking Hotline, Polaris Project, and the Department of Homeland Security’s contact info to report a crime. Notify law enforcement as well. Don’t try to be a hero by intervening on your own — just try to be the best observer you can. Get descriptions and photos of the people involved, clothing, tattoos, vehicles, flights being boarded or disembarked from, and license plates. Do it discreetly. Notifying owners of that establishment or organization runs the risk of making the wrong people aware because they may possibly be in on it.
Ask questions. Strike up a conversation to test the response to see if you can detect if someone you suspect is being trafficked seems in distress or fearful. If they’re hyper vigilant and protective of their “parent,” use common sense and discretion: “Are these your parents? Are you OK? Do you need help?”
What’s Being Done and What You Can Do
There are many reasons why the conviction rate of perpetrators is low. It’s difficult to intervene before a law has actually been broken. The fact that law enforcement is under-resourced, under-trained, and underfunded to keep up with it all allows the criminal component to operate with impunity. Jurisdictional issues and poor communication between agencies only exacerbates the problem. Victims often won’t report crimes or testify because they’re afraid of deportation or retaliation against them and their families. When you add to that inadequate funding for legal defense, shame, stigmatization, lack of knowledge about services, and an inability to recognize their own needs, it equates to a lot of people feeling fearful of coming forward.
Many also often ask, why victims won’t just leave the life. “It’s a whole process of submission both mentally and physically. Sometimes they do things to victims that I didn’t even do to my worst enemies as an interrogator for the CIA,” Baz says. “You’re breaking down someone’s will to be able to think on their own.” Victims often suffer Stockholm syndrome, PTSD, and brainwashing to believe it’s their fault, that no one is looking for them, or that no one will believe their story if they go to the police.
“I do presentations all over. A lot of people don’t believe it exists,” Ladebu says. “I can’t tell you how many people tell me they’ve never heard of human trafficking or they’re shocked that there’s more slaves today than at any time in history. A lot of people check out emotionally. It overwhelms them to think about what’s going on if it’s not affecting them personally.”
It relies on us as a society as well to take action. Contact your local politicians about tougher penalties on convicted traffickers, schools and colleges about awareness programs, and businesses where trafficking often occurs, such as hotels, about staff training to improve their ability to recognize it. While supporting legislation is a start, at the end of the day you vote with your money. Do your research and boycott companies that create products using inhumane conditions.
Within your own family, be very present in your children’s online activity. People can pretend to be whoever they want over the internet. If your child disappeared one day, would you have the ability to access and view the chat logs on platforms they’ve been using for any evidence of possible deception? Know who your children are talking to and how by having an open, participatory discussion about what they’re using to communicate so you can create your own accounts to monitor what’s going on. It’s not being invasive; it’s being smart.
“The penalty for these crimes is not stiff at all. When was the last time you saw someone get the death penalty for molesting a 12-year-old girl?” Baz says. “It’d blow your mind to find out the level of corruption within the ranks of our own law enforcement. This isn’t the case across the board with our law enforcement brothers and sisters, but what we do find is the surprisingly high level of corruption within the ranks that seems to never go away. We haven’t had one victim under 18 that has not testified that many of her clients are law enforcement officers.”
According to Profits and Poverty: The Economics of Forced Labour, a 2014 publication produced by the International Labour Organization (ILO), commercial sexual exploitation and forced economic exploitation earns $150 billion in illegal profits annually. ILO estimated that there were 21-million people being trafficked for these purposes as of 2012. Ask yourself why this topic isn’t discussed in the news cycle on a recurring basis.
“We’re just trying to identify the girls, help them get out of the game, and help bring these traffickers to justice,” Tiegs says. “Rarely are we looking at holding others accountable like hoteliers looking the other way. That’s a growth industry for all of us. When we arrive at that place where people are truly paying the price for aiding and abetting the trafficking of minors, we’ll see a real change in the country.”
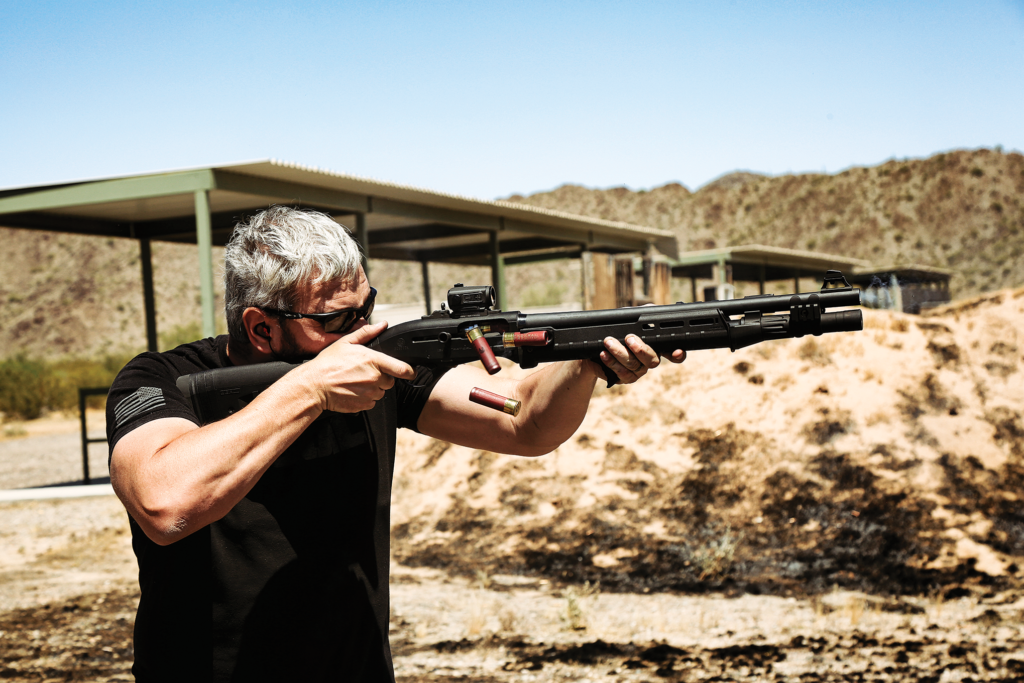
Street Howitzer. Room Broom. Scattergun. Gauge. Twelve Iron. Brixton Typewriter. These are just some of the slang terms for one of the most misunderstood defensive weapons of the 21st century — the self-defense shotgun. For many younger or newer shooters, this class of firearm has been almost entirely written off in favor of short-barreled rifles, rifle-caliber “pistols,” and pistol-caliber carbines. This phenomenon isn’t without good reason. Low recoil, high capacity, faster reloads, and amyriad of aftermarket accessories make these alternatives highly attractive to both the novice and aficionado alike. When measured against pump-action guns, the rate of fire also becomes a factor. And then there are the aggressive options like the Beretta 1301.
But the shotgun isn’t without its own advantages. Firepower per trigger press is going to be hard to beat. There’s also the ability to run buckshot, birdshot, slugs, and almost anything in between depending on your needs and ballistic preferences. Finally, the ability to put multiple “rounds” on target at once is a highly attractive proposition. To put this last point in concrete terms, a standard law enforcement duty load of 00 buckshot is nine pellets. Each pellet is .36 caliber, or just over 9 millimeters at a muzzle velocity typically between 1,100 and 1,200 feet per second. That means each time you fire a shell, you’re sending nine rounds of 9mm — more than a full magazine out of some micro-sized carry pistols — to the target at the same time.
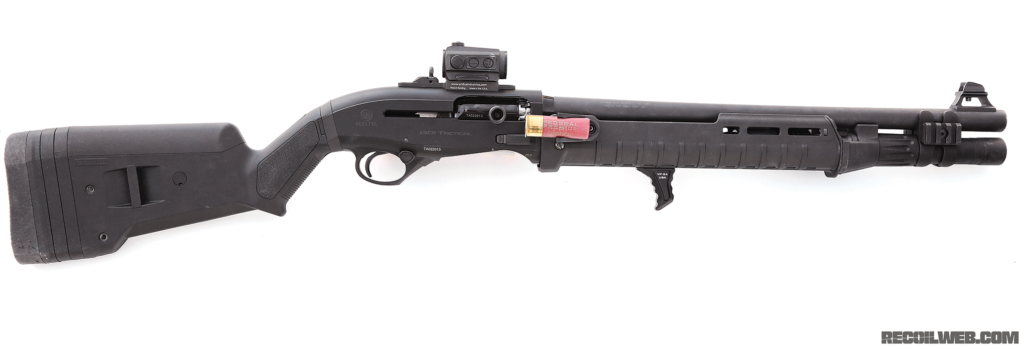
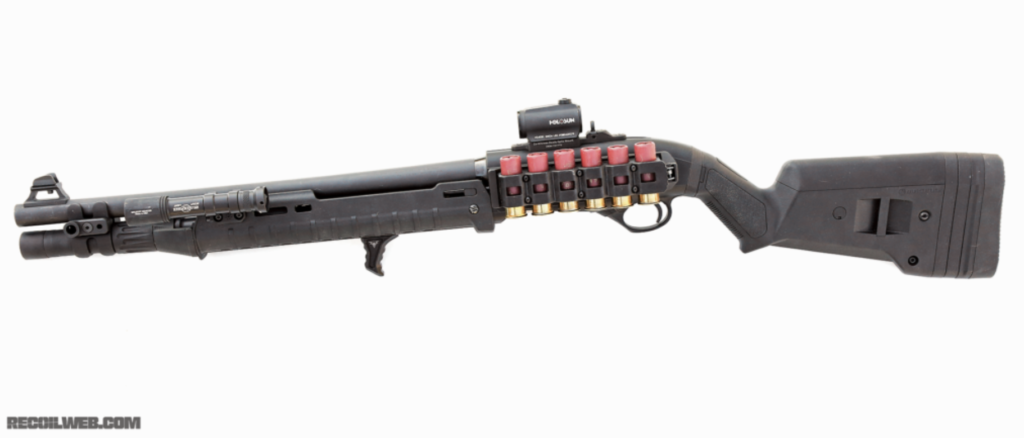
Like the rest of the firearms industry, shotgun technology hasn’t stood still. While often overshadowed by rifle and pistol news, there are companies out there putting hard work into innovating the fighting shotgun. One of these is Beretta — a cornerstone of the high reputation that Italian shotguns have garnered across the globe. We were able to get our hands on a sample of their current premier entry, the Beretta 1301 in the tactical shotgun market, and put it through its paces, not just for performance, but for potential customization as well.
WHAT IT IS
While primarily known for their competition shotguns, Beretta’s no stranger to police and military arms. In the late 1980s, they came out with the 1201FP as a law enforcement-specific variant of their earlier model 1200 sporting shotgun. The 1201FP used an inertia-driven design that’s still seen in combat shotguns today. Then, around 2009, they introduced the TX4, which featured the longer receiver of the 1301 Competition but the sighting configuration of the Beretta 1301 Tactical — that wouldn’t actually come to the market until 2013. One of the most attractive features of the 1301 is its BLINK gas system. As previously stated, most semi-automatic shotguns destined for the duty market use inertia-based cycling systems. Conventional wisdom is that gas systems on shotguns are picky and unreliable and cannot handle transitions between lightweight training or less-lethal loads and full-power buckshot, slug, or door-breacher loads. The trade-off is that inertia systems transfer the bulk of recoil directly back to the shooter. Recoil is a hefty shove and multi-shot strings can lead to muzzle rise that has to be wrestled back down.
Beretta’s BLINK system has a couple of unique features that overcome these problems. The gas piston itself has a self-cleaning design as well as a semi-self-regulating split ring gas seal. The gas valve is also self-regulating, meaning the cycle speed, reliability, and recoil impulse all remain constant despite the pressure differences between ammunition types. In theory, the result is a softer, faster-shooting scattergun that can transition between lightweight bird loads and car-crushing slugs as fast as you can … blink.
WHAT WE DID TO IT
Since modularity is a historical Achilles’ heel for shotguns as a class, we wanted to explore the aftermarket potential for the 1301 Tactical. Our multiple searches kept bringing us back to one place: Aridus Industries. Adam Roth, the founder of Aridus, built his company on an idea for a better ammo carriage system for his shotgun: the Quick Detach Carrier, or QD-C. We’ll talk more about the QD-C later, but the company eventually grew its product line out into a suite of unique products for the 1301 Tactical. We were fortunate enough to get our hands on most of them.
We started with a furniture swap. Aridus Industries sells a receiver adapter plate that allows you to remove the factory stock and replace it with the Mossberg variant of Magpul’s SGA stock. These stocks are inexpensive and use a spacer system to create a significant amount of adjustment in both length-of-pull and cheek comb height. It’s also available in several different colors.
Aridus Industries also produces a forend that uses a modified version of Magpul’s Zhukov AK rifle handguard, and an adapter to fit it over a shotgun magazine tube. With this handguard in place, we were then able to mount M-LOK accessories. Specifically, we put on a SureFire M600 Scout light with Malkoff Devices replacement head in an Arisaka mount and a Vendetta Precision handstop — the latter ensures uniform hand placement at the exact same spot every time we pick up the gun (and keeps it there under recoil). This means we can properly drive the gun while still being able to reach the push-button cap on the Scout light. We actually wound up mounting it backward, as the curvature of the “inside” of the handstop allowed our support hand to slide far enough back that we couldn’t hit the light.
Finally, on the right side of the handguard, we put on a Stage Saver shell holder from TACCOM 3G. The Stage Saver is a single shell caddy positioned directly in front of the chamber. Originally designed for three-gun competition, the idea is that when the shotgun goes to “slide lock” with the bolt locked in the open position, you simply slide that last shell backward out of the Stage Saver and drop it directly into the chamber. Send the bolt home with the release button, and you’ve got one last quick shot to get out of trouble.
The Beretta 1301 comes from the factory with a polymer Picatinny rail on top of the receiver for mounting optics. It’ll do the job. But the Aridus Industries CROM is a much more elegant solution. The Co-witness Ready Optic Mount is a direct replacement for the receiver rail and has a direct-mount footprint for either an Aimpoint T1-style optic or Trijicon RMR-style optic. We went with the former and topped it with a Holosun 403C. The Aridus mount also has a ghost ring rear sight built-in that’s designed to work with the factory front sight.
The final piece of Aridus Industries goodness to go on our Beretta 1301 blaster was their flagship Quick Detach Carrier. The idea of a receiver-mounted “side saddle” caddy for extra shells isn’t new. The idea of a detachable or removable carrier isn’t new either — we’ve seen at least two versions that use Velcro to attach soft-loop caddies to the side of the receiver. What sets the QD-C apart is its novel cassette-style shell holder that clicks securely into place with a spring-loaded latch on the receiver-mounted plate. Removing it is as easy as unbuckling a seatbelt. The metal carrier won’t stretch out and deform over time like elastic loops. The spring-loaded latch won’t wear out or cake with mud, dust, or lint like hook-side Velcro. And you can order multiple carriers (they even sell a 10-pack of them!) to keep stashed in your car, load-bearing kit, rucksack, or bugout property. It’s a clever fix for one of the quintessential problems with tube-fed shotguns: capacity. The QD-C, plus the Stage Saver, gives us full reload aboard the gun.
Speaking of capacity, we added a Nordic Components MXT magazine tube extension kit, which gave us an additional two rounds for a total capacity of 7+1 when using 2¾-inch shells. This kit comes with a tube extension, nut, extra length magazine spring, and a barrel clamp that includes a section of Picatinny rail and a quick-detach socket. Finally, we took our test gun to Wright Armory in Mesa, Arizona, to have a clearance cut, radius, and polish job performed on the loading gate. Sometimes referred to as a 3 Gun Mod, the job entails removing material from the front and either side of the receiver around the loading gate. The result is an angled, funnel-shaped contour that enables faster reloads.
We now had an autoloading 12-gauge that’s self-regulating and self-cleaning, equipped with an optic, white light, handstop, and enough ammo on board to completely refill the magazine. With a full tube, full QD-C, Stage Saver, and one in the chamber, that’s a total of 15 rounds of 12 gauge on tap without ever having to reach into a pouch or pocket.
So, we took 15 rounds — and then some — and hit the range.
WHAT WE DID WITH IT
We took our fully appointed Beretta 1301 Tactical to the range with a box full of Federal 12-gauge shells. The bulk of our test ammo was their Law Enforcement 9-pellet 00 buck load, as well as several boxes of their 1.5-ounce rifled slugs. We also had a handful of Hornady Critical Defense buckshot loads. It had been a while since this author had spent any time behind a scattergun. The good news is that all the accessories worked as advertised. We had some concern about the Nordic Components magazine extension, since the included spring had to be cut to fit. The instructions simply said to snip one coil at a time until we were able to fully load the tube. But fully loading and emptying the extended tube nearly a dozen times didn’t show any feeding or reliability issue. As advertised, Beretta’s BLINK gas system puts pellets downrange with a quickness — as fast we could pull the trigger in every case. However, in terms of recoil, the system doesn’t defy physics. Felt recoil, while not nearly as stout as a pump gun, was substantial. The heavy slugs in particular took several tubes to get used to. Then, we had one great run of dropping an entire tube into the burned-out hulk of a sedan before our shoulder was begging for mercy. The LE buckshot loads were noticeably less punishing and, with practice, can be dispensed at will just as fast as you can manage muzzle rise. We suspect (and hope!) that in most situations, as with pomade, “just a dab’ll do ya.”
SHELLS ON THE DECK
The shotgun is a niche tool. It always has been and always will be. But there’s also no doubt that a properly kitted scattergun is a staple in any well-rounded home armory. Its capabilities are unique, its reputation near-legendary, and it’s effectively undisputed when applied properly. Fortunately, choosing to put a shotgun in the safe no longer requires you to settle for 19th-century cutting edge. The Beretta 1301 comes out of the box with advanced and proven engineering to optimize reliability and cycle time. Combined with a healthy suite of thoroughly modern accessories like lights and optics, you’ll have an easy-to-use, day-or-night solution to imparting immense amounts of firepower to whatever problem stands in your way.
After spending hours at the range and (hopefully) cleaning up as many of your spent casings as possible, why waste all that valuable metal when you can put it to good use? Sure, reloading spent casings is always a great option, but there are other ways to make use of brass besides using them as décor for your belt or guitar strap. Compared to other metals, brass has a low melting point, lower even than silver or gold, making it the perfect candidate to turn into liquid and cast into something that is sure to impress. It is very important that all of the casings you collect for this project are brass, not another kind of alloy. So, grab a bucket, fill it with spent casings, and let’s get started casting a knuckle duster!
Now there’s a reason to hold onto that spent .22 brass.
Design
To get started, you will want to flesh out a design on paper, or better yet, cardstock. Use a note card or the cardboard from a cereal box or case of beer. Just sketch out a brass knuckle duster design approximately the same size as you would have the finished project be. If you are artistically challenged, there is a plethora of brass knuckle outlines on the world wide web that you can use for inspiration or copy-paste-print. The design I am using is modeled after the UK military-issued brass knuckles circa WWII. When you are satisfied with the design, carefully cut the design from the paper, including all of the finger holes. This template will be used as a stencil for the following steps. Double-check that the cut-out template fits your hand, and make any modifications that may be necessary for a comfortable grip. I also suggest reading this article all the way through before starting, making note of any materials you will need to acquire. Careful preparation will reduce the risk of heating and pouring molten metal.
Taking time with the design phase will help refine the final result when making your own Knuckle Dusters.
Next, you will need to find a piece of Styrofoam that matches your desired dimensions and use the template to stencil your design and cut away the excess foam. I used some scrap home insulation foam, but any rigid Styrofoam will work. Do not use the spongy foam used in mattress toppers or pillows. The result should be foam knuckles as close in shape and quality as you would like the finished brass knuckles to be. The fewer defects in your foam knuckles, the better the final product will be.
Prepping the Cast
Plaster of Paris, which can be found in most art sections of department stores, should be thoroughly mixed to a consistency slightly more runny than peanut butter. The smoother the mixture the better. Any lumps or inconsistencies could be a headache later on. Place the foam knuckle duster on a piece of aluminum foil with the most aesthetically pleasing surface facing up, and cover any exposed foam thoroughly with the plaster. Any exposed foam should be covered with ¼ to ½ inch of plaster. Let the plaster of Paris dry completely overnight or until you are sure there is no moisture left.
As the plaster is drying, you can prep the next steps. You will need a container wide and deep enough to hold your Styrofoam knuckles and at least three inches of sand in every direction. If you do some internet sleuthing on metal casting, you will find recommendations for products like professional casting sand and tutorials on how to make your own casting sand. Buying those products is not necessary for the sake of this project. A normal bag of sandbox sand will work. When you are sure the plaster is dry, you can carefully embed the plastered foam knuckles into the top of the sand, still leaving the top exposed. Be very careful not to crack or break the plaster.
Fire Up the Furnace
To heat and melt the brass enough to pour into the knuckle duster mold, you’ll need some kind of refractory to get the temperatures high enough. There are countless tutorials online on how to do this, and you can invest as much or as little time and money as you prefer. You can even build your own forge. Because I do some hobby blacksmithing, I just use my own — it isn’t ideal, but it’ll get the job done. Lastly, you’ll need something to use as a crucible, the container you’ll melt the casings in. A graphite crucible is ideal and inexpensive, but there are ways you can improvise. The key is to ensure your crucible’s melting point is much higher than that of the brass. A steel crucible will work in a pinch, but if your refractory gets too hot, the steel will melt, and you’ll lose all your melted brass.
This is the part where DIY begins to feel less like a craft project, and more like a hobby.
Now it is finally time to melt those spent casings, but before you heat them up, carefully inspect the bottoms and ensure the blasting caps have been fired. The last thing you want is for a blasting cap to pop while it is sitting a puddle of molten brass. Get your refractory fired up, fill your crucible with the casings, and carefully place it in the heat with tongs long enough to keep your hands a safe distance away. As the brass heats up, you’ll see the casings liquify. Estimating the necessary volume of casings with any degree of accuracy is difficult, so it is wise to melt more brass than you think you’ll need. This is also the time to make sure your plastered foam knuckle duster is set properly in the sand and nearby, so you won’t have far to move the crucible.
Brass has a lower heat conductivity than aluminum, so it holds onto its heat longer. Keep that in mind while waiting for it it cool.
Brass is an alloy of copper and zinc, and as it melts, the zinc may burn and create smoke which, if inhaled, could cause flu-like symptoms. Also, if you melt it for too long, you will create a layer of yellow-looking dross, impurities which coagulate and collect as the metal burns. You may end up trying several times before you get the hang of it, but the rewards are worth the efforts! When the brass is melted, carefully pick up the crucible with the tongs and pour it evenly over the exposed foam. The foam will burn away and be replaced with the brass. Fumes from melting brass and Styrofoam are toxic, and these steps should be done in a well-ventilated area. Any precautions to safeguard your respiration should be taken. I also suggest wearing safety glasses, welding gloves, and a long-sleeved shirt and pants made of non-synthetic fiber.
Finishing Touches
It will be tempting to check your results as soon as possible, but resist the urge! Even after the brass solidifies, it will be hot enough to inflict serious burns for a while afterwards. To find out how hot a cast piece of metal was, I dropped it in a bucket of cool water ten minutes after the liquid metal solidified. The water began to boil instantly! Play it safe and let it cool for several hours before plucking it from the sand. When you are certain it is cool enough to inspect, clean or break off any plaster that is left over and admire your work. If there are any flaws or deformities, they can be corrected with files or grinders, and if it is to your liking, you can make it stand out with some sanding, buffing, or polishing. The best part about this project, is if you are not happy with the results, you can always prep another piece of Styrofoam, re-melt the brass, and try again as many times as you wish.
Once free of the plaster, make refining touches with metal files and sandpaper.
As you can see, my casting didn’t quite fill out as perfectly as I would like, and that’s okay. Because I’m using a forge instead of a refractory, the molten brass cooled too quickly and didn’t fill as much of the mold as I would have liked. On top of that, there were some impurities (dross) that I was unable to remove while it was in the crucible. But even though the last knuckle is not entirely enclosed, I would like to think of it as what Bob Ross would term “a happy accident,” and utilize the gap as a bottle opener! Next time, I will improve my method and make something more impressive. This project is not exclusive to making a knuckle duster — this same DIY casting concept can be used to make anything you can carve out of the Styrofoam. So, don’t throw away the casings of the ammunition you spent all that money on — put it to good use and create something!
Summer is officially here, and with it comes a natural variation in wardrobe. Warmer weather leads to lightweight clothing and increased physical activity, neither of which is conducive to pockets crammed full of gear. It’s for this reason that many of us pare down our everyday carry slightly for this season. Maybe that means you start carrying a single-stack subcompact handgun instead of a double-stack full-size, or a lightweight folding knife instead of something more robust. What it shouldn’t mean is that you start leaving behind the essentials. Murphy’s Law dictates the moment that happens is the moment you’ll need those items the most. A EDC flashlight is one such essential tool.
The light in your pocket will help you figure out what the heck your dog keeps barking at in the backyard, find the pen that fell between the seats of your truck, and read the menu in your spouse’s favorite obnoxiously dim restaurant. And unlike a keychain light or the tiny LED on your cell phone, it can provide the focused illumination you need to clear your house if you come home to a door that’s unexpectedly ajar.
However, flashlights can get heavy and bulky, so we decided to compare seven models that can fit into even the smallest pockets. One key constraint was that each of these lights must run on a single CR123 battery. Most of our typical EDC lights are powered by two of these batteries, so we already have plenty of spares on hand, making the seasonal transition easier. If swapping gear out becomes a hassle, you’ll be more prone to leave it at home, so interchangeability is an important consideration.
Read on as we evaluate seven single-CR123 flashlights to determine which might fit your minimalist EDC loadout.
EDC Flashlight: 5.11 Tactical Rapid L1
Notes: This light serves as a replacement to the discontinued 5.11 Tactical TMT L1, which produced 212 lumens from a Cree XPG-B LED. Using a newer Cree XP-L2 V5 LED, the Rapid L1 now offers 290 lumens, and also features a revised switch design and shorter overall length. However, comparing the lights side-by-side, the Rapid looks almost identical, aside from the new name, different tail cap, and some extra texture around the head.
The updated switch is a big improvement over the old TMT series and is now much easier to press with a nice tactile click feel. Raised guards on each side protect it from accidental presses, although we feel these could’ve been shorter and more rounded for improved comfort. Output is 290 lumens on high and 19 on low, with an additional high-power strobe function. The beam pattern appears as a soft spotlight with a subtler flood pattern around the periphery. Unfortunately, the output has a noticeable blue tint, which causes it to appear substantially less powerful than the other lights in this guide. We’ve found this to be a common problem among inexpensive flashlights, and once you learn to recognize it, it’s hard to overlook.
We’ve had plenty of great experiences with 5.11 Tactical packs, apparel, and other products, so it’s unfortunate that this updated light design still feels a few steps behind the competition. It’s definitely an improvement on the old TMT, but it’s far from cutting-edge.
Dimensions: 3.5 by 1.0 inches Claimed Max Output: 290 lumens Claimed Max Runtime: 2 hours 7 minutes Weight with Battery: 2.5 ounces Output Modes: High, low, strobe MSRP: $50 URL:www.511tactical.com
Pros: >Aluminum body feels tough and is rated IPX7 water-resistant to 1 meter immersion > Tail cap switch is easy to use to cycle through modes and gives a positive click for constant activation.
Cons: > Strong bluish tint makes the output feel dimmer than it actually is > Tail cap is sharper and more aggressive than the bezel, so using it as an impact weapon is more likely to hurt your thumb than an attacker
EDC Flashlight: Coast XP6R
Notes: After seeing the brand-new XP6R at SHOT Show in January, we immediately wanted to get our hands on one. When we started working on this article, the production version of the light wasn’t quite ready, but Coast kindly sent us this pre-production prototype. It’s part of a new XP Series of flashlights and will accept a Coast Zithion X rechargeable battery (included) or a single CR123 (not included). Based on the generic blue battery that arrived with the prototype XP6R, it looks like Zithion X will be Coast’s private-label 3.7V 650mAh 16340 battery with a built-in micro USB port. As you might expect, output is visibly reduced when using a CR123, dropping from a maximum of 480 lumens to 290 lumens.
As with many other Coast lights, the XP6R features the company’s signature slide-focusing optic, which lets the user rearrange output from a tight spot to a wide flood pattern by moving the head back and forth with a thumb. This is especially helpful for map reading and other close-up tasks where a spot beam would be detrimental. If most of the items you need to illuminate are within arm’s reach, the XP6R has a clear advantage over the other lights in this guide. Low, medium, and high modes are cycled with each press of the tail cap switch, but no memory function is present, so each time you turn it on, you’ll have to click the button a few times to select the appropriate output. This light is expected to go on sale in the fourth quarter of 2020.
Dimensions: 3.6 by 1.1 inches Claimed Max Output: 480 lumens (see notes) Claimed Max Runtime: 15.5 hours Weight with Battery: 2.6 ounces Output Modes: Low, medium, high MSRP: $40 URL:www.coastportland.com
Pros: The slide-focusing optic offers outstanding versatility. We’ve always been a fan of this feature on Coast’s flashlights. Nice ergonomics and aesthetics, from the knobby machined ridges on the body to the anodized trim ring and sculpted lanyard hole
Cons: It lacks a pocket clip, and that’s practically a deal-breaker for us in this category. Carrying a flashlight loose in a pocket makes it harder to access and easier to activate by accident. No mode memory — this means that if you turn off the light in high mode, it’ll turn back on in low mode next time, then medium the following time.
EDC Flashlight: Fenix E18R
Notes: This impressively tiny light is the smallest in our guide by a substantial margin, with dimensions that are comparable to a USB flash drive or mini BIC lighter. Despite this, it packs in an impressive amount of features. There are four brightness levels, ranging from 5 to 750 lumens, plus a strobe function. There’s a side activation button with a battery indicator LED in the middle, and a lockout function to prevent accidental activation (double-click the button to toggle lockout). On the opposite side of the head, you’ll find a circular charging contact that attaches to the included magnetic USB cable. The light’s tail cap also contains a magnet, so it can be stuck to surfaces such as a toolbox or car hood for hands-free illumination. A removable pocket clip and lanyard are also included.
Although the E18R can be powered by a standard CR123 battery, the magnetic charging function only works with the included Fenix 3.6V 16340 battery or similar models with integrated protection circuits. A standard or rechargeable CR123 “can be used for emergency,” according to the manual, but lumen output will be reduced. Additionally, plugging in the magnetic charger while one of these batteries is installed could cause a fire or explosion. Thankfully, the power button LED clearly indicates charge status ranging from full (green) to critical (red flashing) so you’ll know when it’s time to swap out or plug in.
If you’re heading out in gym shorts and a T-shirt with a bare minimum amount of gear, but still want to carry a flashlight, the E18R is a great choice. It’s about as small as you can get before you leave the realm of pocket flashlights and start looking into micro keychain lights.
Dimensions: 2.4 by 1.0 inches Claimed Max Output: 750 lumens (see notes) Claimed Max Runtime: 70 hours Weight with Battery: 1.8 ounces Output Modes: Low, medium, high, turbo, strobe MSRP: $65 URL:www.fenixlight.com
Pros: > Compact design isn’t much larger than the battery it contains, yet crams in a surprising list of features > The magnetic charger provides a convenient way to make sure your light is always topped off and ready to go. It works great in a car USB port, too.
Cons: > The small, side-mounted activation button and similarly shaped magnetic charging contact can lead to some clumsy fumbling while trying to turn on the light. > If the special magnetic cable is lost or misplaced, finding a replacement will be a hassle.
EDC Flashlight: HDS Systems EDC Tactical, 325 Lumens (OFFGRID Top Pick)
Notes: At most companies, engineers work within specific constraints and budgets set by project managers. At HDS Systems, the engineer runs the company. This is clearly evident in every aspect of the EDC Tactical light, starting with its straightforward name and no-frills knurled aluminum body. Its only identifying marks are the brand name and serial discreetly engraved on the bezel in a plain font. But like a Swiss watch, there’s an obsessive degree of attention to detail beneath the surface.
The light’s key feature is its rotary control mechanism. Twisting the tail cap adjusts between 24 constant brightness settings, momentary strobe, and momentary full output; each is activated via a satisfyingly crisp click switch. Rather than performing occasional quality control checks like most manufacturers, HDS Systems manually calibrates every light to its exact lumen rating in-house. The company’s website offers detailed descriptions of components, including the PVD antireflective lens coating, black-nitride-coated stainless bezel, trapezoidal Acme threads, proprietary constant power LED regulation system, and custom software that has gone through nearly two dozen revisions (ours has version 2.18). When was the last time you thought about the software version your flashlight is running?
The EDC Tactical comes with a four-page user guide, but there’s a downloadable 20-page advanced guide that’ll teach you how to unlock its many programmable functions. If that’s not enough, you can custom-order a light with a variety of LED types, battery types, and other features such as a sapphire crystal (!) instead of glass. There’s even a limited-production C173 beryllium copper body option that brings the light’s price to more than $1,000. No, that wasn’t a typo — one thousand dollars.
Dimensions: 3.9 by 1.0 inches Claimed Max Output: 325 lumens Claimed Max Runtime: 121 hours Weight with Battery: 3.7 ounces Output Modes: Constant-on with 24 brightness level increments, momentary maximum, momentary strobe MSRP: $314 URL: www.hdssystems.com
Pros: > With tight tolerances, tactile controls, and extreme attention to detail, this light exudes quality in a way that’s hard to convey on paper. > If you’re the type of person who has strong feelings about CRI and beam pattern, and frequently gets into debates on flashlight forums, this might be the light you always wanted.
Cons: > Lacks a built-in pocket clip — the slip-on clip seen here is an optional accessory and not an ideal retention solution because of the rotary control scheme. > Although we understand the reasons for the premium price, it’s likely to deter all but the most diehard lighting enthusiasts from purchasing this product.
EDC Flashlight: Nitecore EC11
Notes: The EC11 accepts a CR123 battery, but after using it, that starts to feel like an afterthought. The first sign of this is the spec sheet, which shows that the light produces 900 lumens with a Nitecore IMR 18350 3.7V battery, but 430 lumens with a regular 3V CR123. Additionally, the battery compartment contains a removable plastic spacer that serves to prevent a slightly narrower CR123 battery from rattling around. This wouldn’t bother us if the light came with an 18350 battery by default, but it doesn’t. That battery requires a separate charging cradle if you don’t have one already. Nitecore offers these two optional items for $17 with the purchase of this flashlight, effectively bringing the price to $77.
If, like us, you didn’t buy the Nitecore battery, you’ll need to be careful what you use. Various standard 3V CR123s worked fine, but at diminished brightness as expected. The Coast light’s unbranded 3.7V 16340 battery also worked properly and appeared to produce higher lumen output. However, a Fenix 3.6V 16340 and (more surprisingly) Nitecore’s own NL166 3.7V rechargeable CR123 yielded strange results. Cycling through modes appeared to eliminate low and medium — the light went from ultralow straight to high, then two more identical high settings, and finally turbo.
The EC11 offers a secondary red LED with constant and signal flash modes; it can also display battery power status “when out of the door” [sic]. If you see a pattern of two flashes, a pause, and eight flashes, that indicates 2.8V. The white LED features constant, strobe, SOS, and slow-flashing location beacon functions.
Dimensions: 3.0 by 1.0 inches Claimed Max Output: 900 lumens (see notes) Claimed Max Runtime: 12 hours Weight with Battery: 2.3 ounces Output Modes: Ultralow, low, medium, high, turbo, strobe, SOS, slow flash; secondary red LED MSRP: $60 URL:www.nitecore.com
Pros: > Red LED is a nice addition, especially with its ability to serve as a battery voltage gauge > 430 lumens is bright enough for most purposes, but …
Cons: > … the EC11 is boldly advertised at 900 lumens. Unless you spend extra for a special Nitecore IMR 18350 battery, you won’t be able to reach that maximum output. > Testing revealed it to be very picky about power sources. Several brightness modes didn’t function correctly with some types of rechargeable CR123/16340 batteries.
EDC Flashlight: Streamlight ProTac 1L-1AA (OFFGRID Best Value)
Notes: As much as we appreciate the power and reliability of the CR123 battery for our EDC flashlights and weapon lights, we still recognize that it has some downsides. The biggest among those is availability. You can’t always walk into a gas station or corner store and know that you’ll be able to buy a spare. That’s certainly not the case with AA batteries, which are sold virtually everywhere. Recognizing this, Streamlight made a flashlight that takes either 1L (lithium CR123) or 1AA.
AAs and CR123s provide completely different levels of juice — 1.5V and 3V, respectively — and this has a direct effect on lighting performance. With a CR123, the 1L-1AA can produce 350 lumens for 1 hour and 30 minutes; with an AA alkaline battery, it’ll only produce 150 lumens for 1 hour and 20 minutes. For this reason, the former will be our primary power source, and the latter is a fallback option. Still, we’re thankful for it.
This light is constructed from solid aluminum finished in either black or coyote tan (pictured). It offers three modes, each of which can be activated in constant or momentary fashion. Streamlight’s Ten-Tap system allows the user to choose high/strobe/low, high only, or low/high configuration. Each light includes one of each type of battery, a removable pocket clip, and a nylon belt holster. Real-world prices for Streamlight products are often well below MSRP, and this is no exception. It can be found for less than $40 online, making it an excellent value.
Dimensions: 4.3 by 1.0 inches Claimed Max Output: 350 lumens Claimed Max Runtime: 14 hours Weight with Battery: 2.4 ounces Output Modes: Low, high, strobe MSRP: $68 (see notes) URL:www.streamlight.com
Pros: > Compatibility with AA alkaline or lithium batteries is a huge advantage from a survivalist perspective, and provides a backup power option if resources are scarce > 350-lumen high mode and 40-lumen low mode offer enough versatility for close- and medium-range tasks
Cons: > Prior experience has taught us that these Streamlight pocket clips have a tendency to loosen and pop off.
EDC Flashlight: Haley Strategic / SureFire D3FT Combat Light
Notes: This light was conceptualized by Haley Strategic Partners, the company founded by Force-Recon-Marine-turned-shooting-instructor Travis Haley, and manufactured by SureFire. Its D3FT designation stands for Disruptive 3nvironments Firefly Technique (we’re not entirely sure what a threenvironment is). In a video on the company’s YouTube channel, Haley explains that its name is pronounced “deft,” as in “neatly skillful and quick in one’s movements.”
Regardless of these elaborate naming conventions, the D3FT’s design has an interesting logic behind it. It features a sturdy aluminum ring between the head and battery compartment, which is intended to be used alongside a handgun in the SureFire/Rogers grip — this involves placing the light between the index and middle fingers of your support hand, then pulling it back into a closed fist to depress the tail cap switch using the heel of your palm. This feels slightly awkward at first if you’re used to a thumb-on-tail-cap “icepick” grip, and may not work as well for those with smaller hands or less grip strength, but we quickly got the hang of it.
Functionally, the D3FT is about as simple as it gets. There’s one brightness level, which can be activated in momentary mode with a partial press or constant mode with a full click. Loosening the tail cap serves as a lockout. The beam is focused into a fairly dense spot pattern, comparable to other SureFire weapon-oriented lights like the EDCL series or E2D.
Dimensions: 4.1 by 1.3 inches Claimed Max Output: 500 lumens Claimed Max Runtime: 1 hour Weight with Battery: 3.3 ounces Output Modes: High only MSRP: $169 URL:haleystrategic.com (not available directly from SureFire)
Pros: > The combination of aggressively knurled body, full-fist length, and central grip ring make this light easy to retain and manipulate. > Its tail cap offers the perfect degree of springy responsiveness for reliable momentary or constant activation.
Cons: > We like the pocket clip’s stiffness, but its leading edge is almost completely flat. This made the D3FT difficult to slip back into a pocket one-handed, especially with thick-stitched jeans. > Single output and 1-hour runtime make this much better as a combat light than a utility light
Southern Survival is Duck Dynasty meets Myth Busters. And it doesn't end there.
Weird Flex, but… okay. Some of us have lost track the many subscription boxes there are, but how many of them have their own Netflix series? Only one: BattlBox. Having just launched before the holiday, Southern Survival brings the comedy of backyard testing to a grand scale, putting curated items to task proving they can cut the mustard.
From the opening of the first episode, the BattlBox staff laugh their way though blowing things up, burning them down, and trying out things like vehicle glass breakers, backpacks with a built-in belay system to get out of burning buildings, various machetes, and a settler’s wrench. The show has its jokes, and sticks to a good heart of this-versus-that testing, except with flamethrowers. It’s fun, definitely American, and takes the edge off heavy topics like breaking out of a car caught underwater.
Southern Survival takes testing to comical limits. Image Courtesy of Netflix
Tying a Netflix original series to a company that sources products for its audience has some novelty, but making a show about the trials and tribulations of sorting what comes in the box is a whole new level of thinking outside the… I’ll let that be. Jokes aside, in one episode we got to see some things in action that would have been really nice in Ranger School. As preparedness is an American tradition, the subjects chosen are from real scenarios that pop into our head late at night from a house fire to wilderness survival.
As current events have reminded the world of the inherent fragility of polite society, perhaps Southern Survival, a mix of Myth Busters meets Duck Dynasty, is the right blend of humor and practicality. The knives, invincible matches, and things like the breach pen can be found at their website, whether they come in a mystery box or a specific order. So no fear, if something great comes in the box, they’ll help you find another.
The most important thing about owning a tool is having it when you need it most. Think of a compact pistol in a self-defense situation or a first-aid kit after a catastrophic accident. Neither does you any good if it’s sitting at home while you’re on the road. Of course, it’s not always possible to carry a whole toolbox everywhere you go. Hence, keychain tools can go anywhere.
That’s why humans have used multi-tools for centuries — at least since roughly 200 A.D. when the Roman Empire was using a folding utensil set. That’s why our focus here is on multipurpose gadgets that can fit on your keychain ring.
Why rummage through your bug-out bag for the right tool when you can just reach into your pocket? What these little keychain tools lack in size and leverage they make up in portability. Need to wrench a bolt? Tighten a screw? Or pop open a bottle cap? Check, check, and check. In fact, a couple of these keychain tools could even work as a get-off-me tool in a violent scenario with enough training.
While none of them can help you build an emergency shelter, most can add more functionality to your daily loadout without adding that much more weight.
The Titanium Pocket Clip (or TPC) is first and foremost a suspension clip; hook it to your pocket or your belt loop so your keys don’t lie in a pile at the bottom of your pocket. It also has a bottle opener, 1-inch ruler, key ring holder, and a ¼-inch hex bit driver — all integrated into its small frame. (A $10 upgrade gets you a built-in LED light.)
Pros: > Lightweight and super strong titanium construction > Its brilliant suspension design frees up pocket real estate > Props to Big Idea for its outside-the-box engineering
Cons: > Essentially, it’s a Gucci key ring holder with a bottle opener; the ruler is too short to be practical and the TPC’s small size makes using the hex bit driver a tad frustrating.
The KERT (Keyring Emergency Rescue Tool) is a keychain tool that has an integrated seat belt cutter, which can also slice clothes, webbing, or other fibrous material. The stainless steel frame also houses four other built-in functions: screwdriver, bottle opener, oxygen tank opener, and ¼-inch hex wrench. Comes with key ring and vinyl slip-sheath.
Pros: > The integral seat belt cutter is a smart SHTF feature. > Sturdy flat screwdriver > Comes with a large key ring > Easy on the wallet
Cons: > Even with the slip-sheath, its corners are still kinda pokey — an innate drawback to one-piece multi-tools. > Bottle-opener design limits leverage
This little keychain tool has seven integrated tools: pry bar, key ring hole, wire stripper, bottle opener, cross driver, small flat driver, and medium flat driver. We also used it as an improvised box opener. A titanium nitride coating keeps wear and corrosion at bay. The Shard is promoted as being airline safe, so you can travel with it in most airports, too.
Pros: > Plenty of functions for its size > TSA-friendly travel companion > Cheapest of the bunch > Drivers work well despite being so slim
Cons: > Like most one-piece multi-tools, the Shard can give a minor jab when you sit a certain way or reach into your pocket. > Wire strippers are basically just for show.
Kershaw’s PT-2 is easy to use and provides an abundance of helpful features — all in a slim package that costs less than a movie ticket. It’s longer than most one-piece multi-tools (boosting leverage) while offering eight functions, including a pry bar, two screwdrivers, and a bottle opener. Plus, it comes with a key ring.
Pros: > Longer frame is easier to hold and use > Glass-filled nylon handle boosts grippy-ness > Affordable functionality > Included key ring
Cons: > The PT-2 would be a flawless keychain tool if it had a cutting element (i.e. blade, cord cutter, etc.).
Leatherman is synonymous with the term “multi-tool.” So, no surprise, the Squirt PS4 is hands-down not only the most comfortable model in this buyer’s guide (thanks to its smooth handles), but also the most useful. It comes with nine mini tools, including pliers, a 1.6-inch blade, and spring-action scissors. An easy choice for our Top Pick Award.
Pros: > Loaded with nine useful tools > Easy to use > Comfortable to carry in your pocket > Classic design scaled down
Cons: > Though a liner lock for the blade would fatten up the Squirt, it’d increase safety
The DoohicKey is a solid selection if you’re looking for a budget keychain knife. You can’t baton firewood with its 420J2 stainless steel blade, but its 2-inch length gives more cutting edge than most other keychain tools or knives. Plus, the included S-Biner MicroLock (a twist-to-lock carabiner) makes it easy to secure or detach the knife to packs or key rings.
When fossil meets future. The Prylobite might appear to be nothing more than a unique-looking friction folding knife, but it’s actually a cool, versatile six-in-one multi-tool. Aside from the 1.7-inch-long blade, this top-quality gadget also has a pry bar, hex driver, screwdriver, bottle opener, and suspension clip (to hang as a keychain tool or from your belt loop).
Pros: > Premium S35VN steel > G10 handle improves grip without adding weight > Visually appealing and practical
Cons: > Locking mechanism requires threading the included Nite Ize S-Biner carabiner through the blade and handle — secure but inconvenient.
This odd skull-shaped medallion is actually a 12-in-one multi-tool that’s designed to resemble the Vietnam-era insignia of the covert Studies and Observations Group which SOG is named after. It’s jammed with the usual tools (i.e. drivers and wrenches) as well as some pleasant surprises, including a cord cutter and a blade sharpener.
Pros: > A slew of integrated tools > Unique special operations motif > Carbide blade sharpener > TSA-friendly
Cons: > The short driver heads combined with the 90-degree orientation makes using it as a screwdriver awkward and impractical.

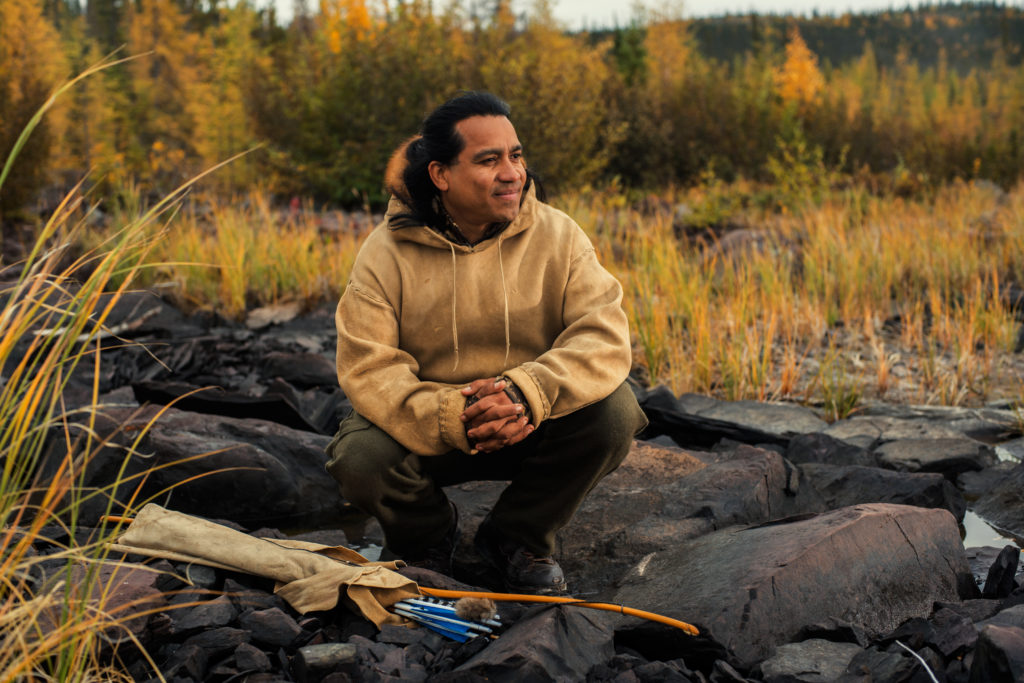
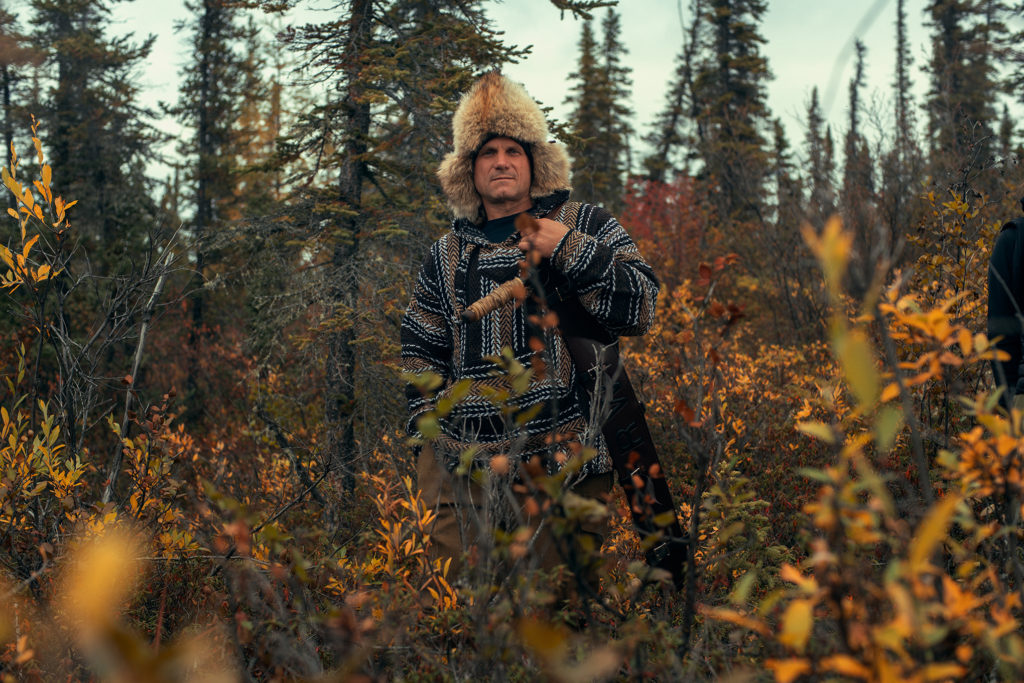


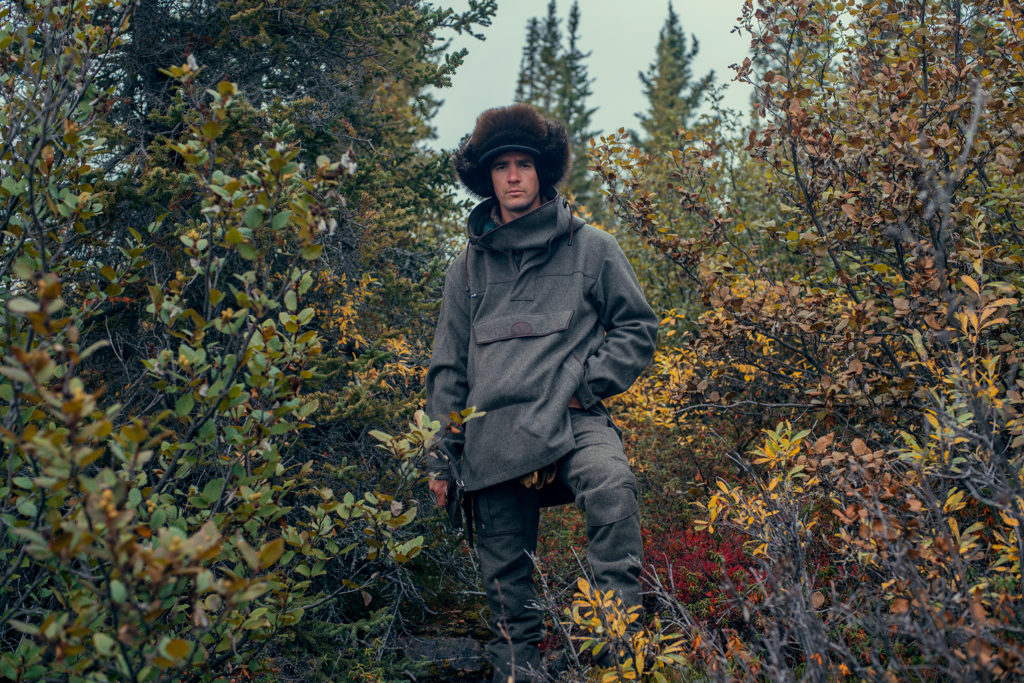
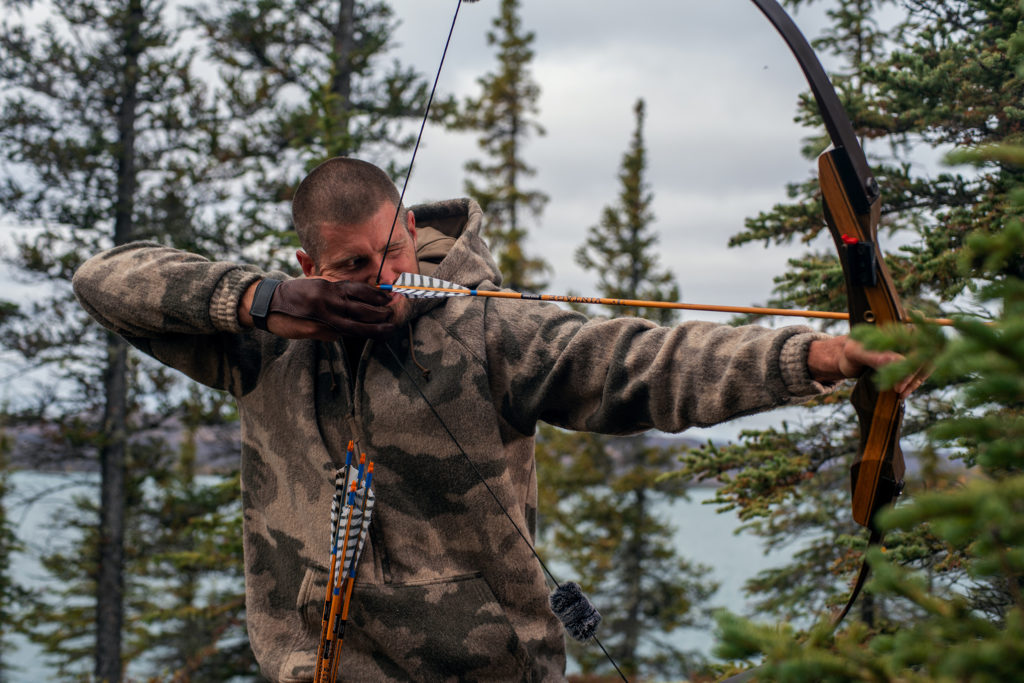
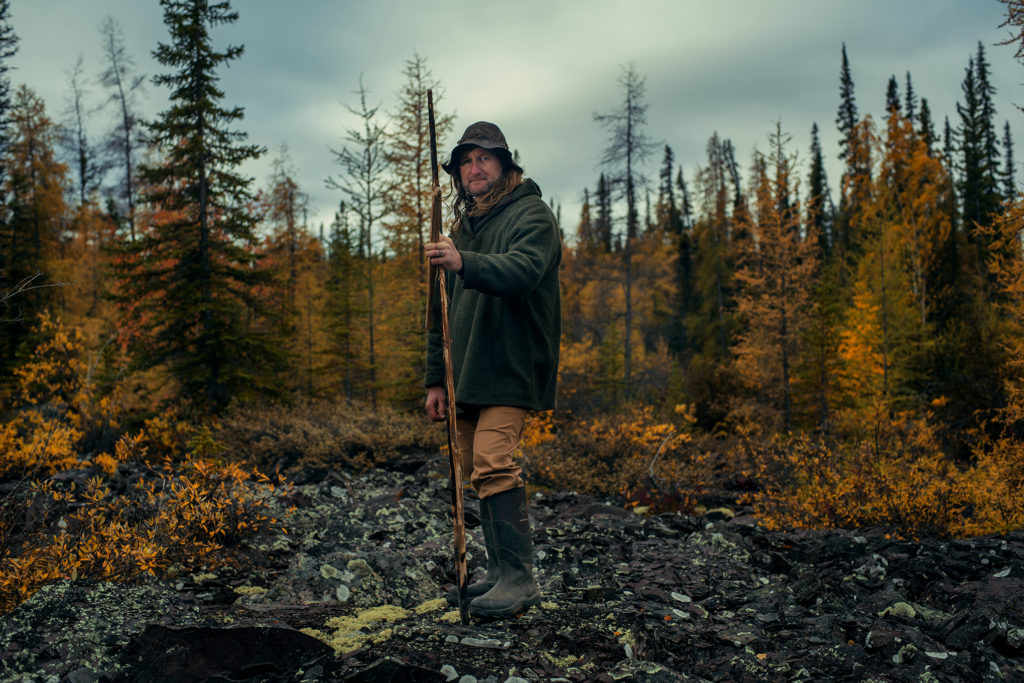


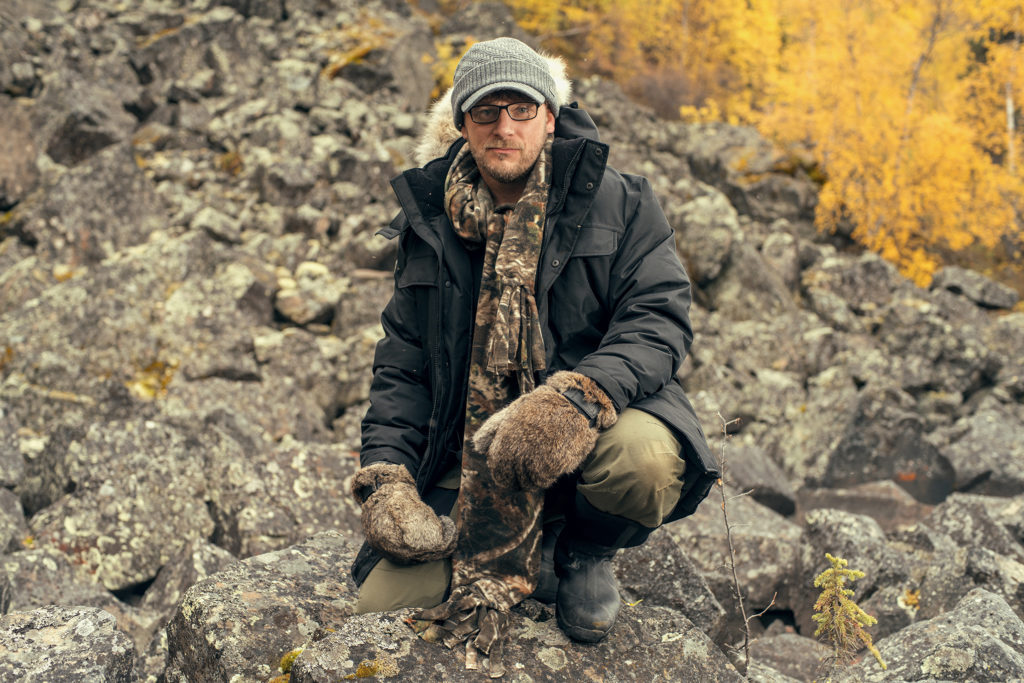

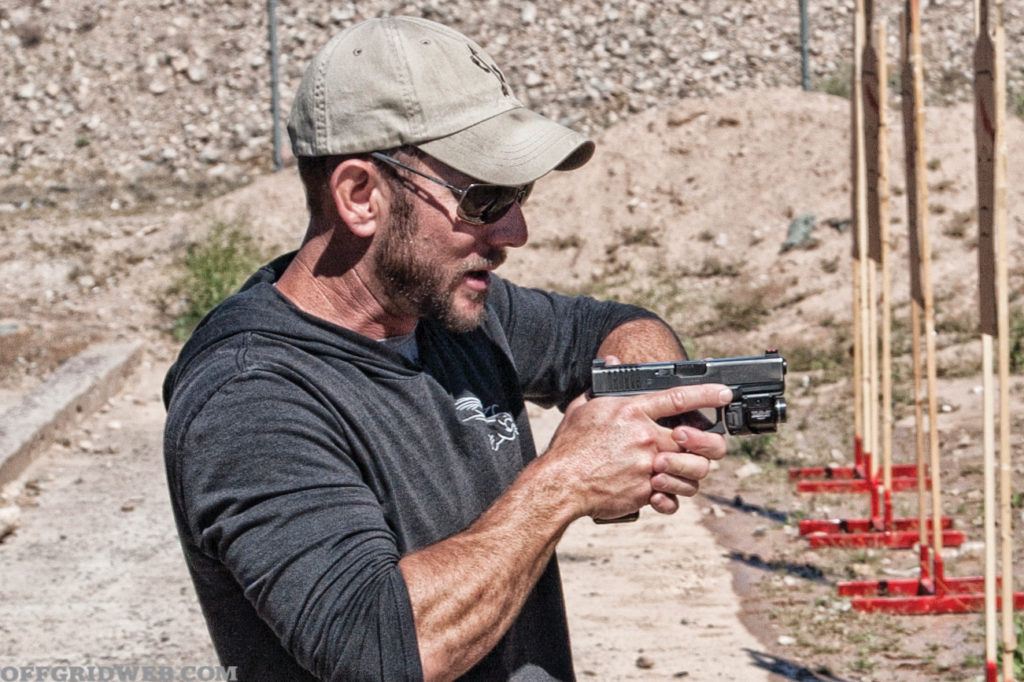 1. Clear cover garment; securely grip weapon.
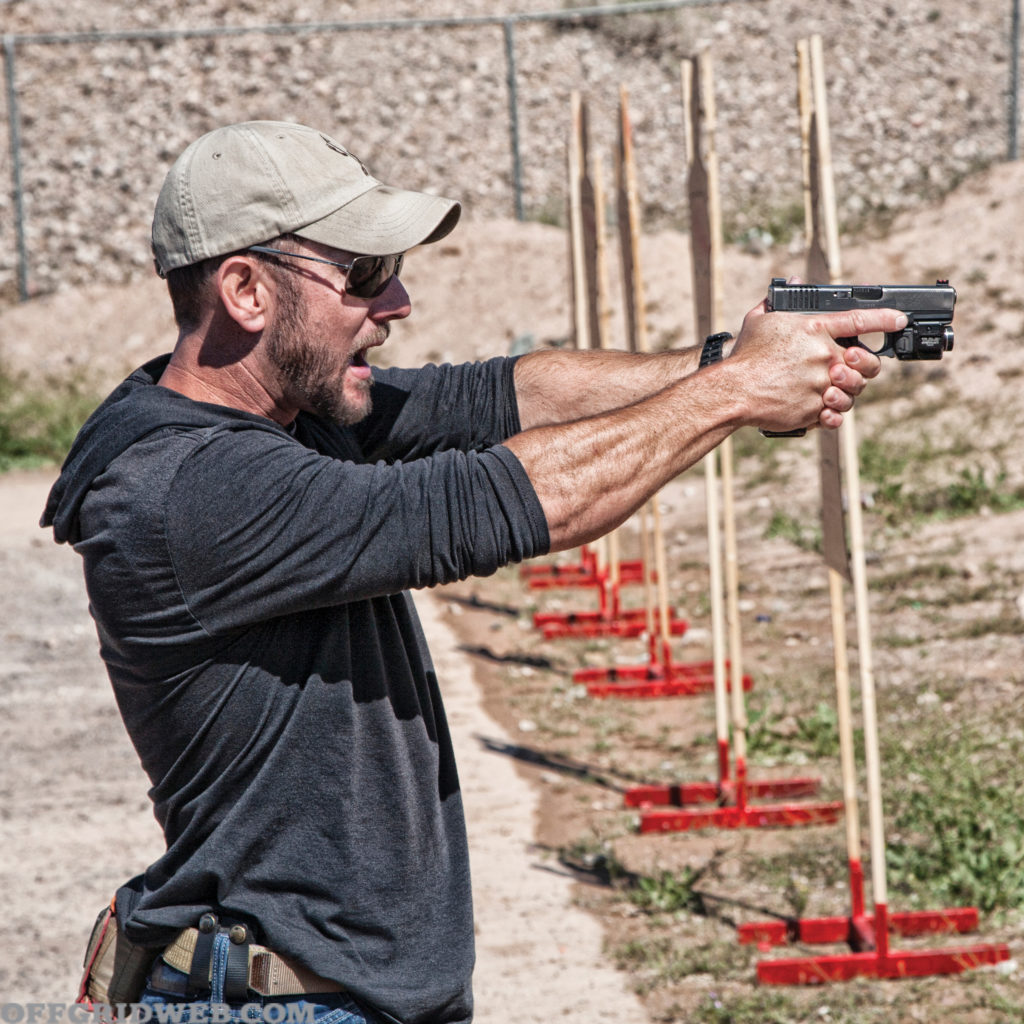

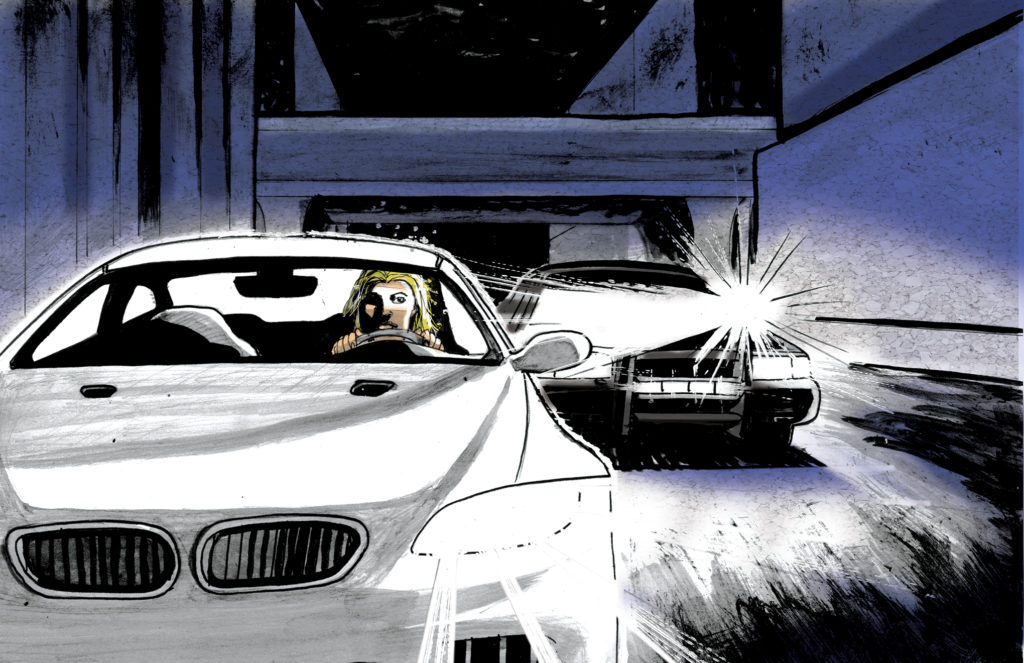
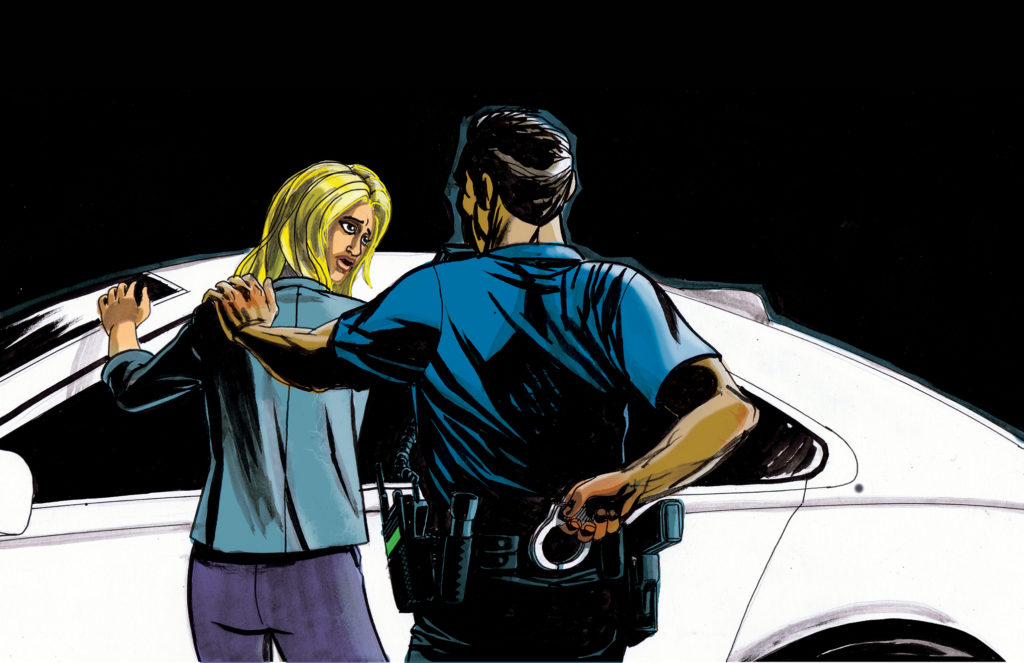

 Jason Squires has been an attorney in Arizona for over 21 years. He has an emphasis on self-defense and firearms cases. During his off-time, he’s an avid three-gun competitor across the country. He’s also a collector of military firearms and vehicles. You can check out his practice at