Shooting and gunfighting are not the same thing — this is a statement we’ve made countless times in this column and elsewhere in our magazine, and it’s always worth reiterating. A strong grasp of technical shooting skills when exercising concealed carry rights, is essential if you expect to defend yourself with a firearm, but that alone doesn’t make you a gunfighter any more than owning a plane and knowing how to perform a basic takeoff makes you a fighter pilot.
Preparing for a gunfight involves maintaining situational awareness, developing a defensive mindset, a smooth and consistent draw, balancing speed and accuracy, footwork, transitioning between multiple targets, and the ability to manage stress. It may also involve skills that are rarely practiced in a typical “flat range” setting, such as one-handed shooting, shooting from retention, and clearing malfunctions.
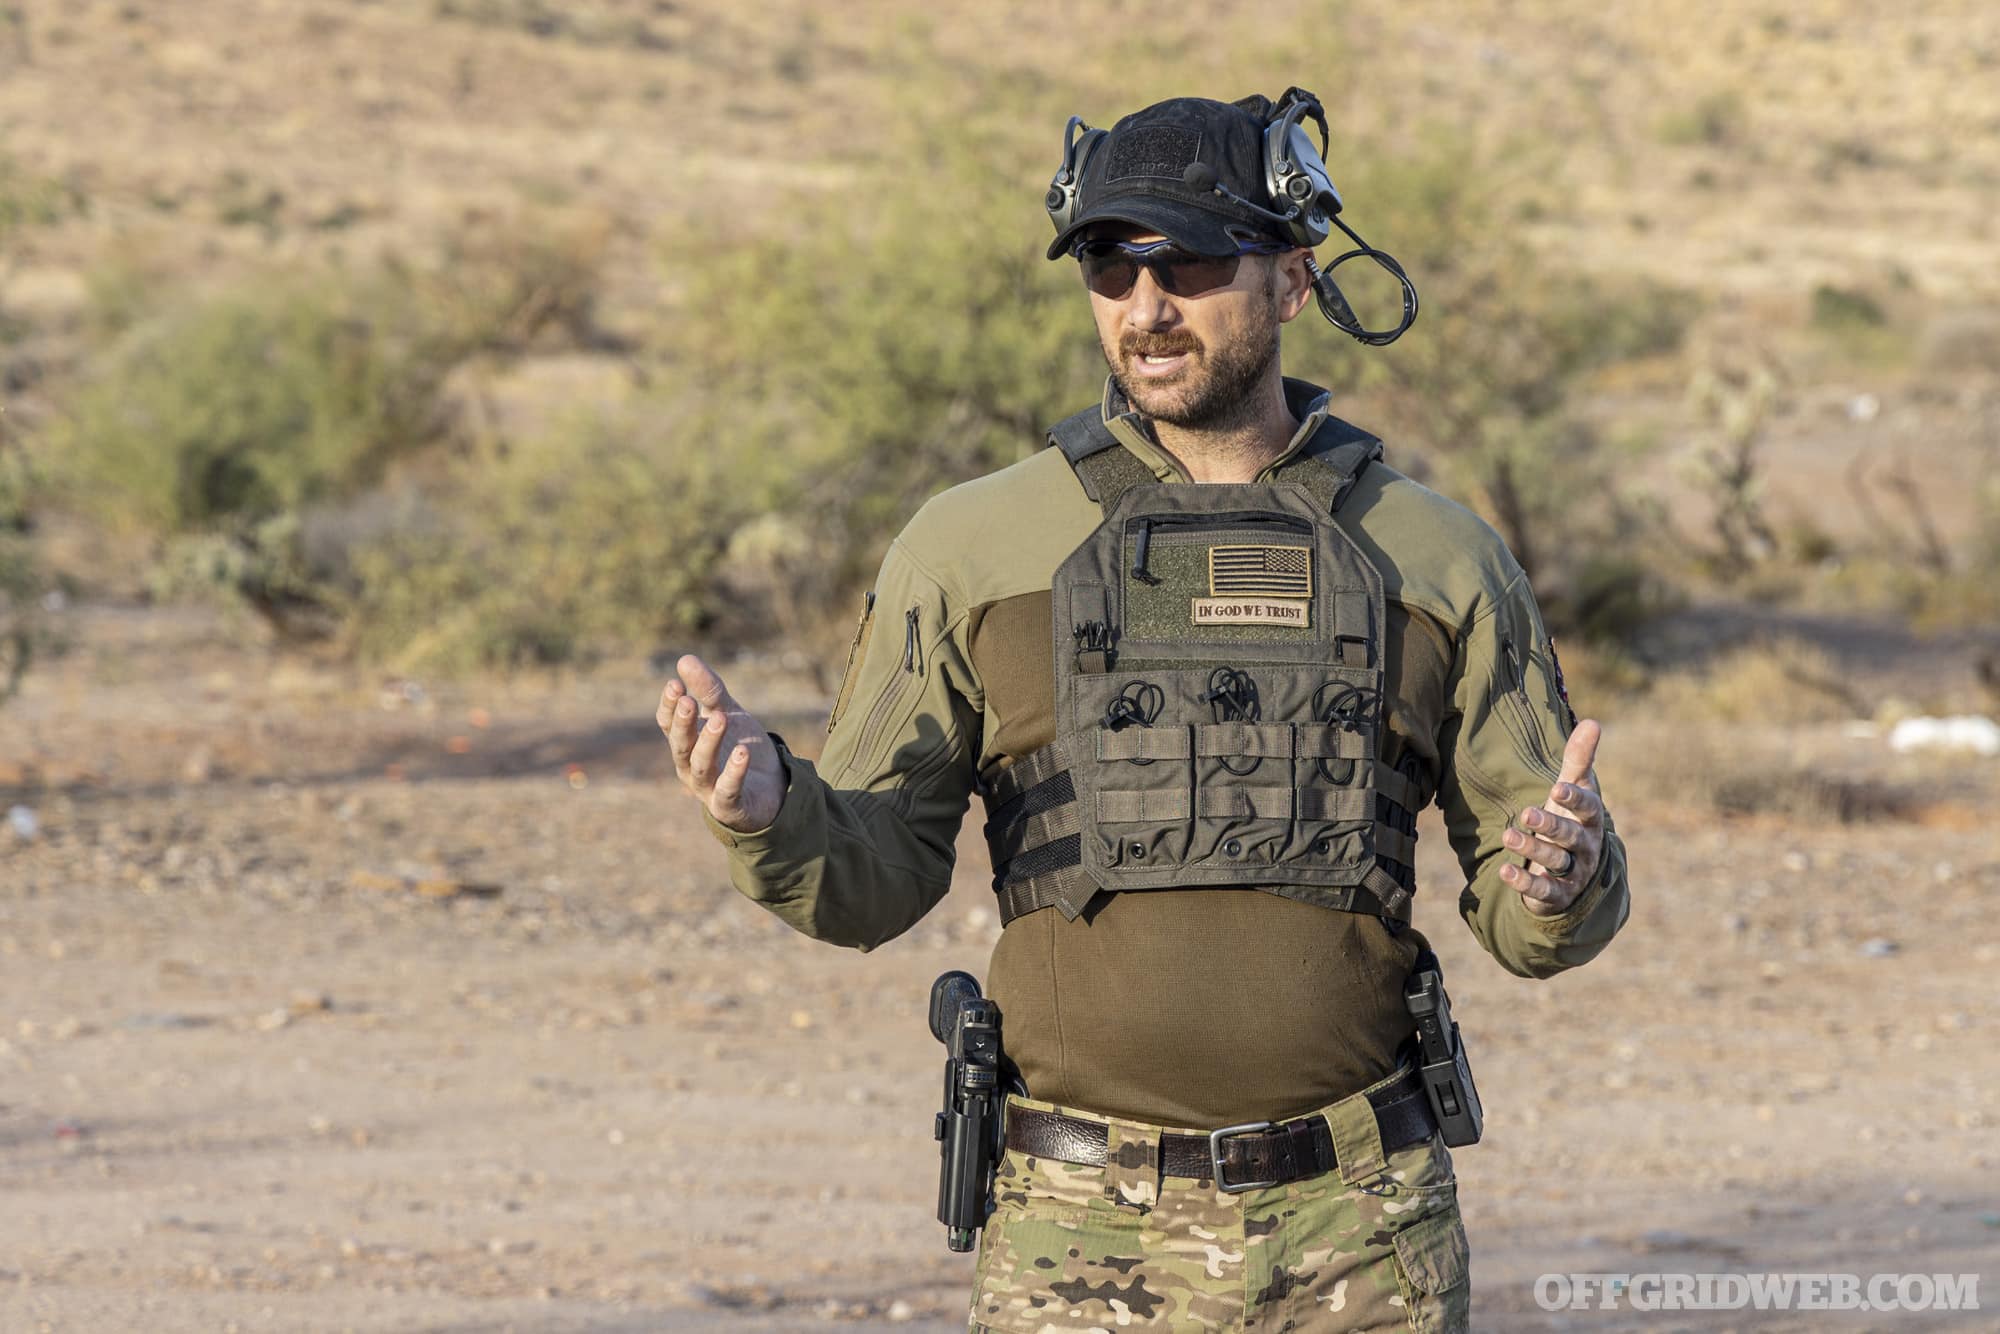
Each of these important skills were addressed at a Core Pistol class I recently attended, taught by lead instructor Chris Vermeer of Core Dynamics Firearms Training.
The Core Pistol class began with a discussion of defensive mindset principles. In addition to reminders of Murphy’s law (if it can happen, it’ll happen) and the OODA loop (observe, orient, decide, act), Vermeer mentioned the less commonly known Hick’s law (the more choices you have, the longer it’ll take to make a decision).
Above: We were reminded that our ability to observe our surroundings before and after an incident can be just as important as our shooting skills.
From these three principles, students learned the importance of preparing for worst-case scenarios, continuously observing our surroundings, and “pre-gaming” situations mentally in order to streamline our heat-of-the-moment defensive decisions.
We were also reminded that violent criminals don’t think the same way we do; they may be desperate addicts, mentally unstable, or ruthlessly determined enough that the presence of a gun won’t phase them in the slightest. In those cases, lethal force may be the only way to stop an attack.
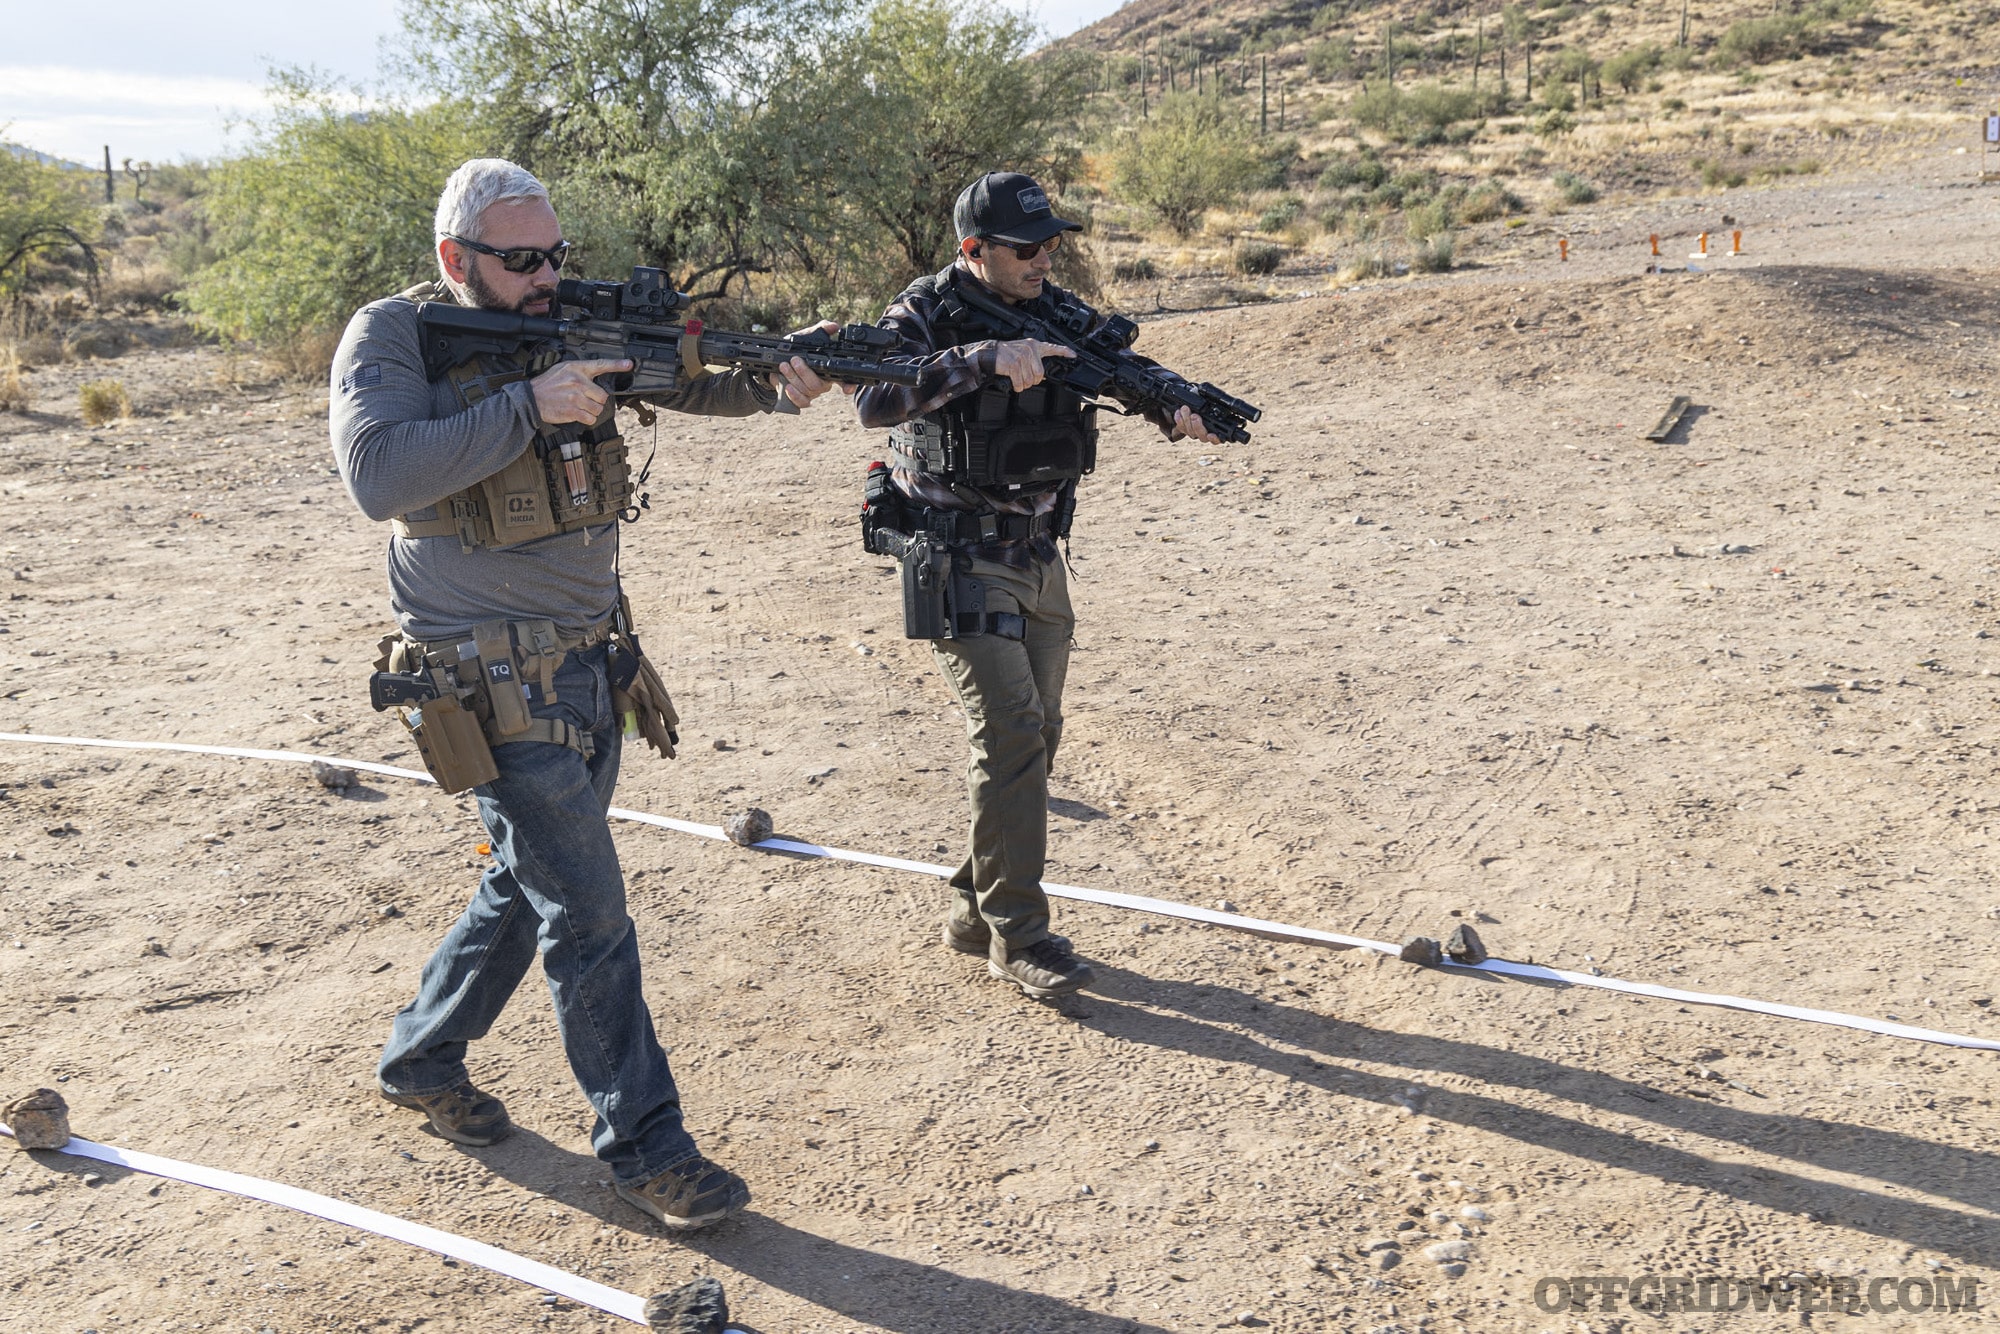
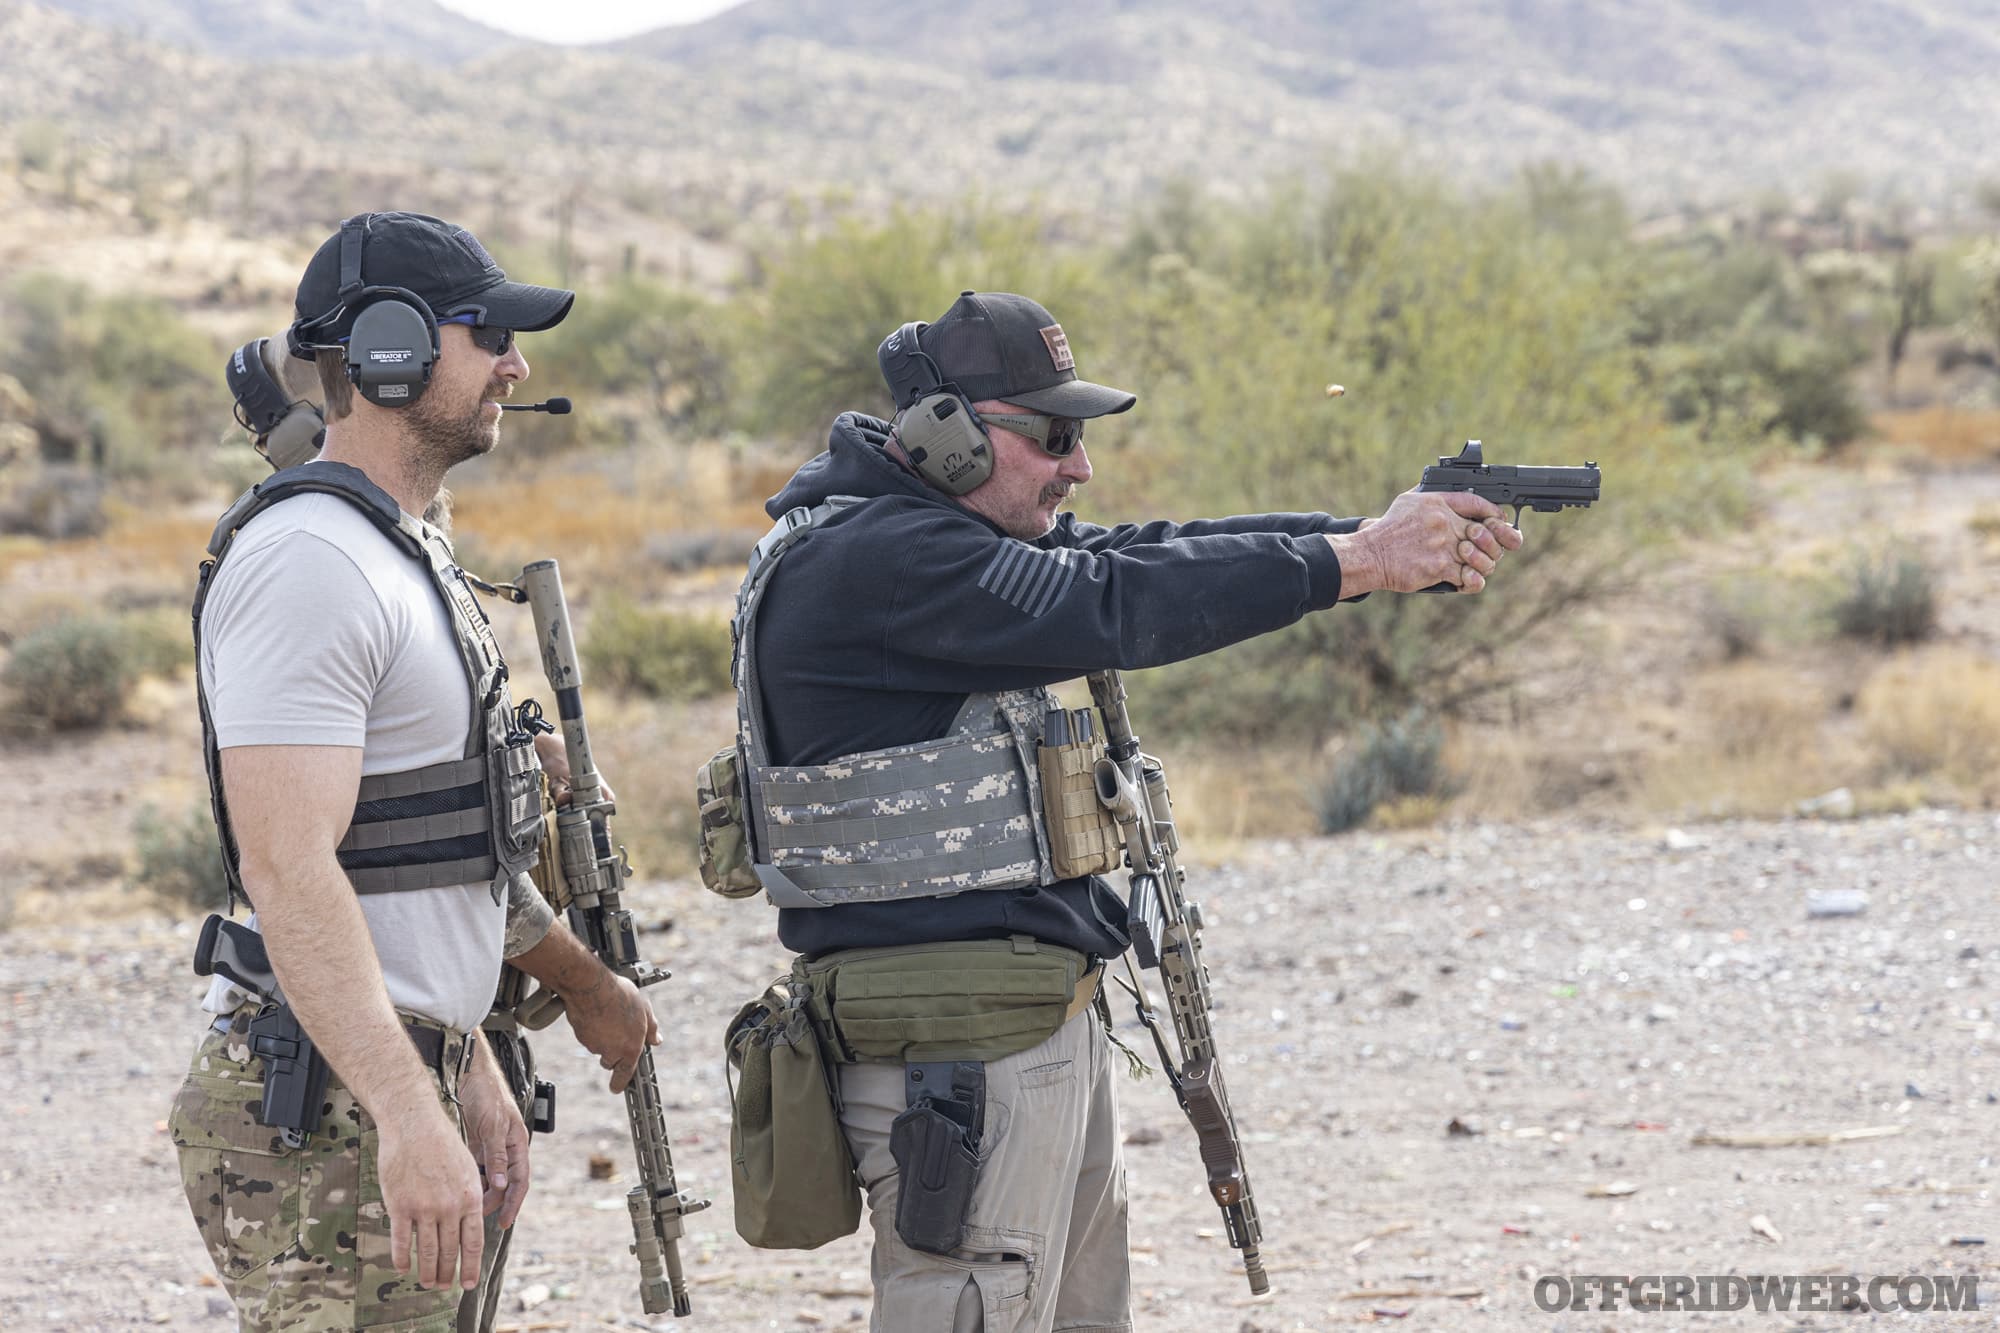
Stepping out onto the range, we practiced the classic five-step draw process from concealment: clear cover garment and establish a secure grip, draw the gun up out of the holster, rotate muzzle toward target, join with the support hand at sternum level, and finally extend to acquire the sights. Next, we worked from three ready positions: low ready (looking over the sights), temple index, and compressed.
Shooting drills started with slow and precise single shots to test our fundamentals, but quickly moved on to multi-shot strings with varying cadences based on target difficulty. We tested ourselves at distances from 5 to 25 yards, and even practiced no-shoot situations to simulate an opponent who surrendered before a shot was fired.
Malfunctions — which should be rare but are never impossible — were an important component of the class due to the aforementioned Murphy’s law. The classic tap-rack (smacking the magazine to ensure it’s seated, then racking the slide) is a technique Vermeer says most shooters don’t practice frequently enough. In order to make it a reflexive action, he recommended students integrate it into our daily dry-fire practice routine.
Above: Students drew from concealment, transitioned between multiple targets, and carefully balanced speed and accuracy.
As drills continued, students began sidestepping left or right while drawing, issuing verbal commands to the hypothetical assailant, and scanning a full 360-degree radius after firing. Obviously, we kept our weapons pointed downrange, but turned to look over each shoulder past the usual 180-degree “scan and assess” range.
To ensure the latter task wasn’t simply range theatrics, Vermeer quizzed us about what we observed once we had scanned our surroundings. In our final exercise, students paired up in front of two steel plates for a simulated fight. On the buzzer, each student quickly drew and shot the steel three times; whoever got three hits the fastest was the winner and advanced to the next round.
This induced stress, since each of us was aware of the consequences a fumbled draw or missed shots might have in a real gunfight.
I enjoyed my time at the Core Pistol class, and felt it was a nice refresher for critical skills related to self-defense with a concealed handgun. For more information on upcoming Core Dynamics pistol, carbine, and medical classes in Arizona, go to coredynamicsaz.com.
Read More
Subscribe to Recoil Offgrid’s free newsletter for more content like this.
We recently had the opportunity to attend a unique training event put on by a new start-up in the training space. It’s called The Solution, and it comes to us from BRVO Tactical – pronounced “Bravo Tactical.” The founder is an active-duty Special Forces Weapons Sergeant, a job that the Army codes in its database as “18B” or “18 Bravo” hence the name. He’s passionate about making Americans better prepared to deal with worst-case scenarios, saying: “I’ve spent my whole career in Special Forces going overseas and training foreign militaries so they can be better. I want to do the same for our own men and women here at home.” We believe that’s an admirable goal.
Photos by Patrick McCarthy
About “The Solution” from BRVO Tactical
First, let’s talk about what The Solution is not. It is not a carbine/pistol training course. In fact, we hesitate to call it a course at all. If you are looking to learn foundational weapons-handling skills like reloads, ready positions, safety manipulation, or fundamental marksmanship, begin your training path elsewhere before showing up to The Solution.
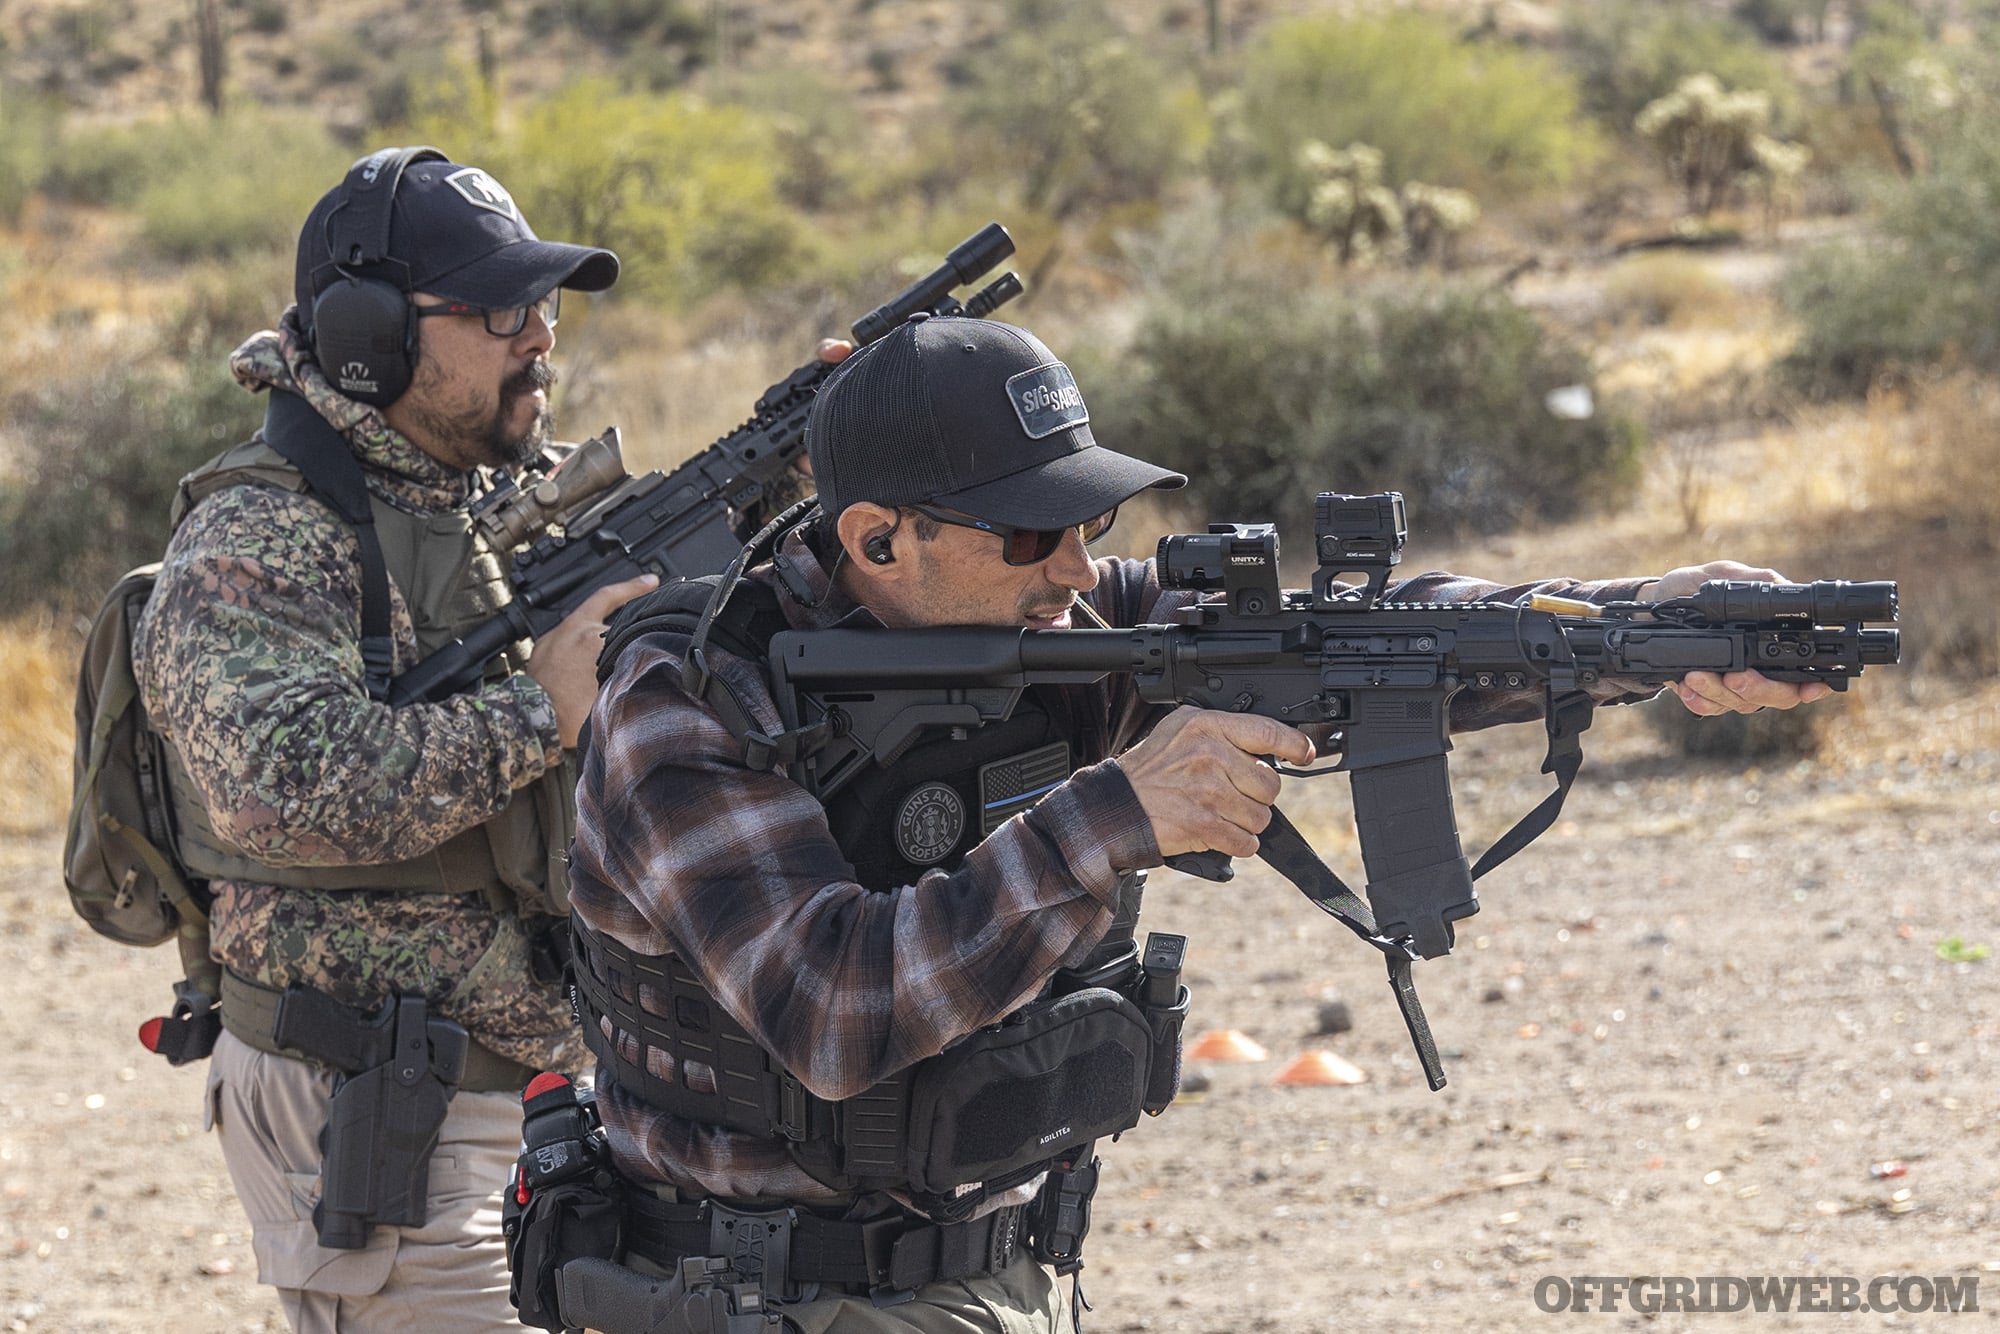
What this event will do is pressure-test your abilities as a shooter. Every problem you face will be complex, multi-faceted, and presented under physical and cognitive stress. In the first thirty minutes of the day, we were required to perform reloads, carbine-to-pistol transition drills, shoot on the move, transition on the move, and demonstrate the fundamentals of moving through a structure with a partner.
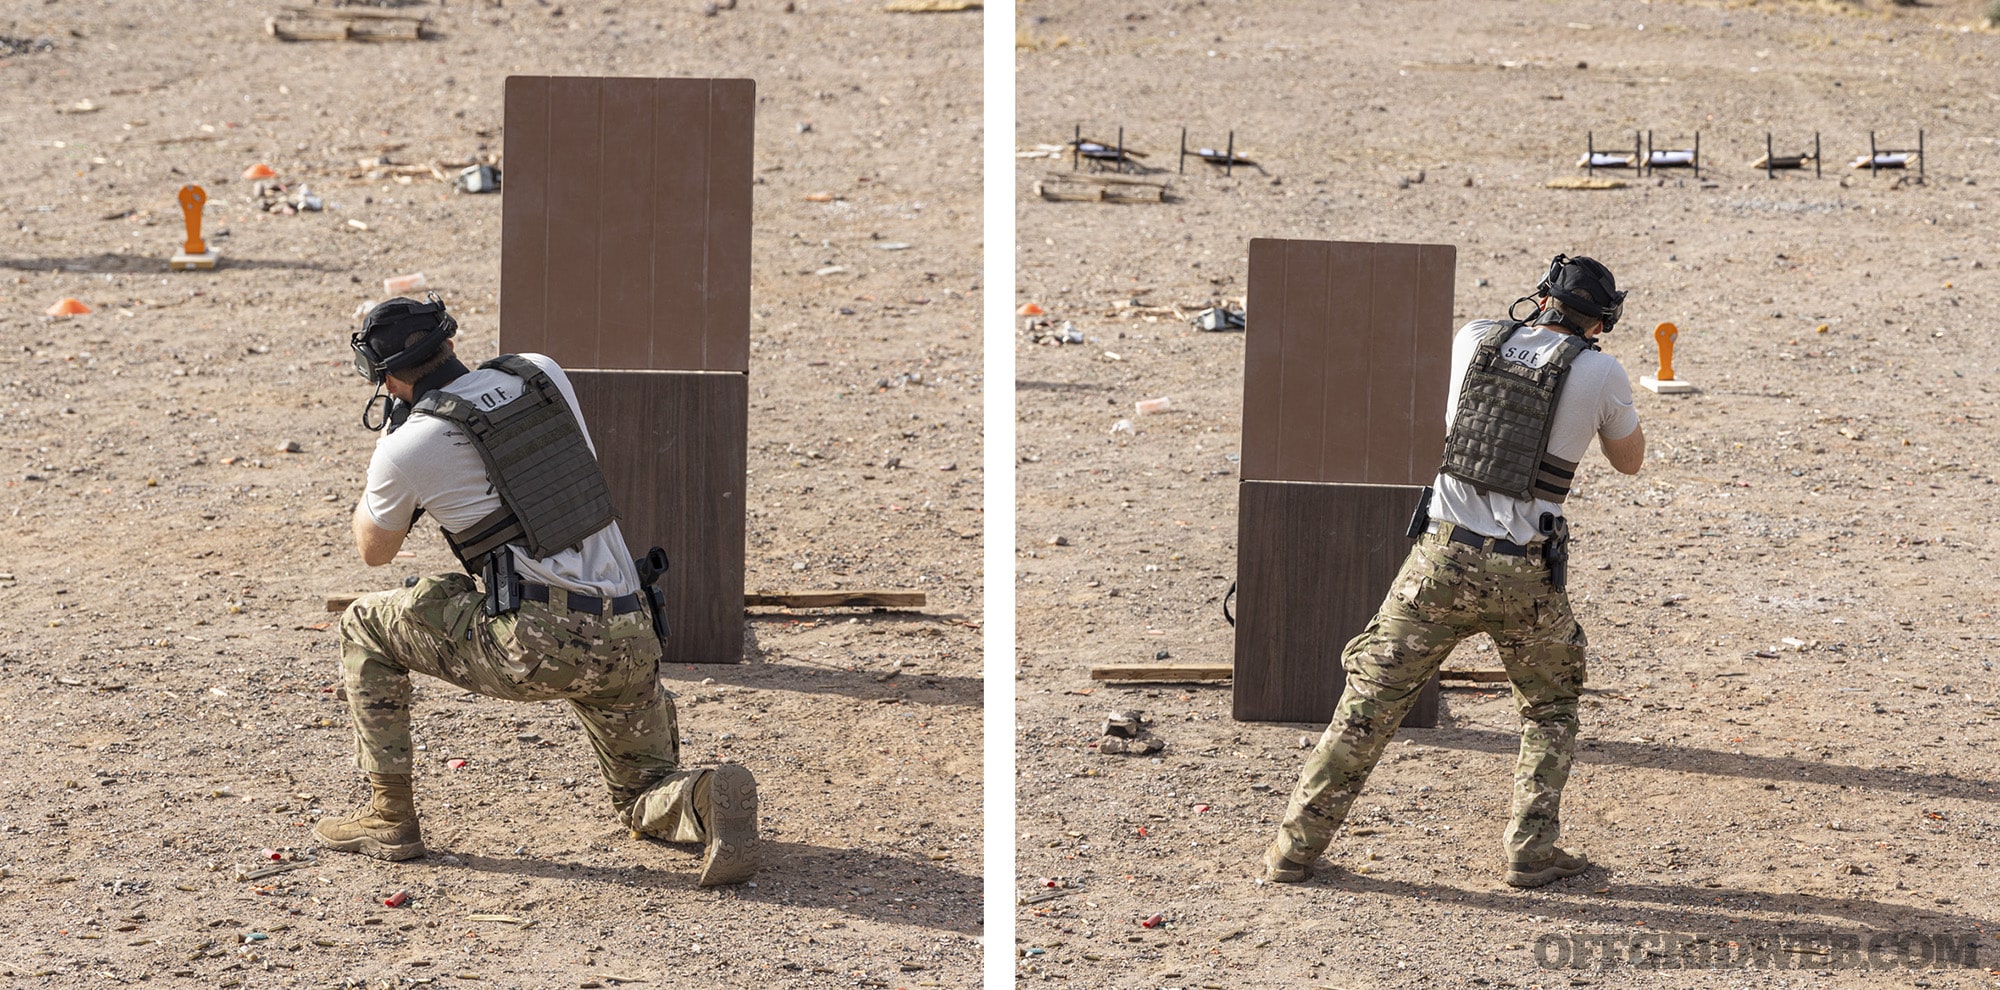
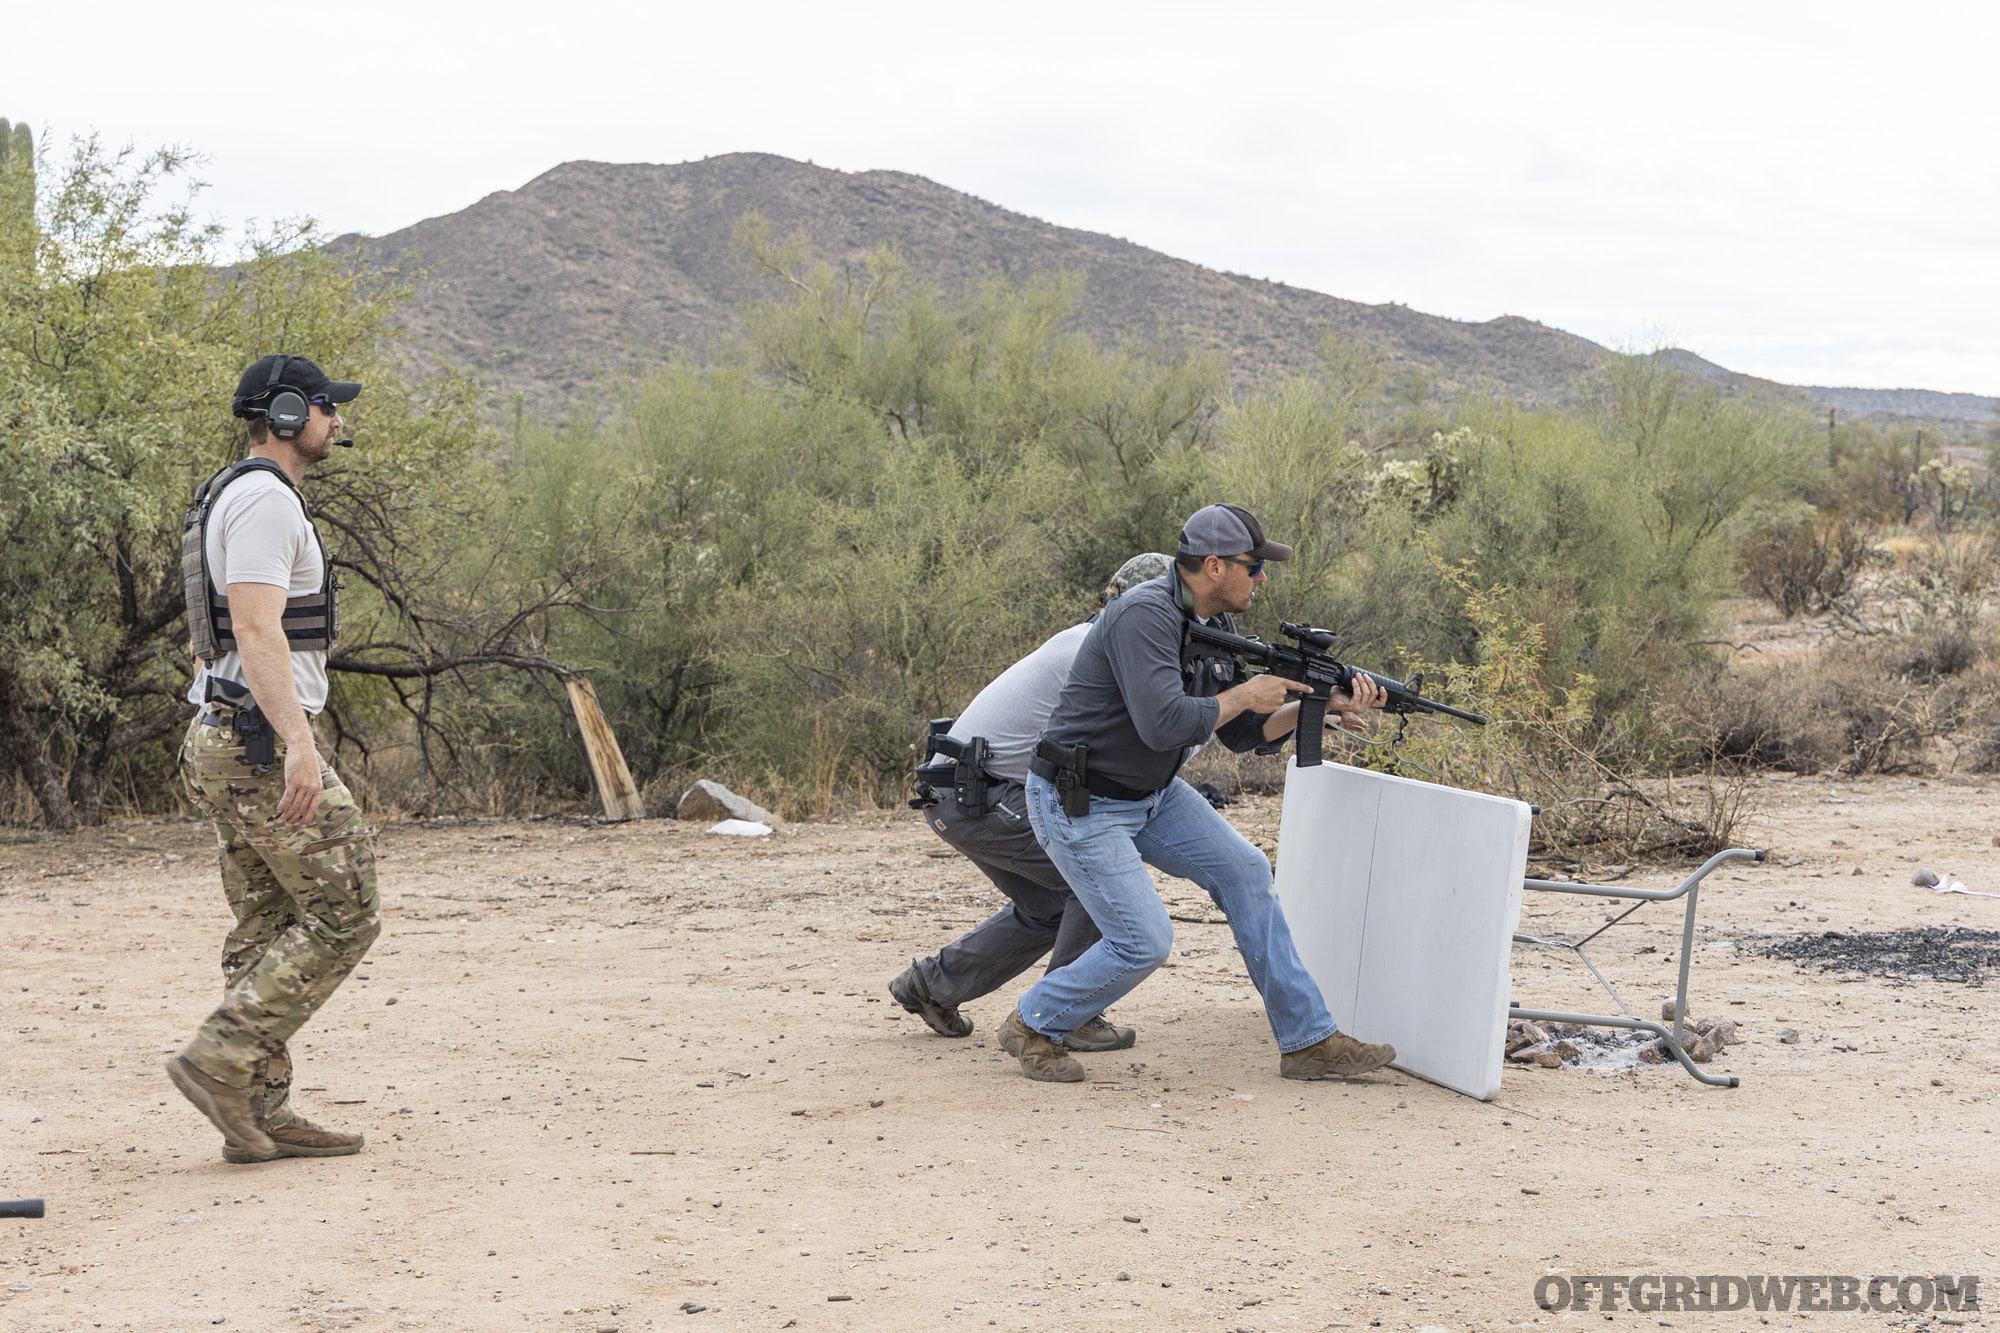
That first thirty minutes was the only time we spent on a line, shooting as a class. The remainder of our five-hour training day was a series of supervised drills, increasing in complexity, with an emphasis on working in two-person teams. This is not a Close Quarters Battle class, but the basics of traversing T-intersections and clearing corners were demonstrated by the instructor and rehearsed by each student team, including live-fire target engagement.
Above: The instructor demonstrated how to work around cover from both sides, kneeling or standing. Loading body weight onto the outside leg improves stability while keeping exposure to a minimum.
It Takes Two to Tango
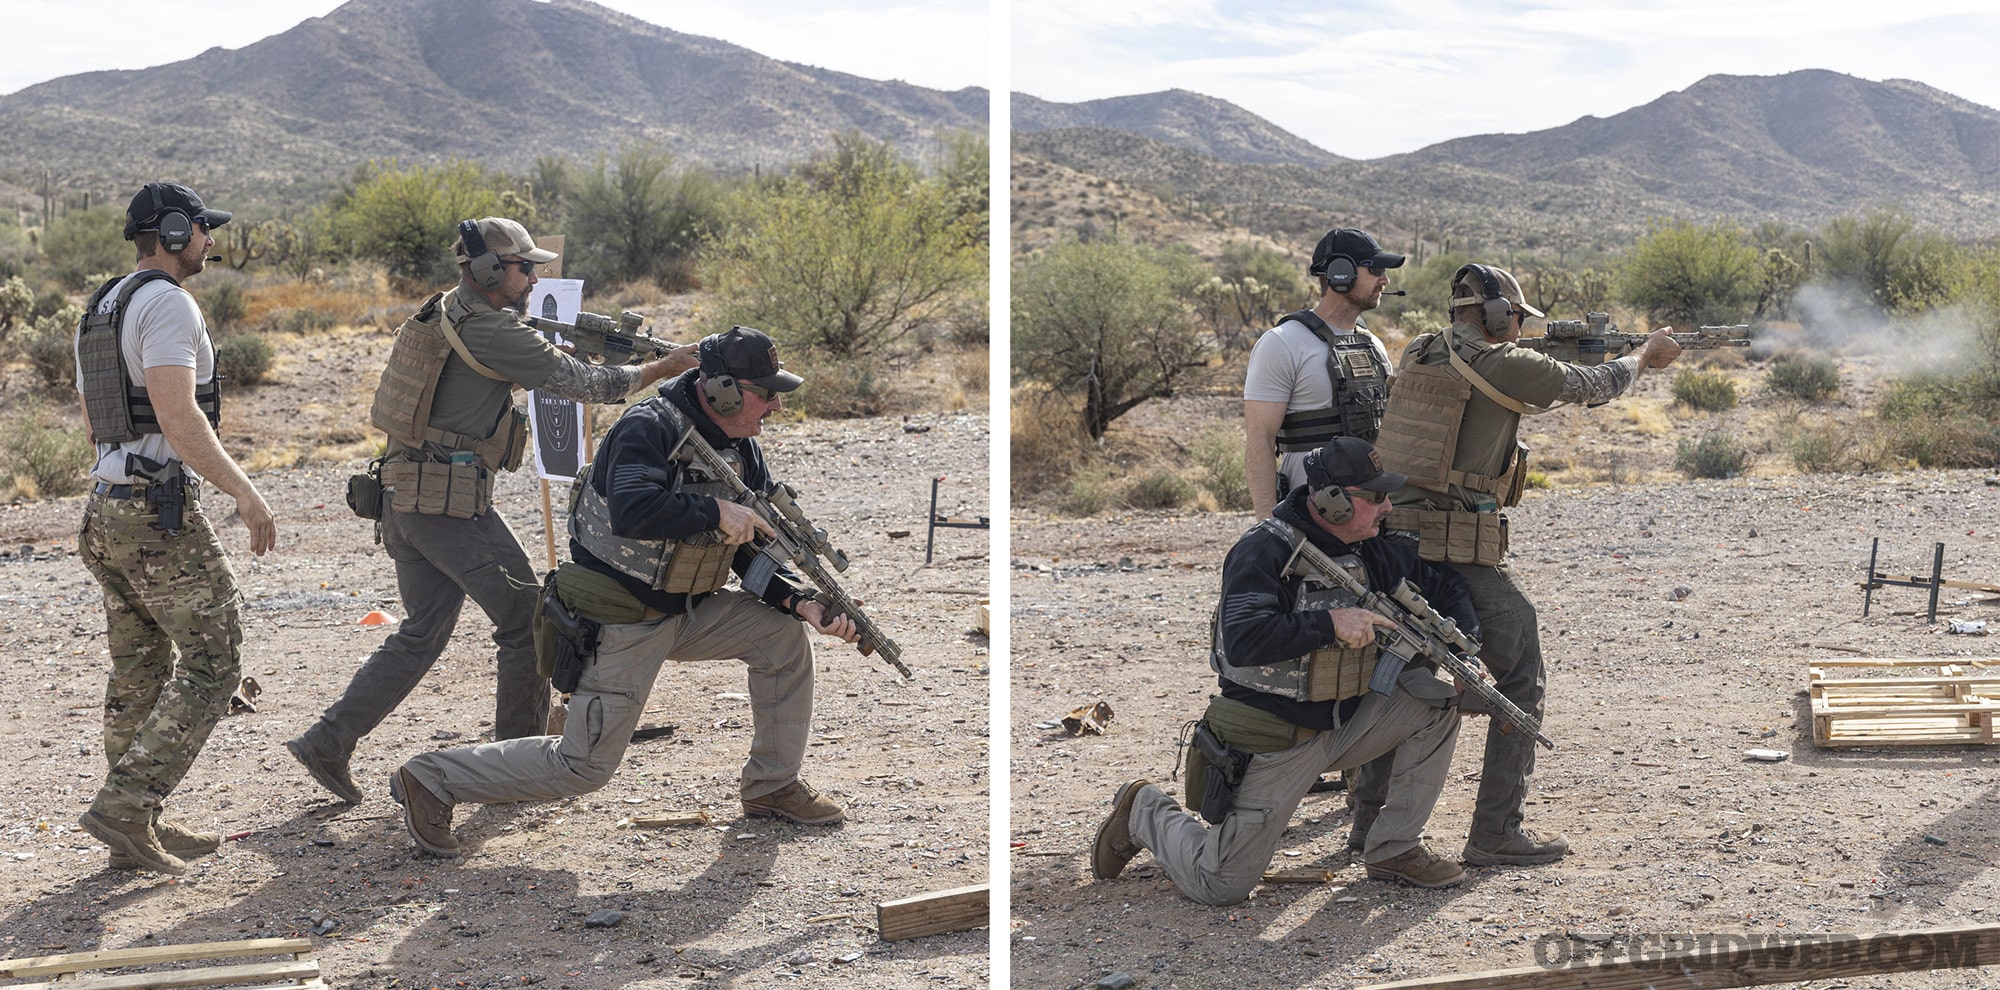
One of the skills most heavily focused on was how to react when your partner experiences a weapon malfunction or reload in the middle of a fight. Being able to protect your partner through body positioning and cover fire, then communicate effectively to get both of you back into the fight, is something the military trains rigorously. But most prepared citizens get little to no opportunity to develop this skill, even though we live, travel, and socialize in pairs and small groups.
Above: When one student experienced a malfunction or needed to reload, he shouted to his partner and dropped to one knee. The partner immediately stepped forward to engage targets until the problem was solved. Each pair of students repeated this leapfrogging maneuver several times along a linear path flanked by paper targets.
Each drill was set up by the instructor, explained to the whole class, then run by one team at a time. Because of this format, every student got a significant amount of individual attention. Instead of simply standing on the sideline watching each team perform, the instructor moved with each and every team, remaining within arm’s length of the shooters for the duration of their run. Not only did this maintain a high level of safety during the most complex drills, but it also let the instructor observe every student directly and provide tailored personal feedback.
Again, viewed as an assessment or proofing opportunity, The Solution’s fast pace and unique format will quickly identify gaps or weaknesses in your capabilities.
Above: Pairs of students ran between points of cover and took turns firing at steel targets in the distance. Accurate hits were the top priority, but speed was also essential.
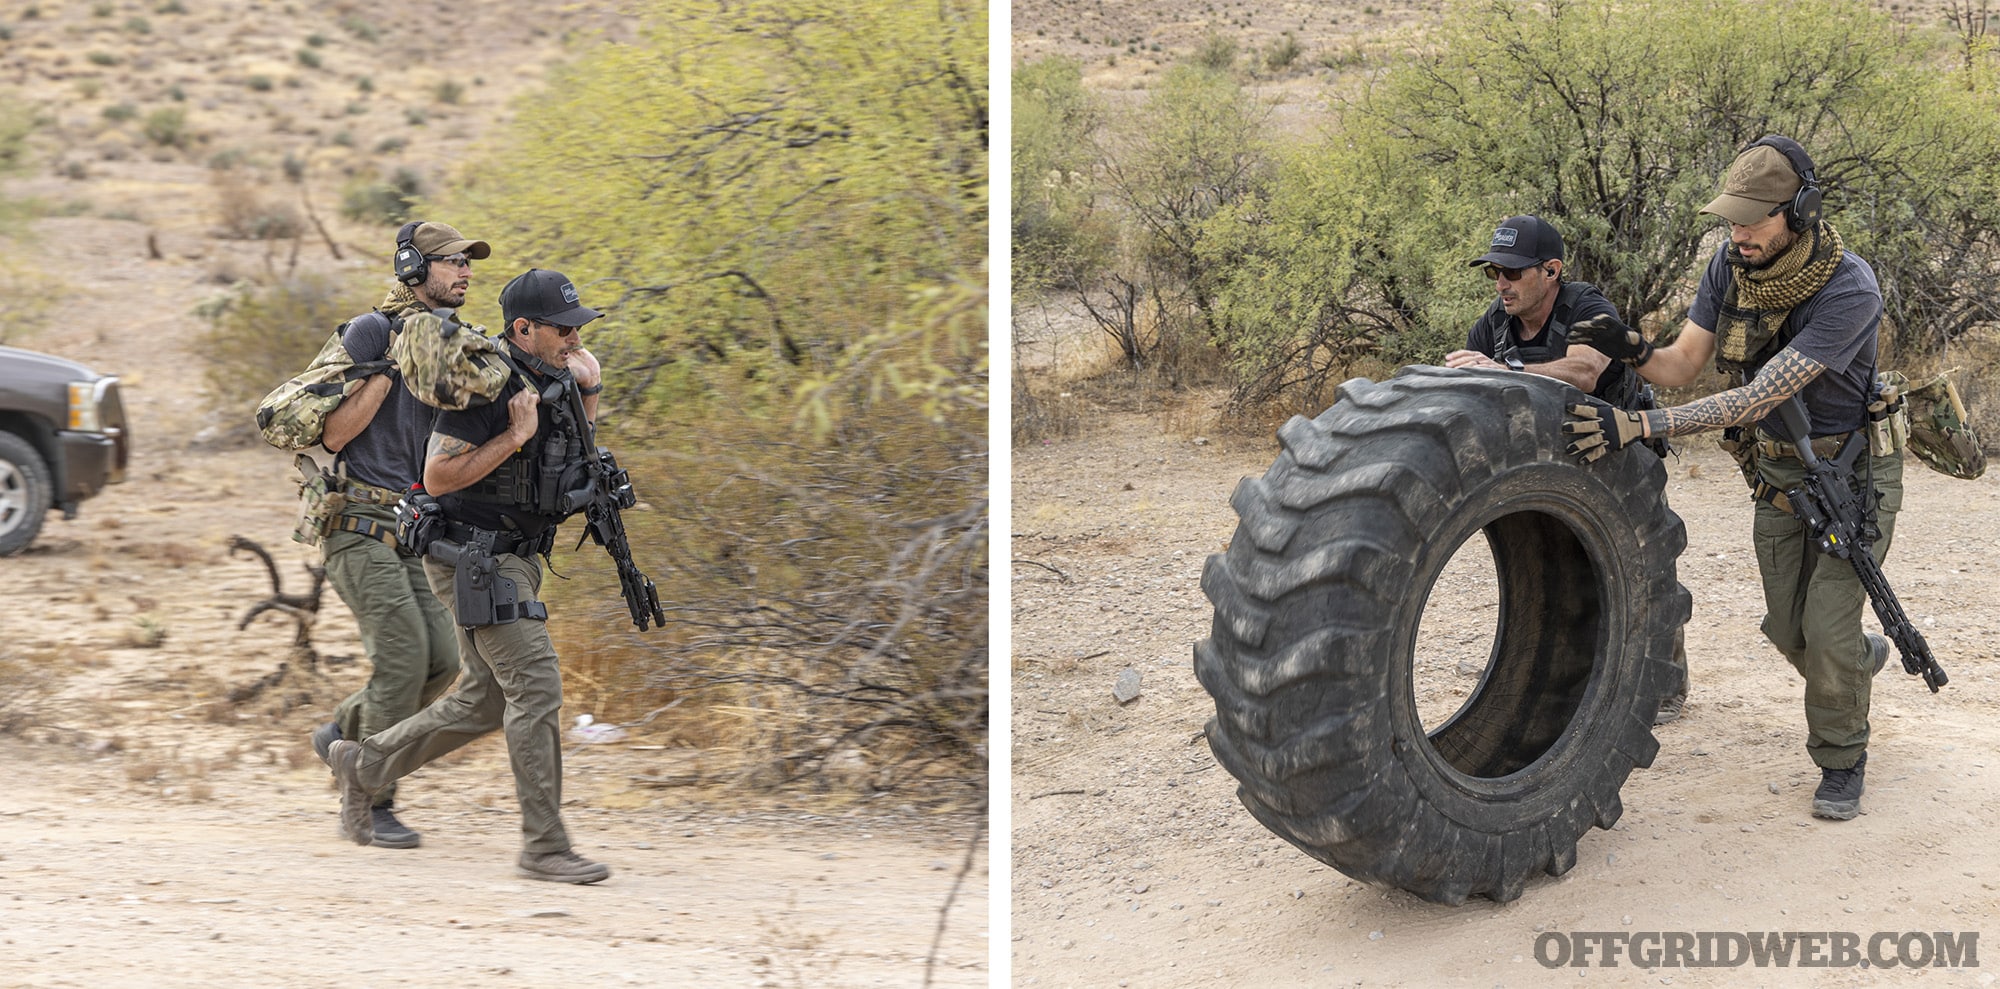
The final exercise of the day was a timed stress shoot that involved almost every individual shooting skill: movement, multiple targets, varied-distance targets, positional shooting, weapon transitions, and ammo management. There was also a physical fitness component involving several functional tasks — for example, weighted sleds to pull, a tractor tire to roll, and large sandbags to carry — scattered throughout the shooting stations.
The weight loads were not high, and you do not have to be an athlete to get through it. But it was more than enough to get our heart rate up, further complicating an already difficult set of tasks. Each team was timed, with harsh penalties for missed shots, and a handful of prizes for the winning team.
For a training brand that’s been in existence less than a year at time of writing, BRVO Tactical has come out the gate with an intensive training experience we’ve not seen anywhere else. Stay tuned to brvotactical.com and @brvo_tactical on Instagram for continued updates on new course offerings and upcoming dates.
Outrage culture is often perceived as a recent phenomenon, but it’s nothing new. Granted, the last few years have shown an uptick in keyboard warriors banding together on social media to berate, harass, and cancel anyone who draws their ire. But these so-called trials by hashtag are only the modern manifestation of a much older problem, the infamous witch hunt.
Law enforcement might call it mob justice; lawyers refer to it as a verdict from the court of public opinion; talent agents say it’s a public relations disaster. Either way, a subset of the population will always jump at the chance to grab their torches and pitchforks (figuratively, or sometimes literally).
For one example of this phenomenon, look at the story of Richard Jewell, an innocent security guard who was portrayed as a person of interest in the bombing attack on the 1996 Summer Olympics. This led to months of public harassment, 24-hour police surveillance, multiple searches of his home by the FBI, and a “trial by media” that forever changed his life.
As the populace’s rage snowballs out of control, the concept of innocent until proven guilty is quickly discarded, and one suggestion of a scapegoat might be all it takes to focus that rage on an innocent individual.
If you were unlucky enough to end up in the crosshairs of a modern-day witch hunt regarding a crime you didn’t commit, what could you do to turn the tide in the court of public opinion, or at least find some temporary solace? We asked former federal law enforcement officer Cody Martin and lawyer J.E. Conery to share their approaches to this complex and challenging scenario.
The Scenario
Situation Type
Implicated in a crime by false rumors.
Your Crew
Yourself, your spouse, and two children (ages 5 and 9).
Location
Tulsa, Oklahoma
Season
Late Summer
Weather
Clear; high 92 degrees F, low 70 degrees F
The Setup
You work as a field technician for a company that maintains and repairs machinery throughout the Tulsa area. This often involves driving your work truck to remote locations outside of normal business hours. One afternoon, you get a call for a repair at a construction site northeast of the city.
You’re met there by one of your coworkers, Jackie, who will be helping with the work. You and Jackie have never been on good terms; she’s frequently impatient and rude, but you always do your best to be professional. At 5 p.m., the rest of the workers pack up and head home, leaving you and Jackie alone to finish up the repair. Around 6:30, you finish the work, say goodbye, and drive home.
The next morning, you awake to a phone call from your boss. Apparently, Jackie never made it home last night and her family is frantically searching for her. Her work truck is still parked at the job site with her cell phone inside, and you were the last person to see her. Shortly after this call, the police come to your house and ask you some similar questions. It seems no one has any leads on her whereabouts.
The Complication
The next day, a friend texts you a screenshot of a social media post from one of Jackie’s family members. It mentions your name and strongly implies that you’re the one responsible for Jackie’s disappearance. Evidently, Jackie had previously told her family that you made all kinds of sexist, racist, and hateful comments to her in the past — things you’d never say in a million years.
It also notes that you were the last person to see her before her disappearance and calls for widespread community action because the police aren’t working fast enough. In a matter of days, the family is giving TV press conferences demanding your arrest, organizing protests, and mentioning your name and personal info in posts with the hashtag #JusticeforJackie. Nothing is specific enough to be defamation in the eyes of the law, but it’s certainly enough to lead to constant harassment.
To avoid getting wrapped up in the drama, your boss promptly fires you. Your wife’s employer seems to be considering doing the same to her. One of your kids was told “your dad is a murderer” by a classmate at school. News crews have started gathering outside your house, waiting to film and asking you leading questions. The police tell you they’re still conducting an investigation and don’t seem especially interested in intervening.
How should you go about dealing with all the rumors and accusations?
Should you attempt to address the situation head-on, holding your own press conferences and asking friends and family to spread the word about your innocence?
Is it wiser to avoid the spotlight and try to wait out the situation?
If the crime remains unsolved and harassment escalates into threats of violence against your family, would you ever consider relocating to a different state or even changing your name?
Former Federal Law Enforcement Officer Cody Martin’s Approach
Preparation
Like it or not, we now live in a world driven by the power and dangers of media sensationalism, both traditional and digital. As a result, we must be proactive in how our actions can either help or hinder professional and personal situations. Prior to any issues with my coworker Jackie, I need to take deliberate steps that go against the complacency most of us have when it comes to social media.
The first thing is to think before I post. I need to be mindful of not only what I post but also how I interact with other posts. Consideration must be made when it comes to how others will perceive my activity. I don’t want anything misunderstood or taken out of context.
In addition, I need to ensure my privacy settings are squared away to control who can see my posts, tag me in photos, and view my personal information. This includes taking precautions to not disclose personal information, such as my home address, phone number, email, or any details related to my daily routine.
Even sharing or being tagged in photos can provide metadata, identifiable landmarks, background details, etc. Someone can analyze background specifics, use Google’s Reverse Image Search, or even utilize harder-to-access machine learning algorithms to do the work for them. Using strong, unique passwords, and enabling two-factor authentication on each of my accounts adds extra security.
When I post, comment, or interact with any social media platform or forum online, I always assume that this can be not only traced back to me, but used against me, so I act accordingly.
Another safeguard is recording our conversations. I know that my coworker Jackie doesn’t like me, and based on her hostility, I’m going to make sure I have recordings of all our interactions since Oklahoma is a one-party state. I’m rarely alone with her on a job site but if I am, I’m going to make an audio recording of the entire duration of our time together, including my departure.
I’m not going to get fancy here. I’m going to use the Voice Memos App on my iPhone. I always carry my phone in the front of my work shirt anyways, since I don’t like to carry it in my pants pockets. This is easy to prep ahead of time to make sure I can hit record when the situation arises.
If I can’t make a recording, I need to make a written record of our interactions. Keeping things simple, I can make a voice memo or use the Notes app on my phone using voice-to-text to record the details of what transpired including specific comments, actions, and other relevant information.
And finally, I also want to make sure I have a digital record of my whereabouts during the day. Since Jackie has a history of making up stories and saying inflammatory things, I am going to use Google Maps Timeline to track when and where I have been.
With the right settings, Google Maps will keep a record of all the places I visit throughout the day, including the routes I take between locations. Another benefit is that it records the time I arrive and leave each location, as well as the route and time it took to get from one place to another. This can be invaluable when trying to prove when and where I have and haven’t been.
Combating accusations in a digital world requires us to use digital evidence to defend ourselves. Data, such as recordings, written records, and location tracking, can help provide evidence and establish a clear timeline of events. The balance is doing it in a way that is intentional and prioritizes privacy.
On-Site
Whenever there’s a full crew on site, Jackie’s not a problem; it’s the times we’re left alone that her true colors start to show. Today’s no different. We had little-to-no interaction during the workday, but when the rest of the crew left at 5 o’clock, she started acting hostile. She’s more aggressive than normal. Her comments are becoming more threatening, and her physical presence is growing more and more animated, so I’m glad I’m recording what she’s saying. As we finish up our work, Jackie finally ends her incoherent tirade by saying, “… I’m telling you, one of these days, you’re not going to leave this job site in one piece.”
As I’m heading out, I snap a few pictures of the job site before I head home. I do this as a hedge against someone complaining that work wasn’t completed, but it also gives me a record of when I left and at what time I finished up.
Based on the threatening statement Jackie made, and how “off” she seems to be acting, I’m making the decision to notify our boss. This isn’t anything formal, just a phone call to have a record of the incident. I’ll make sure to do this immediately upon my departure so that the details are still fresh in my mind. In addition, I plan on sending a follow-up email, just to have a digital record annotating my concerns.
I make it a habit to fill up the work truck on the way home, and I always thank myself the next morning. This helps create a digital trail of my post-work activity. These records serve as additional evidence of my whereabouts at specific times if it becomes necessary.
My concealed carry pistol is also worth addressing. I’ve made the decision not to disclose to my employer that I carry concealed at work. I carry within company policy and the laws of Oklahoma. However, if law enforcement becomes involved and I’m questioned about the events of the day, I’ll only disclose this information under the advice of an attorney. While I have nothing to hide, I know I’m well within the law and I want to make sure my rights are protected.
Crisis
Now is the time to go on the offensive, but I need to be strategic in my actions. Local law enforcement is “working” the case, but the wheels of justice are turning slowly. They offer for me to voluntarily come in for an interview, but I’m not doing that unless I have to and I’m accompanied by an attorney.
I haven’t been charged with a crime, so a court-appointed attorney is currently off the table. This leaves me spending my savings on hiring an attorney out of pocket. This is not a time to be cheap, but I do have limited cash available to put toward this effort. I might consider reaching out to organizations like the Innocence Project (innocenceproject.org), which could provide legal support, but it’s unlikely they’d be able to help since there are no concerns about due process and violations of civil liberties aren’t in play yet.
Another option is to try to find an attorney who will work on a contingency basis. Since I won’t have the money to pay a top-tier attorney upfront, a contingency attorney could offer me another alternative. If I can find one to work under this arrangement, they won’t collect any fees unless they win my case.
My last and final option will be to explore the crowdfunding route. While these platforms have helped other folks raise ridiculous amounts of money in their defense, I’m not confident they’ll work in my scenario. There’s a level of transparency that must be met, and I need to be careful how I navigate the scenario. Regardless of the option I go with, I’m going to have to spend my own money upfront for legal advice to make sure I’m not digging a hole I can’t get out of.
I also need to stay on top of everything that’s being posted, published, or aired. To do this, I need to take screenshots or video clips of all false posts, reports, or accusations. I will also start collecting all emails and other documentation that could help establish my innocence. I’ve done a bit of this work ahead of time, but now it’s time to start putting it all together.
Initially, I’m choosing to stay quiet to prevent any unnecessary attention. As the accusations and frenzy become more widespread, there will be a time I need to address things. When this happens, I will be open and honest about what’s going on and any potential “skeletons in the closet.” Transparency and proactivity can often help to mitigate the damage caused by exposure to these things. I’d also prepare responses to possible negative information that could surface. I’ll use my social media channels to refute pertinent allegations. I need to stay focused, explain the situation, and present any evidence I’ve gathered to counter the allegations in detail.
At the point allegations start turning into harassment, I have more decisions to make. One is whether I need to delete my online presence. I’ve decided against this because I believe it’ll only make it look like I have something to hide. Instead, I’ll continue to use them to address the situation and attempt to gather public sympathy and support.
As it relates to my job, and my unjustified firing, it’ll have to be a fight for another day. With everything else that’s going on, I don’t have the bandwidth to deal with that situation. Even though Oklahoma is an “At Will” state, there may be a chance I have a case for wrongful termination. However, the time will come to address this.
If things continue to escalate and we receive credible threats or if there’s an increased probability of violence, my number-one priority is ensuring the physical safety of my family. The first thing I will do is report this activity to the proper authorities. I’ll also coach and reemphasize what my family needs to be aware of and how they need to respond in various situations that may arise.
Some of my family members have brought up the idea of relocating, but I’m not sure there would be any benefit at this point. I also believe it will be easier to gather hometown support by staying in place.
We, unfortunately, live in a world where we need to operate in a constant state of preparedness for those unexpected “what if” scenarios. We need adequate preparation, prompt responses, and thorough recovery. This disaster management mindset transcends a lot of different situations that may occur in our lives. Whether it’s a man-made or natural disaster, personal crisis, or professional challenge, being prepared, responding promptly with solid information, and using what we’ve learned to improve is key. By maintaining this focus, we can better navigate through any difficult situation and increase our chances of successfully overcoming it.
Lawyer J.E. Conery’s Approach
This is a cautionary tale that should never have to be told, but one which is becoming more frequent in our anonymous social media landscape. How can we protect ourselves from mob rule and the modern-day witch hunt? Are there ways in which we can prepare ourselves or at least mitigate the damage?
It was the end of a scorching August. A customer needed some heavy equipment repaired, so I met Jackie at the work site. We both arrived around 5 p.m. The workers were leaving for the day, so it was just me and Jackie. We completed the repair around 6:30, I left the site … and Jackie was never heard from again. And that’s the end of it. Or so I thought.
Nothing is as simple as it seems, though, and if I could turn back the hands of time, I’d do many things differently. I would’ve done almost everything differently.
Jackie never liked me, and at times I thought she was setting me up for a discrimination lawsuit against the company. She’d often tell horrible lies, make claims that I was rude to her, and made sexist, as well as racist comments. My friends and family can attest that’s not my character. It’s quite the opposite, in fact. I have a great job, a loving family, loyal friends, and am genuinely a happy person.
Never in a million years did I think I’d ever have to defend myself against being accused of anything other than being the upstanding person I know I am. That’s not boasting — that’s a fact. Believing that everyone else shared my values was my first and biggest mistake.
Hindsight
Only with the benefit of hindsight can I clearly see the missteps I made. I hope that you’ll not only listen to my story, but also use it to protect yourself. In the blink of an eye, this could happen to you, and then it’s almost impossible to put the brakes on in time to protect your good name, your family’s safety, and get your life back on track.
Looking back, I recall that not only did Jackie not like me, but she also actually didn’t like most people. I decided early on to not give in to her negativity and kept the relationship professional. Jackie’s attitude toward me and the way she portrayed me to others often made it seem like I was a troublemaker.
But why? Did she have bad experiences with men? Was she jealous? How could that have been the case because we were on equal footing at work? Did she just not like me? At this point, it’s all irrelevant. Jackie was gone, the court of popular opinion was in session, and the jury was already rendering its verdict based on Jackie’s lies. I was guilty even before I could call my first witness.
If someone were to look at the facts, it indeed was possible for me to have harmed Jackie, or worse. The guilt or innocence of a person, even with only circumstantial information, is often based on three things: motive, means, and opportunity.
I had the means because I’m stronger than Jackie and could have easily overpowered her. I had the opportunity because we were alone at a remote work site. I did not, however, have the motive because I never thought twice about doing anything to Jackie even though she’d trashed my name. That’s the gray area, though, because I can now see how someone could think slander was motive enough for me to take action.
But to make a coworker disappear? That’s where the standard of “beyond a reasonable doubt” should ultimately clear me … at least from prison. I’m in a different kind of prison now, and I’d like to think that I could’ve better prepared myself to head this thing off at the pass and help find Jackie instead of allowing the world to think I caused her disappearance.
Aftermath
Oklahoma tornadoes begin with a few swirling winds, and my storm is no different. The morning after we were called to the work site, I woke to a ringing phone. It was my boss. She sounded panicked and told me that Jackie never made it home from the job site. Jackie’s truck was still there, and her mobile phone was found on the floorboard.
She ended the call by saying that I needed to stay home because the police wanted to talk with me, considering I was the last person who saw Jackie. The police came by, asked me a few questions, requested permission to search my truck (which I gave), and left. I expected that they’d have follow-up questions in a day or so but could never have imagined in my worst nightmare what was to come.
Later that morning, a friend text me a screenshot of a social media post from one of Jackie’s relatives that mentioned me by name and implied that I’m responsible for her disappearance. Apparently, Jackie also spread her lies about me to her friends and family. Shortly after I read that text, my phone rang.
It was my boss who called back to tell me that I was fired and that the company had no interest in being caught up in the drama. I spent 10 years with that company, and they fired me with a phone call over something I wasn’t even a part of? A few minutes later, my wife called to tell me that she was coming home. She hadn’t been fired, but her boss wanted her to stay away from the office “until things cooled down.” I was stunned.
Why would anyone at her office even know about the social media posts? I turned on the TV and got my answer — Jackie’s family had called a press conference to solicit help from the community. Initially, I thought that was appropriate and something I’d do. What I didn’t know was that earlier in the press conference I was mentioned by name and accused of being responsible for her disappearance.
I became lightheaded, weak, and nauseated. How could this be happening? Then, the kids returned home from school. One of them was crying because he was told that his daddy was a murderer. It was their first week. How would they get through the year without a constant barrage of insults and stares? At the end of the day, news crews gathered around my driveway.
Neighbors were in their front yards gawking, some being interviewed. Never had I felt so alone and ill-prepared to deal with something as serious as this. In a single day, I lost my job, my wife was on the verge of losing hers, my kids were harassed, and the entire greater Tulsa viewing area heard Jackie’s family call me out by name and now know where I live.
Over the next three months, our family endured threats and accusations from Jackie’s family, strangers, and an activist police department that was only looking at me. And to my horror, they succeeded. I’m sitting here in my 8×10 cell awaiting trial and can only dream about what might’ve been. My wife and kids ended up fleeing the state and are starting over somewhere in western Colorado. I was adamant that my wife not tell me where she’d gone. We keep in touch through pre-paid prison phone calls.
Preparedness Lessons
I’ve thought a lot about what I would’ve done differently to prepare and protect myself. For starters, I should’ve had better situational awareness at work and made sure I kept my distance from a woman who didn’t like me. I should’ve gone out of my way to be as nice to as many people as possible and, more importantly, made sure others witnessed me doing that, especially Jackie’s friends.
An email or text trail could’ve been helpful in building a credibility case in my favor, but one has to be extremely careful and always write with the knowledge that texts and emails might be shown to a jury in open court — no jokes, no political discussions, and for damn sure no disparaging remarks about coworkers nor the company.
It may seem over the top, but with someone like Jackie I might’ve even recorded our conversation at the work site. That’s allowed under Oklahoma law provided one party knows they are being recorded. Additionally, because I was going to a remote work site, I should’ve established a trail of digital breadcrumbs.
It could’ve been as easy as sending a quick text to tell someone where I was going and when I expected to finish. I could’ve taken a picture of the work site when I arrived and left so the date and location would be in the phone’s metadata. If during the job there were signs that something was off, I could’ve asked Jackie if anything was wrong. If she became aggressive, I would’ve excused myself, gotten in my truck, and called my supervisor.
If I couldn’t reach my supervisor, I would’ve called the police. That would’ve done two things: 1) It would demonstrate that I cared for the wellbeing of my coworker; and 2) It would create a record of the date, time, and location. One never knows what goes through a person’s head or if they are in the midst of a health crisis.
It was late August and any one of a number of things could’ve happened from heat exhaustion to a missed dose of medication that could result in delirium. On the way home, I could’ve left another digital breadcrumb and used my credit card to get gas in full view of security cameras.
I didn’t have one, but if there was a weapon in my vehicle, I could’ve immediately volunteered that information. Having a gun isn’t illegal in Oklahoma. If it later turned out that Jackie was shot, ballistics would’ve likely cleared me. The reality is that if the authorities questioned enough people, they would’ve discovered that I owned a gun anyway.
Would that have been risky? Absolutely, especially if your employer has a policy against weapons in company vehicles. Better to lose your job than your freedom.
The authorities weren’t on my side, so I was very guarded in my interactions with them. I was polite, but careful knowing that every single thing I said would be included in their case file. I could’ve contacted the Oklahoma Bar Association, which can help find legal services for low-income people. I wasn’t “low income,” but I could’ve lucked out and found a pro bono clinic. I wasn’t a part of a union, but if I was, the union might’ve provided advice at least for a wrongful dismissal claim against the company. The company might not like the negative press of firing someone who was accused for no reason, so they might’ve let me keep my job.
Help yourself. Don’t go through such a nightmare alone. In fact, never do anything alone in your personal life, especially if you’re adventurous and go camping, fishing, or off-roading. At a minimum, leave that digital trail to help others find you in case of an emergency.
If your smartphone’s battery is running low, quickly send a text message to several of your trusted contacts and state the date, time, place, and whatever information that could help someone find your location. Sending this information to multiple people creates redundancy, in case one doesn’t see the text. If you have data coverage, share a “pin” of your current location from your preferred map app, or check-in through a social media site like Truth Social, Facebook, or Instagram. Whatever you do, just be careful and don’t go it alone or your life could change in the blink of an eye.
Conclusion
In emotionally charged situations such as this one, simply reiterating your innocence won’t be enough. Any evidence you present may be written off as an attempted cover-up, and even if law enforcement and the legal system are on your side, trials are slow and arduous.
Looking back to the true story mentioned in our introduction, Richard Jewell endured 88 days of baseless rumors, accusations, and harassment after being named as a “person of interest.” Even after the true culprit was arrested and Jewell’s name was cleared, he lived with a sense of uncertainty for the rest of his life. In an interview with the New York Times, he said, “I’m a lot more cynical than I used to be. I’m not as trusting as I once was.”
To protect yourself against false accusations, you’ll need to think like an investigator. Be ready to build a portfolio of evidence that can be used in your defense and discuss your “what if” plans with trusted friends and family. Be proactive, not reactive. In a perfect world, you’d be considered innocent until proven guilty through hard evidence, and members of the public would treat you the same way they’d wish to be treated during the investigation — but we all know our current world is far from perfect. As with any survival situation, you shouldn’t be paranoid, but you should always be prepared.
[meetourpanel]
Read More
Subscribe to Recoil Offgrid’s free newsletterfor more content like this.
In the ever-evolving world of survival and preparedness, the wisdom of experience often provides the most valuable insights. For this reason, we’ve tapped into our community of avid readers as a resource for survival knowledge, and are sharing tips that stand out for their simplicity and effectiveness. This Readers’ Survival Tip comes all the way from the United Kingdom, and is an excellent take on Every Day Carry (EDC).
Readers’ Bio
Name/Alias: British Bill
Location: U.K.
Age: 67
Above: British Bill’s EDC layout – Analogue wrist watch(1), Gerber Artifact Mini-Tool(2), folding knife(3), CRKT low-profile pocket knife(4), black sharpie(5), tactical pen(6), Victorinox dual knife sharpening pen(7), Nebo flashlight(8), lighter(9), double gated S-biner(10), USB flash drive(11), Gerber multi-tool(12), sunglasses(13).
British Bill’s Survival Tip
Defining EDC, I advise new preppers that ESSENTIAL CORE EDC items MUST go on the PERSON and never in bags, rucks etc. I advise them to imagine that, during a sudden incident, they are separated from their EDC bag, Bug Out Bag, Get Home Bag, etc., and must survive ONLY with what they have on their persons (i.e., whatever is in their pants/shirt/jacket pockets, or worn on their belt/shoulder holster).
So, PDW (where legal) Knife(3), Lighter(9), Flashlight(8), Compass, Cell Phone, Wallet, Shades(13), Keys, Pen(6), Notebook, Kerchief, Gloves, Hat, Cash, Paracord, Micro FAC etc. These CORE essentials remain on the person at all times, whilst the secondary gear can go in a bag or pack, and third level gear in vehicle/office/home/cache. In many circumstances, it’s just too easy for the citizen to be separated from their CORE EDC gear at the worst possible time.
Submit Your Own Tip
Want to see your own survival tip featured in our publications? Simply fill out the form here: Share Your Survival Tips
We are looking for your best tips, tactics and techniques to share with our audience!
Read More
Subscribe to Recoil Offgrid’s free newsletter for more content like this.
Compared to most animals, humans are extremely fragile. We don’t have sharp claws and teeth for hunting, and we lack the powerful sense of smell and ultra-precise eyesight other apex predators are equipped with. Most importantly, when you strip away the insulated fabrics and durable footwear we’ve spent thousands of years developing, we can’t rely on tough hide or warm fur.
Our exposed bodies are virtually defenseless against environmental factors such as wind, rain, cuts and scratches, and insect pests.
Even the most experienced survivalists shudder at the thought of being stranded in the wilderness with no clothing and minimal tools. This concept led to the development of Discovery’s survival TV series Naked and Afraid, which has aired 15 seasons over the last 10 years. On the show, each contestant is paired up with a stranger and dropped off in a challenging environment for 21 days (or 40 for the spinoff Naked and Afraid XL).
Locations have included every continent except Antarctica, ranging from swamps to grasslands and from deserts to rainforests. Although a camera crew is present during the day, they’re not allowed to intervene unless there’s a medical emergency; at night, the contestants must film themselves using a provided camera.
In order to learn more about the actual reality behind this “reality TV” survival series, we spoke with three former contestants: Zach Benton, Hakim Isler, and Melissa Miller. Read on as they discuss their experiences, struggles, and lessons learned from Naked and Afraid.
Zachary Benton
Above: Zach during his Naked and Afraid challenge in Colombia.
Age: 38
Hometown: Jarrell, Texas
What season(s) did you participate in? Where did you go?
I was on Season 14, Episode 2, “Haunted and Hungry.” It took place in Cartagena, Colombia.
Tell us a little about your survival skills background going into the show.
I grew up on a 3,300-acre cattle ranch playing mountain man and Boy Scout as a kid. I learned a lot about fieldcraft and autonomy in nature as a Scout Sniper in the Marine Corps. Wilderness survival became a favorite topic of study as an adult chasing adventure, and when the opportunity to do the NAA challenge came up, I read 18 books in three months to prepare.
We understand each contestant was allowed to bring one item. What did you bring, and why?
For this season, each contestant was required to bring four items. We handed them over when we arrived in Colombia, and the producers picked what my partner and I would get for our challenge. I took a tarp, knife, pot, and ferrocerium fire-starter. What they ended up giving us was a mosquito net, pot, knife, and fire-starter.
Exposure is a serious threat in any outdoor setting, and nudity is the ultimate form of exposure. What challenges did being naked pose?
The primary issue with being naked in the jungle is the bugs. I was there in August, and the temperatures were only low during the big rainstorms, so maintaining core temperature wasn’t too difficult. The other big problem was my feet. The jungle is blanketed in a layer of thorns, and my feet were swollen, sore, and filled with edema.
One of the books I read leading up to the trip was Native American basket weaving, so on day eight I wove a pair of shoes out of grass and tree bark. To be able to walk normally lifted a huge weight off the mental aspect of the challenge.
Above: Prior to the challenge, Zach read more than a dozen books on survival skills, including one about Native American basket weaving. He used the knowledge to weave this pair of sandals from grass and bark.
It’s in the name, so we’ve got to ask. Were you afraid out there? Tell us about the psychological impact of the scenario you faced and how you dealt with it.
I never felt like I was in any direct danger. I could hear the caiman in the swamp and the howler monkeys swung through the treetops around my camp, screaming every morning and evening, but I never felt afraid. Being alone at night in the jungle, naked, with nothing but a knife certainly presented all the reasons I needed if I wanted to freak out, but I managed to control my thoughts enough to not let it consume me.
The psychological difficulty for me was my personal life. I had just got home from Kabul a month prior. Before I left again for Colombia, my 3-year-old crawled into my lap and thanked me for coming to visit him. I’d been deploying overseas back and forth all his life, so he didn’t understand that I lived there. It was a heavy thought to carry into the jungle and sit with for 21 days, 17 of them solo.
What were your survival priorities going into the show? How did they change once you were out in the field?
Priorities going in were fire, water, shelter, food, security. The order didn’t really change but it took me way longer than I expected to resolve fire, water, and shelter. Food and security took a backseat, which is why I lost 30 pounds. The jungle was filled with wood-eating ants and so every dead stick I found — whether off the ground or in the trees — was completely eaten from within.
I could burn it, but it gave me no coals, just ash, and only lasted 20 minutes. This dilemma kept me shackled to camp for the majority of the first 10 days because without fire I couldn’t sterilize the water and without water, well…
With every reality TV show, we always wonder if events are scripted or if producers intervene to make the show more exciting. Did you experience anything like that?
No, it’s definitely not scripted, not for me anyway. The only things a viewer that has an eye for production might notice are shots on the insertion or extraction because they will request your cooperation on the hike so they can get cool-looking footage.
Above: Zach’s knife of choice is a customized TOPS Knives SXB fixed blade originally designed by fellow Naked and Afraid contestant EJ Snyder, who we interviewed in RECOIL OFFGRID Issue 24.
What was it like attempting to survive alongside a partner you had never met before?
My partner was very nice, but she didn’t stay very long. We worked together pretty well but she got sick on day two and left at sunrise on day four. The remaining 17 days I completed alone. I’m grateful for that experience. I would have spent the rest of my life wanting to know if I could do it alone, but it would have been much more enjoyable to have had someone to share it with.
How did your time on the show end, and what survival lessons did you walk away with?
My last few days were a transition from grinding each day to maximize productivity to managing the bare necessities in an effort to not get hurt. The lack of food and muscular atrophy had me stumbling around, and my knife flew out of my hand a number of times chopping wood. It became an issue of risk mitigation to make sure I made it to 21 days without something stupid happening at the end.
Above: After 21 days naked in the jungle, Zach was caked in dirt from head to toe and had lost 30 pounds.
Please tell us about your latest projects and where we can follow you online.
My latest projects include the FTW Ranch Podcast. I’m a precision rifle and hunting instructor at the FTW Ranch, a 12,000-acre fortress in Barksdale, Texas, with 36 shooting ranges scattered through deep canyons in the hill country, jungle/safari hunting courses with charging buffalo, elephants, plains game, and a maximum of two miles of range.
We host everything from Tier 1 sniper training to some new hunter classes with exotic game to hunt and a professional chef to teach the preparation.
I have another podcast hosting opportunity for Zero Foxtrot in the works to tell amazing stories of moments that required full commitment, where zero f*cks could be given, in the face of triumph or defeat.
Lastly, in December, I partnered with a director who has rewritten a book of mine into a movie. Oddly, I never finished writing the book, but it has been an adventure to be a part of that process and an honor to have a team of people helping me make it happen.
Hakim Isler
Above: Once he headed into the wilderness, Hakim says his priorities quickly diverged from his expectations. Adaptability became an important part of his survival skillset.
Age: 46
Hometown: I grew up in Newark, New Jersey. I currently live in Fayetteville, North Carolina, just outside Fort Bragg (now Fort Liberty).
What season(s) did you participate in? Where did you go?
I participated in two seasons of Naked and Afraid. I went to the Himalayan Mountains in India on Season 3, and then I was on the first 40-day challenge in the Colombian jungle.
Tell us a little about your survival skills background going into the show.
I didn’t have any real background growing up in New Jersey — I come from the concrete jungle, not the real jungle [laughs]. When I moved to Ohio, I moved specifically to train in ninja martial arts under Stephen K. Hayes, who brought ninjutsu to America. While I was there, we did outdoor and wilderness experiential training based on our lineage. That was where I got my first taste of outdoor training.
Then, I joined the Army and began with land navigation and things of that nature. I went to SERE school and learned more about wilderness survival from a tactical perspective, as well as just survival in general. When I got out of the military, a friend of mine had a survival school, and I worked there for a little while, helping out and learning from them. Then, the Naked and Afraid opportunity came up, and I jumped into that.
We understand each contestant was allowed to bring one item. What did you bring, and why?
That’s a very interesting question. I had designed an ax called the Tengu. The tengu is a mythological, benevolent creature — like half man, half crow — that was believed to live in the wilderness of Japan. Some legends have it that they taught the ninjas in these villages skills related to how to use nature to their advantage. I thought it was fitting to name this ax the Tengu, since it was going to be with me on this journey of becoming one with nature.
The Tengu ax had multiple surfaces and features added to it — a skinning knife on top, a notch-maker, a cutting surface, and a hooking surface to pick up logs and look under them without putting your hand under them. That was probably the greatest choice I’ve made, because we cut, skinned, chopped, scraped, everything with it. I wanted something versatile, so that’s why I designed it.
Exposure is a serious threat in any outdoor setting, and nudity is the ultimate form of exposure. What challenges did being naked pose?
They were extremely significant. According to the “law of threes,” you can only handle three hours of extreme exposure before you’re either dead or dying. So, being in an environment like the Himalayas that was in the 30s at night and 60s during the day, that was very intense. It created challenges like not wanting to move, because even a small breeze would result in shivering.
Then, there was the fact that we didn’t have shoes on, so constant walking around and getting stabbed on the bottom of our feet over long periods of time was overwhelming. It also forced us to move slowly. Having bugs land all over us and on our private areas and not being able to do anything about it was also very difficult.
People say all the time, “Well, why didn’t you make clothes?” Because the environment was so harsh, making clothes was the low thing on the totem pole. Just to make it through the night, clothes weren’t going to do it — we needed fire. I had to be collecting firewood all day — enough for 13 hours of darkness — and in between I had to take water breaks to make sure I was hydrated (that was a task in itself). It was not an easy task.
It’s in the name, so we’ve got to ask. Were you afraid out there? Tell us about the psychological impact of the scenario you faced and how you dealt with it.
I don’t think I was necessarily afraid of creatures or the environment or anything like that, the issue of fear was just “Am I going to be able to make it? Am I going to be able to survive? What if I get sick? What if I get injured?” All those things weigh on you psychologically, because you know you have so much to do. I just tried to do the best I could and make sure I didn’t make an idiot out of myself on national TV. [Laughs]
Above: Hakim designed this Tengu ax and brought it with him on Naked and Afraid. Its versatile design and multiple cutting surfaces helped with a variety of survival tasks.
What were your survival priorities going into the show? How did they change once you were out in the field?
That’s a beautiful question, because I had all the priorities, and I had it all figured out. I had practiced at home on my own in the wilderness. I was like, “OK, day one, I know I’m going to be hydrated and full, so all I have to worry about is making sure I find a spot to build a nice shelter. Day two, I’m going to find some water, because I know that’s going to be the next important thing on the list.
Day three, I’m going to build some shoes so I can move around quickly. Day four, I’m going to start looking for some sources of food while thinking about what I can use for some sort of clothing.” None of that happened.
On the first day, we had very little daylight left by the time we got to our destination. We had to pull together a shelter and a fire as soon as possible so we could make it through the night. And then it was just catch-up from there. Once we felt how cold it was that first night, we had to really reinforce our shelter. My partner was sick with a stomach virus from some water she drank, so we had to deal with that.
Then, we had to find drinkable water, because we were at high altitude and had been moving a lot, and that affected us more than we thought. And then like I said, trying to find firewood and keep ourselves warm was the major priority, especially once we realized there wasn’t a lot of food out there and it was so cold.
With every reality TV show, we always wonder if events are scripted or if producers intervene to make the show more exciting. Did you experience anything like that?
There wasn’t a lot of intervention. However, the producers do come out and ask you questions. Some of those questions can be a little guiding, as if they’re trying to see if there’s any tension. They’re trying to pull that out. So, there’s a little bit of that manipulation. But I didn’t personally feel like the producers were trying to create anything that wasn’t there.
That was my experience back then, but of course they’re on season 15 or 16 now. It’s a whole different world now, so I don’t know what it would be like today.
What was it like attempting to survive alongside a partner you had never met before?
That was one of the toughest things. You’ve got two people who’ve never met each other, who don’t know what each other’s personalities are, trying to survive this really chaotic situation. It was beyond challenging. We ended up pulling it together, but in those first few days, it was really difficult. She was sick, dealing with those issues. I was trying to deal with her being sick, and also deal with my own issues of trying to make a plan and get it done.
How did your time on the show end, and what survival lessons did you walk away with?
My times on the show ended well. Well, I had a hard time with the second one in Colombia, but the first one in the Himalayas I think I did good. But both changed my entire life. They taught me what was really important, and changed the trajectory of who I am. They also caused me to want to start this thing called the Soil Foundation, which is a nonprofit organization.
I own 100 acres of land in North Carolina, and I’ve been taking people out and giving them wilderness experiences. Ultimately, I want to do more experiential training out on the property. We are able to provide getaways for people to explore their deeper inner self, so that they can awaken to some of the things that they may have been hiding from themselves due to all the distractions we have in our society.
That was probably the greatest survival skill — recognizing who I am deep down. People need to know that if they’re going to survive any type of real hardship.
Please tell us about your latest projects and where we can follow you online.
I have two awesome projects. Like I said, I created the Soil Foundation. It is a wilderness therapy organization where we specialize in providing outdoor wilderness experiential retreats to help people find out things about themselves and come to terms with things, and hopefully heal from any past trauma in that process. We’re also trying to raise money for a conference center and event space made out of shipping containers.
If you’d like to assist with that or donate, you can go to our website, thesoilfoundation.org.
The next thing is Survive University, my online survival platform. It deals with everything from how to survive based on finances, how to survive based on emotion and psychology, and how to survive based on physicality — wilderness and bushcraft things as well as self-defense. That’s at surviveuniversity.com.
Above: Publicity photo prior to the 40-day challenge in Africa (Photo courtesy of David E. West).
Age: 34
Hometown: Fenton, MI
What season(s) did you participate in? Where did you go?
Season 7 (21 days): Ecuador, Amazon Rainforest; Season 4 Naked and Afraid XL (40 days): South Africa; and Season 10 (21 days): Florida Swamplands
Tell us a little about your survival skills background going into the show.
Growing up, I was always outdoors and that followed me into adulthood. A lot of my life was spent on a lake where I learned how to fish. After graduating college, I taught outdoor education and wilderness survival classes at a nature preserve for several years. I got really passionate about primitive survival, which coincided with me applying for the show.
We understand each contestant was allowed to bring one item. What did you bring, and why?
An inside fact about Naked and Afraid is that the producers actually asked us to bring four items to location. They ultimately chose which one went on the show with us. Production also provides one item depending on what items the survivalists are given.
In Ecuador, I had my hand-fishing line. The fish are abundant there, and it fed us well throughout the three weeks we were on location. I ate lots of red-bellied piranha.
In South Africa, I brought my bow. It was a vintage Bear Archery Kodiak Hunter. I went with the intention of hunting big game, but it ended up providing us food in a different way — catfish. I’d take daily walks to a watering hole with it and bow fish catfish there. On this challenge, we were also allowed a knife, and I brought my TOPS Knives B.O.B Fieldcraft knife.
In the Everglades, both items out there ended up being mine. I actually found out who my partner was going to be ahead of time, and I gave him my Nepalese Khukuri before we went on location. I brought my fire-starter.
Above: Melissa playing with critters in the Amazon before her first challenge.
Exposure is a serious threat in any outdoor setting, and nudity is the ultimate form of exposure. What challenges did being naked pose?
Being naked is what separates this show from any other survival challenge. It’s indescribably miserable. Every inch of your body is at constant exposure to moisture, cold temperatures, and bugs. In environments like the Amazon rainforest, I was a food source for countless mosquitoes. Leafcutter ants are everywhere there and are quick to bite anything in their path.
In South Africa, every other step is a thorn in the foot. There were some very cold nights there in which having partners to share body heat with saved me.
In the Everglades, I was covered in poison ivy. The mosquitoes sucked there too (no pun intended).
It’s in the name, so we’ve got to ask. Were you afraid out there? Tell us about the psychological impact of the scenario you faced and how you dealt with it.
Psychologically, the most difficult things for me were the boredom and the rain. One day feels like a week out there — I really cannot emphasize how slowly time goes by. Without distractions, you very quickly realize what and who is important in your life.
My biggest fear out there was never the animals; it was the rain. Rain threatens your fire, your shelter’s integrity, and your core body temperature. A really rainy environment is, in my experience, the most difficult and miserable environment to survive in.
What were your survival priorities going into the show? How did they change once you were out in the field?
My priorities were to establish a good shelter, get a sustainable fire set up, and to not get sick or infected with parasites. Maintaining fire out there was a priority and an unexpected obsession, especially in the rainforest where it’s so hard to start a fire. Keeping a fire provided warmth, food, comfort, entertainment, water, and protection from insects and animals.
Above: “After Ecuador, hundreds of thorns were embedded in my feet. My hands were burnt, callused, and growing nail fungus.”
With every reality TV show, we always wonder if events are scripted or if producers intervene to make the show more exciting. Did you experience anything like that?
Interaction with production and crew is very limited. There were times where producers might ask us to go on a hunt or do something entertaining for that day. And of course, they might try to facilitate some sort of drama with their interview questions. When we did the 40-day challenge, the editing made it look like there was some sort of deep internal tribe conflict (there wasn’t).
At times I was disappointed to see so much of the editing went toward drama and conflict rather than survival. But I understand it’s TV, and drama/conflict is entertaining.
What was it like attempting to survive alongside a partner you had never met before?
You are placed in an extremely stressful survival situation and trying to work through it with a total stranger. The first day is really rough — you only have a few hours to (hopefully) establish shelter and fire before nightfall, and you need to make all of these really fast decisions and execute them as a cooperative team, or you’re screwed.
In my first challenge, it was really difficult at first because we had totally different approaches to survival. My partner’s background was in the military and mine was in primitive survival/bushcraft. By the end, we figured out how to work well together and became lifelong friends after the show. I stay in touch with all of my previous partners to this day.
Above: “Growing up on a lake helped me learn about fishing from a young age. This knowledge provided a big part of my food supply during the survival challenges.”
How did your time on the show end, and what survival lessons did you walk away with?
I completed all my challenges successfully and learned a lot. A few things that really stick out:
A waterproof shelter where you live might not be waterproof in the Amazon rainforest.
Most of your energy doesn’t go toward exciting things like hunting; it goes toward getting firewood.
Primitive survival is so much trial and error. It’s tedious, time-consuming, frustrating, and stressful, but extremely rewarding once you get it right.
Your body can almost always push further than you think it can.
Above: Returning to the hotel after 40 days in Africa. “I felt like a wild animal.”
Please tell us about your latest projects and where we can follow you online.
I work for the World’s Largest Knife Show, BLADE Show alongside BLADE Magazine doing social media and digital marketing. I’m also on YouTube, Instagram, TikTok, and Facebook as @MelissaBackwoods where I’m actively reviewing knives and survival gear daily.
Read More
Subscribe to Recoil Offgrid’s free newsletter for more content like this.
In our quest to build a comprehensive repository of survival tips, we’re reaching out to you – our knowledgeable community. Your unique survival tips, techniques, and experiences are invaluable, and we’re excited to invite you to share them with us and our readers. Your wisdom could be the key to someone’s safety and success in challenging situations.
How You Can Contribute Tips
Your Best Survival Tips: Whether it’s a clever way to signal for help, an innovative approach to sourcing food in the wilderness, or an effective method to stay warm in extreme conditions, your personal know-how is crucial. Share your practical advice and help us enrich our collective knowledge.
Personal Survival Stories: Real-life situations where you were put to the test are incredibly powerful stories. Share your experiences and let others learn from your challenges and triumphs in survival scenarios.
Engage in Q&A: Know of any survival myths you see people fall for? Or perhaps you have answers to others’ survival dilemmas? Our community is an excellent platform for exchanging information, fostering a culture of learning and preparedness.
The Impact of Your Contributions
By sharing your survival tips, you’re not only enriching our resource pool but also empowering others with knowledge that could be critical in emergencies. Your contribution helps us all to be better prepared and informed.
Submit Your Survival Tips Now
Ready to share your survival tips? Just [click here] to access our easy-to-use submission form. Whether it’s a brief survival tip or an elaborate story, we’re eager to hear from you!
Together, let’s create a haven of survival wisdom and keep the spirit of preparedness alive!
In the realm of survival, adaptability is key. The carabiner, a simple yet versatile tool, offers more than meets the eye. This article delves into how a standard locking carabiner can transform into a practical self-defense device.
Utility Meets Defense
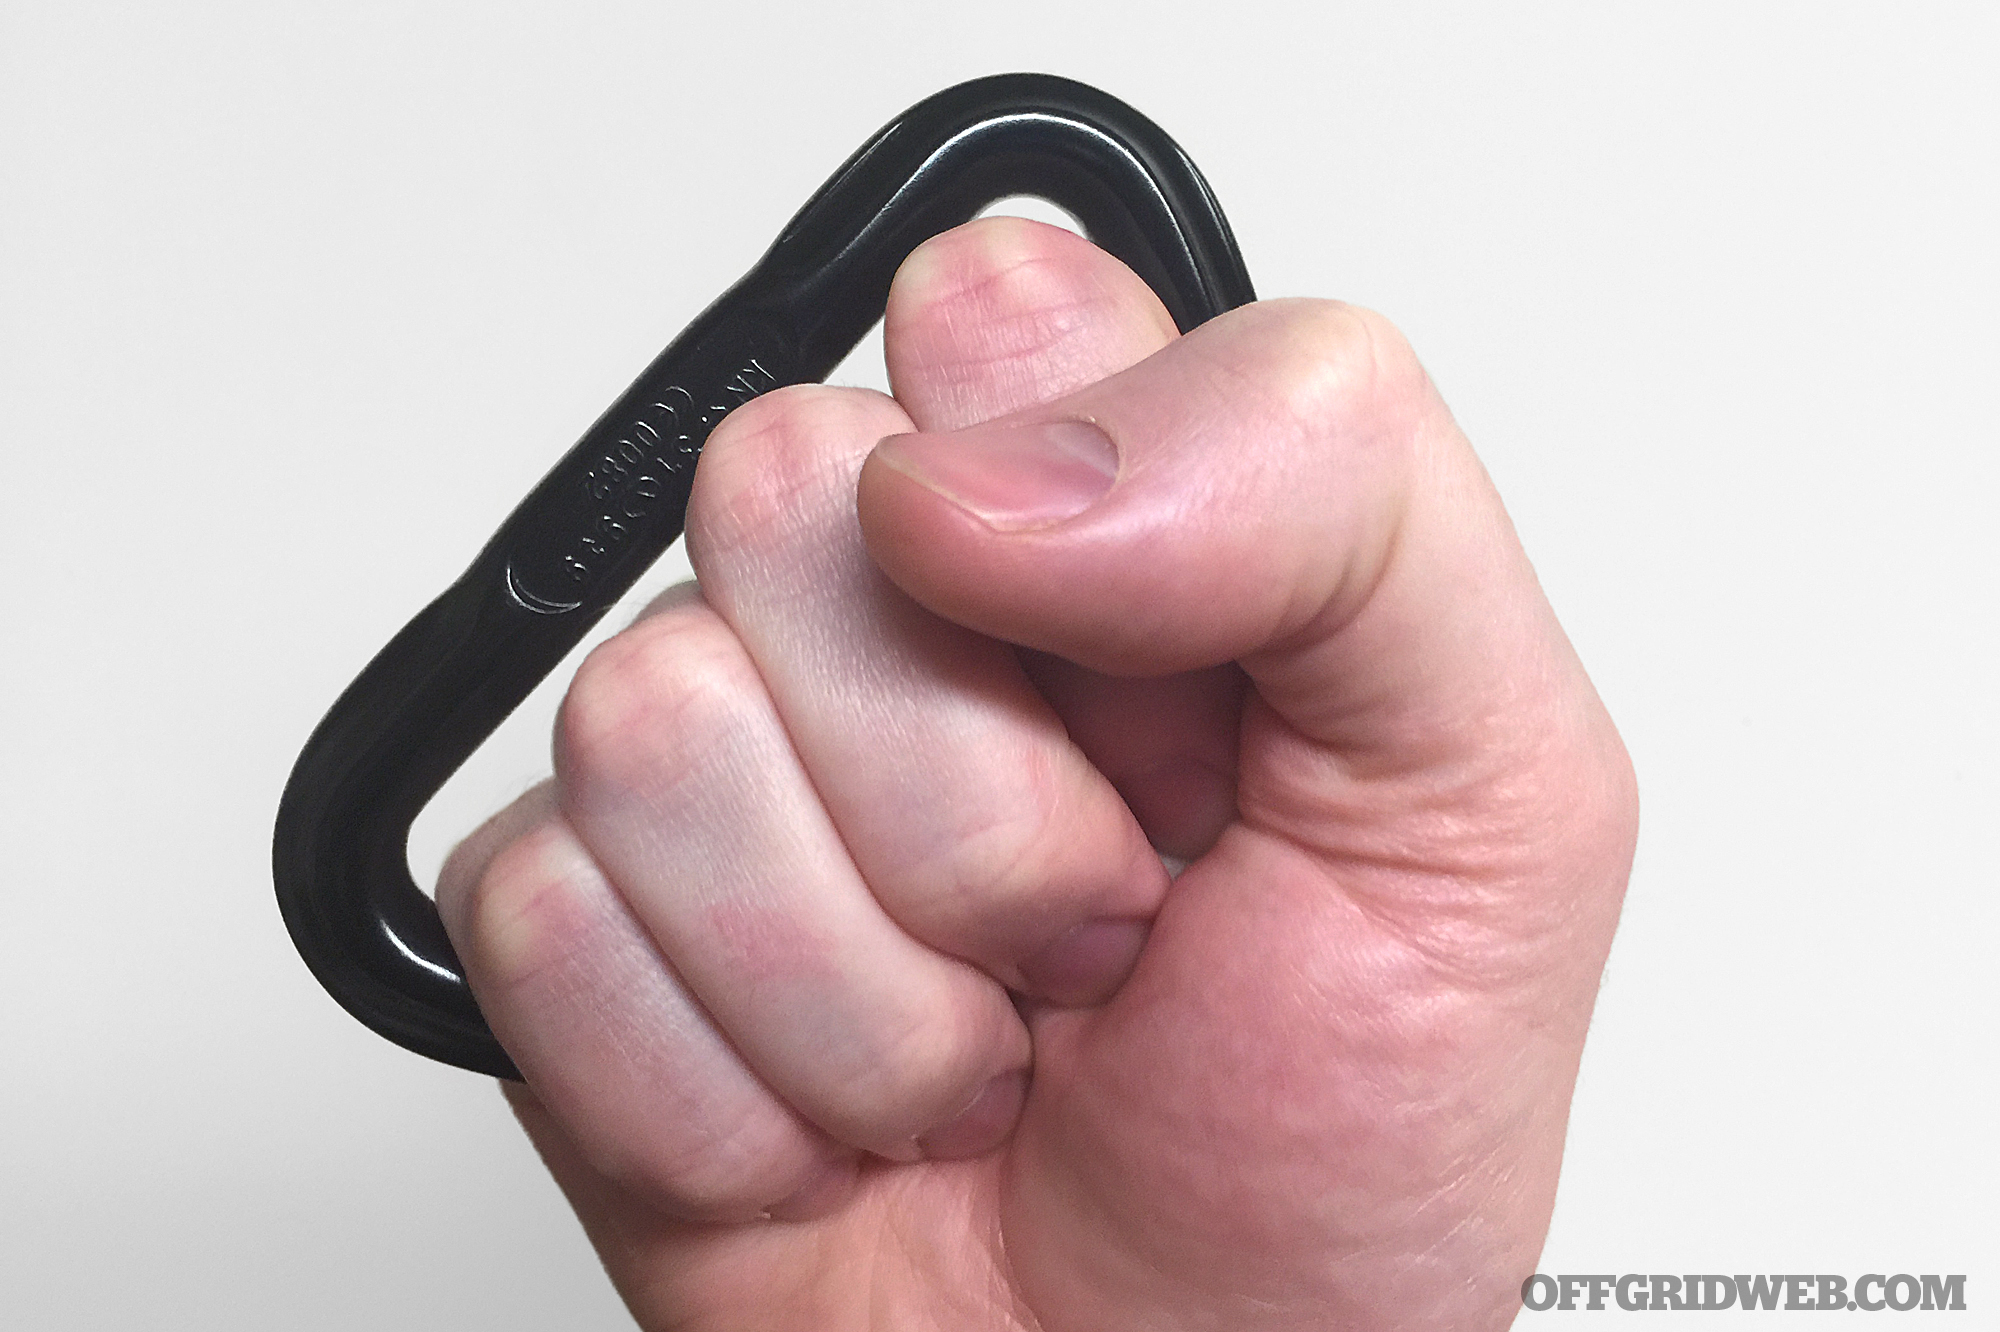
While firearms and knives are conventional self-defense tools, carabiner knuckles offer a discreet alternative. Perfectly legal in most areas, these tools blend into your daily carry, allowing for defense readiness in various settings.
While not as traditional as firearms or blades, carabiners offer a covert advantage. Their everyday appearance and legality in most places make them a suitable option for self-protection in various environments.
Caution: Before incorporating any tool for self-defense, it’s essential to understand your local laws. Such items should only be used in dire situations and with full awareness of the legal implications.
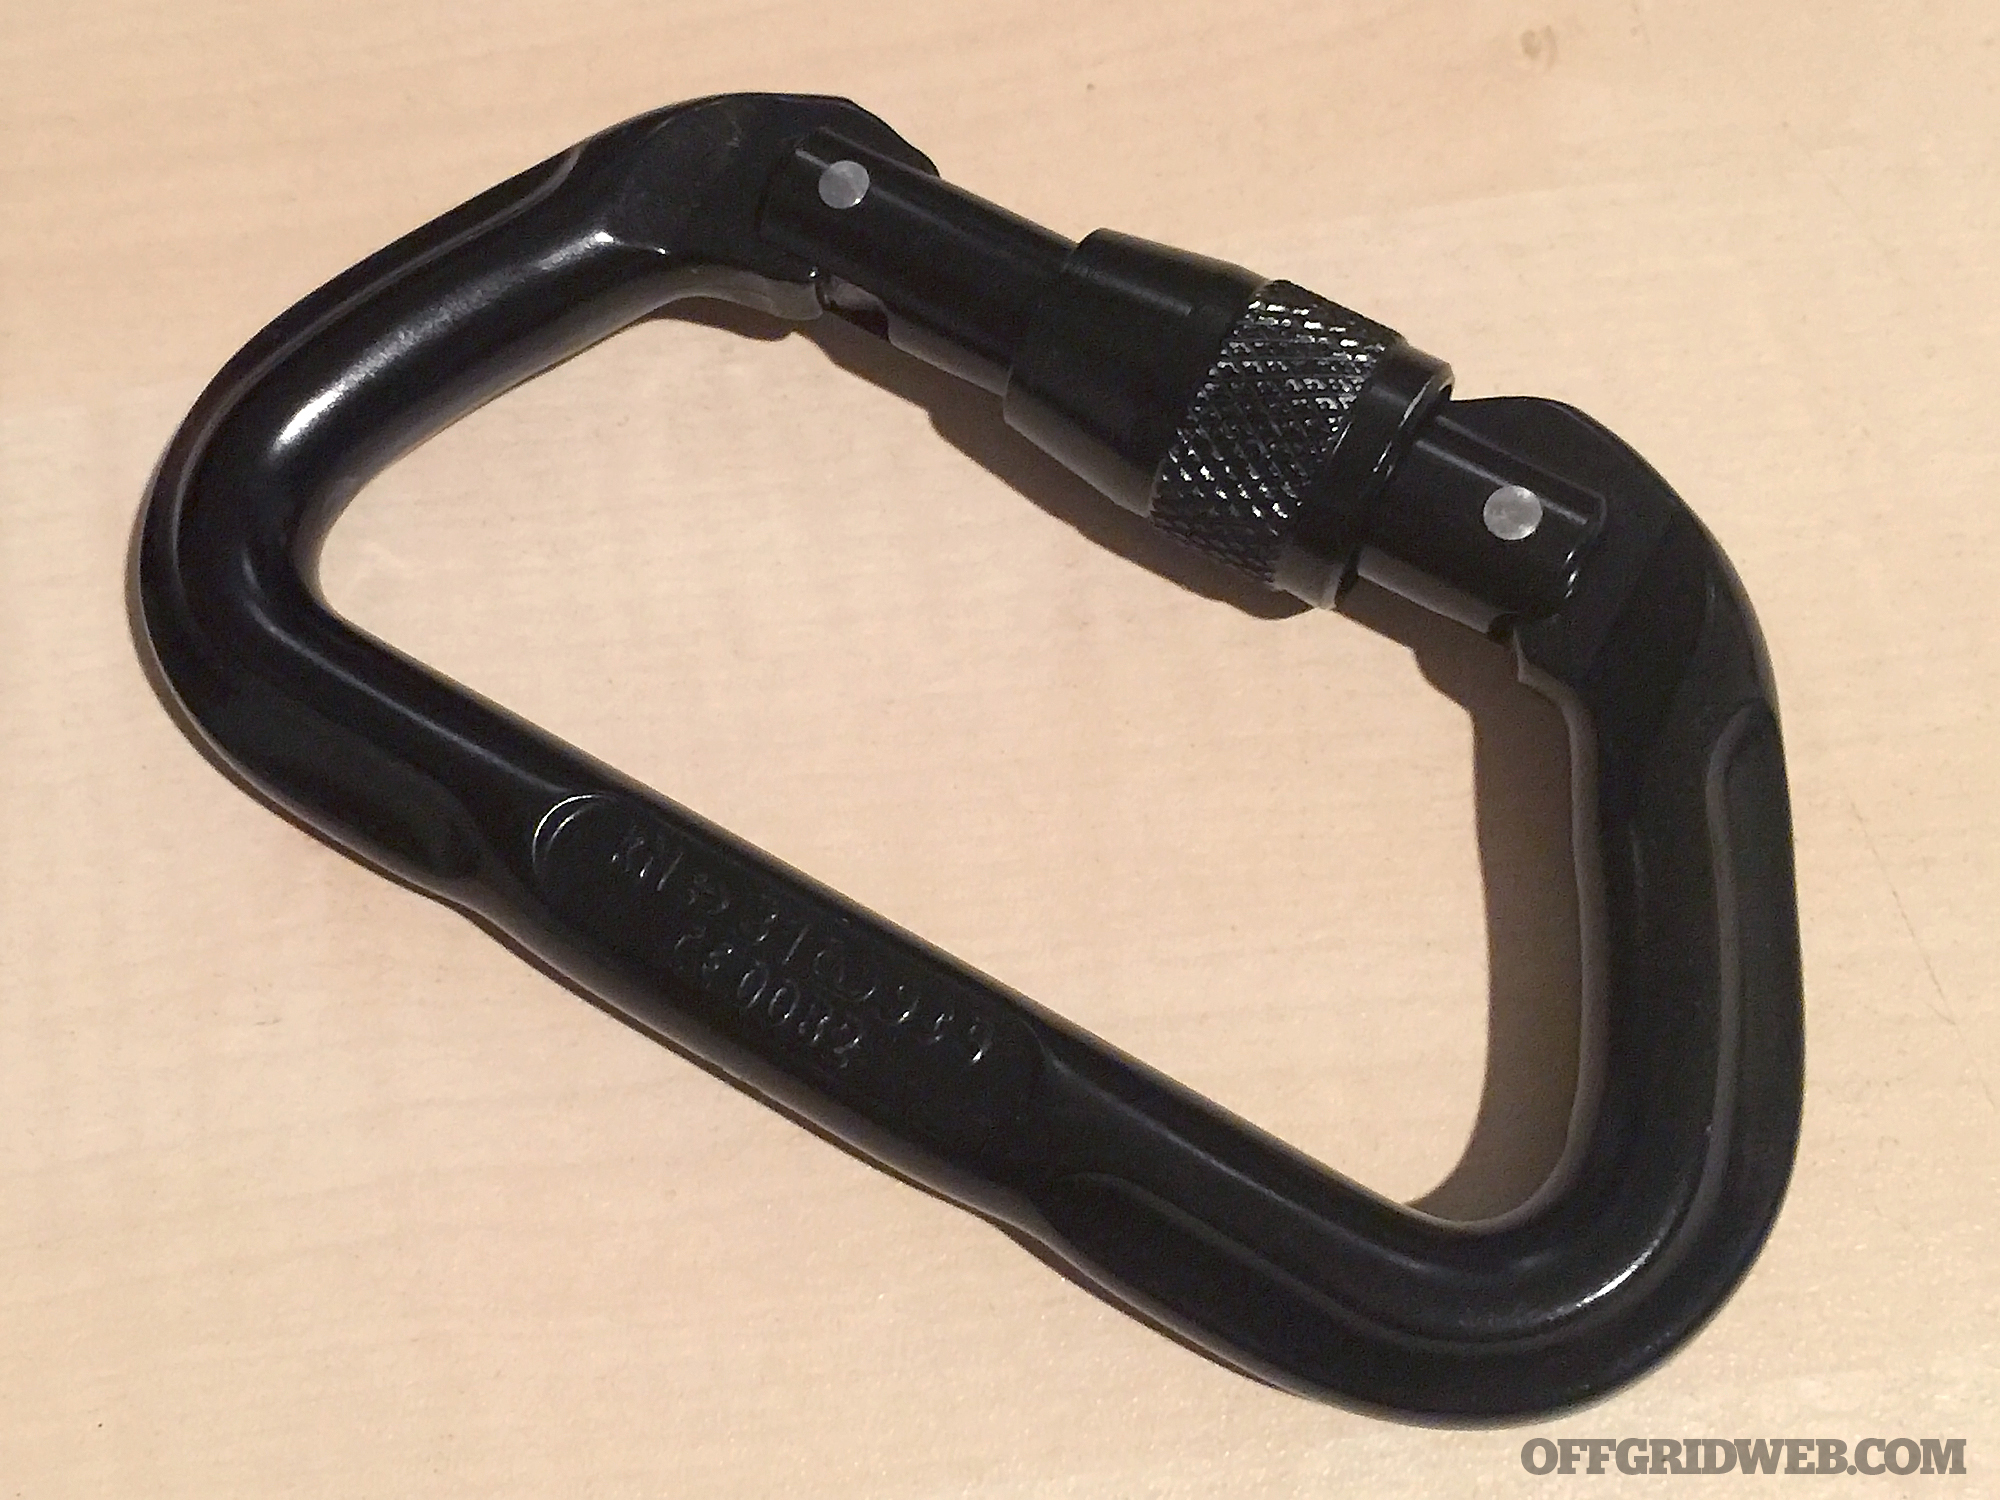
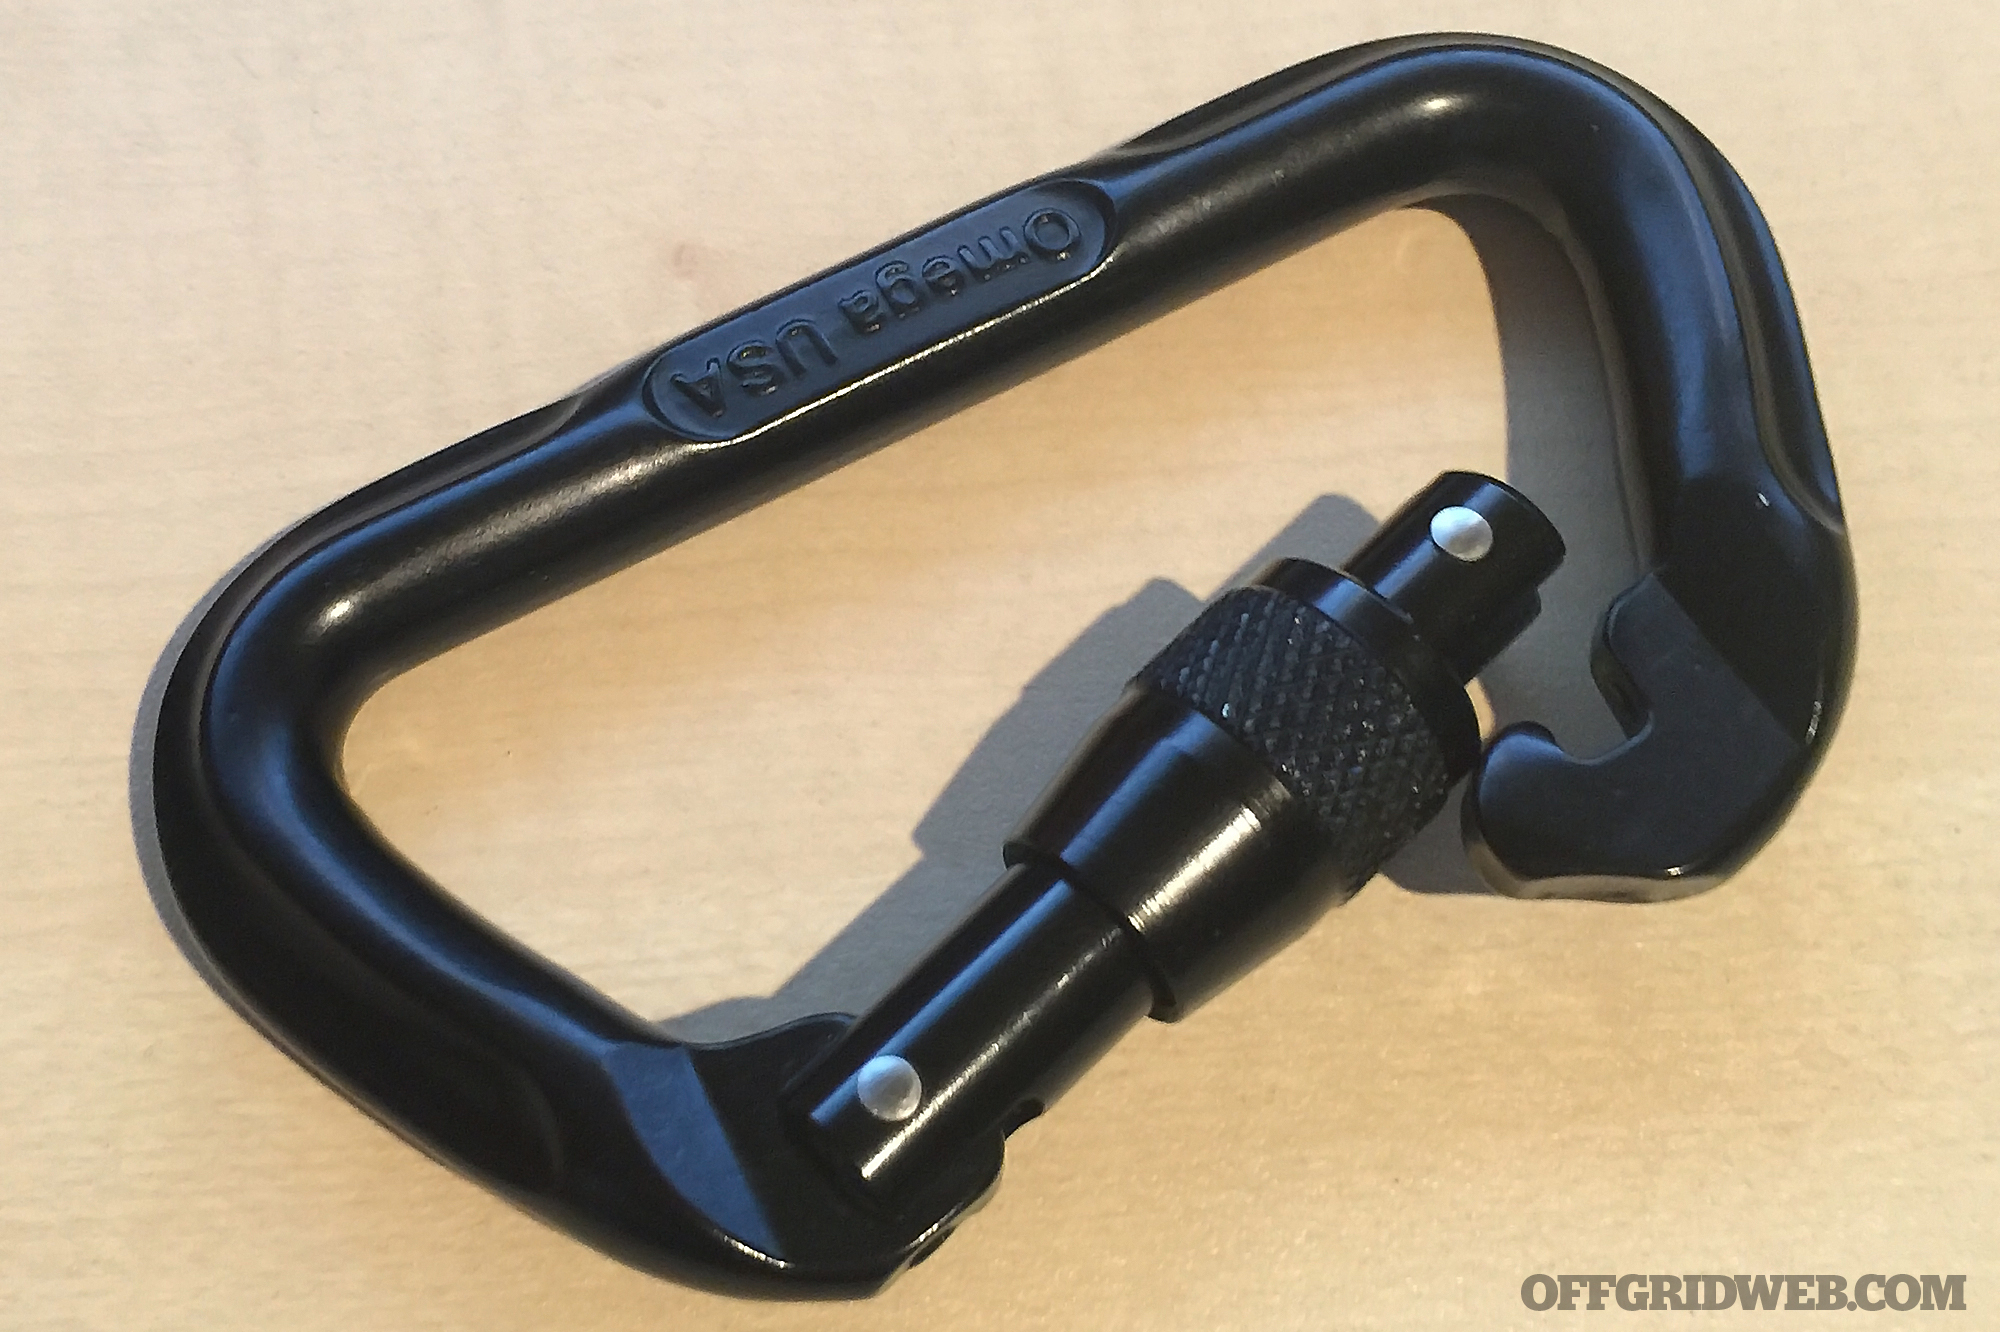
Carabiner knuckles are a convenient improvised self-defense tool. Most of us know of the potential that brass knuckles, knuckle dusters, or “knucks” have to inflict massive damage with a single strike. These purpose-built knucks (and even so-called “decorative keychains” or “paperweights”) are typically restricted by local weapon laws, similar to blades and firearms. However, carrying an ordinary carabiner on your backpack, water bottle, or keys is generally legal.
Above: A locking collar will prevent the carabiner from opening unexpectedly.
Carabiners are generally perceived as benign, unlike brass knuckles or similar devices, which may face legal restrictions. This makes them a discreet yet effective option for defense. For optimal use, choose a carabiner that comfortably fits all fingers and has a locking collar to prevent accidental opening. High-strength aluminum or steel carabiners are recommended for their durability.
Legal Considerations
It’s crucial to verify local laws before using carabiner knuckles for self-defense. Their use is intended strictly for critical situations, with an understanding of the legal ramifications.
Carabiner knuckles, unlike regular brass knuckles, navigate legal restrictions due to their primary function as a tool. When selecting a carabiner for self-defense, prioritize one that fits all fingers comfortably and includes a locking mechanism to prevent accidental opening. Opt for robust materials like high-strength aluminum or steel for durability.
Conclusion
Carabiner knuckles embody the essence of ingenuity in self-defense. While adopting such a tool, remember the importance of responsible use and adherence to legal guidelines.
Read More
Subscribe to Recoil Offgrid’sfree newsletter for more content like this.
As civilians, we often find ourselves envious of all the high-tech equipment that’s only accessible to military organizations. From innovative weapons and communication systems to cutting-edge vehicles and aircraft, costly new technology is often developed for military use first, and eventually trickles down to the civilian market as it becomes more common and affordable. This can be seen across the board in many industries. Even the internet that you’re using right now was originally funded by the U.S. Department of Defense.
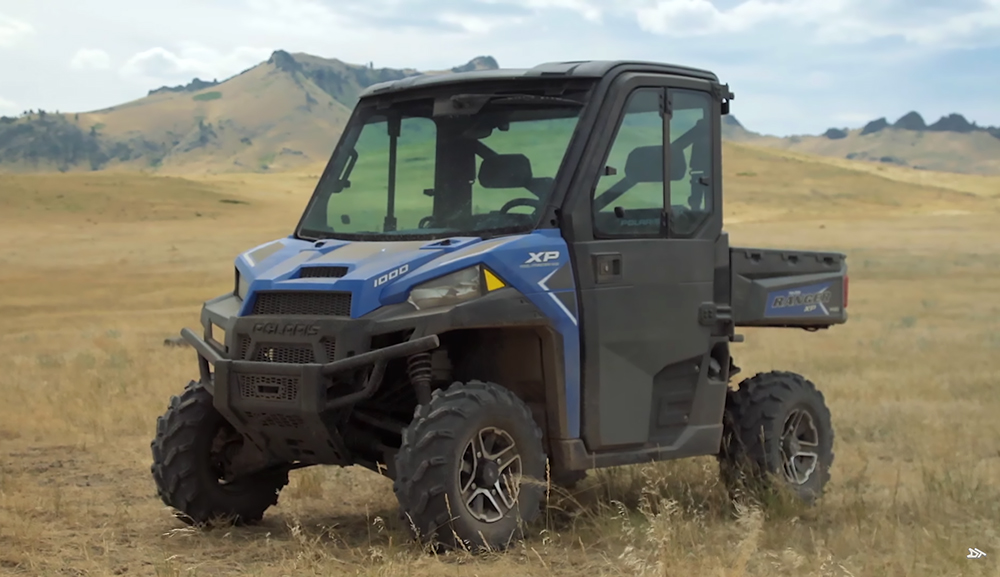
Above: This “side-by-side” Ranger Northstar is a two-occupant off-road utility vehicle produced by Polaris.
Tracked Side by Side
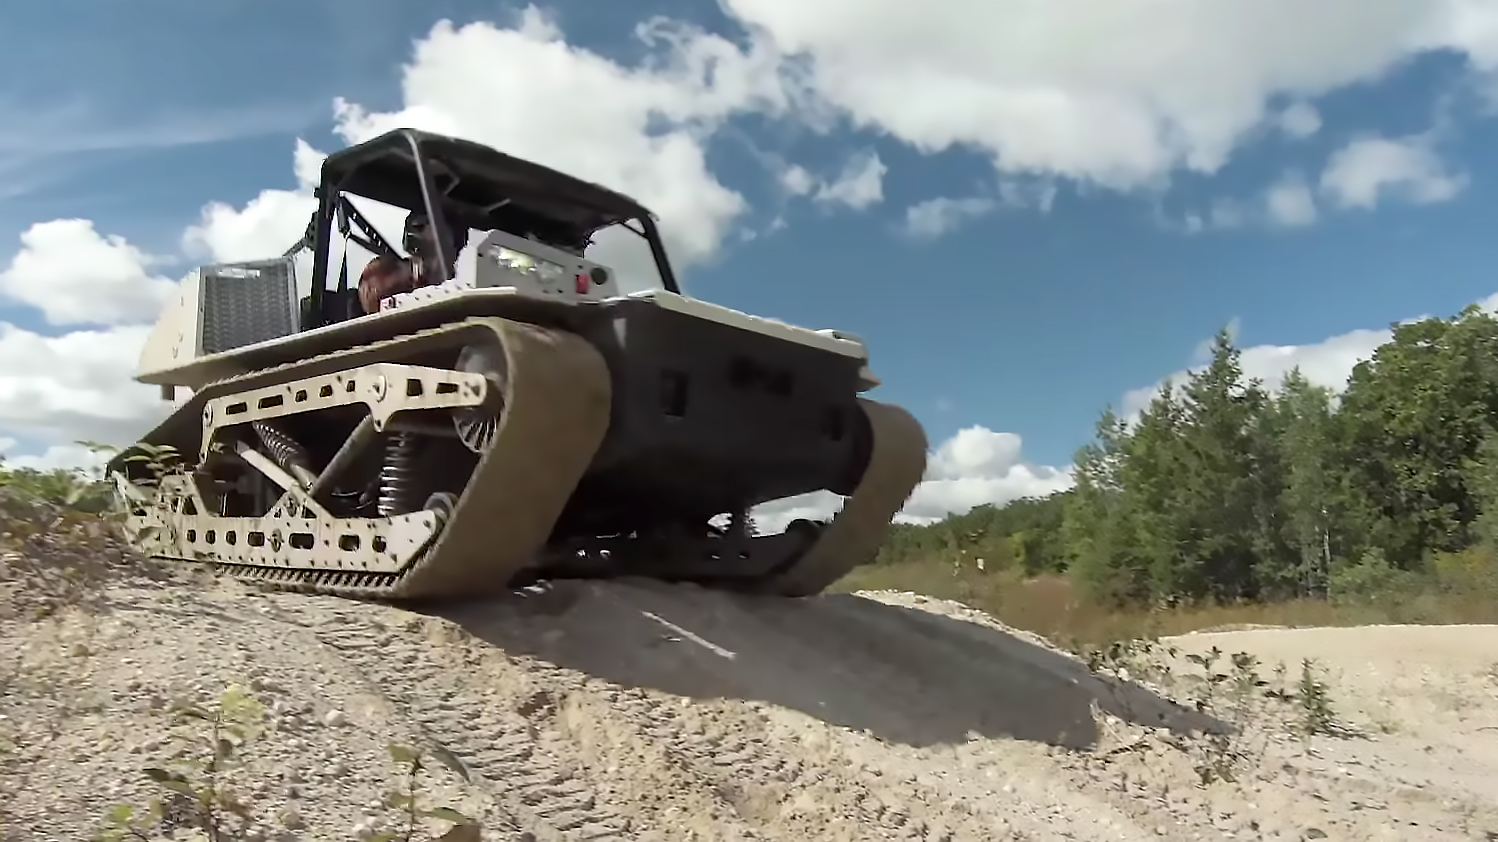
If you’ve ever looked into purchasing a small off-road vehicle, you’ve likely heard of Polaris. The company has been producing ATVs, snowmobiles, and side-by-side vehicles for decades in the commercial market. However, you may not know that Polaris also has a large division focused on the development of military vehicles: Polaris Defense.
Above: The Rampage is no ordinary side-by-side vehicle. It’s not even available to the general public.
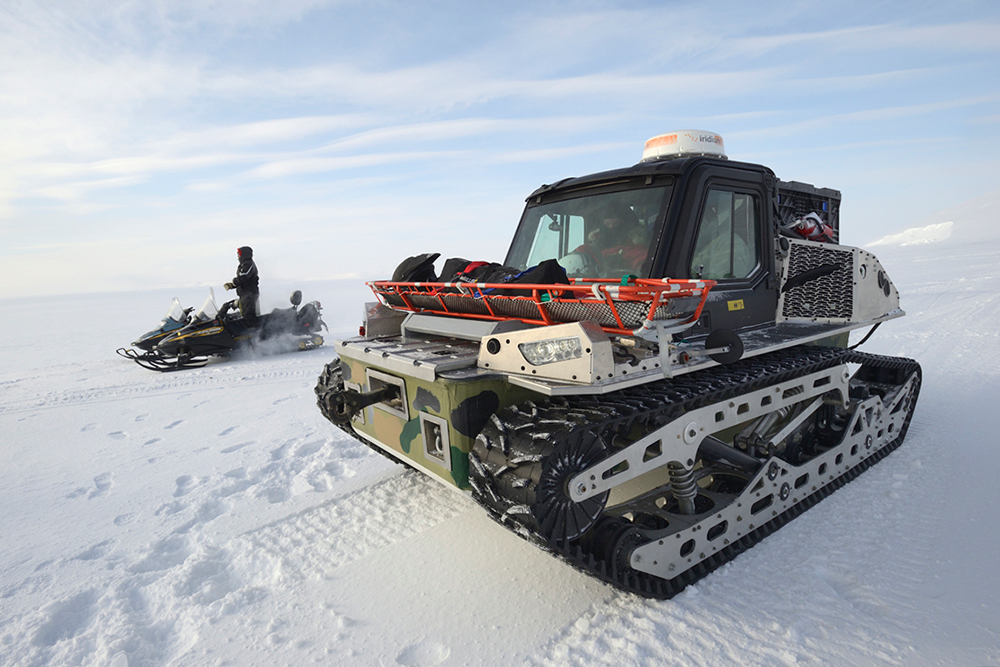
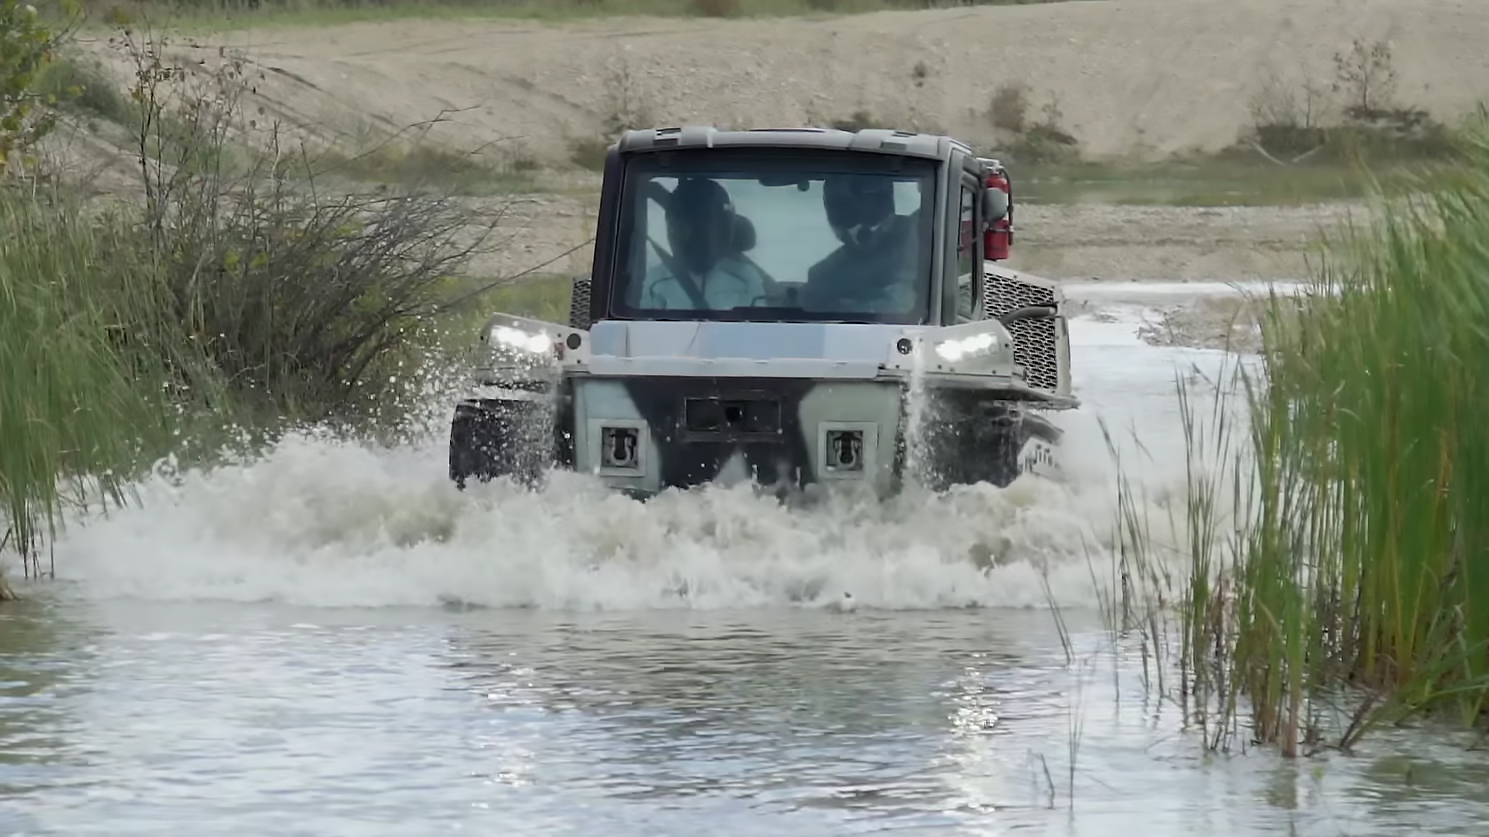
Recently, Polaris Defense has been working in conjunction with the Canadian military to develop a new “Twin-Track Fully-Suspended Amphibious Terrain Vehicle”. It’s known as the Polaris Rampage, and it’s designed to traverse virtually any type of terrain. The Canadian military needed a small and agile vehicle that could handle dirt, sand, mud, water, snow, and ice, even in sub-zero Arctic conditions. Polaris drew on its experience developing wheeled vehicles and snowmobiles, and delivered.
Above: The Polaris Rampage has undergone extensive testing in the arctic. Photo: Defence Research and Development Canada.
The Rampage is powered by a 1000cc Polaris RZR engine under its rear deck, which can propel the vehicle to over 60mph. It also uses a standard steering wheel to control the rotation of its dual tracks, and it can rotate 360 degrees on its own axis.
The rear deck we mentioned earlier is designed to accommodate a shipping pallet for transporting gear over rough terrain. With doors installed, the fully-enclosed and heated cab can keep occupants comfortable and safe in freezing conditions. There are even charging ports for laptops and other electronics.
Rampage In Action
The Rampage is not available to the public at this time, and is exclusively a military-spec project. However, the editors of Dirt Trax Television got their hands on one for some initial testing, and called it “a complete force to be reckoned with”:
Based on what we’ve seen so far, we hope that Polaris eventually brings the Rampage to the civilian market. At the very least, we’re sure some of its innovations will continue to make their way into the company’s commercial and recreational side-by-sides in the near future.
FAQ
Q: Are tracks on a side by side worth it? A: Tracks let you take your all-terrain or utility vehicle off trails, in deep snow or just about anywhere else you want to go, but they can still get stuck.
Q: Can you put ATV tracks on a UTV? A: Yes. Certain brands of tracks can be configured for both.
Q: How fast can you go with tracks on a side by side? A:In general, however, and in ideal conditions, you can get around 40 miles per hour.
Q: How much does it cost to put tracks on an ATV? A:You can purchase track kits perform the installation yourself. Track kits cost anywhere between $2,000 and $5,000 depending on the kit.
Read More
Don’t forget to subscribe to Recoil Offgrid’s free newsletter for more content like this.
Humans have been making clothing with built-in pockets since at least 1200 AD, when our ancestors started cutting slits in their tunics to access coin purses or keys stashed in their undergarments. However, the concept of storing tools on a belt is far older than that of carrying them in our clothes. The frozen body of Ötzi the iceman, who is believed to have died between 3400 and 3100 BC, was found clad in a leather belt. Pouches sewn onto his belt contained a scraper, drill, awl, and fire-starting kit with flint and tinder fungus. Ever since those ancient times, utility belts have seen continuous use, carrying everything from primitive survival supplies and farming implements to swords and six-shooters. They offer quicker access and more load-carrying capability than garment pockets, and can be configured in countless ways to meet the task at hand. With this in mind, let’s take a look at three common categories of belts related to emergency preparedness and self-defense. We’ve divided them into three categories: EDC Belt, Range Belt, and Battle Belt/War Belt, each for their own purpose. But if you’re in a hurry, check out this video on one man’s custom range belt setup:
Belt Categories
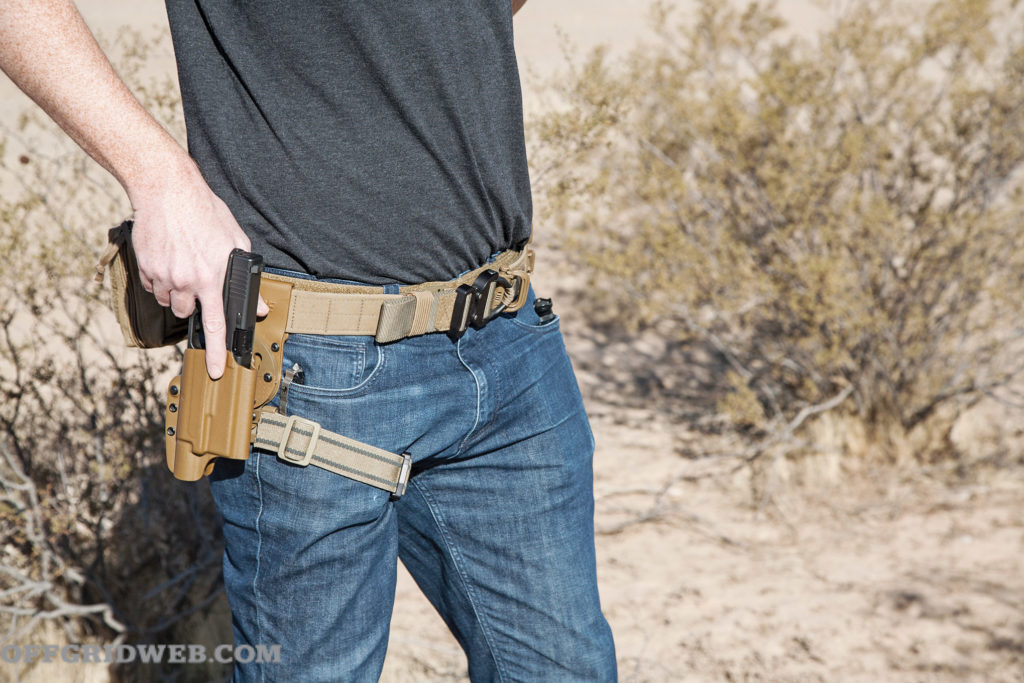
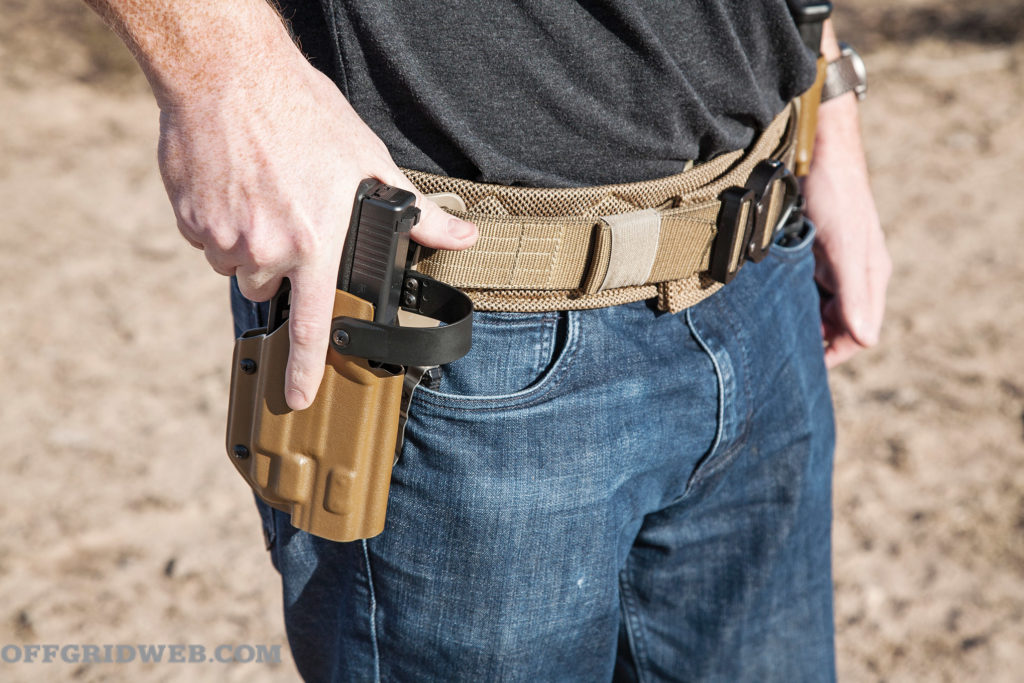
First, everyday carry belts are designed to be slim and comfortable enough for daily wear. Most are intended to provide additional support for concealed carry of a gun, medical gear, and other items. EDC belts also offer higher load-bearing capacity for pants that are weighed down with anything beyond the normal phone, keys, and wallet.
Above: A good belt makes it easy to carry gear without constantly stopping to hike up your pants. The pictured Agis appendix holster from Tier 1 Concealed distributes weight well thanks to two clips and a flexible midsection.
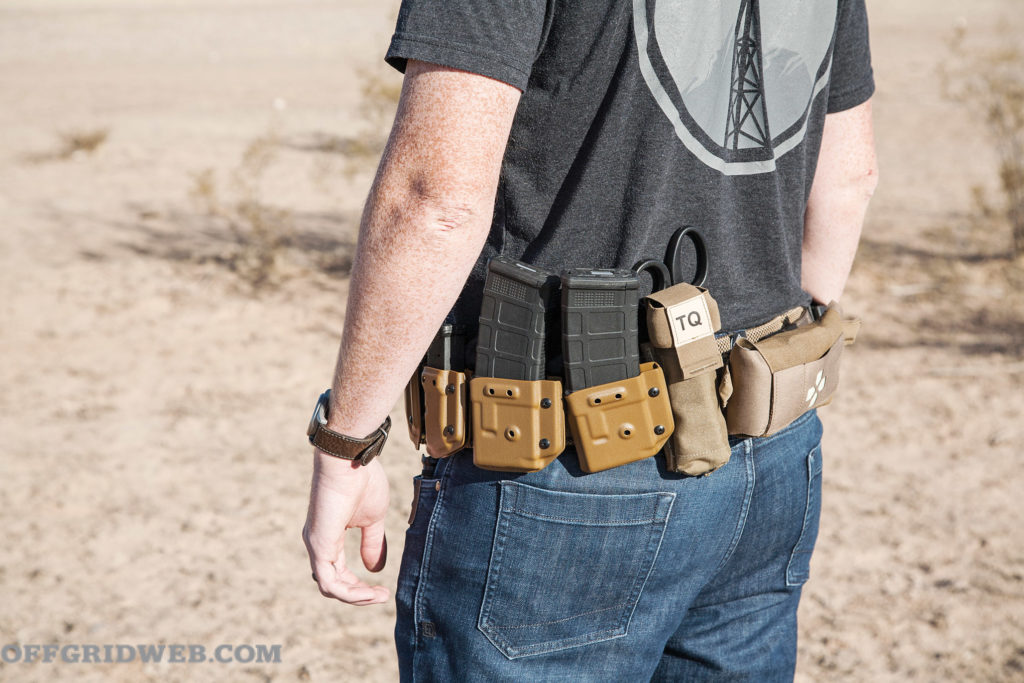
Second is the category we refer to as range belts — the type you’d wear at a shooting class or competition. These tend to be more overt and sturdy; items that were stored inside the waistband (IWB) are now stored outside the waistband (OWB), and additional magazine and accessory pockets are added. Range belts sometimes feature a thin inner belt and detachable outer belt connected by hook and loop material, making it easy to tear off the entire loadout in seconds without dropping trou. Buckles and webbing tend to be larger and stronger, since concealment is no longer a priority.
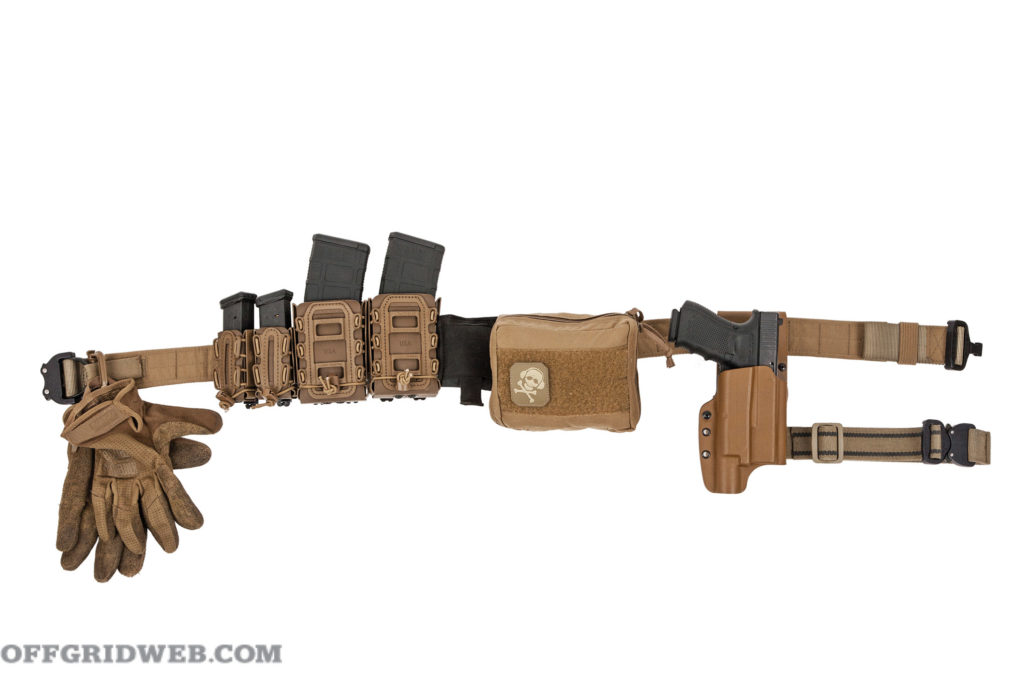
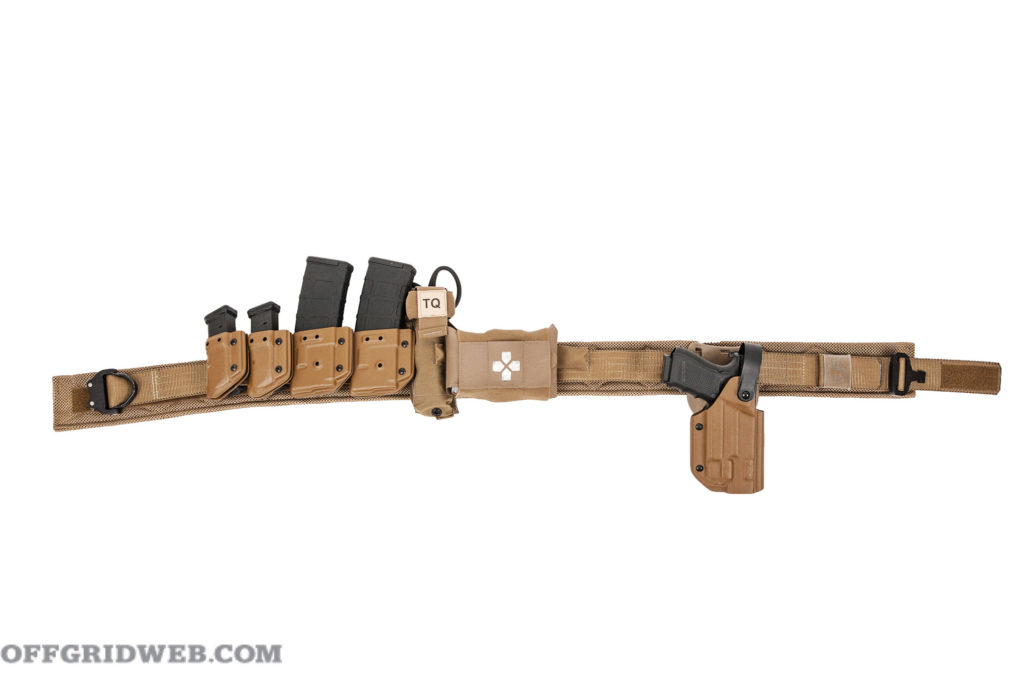
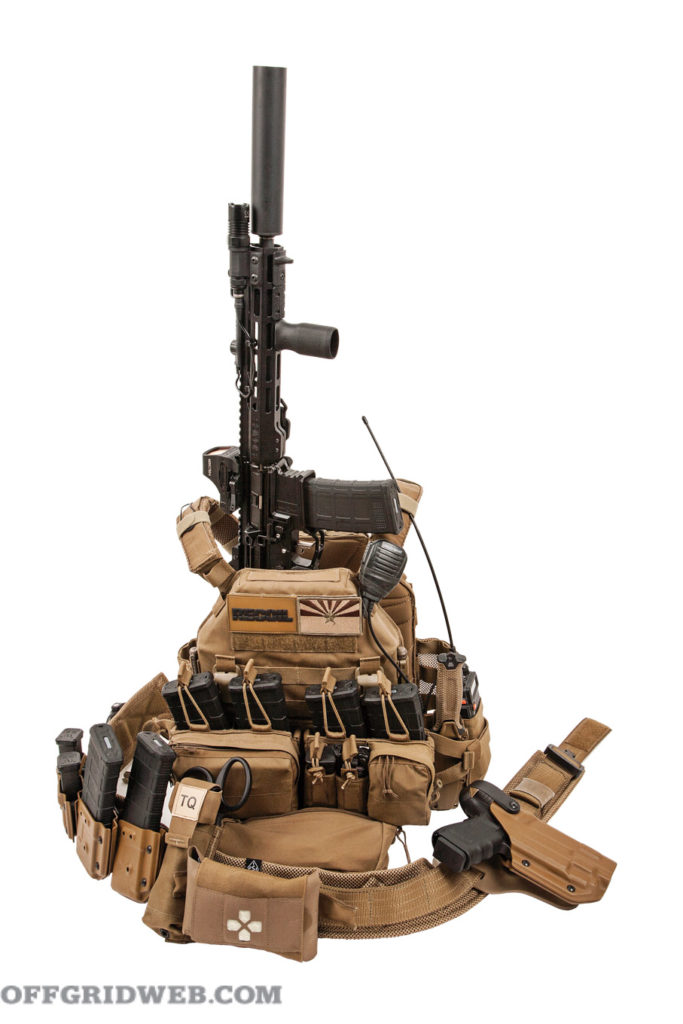
Finally, battle belts or war belts are the most high-profile and full-featured category. Even if you’re not literally going into combat, these setups are made to handle that level of physical activity and abuse. This is where you’ll typically see more mission-driven gear loadouts, padded layers for comfort during extended wear, and in some cases, active retention holsters that restrict unauthorized access to a handgun. You might think every inch of these belts will be packed with gear, but that’s not necessarily true. A war belt or battle belt is often worn as one part of a larger load-bearing system, so some of the equipment may migrate off the waistline and onto a chest rig, vest, or plate carrier. Refer to our article “Front Toward Enemy” in Issue 36 for a thorough look at each of those systems.
Now that you understand the divisions between these three types of belts, buckle up and read on as we show some of the options and considerations for each. All of the following belts and accessories from Carbon Tactics, G-Code, and Snake Eater Tactical are made in the USA.
Everyday Carry Belt
Whether you’re wearing a suit and tie or jeans and a T-shirt, there are EDC belt options that complement almost any type of attire. I tend to fall into the latter category most of the time, so my belt stays concealed beneath the hem of my T-shirt. Thankfully, this means I’m not restricted to styles that look like they belong on the shelf at Men’s Wearhouse.
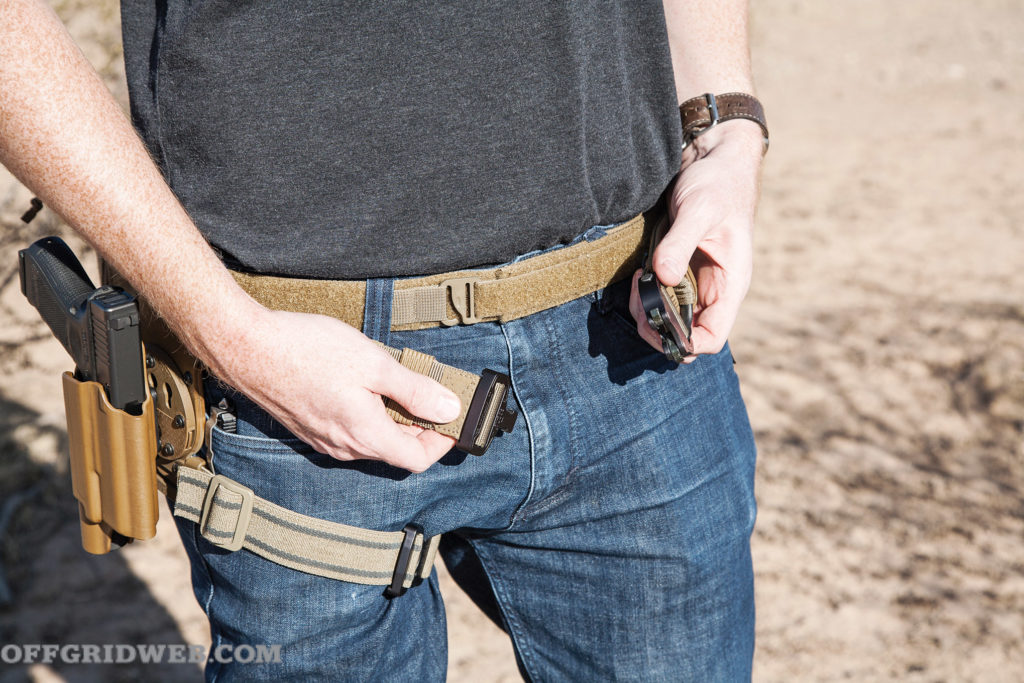
Above: A strong magnet embedded in the BadgerStrap causes the split buckle to snap together with a satisfying click.
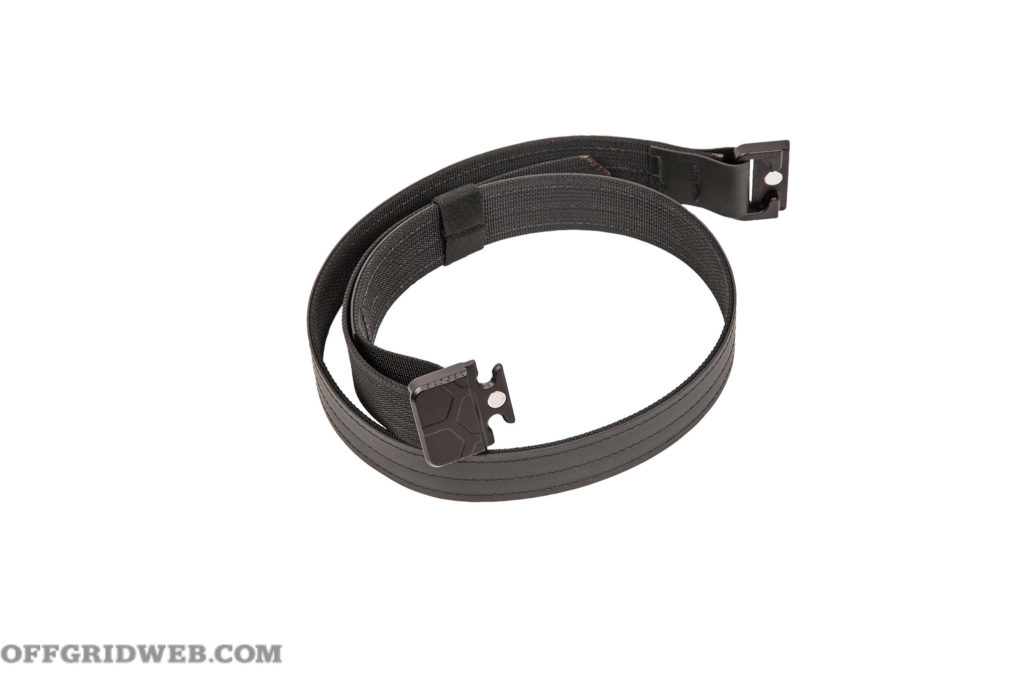
The Foundation: I picked up two belts from Carbon Tactics, a company that designs and manufactures its products in my home state of Arizona. The first is called the BadgerStrap, and consists of a clever split buckle that’s held in place using a strong magnet and CNC-machined, interlocking latch. Although the BadgerStrap was recently discontinued, Carbon Tactics offers the Quicky with a similar magnetic mechanism, as well as the new Cipher, which augments the magnetic latch with a tensioner dial. All of the company’s belts are available with single-layer (more flexible) or double-layer (more rigid) nylon webbing in your choice of black, gray, or coyote brown. A hybrid Biothane option is also offered, integrating an outer layer of polyester webbing coated in tough thermoplastic polyurethane (TPU). I chose this option since it prevents fraying or staining, and makes the belt slightly stiffer than a single-layer style.
The BadgerStrap’s magnetic buckle is rock solid — allegedly strong enough to lift a motorcycle — and I like the fact that its styling is relatively inconspicuous. The nylon and Biothane hybrid construction is supportive without being excessively stiff. I noticed the BadgerStrap has a tendency to loosen slightly throughout the day, especially when it’s loaded with a holster or other heavy items. The brass slider on the male side of the buckle doesn’t grip the webbing as securely as I’d like. That said, this belt is a great choice for those who prefer minimalist loadouts without too much weight on the waistband.
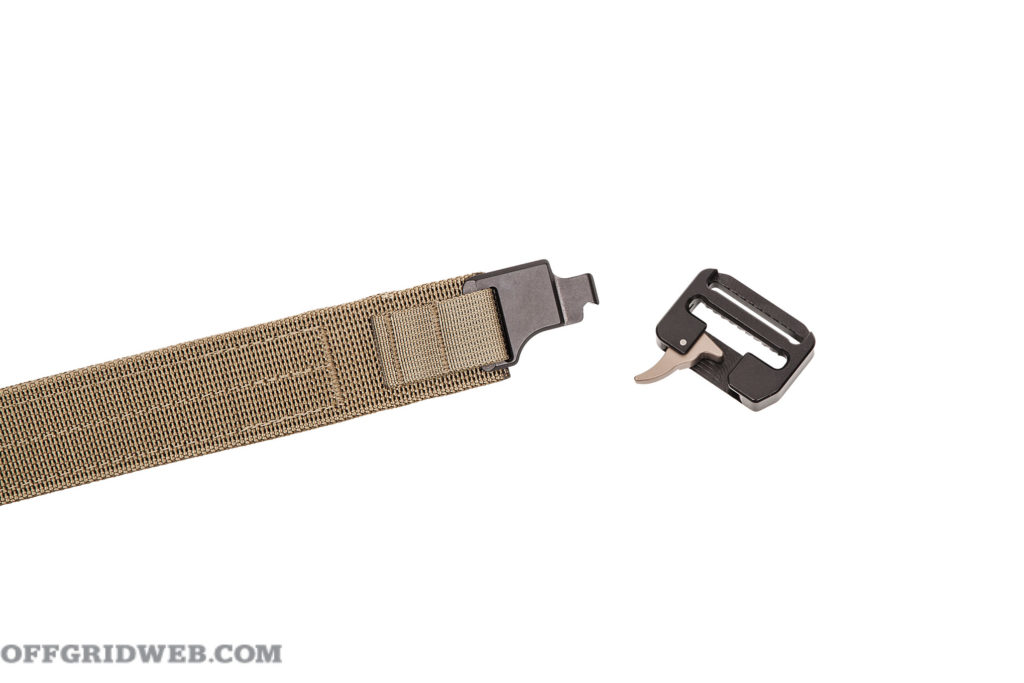
Carbon Tactics also provided a second belt, the Epoch, which demonstrates a heavier-duty EDC option. This belt’s CNC-machined buckle features a trigger-shaped release mechanism on the female side of the buckle. This looks cool, and allows for easy one-handed opening. Apparently, the filmmakers behind the 007 series also liked the design, since this belt is featured in the recent movie No Time to Die. Another benefit of the Epoch is its ability to fit through belt loops; unlike the split-buckle BadgerStrap and Quicky models, you won’t need to slide the Epoch’s buckle off the webbing to swap it between pairs of pants. As for the webbing, this belt features double-layer Coyote Brown nylon.
Above: The Carbon Tactics Epoch features a unique trigger release mechanism, but our favorite part about this design was the fact that it’s slim enough to slide through belt loops without removing the buckle.
I found the Epoch buckle design to be more comfortable and convenient than the BadgerStrap; it’s slimmer and has built-in flexibility between the male and female halves of the buckle, allowing it to contour to my waist. I also didn’t have any issues with this belt loosening during the day, even with a holster, spare mag, and trauma kit inside my waistband. Some users may find the double-layer nylon to be too stiff — it holds a semi-rigid oval shape at all times. It can be ordered with single-layer or hybrid webbing, depending on the user’s preference and load-bearing needs.
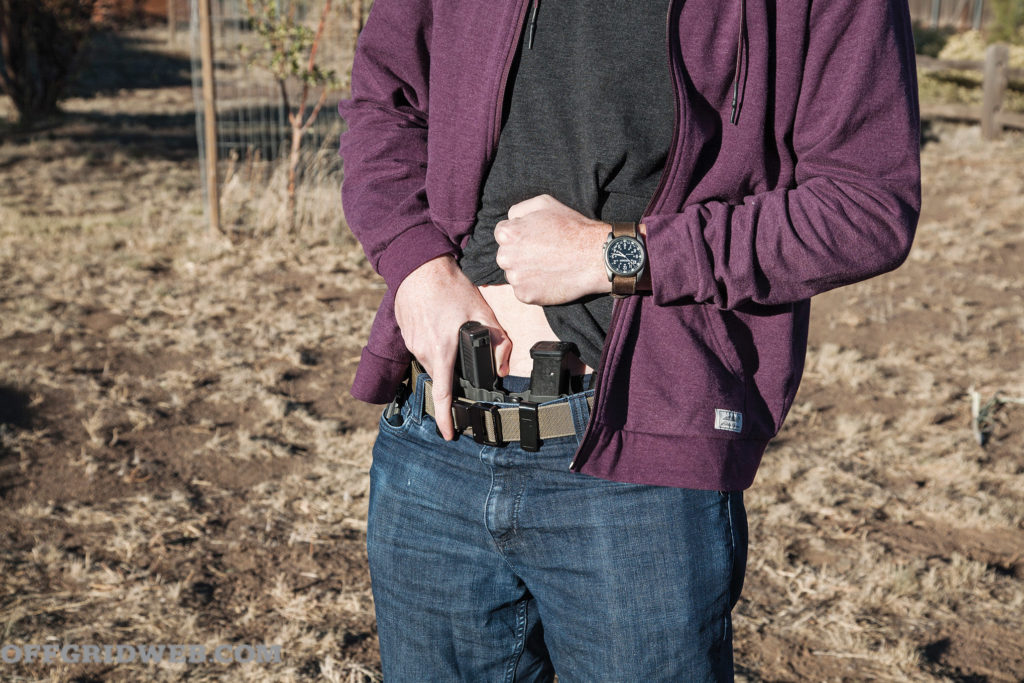
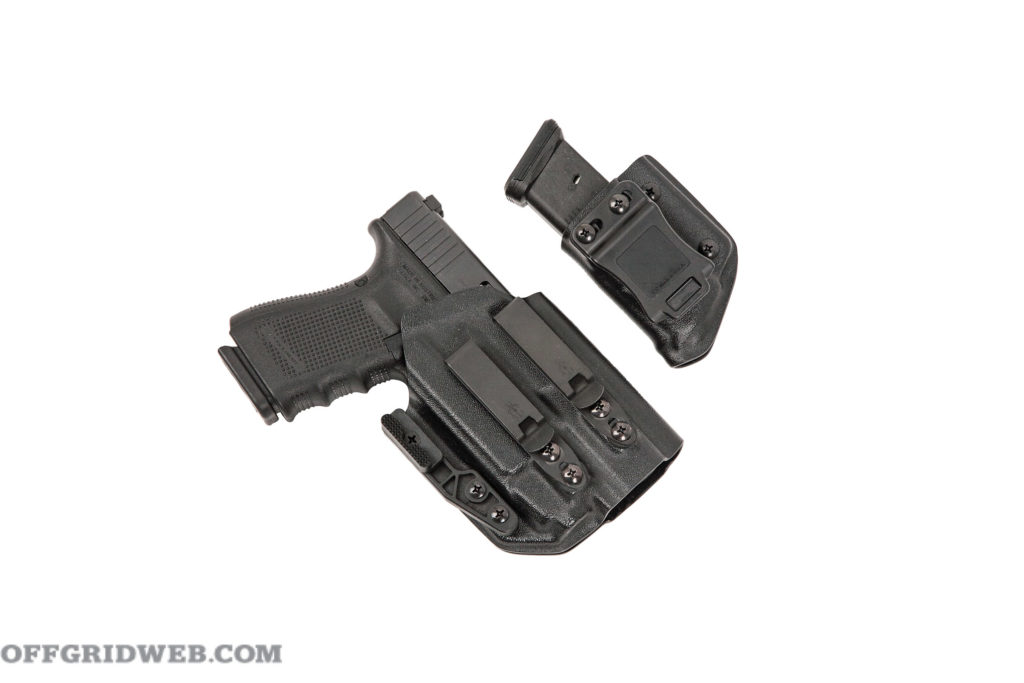
EDC Loadout: Holster Options
I tried out two different holsters with these belts — one made specifically for appendix carry with a spare mag, and a more traditional stand-alone option with a separate mag carrier.
Notes: The Agis is designed for appendix carry, and includes a detachable magazine carrier. Many colors and configurations are available; shown is Storm Gray Kydex set up for a Glock 19 and Streamlight TLR-7A weapon light. With its canted spare magazine, adjustable clips, concealment claw, and flexible midsection, I found this holster to be extremely comfortable and easy to conceal under a T-shirt.
Notes: Modular appendix holsters aren’t everyone’s cup of tea, so I also tried out a stand-alone holster and mag carrier from VEIL Solutions. This holster is set up for my G19/TLR-7A, and it works well for either appendix or strong-side carry. The MOD Wing helps reduce printing, and the optional Discreet Carry Concepts clips make sure it doesn’t move around on my belt. The C2 mag carrier is the same durable Kydex design featured on the war belt/battle belt setup later in this article, but reversed for IWB wear.
Above: VEIL Solutions’ Mantis light-bearing holster provides a minimalist way to carry my Glock 19 and Streamlight TLR-7A. Its metal DCC clips ensure it won’t budge or slide on my belt.
I believe every prepared individual should have basic medical gear and Stop the Bleed or equivalent training. I always carry a bigger kit in my backpack, but an IWB IFAK ensures I’m never without the most critical life-saving gear.
Notes: When I first saw this elastic med kit, I wasn’t sure if it’d end up being too bulky to wear every day. I soon learned it’s surprisingly slim and comfortable, even while sitting in a car for extended periods. It curves to fit my waist and holds a C-A-T tourniquet, H&H mini compression dressing, Celox hemostatic gauze, and gloves. Two metal clips hold the kit securely in place. My only gripe is that the TQ’s hook material sometimes snags on the inner hem of my T-shirt, causing it to fray; switching the C-A-T for a SOFTT-W will alleviate this.
Other Gear
Although the rest of my EDC gear isn’t directly attached to the belt, it’s indirectly supported by it. The more you fill your pockets, the more support you’ll need.
POM Industries pepper spray (concealed inside the waistband)
SureFire E2D LED Defender Ultra flashlight
Microtech Ultratech single-edge pocket knife
Zippo lighter with butane torch insert
Fossil leather wallet with concealed Serepick Bogota Titan lockpicks
Tuff Writer carabiner
iPhone in Otterbox Commuter case with Nite Ize magnetic mount
Range Belt
There are many instances where the amount of gear you can carry, and your ease of access to it, is more important than how discreet it appears. You might be hiking, camping, or hunting in the backcountry, or you might be in a setting where overt carry is expected, such as a gun range. For the sake of simplicity, we’ll refer to this category as range belts. They typically include two or more magazine pouches for primary and secondary weapons, a larger med kit, and an OWB pistol holster, plus any other pouches or tools you may need. Competition-oriented belts, such as those used in USPSA or 3-Gun matches, would technically fall into this category, but they’re much more specialized than the multipurpose setup seen here.
Above: If you’re looking for your first range belt, G-Code offers the Scorpion Low Viz belt as a complete kit with almost everything you’ll need. They’ll even ship it to you fully assembled — just clip on the RTI holster of your choice, and you’re good to go.
The Foundation: Although it’s certainly possible to piece together a range belt setup from off-the-shelf components, there are also several companies that offer range belt starter kits. I selected this G-Code Scorpion Low Viz Belt system, which is based around a two-piece Contact Series Operator’s Belt. Its 1.5-inch-wide inner belt fits through normal belt loops, and is Velcro-lined to attach to the outer belt. A G-hook secures the belt once it’s tightened. The outer belt is made from dual-layer 1.75-inch nylon, with the exterior layer wrapped in wear-resistant Cordura. A sturdy Cobra buckle is standard. Belts are available in black, OD green, coyote tan, wolf gray, MultiCam, or MultiCam Black.
Each Low Viz Belt kit comes with three G-Code Scorpion rifle mags, three Scorpion pistol mags, an Optimal Drop RTI pistol holster platform with elastic leg strap, and an RTI Rotating Belt Mount for an accessory of your choice. The latter two items are compatible with detachable holsters, pouches, and accessories that feature G-Code’s RTI mounting system. I found the belt kit to be very versatile, and have used it at Steel Challenge and 2-Gun matches, as well as for some of the pistol and carbine classes featured in my Final Weapon column.
Range Loadout: Holster
G-Code’s RTI mounting system features three posts that lock into holes on the belt-mounted RTI plate. This allows the wearer to easily swap between holsters for different guns without a need for special tools or removal of the belt. Many manufacturers offer RTI-compatible holsters, but I decided to get a holster straight from G-Code along with my belt.
Above: The included Optimal Drop RTI mount positions the pistol grip even with the belt line, making it easier to draw quickly. It’s not nearly as cumbersome as an old-school drop-leg holster.
Notes: The OSLr features a pre-installed RTI hanger and sturdy Kydex construction in your choice of black, OD green, coyote tan, gray, or MultiCam. A soft “fuzz” finish is optional if you prefer that over bare Kydex. This holster feels well-made, with a positive click as my G19 slides into place. G-Code doesn’t offer a version that’s compatible with my current Streamlight TLR-7A carry light, so I went with the SureFire X300-U. I also selected the RMR cut option ($5 extra) and black anodized hardware (another $5). Paired with the Optimal Drop platform that came with the belt, the OSLr sits comfortably near the natural resting point of my hand, making it easier to draw quickly. The elastic strap prevents the holster from shifting as I run, kneel, or go prone.
Range Loadout: Magazine Carriers
A total of six soft magazine pouches were included with the Scorpion Low Viz belt kit.
Notes: These mag carriers are made from rubberized polymer woven together with elastic shock cord, which can be loosened or tightened to adjust retention. The rifle carriers can accommodate AR-15, AR-10, and AK magazines; the pistol carriers fit single- or double-stack mags and are available in Tall or Short (we chose Short for Glock 19 mags). This is a notable advantage over hard Kydex mag carriers if you plan to use your belt with a variety of weapon types. The elastic design does a good job holding mags in place, and allows them to be removed by pulling straight up or levering outward to break retention. R2 and P2 Operator mounts can be attached directly to the belt, or they can be stacked atop each other to conserve belt space.
Above: Removal of the G-Code belt is simple: Disconnect the Cobra buckles on the belt and leg strap, then pull the hook-and-loop material apart. The inner belt will keep your pants where they belong.
Range Loadout: Individual First Aid Kit (IFAK)
To make use of the RTI Rotating Belt Mount, I picked up an RTI-compatible med pouch from G-Code. Alternatively, a standard med pouch could be attached directly to the belt using clips or MOLLE-compatible soft loops.
Notes: Measuring 6 by 5 by 2 inches, this zippered clamshell pouch is lined with an array of elastic loops for medical supplies. I filled it with supplies for major trauma and range-day cuts/scrapes: C-A-T tourniquet, Rescue Essentials pressure dressing, QuikClot hemostatic gauze, NAR S-rolled gauze, HyFin Vent chest seals, shears, medical tape, assorted Band-Aids, antiseptic wipes, gloves, and a mini Sharpie marker. The pouch itself is great, but I’m not sold on the RTI mounting system for this application — it causes the med kit to stick out further off the belt, making it feel a little cumbersome. A direct-mount kit would work better, unless you need to swap pouches frequently.
I finished off the range belt setup with the following items:
Blue Force Gear Ten-Speed Dump Pouch for shotgun shells or other loose items
ITW Grimloc carabiner to retain Mechanix gloves
Battle Belt / War Belt
A war belt or battle belt takes the concept of a range belt to the next level, offering a platform that can be worn in a professional context along with other load-bearing gear. You might wear a range belt a few weekends each month, but duty belts for law enforcement and military personnel need to withstand continuous daily wear. That includes high-intensity activities like running, climbing, and hand-to-hand fighting, as well as long periods of walking, standing, or sitting. Durability and comfort are paramount, as is retention of all equipment — I shouldn’t have to explain why losing control of your weapon or other gear in a real fight would be disastrous.
Above: We combined the Snake Eater Tactical three-piece War Belt with a Level 2 retention holster and Kydex mag carriers from VEIL Solutions. This setup is maneuverable and comfortable enough to wear while running, jumping, climbing, or crawling.
Wide, padded belts are standard in this category, since they provide the most comfort and support for heavier loadouts. The most traditional approach is to slide a belt through a padded sleeve that’s covered in MOLLE webbing. These sleeved systems can be worn over untucked shirts or jackets since they aren’t attached to the user’s pants. However, they’re bulky and may shift or rotate during physical activity — that’s not ideal if you expect to find your gear in the same place every time.
Suspenders (as seen on old U.S. military ALICE systems) and belt keeper loops (as seen on many LE duty belts) have been used to prevent movement, but Velcro hook-and-loop layers are a more modern solution. The belt I selected comes from Snake Eater Tactical, and features three layers connected in this manner.
The Foundation: The SET War Belt Three-Part System starts with a thin and light piece of 1.5-inch Hypalon fabric, with a simple pass-through loop on one end for tensioning. This is the absolute minimum needed to hold up a pair of pants, but it’s effective. Next, a 4mm-thick layer of closed-cell foam is wrapped in breathable nylon mesh, with hook material sewn to one side and loop material sewn to the other. This creates a thin yet breathable padded layer between the inner and outer belts. It’s wider than the other belt layers in order to provide cushioning for holster mounts and other hard accessories. Finally, the 1.75-inch outer belt is constructed from a double layer of Type 13 nylon parachute webbing, with an inner layer of hook material and a black Cobra buckle. Heavily reinforced stitching throughout this belt shows that it was built with longevity in mind. The SET War Belt is made to order; at time of publication, with a lead time of four to eight weeks.
This three-part system can be used as a two-part system. For example, the middle and outer layers can be worn over a jacket or untucked shirt, much like a traditional padded belt (with the aforementioned drawbacks). The middle layer can be removed for a slightly slimmer waist profile, but after wearing the full system, I can’t imagine wearing it without the padding — it makes a huge difference. The SET War Belt is head and shoulders above a regular range belt for long-term daily wear.
War Loadout: Holster
Given the nature of this belt setup, an active retention holster is a logical choice. Passive retention, as seen on the other holsters in this article, relies on friction induced by the shape of the holster to keep the weapon in place. Pull hard enough, and it’ll pop out. Active retention adds at least one device that must be released before drawing the gun. It ensures the gun won’t get knocked loose while you’re running around, or more importantly, won’t be easily accessible to any bad guy who tries to take it.
Above: Pressing the thumb break lever causes the retention hood to snap forward, allowing the gun to be drawn normally. This takes some getting used to, but it beats losing your gun.
Notes: The Fett features a thumb break — essentially a small lever on the inside edge of the holster — that must be pressed firmly to release a spring-loaded hood. When the hood flips forward, the gun can be drawn normally from passive retention. Each holster is drilled for various mounting patterns including Safariland, G-Code RTI, and Tek-Lok; I picked the ubiquitous Safariland Mid-Ride hanger ($20 extra). It’d be easy to add a thigh strap to this setup if desired, but I felt it was stable enough without one. Even though I’m not working at an LE agency or other job that requires a retention holster, I appreciate the peace of mind it provides. You never know when you might want to do some tactical cartwheels. When the hood isn’t activated, the Fett works great for range practice or competition.
While my range belt came with three rifle mags and three pistol mags, I picked up two and two for the war belt. This is because I’d typically wear it with other load-bearing gear that contains more magazines, such as a chest rig or plate carrier.
Notes: Universal mag pouches have pros and cons, but application-specific, molded Kydex carriers provide the most secure fit and retention. They’re also durable and easy to clean. VEIL Solutions’ C2 series, which stands for Competition & Carry, is available with a reversible polymer belt clip or an optional Tek-Lok clip ($8 extra per carrier). The pistol carriers are available for Glock, SIG, HK, CZ, 2011, and B&T applications; the rifle carriers are available for AR-15, AR-10, and AK mags. Numerous finishes and colors are offered, from plain black to Rhodesian Brushstroke. I’m a fan of the slim profile and strong retention provided by these C2 carriers.
Much like the magazines, this medical gear is supplemented by gear in my chest rig or plate carrier. This belt IFAK serves as my first-line trauma gear. Second-line trauma gear and “boo-boo” kit items are stored elsewhere.
Notes: The Micro TKN consists of an elastic sleeve and a tear-away insert that can be pulled out using the tabs on either end. It can be purchased fully loaded or empty; I packed mine with an H&H mini compression bandage, QuikClot hemostatic gauze, HyFin Vent Compact chest seals, medical tape, and gloves.
Since my micro trauma kit doesn’t have room for a standard TQ, I picked up this carrier from NAR. It attaches securely to the belt with snap straps, and has an elastic cover that protects the Velcro on the C-A-T tourniquet from dirt or abrasions. The straps on the back offer a convenient place to store a set of shears.
Other Gear
Just because you can load down your war belt with six AR mags, four pistol mags, throwing knives, and shark-repellent spray doesn’t mean you should. The only item I’d consider adding is a dump pouch if the situation called for it. It can be used for cycling through a large number of partial mags during reload drills, picking up brass at the end of a range session, or carrying loose ammo for specific weapons (e.g. shotguns).
Above: A war belt will often serve as one piece of a larger load-bearing gear system, such as this Tyr Tactical PICO-DS plate carrier. See our article Here for a detailed look at all of its components.
FAQ
Q: What is a range belt? A: A stable platform that holds gear, but is also flexible for comfort, and sturdy enough to support a holster and other heavy items.
Q: What is a MOLLE Belt? A: A functional load bearing utility belt designed to hold holsters, mag carriers, pouches, and other essential gear.
Q: What is the best shooters belt? A: That is highly dependent on what the belt is going to be used for. But a good belt will be sturdy, capable of carrying everything that is required, and will stand up to abuse.
Closing Thoughts
Much like the emergency preparedness “line gear” Tom Marshall wrote about in Issue 38, it’s not unreasonable to have a few belt setups for different purposes. Many of you reading this article won’t need to spend a big chunk of change on a full-blown war belt. Virtually everyone needs a good everyday belt, unless you wear a bikini or silkies 24/7, in which case we hope you’re good at hand-to-hand combat and MacGyvering your way out of danger. Instead of building a jam-packed belt that would make Batman jealous, consider the situations you face most often, and focus on finding the most efficient way to carry what you truly need.
If you’re reading this, there’s a strong chance you own a smartphone. Most people do these days. We use them less and less for calling and more for living our digital lives: banking, commerce, social media accounts, business deals — our phones are basically an extension of ourselves. Unfortunately, we also find ourselves in an increasingly less-permissive environment, legally and socially. Governments the world over have (both legally and illegally) increased their digital surveillance capabilities at an alarming rate, as the Snowden leaks revealed to the world. NGOs and online sleuths are able to leverage Open-Source Intelligence (OSINT) to track people through cyberspace and the real world, feeding information to authorities or to cancel-culture rage mobs. Abusive partners looking to further control and isolate their spouses may also leverage their phones against them.
Spy fiction has for years popularized the concept of a “burner phone.” The entire first season of the hit HBO crime drama The Wire really revolved around Baltimore PD’s attempt to thwart a drug gang’s use of burners. But when it comes to burner phones in the real world, what are the facts? How do they work? What are the legal and technical hurdles you might find yourself facing should you choose to acquire and operate one? What tradecraft is really needed in order to make a burner phone even worth it? I’ll explore the answer to these and other questions in this article.
What is a Burner Phone?
At a minimum, a burner phone is one that we don’t care about and don’t intend to use for long. They may be used once or just a few times. The phone will often be ditched or destroyed after use, so we want one that’s inexpensive but robust enough to do what we need to do, especially if the intention is to use the internet and online applications at all.
Really, though, the value of a burner phone is in disassociating ourselves from the phone. We don’t want our name associated with the IMEI (International Mobile Equipment Identity) of the phone in any way. IMEI is a globally unique identifier for a phone. While a serial number identifies a phone in terms of its manufacturer, the IMEI is what identifies a phone on the cellular networks. It must be globally unique in order to facilitate roaming between networks. Even if you switch out SIM cards, the IMEI of the phone is still used to identify the phone.
When you sign up for a phone contract with, say, Verizon or AT&T, you’ll be asked to show ID, sign up with a credit card for billing, etc. In their database, they’ll have your phone IMEI associated with your account. This creates an extremely strong association between the two. If you travel to another country and get a local SIM card, you’ll have a new SIM Serial Number (SSN) and even a new MSISDN (Mobile Station International Subscriber Directory Number; i.e., the phone number). However, your IMEI will remain static.
Preventing an association between our identity and an IMEI, and having a phone that can be discarded to make tracking or successful Signals Intelligence (SIGINT) or Communications Intelligence (COMINT) targeting harder is what most people are thinking of when they think about a burner phone.
In another context, a burner really just focuses on the “disposable” aspect. You may still want a strong association between the device and yourself, but don’t want to risk your real phone or its data. In this context, you may also want a burner laptop as well, not just a phone. You may just re-image the devices before and after or you may just ditch them after.
Why Would You Need a Burner Phone?
The media tends to focus on the bad actors when it comes to any tool (guns, anyone?). They’ll bring up spies, terrorists, and drug dealers as reasons why telecommunications should be heavily regulated and everyone should have to have their device tied to their identity. Of course, activists who are afraid they may be targeted for political persecution, as well as just your general privacy enthusiasts would also want access to a burner phone. But there are many perfectly legal, sensible reasons to use a burner. Examples of these include:
An engineer or executive from a technology company traveling to China, who is afraid his device may be targeted by the authorities for industrial espionage purposes.
A tourist who is afraid of being made to unlock a device when clearing customs.
A woman whose abusive boyfriend has access to a phone he gave her, but who needs to communicate without him finding out.
How to Buy a Burner Phone
Above: I purchased a Moto e and unlimited voice and text plus 1GB of data, in cash, at my local Target store. I didn’t need to show ID at point of sale.
At a minimum, a burner phone is a prepaid phone. Depending on the laws of your jurisdiction, and the policies of both the store you buy from and the carrier you choose, it may be more complicated. In much of the world, you’re not going to be able to buy a prepaid phone or even a SIM for your current phone without showing ID. You may not be able to buy with cash, either.
In 2010, there was an attempted car bombing in Times Square in New York City. The terrorists used “burner phones” as part of the trigger system for their device. Predictably, as in all such tragedies, politicians wanted to be seen as “doing something” and introduced legislation to eliminate “burner phones” in U.S. S3427, known as the Pre-Paid Mobile Device Identification Act. It didn’t pass, but some stores adopted the policy anyway.
So, what’s the process like today, and what considerations do you have to be aware of? For research purposes, I was able to go to my local Target and buy a Tracfone Moto e and a plan card. I didn’t have to show ID, and I was able to pay cash. I did have to ask the sales associate to unlock the phone from the shelf for me.
Honestly, it was really easy and straightforward. And depending on your threat model, that might be enough. The woman in an abusive relationship might go in and make her purchase, just as teenagers do daily. However, if “jealous boyfriend” isn’t the adversary you’re concerned with, then you’ll also want to take tradecraft into consideration.
Above: Tracfone and other prepaid mobile services require that you purchase your minutes and data separately. The phone doesn’t come with anything included in the box.
Purchase Precautions
We live in the most surveilled time period in all of human history. We’re constantly being tracked, both online and offline. We know that, which is why we want a burner. But if our goal is to completely disassociate from the phone, even under the scrutiny of knowledgeable and well-equipped state-level adversaries, we have to be craftier.
Here’s a list of things to take into consideration:
We never want our actual phone and the burner phone to be active in the same location, or in relative proximity to each other. In fact, we don’t want our phone to have been near the store where we purchased the burner, and certainly not when we purchased it. Even if we’re not just worried about the cellular service, we don’t want any other emissions from our phone (BTLE, Wi-Fi probes, etc.) to leave a digital bread crumb trail. You might think turning your phone off is enough, but that’s not always true. For example, Apple’s iOS 15 added a new “findable after power off” option for iPhones.
In my local Target, there are surveillance camera bubbles on the ceiling in a matrix, about 8 to 10 feet between each other. Some of those may be decoys, but it’s safe to assume you’re on camera the entire time you’re in the store. You might want to consider wearing a mask for privacy — most people will assume you’re only concerned about getting sick.
There are speed and traffic cameras all over. Many of us also have toll transponders, or vehicles with built-in cellular Wi-Fi systems. There are plenty of opportunities for our vehicle to be tracked going to or from the store.
The obvious solution to these considerations is the use of one or more cutouts. A cutout is an individual whose role is to ensure that two other individuals (such as an intelligence officer and his or her handler) don’t have to meet together. In this case, you get a cutout to have someone else go make the purchase someplace outside of your immediate area of operations (AO), and then meet for the pickup. You either meet for the pickup in a third location, or receive the phone via dead drop (a pre-arranged location to exchange goods without meeting).
It’s also worth noting that if you don’t buy a plan card in the store with cash, you’ll need to provide credit card information when you activate the phone later.
Above: Big-name carriers like AT&T have prepaid options, but may have policies and technical controls in place to limit their usefulness as “burner” phones, even though there’s currently no legislation in place in the U.S. mandating this at a federal level.
How to Set Up a Burner Phone
The process for activating the phone is going to differ depending on the carrier you choose. Some may make it more difficult than others, given our intended purposes and constraints.
The process for Tracfone is relatively straightforward:
Turn on the phone — remember not to do this near your primary phone, home address, workplace, etc.
If you got one of the Android models, make sure you turn off all the location sharing and other Android privacy-spoilers.
From a computer (because the website won’t work on the Android Chrome browser, so you can’t just connect the phone to Wi-Fi), go to the Tracfone website.
Click to activate
Provide the PIN from your plan card
Provide the IMEI and select a zip code you want your phone number to be from
Create an account
Reboot the phone
Now it works!
How to Activate a Burner Phone
Above: Make sure to opt out of all Google tracking and diagnostic “services” when you initially power on the device.
Here are the facts, based on my experience at the time of writing this. The Tracfone activation page won’t progress past the IMEI input and zip code selection if you’re using a well-known VPN service or Tor. I wasn’t able to do it while using ProtonVPN, for instance. This is obviously in order to tie a real IP address to the activation so that an association can be attempted later.
However, when they ask for an email address, they don’t have any requirements for this email address. In fact, I was able to use temp-mail.org/en to get a temporary email address and use that. No email was sent to this address during its lifetime, and I verified that it’d receive email by sending one to myself at the randomized address.
My recommendations for activation tradecraft are:
Activate the phone away from home, with a public computer if possible (library, cyber cafe, etc.) If doing it from a coffee shop, make sure you disable Bluetooth and any sharing, change your Wi-Fi MAC address, etc.
Use a temporary email address to activate the accounts.
Either get your cutout to do this for you, or be cautious of any form of evidence of your presence at this location that might come back to haunt you later. This may include CCTV footage, credit card transaction records, tracking data from your other electronic devices, or even eyewitnesses who remember your appearance.
How to Use a Burner Phone
The operational security (OPSEC) around running a burner phone is based largely on your threat model, or the map between your assets (what you have to protect), the threats against those assets, and how the threats may attempt to exploit weaknesses to attack those assets. The woman in an abusive relationship has a much different threat model than the political activist, for instance.
A complicated threat model will include:
Attacks against your anonymity by tying you to the device (e.g. surveillance of locations where the device is commonly used).
Attacks against your privacy by tying the device, and thus you, to specific locations at specific times (e.g. triangulation or GPS tracking).
Attacks against the confidentiality of your communications (e.g. wiretapping).
Attempts to determine who in your network communicates with whom and map the “social networks” you’re part of (if your burner only contacts your known associates, who aren’t using burners of their own, that’s a clue to your identity).
Making the mistake of logging into online services, especially those such as Google or Facebook, will instantly tie your phone’s IP address to your account. Your Google info can be subpoenaed, and then the carrier will be subpoenaed for information on the phone that had the IP address, thus tying you to the phone.
There have been numerous cases of phone locations being subpoenaed during an investigation. In 2020, an individual was investigated by police merely for having tracked a bike ride on Google Maps past the location of a robbery at roughly the same time. And we’re all aware of the mass leveraging of geolocating phones during the January 6 incident.
All voice calls and SMS text messages, as well as internet traffic, can be subject to lawful intercept due to the Communications Assistance for Law Enforcement Act (CALEA). The scope of the warrant can be for call identifying information (CII), such as information on who called whom and any dialed digits, or might extend to Call Content (CC), which is recordings of the actual phone call or captures of digital data exchanged. Avoid the use of unencrypted communications, even with a burner phone.
Above: F-Droid is a third-party app store that supplies open-source software. By enabling the Guardian Project repo, you can get privacy-focused applications to help bolster your anonymity and increase the value of your burner phone.
Important Privacy Tips
At a minimum, follow these tips to mitigate threats to your mobile phone and privacy:
DO NOT log into a Google account for Android, or in a browser. This should go without saying.
DO NOT enable any telemetry, tracking, optimization, or customization features.
DO NOT enable biometrics (thumbprint, facial recognition, etc.). Stick with a PIN. An alphanumeric pass phrase is best. Use one that’s not shared with any of your other known accounts.
DO NOT power up your device in or around your home, work, contracted cell phone, or anything else electronic that can be used to tie you in time and space to the burner phone conclusively.
DO install Signal manually without using Google Play.
DO install F-Droid to allow you to install a few extra open-source applications (OpenStreetMap, and some others discussed below).
DO commit important phone numbers to memory and avoid saving them as contacts.
DO set up a system of challenges/responses with your associates to establish your identity on a human level. For example, think of the classic “flash” and “thunder” sign/countersign combination Allied forces used to identify each other on D-Day. Since you have gone to great pains to undermine technological identification associations, and you may be cycling through burner phones regularly, this serves as a low-tech fail-safe to confirm you’re speaking with the right person.
Mitigating social network link analysis is more difficult. In intelligence analysis, this refers to the process of graphing subjects (typically people) via associations to each other. Subjects who have the most associations are either the most important person in the network (the “Center of Gravity,” or COG), or a courier/cutout for that individual.
Network traffic analysis, such as seeing what phone numbers call what other numbers, or what IP addresses visit other IP addresses, can be used to build those associations. Thus, avoiding direct communication with attributable endpoints, such as known phone numbers or email addresses, is important in this context.
Above: PixelKnot is a digital steganography application for Android that allows you to securely embed messages in photos, which can then be distributed via anonymous bulletin boards and image-sharing sites to your compatriots.
Covert communications methods, such as steganography, can help mitigate this threat — refer to our article in RECOIL OFFGRID Issue 45 for more details on how to use digital steganography to send messages discreetly. You can gain access to a steganography app through the F-Droid app store by enabling the Guardian Project repository and then installing PixelKnot. You can install Tor browser clients via F-Droid as well.
Burning the Burner
When you’re done with your burner, you’ll want to get rid of it. How you do this will largely depend on the why. In most cases though, you’re going to want to securely dispose of the device and not just toss it into the trash can while on the run, à la Jason Bourne.
Assuming time permits:
Perform a factory reset of the device.
Ensure that you have physically scrubbed it of fingerprints or other biological remnants of your time with the device.
Physically destroy the device to render it inoperable, and more to the point, to ensure that data is physically non-recoverable.
Above: Before tossing your burner phone, make sure to do a factory reset at a minimum. Wipe it (both figuratively and literally with a cloth) and physically destroy it as well, if time permits and your threat model justifies it.
FAQ
Q: What is the point of burner phone? A: Burner phones, or a “burner”, is an mobile phone designed for temporary, sometimes anonymous, use, after which it may be discarded.
Q: Are burner phones legal? A: Burner phones are legal if the use of a burner phone is for acts that are not considered illegal.
Q: Are burner phones traceable? A: A burner phone number can be traced, but it is difficult to trace a burner phone without specialized tools.
Conclusion
In today’s digital world, threats to privacy and security of individuals abound. Those who, for whatever reason, require anonymity can still get it through the use of prepaid cell phones. Making the jump from a mere prepaid phone to a burner requires judicious application of operational security procedures and tradecraft. These precautions will limit the opportunities for state and non-state actors to be able to tie your real-world identity to the device and then leverage the device against you by tracking you, both online and in the real world.
Read More
Don’t forget to subscribe to Recoil Offgrid’s free newsletter for more content like this.