Whether you love them or hate them, modernized or so-called “tactical” lever action rifles have skyrocketed in popularity in recent years. We can attest that our own Marlin 336 Dark Series project is a ton of fun to shoot, but it still has a few downsides. The magazine tube can only hold five rounds, it must be reloaded one round at a time, and the manual of arms is substantially different from a modern semi-auto rifle, leading to a steep learning curve. At SHOT Show 2023, we found a new Bond Arms lever action AR15 that fuses this classic operating mechanism with the ergonomics, capacity, and modularity of an AR-15. The Bond Arms lever action AR lower can be used with any milspec AR-15 upper, feeds from an AR-15 mag, and accepts a variety of Remington 870 shotgun stocks.
About Bond Arms
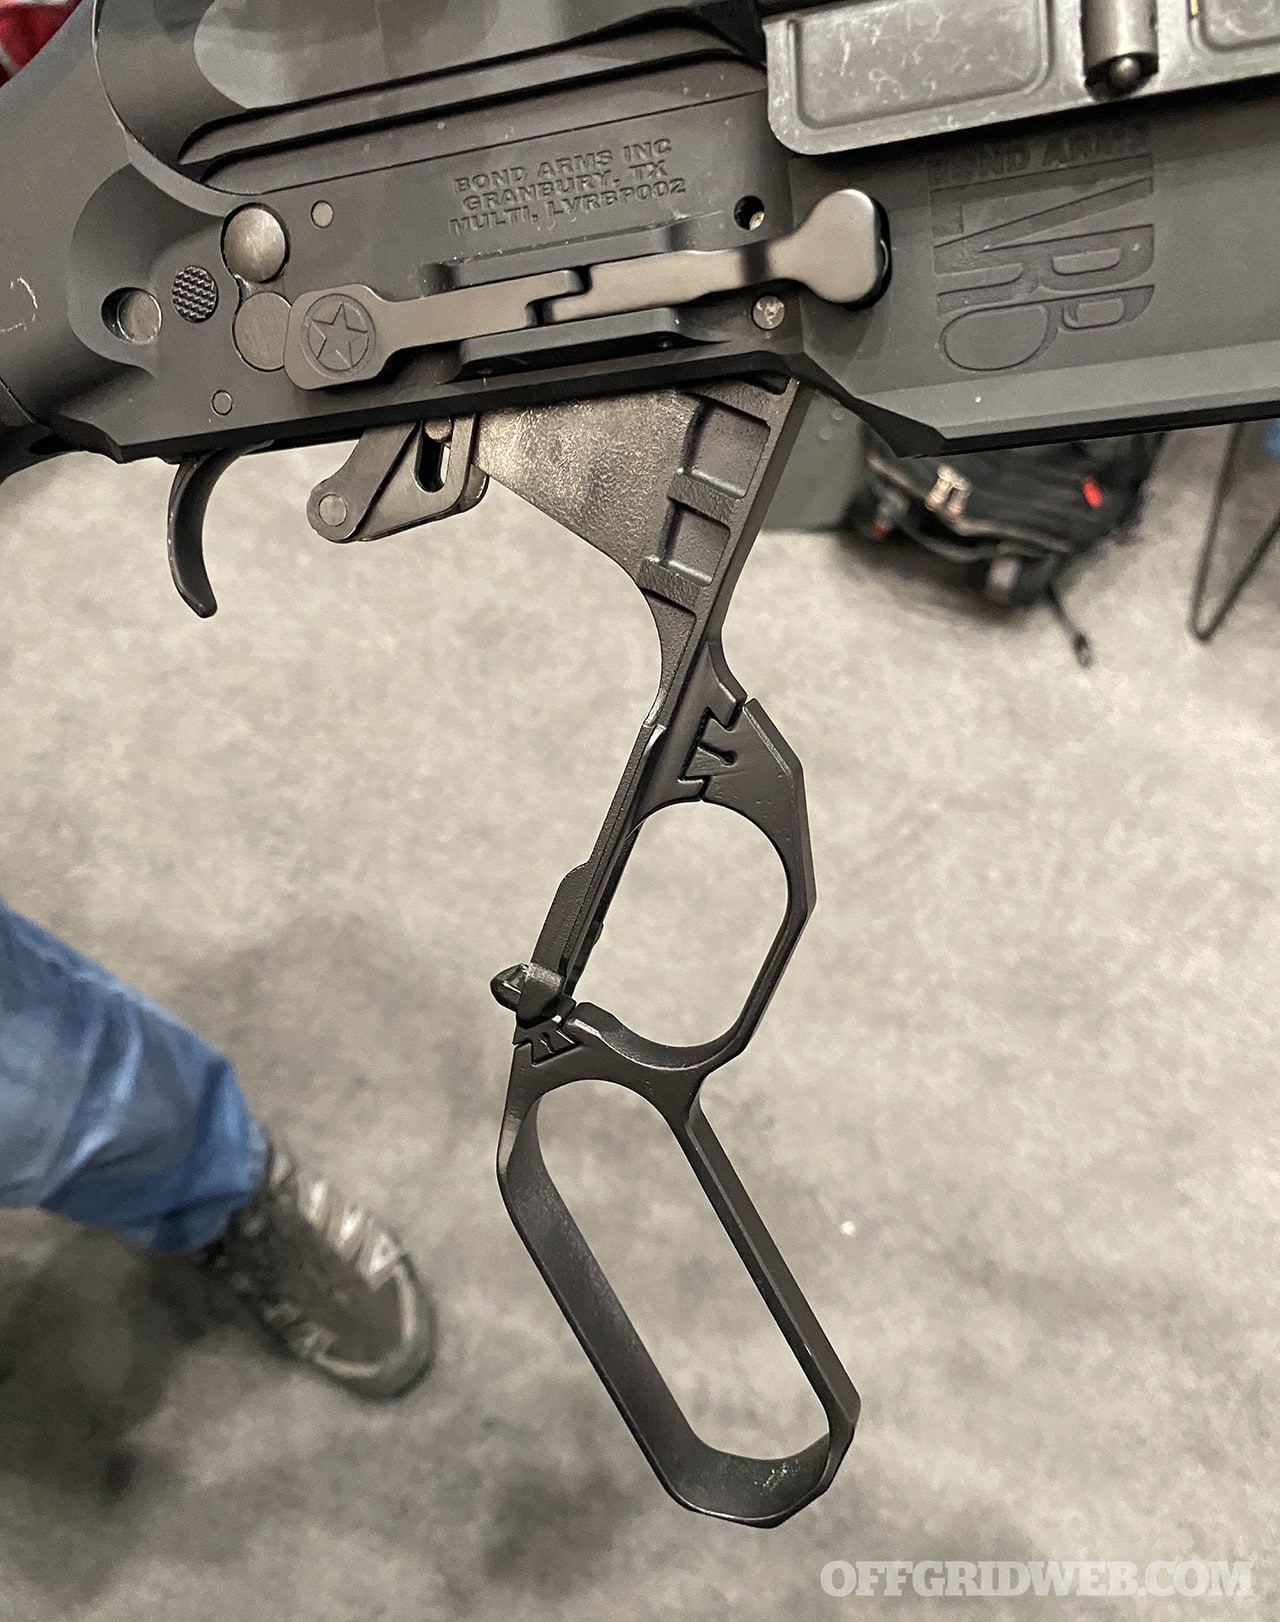
Bond Arms is a Texas-based gun manufacturer that has been around since 1995, but they’re not typically associated with rifles. The company primarily makes Derringer-style double-barrel handguns. So, when we walked by the Bond Arms booth at SHOT Show this week, we were surprised and intrigued to see the lever gun pictured above on a table surrounded by handguns. We immediately asked for more information and were directed to the rifle’s designer, who gave us a detailed run-down of its features. See it in action on RECOIL TV!
The Bond Arms Lever Action AR15
To be clear, this rifle is still in a pre-production prototype phase, but Bond Arms tells us they’ve been testing and refining it for more than a year already. It’s not the first lever-gun-meets-AR project we’ve heard of — the FightLite Herring Model 2024 comes to mind — but it certainly seems like a major step forward in this category.
Starting from the top, it accepts a standard AR-15 upper receiver. Bond Arms says it has been proven to work with everything from a .223/5.56mm upper all the way up to a .50 Beowulf upper. Most of us already own multiple AR upper receivers that can be used with the Bond Arms lever action lower.
Moving on to the lower receiver, this is where it gets really interesting. There’s a push-button safety similar to what you’d find on a lever gun, and a unique mag release that extends rearward to offer easy access to the shooter’s index finger. The front portion of this mag release — the part where a regular AR mag release button would be — can also be pressed directly to drop the mag. On the opposite side of the receiver, there’s another mag release button for ambidextrous use. The mag well is flared for quick reloads; we tested its retention and release with a 30-round PMAG.
The most surprising part of the Bond Arms lever action AR is the lever mechanism itself. According to the designer, it uses an asymmetric cam that rides in a track (the slotted silver piece protruding from the receiver in these photos). This allows the leverage applied to the bolt to increase at points where more force is needed, such as while feeding a round from the magazine. Bond Arms says this complex cam mechanism wasn’t necessary for 5 or 10-round mags, but feeding the first few rounds from a full 30-round mag created more resistance and required more leverage for smooth operation.
There’s also a secondary “grip safety” built into the lever — in order for the rifle to fire, the lever must be squeezed lightly against the stock. This functions similarly to a 1911 grip safety, only reversed to the front of the grip.
We were able to handle and dry fire the lever gun prototype, and found it to be smooth and easy to use. Compared to a traditional lever gun, this rifle has a noticeably shorter throw that lends itself to rapid fire. The only time we noticed the grip safety mechanism was when we attempted to press the trigger without touching the lever; it worked as intended and prevented the rifle from firing.
Another ingenious aspect of this design is the interchangeable lever loop. Bond Arms realized that some users prefer large loops for use with gloves, while others prefer more traditional small loops. They also wanted to allow users to swap to various Remington 870 shotgun stocks, such as the Magpul SGA 870 stock and Hogue Overmolded stock pictured here — this would require different loop shapes to match the contour of the grip. The solution was simple: make the the loop and trigger guard a separate piece from the internal part of the lever. The loop attaches to the gun via two dovetailed sections around the trigger guard.
This modular design allows the user to easily swap lever loops (and stocks) without affecting the rifle’s internal mechanism or requiring gunsmithing work. Want to learn more about the history behind its inspiration, watch the video here.
Price and Availability
We haven’t had a chance to shoot the Bond Arms lever action AR yet, but we hope to get our hands on one soon for a thorough review. Bond Arms told us their goal is to release the retail version of this lever gun by early 2024 at an MSRP of $1,499. Obviously, the price and time frame are not set in stone at this point. For more information, keep an eye on BondArms.com or follow the company’s Instagram @BondArms_.
2024 Update – Bond Arms LVRB Final Prototype
At SHOT Show 2024, one year after we first saw the Bond Arms Lever Action, we learned a few new details about this rifle. According to Bond Arms owner Gordon Bond, this rifle has been named the Bond Arms LVRB and will be available in the second quarter (Q2) of 2024. MSRP will start at $1,599, a slight increase from the original estimated price. Gordon showed us the final prototype of the LVRB and explained that its action has been refined with improvements to the locking mechanism that ensures the rifle won’t be able to fire out of battery. We’re glad to see the dovetailed interchangeable lever is still present, and the trigger feels great. After handling and cycling this final prototype, we’re more excited than ever to get our hands on the production model later this year!
FAQ
Q: How much is the new lever-action ar15? A: The Bond Arms LVRB is estimated to cost $1,599
Q: When will the Bond Arms lever-action be available? A: Bond Arms says it’s coming in Q2 of 2024, meaning between April and June.
Q: Is there another 556 lever-action? A: Yes! Other than the Bond Arms lever action AR in this article, there is also the Henry Long Ranger Express.
Q: Are lever-action rifles obsolete? A: No! Although they are not as common as they were in the past, they are still used in a variety of shooting sports.
Q: Why are lever guns so expensive now? A: Lever action rifles use older technology which must be machined and fitted to work properly. This is a work intensive and time consuming process that usually costs more than their semi-automatic counterparts.
Read More
Don’t forget to subscribe to our free newsletter for more content like this.
Editor’s Note: The author of this article works full-time in law enforcement in a major metropolitan area of the United States, within a state that has used StingRay devices and other cell phone surveillance systems for various investigations. Due to the sensitive nature of this topic, his article has been published under a pseudonym.
It’s safe to assume our readers fall into one of two groups: you know your cell phone tracks you constantly without your permission, or you’re unaware of the potentially serious privacy risks from the neat little device in your pocket. Being in the latter category doesn’t make you wrong — most people tend not to think about things that haven’t affected their lives yet, or dwell on dangers they believe are outside their control. However, when you’re in a particular line of work, the thoughts and ideas mentioned above constantly run through your mind. As writers in this industry, we often joke about being on government watch lists, but those jokes lose their humor when Big Brother may actually be watching.
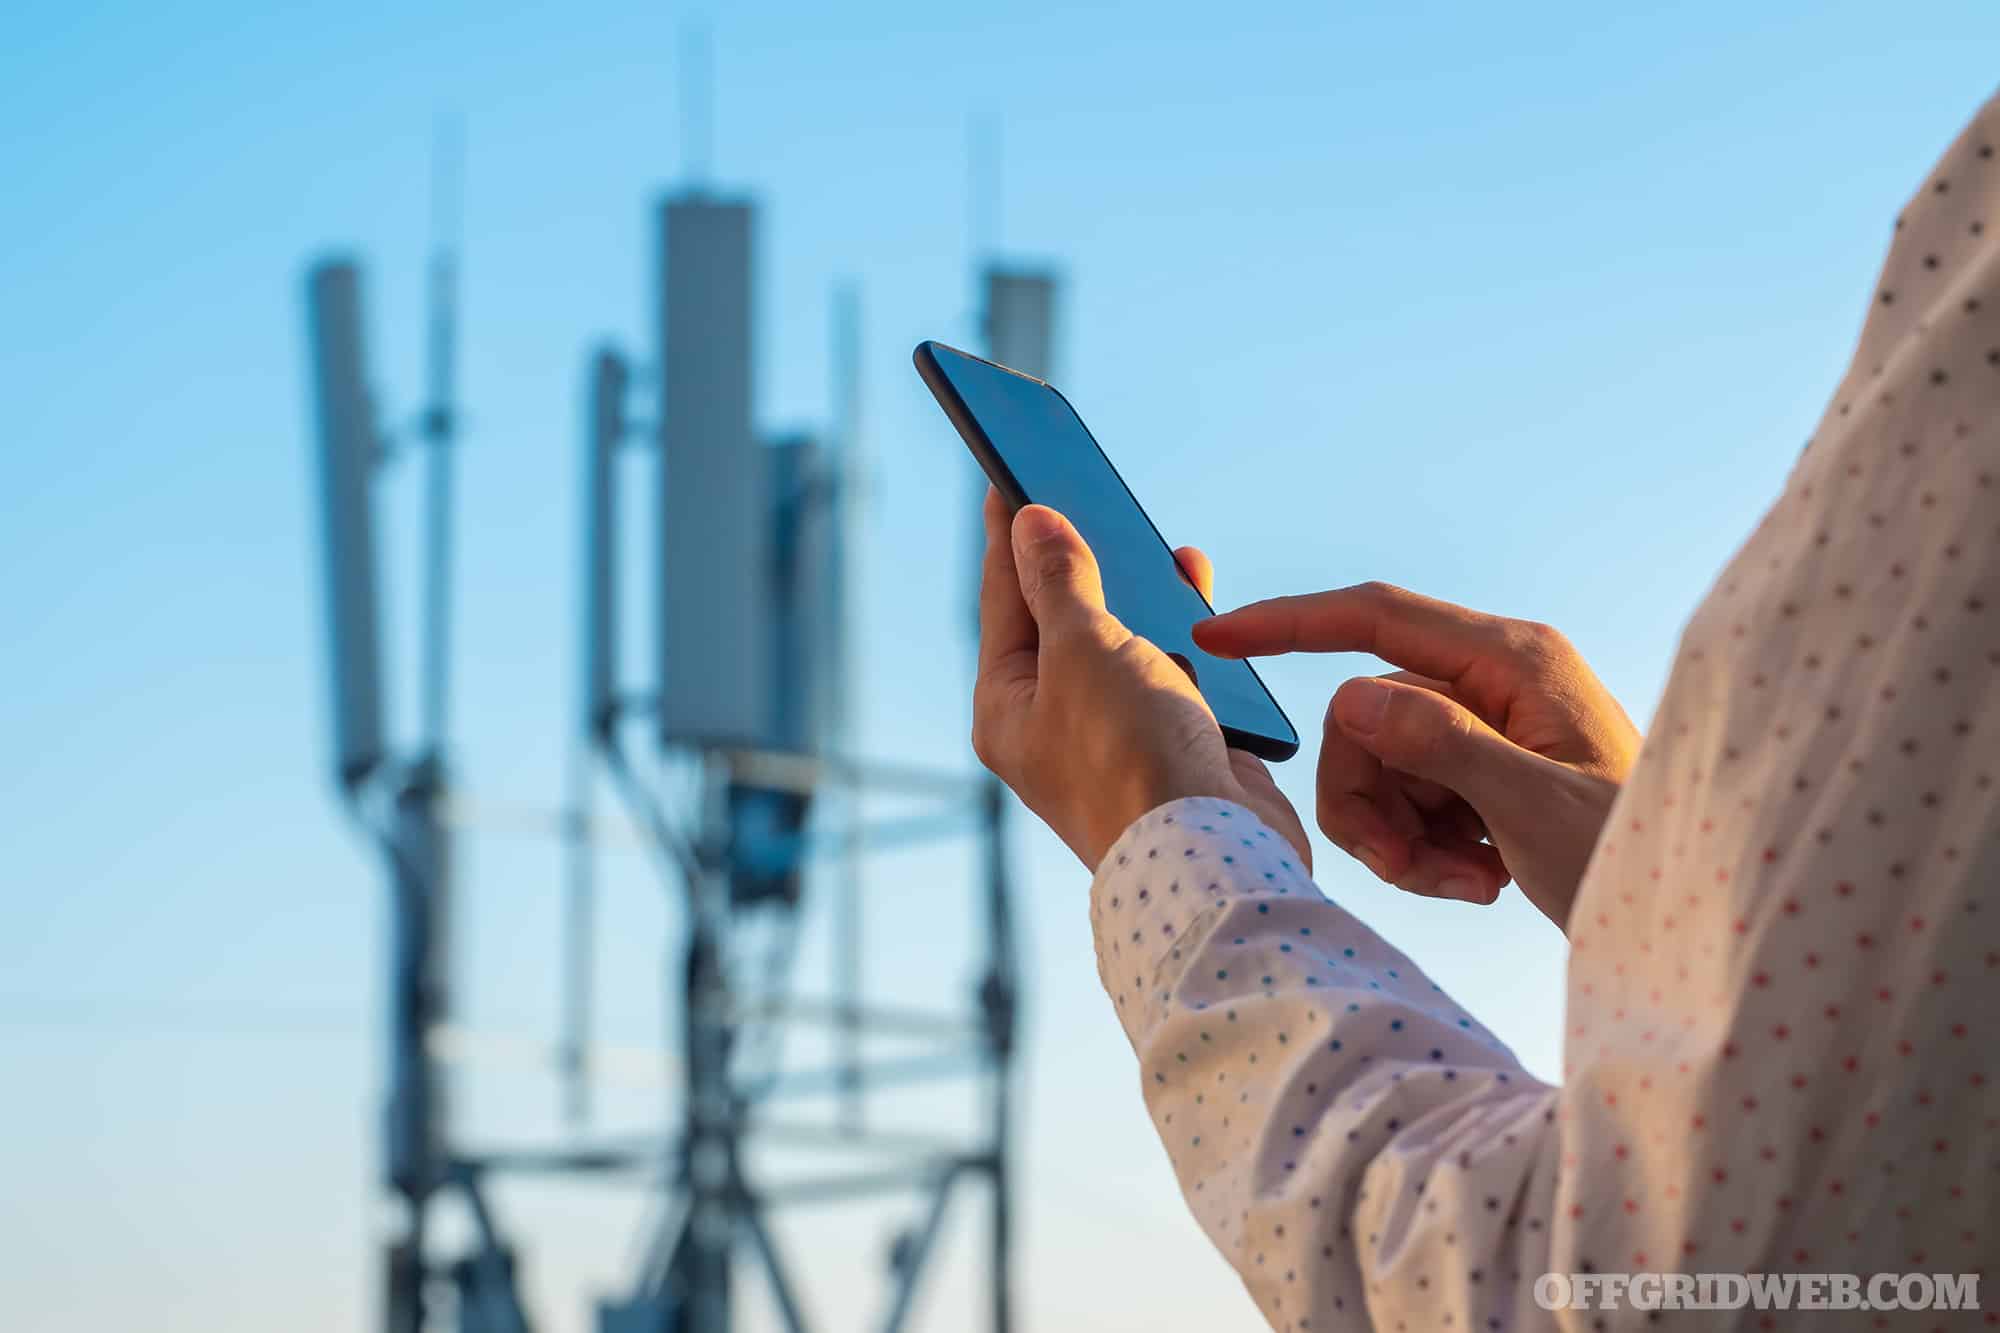
Above: Cell phones automatically connect to nearby towers, but a StingRay device can drown out these towers within a targeted radius, tricking devices into connecting to it instead. The StingRay then collects data and passes it along to the real tower.
If you’ve been watching cases of domestic surveillance in the United States over the last 20 years, you may have heard references to a surveillance device known as a StingRay. So, what is the StingRay, you might ask? Well, it’s not the animal that killed Steve Irwin. It’s a whole different animal in terms of what it can do. Keep in mind that some of this information can get pretty technical, so I’ll do my best to make this as easily readable as possible.
According to a report by the American Civil Liberties Union (ACLU), there are at least 75 agencies in 27 states that are currently known to use StingRay surveillance devices — the actual count is believed to be much higher, since “many agencies continue to shroud their purchase and use of StingRays in secrecy.” On a federal level, users include all branches of the military as well as the FBI, NSA, DEA, ICE, ATF, and even the IRS. However, the devices are also employed by numerous state and local police departments.
Above: The transition from a legitimate cell tower to a cell site simulator is seamless, and the typical user will have no idea that anything unusual has occurred.
Terminology
Before I get started, let’s go over two acronyms I’ll be using. These are important for you to know in general as they are things that can link you to a device:
IMSI: International Mobile Subscriber Identity is a 14- to 15-digit number that identifies your specific device on a cellular network
IMEI: International Mobile Equipment Identity is a 15-digit number that identifies a device but does not have a permanent tie to the owner(s)
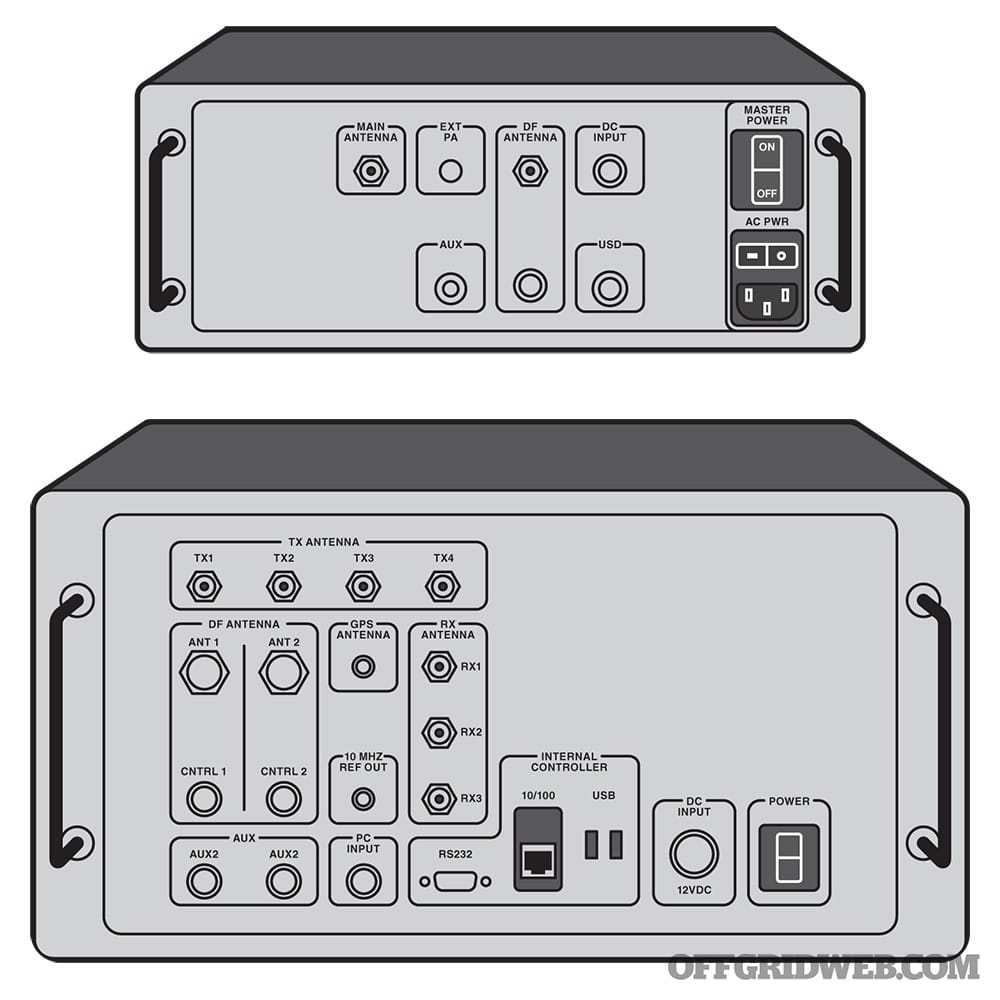
Above: Few images of these devices have been released to the public. These illustrations show the layout of two known variants, the StingRay and StingRay II. A document obtained by VICE magazine showed a StingRay II package was offered to Rochester Police Department in New York for $148,000.
The StingRay is a suitcase-sized device created by L3Harris Technologies, formerly known as the Harris Corporation. It allows the user(s) to gather information about a device, and as a result, a person by multiple methods. The StingRay is designed to be used while mobile or stationary; the live use of the device is conducted by a secondary operator via computer. Due to advancements in technology, the ability to hide the device and antennae have significantly improved in recent years, leaving the public utterly unaware of a StingRay’s location.
The primary application we’ll be going over is using the StingRay as a cell site simulator. A cell site simulator is just what it sounds like — the device impersonates a cell tower. The difference is the simulator will put out a more robust signal that essentially forces smartphones, tablets, and other cellular devices in the area to connect to it. Once your device connects to the StingRay, the IMSI, IMEI, GPS location, and much more information about the device is collected. The connection also stops a device from connecting to an actual cell tower, so certain functions of the device can be disabled on demand. The StingRay can intercept calls, text, and other data depending on the model.
Keep in mind that authorities can still obtain all of this information through traditional investigative channels, by contacting a cellular service provider and requesting data with a warrant. The StingRay is an alternative tool that can be exploited and manipulated to gather information on large groups of subjects without their knowledge, and as we’ve seen from past examples, without a warrant.
Real-World Cell Phone Surveillance Cases
Above: The Los Angeles Police Department was involved in a 2013 scandal that indicated StingRay devices had been used extensively for investigations without warrants and were intercepting private data from innocent bystanders.
Starting with a warrantless use case, let me first address one thing: There are multiple exceptions that allow warrantless searches, granted by the supreme court; there are also ways to get an exigent data request without a warrant. Authorities are still required to get a search warrant within a reasonable amount of time for the collected information or data. An example of an exigent request could be live location data from a cell phone provider for a kidnapping suspect. When going over these cases, let’s look at the facts of the case — I want you to think of how devices such as the StingRay could be abused in certain situations.
The first case, 15-CF-322, originates from the Metropolitan Police Department in Washington, D.C. The case facts are explicit, so I will do my best to make them easy to read. A male, Jones, met a woman for a paid sexual encounter. During that encounter, he forced her to perform sexual acts at knifepoint, then robbed the female and another female who came with her of their belongings, including cellphones. A police report was made, and the StingRay device was used to track Jones’ and a victim’s phones without a warrant. Jones was arrested and subsequently found guilty of the crimes. However, he fought the conviction to the court of appeals, where the following ruling was made in September 2017: using a StingRay type device violates the Fourth Amendment (unreasonable searches and seizures) and a warrant must be authored when utilizing the StingRay. The court then ruled to reverse the conviction unless the arresting agency could prove the use of the StingRay on Jones’ device did not contribute to the verdict. This was the case that paved the way for true rights when it comes to our cellular data privacy. It also showed a local law enforcement agency’s willingness to abuse million-dollar technology in order to spy on citizens.
Above: Washington, D.C., has been the epicenter of more than one controversy regarding use of StingRay devices, both by local law enforcement and by unknown, potentially foreign entities.
Another case comes from the Los Angeles Police Department (LAPD) in 2013. The LAPD has used the StingRay device since approximately 2006; in 2013, information about how often it was being used was revealed to the public. The LAPD used the device to assist in locating burglars, drug dealers, and murderers. LA Weekly reported that LAPD had 155 cellular phone investigations within four months, but only requested 21 search warrants during that time. In many of these cases, the privacy of citizens was blatantly disregarded. Private data including device information, text messages, or other data transmissions were able to be intercepted by the LAPD from individuals who were innocent bystanders in their cases. Whether that data was stored or looked at — a violation without a search warrant — is unknown. Just like the previous case, a pattern is emerging of local law enforcement’s ability to take private and personal information absent a search warrant.
We’ve seen glimpses of how local law enforcement uses this technology, but upon a request filed through the Freedom of Information Act, the department should give information about tools it uses, right? For that, we’ll take a look at a lawsuit filed by the ACLU of Arizona against the Tucson Police Department (TPD). The lawsuit was filed in 2014 on behalf of Beau Hodai, an investigative journalist. Hodai requested information on the StingRay device used by TPD. However, due to the non-disclosure agreement TPD had with the Harris Corporation, Hodai was denied this information based on the NDA. Fast-forward to 2016 after multiple appeals, and the ACLU got what it was after. The appeals court held that when TPD failed to release records, it violated the public records laws in Arizona. This shows that while citizens are supposed to be granted access to information on technology that’s used against them, larger entities will use technicalities to fight giving that information out.
We’ve focused quite heavily on local law enforcement, so now we’ll zoom out to a larger entity. In 2016, the Department of Homeland Security (DHS) disclosed knowledge of multiple unauthorized cell site simulators in and around Washington D.C. DHS explains there isn’t much to be done, goes on to blame the phone companies for poor security, and further deflects the reason for failing to stop the malicious cell site simulators to cost and lack of equipment. As far as we know, DHS still hasn’t determined who was responsible for placing these illegal cell site simulators in D.C. — a foreign intelligence agency, corporate spies, an organized crime ring, or a rogue element of our own government. According to a 2018 article by the Electronic Frontier Foundation (EFF), “DHS doesn’t know who’s operating them or why, or whether these fake cell towers are installed elsewhere in the country.” The prior cases focused on civilians, Jane and John Doe, working hard to live the American Dream, but this one potentially violated the privacy of many high-ranking politicians (including foreign nationals) in our nation’s Capitol. The question remains: if senators and dignitaries can be spied on, how can civilians protect themselves from this technology?
What Can You Do?
Above: The StingRay is capable of silently intercepting calls, text messages, and other data from all devices within its operational radius — that may include the target of an investigation and everyone else nearby.
Directly protecting oneself from cell site simulators is virtually impossible, since you have very little control over which cell tower your phone is using, and no way to know for sure if it’s legitimate, but there are other steps you can take. It must be remembered that the same data collected by the StingRay, and much more, is available from your cell phone provider via a warrant.
The use of Virtual Private Networks (VPN’s) to direct and encrypt your internet traffic is a basic step to start a privacy journey and is something I suggest everyone use. However, the best way to prevent a StingRay, and your cellphone provider, from gathering information on you is the proper use of two items: a burner phone and a faraday bag. The faraday bag is the most accessible and user-friendly option. Buying a reputable bag — not just an Amazon brandless bag — can make all the difference in your phone’s ability to block GPS tracking. I’ve had good experiences with Mission Darkness (mosequipment.com) bags, and SoCal Offgrid wrote about his experience with EDEC Digital Forensics’ OffGrid line of bags (offgrid.co) in Issue 48. Using it is simple; put your burner or daily-use phone in the bag and close it. The signals will be blocked, and the device cannot be communicated with. The obvious drawback to this method is that your phone also can’t send or receive calls, texts, or any other data while it’s inside the bag.
If it’s used properly, a burner phone can give you great privacy; with improper use, it can lead right back to you. Using a burner phone in the same way a daily phone is used — i.e. contacting your spouse, talking to friends and family, not using secure messaging and calling applications — gives the same information to cell phone providers (or StingRays) as a daily use phone. Collecting that data and showing the same patterns of life in two devices can easily link a person to those devices. It’s critical to be cautious about keeping your burner phone isolated from your other electronics and networks. For more details, refer to W. Dean Freeman’s article on burner phone basics in Issue 52.
Lastly, there are unconventional and old-school spycraft techniques for communication. One that’s becoming more popular to talk about, making it more common now, is the use of video game chat functions. Though it’s less obvious than communicating through a phone, most online games don’t dispose of chat logs or have end-to-end encryption, so the messages (and the user’s IP and account information) can still be revealed via search warrant. This is mostly a matter of security through obscurity, which isn’t ideal. Another technique, and one still used today, is a dead drop. Storing a flash drive or SD card in an unlikely location, such as drilled into a tree or concrete wall, allows users to create an offline file sharing system. However, this secret location is only secret when it’s not talked about. Failing to understand proper operational security, a.k.a. OPSEC, paves way for all the private information to become public, or worse, available to an adversary. It’s wise to encrypt any data you share via dead drop, so that any third party who accidentally finds it won’t be able to access it.
The Future of Cell Phone Surveillance
The StingRay is a device that has been used against citizens and criminals without a warrant, time and time again. For every high-profile incident we know about, it’s safe to assume there are dozens more that were never revealed to the public. The device takes naivety, complacency, and blind trust in the government — an entity that employs humans just like you and I, all capable of great good or evil — to gather intelligence on our whereabouts, conversations, and so much more.
The good news is that most of the cases mentioned were quite old, and due to misuse of their devices and the media backlash it generated, L3Harris Technologies stopped selling StingRay technology directly to local law enforcement at the end of 2020. Do not cheer just yet, as Nyxcell, a competitor of L3Harris, has created its own cell site simulator. The Nyxcell can perform the same surveillance as the StingRay, but also has upgraded features for the newer phones hitting the market. Jacobs Solutions, a Fortune 500 company with $14 billion in annual revenue, offers another cell site simulator device through its subsidiary KeyW Corporation. The mysteriously barren web sites of both companies offer no information about the existence of these products or their capabilities, but Nyxcell’s slogan — “When lives and security are at stake, Nyxcell solutions get results” — certainly seems ominous given the context.
I want to leave you with this: Do not be afraid of your phones. A cellphone is an amazing piece of technology that truly helps us all on various levels, from basic communication to controlling life-saving medical equipment attached to our bodies. Just be aware of the risks taken while using them and pause to consider the information you’re revealing before you hit “send.”
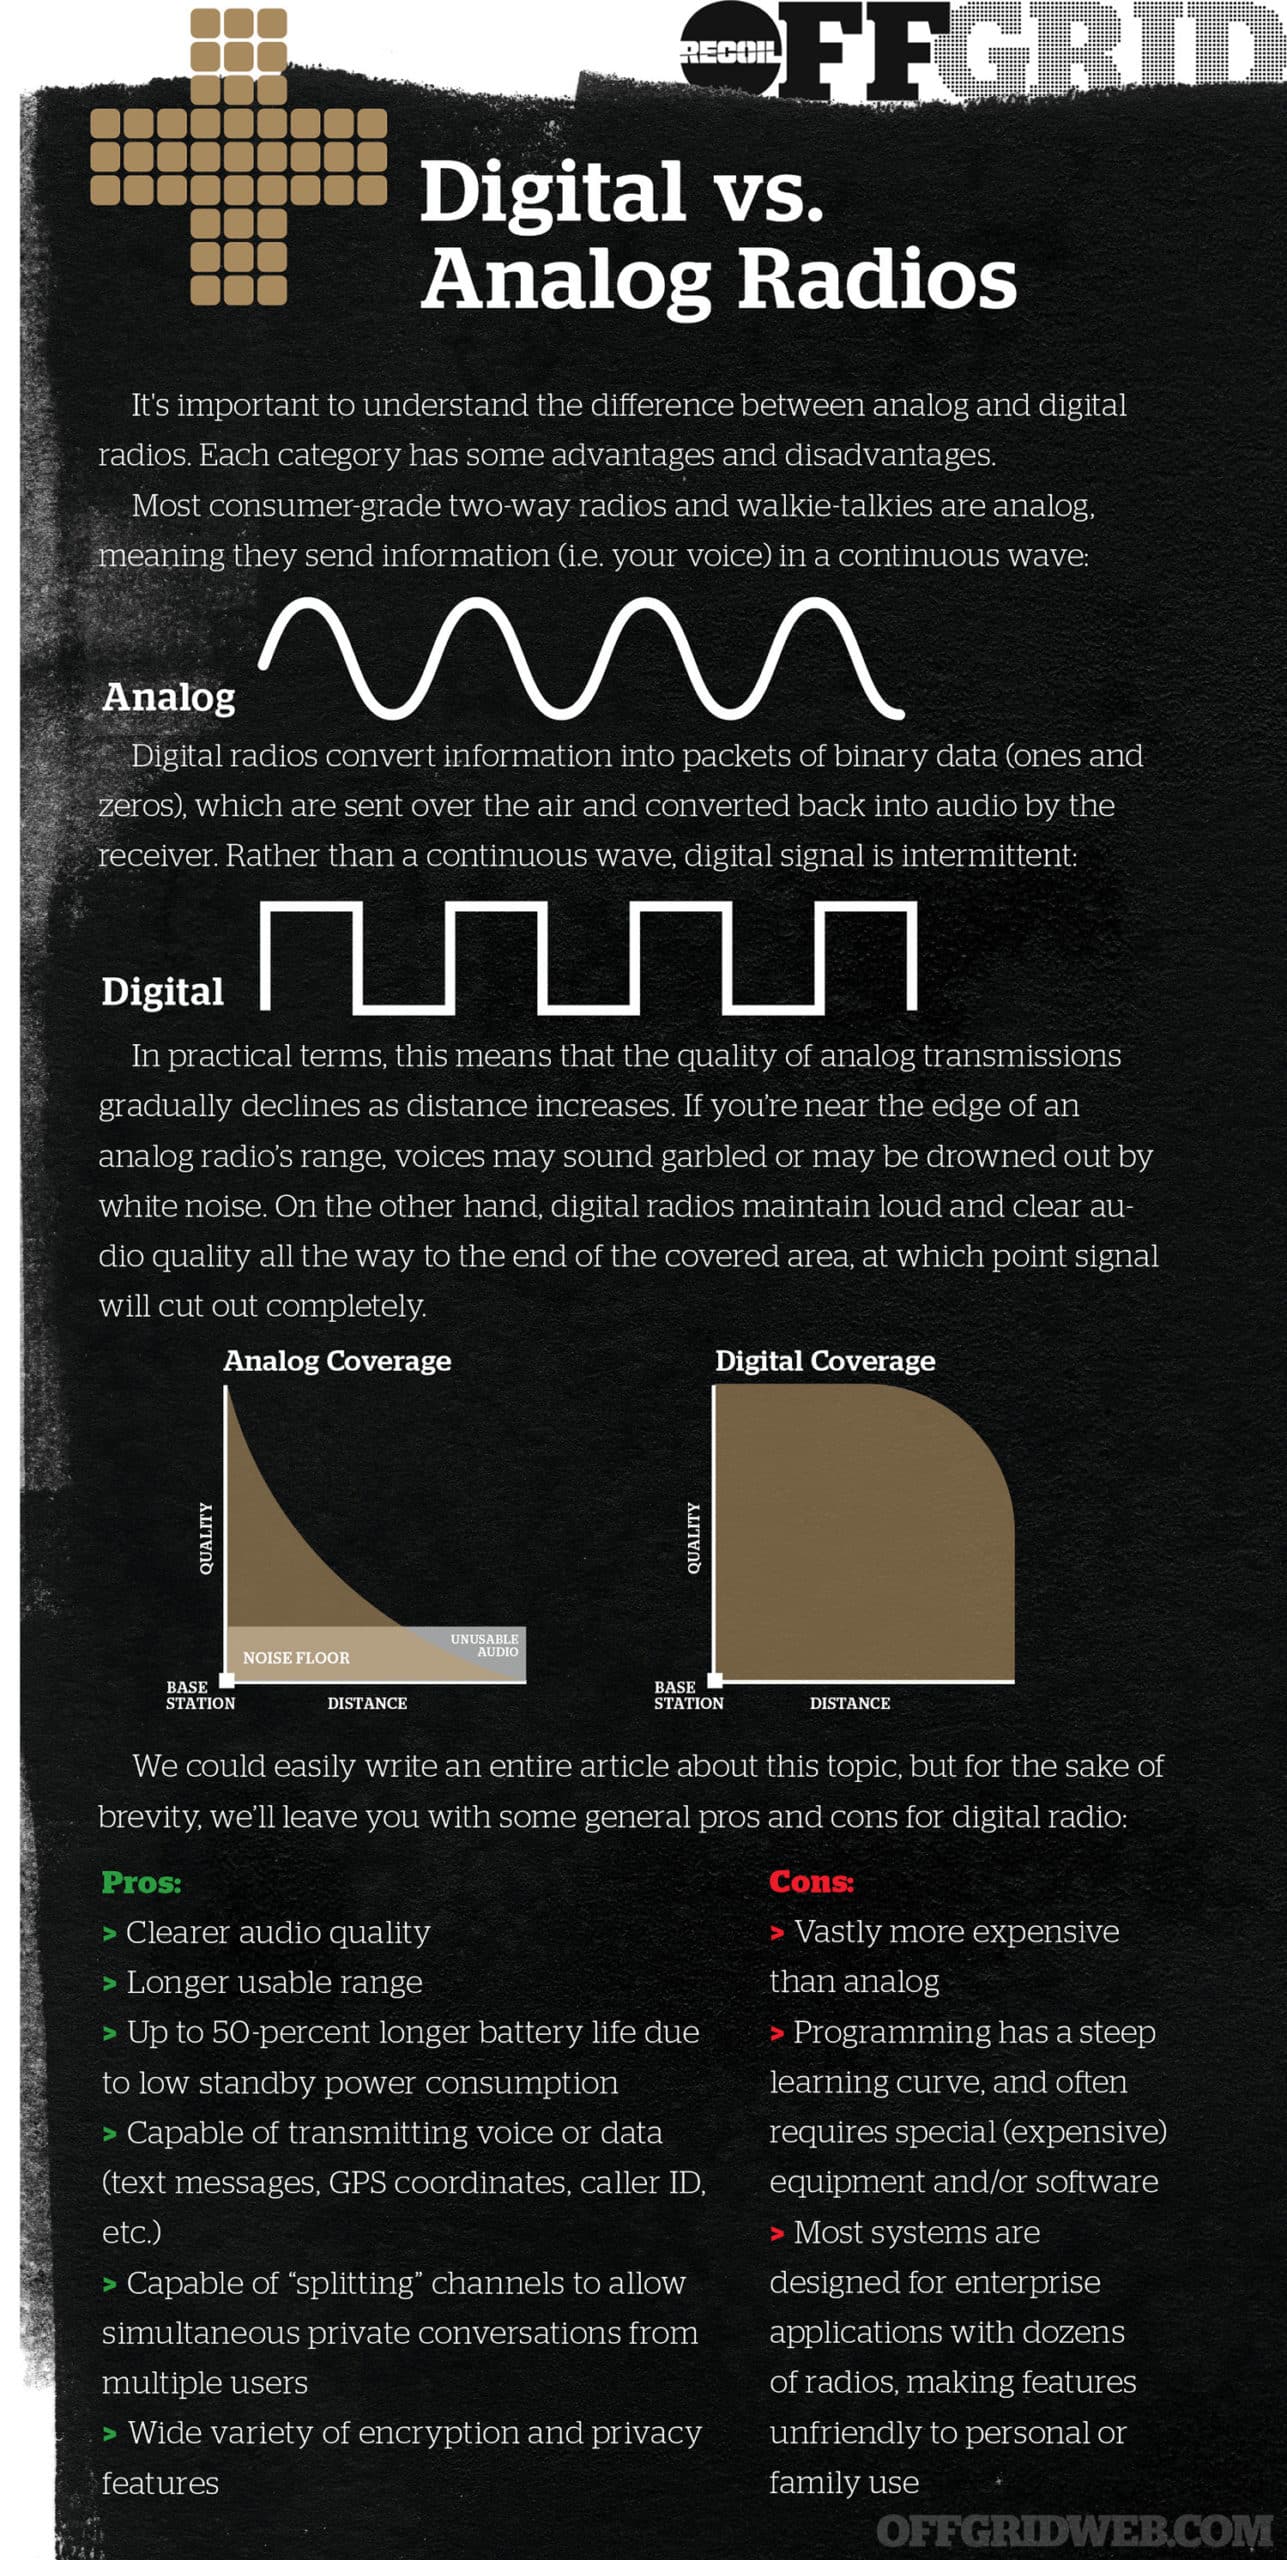
If you’re learning about radios, it’s important to understand the key differences between digital and analog radios. Explaining all the details of the digital vs. analog radio debate would require a lengthy technical article, and that would be overwhelming for beginners, so we’ll give you the simplified Cliff’s Notes version instead.
Most consumer-grade two-way radios and walkie-talkies are analog, meaning they send information (i.e. your voice) in a continuous wave. Digital radios convert information into packets of binary data (ones and zeros), which are sent over the air and converted back into audio by the receiver. Rather than a continuous wave, digital signal is intermittent.
In practical terms, this means that the quality of analog transmissions gradually declines as distance increases. If you’re near the edge of an analog radio’s range, voices may sound garbled or may be drowned out by white noise. On the other hand, digital radios maintain loud and clear audio quality all the way to the end of the covered area, at which point signal will cut out completely.
Pros and Cons of Digital Radios
For the sake of brevity, we’ll leave you with some general pros and cons for digital radio:
PROS
Clearer audio quality
Longer usable range
Up to 50-percent longer battery life due to low standby power consumption
Capable of transmitting voice or data (text messages, GPS coordinates, caller ID, etc.)
Capable of “splitting” channels to allow simultaneous private conversations from multiple users
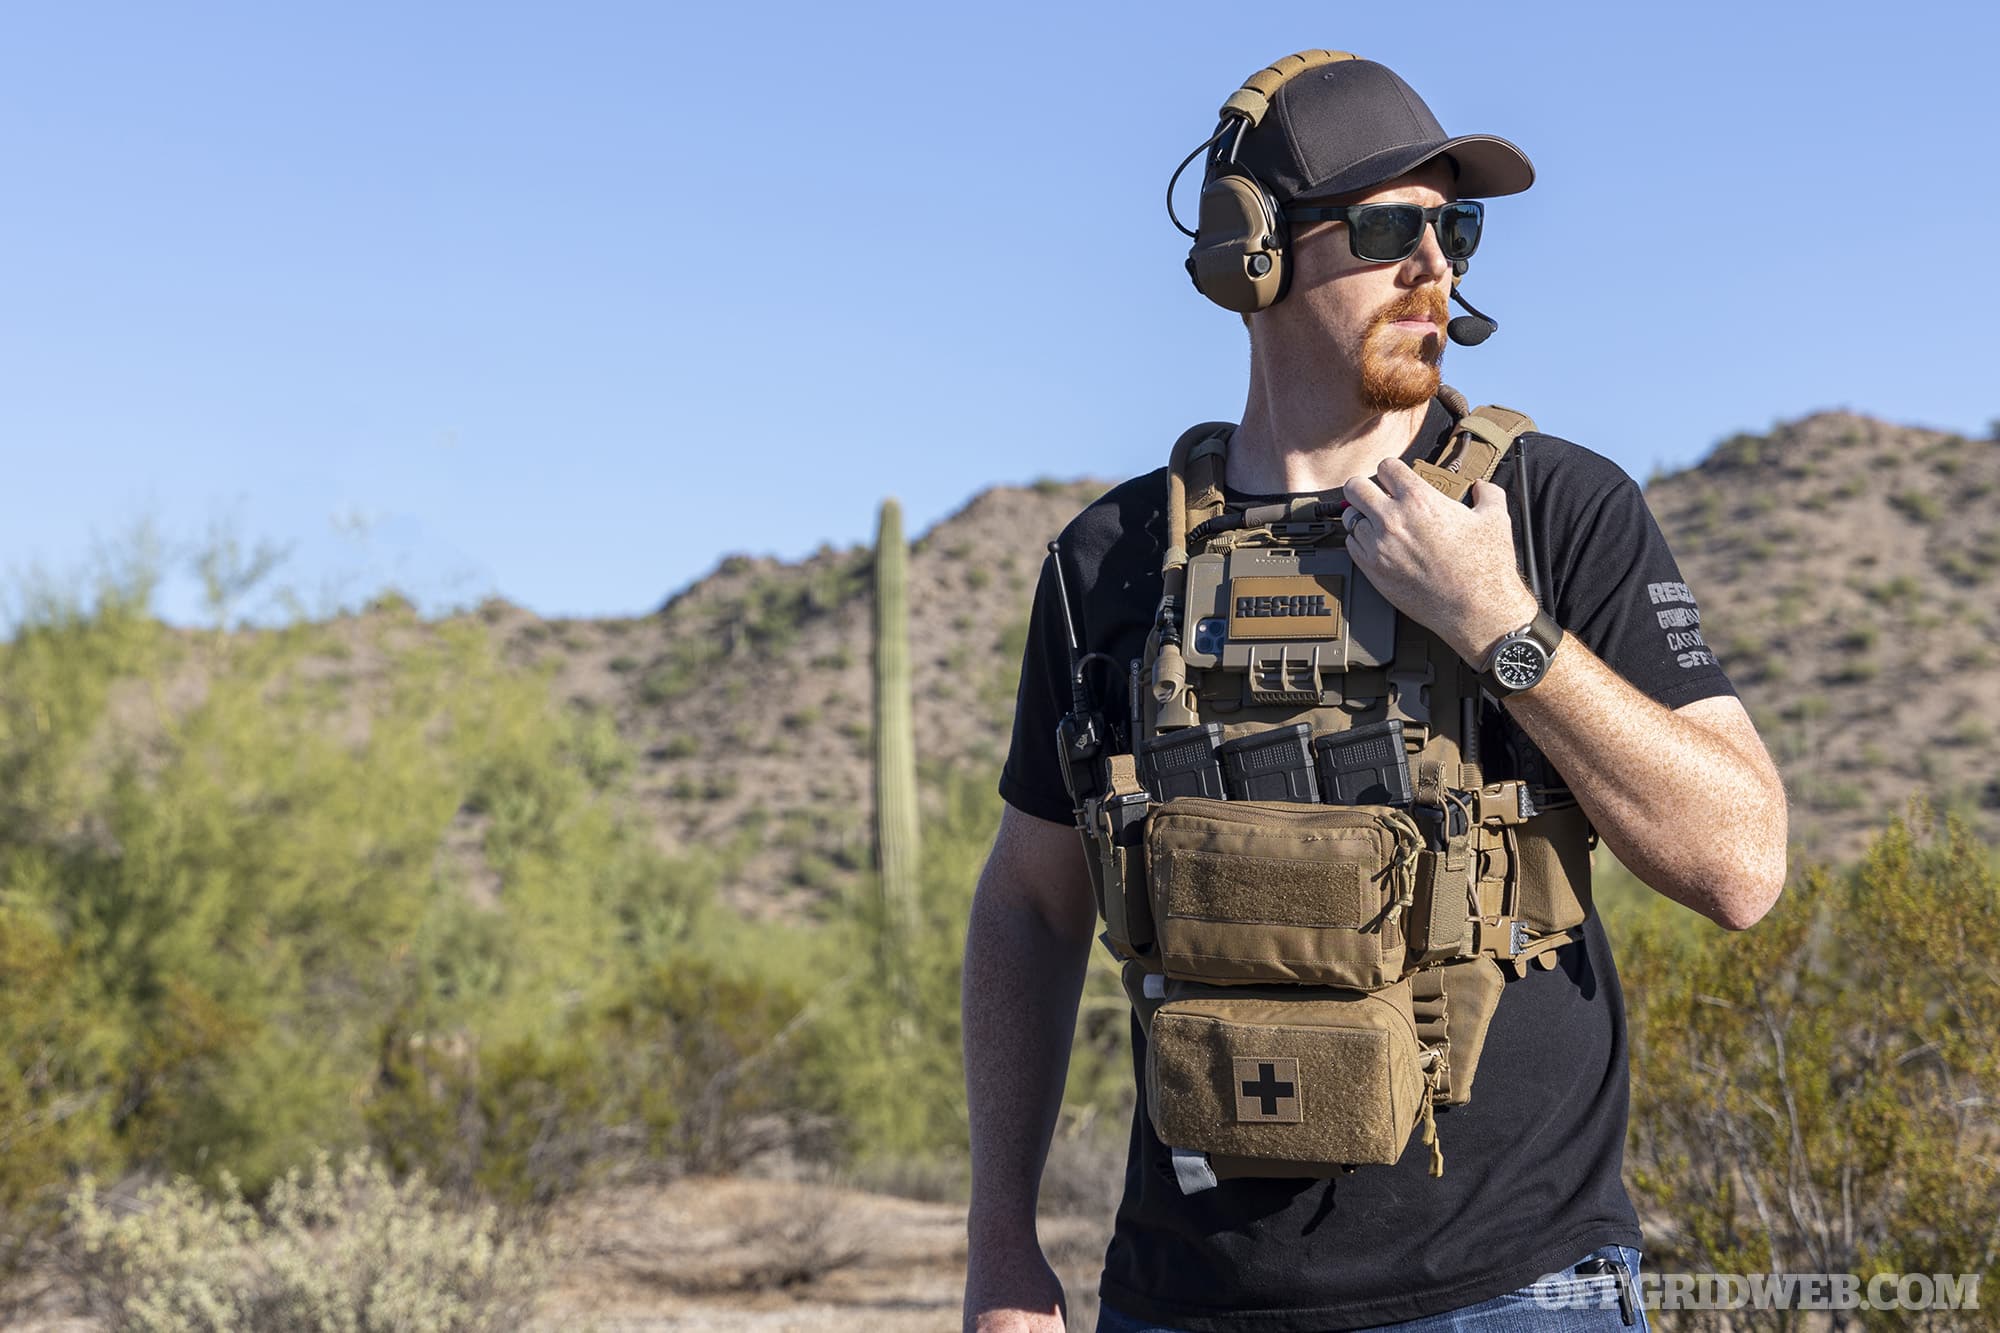
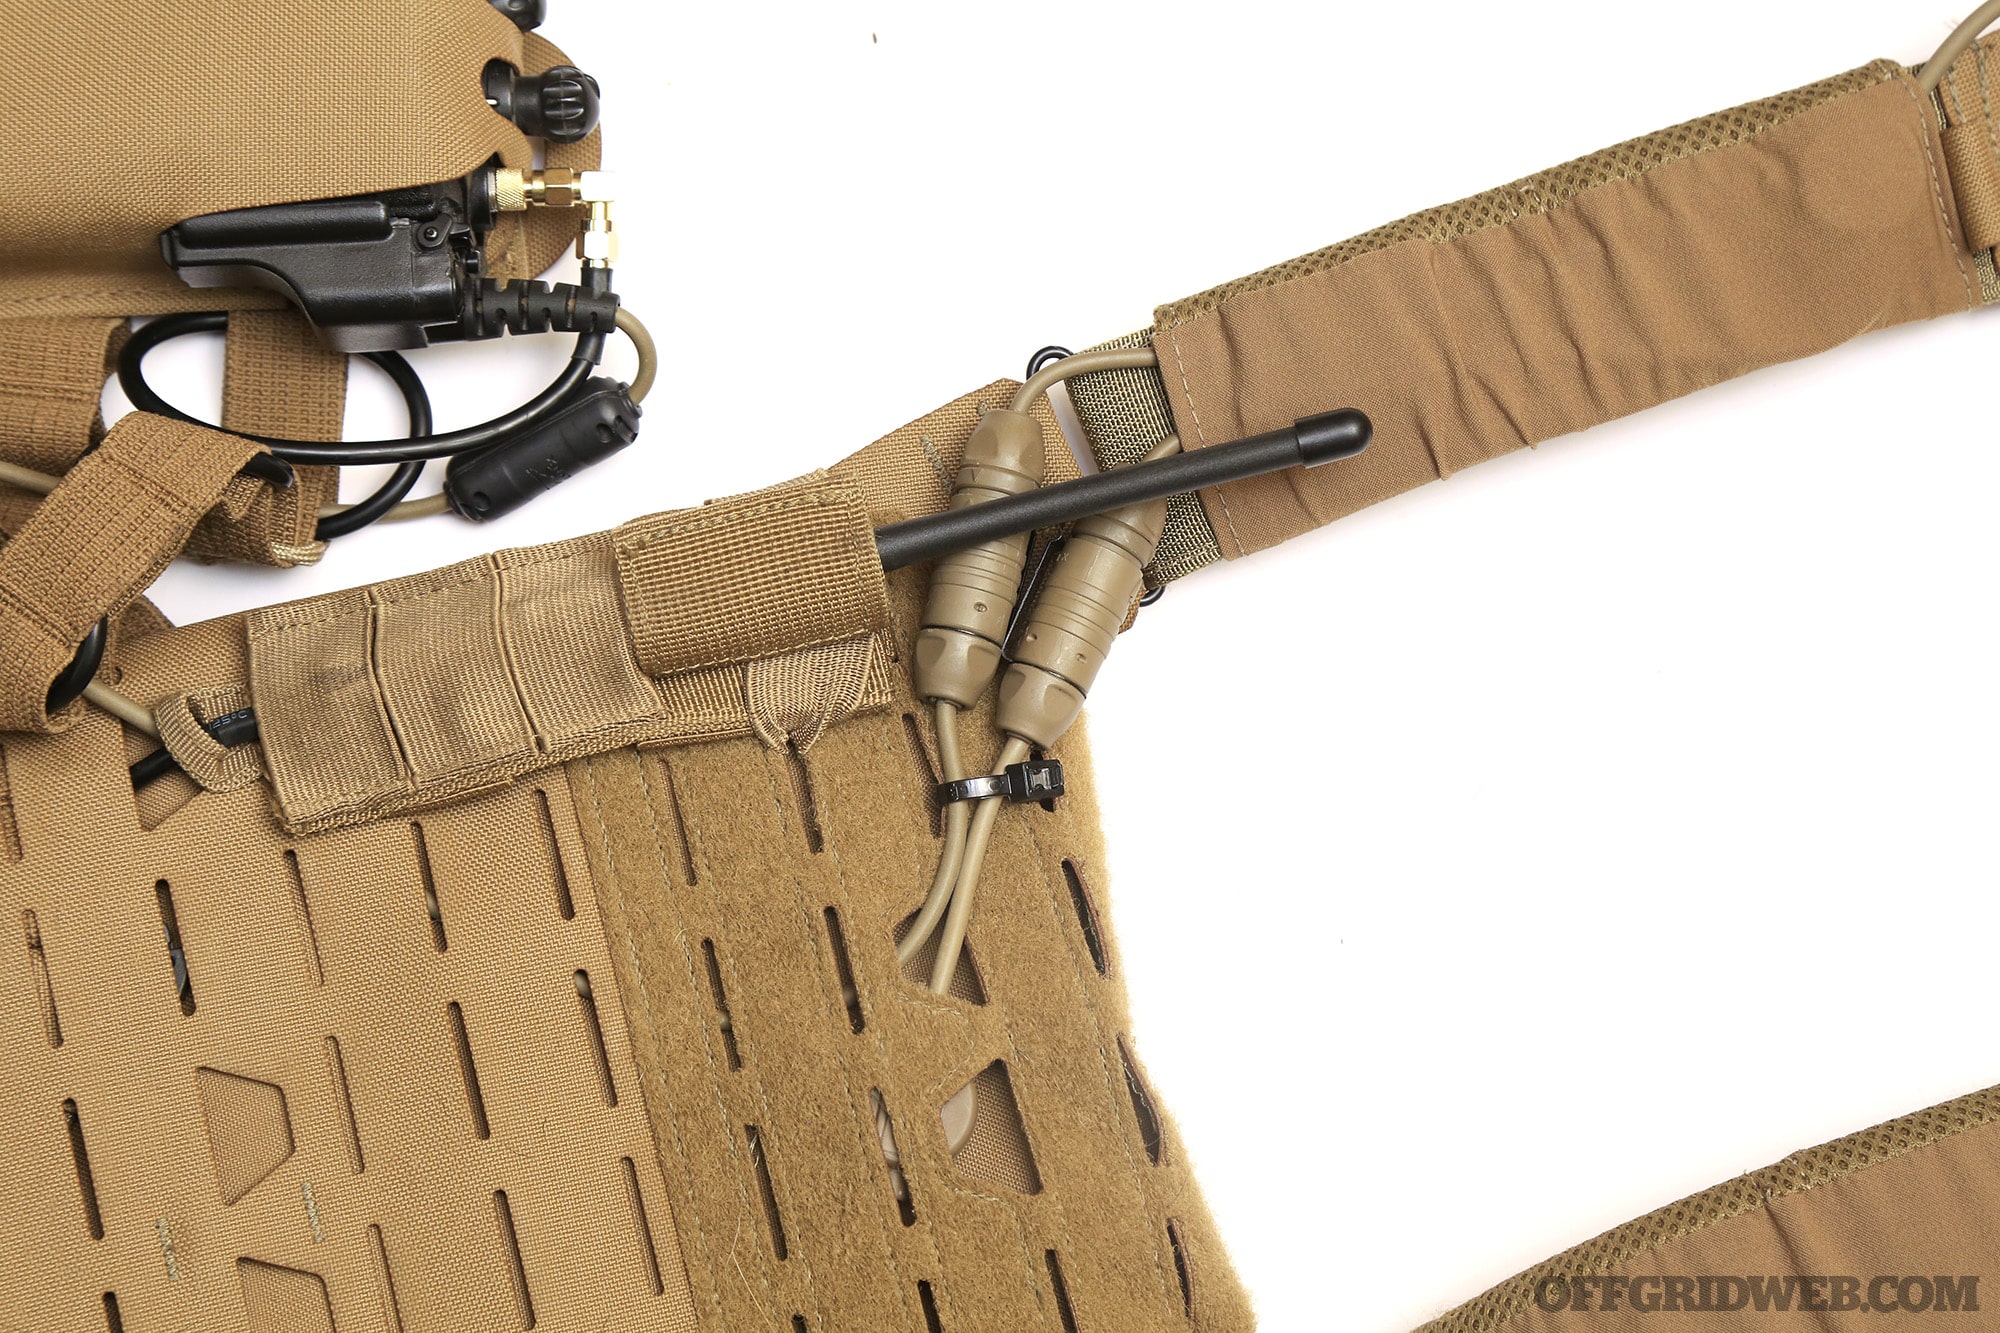
Napoleon famously said, “The secret of war lies in the communications.” This concise statement reinforces the importance of communication at all levels of a fighting force — individuals, squads, platoons, companies, battalions, and so on. If communications are severed, the ability to coordinate often follows suit. Outside of a military context, the same principles apply to civilian emergency preparedness. If your group of family and friends is your squad, you should establish a solid plan for communications for any emergency. In yesterday’s article about encrypted radios, we provided an introduction to how encryption can help you ensure communication security (COMSEC). Today, we’ll take a look at two plate carrier radio setups from Safariland and Silynx that integrate our encrypted Off Grid Comms handhelds into our load-bearing gear.
Radio Setups & Applications
Above: Integrating a dual-comm setup into this TYR Tactical plate carrier was easy, with one radio placed on each side of the cummerbund.
You can do a lot better than clipping your radio to your belt or shoving it into a pocket. There’s a nearly endless ecosystem of accessories and upgrades for radios, especially popular models such as the Motorola XTS series. To make the most of your radio, we recommend integrating it into the rest of your gear. A few options to consider:
Add a speaker mic so you can use the radio while it’s stowed in your hiking pack or on your duty belt
Connect a low-profile earpiece so you can talk more discreetly in public
Pair your radio with an active ear protection system for use at the shooting range, or other loud environments
Build a complete dual-comm system that includes two radios on separate frequencies with a push-to-talk (PTT) button to activate each radio
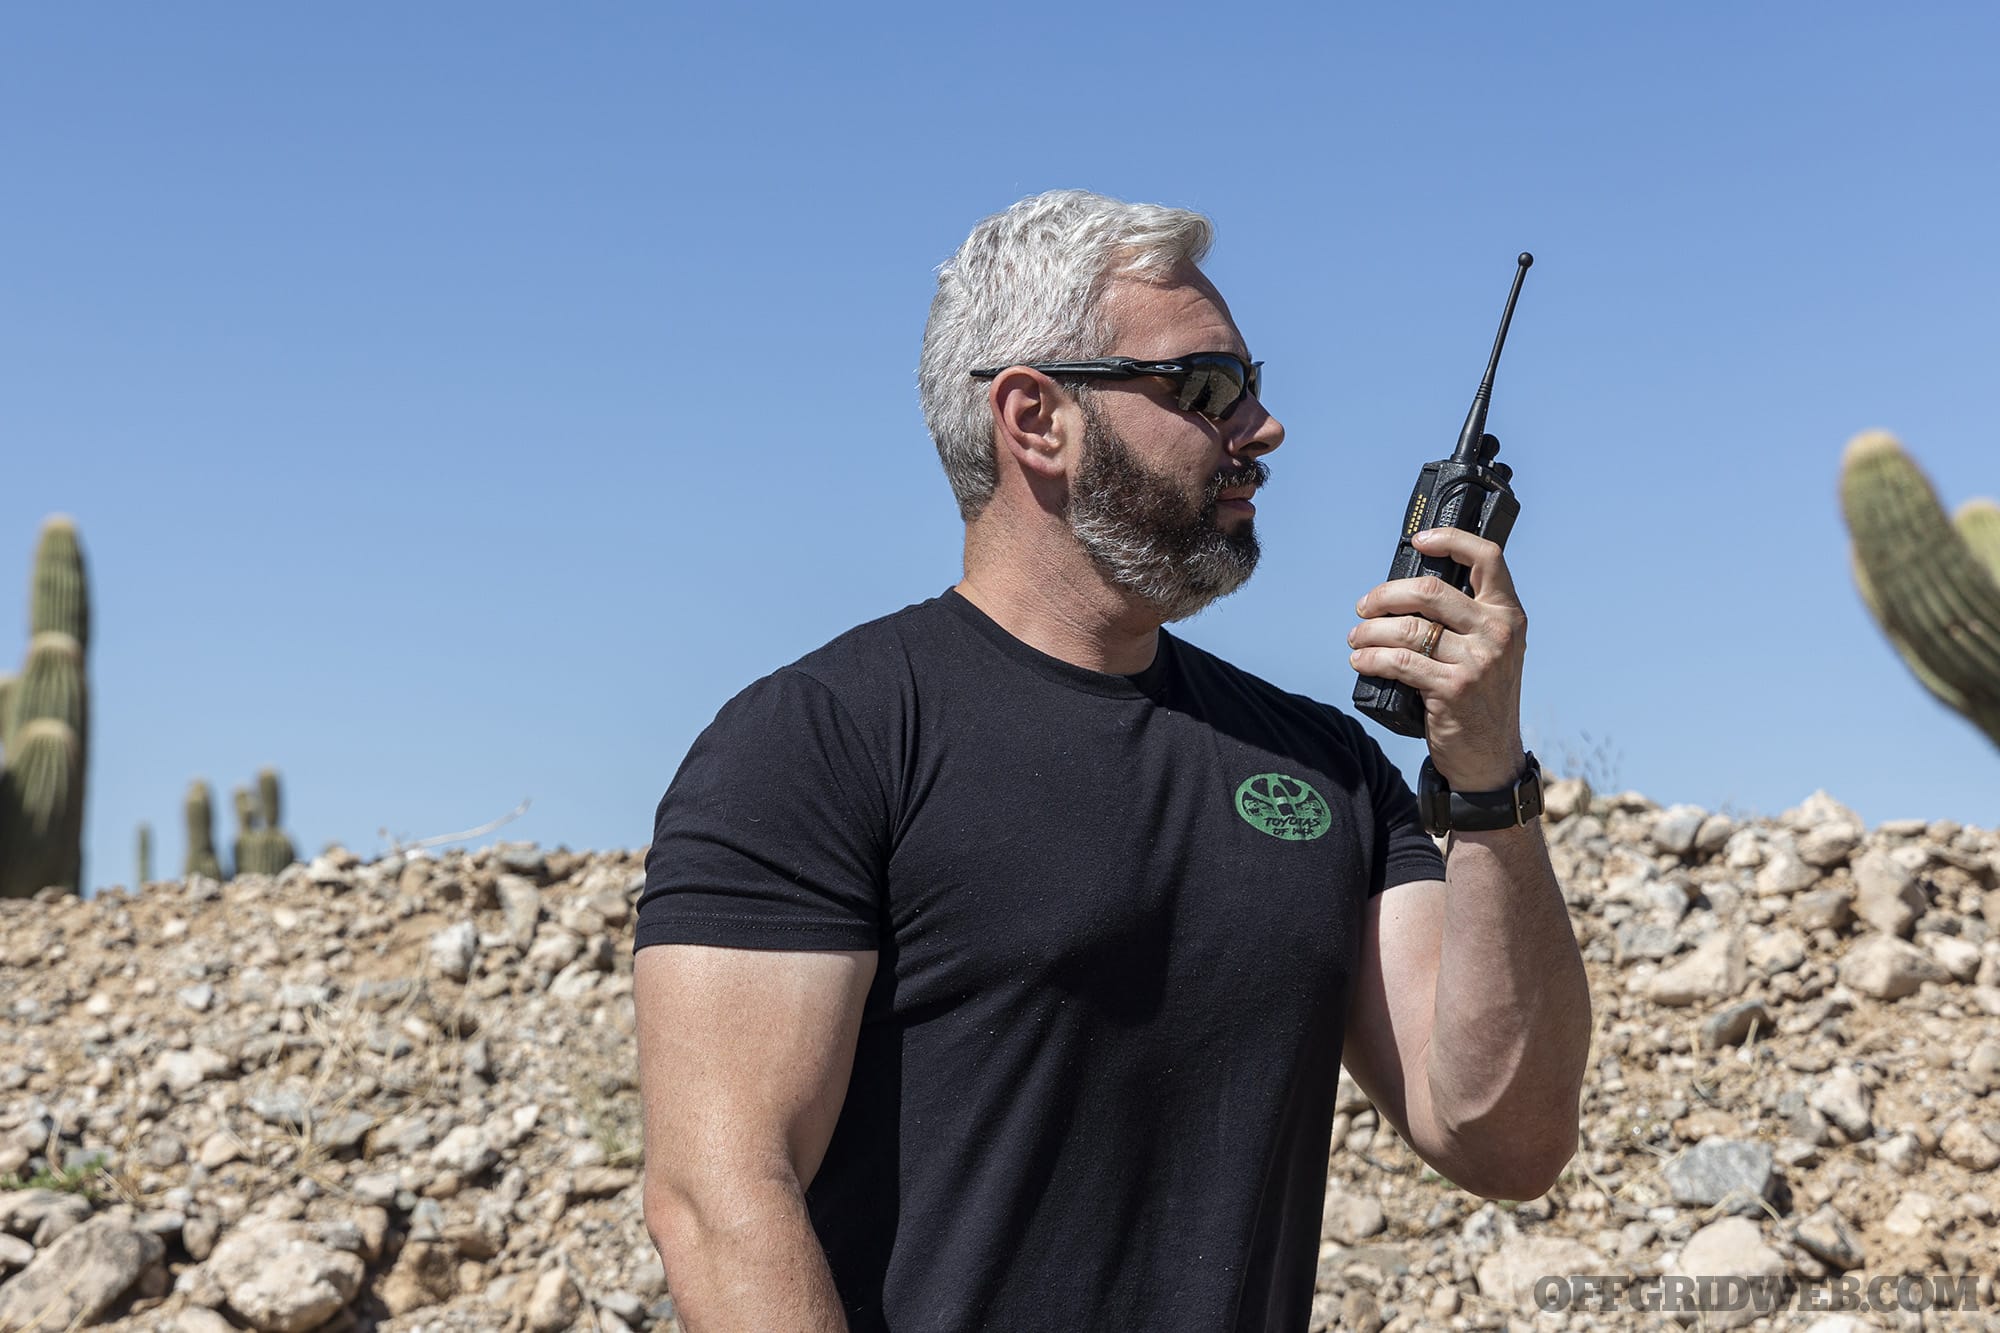
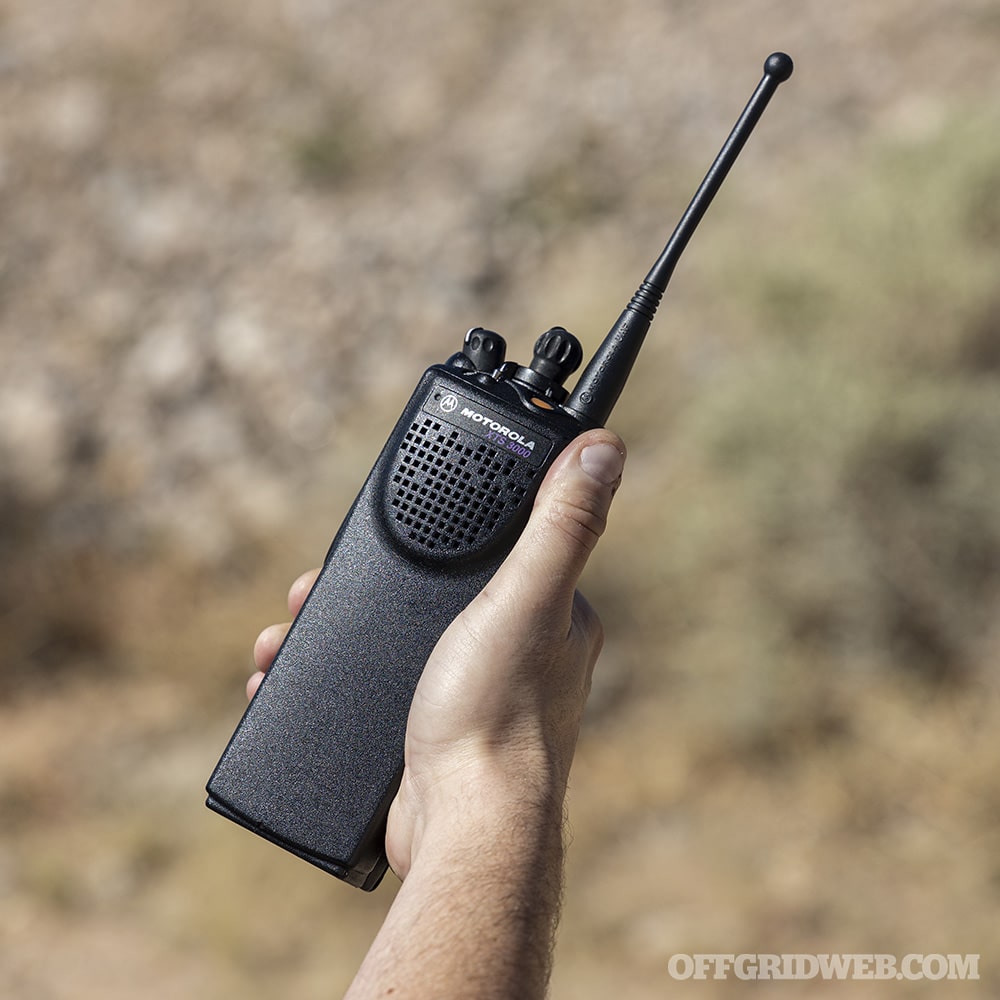
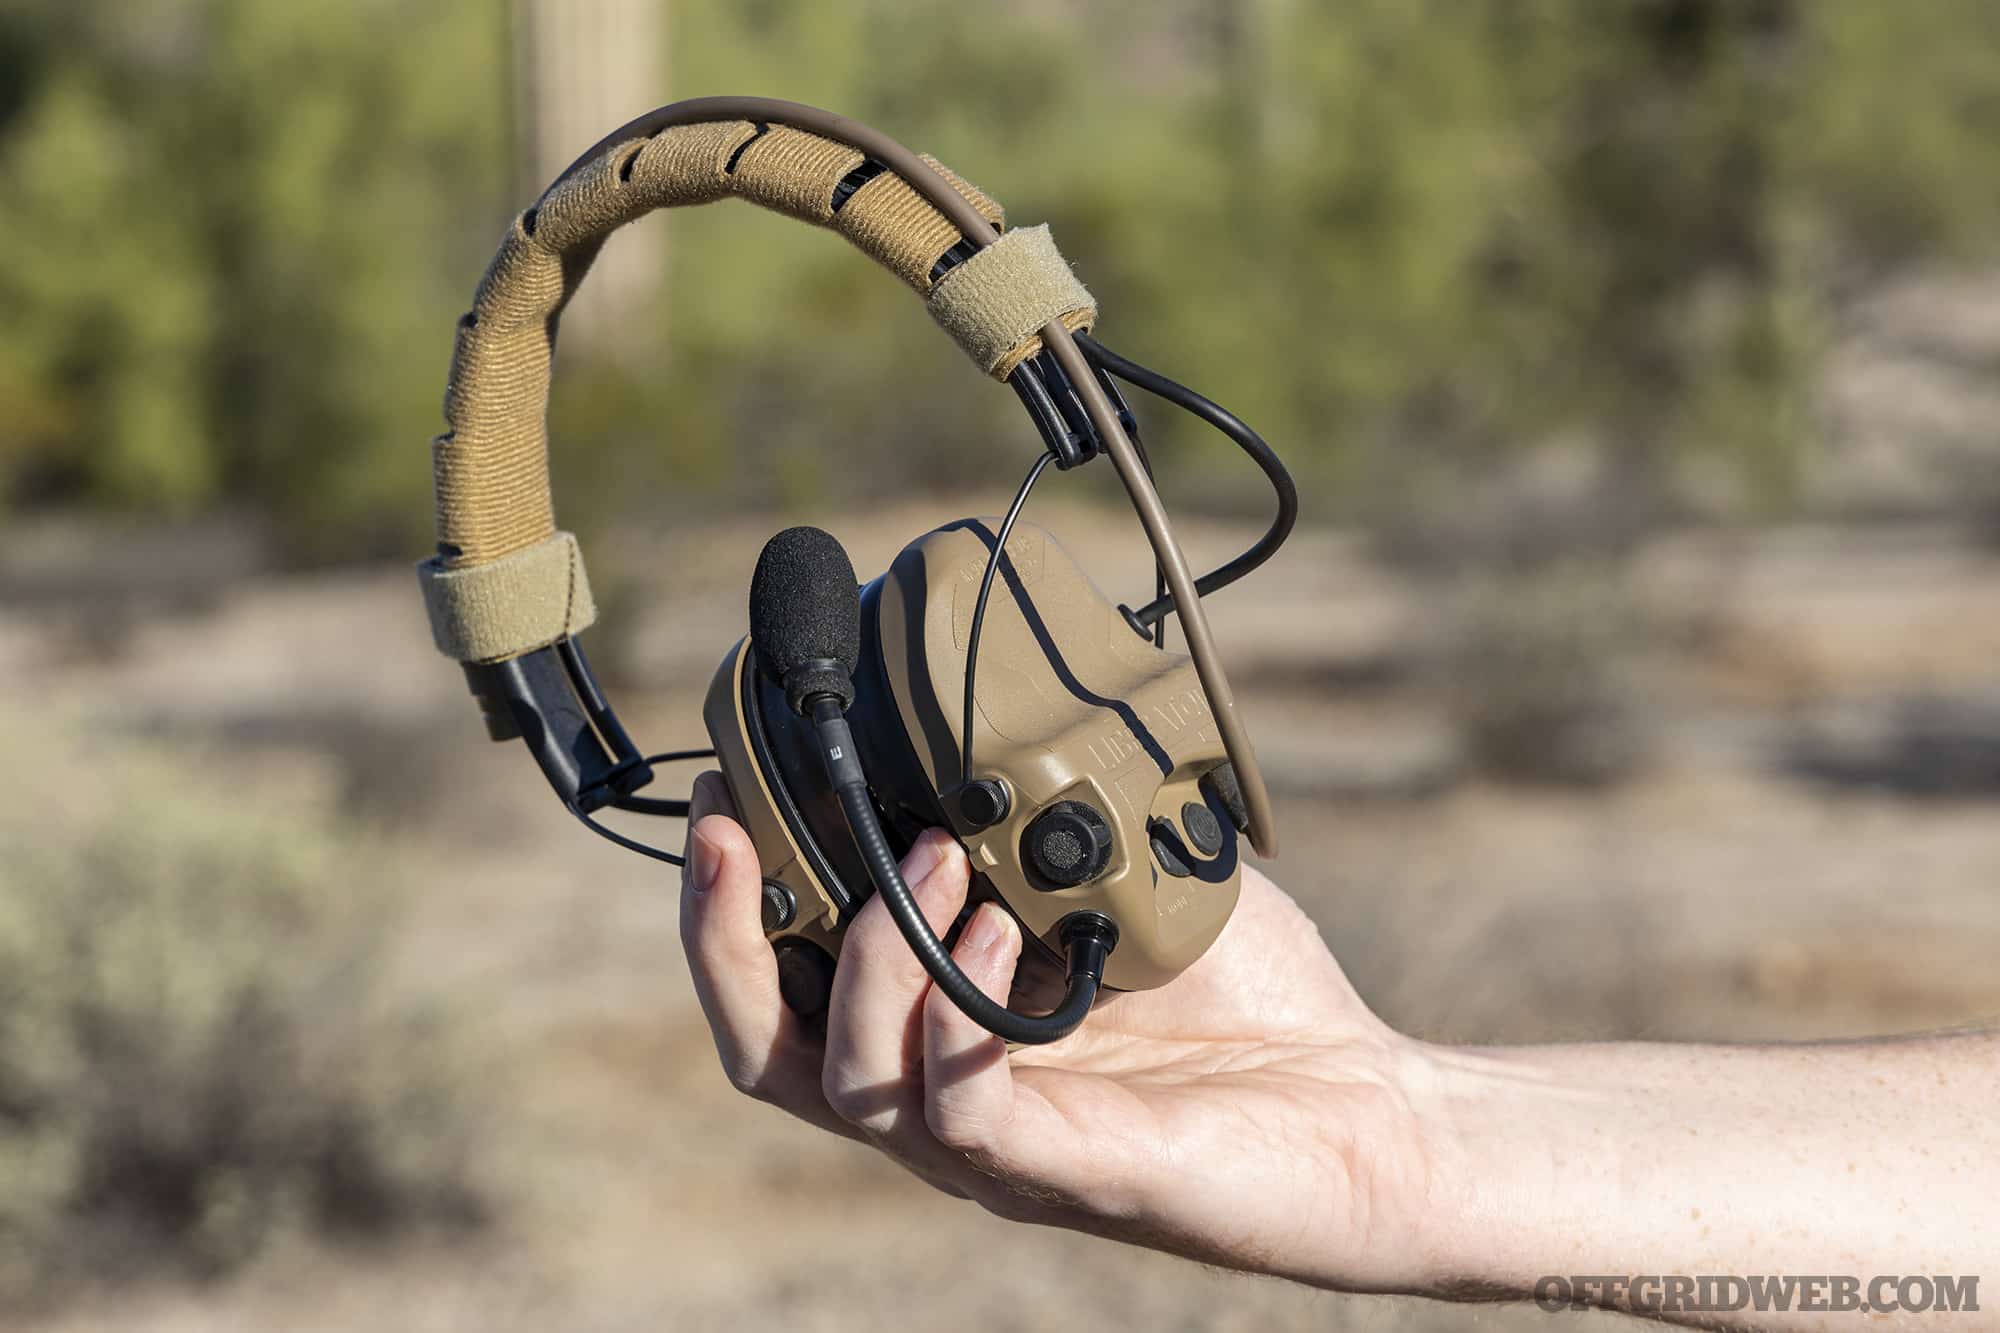
Above: The Motorola XTS 3000 radios provided by Off Grid Comms can be used as stand-alone handsets, or can be connected to a variety of headsets and PTT systems.
Read on as we share two plate carrier radio setups configured by our staff. Each of these is connected to one of the Motorola XTS 3000 radios featured in our encrypted radio article. However, through the use of modular connectors, each of these systems can also be connected to a variety of other radios and comms devices.
Patrick McCarthy: Safariland Liberator V
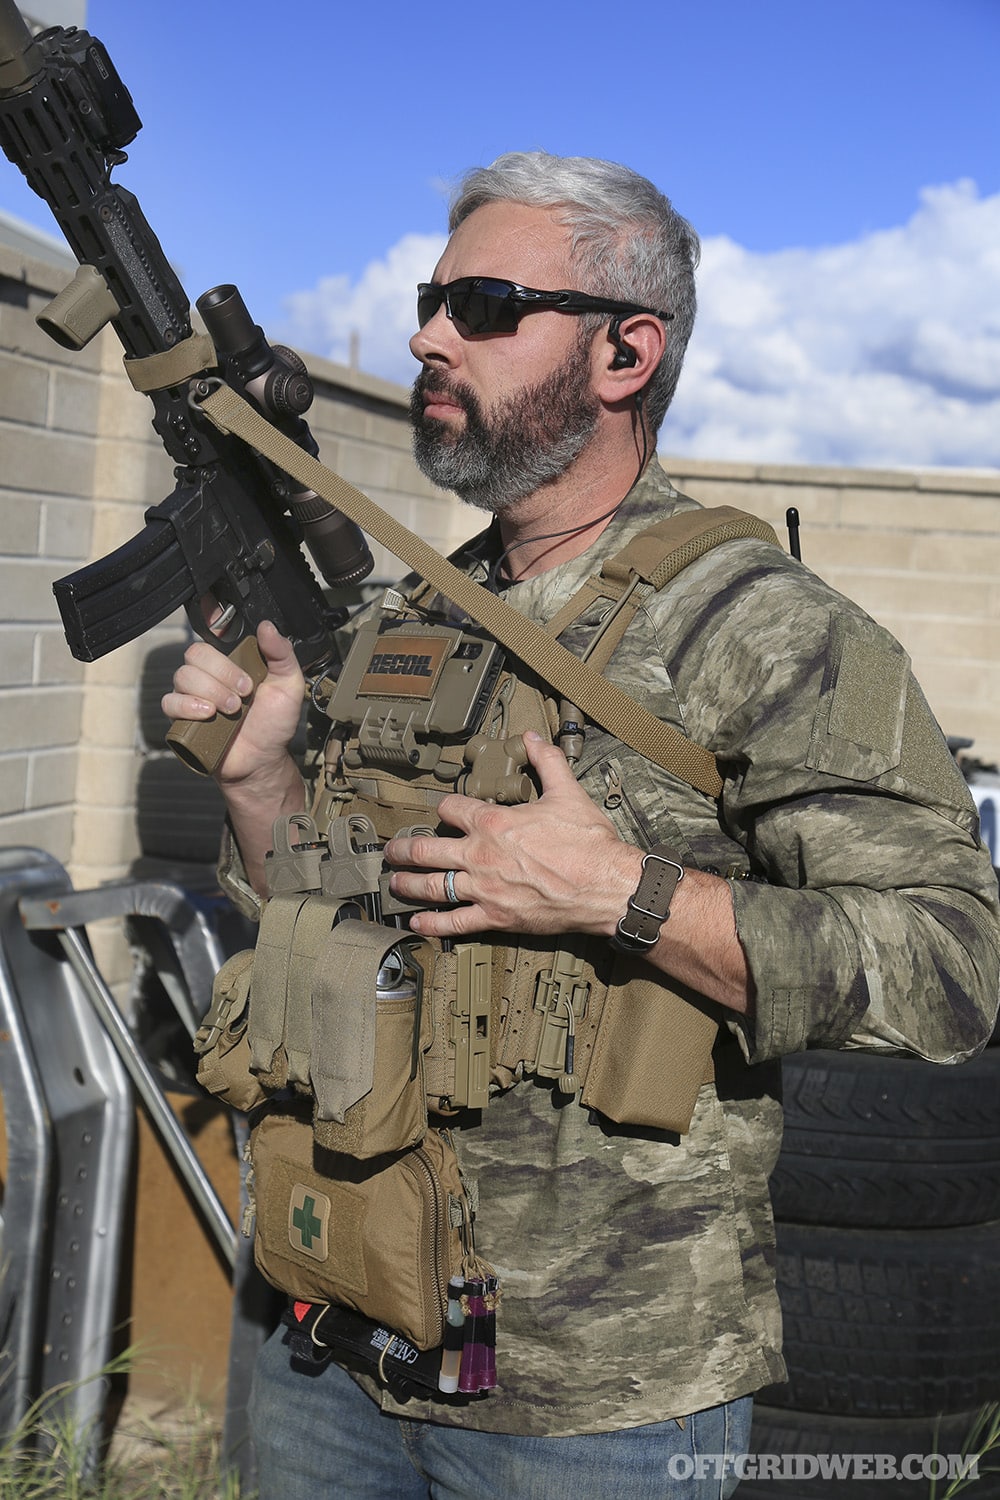
I spend a lot of time shooting, whether it’s out in the desert with friends, at local competitions, or taking classes to learn about specific skills and weapon platforms. These activities don’t always require the same amount of gear — sometimes it’s just ear pro and eye pro, and other times it’s a full plate carrier, battle belt, and helmet with night vision system attached. With this in mind, I wanted a scalable, modular comms system.
The Safariland Liberator V is a professional-grade headset that integrates active ear pro and a dual-comm radio setup. Ordering the Liberator V reveals options for color (black, FDE, or OD green), left or right-side microphone placement, three types of suspension systems, two types of PTT controls, and even a gas mask input. Each system is made to order, and can be configured for a wide variety of military, law enforcement, and commercial radios. Certain configurations also offer a connector to integrate a cell phone into the system.
Above: Safariland’s Adaptive Suspension Kit allowed me to mount the Liberator V headset to the back of the rails on my Team Wendy helmet, keeping the top rails open for lights and other accessories.
Since the Liberator V is a dual-comm system, I requested connectors for two Motorola XTS radios. This allows me to use one in digital encrypted mode for secure communication with Off Grid Comms radios, and one in analog GMRS mode for general use, or use both in encrypted mode to communicate on two separate encrypted channels. Audio from both radios is piped into the headset, and I can control each from the two-button PTT. This configuration didn’t offer a cell phone connector, but I’m OK with that. My phone is clipped into a Juggernaut Case PALS mount for navigation and video-recording duties.
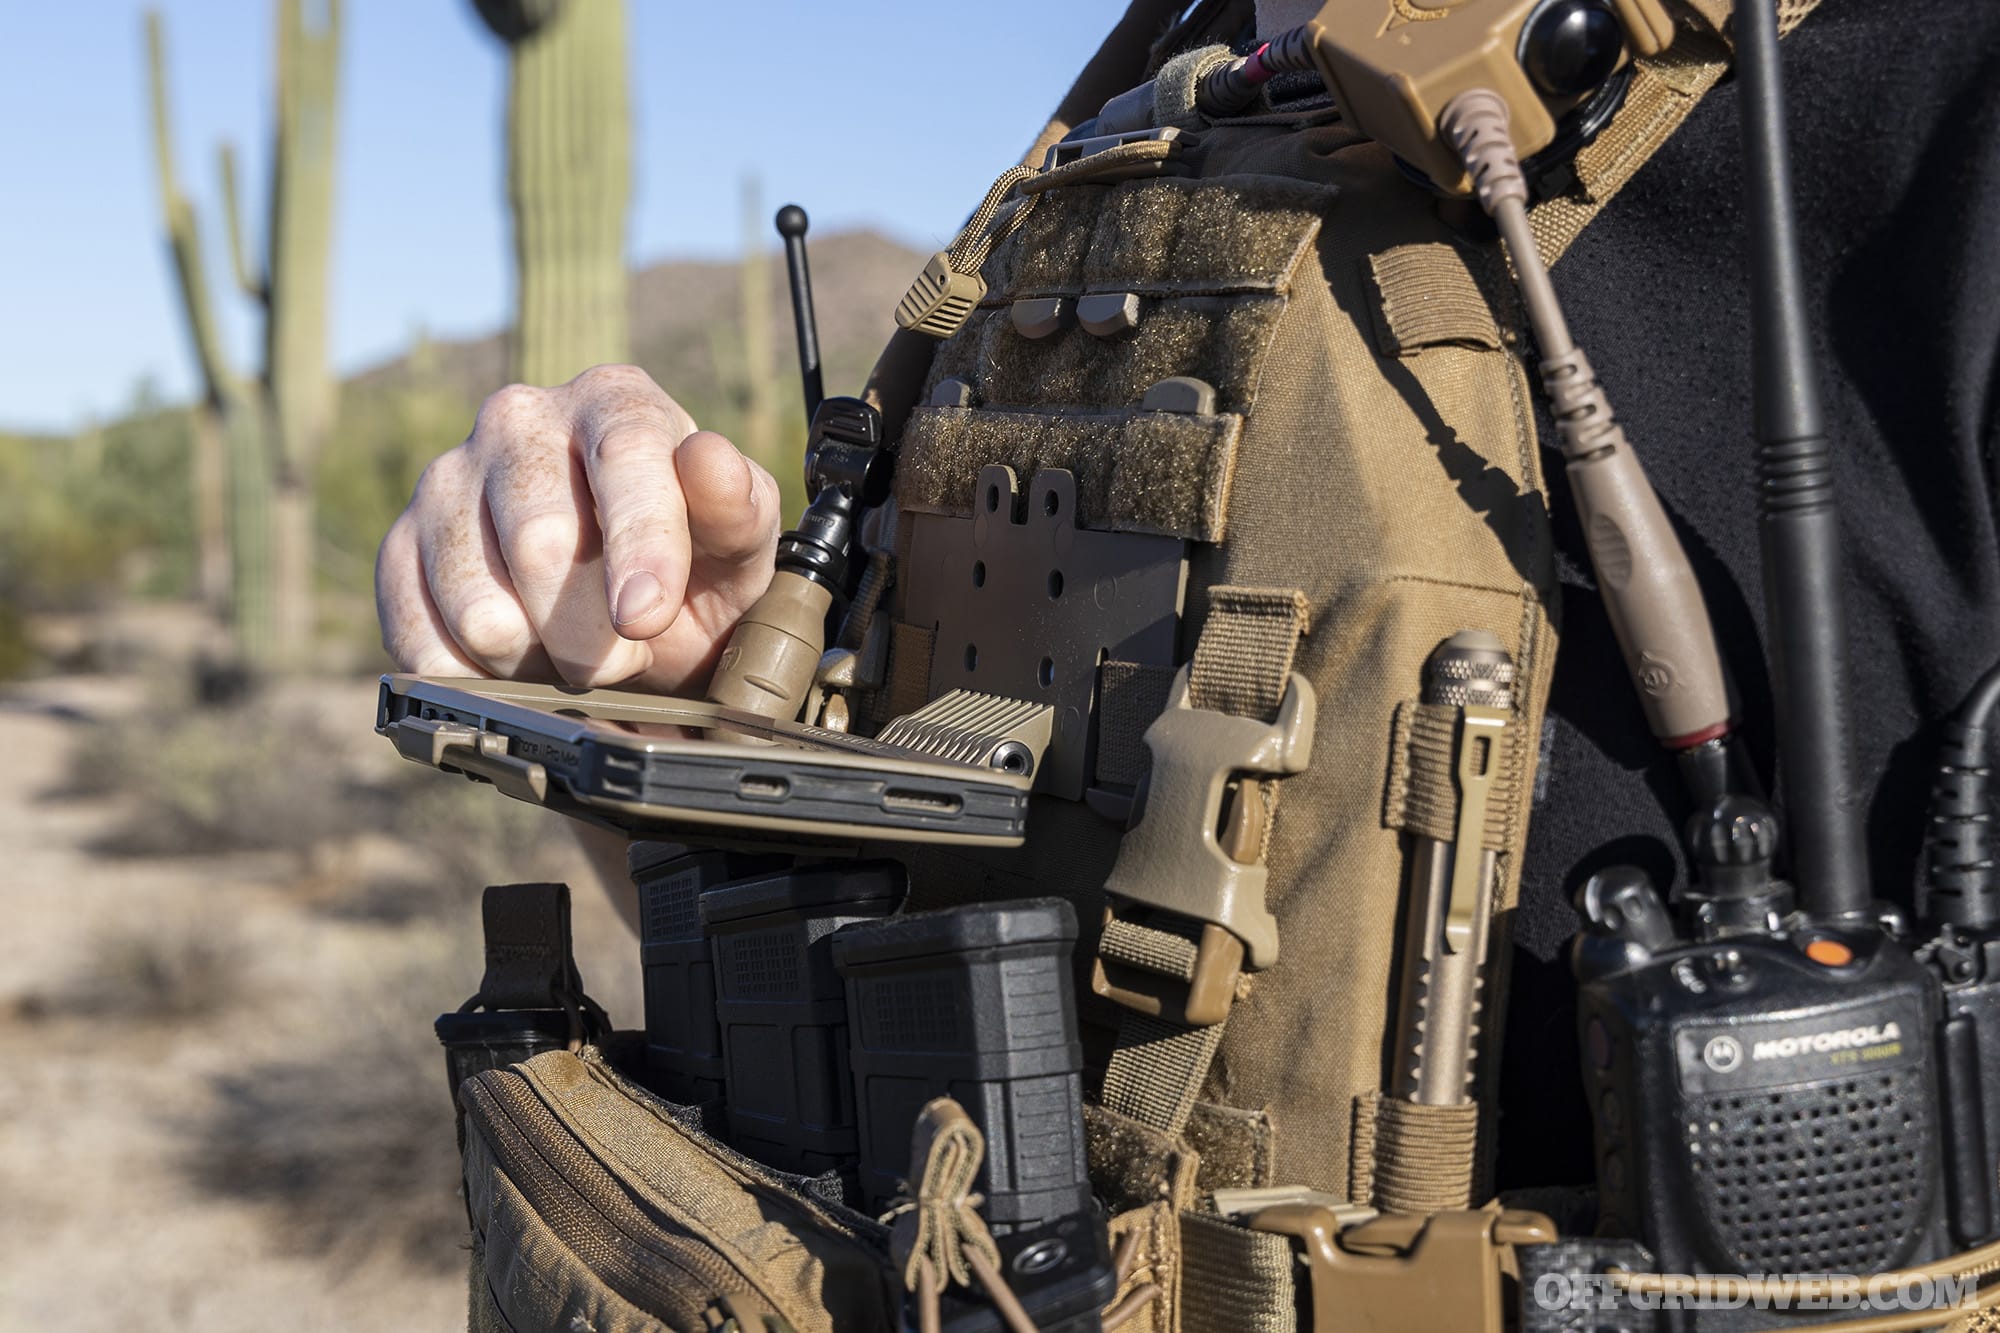
Above: This PALS Plate Carrier Mount from Juggernaut Case offers quick access to a cell phone for communication and navigation.
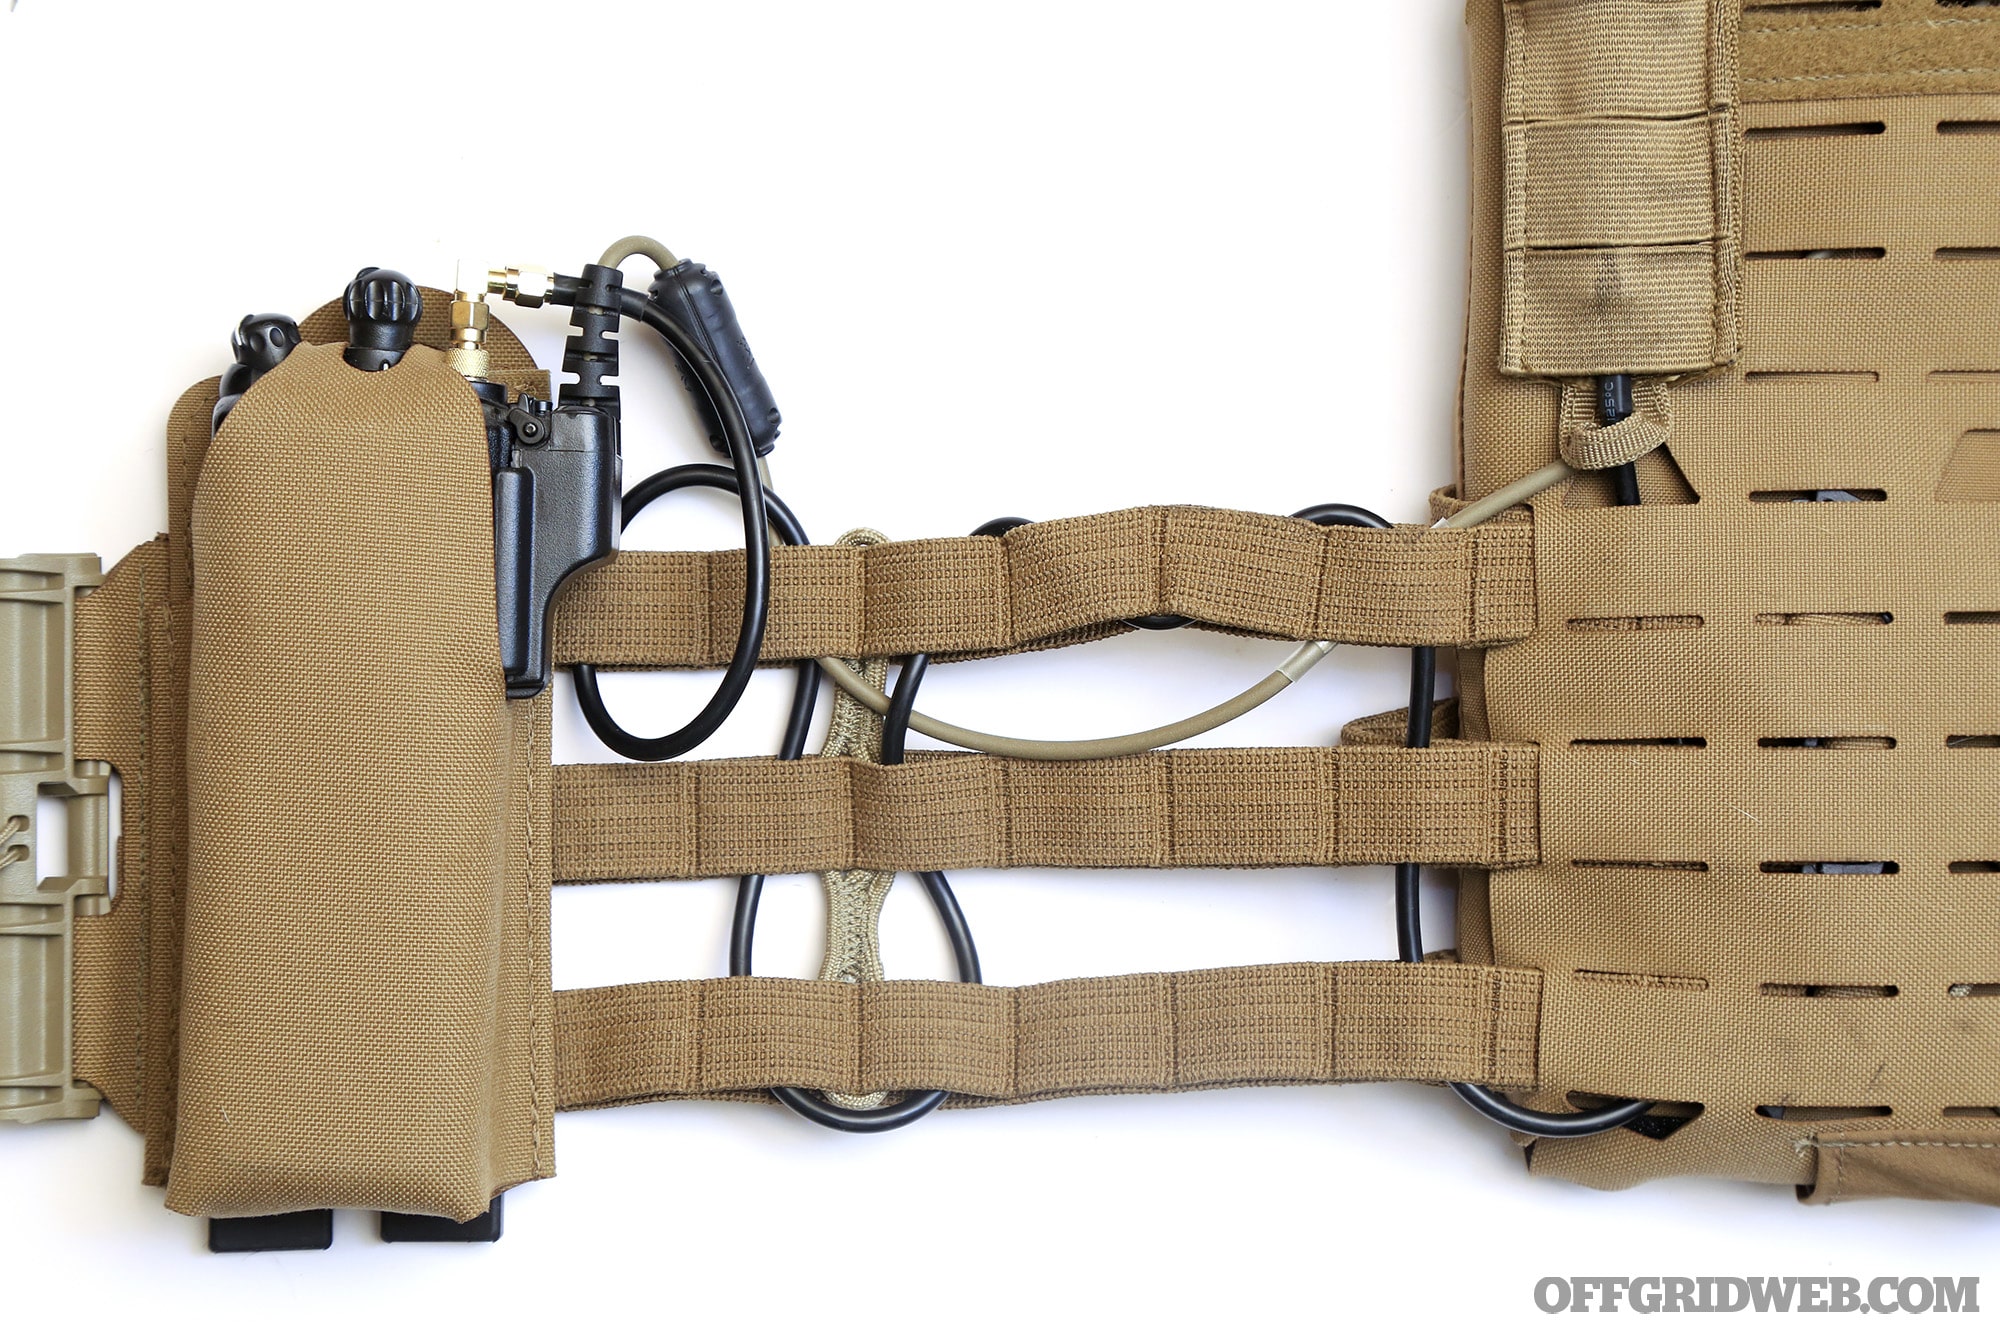
Both XTS radios are mounted on opposing sides of my TYR Tactical plate carrier’s cummerbund in Blue Force Gear elastic pouches. The PTT’s inline disconnects allow me to unplug or replace a radio without any hassle. In situations where I don’t need one of the radios, I can shove a rifle mag into the vacant pouch.
Safariland’s Adaptive Suspension system makes it possible to swap the headset from a headband to a helmet mount in seconds. When I’m training with night vision, I attach it to the Safariland rail mount installed on my Team Wendy Exfil LTP bump helmet. The rest of the time, I use the headset in the standard Comfort Fit headband. And in situations where I just need ear pro without comms — like casual range sessions with friends — I can disconnect the headset from the PTT and use it as active ear protection. Clear sound and comfy gel cups make the Liberator system easy to wear all day, no matter what I’m using it for.
Above: The Safariland Liberator V headset can be used as standalone ear protection, or it can be connected to the included push-to-talk button that offers control over two separate radios.
Tom Marshall: Silynx Clarus
Setting up my comms system, I was looking for two things. First, I wanted my communications system to be independent of my helmet. While over-the-ear muffs attached to helmet rails look cool and are awesome for combat operations where a helmet is mandatory, nowadays I rarely wear one outside of a photo shoot. Even working as a security contractor overseas, helmets weren’t widely used, even though comms capability was mandatory when rolling out of bed in the morning. The other factor important to me was a system that could integrate with multiple types of communication devices. While having an encrypted setup is a boon for family or neighborhood teams working together, prepared civilians cannot ensure everyone around them will be operating on the same frequency or even using the same radio platforms. Enter Silynx. Though their bread-and-butter is outfitting military and government organizations, almost all of their equipment is available to civilians, and they offer scaled hardware suites for a variety of applications.
I started with their Clarus dual-lead push-to-talk (PTT) box, the cornerstone of this entire setup. I wanted to make sure I had the ability to communicate within my family/team on the Off Grid Comms encrypted radios as well as outside elements or responders who may be talking to me on other devices. The Clarus has a modular split-cable adapter system allowing you to configure the PTT box to interface with multiple types of devices. Silynx offers adapters for a variety of device types. I focused on three: the Motorola XTS pattern, a two-pin adapter for Baofeng radios, and a 3.5mm headphone jack that’s compatible with smart phones.
After playing with a couple of different permutations, I settled on setting up my Arbor Arms Communicator Armor System (CAS) plate carrier to run the Silynx Clarus with one Motorola and my smartphone. The Motorola is stowed in an Esstac radio pouch on the left cummerbund arm of the CAS. The smartphone is on a Juggernaut Case phone case and PALS Adapter tray, which lets me attach my phone directly to my plate carrier for hands-free operation. It should be noted that most current-gen smartphones don’t have legacy-style headphone ports built in anymore. But there are small adapters available that will interface this jack with either USB-C or Apple Lightning Cable ports. Since I run a Galaxy phone, I purchased a $20 USB-C adapter from Amazon and was in business. This particular capability — integrating your cell phone into your radio communication setup — is perhaps the most unique and useful feature of the Silynx system for prepared citizens.
With this setup, I’m able to make a phone call and keep the line open hands free. But the person on the other end of the phone can only hear me when I press the corresponding transmit button on my Clarus PTT box. This is an outstanding capability to have if, for example, you have to call 911 and speak with first responders while also coordinating with a family member, neighbor, or friend who has an Off Grid Comms Motorola. Now you no longer have to be at the scene of the incident to direct responders to someone else who needs help — you can relay information remotely by having two lines of communication open. While a regular phone call will not be secure, you can use apps like Signal or Threema (both discussed in Issue 53), to make voice or video calls with end-to-end encryption, while still having the ability to transmit/receive through your Off Grid Comms Motorola, also encrypted.
Above: We used an Esstac pouch to secure the radio to the cummerbund, routing the wires through it and into the rear plate bag.
Since I specifically wanted my communications to be independent of a helmet, Silynx sent me their Clarus in-ear buds, which are equipped with an in-line microphone as well as their hear-thru and sound localization technology. This feature directionally amplifies low-level ambient sound to enhance situational awareness but cuts out when receiving or transmitting communication so you can have clear conversations over radio or phone. This technology functions much like current-generation active hearing protection systems, but with the added benefit of receiving radio and phone transmissions as well. It should be noted that the Clarus we used also has a modular top lead, meaning you can unhook the in-ear buds and switch to helmet-mounted muffs or boom mic-style headsets if that better fits your application.
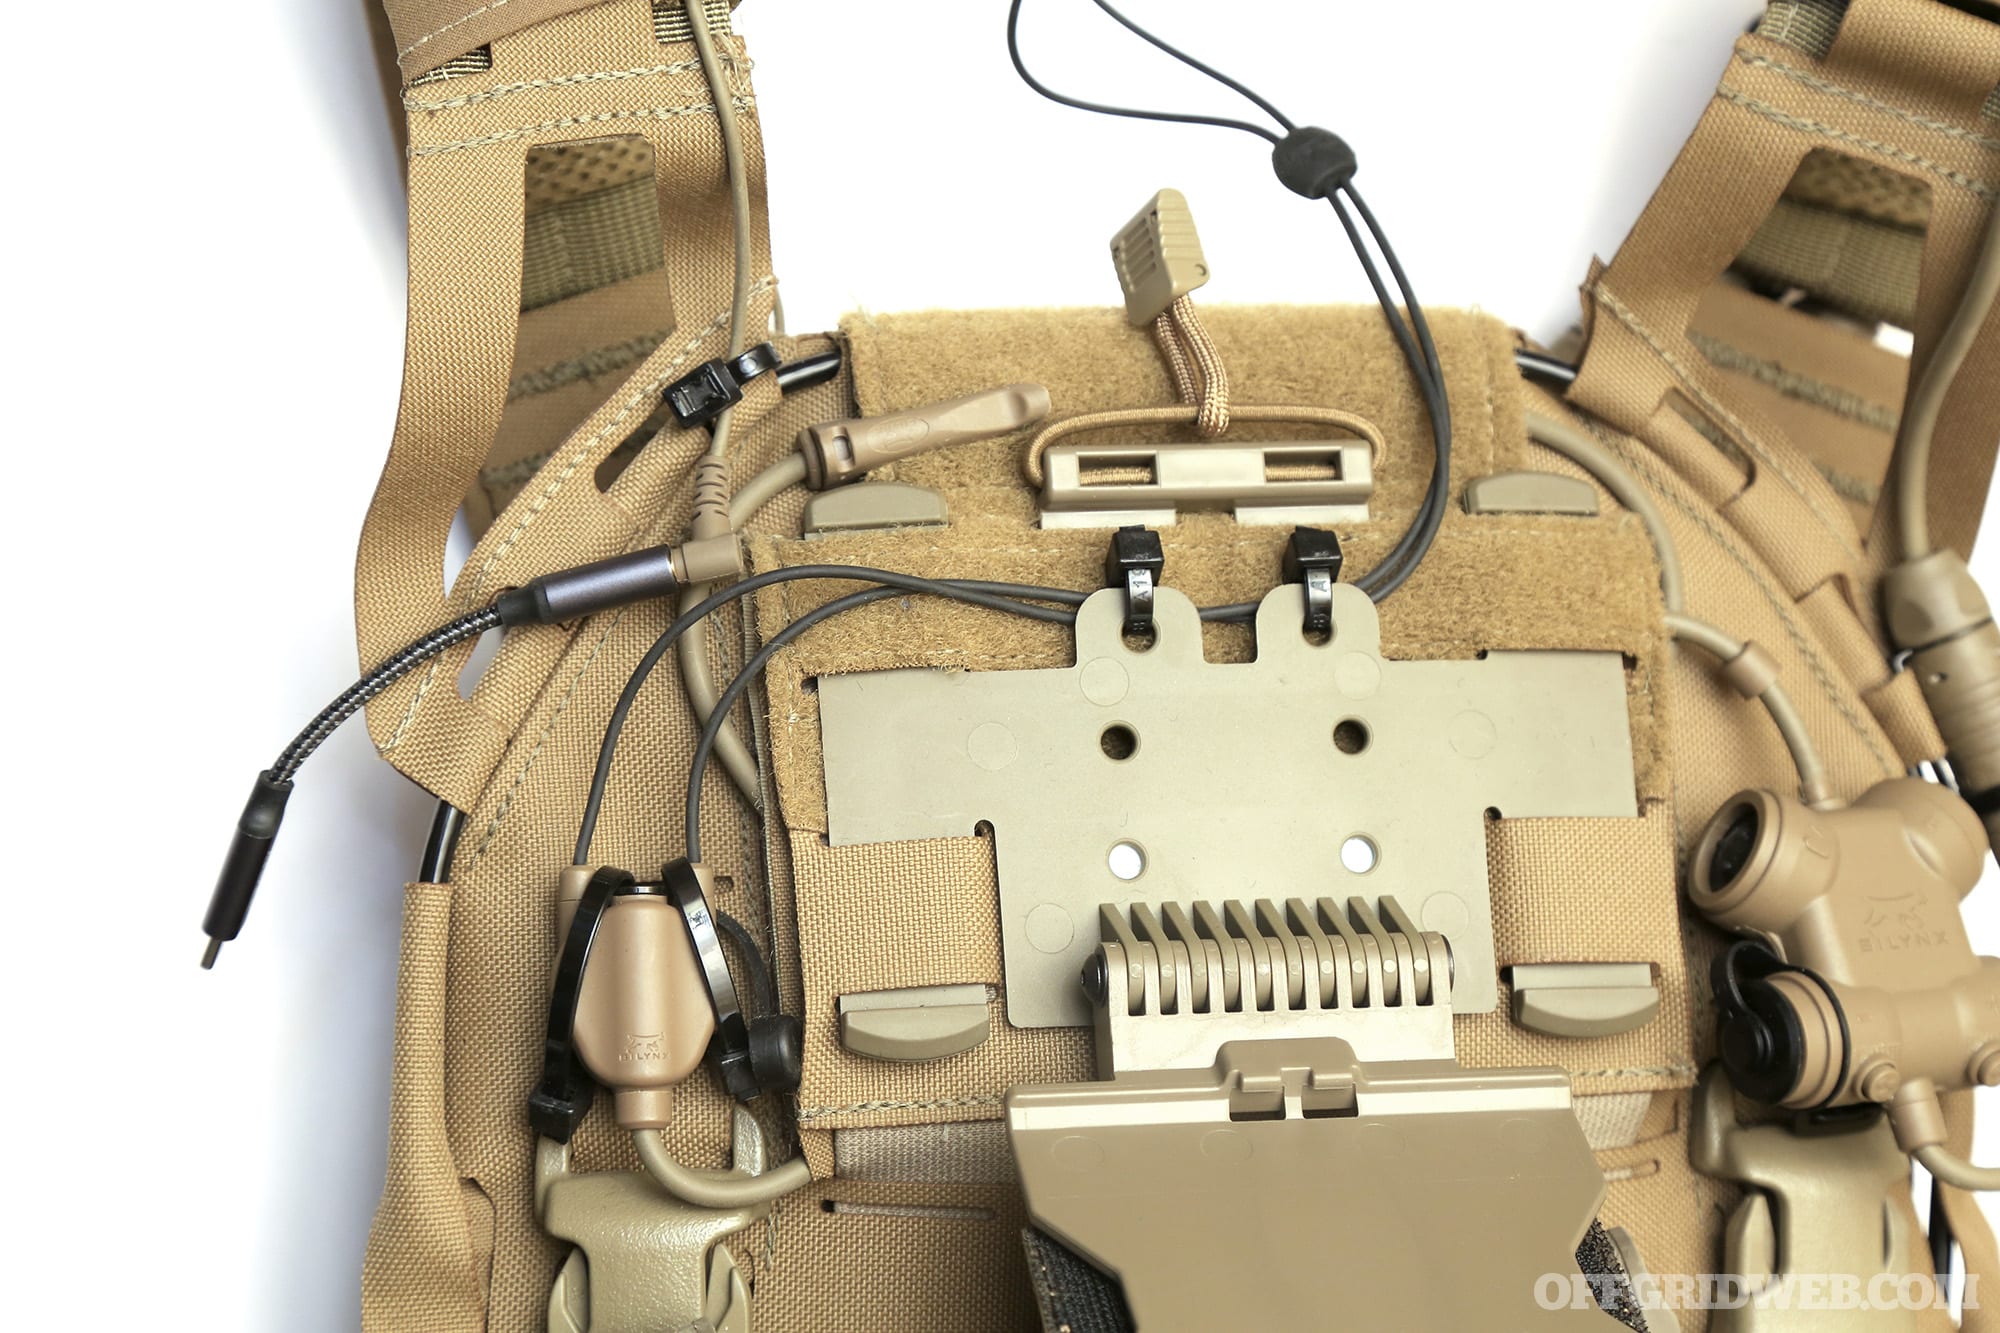
Above: The Arbor Arms CAS 2.0 offers plenty of routing pass-throughs, which let us bury most of the Silynx wiring underneath the carrier.
I was able to route all my cables through sleeves integrated into the Arbor Arms CAS, to minimize the amount of cable exposed to snagging or environment damage. While the Silynx system does include clips that are sized to pass through MOLLE/PALS-style webbing, I used a couple of small zip-ties to fully secure the hardware to my carrier. Routing the antenna and PTT cables through one arm of the wraparound cummerbund lets me don and doff the carrier without having to swim through a sea of cables to get the carrier off.
My experience with Silynx’s communication hardware suite was excellent. Transmission and receiving quality were both clean and clear. The modularity of the Clarus system offers a high degree of flexibility for both user interface and communication/radio platform interface. There are also single-channel and fixed-lead versions of the Clarus available that’ll save you some money if you don’t need dual-comms capability or don’t plan on switching radio types.
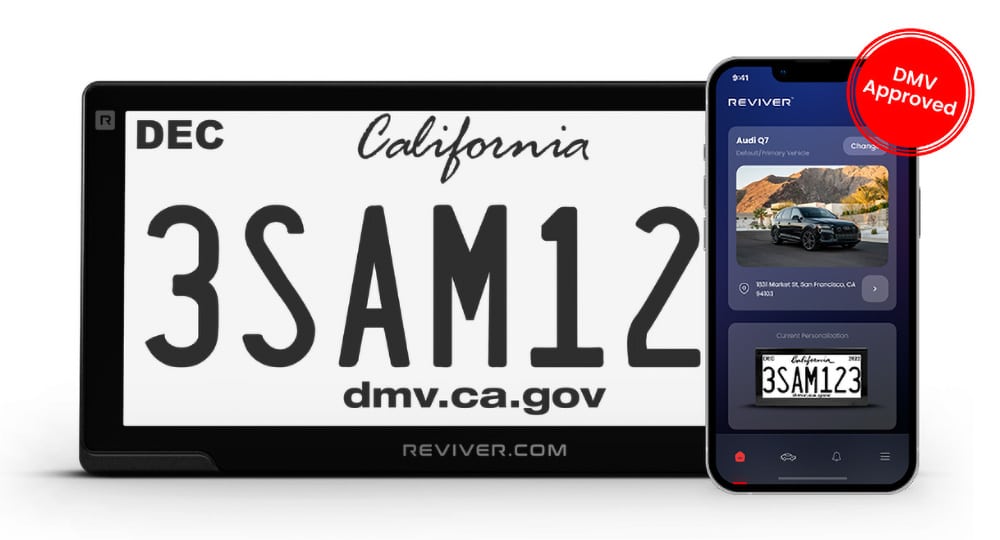
The “Internet of Things” (IoT) is a tech industry term that sounds innocuous, but its existence has some serious implications for our security and privacy. IoT devices are ordinary objects or appliances with embedded sensors, computer processors, and communication modules — WiFi-connected cars, smart picture frames, internet-connected thermostats, and so on. These devices offer some conveniences, but they’ve also become more invasive and prone to security vulnerabilities. You might be concerned about someone hacking your computer or phone, but you probably hadn’t thought about someone hacking your smart fridge. A powerful example of this comes from California, where new digital license plates — promoted as an optional upgrade — were legalized by Governor Gavin Newsom in October 2022. A few months after release, California’s electronic license plate system has already been hacked, allowing hackers to track GPS location, access the owner’s personal info, change text on the plate, and more. They could even flag the vehicle as stolen, which could prompt police to conduct a high-intensity felony stop.
Screenshot via Reviver.com
The Electronic License Plate Hack
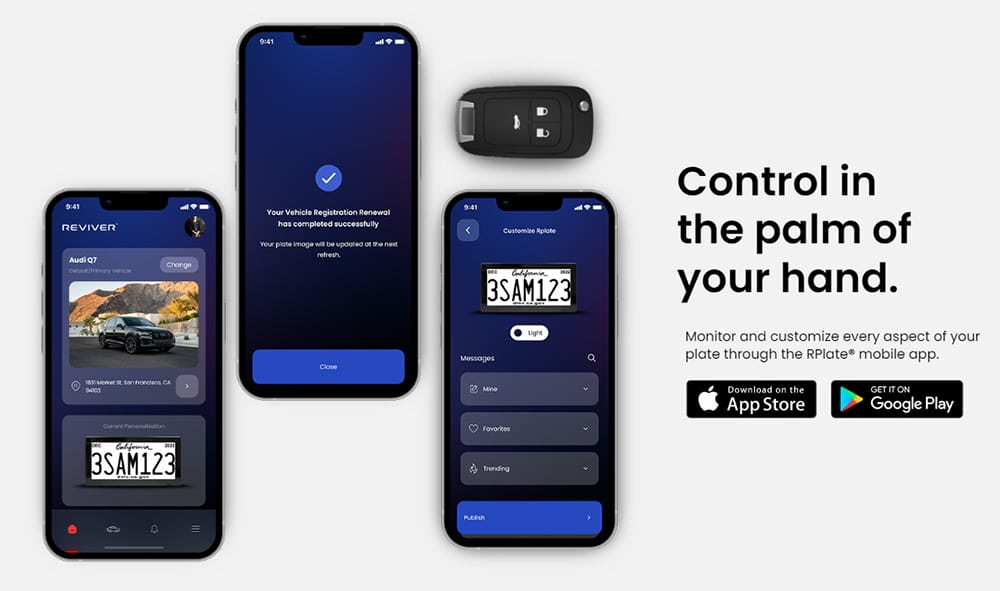
Above: Reviver’s product page touts “control in the palm of your hand” by using the mobile app to customize your RPlate.
Luckily, the hackers in this case were benevolent “white hats” who had no intention of using this vulnerability to cause chaos. Instead, they immediately reported the vulnerability (likely for a large cash bounty) to Reviver, the company that sells and manages the new RPlate electronic license plates. Reviver reportedly patched the flaw within 24 hours. After an internal investigation, the company claimed that it had never been used maliciously and that no user data had been leaked to the public.
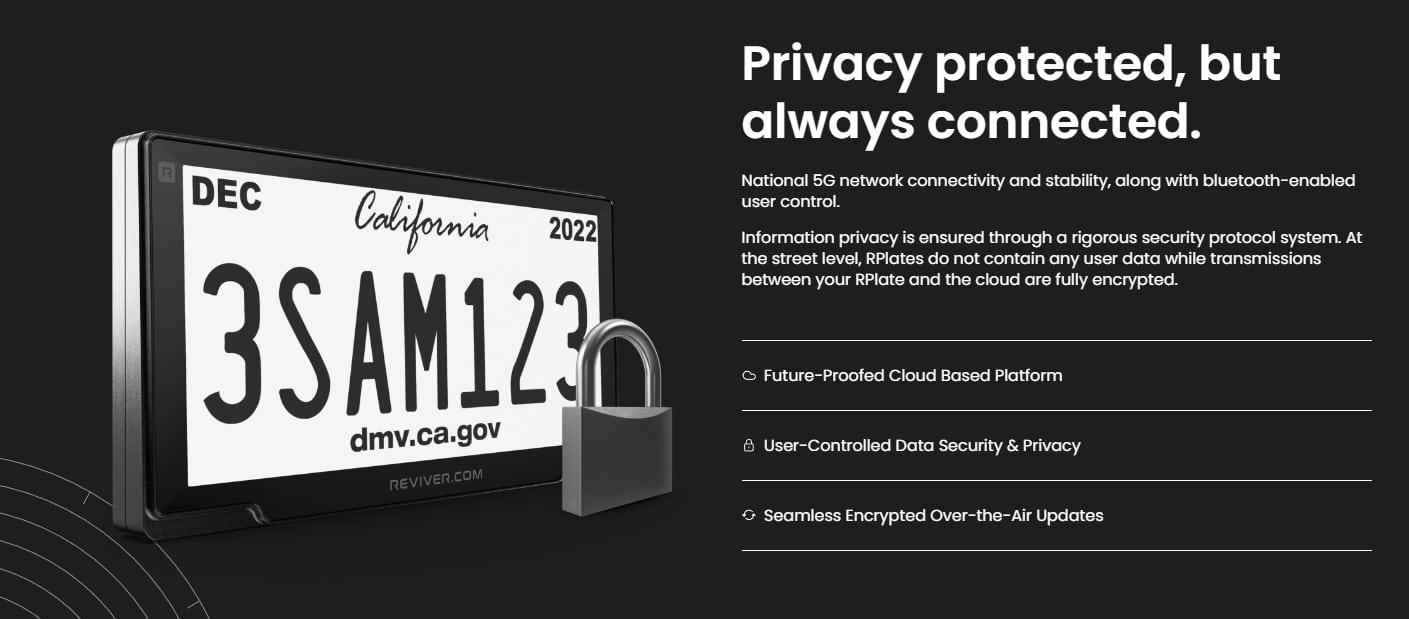
Above: This privacy promise from Reviver seems rather ironic given the recent cybersecurity revelations.
Even though a cybersecurity disaster was narrowly averted in this case, it’s certainly concerning to learn how serious the vulnerability was. Security researcher Sam Curry explained that a Javascript flaw in Reviver’s web site allowed his team to switch their account access level from that of a standard user to a “super administrator.” Once they had admin access, they could…
Access personal information of any electronic plate owner, including vehicles owned, physical address, phone number, and email address
Remotely track the GPS location of any electronic license plate
Delete license plates from the system
Add new license plates to the system
Replace the dealer logo on temporary tags for new cars
Change the custom text line at the bottom of the plate
Update the status of any electronic plate to “STOLEN,” which might potentially lead police to stop the driver at gunpoint
Above: Under normal circumstances, the ability to mark a plate as “STOLEN” instantly might seem beneficial. In this case, it almost became a huge safety issue.
A Growing Cybersecurity Problem
This isn’t even close to the only serious vulnerability documented by Sam Curry in his blog post, Web Hackers vs. The Auto Industry. He also showed web backdoors that affected a staggering list of automakers, including Kia, Hyundai, Honda, Toyota, Infiniti, Nissan, Acura, Ford, Mercedes-Benz, BMW, Porsche, and even Ferrari. Many of these included the ability to “remote lock, unlock, engine start, engine stop, precision locate, flash headlights, and honk” using only the vehicle’s publicly-visible VIN number.
Photo via Reviver
In the past, hackers have also demonstrated the ability to remotely turn off vehicles that are already in motion, which could lead to a serious crash.
Auto industry aside, the state of California is no stranger to glaring cybersecurity vulnerabilities. Last summer, the CA Department of Justice confirmed that the personal data of everyone who was granted or denied a concealed-carry weapon permit between 2011 and 2021 had been leaked. This info included “names, date of birth, gender, race, driver’s license number, addresses, and criminal history.” This leak affected nearly a quarter-million Californians, including judges and police officers, possibly making these individuals a target for home invasion robberies and other crimes.
Talk is Cheap
In almost every case, the affected companies or governing bodies have been quick to apologize and assure everyone it was an isolated incident. But it’s clear that these hacks will continue happening unless those responsible for our data spend the time and money to make cybersecurity a much higher priority.
In the meantime, we encourage you to weigh the pros and cons carefully before adding more IoT smart devices to your home (or garage).
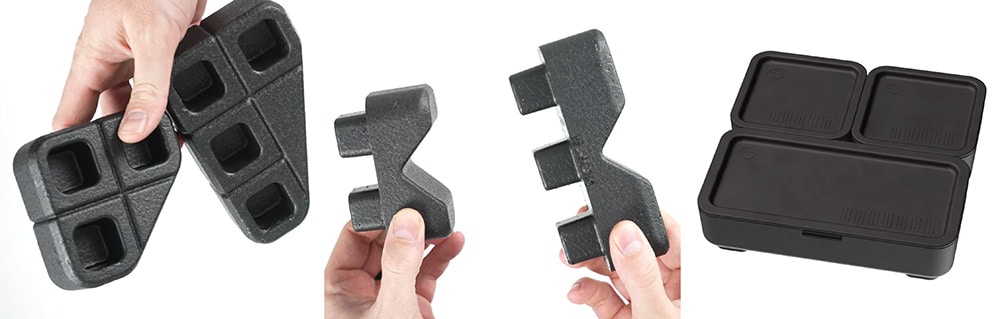
Whether you’re going hunting, heading out for some target practice at the range, or loading up for an emergency situation, it’s a good idea to keep your gear in a hard case. This ensures your guns, ammo, tools, and other equipment will make it to the destination safely. But all hard cases are not created equal — the best cases have organizational systems that can be configured to prevent gear from sliding around in transit. Most of the time, this means “pick and pluck” foam that can be cut or torn out to fit the outline of your gear, but that’s a one-way process. If you change your loadout after you cut the foam, you’ll need to buy new foam. Magpul recently announced a new modular rifle case organization system for Pelican, Plano, and other hard cases known as the Magpul DAKA Grid organizer.
The Magpul DAKA Grid case organizer consists of three pieces. It starts with a thin layer of bottom foam to provide cushioning, and tops this with a middle layer containing a grid of equidistant holes. Included sets of 10 double and 10 triple blocks can be inserted into these holes like pegs to create any layout you need. Best of all, they can be reconfigured in seconds if you want to change the layout.
Magpul says that additional expansion sets will be offered for the DAKA Grid in the future, including:
Angled blocks to fill atypical gaps
V blocks to support barrels, bows, fishing rods, and other narrow items
Tie-down straps to secure items onto the grid
Organizational containers for small items
Currently, the DAKA Grid system is only available for two gun cases, the Pelican Vault V730 and V800. However, Magpul’s announcement video mentions that models will also be available for the Pelican 1720 and 1750, the Plano AW2 42″ case, and a new DAKA rifle case manufactured by Magpul itself (coming soon). You can read more about the Magpul DAKA rifle case line, available in 35, 44, and 53-inch sizes, here.
MSRP for the DAKA Grid system is $140 for Vault V730, and $160 for Vault V800. Block expansion kits (6 additional double-blocks and 6 triple-blocks) will be $30, but they’re currently marked “coming soon.” The remaining case systems and accessories are expected to be available later in 2023. For more information, check out the video below or go to Magpul.com.
When someone mentions “urban survival,” what comes to mind? For many, that term evokes images of wandering alone through a barren, dystopian landscape like those seen in I Am Legend or The Walking Dead. But the reality of urban survival is much more practical — it’s about finding a way to live in a densely-populated, fully-functioning metropolis while avoiding confrontations with other residents or authorities. The so-called stealth camping movement is an interesting approach to this everyday form of urban survival. One YouTube content creator known as Stories from a Van filmed a 15-minute video showing how he lives comfortably under the radar in his innocuous-looking Nissan NV200 panel van.
Evan, the man behind Stories from a Van, says he built this Nissan NV200 with help from his father, a carpenter. Aside from a small vent and some low-profile solar panels on top, it appears to be a completely normal delivery or utility van from the outside. These small vans are common in cities, so no one will bat an eye at it, unlike a larger 10-passenger or Sprinter van.
The build began by insulating the interior and adding a layer of vinyl to cover the insulation. Custom wood cabinets were built across the full length of the van’s floor, offering storage space as well as some surprises like the shower pan and drain in the center compartment. A folded foam mattress serves as Evan’s bed, and a simple Igloo cooler acts as his refrigerator.
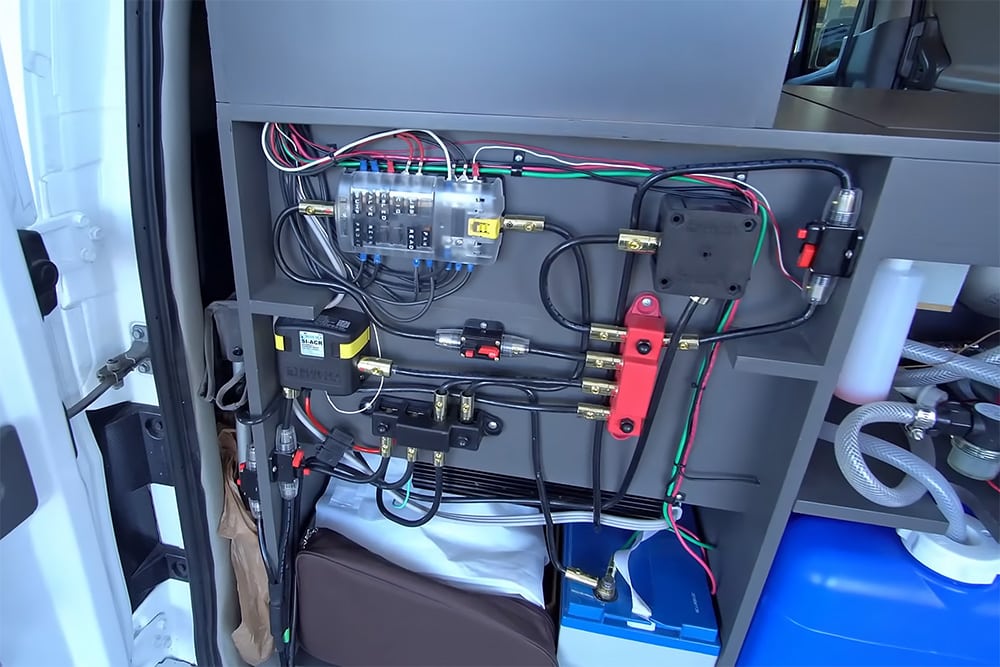
At the back of the van, there’s a sink concealed underneath the desk surface, along with a clever U-shaped drawer that makes use of the dead space around the sink. The lighting on the ceiling and power outlets are connected to a custom electrical system Evan built. It includes onboard batteries linked to the solar panels as well as a charge controller hooked up to the van’s engine for cloudy days.
The rear of the van also contains a custom plumbing system with two fresh water containers and a gray water tank underneath the body. There’s clearly a lot of thought put into this setup, and we appreciate how truly discreet this stealth camping van looks. Check out the full video walkthrough below:
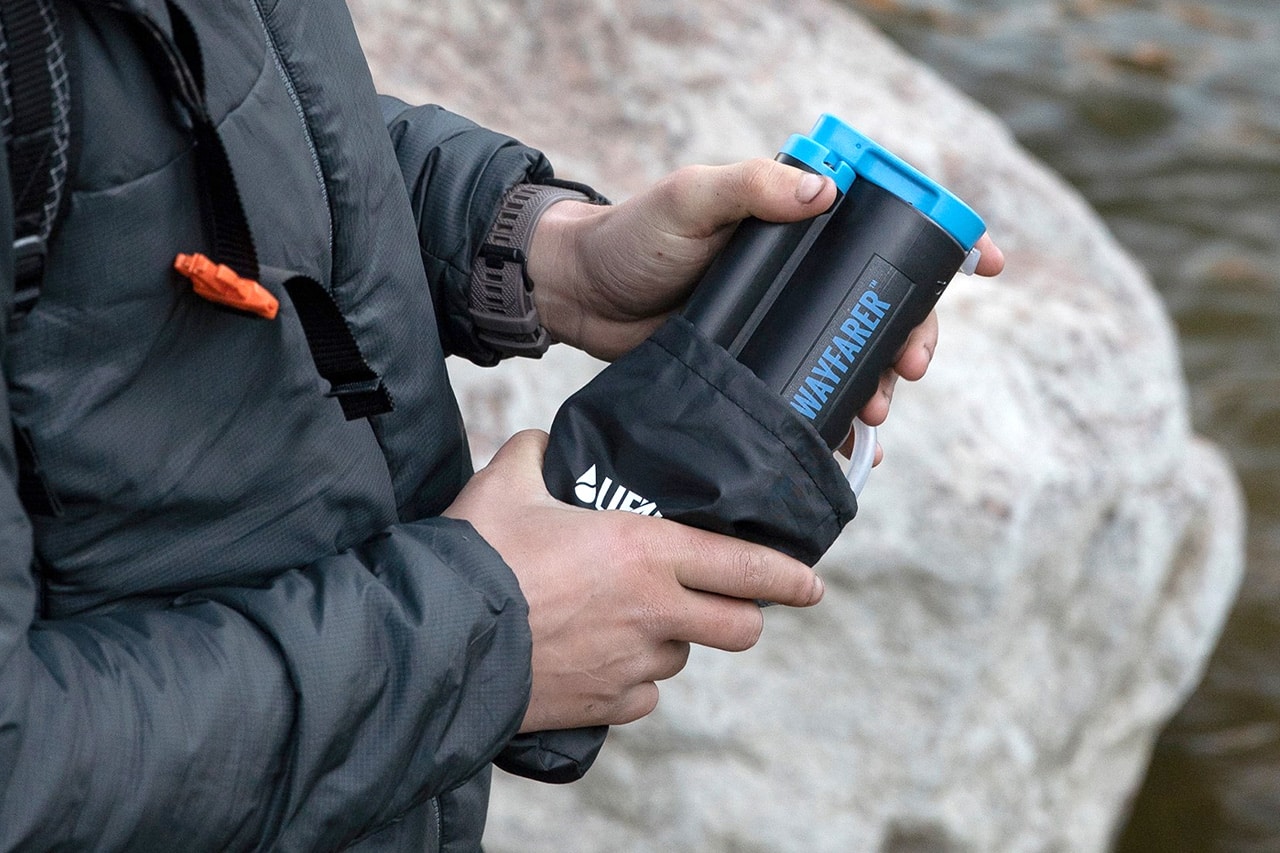
On the hierarchy of resources required for survival, clean water is near the top. As the old adage goes, humans may survive as little as three minutes without air, three hours without shelter (in extreme climates), and three days without water. But even if you have access to a nearby lake or stream, there’s a high likelihood the water is contaminated by microorganisms that will make you violently ill. To avoid this, you’ll need to purify the water first. British water purifier company LifeSaver, whose products we’ve reviewed in the past, recently launched a new compact purifier called the LifeSaver Wayfarer — the company’s smallest and lightest device yet.
The LifeSaver Wayfarer is designed to fit easily into a pocket or small backpack, and weighs only 11.4 ounces. As with other LifeSaver products, it’s made in Britain and tested to exceed NSF/ANSI P231 standards for removal of bacteria, protozoan cysts, and viruses. It also removes chemicals, microplastics, heavy metals, and unpleasant taste/odor from water. Additionally, the Wayfarer features the company’s FailSafe technology that cuts off water flow once the filter reaches the end of its lifespan, ensuring contaminated water won’t pass through.
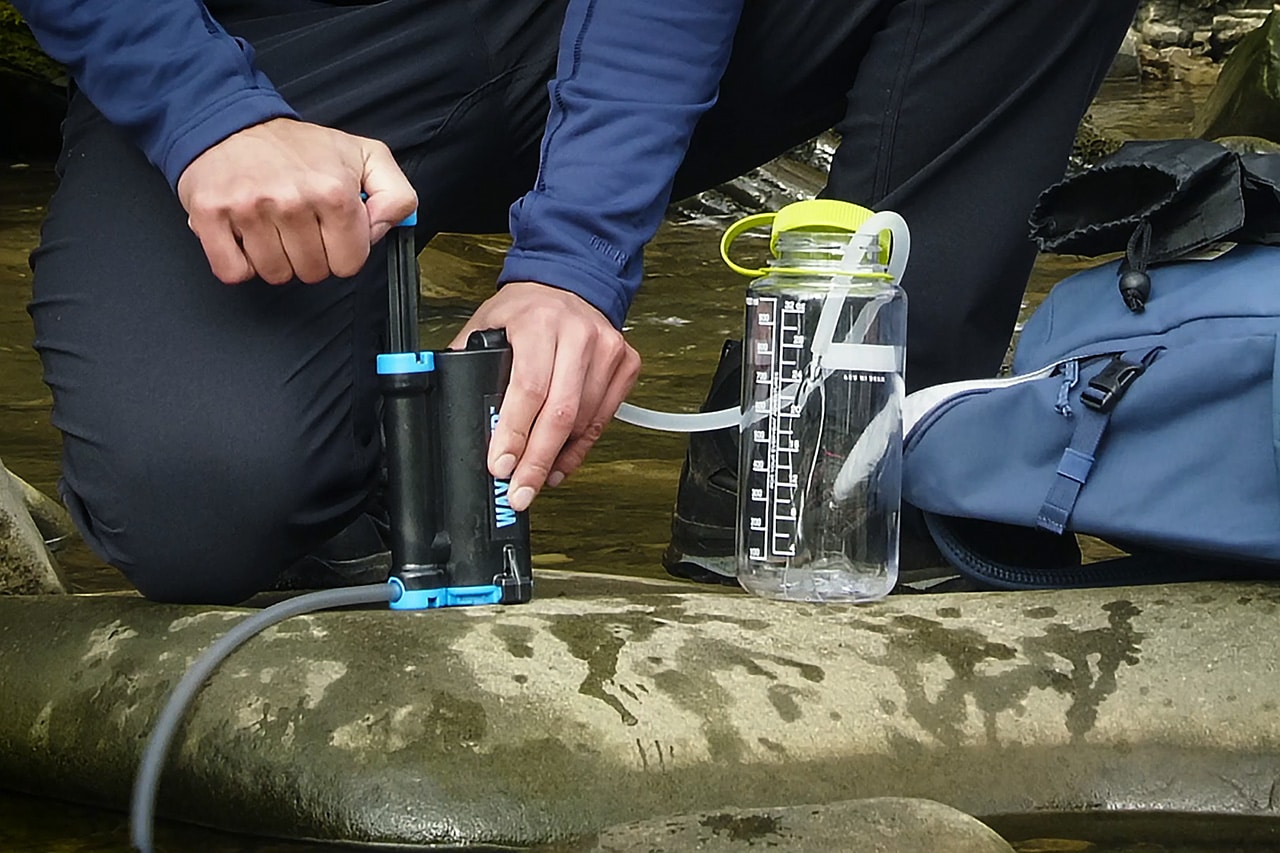
The Wayfarer consists of a black polymer housing with a retractable pump handle, inlet tube, and outlet tube. The 4.2-foot scavenger hose is connected to the inlet, then placed into a body of water; the integrated float keeps it from sinking to the bottom. A shorter clean water hose connects to the outlet, and can be placed into your water bottle or hydration bladder. Pumping the handle forces water up through the first-stage ultrafiltration (UF) cartridge and second-stage activated carbon disc. Both components are replaceable — the cartridge lasts for up to 5,000 liters, and the disc lasts for up to 100 liters.
We were pleasantly surprised to learn that the LifeSaver Wayfarer will retail at an MSRP of $105. Many purifiers in the sub-$100 price range are made in China with questionable testing standards or no mention of lab testing at all. So, the Wayfarer seems like a solid value in comparison.
LifeSaver says the Wayfarer will become available on February 1st, 2023, but it’s currently available for preorder. we’re looking forward to seeing it in person later this month at SHOT Show. For more updates, keep an eye on IconLifeSaver.com.
Catfishing: a security term most commonly used online when a bad actor (criminal) lures prospective victims to give money by pretending to be someone else. — My dad was a baby boomer born in 1946. At age 18, he enlisted in the Marine Corps and served a 13-month term in Vietnam. Dad was very proud of his “service to his country.” He wore the hats and pins that immediately identified him as a proud veteran and would often suggest that debit cards and the internet were a means of social control. Even with all his suspicions, he never quite appreciated how technology and information could be weaponized against him.
In 2019, my father joined the 21st century and purchased a smartphone. He called me on his new device and said, “Now, do I have to go to the library and checkout a Facebook?” A follow-up question was, “What’s an app?” Needless to say, he was in over his head, but he thought he was entering a new age and would brag about his phone and that he learned to text.
How My Dad Fell Victim to a Catfishing Scam
My dad was the type who visited a local coffee shop where he’d complain about the newer generation and there being too many lawyers and the normal rantings of retired people in small-town America. Some of the waitresses thought it would be funny to install a sassy silver singles app on his phone where he began to get requests to “friend” him. He had no idea why these “old crazy women” were calling him. He brought me his phone and I deleted the app in a flash of wizardry. But what my father and I didn’t know is that key pieces of his information were out there for the bad people to see. My father used his real name and phone number. Well, bad guys like to put that information to good use (for them).
Shortly after deletion, he received separate text messages outside the app on the phone number he plugged into the app. He received a text that went something like, “Hey, I saw you on sassy silver singles and I’m looking to move to your town.” A person reached out to him and started with very innocuous requests like if he could recommend a realtor, or if the schools in his town were nice. This back-and-forth blossomed into a full texting relationship where one individual who appeared to be a younger lady would contact him several times a day. His guard began to drop, and he truly failed to realize how information about him was being compiled. Simple statements that might appear genuine included, “Hey, if you’re married, I don’t want to upset your wife.” He replied that he was divorced, and he lived alone. He added that he retired with a full pension from the local mine, that he had five adult children, and other information that might seem routine in conversation. However, this was all done through texts. His guard clearly dropped the longer this texting relationship continued.
Above: This is the “girl” my dad was talking to. It is unknown at this point if the lady pictured here is involved or if this was a random photo lifted off the internet the actual scammer used. This person may be completely unaware their photo is being used to hustle unsuspecting people.
Techies have a funny acronym for a “girl I met online” defined as Guy In Real Life (G.I.R.L.). But a man in his late 70s had no exposure to such things. “Why me?” he would proclaim. “I’m nobody. She just likes an old man who tells it like they see it.” This “girl” pretended to be from England and discussed relocating to Arizona from the UK. She stated that she was due to inherit 2-million British pounds, and she wanted to move to a warmer climate. Dad passed the names of good realtors and good schools to the “girl.” The British “girl” said she had a 4-year-old daughter, and the duo discussed the pains of moving a child before kindergarten. My father was slowly disarmed by the charm of this “girl.” Dad didn’t have enough exposure to the apps to spot scammers.
On Christmas 2020, dad hadn’t arrived at my cabin, and I called him. He stated that he wasn’t meeting with us for Christmas. He stated that he was going to meet “a special lady who likes me for who I am.” This was the first I’d heard of any plans that they were supposed to meet. I dropped the hammer on him and said, “Let me guess, you told her you’re in room 305 of a hotel and you’re waiting with a pocketful of cash to take her around town.”
Above: Photo of the “girl” and her supposedly sick daughter. Again, it is unknown if the individuals shown in these photos are knowingly part of this scam.
He replied, “YES! I did. If she shows, great. I’m really looking forward to meeting her.” I said in no uncertain terms that he was going to be robbed and beaten for the money he had on his person. I ascertained that she had picked the place, and he checked in and told her the room number. The next knock at the door was going to be a robber and a “get the hell out of there” message for him. In an instant, my father presented as a scared little man. He was fearful of this dream not coming true. I persisted and said the “girl” will claim that she missed her flight and try to set him up for a second attempt. He seemed sad that maybe he had been duped and was quite embarrassed.
Above: Photo of the forged boarding pass that helped accelerate the investigation.
He left the hotel more lonely and somewhat suspicious than when he entered. It bugged him that his son (the lawyer) only saw the negative in people. He went home to spend Christmas alone … he spent too much time alone. The COVID pandemic made life on the elderly especially difficult. They became afraid of younger people who might give them the disease. I could tell he was not at ease and felt foolish. Also, part of him wanted to believe this relationship was real. It had been going on for seven months (tens of thousands of texts) — why would anyone in their right mind engage in so much conversation if they were not genuinely interested in him? Again, he failed to consider the totality of all the information he had given up to this “girl.” This was a man who spent decades performing hard labor. The thought of someone stringing him along served absolutely no human purpose in his mind.
Fatal Consequences
Above & Below: Additional documentation I found that substantiate the travel arrangements and fraudulent attempts to gain access to money.
In March of 2021, my dad suffered a serious heart attack. I had to assume control of his resources and monies to help with his recovery. He kept the phone near his side, always close at hand. He would nervously check his phone like a teenager. His health quickly deteriorated, and he passed away.
Under normal circumstances, the story would be over. When I took possession of his phone, papers, and effects, I noticed a $30,000 wire transfer made out from his account. I noticed another $15,000 wire transfer out of his account, and so on. All monies were sent to a law firm in Kansas City. The sum total of the transfers was $168,000. To some people, this is all the money in the world. In fact, this $168,000 represented all the money my dad had to his name. There was even a loan request where he asked for an additional $30,000 loan that was “declined.” There were piles of gift cards in Amazon for $2,500, iTunes for $1,500, eBay for $3,500 — these gift cards totaled another $18,000. My father didn’t know what iTunes was. He never even bought anything off eBay. I went through his phone and found answers.
This “girl” told my father that her daughter was dying. There were pictures of a 4-year-old girl with a sign that said: “I can’t wait to meet you American Daddy.”
My father was instructed by this “girl” to send front and back pictures of the gift cards. This “girl” was able to redeem the gift cards electronically from anywhere in the world. All of this money was promised to provide for this so-called dying 4-year-old child. The pictures were there of a sad kid whose head had been shaved by someone to pretend to be sick. This “girl” had been working him slowly for nine months, every day texting him about how he was doing and was he eating enough vegetables, etc. The “girl” claimed the money was being used for her sick daughter’s treatments (wire transfers) and little toys from Amazon (gift cards) to keep her happy while spending the holidays in the hospital.
The worst realization was in March 2021, my father had stated that he had no more money to help. He was financially tapped out. The “girl” said she needed to know that he could care for the 4-year-old and to attempt a loan with his bank. But, the saddest news came when I compared the date of his heart attack with a text message wherein this “girl” said my dad could not be trusted to provide for her sick 4-year-old. When he realized he was taken advantage of, the heart attack occurred less than 30 minutes later. The disgrace of giving all that he had to someone who tricked him did him in. He sat on his hospital bed and sent a picture to this “girl” to state that he was in the hospital — maybe as proof that he was really ill.
When she failed to appear at his bedside, he knew he had been duped. He died ashamed and broke.
A Long Shot for Justice
I took this information immediately to law enforcement. I received the usual “the internet is not our jurisdiction,” if I was even able to reach an actual officer. I reached out to everyone from the FBI to Homeland Security, Arizona law enforcement, Kansas City law enforcement, etc. What concerned me the most was the forging of boarding passes for international travel. The “girl’s” boarding pass looked legitimate; she was pretending to come and visit my father. It was as if she was trying to say, “See, I really was coming to see you in December, look at my boarding pass.” I compiled a file of relevant documents that I’d forward to law enforcement. I was flatly rejected nearly every time. However, things turned around for the investigation when an officer reviewed my file of information. Apparently, the forging of a boarding pass created a true security concern, and the case began moving forward. The boarding pass, I’m told, was a good enough forgery to board a plane and that got the attention of law enforcement. Certain details I can’t reveal because it might jeopardize the ongoing investigation. Hopefully, the bad guys see justice, but I’m doubtful. And nothing will bring back my dad.
What You Can Do to Prevent Catfishing
I write this as a cautionary tale to other people. Watch out for the elderly. The strong men and women in our lives lose tremendous faculties as they age. The elderly are literally more prone to scams. We like to think of our elders in the best days. We don’t track the missteps or mistakes. The elderly don’t fully comprehend how information can be weaponized and used against them.
Help your loved ones by insisting that your family member have your contact information stored with their banks and credit cards. Ethical bankers will call the family to guarantee the transfer is valid prior to funds being disbursed. In fact, insist upon the bank being ordered to check with another member of the family if funds are directed to non-family members (or anyone). Most banks have a policy on the elderly sending money to persons outside their immediate family. Also, check their credit and credit card activity often.
Make sure that money doesn’t go out that hasn’t been vetted by someone else. The elderly can be quite generous to preferred charities, and they get used to people cold-calling them for donations. They don’t often perceive how much sensitive banking information they give away on what may at first appear to be routine calls. Scammers pretending to represent legitimate charities can steal a tremendous amount of sensitive information. Ask your family members to immediately report to you if someone is contacting them for any money.
Social media is a fantastic venue to see updated pictures of the grandkids, but remember we present a tremendous amount of information about ourselves when we post online to the world around us. I’ve heard stories of scammers pretending to be Mexican police and reporting to have a grandchild in jail. The scammer pretends to be a law enforcement official and requests a bond of $5,000 or kiddo goes to Mexican prison. A simple internet search of social media usually shows friends and family. It’s reasonable to assume that a college-age boy in the southwestern United States might travel to Mexico for spring break. The kiddo posts picture of Mexico and then grandparents get a demand for money and are instructed to tell no one or said relative goes to prison. Guess what? Grandparents pay $5,000 and the kiddo never was in trouble to begin with, but the money will never be recouped.
Please have a family discussion about scams and money. Never, never let parents send any money or divulge any information that comes from email or text messages. Please protect your loved ones so they don’t die alone and ashamed, as my dad did.
About the Author
Jason Squires is an attorney with over 23 years of defense experience protecting the rights of citizens accused of gun crimes. He is an avid firearms enthusiast and in his off-time he competes across the nation in three-gun competitions.
Lever-action rifles have experienced a massive resurgence in popularity over the last few years, and it’s not hard to see why. While they’re obviously not as combat-effective as modern semi-auto rifles like the AR-15, lever guns can be used very effectively for hunting anything from varmints (in pistol-caliber form) to big game (in rifle calibers such as .30-30 and .45-70). Also, in states and countries where semi-auto rifles are heavily restricted, lever-action rifles usually aren’t subject to the same invasive rules, even when equipped with modern features. Above all, they’re simply fun to shoot, as evidenced every time we take our Marlin 336 Dark Series project to the range. POF USA has announced its own entry into the modernized lever-action rifle market with the new Tombstone 9mm carbine.
POF USA Tombstone 9mm Carbine
The new POF USA Tombstone is a modern, lever-action, pistol caliber carbine (PCC). POF says it’s “initially offered” in 9mm, but this language tells us other pistol calibers may be available in the future. From front to back, it features a free-float, fluted, 16.5-inch barrel with a two-chamber muzzle brake over standard 1/2×28 threads. The barrel is surrounded by a 10.5-inch Modular Receiver Rail (M.R.R.) which includes M-LOK slots, Picatinny rail sections, and QD sockets for a sling.
Ghost ring sights are built into the rail system, but we suspect most users will install a red dot sight as shown in these photos.
Magazines & Controls
The receiver features a magwell and button release for the detachable 9mm magazines, which are a proprietary POF USA design compatible with the Tombstone and Phoenix series. Standard Tombstone models include one 20-round mag; Colorado-compliant models include a 10-round mag instead. Additional 35-round magazines are also available separately.
This rifle’s manual of arms should be somewhat familiar to anyone who has used lever guns in the past. It starts with a proprietary 3.5-pound, single-stage, flat-face trigger. The Tombstone’s hammer has the half-cocked position many lever-gun users will already be familiar with. There’s also a shotgun-style cross-bolt safety at the rear of the aluminum receiver. The lever is contoured to fit a standard Magpul SGA shotgun stock, which offers the ability to accept length of pull spacers, cheekpieces, and QD sockets from Magpul.
Total weight of the Tombstone is 5.75 pounds, and total length is 36 inches. MSRP is firmly positioned in the premium end of the spectrum — $1,962 for black variants and $2,097 for FDE tan variants. Additional magazines are $35 each.
Teaser Video
We’re interested to get our hands on the new POF USA Tombstone later this month at SHOT Show, and we hope to review one in the future as well. In the meantime, check out the video below from POF’s YouTube to see the Tombstone in action.