Situational awareness is one of the foundations of preparedness. By observing your surroundings — and teaching your loved ones to do the same — you’ll gain an early warning of any trouble that’s headed your way. Even if it only buys you a second or two to react, that time can be a literal life-saver. Check back tomorrow for Part 2 of our Road Trip Safety web series, which focuses specifically on situational awareness. For now, here’s a real-life situation that illustrates this point.
Good observation and awareness skills are only part of the equation. You need to use that information to react quickly and defend yourself effectively — that means having the tools and the skills to take action. In the following video from Active Self Protection, instructor John Correia analyzes some CCTV footage of a defensive shooting in Brazil. His takeaways from this video are valuable to keep in mind.
The video begins with a woman preparing to move her car at night when her husband, reportedly an off-duty police officer, walks outside and stops her. While it’s possible that he did this for some innocuous reason, it’s more likely that he knew this area might be dangerous for someone alone and unarmed in a vehicle. If that’s the case, he was absolutely correct in that assessment. A man walks towards them with a gun in hand, and attempts to carjack them.
Fortunately, the husband was armed and was able to react quickly and get the upper hand, thanks in part to his wife watching his back and alerting him of the danger. As we’ll discuss more tomorrow, this is a great example of how a “pack mindset” and situational awareness are critical for the entire family.
Among all of the life lessons you were inundated with as a child, there are some that have probably stuck with you throughout your life. Look both ways before you cross the street, don’t run with scissors, and, from the time you were young, “stop, drop, and roll” in case your clothing ever catches on fire. As you got older, and realized your clothing doesn’t catch on fire quite as often as you were led to believe, perhaps you began to notice fire extinguishers for those times when virtually anything besides your clothing goes up in flames.
Fire extinguishers have been around for hundreds of years and have been a staple in fire safety for the past century. You walk by them every day and pay little or no attention to the red cylinders hanging on the walls or support posts of your local stores, schools, hospitals, office buildings, and other structures. They’re required by most, if not all, municipal codes to be easily accessible in commercial occupancies. The specific number of extinguishers and where they’re located can vary, but the National Fire Protection Association (NFPA) recommends no more than 75 feet between extinguishers. That number can fluctuate a bit based on type of occupancy, square footage, and layout.
The less regulated, but probably more important recommendation that all homes have at least one working fire extinguisher can be a source of guilt. No one can deny that having a fire extinguisher in an occupied home is anything but a good idea. But, unfortunately, most have placed a fire extinguisher on the “I’ll get it one of these days” list. If someone hasn’t experienced the immediate and critical need for an easily accessible, working fire extinguisher, the draw to prioritize having one in the home falls dramatically.
I conducted an informal social media poll asking who has a fire extinguisher in their home. I should also mention that I am a career firefighter, so a good number of my social media friends are fellow firefighters and our family members. A shocking 75 percent of those who responded don’t have a fire extinguisher in their home.
One of the primary reasons people give for putting off the purchase of a fire extinguisher is the intimidation factor. Most recognize the obvious: A fire extinguisher is used to extinguish a fire; it’s right there in the name. But it’s not as simple as that. There are different sizes, purposes, styles, and a wide range of costs. Unfortunately, it all adds up to most people overlooking an extremely important and easy-to-use safety tool.
Understanding Fire Extinguisher Classes
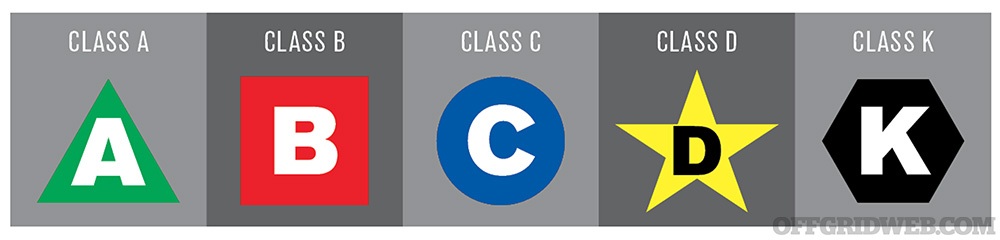
In an effort to simplify the purchase and use of a fire extinguisher, let’s begin with the label and discuss what it’s telling you. The principal information you should pay attention to is the part about the classes of fire that can be extinguished with that specific device. Believe it or not, it’s not as simple as one size fits all. Fire extinguishers aren’t simply pressurized canisters filled with water. As you may know, spraying water on certain fires can actually make a bad situation worse. Most fire extinguishers, in fact, have varying chemical agents or powders that allow them to extinguish a variety of different types of fires. This is where reading the label becomes important. Fires are classified by what’s actually burning. For the average homeowner and fire extinguisher customer, there are five classes of fire you may encounter.
These classes are easily distinguished from one another by differing colors and shapes for each class. The intent of this is so they can be identified, if there were to be any damage to the label, by its shape. To take the simplicity of identification a step further, many fire extinguisher manufacturers have included color coding. Not all fire extinguisher companies use the color coding, but all use the letters and shapes.
The most common types you’ll find are combination extinguishers. They’re known as “ABC” extinguishers, referring to the types of fire they’ll put out. These extinguishers contain a multi-purpose extinguishing powder (usually a combination of monoammonium phosphate and ammonium sulphate) that allows them to be approved by Underwriters Laboratories (UL) to suppress ordinary combustibles, flammable liquids, as well as energized electrical equipment. The aforementioned fire extinguishers that you encounter in all commercial occupancies and homes are almost exclusively ABC extinguishers.
In some specialty shops and industrial locations where flammable metals are prevalent, you may find Class D extinguishers. In most scenarios, though, a Class D extinguisher wouldn’t be needed. They act much like ABC extinguishers, but often use a sodium chloride-based powder. This substance can be used on other classes of fires, but, in short, Class D extinguishers are expensive and messy.
Class K extinguishers are becoming more common and are now available in most retail stores that carry fire extinguishers. These are specially formulated to put out grease-based kitchen fires. They spray a fine mist combination of alkaline chemicals that operate on the principle of saponification, a chemical reaction between a base and an acid to create a salt. (The same principle is used to convert fatty acid and lye into soap — see “All Washed Up” in Issue 30.) Class K extinguishers are able to snuff out the fire without the risk of spread or reignition.
How to Use a Fire Extinguisher
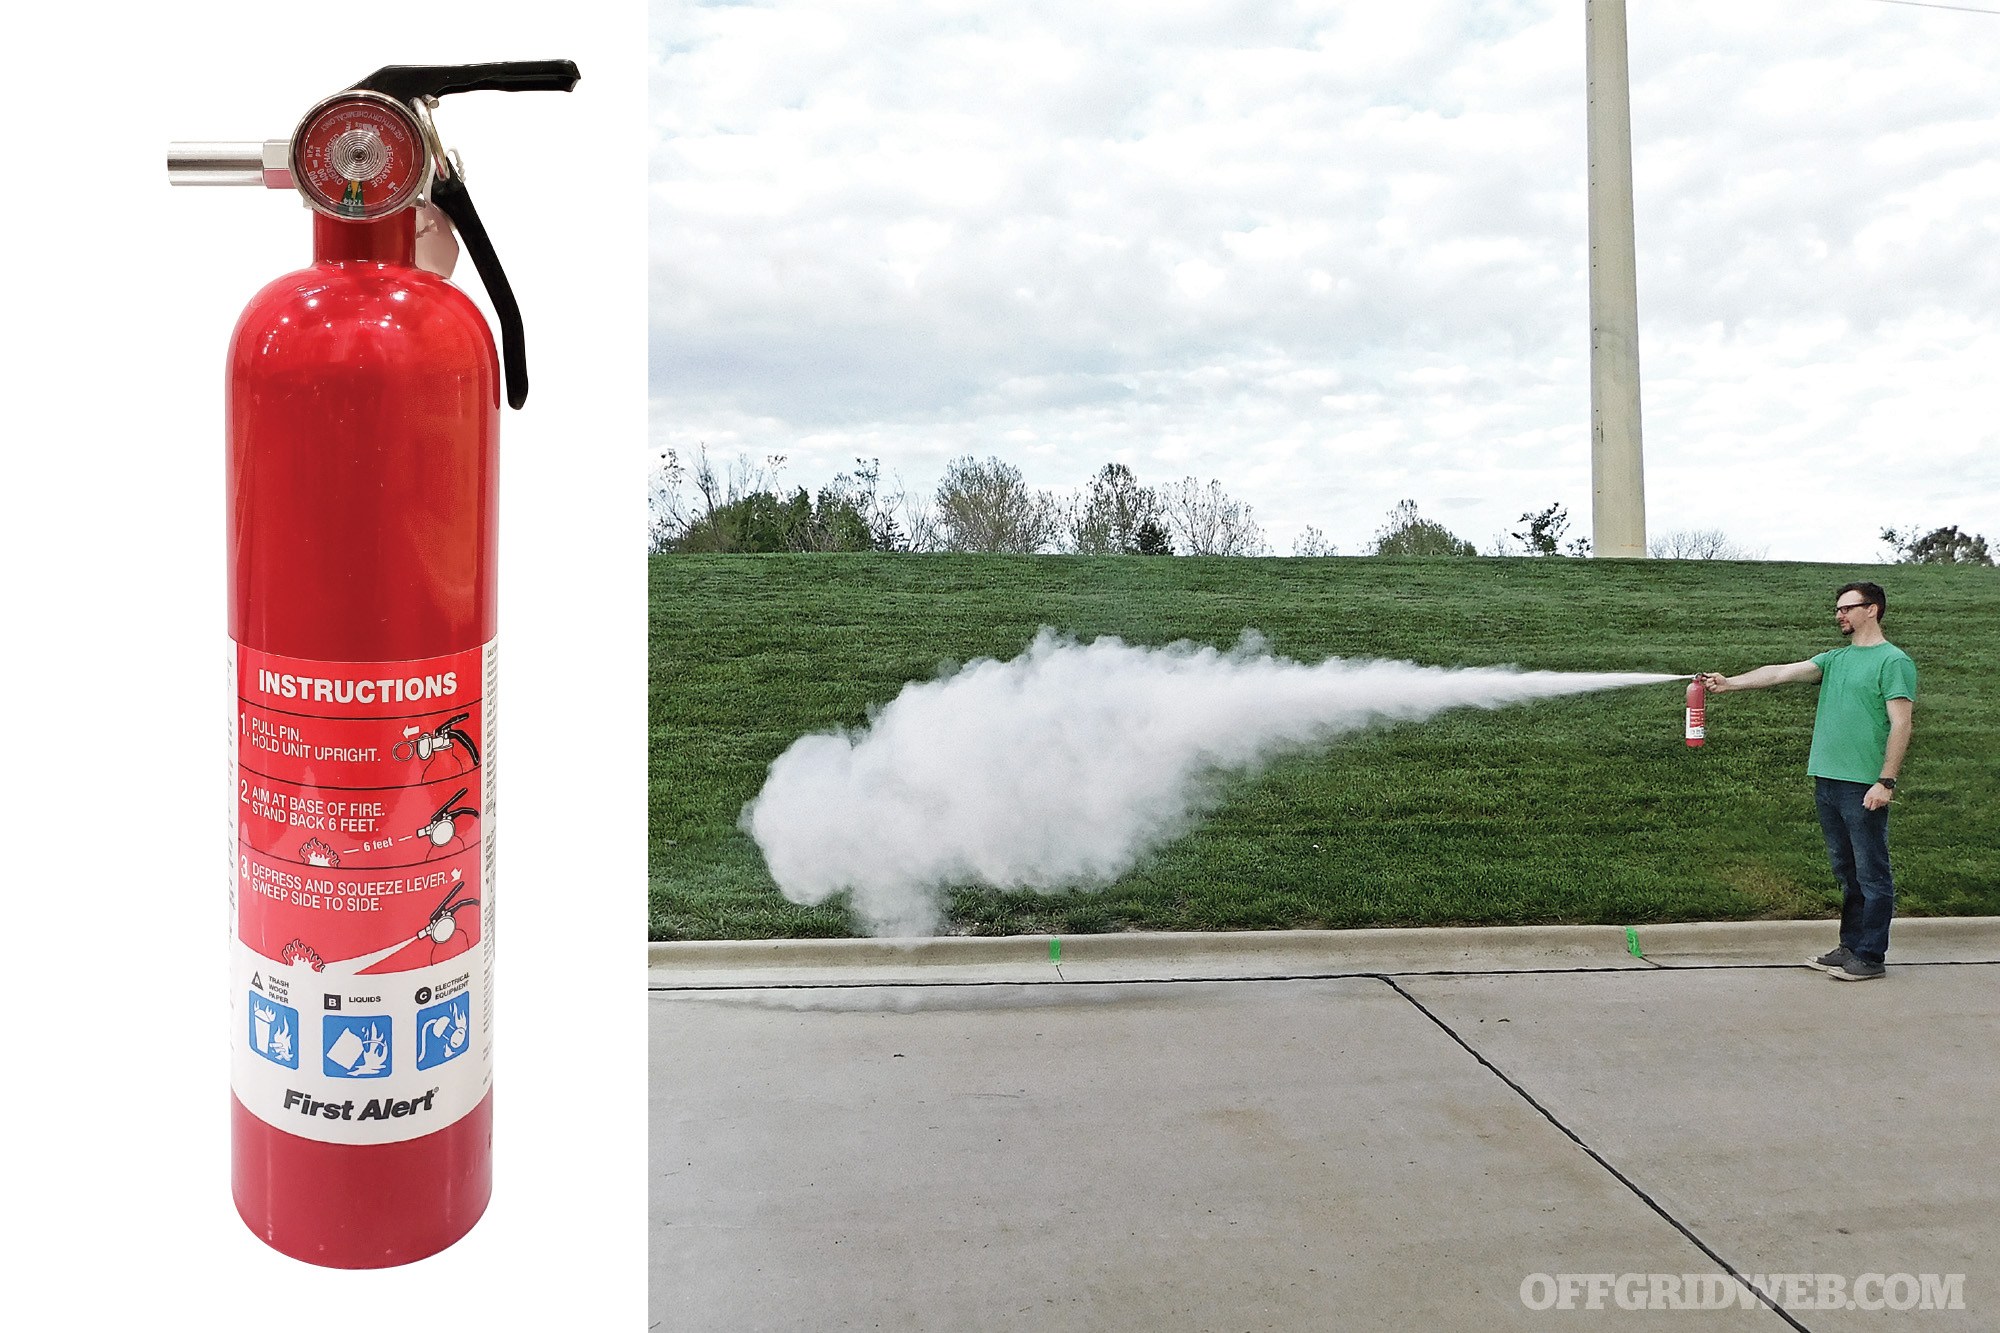
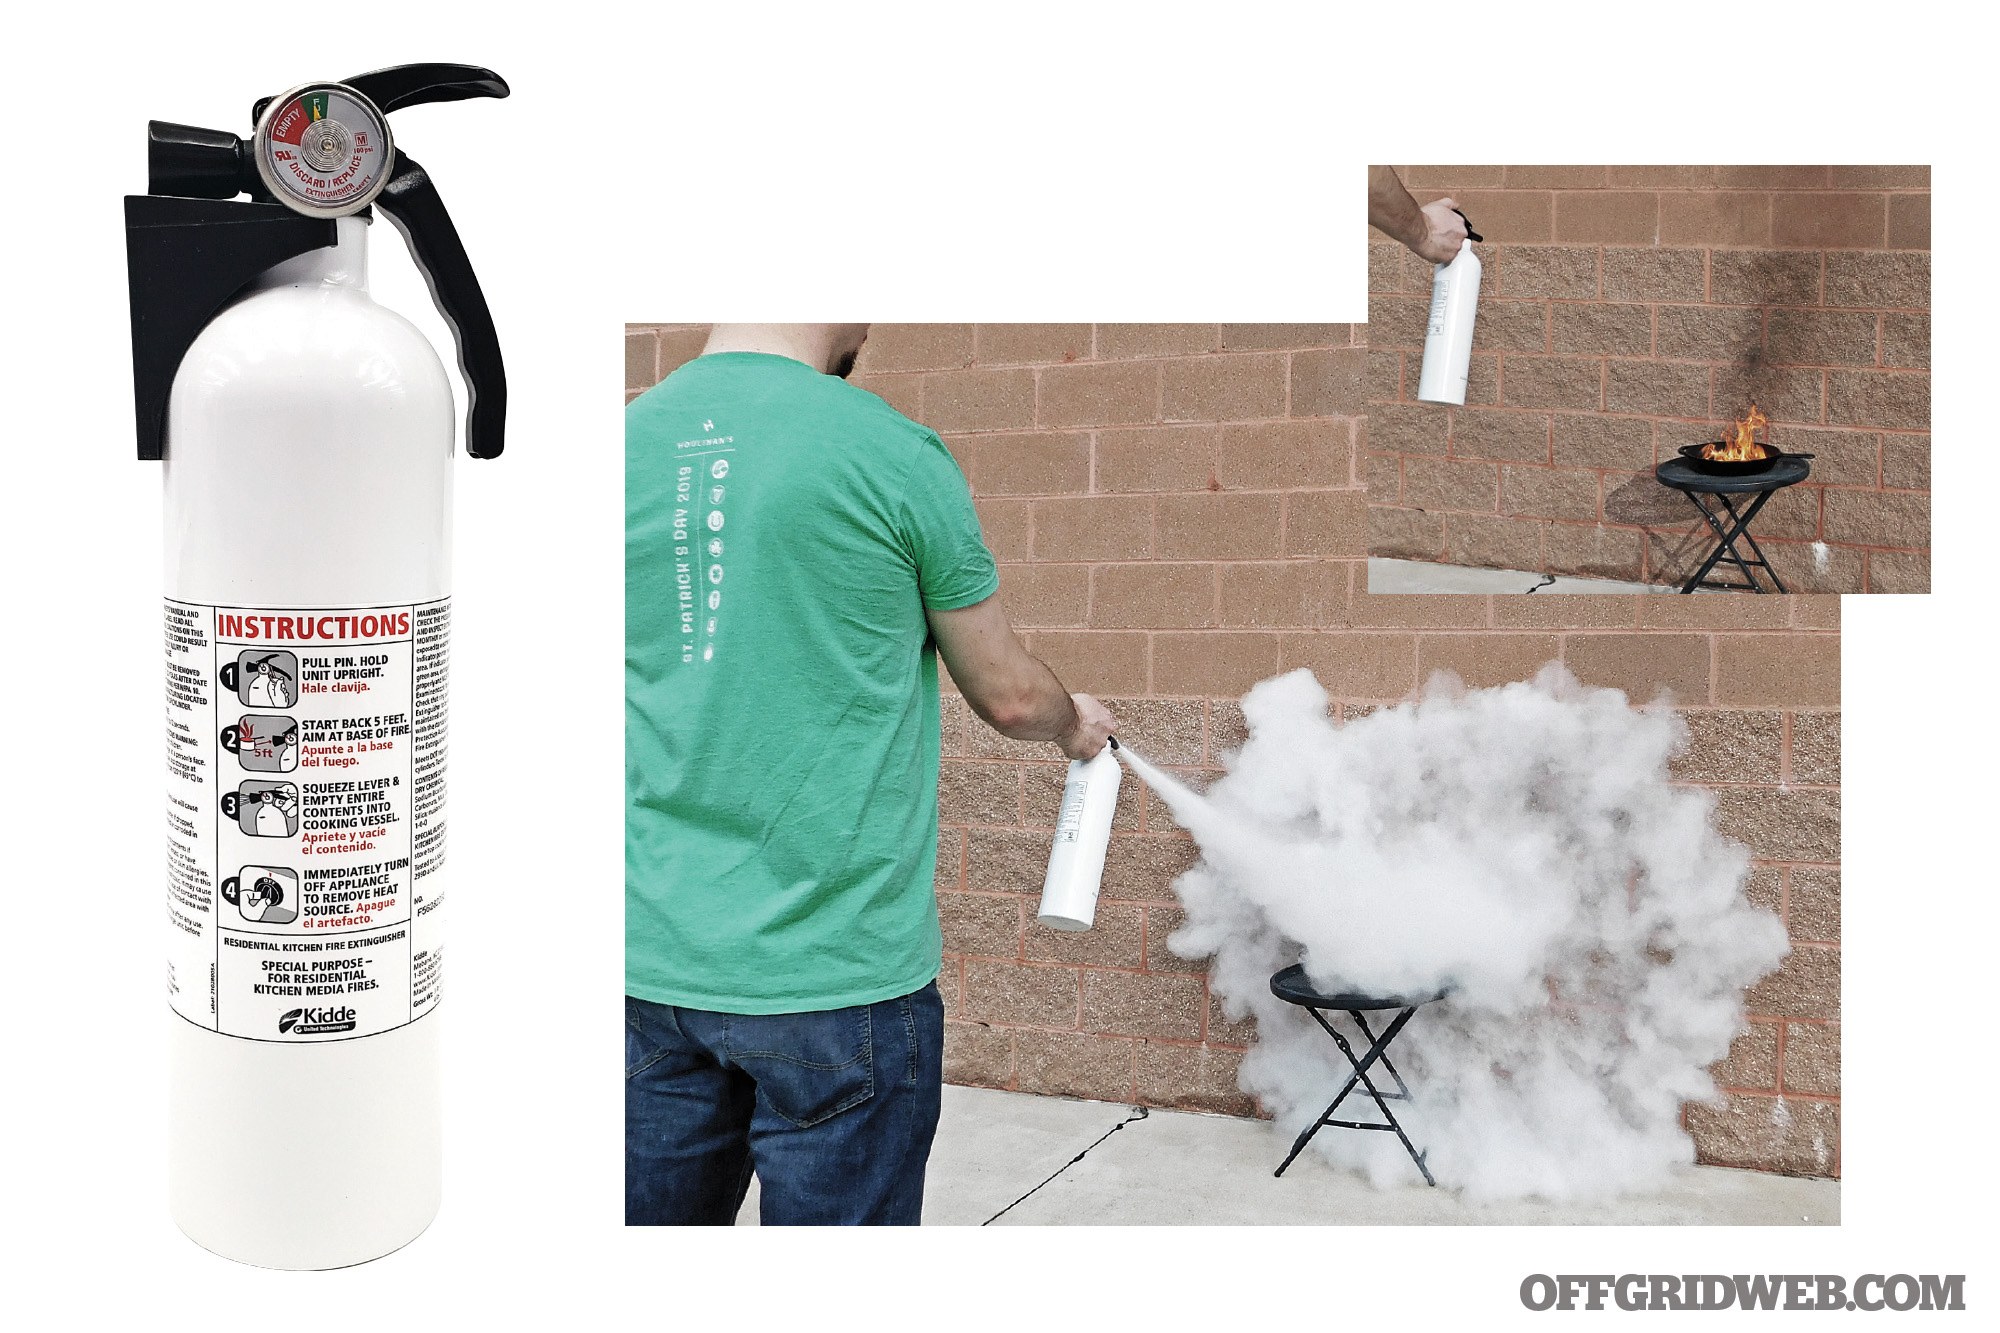
Knowing the purpose of the fire extinguisher is half the battle. Knowing what to do with it is the other half. The safe operation of a fire extinguisher could be a several hour class, but the basics are right there on the box when you purchase one. It’s broken down to a handy acronym: PASS.
Pull: Simply pull the plastic or metal pin sticking out the side of the handle. This pin is in place to prevent accidental discharge. If you’re not too overwhelmed at the moment and think about it, put the pin in your pocket, rather than throwing it. That way, if you wish to reinsert it in the extinguisher handle and carry it after the fire is out, you can.
Aim: Aim low, pointing the extinguisher at the base of the fire. The tendency is to point it at the bulk of the fire, but your most effective use of the contents of the extinguisher is to aim at the base first.
Squeeze: Squeeze the handle to discharge extinguisher.
Sweep: Sweep the fire from side to side until it’s completely extinguished and then back away.
Now that you’re versed on the use and operation of a fire extinguisher, it’s time to purchase one. When looking at your options online or at your local department store, they may all look similar. Which one is right for you? It can be daunting to say the least. Seven extinguishers, commonly found on the shelves of nationwide popular retail stores were put to the test and evaluated on:
Fire Class(es)
Discharge Range
Discharge Time
Weight
Rechargeability
Warranty
Cost
Comparing Performance
All seven fire extinguishers were discharged and evaluated. When fire extinguishers are tested and rated by UL, it’s done in a laboratory in a controlled environment. Our testing was done far less scientifically, but more practically. A mostly windless day (2 to 4 mph) was chosen and the test subject, Nick, had never utilized a fire extinguisher before. He was given minimal instruction (PASS). Each extinguisher was discharged for 2 seconds on a small fire and then that 2 seconds was added to a separate test for discharge time and distance.
The good news is, across the board, all extinguishers performed very well. In every instance the fire was out before even the 2-second mark. It’s in the subjective details that you can differentiate your own comfort level and which extinguisher would best work for you and your family. Listed cost for each extinguisher is based on an internet search at the time of writing.
Important Designations
Class A and B fires also use a numerical designation. Each “A” rating is the equivalent effectiveness that 1¼ gallons of water applied would be. Each “B” designation represents a square foot that can be extinguished by someone trained on its use.
For example: In the hands of a trained user, a 4A20BC extinguisher has the equivalent of 5 gallons of water (4A20BC), can extinguish 20 square feet of fire (4A20BC), and can be utilized on energized electrical equipment (4A20BC).
Summary
Although this is a small sampling of the many fire extinguishers found online or on retail shelves, it provides a broad overview of the high-quality options that you have when identifying which extinguisher is right for your home. There are additional extinguishers designed specifically for automotive use, flammable metals use, and a slew of others. The purpose of this evaluation wasn’t to tell you which fire extinguisher to buy, but rather highlight seven common-purpose fire extinguishers and demonstrate their uses so you can determine what factors are most important to you. Do your research, and make an educated decision about which one(s) to purchase for your home. The most difficult parts are committing to making the purchase and following through.
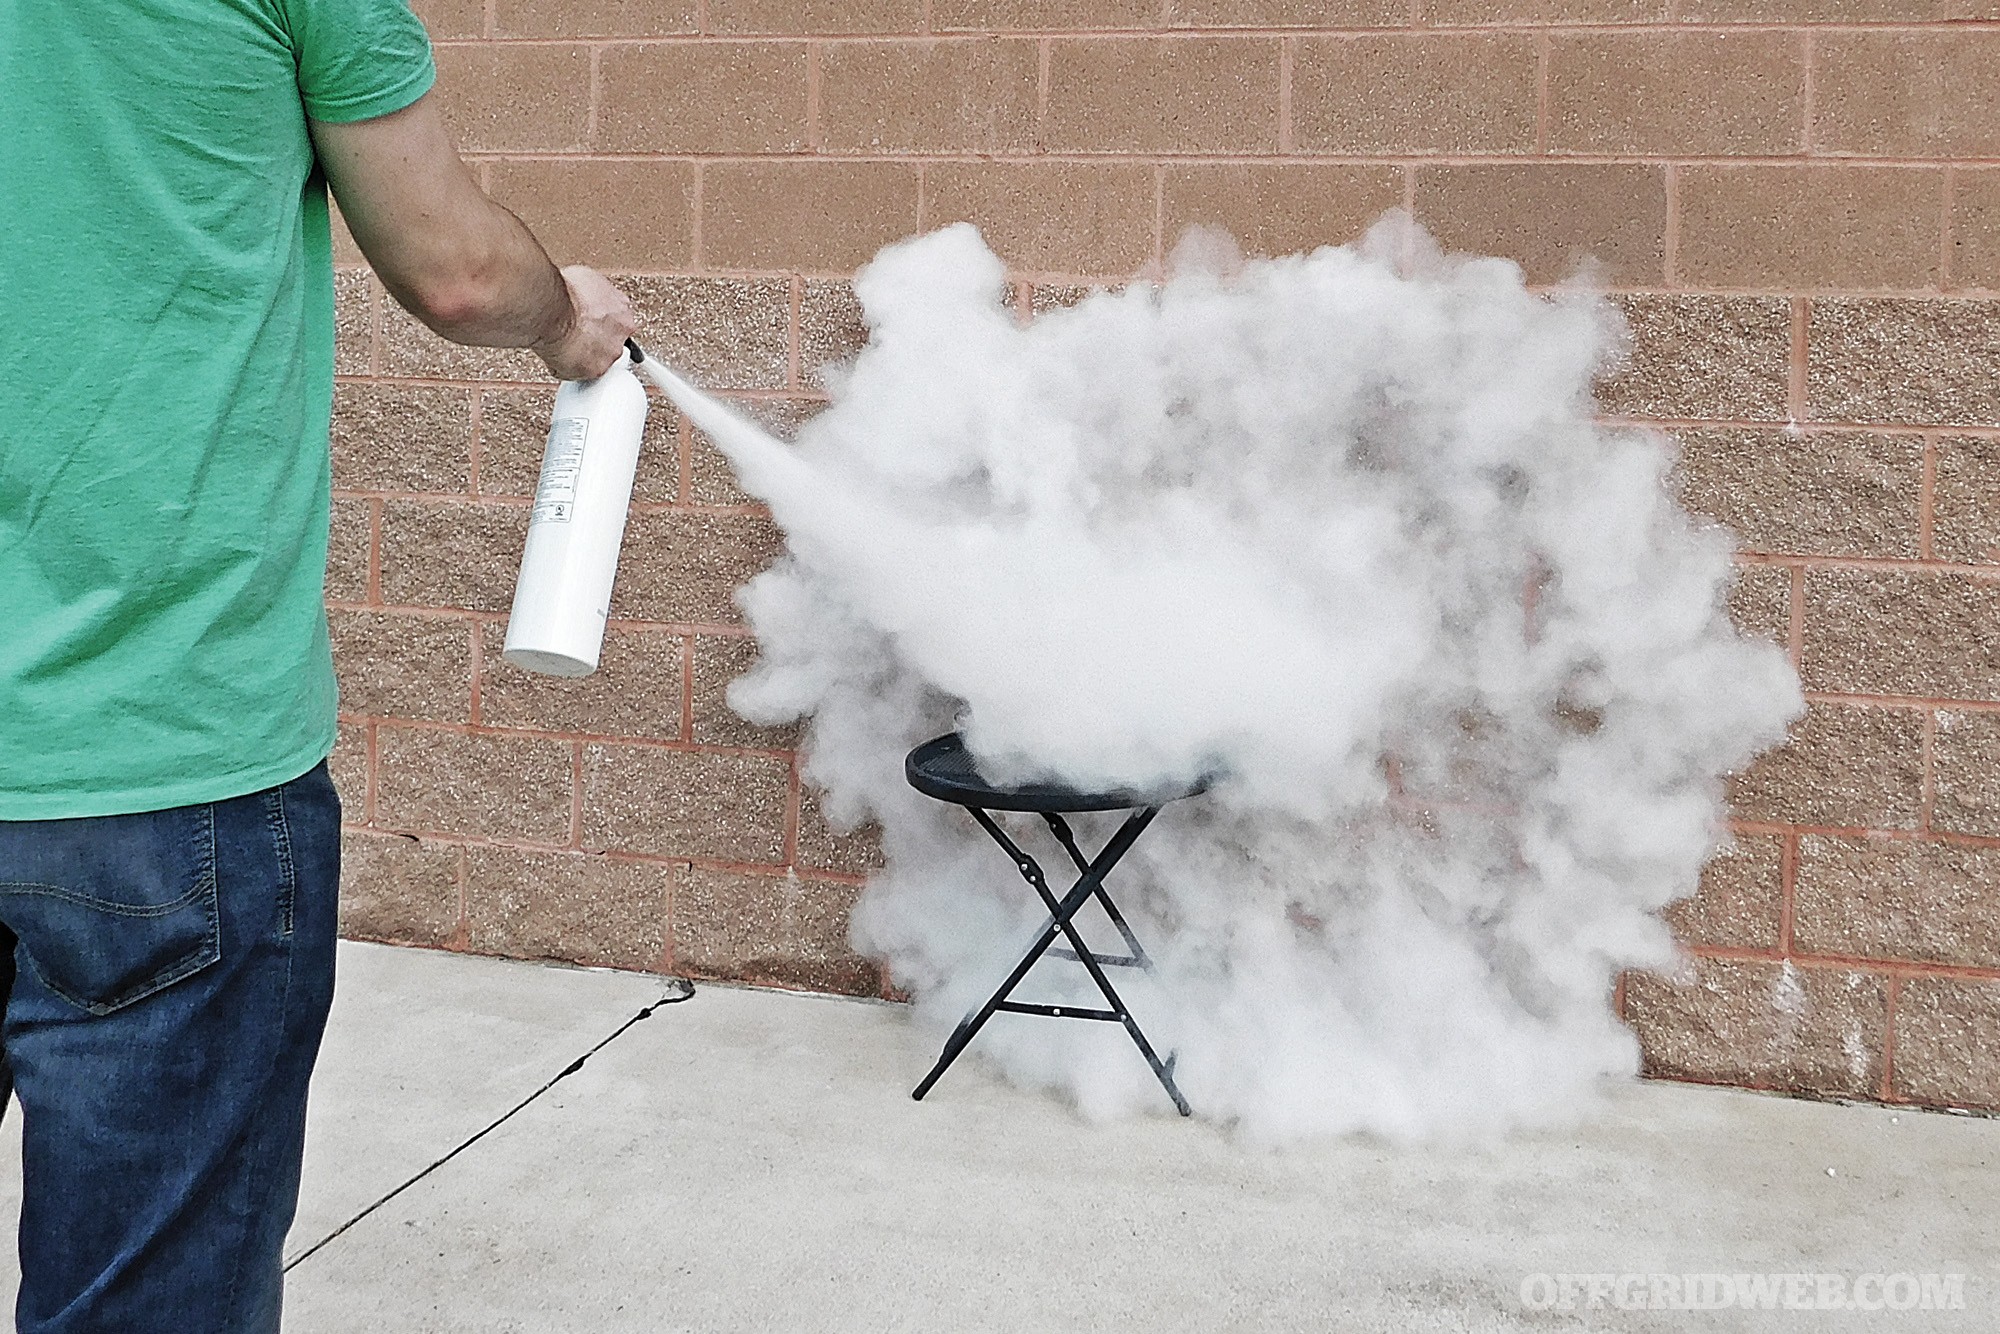
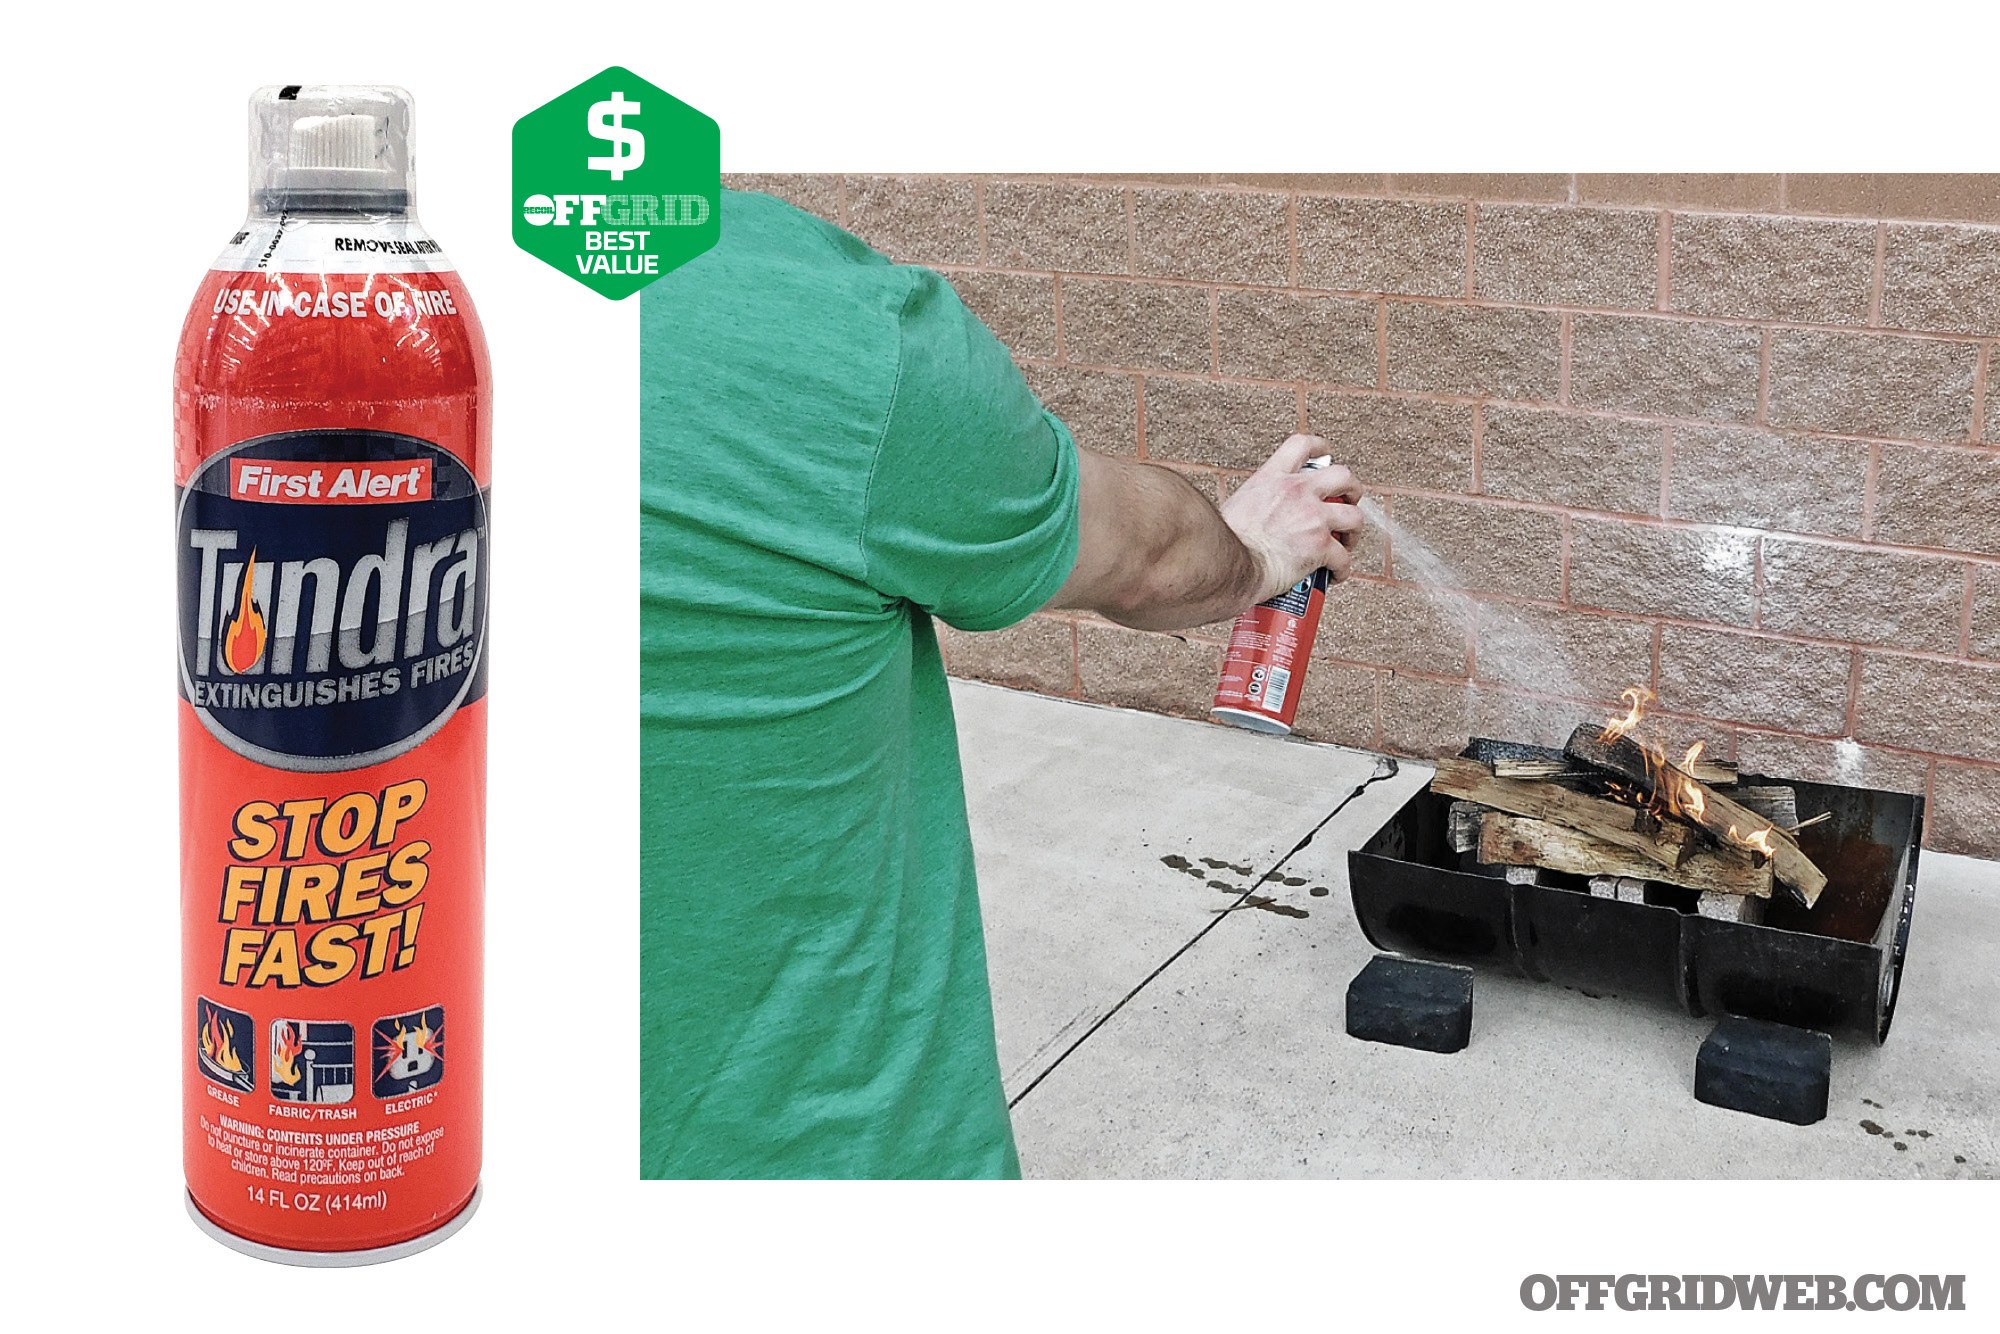
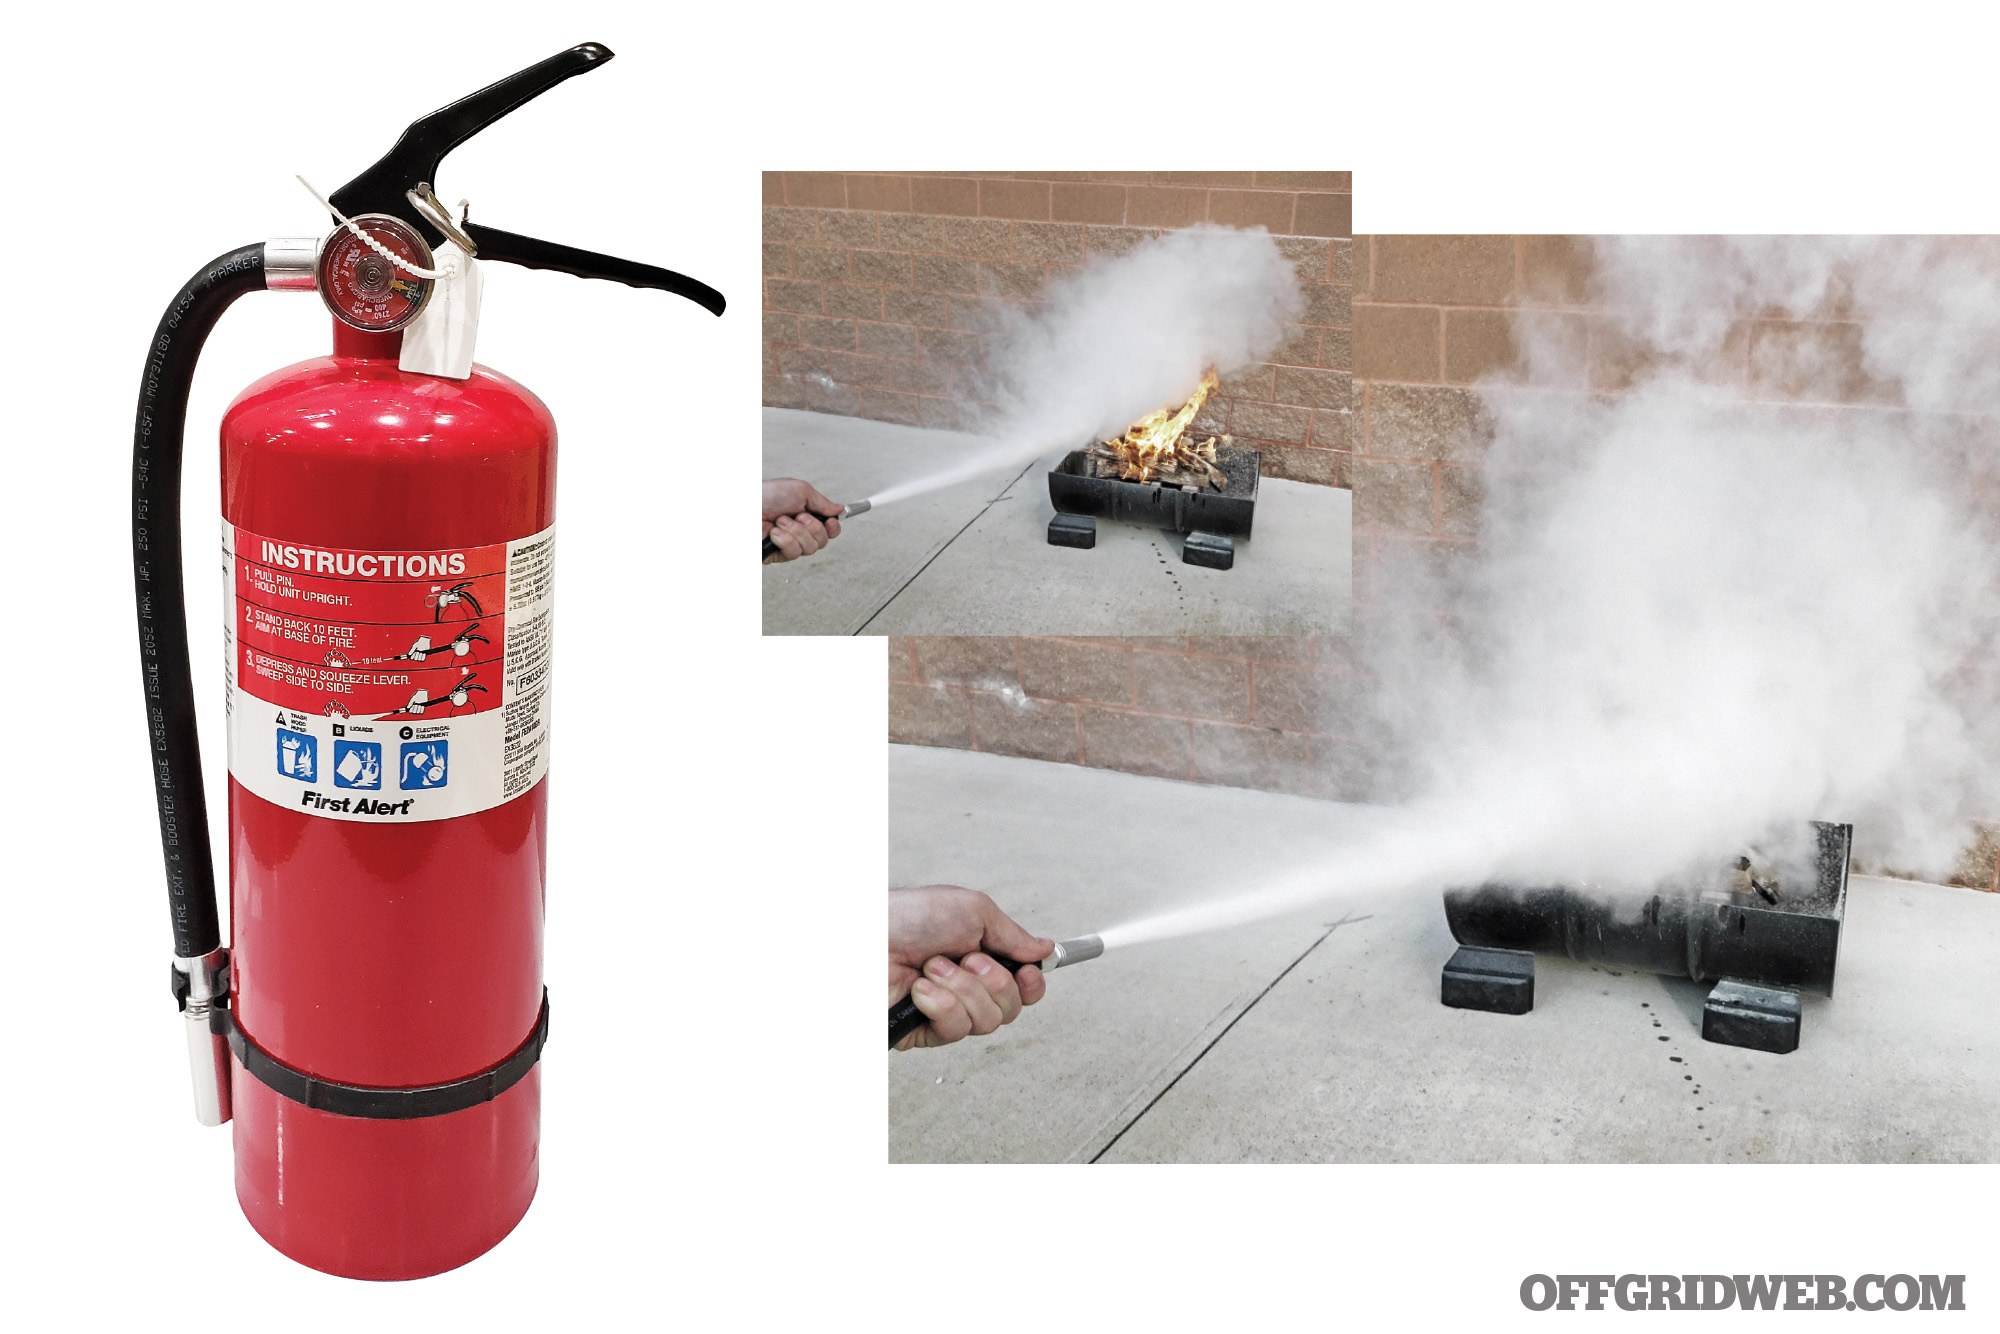
Notes The First Alert Tundra is a bit of a unicorn in the traditional fire extinguisher market as an aerosol-style extinguisher. More and more are becoming available over time. The Tundra breaks from the traditional labeling and uses pictures and simple descriptions to describe its use, rather than the classes. First Alert confirmed that the Tundra can be used with Class A, B, C, and K fires. In our testing, the Tundra remained effective far beyond the advertised 16-foot range, and our discharge time was a full 39 seconds. Impressive for its compact design!
Notes The First Alert Home 1 is one of the most commonly found extinguishers in retail stores and homes. It’s compact, inexpensive, and capable of putting out a good amount of fire for its size. Regardless of the brand you choose, a 1A10BC extinguisher makes a nice, multi-use tool that can be kept accessible, but easily tucked away so as not to stand out in a residential room.
Notes There are a few manufacturers that carry both residential as well as commercially available extinguishers. First Alert is one of them. The First Alert Home 2 Pro is the type of extinguisher you’d commonly see in a department store or school extinguisher cabinet, but it’s available for residential purchase as well. As you can see from the performance numbers, it’s just what you’d expect when compared to its smaller relative: slightly bigger, slightly more expensive, slightly further reach, and slightly longer discharge time. If your home habits lend themselves to a bit more of a fire hazard concern, this might be the extinguisher for you.
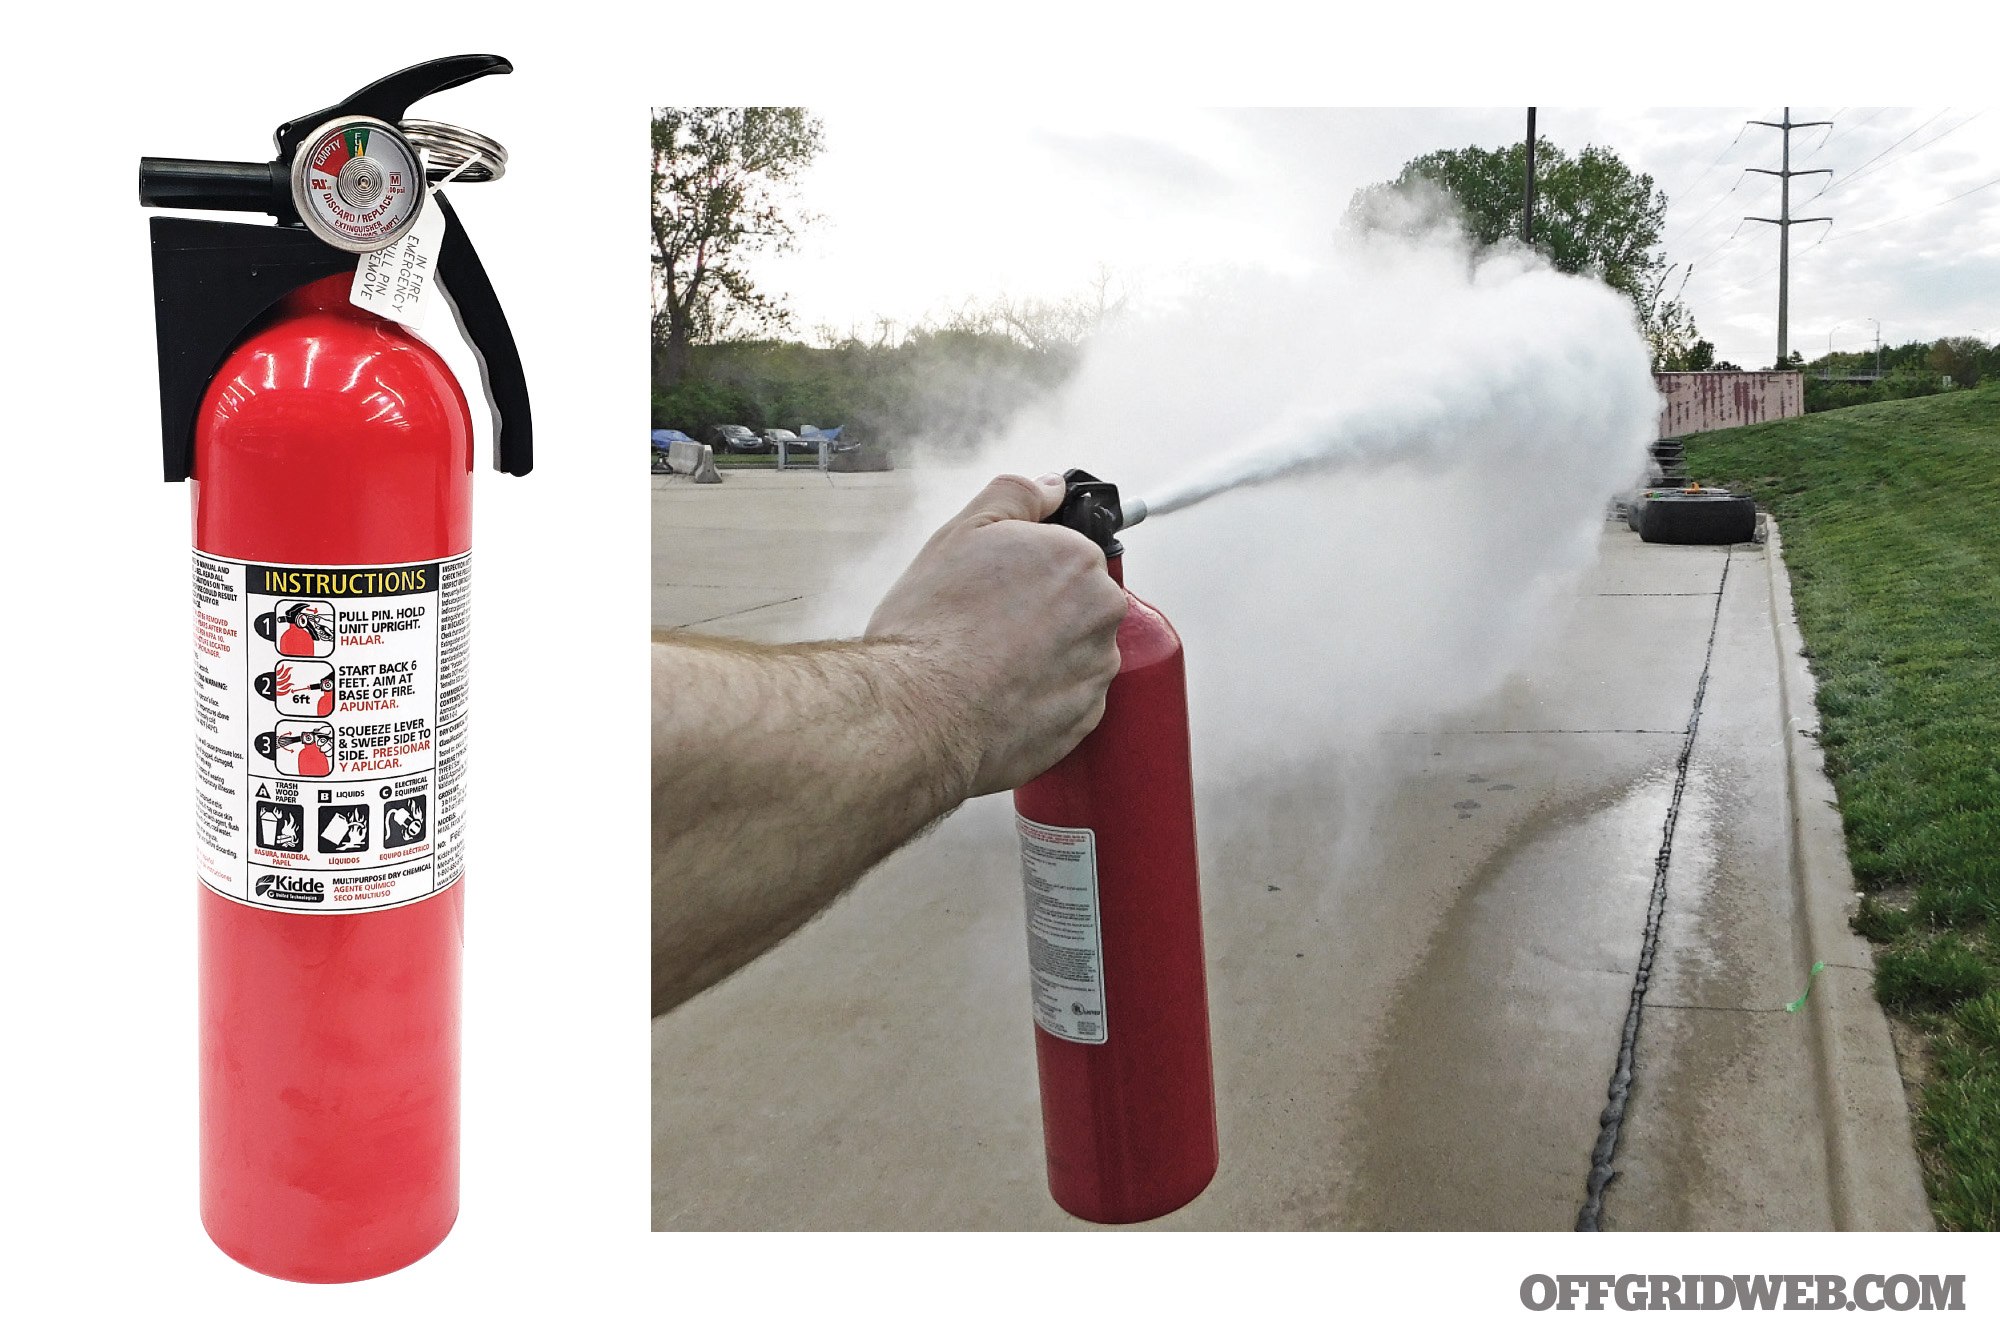
Notes The Kidde Basic Use fire extinguisher is a counterpart to the First Alert Home 1. It performed slightly better in our testing, but only by a marginal amount. Kidde has a strong and enduring reputation as a leader in home fire safety, but in 2017, announced a major recall to a few extinguishers due to clogging or the need of excessive force to activate. By all appearances, the company corrected the problem and has rebounded to regain its place among the home fire safety leaders.
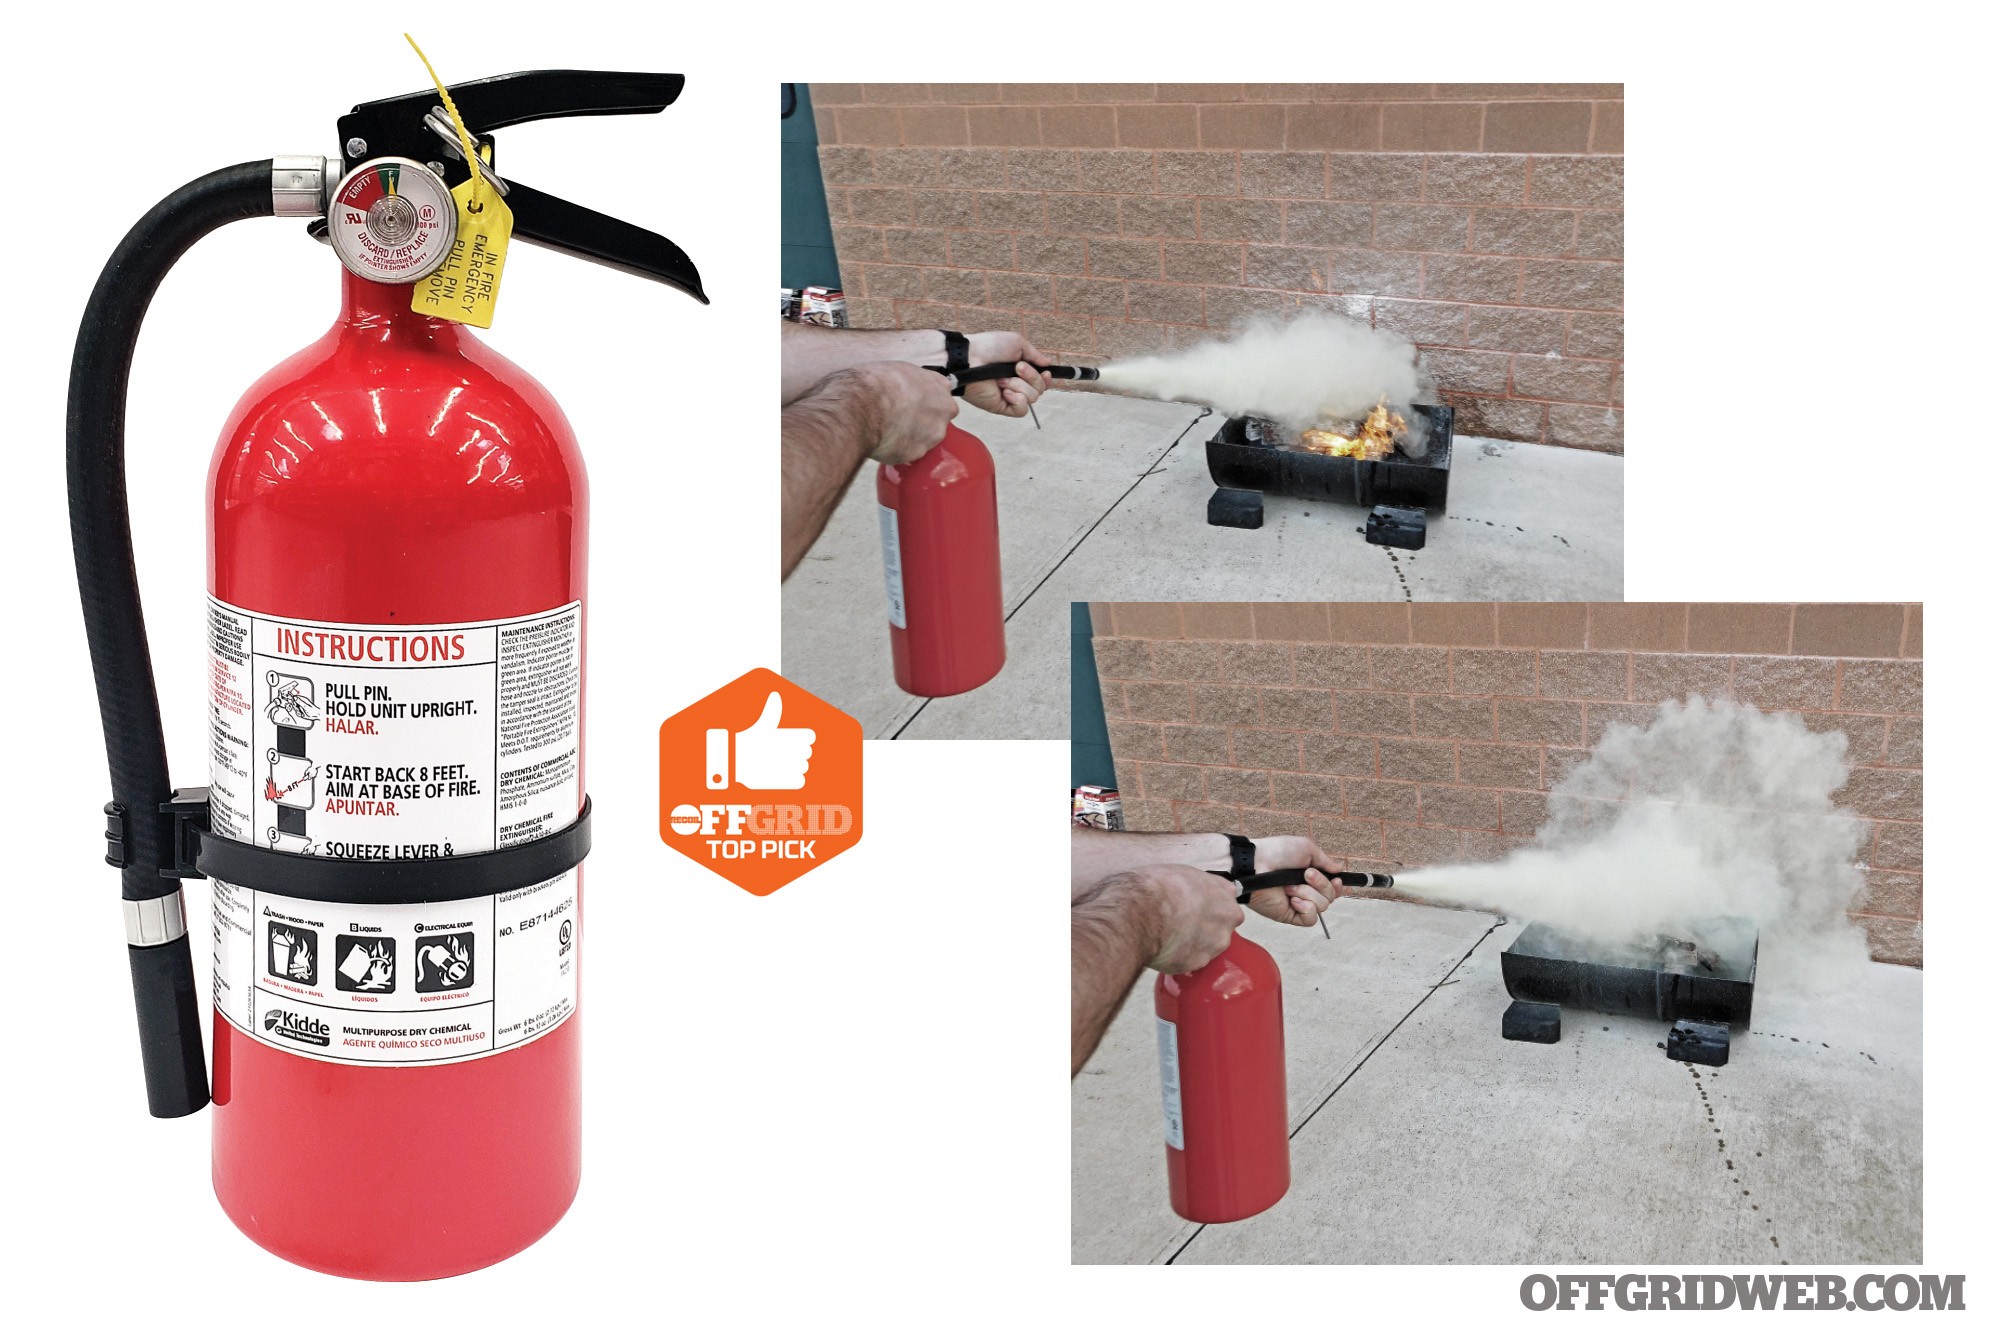
Notes Like the First Alert Home 2 Pro, the Kidde Pro Series 210 is the larger of the residential Kidde options. It performed extremely well in our evaluation, leading the pack in discharge time and distance. Like its competitor, it’s slightly larger, but carries with it greater capacity for fire extinguishment. Some would consider these 2A10BC extinguishers overkill for a residential application, while others feel bigger is better.
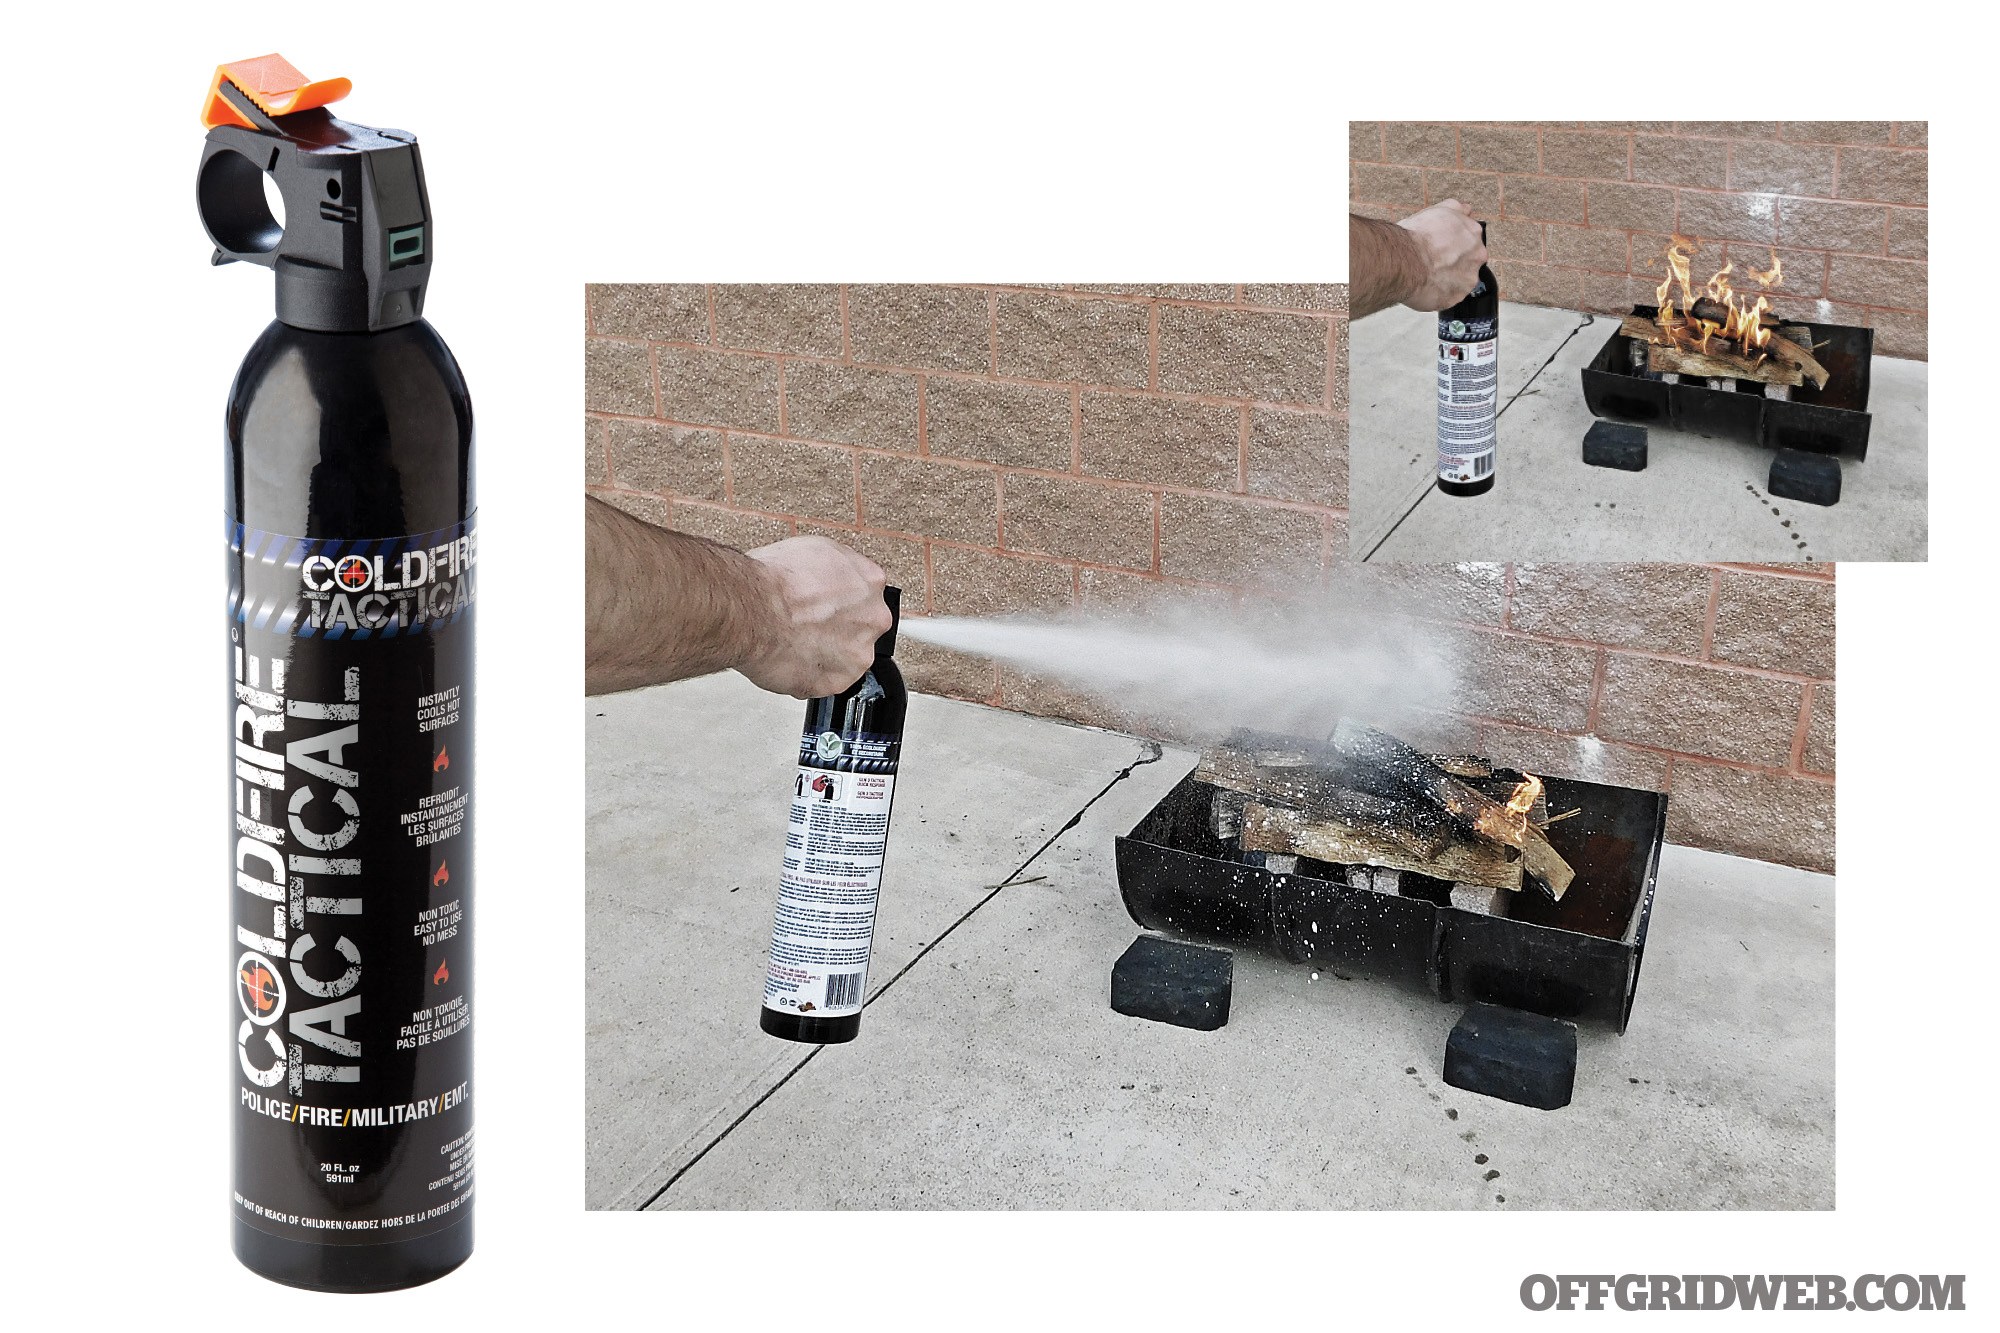
Notes Cold Fire extinguishers are relatively new to the market and are in a class of their own. The company’s popularity is growing among police and fire departments. Although these extinguishers aren’t found on retail shelves, they’re commercially available through the manufacturer’s website and can be ordered by email at ed@desertmountaincf.com. Although their 20-ounce extinguisher performed on the low end of discharge time and distance, the fire knockdown power is unmistakable. Cold Fire touts a UL rating for A, B, D, and K fires, which means, although they lack the Class C rating for energized electrical equipment, the Class K rating makes them usable for kitchen grease fires. Cold Fire is 100-percent biodegradable, nontoxic, noncorrosive, and has six times the penetrating capability of water. Their small extinguishers pack an impressive punch.
Kidde Kitchen
Fire Class(es) 10BC
Discharge Range 15 feet
Discharge Time 22 seconds
Weight 3.9 pounds
Rechargeable No
Warranty 12 years
Price $15 (Menards)
URL www.kidde.com
Notes The Kidde Kitchen extinguisher isn’t like any of the other extinguishers evaluated for this article. It’s specifically formulated for kitchen fires. Although Class K extinguishers are specifically designed for burning cooking oils — the alkaline mixture combines with the burning oil to form a soapy foam layer — this extinguisher is rated for Class B fires, which basically eliminates the oxygen and puts out the fire. In our evaluation, it immediately snuffed out the grease fire, didn’t splatter or spread the fire, and left a film over the oil, suppressing the flammable vapors. This is a great option to have in your family’s kitchen.
Not every self-reliant home is suitable for livestock. You need acreage, and the land would have to support sufficient forage, water, and fencing. You’d need to invest in a working chute to administer vaccines and treat a myriad of health concerns, and marketing the product would require a trailer or a haul bill. But even when cows, sheep, or hogs don’t make sense on a property, bees might.
Honeybees can be kept nearly anywhere, even on a high-rise roof or balcony when local ordinances allow it. They yield a sweetener with an indefinite shelf life, suitable for sale or barter. They can provide wax for waterproofing fabric or treating furniture, and they contribute to the pollination of numerous crops within a two-mile radius of the hive.
Be aware that beekeeping is a different vocation than three or four decades ago. Families with honeybees prior to the mid-1980s may have harvested honey on Independence Day and then not given those hives much thought until the next July 4th, but beekeeping these days requires greater management just to keep the hives going. Our nation has gone from 6 million honeybee colonies at the end of World War II to about 2.5 million today.
Success isn’t guaranteed for all who attempt beekeeping, even if all the textbook wisdom is employed, but it can be a worthwhile endeavor for those willing to accept the risks.
Seven honeybee species exist in the world (none of which is native to North America, by the way). Only two species have been domesticated — Apis cerana (the Asian honeybee) and Apis mellifera (the European honeybee).
A. mellifera is by far the most well-known honeybee in the Western world. First introduced to North America by European colonists, it became known to the Native Americans as “white man’s flies.” And there are over two dozen subspecies of the European honeybee, including those identified commercially as Italian, German, and Carniolan. Russian honeybees are a mite-resistant strain of this species, and the Africanized bees that we read about are any of several subspecies hailing from the African continent.
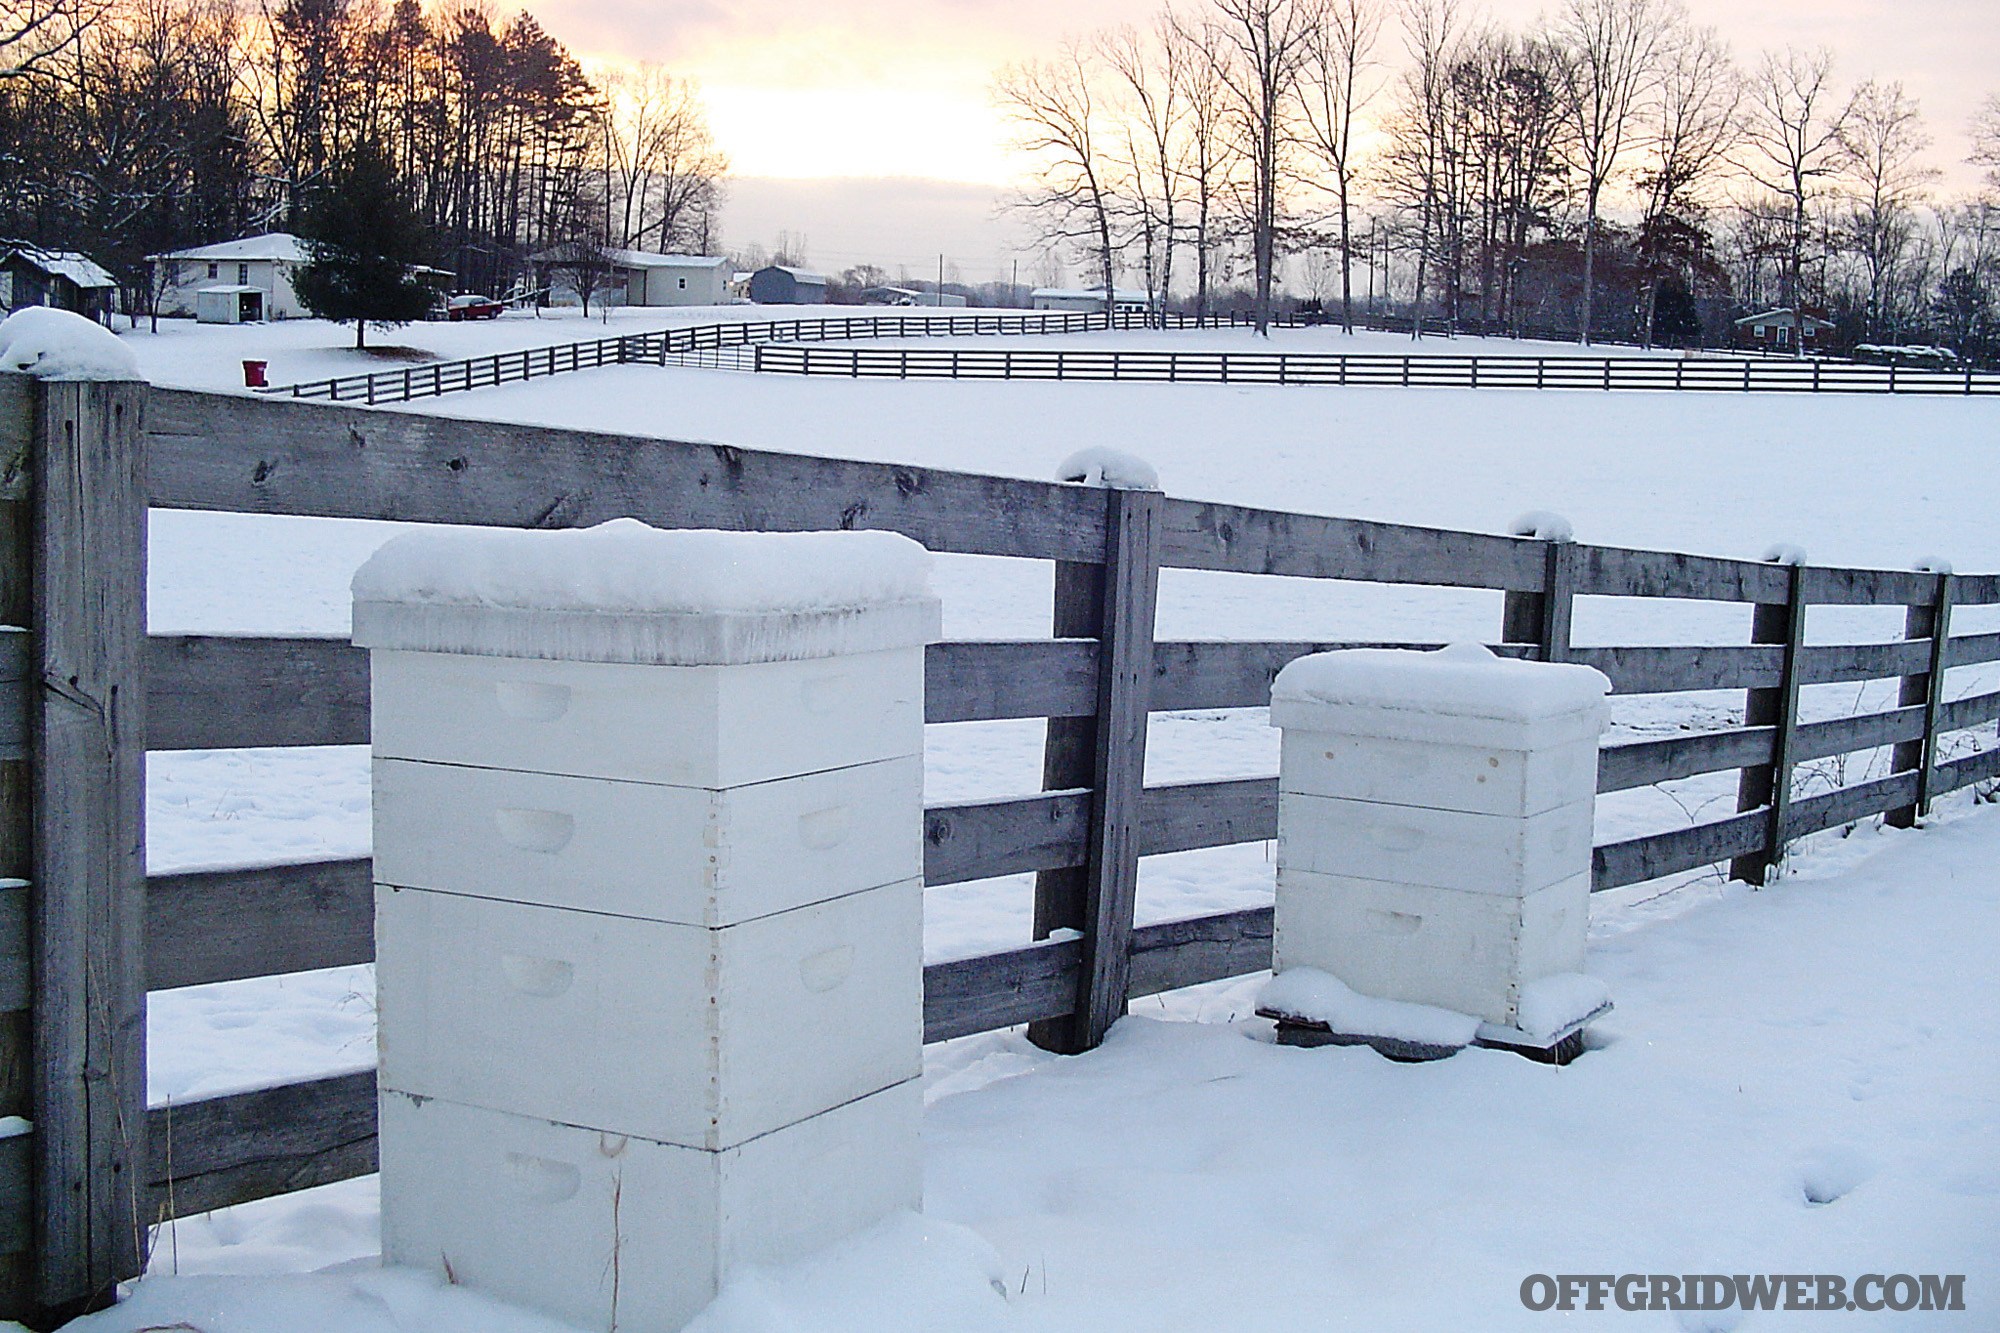
Honeybees overwinter by assembling into a tight cluster inside the hive.
Where Credit is Due
We can all agree that honeybees are wonderful, but is it possible that we’ve placed this specific type of bee on a higher pedestal than we should?
As many as 3,500 bee species native to North America may play some role in crop pollination. In fact, research conducted by Penn State University and other land-grant institutions indicates that the introduction of honeybees to certain fruit and vegetable crops may not increase yields significantly if native bees are present and active.
Why, then, are honeybees still used for pollination services? Predictability. Barring any disease or pest issues, a hive or two in a field practically guarantees 100,000 bees, ready to work. In contrast, native bee populations can fluctuate wildly, and even though they’re more efficient pollinators in many cases, honeybees provide insurance.
The Biology of the Workforce
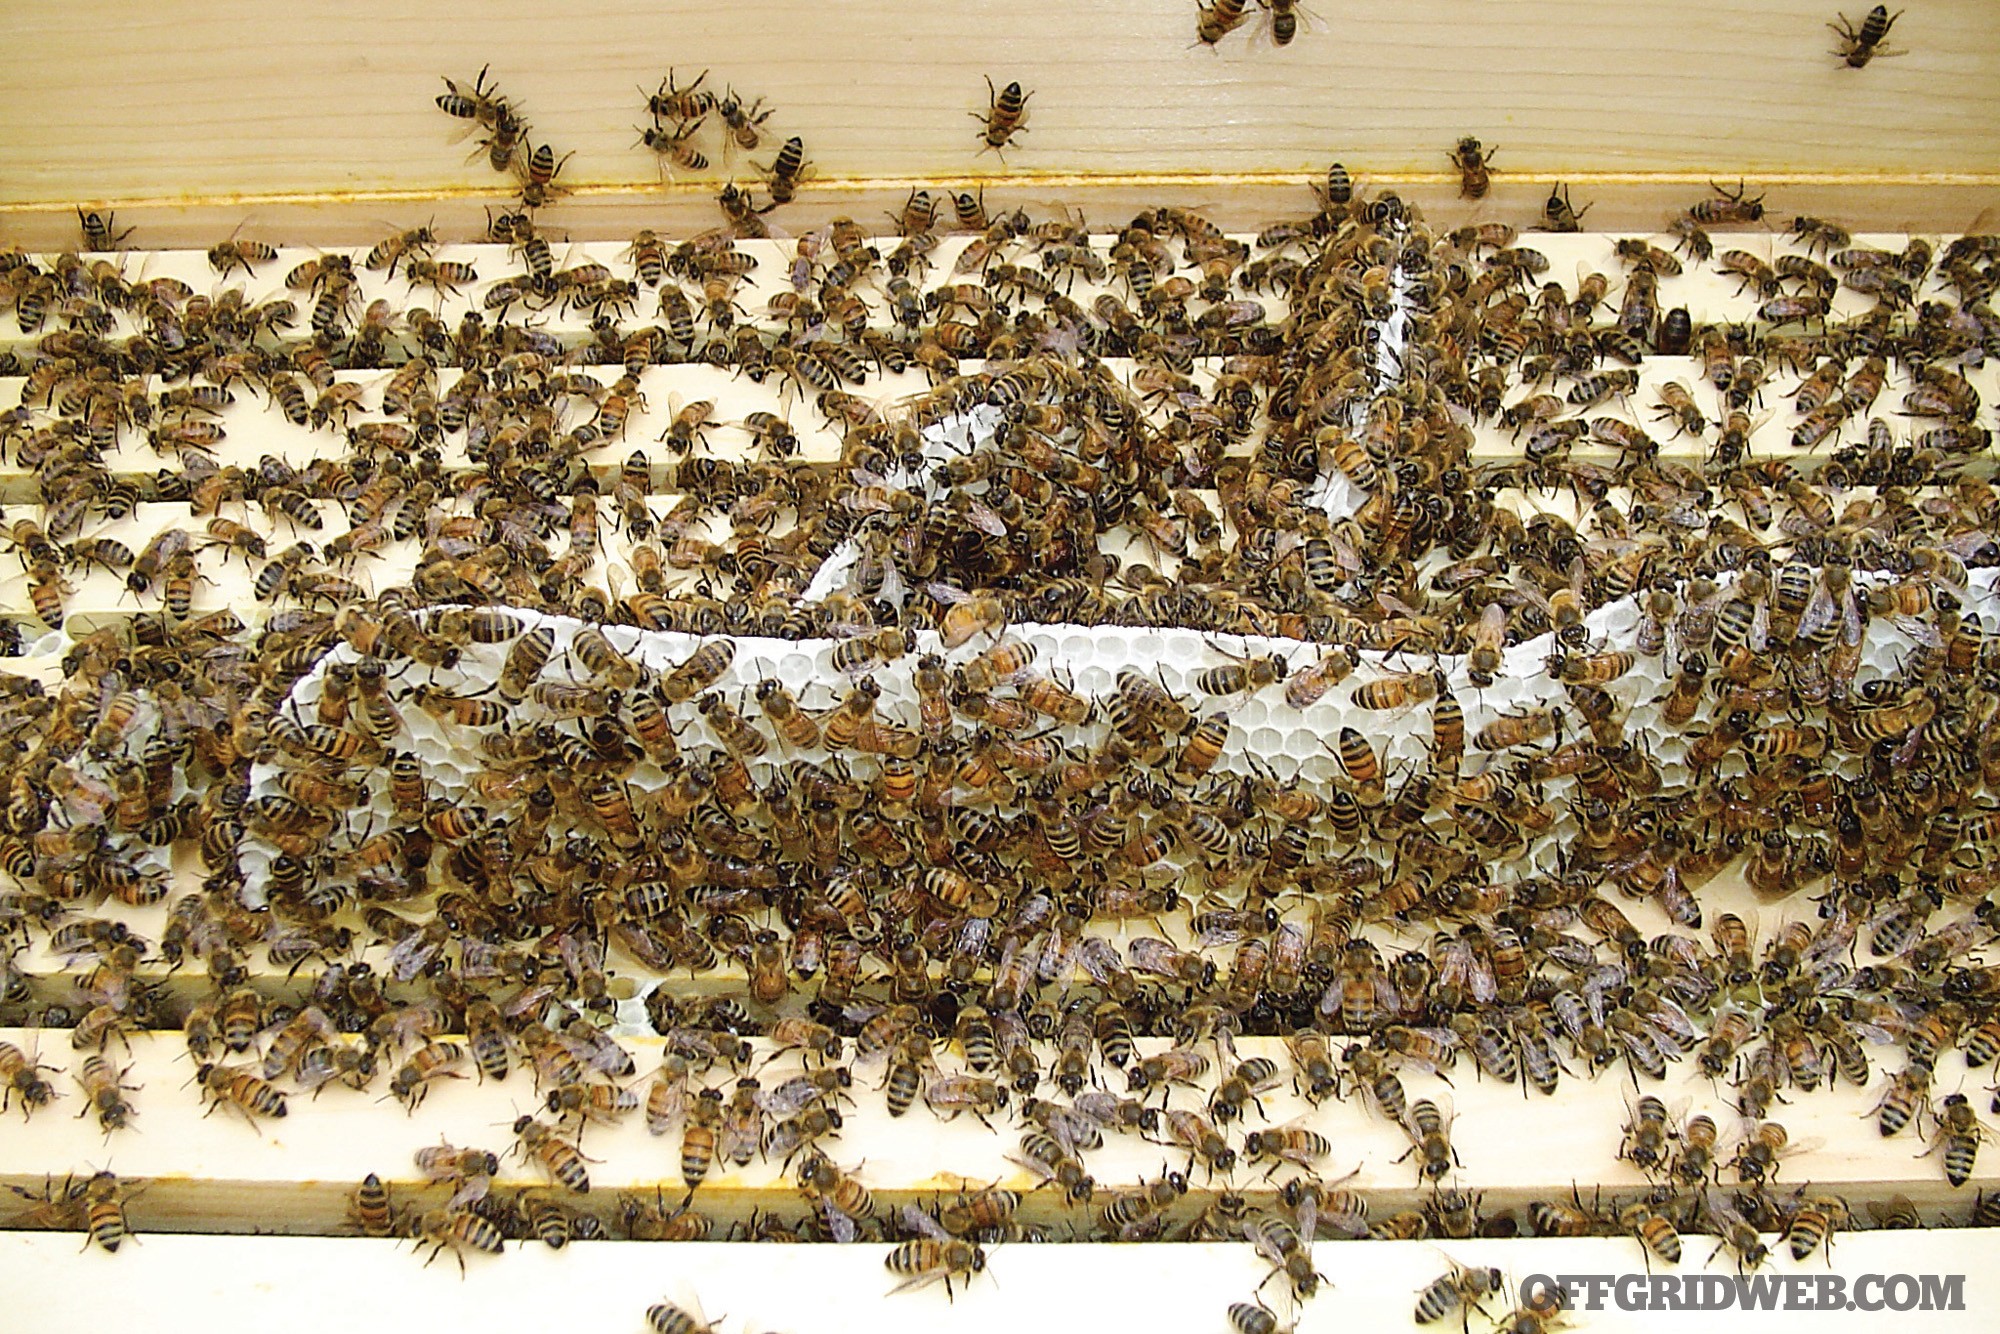
A healthy colony of honey bees will consist of a queen, workers, and drones. The bulk of the hive is made up of workers, who are all female and only survive for about six weeks during the nectar flow. Workers have the barbed, one-use-only stingers that are familiar to anyone who’s stepped barefoot on one.
Workers can create new queens, and if they deem the population large enough to warrant swarming, or if they decide the current queen isn’t replenishing the short-lived workforce quickly enough, then they’ll favor selected larvae to develop as queens.
If the spacing is wrong in a hive, your bees may build comb in ways that make management difficult.
Drones are the only males in the hive and make up 15 percent or more of the population. They’re blocky and slow, and their only purpose is to mate with a virgin queen. If the queen is already mated and reproducing at a rate the colony finds acceptable, then the drones don’t have anything to do. They’re convenient for new beekeepers who want to learn to catch a queen and place her in a cage without harm, since they lack stingers.
The queen’s only purpose is to lay eggs — as many as 2,000 per day. Given the short lifespan of the workforce and all the chores that must be done, this role can make or break a colony. An organ called a spermatheca is where she stores all the sperm from her first and only mating flight and gives her the power to decide the gender of her offspring: An unfertilized egg becomes a drone; a fertilized one becomes a worker.
Methods to Consider
The traditional Langstroth hive is comprised of a series of boxes, each with 8 to 10 frames.
A traditional Langstroth hive is the system most beekeepers employ and is most recognizable. It relies on a box with enough space for 10 removable frames; as the hive grows, additional boxes are stacked on top. Most beekeepers use larger boxes and frames for brood-raising purposes with smaller ones (shallow or medium “supers”) for honey storage.
Top-bar hives are less common but favored by some homesteaders, the argument being that this method more closely mimics how bees build comb in nature. Wooden strips are laid across the top of a trough-like enclosure (made of scrap lumber or even a plastic tote or barrel cut lengthwise). Comb is built onto and hangs freely from the wooden strips, and the colony expands horizontally instead of vertically.
There are certain scenarios where top-bar beekeeping could be a better choice than a conventional Langstroth system:
When funds are tight.
If pollination and/or beeswax are higher priorities than maximized honey production.
The ability to lift a full, 40-pound honey super is an issue.
Of course, there are disadvantages to top-bar beekeeping, and among the greatest of these is the fact that equipment doesn’t translate to standard Langstroths. If you buy or inherit a colony from another beekeeper, those standardized frames may not fit into the top-bar hive easily — not without some carving and wiring of comb, at least.
A wedge along the strips of wood in a top-bar hive provide a point for bees to attach comb.
Honey extraction can also prove frustrating with top-bar hives, as most extractors are built with four-sided frames in mind. Trying to sling the honey out of a comb built onto a top-bar is likely to end with a mess, so most top-bar beekeepers either harvest comb honey or they crush the comb and strain out the honey.
It’s possible to combine some of the advantages of both Langstroth systems and top-bar hives into what’s called a Langstroth long-box, using conventional four-sided frames placed into a box. Just like with top-bar hives, the colonies are allowed to expand horizontally.
Swarm vs. Nuc
Once a person has made the decision to become a beekeeper and has settled on a particular hive system, the next step is sourcing the bees. Ask around, or use the internet, to identify reputable beekeepers close to home. You can buy a swarm or colony outright, or you may be able to barter for one.
If there’s a beekeeping association nearby, join it and network your way to a supplier, as most consider locally sourced bees to be advantageous against colony losses. The American Bee Journal lists some of the more established beekeeping organizations in each state on its site: https://americanbeejournal.com/tiposlinks/beekeeping-associations/.
Nuc boxes hold four to five standard brood frames.
You may opt to order from a company instead, and an early decision that you’ll make is whether to buy a packaged swarm or a nucleus hive (aka “nuc”). Kelley Beekeeping (www.kelleybees.com) and Olivarez Honey Bees (www.ohbees.com) are two examples of companies that deal in live bees.
Packaged swarms tend to be a little cheaper and will arrive in a screened box with about 10,000 bees. The queen is separated into a queen cage. You install the bees by removing a wooden cork from one side of the queen cage, placing the cage — in which the queen is still imprisoned by a sugar plug — into the hive and then dumping the remainder of the bees on top of her.
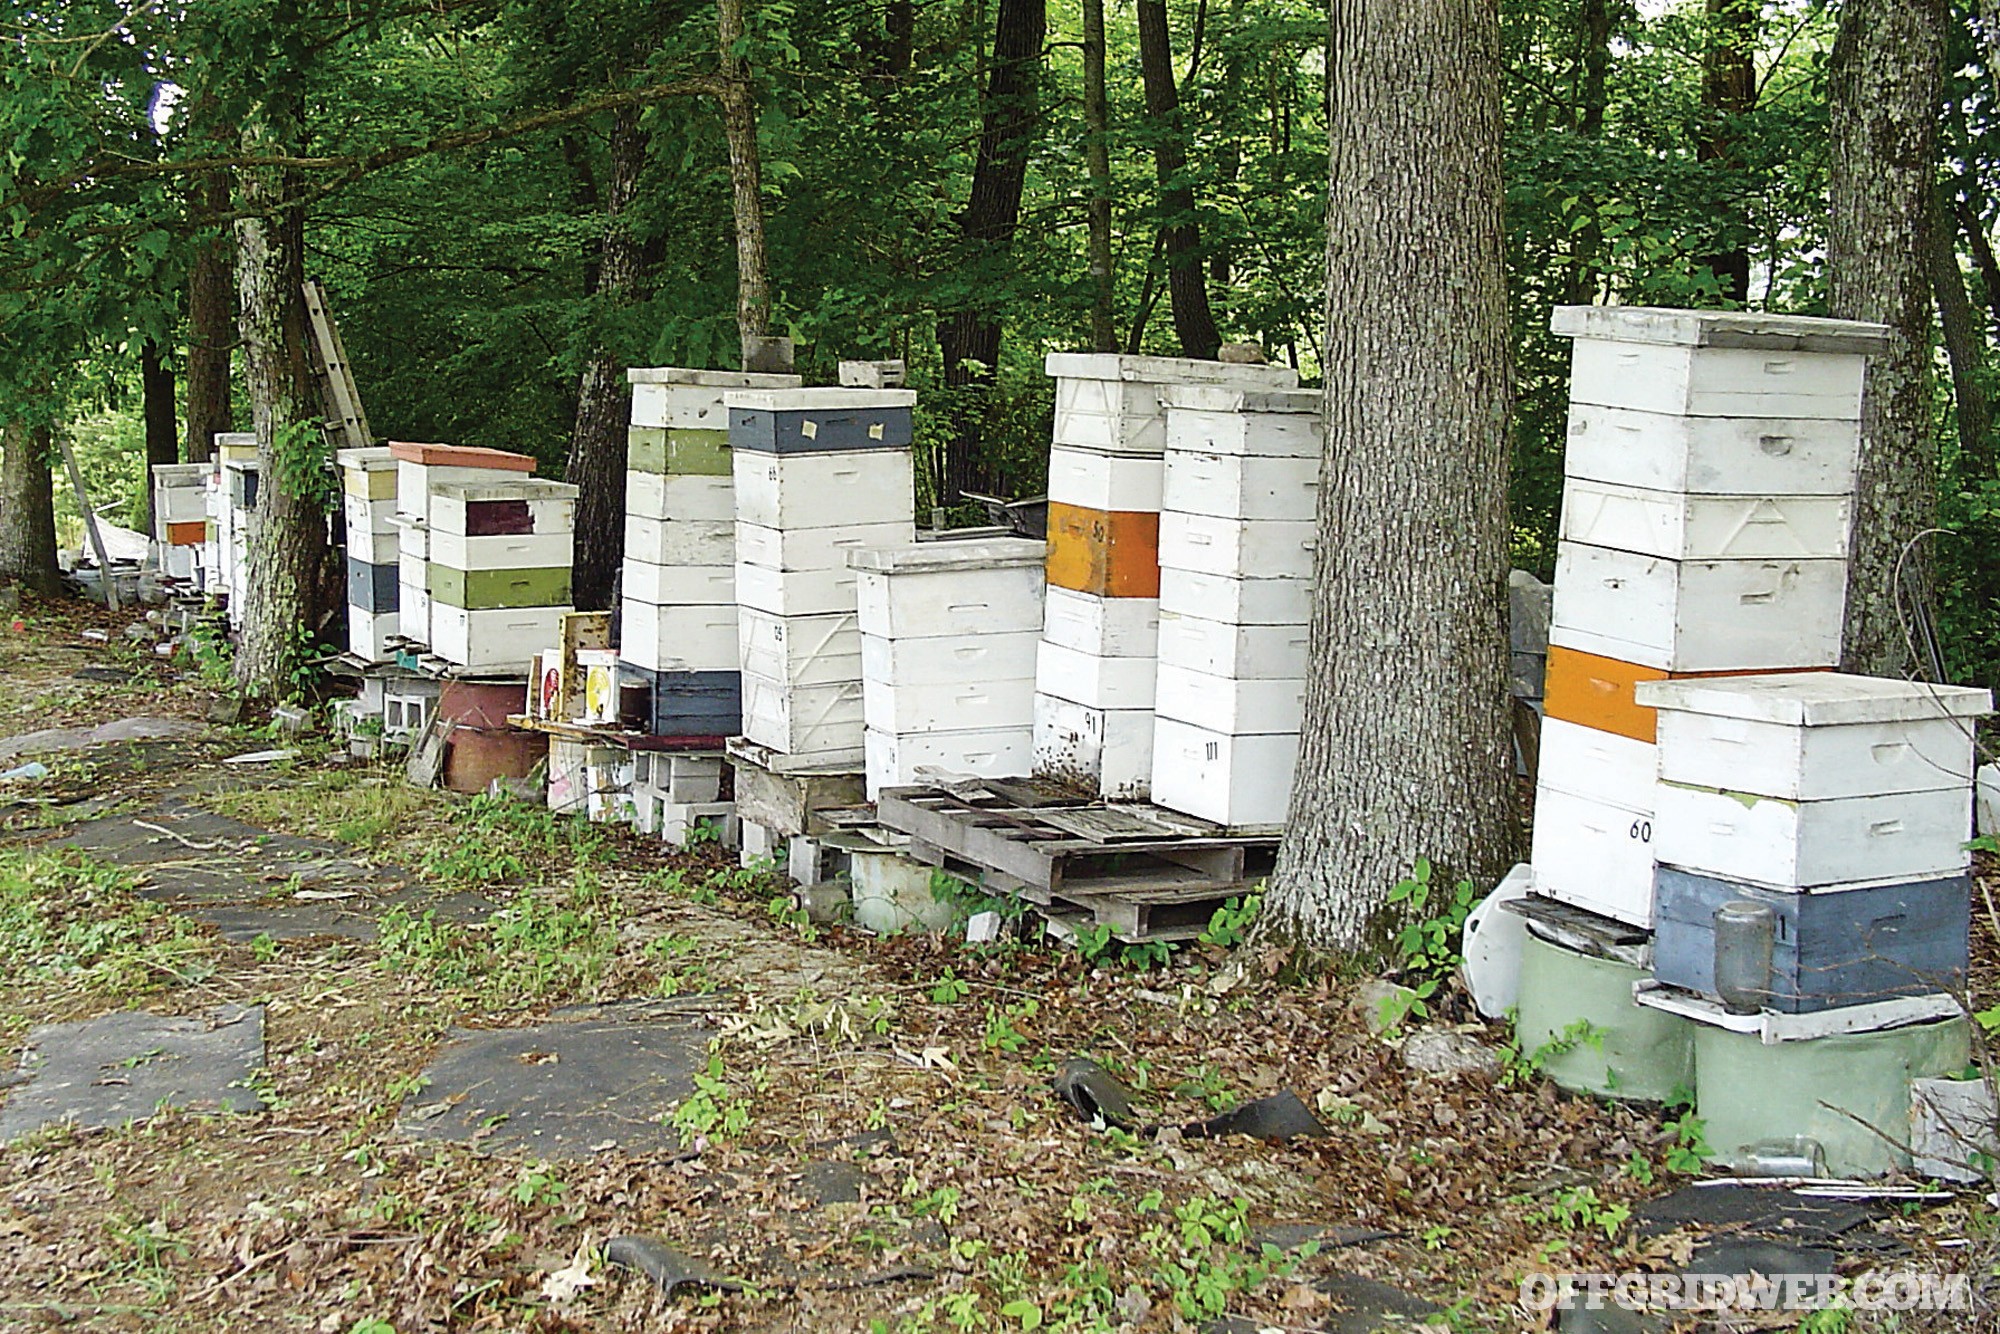
Larger beekeepers often have multiple “bee yards” that they visit and inspect regularly.
By comparison, a nuc is a box of four or five standard-sized frames housed in a wooden or corrugated plastic box. The queen is free and already laying eggs in the cells. The beekeeper simply has to move the frames from the nuc box to the hive, along with some empty frames onto which they can expand.
Cost Considerations
The going price in my area for a three-pound packaged swarm is $140 and a nuc will cost about $165 — this can vary widely by region.
To get the needed personal protective equipment like smoker, hive tool, and woodenware for two complete hives, expect to invest about $400. So, if considering two hives and two nucs, the cost will be in the neighborhood of $730.
Two hives will allow the new beekeeper to compare and contrast and also swap out brood if something happens to one, but you can always start with a single hive, which would bring the cost down considerably.
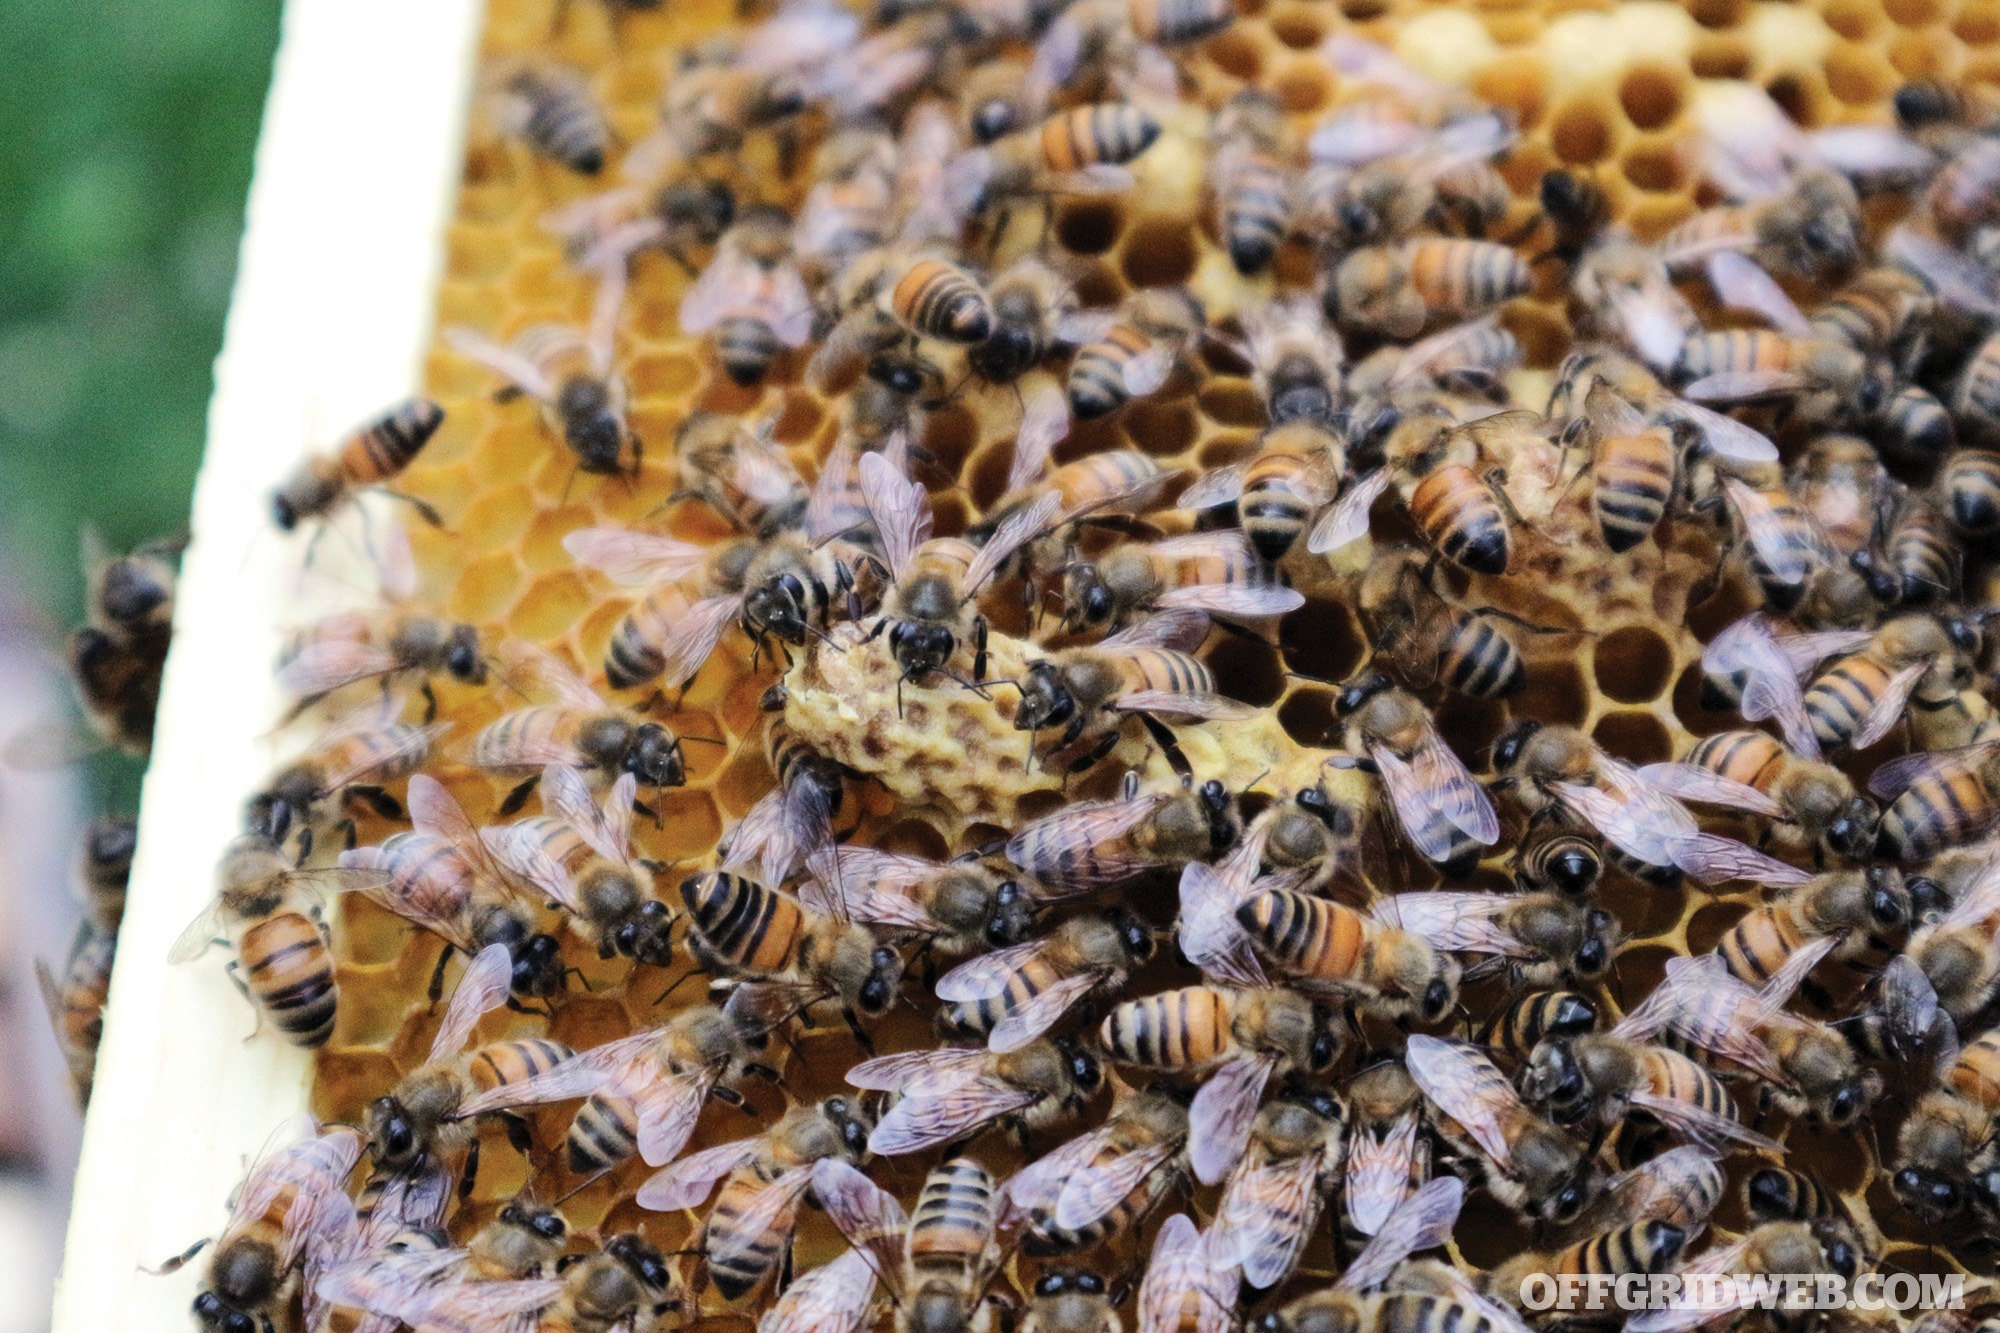
Inside a peanut-shaped cell, a new queen is developing.
Other ways to lower the investment would be to make your own woodenware or to get placed on your local Extension Service’s swarm removal list. Each state has a Cooperative Extension Service affiliated with a university in that state, and there’s likely to be a Cooperative Extension Service office in your county that offers a range of agricultural education and outreach. Contact them and request to be added to their swarm removal list if they maintain one. However, if you want to catch a swarm, it would be wise to enlist the help of someone experienced, especially your first time out.
Making your own woodenware is yet another way to shave a few dollars off a beekeeping investment. Some beekeepers have had success with “bait hives,” using lemongrass oil to draw scout bees in search of a new home for a swarm.
Buying used woodenware is tempting, but it’s not recommended. American foulbrood is a bacterial disease that can destroy all the larvae in a colony, leaving behind decaying brood and an unpleasant smell. The spores of American foulbrood can remain dormant in old equipment for 40 years. (A state department of agriculture may utilize quarantines to halt the spread of this disease, or infected hives may be burned. If you opt to treat American foulbrood — or any other diseases — with antibiotics, federal legislation that went into effect in 2017 requires a veterinarian’s prescription.)
First Season Duties
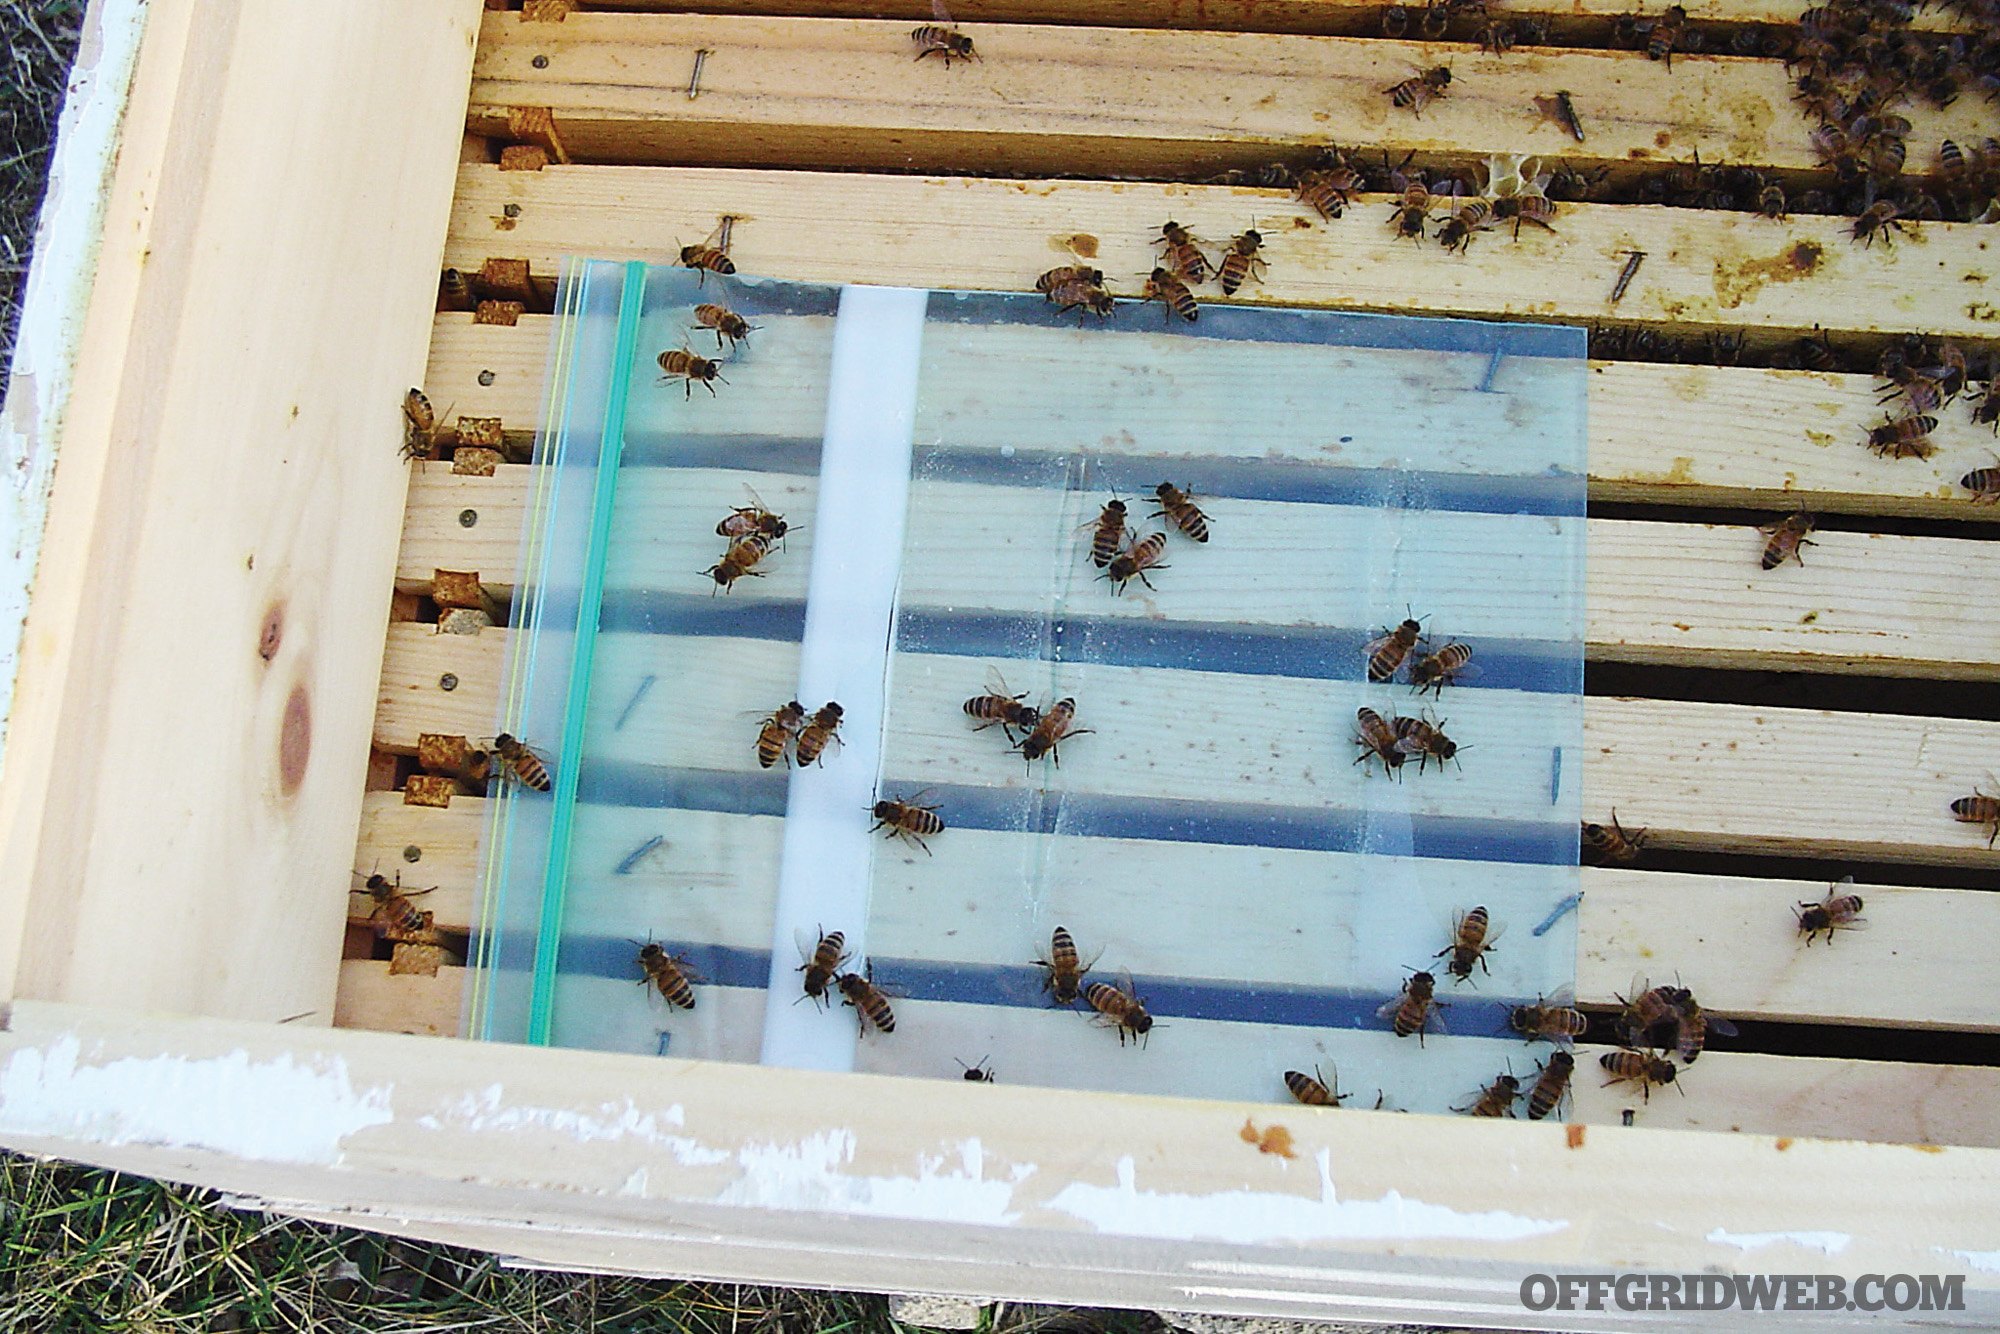
Once the bees arrive and are installed in their new home, it may be prudent to stimulate brood rearing by feeding them sugar water for a short time, especially if they arrive before native bloom is abundant. Commercial feeders are available from supply catalogs, or simply fill a zippered freezer bag with the solution, laying it on the top frames and making a few feeding slits with a razor blade.
A freezer bag with sugar water and razor slits is a cheap and effective feeder.
It’s good to check on the bees to make sure the queen is doing her job and that no other issues have arisen, but new beekeepers should resist the urge to open hives too often.
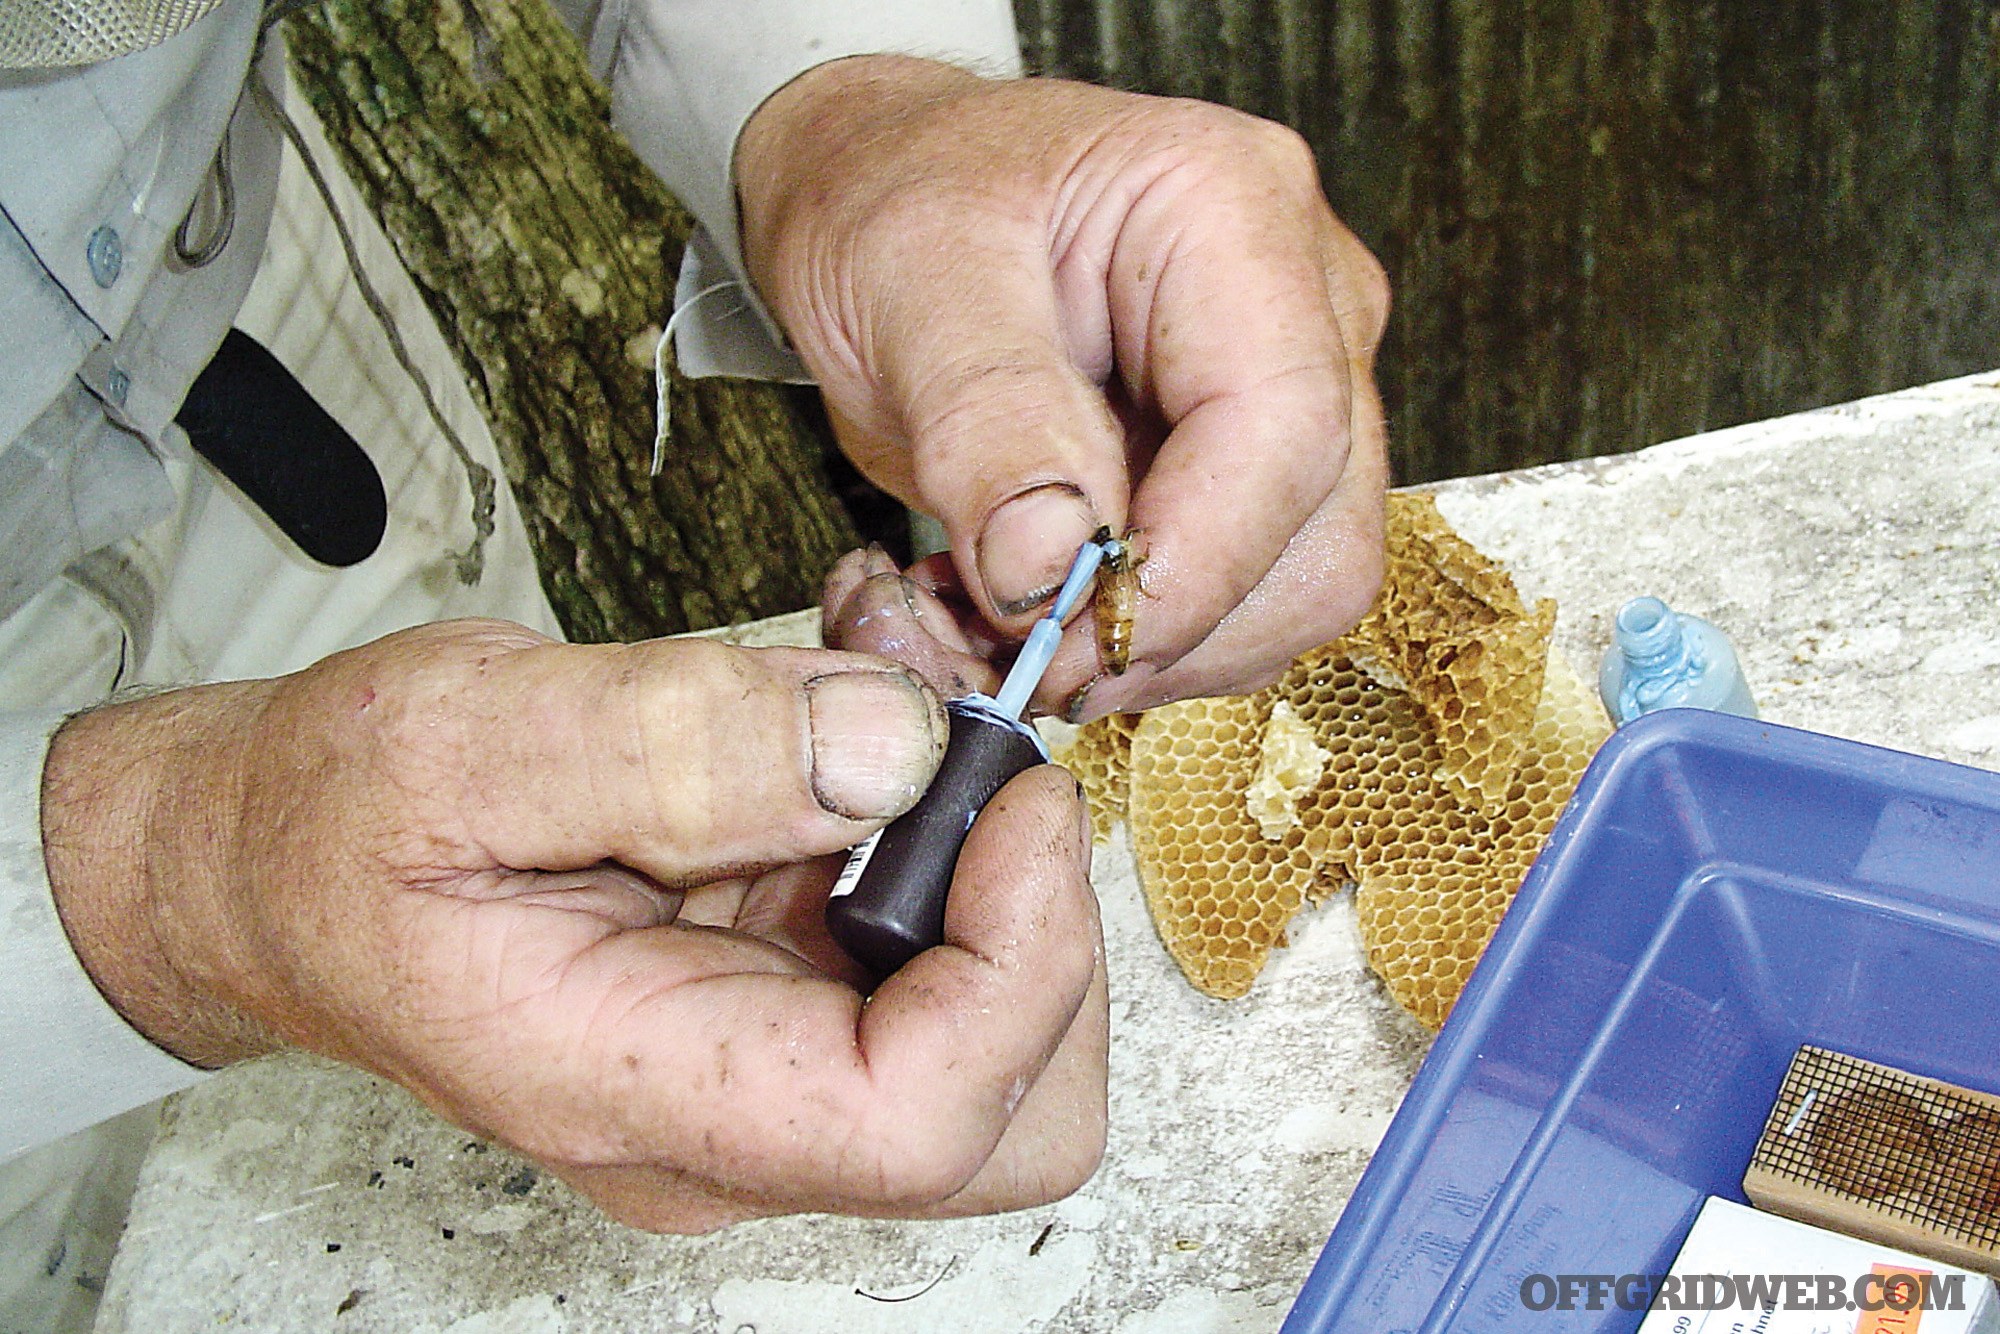
If you’ve gone with packaged swarms, it’s good to make sure the workers have set her free from her cage after a couple of days.
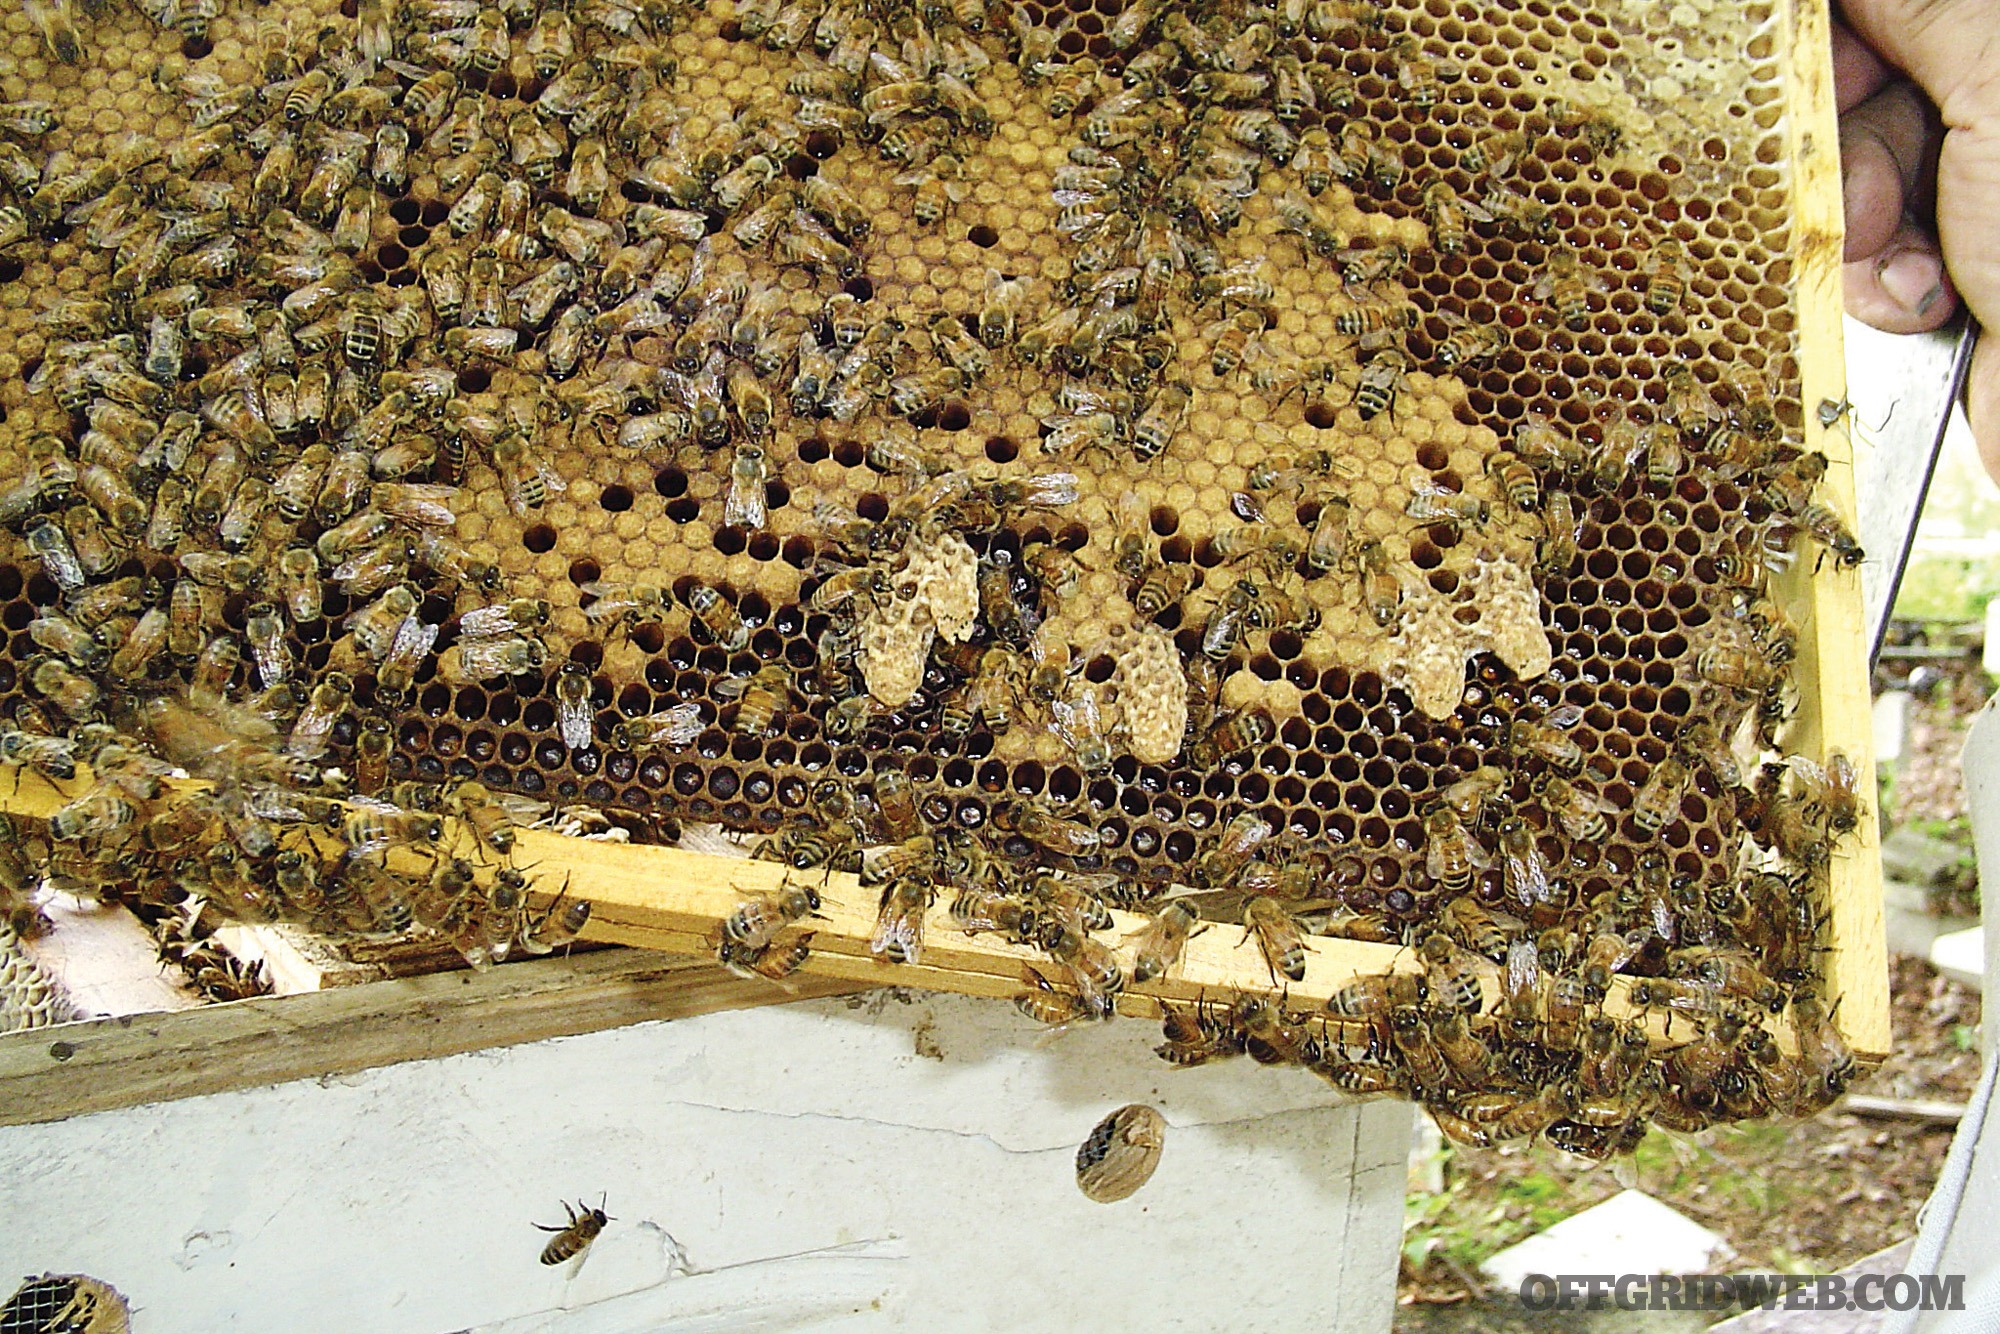
Assuming all is well with the queen, an inspection every couple of weeks should be sufficient. Check their stores. The ideal scenario is to see a rainbow pattern on the frames, with capped brood, pollen, and honey. Keep an eye out for peanut-shaped queen cells, which could signal that either the hive is getting too crowded or there’s a problem with the current queen.
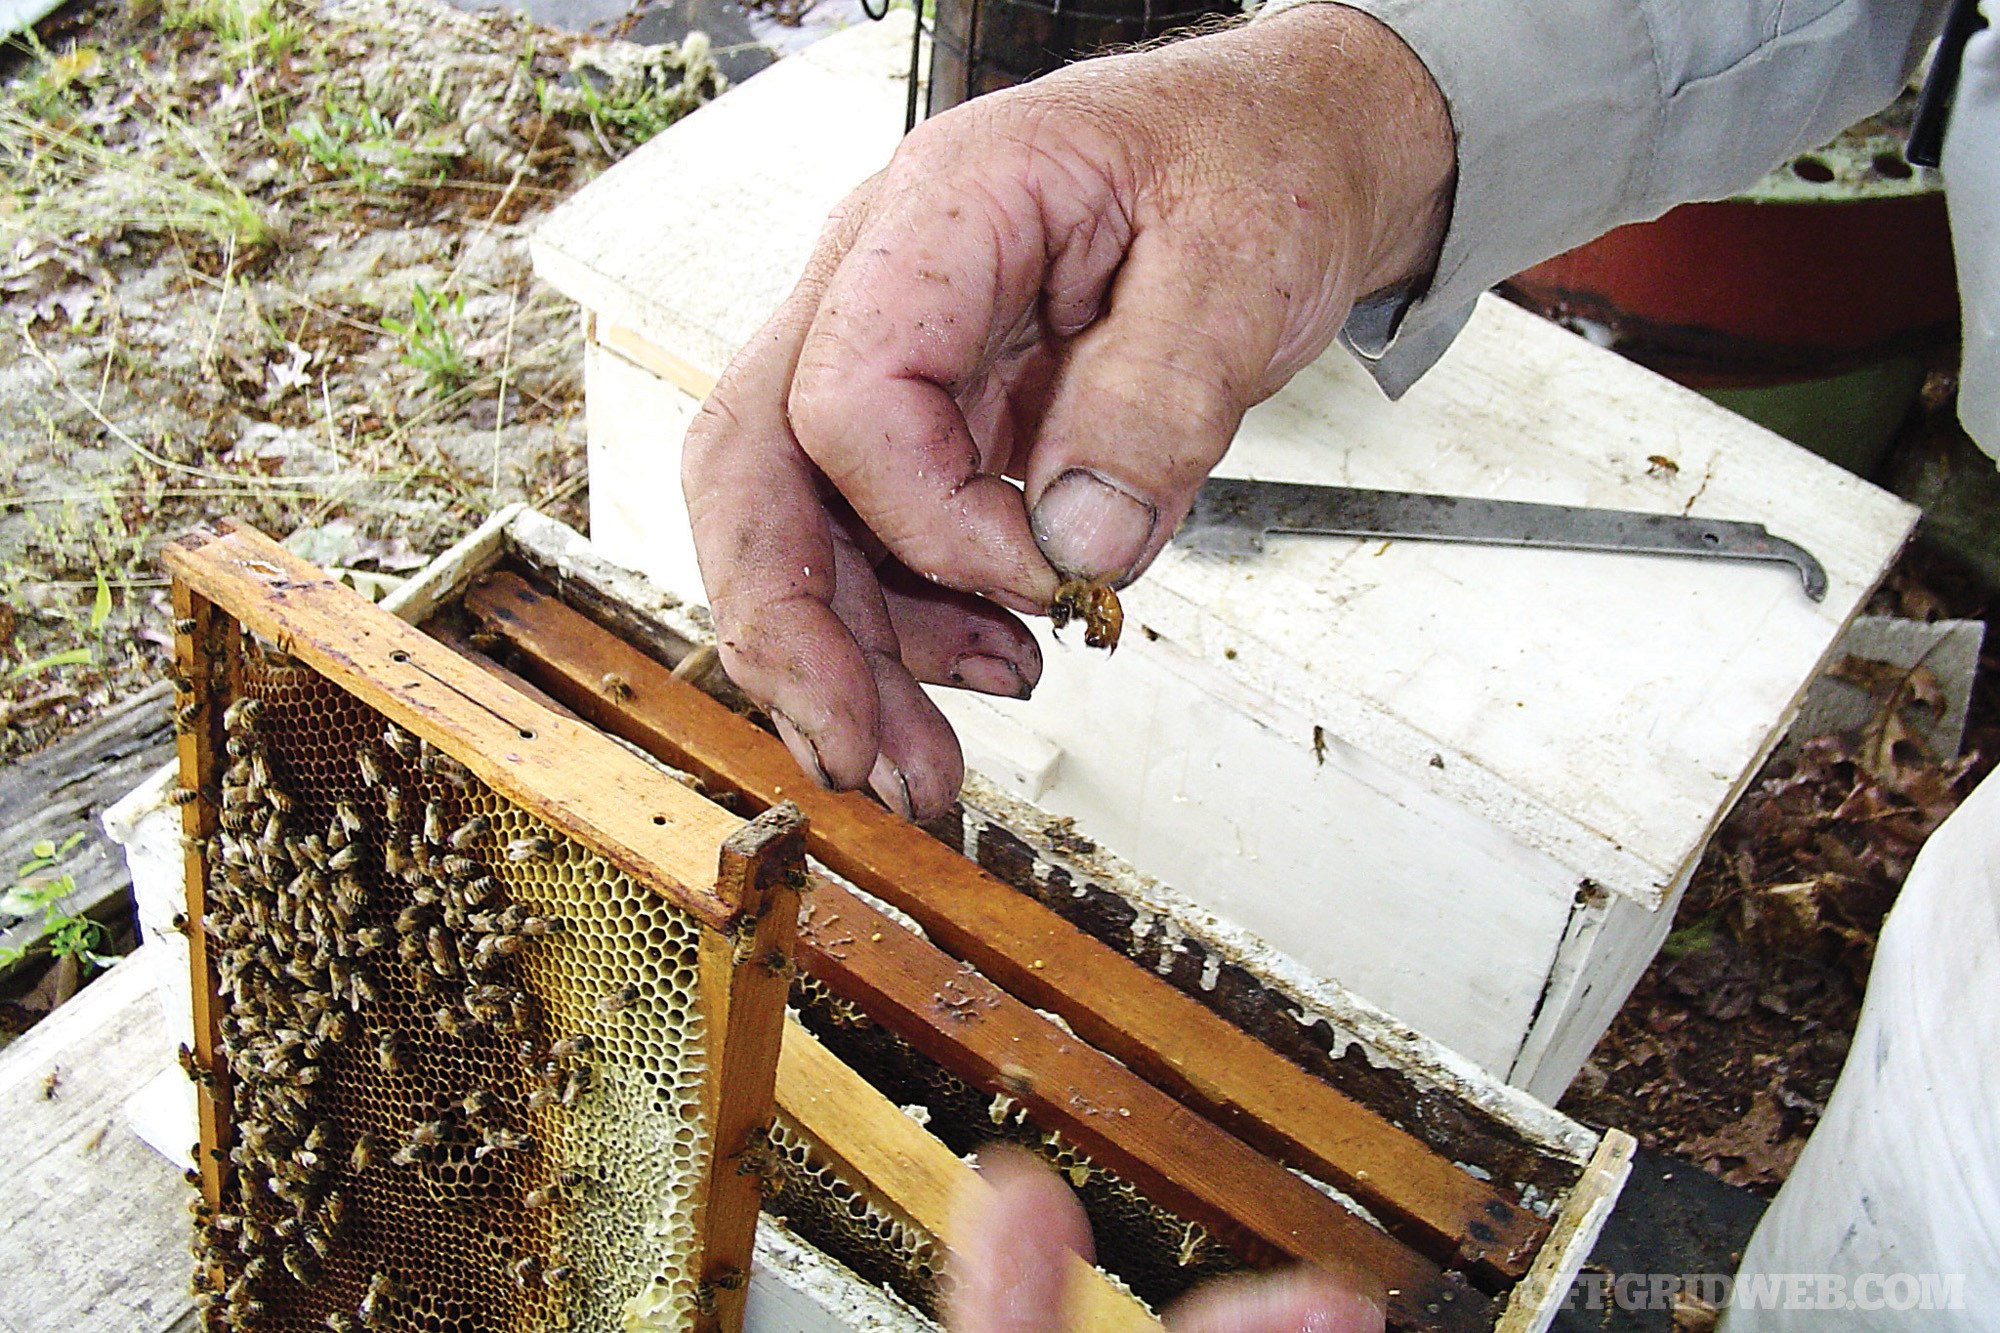
Catching a queen without injuring her takes practice.
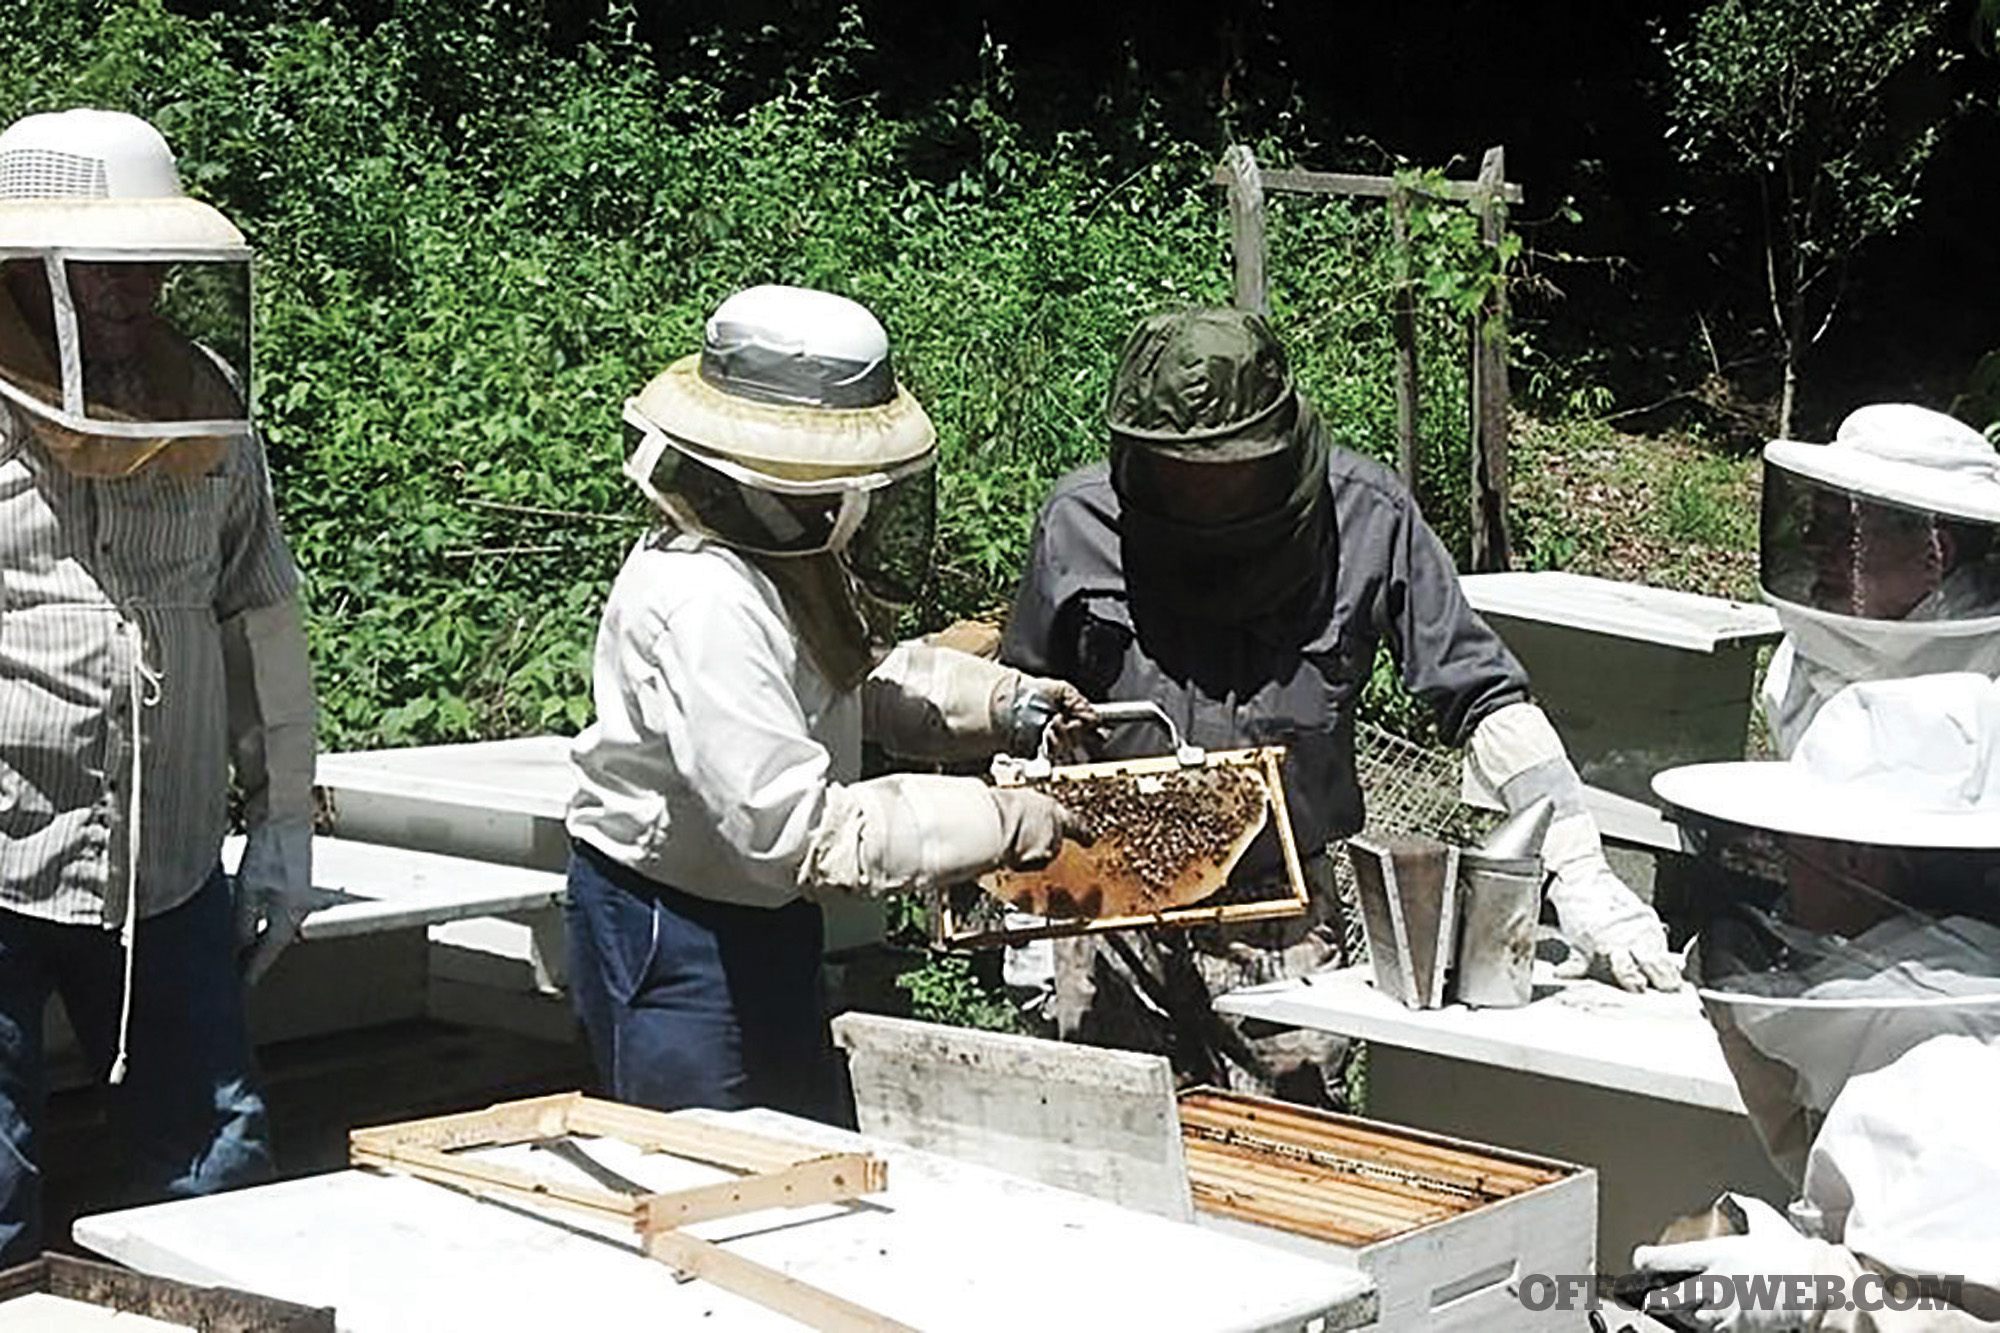
Recruit an experienced beekeeper to help with the first inspection or two. See if you can find the queen on your own. Check that she’s systematically moving from cell to cell, depositing eggs.
If you make friends in your local beekeeping association or you already have a beekeeper in your circle, ask him or her to help you with your first inspection or two. Let them coach you in finding the queen and observing her egg-distributing behavior.
Weather does make a difference when opening hives. A new beekeeper will soon learn that his or her bees are much more cordial on calm, sunny days.
Above: Many beekeepers mark their queens so she can be easily spotted. A different color each year can reveal her age at a glance.
Diseases and Pests
Beginners all too often get overwhelmed with all the potential issues within a hive. It’s good to be aware and prepared, but local, experienced beekeepers will be the best source to prioritize the threats in a particular area.
Varroa mites, tracheal mites, and small hive beetles are all relatively new pests to American hives. Wax moths and European foulbrood have been around a lot longer. There are steps that can help prevent some of these, as well as a growing arsenal of products to enlist for treatment. American foulbrood is a fatal hive disease, and the conventional treatment has been to burn the hive, but your state apiarist (accessed through your state’s department of agriculture) will be able to tell you the prevalence of this bacterial disease in your region.
Joining a local beekeeping club is a good way to learn.
Mammals can wreak havoc on hives, too. Bears and skunks both crave the protein provided by larvae, and the only reliable way to keep them out of your hives is exclusion through fencing. With bears, a properly erected electric fence is recommended, which can cost $300 or more once you purchase posts, wires, and a solar charger. Thieves and vandals may also be a concern, depending on circumstances.
The mysterious Colony Collapse Disorder (CCD) has gotten much media coverage, but oftentimes, CCD gets the blame for poor management or other issues. Data would indicate that fewer hive losses are being attributed to CCD, as scientists still work to determine exactly what it is.
Africanized genetics are a problem in parts of the country, resulting in colonies that swarm often and defend their hives aggressively.
Strive to learn the basics of what you may encounter, and then learn how to inspect for those issues periodically — preferably alongside someone who’s dealt with those problems before.
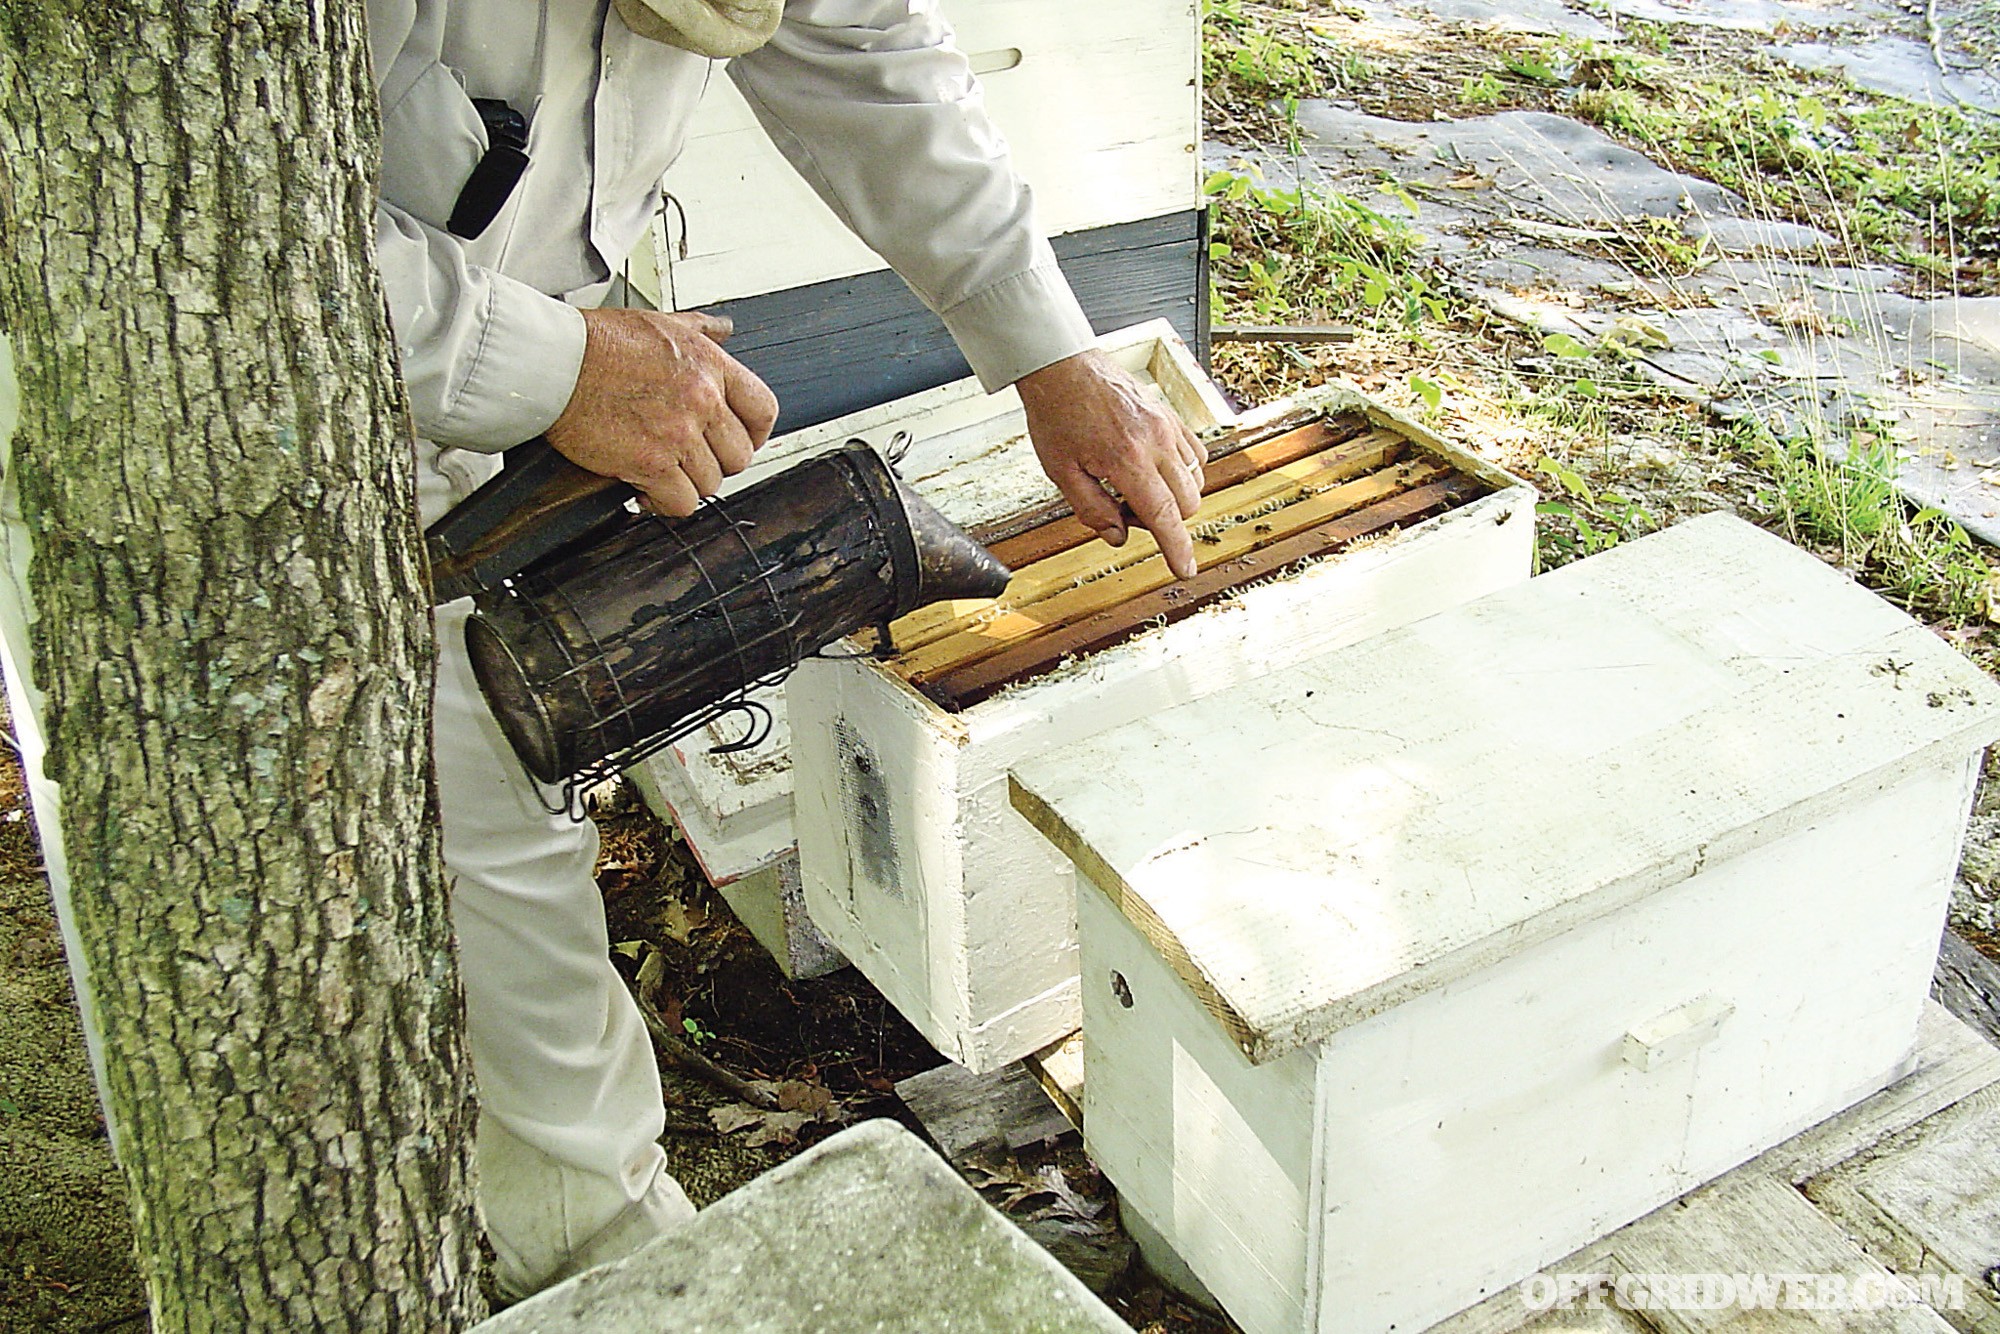
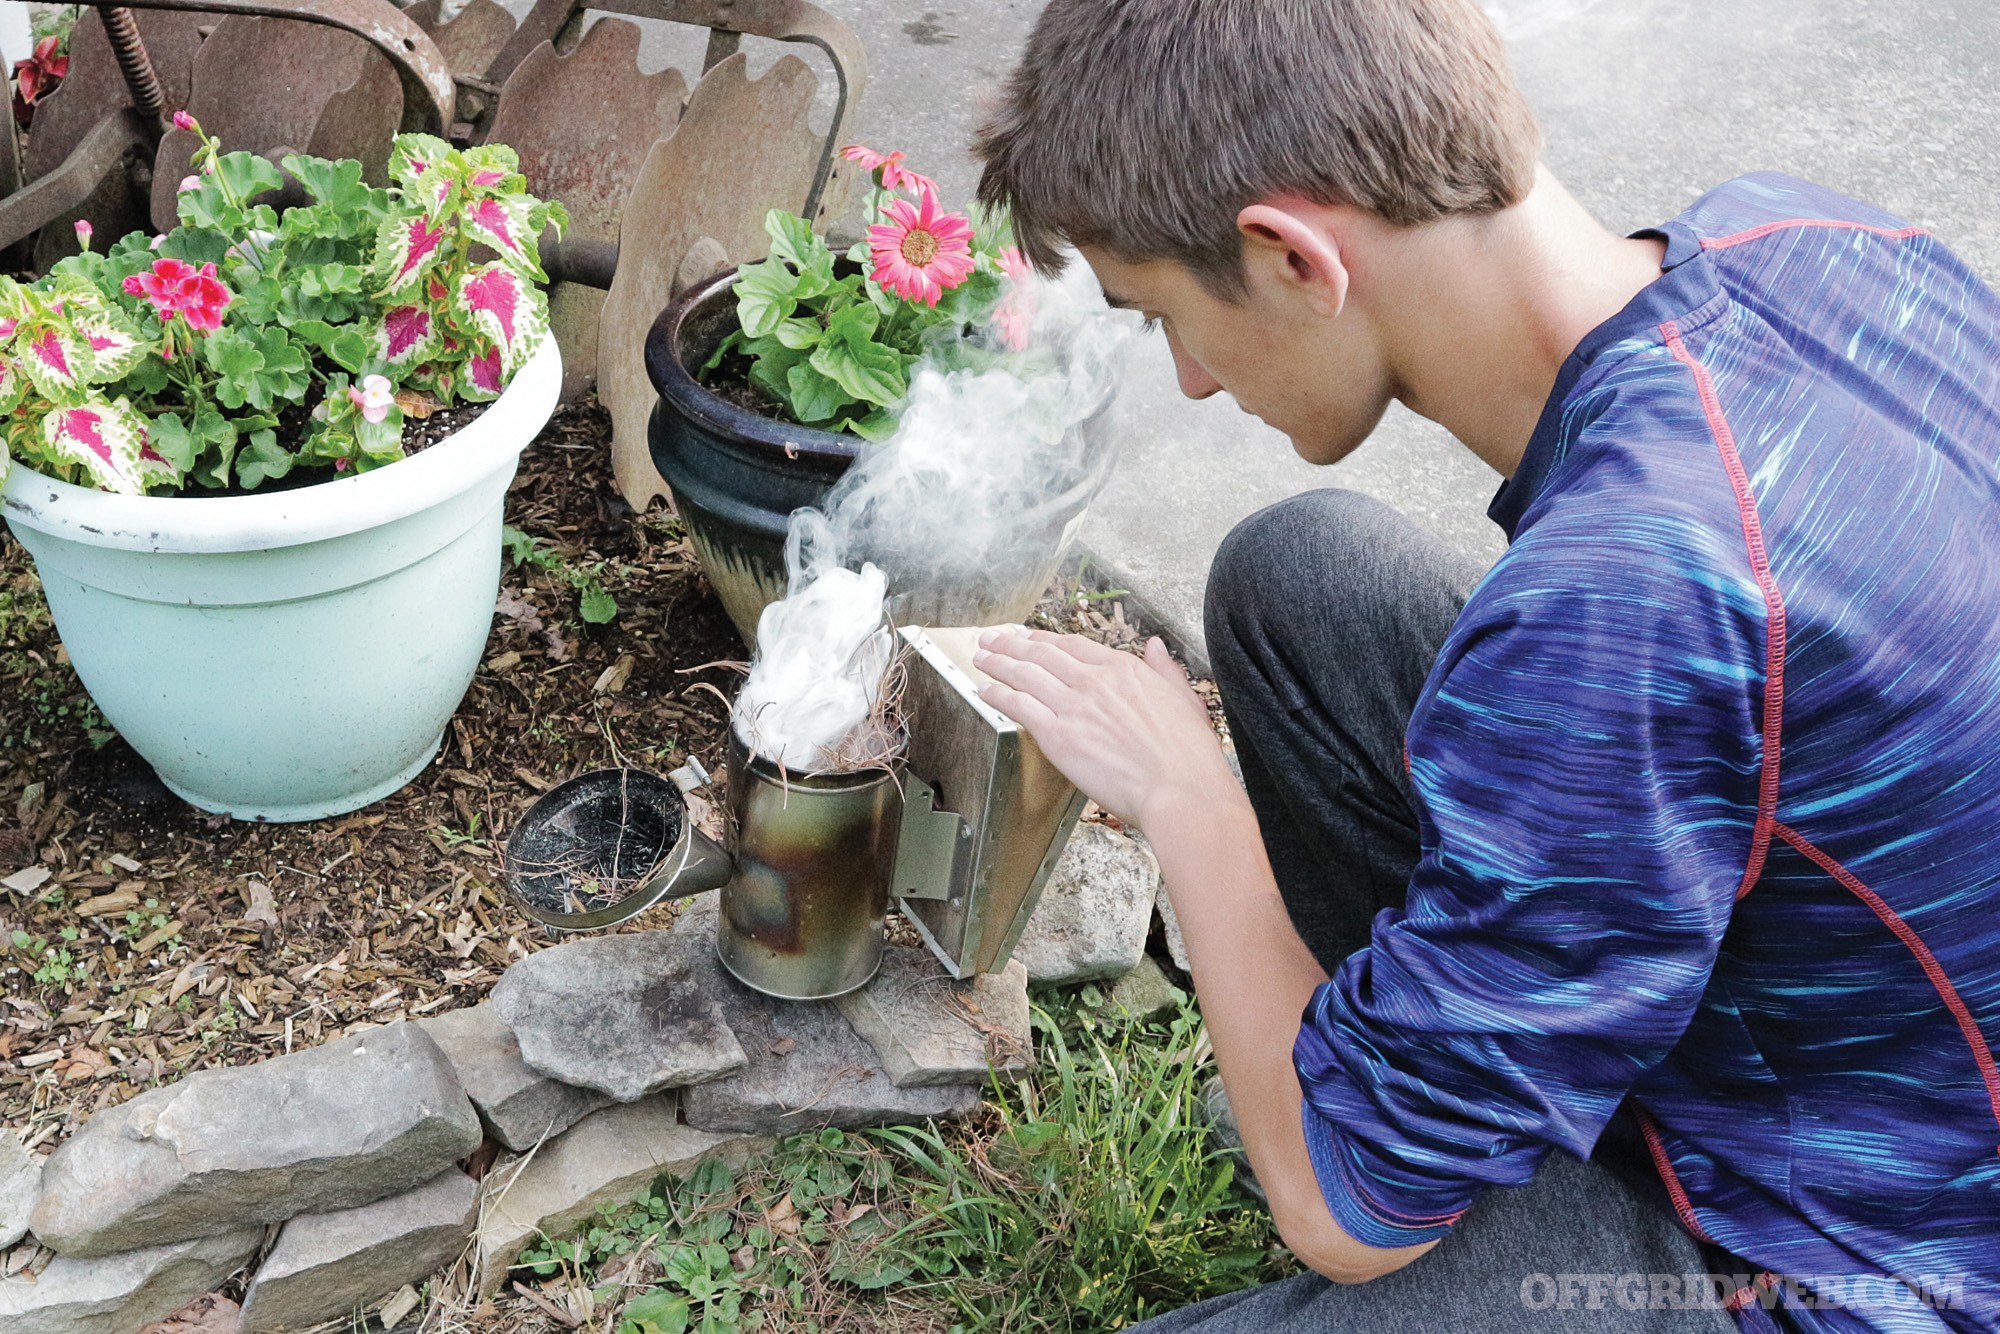
Fuel for a smoker can include wood chips, cotton cloth, cardboard, pine needles, etc.
Safety and Legalities
Speak with a physician about prescribing an epinephrine injector, in case of a bee allergy. There are stories out there of experienced beekeepers who suddenly had a reaction after years of working with bees, so even if you aren’t aware of a family member having an allergy, it’s still a good idea to have protection on hand.
Check with your state’s department of agriculture about the inspection process. Inspections may be on-request or possibly recommended for certain suspected problems. It will differ from state to state. Moving bees across state lines may require a certificate of health, but contacting your state apiarist should confirm whether that’s the case. Of course, suspicion of Africanized genetics, American foulbrood, or other serious problems will usually warrant a formal inspection.
Multiple queen cells are evident on this frame.
Certain localities may have ordinances regarding bee yard locations, although many towns have tighter restrictions on chickens than they do on bees. Beekeeping isn’t without its frustrations, and beekeeping today is more challenging than ever. But if you’re able to dodge the onslaught of enemies, from bears to mites, what you’ll gain is as good as gold. Before taking the leap, it’s important to arm yourself with knowledge and, if possible, to connect with a mentor or two.
About the Author
Phillip Meeks is an agriculture and natural resources educator originally from Tennessee, but now based in the mountains of Southwest Virginia. He likes to spend his weekends hiking, gardening, beekeeping, fishing, and mushroom hunting.
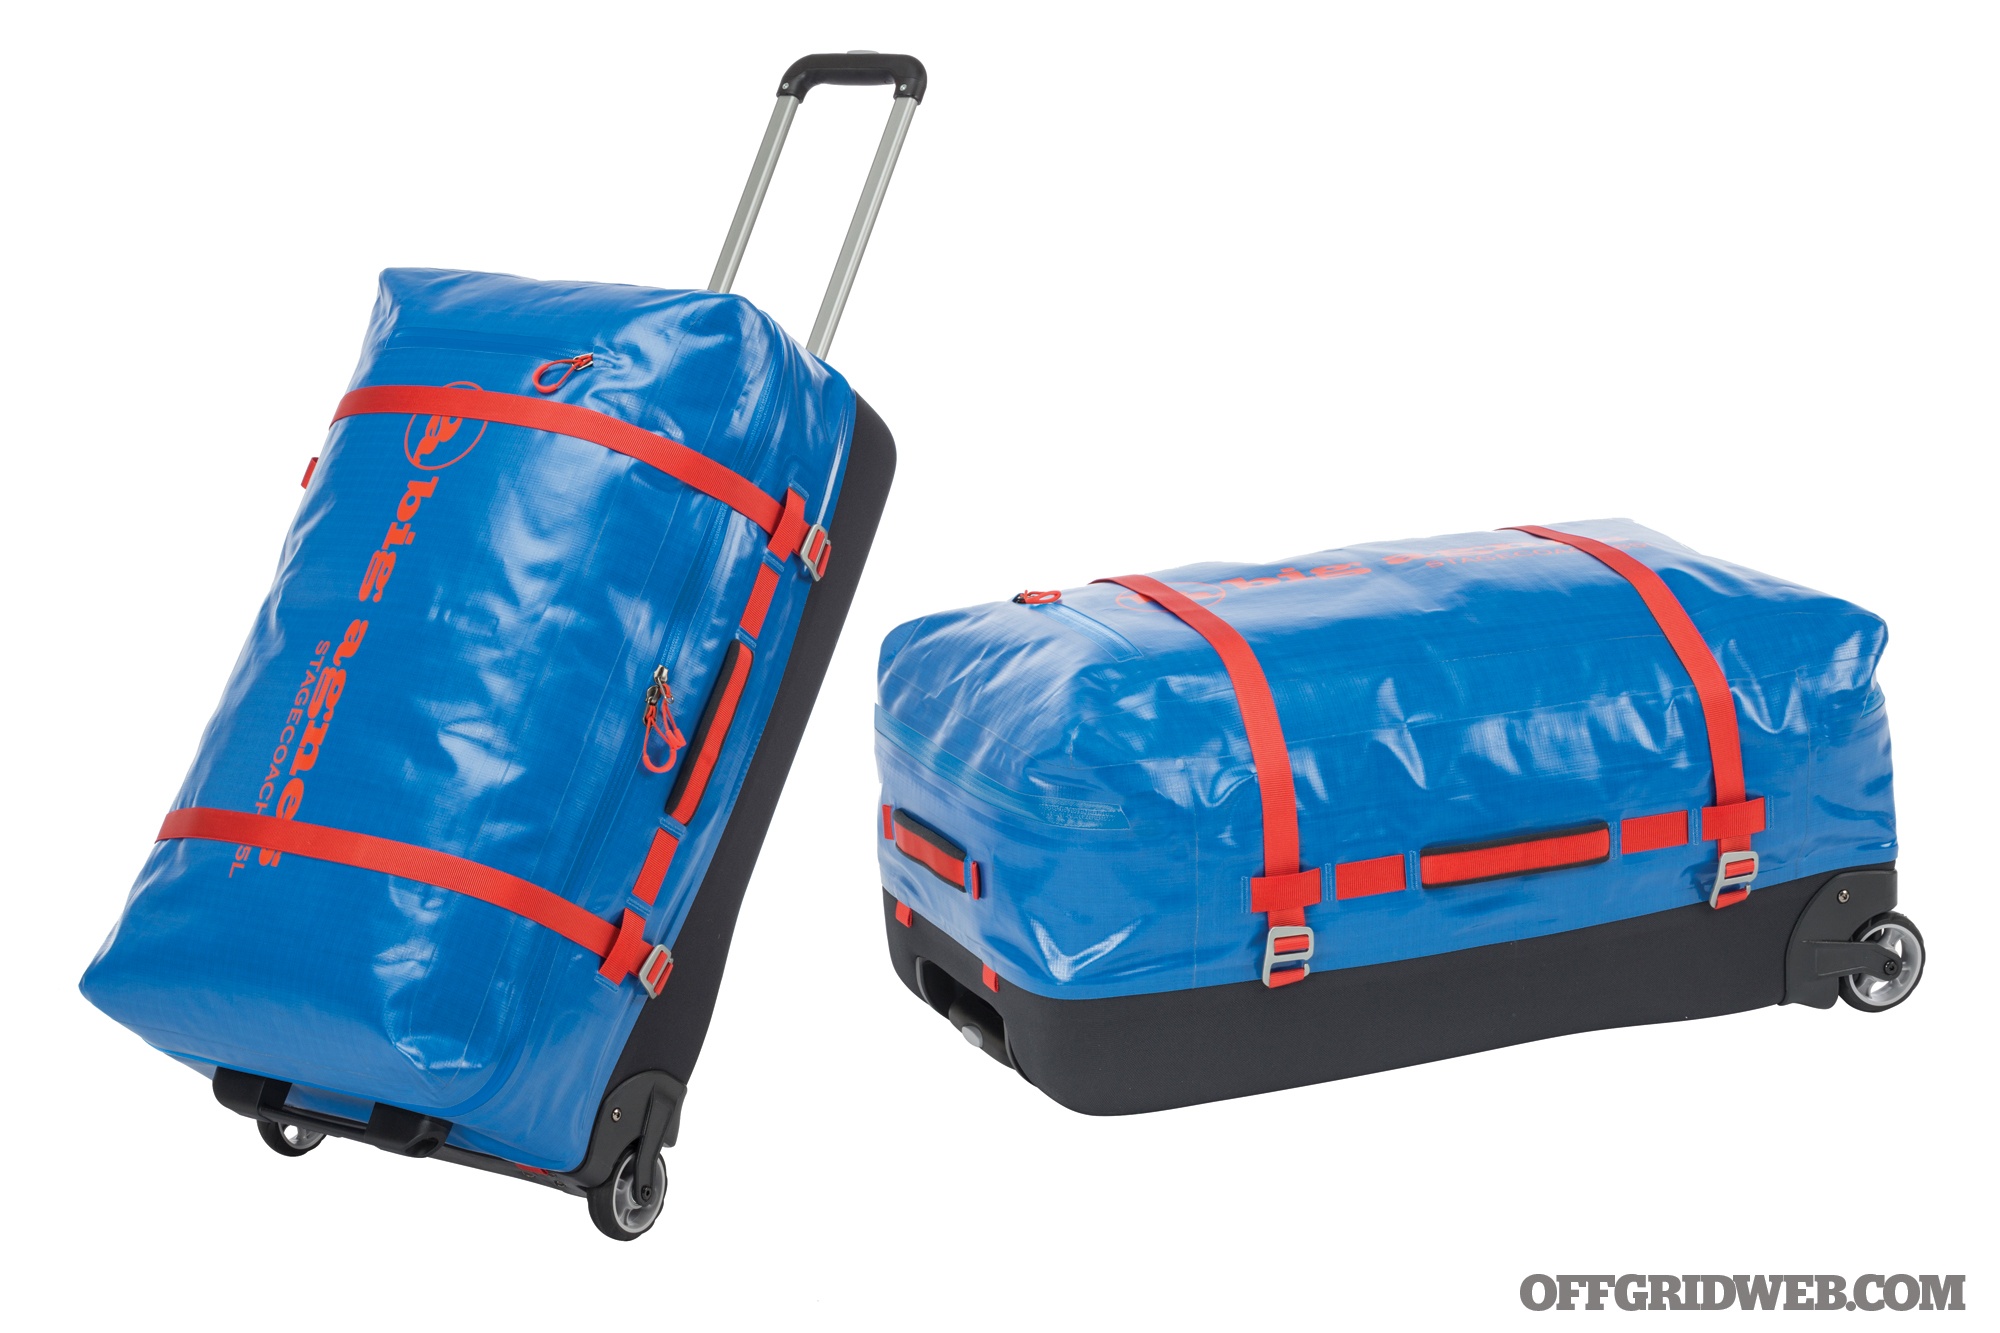
NOTES While we’re not saying that a duffel with wheels should be your bug-out bag, we’re saying it’s exponentially easier to roll your gear than to hump it on your back. Think camping trip or going on vacation. The Stagecoach provides loads of room in an incredibly sturdy but flexible container. It’s made of 420-denier, three-line ripstop fabric that’s tear, puncture, and abrasion resistant. It features 100-percent waterproof fusion-welded seams. And the base is made of a compression-molded EVA bottom with super durable 1,200-denier polyester fabric. This rolling duffel also has a kickstand for stability, padded grab handles, and dual shoulder straps if you need to throw it on your back instead.
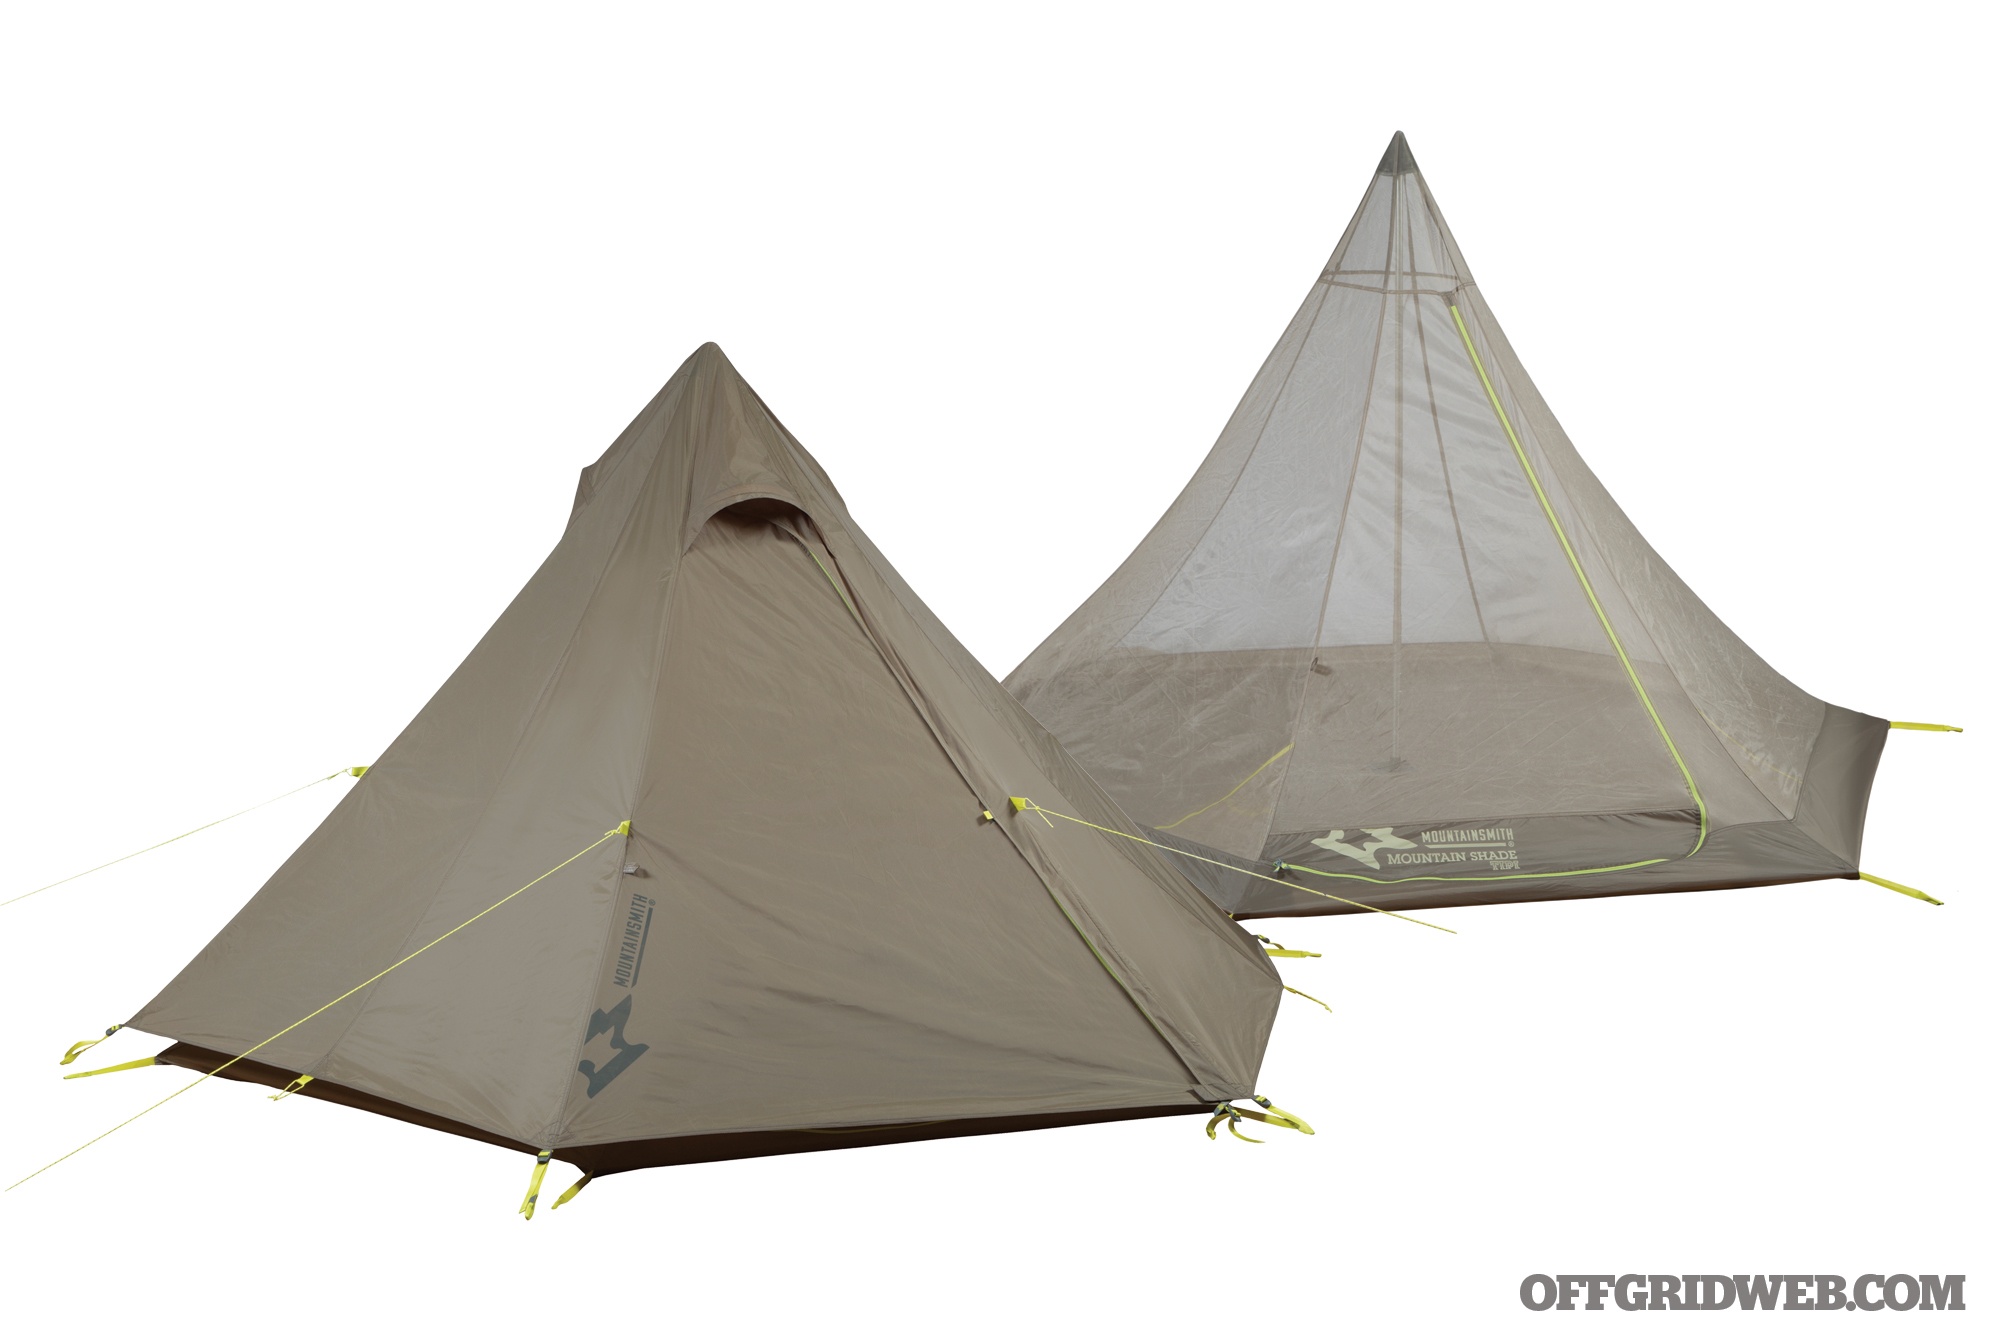
NOTES You could call it a comeback of sorts. The Mountain Tipi was designed more than 30 years ago and became popular with hunters and backpackers who needed a backcountry basecamp. Today, it’s back with a modern update. It can be set up as a tipi with bug nest, a standalone tipi, a standalone nest, or as a fast fly. The nest features No-See-Um mesh while the fly is made of 40-denier Sil-Nylon ripstop. They both work easily with a single pole — made of 7000-series aluminum alloy — that has an adjustable height between 5 feet 2 inches and 5 feet 8 inches. The Mountain Tipi has a single door and a two-person layout, ideal for a solo adventurer or a couple who want a lightweight, versatile shelter.
Real Avid Smart Drive 90
INCLUDES Hammer surface, magnetic parts tray, polycarbonate lid with slide lock, and more
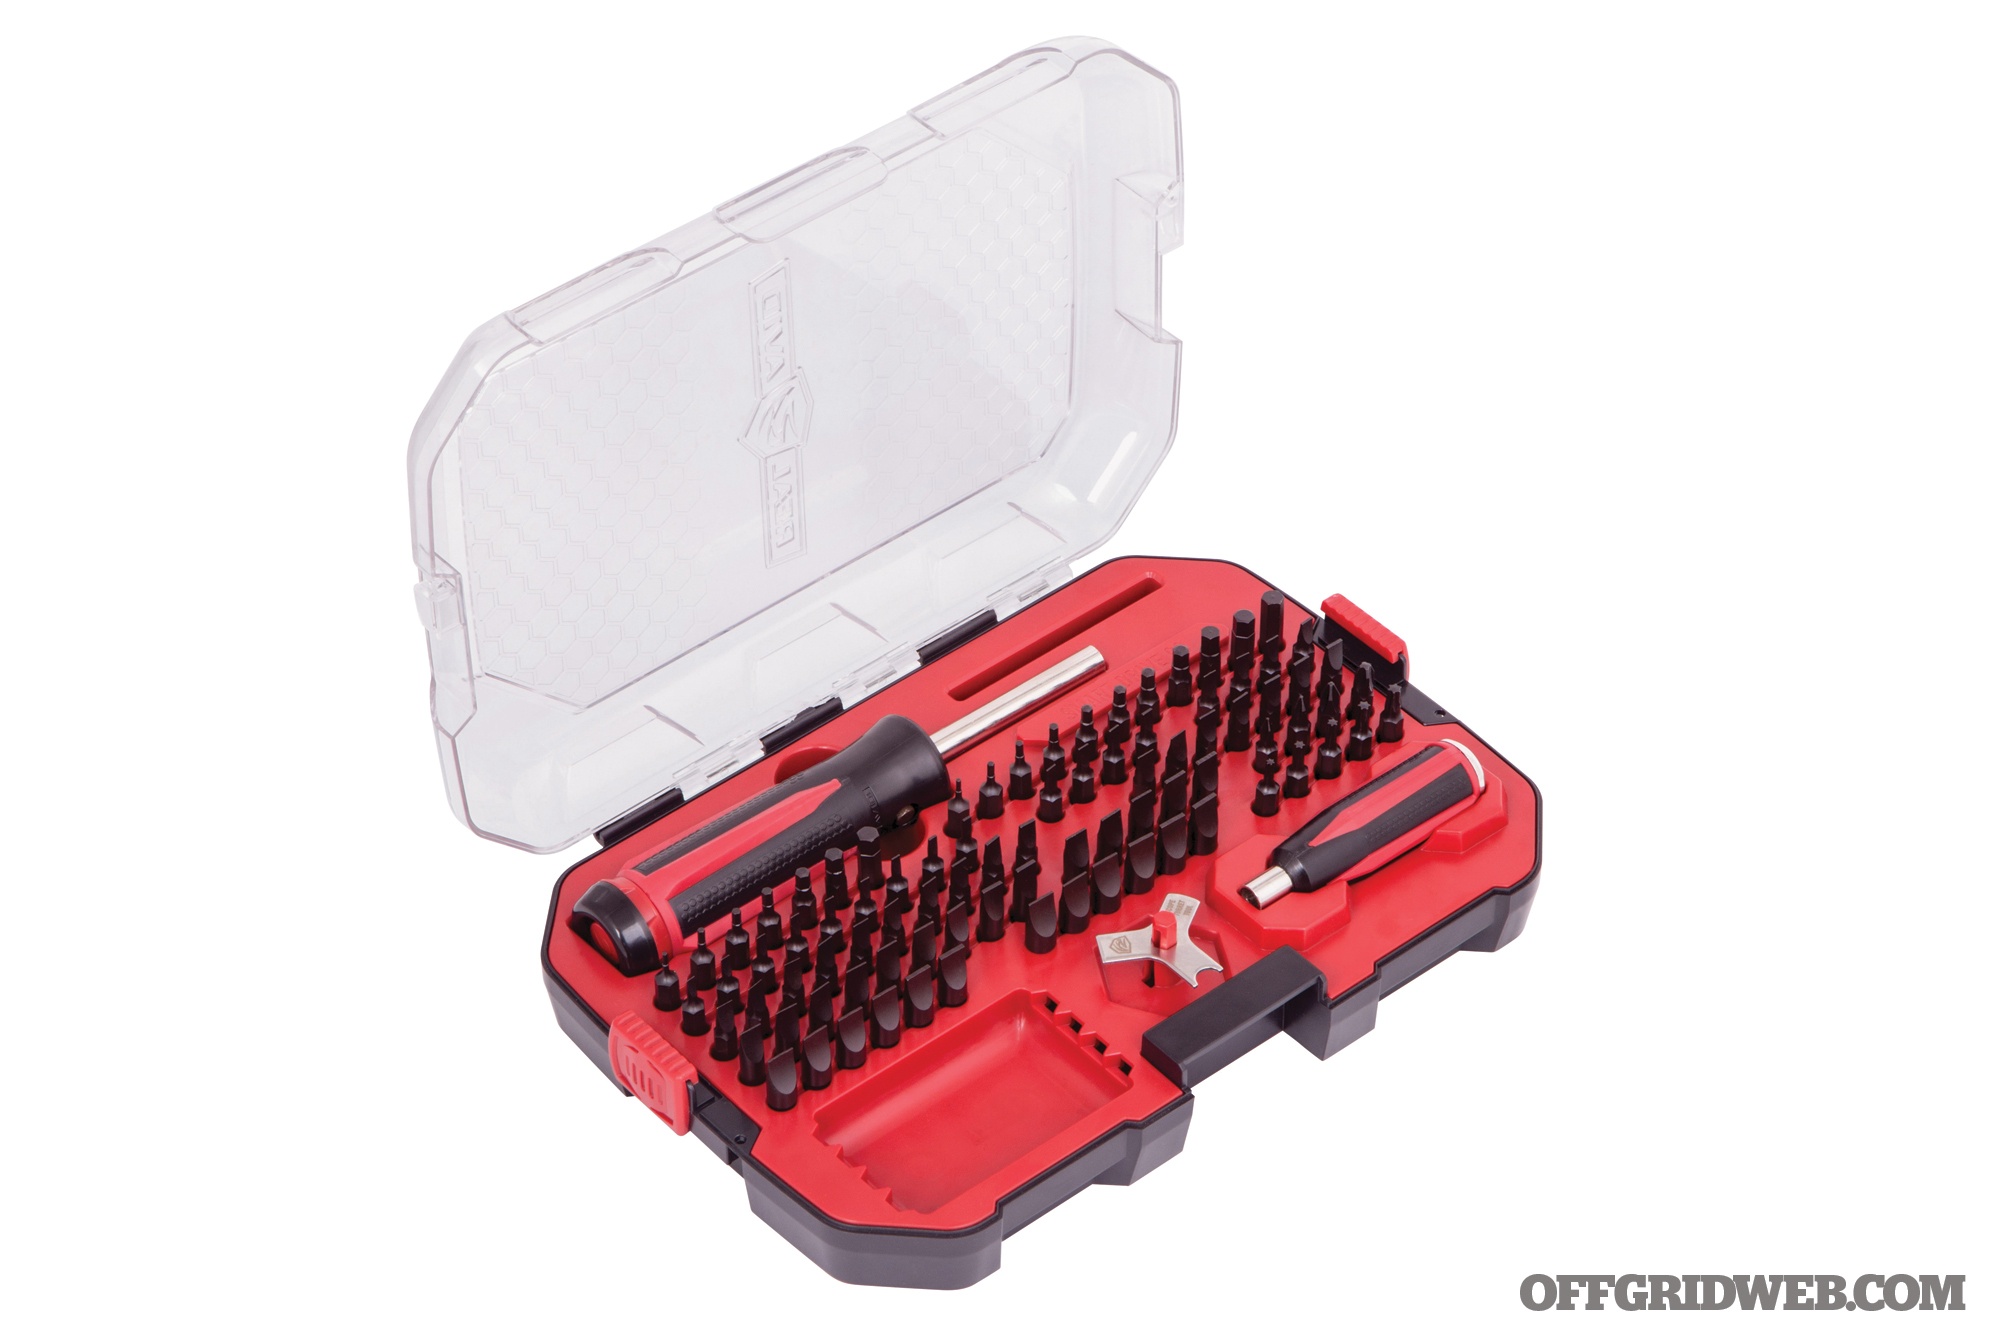
NOTES If a long-term survival situation does happen, you’ll need to keep your tools running at optimal states with limited resources. This is especially true with firearms; it’s not like they’ll be a post-apocalyptic armorer opening up shop at every overrun street corner. No, you’ll have to make repairs yourself. Fortunately, Real Avid offers all sorts of useful tools, including the Smart Drive 90. This 90-piece gunsmithing kit includes everything from a scope turret tool to 87 standard and metric black oxide-coated gun bits. Plus, it comes with an LED-enabled bit driver that — when paired with a “close-quarters” driver — uses Real Avid’s Force Assist system to precisely tighten screws or loosen stuck ones.
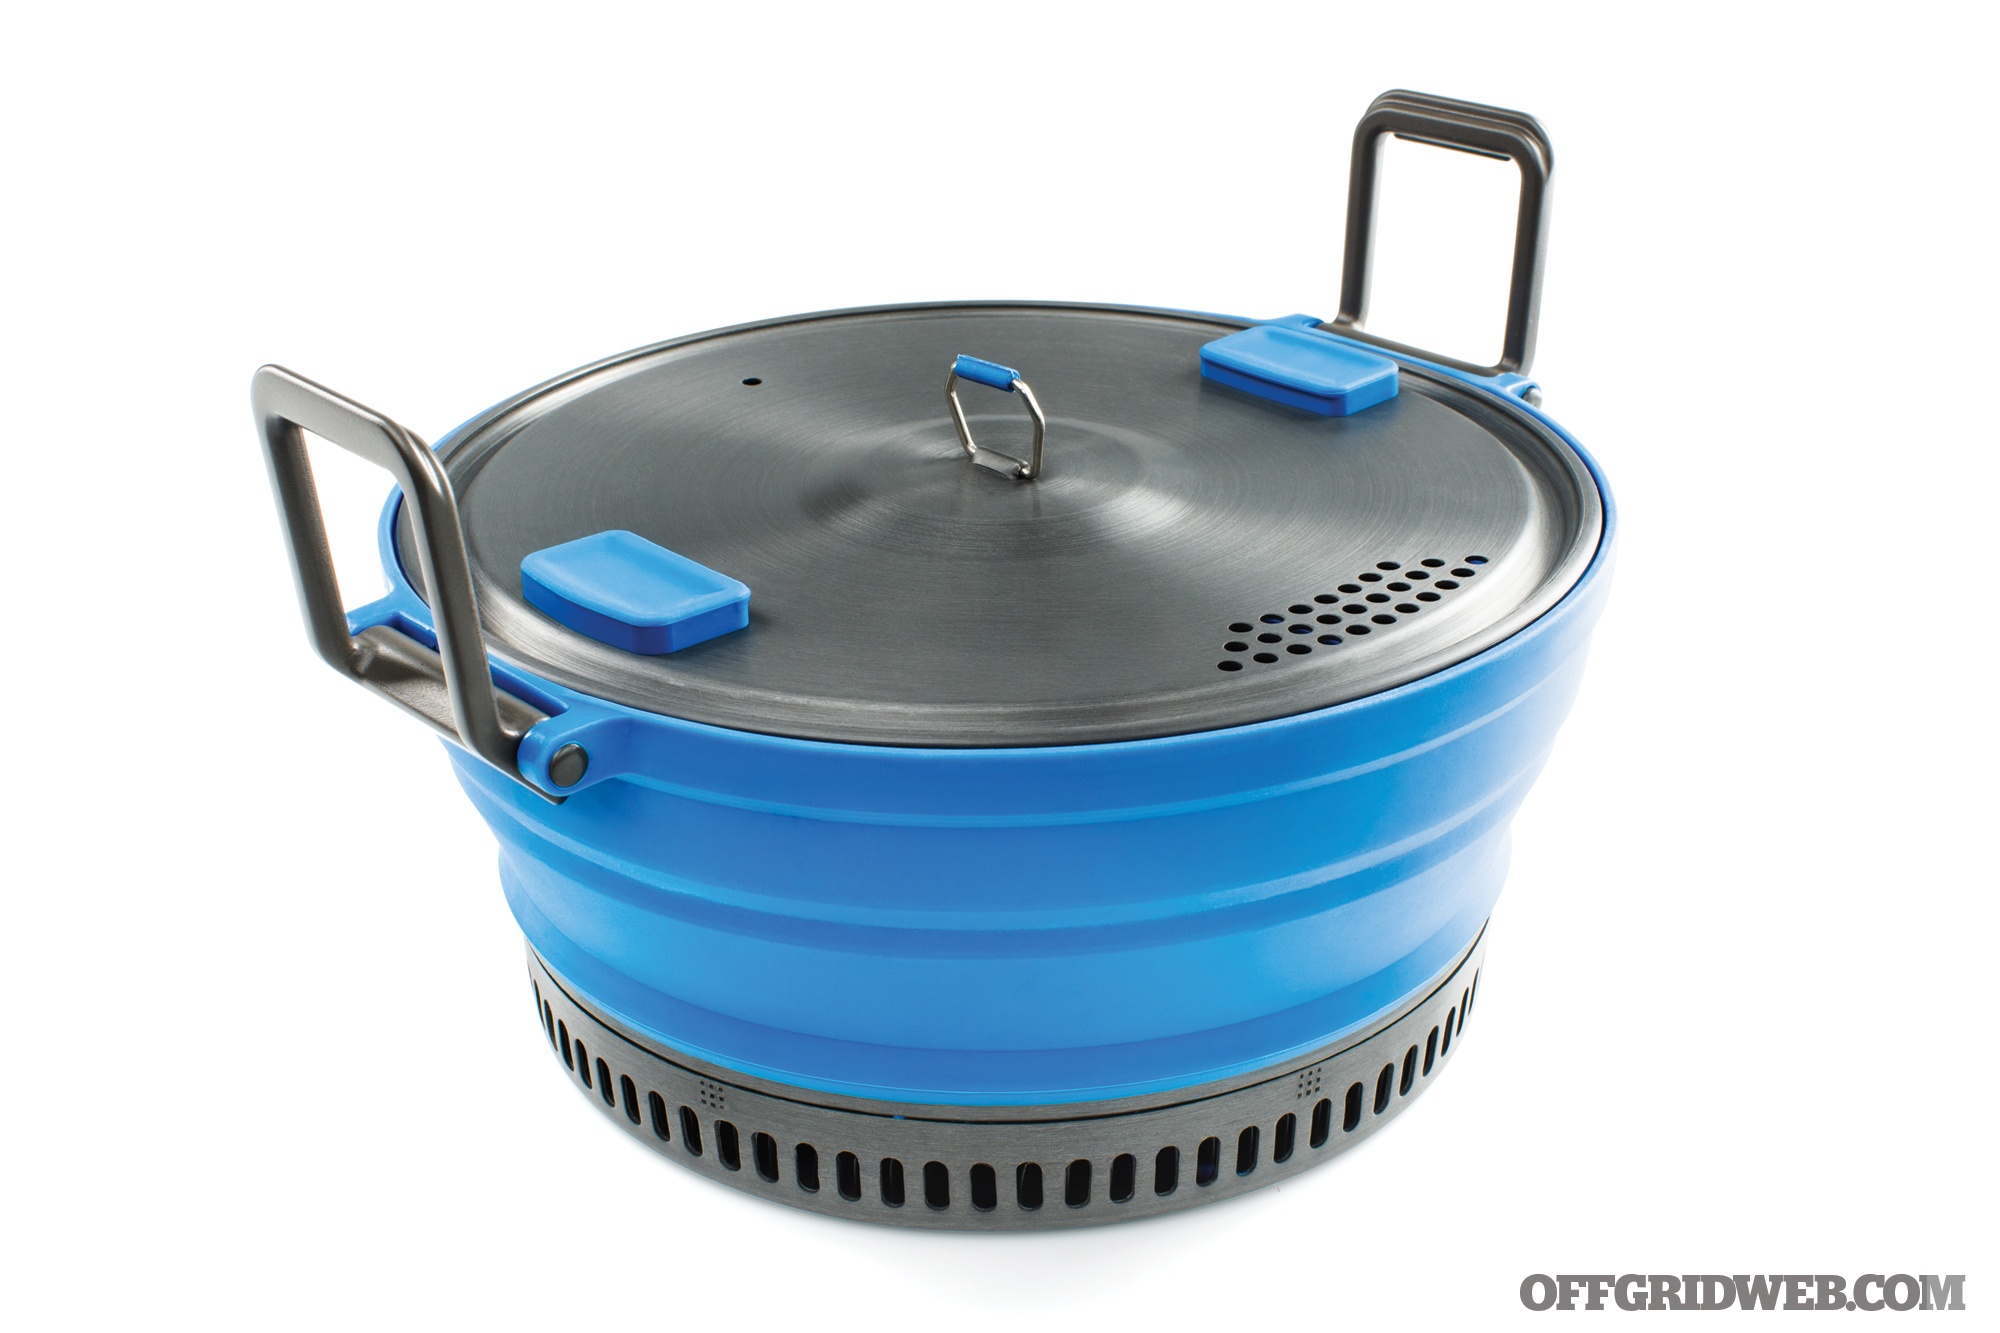
NOTES For years, your choice of camping pots was between silicone and metal. The former offered space savings and lightness while the latter performed faster and was more fuel efficient. Now you don’t have to choose. The Escape HS 2-Liter Pot combines a collapsible silicone body with an aluminum heat sink base that’s coated with Teflon. GSI Outdoors says that its pot saves 53 percent volume, cooks 30-percent faster, and uses 30- percent less fuel than traditional cookware technology. The aluminum lid has integrated straining holes as well as silicone thumb pads to insulate hands from heat. Plus, it collapses down to a 1.9-inch-thick disc for easy portability.
Columbia River Knife & Tool Black Woods Chogan T-Hawk with Sheath
NOTES Ryan Johnson of RMJ Tactical offers some wicked axes for a premium price. But for the blue-collar worker, forking over four C-notes for a tomahawk can be a tall order. Fortunately, CRKT often teams up with him to mass produce his designs and offer them at more affordable levels. Take this model for example. This CRKT.com exclusive offers the popular Woods Chogan T-Hawk with a new look, courtesy of a black magnesium phosphate coating on the 1055 carbon steel head for increased corrosion resistance, a firewood-burned Tennessee hickory handle for a darker aesthetic, and a quality leather sheath. This two-handed ax features a hammer on the backend and weighs just shy of 2 pounds.
NOTES Utah Knife Works owner Mark Russon says that almost 40 years ago his father, Robb Russon, came up with the design for what would eventually become the Tom Brown Tracker knife (which appears in the 2003 film The Hunted) but never got credit for it. So, the younger Russon gave his dad’s model a 21st century makeover and renamed it the UKW Survivor. While we don’t have the space here to investigate further (Russon’s side of the story is on his website), we did get a chance to review his new knife. Each section of it serves a survival purpose. For example, the spine’s sawteeth is for sawing or notching branches, while the utility hook is for processing game. Made of 9Cr18MoV stainless steel with a glass-reinforced nylon handle, the UKW Survivor is a jack-of-all-trades tool that’ll win over some bushcrafters … and maybe even a few Tom Brown fans, too.
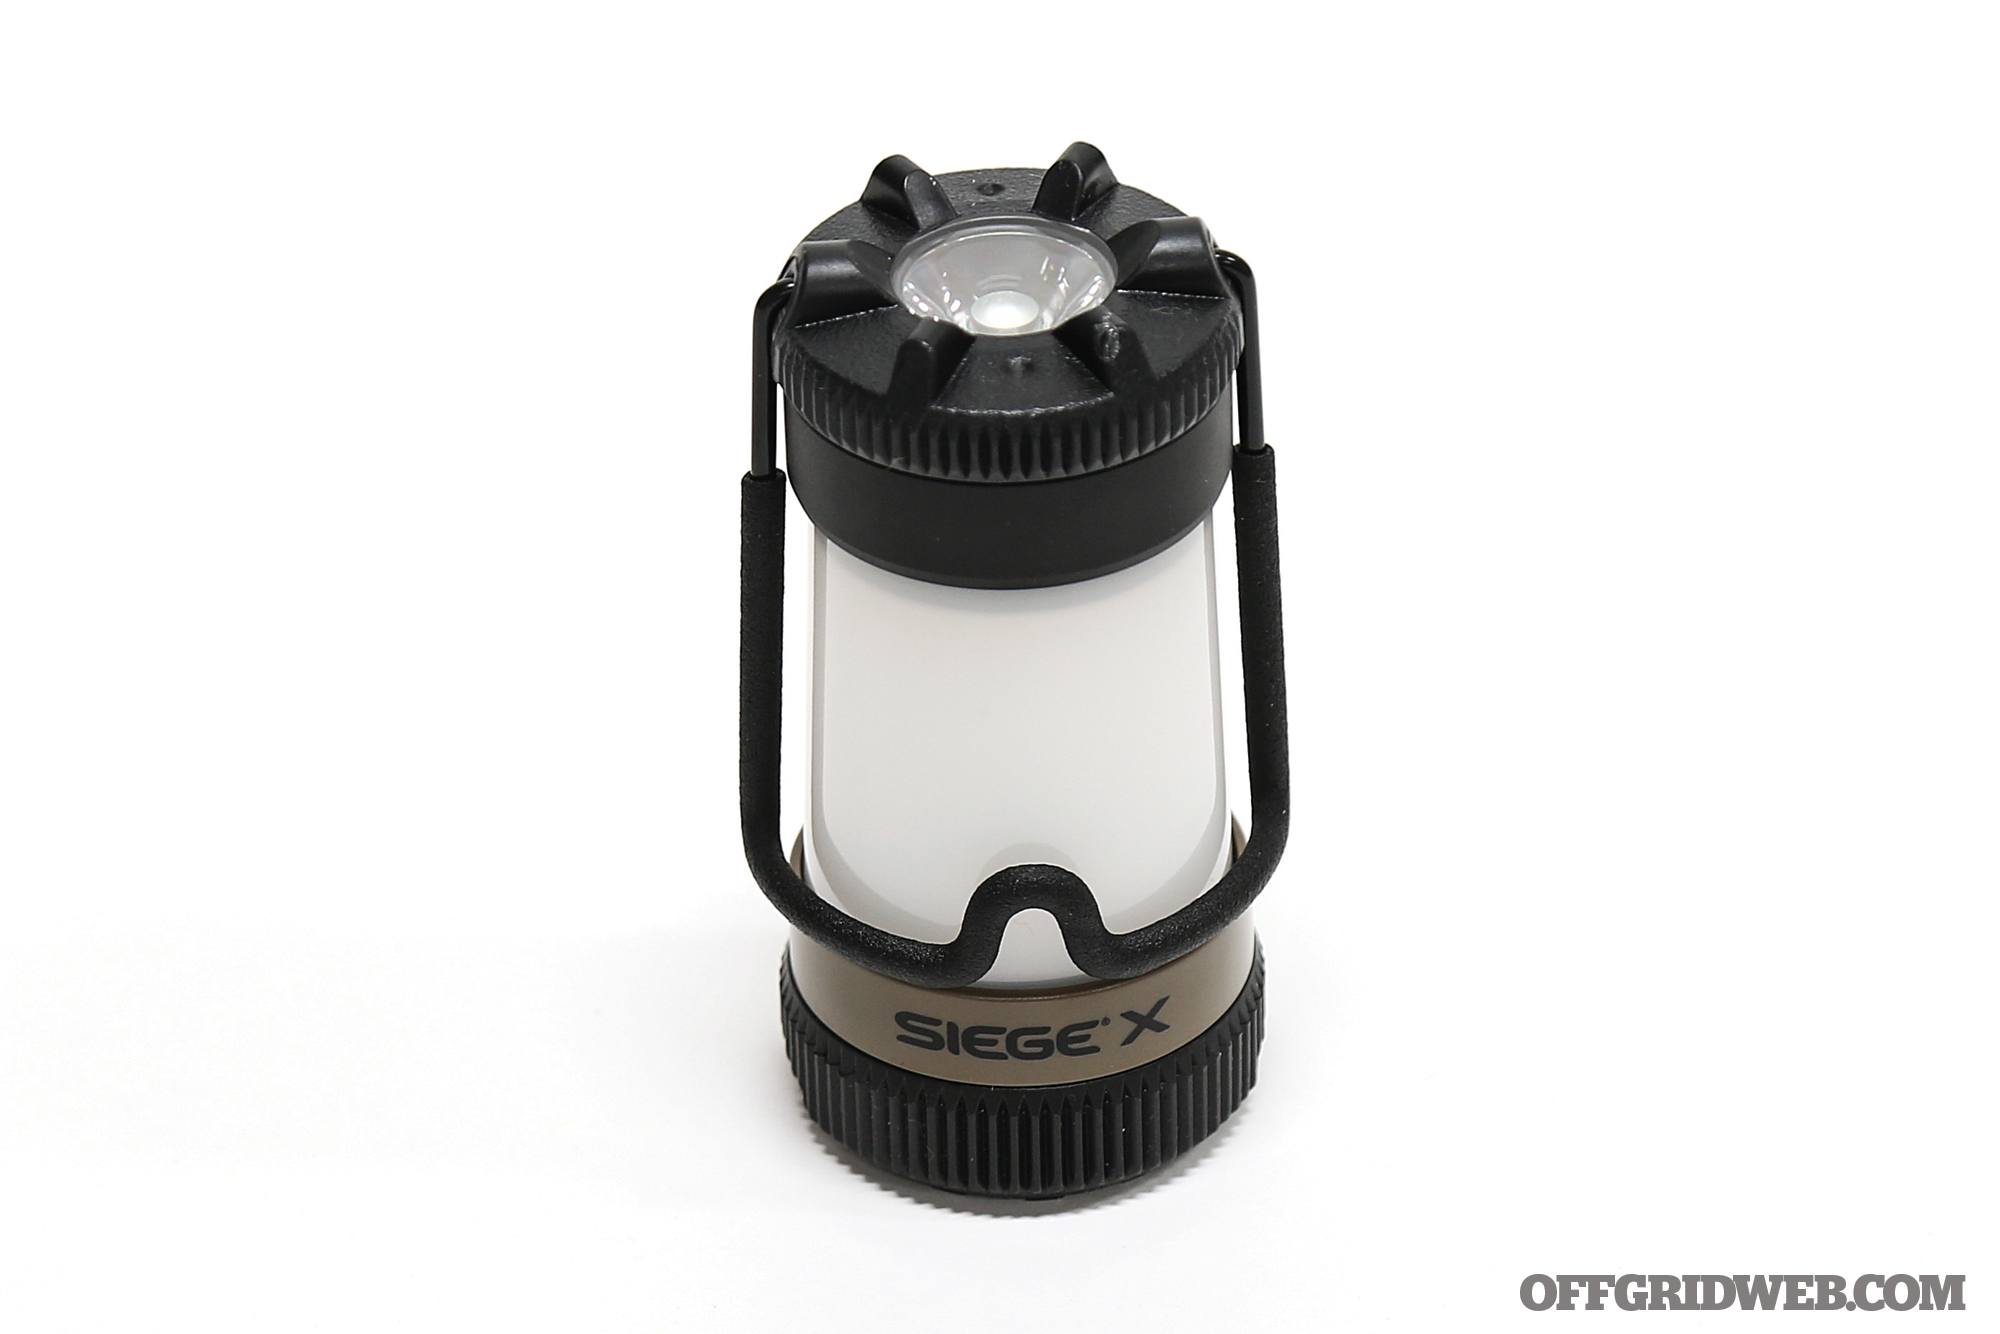
NOTES Just when we think Streamlight can’t make its lanterns any better, we’re proven wrong once again. The Siege X USB is the latest rendition of this popular series and features a small frame that packs plenty of power. Its white LED has three modes, with a max runtime of 4.5 hours and a high output of 325 lumens. For emergencies or preserving night vision, it has a 1.6-lumen red LED that can run for 22 hours or flash SOS for 90 hours. It can run on two CR123A lithium batteries, or you can recharge it by plugging the USB cord directly into its included 18650 battery. The IPX7 waterproof lamp is also loaded with more user-friendly features than we can list, from an integrated D-ring to a recessed power button to prevent accidental activation.
NOTES With 10x magnification and GPO’s proprietary lens coating technology, the Passion 10×56 offers powerful clarity at great distances — a vital ability, whether you’re hunting for big game or watching out for marauders in a post-SHTF situation. These binoculars feature a magnesium body that shaves some ounces without giving up any strength or durability. The lenses have GPObright coatings, which allows up to 99.7 percent of available light to pass through each optical surface. What does that mean? What you see is clear even in low-light conditions. While they’re not the lightest binos we’ve tested at 2.58 pounds, the Passion 10×56 is both waterproof and fogproof, and comes with neoprene strap, hard case, hard-case strap, cleaning cloth, and lens covers.
Notes If you’ve spent any amount of time in the great outdoors, you’ll know that extreme heat or cold can kill you, but it’s the insects that’ll drive you insane. Fortunately, the Hanger Work Henley LS can help with that. It’s a casual-looking performance shirt that’s been treated with Insect Shield technology, which helps to repel ants, ticks, flies, chiggers, midges, and mosquitoes. Plus, it has Polygiene odor control that inhibits bacteria’s ability to grow. And on top of all that, this attractive Henley provides a blend of stretch, comfort, and moisture-wicking properties — letting you enjoy the outdoors without the bugs or stench.
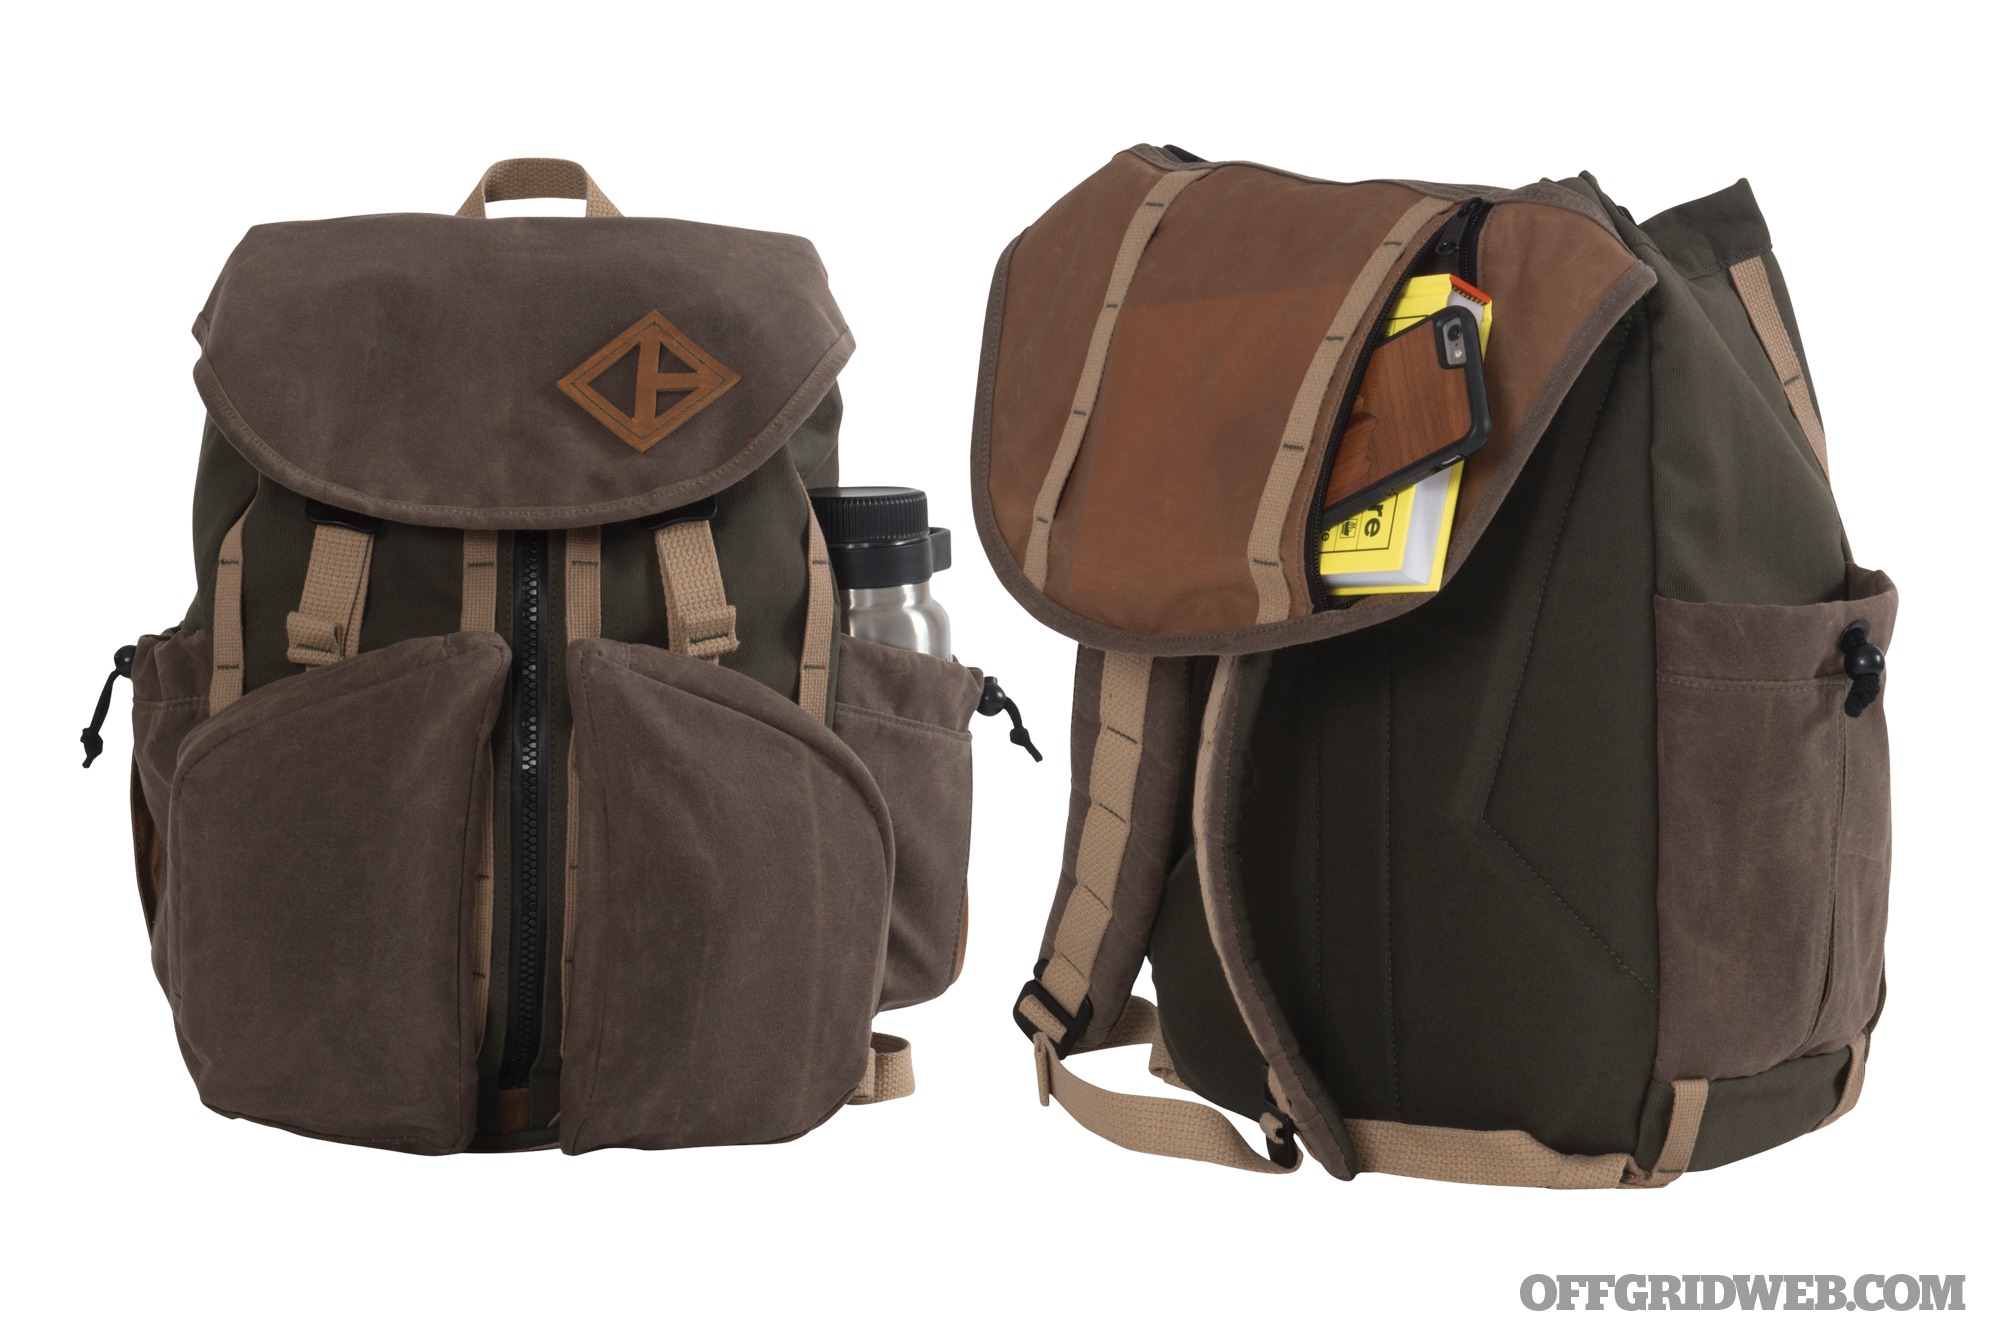
NOTES If this pack gives you that vintage vibe, that’s because Diamond Brand has been around since 1881. Yep, the 19th century. So it knows a thing or two about making durable goods, such as the Great Day pack. This 24.5-liter bag features a water-resistant YKK zipper that runs down the center to provide full access to all your items, adjustable straps that let you switch to sling carry, and detachable front pockets that can be used as standalone sacks. There’s also multiple but subtle PALS webbing so you can attach keys, carabiners, or other gear. This backpack is made in the USA from 18-ounce canvas with wax and a durable water- resistant coating.
NOTES Sun’s out, shades on. At least if you want to maintain healthy eyes and full situational awareness this summer. Unfortunately, not all of us can afford to plunk down two Benjamins for a pair of Oakleys or Smith Optics. Fortunately, there’s the Overwatch. These sunglasses don’t just look good, but are also a solid piece of eye protection, having passed the U.S. military’s MIL-PRF 32432 high-velocity impact standards. The antifog, scratch-resistant polycarbonate lenses provide 99-percent UVA/B/C protection. Meanwhile, the soft nosepiece and rubber temple tips offer daylong comfort.
Wenzel’s Farm Snack Sticks
FLAVORS 11, including teriyaki, beef with bacon, and jalapeno cheddar
Notes Everyone loves to stock up on survival food, but no one really loves to eat it. There’s a reason why MREs (Meals Ready to Eat) are often called “Meals Rejected by Everyone” (due to their manufactured taste) and “Meals Refusing to Exit” (due to their constipation-inducing nature). Fortunately, Wenzel’s Farm has come out with its line of Snack Sticks made of real meat from real animals raised on real farms. They’re naturally smoked, have no MSG or artificial colors, and are a solid source of macronutrients. (A 1-ounce Jalapeno Cheddar Stick has 5 grams of protein and 8 grams of total fat.) Plus, every individual package (which comes with two Snack Sticks) has a shelf life of 12 months. While it won’t replace a meal in a post-disaster scenario, it can boost morale or tide you over until you can hunt your own game.
Carrying a concealed handgun is a subject that we could talk about for hours, given the countless technique considerations and gear options to choose from. You may already be well-versed in the subject — if you’re not, our sister publication CONCEALMENT is a great place to start learning. But concealed carry applies to more than just weapons.
Emergency medical items such as a tourniquet, hemostatic gauze, and a pressure dressing are critical for dealing with traumatic injuries immediately after they occur. However, it’s not always ideal to carry these tools openly — doing so may lead to awkward conversations with coworkers or relatives about how “paranoid” you supposedly are. By concealing your medical gear, you’ll have access to lifesaving tools without advertising your preparedness.
In the following RECOILtv Mail Call episode, former MARSOC Captain Billy Birdzell gives a brief overview of two pieces of medical concealment gear from PHLster. We’ve previously mentioned the company’s Flex Appendix carry system, which offers an AIWB platform for carrying a handgun, spare magazines, and other small items. For those who’d rather distribute gear to other parts of the body, the Pocket Emergency Wallet and Flatpack Tourniquet Carrier are potential options.
The Pocket Emergency Wallet carries a compression wrap, gauze, a hemostatic pad, and a pair of gloves in a slim back-pocket-sized package. The Flatpack Tourniquet Carrier includes soft belt loops and strong elastic straps to retain a CAT, SOFTT-W, or other CoTCCC-approved tourniquets on your belt. For more info on each, go to phlsterholsters.com.
Got a tip you’d like to share? Send it to offgrid@recoilweb.com along with a well-lit, high-resolution photo of yourself. Also include your name, and your website or social media handles if applicable. Please keep your tip submissions between 250 and 350 words. By sending in submissions, you grant CMG West LLC the unrestricted, transferable and sub-licensable, irrevocable, royalty-free, world-wide, and perpetual license to reproduce, distribute, publicly display, make derivative works of, and otherwise use the Submissions in any media whatsoever now known or later invented throughout the world for any purpose whatsoever, commercial or not.
It wasn’t long ago in our country that children, even young ones, were expected to do a lot more than sit around the house and play video games. Because of this expectation and the necessity that drove it, our children were capable of much greater utility than they’re given credit for today. We tend to prolong their adolescence by protectively ushering them away from adult responsibility when really their capacity for maturity and action is astounding when properly nurtured.
One of the things I like to focus on with my children is familiarization with emergency equipment. When you have six children, you need every helping hand you can get particularly in an emergency. But if that helping hand isn’t familiar with the item you need to address a problem, what it looks like, or where to find it, then you’re not leveraging all your assets.
I prefer to make my children an asset rather than a bystander, so periodically we go through all our household and vehicle equipment: first-aid kits, go-bags, off-road recovery kits for the vehicles, hurricane supplies, etc. We lie out each kit and talk about each item inside, its purpose, how to use it, change the batteries, and so on.
I don’t expect my 7-year-old daughter to know how to use a chest seal, but she can certainly identify one and hand it to dad if she happens to be the only free hand nearby. Same goes for my 13-year-old son. Mom or dad will hook the shackles to the truck to pull a stump, but now he can reach into the bag and identify what’s needed. So, familiarize your family, and the next time you need a pair of pliers, your son or daughter can be the force-multiplier who makes the difference.
Mel Ward
Parenting and prepping are both about learning how to confront fear and mitigate insecurity. My son is in his afraid-of-the-dark phase right now. To help him overcome this natural fear and impart some survival skills in the process, we’re talking a lot about flashlights. He’s quickly learned the value of having flashlights staged by his bed and around the house.
For example, the other night he had a bad dream. Instead of lying in bed calling for me in a panic, he grabbed his flashlight, turned it on and oriented to his surroundings, and then came to me. A lot of times, the easiest way to train our children is to disguise it as some form of play. So we’ve also done a few nighttime Nerf gun battles and hide-and-seek games where I black out the entire house and only allow flashlights for searching. The use of Nerf guns allows for a little bit of negative reinforcement (getting hit with a dart) that’s still fun and light-hearted. This is a fun, mildly competitive way to teach search techniques and light discipline.
There’s also an element of light tactics here — i.e., how you don’t necessarily want to stare directly where your light is shining, or how to bounce your light off adjacent surfaces for a broader, indirect illumination. We’ve also touched on “strobing” techniques to blind or disorient an armed (with Nerf guns) opponent. Light work is the kind of thing that you can constantly reinforce through play or routine chores/household tasks. Can’t find your favorite toy? Grab your flashlight and check the way back of your closet. Using white light is something that most people do every day, but don’t think about as a useful skill. A few key pointers, instilled early on, can allow your children to turn a flashlight from a neat toy or occasional convenience into a dedicated tool for all kinds of situations.
Editor’s Note: The following article is a web-exclusive accompaniment to “Road Warrior” by Mel Ward, as seen in the upcoming Issue 33 of our magazine (on sale 8/6/19). In the print article, Mel covers a variety of tips for maintaining safety and security while on a cross-country road trip. Traveling with guns presents its own list of challenges, which Mel examines below.
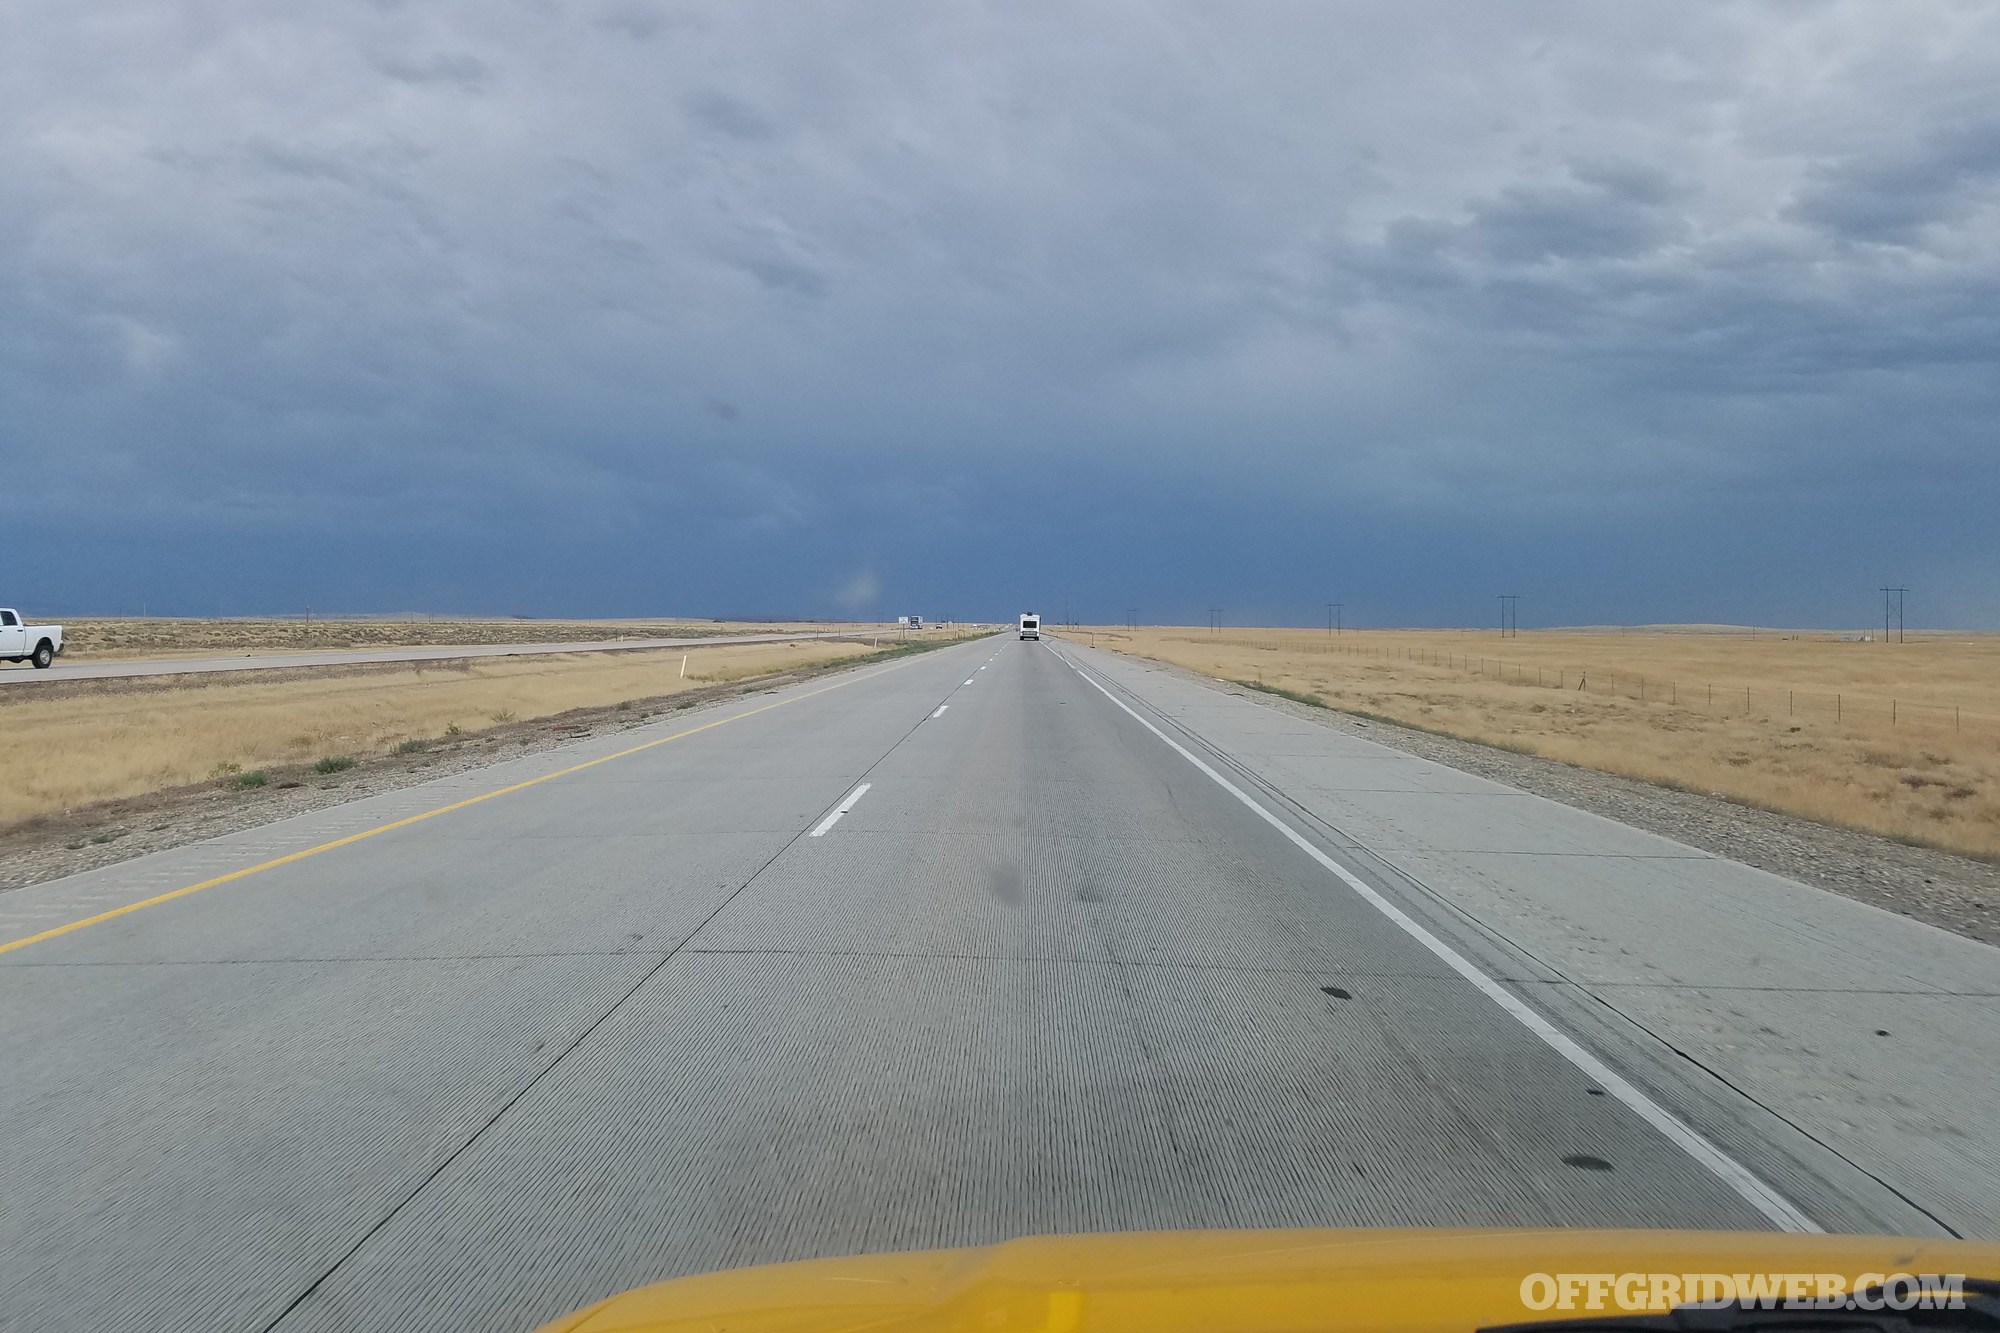
Recently, I completed my second coast-to-coast crossing. As a parent, I found myself confronted with a plethora of challenges presented by traversing 3,500 miles from Washington State to North Carolina in two vehicles with a wife, five children, two dogs, and everything we owned packed into a 16-foot box truck. The following considerations are based on the lessons my family learned while traveling across the country.
Traveling with Firearms
You may or may not be traveling with a firearm. In our case, we were traveling with every gun we owned as we were moving our household across the country. For me personally, this meant I needed to address two issues:
Legally transporting my daily carry pistol for protecting my family on the trip
Legally storing and transporting the rest of the pistols and rifles in my collection in the back of the moving truck
The consequences of ignoring these issues could be dire — arrest, imprisonment, theft, or even your own guns being used against you and your loved ones.
Carrying for Protection
Obviously, I recommend carrying your preferred firearm for protection. That choice, and how you choose to do it is up to you, but we need to be well aware of the legal considerations since we are crossing into city, county, and state jurisdictions that may have gun laws that differ from what we’re used to.
First off, ensure your CCW license will be valid for the duration of your trip. Next, know the reciprocity of your state’s CCW license. Many CCWs are recognized in multiple states. Interactive reciprocity maps can be a good place to start — for example, the USCCA offers a free and frequently-updated map. However, I also like to consult my state’s official government page for all laws pertaining to licensing, carrying, and transporting firearms as well as those pages of any states I’ll be passing through along my chosen route. This enables you to have the most up-to-date information possible for each specific locality along your journey straight from the source. Double-check everything before you leave — it’s not worth the risk of ending your trip early by getting arrested.
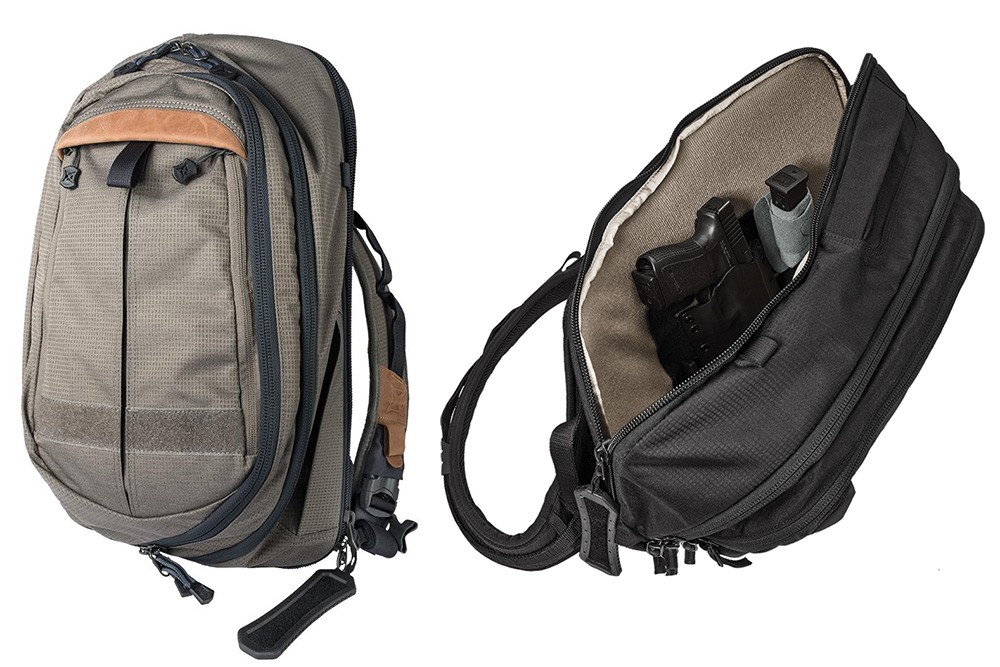
Now, how do we want to carry for optimum protection throughout the trip? It’s hard to beat a good inside-the-waistband holster, but we made this household move in the middle of summer and that called for a steady diet of shorts and T-shirts each day. Depending on your preferred carry position, sitting in the car for hours can also cause IWB carry to become uncomfortable. Without being able to adequately conceal my pistol in a holster, I instead opted to use a single-strap backpack from Vertx called the Commuter Sling.
I was incredibly pleased with the Commuter Sling’s one-shoulder design as it allowed me to skip trying to conceal a full-size pistol on my hip in the summer heat. The sling looks like a high-end messenger bag a college kid might carry, but when you sling it around from back to chest and start unzipping quick-access pockets, the bag goes from urbane to urban combat in nothing-flat. If traditional carry options are unavailable, I strongly recommend a purpose-built bag such as this one. A backpack can do in a pinch, but bags like this are designed with people like us in mind. They feature incredible durability and rapid accessibility in time-is-life situations.
The Vertx Commuter Sling features a purpose-built pocket for CCW weapon storage.
Inside the bag’s Velcro-friendly pistol compartment I carried my full-size Glock 17 held in place by a nylon holster built specifically for this carry configuration. Accessing the pistol by rotating the bag to your chest and yanking open the zipper with oversized lanyard is fast and simple.
Inside the outer-most rip-away compartment I utilized the bag’s built-in MOLLE-compatible loops to weave in a nylon magazine carrier to store five additional magazines hidden from view. In other zippered pouches I stored a light, headlamp, and various other EDC items I wanted close at hand. The Commuter Sling also has compartments to throw your keys and wallet in while you hoof it around on foot. Basically, this bag contained everything I needed to defend my family while looking like nothing more than an ordinary shoulder-slung backpack.
Like so many other suggestions in this article, kit like this is worth the investment. I never had to worry about printing and I was able to one-hand this bag even when carrying one of my young daughters on my hip. Give these bags a look and see if you don’t agree. For more information on carrying concealed, refer to our sister publication CONCEALMENT.
Storing and Transporting Additional Firearms
This is pretty straightforward, but let’s be thorough and cover it anyway. I took every single rifle and pistol I owned on this move. With the exception of my carry gun, I ensured each was unloaded and locked in either their original container or a purpose-built, lockable gun storage box. Next, I ensured all my ammunition was stored in its original packaging (as much as possible) and locked everything away in ammo cans separate from my firearms. Ideally, I would have even gone a step further and transported the ammunition separately, but I had way too much to cram it into the back of my wife’s already overcrowded Suburban. So, I simply made sure weapons and ammo in the back of the rental truck were locked, separate, and physically inaccessible from the passenger compartment.
Next, I purchased an absolute beast of a lock for the back of the rental truck and ensured it was secured at every stop and fill-up along the way. (Refer to “A Look at Locks” in Issue 32 for a guide on selecting a high-security lock.) When we stayed overnight, I opted to leave everything securely locked in the back of the truck. The thought occurred to me to bring the weapons inside, but honestly, I found this to be impractical for several reasons.
For one, I had far too many weapons with me on this cross-country move. They would have needed their own hotel room. I also didn’t want to draw attention to myself by hauling an arsenal inside each night, since hard-sided gun cases look exactly like what they are. I also didn’t want to spook the management, other guests, or alert potential ne’er-do-wells I was sitting on a small fortune in firearms. Finally, I wasn’t fond of the idea of my little ones playing hide-and-go-seek amongst stacks of daddy’s rifles in the hotel room, unloaded and locked though they were.
Ultimately, this decision is up to you, but this was the safest and most practical course of action for my family. Also, the National Rifle Association Institute for Legislative Action recommends you carry printed copies of all your relevant permits and licenses as well as copies of pertinent laws governing the carry and transportation of firearms in each jurisdiction you pass through. This sounds like a lot of work, but it’s really not, and will be well worth the time and effort should you be pulled over.
Now that we’ve discussed what we’re carrying, how to carry and transport it, and how to do so safely and legally, our next part in this series will cover a topic that’s just as important. Check OFFGRIDweb.com next Sunday for Part 2 of our Road Trip Safety series, which addresses ways to maintain situational awareness on the road.
The Premise: Just like the title says, this book contains 101 skills that can save your butt when you’re outdoors. Where this book differs from others with a similar premise is the method in which Kevin Estela, of Estela Wilderness Education, shares his information — he’s a trainer of “feeders.” For the uninitiated, feeders are students of Sayoc Kali, a Filipino martial art that demands students be adaptable, smart, and have the mindset to take control of their situation, whether it’s a knife fight or surviving a night in the woods alone.
Estela provides proven and hard-learned lessons for the reader as well as challenges to them.
The 411: The 101 skills in the book are broken down into 10 sections: fire, shelter, knife, cordage, illumination, navigation, signal and communication, first aid and trauma, water, and food gathering. Each explanation of the skill paints a picture in the reader’s mind about why the skill is important and what the takeaway should be. At the end of each section are ways to further your training with simple out-of-the-box challenges.
The Verdict: Estela launches into the book with some backstory on himself and, most importantly, the methodology of Sayoc Kali and becoming a feeder. Even if you’re not a martial artist, the feeder mindset is applicable to any of life’s situations, and this was explained well. The introduction to this book makes the reader want to improve their skills and Estela explains how his book can help. To say the least, reading the intro motivates the reader to grow into a better person.
The organization of the book is excellent for both the experienced and budding woodsman. Reading through a section and then trying each skill is a worthy and rewarding endeavor. The pace isn’t overwhelming, and each skill builds on the next. Since Estela is both a high school teacher and a professional wilderness survival educator, his ability to connect with the reader was apparent in how he conveys information. Each skill is described in depth and generally accompanied by a visual example. The mantra “always prepared, prepared all-ways” helps the reader understand the overarching theme.
The sections start with introductory skills and build on each one or progress in difficulty and complexity. Here are few of our favorites:
Skill 13: Build a hot seat/bed, a method for warming yourself or your shelter while diminishing concerns of open flame proximity.
Skill 71: Turnbuckle Rattler Perimeter Alarm, a skill that uses proficiency in imagination as well as resourcefulness and knot tying.
Skill 100: Elastic band hunting tools, showing a variety of ways to improve on the old slingshot.
We have very few complaints for 101 Skills You Need to Survive in the Woods; however, our one small gripe is that some skills lack a picture where it would be appropriate. With that being said, going back to the prevailing mindset, a feeder would seek this out elsewhere in an effort to expand personal knowledge. An example would be Skill 81: Use Medicinal Plants. Pictures are provided for only one of the five plants discussed. When it comes to identifying plants, it can be very difficult (and often dangerous) to get it incorrect. Estela does start this skill with a recommendation of seeking the assistance of a local expert.
Overall, Estela knows his stuff, as anyone who has read his previous articles in our magazine can attest. He has made these important skills easy for the common person to read and understand in 101 Skills You Need to Survive in the Woods. His encouragement to train and build on that training will produce a competent woodsman who can adapt and survive in a variety of situations. While many of these skills focus on wilderness survival, having the proper mindset can also be adapted to urban environments.
Book & Author 101 Skills You Need to Survive in the Woods by Kevin Estela
Disclaimer: This article is for informational purposes only. Check all local, state, and federal laws before producing, consuming, or distributing alcohol. Also, improper sanitation or sealing of stored products could cause illness. If you choose to try the recipes here, be well informed and do so at your own risk.
When preparedness enthusiasts start talking about SHTF barter items, the list almost always includes alcoholic beverages. Diversified preppers often stock up on liquor and wine, since they age well, and some even dabble in storing beer (which needs to be rotated, aka consumed, before it gets “skunked”). Since all good things come to an end, at some point your stocks would run out. In the event of a drawn-out economic crisis or grid-down scenario, the value and importance of alcohol would likely increase.
But what’s your resupply strategy? Have you ever thought about making your own wine or beer? It’s not as hard as you might think, and you don’t even need much in the way of supplies. I’ve been home-brewing beer, wine, mead, and hard cider for years, and even running an annual class on the subject here in Virginia. I can’t make any promises about the taste of your first batch, but I’ve been blessed with some very good home-brew batches over the years. With a little luck and diligence to the details, you’ll brew some good batches too!
Fermentation Basics
Before we launch into the nuts and bolts of creating your own alcoholic beverages, it’s important to understand the unsung hero of it all — yeast! This is a fungal organism, acting a bit like a plant and a bit like an animal. There are about 1,500 known species of yeast, with countless strains of each species. Our little friend Saccharomyces cerevisiae is the most important one for our purposes; since it eats simple sugars, burps out carbon dioxide, and excretes alcohol (when held in a sugary liquid in a favorable temperature range and low oxygen levels).
When the right yeast is added to water filled with grain malt sugar, it proliferates and consumes the maltose. The result is beer. When the right strain of yeast goes into fruit sugar water, you get wine. Beer is made with less “sugar” per gallon, and wine is generally made with double the “sugar.” This is why most beers are about 5-percent alcohol by volume (ABV) and wines are around 10-percent ABV.
It takes roughly a month to initially ferment these drinks, during which time the excess CO2 must have a way to escape without letting in oxygen (that would make vinegar instead of alcohol). The job of letting CO2 escape is handled by one of the many forms of “wine lock.” When the alcohol tolerance of the yeast strain is reached in the sugar water and the yeast cells are, essentially, too drunk to work anymore, fermentation slows to a near stop. At this point we’d do separate steps for beer and wine — carbonate the beer and age the wine. Then, after the right amount of time, your work should yield a familiar product. For our purposes, we’ll start with wine, since it’s a simpler process, and work our way up to beer. Enjoy!
Fermenting Wine
Historic Roots: According to scholars, the production of wine dates back even farther than beer. It may have started with naturally fermented fruits, or it could have been watered down honey that turned into wine — commonly known as “mead.” Not only did this strange new elixir give our ancestors a good buzz, wine had the added benefit of being a practical way to preserve the calories of fruit. When you give it a try, go easy in the beginning and don’t be too hard on yourself if your first batch is a little weird. Remember there are thousands of wineries in the world making hundreds of styles of wine on a world-class level. And you’re just fermenting the juice from some berries by keeping it in a jug in your basement. Your results may vary.
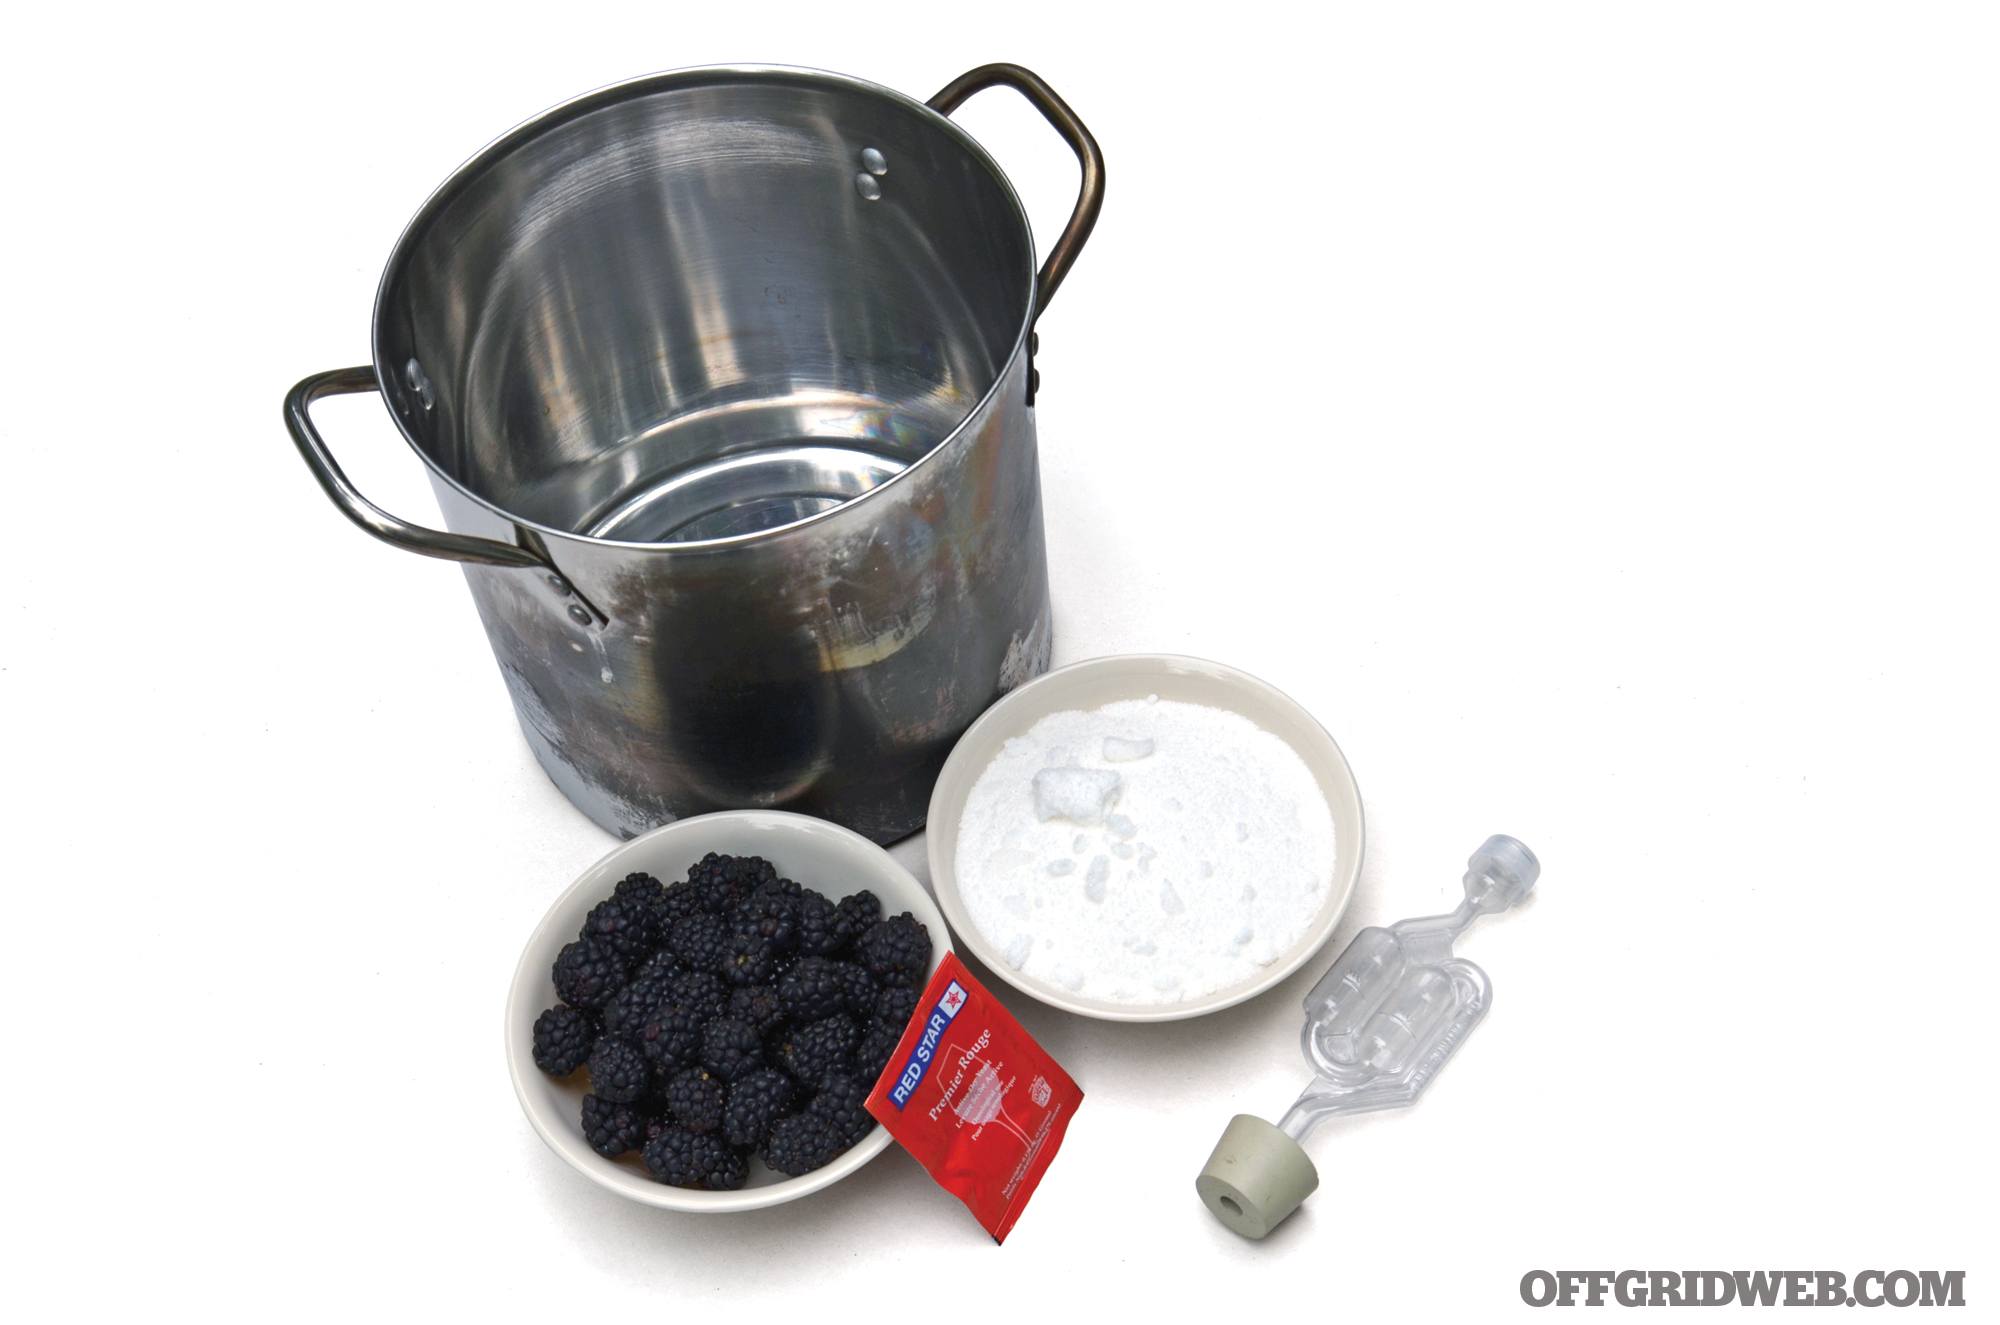
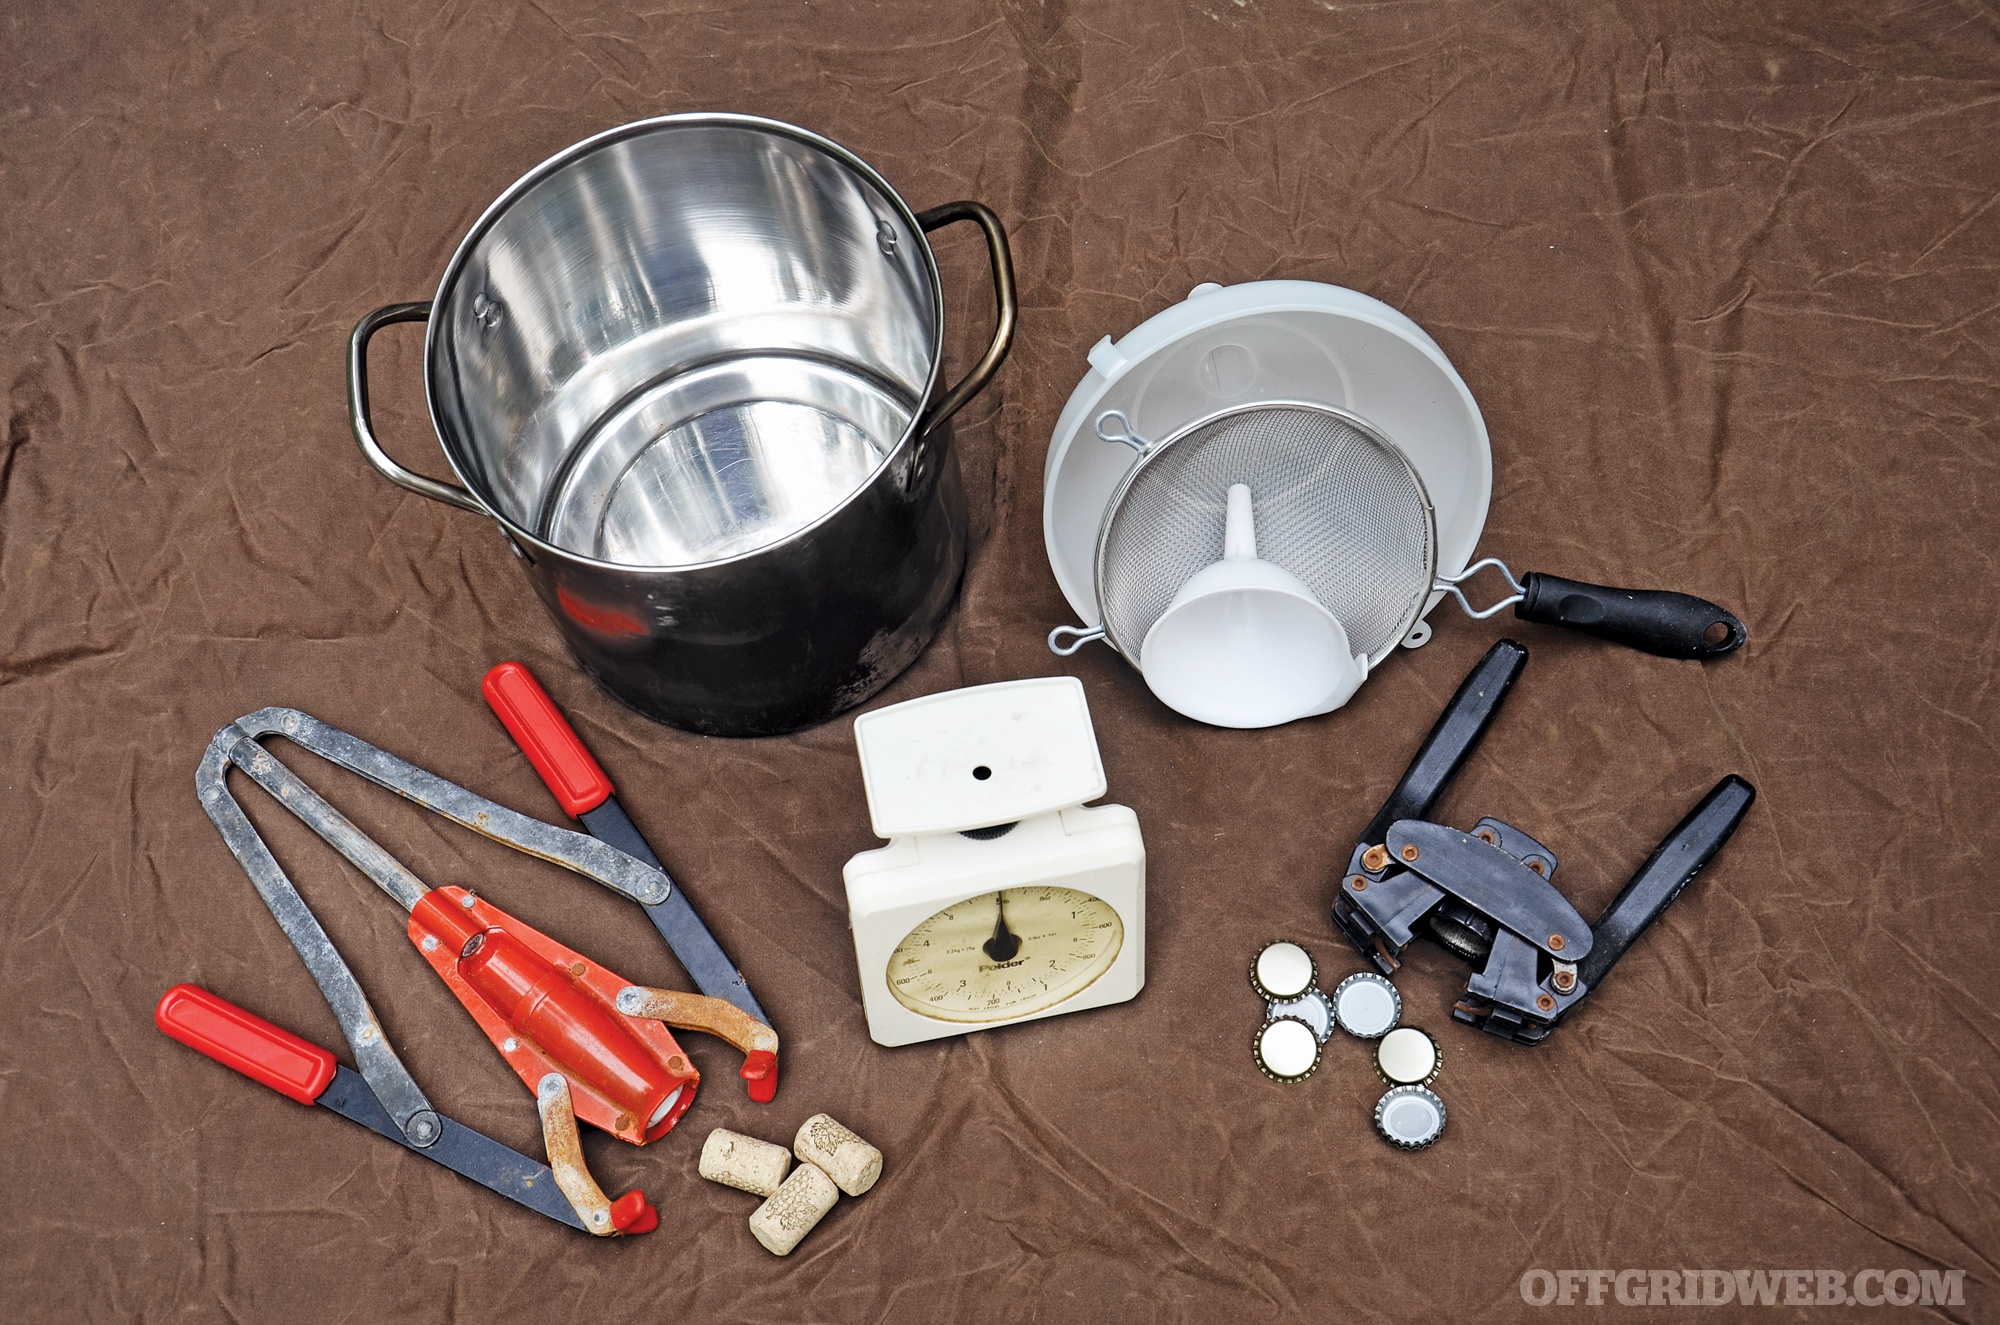
Ingredients: For the truest form of wine, you’d crush fruit and use only the juice to craft your vino — no added water or sugar. But that takes a hell of a lot of fruit. For a more prepper-friendly approach, use a shelf-stable sweetener like white table sugar to produce the alcohol and a small amount of fruit to flavor it. To do this, you’ll need wine yeast, a stainless pot, a 1-gallon glass jug, 1 gallon of spring water (or well water), a wine lock with tight-fitting jug stopper, a strainer, a funnel, a spoon, a thermometer, and sanitizing solution (I prefer One-Step No Rinse Sanitizer).
You’ll also need bottles and corks to store your wine for proper aging. If you’re able to visit a home brew shop or order online, you could also pick up pectic enzyme to help break down the fruit, wine maker’s acid blend for tartness, and yeast nutrient. All three of these are optional, but stand a good chance of improving your wine.
Directions:
Step 1 In a large stainless or enamel pot, combine the sugar and crushed fruit with 3.5 quarts of water. Boil this mixture for 20 minutes (to kill any stray organisms in the water or on the fruit). While the liquid is boiling, add some sanitizing solution to water (follow the package directions) and swish out your strainer, funnel, 1-gallon glass jug, the wine lock, and rubber stopper. You can also cleanse your thermometer. Ideally, all items should have at least two minutes of contact time with the solution. Shake the liquid from them and air dry.
Step 2 Set the pot of hot sugar water in a container of cold water (or an ice water bath) to cool quickly. Once below 80 degrees F, stir in the wine yeast and any optional additives you have.
Step 3 Use a sanitized funnel and strainer to filter and direct your sugary juice (technically known as “must”) into a sanitized glass jug that’ll be your fermentation vessel. Don’t skip the strainer. Even small seeds and bits of fruit skin can plug up your wine lock. This causes pressure to build, and it can blow the wine lock off the top of the jug (if the batch is foamy).
Step 4 Add the sanitized fermentation lock to the fermentation vessel. Place the jug in an open topped plastic bin (in case of spills) and store it in a dark location with a stable temperature between 60 to 70 degrees F. Watch carefully for the next few days. It should start bubbling (fermenting) within a few hours. If it doesn’t start bubbling within 24 hours, add more yeast to the jug.
Step 5 After a bubbly first week, your “must” should be milkier in color and beginning to form sediment. After a month, the sediment should be thick at the bottom of the jug, and the wine should be clearing up. Let it sit for another week or two, and when you can watch it for a long time without a single bubble jumping through the wine lock, it’s finished fermenting. Slowly decant the wine into sanitized bottles or another 1-gallon glass jug and seal them tightly. Fun fact: You can bottle your wine in beer bottles for single-serve packaging, but in beer bottles it’ll only keep for months, instead of years. Although drinkable now, it’s better to age your new wine for a few months in a cool dark place. When you can’t wait any longer, open and enjoy.
Recipe:
2.25 pounds of table sugar
2 to 3 pounds of fresh fruit (blackberries are my favorite for this, but any fruit will work)
¼ of a 5-gram package of wine yeast (red wine yeast for dark fruit and white wine yeast for light-colored fruits — save the remaining ¾ package for future batches)
Optional additives: 2 teaspoons of acid blend, ½ teaspoon of pectic enzyme, and 1 teaspoon of yeast nutrient
Best Practices for Storage Wine is best kept in a cool, dark, and slightly damp environment. If you don’t happen to have a wine cellar, a root cellar will suffice (or a cool basement). Just keep it away from heat and light while aging and while in storage. Bottles with synthetic or natural corks should be stored sideways to keep the corks wet for a tighter seal. With proper storage, your wine will last for decades, and will only improve with each passing year.
“Easy cap” bottles can hold your wine or beer.
Shelf Life and Endurance Since wine yeasts can keep working in higher alcohol solutions, this allows them to keep eating sugar when beer yeast would’ve been “too drunk” to eat or reproduce. This alcohol tolerant yeast, and the higher amount of sugar in the beginning will produce an alcoholic beverage with twice the strength of beer (on average). Typically over 10-percent alcohol by volume, wine keeps much longer than beer (years versus months). A nice glass of wine could be a great indulgence after a hard day of scavenging, and this fermented fluid can also help us sleep and be traded for needed supplies.
Brewing Beer
Historic Roots: Written records in both Egypt and Sumeria show that beer brewing started around 4,000 years ago — though I’m quite sure it dates back to the earliest days of agriculture. Some booze scholars even suggest we started farming so that we could have a regular supply of beer ingredients. And while a big Budweiser plant can turn out over 1 million containers of beer each day, the brewing of beer started in a much more humble manner. It’s likely that some grain that got wet and sprouted, which was then cooked into a porridge or watery soup. When the right strain of yeast blew into the leftovers, which sat for a few days, the world’s first beer began to foam, bubble, and ferment. And whoever drank that questionable leftover broth, liked it enough to try it again and again. For this article, we’ll focus on the beer style of ale. This beer is the easiest and quickest to make, since it ferments at room temperature and only takes three or four weeks. The other main beer is lager, which ferments at lower temperatures and takes about two months to ferment. Unless you have a brewing cave underground with a constant air temp of 56 degrees F (which is how the style originated), lager isn’t as practical for preparedness planning.
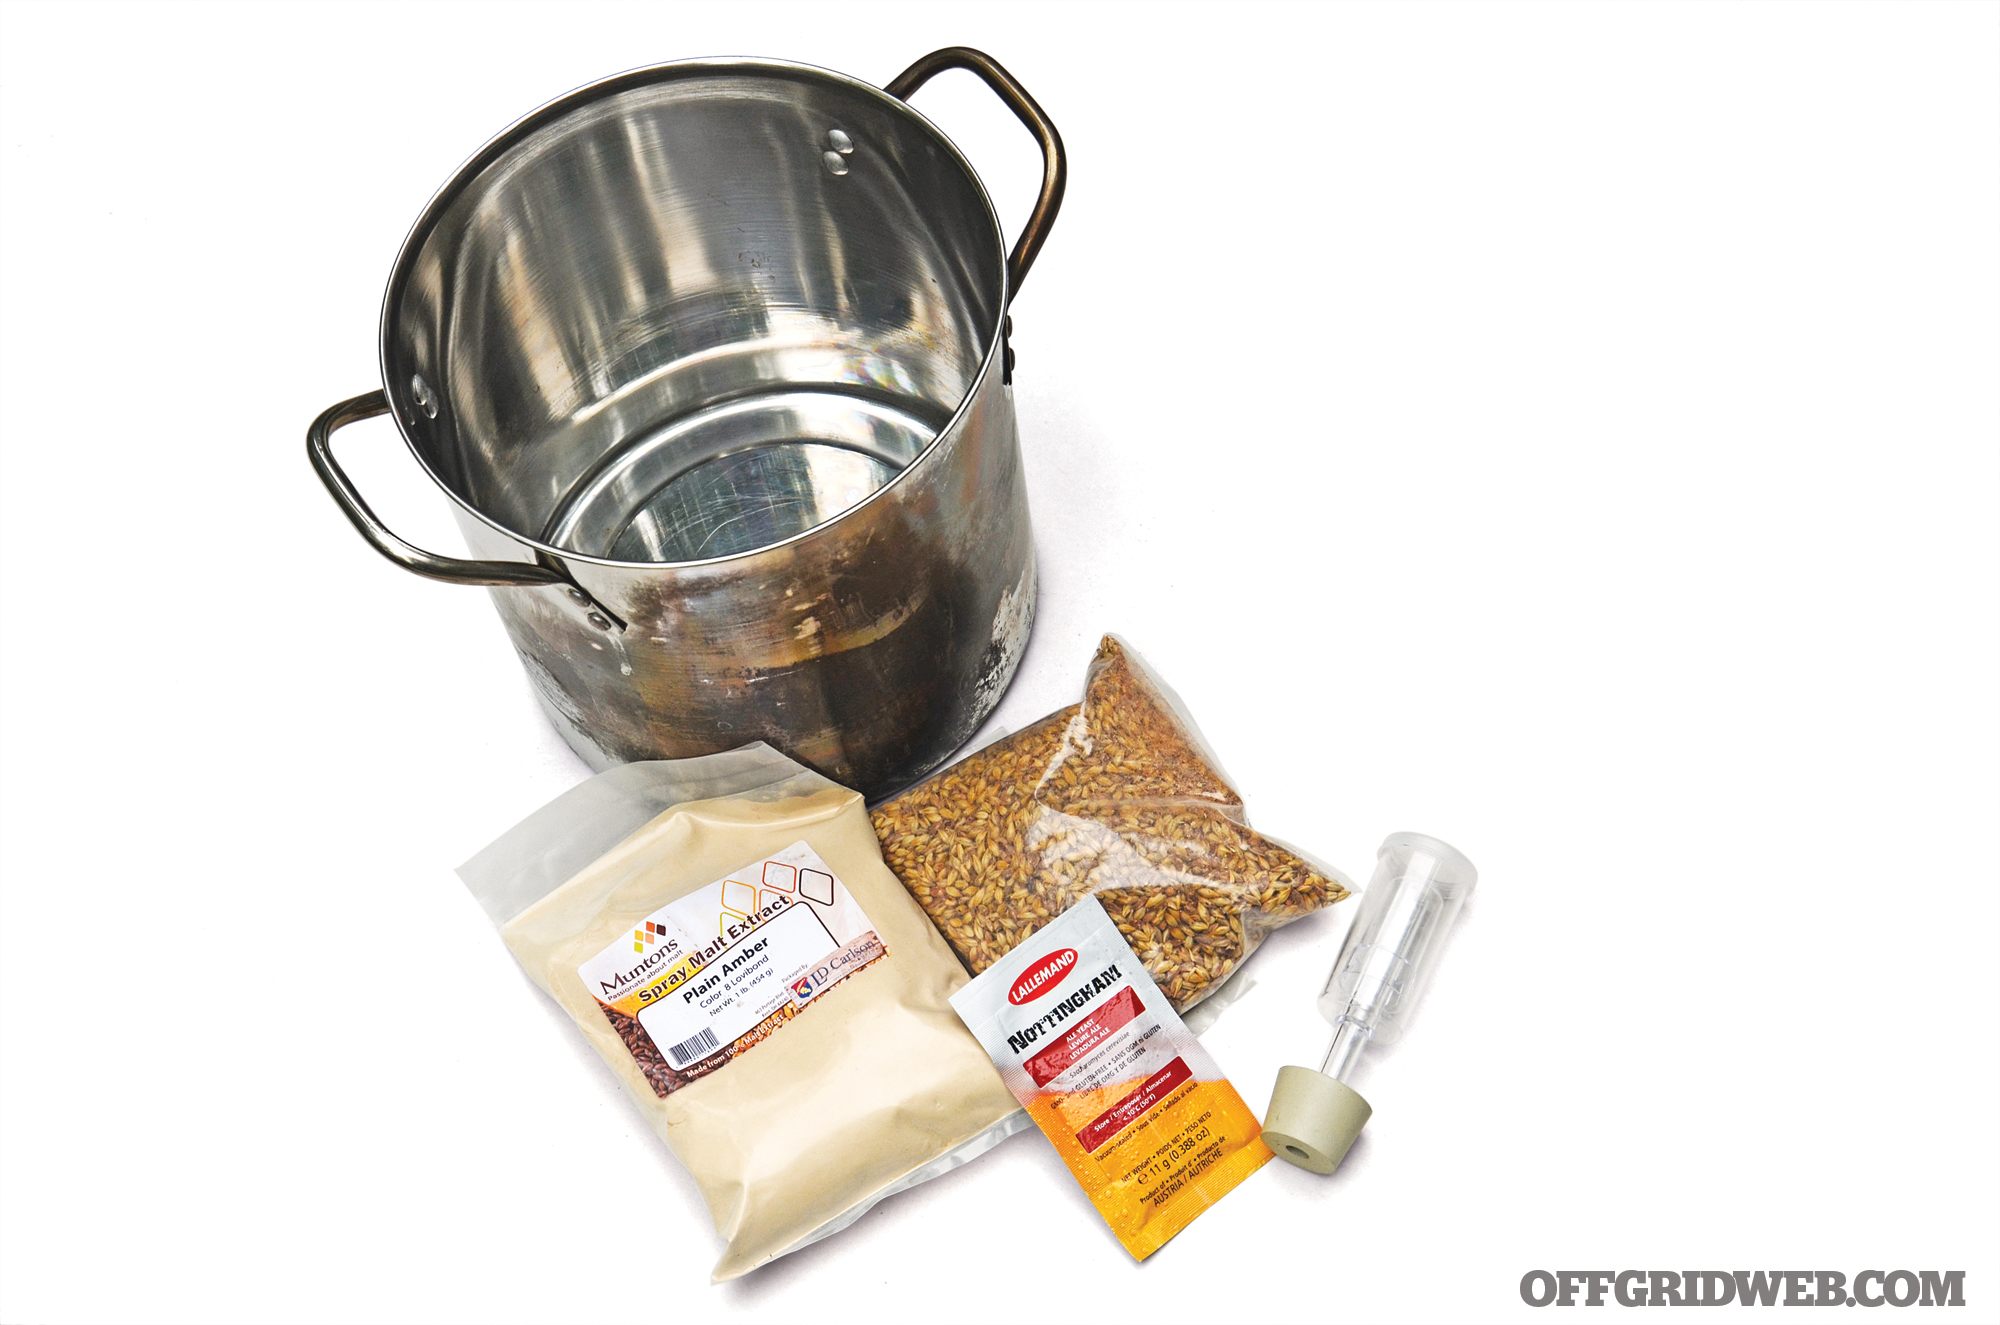
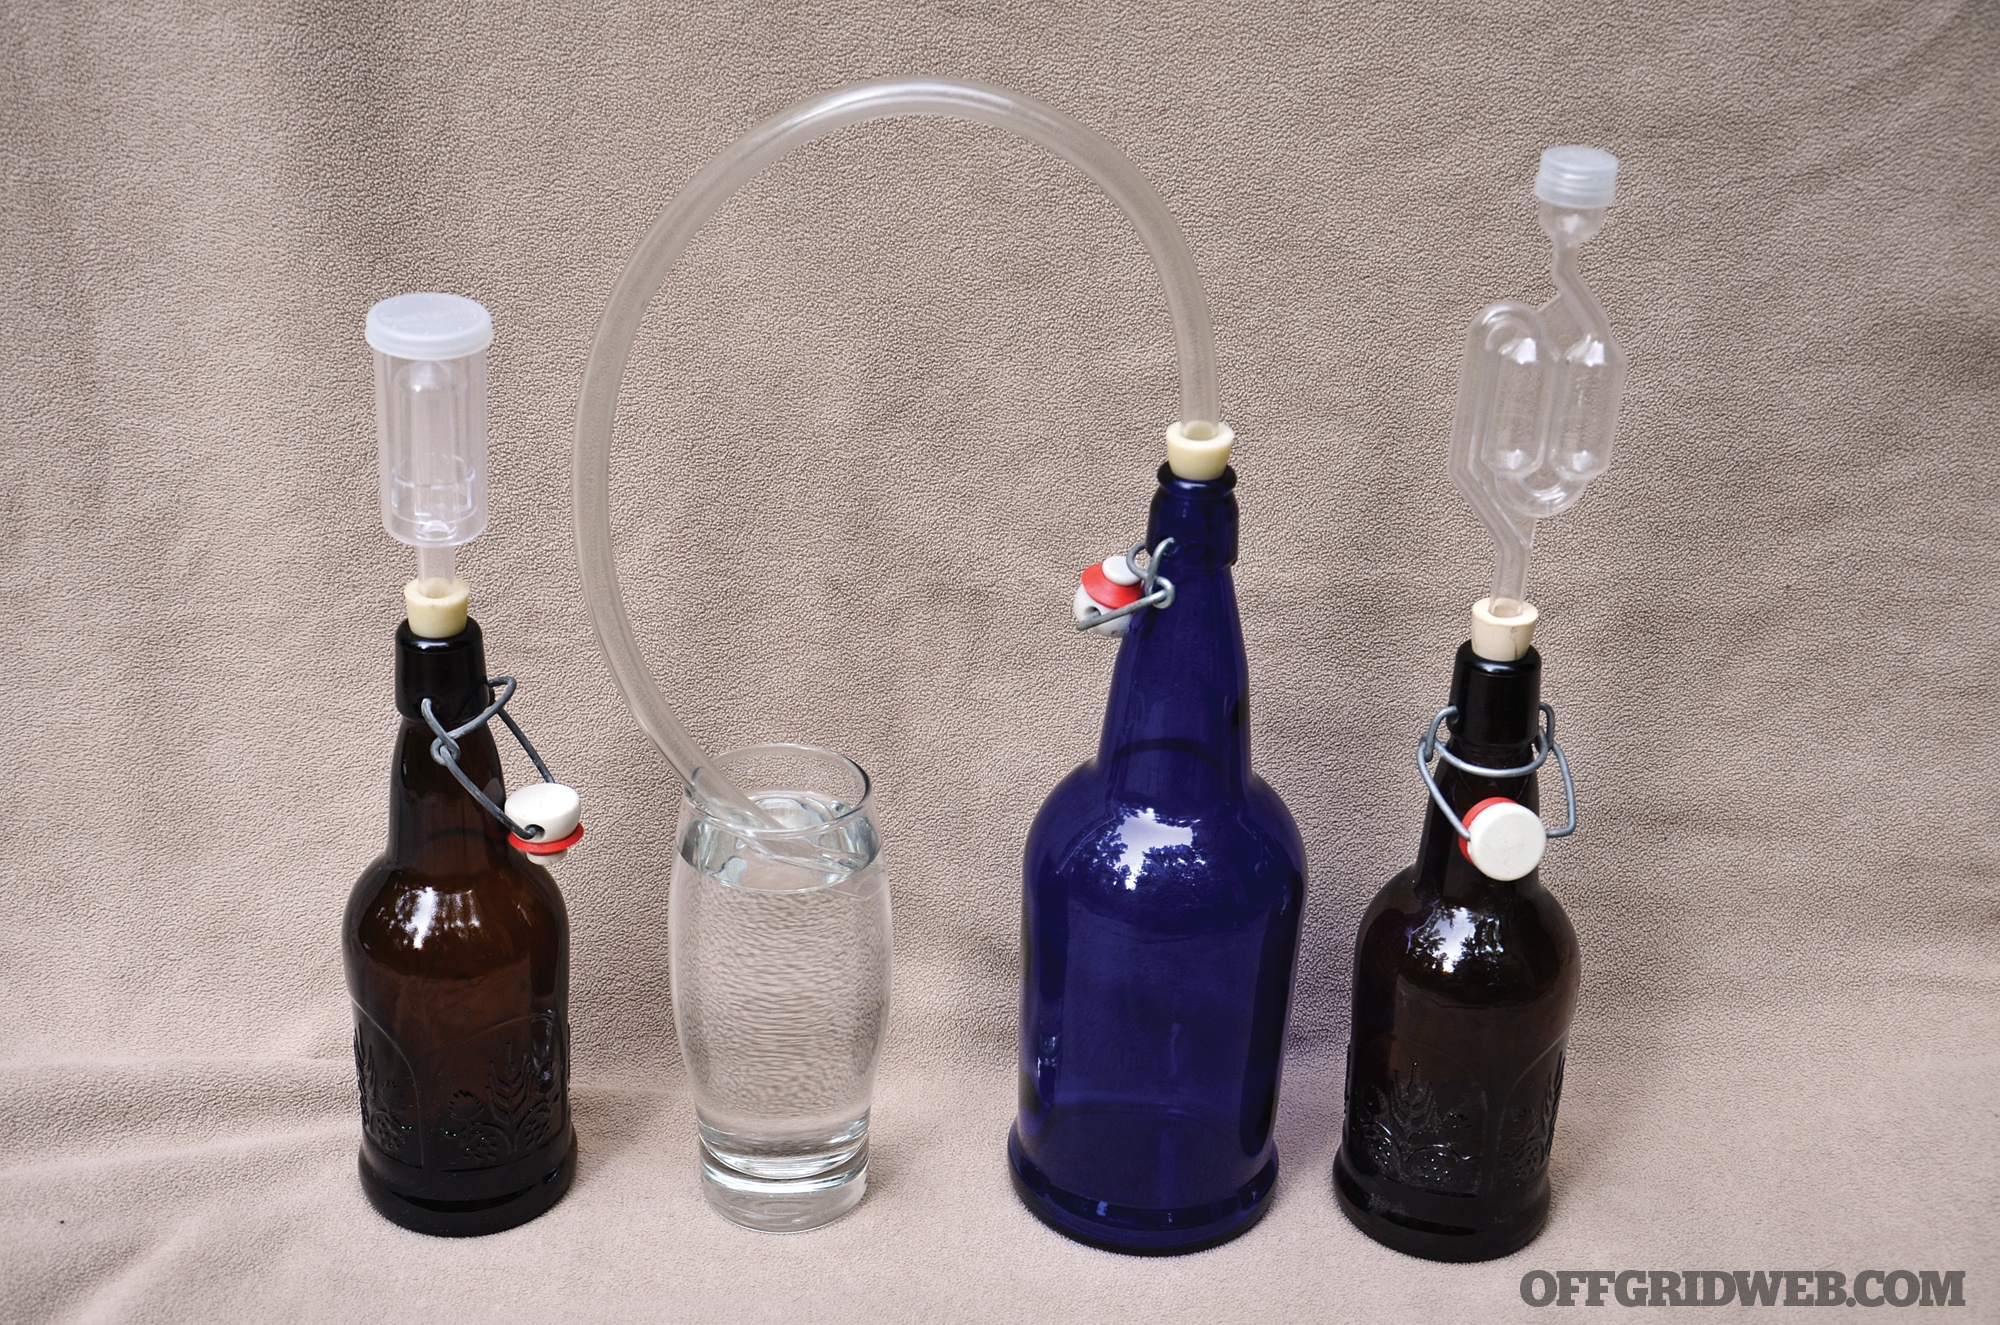
Ingredients: In the old days (and for “all grain” brewing today), home brewers would dampen barley seeds and keep them warm until they sprouted. This sprouting unlocked the malt sugar, and the grain would then be toasted to kill the sprouts and add more flavor. The toasted grain would be crushed and simmered in water to create malt sugar water. Today, you can follow the historic path of 100-percent grain brewing, or take an easier road. Dried malt extract sugar is available commercially, made from many different kinds of malt. This dried sugar powder will keep indefinitely (in a dry, dark, cool place) and is a great choice for preparedness. Skip the canned malt syrup products, as they can potentially lead to the presence of deadly botulism toxin after being stored long term (the cans will swell). In addition to your dry malt extract powder, you’ll need dried hops, ale yeast, a stainless pot, a 1-gallon glass jug, 1 gallon of spring or well water, a wine lock with jug stopper, a clear plastic or vinyl hose that fits the glass jug, a strainer, a funnel, a spoon, a thermometer, and sanitizing solution. When it comes time to bottle the beer, you’ll also need pressure-safe bottles with tight-fitting caps or lids, and a little table sugar to carbonate the beer.
Directions:
Step 1 In a multi-gallon stainless or enamel pot, boil 1 gallon of water with the dried malt extract, crushed grain, and hops for 60 minutes. This breaks down the malt sugar molecules into more “bite-sized” pieces for the yeast to eat. Use a big enough pot and be careful that it doesn’t boil over!
Step 2 Once the hour of boiling is over, cool the pot of liquid quickly by setting it in a container of cold water (ideally, an ice water bath). When the liquid is below 80 degrees F, pour in your yeast and stir. Then, place the sanitized strainer in the funnel and strain the gallon of malt liquid into your sanitized 1-gallon jug.
Step 3 Add your clear plastic or vinyl hose to jug plug, and then arrange the free end of the hose to be submerged in a glass of water. This assembly is called a “blow off hose,” and it’s perfect for dealing with the foamy mess that’ll erupt from your glass jug for the next few days. Place the jug and its accompanying glass of water in a plastic bin (for spills) and set it in a dark place with stable temperatures (ideally from 60 to 70 degrees F). Once you notice that no more foam is flowing through the blow-off hose, switch the hose for a water-filled wine lock.
Step 4 Watch your brew carefully for the first few days. If no bubbles or foam (fermentation) occurred within the first 24 to 36 hours, your yeast was dead in the package or your malt liquid was too hot. Try adding more yeast to save the batch.
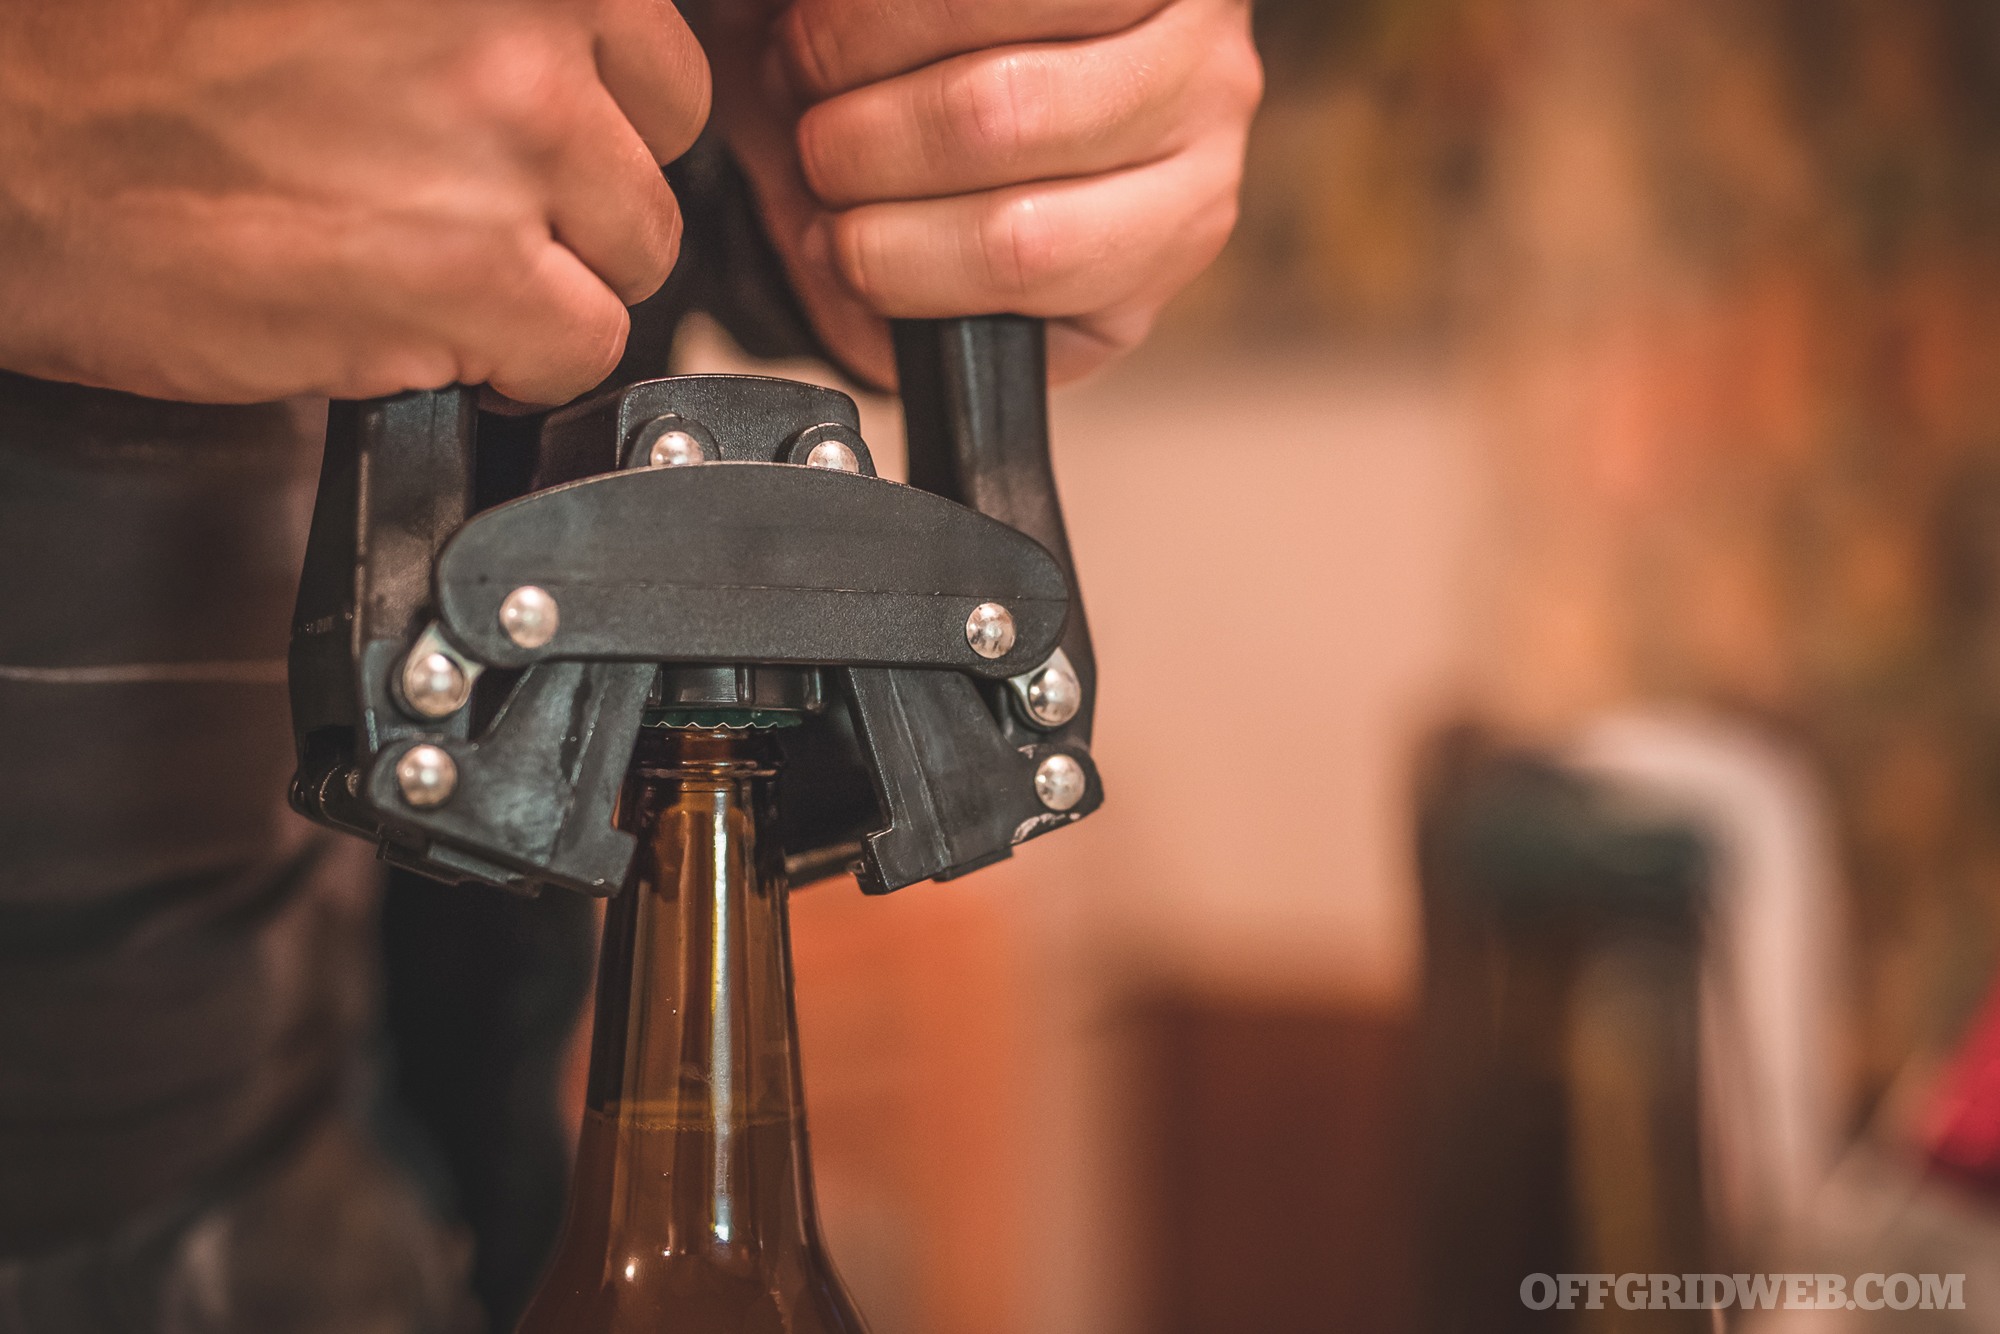
Step 5 After three to four weeks, the sediment will be building up on the bottom of the glass jug, the bubbling will have stopped and the ale should be starting to clarify. At this point, carefully and slowly pour your beer into a sanitized container (to get it away from the sediment). Add the 1 ounce of table sugar and stir to dissolve. Prepare a small funnel, sanitized bottles, and caps for bottling. Bottle into sanitized bottles and cap them. You’ll need about 10 bottles (12-ounce size) and caps for 1 gallon of ale. You could also use soda bottles and their original caps, after sanitizing (however, you may notice the plastic taste). You could also use flip-top bottles, like Grolsch beer. Just make sure your bottles and caps are well-sanitized and keep your bottled beer in the dark at room temperature for one to two weeks. The yeast in the beer will consume the new sugar, and since the bottles are capped, the CO2 can’t escape. This gas actually carbonates your ale! After carbonation is done, chill your ale, and enjoy.
Ingredients:
1 pound of dried amber malt extract
6 ounces of caramel malt grain (crushed as best as you can)
¼ ounce of Cascade (or other variety) hops (whole dried flowers or pellets)
¼ of an 11-gram package of ale yeast (any style of ale will work — save the remaining ¾ package in the fridge for a future batch)
1 ounce of table sugar to carbonate the ale
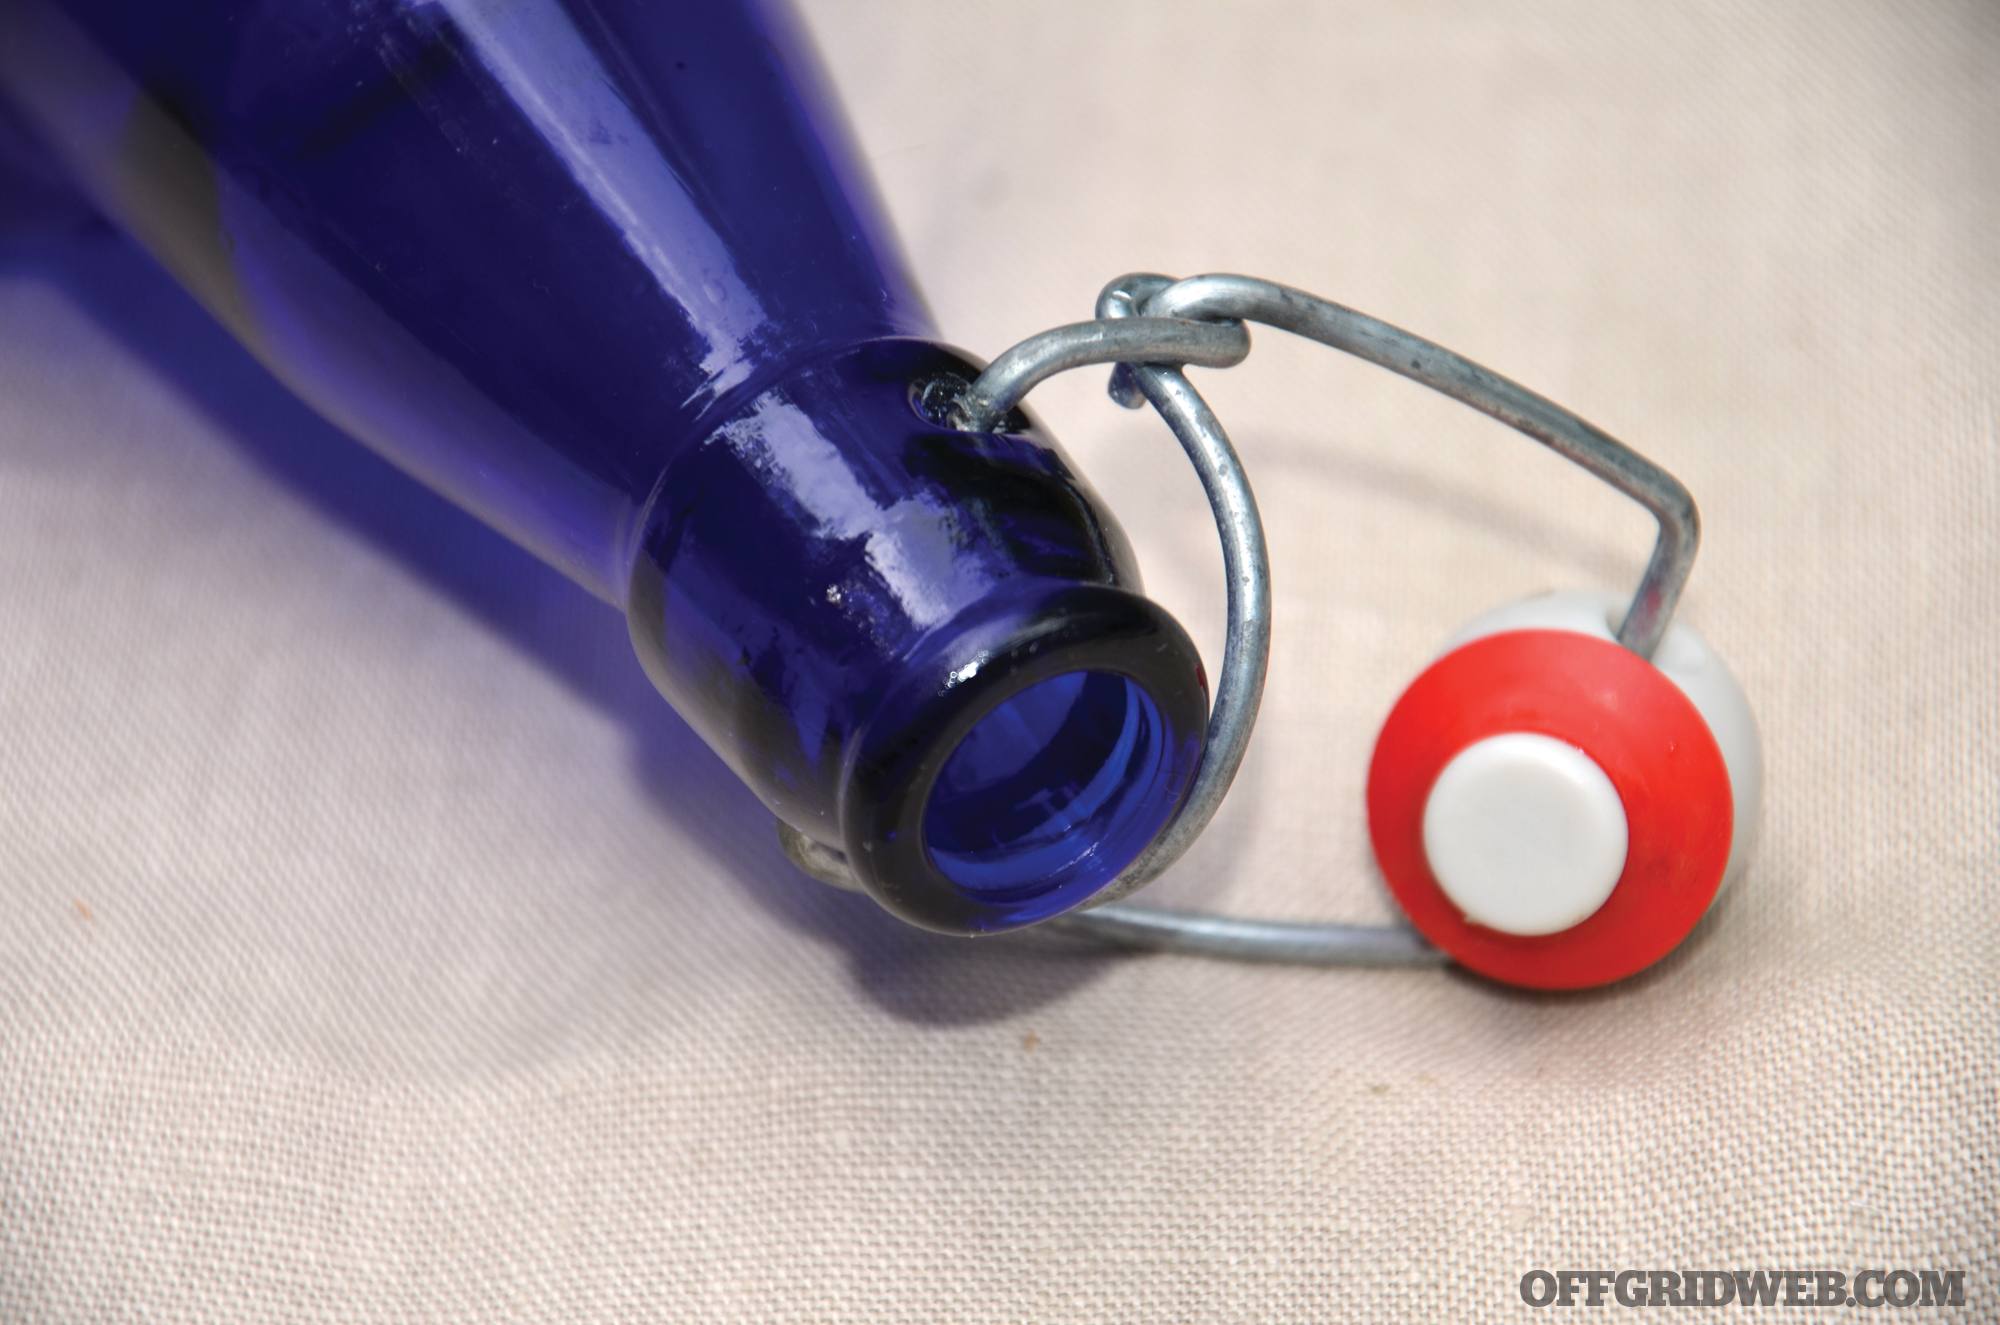
There are many different styles of “wine lock,” but they must all block incoming air while allowing pressure and CO2 to escape.
Best Practices for Storage Shelf life has always been the biggest problem for beer, and unless you have a high-proof strong ale or IPA made with extra malt and extra hops, it’ll get “skunky” in a few months. This is why beer was historically made in small batches and made often. Once you do have some excess built up, keep it in the coolest, darkest place you have. By the way, skunked beer is still safe for human consumption, but it’s just not as nice to drink. Your beer should retain its flavor and quality for several months, or longer if stored cold.
Benefits as a Survival Implement Sometimes considered “liquid bread” by our forebears, beer gave our ancestors a way to store the calories of their grain without the vulnerabilities of grain. Beer wouldn’t mold in damp weather like grain. Insects, rodents, and pests weren’t interested in beer like they were with grain. Sure, some nutrients are lost in the brewing process — but without better ways to preserve food, beer made a lot of sense. And they felt great after drinking it! We still have all those advantages, and you can use beer for trading and nutrition. You may also be the only person in town who’s able to make beer (making you an even more valuable community member).
Alternatives You can certainly make beer and wine using nontraditional ingredients and improvised equipment, but we have to caution you. Cobbling together some DIY brewing equipment isn’t too tricky, but getting weird with the ingredients can turn out some unpredictable results, and can even put you in harm’s way.
Create Some Wine Locks: You’ll need “wine locks” for both beer and wine, since they allow carbon dioxide to escape while preventing the abundant oxygen of our atmosphere from getting into the fermentation vessel. One of the simplest improvised versions is a balloon with a tiny hole pierced in it. Just stab an uninflated balloon with a needle to make one tiny hole (don’t punch all the way through it, you don’t need two holes). Stretch the neck of the balloon over the neck of your fermentation jug and add a few rubber bands around the neck of the vessel to help hold the balloon in place. As the balloon fills with CO2, the balloon expands until the pinprick hole opens and the CO2 escapes. Once the pressure drops, the pinhole closes. Leave this in place until the balloon hangs flaccid and isn’t moving anymore. That means your fermentation is likely to be complete.
Stalking The Wild Yeast: Our remote ancestors didn’t have a local homebrew shop (or Amazon) to provide them with hundreds of different yeast strains for wine, beer, and other fermented drinks. They had to get their yeast from the wild. You can too, but the results are a crap shoot. You know that whitish film that covers your grapes, blueberries, and other fruits? This film can be a natural source of wild yeast. There’s also wild yeast stuck to sappy pine and spruce branches. Wild yeast just blows on the wind pretty much everywhere on dry land. There’s even a species in Mongolia that allows fermenting milk to become alcoholic.
Prior to the understanding of microbiology, our brewing predecessors would make wine using raw fruit with the film-covered skin, or they’d strain their cooled beer through dozens of nontoxic evergreen branches (like a filter). They must have thought it was some kind of magic ritual or spell, but they were actually inoculating the brew with the necessary yeast to ferment it. They also knew that skipping those steps would keep the brew from fermenting. Today, we understand yeast and can experiment by adding filmy fruit skins to small batches of wine so we can see if the strains of yeast in the film will ferment and provide good flavors. We could also stir our pot of cooled beer with a live needle-covered pine or spruce branch to introduce wild yeast. Be warned! The wild yeast strains could create amazing flavors or gross ones, you’ll just have to wait and see. Some yeast strains produce esters with caramel flavors, while others produce esters that taste terrible.
A Recipe for Trouble: Those familiar with prison culture have probably heard of prison wine (aka hooch, pruno, or brown baby). This is a DIY alcoholic drink concocted by creative inmates to get a buzz in lock up. Here’s the problem, the pruno recipe is also a great way to make botulism. As you likely know, botulism is an uncommon but extremely potent toxin, attacking the body’s nervous system. With access to professional medical care and life support — meaning a ventilator — most victims recover. But without definitive medical care, botulism poisoning can lead to paralysis and death.
Pruno is typically made with any sweet food scraps the inmates can acquire, and fermented in a plastic bag for several days. The inability to cook the ingredients (and the questionable ingredients themselves) can allow the growth of the bacterium Clostridium botulinum that causes this odd poisoning. And because it’s a bacterially produced toxin (not the live organism) that makes you sick, the alcohol that forms will not kill the problem. Once the alcohol level exceeds 5 percent, most living organisms will die, but the poison they created will remain. Avoid this issue in your brewing by cooking your ingredients to kill all of the organisms they might harbor, and never use potatoes, oats, or food from bulging cans as home brew ingredients.
Stock up on the unusual supplies, since you may not be able to get them in a crisis.
DIY Beer and Wine Mistakes
There are plenty of things that can go wrong with your homemade alcohol during preparation, fermentation, bottling, or storage. Thankfully, a lot of these faux pas are easy to prevent. Here are three beginner mistakes that I see all too often.
The Wrong Disinfectant: Bleach is a great disinfectant for many things, including drinking water, kitchen countertops, and fouled laundry, but that doesn’t mean it’s a good fit for brewing. The last time I used bleach to clean bottles provided me an experience I’ll never forget. There must’ve been some bleach residue in a bottle that I filled with some very promising ale. But upon tasting, I’ve never spit out a drink so fast in my life. As soon as the liquid hit my tongue, I sprayed it across the wall. The flavor was what I imagine a combination of molten plastic and toilet cleaner tastes like. Don’t use bleach to clean your bottles or other brewing supplies. Instead, use the brewing disinfectant we recommended, or high-proof vodka. You could also boil your non-melting gear in water for five minutes.
Too Much Light: Ever wonder why so many wines come in dark green bottles and many beers come in dark brown glass? Sunlight is needed to grow the grain and fruit that we’ll turn into beer and wine but after that, the relationship is over. As your liquids ferment and while they’re in storage, block all possible sunlight — especially if you’re stuck using clear glass containers. Sunlight can actually create many “off” flavors in your beer and wine.
Killing Your Yeast: There are several things that can kill your yeast, the little workhorses that turn sugar into booze. The most common culprit is that you add the yeast while the beer or wine is too hot. I know you’re in a hurry to make your beer or wine, but it’s going to be weeks before the beer is ready to drink and months for the wine. Wait the extra few minutes for your liquid to cool down to room temperature before “pitching” the yeast. Also be aware that many juices you might try to ferment have been treated to prevent microbial growth (which includes yeast). I know, that big jug of “preservative- free” apple cider is just begging to be turned into hard cider, but if it came from a store, it’s been treated. I don’t care what the label says, something has been added and your yeast will die. Don’t waste your time. If you want hard cider, go to an orchard and watch them press the apples and grab a jug of fresh unpasteurized juice. That’ll usually turn into a fine alcoholic cider.
Bring Your Utensils!
You don’t need too much gear to start home brewing, but here are a few grid-down brewing and distillation utensils you won’t want to be caught without.
Non-Electric Scale: For measuring sugar, hops, and any number of other ingredients and adjuncts, a little spring scale is a great choice. It’ll last for years, it doesn’t mind getting wet, and it’s EMP and CME proof, unlike electronic scales.
Thermometer and Spoon: Self-explanatory.
Stainless Pots: Don’t boil your brew in aluminum pots. Stainless is the best choice, unless you have unchipped enamel pots available. Cast iron, copper, tin, and aluminum can react with acid and sugar, creating some unpleasant tastes.
Bottle Capper and New Caps: You can keep using beer bottles over and over, so long as the bottle mouth is undamaged and they’re well cleaned and disinfected between uses. But you’ll need a bottle capping tool and new caps to keep the system going. These supplies aren’t expensive and easy to find from homebrew suppliers. FYI, you can’t recap twist-off bottles with new metal caps; you can only re-cap pry-off beer bottles.
Wine Corker and New Corks: Just like the beer bottle capper, you’ll need a corker and corks to store your wine. Neither is particularly expensive, and many different types of corks are on the market. Go with natural long-length corks if you want to age the wine for years (instead of months).
Stainless Mesh Strainer: Catch all the gross stuff before it goes into the fermenter.
Funnels: You can’t have too many funnels. Little ones are great for filling beer bottles. Big ones are needed to pour from cooking pot into a fermenting jug. Try to get a funnel big enough to hold your mesh strainer to limit the splashing and mess.
Conclusion
With the right combination of yeast, sugar, flavorings, water, and time, you too can join the honorable ranks of home-brewers worldwide. The main advantage to knowing this art form is your ability to resupply yourself and others. Drinkable alcohol has so many uses, that knowing how to provide it could make you an even more valuable player for your survival group or community. And the main disadvantage of this art is that everyone will always be nagging you for beer and wine, and growing impatient when you keep telling them “it’s not ready yet!”
Many of us like our alcohol and, as a species, we’ve been brewing for thousands of years. For the vast majority of that time, our alcoholic beverages were produced in the home or by local providers. These drinks have evolved from unique combinations of regional ingredients to become sophisticated beverage styles known around the globe. Yet at their heart, they’re still drinks that our forebears would recognize. No matter how complex your recipes may be, it’s still just fermented grain or fruit; you don’t need a chemistry degree to create home brew. You don’t need thousands of dollars of elaborate gear to create something tasty, either.
Pay attention to the recipe and the details, keep things clean, don’t rush the process, and have fun. Even if these skills are never necessary for your doomsday trading post and wine shop, they’re a lot of fun to practice and give us a chance to sample some of our oldest heritage products — one glass at a time.
We recently received an email from a reader who is just beginning his journey into emergency preparedness. He had a question about water distillation, and how it can be accomplished in the backcountry. So, we took the opportunity to provide some context on where it falls in the list of water purification options, and explain some of its advantages and disadvantages.
See below for the original email, followed by our response:
Good morning. Straight off, I admit I am new to prepping. I’m trying to understand the equipment needed to produce (not just boil, but distill) raw water into potable water. However, all the prepper-recommended sites/equipment (which I’ve found so far) offer systems that have a power cord to be plugged into a 110v receptacle. I must be missing something. If I am in a situation where I am having to clean my own water, I’m pretty sure there’s not going to be any operating electrical sockets. Is there not distillation equipment designed for use in the wild? Thank you.
That’s a great question, so thanks for reaching out.
The most important consideration before approaching water purification is the contaminants you suspect are present in the raw water. If the water contains bacteria and protozoan cysts, as most lakes and streams do, then there lots of easy options to purify it. These include:
The SODIS method can be used to kill bacteria present in water. See the linked article above for more info.
Some water sources, such as those in developing nations with limited plumbing or those which may have been contaminated by sewage runoff (or floodwater that contains sewage), may also contain viruses such as norovirus, rotavirus, or hepatitis. Viruses are smaller and more difficult to remove, so if you’re buying an off-the-shelf purifier, look for one that is rated for virus removal. Brands such as Aquamira, Grayl, LifeSaver, and MSR offer purifiers in this category. For more info, see our H2O Hygiene water purifier buyer’s guide.
However, the most challenging contaminants to remove are dissolved chemicals, since they are present on a molecular level. Micro-filters won’t remove them, and boiling will only increase their concentration. Examples of water sources in this category would include seawater, urine, or agricultural runoff. This is where distillation is valuable — it physically separates the water from most chemical contaminants.
An example of a traditional copper still.
The classic distillation device is a still, much like what bootleggers used to make moonshine. These generally consist of a copper vessel over a fire, with a condenser coil that cools water vapor and deposits it into a clean container. As you’d expect, stills are usually heavy and not very portable.
If you need a portable way to distill water in the wild, you’ll need a way to boil it, trap the vapor (steam), and cool it so it condenses back into liquid. It’s possible to do this with two glass bottles, or with a pot, aluminum foil, and a glass jar. It’s also possible to build a solar still, but that method will only generate a small amount of water each day.
Unless you’re concerned that your water source may be contaminated with salt and/or harmful chemicals, we’d recommend using one of the simpler methods of purification we mentioned, since they will require much less equipment and time.
Hopefully this helps you as you begin learning more about prepping.
If you have a survival-related question of your own, you can email us at offgrid@recoilweb.com.