Editor’s Note: The following article was written by Cody Martin of Option Gray. Cody spent more than 11 years in law enforcement, including time as an undercover officer, executive protection agent, and instructor of firearms and survival courses. We’ve shared the post in its entirety with his permission. For more of his articles, check out OptionGray.com.
Bribery is a form of corruption that’s illegal in a lot of places and plagues societies at every level. Many people use bribery as a way to push agendas, manipulate established practices, and coerce folks into doing things they wouldn’t normally do. Money is the driving force. Factor in things such as a third-world location, impoverished living conditions, and societal breakdown, and you have a situation ripe for bribery. Let’s take a look at 15 tips you can use to avoid or get out of paying a bribe.
The first thing to remember and your best option is to avoid being in a situation where you may need to pay a bribe to someone. However, if you find yourself in one of these situations, there are many methods, techniques, tips, and tricks that can be used. We are just scratching the surface in this article. However, what I’ve listed below will have you well on your way to understanding what is going on during a bribe and how you can take steps to control the situation.
15 Tips to Avoid Bribes
1. Maintain your situational awareness
Situational awareness is paramount and transcends all aspects of life. In order to avoid falling victim to bribery, you have to be able to spot it. The common culprits while traveling abroad are the police or sometimes military who are conducting “traffic” enforcement or manning roadblocks. Be aware of the areas you are traveling and the corruption that is common. Be cognizant of all your actions and be sure to conduct yourself accordingly and well within the law.
Common techniques used in shakedowns may be:
Asking you to pay a certain fee to enter or leave the country
Asking you to pay a penalty or fine for breaking a bogus rule or for an infraction you didn’t commit
Asking you to pay a fee in order for them to return important paperwork or documents such as driver license, passport, insurance, registration, etc.
2. Be familiar with and follow local laws
Piggy-backing off of point #1, be familiar with the laws particular to the area you are traveling. Every place has that one weird law that’s hard to believe exists. Don’t fall victim to your own ignorance and avoid the stuff that’s easy to avoid. A lot of travelers bring trouble onto themselves by being in vacation mode and dropping their guard. Don’t be that person.
3. Have all your travel documents squared away
This is another easy one. Make sure all your travel documents are in line well in advance of your trip. It seems silly, but a little research can go a long way. Simple things like the expiration date on your passport, the proper types of visas, etc., can make a break a trip. They can also provide ammunition for someone looking to make a quick buck off of you.
4. Never give out original documents
If at all possible, never hand over any of your original documents. Any paperwork required for you to conduct yourself abroad should be copied for daily use. Handing over your passport and then having someone hold it ransom until a “fine” is paid could be a nightmare situation. Try to avoid this by using copies if feasible.
5. Use an International driver’s permit
If you are stopped and are asked to hand over your identification, it’s best to have an international driver’s permit to hand over as opposed to your original license from back home. In case this permit gets “held” or confiscated you are not out the hassle and inconvenience of losing your original.
6. Don’t stand out
If you are trying to avoid paying a bribe by saying you are broke while you are wearing a $10,000 Rolex, you may have a hard time getting someone to believe your story. The same thing goes for wearing fancy clothes, openly carrying expensive electronics, etc. Depending on where you are traveling, it may be a good idea to employ a gray man approach to your clothing.
When you are out and about, pay attention to those around you and what they are wearing. What stands out? Is it their shoes, shirt, handbag, hairstyle, etc.? Be cognizant of what draws your attention. Make a mental note and be sure to avoid those triggers if you are trying to avoid unnecessary attention.
7. Stay in public view
If you are being stopped or detained for any reason, try to keep your presence in a public place. If you are on foot, avoid being led into isolated or out of view areas, and if you are driving, stop where you are and keep your engine running. It’s even better if you are causing a congestion and drawing attention. Their inconvenience may be a factor in determining you are not worth the hassle.
8. Be polite
Be polite and courteous throughout the ordeal. Even if your blood pressure is through the roof because of this person’s audacity, you need to maintain your cool. They are in a position of power and you are somewhat at their mercy. You will get nowhere by getting into a heated argument while you are being detained. Remember how social engineering plays into human behavior and use it to your advantage.
9. Don’t use the word “bribe”
The term bribe may invoke negative emotion and cause the situation to become worse, so try to avoid its use. This person knows what they are doing is wrong and so do you. Calling it what it is will only backfire if you are trying to diffuse the situation. Keep in mind, you are trying to talk your way out of paying a bribe and you don’t get extra points for pointing fingers.
10. Stay calm
Stay calm, and if you can’t stay calm at least give the appearance of it. When we display fear, anxiety, or worry it only lets the person know they have the upper hand. It also contradicts tactic #11…
11. Act like you don’t understand and “play dumb”
The language barrier may be a legitimate thing depending on where you are traveling and you may not understand all of what is going on. Use this to your advantage. At some point, you will hopefully realize what is happening and that’s a good thing. The sooner the better. However, acting like you have no clue what they are asking for can work exceptionally well.
12. Don’t immediately pay
The longer it takes for them to get what they want the better. Use their impatience to your advantage. Most folks are looking for a quick buck and for targets of opportunity. The longer it takes for them to get what they want out of you the better.
13. Deflection or redirection
Redirect the conversation by asking directions, showing them maps, asking complicated questions, etc. This tactic plays off of #12. The longer you can draw out the interaction in terms of time between the “bribe” and paying the better off you will be. Again, they are looking for quick and easy money. Check out our article on Gray Man Communication: How to Talk to Anyone for information on deflection and redirection.
14. Ask for a written ticket and a receipt
If you aren’t getting anywhere in terms of getting out of paying, ask for a written ticket and for a written receipt. This can be seen as an inconvenience and they may want to avoid the hassle. It can also be a roadblock to the behavior because it documents the behavior, which may be bogus to begin with. If they are trying to make a quick buck they want to avoid all the legalities and formalities of the legitimate process.
15. Give the appearance of compliance
Even though you are trying to circumvent what is truly going on, give the appearance of compliance throughout the whole ordeal. This helps them maintain their position of authority and gives you the upper hand during negotiations. Feed off of that and use it to your advantage.
A Real-Life Example
Take a few minutes and watch the video below. It’s a good demonstration of how to deal with a shakedown or a request for a bribe. A lot of the tips listed above are effectively utilized, especially during the last interaction at the end of the video.
Editor’s Note: For another real-life example, check out the reader-submitted story Mozambique Mayhem.
If All Else Fails
There may be times you are forced into paying a bribe due to a shakedown or other activity by corrupt government officials, police, etc. Safety is your number one priority. So, if there is ever a point where things are getting questionable you need to do what you can to defuse the situation. With that in mind, you may have to pay a bribe as a last resort.
If this is the case, you need to have a way to pay. A $20 bill in U.S. currency will usually be more than enough to do the trick, but sometimes it may take more. On the other hand, a lot of times it can take way less. Be familiar with exchange rates and how far local money will go. You have to weigh the situation for yourself, but it may be worth it to be out the money and be on your merry way. Keep in mind, paying a bribe just continues the cycle of corruption.
A bribe could be your best course of action and could be something that prevents a bad situation from being worse. In a lot of places, bribes aren’t considered illegal or unethical by many and are widely accepted as part of life. That doesn’t mean we have to like it or accept it, it merely means we should understand the dynamics of the situation and how they play into our course of action.
Paying a bribe should not be your first response, but if there is no way around it you should be ready.
Got a tip you’d like to share? Send it to offgrid@recoilweb.com along with a well-lit, high-resolution photo of yourself. Also include your name, and your website or social media handles if applicable. Please keep your tip submissions between 250 and 350 words. By sending in submissions, you grant TEN: Publishing Media the unrestricted, transferable and sub-licensable, irrevocable, royalty-free, world-wide, and perpetual license to reproduce, distribute, publicly display, make derivative works of, and otherwise use the Submissions in any media whatsoever now known or later invented throughout the world for any purpose whatsoever, commercial or not.
Right now the biggest thing for me is situational awareness. My son is 8 and doesn’t pay attention to literally anything, ever. So when we’re walking or driving somewhere, we play a game memorizing cross streets. He’s also recently decided that he likes doing route prep. I print out a street map from Google or MapQuest and tell him to draw the route to somewhere we go regularly (his school, the grocery store, his favorite restaurants, etc). If the route he draws is different from how I normally go, we take it anyway. Then, on the way back, we’ll take my preferred route so he can see the difference. If we’re taking a route he picked, I’ll make him look at the nearest street sign and tell me what the next turn/step is from where we are right now.
Tom Marshall Senior Editor, RECOIL
I have four boys, including a 14-year-old son who is a freshman in high school. I can’t always pick him up. He plays sports, and practice ends at different times every day, so I often arrange to have an Uber to pick him up. To prevent any kidnappings or any other wrongdoings toward him, once I book the Uber driver, I call him/her to let them know where my son is waiting and what he’s wearing. I also let the driver know that I see that they’re currently on “whatever street” and that they’re close-by. (I only say this so that the driver is aware that I’m tracking him/her.) I also let the driver know that I’ve sent my son a screen shot along with his license plate info, car info, and a picture of him so my son can keep an eye out. This is my way of letting the driver know I have all his info, and I’m not afraid to hunt his/her ass down … LOL. Once my son is in the car, I call my son and keep him on the phone for as long as he allows me to (he’s a teenager so he easily gets embarrassed), and I have him call me as soon as he gets home.
Before we go to any place that we know strangers have easy access to kids (amusement parks, malls, etc), I take a picture of my kids before we leave the house. If something were to happen, I can easily text, email, or print the picture for police or staff to take a look at. It’s faster and more accurate than trying to remember what they’re wearing, especially under these circumstances.
I’ve taught all my kids to remember their full name, date of birth, address, and phone number. Although my kids know not to talk to strangers, I know that nice shiny things like the offer of candy and pets can easily make kids forget everything. During long car drives, I like to go over different scenarios on what they should or shouldn’t do.
Most of us have pulled at least a few all-nighters, whether by choice or by necessity. Forgoing sleep and pushing your body to stay awake for days at a time leads to physical and mental strain — for example, you may have heard that driving while you’re exhausted has been found to be as dangerous as driving drunk. But in an emergency or survival situation, you may not have the luxury of regular and restful sleep. It’s useful to know the effects sleeplessness has on your body so you can understand the risks and prepare to deal with them.
The following infographic from Mattress Clarity provides a timeline of what happens when you don’t sleep. Even in the first 24 hours, the effects are substantial, especially if you’re working hard nonstop. After two days, substantial neurological issues appear, and after three days, hallucinations may begin. World-record holder Toimi Soini stayed awake for more than 11 days, but Guinness World Records subsequently stopped tracking this challenge due to the substantial risk of death it poses.
Hello, my name is Last Man and I… I’m a pack addict. I recently got a great deal on a closeout Mystery Ranch Coulee 40 from Backcountry.com. It’s a departure from many other packs I’ve picked up and not one I think many in the preparedness community would normally gravitate to. Why not? Well for starters it’s not some webbed up, 1000-denier nylon, Velcro paneled, multi-pocketed tac-pack (of which I have several).
In fact mine, in the only color they had left, looks kinda like a giant avocado. It’s closer to a dedicated hiker’s pack more at home in a National Park than a military-based pack on a deployment somewhere. Think more Osprey or Kelty and less London Bridge Tactical or Eberlestock. For those of you guys looking to be more “grey” this is a great pack, coming in some low-key colors but with the space and features few if the other less “tactical” options offer.
My initial impressions of this pack are very positive. At 40L it’s not made for long sustainment trips, but for something to help get me home over the course of a week or so it’s just right. Because of its size it’s really difficult to over-pack, although I bet some folks will still succeed in doing just that.
It’s exceptionally comfortable — I hardly notice I’ve got it on. The 3-zipper design, a Mystery Ranch exclusive, is the best way I’ve seen so far in accessing all gear easily. If you lay it down unzipped completely, the pack is wide open. Although I have to admit, when you sit it up and open just the top (pictured), the bag looks disconcertingly like that face-sucker egg from the movie Alien. The zippers are on par with the best I’ve seen in the industry.
Oh, and one last thing on storage. I really love the zippered pockets on the waist belt. They are very handy for all the quick access items you’d normally have to stash somewhere like the lid pockets.
I’m not going in to all the technical voodoo that makes this bag so comfortable. Mystery Ranch says it’s a result of a frame “comprised of two vertical composit rods and an upper horizontal composit bar” paired with an HPDE frame sheet and Futura Yoke. For anyone else, just take it that it’s really, really comfortable.
Now for the downsides. That cavernous interior needs a lot of organization to pack well. There are no interior pockets to organize smaller things inside the main compartment so little pouches and zip-lock bags are your friends.
Speaking of pockets, those four “stretch woven pockets” on the outside are not nearly as handy as Mystery Ranch would like to think they are. They seem too tight or awkward for anything other than a light rain shell or pair of gloves. I’d rather have a couple extra “real” pockets for my money. Lastly, the hydration reservoir pocket is smaller than most packs I have. I crammed the 3L bladder from the Camelbak BFM and its not the ideal set up, but will work.
The bottom line is if you’re looking to travel fast and comfortably with minimal to moderate loads, this is a great choice.
Here are the basic specs from Mystery Ranch’s website:
Weight – 3.8 lbs Volume – 2441 cu-in (40 liters) Dimensions – 28.5″ x 16″ x 12.5″ MSRP – $229
Winter downtime is a myth for anyone living away from the comforts of suburbia. Even though gardening and beekeeping are on hold and egg production is slowed, there’s still much to be done during the colder months. Livestock producers are seeing calves and lambs born. There’s firewood to manage. However, unless you’re a quilter, woodworker, knifemaker, or homebrewer, the shift in activities can lead to cabin fever or a reduction in productivity.
Fortunately, there’s a high-value food product that can be produced and stockpiled on the homestead during the short days of winter — maple syrup.
Even if you don’t reside in a well-known syrup-producing region such as New England or Canada, and even if your neighbors assure you that “we don’t have those kinds of trees around here,” syrup could still be an option. And it’s not restricted solely to those who are blessed with dense groves of sugar maples.
Red maple is one of many species that can yield maple syrup. Photo: Morguefile.com / davidpwhelan
Trees to Target
The classic tree syrup is maple, of course, and sugar maple is the king sap-producer of the Acer genus, but all maple species will yield maple syrup — red maple, black maple, and silver maple. The lowland growing boxelder, too, is technically a maple and makes a decent syrup. The primary difference among these will be the sugar content, and as the name suggests, sugar maple will have the most. The textbooks say that the sap-to-syrup ratio is 40 to 1 for sugar maple and 60 to 1 for red (although this will fluctuate from tree to tree and throughout the season).
Sap can be consumed straight from the tree, where it averages 1 to 3 percent sugar and looks and tastes like water.
Other trees can produce syrup in the same way as the maples, including black walnut and sycamore, although both the sugar levels and sap yields will be lower. Birch syrup is produced in some areas, but the sap-to-syrup ratio is typically going to be upwards of 100 to 1. Furthermore, as opposed to sucrose in maple sap, the sugar in birch is fructose, meaning it’s more likely to scorch, so cooking it down is a much slower process.
Walnut syrup isn’t as well known, but many would say the quality rivals maple.
Naturally, there’s been much more research and tradition tied to maple syrup over the years than other types. If you’re venturing into other genera, proceed slowly and cautiously, as you’ll be figuring out a lot on your own.
A refractometer, although not necessary, can be a convenient way to monitor the sugar content of the sap/syrup.
As far as timing goes, that’s another component you’ll need to figure out. Maine sees its peak sap flow in March, for instance, while the flow in Virginia may end in late February. It’s even possible to tap sycamores in the fall in many instances. For maple production, you’ll want nights with temperatures in the 20 degrees F (-6 degrees C) range, followed by days in the mid-40s (4 degrees C).
Tap only healthy-looking trees that are at least ten inches in diameter, trees with no dieback, fire scarring or other visible weaknesses. Drill a 1.5-inch-deep hole into the trunk at a convenient height using a 5/16-inch bit, and lightly tap the spout in just far enough so that it can’t be pulled out by hand easily. In subsequent years, drill the holes at least six inches above or below and six inches to the right or left of the previous year’s taps.
Once a tap is done, the tree quickly begins an attempt to seal off that wound, so it’s important not to tap too early. Six to ten weeks is about how long that tap can be productive. As for long-term sustainability, the same trees are often tapped for generations. Healthy trees will naturally compartmentalize the wounds after about 10 weeks, sealing off any infections that might try to find their way in.
Buckets or Tubing?
Most backyard syrup producers begin with buckets, and unless you invest in the galvanized ones, this can be the most economical approach. Ten taps can be set up for well under $20. Bakeries and delis will often give away their old plastic buckets, but be sure to avoid any that could taint the flavor of your final product. Icing buckets, for instance, are perfect. Dill pickle buckets — not so much.
Any clean, food-grade container can be used to collect sap.
One-gallon water containers or plastic ice cream tubs are fine for a few trees, too, but keep in mind that the perfect weather can yield well over a gallon of sap per tap in a single 24-hour period.
Plastic spouts can be purchased for a few cents each, and a few feet of tubing will be needed to connect the spout and the container.
As for the number of taps per tree, a good rule of thumb is that if you can reach all the way around the tree, one tap is enough. If you can’t, install two. If it takes two people to reach around it, that’s good for three taps. Tables can be found online that give diameter-specific tap numbers, if you want to be more scientific about it.
If tapping on a steep slope, tubing will eventually seem like a good move. Up until recent years, the norm has been to use 5/16-inch tubing plugged into larger mainlines, but 3/16-inch tubing has gotten more popular. For a small number of taps, the 3/16 can be zig-zagged downslope from tree to tree without a mainline. Another advantage of the 3/16-inch over the 5/16-inch tubing is that, if you have at least a 30-foot descent from the highest to the lowest points, the smaller diameter creates a vacuum effect and will ultimately yield more volume.
The cost for the 3/16-inch tubing is currently about $50 for an 800-foot roll, and this can potentially be enough to connect 25 or 30 trees, depending on the spacing.
Storage
Storing the sap until ready to cook can be a significant challenge, as the sap can sour during warmer days. The weather will often work to your advantage, and if your sap freezes in the containers, count your blessings. Creating a snow bank for storage is a good idea, if you lack enough refrigerator or freezer space to keep it all.
Sap can be kept for a week or longer by pouring it all into a large chest cooler and freezing a gallon or two of sap to float in it, thereby keeping its temperature down.
Be sure to only use food-grade containers for collection and storage, as sap is notorious for hanging onto flavors and smells and imparting those into the syrup.
A low-cost option for larger volume collection is a (new and unused) trash container, but again, make sure it’s food-grade.
Stock tanks, recycled 55-gallon drums from the soft drink industry or stainless steel dairy tanks are other options for storing and collecting sap.
Cooking
Store-bought syrup pans and evaporators make sense for large-scale production, but the prices in a supplier catalog can be discouraging for a backyard producer. A wide pan that exposes as much surface area as possible speeds up the evaporation process, so something like a five- or six-gallon stockpot isn’t very efficient. A wood fire will usually prove to be the best heat source, especially if you have access to your own firewood, although propane is fine for finishing.
Stainless steel water pans from a restaurant supplier can hold several gallons, and there are numerous ideas online for creating wood-burning evaporators that hold two to four of these.
Sap will be cooked until it reaches 66 percent sugar (a measurement also known as Brix or °Bx). A candy thermometer is the cheapest way to monitor this. Find the exact elevation for the spot where you’ll be cooking. Then, find a table online that gives you the degrees (in Fahrenheit) for the boiling point of water at that elevation. Add 7.5 degrees F to that number, and that’s the target. For instance, at 2000 feet above sea level, water will boil at 208 degrees F. The syrup can be bottled when the sap reaches 215.5 degrees F.
Other Equipment
A consistent aggravation for commercial producers is “sugar sand” or niter, a by-product that can cause cloudy syrup or a gritty deposit in the bottom of the container. It’s harmless but ugly. At the very least, run the hot syrup through a couple layers of muslin cloth before bottling, or consider a cone filter from a maple supplier.
Above: Niter or sugar sand (like what’s settled in the bottom of this jar) is harmless but unattractive. Filtration is necessary for a quality product.
As cooking sap requires so many hours, reverse osmosis filtration is something that has advantages for larger producers. Reverse osmosis machines are expensive, but when one considers that they remove up to 75 percent of the water from sap before the boiling even begins, the time-savings can be significant when managing 1000 taps or more.
Selling or Repurposing Your Syrup
Once you’ve established the tools and techniques for syrup production, it’s likely that you’ll end up with more than your family (and your friends, relatives, and neighbors) can use. In this case, selling the excess syrup can be a great way to generate income to support other homesteading projects. If you’re planning to sell syrup, you’ll need to contact your local Extension office for information on bottling and labeling requirements for your area. It may be that you can sell through some venues like farmers’ markets or on-the-farm but not others without an inspection of your facility. Value-added products can increase the revenue per gallon of syrup quite a bit. Bourbon-barrel-aged syrup, syrup coated pecans, or maple candy are good examples.
For those who have invested in reverse osmosis equipment, it’s even possible to bottle the permeate and sell it as “purified maple water” (after jumping through the appropriate legal hoops). Many producers sell maple cotton candy, but most don’t use their own syrup for this, instead buying maple sugar to use.
Selling maple or birch sap straight from the tree could be an option for those who don’t want to bother with cooking. Check with any nearby producers about buying sap. Plus, there seems to be a market for unprocessessed sap among consumers as a sort of natural, organic beverage.
The tourism potential of syrup can include pancake breakfasts, tours and festivals, and this can be especially helpful as fundraising for local fire departments, rescue squads, or youth groups.
Syrup production can be a worthwhile investment of winter hours. Whether it’s approached as a business or simply with the goal of a few pints for one’s own use (or for gifts or bartering), it’s a surprisingly easy and affordable skill to learn.
You’re in that state between waking and dreaming, where you’re not quite sure if what you heard was imagined or not. It’s approximately 3 in the morning, and someone just entered your room. Since you’re spending the night at your friend Paula’s house, perhaps she’s looking for something. But at this hour? This doesn’t make sense. As you open your eyes and the blurriness fades away, you hear something that sounds strangely like duct tape being unrolled. Your heart rate begins to race as you realize whoever is in the room with you isn’t Paula at all. It’s someone who shouldn’t be in the house.
As you turn your head to get a better look at the situation, the stranger realizes you’re beginning to wake up. The man immediately jumps on top of you and covers your mouth with his hand. In a low, threatening voice he growls, “Shut up! Make a sound and you’re dead!” Overcome with the immediate shock of what’s happening, you fear for not only your life, but Paula’s as well.
You’re turned over on your stomach, your mouth and eyes are covered with tape, and your wrists are bound behind your back. You have a knife in your purse, only a few feet away from you. If only you could reach it, you’d have a better chance at escaping your unknown assailant. Whatever their intentions are, you’re not sure at this point. You adjust your breathing to try to dampen the feelings of panic and think clearly about how to free yourself. You may only have a few minutes to live — or maybe they just want to immobilize you so they can rob the place. There’s no way to be sure at this point. Every decision you make could determine whether you survive or not.
In this issue’s What If? column, we look at a topic that’s often in the back of people’s minds — an aggressive home intruder with unknown intentions that could be kidnapping, abduction, or worse. While we often see these incidents reported in the media, we find that they’re accompanied by little, if any, information about what you can do if ever faced with a similar situation to improve your odds of survival. We plan to change that here, with feedback from two of our writers on what they’d do to sway the given scenario in their favor. We asked Morgan Rogue of RoguePreparedness.com and firearms instructor Sheena Green to offer guidance to help you think through some possible ways to turn victimization into victory.
The Setup
It’s a Friday night, and you drive over to your friend Paula’s new house to deliver a housewarming gift and catch up on things. Paula tells you she just recently rented out her detached guesthouse in the back to a male colleague at her work, but that he isn’t currently home. She asks you if you can spend the night since she’s not sure when he’s coming back. Paula’s husband is also out of town, and her new tenant has lately been bringing over a bunch of male friends who stay up past midnight partying. As a result, she’s thinking about evicting him. You’ve known Paula for years and trust her judgment as far as roommate selection, so you can understand her concern. As you’ve spent many a late night talking with Paula over the years, you decide to spend the night in her guest room, located next to Paula’s room, so she feels a bit safer.
The Scenario
Situation Type A friend’s house
Your Crew You and your friend Paula
Location Your hometown
Season Winter
Weather Rainy; high 47 degrees F, low 39 degrees F
The Complication
You awaken on your stomach in the middle of the night to the sound of tape being unwrapped. As you try to roll over, someone hops over you and pushes one of their knees into your back with great force, wrapping a length of tape around your eyes and head. The attacker says if you shout or try to escape, he’ll kill you. He then proceeds to bind your wrists tightly together behind your back with duct tape. At this point, you don’t know if this is the roommate Paula mentioned, one of his friends, or a random intruder. You don’t know if he’s alone or if there are multiple accomplices in the house. You also don’t know if this person has a weapon, what their motive is, or if Paula is even still alive.
Through a gap in the tape and outside light peering through the window, you can make out certain features about your assailant in the reflection of a large mirror on the closet door. You can’t yet see a weapon in his hands, but that doesn’t mean he doesn’t have one. Also, the intruder isn’t wearing a mask. They’re also the only other person in the room at this point. You see your purse right where you left it, about 3 feet from you. It contains a folding knife. Your cell phone is still charging on the nightstand next to you and is within arm’s reach — or would be, if your hands weren’t bound. Your legs aren’t yet bound. What do you do? Scream for help? Use social engineering to talk your way out of it? Remain compliant and hope it influences him to spare you? Try to discreetly break your restraints and escape? Fight your way out?
Survival Advocate “Rogue’s” Approach
Prep
If I had a friend who was worried about her troublesome tenant and his friends, I’d want to do everything I could to protect her. Before settling down, I’d text or call a friend or relative and let them know where I’d be for the night. Initially, I’d ask Paula to give me a rundown on this tenant, his general behavior and the behavior of his friends, their comings and goings, where they work, what they do, etc. I’d also ask if she’d had any confrontations with them before, if it involved the police, or if they’d ever been inside her home. Knowing the layout of her home would give them a good understanding of how to break into it. This info would help me understand the tenant’s present disposition toward Paula, how big a threat he may pose, and if it’s been documented. The more I know, the better.
I carry a firearm and a knife on me at all times. Assuming a reader might not have a firearm or be licensed to carry one, I’ll also address defense techniques that could be used either way. I also carry a cross-body purse that contains odds and ends for everyday and emergency use. Since I’m sleeping over at Paula’s, my knife and firearm would remain inside my purse while we slept. I also usually carry a dog tag-sized lock-picking set as well as a dog tag-sized folding knife from Grim Survival. They attach to the inside of my pants via a retractable keychain with a carabiner. They’re very discreet, and can be easily retrieved or worn in pajamas if needed.
I’m pretty much always alert and wary of becoming a victim due to an attack or sexual assault, so I always strive to learn new skills to protect myself and others. I study Krav Maga because it teaches real-world defense techniques, such as how to push someone off if you’re on the ground and they’re sitting on top of you, how to get out of a bear hug from either behind or in front, or what to do if your hair is pulled. Practicing these skills over and over is essential to muscle memory and proficiency.
We must also have a strong mind. Being attacked is a stressful, gut-wrenching experience. If we have the will to survive, then our chances of survival increase dramatically. Another way to strengthen our mind is to plan out solutions to hypothetical scenarios. I do this by envisioning steps I could take to survive various situations that might happen whenever I’m out and about. The more I think about ways to survive something, the more confident I feel.
On Site
Paula’s house has no alarm system and it’s unfamiliar to me, so I’d check the windows and doors, making sure all locks work and everything is secure. A chain lock can be broken or taken off very easily from the outside; deadbolts and a kick plate are more secure and should be used if possible. Putting a wooden rod in the track of the sliding glass door or window also increases security. Although she may not have some of these items, I’d suggest she invest in these types of reinforcements; perhaps some could be improvised the night I stayed over.
I’d also check the backyard gate for a lock and ensure nothing nearby could be used to climb over, such as a garbage can. The tenant would presumably have a key to an outside gate, but it’d still be one more way to thwart any other intruders. I’d keep the porch, patio, and kitchen lights on — illuminating the interior gives the impression that someone is home and may still be awake. Someone still awake and able to quickly dial 911 could discourage a home invader looking for the low-hanging fruit of people who aren’t home or could be taken by surprise.
Since Paula has every right to be worried, I’d reassure her and recommend she lock her bedroom door (if possible) and try to get some sleep. It might sound extreme, but I’d also tell her to place a chair or some other heavy obstruction against her bedroom door on the inside to further impede an intruder and possibly buy some time to react. I’d tell her that if she hears any suspicious noises to immediately grab her phone, listen for any further noises, and be ready to call 911 if she feels unsafe.
As I head to bed, I’d keep my phone within arm’s reach, ideally on a wireless charger so that I can easily retrieve it without having to fumble around with charging cables. I’d also keep my purse within reach on the floor next to the bed. Since the door to my guest room doesn’t lock, I’d have to figure out a way to not only block a possible intruder, but also to wake up if someone were trying to enter. If nothing better were available, I could also place a chair against the doorknob on the inside.
Crisis
Let’s assume for this situation that some of these additional security measures weren’t possible or failed for some reason. Waking up to someone tying my hands behind my back and telling me he’ll kill me would lead me to believe that the assailant likely has a weapon or perhaps plans to strangle me. Whether his threats are empty or not, I’d have to think quickly.
My legs aren’t bound yet, and I’ve learned how to break out of duct tape, even with my hands tied behind my back. Assuming he’d have to change positions and release his knee from my back at some point, I wouldn’t say a word or scream, but instead just wait. I have no idea if anyone would even hear my screams, so screaming would be useless at this point.
The moment he releases his knee from my back, I’d roll to the opposite side of the bed so that I could fall to the floor, sit up, and quickly lunge my hands up as far as they’ll go and forcefully drop them back down again to attempt to break the duct tape. By rolling away from my attacker, it gives me a few moments to work on getting out of the tape. If I couldn’t break the tape with the first thrust down, I would try to slip my legs through my arms. While this can be difficult and takes practice, it can be done.
This would all happen quickly, but I’d be banking on the possibility that my attacker would be caught off-guard by my sudden actions and wouldn’t react right away. I’d pull the duct tape up enough to see clearly as soon as I freed my hands. If he wrapped his arms around me from behind to try to subdue me once again, I would attempt to lift my arms up and break free from his grip, turn, and punch him in the groin — a good spot to hit, whether you’re fighting a male or female.
If I couldn’t break free from his hold with this technique, I could also simply bend down a bit and attack the groin, step on his feet, kick him in the shins, legs, or whatever your limbs I can reach — attacking some area of his body is better than doing nothing. I would try to jump over the bed to access my phone or purse to retrieve my firearm or knife.
If he grabbed my leg and tried to pull me back, with my other leg, I would kick his arm, face, or whatever my free leg could reach. I could also possibly use the sheets to cover his head and disorient him. If I couldn’t retrieve my knife or firearm fast enough, I’d be reaching for and throwing whatever I could at him to slow him down. Anything can be an improvised weapon and could potentially put him on the defensive.
I may have to scratch, claw, and bite my way out of his grasp to reach my weapon and cell phone. I could also use the small dog tag folding knife I’d kept in my pants to defend myself and buy enough time to get to the other side of the bed to retrieve a more effective weapon.
If I were able to reach my firearm, I would tell him to lie on the ground as I kept my gun on him and called 911. If he didn’t comply with my orders, this is where it gets tricky. If he runs away, I may not have to use my firearm. If he’s fleeing, then in the eyes of the law, he may no longer be considered a threat. If I were to shoot at a fleeing assailant, even with what just happened, I could go to prison. The specifics will depend on the laws in your jurisdiction, so be sure to research and understand them. However, I would keep my gun at the ready and the phone line open, then go check on Paula. On the other hand, if he continued to attack me or tried to take my weapon, I may have to use deadly force to protect myself.
Ideally, after confirming whether Paula is safe or not, I’d remain on the call with the 911 operator until the police arrive. When they get there, they don’t know the situation or if I’m really the bad guy — all they know is that I have a gun. I’d tell them that I’m a concealed carry holder and do my best to comply with what they’re asking and work out the details later, such as if I need a lawyer. Simply being handcuffed doesn’t forfeit your right to speak with a lawyer. Gather your thoughts and remain compliant, but answering questions should be done in the presence of an attorney. [Editor’s note: see “Aftermath” in Issue 1 of our sister publication CONCEALMENT for post self-defense shooting legalities.]
Whether you’re scared for your life in your own home or just walking down the street to work, you should always take every precaution necessary to avoid being a victim. We don’t always have security guards or police nearby when we need it most, so we must be responsible for our own safety.
Firearms Instructor Sheena Green’s Approach
Prep
Even though I hadn’t stayed at Paula’s new home before, could there be a way to become familiar with the layout without even setting foot in it? Possibly. Using social media, I’d look to see if Paula had shared any photos like many excited new homeowners do. Since she recently purchased the house, there might also be a listing with more details on a real estate site. I’d use Google Maps and to see what the outside of her house and the neighborhood looks like to make sure I went to the right place. It’d be worth noting how close the neighbors are and what the terrain is like immediately surrounding Paula’s house.
The news about her tenant and his late-night guests would be an instant red flag. If he were to come home and bring his friends to drink and party, the possibility of having mind-altered strangers in close proximity to where we’ll be sleeping wouldn’t sit well with me. Avoiding a bad situation is impossible if it descends upon me while I’m peacefully dreaming. Upon awakening to the fragility of life years ago, I resolved to take at least one self-defense class a year in addition to firearms training. To supplement the classes, I listen to audiobooks with self-protection themes to fortify my mind and prepare myself mentally.
If I didn’t know about her tenant situation prior to arriving, there wouldn’t be much extra preparation before my visit, outside of my normal EDC. For the purpose of this article, I’ll address the situation with the tools presented earlier and examples from training I’ve taken.
On Site
Asking for a tour of the home would help supplement any impressions of the house’s layout I saw online and enable me to start planning ways to increase our security. Planning escape routes to nearest exits, knowing which second story windows can be used as exits, or hunkering down behind a sturdy, locked door with a cell phone are all options that should be considered.
If needed, barricade or block a flimsy exit door with furniture or a doorstop to slow down an intruder before retiring to bed. Since I’m with my friend, I’d want to test it and be sure the furniture or chair I used won’t give way.
A folding knife in a purse on the other side of the room is worthless. I’d need quick access, staged within arm’s reach and not folded if possible. Paula should have some type of tool or self-defense implement by her bed as well.
I’d suggest that we have a slumber party/movie night in the living room. We could leave lights on in adjacent rooms and have more space to move to other weapons or exits. We could also turn ordinary objects into weapons if needed: scissors, screwdrivers, bookends, fireplace tools, you get the idea.
Implementing emergency plans with friends, family, or trusted neighbors is imperative. Agree to keep cell phones next to the bed and call 911 at the first sign of trouble. Stay on the line with 911 while heading to a designated safe room. Identifying a location down the street to flee to together or meet up at is also a good idea. Make sure it’s a well-lit location with access to help and preferably security cameras as well.
Making a preemptive phone call to the local PD on their non-emergency line is one of the easiest things to do. Inform them of the tenant who parties frequently and, since Paula’s husband is out of town, request a patrol car to make a few trips over the course of the night if possible.
Crisis
The automatic bodily response to being startled awake is disorientation coupled with accelerated heart rate and breathing. The mind races, as it quickly has to process all the sensory inputs to produce an appropriate response. Slipping into panic mode can shut down decision-making capabilities. Slow your breathing to force the brain to match it and clear your mind.
Any fear that was suppressed by confusion will come forward. Reject fear paralysis by addressing it, resolving to survive, and winning the fight. Adding self-talk into stressful situations when there’s loss of control will also help prevent panicking. Breathe. Calm. Listen. Think. What’s my best option?
He said that if I made a sound or tried to escape he’d kill me. If murder was his only motive, he could have done it already. This means he has other intentions; my initial thought is rape.
In this scenario, being pinned on my stomach with my hands behind my back, there isn’t much I can do except for one move called VINE: straighten the legs and lock them at the ankles while engaging the glutes, hamstrings, and quads. This will seal up the legs and tuck the tailbone. I’m banking that he’ll try to pry my legs apart with both hands. We all laughed at the Thighmaster, but this is a good reason to dust off the one in the basement.
He won’t be able to get what he wants, and he’ll have to roll me over. It may seem more vulnerable by giving him access to my breasts and mouth, but it’s a better defensive position and I can use it to gain more control over the situation.
An escape technique while having the hands and arms bound with duct tape is to keep the forearms and hand muscles tense and engaged while the tape is being applied to create wiggle room inside the duct tape once they relax. Application techniques for duct tape and placement are variables that’ll determine escape techniques — some are more difficult than others. A more experienced criminal may be better at it than a novice.
If he rolls me on my back to try to pry my legs apart from the front, I probably have a limited amount of time before he increases force to get what he wants. I would try to quickly work my hands while they are underneath my body so he can’t see what I’m doing, hopefully freeing one hand from the other.
Smelling his alcohol-laden breath, hearing him huff and puff, and feeling his hands on me, I’d use my senses to locate where his head is. If I know where his head is, I can determine where his eyes are. Even though he sloppily placed duct tape over my own eyes, once my hand is free, I can and will drive my fingers into his face without hesitation. The ideal targets are his eyes. Make the first strike count! Unless he’s really out of his mind, his hands should move to his face upon successfully redirecting his external priority (you) to an internal priority (his face).
As soon I make contact with one hand, the other one would rip the duct tape off my eyes. Plant one leg into the bed and use the other to kick him as hard as possible to create some distance. The situation will determine what target areas are available when the time comes. Once you’ve created some space, grab your phone and purse if within reach and GTFO.
Unfortunately, we must also look at this scenario from the opposite outcome. What if I couldn’t get my hands free? What if instead of continuing the attempt to pry my legs open he hit me with a lamp from the nightstand, and I momentarily broke my VINE and passed out?
If I was unsuccessful at keeping him off me, I may lose control over the situation, but there’s one thing I do still have control over — my internal situation, my own mind. The mind is always our most valuable weapon.
Rather than withdrawing from the situation and checking out, I can choose to study parts about him that’ll help me identify him in the future so he can be caught and locked away. What did he smell like? Did he have long hair or short hair? What’s his body size compared to mine? Could I feel the texture of his clothes to determine what he was wearing? If I could get the duct tape off my eyes, I’d want to note any distinctive marks on his face and body, tattoos, piercings, etc. And, while it makes me uncomfortable even writing it, I’d look at the color of his eyes.
The second best weapon in this situation is your voice. While he said no shouting, he didn’t say no talking. This is where skills in social engineering can buy time to plan the next move. I’d try to sit up and, as I’m moving, ask politely if it’s OK to sit up while reassuring him that I won’t run away. It’s a false promise, but as long as he doesn’t say no and push me back down, I’ll be in a position to try to slide my hands underneath then straight up my front to remove the tape from my eyes. More possibilities to fight or run can happen from here.
Conclusion
This What If? scenario is designed to get you thinking about your own personal safety. While we may or may not travel without a firearm or fixed blade on our person, this article specifically addresses the tools in the setup. Undeniably, there are many variables in such a crisis that we simply don’t have space to address here, but the idea is to get you thinking ahead of time to help reinforce the overarching principle of this publication — preparation. The best bet is learning ways to prevent this situation from happening at all. Steve Tarani addresses this in his book titled, Prefense: The 90% Advantage.
The more things we can do to prevent an attack from happening, the more we decrease the chances of it happening. Educate yourself: take classes on martial arts, escape and evasion, and situational awareness. The article Vanishing Act in the previous issue of this magazine (#29) addresses some of the ways to prepare yourself for a kidnapping scenario. Read about self-defense, join a gym, and find like-minded friends to train with. The opportunities are out there; you just have to find them and commit to learning. You’re your own first line of defense.
If you’re a woman reading this, find a class where you can literally manhandle some dudes so you know what it feels like to fight someone bigger than you. You may be surprised at how strong you actually are, or you may be surprised that you aren’t as strong as you thought. Either way, you’ll learn about the areas you need to improve. So, why wait until the last minute to figure it out? We’re all responsible for our own safety, and the best way to stop the world’s victimizers is to stand up to them.
MREs and emergency ration bars are fine examples of modern survival foods. These bug-out-friendly items can be stored for long periods and provide sustaining nutrition, two key requirements for survival food. And while there are many emergency meals and snacks on the market currently, today’s products aren’t the first foods of their kind. Look back into history, and you’ll see many hearty foods that our ancestors used for traveling food or emergency sustenance.
Sure, today’s survival chow is ruggedly packaged and capable of lasting for years, but you can’t make your own MREs in a cave. When the last meal has been gobbled up, you’ll need to be able to make your own “survival food” to replenish your stores. Thankfully, our forebears did plenty of subsistence food experimentation, and they left us with the recipes that worked. They discovered how to make foods with nutrition and longevity, using simple ingredients, and they were even able to prepare them in the absence of electricity. During tough times, you’ll need tough foods; these are some of the most rugged recipes that history has to offer.
Hardtack
Above: While probably the most bland of the recipes here, hardtack is a resilient food that packs a good deal of nutrition.
The origin of this brick-like cracker dates back to ancient Egypt, but the form we know today has its closest resemblance to a food item made during the American Civil War. Baked several months beforehand, these soldier’s rations were rock hard right out of the oven, and even worse when they finally got to the troops. To make their meal chewable (especially with bad Civil War-era teeth), soldiers soaked their hardtack in water or coffee. As an added bonus, the dunking would cause any insect larvae in the hardtack to float to the top of the liquid for easy recognition and removal. Dinner and a show!
Ingredients
The hardtack recipe is very simple. You could add other ingredients, but if you do that, you’ll drift away from hardtack and be making bread.
5 cups (600 g) of wheat flour (all-purpose flour is a good choice)
2 cups of water
3 teaspoons of salt
Recipe
Blend your wet and dry ingredients together in a large bowl. Once the flour, salt, and water have created dry bread dough, use a fat stick (or rolling pin) to roll it out flat, or you could pat it out by hand. Sprinkle on extra flour if the dough has any sticky spots. Create a ½-inch-thick sheet of dough, cut it into 3×3-inch squares, and poke holes in both sides of each dough square. Place them on an ungreased cookie sheet, and bake for 30 minutes per side at 375 degrees F (190 C) for a total of one hour baking time.
Storage
As with most foods, store your hardtack (and the rest of the foods in this article) in a cool, dry, dark spot out of the reach of pests, if you have such a place.
Benefits
Once it’s dried thoroughly, hardtack will keep for years, provided it stays dry and away from pests. Just soak it in the liquid of your choice to eat it. Since it’s completely dehydrated “bread,” hardtack is lightweight and travel tough. It’s a lot of nutrition in a small package!
This odd “survival” food can be best described as the strangest meatball you’ve ever eaten. Made from dried meat and rendered fat, among other ingredients, pemmican is an ancient forerunner to modern survival rations. While different cultures around the globe have made versions of this calorie-packed concoction, it’s the Native Americans who really put this food on the map.
Traditionally rolled into serving-size balls, pemmican can also be pressed into other shapes. Even though it can be a standalone food, some cultures have also used it as greasy “bouillon cube” to create a base for soups and stews.
Ingredients
The time-honored pemmican recipe is a mixture of two or three main ingredients. The first is dried jerky that has been pounded into dust or slivers. This provides protein and bulk to the finished product. This jerky can be salted meat or meat that has been dried with little or no salt. Just keep in mind that salted meat will allow the pemmican to last longer.
The second ingredient is rendered animal fat, which provides the high calories for this food. The fat also acts as the glue that holds everything together. An optional third ingredient is dried fruit or berries, as a supplemental source of carbohydrates, vitamins, and fiber. You could grab these ingredients at your local grocery store to make a test batch at home, or you could whip up a batch in the field from game meat you’ve dried and fat you’ve rendered. It’s all up to you. Here’s a sample ingredient list:
8 ounces of lard
8 ounce packed cup of powdered jerky (pounded with rocks or chopped in a blender)
8 ounces of dried fruit (this could be any dried fruit, but berries are ideal)
Recipe
The recipe is super easy. The only tricky part comes when you’re actually blending the pemmican ingredients. You’ll have to pay careful attention to temperatures. If your animal fat is cold, it won’t blend easily with your other ingredients. And if you heat up the fat too much, the hot melted lard will cook your raw ingredients, which need to stay raw in order to prevent spoilage.
In a pot, warm the lard to a soft pasty texture (below 100 degrees F) while stirring it. Add your “dry ingredients” to the softened fat and stir until thoroughly blended (about two minutes of stirring). Some intrepid explorers have added small amounts of flour or other starch sources for extra carbohydrates, or added spices for more flavor. With or without additions, scoop the pemmican out by hand and compress it into round balls or flat cakes. Allow it to cool before storage.
Storage
You can wrap the pemmican pieces in wax paper (not too tight), in lieu of the rawhide containers of old. If the weather or your storage area is cold, this food can last for months. But when the weather turns warmer, eat it before the fat starts to take on a rancid smell.
Benefits
Ounce for ounce, pemmican is the highest calorie food in this article. One little 2-ounce ball of pemmican has 336 calories (mostly from fat), 57 mg of cholesterol, 17 grams of protein, 770 mg of sodium, and 20 percent of your daily requirement of iron.
Parched Corn
Above: The idea is to roast the corn kernels for longevity, not to make popcorn.
Parched corn is a unique Native American cuisine, essentially a rough form of popcorn. Like pemmican, parched corn was once a common food among Native Americans. Colonists, trappers, hunters, and pioneers soon adopted this food for a snack and as a lightweight trail food. Parched corn can also be ground into coarse meal and simmered in water to make a corn soup.
Ingredients
This food can be made in small batches or large ones, and it’s easy. You’ll need some fat to coat the bottom of a skillet or pan. Bacon fat is great, but any edible oil will work. You’ll also need some dried sweet corn. Other types of corn will work, but sweet corn is the best choice. If you can’t find it, you can buy frozen sweet corn and dehydrate it thoroughly. Your final ingredient is a little salt or sugar for seasoning. Salt makes it taste like popcorn, while sugar makes it taste more like kettle corn.
Above: Fresh, canned, or frozen corn will work, but all varieties need to be dehydrated before use.
Recipe
Grease your pan with oil and bring it up to a medium heat (on the stove or over a fire). Add a handful of your dried corn, and start stirring. You’ll only want enough corn to cover the bottom of the pan, not a pan full of corn. After a few minutes, the corn will begin to swell and start to pop. Keep stirring until all of the kernels are browned. Pour it out of the pan, and add salt or other seasonings while it’s still hot. Drain the excess oil, and enjoy it!
Storage
Parched corn should be stored in a breathable container. Historically, cloth bags and leather pouches were used, as these prevented the corn from sweating. In the event of wet weather, temporarily place the bag of parched corn in a jar, metal tin, or plastic bag to block moisture absorption from the air. Take it out of the waterproof covering when conditions dry out.
Benefits
If kept dry and cool, parched corn can last for months (until the fat goes rancid). Just 1 ounce of this popcorn predecessor has 120 calories, 46 mg of sodium, 5 grams of fat, 120 mg of potassium, 20 grams of carbohydrates, 2 grams of fiber, and 3 grams of protein.
Trench Cake
Above: Trench cake packs an amazing amount of calories using a bare minimum of ingredients.
While the name and concept of a “fruitcake” dates back to the Middle Ages, baked goods like this actually reach back to Roman times. From old-world hunters to soldiers in the Crusades, people have carried sustaining cakes made of flour, honey, spices, and fruit for centuries. In the late 1800s, fruitcake became extremely popular throughout the British Empire. Later, during World War I, English families sent fruitcakes that were nicknamed “trench cakes” to their brave relatives fighting in the trenches of mainland Europe.
Ingredients
4 cups mixed dried fruit (2 to 3 cups should be golden raisins for the classic taste)
1 cup self-rising flour
1 (400 g) tin sweetened condensed milk
½ cup water
1 egg
1 dash rum or brandy (optional)
Recipe
Place the fruit and water in a pot, and bring to a boil. Simmer uncovered for two minutes. Cover and cool to room temperature. While the fruit cools, line a deep square or round baking tin with parchment paper (made for baking), bringing the paper ½ inch above the edge of the tin. Preheat the oven to 300 degrees F (150 degrees C). To the pot of fruit, stir in the condensed milk, egg, and then the flour (and liquor, if using). Thoroughly mix the batter. Spoon it into the prepared tin and bake for two hours (or until a toothpick comes out clean after being inserted into the cake).
Storage
There’s only one way to store fruitcake correctly, and that’s wrapped in a cloth that’s been soaked in liquor. To keep the cloth from drying out, the fruit cake can then be shrouded in plastic wrap, or more historically correct, in a metal tin. When embalmed this way, fruitcake can last for many months in a cool location, maybe as much as a year.
Benefits
If you happen to like fruitcake, then this might be the tastiest survival food on our list. And even if you don’t like these bricks of fruit bread, they provide many necessary nutrients. A 4-ounce slab of the average fruitcake contains 369 calories, 20 grams of fat, 46 grams of carbohydrates, 4.3 grams of protein, 68 mg of cholesterol, and 102 mg sodium.
DIY Food Fails
Whether you’re making your survival food over a campfire or in your home kitchen, there are some common food fails that you’ll want to avoid.
Inaccurate Measurements: This common mistake will alter the chemistry of the food you’re cooking, resulting in unpredictable results and weird textures. Make sure to use measuring cups meant for food, and use dry measures for dry ingredients; wet for wet.
Sloppy Storage: As mentioned throughout, you’ll want to keep your food in a cool, dry, dark place — free from insect and rodent pests. If you don’t, spoiled or contaminated food will be your outcome.
Impatient Preparation: Follow the recipe when it comes to cook times and temperatures. Baking your food at a higher temp doesn’t mean it’ll cook faster — it just means you’ll burn it. Don’t Be Scared of Fat: Forget about your diet! If you’re in a survival situation, calories equal continued life, and nothing has more calories than fat. If a recipe calls for fat, to hell with your Weight Watchers points. Don’t cut back on the fatty ingredients. The food won’t taste right, and it won’t provide you with as much energy. Leave it in there!
Conclusion
While some heritage foods have stayed around because they were tasty, other recipes have lingered because they have proven themselves to be a good way of storing nutrients. Just remember that old doesn’t always equate to outdated or obsolete! We hope that one or more of these historic survival foods will inspire you to try something new, and we hope you end up making these just to try them — not because you had to.
Photos by Chris Heising and Courtesy Sig Sauer Academy
Imagine waking up in your bed from a dead sleep only to find yourself blindfolded and unable to move, with a stranger on top of you holding you down. Your hands are tied, and you’re being told not to talk. If you think this would never happen to you, you may someday learn you’re very wrong. This is exactly what Kim Corban thought until her life was unexpectedly turned upside down.
Kim is a daughter, sister, wife, college graduate, accomplished business professional, and above all a fierce mother of four wonderful children. When you first meet Kim, you can’t help but admire her determination and positivity. Kim doesn’t portray herself as a victim of sexual violence, and without knowing her story, you’d never think she was the survivor of a heinous crime. If you don’t read any further, let this be your biggest takeaway: There is no demographic or segment of a population where sexual violence does not occur — it can happen to anyone, which means everyone should take steps to protect themselves. Here we’ll explore Kimberly Corban’s story from victim, to survivor, to ongoing advocate.
U.S. Department of Justice statistics indicate that rape and sexual crimes are the most underreported categories of violent crime in America, with a staggering 76.8 percent of sexual assaults not reported to the police in 2016.. This is due in part to many survivors viewing the crime as a private matter, fearing reprisal, wondering if they’ll be believed, feeling embarrassment, or citing lack of concrete evidence. Sexual abuse is far more prevalent than most people realize. In fact, it’s estimated that 1 in 10 children will be sexually abused before their 18th birthday.
In 2006, Kim lived in Greely, Colorado. Like most of us, she was comfortable in her routine, and going about her daily business on the assumption that tomorrow would come and be similar to the previous day. That didn’t happen. On May 12, 2006, Kim’s world was torn apart. She was awoken in the early morning hours, blindfolded, and pinned to her bed. For the next several hours, she lived through what many would consider to be their worst nightmare — held against her will and brutally sexually assaulted in the perceived safety of her own home.
Eight out of 10 rape victims know their attacker; Kim did not. Only six out of 1,000 perpetrators end up in prison for the crimes they’ve committed. Fortunately, Kim’s attacker was caught, successfully convicted, and sentenced to 24 years to life in prison for his attack on her.
Above: An assault can happen anywhere. Attackers often research the patterns of their victims through social media. Learning methods of self-defense, such as carrying a concealed firearm, is one of many ways you can defend yourself.
Interview with Kim Corban
RECOIL OFFGRID: What were your initial thoughts when you awoke and realized something was wrong?
Kim Corban: I was lying face down and asleep, and when I woke up I felt like I couldn’t breathe. I tried to get up out of my bed and was immediately pushed back down. At first I felt fear, and then it was survival — I thought, I can’t exit the situation, so what do I need to do to get out of it?
Instinctually, what was your first reaction?
KC: I did not have any means of combating someone. I was in a dead sleep when I realized this was happening. I couldn’t see anything. I was blindfolded so I could only hear what was going on, and I was told not to talk. I had one roommate who was home, but I had no idea where she was or what had happened to her. I thought she was probably dead. My hands were tied so I didn’t have the ability to fight back. I didn’t know how to respond — I was helpless. There was no getting out of it physically for me so I froze.
Can you walk me through those few moments when you realized you may not survive?
KC: My adrenaline was high. It was when he started to undress me I knew that if he’s willing to break into my house and rape me then he’s willing to kill me — I needed to survive. I was trying to have measured responses and I figured it was more than just my life at risk here. In the shock I was experiencing, I thought my best chance at survival was to appear nonconfrontational and comply.
Above: Sheena Green, who also contributed to our What If? column elsewhere in this issue, is seen here demonstrating self defense with an edged weapon. She’s a certified firearms instructor and co-leads the Des Moines, Iowa, chapter of The Well Armed Woman.
What was the point in your mind when you said to yourself, I’m going to survive this?
KC: It was a fight to survive. I thought, I have to live through this and try to remember as much as I can and catalog it in my mind, so this doesn’t happen to anyone else. I would talk to him and tell him things like I have an STD, or that I’m claustrophobic, hoping that would matter, and he would untie me so I could get away. It didn’t matter.
He continued with the rape, and when he ejaculated on me he turned me around and I wondered if this is the point where he kills me. My blindfold moved slightly so I could see out the window and I had a sense for the time of day. I just kept talking. Talking kept me alive to this point, so I kept talking. After the rape he held me captive for an hour, and I kept talking. I even told him it was OK what had just happened, hoping that he would leave. He finally asked for a glass of water, told me he was going to come back and take care of me, and I heard the front door of my apartment opening and closing.
At what point did you know that it was safe to call for help?
KC: When I heard my front door open and close, I looked out the window down at the sidewalk and the parking garage to see if I could see him leave. I couldn’t, so I had no idea where my attacker was. I grabbed my cell phone, which was in my room, and called 911. I remember muffling the phone, so he would not hear any sounds if someone picked up — still not knowing if he was in the apartment. The service at this point was not good, so my call kept getting dropped. I still couldn’t hear anything, so I took a chance and ran across the hall to check on my roommate. She was alive, and we realized he had left the apartment. Sixteen minutes passed before there was any police response. It seemed like forever.
How has your experience changed your belief system?
KC: Prior to the rape, I was sheltered. I just didn’t think this could happen to me. I never actually even considered that this could happen to me. That mentality is a psychological defense to make us feel like we have control, but unfortunately, we don’t always have control. Sexual violence is not a discriminatory crime — I know that now and am very situationally aware of my immediate surroundings.
Above: Sig Sauer Director of Training and Special Events, Hana Bilodeau, demonstrates martial arts techniques to a group of students.
Since the incident, what steps in your personal life have you taken?
KC: I made the decision to carry a firearm, not because I fear what can happen, but because I know what can happen. Carrying gives me control. I’m still recovering mentally and emotionally, and that means a lot of therapy and someone to talk to even on those days when you don’t think you need it. For me, it’s also about speaking up and being a voice for other survivors. After my experience, I didn’t want to just find a way to live as a survivor, I wanted to find a way to thrive. I found I was able to do that by becoming an advocate, sharing my story, and helping other victims.
Becoming a victim presumably left you feeling vulnerable. What have you done to change that?
KC: My first goal was to not live my life in the role of a victim. My second goal was to help at least one other person to not experience what I did, and give people the confidence to talk about it without feeling ashamed to help others. I accomplished both of these goals by becoming an advocate. I told my story, and I tried to make others feel like it was alright to share and take action to take their lives back.
Survival advocate Kim Corban is seen here practicing her firearms skills.
What home security measures do you use now that you didn’t before?
KC: I moved to an upstairs apartment. My previous apartment was on the ground level, which left me vulnerable. We installed an alarm system, and while we all know that won’t necessarily prevent crime, it’s a deterrent and awareness mechanism. I have a huge dog. I also got properly trained and educated on firearms safety and use, I understand “stand your ground,” and I now carry. I also have a lot of situational awareness — for instance, I don’t post anything specific on social media, and I am constantly monitoring what’s happening around me.
What one piece of personal safety advice would you offer to others?
KC: Know your options, get educated, and decide what’s best for you. Your needs and protection can change over time so you have to constantly evaluate what those are. Nobody knows what’s best for you other than you. There’s a lot of judgment about owning firearms, but I got educated first and then made my decision — and for me it’s the right decision. Keep an open mind.
Conclusion
Through Kim’s story, it’s clear that we must be prepared to physically stand our ground to protect ourselves. You can work on acquiring skills on how to deliver basic hand-to-hand strikes, learning the anatomy of the body to exploit weaknesses in your enemy, learning to use an object as an improvised weapon to combat an attack, and finding ways to create distractions. Being committed to personal defense and survival could one day save your life or the life of another. Locate a trainer in your area to teach you countermeasures to various forms of physical attack.
Carrying a firearm for personal defense, as Kim has done, may not be viable for everyone or every setting — but don’t dismiss it either. Handgun ownership and use is a huge responsibility and is deserving of research and education to decide if it’s the right choice for you. Research your home state’s laws and firearm regulations, specifically concealed carry laws, home storage laws, and laws of self-defense. If you make the choice to carry, it doesn’t begin and end with the purchase of your firearm. Your focus should be on becoming comfortable with the basic mechanics of the firearm and building a solid foundation through continuous instruction and practice.
In closing, we think Kim said it best, “Survival is something you do every day, and you have to make the choice to fight for it. You can keep moving forward and have bad days. I have learned to do that. I made the choice to carry, because carrying is one more tool in my toolbox to equalize the odds. It gives me the ability to protect myself and helps me not live in fear.”
Getting a fire going in cold and wet conditions can be a real struggle, and one that can put your life in danger due to hypothermia if you’re not adequately prepared. Obviously, the ideal solution is to bring energetic, water-resistant fire-starting supplies (such as waxed tinder wick, fatwood, or Vaseline-coated cotton balls) with you at all times. But preparing only for the ideal scenario is foolish — you should always have backup plans in mind.
Dig through your survival pack, and you’ll find a variety of petroleum-based plastic and rubber products. While burning these materials in large quantities creates black smoke and may not be friendly to Mother Nature, doing so in small amounts can help you get a fire going. Potential combustible materials include disposable plastic bottles, food wrappers, rubber gloves, shreds of tape, or ranger bands. Some will ignite easily, while others will be more resistant, but when they burn they’ll usually do so with a strong flame.
In the following video, Dan from Coalcracker Bushcraft demonstrates one source for synthetic tinder that you may not have considered: a knife sheath. Specifically, he’s using the 90-degree spine on a Mora Basic 511 to scrape small curls of plastic off its hard sheath. Although this damages the sheath, you could easily use this method multiple times without completely ruining it — and as Dan mentions, this is an emergency measure, not one you’ll be using constantly. Plus, the Basic 511 is only $8, so buying another one won’t exactly break the bank.
When you hear Rudy Reyes talk about his 47 years of existence, it makes you wonder why he isn’t being passed around like a hot potato among VA hospitals or slamming heroin under a bridge somewhere. He was the product of a father he never really knew. He was raised in a big city surrounded by gangs, crime, and drug abuse. He was shuffled around between relatives, abused mercilessly, and ultimately ended up in a boys’ home. He’s been in warzones where the worst aspects of human nature are seething and raw, leaving an indelible imprint on the souls of those who live through it. The odds didn’t favor him living long enough to tell his story, but odds are something that Rudy’s understood how to control and use to his advantage. The hallmarks of a reluctant but self-admitted warrior.
Leading 1st Marine division near Baghdad during the invasion in 2003.
He isn’t some self-aggrandizing personality putting his own interests above everyone else so he can make money off his own name. Quite the opposite. Everyone else comes first for Rudy. He’s one of those guys whom after knowing him 20 minutes you feel like you’ve known him 20 years. It’s a personality that can only be described as incandescent; the big brother you never had and always wanted. He doesn’t need to prove anything to anyone. He’s living proof of what you can do if you have the tenacity to rise above what’s thrown at you and be there for others who need you.
Martial artist, Recon Marine team leader and scout sniper, DoD consultant, actor, motivational speaker, environmentalist, brand ambassador, father — the list just keeps growing. We spoke with Rudy about what’s kept him going in the face of adversity, his experiences in the military, his work to rebuild our planet, and what’s really at the core of a true survivor. If we could bottle and sell Rudy’s motivation and infectious enthusiasm, we could make Warren Buffett look destitute. Until we figure out a way to do that, we’ll give you some insight into what makes him tick and his advice to survive whatever you encounter in life.
Our Interview with Rudy Reyes
RECOIL OFFGRID: It sounds like you learned about survival from a young age. Tell us how you came into this world.
Rudy Reyes: So I was taught very early that the world’s designed to kill you, and it wouldn’t be doing its job if it were anything but. How we thrive as a human race is through struggle, strife, and conquest. Through that we become intelligent and people with will. The people with grit who can somehow, no matter what, make it to that new dawn, they’re the ones remembered throughout history, and the ones we extol in songs and movies, and our very society is built upon their backs.
Rudy with his brothers and mom, Norma, Christmas 1975.
My mother was 16 years old and fell in love with my father, who was a Marine getting ready to go on a second tour of Vietnam. He was very intelligent and handsome, and people gravitated to him his whole life. I guess in a lot of ways I’m a lot like my biological father; however, he didn’t want me or my mother. He came from a more prestigious family, and my mother came from a very poor family. He didn’t choose to stay with my mother and I, so while my mom was pregnant with me, the father who gave me his name and ethos is Rodolfo Reyes, Sr. He’s the one who taught me to fight for what’s right and that selfishness and greediness are the two ugliest things a man can be. He was also a proud Marine and was a law enforcement officer for much of his life afterward. They’ve both since passed away, but it was Rudy Reyes, Sr. who I carry with me to this day, and I think he’s an angel looking after me.
When I was a child, there was always fighting, yelling, and I was treated much worse than my other two brothers. Little did I know, but everyone else in the family knew, that I was his bastard son. I looked more white and different than my other two brothers and some of my other family. I stuck out. I can remember my father Rudy Reyes, Sr., in my front yard with his pistol pulled out and in the head of my grandfather who had his knife out and was horribly abusive, and almost beat me to death. It was frightening, people were screaming, and the other police were coming, but I was very proud and knew that the measure of a man was my father who stood up for me and what was right.
Shortly after that my mother and father divorced, and my brothers and I grew up being shuffled around among different relatives. My mother got involved with another man, and we became second priority. Then, it got harder and harder; we went to very tough schools with lots of kids with very tough backgrounds and no fathers at home, so I also learned that the strong survive. I excelled at lifting weights and sports to make myself stronger, although I was malnourished and we all got very sick because of the conditions we were in. We had lice, worms, and ultimately I got hepatitis and almost died when I was 10 or 11, but I still kept pushing myself.
In Houston, Texas, 1977, with little brothers Michael (center) and Caesar on the right.
When my little brother Caesar and I were blessed enough to go to the Omaha Home for Boys, then we were able to get well. There we got shots, dental care, haircuts, sports, coaching, and rules. Young men thrive in structure.
I just took the ball and ran with it. I did sports and still kept painting and drawing. We farmed, I learned to drive a tractor, we worked to feed ourselves, and it was very much like the military. I really thrived there, and it gave me confidence. One of the things in survival and times of crisis — confidence is the medicine for panic and it comes from competence. You can’t be confident unless you’re competent, and you can’t be competent unless you’re trained. We’d say in Recon, there were two types of men — trained and untrained.
Strangely enough, it sounds like being in an orphanage improved your situation.
RR: It very much did. For the average American it’d probably seem austere, but for me it was amazing. We got to eat all we wanted. We got to train. We had strength in numbers. When we went to the public school, we banded together, and that way the other kids wouldn’t bully us. It was incredible, brother.
OPFOR at Ft. Hunter Liggett, 2002.
Tell me how Bruce Lee became an inspiration, what you love about martial arts, and how it became a way to protect yourself.
RR: My father, being a Marine, loved to whoop ass. He was 5-foot-4, but walked around like he was 7 feet tall. The confidence of infantrymen in the Marines is just unreal. He would take me to see the Kung Fu cinema at the drive-ins. I was obsessed with the asceticism and culture of the East, because it seemed they had something for self-development. My father also collected Black Belt magazine and was always practicing with his nunchucks. There was already a culture of warriors there and I was always in love with manhood, so I tried to soak up every little bit I could.
I grew up in the hard inner-city parts of Kansas City as well as impoverished South Texas on the border. You think the border’s hard now; you can’t imagine what it was like in the ’70s and early ’80s. My mother was into drugs, and so were the people around her. In the early ’80s, crack had hit the streets in Kansas City. Gangs were proliferating. It was legitimate combat. I had to be able to fight to protect my two little brothers, and it gave me great pride to do that. And it empowered them to become lifelong martial artists as well.
Did you get into MMA as a profession or a hobby?
RR: I got into Sanshou, which is kickboxing and Judo. It was just in its infancy when I was competing as a kickboxer in the Chin Woo Martial Art Academy and throughout international competitions. Where I got heavier into MMA was in the Marine Corps. We do the MMA program in the Corps, and it’s one mind, any weapon. We fight, we grapple. We fight with knives, guns, improvised weapons such as E-tools and helmets — what you’re wearing is a weapon. Being stationed in San Diego my whole career, there was an immense martial arts community there, and I just immersed myself in it. To this day, it’s just part of who I am.
Continuous sniper missions in Fallujah, 2004.
What made you want to become a Marine?
RR: Believe it or not, what made me want to go into it is goodness. I saw a documentary on the war in Kosovo with an orphanage and all these kids who’ve lost their parents in sniper alley. Shortly after that I read in the paper that President Clinton was putting boots on the ground in Kosovo. That’s why — to fight and defend my little brothers all over again. It struck me as something that needed to be done. I joined as an infantryman and was afforded the opportunity to try out for Recon, and it changed my pathway.
I went through a training evolution that’d culminate three years later after being a paratrooper, combat diver, demolition expert, mountain warfare expert, and then running things in and out of helicopters of all sorts. From doing that, I was on the 15th Mountain Expeditionary Unit. Then sure enough, as karma would have it, I was on a ship when the towers were hit, and my platoon and a platoon of SEALs were the very first American fighters in Pakistan, and then Afghanistan. I found myself fighting as a point man and scout sniper with an amazing team. My team leader was a Ranger, sniper, and badass drill instructor, and we came back after fighting and winning, and then I got the orders that we were to prepare for Iraq.
And as you know, the Iraq war didn’t slow down for many years. I fought and led the invasion with my team, and it’s documented — many people know about it from Generation Kill on HBO and the book of the same title, which is the true story of my team. Then, we fought in Fallujah and Ramadi in some of the worst guerilla warfare you can imagine — some of the heaviest street-to-street, village-to-village fighting since Hue City in Vietnam.
Helicopter insertion in Afghanistan, 2001.
After all that, I came back after two enlistments in the Marine Corps and didn’t know what I wanted to do, except somehow be relevant. I thought, with those experiences, both sacred and profane, what do I do with them now? I went back to my simple disciplines: training, martial arts, teaching MMA, and doing triathlons. But even that wasn’t making me happy. I needed my community back. I needed my dignity and pride back from doing something truly immense.
The glory one feels in war is well earned in knowing you’re alive and your enemies are dead. If you weren’t absolutely sharp, together, and professional at being the most dangerous face on the friggin’ planet for seven months straight in Fallujah and Ramadi, if you were anything less than a warlord, you’d be dead. So after vibrating at that level, then I came back here and there’s nothing that was bringing that to me, I had to bring it to myself.
What were your experiences like in combat that had the biggest impact on you?
RR: There’s so many. You’re living and breathing it everyday. I also think the brain puts it away too because it can only handle so much for so long. Some things were forgotten and then they come back to me in flashes or were triggered by some other experience. We did the heaviest stuff. Patrolling day and night for two or three days in immense heat. Then other times we’d lay in a canal and let the patrol move on out. And then me and my team would be the hunter-killer team to circumvent the main supply route and set in as the gun trucks would do a vehicle checkpoint on any enemy running the opposite way. That stuff was like every other day.
What was even heavier, aside from toppling two regimes and cutting off the snake — my platoon was chopped away for a special program called Operation: Trojan Horse, where men who look ethnic/Latin like me would disguise ourselves as Pakistani workers. Spies would see me leaving the base into a taxi, which had other Recon Marines in it and some armor inside the cab. We’d have cutoff teams and close air support. It was highly mechanized and highly rehearsed in conjunction with various units — Green Berets, Recon Marines, Air Force, other agencies — and we would draw the insurgents or corrupt policemen out and they would try to kidnap and kill me in close quarters on the road.
In milliseconds we’d be engaging at 50 mph with fully automatic weapons, kill these insurgents or policemen, and cut off the road. From the information we’d get off their phones and computers or anything they had; we’d do direct-action hits. We really shut down the IED and major terrorist threat in that zone for some time. Of course, we’re not able to hold it forever because eventually we rotated back to the world and then the tyranny seeps back in. These are just some of the things I did out there. Our First Recon battalion did jump missions, snatch and grab direct-action, sniper missions, demo missions, you name it. It was a target-rich environment, and there was so much fighting to do.
What do you think the key to surviving in combat is? Is it training? Innate skill? Instinct?
RR: I think you hit on all of them, but most people don’t trust their instincts because they’ve not honed them. You have to have a positive mental attitude and be immersed into the process of training and improving your position, always! You can think about survival in this way. Always in a survival or combat situation, always improve your position. Insist on it. When you instill young men and women with that mindset and confidence in themselves, they will be seeking self-improvement always. They’ll never be filled with hubris. It’s a mosaic of skills, practice, attitude, physical fitness — it’s all of those things together. And passion!
How did you feel after you rotated back to civilian life with all these experiences that you’d lived through?
RR: When you live like that for so long, it becomes normal to you and you’re so happy with the small things — hot chow, hot coffee, laughing with your brothers. It’s really rich in a lot of ways; it’s so extreme, but so rich because happiness is true happiness there. You’re filled with happiness because you’re alive and have developed self-esteem and respect. Imagine your best friend, and now imagine four other of them always around you just as good as your best friend, and the rest of the platoon — you have a war tribe family that supports you. So coming back here without the family and without a mission that’s so dangerous that I had to put all of my passion and intelligence into it, without those things you can stumble and fall down and have depression. All those things happen to a lot of us.
Cultivating antler coral in Cayman Islands.
After you got out of the military and wondering what you were going to do, how did you start the next chapter?
RR: I went to my warrior discipline. I was training and immediately started coaching boxing, kickboxing, and MMA, and clients just flooded me with work. Soon the State Department got a hold of me and needed me to teach and prepare Navy explosive ordnance disposal techs to go in country and attach to special operations units. So I was contracting stateside, teaching and training, and I still had this idea that I’d try and change the world somehow. As this was happening I got a call and the people at HBO were very interested in me helping with the production of this miniseries called Generation Kill. That sent me in a whole other trajectory.
What would you say to the men and women out there suffering from what they’ve experienced in combat and feel helpless and dismissed?
RR: I felt all those things too, so I was no different than the rest of the brothers and sisters. I had so much forward momentum that I could keep a focus. Now we know so much more about PTSD and what men and women who go down range carry back with them. I believe there are four things that can make a stable structure. First is physical fitness because it creates self-esteem. And the chemicals that happen from training can combat the things that cause depression. Number two is your community — reach out! Isolation kills. Now, in this age of social media, there are so many people and groups in which you can do this.
Number three is having Mother Nature. You must go out and be in the ocean, the land, the mountains. You must get out there and get your hands dirty and feel the rain upon your chest. This is the way human beings are designed; we are animals of the Earth and very much need to connect with that source. The last thing is you need a mission, whether it’s getting a job or being the best spouse and parent or starting a nonprofit like I did or going to school. Whatever’s going to improve your position. All the things you learned in the military, push it forward and remember those four things.
First Force Blue graduation at Sunset House, Grand Cayman Islands.
Tell us about some of the other movie and television experiences you’ve had like Apocalypse Man and how those came about.
RR: Isn’t that awesome? It was such a good show! Discovery Channel threw every bit of its budget to defeat History Channel, and History Channel didn’t have the money. Everyone looks back at Apocalypse Man and says, “Rudy, this is some of your best work!” It was about how you use urban techniques practically and people loved it. Since then, I’ve had a few other television shows like Ultimate Survival Alaska. I have another show I’m working on right now that has elements of warrior and survival, and all the stuff I do and love. When that was happening, I started getting into feature films. I acted in films, advising, some stunts, and now I write and help with the scripts. I also assistant directed the Marine Corps Super Bowl commercial — massive responsibility!
I’m an advocate for physical fitness and mental wellness for our people. I help bring attention and get people to get along financially. I help special organizations like the Recon Sniper Foundation and another called Lionhearted utilizing art and expression that’s absolutely wonderful. I work with We Are the Mighty, which is a for-profit business that employs veterans. Really I’m just back full circle to where I was before. I’m expressing myself because I can write and speak publicly. I’m staying fit, I’ve partnered with Spartan Race, and I lead with their adventures. I’m working on my own clothing company with David Wood, who is a Marine as well, called Virtus. I’m the commander of my life now as well as the point man. I make my missions.
With Nicole Rozga in Puerto Rico doing massive coral restoration and relief work after Hurricane Irma.
Tell me about Force Blue and how that came about.
RR: To this day, I don’t think there’s been anything more important that I’ve been a part of in my short life than Force Blue. It came about as a dream. Myself, Jim Ritterhoff, and others went down to the Cayman Islands for some PTSD therapy. I used to be a combat diver, but I never felt a dive in a way that was healthy. It just made me happy and calm in the ocean with all the blue, the fish, and the sky — it brought a childhood wonder back to my life. I understood that these coral reefs were being destroyed by the cruise liner industry and other manmade things, and I said, “No way, we’ve gotta do something.” Jim said that we’re going to lose it if we don’t do something about it, so I said that’s what we’re gonna do then. I don’t know how, but that’s it.
We’ve been fully operational for a whole year and rebuilt coral reefs after the hurricanes. We’re really fighting for the most precious and noble cause in the world that’s all about survival — and that’s the ocean. Every third breath you take is from the coral reefs, and if we lose those reefs we lose it all. It’s fantastic, brother! I don’t know how to tell you how rad it is that I’m smiling and doing all this work with other veterans and families. That’s really proof in the pudding that Force Blue saves lives, and it’s only just begun.
With Force Blue Team 2 and master of culture, Roger Sparks (seen behind Rudy).
So many people still think that the world of survival and preparation is just based on paranoia and some fringe movement. What do you think it takes to make people more conscientious about it and put aside these misconceptions?
RR: Too many of the Doomsday Preppers-style narratives and shows have been out there. Media has to sell product, and there’s a few ways to sell. If you know about advertising and media using base drives inside of people to mobilize them to buy things, guess what? Fear is a big one. Let us break out of that narrative of fear and instead have a narrative of self-reliance and the confidence and happiness one has when they’re prepared. That’s what I love. How rad is it when you learn how to forage for your own food? When you learn how to make your own bio-diesel? When you know how to garden, hunt, and make your own tools? It’s a beautiful transition and new narrative of a human society that’s more responsible, capable, and ready, rather than just waiting for something to happen.
What do you think the single biggest thing is that people need to prepare for?
RR: The basics. In the Marine Corps you have to have your survival kit. You have to have water procurement, fire procurement, medical, signaling, shelter, those basics. You should have your basic survival kit, and it’s so simple to do. Make your little go-bag for the car, make some for the house, make sure you have access to water or know how to purify your water, basic first-aid, and signaling, which is very important. If there’s certain emergencies where we don’t have comms, if there’s an EMP, you’re out of range, then all of a sudden you’re reliant on simple communication. You should also learn how to use Ham radios. Also, rehearsing things with your neighbors and community. There’s nothing that people can’t overcome with just a little passion, planning, and a couple rehearsals.
Hunting lionfish, an invasive species in Florida.
If you had three wishes for the future of our survival and this planet, what would they be?
RR: Three ideals. The first is that conservation becomes a bedrock of human culture, regardless of nationality, language, race, or religion. Number two is a return to families having time to spend in the wilderness or in the ocean, whether it’s learning to sail, going into the woods to camp, fishing, hunting, and not just going to Disneyland or on a cruise. Inner cities creating community gardens everywhere. Number three is everyone leaving wherever they’re at a little better than they found it. If we do that, we’ll solve all the problems on this planet.
About Rudy Reyes
Age: 47
Hometown: Kansas City, MO
Best advice you ever got: “Take it personal.” — Roger Sparks, Recon mentor
Childhood dream girl: Farrah Fawcett and Chrissie Hynde
Bedside gun: Glock 19, but any weapon you got is the right weapon.
Marital status: Single
Children: Dylan, 5; Belladonna, 8
Required reading list:
Guns, Germs and Steel: A Short History of Everybody for the Last 13,000 Years by Jared Diamond
Collapse: How Societies Choose to Fail or Succeed by Jared Diamond
The Seat of the Soul by Gary Zukav
Gates of Fire by Steven Pressfield
Dark Tower series by Stephen King
Favorite movie: Heat, but anything by Michael Mann, really.
Favorite word: Magnificent
Least favorite word: Can’t
Everyday carry: Glock 19, snubby Taurus .38 when permissible

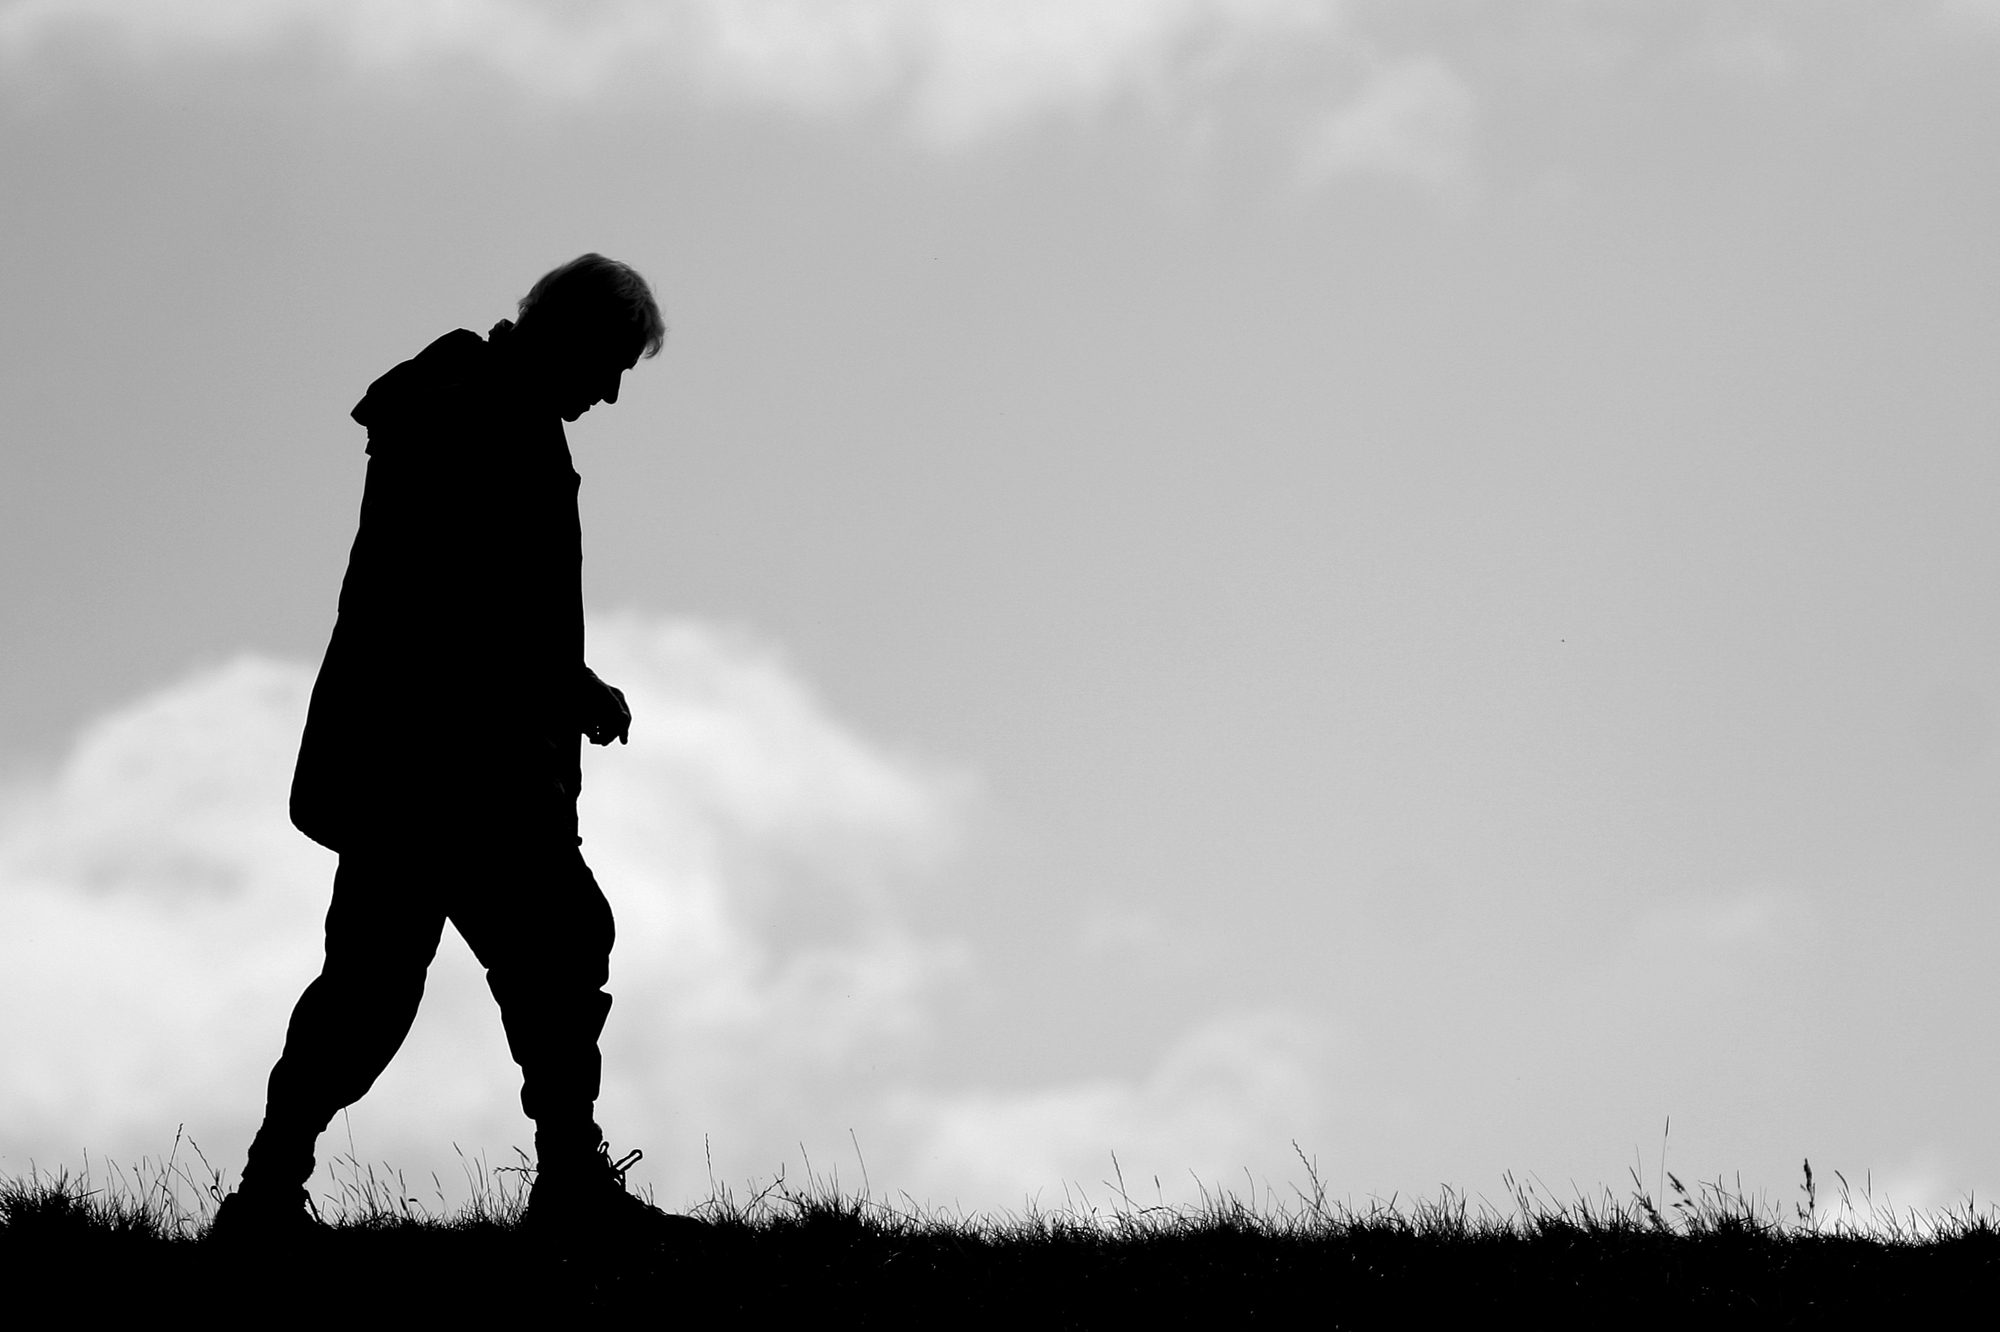


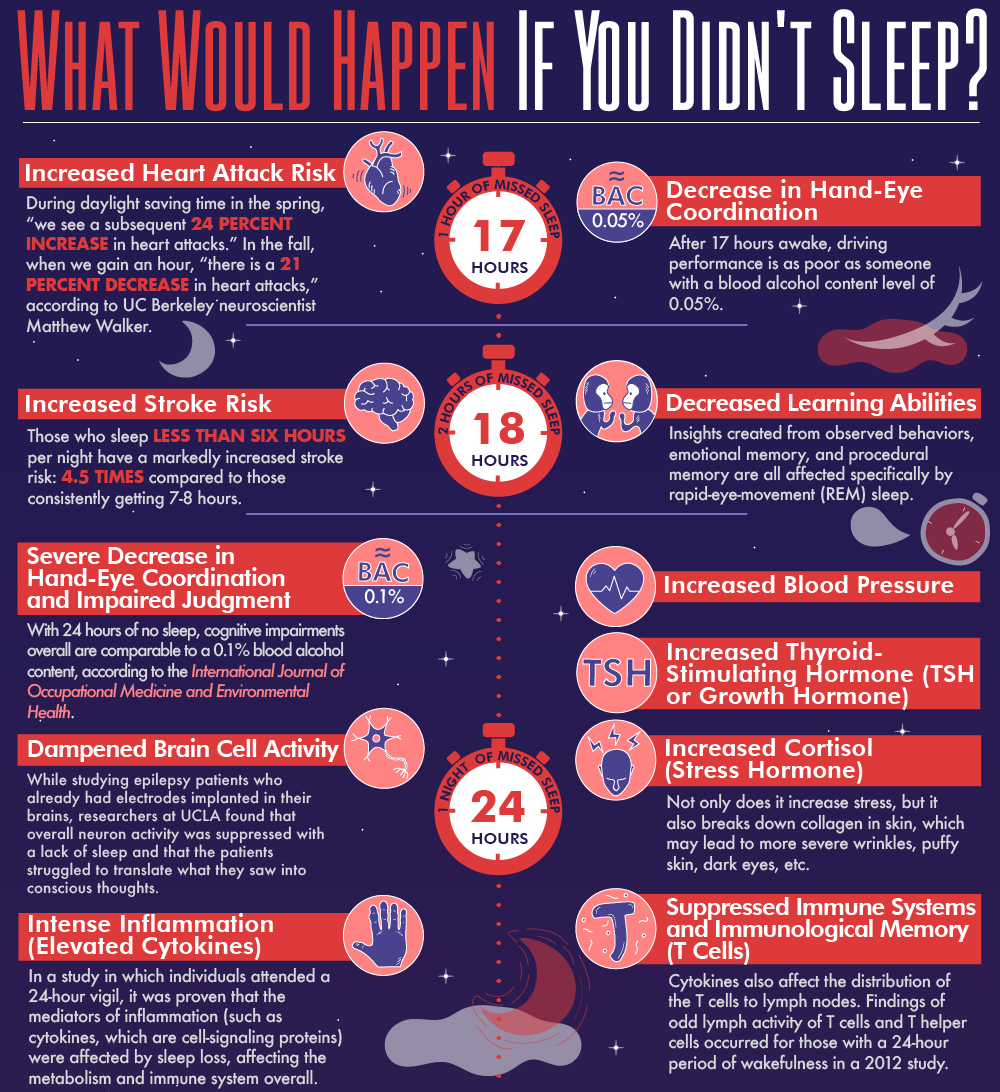


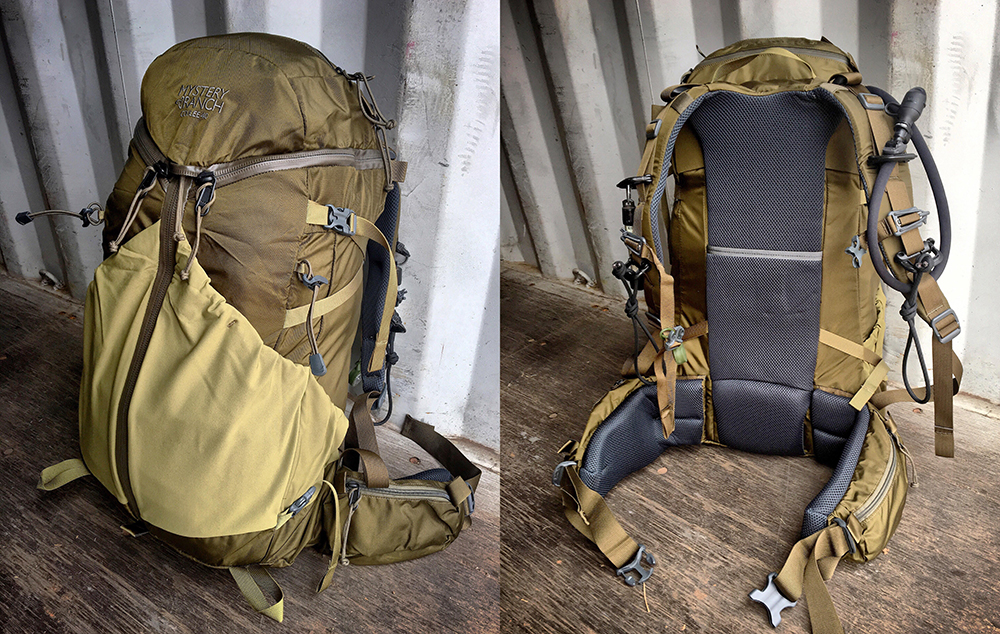
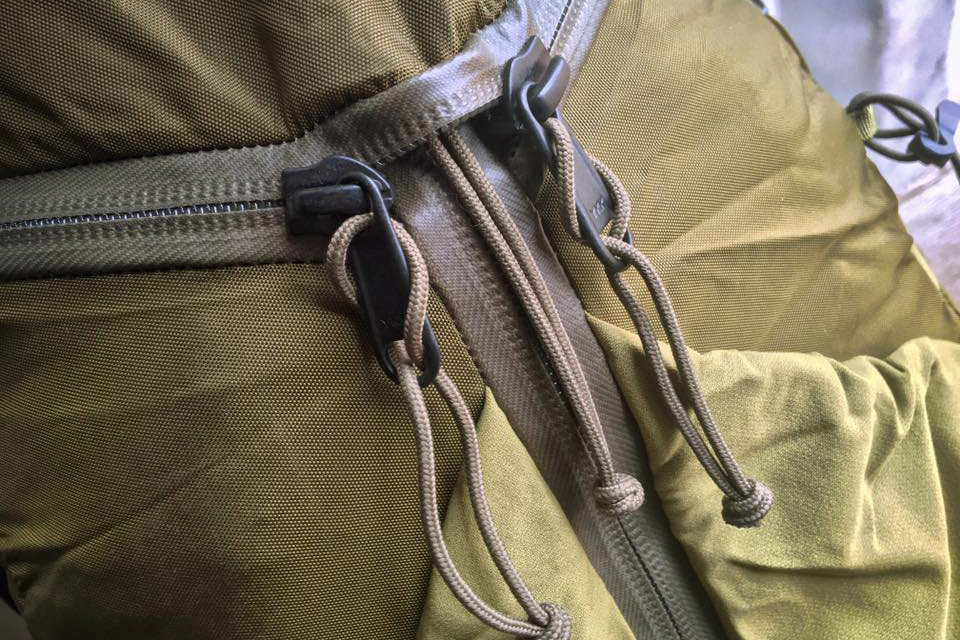


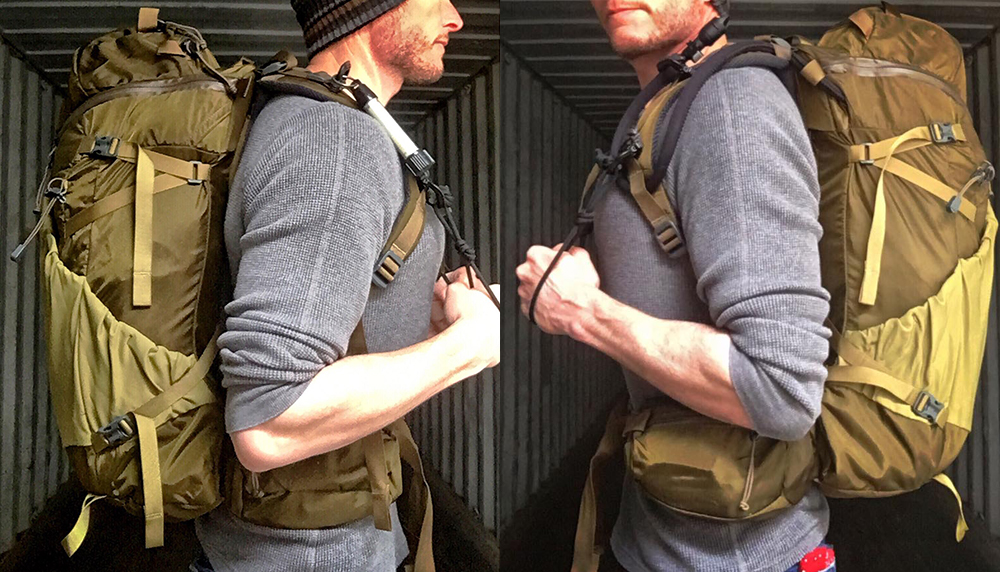
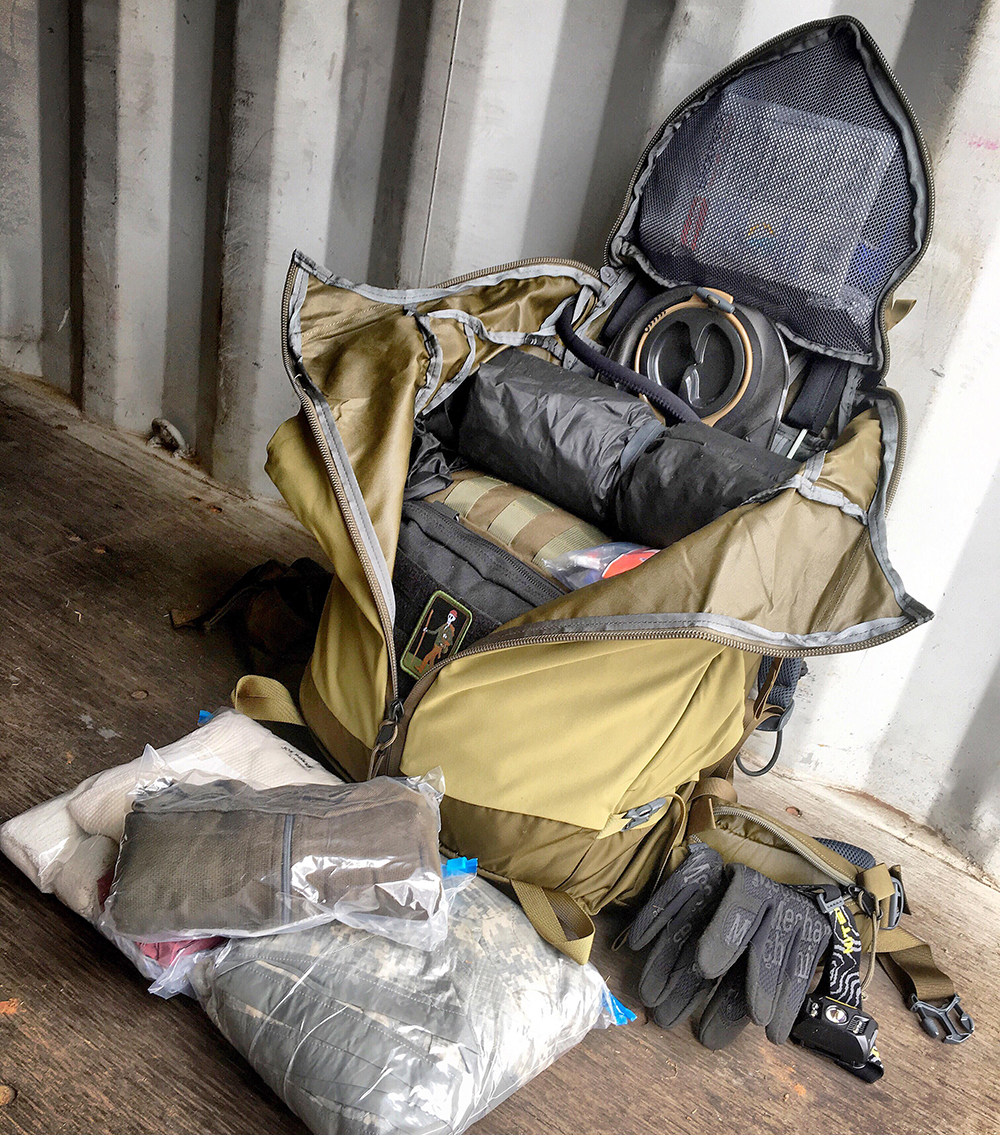


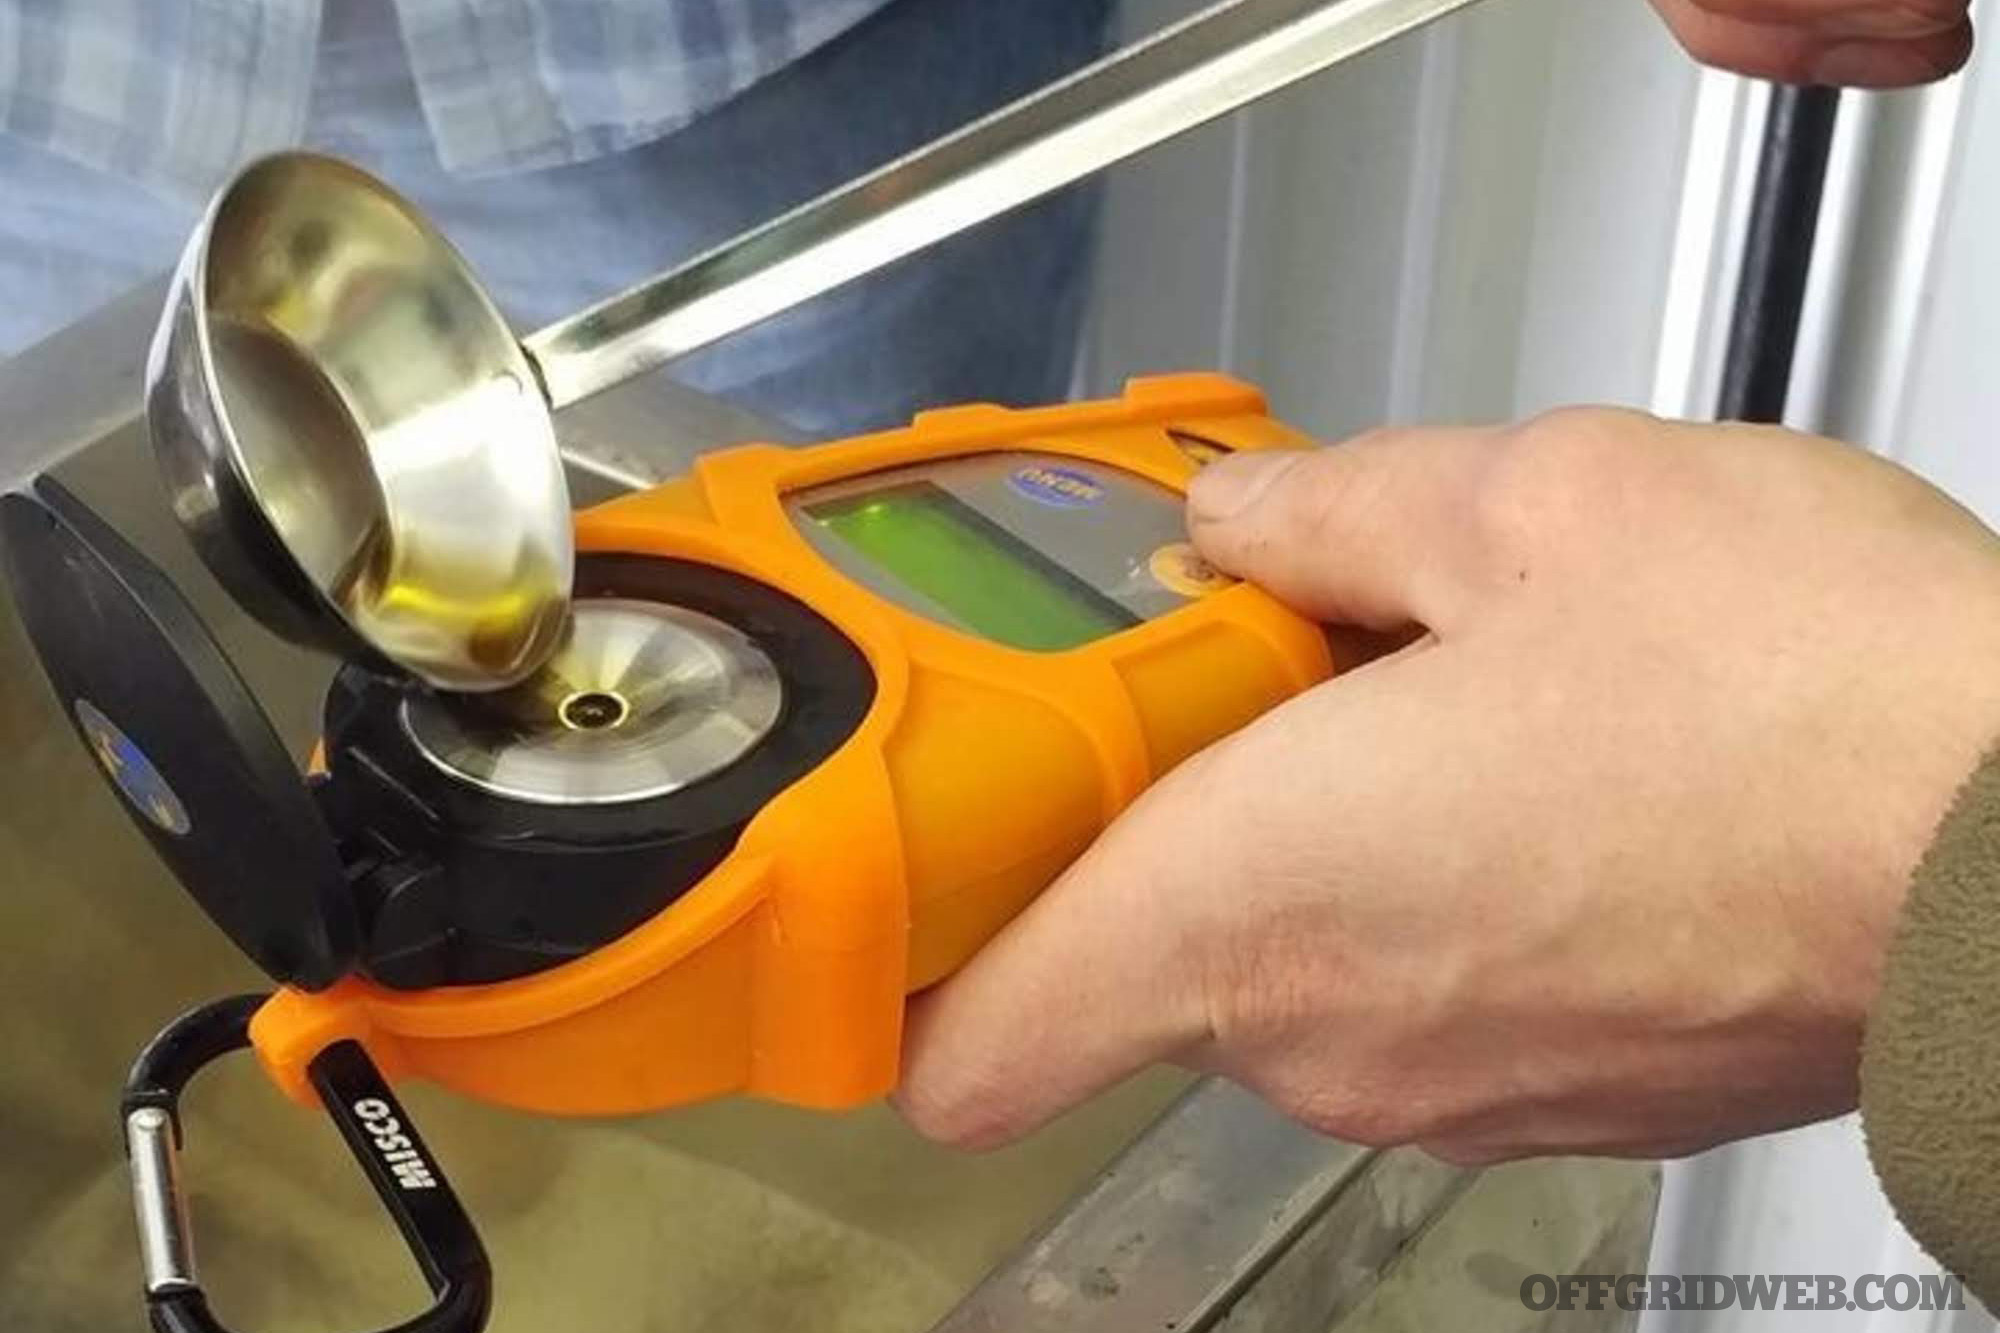


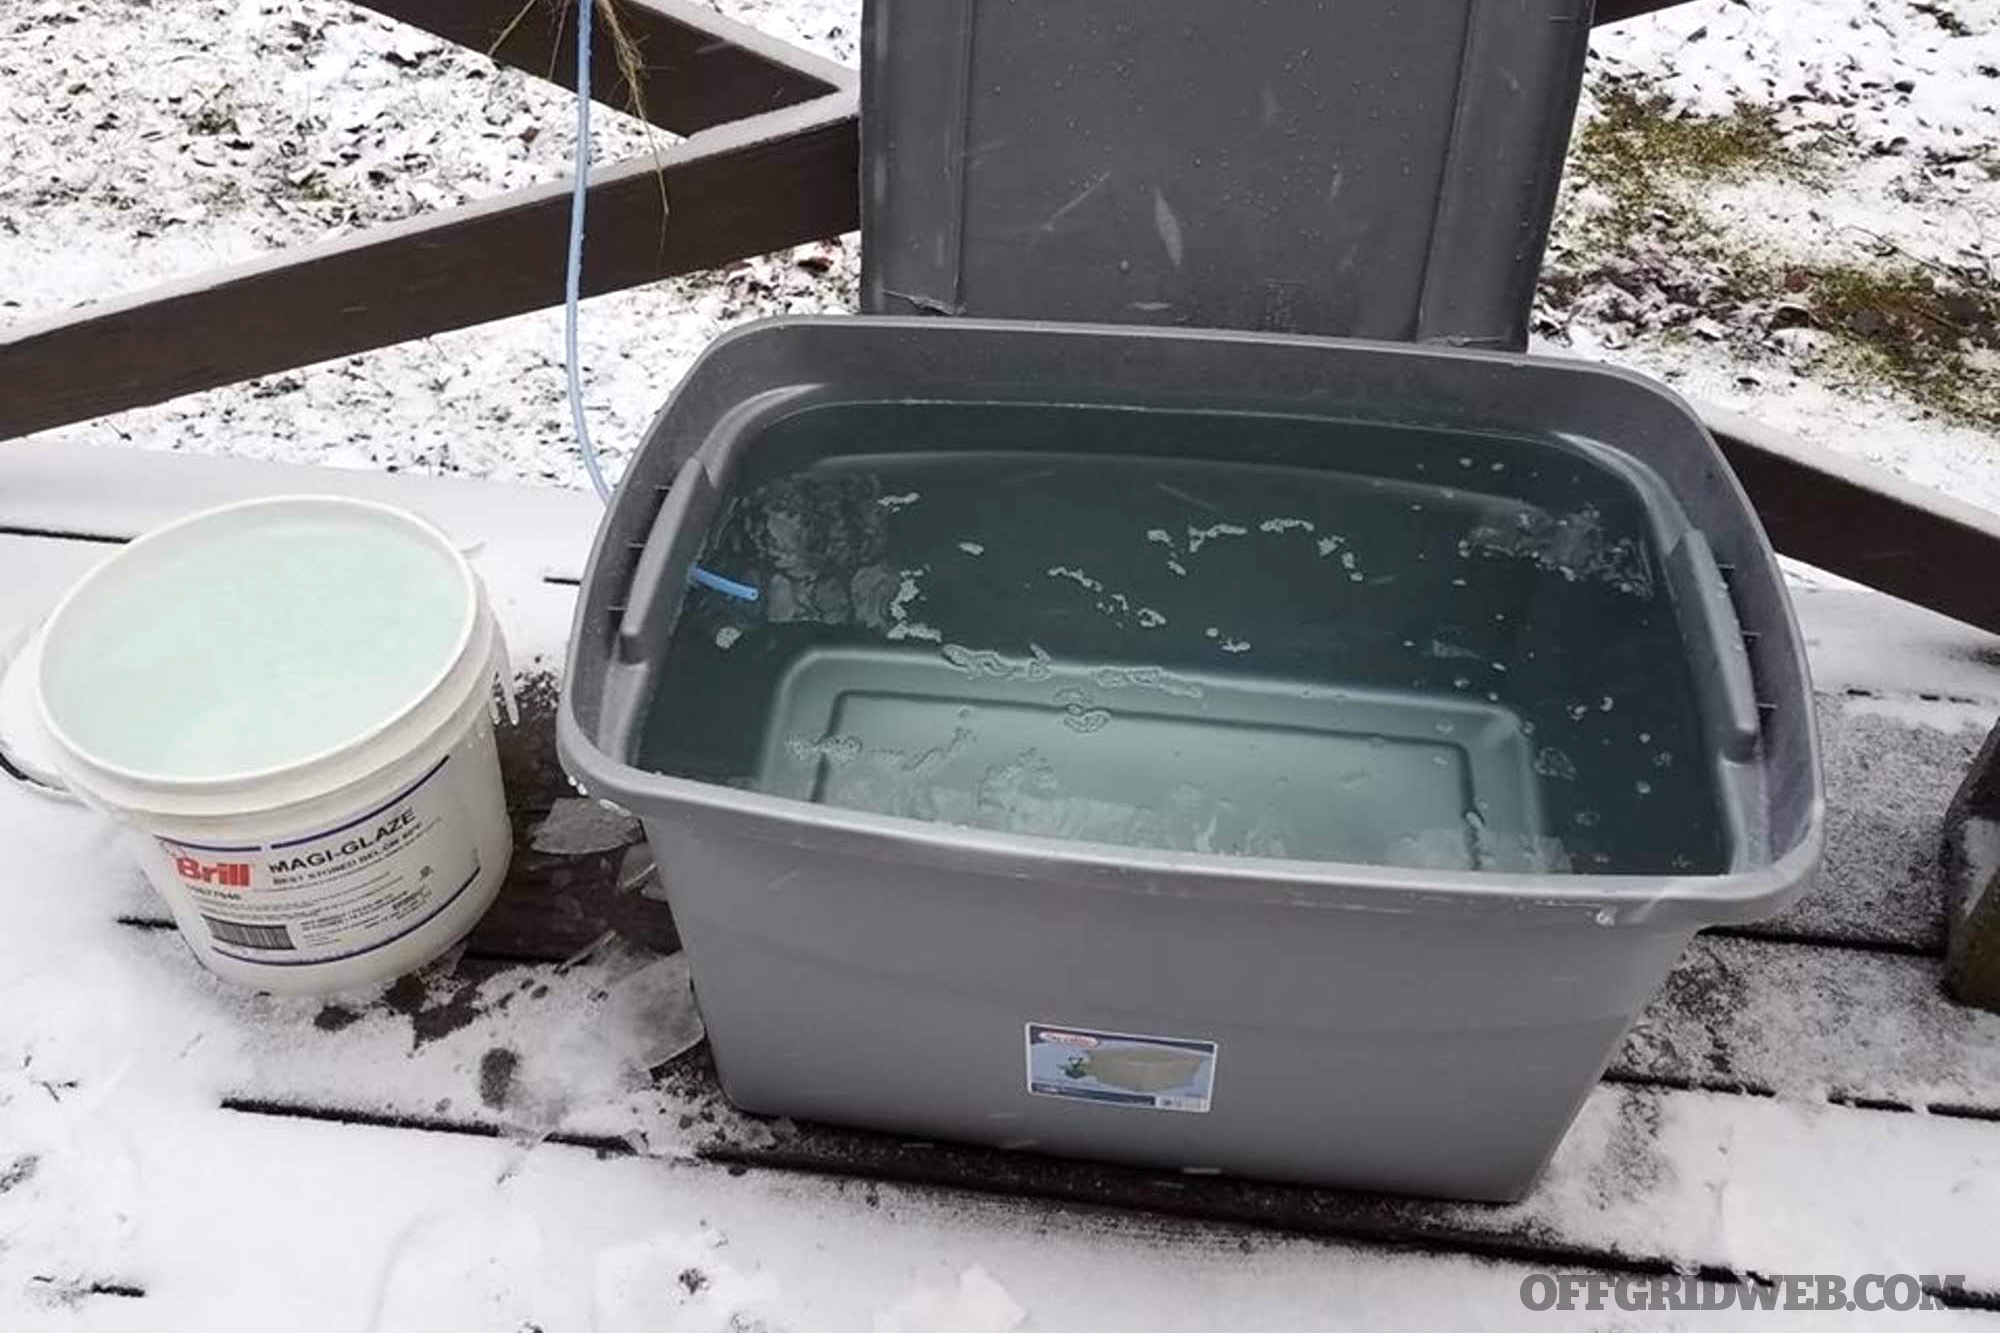
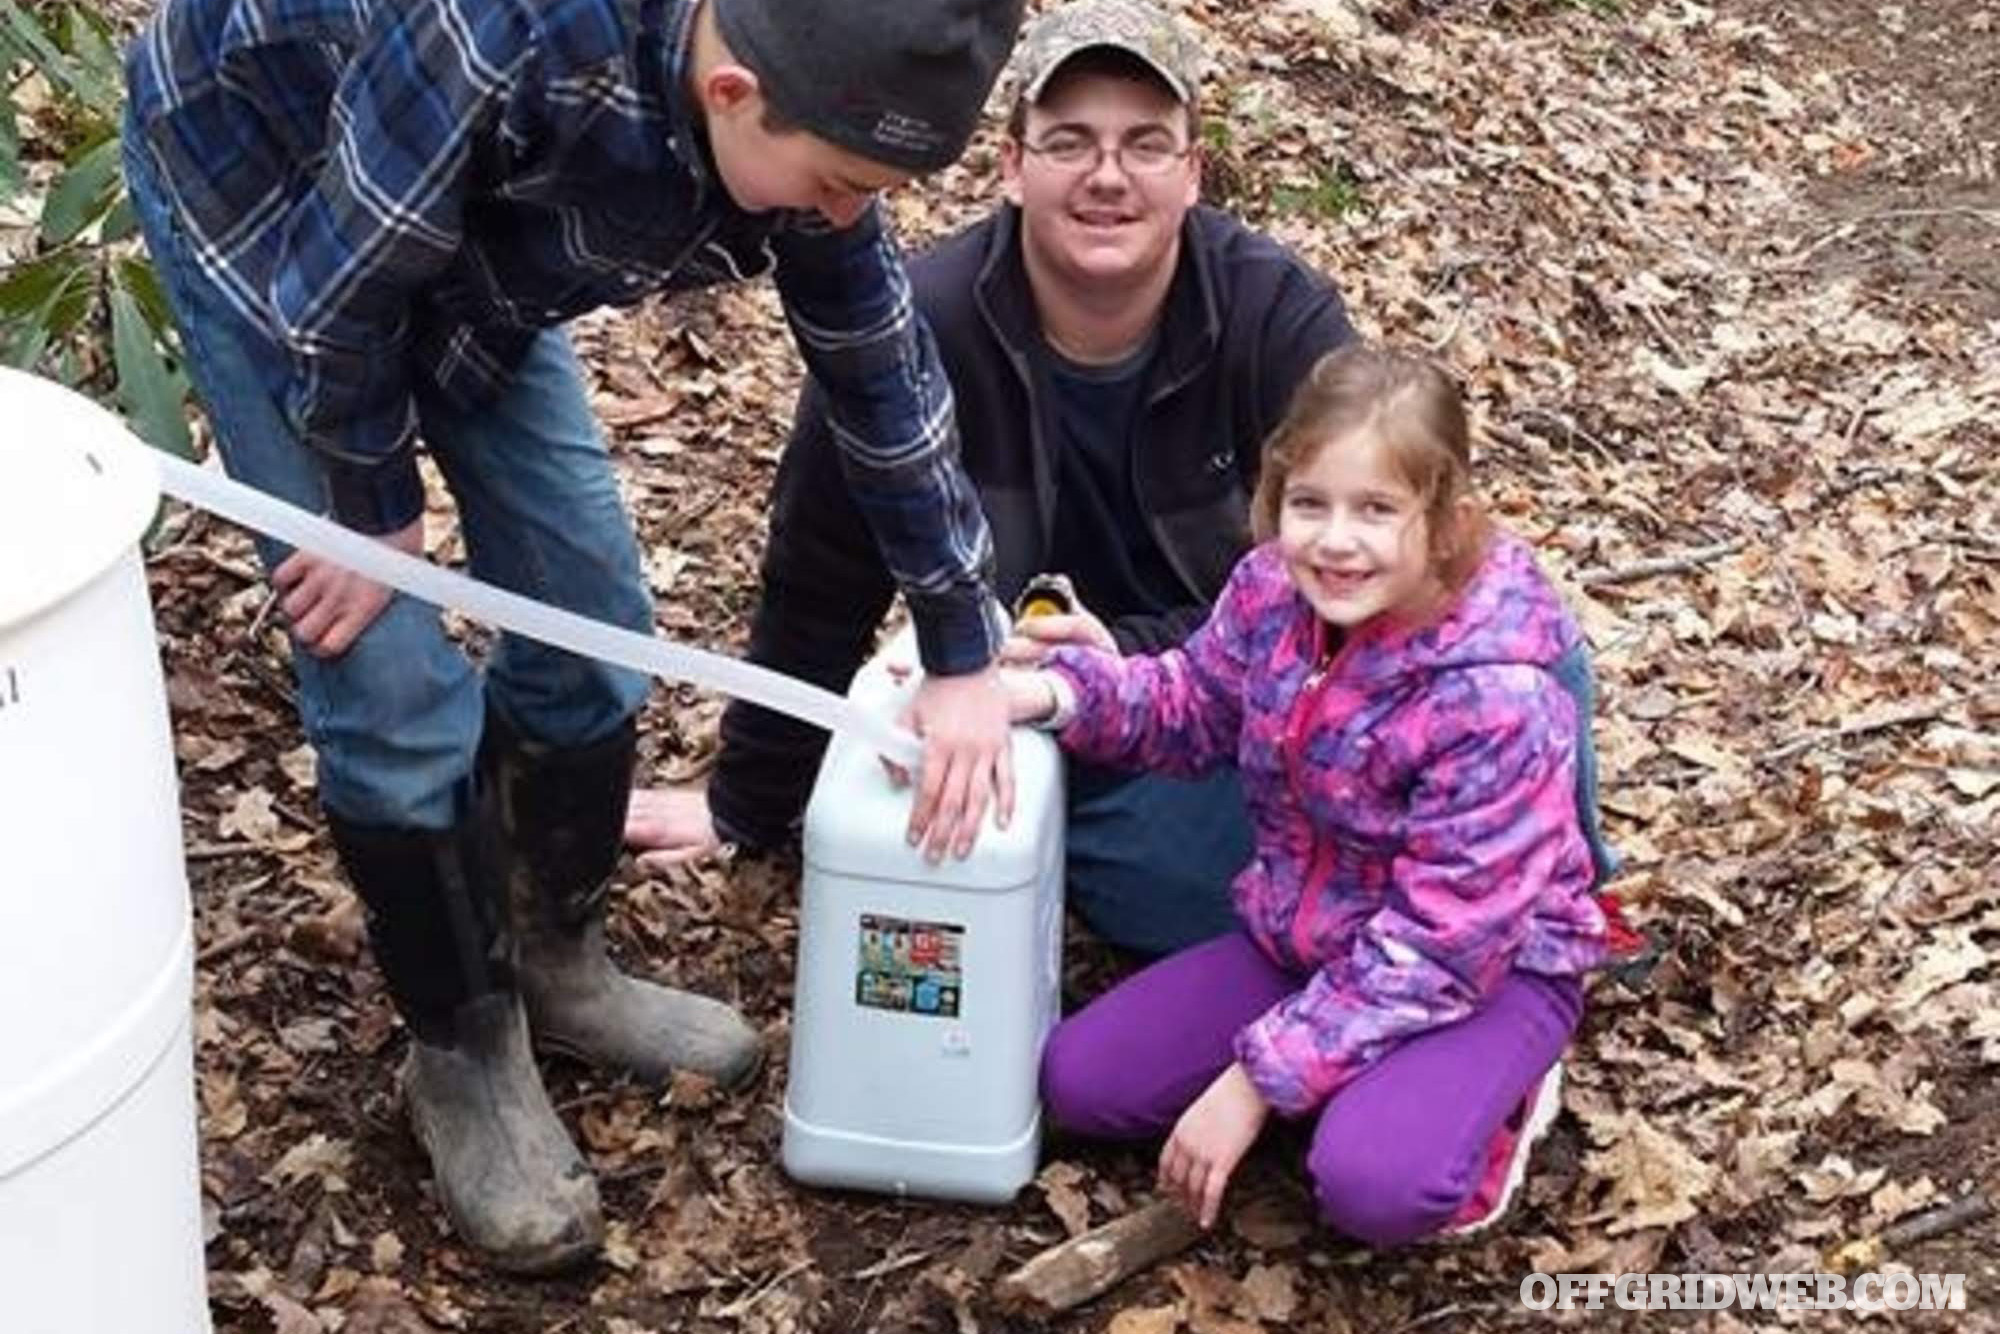
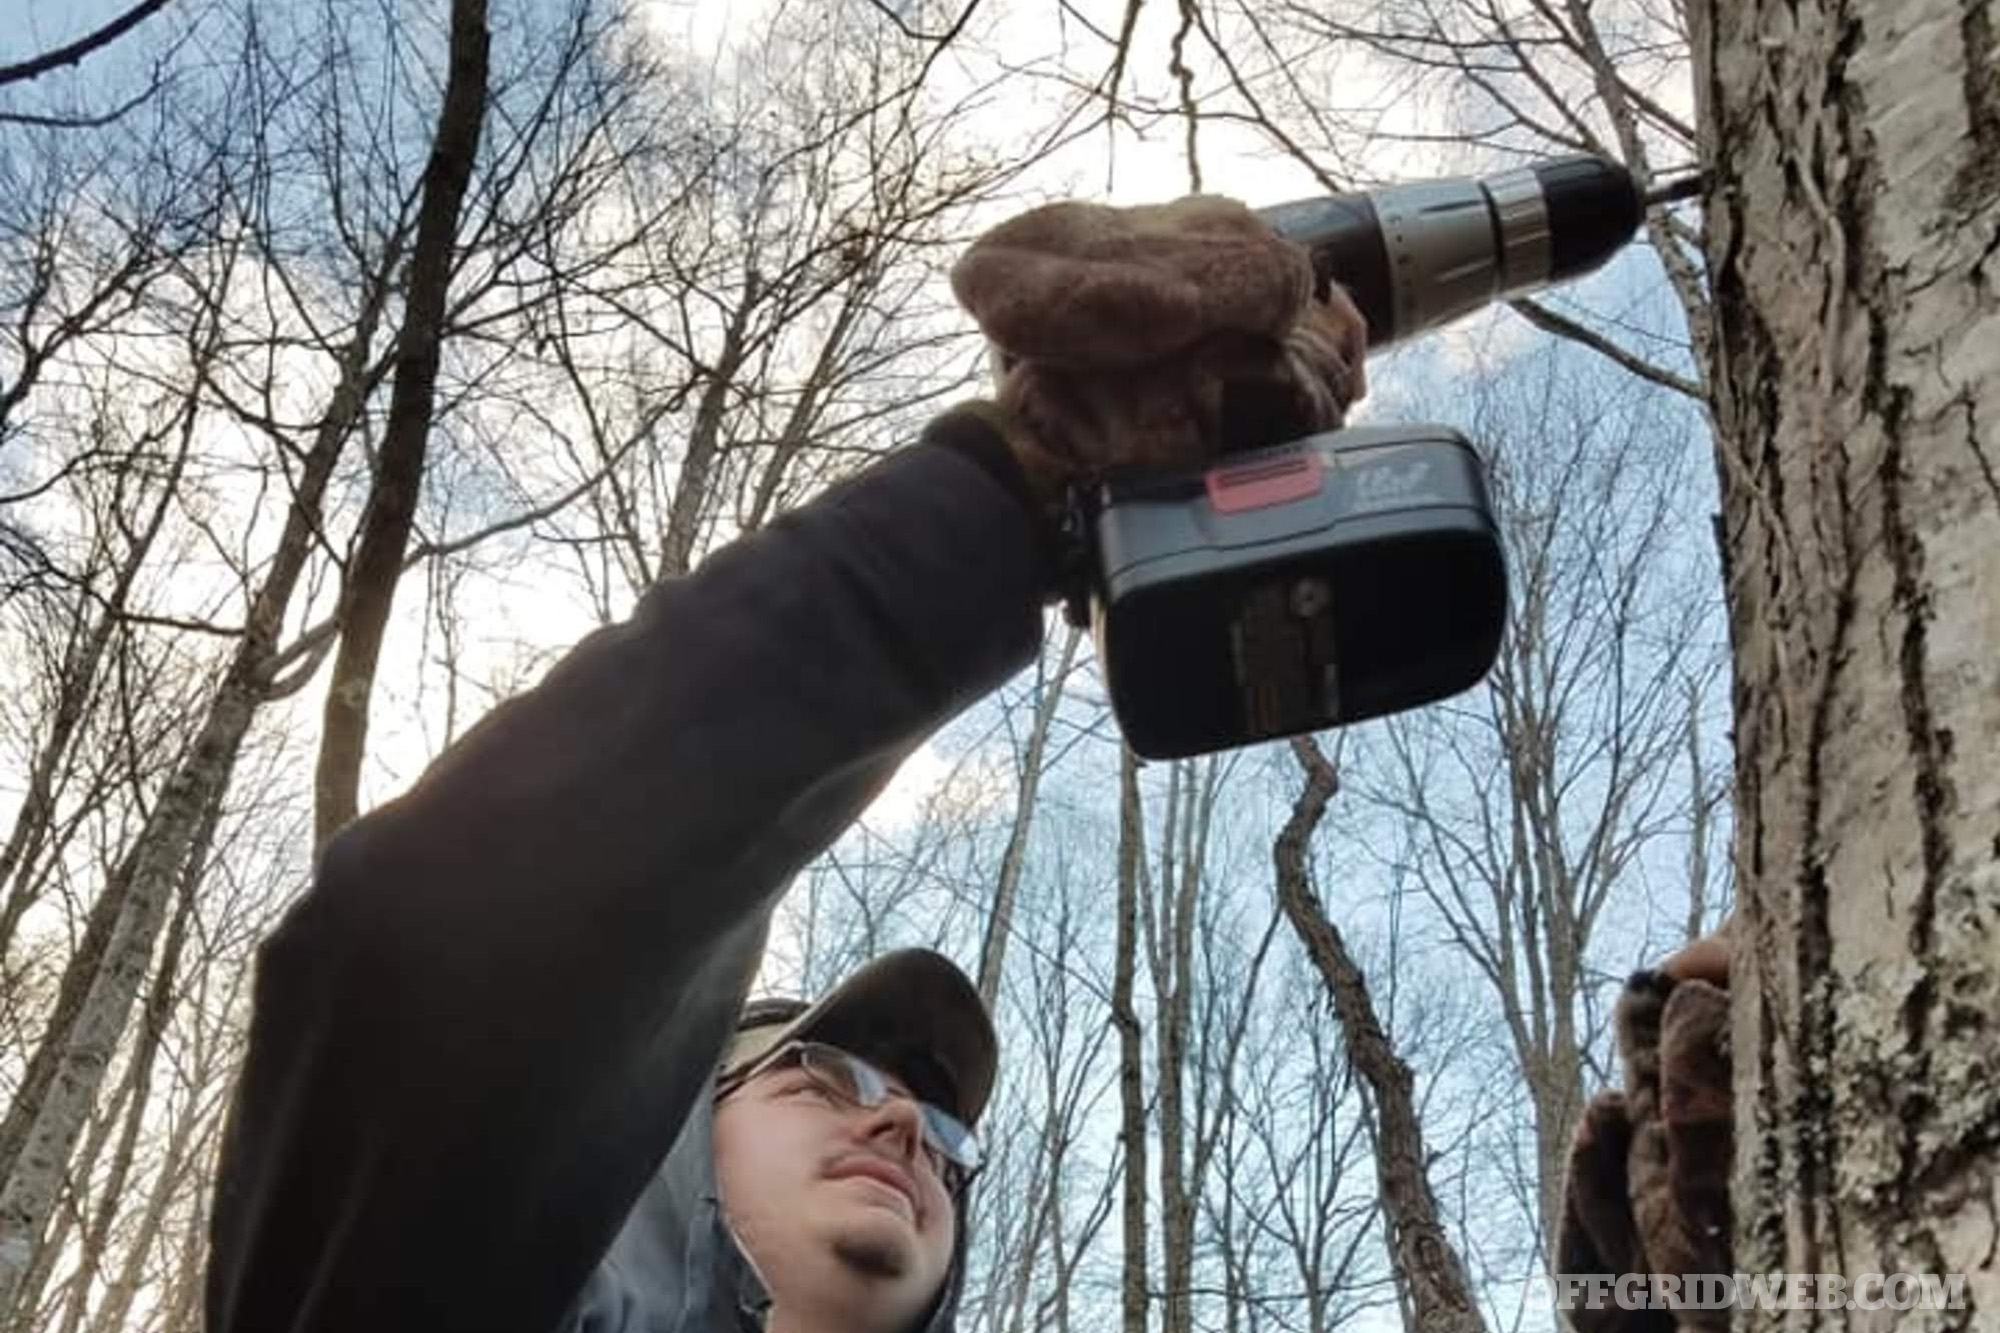
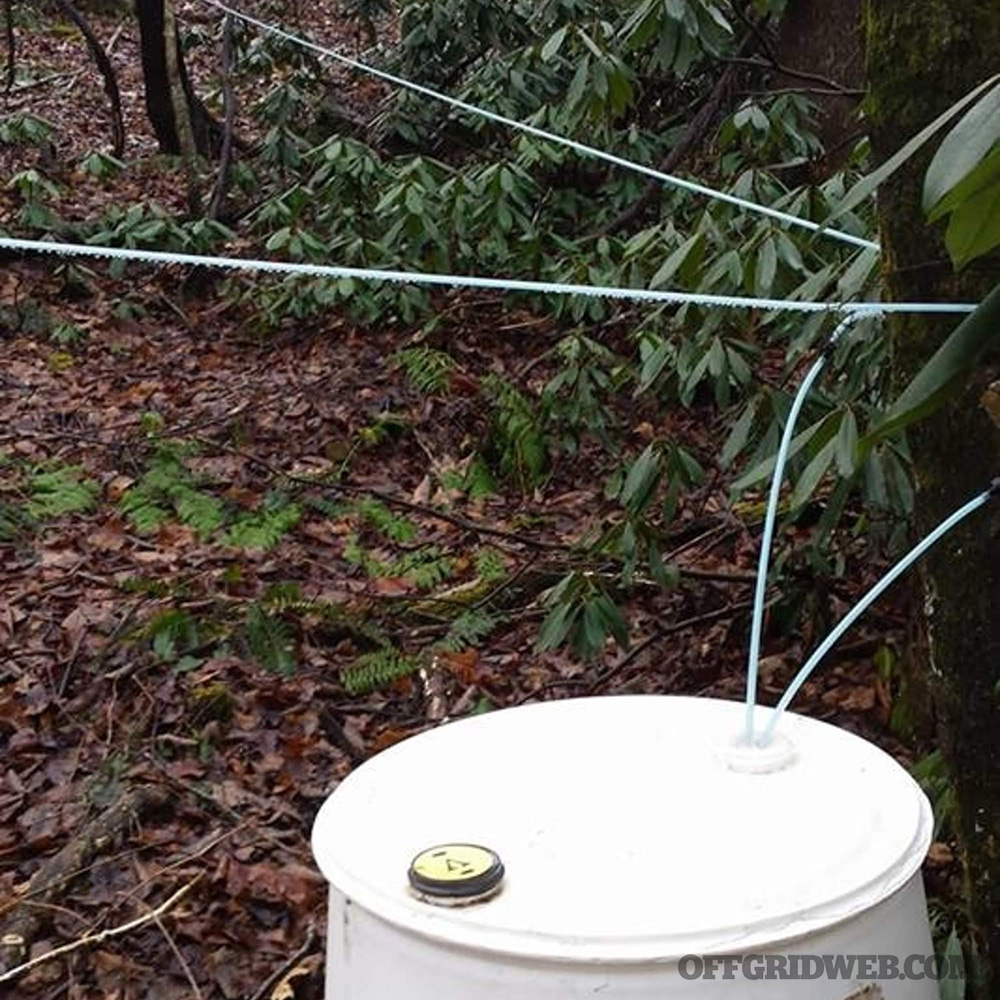
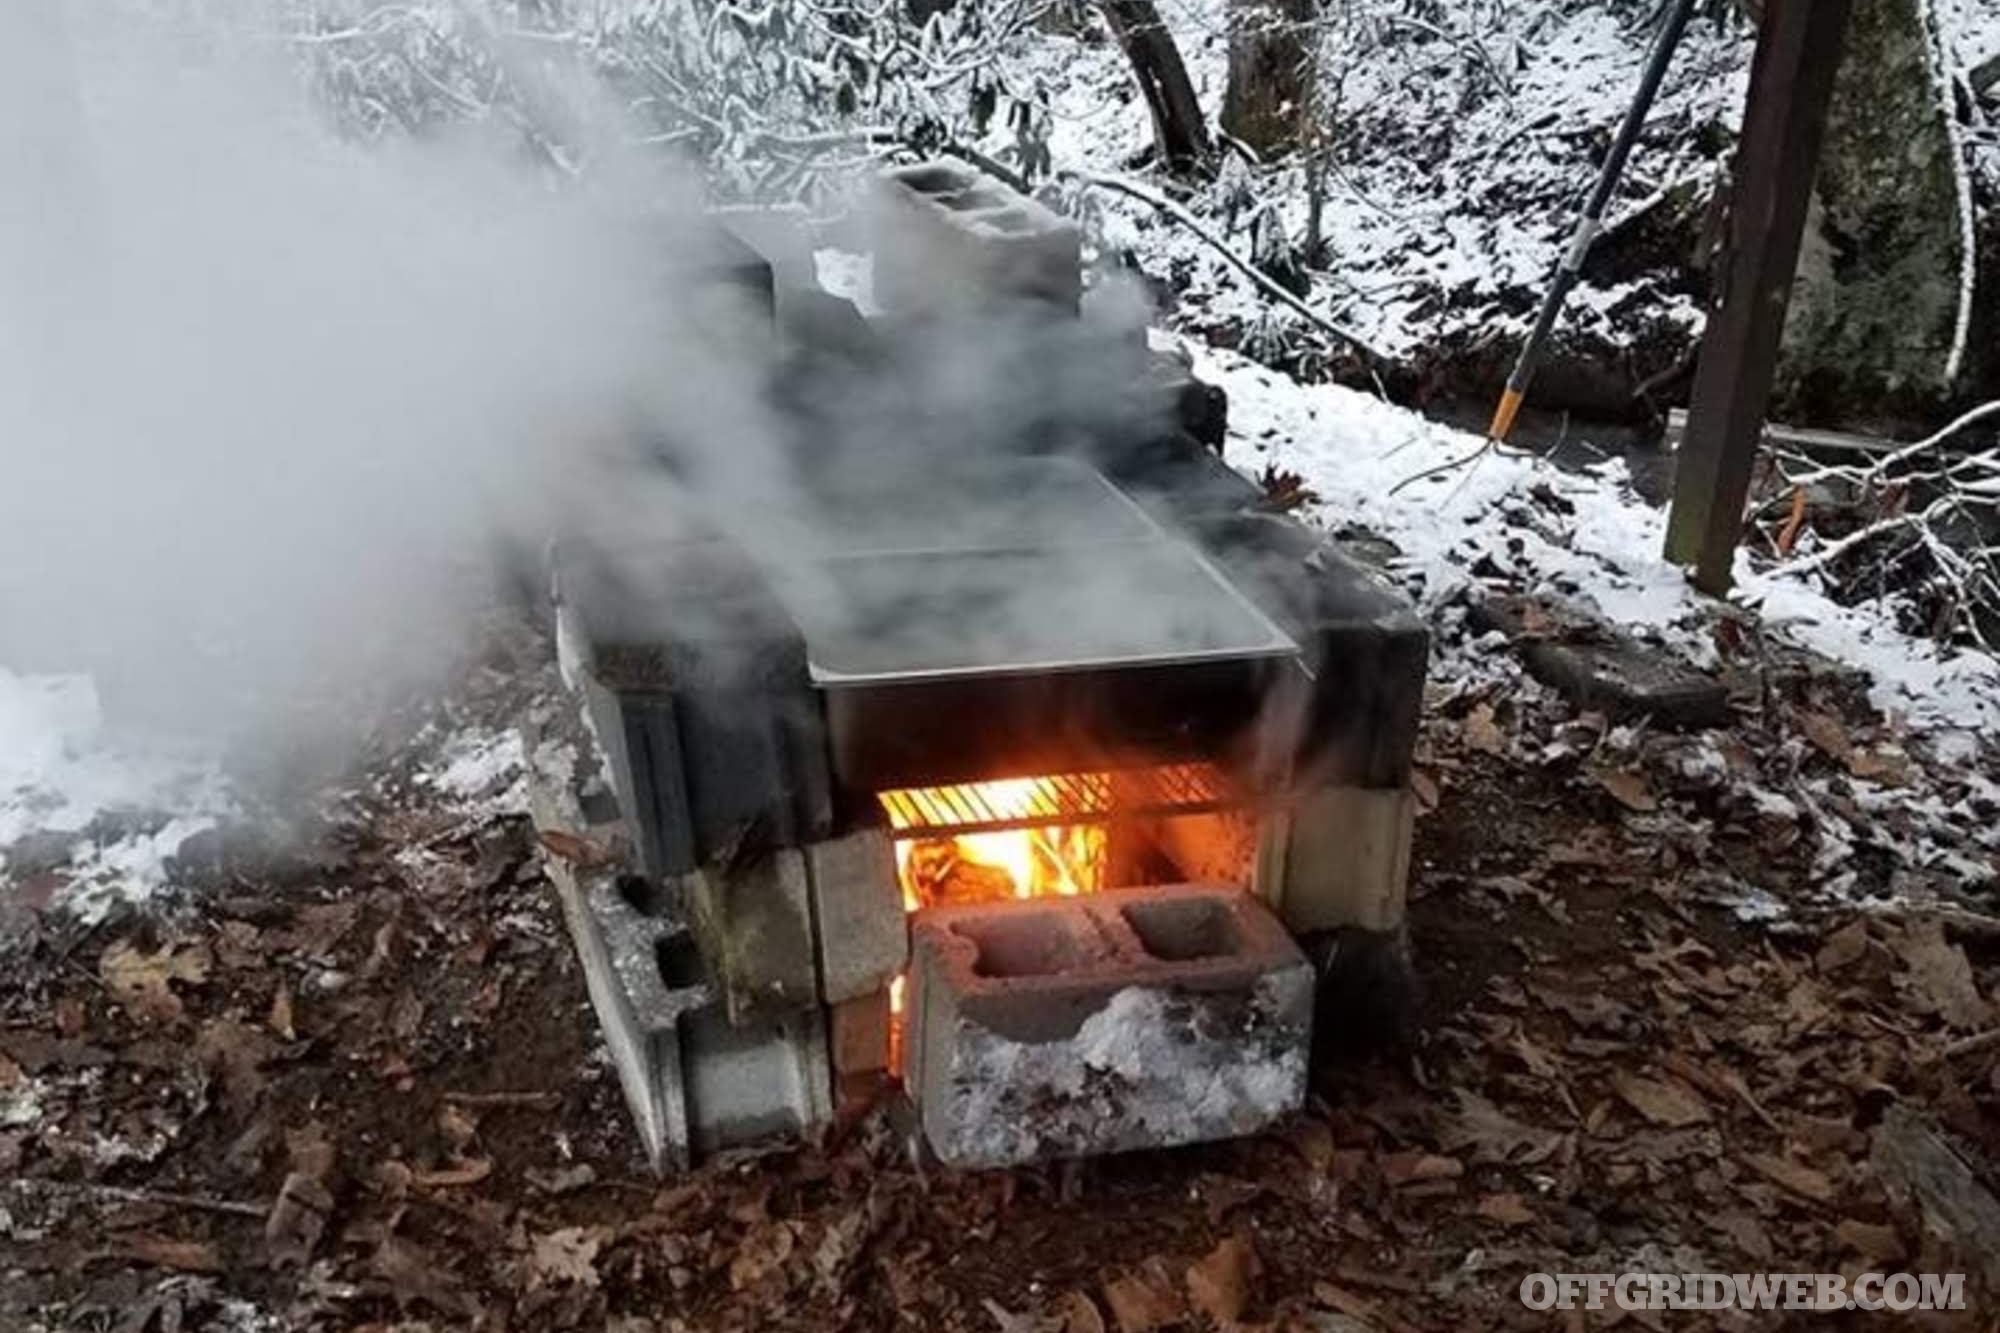


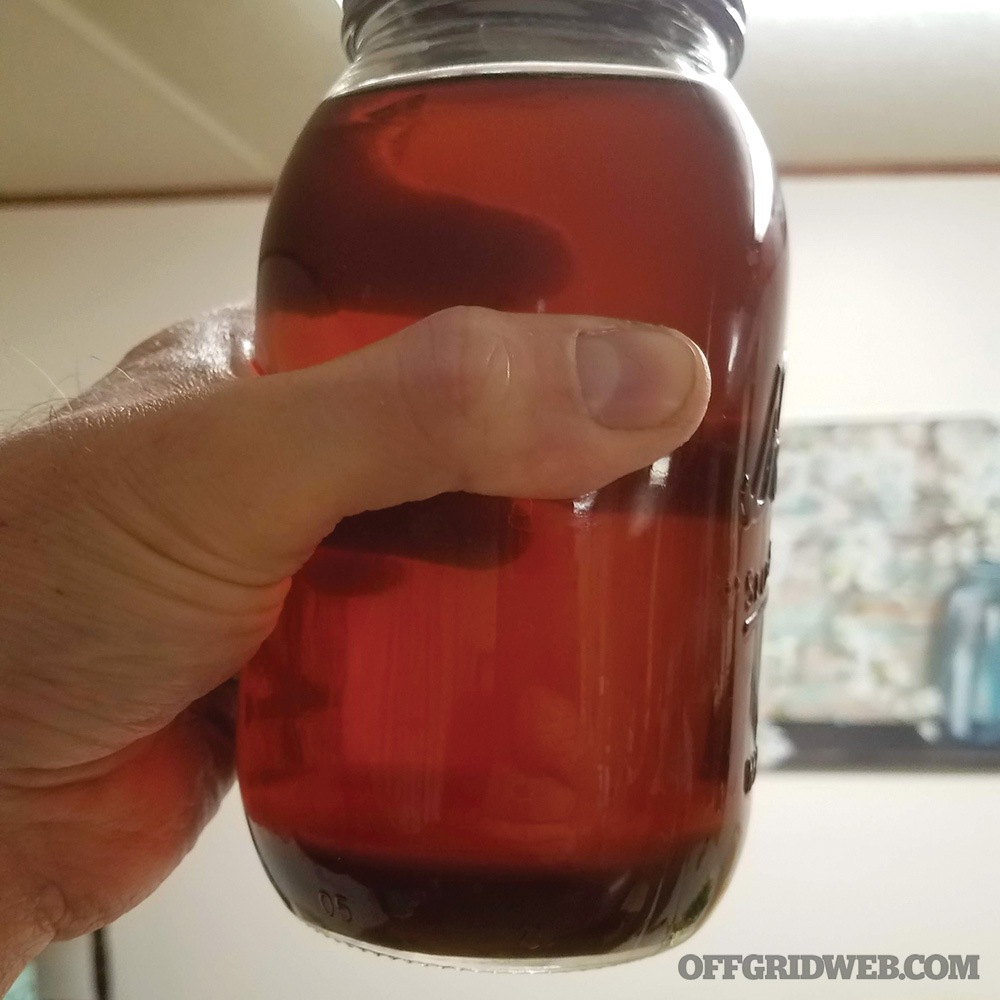
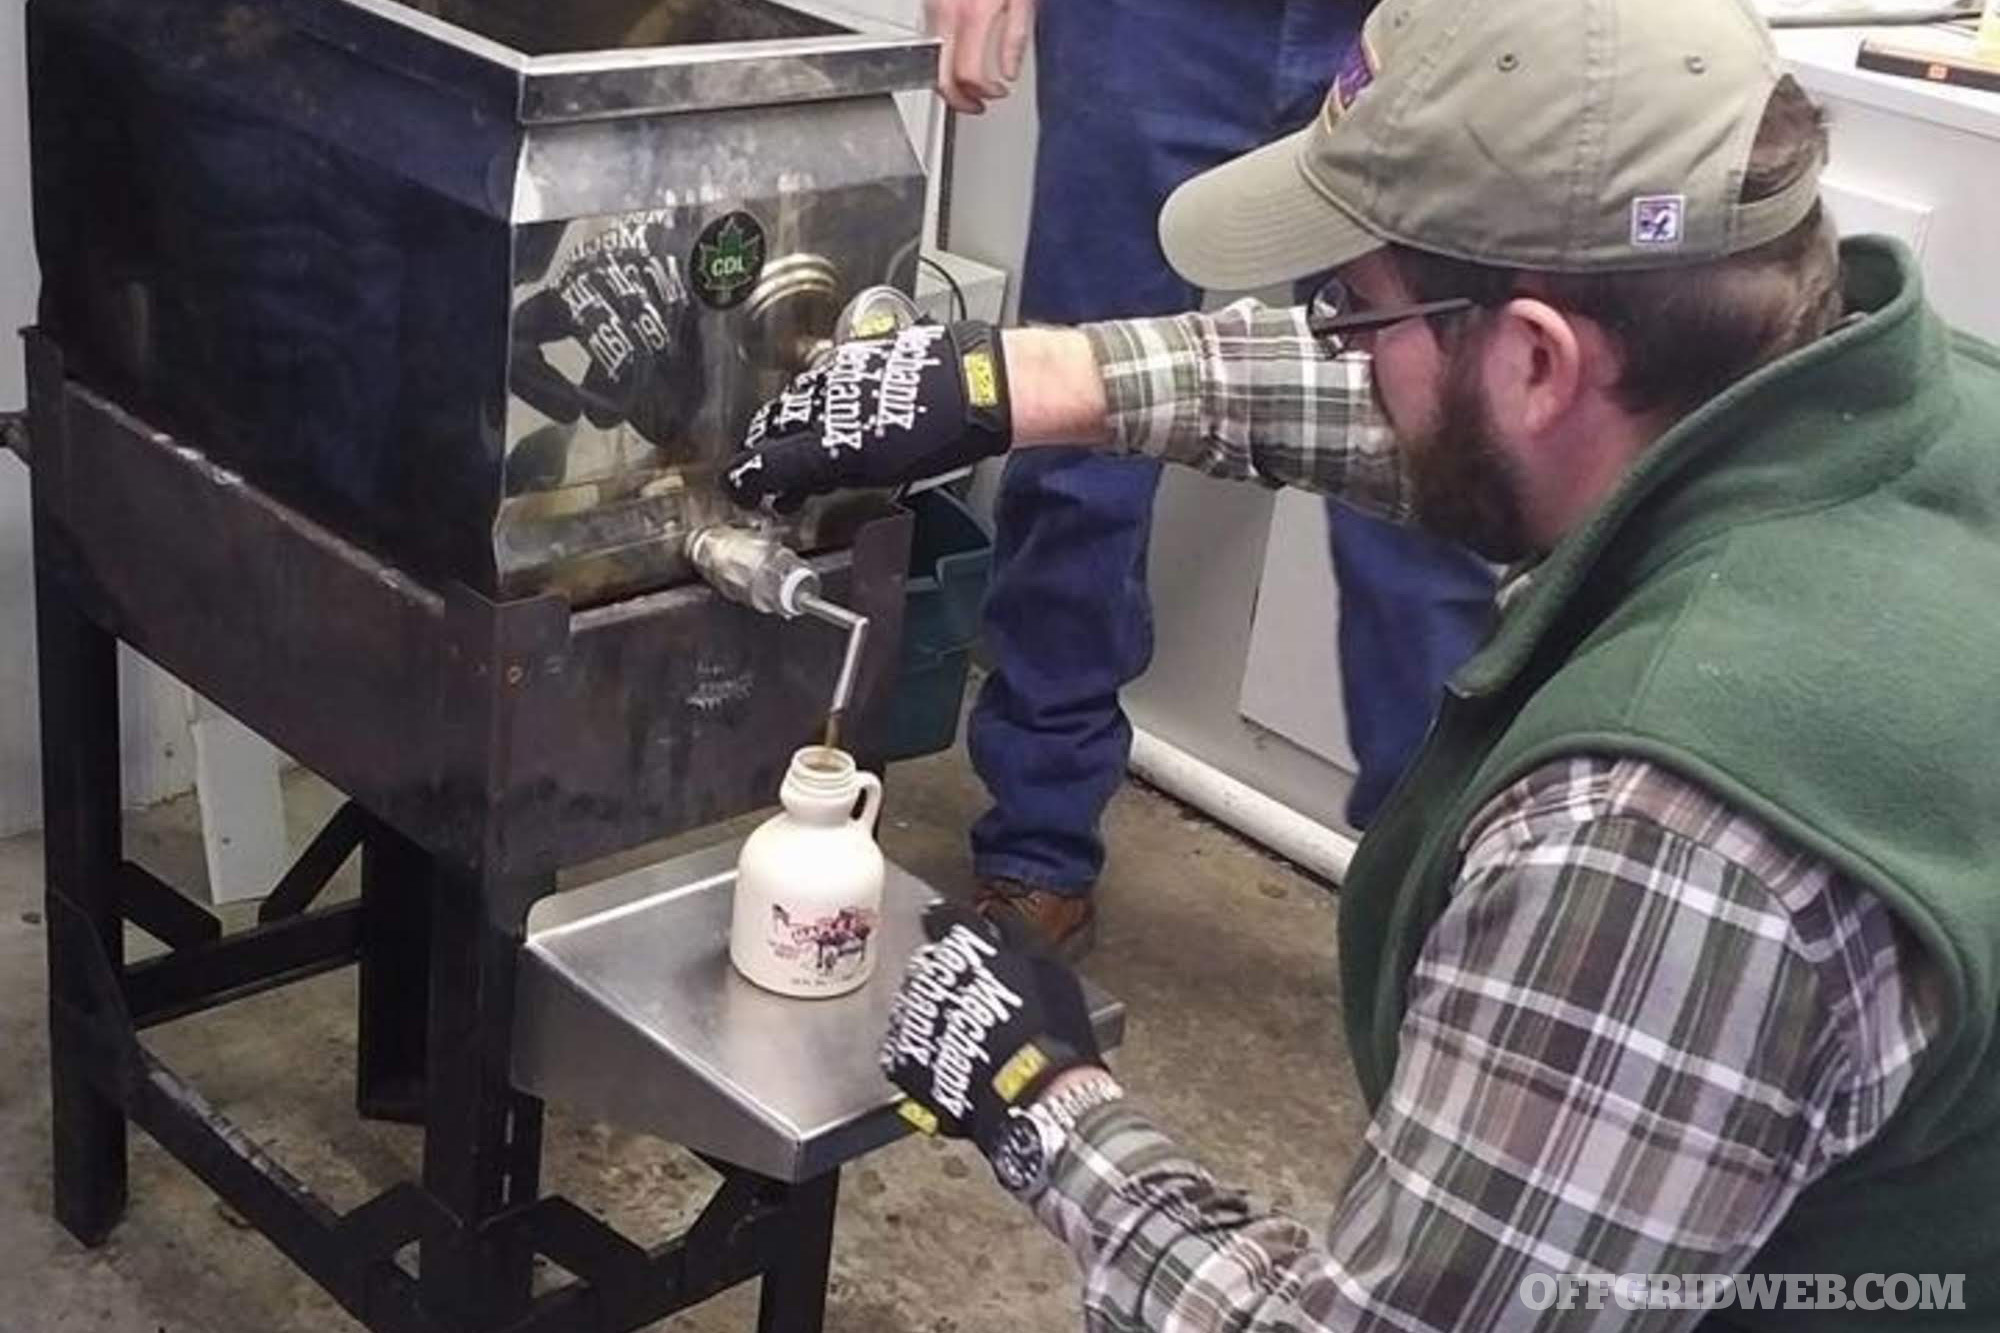


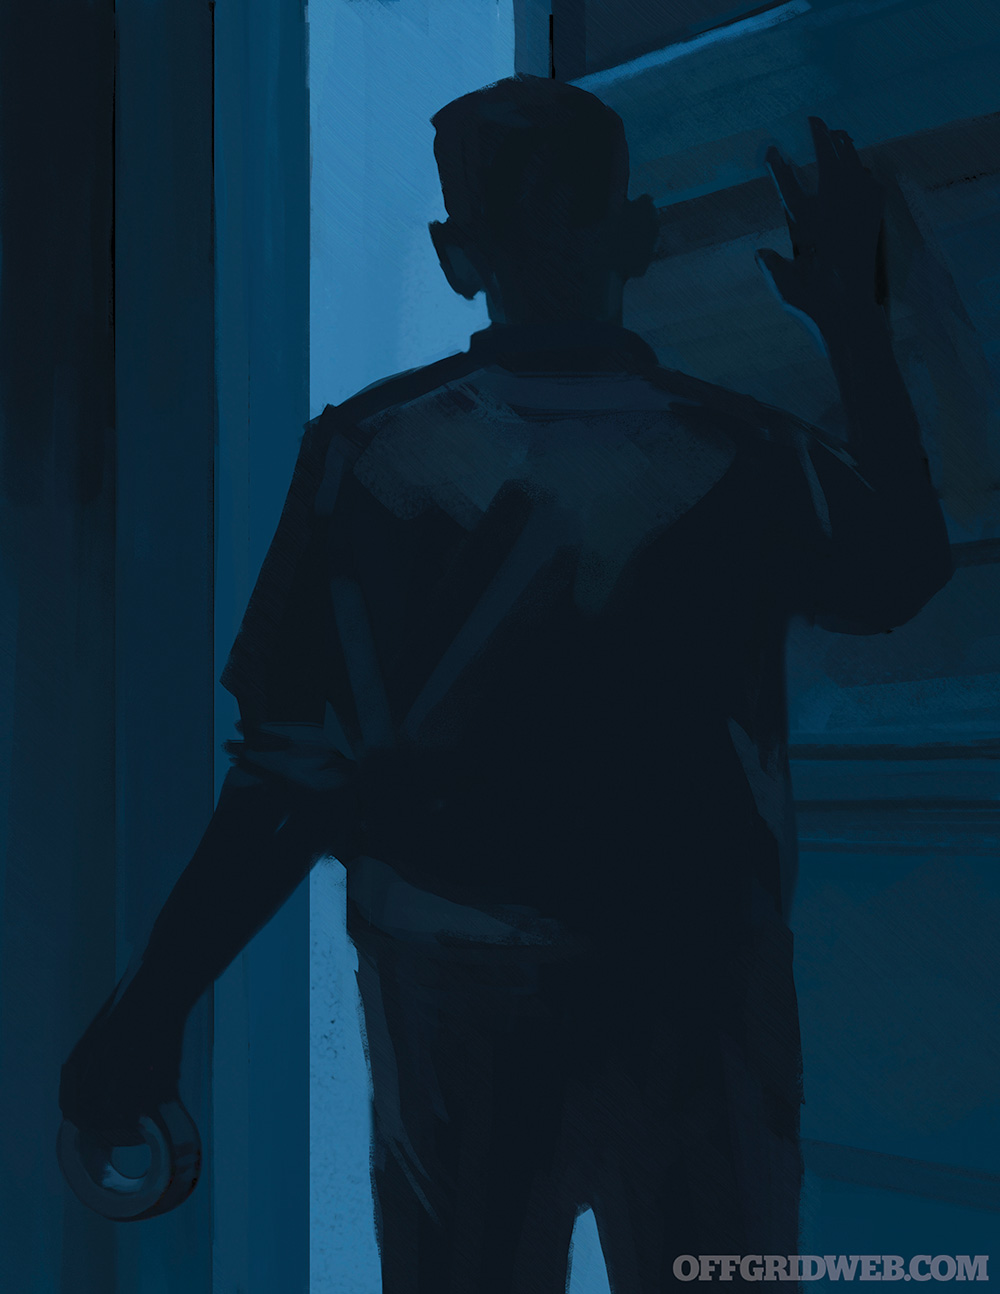
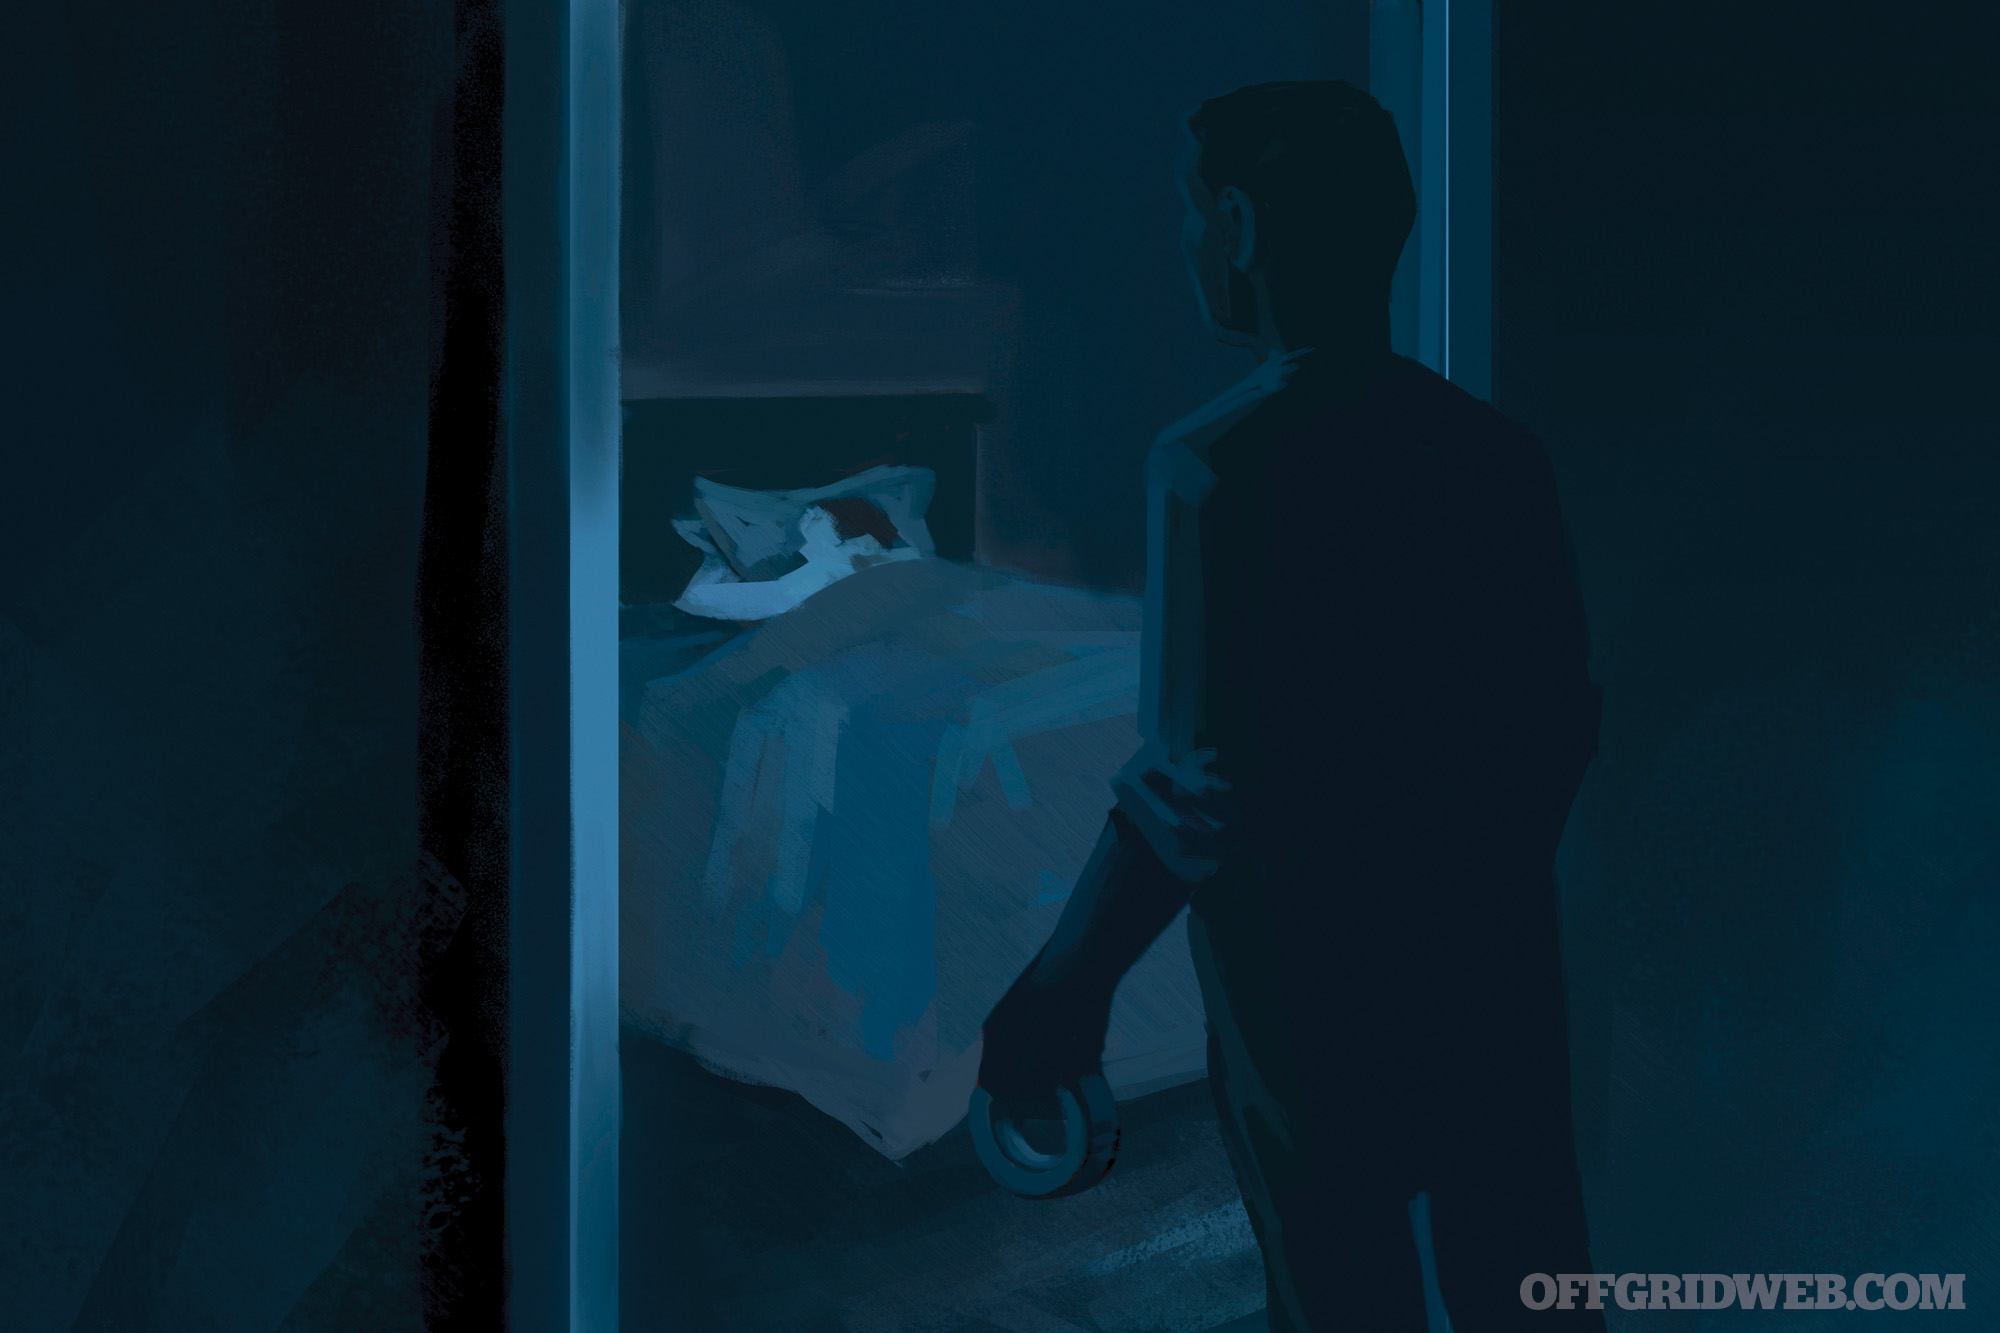
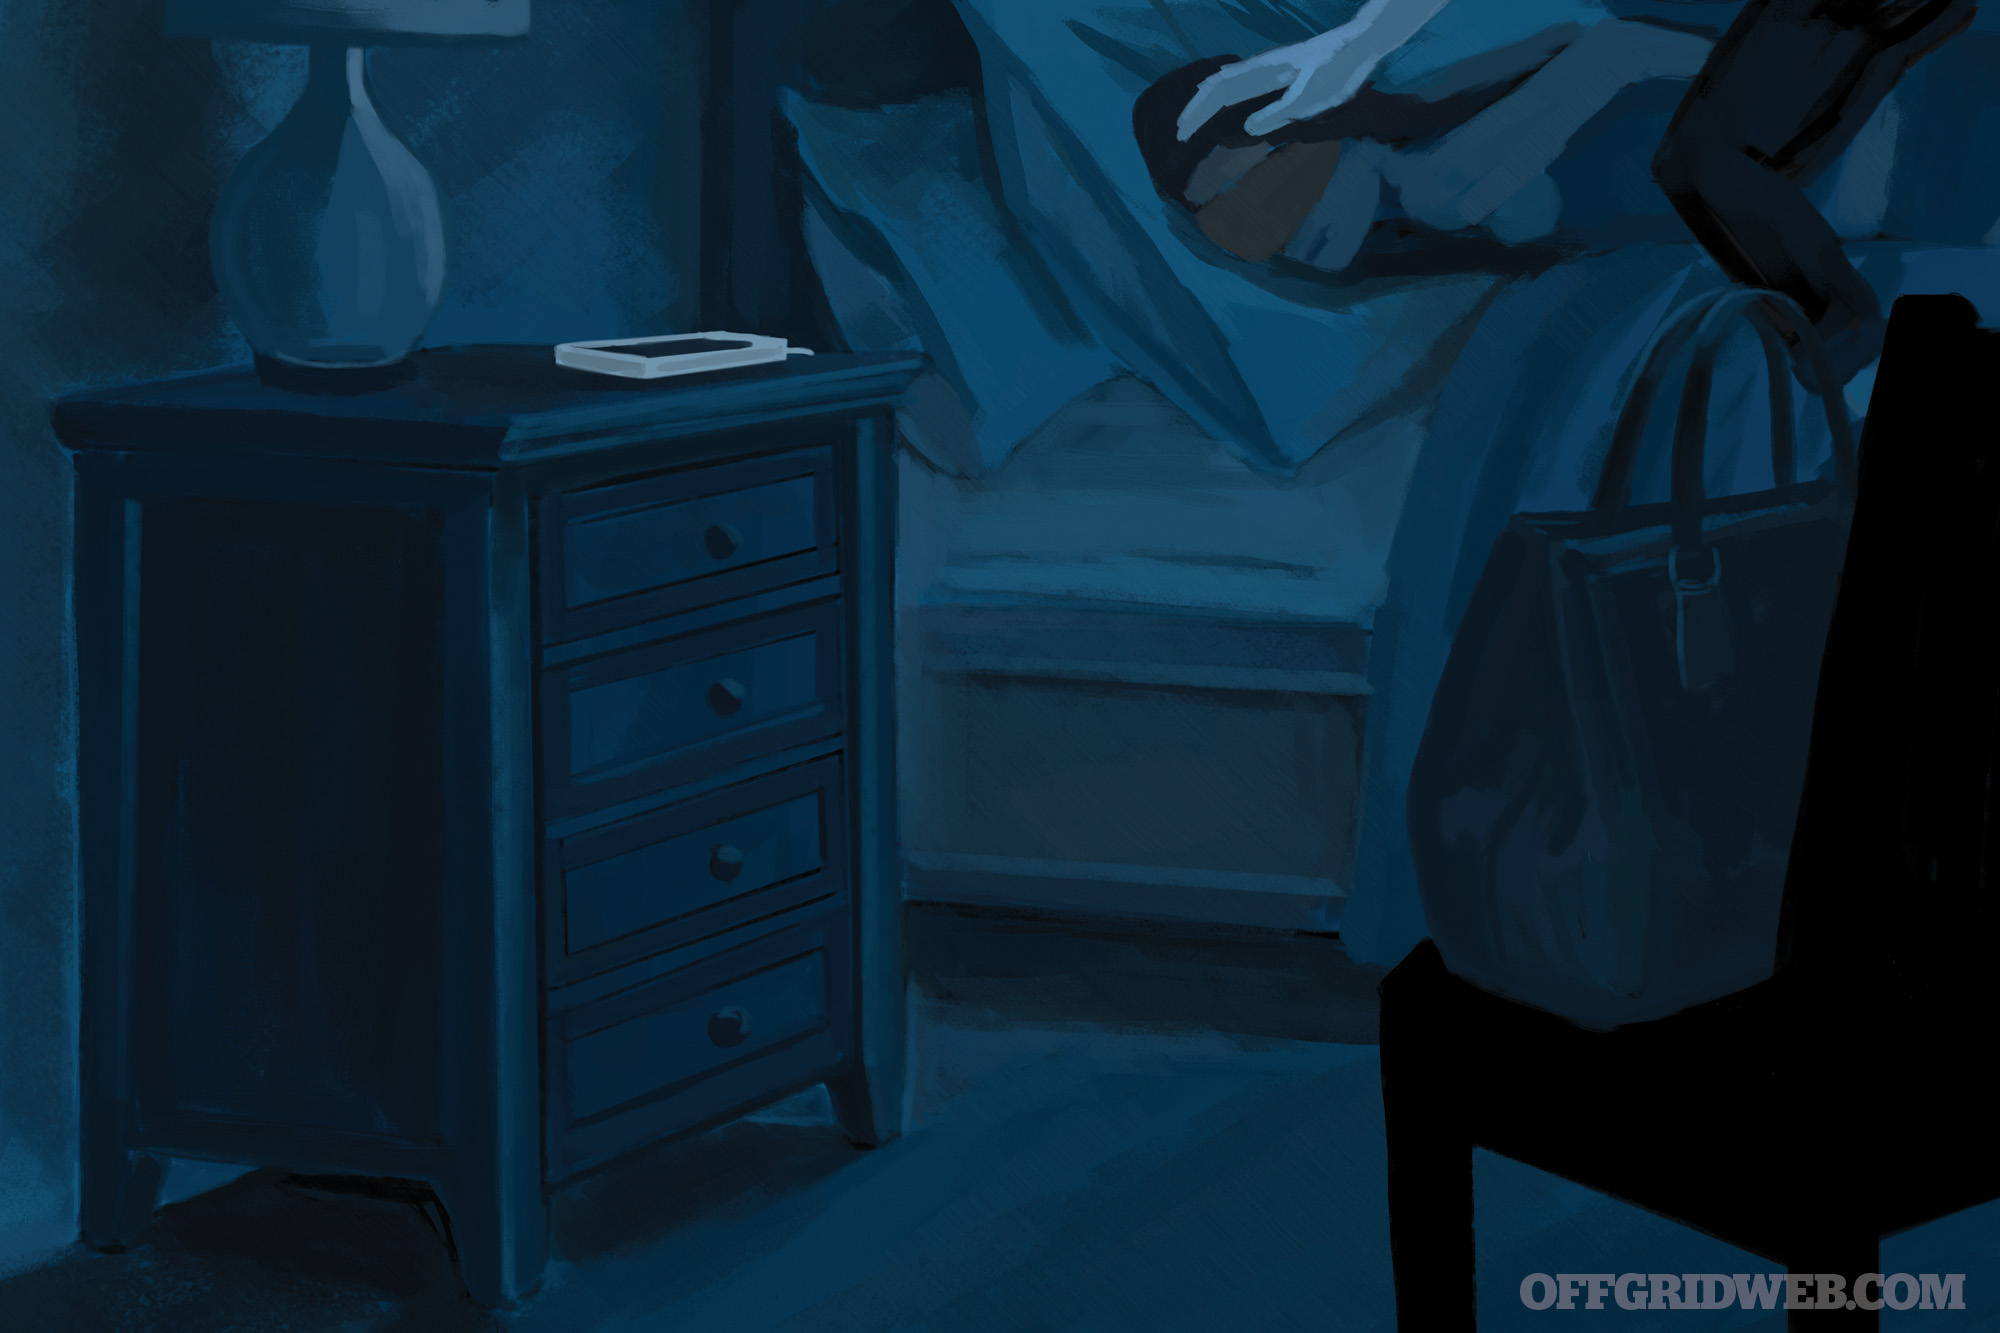


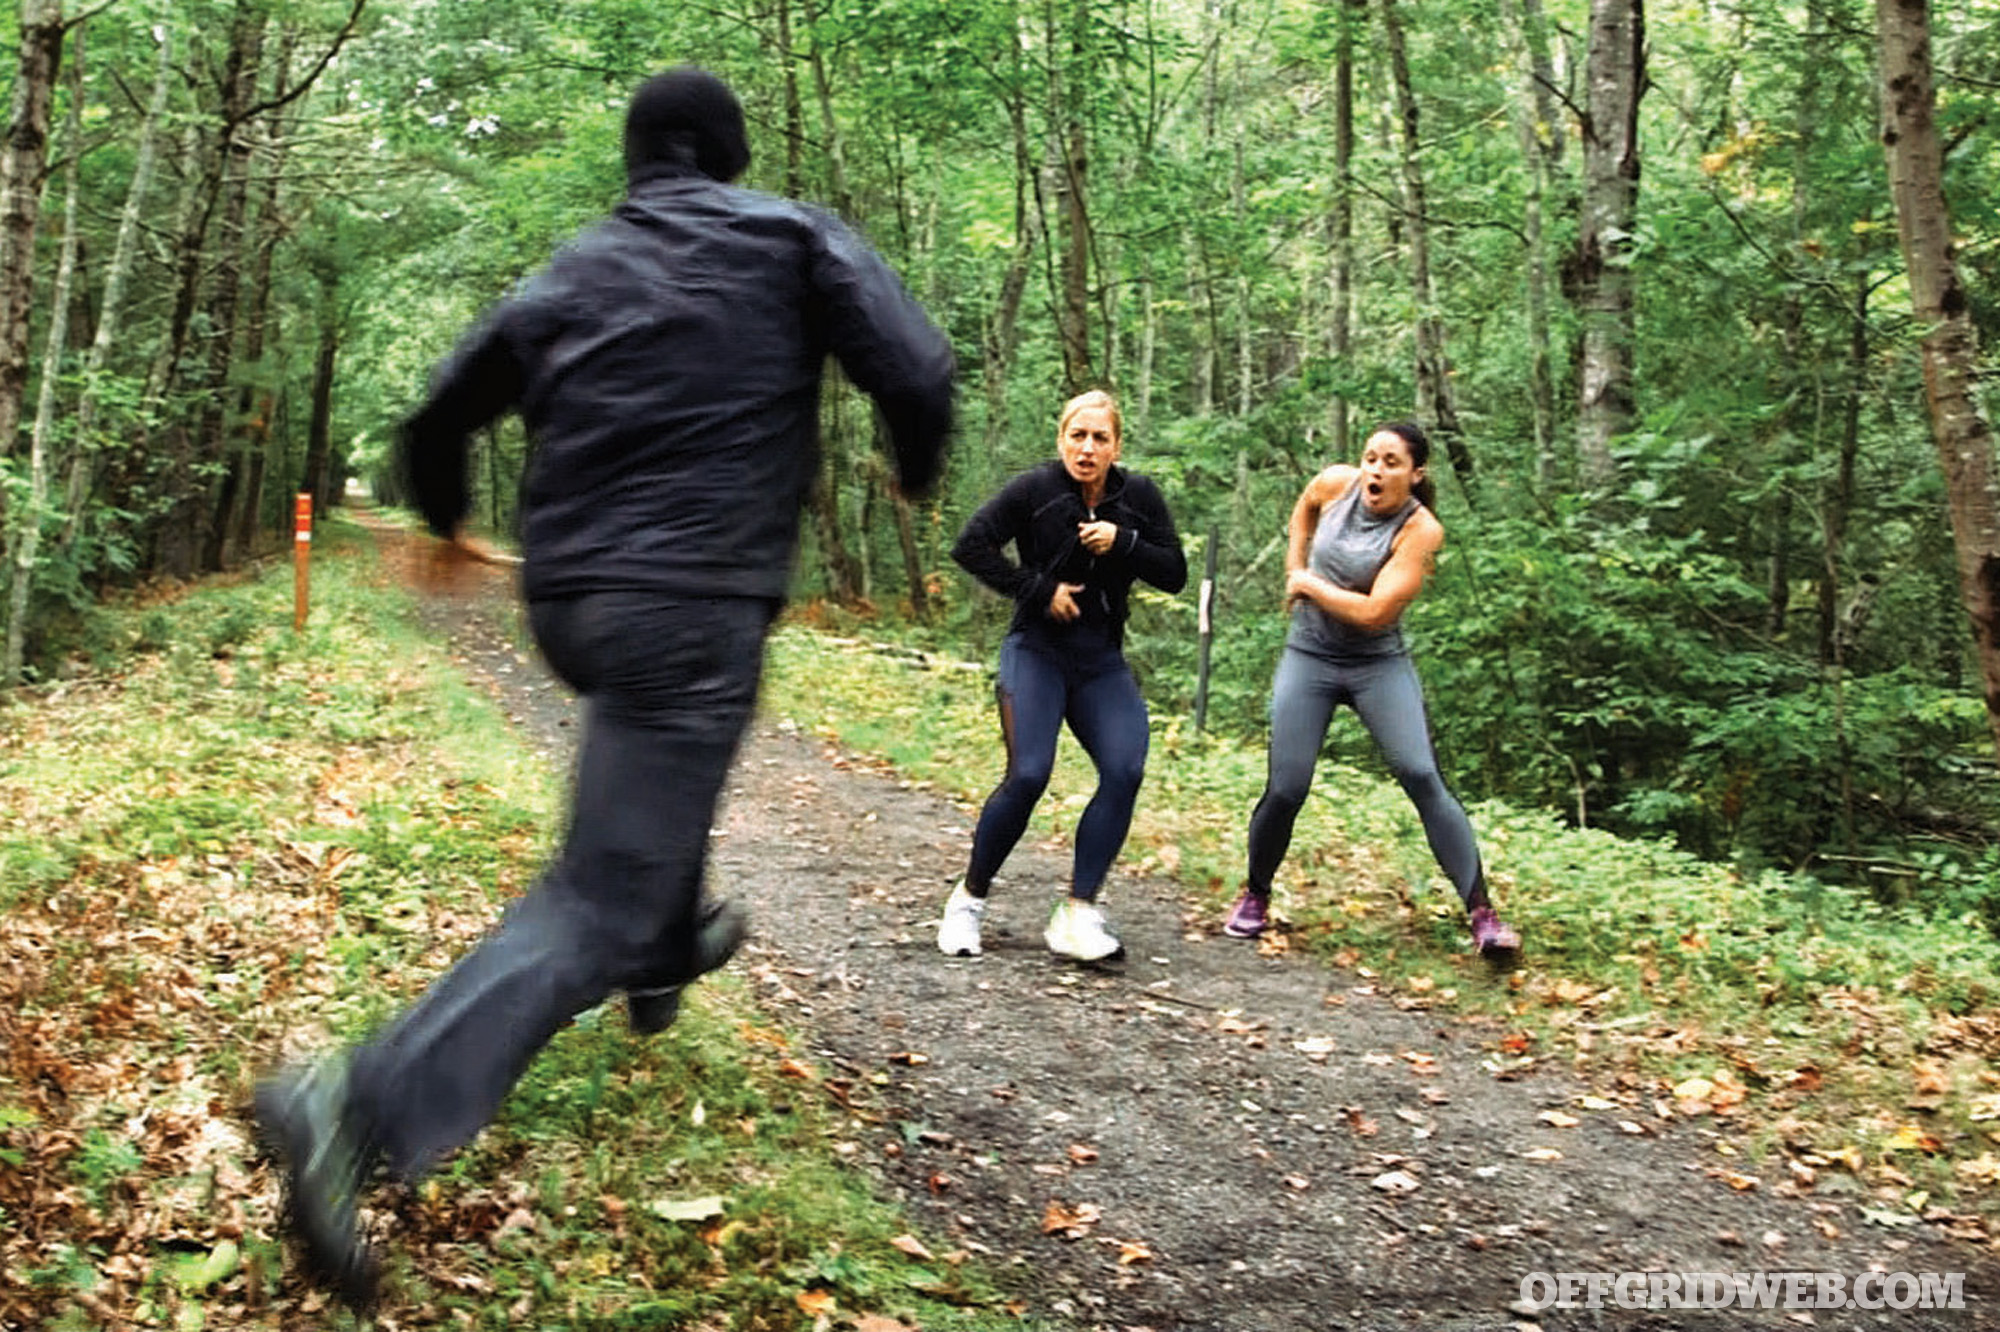

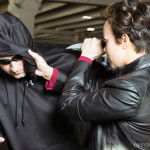
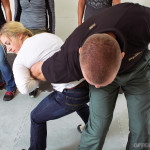
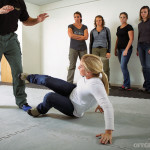
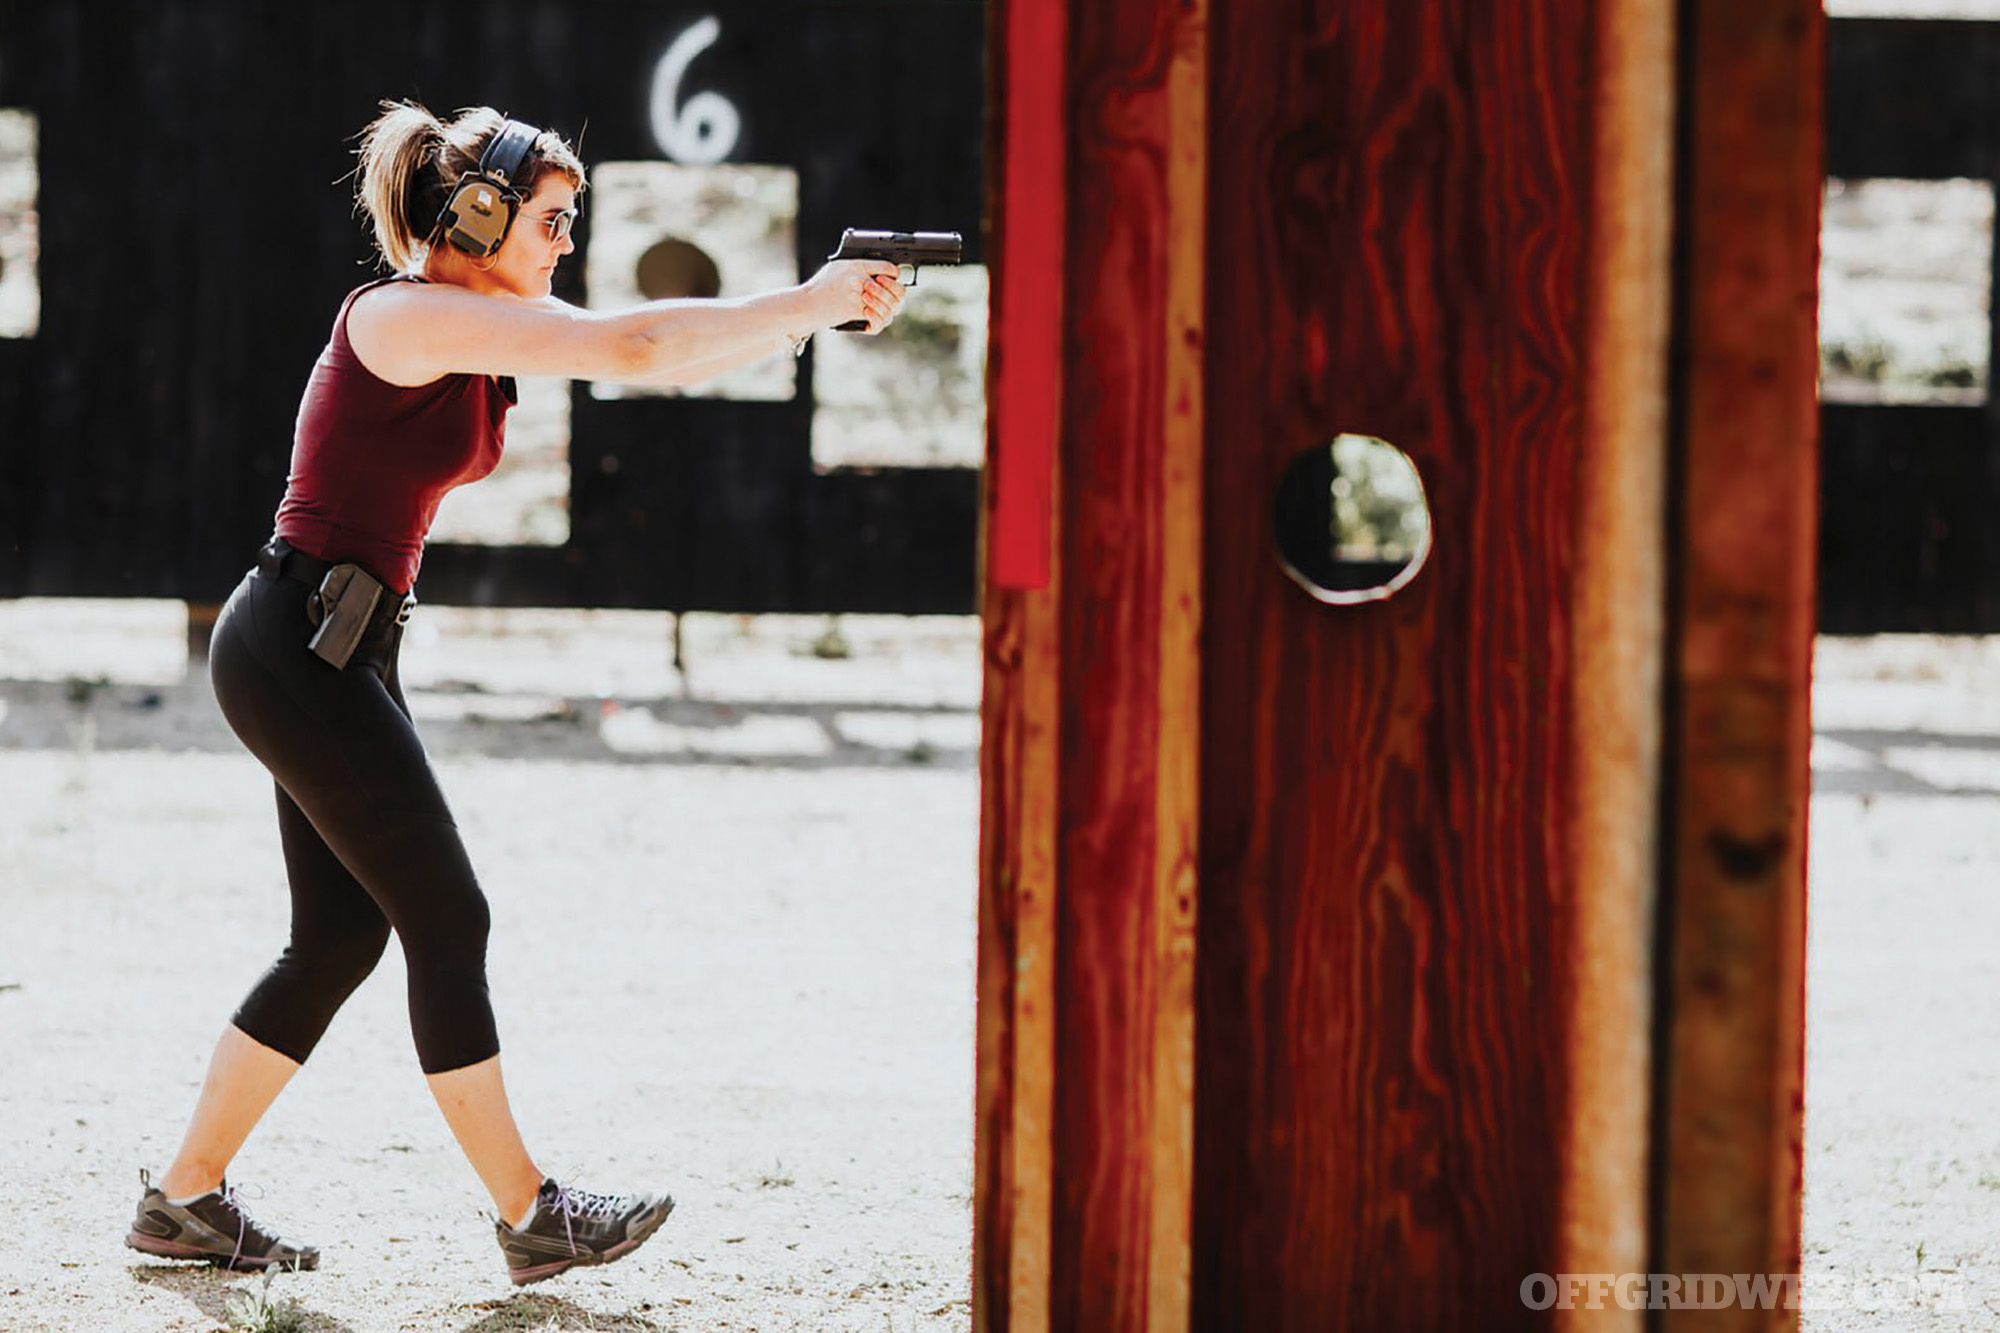


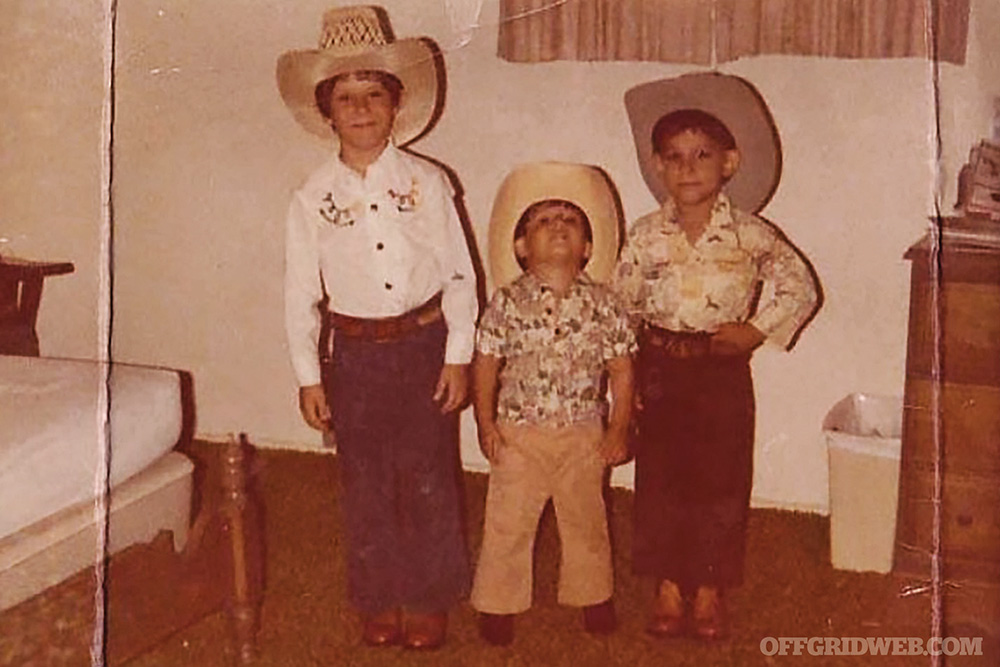
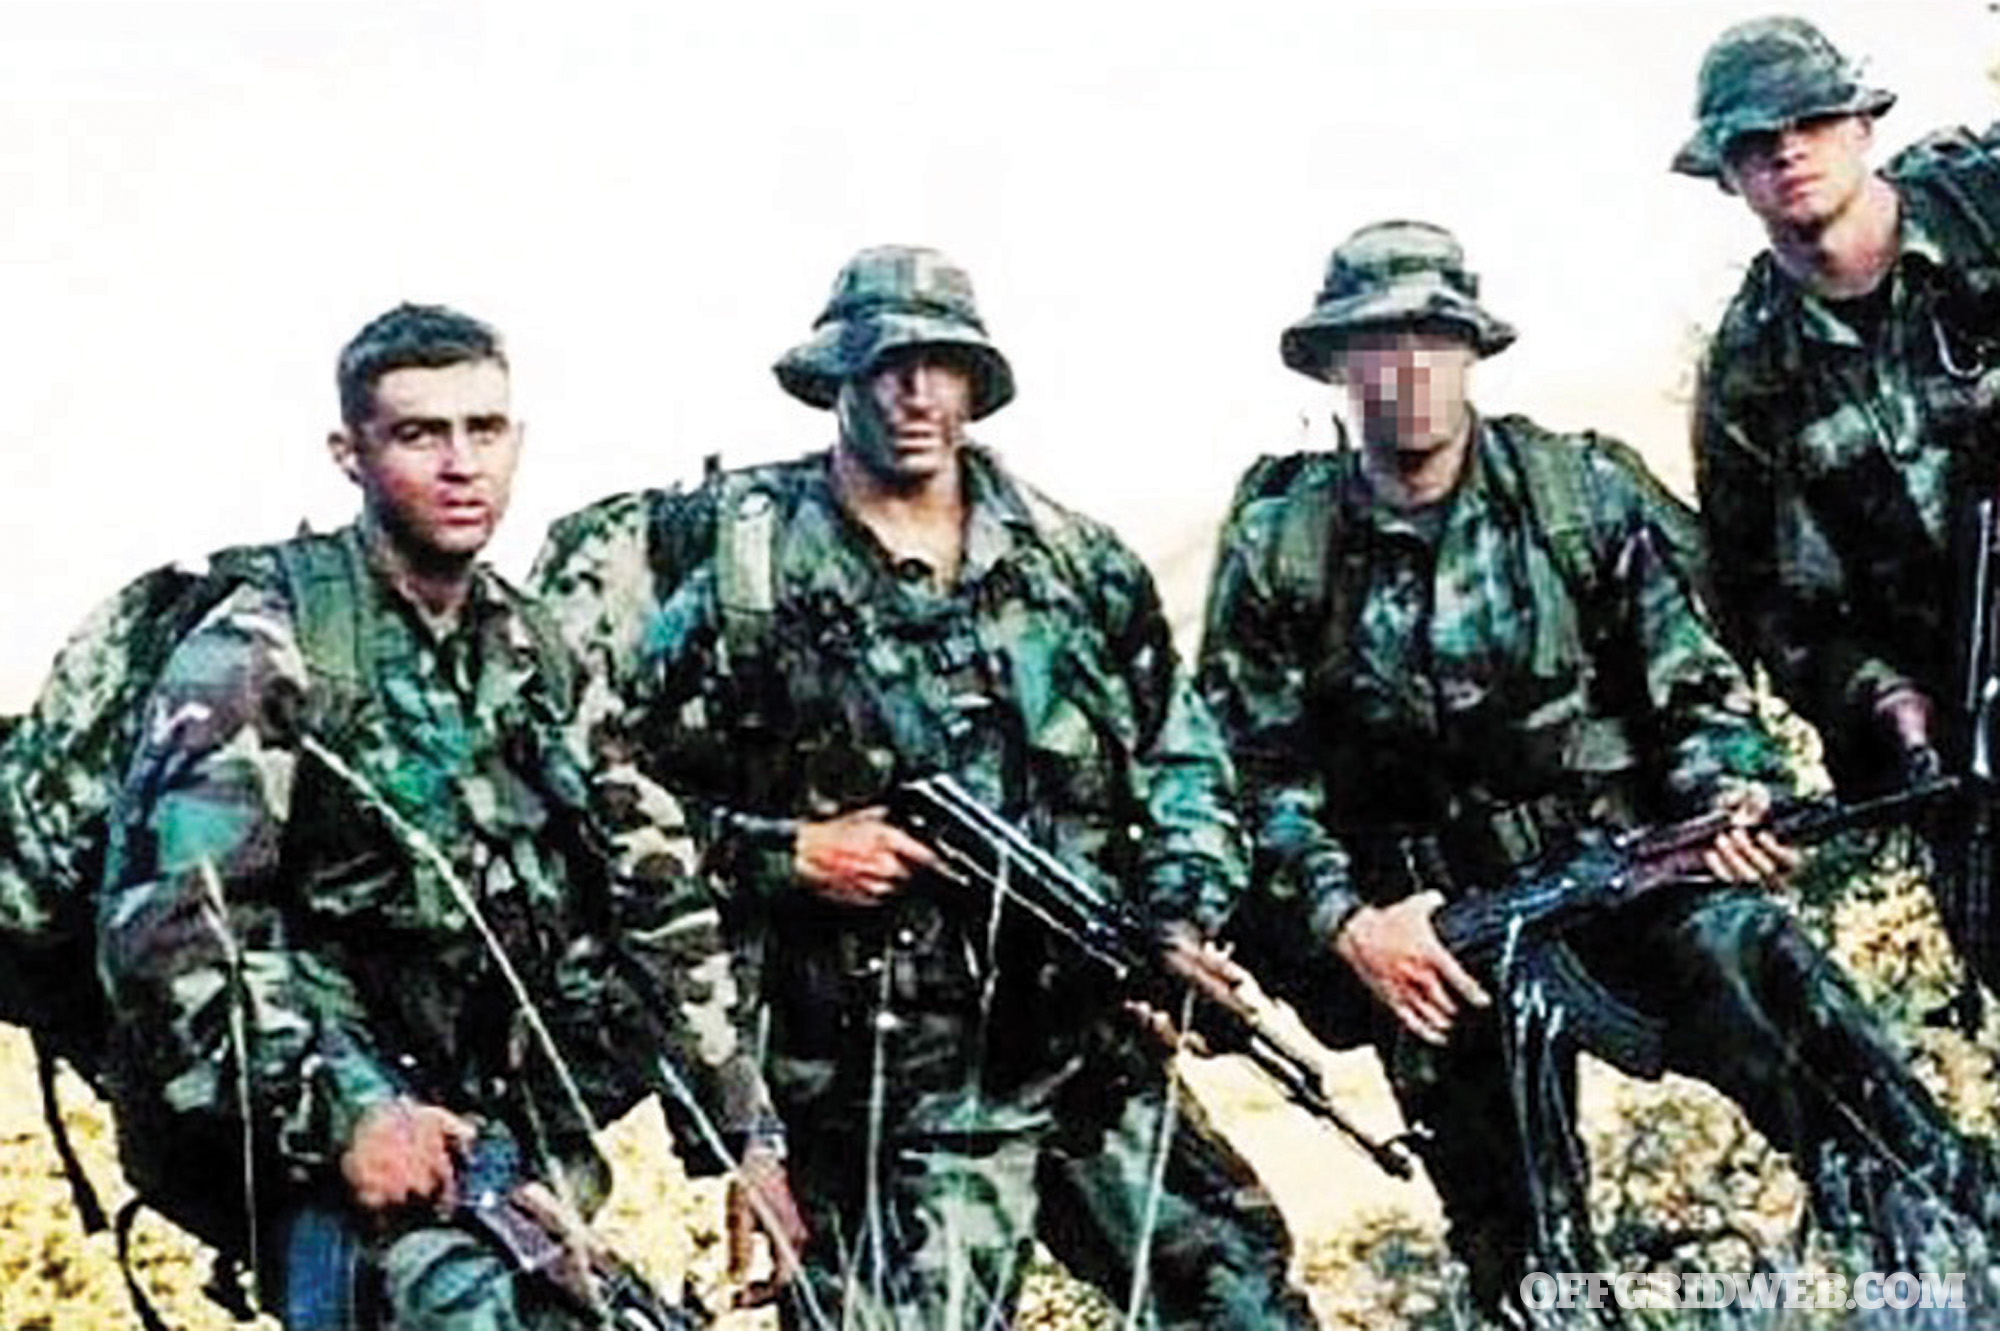
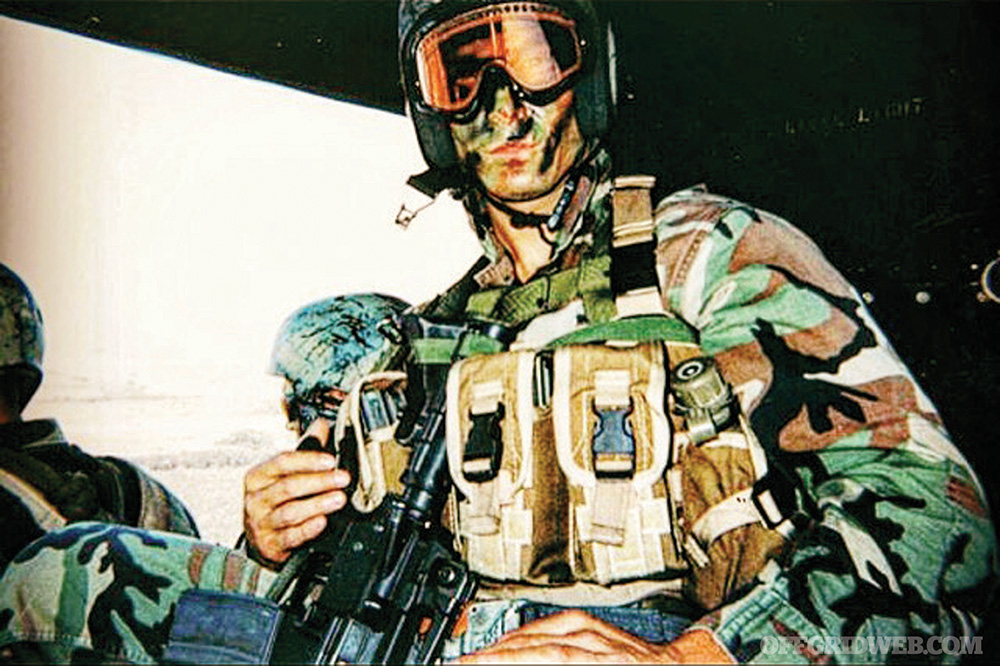
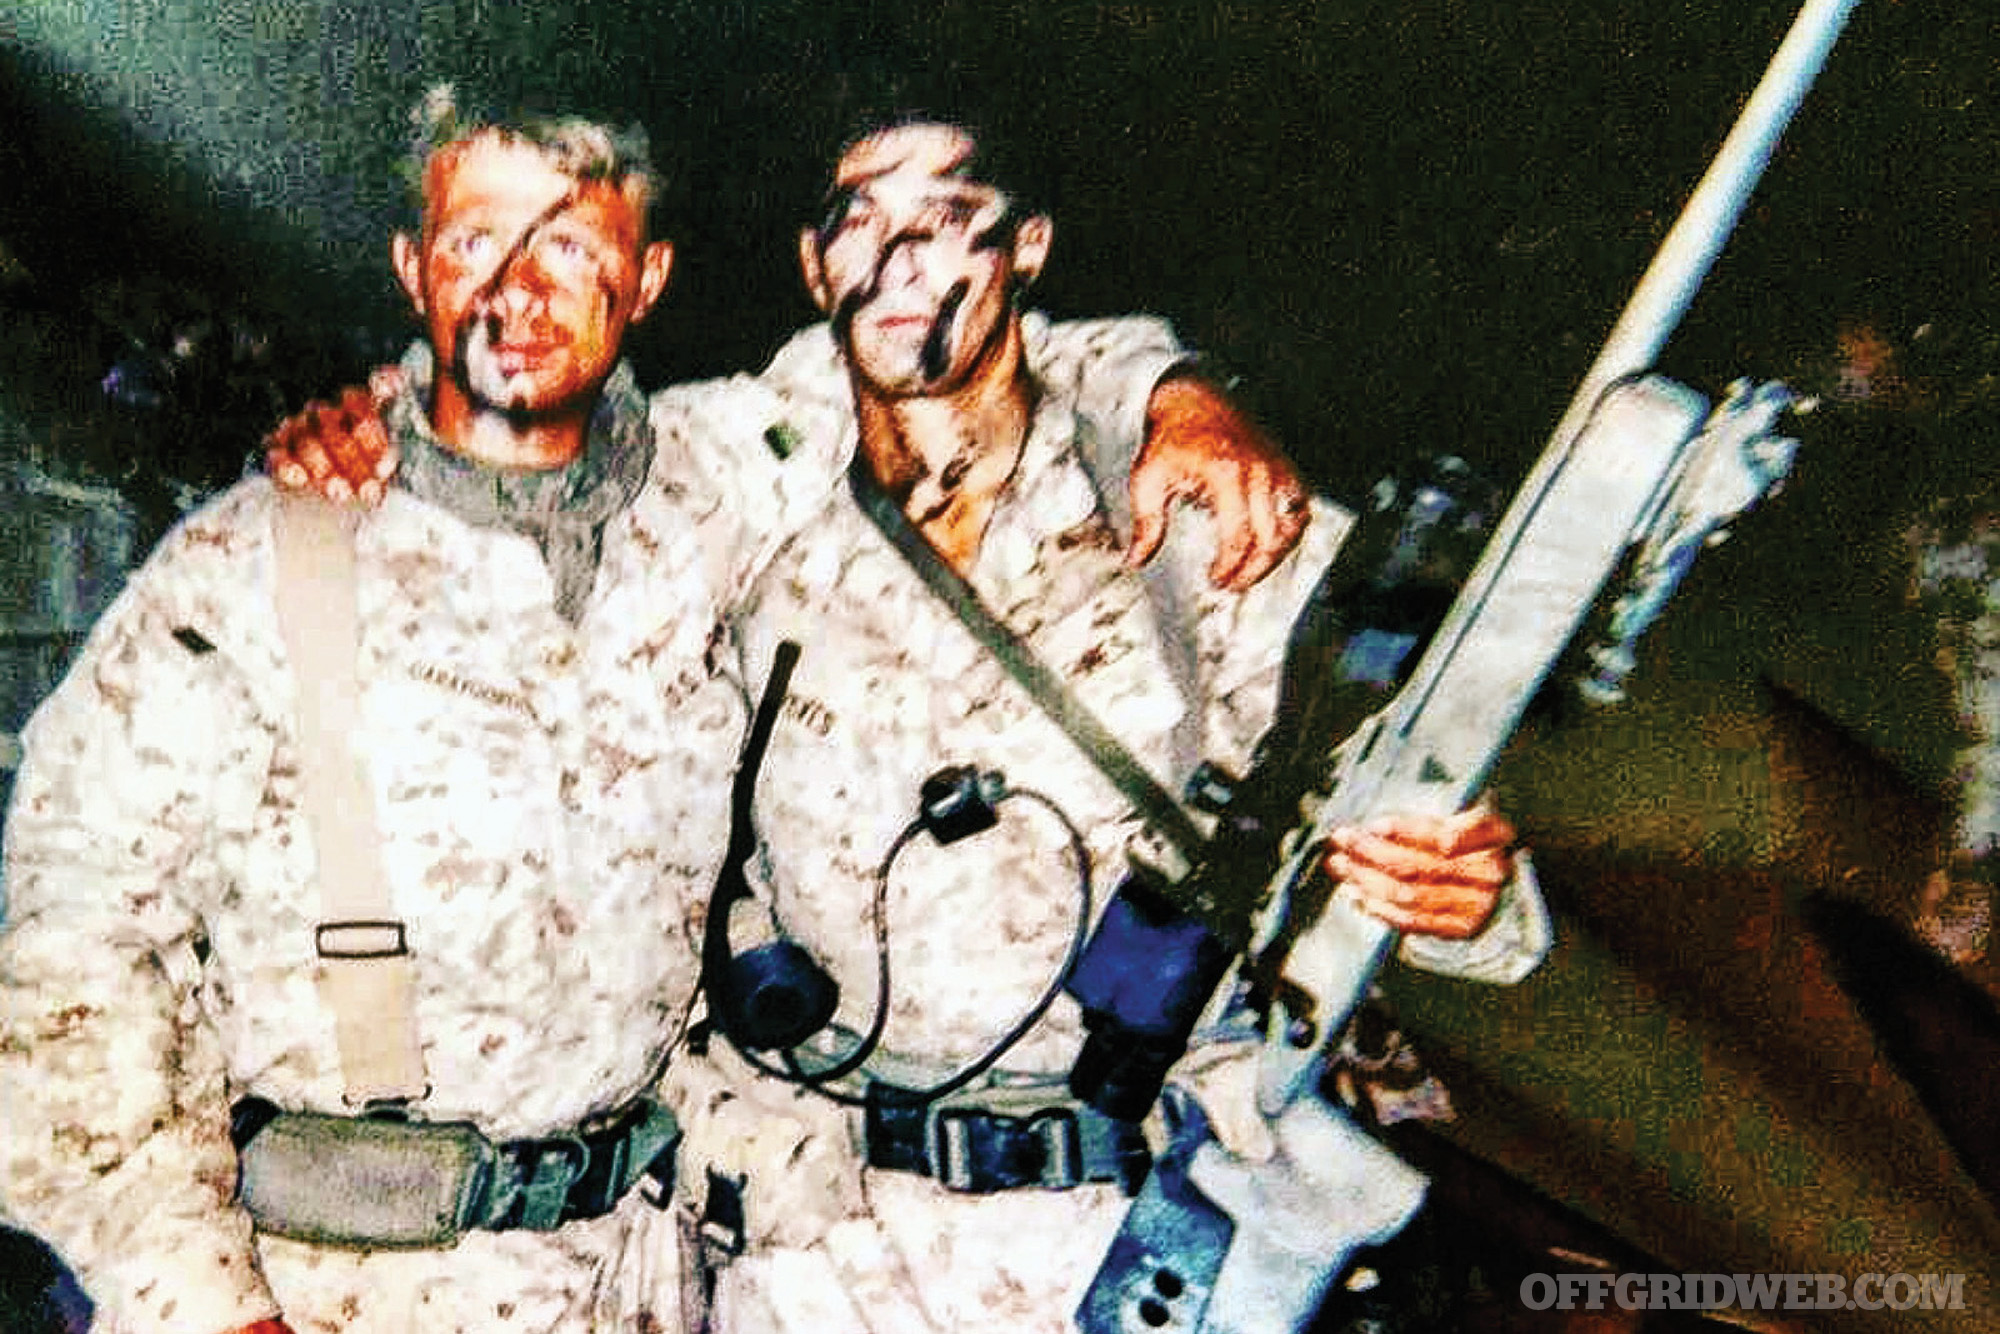
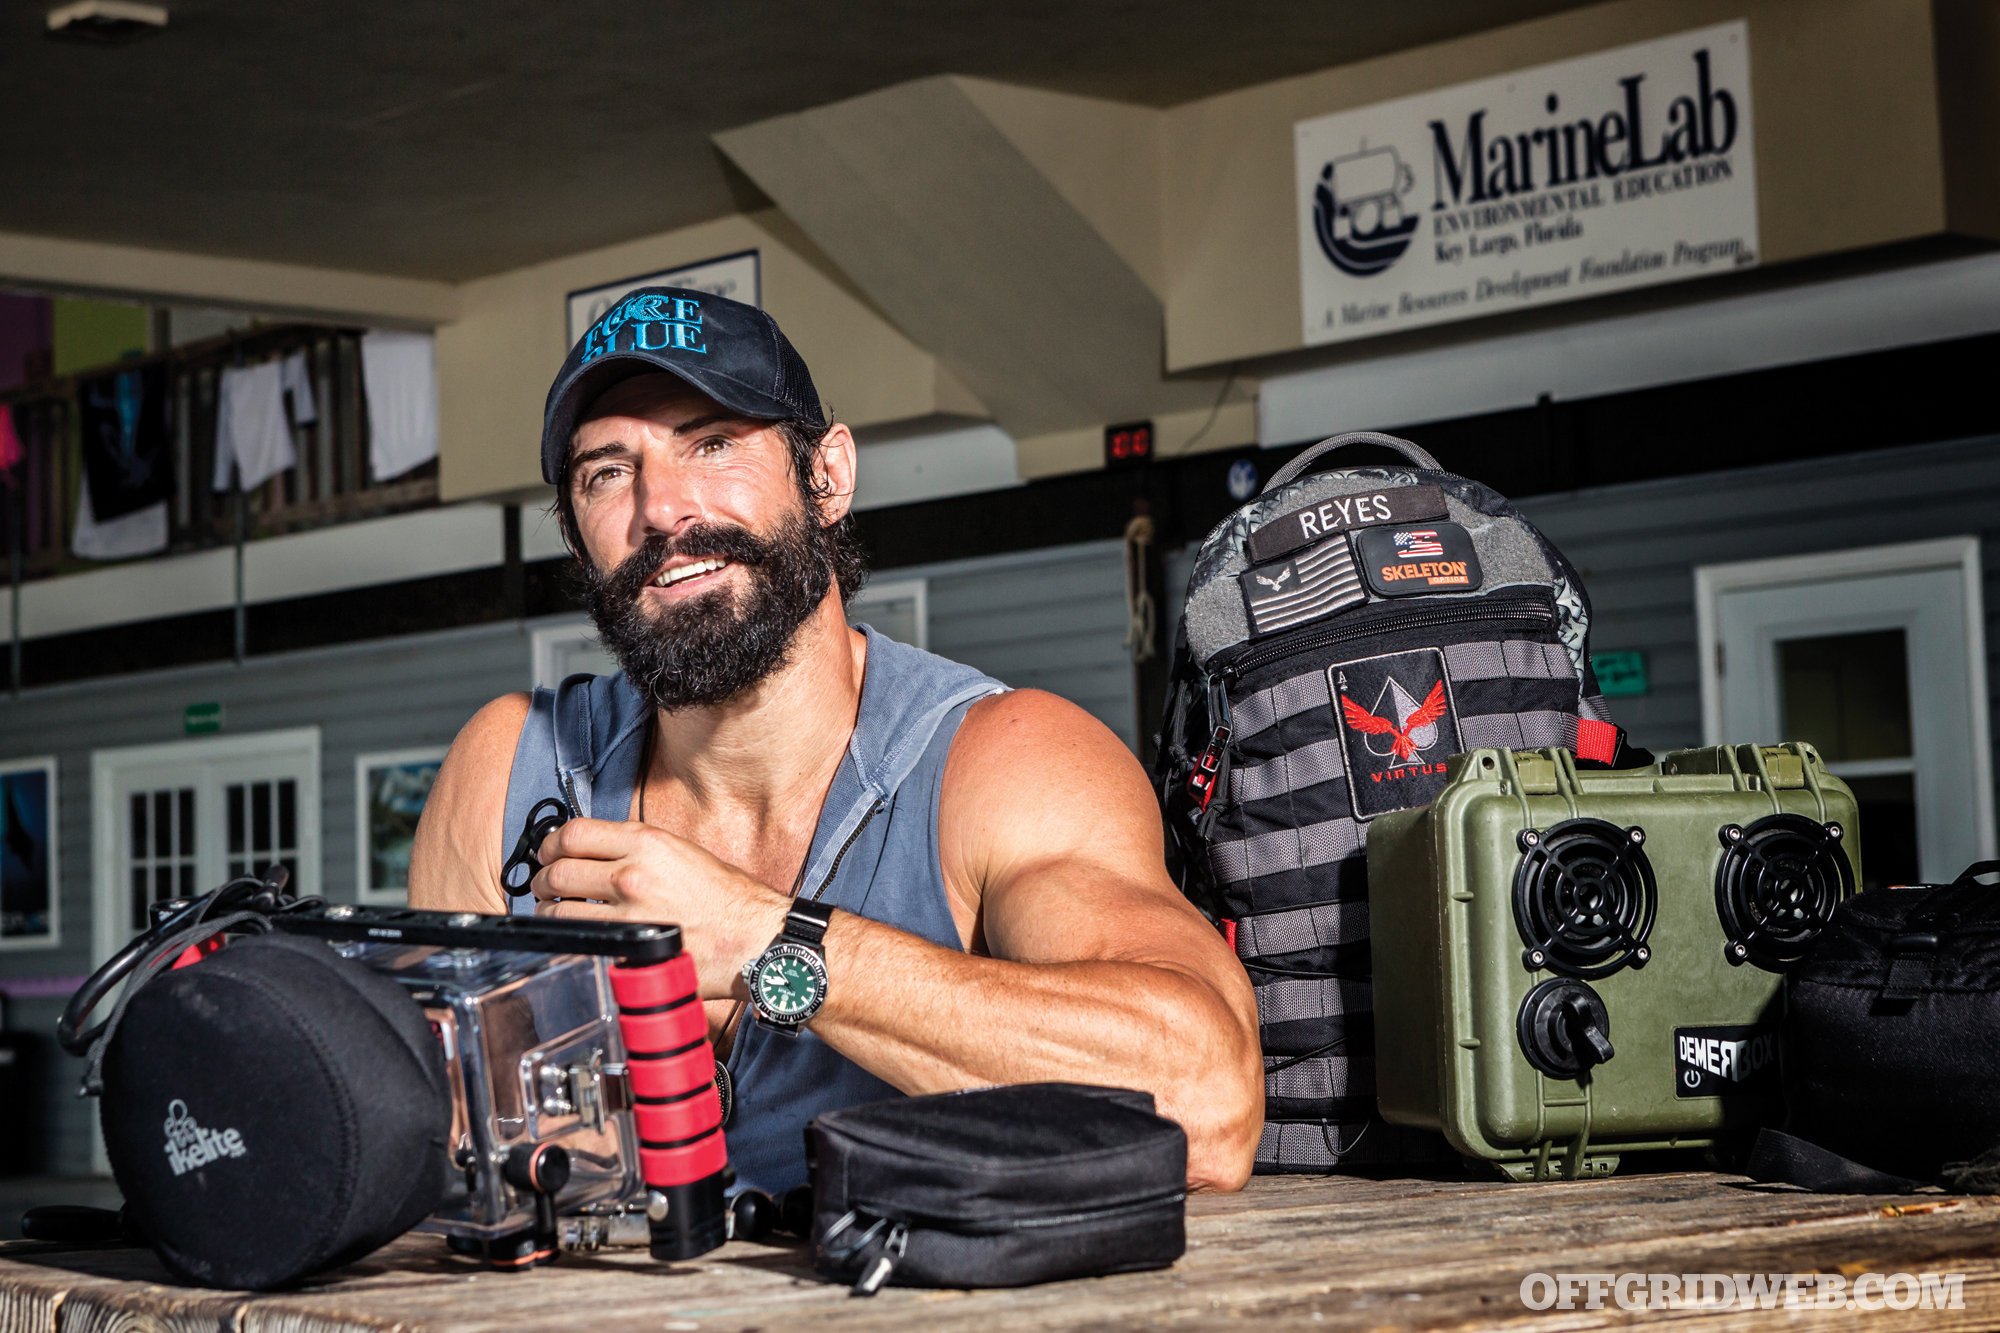


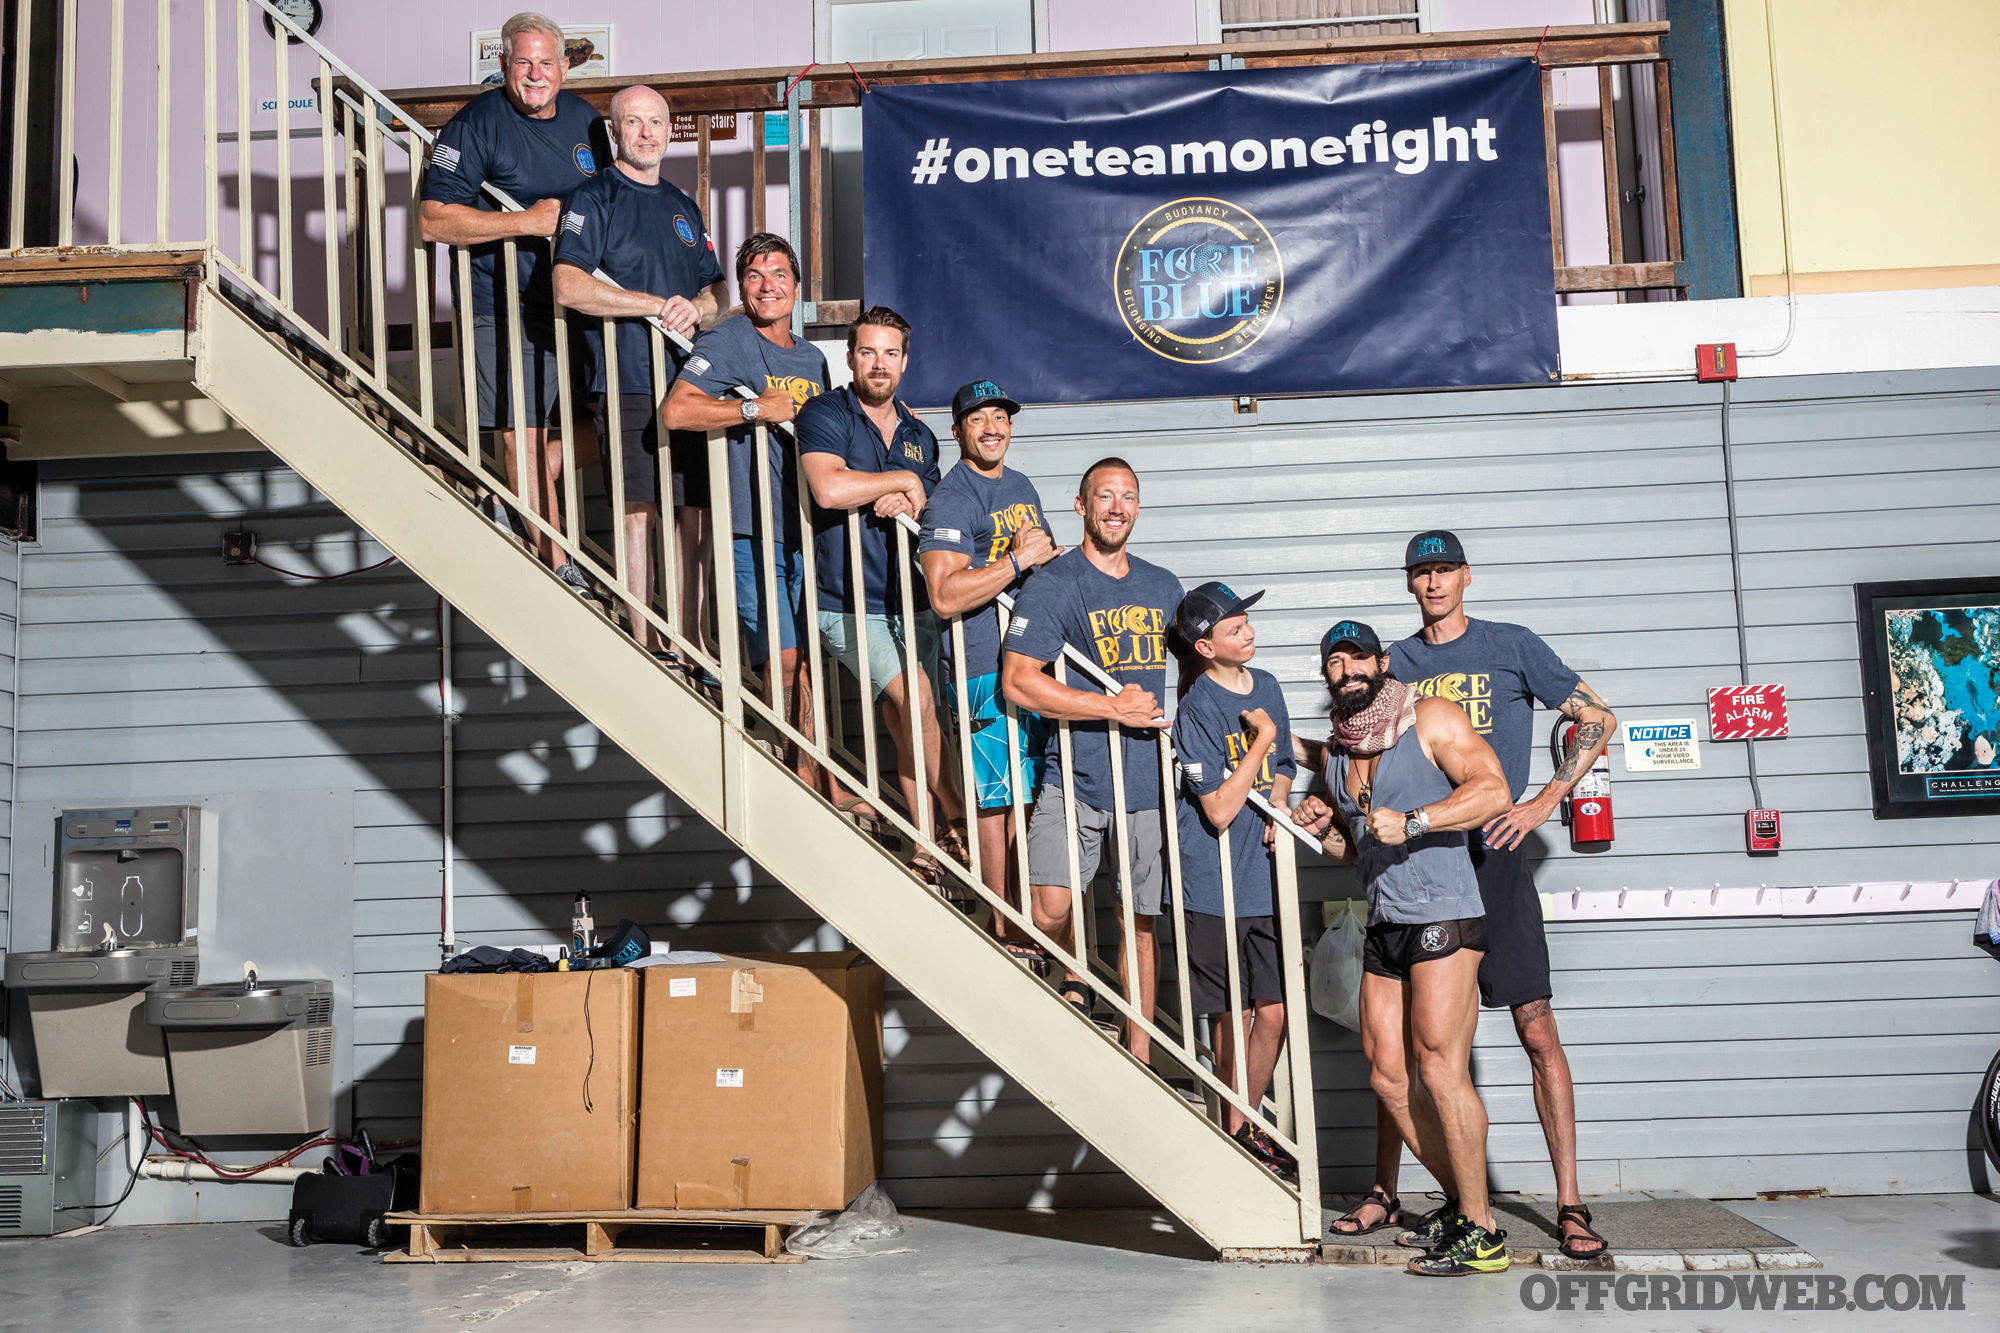
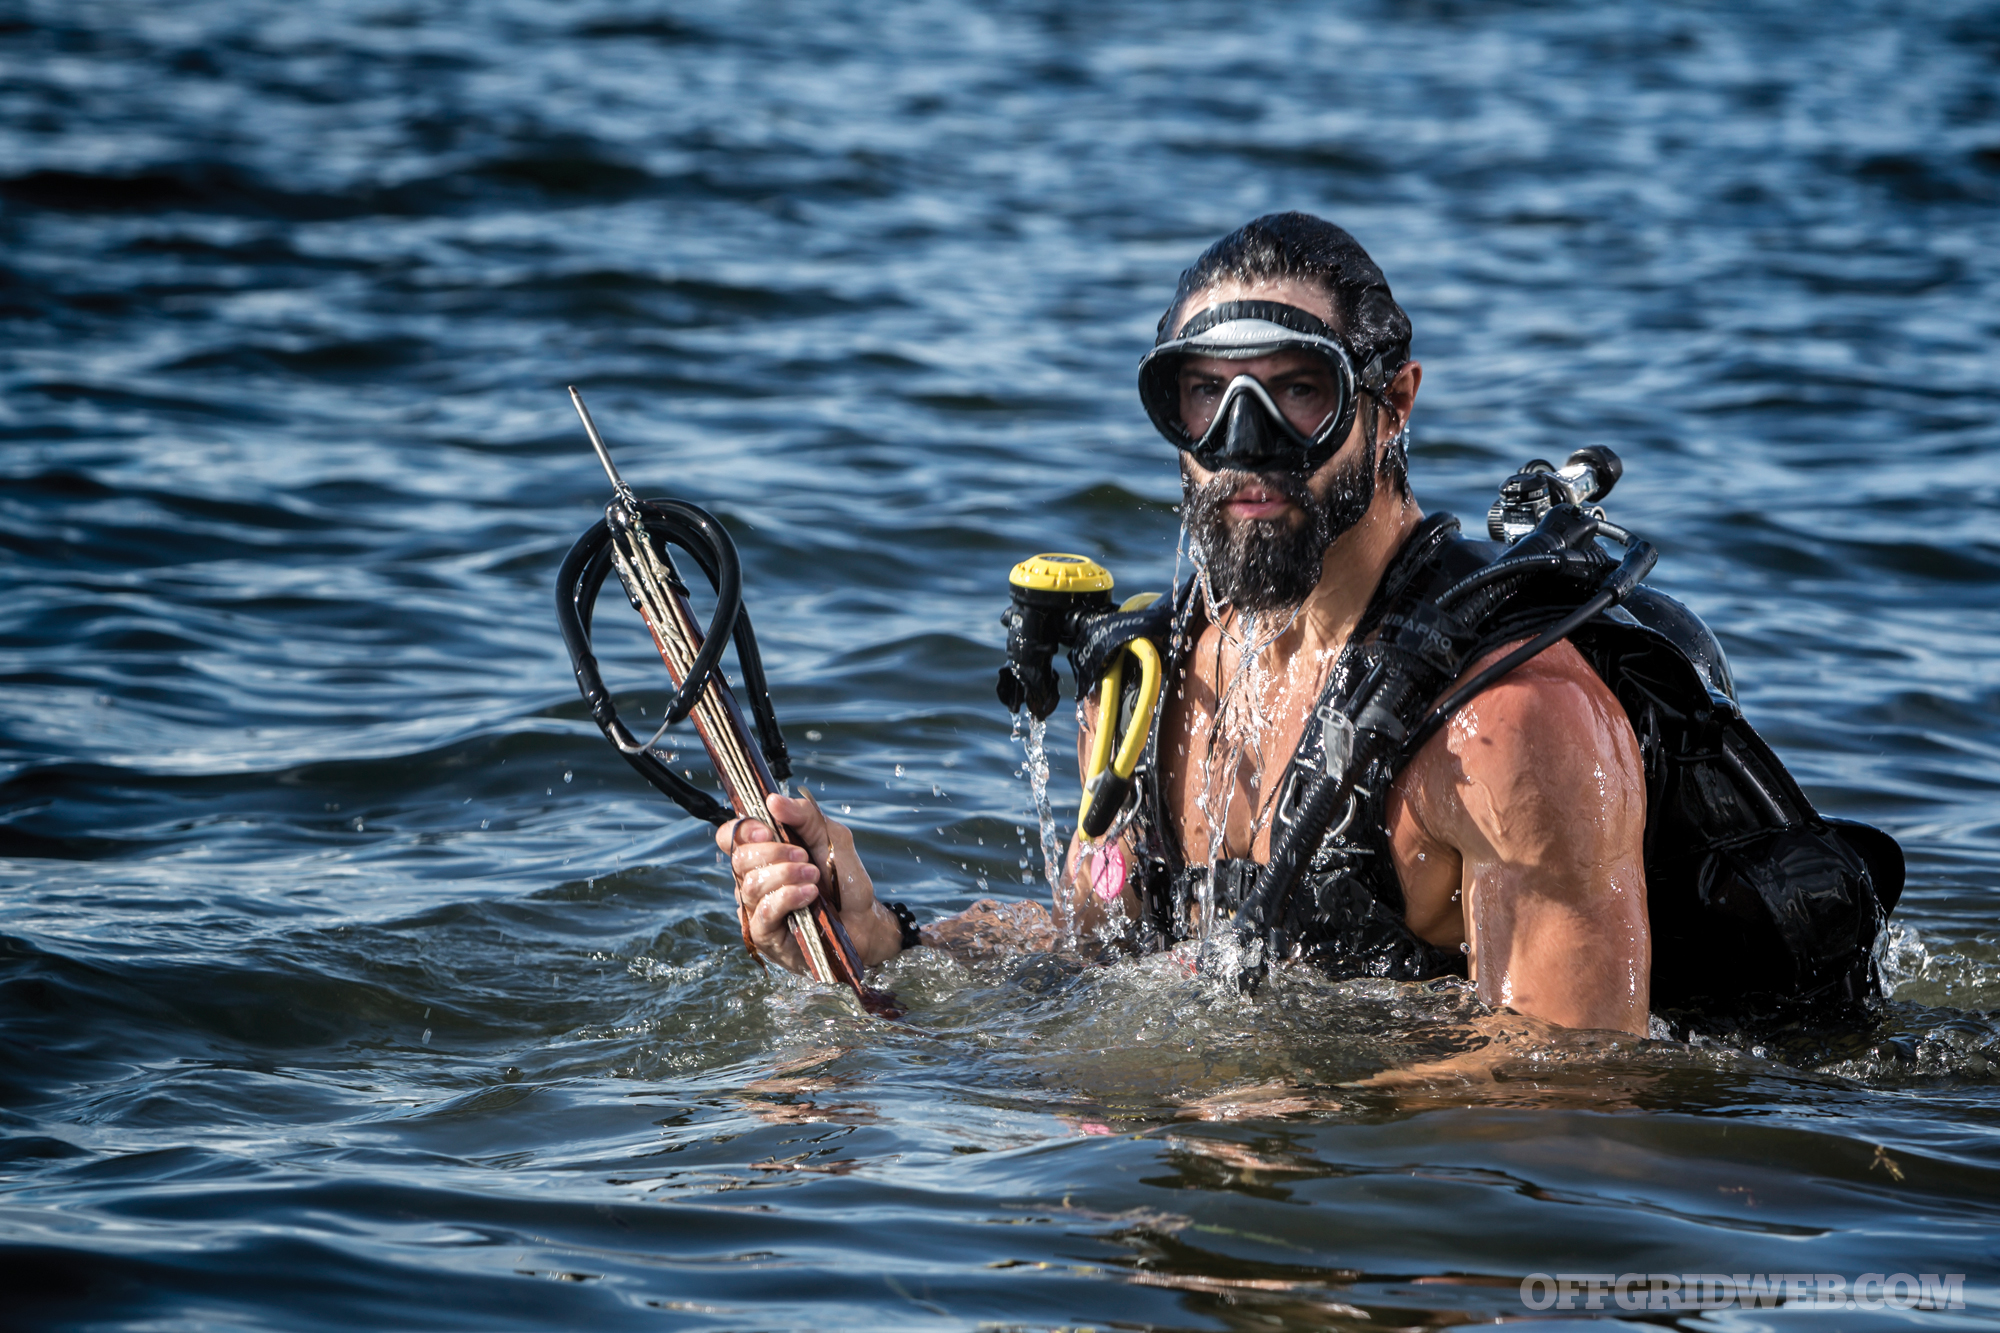
