Like air conditioning and a lack of back hair, refrigeration is one of those things separating man from beast. Cold storage slows food spoilage — without it, we’d be in a constant state or foraging or hunting to maintain food stocks. With it, though, we can stockpile days of fresh rations, and that lets us concentrate on other survival priorities.
Ice chests were, and are, a great cooling option if the means to make and store ice are available. But, sourcing or making ice from scratch isn’t anywhere as convenient as running a highly efficient refrigerator/freezer from a solar-fed battery. Before hitting the end of days, we decided to get familiar with a portable fridge/freezer made by Dometic.
Dometic is a global company that traces its roots back to a couple of young Swedish scientists who invented what would become the modern refrigerator back in the 1920s. Electrolux acquired the rights to the technology in the 1920s, grew its appliance business and by the ’60s, gave birth to Dometic, a division of the company focusing on portable and leisure appliances. In 2001, Electrolux spun off the Dometic division as we see it today, standing on its own as one of the largest producers of portable appliances in the world. Dometic fridges are found in RVs, semitruck cabs, and boats, among other places where milk, eggs, and medications (such as the insulin mentioned earlier in this issue) need to be refrigerated.
The CFX35W is on the smaller end of Dometic’s eight compact portable fridge/freezers. It provides a little more than a square foot of cold storage; acting as either a refrigerator or freezer at the push of a few buttons. The box’s compressor sips power with remarkable efficiency.
Capabilities
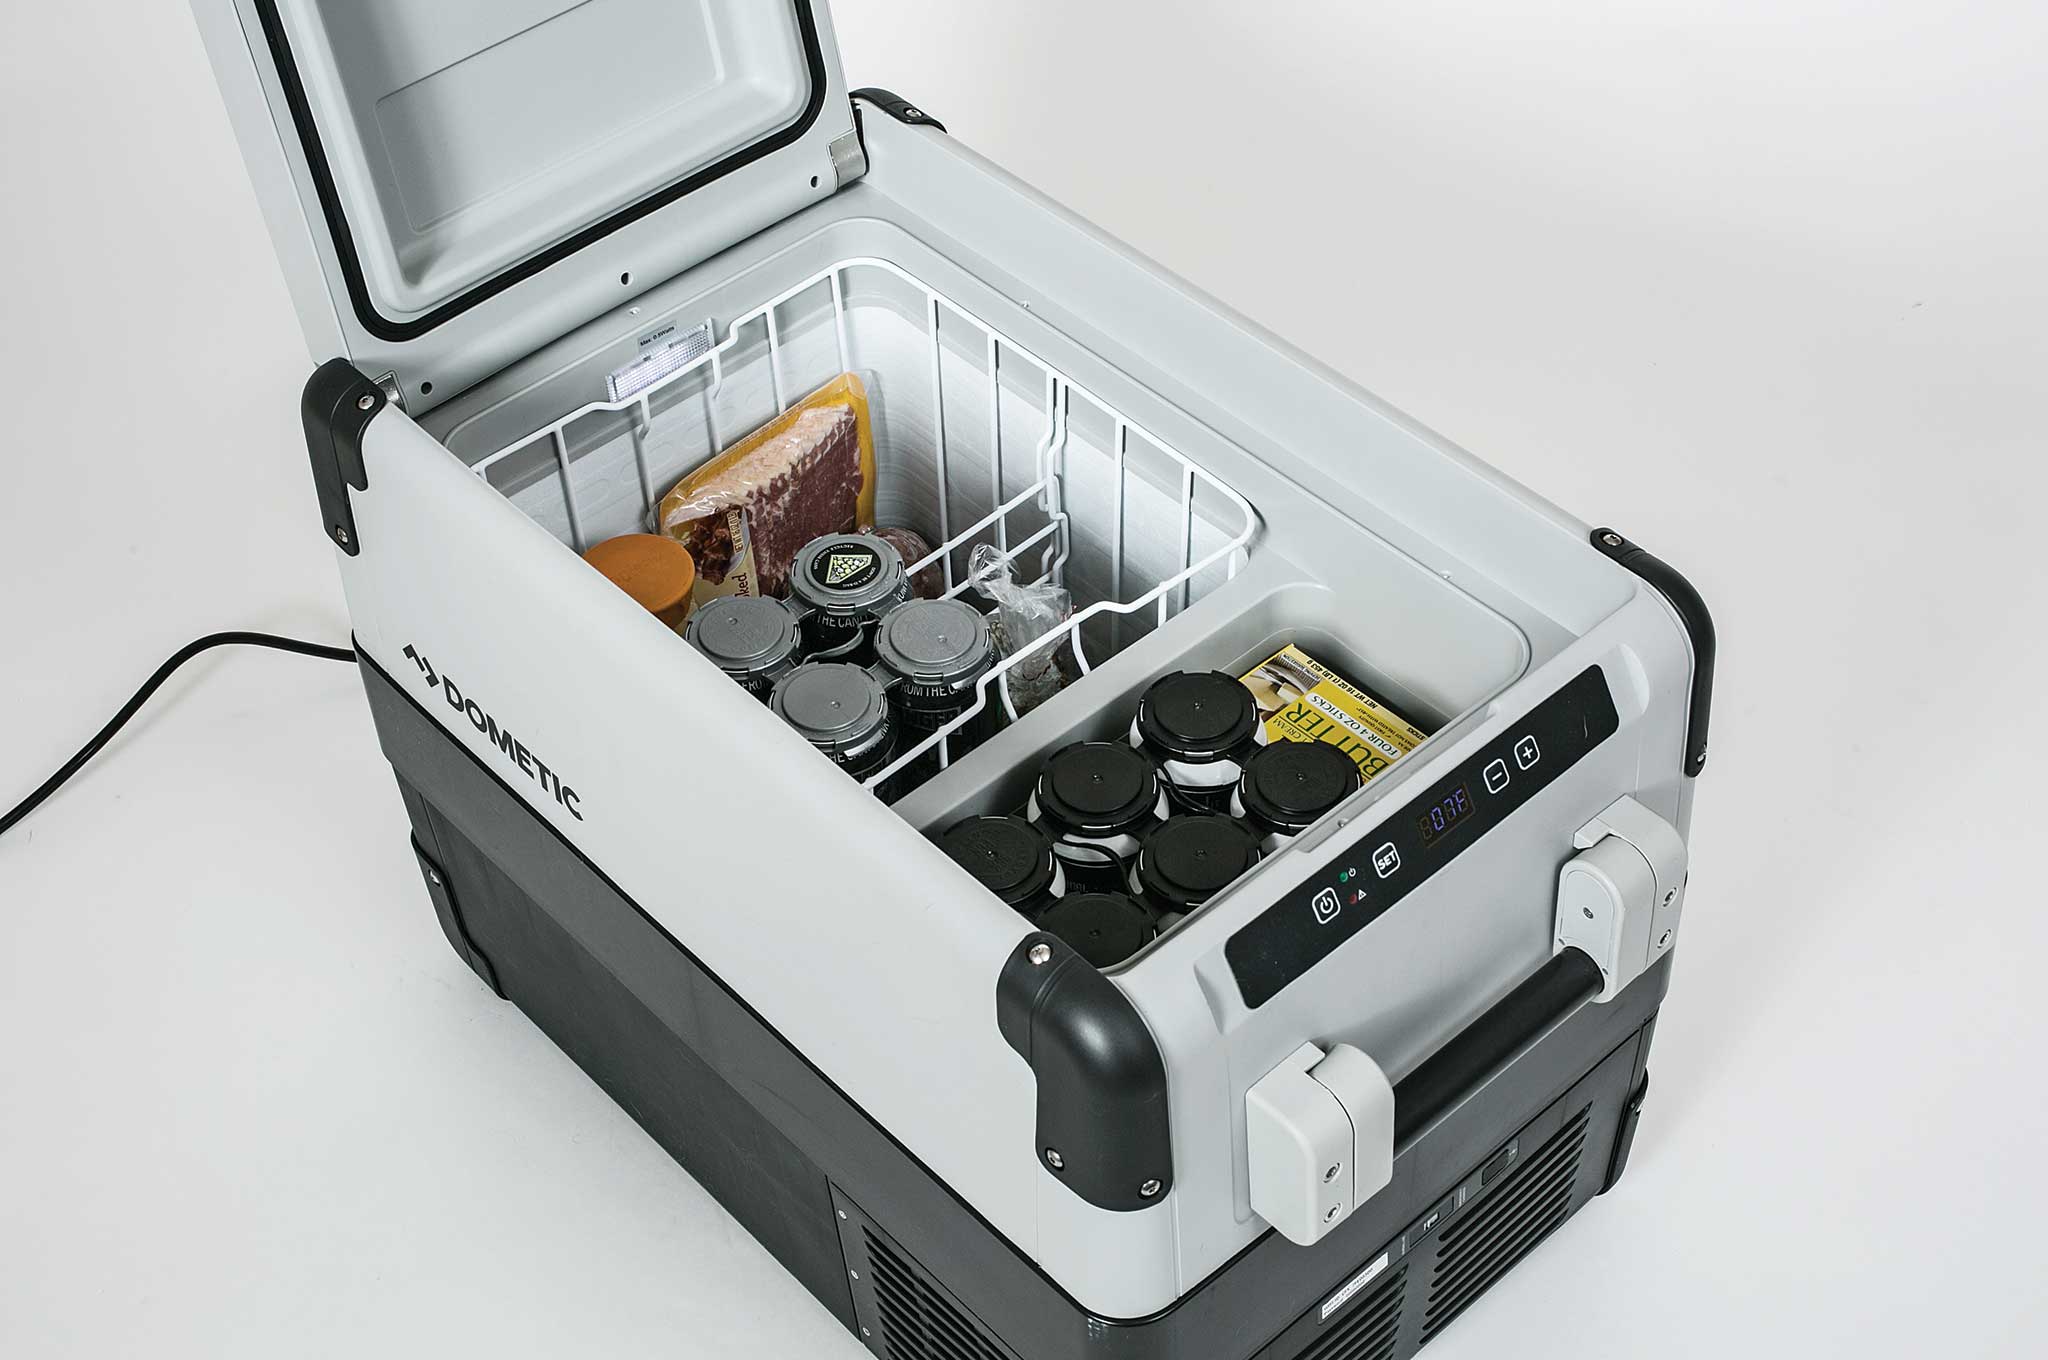
The CFX35W fridge/freezer provides 1.1 cubic feet of storage. That’s enough for more than a week of meals and condiments if you pack carefully, and the included two-compartment wire basket helps keep things organized. The unit is capable of cooling contents down to -7F.

Before you can cool your bacon, you have to supply power to the box. It runs on both AC and DC power and features a priority circuit that automatically switches to AC power when connected to both. On the DC side, the unit senses the power draw and battery level and cuts off the juice at one of three user-selectable levels to prevent over-discharging.
All this cooling power is good for nothing if the box falls apart or craps out, so Dometic uses stainless steel hinge hardware, reinforces the housing corners for durability, and seals the control and display, giving it the best chance for long-term survival whether the box spends its days serving as a primary fridge in an austere kitchen, banging around in the back of a truck or chilling veterinary medication in a barn.
Purpose
Portable fridges are great for RVing and overlanding, but they come into their own during extended power outages and other scenarios that go past a week. As simple and rugged as they are, ice-fed coolers have a place in short and medium-term survival situations, but at a certain point passive coolers become impractical. And that’s without considering how little fun it is to open up an ice chest full of food, finding limp cardboard packaging floating amidst soggy provisions in a mini Arctic sea.
An ideal, long-term refrigeration solution is running a highly efficient, portable fridge/freezer with a solar-rechargeable battery system. With a properly sized battery and panel, the CFX35W will run indefinitely. Near as we can tell using basic metering equipment, the unit pulls DC power in one of three modes: cooling, station-keeping, and idle. At peak draw, it pulls 60 to 70 watts when cooling. While maintaining its temperature, it pulls 40 to 50 watts for a few minutes at a time, and it pulls about 1 watt at other times, powering the brains, display, and interior LED.
Controls
As we’ve hinted, the CFX35W is smarter than your average fridge/freezer. Like your home fridge, it’s thermostat controlled and is user adjustable from ambient to -7 degrees F. The CFX35W has a single cooling zone that acts as either a fridge or freezer based on the selected temperature setting. While the main bin is actively cooled, the smaller insulated bin above the compressor acts as a crisper, or a fridge area when the main compartment provides a deep freeze.
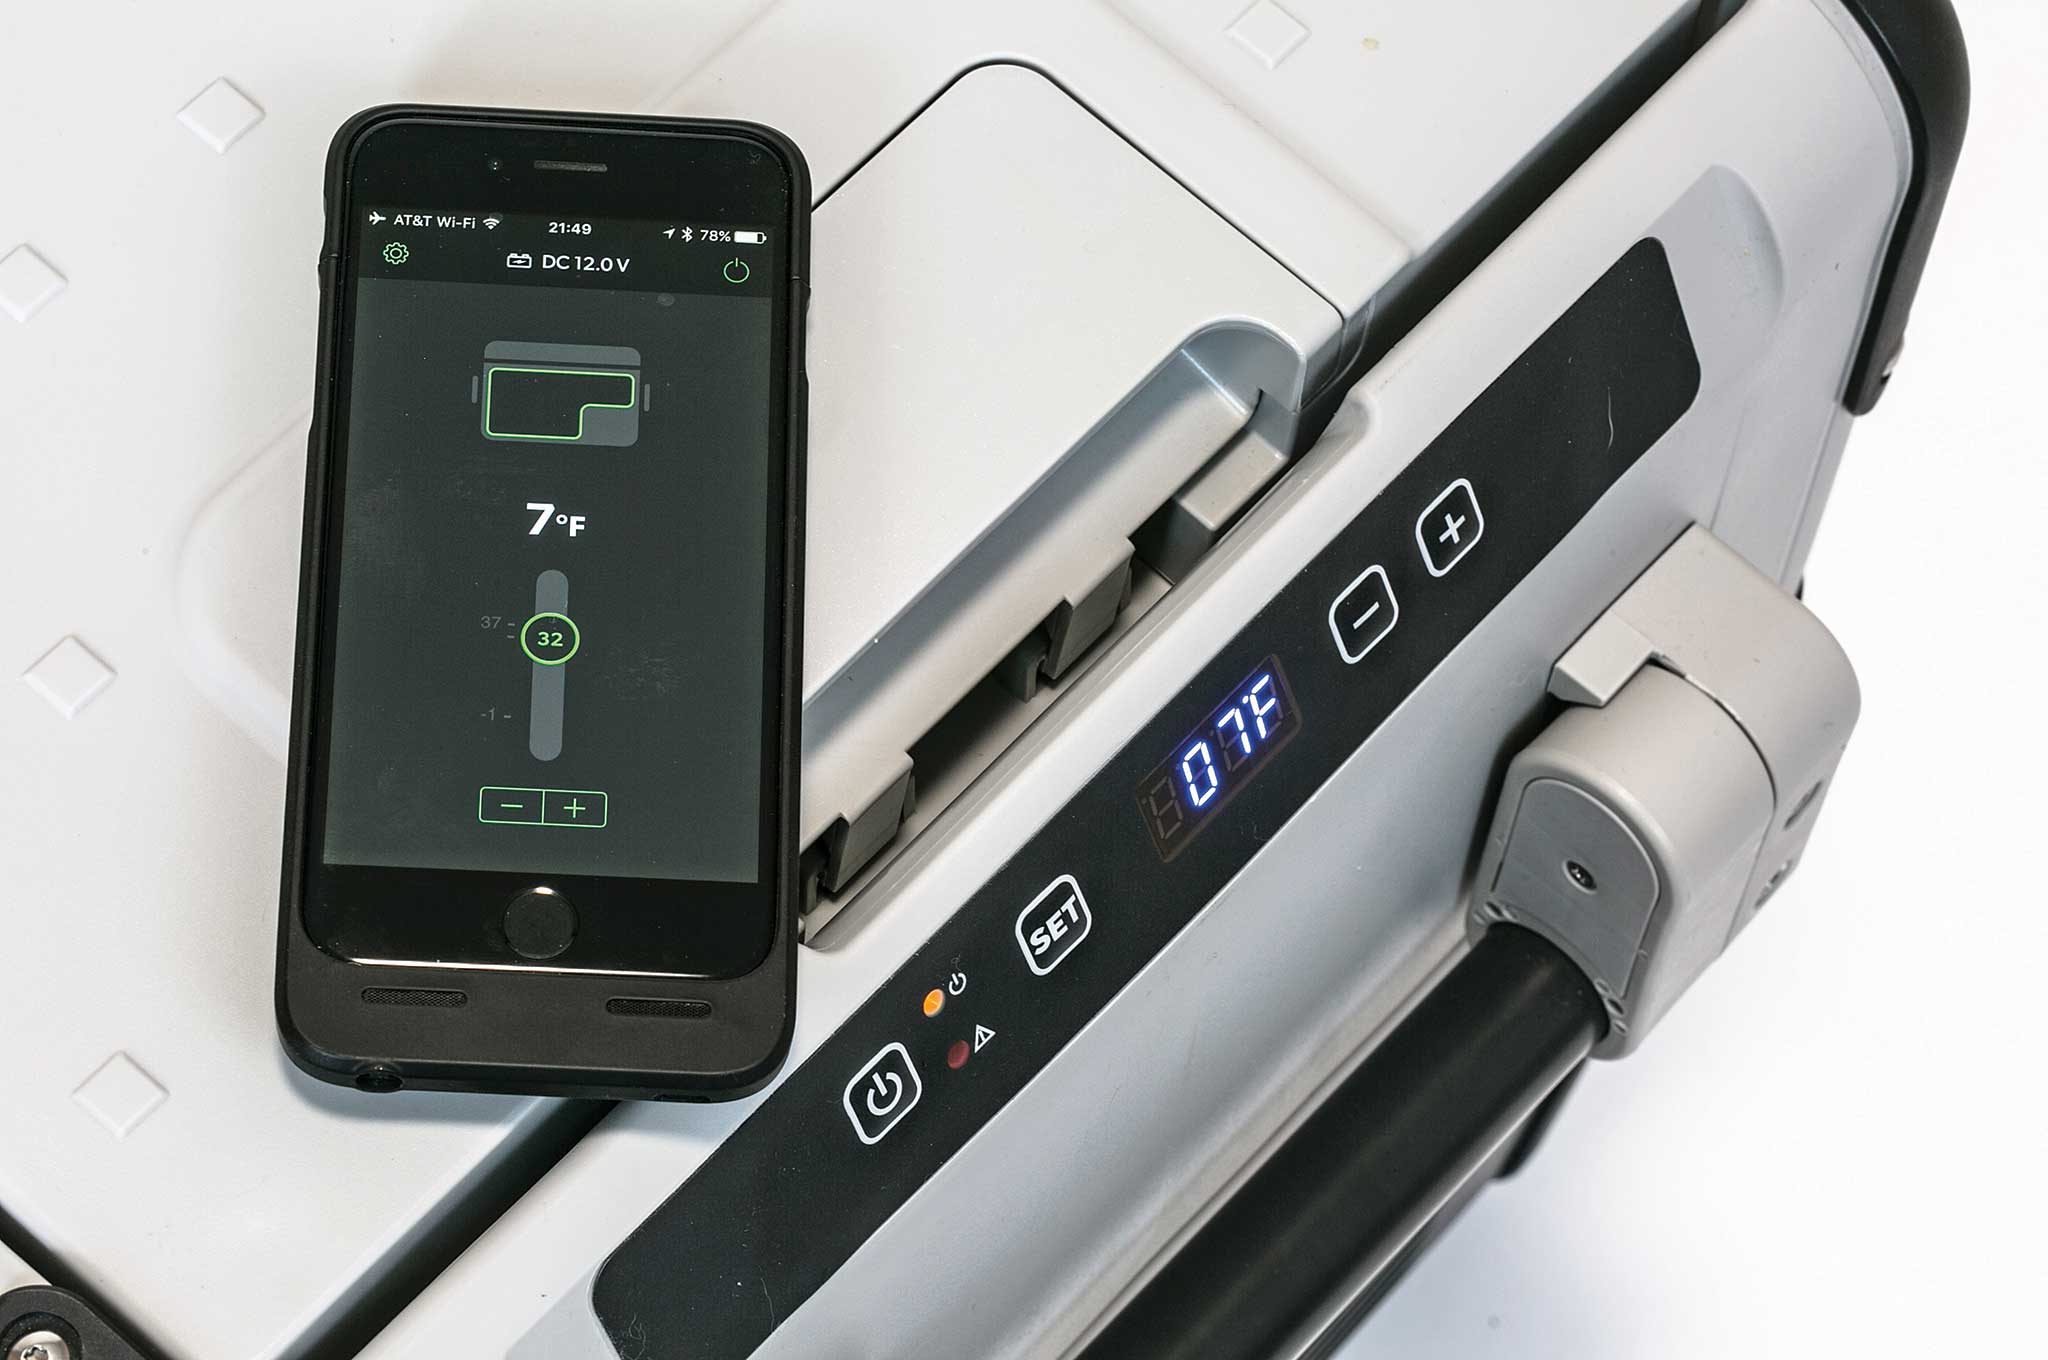
The front panel offers a readout displaying the unit’s internal temperature. A colored LED lets you know when the unit is powered up, when the compressor is running, and if there’s a fault. Hit the “SET” button to adjust a handful of options including the temperature setting, display brightness, Celsius or Fahrenheit display, the battery monitor level, and to turn the onboard Wi-Fi on or off. The Wi-Fi is somewhat convenient when setting up the fridge, but it’s a pain to use otherwise. The fridge won’t join an existing Wi-Fi network, so you have to manually join the fridge’s network whenever you want to adjust a setting.
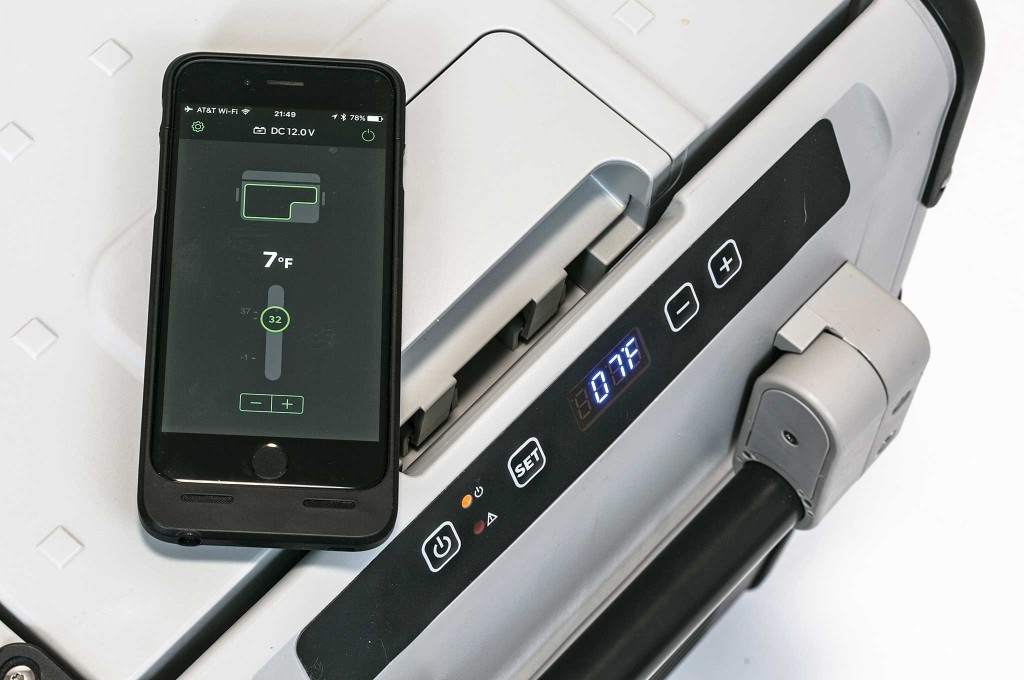
The Wi-Fi option makes it possible to remotely monitor and adjust all of the unit’s settings using iOS and Android devices. Viewing and changing the box’s setting with a smartphone is easier than scrolling through the push-button menus on the CFX’s top deck, but the fridge’s Wi-Fi is a dead-end network. To take advantage of this functionality, you have to leave behind whatever data service you’re on and manually join the fridge’s network. Not a problem when you’re out in the boonies, but if you’ve got a Wi-Fi network in your bug-out base, this option isn’t ideal. A Bluetooth connection would make more sense, since it won’t kidnap your mobile device from its cellular network connection.
There’s a USB port on the front of the fridge to charge a phone or USB power pack, which is useful in any location remote or austere enough to warrant the use of a little fridge like this. Next to the USB port there’s an emergency switch. When in emergency mode, the thermostat and controls are bypassed, and the compressor runs continuously. It’s a fail-safe option that’ll keep the unit going in dumb mode if the electronics suffer a malfunction; you’ll have to monitor the temp, though.
Other features include sturdy folding handles (which is important since the unit weighs more than 40 pounds), an interior LED, a removable wire basket with divider, and a drain port. Dometic offers optional accessories, including an insulated cover to increase the unit’s efficiency and a slider for vehicle installs as optional accessories.
Performance
We ran the CFX35W over the summer almost exclusively from a Goal Zero Yeti 1400 battery and a Boulder 100 solar panel. We ran it in a stationary, solar configuration using DC power for weeks behind the house.
We loaded it with meats, cheeses, milk, eggs, bacon, and all the other stuff you’d expect to find in a fridge. With the unit set to a lazy 36 degrees F, our logging thermometer showed us the unit fluctuated 1 degree above and below the selected temp over the course of a two-week test. We switched over to freezer mode toward the end of our test and cranked the temp down to -5 degrees F with a few pounds of ground beef in the chest. No surprises. The sleeves of cow meat came out as they went in, cryogenically preserved and suitable for use as batons.
In 85-degree temperatures, the fridge/battery/solar panel system seemed capable of running indefinitely. With the fridge and battery plugged into the solar panel, the fully charged Yeti battery fed the fridge while charging cell phones and a few LED lanterns without dropping into the red for the duration of the test. Without the solar panel, the fridge ran the battery alone down in about five days. Keep in mind, you’ll have to start with a full battery on a sunny day, otherwise, the solar panel will eventually fall behind the charge/use cycle.

Also, and importantly, the CFX35W is meant for use in cars and trucks with lead-acid batteries. Running it from the Yeti’s Li-ion NMC battery gave it some fits. We had to game the CFX’s protection circuit to get the initial cooling temp. We ran from the less efficient AC side of the Yeti to get the temp down without tripping the CFX’s DC current monitor’s threshold, then switched to DC for station keeping. Once it reaches its target cooling temp, the fridge runs fine from Li-ion cells.
One other compatibility issue popped up between the CFX and the Yeti. The Yeti has a little ring around the center pole of its auto socket that was too narrow for the contact on the CFX to reach. We put a small magnet in there to fill the gap. Problem solved.
Cooling speed was impressive. The unit went from 70 degrees F to its target setting of 36 degrees F in 40 minutes, though it only took 19 minutes to get to 40 degrees F. It took about an hour to dive from 70 to 0 degrees F. To test its insulation, we cut the power and timed the internal temperature rise. As efficient as it is in cooling, it’d benefit from added insulation, as it warmed from 0 degrees F back to 70 degrees F ambient in 35 minutes.
It’s not terribly loud when the compressor’s on. It’s about as loud as a humidifier indoors and sonically invisible outdoors. Depending on your situation, running a quiet fridge from a silent power source might be a desirable alternative to dinosaur juice-powered generator.
Value
When it comes to value, if you’re pitting the fridge against something as durable, efficient, and pricey as a Yeti cooler, the CFX35W compares favorably since it holds more food (ice takes up a lot of space), runs for days on a battery, and for weeks (at least) on a solar system. When the reliance on ice is removed from the equation, the cost of the fridge versus any decent ice chest is justified in an extended-use scenario. There are times when running a whole house generator isn’t feasible or advisable, too, and a super quiet setup like a small fridge running on a battery goes a long way in preventing visits from unwelcome guests.
When the SHTF, an icebox isn’t a viable option, long-term, and compared to other portable fridges such as those from ARB, the Dometic brand offers similar features and performance at a lower price. Bottom line, if you’re in the market for a portable fridge/freezer, the CFX35W is a good value.
| MAKE & MODEL: | Dometic CFX35W |
| MAXIMUM COOLING: | -7 degrees F |
| WEIGHT: | 42 pounds 11 ounces |
| EXTERNAL DIMENSIONS (inches): | 16.2 by 27.2 by 15.7 |
| INTERNAL VOLUME: | 1.14 cubic feet |
| POWER SOURCE: | 120V AC and 12/24 DC |
| SAFETY SYSTEMS: | Battery protection and fail-safe operation |
| MSRP: | $830 |
| URL: | www.dometic.com/en-us/us |
PROS:
- Excellent power efficiency; runs from a portable battery for days.
- Convenient; no ice management
- Capable of refrigeration and freezing
- Quickly reaches target temps and holds them accurately
- Quiet
CONS:
- Wi-Fi instead of Bluetooth for smartphone control
- Picky about DC input
- Could use more insulation
- Fat DC plug needs to be customized to fit some sockets
More From Issue 24
Don’t miss essential survival insights—sign up for Recoil Offgrid’s free newsletter today!
Read articles from the next issue of Recoil Offgrid: Issue 25
Read articles from the previous issue of Recoil Offgrid: Issue 23
Check out our other publications on the web: Recoil | Gun Digest | Blade | RecoilTV | RECOILtv (YouTube)
Editor’s Note: This article has been modified from its original version for the web.