Emergency Dentistry: Where There is No Dentist

It's often said that nobody likes going to the dentist. It's not much fun to have someone poking and prodding inside your mouth with sharp metal instruments, especially when you've got to pay a hefty sum to have any dental issues taken care of. However, if you're stuck with a major dental issue like a broken or abscessed tooth, a skilled dentist is suddenly your best friend in the world. It's nearly impossible to go about your daily routine in excruciating, mind-numbing pain, and the dentist can quickly alleviate your suffering.

Like it or not, regular dental visits keep your pearly whites pearly and white.

Like it or not, regular dental visits keep your pearly whites clean and healthy.

In a SHTF emergency situation, it may not always be possible to simply go to the dentist. There may no longer be any dentists available, or those who are may be so busy they can't possibly help you. So, it's wise to have a basic level of knowledge about dental care and emergency treatment. This may make you squeamish, but it might be necessary to pull your own tooth or fill your own cavity to survive.

DIY dentistry teeth 3

An illustration from “Where There Is No Dentist” by Murray Dickson.

There's an excellent book available that can teach you almost everything you need to know about emergency dentistry. It's called “Where There Is No Dentist”, and it was written by Murray Dickson in collaboration with Hesperian Health Guides, a non-profit medical organization. This 200-page book is available for free through Hesperian's web site, so you can start reading it today without spending a cent. It's even filled with simple instructions and illustrations, since it's targeted at readers with no medical background.

DIY dentistry teeth 4

Here's a glossary of links to each chapter of the book, in free PDF format:

If you're so inclined, you can buy a hard copy of the book on Amazon.com for $16. For more medical tips and tricks, check out our previous medical articles.


Weekly RECOIL EDC: Monday Morning Mayhem

Even if you love your job, of us don't really like Mondays, because they mean the end of the weekend and the beginning of a new work week. However, the guys at RECOIL do what they can to brighten our Monday mornings with their Monday Morning EDC posts. These weekly RECOIL EDC posts show off different daily-carry gear setups, and discuss the reasoning behind these choices.

Recoil EDC mayhem 3

This week's RECOIL EDC loadout comes from contributor “John Darwin”. The author is using a pseudonym due to the fact that he has been working with a maritime SOF unit for over a decade, and must conceal his identity while he remains active duty. John is carrying a custom Springfield Armory Milspec 1911, an Emerson CQC-15, and a Surefire L1 Lummox flashlight, among other items.

Recoil EDC mayhem 1

For more details on John's EDC loadout, check out the full story on RECOILweb.com.

In the past, I've used these posts as an opportunity to showcase some of my own EDC gear. So, read on to see my weekday EDC loadout (photos taken yesterday).

Recoil EDC mayhem 4

Starting in the bottom left, we have a Gerber Diesel Multi-Plier in matte black finish. I normally carry a folding knife instead of a multi-tool, but the partially-serrated locking Wharncliffe-style blade on this tool is great for day-to-day use. The scissors and screwdrivers also come in handy.
On my keys, I have a Griffin Pocket Tool Mini, which I picked up at Blade Show earlier this month. It keeps my keys hooked to the edge of my pants pocket for easy access, and also acts as a compact bottle-opener and prybar (among many other functions). There's also a Sandisk 32GB USB 3.0 flash drive, which I often use to carry photos and work-related documents.

Recoil EDC mayhem 9

The First Tactical Medium Duty Light is capable of 274 lumens, and has an interchangeable bezel ring (seen here with the striking bezel). It also runs on AA batteries, which I usually prefer for a light that I'm carrying every day. They're a lot less expensive to replace than CR123s.

The watch is an old Fossil model, which has long since been discontinued. The sunglasses are Oakley Conductor 6s with grey polarized lenses. Not shown are my Otterbox-clad iPhone 6+ and brown leather wallet.

What does your EDC loadout consist of today? Post your photos on Instagram, and give us a shout-out at @recoiloffgridmagazine.

Emergency Cordage for a Survival Bow Drill

Although most of us already carry paracord or rope as part of our survival kits or bug-out bags, it's always wise to know where to find backup sources of cordage. There are obvious choices, like boot laces and lanyards, but some are less obvious. If you really think about it, you always have cordage on hand, even if all you've got is the clothes on your back.

Emergency cordage friction fire 2

Lonnie of Far North Bushcraft and Survival shows how to find emergency cordage.

In this video from Far North Bushcraft and Survival, the host demonstrates how to scavenge cordage from an old T-shirt's hem. The additional stitching and doubled-up fabric in this area makes for added strength, and it's easy to cut off without losing the protective qualities of the shirt. You might end up showing a little midriff or plumber's crack, but in a survival situation, that doesn't matter much, now does it?

Lonnie takes this T-shirt cordage, and twists it for added strength. Then, he incorporates it into a bow drill, which is an excellent friction fire-starting tool that we've covered here before. Considering the only other tools you'd need for this method are some wood and a knife, the T-shirt cordage could make the difference between a cold night and a crackling fire.

Emergency cordage friction fire 1

After hearing about this tip, you may think cannibalizing a T-shirt for cordage is an obvious choice. However, in a frantic survival scenario, you might easily overlook this resource, so it's good to be aware of. You can even use the sleeve and collar hems in a similar manner, without losing the warmth that the shirt provides to your core.

Emergency cordage friction fire 4

Of course, the bow drill is a great tool in its own right. To learn more about building a bow drill, check out our MacGyver-Level Pyro guide.


DIY: Making a Knife from a File

After spending several days walking through Blade Show, we have a renewed appreciation for those who make knives, especially when those knives are formed from unconventional materials. In the past, we've shown that it's possible to make a Karambit knife from a wrench, and Jack Stottlemire of Rustick Knives even made a Bowie blade from gun barrel steel. These techniques are especially relevant to survivalists, since we may be forced to work with found materials instead of buying whatever we need.

File knife DIY 4

So, here's another interesting DIY knife, modeled after the Japanese traditional blade called a kiridashi. The word kiridashi roughly translates to “to carve out”, and this straight-edged blade is similar in profile to a utility knife or X-Acto knife. These small fixed-blades were often used for detailed woodworking, bamboo carving, or even sharpening pencils. Traditionally, a kiridashi is beveled on only one side, but this modified version features a double-sided bevel.

File knife DIY 2

In the video below from Miller Knives on YouTube, the bladesmith demonstrates how to make a kiridashi knife from a file. Old metal files like the one in this video are often found in workshops and garages, and are typically made of carbon steel—similar to that used in many survival knives.

Watch the video to see how it's done:

It's not fancy, but it's simple and durable enough for frequent use. One downside is that bare carbon steel will need to be oiled occasionally to prevent surface rust, but that's true for many knives. We'd also consider rounding out the edges of the handle, or even wrapping it in leather or paracord, so it would be a bit easier to hold. Still, we really like the utilitarian aesthetic of this small blade.

Related Posts


Review: RoguePak Modular Hydration System

If you've ever used a hydration reservoir to carry water on the go, you'll know that these systems provide a convenient method of staying hydrated during physical activity. Rather than stopping, taking off your pack, and fumbling with a water bottle, hydration packs allow you to sip your beverage of choice through a long tube and bite valve. You don't even have to take off your pack or touch a zipper.

AquaPodKit emergency water storage 30

However, there's one flaw with traditional hydration systems: cleaning. They're much more difficult to clean than a water bottle. To clean a plastic reservoir properly, you'll need to drain it, wash the inside with water and baking soda (or use specialized cleaning tablets), and then hang all the components out for several hours to air dry. This process must be performed frequently, or the system may start to grow mold or bacteria that can make you sick. Even if trace amounts of mold in your pack don't make you sick, they can make the water you're drinking taste bad.

Plastic water bottles aren't ideal when you're on the move, since you can't always unscrew the...

Speaking of taste, you need to be very careful what liquids you fill ordinary hydration systems with. Plain water is fine, but if you make the mistake of pouring in some flavoring powder or sports drink, the system may retain that flavor and smell forever. Don't even think about filling up with iced tea or juice, as these strong flavors will be near impossible to remove, even with repeated cleaning. To remove any residual taste and odor, you'll need to buy a new system (complete with hose and bite valve), since replacement reservoirs are usually not available on their own.

RoguePak Hydration System

AquaPodKit emergency water storage 02

The RoguePak and AquaPodKit are both made in the USA by parent company AquaStorage.

As a result of these frustrations with cleaning and lingering taste, a company known as RoguePak has developed a new type of hydration system. RoguePak is made in the USA as a division of AquaStorage, the same Austin, Texas-based parent company that makes the AquaPodKit emergency water storage system we previously reviewed.

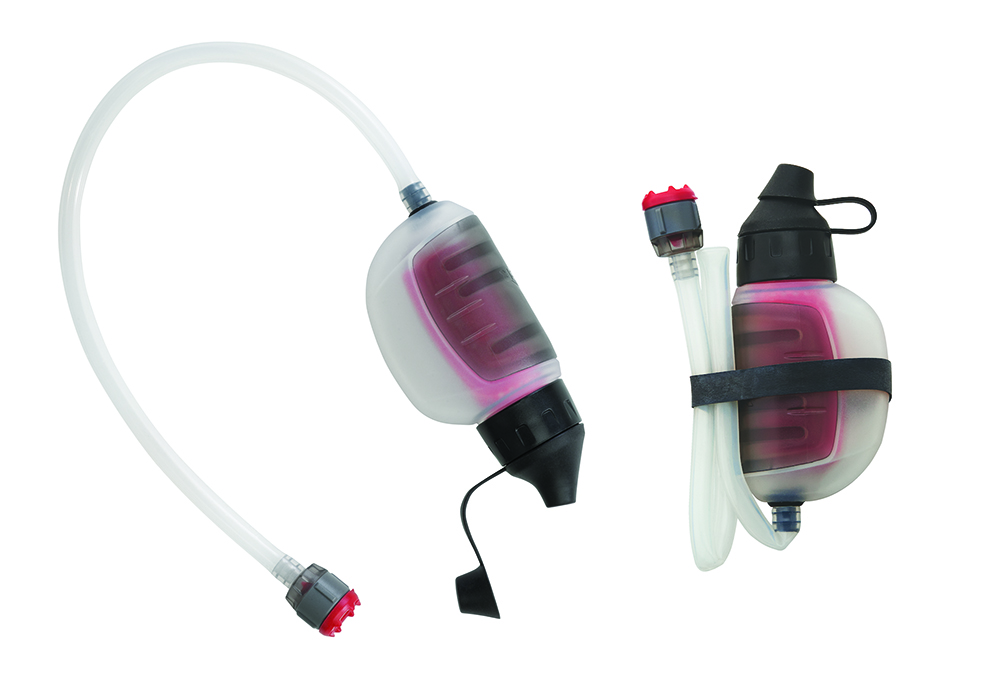
The RoguePak modular hydration system allows what other hydration packs don't: replacing the reservoir at an affordable price. Every RoguePak system includes at least one spare reservoir, and the hose is fitted with a quick-disconnect adapter, so it can be swapped between the reservoirs in seconds. For $23, you get a complete system with one extra reservoir, or you can buy a 4-pack for $36.

The effects of this modular design are surprising, and they can actually change the way you carry water. So, we'll list some of the benefits we noticed during our testing of the RoguePak.

Advantage #1: Less Cleaning

AquaPodKit emergency water storage 26

Firstly, the modular design takes a whole lot of time out of the cleaning process. RoguePak reservoirs are reusable like other systems on the market, so you can still wash them out and fill them up again. However, having two (or more) reservoirs means you don't have to wait around for the system to air dry—you can leave one at home to dry out after cleaning, and fill another up immediately.

Advantage #2: No Residual Taste or Smell

Remember how we mentioned hydration systems tend to retain flavors and odors from the liquids inside? This is pretty much unavoidable, since the liquids dry into the seams of the reservoir, or seep into the plastic itself. Fortunately, replacing the reservoir eliminates both of these issues.

If the taste and smell isn't too bad, you can clean one reservoir thoroughly, while continuing to use the RoguePak with a spare. On the other hand, if the taste and smell can't be removed by cleaning, you can simply toss the offending reservoir in the recycling bin and buy a new one. The reservoirs are only about $5 each, with a four-pack available for $15 or $16 (depending on the capacity you choose).

Advantage #3: A Better Seal

Most hydration packs on the market today use a screw-on cap, positioned on the front of the reservoir pouch. To fill, you unscrew the cap, pour in water, and then tightly twist the cap back into place. A few others use a zipper that runs across the top edge of the reservoir. These designs seem fine, until you see what RoguePak came up with to replace them.

AquaPodKit emergency water storage 27

The RoguePak system replaces the traditional cap or zipper with a beautifully simple Fast-Fill port. Just pinch the layers together to create an opening, and fill with water. The port naturally flattens out and seals itself. Check out the video below to see how it works:

This isn't some TV studio magic—we tried this exact test with a RoguePak system, and it works as seen in the video, even if the bladder is filled to the max fill line and squeezed. To prove it really seals tightly, the RoguePak's inventor pumped it full of air until it burst:

Although the nature of the Fast-Fill port makes leaks very unlikely, RoguePak provides added leak-proofing via a Secure-Seal tube. Just roll the top of the port around the blue plastic tube, then snap the C-clip section over the top to hold the roll in place.

In addition to providing a leak-proof seal, this design keeps the RoguePak lightweight. It also eliminates the threaded cap and O-rings found on most hydration packs, making this design less complex and potentially less prone to failure.

Other Factors to Consider

At this point, some of you may be thinking that it's wasteful to discard reservoirs, or that the plastic materials may be harmful to the environment. Fortunately, RoguePak has addressed those concerns as well. Like we said earlier, the reservoirs are durable and reusable, so you could easily use them again and again to avoid waste.

AquaPodKit emergency water storage 31

Also, each RoguePak reservoir is made of LDPE, also known as low-density polyethylene. The particular LDPE material used by RoguePak is FDA and USDA compliant, Kosher, and has even passed a bio-toxicity report that indicated it can be used for medical applications. RoguePak reservoirs are 100% recyclable, so you can put them in your recycling bin instead of the trash can.

To top it all off, you can even burn discarded reservoirs as kindling. RoguePak says this LDPE material “burns as clean as natural gas”, so it won't produce highly toxic fumes like those from some other plastics. LDPE also burns slowly, so it can help sustain a fire until you add some larger logs.

Conclusions

We had a hard time finding any major flaws with the RoguePak. The biggest issue we noticed is that this reservoir is only designed with two round mounting holes, one on each side. This is fine for many backpacks, but certain packs—such as an old REI-brand pack we own—only offer one central hook for hanging hydration reservoirs. Another pack we have from Triple Aught Design has a central strap and two side straps, but these would require oblong mounting holes, not the round ones the RoguePak has.

If your backpack doesn't have compatible side anchor points, you'll have to rig up some paracord or small carabiners, or leave the reservoir loose in your backpack. Not a deal-breaker by any means, but we wish there was a little more adaptability here. Also, the flat profile of the Fast-Fill port makes air-drying a used reservoir a slow process, but that's a small price to pay for its various other benefits.

AquaPodKit emergency water storage 25

Overall, we were pleased with the RoguePak. It filled easily, didn't leak a drop, and provided reliable hydration when we needed it. On top of this, by throwing a second reservoir and some powdered drink mix into our bag, we could swap out reservoirs and re-fill with a flavored drink when we wanted to. Additional reservoirs weigh next to nothing—only 0.8 ounces each, according to our scale—and they can be rolled or folded into small spaces easily. RoguePak tells us the system is currently being tested by the US Army and Marines, and has received positive feedback as a result of these qualities.

For more information on RoguePak, visit RoguePak.com.


Infographic: DIY Motorcycle Maintenance

Take one look at the streets of developing nations around the world, and you'll see that motorcycles are an economical and speedy way to get around, even when chaos ensues. On a motorbike, you can squeeze through tight gaps in traffic, out-accelerate most cars on the road, and tackle windy off-road paths that a truck or jeep could never dream of traversing. That's why a motorcycle makes an excellent bug-out vehicle, as we've said many times in the past.

kawasaki-klx-140-off-road-motorcycle-rear-view

However, as with any bug-out vehicle, it's crucial to keep your ride in good working order. The last thing you want is to pop a tire in the middle of nowhere, or to crank the key and have nothing happen during a real-life SHTF situation. So, knowing how to perform basic maintenance is strongly recommended. You don't need to be a master-certified mechanic to handle the basics.

This infographic from TitleMax shows the most essential motorcycle maintenance procedures, and how to do them yourself with basic tools. Check it out:

Motorcycle maintenance DIY infographic 1

Motorcycle maintenance DIY infographic 2

Of course, these tips are perfect for anyone who already owns a bike. However, even if you don't have one of your own, they might be worth remembering—you never know when you might need to revive an old abandoned motorcycle and use it to get out of Dodge.


Reader Survey

As writers and editors, our purpose in life is to produce content that appeals to our core audience—since you’re reading this right now, that means you. It’s a pretty safe bet that you only read our articles because we talk about the issues you care about. If, all of a sudden, we decided to turn into a publication about stamp collecting, you’d drop us like a bad habit—and we wouldn’t blame you one bit. It’s absolutely essential for us to understand exactly what you want to read about, and what you don’t.

So, how do we achieve this goal, and get to know you better? Well, there’s the obvious stuff, like reading the emails you send us and checking the comments you post on our Facebook and Instagram pages. We also attend as many shows and events as our schedules permit, so we can chat with our readers face-to-face. This still barely scratches the surface, so we’re trying something new: a reader survey.

The very first reader survey will start off by asking for some basic demographic info, such as your gender, age range, and geographic location. Then, we’ll ask about your favorite parts of the magazine, your least favorite parts of the magazine, and new types of stories you’d like to see from us in the future. It’s all totally voluntary and anonymous. You can use the survey to tell us we’re doing a bang-up job, or that we’re big fat failures—either way, we genuinely care what you have to say, and we promise to listen to your suggestions.

You can take our survey below. Thank you in advance for supporting us, and for taking the time to complete this survey!


Using Filipino Self-Defense Tactics for When SHTF

Confronting a bad guy armed with muscles and a bad attitude can be scary enough, but what if he also has a weapon? A crowbar, a knife, or a gun? Having to fight off an armed thug regardless of the circumstances is a situation that should be avoided at all costs. However, as the expression goes, hope for the best and prepare for the worst. The real world of self-defense can be chaotic and confusing, and there are many unknowns that you can't always anticipate, such as the presence of weapons. To not only survive, but also win a fight of this nature isn't always easy, but it's very much possible — especially with the principle of Zero Pressure. As a key concept from a style of Filipino martial arts called Pekiti-Tirsia Kali (PTK), Zero Pressure is the intercepting and trapping of an attack is at its weakest point.

Warning!
Warning! The concepts shown here are for illustrative purposes only. Seek a reputable instructor before attempting any techniques discussed or shown in this story.

So what exactly is Zero Pressure in the context of combatives? The range of motion for every attack has a beginning point and an end point. The beginning point is where the arm is positioned before it, say, takes a swing — it's that moment in time when the attack's velocity is zero. That might be where the arm retracts so that it can gain more power in the swing, or a stationary non-retracted position that is harder to see coming because it's not as telegraphed. Then there is the point where the attack reaches the end of its range of motion, and the velocity of the attack again reaches zero velocity. These two positions are components of the principle of Zero Pressure.

There is also a point between beginning and end where the attack will reach its maximum velocity or 100 percent. Obviously, that's the point where your ticket could get punched and should be avoided whenever possible.

There is another part of the attack that can also be measured from zero to 100 percent, and that would be from the shoulder to the tip of the weapon (which could be the muzzle of a gun or it might just be a fist). If you look at the arm and weapon as one measured unit, the further you get from the shoulder, the faster the unit is moving. Maximum velocity or 100 percent will be at the tip of the weapon, and velocity decreases as you get closer to the shoulder. For the intents and purposes of this principle, the shoulder is the pivot point or position zero.

Up Close or Far Away

When dealing with weapon-based attacks, there are ultimately two positions that will give me the highest likelihood of saving my bacon. I need to get completely outside of the range of the weapon altogether, or I need to get completely inside the most effective range of the weapon or 100 percent velocity, as close to the assailant's shoulder as possible, position zero. This is a philosophy that many martial arts will describe in different ways, but the analogy I like most is that of a hurricane. The safest places to be in a hurricane are either completely outside the hurricane's wind field, or right in the hurricane's eye.

This concept might even be compared to a pendulum swing. The points of the pendulum where there will be the least kinetic energy are the beginning and end points of a weight's trajectory, and the portion of the swinging cord closest to the pivot point.

If only the reality of self-defense were that simple.

The dynamics of human physical confrontation offer too many variables, and to attain true Zero Pressure one must also employ forward momentum and constant pressure to the weapon-bearing arm. Failure to do so will result in losing control of the arm and allowing the assailant to bring his weapon back into the fight quicker.

using-filipino-self-defense-tactics-for-when-shtf-beginning-of-zero-pressure-001

using-filipino-self-defense-tactics-for-when-shtf-beginning-of-zero-pressure-002

using-filipino-self-defense-tactics-for-when-shtf-beginning-of-zero-pressure-003

using-filipino-self-defense-tactics-for-when-shtf-beginning-of-zero-pressure-004

using-filipino-self-defense-tactics-for-when-shtf-beginning-of-zero-pressure-005

using-filipino-self-defense-tactics-for-when-shtf-beginning-of-zero-pressure-006

using-filipino-self-defense-tactics-for-when-shtf-beginning-of-zero-pressure-007

Beginning Point of Zero Pressure: Jared Wihongi immediately closes the gap before Conrad Bui (left) can launch his attack, traps his arms, and takes him down. Wihongi then disarms by twisting the butt-end of the pool cue and dropping his knee on his attacker's face and neck.

Beginning Point of Zero Pressure: Jared Wihongi immediately closes the gap before Conrad Bui (left) can launch his...

For example, if I were successful in jamming or trapping a knife attack, a bad guy could retract his arm and stab again and again until he gets me. However, if I move forward to Zero Pressure, I will reach a point where they cannot retract their arm any further without moving backward, which is why my forward momentum is important so they can't free themselves. Or in the case of a firearm, if I were successful in deflecting and grabbing a thug's arm or the weapon itself, I can keep the muzzle pointed away from me so long as I move forward, but if I stop and he moves backward, his arm will straighten and the muzzle will point at me.

I like to compare it to the military doctrine that is commonly taught with regards to countering a close-range ambush. Moving backward and recoiling away from the ambush will be a liability and put you in a position where you're off balance, on your heels, and unable to achieve or maintain Zero Pressure. You must push forward. Don't be under the illusion that you will always be strong enough to push your opponent backward, the idea is that even if he's pushing you backward, you're able to temporarily immobilize his arm or lock it into a trapped position to prevent further damage while you work toward your next counter tactic.

using-filipino-self-defense-tactics-for-when-shtf-end-of-zero-pressure-001

using-filipino-self-defense-tactics-for-when-shtf-end-of-zero-pressure-002

using-filipino-self-defense-tactics-for-when-shtf-end-of-zero-pressure-003

using-filipino-self-defense-tactics-for-when-shtf-end-of-zero-pressure-004

using-filipino-self-defense-tactics-for-when-shtf-end-of-zero-pressure-005

using-filipino-self-defense-tactics-for-when-shtf-end-of-zero-pressure-006

using-filipino-self-defense-tactics-for-when-shtf-end-of-zero-pressure-007

using-filipino-self-defense-tactics-for-when-shtf-end-of-zero-pressure-008

End Point of Zero Pressure: After talking down his aggressor doesn't work, Jared Wihongi slips out of range of the swing before crashing in and trapping Conrad Bui's arms. He then takes Bui down, strips the pool cue, and can now counterattack, scan for other bad guys, or make an escape.

End Point of Zero Pressure: After talking down his aggressor doesn't work, Jared Wihongi slips out of range of...

Angles of (Counter) Attack

So how can you utilize this principle in application? To achieve Zero Pressure, you need to put yourself in the right position. Moving to a point of domination in a combative encounter can mean the difference between going home or going to the morgue. The best position to deliver a counterattack is from the rear, but in most situations this will also be the most difficult position to achieve.

When countering a weapon-based attack, the key is to move to the Outside Line. Outside Line refers to the side of the assailant's lead shoulder that's toward his back and away from his other arm. For example, if the bad guy leads with his right shoulder, you should move to your left so you're on the outside of his right arm and closer to his right shoulder blade, away from his left arm. With a weapon-based attack, you'll want to move to the Outside Line of the weapon-bearing arm.

using-filipino-self-defense-tactics-for-when-shtf-outside-line-angle-of-attack-001

using-filipino-self-defense-tactics-for-when-shtf-outside-line-angle-of-attack-002

using-filipino-self-defense-tactics-for-when-shtf-outside-line-angle-of-attack-003

using-filipino-self-defense-tactics-for-when-shtf-outside-line-angle-of-attack-004

using-filipino-self-defense-tactics-for-when-shtf-outside-line-angle-of-attack-005

using-filipino-self-defense-tactics-for-when-shtf-outside-line-angle-of-attack-006

using-filipino-self-defense-tactics-for-when-shtf-outside-line-angle-of-attack-007

using-filipino-self-defense-tactics-for-when-shtf-outside-line-angle-of-attack-008

using-filipino-self-defense-tactics-for-when-shtf-outside-line-angle-of-attack-009

using-filipino-self-defense-tactics-for-when-shtf-outside-line-angle-of-attack-010

Jared Wighongi (left) steps to the Outside Line while parrying. In a dominant position, he slams the bad guy against the wall, pins the gun, and transitions to his Browning Vanquish Pocket Deploy knife.

Jared Wighongi (left) steps to the Outside Line while parrying. In a dominant position, he slams the bad guy against...

Conversely, the Inside Line would be the side closest to your opponent's non-weapon bearing arm. (It's a less desirable position to be in because the bad guy can attack with both arms and legs.)

With the principles of position in mind, Zero Pressure will typically be achieved in one of these three positions, what I like to call Zero Pressure One, Two, or Three.

Zero Pressure One: This position takes place on the Inside Line, where I push the attacker's arm outward and away from his body. This position is normally achieved by jamming the attack as close as possible to its starting point before it gains momentum. This can be a good tactic, but staying in this position too long is less than favorable because of the bad guy's ability to curl his arm inward. This can make things difficult when controlling an assailant's weapon arm. Plus, the close proximity to the assailant's other arm will also give him the additional ability to attack and defend.

Zero Pressure Two: This is more of a central position, where the assailant's elbow is bent and you're pushing the arm into their body.

Zero Pressure Three: This is the preferred position, where you're on the Outside Line and pushing his arm across his body. Plus, you're furthest away from his other arm.

Give Yourself Options

With this concept in mind, it's important to figure out the best way to get to the Outside Line. A common tactic that is taught in Pekiti-Tirsia Kali is forward angular movement toward the Outside Line position, often illustrated with a triangle or “V” motion. This angular movement moves you off line of the attack, while still keeping you close enough to gain control of the weapon-bearing arm. Good balance and foot mobility becomes important so that you can maintain a solid base and dictate distance and proximity.

The key is to move to the Outside Line — but keep in mind that you can't always dictate position. Sometimes objects in the environment or your position when the attack starts may dictate which direction you can realistically move. If the fight ends up on the ground or against a wall, you should look to pin the weapon-bearing limb to the ground, wall, or — in the case of Zero Pressure Two — to the assailant's body. The ideal way to control an arm is with one hand on the tricep, just above the elbow, controlling the upper arm. The other hand should be on the wrist close to the hand, controlling the lower arm. Your hands should be in an over/under grip position to maximize control.

The principle of Zero Pressure is universal in application, meaning it can be applied regardless of the weapon involved, or even to empty-hand assaults for that matter. The key is to immobilize the attacker's weapon-bearing limb just long enough for you to survive, orientate yourself, decide upon a course of action, and do it!

But what are some viable courses of action you might ask? The first thing is to decide whether you must remain engaged with the bad guy and counterattack, or disengage. You can then continue to one of the following options:

Completely disengage from the situation — if it's feasible (it might not be a good idea to disengage and leave your wife and kids behind!)

  • Transition to a weapon that is tactically or legally more appropriate to the threat you're facing. You can shift to something you're carrying or something in the environment that can be used as an improvised weapon.
  • Utilize a takedown or throw technique, and then take that opportunity to disengage or subdue the assailant.
  • Go ballistic on the assailant, delivering strikes with the intent of creating a distraction that can set you up for the next tactic, or cause sufficient blunt trauma to neutralize the threat.
  • Oftentimes it will require a combination of two or more of the above tactics to handle the situation appropriately.

The concept of Zero Pressure is all about survival. Understanding the concepts of movement, momentum, and position can be integrated into an existing combatives skill set. Whether you're a prepper with only rudimentary self-defense knowledge or someone who trains regularly in a fighting system, it's impossible to prepare for every variable that might be faced in the real world. But fundamental principles like Zero Pressure can be applied to give us a tactical edge — or at the very least help us to not make fatal mistakes when confronted with the situation we can only hope we never have to face.

using-filipino-self-defense-tactics-for-when-shtf-disarming-001

using-filipino-self-defense-tactics-for-when-shtf-disarming-002

If you've used Zero Pressure against an armed aggressor, but you can't transition to a weapon of your own, you'll need to disarm the bad guy. Here Jared Wihongi takes care not to cover the muzzle as he grabs the gun and rips it out of Conrad Bui's grip, going against the thumb, while delivering an elbow to the ribs as an added distraction.

If you've used Zero Pressure against an armed aggressor, but you can't transition to a weapon of your own,...

Top 5 Rookie Mistakes To Avoid When Defending Against an Armed Attacker

Running Backward: You'll never outrun someone who's running forward if you're running backward — plus it causes all kinds of balance problems.

Think That Being Armed Is Being Prepared: Being armed yourself is only half the battle. Training is paramount.

Access a Weapon Too Soon: Think self-preservation first, then look for the opportunity to grab a weapon, whether it's something you're carrying or an improvised weapon.

Staying Unaware: Failing to recognize improvised weapons in your environment could be a fatal mistake.

Block Your Way to Victory: Defensive wounds on the arms are common in weapon-based attacks. Use Zero Pressure and counterattack!

Historical Background of Pekiti-Tirsia Kali

Pekiti-Tirsia Kali is a combat art native to the Negros Occidental area of the Philippines. It was forged through centuries of warfare, both intertribal and international. Like many Asian fighting systems, the art was safeguarded by a particular family and taught to warriors of their tribe. It was first taught to non-Filipinos by Grand Tuhon (master) Leo Tortal Gaje Jr. in 1970s New York, shortly after he moved there from the Philippines. Kali differs from most martial arts in that training begins with weapons (primarily bladed) and then evolves to empty-hand application. The focus on no-nonsense weapon applications has made Filipino fighting arts a hot commodity with military special-operations units around the world, including here in the United States.

About the Author

Jared Wihongi is founder and president of Survival Edge Tactical Systems Inc., a tactical training and consulting company. He is known to many as the face of Browning's Black Label tactical equipment line. He is one of a handful of master-level (tuhon) instructors in the Filipino combat art of Pekiti-Tirsia Kali and has 15 years of experience in law enforcement. Most of that was spent as a SWAT officer and instructor of firearms and defensive tactics. Plus, he's spent more than a decade teaching combatives and survival skills to police, military, and covert-operations units in Asia, Europe, North America, and South America.
www.facebook.com/jared.wihongi
www.jaredwihongi.com

Sources

Pekiti Tirsia Tactical Association
www.teampekiti.com/ptta

The Gun Vault Utah
thegunvaultut.com

More From Issue 11

Don’t miss essential survival insights—sign up for Recoil Offgrid's free newsletter today.

Read articles from the next issue of Recoil Offgrid: Issue 12

Editor's Note: This article has been modified from its original print version for the web.


Daily Stretching Exercises

Whether you're doing hard physical labor outdoors all day, or hunching over a computer screen at your desk job, muscle aches are a fact of life. These minor pains can be a real annoyance during the work week, but if you're in a survival situation, pulled muscles and reduced mobility may have devastating effects. Shin splints can slow your movement, a tense neck can limit your visibility, and a tweaked back can cripple you completely.

Even simple head movements can be used effectively to reduce muscle pain, as shown in the Strength Camp video below.

Even simple head movements can be used effectively to reduce muscle pain, as shown in the Strength Camp video below.

In order to avoid these muscular issues, it's important to exercise regularly—we've showed you how in past articles. However, it's equally important to maintain those muscles between workouts through stretching. Proper stretching can keep you flexible and improve blood flow to your extremities, leaving you ready to move at a moment's notice if SHTF. It'll also help alleviate nagging aches that may plague you on a daily basis.

Here's a helpful infographic from MichaelGeorge.com that provides 25 different exercises to keep your muscles working smoothly.

Stretching exercises 2

In addition to these exercises, be sure to place extra emphasis on stretching your neck and upper back. Try to go through even the most mundane activity without turning or tilting your head, and you'll understand why a locked up neck muscle can be catastrophic. The video below from Strength Camp on YouTube shows four critical stretches for these key muscles:

Obviously, not all of these exercises are necessary to memorize, but adding a few to your daily routine can help you be better prepared for whatever comes your way.


Use a Belt as an Improvised Weapon

In a self-defense scenario, especially one involving armed attackers, escape should always be the first option you consider. If you can run from danger and survive, you should do so. However, there are often situations when escape is simply not an option. If your back's against the wall, and you have to fight for your life, using an improvised weapon can greatly sway the odds in your favor.

Nick Drossos belt weapon 1

Self-defense instructor Nick Drossos shows how to use an ordinary belt as an improvised weapon.

We previously discussed the Millwall brick, a blunt-force weapon made of folded newspaper, as well as carabiner knuckles. While both these tools would be good defense options in a fistfight, they require you to be up close and personal with your attacker(s). If you're facing armed opponents, such as thugs carrying knives or batons, keeping your distance is key to avoiding slices and broken bones. Even a foot or two between you and the attacker can save your life.

Even a lightweight belt buckle like the one on this dress belt can do substantial damage on impact.

Even a lightweight belt buckle like the one on this dress belt can do substantial damage on impact.

Keeping in mind this element of range, consider improvising a weapon from an item you're already carrying: a belt. You can wear a belt almost anywhere, even in locations that might explicitly forbid other weapons, and when swung quickly, it can provide an excellent means of protection. Self-defense instructor Nick Drossos of CodeRedDefense.com shows how to use a belt as an improvised weapon in the video below: