In This Article
Photos by Niccole Elizabeth
In the post-Sept. 11 era of the U.S. PATRIOT Act, the level of scrutiny given to electronic communication, by both government and criminals alike, is so intense as to be the butt of cocktail party jokes. The slew of memes, comedy sketches, and sarcastic eye-rolls has all but completely normalized the idea that our various electronic communications are under constant surveillance by one agency or another. (If our NSA handler reads this, we promise all those countersurveillance-related Google searches were for research purposes only.) But when sensitive information is at stake, the jokes get old in a hurry.
So how can we counter the various armies of hackers, code-crackers, and digital pirates looking to get their electronic eyes on our data? One way is by looking toward the growing market for IT security. Dozens of new products and services are popping up around the web to help protect your privacy. Everything from antivirus software to professional penetration testers can help you lock down your digital footprint. But there’s another alternative: Take your sensitive messages completely offline and find another way to transmit them. This could be as innocuous as sticking a letter in the mail. Or you could employ a slightly more creative solution, such as the dead drop.

The dead drop has its roots in “The Great Game” played by the U.S. and the Soviet Union during the Cold War. While Hollywood spy movies regale us with tales of exploding pens, exotic locales, and seductive double-agents, true intelligence tradecraft is often much more mundane. Dead drops are a perfect example of this. Simple, unexciting, but ruggedly effective, dead dropping can be a great tool to communicate in a more discreet manner.
Though initially intended to pass state secrets between agents, there are some less-sensational scenarios where a dead drop could be set up and employed effectively, without nefarious intent. If you find yourself in a less-developed part of the world where digital service coverage is spotty and postal service is either unreliable or non-existent, a prearranged dead drop with a local contact could be a long-standing method to get messages back and forth without risking interception by criminal elements or corrupt local government. If there’s a local or regional disruption to daily life, like a large-scale power outage or natural disaster that short-circuits normal lines of communication, you could employ a dead drop to get messages to your neighbors or loved ones. Or you could have a standing dead drop as a contingency component of an overall family communication plan, whereby everyone in the family knows the drop location as well as the signpost and marking method (we’ll discuss all this in a minute) and if any member of the family sees the appropriate signal, they check the drop.
Regardless of what you use them for, dead drops require a little bit of advanced planning and careful consideration.
The Plan
In intelligence parlance, when two people meet in person to exchange information or materiel face-to-face, this is known as a live drop. In spy movies, a live drop usually looks something like this: Agent #1 sits down at a café table, placing his briefcase on the floor under the table. Minutes later, Agent #2 sits down across the table. After a cup of coffee and some mindless chit-chat about the weather, Agent #2 picks up the briefcase and both men walk away.

In contrast, a dead drop is when the two agents never actually come into direct contact to transmit information. The parties involved must set two things ahead of time: the drop point and the signpost. The drop point, obviously, is where the message or information would be left for the other party to pick up. Drop points must be selected with due consideration to the circumstances. If you have to go to a specific location at a specific time, you’d best be able to justify your presence there on the off-chance someone questions you about it.

A signpost would be at a different location from the drop point, where a signal can be left to indicate that there is, in fact, a message waiting at the drop. A well-known example of signposting comes from the case of Aldrich Ames, a CIA officer who volunteered himself to the KGB as a double agent in 1985. He subsequently spent nearly a decade feeding the Soviet government detailed information about our intelligence operations against them. While working for the CIA in Washington DC, Ames would use chalk to make small, nondescript marks on a particular mailbox in Northwestern DC. Russian agents would observe this mailbox at regular intervals. Whenever they saw chalk marks on the side, they would send someone to the drop point to retrieve whatever materials Ames had left for them.
If chalk scribbles on a mailbox don’t suit your fancy, the signpost could be a ribbon tied around a specific tree in your yard. Or a piece of chewing gum stuck to the windshield of the recipient’s car. The possibilities are endless, as long as you and your partner agree upon exactly what the signpost signal is and where it should be placed.


Alternately, you could forgo the use of a signpost completely. In that situation, the drop point would simply be checked on a regular schedule. If using this method, precautions should be taken so that regularly scheduled trips to check the drop point don’t stand out from your normal daily activities. For example, let’s say there’s a public park down the street from your house. Every morning you get up early and walk your dog around the park before getting ready for work. Then, we agree that our drop point will be the underside of the green bench on the northeast side of that park, and that you’ll check it every Wednesday at 7:45 a.m. Since you’re already at that location, at that time, as part of your normal routine, taking a break on that bench every Wednesday morning is much less likely to be noticed by casual observers or other morning dog-walkers.
The Execution
When actually leaving information at a drop point, you can perform either a covert or overt drop. A covert drop is deliberately concealed from view and must be found or retrieved, while an overt drop makes use of everyday items or contextual camouflage to “hide in plain sight.”

The item most commonly associated with covert dead drops is the dead drop spike. Although they’re not nearly as common as in past eras, they can still be found. The example you see here comes from ITS Tactical. It’s a hollow steel spike with a threaded cap at the flat end. Simply unscrew the cap, drop your message or items inside, and screw it closed. The ITS model even features a rubber gasket on the cap to keep the contents safe from moisture. Once sealed, the spike can be pushed into the ground, to be pulled up by the recipient later.

Overt dead drops can be just about any size or shape your drop site will allow. There are some specialized tools available for this task. As a counterpoint to their Dead Drop Spike, ITS also sells a hollow spy bolt. This is an actual steel bolt with a head that can be removed to access the bolt’s hollow body.


Above: ITS Tactical still produces hollowed-out bolts and coins to conceal small items. These items can be left at the drop point with a small paper note or micro SD card inside.
Similarly, hollow coins have been in use for decades. During the Cold War, they’d conceal small squares of microfilm. In modern times, micro SD cards can fit in almost the same size footprint.
If you don’t have, need, or want special dead drop tools, there are plenty of ways to conceal or camouflage a dead drop. Covert drops can be regular items stuck underneath a park bench or public trash barrel, or inside the toilet paper dispenser of a public bathroom. Overt drops could be as simple as putting a USB drive inside an empty soda can and leaving it to look like discarded litter. Just be careful where you place your drop and how long it’s left there before pickup. The old flash-drive-in-a-soda-can trick goes awry awfully quick if some eco-conscious passer-by decides to recycle your trash for you.


Above: If you don’t want to use specialty items like the ITS Tactical products, everyday trash like an empty can are also ideal for concealing things like encrypted flash drives.
Considerations
As with any other communication method, there are risks and drawbacks to consider. For starters, there’ll be a built-in time delay from the time you plant the drop until the time it’s received — a few hours at a minimum, more likely a couple of days. So, truly urgent or highly time-sensitive information may need to be passed through other means. Also, there may be size limits to the kinds of things you can leave at a drop. In the old days, messages were passed on hand-written notes. Documents were shrunk down to microdots. So the squirrely spy tools designed for this purpose only had to be large enough to hide a rolled up piece of paper or film. While a USB sticks and SD cards aren’t particularly large, they’re larger than a single scrap of note paper. You’ll have to build out your dead drop plan accordingly to accommodate the physical size of whatever you intend to conceal.
There’s also the inherent risk of your drop being found by someone other than its intended recipient. This is why your drop point and method of concealment are both vitally important. If possible, you may want to consider “proofing” your drop point by leaving a sacrificial item there and seeing if a curious stranger notices it. With digital media, you can also password-protect or encrypt files for an added level of safety.
From a security standpoint, there are two major considerations to look at. One is the possibility of being spotted while placing or retrieving a drop. If someone witnesses you servicing a drop point, especially if the same person sees you more than once, it can quickly draw curiosity or suspicion. Do you have a narrative as to what you’re doing at that spot at that hour? Is anything about the information you’re passing illicit or illegal? The other consideration is that if your drop gets discovered unbeknownst to you, both you and your recipient could be manipulated with false information left by a third party. This may or may not be an issue at all, depending on what you’re using the dead drop for in the first place. But it’s something to think about.
Covert Communication Signals From the CIA
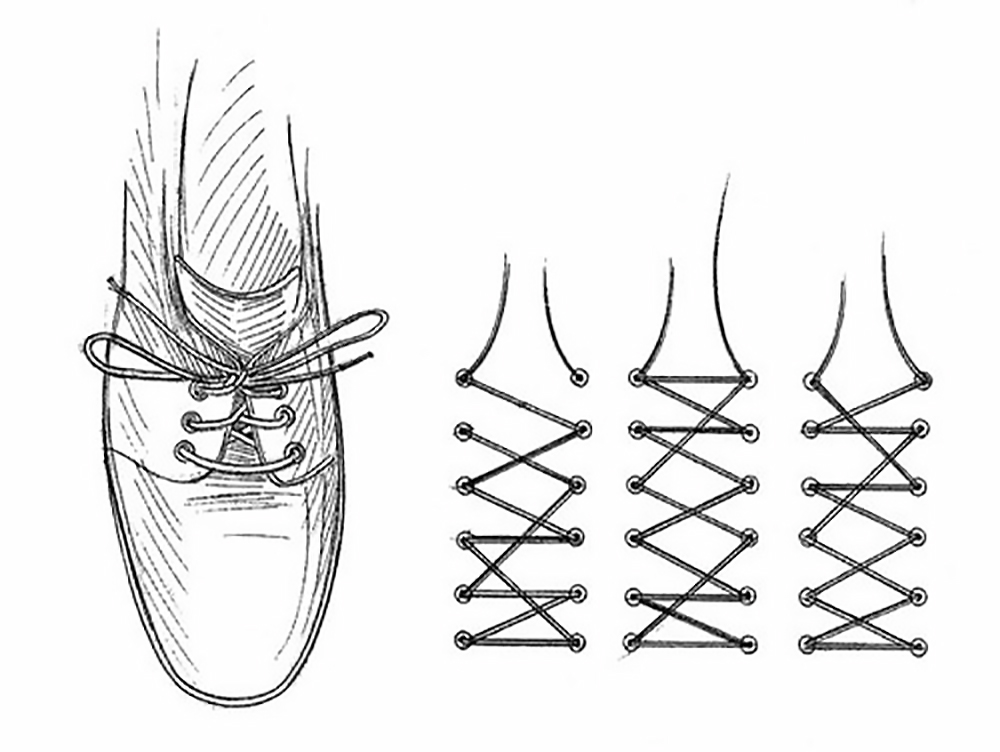
During the Cold War, CIA agents operating behind the Iron Curtain reportedly used some ingeniously subtle visual cues to communicate with their contacts. Several of these were documented by Robert Parker in his book The Cold War Spy Pocket Manual. For example, agents might vary the pattern in which shoelaces were inserted into shoes, change the size or color of one shirt button, or alter the position of a pen or pencil in a pocket. These on-body signposts might mean “I have information for you” or “I’m awaiting new instructions.” To read more about these codes, refer to our previous article Covert Communication: The CIA Shoelace Code.
Conclusion
Dead drops are a niche method of transferring information, originally developed for spies and agents to avoid interception by hostile intelligence services. But the basic principles can be tweaked to make a solid grid-down or non-permissive communications plan. The fact that dead dropping requires no electricity or outside resources whatsoever makes it unhackable, untappable, and EMP-proof. With some careful planning and a little ingenuity, you can set up a sustainable system of passing along whatever information you need, regardless of Wi-Fi signal, cell reception, or power supply.