When we think of gardening for survival purposes, we often envision neat plastic planters with pre-made trellises, wire fences, and drip irrigation. If you’re starting a garden now, such a setup may be attainable, but there are many scenarios where these modern supplies may not be available. You might be facing a long-term disaster that interrupts the supply chain, a remote location that makes transporting these items difficult, or simply a restrictive budget. In any case, you can always turn to more primitive methods of gardening.
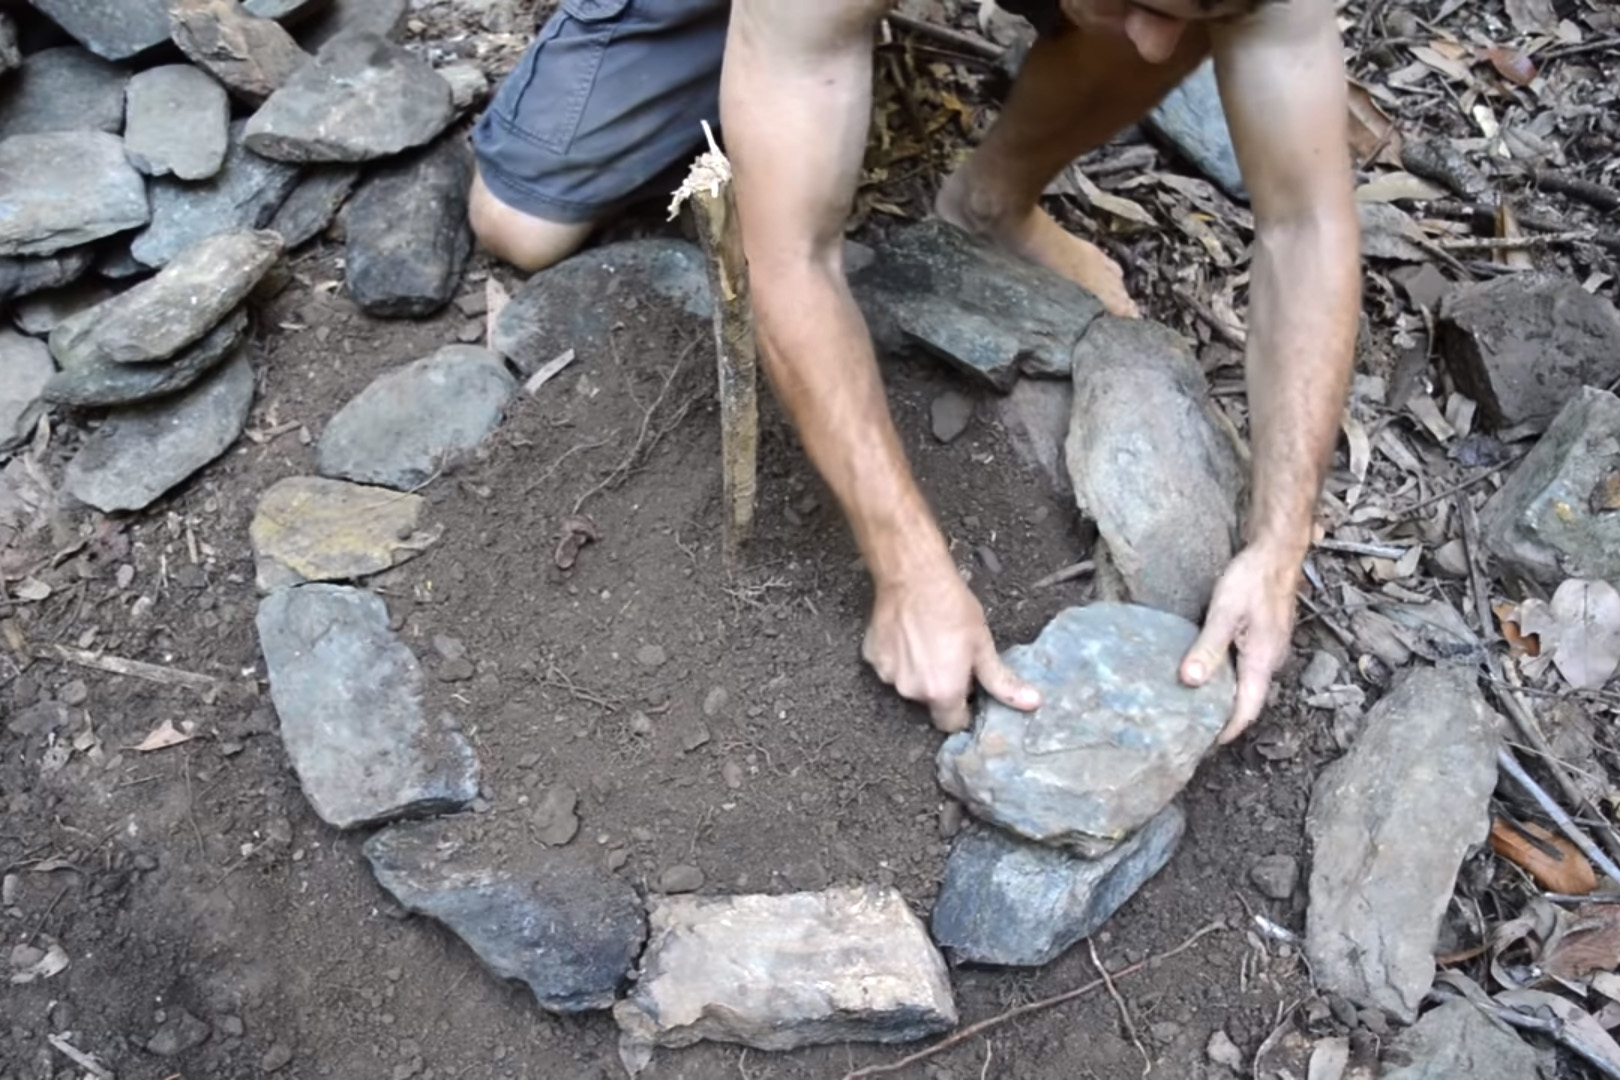
In the following video from Primitive Technology, you’ll see how the host constructs round planters in the Australian jungle using soil and river rocks. He then plants yams around a tall pole in the center of the planter. This setup offers protection against wild turkeys and pigs that might otherwise ransack his crops, and also offers an elevated surface for the yams’ vines to cling to.
The garden is finished off with horizontal beams that connect the yam planters into an improvised trellis. After a few months, a thick network of vines should offer the plants the sunlight they need to thrive. Check out the full video below:
Whether your objective is getting back to your family after a large-scale event throws the local population into chaos and anarchy or fending off a home invader in the middle of the night, when it comes to close-range combat, there are few weapons more formidable than a shotgun. It’s hard to surpass the simultaneous injection of eight .33-caliber pellets at 1,500 fps or a one-ounce piece of lead at 1,200 fps.
While the shotgun is a platform that’s often unaffected by the Draconian laws meant to specifically target ARs, it has always had three major limiting factors: accuracy, range, and ammunition capacity. The accuracy issue has been mitigated through better barrel and ammunition technology over the years, and range isn’t a big issue when we’re talking about close-quarters confrontations, leaving ammunition capacity as the major concern for many users. Fortunately, several manufacturers have recognized this shortcoming and have begun building guns that combine the benefits of the defensive scattergun with a double-digit shell count.
Choosing a tactical shotgun can be a daunting task, especially if you haven’t spent a lot of time getting to know them. To make the decision a little easier, we took a closer look at two contenders in a side-by-side comparison to see how each of these models addresses the long-standing capacity issue and what advantages they bring to the self-defense arena.
SRM 1216
The SRM 1216 is a high-capacity, self-loading shotgun developed for tactical and home defense applications. It’s the flagship product of SRM Arms, a small arms manufacturer specializing in shotguns and shotgun components.
The 1216 has a polymer lower receiver and a steel upper receiver, barrel, and bolt group. A pushpin disassembly and break-open design allows for easy takedown, similar to an AR-style firearm. A roller-delayed blowback action reduces felt recoil and ensures fast cycling.
The 1216 push-pin, break-open design allows for easy disassembly that AR fans will find familiar.
The controls on the 1216 are fully reversible to accommodate right- and left-handed shooters. These include the bolt handle, bolt stop, ejector plate, and safety lever, as well as the front sling plate. A 6-inch, three-way Picatinny rail atop the upper receiver provides an accessory mounting platform for 12, 3, and 9 o’clock positioning, while a separate 1½-inch rail located 4 inches from the muzzle offers an attachment point for an aftermarket front sight.
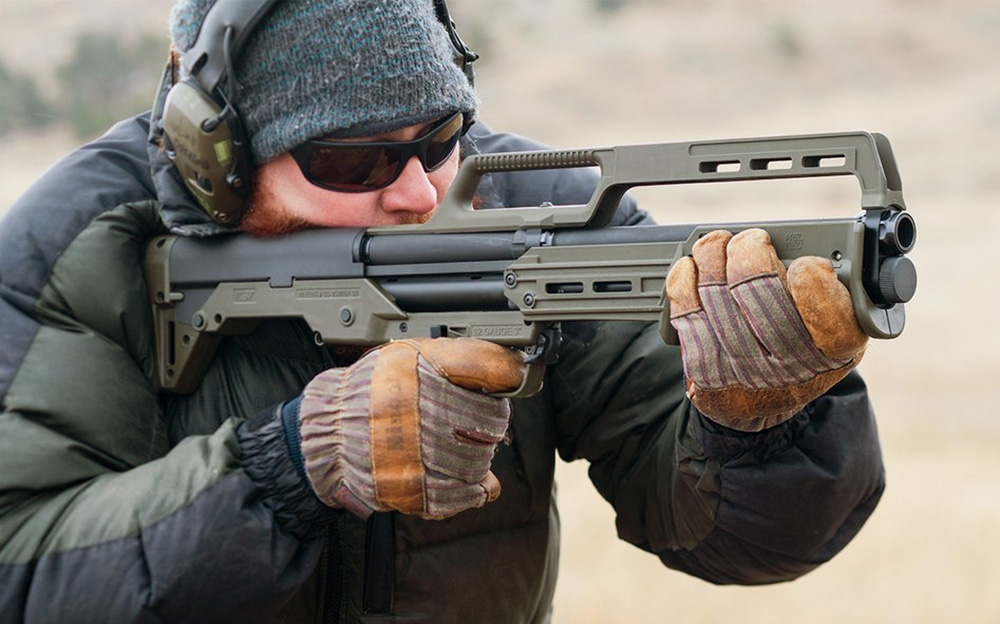
Putting a twist (pun intended) on the traditional shotgun tube magazine, the 1216 uses a detachable, rotary magazine to supply a steady stream of 12-gauge ammunition. The magazine works off the same concept as a standard tube magazine, but with four integral tube that rotate into place, each of which has its own spring, follower, and shell retainer. The tubes each hold four rounds of 2¾- or 3-inch shells. In case the name designation isn’t obvious at this point, the 1216 is aptly named because of its ability to hold 16 rounds of 12-gauge ammunition.
The 1216 four-tube rotary magazine and open magazine well.
The magazine is removed from the shotgun by pressing the magazine release lever located at the front of the magazine hanger near the muzzle and pulling downward on the front of the magazine. Reattaching the magazine can be a little bit tricky, as it requires the user to angle the magazine into the magazine well, then press the tube upward into the magazine hanger. Once in place, however, the 1216 is ready to deliver enough firepower to remove the wall your home invader is hiding behind.
Operation is simple. A pull of the charging handle chambers the first round. When the current magazine tube is spent of all four rounds, a forward press of the magazine index lever unlocks the magazine, so it can be rotated in either a clockwise or counterclockwise direction. Once the next loaded magazine tube is aligned with the carrier, the bolt will automatically release to chamber the next round.
There’s a California-legal version of the scary-looking 1216 with a magazine lock release that requires a tool to remove the magazine. Since the magazine consists of four separate four-round tubes and requires that the user manually index the magazine to switch to the next tube of four rounds, rather than continuously feeding all 16 rounds, it complies with California law.
The KSG is a dual-magazine, select-feed, pump action shotgun produced by Kel-Tec CNC Industries. Its unique bullpup design has made it one of the most recognizable tactical shotguns on the market. It has even found its way onto the big screen in movies like John Wick and Peppermint.
The KSG has an interesting design that’s both familiar and foreign at the same time. The general operation is the same as a traditional tube-fed, pump-action shotgun. The fore-end connects to the action bar and slides across the magazine tubes (plural in this case), the action bar moves the bolt carrier to the rear, a lifter lifts the shell from the magazine tube toward the chamber, and the bolt assembly pushes the round into the chamber as the action of the pump is reversed.
Disassembly of the KSG is less intuitive than the 1216 because of its unique design. Manual reference required.
Unlike a traditional pump, however, the KSG uses a combined loading and ejection port. Rather than kicking spent shells out of a side ejection port, they’re ejected out the bottom. Also, the hammer, hammer bar, action lock, and sear are built into the grip assembly, along with the ambidextrous action lock button and safety.
The side-by-side, dual six-round magazine tube has a three-position magazine selector lever. The center position prevents access to either magazine for loading or feeding and can be placed in this configuration when empty or loaded, acting as an additional safety feature. Switching the lever toward the desired magazine gives the user access to that magazine for loading and feeding. This function provides the user with the option to carry and select from two different loads (such as 00 Buck and rifled slugs) for specific tactical situations. The loading procedure for the KSG differs little from that of a traditional pump action once the desired magazine is selected, except that the tubes are recessed deep in the buttstock and more difficult to load quickly than a typical shotgun.
A view of the KSG dual six-round tubes and common loading and ejection port.
The underside of the polymer fore-end of the KSG has a 5-inch standard Picatinny rail section for mounting accessories. Given the compact bullpup design and the short distance from the fore-end to the muzzle, a hand stop is a highly recommended accessory. For our testing, we attached a Magpul AFG-2 Angled Fore Grip, which mated well with the pump action.
Aside from sharing the same ammunition, the SRM 1216 and the Kel-Tec KSG have little in common. To level the playing field as much as possible, we used the same sighting system on both guns, a Vortex Venom mounted on a LaRue Tactical riser. The 6 MOA red dot makes a perfect shotgun sight and ought to be considered when purchasing either one of these shotguns, since neither comes equipped with factory sights.
In terms of size, the KSG has the distinct advantage when you consider the amount of gun per square inch. The KSG packs an 18.5-inch barrel and 12 rounds of ammunition into a 26.1-inch package. That’s an extra ½ inch of barrel over the 1216 and four rounds less in capacity, with a difference in overall length of 6.4 inches. With such a compact design, the KSG can be stashed just about anywhere but the tank of your downstairs toilet.
When it comes to rate of fire, the 1216 takes the prize. The automatic, roller-delayed blowback action cycles quickly and mitigates felt recoil quite a bit. With an aggressive shooting stance, the 1216 can easily be emptied of its 16 rounds in just as many seconds. The pump action KSG with the magazine selector lever is a bit slower, as would be expected.
One of the biggest concerns for any firearm being used for self-preservation is reliability. The manual operation of a pump action tends to be a little more reliable than an automatic, as long as you don’t short stroke it. However, the KSG pump can be a little challenging. It’s very easy to short-stroke if you don’t handle it with authority.
The pump has a point where it meets some resistance, about ¼ inch from the rear. That resistance is where the lifter catches and drops below the tube to catch the next round. It’s easy to reach that point and think you’ve reached the end of travel. We experienced this a few times on the range during some speed drills and heard some hollow-sounding clicks as a result.
The blowback action of the 1216 operated almost flawlessly. We had one hang-up during our live-fire evaluation. As soon as we rolled the gun to the side to inspect the chamber, the bolt slid forward into battery and we were back up and running.
Decisions, Decisions
Based on our experience with these two shotguns, it would be hard to go wrong with either one. Each one has its advantages and disadvantages when compared to the other. It ultimately comes down to shooter preference.
If you’re looking for a compact, reliable, high-capacity shotgun that you can tuck away or throw in a bug-out bag, the KSG would probably be your best choice. If you want maximum firepower and minimal recoil, then the 1216 is sure to tickle your fancy.
The final factor to consider when choosing between these two lead blasters is the price. The 1216 retails around $1,800, whereas the KSG is about half that price at $990. Both can be found for a couple hundred bucks less than the MSRP, but there’s still a significant cost difference between the two. Kel-Tec also offers other variants of the KSG, including the KSG-25, which holds a whopping 20 3-inch shells.
Final Thoughts
The role of any defensive firearm is to stop the threat as quickly as possible. In close quarters, the shotgun reigns supreme. The Kel-Tec KSG and the SRM 1216 are two excellent specimens of the high-capacity, tactical shotgun variety. When the grid goes offline, or something goes bump in night, reaching for one of these big-bore scatterguns will give you the firepower you need to ensure the safety of you and your loved ones.
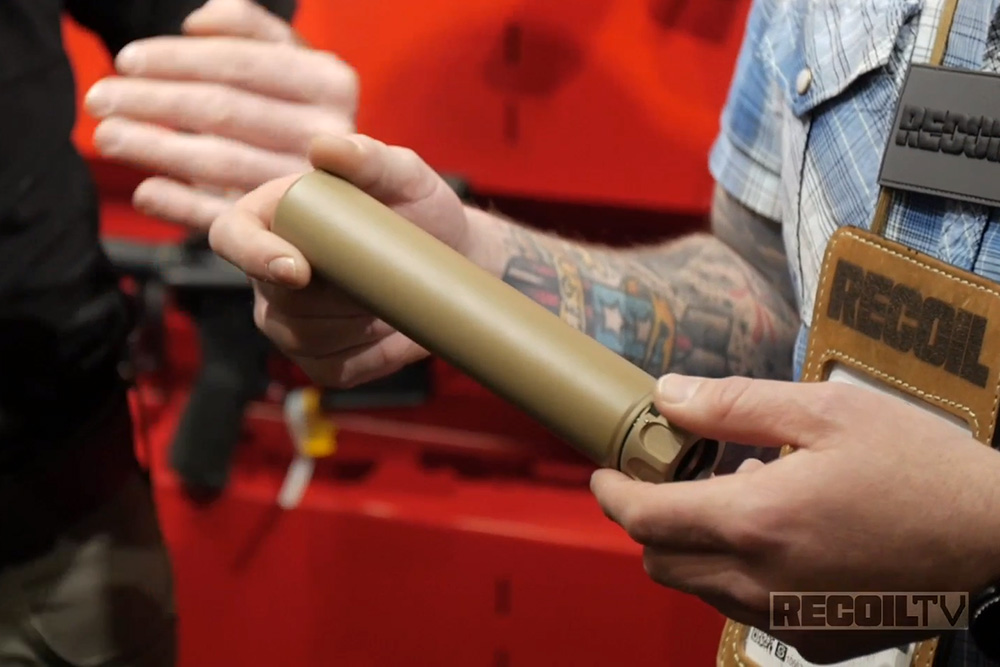
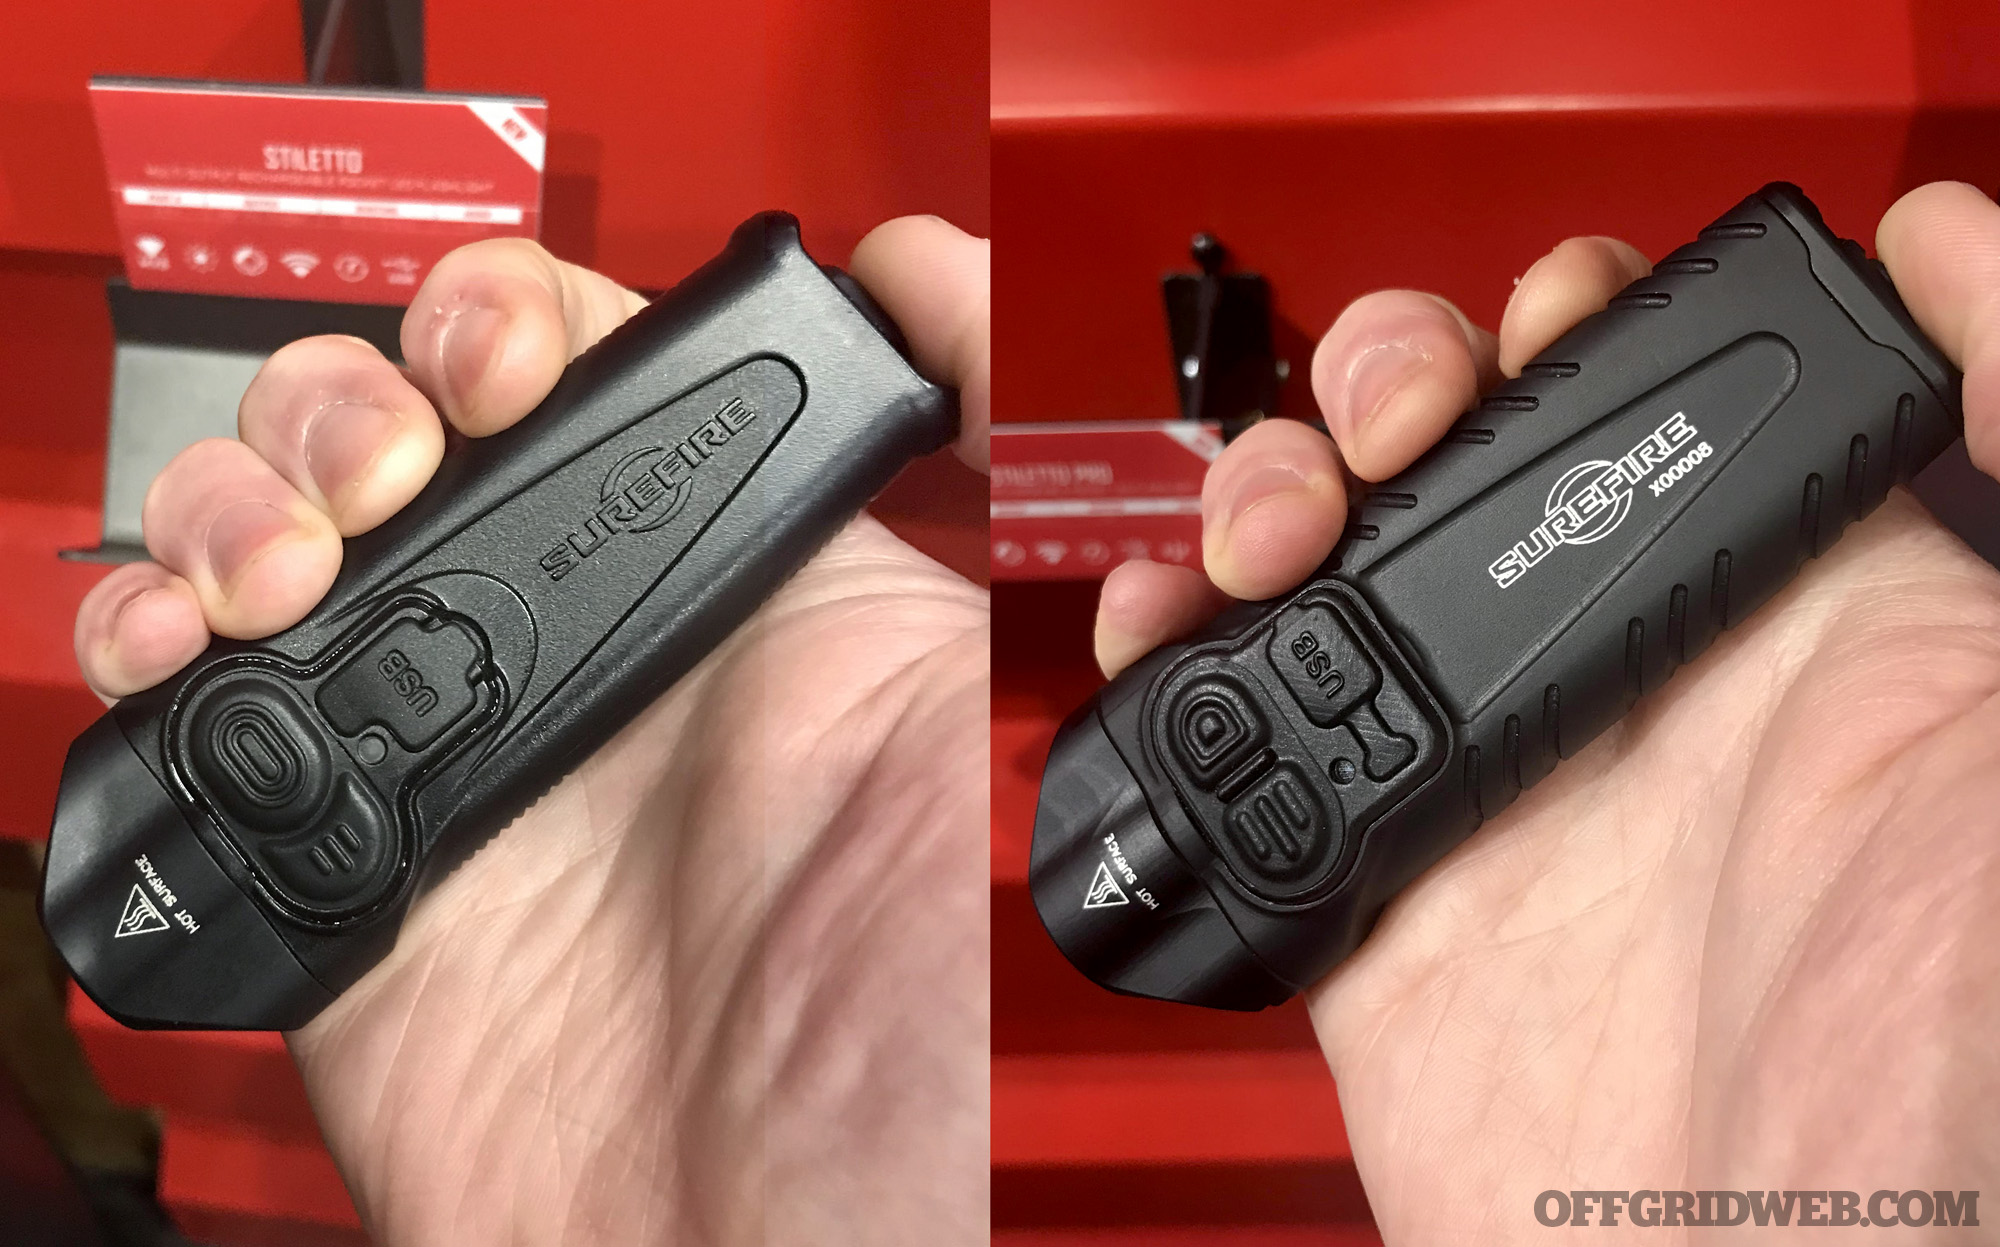
Every year at SHOT Show, the guys at Surefire have some cool new gear to show us, and this year was no different. Dave Merrill stopped by with the RECOILtv camera crew to talk with Andrew Wright, and get a closer look at some of the items the company will be releasing in 2019. These include the 300Ti lightweight suppressor, the XVL2 weapon light/laser/IR illuminator, the XR1 rechargeable weapon light, and the upgraded Stiletto Pro flashlight.
As you can guess from its name, the Surefire 300Ti suppressor is constructed out of titanium. While this won’t have the same longevity as a traditional can if it’s subjected to repeated full-auto mag dumps, it’s better-suited for those who are trying to cut as much weight as possible from their weapons.
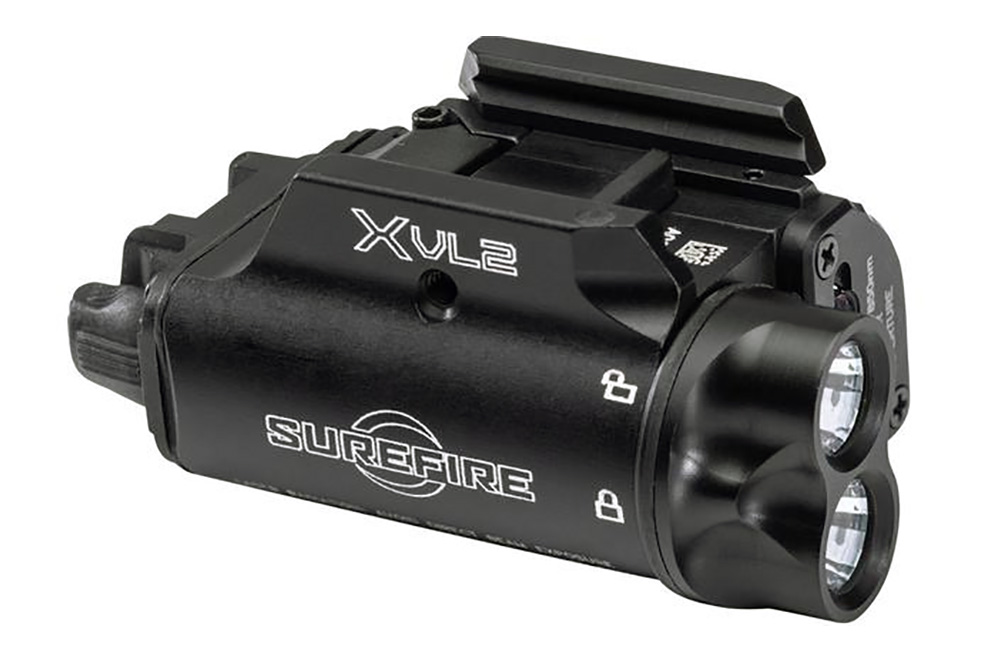
The XVL2 acts like a miniature pistol-mounted counterpart to the rifle-mounted AN/PEQ-15 laser/illuminator. It offers four outputs: white light, a green visible laser, an infrared illuminator, and an infrared laser. The latter two outputs are designed for use with night vision systems. For more details on the Surefire XVL2, check out this article on RECOILweb.com. You’ll also see this light featured on the cover of RECOIL Issue 41, on sale now.
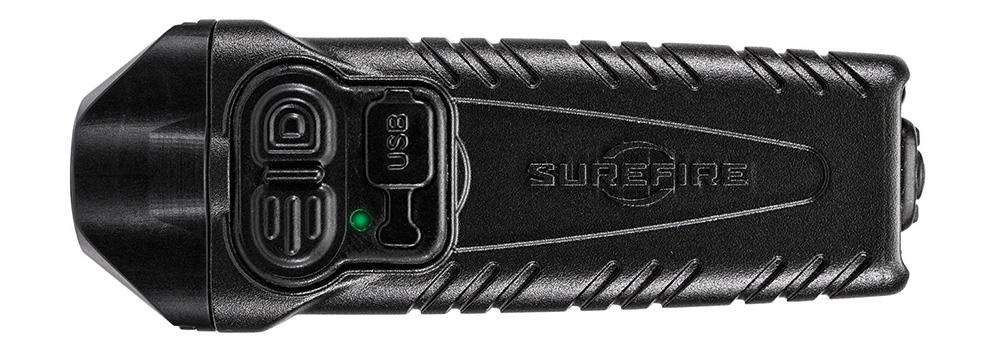
The XR1 is essentially an update to the XC1 compact weapon light. Rather than a AAA battery, it features a rechargeable battery. This also makes room for a second LED where the AAA battery previously resided, and increases output to 600 lumens. There’s also an XR2 variant with a laser that acts as an update to the XC2.
Lastly, the Stiletto Pro is an improved version of the Stiletto that was released last year. It’s built with an aluminum body instead of polymer, and now has a reversible pocket clip.
Left: an original Stiletto. Right: the new Stiletto Pro.
Output of the Stiletto Pro has also been increased to 1000 lumens. The Stiletto’s unique 3-switch design and built-in USB port are retained, although the button shapes have changed slightly. Refer to this article on RECOILweb for more details about the Surefire Stiletto family.
The Premise: Sometimes only imagery has the power to describe things with the poignancy that words often lack. While the subject matter of David T. Hanson’s Waste Land might deviate from the traditional coffee table book, it vividly and shockingly displays man’s apathy for the consequences of destroying Mother Nature. Hanson photographically documents various toxic waste locations across 45 states known as “Superfund” sites that require a long-term abatement plan.
To get a little granular, in 1980 the Comprehensive Environmental Response, Compensation, and Liability Act (CERCLA) designated a list of sites that are ranked ranging from 1 to 100 of their actual or potential release of hazardous substances. A score of 28.5 or greater puts a site on the National Priorities List, which makes it eligible for “long-term remedial action” under the Superfund program. Nearly half a million known toxic waste sites exist in the United States, and according to the book, 400 of these were declared highly hazardous and in need of immediate attention — a number that has at least tripled since 1980. Hanson shows us 67 of these Superfund sites and leaves our minds wondering what others must look like, and if we’re living near one. (If you’re that curious, you can always check www.epa.gov/superfund/search-superfund-sites-where-you-live.)
Hanson’s approach is primarily visual impact, which Waste Land does exceptionally well. Aerial photographs of the sites are flanked by a USGS topographic map of its location as well as the EPA’s own description of its history and current status. Some are as well known as Love Canal, while others are as innocuous looking as a major airport in Tucson. The sites shown, both active and abandoned, encompass illicit landfills, wood processing plants, uranium mines, smelters, military bases, and various other locations where pristine land became a receptacle for toxic chemical production and/or disposal.
The 411: Waste Land gives us a glimpse of events and locations we usually only stumble upon through random internet searches. While the book contains information that’s totally public record, as the reader you feel like you’re looking at some clandestine government file. The seemingly absent media coverage on this ongoing problem stimulates one’s conspiracy speculation as to whether or not there’s really an agenda at work to keep these horrific images out of the public conscience. The book truly delivers a knockout punch in its striking, 11 ¾ x 9 ¾-inch pages of pictorial depiction, and yet gives you only a taste of a dilemma that could comprise several dozen volumes.
We see how many of these sites are situated on or near major waterways and wildlife habitats, while others are in close proximity to residential areas or have often been swept under the proverbial rug and built over with new neighborhoods. Many of Waste Land’s site descriptions outline known contamination in local aquifers, denote that the full extent of the pollution is in some cases unknown, and leave the reader hanging with typical vague government language that cleanup may still be decades away. It shows how modern industry operates with little if any consequence for their ignorant, and often intentional, degradation of our landscape. The bureaucratic uncertainty of what can be done about it, where the money will come from, who will do the work, or if the work will ever be done definitely leaves the reader with a great deal of anxiety.
The Verdict: It’s a pessimistic topic, but one that isn’t going away anytime soon. Waste Land is the kind of book that reaffirms why it’s critical to have a survivalist mindset. As these types of sites only grow in number and government intervention can’t seem to keep up with their expansion, Hanson’s work serves as a tool to promote awareness, discussion, and action. Hopefully Waste Land readers will be inspired to follow in the footsteps of Erin Brockovich as well as be more proactive about preparing for the long-term effects this type of activity will have on our health and ecosystem. Pick up copy of Waste Land, leave it out when company comes over, and share with others what goes on everyday in our country and has no end in sight. Without books like this to help facilitate taking the fight to those who cause these problems, this kind of opportunism will continue unmitigated and turn our country into a giant landfill.
Shopping online for gear is often more convenient than driving to a brick and mortar store, but trying to weed through the thousands of options listed online is a daunting task, especially when many product pages seem to be awash with vague 5-star reviews. To make this selection process a little less overwhelming, we test gear and report our findings with total honesty. If our time with an item reveals its flaws, we’ll tell you all about them, and if it’s good to go we’ll say so. What you won’t get here on OFFGRIDweb is a bland marketing-friendly review that deems every item to be good enough.
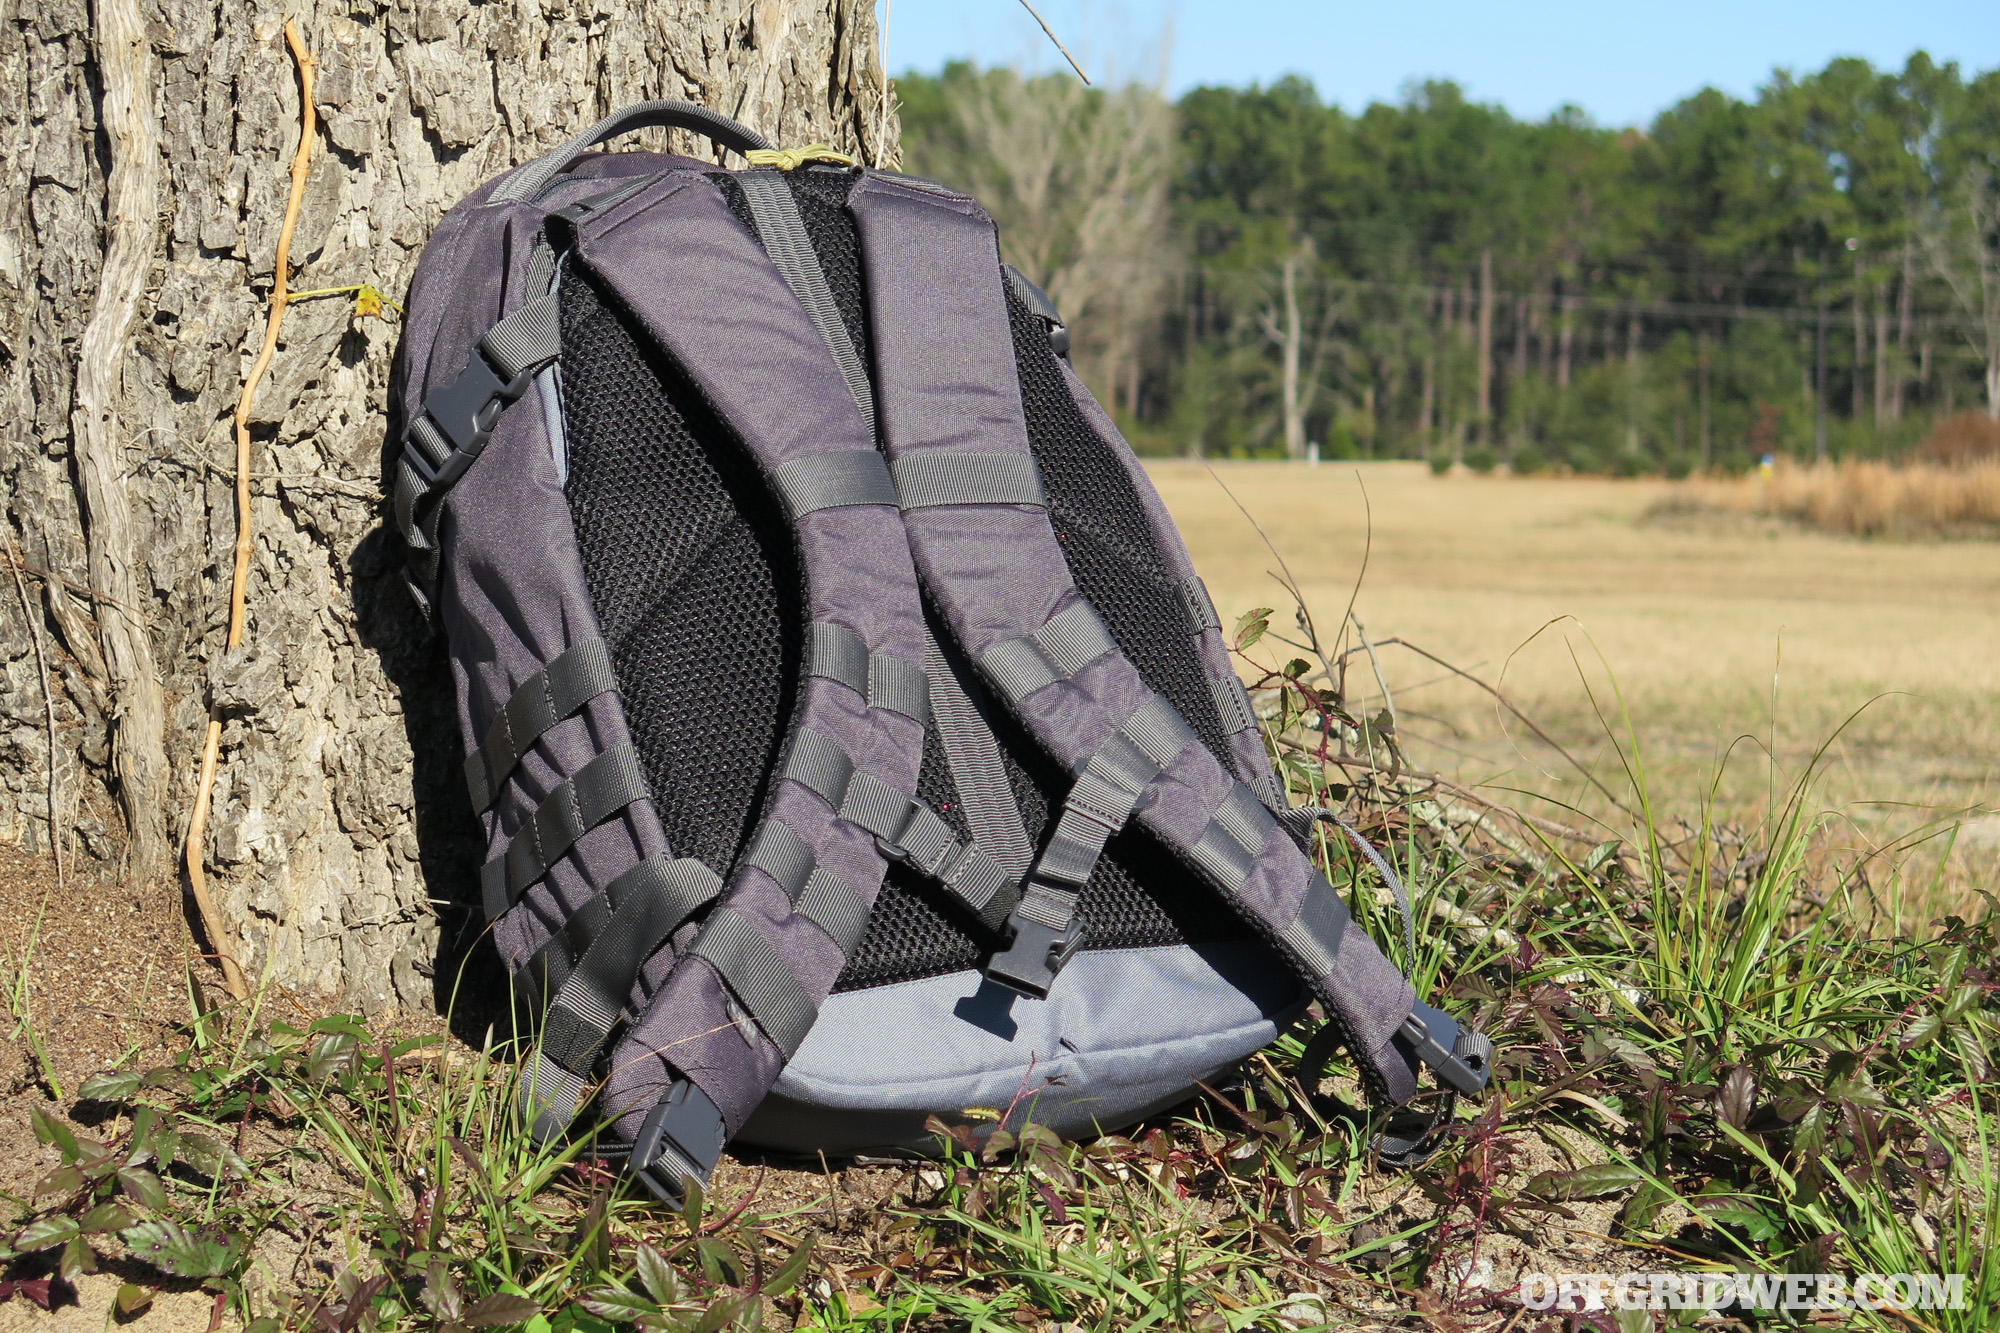
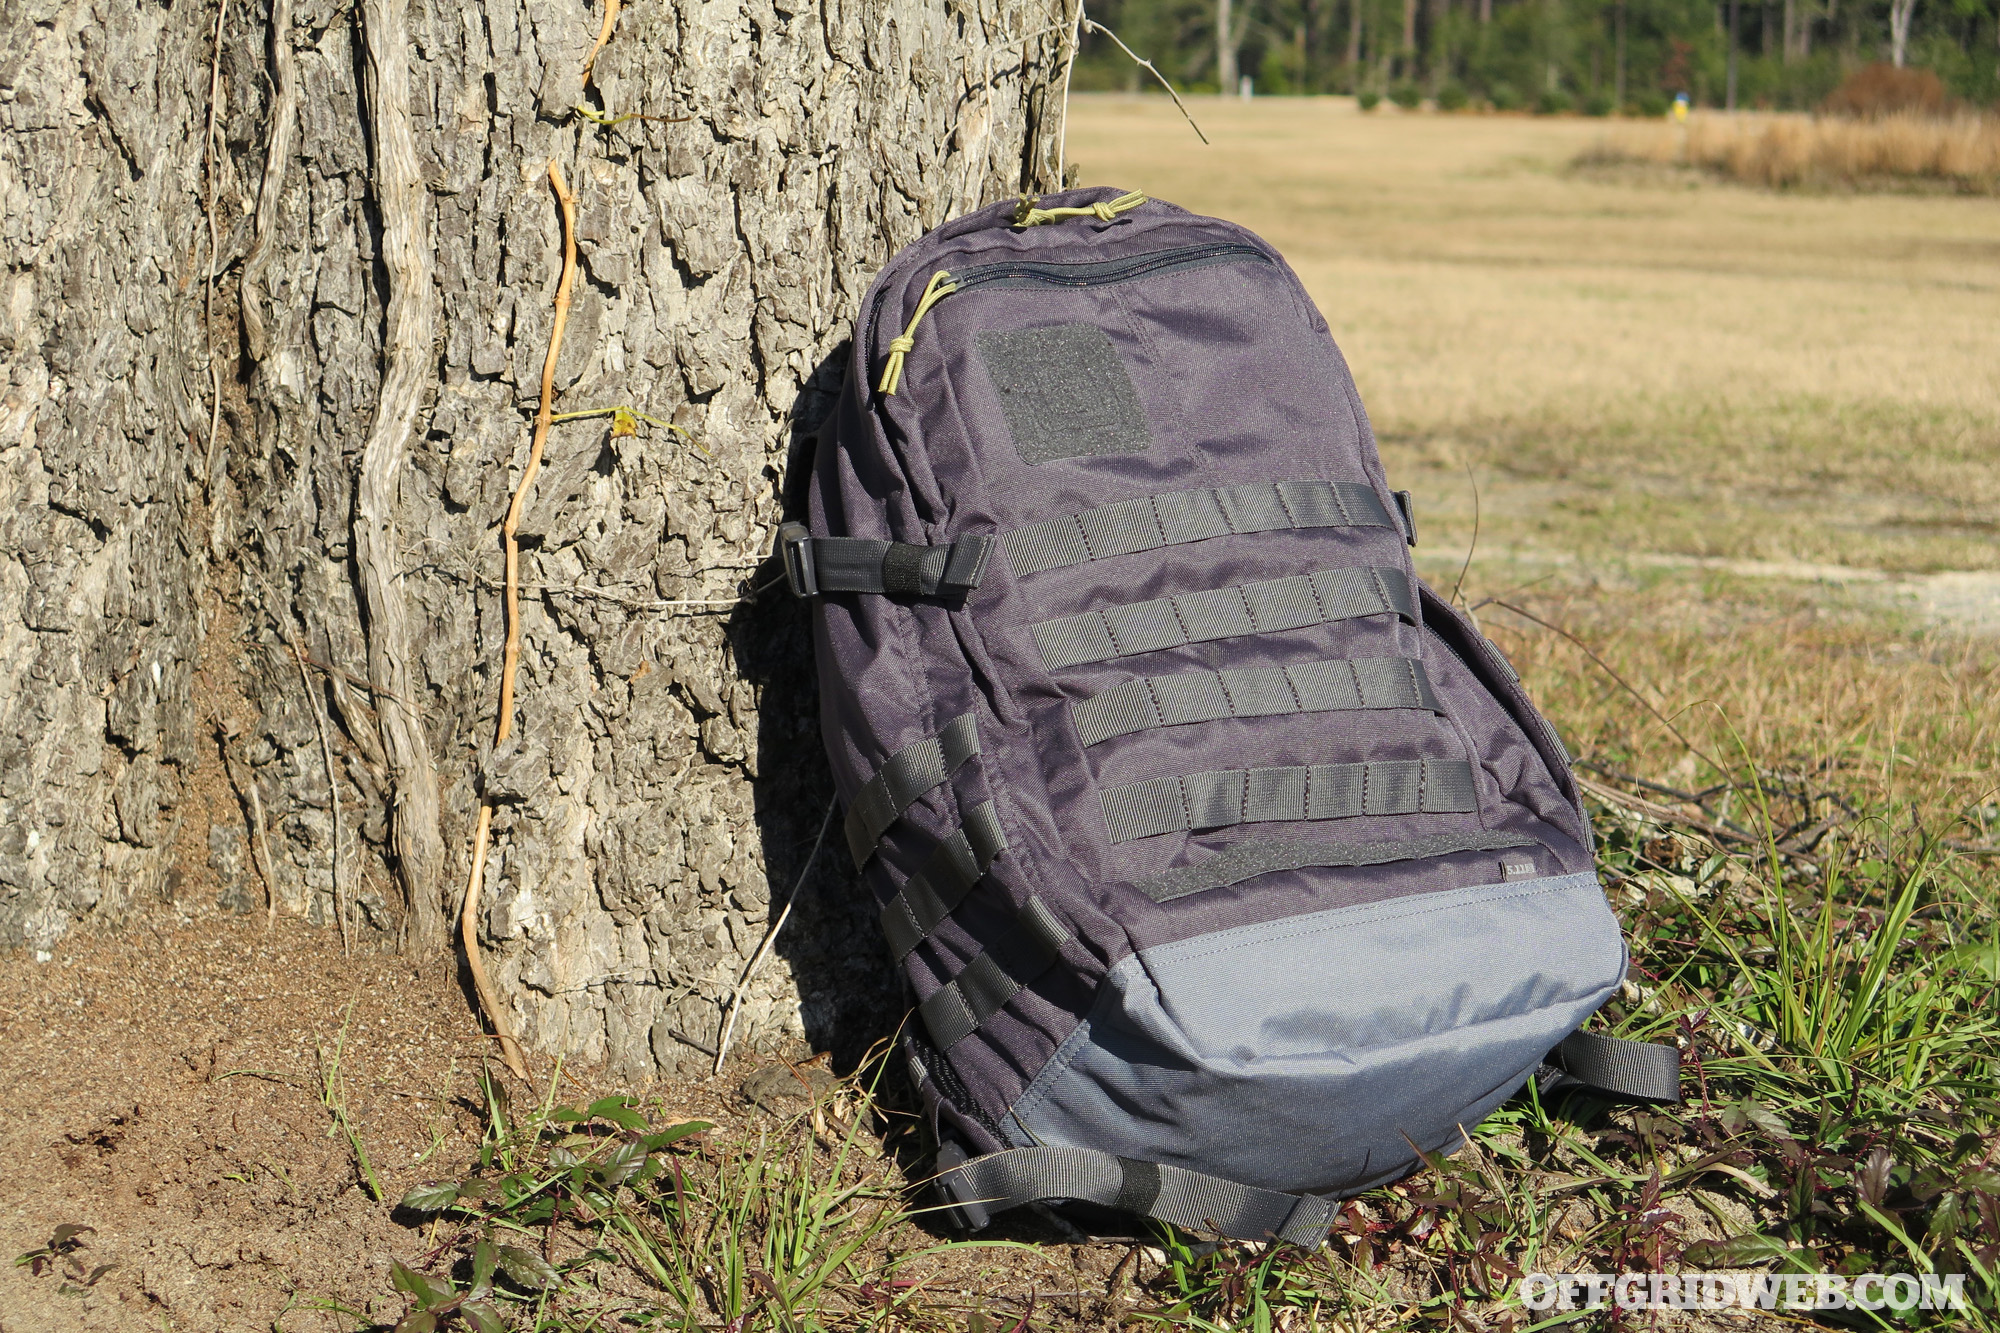
The latest product on our review itinerary is a compact EDC-friendly backpack from 5.11 Tactical. Over the last few weeks, we have traveled with and tested the Rapid Origin Pack extensively. Read on for a summary of our findings.
The Rapid Origin Pack
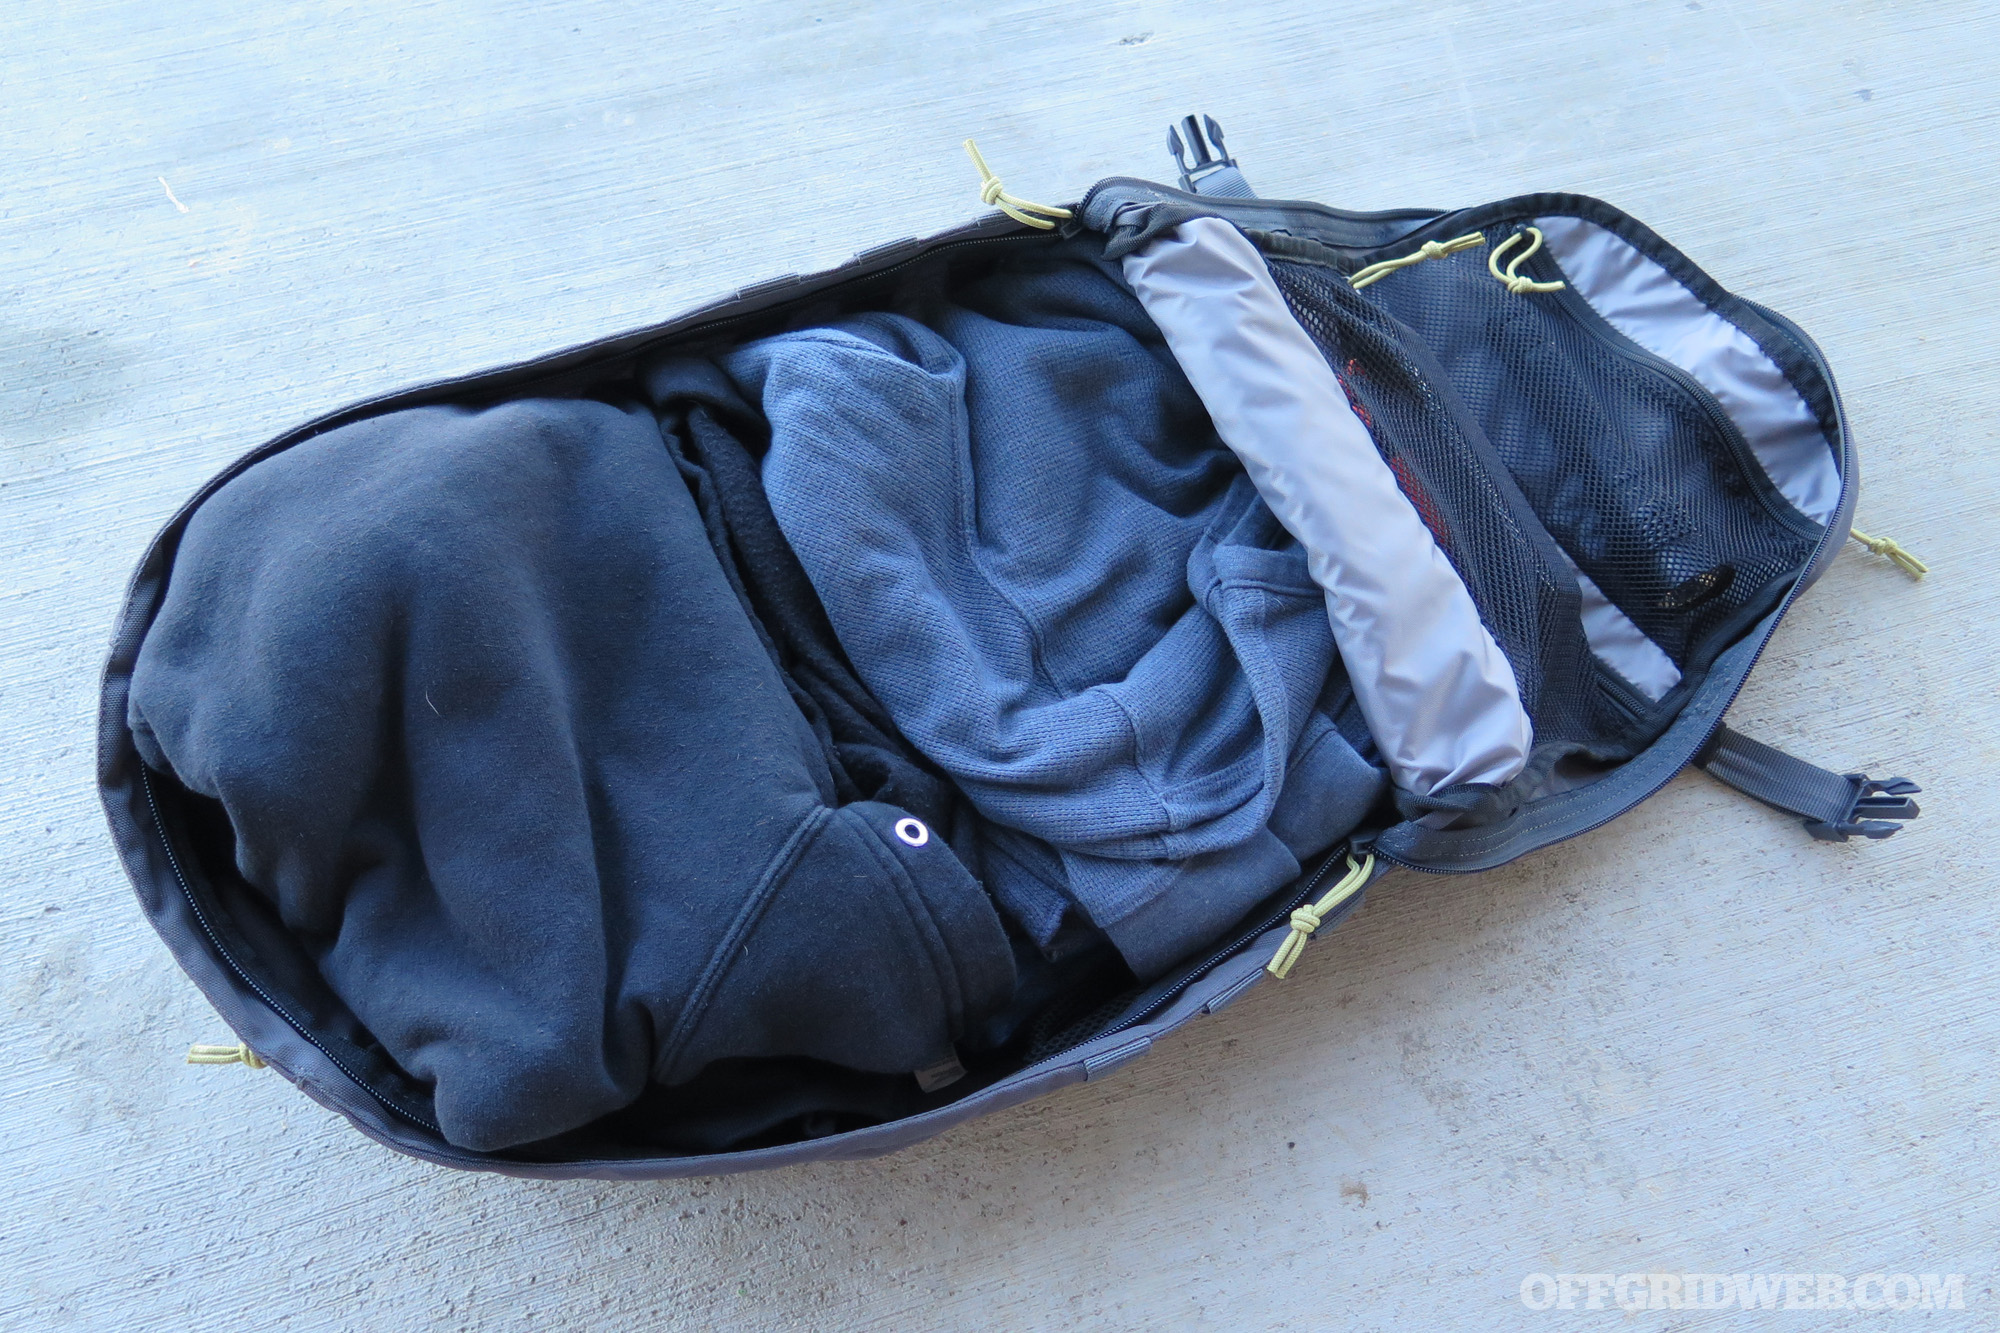
Despite its small 25L capacity, this pack offers a good combination of roomy storage and organization. It’s ideal for use as part of your EDC loadout, as an extended weekend getaway bag, or as an airline carry-on. The pack features a lightweight, minimalistic design with a large main pocket, small outer pocket, and hidden hydration/CCW pocket. Available in four different colorways (pictured in Coal), the Rapid Origin Pack is constructed from 600D polyester making it a durable backpack with a good degree of wear resistance.
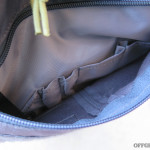
The main pocket is roomy enough to hold a few days worth of clothes, while also keeping your small items organized. Two small mesh, zippered pockets are found on the inside front of the main compartment to keep your smaller items together in one place. Finally, a padded laptop sleeve and water bottle pocket retain these important items. However, the fact that the water bottle pocket is inside the pack is an interesting choice, as it requires the wearer to zip open the main compartment and push aside gear to access a bottle. It also makes re-inserting the bottle a challenge, especially if the pack is fully-loaded.
The water bottle sleeve is along the inside edge of the main compartment.
One of the best features of this pack is the full-opening drop front. This gives you full view of everything in the main compartment, as well as access to the smaller zippered pockets without having to dig down to the bottom to find anything. If you don’t want to open that pocket all the way, a set of compression/retention straps on the sides keep everything secure even if the pack isn’t fully loaded.
On the outside of the main pocket is a small, quick-access admin pocket. Inside you’ll find several small sleeves and pen holders as well as a key retainer hook handy for keeping your EDC loadout organized. This pocket is a good size without being overly large and cavernous. Stitched onto this quick access pocket is a hook-and-loop field in the shape of the 5.11 Tactical logo, enabling the wearer to add morale patches and other personal touches. There’s another strip of hook-and-loop at the bottom of the PALS webbing on the front of the pack, which can be used for name tape or small patches.
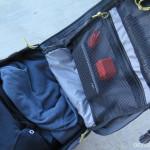
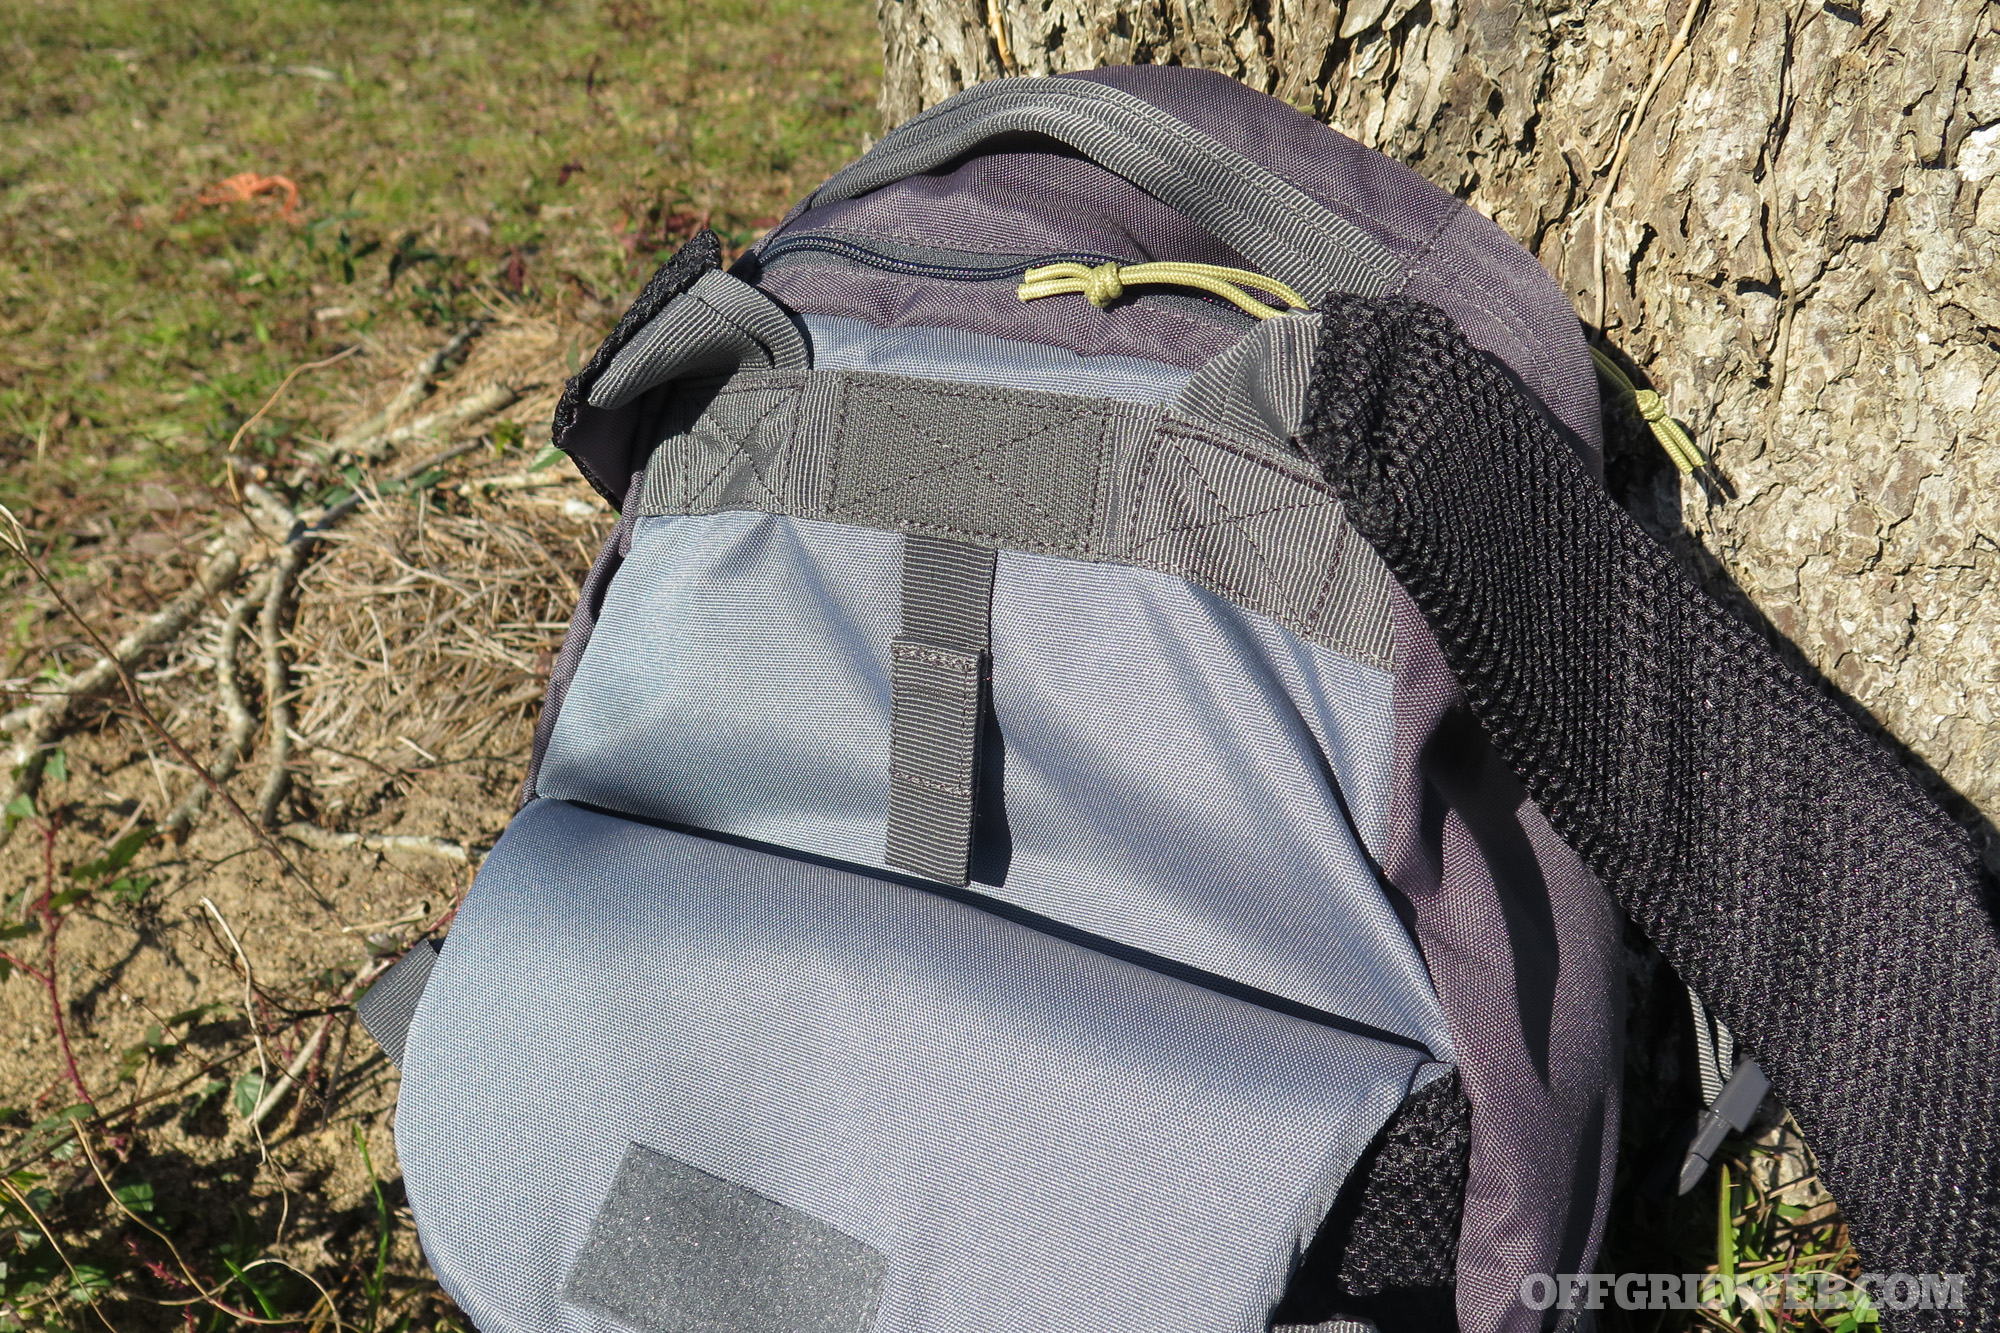
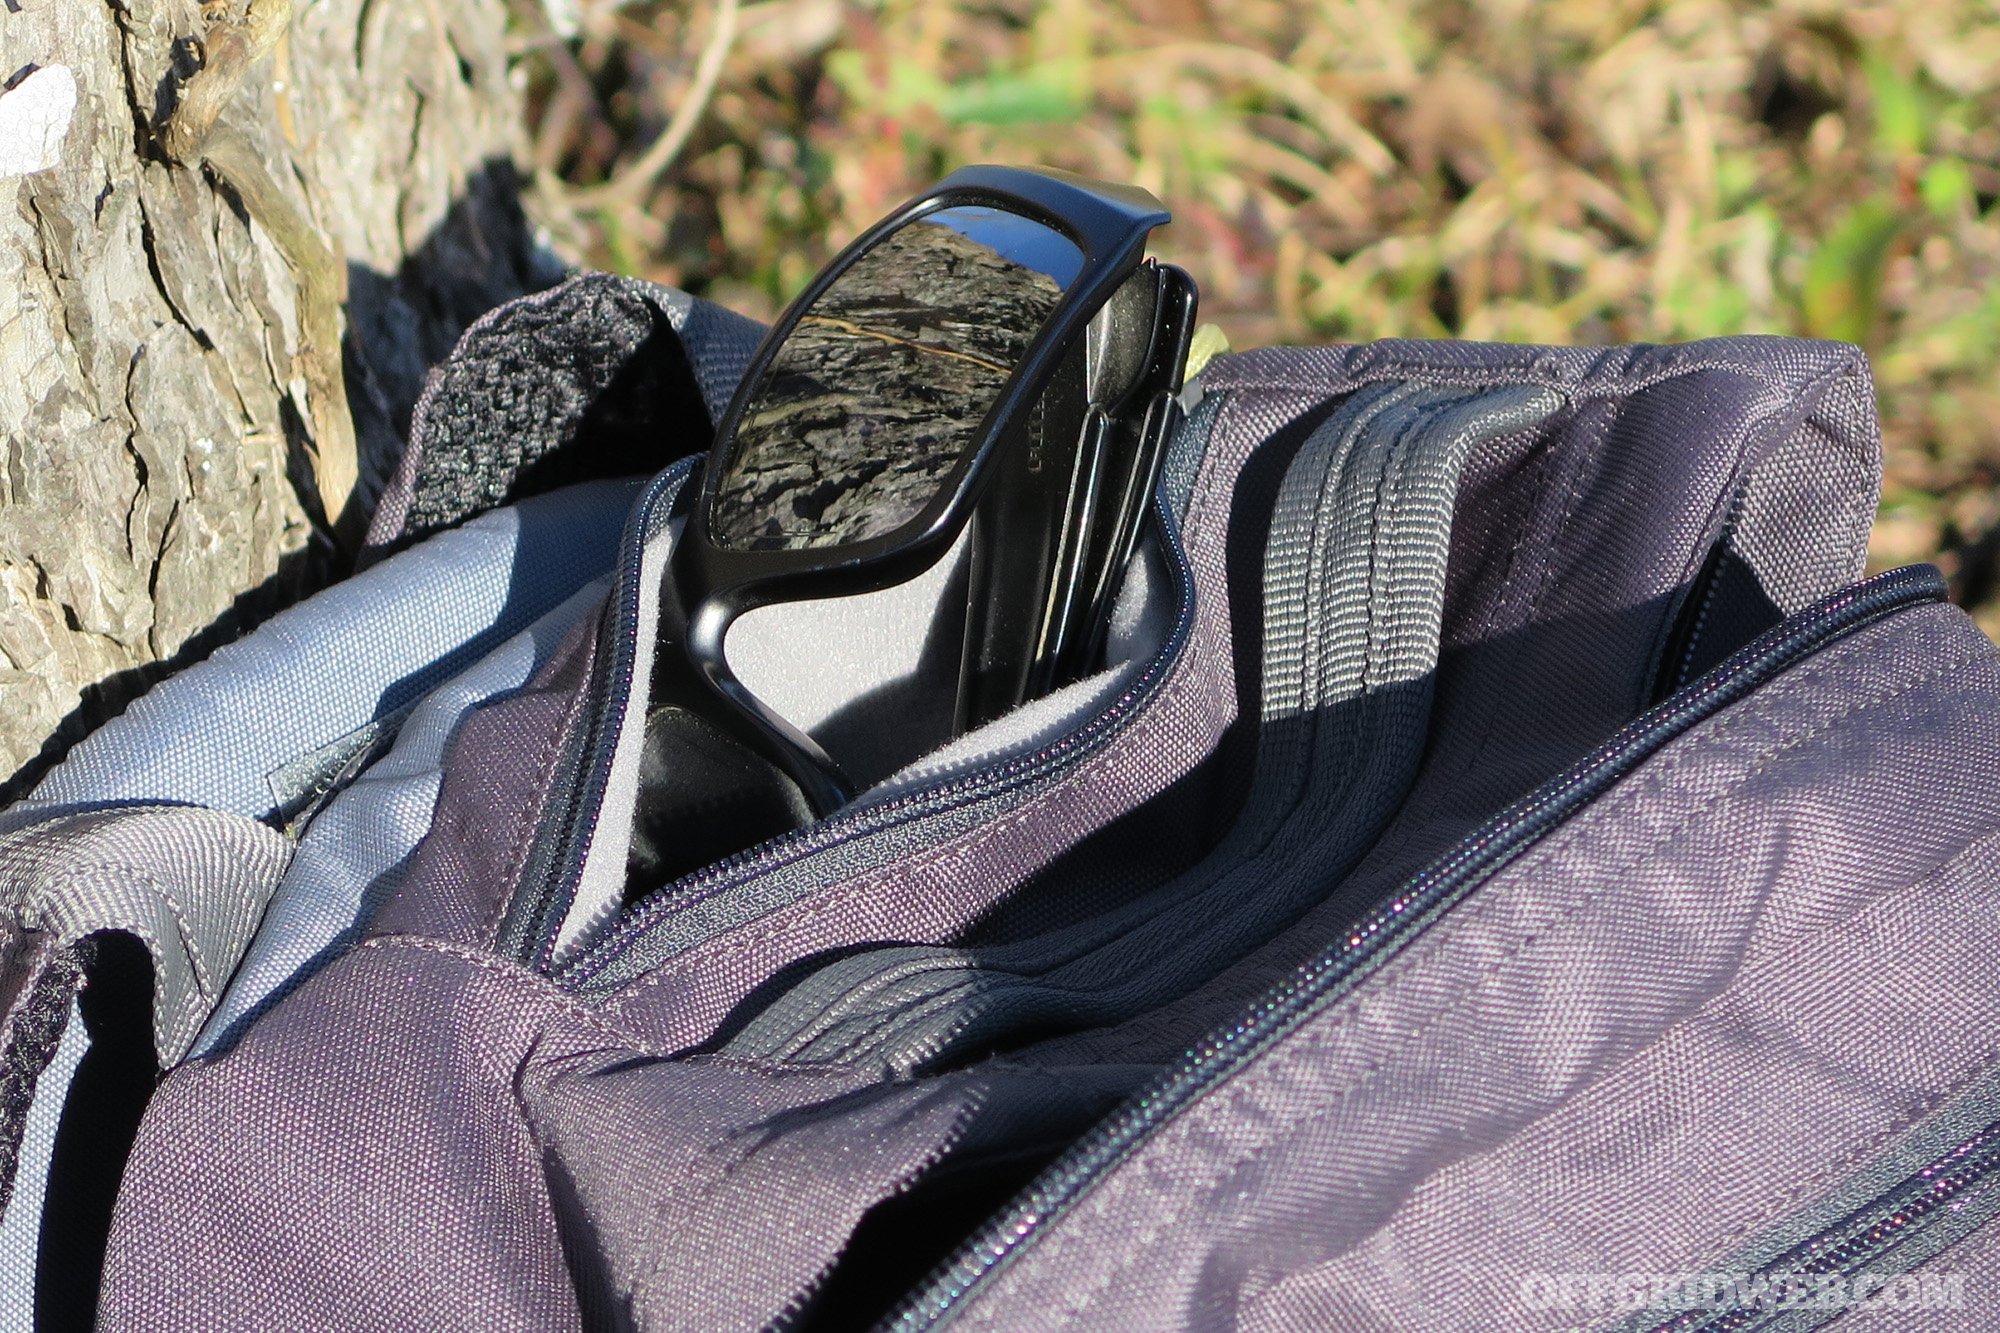
The top of the main compartment features a snug fleece-lined pocket for sunglasses, goggles, or anything else you don’t want crushed or scratched up. The back pad hides a hydration pouch with hook-and-loop hanger strap.
5.11 Tactical also says you can store your CCW in this pocket, however we found it to be a bit uncomfortable since it adds a noticeable bulge along the back while carrying. In all honesty, this pocket could be removed all together. We’ve found that when we need a small pack with a hydration pouch, it’s better to use a dedicated hydration pack, as opposed to converting an EDC pack for that use.
On the Move
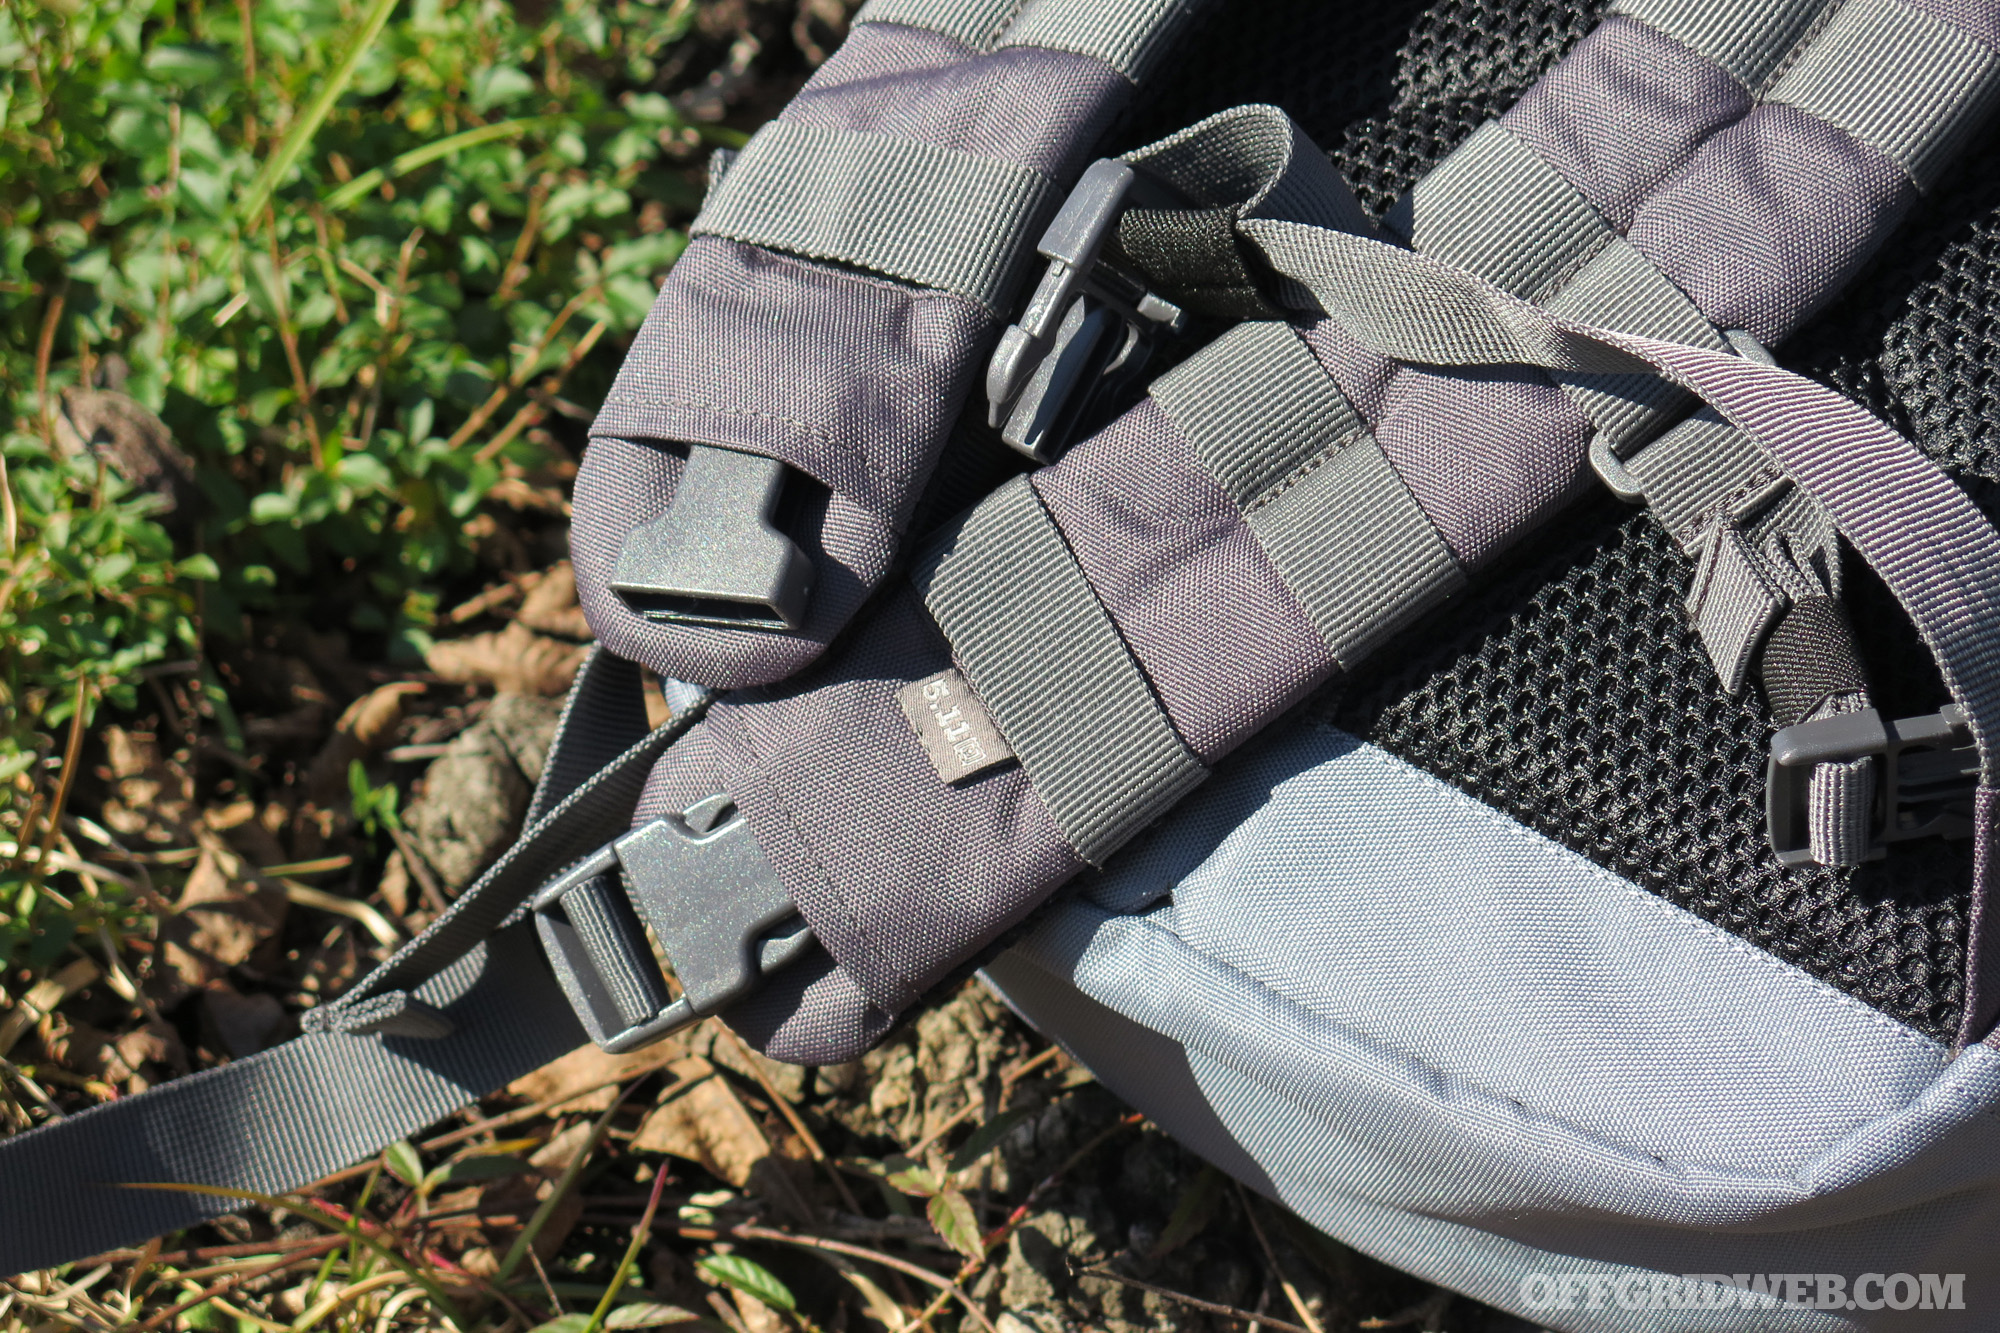
Even when fully loaded, the pack fits and carries very comfortably. The wide, padded shoulder straps distribute weight evenly and the supportive back pad prevents any of the cargo in the main compartment from putting excessive pressure on one spot. Both sets of pads are covered with a thick mesh layer, which keeps the skin these pads ride on dry and cool. One interesting note about the shoulder pads is the addition of a buckle at the base of the pads. We couldn’t find an exact reason for this, as the top ends of the straps are permanently affixed. What we’ve used this for is to disconnect the pads and tuck them inside for travel when using the pack as a carry-on or truck bag.
If you desire more storage options, the Rapid Origin has you covered there too. The front and sides of the pack are covered in PALS webbing. This allows you to attach countless pouches, pockets, and other attachments to customize this pack to your needs. That said, we didn’t find ourselves wanting additional capacity. We used this pack on several day and weekend trips and found it to be the right size, shape, and weight for its purpose. At 25L, it is small enough to take almost anywhere but with the large main compartment and several smaller organization pockets, it holds more than it seems at first glance.
Conclusion
The 5.11 Rapid Origin pack is a solid choice for a compact, short trip pack. During our testing we compared it to the 5.11 Rush 72 that we’ve had for years. Unsurprisingly, the Rush 72 is a lot bigger with a lot more pockets, making it good for longer trips with more necessities. Even with the few small tweaks we would like to see made, this Rapid Origin pack is priced right and comes with features that we appreciate. For more information on this and the rest of the products that 5.11 offers, visit 511tactical.com.
Pros:
Priced under $100
Large main pocket with full drop front
Plenty of smaller pockets for organization
Cons:
Odd location of water bottle pouch
Hydration pouch isn’t particularly helpful — if that’s a top priority, you may prefer the RUSH or AMP series packs
WARNING: This article is meant to be a quick overview and not a detailed guide on how to deal with shock in an emergency situation. Professional medical treatment should always be sought first before attempting any of these methods.
Shock has many different possible meanings. You could be shocked at the turn of events in a movie. You could be shocked by touching a live wire. You could be in shock after receiving news of the death of a loved one or due to trauma. For me, shock is a chilling term that portends poor outcomes despite our best medical efforts. Mortality can be 40 to 50 percent, despite the best medical care in the best hospitals. What will you do if your partner or family member has an accident or heart attack and goes into shock? Perhaps the most important part of treating shock is learning to identify it as soon as possible. The earlier the identification, the earlier the treatment can begin.
What is Shock?
First off, shock is essentially a lack of blood and oxygen supply to the tissues. The lack of these nutrients causes tissues and cells to starve. When this occurs, the tissues and organs lose function. The more organs that fail, the higher the mortality rate. The sooner the cells can restore their nutrients and function, the better the chance of survival.
The body has several mechanisms to attempt to compensate for the lack of tissue perfusion in order to minimize the damage to the cells. Although many organ systems are involved in the compensatory mechanisms, it’s the cardiovascular system that’s the foundation of the process. In order for the cardiovascular system to maintain its pressure in a closed loop, there has to be a pump (the heart), pipes (the blood vessels), and fluid (the blood). If there’s something wrong with any one of these components, then there’s a loss of pressure in the system. If that loss of pressure is severe, the tissues and organs won’t be nourished with the essential components that allow for proper function of the organs and our body.
Let’s look at this in a little more detail. The pressure in the system is controlled by the output of the pump (cardiac output) and the systemic vascular resistance (changes in vessel diameter or changes in blood viscosity). The cardiac output is determined by the heart rate and the stroke volume (how much blood is pumped out with each contraction of the heart). The equation is as follows:
Mean Arterial Pressure (MAP) = Cardiac Output (CO) x Systemic Vascular Resistance (SVR)
Cardiac Output = Heart Rate (HR) x Stroke Volume (SV)
Therefore, MAP = (HR x SV) x SVR
In order to raise the pressure in the system, we need to increase heart rate, increase stroke volume, or increase systemic vascular resistance (or some combination of the three). What often happens in an injury or disease is that one of these components falters and the other two attempt to compensate. This equation is paramount to understand what’s happening physiologically to someone in shock.
With that in mind, the symptoms of shock should make sense. Hypotension (low blood pressure) is prevalent. The person may experience extreme fatigue, dizziness when standing, or faintness. Low blood pressure causes the body to shunt blood away from less essential organs like the skin. The skin becomes pale and cold. In order to attempt to compensate for the low blood pressure, the heart rate increases. This pushes the blood faster around the system to utilize the remaining oxygen within the system. The respiratory rate increases to bring more oxygen into the system and to lessen the effects of increased acid buildup from lack of tissue perfusion. A person may become disoriented or confused due to lack of blood or oxygen to the brain.
Stages of Shock
The whole process can develop rapidly and has three stages to focus on. The first stage is the initial, or pre-shock, stage. This is the moment an injury occurs to the person. In an example of trauma, blood is being lost through a wound. This is essentially a decrease in the stroke volume from the equation above. This in turn decreases the cardiac output. The body will attempt to compensate by increasing the heart rate and increasing the systemic vascular resistance (via vasoconstriction). The latter mechanism attempts to control the bleeding and shunt blood away from less essential tissues.
In the second stage (compensatory stage), the body continues to minimize the damage being done. This stage is reversible (by acting quickly, there’s a good chance tissue and organs can be saved). The body activates the sympathetic nervous system due to the decreased cardiac output, and hormones such as epinephrine are released to increase the contractility of the heart. When the body fails to compensate, the progressive stage ensues. This is where the tissues suffer increased ischemic damage, and lactic acid builds up in the bloodstream. The further along this stage goes, the more likely it becomes irreversible and organs start to fail. Urine output drops initially as the body tries to retain all the volume it can. Later, urine production stops due to the death of cells in the kidney. The liver fails, which causes a disturbance in the coagulation cascade, and it’s easier to bleed. Death is imminent.
So, with the physiology of shock outlined above, let’s look at how that physiology is affected by various causes of shock. There are two different classifications of shock: differentiated and undifferentiated. Many times when someone is in shock, we say it’s undifferentiated because the patient exhibits signs of shock, but we may not know the exact cause. We start treatment protocols immediately because time is off the essence. When we do know what is causing the shock (differentiated shock), we break it into four general categories: distributive, cardiogenic, hypovolemic, and obstructive.
Distributive Shock
Referencing the aforementioned equation, distributive shock is where the systemic vascular resistance decreases, and blood vessels generally dilate. The body tries to compensate by increasing the heart rate. We further break distributive shock down into septic and non-septic causes. Sepsis is the effect of the body’s response to infection. Common sources of infection are urinary tract infections, pneumonia, and even skin infections. With treatment in the hospital setting, the mortality is roughly 40 percent. For non-septic causes of distributive shock, mortality depends on the initial insult.
There are four categories of non-septic distributive shock: inflammatory, neurogenic, anaphylactic, and “other.” The inflammatory portion could also be a component of sepsis, or could be associated with a severe burn, trauma, or heart attack. Neurogenic shock is usually due to a spinal cord injury or traumatic brain injury. The autonomic nervous system is altered, leading to decreased systemic vascular resistance and unopposed vagal tone.
Because of these changes, the distinguishing feature of neurogenic shock is usually a slow heart rate, which makes it difficult for the body to compensate. Anaphylactic shock can be caused by food allergies, environmental allergies, medication allergies, or idiopathic reasons.
Injectable epinephrine at the onset of anaphylaxis is critical to survival. Venomous stings (e.g. bees, scorpions, and snakes) are often considered in the “other” category. Interestingly, carbon monoxide, myxedema (due to extreme hypothyroidism), and narcotics are also included in this category due to their effect on systemic vascular resistance.
In a survival setting, many of the causes of distributive shock could be prevented or prepared for prior to the irreversible portion of shock. Carrying antibiotics and keeping wounds clean can minimize risk of infection. You could also try eating garlic or onion at the first sign of infection. This won’t do anything once you’re very far into the pre-shock stage, though. You could also try apple cider vinegar, Echinacea, hydrogen peroxide, or turmeric to help keep a wound clean. Keep in mind that these are very early interventions. Readily available epinephrine for anaphylaxis is a no-brainer, especially if you know you have such reactions. If you have a thyroid condition, ensure that you have enough medication. People who are on chronic steroids must also ensure they don’t run out of these, or they risk adrenal insufficiency, shock, and death.
Hypovolemic Shock
This occurs when there’s a loss of fluid and, in essence, a decrease in stroke volume due to the loss. In order to maintain blood pressure, the heart rate increases to maintain cardiac output, and the arteries constrict to maintain systemic vascular resistance. There are two classifications in hypovolemic shock: hemorrhagic and non-hemorrhagic. In hemorrhagic shock, there’s a disruption of the vascular system, causing a leak. While this can be easily identified by severe external bleeding, don’t forget that internal hemorrhage may not be as apparent.
This could be due to blunt force trauma that causes a rupture in an organ such as the spleen, or a tear in a major vessel from a motor vehicle crash. Pelvic fractures are also known for internal bleeding. Look for bruising on the abdomen or flank, as well as for abdominal distention, as potential indicators of hemorrhage. Stabilizing a pelvic fracture at the scene when there’s evidence of internal bleeding or shock can help slow the hemorrhage. You could consider using a sheet, blanket, or the SAM Pelvic Sling.
Remember that people on any type of blood thinner, including aspirin, are at increased risk of more significant bleeding. Other treatments involve stopping the bleeding by holding pressure to obvious sources of bleeding. If a tourniquet is needed for injuries to the extremity, apply it if you have the proper training on their use. Coagulant powder is also an option. If you don’t have any, remember that cayenne pepper, turmeric, juniper sap, and other natural remedies could also help. Because you might be miles from help, the key is to stop the bleeding rather than replace the fluids.
In non-hemorrhagic shock, the loss of total body water is profound. Because of the water loss (as opposed to blood loss), the viscosity of the blood increases, and thus systemic vascular resistance increases. Fluid loss can be severe due to vomiting and/or diarrhea due to enteritis from bad food or water. Heat stroke can also cause profound dehydration, leading to shock. Mortality for heat stroke can be as high as 80 percent if it’s not treated promptly.
In cases of heat stroke in the wild, sitting in a cold stream may help cool core temperatures. Burns can also cause significant water loss. Due to the loss of the skin barrier, the evaporation of fluid is much greater from the burned area. The larger the area of the burn, the more water is lost. A burn can also increase the risk of secondary infection due to the loss of the protective skin barrier. Even in a hospital setting, someone with a severe burn (third degree) over greater than 40 percent of their body can have a 40 percent chance of mortality.
In a survival situation, honey would be a good makeshift barrier for a burn, serving as a barrier as well as providing some antimicrobial coverage. Lastly, in a prolonged survival setting, the ability to maintain nutrition decreases, as does the amount of protein stored in your body. As the protein levels drop, it becomes more difficult to keep fluids in the vascular space and can lead to hypovolemia (a decreased volume of circulating blood in the body).
Cardiogenic Shock
This is when the heart fails to function efficiently. When the heart weakens acutely because of a heart attack, there’s less muscle available to do work. Sometimes the cardiac muscle becomes weak over time due to heart failure, and no longer can meet the demands of the body. These situations decrease the heart’s ability to pump blood with each contraction and thus decrease stroke volume. Another reason the pump cannot meet demand is if the heart rate is too slow. As the heart rate drops, the heart muscle has to contract harder to push the volume of blood out to maintain cardiac output. Conversely, if the heart rate is too fast (over 200), the heart doesn’t have enough time to fill with blood between contractions, and the stroke volume decreases.
Mortality for cardiogenic shock in the hospital is around 50 percent. Normally, aspirin is given at the onset of a heart attack; however, if there’s no aspirin, natural salicylates would include willow bark, blackberries or red raspberries, cayenne pepper, and almonds. Several days rest would also be important for the patient. Using a drug to increase heart rate wouldn’t be wise. It’s likely a heart attack affected the pacemaker area of the heart, and putting chemical stress on the heart could further expand the area of heart muscle involved.
While external bleeding may not be present after bodily trauma, internal bleeding can often lead to the onset of shock.
Obstructive Shock
This occurs when compression of the heart prevents it from filling with blood. This decreases the stroke volume, because the heart cannot generate enough force to contract. Examples of this would include tension pneumothorax and pericardial tamponade. In a tension pneumothorax, air leaks from a hole in the lung into the space between the lung and the chest wall. If the air cannot escape, then pressure builds within the space and creates the “tension.” The increased pressure in the chest doesn’t allow the heart to fill, and blood pressure falls. The neck veins (jugulars) become distended, and the trachea may even deviate away from the side of injury. The lifesaving measure is to use a decompression needle to allow the air to escape and decrease the tension. The decompression procedure is much more risky in a non-hospital setting.
Pericardial tamponade occurs when fluid builds up within the pericardial sac surrounding the heart. When this fluid accumulates (from trauma, infection, inflammation, or cancer), it prevents the heart from filling with blood due to the constriction and increased pressure in the pericardial space. This can also cause a decrease in blood pressure or signs of congestive heart failure. Natural diuretics like grapes, garlic, onions, dandelion, and green tea could be used to help with congestive heart failure; however, the likelihood that these will be strong enough or act quickly enough to overcome the effects of pericardial tamponade is very low.
In Summary
Shock is a devastating process that has about a 50-percent mortality rate in the hospital setting. In a survival situation with no immediate help, the chances of survival are poor. The best chance of survival is to prepare for causes that can be reversed (e.g. anaphylaxis, hypovolemia, and hemorrhage). Ensure adequate hygiene to prevent even the simplest of scratches from leading to sepsis. Natural plants are helpful for many situations, but aren’t likely to be potent enough or work fast enough to make a difference in the case of shock. And if you haven’t already, take a basic first-aid course and continue with more advanced education so you’re better prepared to handle an emergency.
About the Author
David Miller, DO, FACOI, is an internist in private practice. Diagnosed with Type 1 diabetes in 1990, he has a unique perspective on patient care and disease management. Experiences away from the office include being a fight doctor for regional MMA bouts and a team physician for a Division I university in west central Illinois. Dr. Miller is an instructor for the Civilian Crisis Response Team (medical section) based out of Indianapolis.
Kel-Tec has become famous for its unconventional gun designs, especially the dual-magazine-fed KSG shotgun — check out our detailed analysis of that weapon in “Battle of the Boomsticks” in Issue 30 of our magazine (on sale February 8th). While the KSG can be considered controversial, it also has some appealing characteristics. Compared to a run-of-the-mill Remington 870 or Mossberg 500, its bullpup design results in a dramatically reduced overall length with an 18.5-inch barrel. Also, its dual magazine tubes provide a substantial 12-round capacity.
Top: the KSG. Bottom: the new KS7.
This year at SHOT Show, the company showed off a new twist on the KSG format: the Kel-Tec KS7. This shotgun retains the small footprint of its predecessor, but uses a single 6-round magazine tube to reduce weight and bulk. Specifically, the KS7 is considerably slimmer and a full pound lighter than the KSG (5.9 pounds vs. 6.9).
Another noteworthy change to the KS7 is its removable carry handle, which includes M-LOK slots along each side for lights and other accessories. The carry handle also serves as a channel sight with a triangular green fiber optic bead. The KSG has a BYO-optic bare Picatinny rail setup without iron sights, so we appreciate this addition.
For those who prefer to run an optic instead of the bead sight, Kel-Tec has plans to offer a rail that will replace the carry handle.
The Kel-Tec KS7’s pump handle is a new design with hand stops at front and rear. Since our previously-mentioned review of the KSG specifically recommends adding a hand stop or foregrip to the picatinny rail on its fore-end, we’re glad to see it’s built in on the KS7. The remainder of the gun’s controls should be familiar to KSG users, although it obviously lacks a magazine selector lever.
Overall length of the KS7 is 26.1 inches, the same as the KSG, so it should fit into your backpack, truck, or safe with relative ease. MSRP is $495. For more information on the KS7, go to KelTecWeapons.com.
Kitanica is an outdoor apparel company that has become famous for its bold, almost-futuristic clothing designs. We’ve heard some describe the company’s products as the sort of thing you’d see in a sci-fi movie, and we wouldn’t say that’s entirely wrong. Some are drawn to this unique look — Mythbusters host Adam Savage and Duane Johnson have appeared in Kitanica gear — while others prefer more traditional clothing.
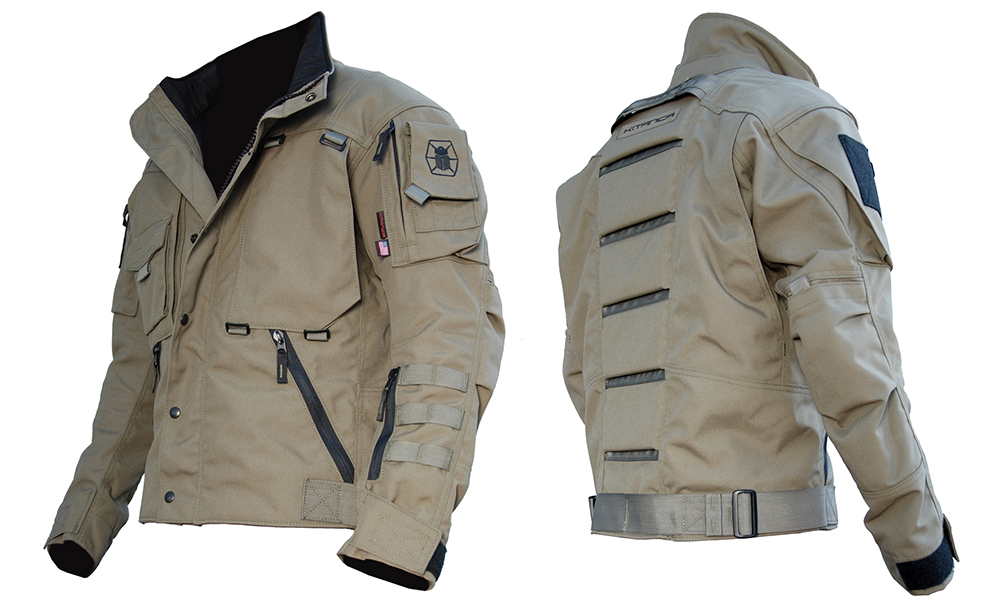
Kitanica Mark IV jacket
Regardless of your stance on the styling, it’s hard to deny that Kitanica’s apparel is built to an extremely high standard. Our experience with the Kitanica Mark IV jacket was a testament to this. We also have a pair of RSP pants that have seen frequent use and held up admirably.
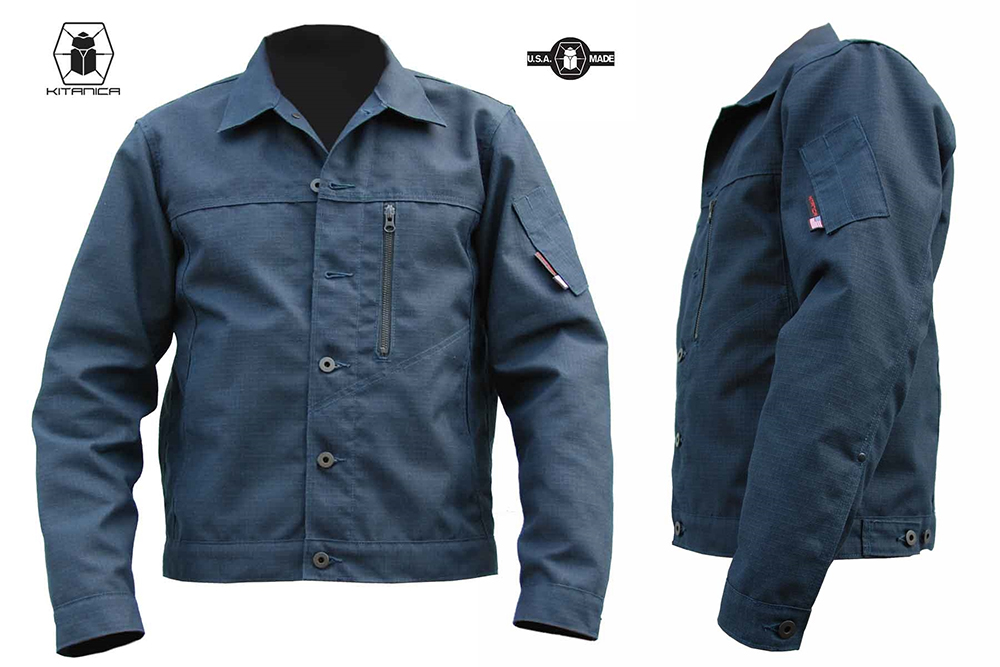
If you like the idea of Kitanica’s ultra-durable gear but tend to prefer simpler designs, the new Roughneck jacket should be just what you’ve been waiting for. This is the company’s take on a classic collared button-up jacket, and as with all other Kitanica apparel, it’s handmade in America from domestically-produced materials.
The Roughneck is available in either water-resistant cotton duck fabric or fire-retardant Kevlar/Nomex ripstop fabric. It features a left-side zippered chest pocket, two hand pockets, two interior pockets, and a pen holder on the left shoulder. Cinch tabs at the waist and buttons at the cuffs help seal out cold drafts.
Kitanica Roughneck FR in Midnight Blue
Currently, the standard cotton Roughneck is available in black, and the Kevlar/Nomex Roughneck FR is available in midnight blue. However, more colors may be offered in the future. MSRP is $179 for the standard Roughneck and $349 for the Roughneck FR (substantially more expensive due to the costly fire-retardant fabric).
For more information on the Roughneck, go to Kitanica.net.
This article originally appeared in Issue 2 of our magazine.
What is hypothermia and how does it affect the human body? Have you experienced a form of hypothermia and did not know it?
Most people walking this planet have no idea what hypothermia really is or what its signs and symptoms may be. Let’s say you and your buddies decide to go to a football game, and sometime between the tailgating and the sun setting you begin to feel cold. Next thing you know, your teeth are chattering and you start to shiver, but you suck it up because your buddies are powering on. Now your skin hardens, your fingers become hard to move, and your lips feel like they are burning. Whether you realize it or not, these are some of the beginning stages of hypothermia.
Hypothermia occurs when your body loses heat more rapidly than it can replace it. Commonly caused by exposure to cold weather or even being dunked in cold water, your bodily functions (heartbeat, blood flow, nervous system), and organs will rapidly start to degrade, which will lead to death. The human body operates best at 98.6 degrees Fahrenheit, but when your body is headed south of 95 degrees F, you’re in hypothermia territory.
The cold can injure or even kill you just as heat does, and in some cases, the cold can do it faster and more painfully. Like other medical conditions, there are different severities of hypothermia, and just as with heat-related emergencies, cold-related emergencies are affected by your body’s thermostat, the hypothalamus.
Symptoms
There are three levels of hypothermia. In mild cases, you’ll see some shivering and hypotension. If it gets worse, moderate cases will demonstrate more intense shivering, along with paleness of the skin, bluing of lips, ears, fingers, and toes. You’ll also notice that the patient will seem alert, but steadily lose their coordination and display confusion and less agility. When things get even more serious, the skin will become blue and puffy. Severe cases also show difficulty in speaking and thinking as well as low blood pressure, slowed breathing, and in many cases, irrational behavior and labored walking. Strangely enough, sometimes victims suffering from severe stages will begin to strip off their clothes, believing that they feel overheated. The stripping of the clothes increases heat loss, which leads to death.
Treatment
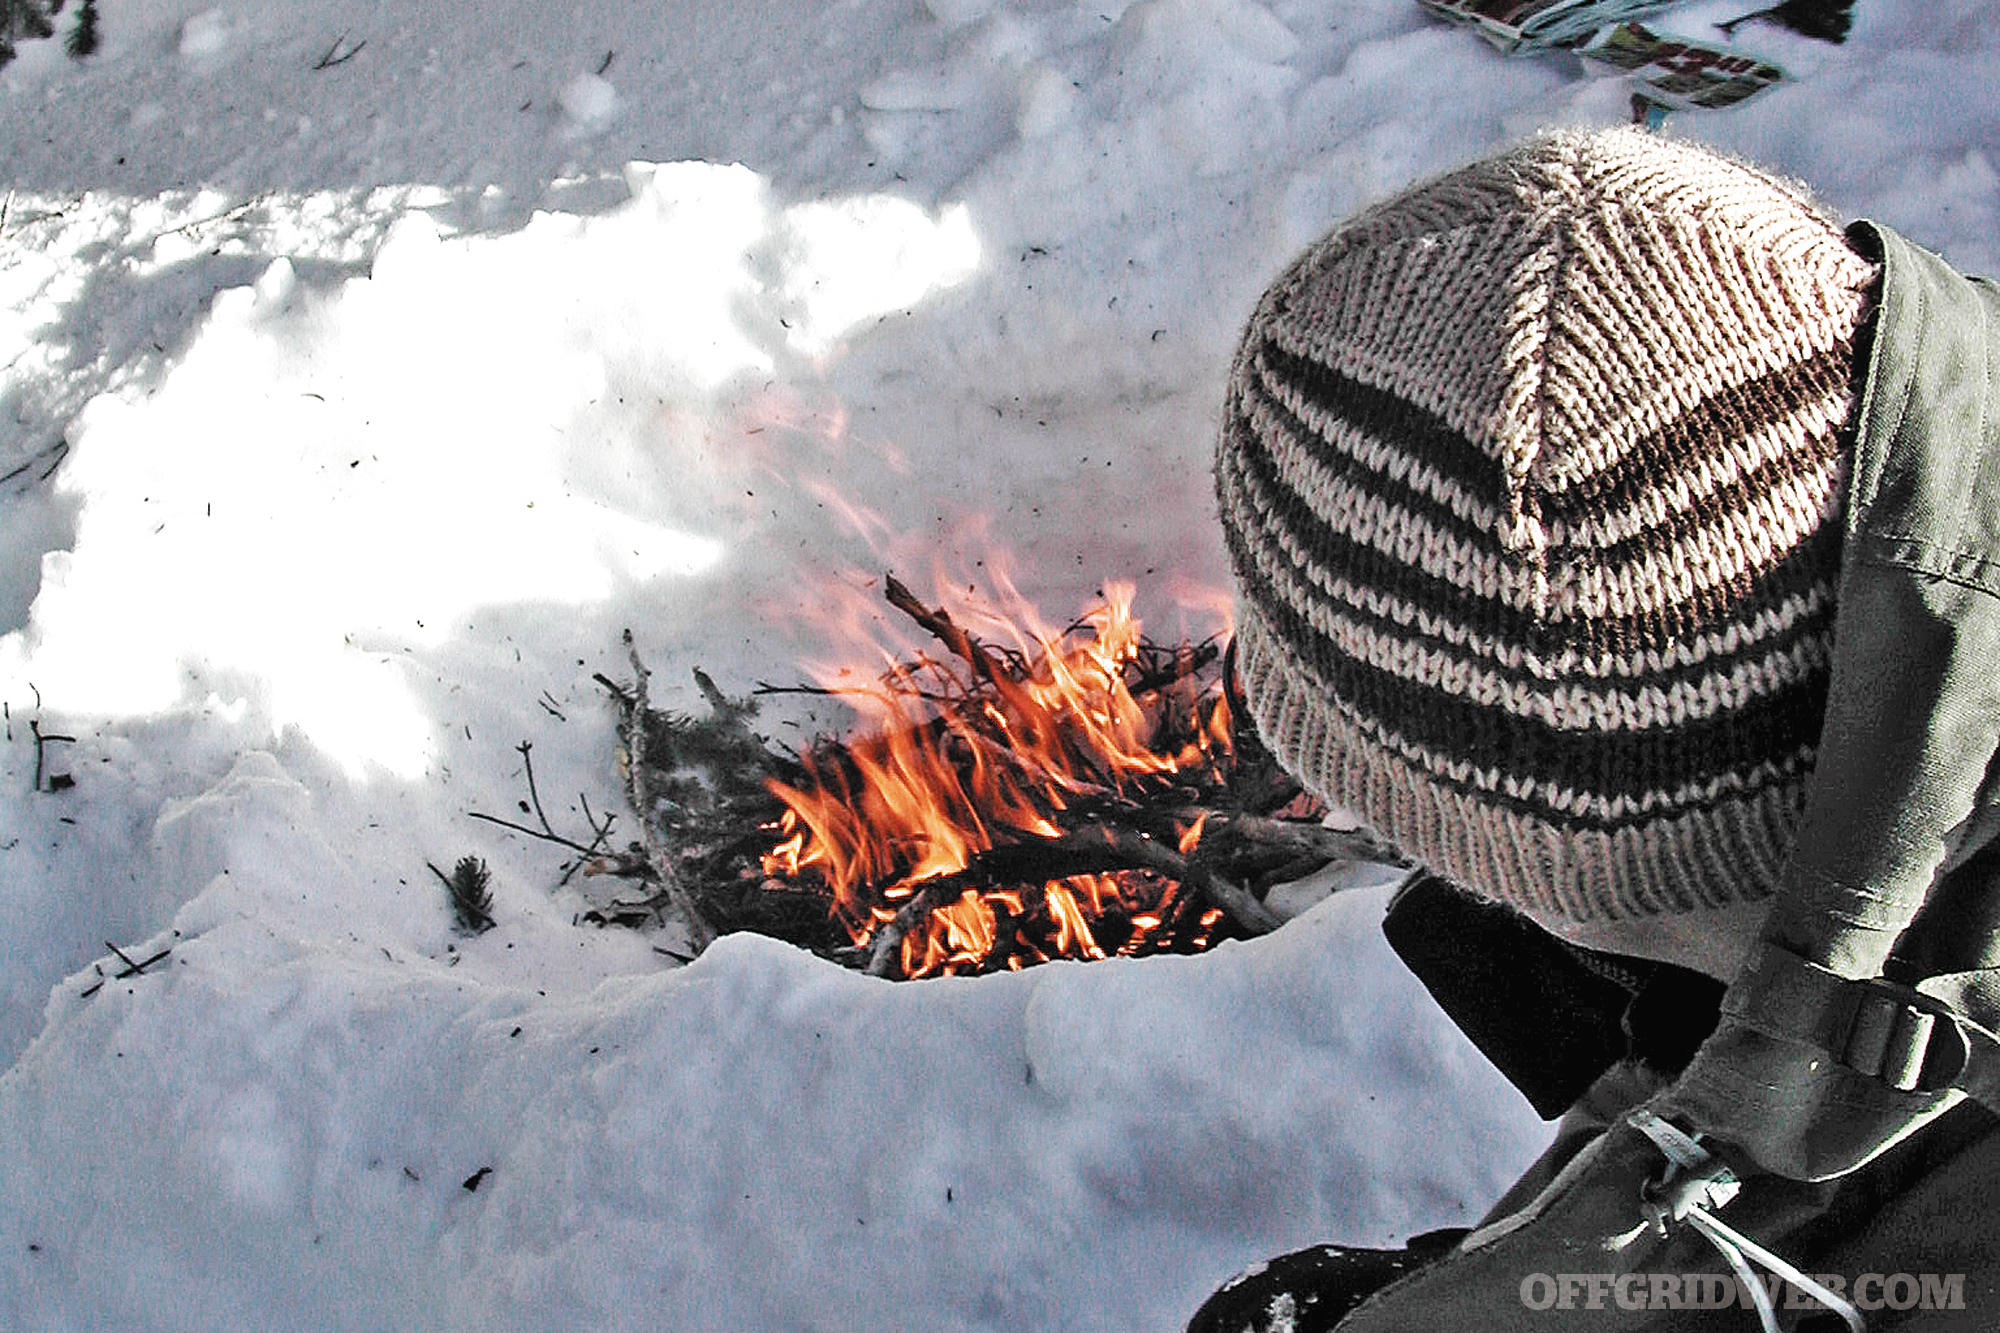
Treatment of all types of hypothermia and other cold-related emergencies is simple. Attempt to get out of the elements as quickly as possible. If you are stranded, you must find shelter or make shelter and get warm by bundling up and, if possible, building a fire. If you’re wet, get dry as soon as possible. Bundle up, under blankets without direct contact with the cold ground. Thermal balance must be maintained for survival. Getting out of the elements and creating a warming environment around you will take care of mild cases.
Don’t be too shy to share body heat by initiating skin-to-skin contact. Also, drinking warm, non-alcoholic, non-caffeinated drinks will help. Application of hot water bottles in the armpit and groin areas would help sufferers of moderate hypothermia. If the patient is suffering from a severe case, professional medical assistance will be required to introduce warm fluids into the patient intravenously. Dangerously shallow breathing might require CPR.
Prevention
The best way to avoid hypothermia is to stay warm, dry, and hydrated. It’s important to wear the proper clothing and shoes or boots for the elements. A good rule of thumb is to maintain a good, comfortable level of body heat in cold temperature. Don’t overdo it and bundle up until you’re sweating. On the other hand, don’t go out in the cold in your birthday suit, either. It’s also probably a good idea to pass on the next polar bear plunge, too.
Maintaining Body Temperature
In cold weather, your body burns more calories faster than in warmer climates. The more you move, the more energy you burn, and the more your body needs to be hydrated. Your primary objective is to stay hydrated. Maintaining a level body temperature goes hand in hand with hydration. Layering clothing is also very important to help maintain your body’s core temperature. Excessive sweating in cold environs is not a good thing since it makes it harder for your body to stay warm. The best way to balance your body warmth is to make adjustments to your clothing as necessary by putting on or taking off layers.
Alcohol
Alcohol can play a role in dehydration. Alcohol when consumed is absorbed rather quickly by the body because of its smaller molecular makeup. Your body wants to process this foreign substance faster, and it then uses water to process the alcohol. That’s why you have to pee when you get hammered. Your body wants to pee it out — and quickly. In a hypothermia situation, depleting water from your body has the opposite desired effect of what we are attempting to achieve. So when you’re freezing, it’s a good idea to avoid that bottle of bourbon or vodka. It may feel like it’s warming you up, but in the end, it’ll freeze you, maybe even to death.
Even after one recovers from the symptoms of hypothermia, it’s a good idea to have a trained medical professional examine the patient to make sure they are fully recovered. Hypothermia is a dangerous killer that can be avoided with proper preparation. When it’s cold out, make sure you take in water and you are properly bundled up. But, hypothermia isn’t the only condition to keep an eye out for. There are other dangers to cold environments, as well. Take a look at the sidebars on these pages to learn what else to avoid.
Other Cold-Induced Injuries
Frost Nip
Frost nip by definition is damage to the skin and underlining tissue as a result of exposure to severe cold. The signs of frost nip are:
Possibly red or pale grayish skin tone
Hard and waxy appearance with a burning sensation
Numbness and stiff joints
Cracking and painful skin
This usually occurs to exposed areas of the body, such as the hands, fingers, toes, noes, ears, or cheeks. While this is occurring, you may not even be aware of it once the numbness sets into those areas. If exposure to the elements continues, the next level of severity would be frostbite.
Frostbite
Frostbite is an injury to body tissues caused by exposure to extreme cold, typically affecting the extremities. Prolonged exposure could result in gangrene or tissue death.
Frostbite signs are:
Reddening of the skin that turn white or pale
Direct exposure would have an icy appearance
Stinging, burning sensation with swelling to the affected area
Over a 24-hour period, you could develop blisters
Loss of sensation with continued pain
Reduced movement or range of motion in joints and muscles
As the skin continues to be exposed to the extreme cold, the tissue on the surface will be damaged. However, the real problems start with extended exposure to the cold and when the underlining layers of skin are damaged. This could result in damage to blood vessels and capillaries, and it will eventually kill the cells. This is where gangrene starts to set in. If it does, professional medical assistance must be sought immediately.
Trench Foot
Trench foot is a painful condition to the feet caused by long exposure to cold water or mud and marked by blackening and death of surface tissue. It also leads to gangrene or tissue death occurring at the affected area. Keep in mind these are the worst-case situations to extreme cold exposure. The key point here is exposure as it’s related to time and temperature. The colder it is, the worse the damage to the body.
Trench foot signs and symptoms are:
Tingling or itching sensation with pain and swelling
This article was originally published in Issue 1 of our magazine.
WARNING: The content in this story is provided for illustrative purposes only and not meant to be a detailed guide on fuel transfer or vehicle repair. Any use of the information contained in this article shall be solely at the reader’s risk.
Urban preppers face many unique challenges that their rural cousins need not consider. Urban living has its perks for sure, but ample and adequate space to store certain items is not one. Things like food, water, and medical supplies are manageably stored in a closet or cupboard. Gasoline is not so easy to store if you’re eight floors up and hurtin’ for closet space.
If your plan is to “bug in,” your food and water stockpile can keep you comfortable for however long you’ve prepared to stay. But, what about when you have to bug out? How far can you go on what’s left in the tank of your vehicle? Is it far enough? How can you get the gas you need to go farther?
Here’s a likely scenario: You have to get mobile, and your car… well, let’s say you haven’t been as diligent as you should’ve about keeping it above the 3⁄8 mark. Your saving grace? You spot an abandoned car in a parking lot. You know chances are it has at least a little gas in it. Assuming the fuel hasn’t expired, it’s liquid gold. Now you just have to figure out the best way to get those tigers into your tank.
Suck It?
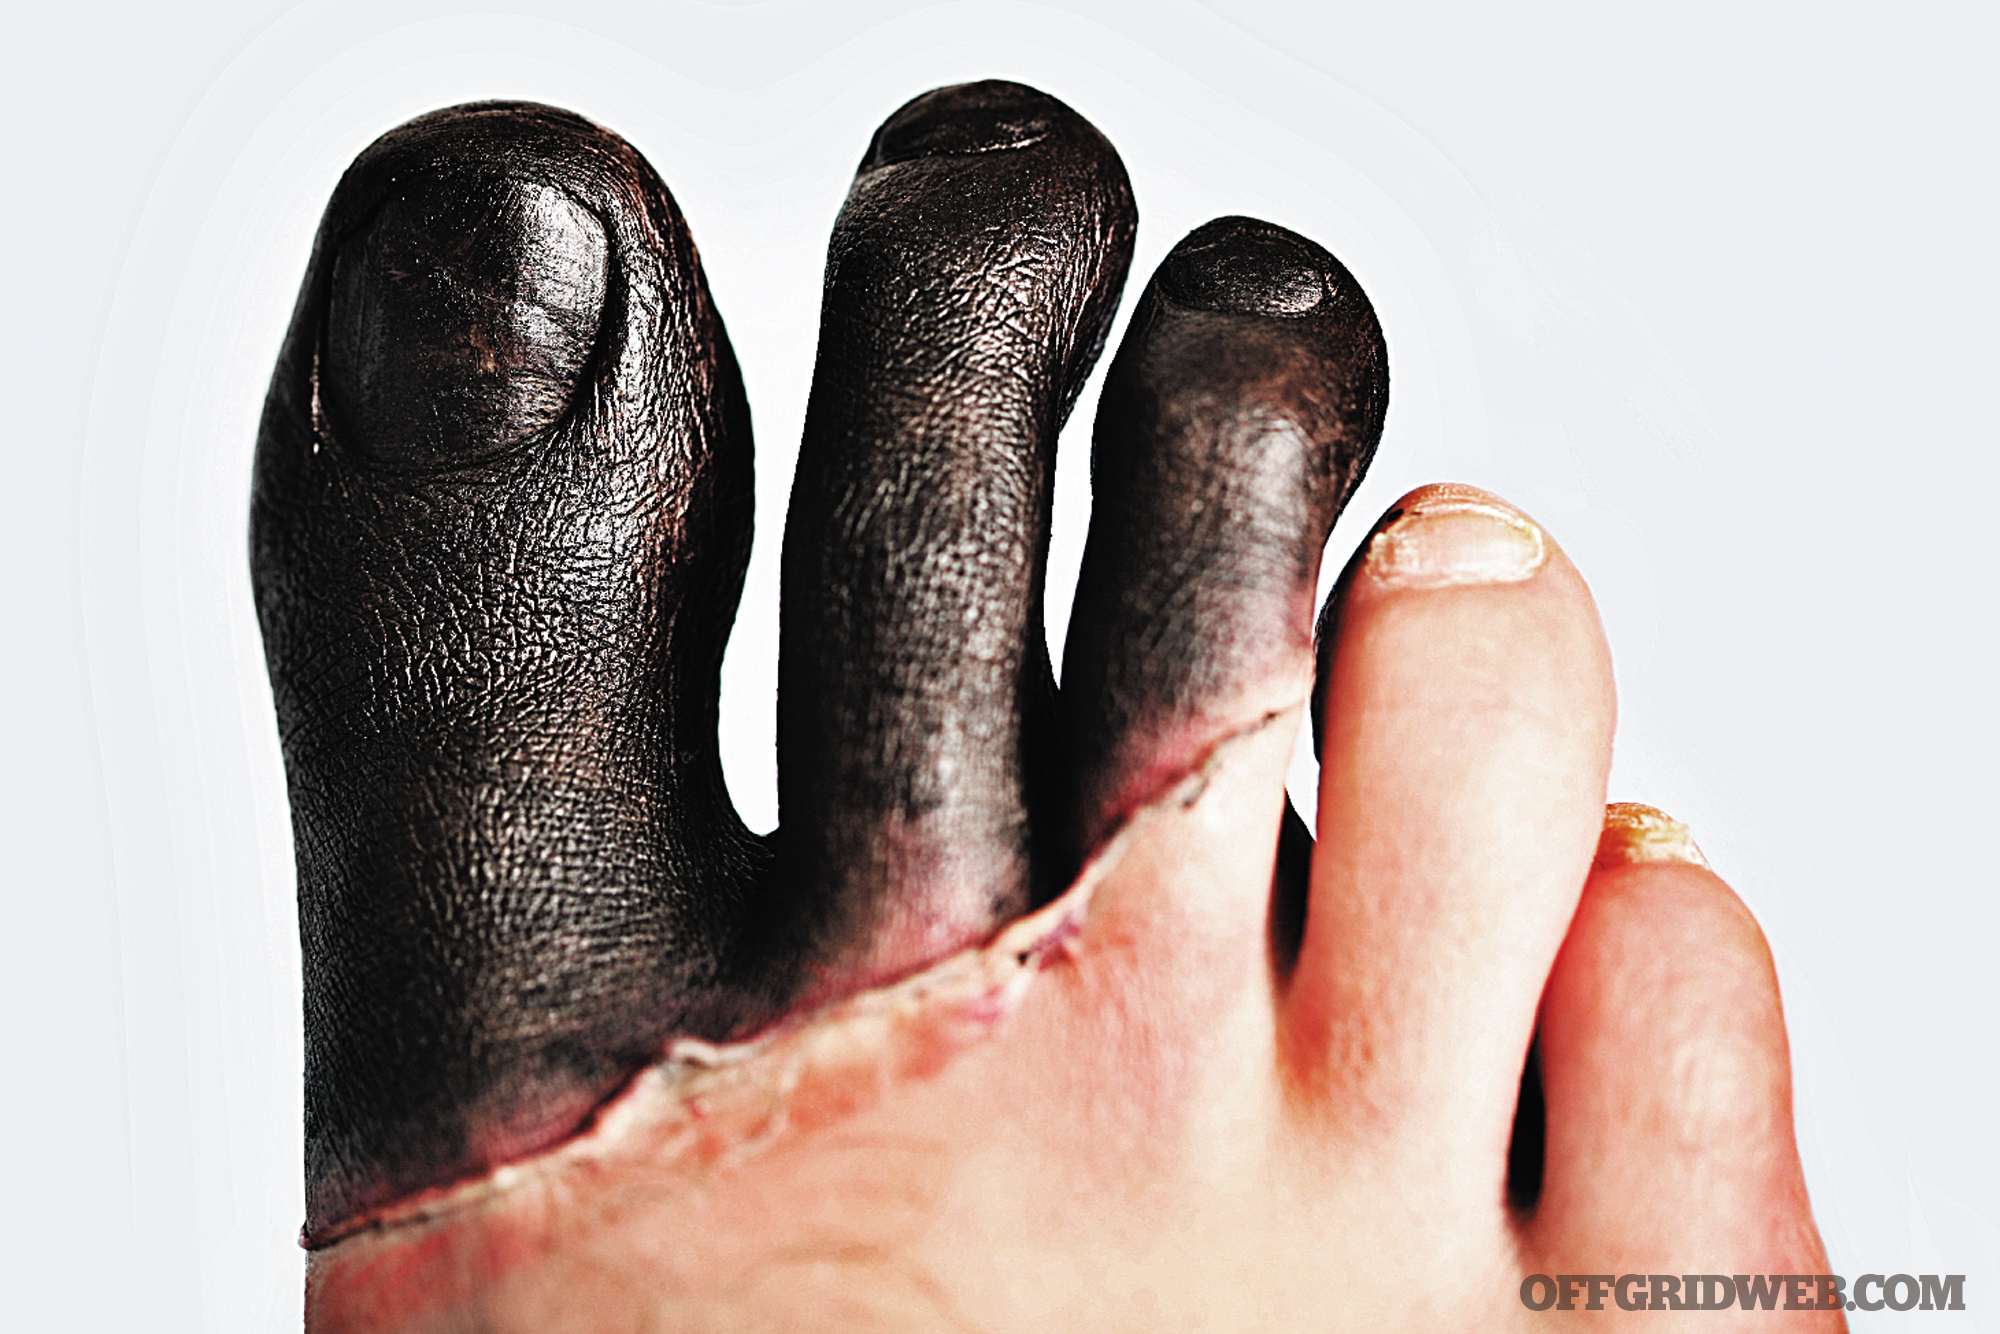
We’ve all seen it, someone sticking a hose into the gas tank and creating a siphon by sucking on it madly until they get a mouth full of 87 octane. Don’t do it. The whole idea is to survive — not to become a rotting corpse, collapsed in a heap, dead from either respiratory arrest, being eaten from the inside out by the petrol in your stomach, or suffocating because of a vapor-burnt esophagus.
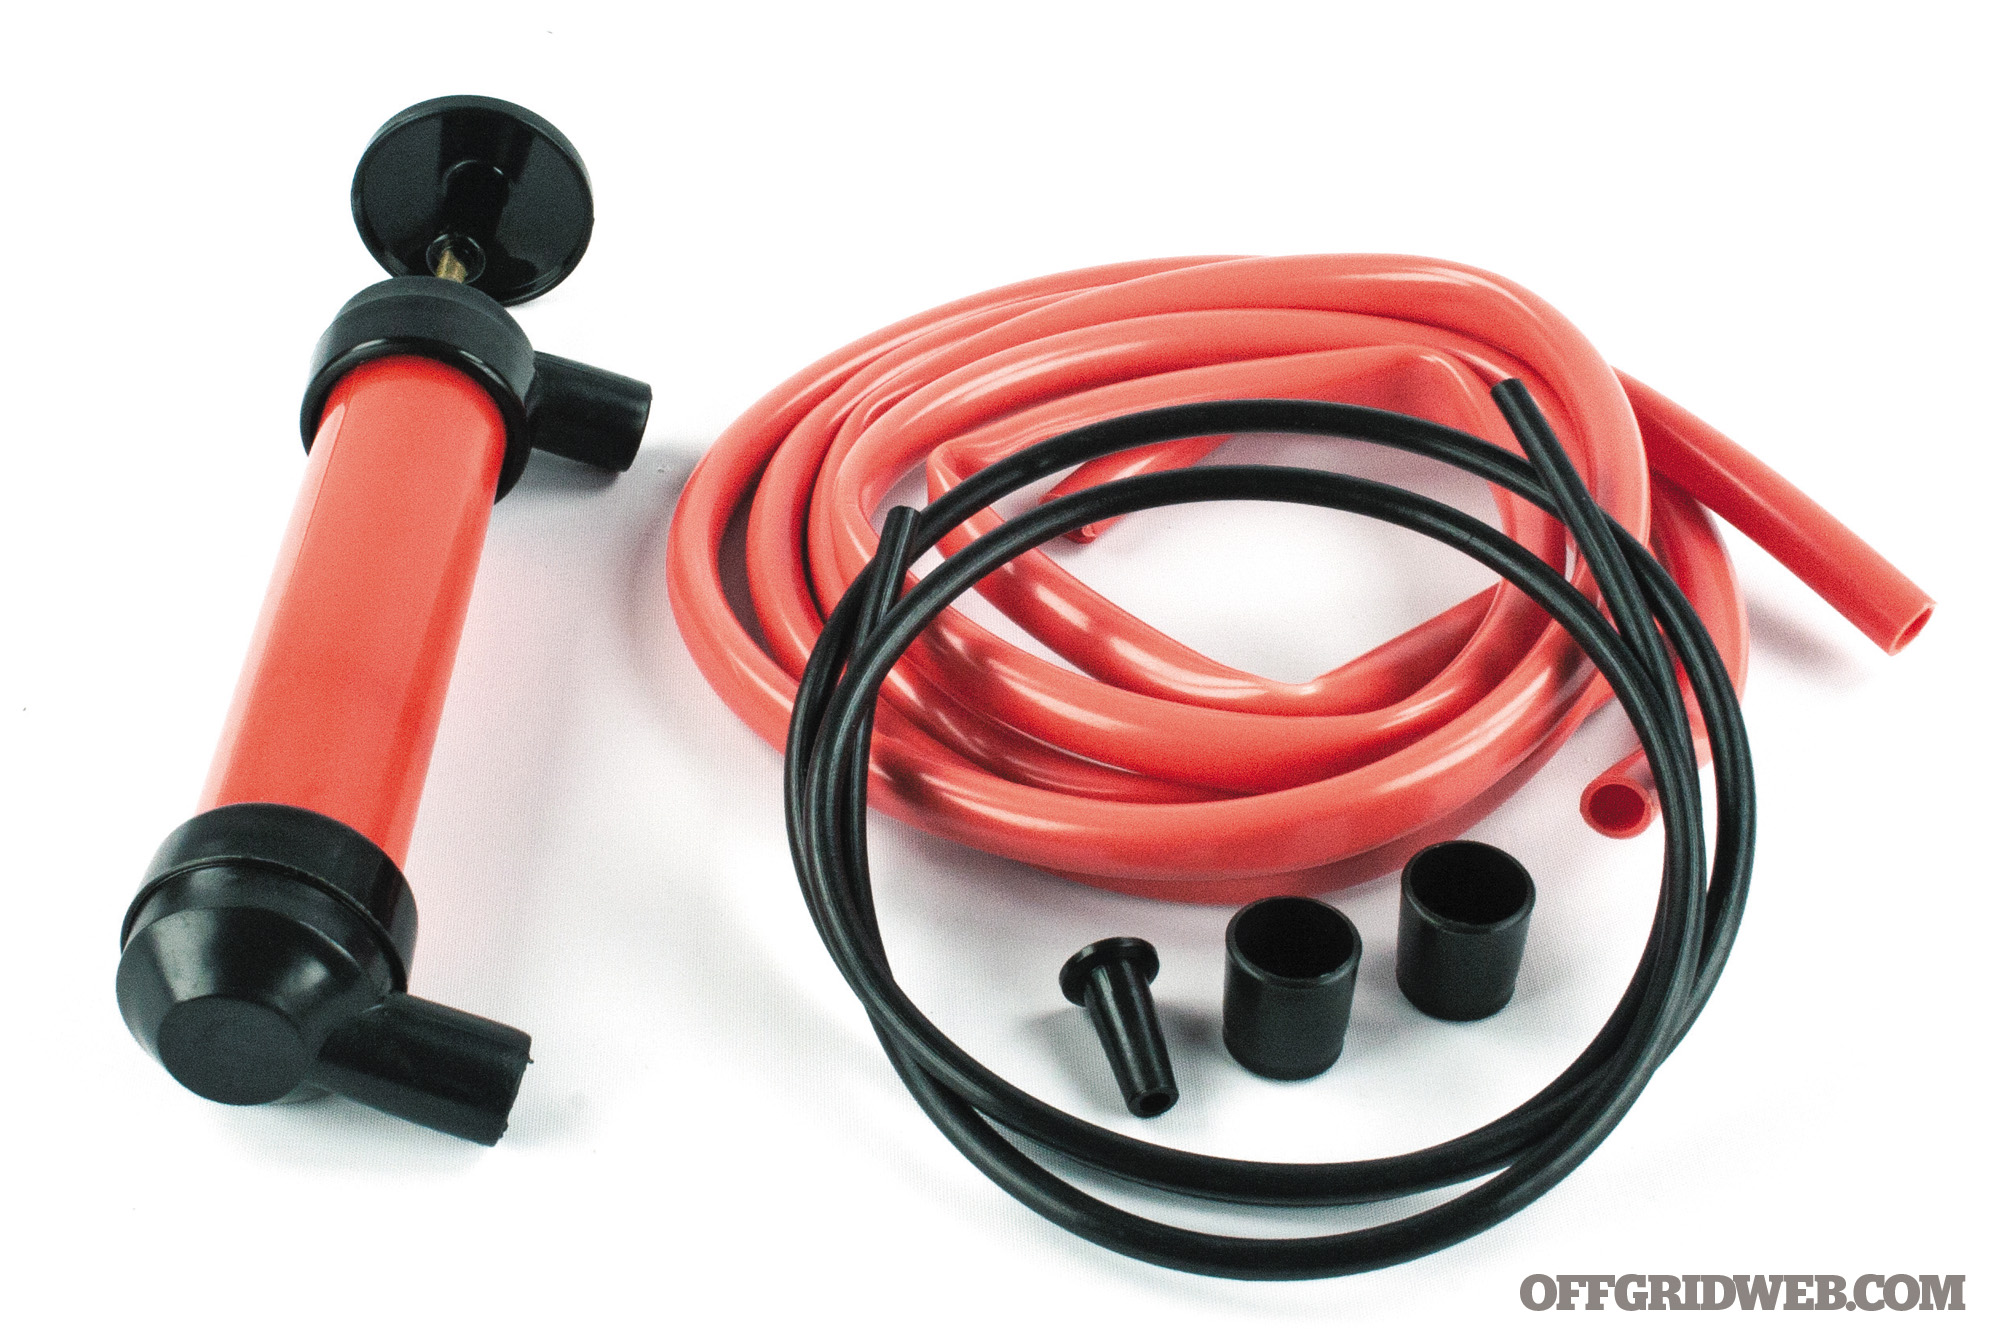
There’s no need to put mouth to hose when there are plenty of other ways to appropriate gas. The easiest and most portable way is with a simple hand pump like the one pictured. There are a number of designs and sizes; any home improvement store or auto center will have a good selection.
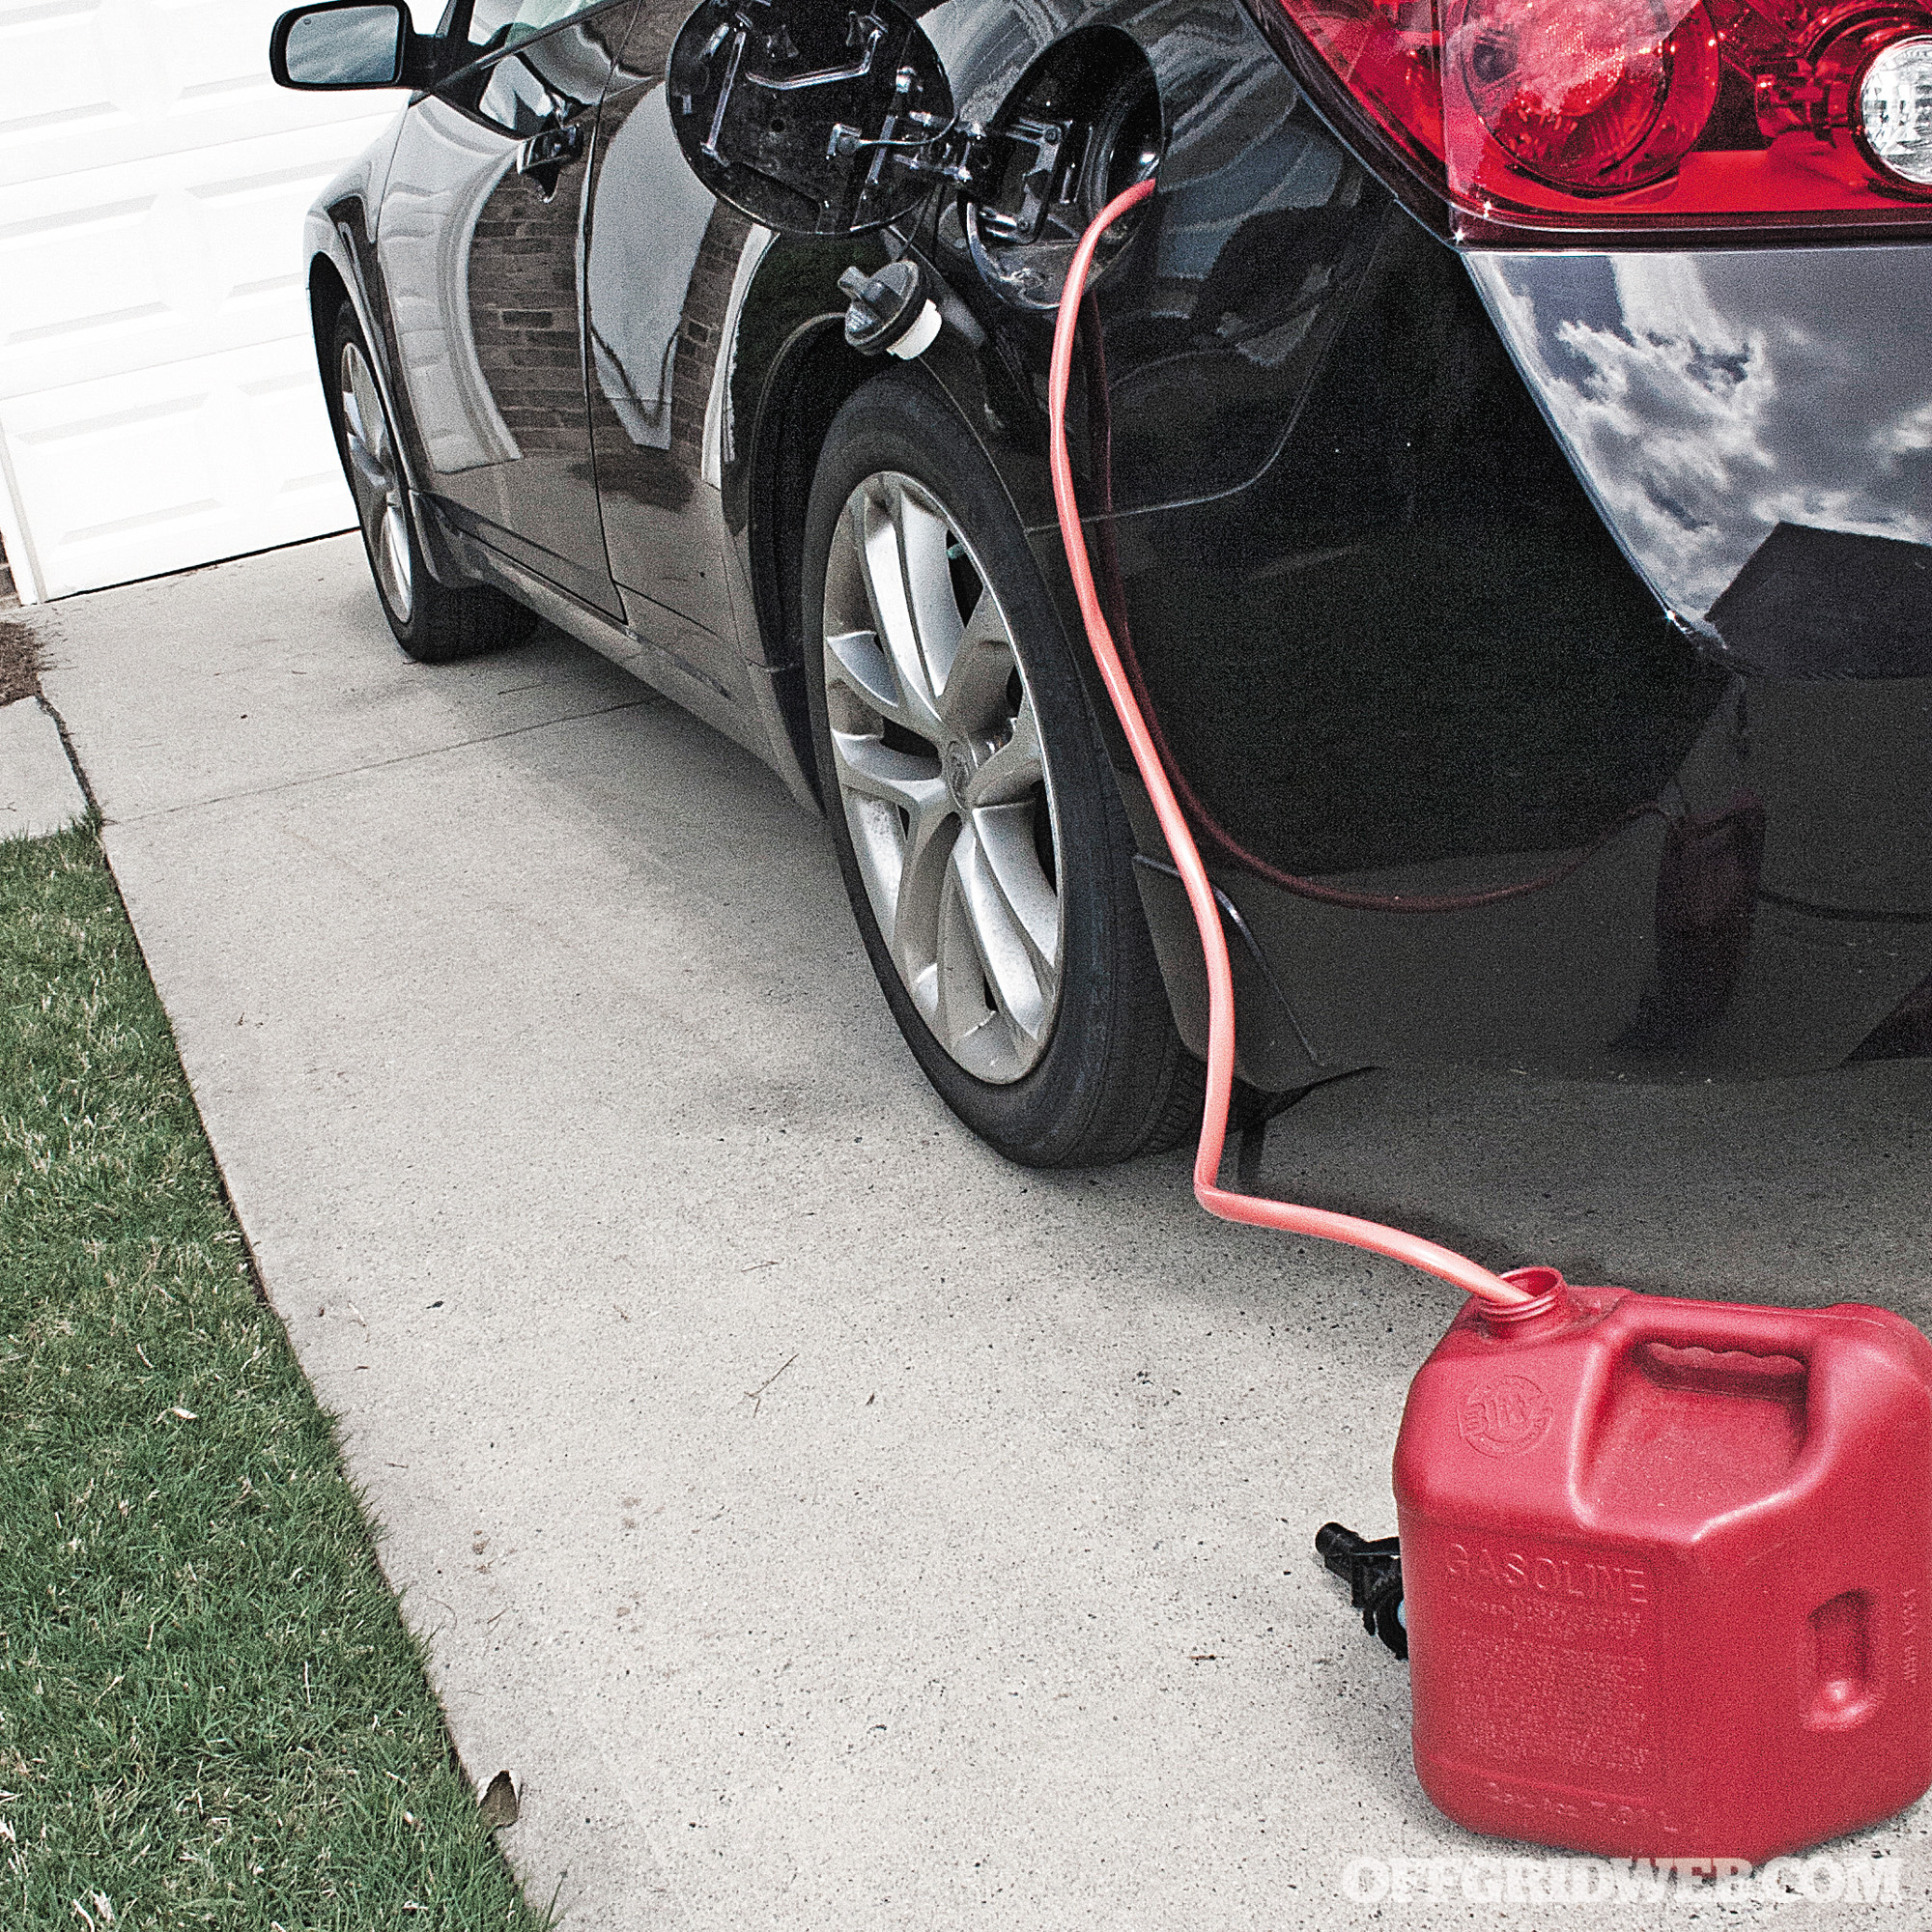
Our advice? Get the smallest most packable siphon pump you can find, and keep it in your vehicle emergency kit. We chose an Arnold 490, mainly because of its size, but also because it comes with two different hoses: a large one for gas and a smaller one for Texas tea (oil, that is). It’s efficient, simple, and person-powered. All you do is hook a hose at each end of the pump; the in tube goes into the source tank and the out tube belongs in the gas can, car, or wherever you’re storing your bounty. Now, you’re ready to pump away.
Another source for a simple siphon pump is your local pet store in the aquarium section. Look for a hand-powered aquarium vac. Instead of pumping out fish poop-laden water, it’ll be suckin’ up gas. It’s also a bonus that they come with the clear tubing, so you can see that it’s actually gas you’re getting.
It’s Never As Easy As It Should Be
Chances are it won’t be as easy as sticking a tube into the gas tank and pumping away. In general, car companies consider the filler tube a one-way street. They make it easy to put gas in, but frown on the ability to take it out.
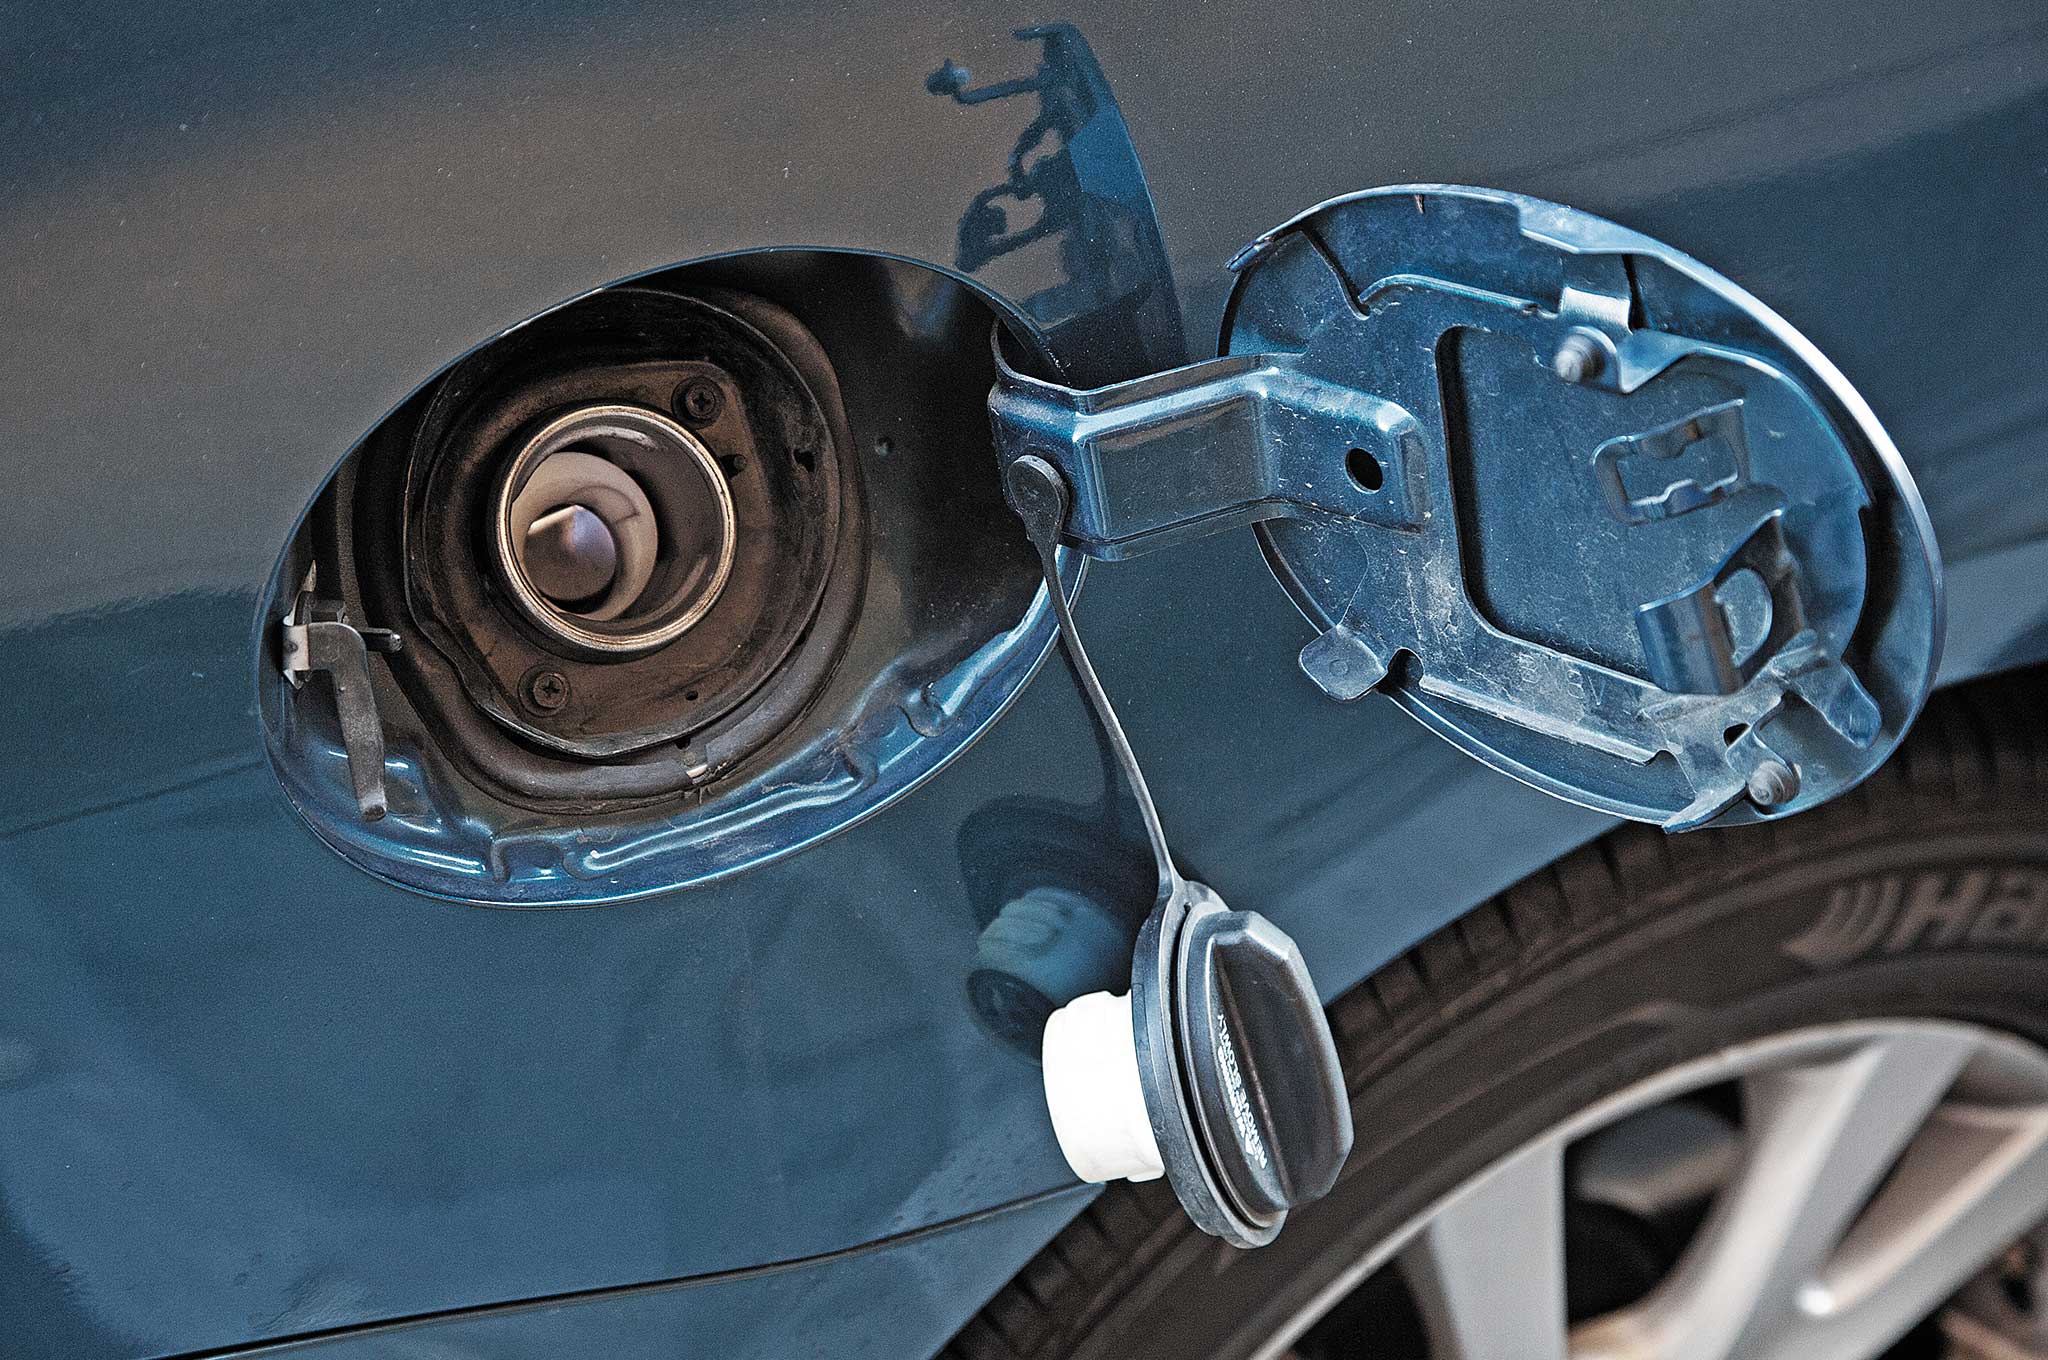
Several late-model cars have one or more devices to discourage the transfer of fuel out of the tank. The first line of defense you’ll need to get around is the lockable filler door and/or filler cap. Without going into too much detail, the only way past them may be the brute force required to pry, pick, and break your way past the doors and locks.
Now that you have access to the filler tube, you notice there’s a little flapper thing covering the top of the filler tube. Sure, the siphon hose will push it aside as it goes in, but much like Chinese finger cuffs, the more you try to pull the hose out, the more the flap pinches it. Be prepared to use your screwdriver to push the flap up when taking the hose out.
Now that we’ve dealt with the easily-beatable first lines of defense, a much more defiant adversary awaits. If you start to feel some resistance as you put the hose down into the tank, chances are you’ve hit one of two things: an anti-siphon screen or an anti-siphon valve.
The anti-siphon screen is merely a piece of perforated metal that prevents anything solid from going into the tank. That’s easy enough to get around. All you need to find is a long enough screwdriver or any sturdy stick thin enough to fit on the tube and long enough to hit the screen with room to spare. You can guess what happens next; you’re going to use what you have to break the screen. Caution! Gas vapor is extremely flammable, so using a metal rod to puncture the screen may cause sparks, followed by a flash, followed by you doing an impression of the human torch. Again, the object is to survive, so common sense should be applied abundantly.
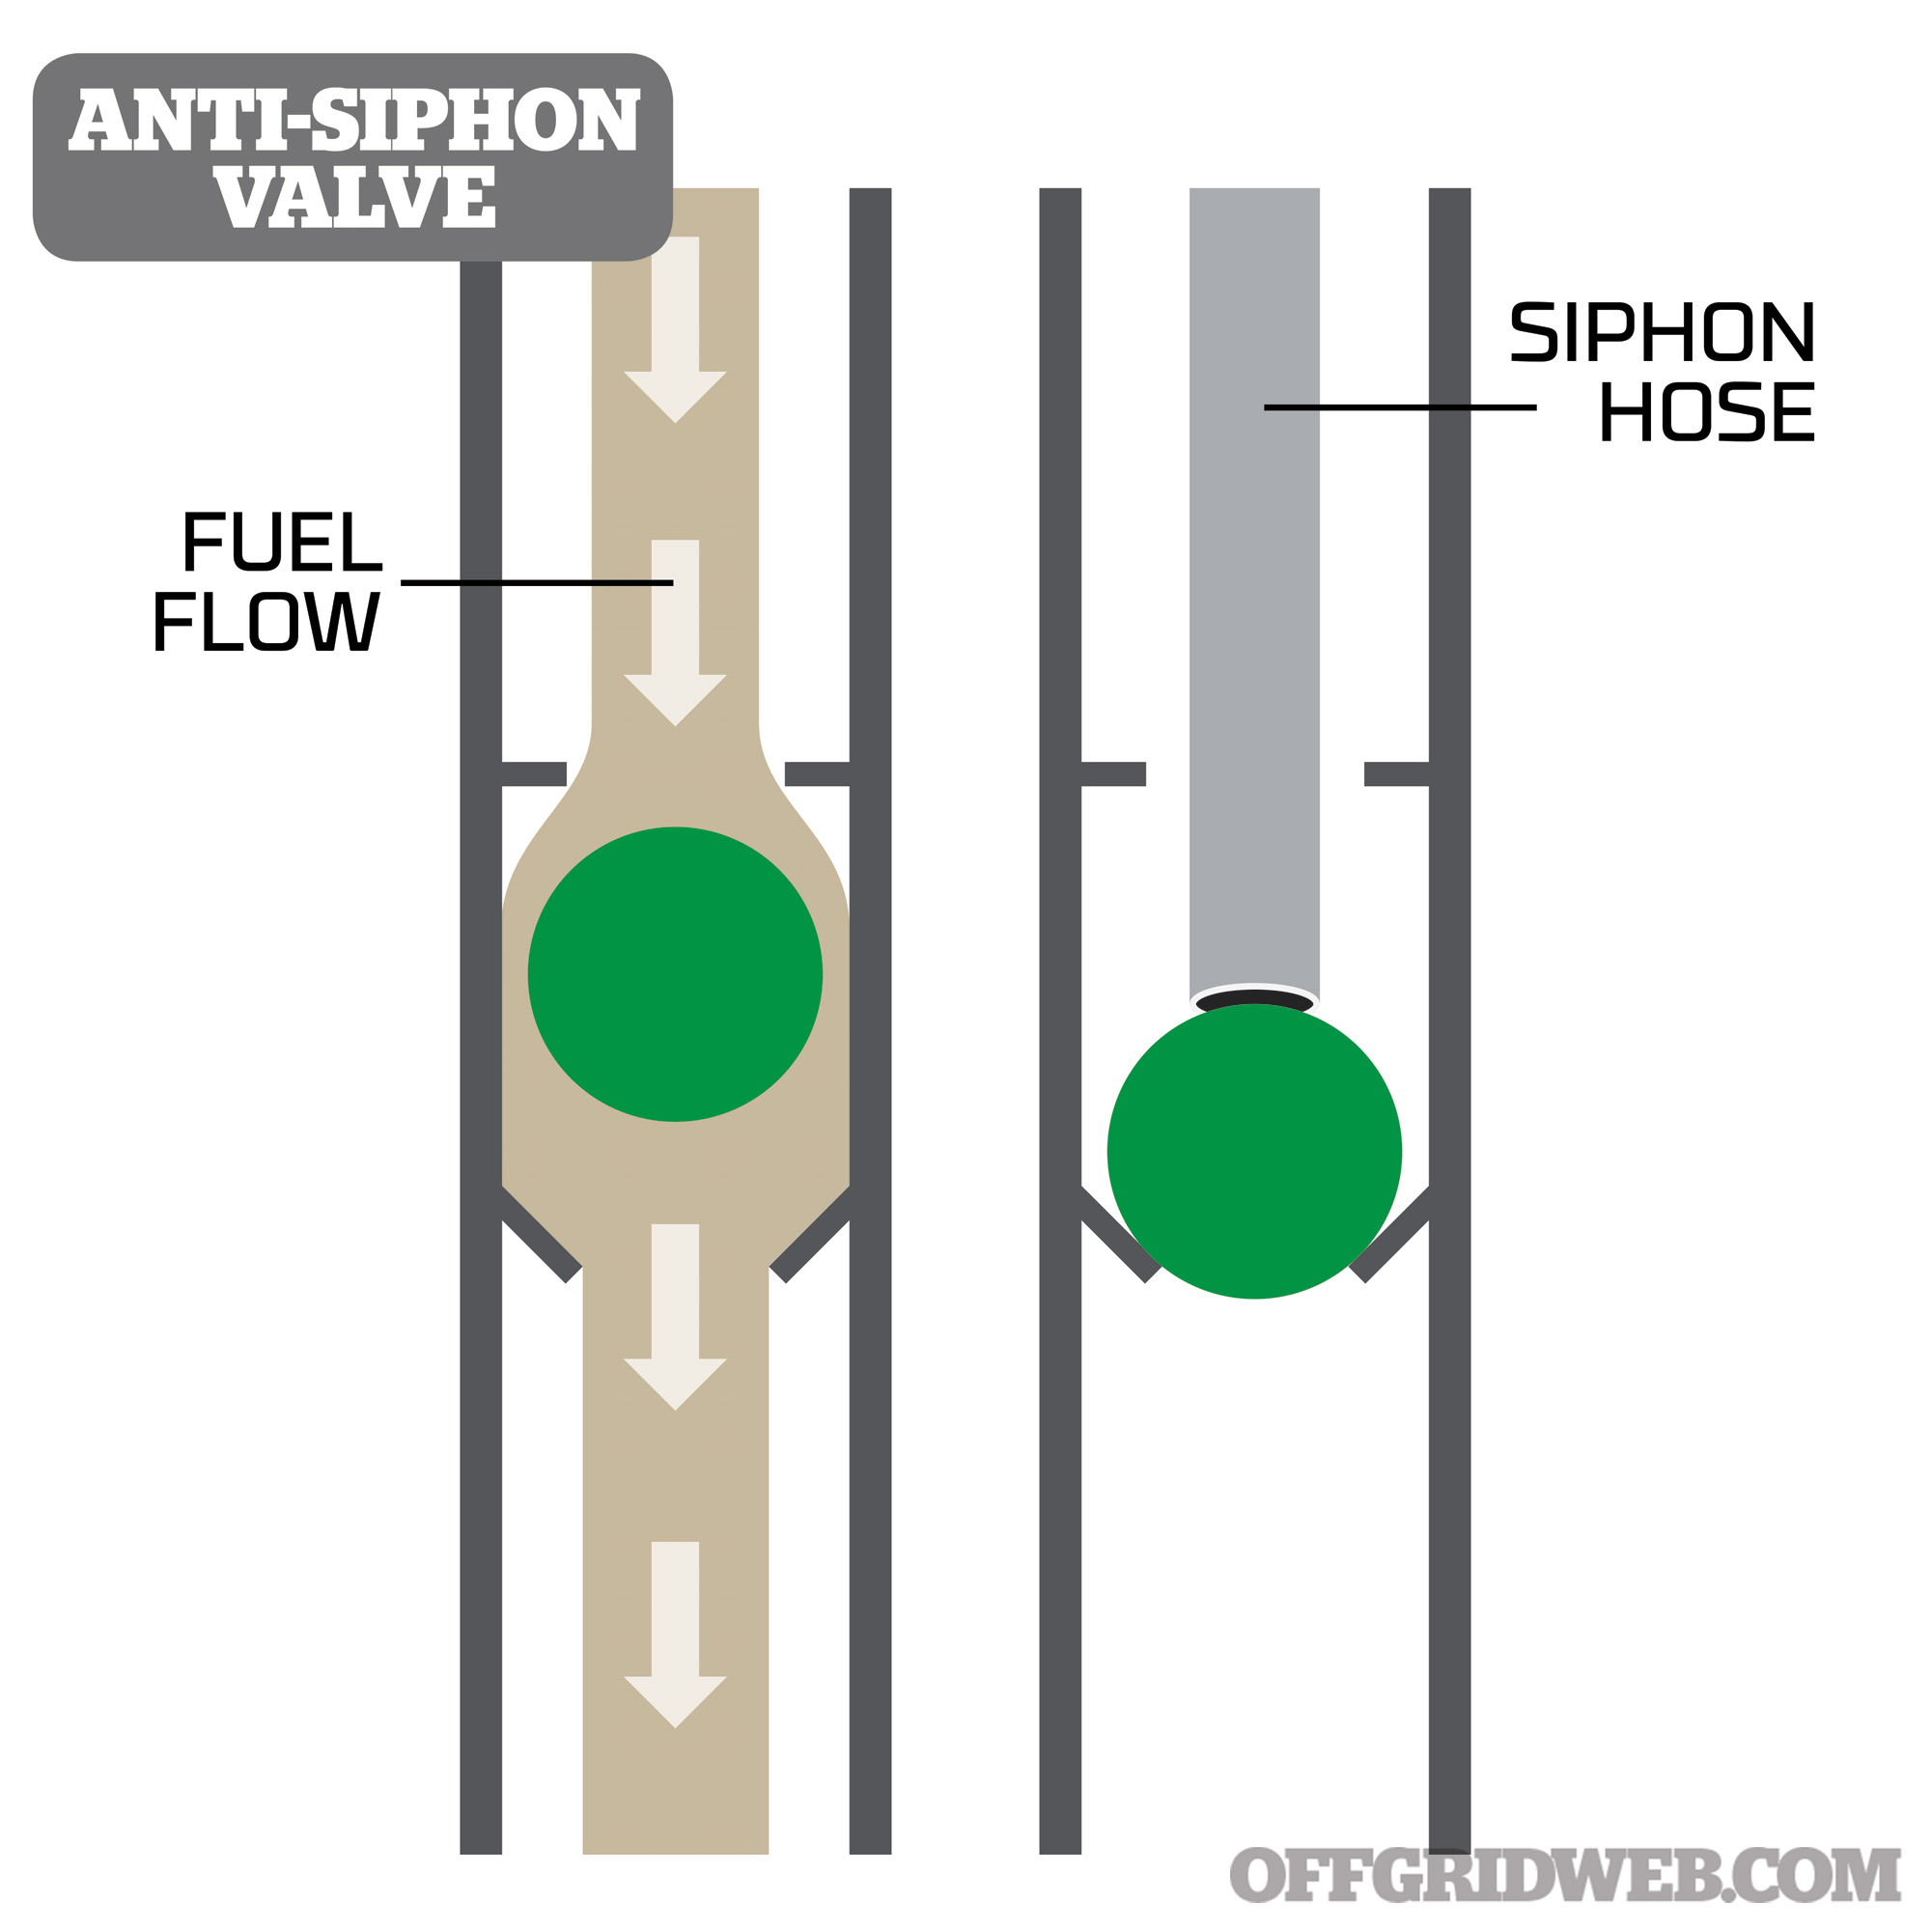
The Anti-Siphon Valve
If there’s still resistance while pushing the hose down the filler tube, then you’ve most likely come across an anti-siphon valve. Though exact designs vary with manufacturers, the most basic and efficient valve is a simple ball valve. Push against it, and it closes the filler tube. When gas is flowing it floats up, and the gas gets to the tank.
So, how do you get through the anti-siphon valve? Short of disassembling the filler tube, you can’t go through the valve. Instead, you’ll have to go around. The easiest but least comfortable way is to climb under the car, and if it’s a polymer tank, drill into it with the battery-operated drill you always have with you.* What? A cordless drill isn’t part of your bug-out bag. No worries, it’s not in ours either. So, how do we tap that gas?
*Note: Never attempt to drill a hole into a metal fuel tank with a metal drill bit. Sparks from a bit and from the electric motor may ignite fuel vapors in the tank, causing explosion and death.
Since you’re always prepared, your multitool has various ways to create holes in the tank. Depending on the tool, you can use an awl, a corkscrew, a screwdriver, or a knife to get into the tank. Basically, any sharp pointy object can be used to work or punch your way in. Remember these tanks are designed to withstand a good amount of damage before being punctured. Any method of putting a hole in the tank is going to require a little muscle and a lot of patience.
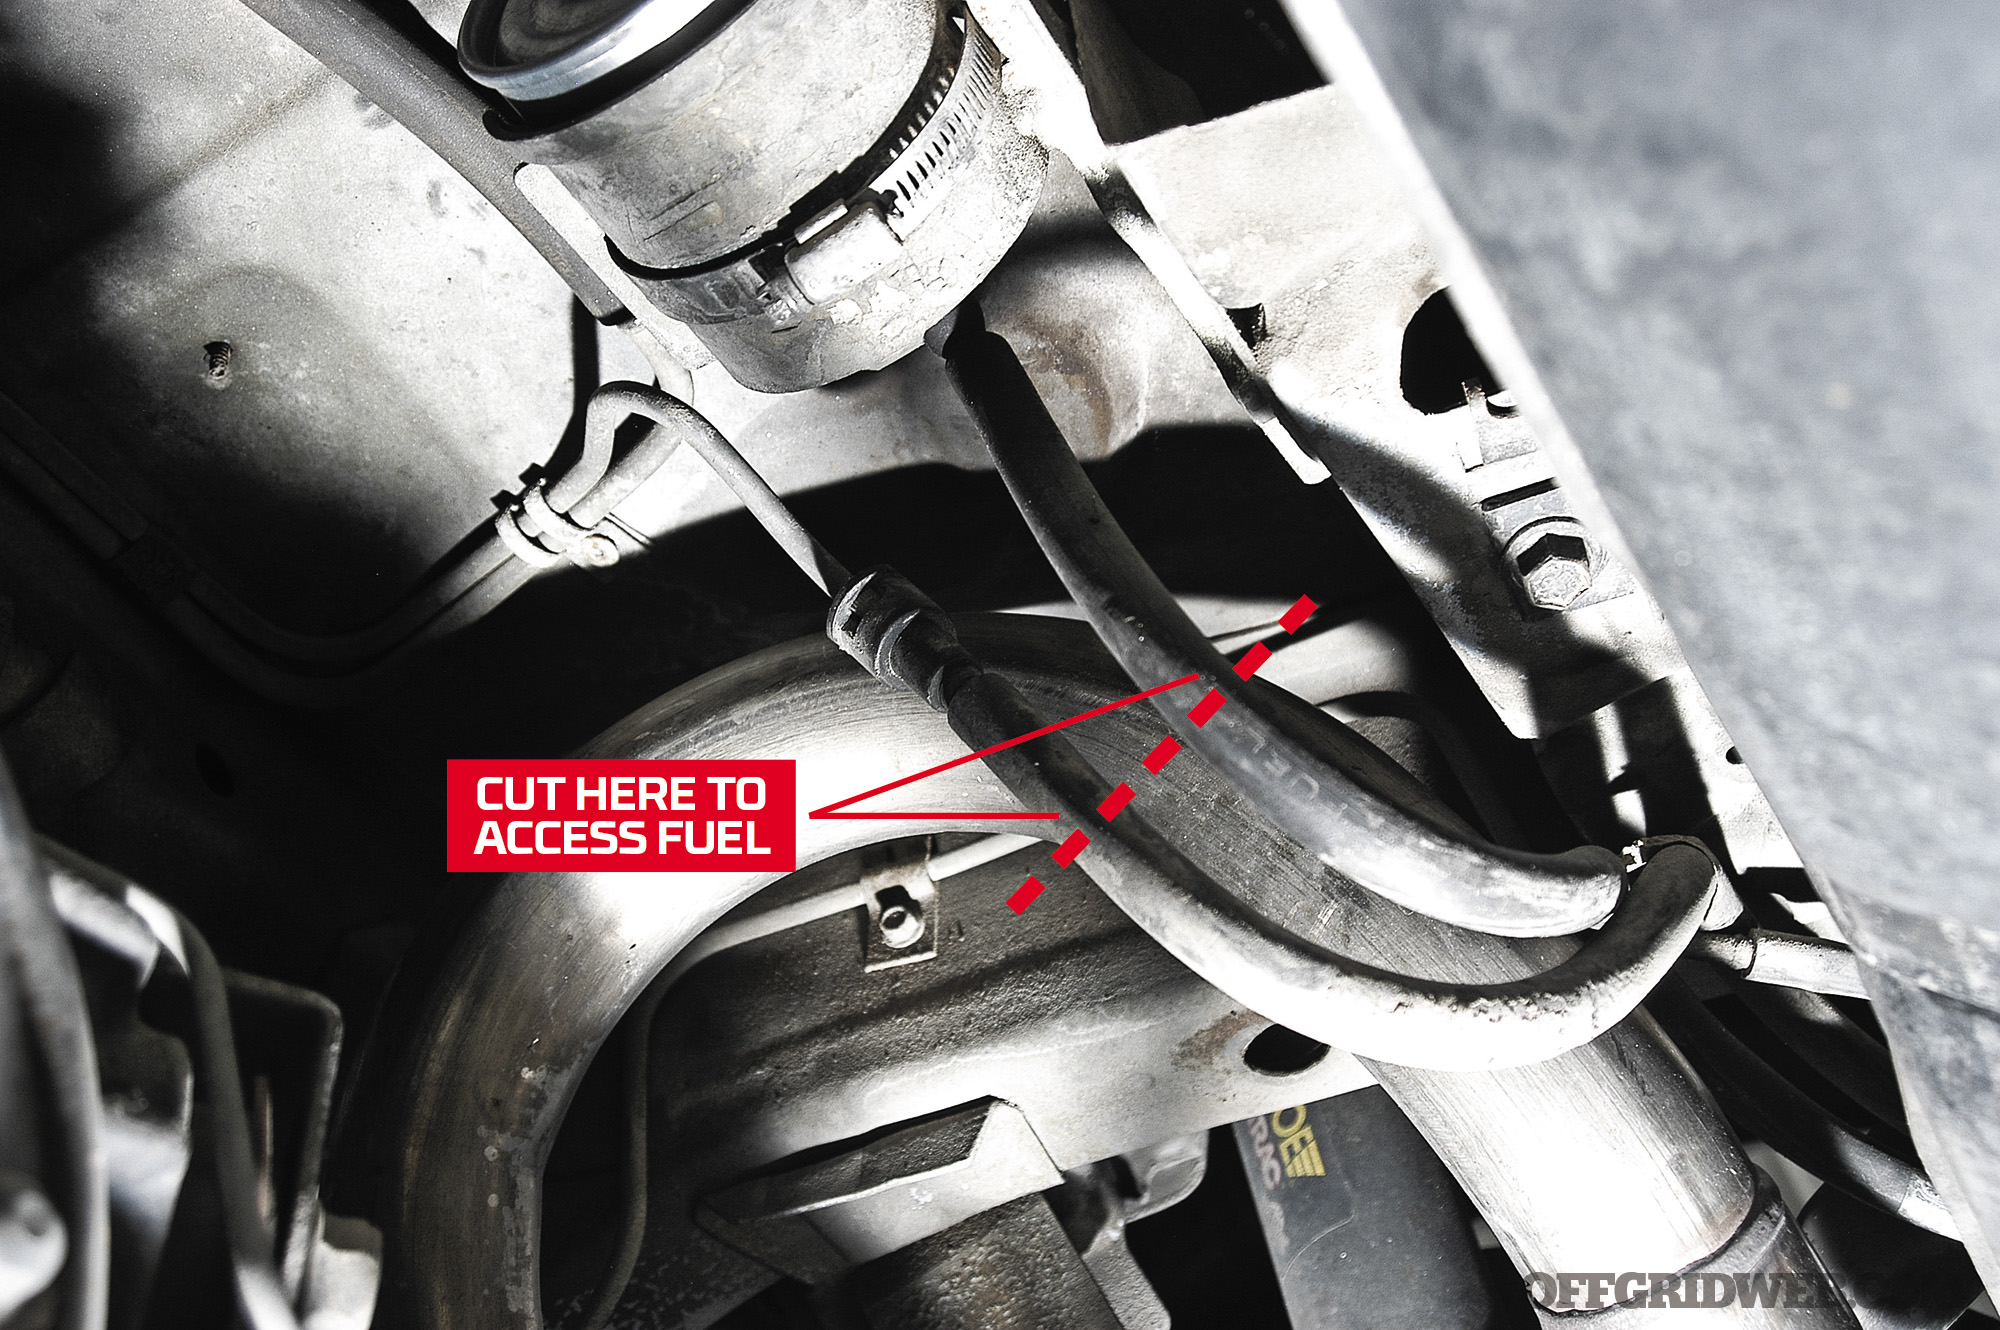
If you’re so inclined, an alternative method to get around the anti-siphon valve is to attack the tank from the other end. This requires you to be a little more mechanically adventurous. You’ll need to find the fuel line coming out from the tank to the engine. You’ll see that it’s attached to the tank with a metal clamp. With the pliers on your multitool, remove the clamp and, bingo, you’re in. Put the siphon hose where the fuel line was and away you go. If you found the keys to the car, you can crank the ignition with this hose disconnected to let the fuel pump force fuel through the hose.
It’s worth noting that not all of these methods work on all models of cars. It’s easier to get gas out of some cars (especially pre-1990s models) than others. If you have time you may need to exercise some creativity to get what you need. It’s important to remember, however, the longer you’re trying to figure it out, the longer you’re not moving forward. Moving on to easier pickins may be the best option. Needless to say, the essence of functioning effectively in any emergency or crisis is being prepared to adapt and overcome.