Each year at SHOT Show, one of the first stops we make is at the Kershaw and Zero Tolerance booth. These two sister brands never fail to release a surprising number of blades at the show, and our meeting provides a rare opportunity to sit down behind closed doors and handle each one of them.
For SHOT Show 2019, the unveil list added up to 23 knives — some are revisions to existing designs, while others are completely new. Below, we’ll show you these releases, along with some quick facts about each.
Kershaw Cinder Copper
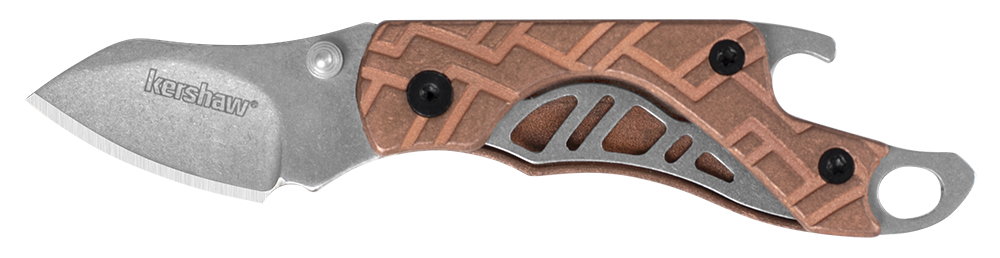
Updated for 2019 with copper handle scales.
Steel: 3Cr13, stonewashed finish
Handle: Copper
Mechanism: Liner lock, manual opening
Blade: 1.4 in. (3.6 cm)
Closed: 2.6 in. (6.6 cm)
Weight: 1.5 oz. (43 g)
MSRP: $30
Kershaw Reverb XL
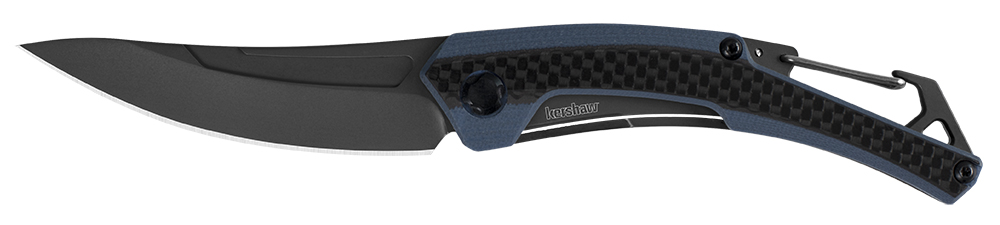
Updated for 2019 with larger dimensions, upswept blade shape, and dual-material front handle.
Steel: 8Cr13MoV, titanium carbo-nitride coating
Handle: G10, carbon fiber overlay front, stainless steel back
Mechanism: Frame lock, manual opening
Blade: 3 in. (7.6 cm)
Closed: 4.25 in. (10.9 cm)
Weight: 2.1 oz. (60 g)
MSRP: $45
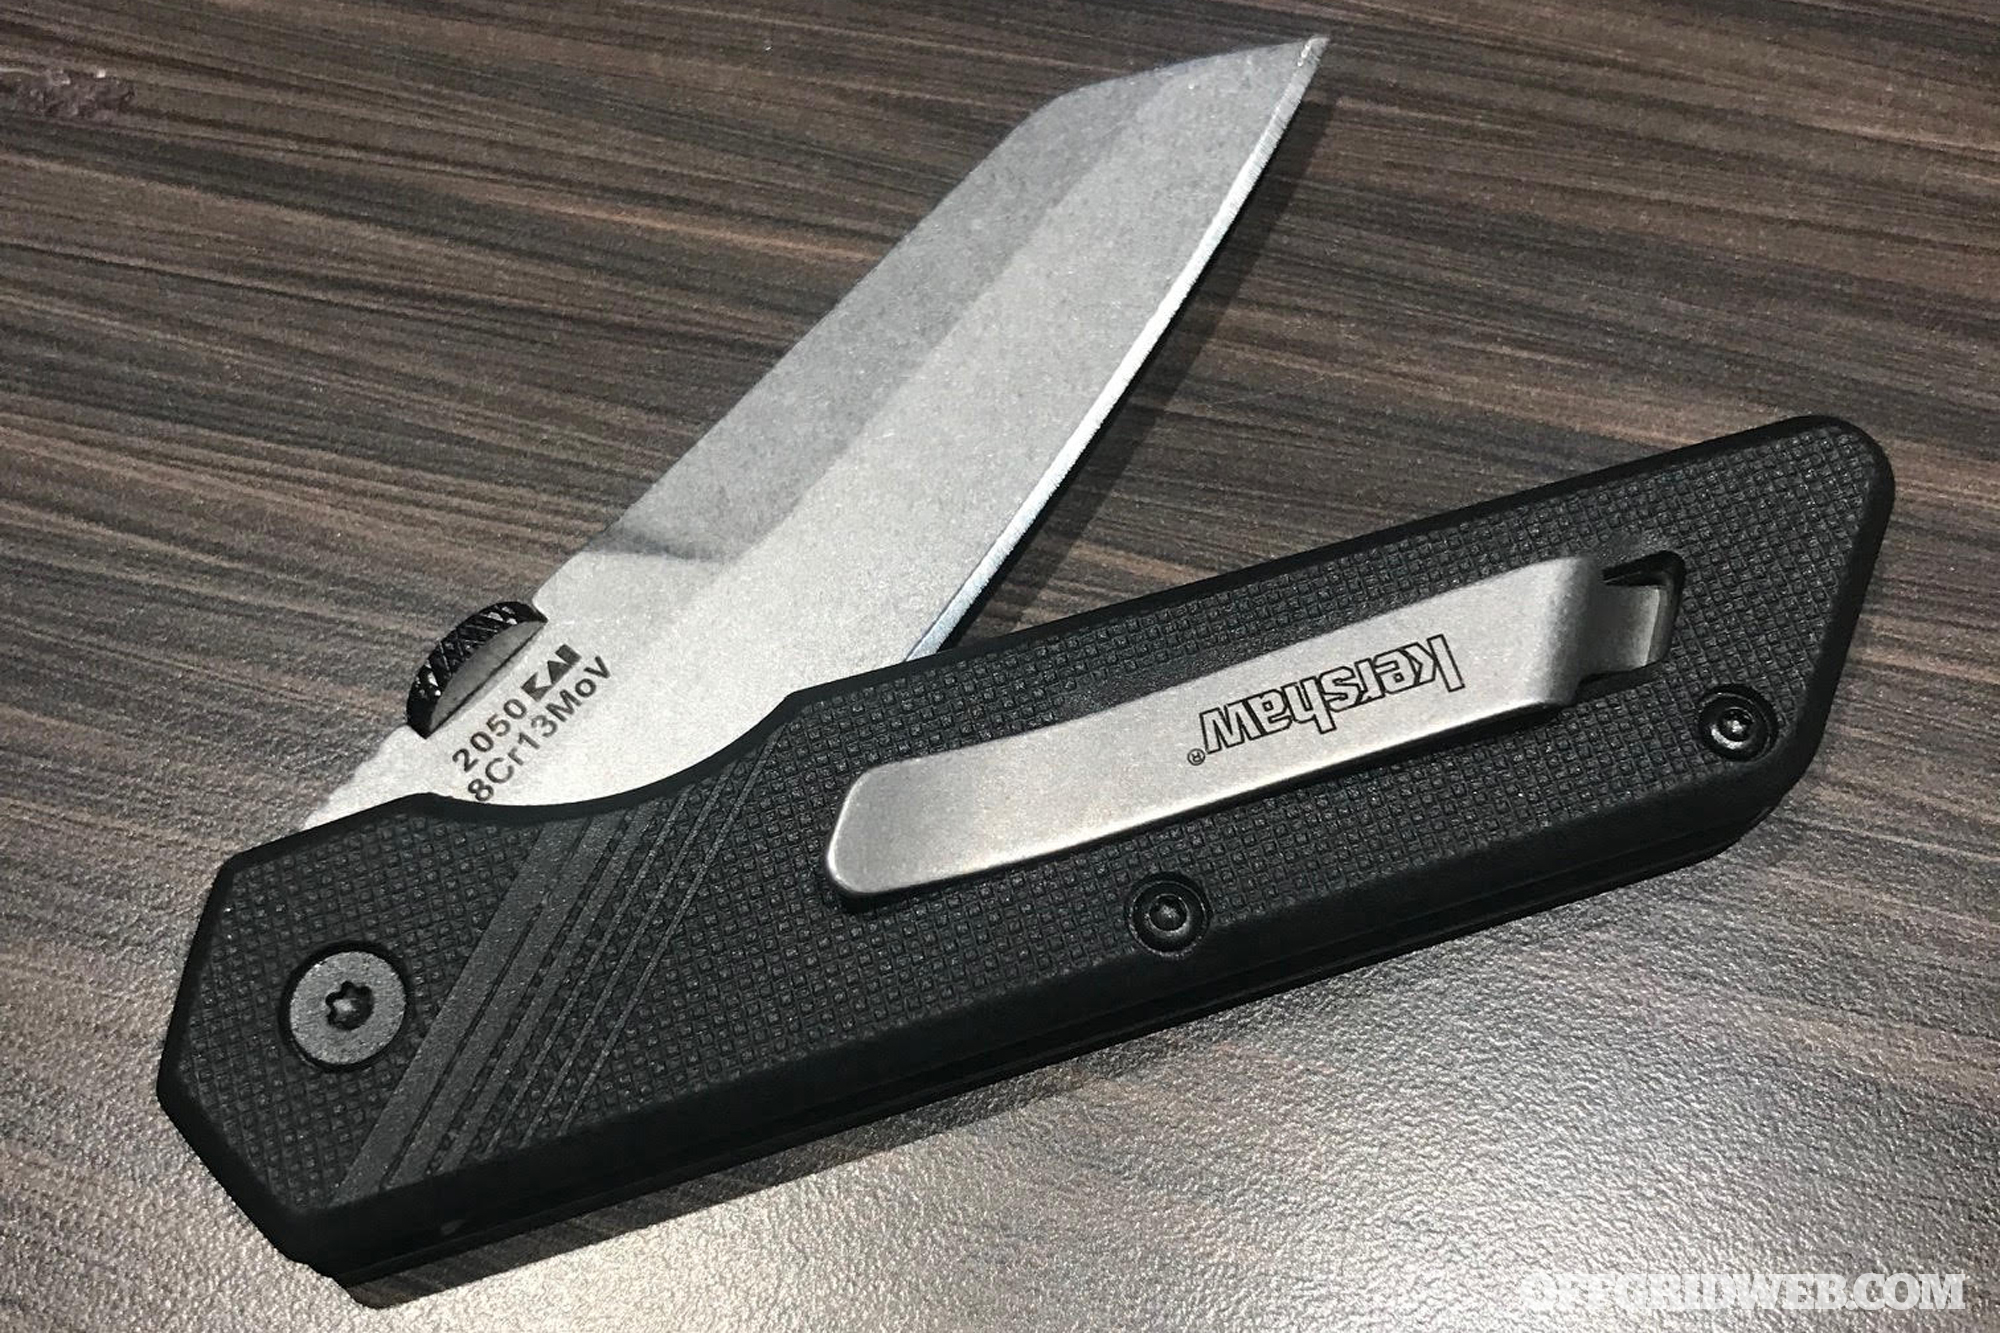
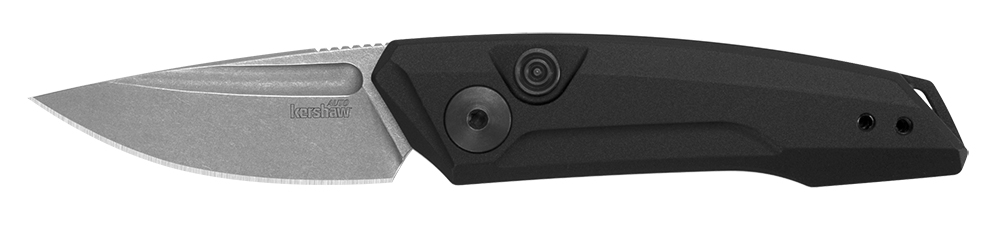
Kershaw Misdirect


All-new for 2019.
Steel: 4Cr13, black-oxide BlackWash finish
Handle: Stainless steel, bead-blasted finish
Mechanism: Frame lock, SpeedSafe assisted opening with flipper
Blade: 2.9 in. (7.6 cm)
Closed: 4 in. (10.1 cm)
Weight: 3.2 oz. (92 g)
MSRP: $35
Kershaw Decibel

All-new for 2019.
Steel: 8Cr13MoV, titanium carbo-nitride coating
Handle: Stainless steel, titanium carbo-nitride coating
Mechanism: Frame lock, manual opening
Blade: 3 in. (7.6 cm)
Closed: 3.75 in. (9.6 cm)
Weight: 2.7 oz. (77 g)
MSRP: $60
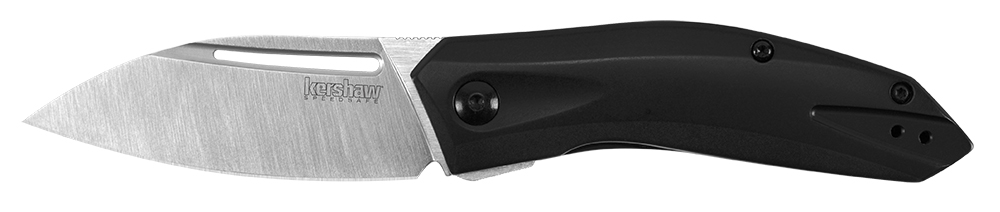
Kershaw Mixtape

All-new for 2019.
Steel: 8Cr13MoV, stonewashed finish
Handle: Glass-filled nylon with cutaway window
Mechanism: Inset liner lock, manual opening
Blade: 3.1 in. (7.9 cm)
Closed: 4.1 in. (10.5 cm)
Weight: 2.7 oz. (77 g)
MSRP: $40
Kershaw Epistle

All-new for 2019.
Steel: 8Cr13MoV, bead-blasted finish
Handle: Aluminum, clear-anodized finish
Mechanism: Inset liner lock, manual opening
Blade: 3 in. (7.8cm)
Closed: 4 in. (10 cm)
Weight: 2.1 oz. (60 g)
MSRP: $45
Kershaw XCOM

All-new for 2019.
Steel: 8Cr13MoV, black-oxide coating
Handle: Glass-filled nylon
Mechanism: Inset liner lock, manual opening
Blade: 3.6 in. (9.2 cm)
Closed: 4.4 in. (11.4 cm)
Weight: 4.2 oz. (120 g)
MSRP: $45
Kershaw Innuendo

All-new for 2019.
Steel: 8Cr13MoV, titanium carbo-nitride coating
Handle: Stainless steel, bead-blasted finish
Mechanism: Frame lock, manual opening
Blade: 3.3 in. (8.5 cm)
Closed: 4.25 in. (10.8 cm)
Weight: 4 oz. (115 g)
MSRP: $45
Kershaw Boilermaker
All-new for 2019.
Steel: 8Cr13MoV, brown PVD coating, stonewashed finish
Handle: Stainless steel, brown PVD coating, stonewashed finish
Mechanism: Frame lock, SpeedSafe assisted opening with flipper
Blade: 3.3 in. (8.5 cm)
Closed: 4.25 in. (10.8 cm)
Weight: 4.4 oz. (127 g)
MSRP: $60
Kershaw Seguin
All-new for 2019.
Steel: 8Cr13MoV, gray PVD coating
Handle: Stainless steel, bead-blasted finish
Mechanism: Frame lock, SpeedSafe assisted opening with flipper
Blade: 3.1 in. (8 cm)
Closed: 4.25 in. (10.8 cm)
Weight: 4.9 oz. (139 g)
MSRP: $60
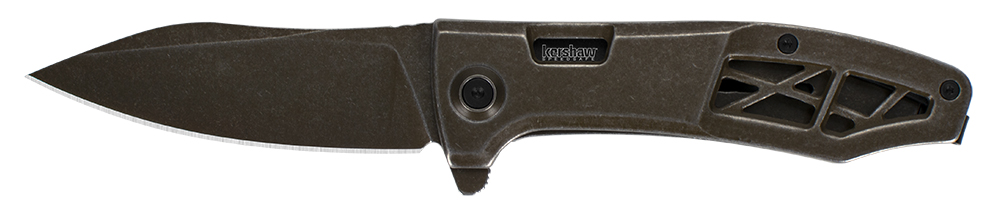
Kershaw Oblivion

All-new for 2019.
Steel: 8Cr13MoV, bead-blasted & stonewashed finish
Handle: Stainless steel, bead-blasted & stonewashed finish, glass-filled nylon inserts
Mechanism: Frame lock, SpeedSafe assisted opening with flipper
Blade: 3.5 in. (9 cm)
Closed: 4.6 in. (11.8 cm)
Weight: 5.1 oz. (146 g)
MSRP: $60
Kershaw Collateral

All-new for 2019.
Steel: 8Cr13MoV, satin finish with sanded flats
Handle: Stainless steel, titanium carbo-nitride finish, carbon fiber insert
Mechanism: Frame lock, SpeedSafe assisted opening with hidden SLT flipper tab
Blade: 3.25 in. (8.3 cm)
Closed: 4.5 in. (11.4 cm)
Weight: 4.6 oz. (132 g)
MSRP: $65
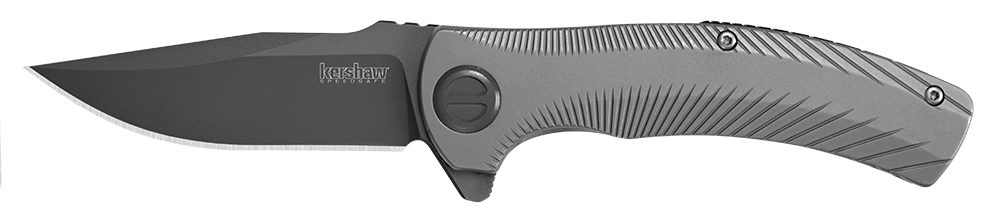
Kershaw Turismo
All-new for 2019.
Steel: 8Cr13MoV, satin finish with sanded flats
Handle: Stainless steel, black-oxide coating
Mechanism: Frame lock, SpeedSafe assisted opening with hidden SLT flipper tab
Blade: 2.8 in. (7.3 cm)
Closed: 3.9 in. (10 cm)
Weight: 3.5 oz. (102 g)
MSRP: $60
Kershaw Launch 8

All-new for 2019. Made in the USA.
Steel: CPM 154, stonewashed finish
Handle: 6061-T6 aluminum, gray anodized, carbon fiber front insert
Mechanism: Push-button automatic folder
Blade: 3.5 in. (9 cm)
Closed: 4.75 in. (12.2 cm)
Weight: 2.4 oz. (89 g)
MSRP: $160
Kershaw Launch 9
All-new for 2019. Made in the USA.
Steel: CPM 154, working finish
Handle: 6061-T6 aluminum, black anodized
Mechanism: Push-button automatic folder
Blade: 1.8 in. (4.6 cm)
Closed: 3.25 in. (8.3 cm)
Weight: 1.5 oz. (45 g)
MSRP: $140
Kershaw Launch 10 (a.k.a. “The Claw”)
All-new for 2019. Made in the USA.
Steel: CPM 154, working finish
Handle: 6061-T6 aluminum, gray anodized
Mechanism: Push-button automatic folder
Blade: 1.9 in. (4.8 cm)
Closed: 3.2 in. (8.1 cm)
Weight: 1.7 oz. (51 g)
MSRP: $150
Kershaw Antic
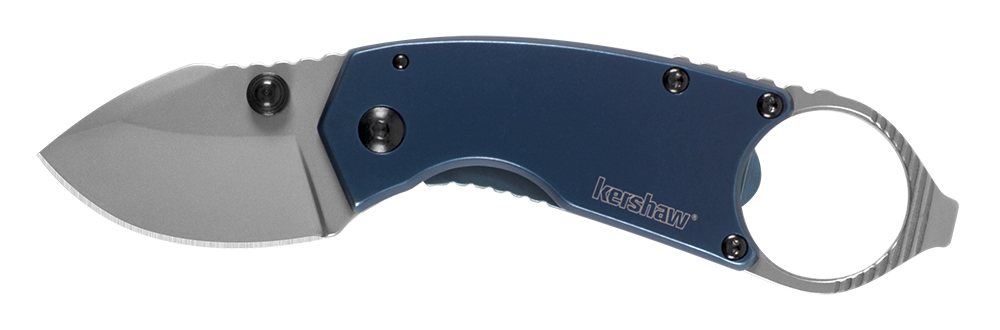
All-new for 2019 as part of the Shuffle family.
Steel: 8Cr13MoV, bead-blasted finish
Handle: Stainless steel, blue PVD coating
Mechanism: Frame lock, manual opening
Blade: 1.7 in. (4.4 cm)
Closed: 3.8 in. (9.9 cm)
Weight: 3.1 oz. (90 g)
MSRP: $30
Zero Tolerance 0022
All-new for 2019. Designed by Tim Galyean, made in the USA.
Steel: CPM 20CV, stonewashed finish
Handle: Carbon fiber front, stonewashed titanium back
Mechanism: Frame lock, manual opening flipper with KVT ball bearing pivot
Blade: 1.8 in.
Closed: 3 in.
Weight: 1.7 oz.
MSRP: $250
Zero Tolerance 0393GLCF
Updated for 2019 with working finish and glow-in-the-dark carbon fiber scale. Designed by Rick Hinderer, made in the USA.
Steel: CPM 20CV, working finish
Handle: Titanium with working finish and glow-in-the-dark carbon fiber overlay
Mechanism: Frame lock, manual opening flipper with KVT ball bearing pivot
Blade: 3.5 in.
Closed: 4.75 in.
Weight: 5 oz.
MSRP: $350
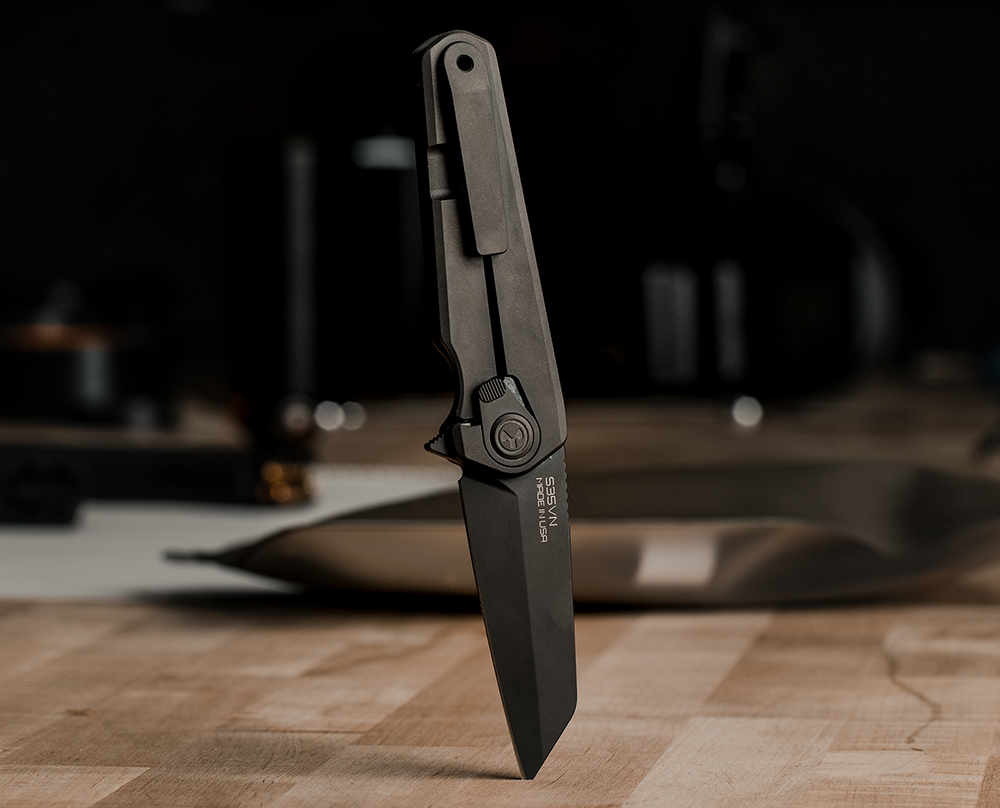
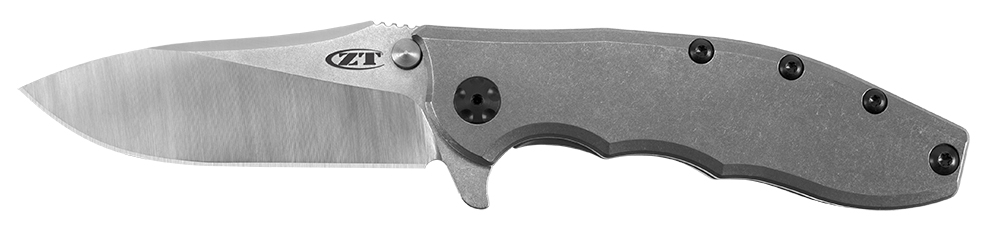
Zero Tolerance 0460Ti
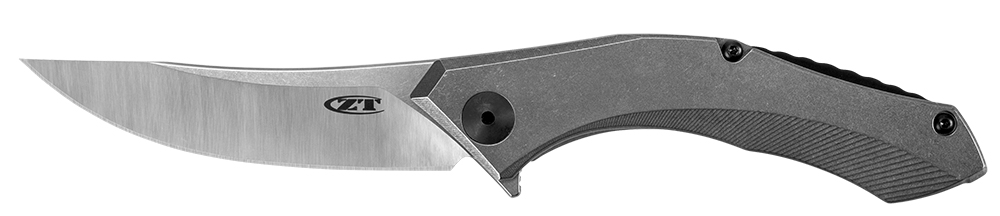
Updated for 2019 with full-titanium handle. Designed by Dmitry Sinkevich, made in the USA.
Check out our review of the larger, carbon-fiber-equipped ZT 0462CF for our impressions of this Dmitry Sinkevich design.
Steel: S35VN, machined satin grinds, stonewashed flats
Handle: Titanium with stonewashed finish
Mechanism: Frame lock, manual opening flipper with KVT ball bearing pivot
Blade: 3.25 in.
Closed: 4.4 in.
Weight: 2.9 oz.
MSRP: $275
Zero Tolerance 0470
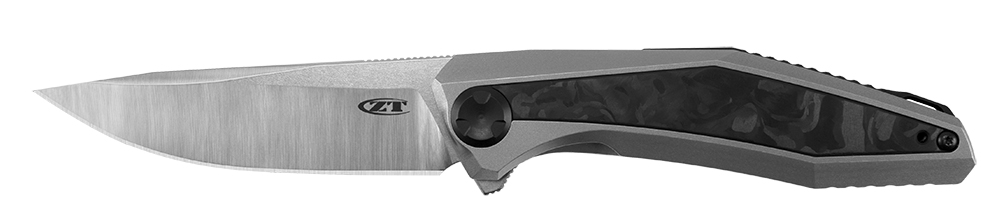
All-new, released in late 2018. Designed by Dmitry Sinkevich, made in the USA.
Steel: CPM 20CV, machined satin grinds, stonewashed flats
Handle: Titanium with bead-blasted finish, marbled carbon fiber insert
Mechanism: Frame lock, manual opening flipper with KVT ball bearing pivot
Blade: 3.4 in.
Closed: 4.4 in.
Weight: 3.3 oz.
MSRP: $325
Zero Tolerance 0562CF
Updated for 2019 with full-titanium handle. Designed by Rick Hinderer, made in the USA.
Steel: CPM 20CV, machined satin grinds, stonewashed flats
Handle: Titanium with stonewashed finish
Mechanism: Frame lock, manual opening flipper with KVT ball bearing pivot
Blade: 3.5 in.
Closed: 4.8 in.
Weight: 5.3 oz.
MSRP: $350
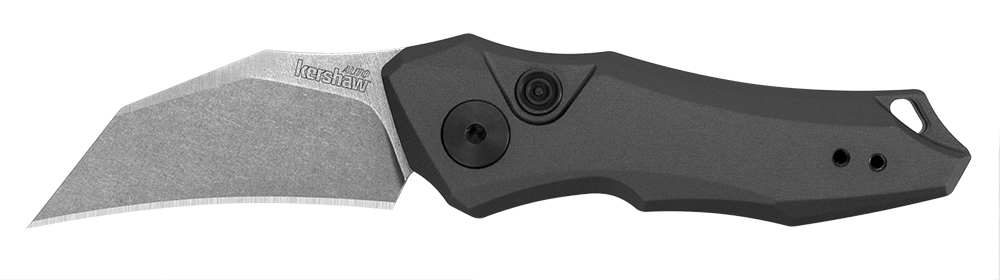
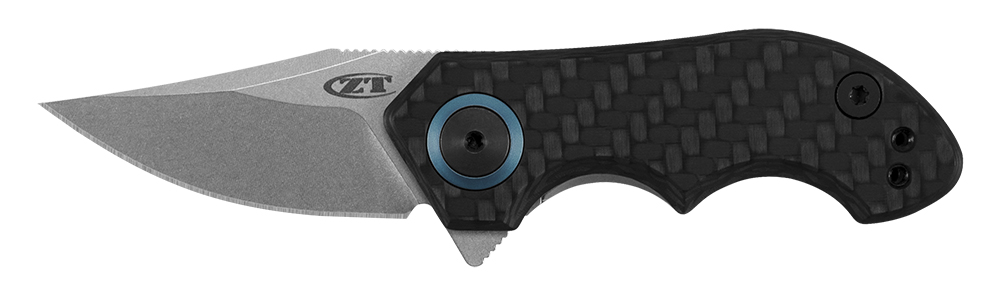
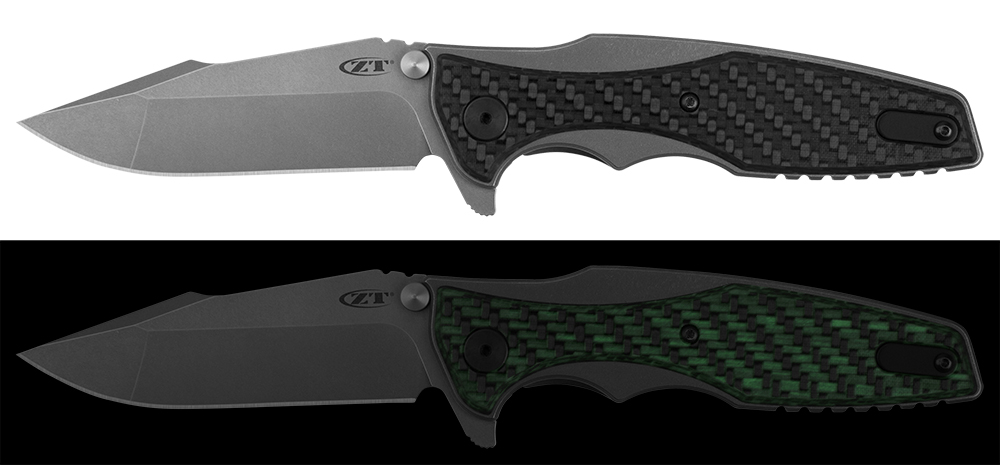
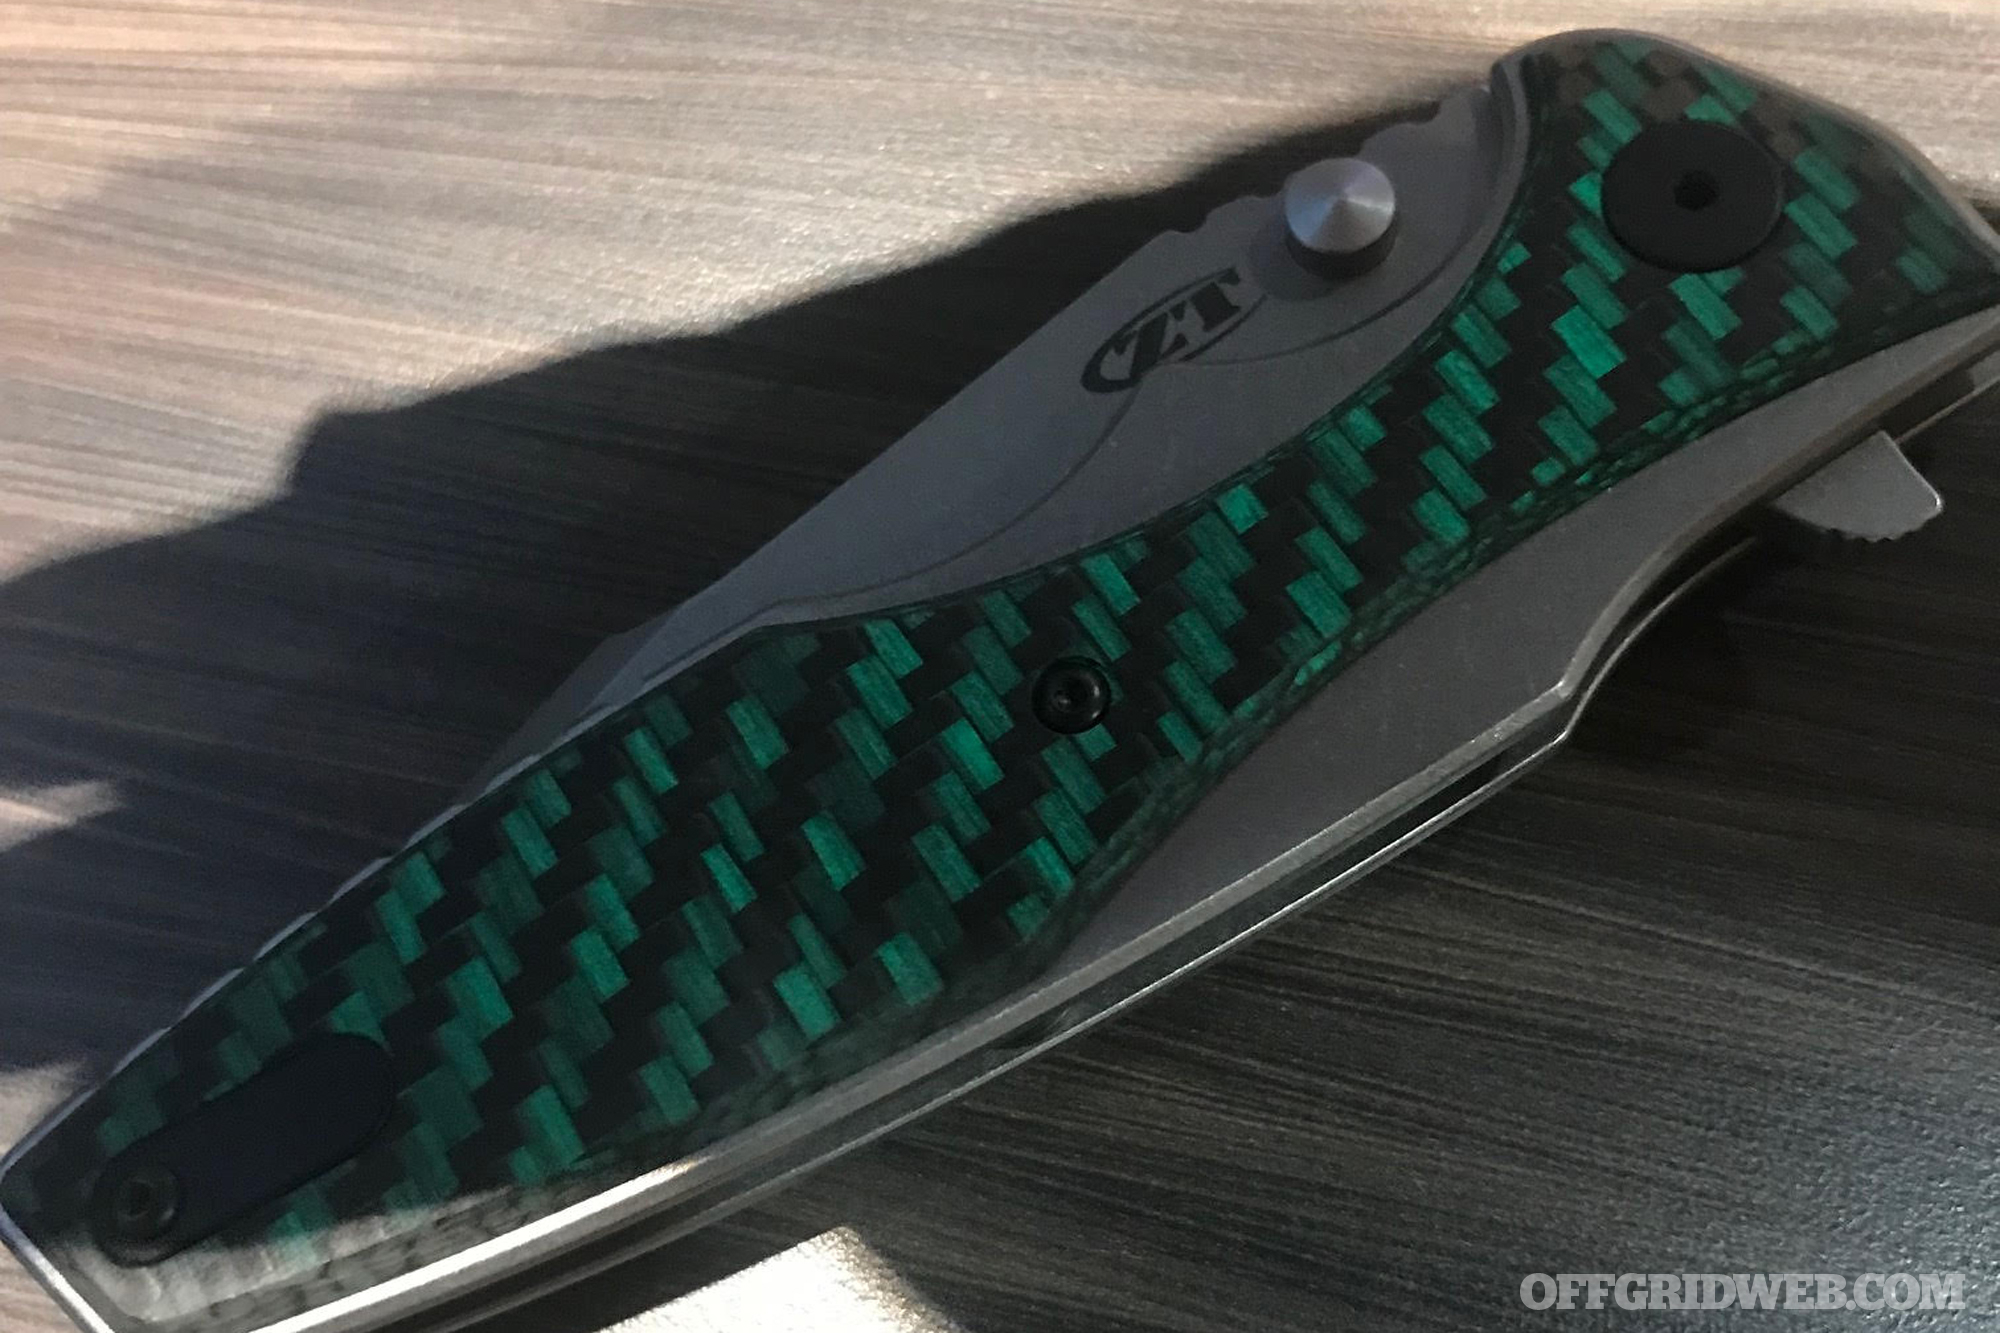
Zero Tolerance 0640

All-new for 2019. Designed by Ernest Emerson, made in the USA.
Steel: CPM 20CV, machined satin grinds, stonewashed flats
Handle: Titanium with stonewashed finish, green carbon fiber overlay
Mechanism: Frame lock, manual opening with KVT ball bearing pivot
Blade: 3.75 in.
Closed: 4.75 in.
Weight: 4.4 oz.
MSRP: $310
For more info on these new releases from SHOT Show 2019, go to Kershawknives.com or ZTknives.com.


.JPG")