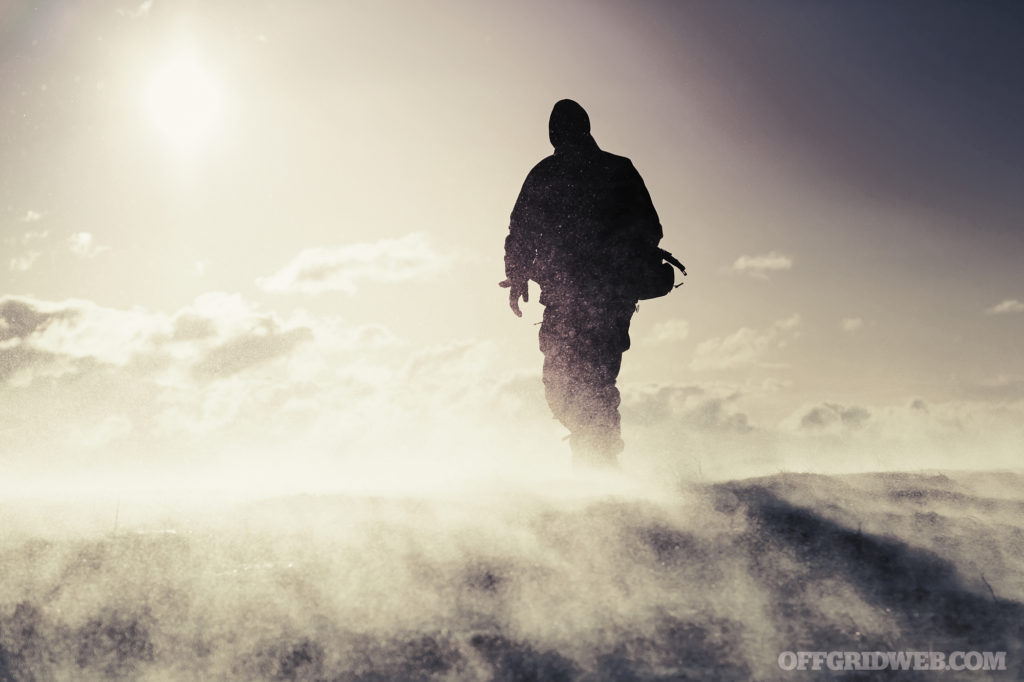
The cold winter months bring about some serious issues for outdoor enthusiasts and those who may inadvertently go stuck outside for an extended period of time. Snow, wind, and freezing temperatures can make the terrain more difficult to navigate and make roads dangerous. Beyond the terrain challenges one of the biggest threats to our health and safety in the winter months is hypothermia. Understanding the basics of how hypothermia can occur, what can be done to prevent it, and how to treat someone in a hypothermic state can go a long way to helping us healthy and prepared in the cold seasons!
What is Hypothermia?
Hypothermia is caused by a drop in core body temperature below 95 degrees Fahrenheit. Hypothermia impacts a number of essential systems in our bodies including our cardiovascular nervous, and respiratory systems. If left untreated hypothermia can lead to a total failure of one or all of these systems resulting in death. Even if hypothermia is treated in severe cases long-term damage to the body is possible from a reduction of blood flow. This is most common in arms, legs, hands, and feet.
How Hypothermia Occurs
Hypothermia occurs when our bodies lose heat faster than it can produce heat. Most of the body’s heat loss will occur through the skin, 90% of heat loss occurs through your skin. The other 10% of the body’s heat loss occurs through the respiration (breathing) process.
Hypothermia is commonly caused by extended exposure to cold temperatures or being submerged in cold water. While this most commonly occurs in the winter months, it is possible to become hypothermic in warmer conditions. In spring the air temperature is warm, but water can still be very cold, extended submersion in recently thawed water can easily trigger hypothermia. Wind exposure also increases the risk of hypothermia, as the wind will displace the thin layer of warm air that surrounds our skin.
Young children and the older adults are more susceptible to hypothermia than other groups. While hypothermia is most common in temperatures below 40 degrees Fahrenheit, it is possible that long-term exposure of 60 degrees or less can lead to hypothermia in these more sensitive groups.
Signs and Symptoms of Hypothermia
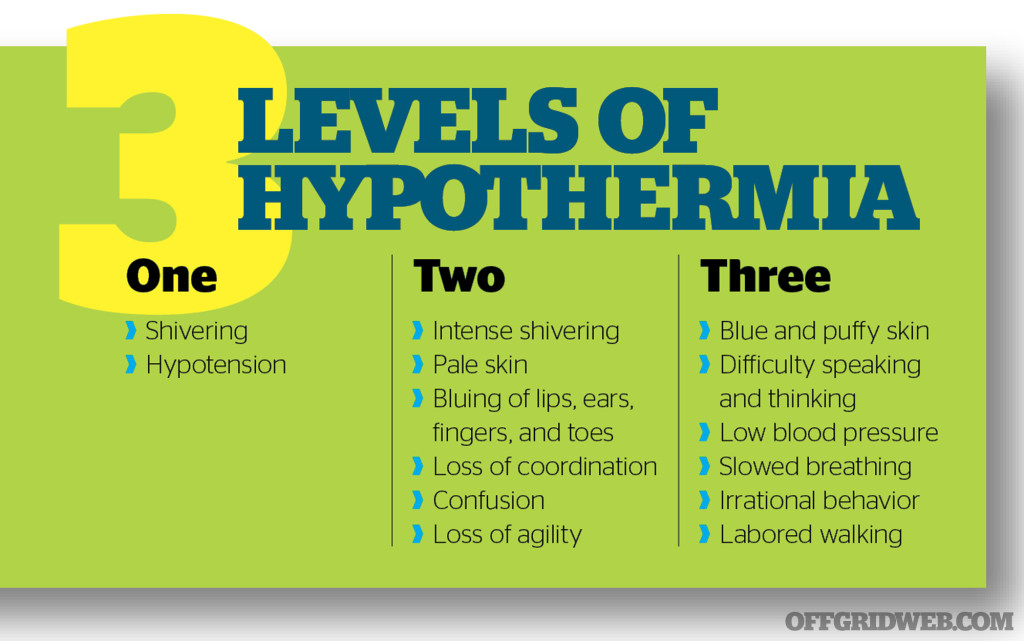
Shivering uncontrollably in the early stages
Slow, shallow breathing
Feeling of being drowsy or exhausted
Slurred Speech
Loss of coordination and motor function
Slow and/or weak pulse
In severe cases loss of consciousness and very little signs of breathing or pulse
Hypothermia isn’t only a concern in cold weather. A moisture-wicking base layer will keep your skin dry, reducing your risk of this condition.
Preventing Hypothermia: Avoiding Extreme Cold
Preventing hypothermia is far better than having to treat hypothermia. There are a number of steps we can take to prevent our bodies from going into a hypothermic state.
Let’s face it, even if you love the great outdoors there are times we should avoid it. During periods of extreme cold and wind, it is in our best interest to avoid prolonged exposure. The misconception that people often have is that if there is no snow, they will be safe outdoors in the winter. This is unfortunately a life-threatening misconception. It is also important to remember that the wind has a large impact on how fast our body cools and loses heat.
Preventing Hypothermia: Proper Clothing and Layering
If you can’t avoid the cold, ensuring we have the appropriate clothing and outerwear is very important. Creating layers that will help insulate our body is vital for any long-term cold exposure.
Base Layer: base layers typically go beneath your other clothing, while there are many material options sold I only recommend a wool base layer. Wool is a natural material that animals use to help regulate their body temperature. Unlike cotton wool retains the ability to keep you warm when wet, and unlike synthetic materials, wool is naturally fire-resistant. For my base layer, I use Merino wool from head to toe. Wool socks are especially important as they will keep your feet warm and reduce the absorption of sweat and help prevent damage to your foot tissue.
Mid Layer: This layer consists of your regular clothes, pants, shirt, etc. Again avoiding standard cotton is a good idea, especially if you may get wet or plan on being very active and generating sweat. Materials that can absorb water from rain of melting snow will diminish our ability to stay warm, especially if we are facing declining temperatures throughout the day. Water resistant or waterproof pants can help prevent the loss of body heat.
Keeping your core warm is vital. Your heart will be pumping blood from your core through your body and cooler blood will be returning from your extremities. In extreme temperatures including a fleece or insulated vest will go a long way to keeping your core warm..
Outer Layer: This consists of your coat, hat, gloves, and shoe/boot. It is important that you get the appropriate outer layers, as most “fashion” hats, gloves, and coats will do very little to protect you from the elements. An insulated coat or parka is the way to go, and I highly recommend you have one that is waterproof in the case of snow or rain. Wool beanies and gloves can serve as a good outer layer for your head and hands or be placed under a thicker hat and glove. For your feet, a solid boot hiking boot that is waterproof is beneficial because the waterproofing often serves as insulation. For long-term extreme cold situations, insulated boots are a good choice.
Synthetic Fire starters such as the Black Beard Fire Plugs and Wazoo Fire Cards can produce a hot flame even when wet.
Preventing Hypothermia: Build a Fire
Fire provides warmth, light, and so much more; having the ability to build a fire, especially one large enough to produce enough warmth to heat your body is very important. Wet conditions and high winds may make this task difficult.
I always recommend keeping some water-resistant fire-starting material in your survival kits. With some practice, you can get a fire started with these tinder sources even in adverse conditions.
Tips for Treatment for Hypothermia
Even with all of our efforts to prevent hypothermia from occurring it is still very possible to succumb to it, or encounter someone else who is in a hypothermic state. These guidelines can help in an emergency situation, but it is still important to contact emergency medical professionals in the case that you or someone else is in a hypothermic state.
If possible, bring the person indoors, if not do your best to insulate them from the cold ground.
Remove any wet clothing and replace it with warm dry clothing if possible.
Rewarm the person focusing on their core using extra clothing and blankets.
Do not warm extremities first (arms and legs) as this can cause arrhythmia (irregular heartbeat)
Do not put in a warm shower or bath as this can cause arrhythmia.
If conscious offer warm fluids, without caffeine or alcohol as they can speed heat loss.
If the person is unconscious begin CPR and contact emergency medical personnel immediately.
Cold Weather Vehicle Considerations
People often mistakenly view their vehicles as a potential shelter from the extreme cold. If the vehicle is not running its does not produce heat and will quickly become very cold inside. While this may shelter you from the wind, it will, at best delay hypothermia. What vehicles do provide us is the ability to store some essential supplies.
Blankets: Keeping blankets in your vehicle, especially wool blankets, can provide us a much-needed form of insulation in a cold weather emergency.
Spare Clothing: Travel with a spare set of appropriate winter clothing. If the clothing you are wearing become wet, it hurt us more than they help us and can lead to hypothermia. That spare set of warm and dry clothing can potentially save your life.
Survival Kit: Having a survival kit, especially one that provides a means of making fire and the tools you may need to build a makeshift shelter is very valuable in an extreme cold survival situation.
Fuel: It is important to ensure your vehicle has as close to a full tank of gas as possible during the cold months as the ability to keep your heat running as long as possible is vital in an emergency.
Maintenance: Just as the winter is hard on our bodies, it is also hard on our vehicles. Making sure maintenance is up to date will help prevent unexpected vehicle breakdowns in extreme cold conditions.
With winter upon us, it is time to adjust my go bag to help sustain me through the colder months. When temperatures drop, many survival priorities change and the survival kit that was built for warm weather lacks many essentials needed to take on freezing temperatures, snow, and a barren land scape. Building out a winter survival kit requires more space and weight than my typical spring and fall kit, so the satchel I use in temperate months will be switched out for the Badger Claw Outfitters Discovery M1 Backpack. While not as large as a Bug Out Bag, a Go Bag is an easy to carry survival kit that can help us get through short term emergencies.
The cold winter weather produces a number of survival challenges not found in warmer months. Snow, ice, wind, and cold water are all factors that can lead to hypothermia if we are not prepared.
Many survival kit essentials will not change throughout the seasons. Much of the gear and supplies discussed in this article will be practical all year long. However, just as the heat of summer requires special consideration, the freezing temperatures, snow, ice, and lack of natural food sources in the winter must be considered when building an effective go bag.
Go Bag Vs. Bug Out Bag
First things first, let’s look at what a go bag is and how it differs from a bug out bag. Both a go bag and a bug out bag are designed to help you survive when you are on the move. The primary difference between these two survival kits is how long they are designed to sustain you for.
A bug out bag is designed to sustain you over an extended period, typically 3 days or more. Sustainment over time requires a good deal of gear, supplies, and food making the bug out bag large and heavy.
A go bag is similar to the larger bug out bag, but it is only designed to sustain a person for around 24 hours. This allows for the use of a smaller pack and a lighter load. While the go bag lacks all the life sustaining survival items a bug out bag has, it allows for faster movement and less strain on your body while on the go.
While we will be going into detail on how to build a go bag in this article, having a bug out bag is just as important. Read Bug Out Bag Essentials for all the details you need to build a comprehensive multiday survival kit.
How Big Should a Go Bag Be?
While there is no set rule, I tend to build my go bags within the weight limits of a typical hiking pack. Hiking bags should weigh no more than 20% of your total body weight before the addition of food and water. For example, I weigh 200 pounds, so I limit my go bag weight to no more than 20 pounds. Personally, I like to go a bit lighter, with the goal of having the bag closer to 15 pounds for ease movement.
When it comes to picking a bag size something in the 20-to-25-liter range is more than enough space to fit everything you need for a 24-hour period.
The smaller size of the go bag compared to a large bug out bag allows it to be more versatile and useful on a day-to-day basis. I use my go bag as my primary day hiking and daily travel survival kit, ensuring all my vital gear is always with me if an emergency arises.
Winter brings barren landscapes with limited resources. This area is overrun with wild edible plants during the warmer months, all that was found on this outing was a small amount of slime mold. While it is technically edible in small quantities, it has very little taste or nutritional value.
Go Bag Survival Kit Content Considerations
Choosing the right gear for your go bag will depend on your environment, season, where you travel daily, and skill set. When looking at the environment we are primarily looking at the type of location you find yourself in. Do you live in a big city, in the suburbs, or in a rural location? Some equipment is a great fit for some environments and less useful in others. For example, a silcock key may be a valuable tool to access clean water in an urban environment, but it is far less useful in a rural location.
The current season is also important when picking gear for your go bag. During temperate seasons there are few special considerations, but the extreme heat of summer or the cold snow of the winter months both require specialized requirements to ensure your survival kit will sustain you.
Regular travel should be considered. People often live and work in different environments. If you live in a rural area but work in a city you will have to adapt your go bag for both locations and everything in between home and work.
Skill set and experience will play a significant role in your kit. Carry gear you don’t know how to use is just a waste of space and weight. Having a robust skill set will often allow you to do more with less and allow you to carry a smaller survival kit.
The Badger Claw Outfitters Discovery M1 Pack, set up as my winter go bag.
The Badger Claw Outfitters Discovery M1
The M1 Discovery is more than a backpack, it is an entire carry system! This versatile pack was designed to accept several optional pouches and attachments to increase its carry capacity and organization.
Even if you opt to not add any of the additional pouches the M1 Discovery is a highly functional pack. It can hold all your essential survival kit items and be carried comfortably over long distances if needed.
The Discovery M1 has a narrow boxy shape with a wide zipper panel at the top. The pack does not have any kind of built-in frame. This keeps the weight down and relies on the packed gear to provide structure. The straps and narrow profile allow the pack to sit snug to your body allowing for good weight distribution and easy movement.
The Discovery M1is made from durable water resistant Cordura Fabric, the zipper panels have waterproof YKK Zippers.
The pack itself is made from 500D Cordura nylon, a material known for its durability and water resistance. High stress points where the straps attach to the body of the pack are reinforced with high abrasion neoprene Kevlar to provide added durability.
The main compartment is accessed from the top zipper panel and there is one zipper pocket on the front of the pack. Both zippers are highly water resistant YKK zippers. The zippers and Cordura make the Discovery M1 a reasonably water-resistant pack and will keep the survival kit gear inside dry through light rain and snow and will buy you some time to find a dry spot if caught in a heavier rainstorm.
On the sides there are two water bottle holders designed to accommodate 1 liter Nalgene sized bottles securely. There is also some shock cord across the front of the pack so you can stash extra gear on the outside of the pack.
The Discovery M1 has padded mesh back panel and back straps for comfort and breathability.
The back panel and back of the straps the Discovery M1 have padded mesh to increase user comfort and allow for some airflow. The Interior has a single large pocket on the back panel to help organize survival kit gear.
Both the exterior and the interior of the pack have multiple attachment points to accommodate optional pouches or allow the user to add compatible pouches that they currently own.
My Discovery M1 is currently fitted with a large zipper pouch in the front with a small clipper pouch on one of the straps, and an admin pouch on the inside above the large pocket.
While The Discovery M1 is new pack, there are already plans to add additional modular attachment options in the future allowing users to further customize this already versatile pack.
The Large Zipper Pouch is one of the add on modular accessories for the Discovery M1
Badger Claw Outfitters Discover M1 Specs:
Main Body Dimensions: 17”x12”x5”
Volume: 23L
Materials: 500D Cordura, High Abrasion Neoprene Kevlar, Heavy Weight polypropylene nylon webbing, High-density 5mm EVA closed cell foam, and 1/4″ closed cell foam padding with 3mm Berry compliant 3D spacer mesh.
Hardware: ITW Nexus buckles, sliders and d-rings, 4mm shock cord, water resistant YKK #8 zippers
Made In: USA
Price: Base $229, $321 as shown with optional attachments.
Some of the components of my fire kit including Wazoo Gear Fire Cards, Black Beard Fire Plugs, and Storm Matches.
Fire
The ability to make fire is vital in most survival situations. Fire serves as a means of cooking food, boiling water, and producing heat. Fire can also be used to help signal for help and raise morale. In the winter months, producing heat if stuck outdoors is a top priority, and some special consideration is needed when packing fire starting equipment for the winter.
Standard lighters will not always work as well in the extreme cold. Electronic lighters can be an acceptable alternative, but batteries will also deplete faster in cold environments. We must also consider the high levels of moisture from snow and melting snow. Man made tinder and chemical tinder will burn hot even when wet. A ferrocerium rod will work in both cold and wet environments and may give us the edge we need to get a fire started on in the snow or wind.
Winter Go Bag Fire Items:
Bic Lighter: Make fire simple.
Wazoo Tinder Cards: Simple, lightweight flat cards that spark up easily and can be shaved or burned whole depending on my needs.
Black Beard Fire Plugs: Another synthetic tinder option that will burn for up to 5 minutes each. Even if wet, the fire plugs can be pulled apart and easily ignited.
Fatwood Tin: A small tin with assorted fatwood pieces, shavings, and chips as well as some jute twine.
Outdoor Element Fire Flute: This ferro rod has an integrated whistle. Helpful when making a fire and signaling with the whistle.
The Grayl Geopress removes sediment, microbes, and chemical contamination from water. It is also rated for freezing conditions
Water
Water is one the things we can’t go without for very long. When it comes to dehydration, many people immediately think of hot climates, but dehydration is as much of a threat in the winter as it is in the summer. Coats and heavy clothing we wear to shelter us from the harsh winter elements can also cause us to sweat once we start exerting ourselves, which can cause rapid water loss if we are not careful.
Stored water can freeze, so in many cases wild water sources will have to do. Wild water sources can still contain harmful microbes and chemicals in the winter, so boiling and filtering water is a must. Not all water filters are rated for freezing temperatures, so it is important to identify if our filtration is rated for freezing.
Winter Go Bag Water Items:
Badger Claw Outfitters Water Bottle: One liter water bottle that is semi flexible to account for freezing water expansion. Storing the water bottle upside down will help keep the drinking area from completely freezing over. Ice floats and will naturally gravitate to the top of the bottle. By flipping the bottle upside down the ice will develop on the bottom of the bottle rather than the cap area.
Grayl Geopress: Easy to use water filter bottle with impressive filtration capabilities and is rated for freezing temperatures. With a 24-ounce capacity it is also good for storing water if needed. While the water may freeze in the bottle once thawed the filter is still effective. Grayl recommends replacing the filter after 3 freeze/thaw cycles.
Chemical Tabs: Chemical water purification tabs are a redundancy should there be an issue with the filter and I am not capable of boiling water. While the water won’t taste great, the chemical tabs will kill most harmful microbes.
Mountain Ops Electrolytes: Electrolytes are essential to ensuring your body stays properly hydrated. In addition, the salts in electrolyte packets can help prevent stored water from freezing and colored electrolyte powder can even be used as a signaling tool against the white snow.
A few of my shelter items including the PNWBUSHCRAFT Jr. Ground Cloth and Tuff Possum Gear Survival Scarf.
Shelter
Having shelter or carrying the items you need to make a shelter is an important addition to any survival kit. In the winter we may be wearing heavier clothing, but sheltering ourselves from wind, snow, and freezing rain can help extend our ability to survive outdoors longer if needed.
In the winter we need to account for higher winds and the weight on snow and ice when building a shelter, resulting in the need for more durable materials in the build.
Winter Go Bag Shelter Items:
Tarp: A heavy-duty tarp with gromets is an excellent shelter building tool that can help provide much needed cover from the elements, fashioned into a makeshift tent, or used as a large ground cover.
Paracord: Durable paracord is a great choice for building a makeshift shelter and can serve a number of other purposes such as lashing things together, attaching things to your pack or body, and suspending gear from trees to keep it off the ground.
Space Blankets: These light weight mylar blankets can provide extra heat by reflecting your body heat back at you and double as a signaling device. They are not very durable, but they weigh next to nothing, so I pack an extra.
55 Gallon Drum Liner: A large drum liner can serve many purposes including serving as a ground cover, storing extra items, be used to make a litter bed, and used as additional cover if needed.
Tuff Possum Survival Scarf: This is more than a scarf it is a multi-purpose survival tool! The nylon material is sewn together in a tube with one end stitched closed, so when not using it as a scarf it can be stuffed with clothing or fallen leaves to create a pillow, used as extra storage space, and more. The inside is bright orange so it can also be flipped inside out to use as a signaling device.
PNW Bushcraft Jr. Ground Cloth: This small wool and waxed canvas ground cloth provides a clean dry surface to sit on or kneel on. It can double as a workspace to keep your tools and equipment off the wet and snowy ground.
The Garmin 64ST is weather resistant allowing it to be clipped to the outside of my Discovery M1 for easy access.
Navigation
Snow can make navigating in the wild far more difficult. Even a familiar area can look alien when it is covered in snow, especially areas that are less traveled. Paths and trails become impossible to see, and familiar landmarks can be obscured by snow cover.
Packing and knowing how to use a compass can help give you a sense of direction while on the move. A standalone GPS unit can help guide you to snow covered paths or trails, but like all electronics can suffer from faster battery depletion in the cold.
Winter Go Bag Navigation Items:
Garmin 64ST: While this model is a bit older, it is still highly functional with the incorporated USGS topographical map, the ability to pre-plan routes, and easy connection to a smart phone. The GPS receiver works well in most outdoor locations. The unit runs on two AA batteries and has an optional rechargeable battery pack.
Compass: A good quality compass is always a good option, more important than carrying a compass is having the knowledge to use one properly.
The ASP Spectrum Flashlight has UV mode allowing us to see traces that are normally invisible to the naked eye. This is very helpful when tracking animals or people.
Light
A method of light production is something that everyone should have available in their everyday survival kit. Light is even more important for extended emergencies. One advantage to snow is that it is light reflective allowing better visibility from both synthetic light sources and the moon at night.
When considering light sources we must account for cold weather battery drain. In addition, I prefer a light with alternate color modes beyond just white to help preserve my night vision.
Winter Go Bag Light Sources:
ASP Spectrum Strategic Flashlight: Full sized rechargeable flashlight with white, red, blue and UV modes. Useful for general lighting needs, tracking, and preserving night vison using red light mode. With a maximum output of 700 lumens the Spectrum provides more than enough light for most applications and gives excellent run time. The optional holster provides various mounting options that allow for hands-free use of the light.
Thorfire Mini Lantern: Compact stationary light source, rechargeable, and has a hand crank that can be used to keep light going when the power runs out.
The TM Hunt M18 is one serious multi-purpose outdoor tool for chopping, wood processing and more!
Tools
Basic tools can make a big difference in survival situations and play an important role in our survival kits. Knives, multi-tools, saws, hatchets and axes can serve just as well in the winter as they do in the warmer months. When picking tools for winter survival we should consider tools we can effectively use with gloves on.
If we must take our gloves off to use a tool, keep in mind that metal handles can get very cold if exposed to the elements so it’s best to pick other handle materials or keep metal tools close to our body to retain heat.
Winter Go Bag Tools:
TM Hunt M18: Large Multi-purpose outdoor blade for chopping and wood processing. For more on the M18 check out this article.
Silky Pocket Boy Pro: Compact Folding Saw for wood processing.
Dark Energy Poseidon Pro: Back Up Power is essential when relying on electronic items. The Poseidon Pro is rated for outdoor use in inclement weather. It is rugged and both water and temperature resistant allowing you to keep your charge longer.
Leatherman Sidekick: A basic yet reliable multitool can serve several purposes in both outdoor and wilderness environments.
WESN Allman Folding Knife: a simple compact utility-oriented knife that does a fine job with outdoor tasks, especially foraging.
Nite Ize Runoff Pouch: This waterproof pouch will protect any sensitive electronics or documents from the elements. It is also designed to float just in case it ends up falling into the water, making retrieval far easier especially in the cold weather.
The Solo Stove Lite and Stanley Pot are compact and lightweight cooking options.
Food
Food provides valuable fuel to keep our bodies moving. In the cold months we can see a significant increase in caloric burn to help keep our bodies warm so having access to calories is important. While wild food sources may be abundant in the warm months, they can become scarce in the winter.
While a bug out bag allows for the packing of larger food items and equipment, the short term use of a bag bag should keep food and cooking gear to a minimum. In the Winter packing food that is not freeze sensitive can be beneficial, especially when you need a quick refuel. I pack things like protein and adventure bars into the large back pocket of the Discovery M1 to help prevent them from freezing with my body heat.
Winter Go Bag Food and Preparation Items:
Solo Stove Lite: a small, lightweight stove that can be used to cook or boil water with. Natural materials or chemical cubes can be used to produce fire. The closed wall nature of this stove has yielded good results in windy conditions.
Stanly Cook Pot: A compact pot that can be used to cook food and boil water.
Kabar Spork: This polymer spork with stowed polymer steak knife is a great option for cold weather as metal tools can cold and uncomfortable to hold.
Nutrient Survival: Powdered and freeze-dried food options, packed with essential nutrients your body needs to keep moving in high stress scenarios. Some can be cooked, while others can be consumed as a shake.
Mountain Ops Venture Bars: These bars are designed to provide calories, protein, and carbohydrates to give your body the fuel it needs to keep working through sustained physical activity. They are small enough to keep a few in your bag and one or two in your pockets to keep from freezing.
Mountain Ops Ignite: Caffeine and vitamins can serve as a great pick me up. It is also essential for some like me who consumes coffee on a regular basis to avoid caffeine withdrawal symptoms during an emergency.
Wool clothing like this Minus 33 Merino Wool Beanie can keep you warm even if wet. A pair of lined leather work gloves will keep you warm and protect your hands in when performing tasks.
Clothing
In the winter we should be dressing appropriately even for a short excursion away from home because things happen, and you don’t want to be stuck out in the cold without the proper protection from the elements. In warmer months I typically will not carry a change of clothes in my go bag and keep them reserved for a bug out bag.
When in cold climates it is vital to carry a spare set of dry clothes with you. Wet clothing is a major contributor to hypothermia. If you fall into a body of water or your clothing becomes saturated with sweat, getting into fresh dry clothes can keep you alive! I store my spare clothing in a plastic garbage bag to keep them dry should rain or snow enter my pack.
Winter Go Bag Clothing:
Full Change of Base Clothing: Clean and dry pants, shirt, and underwear. Wool base layer and socks.
Minus 33 Merino Wool Beenie: Wool retains its ability to keep you warm even when wet, if you can’t stay dry, wool is a better option than cotton or synthetics.
Badger Claw Leather Lined Leather Gloves: Lined work gloves to keep your hands warm and protect them while doing any kind of bushcraft and survival builds that may come up while on the go.
Yaktrax: While not clothing per se, these crampons slip over your shoes or boots to provide great traction when moving over icy surfaces.
The Auxiliary Manufacturing Pocket Bowie and ASP Defender D2 Sport Attached to the strap of the Discovery M1 for easy access.
Self-Defense
Having something on your person to defend yourself in an emergency is important. With less space then a bug out bag we should keep our go bag defense items compact. In the winter we must keep in mind that some of these tools may be affected by freezing temperatures. Pepper Spray can be slightly less effective, have reduced spray patterns, and canisters can be damaged in extreme cold temperatures. Keeping your pepper spray close to your body can keep it functional.
Firearms can also be damaged or have performance issues with prolonged exposure to freezing temperatures. Proper lubrication and maintenance beforehand can reduce both corrosion and performance issues. For my go bag I like to keep my self defense options small and discreet, with the ability to move them to on body carry if needed.
Winter Go Bag Self Defense:
ASP Defender D1 Sport Pepper Spray: This compact polymer pepper spray features a potent 1.4% capsaicin solution that disperses as a small cloud with an effective range of 5 feet. The canister has enough to produce 6 half second bursts. The unique design allows for the Defender to be held like a flashlight and has an easy-to-use button on the top that will release the spray on the bottom of the unit. The D2 Sport has a pocket clip as well as key ring for multiple carry options.
Auxiliary Manufacturing Pocket Bowie: This compact clip point blade features excellent ergonomics, a slicey blade and a very defined point. With the proper training it is an excellent self defense tool that can also easily handle most basic cutting tasks. Read our full review on the Auxiliary Manufacturing Pocket Bowie.
*ASP Spectrum and TM Hunt M18 can also double as defensive tools
A small emergency bleeding kit housed in in a Tuff Possum Pouch and a SAM Splint.
First Aid and Medical
Basic first aid items to treat a minor injury is a must for any survival kit. A bug out bag allows more room for a comprehensive medical kit, The smaller go bag should have just the essentials to cover a day or two.
Additional items to cover more severe injuries can mean the difference between life and death in an emergency, but only have value with the proper training to use them. In the winter months I pack more items related to slip and fall injuries due to the higher likelihood of losing my footing on snow and ice.
Winter Go Bag First and Medical Equipment:
Bleeding Kit: A basic bleed kit that has a TQ, quick clot, pressure bandages, and other assorted gauze pads.
First Aid: a basic hiking first aid kit to handle minor injuries.
SAM Splint leg and Arm Sizes: With the increased likelihood of myself or someone I am traveling slipping and falling or getting their ankle caught in an unexpected hole I like to carry SAM Splints with so wrap if needed.
The Optional admin panel for the Discovery M1 is a great place to store odds and ends.
Odds and Ends
Some things don’t have a specific category but can be very useful. A simple bandana like the Wazoo Gear Foraging Bandana can fill multiple rolls, a pen, maker, and notebook allow you to take notes and leave notes if needed. A shop cloth can be used to dry your knives or electronic gear after use.
Giving your body fuel to function is often over looked in when packing go bags and bug out bags. Adding simple easy to carry and eat food items to your survival kit like these MTN OPS Venture Bars and Nutrient Survival packs can go a long way to keeping you moving.
Final Thoughts
At the end of my build, the pack came in weight just under 16 pounds, which is close enough to my goal of 15 pounds. I found the BCO Discovery M1 to be a great bag choice. The modular nature of the Discovery M1 will allow for quick additions of storage space if needed and streamlining it to cut bulk can be done in just a minute. I have covered many miles with it already and find it comfortable to carry, easy to access the necessary gear, and everything inside is still relatively dry, though I would like to see an optional rain fly in the future.
Large Bug out bags can provide us with what we need for the long term, but are often difficult to transport due to the size and weight. A go bag provides us with essential tools and equipment we can easily keep close to us to better prepare us for the unexpected. There is no “cookie cutter” template that will work for everyone, especially in the colder months.
While many of our essential needs will not change from season to season, accounting for both our body’s and our equipment’s exposure to the elements is vital. Beyond just accounting for the climate and weather, we must also evaluate our location, personal needs and skill set to ensure we can maximize the life saving efficiency of our survival kit items. Armed with the knowledge of our local environment, an honest evaluation of our abilities, and the proper gear we can better position ourselves to make it through unexpected events and emergency situations safely.
With any gear loadout it is important to train and practice with your gear. You may find you are missing something or have something that is adding weight that you don’t really need.
Welcome back to Gear Up, your go-to guide for the latest in survival gear and preparedness tools. This edition is packed with innovations and tried-and-true classics that are essential for staying ready for any situation. From cutting-edge tech to reliable gear, we aim to equip you with the knowledge and tools you need to stay ahead of the game. Whether you’re gearing up for the unexpected or fine-tuning your survival kit, join us as we take a closer look at this month’s must-haves.
The 5.11 Chukka boot is designed to provide a balance of comfort, style, and durability, making it suitable for various situations. Whether you’re on your feet for extended periods, navigating through crowds, or in a professional setting, the Chukka offers reliable support. Its full rubber outsole, developed in collaboration with Vibram, ensures excellent traction across multiple surfaces, enhancing your mobility in different environments. The drop-in Ortholite foam insole contributes to all-day comfort, cushioning your foot and promoting a comfortable experience no matter how long you’re on the move. Constructed from full-grain leather, the boot combines style with a rugged build, making it versatile enough to wear in both formal and casual scenarios. The Achilles relief heel further enhances comfort, reducing strain during extended use. With an emphasis on both function and fashion, the Chukka is a well-rounded option for individuals who need footwear that performs without sacrificing aesthetics.
Built for quick and efficient game processing, the Pickens Game Knife is an efficient skinner. A trailing point curves upward, creating an elevated point higher than the handle. This design forms an oversized belly ideal for slicing and skinning tasks. Made from 80CrV2 high-carbon steel, this blade can process an entire deer with minimal resharpening, preserving both time and valuable meat. Measuring 7.5 inches overall with a 3.5-inch blade, it offers a balance of control and cutting performance. A thickness of 0.09 inch and a full flat grind enhances its slicing ability, while the rounded spine ensures comfort during extended use. The rock-tumbled acid wash finish lends a rugged, practical aesthetic. Handle materials include options such as camo crosscut Micarta, green and black Micarta, and red oak. Paired with a Kydex Tru-Hide sheath available in whiskey or OD green, this USA-made knife is ready for the field.
These shemaghs, loomed and sourced in Kabul, Afghanistan, are more than just a versatile survival and fashion accessory — it carries a powerful story. The company behind The Shemagh, Combat Flip Flops, is composed of military veterans still working with their Afghan counterparts. Measuring 44 by 44 inches and made from 100-percent cotton, it offers a comfortable and practical solution for various outdoor or everyday needs. Whether shielding from the sun, cooling off, or using it creatively, The shemagh proves to be a reliable and multi-functional tool. Its design serves a wide range of purposes, from providing protection from dust and heat, to enhancing personal style. Beyond its functionality, purchasing this shemagh contributes to a positive impact, supporting the ongoing efforts of the factory in Afghanistan. Crafted with care and purpose, this piece stands out not only for its quality but also for the difference it makes in the lives of those who produce it.
The Joolca GottaGo Toilet offers a convenient and efficient solution for separating solids from liquids, making it stand out from traditional chemical toilets. By not filling the solids tank with urine or flush water, this toilet provides versatility, allowing users to opt for a bag when dump points aren’t available. It can even be used as a composting toilet. Airtight and leakproof, the Gotta-Go eliminates odor and offers a safer and easier emptying process compared to standard camping toilets. With a non-flush design, maintenance is simple. A spray of vinegar is all that’s needed to keep the bowl clean, meaning no heavy water containers or cumbersome cassettes full of liquids. The GottaGo also comes with a handy po(o)ker stick to manage toilet paper, ensuring everything remains hassle-free. Engineered for user convenience, the GottaGo has a large capacity while staying lightweight. The chemical cassette holds approximately 11 liters, and the eco cassette has a 9.4-liter capacity. The urine container can hold up to 4.6 liters. The toilet is crafted from durable rotomolded LLDPE and features a blow-molded HDPE urine container for lasting performance.
Fifth-generation KUIU Pro Packs are built for organization and reliability. Featuring a built-in load sling mode, the pack offers an additional 2,500 cubic inches of storage between the frame and the bag, making it ideal for hauling gear or game. Hydration compatibility is integrated, allowing for up to 3-liter water reservoirs. Each pack is shipped fully assembled, with options for color, frame size, and waist belt size to ensure a tailored fit. The carbon-fiber frame, which weighs just 11 ounces, can support up to 150 pounds. The frame comes in three sizes — regular (22 inches), tall (24 inches), and X-tall (26 inches) — with a 4-inch adjustable shoulder strap height for a personalized fit. Durability and comfort are prioritized in the Pro Suspension, featuring wide, soft shoulder straps, an adjustable hip belt, and a breathable spacer air mesh for airflow. The suspension is designed to handle heavy loads without collapsing, ensuring comfort even under extreme conditions. Made with top-tier materials, including Cordura 500D fabric, YKK zippers, and Duraflex hardware, the KUIU Pro Packs are built to withstand the rigors of the outdoors.
Translucent magazines offer clear visual confirmation of both round count and ammunition type. Constructed with next-generation material technology, this AR-15/M4 magazine has enhanced strength, durability, and reliability. Made from military-grade copolymer, the magazine is resistant to extreme temperatures, UV exposure, harsh chemicals, and impacts from drops, ensuring performance in any environment. The translucent body allows for quick ammo checks, while the textured surface eliminates unwanted shine. These magazines are compatible with a wide range of AR-15/M4 platforms, as well as non-AR-15/M4 rifles, making it a versatile option for shooters. Various color options serve specific training purposes. Each mag includes a USGI-spec stainless steel spring, a self-lubricating anti-tilt follower, and a flared floor plate for easier handling. The oversized bolt catch, and paint pen dot matrix offer additional convenience, while the tool-less disassembly system with double floor plate safety release tabs makes maintenance straightforward.
Real Avid Armorer’s Master Hammer and Accu-Punch 11-Piece Standard Pin Punch Set
Armorer’s Master Hammer, paired with the Accu-Punch 11-Piece Standard Pin Punch Set, offers a complete gunsmithing solution designed for precision and control. Weighing 22 ounces, the Master Hammer features a full-length tang, ensuring consistent force distribution and optimal balance. Equipped with interchangeable heads — soft-blow, steel, nylon, brass, and rubber — it adapts to various material needs, making it versatile for a wide range of firearm tasks. An integrated magnetic pin starter secures small pins, enhancing efficiency during assembly and preventing pin loss. The Accu-Punch Set complements the hammer with 11 hardened steel punches, available in sizes from 1/16 to 9/32 inch, covering essential dimensions for firearm maintenance. Nickel plating provides corrosion resistance, while hex-shaped handles with rubber O-rings ensure a secure, slip-resistant grip, allowing for precise control when installing or removing pins. Housed in a durable case, the set ensures organized storage and easy access.
Slim and lightweight enough for everyday carry, the RFK delivers the strength and durability expected from a high-performance fixed blade. Built for field use, it’s built for scenarios like rescue operations, vehicle egress, military deployment, bushcraft, camping, and survival situations. Crafted from 3/16-inch-thick 1075 high carbon steel, the RFK features a 3.75-inch chisel-ground blade with a sanded finish, offering toughness and edge retention. With a paracord-wrapped handle, an overall length of 8.5 inches, and a weight of just 7 ounces, the blade has a comfortable grip in a variety of conditions. The knife includes a Kydex sheath made by OxCreek Tactical and features an adjustable friction tensioner for convenient carry options on a backpacks, vests, belts, or pockets. Designed with versatility in mind, the sheath allows for compatibility with aftermarket clips and mounts.
Designed for cold, wet conditions where dexterity is crucial, the Altimeter Gloves feature waterproof, breathable shells. These gloves protect your hands from the elements while preventing moisture buildup inside. The removable PrimaLoft insulation liners provide exceptional warmth without adding bulk, ensuring comfort during extended use. The versatility of removable liners allows quick drying and the option to pair them with other SG gloves for adaptable performance in various weather conditions. Weighing 6.9 ounces (large size), the gloves maintain a lightweight profile without sacrificing durability or warmth. The three-layer shell resists rain and snow while allowing sweat to escape, keeping your hands dry and warm. For enhanced grip in cold, slick conditions, the gloves feature Melco taped palms and thumbs. An articulated fit and strategically placed seams improve dexterity. Additional features include a one-handed wrist collar cinch, removable wrist tethers, and hang loops for drying. Pull loops make for easy on/off functionality, and the gloves pack down for convenient storage when not in use.
Streamlight TLR RM 2 Laser-G Rail Mounted Tactical Lighting System
The TLR RM 2 Laser-G is designed for long-range performance, featuring a low-profile build and advanced illumination technology. With its HPL face cap, this light delivers a concentrated beam that enhances candela output without sacrificing overall lumen performance. Capable of producing 1,000 lumens and 22,000 candelas, the light reaches distances of up to 297 meters, ensuring visibility in demanding environments. Equipped with both push-button and remote pressure switches, the system allows for easy and independent operation, ensuring reliable light activation when needed. The integrated 510-530nm green laser enhances targeting precision, running for up to 11 hours in laser-only mode. A mode toggle switch offers flexibility with three settings: laser only, light only, or a light/laser combination. Powered by two CR123A lithium batteries, this system provides 1.5 hours of run time for LED or LED/laser modes, while strobe mode extends operation up to 3 hours. Weighing just 5.11 ounces and measuring 4.97 inches in length, this compact, black-finished light is built for both tactical use and long-term durability.
This wood-burning hobo stove of Finnish design offers a practical and efficient solution for outdoor cooking. It is highly functional, and packs flat for easy transport. Available in two sizes — regular and large — it caters to different fire needs, making it ideal for everything from small camping trips to extended outdoor adventures. Each stove includes a sturdy M05-patterned carry pouch with a belt loop and a D-ring for convenient carrying. Constructed from laser-cut sheet steel, the stove is designed for durability and stability when used with most pots and cups. The smaller version fits neatly into certain admin pouches, making it even more portable. Both sizes can be used with dry twigs and branches, making them more fuel-efficient than traditional campfires. The large stove can also accommodate vertically placed firewood for a longer-lasting burn. Designed in Finland and crafted by HTLaser, this stove is backed by a 12-month warranty on materials and workmanship.
Work Sharp Sharpeners Professional Precision Adjust Knife Sharpener
Built with robust metal components, including a rigid sharpening chassis and clamp, this system is designed for long-term use. Whether repairing a damaged edge or fine-tuning a blade to optimal sharpness, the full range of included abrasives ensures any knife can be restored to a blistering sharp edge. Weighing 7.5 pounds, this system offers a reliable solution for many sharpening needs. The sharpening system comes with a sturdy base for added stability, making it ideal for benchtop use. It includes a comprehensive set of seven 1×6-inch sharpening abrasives, ranging from 220- to 800-grit diamond, as well as a fine ceramic rod for serrations and a leather strop for polishing the edge. The metal V-Block clamp securely holds knives in place, providing repeatable accuracy with each sharpening session. For added versatility, a small knife table attachment enables sharpening of small pen knives down to a 15-degree angle. Featuring a metal sharpening frame with a continuous angle adjustment from 15 to 30 degrees, it allows users to fine-tune edge angles for exact sharpening control. The included digital angle indicator ensures consistent results, allowing angles to be set within 0.25 degree accuracy.
When most people think of handheld flashlights, they don’t think of flat Flaslights. They probably envision a cylindrical device. This isn’t surprising, given the round shape of traditional batteries and reflectors designed to direct and focus the beams of light. For decades, we’ve carried cylindrical flashlights, whether stashed in pockets or on our belts.
Is that a flashlight in your pocket, or are you just happy to see me? But when you give more thought to your daily carry flashlight, wouldn’t a flat rather than a rounded shape make more sense? Slimmer in your pocket and less bulky on your belt, a flat flashlight is more space- efficient, discreet, and comfortable to carry.
SureFire kicked off the flat flashlight category in 2018 with their Stiletto pocket flashlight, at just under 4.5 inches long and weighing less than 3 ounces. By incorporating an integrated, rechargeable lithium polymer battery rather than using standard replaceable batteries, SureFire was able to achieve a unique, flat housing. Meanwhile, advances in LED technology and reflector design allowed the Stiletto to output 650 lumens of light, despite its small size.
Fast-forward to today, and numerous companies now offer flat flashlights, with varying mixes of features, size, light output, and price points. Naturally, the larger the flashlight, the more output, battery life, and features you can expect.
LED emitters and reflectors keep getting better, and SureFire and Nitecore have new offerings with dual emitters generating staggering amounts of light to reach out into the darkness and punch through barriers. Coast has options for a secondary night-vision-friendly red beam or a laser.
Feature sets run the gamut from simple to programmable, with one-, two-, and three-button interfaces, multi-stage buttons, rocker switches, and even small OLED displays to display status and settings. Several flashlights can also be physically customized, with optional lanyards, configurable pocket clips, and button guards.
All the lights shown here charge via USB-C. Integrated rechargeable batteries come with the territory for this style of flashlight; if you’re still reading this article, we figure you’re OK with that. Of course, we still recommend you have other flashlights in your stable that take standard batteries.
This is an impressive batch of flat flashlights that we enjoyed testing, and they’re fantastic for daily carry. You’ll find one to love too.
5.11 Tactical Deploy PL-USB
Output: 30 / 300 lumens (740 candela) Dimensions: 0.6 by 1 by 4.2 inches Weight: 1.9 ounces Battery capacity: 1,050 mAh Runtime: 1.5 to 9.5 hours MSRP: $60 URL: 5.11 Tactical
This diminutive flat flashlight from 5.11 Tactical nearly disappears when you stash it. “PL” stands for “pocket light,” and it’s intended to fill that gap below more powerful tactical lights. It’s tiny, light, affordable, and bright — but nowhere near as blinding as the bigger lights. With two output levels, the Deploy PL-USB puts out 300 lumens, 740 candela with 50 meters of throw on high, and 30 lumens, 100 candela on low. Switchology with this light is simple with a single, rubber-covered tail switch that’s protected from inadvertent activation by a fence surrounding it. A half-press activates momentary-on, while a full press clicks into constant-on mode. Following with another press switches from high to low and back again.
The housing is comprised of anodized aluminum, and the lens is polycarbonate. The small pocket clip is removable if you wish to go without. The USB-C charging port is on the side, with a rubber cover and a bicolor charging indicator underneath. The light is rated IPX4 for water resistance and to 1 meter for impacts. Available in black and ranger green.
Pros:
So small and light, you’ll have no excuse to ever be without a flashlight
Intuitive and dead-nuts-simple operation with a nice tail switch
Switch guard prevents negligent light discharges
Light defaults to high mode, our preference for a tactical light
Cons:
For a utility flashlight, you might wish it to default to low mode.
Low tension on pocket clip; easy to slip in and out of your pockets, but can lose grip on thinner fabrics
Not super bright, but that’s to be expected for its size
5.11 Tactical Deploy TL-USB
Output: 80 / 500 / 1,000 lumens (2,540 candela) Dimensions: 0.6 by 1.3 by 4.9 inches Weight: 3.5 ounces Battery capacity: 1,650 mAh Runtime: 1 to 7 hours MSRP: $80 URL: 5.11 Tactical
This flat flashlight is the top of 5.11 Tactical’s family of Deploy flashlights, with “TL” representing “tactical light.” Just under 5 inches long, it befits its name by outputting 1,000 lumens and 2,540 candela on high, with 100 meters of throw. Successive button presses cycle through medium and low modes, ratcheting down to 500 and 80 lumens, respectively. The rubber-covered tail switch defaults to high mode.
On the side of the light is a flush-mounted rubber button that displays the fuel gauge, with four LED segments showing the battery’s state of charge. The USB-C port has a rubber cover and charges the internal lithium-polymer battery.
The anodized aluminum housing is ribbed for a secure grip, with two sets of channels to accept the removable pocket clip — allowing for two height settings, one for deeper carry and the other with the tail standing proud of your pocket. Additionally, raised switch guards mitigate negligent light discharge; you can remove either or both, if you wish. 5.11 rates the light to 1 meter for impacts and IPX4 for water resistance.
Pros:
Solid light output
Tension on pocket clip is just right, clipping in smoothly but also hanging on to fabric
Switch guard to mitigate inadvertent activation
Customizability of pocket clip and switch guards to fit your preference
Cons:
Tail switch is a bit fiddly to activate from certain angles
COAST Products Slayer Red
Output: 10 / 110 / 530 / 1,000 lumens Dimensions: 0.8 by 1.1 by 5.4 inches Weight: 3.5 ounces Runtime: 2 to 55 hours MSRP: $85 URL: Coast
The new Slayer Red flat flashlight from Coast Products is for fans of thumb switches. Looking at the business end, you’ll notice two emitters. The primary one is a white spot beam with a turbo mode that pushes 1,000 lumens out to 110 meters. Activate it by holding down the rubberized forward power button for one second; it’ll stay in this mode for 40 seconds then revert back to the previous setting. In regular use, you can cycle through high, low, and “moon glow” modes, corresponding to 530, 110, and 10 lumens. In the latter, the Slayer can last for 55 hours. The light always defaults to high with the first press, and there’s no momentary activation mode.
The other emitter is a red flood to preserve your night vision. Press the rear button to cycle from high to low mode, then off again. There’s a nub on the forward button, so you can tell them apart by feel. Instead of the red LED, other variants of the Slayer have a laser pointer or another white emitter, contributing to 1,150 lumens of total output.
Made of aluminum, the Slayer has serrations and contours for a comfortable grip, as well as two magnets so you can attach it to something for hands-free illumination. Bicolor LEDs shine through the power buttons to display battery status. The USB-C port for charging is under a rubber cover on its tail end, where we would have liked a switch for tactical use. The Slayer is rated IP57 for dust and water resistance (up to 1 meter of immersion).
Pros:
Good tension on the pocket; smoothly slips into place while remaining secure
Red beam is very useful in certain circumstances
Magnets are convenient to slap the Slayer on metal surfaces
Cons:
No momentary activation
Not as well suited for tactical applications
Bit larger than other lights given its light output
Nitecore EDC27 UHi
Output: 15 / 65 / 200 / 1,100 / 3,100 lumens (23,500 candela) Dimensions: 0.9 by 1.2 by 5.3 inches Weight: 4.2 ounces Battery capacity: 1,700 mAh Runtime: 1.5 to 55 hours MSRP: $90 URL: Nitecore
Nitecore’s new EDC27 UHi is an updated version of their popular ED27 flat flashlight, with more powerful UHi LEDs. In turbo mode, its dual emitters blast 3,100 lumens and 23,500 candela out to 305 meters. Four other modes span from 15 to 1,100 lumens, with the ultra-low mode lasting for 55 hours. Nitecore packed this light full of features, but you’ll need the manual to figure them out.
A small OLED display shows brightness level, battery level, runtime, lockout mode, and a countdown for turbo mode, which gets toasty and cuts off after about 9 seconds in our testing.
There are dual two-stage buttons on the tail end, one inset and one proud, so you can tell them apart. The inset one is the mode button — half-press and hold to immediately activate turbo mode. After it times out, it drops down to high mode. A full press activates strobe mode. Both are momentary. The tall button is the power button; half-press and hold to immediately turn on ultra-low mode. Consecutively half-clicking the button cycles through the four output modes, displaying the selection on the screen, so that you can preset the mode before turning it on. A full press turns on the light.
You can engage two lock-out modes — one deactivates the tall power button, the easiest to inadvertently hit, while leaving the inset button intact. The other nullifies both buttons. The process is fiddly until you get used to it. The housing is a PVD-coated stainless steel shell with carbon-fiber-reinforced polymer frame. It’s IP54 rated and impact resistant to 1 meter. Comes with a lanyard.
Pros:
Impressive light output in a great form factor
Most of the body is only half an inch thick, so the light feels very thin in your pocket
Features are great once you crest the learning curve
Good amount of tension on pocket clip
Good value
Cons:
User interface can be confusing at first
Tall power button can be hit accidentally
Fussy lock-out sequence
Nitecore EDC29
Output: 15 / 100 / 400 / 1,200 / 3,000 / 6,500 lumens (40,230 candela) Dimensions: 0.9 by 1.4 by 5.3 inches Weight: 5.5 ounces Battery capacity: 2,500 mAh Runtime: 2 to 61 hours MSRP: $110 URL: Nitecore
Nitecore built a tremendous beast of a flat flashlight with their new EDC29. Its dual LEDs have 18 cores and can output both spot and flood beams. The “search” spotlight mode puts out 3,000 lumens and 40,230 candela out to 400 meters, while the floodlight mode blasts a blinding 6,500 lumens and 35,360 candela to 370 meters. The four regular modes range from 15 to 1,200 lumens. With a hefty 2,500 mAh battery, the ultra-low mode can run for 61 hours.
Like its little brother, the EDC29 bristles with features, with a physical lock-out switch to avoid fiddly button presses. The two tail switches function similarly, with the inset customizable button activating the search spotlight mode at half-press and either floodlight or strobe mode at full-press, depending on how you configure it. The tall power button works the same as the EDC27, cycling through modes with half presses and entering constant-on mode with a full press.
The OLED display also shows brightness and battery levels, runtime, lockout mode, and a countdown for spotlight/floodlight mode, cutting off after about 8 seconds in our testing.
The housing is a PVD-coated stainless steel shell with carbon-fiber-reinforced polymer frame, rated IP54 for dust/water resistance and to 1 meter for impacts. Comes with a lanyard.
Pros:
Absolutely scorching light output
Unique ability to switch between spot and flood for differing needs and situations
Rich set of features
Physical lock-out switch
Excellent value
Cons:
Pocket clip is excessively tight
User interface can be confusing at first
Tall power button can be hit accidentally
Streamlight Wedge XT
Output: 50 / 500 lumens Dimensions: 0.6 by 1 by 4.25 inches Weight: 2.6 ounces Battery capacity: 950 mAh Runtime: 2 to 11 hours MSRP: $155 URL: Streamlight
Streamlight’s Wedge XT flat flashlight feels “just right” as a very compact, general-purpose EDC utility light that can also fill the tactical role if needed. It’s very small, so it maxes out in high mode at 500 lumens and 1,900 candela out to 87 meters. The tail switch cycles between high and 50-lumen low mode, which lasts for 11 hours.
The switch behaves like other Streamlight products, where a quick tap activates constant-on while a longer press is momentary. Clicking it five times locks out the switch to prevent unintended activation. Meanwhile, clicking it 10 times allows you to choose between high mode or low mode first.
The Wedge XT comes with a convenient, small lanyard that attaches to the pocket clip, which positions the light very deep in your pocket. The housing is anodized aluminum in your choice of black or coyote, with a polycarbonate lens. The USB-C charging port is exposed, but the light is still rated IPX7 for water resistance to one meter. There’s a bicolor LED to indicate charging status.
Pros:
Great small, general-purpose EDC flashlight
Simple, configurable operation with nice tail switch
We liked the lanyard design so much, we wanted to use it on other lights too
Pocket clip has good amount of tension
Cons:
Not as bright as the others, but it’s a very small light
Streamlight Wedge Slim
Output: 300 / 1,000 lumens (3,000 candela) Dimensions: 0.6 by 1 by 5.5 inches Weight: 3.1 ounces Battery capacity: 1,500 mAh Runtime: 3 hours (35 second bursts in high mode) MSRP: $168 URL:Streamlight
If you prefer thumb switches on your flat flashlight, the Streamlight Wedge is for you. It has a unique, tactile rotating switch that’s easy to find and operate by touch. Rotate it forward and it clicks into constant-on in the lower 300-lumen mode. Keep pushing further forward, and it’s spring-loaded for momentary high mode. In this mode, the Wedge outputs 1,000 lumens and 3,000 candela out to 110 meters. That’s it; there’s no other settings or modes to worry about. Note that the high mode is limited to 35-second bursts.
The case is anodized aluminum and available in black, coyote, blue, red, or purple; the latter three colors are $5 extra. The clip is positioned for deep pocket carry and can be installed on either side of the light (though always head-down). There’s a bicolor charging indicator, and the USB-C charging port is located at the tail end of the light. It’s exposed, but the light is IPX7-rated for water immersion to one meter.
Pros:
True to its name, it’s very slim
Great for those who like thumb switches
Simple, intuitive operation
Good tension on the pocket clip
Cons:
Lacks a low mode
A bit long
We prefer tail switches for tactical use.
SureFire Stiletto Pro II
Output: 25 / 500 / 1,500 lumens (35,000 candela) Dimensions: 0.9 by 1.7 by 4.9 inches Weight: 4.9 ounces Battery capacity: 1,600 mAh Runtime: 1 to 23.5 hours MSRP: $379 URL: Surefire
For mission-critical hard use, we’d reach for the SureFire Stiletto Pro II flat flashlight — and not surprisingly, our wallets will suffer accordingly. The dual optic design throws 1,500 lumens and 35,000 candela out to 375 meters, with a hybrid beam pattern that also provides a good amount of spill light. For tactical use, the rubber tail switch immediately actuates high mode in either momentary- or constant-on fashion, depending on your preference. Triple-tapping the tail switch activates a rapid strobe. Raised switch guards mitigate negligent light discharges.
On the side of the flashlight are two flat rubber buttons, inset below the surface to avoid accidental activation. The primary switch cycles between high, medium, and low output modes, down to 25 lumens for 23.5 hours. The other button programs the light to customize its behavior. You can use it to set the order of the primary switch sequence to go from low to high instead, as well as swap between momentary and constant for the tail switch. There’s also an emergency mode that blinks at three to four times per second in medium output to use the light for signaling. Additionally, a tricolored LED fuel gauge provides four levels of battery status.
The Stiletto Pro II’s tapered housing is anodized aluminum, rated IPX7 for immersion in 1 meter of water for 30 minutes. The pocket clip is melonited spring steel and can be configured for head up or down carry.
Pros:
Excellent quality light delivered downrange, even compared to others with higher specs
No time limit on high mode, though it’ll eventually automatically ratchet down output if the light overheats
In the realm of survival tools, few items are as essential as a reliable, compact firearm. Dark Mountain Arms, a veteran-owned company, has designed the Stowaway Rifle and Pistol to meet the needs of outdoor enthusiasts, survivalists, and anyone looking for lightweight, packable firearms. These single-shot firearms aren’t just ultralight — they’re adaptable, suppressor-ready, and easy to break down for transportation. Fortunately, we got our hands on these to explore the features, practical applications, and real-world performance of the Dark Mountain Arms Stowaway series of firearms.
After the barrel is seated, the shroud is screwed in place and locks it firmly together. When it is broken down, the entire firearm fits nicely in a variety of day packs.
Dark Mountain Arms Stowaway Rifle
The standout feature of the Dark Mountain Stowaway Rifle is its packable design. With a barrel length of 16 inches, the rifle can be taken down into two parts, reducing its total length to less than 17 inches. This makes it ideal for packing into backpacks during long hikes, camping trips, or survival situations. Despite its small footprint, the rifle can be assembled in less than 30 seconds, making it quick to deploy when needed.
Weighing just over 4 pounds, even with an optic attached, the Stowaway Rifle remains incredibly light without compromising its durability. Its minimalistic design makes it easy to carry for extended periods, and the threaded barrel allows for the attachment of suppressors or other barrel accessories, adding to its versatility. The ½x28 thread pitch ensures compatibility with a wide range of accessories, including compensators and flash hiders.
Caliber Swapping and Optics-Ready Rail
One of the rifle’s most versatile features is its ability to swap calibers easily. By changing out the bolt face and barrel, you can quickly adjust the rifle to suit different needs. This adaptability makes it particularly appealing to survivalists who may need to shift between calibers based on the availability of ammunition.
The rifle comes optics-ready, equipped with a Picatinny rail that allows you to attach a variety of sighting systems. We mounted the Primary Arms GLx 1x MicroPrism for testing the rifle, an optic with clarity and wide field of view. This optic also complements the rifle’s lightweight and compact design perfectly, adding a mere 9.1 ounces to the total weight. When paired with the GLx, the combined weight of the Stowaway Rifle and optic remained well under 5 pounds, a significant advantage for those trekking long distances with their gear.
Suppression-Ready for Stealth Hunts
Its ability to attach a suppressor makes the Stowaway Rifle a top choice for small game hunting, particularly in scenarios where stealth is critical. Whether you’re hunting rabbits, squirrels, or other small game in a survival situation, the ability to reduce noise is invaluable. A suppressed shot is less likely to alert other animals, giving you a better chance at landing multiple kills in a single outing.
The pistol assembles and disassembles the same as the rifle, but with an even more compact profile.
Dark Mountain Arms Stowaway Pistol
While the Stowaway Rifle offers a balance between portability and power, the Stowaway Pistol pushes the concept of a survival firearm even further. This bolt-action pistol is designed to be just as packable and versatile as the rifle. The barrel is removable, making it easy to break down and stow in a small pack or compartment. Despite its large format, the pistol remains easy to handle, particularly for close-range encounters.
During testing, the SIG Sauer Romeo-MSR was mounted on the pistol’s Picatinny rail. The optic’s lightweight design paired well with the pistol, adding minimal bulk while providing clear, parallax-free sighting. We found the Romeo to be a good choice for the Stowaway Pistol, as it added only 4.9 ounces to the total weight, keeping the pistol light and maneuverable.
If you’re a right-handed shooter, resting the thumb of your support hand on the charging handle makes handling the pistol less awkward.
Smaller Size, Same Capabilities
Like the rifle, the Dark Mountain Arms Stowaway pistol comes threaded for suppressors (½x28 thread), making it a great option for discrete, close-range shooting. This is particularly useful in situations where you may need to shoot without drawing attention, or where you’re hunting small game and want to remain as quiet as possible.
Caliber swaps are just as easy with the pistol as with the rifle, offering the same flexibility to change out the barrel and bolt face. This adaptability means that, much like the rifle, the Stowaway Pistol can be tailored to different situations, whether you need a higher velocity round for hunting or a smaller caliber for target shooting.
The recoil of the rifle is almost non-existent, making it a stable platform to aim with.
SBR Kit for Added Stability
The pistol can also be upgraded with a 1913 Style Adapter kit, which allows the shooter to add a stock for improved stability and control. This is an excellent option for those who want to maximize the pistol’s performance for more precise shooting.
Dark Mountain Arms Stowaway Performance and Real-World Applications
When testing both firearms at the range, we were impressed with the balance and performance, especially given the lightweight nature of both setups. One unique aspect of the Dark Mountain Arms Stowaway Pistol is its left-side bolt placement, which can be a little awkward for right-handed shooters. Placing your support thumb on the charging handle, while resting the shooting thumb on top, resolves this issue and allows for smoother operation. It’s a minor adjustment, but one that’s important to get used to if you plan to use the pistol regularly.
For survivalists, both the Stowaway Rifle and Pistol provide reliable, lightweight options that can be easily packed away until needed. Their single-shot designs may not be ideal for high-threat scenarios, but they encourage precision and patience, which can be a major advantage in situations where ammunition is scarce.
The ability to quickly swap calibers makes both firearms adaptable for a range of survival scenarios, from small game hunting to self-defense. And with their suppressor-ready barrels, you can operate more stealthily in the field, a critical feature when trying to avoid detection.
Being single shot with no magazine means that the shooter is forced to make the shot count.
Recreational Use
Though designed for survival, these Dark Mountain Stowaway firearms are also well-suited for recreational shooting. Their low recoil and ease of handling make them ideal for younger or less experienced shooters, while their compact designs make them fun and convenient for backpacking trips, camping, or off-the-grid excursions. With price points under $400, they’re also affordable enough to be enjoyed by a wide range of users.
Final Thoughts on the Dark Mountain Arms Stowaway Rifle and Pistol
Both the Dark Mountain Arms Stowaway Rifle and Pistol are perfect examples of how modern firearms can be designed for portability, adaptability, and performance, all at an affordable price. These firearms are designed to be companions for campers, overlanders, and outdoor enthusiasts alike. Their ultralight weight, suppressor readiness, and optics compatibility make them versatile solutions for a variety of scenarios. Whether you’re planning an extended backcountry trip or simply preparing for the unexpected, the these firearms strike the right balance between features and performance.
It’s easily one of the most common debates among those who contemplate emergency preparedness: should one bug-out — moving to a potentially safer location — or bug-in — sheltering in place, because leaving would be even more dangerous. Typically, the answer is always, it depends. This is because conditions and circumstances can differ dramatically between every situation. If being issued evacuation orders before a hurricane, tsunami, or wildfire, it’s the wise choice to move out of harm’s way.
Someone receiving an imminent tornado warning will seek shelter inside, hopefully in or near their own residence. But there are more ambiguous situations, where making the choice to stay or go is less clear. And those hazy situations have been occurring with increased frequency.
Over the past several years, several high-profile cyberattacks have exposed the vulnerability of critical infrastructure across the globe, affecting municipal systems, cellular networks, and emergency response systems. Moments like these point to man-made problems, but nature is also a culprit. Powerful atmospheric storms and coronal mass ejections can easily disrupt our means of communication for days, if not several weeks.
These incidents underscore the frightening reality that the systems we rely on for our safety can be crippled at the whim with a few keystrokes, or randomly from natural events, leaving us to fend for ourselves.
Imagine waking up one morning to find that 911 no longer works, your phone has no signal, and the electric power we rely on for everything is unreliable or non-existent. Emergencies and crimes still occur at their usual daily pace, all while law enforcement and first responders remain unreachable. This very scenario has played out across numerous states in the United States, affecting millions of people and causing tens of thousands of 911 calls to go unanswered.
What would you do if your ability to call for help vanished overnight? This is not a hypothetical situation, but a very real possibility that many experts warn could occur as cyber warfare and infrastructure sabotage become more common. It forces the question: How prepared are you to protect your family when the systems meant to keep you safe are no longer reliable, and under which circumstances will you decide to move to a safer location or stay hunkered down?
The Scenario
Situation type A large-scale failure in the 911 system
Your Crew You, your spouse, your 7-year-old daughter, an elderly Labrador retriever, and a skittish cat
Location Monroe, North Carolina
Season Late fall
Weather Cool, high of 65 degrees F, low of 40 degrees F
The Setup: It started slowly. A few days ago, the news began to report that 911 calls were taking longer to connect. At first, local anchors described it as a “technical glitch,” with no immediate cause for concern. But over the next 48 hours, things spiraled, and the truth became known. As had happened in other areas of the country, the 911 system had been hacked, and it wasn’t just your town — it was a large portion of the entire East Coast. Emergency services, including police, fire, and medical responders, were unreachable. With no backup systems in place and no clear timeline for a fix, people already on edge because of current political tensions began to panic.
In your small town of 35,000, the initial reaction was confusion. Neighbors shared stories of calling 911 and getting nothing but static or dead air. The local police department, already stretched thin, did what it could to maintain order, but without communication, there was no way for them to respond to the increasing number of incidents.
The situation was worse in nearby Charlotte. Riots had erupted in several neighborhoods, as looters took advantage of the chaos. Social media was flooded with reports of businesses being ransacked and vehicles being stolen.
On the third day of the crisis, the power went out. No official word had come through as to why — rumors ranging from another hack on the grid, to a vandalized substation — but the timing couldn’t have been worse. By now, the grocery stores had been picked clean, and gas stations were either shut down or had long lines of desperate people hoping to fill up before supplies ran out.
Even if you wanted to leave town, the roads were a nightmare — every major route was severely affected by vehicle accidents paramedics either couldn’t get to or had no idea existed. There were also rumors of opportunistic looters setting up roadblocks and robbing people who tried to get through. The radio buzzed with unconfirmed reports of mob activity in the nearby city, with law enforcement overwhelmed and first responders unable to intervene.
The Complication: It’s now day five, and things are getting dangerous in your once-quiet town. The temperature has dropped, and without reliable power, your home is starting to feel the bite of the cold at night. You and your spouse try to keep your child entertained, but the lack of communication from authorities has left you both on edge. The situation feels like it could explode at any moment. That night, it does.
Around 10 p.m., you hear the unmistakable sound of breaking glass. You rush to the window and see several figures smashing their way into a house down the street. The home belongs to an elderly couple who you know aren’t prepared for this kind of chaos.
There’s no way to call for help, and the looters — emboldened by the lack of police presence — are acting with impunity. They ransack the house, leaving with armfuls of valuables and supplies. Your spouse asks if you should intervene, but the group looks dangerous, and you know that without backup, any confrontation could end badly.
By morning, word spreads through the neighborhood that the looters have been moving from house to house. One family packed up their car and tried to leave, but they didn’t get far on the congested road, and the situation on the highways is just as chaotic. You check your supplies.
Food from the refrigerator and freezer is mostly gone, having had to eat it before it spoiled after the power went out. You’ve got about three days’ worth of shelf-stable food and water for the family, and two go-bags — preps for a potentially bad hurricane season. However, you haven’t checked the go-bags in over a year. You’re not sure what’s in them, but they’re there if you need to leave quickly. The family dog is starting to show signs of age, struggling to get up and down the stairs, while your daughter’s beloved cat has been hiding under the bed, skittish from the loud noises outside.
The local radio station — one of the few remaining reliable sources of information — warns that things are only going to get worse. Without power and a functional 911 system, law enforcement and first responders can’t be reached, and criminals have become more brazen. There’s talk of forming neighborhood watch groups to defend against break-ins, but you’re not sure how much good that’ll do if things continue to deteriorate. To make matters worse, more people are trying to leave the town, clogging up the already congested roads and leaving fewer places to escape to if you decide to bug-out.
As you sit with your spouse that evening, you discuss your options. Bugging in feels increasingly dangerous — your neighborhood is becoming a target for looters, and without reliable heat, the cold is becoming a serious issue. Bugging out, however, is also risky. The roads are choked with traffic, and reports of armed gangs robbing travelers make the thought of loading your child and pets into the car seem like a gamble with your safety.
The night brings no relief. Around 2 a.m., you hear shouting outside again. This time, it’s closer. Two houses down, a group is trying to break into a neighbor’s garage. You and your spouse exchange a worried look. How much longer can you wait? Your family’s safety is at stake, but leaving might put you all in an even more dangerous situation. You wonder if your neighbors are having the same debate.
Emergency Manager Mark Linderman’s Approach to 911 Down Scenario
I’ll be up front. I’m a “bug-in” kind of guy. The resources I’ve invested in to shelter at home during a disaster give me the peace of mind to relax on my couch with a good book, even if the world is falling apart around us. I know, though, that reality sets in, and as life unfolds, I must keep moving forward with it.
I adopt the approach of the Baby Boomers when preparedness wasn’t “prepping,” it was just a way of life due to the precarious times they themselves lived in during the early stages of the Cold War. Times are different, but the need for me to prepare my family for an emergency isn’t. Knowing that makes this scenario one that hits at the heart of why I prepare for the unthinkable and exemplifies why others should too.
Preparation
A handful of years ago, I woke up to find that our community had neither cell phone service nor internet capability. While I wasn’t overly anxious about the North Koreans hacking into our system, it was bizarre to feel “disconnected” from the world. Communications were restored an hour later, and all was good in my little neighborhood.
However, it left me feeling vulnerable to the nefarious whims of both nature and those seeking to do our nation harm. I believe that investing in radio systems would be a great advantage in scenarios like this, with the understanding that radios wouldn’t work for long distances and communication relationships should be established with those we trust long before calamity strikes.
Because we live in such a polarized nation, I’ve given the concept of “going gray,” or the ability to fit in and not stand out in society, more credence than I had in my earlier years. Thankfully, we live in a small community where residents share common ideals and political affiliations. Small communities, though, are often surrounded with small bubbles. In a larger community, such as the one in this scenario, you’re faced with more opinions, more extremism on both sides, and unfortunately, more adverse engagement.
One thing that I’ve realized in life is that people are people, and most members of society will resort to their reptilian natures when it comes to their own survival. This undoubtably leads to community members who may be more volatile, especially with the added angst from an unresponsive emergency response system. That said, I believe that living in an amicable state with my neighbors wouldn’t be a necessary struggle to take upon myself, especially if continuing to adopt the “gray man” philosophy.
We have a seasonal farmer’s market within walking distance from our home. Every Saturday when we visit it, I often think that if society were to collapse, this type of venue would be the go-to solution for bartering and getting food. It’s the benefit of a small community, even if that community is the size of Monroe, North Carolina. Within small communities come stronger support networks because we live side-by-side with our neighbors. It’s not that larger cities can’t do this. In fact, they do so with a pool of greater resources.
It’s different in smaller communities where we literally see the same people on a consistent basis, even if we don’t personally know the person. Resource sharing is more personal, and communication may actually become more streamlined in a smaller community, circumventing the vast amounts of misinformation that you may find in larger cities.
At the end of the day, it’s about resources and if the infrastructure in our community collapses, then I would have no qualms about asking my family to stay home from their daily activities to help us retain our own infrastructure. This would include protecting their safety from those who seek to do harm in society. Looters, who may be in a state of starvation and looking for their next meal, will do what they feel they must to procure life essentials.
A school makes a lot of sense to ransack and would be the last place I want my child. People are people, and people do insane things in the name of survival of the fittest, especially when the opportunity presents itself if emergency services have failed.
On-Site
Not every community has standout people in it, but a strong community is able to forge solid enough alliances to overcome this adversity, at least during the initial stages of the disaster. A strong community will understand that their strength comes in numbers and that weaknesses should be strengthened to fortify the community. This means developing early warning systems, neighborhood watches, and establishing a system of leadership even if it only represents a few city blocks. Community cohesion isn’t as strong as it once was because we don’t necessarily know our neighbors like we used to.
I have a tall row of bushes separating our home from our neighbor’s, and we’ve waved to each other once in three years without a word spoken. We’re just not as cordial as we once were in our culture, and it has become a detriment to our vitality, especially in disaster scenarios. We don’t know our neighbors anymore, and that’s not necessarily a good thing.
Regardless, emergencies still bring people together. To protect my home from those who seek to take what I have, I need to help protect other’s homes from the same. Whether it’s looting, vandalism, arson, or intimidation, I believe that developing a community web is the best short-term solution to protect our families and homes. It represents a shift in our nation’s mindset that needs to be nurtured now, not just after worst-case scenarios unfold.
As I mentioned earlier, I believe that the “gray man” approach to disaster readiness is the best method of interaction within community even if it’s short lived. Maybe going gray goes out the window when the first shot is fired at those who are attempting to loot your home. For all intents and purposes, it’s a good approach if your neighbors become unstable because it affords you the ability to quietly distance yourself from them, saving you from a multitude of additional problems you never asked for.
Crisis
Part of survival is retaining flexibility in your situation. If, in this scenario, the temperature is dropping and my family and I are running out of food, then things may be grimmer than I had hoped. There would be enough circumstantial evidence to know that this is not a local problem, but indicative of a wider issue that would affect a larger region of American society.
While I know that we should not trust outside help to come to our aid, I would believe that if the situation were this dire, information would be made available through social media or the web, especially if a societal breakdown was in process. In that case, I might be more inclined to shelter in place, but if all communication systems were down, including the internet, it may just be the breaking point for me to think about moving my family out of our location and to a premise that’s better equipped.
Since Monroe is approximately 25 miles from Charlotte, it potentially hinders an efficient egress from those other panicked citizens leaving the city. If you haven’t already found back road systems to vacate your area, your best bet is to hopefully obtain a physical map and mark the less traveled roadways so you may find a quieter way out of the community.
Keep in mind that those aware of such roadways may have nefarious intentions. Pay attention to the actual areas that could be problematic as you leave town, including broken or blocked roadways if the incident is environmental in nature.
If the situation spiraled out of control, then it’s highly probable similar atrocities are widespread and therefore resemblant of civil conflicts often seen in other global arenas. America isn’t immune from suffering its own atrocities. Human beings will always resort to their base natures when pushed to do so.
New Orleans fell into social chaos during the aftermath of Hurricane Katrina and serves as the case study of what not to do in terms of human depravity mixed with poor governmental response. Why should all of America not suffer a similar fate as the Gulf region did in 2005?
We would like to think we would always resort to civility, but history tells us otherwise. I’d like to believe I could weather the collapse of our emergency response system at home. But with dwindling resources, dropping temperatures, and a restless community, my best option would be to pack up my family with enough supplies for at least three days, a few gallons of gas, and head to the safety of our family farm several states away.
A side note on gas
stock up on it ahead of time. Gas is gold in a bug-out situation, so hide and secure it at your home and in your vehicle after you bug-out. People have killed for less, and if they don’t feel like waiting in line for five hours to fill their tank, you might be their next target if they know you have it. If you need to fill up, do so secretly where no one is around to see you.
By this time, I would have examined our bug-out bags, restocked and equipped them for colder weather, and gotten enough food for our furry friends to make the two-day journey to safety.
Another side note
Your pets are your family and must always be included in your preparation plans. I have a special bug-out bag just for our two dogs equipped with food that has a decent shelf life, bowls, blankets, toys, and ground stakes with leashes, so I am not trying to collect everything in a moment’s notice.
Conclusion
A wide range of disasters could lead to such a scenario, but one stands out to me as the most plausible: an electromagnetic pulse (EMP). The growing threat of a rogue nation detonating an EMP high above America is alarming. Unlike a nuclear explosion in a major city, an EMP wouldn’t be deadly on impact, but the aftermath — crippling our electronic infrastructure — would be far more devastating. Emergency services would be overwhelmed by rising crime, healthcare would falter, and basic necessities would vanish from grocery store shelves in a matter of days. Life, as we know it, would grind to a halt.
For those of us who prepare for emergencies, we understand that help might not arrive for several days, but we hold onto a sliver of hope. In the case of an EMP attack, however, hope could quickly fade, and the reality of being completely on our own is a daunting thought. That said, a “grid down” situation doesn’t necessarily mean the collapse of society.
Despite the fear and uncertainty, I still believe in the resilience of America. Our nation has weathered countless challenges in its short history, yet we remain united through it all. I like to think my family would show the same resilience that defines our country.
Would I bug-out in such a scenario? I hope it never comes to that. At the end of the day, home is where the heart is, and for now, I’m still a “bug-in” kind of guy … for now.
Former Navy SEAL Human Performance Specialist Jason Salyer’s Approach 911 Down Scenario
Preparing for a 911 system or grid-down failure requires a mix of resource planning, physical security, and community building. Bugging out is the absolute last resort simply from a supply logistics point of view. Most, if not all, of your supplies will be at your home, and transporting these supplies to another location will be difficult and costly in the best of times and impossible in the worst.
Preparations to bug-in re essential. Where I choose to live is a key element of my disaster plan. I choose to live in a low crime, low population density area because more people equal more problems. Because of this choice, the likelihood of needing to bug-out is reduced significantly.
Preparation
After Hurricane Helene, many thought they had a month’s worth of food, but ran out after just three days. Others had only a week’s supply, which wasn’t even close to enough. Disasters like this reveal a harsh truth: We often overestimate our preparedness. A stockpile of essentials like food, water, and medical supplies are a good place to start.
Aim for at least a one-month supply to ensure you can weather a prolonged emergency. A year’s supply would be the ultimate goal, but I realize there are budget and storage space limitations.
Most homes have ample storage options if you’re creative, handy, and willing to minimize clutter. I mean how many Christmas decorations does my wife really need in the garage? Wouldn’t a few hundred gallons of potable water be more valuable than your collection of antique pinball machines? I think so. A bit of compromising with the missus and perhaps parting ways with some of your junk is all it takes to free up some space.
Many preparedness-minded individuals have no problem dumping $1,000 on yet another rifle that they most likely will never need, but squirm at the thoughts of spending $100 on compressed gauze bandages and extra hygiene products that you’ll surely need eventually. While the rest of the neighborhood is out facing the chaos in the grocery stores and gas stations, we could be safe at home because of a little bit of forethought and preparation.
Self-defense isn’t just about kung fu and AKs. I highly recommend having the necessary tools and skills to protect yourself and your family. When considering your home, it’s more about becoming a less appealing target. Just like the hyenas of the African plains choose the softest and weakest for their prey, human predators will do the same.
I like to put myself in the shoes of a looter. Would I go for the house with a gate, motion sensing lights, and a barking dog or the house across the street with nothing more than a welcome mat and a cat in the window? Make your home less desirable. Ensure that the juice isn’t worth the squeeze, and the bad guys will move on down the street in hunt of easier prey.
On-Site
Let’s say for this scenario that all the easy houses have been picked through, and we’re all that is left. Perhaps we have chosen to stay, bug in, and ride this disaster out. It would be necessary to have someone on watch 24/7 while everyone else is either sleeping or taking care of essential chores. With only two adults and a weary old dog capable of covering these watch shifts, life would be stressful. We would need to rehearse an intruder plan many, many times to the point where it would be automatic.
We would have established the safest and most defensible locations in the home and ensured there’s plenty of supplies such as water and weapons to defend ourselves. This location should be secure and positioned in such a manner to make it impossible for intruders to enter without taking multiple casualties. Most looters will not be interested in what you have in one specific location in the home if it means they’ll have to absorb some lead to get to it.
Building a community of trusted individuals and families is a huge part of preparing for such a crisis. I’m doing this well in advance to ensure people are well vetted before disaster strikes. After this grid-down event has already occurred, people will be guarded, defensive, untrusting, and on edge. I get asked all the time, “How do you build community?” This is no easy task in a world of selfish introverts. I have a friend who swears he lives next door to a vampire because he has never seen him in the light of day.
Building a trusted community begins with you. I’m attempting to become the man I want everyone else to be. This involves putting in the work to become physically, spiritually, emotionally, and mentally stronger each day. I often fall short but am steadily making progress to better myself and the people around me. By doing this, I attract the right kind of people.
I attract good moral doers and hopefully inspire others to do the same. Having people who you can count on when in need is invaluable. These kinds of relationships are precious and should be protected at all costs. When a friend calls on you for help, be there. No questions or complaints are allowed. There’s no score or IOUs to be kept. Just friends helping friends because it’s the right thing to do.
Staying informed and communications are key. I’m just like everyone else and use my cell phone for everything. In this scenario, that’s no longer an option. Equip yourself with a battery-powered and/or hand-cranked radio. I’m definitely not an expert ham operator and have no aspirations of speaking with someone in Bangladesh via Baofeng radio.
I do know how to turn it on, listen, change the frequencies, and communicate if needed with my local friends. Aside from in-person communication, radios may be our best option if the cell networks are down. Just being able to listen in on conversations or emergency broadcasts could give you a huge lifesaving heads up when we would otherwise be left in the dark.
I believe in training your family on emergency procedures. Everything from first aid and fire drills to basic small unit tactics. Who knows what a scenario such as this will throw at you? The more “tools” you have in your skill toolbelt the better, and having well-trained individuals will make everything that much easier. Teaching these lessons to my family and friends has also had the very valuable side effect of improving my own skills.
Crisis
Deciding whether to stay home or evacuate is one of the most critical decisions in this survival scenario. Bugging in is generally safer if your home is secure, well-supplied, and away from major conflict zones. However, if the violence gets too close or perhaps the homes are on fire in your area, it’s time to go. Nothing you have in your home is as valuable as the people in it.
Get them to safety as quickly as possible. Just running away in a vehicle or on foot with your family in tow isn’t an option. Becoming one of the starving wandering refugees isn’t a plan. A good plan needs to consider destination, fitness, supplies, mobility options, route, and alternative route selection.
First, where would we bug out to? I would have multiple possibilities for end destinations. Trusted family and friends who have already agreed to take us in for this type of scenario would be my first choices. It wouldn’t be difficult to store clothing, food, and other supplies at a trusted friend’s home. An alternative or vacation home that’s fully stocked would be ideal as to not inconvenience friends or relatives, but not everyone has the budget for that.
Some individuals have rented storage units between their home and bug-out locations that are fully stocked with supplies. I even have one buddy who has a gym membership at one of the larger nationwide gyms and has supplies stashed in lockers in the areas he frequents.
If the streets are in chaos and the roads are blocked, traveling on foot may be our best bet to escape. When it comes to gear, less is more. The lighter your load the more mobile you will be and the less likely you are to suffer from overuse injuries such as blisters, chafing and stress fractures. Have your bug-out bags packed and ready to go with essentials like food, water, clothing, first-aid supplies and basic camping gear.
When packing, I divide my gear into two piles. One has the absolute “have to have” gear and the other is a pile of “want to haves.” Then, the “want to have” pile composed mostly of comfort items is thinned down to a manageable size. This keeps me light on my feet and unburdened by excessive unnecessary gear.
A bicycle can be a game changer. I’m not an avid rider but can relatively easily cover 100 miles in a day on a bike. In comparison, the furthest I have ever walked in a day is 30 miles and that was rough. How fit are you? Could you walk 20 miles in a day? Could you do it with your wife and young child?
Does anyone in your family have special needs? Is anyone sick or recovering from an injury? If leaving on foot was the only option, I would not bring the cat and decrepit old dog. This would be an extremely sad and difficult decision to make but I couldn’t risk my family for my pets. Start getting fit today. Eluding back to what we discussed earlier, the fitter you look the less vulnerable you will be. Who is more likely to be mugged? The 200-pound lean athlete or the guy who looks like a pile of mashed potatoes?
My truck is a heavy-duty F-350 that runs on diesel and has also been converted to burn used vegetable oil. I have a considerable stockpile of oil always on hand and will never be at the mercy of the inflated gas prices or shortages. Always keep your vehicle fueled. My rule is that a quarter tank is empty.
If you have a quarter tank of fuel, you can potentially travel 100 miles away from the immediate danger. I always recommend 4-wheel-drive or all-wheel-drive vehicles. The need to cross the grassy steep median in the road may arise and a two-wheel-drive pickup loaded with supplies may be stopped in its tracks because of a little dew on the ground. Keeping my vehicle properly maintained is always a priority. Staying on top of oil changes, tire rotations, fluid levels, etc., can keep your family alive in the event of an emergency such as this one.
Your route selection will be crucial. I want to have at least three ways to get to my end destination. One primary route that takes the easiest most convenient path, one that sticks to back roads, and one that potentially takes me cross-country avoiding roads altogether. Committing the way to memory is helpful if communications and GPS has failed.
I always keep paper maps and a compass in my vehicle. Using these analog methods ensures that I can still navigate my way home in the case of a network failure. When traveling in stressful times such as this, I can’t stress enough how important it is to listen to your instincts. If an area up ahead looks sketchy and dangerous, it is. Stop, go back, choose a different route and always be ready to defend yourself. Just like your home, be ready to abandon ship at a moment’s notice. My truck and its contents are not as valuable as my family.
Conclusion
If I was fortunate enough to make it to my bug-out location all people accounted for, the work would just be getting started. I already have security measures in place at this location and would be constantly monitoring the radio to gain insight on the situation. Possibly reaching out to neighbors in this area to see how this disaster has affected them would be a wise move. I would be busy taking inventory of our supplies and developing a game plan moving forward.
How long do we anticipate this event lasting? Do we need to be rationing our food and supplies? Are there opportunities to gather additional supplies and or help other people in need? If you are at a friend or family members home, be as helpful as possible. I would want to show how appreciative I am of their hospitality understanding that this is no small favor. There are so many variables to consider in an event like this that it can be overwhelming. That is why planning and preparation are key. Do not be afraid. Be prepared!
At first glance, you might think you’re looking at Billy Jack, the iconic martial arts character who graced our television sets in the 1970s, but Christopher Nyerges is just the opposite. He’s a soft-spoken Los Angeles native who first developed an interest in botany and wild foods at the age of 10 while visiting his father’s farm in Ohio. This eventually led him to create what’s now one of the oldest survival schools in the country. Officially started in 1974, the School of Self Reliance teaches skills ranging from wild food identification and cooking to primitive weaponry, orienteering, shelter construction, obtaining potable water, and much more. And of all places, it’s right in the heart of Los Angeles.
Nyerges isn’t just another survival instructor, he has written over 10 books, including the bestseller How to Survive Anywhere: A Guide to Urban, Suburban, Rural and Wilderness Environments. He has also been on several survival-related television shows, such as Doomsday Preppers and served as a consultant for Naked and Afraid. The School of Self Reliance offers a Self-Reliance Skills Specialist Certification to students who successfully complete enough courses.
I had the opportunity to attend one of Nyerges’ courses on securing water in an urban environment, which also included a segment on plant identification. One thing many people aren’t aware of is that Los Angeles is an extension of the Mojave Desert. Within the heavily developed Southern California ecosystem, there are still pockets of the raw rugged desert it once was before the cement city invasion.
A prime example of this is the Arroyo Seco area of Los Angeles, bordering Pasadena — a wash basin that has yet to be developed and runs 25 miles beyond the edge of the Angeles National Forest just below the famed Rose Bowl.
Students learn common plants in the southwest that can be foraged as a source of hydration.
Potable Water Sources and Plant ID
Nyerges starts off the morning session questioning students about water sources in Los Angeles and, if the grid was to go down, what their options would be — a discussion relevant to anywhere you might live. The session moved briskly with tabletop discussions and drawings about different ways to secure potable water in the urban jungle. Walking through Arroyo Seco, we were reminded to become aware of the edibles lying in plain sight. While others may be freaking out, you’ll be able to stroll down to your natural supermarket, quietly grab some grub, and get back home.
During our walk through the thick vegetation, it was amazing to see how many edible plants or vegetation are present in the arid landscape. Throughout the day we picked nettles, lamb’s-quarter, and mustard. Granted, this is no Gordon Ramsay spread, but it’s a meal for sure.
One memorable phrase we heard was, “When in doubt, do without.” In other words, know what you’re eating. At the end of the day, the edibles we collected would be used for a soup we’d be preparing. One thing that hit home is that the skills needed for wilderness survival have practical applications in an urban environment.
Walking along the trail, we came upon some desert cactus. It had been a while since I’d eaten this, but once you brush away the needles and peel the skin, it’s edible. Although not my first choice, with a little salt and pepper and a quick boil or sear on a grill, you’re good to go. Search online for “nopales recipe” to find a wide range of preparation techniques for this plentiful desert resource.
A thin sheet of plastic can also be used to extract and collect moisture from the ground by acting as a solar still.
Obtaining Potable Water: Transpiration Bag
Finding a suitable tree, we set up the first of our water catchment devices. A transpiration bag is a clear plastic bag used to collect transpiring water — moisture that escapes from green foliage such as leaves. As the leaves sweat, the humid air condenses, and moisture is caught in the bag.
The first step is placing a bag around the tree. After finding a suitable leafy branch, wrap a clear plastic bag around the branch, preferably in full sun, then tie it off at the base and wait. The pint or so of water recovered over the course of several hours wasn’t much in the large scheme of things but left for 24 hours and placed over several trees, you’ll have a slow-but-reliable source of potable water. The one drawback is that a transpiration bag needs to be moved every 24 hours. Ideally, this system works best with a willow tree; however, oak is another common tree with a high rate of transpiration.
A solar still can collect moisture as it evaporates from the ground, providing thirst-quenching water in larger quantities.
Obtaining Potable Water: Desert Solar Still
The “desert solar still” involves a process whereby you construct an approximately 3-foot-deep-by-3-foot-wide hole in the ground, covered with a large sheet of clear plastic. A cup or container is put in the middle of the hole to catch the water, with a small stone on the plastic above it to allow condensation to run into the cup. When constructing a desert solar still, Nyerges says the focus should be at the bend or curve in a dry riverbed. This is where water tends to back up and pool, thus offering an easier time to dig into potentially damp soil.
Comparing the transpiration bag to the solar still, we certainly received more potable water from the bag at a faster rate than we did with the still. Keep in mind, if you construct this in combination with other setups at several locations, things will start to look good.
How Much Potable Water a Day Does a Person Truly Need?
I’ve always been taught that we need at least 1 gallon of potable water per day per person. However, in this class it increased to 11 gallons of water per day, per person. Seems like a lot, right? Nyerges stated that by the time you use water in a cook pot throughout the day, clean yourself and your dishes, and stay fully hydrated in an arid environment, 1 gallon is nowhere near enough.
It’s certainly more than you could ever hope to obtain from the emergency transpiration bag and solar still methods — those can keep you alive in truly dire situations, but that’s all. Generally, the more water you can procure, the better.
When a catastrophic event happens, we see people fighting at the store for potable water and supplies. Let’s look at both obvious and not-so-obvious sources of larger quantities of water in the urban environment.
Obvious Sources
Swimming pools: Throughout our neighborhoods we have swimming pools with thousands of gallons of water. Work with your neighbors and talk about water sources. Yes, there are chemicals such as chlorine and/or salt in pools, and most water filters and purifiers are not able to remove these harmful dissolved substances. However, much like seawater, pool water can be distilled to separate pure water vapor from chemicals. A purpose-built metal still can be used, or you can simply use a glass to catch the steam emitted from a boiling kettle.
Water heaters: The average home water heater has 40 gallons of usable water in it. Flushing your water heater regularly, as recommended by the manufacturer, will limit the amount of sediment you’ll need to filter out of its contents.
Toilet tanks: The first thought is “there’s no way,” but keep in mind that a flushed toilet fills with tap water and holds up to seven gallons. Unlike the bowl, the toilet tank should be relatively clean, and you can easily boil and/or filter its contents just to be safe.
House pipes: To keep pipes from freezing in the colder environments, we turn the water off when we leave and drain the pipes. But even when water stops at the street main, we still have a fair amount of water in the pipes, and this is a space we often don’t think about. Open a faucet on the lowest level of the house, and it should run for a minute or two before the trickle ceases.
Stored water: From bottled water to outside water barrels and catchments, abandoned homes or buildings often contain these sources. Keep in mind that “borrowing” water that doesn’t belong to you should only be used as an absolute last resort in without-rule-of-law disasters.
Reservoirs: Most cities have some form of a water drainage basin or a reservoir. Know where yours are and be ready to use it if necessary.
Not-So-Obvious Sources
Rainwater: During an emergency, John Q. Public focuses on bottled water or the lack thereof. If you’re in a rainy environment or a hurricane situation, put out storage drums to collect water.
Tubs: In unfolding disasters, you may have enough advance notice to fill your bathtub with tap water. Tub-shaped water bags are available for long-term storage.
Wells: See our article, “Well Informed” in Issue 35, for the various types and how they operate.
Ocean Water
There have been discussions about using ocean water, and you’ve probably heard the stories of people in survival situations stranded in the middle of the ocean drinking saltwater with undesirable outcomes. Drinking ocean water is just not an option since it’s full salinity. Like pool water, it can be distilled to harvest freshwater vapor. It could also be used in a pinch to extend rationed fresh potable water supplies.
Famed explorer Thor Heyerdahl journaled his consumption of diluted seawater in his epic voyages. Through trial and error, his sailors came up with a ratio of around 60/40 — 60-percent clean water to 40-percent ocean water. This level of sodium won’t be pleasant or good for your health long-term, but the combination sustained Heyerdahl’s crew with no immediate ill effects throughout multiple journeys. Beyond its salinity, the water at urban beaches may be polluted with chemical runoff and sewage, so this is another risk that must be considered.
Learning to ID plants from a local expert is crucial to safely foraging for wild edibles.
Final Test
The end of the day came with the class preparing a soup with the edibles picked throughout the day. We built small fires and added the ingredients with a bit of household spices. Much to my surprise, it was really good. Following that, a test of the day’s knowledge was handed out. I hated school, but my enjoyment of this class made the test feel less academic.
Conclusion
Countless survival schools have come and gone over the years. When asked why he feels his has lasted so long, Nyerges simply says, “I love what I do, and I feel it’s important for us to be connected to earth. If it was about money or prestige, I would have found something else to do.”
With Los Angeles’ history of earthquakes and mudslides, the experts say it’s only a matter of time till the big one hits. Surrounded by urban sprawl and the 10 million residents of Los Angeles County, the value of taking a class like this is truly immeasurable.
The TOPS MSK or Mini Scandi Knife is a compact, rugged tool designed with minimalism and functionality at its core. Known for the TOPS modified scandi grind and exceptional build quality, the MSK is an all-around knife that’s ideal for the outdoor enthusiasts from bushcrafters to campers and everyone in between. Whether you’re looking for an everyday carry or a handy tool for carving or whittling in the wild, the MSK offers durability and precision in a compact package. Being a small knife does the MSK live up to the TOPS reputation of hard use overbuilt knives? Let’s dive in and see what MSK has to offer.
Design and Carry Options
The MSK’s small size allows it to work out great in a variety of carry styles. It’s small enough to be a neck knife, but works great in the pocket, IWB or clipped onto a backpack. The slim sheath makes for a compact package that is easy to carry on your person and takes up very little room in a pack or pouch.
The MSK is 6.13” long from butt to tip, the blade and actual cutting edge is exactly 3” long. Despite being a small knife, it still gives you a good bit of useable edge for outdoor and survival tasks. The handle provides a comfortable 3 finger grip and a lanyard can be added to get that full hand grip.
TOPS MSK Steel
Like many TOPS Knives the blade steel is tough 1095 high carbon steel. 1095 is commonly found in outdoor knives, and the TOPS heat treatment brings out 1095’s best properties. Even with its small size, the tough steel ensures the TOPS MSK will be a little tank of a knife.
While it may not have the edge retention found in modern super steels, if you need to sharpen it on the fly you can pretty much grab a smooth rock and get a working edge back on your knife.
What Can the TOPS MSK Do?
The TOPS MSK is a versatile and reliable knife. In the wilderness the scandi grind allows it help you process wood and build a fire or shelter. It can also help prepare food and even act as a last-ditch defensive tool if needed.
The small size and ergonomics also makes it a great option for an EDC fixed blade. The modified scandi grind has no problem cutting packages, tape, strings, and whatever else you come across in your daily life.
It’s a valuable tool that fits pretty much any kit or style of carry without being a burden. Its size maybe be deceiving but this tool can handle any and everything you throw at it, and it’ll ask for more.
Final Thoughts
All in all, the TOPS MSK is a great little tool that’s as tough as it is handy. It has the durability you’d expect from TOPS, with an ergonomic handle that feels solid in the hand. Whether you’re outdoors or need a reliable everyday carry, this knife won’t let you down. If you’re on the hunt for a compact blade that will get the job done, the MSK is worth a spot in your kit!
Check out the MSK and the full line of hard use TOPS Knives on topsknives.com
Over the past few years, there has been a push to stop hemorrhages in the civilian trauma world. The Stop the Bleeding course (www.stopthebleed.org) has been made readily available through the internet and is an excellent place to start. Beyond that, other Traumatic injuries often don’t get publicity. During the war, recognizing and managing these wounds are critical to ensure casualties can survive. This article will explain some of the wounds of war and things to consider in management and triage.
Whether it’s from a bullet, or shrapnel from an explosion, treating a traumatic limb injury is one of the easier wounds to address.
Traumatic Injury: Limbs
There are essentially three types of reasons for a traumatic limb on the battlefield as it relates to projectiles. The first is from a bullet, whether it be a handgun or a rifle round. Unless it hits a major artery or organ, the damage is usually something that can be triaged. The second is from a larger projectile like shrapnel. The problem with these is that multiple fragments are involved in the blast. This makes the repair of the wound more challenging. The last type is like that from an improvised explosive device (IED). These have enough energy to amputate the limb involved. These pressure-detonated blasts often contain dirt and debris, making them more challenging to clean and treat.
Medical classes have recently become more available to the civilian population to help with such treatment scenarios (www.7ccrt.org). Tactical Combat Casualty Care classes are a great place to start your training. It isn’t always about putting on a tourniquet and “calling it good.” We need to know when to put it on, and more recently, data suggesting when to convert the tourniquet to a lower-level dressing. The logistics of war may not mean you get to triage right away and will need to care for the casualty for a prolonged period of time. We are starting to see Prolonged Field Care classes that are also incredibly insightful (see RECOIL OFFGRID Issue 53).
Treating chest wounds can be tricky, especially when it’s impossible to use a tourniquet to control bleeding.
Traumatic Injury: Chest Wounds
Several types of chest wounds can occur in trauma; however, it will be delineated here as penetrating chest trauma versus blunt-force trauma. As for penetrating chest trauma, like from a bullet or a knife, we are taught to “seal the box.” Place a chest seal, preferably a vented chest seal, over the wound and watch for good or bad changes in the patient’s condition. The two types of injury patterns seen with penetrating trauma are pneumothorax and tension pneumothorax.
This hole in the chest wall and/or lung can disrupt the physiologic mechanisms that allow us to breathe effectively. A tension pneumothorax is life-threatening and should be recognized and treated immediately. The importance of the vented chest seal, or burping the non-vented seal, cannot be overstated. There are classes readily available to help distinguish these two types of penetrating injuries and how to treat them.
In blunt-force chest trauma, the mechanism of injury becomes important to understand. A motor vehicle accident may cause blunt-force trauma from the seatbelt alone. Other times, the vehicle impacting the body can cause trauma. Fractured ribs could potentially cause a pneumothorax; it’s important to remember this upon your evaluation.
Higher levels of blunt-force trauma, like from blast injuries, can have a delayed onset of symptoms. The patient may have shortness of breath, cough, coughing up blood, and chest pain. In this case, the lungs will fill up with blood and fluids, exacerbating the shortness of breath. The other thing with blast injuries to the lung is that there are often blast injuries to different body parts (e.g., brain, ears, eyes, abdomen), which should also be evaluated.
There are four patterns of blast injuries to consider. The primary blast injury is from the over-pressurization of the blast itself. Secondary blast injury is from fragments of debris and projectile that enter the wound. Tertiary blast injuries occur from being thrown from the explosion. This is where head trauma can be seen apart from the initial percussion blast. Quaternary blast injuries are from the burns, smoke, chemicals, and toxins in the reaction to the blast aftermath. These injuries will need immediate treatment followed by triage to higher levels of care.
head injury is obvious, but there doesn’t need to be a visible sign for damage to the brain to occur.
Traumatic Injury: Brain
We use terms like “shellshock,” concussion, closed head injury, and traumatic brain injury to describe any situation where the brain is shaken, not stirred. This can be from a projectile or a blast injury. Fortunately, the government is taking more credence into our military member’s complaints of headaches, confusion, change in consciousness, and subsequent psychological issues.
It was estimated that during the Iraqi wars, 25 percent of soldiers suffered some form of mild traumatic brain injury due to exposure to repeated blast injuries, perhaps by sending rounds downrange. For some soldiers, the blast would occur from an IED or incoming round and cause the casualty to leave their feet. This would invariably cause the soldier to strike their head as a tertiary impact from the blast and lead to traumatic brain injury. With further research, there’s now some evidence that traumatic brain injury has both neurological and psychological lasting effects.
The latter part has developed into what we are now calling post-traumatic stress disorder (see RECOIL OFFGRID Issue 43). While the effects of PTSD can vary widely, there are many therapies that can at least be offered to provide some relief. Unfortunately, cognitive therapies and standard medications (like sertraline and paroxetine) have only been about 50-percent effective in reducing symptoms. Off-label use of prazosin has varied potential for benefit, especially with respect to night terrors.
One medication that is being considered due to its significant effect on hard-to-treat depression is ketamine. This is a drug that would typically be used to put someone to sleep with anesthesia before surgery. There have been anecdotal reports that it’s helpful in people with traumatic brain injury as well as PTSD. Reviews of the literature also say it’s relatively safe to administer in these patients.
Traumatic Injury: Inhalation
The vivid pictures of the World Trade Center coming down with billowing smoke and debris littering the area serve as a poignant example of a quaternary blast injury pattern. This occurs when debris, heat, chemicals, and toxins infiltrate the lungs and cause respiratory distress. Since 9/11, there have been more deaths associated with the victims and first responders than the original bloodbath itself. These fatalities have been linked to various cancers, mental health, and breathing issues.
Perhaps the most common inhalation injury is that of smoke inhalation and the toxic chemicals from the burning matter. Nearly one-third of those exposed to fire will suffer from inhalation injury. The injury pattern is usually more in the upper airway, where swelling, fluids, and tissue damage occur.
This prevents adequate air movement to the lower levels of the lungs, where we can exchange oxygen for carbon dioxide. The more chemicals that are spread by the fire, the deeper they can penetrate the lungs and cause damage at the alveolar level. Chemicals such as ammonia and sulfur dioxide can cause further tissue damage and impede gas exchange, which is essential for normal respiration.
In milder cases, they may heal within a few days. Most of the moderate-to-severe patients will need airway support via intubation or tracheotomy and, once intubated, higher levels of care. These people will often die from respiratory failure or pneumonia.
This color-coded diagram from Dark Angel Medical makes remembering which treatment goes where much easier.
Traumatic Injury: Burns
Fire has been weaponized throughout the millennia. From shrapnel wounds causing minor burns to penetrating projectiles trapping service men and women in personnel carriers and causing extensive burns, burn management has been at the forefront of the war. As the burn progresses from a superficial first-degree burn (like a sunburn) to a third-degree deep burn, management becomes more complex. The third-degree burn has denuded all the skin, which acts as a protective barrier from infection and debris.
The skin also serves as a barrier to prevent fluid loss, and without the protection, the fluid loss from oozing and evaporation can be extensive, depending on the size of the burn.
One way we determine the extent of a burn is to determine its total body surface area. We use a Rule of Nines to assess second- and third-degree burns. The head and each arm are considered 9-percent involved. The legs are considered 18-percent each (9-percent anteriorly and 9-percent posteriorly). The thorax is considered 36 percent and can be broken down into anterior and posterior (18 percent) and further by chest and abdomen (9-percent each). Fluid resuscitation should be 2-4mL per kilogram of ideal body weight per total body surface area of burn involved over the first 24 hours.
Burn dressings will help keep moisture from evaporating as quickly as possible. Water-Jel makes a great product and is available to cover the areas exposed by the Rule of Nines. Silvadene cream is an antibiotic-impregnated cream that provides a barrier over the burn and helps control infection. If the casualty has a delay in transport to higher levels of care, this would be a good option. And don’t forget about pain control.
In Conclusion
The examples above should encourage more understanding of injury patterns in war. It’s not meant to be a comprehensive review but to bolster your underlying fund of knowledge. With an internet search, you should be able to find classes to help increase your repertoire should the need arise. Once you find a training cadre you like, stick with them.
Information changes and evolves in the medical world; keeping up with those changes is essential. Some great things are being done on the management side, which is making a difference in saving civilians, first responders, and our servicemen and women.
About the Author
David L. Miller, DO FACOI, is an internist in private practice for 20 years. His experiences away from the office have included time as a fight doctor in regional MMA events and as a team physician for 10 years at a mid-major university in the Midwest. Currently, he serves as the lead medical instructor for the Civilian Crisis Response team based out of Indianapolis.
Emergency evacuation, often termed bugging out, is a hugely popular topic in prepper and survivalist circles. As with many areas of preparedness, people tend to focus on the gear more than anything else. Lists abound of what you should have in your bug out bag. That’s just one element of the overall equation, though. There are four components to a proper bug out or evacuation plan.
When to leave
Where to go
How to get there
What to bring with you
While they’re all important, that first one is arguably the most critical. If you don’t time it right, the rest of those elements may not matter a whole lot.
Now, the interesting thing here is that all of those elements are applicable in virtually any evacuation scenario. While we typically think of this in terms of bugging out from home, dangerous situations can arise anywhere, including the workplace as well as when we’re just out in public.
Learning that wildfires are getting closer to your neighborhood is an obvious cue that you’ll want to seek a safer location.
Bugging Out When Disasters Hitting Home
Here’s the thing: Sheltering in place at home is ideal, all other things being equal. That’s where the bulk of your gear and supplies are located. You’re familiar with the area, and odds are that’s where you’ll be the most comfortable. But there are situations where home is not where you’ll want to stay. Depending on your location and overall situation, any number of realistic threats could result in home not being safe.
Red flags are alert signals indicating that something might be about to kick off, and that you may want to be somewhere else if it does. It’s important to give serious thought as to what realistic scenarios could impact your area and make your home unsafe to occupy, even if you only bug out temporarily.
Being caught in an area where martial law has been declared isn’t recommended. One red flag that indicates a martial law declaration might be on the way would be trustworthy reports of National Guard troops being moved into the area.
Martial law isn’t guaranteed to happen based on that, but it should get your attention. Interpreting red flags is sort of like reading body language. One indicator by itself is all but meaningless. You have to look at it in context and as just one part of the overall picture.
The past can help predict the future, which allows for potential red flags to be noted. If things got dicey in the area each time a wildfire came within 20 miles of your neighborhood in the last two decades, hearing that another one is planning a visit is a red flag that you might want to get out ahead of the crowd.
Give some thought as to the risks to your area, such as natural disasters or civil unrest. From there, develop a list of red flags for each of them that will push you toward loading up the family truckster and heading bugging out of town for a bit.
You also need to determine how you’ll see or hear about these alert signals. These might involve TV news reports, radio broadcasts, monitoring amateur radio traffic, and consulting online sources.
One of the positive attributes of social media is the ability to obtain localized intel, if you know where to look. Many areas have a “scanner page” on Facebook. These are usually city or county based. One or more people will routinely monitor radio traffic involving police, fire, and rescue dispatches and post those calls to Facebook.
These aren’t anything official, just private citizens sharing publicly accessible information. While the comment threads often turn into dumpster fires, the raw data can certainly prove useful.
Knowing evacuation routes will help you avoid the crowds if you need to get out of town quickly.
Pro Tip: With a little digging, you should be able to acquire a copy of your county’s emergency management plans for various potential disasters. These probably include evacuation routes, among other bits of helpful information. These plans are a matter of public record, though they might not always be posted right on the county website.
Workplace Violence Red Flags
Here’s a fun fact. There are at least two generations out there now who use the term “going postal” without knowing the origin of that phrase. It’s become a common phrase to describe someone who is exceptionally angry and stressed, to the point to where they become violent.
What many don’t know or maybe don’t remember is that the phrase is tied to a series of workplace shootings that involved postal workers beginning in 1986. The phrase was first published in an article appearing in the St. Petersburg Times in December of 1993, but it was likely in use colloquially long before that.
Workplace violence wasn’t anything new even back in 1986, but it seemed to become much more common throughout the last few decades. Whether this is due to an actual increase in incidents or just better reporting, the fact is that it’s important to recognize red flags for potential violence at work and be ready to bug out. These bad actors are generally under a lot of stress, so that tends to be the focus for observable signs something is amiss. It’s common that these behaviors are a change from their usual workplace demeanor.
A rapid decline in work quality or attention to detail
They have a difficult time concentrating or staying on task.
Others are always to blame for their mistakes.
They isolate themselves from others.
They hold grudges, often verbalizing a desire for those people to get hurt.
Their attendance isn’t great. They’re chronically late or absent.
They complain a lot about financial problems, an unrequited love interest, or other personal issue.
Other red flags that this person might be contemplating getting violent include a history of doing so elsewhere, such as having been arrested in the past for fighting, disorderly conduct, and the like.
They might exhibit an extreme fascination with weapons, well beyond what might be considered a hobby-level interest. They may try to intimidate others, sometimes with overt threats. Admittedly, these cues might not mean immediate evacuation is required. But they should warrant further observation. The concerns should also be reported to a supervisor and/or human resources for follow-up.
How do you know the person has reached the boiling point? A combination of a few of these alert signals should raise the hair on the back of your neck. Again, these are usually different from their usual behavior.
Repetitive movements, such as pacing
Rapid, shallow breathing, almost like hyperventilating
A flushed or pale appearance, often heavily sweating
Talking loudly, often combined with abusive language
They may be shaking or trembling, seemingly enraged.
Invading personal space is common.
Aggressive body language is also often observed just before the person kicks into high gear. They may crouch their knees a bit or turn so that their body is at about a 45-degree angle with their legs spread. Clenched fists are a strong sign that they’re about to get violent. If you see them nodding their head yes or shaking their head no, and nobody has asked them any questions, get some distance between yourself and them.
Many businesses have back doors, such as fire exits for employees. These will likely be less crowded than front doors in an emergency evacuation.
Bugging Out of Public Venues
Active shooters, riots, bombings, and other violent situations occurring out in public seem to be more and more commonplace. While we might imagine ourselves taking care of business and saving the day, the reality is that you may not have that opportunity.
In her book Becoming Bulletproof, former Secret Service agent Evy Poumpouras talks about what she calls the 3 P’s. These help to determine the potential vulnerability of a public venue when it comes to some sort of attack.
People – the more people who are there, the greater the chance of an attack.
Place – a single location filled with people is more vulnerable than if those people are spread out.
Press – the higher the number of media cameras likely to be present, the more tempting the venue might be, as attention is what the attacker is likely after.
Now, none of this is to say you should avoid going anywhere that’s going to involve a lot of people in a single location, such as a concert hall, and where the media might be covering the event. The takeaway here is that the greater the vulnerability of the venue, the more alert you should be to possible red flags and the need to avoid an area or bug out.
An active shooter is one of the more difficult situations to see coming because they’re often random, at least from the perspective of the victims. One minute you’re enjoying a movie or concert, the next moment bullets are flying.
There are a couple of red flags you can watch for, though. If you see someone enter the area who looks exceptionally nervous, especially if they’re obviously armed, it might be a good idea to find some cover until you can determine if the situation is safe or you need to bug out.
Most RECOIL OFFGRID readers can likely tell the difference between the sound of fireworks and the sound of gunfire, especially indoors. If you hear the latter and you’re not at the range, that should definitely get your attention. It’s also worth noting that there are a number of reasons why you might need to bug out of an establishment that have nothing to do with violence.
For example, there have been several nightclub fires over the years where partygoers were trapped inside because they couldn’t get to an exit and ended up with tags on their toes.
Think about what would alert you to danger at this concert venue. Where would you go if something went sideways?
Bugging Out: Crowd Control
If you and your family somehow end up swept into a crowd, such as a large group of protesters, here are some tips. Now isn’t the time to voice your dissenting opinion about their protest. There’s no need to add fuel to the fire, so to speak, especially if you have family members you want to keep safe.
Link arms with those you’re with so you don’t lose track of anyone. Trying to navigate your way through the crowd while moving in the opposite direction of everyone else isn’t likely to work out well. Instead, move at a 90-degree angle and slip across the crowd as best you can.
You’ll find there’s much less resistance that way. Work your way to a sidewalk or other less congested area, then get out of the area.
When police arrive, follow every instruction as quickly as possible. Let them come to you.
When Police Arrive
If you are present when police respond to a mass shooting or similar event, there are some dos and don’ts to follow. Bear in mind that while you know that you’re not a risk to them, they don’t know who you are. It will take a little time for them to get up to speed on what’s going on.
DO give a description of yourself to the dispatcher, if you’re the one on the phone with them. Explain where you’re located and what you’re wearing, in addition to what’s going on. This way, officers will know to look for you.
DON’T run toward the responding police officers, no matter how happy you might be to see them, unless you’re told to do so. Anything that looks even remotely like a threat is likely to be put down hard and fast.
DO put down any weapon you may be holding and keep your hands visible.
DON’T get offended if you’re manhandled a bit while they move you to a safe location.
DO follow every instruction you’re given to the best of your ability.
DO communicate as clearly as possible any information you have regarding the situation.
Always make note of emergency exits in every building you enter.
Egress Points
It’s important that any time you enter places like a restaurant, store, or movie theater that you make note of points of egress. If things go sideways for some reason, most people will head toward the door through which they came in. It’s a better plan to avoid that crowd when bugging out, if possible. Some egress points will be obvious, like clearly marked emergency exits.
Others might not be out in the open, but logic dictates their presence. For example, restaurants almost always have a back door in the kitchen through which they receive deliveries. In a pinch, windows might also serve as egress points, assuming you’re not several floors up.
This need to find an exit strategy applies to outdoor venues as well. Let’s say you’re attending a concert. Depending on the situation, heading directly for the stage with plans to find the exits on the other side might be feasible, rather than battling the crowds headed to the parking lot. The point here is simple. Know where you’re going to head if something goes south.
Again, though, the need for evacuation might not be violence related. While that’s what we might often envision, what with so many news reports of mass shootings and such, the reality is that it could be any number of things that cause the need to bug out.
Noting egress points is part and parcel of situational awareness. Being fully present when you’re out in the world is critical. This doesn’t mean everyone has to approach life like Jason Bourne and notice every single detail about every single person encountered each day. What it does mean is that paying more attention to your social media feed than to the world around you is a recipe for disaster.
Baselines
Another aspect of situational awareness is establishing a baseline. This refers to how things are supposed to normally appear. Anything outside the norm should be an alert signal. Here’s a simple example. Let’s say you’re having lunch at a sidewalk café. The sidewalk is crowded with everyone seemingly in a hurry to get to where they’re going. But then you see one lone male subject just standing in the middle of the sidewalk. He’s staring off into nowhere, not moving.
He’s also wearing a heavy jacket, even though it’s 75 degrees F and sunny. He might be a terrorist building up the courage to ruin everyone’s day. Of course, he might also be experiencing a seizure or dealing with some other sort of medical event. Either way, you might want to bug out of the area and alert someone that this individual needs some help.
This notion of a baseline can even help with noticing possible improvised explosive devices (IEDs). According to the Cybersecurity and Infrastructure Security Agency (CISA), the acronym HOT can help you determine if a found object, such as a duffel bag, is a potential risk. If these elements are present, vacate the area with extreme caution and alert the authorities.
Hidden – an attempt has been made to conceal the item. Maybe it’s loosely covered by garbage or it’s on the ground behind a pillar.
Obviously Suspicious – it looks dangerous. It might have wires sticking out or otherwise just plain looks like a bomb.
Not Typical – it violates the baseline you’ve established for the area. It’s obviously out of place and doesn’t belong there.
Keep Your Head Up
There are several advantages to paying close attention to what’s going on around you. For starters, you’ll be in a better position to notice and react to red flags and bug out if needed. You’ll be able to see most threats coming and deal with them in whatever way necessary.
On top of that, someone who walks around with their head up and on a swivel is less likely to be seen as a target by those who prey upon others. This means you won’t be late for your lunch date, which keeps everyone happy.
About the Author
Jim Cobb is a nationally recognized authority on disaster readiness. He has been involved with preparedness for nearly 40 years and has developed a reputation for his common-sense approach to the subject. In addition to his numerous books and several hundred magazine articles, Cobb is one of the cohosts of the How to Survive 2025 podcast. He offers a free weekly newsletter called The Survival Weekly Dispatch